Embed Size (px)
Citation preview

How To – Allow Secured Internet Access to Guest Users
Applicable Version: 10.02.0 Build 224 onwards
Applicable Models: Wi-Fi Models Only
Overview
Places like public hotspots and hotels have numerous Internet users that require temporary Internet
access just for a few days or hours. Maintaining such users becomes quite a hassle for
administrators. Furthermore, applying access restrictions upon these users is difficult. Cyberoam
allows the administrator to provide temporary access to Guest Users. This is mostly done via Wireless
Guest Access Points by deploying a Wireless LAN (WLAN). A good guest access system ensures
reliable and high-performance access to the Internet without the guest having to go through the
hassle of reconfiguring his/her PC to connect to the WLAN. A Guest Access Point must segregate
internal and guest traffic to provide ironclad security for the organization’s LAN and servers. Since
guest access is provisioned on the same network infrastructure carrying internal traffic, this is a
significant challenge.
Scenario
Create a Wireless Access Point and allow controlled Internet access to Guest Users.
Configuration
Configuration is to be done from Cyberoam Web Admin Console using profile having read-write
administrative rights over relevant features. This configuration consists of Two (2) parts:
1. Configure Access Point for Guest User
2. Configure Guest User Authentication
Configure Access Point for Guest User
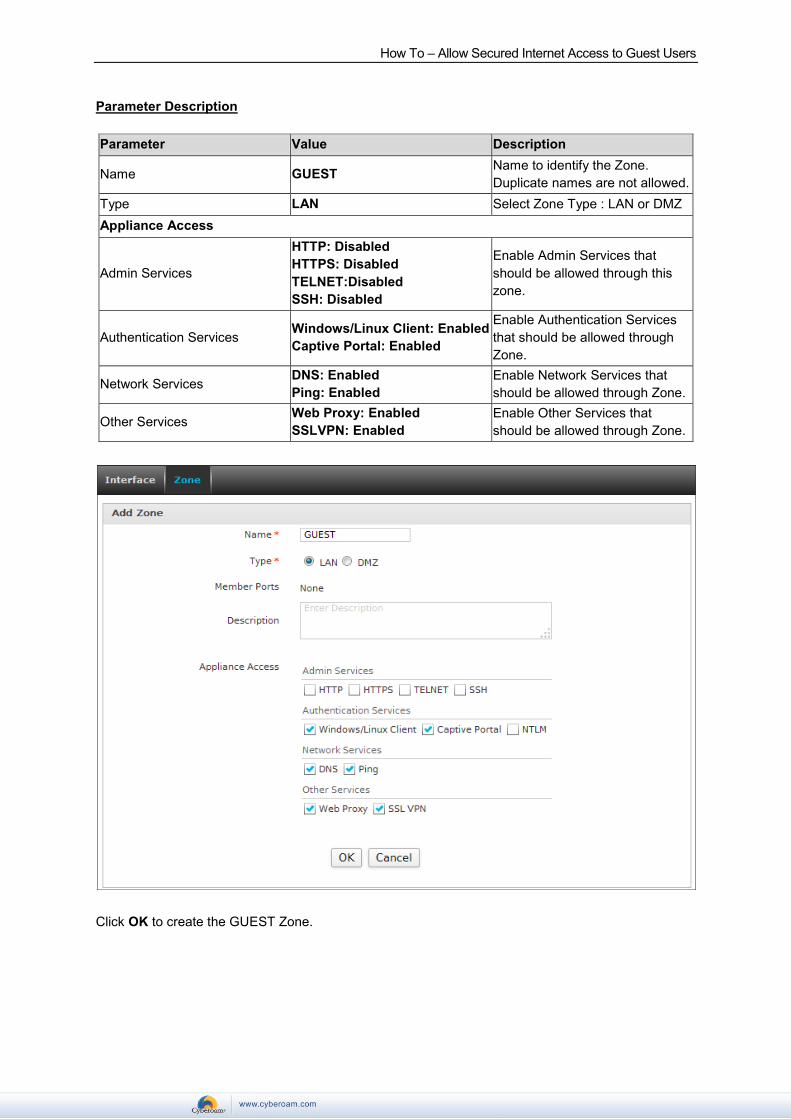
Step 1: Create Guest Zone
Go to Network > Interface > Zone and click Add to create a new zone using parameters given
below.
How To – Allow Secured Internet Access to
Guest Users
How To – Allow Secured Internet Access to Guest Users
Parameter Description
Parameter Value Description
Name GUEST Name to identify the Zone.
Duplicate names are not allowed.
Type LAN Select Zone Type : LAN or DMZ
Appliance Access
Admin Services
HTTP: Disabled
HTTPS: Disabled
TELNET:Disabled
SSH: Disabled
Enable Admin Services that
should be allowed through this
zone.
Authentication Services Windows/Linux Client: Enabled
Captive Portal: Enabled
Enable Authentication Services
that should be allowed through
Zone.
Network Services DNS: Enabled
Ping: Enabled
Enable Network Services that
should be allowed through Zone.
Other Services Web Proxy: Enabled
SSLVPN: Enabled
Enable Other Services that
should be allowed through Zone.
Click OK to create the GUEST Zone.

How To – Allow Secured Internet Access to Guest Users
Step 2: Create Access Point in Guest Zone
Go to Network > Wireless LAN > Access Point and click Add to create a new Wireless Access
Point using the parameters given below.
Parameter Description
Parameter Value Description
Zone Guest Specify the Zone in which Access
Point is to be created
IP Address 172.16.16.1 Specify IP Address
Netmask /24 (255.255.255.0) Specify Netmask
SSID Guest-WiFi
Specify the Service Set Identifier
(SSID) by which the WLAN is to be
identified
Broadcast SSID Enable
Enable if you want to broadcast the
SSID, i.e., make the WLAN
discoverable.
Security Mode WPA-PSK Select the Security Mode.
Encryption TKIP Select the Encryption Method
Pass Phrase cyberoam Enter the Pass Phrase
Group Key Update Disable
Enable if you want to generate new
security key after specified Timeout
Interval.
Timeout Interval 86400 (Default) Specify the time interval after which
the security key expires.
Maximum Clients 255
Specify maximum number of clients
allowed to connect to the Access
Point

How To – Allow Secured Internet Access to Guest Users
Click OK to create an Access Point. You are immediately asked to configure the DHCP Server linked
with this Access Point as shown below.
How To – Allow Secured Internet Access to Guest Users
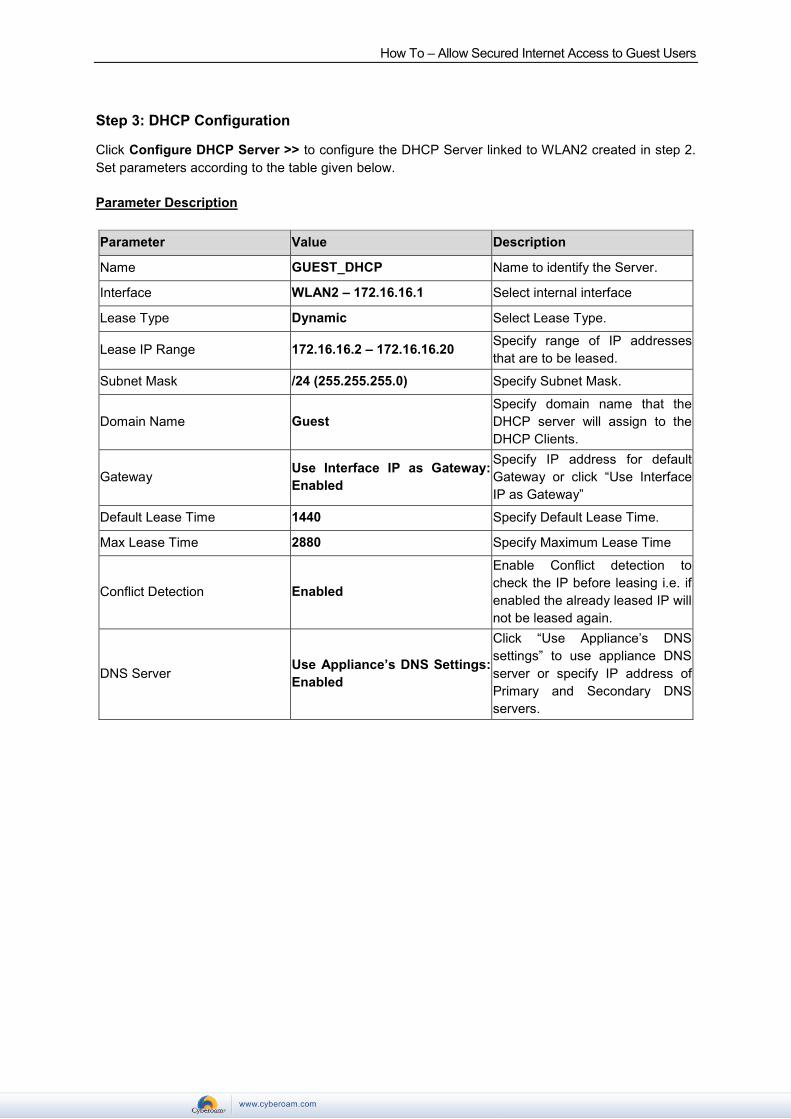
Step 3: DHCP Configuration
Click Configure DHCP Server >> to configure the DHCP Server linked to WLAN2 created in step 2.
Set parameters according to the table given below.
Parameter Description
Parameter Value Description
Name GUEST_DHCP Name to identify the Server.
Interface WLAN2 – 172.16.16.1 Select internal interface
Lease Type Dynamic Select Lease Type.
Lease IP Range 172.16.16.2 – 172.16.16.20 Specify range of IP addresses
that are to be leased.
Subnet Mask /24 (255.255.255.0) Specify Subnet Mask.
Domain Name Guest
Specify domain name that the
DHCP server will assign to the
DHCP Clients.
Gateway Use Interface IP as Gateway:
Enabled
Specify IP address for default
Gateway or click “Use Interface
IP as Gateway”
Default Lease Time 1440 Specify Default Lease Time.
Max Lease Time 2880 Specify Maximum Lease Time
Conflict Detection Enabled
Enable Conflict detection to
check the IP before leasing i.e. if
enabled the already leased IP will
not be leased again.
DNS Server Use Appliance’s DNS Settings:
Enabled
Click “Use Appliance’s DNS
settings” to use appliance DNS
server or specify IP address of
Primary and Secondary DNS
servers.

How To – Allow Secured Internet Access to Guest Users
Click OK to save DHCP Server settings.
Step 5: Update Firewall Rule to Secure WLAN Traffic
On creation of the GUEST Zone (as shown in step 1), Cyberoam automatically creates default rules
allowing traffic from GUEST to WAN as shown below.

How To – Allow Secured Internet Access to Guest Users
Update Default Rule #Guest_WAN_AnyTraffic, to Drop all traffic that hits it. This is required if you
want to drop all unauthenticated traffic. Any Guest User trying to access Internet is forced to
authenticate enabling controlled Internet Access.
The above steps configure Internet Access Point for Guest Users.
Configure Guest User Authentication
Once the Internet Access Point is configured and all unauthenticated traffic is dropped to enforce user
authentication, administrator needs to configure the Guest User Authentication settings.
Step 1: Create and Assign Policies to Guest Group
Create a Guest Group to implement various policies upon the guest users included in that group. This
ensures controlled Internet access by guest users. To create a group, go to Identity > Groups >
Groups and click Add to create a new group with parameters given below.
Parameter Description
Parameter Value Description
Group Name Guest_Group Name to identify group.
Group Type Normal Select Group Type
Policies
Web Filter General Corporate Policy Select Web Filter policy from list.
Application Filter Allow All Select Application Filter policy
from list.

How To – Allow Secured Internet Access to Guest Users
Surfing Quota Unlimited Internet Access Select Surfing Quota policy from
list.
Access Time Allowed only during Work
Hours
Select Access Time policy from
list.
Data Transfer Daily 10 MB Select Data Transfer policy from
list.
QoS None Select QoS policy from list.
SSLVPN No Policy Applied Select SSL VPN policy from list.
Spam Digest Enabled Configure Spam Digest.
MAC Binding Disabled
Enable/disable “MAC Binding”.
By binding User to MAC address,
you are mapping user with a
group of MAC addresses.
L2TP Disabled Enable if group users can get
access through L2TP connection
PPTP Disabled Enable if group users can get
access through PPTP connection
Login Restriction Any Node
Select the appropriate option to
specify the login restriction for the
user group
Click OK to create the group.

How To – Allow Secured Internet Access to Guest Users
Step 2: Configure Guest User Settings
Go to Identity > Guest Users > General Settings and set parameters according to table given
below.
Parameter Description
Parameter Value Description
Username Prefix GUEST Provide prefix to be used for Auto-Generation of
username for guest users.
Group Guest_Group Select the group to which all guest users are
assigned.
Password Length 8 Specify the length of the auto-generated
password for Guest Users.
Password Complexity Alphanumeric
Password
Select a type of password from the available
options to be used for complexity of an auto-
generated password
Auto Purge on Expiry Enabled Check if you want users to be purged from
Cyberoam once their credentials expire.
Click Apply to save Guest User settings.
Step 3: Create Guest Users
Guest Users can be created in Two (2) ways:
1. Manually (by the Administrator)
2. Automatically
Create Guest Users Manually
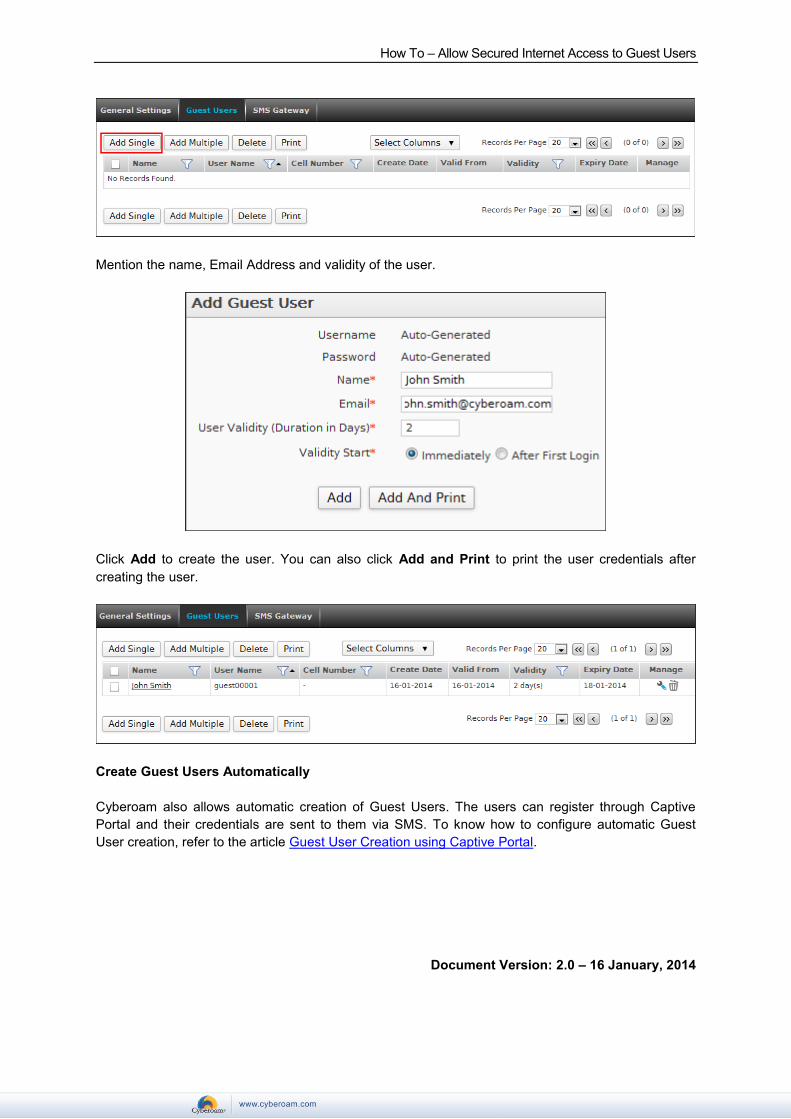
This is the more commonly used method to create Guest Users. To create users manually, go to
Identity > Guest Users > Guest Users and click Add Single to create a single user OR Add
Multiple to create multiple users simultaneously. Here, as an example, we have created a single
user.
How To – Allow Secured Internet Access to Guest Users
Mention the name, Email Address and validity of the user.
Click Add to create the user. You can also click Add and Print to print the user credentials after
creating the user.
Create Guest Users Automatically
Cyberoam also allows automatic creation of Guest Users. The users can register through Captive
Portal and their credentials are sent to them via SMS. To know how to configure automatic Guest
User creation, refer to the article Guest User Creation using Captive Portal.
Document Version: 2.0 – 16 January, 2014