Embed Size (px)
Citation preview

HP MediaSmart ServerUser’s Guide
Version Update 1.1.1
Revised 05 November 2007

Version Update 1.1.1
i
Contents
Welcome to HP MediaSmart Server
Chapter 1: InstallingOverview of the HP MediaSmart Server Setup 1-1Before Starting 1-2Connecting the server 1-5Turning on the HP MediaSmart Server 1-6Checking the Server Lights 1-7Updating Your Firewall’s Trusted Program List 1-7Installing the Software on the First Computer 1-8Congratulations! You are ready to start using your server 1-12
Chapter 2: Getting StartedOpening the Windows Home Server Console 2-1Setting up the HP MediaSmart Server using the Assistant 2-2Task 1 of 6: Setup HP Software Update 2-5Task 2 of 6: Create User Accounts 2-7Task 3 of 6: Configure Remote Access 2-13Task 4 of 6: Configure your HP Photo Webshare 2-17Task 5 of 6: Turn on Media Sharing 2-19Task 6 of 6: Learn more about your HP MediaSmart Server 2-20Installing the Software on Additional Home Computers 2-21Setting up Additional Home Computers 2-23
Chapter 3: Server ConsoleMediaSmart Server tab 3-1Windows Home Server tabs 3-2
Version ii
Chapter 4: Control CenterAccessing the Control Center 4-1MediaSmart tab 4-1Tools tab 4-2Help & Support tab 4-3
Chapter 5: Photo WebshareBefore You Begin 5-1Logging on to HP Photo Webshare 5-4Webshare home page 5-5Managing Webshare User Accounts 5-6
About the Types of Webshare User Accounts 5-7Managing Visitors 5-8Managing Groups 5-12
Creating an album to share 5-13Naming your album 5-14Adding photos to your album 5-14Sharing an album 5-17
Notifying visitors by email 5-18Viewing, printing, and saving photos 5-19
Viewing photos 5-19Buying prints 5-21Saving photos 5-22Presenting slideshows 5-23
Changing a Visitor’s Password 5-23Frequently Asked Questions 5-23
Chapter 6: Using the ServerShared folders 6-2
Windows Home Server Console Help for shared folders 6-2Accessing shared folders from your computer 6-2
Backing up and restoring a computer 6-4Expanding server storage 6-5
Installing an internal SATA drive 6-5
iii
Installing and removing an external USB disk drive, eSATA drive, SATA port multiplier 6-9
Adding and removing drives from server storage 6-11Removing a hard drive from the server 6-12
Replacing the system drive 6-16Removing the system drive 6-16Re-installing the new system drive 6-20
Securing your server from intruders 6-22Streaming media 6-27Setting up iTunes on the server and the client computer 6-29Network health 6-30How to add shared folders to network places 6-31Hardware status 6-32Remote access 6-33How to map and disconnect a drive letter 6-34
Chapter 7: TroubleshootingHP MediaSmart Server troubleshooting tips: 7-1
What to do if the server is unresponsive 7-2Power-on indicator is off 7-3Why is the hard drive light-bar purple? 7-3Why is the hard drive light-bar red? 7-3Why is the server’s health indicator light red? 7-4Computer Recovery 7-5What to do about hardware warning messages? 7-5Using Server Recovery and Factory Reset 7-7File transfer failure 7-13If you cannot access the Windows Home Server 7-14Health indicator codes 7-14
Network connection troubleshooting tips: 7-16Network connection issues 7-16No available port on network router 7-20Why did URL not work? 7-20What do firewall blocking messages mean? 7-21
Webshare troubleshooting tips: 7-21
Version iv
Why can’t I share my album? 7-22How to add photos from your photos shared folder to your
Webshare. 7-23Unable to upload images. 7-23How do you make Webshare work in the home? 7-23Why am I getting a certificate error? 7-24Upload Photos requires ActiveX control to be loaded? 7-24Clicking on photo Webshare on CC Does Not Open. 7-24Webshare administrator cannot delete Visitor account. 7-24Visitor can create a photo album and add pictures but the album
doesn't display. 7-24Visitor can create a photo album and add pictures but the album
doesn't display the pictures. 7-24Visitor cannot download pictures and sees a message telling them that
they cannot download pictures. 7-25Visitor cannot add pictures and sees a message telling them that they
can't add pictures. 7-25Visitor has created an album (or albums) and wants to delete the
album but cannot. 7-25Visitor has changed their password, now they can't log into
Webshare. 7-25Selecting URL from address field in web browser loads “page that
opens cannot be closed without closing the entire application”. 7-26
Webshare user is unable to log out of Webshare. 7-26Trouble uploading large files to Webshare. 7-26Clicking on Photo Webshare on CC causes command error. 7-26Browser cannot display the page when accessing through URL. 7-26
Other common troubleshooting tips 7-27How to find the server software and firmware information. 7-27The first backup is taking a long time. 7-27What are optimum data throughput speeds for different network
interfaces? 7-28iTunes troubleshooting tips 7-28
iTunes aggregator does not appear to be working. 7-29Song selection from the server is not updating with new additions. 7-
29
v
Podcasts not showing in playlist. 7-29Microsoft Windows Home Server troubleshooting tips 7-29
Server low on space. 7-29Cannot connect to server shares. 7-30
Email troubleshooting tips 7-30Why do I need email address for visitors and Home Server users? 7-
30Why do I need to set-up Webshare notifications? 7-31How do I find what my SMTP server is? 7-31Do I need to do an SMTP email configuration? 7-31If you have chosen to use your own email provider to send Photo
Webshare announcements and these email announcements have not been received by the people on your lists. 7-31
Emailed link not opening. 7-31Email is not received. 7-32
Media Streaming troubleshooting tips 7-32Why my files do not show up on DMA? 7-32File doesn't appear. 7-33Server not showing up. 7-34Media Files (audio/Video) of supported format aren't seen by
device. 7-34Why can I play and stream DRM content my home computer but I can not
stream it from my HP MediaSmart Server? 7-34What value does TZO domain names provide beyond the Microsoft Live
option: 7-35
Chapter 8: Product informationProduct specifications 8-1Regulatory statements 8-5WM-DRM 10 licensed technology 8-7Limited warranty and technical support statement 8-8
Chapter 9: Licenses, Copyrights and Notices for Open Source Components
Apache License 9-1BSD License 9-7
Version vi
ImageMagick License 9-8JSON License 9-12Codehaus License 9-13GNU General Public License (GPL, Version 2, June 1991) 9-13
Glossary
1-1
Welcome to HP MediaSmart ServerThe HP MediaSmart Server is a home server for families with multiple computers on a home network who want to enjoy their digital experiences when and where they want. The HP MediaSmart Server includes remote access to files, automatic computer backups, virtually unlimited storage expendability, media streaming to the entertainment center, and HP’s new Photo Webshare.
Help is available from most windows on the HP MediaSmart Server.
HP Help
HP Help includes the types of help shown in the following table. Additionally, the online User’s Guide provides links to topics in the Windows Home Server Help.
Windows Home Server Console Help
Some tasks, such as creating users and using shared folders, are done through the Windows Home Server Console.
1 At the computer, double-click the Windows Home Server icon in the system tray.
2 Log on to the Windows Home Server Console.
User’s Guide—Contains online help, installation instructions, guidance for set up, using the product, tutorials, recovery information, and other important information.Online Help—A Help button is available on most pages.
HP Support Web site—Additional support and informational articles are available at http://www.hp.com/support.

Version Update 1.1.11-2
3 Click Help in the upper right corner, indicated by a icon, or click help buttons on dialog boxes.
Table 1: Windows Home Server Console Help
Main Topics Description
Welcome to the Windows Home Server Console
Learn what the Windows Home Server tray icon colors mean. This topic also provides an overview of adding user accounts, organizing files, configuring backups, and customizing server settings.
Computers & Backup Explains how backups work and how to configure, restore, and troubleshoot backups.
User Accounts How to add users to your server.
Shared Folders Adding, opening, removing, viewing the history of shared folders, and using folder duplication.
Server Storage View, add, repair, and remove hard drives from total storage.
Network Health What health notifications mean and what to do about them.
Windows Home Server Settings How to configure backups, passwords, media sharing, remote access, add-ins, resources, and more.
Remote Access How to set up the server to easily access your files away from home.
Installing 1-1
1 InstallingIn this chapter you’ll connect the HP MediaSmart Server to you home network and install the software on your first home computer.
What’s in this chapter» Overview of the HP MediaSmart Server Setup» Before Starting» Connecting the server» Turning on the HP MediaSmart Server» Checking the Server Lights» Updating Your Firewall’s Trusted Program List» Installing the Software on the First Computer» Congratulations! You are ready to start using your server
Overview of the HP MediaSmart Server SetupComplete the following steps to set up the HP MediaSmart Server on your home network.
To set up the HP MediaSmart Server
1 Connect the HP MediaSmart Server to your network and turn it on.For additional information, see Connecting the server on page 1-5.
2 Update the trusted programs list for any firewall or anti-virus software on your computer.For additional information, see Updating Your Firewall’s Trusted Program List on page 1-7.
3 Install the HP MediaSmart Server software on one computer.For additional information, see Installing the Software on the First Computer on page 1-8.
4 Follow the Setup Assistant in the Windows Home Server Console.
Installing Version Update 1.1.11-2
For additional information, see Setting up the HP MediaSmart Server using the Assistant on page 2-2.
5 Install the HP MediaSmart Server software on additional computers.For additional information, see Installing the Software on Additional Home Computers on page 2-21.
Before StartingImportant information about locating and using the HP MediaSmart Server.• Locating the server• Network Requirements• Supported operating systems• Wireless support• Additional Software
Locating the serverFind a suitable place to locate your HP MediaSmart Server before you install the software on your computers. The location you choose must have either an available wired network connection to your broadband router or a switch connected to your broadband router.
The server also requires adequate ventilation to ensure it does not get too hot:• Do not locate the server in an unventilated space.• Make sure that the server’s front and back panels are not blocked.• Check that the location of the server is not too hot. Maximum
environmental temperature for operating the server is 35° C (95° F).
Installing 1-3
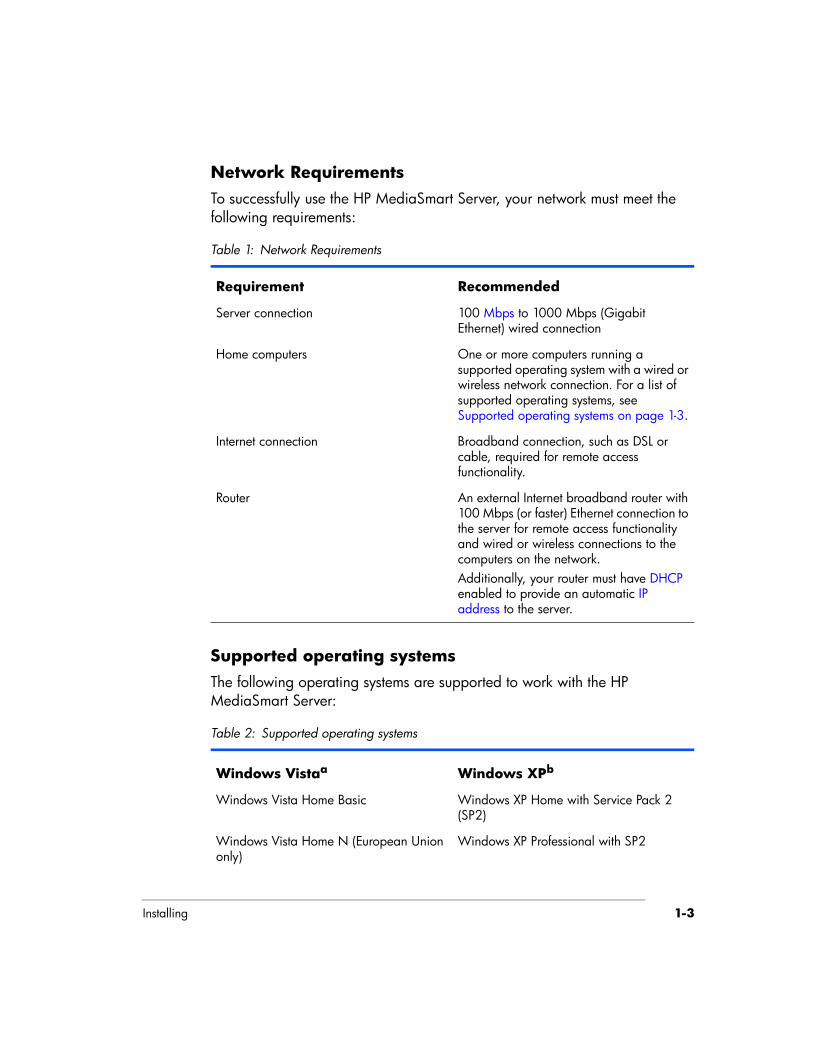
Network RequirementsTo successfully use the HP MediaSmart Server, your network must meet the following requirements:
Supported operating systemsThe following operating systems are supported to work with the HP MediaSmart Server:
Table 1: Network Requirements
Requirement Recommended
Server connection 100 Mbps to 1000 Mbps (Gigabit Ethernet) wired connection
Home computers One or more computers running a supported operating system with a wired or wireless network connection. For a list of supported operating systems, see Supported operating systems on page 1-3.
Internet connection Broadband connection, such as DSL or cable, required for remote access functionality.
Router An external Internet broadband router with 100 Mbps (or faster) Ethernet connection to the server for remote access functionality and wired or wireless connections to the computers on the network.Additionally, your router must have DHCP enabled to provide an automatic IP address to the server.
Table 2: Supported operating systems
Windows Vistaa Windows XPb
Windows Vista Home Basic Windows XP Home with Service Pack 2 (SP2)
Windows Vista Home N (European Union only)
Windows XP Professional with SP2
Installing Version Update 1.1.11-4
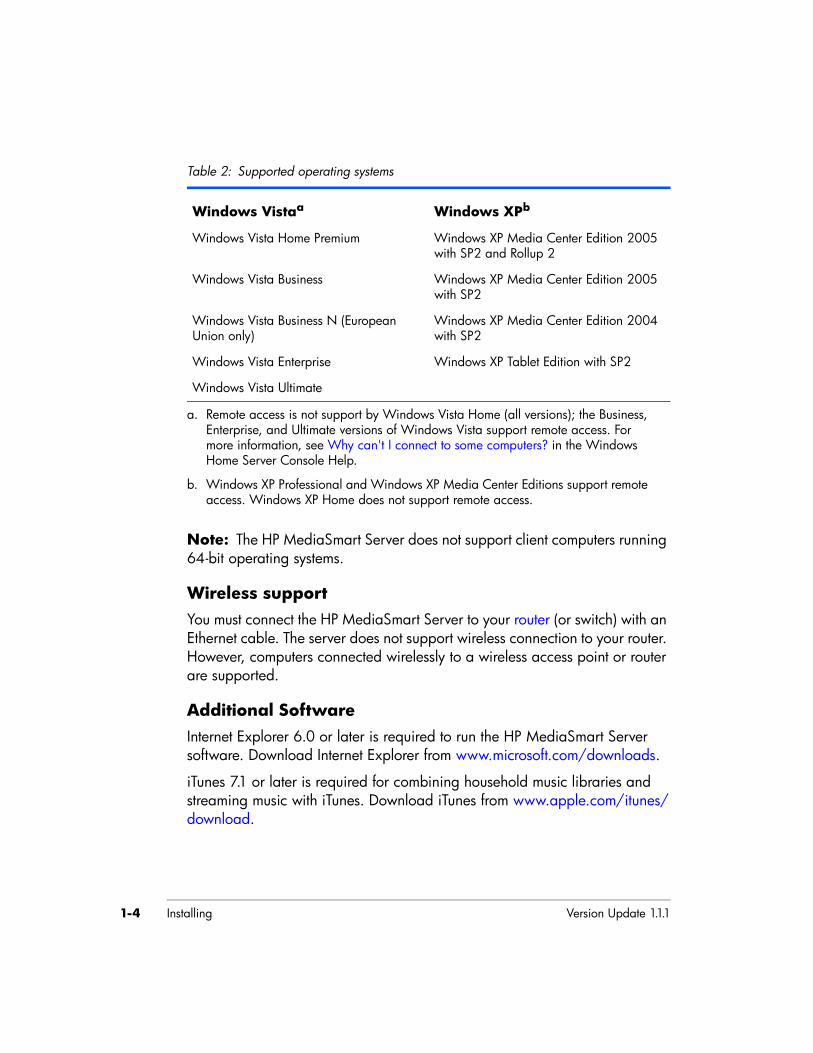
Note: The HP MediaSmart Server does not support client computers running 64-bit operating systems.
Wireless supportYou must connect the HP MediaSmart Server to your router (or switch) with an Ethernet cable. The server does not support wireless connection to your router. However, computers connected wirelessly to a wireless access point or router are supported.
Additional SoftwareInternet Explorer 6.0 or later is required to run the HP MediaSmart Server software. Download Internet Explorer from www.microsoft.com/downloads.
iTunes 7.1 or later is required for combining household music libraries and streaming music with iTunes. Download iTunes from www.apple.com/itunes/download.
Windows Vista Home Premium Windows XP Media Center Edition 2005 with SP2 and Rollup 2
Windows Vista Business Windows XP Media Center Edition 2005 with SP2
Windows Vista Business N (European Union only)
Windows XP Media Center Edition 2004 with SP2
Windows Vista Enterprise Windows XP Tablet Edition with SP2
Windows Vista Ultimate
a. Remote access is not support by Windows Vista Home (all versions); the Business, Enterprise, and Ultimate versions of Windows Vista support remote access. For more information, see Why can't I connect to some computers? in the Windows Home Server Console Help.
b. Windows XP Professional and Windows XP Media Center Editions support remote access. Windows XP Home does not support remote access.
Table 2: Supported operating systems
Windows Vistaa Windows XPb
Installing 1-5
Connecting the serverHow you connect the HP MediaSmart Server to your network depends on the network configuration.
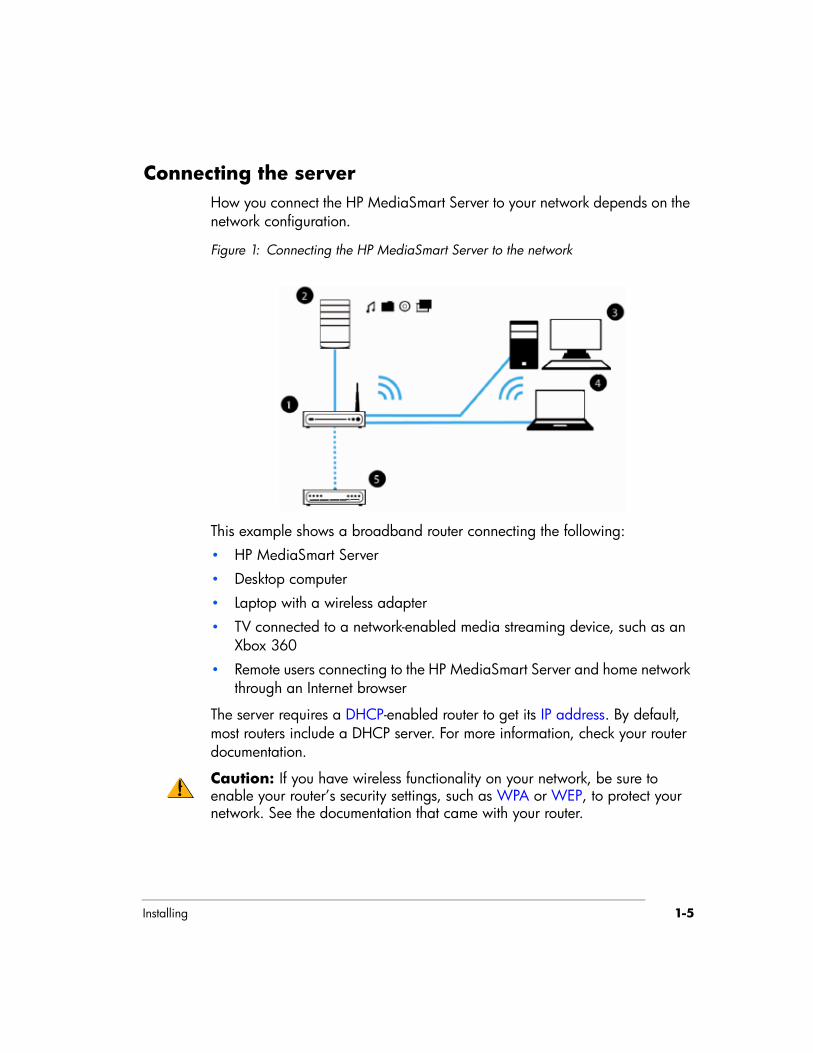
Figure 1: Connecting the HP MediaSmart Server to the network
This example shows a broadband router connecting the following:• HP MediaSmart Server• Desktop computer• Laptop with a wireless adapter• TV connected to a network-enabled media streaming device, such as an
Xbox 360• Remote users connecting to the HP MediaSmart Server and home network
through an Internet browser
The server requires a DHCP-enabled router to get its IP address. By default, most routers include a DHCP server. For more information, check your router documentation.
Caution: If you have wireless functionality on your network, be sure to enable your router’s security settings, such as WPA or WEP, to protect your network. See the documentation that came with your router.
Installing Version Update 1.1.11-6
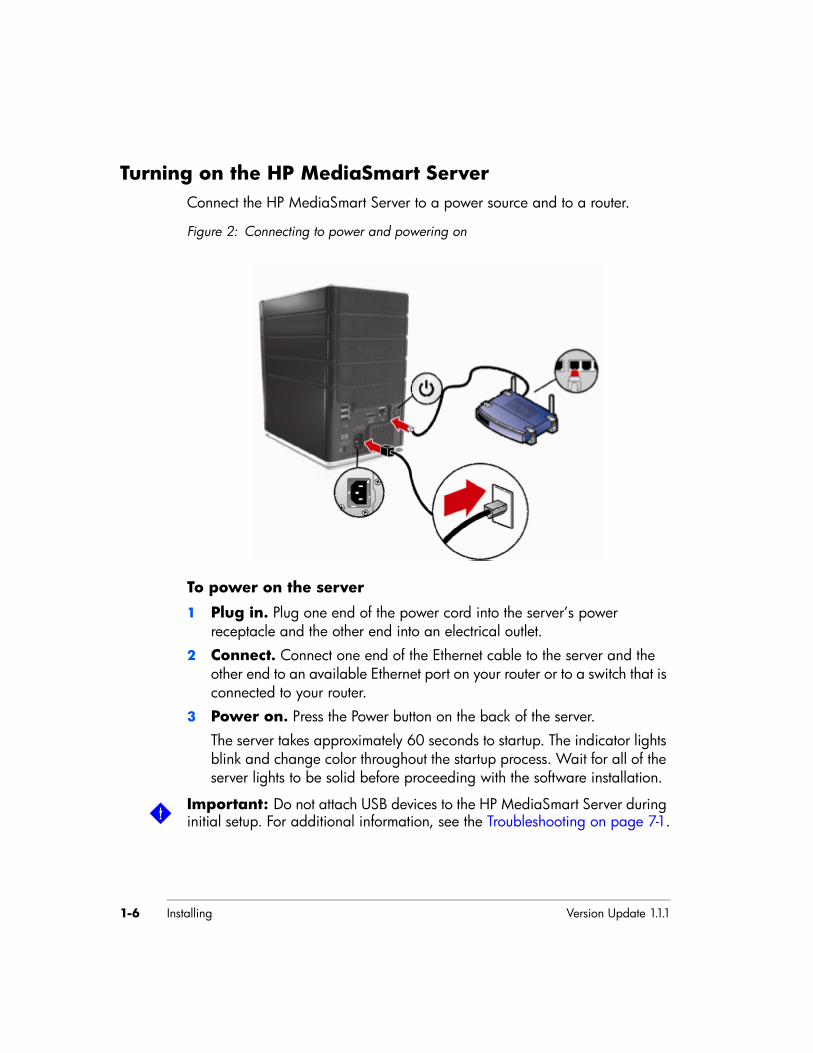
Turning on the HP MediaSmart ServerConnect the HP MediaSmart Server to a power source and to a router.
Figure 2: Connecting to power and powering on
To power on the server
1 Plug in. Plug one end of the power cord into the server’s power receptacle and the other end into an electrical outlet.
2 Connect. Connect one end of the Ethernet cable to the server and the other end to an available Ethernet port on your router or to a switch that is connected to your router.
3 Power on. Press the Power button on the back of the server. The server takes approximately 60 seconds to startup. The indicator lights blink and change color throughout the startup process. Wait for all of the server lights to be solid before proceeding with the software installation.
Important: Do not attach USB devices to the HP MediaSmart Server during initial setup. For additional information, see the Troubleshooting on page 7-1.
Installing 1-7
Checking the Server LightsThe lights on the front of the HP MediaSmart Server indicate the status of the server. After the HP MediaSmart Server startup completes and prior to the first software installation, the indicator lights show:• Hard drives—solid purple • Network—solid blue • Health—solid purple
After you complete the software installation, all lights should be solid blue.
If the lights are not solid blue, see the following:• Why is the hard drive light-bar purple? on page 7-3• Why is the hard drive light-bar red? on page 7-3• Power-on indicator is off on page 7-3• Why is the server’s health indicator light red? on page 7-4
Updating Your Firewall’s Trusted Program ListThe HP MediaSmart Server Software Installation Disc installs several programs that enable your computer to communicate with the HP MediaSmart Server over your network. Software firewalls installed on your computer can block this communication and prevent the computer from locating the HP MediaSmart Server on your network. The following steps are recommended before installing the HP MediaSmart Server programs:• Launch your firewall and anti-virus software and update the trusted
programs list.• Verify that your firewall and anti-virus software is set to "Learn" new
programs. After the HP MediaSmart Server software is installed, the firewall should prompt you to allow the installed programs to communicate with the server.
• If you are using a firewall or anti-virus program that cannot automatically update its trusted software list, please contact the firewall or anti-virus software vendor to find out how to manually add software to the trusted
Installing Version Update 1.1.11-8
software list. Then, visit http://www.hp.com/go/support for a list of software to add.
Installing the Software on the First ComputerUse the Software Installation Disc to install both the HP MediaSmart Server software and the Windows Home Server Connector software.
The software installation consists of the following:• HP Update (if not already installed)• Windows components—Windows Installer 3.1 and .NET 2.0 or later
software. (Installed only if they are not already on the computer)• HP MediaSmart Server software• Windows Home Server Connector• Windows Home Server Setup—the setup runs only on the first computer
where the software is installed.
Checking for Administrative PrivilegesYou must have administrative privileges on your home computer to install the software. Complete the following instructions for Windows Vista or Windows XP to view or change user account settings.• In Windows Vista, click Start, Control Panel, and then User
Accounts and Family Safety.• In Windows XP, click Start, click Control Panel, and then double-click
User Accounts.
Inserting the Software Installation DiscThe Software Installation Disc first installs the HP MediaSmart Server software and then the Microsoft Home Server Connector software on your computer.
Sidebar: Hubs and Network Health Light
Some network hubs, as opposed to switches or routers, may reduce performance between your computer and the HP MediaSmart Server, or the hub may prevent your computer from communicating with the server. If this is a problem, the network health indicator light on the front of the server will be off. Replacing the hub with a switch may improve the network performance or restore connectivity.
Installing 1-9
1 Insert the Software Installation Disc into a computer connected to your network. The installation starts.
2 Follow the instructions on each installation page. The remainder of this chapter describes important parts of the installation, but not every step is described.
Note: Computers running Windows Vista may display User Account Control messages, such as “A program needs your permission to Continue.” Click Continue.
About the HP MediaSmart Server SoftwareThe HP MediaSmart Server software installs first. This software is used to• Provide a single point of access for all of the server’s features,• Share photos and videos quickly and securely over the Web using HP
Photo Webshare,• Centralize your iTunes music library, and more!Note: Click User’s Guide on this dialog box if you need additional assistance with the installation and setup.
Click Next to display and accept the end user license agreement.
Installing the HP MediaSmart ServerClick Install and follow the instructions on each page.
The following components are installed if they are not already on your computer. This installation may restart your computer and take several minutes.• Windows Installer 3.1• Microsoft .Net Framework 2.0• HP Update
The HP MediaSmart Server software automatically installs after the components. Once the HP software is installed, the Windows Home Server Connector install begins.
About the Windows Home Server ConnectorThe Windows Home Server Connector:
Installing Version Update 1.1.11-10
• Connects your computer to the server.• Automatically backs up your computer every night.• Monitors the health of the network and computers running Windows
Vista.• Enables configuration of the server from your computer.
Windows Home Server Setup runs only once—on the first computer where you install the Windows Home Server Connector software.
Finding the ServerThe Windows Home Server Connector installations looks for and connects to your HP MediaSmart Server. If the installation cannot find your server, see Troubleshooting on page 7-1.
Once the server is found, click Next to continue the installation.
Initializing Windows Home ServerThe Windows Home Server initialization begins and can take several hours depending on your hardware. Please wait while Windows Home Server:• Configures your hardware• Recovers your data• Starts Windows Home Server
Naming the HP MediaSmart ServerType a name for your server. Server names can be:• 15 characters maximum with no spaces• Letters (at least one), numbers and hyphensNote: This is the only time you can name your server. It cannot be changed later. The default name is HPSERVER. Write down the server name if you change it.
Setting the Server PasswordOn the Windows Home Server password page, you are asked to create a strong password. A strong password must be at least 7 characters long and must fulfill three of the following four requirements:
Installing 1-11
• Uppercase characters• Lowercase characters• Numbers• Symbols (such as !, @, and #)Note: A password hint can be seen by anyone who clicks the Password hint button. It is recommended that you write your password down somewhere safe.
Important: The server password is not the same as a user password. For additional information on user accounts and passwords see, Task 2 of 6: Create User Accounts on page 2-7.
Help Protect Windows Home Server AutomaticallyWindows Home Server Setup automatically downloads and installs relevant important updates from Windows Update to help make your home server more secure.
Choose if you want Windows Home Server to continue automatically downloading updates after Setup and click the next arrow.Note: It is recommended that you turn on Automatic Windows Updates.
Customer Experience Improvement ProgramJoin the Customer Experience Improvement Program (CEIP) and help make Windows Home Server even better. CEIP collects information about your hardware and home server usage without interrupting you. No information collected is used to identify or contact you.
Choose if you want to participate in this program and click the next arrow.
Windows Error ReportingTo help understand the problems you may encounter with Windows Home Server, Windows Error Reporting can automatically report them to Microsoft. Any personal information inadvertently collected in the reports will not be used.
Choose if you want to participate in this program and click the next arrow.
Installing Version Update 1.1.11-12
Checking for Windows Home Server UpdatesThe Windows Home Server installation checks for any relevant important updates. This may take some time to complete, but does not require additional information from you.
Important: Do not restart or turn off your home server during the update process.
Checking for HP MediaSmart Server UpdatesThe HP MediaSmart Server installation checks for any updates. Installing updates ensures that you experience the full functionality and optimal performance of the HP MediaSmart Server.
Important: Do not restart or turn off your home server during the update process.
When do you log on to the server?
Introducing the HP MediaSmart Server AssistantThe server installation is complete. When you click OK, the Assistant remains at the bottom of the page to guide you through setting up your HP MediaSmart Server.
A green check mark appears for each completed step. Once all of the steps are complete, the Assistant link at the top of the page turns green. For additional information, see Setting up the HP MediaSmart Server using the Assistant on page 2-2.
Congratulations! You are ready to start using your server
Some HP MediaSmart Server features, such as backups and shared folders, are pre-configured and ready to go as soon as the first software installation is complete. Other features require some set up before you can use them.
BackupsAfter running the Software Installation Disc on your first home computer it is automatically added to the list of computers that are backed up by the HP
Installing 1-13
MediaSmart Server each night. Run the Software Installation Disc on additional home computers to enable them to communicate with the server and to add them to nightly backups.
To customize the hard-drive volumes to back up, or to exclude folders from the backup
1 At the computer, double-click the Windows Home Server icon in the task tray and log on.
Figure 3: Windows Home Server system tray icon
2 Click the Backups & Computers tab.
Shared Folders and Media SharingStart copying digital assets from your computer to shared folders on the HP MediaSmart Server.
1 At the computer, double-click the HP MediaSmart Server desktop icon.
Figure 4: HP MediaSmart Server desktop icon
2 Copy Photos, Music, or Videos to the appropriate shared folder or click Server to create shared folders for other digital content.
Note: From the Media Sharing page on the Windows Home Server Settings tab, you can turn on digital media streaming for the Photos, Music, or Videos shared folders. Click On for each folder that you want to stream from.
Set up Additional FeaturesFeatures such as HP Software Update, User Accounts, Remote Access, Photo Webshare, and Media Sharing require some setup. The Assistant guides you through setting up your server. Using the Assistant is optional but
Installing Version Update 1.1.11-14
recommended to ensure that the most frequently used server features are set up correctly.
1 At the computer, double-click the Windows Home Server icon in the task tray and log on.The MediaSmart Server tab should be active.
2 Follow the instructions in the Assistant at the bottom of the page.
See Setting up the HP MediaSmart Server using the Assistant on page 2-2 for detailed instructions on using the Assistant.
2 Getting StartedAfter completing the first installation, use this chapter to set up the HP MediaSmart Server.
What’s in this chapter» Opening the Windows Home Server Console» Setting up the HP MediaSmart Server using the Assistant» Task 1 of 6: Setup HP Software Update» Task 2 of 6: Create User Accounts» Task 3 of 6: Configure Remote Access» Task 4 of 6: Configure your HP Photo Webshare» Task 5 of 6: Turn on Media Sharing» Task 6 of 6: Learn more about your HP MediaSmart Server» Installing the Software on Additional Home Computers» Setting up Additional Home Computers
Opening the Windows Home Server ConsoleYou can access the Windows Home Server Console in the following ways:• To open the Windows Home Server Console from the start menu• To open the Windows Home Server Console from the HP MediaSmart
Server desktop icon• To open the Windows Home Server Console from the system tray
To open the Windows Home Server Console from the start menu
1 At the computer, click Start, All Programs, and then select Windows Home Server Console.
2 Log on to the Windows Home Server Console.
Getting Started Version Update 1.1.12-2
To open the Windows Home Server Console from the HP MediaSmart Server desktop icon
This method requires that during installation you selected to create a desktop shortcut to the HP MediaSmart Server.
1 From the computer desktop, double-click HP MediaSmart Server icon.
Figure 5: Desktop HP MediaSmart Server icon
2 In the Control Center, click the Tools tab.3 Click Home Server Console.4 Log on to the Windows Home Server Console.
To open the Windows Home Server Console from the system tray
1 At the computer, double-click the Windows Home Server icon in the system tray.
2 Log on to the Windows Home Server Console.
Setting up the HP MediaSmart Server using the AssistantAfter running the Software Installation Disc on the first computer, the installer displays the Windows Home Server Console with the MediaSmart Server tab selected. Additionally, the Assistant displays at the bottom of the page and describes the most important tasks for configuring the HP MediaSmart Server.
This topic includes the following:• About the Assistant• Opening and Closing the Assistant• Using the Assistant Task Indicators• Other HP MediaSmart Server Settings
Getting Started 2-3
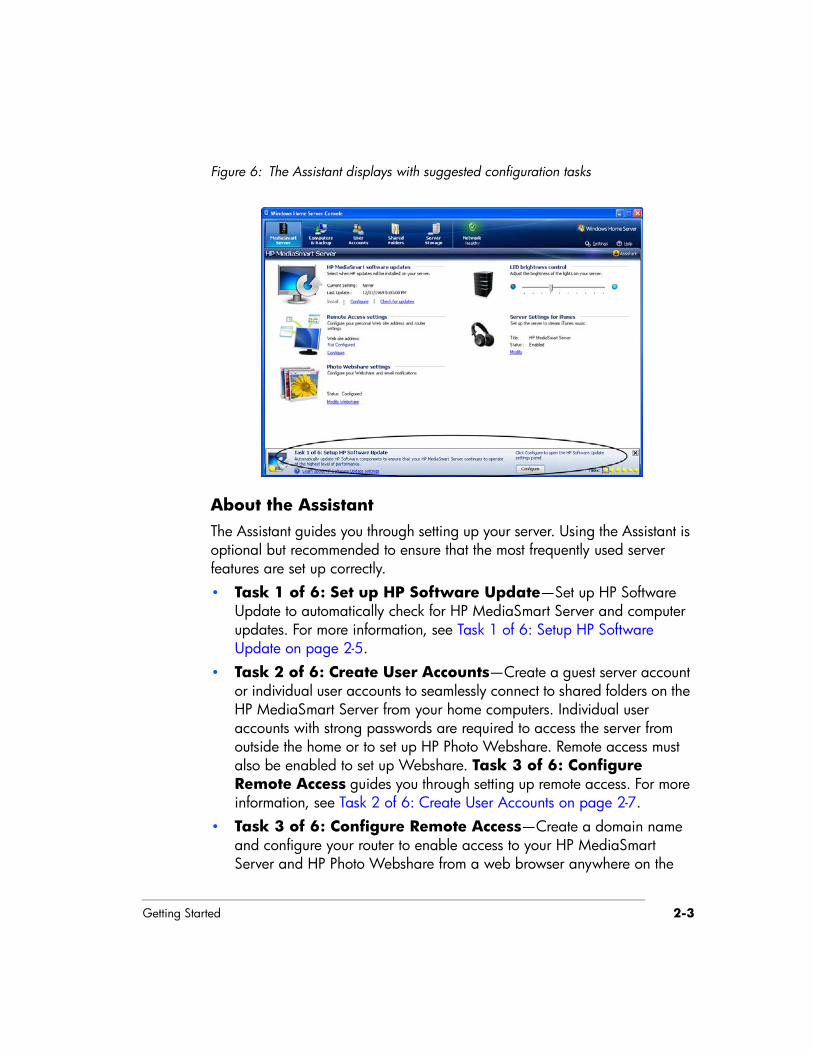
Figure 6: The Assistant displays with suggested configuration tasks
About the AssistantThe Assistant guides you through setting up your server. Using the Assistant is optional but recommended to ensure that the most frequently used server features are set up correctly.• Task 1 of 6: Set up HP Software Update—Set up HP Software
Update to automatically check for HP MediaSmart Server and computer updates. For more information, see Task 1 of 6: Setup HP Software Update on page 2-5.
• Task 2 of 6: Create User Accounts—Create a guest server account or individual user accounts to seamlessly connect to shared folders on the HP MediaSmart Server from your home computers. Individual user accounts with strong passwords are required to access the server from outside the home or to set up HP Photo Webshare. Remote access must also be enabled to set up Webshare. Task 3 of 6: Configure Remote Access guides you through setting up remote access. For more information, see Task 2 of 6: Create User Accounts on page 2-7.
• Task 3 of 6: Configure Remote Access—Create a domain name and configure your router to enable access to your HP MediaSmart Server and HP Photo Webshare from a web browser anywhere on the
Getting Started Version Update 1.1.12-4
Internet. For more information, see Task 3 of 6: Configure Remote Access on page 2-13.
• Task 4 of 6: Configure your HP Photo Webshare—Set up Webshare managers, email, and visitor upload limits. Before configuring Webshare, create at least one user account with remote access enabled and configure remote access settings. For more information, see Task 4 of 6: Configure your HP Photo Webshare on page 2-17.
• Task 5 of 6: Turn on Media Sharing—Turn on media sharing to stream music, videos, or pictures to supported digital media players or digital media receivers in your home network. For more information, see Task 5 of 6: Turn on Media Sharing on page 2-19.
• Task 6 of 6: Learn more about your HP MediaSmart Server—Click the link to open the online User’s Guide to learn about using all of the HP MediaSmart Server features. For more information, see Task 6 of 6: Learn more about your HP MediaSmart Server on page 2-20.
Opening and Closing the Assistant
1 At the computer, double-click the Windows Home Server icon in the system tray and log on.
2 Click the MediaSmart Server tab.3 Click Assistant in the upper right corner to toggle between opening and
closing the Assistant.The Assistant opens to the first incomplete task or closes at the bottom of the Windows Home Server.
Using the Assistant Task IndicatorsThe Assistant task indicators are in the lower right corner of the page. They tell you at a glance which tasks are complete and which ones still need to be set up.• Incomplete tasks. Incomplete tasks have yellow indicators. Roll over
the yellow indicators with your mouse to see descriptions of the tasks. Click a yellow indicator to jump directly to that step in the Assistant.Note: If a previous step needs to be completed before the step you selected, the Configure button is greyed out and the text above the
Getting Started 2-5
button tells you what step needs to be done prior to completing the current step.
• Complete tasks. Complete tasks have a green check mark. After all of the tasks are complete, the Assistant button at the top of the page turns green.
Other HP MediaSmart Server SettingsWhile the Assistant guides you through setting up several HP MediaSmart Server features, there are some features that it does not describe. The MediaSmart Server tab of the Windows Home Server also contains the following items:• LED brightness control—move the slider to adjust the brightness of
the lights on the front of the HP MediaSmart Server.• Server Settings for iTunes—enable or disable this feature, set up a
password, change the name displayed for the HP MediaSmart Server in iTunes. For more information, see Setting up iTunes on the server and the client computer on page 6-29.
Task 1 of 6: Setup HP Software UpdateUse the HP MediaSmart software update to keep your server and home computers current with the latest HP software, online help, and new features.
HP MediaSmart software update does not update the Microsoft Windows Home Server operating system. For information about updating Windows Home Server, see Configuring Windows Update in the Windows Home Server Console Help.
This topic includes the following:• Configuring HP MediaSmart software update• Client computer updates
Getting Started Version Update 1.1.12-6
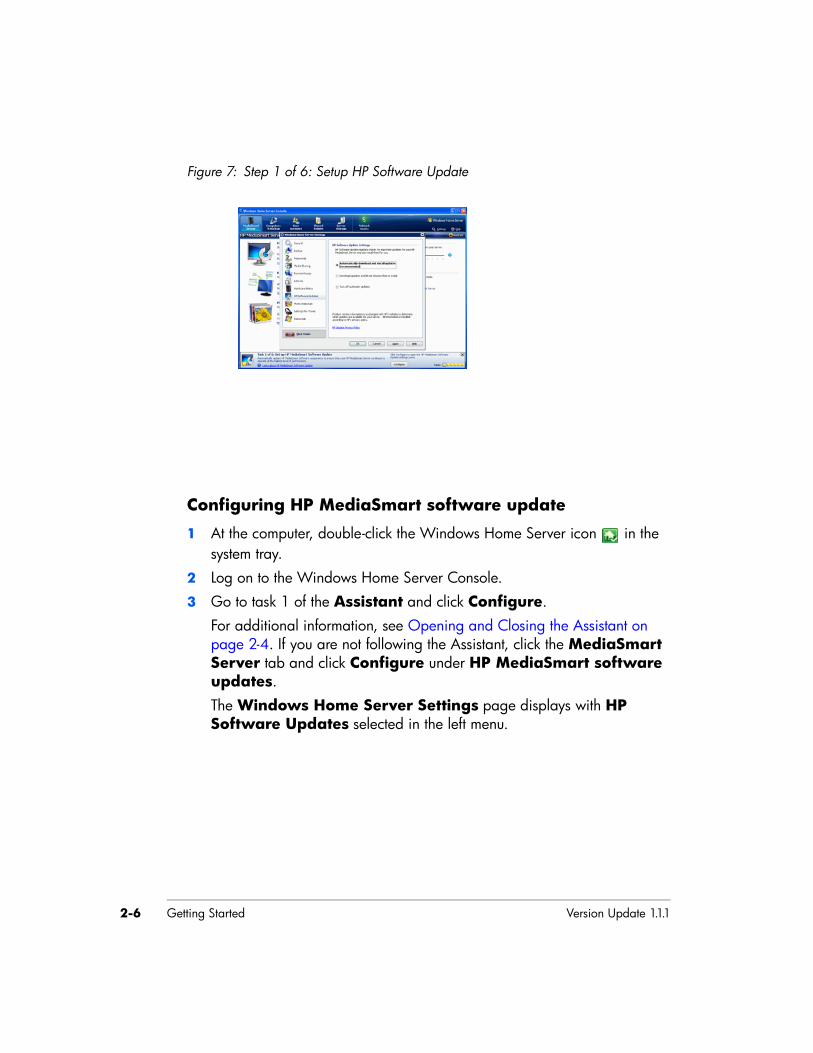
Figure 7: Step 1 of 6: Setup HP Software Update
Configuring HP MediaSmart software update
1 At the computer, double-click the Windows Home Server icon in the system tray.
2 Log on to the Windows Home Server Console.3 Go to task 1 of the Assistant and click Configure.
For additional information, see Opening and Closing the Assistant on page 2-4. If you are not following the Assistant, click the MediaSmart Server tab and click Configure under HP MediaSmart software updates.The Windows Home Server Settings page displays with HP Software Updates selected in the left menu.
Getting Started 2-7
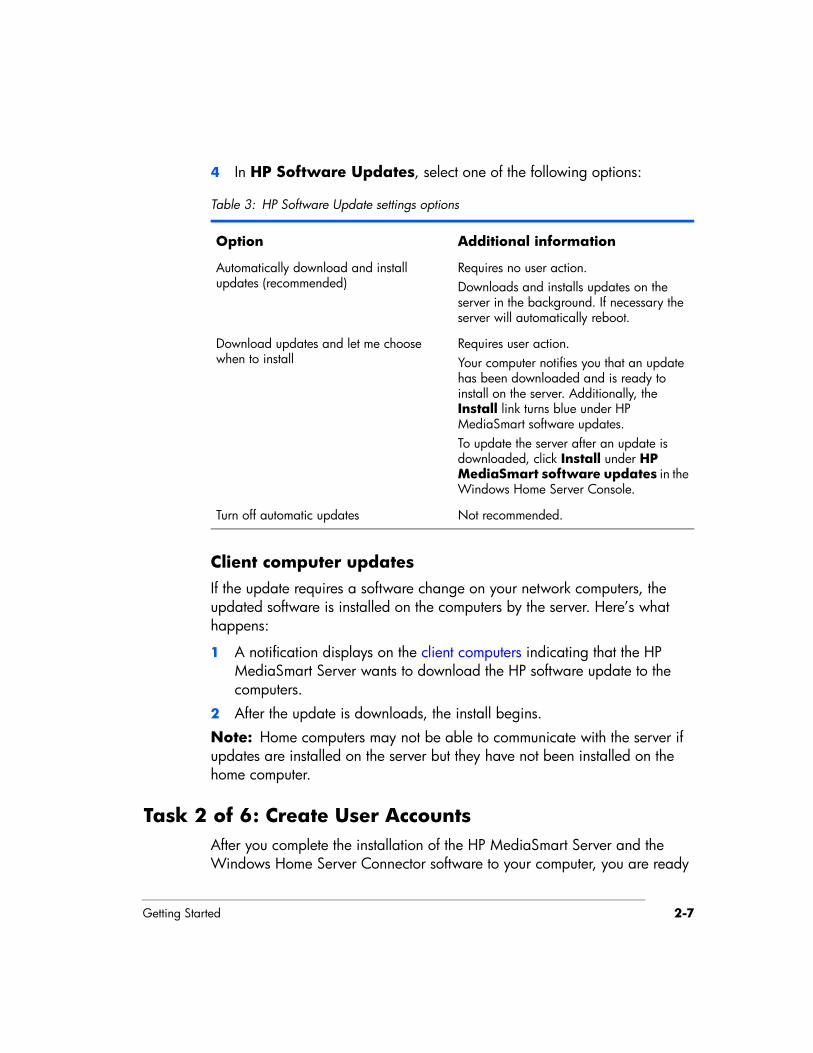
4 In HP Software Updates, select one of the following options:
Client computer updatesIf the update requires a software change on your network computers, the updated software is installed on the computers by the server. Here’s what happens:
1 A notification displays on the client computers indicating that the HP MediaSmart Server wants to download the HP software update to the computers.
2 After the update is downloads, the install begins.Note: Home computers may not be able to communicate with the server if updates are installed on the server but they have not been installed on the home computer.
Task 2 of 6: Create User AccountsAfter you complete the installation of the HP MediaSmart Server and the Windows Home Server Connector software to your computer, you are ready
Table 3: HP Software Update settings options
Option Additional information
Automatically download and install updates (recommended)
Requires no user action.Downloads and installs updates on the server in the background. If necessary the server will automatically reboot.
Download updates and let me choose when to install
Requires user action.Your computer notifies you that an update has been downloaded and is ready to install on the server. Additionally, the Install link turns blue under HP MediaSmart software updates.To update the server after an update is downloaded, click Install under HP MediaSmart software updates in the Windows Home Server Console.
Turn off automatic updates Not recommended.
Getting Started Version Update 1.1.12-8
to add user accounts for other family members in your household. The HP MediaSmart Server supports two types of user accounts: guest and individual.
Use the table below to determine which type of user account best suits your needs.
This topic includes the following:• Enabling the Guest Account• Creating Individual User Accounts
For additional information on user accounts, see the following help topics in the Windows Home Server help.• Why do I need user accounts?• Why should logon names match?• Which user accounts password policy should I choose?
Enabling the Guest AccountIf you want everyone to use the same logon account to access the HP MediaSmart Server, enable the guest account. If the guest account is enabled with no password, family members are not required to logon when they use home computers. Additionally, all family members can have Full access to all shared folders through the guest account.
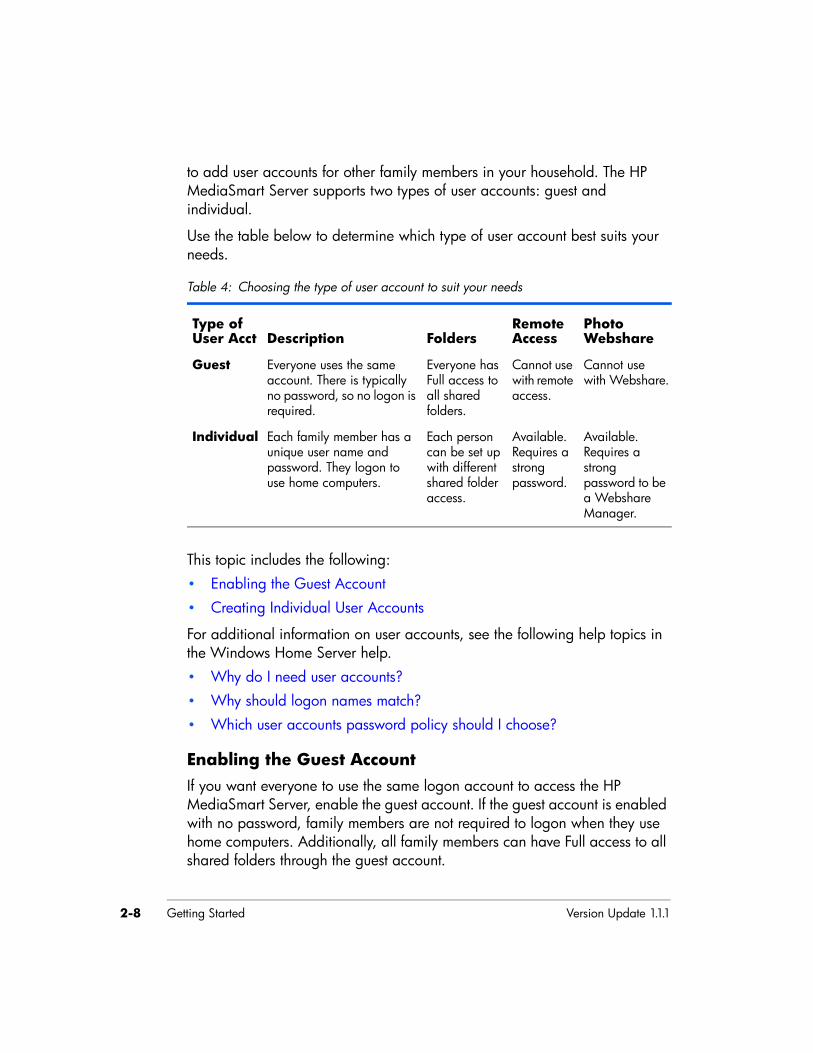
Table 4: Choosing the type of user account to suit your needs
Type of User Acct Description Folders
Remote Access
Photo Webshare
Guest Everyone uses the same account. There is typically no password, so no logon is required.
Everyone has Full access to all shared folders.
Cannot use with remote access.
Cannot use with Webshare.
Individual Each family member has a unique user name and password. They logon to use home computers.
Each person can be set up with different shared folder access.
Available. Requires a strong password.
Available. Requires a strong password to be a Webshare Manager.
Getting Started 2-9
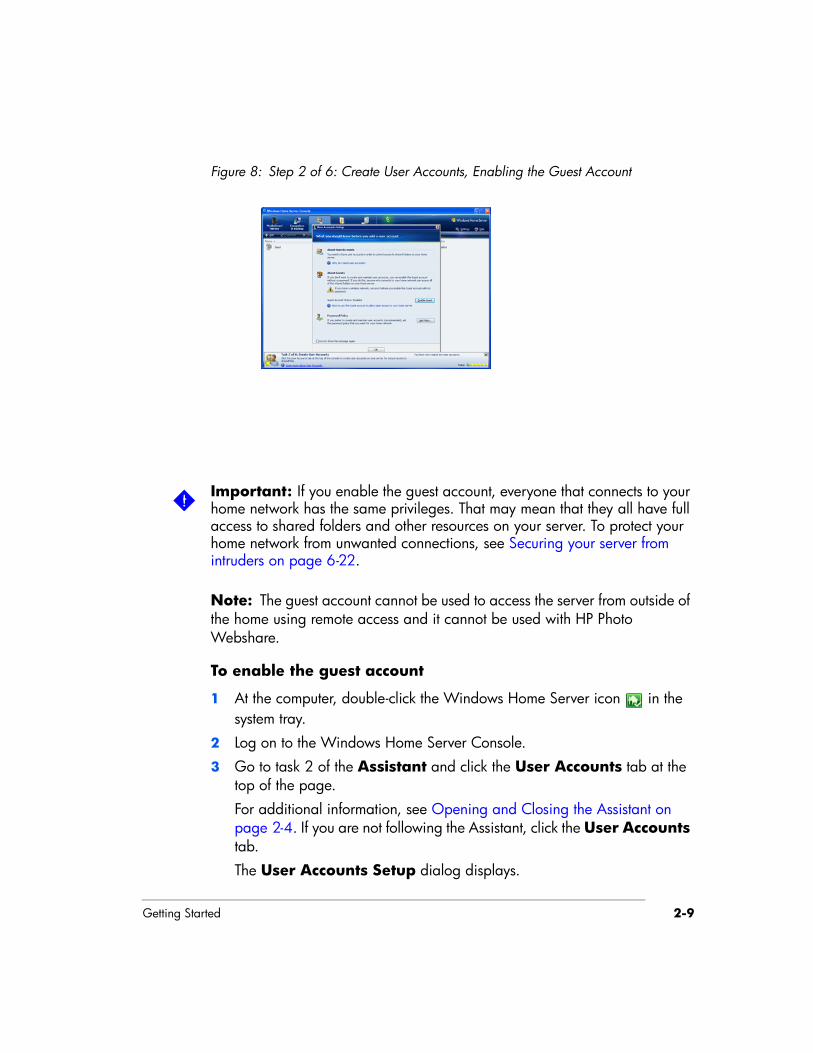
Figure 8: Step 2 of 6: Create User Accounts, Enabling the Guest Account
Important: If you enable the guest account, everyone that connects to your home network has the same privileges. That may mean that they all have full access to shared folders and other resources on your server. To protect your home network from unwanted connections, see Securing your server from intruders on page 6-22.
Note: The guest account cannot be used to access the server from outside of the home using remote access and it cannot be used with HP Photo Webshare.
To enable the guest account
1 At the computer, double-click the Windows Home Server icon in the system tray.
2 Log on to the Windows Home Server Console.3 Go to task 2 of the Assistant and click the User Accounts tab at the
top of the page.For additional information, see Opening and Closing the Assistant on page 2-4. If you are not following the Assistant, click the User Accounts tab.The User Accounts Setup dialog displays.
Getting Started Version Update 1.1.12-10
4 Click Enable Guest.
Creating Individual User AccountsIf family members want to access information on your home network from an Internet café, coffee shop, or other location outside of your home, they need individual user accounts with strong passwords. At least one individual user account with a strong password is also required to create a Webshare Manager and to set up HP Photo Webshare. For additional information, see Task 4 of 6: Configure your HP Photo Webshare on page 2-17.
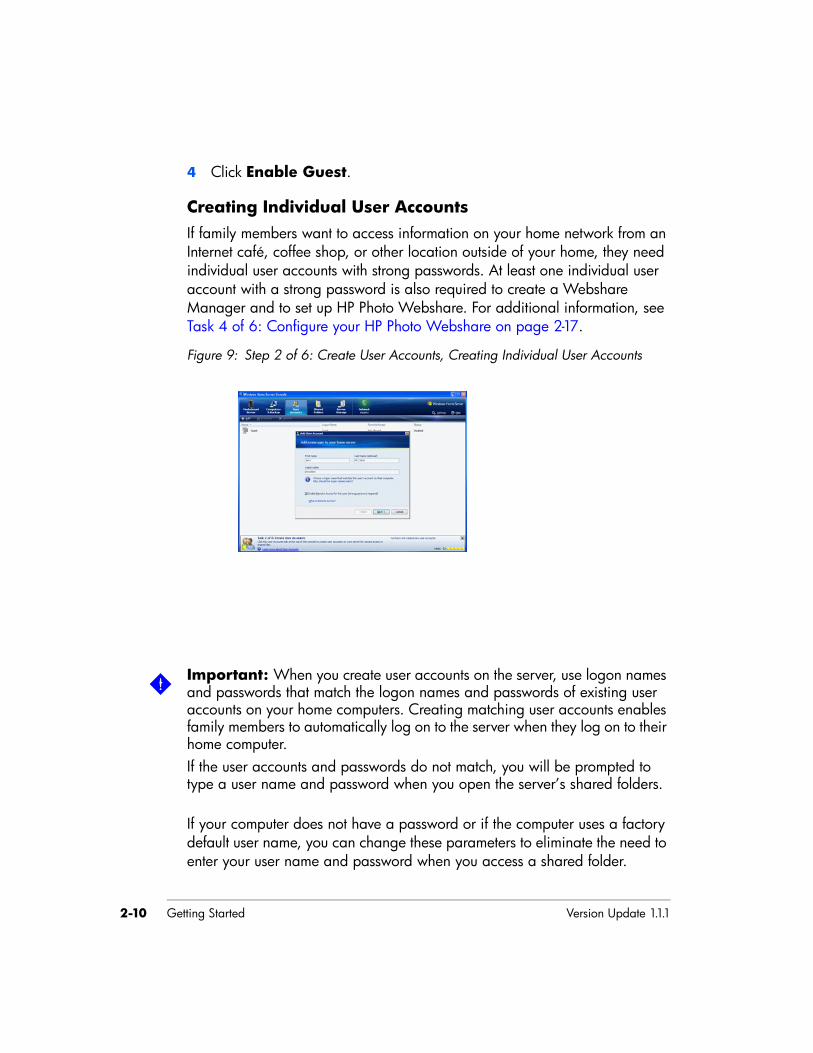
Figure 9: Step 2 of 6: Create User Accounts, Creating Individual User Accounts
Important: When you create user accounts on the server, use logon names and passwords that match the logon names and passwords of existing user accounts on your home computers. Creating matching user accounts enables family members to automatically log on to the server when they log on to their home computer.If the user accounts and passwords do not match, you will be prompted to type a user name and password when you open the server’s shared folders.
If your computer does not have a password or if the computer uses a factory default user name, you can change these parameters to eliminate the need to enter your user name and password when you access a shared folder.

Getting Started 2-11
Do I need to create user accounts on each home computer?
Computer user accounts are created on each home computer that connects to the server. Likewise, if three family members share a home computer, each family member should have an individual user account on that computer.
For instance, if Mom and Dad share a computer, you will create user accounts for both of them on the computer that they share. If the children, Jill and Bobby, have their own computers, you can create one user account for each of them and only on the computer that they use.
Another option is to set up user accounts for all family members on all computers.Then, each family member can log on to any home computer and access the server seamlessly.
To create a user account for a home computer running Windows XP
1 At the computer, click Start, Control Panel, and then User Accounts.
2 Click Add to create a user account.-or-Click Change an Account to change a logon name or password for an existing account.A strong password is suggested to ensure security and is required to use remote access or HP Photo Webshare. A strong password must be at least 7 characters long and must fulfill three of the following four character criteria:
Uppercase charactersLowercase charactersNumbersSymbols (such as !, @, #, and so on.)
A password hint helps you remember your password. The password hint can be seen by anybody who clicks the link to display it.
Getting Started Version Update 1.1.12-12
To create a user account for a home computer running Windows Vista
1 At the computer, click Start and then Control Panel.2 Under User Accounts and Family Safety, select Add or remove
user accounts.Add user accounts or make changes to existing user accounts.A strong password is suggested to ensure security. A strong password must be at least 7 characters long and must fulfill three of the following four character criteria:
Uppercase charactersLowercase charactersNumbers
Symbols (such as !, @, #, and so on.)A password hint helps you remember your password. The password hint can be seen by anybody who clicks the link to display it.
To create user accounts on the server
1 At the computer, double-click the Windows Home Server icon in the system tray.
2 Log on to the Windows Home Server Console.3 Go to task 2 of the Assistant and click the User Accounts tab at the
top of the page.For additional information, see Opening and Closing the Assistant on page 2-4. If you are not following the Assistant, click the User Accounts tab.The User Accounts Setup dialog displays.
4 Click Set Policy to force a password strength for all user accounts and click OK. (optional)User accounts that are enabled for remote access in the Add User Account Wizard in step 6 below, require a strong password regardless of what is selected on the Set Policy page.
5 Click OK on the User Accounts Setup dialog to begin creating user accounts.
Getting Started 2-13
6 Click Add, and then complete the Add User Account Wizard.Use only the following characters for names:
Uppercase letters—A, B, C, and so on.Lowercase letters—a, b, c, and so on.Numbers—0, 1, 2, 3, 4, 5, 6, 7, 8, 9Symbols—use only: dash - underscore _ period . space [ ]
7 Check to enable remote access if the family member wants to access the home network from outside of the home of if they want to use HP Photo Webshare.
8 Repeat for each user account that you want to add.
Task 3 of 6: Configure Remote AccessTo access your Photo Webshare from a Web browser outside of your home network, or to easily access your files and home computers while you are away from home, you must configure remote access.
Getting Started Version Update 1.1.12-14
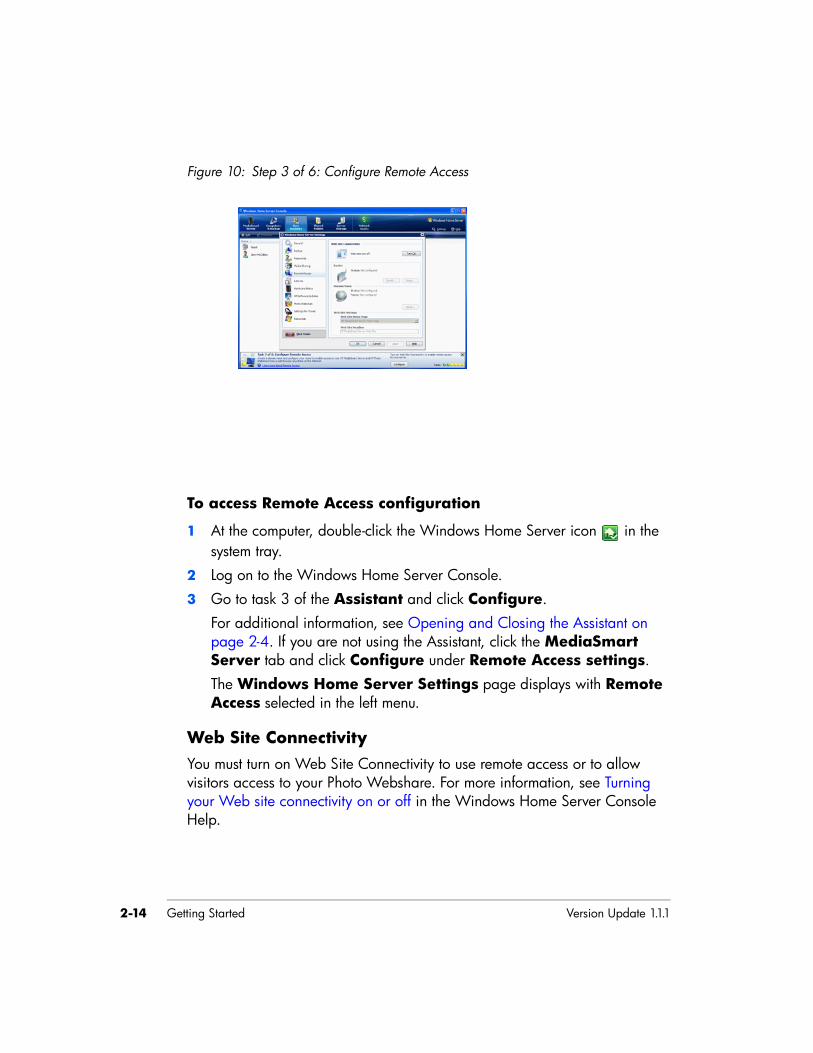
Figure 10: Step 3 of 6: Configure Remote Access
To access Remote Access configuration
1 At the computer, double-click the Windows Home Server icon in the system tray.
2 Log on to the Windows Home Server Console.3 Go to task 3 of the Assistant and click Configure.
For additional information, see Opening and Closing the Assistant on page 2-4. If you are not using the Assistant, click the MediaSmart Server tab and click Configure under Remote Access settings.The Windows Home Server Settings page displays with Remote Access selected in the left menu.
Web Site ConnectivityYou must turn on Web Site Connectivity to use remote access or to allow visitors access to your Photo Webshare. For more information, see Turning your Web site connectivity on or off in the Windows Home Server Console Help.
Getting Started 2-15
RouterYou must configure your router to access your HP Photo Webshare from outside the home network and to use remote access. After clicking Setup, the server automatically tries to configure your broadband router. For more information, see Configuring your broadband router in the Windows Home Server Console Help.
Domain NameA Domain Name is a Web address. It allows you to access your HP MediaSmart Server and HP Photo Webshare from the Internet. For instance, if you registered MyFamily.hpshare.net for your HP MediaSmart Server, you would use this address to connect to your server using remote access. Additionally, this address is part of the URL for accessing an album on your Photo Webshare.
To set up a domain name
1 Click the Setup button for Domain Name.2 Follow the instructions in the Domain Name Setup. The following topics
provide guidance for setting up your Domain Name:Select Domain Name and DNS hosting serviceAbout HP Personal Domain Name by TZO.COMAbout TZO.COM Custom Domain NamesAbout Windows Live Personalized Domain Name
Select Domain Name and DNS hosting serviceThe HP MediaSmart Server provides three alternatives for setting up a domain name:• HP Personal Domain Name by TZO.COM• TZO.COM Custom Domain Name• Windows Live Custom Domains
When choosing which service to use, consider the following:• TZO domain names allow you to automatically notify Photo Webshare
visitors when new photos are available through email without having to set up an SMTP email server.
Getting Started Version Update 1.1.12-16
• TZO domains names allow easy remote access, even if your broadband ISP blocks port 80. Blocking port 80 prevents a Web browser from reaching the server.
• With the TZO.COM Custom Domain Name option, you can create a domain name with any name that is not already registered.
About HP Personal Domain Name by TZO.COMHP Personal domain name is free for the first year. After the first year, the cost is a nominal $9.99 per year, as of September 2007.
An HP personal domain name has two parts:• Personalized name—enter a name of your choice. TZO.COM will check
your choice against existing names. If the name you picked already exists, TZO provides a list of alternatives.
• Second part of the name—choose from an assortment of domain names such as hphomeserver.com or hpshare.net.
Each part is combined so the Domain Name looks like MyFamily.hphomeserver.com.
About TZO.COM Custom Domain NamesWith this option, you can create a domain name with any name you want, like MyName.com, as long as that name is not already registered.
A domain name has several components:• Top-level or first-level domain names—all domain names end in a small
list of generic names, such as .com or .net, or in a country code, such as .es or .fr.
• Second-level domain names—the part or parts of the domain name located to the left of the top-level domain name. For example, “MyName” in MyName.com.
About Windows Live Personalized Domain NameMicrosoft also offers a service to get a personalized domain name for your server. Using Windows Live Personalized Domain Name requires email SMTP configuration to use Webshare.
Getting Started 2-17
To set up email SMTP settings for Webshare
1 Double-click the Windows Home Server icon in the system tray.
2 Log on to the Windows Home Server Console.3 Click Settings in the upper right corner.4 Click Photo Webshare in the left menu.5 On the right side under Webshare Notifications, click Configure.6 Select Use my own email provider to send Webshare
announcements and click Next.7 Type the name and email address to use in your Webshare notifications
and click Next.8 Type the SMTP server information and click Next.
Contact your Internet service provider if you do not know your SMTP server information.
9 Click Send Sample Announcement to test the configuration.10 Click Finish.
Task 4 of 6: Configure your HP Photo WebsharePersonalize your Photo Webshare, set up email notifications, create Webshare managers, and determine visitor upload limits.
Getting Started Version Update 1.1.12-18
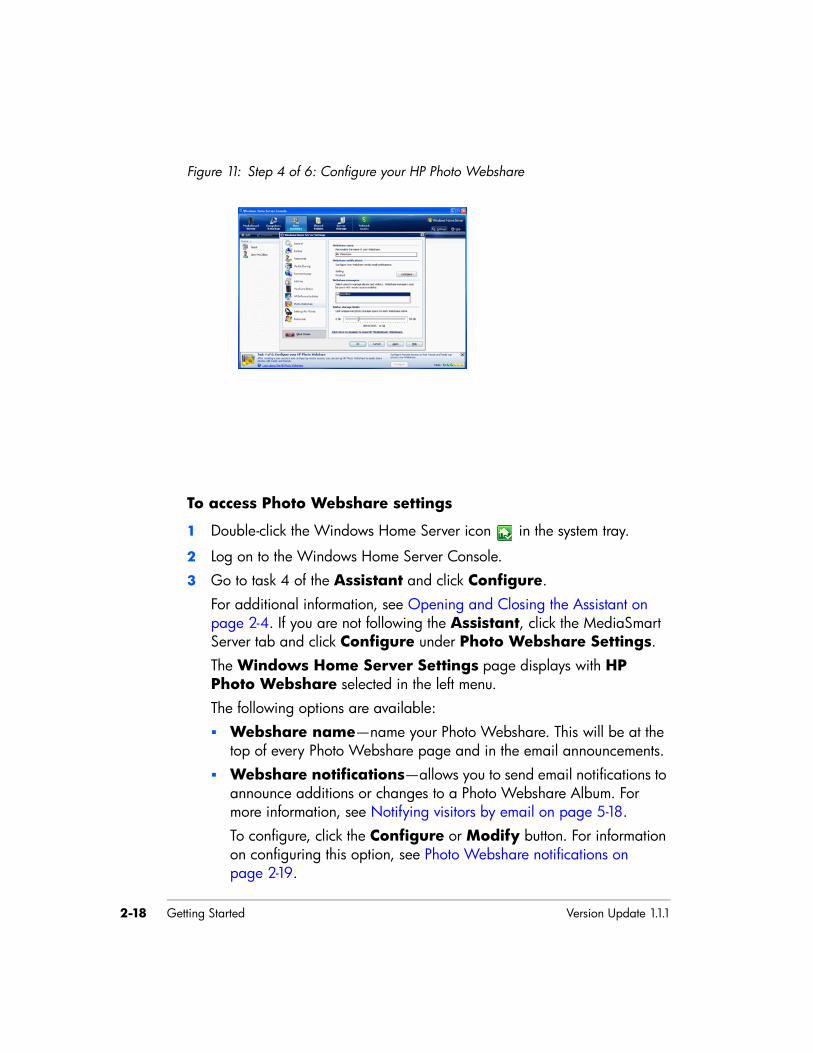
Figure 11: Step 4 of 6: Configure your HP Photo Webshare
To access Photo Webshare settings
1 Double-click the Windows Home Server icon in the system tray.
2 Log on to the Windows Home Server Console.3 Go to task 4 of the Assistant and click Configure.
For additional information, see Opening and Closing the Assistant on page 2-4. If you are not following the Assistant, click the MediaSmart Server tab and click Configure under Photo Webshare Settings.The Windows Home Server Settings page displays with HP Photo Webshare selected in the left menu.The following options are available:
Webshare name—name your Photo Webshare. This will be at the top of every Photo Webshare page and in the email announcements.Webshare notifications—allows you to send email notifications to announce additions or changes to a Photo Webshare Album. For more information, see Notifying visitors by email on page 5-18.To configure, click the Configure or Modify button. For information on configuring this option, see Photo Webshare notifications on page 2-19.
Getting Started 2-19
Webshare managers—all users are listed. A check mark indicates who can create, edit, or remove albums and visitors.Visitor storage limits—set the amount of disk space that visitors can use for uploading photos and video clips before they are approved by a Webshare manager.
Photo Webshare notificationsThe following options are available:• Use the TZO service to send Photo Webshare announcements on your
behalf—available only if you have previously selected to use the TZO service. For more information, see About HP Personal Domain Name by TZO.COM on page 2-16 or About TZO.COM Custom Domain Names on page 2-16.
• Use your own email provider to send Photo Webshare announcements—send email through your own email service. Some web-based email services, such as Hotmail, are not supported.If choosing to use your own email provider to send Photo Webshare announcements, you must enter your email account information, including the name of the SMTP server. You can get this information from your email provider or from the email account settings on your email program.
• Do not send any Photo Webshare announcements.
Task 5 of 6: Turn on Media SharingTurn on media sharing to stream music, videos, or pictures to supported digital media players or digital media receivers.
Getting Started Version Update 1.1.12-20
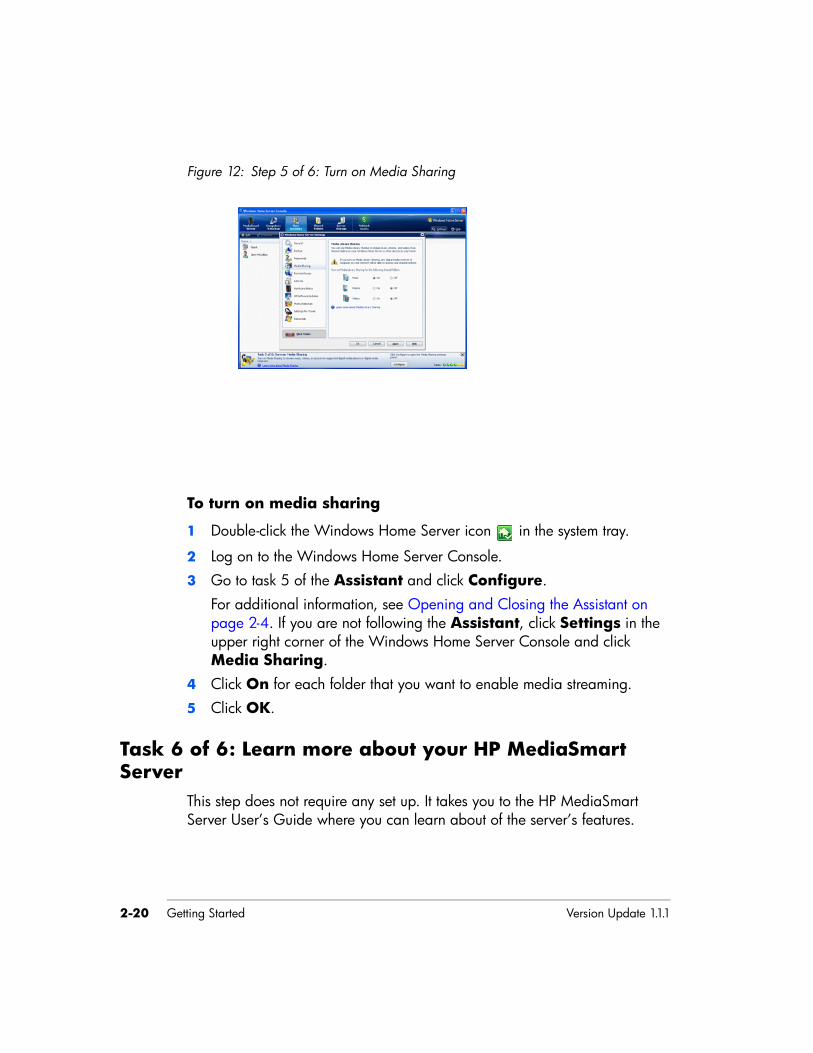
Figure 12: Step 5 of 6: Turn on Media Sharing
To turn on media sharing
1 Double-click the Windows Home Server icon in the system tray.
2 Log on to the Windows Home Server Console.3 Go to task 5 of the Assistant and click Configure.
For additional information, see Opening and Closing the Assistant on page 2-4. If you are not following the Assistant, click Settings in the upper right corner of the Windows Home Server Console and click Media Sharing.
4 Click On for each folder that you want to enable media streaming.5 Click OK.
Task 6 of 6: Learn more about your HP MediaSmart Server
This step does not require any set up. It takes you to the HP MediaSmart Server User’s Guide where you can learn about of the server’s features.
Getting Started 2-21
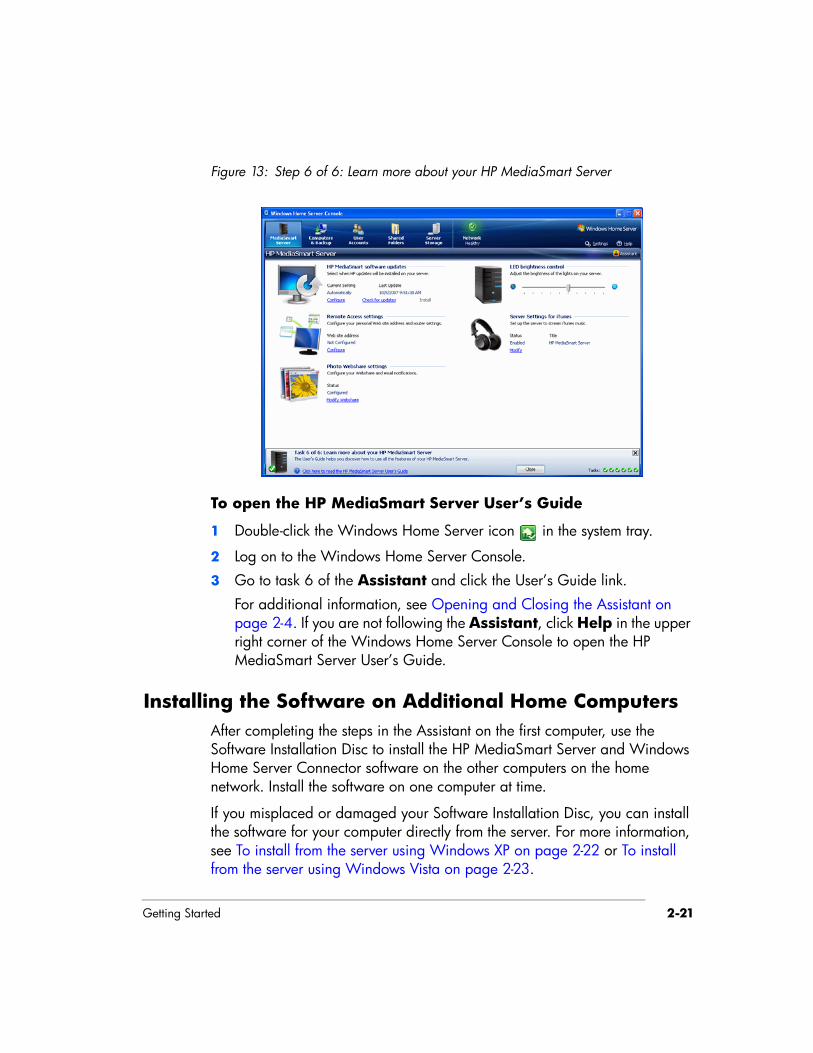
Figure 13: Step 6 of 6: Learn more about your HP MediaSmart Server
To open the HP MediaSmart Server User’s Guide
1 Double-click the Windows Home Server icon in the system tray.
2 Log on to the Windows Home Server Console.3 Go to task 6 of the Assistant and click the User’s Guide link.
For additional information, see Opening and Closing the Assistant on page 2-4. If you are not following the Assistant, click Help in the upper right corner of the Windows Home Server Console to open the HP MediaSmart Server User’s Guide.
Installing the Software on Additional Home ComputersAfter completing the steps in the Assistant on the first computer, use the Software Installation Disc to install the HP MediaSmart Server and Windows Home Server Connector software on the other computers on the home network. Install the software on one computer at time.
If you misplaced or damaged your Software Installation Disc, you can install the software for your computer directly from the server. For more information, see To install from the server using Windows XP on page 2-22 or To install from the server using Windows Vista on page 2-23.

Getting Started Version Update 1.1.12-22
To install from the Software Installation Disc
1 Insert the Software Installation Disc into a computer connected to the home network.You must have administrative privileges to install. For additional information, see Installing the Software on the First Computer on page 1-8.
2 Follow the instructions on the installation wizards.The installation process is identical to installing on the first computer except for the following:
The Windows Home Server Setup does not run.Your server password is required to install, as shown in the following figure:
Figure 14: Log on to Windows Home Server
To install from the server using Windows XP
1 At the computer, click Start, and then click My Computer.2 Do one of the following:
Click My Network Places.Under Other Places, click My Network Places.
3 In the Add Network Place Wizard, use the following (UNC) network address:\\<name of the server>\software
Getting Started 2-23
For example, \\HPSERVER\softwareWhen the wizard completes, you should see software on server in the My Network Places window.
4 Double-click the network place, and then open the Home Server Connector Software folder.
5 Double-click Install.exe and follow the instructions on the installation wizards.
To install from the server using Windows Vista
1 At the computer, click Start, and then click Network.2 Under Network Tasks, click Add a network place.3 In the Network Place Wizard, use the following UNC network
address:\\<name of the server>\software
For example, \\HPSERVER\softwareWhen the wizard completes, you should see the name you chose for the network place in the window.
4 Double-click the network place, and then open the Home Server Connector Software folder.
5 Double-click Install.exe and follow the instructions on the installation wizards.
Note: Network discovery must be turned on to access the server. See To ensure that Network Discovery is turned on on page 7-17.
Setting up Additional Home ComputersAfter installing the software on the Software Installation Disc, there are a few setup options for you to consider.• The home computer is automatically set up to be backed up each night. If
you want to customize back up settings for this computer, see Backing up and restoring a computer on page 6-4.
• If you created individual user accounts in Windows Home Server for one or more family members that use this computer, you also need to set up computer user accounts for them if you want them to be able to access
Getting Started Version Update 1.1.12-24
features on the server without logging on. For additional information, see Task 2 of 6: Create User Accounts on page 2-7.
• If there is an iTunes library on this computer that you want to include in an aggregated iTunes library on the server, set up this computer to copy its iTunes library to the server. For additional information, see To setup copying your iTunes library to the server on page 6-29.
Server Console 3-1
3 Server ConsoleThe Windows Home Server Console is where you manage and configure the HP MediaSmart Server.
What’s in this chapter» MediaSmart Server tab
Tools and settings for managing the HP MediaSmart Server.» Windows Home Server tabs
Overview of Windows Home Server functionality.
MediaSmart Server tabThe MediaSmart tab contains the tools and settings for managing the HP features.
HP MediaSmart software updateUse the HP MediaSmart software update to keep your server and client computers updated with the latest software, online help, and new features.
LED Brightness ControlMove the slider to adjust the brightness of the lights on the front of the HP MediaSmart Server. If you turn the LEDs off, the power light will remain on, but will be dim.
Remote access settingsConfigure remote access settings to access your files away from home or to allow your friends and family to access your Photo Webshare. For more information, see Task 3 of 6: Configure Remote Access on page 2-13.
Server Settings for iTunesPut your iTunes music library and playlists on the server for playback to any computer or notebook running iTunes on your home network. Enable or disable this feature, set up a password, change the name displayed for the
Server Console Version Update 1.1.13-2
HP MediaSmart Server in iTunes. For more information, see Setting up iTunes on the server and the client computer on page 6-29.
Photo Webshare settingsSet up Webshare managers, email, and visitor upload limits. For more information, see Task 4 of 6: Configure your HP Photo Webshare on page 2-17.
Windows Home Server tabsThe Windows Home Server enables you to share, store, access, and automatically protect your pictures, videos, music, and files. It contains the following tabs:• Computers & Backups—view and customize backups. Also, view the
status of your home computers running Windows Vista. For more information, see Computers & Backup in the Windows Home Server Console Help.
• User Accounts—add, remove, and modify user accounts. For more information, see User Accounts in the Windows Home Server Console Help.
• Shared Folders—add, open, remove, and view the properties of the shared folders on your server. For more information, see Shared Folders in the Windows Home Server Console Help.
• Server Storage—view, add, repair, and remove hard drives from server storage. For more information, see Server Storage in the Windows Home Server Console Help.
• Network—displays health notifications from your server and your home computers running Windows Vista. For more information, see Network Health in the Windows Home Server Console Help.
• Settings—configure general settings, such as date and time, backups, passwords, media sharing, remote access, add-ins, resources, and more. For more information, see Server Settings in the Windows Home Server Console Help.
• Help—access the Windows Home Server Console Help.

Control Center 4-1
4 Control CenterThe Control Center is the starting point for accessing the features of the HP MediaSmart Server. The Control Center has three tabs:
What’s in this chapter» MediaSmart tab
Access your Photo Webshare and shared folders.» Tools tab
Tools and settings for configuring your server.» Help & Support tab
Learn to use the HP MediaSmart Server and connect to online support.
Accessing the Control CenterThe Control Center desktop icon and system tray icon are available only if you selected to create them during installation.
The Control Center can be accessed from the following:
MediaSmart tabUse this tab to access Your Albums in Photo Webshare and your shared folders.
Windows Start menu—at the computer, click Start, All Programs, and then select HP MediaSmart Server.Desktop icon —at the computer, double-click the HP MediaSmart Server icon on the desktop.System tray icon —at the computer, double-click the HP MediaSmart Server icon on the system tray.
Control Center Version Update 1.1.14-2
Photo Webshare
Figure 15: Photo Webshare on the MediaSmart tab
Opens Photo Webshare on the Your Albums page in a Web browser window. For information about using Photo Webshare, see Photo Webshare on page 5-1.
Shared FoldersShared folders are places to help you get started saving and organizing your files so that you can share them with other people on your network.
If the logon name for the user account on your server does not match the logon name for your computer, you must enter a user name and password. For information about creating matching user accounts, see Why should logons names match? in the Windows Home Server Console Help.
Tools tabUse the tools and settings on this tab to configure your HP MediaSmart Server.
Server—opens a folder that displays a list of all your shared folders.
Photos—opens a folder that displays a list of photos and photo subfolders.
Music—opens a folder that displays a list of music and music subfolders.
Video—opens a folder that displays a list of video and video subfolders.
Home Server Console—opens the Windows Home Server Console, where you manage and configure the server. For more information, see Server Console on page 3-1.
Backup now—immediately backs up your computer. All files not backed up since the last nightly backup are backed up. For more information, see Backup Now in the Windows Home Server Console Help.
Control Center 4-3
Help & Support tabGet information about using, configuring, and getting accessories for your HP MediaSmart Server.
Settings for iTunes—automatically copies your iTunes music library and playlists to the server for playback on any computer running iTunes on your home network. For more information, see Setting up iTunes on the server and the client computer on page 6-29.
User’s Guide—contains installation information, setup instructions, how to use the server, tutorials, and other important information.
Online support—go to the HP Support web site, where you can get more information about the HP MediaSmart Server.
Need accessories?—get accessories for your server and shop HP Home & Home Office.

Control Center Version Update 1.1.14-4
Photo Webshare 5-1
5 Photo WebshareWhat’s in this chapter» Before You Begin» Logging on to HP Photo Webshare» Webshare home page» Managing Webshare User Accounts» Creating an album to share» Notifying visitors by email» Viewing, printing, and saving photos» Changing a Visitor’s Password» Frequently Asked Questions
Securely share your photos and video clips with friends and family directly from your HP MediaSmart Server using HP Photo Webshare.• Easily set up a secure, personal web address* to be used for remote
access and by visitors to your HP Photo Webshare.• Set up groups for sharing the different photo albums, such as family, ski
club, and soccer team.• Give specific visitors permission to add their own photos for sharing.• HP Photo Webshare links to Snapfish for easy photo printing.
*Free and charge options (for personal domain name) are available.
Before You BeginSome set up is required before logging on to the HP Photo Webshare for the first time. Check that the following configuration steps are complete.• Enable at least one user account with remote access• Select at least one user account to be a Webshare Manager• Setup Webshare notifications
Photo Webshare Version Update 1.1.15-2
• Select visitor storage limits• Setup remote access
Enable at least one user account with remote access
1 At the computer, double-click the Windows Home Server icon in the system tray.
2 Log on to the Windows Home Server Console.3 Click the User Accounts tab.
If the User Accounts Setup dialog displays, click OK.4 Click Add on the User Accounts page.
The Add User Accounts dialog box opens. If you 5 Type First name, Last name, and Logon name.
The Logon name must be unique.6 Check Enable remote access for this user and click Next.7 Type and confirm a strong Password and click Next.8 Set access to shared folders and click Finish.
Select at least one user account to be a Webshare Manager
Webshare Managers must have a user account with remote access enabled. If remote access is not enabled, complete the above steps before doing these.
1 Click Settings in the upper right of the Windows Home Server Console.The Windows Home Server Settings dialog box opens.
2 Click Photo Webshare in the left menu.3 Under Webshare Managers, select the user accounts to manage
albums and visitors.All user accounts are listed. However, remote access must be enabled on user accounts that are also Webshare Managers. If remote access is not enabled, you cannot select the user account. For more information, see Enable at least one user account with remote access on page 5-2.
4 Click OK on the Windows Home Server Settings dialog or keep it open to set up Webshare notifications, which are described in the next procedure.
Photo Webshare 5-3
Setup Webshare notifications
Webshare notifications allow users to receive email notifications letting them know photos, or other albums, have been created/updated or shared with other users.
1 Click Settings in the upper right of the Windows Home Server Console.The Windows Home Server Settings dialog box opens.
2 Click Photo Webshare in the left menu.3 Under Webshare Notifications, click Configure.4 Follow the instructions in the Email Settings wizard.5 Click Finish at the end of the wizard.6 Click OK on the Windows Home Server Settings dialog or keep it
open to set up visitor storage limits, which are described in the next procedure.
There is a section in the FAQ covering SMTP notification setup.
Select visitor storage limits
Visitors are friends and family outside your home network that you choose to share Webshare albums with. Depending on how you set up visitors, they may be able to add photos and videos to Webshare albums. The storage limit restricts the space for unapproved photos and videos added by visitors.
1 Click Settings in the upper right of the Windows Home Server Console.The Windows Home Server Settings dialog box opens.
2 Click Photo Webshare in the left menu.3 Under Visitor storage limits, select a limit for unapproved photo
storage space for each Webshare visitor.4 Click OK on the Windows Home Server Settings dialog or keep it
open to set up remote access, which is described in the next procedure.
Setup remote access
1 Click Settings in the upper right of the Windows Home Server Console.The Windows Home Server Settings dialog box opens.
2 Click Remote Access in the left menu.3 Under Web site Connectivity, click Turn on.
Photo Webshare Version Update 1.1.15-4
4 Under Router, click Setup.The server automatically tries to configure your broadband router. For more information, see Configuring your broadband router in the Windows Home Server Console Help.
5 Under Domain Name, click Setup.A Domain Name is a Web address. It allows you to access your HP MediaSmart Server and HP Photo Webshare from the Internet. For instance, if you registered MyFamily.hpshare.net for your HP MediaSmart Server, you would use this address to connect to your server using remote access. Additionally, this address is part of the URL for accessing an album on your Photo Webshare.For additional information, see Domain Name on page 2-15.
6 Customize Web site Settings as desired.
7 Click OK.
Logging on to HP Photo Webshare
1 At the computer, click Start, All Programs, and then select HP MediaSmart Server.The HP MediaSmart Server—Control Console opens.
2 On the MediaSmart tab, click Photo Webshare.3 Type your User name and Password (Created during initial Install
and Setup for the MediaSmart Server) and click Logon.You are connected to the HP Photo Webshare where you can create and share albums over the Web with friends and family.User names are not case sensitive. However, passwords are case sensitive.Note: You are automatically logged out of Photo Webshare if there is no activity after 30 minutes.
Forgot Your Password?Note: This is only used for Visitor account (accounts from outside the home network). Type your email address into the log on page and a message is sent to you with your user name and instructions for changing your password.
Photo Webshare 5-5
There is another section for server users, using the Admin Console.
Webshare home pageThe HP Photo Webshare home page displays icons for each of your photo albums. Albums can be sorted by Modification Date or Name. Click Create new album to create and share photos and videos with friends and family. The following features are available on this page.
To view the HP Photo Webshare home page
1 Log on to the HP Photo Webshare.For more information, see Logging on to HP Photo Webshare on page 5-4.
2 View the following album information on the Webshare home page.My Webshare—click My Webshare in the upper left corner of the page to return to the Webshare home page at any time. If you changed the name of your Webshare, that name appears in the upper left corner. For more information, see Task 4 of 6: Configure your HP Photo Webshare on page 2-17.Visitors—opens the Manage Visitors page for adding, deleting, and editing visitors. This is also where you setup email notifications for server users.Groups—opens the Manage Groups page for adding, deleting, and editing groups.My Server—click My Server in the title bar to go to the HP MediaSmart Server home page.Help—opens the HP MediaSmart Server User’s Guide.Sort by:– Modification date—sorts photo albums ascending or
descending by the last date they were modified. When you open Webshare, albums are sorted descending by modification date so the most recently changed albums are at the top.
– Name—sorts albums alphabetically ascending or descending by album name.
Create new album—creates a new album.
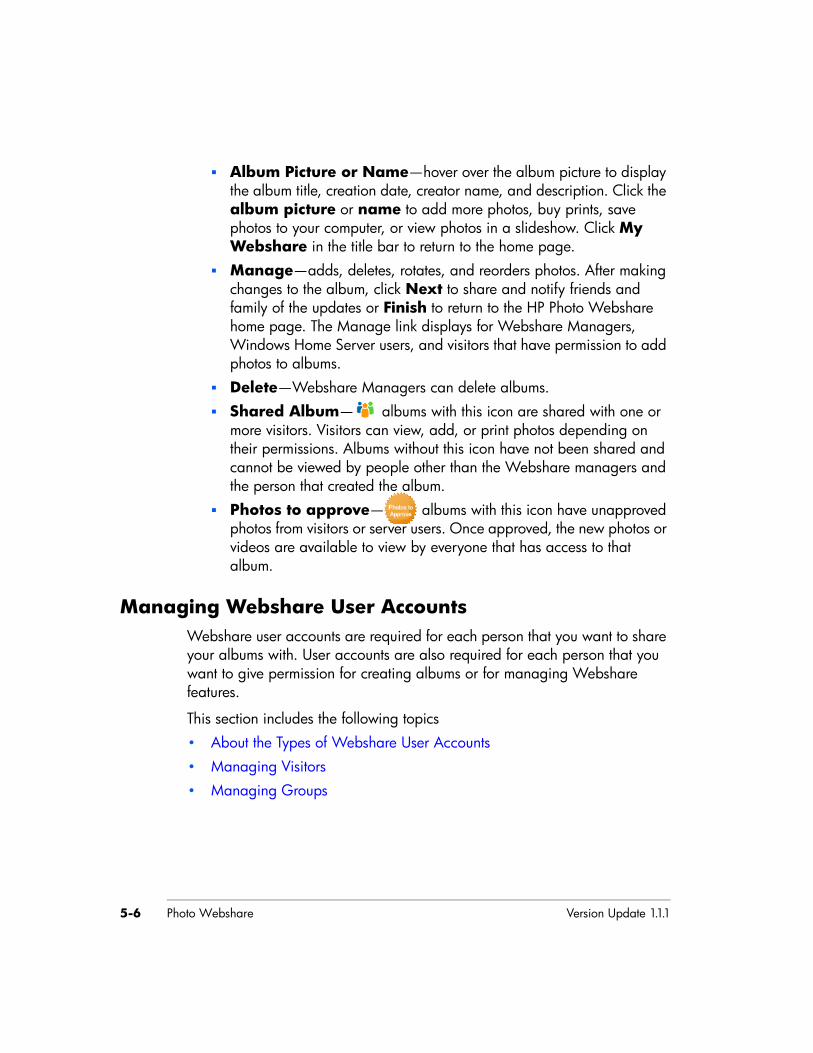
Photo Webshare Version Update 1.1.15-6
Album Picture or Name—hover over the album picture to display the album title, creation date, creator name, and description. Click the album picture or name to add more photos, buy prints, save photos to your computer, or view photos in a slideshow. Click My Webshare in the title bar to return to the home page.Manage—adds, deletes, rotates, and reorders photos. After making changes to the album, click Next to share and notify friends and family of the updates or Finish to return to the HP Photo Webshare home page. The Manage link displays for Webshare Managers, Windows Home Server users, and visitors that have permission to add photos to albums.Delete—Webshare Managers can delete albums.Shared Album— albums with this icon are shared with one or more visitors. Visitors can view, add, or print photos depending on their permissions. Albums without this icon have not been shared and cannot be viewed by people other than the Webshare managers and the person that created the album.Photos to approve— albums with this icon have unapproved photos from visitors or server users. Once approved, the new photos or videos are available to view by everyone that has access to that album.
Managing Webshare User AccountsWebshare user accounts are required for each person that you want to share your albums with. User accounts are also required for each person that you want to give permission for creating albums or for managing Webshare features.
This section includes the following topics• About the Types of Webshare User Accounts• Managing Visitors• Managing Groups
Photo Webshare 5-7
About the Types of Webshare User AccountsThere are three types of Webshare user accounts: Visitors, Windows Home Server User Accounts, and Webshare Managers. Each one is described below.• Visitors• Windows Home Server User Accounts• Webshare Managers
VisitorsHP Photo Webshare albums can be shared with people outside your local network, called visitors. If you use the HP MediaSmart Server for personal use, visitors may be family or friends such as Grandma or Aunt Karen. If you use the Server for business, visitors may be your customers or business partners.
Visitors can have different levels of access to albums. At a basic level, visitors can view photos in the albums you choose to share with them. If you select to give visitors additional permissions, they can add photos to albums or save photos to their computers.
Visitors can be assigned to one or more groups. When you share albums, you select individual visitors or groups of visitors to notify that there is a new album available to view.
Windows Home Server User AccountsWindows Home Server user accounts are different from visitors. Windows Home Server users can also use HP Photo Webshare. If you want to create a Webshare user account for someone inside your local network, such as a family member using a computer inside your home, use the Home Server Console so you can configure their permissions for all of the features on the HP MediaSmart Server. For more information, see Task 2 of 6: Create User Accounts on page 2-7.
Webshare ManagersWebshare Managers have access to all HP Photo Webshare features, including viewing and managing content in all albums, sharing albums with people outside the home network, and approving album content added by

Photo Webshare Version Update 1.1.15-8
people that share the album. At least one Webshare Manager user account should be created before you can log on to the HP Photo Webshare. For more information, see Before You Begin on page 5-1.
Managing VisitorsVisitors are managed from within the HP Photo Webshare. This section provides steps for• To view visitors• To create or edit visitors
To view visitorsThe Manage Visitors page lists all Webshare user accounts and summaries their permissions.
1 Log on to the HP Photo Webshare.For more information, see Logging on to HP Photo Webshare on page 5-4.
2 Click Visitors in the upper right corner of the HP Photo Webshare to view a list of visitors and the following information.The Visitor link is visible for Webshare Managers only. Windows Home Server users and Visitors do not see the Visitor link when they log on to Webshare.
User name—unique identifier for each visitor. User names can only be used once. Initially the user name is their users email address.First name—the visitor’s first name.Last name—the visitor’s surname.Add photos—gives visitors the ability to add photos to an album. Visitors with add photos permission must logon to the Webshare with a user name and password. If the visitor also has auto-approve ability, there are no limitations on the size or quantity of files that the visitor can add.If the visitor does not have auto-approve ability, a Webshare Manager must approve added photos and videos before other visitors can see them. Visitors without auto-approve ability have a limited amount of disk space that they can use for uploading photos and video before they are approved by a Webshare Manager.
Photo Webshare 5-9
Note: If you create a visitor with add photos but not auto-approve ability, you must also define their un-approved photo and video upload limits. Initially, the limit is set to 0GB. For additional information, see Task 4 of 6: Configure your HP Photo Webshare on page 2-17.
Save photos—gives visitors the ability to select, size, and save photos from the HP Photo Webshare to their computer. For more information, see Saving photos on page 5-22.Auto-approve—automatically approves photos added to an album by this visitor. Use caution when giving visitors this permission. Auto-approved photos and videos are immediately viewable by all visitors with access to that album.For additional information, see Adding photos to your album on page 5-14.Email—enables the visitor to be notified of new or changed albums. The visitor must have an email address to receive notifications. For additional information on notifications, see Sharing an album on page 5-17.
Note: In the footer of the email notification there is an option for visitors to unsubscribe if they do not want to receive future notifications. When visitors unsubscribe, the check mark is cleared from this option.
Delete—click the trash can to remove the visitor.Note: Webshare Managers or Windows Home Server user accounts cannot be deleted from within HP Photo Webshare. Go to the Windows Home Server console to manage those users. For more information, see User Accounts in the Windows Home Server Console Help.
Edit—click to change visitor information. All visitor information can be changed except for the user name.If you need to change the user name, you must delete the visitor and create them again. Be sure to add the visitor back to the appropriate groups after they are re-created.
To create or edit visitorsThis page allows you to add a new visitor or change the information for an existing visitor.
Photo Webshare Version Update 1.1.15-10
1 Log on to the HP Photo Webshare.For more information, see Logging on to HP Photo Webshare on page 5-4.
2 Webshare Managers click Visitors in the upper right corner of the HP Photo Webshare.
3 Click Create Visitor or click Edit next to an existing visitor.If adding a visitor, the first field is the email address. The email address becomes the user name when the visitor is saved. If editing a visitor, the first field shows the user name.
4 Type the Email Address for the new visitor. If you are editing an existing visitor, the email address is the User Name and it cannot be changed.Use only the following characters when typing the Email Address:
Uppercase letters—A, B, C, and so on.Lowercase letters—a, b, c, and so on.Numbers—0, 1, 2, 3, 4, 5, 6, 7, 8, 9Symbols—use only: dash - underscore _ period . space [ ]
Note: After creating a visitor, the user name cannot be edited. If you need to change the User Name, you must delete the visitor and create a new one. Be sure to add the visitor back to the appropriate groups, as needed.
5 Type or change the remaining information for the visitor.For detailed descriptions of each of the fields on this page, see To view visitors on page 5-8.Note: Passwords for Windows Home Server User Accounts and Webshare Managers cannot be managed from within Webshare. They are managed in the Windows Home Server Console. For more information, see Task 2 of 6: Create User Accounts on page 2-7.
6 Select visitor permissions.Add Photos: These visitors can add photosCheck to give visitors the ability to add photos to an album. Visitors with the add photos permission must logon to the Photo Webshare with a user name and password.
Photo Webshare 5-11
If the visitor does not have auto-approve ability, a Webshare Manager must approve added photos before other visitors can see them.
Note: Visitors with Add Photos checked must also have passwords.
Save Photos: These visitors can save photosCheck to give visitors the ability to select, size, and save photos from the HP Photo Webshare to their computer. For more information, see Saving photos on page 5-22.
Note: Visitors with Save Photos checked must also have passwords.
Auto-approve: These visitors can add photos without your approval.Check to automatically approve photos added to an album by this visitor. Use caution when giving visitors this permission. Auto-approved photos and videos are immediately viewable by all visitors with access to that album. Once logged on, there are no limitations on the size or quantity of files that the visitor can add. For additional information, see Adding photos to your album on page 5-14.Email: These visitors can receive email notifications and can unsubscribe.Check to enable the visitor to receive notifications of new or changed albums. The visitor must have an email address saved to their user account to receive notifications. For additional information on notifications, see Sharing an album on page 5-17.In the footer of the email notification there is an option for visitors to unsubscribe if they do not want to receive notifications in the future. When visitors unsubscribe, the check mark is cleared from this option.
7 Albums to View—select the albums this group can view. Click Select All to select all albums. Clicking a second time, deselects the albums. You can also check individual albums to select them. For additional information, see Creating an album to share on page 5-13.
8 Select the Groups that this visitor is a member.
Photo Webshare Version Update 1.1.15-12
For example, Friends, Family, Soccer Team. For more information, see Creating or editing groups on page 5-13.
Managing GroupsThis section has steps for
• Viewing groups• Creating or editing groups
Viewing groupsWhen you are ready to share albums, the HP Photo Webshare gives you the opportunity to select and notify one or more groups that there is an album ready for viewing. For additional information, see Sharing an album on page 5-17.
To view groups
1 Log on to the HP Photo Webshare.For more information, see Logging on to HP Photo Webshare on page 5-4.
2 Click Groups in the upper right corner of the HP Photo Webshare to view a list of groups and the following information.The Groups link is visible for Webshare Managers only. Windows Home Server users and Visitors do not see the Groups link when they log on to Webshare.
Groups—visitors can be members of one or more groups. Groups allow Webshare Managers to share albums with a collection of visitors quickly and easily.
Did you know?
You can share albums with friends and family without requiring them to log on to the HP Photo Webshare. To do this, create a visitor with only Email and Save Photos checked. When that visitor receives an email notification with a link to an album, they can go directly to the HP Photo Webshare home page using a single click of the email notification link.
Photo Webshare 5-13
Delete—click the trash can to remove the group. Members of deleted groups do not have the ability to view any previously shared albums or new albums.Edit—click to change group information.
Creating or editing groupsThis page allows you to add a new group or change the information for an existing group.
To create or edit groups
1 Log on to the HP Photo Webshare.For more information, see Logging on to HP Photo Webshare on page 5-4.
2 Click Groups in the upper right corner of the HP Photo Webshare.The Groups link is visible for Webshare Managers only. Windows Home Server users and Visitors do not see the Groups link when they log on to Webshare.
3 Click Create Group or click Edit next to an existing group.The following information displays for groups.
Group—type a unique name for the group. Group names can only be used once.The group name cannot be edited. If you need to change the group name, you must delete the group and create a new one. Be sure to add the appropriate visitors back to the group.Members—members include visitors and network users with HP Photo Webshare accounts. Click Select All to select all members. Clicking a second time, deselects the members. You can also check individual names to select them. For additional information, see To create or edit visitors on page 5-9 or Task 2 of 6: Create User Accounts on page 2-7.
Creating an album to share
Photo Webshare Version Update 1.1.15-14
To create an album to share over the Web
1 Log on to the HP Photo Webshare.For more information, see Logging on to HP Photo Webshare on page 5-4.
2 Click Create New Album. The wizard walks you through the process of:
Naming your albumAdding photos to your albumSharing an album
Webshare Managers or visitors with permission to add photos can create new albums and add photos to existing albums.
Naming your albumGive your album a name and description that are recognized by family and friends.
To name your album
1 Log on to the HP Photo Webshare.For more information, see Logging on to HP Photo Webshare on page 5-4.
2 Click Create New Album.Type the following information.
Name—the title of the albumDescription—type a caption for your album. Optional.
3 Click Next to go to the next step in creating albums, adding photos and videos.
Adding photos to your albumAdd and arrange photos and videos on this page.
The Photos page is one of the tabs in the Create New Album wizard. Once an album is created, you can return to the Photos page by clicking Manage under each album on the HP Photo Webshare home page.
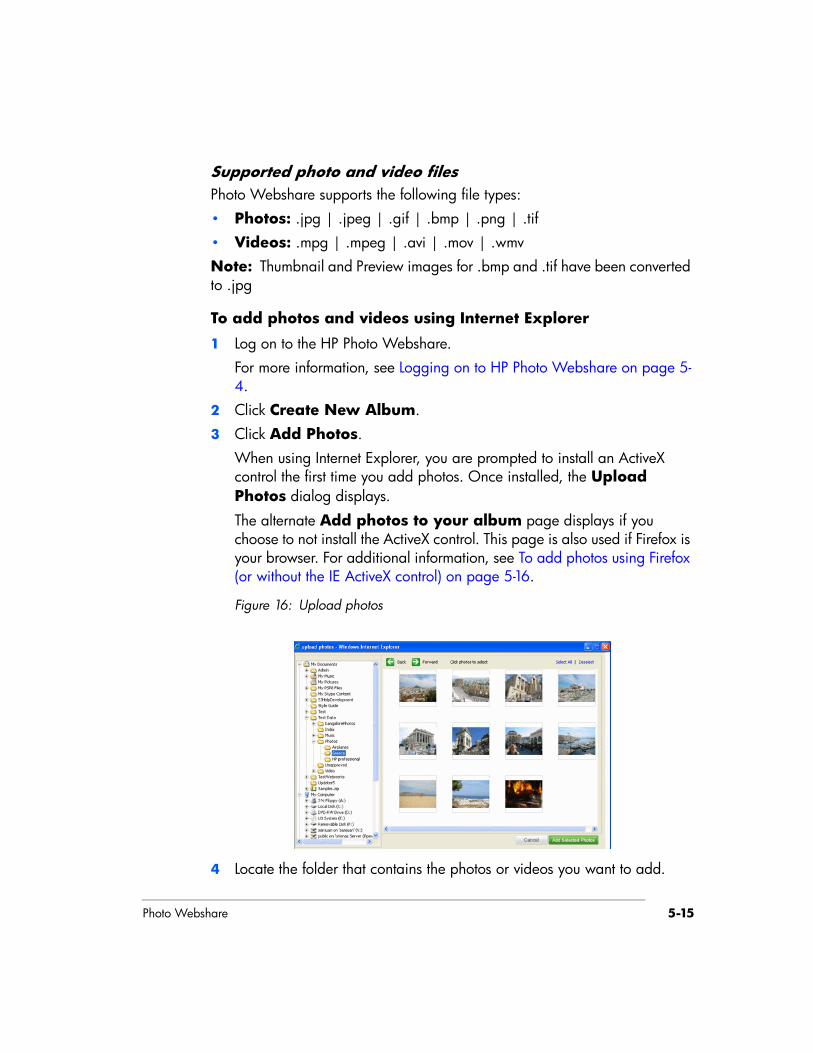
Photo Webshare 5-15
Supported photo and video files Photo Webshare supports the following file types:• Photos: .jpg | .jpeg | .gif | .bmp | .png | .tif• Videos: .mpg | .mpeg | .avi | .mov | .wmvNote: Thumbnail and Preview images for .bmp and .tif have been converted to .jpg
To add photos and videos using Internet Explorer
1 Log on to the HP Photo Webshare.For more information, see Logging on to HP Photo Webshare on page 5-4.
2 Click Create New Album.
3 Click Add Photos.When using Internet Explorer, you are prompted to install an ActiveX control the first time you add photos. Once installed, the Upload Photos dialog displays.
The alternate Add photos to your album page displays if you choose to not install the ActiveX control. This page is also used if Firefox is your browser. For additional information, see To add photos using Firefox (or without the IE ActiveX control) on page 5-16.
Figure 16: Upload photos
4 Locate the folder that contains the photos or videos you want to add.
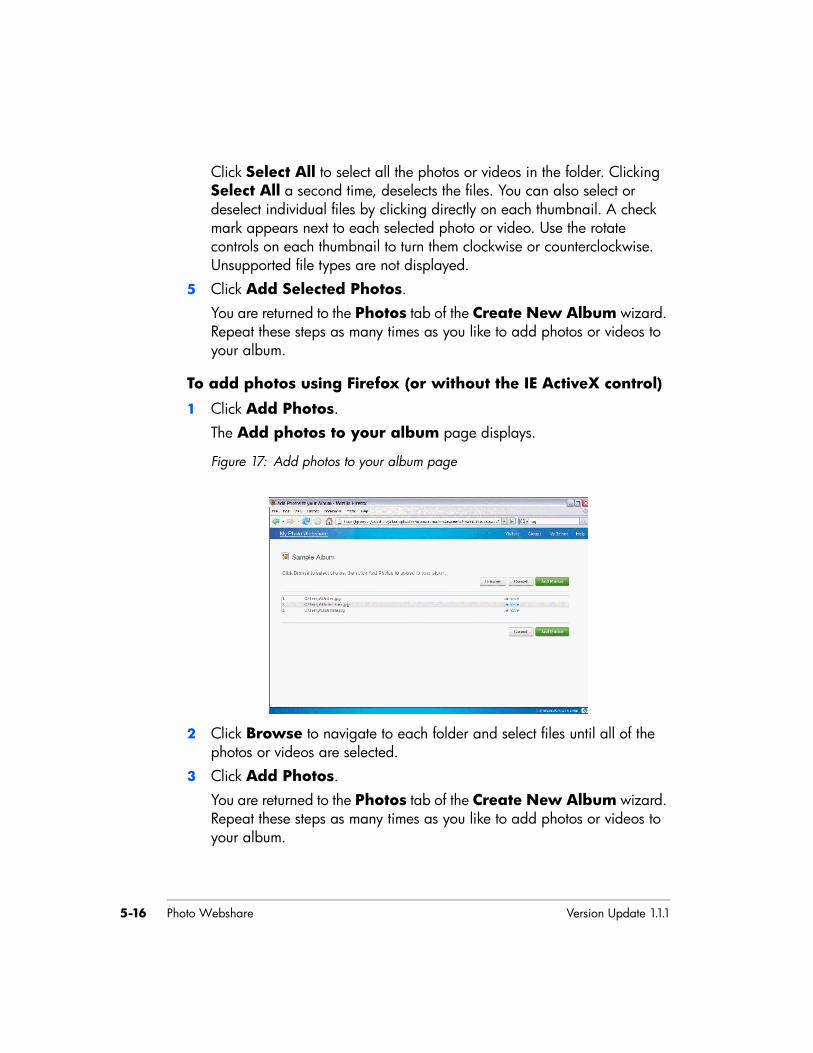
Photo Webshare Version Update 1.1.15-16
Click Select All to select all the photos or videos in the folder. Clicking Select All a second time, deselects the files. You can also select or deselect individual files by clicking directly on each thumbnail. A check mark appears next to each selected photo or video. Use the rotate controls on each thumbnail to turn them clockwise or counterclockwise. Unsupported file types are not displayed.
5 Click Add Selected Photos.You are returned to the Photos tab of the Create New Album wizard. Repeat these steps as many times as you like to add photos or videos to your album.
To add photos using Firefox (or without the IE ActiveX control)
1 Click Add Photos.The Add photos to your album page displays.
Figure 17: Add photos to your album page
2 Click Browse to navigate to each folder and select files until all of the photos or videos are selected.
3 Click Add Photos.You are returned to the Photos tab of the Create New Album wizard. Repeat these steps as many times as you like to add photos or videos to your album.
Photo Webshare 5-17
To organize photos and videos
The Photos page displays all of the photos and videos in the album. You can make the changes below to photos or videos from this page. Click Next to share the album or Finish to return to the HP Photo Webshare home page when you are done making changes.• Reorder—drag and drop pictures to reorder them.
Note: Files are added to the beginning of the album and may need to be reordered. For additional information, see To create or edit visitors on page 5-9.
• Rotate—select the photos to rotate. A check mark appears in the lower left corner of the selected pictures. Click a button to rotate photos 90º clockwise or counterclockwise .
• Delete—select the photos to delete. A check mark appears in the lower left corner of the selected pictures. Click the trash can to delete the pictures.
• Add captions—click Caption below a photo or video and type a title or description. Press Enter or click outside the caption to save it. Click the text again to change the caption.
• Add Photos—opens a page for selecting and inserting more photos or videos into the album.
If visitors have permission, they may add photos or videos to the album after it has been shared. Files added by visitors with auto-approve permission are placed at the beginning of the album and may need to be reordered.
Files added by visitors without auto-approve permissions are placed in a section at the bottom of the Add Photos page. They remain there and cannot be viewed by other visitors until a Webshare Manager approves them. For additional information on visitor permissions or approving photos, see To create or edit visitors on page 5-9.
Sharing an albumAlbums are shared with visitors. Check the visitors with whom you want to share the album. Click Select All to share the album with all visitors. Click Select All a second time to deselect all visitors. Check a group to share the album with a set of visitors.

Photo Webshare Version Update 1.1.15-18
The Sharing page is one of the tabs in the Create New Album wizard. Once an album is created, you can return to the Sharing page by clicking Manage under each album on the HP Photo Webshare home page. The Photos page opens. Click Next to advance to the Sharing page or click the Share tab.
Albums are shared with visitors. If no visitors are listed, a Webshare Manager must add them. For additional information, see To create or edit visitors on page 5-9.
Notifying visitors by emailSends an email notification to visitors to let them know a new album has been created. If you make changes to an album later, you can come back to this page and send another notification.
The Notify page is one of the tabs in the Create New Album wizard. Once an album is created, you can return to the Notify page by clicking Manage under each album on the HP Photo Webshare home page. The Photos page opens. Click Next until you advance to the Notify page or click the Notify tab.
Figure 18: Sample email notification
• Groups— Check the groups with whom you want to share the album. Click Select All to share the album with all groups. Click Select All a second time to deselect all groups. Click the arrow next to each group to
Photo Webshare 5-19
expand the group and see the visitors in that group. Select or deselect individual visitors with whom to share the album.
• To—You can directly type in email addresses to share with users who are not already visitors, and you will be prompted to setup a new visitor account. If you would like to notify existing visitors, ensure they are selected at the left for sharing and then select them from the drop down list.
• Subject—type a subject line for the email notification. HP Photo Webshare puts the name of the album in the subject line if you do not type one.
• Message—type a message for the email notification. By default, this field is the album description.
Viewing, printing, and saving photosClick an album picture or name on the HP Photo Webshare home page to access features for:• Viewing photos• Buying prints• Saving photos• Presenting slideshows
Viewing photosWhen you click an album picture or name in the HP Photo Webshare, a page displays for viewing the album’s photos.
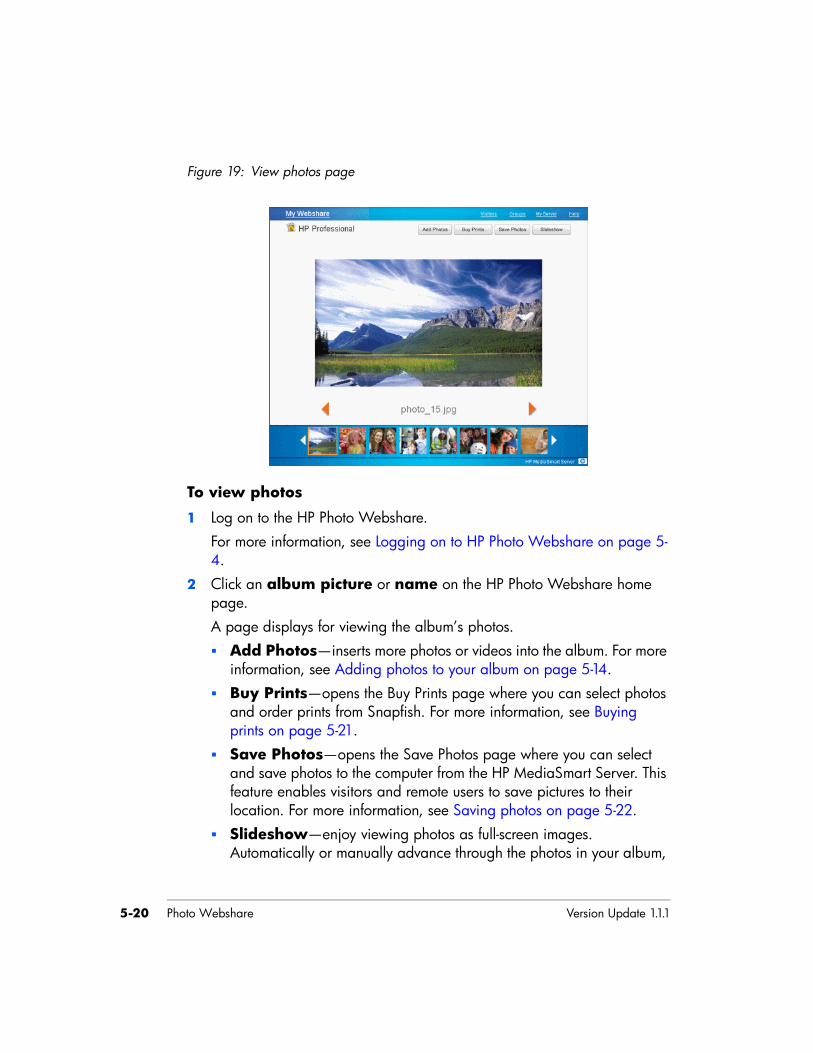
Photo Webshare Version Update 1.1.15-20
Figure 19: View photos page
To view photos
1 Log on to the HP Photo Webshare.For more information, see Logging on to HP Photo Webshare on page 5-4.
2 Click an album picture or name on the HP Photo Webshare home page.A page displays for viewing the album’s photos.
Add Photos—inserts more photos or videos into the album. For more information, see Adding photos to your album on page 5-14.Buy Prints—opens the Buy Prints page where you can select photos and order prints from Snapfish. For more information, see Buying prints on page 5-21.Save Photos—opens the Save Photos page where you can select and save photos to the computer from the HP MediaSmart Server. This feature enables visitors and remote users to save pictures to their location. For more information, see Saving photos on page 5-22.Slideshow—enjoy viewing photos as full-screen images. Automatically or manually advance through the photos in your album,
Photo Webshare 5-21
making them a great way to show pictures to family and friends. For more information, see Presenting slideshows on page 5-23.View—click the left or right arrow to move the preview to the previous or next image.Filmstrip—displays a set of images from the album. Click the left or right arrow to page backward or forward through the photos.
Buying printsSelect photos for professional printing through Snapfish. Click Order to open a new browser window and connect to the Snapfish web site.
To buy prints
1 Log on to the HP Photo Webshare.
For more information, see Logging on to HP Photo Webshare on page 5-4.
2 Click an album picture or name on the HP Photo Webshare home page.A page displays for viewing the album’s photos.
3 Click Buy Prints.The Buy Prints page displays with the following options.
Select All—selects all the photos in the album. Clicking a second time, deselects the photos. You can also select or deselect individual photos by clicking directly on each thumbnail. A check mark appears next to each selected photo. Unsupported file types are grayed out.Preview—opens a larger image of the photo in a pop-up window.Order—opens a window for you to type your Snapfish login email address and password. If you do not have a snapfish login, go to the Snapfish web site and create one. Click Confirm to connect to Snapfish and transfer the selected photos. Once on Snapfish, you can order prints or other products from the Snapfish store.
Note: A new album is created each time you transfer photos to Snapfish. If you transfer photos multiple times to Snapfish for a single Webshare album, a new Snapfish album is created for each photo transfer.
Photo Webshare Version Update 1.1.15-22
Cancel—clears the selection and returns to the view photo page.Note: The Buy Prints option is only available for .jpg images.
Saving photosSelect, size, and save photos from the HP MediaSmart Server to your computer. This is especially useful for visitors and remote users who want a copy of the photo on their computer to view or manipulate.
To save photos
1 Log on to the HP Photo Webshare.For more information, see Logging on to HP Photo Webshare on page 5-4.
2 Click an album picture or name on the HP Photo Webshare home page.A page displays for viewing the album’s photos.
3 Click Save Photos.The Save Photos page displays with the following options.
Select All—selects all the photos in the album. Clicking a second time, deselects the photos. You can also select or deselect individual photos by clicking directly on each thumbnail. A check mark appears next to each selected photo.Preview Size—reduces photos to at most 960 pixels on a side. If the original photo was smaller, then the original size and preview size are the same.
Note: Tif and Bmp previews are stored as jpg files
Original size—does not change the size of the photo. Saves the photo at the same size it was added to Webshare.Save—saves the selected photos to the computer from the HP MediaSmart Server. This feature enables visitors and remote users to save pictures to their location. If a single photo is selected, you can open or save the graphic file. If multiple photos are selected, Webshare puts them in a zip file that you can open or save to your computer.Cancel—clears the selection and returns to the view photo page.
Photo Webshare 5-23
Presenting slideshowsSlideshows automatically or manually advance through the photos in your album, making them a great way to show pictures to family and friends.
To present slideshows
1 Log on to the HP Photo Webshare.For more information, see Logging on to HP Photo Webshare on page 5-4.
2 Click an album picture or name on the HP Photo Webshare home page.A page displays for viewing the album’s photos.
3 Click Sideshow.The Slideshow page displays with the following options.
Play—advances each photo based on the speed you selected. The Play button toggles to Pause when it is clicked.Pause—stops the automatic advancement of photos. The Pause button toggles to Play when it is clicked.Previous/Next—click left or right to move the slideshow to the previous or next image.Beginning/End—click left or right to move the slideshow to the first or last image.Speed—determines the number of seconds each photo displays before advancing to the next one during Play mode. Click a time to change the speed.
Changing a Visitor’s PasswordWhen logged on as a visitor account, there is a change password link at the top left. Once logged in, visitors can change (or remove) their password as they wish.
Frequently Asked Questions
Photo Webshare Version Update 1.1.15-24
• Where are my Webshare photos and videos stored on my HP MediaSmart Server?The files and photos for Webshare are stored in a separate location on the server. This location is not available through network shares to help ensure that the correct file management aspects are enforced.
• When I’m browsing to a location on my computer to add photos and videos to a Webshare album, I can’t see all of my files. Where are they?Only photo and video file formats are visible when browsing to add files to albums. Other file types, such as documents or spreadsheets, are not displayed for selecting.
• What is the difference between a Webshare Manager, a Windows Home Server User, and a Visitor?
• What do I do if I forgot my Webshare user name or password?
For visitor accounts : Open the Webshare logon page. Type your email address in the Forgot your user name or password? box and click Send.For Windows Home Server accounts: Use the Windows Home Server user management tool(s) to reset / change passwords for user accounts.
• How do I set the amount of disk space that visitors can use for uploading photos and video clips before they are approved by a Webshare manager?See Task 4 of 6: Configure your HP Photo Webshare on page 2-17.
• What happens to the albums / files for accounts when they are deleted? .When an account is deleted, all of the content remains and is the responsibility of the Webshare manager to either keep the remaining albums and photos and manage the sharing, or delete these items
Using the Server 6-1
6 Using the Server The following topics provide information about using and configuring the HP MediaSmart Server.
What’s in this chapter» Shared folders
Using and accessing shared folders.» Backing up and restoring a computer
How backups work and how to configure, restore, and troubleshoot them.» Expanding server storage
How to add hard drives, USB drives, and eSATA drives to your server.» Replacing the system drive
How to replace the internal system drive.» Securing your server from intruders
Protect your server, network, and computers.» Streaming media
Stream your favorite music, videos, and photos from the server to a digital media receiver.
» Setting up iTunes on the server and the client computerCopy your iTunes music library and playlists to the server for playback on any computer running iTunes on your home network.
» Network healthWhat health notifications mean and what to do about them.
» Hardware statusStatus of the server’s fans, voltages, and operating temperatures.
» How to add shared folders to network placesHow to add shared folders to network places in Windows XP and Windows Vista.
» Remote access
Using the Server Version Update 1.1.16-2
Access your files and home computers via a Web browser while you are away from home.
» How to map and disconnect a drive letterSome software, such as anti-virus programs, may require that you map a drive letter to the server.
Shared foldersShared folders are places for you to organize and store files on your home server so that you can share them with other people on your network.
See the following topics for using shared folders:• Windows Home Server Console Help for shared folders—Windows
Home Server Console contains a Shared Folders tab, where you can add, view the properties of, open, and remove shared folders on the server.
• Accessing shared folders from your computer—describes the various ways you can access shared folders.
Windows Home Server Console Help for shared foldersFor assistance using shared folders, see the following in the Windows Home Server Console Help:• Shared Folder• Adding a shared folder• Viewing shared folder properties• Opening a shared folder• Removing a shared folder• Viewing shared folder history• What is Folder Duplication?
Accessing shared folders from your computerFor convenience, the HP MediaSmart Server provides several ways to access shared folders: • To access shared folders from the Control Center• To access shared folders from the desktop shortcut
Using the Server 6-3
• To access shared folders from the system tray• To access shared folders from My Network Places in Windows XP• To access shared folders from Network in Windows Vista
To access shared folders from the Control Center
1 At the computer, click Start, All Programs, and then select HP MediaSmart Server.
2 In the Control Center, click the MediaSmart tab.3 Click one of the following:
Server—opens a folder that contains all your shared folders.
Photos—opens a folder for sharing photos.
Music—opens a folder for sharing music.
Videos —opens a folder for sharing videos.
To access shared folders from the desktop shortcut
1 At the computer, go to the desktop, and then double-click the Shared Folders on Server shortcut.
Figure 20: Shared Folders desktop shortcut
2 Double-click the shared folder you want to open.

Using the Server Version Update 1.1.16-4
To access shared folders from the system tray
1 Right-click the Windows Home Server icon.
Figure 21: Windows Home Server system tray icon
2 Click Shared Folders. 3 Double-click the shared folder you want to open.
To access shared folders from My Network Places in Windows XP
1 At the computer, click Start, and then click My Network Places.
2 Double-click the shared folder you want to open.Note: If the shared folders are not in My Network places, you can add them manually, as described in How to add shared folders to network places on page 6-31.
To access shared folders from Network in Windows Vista
1 At the computer, click Start, and then Network.2 In Network, double-click the computer icon next to SERVER.
If you changed the default name of the server, that name appears next to the computer icon instead.
Figure 22: HP MediaSmart Server icon in Windows Network
Note: Be sure to select this icon. There may be other servers in the list.
3 Double-click the shared folder you want to open.
Backing up and restoring a computerBacking up and restoring a computer is available through the Backups & Computers tab on the Windows Home Server console.
Using the Server 6-5
To access the Backups & Computers tab
1 At the computer, double-click the Windows Home Server icon in the system tray.
2 Log on to the Windows Home Server Console.3 Click the Backups & Computers tab.
For assistance backing up or restoring a computer, see the following in the Windows Home Server Console Help:• Computers & Backup• How does backup work?• Managing and Configuring Backups• Restoring Computer Backups• Removing a Computer• Troubleshooting Computers & Backup
Expanding server storageYou can expand storage in the HP MediaSmart Server in several ways:• Add one or more SATA hard drives to the server’s internal expansion
bays. (Integrated Drive Electronics (IDE) drives are not supported.)• Add up to four USB disk drives to the server’s USB ports.• Add an external SATA (eSATA) hard drive to the server’s external eSATA
port.• Add a SATA port multiplier to the server’s external eSATA port.
The following topics provide information on expanding server storage:• Installing an internal SATA drive• Installing and removing an external USB disk drive, eSATA drive, SATA
port multiplier• Adding and removing drives from server storage
Installing an internal SATA driveHow to place a hard drive into an expansion bay in the HP MediaSmart Server.
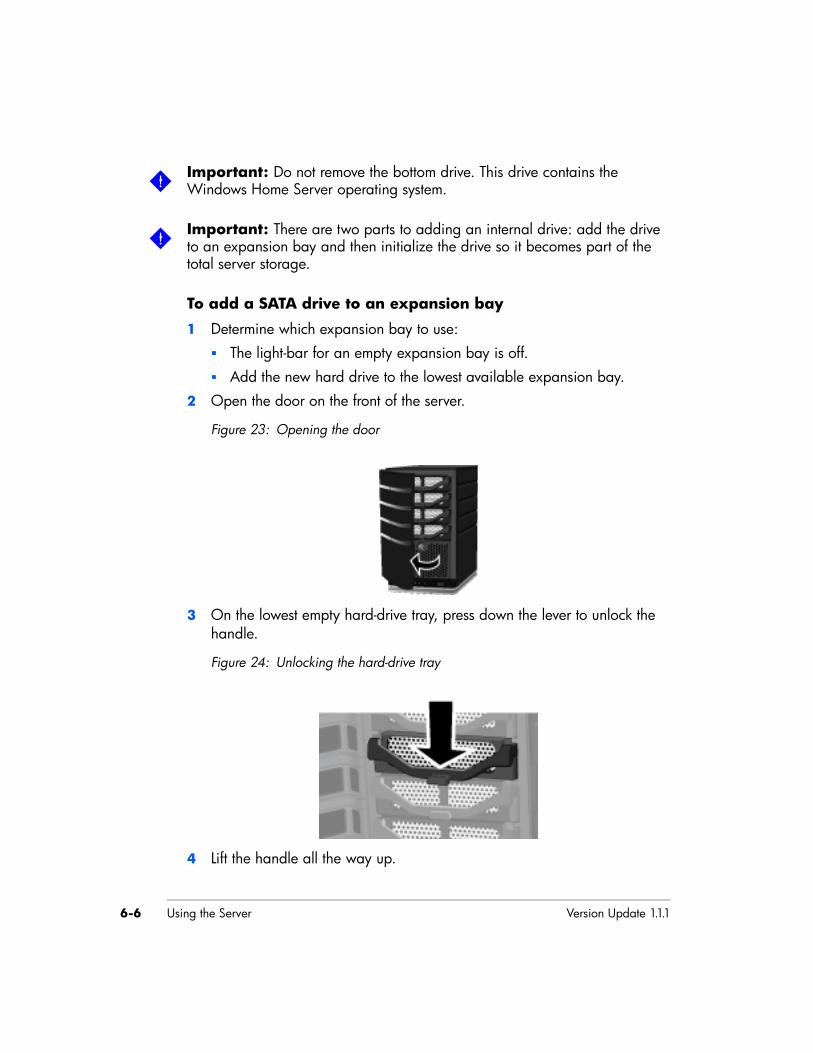
Using the Server Version Update 1.1.16-6
Important: Do not remove the bottom drive. This drive contains the Windows Home Server operating system.
Important: There are two parts to adding an internal drive: add the drive to an expansion bay and then initialize the drive so it becomes part of the total server storage.
To add a SATA drive to an expansion bay
1 Determine which expansion bay to use:The light-bar for an empty expansion bay is off.Add the new hard drive to the lowest available expansion bay.
2 Open the door on the front of the server.
Figure 23: Opening the door
3 On the lowest empty hard-drive tray, press down the lever to unlock the handle.
Figure 24: Unlocking the hard-drive tray
4 Lift the handle all the way up.
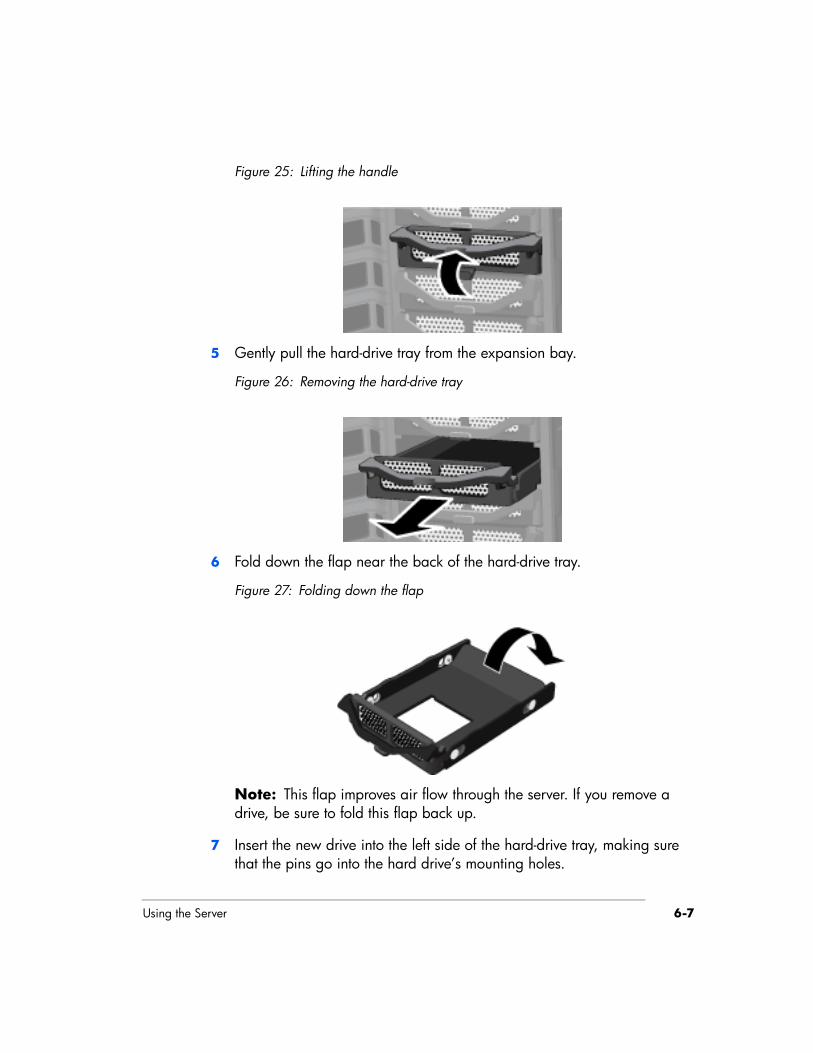
Using the Server 6-7
Figure 25: Lifting the handle
5 Gently pull the hard-drive tray from the expansion bay.
Figure 26: Removing the hard-drive tray
6 Fold down the flap near the back of the hard-drive tray.
Figure 27: Folding down the flap
Note: This flap improves air flow through the server. If you remove a drive, be sure to fold this flap back up.
7 Insert the new drive into the left side of the hard-drive tray, making sure that the pins go into the hard drive’s mounting holes.
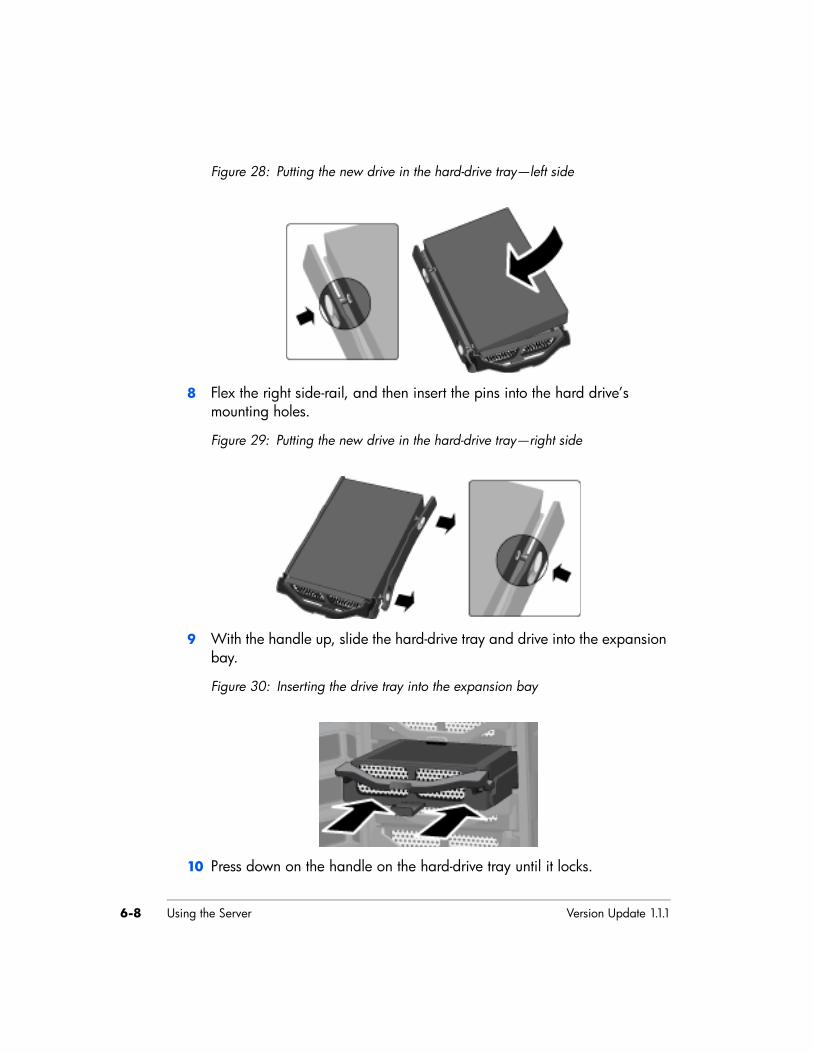
Using the Server Version Update 1.1.16-8
Figure 28: Putting the new drive in the hard-drive tray—left side
8 Flex the right side-rail, and then insert the pins into the hard drive’s mounting holes.
Figure 29: Putting the new drive in the hard-drive tray—right side
9 With the handle up, slide the hard-drive tray and drive into the expansion bay.
Figure 30: Inserting the drive tray into the expansion bay
10 Press down on the handle on the hard-drive tray until it locks.

Using the Server 6-9
Figure 31: Closing the handle
11 Close the door on the front of the server.
Figure 32: Closing the door
12 Notice that within a few seconds the light-bar for the new hard drive turns purple .This indicates that the hard drive has been installed, but has not been initialized.
13 Add the drive to the server’s total storage. See To add a drive to the server’s total storage on page 6-11.
Installing and removing an external USB disk drive, eSATA drive, SATA port multiplierYou can add external USB disk drives to any of the HP MediaSmart Server’s four USB ports. You can add either an eSATA drive or SATA port multiplier to the eSATA port.
Important: There are two parts to adding external drives: connect the drive to a USB port and then initialize the drive so it becomes part of the total server storage.
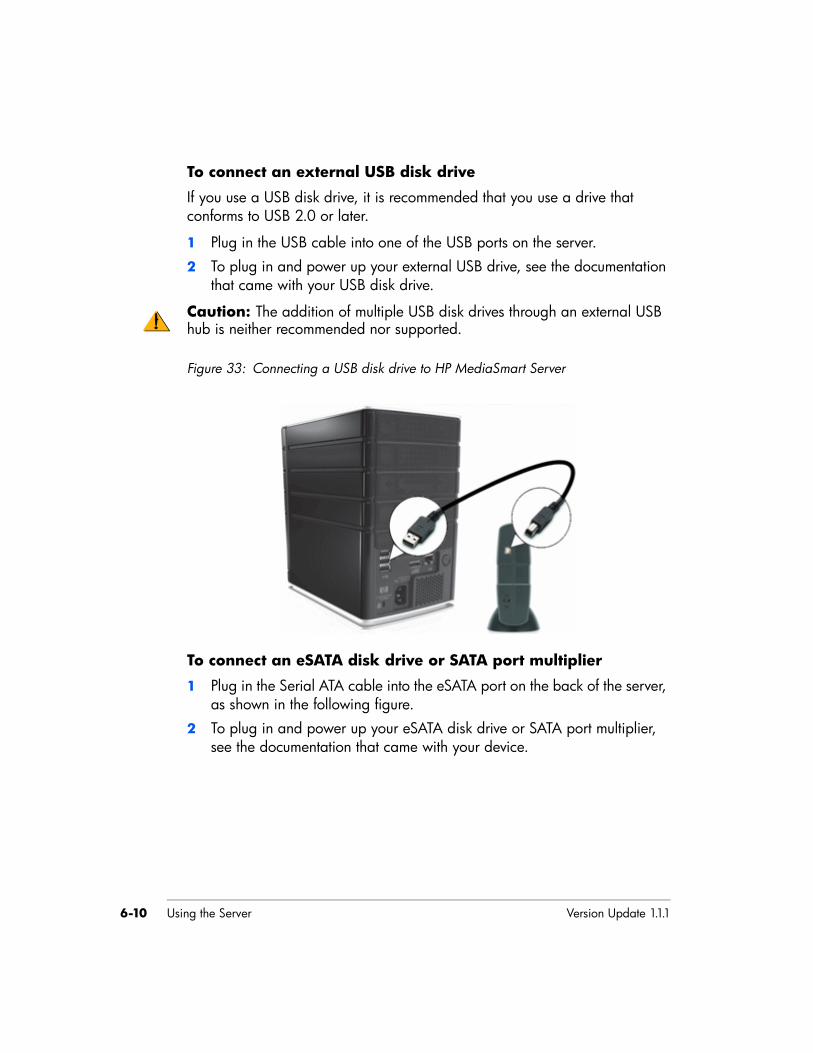
Using the Server Version Update 1.1.16-10
To connect an external USB disk drive
If you use a USB disk drive, it is recommended that you use a drive that conforms to USB 2.0 or later.
1 Plug in the USB cable into one of the USB ports on the server.2 To plug in and power up your external USB drive, see the documentation
that came with your USB disk drive.
Caution: The addition of multiple USB disk drives through an external USB hub is neither recommended nor supported.
Figure 33: Connecting a USB disk drive to HP MediaSmart Server
To connect an eSATA disk drive or SATA port multiplier
1 Plug in the Serial ATA cable into the eSATA port on the back of the server, as shown in the following figure.
2 To plug in and power up your eSATA disk drive or SATA port multiplier, see the documentation that came with your device.
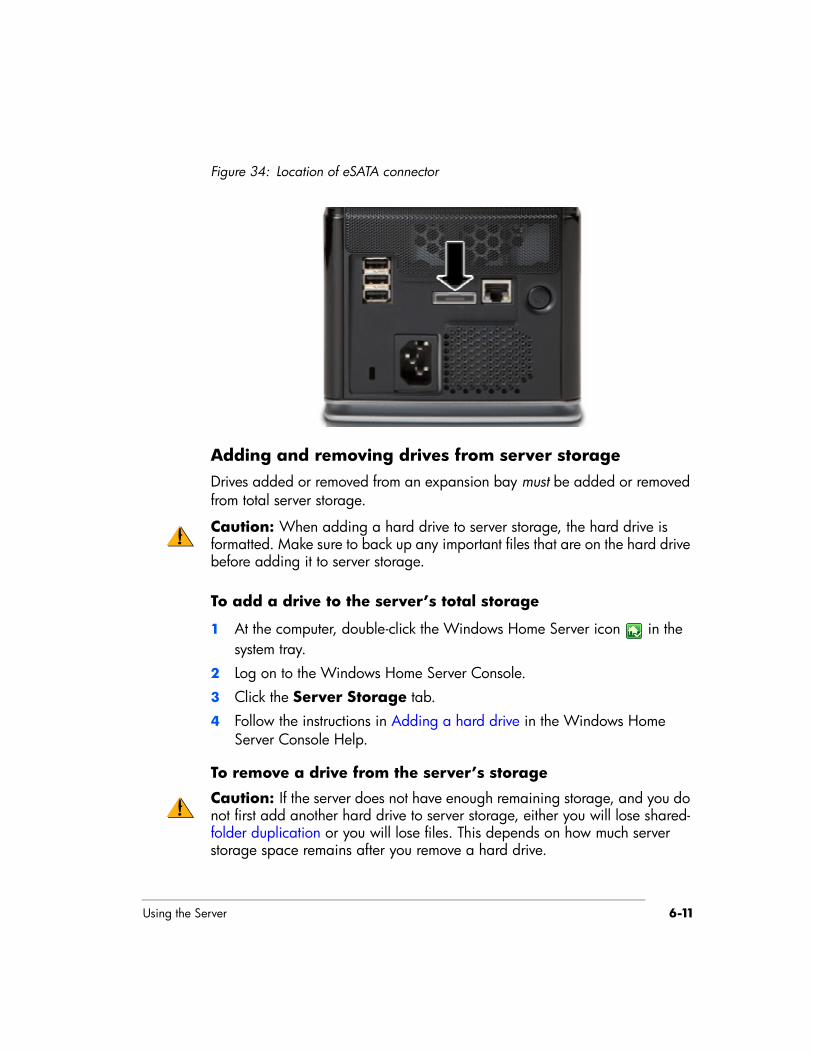
Using the Server 6-11
Figure 34: Location of eSATA connector
Adding and removing drives from server storageDrives added or removed from an expansion bay must be added or removed from total server storage.
Caution: When adding a hard drive to server storage, the hard drive is formatted. Make sure to back up any important files that are on the hard drive before adding it to server storage.
To add a drive to the server’s total storage
1 At the computer, double-click the Windows Home Server icon in the system tray.
2 Log on to the Windows Home Server Console.3 Click the Server Storage tab.4 Follow the instructions in Adding a hard drive in the Windows Home
Server Console Help.
To remove a drive from the server’s storage
Caution: If the server does not have enough remaining storage, and you do not first add another hard drive to server storage, either you will lose shared-folder duplication or you will lose files. This depends on how much server storage space remains after you remove a hard drive.
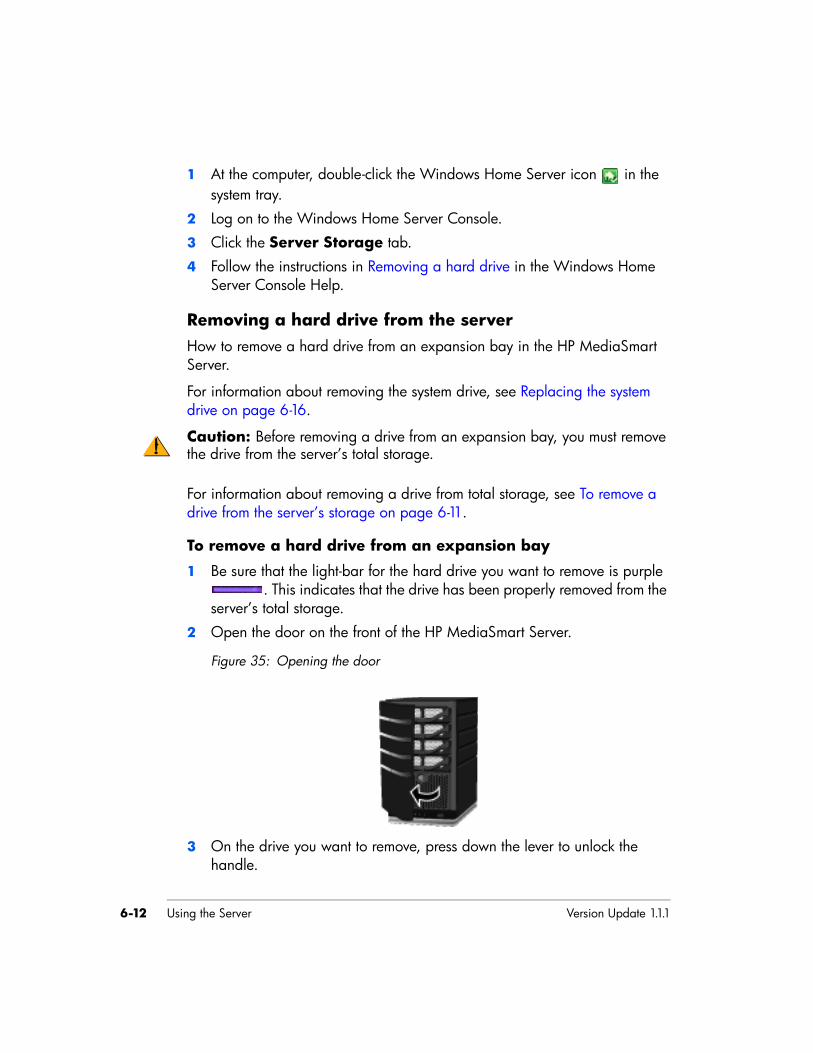
Using the Server Version Update 1.1.16-12
1 At the computer, double-click the Windows Home Server icon in the system tray.
2 Log on to the Windows Home Server Console.3 Click the Server Storage tab.4 Follow the instructions in Removing a hard drive in the Windows Home
Server Console Help.
Removing a hard drive from the serverHow to remove a hard drive from an expansion bay in the HP MediaSmart Server.
For information about removing the system drive, see Replacing the system drive on page 6-16.
Caution: Before removing a drive from an expansion bay, you must remove the drive from the server’s total storage.
For information about removing a drive from total storage, see To remove a drive from the server’s storage on page 6-11.
To remove a hard drive from an expansion bay
1 Be sure that the light-bar for the hard drive you want to remove is purple . This indicates that the drive has been properly removed from the
server’s total storage.2 Open the door on the front of the HP MediaSmart Server.
Figure 35: Opening the door
3 On the drive you want to remove, press down the lever to unlock the handle.
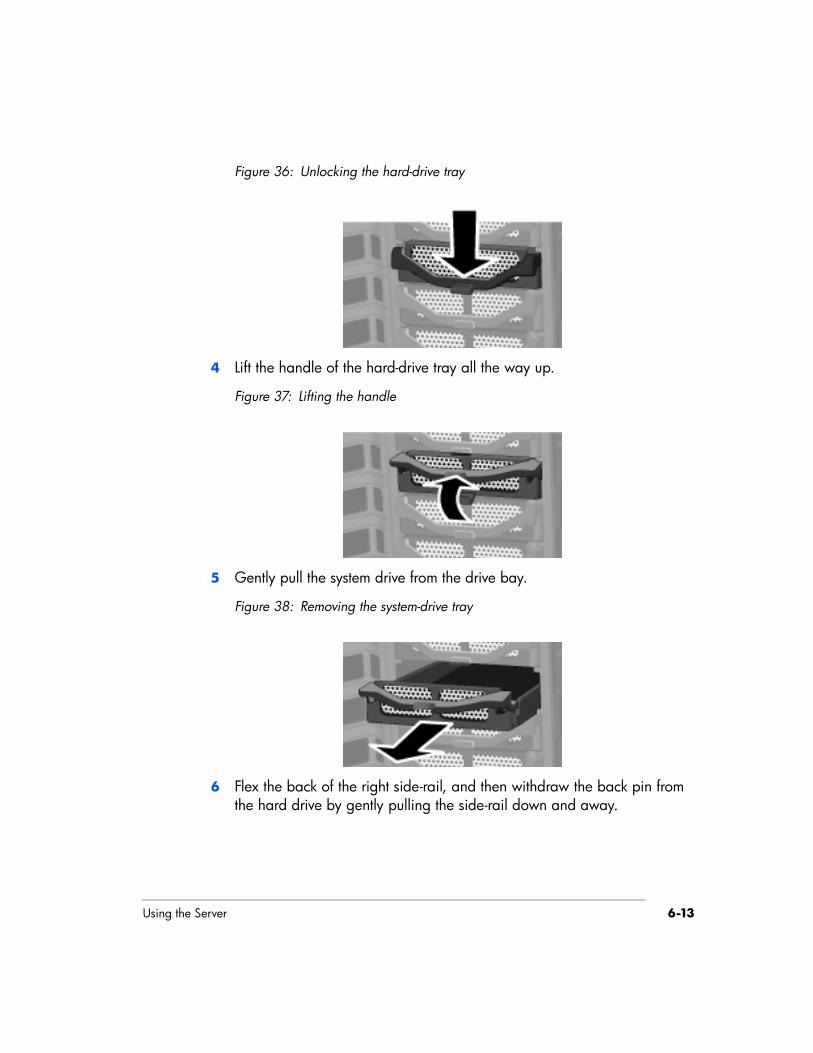
Using the Server 6-13
Figure 36: Unlocking the hard-drive tray
4 Lift the handle of the hard-drive tray all the way up.
Figure 37: Lifting the handle
5 Gently pull the system drive from the drive bay.
Figure 38: Removing the system-drive tray
6 Flex the back of the right side-rail, and then withdraw the back pin from the hard drive by gently pulling the side-rail down and away.
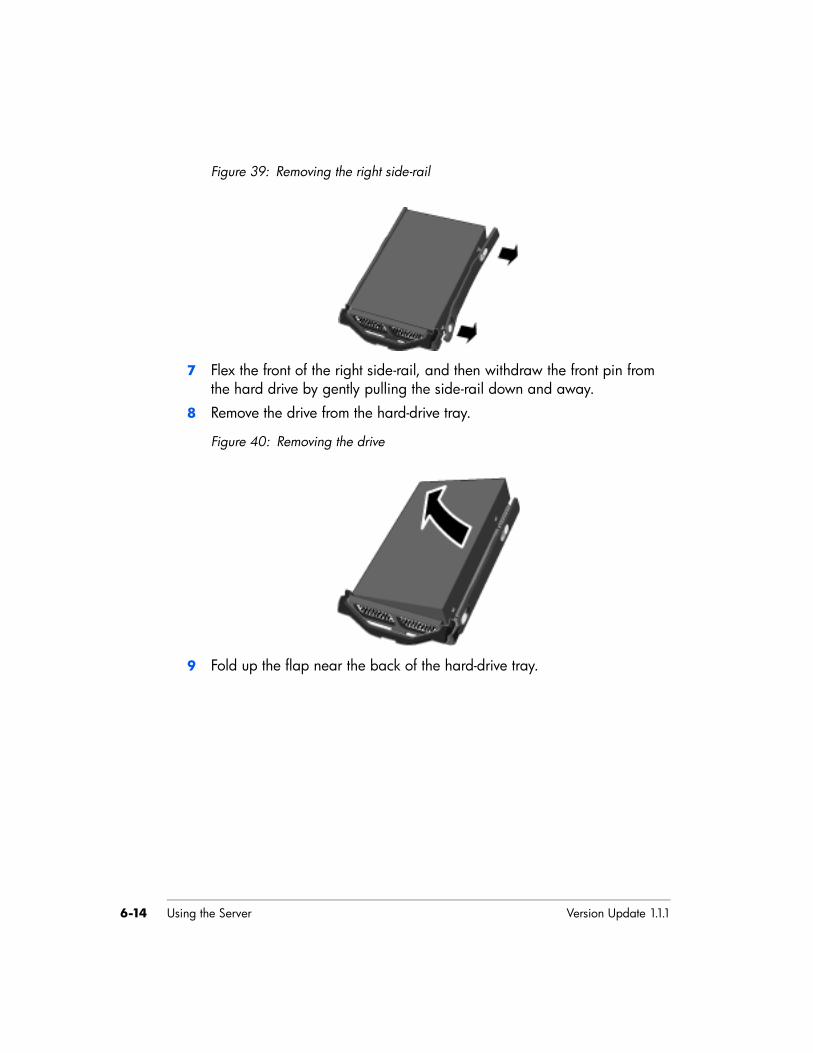
Using the Server Version Update 1.1.16-14
Figure 39: Removing the right side-rail
7 Flex the front of the right side-rail, and then withdraw the front pin from the hard drive by gently pulling the side-rail down and away.
8 Remove the drive from the hard-drive tray.
Figure 40: Removing the drive
9 Fold up the flap near the back of the hard-drive tray.
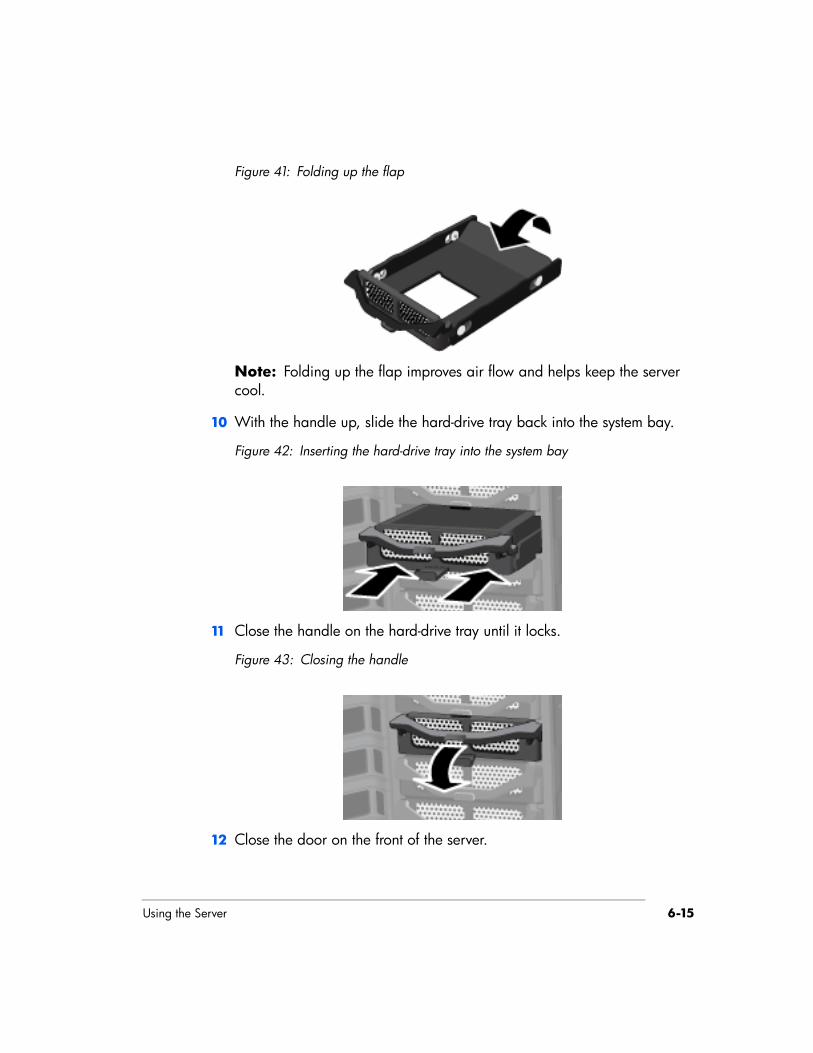
Using the Server 6-15
Figure 41: Folding up the flap
Note: Folding up the flap improves air flow and helps keep the server cool.
10 With the handle up, slide the hard-drive tray back into the system bay.
Figure 42: Inserting the hard-drive tray into the system bay
11 Close the handle on the hard-drive tray until it locks.
Figure 43: Closing the handle
12 Close the door on the front of the server.

Using the Server Version Update 1.1.16-16
Figure 44: Closing the door
Replacing the system driveReplacing the internal system drive consists of four parts:
1 Removing the system drive2 Re-installing the new system drive3 Resetting the System. See Using Server Recovery and Factory Reset on
page 7-7.4 Reinstall the software on each computer. See Installing the Software on
Additional Home Computers on page 2-21.
Important: The system drive contains the Microsoft Windows Home Server operating system. The server cannot operate while the system drive is removed and must be re-installed via the Server Recovery Disc or factory reset. See Using Server Recovery and Factory Reset on page 7-7.
Removing the system driveThe following figure shows the location of the system hard drive.
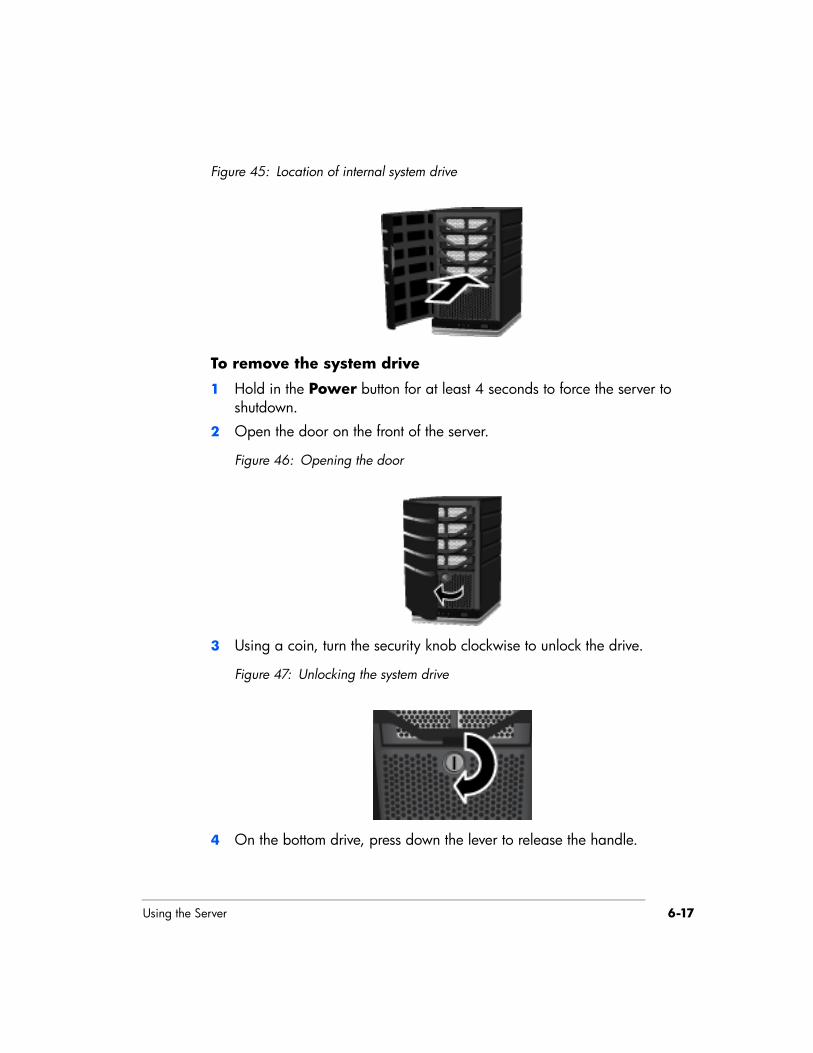
Using the Server 6-17
Figure 45: Location of internal system drive
To remove the system drive
1 Hold in the Power button for at least 4 seconds to force the server to shutdown.
2 Open the door on the front of the server.
Figure 46: Opening the door
3 Using a coin, turn the security knob clockwise to unlock the drive.
Figure 47: Unlocking the system drive
4 On the bottom drive, press down the lever to release the handle.
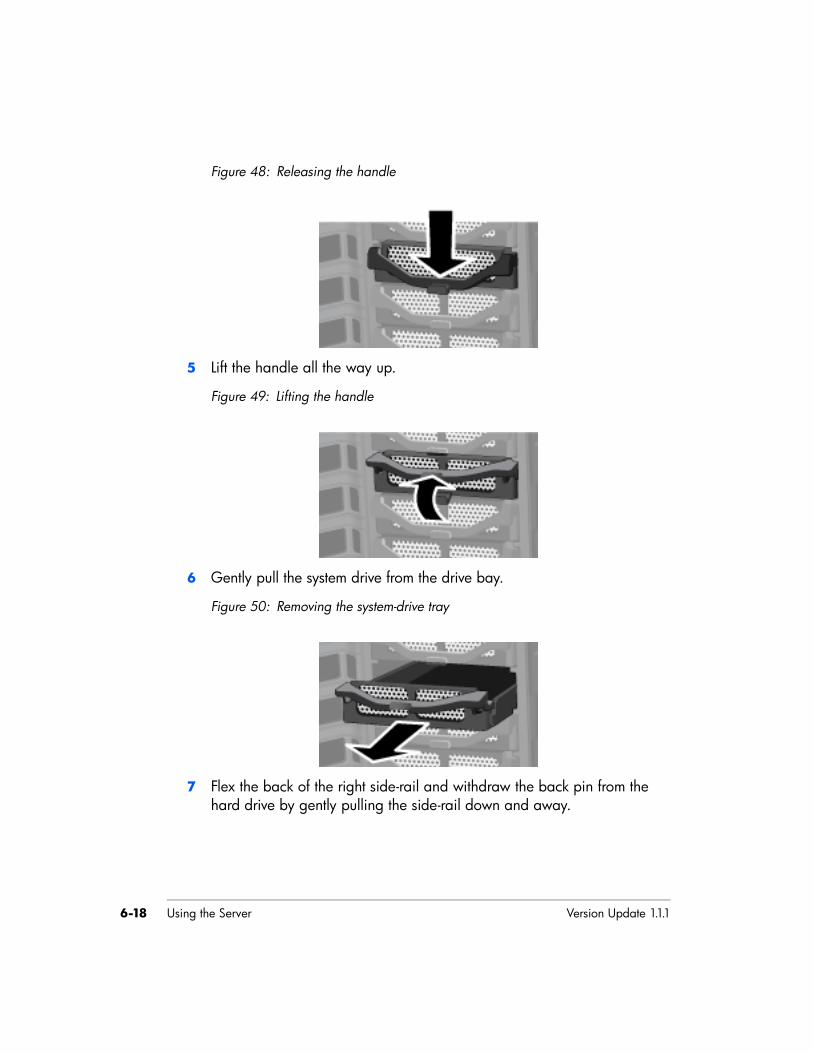
Using the Server Version Update 1.1.16-18
Figure 48: Releasing the handle
5 Lift the handle all the way up.
Figure 49: Lifting the handle
6 Gently pull the system drive from the drive bay.
Figure 50: Removing the system-drive tray
7 Flex the back of the right side-rail and withdraw the back pin from the hard drive by gently pulling the side-rail down and away.
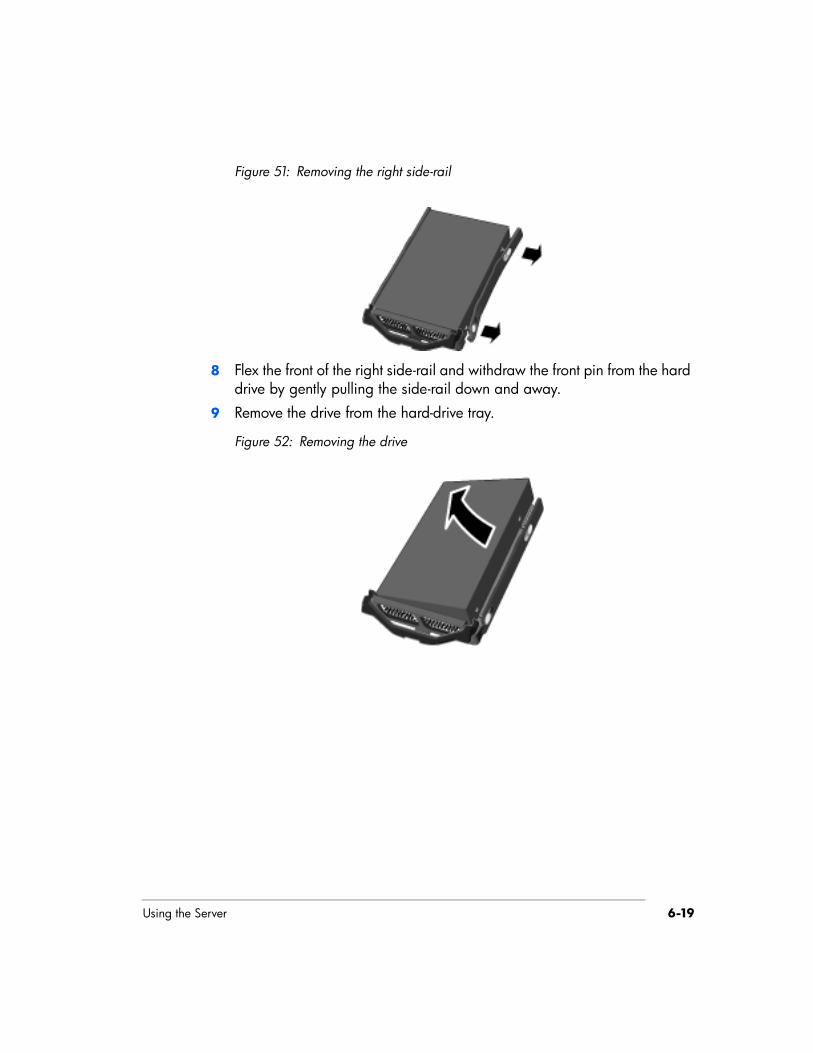
Using the Server 6-19
Figure 51: Removing the right side-rail
8 Flex the front of the right side-rail and withdraw the front pin from the hard drive by gently pulling the side-rail down and away.
9 Remove the drive from the hard-drive tray.
Figure 52: Removing the drive
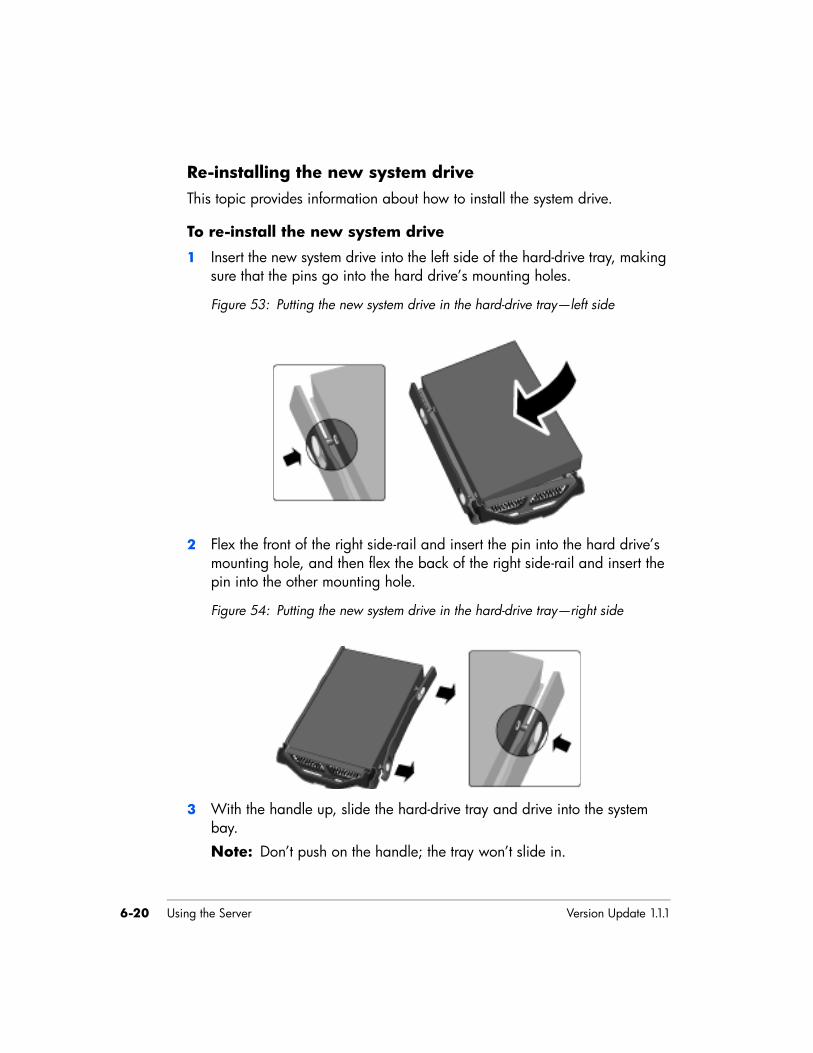
Using the Server Version Update 1.1.16-20
Re-installing the new system driveThis topic provides information about how to install the system drive.
To re-install the new system drive
1 Insert the new system drive into the left side of the hard-drive tray, making sure that the pins go into the hard drive’s mounting holes.
Figure 53: Putting the new system drive in the hard-drive tray—left side
2 Flex the front of the right side-rail and insert the pin into the hard drive’s mounting hole, and then flex the back of the right side-rail and insert the pin into the other mounting hole.
Figure 54: Putting the new system drive in the hard-drive tray—right side
3 With the handle up, slide the hard-drive tray and drive into the system bay.Note: Don’t push on the handle; the tray won’t slide in.
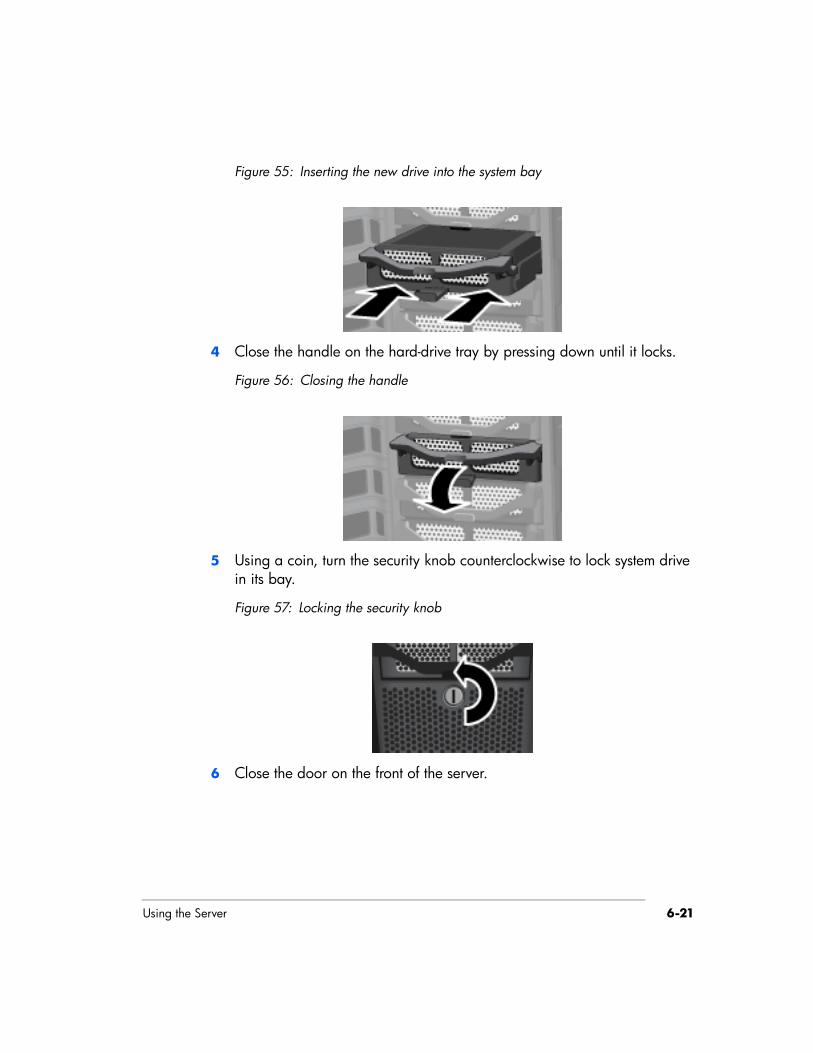
Using the Server 6-21
Figure 55: Inserting the new drive into the system bay
4 Close the handle on the hard-drive tray by pressing down until it locks.
Figure 56: Closing the handle
5 Using a coin, turn the security knob counterclockwise to lock system drive in its bay.
Figure 57: Locking the security knob
6 Close the door on the front of the server.
Using the Server Version Update 1.1.16-22
Figure 58: Closing the door
7 Power on the server.The Health indicator light is initially purple and then blinks blue and red.
8 Perform a Factory Reset to initiate the drive. See Using Server Recovery and Factory Reset on page 7-7.
Securing your server from intrudersThe HP MediaSmart Server is designed as an “always on” device, which comes in handy for accessing files any time your network users need or want them. Additionally, Photo Webshare can allow visitors to view, add, and delete photos and videos. If not properly secured, these features present security risks, so you’ll want to ensure that unauthorized users can’t access your server and the files stored on it.
The following security measures help protect your network and computers:• Firewall protection• Wireless security• Anti-virus software• User name and password protection• Remote Access security• Photo Webshare security
Firewall protectionA firewall is a hardware device or software program that protects your network from unauthorized access. It protects your system from hackers running programs, sending email, and gaining access to your private
Using the Server 6-23
information. The following types of firewalls protect your network and computers:• Broadband router firewall• Windows Home Server firewall• Personal firewall
Broadband router firewall
The HP MediaSmart Server requires a broadband router. Broadband routers allow multiple computers and devices to share an internet connection using NAT (Network Address Translation) technology. NAT allows all the computers and devices on your network to use a single internet connection (IP address). NAT acts as a firewall by masking the real IP addresses of your network components—including the HP MediaSmart Server—which keeps them from being seen outside the home.
Some broadband routers implement Stateful Packet Inspection (SPI), which adds enhanced security by examining each packet of information before allowing it into the network. SPI can prevent advanced forms of incursions like Denial of Service attacks.
Windows Home Server firewall
Windows Home Server includes Windows Firewall, which protects communications between the server and the computers on your home network. This firewall is configured to allow remote access. It is not configurable by the user.
Personal firewall
A personal firewall is a software application that protects an individual computer. Because a personal firewall is behind the broadband firewall, it will protect the computer on which it is installed from attacks from other computers within the network.
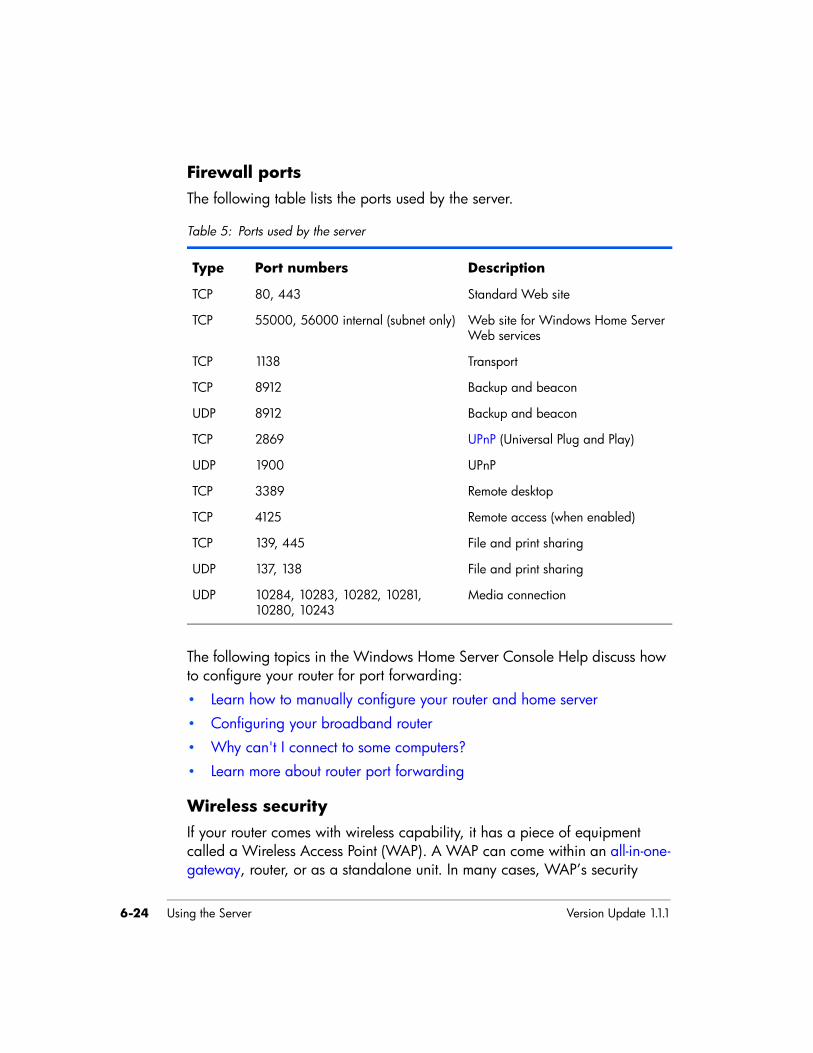
Using the Server Version Update 1.1.16-24
Firewall portsThe following table lists the ports used by the server.
The following topics in the Windows Home Server Console Help discuss how to configure your router for port forwarding:• Learn how to manually configure your router and home server• Configuring your broadband router • Why can't I connect to some computers?• Learn more about router port forwarding
Wireless securityIf your router comes with wireless capability, it has a piece of equipment called a Wireless Access Point (WAP). A WAP can come within an all-in-one-gateway, router, or as a standalone unit. In many cases, WAP’s security
Table 5: Ports used by the server
Type Port numbers Description
TCP 80, 443 Standard Web site
TCP 55000, 56000 internal (subnet only) Web site for Windows Home Server Web services
TCP 1138 Transport
TCP 8912 Backup and beacon
UDP 8912 Backup and beacon
TCP 2869 UPnP (Universal Plug and Play)
UDP 1900 UPnP
TCP 3389 Remote desktop
TCP 4125 Remote access (when enabled)
TCP 139, 445 File and print sharing
UDP 137, 138 File and print sharing
UDP 10284, 10283, 10282, 10281, 10280, 10243
Media connection
Using the Server 6-25
settings are toggled off by default and you must manually turn on the security settings. If the security settings are toggled off, anyone can access your network and may be able to get into the server and any computer or other device on your network. Firewalls and anti-virus software do not keep intruders out of wireless networks.
Most wireless networking equipment supports two forms of data encryption as security features: • Wired Equivalent Privacy (WEP)• Wi-Fi Protected Access (WPA)
For more information on how to configure the security for your wireless network, see the user’s guide that came with your networking equipment.
Anti-virus softwareYou should install anti-virus software on all the computers on your network, and configure the software from one of the computers to scan all the shared folders on the server. You might be required to assign (map) drive letters to all your shared folders to enable the anti-virus software to scan the server. For information on how to map drive letters to your shared folders, see How to map and disconnect a drive letter on page 6-34.
Important: Remember to keep your anti-virus definitions up-to-date.
User name and password protectionUser names and passwords help secure the server by requiring authentication for managing the server, accessing shared files, and using remote access.• Server password—during the first install of the HP MediaSmart
Server, you are asked to create a strong password to allow access for managing your server from the Windows Home Server console. This password will protect the server from unwanted changes.
• User account passwords—each person who uses your network must have a user account so they can access shared folders on the server or, if configured, use remote access. For more information, see User Accounts and Setting User Accounts Password Policy in the Windows Home Server Console Help.
• Computer passwords—by using the same user name and password for logging onto a computer as for the server user account, you can avoid
Using the Server Version Update 1.1.16-26
having to enter the user name and password when accessing a shared folder. Requiring logon to each computer on your network adds a level of security. For more information, see Why should logon names match? in the Windows Home Server Console Help.
• Webshare passwords—you can require passwords for outside visitors to your Photo Webshare. See Photo Webshare security on page 6-27.
Remote Access securityBy default Remote Access is turned off.
Using a computer to remotely access the files on your server is protected in several ways:• Security certificate• HTTPS (encrypted Secure Sockets Layer (SSL) protocol)• User account with strong password
Security certificate: When you install the HP MediaSmart Server software on your home computers, the Windows Home Server Connector software adds the Windows Home Server security certificate to the computer’s trusted certificate list. This security certificate helps secure the information that is exchanged between the server and your computer’s Web browser. The best way to access the files on the server while away from home is from a portable computer that has the HP MediaSmart Server software installed on it.
Caution: Using remote access to access your server from public or other untrusted computers is not recommended. Doing so can potentially expose your server to malicious software and viruses.
HTTPS: Remote Access is secure because the connection between the remote computer and the server is done over HTTPS. HTTPS uses the encrypted Secure Sockets Layer (SSL) protocol, the same protocol used for banking transactions and retail commerce.
User Account: Remote access does not allow logging on from the Guest or Administrator account. Moreover, the user account must be enabled for remote access, which requires a strong password to ensure that authentication is as secure as possible.
Using the Server 6-27
Photo Webshare securityHome network users with user accounts and Photo Webshare access, must use their user name and password to logon to Webshare. Outside visitors who can create albums, add photos to an album, or download photos, must also have a user name and password.
For visitors who aren’t required to have a user name and password, your server is still protected from open access because of the nature of the link (URL) provided in the email notification. For example:
https://myfamily.hp.share.net/WebShare/MAC=93728e7dc64b20a56f1&album=Weminuche%20Wilderness
This type of URL restricts open access because of its complexity, but allows anyone who has received the URL to view the album without a user name and password. If you want more protection for accessing your albums, you can set visitor permissions so that every visitor must provide a user name and password. Normally, only visitors who can upload photos or video clips require a user name and password.
Streaming mediaYou can stream your favorite music, videos, and photos from the HP MediaSmart Server to any supported digital media receiver (DMR) or to a supported digital media player.
The following figure shows a possible layout for media streaming.
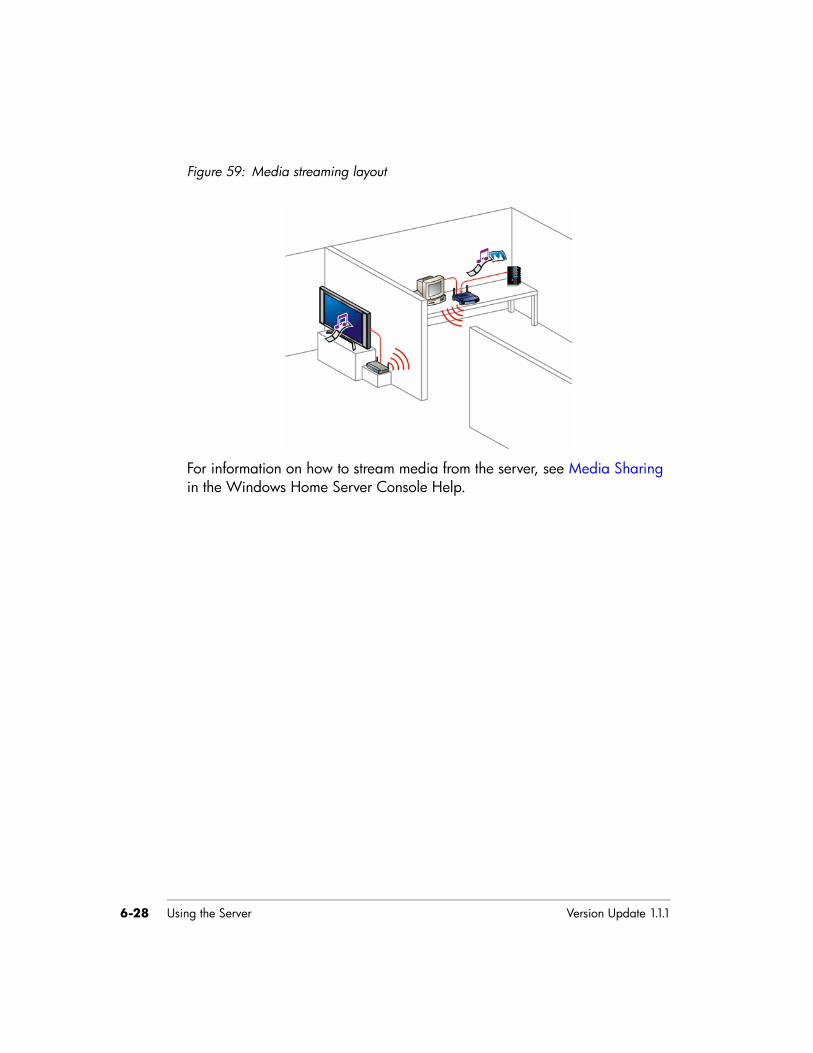
Using the Server Version Update 1.1.16-28
Figure 59: Media streaming layout
For information on how to stream media from the server, see Media Sharing in the Windows Home Server Console Help.
Using the Server 6-29
Setting up iTunes on the server and the client computerThe HP MediaSmart Server provides the ability to copy your iTunes music library and playlists to the server. This feature allows you to centralize your iTunes library for playback on any computer or notebook running iTunes on your home network.
To set up the Server for iTunes
The server is enabled for iTunes by default.
1 At the computer, double-click the Windows Home Server icon in the system tray.
2 Log on to the Windows Home Server Console.3 Under Server Settings for iTunes, click Modify.4 In the Settings for iTunes page, set up the following:
Status—enable or disable.Shared name—the name displayed in iTunes for the server.Password—optionally require a password to connect to the server from iTunes. If a password is assigned, only users that provide the correct password can play music from server’s shared library. Check interval—how often to check for music that has been added to the shared Music folder on the server.
5 Click OK to finish.
To setup copying your iTunes library to the server
How to set up a computer to copy its iTunes music library and playlists to your shared Music folder on the server.
1 At the computer, click Start, All Programs, and then select HP MediaSmart Server.
2 In the Control Center, click the Tools tab.3 Click Settings for iTunes.4 In the Settings for iTunes dialog box, set up the following:
Enable or disable automatic copying of iTunes music for the computer.
User name and Password—optionally, enter the name and password for your User Account that you use to access the server.
Using the Server Version Update 1.1.16-30
If you do not enter a user name and password, the user name and password on your local User Account is used (that is, the User Account on the computer that you are currently using).If you provide an invalid user name or password, access is attempted using the user account information on your computer; if this information matches, you can access the iTunes share music library on the server. If the user account information does not match and the user name and password entered in the Setting for iTunes dialog box are invalid, access to the iTunes shared music library on the server is denied.Check for new music every—how often to check for new music to copy to the iTunes folder in your shared Music folder on the server.
5 Click Done to finish.
Network healthThe Windows Home Server console contains a Network Health button to view the health of your network.
The Home Network Health dialog box shows health notifications from the server and the computers that are running Windows Vista.
To access the Network Health button
1 At the computer, double-click the Windows Home Server icon in the system tray.
2 Log on to the Windows Home Server Console.3 Click the Network Health button.
For assistance with Network Health notifications, see the following in the Windows Home Server Console Help:• Network Health• Home Server Health Notifications• Home Computer Health Notifications

Using the Server 6-31
How to add shared folders to network placesHow to add shared folders to network places in Windows XP and Windows Vista.• To add shared folders to My Network Places in Windows XP• To add a network place in Windows Vista
To add shared folders to My Network Places in Windows XP
1 At the computer, click Start, and then click My Computer.Note: If you use the classic start menu, click My Computer on the desktop.
2 Under Other Places, click My Network Places.
3 Under Network Tasks, click Add a network place.4 In the Add Network Place Wizard, click Next.5 Highlight Choose another network location, and then click Next.6 To add the network place, you have two options:
In the Internet or network address box, enter the path to the shared folder you want to map, and then click Next. For example, enter \\SERVER\Music SERVER is the default name. If you changed the name of the server, use that name. Music is the shared folder’s name.Click the Browse button and then use Windows Explorer to locate the network place.The path is usually: Entire Network, Microsoft Windows Network, Workgroup, <Name of Server>.
7 After locating the shared folder, click to highlight it, and then click OK.The location will appear in the Folder box.
8 Specify whether you want to reconnect every time that you log on to your computer, and then click Finish.
Once you create a network place for one of the shared folders, the other shared folders on the server will be available on My Network Places.
Using the Server Version Update 1.1.16-32
To add a network place in Windows VistaNote: Network discovery must be turned on to add a shared folder to Network places in Windows Vista. If network discovery is not turned on, see How to add shared folders to network places on page 6-31.
1 At the computer, click Start, and then click Network.2 Under Network Tasks, click Add a network place.3 In the Network Place Wizard, click Next.4 Highlight Choose another network location, and then click Next.5 To add the network place, you have two options:
In the Internet or network address box, enter the path to the shared folder you want to map, and then click Next.For example, enter \\SERVER\SoftwareSERVER is the default name. If you changed the name of the server, use that name. Software is shared folder’s name.Click the Browse button and then use Windows Explorer to locate the network place.The path is usually: Entire Network, Microsoft Windows Network, Workgroup, <Name of Server>.After locating the shared folder, click to highlight it, and then click OK. The location will appear in the Internet or network address box.
6 To create a name for the network place, enter a name in the Type a name for this network place box, and then click Next.
7 Specify whether you want to reconnect every time that you log on to your computer, and then click Finish.
Hardware statusDisplays the status of the server’s fans, voltages, and operating temperatures.
Using the Server 6-33
To access the Hardware status page
1 At the computer, double-click the Windows Home Server icon in the system tray.
2 Log on to the Windows Home Server Console.
3 Click the Settings tab , and then click Hardware Status in the left panel.
Hardware status indicatorsThe following colors indicate the status of the hardware component:• Green—normal operating state.• Yellow—at risk, attend to soon.• Red—critical, attend to immediately.
If an indicator is yellow or red, see What to do about hardware warning messages? on page 7-5.
Remote accessRemote Access provides easy access your files and home computers via a Web browser while you are away from home. You can download files, upload files, connect to your home computers, and administer Windows Home Server.
If enabled, remote access to network computers is available on the following operating systems:
For assistance in using remote access, see the following in the Windows Home Server Console Help:• Remote Access• Learn more about Remote Access to shared folders and files• Learn more about Remote Access to computers• How do I enable JavaScript?• Remote Access security
Using the Server Version Update 1.1.16-34
How to map and disconnect a drive letterSome software may require that you map a drive letter to the server. For example, an anti-virus program may need a mapped drive from the computer running the virus scan in order to scan the server’s folders and files. • To map a drive letter using Windows XP• To map a drive letter using Windows Vista
To map a drive letter using Windows XP
1 At the computer, click Start and then select My Documents (or any other folder).
2 In the folder window, click the Tools menu, then select Map Network Drive....
3 Mapping drives usually defaults to an unused letter, such as Z:. but you can select another drive letter as follows: a To view a list of available drive letters, click the Drive drop-down list.b Click a drive letter to select it.
4 To enter the shared folder in the Folder box, you have two options:In the Folder box, enter the path to the shared folder you want to map.For example, enter \\SERVER\MusicSERVER is the default name. If you changed the name of the HP MediaSmart Server, use that name. Music is the shared folder’s name.Click the Browse button and then use Windows Explorer to locate the shared folder. The path is usually: Entire Network, Microsoft Windows Network, Workgroup, <Name of Server>.After you find the folder, click to highlight it, and then click OK. The path to the folder will appear in the Folder box.
5 Select Reconnect at logon. Windows will re-establish the mapped drive every time you start Windows.
6 Click Finish.

Using the Server 6-35
To disconnect a mapped drive using Windows XP
1 At the computer, click Start and then select My Computer.2 Right-click the icon for the mapped drive, and then click Disconnect.
To map a drive letter using Windows Vista
1 At the computer, click Start and then Computer.
2 In the tool bar, click Map network drive .
3 Mapping drives usually defaults to an unused letter, such as Z:. but you can select another drive letter as follows: a To view a list of available drive letters, click the Drive drop-down list.b Click a drive letter to select it.
4 To enter the shared folder in the Folder box, you have two options:In the Folder box, enter the path to the shared folder you want to map.For example, enter \\SERVER\MusicSERVER is the default name. If you changed the name of the HP MediaSmart Server, use that name. Music is the shared folder’s name.Click the Browse button and then use Windows Explorer to locate the shared folder.The path is usually: Entire Network, Microsoft Windows Network, Workgroup, <Name of Server>.After you find the folder, click to highlight it, and then click OK. The path to the folder will appear in the Folder box.
5 Select Reconnect at logon. Windows will re-establish the mapped drive every time you start Windows.
6 Click Finish.
To disconnect a mapped drive using Windows Vista
1 At the computer, click Start and then select Computer.2 Under Network Location, right-click the icon for the mapped drive, and
then click Disconnect.

Using the Server Version Update 1.1.16-36
Troubleshooting 7-1
7 TroubleshootingFind solutions for difficulties with your HP MediaSmart Server.
If your problem is not listed, consult the HP support web site at http://www.hp.com/support.
What’s in this chapter» HP MediaSmart Server troubleshooting tips: on page 7-1» Network connection troubleshooting tips: on page 7-16» Webshare troubleshooting tips: on page 7-21» Other common troubleshooting tips on page 7-27» iTunes troubleshooting tips on page 7-28» Microsoft Windows Home Server troubleshooting tips on page 7-29» Email troubleshooting tips on page 7-30» Media Streaming troubleshooting tips on page 7-32» Why can I play and stream DRM content my home computer but I can not
stream it from my HP MediaSmart Server? on page 7-34» What value does TZO domain names provide beyond the Microsoft Live
option:
HP MediaSmart Server troubleshooting tips:In this section we will cover:
What to do if the server is unresponsive on page 7-2
Power-on indicator is off on page 7-3
Why is the hard drive light-bar purple? on page 7-3
Why is the hard drive light-bar red? on page 7-3
Why is the server’s health indicator light red? on page 7-4
Computer Recovery on page 7-5
What to do about hardware warning messages? on page 7-5
Troubleshooting Version Update 1.1.17-2
Using Server Recovery and Factory Reset on page 7-7
Choosing Server Recovery or Factory Reset? on page 7-7
Recovering or resetting the server on page 7-8
No server found on page 7-12
Recovery fails on page 7-12
File transfer failure on page 7-13
If you cannot access the Windows Home Server on page 7-14
Health indicator codes on page 7-14
What to do if the server is unresponsiveIf the server appears to be unresponsive, do either of the following:• Reset the server• Shutdown and restart the server manually
Reset the serverHow to reset the server from the Windows Home Server Console.
To reset the server
1 If the Windows Home Server Console is open, click the Close button in the upper-left corner of the console.
2 Double-click the Windows Home Server icon in the task tray.
3 On the Windows Home Server Console startup page, click Options.4 From the drop-down menu, select Reset the Windows Home Server
Console.5 Click OK to verify that you want to reset the console.
Shutdown and restart the server manuallyHow to force the server to turn off and restart.
To perform a soft shut down and restart
1 On the back of the server, press the Power button.2 The health light should begin blinking.
Troubleshooting 7-3
The shutdown process may take up to two minutes to complete.3 After the server is completely off, press the Power button to restart.
To force a shutdown and restart
1 On the back of the server, hold in the Power button for at least 4 seconds to force the server to shutdown.
2 After the server is completely off, press the Power button to restart.
Power-on indicator is offThe server is not powered on.
To power on the server
1 Make sure the power cord is fully plugged into the server and a powered electrical outlet.
2 If plugged into a surge protector or power strip, make sure the device is switched on.
Why is the hard drive light-bar purple?A purple light bar indicates that a hard drive has been installed, but has not been initialized. It occurs in the following conditions:• When setting up the server for first time—the light-bar is purple until the
set up on the first computer is complete.• The drive has been removed from total storage—for example, when
removing a drive from the drive bay. See Removing a hard drive from the server on page 6-12.
• When adding a new drive, before is has been added to server storage.
For information on initializing a hard drive, see Server Storage in the Windows Home Server Console Help.
Why is the hard drive light-bar red?A red light-bar indicates the following:• That a hard drive has failed and must be replaced. Additionally, the
connected computers show the following:
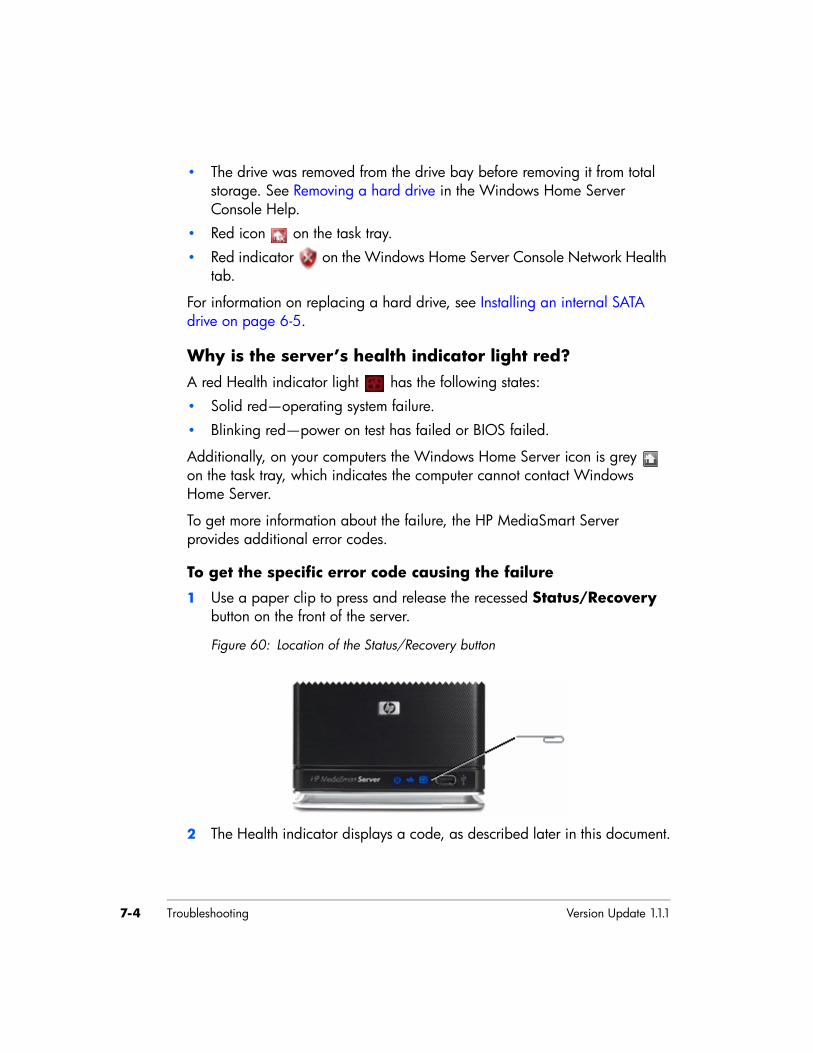
Troubleshooting Version Update 1.1.17-4
• The drive was removed from the drive bay before removing it from total storage. See Removing a hard drive in the Windows Home Server Console Help.
• Red icon on the task tray.• Red indicator on the Windows Home Server Console Network Health
tab.
For information on replacing a hard drive, see Installing an internal SATA drive on page 6-5.
Why is the server’s health indicator light red?A red Health indicator light has the following states:• Solid red—operating system failure.
• Blinking red—power on test has failed or BIOS failed.
Additionally, on your computers the Windows Home Server icon is grey on the task tray, which indicates the computer cannot contact Windows Home Server.
To get more information about the failure, the HP MediaSmart Server provides additional error codes.
To get the specific error code causing the failure
1 Use a paper clip to press and release the recessed Status/Recovery button on the front of the server.
Figure 60: Location of the Status/Recovery button
2 The Health indicator displays a code, as described later in this document.
Troubleshooting 7-5
Computer RecoveryTo help you recover your computer and data in the event of a hard drive failure, the HP MediaSmart Server includes a PC Restore Disc. Use this disc to restore your computer from the HP MediaSmart Server in the event of the following:• To restore the system drive.• When the operating system will not start (boot).• If you cannot use System Restore to restore the system files.
Important: To ensure that you have the latest version of the PC Restore Disc, contact HP support at http://www.hp.com/support.
The Microsoft® Windows® Preinstallation Environment software included with this computer or software may be used for boot, diagnostic, setup, restoration, installation, configuration, test or disaster recovery purposes only. NOTE: THIS SOFTWARE CONTAINS A SECURITY FEATURE THAT WILL CAUSE END USER CUSTOMER'S SYSTEM TO REBOOT WITHOUT PRIOR NOTIFICATION TO THE END USER CUSTOMER AFTER 24 HOURS OF CONTINUOUS USE.
To recover your computer
1 Insert the PC Restore Disc into a CD/DVD drive in the computer you want to restore.
2 Restart the computer, and boot from the CD.3 Follow the instructions in the Restore Wizard.
For additional information about restoring computer backups, see Restoring Computer Backups in the Windows Home Server Console Help.
For information about restoring the HP MediaSmart Server, see Using Server Recovery and Factory Reset on page 7-7.
What to do about hardware warning messages?Warning messages indicate Critical issues or At Risk issues.• Critical issues—address immediately; otherwise, the server may be
damaged.• At Risk issues—address as soon as possible.
Troubleshooting Version Update 1.1.17-6
The HP MediaSmart Server monitors the temperature of the system, microprocessor (CPU), fan speed, and voltages. It displays the following messages: • Temperature warnings• Fan speed warnings• Voltages warnings
Temperature warningsTemperature warning messages indicate that some server components are too hot.
To lower the temperature of the server
1 Check the ventilation surrounding the server:If the server is located in a small unventilated space, move the server to a more ventilated location.Check that the server’s front and back panels are not blocked. Check that the location of the server is not too hot. Maximum environmental temperature for operating the server is 35° C (95° F).
2 Remove any accumulated dust on the back and front of the server.3 Fold up the flap on any empty system drive trays. For more information,
see Installing an internal SATA drive on page 6-5.4 If none of the previous steps return the temperature to normal:
a Write down the temperatures of the CPU and System.b Turn off the server.c Contact HP Support at http://www.hp.com/support.
Fan speed warningsThe fans cool the disk drives and other electronics. If they are not cooling the server sufficiently, the hard drives and server may be damaged.
For fan speed out of specification
1 Write down the speeds of the upper and lower fans.2 Turn off the server.3 Contact HP Support at http://www.hp.com/support.

Troubleshooting 7-7
Voltages warningsThe voltages indicate the health of the server’s power supply.
For voltages out of specification
1 Write down the voltages.2 Turn off the server.3 Contact HP Support at http://www.hp.com/support.
Using Server Recovery and Factory ResetTo help recover or reset the server, the HP MediaSmart Server includes a Server Recovery Disc. Using this disc requires a DVD drive.
Server Recovery attempts to recover all data and restore the folders. However, because of the state of the system prior to the recovery, not all data may be able to be recovered or integrated into the folder structure.Note: For information about recovering a computer, see Computer Recovery on page 7-5.
Choosing Server Recovery or Factory Reset?How to chose which process to use.
Caution: During Server Recovery, all system settings, such as User Accounts and Photo Webshare settings, are lost. You will need to recreate them. During Factory Reset, in addition to loosing all system settings, the data on all drives is lost.
The following table will help you determine whether to choose Server Recovery or Factory Reset.
Table 6: Choosing Server Recovery or Factory Reset
Server Recovery Factory Reset
Server operating system has been corrupted.
The partition data on the other storage drives is corrupted.
Disk replacement—partition data on other storage drives are okay.
Giving away or selling the server. See the caution below this table.
If you have lost your password.
Troubleshooting Version Update 1.1.17-8
Caution: Factory Reset does not remove data from the drives; instead it allows the existing data to be overwritten. To insure that your data can never be accessed, use a “shredder” program that overwrites the hard drives with random numbers or meaningless data.
Recovering or resetting the serverSteps for performing a Server Recovery or Factory Reset.
To recover or reset the server
Important: Use the Server Recovery Disc from a computer using a wired connection to the router (or switch). A wireless connection is not recommended. Additionally, if the server is some distance from the computer you are using for Server Recovery or Factory Reset, it may be more convenient to move the server near the computer.
1 If the HP MediaSmart Server Control Center is open on your computer, close it before proceeding.
2 Insert the Server Recovery Disc into a DVD drive in a computer connected to the network by an Ethernet cable.The Server Recovery program automatically starts.
Server’s system hard drive has been replaced.
Table 6: Choosing Server Recovery or Factory Reset
Server Recovery Factory Reset
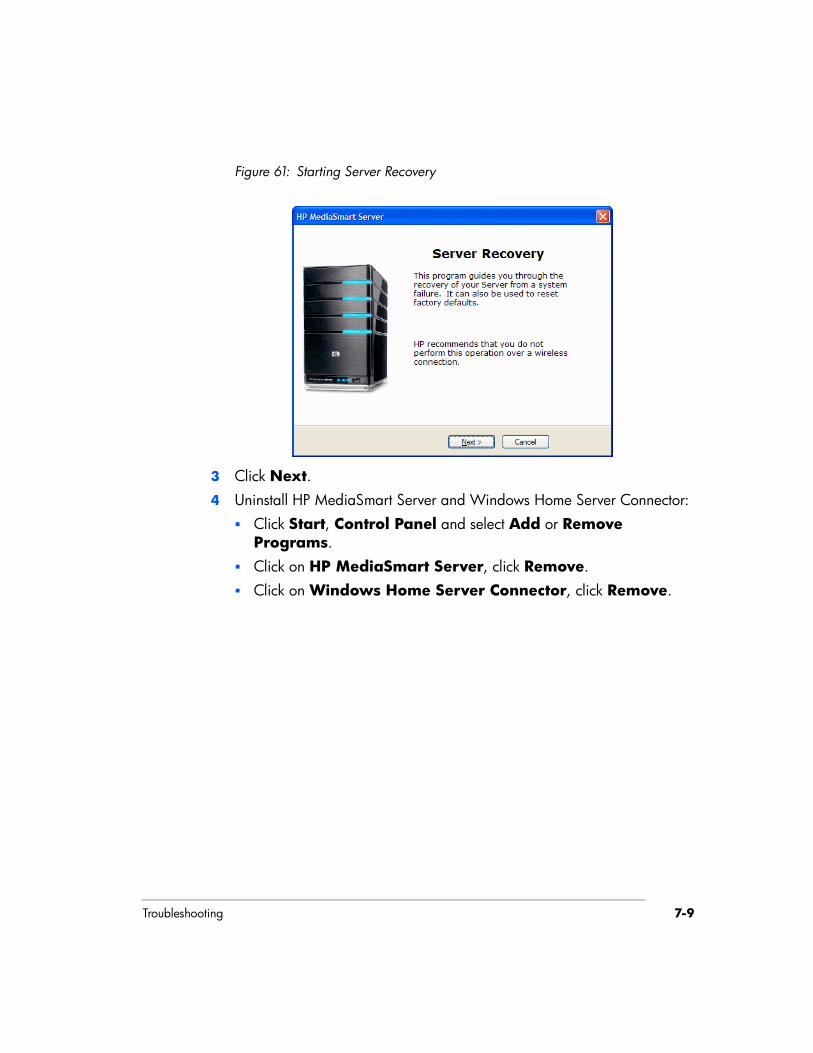
Troubleshooting 7-9
Figure 61: Starting Server Recovery
3 Click Next.4 Uninstall HP MediaSmart Server and Windows Home Server Connector:
Click Start, Control Panel and select Add or Remove Programs.Click on HP MediaSmart Server, click Remove.Click on Windows Home Server Connector, click Remove.
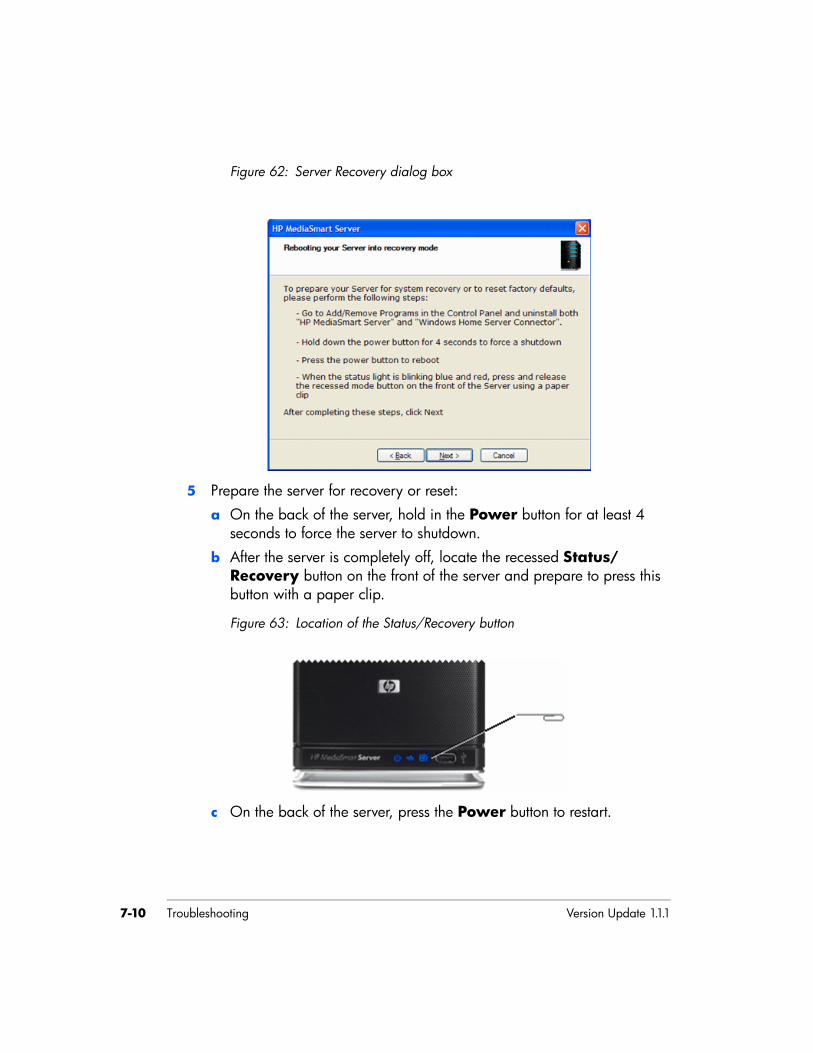
Troubleshooting Version Update 1.1.17-10
Figure 62: Server Recovery dialog box
5 Prepare the server for recovery or reset:a On the back of the server, hold in the Power button for at least 4
seconds to force the server to shutdown.b After the server is completely off, locate the recessed Status/
Recovery button on the front of the server and prepare to press this button with a paper clip.
Figure 63: Location of the Status/Recovery button
c On the back of the server, press the Power button to restart.
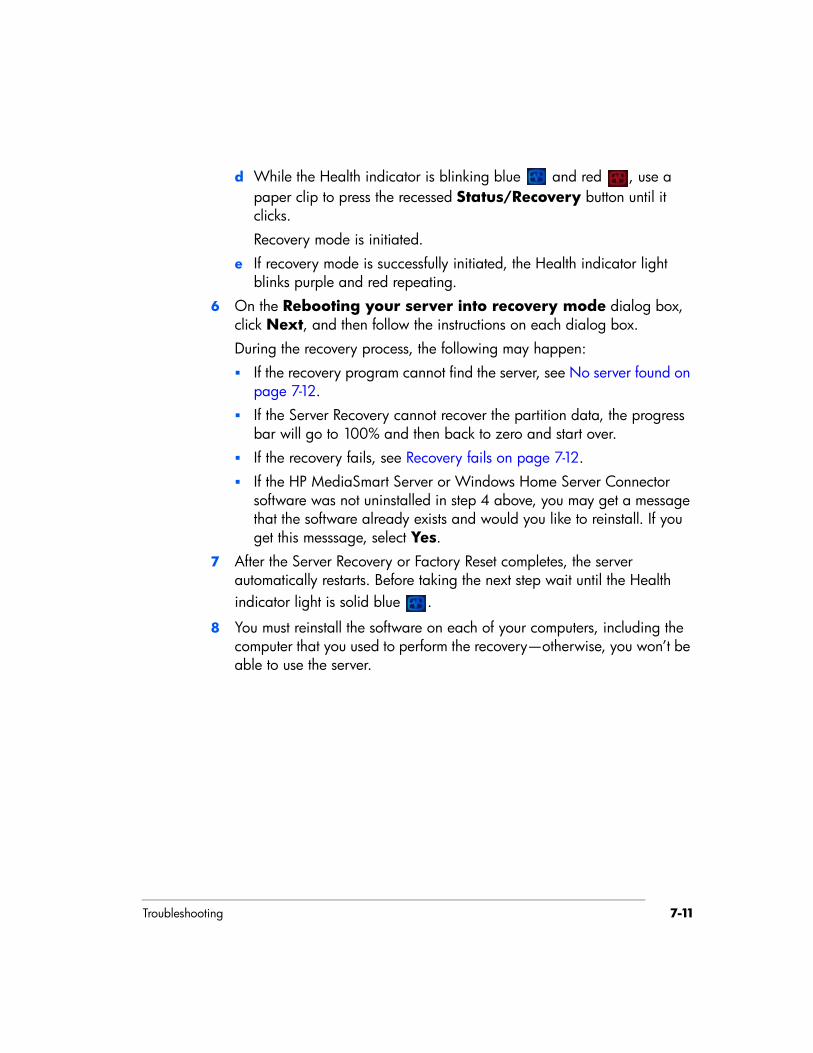
Troubleshooting 7-11
d While the Health indicator is blinking blue and red , use a paper clip to press the recessed Status/Recovery button until it clicks.Recovery mode is initiated.
e If recovery mode is successfully initiated, the Health indicator light blinks purple and red repeating.
6 On the Rebooting your server into recovery mode dialog box, click Next, and then follow the instructions on each dialog box. During the recovery process, the following may happen:
If the recovery program cannot find the server, see No server found on page 7-12.If the Server Recovery cannot recover the partition data, the progress bar will go to 100% and then back to zero and start over.If the recovery fails, see Recovery fails on page 7-12.If the HP MediaSmart Server or Windows Home Server Connector software was not uninstalled in step 4 above, you may get a message that the software already exists and would you like to reinstall. If you get this messsage, select Yes.
7 After the Server Recovery or Factory Reset completes, the server automatically restarts. Before taking the next step wait until the Health indicator light is solid blue .
8 You must reinstall the software on each of your computers, including the computer that you used to perform the recovery—otherwise, you won’t be able to use the server.
Troubleshooting Version Update 1.1.17-12
9 Click Finish on the Server recovery complete dialog box.The HP MediaSmart Server software will automatically be installed on the computer where you performed the Server Recovery or Factory Reset.
Caution: If you did not close the HP MediaSmart Server Control Center, as indicated in step 1, you may see a message asking you to reboot your computer. If you see this message, choose to reboot later. Otherwise, rebooting may leave the server in a state where it cannot be configured, and you will have to repeat the recovery or reset process.
Important: It takes a few minutes for the server to go through the finishing process. Please be patient.
10 To install the software on other client computers, see Installing the Software on Additional Home Computers on page 2-21.
No server foundIf the recovery program cannot find the server, the most likely causes are:• The Recovery Mode was not successfully initiated—repeat step 5 if you
did not push the Status/Recovery button while the Health indicator lights was blinking red and blue.
• A firewall is blocking the connection—configure the firewall to allow the Windows Home Server Recovery application or to allow connections over TCP port 8192 and UDP port 8192. If opening these ports, be sure to close them after the recovery has completed. For more information, see the vendor’s documentation.
• The network connection is not working. For troubleshooting network connections, see Network connection issues on page 7-16.
Recovery failsIf the recovery fails, one of the following messages will be displayed: • the server disks could not be reformatted• the partition data on the server could not be written• the primary volume on the server could not be written• the recovery image could not be loaded
The most likely causes of these messages are:
Troubleshooting 7-13
• A connection failure.a Make sure that you are using a wired connection to the server from the
computer you are using to do the recovery.b Check network connections—see Network connection issues on
page 7-16.c Repeat the recovery or reset.
• Server Recovery Disc is damaged—obtain a new disc from HP Support at http://www.hp.com/support.
File transfer failureWhat to do about a failure when transferring photos or video clips to the HP MediaSmart Server from your computer.
To correct a file transfer failure
1 Compare files that you were transferring with the files on the shared folder and try transferring the missing files again.
2 If the transfer fails again, check that you can access the Windows Home Server. See Opening the Windows Home Server Console on page 2-1.
3 If you cannot access the Windows Home Server, check the network connections:
Make sure that all the cable connections are correctly plugged in. Make sure the HP MediaSmart Server has power and the Network indicator light is blue . See Network connection issues on page 7-16.Make sure the router (or switch) has power.Restart the router or switch (or unplug and plug it back in).Restart all the devices on the network, including the computers and the server.Make sure your server and computers are on the same logical network (subnet). See What is an advanced network configuration? in the Windows Home Server Console Help.
4 If the computer that you transferring files from is connected wirelessly to the network, try connecting it with an ethernet cable.
5 Check the Event Viewer to see if the System logs loss shows a disconnect:
Troubleshooting Version Update 1.1.17-14
In Windows XP, click Start, Control Panel, Performance and Maintenance, Administrative Tools, and then select Event Viewer.In Windows Vista, click Start, Control Panel, System and Maintenance, Administrative Tools, and then select Event Viewer.
If you cannot access the Windows Home ServerTry the suggested resolutions:• Make sure that all the cable connections are correctly plugged in. • Make sure the HP MediaSmart Server has power and the Network
indicator light is blue.• Make sure the router (or switch) has power.
• Restart the router or switch.• Restart all the devices on the network, including the computers and the
server.• Make sure your server and computers are on the same Network.
Health indicator codesThe Tables below are a breakdown of the Health indicator displays. To see this code, using a paper clip, press and release the recessed Status/Recovery button on the front of the server.
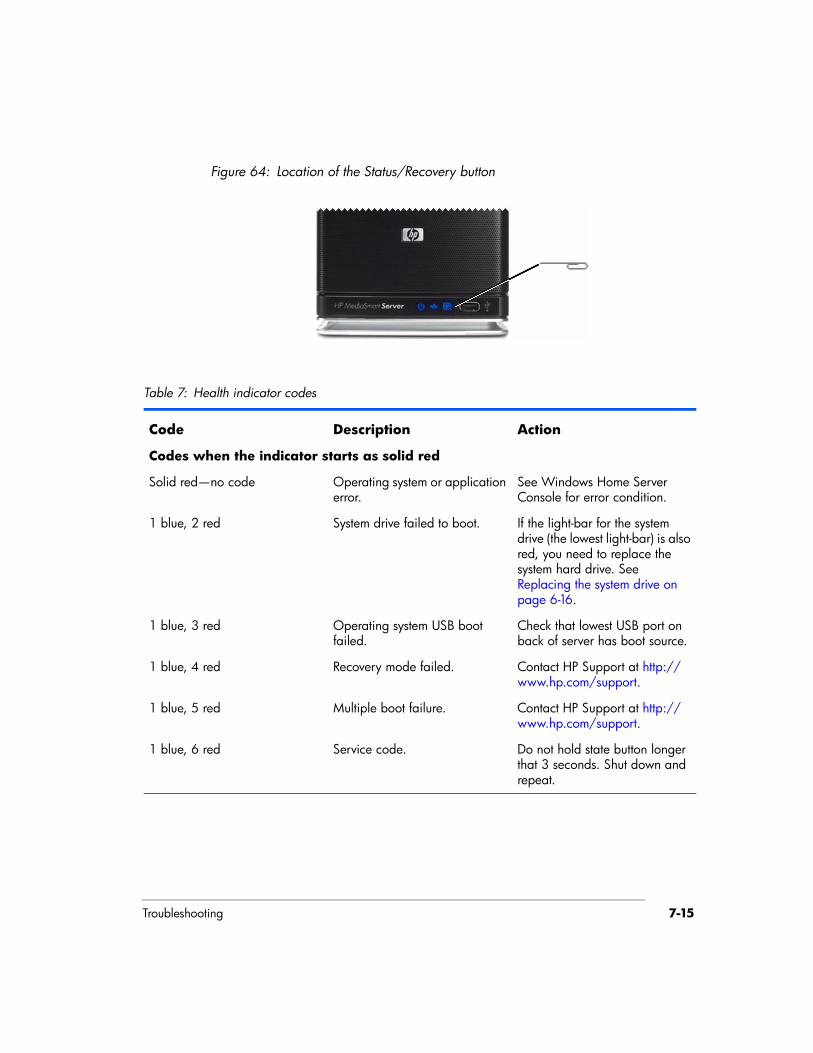
Troubleshooting 7-15
Figure 64: Location of the Status/Recovery button
Table 7: Health indicator codes
Code Description Action
Codes when the indicator starts as solid red
Solid red—no code Operating system or application error.
See Windows Home Server Console for error condition.
1 blue, 2 red System drive failed to boot. If the light-bar for the system drive (the lowest light-bar) is also red, you need to replace the system hard drive. See Replacing the system drive on page 6-16.
1 blue, 3 red Operating system USB boot failed.
Check that lowest USB port on back of server has boot source.
1 blue, 4 red Recovery mode failed. Contact HP Support at http://www.hp.com/support.
1 blue, 5 red Multiple boot failure. Contact HP Support at http://www.hp.com/support.
1 blue, 6 red Service code. Do not hold state button longer that 3 seconds. Shut down and repeat.
Troubleshooting Version Update 1.1.17-16
Network connection troubleshooting tips:In this section we will cover:
Network connection issues on page 7-16
No available port on network router on page 7-20
Why did URL not work? on page 7-20
What do firewall blocking messages mean? on page 7-21
Network connection issuesFor issues connecting the server to the network, check the following:• Why is the Network connection light off• The firewall is blocking the connection• Check that the router is correctly configured for DHCP• Check the network is set up properly for TCP/IP• Check the network NetBIOS properties
The network connection light alternates between blue and offThe server is intermittently connected to the network.
Check the cable connection between the server and the router or switch.
Table 8: Health indicator codes
Code Description Action
Codes when the indicator starts as blinking red
2 blue, 1 red BIOS corrupted. Repeat power-on to validate. If repeats Contact HP Support at http://www.hp.com/support.
2 blue, 2 red Memory failure. Contact HP Support at http://www.hp.com/support.
2 blue, 3 red BIOS recovery source not present.
Contact HP Support at http://www.hp.com/support.
Troubleshooting 7-17
Why is the Network connection light off
To determine why the network connection light is off
1 Make sure that all the cable connections are correctly plugged in. 2 Make sure the router or switch has power.3 Restart the router or switch (or unplug and plug it back in).4 If you are using your own Ethernet cable, try using the Ethernet cable that
came with the HP MediaSmart Server.
The network connection light alternates between blue and off
The server is intermittently connected to the network.
Check the cable connection between the server and the router (or switch).
The firewall is blocking the connectionIf using a firewall program, configure it to allow any HP MediaSmart or Windows Home Server applications.
For instructions to unblock, see the software vendor's documentation.
For information about firewall blocking alerts, see What do firewall blocking messages mean? on page 7-21.
Check that the router is correctly configured for DHCP The HP MediaSmart Server comes automatically set to use a DHCP server to dynamically assign IP addresses. Most router come with a built-in DHCP server.
Check that the router has the DHCP server correctly enabled. Refer to the documentation that came with the router for instructions on proper DHCP server configuration.
For information about configuring a router for remote access, see Configuring your broadband router in the Windows Home Server Console Help.
Windows Vista: Check that Network Discovery is turned on
To ensure that Network Discovery is turned on
1 Click the Start menu, and then select Control Panel.2 In the Control Panel, click View network status and tasks.
Troubleshooting Version Update 1.1.17-18
3 In the Network and Sharing Center, make sure that Network discovery is on.
4 If Network discovery is off, click , then select Turn on network discovery and Apply.
Check the network is set up properly for TCP/IPCheck that each computer on the network has TCP/IP listed and selected for the network properties with these options selected: • Obtain IP address automatically• Obtain DNS server address automatically
Windows XP: To ensure your network is set up properly for TCP/IP
1 Click Start, and then select Control Panel. 2 Double-click Network and Internet Connections.3 Double-click Network Connections.4 If the computer is connected via Ethernet cable to the network, right-click
Local Area Connection (LAN). 5 If the computer is using a wireless connection, right-click Wireless
Network Connection.6 Click Properties. In the dialog box that opens, check to ensure that
TCP/IP is listed and selected. If TCP/IP is not listed, click Install, Protocol, and then Add. In the dialog box that appears, select Internet Protocol (TCP/IP). If TCP/IP is listed and checked, highlight it and click Properties, then select Obtain IP address automatically and Obtain DNS server address automatically.
7 All computers should be set identically.
Windows Vista: To ensure your network is set up properly for TCP/IP
1 Click Start, and then select Control Panel. 2 Click View network status and tasks under Network and
Internet.

Troubleshooting 7-19
3 In the left pane, click Manage Network Connections.4 If the computer is connected via Ethernet cable to the network, right-click
Local Area Connection (LAN). 5 If the computer is using a wireless connection, right-click Wireless
Network Connection.6 Click Properties. In the dialog box that opens, check to ensure that
Internet Protocol Version 4 TCP/IPv4 is listed and selected. If TCP/IP is not listed, click Install, Protocol, and then Add. In the dialog box that appears, select Internet Protocol (TCP/IPv4). If TCP/IP is listed and checked, highlight it and click Properties, then select Obtain IP address automatically and Obtain DNS server address automatically.
7 All computers should be set identically.
Check the network NetBIOS propertiesCheck that each computer on the network has TCP/IP advanced network properties set to Enable NetBIOS over TCP/IP. All computers should be set identically.
Windows XP: To ensure your network has the correct NetBIOS set up
1 Click Start, and then select Control Panel.2 Double-click Network and Internet connections. 3 Double-click Network Connections.4 Double-click your default network connection.
Local Area Connection for wired networks.Wireless for wireless connections.
5 Click Properties. 6 Highlight Internet Protocol (TCP/IP). 7 Click Properties. 8 Click Advanced. 9 Click the WINS tab.
Troubleshooting Version Update 1.1.17-20
WINS refers to Windows Internet Naming Service, which converts NetBIOS network names to IP addresses.
10 NetBIOS settings are found at the bottom of the dialog box. Make sure that the NetBIOS setting is not set to Disable NetBIOS over TCP/IP.
Windows Vista: To ensure your network has the correct NetBIOS set up
1 Click Start, and then select Control Panel. 2 Click View network status and tasks under Network and
Internet.3 In the left pane, click Manage Network Connections.4 Right-click your default network connection:
Local Area Connection (LAN) for wired networks.Wireless Network Connection for wireless connections.
5 Highlight Internet Protocol Version 4 (TCP/IP). 6 Click Properties. 7 Click Advanced. 8 Click the WINS tab.
WINS refers to Windows Internet Naming Service, which converts NetBIOS network names to IP addresses.
9 NetBIOS settings are found at the bottom of the dialog box. Make sure that the NetBIOS setting is not set to Disable NetBIOS over TCP/IP.
No available port on network routerTake the following steps:
1 To add more Ethernet ports, connect an Ethernet switch to the router. Refer to the switch documentation for instructions on how it connects to the router.
2 Connect one end of the Ethernet cable that came with the server to the switch and the other end to the HP MediaSmart Server.
Why did URL not work? DNS has not updated, wait about 10 minutes for DNS to update.

Troubleshooting 7-21
What do firewall blocking messages mean?Firewalls block certain types of communications between network devices. This helps protect your data from hackers, viruses, spyware, and Trojan horse software. The computer might have one or more firewall programs installed. For example, if the latest version of the Microsoft Windows XP operating system is installed, the computer may be using the Windows XP Firewall.
The HP MediaSmart Server comes with software applications that must communicate over the network. Sometimes these programs are blocked by a firewall. When this happens, security alerts pop up on the computer screen.
Security alerts usually have a list of possible options. The particular messages or alerts displayed depend on the vender.
For example, the alert might offer the following options: • Keep Blocking• Unblock • Defer the choice and be reminded later
If a security alert dialog box for an HP MediaSmart Server application or the Windows Home Server is displayed by the firewall, click Unblock or Allow to permit the application to execute. It is safe to unblock the communications because no connection or communication with the Internet is enabled, only those between the server and its software applications. After unblocking an application, if any software is reinstalled, moved to a new disk location, or if the application is deleted from the exception list using the Windows XP Security Center control panel, communications between that software and the server may once again be blocked by the firewall.
Configure your firewall to allow any HP MediaSmart or Windows Home Server applications.
Webshare troubleshooting tips:In this section we will cover:
Why can’t I share my album? on page 7-22
How to add photos from your photos shared folder to your Webshare. on page 7-23
Unable to upload images. on page 7-23
Troubleshooting Version Update 1.1.17-22
How do you make Webshare work in the home? on page 7-23
Why am I getting a certificate error? on page 7-24
Upload Photos requires ActiveX control to be loaded? on page 7-24
Clicking on photo Webshare on CC Does Not Open. on page 7-24
Webshare administrator cannot delete Visitor account. on page 7-24
Visitor can create a photo album and add pictures but the album doesn't display. on page 7-24
Visitor can create a photo album and add pictures but the album doesn't display the pictures. on page 7-24
Visitor cannot download pictures and sees a message telling them that they cannot download pictures. on page 7-25
Visitor cannot add pictures and sees a message telling them that they can't add pictures. on page 7-25
Visitor has created an album (or albums) and wants to delete the album but cannot. on page 7-25
Visitor has changed their password, now they can't log into Webshare. on page 7-25
Selecting URL from address field in web browser loads “page that opens cannot be closed without closing the entire application”. on page 7-26
Webshare user is unable to log out of Webshare. on page 7-26
Trouble uploading large files to Webshare. on page 7-26
Clicking on Photo Webshare on CC causes command error. on page 7-26
How to find the server software and firmware information. on page 7-27
The first backup is taking a long time. on page 7-27
Browser cannot display the page when accessing through URL. on page 7-26
Why can’t I share my album?Server users can create albums, but not share them.
Troubleshooting 7-23
How to add photos from your photos shared folder to your Webshare.Cannot access/browse server shares from the photo selector.
1 Use the photo loader, on the left hand side to browse Network Neighborhood (XP PCs) or Network (Vista PCs).
2 If your server shared folder does not show up in this list, then use the desktop shortcut to access shared folders on the server, right click on the shared folder you wish to use, and click on "map network drive".
3 The next time you use the photo loader, browser to my computer and select the drive previously mapped.
Unable to upload images.
• Installs may be blocked by browser security.Click to enable download/install at top of browser.
• Just inserted the drive while Upload photo was loading.Reinsert the thumb drive.
• Pop up blocker blocked install.Disable pop up blocker, or enable pop ups for the URL.
• ActiveX is disabled.Enable ActiveX.
• Not using Internet Explorer.Use Internet Explorer.
How do you make Webshare work in the home?Once remote access is setup and you have a custom domain name, frequently urls that look something like https://{your domain name}/Webshare/ will be used. For many internet service providers, this can cause problems and occasionally even redirect you to your home network router or modem.
To work around this:
Troubleshooting Version Update 1.1.17-24
1 Replace the {your domain name} section of the URL address with the local name of your server (the default is “hpserver”).
2 In addition to removing common network issues, this will also perform faster.
Why am I getting a certificate error? If you access your HP MediaSmart server from a computer that is not being backed up by the server, you will get a warning about the server's security certificate whenever you access any of its https:// URLs. The reason is that the server issues its own security certificate, and since it is not an official Certificate Authority, your web browser issues the warning or error message.
You may ignore the warning or error message and continue to the HP MediaSmart server's web pages.
Upload Photos requires ActiveX control to be loaded? Alternately, you can use non-ActiveX. Add photos to add photos to your album.
Clicking on photo Webshare on CC Does Not Open. No Default Browser. Select a default browser or reboot PC.
Webshare administrator cannot delete Visitor account. Added visitor as User in WHS Console. Add the visitor in Webshare instead on in the Admin Console.
Visitor can create a photo album and add pictures but the album doesn't display.Visitor does not have auto-approve rights.
This is expected behavior for a Webshare Visitor who has permission to add photos. The photos must be approved by a Webshare administrator before they will display in the photo album.
Visitor can create a photo album and add pictures but the album doesn't display the pictures. Visitor does not have auto-approve rights.
Troubleshooting 7-25
This is expected behavior for a Webshare Visitor who has permission to add photos. The photos must be approved by a Webshare administrator before they will display in the photo album.
Visitor cannot download pictures and sees a message telling them that they cannot download pictures. Visitor does not have download rights.
Downloading permissions are set by the Webshare administrator.
Visitor cannot add pictures and sees a message telling them that they can't add pictures. Visitor does not have add rights.
Permission to add pictures to photo albums are set by the Webshare administrator.
Visitor has created an album (or albums) and wants to delete the album but cannot. Visitors do not have delete album rights. Visitor should delete the photos from the file. The Webshare administrator has permissions to delete photo albums.
Visitor has changed their password, now they can't log into Webshare. Visitor has changed their password in Webshare to nothing (using "Change Password" link). Now they can't log into Webshare. They are getting a message about their password being incorrect users can create albums, but not share them.
The Webshare admin has edited the Visitor's password.
There is an option on the Webshare login page to obtain a new password.
Troubleshooting Version Update 1.1.17-26
Selecting URL from address field in web browser loads “page that opens cannot be closed without closing the entire application”. Webshare Visitor or Administrator is selecting URL from address field in web browser and after login the page that opens cannot be closed without closing the entire application.
Browser remembers previous credentials.
Type IP into browser address field, (e.g. www.192.168.1.103) and save the login page as a Favorite.
Webshare user is unable to log out of Webshare. Browser remembers previous credentials.
There is no logout screen for Webshare. Closing the browser will log out the user if credentials not saved.
Trouble uploading large files to Webshare. May keep timing out.
Give directions for configuring FTP functionality of imbedded 2003 Server
Clicking on Photo Webshare on CC causes command error. Click OK on error and attempt to open Photo Webshare again.
Browser cannot display the page when accessing through URL.
• UPnP disabled.Enable UPnP.
• Web sites are turned off.Turn Web sites on.
• Multiple DHCP devices are on the network.Verify that there is only one DHCP server on the network - VOIP devices often are DHCP servers.

Troubleshooting 7-27
• Accessing the server through the URL while behind the same router has known issues.Access the server through the local name (Photo Webshare in CC) and use the URL when outside the network.
• Upnp not supported by router.Enable port forwarding for ports 80, 443, and 4125 to the server's IP address.
Other common troubleshooting tipsIn this section we will cover:
How to find the server software and firmware information. on page 7-27
The first backup is taking a long time. on page 7-27
What are optimum data throughput speeds for different network interfaces? on page 7-28
What is the ideal minimum time to transfer a 1GB file for different network interfaces? on page 7-28
How to find the server software and firmware information. The Hardware Status page contains information about your HP MediaSmart Server, such as the software and BIOS version.
1 At the computer, double-click the Windows Home Server icon in the task tray.
2 Log on to the Windows Home Server.3 On the Windows Home Server Console, click the Settings tab and then
click Hardware Status in the left panel.
The first backup is taking a long time.Your initial PC backup could take several hours, depending on how much data you have on your computer. Subsequent backups will go much faster since only the data that has changed is copied to the server.
Troubleshooting Version Update 1.1.17-28
What are optimum data throughput speeds for different network interfaces? Depending on the network interface your computer uses, you will experience different rates of data transfer to your server. Network Interfaces are described in terms of their ideal maximum speed, but many factors can affect the actual data transfer speeds you will experience. For example, your optimal wireless transfer speed will be reduced depending on the type of security and encryption you have enabled on your wireless network and by the amount of other work your computer and server are performing at the same time.
What are optimum data throughput speeds for different network interfaces?
• Gigabit Ethernet—1000mbps/125MBs.• Fast Ethernet—100mbps/12.5MBs.• Wireless N—600mbps/75MBs.• Wireless G—54mbps/6.75MBs.• Wireless A—54mbps/6.75MBs.• Wireless B—11mbps/1.375MBs.
What is the ideal minimum time to transfer a 1GB file for different network interfaces?
• Gigabit Ethernet—8s.• Fast Ethernet—1min 20s.• Wireless N—13.3s.• Wireless G—2min 28s.• Wireless A—2min 28s.• Wireless B—12min 7s.
iTunes troubleshooting tipsIn this section we will cover:
iTunes aggregator does not appear to be working. on page 7-29
Troubleshooting 7-29
Song selection from the server is not updating with new additions. on page 7-29
Podcasts not showing in playlist. on page 7-29
iTunes aggregator does not appear to be working.
• No music in iTunes library.Add music to library.Check C:\Program Files\Hewlett-Packard\Media Aggregator.txt.
• Accounts may not match or guest account disabled.Fix account synchronization.Enable guest account.
Song selection from the server is not updating with new additions.Server has not refreshed yet.• Wait for the Server to synchronize.• Click on eject button on the Server bar.
Podcasts not showing in playlist.Podcasts copied over will not show in playlist for server.
Microsoft Windows Home Server troubleshooting tips In this section we will cover:
Server low on space. on page 7-29
Cannot connect to server shares. on page 7-30
Server low on space.Clean out unused files.
Earmark backups for deletion and 'clean now', delete unused docs from Shared Folders.

Troubleshooting Version Update 1.1.17-30
Cannot connect to server shares.
• A duplicate device exists on the network.Verify that there is no device on the network named "server".
• User names and passwords do not match.Create a user on the server whose name and password match the user on the PC.
Email troubleshooting tipsIn this section we will cover:
Why do I need email address for visitors and Home Server users? on page 7-30
Why do I need to set-up Webshare notifications? on page 7-31
How do I find what my SMTP server is? on page 7-31
Do I need to do an SMTP email configuration? on page 7-31
If you have chosen to use your own email provider to send Photo Webshare announcements and these email announcements have not been received by the people on your lists. on page 7-31
Emailed link not opening. on page 7-31
Email is not received. on page 7-32
Why do I need email address for visitors and Home Server users?Webshare has a notification mechanism that uses email to share photos with others. In order for Webshare to send email and notify other users or visitors, you must configure and enable Webshare email notification in the administrative console. TZO email is strongly recommended whenever TZO domain names are being used, but SMTP email can also be used for email notifications.
Troubleshooting 7-31
Why do I need to set-up Webshare notifications?Webshare has a feature to send email notifications whenever items are shared with others, and the email addresses of these users is required. It is recommended that visitor accounts always use the same email as the user name, as opposed to having a different user name than the email address of a visitor (which can add confusion for visitors). Email for Home Server users must be set up separately within Webshare, as there is no other location that uses the email address of Home Server users.
How do I find what my SMTP server is?Contact your internet service provider to find your SMTP email settings. Many service providers provide these settings as part of their email setup instructions for users. However, occasionally some ISPs do not provide SMTP email services. For these situations, some free email accounts also provide SMTP access.
Do I need to do an SMTP email configuration?If you are not using TZO domain services, then SMTP is required to use any Webshare email feature. TZO email and domain services are a package, and for most situations it is recommended that you use both together or neither.
If you have chosen to use your own email provider to send Photo Webshare announcements and these email announcements have not been received by the people on your lists.
• Ensure that SMTP server information is correct.Contact your ISP to insure the information you entered is correct.
• Check that you enabled email notification for the group.Check that the persons who have not received the email are in the correct group.
Emailed link not opening.Web site connectivity not on, turn web site connectivity on
Troubleshooting Version Update 1.1.17-32
Email is not received.Verify that the correct email address was entered.
Media Streaming troubleshooting tipsIn this section we will cover:
Why my files do not show up on DMA? on page 7-32
File doesn't appear. on page 7-33
Server not showing up. on page 7-34
Media Files (audio/Video) of supported format aren't seen by device. on page 7-34
Why my files do not show up on DMA?Digital Media Adapters (DMA, or Digital Media Receivers - DMR) use the Universal Plug 'n Play (UPnP) protocol to automatically discover Digital Media Servers (DMS). The HP MediaSmart Server uses Windows Media Connect 2.0 (WMC) as its DMS. In order for a DMA to discover the HP MediaSmart Server and access its content, WMC must be enabled. WMC defaults to being disabled; it is automatically enabled for all DMAs when the server administrator selects one or more of the three media shared folders (Music, Photos and Videos) for media sharing. On your DMA, you should then see the HP MediaSmart Server listed as:
<YourServerName>: 1 : Windows Media ConnectNote: Some DMAs aggregate the content from all DMSs into a single view; in such a case you may not be able to identify each DMS individually. Further troubleshooting steps form DMA follow:
Once WMC has been enabled to share a shared folder, it continually monitors the folder for new files.1 Open the Control Center on one of your home PCs.2 Select the Tools tab at the bottom.3 On the Tools tab, click on the Home Server Console (HSC) icon.4 On the HSC password screen, type in the Administrator's password.5 When the HSC comes up, click on the Settings button near the top right.6 In the left pane of the Settings panel, select Media Sharing.
Troubleshooting 7-33
7 In the right pane of the Settings panel, you must now select at least one of the shared folders for sharing by selecting the On radio button.
8 Click Apply.This will automatically start WMC, which will then share all of the files in the selected shared folders.
If your DMA does not display WMC from the HP MediaSmart Server, or none of your files are found by the DMA.1 Check that WMC is enabled (use the above steps to get to the Media
Sharing settings, and verify that at least one of the shared folders is On).2 Check that the HP MediaSmart Server and DMA are both connected to
the same home network (a router or firewall between them could interfere with the discovery and content sharing protocols).
3 Restart the DMA.4 Restart the HP Media Smart server.
If some of your files (e.g., files newly copied to the server) are not found by the DMA.1 Check that the files were copied to the correct location. Only the Music,
Photos and Videos shared folders may be enabled for media sharing. Note that if one of these folders is enabled for media sharing; then all folders below that are also enabled for media sharing.
2 Re-enable the shared folder for media sharing.Go to the Media Sharing Settings panel (see the instructions above for how to get here).Turn sharing Off for the shared folder with the missing files and select Apply.Turn sharing back On for the shared folder and select Apply.
3 Restart the DMA.4 Restart the HP MediaSmart Server.
File doesn't appear.File type may not be supported, may need to convert file to supported type.
Server not showing up. Turn on Media-Sharing.
Media Files (audio/Video) of supported format aren't seen by device. Possible naming convention issues.
Double check names on server, make sure they start with a word, and not a number or symbol.
Why can I play and stream DRM content my home computer but I can not stream it from my HP MediaSmart Server?
The HP MediaSmart Server includes a media server for streaming iTunes music to PCs running iTunes through the house. See the section in the User's Guide on iTunes.
For Windows Media DRM (WMDRM) content (protected .wma music and .wmv videos), the HP MediaSmart server does not support streaming of this content to DMAs at this time. Playing (and streaming) of WMDRM protected content requires that the device that is playing the content have a license for the content. When you downloaded the content to your PC, you also received a license to play the content on that PC. If you copy the files to the HP MediaSmart Server, you cannot copy or transfer the license to the server. The server must obtain its own license, and we do not provide for this feature in the current product.
What you can do however, is store your protected content on the HP MediaSmart Server. This allows all of the PCs in the home that have a license for the content to play it from the HP MediaSmart Server by accessing it through the network. For example, to add all of the music on your Server to the Windows Media Player library on your PC:
Open Windows Media Player on your PC. Select File -> Add to Media Library -> Add Folder ….
In the Add Folder dialog, type \\<YourServerName\Music and click OK.
7-34 Troubleshooting Version Update 1.1.1
Troubleshooting 7-35
This will add all of the music files in your Music shared folder on the HP MediaSmart Server to your Windows Media Player library. You will then be able to play all of the protected content for which this PC has a license.
What value does TZO domain names provide beyond the Microsoft Live option:
• TZO provides automatic email notifications to Webshare visitors that new photos are available without having to set up an SMTP email server.
• Some broadband ISPs block Port 80 which is required for easy remote access. The TZO service allows you to obtain easy remote access even if Port 80 is blocked.
• With the Microsoft domain name, if you don't already have a Microsoft Live account, you'll have to set that up.
• With TZO custom domain name option, you can get your own domain name (e.g., smithfamily.com).
• TZO customer support and troubleshooting.

Troubleshooting Version Update 1.1.17-36

Product information 8-1
8 Product informationWhat’s in this chapter» Product specifications» Regulatory statements» WM-DRM 10 licensed technology» Limited warranty and technical support statement
Product specificationsThe product specifications contain information about the HP MediaSmart Server, its requirements, and standards.
Minimum client-computer requirementsOne or more computers that meet or exceed these requirements:
Computer requirements
Any computer capable of running the supported operating systems listed in the following table.
Operating systems
Table 9: Supported operating systems
Windows Vistaa Windows XPb
Windows Vista Home Basic Windows XP Home with Service Pack 2 (SP2)
Windows Vista Home N (European Union only)
Windows XP Professional with SP2
Windows Vista Home Premium Windows XP Media Center Edition 2005 with SP2 and Rollup 2
Windows Vista Business Windows XP Media Center Edition 2005 with SP2
Windows Vista Business N (European Union only)
Windows XP Media Center Edition 2004 with SP2
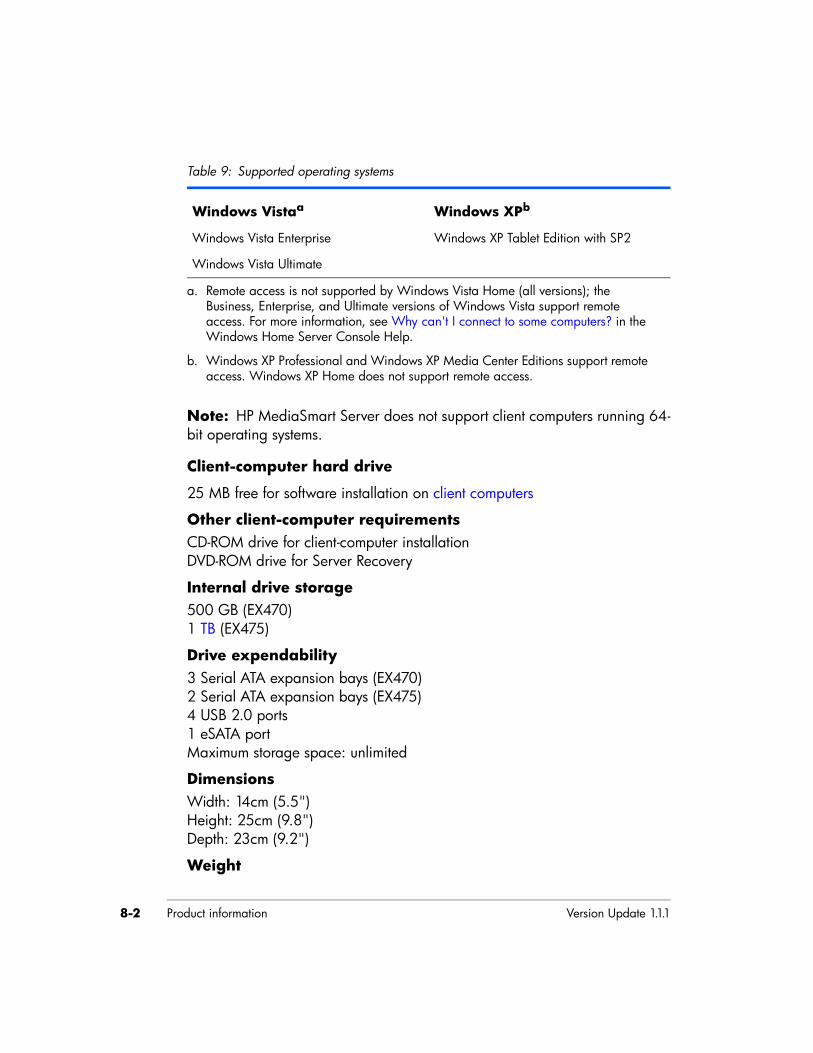
Product information Version Update 1.1.18-2
Note: HP MediaSmart Server does not support client computers running 64-bit operating systems.
Client-computer hard drive
25 MB free for software installation on client computers
Other client-computer requirementsCD-ROM drive for client-computer installationDVD-ROM drive for Server Recovery
Internal drive storage500 GB (EX470)1 TB (EX475)
Drive expendability3 Serial ATA expansion bays (EX470)2 Serial ATA expansion bays (EX475)4 USB 2.0 ports1 eSATA portMaximum storage space: unlimited
DimensionsWidth: 14cm (5.5") Height: 25cm (9.8") Depth: 23cm (9.2")
Weight
Windows Vista Enterprise Windows XP Tablet Edition with SP2
Windows Vista Ultimate
a. Remote access is not supported by Windows Vista Home (all versions); the Business, Enterprise, and Ultimate versions of Windows Vista support remote access. For more information, see Why can't I connect to some computers? in the Windows Home Server Console Help.
b. Windows XP Professional and Windows XP Media Center Editions support remote access. Windows XP Home does not support remote access.
Table 9: Supported operating systems
Windows Vistaa Windows XPb
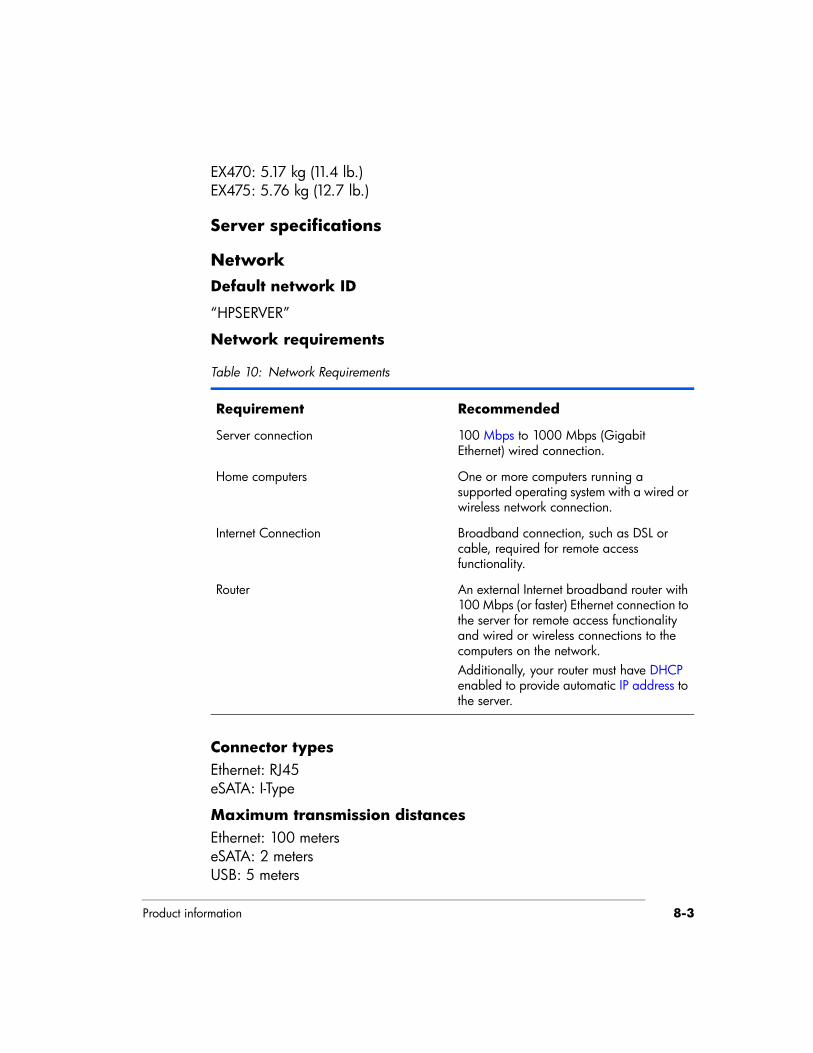
Product information 8-3
EX470: 5.17 kg (11.4 lb.)EX475: 5.76 kg (12.7 lb.)
Server specifications
NetworkDefault network ID
“HPSERVER”
Network requirements
Connector typesEthernet: RJ45eSATA: I-Type
Maximum transmission distancesEthernet: 100 meterseSATA: 2 metersUSB: 5 meters
Table 10: Network Requirements
Requirement Recommended
Server connection 100 Mbps to 1000 Mbps (Gigabit Ethernet) wired connection.
Home computers One or more computers running a supported operating system with a wired or wireless network connection.
Internet Connection Broadband connection, such as DSL or cable, required for remote access functionality.
Router An external Internet broadband router with 100 Mbps (or faster) Ethernet connection to the server for remote access functionality and wired or wireless connections to the computers on the network.Additionally, your router must have DHCP enabled to provide automatic IP address to the server.
Product information Version Update 1.1.18-4
BrowserInternet Explorer 6.0 or greaterNetscape 8.0 or greaterFirefox 2.0 or greater.
EnvironmentalTemperatureOperating: 5° to 35° C (41° to 95° F)Nonoperating: –30° to 65° C (–22° to 149° F)
Humidity (no condensation allowed) Operating: 15% to 90% RHNonoperating: 5% to 95% RH
Shock
Nonoperating: 85 G
VibrationOperating: 0.2 GrmsNonoperating: 2.0 Grms
Electrical and powerElectrical ratings
AC input 100–127V ~5.0A max or 200–240V ~3.0A max, 50/60Hz
Power consumptionEX470 (single drive): ~52 W idle state, ~60 W full loadEX475 (two drives): ~60W idle state, ~73 W full loadWith three drives: ~68W idle state, ~86 W full loadWith four drives: ~76W idle state, ~99 W full load
SafetyIEC 950-compliant USA – UL, CDRH Radiation Control Standards 21CFR 1010 and 1020-1 0.50Canada – CSA or CULEurope – LVD 73/23/EEC 93/68/ECIEC 60950 plus amendments

Product information 8-5
EN60825 plus amendments
Regulatory statementsThe HP MediaSmart Server complies to the following:• Federal Communications Commission Notice• Modifications• Cables• Declaration of Conformity for Products Marked with the FCC Logo (United
States only)• Canadian Notice• Avis Canadien• European Union Regulatory Notice• Japanese Notice
Federal Communications Commission NoticeThis equipment has been tested and found to comply with the limits for a Class B digital device, pursuant to Part 15 of the FCC Rules. These limits are designed to provide reasonable protection against harmful interference in a residential installation. This equipment generates, uses, and can radiate radio frequency
energy and, if not installed and used in accordance with the instructions, may cause harmful interference to radio communications. However, there is no guarantee that interference will not occur in a particular installation. If this equipment does cause harmful interference to radio or television reception, which can be determined by turning the equipment off and on, the user is encouraged to try to correct the interference by one or more of the following measures:• Reorient or relocate the receiving antenna.• Increase the separation between the equipment and the receiver.• Connect the equipment into an outlet on a circuit different from that to
which the receiver is connected.• Consult the dealer or an experienced radio or television technician for
help.
Product information Version Update 1.1.18-6
ModificationsThe FCC requires the user to be notified that any changes or modifications made to this device that are not expressly approved by Hewlett-Packard Company may void the user's authority to operate the equipment.
CablesConnections to this device must be made with shielded cables with metallic RFI/EMI connector hoods in order to maintain compliance with FCC Rules and Regulations.
Declaration of Conformity for Products Marked with the FCC Logo (United States only)This device complies with Part 15 of the FCC Rules. Operation is subject to the following two conditions:
1 This device may not cause harmful interference, and2 This device must accept any interference received, including interference
that may cause undesired operation.
For questions regarding the product, contact:Hewlett-Packard CompanyP. O. Box 692000, Mail Stop 530113Houston, Texas 77269-2000
Or, call 1-800-HP-INVENT (1-800-474-6836).
For questions regarding this FCC declaration, contact:Hewlett-Packard CompanyP. O. Box 692000, Mail Stop 510101Houston, Texas 77269-2000
Or, call (281) 514-3333.
To identify this product, refer to the part, series, or model number found on the product.
Canadian NoticeThis Class B digital apparatus meets all requirements of the Canadian Interference-Causing Equipment Regulations.

Product information 8-7
Avis Canadien Cet appareil numérique de la classe B respecte toutes les exigences du Règlement sur le matériel brouilleur du Canada.
European Union Regulatory NoticeThis product complies with the following EU Directives:• Low Voltage Directive 2006/95/EC• EMC Directive 2004/108/EC
Compliance with these directives implies conformity to applicable harmonized European standards (European Norms) which are listed on the EU Declaration of Conformity issued by Hewlett-Packard for this product or product family.
This compliance is indicated by the following conformity marking placed on the product:
Hewlett-Packard GmbH, HQ-TRE, Herrenberger Strasse 140, 71034 Boeblingen, Germany
Japanese Notice
WM-DRM 10 licensed technologyContent providers are using the digital rights management technology for Windows Media contained in this device (“WM-DRM”) to protect the
Product information Version Update 1.1.18-8
integrity of their content (“Secure Content”) so that their intellectual property, including copyright, in such content is not misappropriated. This device uses WM-DRM Software to play Secure Content (“WM-DRM Software”). If the security of the WM-DRM Software in this device has been compromised, owners of Secure Content (“Secure Content Owners”) may request that Microsoft revoke the WM-DRM Software’s right to acquire new licenses to copy, display and/or play Secure Content. Revocation does not alter the WM-DRM Software’s ability to play unprotected content. A list of revoked WM-DRM Software is sent to your device whenever you download a license for Secure Content from the Internet or from a PC. Microsoft may, in conjunction with such license, also download revocations lists onto your device on behalf of Secure Content Owners.
Limited warranty and technical support statementHP MediaSmart Server Limited Warranty
Duration
Hardware: 1 year Limited Warranty
Software: 1 year Technical Support
General Terms
This HP Hardware Limited Warranty gives you, the customer, express limited warranty rights from HP, the manufacturer. Please refer to HP’s Web site for an extensive description of your limited warranty entitlements. In addition, you may also have other legal rights under applicable local law or special written agreement with HP.
HP MAKES NO OTHER EXPRESS WARRANTY OR CONDITION, WHETHER WRITTEN OR ORAL, AND HP EXPRESSLY DISCLAIMS ALL WARRANTIES AND CONDITIONS NOT STATED IN THIS LIMITED WARRANTY. TO THE EXTENT ALLOWED BY THE LOCAL LAW OF JURISDICTIONS OUTSIDE THE UNITED STATES, HP DISCLAIMS ALL IMPLIED WARRANTIES OR CONDITIONS, INCLUDING ANY IMPLIED WARRANTIES OF MERCHANTABILITY AND FITNESS FOR A PARTICULAR PURPOSE. FOR ALL TRANSACTIONS OCCURRING IN THE UNITED STATES, ANY IMPLIED WARRANTY OR CONDITION OF MERCHANTABILITY, SATISFACTORY QUALITY, OR FITNESS FOR A PARTICULAR PURPOSE IS LIMITED TO THE DURATION OF THE EXPRESS WARRANTY SET FORTH ABOVE. SOME
Product information 8-9
STATES OR COUNTRIES/REGIONS DO NOT ALLOW A LIMITATION ON HOW LONG AN IMPLIED WARRANTY LASTS OR THE EXCLUSION OR LIMITATION OF INCIDENTAL OR CONSEQUENTIAL DAMAGES FOR CONSUMER PRODUCTS. IN SUCH STATES OR COUNTRIES/REGIONS, SOME EXCLUSIONS OR LIMITATIONS OF THIS LIMITED WARRANTY MAY NOT APPLY TO YOU.
THE LIMITED WARRANTY TERMS CONTAINED IN THIS STATEMENT, EXCEPT TO THE EXTENT LAWFULLY PERMITTED, DO NOT EXCLUDE, RESTRICT, OR MODIFY BUT ARE IN ADDITION TO THE MANDATORY STATUTORY RIGHTS APPLICABLE TO THE SALE OF THIS PRODUCT TO YOU.
This Limited Warranty is applicable in all countries/regions and may be enforced in any country/region where HP or its authorized service providers offer warranty service for the same product model number subject to the terms and conditions set forth in this Limited Warranty.
Under the HP Global Limited Warranty program, products purchased in one country/region may be transferred to another country/region, where HP or its authorized service providers offer warranty service for the same product model number, without voiding the warranty. Warranty terms, service availability, and service response times may vary from country/region to country/region. Standard warranty service response time is subject to change due to local parts availability. If so, your HP authorized service provider can provide you with details.
HP is not responsible for any tariffs or duties that may be incurred in transferring the products. Transfer of the products may be covered by export controls issued by the United States or other governments.
This Limited Warranty applies only to HP-branded and Compaq-branded hardware products (collectively referred to in this Limited Warranty as “HP Hardware Products”) sold by or leased from Hewlett-Packard Company, its worldwide subsidiaries, affiliates, authorized resellers, or country/region distributors (collectively referred to in this Limited Warranty as “HP”) with this Limited Warranty. The term “HP Hardware Product” is limited to the hardware components and required firmware. The term “HP Hardware Product” DOES NOT include any software applications or programs; non-HP products or non-HP branded peripherals. All non-HP products or non-HP branded peripherals external to the HP Hardware Product — such as external storage subsystems, displays, printers, and other peripherals — are provided “AS IS” without HP
Product information Version Update 1.1.18-10
warranty. However, non-HP manufacturers and suppliers, or publishers may provide their own warranties directly to you.
HP warrants that the HP Hardware Products that you have purchased or leased from HP are free from defects in materials or workmanship under normal use during the Limited Warranty Period. The Limited Warranty Period starts on the date of purchase or lease from HP or from the date HP completes installation. Your dated sales or delivery receipt, showing the date of purchase or lease of the product, is your proof of the purchase or lease date. You may be required to provide proof of purchase or lease as a condition of receiving warranty service. You are entitled to hardware warranty service according to the terms and conditions of this document if a repair to your HP Hardware Product is required within the Limited Warranty Period.
Unless otherwise stated, and to the extent permitted by local law, new HP Hardware Products may be manufactured using new materials or new and used materials equivalent to new in performance and reliability. HP may repair or replace HP Hardware Products (a) with new or previously used products or parts equivalent to new in performance and reliability or (b) with equivalent products to an original product that has been discontinued. Replacement parts are warranted to be free from defects in material or workmanship for ninety (90) days or, for the remainder of the Limited Warranty Period of the HP Hardware Product they are replacing or in which they are installed, whichever is longer.
During the Limited Warranty Period, HP will, at its discretion, repair or replace any defective component. All component parts or hardware products removed under this Limited Warranty become the property of HP. In the unlikely event that your HP Hardware Product has recurring failures, HP, at its sole discretion, may elect to provide you with (a) a replacement unit of HP’s choosing that is the same or equivalent to your HP Hardware Product in performance or (b) to give you a refund of your purchase price or lease payments (less interest) instead of a replacement. This is your exclusive remedy for defective products.
Exclusions
HP does not warrant that the operation of this product will be uninterrupted or error-free. HP is not responsible for damage that occurs as a result of your failure to follow the instructions intended for the HP Hardware Product.
Product information 8-11
This Limited Warranty does not apply to expendable or consumable parts and does not extend to any product from which the serial number has been removed or that has been damaged or rendered defective (a) as a result of accident, misuse, abuse, contamination, improper or inadequate maintenance or calibration, or other external causes; (b) by operation outside the usage parameters stated in the user documentation that shipped with the product (c) by software, interfacing, parts, or supplies not supplied by HP; (d) by improper site preparation or maintenance; (e) by virus infection; (f) from loss or damage in transit; (g) by modification or service by anyone other than (i) HP, (ii) an HP authorized service provider, or (iii) your own installation of end-user-replaceable HP or HP-approved parts if available for your product in the servicing country/region.
YOU SHOULD MAKE PERIODIC BACKUP COPIES OF THE DATA STORED ON YOUR HARD DRIVE OR OTHER STORAGE DEVICES AS A PRECAUTION AGAINST POSSIBLE FAILURES, ALTERATION, OR LOSS OF THE DATA. BEFORE RETURNING ANY UNIT FOR SERVICE, BE SURE TO BACK UP DATA AND REMOVE ANY CONFIDENTIAL, PROPRIETARY, OR PERSONAL INFORMATION. HP IS NOT RESPONSIBLE FOR DAMAGE TO OR LOSS OF ANY PROGRAMS, DATA, OR REMOVABLE STORAGE MEDIA. HP IS NOT RESPONSIBLE FOR THE RESTORATION OR REINSTALLATION OF ANY PROGRAMS OR DATA OTHER THAN SOFTWARE INSTALLED BY HP WHEN THE PRODUCT IS MANUFACTURED. UNITS SENT IN FOR SERVICE MAY HAVE THE DATA ERASED FROM THE HARD DRIVE AND THE PROGRAMS RESTORED TO THEIR ORIGINAL STATE.
Exclusive Remedy
TO THE EXTENT ALLOWED BY APPLICABLE LOCAL LAW, THESE TERMS AND CONDITIONS CONSTITUTE THE COMPLETE AND EXCLUSIVE WARRANTY AGREEMENT BETWEEN YOU AND HP REGARDING THE HP HARDWARE PRODUCT YOU HAVE PURCHASED OR LEASED. THESE TERMS AND CONDITIONS SUPERSEDE ANY PRIOR AGREEMENTS OR REPRESENTATIONS — INCLUDING REPRESENTATIONS MADE IN HP SALES LITERATURE OR ADVICE GIVEN TO YOU BY HP OR AN AGENT OR EMPLOYEE OF HP — THAT MAY HAVE BEEN MADE IN CONNECTION WITH YOUR PURCHASE OR LEASE OF THE HP HARDWARE PRODUCT. No
Product information Version Update 1.1.18-12
change to the conditions of this Limited Warranty is valid unless it is made in writing and signed by an authorized representative of HP.
Limitation of Liability
IF YOUR HP HARDWARE PRODUCT FAILS TO WORK AS WARRANTED ABOVE, HP’S MAXIMUM LIABILITY UNDER THIS LIMITED WARRANTY IS EXPRESSLY LIMITED TO THE LESSER OF THE PRICE YOU HAVE PAID FOR THE PRODUCT OR THE COST OF REPAIR OR REPLACEMENT OF ANY HARDWARE COMPONENTS THAT MALFUNCTION IN CONDITIONS OF NORMAL USE.
EXCEPT AS INDICATED ABOVE, IN NO EVENT WILL HP BE LIABLE FOR ANY DAMAGES CAUSED BY THE PRODUCT OR THE FAILURE OF THE PRODUCT TO PERFORM, INCLUDING ANY LOST PROFITS OR SAVINGS OR SPECIAL, INCIDENTAL, OR CONSEQUENTIAL DAMAGES. HP IS NOT LIABLE FOR ANY CLAIM MADE BY A THIRD PARTY OR MADE BY YOU FOR A THIRD PARTY.
THIS LIMITATION OF LIABILITY APPLIES WHETHER DAMAGES ARE SOUGHT, OR A CLAIM MADE, UNDER THIS LIMITED WARRANTY OR AS A TORT CLAIM (INCLUDING NEGLIGENCE AND STRICT PRODUCT LIABILITY), A CONTRACT CLAIM, OR ANY OTHER CLAIM. THIS LIMITATION OF LIABILITY CANNOT BE WAIVED OR AMENDED BY ANY PERSON. THIS LIMITATION OF LIABILITY WILL BE EFFECTIVE EVEN IF YOU HAVE ADVISED HP OR AN AUTHORIZED REPRESENTATIVE OF HP OF THE POSSIBILITY OF ANY SUCH DAMAGES. THIS LIMITATION OF LIABILITY, HOWEVER, WILL NOT APPLY TO CLAIMS FOR PERSONAL INJURY.
THIS LIMITED WARRANTY GIVES YOU SPECIFIC LEGAL RIGHTS. YOU MAY ALSO HAVE OTHER RIGHTS THAT MAY VARY FROM STATE TO STATE OR FROM COUNTRY/REGION TO COUNTRY/REGION. YOU ARE ADVISED TO CONSULT APPLICABLE STATE OR COUNTRY/REGION LAWS FOR A FULL DETERMINATION OF YOUR RIGHTS.
Limited Warranty Period
The Limited Warranty Period for an HP Hardware Product is a specified, fixed period commencing on the date of purchase. The date on your sales receipt is the date of purchase unless HP or your reseller informs you otherwise in writing.
Types of Warranty Service

Product information 8-13
To enable HP to provide the best possible support and service during the Limited Warranty Period, you may be directed by HP to verify configurations, load most recent firmware, patches, run HP diagnostics tests, or use HP remote support solutions where applicable.
HP strongly encourages you to accept the use of or to employ available support technologies provided by HP. If you choose not to deploy available remote support capabilities, you may incur additional costs due to increased support resource requirements. Listed below are the types of warranty support service that may be applicable to the HP Hardware Product you have purchased.
Customer Self Repair Warranty Service
In countries/regions where it is available, your HP Limited Warranty may include a customer self repair warranty service. If applicable, HP will determine in its sole discretion that customer self repair is the appropriate method of warranty service. If so, HP will ship approved replacement parts directly to you to fulfill your HP Hardware Product warranty service. This will save considerable repair time. After you contact the HP Technical Support Center and the fault diagnosis identifies that the problem can be fixed using one of these parts, a replaceable part can be sent directly to you. Once the part arrives, replace the defective part pursuant to the provided instructions and documentation. If further assistance is required, call the HP Technical Support Center, and a technician will assist you over the phone. In cases where the replacement part must be returned to HP, you must ship the defective part back to HP within a defined period of time, normally thirty (30) days. The defective part must be returned with the associated documentation in the provided shipping material. Failure to return the defective product may result in HP billing you for the replacement.
With a customer self repair, HP will pay all shipping and part return costs and determine the courier/carrier to be used. If customer self repair applies to you, please refer to your specific HP Hardware Product announcement. You can also obtain information on this warranty service on the HP Web site at:
http://www.hp.com/support
Pickup and Return Warranty Service
Your HP Limited Warranty may include a pickup and return warranty service. Under the terms of pickup and return service, HP will pick up the defective unit
Product information Version Update 1.1.18-14
from your location, repair it, and return it back to your location. HP will incur all repair, logistics, and insurance costs in this process.
Carry-in Warranty Service
Under the terms of carry-in service, you will be required to deliver your HP Hardware Product to an authorized service location for warranty repair. You must prepay any shipping charges, taxes, or duties associated with transportation of the product to and from the service location. In addition, you are responsible for insuring any product shipped or returned to an authorized service location and assume risk of loss during shipping.
Service Upgrades
HP has a range of additional support and service coverage for your product that can be purchased locally. However, some support and related products may not be available in all countries/regions. For information on availability of service upgrades and the cost for these service upgrades, refer to the HP Web site at:
http://www.hp.com/support
Options Limited Warranty, Software and Digital Content
Your Options Limited Warranty is a one (1) year (HP Options Limited Warranty Period) parts replacement warranty on any HP branded or Compaq-branded options (HP Options). If your HP Options are installed in an HP Hardware Product, HP may provide warranty service either for the HP Options Limited Warranty Period or the remaining Limited Warranty Period of the HP Hardware Product in which the HP Options are being installed, whichever period is the longer but not to exceed three (3) years from the date you purchased the HP Options. The HP Options Limited Warranty Period starts on your date of purchase. Your dated sales or delivery receipt, showing the date of purchase, is your start date. Non-HP options are provided “AS IS”. Non-HP manufacturers and suppliers may provide warranties directly to you. EXCEPT AS PROVIDED IN ANY SOFTWARE END-USER LICENSE OR PROGRAM LICENSE AGREEMENT, OR IF OTHERWISE REQUIRED BY LOCAL LAW, SOFTWARE AND THIRD PARTY DIGITAL CONTENT, INCLUDING THE OPERATING SYSTEM OR ANY SOFTWARE OR THIRD PARTY DIGITAL CONTENT PREINSTALLED BY HP ARE PROVIDED “AS IS”. EXCEPT AS SPECIFICALLY PROVIDED IN THIS LIMITED WARRANTY, IN NO EVENT WILL HP BE LIABLE FOR ANY DAMAGES CAUSED BY OR ARISING

Product information 8-15
FROM ANY THIRD PARTY DIGITAL CONTENT PREINSTALLED ON YOUR HP HARDWARE PRODUCT.

Product information Version Update 1.1.18-16
Licenses, Copyrights and Notices for Open Source Components 9-1
9 Licenses, Copyrights and Notices for Open Source Components
What’s in this chapter» Apache License» BSD License» ImageMagick License» JSON License» Codehaus License» GNU General Public License (GPL, Version 2, June 1991)
Apache LicenseVersion 2.0, January 2004; http://www.apache.org
Ant 1.6.5NOTICE file corresponding to the section 4 d of the Apache License, Version 2.0, in this case for the Apache Ant distribution.
This product includes software developed by The Apache Software Foundation (http://www.apache.org/).
This product includes also software developed by :• the W3C consortium (http://www.w3c.org)• the SAX project (http://www.saxproject.org)
Please read the different LICENSE files present in the root directory of this distribution.
Axis2 1.1.1NOTICE file corresponding to the section 4 d of the Apache License, Version 2.0, in this case for the Apache Axis2 distribution.
Licenses, Copyrights and Notices for Open Source Components Version Update 1.1.19-2
This product includes software developed by The Apache Software Foundation (http://www.apache.org/). Portions Copyright 2006 International Business Machines Corp.
Please read the different LICENSE files present in the lib directory of this distribution.
Jakarta CommonsBeanutils 1.7.0
This product includes software developed by The Apache Software Foundation (http://www.apache.org/).
Codec 1.3
Discovery 0.4
Apache Jakarta Commons Discovery
Copyright 2002-2006 The Apache Software Foundation
This product includes software developed by The Apache Software Foundation (http://www.apache.org/).
Fileupload 1.3
Apache Jakarta Commons FileUpload
Copyright 2002-2006 The Apache Software Foundation
This product includes software developed by The Apache Software Foundation (http://www.apache.org/).
Httpclient 3.0.1
Io 1.3.2
Apache Jakarta Commons IO
Copyright 2001-2007 The Apache Software Foundation
This product includes software developed by The Apache Software Foundation http://www.apache.org/).
Logging 1.1
This product includes software developed by The Apache Software Foundation (http://www.apache.org/).
Licenses, Copyrights and Notices for Open Source Components 9-3
Jetty 5.1.12
Maverick 2.2.4
Spring Framework 1.2.6
NOTICE file corresponding to section 4 d of the Apache License, Version 2.0, in this case for the Spring Framework distribution.
This product includes software developed by the Apache Software Foundation (http://www.apache.org/).
This product also includes software developed by Clinton Begin (http://www.ibatis.com).
The end-user documentation included with a redistribution, if any, must include the following acknowledgement:
This product includes software developed by the Spring Framework Project (http://www.springframework.org)."
Alternatively, this acknowledgement may appear in the software itself, if and wherever such third-party acknowledgements normally appear.
The names "Spring" and "Spring Framework" must not be used to endorse or promote products derived from this software without prior written permission. For written permission, please contact [email protected] or [email protected].
StAX 1.0.1
TERMS AND CONDITIONS FOR USE, REPRODUCTION, AND DISTRIBUTION1. Definitions.
"License" shall mean the terms and conditions for use, reproduction, and distribution as defined by Sections 1 through 9 of this document.
"Licensor" shall mean the copyright owner or entity authorized by the copyright owner that is granting the License.
Licenses, Copyrights and Notices for Open Source Components Version Update 1.1.19-4
"Legal Entity" shall mean the union of the acting entity and all other entities that control, are controlled by, or are under common control with that entity. For the purposes of this definition, "control" means (i) the power, direct or indirect, to cause the direction or management of such entity, whether by contract or otherwise, or (ii) ownership of fifty percent (50%) or more of the outstanding shares, or (iii) beneficial ownership of such entity.
"You" (or "Your") shall mean an individual or Legal Entity exercising permissions granted by this License.
"Source" form shall mean the preferred form for making modifications, including but not limited to software source code, documentation source, and configuration files.
"Object" form shall mean any form resulting from mechanical transformation or translation of a Source form, including but not limited to compiled object code, generated documentation, and conversions to other media types.
"Work" shall mean the work of authorship, whether in Source or Object form, made available under the License, as indicated by a copyright notice that is included in or attached to the work (an example is provided in the Appendix below).
"Derivative Works" shall mean any work, whether in Source or Object form, that is based on (or derived from) the Work and for which the editorial revisions, annotations, elaborations, or other modifications represent, as a whole, an original work of authorship. For the purposes of this License, Derivative Works shall not include works that remain separable from, or merely link (or bind by name) to the interfaces of, the Work and Derivative Works thereof.
"Contribution" shall mean any work of authorship, including the original version of the Work and any modifications or additions to that Work or Derivative Works thereof, that is intentionally submitted to Licensor for inclusion in the Work by the copyright owner or by an individual or Legal Entity authorized to submit on behalf of the copyright owner. For the purposes of this definition, "submitted" means any form of electronic, verbal, or written communication sent to the Licensor or its representatives, including but not limited to communication on electronic mailing lists, source code control systems, and issue tracking systems that are managed by, or on behalf of, the Licensor for the purpose of discussing and improving the Work, but excluding
Licenses, Copyrights and Notices for Open Source Components 9-5
communication that is conspicuously marked or otherwise designated in writing by the copyright owner as "Not a Contribution."
"Contributor" shall mean Licensor and any individual or Legal Entity on behalf of whom a Contribution has been received by Licensor and subsequently incorporated within the Work.
2. Grant of Copyright License.
Subject to the terms and conditions of this License, each Contributor hereby grants to You a perpetual, worldwide, non-exclusive, no-charge, royalty-free, irrevocable copyright license to reproduce, prepare Derivative Works of, publicly display, publicly perform, sublicense, and distribute the Work and such Derivative Works in Source or Object form.
3. Grant of Patent License.
Subject to the terms and conditions of this License, each Contributor hereby grants to You a perpetual, worldwide, non-exclusive, no-charge, royalty-free, irrevocable (except as stated in this section) patent license to make, have made, use, offer to sell, import, and otherwise transfer the Work, where such license applies only to those patent claims licensable by such Contributor that are necessarily infringed by their Contribution(s) alone or by combination of their Contribution(s) with the Work to which such Contribution(s) was submitted. If You institute patent litigation against any entity (including a cross-claim or counterclaim in a lawsuit) alleging that the Work or a Contribution incorporated within the Work constitutes direct or contributory patent infringement, then any patent licenses granted to You under this License for that Work shall terminate as of the date such litigation is filed.
4. Redistribution.
You may reproduce and distribute copies of the Work or Derivative Works thereof in any medium, with or without modifications, and in Source or Object form, provided that You meet the following conditions:
1 You must give any other recipients of the Work or Derivative Works a copy of this License; and
2 You must cause any modified files to carry prominent notices stating that You changed the files; and
3 You must retain, in the Source form of any Derivative Works that You distribute, all copyright, patent, trademark, and attribution notices from
Licenses, Copyrights and Notices for Open Source Components Version Update 1.1.19-6
the Source form of the Work, excluding those notices that do not pertain to any part of the Derivative Works; and
4 If the Work includes a "NOTICE" text file as part of its distribution, then any Derivative Works that You distribute must include a readable copy of the attribution notices contained within such NOTICE file, excluding those notices that do not pertain to any part of the Derivative Works, in at least one of the following places: within a NOTICE text file distributed as part of the Derivative Works; within the Source form or documentation, if provided along with the Derivative Works; or, within a display generated by the Derivative Works, if and wherever such third-party notices normally appear. The contents of the NOTICE file are for informational purposes only and do not modify the License. You may add Your own attribution notices within Derivative Works that You distribute, alongside or as an addendum to the NOTICE text from the Work, provided that such additional attribution notices cannot be construed as modifying the License.
You may add Your own copyright statement to Your modifications and may provide additional or different license terms and conditions for use, reproduction, or distribution of Your modifications, or for any such Derivative Works as a whole, provided Your use, reproduction, and distribution of the Work otherwise complies with the conditions stated in this License.
5. Submission of Contributions.
Unless You explicitly state otherwise, any Contribution intentionally submitted for inclusion in the Work by You to the Licensor shall be under the terms and conditions of this License, without any additional terms or conditions. Notwithstanding the above, nothing herein shall supersede or modify the terms of any separate license agreement you may have executed with Licensor regarding such Contributions.
6. Trademarks.
This License does not grant permission to use the trade names, trademarks, service marks, or product names of the Licensor, except as required for reasonable and customary use in describing the origin of the Work and reproducing the content of the NOTICE file.
7. Disclaimer of Warranty.
Licenses, Copyrights and Notices for Open Source Components 9-7
Unless required by applicable law or agreed to in writing, Licensor provides the Work (and each Contributor provides its Contributions) on an "AS IS" BASIS, WITHOUT WARRANTIES OR CONDITIONS OF ANY KIND, either express or implied, including, without limitation, any warranties or conditions of TITLE, NON-INFRINGEMENT, MERCHANTABILITY, or FITNESS FOR A PARTICULAR PURPOSE. You are solely responsible for determining the appropriateness of using or redistributing the Work and assume any risks associated with Your exercise of permissions under this License.
8. Limitation of Liability.
In no event and under no legal theory, whether in tort (including negligence), contract, or otherwise, unless required by applicable law (such as deliberate and grossly negligent acts) or agreed to in writing, shall any Contributor be liable to You for damages, including any direct, indirect, special, incidental, or consequential damages of any character arising as a result of this License or out of the use or inability to use the Work (including but not limited to damages for loss of goodwill, work stoppage, computer failure or malfunction, or any and all other commercial damages or losses), even if such Contributor has been advised of the possibility of such damages.
9. Accepting Warranty or Additional Liability.
While redistributing the Work or Derivative Works thereof, You may choose to offer, and charge a fee for, acceptance of support, warranty, indemnity, or other liability obligations and/or rights consistent with this License. However, in accepting such obligations, You may act only on Your own behalf and on Your sole responsibility, not on behalf of any other Contributor, and only if You agree to indemnify, defend, and hold each Contributor harmless for any liability incurred by, or claims asserted against, such Contributor by reason of your accepting any such warranty or additional liability.
BSD LicenseDojo 0.3.1
PostgreSQL 8.2.1
Copyright (c) 1998, Regents of the University of California
All rights reserved.
Licenses, Copyrights and Notices for Open Source Components Version Update 1.1.19-8
Redistribution and use in source and binary forms, with or without modification, are permitted provided that the following conditions are met:• Redistributions of source code must retain the above copyright notice, this
list of conditions and the following disclaimer.• Redistributions in binary form must reproduce the above copyright notice,
this list of conditions and the following disclaimer in the documentation and/or other materials provided with the distribution.
• Neither the name of the University of California, Berkeley nor the names of its contributors may be used to endorse or promote products derived from this software without specific prior written permission.
THIS SOFTWARE IS PROVIDED BY THE COPYRIGHT HOLDERS AND CONTRIBUTORS "AS IS" AND ANY EXPRESS OR IMPLIED WARRANTIES, INCLUDING, BUT NOT LIMITED TO, THE IMPLIED WARRANTIES OF MERCHANTABILITY AND FITNESS FOR A PARTICULAR PURPOSE ARE DISCLAIMED. IN NO EVENT SHALL THE COPYRIGHT OWNER OR CONTRIBUTORS BE LIABLE FOR ANY DIRECT, INDIRECT, INCIDENTAL, SPECIAL, EXEMPLARY, OR CONSEQUENTIAL DAMAGES (INCLUDING, BUT NOT LIMITED TO, PROCUREMENT OF SUBSTITUTE GOODS OR SERVICES; LOSS OF USE, DATA, OR PROFITS; OR BUSINESS INTERRUPTION) HOWEVER CAUSED AND ON ANY THEORY OF LIABILITY, WHETHER IN CONTRACT, STRICT LIABILITY, OR TORT (INCLUDING NEGLIGENCE OR OTHERWISE) ARISING IN ANY WAY OUT OF THE USE OF THIS SOFTWARE, EVEN IF ADVISED OF THE POSSIBILITY OF SUCH DAMAGE.
ImageMagick LicenseImageMagick 6.2.9
The legally binding and authoritative terms and conditions for use, reproduction, and distribution of ImageMagick follow:
Copyright 1999-2007 ImageMagick Studio LLC, a non-profit organization dedicated to making software imaging solutions freely available.
1. Definitions.
License shall mean the terms and conditions for use, reproduction, and distribution as defined by Sections 1 through 9 of this document.
Licenses, Copyrights and Notices for Open Source Components 9-9
Licensor shall mean the copyright owner or entity authorized by the copyright owner that is granting the License.
Legal Entity shall mean the union of the acting entity and all other entities that control, are controlled by, or are under common control with that entity. For the purposes of this definition, control means (i) the power, direct or indirect, to cause the direction or management of such entity, whether by contract or otherwise, or (ii) ownership of fifty percent (50%) or more of the outstanding shares, or (iii) beneficial ownership of such entity.
You (or Your) shall mean an individual or Legal Entity exercising permissions granted by this License.
Source form shall mean the preferred form for making modifications, including but not limited to software source code, documentation source, and configuration files.
Object form shall mean any form resulting from mechanical transformation or translation of a Source form, including but not limited to compiled object code, generated documentation, and conversions to other media types.
Work shall mean the work of authorship, whether in Source or Object form, made available under the License, as indicated by a copyright notice that is included in or attached to the work (an example is provided in the Appendix below).
Derivative Works shall mean any work, whether in Source or Object form, that is based on (or derived from) the Work and for which the editorial revisions, annotations, elaborations, or other modifications represent, as a whole, an original work of authorship. For the purposes of this License, Derivative Works shall not include works that remain separable from, or merely link (or bind by name) to the interfaces of, the Work and Derivative Works thereof.
Contribution shall mean any work of authorship, including the original version of the Work and any modifications or additions to that Work or Derivative Works thereof, that is intentionally submitted to Licensor for inclusion in the Work by the copyright owner or by an individual or Legal Entity authorized to submit on behalf of the copyright owner. For the purposes of this definition, submitted means any form of electronic, verbal, or written communication intentionally sent to the Licensor by its copyright holder or its representatives, including but not limited to communication on electronic
Licenses, Copyrights and Notices for Open Source Components Version Update 1.1.19-10
mailing lists, source code control systems, and issue tracking systems that are managed by, or on behalf of, the Licensor for the purpose of discussing and improving the Work, but excluding communication that is conspicuously marked or otherwise designated in writing by the copyright owner as Not a Contribution.
Contributor shall mean Licensor and any individual or Legal Entity on behalf of whom a Contribution has been received by Licensor and subsequently incorporated within the Work.
2. Grant of Copyright License. Subject to the terms and conditions of this License, each Contributor hereby grants to You a perpetual, worldwide, non-exclusive, no-charge, royalty-free, irrevocable copyright license to reproduce, prepare Derivative Works of, publicly display, publicly perform, sublicense, and distribute the Work and such Derivative Works in Source or Object form.
3. Grant of Patent License. Subject to the terms and conditions of this License, each Contributor hereby grants to You a perpetual, worldwide, non-exclusive, no-charge, royalty-free, irrevocable patent license to make, have made, use, offer to sell, import, and otherwise transfer the Work, where such license applies only to those patent claims licensable by such Contributor that are necessarily infringed by their Contribution(s) alone or by combination of their Contribution(s) with the Work to which such Contribution(s) was submitted.
4. Redistribution. You may reproduce and distribute copies of the Work or Derivative Works thereof in any medium, with or without modifications, and in Source or Object form, provided that You meet the following conditions:
a.You must give any other recipients of the Work or Derivative Works a copy of this License; and
b.You must cause any modified files to carry prominent notices stating that You changed the files; and
c.You must retain, in the Source form of any Derivative Works that You distribute, all copyright, patent, trademark, and attribution notices from the Source form of the Work, excluding those notices that do not pertain to any part of the Derivative Works; and
Licenses, Copyrights and Notices for Open Source Components 9-11
d.If the Work includes a NOTICE text file as part of its distribution, then any Derivative Works that You distribute must include a readable copy of the attribution notices contained within such NOTICE file, excluding those notices that do not pertain to any part of the Derivative Works, in at least one of the following places: within a NOTICE text file distributed as part of the Derivative Works; within the Source form or documentation, if provided along with the Derivative Works; or, within a display generated by the Derivative Works, if and wherever such third-party notices normally appear. The contents of the NOTICE file are for informational purposes only and do not modify the License. You may add Your own attribution notices within Derivative Works that You distribute, alongside or as an addendum to the NOTICE text from the Work, provided that such additional attribution notices cannot be construed as modifying the License.
You may add Your own copyright statement to Your modifications and may provide additional or different license terms and conditions for use, reproduction, or distribution of Your modifications, or for any such Derivative Works as a whole, provided Your use, reproduction, and distribution of the Work otherwise complies with the conditions stated in this License.
5. Submission of Contributions. Unless You explicitly state otherwise, any Contribution intentionally submitted for inclusion in the Work by You to the Licensor shall be under the terms and conditions of this License, without any additional terms or conditions. Notwithstanding the above, nothing herein shall supersede or modify the terms of any separate license agreement you may have executed with Licensor regarding such Contributions.
6. Trademarks. This License does not grant permission to use the trade names, trademarks, service marks, or product names of the Licensor, except as required for reasonable and customary use in describing the origin of the Work and reproducing the content of the NOTICE file.
7. Disclaimer of Warranty. Unless required by applicable law or agreed to in writing, Licensor provides the Work (and each Contributor provides its Contributions) on an AS IS BASIS, WITHOUT WARRANTIES OR CONDITIONS OF ANY KIND, either express or implied, including, without limitation, any warranties or conditions of TITLE, NON-INFRINGEMENT, MERCHANTABILITY, or FITNESS FOR A PARTICULAR PURPOSE. You are solely responsible for determining the appropriateness of using or redistributing the Work and assume any risks associated with Your exercise of permissions under this License.
Licenses, Copyrights and Notices for Open Source Components Version Update 1.1.19-12
8. Limitation of Liability. In no event and under no legal theory, whether in tort (including negligence), contract, or otherwise, unless required by applicable law (such as deliberate and grossly negligent acts) or agreed to in writing, shall any Contributor be liable to You for damages, including any direct, indirect, special, incidental, or consequential damages of any character arising as a result of this License or out of the use or inability to use the Work (including but not limited to damages for loss of goodwill, work stoppage, computer failure or malfunction, or any and all other commercial damages or losses), even if such Contributor has been advised of the possibility of such damages.
9. Accepting Warranty or Additional Liability. While redistributing the Work or Derivative Works thereof, You may choose to offer, and charge a fee for, acceptance of support, warranty, indemnity, or other liability obligations and/or rights consistent with this License.
JSON LicenseJSON Simple
Copyright (c) 2002 JSON.org
Permission is hereby granted, free of charge, to any person obtaining a copy of this software and associated documentation files (the "Software"), to deal in the Software without restriction, including without limitation the rights to use, copy, modify, merge, publish, distribute, sublicense, and/or sell copies of the Software, and to permit persons to whom the Software is furnished to do so, subject to the following conditions:
The above copyright notice and this permission notice shall be included in all copies or substantial portions of the Software.
The Software shall be used for Good, not Evil.
THE SOFTWARE IS PROVIDED "AS IS", WITHOUT WARRANTY OF ANY KIND, EXPRESS OR IMPLIED, INCLUDING BUT NOT LIMITED TO THE WARRANTIES OF MERCHANTABILITY, FITNESS FOR A PARTICULAR PURPOSE AND NONINFRINGEMENT. IN NO EVENT SHALL THE AUTHORS OR COPYRIGHT HOLDERS BE LIABLE FOR ANY CLAIM, DAMAGES OR OTHER LIABILITY, WHETHER IN AN ACTION OF CONTRACT, TORT OR OTHERWISE, ARISING FROM, OUT OF OR IN
Licenses, Copyrights and Notices for Open Source Components 9-13
CONNECTION WITH THE SOFTWARE OR THE USE OR OTHER DEALINGS IN THE SOFTWARE.
Codehaus LicenseXFire 1.1.2
Copyright (c) 2005 Envoi Solutions LLC
Permission is hereby granted, free of charge, to any person obtaining a copy of this software and associated documentation files (the "Software"), to deal in the Software without restriction, including without limitation the rights to use, copy, modify, merge, publish, distribute, sublicense, and/or sell copies of the Software, and to permit persons to whom the Software is furnished to do so, subject to the following conditions:
The above copyright notice and this permission notice shall be included in all copies or substantial portions of the Software.
THE SOFTWARE IS PROVIDED "AS IS", WITHOUT WARRANTY OF ANY KIND, EXPRESS OR IMPLIED, INCLUDING BUT NOT LIMITED TO THE WARRANTIES OF MERCHANTABILITY, FITNESS FOR A PARTICULAR PURPOSE AND NONINFRINGEMENT. IN NO EVENT SHALL THE AUTHORS OR COPYRIGHT HOLDERS BE LIABLE FOR ANY CLAIM, DAMAGES OR OTHER LIABILITY, WHETHER IN AN ACTION OF CONTRACT, TORT OR OTHERWISE, ARISING FROM, OUT OF OR IN CONNECTION WITH THE SOFTWARE OR THE USE OR OTHER DEALINGS IN THE SOFTWARE.
GNU General Public License (GPL, Version 2, June 1991)Source code for the GPL components used in the HP MediaSmart Server can be found on HP support site at www.hp.com/support.
Firefly Media Server SVN-1615 (previously known as mt-daapd)
Copyright (C) 1989, 1991 Free Software Foundation, Inc.
59 Temple Place, Suite 330, Boston, MA 02111-1307 USA
Everyone is permitted to copy and distribute verbatim copies of this license document, but changing it is not allowed.
Preamble
Licenses, Copyrights and Notices for Open Source Components Version Update 1.1.19-14
The licenses for most software are designed to take away your freedom to share and change it. By contrast, the GNU General Public License is intended to guarantee your freedom to share and change free software--to make sure the software is free for all its users. This General Public License applies to most of the Free Software Foundation's software and to any other program whose authors commit to using it. (Some other Free Software Foundation software is covered by the GNU Library General Public License instead.) You can apply it to your programs, too.
When we speak of free software, we are referring to freedom, not price. Our General Public Licenses are designed to make sure that you have the freedom to distribute copies of free software (and charge for this service if you wish), that you receive source code or can get it if you want it, that you can change the software or use pieces of it in new free programs; and that you know you can do these things.
To protect your rights, we need to make restrictions that forbid anyone to deny you these rights or to ask you to surrender the rights. These restrictions translate to certain responsibilities for you if you distribute copies of the software, or if you modify it.
For example, if you distribute copies of such a program, whether gratis or for a fee, you must give the recipients all the rights that you have. You must make sure that they, too, receive or can get the source code. And you must show them these terms so they know their rights.
We protect your rights with two steps: (1) copyright the software, and (2) offer you this license which gives you legal permission to copy, distribute and/or modify the software.
Also, for each author's protection and ours, we want to make certain that everyone understands that there is no warranty for this free software. If the software is modified by someone else and passed on, we want its recipients to know that what they have is not the original, so that any problems introduced by others will not reflect on the original authors' reputations.
Finally, any free program is threatened constantly by software patents. We wish to avoid the danger that redistributors of a free program will individually obtain patent licenses, in effect making the program proprietary. To prevent this, we have made it clear that any patent must be licensed for everyone's free use or not licensed at all.
Licenses, Copyrights and Notices for Open Source Components 9-15
The precise terms and conditions for copying, distribution and modification follow.
TERMS AND CONDITIONS FOR COPYING, DISTRIBUTION AND MODIFICATION
0. This License applies to any program or other work which contains a notice placed by the copyright holder saying it may be distributed under the terms of this General Public License. The "Program", below, refers to any such program or work, and a "work based on the Program" means either the Program or any derivative work under copyright law: that is to say, a work containing the Program or a portion of it, either verbatim or with modifications and/or translated into another language. (Hereinafter, translation is included without limitation in the term "modification".) Each licensee is addressed as "you".
Activities other than copying, distribution and modification are not covered by this License; they are outside its scope. The act of running the Program is not restricted, and the output from the Program is covered only if its contents constitute a work based on the Program (independent of having been made by running the Program). Whether that is true depends on what the Program does.
1. You may copy and distribute verbatim copies of the Program's source code as you receive it, in any medium, provided that you conspicuously and appropriately publish on each copy an appropriate copyright notice and disclaimer of warranty; keep intact all the notices that refer to this License and to the absence of any warranty; and give any other recipients of the Program a copy of this License along with the Program.
You may charge a fee for the physical act of transferring a copy, and you may at your option offer warranty protection in exchange for a fee.
2. You may modify your copy or copies of the Program or any portion of it, thus forming a work based on the Program, and copy and distribute such modifications or work under the terms of Section 1 above, provided that you also meet all of these conditions:
a) You must cause the modified files to carry prominent notices stating that you changed the files and the date of any change.
b) You must cause any work that you distribute or publish, that in whole or in part contains or is derived from the Program or any part thereof, to be
Licenses, Copyrights and Notices for Open Source Components Version Update 1.1.19-16
licensed as a whole at no charge to all third parties under the terms of this License.
c) If the modified program normally reads commands interactively when run, you must cause it, when started running for such interactive use in the most ordinary way, to print or display an announcement including an appropriate copyright notice and a notice that there is no warranty (or else, saying that you provide a warranty) and that users may redistribute the program under these conditions, and telling the user how to view a copy of this License. (Exception: if the Program itself is interactive but does not normally print such an announcement, your work based on the Program is not required to print an announcement.)
These requirements apply to the modified work as a whole. If identifiable sections of that work are not derived from the Program, and can be reasonably considered independent and separate works in themselves, then this License, and its terms, do not apply to those sections when you distribute them as separate works. But when you distribute the same sections as part of a whole which is a work based on the Program, the distribution of the whole must be on the terms of this License, whose permissions for other licensees extend to the entire whole, and thus to each and every part regardless of who wrote it.
Thus, it is not the intent of this section to claim rights or contest your rights to work written entirely by you; rather, the intent is to exercise the right to control the distribution of derivative or collective works based on the Program.
In addition, mere aggregation of another work not based on the Program with the Program (or with a work based on the Program) on a volume of a storage or distribution medium does not bring the other work under the scope of this License.
3. You may copy and distribute the Program (or a work based on it, under Section 2) in object code or executable form under the terms of Sections 1 and 2 above provided that you also do one of the following:
a) Accompany it with the complete corresponding machine-readable source code, which must be distributed under the terms of Sections 1 and 2 above on a medium customarily used for software interchange; or,
b) Accompany it with a written offer, valid for at least three years, to give any third party, for a charge no more than your cost of physically performing
Licenses, Copyrights and Notices for Open Source Components 9-17
source distribution, a complete machine-readable copy of the corresponding source code, to be distributed under the terms of Sections 1 and 2 above on a medium customarily used for software interchange; or,
c) Accompany it with the information you received as to the offer to distribute corresponding source code. (This alternative is allowed only for noncommercial distribution and only if you received the program in object code or executable form with such an offer, in accord with Subsection b above.)
The source code for a work means the preferred form of the work for making modifications to it. For an executable work, complete source code means all the source code for all modules it contains, plus any associated interface definition files, plus the scripts used to control compilation and installation of the executable. However, as a special exception, the source code distributed need not include anything that is normally distributed (in either source or binary form) with the major components (compiler, kernel, and so on) of the operating system on which the executable runs, unless that component itself accompanies the executable.
If distribution of executable or object code is made by offering access to copy from a designated place, then offering equivalent access to copy the source code from the same place counts as distribution of the source code, even though third parties are not compelled to copy the source along with the object code.
4. You may not copy, modify, sublicense, or distribute the Program except as expressly provided under this License. Any attempt otherwise to copy, modify, sublicense or distribute the Program is void, and will automatically terminate your rights under this License. However, parties who have received copies, or rights, from you under this License will not have their licenses terminated so long as such parties remain in full compliance.
5. You are not required to accept this License, since you have not signed it. However, nothing else grants you permission to modify or distribute the Program or its derivative works. These actions are prohibited by law if you do not accept this License. Therefore, by modifying or distributing the Program (or any work based on the Program), you indicate your acceptance of this License to do so, and all its terms and conditions for copying, distributing or modifying the Program or works based on it.
Licenses, Copyrights and Notices for Open Source Components Version Update 1.1.19-18
6. Each time you redistribute the Program (or any work based on the Program), the recipient automatically receives a license from the original licensor to copy, distribute or modify the Program subject to these terms and conditions. You may not impose any further restrictions on the recipients' exercise of the rights granted herein. You are not responsible for enforcing compliance by third parties to this License.
7. If, as a consequence of a court judgment or allegation of patent infringement or for any other reason (not limited to patent issues), conditions are imposed on you (whether by court order, agreement or otherwise) that contradict the conditions of this License, they do not excuse you from the conditions of this License. If you cannot distribute so as to satisfy simultaneously your obligations under this License and any other pertinent obligations, then as a consequence you may not distribute the Program at all. For example, if a patent license would not permit royalty-free redistribution of the Program by all those who receive copies directly or indirectly through you, then the only way you could satisfy both it and this License would be to refrain entirely from distribution of the Program.
If any portion of this section is held invalid or unenforceable under any particular circumstance, the balance of the section is intended to apply and the section as a whole is intended to apply in other circumstances.
It is not the purpose of this section to induce you to infringe any patents or other property right claims or to contest validity of any such claims; this section has the sole purpose of protecting the integrity of the free software distribution system, which is implemented by public license practices. Many people have made generous contributions to the wide range of software distributed through that system in reliance on consistent application of that system; it is up to the author/donor to decide if he or she is willing to distribute software through any other system and a licensee cannot impose that choice.
This section is intended to make thoroughly clear what is believed to be a consequence of the rest of this License.
8. If the distribution and/or use of the Program is restricted in certain countries either by patents or by copyrighted interfaces, the original copyright holder who places the Program under this License may add an explicit geographical distribution limitation excluding those countries, so that distribution is permitted only in or among countries not thus excluded. In such
Licenses, Copyrights and Notices for Open Source Components 9-19
case, this License incorporates the limitation as if written in the body of this License.
9. The Free Software Foundation may publish revised and/or new versions of the General Public License from time to time. Such new versions will be similar in spirit to the present version, but may differ in detail to address new problems or concerns.
Each version is given a distinguishing version number. If the Program specifies a version number of this License which applies to it and "any later version", you have the option of following the terms and conditions either of that version or of any later version published by the Free Software Foundation. If the Program does not specify a version number of this License, you may choose any version ever published by the Free Software Foundation.
10. If you wish to incorporate parts of the Program into other free programs whose distribution conditions are different, write to the author to ask for permission. For software which is copyrighted by the Free Software Foundation, write to the Free Software Foundation; we sometimes make exceptions for this. Our decision will be guided by the two goals of preserving the free status of all derivatives of our free software and of promoting the sharing and reuse of software generally.
NO WARRANTY
11. BECAUSE THE PROGRAM IS LICENSED FREE OF CHARGE, THERE IS NO WARRANTY FOR THE PROGRAM, TO THE EXTENT PERMITTED BY APPLICABLE LAW. EXCEPT WHEN OTHERWISE STATED IN WRITING THE COPYRIGHT HOLDERS AND/OR OTHER PARTIES PROVIDE THE PROGRAM "AS IS" WITHOUT WARRANTY OF ANY KIND, EITHER EXPRESSED OR IMPLIED, INCLUDING, BUT NOT LIMITED TO, THE IMPLIED WARRANTIES OF MERCHANTABILITY AND FITNESS FOR A PARTICULAR PURPOSE. THE ENTIRE RISK AS TO THE QUALITY AND PERFORMANCE OF THE PROGRAM IS WITH YOU. SHOULD THE PROGRAM PROVE DEFECTIVE, YOU ASSUME THE COST OF ALL NECESSARY SERVICING, REPAIR OR CORRECTION.
12. IN NO EVENT UNLESS REQUIRED BY APPLICABLE LAW OR AGREED TO IN WRITING WILL ANY COPYRIGHT HOLDER, OR ANY OTHER PARTY WHO MAY MODIFY AND/OR REDISTRIBUTE THE PROGRAM AS PERMITTED ABOVE, BE LIABLE TO YOU FOR DAMAGES, INCLUDING ANY GENERAL, SPECIAL, INCIDENTAL OR CONSEQUENTIAL DAMAGES

Licenses, Copyrights and Notices for Open Source Components Version Update 1.1.19-20
RISING OUT OF THE USE OR INABILITY TO USE THE PROGRAM (INCLUDING BUT NOT LIMITED TO LOSS OF DATA OR DATA BEING RENDERED INACCURATE OR LOSSES SUSTAINED BY YOU OR THIRD PARTIES OR A FAILURE OF THE PROGRAM TO OPERATE WITH ANY OTHER PROGRAMS), EVEN IF SUCH HOLDER OR OTHER PARTY HAS BEEN ADVISED OF THE POSSIBILITY OF SUCH DAMAGES.
10-1
GlossaryThis glossary defines terms that are used in the HP MediaSmart Server.
A
all-in-one-gateway A device that provides multiple network features such as a router, modem, local area network (LAN) switch, firewall, and/or a wireless access point. Also see LAN.
anti-virus software Software that checks a hard drive for viruses (harmful computer code) that may infect a computer.
B
BIOS Basic Input/Output Services—the firmware code run by the HP MediaSmart Server when first powered on. The BIOS prepares the server for operation and allows the server software to load, execute, and assume control of the server. This process is also known as booting up.
Browser window A browser window is used to display web pages either on a web site or stored locally such as the HP MediaSmart Server’s User’s Guide.
C
client computers A client computer is a computer that accesses the HP MediaSmart Server by the home network. This term also applies to computers using remote access to the server.
D
DHCP Dynamic Host Configuration Protocol—the protocol used to assign IP addresses to network devices, such as computers. DHCP automatically assigns IP addresses to network devices; the assigned address can change over time. Also see IP address, Protocol, and Static IP Address.
digital rights management Technology built into digital media, such as music and movies, that allows companies in charge of their copyrights to decide how and where media can be used.
DMR Digital Media Receiver (DMR), Digital Media Adapter (DMA), Digital Media Player (DMP)—a consumer electronic device that communicates with
Version Update 1.1.110-2
the HP MediaSmart Server and brings digital media streams—such as photos, music, or video—to your entertainment center.
DNS Domain Name System—a server that associates network names with IP addresses. Also see IP address.
E
No terms begin with the letter E.
F
folder duplication Folder duplication duplicates folders and files across multiple hard drives. If you enable folder duplication and one hard drive fails, you will not lose any files stored in a shared folder. Any folder that has folder duplication enabled uses twice the amount of server storage.
G
No terms begin with the letter G.
H
HTTPS A secure HTTP connection. HTTP (HyperText Transfer Protocol) is the format used to transfer and send web page information across networks, on the Internet, and in help systems. HTTPS is an HTTP connection over encrypted Secure Sockets Layer (SSL) transport mechanism. Also see Protocol.
I
IP address An IP (Internet Protocol) address is a number that uniquely identifies devices, such as computers, on a network.
J
No terms begin with the letter J.
K
No terms begin with the letter K.
L
LAN Local area network—a small number of computers that are connected together in a small area, usually in the same building.
logical A device, such as a partition named by the logic of a software system, regardless of its physical relationship to the system. For example, a
10-3
computer with a single physical hard disk that contains two logical drives, C: and D:. Another example is an HP Media Vault with two hard drives that contains a single logical volume spanning both drives.
M
Map Assigning a drive letter to the connection on a computer to access a shared folder on the server.
Mbps Megabits per second.
Media streaming Media streaming sends media—music, photos and video files—from the HP MediaSmart Server to other devices that can play the media. The HP MediaSmart Server includes functionality that allows media to stream to a Digital Media Adapter (DMA). Also see DMR.
N
NAT Network Address Translation—Broadband routers use NAT technology to allow network components to share Internet access over a single IP address. Additionally, NAT acts like a firewall because the computers and other devices—including the HP MediaSmart Server—on the network are given IP address that are non-routable (non-internet addresses). This masks the real IP addresses of your network components and keeps them from being seen outside the home. Also see IP address.
0
No terms begin with the letter O.
P
partition A logical division of a physical hard disk. Partition data refers to the information contained within the divisions on the drive. For example, some computers are formatted with a C: and D: drive, both of which use the same physical hard drive.
password hint A password hint helps you remember your password. The password hint can be seen by anybody who clicks the link to display it.
physical hard disk The actual hard disk (hard drive) located in a device that stores files and data.
port 80 Usually, an HTTP client, such as a Web browser, initiates contact to a server, such as the HP MediaSmart Server, through port 80. After
Version Update 1.1.110-4
contacting the server, the server sends back a response, such as a Photo Webshare page.
Privilege level A level assigned by the user that decides what access levels are available to other users.
Protocol The standard(s) of how computers communicate data with each other.
Q
No terms begin with the letter Q.
R
router A device connected to your computer that joins two or more networks. For example, a router connects your local network to the internet.
Run In Windows Vista and Windows XP, you can make the Run box appear by pressing the Windows key, and the R key on your keyboard.
S
SATA Serial Advanced Technology Attachment (or Serial ATA) is an interface standard that moves information to and from a storage device, such as a hard drive.
shared folders A “share folder” means the same as a “share,” and you can use these terms interchangeably: A shared folder is a top-level folder that is shared on the network and stores other folders within it. For example, the Music shared folder can store other folders (called sub-folders). A subfolder might be named for a musician, such as Mark Knopfler.
SMTP Simple Mail Transfer Protocol—The main protocol used to send email on the Internet, consisting of rules for how programs sending mail should interact with programs receiving mail.
Static IP Address A number assigned to a device, such as a computer, on a network to be its permanent IP address. Also see IP address and DHCP.
strong password A strong password must be at least 7 characters long and must fulfill three of the following four character criteria: uppercase characters, lowercase characters, numbers, and symbols (such as !, @, #, and so on.) Also see password hint.
10-5
Sub-folders A folder within a folder or a shared folder.
Subnet Mask Identifies the portion of the network IP address that can be used for subnetworks. Also see IP address.
System drive The hard drive (or drive partition) containing the operating system.
T
TCP/IP Transmission Control Protocol/Internet Protocol. A set of communications protocols used to transmit data over networks. TCP provides for the establishment of connections and exchanges streams of data. IP specifies the format of the data. Also see IP address.
TCP/IPv4 TCP/IPv4 is the standard TCP/IP protocol in use today.
TCP/IPv6 TCP/IPv6 is the standard TCP/IP protocol used by Windows Vista. IPv6 main advantage is the increase in number of available addresses.
TB Terabyte—refers to a data storage capacity equal to approximately 1000 gigabytes.
U
UNC Uniform Naming Convention—identifies shared network devices, such as the HP MediaSmart Server. It is a format for specifying the location of resources on a local-area network (LAN). It identifies each shared resource with a unique address in the following format: \\server-name\sharedfolder-name. For example, \\SERVER\software. Also see LAN.
UPnP Universal Plug and Play—a networking protocol that allows for many different types of devices to interact with one another. UPnP is the protocol used by media streaming.
V
Visitor HP Photo Webshare albums can be shared with people outside your local network, called visitors. If you use the HP MediaSmart Server for personal use, visitors may be family or friends such as Grandma or Aunt Karen. If you use the Server for business, visitors may be your customers or business partners.
Version Update 1.1.110-6
W
WAP Wireless Access Point—a device, such as a wireless router, that connects wireless communication devices together to form a wireless network. A WAP often connects to a wired network, and can relay data between wireless devices and wired devices.
Web browser An application used to access information on networks, on the internet, and in help systems. Common web browsers include Internet Explorer, Netscape, and Firefox.
Webshare Manager A type of user account that is enabled with Webshare Manager permissions. Webshare Managers have access to all HP Photo Webshare features, including viewing and managing content in all albums, sharing albums with people outside the home network, and approving album content added by people that share the album.
WEP Wired Equivalent Privacy—a protocol that encrypts data on a wireless system for security.
WPA Wi-Fi Protected Access—a technology that allows for increased security with wireless networks.
X
No terms begin with the letter X.
Y
No terms begin with the letter Y.
Z
No terms begin with the letter Z.


![[MS-SRVS]: Server Service Remote Protocol... · 2016. 6. 22. · Server Service Remote Protocol server server server server. [MS-SRVS]](https://img.pdfslide.net/doc/110x75/6052fdcbe569cc07291c95a3/ms-srvs-server-service-remote-protocol-2016-6-22-server-service-remote.jpg)