Embed Size (px)
Citation preview
P a g e 1 | 28
HRMS User Guide
P a g e 2 | 28
Prepared by:
eCIFM Solutions Inc.
3160 Crow Canyon Road, Suite 240
San Ramon, CA 94583
Phone: (925) 830 –1925
Fax: (925) 830 – 2750
http://www.ecifm.com/IWMS/
P a g e 3 | 28
This Page Is Intentionally left Blank
P a g e 4 | 28
1 Contents
Quick Reference .................................................................................................................... 5
URL of Timecard Application ................................................................................................................... 5
Login ......................................................................................................................................................... 5
First Time User ......................................................................................................................................... 6
Add Time Entry ......................................................................................................................................... 8
How to choose the drop down values in the timesheet entry? ........................................ 8
Copy Entries from previous week ......................................................................................................... 13
View My Time Sheet .............................................................................................................................. 14
Approve Time Entry ............................................................................................................................... 16
How will a Project Manager approve the timesheet entry? ........................................... 16
How will Executives, Management team and HR approve the timesheet entry? ............ 16
Edit previous week time entries ............................................................................................................ 17
How to edit the time entries for the previous weeks? ................................................... 17
Sales Support Role ................................................................................................................................. 19
How to add an activity category? .................................................................................. 19
How to add Project Role? ............................................................................................. 21
How to add total budget hours and categorize projects? ............................................... 21
How to divide the total budget hours according to the project type?............................. 22
Generate Dashboard Report ................................................................................................................. 24
Generate Dashboard Report ......................................................................................... 24
Activity Category (AC): .................................................................................................. 25
Project Role (PR): .......................................................................................................... 26
Internal Project (IP): ..................................................................................................... 27
Support Project (SP): .................................................................................................... 27
P a g e 5 | 28
Quick Reference
URL of Timecard Application
For accessing the Timecard Application you need to enter the URL: http://timecards.ecifm.net/ in web
browser.
Note! Timecard Application is best viewed with IE 8+, Firefox 3.0+, and Chrome 3.0+ with a
resolution of 1024x768
Login
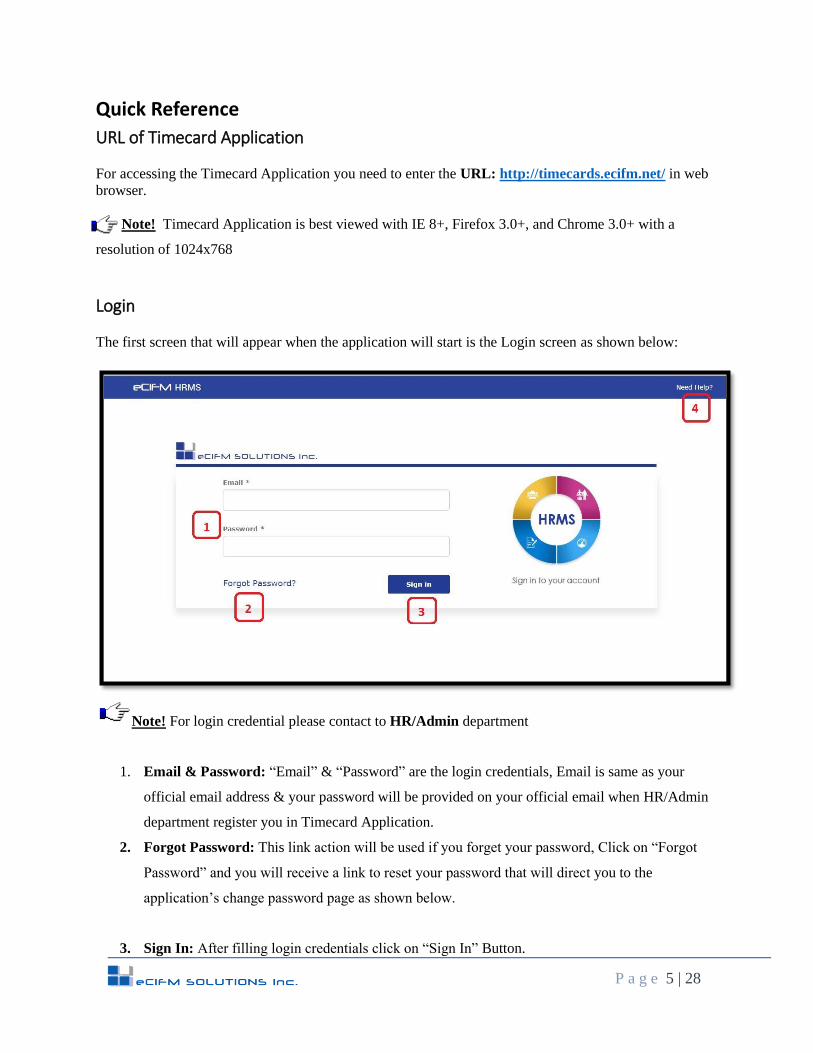
The first screen that will appear when the application will start is the Login screen as shown below:
Note! For login credential please contact to HR/Admin department
1. Email & Password: “Email” & “Password” are the login credentials, Email is same as your
official email address & your password will be provided on your official email when HR/Admin
department register you in Timecard Application.
2. Forgot Password: This link action will be used if you forget your password, Click on “Forgot
Password” and you will receive a link to reset your password that will direct you to the
application’s change password page as shown below.
3. Sign In: After filling login credentials click on “Sign In” Button.
P a g e 6 | 28
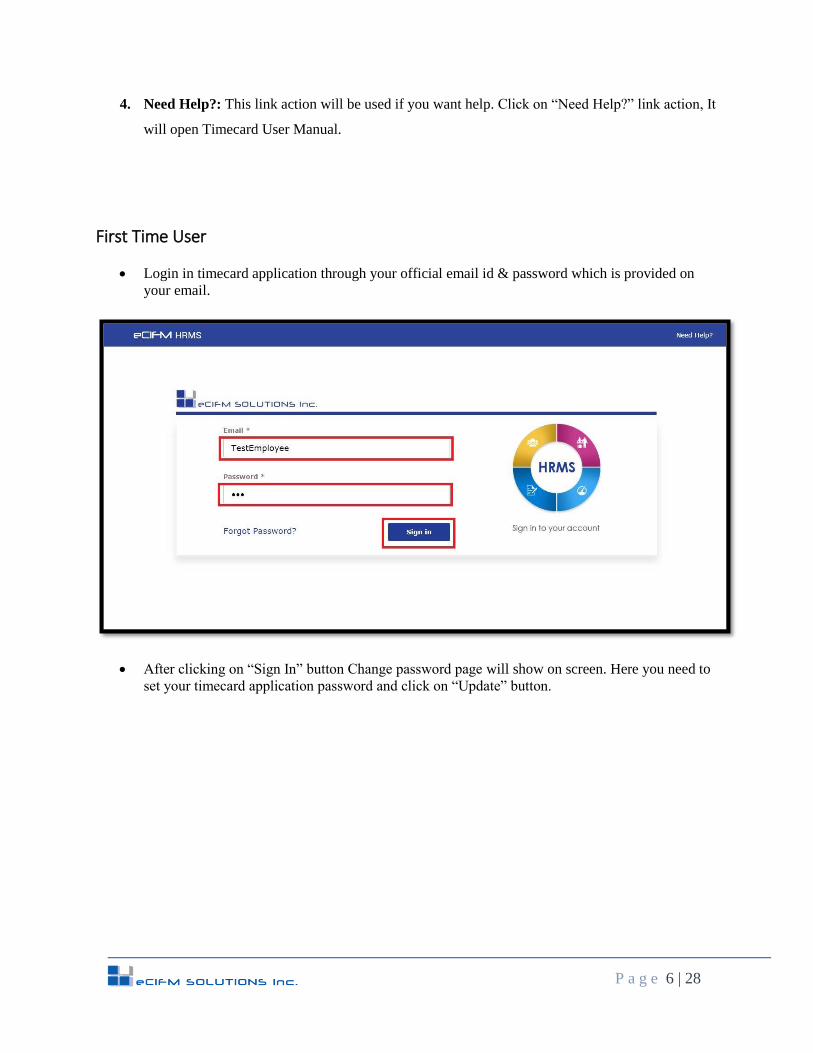
4. Need Help?: This link action will be used if you want help. Click on “Need Help?” link action, It
will open Timecard User Manual.
First Time User
Login in timecard application through your official email id & password which is provided on
your email.
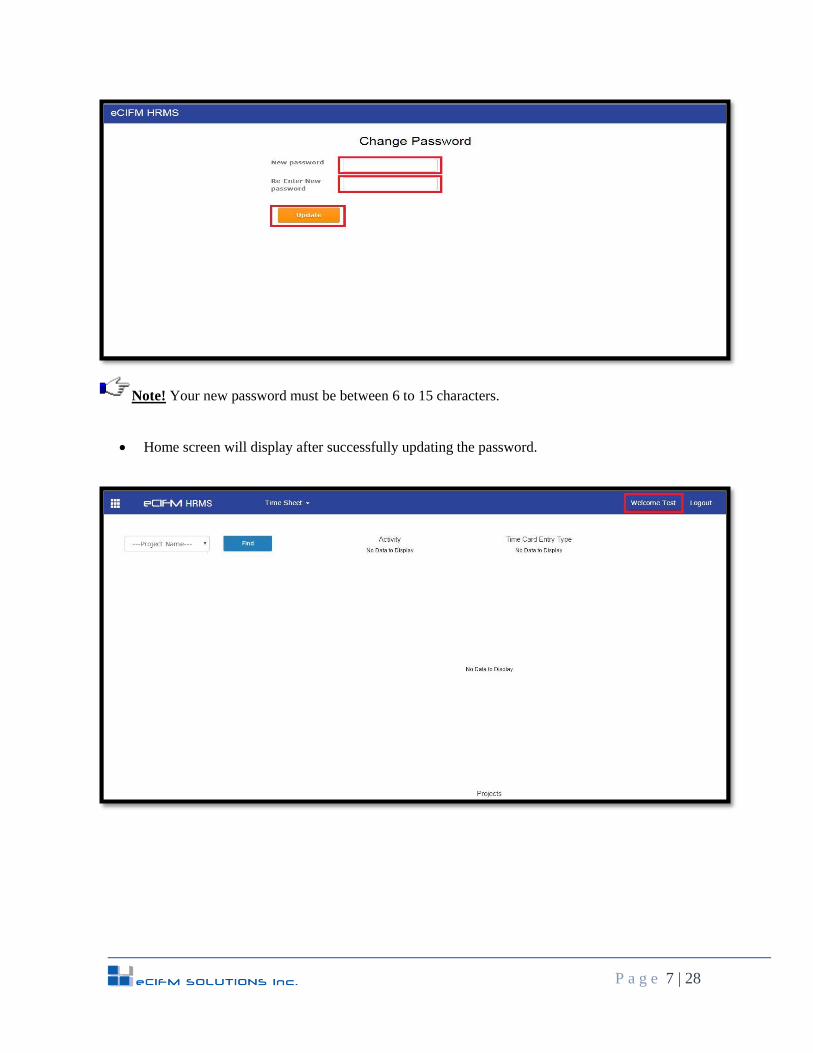
After clicking on “Sign In” button Change password page will show on screen. Here you need to
set your timecard application password and click on “Update” button.
P a g e 7 | 28
Note! Your new password must be between 6 to 15 characters.
Home screen will display after successfully updating the password.
P a g e 8 | 28
Add Time Entry
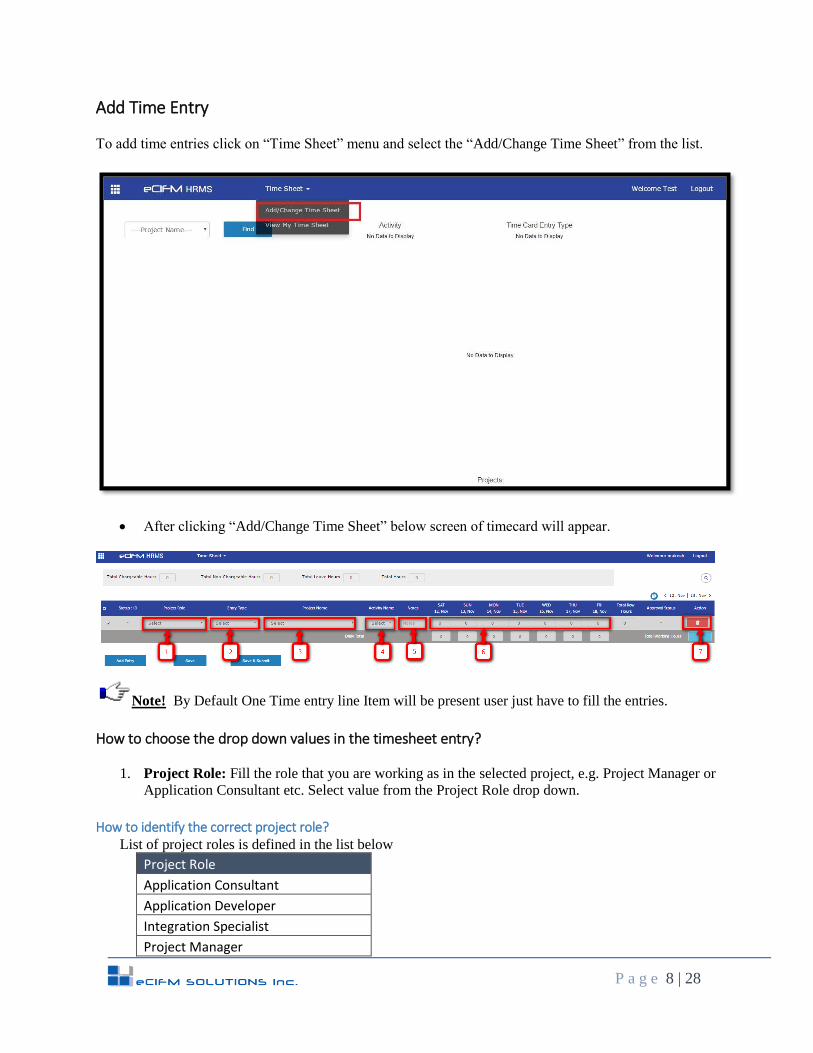
To add time entries click on “Time Sheet” menu and select the “Add/Change Time Sheet” from the list.
After clicking “Add/Change Time Sheet” below screen of timecard will appear.
Note! By Default One Time entry line Item will be present user just have to fill the entries.
How to choose the drop down values in the timesheet entry?
1. Project Role: Fill the role that you are working as in the selected project, e.g. Project Manager or
Application Consultant etc. Select value from the Project Role drop down.
How to identify the correct project role? List of project roles is defined in the list below
Project Role
Application Consultant
Application Developer
Integration Specialist
Project Manager
P a g e 9 | 28
Project Role
Trainer
Employee
2. Entry Type: Fill Entry Type by clicking on the drop down and select value from the Entry Type
list.
How to identify the correct entry type? Identify the correct activity name and the corresponding entry type for the time entry line item.
Please note: Refer Point 4 below to choose the correct activity name
3. Project Name: Fill Project Name by clicking on the drop down and select value from the Project
Name list.
How to identify the correct project code? The nomenclature to identify the project codes:
Internal Projects code:
Nomenclature: eCIFM. Internal Project Name
Internal project code has a prefix eCIFM
External Projects code:
Nomenclature: Client name. SOW# or Contract#. Phase#. Change Order#
SOW# or Contract # starts with 01 (The first SOW or contract with the Client)
Phase # starts with 01 (The first phase under the contract with the Client)
Change Order # starts with CO1 (00 -> No change order, CO1 -> the first change order within
the current phase of the contract (or SOW) with the Client)
Support Projects code:
Nomenclature for the projects ending with the below suffix:
.SaaS: SaaS Clients only
.CSAT: Post go live support (Customer Satisfaction)
.S&S: Subscription & Support Client
.upgrade: Client paid platform or application upgrade
.Support: Paid T&M Support
.hosting: Hosting Client
One more project code for Warranty work (e.g. break fixes, which are non-chargeable), may be
introduced
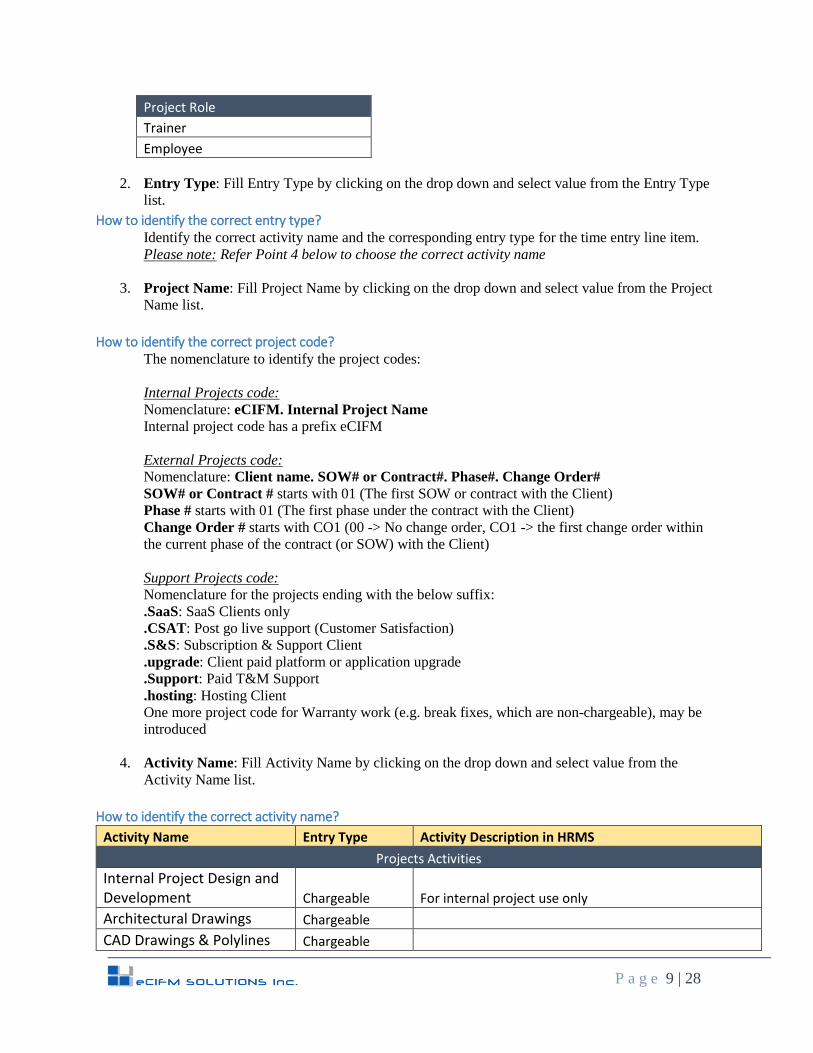
4. Activity Name: Fill Activity Name by clicking on the drop down and select value from the
Activity Name list.
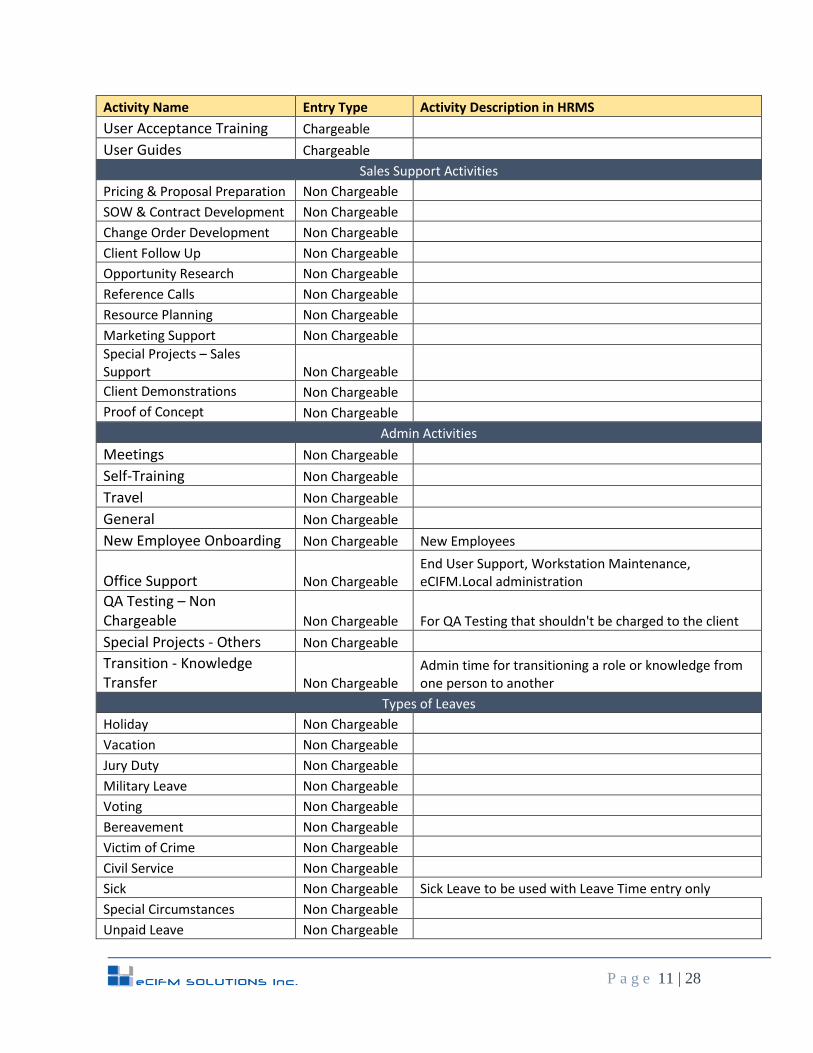
How to identify the correct activity name?
Activity Name Entry Type Activity Description in HRMS
Projects Activities
Internal Project Design and Development Chargeable For internal project use only
Architectural Drawings Chargeable
CAD Drawings & Polylines Chargeable
P a g e 10 | 28
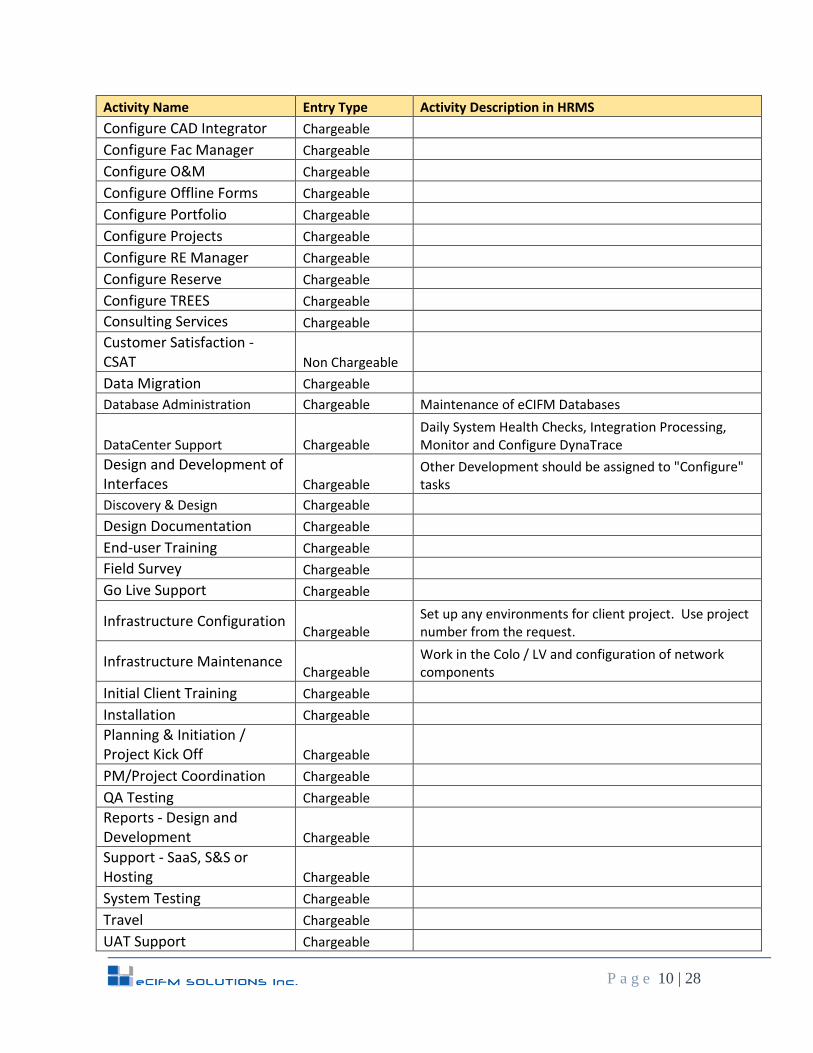
Activity Name Entry Type Activity Description in HRMS
Configure CAD Integrator Chargeable
Configure Fac Manager Chargeable
Configure O&M Chargeable
Configure Offline Forms Chargeable
Configure Portfolio Chargeable
Configure Projects Chargeable
Configure RE Manager Chargeable
Configure Reserve Chargeable
Configure TREES Chargeable
Consulting Services Chargeable
Customer Satisfaction - CSAT Non Chargeable
Data Migration Chargeable
Database Administration Chargeable Maintenance of eCIFM Databases
DataCenter Support Chargeable Daily System Health Checks, Integration Processing, Monitor and Configure DynaTrace
Design and Development of Interfaces Chargeable
Other Development should be assigned to "Configure" tasks
Discovery & Design Chargeable
Design Documentation Chargeable
End-user Training Chargeable
Field Survey Chargeable
Go Live Support Chargeable
Infrastructure Configuration Chargeable
Set up any environments for client project. Use project number from the request.
Infrastructure Maintenance Chargeable
Work in the Colo / LV and configuration of network components
Initial Client Training Chargeable
Installation Chargeable
Planning & Initiation / Project Kick Off Chargeable
PM/Project Coordination Chargeable
QA Testing Chargeable
Reports - Design and Development Chargeable
Support - SaaS, S&S or Hosting Chargeable
System Testing Chargeable
Travel Chargeable
UAT Support Chargeable
P a g e 11 | 28
Activity Name Entry Type Activity Description in HRMS
User Acceptance Training Chargeable
User Guides Chargeable
Sales Support Activities
Pricing & Proposal Preparation Non Chargeable
SOW & Contract Development Non Chargeable
Change Order Development Non Chargeable
Client Follow Up Non Chargeable
Opportunity Research Non Chargeable
Reference Calls Non Chargeable
Resource Planning Non Chargeable
Marketing Support Non Chargeable
Special Projects – Sales Support Non Chargeable
Client Demonstrations Non Chargeable
Proof of Concept Non Chargeable
Admin Activities
Meetings Non Chargeable
Self-Training Non Chargeable
Travel Non Chargeable
General Non Chargeable
New Employee Onboarding Non Chargeable New Employees
Office Support Non Chargeable End User Support, Workstation Maintenance, eCIFM.Local administration
QA Testing – Non Chargeable Non Chargeable For QA Testing that shouldn't be charged to the client
Special Projects - Others Non Chargeable
Transition - Knowledge Transfer Non Chargeable
Admin time for transitioning a role or knowledge from one person to another
Types of Leaves
Holiday Non Chargeable
Vacation Non Chargeable
Jury Duty Non Chargeable
Military Leave Non Chargeable
Voting Non Chargeable
Bereavement Non Chargeable
Victim of Crime Non Chargeable
Civil Service Non Chargeable
Sick Non Chargeable Sick Leave to be used with Leave Time entry only
Special Circumstances Non Chargeable
Unpaid Leave Non Chargeable
P a g e 12 | 28
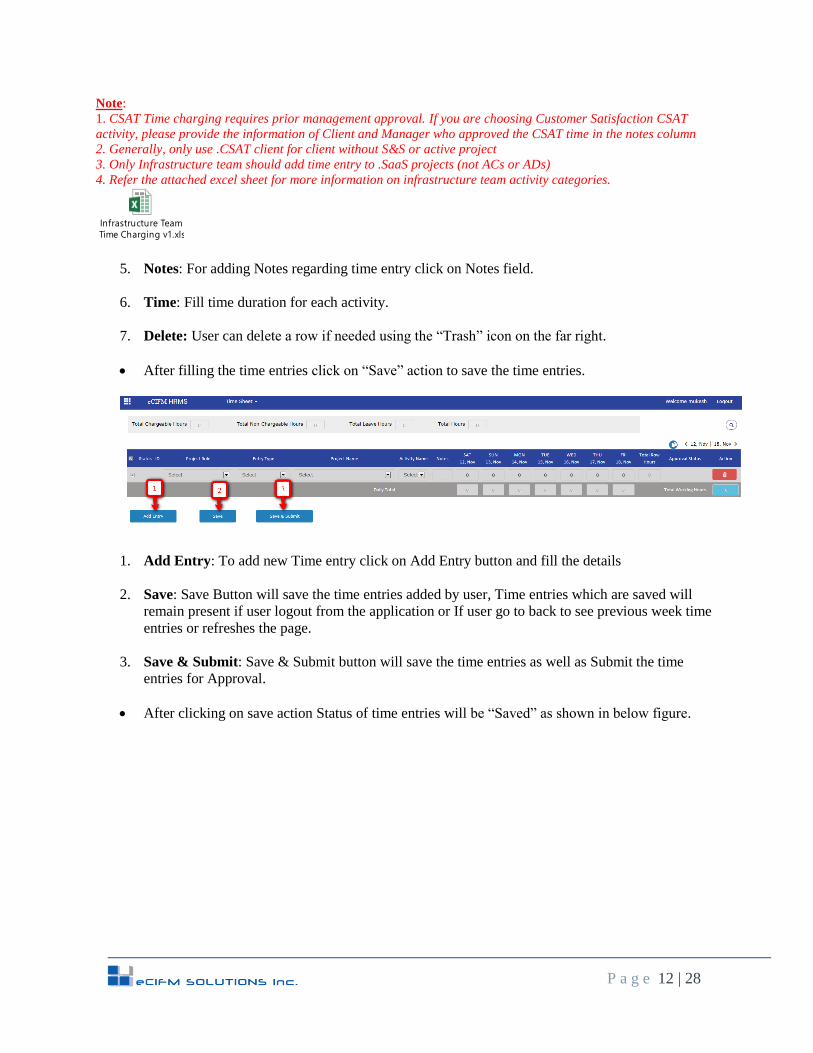
Note:
1. CSAT Time charging requires prior management approval. If you are choosing Customer Satisfaction CSAT
activity, please provide the information of Client and Manager who approved the CSAT time in the notes column
2. Generally, only use .CSAT client for client without S&S or active project
3. Only Infrastructure team should add time entry to .SaaS projects (not ACs or ADs)
4. Refer the attached excel sheet for more information on infrastructure team activity categories.
Infrastructure Team
Time Charging v1.xlsx
5. Notes: For adding Notes regarding time entry click on Notes field.
6. Time: Fill time duration for each activity.
7. Delete: User can delete a row if needed using the “Trash” icon on the far right.
After filling the time entries click on “Save” action to save the time entries.
1. Add Entry: To add new Time entry click on Add Entry button and fill the details
2. Save: Save Button will save the time entries added by user, Time entries which are saved will
remain present if user logout from the application or If user go to back to see previous week time
entries or refreshes the page.
3. Save & Submit: Save & Submit button will save the time entries as well as Submit the time
entries for Approval.
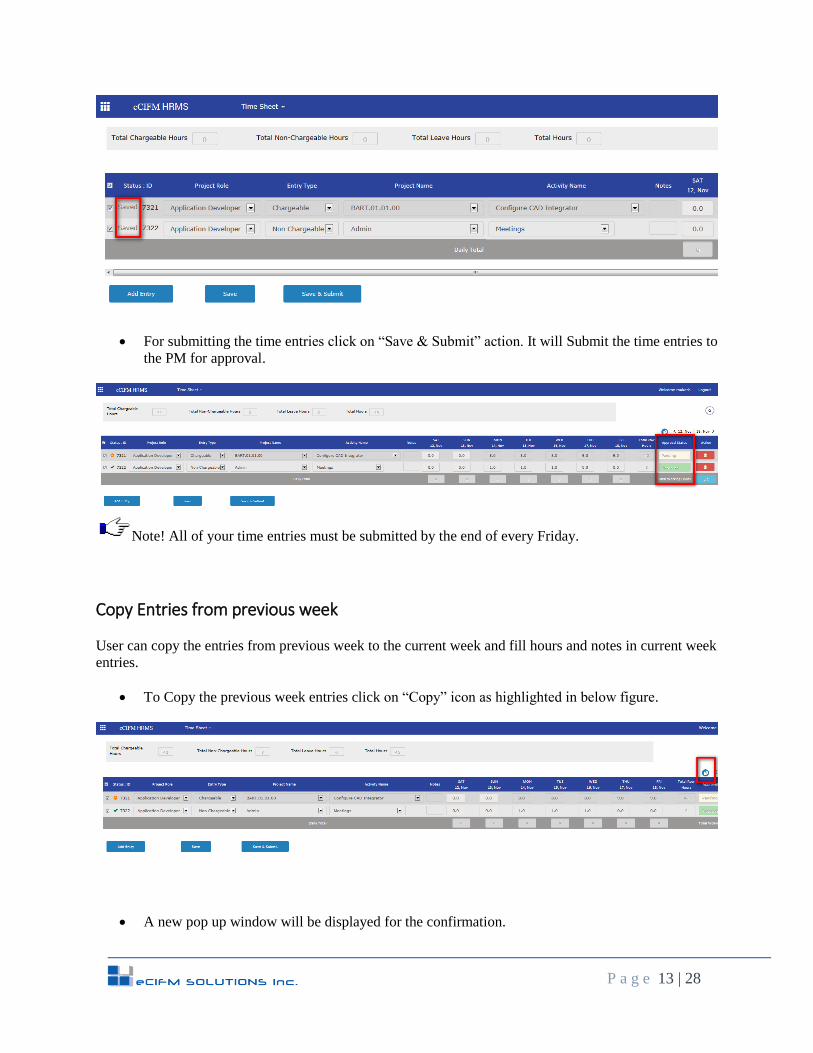
After clicking on save action Status of time entries will be “Saved” as shown in below figure.
P a g e 13 | 28
For submitting the time entries click on “Save & Submit” action. It will Submit the time entries to
the PM for approval.
Note! All of your time entries must be submitted by the end of every Friday.
Copy Entries from previous week
User can copy the entries from previous week to the current week and fill hours and notes in current week
entries.
To Copy the previous week entries click on “Copy” icon as highlighted in below figure.
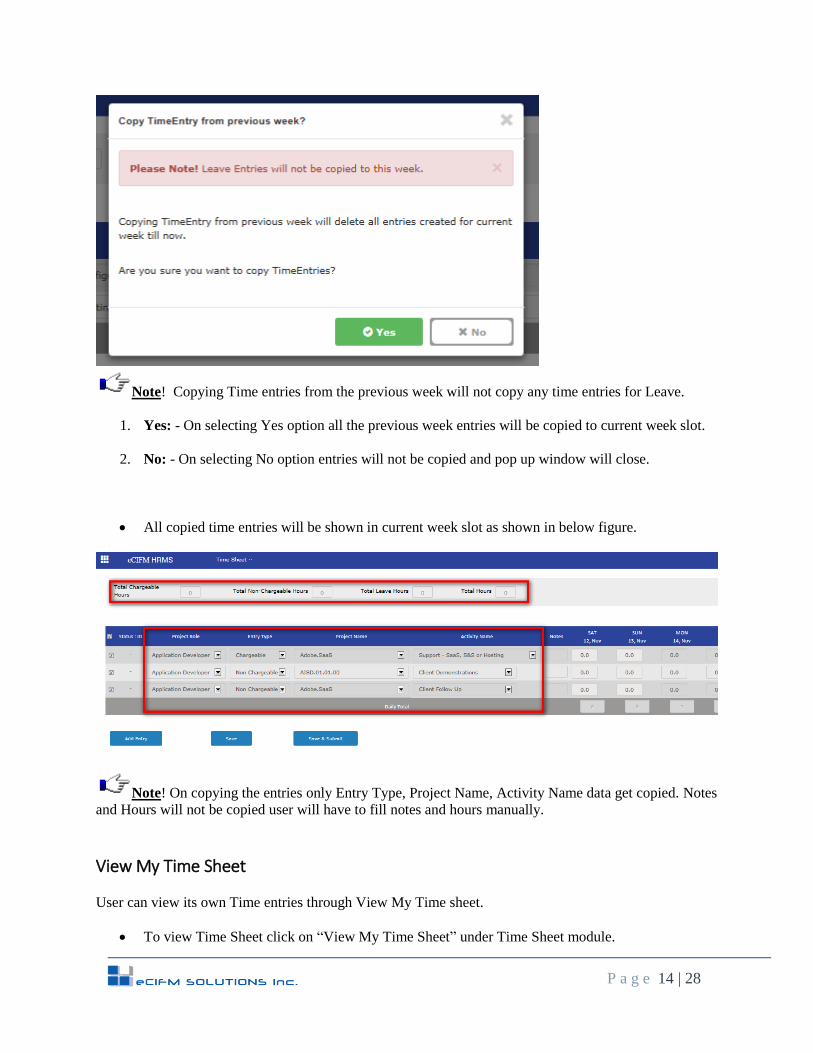
A new pop up window will be displayed for the confirmation.
P a g e 14 | 28
Note! Copying Time entries from the previous week will not copy any time entries for Leave.
1. Yes: - On selecting Yes option all the previous week entries will be copied to current week slot.
2. No: - On selecting No option entries will not be copied and pop up window will close.
All copied time entries will be shown in current week slot as shown in below figure.
Note! On copying the entries only Entry Type, Project Name, Activity Name data get copied. Notes
and Hours will not be copied user will have to fill notes and hours manually.
View My Time Sheet
User can view its own Time entries through View My Time sheet.
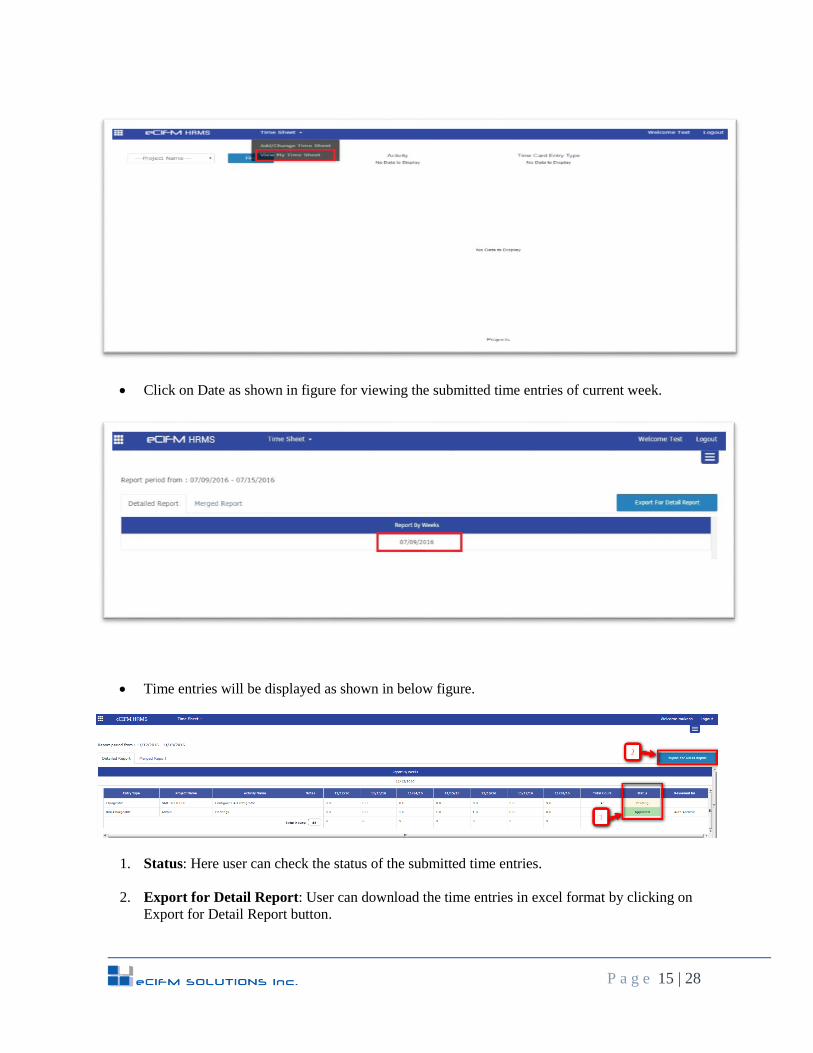
To view Time Sheet click on “View My Time Sheet” under Time Sheet module.
P a g e 15 | 28
Click on Date as shown in figure for viewing the submitted time entries of current week.
Time entries will be displayed as shown in below figure.
1. Status: Here user can check the status of the submitted time entries.
2. Export for Detail Report: User can download the time entries in excel format by clicking on
Export for Detail Report button.
P a g e 16 | 28
Approve Time Entry
Project Managers, Executives, Management team, and HR can approve the Timesheet entry hours.
Project Managers will approve the timesheet hours of the employees who are assigned to their
project.
Executives, Management team and HR will approve the timesheet hours of the employees who
report to them.
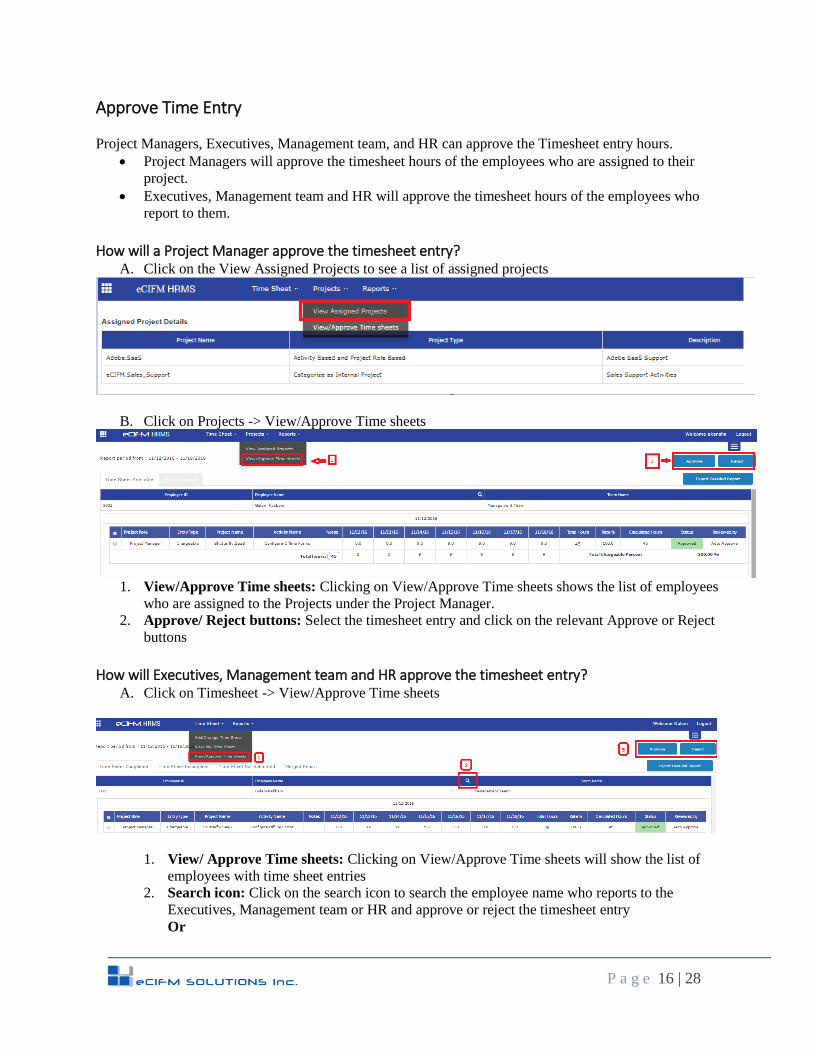
How will a Project Manager approve the timesheet entry? A. Click on the View Assigned Projects to see a list of assigned projects
B. Click on Projects -> View/Approve Time sheets
1. View/Approve Time sheets: Clicking on View/Approve Time sheets shows the list of employees
who are assigned to the Projects under the Project Manager.
2. Approve/ Reject buttons: Select the timesheet entry and click on the relevant Approve or Reject
buttons
How will Executives, Management team and HR approve the timesheet entry? A. Click on Timesheet -> View/Approve Time sheets
1. View/ Approve Time sheets: Clicking on View/Approve Time sheets will show the list of
employees with time sheet entries
2. Search icon: Click on the search icon to search the employee name who reports to the
Executives, Management team or HR and approve or reject the timesheet entry
Or
P a g e 17 | 28
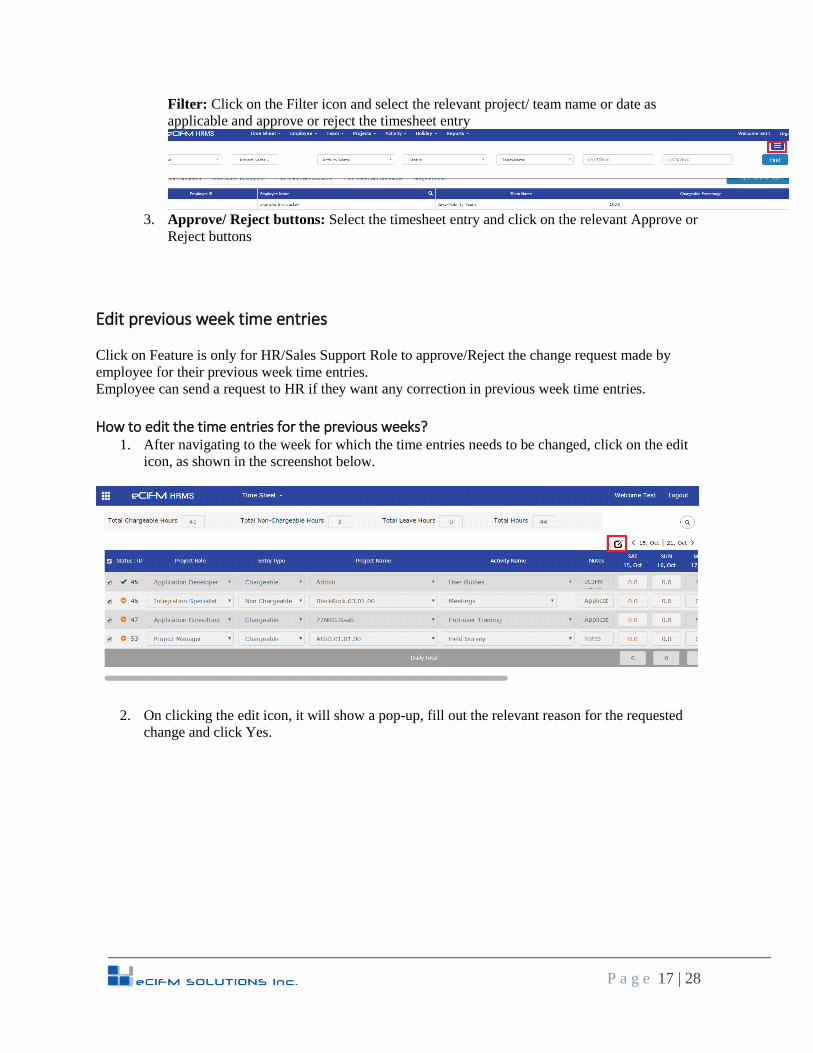
Filter: Click on the Filter icon and select the relevant project/ team name or date as
applicable and approve or reject the timesheet entry
3. Approve/ Reject buttons: Select the timesheet entry and click on the relevant Approve or
Reject buttons
Edit previous week time entries
Click on Feature is only for HR/Sales Support Role to approve/Reject the change request made by
employee for their previous week time entries.
Employee can send a request to HR if they want any correction in previous week time entries.
How to edit the time entries for the previous weeks? 1. After navigating to the week for which the time entries needs to be changed, click on the edit
icon, as shown in the screenshot below.
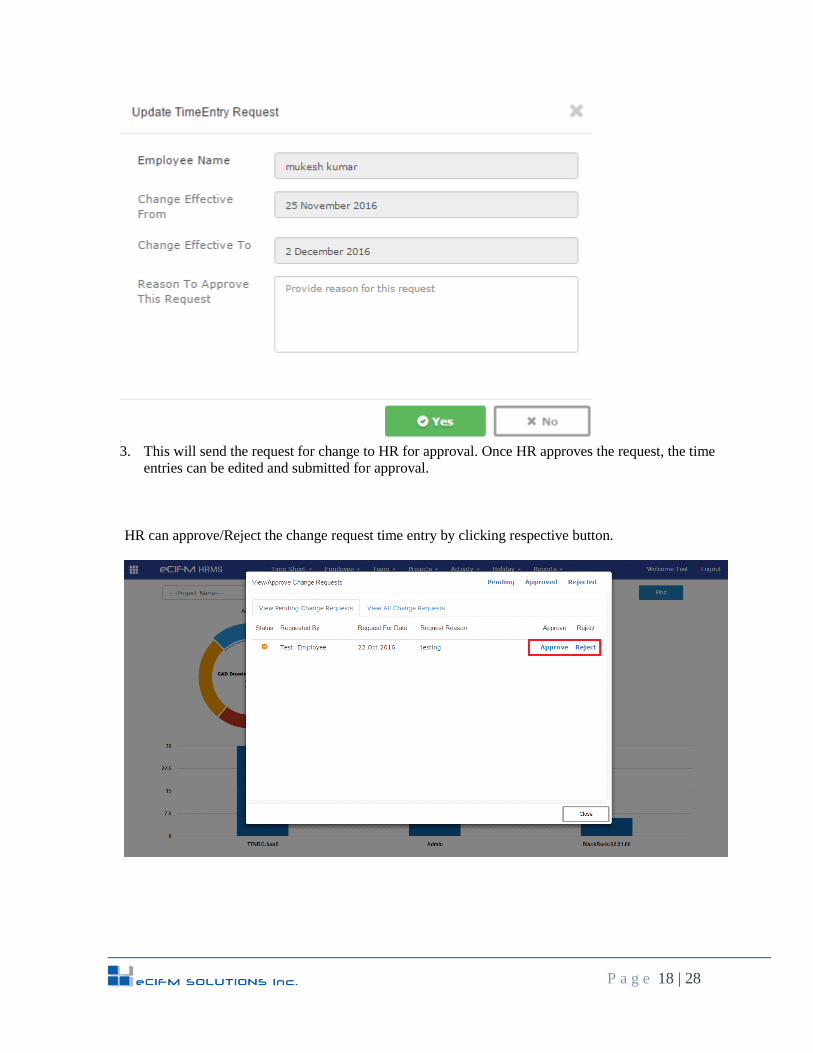
2. On clicking the edit icon, it will show a pop-up, fill out the relevant reason for the requested
change and click Yes.
P a g e 18 | 28
3. This will send the request for change to HR for approval. Once HR approves the request, the time
entries can be edited and submitted for approval.
HR can approve/Reject the change request time entry by clicking respective button.
P a g e 19 | 28
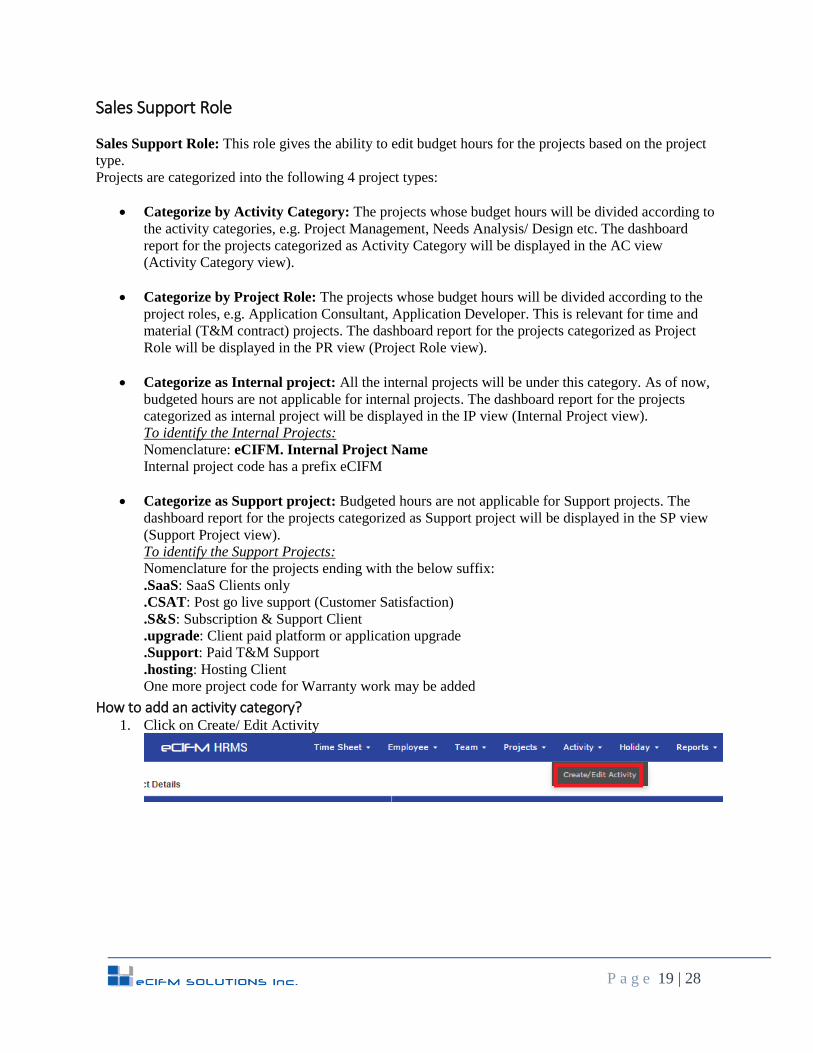
Sales Support Role
Sales Support Role: This role gives the ability to edit budget hours for the projects based on the project
type.
Projects are categorized into the following 4 project types:
Categorize by Activity Category: The projects whose budget hours will be divided according to
the activity categories, e.g. Project Management, Needs Analysis/ Design etc. The dashboard
report for the projects categorized as Activity Category will be displayed in the AC view
(Activity Category view).
Categorize by Project Role: The projects whose budget hours will be divided according to the
project roles, e.g. Application Consultant, Application Developer. This is relevant for time and
material (T&M contract) projects. The dashboard report for the projects categorized as Project
Role will be displayed in the PR view (Project Role view).
Categorize as Internal project: All the internal projects will be under this category. As of now,
budgeted hours are not applicable for internal projects. The dashboard report for the projects
categorized as internal project will be displayed in the IP view (Internal Project view).
To identify the Internal Projects:
Nomenclature: eCIFM. Internal Project Name
Internal project code has a prefix eCIFM
Categorize as Support project: Budgeted hours are not applicable for Support projects. The
dashboard report for the projects categorized as Support project will be displayed in the SP view
(Support Project view).
To identify the Support Projects:
Nomenclature for the projects ending with the below suffix:
.SaaS: SaaS Clients only
.CSAT: Post go live support (Customer Satisfaction)
.S&S: Subscription & Support Client
.upgrade: Client paid platform or application upgrade
.Support: Paid T&M Support
.hosting: Hosting Client
One more project code for Warranty work may be added
How to add an activity category? 1. Click on Create/ Edit Activity
P a g e 20 | 28
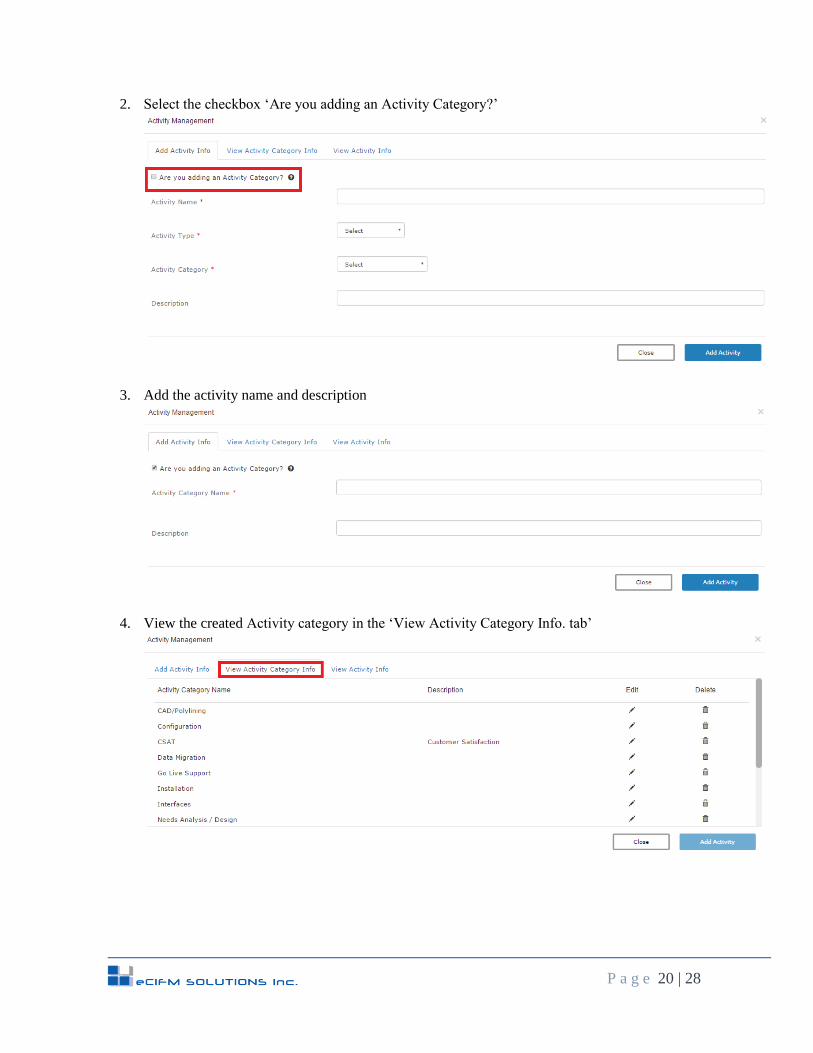
2. Select the checkbox ‘Are you adding an Activity Category?’
3. Add the activity name and description
4. View the created Activity category in the ‘View Activity Category Info. tab’
P a g e 21 | 28
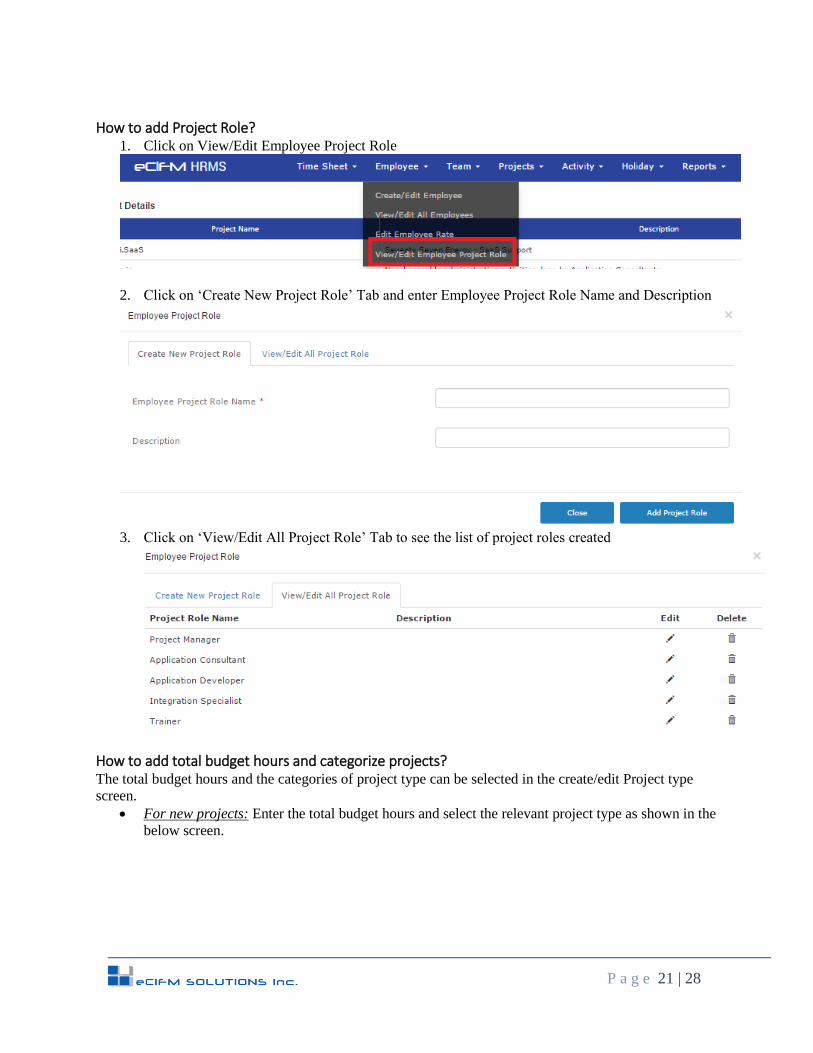
How to add Project Role? 1. Click on View/Edit Employee Project Role
2. Click on ‘Create New Project Role’ Tab and enter Employee Project Role Name and Description
3. Click on ‘View/Edit All Project Role’ Tab to see the list of project roles created
How to add total budget hours and categorize projects? The total budget hours and the categories of project type can be selected in the create/edit Project type
screen.
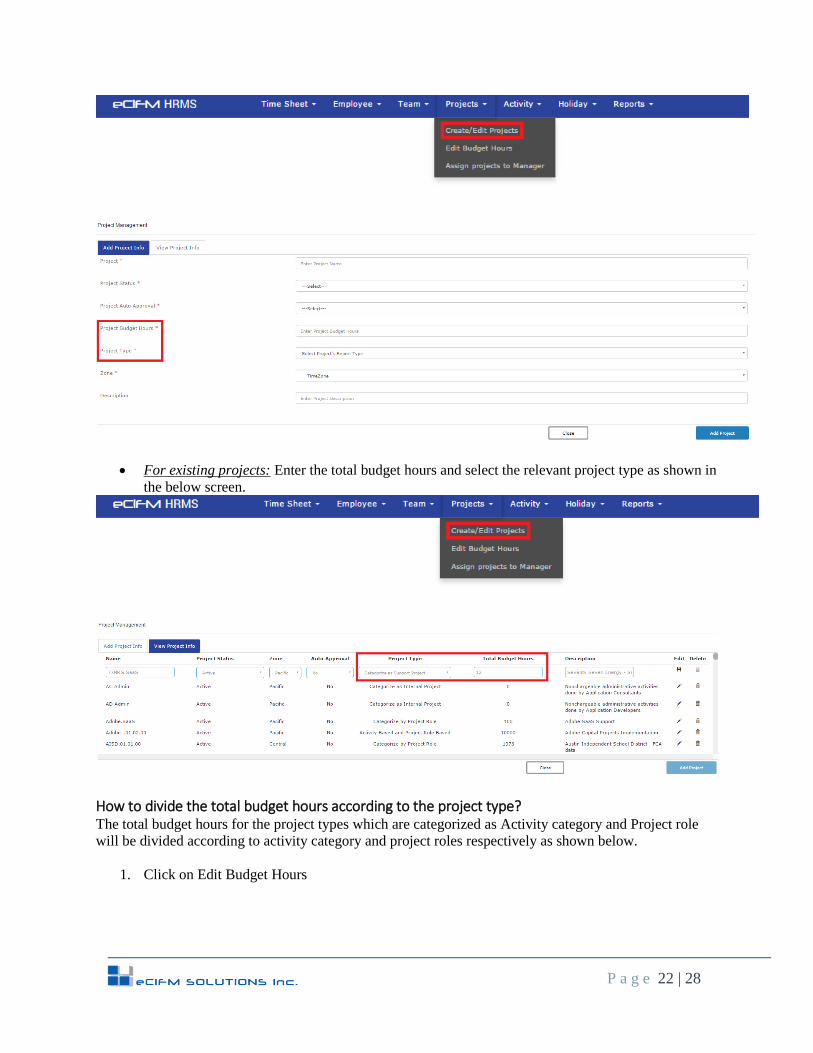
For new projects: Enter the total budget hours and select the relevant project type as shown in the
below screen.
P a g e 22 | 28
For existing projects: Enter the total budget hours and select the relevant project type as shown in
the below screen.
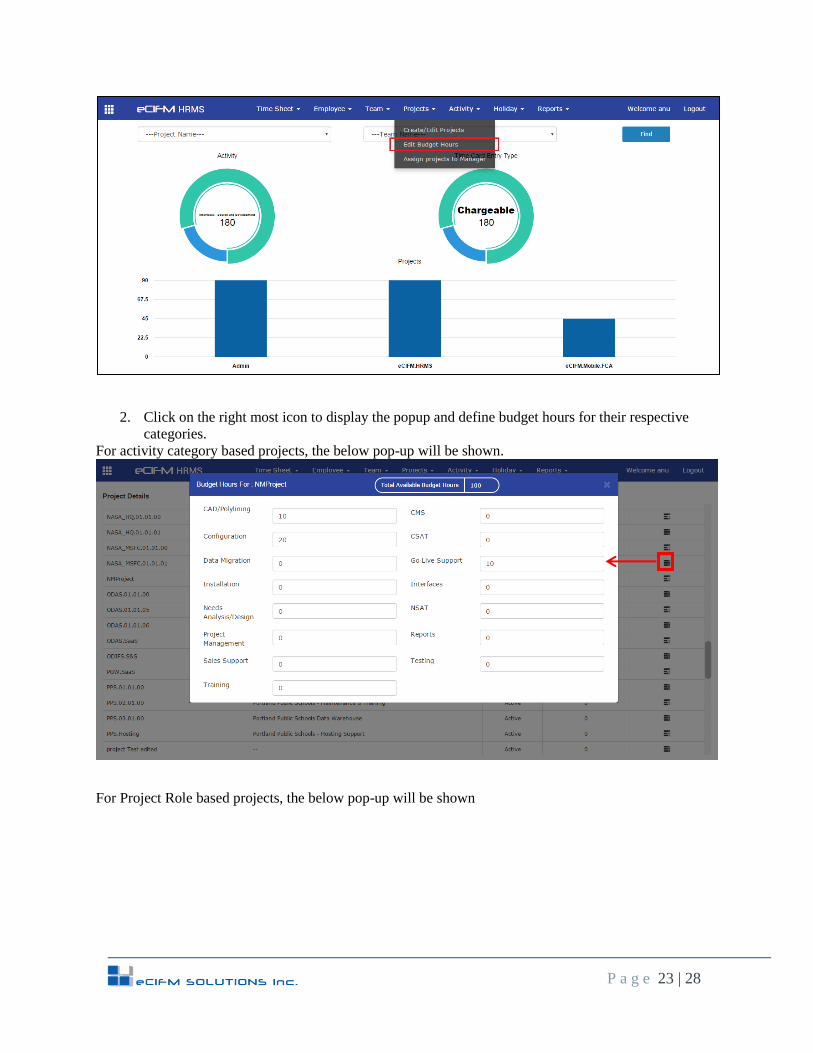
How to divide the total budget hours according to the project type? The total budget hours for the project types which are categorized as Activity category and Project role
will be divided according to activity category and project roles respectively as shown below.
1. Click on Edit Budget Hours
P a g e 23 | 28
2. Click on the right most icon to display the popup and define budget hours for their respective
categories.
For activity category based projects, the below pop-up will be shown.
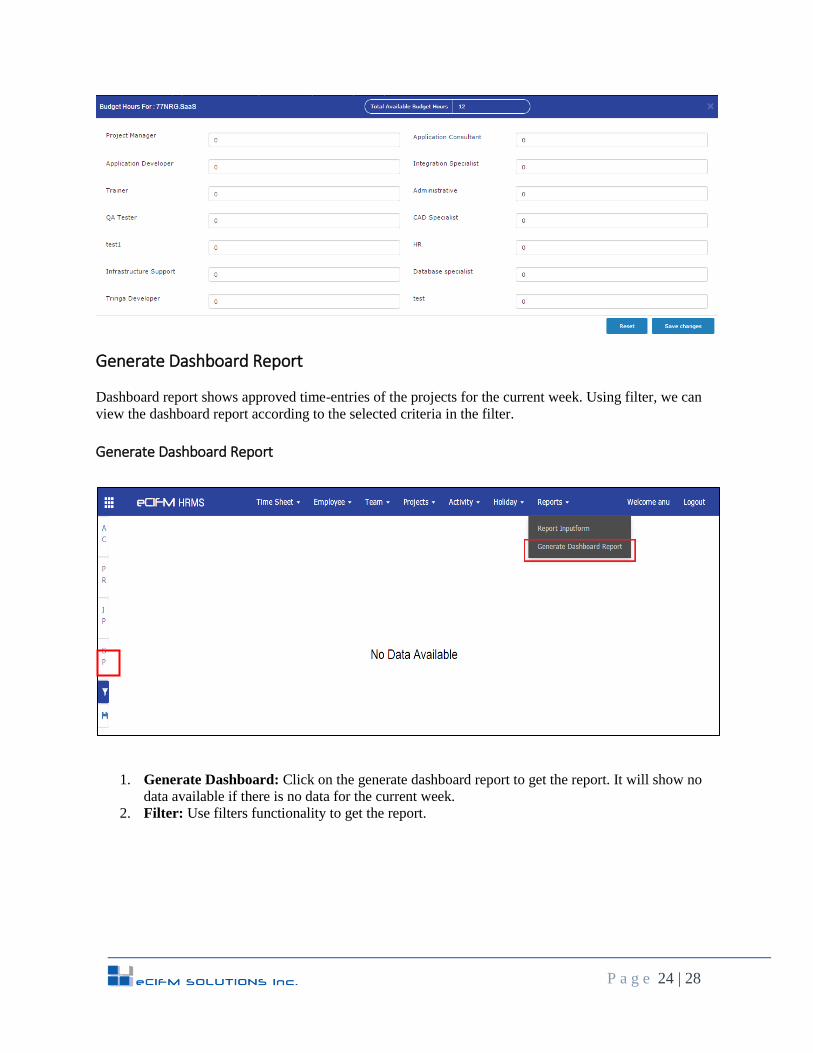
For Project Role based projects, the below pop-up will be shown
P a g e 24 | 28
Generate Dashboard Report
Dashboard report shows approved time-entries of the projects for the current week. Using filter, we can
view the dashboard report according to the selected criteria in the filter.
Generate Dashboard Report
1. Generate Dashboard: Click on the generate dashboard report to get the report. It will show no
data available if there is no data for the current week.
2. Filter: Use filters functionality to get the report.
P a g e 25 | 28
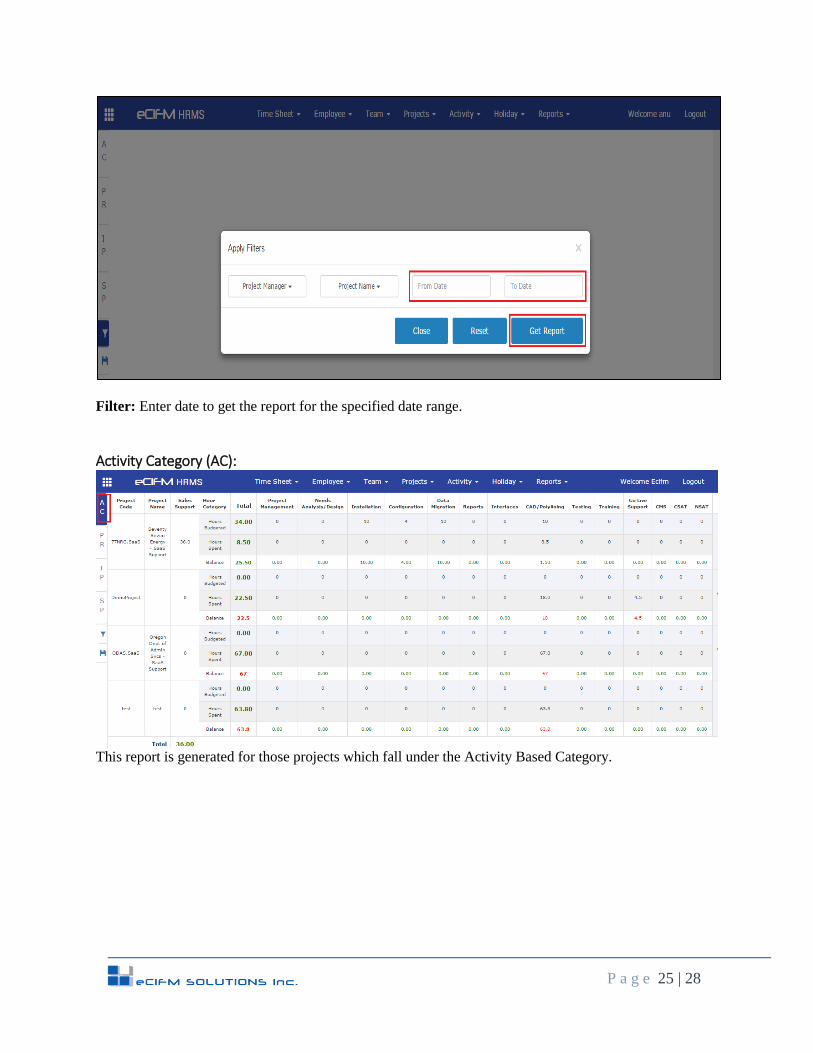
Filter: Enter date to get the report for the specified date range.
Activity Category (AC):
This report is generated for those projects which fall under the Activity Based Category.
P a g e 26 | 28
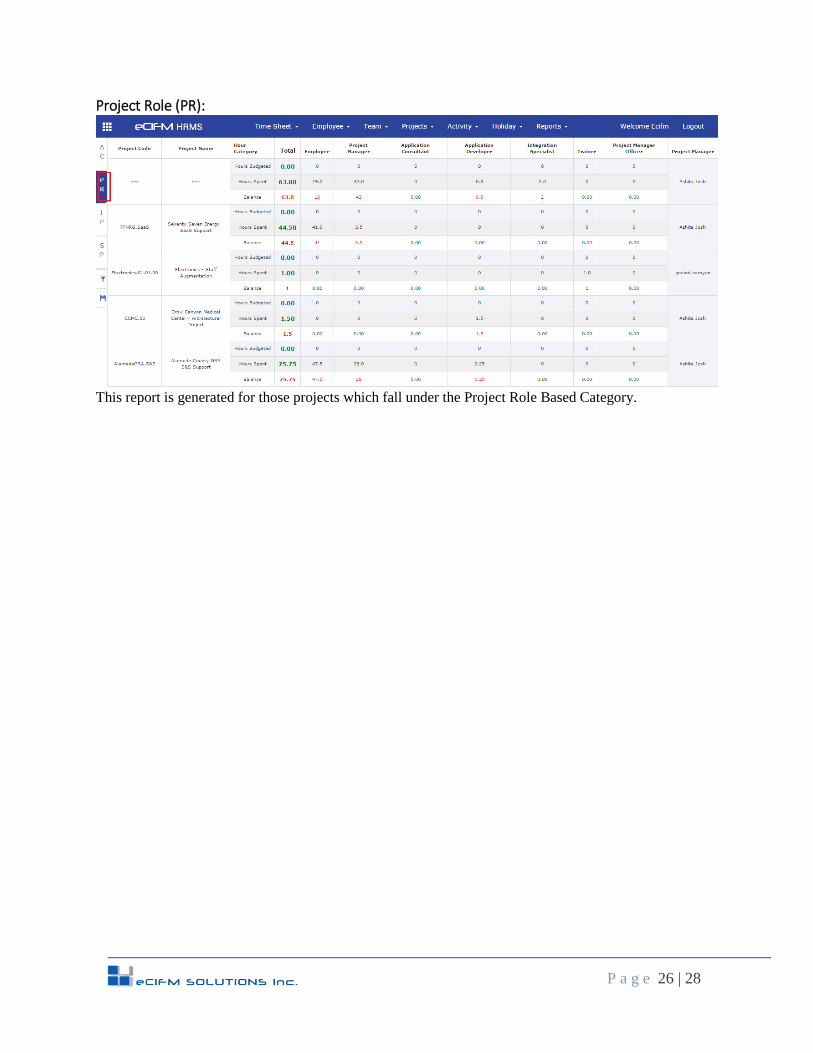
Project Role (PR):
This report is generated for those projects which fall under the Project Role Based Category.
P a g e 27 | 28
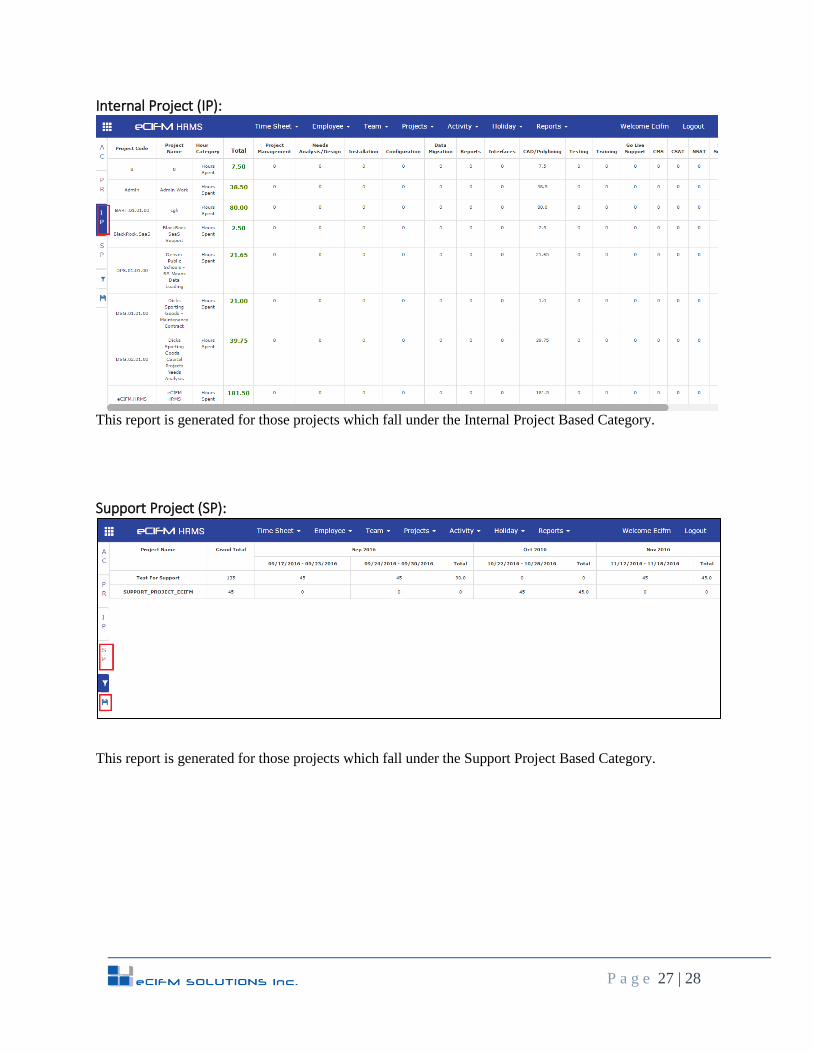
Internal Project (IP):
This report is generated for those projects which fall under the Internal Project Based Category.
Support Project (SP):
This report is generated for those projects which fall under the Support Project Based Category.
P a g e 28 | 28
eCIFM Solutions is an AAA accredited Premier IBM
business partner providing Integrated Work Place
Management System (IWMS) solutions for organizations
looking to improve their real estate portfolios, facilities
and workplace management. Our premier level IBM
business partnership relays that IBM has endorsed our
superior skills, certified professionals and innovative
software solutions that drive exceptional business results
and value to our clients. Hence, our credential is a key
differentiator in selecting a partner for implementation
services.
eCIFM has over 14 years of experience in implementing
Workplace Management Systems for various clients in
the corporate, federal, state and local government sectors.
Our service solutions boost an organization’s overall
operational effectiveness and help our clients achieve
significant return from real estate investments. For more
information about eCIFM Solutions Inc., visit
www.ecifm.com/iwms or
call (925) 830 - 1925.
For more information about IBM TRIRIGA®, visit
www.ibm.com/tivoli/tririga
© Copyright eCIFM Solutions Inc. 2016
www.ecifm.com
3160 Crow Canyon Road, Suite 240, San Ramon,
CA 94583
Office: (925) 830-1925 | Fax: (925) 830-2750
Please consider the environment before printing
this document