Embed Size (px)
Citation preview

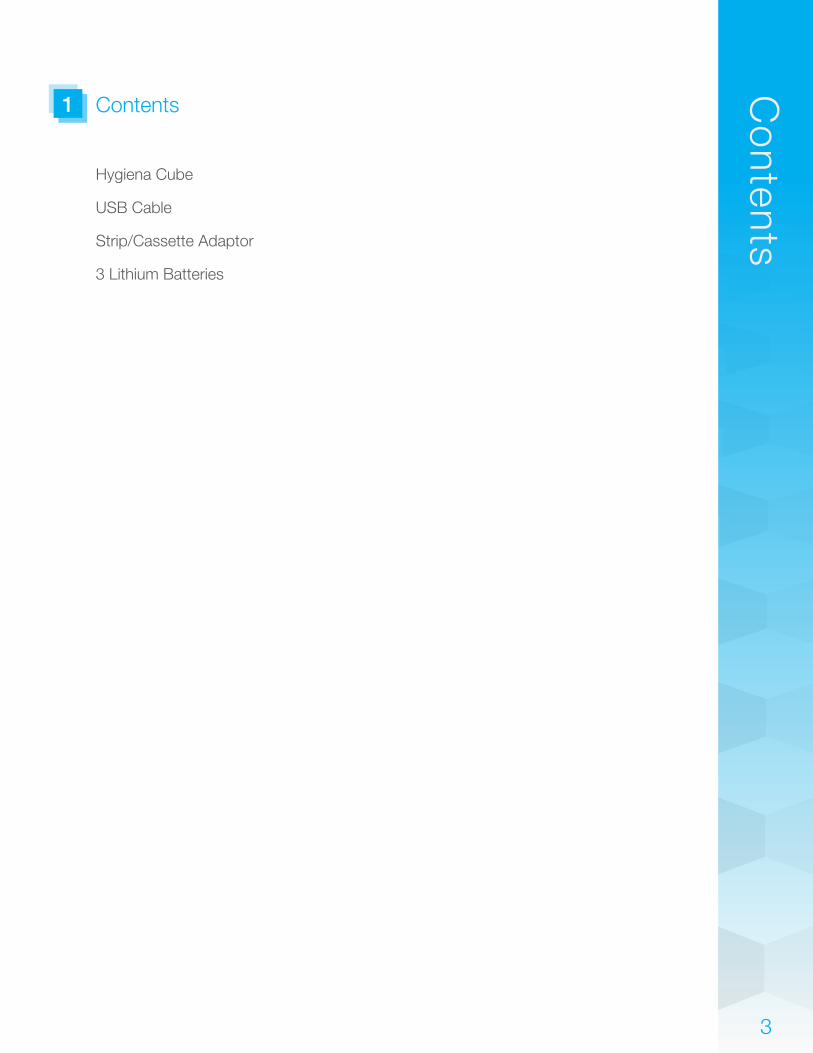
Hygiena Cube
ASY3206
2
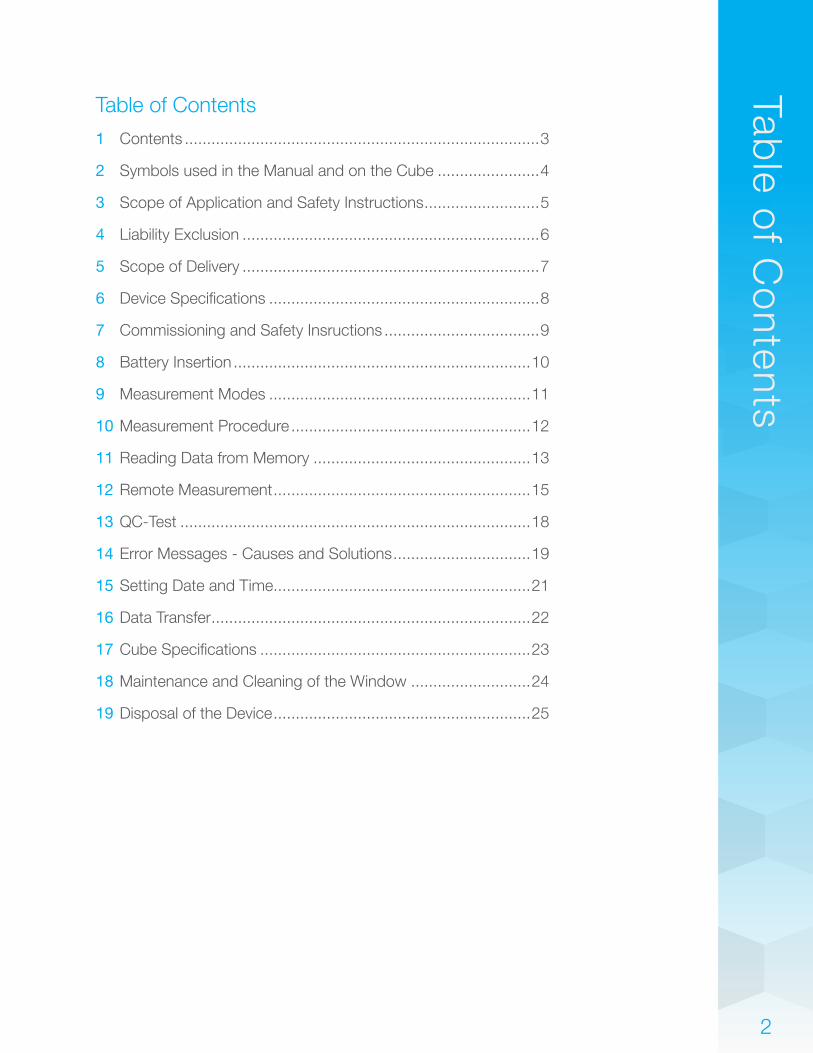
Table o
f Co
ntentsTable of Contents
1 Contents ................................................................................3
2 Symbols used in the Manual and on the Cube .......................4
3 Scope of Application and Safety Instructions ..........................5
4 Liability Exclusion ...................................................................6
5 Scope of Delivery ...................................................................7
6 Device Specifications .............................................................8
7 Commissioning and Safety Insructions ...................................9
8 Battery Insertion ...................................................................10
9 Measurement Modes ...........................................................11
10 Measurement Procedure ......................................................12
11 Reading Data from Memory .................................................13
12 Remote Measurement ..........................................................15
13 QC-Test ...............................................................................18
14 Error Messages - Causes and Solutions ...............................19
15 Setting Date and Time ..........................................................21
16 Data Transfer ........................................................................22
17 Cube Specifications .............................................................23
18 Maintenance and Cleaning of the Window ...........................24
19 Disposal of the Device ..........................................................25
3
Co
ntents
Hygiena Cube
USB Cable
Strip/Cassette Adaptor
3 Lithium Batteries
Contents1
4
Sym
bo
ls used in the M
anual and o
n the Cub
eSymbols used in the Manual and on the Cube2
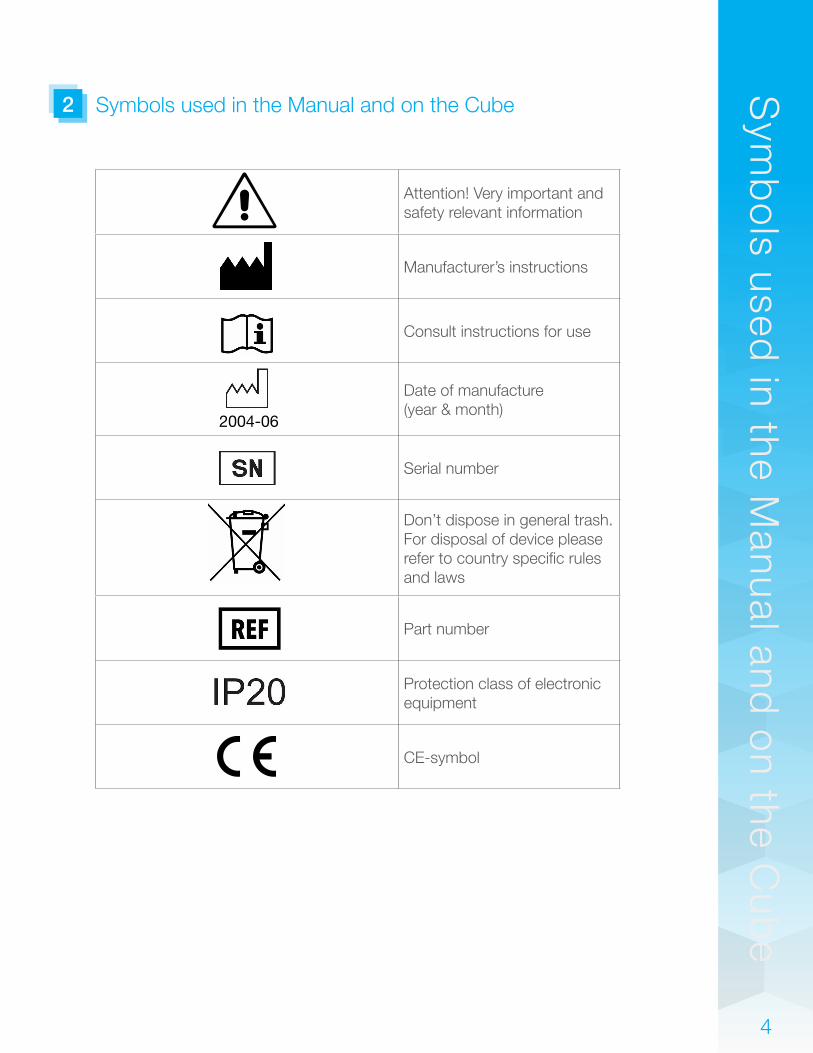
Attention! Very important and safety relevant information
Manufacturer’s instructions
Consult instructions for use
Date of manufacture (year & month)
Serial number
Don’t dispose in general trash. For disposal of device please refer to country specific rules and laws
Part number
Protection class of electronic equipment
CE-symbol
2004-06
5
Sco
pe o
f Ap
plicatio
n and S
afety Instructions
Scope of Application and Safety Instructions3
The Hygiena Cube is a mobile measuring device for colorimetric tests based on reflectance measurements to capture the optical density. The built-in techniques allow a quantitative and qualitative evaluation of every lateral flow assay. The test specific data is transferred wirelessly by radio-frequency identification (RFID) before each measurement. Please check before each measurement if the batch number of the lateral flow test matches the one printed on the RFID tag. In case different shaped cassette/strip types will be used, always ensure using the correct cassette/strip adapter with this particular cassette/strip. A wrong cassette adapter or using it incorrectly can affect the measurement result.
The measurement data can be stored internally. Every saved result includes a unique measurement ID, test name, lot number, manufacturer, and date and time. The measurement data can be extracted via USB using a special USB cable and the Hygiena Cube DataReader Software. The device is powered by battery but can also be powered via USB.
The use of the monitoring device is only allowed by following the instructions stated in Chapter 7 Commissioning and Safety Instructions. The Cube can be used as a mobile handheld device or as a desktop measuring device remotely controlled via USB cable and the free-to-use Cube DataReader Stoftware.
The device and cassette adapter can get contaminated by any test specific residues. In this case, cleaning with a disinfectant solution and protective equipment which does not affect the housing or the cassette adapter has to be conducted (e.g. alcohol-based disinfectant or similar products).
6
Liability E
xclusion
Liability Exclusion4
The devices are produced, calibrated and checked before shipping under strict quality control measures in order to guarantee a high degree of quality. Test-specific analysis configurations are provided via RFID card for running the tests on the Hygiena Cube.
Results determined with the device should not be the sole base of analysis. The test should be compared to reference values obtained from approved and comparable methods.
7
Sco
pe o
f Delivery
Scope of Delivery5
Every Hygiena Cube comes with 3 batteries (type CR2032) and a lid for the battery compartment. Depending on the shape of the test, each Hygiena Cube also includes a specific cassette adapter (for tests provided as a strips/cassette, a specific strip/cassette adapter must be used). A USB cable is included to download the data to a PC. The reader contains a QC set consisting of QC cassette and RFID card with QC configuration. Test specific analysis configurations are uploaded via RFID card included in the kit.
Manual of use as well as the software to download the results on a PC can be downloaded from our website www.hygiena.com
8
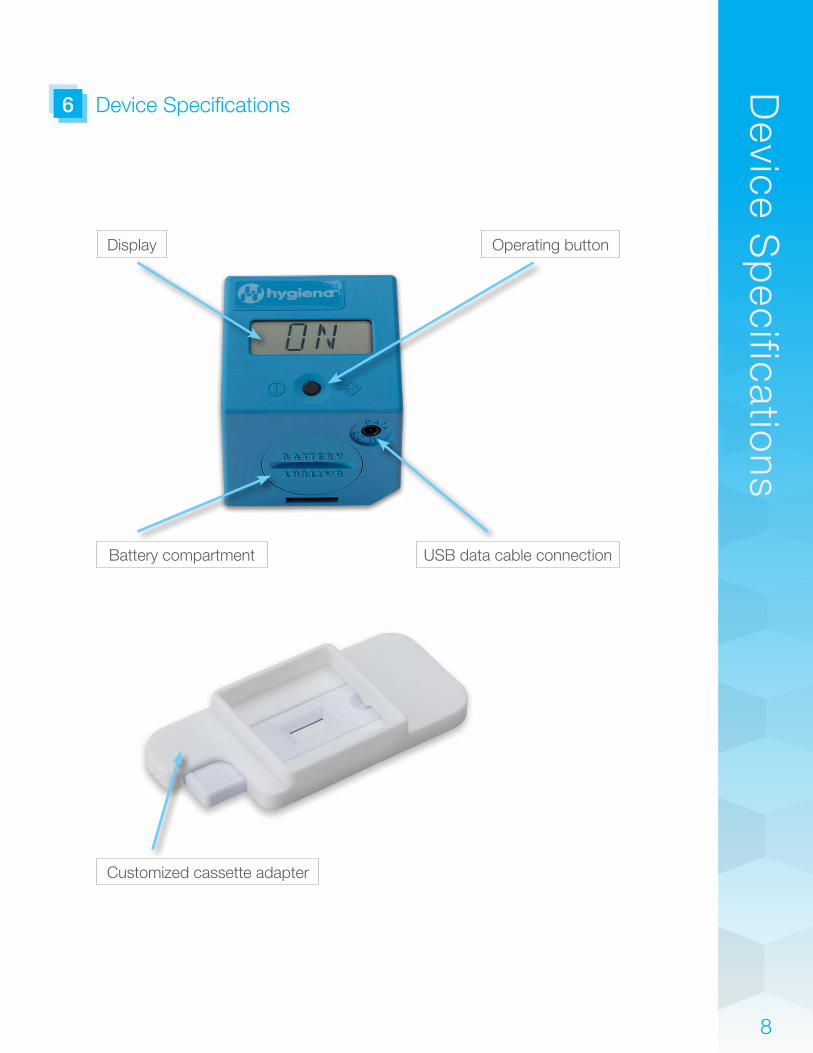
Device Specifications6
Device S
pecificatio
ns
Customized cassette adapter
Battery compartment USB data cable connection
Operating buttonDisplay
9
Commissioning and Safety Instructions7
Co
mm
issioning
and S
afety Instructions
Attention: The device is designed for use on a straight and horizontal surface area. During the measurement it should not be moved and not be exposed to any bright light (e.g. sunlight).
Attention: Always ensure that the Hygiena Cube is attached correctly and tightly to the cassette adapter. A wrong or improper attachment can lead to faulty results.
Attention: Protect the device from any liquids. Be aware that direct contact with any liquid can damage the Hygiena Cube. Damages caused by liquids can be irreparable.
Attention: The device shall not be opened. Otherwise the warranty of the manufacturer is terminated.
Attention: With proper usage, there are no biological hazards coming from the device. However, when not handled properly, contamination due to biological dangerous material is possible. Safety measures of the device can become ineffective with improper usage.
Therefore, please follow all instructions in this manual.
Attention: Concerning test disposal of cassettes containing hazardous or infectious material, please follow the instructions of the test manufacturer.
Attention: Metal surfaces can influence the RFID scanner. Always place the RFID tag on top of the housing/display to ensure best readability of the configuration information.
Prior to commissioning, please read the instruction manual carefully.
10
Battery Insertion8
Battery Insertio
n
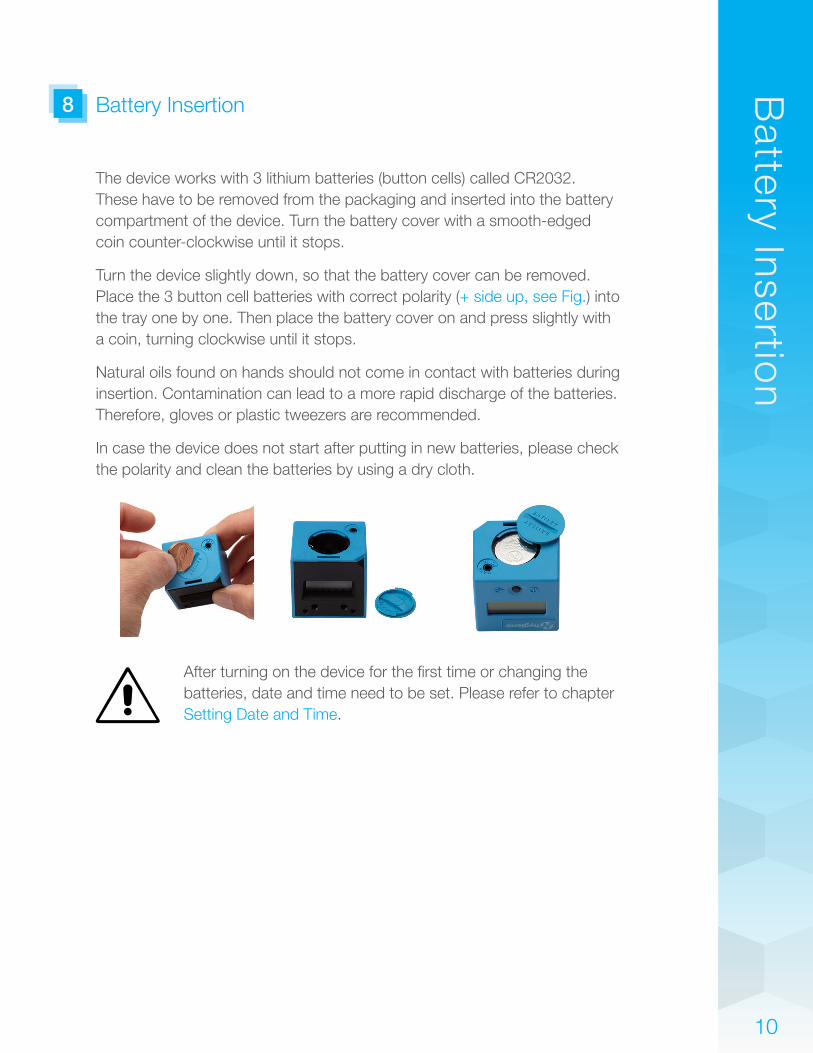
The device works with 3 lithium batteries (button cells) called CR2032. These have to be removed from the packaging and inserted into the battery compartment of the device. Turn the battery cover with a smooth-edged coin counter-clockwise until it stops.
Turn the device slightly down, so that the battery cover can be removed. Place the 3 button cell batteries with correct polarity (+ side up, see Fig.) into the tray one by one. Then place the battery cover on and press slightly with a coin, turning clockwise until it stops.
Natural oils found on hands should not come in contact with batteries during insertion. Contamination can lead to a more rapid discharge of the batteries. Therefore, gloves or plastic tweezers are recommended.
In case the device does not start after putting in new batteries, please check the polarity and clean the batteries by using a dry cloth.
After turning on the device for the first time or changing the batteries, date and time need to be set. Please refer to chapter Setting Date and Time.
11
Measurement Modes9
Measurem
ent Mo
des
The device offers the following options for the test measurement:
a) Immediate measurement
For this type of measurement the test-specific incubation time must be monitored by the user. The user will decide when to apply the test to the Hygiena Cube. If the user is not monitoring the incubation time correctly, the measurement results can be wrong.
When applying the test to the Cube, the measurement starts immediately after pressing the button if the specific analysis configurations were previously uploaded via RFID card. The result will be displayed and can be stored in the internal memory.
b) Timer measurement
This type of measurement follows a test-specifically configured incubation period, e.g. 10 minutes. The incubation time is implemented in the configuration file and will be automatically started if chosen by the user. At the end of the incubation period the measurement starts and displays the result. The timer measurement procedure can be stopped by pressing the control button. The user must start the measurement after the lateral flow test has been activated. Waiting too long will affect the incubation time and thus the result.
The actual procedure of measuring will be described in the following chapter.
12
Measurement Procedure10
Measurem
ent Pro
cedure
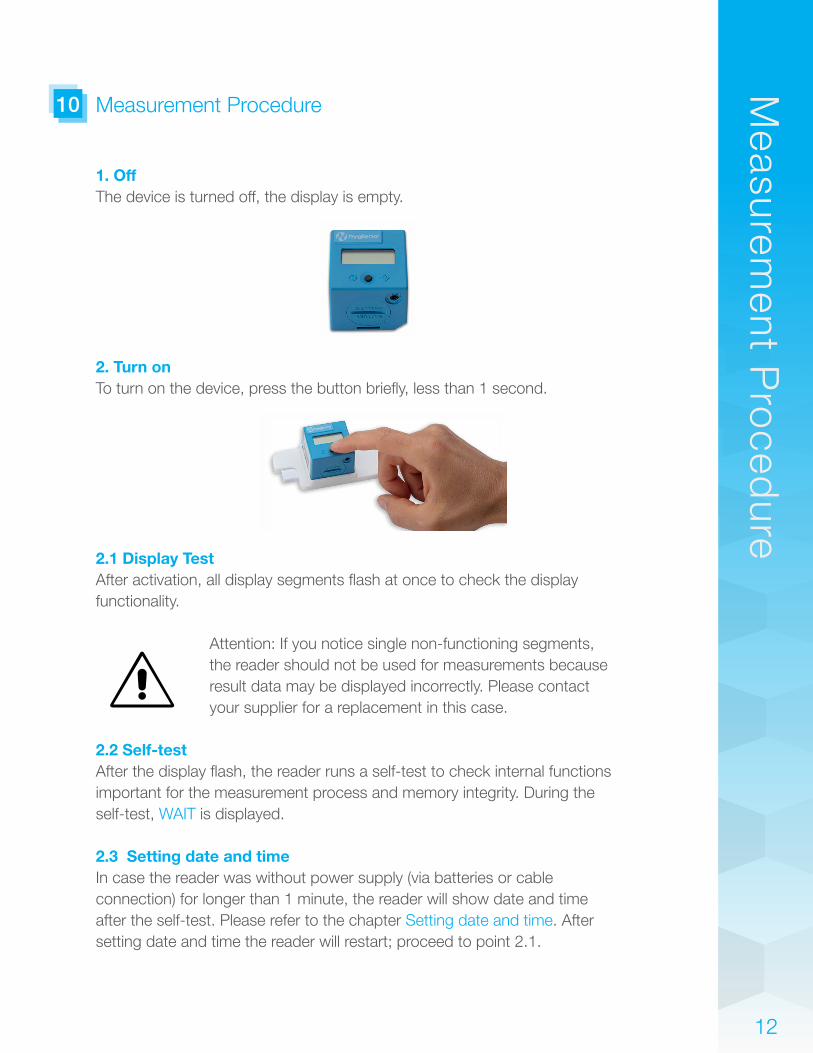
1. OffThe device is turned off, the display is empty.
2. Turn onTo turn on the device, press the button briefly, less than 1 second.
2.1 Display TestAfter activation, all display segments flash at once to check the display functionality.
Attention: If you notice single non-functioning segments, the reader should not be used for measurements because result data may be displayed incorrectly. Please contact your supplier for a replacement in this case.
2.2 Self-testAfter the display flash, the reader runs a self-test to check internal functions important for the measurement process and memory integrity. During the self-test, WAIT is displayed.
2.3 Setting date and timeIn case the reader was without power supply (via batteries or cable connection) for longer than 1 minute, the reader will show date and time after the self-test. Please refer to the chapter Setting date and time. After setting date and time the reader will restart; proceed to point 2.1.

13
Reading Data from Memory11
Read
ing D
ata from
Mem
ory
3. Ready for operationThe display shows ON and the reader is ready for operation. The rapid test is now required.
4. Test insertionPlace the test into the adapter. If you use a strip adapter, you have to put the strip inside the adapter. If you use a cassette adapter, you have to put the adapter on top of the cassette. Be sure that the adapter is correctly placed.
After the test is placed in the strip/cassette adapter, the reader can be placed on top. The slanted reader corner and an corresponding counterpart inside the adapter help to find the correct position of the reader.

14
Reading Data from Memory11
Read
ing D
ata from
Mem
ory
5. MeasurementThe reader is now ready to start a measurement.
5.1 Direct MeasurementPress the button briefly. The display will show RFID or TEST. Proceed to 6.1.
5.2 Timer MeasurementIf you want to start the measurement after a certain incubation time has passed, press the button longer than 1 second. The display will show RFID or TEST, depending on your reader configuration. Each timer measurement can be stopped by pressing the button during the measurement.
6. Test configuration dataThere are different possibilities of test configuration data transmission depending on the reader configuration.
6.1 Configuration data via RFID Test configurations are uploaded via RFID before the measurement. Put the lot specific RFID card onto the top side of the device or hold the device against the RFID tag sticking on the test box until the configuration data has been uploaded (audible signal).

15
Remote Measurement12
Rem
ote M
easurement
6.2 Transfer of configuration from RFID to reader Data on the RFID card is transferred and stored to the Cube memory after being uploaded via RFID. The configuration is still available for further tests after the measurement.
By briefly pressing the button, the reader will use the stored configuration and proceed to point 7. If a new RFID card is placed on the reader instead, the new configuration will be uploaded and will replace the old stored configuration. Then the reader proceeds to point 7. The configuration is still stored after turn-off and can be used again after turn-on until it is replaced with a new RFID transmission.
Attention: The permanent version of the feature bears the risk that the currently stored configuration is unknown, and a wrong test is measured with it which can lead to faulty results.
7. TestAfter a successful RFID transmission of the configuration the display shows TEST. Press and hold the button longer than 1 second to show test and lot specific information of the test to be run. Briefly press the button to return to TEST and continue with the measurement process.
8. Start measurementStart the measurement by briefly pressing the button.

16
9. RunThe device measures and the display shows RUN.
10. ResultAfter a few seconds the result is displayed.
11. Result savingThe reader has an internal memory to store up to 100 readings. If the internal memory is full and a new result is saved, the reader overwrites the first saved result. Every new saved result will overwrite the saved results in chronological order.
There are different possibilities concerning result saving on the reader depending on the reader configuration. If no saving is required or if data saving is deactivated on your reader, proceed to 11.3.
11.1 Automatic saving All results will be saved after the measurement. The reader will not give a specific display message. Proceed to point 11.2.
11.2 Return to ON statePress the button again to return to ON. Proceed to point 4 for a new measurement.
12 Remote Measurement
Rem
ote M
easurement
17
12 Remote Measurement
Rem
ote M
easurement
11.3 No savingIf no result storage is required, or if data saving is deactivated on your reader, briefly press the button less than 1 second to not store the result. ON appears in the display; proceed to point 4 if a new measurement will be started.
12. Turn offIf the device is switched on and will not be activated for about 50 seconds, the device automatically shuts down. If a new measurement will be started, proceed to point 2.
Please note: There is no active function to shut off the device.
18
If you wish to perform a QC test after a certain amount of measurements, a QC set consisting of a special QC cassette and a corresponding QC configuration on the RFID card can be provided for this purpose (please contact your supplier).
When a QC test is required, please take the provided QC set and insert the QC cassette into the cassette adapter according to the Test Insertion point of the measurement procedure and place the reader on top. Briefly press the button and RFID will be displayed. Put the QC RFID card on top of the reader and wait until the QC configuration data has been uploaded (audible signal). Alternatively, select the QC test from the reader memory. Briefly press the button again to start the QC test. The QC test result will be displayed afterwards.
Attention: The result of the QC test may be PASS or FAIL.The reader will be able to measure again after the QC test, even if the QC result was FAIL. When a QC test fails, the reader should not be used for measurements because results could be faulty. The Cube should be switched off and on again, and the bottom part of the Cube that performs the reading should be cleaned. If the problem persists, please contact your supplier for a replacement.
QC-Test13
QC
-Test
19
Error Messages - Causes and Solutions14
Erro
r Messag
es - Causes and
So
lutions
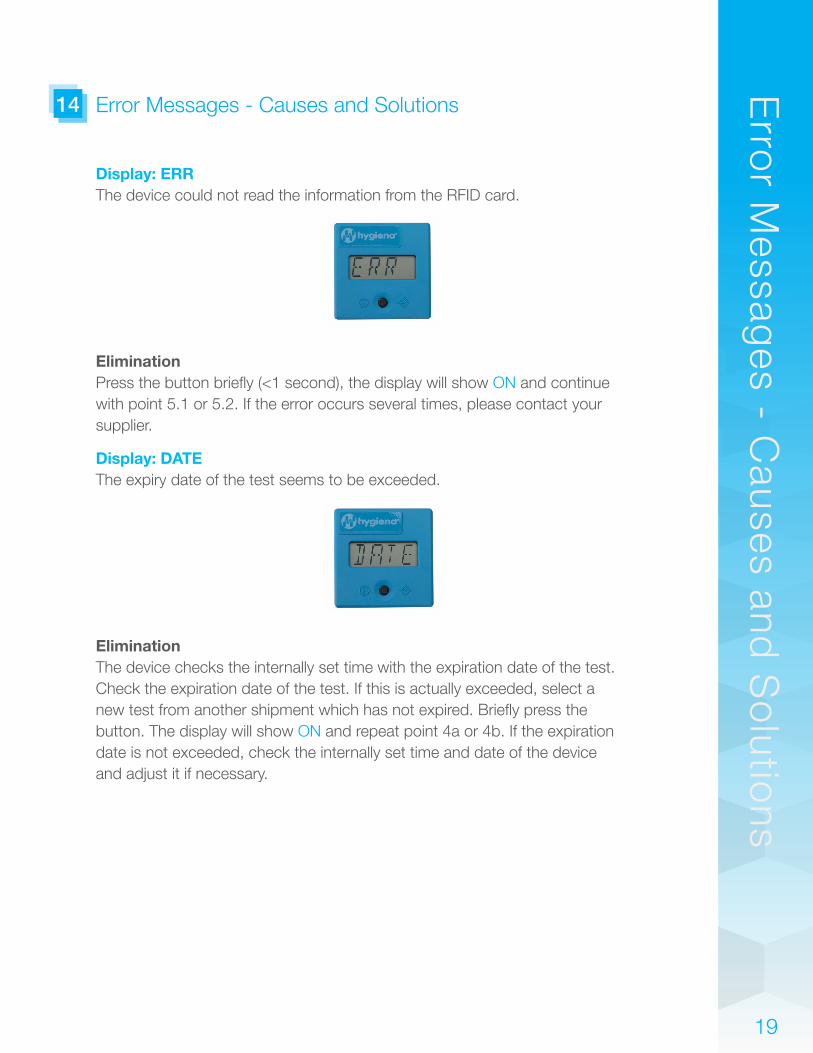
Display: ERRThe device could not read the information from the RFID card.
EliminationPress the button briefly (<1 second), the display will show ON and continue with point 5.1 or 5.2. If the error occurs several times, please contact your supplier.
Display: DATE The expiry date of the test seems to be exceeded.
EliminationThe device checks the internally set time with the expiration date of the test.Check the expiration date of the test. If this is actually exceeded, select a new test from another shipment which has not expired. Briefly press the button. The display will show ON and repeat point 4a or 4b. If the expiration date is not exceeded, check the internally set time and date of the device and adjust it if necessary.
20
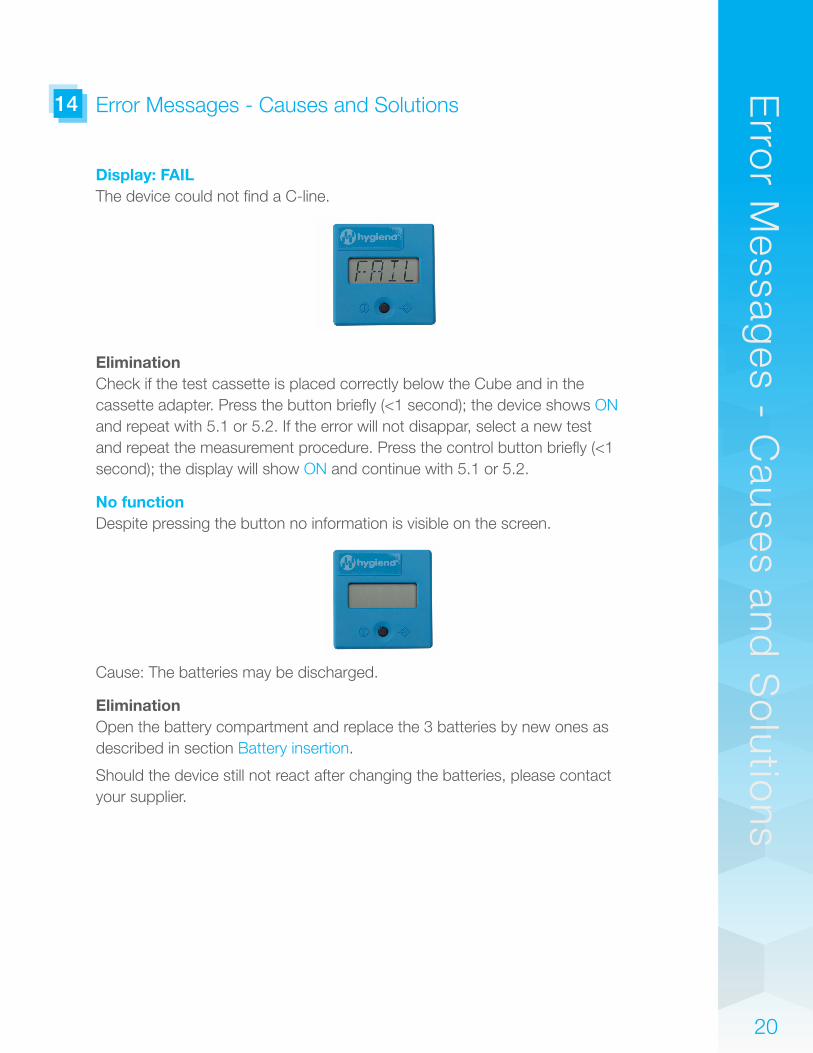
Display: FAILThe device could not find a C-line.
EliminationCheck if the test cassette is placed correctly below the Cube and in the cassette adapter. Press the button briefly (<1 second); the device shows ON and repeat with 5.1 or 5.2. If the error will not disappar, select a new test and repeat the measurement procedure. Press the control button briefly (<1 second); the display will show ON and continue with 5.1 or 5.2.
No functionDespite pressing the button no information is visible on the screen.
Cause: The batteries may be discharged.
EliminationOpen the battery compartment and replace the 3 batteries by new ones as described in section Battery insertion.
Should the device still not react after changing the batteries, please contact your supplier.
Error Messages - Causes and Solutions14
Erro
r Messag
es - Causes and
So
lutions

21
Setting Date and Time15
Setting
Date and
Tim
e
Bring the device to position ON according to step 1. Briefly press the button twice (<1 second). Year, date and time will appear on the display.
Press the button for about 1 second. A flashing display appears with the first time specification: year. By repeated brief (<1 second) pressing of the button, the displayed value can be changed. When the wanted value is reached (e.g. year) press the button longer (>1 second). The appointed value will be stored and the next time information will be presented. Repeat these steps to successively move through year, month, day, hour and minute. After setting the date and time information accordingly, the device will display OK.
Press the button one more time. The reader will show ON and is now ready for use. Repeat this process after every battery change.
22
Data Transfer16
Data Transfer
The device provides the possibility of data transfer to a PC or laptop, for which a unique USB cable and the Cube DataReader Software are required. The software can be downloaded from the website www.hygiena.com
23
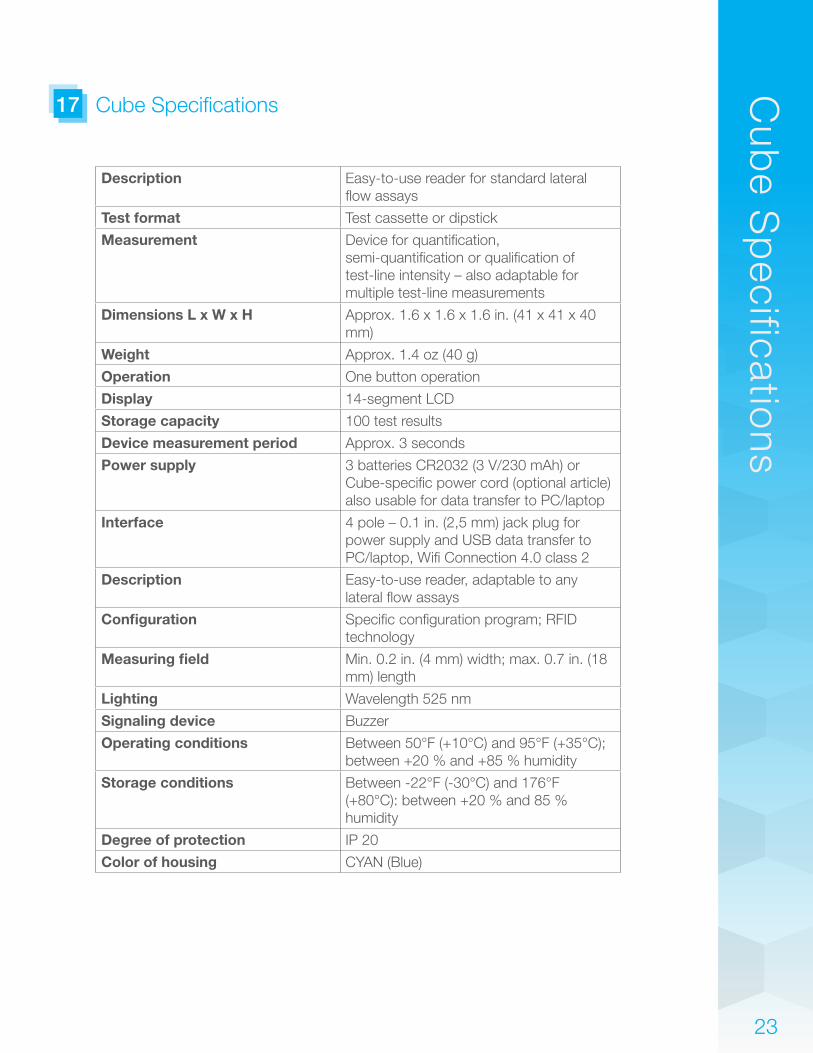
Cube Specifications17
Cub
e Sp
ecifications
Description Easy-to-use reader for standard lateral flow assays
Test format Test cassette or dipstick
Measurement Device for quantification, semi-quantification or qualification of test-line intensity – also adaptable for multiple test-line measurements
Dimensions L x W x H Approx. 1.6 x 1.6 x 1.6 in. (41 x 41 x 40 mm)
Weight Approx. 1.4 oz (40 g)
Operation One button operation
Display 14-segment LCD
Storage capacity 100 test results
Device measurement period Approx. 3 seconds
Power supply 3 batteries CR2032 (3 V/230 mAh) or Cube-specific power cord (optional article) also usable for data transfer to PC/laptop
Interface 4 pole – 0.1 in. (2,5 mm) jack plug for power supply and USB data transfer to PC/laptop, Wifi Connection 4.0 class 2
Description Easy-to-use reader, adaptable to any lateral flow assays
Configuration Specific configuration program; RFID technology
Measuring field Min. 0.2 in. (4 mm) width; max. 0.7 in. (18 mm) length
Lighting Wavelength 525 nm
Signaling device Buzzer
Operating conditions Between 50°F (+10°C) and 95°F (+35°C); between +20 % and +85 % humidity
Storage conditions Between -22°F (-30°C) and 176°F (+80°C): between +20 % and 85 % humidity
Degree of protection IP 20
Color of housing CYAN (Blue)
24
Maintenance and Cleaning of the Window
Maintenance and
Cleaning
of the W
indo
w
The device is maintenance-free. Before each measurement, the glass on the bottom should be checked for impurities. For cleaning, a commercial cloth together with a commercial cleaning fluid, e.g. for glass products, is recommended.
The status of the batteries is monitored. Replace the batteries when the battery symbol starts to blink. The batteries cannot be recharged and must be properly disposed of.
18
25
Disposal of the Device19
Disp
osal o
f the Device
As the device can be contaminated by any material, it should be disinfected with appropriate safety equipment.
After removing the batteries, dispose of the used device in accordance with the applicable country-specific regulations.
26INS3030 REV A
Americas:
Hygiena Headquarters 941 Avenida Acaso
Camarillo, CA 93012 1-805-388-8007
Hygiena Canada 2650 Meadowvale Blvd Unit 14 Mississauga, Ontario L5N 6M5
1-833-494-4362 (Toll-free) or 1-416-686-7962
Hygiena Mexico, S.A. de C.V. Calle 3 Anegas 409 Bodega 5, Col. Nueva Indus-trial Vallejo, Delegación Gustavo A. Madero, C.P.
07700, CDMX, México. +52 (55) 5281-4108 y 5281-4146
International:
Hygiena International 8, Woodshots Meadow Watford, Hertfordshire
WD18 8YU, UK +44 (0)1923-818821
Hygiena (Shanghai) Trading Co., Ltd. Rm.7K, No.518, Shangcheng Rd.
Pudong New District Shanghai, China 200120
+86 21-5132-1081, +86 21-5132-1077, +86 21-5132-1078
Hygiena Diagnóstica España S.L. P. I. Parque Plata, Calle Cañada Real 31-35,
41900, Camas, Sevilla, Spain +34 954-08-1276
www.hygiena.com