Embed Size (px)
Citation preview
3-258-853-13 (1)
IC Recorder
©2003 Sony Corporation
ICD-BM1/BM1PRO
Operating Instructions
Owner’s RecordThe model number and the serial number are locatedon the back of the unit.Record the serial number in the space provided below.Refer to these numbers whenever you call upon yourSony dealer regarding this product.
Model No. ICD-BM1/BM1PRO Serial No.
2GB
For the customers in the United States
Declaration of ConformityTrade Name: SONYModel No.: ICD-BM1Responsible Party: Sony Electronics Inc.Address: 680 Kinderkamack Road, Oradell, NJ. 07649 USATelephone No.: 201-930-6972
This device complies with Part 15 of the FCC Rules. Operation is subject to thefollowing two conditions: (1) This device may not cause harmful interference, and(2) this device must accept any interference received, including interference thatmay cause undesired operation.
For the customers in the United StatesINFORMATIONThis equipment has been tested and found to comply with the limits for a Class Bdigital device, pursuant to Part 15 of the FCC Rules. These limits are designed toprovide reasonable protection against harmful interference in a residential installation.This equipment generates, uses, and can radiate radio frequency energy and, if notinstalled and used in accordance with the instructions, may cause harmful interferenceto radio communications.However, there is no guarantee that interference will not occur in a particularinstallation. If this equipment does cause harmful interference to radio or televisionreception, which can be determined by turning the equipment off and on, the user isencouraged to try to correct the interference by one or more of the following measures:– Reorient or relocate the receiving antenna.– Increase the separation between the equipment and receiver.– Connect the equipment into an outlet on a circuit different from that to which the
receiver is connected.– Consult the dealer or an experienced radio/TV technician for help.
You are cautioned that any changes or modifications not expressly approved in thismanual could void your authority to operate this equipment.
For “Memory Stick”This device complies with Part 15 of the FCC Rules. Operation is subject to thefollowing two conditions: (1) This device may not cause harmful interference, and (2)this device must accept any interference received, including interference that maycause undesired operation.
If you have any questions about this product, you may call:Sony Customer Information Services Center (800)-222-7669or write to:Sony Customer Information Services Center 12451 Gateway Blvd. Fort Myers, FL33913

3GB
Notice for usersProgram © 1999, 2000, 2001, 2002, 2003 Sony CorporationDocumentation ©2003 Sony Corporation
All rights reserved. This manual or the software described herein, in whole or in part,may not be reproduced, translated or reduced to any machine readable form withoutprior written approval from Sony Corporation.
IN NO EVENT SHALL SONY CORPORATION BE LIABLE FOR ANY INCIDENTAL,CONSEQUENTIAL OR SPECIAL DAMAGES, WHETHER BASED ON TORT,CONTRACT, OR OTHERWISE, ARISING OUT OF OR IN CONNECTION WITHTHIS MANUAL, THE SOFTWARE OR OTHER INFORMATION CONTAINEDHEREIN OR THE USE THEREOF.
Sony Corporation reserves the right to make any modification to this manual or theinformation contained herein at any time without notice.
The software described herein may also be governed by the terms of a separate userlicense agreement.• This software is for Windows and cannot be used for Macintosh.• The supplied connecting cable is for the IC recorder ICD-BM1/BM1PRO only. You
cannot connect other IC recorders.
InformationIN NO EVENT SHALL SELLER BE LIABLE FOR ANY DIRECT, INCIDENTAL ORCONSEQUENTIAL DAMAGES OF ANY NATURE, OR LOSSES OR EXPENSESRESULTING FROM ANY DEFECTIVE PRODUCT OR THE USE OF ANY PRODUCT.
Trademarks• “Memory Stick“ and are trademarks of Sony Corporation.• “LPEC” is the trademark of Sony Corporation.• IBM and PC/AT are registered trademarks of International Business Machines
Corporation.• Microsoft, Windows and Outlook are trademarks of Microsoft Corporation,
registered in the U.S.A. and other countries.Copyright ©1995 Microsoft Corporation.All rights reserved.Portion Copyright ©1995 Microsoft Corporation
• Apple and Macintosh are trademarks of Apple Computer Inc., registered in theU.S.A. and other countries.
• Pentium is a registered trademark of Intel Corporation.• NaturallySpeaking, Dragon Systems are trademarks owned by ScanSoft, Inc. and
are registered in the United States and/or other countries.• All other trademarks and registered trademarks are trademarks or registered
trademarks of their respective holders. Furthermore, “™” and “®” are notmentioned in each case in this manual.
The “Digital Voice Editor” uses software modules as shown below:Microsoft® DirectX® Media Runtime©2001 Microsoft Corporation. All rights reserved.
4GB
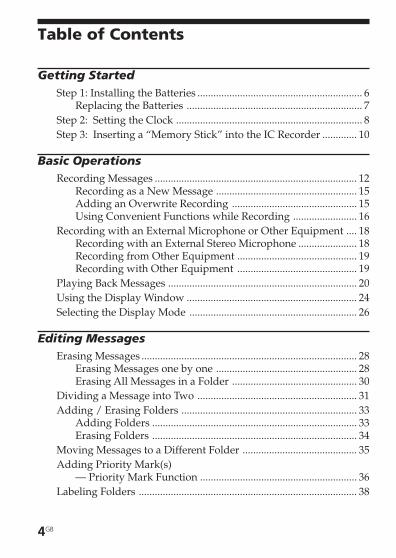
Table of Contents
Getting StartedStep 1: Installing the Batteries .............................................................. 6
Replacing the Batteries .................................................................. 7Step 2: Setting the Clock ...................................................................... 8Step 3: Inserting a “Memory Stick” into the IC Recorder ............. 10
Basic OperationsRecording Messages ............................................................................ 12
Recording as a New Message ..................................................... 15Adding an Overwrite Recording ............................................... 15Using Convenient Functions while Recording ........................ 16
Recording with an External Microphone or Other Equipment .... 18Recording with an External Stereo Microphone ...................... 18Recording from Other Equipment ............................................. 19Recording with Other Equipment ............................................. 19
Playing Back Messages ....................................................................... 20Using the Display Window ................................................................ 24Selecting the Display Mode ............................................................... 26
Editing MessagesErasing Messages ................................................................................. 28
Erasing Messages one by one ..................................................... 28Erasing All Messages in a Folder ............................................... 30
Dividing a Message into Two ............................................................ 31Adding / Erasing Folders .................................................................. 33
Adding Folders ............................................................................. 33Erasing Folders ............................................................................. 34
Moving Messages to a Different Folder ........................................... 35Adding Priority Mark(s)
— Priority Mark Function ........................................................... 36Labeling Folders .................................................................................. 38
5GB
Other FunctionsAdjusting the Playback Speed — DPC
(Digital Pitch Control) .................................................................. 39Setting the Overwrite Mode .............................................................. 41Playing Back a Message at a Desired Time with an Alarm ........... 43Formatting a “Memory Stick“ ........................................................... 47Changing the Settings — MENU ...................................................... 49Using the ”Digital Voice Editor“ Software ...................................... 52
Additional InformationPrecautions ........................................................................................... 54Troubleshooting ................................................................................... 56
Error messages of the IC Recorder ............................................. 59System Limitations ....................................................................... 61
Specifications ........................................................................................ 63Index to Parts and Controls ............................................................... 64
Using the optional AC power adaptor ...................................... 66Index ...................................................................................................... 67
6GB
BGetting Started
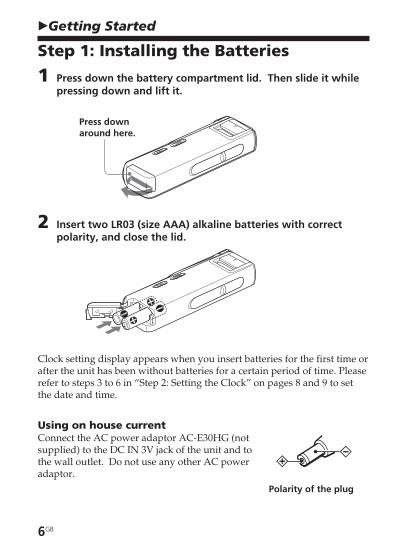
Step 1: Installing the Batteries
1 Press down the battery compartment lid. Then slide it whilepressing down and lift it.
2 Insert two LR03 (size AAA) alkaline batteries with correctpolarity, and close the lid.
Clock setting display appears when you insert batteries for the first time orafter the unit has been without batteries for a certain period of time. Pleaserefer to steps 3 to 6 in “Step 2: Setting the Clock” on pages 8 and 9 to setthe date and time.
Using on house currentConnect the AC power adaptor AC-E30HG (notsupplied) to the DC IN 3V jack of the unit and tothe wall outlet. Do not use any other AC poweradaptor.
Polarity of the plug
Press downaround here.
7GB
Getting Started
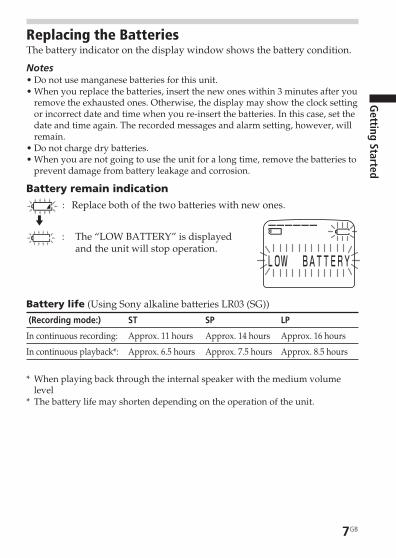
Replacing the BatteriesThe battery indicator on the display window shows the battery condition.
Notes• Do not use manganese batteries for this unit.• When you replace the batteries, insert the new ones within 3 minutes after you
remove the exhausted ones. Otherwise, the display may show the clock settingor incorrect date and time when you re-insert the batteries. In this case, set thedate and time again. The recorded messages and alarm setting, however, willremain.
• Do not charge dry batteries.• When you are not going to use the unit for a long time, remove the batteries to
prevent damage from battery leakage and corrosion.
Battery remain indication
: Replace both of the two batteries with new ones.
m
: The “LOW BATTERY” is displayedand the unit will stop operation.
Battery life (Using Sony alkaline batteries LR03 (SG))
(Recording mode:) ST SP LP
In continuous recording: Approx. 11 hours Approx. 14 hours Approx. 16 hours
In continuous playback*: Approx. 6.5 hours Approx. 7.5 hours Approx. 8.5 hours
* When playing back through the internal speaker with the medium volumelevel
* The battery life may shorten depending on the operation of the unit.
8GB
Jog lever
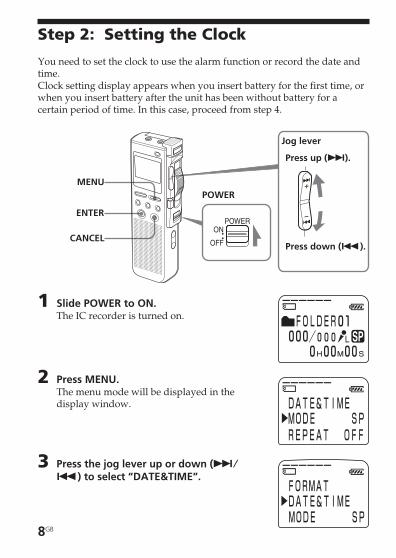
Step 2: Setting the Clock
You need to set the clock to use the alarm function or record the date andtime.Clock setting display appears when you insert battery for the first time, orwhen you insert battery after the unit has been without battery for acertain period of time. In this case, proceed from step 4.
1 Slide POWER to ON.The IC recorder is turned on.
2 Press MENU.The menu mode will be displayed in thedisplay window.
3 Press the jog lever up or down (>/
.) to select “DATE&TIME”.
MENU
Press up (>).
Press down (.).
ENTER
CANCEL
POWER
9GB
Getting Started
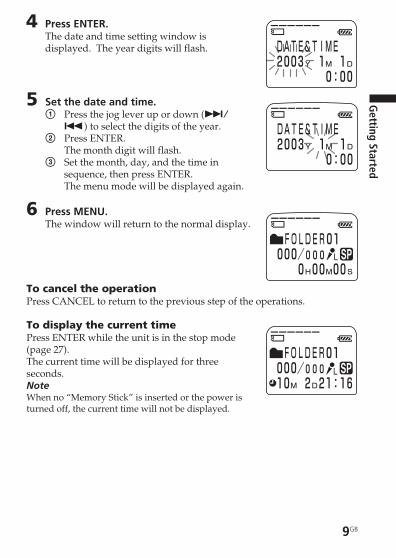
4 Press ENTER.The date and time setting window isdisplayed. The year digits will flash.
5 Set the date and time.1 Press the jog lever up or down (>/
.) to select the digits of the year.2 Press ENTER.
The month digit will flash.3 Set the month, day, and the time in
sequence, then press ENTER.The menu mode will be displayed again.
6 Press MENU.The window will return to the normal display.
To cancel the operationPress CANCEL to return to the previous step of the operations.
To display the current timePress ENTER while the unit is in the stop mode(page 27).The current time will be displayed for threeseconds.NoteWhen no “Memory Stick” is inserted or the power isturned off, the current time will not be displayed.
10GB
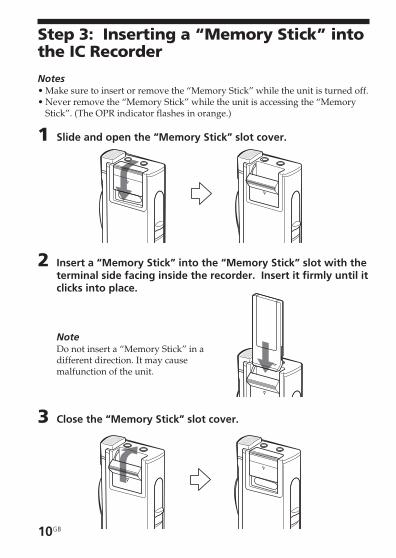
Step 3: Inserting a “Memory Stick” intothe IC Recorder
Notes• Make sure to insert or remove the “Memory Stick” while the unit is turned off.• Never remove the “Memory Stick” while the unit is accessing the “Memory
Stick”. (The OPR indicator flashes in orange.)
1 Slide and open the “Memory Stick” slot cover.
2 Insert a “Memory Stick” into the “Memory Stick” slot with theterminal side facing inside the recorder. Insert it firmly until itclicks into place.
NoteDo not insert a “Memory Stick” in adifferent direction. It may causemalfunction of the unit.
3 Close the “Memory Stick” slot cover.
11GB
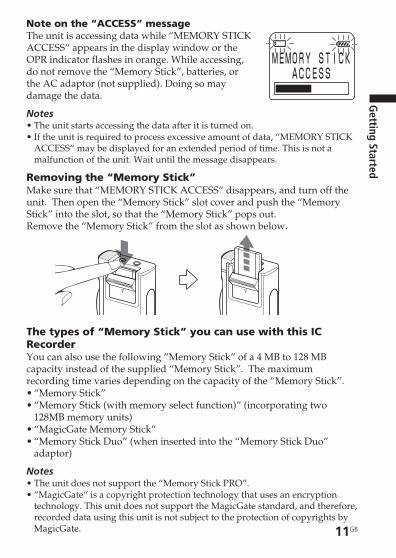
Note on the “ACCESS” messageThe unit is accessing data while “MEMORY STICKACCESS“ appears in the display window or theOPR indicator flashes in orange. While accessing,do not remove the “Memory Stick”, batteries, orthe AC adaptor (not supplied). Doing so maydamage the data.
Notes• The unit starts accessing the data after it is turned on.• If the unit is required to process excessive amount of data, “MEMORY STICK
ACCESS“ may be displayed for an extended period of time. This is not amalfunction of the unit. Wait until the message disappears.
Removing the “Memory Stick”Make sure that “MEMORY STICK ACCESS“ disappears, and turn off theunit. Then open the “Memory Stick” slot cover and push the “MemoryStick” into the slot, so that the “Memory Stick” pops out.Remove the “Memory Stick” from the slot as shown below.
The types of “Memory Stick” you can use with this ICRecorderYou can also use the following “Memory Stick” of a 4 MB to 128 MBcapacity instead of the supplied “Memory Stick”. The maximumrecording time varies depending on the capacity of the “Memory Stick”.• “Memory Stick”• “Memory Stick (with memory select function)” (incorporating two
128MB memory units)• “MagicGate Memory Stick”• “Memory Stick Duo” (when inserted into the “Memory Stick Duo”
adaptor)
Notes• The unit does not support the “Memory Stick PRO”.• “MagicGate“ is a copyright protection technology that uses an encryption
technology. This unit does not support the MagicGate standard, and therefore,recorded data using this unit is not subject to the protection of copyrights byMagicGate.
Getting Started
12GB
BBasic Operations
Recording Messages
You can record messages in each (initially named FOLDER01, FOLDER02,and FOLDER03) folder. The maximum number of recordable messagesdiffers depending on the “Memory Stick” capacity.You can record messages using the following three functions:• Add a recording to a previously recorded message (next page)• Add a recording as a new message (page 15)• Add an overwrite recording (page 15)
This section explains how to add a recording to a previously recorded message.
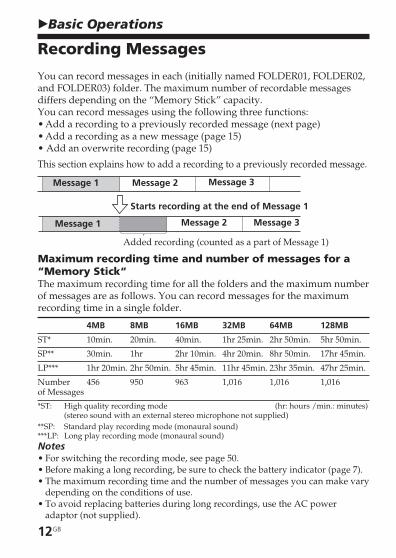
Maximum recording time and number of messages for a“Memory Stick“The maximum recording time for all the folders and the maximum numberof messages are as follows. You can record messages for the maximumrecording time in a single folder.
4MB 8MB 16MB 32MB 64MB 128MB
ST* 10min. 20min. 40min. 1hr 25min. 2hr 50min. 5hr 50min.
SP** 30min. 1hr 2hr 10min. 4hr 20min. 8hr 50min. 17hr 45min.
LP*** 1hr 20min. 2hr 50min. 5hr 45min. 11hr 45min. 23hr 35min. 47hr 25min.
Number 456 950 963 1,016 1,016 1,016of Messages
*ST: High quality recording mode (hr: hours /min.: minutes)(stereo sound with an external stereo microphone not supplied)
**SP: Standard play recording mode (monaural sound)***LP: Long play recording mode (monaural sound)Notes• For switching the recording mode, see page 50.• Before making a long recording, be sure to check the battery indicator (page 7).• The maximum recording time and the number of messages you can make vary
depending on the conditions of use.• To avoid replacing batteries during long recordings, use the AC power
adaptor (not supplied).
Message 1 Message 2 Message 3
Message 1 Message 2 Message 3
Starts recording at the end of Message 1
Added recording (counted as a part of Message 1)
Basic Operations
13GB
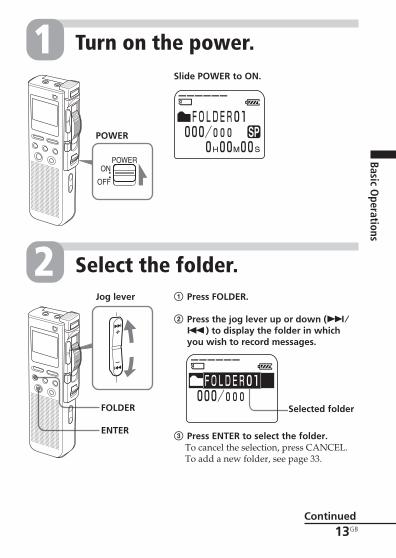
Turn on the power.Slide POWER to ON.
Select the folder.2
FOLDER
1
POWER
1 Press FOLDER.
2 Press the jog lever up or down (>/
.) to display the folder in whichyou wish to record messages.
ENTER
Selected folder
Continued
3 Press ENTER to select the folder.To cancel the selection, press CANCEL.To add a new folder, see page 33.
Jog lever
14GB
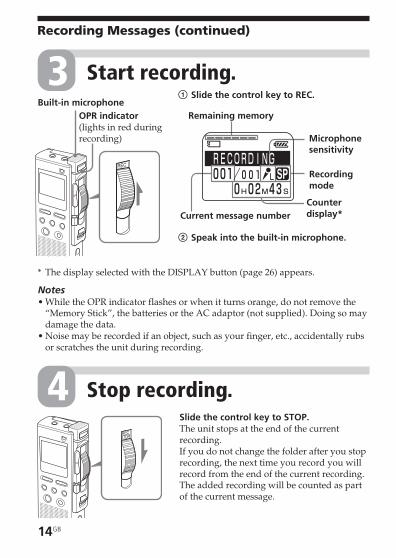
Slide the control key to STOP.The unit stops at the end of the currentrecording.If you do not change the folder after you stoprecording, the next time you record you willrecord from the end of the current recording.The added recording will be counted as partof the current message.
Stop recording.4
Start recording.31 Slide the control key to REC.
2 Speak into the built-in microphone.
Remaining memory
Recordingmode
Current message number
Built-in microphone
Microphonesensitivity
Recording Messages (continued)
OPR indicator(lights in red duringrecording)
Counterdisplay*
* The display selected with the DISPLAY button (page 26) appears.
Notes• While the OPR indicator flashes or when it turns orange, do not remove the
“Memory Stick”, the batteries or the AC adaptor (not supplied). Doing so maydamage the data.
• Noise may be recorded if an object, such as your finger, etc., accidentally rubsor scratches the unit during recording.
Basic Operations
15GB
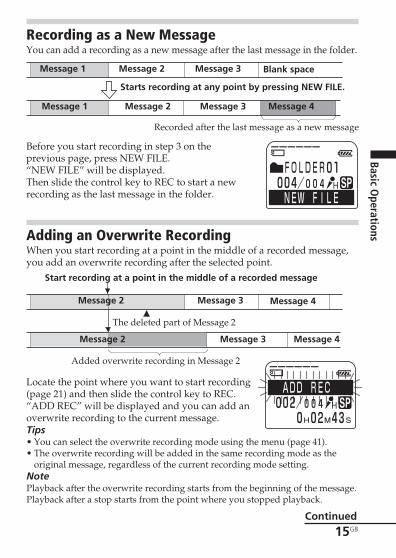
Recording as a New MessageYou can add a recording as a new message after the last message in the folder.
Before you start recording in step 3 on theprevious page, press NEW FILE.“NEW FILE” will be displayed.Then slide the control key to REC to start a newrecording as the last message in the folder.
Adding an Overwrite RecordingWhen you start recording at a point in the middle of a recorded message,you add an overwrite recording after the selected point.
Locate the point where you want to start recording(page 21) and then slide the control key to REC.“ADD REC” will be displayed and you can add anoverwrite recording to the current message.Tips• You can select the overwrite recording mode using the menu (page 41).• The overwrite recording will be added in the same recording mode as the
original message, regardless of the current recording mode setting.NotePlayback after the overwrite recording starts from the beginning of the message.Playback after a stop starts from the point where you stopped playback.
Continued
Message 1 Message 2 Message 3
Message 1 Message 2 Message 3
Starts recording at any point by pressing NEW FILE.
Blank space
Recorded after the last message as a new message
Message 4
The deleted part of Message 2
Added overwrite recording in Message 2
Message 4
Message 4
Start recording at a point in the middle of a recorded message
Message 2 Message 3
Message 3Message 2
16GB
Recording Messages (continued)
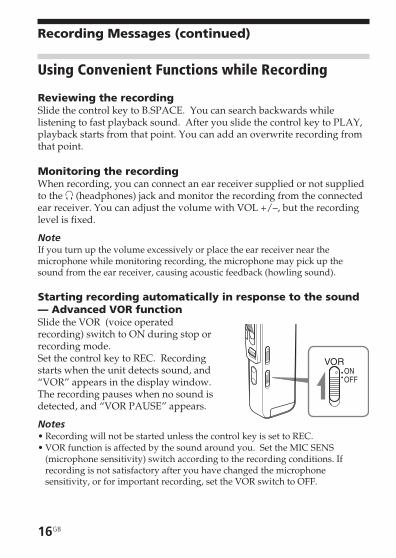
Using Convenient Functions while Recording
Reviewing the recordingSlide the control key to B.SPACE. You can search backwards whilelistening to fast playback sound. After you slide the control key to PLAY,playback starts from that point. You can add an overwrite recording fromthat point.
Monitoring the recordingWhen recording, you can connect an ear receiver supplied or not suppliedto the i (headphones) jack and monitor the recording from the connectedear receiver. You can adjust the volume with VOL +/–, but the recordinglevel is fixed.
NoteIf you turn up the volume excessively or place the ear receiver near themicrophone while monitoring recording, the microphone may pick up thesound from the ear receiver, causing acoustic feedback (howling sound).
Starting recording automatically in response to the sound— Advanced VOR functionSlide the VOR (voice operatedrecording) switch to ON during stop orrecording mode.Set the control key to REC. Recordingstarts when the unit detects sound, and“VOR” appears in the display window.The recording pauses when no sound isdetected, and “VOR PAUSE” appears.
Notes• Recording will not be started unless the control key is set to REC.• VOR function is affected by the sound around you. Set the MIC SENS
(microphone sensitivity) switch according to the recording conditions. Ifrecording is not satisfactory after you have changed the microphonesensitivity, or for important recording, set the VOR switch to OFF.
Basic Operations
17GB
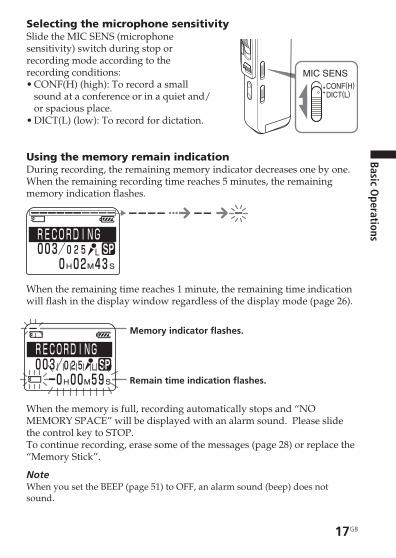
Selecting the microphone sensitivitySlide the MIC SENS (microphonesensitivity) switch during stop orrecording mode according to therecording conditions:• CONF(H) (high): To record a small
sound at a conference or in a quiet and/or spacious place.
• DICT(L) (low): To record for dictation.
Using the memory remain indicationDuring recording, the remaining memory indicator decreases one by one.When the remaining recording time reaches 5 minutes, the remainingmemory indication flashes.
When the remaining time reaches 1 minute, the remaining time indicationwill flash in the display window regardless of the display mode (page 26).
When the memory is full, recording automatically stops and “NOMEMORY SPACE” will be displayed with an alarm sound. Please slidethe control key to STOP.To continue recording, erase some of the messages (page 28) or replace the“Memory Stick”.
NoteWhen you set the BEEP (page 51) to OFF, an alarm sound (beep) does notsound.
Memory indicator flashes.
Remain time indication flashes.
18GB
Recording with an External Microphoneor Other Equipment
You can record sound of an external microphone or other equipment (taperecorder, MiniDisc player, or etc.) with the IC recorder. Depending on thedevice you use, connect the IC recorder as follows. For availableaccessories, consult with your nearest Sony dealer.
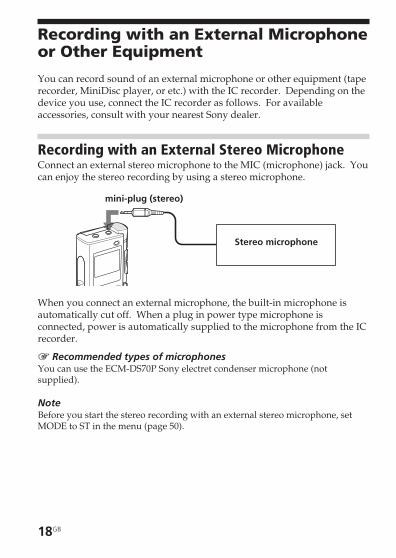
Recording with an External Stereo MicrophoneConnect an external stereo microphone to the MIC (microphone) jack. Youcan enjoy the stereo recording by using a stereo microphone.
When you connect an external microphone, the built-in microphone isautomatically cut off. When a plug in power type microphone isconnected, power is automatically supplied to the microphone from the ICrecorder.
1 Recommended types of microphonesYou can use the ECM-DS70P Sony electret condenser microphone (notsupplied).
NoteBefore you start the stereo recording with an external stereo microphone, setMODE to ST in the menu (page 50).
Stereo microphone
mini-plug (stereo)
Basic Operations
19GB
Recording from Other EquipmentTo record sound of other equipment with the IC recorder, connect the MIC(microphone) jack of the IC recorder to the earphone jack of otherequipment (tape recorder etc.) by using an audio connecting cable.
Notes• When the audio recording level is large, sound may be recorded
interrupted if you use an audio connecting cable without register. Use aregistered audio connecting cable.
• When the audio recording level is small, do not use a registered audioconnecting cable.
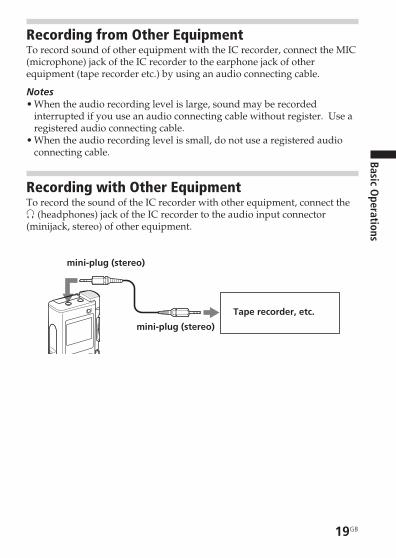
Recording with Other EquipmentTo record the sound of the IC recorder with other equipment, connect thei (headphones) jack of the IC recorder to the audio input connector(minijack, stereo) of other equipment.
Tape recorder, etc.
mini-plug (stereo)
mini-plug (stereo)
20GB
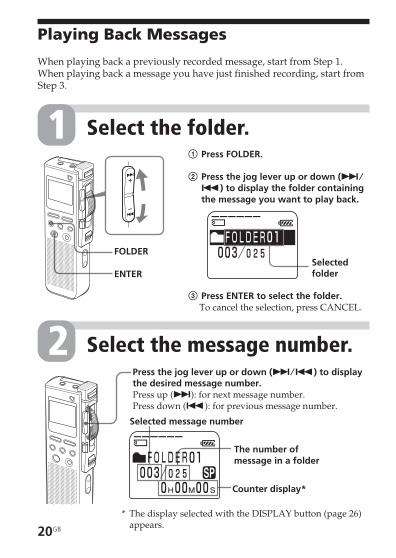
1 Press FOLDER.
2 Press the jog lever up or down (>/
.) to display the folder containingthe message you want to play back.
3 Press ENTER to select the folder.To cancel the selection, press CANCEL.
Selectedfolder
Select the message number.
Selected message number
The number ofmessage in a folder
Press the jog lever up or down (>/.) to displaythe desired message number.Press up (>): for next message number.Press down (.): for previous message number.
Counter display*
Playing Back Messages
When playing back a previously recorded message, start from Step 1.When playing back a message you have just finished recording, start fromStep 3.
Select the folder.1
FOLDER
ENTER
2
* The display selected with the DISPLAY button (page 26)appears.
Basic Operations
21GB
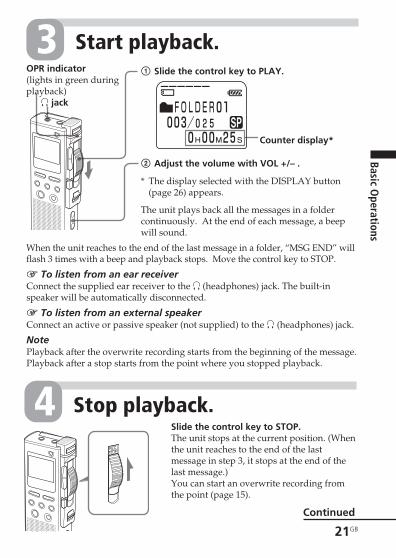
Slide the control key to STOP.The unit stops at the current position. (Whenthe unit reaches to the end of the lastmessage in step 3, it stops at the end of thelast message.)You can start an overwrite recording fromthe point (page 15).
Stop playback.4
Start playback.1 Slide the control key to PLAY.
2 Adjust the volume with VOL +/– .
* The display selected with the DISPLAY button(page 26) appears.
The unit plays back all the messages in a foldercontinuously. At the end of each message, a beepwill sound.
When the unit reaches to the end of the last message in a folder, “MSG END” willflash 3 times with a beep and playback stops. Move the control key to STOP.
1 To listen from an ear receiverConnect the supplied ear receiver to the i (headphones) jack. The built-inspeaker will be automatically disconnected.
1 To listen from an external speakerConnect an active or passive speaker (not supplied) to the i (headphones) jack.
NotePlayback after the overwrite recording starts from the beginning of the message.Playback after a stop starts from the point where you stopped playback.
i jack
OPR indicator(lights in green duringplayback)
3
Counter display*
Continued
22GB
Playing Back Messages (continued)
Other operations
To Do thisgo back to the beginning Press the jog lever down (.)of the current message* once.**go back to previous Press the jog lever down (.)messages* repeatedly. (During stop mode,
keep the button pressed to go backthe messages continuously.)**
skip to the next message* Press the jog lever up (>) once.***skip to the succeeding messages* Press the jog lever up (>)
repeatedly.***
* These operations are for when EASY-S is set to OFF. For operations whenEASY-S is set to ON, see page 51.
** If you do these operations at the beginning of the first message in a folderduring stop mode, the unit locates the end of the last message.
*** If you do these operations at the end of the last message in a folder duringstop mode, the unit locates the beginning of the first message.
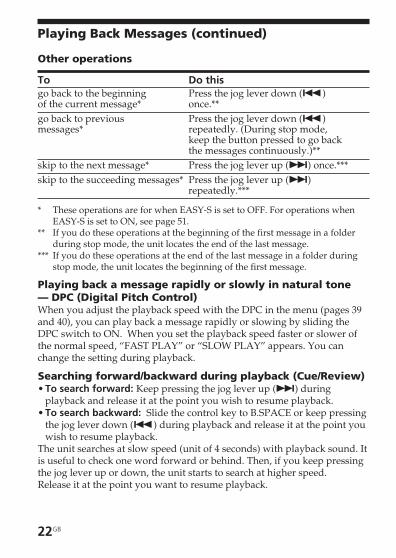
Playing back a message rapidly or slowly in natural tone— DPC (Digital Pitch Control)When you adjust the playback speed with the DPC in the menu (pages 39and 40), you can play back a message rapidly or slowing by sliding theDPC switch to ON. When you set the playback speed faster or slower ofthe normal speed, “FAST PLAY” or “SLOW PLAY” appears. You canchange the setting during playback.
Searching forward/backward during playback (Cue/Review)• To search forward: Keep pressing the jog lever up (>) during
playback and release it at the point you wish to resume playback.• To search backward: Slide the control key to B.SPACE or keep pressing
the jog lever down (.) during playback and release it at the point youwish to resume playback.
The unit searches at slow speed (unit of 4 seconds) with playback sound. Itis useful to check one word forward or behind. Then, if you keep pressingthe jog lever up or down, the unit starts to search at higher speed.Release it at the point you want to resume playback.

Basic Operations
23GB
1 When you play back to the end of the last messageWhen the unit locates the end of the last message, “MSG. END” flashes 3 timeswith a beep and the OPR indicator lights in green.• When “MOVE CONTROL KEY TO STOP POSITION” appears, slide the
control key to STOP. The unit will stop at the end of the last message.• To go back to the beginning of the first message in a folder during stop mode,
press the jog lever up (>).• If you slide the control key to B.SPACE or keep pressing the jog lever down
(.), the messages are played back rapidly, and normal playback will startat the point you release the button.
• If the last message is long and you wish to start playback at a later part of themessage, keep pressing the jog lever up (>) to go to the end of the messageand then press the jog lever down (.) to go back to the desired point.
Quickly locating the point at which you wish to startplayback (Easy Search)When EASY-S is set to ON (page 51) in the menu, you can quickly locatethe point you wish to start playback by pressing the jog lever up or down(>/.) repeatedly during playback.You can go back approximately 3 seconds by pressing the jog lever down(.) once, or advance approximately 10 seconds by pressing the jog leverup (>) once. This function is useful when locating a desired point in along recording.
Playing back a message repeatedly — Repeat PlayWhen REPEAT is set to ON in the menu (page 50),you can play back a message repeatedly.Slide the control key to PLAY. “MSG.REPEAT“will be displayed and the selected message will beplayed back repeatedly.To stop playback, slide the control key to STOP.To resume normal playback, set REPEAT to OFF inthe menu.
24GB
Using the Display Window
Parts in the display window
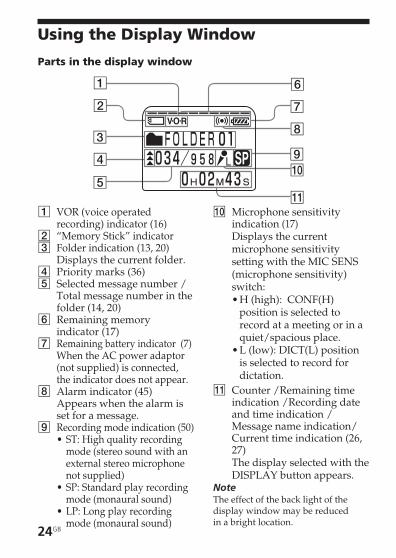
1 VOR (voice operatedrecording) indicator (16)
2 “Memory Stick” indicator3 Folder indication (13, 20)
Displays the current folder.4 Priority marks (36)5 Selected message number /
Total message number in thefolder (14, 20)
6 Remaining memoryindicator (17)
7 Remaining battery indicator (7)When the AC power adaptor(not supplied) is connected,the indicator does not appear.
8 Alarm indicator (45)Appears when the alarm isset for a message.
9 Recording mode indication (50)• ST: High quality recording
mode (stereo sound with anexternal stereo microphonenot supplied)
• SP: Standard play recordingmode (monaural sound)
• LP: Long play recordingmode (monaural sound)
0 Microphone sensitivityindication (17)Displays the currentmicrophone sensitivitysetting with the MIC SENS(microphone sensitivity)switch:•H (high): CONF(H)
position is selected torecord at a meeting or in aquiet/spacious place.
•L (low): DICT(L) positionis selected to record fordictation.
qa Counter /Remaining timeindication /Recording dateand time indication /Message name indication/Current time indication (26,27)The display selected with theDISPLAY button appears.
NoteThe effect of the back light of thedisplay window may be reducedin a bright location.
Basic Operations
25GB
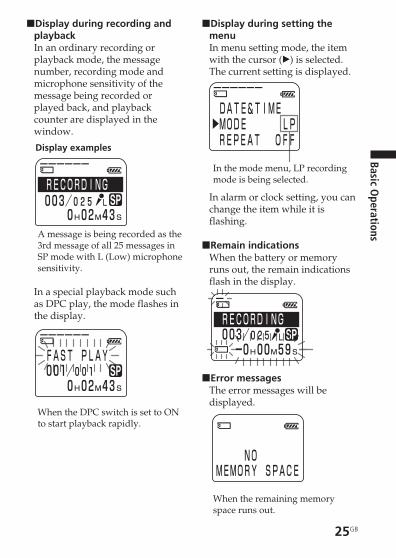
xDisplay during recording andplaybackIn an ordinary recording orplayback mode, the messagenumber, recording mode andmicrophone sensitivity of themessage being recorded orplayed back, and playbackcounter are displayed in thewindow.
A message is being recorded as the3rd message of all 25 messages inSP mode with L (Low) microphonesensitivity.
In a special playback mode suchas DPC play, the mode flashes inthe display.
When the DPC switch is set to ONto start playback rapidly.
Display examples
xDisplay during setting themenuIn menu setting mode, the itemwith the cursor (B) is selected.The current setting is displayed.
In the mode menu, LP recordingmode is being selected.
In alarm or clock setting, you canchange the item while it isflashing.
xRemain indicationsWhen the battery or memoryruns out, the remain indicationsflash in the display.
xError messagesThe error messages will bedisplayed.
When the remaining memoryspace runs out.
26GB
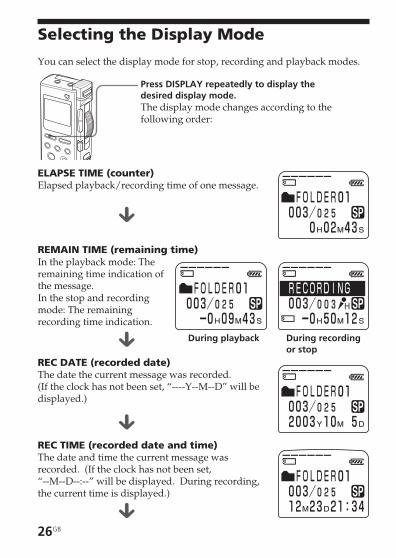
Selecting the Display Mode
You can select the display mode for stop, recording and playback modes.
Press DISPLAY repeatedly to display thedesired display mode.The display mode changes according to thefollowing order:
During playback During recordingor stop
ELAPSE TIME (counter)Elapsed playback/recording time of one message.
x
REMAIN TIME (remaining time)In the playback mode: Theremaining time indication ofthe message.In the stop and recordingmode: The remainingrecording time indication.
xREC DATE (recorded date)The date the current message was recorded.(If the clock has not been set, “----Y--M--D” will bedisplayed.)
xREC TIME (recorded date and time)The date and time the current message wasrecorded. (If the clock has not been set,“--M--D--:--” will be displayed. During recording,the current time is displayed.)
x
Basic Operations
27GB
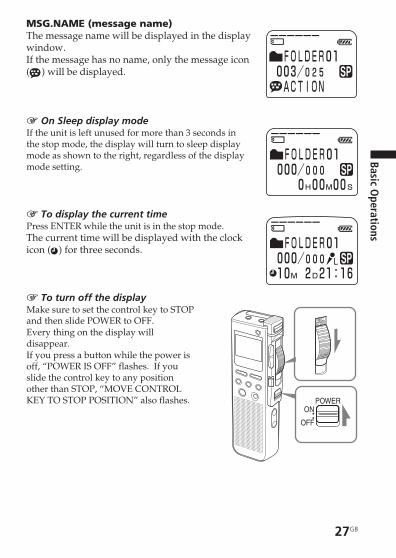
MSG.NAME (message name)The message name will be displayed in the displaywindow.If the message has no name, only the message icon( ) will be displayed.
1 On Sleep display modeIf the unit is left unused for more than 3 seconds inthe stop mode, the display will turn to sleep displaymode as shown to the right, regardless of the displaymode setting.
1 To display the current timePress ENTER while the unit is in the stop mode.The current time will be displayed with the clockicon ( ) for three seconds.
1 To turn off the displayMake sure to set the control key to STOPand then slide POWER to OFF.Every thing on the display willdisappear.If you press a button while the power isoff, “POWER IS OFF” flashes. If youslide the control key to any positionother than STOP, “MOVE CONTROLKEY TO STOP POSITION” also flashes.
28GB
Before erasing
After erasing
Remaining messages are renumbered.
BEditing Messages
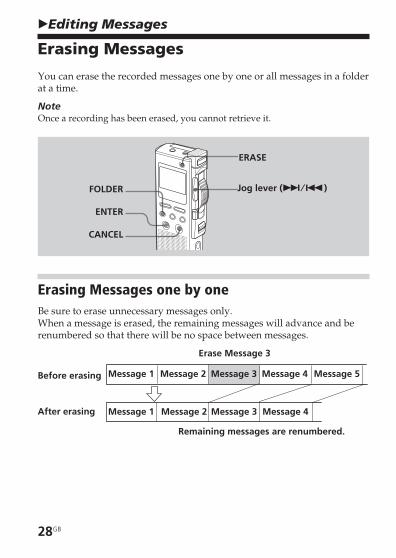
Erasing Messages
You can erase the recorded messages one by one or all messages in a folderat a time.
NoteOnce a recording has been erased, you cannot retrieve it.
Erasing Messages one by oneBe sure to erase unnecessary messages only.When a message is erased, the remaining messages will advance and berenumbered so that there will be no space between messages.
ERASE
FOLDER
ENTER
CANCEL
Erase Message 3
Message 1 Message 2 Message 3 Message 4 Message 5
Message 1 Message 2 Message 3 Message 4
Jog lever (>/.)
Editing Messages
29GB
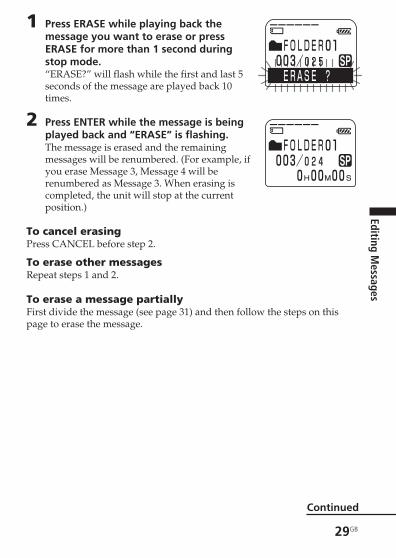
1 Press ERASE while playing back themessage you want to erase or pressERASE for more than 1 second duringstop mode.“ERASE?” will flash while the first and last 5seconds of the message are played back 10times.
2 Press ENTER while the message is beingplayed back and “ERASE” is flashing.The message is erased and the remainingmessages will be renumbered. (For example, ifyou erase Message 3, Message 4 will berenumbered as Message 3. When erasing iscompleted, the unit will stop at the currentposition.)
To cancel erasingPress CANCEL before step 2.
To erase other messagesRepeat steps 1 and 2.
To erase a message partiallyFirst divide the message (see page 31) and then follow the steps on thispage to erase the message.
Continued
30GB
Erasing Messages (Continued)
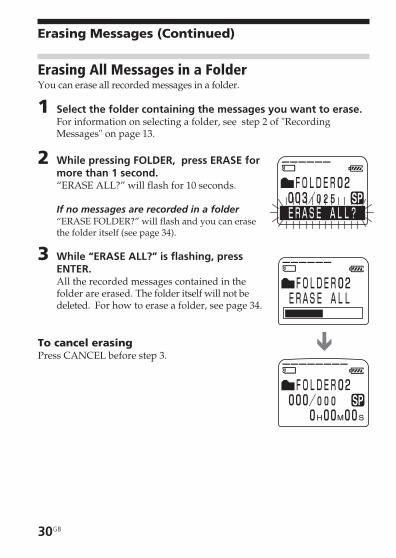
Erasing All Messages in a FolderYou can erase all recorded messages in a folder.
1 Select the folder containing the messages you want to erase.For information on selecting a folder, see step 2 of "RecordingMessages" on page 13.
2 While pressing FOLDER, press ERASE formore than 1 second.“ERASE ALL?” will flash for 10 seconds.
If no messages are recorded in a folder“ERASE FOLDER?” will flash and you can erasethe folder itself (see page 34).
3 While “ERASE ALL?” is flashing, pressENTER.All the recorded messages contained in thefolder are erased. The folder itself will not bedeleted. For how to erase a folder, see page 34.
To cancel erasingPress CANCEL before step 3.
Editing Messages
31GB
Dividing a Message into Two
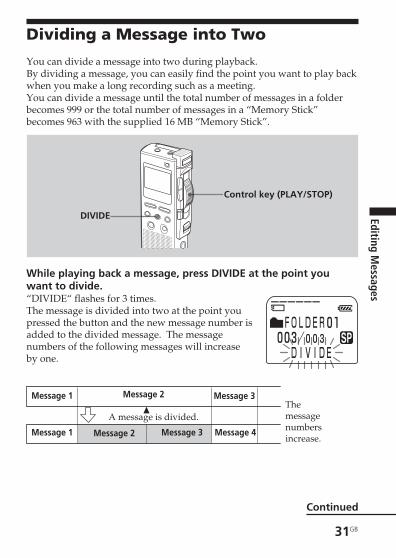
You can divide a message into two during playback.By dividing a message, you can easily find the point you want to play backwhen you make a long recording such as a meeting.You can divide a message until the total number of messages in a folderbecomes 999 or the total number of messages in a “Memory Stick”becomes 963 with the supplied 16 MB “Memory Stick”.
While playing back a message, press DIVIDE at the point youwant to divide.“DIVIDE“ flashes for 3 times.The message is divided into two at the point youpressed the button and the new message number isadded to the divided message. The messagenumbers of the following messages will increaseby one.
DIVIDE
Control key (PLAY/STOP)
Themessagenumbersincrease.
A message is divided.
Message 3
Message 4
Message 1
Message 1 Message 2 Message 3
Message 2
Continued
32GB
Dividing a Message into Two (continued)
To play the divided messagePress the jog lever up or down (>/.) to display the message numberas the divided messages have message numbers.
Notes• You need a certain amount of space in the memory to divide a message. For
more information, see “System Limitations“ on page 61.• If you divide a message with priority mark(s), priority mark(s) will be added
to both parts of the divided message.• If you divide a message with alarm setting, the alarm setting will remain with
the first part of the divided message.• If you divide a labeled message, the other part of the divided message will
have the same message name.
Editing Messages
33GB
Adding / Erasing Folders
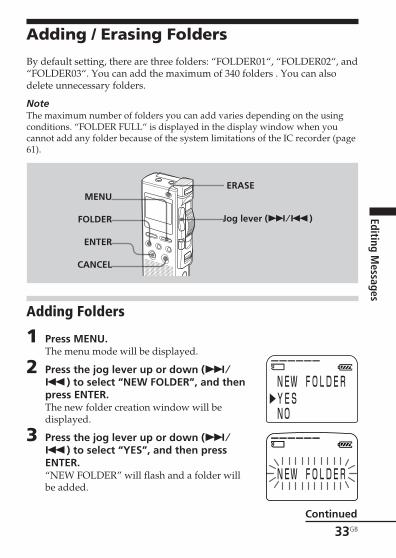
By default setting, there are three folders: “FOLDER01“, “FOLDER02“, and“FOLDER03“. You can add the maximum of 340 folders . You can alsodelete unnecessary folders.
NoteThe maximum number of folders you can add varies depending on the usingconditions. “FOLDER FULL“ is displayed in the display window when youcannot add any folder because of the system limitations of the IC recorder (page61).
Adding Folders
1 Press MENU.The menu mode will be displayed.
2 Press the jog lever up or down (>/
.) to select “NEW FOLDER”, and thenpress ENTER.The new folder creation window will bedisplayed.
3 Press the jog lever up or down (>/
.) to select “YES”, and then pressENTER.“NEW FOLDER” will flash and a folder willbe added.
ERASE
Jog lever (>/.)
MENU
FOLDER
ENTER
CANCEL
Continued
34GB
Adding / Erasing Folders (continued)
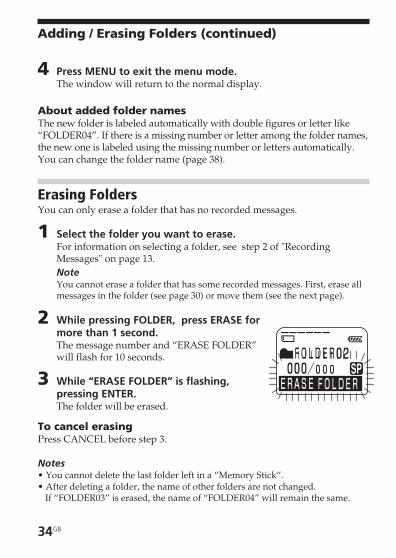
4 Press MENU to exit the menu mode.The window will return to the normal display.
About added folder namesThe new folder is labeled automatically with double figures or letter like“FOLDER04”. If there is a missing number or letter among the folder names,the new one is labeled using the missing number or letters automatically.You can change the folder name (page 38).
Erasing FoldersYou can only erase a folder that has no recorded messages.
1 Select the folder you want to erase.For information on selecting a folder, see step 2 of "RecordingMessages" on page 13.NoteYou cannot erase a folder that has some recorded messages. First, erase allmessages in the folder (see page 30) or move them (see the next page).
2 While pressing FOLDER, press ERASE formore than 1 second.The message number and “ERASE FOLDER”will flash for 10 seconds.
3 While “ERASE FOLDER” is flashing,pressing ENTER.The folder will be erased.
To cancel erasingPress CANCEL before step 3.
Notes• You cannot delete the last folder left in a “Memory Stick“.• After deleting a folder, the name of other folders are not changed.
If “FOLDER03” is erased, the name of “FOLDER04” will remain the same.
Editing Messages
35GB
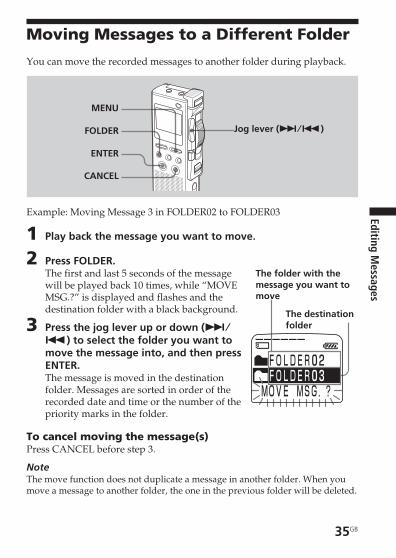
Moving Messages to a Different Folder
You can move the recorded messages to another folder during playback.
Example: Moving Message 3 in FOLDER02 to FOLDER03
1 Play back the message you want to move.
2 Press FOLDER.The first and last 5 seconds of the messagewill be played back 10 times, while “MOVEMSG.?” is displayed and flashes and thedestination folder with a black background.
3 Press the jog lever up or down (>/
.) to select the folder you want tomove the message into, and then pressENTER.The message is moved in the destinationfolder. Messages are sorted in order of therecorded date and time or the number of thepriority marks in the folder.
To cancel moving the message(s)Press CANCEL before step 3.
NoteThe move function does not duplicate a message in another folder. When youmove a message to another folder, the one in the previous folder will be deleted.
The destinationfolder
The folder with themessage you want tomove
Jog lever (>/.)
MENU
FOLDER
ENTER
CANCEL

36GB
Adding Priority Mark(s)— Priority Mark Function
Usually the recorded messages are lined up in the order of recording.By adding priority marks (v) to important messages, you can renumberthe messages in the order of their priority. There are four levels, “vvv”(the most important), “vv”, “v”, and no priority mark. You can addpriority marks both in the stop mode and in playback mode.
1 Select or play back the message you want to mark.
2 Press PRIORITY.“PRIORITY” will flash on the display window.
3 Press the jog lever up or down (>/
.) to select the number of prioritymark(s) (v) while “PRIORITY“ is flashing.
4 Press ENTER.The setting is finished and the messages willbe renumbered.
To cancel setting priority mark(s)Press CANCEL before step 3.
PRIORITY
ENTER
CANCEL
Jog lever (>/.)
Editing Messages
37GB
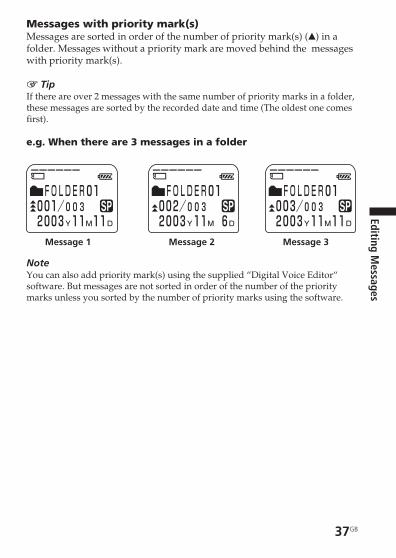
Messages with priority mark(s)Messages are sorted in order of the number of priority mark(s) (v) in afolder. Messages without a priority mark are moved behind the messageswith priority mark(s).
1 TipIf there are over 2 messages with the same number of priority marks in a folder,these messages are sorted by the recorded date and time (The oldest one comesfirst).
e.g. When there are 3 messages in a folder
NoteYou can also add priority mark(s) using the supplied “Digital Voice Editor“software. But messages are not sorted in order of the number of the prioritymarks unless you sorted by the number of priority marks using the software.
Message 1 Message 2 Message 3
38GB
Jog lever (>/.)
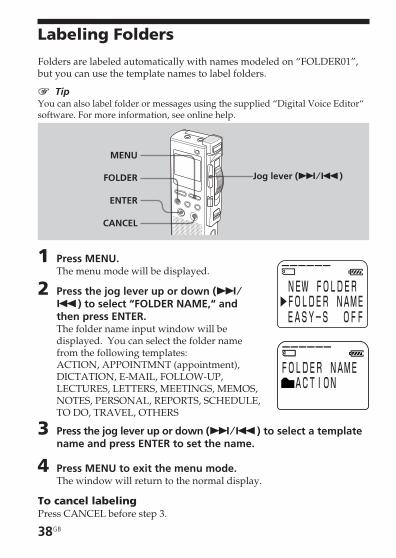
Labeling Folders
Folders are labeled automatically with names modeled on “FOLDER01”,but you can use the template names to label folders.
1 TipYou can also label folder or messages using the supplied “Digital Voice Editor“software. For more information, see online help.
1 Press MENU.The menu mode will be displayed.
2 Press the jog lever up or down (>/
.) to select “FOLDER NAME,“ andthen press ENTER.The folder name input window will bedisplayed. You can select the folder namefrom the following templates:ACTION, APPOINTMNT (appointment),DICTATION, E-MAIL, FOLLOW-UP,LECTURES, LETTERS, MEETINGS, MEMOS,NOTES, PERSONAL, REPORTS, SCHEDULE,TO DO, TRAVEL, OTHERS
3 Press the jog lever up or down (>/.) to select a templatename and press ENTER to set the name.
4 Press MENU to exit the menu mode.The window will return to the normal display.
To cancel labelingPress CANCEL before step 3.
MENU
FOLDER
ENTER
CANCEL

Other Functions
39GB
BOther Functions
Adjusting the Playback Speed — DPC(Digital Pitch Control)
You can adjust the speed of the playback between twice the normal speed(+100%) and half the normal speed (–50%). The message is played back innatural tone thanks to the digital processing function.
Jog lever (>/.)
Playing back a message rapidly or slowlySlide DPC to ON.“FAST PLAY” or “SLOWPLAY” flashes for 3 secondsand the message is playedback at the speed youspecified with the menu.
To resume normal playbackSlide the DPC switch to OFF.
Setting the playback speedYou can set the playback speed when the DPC switch is set to ON. Thesetting for the playback speed holds effective until you change the setting.
1 Press MENU.The menu mode will be displayed.
DPC
MENU
ENTER
CANCEL
Continued
40GB
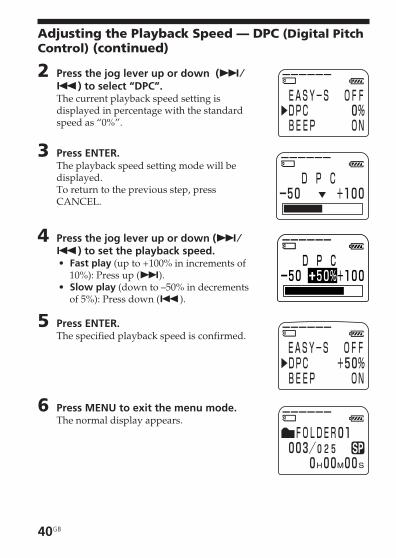
Adjusting the Playback Speed — DPC (Digital PitchControl) (continued)
2 Press the jog lever up or down (>/
.) to select “DPC”.The current playback speed setting isdisplayed in percentage with the standardspeed as “0%”.
3 Press ENTER.The playback speed setting mode will bedisplayed.To return to the previous step, pressCANCEL.
4 Press the jog lever up or down (>/
.) to set the playback speed.• Fast play (up to +100% in increments of
10%): Press up (>).• Slow play (down to –50% in decrements
of 5%): Press down (.).
5 Press ENTER.The specified playback speed is confirmed.
6 Press MENU to exit the menu mode.The normal display appears.
Other Functions
41GB
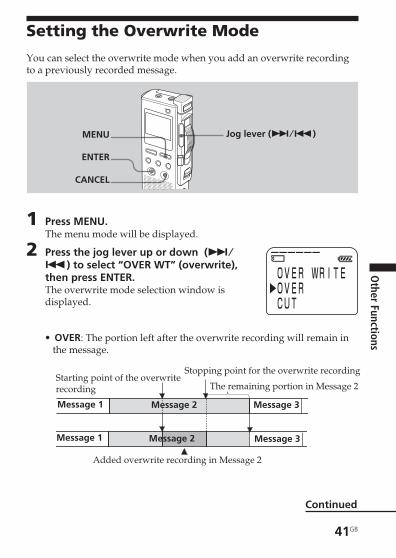
Setting the Overwrite Mode
You can select the overwrite mode when you add an overwrite recordingto a previously recorded message.
1 Press MENU.The menu mode will be displayed.
2 Press the jog lever up or down (>/
.) to select “OVER WT” (overwrite),then press ENTER.The overwrite mode selection window isdisplayed.
• OVER: The portion left after the overwrite recording will remain inthe message.
Jog lever (>/.)
The remaining portion in Message 2
Added overwrite recording in Message 2
Message 2 Message 3
Message 3Message 2
Starting point of the overwriterecording
Stopping point for the overwrite recording
Message 1
Message 1
MENU
ENTER
CANCEL
Continued

42GB
•CUT: The portion left after the overwrite recording will be deleted.
3 Press the jog lever up or down (>/
.) to select “OVER” or “CUT”, thenpress ENTER.
4 Press MENU to exit the menu mode.The normal display appears.When you add an overwrite recording (page15), the recording will be added in theselected overwrite mode.
To cancel settingPress CANCEL. The window returns to that of the previous step.
The remaining portion in Message 2
Added overwrite recording in Message 2
Message 2 Message 3
Message 3Message 2
Starting point of the overwriterecording
Stopping point for the overwrite recording
Message 1
Message 1
Setting the Overwrite Mode (continued)
Other Functions
43GB
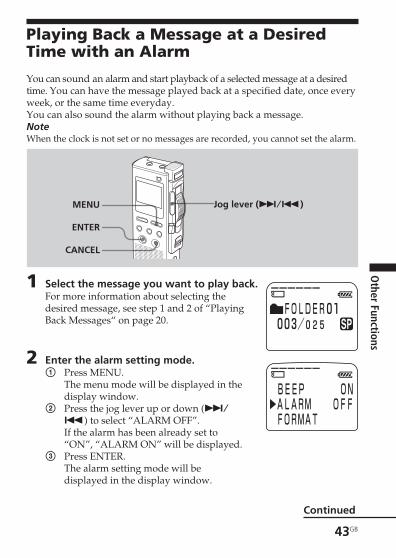
Playing Back a Message at a DesiredTime with an Alarm
You can sound an alarm and start playback of a selected message at a desiredtime. You can have the message played back at a specified date, once everyweek, or the same time everyday. You can also sound the alarm without playing back a message.NoteWhen the clock is not set or no messages are recorded, you cannot set the alarm.
1 Select the message you want to play back.For more information about selecting thedesired message, see step 1 and 2 of “PlayingBack Messages“ on page 20.
2 Enter the alarm setting mode.1 Press MENU.
The menu mode will be displayed in thedisplay window.
2 Press the jog lever up or down (>/
.) to select “ALARM OFF”.If the alarm has been already set to“ON”, “ALARM ON” will be displayed.
3 Press ENTER.The alarm setting mode will bedisplayed in the display window.
Jog lever (>/.)MENU
ENTER
CANCEL
Continued
44GB
Playing Back a Message at a Desired Time with anAlarm (continued)
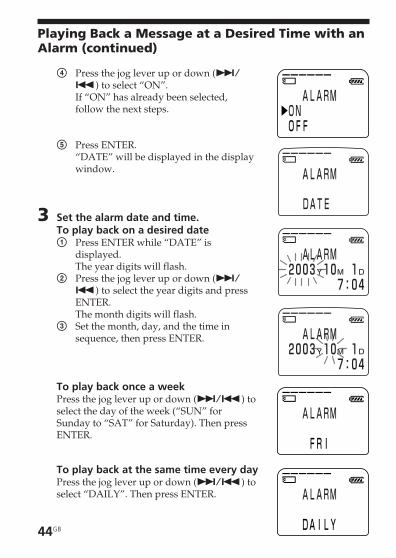
4 Press the jog lever up or down (>/
.) to select “ON”.If “ON” has already been selected,follow the next steps.
5 Press ENTER.“DATE” will be displayed in the displaywindow.
3 Set the alarm date and time.To play back on a desired date1 Press ENTER while “DATE” is
displayed.The year digits will flash.
2 Press the jog lever up or down (>/
.) to select the year digits and pressENTER.The month digits will flash.
3 Set the month, day, and the time insequence, then press ENTER.
To play back once a weekPress the jog lever up or down (>/.) toselect the day of the week (“SUN” forSunday to “SAT” for Saturday). Then pressENTER.
To play back at the same time every dayPress the jog lever up or down (>/.) toselect “DAILY”. Then press ENTER.
Other Functions
45GB
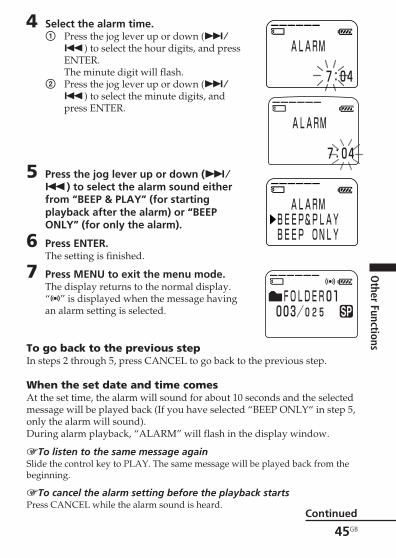
4 Select the alarm time.1 Press the jog lever up or down (>/
.) to select the hour digits, and pressENTER.The minute digit will flash.
2 Press the jog lever up or down (>/
.) to select the minute digits, andpress ENTER.
5 Press the jog lever up or down (>/
.) to select the alarm sound eitherfrom “BEEP & PLAY” (for startingplayback after the alarm) or “BEEPONLY” (for only the alarm).
6 Press ENTER.The setting is finished.
7 Press MENU to exit the menu mode.The display returns to the normal display.“,” is displayed when the message havingan alarm setting is selected.
To go back to the previous stepIn steps 2 through 5, press CANCEL to go back to the previous step.
When the set date and time comesAt the set time, the alarm will sound for about 10 seconds and the selectedmessage will be played back (If you have selected “BEEP ONLY“ in step 5,only the alarm will sound).During alarm playback, “ALARM” will flash in the display window.
1To listen to the same message againSlide the control key to PLAY. The same message will be played back from thebeginning.
1To cancel the alarm setting before the playback startsPress CANCEL while the alarm sound is heard.
Continued
46GB
Playing Back a Message at a Desired Time with anAlarm (continued)
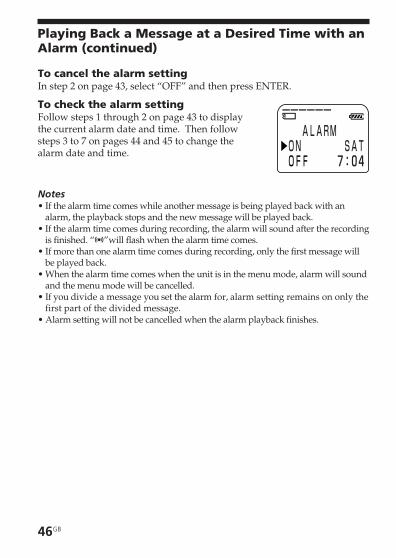
To cancel the alarm settingIn step 2 on page 43, select “OFF” and then press ENTER.
To check the alarm settingFollow steps 1 through 2 on page 43 to displaythe current alarm date and time. Then followsteps 3 to 7 on pages 44 and 45 to change thealarm date and time.
Notes• If the alarm time comes while another message is being played back with an
alarm, the playback stops and the new message will be played back.• If the alarm time comes during recording, the alarm will sound after the recording
is finished. “,”will flash when the alarm time comes.• If more than one alarm time comes during recording, only the first message will
be played back.• When the alarm time comes when the unit is in the menu mode, alarm will sound
and the menu mode will be cancelled.• If you divide a message you set the alarm for, alarm setting remains on only the
first part of the divided message.• Alarm setting will not be cancelled when the alarm playback finishes.
Other Functions
47GB
Formatting a “Memory Stick“
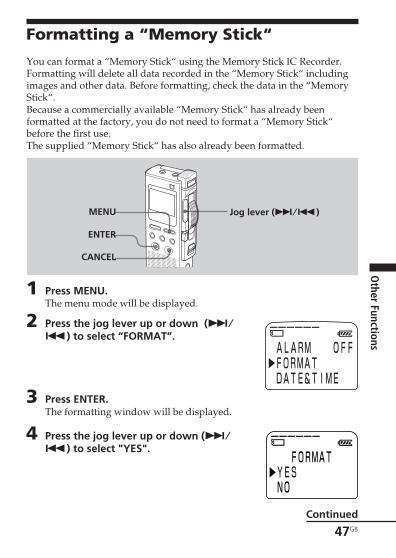
You can format a “Memory Stick“ using the Memory Stick IC Recorder.Formatting will delete all data recorded in the “Memory Stick“ includingimages and other data. Before formatting, check the data in the “MemoryStick“. Because a commercially available “Memory Stick“ has already beenformatted at the factory, you do not need to format a “Memory Stick“before the first use.The supplied “Memory Stick“ has also already been formatted.
1 Press MENU.The menu mode will be displayed.
2 Press the jog lever up or down (>/
.) to select “FORMAT”.
3 Press ENTER.The formatting window will be displayed.
4 Press the jog lever up or down (>/
.) to select "YES".
Jog lever (>/.)MENU
ENTER
CANCEL
Continued
48GB
Formatting a “Memory Stick“ (continued)
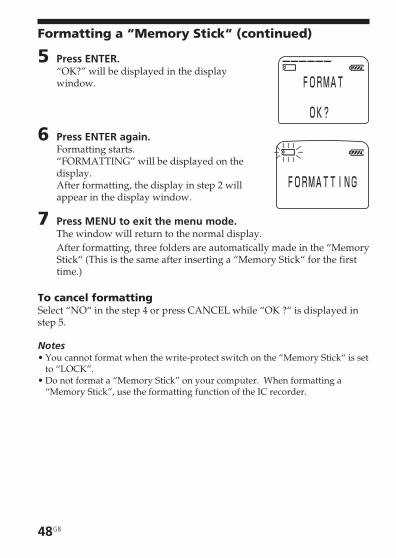
5 Press ENTER.“OK?” will be displayed in the displaywindow.
6 Press ENTER again.Formatting starts.“FORMATTING” will be displayed on thedisplay.After formatting, the display in step 2 willappear in the display window.
7 Press MENU to exit the menu mode.The window will return to the normal display.After formatting, three folders are automatically made in the “MemoryStick“ (This is the same after inserting a “Memory Stick“ for the firsttime.)
To cancel formattingSelect “NO“ in the step 4 or press CANCEL while “OK ?“ is displayed instep 5.
Notes• You cannot format when the write-protect switch on the “Memory Stick“ is set
to “LOCK”.• Do not format a “Memory Stick” on your computer. When formatting a
“Memory Stick”, use the formatting function of the IC recorder.
Other Functions
49GB
Changing the Settings — MENU
You can use the menu to change the IC recorder settings. You cannot usethe menu during recording. During playback or during stop modewithout a “Memory Stick” inserted, the menu items to be displayed arelimited. Follow the procedures below to display the menu and change thesettings:
1 Press MENU.The menu mode will be displayed.
2 Press the jog lever up or down (>/.) to select the menu item forwhich you want to change setting.
3 Press ENTER.The setting mode of the selected menu item will be displayed.
4 Press the jog lever up or down (>/.) to select the setting that youwant to set, and then press ENTER.The setting will be changed.
5 Press MENU to exit the menu mode.The window will return to the normal display.
To go back to the previous stepPress CANCEL.
NoteIf you do not press any keys for one minute, the menu mode is automaticallycancelled and the window will return to the normal display.
Continued
50GB
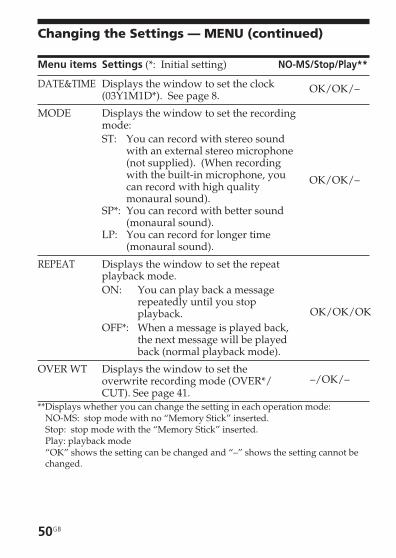
Menu items Settings (*: Initial setting) NO-MS/Stop/Play**
DATE&TIME Displays the window to set the clock(03Y1M1D*). See page 8.
MODE Displays the window to set the recordingmode:ST: You can record with stereo sound
with an external stereo microphone(not supplied). (When recordingwith the built-in microphone, youcan record with high qualitymonaural sound).
SP*: You can record with better sound(monaural sound).
LP: You can record for longer time(monaural sound).
REPEAT Displays the window to set the repeatplayback mode.ON: You can play back a message
repeatedly until you stopplayback.
OFF*: When a message is played back,the next message will be playedback (normal playback mode).
OVER WT Displays the window to set theoverwrite recording mode (OVER*/CUT). See page 41.
**Displays whether you can change the setting in each operation mode:NO-MS: stop mode with no “Memory Stick” inserted.Stop: stop mode with the “Memory Stick” inserted.Play: playback mode“OK” shows the setting can be changed and “–” shows the setting cannot bechanged.
OK/OK/–
OK/OK/–
–/OK/–
OK/OK/OK
Changing the Settings — MENU (continued)
Other Functions
51GB
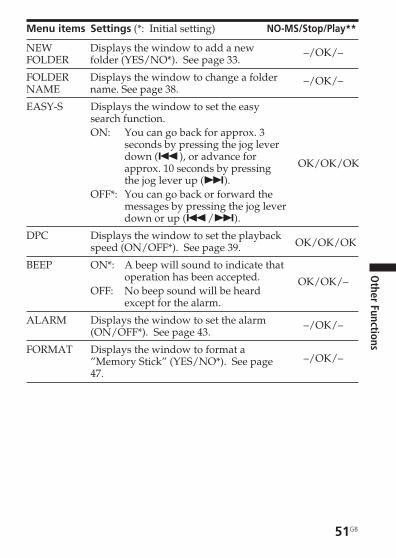
Menu items Settings (*: Initial setting) NO-MS/Stop/Play**
NEW Displays the window to add a newFOLDER folder (YES/NO*). See page 33.
FOLDER Displays the window to change a folderNAME name. See page 38.
EASY-S Displays the window to set the easysearch function.ON: You can go back for approx. 3
seconds by pressing the jog leverdown (.), or advance forapprox. 10 seconds by pressingthe jog lever up (>).
OFF*: You can go back or forward themessages by pressing the jog leverdown or up (./>).
DPC Displays the window to set the playbackspeed (ON/OFF*). See page 39.
BEEP ON*: A beep will sound to indicate thatoperation has been accepted.
OFF: No beep sound will be heardexcept for the alarm.
ALARM Displays the window to set the alarm(ON/OFF*). See page 43.
FORMAT Displays the window to format a”Memory Stick” (YES/NO*). See page47.
–/OK/–
–/OK/–
–/OK/–
OK/OK/OK
OK/OK/OK
–/OK/–
OK/OK/–
52GB
Using the ”Digital Voice Editor“Software
By connecting the IC recorder to your computer with the supplied USBcable, you can use the “Digital Voice Editor” software to do the following:• Saving new IC recorder messages automatically on your computer‘s hard
disk (AutoSave function)• Saving the selected IC recorder messages on your computer’s hard disk.• Transferring the PC messages back to the IC recorder.• Playing or editing the messages on your computer.• Sending a voice e-mail message using MAPI e-mail software.• Transcribing your IC recorder message using Dragon
NaturallySpeaking® speech-recognition software (not supplied).For the details, see the supplied “Digital Voice Editor 2” softwareoperating instructions.
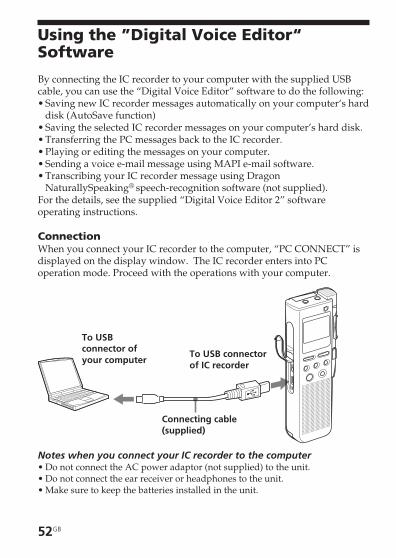
Connection When you connect your IC recorder to the computer, “PC CONNECT” isdisplayed on the display window. The IC recorder enters into PCoperation mode. Proceed with the operations with your computer.
To USBconnector ofyour computer
To USB connectorof IC recorder
Connecting cable(supplied)
Notes when you connect your IC recorder to the computer• Do not connect the AC power adaptor (not supplied) to the unit.• Do not connect the ear receiver or headphones to the unit.• Make sure to keep the batteries installed in the unit.
Other Functions
53GB
System requirementsYour computer and system software must meet the following minimumrequirements.• IBM PC/AT or compatible
– CPU: 266MHz Pentium® II processor or higher– RAM: 64MB or more– Hard disk space: 70MB or more depending on the size and number of
sound files you store– CD-ROM drive– USB port– Sound board: Sound Blaster 16 compatible– Display: High color (16 bits) or more and 800 x 480 dots or more
• OS: Microsoft® Windows® XP Home Edition/XP Professional/2000Professional/Millennium Edition/98/98 Second Edition standardinstallation (You cannot use this software with Windows® 95 orWindows® NT.)
Notes• You cannot use the software with a Macintosh machine.• A handmade computer, a computer whose operating system is installed or
upgraded by the user, or a computer with multi-boot operating environmentare not supported.
54GB
BAdditional Information
Precautions
On power• Operate the unit only on 3 V DC. Use two LR 03 (size AAA) alkaline
batteries.
On safety• Do not operate the unit while driving, cycling or operating any
motorized vehicle.
On handling• Do not leave the unit in a location near heat sources, or in a place subject
to direct sunlight, excessive dust or mechanical shock.• Should any solid object or liquid fall into the unit, remove the batteries
and have the unit checked by qualified personnel before operating it anyfurther.
On noise• Noise may be heard when the unit is placed near an AC power source, a
fluorescent lamp or a mobile phone during recording or playback.• Noise may be recorded when an object, such as your finger, etc., rubs or
scratches the unit during recording.
On maintenance• To clean the exterior, use a soft cloth slightly moistened in water. Do not
use alcohol, benzine or thinner.
If you have any questions or problems concerning your unit, pleaseconsult your nearest Sony dealer.
Backup recommendationsTo avoid potential risk of data loss caused by accidental operation ormalfunction of the IC recorder, we recommend that you save a backupcopy of your recorded messages to a computer, etc.

Additional Inform
ation
55GB
On using a “Memory Stick“• Do not touch or allow metallic objects to come into contact with the metal
parts of the connecting section.• Stick the label supplied for the “Memory Stick” only on the labeling
position. Do not use any other labels.• Do not bend, drop or apply strong shock to the “Memory Stick”.• Do not disassemble or modify the “Memory Stick”.• Do not let the "Memory Stick" get wet.• Do not use or keep the “Memory Stick” in locations that are:
– Extremely hot such as in a car parked in the sun– Under direct sunlight– Very humid or subject to corrosive gases
• When you carry or store a “Memory Stick”, put it in its case.
About write-protect of a “Memory Stick“
You cannot record or erase data when the write-protect switch on the“Memory Stick” is set to “LOCK“.
Write-protect switch
56GB
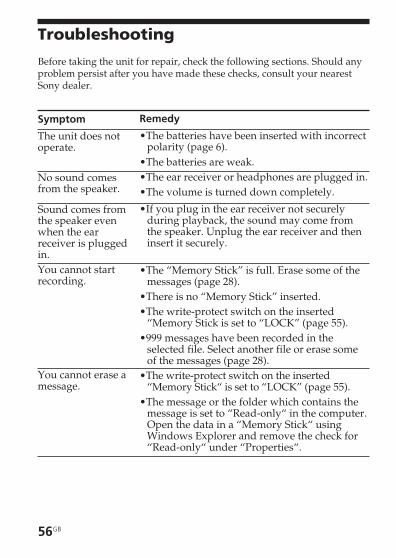
Troubleshooting
Before taking the unit for repair, check the following sections. Should anyproblem persist after you have made these checks, consult your nearestSony dealer.
Symptom
The unit does notoperate.
No sound comesfrom the speaker.
Sound comes fromthe speaker evenwhen the earreceiver is pluggedin.You cannot startrecording.
You cannot erase amessage.
Remedy
•The batteries have been inserted with incorrectpolarity (page 6).
•The batteries are weak.•The ear receiver or headphones are plugged in.•The volume is turned down completely.
•If you plug in the ear receiver not securelyduring playback, the sound may come fromthe speaker. Unplug the ear receiver and theninsert it securely.
•The “Memory Stick” is full. Erase some of themessages (page 28).
•There is no “Memory Stick” inserted.•The write-protect switch on the inserted
“Memory Stick is set to “LOCK” (page 55).•999 messages have been recorded in the
selected file. Select another file or erase someof the messages (page 28).
•The write-protect switch on the inserted“Memory Stick“ is set to “LOCK” (page 55).
•The message or the folder which contains themessage is set to “Read-only“ in the computer.Open the data in a “Memory Stick“ usingWindows Explorer and remove the check for“Read-only“ under “Properties“.
Additional Inform
ation
57GB
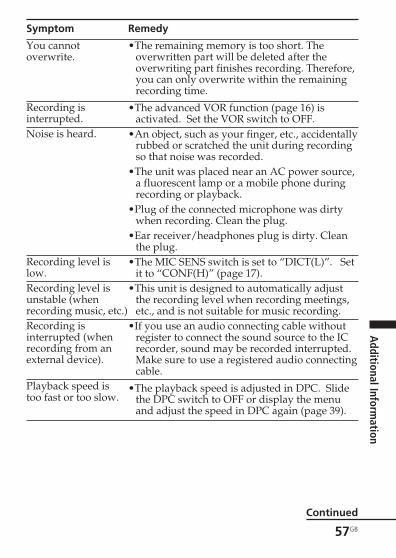
Symptom
You cannotoverwrite.
Recording isinterrupted.Noise is heard.
Recording level islow.Recording level isunstable (whenrecording music, etc.)Recording isinterrupted (whenrecording from anexternal device).
Playback speed istoo fast or too slow.
Remedy
•The remaining memory is too short. Theoverwritten part will be deleted after theoverwriting part finishes recording. Therefore,you can only overwrite within the remainingrecording time.
•The advanced VOR function (page 16) isactivated. Set the VOR switch to OFF.
•An object, such as your finger, etc., accidentallyrubbed or scratched the unit during recordingso that noise was recorded.
•The unit was placed near an AC power source,a fluorescent lamp or a mobile phone duringrecording or playback.
•Plug of the connected microphone was dirtywhen recording. Clean the plug.
•Ear receiver/headphones plug is dirty. Cleanthe plug.
•The MIC SENS switch is set to “DICT(L)”. Setit to “CONF(H)” (page 17).
•This unit is designed to automatically adjustthe recording level when recording meetings,etc., and is not suitable for music recording.
•If you use an audio connecting cable withoutregister to connect the sound source to the ICrecorder, sound may be recorded interrupted.Make sure to use a registered audio connectingcable.
•The playback speed is adjusted in DPC. Slidethe DPC switch to OFF or display the menuand adjust the speed in DPC again (page 39).
Continued

58GB
Symptom
“--:--” is displayed.“--Y--M--D” or ” --:--”is displayed on theREC DATE display.There are fewermenu items in themenu mode.A character in afolder or messagename is displayed as“s“.Messages are notsorted in order of thenumber of prioritymarks in a folder.
The remaining timedisplayed in thedisplay window isshorter than thatdisplayed in thesupplied “DigitalVoice Editor“software.The unit does notoperate correctly.
Please note that recorded messages may be erased during service or repairwork.
Remedy
•You have not set the clock (page 8).
•The date of recording will not be displayed ifyou recorded the message when the clock wasnot set.
•There are some menu items which are notdisplayed because a “Memory Stick“ is notinserted (page 50).
•The unit cannot support and display somecharacters which are entered using thesupplied “Digital Voice Editor“ software.
•Unless you sort messages using the supplied“Digital Voice Editor“ software, messages aresorted in the unit the same as the setting in thecomputer. Sort again in the order of thenumber of priority marks in the computerusing the supplied “Digital Voice Editor“software.
•The unit requires a certain amount of memoryfor system operation. That amount issubtracted from the remaining time, which isthe reason for the difference.
•Take out the batteries and insert them again(page 6).
Troubleshooting (continued)
Additional Inform
ation
59GB
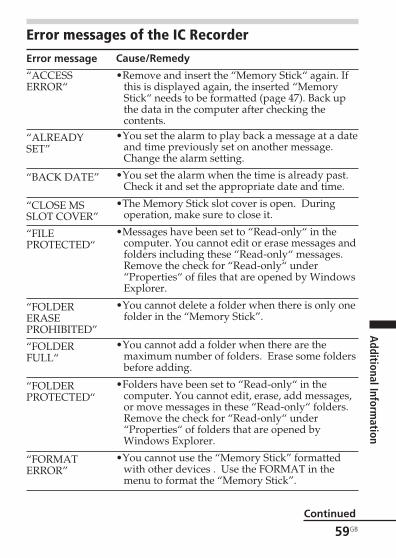
Error messages of the IC Recorder
Error message
“ACCESSERROR“
“ALREADYSET”
“BACK DATE”
“CLOSE MSSLOT COVER”
“FILEPROTECTED“
“FOLDERERASEPROHIBITED”
“FOLDERFULL“
“FOLDERPROTECTED“
“FORMATERROR”
Cause/Remedy
•Remove and insert the “Memory Stick“ again. Ifthis is displayed again, the inserted “MemoryStick“ needs to be formatted (page 47). Back upthe data in the computer after checking thecontents.
•You set the alarm to play back a message at a dateand time previously set on another message.Change the alarm setting.
•You set the alarm when the time is already past.Check it and set the appropriate date and time.
•The Memory Stick slot cover is open. Duringoperation, make sure to close it.
•Messages have been set to “Read-only“ in thecomputer. You cannot edit or erase messages andfolders including these “Read-only“ messages.Remove the check for “Read-only“ under“Properties“ of files that are opened by WindowsExplorer.
•You cannot delete a folder when there is only onefolder in the “Memory Stick”.
•You cannot add a folder when there are themaximum number of folders. Erase some foldersbefore adding.
•Folders have been set to “Read-only“ in thecomputer. You cannot edit, erase, add messages,or move messages in these “Read-only“ folders.Remove the check for “Read-only“ under“Properties“ of folders that are opened byWindows Explorer.
•You cannot use the “Memory Stick” formattedwith other devices . Use the FORMAT in themenu to format the “Memory Stick”.
Continued
60GB
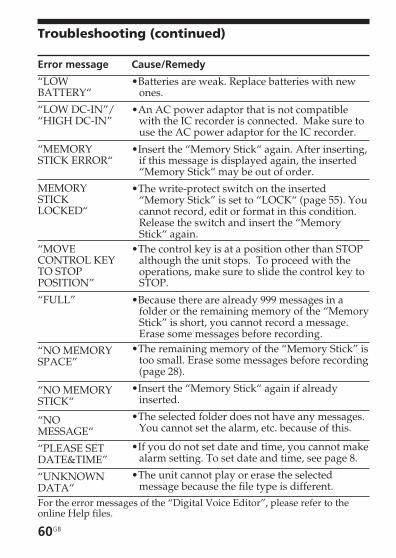
Error message
“LOWBATTERY“
“LOW DC-IN”/“HIGH DC-IN”
“MEMORYSTICK ERROR“
MEMORYSTICKLOCKED“
“MOVECONTROL KEYTO STOPPOSITION”
“FULL”
“NO MEMORYSPACE”
“NO MEMORYSTICK“
“NOMESSAGE“
“PLEASE SETDATE&TIME”
“UNKNOWNDATA“For the error messages of the “Digital Voice Editor”, please refer to theonline Help files.
Cause/Remedy
•Batteries are weak. Replace batteries with newones.
•An AC power adaptor that is not compatiblewith the IC recorder is connected. Make sure touse the AC power adaptor for the IC recorder.
•Insert the “Memory Stick“ again. After inserting,if this message is displayed again, the inserted“Memory Stick“ may be out of order.
•The write-protect switch on the inserted“Memory Stick” is set to “LOCK“ (page 55). Youcannot record, edit or format in this condition.Release the switch and insert the “MemoryStick“ again.
•The control key is at a position other than STOPalthough the unit stops. To proceed with theoperations, make sure to slide the control key toSTOP.
•Because there are already 999 messages in afolder or the remaining memory of the “MemoryStick” is short, you cannot record a message.Erase some messages before recording.
•The remaining memory of the “Memory Stick” istoo small. Erase some messages before recording(page 28).
•Insert the “Memory Stick“ again if alreadyinserted.
•The selected folder does not have any messages.You cannot set the alarm, etc. because of this.
•If you do not set date and time, you cannot makealarm setting. To set date and time, see page 8.
•The unit cannot play or erase the selectedmessage because the file type is different.
Troubleshooting (continued)
Additional Inform
ation
61GB
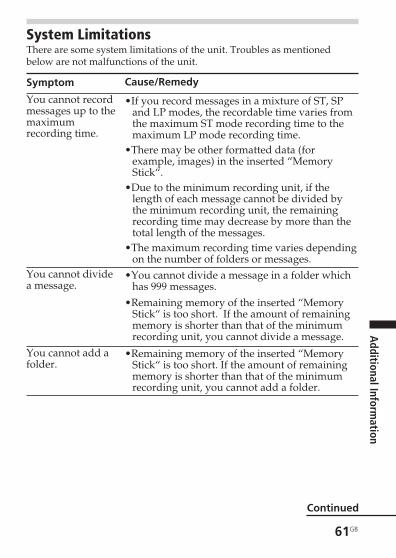
System LimitationsThere are some system limitations of the unit. Troubles as mentionedbelow are not malfunctions of the unit.
Symptom
You cannot recordmessages up to themaximumrecording time.
You cannot dividea message.
You cannot add afolder.
Cause/Remedy
•If you record messages in a mixture of ST, SPand LP modes, the recordable time varies fromthe maximum ST mode recording time to themaximum LP mode recording time.
•There may be other formatted data (forexample, images) in the inserted “MemoryStick“.
•Due to the minimum recording unit, if thelength of each message cannot be divided bythe minimum recording unit, the remainingrecording time may decrease by more than thetotal length of the messages.
•The maximum recording time varies dependingon the number of folders or messages.
•You cannot divide a message in a folder whichhas 999 messages.
•Remaining memory of the inserted “MemoryStick“ is too short. If the amount of remainingmemory is shorter than that of the minimumrecording unit, you cannot divide a message.
•Remaining memory of the inserted “MemoryStick“ is too short. If the amount of remainingmemory is shorter than that of the minimumrecording unit, you cannot add a folder.
Continued

62GB
Troubleshooting (continued)
About the minimum recording unitFor recording a message, dividing a message, or creating a folder, the timeof the minimum recording unit is needed. Although the actual recordingtime of a message may be less than that of the minimum recording unit,the time of the message is counted as a minimum recording unit.If the remaining recording time of the inserted “Memory Stick“ is less thanthat of the minimum recording unit, you cannot divide a message or createa folder in the “Memory Stick“.
The minimum recording unit
Capacity of the ST mode SP mode LP mode“Memory Stick“
4 MB 2 seconds 4 seconds 11 seconds8 MB 2 seconds 4 seconds 11 seconds16 MB 2 seconds 8 seconds 22 seconds32 MB 2 seconds 8 seconds 22 seconds64 MB 2 seconds 8 seconds 22 seconds128 MB 2 seconds 8 seconds 22 seconds
About the maximum recording time and the maximumnumber of messages or foldersA “Memory Stick“ saves not only recorded messages but also theinformation about division and the number of folders. Therefore, as thenumber of messages or folders increases, the amount of memory in the“Memory Stick“ decreases.The maximum recording time and the number of messages or foldersvaries depending on this.However, only in the case that you recorded up to the maximum recordingtime, you can divide a message into three parts and delete the unnecessarypart in the message.
Additional Inform
ation
63GB
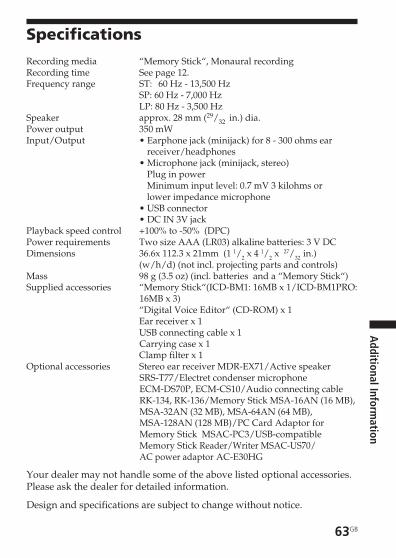
Specifications
Recording media “Memory Stick“, Monaural recordingRecording time See page 12.Frequency range ST: 60 Hz - 13,500 Hz
SP: 60 Hz - 7,000 HzLP: 80 Hz - 3,500 Hz
Speaker approx. 28 mm (29/32 in.) dia.Power output 350 mWInput/Output • Earphone jack (minijack) for 8 - 300 ohms ear
receiver/headphones• Microphone jack (minijack, stereo)
Plug in powerMinimum input level: 0.7 mV 3 kilohms orlower impedance microphone
• USB connector• DC IN 3V jack
Playback speed control +100% to -50% (DPC)Power requirements Two size AAA (LR03) alkaline batteries: 3 V DCDimensions 36.6x 112.3 x 21mm (1 1/2 x 4 1/2 x 27/32 in.)
(w/h/d) (not incl. projecting parts and controls)Mass 98 g (3.5 oz) (incl. batteries and a “Memory Stick“)Supplied accessories “Memory Stick“(ICD-BM1: 16MB x 1/ICD-BM1PRO:
16MB x 3)“Digital Voice Editor“ (CD-ROM) x 1Ear receiver x 1USB connecting cable x 1Carrying case x 1Clamp filter x 1
Optional accessories Stereo ear receiver MDR-EX71/Active speakerSRS-T77/Electret condenser microphoneECM-DS70P, ECM-CS10/Audio connecting cableRK-134, RK-136/Memory Stick MSA-16AN (16 MB),MSA-32AN (32 MB), MSA-64AN (64 MB),MSA-128AN (128 MB)/PC Card Adaptor forMemory Stick MSAC-PC3/USB-compatibleMemory Stick Reader/Writer MSAC-US70/AC power adaptor AC-E30HG
Your dealer may not handle some of the above listed optional accessories.Please ask the dealer for detailed information.
Design and specifications are subject to change without notice.
64GB
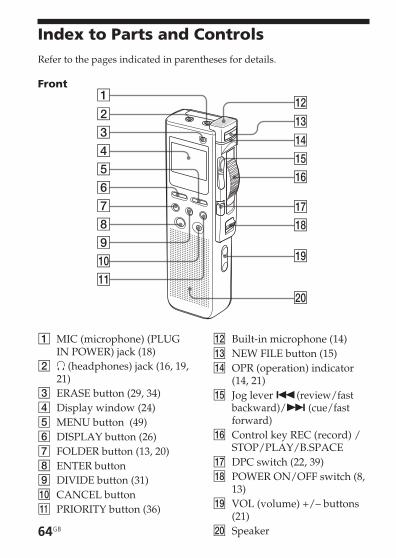
1 MIC (microphone) (PLUGIN POWER) jack (18)
2 i (headphones) jack (16, 19,21)
3 ERASE button (29, 34)4 Display window (24)5 MENU button (49)6 DISPLAY button (26)7 FOLDER button (13, 20)8 ENTER button9 DIVIDE button (31)0 CANCEL buttonqz PRIORITY button (36)
Index to Parts and Controls
qs Built-in microphone (14)qd NEW FILE button (15)qf OPR (operation) indicator
(14, 21)qg Jog lever .(review/fast
backward)/> (cue/fastforward)
qh Control key REC (record) /STOP/PLAY/B.SPACE
qj DPC switch (22, 39)qk POWER ON/OFF switch (8,
13)ql VOL (volume) +/– buttons
(21)w; Speaker
Refer to the pages indicated in parentheses for details.
Front
Additional Inform
ation
65GB
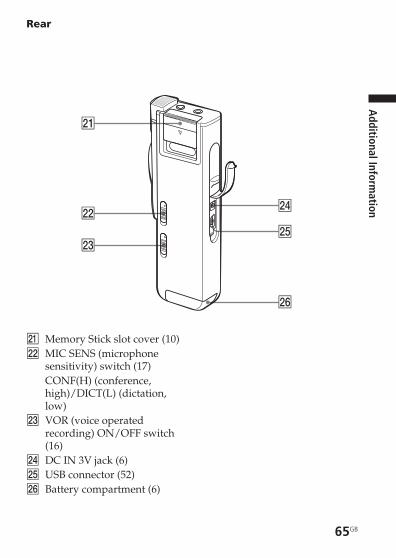
Rear
wz Memory Stick slot cover (10)ws MIC SENS (microphone
sensitivity) switch (17)CONF(H) (conference,high)/DICT(L) (dictation,low)
wd VOR (voice operatedrecording) ON/OFF switch(16)
wf DC IN 3V jack (6)wg USB connector (52)wh Battery compartment (6)
66GB
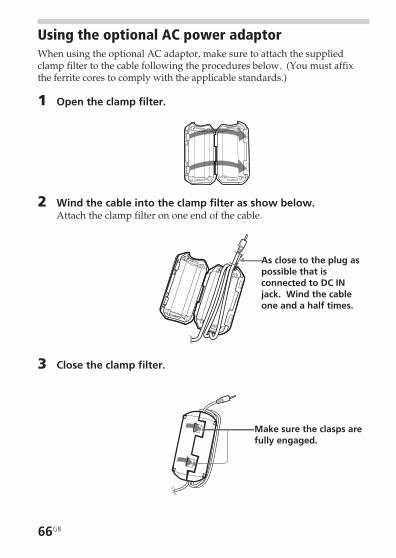
Using the optional AC power adaptorWhen using the optional AC adaptor, make sure to attach the suppliedclamp filter to the cable following the procedures below. (You must affixthe ferrite cores to comply with the applicable standards.)
1 Open the clamp filter.
2 Wind the cable into the clamp filter as show below.Attach the clamp filter on one end of the cable.
3 Close the clamp filter.
As close to the plug aspossible that isconnected to DC INjack. Wind the cableone and a half times.
Make sure the clasps arefully engaged.
Additional Inform
ation
67GB
IndexA“ACCESS“ message ................... 11Add, folders ................................ 33Add, priority .............................. 36Advanced VOR .......................... 16Alarm ........................................... 43
BBattery life ..................................... 7Beep ............................................. 51Built-in microphone .................. 14
CConnecting, computer .............. 52Connecting, externalmicrophone ................................. 18Connecting, other equipment .. 19Counter display ......................... 26Cue ............................................... 22Current time display ................. 27
DDigital Voice Editor ................... 52Display mode ............................. 26Display window ........................ 24Dividing a message ................... 31DPC(Digital Pitch Control) ........ 22, 39
EEasy search .......................... 23, 51Erase, folders .............................. 34Erase, messages .......................... 28Error messages ........................... 59External microphone ................. 18
FFolder, adding/erasing ............. 33Folder, labeling .......................... 38Folder, selecting .................. 13, 20Folder name ................................ 38Format ......................................... 47
LLabeling folders ......................... 38LP mode .......................... 7, 12, 50
MMaximum number ofmessages .............................. 12, 62Maximum recording time .. 12, 62“Memory Stick”, format ........... 47“Memory Stick”, inserting ....... 10“Memory Stick“, notes on use ... 55“Memory Stick”, types .............. 11“Memory Stick“, write-protectswitch .......................................... 55Menu ............................................ 49Message, dividing ...................... 31Message, erasing ........................ 28Message, moving ....................... 35Message, playback ..................... 20Message, recording .................... 12Message name display .............. 27Message number ................. 14, 20Microphone, built-in ................. 14Microphone, connecting ........... 18Microphone, external ................ 18Microphone sensitivity ...... 17, 24Minimum recording unit .......... 62Monitoring recording ................ 16Moving a message ..................... 35
Continued
Printed in Japan
Printed on 100% recycledpaper using VOC (VolatileOrganic Compound)-freevegetable oil based ink.
NNEW FILE ................................... 15
OOPR indicator ...................... 14, 21Overwrite recording ........... 15, 41
PPlayback ...................................... 20Playback speed ........................... 39Plug in power ............................. 18POWER .................................. 8, 13Priority mark .............................. 36
RRecorded date andtime display ................................ 26Recording .................................... 12Recording as a new message ... 15Recording mode .............. 7, 12, 50Recording with otherequipment ................................... 19Remaining battery ....................... 7Remaining memory ................... 17Remaining time display ............ 26Repeat playback .................. 23, 50Review .................................. 16, 22
SSearching forward/backward . 22Setting the clock ........................... 8SP mode .......................... 7, 12, 50Specifications .............................. 63ST mode .......................... 7, 12, 50System limitations ..................... 61System requirements ................. 53
TTroubleshooting ......................... 56Turning on power ................. 8, 13
UUSB cable .................................... 52Using the house current ............. 6
VVOR ............................................. 16
Index (continued)