Embed Size (px)
Citation preview

FastRawViewer!

1www.fastrawviewer.com
FastRawViewer: Tips for a Quick Start
IndexGetting familiar with the FRV Tools and Features
How to Customize FastRawViewer ................................................................................................................... 4
Preferences #1 .......................................................................................................................................................... 5
Preferences #2 ......................................................................................................................................................... 6
Examining Shortcuts #1 ....................................................................................................................................... 7
Examining Shortcuts #2 ....................................................................................................................................... 8
Adjusting Shortcuts #3 .......................................................................................................................................... 9
Interface Customization #1 ...............................................................................................................................10
Interface Customization #2 ...............................................................................................................................11
Interface Customization #3 ...............................................................................................................................12
Bottom Bar ..............................................................................................................................................................13
Color Management ..............................................................................................................................................14
EXIF View ..................................................................................................................................................................15
Working with Removable Media ....................................................................................................................16

2www.fastrawviewer.com
FastRawViewer: A Quick Start Tips
Favorite Folders .....................................................................................................................................................17
Grid View/Single File View Modes #1 .............................................................................................................18
Grid View/Single File View Modes #2 .............................................................................................................19
File Sorting Order .................................................................................................................................................20
File Selection/Batch Operation #1 .................................................................................................................21
File Selection/Batch Operation #2 .................................................................................................................22
Rating and Labels .................................................................................................................................................23
Filtering Files ...........................................................................................................................................................24
Assessing the Image
Tools and Features ...............................................................................................................................................25
Matching Image Display #1 ...............................................................................................................................26
Matching Image Display #2 ...............................................................................................................................27
Over- and Underexposure ................................................................................................................................28
In-Focus Areas .......................................................................................................................................................29
Sharpness ................................................................................................................................................................30

3www.fastrawviewer.com
FastRawViewer: A Quick Start Tips
Shadows ..................................................................................................................................................................31
Highlights .................................................................................................................................................................32
Exposure Correction #1 .......................................................................................................................................33
Exposure Correction #2 .......................................................................................................................................34
White Balance Presets ..........................................................................................................................................35
Custom White Balance .......................................................................................................................................36
White Balance Display ........................................................................................................................................37
Tuning White Balance .........................................................................................................................................38
Contrast ...................................................................................................................................................................39
Time-saver
Getting Ready for RAW Conversion #1 .........................................................................................................40
Getting Ready for RAW Conversion #2 .........................................................................................................41
Propagation ............................................................................................................................................................42
Propagation to Sidecar Files .............................................................................................................................43
4www.fastrawviewer.com
Getting familiar with the FRV Tools and Features: PreferencesGetting familiar with the FRV Tools and Features
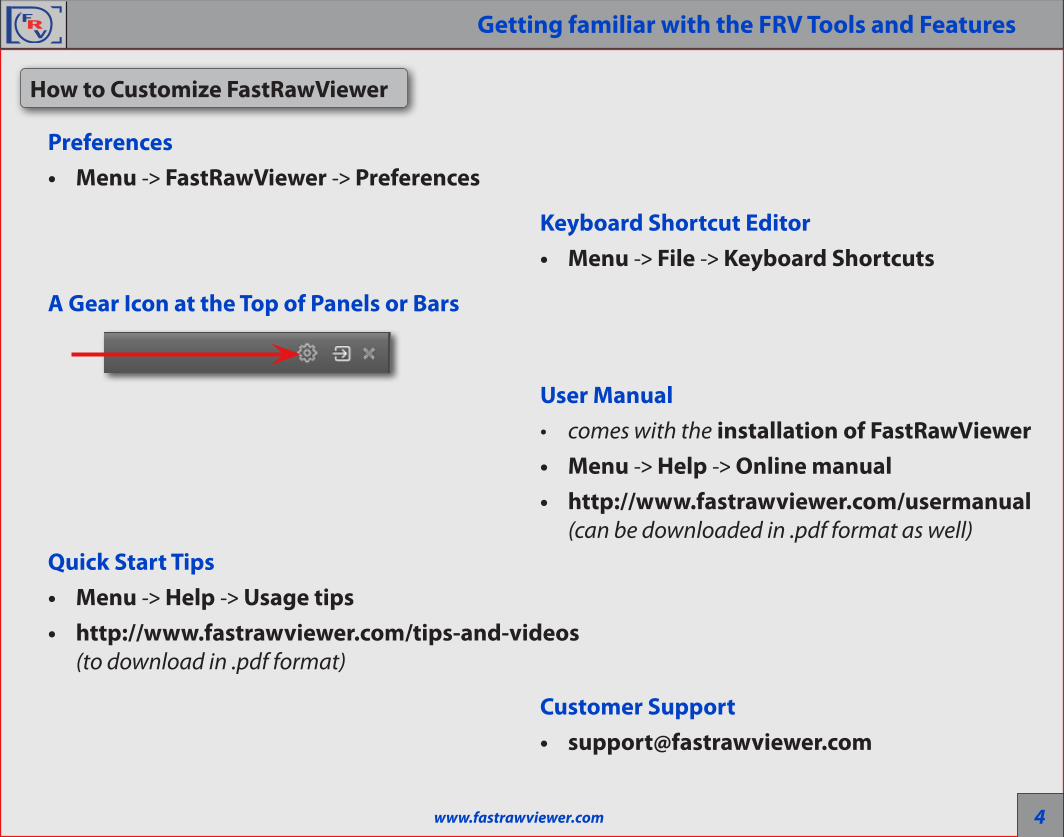
Preferences• Menu -> FastRawViewer -> Preferences
Keyboard Shortcut Editor• Menu -> File -> Keyboard Shortcuts
A Gear Icon at the Top of Panels or Bars
User Manual• comes with the installation of FastRawViewer• Menu -> Help -> Online manual• http://www.fastrawviewer.com/usermanual
(can be downloaded in .pdf format as well)Quick Start Tips• Menu -> Help -> Usage tips• http://www.fastrawviewer.com/tips-and-videos
(to download in .pdf format)
Customer Support• [email protected]
How to Customize FastRawViewer
5www.fastrawviewer.com
Getting familiar with the FRV Tools and Features: Preferences
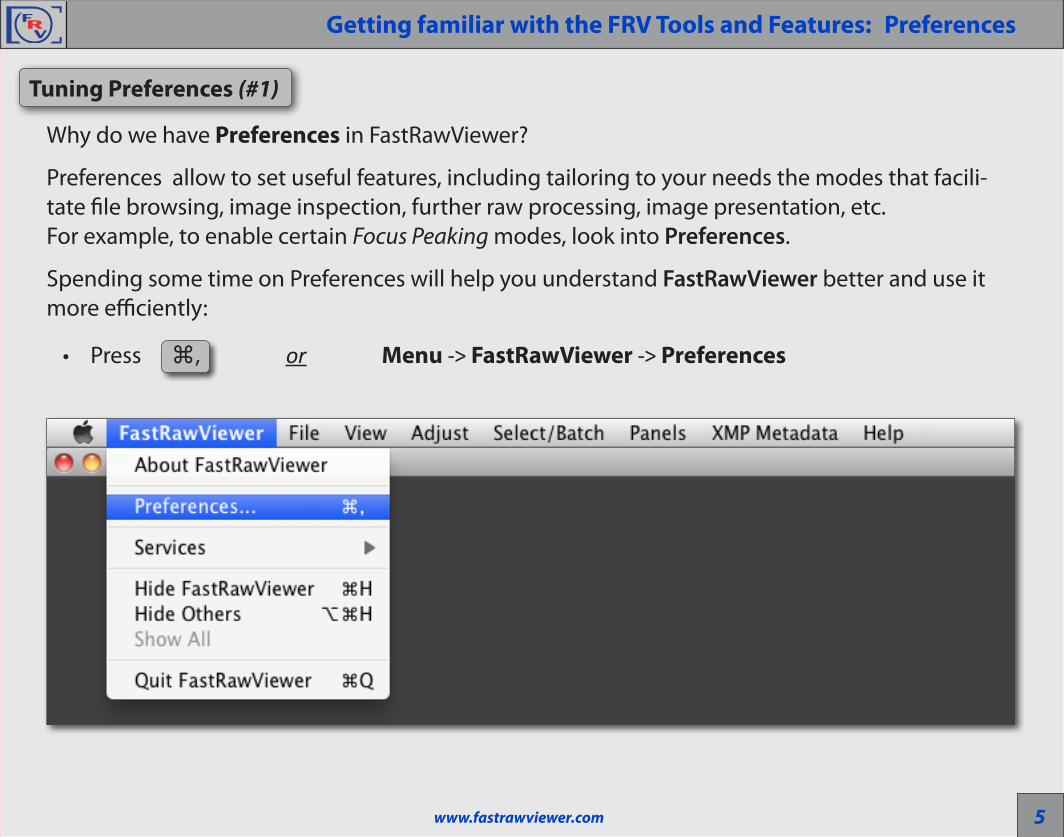
Tuning Preferences (#1)
Why do we have Preferences in FastRawViewer?
Preferences allow to set useful features, including tailoring to your needs the modes that facili-tate file browsing, image inspection, further raw processing, image presentation, etc. For example, to enable certain Focus Peaking modes, look into Preferences.
Spending some time on Preferences will help you understand FastRawViewer better and use it more efficiently:
• Press ⌘, or Menu -> FastRawViewer -> Preferences
6www.fastrawviewer.com
Getting familiar with the FRV Tools and Features: Preferences
Tuning Preferences (#2)
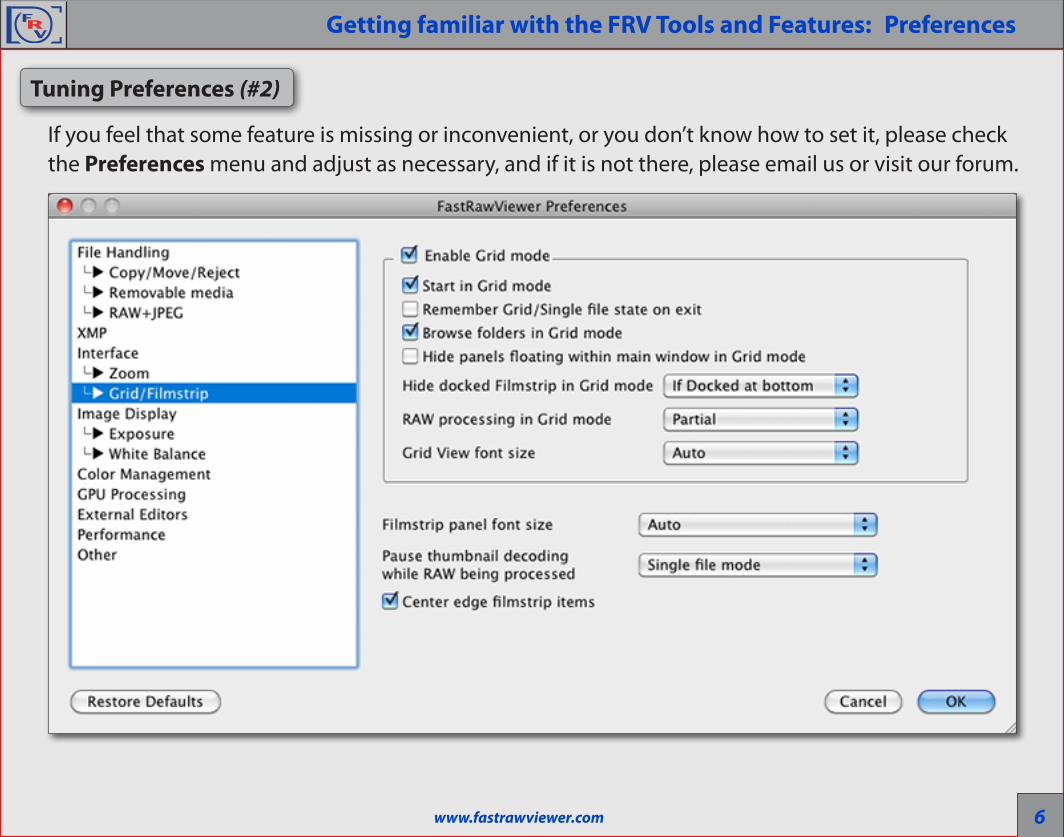
If you feel that some feature is missing or inconvenient, or you don’t know how to set it, please check the Preferences menu and adjust as necessary, and if it is not there, please email us or visit our forum.

7www.fastrawviewer.com
Getting familiar with the FRV Tools and Features: Examining Shortcuts
FastRawViewer is designed to be controlled mostly with keyboard and mouse, without much reaching for menus.
You can examine the default/current key/mouse control combinations and change them to your preferred ones anytime:
• Press ⌘K or Menu -> File -> Keyboard Shortcuts
Examining Keyboard/Mouse Controls (#1)

8www.fastrawviewer.com
Getting familiar with the FRV Tools and Features: Examining Shortcuts
Examining Keyboard/Mouse Controls (#2)
We suggest that you spend some time familiarizing yourself with the shortcuts with the help of the Keyboard Shortcuts Menu, tips, and FastRawViewer Manual; it is not just an overview of the program (that is, showing what can be done in FastRawViewer), but will also help you to do more things in less time.

9www.fastrawviewer.com
Getting familiar with the FRV Tools and Features: Adjusting Shortcuts
Changing Keyboard/Mouse Controls
If you feel that some feature or shortcut is missing or inconvenient, please check the Keyboard Shortcuts Editor and adjust as necessary, and if it is not there, please let us know.
Many features are already pre-programmed and assigned to shortcuts. Nevertheless you can change the shortcuts so that they will be similar to the ones you use with other graphic programs.
Press here to add a Shortcut Combination
Press here to delete the Shortcut Combination
Press here to change a Shortcut Combination

10www.fastrawviewer.com
Getting familiar with the FRV Tools and Features: Interface Customization
Changing Background, Panels Color Scheme and Font Size
Menu -> FastRawViewer -> Preferences -> Interface
The background or panel color scheme can be changed to any shade of grey, from black to white. Also, the bottom bar or panel’s font size can be changed.
11www.fastrawviewer.com
Getting familiar with the FRV Tools and Features: Interface Customization
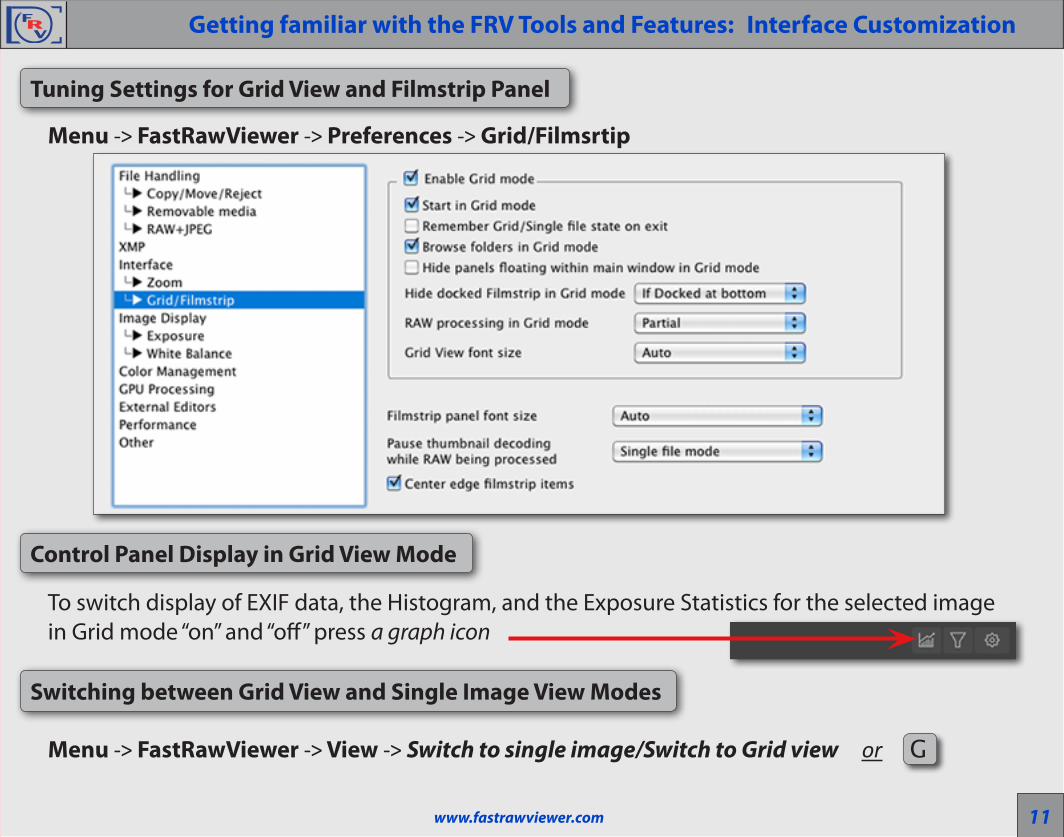
Tuning Settings for Grid View and Filmstrip Panel
Menu -> FastRawViewer -> Preferences -> Grid/Filmsrtip
Control Panel Display in Grid View Mode
To switch display of EXIF data, the Histogram, and the Exposure Statistics for the selected image in Grid mode “on” and “off” press a graph icon
Switching between Grid View and Single Image View Modes
Menu -> FastRawViewer -> View -> Switch to single image/Switch to Grid view or G

12www.fastrawviewer.com
Grid View Mode and Panels Settings Customization
A little gear icon at the top right corner of a panel (or the top left corner of the filmstrip placed at the bottom) allows customization of the panel or bar.
Getting familiar with the FRV Tools and Features: Interface Customization
Arranging Panels
1. All panels can be placed anywhere on the screen or even other monitor — just drag-and-drop it where you want it to be.
2. If the Filmstrip panel is outside the program window, it can be easily organized into a light-table.
3. The filmstrip can be docked at the top, bottom, or left side of the main window. All other panels — at the right or left side. You can dock a panel to the most recent docking position by pressing an arrow icon.
1. Every panel can be toggled open and closed through:
• Menu -> Panels or a keyboard shortcut (default or assigned)
To change panels keyboard shortcuts, please look at:
• Menu -> File -> Keyboard Shortcuts -> Information Panels
2. The Tab key toggles all presented on the screen panels hide and unhide together.
Toggle Panel Display

13www.fastrawviewer.com
1. Open Bottom Bar Customization Dialog
• Through the gear icon at the lower right corner of the Bottom Bar:
or through• Menu -> File -> Customize bottom bar
or through• Menu -> FastRawViewer -> Preferences -> Interface
press the button
2. At the Bottom Bar Customization Dialog choose Bottom Bar options to be displayed (see the image to the right).
Getting familiar with the FRV Tools and Features: Bottom Bar
Bottom Bar Customization
Press here to open Bottom Bar Customization Dialog

14www.fastrawviewer.com
Getting familiar with the FRV Tools and Features: EXIF ViewGetting familiar with the FRV Tools and Features: Color Management
Color Management
Menu -> FastRawViewer -> Preferences -> Color ManagementIf you use Custom monitor profile
Do not override if the system color profile is already the one you want to use; in this case “Use color profile of display” is enough.
If you use a Wide Gamut monitorTry to use Adobe RGB as the selected color space (“RAW processing color space” field)
If your Custom monitor profile is accurateYou may benefit from selecting ProPhoto RGB (“RAW processing color space” field)
If you use a generic monitor with a canned profileThe image may look better with color management off (leave the box “Enable Color Management” at the top of Color Management Menu unchecked)

15www.fastrawviewer.com
1. At the top right corner of the EXIF Window:
2. Choose EXIF fields to be displayed (see the image to the right).
Getting familiar with the FRV Tools and Features: EXIF View
Customization of EXIF Fields display
Press to open EXIF Display Menu
16www.fastrawviewer.com
Getting familiar with the FRV Tools and Features: Favorite FoldersGetting familiar with the FRV Tools and Features: Working with Removable Media
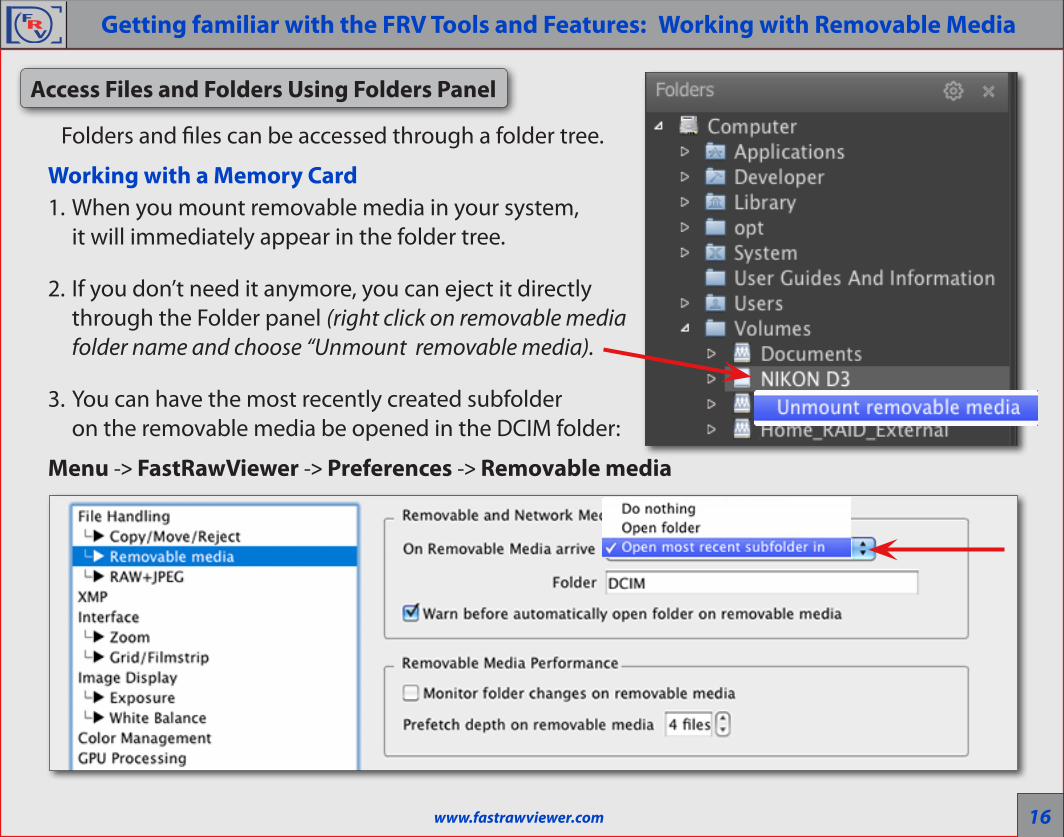
Access Files and Folders Using Folders Panel
Folders and files can be accessed through a folder tree.
Working with a Memory Card1. When you mount removable media in your system,
it will immediately appear in the folder tree.
2. If you don’t need it anymore, you can eject it directly through the Folder panel (right click on removable media folder name and choose “Unmount removable media).
3. You can have the most recently created subfolder on the removable media be opened in the DCIM folder:
Menu -> FastRawViewer -> Preferences -> Removable media

17www.fastrawviewer.com
Getting familiar with the FRV Tools and Features: Favorite Folders
Working with the Favorite Folders Panel
This panel allows one to keep a list of often-used folders, and lets one readily access them.
Add a Folder to Favorite Folders1. Right-click on the selected folder in the Folder tree and use the appearing context menu.
2. Highlight the selected folder in the Folder Tree and press the Gear icon on the Favorite Folders panel to ac-cess the context menu.
Remove a Folder from Favorite Folders1. Right-click on the selected folder
in the Favorite Folders and use the appearing context menu.
Open folders2. A click on an item (folder) in this list opens the chosen folder in the Filmstrip/Thumbnails panel3. A double-click opens an item in the Filmstrip/Thumbnails panel and loads the first file in the
main window. Clear Favorite Folders List1. Press the Gear icon on the Favorite Folders panel to access the context menu.

18www.fastrawviewer.com
Getting familiar with the FRV Tools and Features: Grid View / Single File View Modes
If FastRawViewer is launched without indicating a filename, it will start in Grid View mode, displaying the thumbnail previews of all of the supported files from the selected folder (current folder, if switched to Grid View mode from Single FileView mode) :
Navigating files• Keyboard: arrowkeys in the main window, PgUp/PgDn, Home/End; customizable shortcuts for Next File/Prev. File and First/Last File in folder.
• Mouse: the wheel scrolls through the contents of the folder up and down.
Switching to Single File View Mode• A double-click on a file in the grid or Enter• Menu -> View -> Switch to single image or G
Grid View Mode

19www.fastrawviewer.com
Getting familiar with the FRV Tools and Features: Grid View / Single File View Modes
Single File View Mode
If FastRawViewer is launched over a specific file (for example, by dropping a RAW file onto the program’s icon, or by double-clicking a file which is associated with FastRawViewer, etc.) it will start in Single File View mode.
Navigating files• Keyboard: arrowkeys in the Filmstrip, customized shortcuts for Next File/Prev. File and First/Last File in folder.
• Mouse: the wheel scrolls through the contents of the Filmstrip left and right;
• Buttons for navigating through the current folder: previous file, number of file in the file list and the length of the list, next file;
Switching to Grid View Mode• Menu -> View -> Close single image or Esc (Esc/close single image also exits full screen mode)
• Menu -> View -> Switch to single image or G

20www.fastrawviewer.com
Getting familiar with the FRV Tools and Features: File Selection/Batch OperationGetting familiar with the FRV Tools and Features: File Sorting Order
File Sorting Order / EXIF Timestamp
Files can be sorted according to different criteria:
FastRawViewer -> Preferences -> File Handling -> File sort order
Sorting the File List by the EXIF TimestampFor this sorting, FastRawViewer reads the DateTimeOriginal and SubSecTimeOriginal EXIF tags.
• If this sorting is turned on, then the first time a folder with files is accessed, FastRawViewer will read EXIF data from all of the files in the folder. At the same time, XMP blocks in the files and XMP sidecar files will be analyzed (on slow discs/cards, this reading might take a while).
• Files with EXIF Timestamps will be sorted alphabetically within a second.

21www.fastrawviewer.com
Getting familiar with the FRV Tools and Features: File Selection/Batch Operation
File Selection
To fulfill Batch operations (such as copy, move, rotate, set rating and label etc.) with multiple files you will first have to select those files.
To mark a file for group operations in Grid View or Filmstrip panel:
• Ctrl-Click on the file preview thumbnail;
or
• Set/unset a checkmark in a checkbox in the upper-right corner of the preview thumbnail (the checkbox appears for the files that are currently unmarked when you hover a mouse over its preview; the checkbox is permanently visible for those files which are already marked).
or
• choose the actions through:Menu -> Select/Batch
22www.fastrawviewer.com
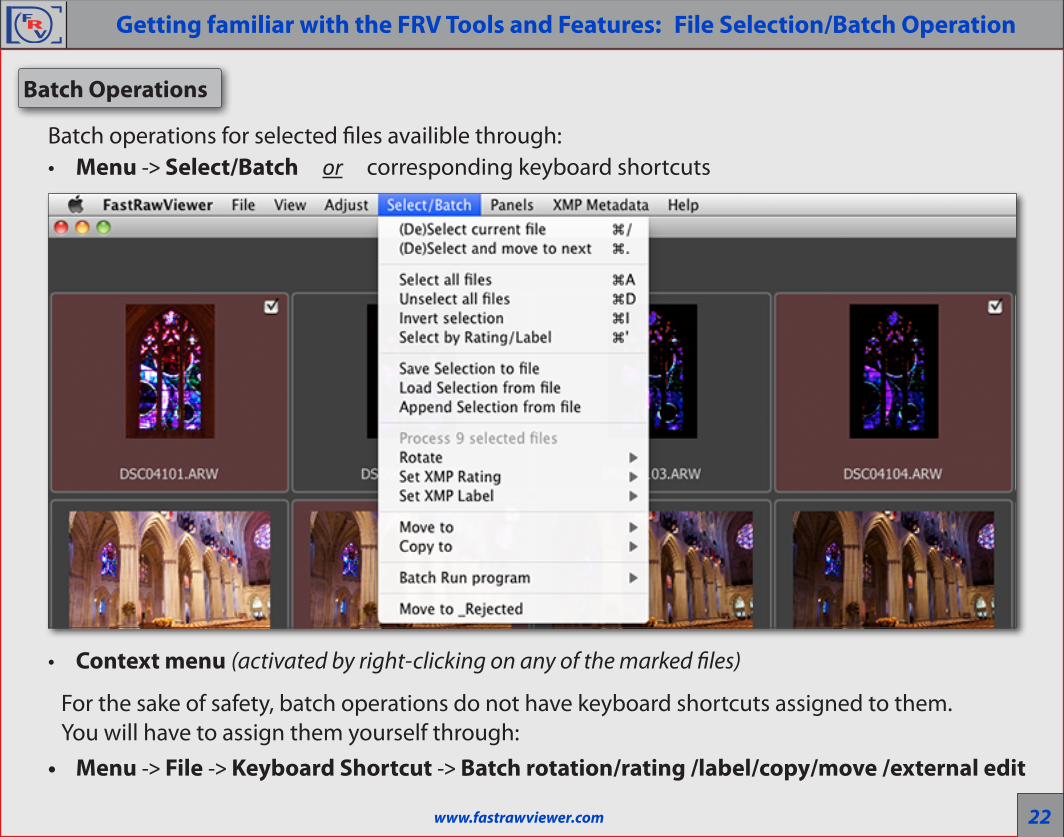
Getting familiar with the FRV Tools and Features: File Selection/Batch Operation
Batch Operations
Batch operations for selected files availible through:• Menu -> Select/Batch or corresponding keyboard shortcuts
• Context menu (activated by right-clicking on any of the marked files)
For the sake of safety, batch operations do not have keyboard shortcuts assigned to them. You will have to assign them yourself through:
• Menu -> File -> Keyboard Shortcut -> Batch rotation/rating /label/copy/move /external edit

23www.fastrawviewer.com
• Menu -> FastRawViewer -> Preferences -> XMP
Getting familiar with the FRV Tools and Features: Ratings and Labels
Choose XMP Label and Rating Style
Assign XMP Label and Rating to the Image
• Menu -> XMP Metadata or corresponding keyboard shortcuts
Change Keyboard Shortcuts
• Menu -> File -> Keyboard Shortcuts -> XMP Rating
• Menu -> File -> Keyboard Shortcuts -> XMP Labels

24www.fastrawviewer.com
1. To choose XMP ratings and labels for the filtering
• Menu -> File -> Filter Files by rating/label or Shift-For press the Funnel icon on the Grid View or Filmstrip panel
2. To set navigation control options for filtering press the Gear icon and choose an option:
3. To account for the labels/ratings in XMP blocks embedded into RAW files*:
• Menu -> FastRawViewer -> Preferences -> XMP
Getting familiar with the FRV Tools and Features: Filtering Files
Filtering the File List by the XMP Ratings and Labels
Filter Settings Dialog
* Some RAW files contain embedded XMP blocks:a) DNG files, which have the label and/or rating set in Adobe pro-grams (Bridge, Lightroom)b) RAW files, which have the label and/or rating set in the camera

25www.fastrawviewer.com
Assessing the Image: Tools and Features
RAW Histogram
Over- and Underexposure Indication and Statistics
Focus Peaking
Screen Sharpening
Shadow Boost
Highlight Inspection
Exposure Compensation
White Balance
Contrast (Tone) Curve
Using these tools is super easy. They can be activated and deactivated through the Shortcuts, or the Bottom Bar, or through the Menu. Parameters for the tools are set through the Preferences.
The detailed information about these tools can be found in FastRawViewer manual. They also briefly covered in tips.
FastRawViewer Image Assessing Tools
Of course the composition is a priority while sorting images. If the image you are viewing is com-posed well next thing you want to know is: if the technical quality of the image good enough.
FastRawViewer offers essential Image Assessing Tools:
26www.fastrawviewer.com
Assessing the Image: Matching Image DisplayAssessing the Image: Matching Image Display
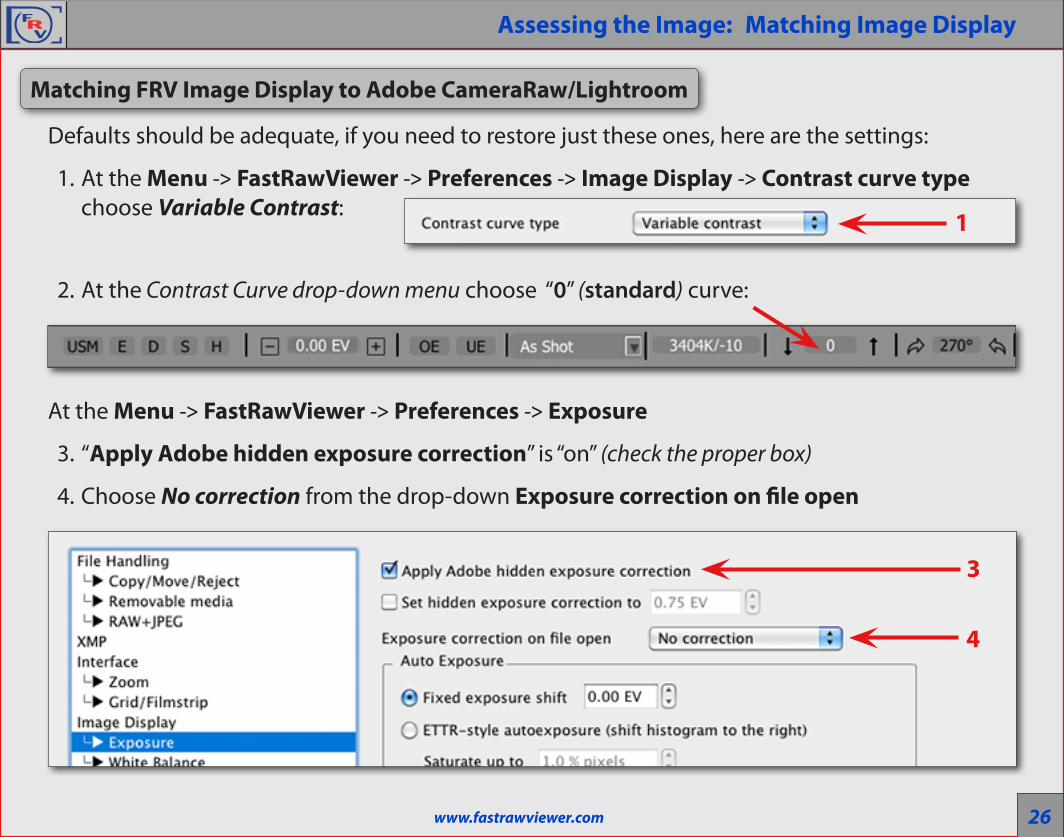
Matching FRV Image Display to Adobe CameraRaw/Lightroom
Defaults should be adequate, if you need to restore just these ones, here are the settings:
1. At the Menu -> FastRawViewer -> Preferences -> Image Display -> Contrast curve type choose Variable Contrast:
2. At the Contrast Curve drop-down menu choose “0” (standard) curve:
At the Menu -> FastRawViewer -> Preferences -> Exposure
3. “Apply Adobe hidden exposure correction” is “on” (check the proper box)
4. Choose No correction from the drop-down Exposure correction on file open
4
1
3

27www.fastrawviewer.com
Assessing the Image: Matching Image Display
If the image display in FastRawviewer does not match the display in Adobe ACR/Lr or other con-verter (brightness is different, color is off, etc.), please check the following:
Disable Auto Exposure Correction
• Press A or Toggle Exposure Correction button at the Bottom Bar
Enable Color Management• Menu -> FastRawViewer -> Preferences -> Color Management -> check the box
“Enable Color Management”
Choose correct Montor ProfileIf colors still look off, please check at the same Color Management menu that you’ve chosen the correct Monitor Profile
Matching FRV Image Display to RAW Converter
Bottom Bar

28www.fastrawviewer.com
Assessing the Image: Over- and Underexposure
Checking for Over- and Underexposure
Toggle Overexposure Toggle Underexposure
Bottom Bar
Toggling Over- and Underexposure Indication
• O or Menu -> View -> Overexposure Display
• U or Menu -> View -> Underexposure Display
Over- and Underexposure StatisticsAt the Information Windows Dock you can find Over- and Underexposure Statistics Window (see the picture to the right)
Setting Underexposure Detection LimitMenu -> FastRawViewer -> Preferences -> Exposure -> Underexposure Detection Limit
29www.fastrawviewer.com
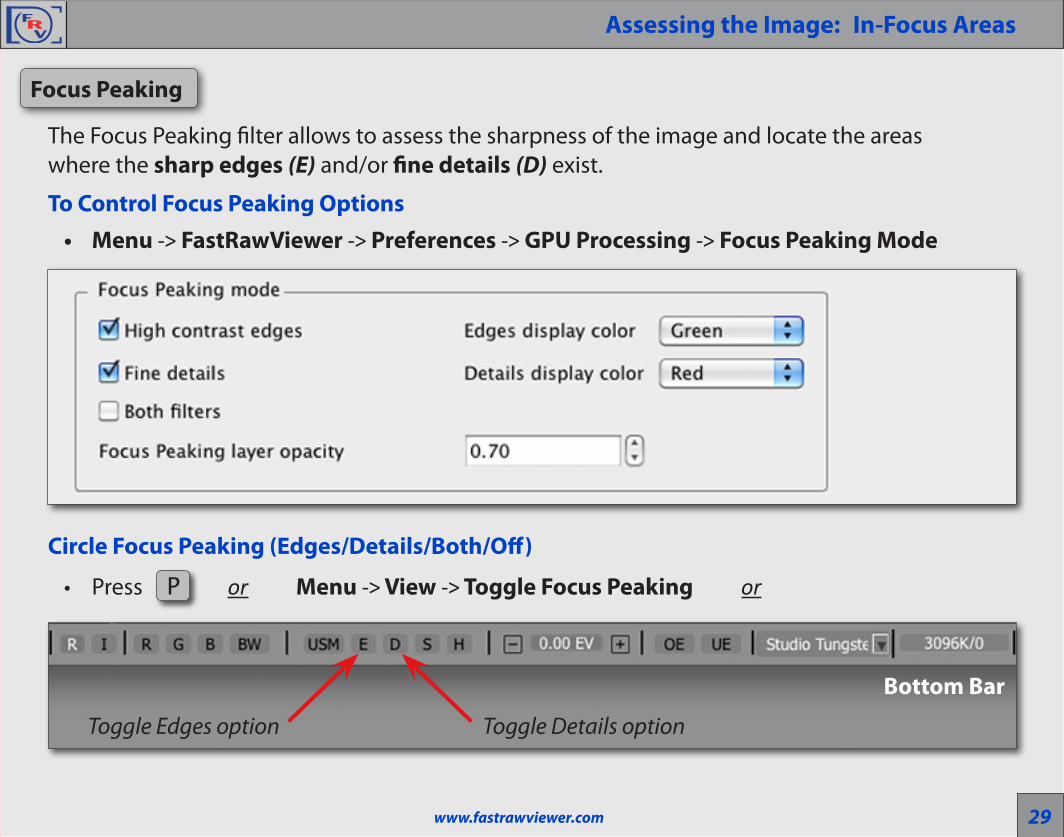
Assessing the Image: In-Focus Areas
The Focus Peaking filter allows to assess the sharpness of the image and locate the areas where the sharp edges (E) and/or fine details (D) exist.
To Control Focus Peaking Options• Menu -> FastRawViewer -> Preferences -> GPU Processing -> Focus Peaking Mode
Circle Focus Peaking (Edges/Details/Both/Off)
• Press P or Menu -> View -> Toggle Focus Peaking or
Focus Peaking
Toggle Edges option Toggle Details option
Bottom Bar
30www.fastrawviewer.com
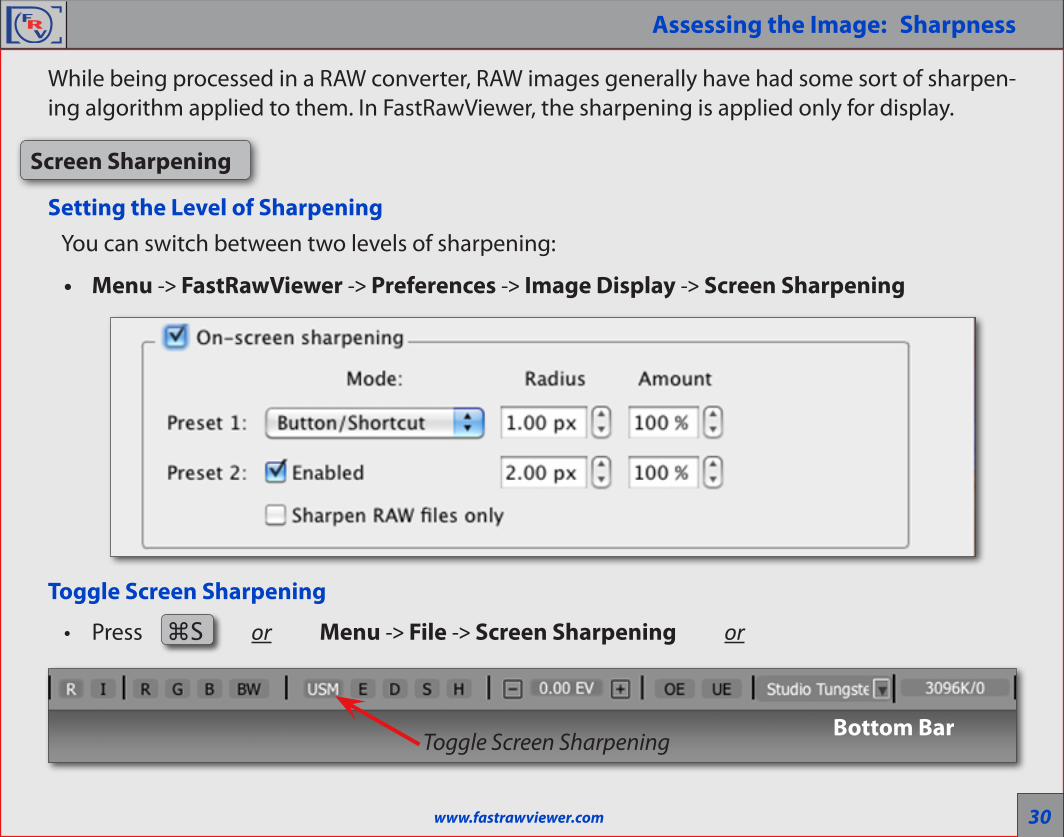
Assessing the Image: Sharpness
Setting the Level of SharpeningYou can switch between two levels of sharpening:
• Menu -> FastRawViewer -> Preferences -> Image Display -> Screen Sharpening
Toggle Screen Sharpening
• Press ⌘S or Menu -> File -> Screen Sharpening or
Screen Sharpening
Toggle Screen SharpeningBottom Bar
While being processed in a RAW converter, RAW images generally have had some sort of sharpen-ing algorithm applied to them. In FastRawViewer, the sharpening is applied only for display.
31www.fastrawviewer.com
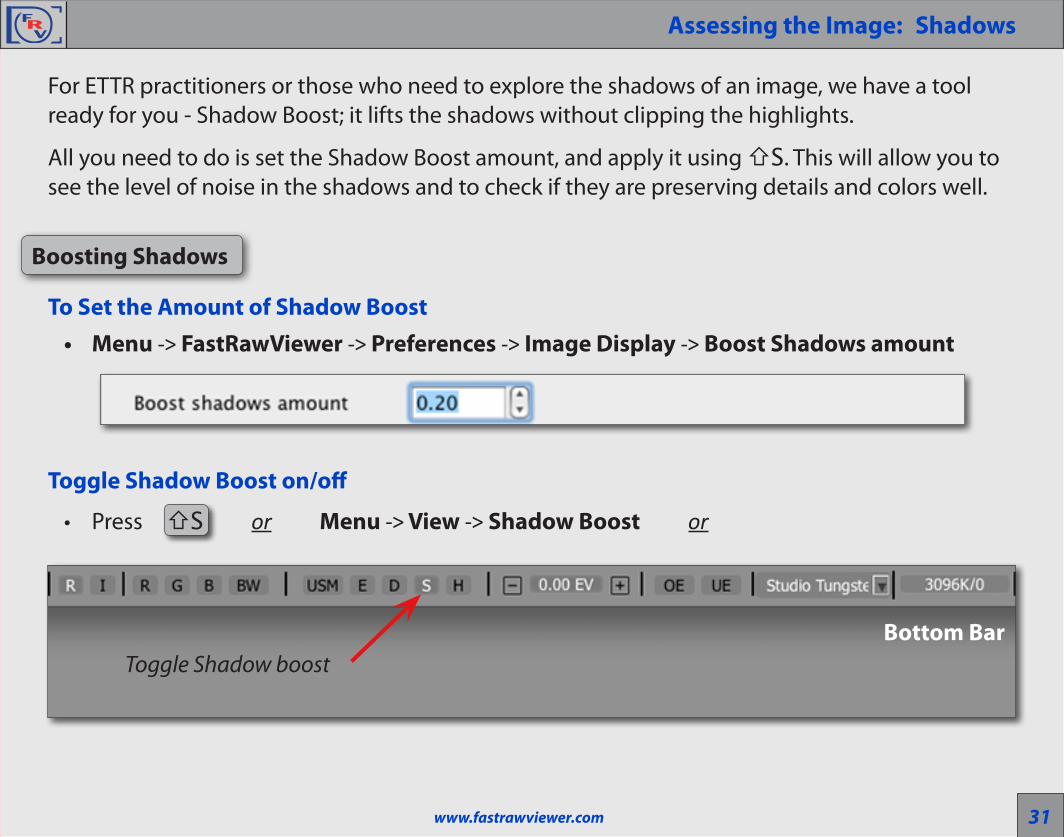
Assessing the Image: Shadows
To Set the Amount of Shadow Boost• Menu -> FastRawViewer -> Preferences -> Image Display -> Boost Shadows amount
Toggle Shadow Boost on/off
• Press ⇧S or Menu -> View -> Shadow Boost or
Boosting Shadows
Toggle Shadow boostBottom Bar
For ETTR practitioners or those who need to explore the shadows of an image, we have a tool ready for you - Shadow Boost; it lifts the shadows without clipping the highlights.
All you need to do is set the Shadow Boost amount, and apply it using ⇧S. This will allow you to see the level of noise in the shadows and to check if they are preserving details and colors well.

32www.fastrawviewer.com
Choose Settings for Highlights Inspection• Menu -> FastRawViewer -> Preferences -> Image Display -> Highlights Inspection
Toggle Highlights Inspection on/off
• Press ⇧H or Menu -> View -> Highlights inspection or
Highlights Inspection
Toggle Highlights InspectionBottom Bar
Highlight Inspection mode does the “opposite” of the Shadow Boost mode: the brightness of the shadows and midtones is decreased, thus the image looks darker; the contrast in the high-lights is increased; white balance can be “canceled” by setting it to UniWB. As result it allows to evaluate details in highlights and inspect which channels are clipped (if any) and where.
Assessing the Image: Highlights

33www.fastrawviewer.com
Assessing the Image: Exposure Correction
Controlling Exposure Correction (#1)
Switch Auto Exposure Correction “on”
• Press ⇧A or Menu -> Adjust -> Auto Exposure Correction
Choosing the Step Size for Exposure Correction• Menu -> FastRawViewer -> Preferences -> Exposure -> Manual exposure step size drop down
You can save a lot of time spent on adjusting images in Lr/ACR, Capture One, or RPP, if you select and apply adjustments to Exposure, White Balance, and Orientation right in FastRawViewer, while browsing and save the applied settings in sidecar XMP and/or RPPS files. Raw converter program will be picking up those sidecar files prepared in FastRawViewer as the starting point for conversions.
This technique works well in combination with Propagation (see the tip “Time-saver: Propagation”)

34www.fastrawviewer.com
Assessing the Image: White Balance Presets
Switch Exposure Correction on/off
• Press A or Menu -> Adjust -> Exposure Correction or
Press the Exposure Correction Value field at the Bottom Bar
Increase/Decrease Exposure Correction
• Press ⌥+ / ⌥- or
Click + / - at the lower Bottom Bar
Assessing the Image: Exposure Correction
Controlling Exposure Correction (#2)
Press to decrease Press to increaseToggle on/off
Bottom Bar
35www.fastrawviewer.com
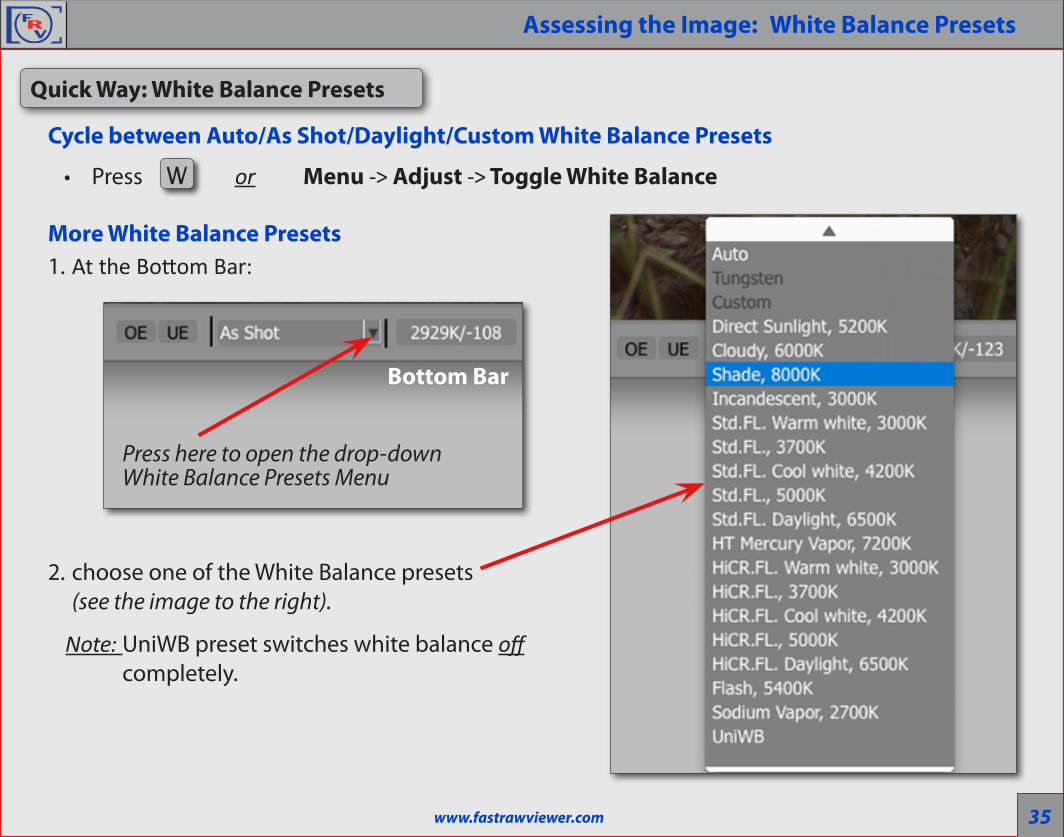
Cycle between Auto/As Shot/Daylight/Custom White Balance Presets
• Press W or Menu -> Adjust -> Toggle White Balance
More White Balance Presets1. At the Bottom Bar:
2. choose one of the White Balance presets (see the image to the right).
Note: UniWB preset switches white balance off completely.
Assessing the Image: White Balance Presets
Quick Way: White Balance Presets
Press here to open the drop-down White Balance Presets Menu
Bottom Bar

36www.fastrawviewer.com
Choosing the Sampler Size
• Menu -> FastRawViewer -> Preferences -> White Balance -> White Balance Sampler Size
Setting the Grey Point
• Click on ⌥ LeftClick on the image on something you designate as neutral.
Assessing the Image: Custom White Balance
Sampling Grey Point

37www.fastrawviewer.com
Assessing the Image: White Balance Display
• Menu -> FastRawViewer -> Preferences -> White Balance -> White Balance Display Mode
White Balance settings in the chosen mode will be displayed at the Bottom Bar:
Choosing White Balance Display Mode
Color Temperature and Tint Mired and Tint
Per-channel correction in EVWhite balance coefficients

38www.fastrawviewer.com
Assessing the Image: Tuning White Balance
Choose White balance Edit Mode• Menu -> FastRawViewer -> Preferences -> White Balance -> White Balance Edit Mode
Adjust White Balance
• Click White Balance Display at the Bottom Bar to adjust white balance using sliders in the White Balance Adjustment Window
Fine-tuning White Balance
Bottom BarPress here to open White Balance Adjustments Window
Bottom BarBottom Bar
39www.fastrawviewer.com
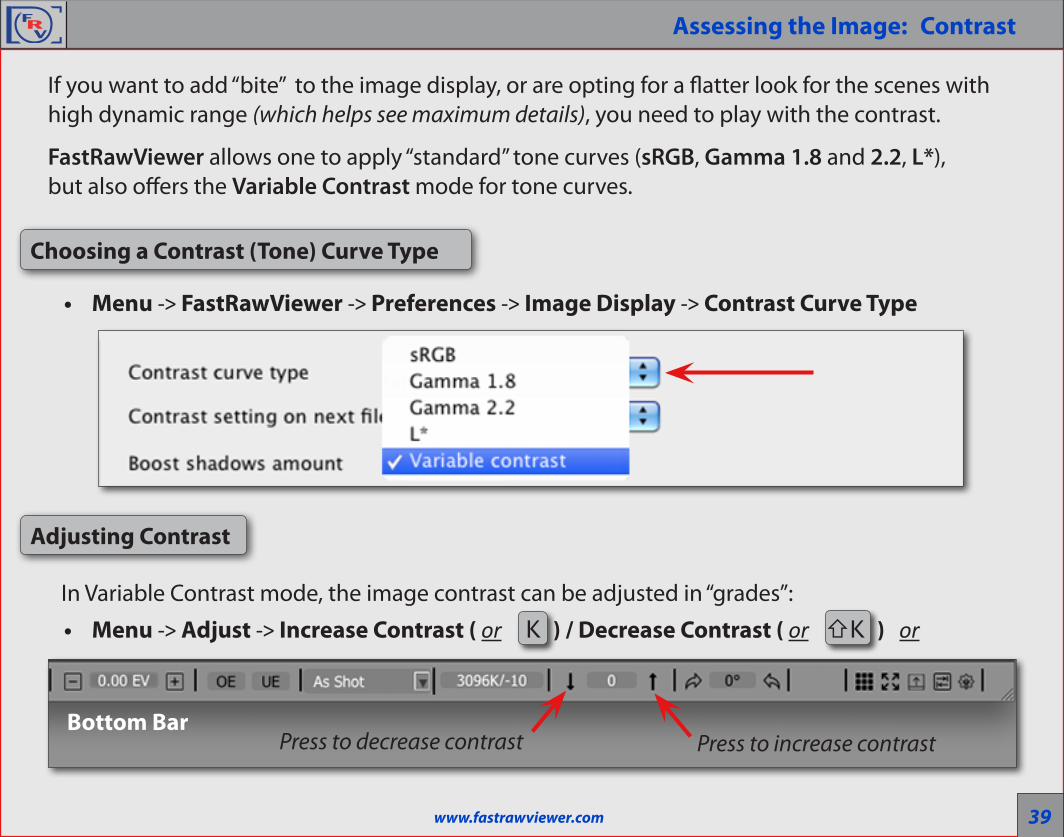
Assessing the Image: Contrast
• Menu -> FastRawViewer -> Preferences -> Image Display -> Contrast Curve Type
Choosing a Contrast (Tone) Curve Type
If you want to add “bite” to the image display, or are opting for a flatter look for the scenes with high dynamic range (which helps see maximum details), you need to play with the contrast.
FastRawViewer allows one to apply “standard” tone curves (sRGB, Gamma 1.8 and 2.2, L*), but also offers the Variable Contrast mode for tone curves.
Bottom Bar
Adjusting Contrast
In Variable Contrast mode, the image contrast can be adjusted in “grades”:
• Menu -> Adjust -> Increase Contrast ( or K ) / Decrease Contrast ( or ⇧K ) or
Press to decrease contrast Press to increase contrast

40www.fastrawviewer.com
Time-saver: Getting Ready for RAW ConversionTime-saver: Getting Ready for RAW Conversion. XMP/RPPS Settings Customization
Customizing XMP or RPPS Settings to Match You RAW Converter
Many RAW converters and image browsers are using sidecar files to store non-destructive chang-es to the image as well as ratings, labels, comments, etc.
Choosing XMP Settings in Preferences• Menu -> FastRawViewer -> Preferences -> XMP
In XMP settings Window you will see several options tuning of which allows better communica-tion between FastRawViewer and your preferred RAW converter.
For RPP Users
• Menu -> FastRawViewer-> Preferences -> Other

41www.fastrawviewer.com
If you are using Adobe ACR or Lr you should:
0a. Switch on “Apply Adobe Exposure Correction”• Menu -> FastRawViewer -> Preferences -> Exposure
0b. Switch on “Adobe compatible Exposure, Contrast and White balance”• Menu -> FastRawViewer -> Preferences -> XMP
To record Contrast in the format that is acknowledged by Adobe convert-ers, check “Write Adobe-compatible Contrast/Blacks into XMP file”
1. Check the Settings for Sidecar Files .xmp/.rpps (please see the previous tip)
2. Set Image Orientation (if needed)• Menu -> Adjust -> Rotate 900 CCW (or ⌘7 )/ Rotate 900 CW (or ⌘9 ) or
3. Tune White Balance and Adjust Exposure Correction (see tips for ‘Assessing the Image: White Balance’ and ‘Assessing the Image: Exposure Correction’)
5. Adjust Contrast (if using Adobe raw converters) (see tips for ‘Assessing the Image: Contrast’)
Time-saver: Getting Ready for RAW Conversion
Adjusting Settings and Basic Conversion Parameters
Press to rotate 900 CW Bottom BarPress to rotate 900 CCW

42www.fastrawviewer.com
Time-saver: Propagation
Keep Exposure Correction for the Next Frame• Menu -> FastRawViewer -> Preferences -> Exposure -> choose Keep from prev. file
from drop-down Exposure correction on file open
Keep White Balance for the Next Frame• Menu -> FastRawViewer -> Preferences -> White Balance -> choose Same as previous
from drop-down White Balance for next file
Propagation of Settings from the “Previous” Image to the “Next” (#1)
It often happens that several files need the same adjustments to White Balance, Exposure and Orientation. To do so, FastRawViewer offers Propagation Mode: in this mode adjustments made to Exposure and White Balance are automatically applied to the next image you open in FastRawViewer.

43www.fastrawviewer.com
Time-saver: Propagation to Sidecar Files
Force XMP Files Creation• Menu -> FastRawViewer -> Preferences -> XMP
Force RPPS Files CreationIf you are using RPP (RawPhotoProcessor) switch on the following:
• Menu -> FastRawViewer -> Preferences -> Other
Propagation of Settings from the “Previous” Image to the “Next” (#2)
When using Propagation you may choose Forced Mode of recording sidecar files. In this case even if no individual adjustments were applied to the image the sidecar file will be written con-taining all the changes you’ve made last time within the session. Thus all RAW files will have ac-companying sidecar files with the parameter already set to be picked up by RAW converter.