Embed Size (px)
Citation preview
IFS CLOUD UPLINK™ INSTALLATION GUIDE
ABSTRACT
This guide describes how to install IFS Cloud Uplink.
UPLINK VERSION
4.13
PREPARE THE WEB SERVER THAT SERVES IFS EXTENDED SERVER
Since the user credentials are set up on a mobile device that is not part of your Windows
domain, single sign on – Integrated Windows Authentication – cannot be used between IFS
Cloud Uplink and your IFS Applications Extended Server. If you currently have an SSO only
policy set up in the web server that your Extended Server is connected to you will have to
allow basic http authentication on that web server or set up another web server with or
without https support which allows basic http authentication. Note that this requirement is for
traffic on your internal network only. Transporting user credentials from the mobile device
that runs the end user’s Touch App to the Uplink at your site does not rely on basic http
authentication.
PREPARE YOUR IFS APPLICATIONS INSTANCE
You must prepare the IFS Applications instance before it can be accessed from the IFS Cloud™.
GRANT PERMISSIONS
You must grant permission to execute the PL/SQL methods
Security_SYS.Is_Object_Available_ (note the trailing underscore) and
Cache_Management_API.Get_Refreshed to the end user role FND_ENDUSER. You must also
grant permission to execute the PL/SQL method Security_SYS.Has_System_Privilege to
the end user role FND_ADMIN.
In the Permission Set detail feature you find these entries in the Database Objects tab. In the
component tree it’s under IFS Base Functionality, and then Security.
From IFS Applications 8 SP1, these methods are included in the Presentation Objects
TouchAppsEndUser and TouchAppsAdministrator and are granted to the FND_ENDUSER and
FND_ADMIN roles respectively.
To be able to log on to the customer portal, the admin user needs to have the system privilege "ADMINISTRATOR" (and the above mentioned method Security_SYS.Has_System_Privilege granted).
If a System Privilege named PLSQLGATEWAY exists, grant it to the functional role
FND_RUNTIME. This privilege was removed in a late service pack of IFS Applications 7.5
Grant activity AccessPlsql in IFS Base Functionality to FND_RUNTIME.
Remember to refresh the security cache when done.
IFS CLOUD UPLINK INSTALLATION
The IFS Cloud Uplink Service connects the IFS Cloud to a local Application Server instance.
CONFIGURE UPLINK SERVER MACHINE
To run IFS Cloud Uplink you will need a 64 bit Windows machine (running Windows 7,
Windows Server 2008 R2 or Windows Server 2012 R2) with an external IP address. For best
performance this machine should be located on the same high speed LAN as the IFS
Applications application server.
The user LocalSystem should have permission to access internet.
INSTALL PREREQUISITE SOFTWARE
All software should be installed running as local administrator on the machine.
- Microsoft .NET 4 Framework (It’s not enough with the Client Profile). Standalone
installer can be found here.
- IIS with ASP.NET . The uplink does not have any particular requirements regarding
configuration. It runs on the Default Website.
CREATE A CERTIFICATE
In order for your IFS Cloud Uplink to authenticate itself to IFS Cloud, and prove to IFS Cloud
that the uplink really belongs to your organization, a certificate is needed. The certificate is
also used to prove to the uplink that it talks to IFS Cloud and not to an impostor. It’s also used
to encrypt the end user’s password when authenticating with IFS Applications from a mobile
device.
This should be a public key certificate with a matching private key. This certificate can be
generated in house, and need not be purchased from a third party certification authority. You
can use the MakeCert.exe tool available with Microsoft Visual Studio or the Windows SDK to
generate this certificate and private key on the machine that you wish to install the Uplink. If
you do Windows development on your site the Makecert tool can be copied from an existing
development environment. If not, since the Makecert tool is bundled in development tools of
substantial size and complexity you may consider obtaining a certificate by other means.
More information about Makecert at MSDN >>
To generate a certificate using Makecert, use the following command line example.
makecert -sky exchange -n "CN=My Company Uplink Certificate" -sk PROD -sr
LocalMachine cert_for_prod.cer
-sky exchange: Defines the key type as exchange.
-n: Specifies the name of the public key certificate. Normally begins with “CN=”
followed by anything you want to put there.
-sk: The key container name which contains the private key counterpart for this
certificate.
-sr LocalMachine: Specifies that this key is to be added to the LocalMachine’s store.
Please do not forget the name of the key container. You need it later.
Once the private key is installed on the machine, you need to send the certificate to
IFS. You should have received information where to send it. You then need to verify
with IFS that the certificate has been added to the IFS Cloud to enable your uplink to
authenticate. IFS will at this point provide you with a System ID which is a human
readable key for your organization that will be used in conjunction with the certificate
to authenticate your users and your uplink.
INSTALL IFS CLOUD UPLINK SERVICE MANAGER
1. Run the IFS Cloud Uplink installer MSI and it will guide you through the process of
installing the IFS Cloud Uplink.
2. Once installation is complete, you should see a new start menu item called IFS Cloud
Uplink Manager. Click it to start the IFS Cloud Uplink Manager which will allow you to
configure the IFS Cloud Uplink to your environment.
The windows user running IFS Cloud Uplink Manager should have access rights to start,
stop, create and delete local services.
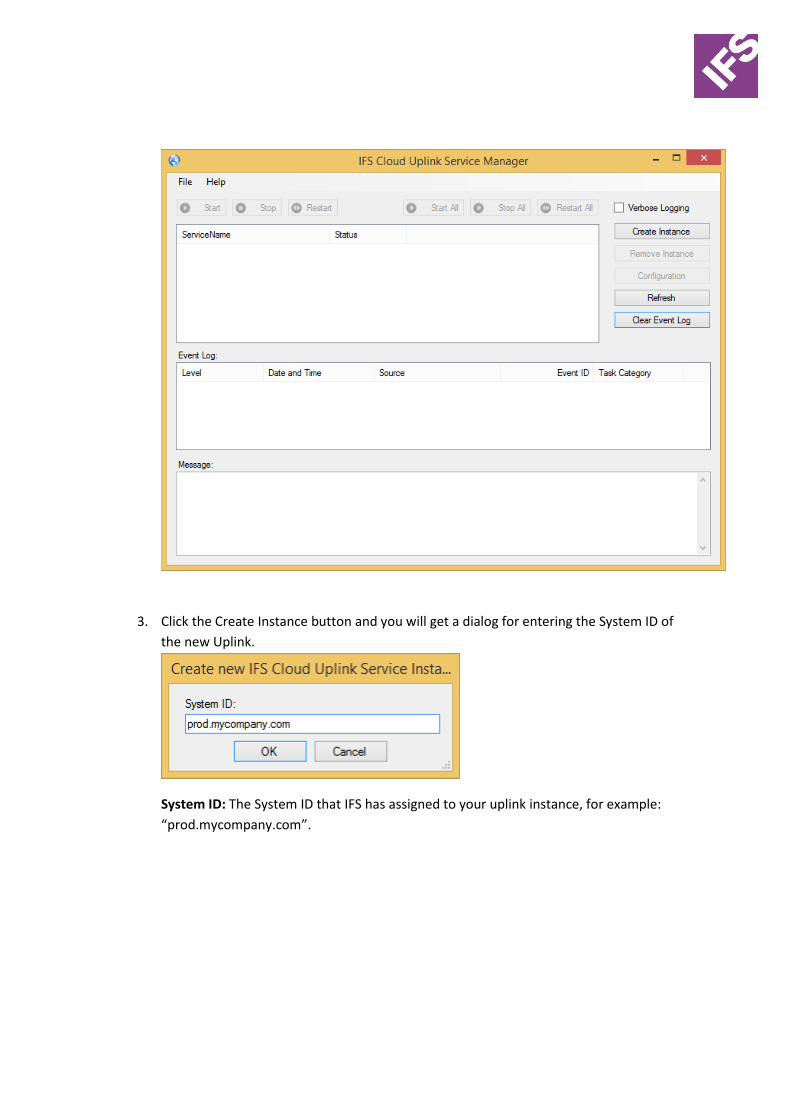
3. Click the Create Instance button and you will get a dialog for entering the System ID of
the new Uplink.
System ID: The System ID that IFS has assigned to your uplink instance, for example:
“prod.mycompany.com”.
4. Click OK and your new IFS Uplink will be visible in the IFS Cloud Uplink Manager. Now,
select the new Uplink and click Configuration or hit the Enter key.
This will give you the configuration dialog below. Enter appropriate values and click
OK.
Basic Settings
System Name: An arbitrary descriptive name for your installation, for example: “My
Company Production System”.
Uplink URL: The uplink URL is the location in which the uplink is exposed to the
internet. This can be an IP or a non IP URL if a DNS entry has been added for the public
IP. Use whatever path you like in the URL, /produplink is what we used in the example
above. The URL must be unique so IFS Cloud calls the correct Uplink for the given
System ID in case you have more than one Uplink on the machine.
Ex with two uplinks:
http://uplink.mycompany.com/produplink
http://uplink.mycompany.com/testuplink
Specify https as the protocol if you want your IFS Cloud Uplinks to use https for
incoming traffic from IFS Cloud. All information that flows between IFS Cloud and your
Uplink is always encrypted so enabling https is optional. Setup SSL
Application Server URL: The location and port of the application server to which you
wish to pair this Uplink.
Key Container Name: The name of the key container which you generated in the
prerequisites, which is “PROD” in this example.
Application Version:
Version of IFS Applications.
Ping
You can click Ping to verify that Application Server is reachable.
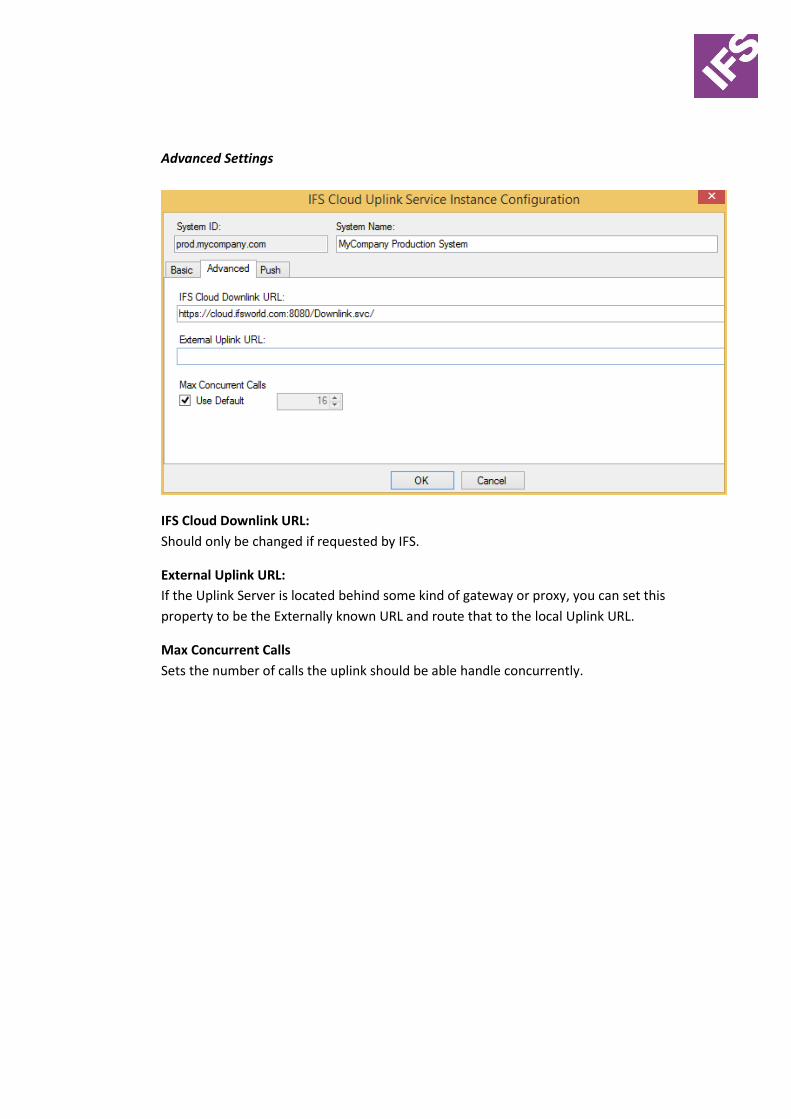
Advanced Settings
IFS Cloud Downlink URL:
Should only be changed if requested by IFS.
External Uplink URL:
If the Uplink Server is located behind some kind of gateway or proxy, you can set this
property to be the Externally known URL and route that to the local Uplink URL.
Max Concurrent Calls
Sets the number of calls the uplink should be able handle concurrently.
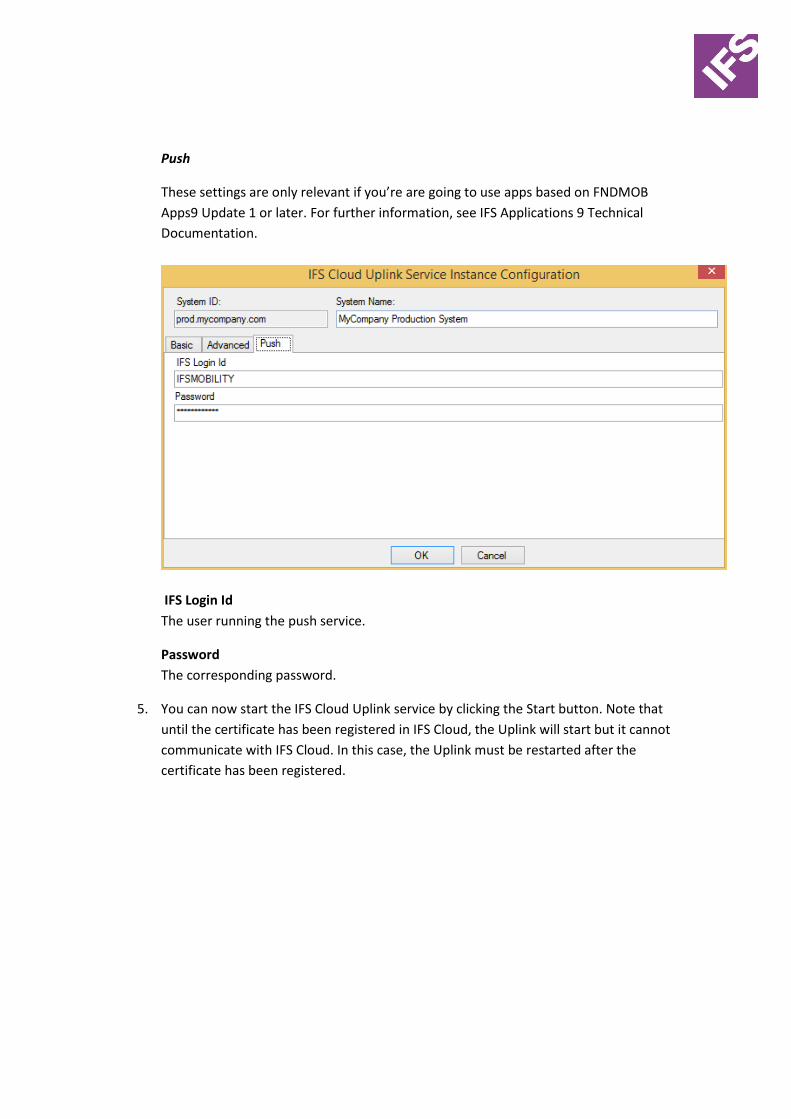
Push
These settings are only relevant if you’re are going to use apps based on FNDMOB
Apps9 Update 1 or later. For further information, see IFS Applications 9 Technical
Documentation.
IFS Login Id
The user running the push service.
Password
The corresponding password.
5. You can now start the IFS Cloud Uplink service by clicking the Start button. Note that
until the certificate has been registered in IFS Cloud, the Uplink will start but it cannot
communicate with IFS Cloud. In this case, the Uplink must be restarted after the
certificate has been registered.
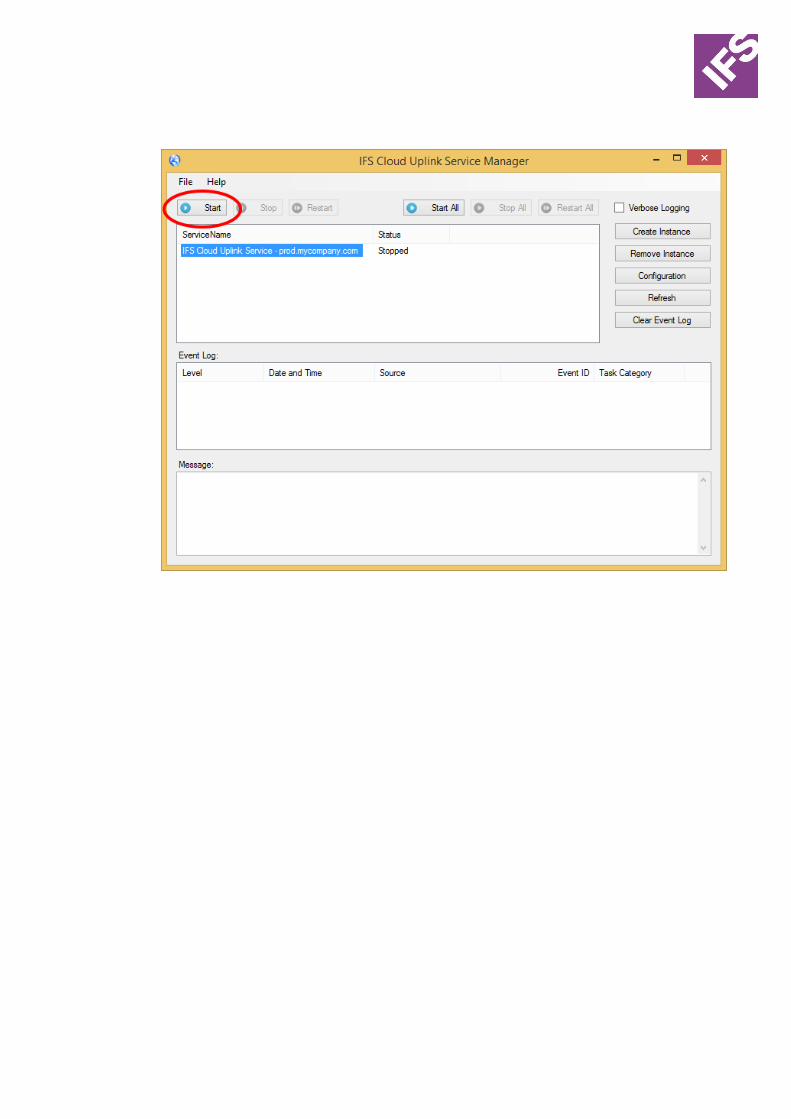
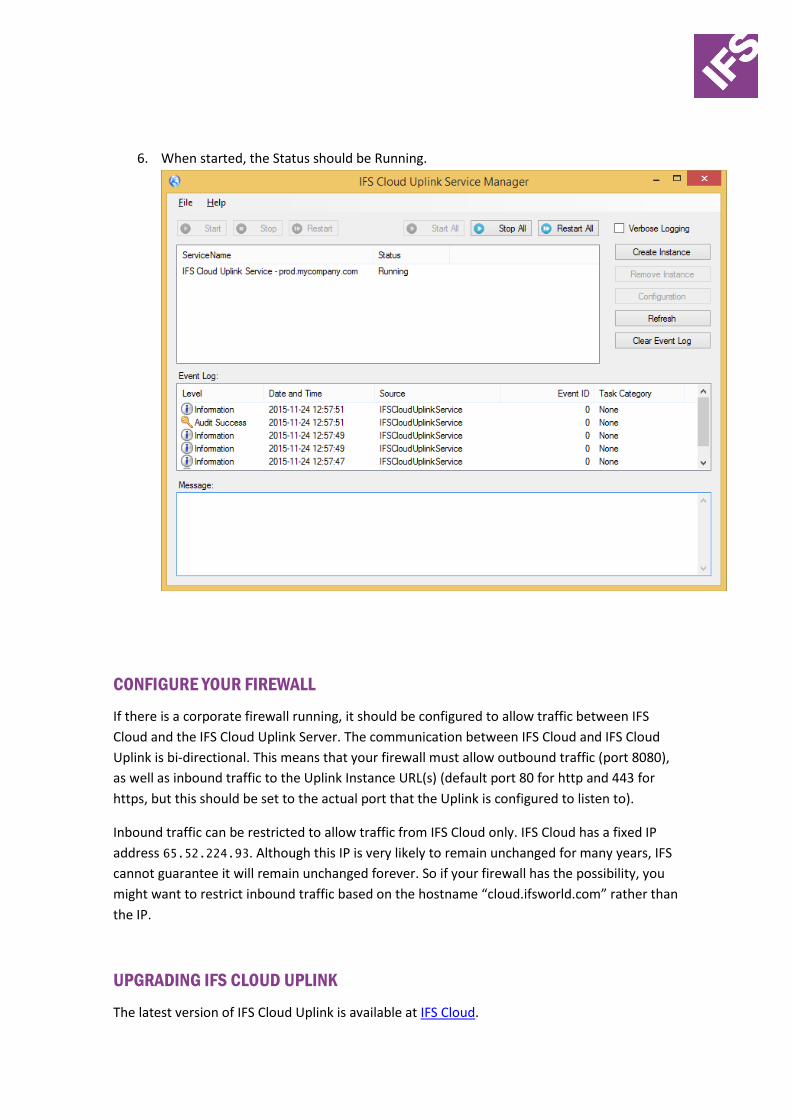
6. When started, the Status should be Running.
CONFIGURE YOUR FIREWALL
If there is a corporate firewall running, it should be configured to allow traffic between IFS
Cloud and the IFS Cloud Uplink Server. The communication between IFS Cloud and IFS Cloud
Uplink is bi-directional. This means that your firewall must allow outbound traffic (port 8080),
as well as inbound traffic to the Uplink Instance URL(s) (default port 80 for http and 443 for
https, but this should be set to the actual port that the Uplink is configured to listen to).
Inbound traffic can be restricted to allow traffic from IFS Cloud only. IFS Cloud has a fixed IP
address 65.52.224.93. Although this IP is very likely to remain unchanged for many years, IFS
cannot guarantee it will remain unchanged forever. So if your firewall has the possibility, you
might want to restrict inbound traffic based on the hostname “cloud.ifsworld.com” rather than
the IP.
UPGRADING IFS CLOUD UPLINK
The latest version of IFS Cloud Uplink is available at IFS Cloud.

1. Download the installation package to the Uplink Server.
2. Start IFS Cloud Uplink Service Manager.
3. Stop All services.
4. Close IFS Cloud Uplink Service Manager.
5. Open Control Panel\All Cotrol Panel Items\Programs and Features
6. Select IFS Cloud Uplink Service Manager.
7. Do RMB Uninstall.
8. Answer Yes to keep the instance configurations.
Note! The dialog might be hidden under the uninstall progress window.
9. Install the new version.
10. Start IFS Cloud Uplink Service Manager.
11. Start All services.
TROUBLESHOOTING THE INSTALLATION
CAN IFS CLOUD UPLINK SERVICE CONNECT TO IFS CLOUD?
First verify that IFS has uploaded the certificate to IFS Cloud. You should have received a
confirmation from IFS when this has been done. Then verify that the Uplink Service has started
correctly as stated in the sections above. If an error was reported during startup and the cause
of the problem is not obvious, stop the service and start it again. Only after the certificate has
been uploaded to IFS Cloud can the Uplink Service start without an error.
If the service still can’t establish contact with the IFS Cloud, start a web browser on the IFS
Uplink Service machine and browse to
https://cloud.ifsworld.com:8080/Downlink.svc/resources/Ifs.Cloud.CustomerResource.
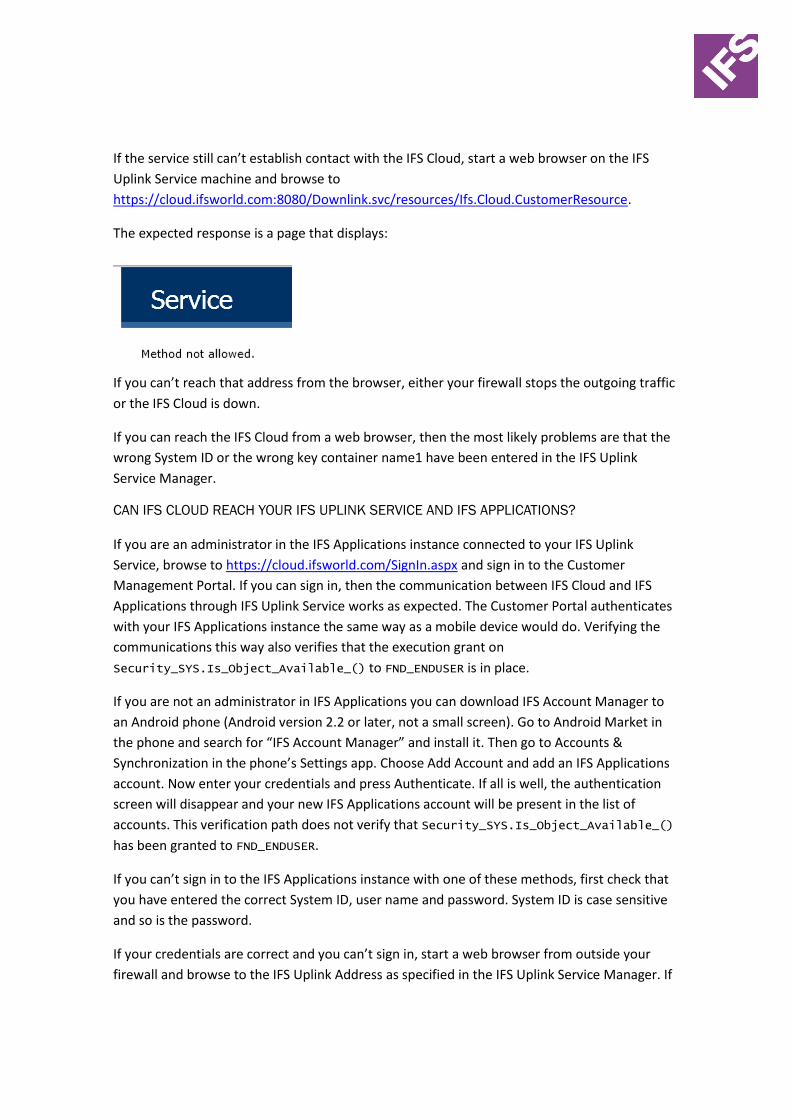
The expected response is a page that displays:
If you can’t reach that address from the browser, either your firewall stops the outgoing traffic
or the IFS Cloud is down.
If you can reach the IFS Cloud from a web browser, then the most likely problems are that the
wrong System ID or the wrong key container name1 have been entered in the IFS Uplink
Service Manager.
CAN IFS CLOUD REACH YOUR IFS UPLINK SERVICE AND IFS APPLICATIONS?
If you are an administrator in the IFS Applications instance connected to your IFS Uplink
Service, browse to https://cloud.ifsworld.com/SignIn.aspx and sign in to the Customer
Management Portal. If you can sign in, then the communication between IFS Cloud and IFS
Applications through IFS Uplink Service works as expected. The Customer Portal authenticates
with your IFS Applications instance the same way as a mobile device would do. Verifying the
communications this way also verifies that the execution grant on
Security_SYS.Is_Object_Available_() to FND_ENDUSER is in place.
If you are not an administrator in IFS Applications you can download IFS Account Manager to
an Android phone (Android version 2.2 or later, not a small screen). Go to Android Market in
the phone and search for “IFS Account Manager” and install it. Then go to Accounts &
Synchronization in the phone’s Settings app. Choose Add Account and add an IFS Applications
account. Now enter your credentials and press Authenticate. If all is well, the authentication
screen will disappear and your new IFS Applications account will be present in the list of
accounts. This verification path does not verify that Security_SYS.Is_Object_Available_()
has been granted to FND_ENDUSER.
If you can’t sign in to the IFS Applications instance with one of these methods, first check that
you have entered the correct System ID, user name and password. System ID is case sensitive
and so is the password.
If your credentials are correct and you can’t sign in, start a web browser from outside your
firewall and browse to the IFS Uplink Address as specified in the IFS Uplink Service Manager. If
the call goes through you will see a page that – although with strange content – shows that
you did reach the IFS Uplink Service.
If you can reach the Uplink Service with a web browser from outside your firewall, verify that
the address entered in IFS Uplink Service Manager for your IFS application server is correct.
CAN NO USER GET DATA TO THEIR PHONES OR PERFORM ACTIONS?
If the users can create their IFS Applications accounts on their phones but can’t use their apps
as expected, Security_SYS.Is_Object_Available_() may not have been granted to
FND_ENDUSER. Please refer to the preparations section of this document to verify that this has
been done.
If some users can get data to their phones and can perform the actions they want, verify that
the users with problems are authorized to perform these actions from their usual IFS
Applications client.
STARTING THE UPLINK AS CONSOLE APPLICATION
If you run the uplink as a console application you can see all communication between the
uplink and the cloud and it will also be saved to a log-file called “IFSCloudUplinkService –
systemid.log” in the application directory. This file can be sent to IFS for further
troubleshooting. To start as console application:
Stop the service
Do RMB, “Start as Console Application”
RESOLVING ISSUES THAT ONLY OCCURS WHEN RUNNING AS A SERVICE
How to save IFS Cloud Uplink event log.
1. Open Event Viewer
2. Select Windows Logs \ Application
3. Clear Log… (Optionally save old log)
4. Open IFS Cloud Uplink Service Manager
5. Stop the Cloud Service
6. Select Verbose Logging
7. Start the Cloud Service
8. Run the test case.
9. Open Event Viewer
10. Select Windows Logs \ Application
11. Action \ Filter Current Log…
12. Select: IFSCloudUplinkService
13. Action \ Save Filtered Log File As… “name”
14. Stop the Cloud Service
The file can then be analyzed and can be attached to a case.
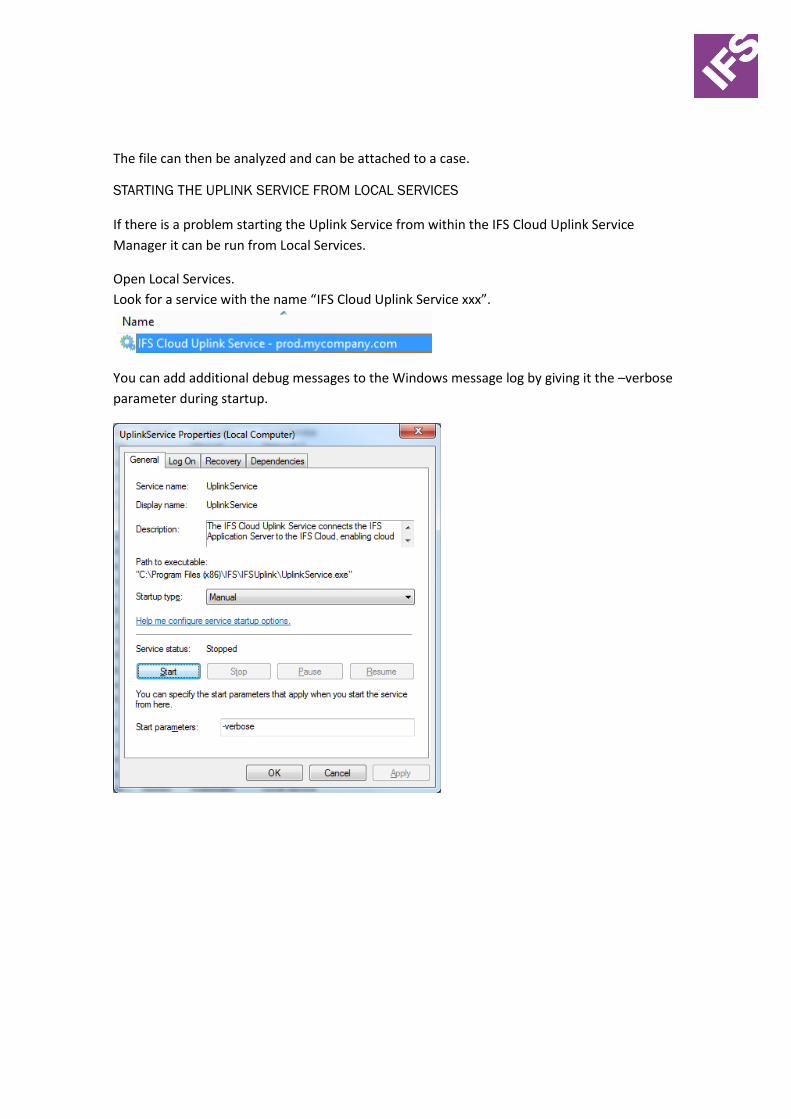
STARTING THE UPLINK SERVICE FROM LOCAL SERVICES
If there is a problem starting the Uplink Service from within the IFS Cloud Uplink Service
Manager it can be run from Local Services.
Open Local Services.
Look for a service with the name “IFS Cloud Uplink Service xxx”.
You can add additional debug messages to the Windows message log by giving it the –verbose
parameter during startup.
APPENDIX
USING HTTPS
IFS recommend that you publish your uplinks over HTTPS. The secure channel can either be
terminated in a reverse proxy (or similar) or on the Uplink server itself. This section describes
how to configure your Uplink server for HTTPS. If you terminate the HTTPS traffic on a separate
box then please refer to the relevant documentation for instructions.
The instructions below is a quick guide describing the installation. For more details please refer
to the Microsoft documentation.
To be able to use HTTPS you need an SSL/TLS certificate issued by a trusted certificate authority (CA). Self-signed certificates are not supported. When you have received the certificate you need to import it into IIS.
1. Open IIS Manager. 2. Select the server node. 3. Open Server Certificates. 4. Actions\Import 5. Select Default Web Site 6. Actions\Bindings 7. Add a https binding using the imported certificate
SSL 3.0 SECURITY VULNERABILITY
When terminating the secure channel on the uplink server it is strongly recommend that SSL 3.0 is disabled to protect against the POODLE vulnerability. Please follow the instructions in the IFS solution: 220962 - CVE-2014-3566 "POODLE" security vulnerability
Customers of IFS registered to use the Internet Support Center may access the solution from
this link:
https://support.ifsworld.com/lcs/secured/castrw/Solution.page?SOLUTION_ID=220962
Partner users please use the following link:
https://support.ifsworld.com/partner/secured/castrw/Solution.page?SOLUTION_ID=220962
IFS users please use the following link:
http://lcs.corpnet.ifsworld.com/login/secured/castrw/Solution.page?SOLUTION_ID=220962