Embed Size (px)
Citation preview

A User’s Guide to
IL-2 Sturmovik
hosted at Eastern Skieshttp://people.ee.ethz.ch/ chapman/il2guide/
version 0.2August 14, 2004
Copyright c©2004

ii
This work is dedicated to all the men and women who served their countriesand fellow man on land, sea and in the air in the Great Patriotic War, andto all who suffered or died in that tragic struggle. We who fly are fascinatedwith machines and combat, but we wish to honor with heart and mind thosepoor and brave souls.
When morning lights the eastern skies,O Lord, Thy mercy show;On Thee alone my hope relies,Let me Thy kindness know.
For Thy Name’s sake, O gracious Lord,Revive my soul and bless,And in Thy faithfulness and loveRedeem me from distress.
Extract from The Psalter, 1912

CONTENTS
1 Introduction 1
2 Machines of war 42.1 Aircraft of the Voyenno-Vozdushnyye Sily . . . . . . . . . . . . 5
2.1.1 Fighters . . . . . . . . . . . . . . . . . . . . . . . . . . 62.1.2 Ground-attack aircraft . . . . . . . . . . . . . . . . . . 112.1.3 Transport and reconnaissance . . . . . . . . . . . . . 12
2.2 Aircraft of the Luftwaffe . . . . . . . . . . . . . . . . . . . . . 122.2.1 Fighters . . . . . . . . . . . . . . . . . . . . . . . . . . 132.2.2 Ground-attack aircraft . . . . . . . . . . . . . . . . . . 182.2.3 Transport and reconnaissance . . . . . . . . . . . . . 19
2.3 Armament and loadout . . . . . . . . . . . . . . . . . . . . . 20
3 Ground school 213.1 Gauges and levers and toggles, oh my! . . . . . . . . . . . . 223.2 Cockpit orientation . . . . . . . . . . . . . . . . . . . . . . . 263.3 Starting up . . . . . . . . . . . . . . . . . . . . . . . . . . . . 283.4 Checklists . . . . . . . . . . . . . . . . . . . . . . . . . . . . . 283.5 Taxiing . . . . . . . . . . . . . . . . . . . . . . . . . . . . . . 293.6 Attack! . . . . . . . . . . . . . . . . . . . . . . . . . . . . . . 313.7 Secondary control surfaces . . . . . . . . . . . . . . . . . . . 35
3.7.1 The effect of primary flight control surfaces . . . . . . 353.7.2 Trim . . . . . . . . . . . . . . . . . . . . . . . . . . . . 363.7.3 Flaps . . . . . . . . . . . . . . . . . . . . . . . . . . . 40

CONTENTS iv
4 Flight 424.1 Stalls . . . . . . . . . . . . . . . . . . . . . . . . . . . . . . . 424.2 Energy . . . . . . . . . . . . . . . . . . . . . . . . . . . . . . 454.3 Changing altitude and airspeed . . . . . . . . . . . . . . . . . 46
4.3.1 The power curve . . . . . . . . . . . . . . . . . . . . . 504.3.2 Applying the power curve . . . . . . . . . . . . . . . . 524.3.3 Low and slow . . . . . . . . . . . . . . . . . . . . . . 53
4.4 Take-off . . . . . . . . . . . . . . . . . . . . . . . . . . . . . . 544.4.1 The roll-out . . . . . . . . . . . . . . . . . . . . . . . 544.4.2 Rotation and climbing . . . . . . . . . . . . . . . . . . 554.4.3 Use of flaps . . . . . . . . . . . . . . . . . . . . . . . . 56
4.5 Level flight . . . . . . . . . . . . . . . . . . . . . . . . . . . . 574.6 Turns . . . . . . . . . . . . . . . . . . . . . . . . . . . . . . . 60
4.6.1 Horizontal turns . . . . . . . . . . . . . . . . . . . . . 614.6.2 The vertical . . . . . . . . . . . . . . . . . . . . . . . . 65
4.7 Landing . . . . . . . . . . . . . . . . . . . . . . . . . . . . . . 654.7.1 Approach . . . . . . . . . . . . . . . . . . . . . . . . . 664.7.2 Correction . . . . . . . . . . . . . . . . . . . . . . . . 704.7.3 Flare and touchdown . . . . . . . . . . . . . . . . . . 734.7.4 Abort! . . . . . . . . . . . . . . . . . . . . . . . . . . . 744.7.5 The roll-out . . . . . . . . . . . . . . . . . . . . . . . 744.7.6 Summary . . . . . . . . . . . . . . . . . . . . . . . . . 76
4.8 Airfield operations . . . . . . . . . . . . . . . . . . . . . . . . 774.8.1 Rectangular pattern . . . . . . . . . . . . . . . . . . . 784.8.2 Circular pattern . . . . . . . . . . . . . . . . . . . . . 80
4.9 Take her for a spin . . . . . . . . . . . . . . . . . . . . . . . . 814.9.1 Preventing spins . . . . . . . . . . . . . . . . . . . . . 834.9.2 Recovering spins . . . . . . . . . . . . . . . . . . . . . 84
5 Combat fundamentals 875.1 Gunnery . . . . . . . . . . . . . . . . . . . . . . . . . . . . . 88
5.1.1 Convergence . . . . . . . . . . . . . . . . . . . . . . . 895.1.2 Gunsight reticle . . . . . . . . . . . . . . . . . . . . . 895.1.3 Armament: machine guns and cannons . . . . . . . . 905.1.4 Angle-off and deflection shooting . . . . . . . . . . . 92
5.2 Situational awareness . . . . . . . . . . . . . . . . . . . . . . 935.3 Detection and closing . . . . . . . . . . . . . . . . . . . . . . 965.4 Viewing systems . . . . . . . . . . . . . . . . . . . . . . . . . 96
5.4.1 Common visual aids . . . . . . . . . . . . . . . . . . . 975.4.2 Difficulty-setting visual aids . . . . . . . . . . . . . . . 100

CONTENTS v
5.5 Engine management . . . . . . . . . . . . . . . . . . . . . . . 1015.5.1 Throttle . . . . . . . . . . . . . . . . . . . . . . . . . . 1025.5.2 WEP . . . . . . . . . . . . . . . . . . . . . . . . . . . 1025.5.3 Radiator . . . . . . . . . . . . . . . . . . . . . . . . . 1035.5.4 Propeller system . . . . . . . . . . . . . . . . . . . . . 1035.5.5 Application in combat . . . . . . . . . . . . . . . . . . 104
5.6 Navigation . . . . . . . . . . . . . . . . . . . . . . . . . . . . 1055.7 Radio commands . . . . . . . . . . . . . . . . . . . . . . . . 1075.8 Emergency procedures . . . . . . . . . . . . . . . . . . . . . 107
5.8.1 Bailing out . . . . . . . . . . . . . . . . . . . . . . . . 1075.8.2 Forced landings . . . . . . . . . . . . . . . . . . . . . 107
5.9 Combat training . . . . . . . . . . . . . . . . . . . . . . . . . 107
6 Fighter combat maneuvers and tactics 1116.1 Turns . . . . . . . . . . . . . . . . . . . . . . . . . . . . . . . 111
6.1.1 Turn performance . . . . . . . . . . . . . . . . . . . . 1116.1.2 Types of turns . . . . . . . . . . . . . . . . . . . . . . 111
6.2 Pursuit . . . . . . . . . . . . . . . . . . . . . . . . . . . . . . 1116.2.1 Pure . . . . . . . . . . . . . . . . . . . . . . . . . . . . 1126.2.2 Lead . . . . . . . . . . . . . . . . . . . . . . . . . . . 1126.2.3 Lag . . . . . . . . . . . . . . . . . . . . . . . . . . . . 112
6.3 Basic flight maneuvers (BFM) . . . . . . . . . . . . . . . . . 1126.3.1 High and low yo-yos . . . . . . . . . . . . . . . . . . . 1126.3.2 Nose-to-nose and nose-to-tail turns . . . . . . . . . . 1126.3.3 Vertical and oblique turns . . . . . . . . . . . . . . . . 1126.3.4 Rolling scissors . . . . . . . . . . . . . . . . . . . . . . 112
6.4 Angle and energy tactics . . . . . . . . . . . . . . . . . . . . 1126.5 Section tactics . . . . . . . . . . . . . . . . . . . . . . . . . . 112
6.5.1 Comms and brevity . . . . . . . . . . . . . . . . . . . 1126.5.2 Wing doctrines . . . . . . . . . . . . . . . . . . . . . . 1126.5.3 Tips . . . . . . . . . . . . . . . . . . . . . . . . . . . . 112
7 Ground pounding 1137.1 Desirable aircraft features . . . . . . . . . . . . . . . . . . . . 1137.2 Delivering the payload . . . . . . . . . . . . . . . . . . . . . 114
7.2.1 Level bombing . . . . . . . . . . . . . . . . . . . . . . 1147.2.2 Dive bombing . . . . . . . . . . . . . . . . . . . . . . 1157.2.3 Rocket attack . . . . . . . . . . . . . . . . . . . . . . . 1177.2.4 Torpedo attack . . . . . . . . . . . . . . . . . . . . . . 1187.2.5 Skip bombing . . . . . . . . . . . . . . . . . . . . . . 118

CONTENTS vi
7.3 Exiting . . . . . . . . . . . . . . . . . . . . . . . . . . . . . . 1187.4 Targets . . . . . . . . . . . . . . . . . . . . . . . . . . . . . . 1197.5 Team tactics . . . . . . . . . . . . . . . . . . . . . . . . . . . 1217.6 Summary . . . . . . . . . . . . . . . . . . . . . . . . . . . . . 123
8 Flying online 1248.1 Finding online hosts . . . . . . . . . . . . . . . . . . . . . . . 124
8.1.1 Ubi.com . . . . . . . . . . . . . . . . . . . . . . . . . 1258.1.2 HyperLobby . . . . . . . . . . . . . . . . . . . . . . . 125
8.2 Coop and dogfight servers . . . . . . . . . . . . . . . . . . . 1268.3 Difficulty settings . . . . . . . . . . . . . . . . . . . . . . . . 1268.4 Online etiquette . . . . . . . . . . . . . . . . . . . . . . . . . 126
9 IL-2 features and references 1319.1 Pilot . . . . . . . . . . . . . . . . . . . . . . . . . . . . . . . . 1319.2 Controls . . . . . . . . . . . . . . . . . . . . . . . . . . . . . 132
9.2.1 Commands . . . . . . . . . . . . . . . . . . . . . . . . 1329.2.2 HOTAS . . . . . . . . . . . . . . . . . . . . . . . . . . 1339.2.3 Joystick settings . . . . . . . . . . . . . . . . . . . . . 133
9.3 View objects . . . . . . . . . . . . . . . . . . . . . . . . . . . 1349.4 Credits . . . . . . . . . . . . . . . . . . . . . . . . . . . . . . 1349.5 Hardware setup . . . . . . . . . . . . . . . . . . . . . . . . . 134
9.5.1 Video modes . . . . . . . . . . . . . . . . . . . . . . . 1349.5.2 Video options . . . . . . . . . . . . . . . . . . . . . . 1359.5.3 Sound setup . . . . . . . . . . . . . . . . . . . . . . . 1369.5.4 Input . . . . . . . . . . . . . . . . . . . . . . . . . . . 1369.5.5 Network . . . . . . . . . . . . . . . . . . . . . . . . . 136
9.6 Tracks . . . . . . . . . . . . . . . . . . . . . . . . . . . . . . . 1369.6.1 Capturing tracks . . . . . . . . . . . . . . . . . . . . . 1369.6.2 Reviewing tracks . . . . . . . . . . . . . . . . . . . . . 1369.6.3 Sharing tracks . . . . . . . . . . . . . . . . . . . . . . 1369.6.4 Track woes . . . . . . . . . . . . . . . . . . . . . . . . 136
9.7 Training . . . . . . . . . . . . . . . . . . . . . . . . . . . . . 1369.7.1 Installing new training tracks . . . . . . . . . . . . . . 1379.7.2 Making training tracks . . . . . . . . . . . . . . . . . 137
9.8 Quick Mission Builder (QMB) . . . . . . . . . . . . . . . . . 1399.9 Single missions . . . . . . . . . . . . . . . . . . . . . . . . . . 1409.10 Pilot career: campaigns . . . . . . . . . . . . . . . . . . . . . 142
9.10.1 Campaign hints . . . . . . . . . . . . . . . . . . . . . 1439.10.2 Campaign installation . . . . . . . . . . . . . . . . . . 144

CONTENTS vii
9.11 Multiplay: flying online . . . . . . . . . . . . . . . . . . . . . 1449.11.1 Dogfights . . . . . . . . . . . . . . . . . . . . . . . . . 1449.11.2 Coops . . . . . . . . . . . . . . . . . . . . . . . . . . . 144
9.12 Full Mission Builder (FMB) . . . . . . . . . . . . . . . . . . . 1449.13 Demo . . . . . . . . . . . . . . . . . . . . . . . . . . . . . . . 1459.14 Patches . . . . . . . . . . . . . . . . . . . . . . . . . . . . . . 145
9.14.1 Installing parallel patch versions . . . . . . . . . . . . 146
10 Technical hints 14710.1 Screenshots . . . . . . . . . . . . . . . . . . . . . . . . . . . 14710.2 Terminology . . . . . . . . . . . . . . . . . . . . . . . . . . . 14810.3 Game settings . . . . . . . . . . . . . . . . . . . . . . . . . . 148
10.3.1 il2setup.exe . . . . . . . . . . . . . . . . . . . . . . . 14910.3.2 conf.ini . . . . . . . . . . . . . . . . . . . . . . . . . . 152
10.4 Flight model . . . . . . . . . . . . . . . . . . . . . . . . . . . 15210.4.1 Known issues . . . . . . . . . . . . . . . . . . . . . . . 154
10.5 System performance . . . . . . . . . . . . . . . . . . . . . . . 15410.5.1 System requirements . . . . . . . . . . . . . . . . . . 15410.5.2 CPU . . . . . . . . . . . . . . . . . . . . . . . . . . . . 15410.5.3 RAM . . . . . . . . . . . . . . . . . . . . . . . . . . . 15410.5.4 Graphics card . . . . . . . . . . . . . . . . . . . . . . 15410.5.5 Hard disk . . . . . . . . . . . . . . . . . . . . . . . . . 154
10.6 Multiplayer lag . . . . . . . . . . . . . . . . . . . . . . . . . . 15410.7 Useful external hardware . . . . . . . . . . . . . . . . . . . . 15810.8 Further help . . . . . . . . . . . . . . . . . . . . . . . . . . . 158
11 The IL-2 community 15911.1 The official forums . . . . . . . . . . . . . . . . . . . . . . . . 15911.2 Online resources . . . . . . . . . . . . . . . . . . . . . . . . . 15911.3 How much is too much? . . . . . . . . . . . . . . . . . . . . 16011.4 Squadrons . . . . . . . . . . . . . . . . . . . . . . . . . . . . 160

Acknowledgements
It is appropriate that Mark “Shoot” Kratzer, whose work STK/EAW gaveme the idea for the IL-2 Guide, be the first to receive thanks. Without hisinitiative, I likely never would have decided to take on this project.
Many thanks go to Oleg Maddox and the 1C:Maddox development team,for their creative labor, patient dedication to both product and community,and surprising depth of attention to detail.
Since the idea for this project started in September 2002, there havebeen a fair number of people who have stepped forward to offer their helpwith this project. In particular is mikeyg007, who wrote chapter 7 on groundattack and encouraged me greatly, and Dart, who humbly contributed sec-tion 8.4 about online etiquette without complaining about my slowness.Tully , effte and Loco-S all three willingly provided their considerable knowl-edge of aviation and IL-2 in an effort to evaluate, make corrections and addto the project. All three of these have offered good advice, encouraging cor-respondence and also material to add to the book and website. Loco-S inparticular has contributed large amounts of download material.
Ham, who made and ran the late great Sturmovik Technika, alwaysgladly helped me and was a voice of experience, is much appreciated. Grate-ful thanks go to Simon Griffee (sgriffee), who freely contributed to a newCSS-based design of Eastern Skies, which I adapted to achieve its facelift.
Hristos, MajDeath, FW190fan and JG14 Josf made valuable contribu-tions to the interview that provided extensive information for the FW-190.igor firebird contributed the information in 2.2 for the MC.202. JG14 Josf,JG14 Hertt and Old Canuck are kindly thanked for their contributions to the

CONTENTS ix
community tracks page. (Others are encouraged to contribute!) JG14 Josfis especially appreciated for his collaboration in the preparation of materialfor the as-yet incomplete chapter on combat maneuvers and tactics.
There are others, to be sure. The credits will continue to be updated ascontributions are made. If I’ve overlooked you and you’d like to have yourname included, please contact me through Eastern Skies.

Preface
You probably do not want to sit down and read this guide from the begin-ning. It is a fairly long read, although some of the material, and especiallythe instructive material, is meant to be read progressively. Other parts mightbe browsed through and read selectively. It is up to you, the reader, to knowwhich parts you believe you will find useful and which parts not. Feel freeto skip around, but keep in mind that with some effort you might learnsomething useful.
A lot of this manual was written with a joystick on the desk. Its mainreference is IL-2 itself; beyond stemming from user experience, a lot ofchecking was done to make sure this and that were correct and really so inthe simulator. Another important source of the material in this book wasthe IL-2 community, notably those at the Ubi Soft IL-2 Sturmovik forums,especially in General Discussion and Technical Support. Every effort is beingmade to give credit to the contributors, even if all sources are not yet listed.If you think you have found an area where credit is not given, please contactthe editor through the website.

Editor’s Notes
This guide has been written out of love for the game and in the hope of help-ing others, thereby bringing the IL-2 community closer together. It still is awork in progress, and putting it together is done during free time. There arebound to be inconsistencies, errors and omissions. Please submit suspectedmistakes (besides areas where the work is clearly not finished) by droppingan email at the official site. You might even consider sharing some of yourknowledge by contributing.
This is the second public release of the guide, and labeled version 0.2.Here is a list of changes made since the first release (version 0.1).
• Update of the chapter “Introduction”
• Removed empty chapter “Air war on the Eastern Front.” If you orsomeone you know would like to write on this historical and relevanttopic, please contact me.
• Substantial progress on the chapter “Machines of war,” including im-plementation of information from the FW-190 interview
• In the chapter “Flight”: changes to section Stalls, section Changingaltitude and airspeed, section Take-off changed, removed the smallsection on yaw (the material was simply redistributed), section Levelflight added renovation of the section Turns, section Landing finished,section Airfield operations added and section Spins finished
• In the chapter “Combat fundamentals”: section Gunnery expanded,small addition to section Situational awareness, section Engine man-

CONTENTS xii
agement partially updated, finished section Combat procedures (waspreviously How to get started)
• Chapter “Combat maneuvers” dumped; concept of chapter “Fightercombat maneuvers and tactics” planned as replacement
• Finished editing the chapter Ground pounding (was “Ground pound-ing and combat fundamentals”); some material moved out
• Removed chapter “Advanced topics,” this material may be reorganizedinto an appendix later
• Added new chapter “Flying online,” featuring Dart’s section Onlineetiquette; chapter is partially incomplete
• In chapter “IL-2 features and references”: worked on sections QMB,FMB, Single missions and Campaigns
• In chapter “Technical hints”: section Screenshots added; otherwisethis potentially useful chapter unchanged
• Typesetting corrections, numerous small corrections and updates ofoutdated resources
• Some other stuff probably went forgotten
The document was prepared with the LATEX 2εsystem using PDFTEX, andit was used to embed hyperlinks directly in the PDF format. You should beable to click links to navigate about the document, and if your PDF pro-gram is configured to enable it, many links will open the linked website inyour browser. In addition to a linked table of contents, in Adobe R©AcrobatReader R©(and possibly other PDF readers), the bookmark feature allows youto always have a window frame open for easy navigation.
For some still unknown reason, there is an error with the automaticfigure references. Hopefully the reader will be able to work out which figureis being referred to. The references are clickable.
The current page format is A4, the European standard for “normal” print-ing, although the page layout is conservative and can easily be printed inLetter format (81
2
′′ × 11′′). The headers and margins are also double-sidedfor printing, which is why some pages are left blank. In future versions thedocument should be made available in various formats, including both A4and letter format for both double-sided and single-sided layouts.
If you would like to submit a track for use with this guide (see examplesat the Eastern Skies training page), please do so using the address found atthe Eastern Skies website.

CHAPTER 1
Introduction
Be sure.
— Oleg Maddox, creator of IL-2Sturmovik
IL-2 Sturmovik is a very rewarding WWII combat simulator with highlyrealistic flight and damage models and gunnery, excellent graphics and eye-boggling effects, attention to detail and historical accuracy, together witha large number of surface objects and flyable and AI planes, and fantasticonline play. Add to that the unique setting among WWII sims of the EasternFront, unprecedented regular interaction of its creators with users, bug-free, stable operation, the consistent public release of patches to implementrequested updates for flight models, acoustics, gunnery, etc. and to add onfree new aircraft, and you can’t help but start to get the impression that thewhole project is nothing less than a labor of love. It is no wonder then that ithas also become quite popular among WWII combat simulation enthusiastsand earned a very solid reputation among sims.
Chances are that you already know most of that. What you want is toget on your way to winging through virtual but beautiful eastern skies, con-fidently anticipating the appearance of any who would oppose you. Thatis one of the aims of this guide: getting you started, be it with overcomingtechnical troubles, learning about the strengths and weaknesses of the var-ious aircraft, learning how to fly properly, combat tactics, finding resourcesonline, or even other topics. We’ve really tried to cover just about every-

2
thing. What this guide cannot claim to be is official. It is not the final wordon any of these topics, it really is nothing more than the compilation ofexperience and carefully considered opinions. You might also learn somethings here that go beyond IL-2 itself, but you’ll just have to read on andsee.
The purpose of this book then, is not just to get rid of newbies efficientlyand prevent some bad habits. Yes, we want to turn you into a knowledgeablevirtual combat pilot, and we want you to enjoy it. You’ll find, however, thatthe contents of this guide don’t delve very deeply into any of the issues itaddresses. There’s so much more to discover, and you will soon find yourselfdeveloping your own style and tastes, often in contrast to what you findhere, and doing your own research. So much the better!
A chapter was planned to provide a glimpse into the horrible, historicstruggle that is the setting of this fun simulator. The tremendous sufferingand appalling loss of life in this theater on a scale so massive it defies com-prehension is awing, and is to be appreciated. It is important for the readerto create a sense of immersion in the sim, which the content of this user’sguide cannot accomplish. Such an account ought to focus on the air warand the hardy men and women who carried it out and lived to tell aboutit. Unfortunately, this important chapter is unwritten and significantly unre-searched by the guide’s authors. Authors for this chapter are quite particu-larly welcome. A historical background has been written by the developersof IL-2 , and is highly recommended for a context and sense of the campaignsinvolved.
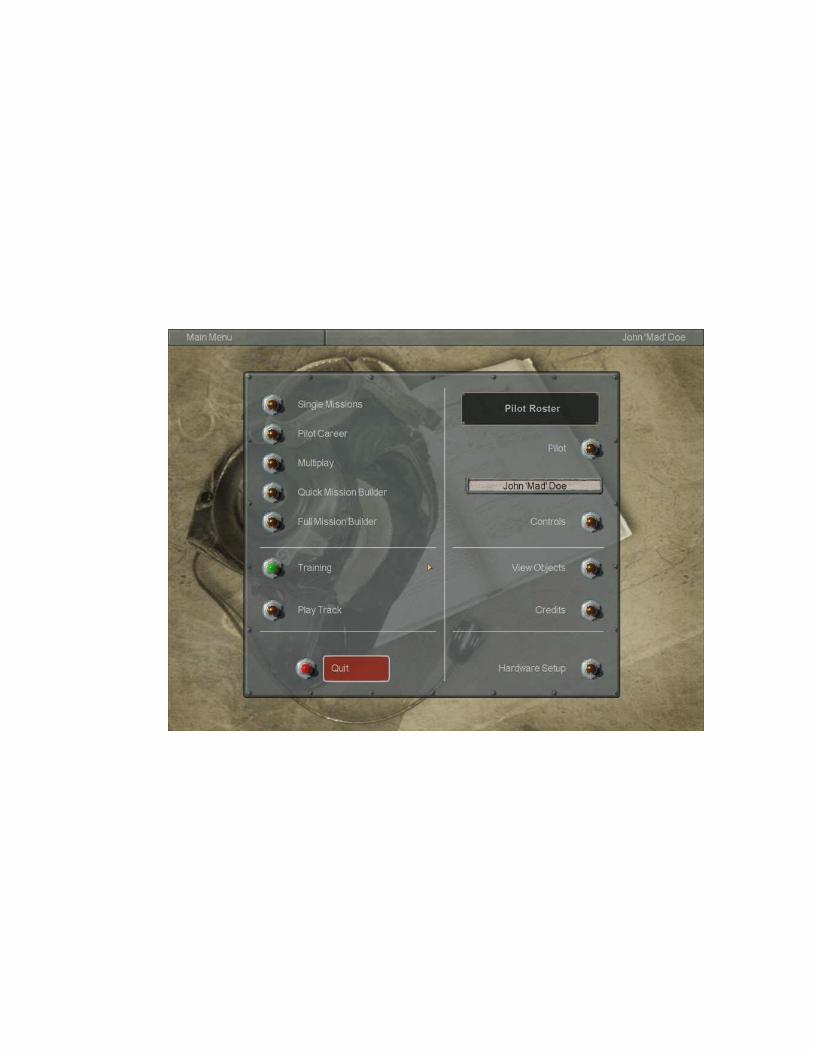
The chapter “Machines of war” will supplement the generous helping ofinformation found in the in-game object viewer (click View Objects fromthe main menu) to provide you with a better idea of the strengths and weak-nesses of the aircraft in the simulator, based on user experience and filledout with some factual information.
“Ground school” is meant to ground you in the basics of flight, the thingsyou need to learn before taking off. You will be familiarized with the cockpitand its main instruments, learn how to taxi, clear up some misconceptionsyou may well have about how an airplane reacts to control inputs, and findout what secondary control surfaces are all about.
The topics covered in “Flight” will prepare you for training and sharpen-ing your skills during training and combat. In addition to an introductionto the critical concept of energy, operation of the aircraft under such normalprocedures as take-off, turning, maintaining level flight, climb and descentand landing are all covered. It’s probably less tedious than you think. Thetheory and skills you learn here are an indispensable foundation for combat

3
maneuvers and tactics. In fact this chapter is limited to cover only the top-ics immediately relevant to getting an excellent start to actually flying theaircraft, which is why combat maneuvers are discussed in a later chapter.
“Combat fundamentals” introduces the various aspects of developingyour state of mind, gunnery skills, awareness of environment and knowl-edge of the view system and how to find your location. It is relevant to bothair-to-air and air-to-ground combat. Important parts of this chapter are stillincomplete.
The majority of aircraft in IL-2 are fighter aircraft. These aircraft havethe purpose of shooting other aircraft down, and are to be differentiatedfrom ground-attack aircraft. “Fighter combat maneuvers and tactics” is achapter in the planning stages that introduces the student combat pilot tothe relevant concepts of air combat in a fundamental approach. Included arecombat turns, types of pursuit, basic fighter maneuvers, angle and energytactics, and section tactics.
“Ground pounding” gets into the basics of the nitty-gritty business ofslamming hardware into the mud and ice while presenting yourself as atarget to bloodthirsty defensive batteries.
“Flying online” is meant to help you get started in your online adven-tures, and offers a few reminders that will help you be prepared for whatmay be expected in terms of behavior. This recently added chapter is stillincomplete.
The “IL-2 features and references” gets into some of the details con-cerning the settings that you can control, organized by menus and startingfrom the main menu. It goes beyond simply describing the features, offeringadvice from those who have been there and spent hours learning the advan-tages gained and making mistakes. Parts of this chapter are still incomplete.
In “Technical hints” you will find information about the various hard-ware settings, general recommendations concerning the computer-systemcomponents and their relevance to performance of IL-2 , some commentsabout the flight model, and a few hints about useful external hardware.This chapter needs to be trimmed and completed.
The final chapter, “The IL-2 community,” you can read some commentsabout online resources, notably the main IL-2 -related websites and basicinformation and advice about squadrons.
A section is planned for an appendix entitled “Advanced topics,” whichis to pick up on some of the loose ends where “Flight” left off, going intofurther practical detail about flight.

CHAPTER 2
Machines of war
But owing to the unlucky discovery by an immature civilisation ofthe internal combustion engine and the art of flying, a new weaponof national rivalry had leapt upon the scene capable of altering muchmore rapidly the relative war-power of States.
— Winston Churchill on the rearming ofGermany
There are a lot of planes to learn about in IL-2 . To be specific, thereare 51 Allied aircraft, 36 of which are flyable, and 31 Axis aircraft, 14 ofwhich are flyable. This makes for a total of over 80 aircraft, and for 50of these you can climb into the cockpit. You can find out a lot of in-depthinformation on these aircraft at the aircraft section of the official Ubi Soft IL-2 site, from which some of this material has been taken, as well as in the in-game Object Viewer, which is selectable from the main menu. Furthermore,there is a less advertised but still quite helpful resource provided by theofficial site on their media page: in their site kit are the three documentsUSSR planes, German planes and ALL vehicules, which contain technicaland background information about aircraft and ground vehicles used in thegame. These and a few other documents have been extracted from the restof the site kit and are hosted on the technical page of Eastern Skies.
The goal of this chapter, however, is not to repeat information that isalready available to the user in the game and its documentation, since the1C:Maddox team has already provided it. Rather, the intent is to provide

2.1 Aircraft of the Voyenno-Vozdushnyye Sily 5
a short overview of how and when the aircraft were historically used, ac-companied by practical information about how the aircraft perform in thesim based on user experience and in-game user research on the planes. Thismight include a general overview of the basic role of each aircraft type, whatspecial characteristics they have, how they might be dangerous, what theirweak points are, and tips on handling and specific tactics. A notable butregrettably isolated example of how such information can be gathered fromthe community can be seen in this thread in the General Discussion at theUbi forums.
In the preparation of this material, numbers and historical use of theaircraft was gathered in part from reference books and Internet sites. Ma-terial was in particular borrowed from the Rand McNally Encyclopedia ofAircraft [1]. Books, being published and subject to an editing process, aremore accountable and have been preferred. Internet sites, however, can berather well researched and authentic. Discrepancies are found even amongbooks of course, and as the authors are not themselves historians, no partic-ular claim is made as to the authenticity of the information made availablehere.
Both Axis and Allied aircraft are divided into three sections. Fightersare designed with the purpose of shooting down enemy aircraft. Ground-attack aircraft consist of both dive and level bombers. Aircraft dedicated totransport and reconnaissance are grouped together. Of course some fighterscan move mud and even dedicated ground-attack aircraft can be used asfighters in a pinch.
A number of the aircraft types are unavailable in the original, out-of-the-box release, but all are available with patch release version 1.2. Seesection 9.14 for information about patches.
2.1 Aircraft of the Voyenno-Vozdushnyye Sily
Before the beginning of the war, the Voyenno-Vozdushnyye Sily (VVS), mean-ing military air forces, was one of the largest air forces in the world. Itsaircraft, however, were quite obsolete and proved themselves incapable ofcompeting with the superior organization and aircraft of the Luftwaffe of theinvading German forces. Yet what the Russians lacked in technology, theymade up for in spirit and in numbers. Early on, important aircraft manufac-turing plants were relocated west of the Urals, out of range of the Germanstrike capability, who had no usable strategic bombers. This industry was toprove to be critical later on, as the Soviets showed tremendous innovation

2.1 Aircraft of the Voyenno-Vozdushnyye Sily 6
in their craft, and by mid war production numbers soared. The Soviet forceswere supplemented by the American lend-lease program, enabling them touse more modern fighters than they were able to use themselves. By 1943,the VVS was able to field fighters that could easily compete with the once-superior German forces, and German air superiority was no longer a matterof course.
Soviet aircraft designation uses either initials of the names of the designor factory engineers or an initial system: “I” stands for istrebitel (fighter)and “U” for uchebny (trainer). Aircraft marked with a in the margin areflyable by the player, others are AI controlled only.
2.1.1 Fighters
BI-1 The Berezniak-Isaev rocket-power combat aircraft was intended as ainexpensively constructed, high-speed interceptor to protect Moscow fromGerman bombers. It obviously enjoys a very high speed and exceptionalrate of climb, but its low fuel reserves limit flight time and it carries littleammunition. It is also incapable of competing in horizontal maneuvers withpropeller-driven fighters. The controls are simple, landings are a challenge,and a short campaign was provided with the patch that introduced it.
I-153 The “Tchayka” (seagull) is a fabric-covered, single-seat, open-cockpit biplane fighter. Designed in 1937 as a further development of the1933 I-15 by Polikarpov, it is several years younger than the I-16 and wasthe last mass-produced Soviet biplane. Its marvelous design, including theretractable gear and a new 1000 HP M-62 engine, and high quality of massconstruction made it a very fast pre-war fighter and extremely nimble. How-ever, its speed was far too low for the rapid advances of the period, and itwas only used in the first few years of the war, serving until 1943. Its ar-mament of of four machine guns (or 2 20 mm cannons in the P model) wasalso strong for the period in which it served.
I-16 The Polikarpov I-16 ”Ishak,” Russian for Little Donkey, was a main-stay of the VVS at the beginning of the war, but, just as even the modernaircraft of the VVS, was outclassed by the Luftwaffe fighters when OperationBarbarossa began in 1941. It is quite maneuverable and although it can’tkeep up the German fighters’ high speed, it can easily out-turn them and isextremely dangerous when it catches them up close. The fighter served un-til 1942, when it was replaced by the increasing number of faster and more

2.1 Aircraft of the Voyenno-Vozdushnyye Sily 7
modern aircraft.The I-16, although a monoplane, is quite an old design, dating to 1933,
although the in-game models are from 1939. It was the first Soviet fighter tohave retractable undercarriage, although this had to be cranked 33 times byhand. Volunteer Soviet pilots received combat experience in the I-16 whileparticipating in the Spanish Civil War. The enemy pilots rather disliked thispesky fighter and nicknamed it Rata, Spanish for rat, a name that continuedto enjoy circulation among German pilots after 1941. The Type 18 fighteris much the same as the Type 24, the latter enjoying a greatly increasedarmament with the 2×20 mm ShVAK cannons.
In the game, it is necessary to create key assignments for the Rise Gearmanually (rise as in raise) and Lower Gear manually controls and to pressthese many times in succession in order to simulate manually lowering andraising the gear.
LaGG-3 This initial development by the team of engineers led by Lav-ochkin and his assistants Gorbunov and Gudkov had an all-wood construc-tion. It was produced in large numbers and helped the Russians gain muchexperience in mass production [1]. Although not a phenomenally outstand-ing fighter, it was produced in large numbers and helped modernize theVVS in the post-invasion period of 1941 and 1942. In this time period itis a capable aircraft with good maneuverability. Although it quickly losesspeed during hard turns, is slower than the German fighters and not a quickclimber, it nevertheless has a strong armament that is better to be well re-spected by Luftwaffe pilots. It was replaced by the next Lavochkin design,the La-5, in 1943.
La-5FN Developed from the La-5 after the LaGG-3 (the La-5 is availablein Forgotten Battles), the new fuel-injected engine and improved structurecreated an agile Lavochkin fighter with lively acceleration that is one of thefaster Soviet climbers. It is blessed with good visibility through its bubblecanopy and carries the only two weapons it needs: nose-mounted 20 mmcannons with 200 rounds each, synchronized to fire through the propeller.It serves best as a low- to medium-level fighter, and is equipped to carryrockets or light bombs for ground attack.
The La-5FN is well respected by German fighters and was one of themain fighters of the war starting with the Battle of Kursk in summer of 1943.In addition to its acceleration and speed, it has a high turn rate: at low tomedium altitudes, it is faster than the 109G’s and 190A’s and out-turns them

2.1 Aircraft of the Voyenno-Vozdushnyye Sily 8
both in horizontal and vertical maneuvers.
La-7 The La-7 is the big brother of the La-5FN: faster, more powerful andin all ways downright scary. Introduced in 1944, refinements to the designmade the La-7 one of the best front-line fighters at the end of the war, andit enjoyed superiority to nearly every propeller-driven fighter.
MiG-3 Together with the LaGG-3 and Yak-1, the MiG-3 was one of the fewmodern fighters of the VVS in the first year of the Eastern Front, the MiG-3being made available toward the end of 1941. It is a high-altitude intercep-tor and the fastest of such in the first years for the Soviets. Unfortunately, itis weakly armored and often catches fire when hit. At low altitudes it turnsslowly and has poor maneuverability, but at high altitudes fast the only in-terceptor in its time capable of dealing with the superior German fighters.Because of its relatively poor low-altitude performance, some consider it aspecialist’s plane. It is often underestimated, but dangerous and a stablegun platform in its element, and responds well at high angles of attack.With 2 7.62 mm light machine guns and one 12.7 mm heavy machine gun,the armament is not overwhelmingly strong.
P-39 Also known as the Airacobra, Cobra, Snake and sometimes the IronDog, the P-39 is one of the more powerful fighters in the Soviet arsenal. ThisAmerican-designed and constructed aircraft was provided to the Soviets inlarge numbers as part of the lend-lease program, starting to arrive on thefront lines in late 1942. The aircraft was designed around its armament,namely the 37 mm T9 cannon that fires through the propeller hub. The vari-ants also have .50-caliber (12.7 mm) heavy machine guns, and .30-caliber(7.92 mm) machine guns. With these and the 37 mm cannon firing 3 shellsper second through the propeller hub (there are 30 of these rounds), she iswell equipped to fight. The .50 caliber guns can fire for 27 seconds contin-uously, and the .30 caliber guns of the N-1 type can fire for 75 seconds, soyou need not always save ammo.
The placement of such a whopping cannon in a small fighter was madepossible by placing the engine behind the pilot, a revolutionary design atthe time, and one that helped establish its fledgling maker, Bell. This shift inweight distribution and the leftover space up front made the implementationof tricycle gear possible, and the P-39s are the only planes in IL-2 withtricycle gear. In addition, the weight required to secure the engine also

2.1 Aircraft of the Voyenno-Vozdushnyye Sily 9
makes the Cobra somewhat underpowered. The rearward center of gravitydue to engine placement helps the P-39 in regards to maneuverability, butalso gives it a nasty spin characteristic, which requires some patience (andaltitude) in the spin recovery procedure (see section 4.9). She can turn well,but always be fairly gentle on the controls. As a P-39 training film puts it,“You want to treat this airplane like a lady, don’t try to be fast or rough ifyou expect to get along.”
The Airacobra has an extremely efficient airframe, and as a result doesnot lose airspeed very quickly. Use this to your advantage in combat. Sincethe supercharger was not included in production, this plane was not popularamong USAF pilots of the high-altitude Pacific theater engagements, andearly trial models were passed over by the British and on to Russia. Sovietpilots took advantage of its superb low-altitude performance and used it togreat advantage, as reported in [2]. It is certainly well documented that ofthe slightly more than 9,500 Cobras of all types built, just over half weresent to the USSR.
You can find a cockpit reference for the P-39 at Eastern Skies. All threemodels (N-1, Q-1, Q-10) have a nearly identical cockpit layout. As anAmerican-built aircraft, the gauges use non-metric units such as airspeedin miles per hour (mph) and altitude in feet.
PZL P.11c This delightful plane was already hopelessly outmoded at theonset of the 1939 Blitzkrieg into Poland. It climbs well at low altitudes dueto its light weight, and although it is quite maneuverable and therefore hardto hit, it is woefully underpowered and slow and has a weak armament.Nevertheless it is a mistake to disregard or dismiss it.
Yak Aleksandr S. Yakovlev’s first fighter design, the I-26, began produc-tion in 1940. It was armed with a ShVAK 20 mm cannon and two 7.9 mmcannon and had some technical difficulties, which were worked on duringproduction, which slowly increased. By the end of the year, Stalin orderedthe aircraft to be renamed the Yak-1. The Yak-1 Krasavyets (beauty) madeits first public appearance at an air display on November 7, 1940.
Until the introduction of the La-5 into service in 1943, the Yak-seriesfighters, affectionately named “The Little Ones” on the front, were the mostimportant Soviet fighter. It remained a leading fighter throughout the war,and with over 30,000 units produced was present everywhere. When thewar began, the LaGG-3 and Yak-1 were essentially the only modern fightersavailable to the Red air forces. About 400 units were available when the

2.1 Aircraft of the Voyenno-Vozdushnyye Sily 10
German attack came in June 1941, and by the end of the year over 1,000Yak-1s had been manufactured. In September 1941 the Yakovlev factorywas relocated from Moscow to the Urals, but production was again soonunderway, and after three months, production numbers were larger thanbefore.
Each new variant of the Yak series represented an improvement. In thesummer of 1942 several valuable, major changes were made, including en-gine and armament upgrades and a three-piece, all-round vision canopy.The new aircraft was unofficially called the Yak-1B by field units. Productionof Yak-1 types was continued into 1944, with over 8,600 units produced.
The Yak-1 and Yak-3 types represent the “lightweight” branch of theYakovlev fighter development. A two-seat trainer was offered by Yakovlevfrom the beginning, which was essentially a modified version of the (pre-Yak-1) I-26. The design of this trainer evolved parallel to the Yak-1 seriesunder the designation of the Yak-7 series. In 1941, the great need for fight-ers motivated development of the trainer into a fighter, in which the rearcockpit was replaced with a fuel tank, along with several other necessarymodifications. A few of these (about 60) were available by the end of 1941,and improvements continued into 1942, leading to production of the Yak-7B in 1942, which received a radio, an improved engine (the M-105P) andan upgrade in armament with the ShVAK 20 mm cannon in addition to thetwo 7.62 mm light machine guns. This somewhat heavier Yak fighter typewas a bit slower and less maneuverable (by Yak standards at least) than itscontemporary Yak-1 variants. Over 6,300 of the several Yak-7 variants wereproduced, ending in early 1943.
In 1942, development of the Yak-1 further evolved into the Yak-1M, re-designated the Yak-3. (An earlier developed type also going by the nameYak-3 had been abandoned in late 1941.) The more powerful Klimov M-105PF engine was implemented, the wingspan was shortened, it was givena new canopy with even better visibility, and the radiator was moved fromunder the nose into the wing roots. A powerful armament for such a lightfighter was adopted: two 12.7 mm (.50-caliber) heavy machine guns andone 20 mm ShVAK cannon. As with all Yak models, the supercharging sys-tem used meant that it performed best at lower altitudes, and the Yak-3 didbest under 3,500 m, where it had true superiority to its German opponentsand quickly proved itself. The earliest of this type were made available in1943, but was first available in large quantities in the summer of 1944. TheYak-3 turned out to be one of the lightest, nimblest fighters of the war, andit was well respected. A Luftwaffe directive from the front advised: “Combatunder 5000 m with Yakovlev fighters without a radiator under the nose are

2.1 Aircraft of the Voyenno-Vozdushnyye Sily 11
to be avoided.”It must be again be emphasized that the Yak-series fighters had superi-
ority at low altitudes. One source [3] reinforces this with a report on typicalYak-3 tactics: “As well as performing the role of interceptor, it was exten-sively employed in close support of the ground forces, and for the escort ofPe-2 and Il-2 assault aircraft, on formation of Yak-3s preceding the bombersand attacking German fighter airfields while another provided closer escort.”
The high-altitude superiority of German fighters prompted their ex-tremely common tactic of a surprise bounce from above, the well-known“boom and zoom” attack. To counter this, Russian pilots adopted a coun-termeasure of regularly flying at full throttle (not emergency power). Thisburned a lot of fuel, negatively affecting its effective range and endurance.This limitation was addressed in the progression of the design of the Yak-7,backed by the experience of constructing the Yak-1 and Yak-3, producing thefirst all-metal Yakovlev fighter, the Yak-7D Dal’ny (long range), whose metalwings allowed for added fuel stores though at the cost of added weight. Thiswas finally put into production as the Yak-9, early models reaching the frontlines as early as late 1942 and participating in the Battle of Stalingrad. Pro-duction was in full swing by early 1943, and by mid-1944 the Yak-9 variantshad become by far the most numerous, with more Yak-9 fighters in servicethan all other Soviet fighter types combined.
Several variations of the Yak-9 are modeled in IL-2 , including the long-range escort Yak-9D and those equipped with large-caliber cannons: the air-to-air Yak-9T Tyazhelowooruzheny (heavily armed) with its NS-37 37 mmin the spring of 1943 and the Yak-9K Krupnokaliberniy (large caliber ver-sion) with an increased-caliber NS-45 45 mm visibly protruding from thepropeller hub, which did not reach production. Also available is the Yak-9UUluchshenny (improved), truly an outstanding performer and comparable inperformance and handling to the famous P-51D Mustang. The Yak-9U firstbecame available in December 1943.
The information presented on the Yak fighters was obtained from sources[3, 4, 5].
2.1.2 Ground-attack aircraft
Il-2 The Ilyushin 2 Sturmovik is an absolute joy to fly. The Russian leadersrecognized the high value of supporting their front lines with highly special-ized ground-attack aircraft, and this design of Sergei Vladimorovich Ilyushinwas more than highly successful in this role, especially useful against tanks.That this need of the ground forces for air support was met by the Il-2 is

2.2 Aircraft of the Luftwaffe 12
aptly described by Stalin’s famous quotation, “They were as vital to the Rus-sian army as oxygen and bread.” The design was made in 1938 and they firstsaw service in the summer of 1941, just in time for the German invasion.
Armored like the tanks it attacks, the entire front part of the aircraft isconstructed of a single armored shell. This makes the Sturmovik somewhatlumbering, but it is armed to the teeth and even able to get air kills, es-pecially unwary figthers and slow bombers. It is very difficult to stall, andessentially will not spin. Poor rear visibility is compensated in later modelswith a rear gunner.
There are a great variety of Il-2 types available in the game: the first,second and third series; the field modification, the 2M first and later series,types 3 and 3M, the torpedo-armed T type and the 2I. The modificationswere made to improve both offensive and defensive armament. It was rec-ognized fairly early on that a rear gunner was needed, and some modelswere modded in the field to achieve this. The modification of course in-trouced aerodynamic problems, and the M3 model, of which the most unitswere produced, introduced the incorporation of a rear gunner as part of thedesign. There were 36,183 Il-2s built, more than any other type of aircraftin history [3].
Note that the Ilyushin 2 aircraft is designated as Il-2, while the game IL-2Sturmovik, which is indeed named after the Il-2 aircraft, uses a capital “L.”The aircraft is named after S. V. Ilyushin, hence the lower-case “l.” The gamewas named IL-2 Sturmovik by its makers, so this abbreviation is retainedhere, while Il-2 is used as in literature to refer to the aircraft itself.
Aircraft to be added: Pe-2, Pe-3, Pe-8, Tu-2S
2.1.3 Transport and reconnaissance
Aircraft to be added: G-11, Li-2, MBR-2 AM-34, R-10 and U-2VS
2.2 Aircraft of the Luftwaffe
The German Luftwaffe, literally meaning air weapon or air force, was themost powerful, most advanced air force of the world as Hitler-led Germanybegan its domination of the European continent. The critical role it playedin the astounding early-war gains served it well, and it was an experiencedair force that confronted the Soviets in the 1941 Operation Barbarossa. Inthe first year or so of the war, it overwhelmed the numerous but obsoleteaircraft of the VVS, but such superiority was not to last indefinitely. As the

2.2 Aircraft of the Luftwaffe 13
war dragged on and the German forces had to suffer through the harsh Rus-sian winters, resources became increasingly thin, and the quality of aircraftmanufacture suffered. Despite this, tremendous gains in aviation knowledgeand practice were made by the Germans during the course of the war, andthe late-war plans for aircraft that were never realized are truly astounding.
German aircraft designation uses the initials of aviation company thatproduces the aircraft: Bf stands for Bayerische Flugzeugwerke, Fi for Fiesler,FW for Focke Wulf, He for Heinkel, Hs for Henschel, Ju for Junkers andMe for Messerschmitt (this name replaced the Bayerische Flugzeugwerke).Aircraft marked with a are flyable by the player, others are AI controlledonly.
2.2.1 Fighters
Bf-109 The Messerschmitt 109, a single-seat, all-metal low-wing mono-plane fighter was a mainstay of the Luftwaffe throughout the war. This rev-olutionary, advanced design began in 1934 as one of the early monoplanedesigns.
This essential German fighter deserves a thorough review, which isplanned for a future edition. Bf-109 types available in IL-2 are as follows:in the E-series (Emil) are the E-4, E-4/B (Jagdbomber or “jabo,” meaningfighter-bomber), E-7/B and E-7/Z; in the F-series (Friedrich) are the F-2 andF-4; in the G-series (Gustav) are the G-2, G-6 G-6 late and G-6/AS; and inthe K-series (Kurfurst) is the K-4.

2.2 Aircraft of the Luftwaffe 14
The 109 may go by the name Me-109 and Bf-109. This is because theBayerische Flugzeugwerke AG was renamed Messerschmitt AG in July 1938.Designs previous to this, including the 109, are officially labeled using theBf prefix. However, many non-official sources use the Me prefix, and isperfectly acceptable.
FW-190 The Focke Wulf 190 fighter series is one of the two main fightertypes for the Luftwaffe. When they first saw action in the skies in 1941 overthe English Channel, the first-class qualities of this high-altitude fighter wereswiftly recognized, and it was considered to be the most superior fighter ofthat time. In IL-2 , the earliest model (the A-4) appears in 1942. Thereare three types available for you to fly: the FW-190 A-4, A-5 and A-8. TheFW-190 D-9 is present as AI only.
An interview of experienced virtual FW-190 pilots was conducted at theUbi General Discussion forum, including Hristos, MajDeath and FW190fanand JG14 Josf. The following information comes from that interview.
The Focke Wulf is a very direct aircraft, able to rush in, deliver a deathblow and quickly leave with no questions asked. All models have a veryfast horizontal speed compared to their contemporaries, and the armamenton all models is strong and among the most powerful of any aircraft in theskies. It is an excellent diver and has a rugged design, able to bring itspilot home after much damage. These qualities make it ideal for attackingbombers and scattering enemy formations. The A-8 is particularly suited tokilling bombers, especially if equipped with MK 108 cannons.
The key to the devastating armament that all 190’s have are its 20 mmcannons. In particular, the high-velocity, 20 mm MG 151/20 cannons areaccurate, powerful and have low recoil, possibly making them the best all-around gun in IL-2 . The later models add more of these cannons. Due to thisimpressive weaponry, the plane lives from snapshots and slashing attacks. Agood convergence range for the 190 is 200 m for all guns (the convergenceof the nose and inner-wing cannons are tied together; the outer-wing can-nons are controlled with the cannon convergence setting), because it allowsto hit targets in a large range of distances. However, each pilot must exper-iment to find what best suits personal taste. The large variety of possiblearmament and loadout changes possible through the U and R variants ofeach model adds to the 190’s versatility, making it an excellent high-speed,light ground-attack aircraft.
Use the rudder to avoid yawing while shooting. The 190’s armamentprovides a fair amount of scattered but powerful fire outside the conver-
2.2 Aircraft of the Luftwaffe 15
gence range, but if your gunnery skills are good enough to be able to aimat precise sections of the target, consider the following. Against fighters,just aim for the cockpit and engine. With medium bombers, go for the wingroots or tail section. For large bombers, go for the wings in general.
The poor forward visibility from the FW-190 cockpit hinders gunneryto some extent, but by no means does this make it ineffective. Given theelement of surprise, it may be helpful to dive behind opponents with andattack from the low six-o’clock position. Visibility in all other directions isexcellent, especially below and to the sides. This makes it easier to spotenemies below. One successful tactic is to fly 1000 m above the enemy’santicipated position, then fly slightly to the side of their flight path to geta clear view and make yourself less visible. The element of surprise is veryimportant; for this reason the 190 is at an advantage in servers with icons,external views and padlock turned off.
The 190’s are very modern, well-equipped aircraft with an excellentcockpit design. Many gauges are installed, and the principle gauges areplaced on top for ease of visibility. An artificial horizon is installed for blindflight.
There are no special issues concerning take-off and landing, except forthe poor forward visibility. This can be compensated by skilled pilots duringlanding by flying a curved approach or by crabbing (cross-control using rud-der and aileron), and somewhat during take-off by raising the tail early withthe elevator or centering the plane by looking at the runway edges. In thetake-off flap configuration, rotation can be made at speeds above 160 kph,or 170 kph with payload. Touchdown speed is 150–160 kph in all models,with an approach speed of 180–200 kph.
The weak point of the FW-190 is its wings: the vast majority of catas-trophic damage comes from the loss of a wing, and even small amounts ofdamage can reduce performance. In addition, with its high roll rate and ab-sence of aileron trim, damaged wings complicate the controls significantly.Next is engine damage, which typically occurs in head-ons, something toavoid in the Butcherbird despite its strong armament. Another small weakspot is the canopy; the pilot may be killed by aircraft with a high rate ofdecent-caliber fire, such as the .50-caliber heavy machine gun. The fuselageis very sturdy and almost never causes major failure.
Tactics in the FW-190 are fairly specific. Its superior speed should beused to advantage to avoid having to engage enemy fighters close in. It ispurely a hit-and-run fighter, not really even boom-and-zoom. Like the 109,they enjoy increased relative performance at altitudes above 3000 m, andhigh altitudes are to be strongly preferred. Maintaining an energy advantage

2.2 Aircraft of the Luftwaffe 16
in this aircraft cannot be overemphasized. If you are slow with an enemynearby, you have already made a big mistake. The skilled Butcherbird pilotmust learn to maintain energy through maneuvers, avoiding energy bleed.Look for opportunities to build speed and altitude.
The FW-190 in IL-2 does not lend itself very well to energy tactics,counter to the historical combat records. This is a question of relative air-craft performance, and in IL-2 the 190 burns energy too quickly to dominateusing energy tactics. This is not to say that energy tactics cannot be used,but there is no significant performance capability in the areas where energyfighting is adaptable in regards to the FW-190.
When caught, a practiced pilot can use combat flaps1 to make tight andslow turns inside the opponent. A better alternative is to enter a barrel rollfight, performing wide, low barrel rolls that conserve energy and make youa difficult target, and using the 190’s nearly untouchable roll rate to causethe enemy to overshoot, then extend away while they reverse. The mostdangerous enemy in these situations are those with a large cannon.
If you’ve gotten yourself into a pinch but have altitude, then dive atfull power to escape. All models of the FW-190 series can out-dive mostopponents. The break apart speed is roughly 810 kph IAS.
Here are a few simple rules. Always stay fast. When the enemy is near,you should be doing at least 400 kph with you, preferably 500 kph or more—this should be your first priority when starting engagements. Go for de-flection shots. The 190 is well equipped for it, and you can get planformshots where hits are most lethal. This also minimizes the enemy’s chanceto hit you when you pass him. Use gentle maneuvers, concentrate on speedand nose low maneuvering when enemy aircraft are near, and grab altitudewhen they are not. Dive when in trouble, avoid nose up maneuvering whenenemy aircraft are near.
He-162 The call for a Volksjager (people’s fighter) is an astonishing late-war accomplishment that went from drawing board to flight in only threemonths. This very hurried project (code-named “Salamander”) managedto produce the Heinkel 162, “unique in the history of aviation as the onlyaircraft in which development, pre-production prototypes and main produc-tion lines were started almost simultaneously and proceeded in parallel.”Curious in the design is the location of the jet engine, mounted on top ofthe fuselage directly above and behind the cockpit; this motivated the instal-lation of a simple ejection seat, reflecting that the pilots were more highly
1This applies only to the IL-2 flight models.
2.2 Aircraft of the Luftwaffe 17
valued than the aircraft itself. [6]The aircraft itself was very effective as a fighter interceptor, equalling
the Me-262. In some ways it was superior: “The BMW engine proved to befar less sensitive to throttle movments than those of the Me 262, though stillprone to flameouts. This allowed the He 162 to be flown up to the limitsof the pilot’s confidence in the aircraft, unlike the Me 262 whose enginesrestricted much in the way of maneuvers [6].” It was very fast and wellarmed. However, it had a problem of having a very short flight time of 30minutes, and many operational losses were due to running out of fuel.
Despite its rapid development and excellent qualities, it was another caseof too little to late for the Luftwaffe. The production program was plannedto put out 4,000 aircraft per month, but only a few hundred were in factproduced because of the success of the Allied bombing campaign. Althougha very few He-162s did see action over Germany in April 1944, the fighteressentially had no impact on the war.
I.A.R. 80 The Romanians realized in the late thirties that their Polish fight-ers were obsolete. The Industria Aeronautica Romana factory offered an el-egant design that incorporated many parts of the older Polish P-24 in use.The first batch of the resulting IAR 80 left the production facility in Febru-ary 1941, having finally received the necessary materials for production af-ter joining the axis in November 1940. [6] The IAR 80 is the only Romanianfighter aircraft of original production that served in the war, and it served ef-fectively with distinction. About 120 were made, and it remained in serviceuntil 1944. It is not particularly well armored or very fast in comparisonto its opponents, but quite maneuverable and well armed with 2 7.9 mmmachine guns and 2 20 mm cannon.
The IAR 80, IAR 81 and MC-202 are the only Axis aircraft in IL-2 thatdo not actually belong to the German Luftwaffe.
MC-202 The MC-202 “Folgore” (thunderbolt) was a development of theMC-200 “Saetta”, of which it retained most of the fuselage and wing struc-ture. The original radial engine of the MC-200 was replaced with the morepowerful V12 Alfa Romeo RA 1000, actually a licensed version of the Ger-man DB 601. The open cockpit was replaced with a closed cockpit, but theweak armament of its predecessor (only 2 12.7 mm machine guns) remainedunchanged and represented the main flaw of this aircraft. Like most Italianfighters of WW2, the Folgore had excellent maneuverability; it was superiorto the Hurricanes and P-40s but easily outgunned by the Spitfires. Quite

2.2 Aircraft of the Luftwaffe 18
oddly, the MC-202 was only marginally used in the Eastern Front (only 12MC-202s, which managed 17 sorties in total), the mainstay fighter being theMC-200 which was clearly unfit for that theater.
Me-262 The design of the Me-262 started in 1938, while the new turbojetengines were in development by BMW and Junkers. Delays in the designwere caused by development of the engines, but were finally ready for trialsearly in 1943. Full-scale production was delayed until early 1944, and theMe-262 first saw action in September of 1944 over Germany, and at thislate stage of the war was used to defend against counter-invasion of thehomeland.
The unconventional drives enabled the Me-262 to reach extremely highairspeeds, and it was the world’s first true turbojet fighter. It was by thefastest aircraft around when it was introduced, while still retaining ma-neuverability (though not as maneuverable as propeller fighters), and washighly successful in its originally intended role of interceptor. The A-1Schwalbe (swallow) with 4 30 mm MK 108 cannons and the A-2 Sturmvogel(albatross) with 2 30 mm MK 108 and a bombload are present in IL-2 .
2.2.2 Ground-attack aircraft
He-111 The Heinkel 111 level bomber is present in the game as AI only.This twin-engine, middle bomber, together with the Dornier Do-17 (not ingame) and the Ju-88, formed the backbone of the Luftwaffe bomber programat the outset of the war. Over 7,000 of the various types of He-111s wereproduced throughout the war. Although a fast bomber equipped with fivedefensive machine-gun positions that provide an extremely wide field ofcoverage, it by mid-war it proved to be rather vulnerable, requiring a largefighter escort wherever modern enemy interceptors are around. The H-2model can select from a wide variety of bomb loads, and the H-6 model iscapable of being equipped with two torpedos.
Hs-129 The Henschel 129 is based on the He-123, which successfullyserved at the outset of the invasions of Poland and France, and is “in effecta sort of flying armoured car” [1]. This dedicated ground-attack aircraft isheavily armored, and the in-game B-2 is equipped with light machine gunsand cannons ranging from 13 mm to 30 mm, while the B-3/Wa Waffentrager(weapons carrier) can be equipped with a 75 mm cannon! This was neces-sitated by the increasing strength of armored ground targets. The B-series

2.2 Aircraft of the Luftwaffe 19
appeared in 1942 and the Henschel served through 1944, mostly on theRussian Front.
I.A.R. 81 The IAR 81 is the Romanian IAR 80 fighter modified to be abomber. It consists of additional pilot armor and 6 7.62 mm machine guns,with the ability to carry bombs.
Ju-87 The Junkers 87 Stuka is possibly the most famous and recognizableaircraft of WWII. The word Stuka stands for Sturzkampfflugzeug, literally“dive-combat aircraft,” what in English is called a dive bomber. The B-2type became flyable with the version 1.2 patch, and the D-3 and G-1 typesare AI only. This awe-inspiring machine struck abject fear into the hearts ofmany in the early parts of the war, not in small part due to the effect thewail of its diving siren had on those below. As the armament and speedof enemy fighters grew, it ceased being as feared as it once had, as manyStukas were lost due to their slow speed and relatively poor defenses. Itnevertheless is a dangerous threat to any ground target, due to its highlyprecise dive-bombing attack.
Ju-88 This medium-sized Junkers bomber is another deservedly well-recognized aircraft. It proved itself to be the Luftwaffe’s most versatilebomber, being capable of both level and dive bombing, reconnaissance,night fighting, close support and torpedo bombing. Although not all ofthese roles are fulfilled in the Ju-88 A-1 present in IL-2 was constructedin 17 variants. Over the course of the war, more than 16,000 units of 10different models were constructed.
The Ju-88, like the He-111 is vulnerable to attack yet not easily ap-proached with its good rear field of fire. Like the Ju-87, its ability to divebomb can make an attacking flight fearfully difficult to stop in time over thedefended target.
2.2.3 Transport and reconnaissance
Ju-52 The Junkers 52 was the transport cow of the Luftwaffe and couldcarry 18 passengers, which in wartime often translated to paratroops. Itsrole in the evacuation efforts at Stalingrad are legendary. Slow and lumber-ing, it requires a good escort, but if caught unawares it has teeth in the formof defensive machine guns with a good field of fire. There are both land andsea versions of this plane.

2.3 Armament and loadout 20
Fi-156 The Fiesler Storch is a small and highly versatile reconnaissanceaircraft. The two-man “Stork” is equipped with a rear machine gunner, andits special aerodynamics allows it to fly at an extremely low operating speedof 50 kph and take off in 50 m and land in 15 m. It was present on all frontsand is able to carry out tasks of liaison, transport and even air-sea rescue.
FW-189 The Focke Wulf 189 A-2 Uhu (eagle owl), also known as dasFliegende Auge (the flying eye), is a light twin-engine aircraft specially de-signed for tactical ground reconnaissance. Its twin boom allows for a verywide field of view to the rear and is very stable at low speeds. It is equippedwith a rear gunner and capable of carrying bombs.
Me-321 The Messerschmitt 321 is a glider transport built in 1941, havingits roots in the plans of Operation Sea Lion, the proposed German planto invade England. With a wingspan of 55 m and a maximum weight of34,400 kg, this is a rather large glider at that! The Gigant was mainly useddifferent units that were formed for special purposes and then disbanded.
Me-323 The six-engined Messerscmitt 323 is a monster of a transport, de-rived from the Me-321 glider. It served starting from the end of 1942 andwas used in the Mediterranean and Eastern Front. The tremendous payloadwas put to good use supplying troops trapped in the Soviet counter-offensiveof 1943. In IL-2 , the Me-323 can be used to haul the Me-321.
2.3 Armament and loadout
The various armament and possible loadouts of all aircraft in IL-2 are avail-able in the in-game Object Viewer, together with a great deal of informationabout each aircraft and many objects (boats, tanks, etc.) in the game. Muchinformation on armament and especially loadout is also available in con-densed form at Sturmovik101, which was compiled by kajr and is hostedby Mudmovers. In addition, all armament and loadout information for theaircraft in IL-2 (and Forgotten Battles as well) can be found in a well-made,third-party software program called Hardball’s Aircraft Viewer. A list of cur-rent hosts can be found in this SimHQ thread, although that informationwill remain current indefinitely.
CHAPTER 3
Ground school
A small correction early is better than a large correction late.
— Aviation proverb
I’ve given it some thought, and have more or less come to the conclusion:you can’t be useful in the air, much less good at aerial combat, until youknow how to fly an airplane. I would have thought that this is obvious,but I am reminded time and again that it is not. So many eager folks cometo the IL-2 forums wanting to learn the “tricks that will help them win inIL-2” or want to learn why they can’t land a bullet and always end up adirt torpedo. The answers offered to specific questions vary in usefulnessas well as temperament, but they usually have a common theme: learn thebasics, practice, try this or that, then practice it, read this or that article,practice. All I can say is that it’s pretty sound advice. There is a lot to learn,but you don’t have to learn everything at once. We hope to provide a goodbeginning here. An introduction to the basics for flying in IL-2 is here, andthe practicing is up to you.
Fortunately for you this is a user’s guide and not formal flight training.You won’t have to spend countless hours studying and learning before youeven get up in the air. Our goal is to get you started discovering and im-proving your flight sim experience, not to prep you for your private license.Although learning to fly in IL-2 won’t make you able to fly a real airplane,it is realistic enough to demand some knowledge on your part.

3.1 Gauges and levers and toggles, oh my! 22
Most of us don’t have real airplanes, but we would like to learn from theoutset in the most realistically simulated environment we can. Hence, in thediscussions of this and the following chapter we are going to assume that therealism settings having to do with the flight model are all set in the difficultyoptions. These are: wind and turbulence, flutter effect, stalls and spins,blackouts and redouts, engine overheat, torque and gyro effects, realisticlandings, take-off and landing, head shake, realistic gunnery, limited ammo,limited fuel and vulnerability. The rest of the settings—cockpit always on,no external views, no padlock, no icons, and no map icons—also have to dowith realism, but are concerned with viewing and have little or nothing todo with the flight model.
Some of the absolute introductory basics of flight, namely the forces act-ing on an aircraft, its axes of movement and the principle effects of manipu-lating the primary control surfaces—the ailerons, elevator and rudder—arecovered in the IL-2 User Manual [7]. If after reading this manual you arethirsty for more knowledge about how airplanes fly and not too sure whereto look, the informative and not infrequently entertaining book See How ItFlies [8] is a great place to start. It is an online book and, as its authordescribes, it is a book about the “perceptions, procedures, and principles offlight.” We will certainly repeat some things about the basics later on, butfirst let’s have a seat in the office where business will be taken care of.
3.1 Gauges and levers and toggles, oh my!
I remember how I was always impressed when I looked at the instrumentpanels in cockpits of all kinds. I still am. I have little idea of half the flips andinstruments in the cockpits of modern jets, but I certainly have learned a lotabout the gauges of the 1930s and ’40s. Being able to tell what is going onwith your plane from its panel is a vital aspect of being a pilot, and althoughwe will not get into heavy detail, you will greatly benefit from being able todecipher some of the more critical gauges. Keep in mind that all of the topicsmentioned here have not been discussed yet; you might want to come backand read this section again after you have learned more about flight basicsin later sections. Refer to the illustrations in the instrumentation guide thatcame with IL-2 to compare the instruments to your cockpit. You might wantto climb into a cockpit of your choice and identify these instruments as youread through the descriptions below.
Altimeter As mentioned in the documentation, this is your altitude abovesea level, either in meters, kilometers or feet. The little hand shows

3.1 Gauges and levers and toggles, oh my! 23
thousands and the big hand hundreds, or in German machines, thehand shows tenths of kilometers (hundreds of meters) and the counterat the bottom shows kilometers. Some airplanes had this gauge zeroedto their airfield altitude; this is not so in IL-2 . It is useful in navigation,combat and any time you are close to the ground.
Airspeed indicator This one is pretty obvious at first glance. It is critical toknow the speed with which your aircraft is meeting the air. It’s usefulin take-offs, landings, avoiding stalls, flying formation, avoiding struc-tural damage, finding optimal climb rates, and in nearly every aspectof combat. It can also indicate whether your engine is performing upto par, or if something is amiss—damage-induced drag, or forgottenflaps or landing gear. Be careful when interpreting the gauge; it isthe indicated airspeed, not the true airspeed, so it doesn’t compensatefor wind or altitude. Watch the units, too—American-made craft mayindicate mph instead of kph (1 mile = 1.6 km).
Artificial horizon Also called the flight indicator or attitude indicator. Thisgyroscopic instrument indicates the attitude of your airplane, or itspitch and roll, the angles of your nose and wings relative to theground. If for example you bank left, the line or figure representingthe airplane will tilt to the left (left side is lower) in the same measureyour wings do. If you raise the nose instead, the line representing thehorizon will go lower than the line representing the airplane. If you’rein a taildragger on the runway, the horizon line will already be a littlebelow the airplane line. The different gauges represent this somewhatdifferently, but with some effort you will be able to figure it out. Thisinstrument is especially handy if you can’t see the horizon very well.You can’t necessarily rely on it to give you an instant orientation whenthe nose of the aircraft is very far from the horizontal, but after prac-tice you may find it to be a good friend in tight spots. It’s a great helpwhen playing hide-and-seek in the clouds.
Climb indicator Also referred to as the variometer. If you make gradualchanges in the climb rate, it shows you the rate of climb or descent inm/s or ft/min×1000. The instrument doesn’t react instantly to changesin climb rate. When making quick changes rely on the altimeter first.For instance, many times the altimeter reading is decreasing when thevariometer still shows a climb.
Heading indicator The IL-2 User Manual refers to this as the repeater com-

3.1 Gauges and levers and toggles, oh my! 24
pass or remote reading compass. This instrument is purely for nav-igational purposes, but don’t go underestimating the importance ofnavigation in aviation. The idea is to use the reading to get yourselforiented toward the next waypoint. Yes, the technology for this reallyexisted back then! One needle shows your current heading (the Rus-sian version doesn’t have this) and the other shows the direction ofthe next waypoint. Keep the needle lined up to navigate your course.In planes that have both, the heading indicator can also be a hand-ier reference than the harder-to-read magnetic compass when goingthrough turns, especially in combat.
Magnetic compass Also known as the turn indicator or whiskey compass.You may have used one of these in a forest once; they float in a liq-uid and point toward magnetic north. In the cockpit they’re not al-ways highly legible, especially in stressful circumstances—which arenot entirely unheard of in combat aircraft—but sometimes they’re allyou’ve got. In some cockpits the magnetic compass is partially or fullyobscured by the control stick or other object.
Turn and bank indicator Also called the turn-and-slip indicator, this gyro-scopic device provides indirect information about the bank angle ofthe wings and the coordination of a turn. The ball shows the directionof a slip or skid, so you should “step on the ball”. Both are useful forsteadying the aircraft to hit targets, especially the slip indicator. It ismeant to help you in turns, as well as to tell whether you are turn-ing. It is very helpful in trimming out the plane against slip, as well asholding the aircraft in a steady bank angle.
Manifold pressure gauge This handy but tricky gauge measures the pres-sure in the intake system of the engine. It is handy because it canbe used as an indicator of engine power output. When the engine isrunning the engine creates suction in the intake, but with the throttleclosed there is little pressure in the intake manifold, and the manifoldpressure (MP) gauge shows a lower pressure reading. As the throttleis opened, it allows the engine suction to create a higher pressure inthe manifold, so that the MP reading increases. The MP gauge canand should be used to set the throttle for a desired power setting. Itis also useful for troubleshooting, since a damaged engine will notcreate as much suction, and so a lower MP reading than usual at fullthrottle indicates engine damage. You shouldn’t want to anyway untilit becomes an emergency.

3.1 Gauges and levers and toggles, oh my! 25
Tachometer This is the engine’s speed in revolutions per minute. Airplanesof the era have relatively low engine speeds. In planes that haveconstant-speed propellers the tachometer is used for propeller gov-ernor settings. It is used with the manifold pressure gauge for enginemanagement and diagnosis.
Oil temperature and pressure This gauge lets you know when your en-gine is warm, when it is normal and when it is cooking. Overheatingthe engine causes damage, and you can use this gauge to help preventit. When the oil pressure becomes abnormal the engine is probablydamaged. In some planes oil temperature and pressure are shown onseparate gauges, on others they are integrated into an engine gaugeunit.
Coolant temperature As with the oil, when the coolant temperature goesabove the marked limit it is time to think about cooling the engine,just like in a car. If you let the engine get too hot you will hear theengine fluids boiling.
Propeller pitch The Luftwaffe aircraft have a Luftschraube Stellungsanzeige,that is, a propeller position indicator. As the pilot varies the propellercontrol, this indicator gives a measure of the pitch of the propeller, orthe angle at which it meets the air. In most applications in German(and other) aircraft you can leave the blade pitch control on auto-matic. In a few circumstances, you may be able to use manual pitchcontrol to make finer adjustments to the engine management. In mostother aircraft, the tachometer (rpm) is used as an indicator of the pro-peller control. Most of the VVS aircraft use constant-speed propellers,and none of them have this indicator.
OWI The outside world indicator is implemented in most aircraft as a large,transparent material, often referred to simply as the “windscreen.” Pi-lots must check this indicator regularly to maintain situational aware-ness. Under low visibility conditions it can become highly unreliable.
Of all of these instruments, we can identify six that are the most of-ten used in flight: the airspeed indicator, altimeter, artificial horizon, turnand bank indicator, heading indicator, and climb indicator. You may haveheard of pilots referring to an instrument scan. This process, which is crit-ical to low-visibility flying, involves the checking of these six important in-struments, starting with the artificial horizon, and the decision-making thatmust be done before making major attitude changes.

3.2 Cockpit orientation 26
3.2 Cockpit orientation
Each aircraft cockpit has its own layout of various gauges, selectors, leversand switches. Some are more advanced and automated than others, andthey may or may not seem to make sense. That’s how cockpits are though,and the 3-D cockpits in IL-2 are modeled to a high degree of detail andaccuracy, even if every last thing you see is not animated. The P-39N-1cockpit for example has over 60 items modeled, and these compare closelyin placement and detail to the documentation in actual pilot’s handbooks. Ifyou would like to find out more about the various items in the cockpit, youcan find cockpit reference guides for a few of the planes at [9].
In each cockpit the most important thing is what you find first afterclimbing into the cockpit: the instrument panel. You should be able to iden-tify a number of items fairly quickly. The most important and frequentlyneeded gauges are usually large and placed near the center of your view.Some indicators that you will recognize from the previous section that areusually highly perceptible are the airspeed indicator, altimeter, artificial hori-zon, turn and bank indicator and variometer (climb indicator). Get intoyour favorite cockpit and take a moment to look around and find these in-struments by comparing them to the images on your reference card. Keep inmind that not all aircraft has every gauge, although you should always findan airspeed indicator and an altimeter.
The manifold pressure and tachometer are especially important for en-gine settings. Look for a whiskey compass or repeater compass for navi-gation.1 When you plan to be flying a particular aircraft very much, it isdefinitely worthwhile to learn what instruments are available to you andto have their placement memorized. Stuff happens fast up there, and thisgreatly aids your ability to gather vital information at a glance.
In most aircraft the controls for the gear, flaps and radiator/coolant cowl-ing flaps, etc. are not animated. Several aircraft do have warning lights thatindicate the position of landing gear, and in some aircraft such as the Il-2there are manual indicators.
The next thing to learn to adjust to life in the cockpit is how to usethe OWI indicator (see section 3.1). The point of view rotates around anpoint in the cockpit meant to represent the position of the pilot’s eyes. Themouse can be used to rotate the view smoothly, and the mouse speed can bealtered. (From the main menu, click Hardware Setup and then Input, and
1Unfortunately, some of the compasses are 90◦ or so off, be sure to compare them to theheading shown in the speed bar.

3.2 Cockpit orientation 27
Type Model Alt
imet
erH
eadi
ngM
an.
pres
s.
Air
spee
d
Turn
&B
ank
Tach
omet
erPr
oppo
s.
Art
.ho
riz
Vari
omet
erFu
elO
ilte
mp
Oil
pres
s.
Clo
ckA
mm
oqt
y.
Bf 109 E4 ✓ ✓ ✓ ✓ ✓ ✓ ✓ – – ✓ ✓ ✓ ✓ –E-7/B ✓ ✓ ✓ ✓ ✓ ✓ ✓ – – ✓ ✓ ✓ ✓ –E-7/Z ✓ ✓ ✓ ✓ ✓ ✓ ✓ – – ✓ ✓ ✓ ✓ –F-2 ✓ ✓ ✓ ✓ ✓ ✓ ✓ – – ✓ ✓ ✓ ✓ –F-4 ✓ ✓ ✓ ✓ ✓ ✓ ✓ – – ✓ ✓ ✓ ✓ –G-2 ✓ ✓ ✓ ✓ ✓ ✓ ✓ ✓ – ✓ ✓ ✓ ✓ ✓
G-6 ✓ ✓ ✓ ✓ ✓ ✓ ✓ ✓ – ✓ ✓ ✓ ✓ ✓
G-6 Late ✓ ✓ ✓ ✓ ✓ ✓ ✓ ✓ – ✓ ✓ ✓ ✓ ✓
G-6/AS ✓ ✓ ✓ ✓ ✓ ✓ ✓ ✓ – ✓ ✓ ✓ ✓ ✓
FW 190 A-4 ✓ ✓ ✓ ✓ ✓ ✓ ✓ ✓ ✓ ✓ ✓ ✓ ✓ ✓
A-5 ✓ ✓ ✓ ✓ ✓ ✓ ✓ ✓ ✓ ✓ ✓ ✓ ✓ ✓
A-8 ✓ ✓ ✓ ✓ ✓ ✓ ✓ ✓ ✓ ✓ ✓ ✓ ✓ ✓
Ju-87 B-2 ✓ ✓ ✓ ✓ ✓ ✓ – – ✓ ✓ ✓ ✓ ✓ –
Table 3.1: German cockpit instruments
enter a number into the Mouse Sensitivity field.) You can also use the hatbutton of a joystick to snap or pan between various viewing angles; pressingF9 toggles between snap and pan modes. You may also choose to have alook around the outside of the aircraft by pressing F2. See section 5.4 formore on changing views.
As you climb into the various cockpits you will notice that the visibilityvaries greatly from aircraft to aircraft. In some planes the forward visibilityis fairly obscured, in others great. Often armor plating blocks your view,sometimes the plating is there but transparent. Some aircraft have bub-ble canopies and some have terrible rearward visibility. In a few aircraftthe pilot sits further forward or behind the wings and enjoys an increaseddownward field of view. Learn to use the full field of view of an aircraft.
This is true not only of the OWI but also of the indicators in the cockpit.Human binocular vision is not modeled and you can’t move your point ofview to the side, so sometimes you just can’t see a given instrument. In-struments hidden by the stick can be seen by moving the stick well to theside—not recommended practice in critical situations or at low altitudes.

3.3 Starting up 28
3.3 Starting up
In IL-2 , starting the engine is a snap—you just press I on the keyboard.Unfortunately, you cannot start the engine with a simulation of the proce-dures it took to get those powerful engines revving. There are all kinds ofcontrols and checks before, during and after starting and warming up theengine that are standard procedure. This was often a difficult aspect for theground crews on the Eastern Front during winters. Sometimes they wouldlight fires under the fuselage to get the engine warm enough to turn over.
There is, however, one aspect that you as a virtual pilot have to consider,and that is when going online. In an online coop mission (dogfight server?)you should not touch the engine controls while the mission is loading, norfor the first two seconds or so after it is loaded. If you do this you riskrandomly damaging your engine! This is a known bug.
3.4 Checklists
We all forget. Checklists are there to help you prep your plane for flight andcarry out simple maneuvers such as take-off, climbing, cruising and landingunder various conditions. This is something the 1C:Maddox team chose notto develop for their planes, and given the amount of work required to makehistorically accurate checklists for the large number of aircraft the choice isunderstandable. The reasoning is that the vast majority of flight simmersare not ready to give the time required to go through real checklists, whichare pretty detailed: you have to check brakes, electrical equipment, controlsurfaces, landing gear, cowl flaps, fuel selection valves, propeller, mixtureand throttle settings, then go through a precise engine startup and warm-upprocedure and observe that everything reacts properly. That is just the pre-flight checklist. There is detailed documentation out there for your airplane,but no in-game lists.
You may wish to make some simplified checklists of your own. Somethings that you do want to learn to do before taking off are: allowing theengine to warm up somewhat, checking control surfaces to make sure yourcontrollers are connected properly, setting your view, applying brakes beforeincreasing throttle, making sure that nothing is obstructing your path, anddeploying the flaps to the desired setting.

3.5 Taxiing 29
3.5 Taxiing
Way up in the sky, airplanes are elegant and doing what they do best. Onthe ground, they are clumsy at best and have poor forward views. Taxiing isperformed at low speeds, a bit faster than you can walk, although you willhave to get a feel for safe taxi speeds through practice. The faster you taxi,the faster your airplane will become unstable. Keep in mind that you have tostay ahead of the airplane, as the hint at the very beginning of the chapterimplies. Keep the stick well back while taxiing. This uses the elevator tohelp prevent the aircraft nosing over.
To get the airplane to maneuver on the ground, you must use the thrustprovided by the engine to go forward. The propwash also flows over yourrudder, and this is what you use to steer. Before you start moving though,a further word on steering. The rudder is the only primary control surfaceused to maneuver on the ground—you can keep your hands off the stick On the ground,
steer with therudder.
until you are ready for take off. Moving the rudder pedal to the left2 steersyou toward the left, and vice-versa. For gradual turns the rudder alone willoften provide you with sufficient steering control. The faster your forwardspeed, the more authority the rudder has (and the more danger you are inof an accident). You will probably notice this during take-off.
When taxiing, a number of forces created by the spinning propeller com-bine to produce torque, which causes the airplane to want to turn. If yourpropeller rotates to the right, the aircraft will want to turn to the left, andif the prop rotates left, then it wants to swing right. The tendency of theairplane to deviate from a straight path is called ground looping. Groundlooping is also prevalent in taildraggers because their center of gravity isbehind the wheels, so any movement to the side makes the aircraft wantto turn. With sharp movements in taildraggers it is not hard to make themswap ends, which can be desirable if done purposely but usually is not. Youwill constantly have to use the rudder to counter ground looping while taxi-ing.
At the low speeds used for taxiing, sometimes the rudder is not enoughto turn sharply. For sharper turns the planes are equipped with a differentialbraking system, which is handy since your ground crew is never to be found.There is only one control for the wheel brakes, so the differential braking isactivated by the rudder input.3 If you want to turn left sharply, give full left
2If you do not have rudder pedals, use the twist action of your joystick or the keys forrudder control (the . and , keys by default).
3If you have rudder pedals that support toe braking, you can assign one of the toe-brakeaxes to the wheel brake HOTAS. Such a slider control gives you various degrees of braking.

3.5 Taxiing 30
Figure 3.1: When taxiing, S continuously.
rudder and then apply the wheel brake control. Holding the wheel brakefor too long is not usually good unless you want to stop the plane. To turneven more quickly, you can give quick bursts of throttle. Note the followingfrom [10]: “Turning the airplane with one wheel locked is very bad practice,as it grinds rubber from the tire and may overstrain the spindles of the mainlanding gear to a point where they will later fail on landing or take-off.” Inaddition, overbraking can quickly heat up the braking surfaces and glazethem. In the sim we are not constrained to worry about such things, andyou can adopt the bad practice of overbraking liberally. Be careful though, Brake softly but
liberally.too much braking can cause a nose up, causing a prop strike or even flippingyour airplane.
To start moving, make sure that the tail wheel is not locked and clearthe engine with a burst of thrust (this latter is more a real-world procedure).You will need a fair amount of thrust, but once the plane starts moving, backoff on the throttle to about 10–25% thrust (real-world procedure calls for acertain amount of rpm), depending on the airplane, your load, and how fastyou want to go. If you start to go too fast, just ease the throttle to idle andgently apply the brakes. It is generally recommended to open the oil andcoolant shutters (use R) when taxiing.
Few aircraft in the war have tricycle landing gear. These aircraft enjoyfairly good forward visibility on the ground. Of the flyable planes in IL-2 ,
Otherwise you can use the keyboard (B by default).

3.6 Attack! 31
only the P-39 enjoys this advantage.4 The other planes have the third wheelat the tail of the plane and are known as taildraggers.5 No pilot has everfailed to notice a big and obvious problem when taxiing taildraggers: thefront of the aircraft. Namely, that it’s blocking everything in front of them.In these planes you will have to be much more careful and taxi slowly. Nor-mally you cannot detect anything directly in front of you, including parkedplanes. In a congested area, get someone to walk your wing—if you canfind a volunteer! The only way to see what lies ahead of your path is to S S continuously
when you taxi.continuously. To S means using the rudder to steer the plane left and rightseveral degrees in order to get a quick view of what’s ahead through thefront quarter panel of the cockpit. You’ll have to reverse the direction ofthe turn as you get closer to the edge of the runway: the resulting curvedpath resembles an S. When S-ing, use the brakes only intermittently. Scrap-ing wings on the ground and nosing over are not as bad as plowing intosomeone in front of you, but they’re still not desirable. Be careful to unlockthe tail wheel before carrying out this procedure, and to lock it again afterhaving started moving forward for take-off.
3.6 Attack!
Those first few sections were all okay, but now we’re coming to the reallypractical stuff. You’re about to be prepped for learning how an airplanereally flies. The first thing we have to do is get used to the idea that we’regoing to be controlling a vehicle that moves about through the air. So beforeyou get into the air, there’s something you ought to know about controllingthe airplane: it’s not a car. Really, it’s not. In a car, to go faster you giveit more gas, or maybe shift gears, but in an airplane there is an extra di-mension of movement, so the thing is a little more complex. For instance,opening up the throttle might not change your airspeed much at all. (Thisis so in a car as well when the car is headed up a hill, although in a car wewouldn’t talk about airspeed.)
There’s another misconception you might be under, and that is thatpulling and pushing on the stick makes the airplane go up and down. Whatit does do is cause the elevator,6 or flipper, to deflect up and down, respec-
4The nose gear of the P-39 is also coordinated with the rudder to give it additional turningability.
5Although also a taildragger, the BI-1 has good forward visibility.6This name is somewhat of an unfortunate misnomer, since it gives a wrong impression
of the function.

3.6 Attack! 32
60% throttle
75% throttle
Horizontal
HorizontalClimb
Inc
Pitc
h
Ao
A
Figure 3.2: In the first picture, Oleg is flying his LaGG-3 in level flight (see section 4.5)at about 310kph. In the second, he has smoothly added throttle and begun to climb. Itis clear that the angles of pitch and climb have increased, although the angle of attackhas not. The airspeed has not appreciably changed.
tively. The change in lift of the deflected flipper causes the pitch of theairplane to change in the direction of the deflection. That’s what pushingand pulling on the stick does: it changes your pitch. The stick seems to workas an up/down control most of the time, but the truth is you have to workwith the stick and the throttle together to determine airspeed and changealtitude. We’ll come back to this.
Alright, so much for those misconceptions. Understanding more cor-rectly what does happen will really pay off, so let’s be a little more precise.We’ll start with an example. Imagine an airplane flying along in level flight,meaning it is flying straight ahead without changing speed or altitude. Infact, have a look at the first picture in figure 3.6, where a man—for lackof a better name let’s call him Oleg—is cruising along on a frosty winterafternoon in a ’41 LaGG-3 at about 310 kph. Oleg’s fighter is in a state ofequilibrium, meaning that all forces are in balance, and if you look care-fully, you’ll see that as it moves forward the wing is meeting the air at a

3.6 Attack! 33
certain angle, called the angle of attack. This angle of attack is so important Angle of attack
to understand7 because it affects so many things. A good definition is “theangle at which the air hits the wing.” [8] Simple enough, but let’s make surewe understand that. How does one figure out what the angle of attack is?There are three things that determine it, which we are about to get to.
An angle is measured between two lines, and for our purposes our twolines are the chord line and a line representing the direction of the relativewind. Picture the chord line as being the line between the leading edge ofthe wing and the trailing edge of the wing; look closely at figure 3.6, wherein both pictures the chord line is represented by an orange line. The chordline doesn’t change relative to the aircraft unless you change the shape ofthe wing. (A notable example of this is when you change flap positions; seesection 3.7).
The direction of the wind relative to the aircraft changes often. Therelative wind has less to do with wind relative to the ground and everythingto do with the direction of air movement relative to the airplane.It dependson both the direction of the movement of the airplane in the air and themovement of the air itself. In IL-2 it’s often the case that there is no wind,so let’s take the relative wind to be the same thing as the direction of motionof the airplane. The relative wind is represented by a sky-blue line in thefigure and is considered to be the same thing as the direction of flight.
Now in the bottom part of the figure, you can see that the nose of theLaGG is pointed slightly up and Oleg and his aircraft are climbing.8 Theairplane is headed in the direction of the blue line, even though it is pointedin the direction of the white line. The orange line is still lined up with thechord line, and the black line is level with the horizontal direction, perpen-dicular to gravity. All of these directional lines determine important anglesthat are going to help us figure out the angle of attack:
Climb + Angle of attack = Pitch attitude + Incidence
Incidence, labeled as Inc in the figure, is the angle between the directionthe plane is pointing (its longitudinal axis) and the chord line. Pitch is theangle between the axis (direction the plane is pointing) and the horizontal.Climb is the angle between the direction of flight and the horizontal. Angleof attack (AoA) is as before the angle that the wing is meeting the air, thatis the angle between the chord line and the relative wind (again, here therelative wind is taken to be the direction of flight).
7The only instrument in the Wright brother’s first plane measured angle of attack [8].8Actually you can’t see that they’re climbing, but they are. If you understand why you
can’t see it, you’re well on your way to understanding the lessons of this section.

3.6 Attack! 34
The simplest case is in the first picture, in level flight at cruise speed.The angle of climb is zero, and so is the pitch, so the angle of attack is justthe angle of incidence. When the airplane is climbing, if it is pointed in justthe same direction as the climb (this will be the case if it is climbing at acertain optimal speed), then the AoA will still be the same as it was in thecase of level flight at cruise speed. In fact, this is probably close to the casein Oleg’s climb in figure 3.6: assume that the angle of the climb is the sameas the pitch attitude, and you’ll notice that the angle of attack is the same asthe angle of incidence.
Now how did Oleg get into that climb in the first place? To answer that,let’s go back to when Oleg was in level cruise.
It’s a beautiful afternoon and the sun is low in the sky directly ahead,but there are bandits about. Not content with things, Oleg increases thethrottle setting. Does he go faster? You might be in for a surprise. His planeimmediately starts to climb, and the airspeed indicator still shows around310 kph! Here’s a hint: the flight model isn’t wrong, real airplanes behavethis way too. What happened? Increasing the power does pull the planeforward, but the wings maintain their angle of attack and change the pitchof the airplane, converting the added power into altitude (see section 3.7).If you don’t understand that yet don’t sweat, the main thing is to notice thatthe throttle controls power. What is that power good for? Three things: Throttle controls
power.1. Overcoming drag to maintain speed and altitude, which is necessary
most of the time
2. Climbing
3. Changing airspeed
Had Oleg wanted his LaGG to speed up but maintain the current altitude,he would have added throttle and at the same time pushed the stick slightlyforward. Burn this into your brain:
The stick and the throttle work together to determine airspeed andaltitude.
The stick, together with elevator trim, controls angle of attack, and in sodoing determines airspeed. Airspeed is linked to altitude by means of thepower curve, and because you can convert between the two. We’ll see moreabout this in section 4.3. The throttle controls power. (Is that burned inyet?) We put an engine in the airplane so that we can overcome drag, speedup, and climb.

3.7 Secondary control surfaces 35
The majority of this discussion is parallel to [8], where the topics arecovered in more detail. This discussion is geared to meet our needs in IL-2 ,but if you’d like to learn more, you know where to look.
3.7 Secondary control surfaces
Alright already, can we get into the air now? You poor little newbie pilot.It’s good that you’re so eager! However, we’ve put off discussing take-offuntil section 4.4 for good reason. There is still some critical stuff to absorb.Before you actually take off, you have to realize that often you can’t doeverything with the stick, rudder pedals and throttle. In fact, often thesecontrols alone will not be enough to even get your plane off the ground.Besides that, you’re going to have to maintain steady flight without wearingyour arms out. To help where we otherwise couldn’t help ourselves, wehave secondary flight surfaces. How are they different from the primaryones, then?
3.7.1 The effect of primary flight control surfaces
The ailerons, elevator and rudder are the first things you hear about whenlearning how to control an airplane. What they actually do is to create dragand/or change lift to shift the equilibrium of the aircraft, thereby creatingforces that change the way it moves through the air. Just to make sure weknow the effects of deflecting these surfaces, let’s go over them quickly.
Let’s consider the ailerons first. When in level flight you move the stickleft, you expect the plane to bank to the left, and it does, but why? Theaileron on the left wing has been deflected upwards and the aileron on theright wing has been deflected downwards. As a result, the left wing losessome lift and is also deflected downwards, whereas the right wing gains liftand is deflected upwards.
The flipper, or elevator, is controlled by pushing or pulling on the stick.When you pull on the stick, these surfaces are deflected upwards. Theairstream over them is deflected upwards, resulting in a new downwardforce on the tail of the plane. This force also causes the nose to pitch up,changing the angle of attack.
If the right rudder pedal is pushed forward (the left one will move back),the rudder will pivot outward to the right-hand side of the plane. Theairstream will be deflected towards the right, and create a force pushingthe the tail in the other direction—a clockwise direction looking from the

3.7 Secondary control surfaces 36
Figure 3.3: The Il-2 models have particularly obvious trim tabs, marked here in red.The hydraulic tab-operating systems are nicely animated, you can watch the ailerontrim tabs from the cockpit.
top view of the plane. This force causes the tail to swing (yaw) in thatdirection, the pilot might think “to the left,” and the nose will yaw to theright.
There are variations in the designs of primary control surfaces, but forour purposes this is what we need to know. As it turns out, in most planesyou can control these surfaces with other means than the stick and pedals.There are also very good reasons for doing so.
3.7.2 Trim
On the primary control surfaces of most planes there are secondary controlsurfaces called trim tabs. You can see an example of the trim tabs in fig-ure 3.7.2. Moving these tabs in one direction will cause a force that movesthe primary control surface in the other direction. The most important ofthese secondary control surfaces is easily the elevator trim tab, because ithelps determine the angle of attack. The trim mechanisms for rudder andailerons work in a similar way, so let’s consider how elevator trim works,and the major whens and hows of applying it.
Figure 3.7.2 depicts an elevator airfoil seen from the side. On the rearupper surface you can see that a part on the trailing edge of the airfoil hasbeen hinged or bent upwards. In fact the bent part of the airfoil is not allalong the edge, but only a fraction of the width of the edge, like the tab youcan see on the rudder. The result of this tab being hinged upwards (and held

3.7 Secondary control surfaces 37
Figure 3.4: The effect of moving a surface on the elevator airfoil upward is a downwardforce on the airfoil.
in place) is the deflection of some of the incoming air upwards, creatinga downward force on the elevator airfoil. This force pushes the elevatordown (not shown in the figure). In fact, this is very similar to our earlierdescription of the way the stick and elevator work together. The differencenow is that the tab is located on the elevator, so if the tab is moved upwards,the resulting air pressure pushes the elevator down. The result of this is thesame as if we had pushed forward on the stick: a decrease in the angle ofattack.
The actual trim tabs of the primary control surfaces are not typicallybent, but rather pivot around a hinge in positions controlled by a mechanicalsystem, possibly by hydraulics. The advantage of this mechanical system isobvious: we can control the position of the primary control surfaces withouthaving to manually put pressure on the stick. We already know that theelevator is used to control the angle of attack of the airplane. This meansthat an airplane is trimmed for angle of attack. If you trim an airplane andthen leave it alone, it will continue to fly at a certain angle of attack. This isalso true of airplanes without trim mechanisms, they just aren’t adjustable.This is something that you should never forget. Use the elevator trim to setthe angle of attack. Trim for angle of attack.
Trim for angle of attack. Airspeed depends on angle of attack (andload factor).
Why don’t we try a simple experiment to illustrate. Use the QuickMission Builder (see section 9.8) to hop into the cockpit of your favorite

3.7 Secondary control surfaces 38
fighter. For this experiment you probably won’t want one whose variometeris blocked by the stick (like the MiG). Set it for any altitude your heart de-sires, but give yourself at least 500 m. Set the throttle to about 50%, and tryto fly straight ahead without gaining or losing altitude. By default, Ctrl+UpArrow will provide positive elevator trim (like pushing on the stick), andCtrl+Down Arrow negative (pulling). You probably will have to use someslight forward stick pressure, so fool with small trim inputs until you are sat-isfied that you are flying pretty level. Get it to where you don’t need to putany forward or backward pressure on the stick, maybe just a little rudderand/or side pressure on the stick. Steady? Good, the airplane is now flyingat its current trim speed. Get your view to where you can see the stick,the airspeed indicator and altimeter, the variometer and the horizon out thewindscreen. Now give in a small amount of positive elevator trim, only 2taps on the keyboard. If you watch the stick, you’ll notice that it moved backslightly but immediately. Some other things will follow: the nose will go up,the plane will start to climb, and the airspeed will drop. After the plane hasmore or less stopped or slowed its climb, check your airspeed and give it twomore clicks up. After it stops or slows its climb again, check your airspeedand give it still two more clicks up. You’ll have noticed that your airspeedhas significantly dropped. Maintain this airspeed for a while, although theaircraft may want to lower its nose and pick back up some of the airspeed,then raise the nose again and lose some of the airspeed, and so on. Aftera little while, start giving clicks back down if you like and watch your nosedrop and airspeed start to climb.
You can try variations of this experiment at different throttle settings. Setthe throttle and settle into level flight or a steady rate of climb or descent,then change the trim.
To understand these experiments more fully you can read about phugoidoscillations in Denker’s online book. There it is explained why the aircrafttends to change both airspeed and altitude in an alternating pattern. Themore dramatic your change in trim, the stronger those oscillations will be.
Another good trim experiment is described in [8]: “If you want to make atemporary increase in angle of attack, just raise the nose by applying a littleback pressure on the yoke [stick]. When you reach the new pitch attitude,you can release most of the pressure, and for the first few moments theairplane will maintain the new pitch attitude. Then, as it slows down, youwill need to maintain progressively more back pressure in order to maintainthe new pitch attitude (and new angle of attack). After a few seconds thingswill stabilize at a new pitch attitude, a new angle of attack, and a newairspeed. At this point, if you release the back pressure, the airplane will

3.7 Secondary control surfaces 39
want to drop its nose so it can return to its trimmed angle of attack.”Rudder trim works the same way but for the yaw axis. If you did the
experiment in a fighter that has rudder trim, you could have set a few clicksof right or left rudder trim (depending on the direction of propeller rota-tion) instead of holding the rudder in place manually with the rudder ped-als (or joystick twisting action). Using rudder trim compensates for thatever-present yaw.
Aileron trim doesn’t have much use in normal flight, but can come inhandy if a few holes get punched into one of your wings. Applying ailerontrim can help hold your plane level without you having to put in constantstick side pressure. If you think this is annoying in IL-2 , just imagine theforce it required in a real plane.
The thing about trim is that it’s really necessary, and you need to beconcerned about it all the time. Every time you change power settings youneed to think about adjusting your trim for angle of attack. As your airspeedchanges, the forces on your rudder change and, if you are fortunate enoughto have it, you need to readjust yaw with rudder trim. Changes in loadfactor require retrimming, such as after dropping external fuel tanks or apayload. Even in cruise you have to trim to adjust for changes in the fuelload (check this). It is not necessary or practical to mention every instancehere; trim procedures will continue to surface in further discussions.
It is important to realize that the primary control surfaces and the sec-ondary control surfaces work together. Trim is an extension of stick or rud-der input. To make long-term changes, you should first use the primarycontrols. Taking the example of elevator control again, you should initiatea change in angle of attack with the stick until you get the angle you want,and then relieve the pressure needed on the stick with trim input.
Initiate surface control changes with the stick or rudder pedals, thentrim to relieve the pressure.
Note that stick forces are modeled in IL-2 . The force on the elevatorcaused by trim will hold the elevator in place, and the virtual stick (notyour joystick) will stay in its new position. This becomes important in laterdiscussions, because trim can be used to overcome the stick forces that limitthe effect of your joystick input.
It has been hinted at that not all aircraft have trim on all surfaces. More Some planes donot have trim forall surfaces.
accurately, their trim is not pilot-adjustable, but historically was performedby the ground crew before flight. German fighters—specifically the Bf 109and FW 190 series—have elevator trim only, no rudder or aileron trim. Your

3.7 Secondary control surfaces 40
right leg will become larger than your left after all those long missions hold-ing right rudder. The Polikarpov I-16 and some others have no trim on anyof their control surfaces.
3.7.3 Flaps
In the early days of aviation, aircraft developers needed a way to stabilizeaircraft at low speeds, as it was common for them to go into a spin. A slotsystem was developed by Handley Page, and this led to the development offlaps on the wings, which when extended provided extra lift and increaseddrag to allow a lower landing and take-off speed. This feature came tobe applied more and more as they began to build planes that were fasterand heavier—a way was needed to allow heavy aircraft to safely fly slowlyenough to land. By the second World War, flaps had become a standardfeature.
This means that when you deploy flaps and other high-lift devices,9 youcan expect two things to happen: the aircraft will get a boost in lift at theprice of increased drag. It is important to think not just of lift or drag,but to recall that there is a ratio of lift to drag—textbooks talk about thecoefficient of lift and coefficient of drag. Interestingly enough, these bothdepend mostly on angle of attack, but of course extending flaps alters bothdrastically. The extra drag means that you will either slow down or haveto decrease the rate of climb to maintain airspeed. This is also a benefit ofcourse. The extra lift means that you can fly more slowly without reducingthe rate of climb (or increasing the rate of descent, as you like). The liftgained also means you can climb more steeply. (See section 4.3 for moreinformation on how flaps affect climb.) Alternatively, after deploying flapsyou can increase thrust if the engine permits to maintain airspeed and/orrate of climb.
Flaps thus afford increased stability at lower airspeeds and can also beused to brake the aircraft. Since they produce a significant amount of drag,there is tremendous pressure on the flaps when they are deployed in flight.If you try to deploy them at high speeds or gain too much speed with themdeployed, things will break. Often what happens is the flaps get stuck intheir current position. As a result, each aircraft has a maximum speed forthe deployment of flaps. Unfortunately, for the time being you are left to
9High-lift devices include flaps, slats and slots. To find out more than the introductorycomments here, have a look at Andy Bush’s highly informative article, Secondary FlightControls – Flaps [11]. Many of these device designs are present in IL-2 , but they are referredto collectively as flaps for simplicity.

3.7 Secondary control surfaces 41
guess what that speed is for each aircraft, but with reasonable precaution itshould not pose a problem.
The flaps on each IL-2 aircraft have four different default positions, andthey can be deployed in two different ways. One way is to switch betweenthe positions with keys: pressing V moves the flaps down in increments andF moves them back up. The four default positions are closed, combat, take- Flap positions
off and landing. These positions resemble the actual deployment positionsof the aircraft and are sufficient for almost any situation. The use of theindividual positions will be discussed later in their appropriate contexts.Should you find a reason for it the second way is to assign a slider control tothe flaps in the HOTAS setup (see section 9.2.2). This provides a finer degreeof control over flap positions. Looking at the aircraft from an external viewshows the various flap positions.

CHAPTER 4
Flight
Maintain thine airspeed, lest the ground arise and smite thee.
— Aviation proverb
Stop for a moment to consider all that you’ve reviewed so far in the lastchapter: how to tell what is going on from the instruments and gauges;starting her up and getting in position for take-off, all kinds of theory abouthow to control airspeed, and about control surfaces. You’ll surely want toactually go for a ride now. There are still a few topics that might interestyou, such as how to actually take off and land, change direction and altitudewhile safely staying up in the air. Then it’s a cinch to find your way aroundthe sky and gently become reacquainted with the tarmac.1
4.1 Stalls
There’s an aviation adage that says take-offs are optional, and landings are,sooner or later, mandatory. What goes up must come down. This is, in fact,usually the scariest aspect of flight. It won’t surprise you then that thereare basically two ways to land: the way you walk away from (controlledlanding) and the way you don’t (bad landing). One of the big factors thatcommonly determines which of these two types of landings you end up with
1It’s true. In IL-2 the weak of heart can choose to start and finish in the air and havenothing to do with the ground except under tragic circumstances.

4.1 Stalls 43
is called a stall, and that’s why it is being covered first. As a combat pilot, youwill have to worry about other factors that influence your type of landingas well, such as bullets, flak and collisions, but we’ll worry about those inother chapters. Another important phenomenon that probably causes morevirtual deaths than enemy fire and is directly related to stalling is the spin,which really is a special kind of stall, and is covered in section 4.9. Rightnow it’s important to understand what a stall is. It will prove very useful inlater discussions about take-off, landing, and combat maneuvers.
Let’s again picture an aircraft in level flight at cruise speed, as in sec-tion 3.6 about angle of attack. Suppose that the pilot, whose name is Amelia,is feeling adventurous and would like to find out just how slow her aircraftcan fly while maintaining altitude. Having read about AoA, she reducesthrottle and, in order to prevent the aircraft from descending, pulls back onthe stick a bit. Pulling on the stick increases the pitch, and since the aircraftis still not changing altitude the the angle of attack increases. The result-ing increase in lift is enough to prevent the aircraft from descending, andthe corresponding increase in drag slows the aircraft. Amelia dials in somenose-up trim, and then decides to close the throttle considerably. To keepthe aircraft level, she’ll now need to continue to pull back on the stick. TheAoA thus increases, increasing lift and drag. In fact, the forward view is nowreduced because of the nose-up attitude. She manages to maintain altitude,and sees that the aircraft has slowed to a crawl. What’s more, she hearsa rushing sound, feels quite a bit of vibration in the stick, and notices thatthe controls have gone “mushy,” not responding very easily to her controlinputs.
Amelia is not satisfied. She knows that she can fly slower. She trims out,reduces the throttle still further, and continues to add back pressure. All ofa sudden, the aircraft gets an idea of its own, and drops its nose sharply.What happened?
Recall that the angle of attack is the angle between the chord of thewing and the direction of the relative wind. It produces lift in large partdue to the way the air flows around it. As the AoA increases, the air on theupper part of the wing can no longer flow smoothly, and begins to detachitself from the wing and flow turbulently. This results in less lift gain thannormal and more drag, and only gets worse with increasing AoA. Beyond acertain AoA, an increase in AoA actually results in a reduction of lift and asignificant increase in drag. This AoA is called the critical angle of attack.Nothing magical happens at this angle, but once the wings get up into thisregion of AoA, a sudden reduction of lift may occur, causing the weight ofthe aircraft to drop the nose—as long as the center of mass is in front of the

4.1 Stalls 44
center of lift!2
For our purposes, the stall is the condition that the wings are in, andnot the dropping of the nose, which is the reaction of the aircraft to thestalled condition of the wings. The nose drop can rightly be called a stall,but other reactions can also result from a stalled condition as well. If youtry to repeat Amelia’s experiment in IL-2 , you’ll notice that it doesn’t happenthe way it’s been described here. In that experiment, the wings are at equalangles of attack, and stall together. If one wing is at a higher AoA and stallsbefore the other, which may occur if the aircraft is yawing, there is wind,in a bank angle, and so on, then the wings introduce a rolling motion ontheir own. At the critical angle of attack, roll stability begins to disappear,meaning that the wings may continue or even accelerate on their own. Theresult is that the stalled wing drops. For reasons we won’t speculate on here,the IL-2 flight model nearly always drops a wing in a stall instead of or inaddition to dropping the nose; it seems nearly impossible to get the nose todrop straight on. This is again mentioned in section 4.9 in the footnote onpage 81.
So the lesson here is that Amelia cannot fly just as slow as she wants,because her aircraft will stall out, right? No! The lesson is that at highangles of attack, the wings will actually start to lose lift instead of gainingit. This is not simply due to low airspeed, but rather directly due to angle ofattack. Note that well:
Stall is a function of angle of attack, and not of airspeed.
Airspeed can play a role, insofar as it affects angle of attack: because ofthe reduced air flow, lower airspeeds require a greater AoA to produce thesame amount of lift as at higher airspeeds. You can continue to “fly in astall” at high angles of attack greater than the critical angle,3 but you can-not continue to fly at airspeeds lower than the stall speed without giving upaltitude. Beyond the critical AoA no additional lift is available to maintainthe vertical equilibrium (fighting gravity), so the aircraft will begin to de-scend or, if loss of lift is dramatic, accelerate downward, and control of theairplane can even be lost. Sound scary? It can be without enough altitudeto recover, and at any rate it’s not usually exactly productive in a combatsituation.
2This is actually important in aircraft design, otherwise it becomes quite difficult to re-cover from a stall.
3Although this becomes nearly impossible for mere mortals.

4.2 Energy 45
The implication that stalls are a function of AoA is that stalls can occurat any airspeed. If in a high-speed turn the pilot pushes the wings into asufficiently high angle of attack, the aircraft will stall just as at lower speeds,with the exception that the stall will usually be accompanied by a muchmore violent wing/nose drop. This can occur in any position and duringhigh-speed maneuvers. Fortunately, pilot strength is often insufficient athigh speeds to pull the stick hard enough to drive the wings into a stall, butthis is no guarantee. Due to wing and aircraft design, the way the wingsare loaded, the stall characteristic of each plane is different. Some aircraftare easier to stall than others, some react less violently, and some are easierto recover than others. It is very beneficial to thoroughly acquaint yourselfwith the high- and low-speed stall characteristics of each aircraft that youfly into combat.
Logically, stall recovery always involves allowing the wings to unstall.Often it is sufficient to simply relax back pressure on the stick to preventa nose/wing drop or to unstall the wings. If back pressure is not relaxedin a high-speed stall, a spin is likely to develop (see section 4.9). Deepstalls can be difficult to recover. Stall recovery procedures typically involvereducing throttle and neutralizing the stick and rudder. The aircraft shouldbe allowed to build up speed in the nose-down attitude before recovering.Trying to recover too quickly can result in a second stall. If recovering atcritically low altitude where the aircraft cannot be allowed to simply dive,be very attentive during the pullout to indications of a stall: the buffetingsound and, if you have a force-feedback stick, vibration.
4.2 Energy
Have you ever read something to the effect of, “When you’re fighting, you’vegot to keep your E.” E stands for energy, but what does energy do anyway?As it turns out, energy doesn’t do anything, energy is. You can think of itas something your aircraft has. Understanding the energy your aircraft hasand in what forms is key to controlling the aircraft.
What is our coveted friend E in the context of flight? Of all the kinds ofenergy that are out there, aviation generally involves four: kinetic, potential,chemical and what we could call dissipated energy. Kinetic energy is theenergy an object has when it is moving, such as a ball thrown through theair. It depends on the mass and speed of the object. If you want to calculateit, it is Ek = 1
2mv2, where m is the mass and v is the speed. (Don’t panic ifyou hate math.) Potential energy is the energy an object gets from gravity.

4.3 Changing altitude and airspeed 46
It is also simple to calculate: Ep = mgh, where m is again the mass, gthe acceleration due to gravity (9.8 m/s downward), and h the altitude, orchange in altitude if you want to calculate the difference in energy betweenaltitudes. Chemical energy is the energy stored in the fuel. It is a littlemore complicated to calculate, but you could make a conversion factor as afunction of altitude and mass of the aircraft and the volume of fuel burned[8]. Dissipated energy is the energy the aircraft gives to the air it movesthrough. You could think of this as energy lost as heat. It too is morecomplicated to calculate . . . but then again, we’re not here to calculate, arewe? All that we need is the understanding that our aircraft always has anenergy state, and that it is necessary for us to be aware of what that energystate is and how to exchange between the types of energy.
Of course you can and will change the energy states. An often heardanalogy is that energy is like money in a bank account. You can depositand withdraw, and even if you don’t always need to carefully calculate, youhave to keep your balance up. As with your bank account, you normallywant to keep your energy as high as possible. Altitude and airspeed are likehaving money in the bank and fuel in the tank is like money in savings, butin all situations you have to pay for drag, like paying for rent. Some aircrafthave to pay a higher rent than others. You as pilot can convert between thedifferent forms of energy. You can trade altitude for airspeed and vice-versaquickly, and you can use fuel to gain altitude, airspeed and pay the rent.Energy is better conserved when you do this smartly.
Energy is also related to but different from something else you’ve alreadyheard of—power. Remember that the throttle controls power? Power is,quite simply, the rate at which energy is used. A 60 Watt light bulb is onethat burns 60 Joules per second.4 So power is energy over a period of time.When we say power, we’re talking about how fast we are gaining, losingor converting energy. When we speak of an engine’s horsepower, we areindicating how fast that engine, with the help of the propeller, can overcomethe aircraft’s inertia to convert fuel into the other forms of energy, namelyairspeed and altitude. But let’s not get into inertia.
4.3 Changing altitude and airspeed
Climbing, descending, speeding up and slowing down are all a matter ofmanaging your account at the First United Energy Bank—you’ll be trading
4A Joule is a standard measure of energy, just like a second is standard measure of time,or 1Watt = 1 Joule/ second.

4.3 Changing altitude and airspeed 47
in one form of energy to gain another, and paying the rent (what a drag).In fact this is so related to energy, it is really an extension of the previoussection. And since the airplane changes energy states at a given rate, we aretalking about the power involved.
This has already been emphasized in section 3.6, but it is important torealize that you have to work with the stick and throttle together to con-trol your airspeed and rate of climb or descent. The concepts of angle ofattack, energy and power come to our aid here. To make controlled changesin altitude you will have to watch your airspeed. To make changes in yourairspeed, you will have to watch that you don’t unintentionally change youraltitude. To climb or descend at a given rate you have to watch your air-speed, which you will of course control with angle of attack (i.e., stick andtrim) and throttle setting.
The idea of trimming for angle of attack, which essentially determinesairspeed,5 is very important to keep in mind when making changes in air-speed and altitude. We have gotten out of our minds now the concept thatthe stick is the up/down control for the airplane, and that the throttle con-trols airspeed. This misconception is due to the fact that it seems to workin most conditions. Actually, it would also be wrong to the the other wayaround—that the throttle controls up/down and the stick controls airspeed.Controlling altitude and airspeed requires manipulation of both.
In this sense, the pilot has to be aware that he can’t generally follow afixed set of rules for changing altitude and airspeed, neither for the stick northe throttle. For example, being high and slow is very different from beinglow and slow: you wouldn’t make the same adjustments in one situation asthe other. This means that a rule such as, “If you are slow, do this,” cannotalways be right. We’ll talk about this some more in the section on the powercurve.
To get a feel for how changes in airspeed and altitude can “normally” bemade, let’s now look at a practical situation. You are flying along en routeto your mission at 2500 m and 280 kph, when the change in waypoints forsome reason only your commanding officer understands calls for a changeof heading and an altitude of 2800 m. For simplicity let’s say that you turnfirst and then climb. Once on the new heading you will need to climb. Whatwill you do?
There are a couple of ways you can climb to the new altitude:
5Angle of attack determines airspeed together with load factor, which includes bombs,ammunition and fuel, and more significantly the positive G force during turning maneuvers.However, for our present discussion we will not concern ourselves with load factor.

4.3 Changing altitude and airspeed 48
• You can pull back on the stick and hold it there. In the describedsituation you are in cruise and have enough airspeed to trade some ofit for altitude. This is called a zoom climb. So you pull back on thestick until you have climbed 300 m, but now realize that your airspeedis pretty low. You will have to throttle up to get back to the desiredairspeed. If you don’t, your airplane is unlikely to maintain the newaltitude.
• You can open the throttle up. As we found out in section 3.6, the planewill start to climb without increasing its airspeed very much. Once youhave the new altitude you can reduce throttle and resume level flight.Don’t think you won’t have to touch your control stick, though.
Which is better? In this example situation the first possibility could bringyour airspeed dangerously low. What if you had had to climb to an evenhigher altitude? It’s pretty clear that you need more throttle to climb. Hadyou already been flying with full power and needed to gain altitude, thenthe first option, that of pulling back the stick, would be the only one open toyou. However, under normal cruise conditions you are not at full power andcan increase your power setting to climb.6 It would be a great idea to varythe angle of attack with the stick (and trim out to relieve pressure on thestick) to achieve the airspeed desired for climbing. You might or might notalready have guessed it, but the airspeed is linked to the way the airplaneclimbs.
If you choose the second method, then to climb faster (more verticalmeters gained per second), you could change the airspeed to the airspeedcloser to the maximum rate of climb. This airspeed is called Vy, and as itturns out is just a little bit slower than optimal cruise speed. (Don’t worry,you haven’t missed any discussion about how airspeed affects climb rate.)If in the example you were cruising at 340 kph and the airspeed for optimalrate of climb were 260 kph, then you might actually pull the nose ever soslightly up, add power and settle into 260 kph, making small pitch adjust-ments with the stick and trim to keep the airspeed at 260 kph.
Let’s say that you’re flying alone and have noticed you are about to hit acloud you’d prefer to fly over. You don’t have enough room left to climb atoptimal climb rate. Instead you need to gain as much altitude in as short adistance as possible. As before, pour on the power but steepen the climb. Todo this hold the stick back even more than before and trim off, until you in a
6Throughout this discussion throttle is spoken of, but rpm may need to be changed withthrottle if the propeller system is being manipulated for cruise settings.

4.3 Changing altitude and airspeed 49
steady climb at an airspeed that corresponds to the optimal gain of verticalmeters per horizontal meter. This airspeed is called Vx and correspondsto the maximum climb angle. This won’t get you up as fast as optimalclimb rate, but gives you a better chance of getting over that cloud withthe distance you have.
Let’s briefly revisit trying to change altitude using stick alone. In a zoomclimb (trading airspeed for altitude), the steeper the pitch of the climbthe faster you’ll trade airspeed for altitude, the limit being a purely verti-cal climb. Make sure you understand the distinction from a steady climb.You can trade in excess airspeed for more altitude in a zoom climb. How-ever, if you are maintaining airspeed in a steady climb, then setting a higherpitch for a lower airspeed will help you climb more steeply although notmore quickly. Of course there is a limit to the steepness and lower airspeed,which makes sense. At some airspeed you won’t be flying anymore.
In any case, whether you zoom climb or climb with a steady speed, beit quickly or steeply, you should use the stick and throttle to start levelingoff before you reach the new altitude to prevent overshooting it. Of courseyou’ll need to close the throttle if you want to resume your previous cruisespeed. It’s worth noting that if you simply reset the throttle to the cruisesetting while leveling off you will need a lot of forward stick pressure andit might take a while for the aircraft to settle into the cruise speed. Insteadyou can close the throttle further than the cruise setting and let the nosedrop in order to make the change in climb rate more quickly with less stickpressure, then open the throttle as you level off to resume cruise speed atyour new altitude.
If the climb is long enough to warrant using trim (to relieve pressure onthe stick and hold the climb steady; your 300 m climb might not be enoughto bother ), be sure to trim the nose back down for cruise. The reason youneed stick control in all cases is explained in Denker’s section on phugoidoscillations.
Examples are well and good, but it is more beneficial to understandwhat is going on, and how to expect the aircraft to react in different situ-ations. We’ll have to bring drag and airspeed into the picture, and look atclassic ground-school material. The following discussion is adapted fromsection 1.2.5 and chapter 7 of Denker’s See How It Flies. His online bookprovides a much more thorough explanation and many more concepts.

4.3 Changing altitude and airspeed 50
airspeed
po
we
rre
quire
d(h
p)
Figure 4.1: The power curve illustrates the power associated with airspeed. This poweris related to drag and can be expressed in terms of propeller power output.
4.3.1 The power curve
So far in our discussion about changing altitude and airspeed we’ve consid-ered an example where we are travelling at 280 kph. In the warbirds you’llbe flying this is well above stall speed, though not so high that you don’thave to pay some attention. Lose 100 kph and you’ll have to start beingpretty careful. The airspeed at which you are flying places a requirement onthe amount of power you need to maintain altitude, and this changes theway that you’ll want to make adjustments to airspeed and altitude.
How much engine power do you need to fly level at 280 kph? Whatabout 380 kph, and what about 180 kph? What effect does airspeed haveon climbing? The best climb rate and cruise speed, the amount of powerneeded to fly at faster speeds—all of these are of course related to movingthrough the air and giving away energy every second. In other words, youraircraft is dissipating power due to drag, paying the rent. The amount ofrent we have to pay depends on airspeed, but not in a simple way. I’d bet itmakes sense to you that flying faster requires more power from your engine,because the force of drag is higher. As you slow the aircraft, you need lesspower to maintain level flight. But if you continue slowing your aircraftdown, you’ll begin to need more power again! To support its weight at lowspeeds, the aircraft needs a high angle of attack, and the associated force ofdrag is also high.
Figure 4.3.1(a) illustrates the amount of power at various airspeeds thisis required of the propeller to keep the aircraft in question in level flight.Because it shows the power required, this curve is called the power curve;we could also call it the power-required curve. Notice that the curve goesup both for high and low airspeeds. If you keep in mind that the curverepresents the power required to maintain level flight, it also becomes clearthat at any airspeed there is some minimal input required from the engine tooffset drag. (Actually, a significant updraft could also provide the requiredpower.) Essentially, this figure indicates for us how much drag is present
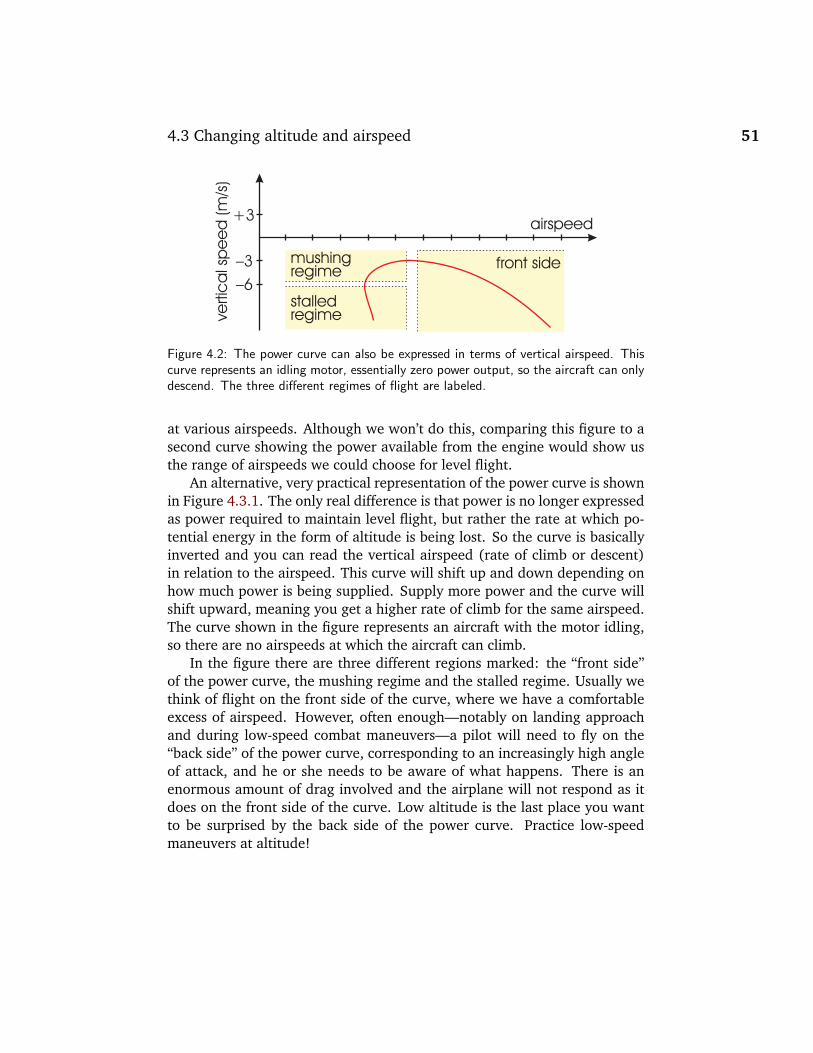
4.3 Changing altitude and airspeed 51
airspeed
front sidemushingregime
stalledregimev
ertic
als
pe
ed
(m/s
)+3
–3
–6
Figure 4.2: The power curve can also be expressed in terms of vertical airspeed. Thiscurve represents an idling motor, essentially zero power output, so the aircraft can onlydescend. The three different regimes of flight are labeled.
at various airspeeds. Although we won’t do this, comparing this figure to asecond curve showing the power available from the engine would show usthe range of airspeeds we could choose for level flight.
An alternative, very practical representation of the power curve is shownin Figure 4.3.1. The only real difference is that power is no longer expressedas power required to maintain level flight, but rather the rate at which po-tential energy in the form of altitude is being lost. So the curve is basicallyinverted and you can read the vertical airspeed (rate of climb or descent)in relation to the airspeed. This curve will shift up and down depending onhow much power is being supplied. Supply more power and the curve willshift upward, meaning you get a higher rate of climb for the same airspeed.The curve shown in the figure represents an aircraft with the motor idling,so there are no airspeeds at which the aircraft can climb.
In the figure there are three different regions marked: the “front side”of the power curve, the mushing regime and the stalled regime. Usually wethink of flight on the front side of the curve, where we have a comfortableexcess of airspeed. However, often enough—notably on landing approachand during low-speed combat maneuvers—a pilot will need to fly on the“back side” of the power curve, corresponding to an increasingly high angleof attack, and he or she needs to be aware of what happens. There is anenormous amount of drag involved and the airplane will not respond as itdoes on the front side of the curve. Low altitude is the last place you wantto be surprised by the back side of the power curve. Practice low-speedmaneuvers at altitude!

4.3 Changing altitude and airspeed 52
4.3.2 Applying the power curve
At the top of the power curve, defining the boundary between the the frontand back sides of the curve, there is an airspeed where drag on the aircraftis at a minimum. It is clear that at this airspeed you will get the minimumrate of descent, or minimum sink—after all, the engine is at idle. This willgive you your best endurance glide. If we add power from the prop, thisairspeed will provide the maximum climb rate. As mentioned earlier in thesection, this airspeed is called Vy. A typical value for our warbirds is 160knots, or about 250–260 kph. The actual value of Vy can be lower or higherdepending on the drag on the aircraft, including the airframe and especiallythe wings, which are what determine the shape of the power curve. If youhave the flaps lowered you will never get the best rate of climb, because youhave introduced too much drag. Also note that the curve is fairly flat on top.If you are off Vy by just a few kph, your climb rate won’t vary drastically.
Think back to climbing over that cloud, or clearing an obstacle at theend of the runway. The power curve also helps us understand the best angleof climb, Vx. If you slow down just a bit from Vy, you will not climb at thebest rate, but your slower forward airspeed will help get you higher overa shorter distance. If you slow down too much though, you can quicklyfind yourself not getting much climbing done and approaching the stalledregime. Lowering flaps one notch might well help you get a better angle ofclimb.
The same principle applies of course for descent. If you are too highclose the airfield with the intention to land, it is not at all necessary tomake a nuisance of yourself by diving and dangerously building up speedwhere there is air traffic. Let’s assume you are on approach and find yourselftoo high—on approach you certainly don’t want to dive. The best way toincrease your descent before getting too close to the airfield is to increasedrag without increasing airspeed. Let’s suppose you’re already at idle. Ifyou’re on approach and too high, you might already have extended yourgear and flaps. Nosing over would help increase your rate of descent, butit will also increase airspeed (and possibly damage your flaps). What youcan do is put yourself at a lower airspeed, where there is more drag. Keepthe throttle at idle and the nose up, allowing your airspeed to fall into themushing regime while staying above the stalled regime. This will increaseyour rate of descent.

4.3 Changing altitude and airspeed 53
4.3.3 Low and slow
Thinking of this behavior in terms of drag also helps us understand why flapsare used for take-off and landing but not for climbing. We need to land atlow speed, and at take-off we’ll take all the speed we can get, althoughit’s usually not very much. So in these inevitable situations we are in thetypically fearful position of being on the back side of the power curve nearthe ground. This is where flaps can come in handy. Although they increasedrag, flaps also lower the stalling speed and permit stabler flight at lowerairspeeds. When taking off, the landing flap configuration produces toomuch drag for climbing, so we raise the flaps a bit to decrease drag. If theaircraft is not heavily loaded and the runway long enough to build up speed,flaps are often not required at all.
Even with flaps, being at low airspeed and low altitude carries an inher-ent potential danger: a loss of airspeed is difficult to overcome because youhave no spare altitude to cash in to get more airspeed. If the airspeed isallowed to drop into the stalling regime, it’s entirely possible to get into asituation where a snap roll, spin or unrecoverable roll results in a crash. Thishas to be carefully guarded against, especially during take-off and landingprocedures, when the pilot has a high workload.
The key to staying safe at low altitudes is to know the safe speeds atwhich to fly, and to avoid action that will cause the speed to get dangerouslylow. Knowing the safe speed includes thinking about flap configuration andhow heavily the aircraft is loaded. A typical mistake is to pull back on thestick in order to increase climb on take-off or to reduce rate of descent inthe landing approach. This will be discussed a bit more in the appropriatesections.
Stalls can occur at any speed, but are more likely at low speeds. Steepturns will bring the inside wing into a stall condition at higher speeds thanstraight-on flight, so be careful with these at low speeds. It is especiallyimportant to make coordinated turns at low altitude. You can get away withignoring the rudder at cruise speeds, but the yaw component in improperlycoordinated turns at low speeds help to create spin or snap-roll conditions.Furthermore, it can be dangerous to make quick throttle changes at lowspeeds and altitudes, because the sudden adverse torque can cause a stall.However, this does not seem to be a great danger in IL-2 .

4.4 Take-off 54
4.4 Take-off
Under certain circumstances, taking off is the easiest thing that there is todo in an airplane. Let’s get started. Your commander has ordered you toget out and try some basic flight maneuvers. It’s a still and sunny day andthe long, paved runway shimmers outside the windscreen. The engine isstarted up and warm, and you’ve just had breakfast with coffee and arefeeling good. You’ve completed your pre-flight checklist, checked all yourflight surfaces, and oriented yourself on the runway. There are no obstaclesaround such as trees or raises in elevation. Now what do you have to do?Give it throttle, build up speed, use the rudder to keep yourself centered,and once an acceptable ground speed is reached, pull back on the stick alittle to bring the plane into a gentle climb. That’s it. Well, almost. Itwouldn’t do to have too short of a section on such an important and thrillingtopic as take-off now, would it?
4.4.1 The roll-out
Let’s back up to where you were sitting on the runway and cleared to pro-ceed. Unless you need to get as much speed in as short a distance aspossible—say you are on a short strip or have a hill facing you—you canrelease the brakes and start applying power. Start the plane rolling bysmoothly increasing the throttle. At a certain engine power the plane startsto roll out, and this is different for different aircraft. Once rolling, continuebringing the throttle control over several seconds to full throttle.
As you advance the throttle, you will probably notice (hopefully in time)that your plane doesn’t want to roll straight ahead, just as it does duringtaxiing. Remember that this side-to-side turning movement you’ve come tolearn is collectively called ground looping. On take-off is principally due tohelical propwash and, at the point where the plane’s tail raises, gyroscopicprecession.7 Smoothly advancing the throttle greatly helps to reduce severeground looping. However, the airplane will want to turn, so you must userudder to keep the airplane straight on the roll-out. (The same problemoccurs during a landing roll-out, and the same procedure applies to correctit.) To go straight you need to hold a certain amount of rudder. The fasteryou go, the more rudder authority you have and the less you need to holdthe rudder down. Now if the plane starts heading too far to one side, usemore, but be careful not to overcorrect; you need to use lots of rudder on
7P-factor is negligible even in taildraggers.

4.4 Take-off 55
the ground, but if you do it too long you’ll have the same problem in a newdirection. Learn to anticipate what is going to happen.
After a stretch the plane really starts picking up speed. Once you reacha certain speed, maybe around 100 kph, the wings produce enough lift tobring the tail up8—we clever pilots notice this because the nose comesdown. In some planes, such as the Bf 109 and the I-16, you want to getthe tail up as early as possible by pushing forward on the stick as you beginto roll out. Don’t forget to relax that forward pressure as you pick up speed,because the tail will start to stay up on its own, and you don’t want to noseover. Before too long, the plane will have reached a speed, typically around160–180 kph, at which it can sustain its weight at a certain angle of attack9 once the nose is brought up slightly. How long does this take, then? Untilit’s ready, and not before—learn the airspeed that has to be reached beforeyou can pull back on the stick. More on this in the next section.
The best way to learn the roll-out is to practice slow take-offs on long,paved airstrips to allow for long roll-outs. Advance the throttle slowly andpractice holding the aircraft straight on, and let the tail come off the groundgradually (in taildraggers). As you get more experience with your feet (as-suming you have rudder pedals) you can advance the throttle more aggres-sively, get the tail up more quickly, shorten your take-off run, and use softfields.
4.4.2 Rotation and climbing
Taking off is little other than initiating a climb from level flight, so expect toapply the stuff we learned in the last section about climbing. We’ve alreadycovered the first task of rolling down the runway at high power to build upairspeed beyond what will allow you to start climbing. It is imperative tounderstand what a critical role airspeed plays. As has been emphasized, youare on the back side of the power curve at low altitude. Once the aircraft isrolling with enough speed to get airborne, you can back a small amount onthe stick to increase the angle of attack and provide more lift. This makesthe slight transition from ground airspeed to a climbing attitude. This actof lifting the nose in order to initiate a climb is called “rotation.” Actually,once you have reached take-off speed a properly trimmed airplane will takeitself off without further pilot input. All you are doing with rotation is touse the extra airspeed you have built up to make the transition to a climb
8You P-39 jocks just pretend you didn’t read that.9about twelve degrees’ worth [8]

4.4 Take-off 56
when you want. What you do not want to do is initiate a zoom climb! Apowerful aircraft with an excess of airspeed can literally leap into the air,but only experienced pilots should undertake such maneuvers. You can onlysuccessfully zoom climb when you have excess airspeed, and normally thereis precious little of that just during take-off, so use back pressure on the stickwith moderation. Pulling back too hard will dump your airspeed, bringingon a stalled condition. You’re likely to find yourself unable to recover beforeyou return to your original altitude—the ground!
Powerful and light fighters can do acrobatics quickly after take-off, butdon’t get ahead of yourself. After initially getting off the ground it is goodpractice to accelerate to a good climbing airspeed somewhere in the area ofVy before you begin climbing further (see section 4.3). If you don’t know thisairspeed for your aircraft, a good guess is 260–300 kph. If heavily loaded,Vy will be higher. The angle of attack corresponding to Vy will keep theairplane at the best climb rate and allow the excess engine power to betranslated into gained altitude. Once you have altitude and are in a steadyclimb, you can power back to climb power, unless you are scrambling or areone of those pilots who flies everywhere on full throttle.
The aircraft in IL-2 are more or less trimmed when you start a flightsession to maintain a good climbing speed, so if you don’t retrim you needlittle stick input to get the right speed once you have achieved it and arein the climb. Many inexperienced pilots want to just get up in the air asfast as they can after taking off and keep their nose too high. Even if theyare not as low as stall speed and are climbing, their high attitude keeps theairspeed down and they stay on the back side of the power curve. Allowyour airspeed to build up. The only exception is when you need a highclimb angle to clear any obstacles.
4.4.3 Use of flaps
The airfields in IL-2 are generously long, and under many conditions flapsare not required for take-off. However, situations might arise in which youonly have a limited length of the strip available to you, the field is soft orbumpy, or you have to clear an obstacle at the end of the runway. Load factoralso plays a big role on take-off, meaning when you are heavily laden withbombs, fuel, ammo, your ground crew (when evacuating Stalingrad), etc. Inall of these situations, it is advantageous to deploy flaps to help stabilize theaircraft at lower speeds. This means that you can rotate (lift the nose) at alower airspeed, so you need less runway to get airborne. The flaps will alsoincrease Vx, so that you get higher in less horizontal distance. Yet another

4.5 Level flight 57
reason you might use flaps, even on a long smooth runway, is to improveforward visibility. Since the flaps change the angle of incidence, you get therequired angle of attack for taking off at a lower pitch angle, and can seebetter faster. This is especially true for taildraggers.
There are a couple of important things to observe when using flaps ontake-off. First of all, don’t forget to raise them at some point! You’ll notice ifyou don’t, because you won’t be able to climb or fly very fast. And if you domanage to fly fast, you might jam the flaps. But even more important is toavoid that rookie mistake of raising the flaps without having built enoughaltitude and airspeed. Leave the flaps in their deployed position, and get atleast 100 m of clearance before you raise the flaps. More altitude is certainlybetter before raising flaps. When you do raise the flaps, raise them one notchat a time and keep some back pressure on the stick to prevent the nose fromdropping too far. Don’t worry, having raised the flaps you’ve removed allthat drag, so have just a little patience: your airspeed will build up prettysoon. It’s true that you could get airspeed back more quickly by letting thenose drop, but you’re likely to drop faster than you want to. The commonrookie mistake is to raise the flaps, see the nose drop and notice that you’redescending quickly toward the ground, and pull back too hard on the stickto keep the plane in the air. In no time this sharp pulling back on the stickat low airspeed leads to a stall and a dropped wing, and finally the resultingcrash report—filed by the ground crew. So remember, raise the flaps onenotch, keep full power on, anticipate the nose drop and keep the nose fromdropping too fast. After stabilizing, raise them another notch, and soonyou’ll be climbing steadily.
4.5 Level flight
Level flight means flying straight ahead, without gaining or losing altitude.Although the airplane will fly itself if you just release the controls, achievingand maintaining perfectly level flight is a difficult task to undertake, even ina simulator where you don’t have to deal with updrafts, and there typicallyis no wind or turbulence at all. Not many pilots are enthusiastic about takingtime to train sustaining level flight at a required airspeed, but the value ofthis lesson is not to be underestimated. This is war; flights of fancy are notthe order of the day, and disciplined, precise skills are required to advance tobeing a useful pilot. The skills you develop learning to fly level and straighton are fundamental to other maneuvers. For this reason, maintaining levelflight at various airspeeds is to be considered the first skill a pilot must

4.5 Level flight 58
master. Do not move on to other topics until you are able to do this. Preciselevel flight also becomes invaluable in navigation and formation flying.
Of course the key to level flight is making the proper adjustments ofstick, trim and throttle. Remember that no one control affects only altitudeor airspeed. Changing pitch and setting the trim controls AoA and thusinfluences airspeed, but can also cause changes in altitude. Changing thepower (throttle and propeller setting) helps adjust the rate of climb, butcan also be used to influence airspeed. These concepts were introduced insection 3.6 on page 31. Let’s review the coordination of these controls bylooking at some specific situations. Recall that your stick is a primary flightcontrol. In all cases you first use the stick to initiate changes in AoA, andthen trim off the pressure once the new angle is established. When learningand flying alone you should always make smooth changes in both stick andthrottle, and carefully observe the effect they produce.
Case 1: too slow You are maintaining altitude, but can’t seem to keepspeed. You cruise at a higher speed you need to reduce the angleof attack, but to prevent your aircraft from losing altitude you alsoneed to increase power. So, like Oleg and his LaGG, you add powerand push the nose down. Then trim to the new setting so you can re-lax pressure on the stick. The trick is to do this in such a way that theplane stays at the same altitude. It takes smooth control and practice.
Case 2: too low If you are in level flight at the right airspeed but aretoo low, add some power. This alone may not solve your problemthough—if you only add power you will end up in a phugoid oscilla-tion. You will begin to climb, and should use your stick to damp anyoscillation in the climb by keeping the airspeed constant in the climb.Once you are almost back to altitude, reduce throttle to the previouspower setting and use the stick to transition back into level flight atthe newly acquired altitude. Since you were trimmed to the correctairspeed before and have returned to the same power setting, you willnot need to retrim.
Case 3: too low and too slow You find yourself flying level, but too lowand slow. As in case 2, add power. This time, however, you will wantto push the stick forward so that you accelerate to a good climbingspeed before initiating the climb to the desired altitude. Then levelout as before, but don’t throttle back to the previous power setting.Similarly to case 1, you were too slow before, so you will need to keep
4.5 Level flight 59
some of the power you added for the climb. Adjust throttle and sticktogether to find the right equilibrium.
Case 4: too high This often happens when you overzealously apply powerand/or have your nose trimmed up too high. The solution is obvious:reduce power. However, it important to control your descent by notletting the pitch drop too far. This is especially a problem if you makea drastic reduction of power. In this case, you may need to apply back-pressure to increase AoA so that the airplane does not pick up speedin the descent. When you have descended down to almost your goalaltitude, gently add throttle to the previous power setting, and use thestick to control your transition to level flight at the new altitude. Asin leveling out of a climb in case 2, since you were trimmed to thecorrect airspeed before and have returned to the same power setting,you won’t need to retrim.
Case 5: too fast If you are flying level but too fast, you can reduce speedby applying back-pressure on the stick and thereby increasing angleof attack. This of course will cause you to zoom climb. To preventthat, reduce power with the throttle and then prevent yourself fromdescending by increasing back-pressure. Find the necessary AoA withthe stick and adjust throttle until you settle into the new speed, beingcareful not to change altitude.
Case 6: too high and too fast If you are in level flight but discover thatyou are above altitude and going too fast, then there is no doubt thatyou need to reduce power. Simply combine the procedures from cases4 and 5 to achieve the desired altitude and airspeed.
Case 7: too slow and too high In this case you can trade the excess alti-tude for some airspeed by nosing over with the stick. However, it islikely after you have descended to your goal altitude and are transi-tioning to level flight that you will have to alter AoA and throttle. Thisdepends on why you were too high and too slow.
Case 8: too fast and too low As in case 7, here you can exchange formsof energy, this time by zoom climbing. Again, depending on why youwere in this position, you will probably need to adjust AoA and throttleto achieve level flight at the new altitude.
Case 7: undesired climb or descent You often find that you are at a goodspeed, but unexpectedly climbing or descending. This is simple to

4.6 Turns 60
remedy: make a power change. If you are climbing, the correct re-sponse is to throttle back. If descending, power up. Do not try to getrid of the ascent or descent just with the stick, as this will introducea new problem of changes in the airspeed. (It takes some experienceto learn for a given aircraft how much change in power is required tocounter the vertical speed.) As you transition out of the climb or de-scent, you will notice that you are either too low or too high, and youshould continue with the measures described in case 2 or 4. If duringthe correction variations in airspeed are also incurred, you will needto apply the methods for the appropriate case as described above.
The main indicators you need for these corrections are: the position ofthe nose relative to the horizon, or an artificial horizon in the absence ofa visible horizon, the airspeed indicator and the altimeter. Don’t rely toomuch on the vertical speed indicator, since it reacts more slowly than thealtimeter and the horizon.
Once you have settled into level flight you will have to keep movementabout all three axes in equilibrium in order to maintain level flight. (Formore on settling in after changes, see again Denker’s section on phugoidoscillations.) This can take some concentration, but soon you will learn toquickly notice deviations from level flight and how to make slight, smoothchanges to correct.
It is important to note that at various speeds you will need to adjustrudder trim to prevent movement about the yaw and roll axes. There is acertain airspeed at which the rudder will counter rotation around the yawaxis, and this is generally designed to be in the area of cruising speed. Forother airspeeds, the rudder will no longer provide the force necessary tocounteract rotation and has to be adjusted. The happy pilots with ruddertrim can relax this pressure, but those without—for instance Bf-109 jocks—will get a leg workout.
4.6 Turns
Combat maneuvers require a lot of hard turning, often using both the hor-izontal and vertical planes of movement, and combat aircraft are equippedto deal with these stresses—better even than the pilot. How and when tomake turns in the context of combat maneuvers, as well as the parametersinvolved in turn performance and different types of turns, are discussed inchapter 6. For now, we begin by considering the required control inputs and

4.6 Turns 61
forces involved on the aircraft during horizontal turns. In learning these youwill better understand the process of turning and its implications on aircraftperformance, which is so crucial during air combat.
4.6.1 Horizontal turns
As everyone who has observed a turning airplane knows, an aircraft isturned by rolling it into a bank angle. The roll is performed using ailerons,so the pilot deflects the stick in the direction of the turn. The turning aircraftwill inscribe an arc (a segment of a circle) through the sky as long as theaircraft remains in its bank angle. Once the aircraft is rolled into the bankangle, the aircraft’s roll stability will hold it there and aileron deflection isno longer needed, so that aileron control on the stick is no longer required.There seems to be something in the roll stability of the IL-2 flight modelthat requires some aileron input to be held during a turn, so you will haveto learn to hold the aircraft in the desired bank angle with the ailerons.
Actually, use of the ailerons is not the only required control input. Theaircraft is turning because its wings are pushing it along the path of thecircle. However, if only ailerons are used during placement of the aircraftinto a bank angle, the aircraft will yaw. Because the wings are pushing theaircraft in the horizontal plane, the aircraft is suddenly no longer pointingin the direction it is moving. This is experienced by the pilot as being forcedto the side in the cockpit, and measured by the ball moving out of the centeron the turn and bank indicator. To compensate for this adverse yaw, thepilot should coordinate the transition by applying rudder in the direction ofthe turn. How much rudder? This depends on the aircraft. In the aircraft ofIL-2 , the answer is usually, “not much.” As the bank angle is beginning tobe established, the rudder pressure should be released, or the aircraft willyaw in the other direction.
In level flight, the lift vector compensates the downward force causedby gravity. As the aircraft is rolled into a bank angle, the lift vector, beingcreated by the wings and perpendicular to them, is no longer applied only inthe vertical direction; it now has a horizontal component as well. This hor-izontal component is what is causing the aircraft to turn in the horizontal.However, this means that the vertical component of lift is no longer equal tothe gravitational force, so the aircraft will start to accelerate downward. Toprevent this, the total lift must be increased, so that the vertical componentremains equal to the gravitational force. In order to increase the total lift,the pilot adds back pressure with the stick, using the flippers (or elevators)to increase the wing’s angle of attack. The back pressure should be smoothly

4.6 Turns 62
Shallow bank Steep bank
Figure 4.3: Forces involved in a horizontal turn
applied at the same time as the ailerons and increase with the bank angle.The back pressure must also be maintained throughout the turn, since theadditional lift is required as long as the aircraft is in its bank angle.
This is illustrated by Gunther, who is flying the Focke Wulf in figure 4.6.1.He is seen making a horizontal turn to his right using two different bank an-gles. Six force vectors are drawn: the gravitational force G and the verticalcomponent of lift L opposing it; the horizontal component of lift T that isturning the aircraft and the centrifugal force C according to the laws of mo-tion; and the total lift force and the resultant force. As can be seen in thefigure, the total lift force is the sum of L and T , and the resultant force isthe sum of G and C.
In the shallow bank angle, about 37◦, the horizontal turning force T isrelatively small. The aircraft will therefore turn at a slow rate along an arcof large radius. In addition, the total lift force required is not much greaterthan the vertical component of lift L, so not much extra lift is required of thewings and little back pressure on the stick is required. The resultant force,equal to the total lift, is not much larger than L.
In the steep bank angle, about 60◦, the turning force T is much larger.The aircraft will be turning at a much faster rate along an arc of smallerradius. Because the aircraft is banked so steeply, the total force required ofthe wings in order to maintain altitude is quite large, and a rather large stickback pressure is required of the pilot. The resultant force is approximatelytwice that of L.
These simple observations raise some questions. One obvious one is,how much back pressure is required in the turn? In general, you can use

4.6 Turns 63
the position of the nose relative to the horizon to tell whether your theattitude is correct and you are gaining or losing altitude in the turn. Thenose should be only a few extra degrees higher than normal, depending onthe bank angle. You can also use the attitude indicator (artificial horizon)if you have one to check attitude. Another excellent way of correcting is tolook at the altimeter. Here the rate of change of the altitude is important.The faster the needle is increasing or decreasing, the more adjustment inpressure is required. However, if the aircraft is in a severely nose-downposition and steep bank angle, do not try to correct the turn by applyingmore back pressure. This corresponds to the conditions of a spiral dive.Instead, reduce throttle and roll the wings level, then apply back pressureto return to level flight.
Another question is, how can this turning force be measured, or, whatis a measure of turning performance? The downward vertical force com-ponent G is always due to the acceleration of gravity acting on the massof the aircraft.10 The turning force T is due to the centrifugal acceleration.The acceleration due to gravity (9.8 m /s2) can be taken as a standard and Definition of G
expressed as one G unit. The acceleration of the aircraft is the same accel-eration of the pilot. Since the mass of the aircraft and the mass of the pilotare quite different, so are the forces—thank goodness! Therefore, it is theacceleration that the pilot feels. A turn in which centrifugal acceleration isthree times that of gravity is called a 3-G turn. Gunther’s steep turn of about60◦ is a 2-G turn, so the poor guy feels as though he weighs twice as muchas normal.
This acceleration works on the blood too, pushing it toward the lowerend of the body. At high-G turns, the eyes don’t get enough oxygen from theblood, the cones in the retina stop functioning properly and the pilot’s visiongreys out and may also black out. After prolonged or very high-G turns, thebrain can’t get enough oxygen due to the lack of blood flow and the pilotcan pass out. This is called G-lock and can last many seconds after the highacceleration is reduced. The dangers to a pilot in G-lock are obvious.
The increase of angle of attack that provides sufficient lift to both turnthe airplane and oppose gravity also increases the drag. This means that theaircraft wants to slow during the turn. As Gunther has shown, the steeper theturn the greater the increase in required total lift. In very steep turns the air-craft will tend to slow down dramatically. To maintain airspeed during theturn, the pilot should open the throttle to increase engine power. There is amaximum maintainable airspeed for a given turn performance, at which the
10According to a certain Isaac Newton, force is mass times acceleration: F = ma.

4.6 Turns 64
entire thrust of the engine is being used to overcome drag. If the turn per-formance is increased beyond this, airspeed will decrease. In other words, ifthe pilot is turning hard with the throttle fully open and the aircraft is losingairspeed, the pilot will either have to accept the loss of airspeed due to theincreased drag the turn imposes on the wings, or else reduce the turn rate.Alternatively, the pilot can allow the aircraft to descend in the turn, tradingin altitude to maintain turn performance and airspeed. Such a turn is calleda gravity-assisted turn.
In extremely steep turns approaching 90◦, the aircraft will no longer beable to produce enough vertical lift to overcome gravity. In such steep turnsthe nose above the horizon can be raised to assist. However, this will not beenough to overcome gravity, and the aircraft will lose altitude.
When Gunther is ready to finish his turn and resume level flight, heneeds to use the ailerons roll the plane back to a wings-level flight attitude.He should begin to roll out several degrees ahead of the desired heading,because the aircraft will continue to turn until the wings are leveled. Forsteeper turns, more degrees before the desired heading should be allowed.As Gunther rolls the wings back to level, this again requires rudder in thedirection of the roll in order to overcome adverse yaw and coordinate thetransition. Also, the back pressure should be smoothly decreased as theplane rolls back to wings level. Some forward pressure may even be requiredto prevent the nose from coming up. In addition, Gunther can close throttleto the previous cruise setting in order to maintain airspeed. If the plane istrimmed for level flight, no stick pressure will be required once the aircrafthas settled into the wings-level attitude.
Let’s summarize the horizontal turn procedure:
1. Initiate the turn with your ailerons.
2. At the same time, coordinate the turn by applying rudder in the direc-tion of the turn: “step on the ball.”
3. At the same time, anticipate the tendency to lose altitude by smoothlyapplying an increasing back-pressure in the turn until the desired bankangle is reached; this increases angle of attack to produce more lift.
4. To maintain airspeed with the increased angle of attack, add power byopening the throttle.
5. As the desired bank angle is being reached, release the rudder pres-sure and aileron deflection. In IL-2 some aileron deflection may berequired to hold the bank angle.
6. Maintain back pressure on the stick throughout the turn.

4.7 Landing 65
7. Several degrees before the desired heading, use the ailerons to roll thewings back level, use the rudder in the direction of the roll to coordi-nate the turn, and decrease back pressure or apply forward pressureas necessary to keep the nose at the required attitude.
8. Return the throttle to the previous power setting to maintain airspeed.
4.6.2 The vertical
A horizontal turn is a common maneuver that the pilot uses to reorientthe aircraft onto a new heading. They are normally done smoothly, butin combat are often performed hard and fast. Purely vertical turns are bycomparison always performed quickly, due to gravity. Use a vertical turn togo up and before long you’ll run out of airspeed. Use a vertical turn to godown and it won’t be very until you run out of air. There’s nothing leisurelyabout it, it needs to be performed quickly. Even if you don’t run out ofairspeed or air, an inefficient vertical turn wastes precious energy.
This is not to say that the pilot should use as much pressure as possible,because this can cause a stall or an undue loss of energy. Just keep in mindthat timing and energy are important in a vertical turn. Before you engagein the maneuver, you have to know just where you want it to take you andwhether conditions are right to initiate it. You have to have enough airspeedto reach your goal, or enough altitude to avoid the ground.
Some purely vertical turns are standard maneuvers that should belearned practiced, and are sometimes useful in combat. These include theloop, split-S and wing over.
4.7 Landing
Outside of combat, landing your aircraft is quite probably the most chal-lenging and exciting procedure you are called to perform. Well, doing itproperly is, anyway. There’s nothing more beautiful than a good landing.On the other hand, few things are more embarrassing (or painful, if yousurvive the wreck) than racking up some kills in a sortie and then botchinga landing in front of your mates. With some knowledge and training it’snot hard to avoid this, and in time you might even become rather interestedin performing good landings. While it is true that any landing you walkaway from is a good one, and any landing where they can re-use the air-craft is a great one, you’re not going to keep getting assigned fighter duty

4.7 Landing 66
if fighter command learns that every time you go up they can kiss that ex-pensive fighter good-bye. So get yourself revived with some radiator vodka,and let’s talk technique. Making a safe landing, especially under non-idealcircumstances, requires a lot of concentration.
First, an overview of the landing procedure. Here are the major compo-nents of every landing:
• approach, in which you establish a glide slope toward an aim point on(or before) the runway
• correction, or getting your approach lined up with the runway andkeeping it there
• transition from glide to touchdown attitude, called the flare
• touchdown and ground roll, or roll-out
Every single landing that doesn’t involve crashing involves all of these com-ponents. Obtaining landing permission is also usually involved, at leastthat’s what my CO tells me. The hardest of these stages to learn is settingup the approach.
As usual, you can use Denker’s work to supplement the material here.The material in chapter 12 of his online book has been used in the prepara-tion of parts of this discussion.
4.7.1 Approach
After you have found the airstrip and have it in sight, preparing the approachstarts with setting your airspeed and altitude. Knowing what these shouldbe requires knowledge of your aircraft, the runway altitude and weatherconditions. Since it would be too confusing to try to cover all situations atonce, we will assume you have good weather conditions and a runway at sealevel on flat terrain, so you won’t have to compensate for wind or do anysubtraction to calculate your above-ground-level altitude (AGL). Typicallyyou will need to descend from altitude before landing. During your descentto the airfield, slow the aircraft. A good altitude to begin an approach isat least 1000′ (1000 feet, just over 300 m). Anywhere between 300–600 mis good, depending on your distance to the airfield. Prepare the approachby descending to within 300–600 m of the runway altitude and having therunway in sight.
The approach described so far assumes that the airspace around the air-field is clear, so that the pilot can determine his own approach. If there isany doubt whether the airspace is clear, the airfield traffic pattern will be in

4.7 Landing 67
effect. The airfield will typically have restrictions on altitude and airspeed inits airspace. See section 4.8 for more information on airfield traffic patterns.
Your aircraft has a rated speed below which it is safe to drop the gear,and another speed below which you can start extending flaps. (A few air-craft of course have fixed gear and/or no flaps.) Now that you are beginningyour approach, you want to reduce your airspeed to below the maximumspeed for dropping gear. If you don’t know for a given aircraft, you can as-sume a value in the range of 250–300 kph. You cannot begin your approachwhile you are going faster than this. You can of course go slower than thegear extension limit. The airfield may have rules for altitude and airspeed ofaircraft in the traffic pattern, so make sure you don’t make anybody downthere mad, they do have flak guns! There is also always a chosen side ofthe airstrip for approach, because the runway is no place to play chicken.Normally the approach side is the side into the wind, and the runway wasbuilt with local wind patterns in mind for this purpose. Unless you happento know in advance, observe the local traffic pattern and approach from thesame side.
After establishing flight at a good airspeed and altitude, maintain themand position yourself on the approach side of the strip. Your heading isnot important unless you are in a traffic pattern, meaning you need notnecessarily be on a specific heading relative to the runway heading. As youmaneuver keep a sharp eye out for traffic, especially traffic below you if youare in a low-winged plane.
The next thing to do is to contact ground traffic control. They will letyou know whether you are cleared for landing. If you are not equipped witha radio, it’s broken or the controllers seem to be on coffee break, then youjust have to keep your eyes out for local traffic, and especially on short finaland whether the runway is clear.
Once you are at the right altitude and airspeed and have permission andare visually clear to land, you are ready to begin your approach. Thereare several different kinds of approaches, but for now we are only going toconcern ourselves with a straight-in approach. Later you may want to ex-

4.7 Landing 68
periment with curved approaches, which help in aircraft with poor forwardvisibility. In any approach, you are going to establish a glide slope, which isa steady descent at a given angle, and maintain it until just before it wouldsmack you into the ground. You are going to aim the glide slope so that itbrings you to a given point at or just before the beginning of the airstrip.This point is unimaginatively but appropriately called the aim point. Thedifficult part of all of this—and perhaps of any landing procedure at all—islearning to visualize the glide slope and judging where you are relative tothe intended glide slope. We are only going to discuss it qualitatively.
The glide slope in a straight-on approach needs to be stable, meaningthat once you are in it you ought to stay in it as much as possible in orderto maintain a steady descent. A steady rate of descent on the glide slopewill be achieved, but don’t rely on your variometer to establish the glide,it reacts too slowly.11 To help keep the descent steady, you want to lowerthe gear and extend flaps before you start the glide slope, while you are stilla good ways from the field. Check again to make sure that you are belowmaximum gear extension speed, and drop the gear. Make sure that they aredown by whatever means you have, such as lights on the panel or physicalindicators. If they seem to be stuck try swinging the aircraft around a bit.You will probably need to throttle up slightly to compensate for the addeddrag, but unless you are already near stall speed (you shouldn’t be), don’tworry about slowing down a little. Next, verify that you are below max flapextension speed and start lowering your flaps in stages.
The best flap configuration for almost all aircraft is—can you guess?—landing flaps. As you extend the flaps, you can use forward pressure onthe stick to counter the tendency to pitch up until the aircraft stabilizes.This helps prevent sudden changes in altitude and airspeed. Extending theflaps reconfigures the wing incidence and therefore angle of attack, allowingmore of a nose-down attitude for the given airspeed. Allow the aircraft tostabilize and repeat the process for the second and third notches of flaps, atwhich point you will be have landing flaps. Now you need to retrim. Thenose-down pitch is going to come in handy for visibility on the approach.With flap extension you are also going to lose some more speed and shouldthrottle up as necessary. You are now ready to bring the airplane to itsapproach airspeed.
For each aircraft there is an airspeed at which, with gear and flaps in thelanding configuration, it will stall in level flight. This airspeed is called Vso Vso is the stall
speed in landingconfiguration.
11None of the warbird flight manuals I have seen recommend using this instrument in theapproach.

4.7 Landing 69
3°
Figure 4.4: The glide slope should place the aim point just above your nose, and thefield should not look too long or too flat.
and is very useful to know for landing. If you don’t know what it is, you candetermine it for yourself as long as you have some altitude for recovery afterthe stall: drop the gear and extend the flaps to landing configuration, andwhile keeping a close eye on airspeed, maintain level flight and adjust thethrottle and attitude (using trim helps) until a wing starts to drop.12 Theairspeed at which this happens in level flight is Vso, and for most aircraftin IL-2 is between 120–140 kph. Keep in mind that fuel and payload raisethis airspeed! (Not that you should be landing with ordnance.) If you arereturning to base with damaged wings, it is a good idea to test your newVso stall speed at altitude before attempting a landing, in order to preventdropping a wing on approach or during the flare.
Begin your approach after extendingComing in too high or
too fast is going to landyou in a lot of trouble.
gear and flaps, by allowing the airspeedto drop to a value of about 1.3 × Vso. This Approach speed is
1.3× Vso.is your desired airspeed for the approach.Learn these two values of Vso and 1.3× Vso
for your aircraft. If for your aircraft Vso is 140 kph, then in your glide slopeyou should maintain right about 180 kph; this is a typical value for manyaircraft. Lighter aircraft generally have lower values. As you lower the gearand flaps you should more or less maintain altitude but allow your airspeedto drop to approach speed. Now you are on the glide slope.
The glide slope itself is simply a steady descent at this airspeed. Tech-nically, a perfect approach has a glide angle of 3◦, which is not very steepand a flatter approach than most new pilots are comfortable with. The goodnews is that you can use a bit more angle and get away with it. A workableglide slope should place the aim point just above the nose of your aircraft(in single-engined aircraft). You can judge the steepness by how the fieldlooks—it should not appear too long or too squat. If it seems long and thinthen you are too high in the approach, and if it looks too squat and wideyou are too low. Figure 4.7.1 makes some comparisons to demonstrate howthe field should and should not appear. Since this is learned visually, it isbest to watch a track to get the feel for it. (You can find some examplesat Eastern Skies.) You want to descend at a constant rate, although thereis of course room for making adjustments. If you descend too steeply, you
12Real aircraft will typically drop the nose in a straight-on stall, but in IL-2 they drop awing.

4.7 Landing 70
(a) Too high (b) Too low
Figure 4.5: These figures illustrate approaches that are too high or too low on theglideslope.
are going to find it difficult to stay slow, and your transition between glideand touchdown will be much more critical. If you adopt a descent that is tooshallow, you are going to have to add a lot of power and have a high attitudeto maintain rate of descent and airspeed, making visibility very difficult.
You are now on approach. Hang on to that 1.3× Vso, and stay on a glideslope that will bring you to the aim point before transitioning into a flare.We’ll get to the flare, but what happens if you mess up before then? Let’shave a look at how to correct any problems in the approach.
4.7.2 Correction
The glide slope is no place for day-dreaming. During your descent youwill need to be aware of how you are doing in relation to your intendedglide slope, and how well you are lined up with the runway. Even withoutwind, which we are not discussing here, you will probably need to do some

4.7 Landing 71
(a) too far left (b) centered (c) too far right
Figure 4.6: These three approaches show how to judge left-right alignment on approach.
correcting, especially if you have done a sloppy job of lining up the approachand initiating the glide slope.
The easiest and least critical correction to make is alignment with therunway. Correct large course errors with shallow, coordinated turns, andcorrect small ones with rudder only. Use the rudder to point the noseand use the ailerons to hold the wings level. Figure 4.7.2 shows three ap-proaches: one too far to the left, one lined up on the center, and one too farto the right. Use the edges of the runway to help judge where the aircraft islined up. Looking at the vertical line of the gunsight reticle provides a lineto help us. In all three approaches, the aircraft is lined up with the runwayheading. In 4.7.2 (a), the pilot is on a line that runs along the left-handedge of the runway. This is seen because a point on the left edge at the rearof the runway lies directly above a point on the left edge at the front of therunway. So even though he is on the runway heading, if he continues hiscourse he will be landing half off the runway. In (b), the pilot is on a linethrough the center of the runway, and will land right in the middle of therunway. In (c), the rear of the right-hand side of the runway lies directlyover the front of the right-hand side, so the pilot is having the same troubleas the pilot approaching in (a).

4.7 Landing 72
The right way to make the correction is not to just aim for the middle ofthe runway. This would bring the airplane to the right point, but the aircraftwould not be traveling aligned with the runway when it arrives. How then?On approach it is not desirable to make turns to correct. Instead, the pilotshould slip the aircraft in the desired direction. This is done by dipping thewing on the side you wish to with the ailerons, and applying opposite rudderto keep the nose aligned with the runway heading, so that the aircraft is notturning. In (a) the pilot should give right aileron and a matched amountof left rudder. The aircraft will then slip to the right without turning. Thisshould be done with sufficient airspeed, because the slip also increases dragon the aircraft. The motion must also be coordinated, because of the dangerof a snap roll.
If you see that you have gotten too far off too late in the approach tocorrect, simply go around (see section 4.7.4) instead of flailing about. Andif you land on an a ridiculously short runway that is at least a kilometerwide, then you needed to correct about 90◦.
The more difficult corrections are those to the glide slope. They’re es-pecially difficult because without knowing your distance from the airfield,it’s difficult to know what your altitude should be. It simply takes practiceto learn to judge the glide slope correctly. The main thing while practicingis to think about maintaining a steady glide slope with the aim point stay-ing steady in your view, and making small changes to correct. Think aboutwhether you are too low or too high based on Figure 4.7.1. Practice mak-ing approaches at various angles of steepness, and notice how much or howlittle power is required to maintain the glide at the approach speed.
Above all, be careful with your airspeed—this will help you survive longenough to get the necessary experience to land. Many pilots have a ten-dency to want to use their stick as the up/down control, and their throttleto control speed, as discussed in section 3.6. As you know if you read sec-tion 4.3.2 on the power curve, at low airspeed and low altitude, that kindof thinking is extremely dangerous. You simply don’t have enough airspeedto perform a zoom climb of much duration at all, and you also don’t haveenough altitude to recover from a stall. In the approach you can use yourthrottle to regulate rate of descent and the stick to help control airspeed:the flippers primarily control airspeed. However, you need to use both con-trols together smartly, and especially watch to make sure your airspeed andrate of descent stay in the right range. See section 7.2 of Denker, which hasalready been partially covered, for some more advice on changing airspeed.
If you find yourself below the glideslope, add power in increments anduse the stick to maintain airspeed. Anticipate finding the glideslope again

4.7 Landing 73
and restore power settings in a way that will prevent overshooting or dra-matic control manipulation. In other words, make smooth transitions. If youfind yourself too high, throttle back and use small amounts of stick pressureto maintain airspeed. The slip technique used for left-right correction canalso be used for wind correction and can also be used to burn off excessaltitude when well above the glideslope.
It bears repeating—maintaining airspeed is critical. Too fast is betterthan too slow, although if you are really too fast you should go around. Ifyou are too slow, use some forward stick and open the throttle to get backup to speed, then readjust the controls to maintain speed.
4.7.3 Flare and touchdown
The concept of the flare is simple and beautiful. You’re familiar with theglide slope, and the goal of landing is to be on the ground and no longerflying. No longer flying means essentially that the wings are producing lesslift than the weight of the aircraft, so once you have touched down the wingsshould be in a stalled condition. The flare is what transitions the aircraftfrom 1.3 × Vso to less than Vso. It does this by using the excess 0.3 × Vso
to reduce the descent so that the aircraft is levels out flying at stall speedjust above the runway surface. The nose of the aircraft smoothly goes fromthe nose-down approach to the nose-high touchdown attitude, increasingAoA. The extra lift brakes the descent and burns off the excess speed, andthe aircraft settles gently onto the ground. All the pilot has to do is closethe throttle and pull the stick back gently back with the right timing. Andtiming is what the flare is all about.
As you can gather, timing the flare has to be done to achieve these threethings at the same time: the aircraft reaches stall speed (Vso), is flying level,and is at or just barely above the ground. To do this, you should start toexecute the flare about two seconds before the aircraft would carry you intothe aim point. How high off the ground you are depends on your airspeedand the steepness of descent, but is typically very low, only about 6 m offthe ground. Developing a sense of timing for the flare is not so very hard forpilots who have learned how to establish the glide slope and hold their aimpoint. A good idea is to watch some tracks where it is performed and thinkabout the situation, then practice it.
The danger of mistiming the flare is very real and very high. Flare toosoon and you will be close to stall speed too high up. Flare too late and youwill hit too hard. It is possible to adjust the flare as you are performing it,but this leads to problems and should be avoided.

4.7 Landing 74
How quickly you bring up the nose is important to get a feel for. If youpull back too hard you will zoom back up and be too high and too slow.How far you bring the nose up plays a role too, because this can also leadto a zoom or an early stall. However, the tendency is rather to not bringthe nose up too far, because pilots tend to want to see ahead and as a resultdon’t bring the nose up high enough. You should not be able to see therunway ahead of you during the latter stage of the flare when the aircraft isin landing attitude, so use the edge of the runway for alignment and watchobjects at the airfield and the horizon to judge whether you are too high.
Since it is difficult and not always practical—especially if you are dealingwith wind or combat damage—to get the flare just right in one fluid motion,it is a fine idea to perform the flare in two parts. In the first part, called theroundout, reduce your descent to level flight without giving away all of yourexcess airspeed, so that you are a meter or two higher than during a fluid,one-part flare. In the second part, called skimming, maintain level flight andgradually raise the nose, allowing the airspeed to bleed off and the aircraftto settle onto the ground. This two-part flare technique uses more runwaybut is a safer approach.
4.7.4 Abort!
As has been mentioned, if you are too low, too high or too far to eitherside, and too close to touchdown to smoothly correct, you should break offthe approach. Do this by raising the gear and smoothly adding power totransition to level flight. If you have sufficient altitude and airspeed, beginraising flaps and climb back out to traffic altitude, around 300–600 m AGL.If the surrounding terrain is high, extend along the runway heading andclimb as required. Once you break off the approach, level out and beginto climb away from the airfield, you are “going around.” The go-aroundprocedure is described in section 4.8.
4.7.5 The roll-out
Once the aircraft is on the ground, your job is to keep it on the runway, slowit down to taxiing speeds, then get it off the runway. The first two of theseare called the roll-out, because you are just letting the aircraft roll safelyalong until most of its speed dies off. As simple as this sounds, there are afew things you have to be aware of.
One thing that occasionally surprises pilots is that being on the grounddoes not mean being safe. In some ways, a fast-rolling aircraft on the ground

4.7 Landing 75
is in more danger than one flying just above the ground due to the contact ofthe wheels with the ground. The rolling aircraft can pivot about the wheelsalong all three axes of movement. It can yaw, roll and nose over, but nolonger due solely to the wings. This is why a smooth, safe roll-out requiresattention on the part of the pilot.
The greatest dangers in taildraggers are ground loops. Tricycle-gear air-craft are less prone but not immune to ground loops. Although groundlooping is a danger during taxi and take-off, it is a greater danger duringthe roll-out. The center of gravity (CoG) is located behind the landing gear,and while the aircraft is accelerating forward or at constant speed, it haslittle reason to try to pivot around the gear. By contrast, on the roll-out theaircraft is slowing down and any turning motion that brings the CoG outof line of motion with the gear causes the CoG to want to pivot around thegear to be in front. This ground looping can be partial, or the aircraft canswap ends rather hurriedly. Once the pivoting motion begins to happen, theaircraft has a turning momentum and the sideways pivoting motion is hardto stop. The best method is to realize that the tendency to ground loop,which is present as long as the aircraft is moving since the adverse torqueis also always present, must be constantly be countered with the rudder.As the aircraft slows down, the more rudder will be required, because thelower airspeed will cause rudder authority to reduce.
The second greatest danger is nosing over. Upon touching down afterthe flare, the aircraft might still have enough lift to get off the ground again,and it might not. Either way, there is still enough lift on the flippers to pivotthe aircraft about the wheels. For this reason, it’s a very bad idea to pushforward on the stick during the roll-out. Keep the nose high—the aircraftwill slow down faster in this attitude. The more common cause of nose-overs is riding the brakes too hard. This is typical of pilots who see a dangerahead, such as the end of the runway or a parked object, or who simplywant to turn off onto this taxiway. The result is that the CoG rotates notaround the gear to the side, but over top of them. The propeller strikes theground, killing the engine violently, the airframe is damaged, and the pilotgets a rather queasy feeling in the stomach.
These are the reasons that it is advisable to to land hot. Slow down tothe appropriate airspeed on approach: the flare will burn off most of yourexcess, and you’ll be able to avoid overly long roll-outs.
The only safe way to get the aircraft to slow down after landing isthrough drag and brakes. Brakes can be pulsed—applied, released andreapplied—in order to help slow the aircraft and avoid nosing over. Thebest way to maximize drag is to keep the flaps down and keep the nose

4.7 Landing 76
high: the wings and flaps create maximal form drag in this position. This isnot obvious to all pilots flying aircraft equipped with tricycle gear. Leavingthe flaps down will increase drag, but also increases lift. You should raiseflaps at least one notch if you are worried about being too fast after touch-down, as this will reduce lift and help keep you on the ground, even if youdon’t slow down as quickly. Another way to increase drag is to open theradiator. Of course, you should always check to make sure that you haveclosed the throttle all the way. Killing the engine will slow the aircraft morequickly on the ground, but this is to be reserved for emergencies, since theaircraft may called on to maneuver quickly and may not be able to do sowith the engine off.
When the aircraft is at taxi speeds, it is safe to leave the runway. Watchout for other aircraft, and especially watch your six. Many online pilots, andcertainly AI pilots, have not “read the instructions” and don’t know how totaxi safely!
4.7.6 Summary
Since this section on landing has so much material, some might find it handyto have a summary of the steps to take for landing:
1. Reduce airspeed to about ∼300 kph and descend to 300–600 m AGL,with the runway in sight.
2. Position your aircraft so that you can approach the runway, and keepthe runway in sight.
3. Below ∼300 kph, lower gear and throttle up to compensate for drag.Adjust radiator to keep engine within operating limits at the lowerairspeed.
4. Below max flap speed, ∼250 kph, lower flaps in stages, maintainingairspeed and altitude with forward pressure on the stick and openingthe throttle further to counter drag.
5. At the appropriate distance from the runway, select an aim point andbegin a glide toward it. Adjust throttle and pitch to maintain a steadydescent of 1.3× Vso, typically 180 kph.
6. Flare the aircraft and gently close the throttle all the way allowing theaircraft to settle in a nose-high attitude onto the runway at Vso.
7. Use rudder to keep the aircraft from ground looping, and allow theaircraft to roll to taxiing speed.

4.8 Airfield operations 77
8. Taxi off the runway to the assigned parking area.
Now you’re well equipped to get back in one piece from your trainingsessions. There’s no substitute for practice, so make an effort to end everymission, small or large, with a successful landing. Get up there, and “try notto prang the bloody thing!”
4.8 Airfield operations
Airfields are a center of air traffic. To avoid collisions, it is important thateach pilot understand the rules that will enable them to be aware of whereother aircraft are. This also helps in the coordination of landing approachesand emergency procedures. Learn the traffic pattern, communicate withthe tower if one is available, and you will greatly decrease the chances of atragic collision. Don’t be the one who makes it home, only to throw it allaway.
Airfield airspace typically extends only about 2–3 km from the airfield,and at least 1000 m above ground level (AGL). It is thus considered safe tofly without regard to traffic in the airfield pattern when well above 1000 mAGL or more than 2 km from the airfield. It is, of course, still important tokeep an eye out for incoming and outgoing aircraft.
The two main categories of airfield operation are take-off and landing.Because take-off can be coordinated while aircraft are on the ground insteadof in the air, the rules for take-off procedures are simpler and less restrictive.Under normal conditions the airfield airspace will be empty during take-off,especially at the beginning of a mission. If the airspace is not clear, departingaircraft should take off straight out and climb. Once they are clear of theairfield airspace, they can then turn to their desired heading. If the airspaceis clear, the aircraft may turn once they have established a climb. This maybe desirable for aircraft that circle in order to form up before followingmission waypoints.
It is important to note that when the airfield is busy, all aircraft shouldtake off using the same heading, in order to avoid runway collisions. Fur-thermore, this very important rule governing right-of-way applies in every

4.8 Airfield operations 78
situation:
Landing aircraft always have priority over aircraft that are taking off.Aircraft waiting to take off must keep the runway clear until aircrafton approach have landed and exited the runway.
Landing operations involve the use of a traffic pattern, which is to berespected immediately upon entering the airfield airspace. The traffic pat-tern includes the following: an assigned use of only one approach heading,so that all aircraft fly and land in the same direction; either a rectangularor circular pattern relative to the runway in use; and assigned altitude andairspeed. Assigned altitude is usually between 300–600 m AGL. If a pilotapproaching the airfield airspace specifically knows that it is clear, he mayenter the airspace and establish a landing approach as desired. However, ifthere is any doubt, he must enter the airfield traffic pattern as follows.
• If possible, fly over the airfield above 1000 m AGL and observe traffic.
• If there is no risk of enemy aircraft in the area, switch on navigationlights.
• Descend to the assigned traffic pattern altitude before entering theairfield airspace. This is necessary because of restricted downwardvisibility.
• Reduce airspeed to the assigned pattern airspeed. If this is unknown,assume an airspeed between 220–270 kph.
• Check the airspace carefully for airfield traffic, and maintain a gener-ous distance.
• Enter the airspace on a heading approximately 180◦ opposite that ofthe runway heading in use.
It is important to note that it is not permitted to pass other aircraft in thetraffic pattern. Aircraft that are damaged and require an emergency landinghave priority. It is critical to give such aircraft right-of-way.
The following sections describe the two landing patterns in general use.
4.8.1 Rectangular pattern
The rectangular pattern is quite useful because its four legs allow the pilotto maintain good awareness of his orientation to the airfield, and is easy tofly. It has the disadvantage of being somewhat congested for airfields with alarge amount of traffic. It is not used by AI traffic, but may be quite helpful

4.8 Airfield operations 79
upwind
crosswind
downwind
base
line
ofsig
ht
Figure 4.7: The rectangular traffic pattern has four legs.
for use by human pilots in the absence of AI traffic. It is standard to use aleft-hand traffic pattern, as illustrated in figure 4.8.1.
In a left-hand rectangular pattern, the following four legs are flown:crosswind, downwind, base and final. The final leg is the leg on which ap-proach for landing is made. The crosswind and base legs may be of varyinglength, so long as the airstrip is visible. They should be the same length, andmust be sufficiently long to allow preparations in the base leg for final. Theupwind leg is the same as the final leg, and is so called after a go-around,or to differentiate it from the approach section of the final leg. The upwindleg may be shortened considerably if desired.
The pattern is entered at the assigned airspeed and altitude on the down-wind leg, parallel to the runway. (An airspeed of 220–270 kph and altitudeof 300–600 m AGL should be maintained if unassigned.) Here the prepara-tory landing checklist should be followed and the aircraft prepared for land-ing. The 90◦ left-hand turn to the base leg is made when the runway thresh-old appears to be about 45◦ behind the left wing (between the 7 and 8o’clock positions). On the base leg, ask for permission to land if the air-field is equipped with ground control. (All airfields in IL-2 happen to haveground control. If ground control is not in use, proceed with landing aslong as the approach and runway are unobstructed.) If permission to landis not granted, maintain altitude and airspeed and go around, continuing tofollow the pattern, keeping an eye out for any aircraft going around belowyou. If permission is granted, turn on the landing light, extend gear andflaps, keeping stable flight, maintaining sufficient altitude for the approach.Begin the turn onto final for approach early enough to come out lined upwith the runway. Stabilize the glide slope as described in section 4.7. Com-plete checklists and land.
If on the landing for any reason you need to abort the approach (see sec-

4.8 Airfield operations 80
round leg
final
Figure 4.8: The circular traffic pattern
tion 4.7.4), go around as follows. Abort the approach by adding power andraising gear, gain airspeed and altitude and retract flaps, and resume pat-tern altitude. It is permissible to turn onto the crosswind leg before patternaltitude is achieved. Resume the pattern by turning onto the downwind leg.Make sure to go through checklists and get permission again before landing.
4.8.2 Circular pattern
The circular traffic pattern is the pattern used by AI traffic, and thereforeis the default traffic pattern used in IL-2 missions. It has the advantage ofbeing able to handle large amounts of traffic, but the disadvantage of pilotdisorientation concerning location relative to the airfield.
The circular pattern consists of a straight final leg and a long, roundleg. An example pattern is provided in figure 4.8.2. The round leg is nota perfect circle, but rather an extended loop on the approach side of therunway in which the aircraft is in a continuous turn. Alternatively, this legcan consist of straight and curved segments, or even a triangular or box-likepattern if desired. The principle difference to the rectangular pattern is thatthis pattern is maintained on one side of the airfield, and not flown parallelto the runway. It is also standard practice to fly the pattern to the left of theapproach.
These patterns as flown by the AI often extend beyond visible range of

4.9 Take her for a spin 81
the airfield, especially in low-visibility conditions. This is not a desirablefeature and should be avoided if possible. The Curtiss P-40 pilot trainingmanual specifies the following: “You have been used to flying a rectangularpattern. Now, with few exceptions, you have to fly a circular pattern, vary-ing at different fields but generally to the left . . . . Circle around the bound-aries of the field, staying close enough to the field and keeping enoughaltitude to make an emergency landing from any position.” However, whenAI-controlled aircraft are present, it is safer to use the AI pattern. This canbe done by following AI aircraft at some safe distance, then increasing dis-tance to the AI by slowing down before the runway. This distance shouldbe large enough to allow the AI to land or be sufficiently down the runwaywhile you are on final approach. If the pattern is particularly difficult tofollow or visibility conditions low, the pilot may have to decide to land witha partially obstructed runway or select a modified flight pattern that permitskeeping the runway threshold in sight.
The round leg of the pattern should bring you to the final leg with suffi-cient distance to the runway threshold to set up an approach. Begin landingchecklists and request landing permission before or just after entering thefinal leg, depending on its length. If permission is denied, go around bymaintaining altitude and airspeed, and recommence following the roundleg once near or past the runway threshold. Be careful to keep an eye outfor any aircraft going around from below. If permission is granted, turnon the landing light, extend gear and flaps, and establish the approach atan appropriate distance to the runway threshold. Complete checklists andland.
If for any reason you need to abort the approach (see section 4.7.4), goaround as described in the previous section, following the round leg as youclimb back to pattern altitude. Make sure to go through checklists and getpermission again before landing.
4.9 Take her for a spin
Actually, don’t! Spins are a good way to forego your pension. There is yetanother aviation proverb—part of an endless supply, probably—that goes asfollows: “If you want to go up, pull back on the yoke. If you want to godown, pull back a little more. If you want to go down real fast and spinaround and around and around, just keep pulling back [8].” Spins occur

4.9 Take her for a spin 82
when the aircraft is placed in a stalled condition that results13 in a straight-down descent in which the aircraft rotates rapidly about a vertical axis. Thepath of the aircraft is shaped very much like a spiral staircase, and is alsoreferred to as “augering in,” named after the carpenter’s tool for boring holeswith a spiral groove. This mode of flight unfortunately develops into a verystable state, so that if the pilot does not take proper action in time, the spinresults in a fatal crash. The stall/spin accident has been the result of manyfatalities.
What causes a spin? When the wings are at a high angle of attack, nearor in a stalled condition, roll damping nearly disappears, meaning that anymovement in the roll axis causes the aircraft to roll without control input.14
At even higher angles of attack, any rolling motion will even accelerate,corresponding to dropping a wing. If then an aircraft in the stalled conditionis for any reason subjected to a yawing motion, a difference in angle ofattack of the two wings is created that causes the wing at a higher AoA todrop a wing. The nose will also drop, and the aircraft enters a flight regimein which the nose is low and one wing is more deeply stalled than the other.Due to the insufficient lift of the wings, the aircraft descends rapidly. Theless stalled (or possibly unstalled) wing will cause the aircraft to rotate inthe direction of the deeply stalled wing at a high speed. At this stage thespin is likely to be very steep, with a significant nose-down attitude. This isthe initial stage of the spin, also called the incipient spin. The first rotationof the spin represents an important stage, as it is easiest to recover the spinin this stage. As the aircraft continues to rotate, the centrifugal force ofthe spin counters the undamped rolling tendency, and the spin begins to
13The IL-2 flight model has been criticized, with justification, in regards to stalls and spinentry. As mentioned in the section on stalls on page 42, in IL-2 it is practically impossible toexperience a straight-on stall; there is always a tendency for one wing to drop, as if one wingalways stalls before the other. Flying an aircraft into a stalled condition is not sufficient tospin an aircraft—spin entry also requires a yawing motion. While in IL-2 the spins are fairlywell modeled, it appears that a stalled condition tends to lead to a spin without requiring ayawing motion to initiate it, so that there is a tendency to spin more than in real life. This isdiscussed along with the stall model in this thread in the Ubi forums.
Even with these problems, the spin entry and behavior in IL-2 , along with spin recovery,provide a decent approximation of the flight envelope of WWII aircraft. The problem is notthat the makers do not understand flight dynamics, but rather due to necessary comprises inthe choice of modeling. The mechanics of the situation and governing mathematics becomemuch more involved. Spins are also very complex, and it could be suggested that tamperingwith the flight model could result in simulated flight behavior even less desirable.
14In this high angle of attack, aileron input creates little lift and lots of drag. The effect ofthe ailerons can reverse in this condition, so that the wings roll in the opposite direction ofnormal aileron input.

4.9 Take her for a spin 83
stabilize. After a few turns, the centrifugal forces flatten the wings, furtherdeveloping the spin and making it more stable. The tendency is for the spinto become less steep. Typically a flat spin develops, in which the nose is at afairly shallow attitude and the radius of the turn is extremely small. This isa dangerous stage that in many aircraft may be unrecoverable. The rotationof the aircraft may increase to some 3–5 seconds per 360◦ rotation. [8]
Obviously, it is to the pilot’s advantage to know how to prevent a spinand be able to recover from spins. Both of these tasks involve principlescommon to all aircraft, but procedures are aircraft dependent, so the pilotmust learn his aircraft. Spins are commonly entered during hard turns orquick changes in direction at low speeds, such as at the top of a climb. Thepilot’s intention in such situations is commonly to quickly change directionand maneuver to a position of advantage. During the maneuver, the pilotpushes the aircraft beyond its performance capability, driving the wings intoa high angle of attack and inducing a stalled condition that immediatelydevelops into a spin. Even if a full spin does not develop, much time islost, along with energy (in the form of altitude and airspeed) and positionaladvantage. Furthermore, after having recovered from the spin, the pilotwill be for at least some time slightly disoriented and will probably have toreacquire his target. The pilot has therefore frustrated his own intention.The ability of a pilot to know an aircraft and place it at or near maximumperformance while avoiding the stall/spin situation is an important part ofwhat is known as “pushing the edge of the envelope.”
Some pilots consider the ability to purposely enter a spin to be an advan-tage in combat, used for the purpose of evasion in a tight spot—a spinningaircraft makes a difficult target. As long as the pilot is able to control thespin and has sufficient altitude to recover, this must be considered a validtactic. However, it is very defensive in nature and seems suitable only as adesperate measure. A spin maneuver is coupled with loss of altitude, air-speed and situational awareness.
4.9.1 Preventing spins
How far you can push an aircraft before it stalls and snaps into a spin re-ally depends on the aircraft’s flight characteristics. Some, such as the Il-2,are practically impossible to spin. Others require a fair amount of care toprevent the spin. The P-39 with its mid-engine placement is a notorious ex-ample. Significantly troublesome in IL-2 is that no yaw is required to spinthe aircraft, so stalls quite often lead to spins. However, no spin can occurwithout the wings stalling, so the key to preventing a spin is to prevent a

4.9 Take her for a spin 84
stall. From section 4.1 we already know how to do prevent a stall: avoidexcessively high angles of attack. Theoretically then, you will never need toworry about spins, because you are going to behave and not push your air-plane into a stall. Experience says that pilots starting out in IL-2 are not onlygoing to stall—a lot—but they are going to do a fair amount of spinning too,and use up at least a few dozen virtual lives in the process.
Since stalls occur at high angles of attack (beyond the critical angle ofattack), they can occur at any airspeed. This is why the pilot maneuveringfor position in a high-speed turn may drive the wings into a stalled conditionand induce a spin. Stalls that occur due to excessive back pressure arecalled accelerated stalls. Unfortunately, there is no gauge the pilot can use todirectly measure the angle of attack. However, if he knows that the wingsare at a high AoA, he can listen for the buffeting sound that precedes a stalland anticipate it. If a force feedback joystick is used, the stick vibrationaccompanying the stall may also serve as a warning. To prevent the stall,it is usually sufficient to quickly reduce the angle of attack by relaxing backpressure on the stick. If the wings do stall, there is still a chance to counterthe wing drop that begins the spin by quickly applying opposite rudder.However, this requires an experienced eye and very quick reaction time onbehalf of the pilot.
4.9.2 Recovering spins
The general thing to do to get out of a spin is to oppose the direction ofspin and to unstall the wings. The challenge is to do this before you lose toomuch altitude, whether your criterion be minimizing lost energy in combator avoiding the ground. Be warned: each aircraft has a slightly differentspin characteristic, so it is best to get to know the behavior of each aircraft.Furthermore, the spin behavior is likely to change with fuel and ammunitionload.
In most aircraft, the technique for recovering non-inverted spins is asfollows:
• Center the stick by releasing it. Do not pull back or give aileron input;this only makes things worse.
• Cut throttle all the way back to idle.
• Note the direction of spin, then give full rudder in the opposite direc-tion of spin. This reduces or stops the rotational motion. Continueholding opposite rudder until rotation stops.

4.9 Take her for a spin 85
• If after applying the above control procedures rotation persists, pushthe stick gradually forward, being careful to maintain neutral aileroninput. Pushing the nose down helps unstall the wings.
• Once the rotational motion has stopped, finish unstalling the wings bykeeping the nose in a downward attitude.
• After recovering from the stall, smoothly apply full throttle and re-cover from the dive normally, maintaining sufficient airspeed for stableflight.
It should be noted that not all aircraft may be successful with this proce-dure. For example, the real-life recovery procedure of the P-39 is a notableexception. However, in IL-2 even the P-39 can be recovered in the abovefashion, it just takes a bit longer to come out of the spin. One notable ex-ception are certain models of the Bf-109. For example, it can be extremelydifficult to recover a well-developed spin in a Bf-109 F-4. In some cases, ex-tending gear and even flaps can aid in getting the nose down and exitingthe spin.
One aspect of spins that has been mentioned but is very useful to note isthat they are much easier to recover in the early stages. The best chance ofrecovering from a spin therefore comes from a quick and correct course ofaction immediately up realization that a spin may occur or is occurring. Itis important to immediately release the stick so that it returns to the neutralposition. This should be the first reaction because gives the wings a chanceto unstall before the spin occurs or further develops. Reducing the throttle toidle helps to let the nose drop, and is thus also a good early reaction. If this isinsufficient to arrest the spin or unstall the wings, you should immediatelycontinue the recovery procedure. However, it is essential to first note thedirection of the spin before applying rudder to oppose the spin, because ifthe rudder is applied in the wrong direction it is likely to accelerate spindevelopment. So remember,
React quickly after the stall or early in the spin to recover the spinbefore it develops. Neutralize the stick and chop the throttle. If thespin occurs or continues to develop regardless, first note the directionof the spin before applying opposite rudder.
If you spin the aircraft while inverted, it is possible that an inverted spinwill develop. This normally occurs only in acrobatic maneuvers such as atthe top of loops. Normal spin recovery procedures tend to make an invertedspin even worse. Inverted spin recovery involves opposing the spin rotation

4.9 Take her for a spin 86
with opposite rudder as in a non-inverted spin, and increasing back pressureon the stick until rotation stops. Then speed must be allowed to increasesufficiently and the aircraft can be rolled level. Inverted spins have a dan-gerous tendency to disorient the pilot, so great caution is recommended.
If you spin at altitudes too low for bailing out, you have no choice butto try to recover the spin. If you spin at higher altitudes, try to recover thespin until you approach dangerously low altitudes. If the recovery proce-dure fails, leave yourself enough altitude to exit stage right: see section 5.8.However, this is not a failsafe method! The high centrifugal force of thespin may prevent you from being able to bail. Therefore, if you find yourselfgoing past the first spin rotation in an aircraft that is difficult to recover,consider bailing immediately, before the centrifugal forces increase.

CHAPTER 5
Combat fundamentals
The objective is to kill the bandit. That’s it. Pure and simple. That,and stay alive in the process. So, do what you have to . . . But killthe bandit dead. Anything else is rubbish.
— Andy Bush
It is not until you are shaking down the runway at 110 kph thatyou realize for the first time that this morning’s haze might makelining up the the approach difficult when you return later. If youreturn; only one pilot of yesterday morning’s patrol Zveno had thatgood fortune. Such habitual thoughts don’t distract you very long,and as your well-weathered Ilyushin-2 passes 210 kph you initi-ate a lazy turn toward your next waypoint over Orel. Forests andrivers shrouded in this haze slip beneath your wings on the twenty-minute hop to your target, and by now it doesn’t take so muchconcentration to stay in formation. You use the time between in-strument checks to try and remember faces of lost comrades overthe last two months of your war—just how many have there been?You are jerked out of your thoughts by the sound of a sudden leap inthe engines of the accompanying I-153s. Seconds later your num-ber two calls out: “Vra�eskie istrebiteli, sleva vyxe!1”
1The words are literally: “Enemy fighters, left higher!” English-speaking pilots might say,“Enemy fighters, 10 o’clock high!”

5.1 Gunnery 88
Of course you had been maintaining a sweeping gaze to spot enemyfighters, but you have also taken your time squinting at the roadrunning alongside that lake—what’s its name again—searching forvehicles. Wake up! We’re still three kilometers from the target. . .
Air combat in the second World War was terrifying, demanding, boringand thrilling, and required a hard life. Most of us are perfectly content tosimulate the more “glorious” aspects; some do it more seriously, with aneye on historical accuracy and immersion, some more lightly, with a lust forshooting something down, and we all are likely to enjoy a wide variety ofexperiences. All the same, regardless of whether you are hitting autopilotand 8x speed to get to the battle in an offline campaign or flying with noview assistance into an online coop with human opponents, the basics ofcombat are the same. As you read through this chapter, keep in mind that atsome point just about every topic discussed is going to become very relevantto keeping you in the sky.
5.1 Gunnery
I like to show off my shooting prowess to the enemy pilots by care-fully hitting insects that are flying near their aircraft. Then, ifI really want to instill the fear of God in them, I begin chippingaway all the paint on their wings. Highly impressed, the enemythen tries to duplicate my feat. However, the attempt is clumsy andthey end up shooting off one of my wings. As my chute pops open Iwave and laugh at the clumsy enemy as he flies back to his base inshame. And so, I continue to rule the skies over Russia.
— Letterboy1
Marksmanship is one of the most valuable skills a combat pilot can have,and especially fighter pilots. Warplanes are essentially intended to be noth-ing other than mobile weapons platforms. Cleverly maneuvering your planeinto a firing solution on your enemy does nothing for you if you are in nodanger of hitting him. As a combat pilot, gunnery is very probably the firstskill that you ought to develop after basic flight. You are not likely to be asskilled as Letterboy1 at first, so we’ll have to set our goals a little lower andcontent ourselves with making holes in enemy aircraft.

5.1 Gunnery 89
Figure 5.1: The paths of the projectiles are converging towards each other horizontallyfrom the wings or to a certain height from below the pilot’s line of sight. In either casethis doesn’t happen until a certain distance from the plane, which can be adjusted.
5.1.1 Convergence
Just like every other unpowered object in a gravitational field, bullets2 don’ttravel in a straight path.3 Instead, the path they follow is very close to aparabola, which is a curved path: they go away from you very quickly, butthey also fall towards earth. The implication is that it can be difficult tovisualize where your rounds will pass in the vertical plane relative to yourtarget. This is a fundamental problem of vertical convergence.
What’s more, most or at least many of the aircraft you will fly with haveguns in the wings. Not only does this reduce the maneuverability of theplane, it creates a sizeable distance between the more or less parallel pathsof the bullets as they leave your plane. That’s not so great if you think aboutit, because you are hoping that they’ll all end up in the same place on yourtarget. This is a problem of horizontal convergence.
The answer to these worrying problems is to set the paths of the bulletsto converge at a given distance in front of the plane that you expect thetarget to be. This is illustrated in figure 5.1.1.
5.1.2 Gunsight reticle
The gun sight in most planes in IL-2 Sturmovik uses a reflector sight, orreticle, which is the primary means of estimating where your shells will go,
2You don’t mind if I just refer to all calibers of fired projectiles as bullets, do you? Good,thanks.
3Unless they’re going straight down.

5.1 Gunnery 90
as the crosshair in a rifle scope. This is pretty intuitive, so we’ll try to just“point out” a few noteworthy things. First of all, the reticle itself is a pieceof glass slanted backward towards you. The yellow pattern you see on it isreflected light that is being projected from below. The main advantage ofthis system is that as your head moves a bit out of position with the glassplate and the target, the reflected light tells you this (is this true?). A furtherhistorical advantage is that this system made it easier to adjust the sights topoint to the convergence set for the guns. There are also either concentricrings or tick marks on the crosshair. These are meant to be used to help lineup deflection shots, which you can read about below.
There’s one more thing about that reticle that you’ve surely noticed. Inmany of these craft they were positioned so as to not line up with the pilot’snormal line of sight. That means that the pilot had to move his head a bit Shifting the
gunsightto see the target through the gun sight. In IL-2 , you can switch between anormal view and the gun-sight view with the key combination Shift+F1.
5.1.3 Armament: machine guns and cannons
Armament can make or break the effectiveness of a fighter design. Anyfighter aircraft that is not equipped to take down its opponent will be in-effective, and the ability to quickly take down an opponent—ideally in onepass or given a certain window of firing time—can mean the difference be-tween victory and defeat. Important factors influencing armament are size(caliber) and mass (weight) of the projectiles, their velocity (usually mea-sured at the muzzle), the rate at which they are fired and the scatter of therounds. Further factors are whether the rounds are explosive, and whetherthey are a tracer round.
The caliber and mass of a round are tied together, since the mass of around tends to increase with caliber.4 The velocity of the round when fired,together with its mass, determines its kinetic energy it has according toEk = 1
2mv2.5 The higher the kinetic energy, the more destructive the round
4The relation is not one-to-one, since it is possible for two rounds of identical caliber tohave different masses.
5Note that the velocity of the round is far more significant than the mass, since it issquared. However, the more massive a round is, the more difficult it is for the gun to providea higher velocity, that is, more energy is required from the explosive charge in the gun. Thisin turn has an impact on the rate at which rounds can be fired, because of the amount ofmass of moving parts required of the gun for handling the high power of the dischargedround. Much research went into improving materials and methods to improve the efficiencyof guns in this regard during the war, but limits are nevertheless imposed.

5.1 Gunnery 91
will be when it impacts its target. Explosive rounds explode upon contactwith the target, greatly increasing the damage done.
Velocity also has a significant impact on the projectile trajectory (ballis-tic). Faster rounds have a flatter curve, as pictured in the top part of fig-ure 5.1.1, which facilitates aiming. The projectile ballistics of tracer roundsalso differ from that of normal rounds, since they are lighter and the phos-phorescent material that burns from friction with the air to make the roundvisible also reduces drag, thus affecting the trajectory. Since in guns that usetracers only about one out of every six rounds is a tracer round, the resultis that the majority of rounds are following a different flight path than thetracer rounds. It is difficult to tell whether this is modeled in IL-2 however,and it does seem that tracers can effectively be used to track the shot.
The rate of fire of a gun affects the rate at which the destructive energyof the projectiles can be applied to and concentrated on the target. A higherrate of fire results in more rounds landing within a given area, or indeedhitting the target. However, a higher rate of fire may also involve a gundesign that produces more scatter in the projectile trajectory. Scatter maybe of benefit for hitting the target, but also reduces the concentration ofrounds that strike a given area of the target. The destructive power of agun is a combination of the destructive power of each round (mass, velocityand explosiveness if applicable) and the rate at which the rounds can bedelivered to the target (rate of fire and scatter). A .303-caliber or a 7.62 mmlight machine gun can deliver a tremendous number of rounds in a shortamount of time, and still do considerably less damage than say a 20 mmcannon delivering high-velocity rounds at a lower rate of fire. A far fewernumber of 20 mm rounds arrive at the target in a given time window, butthe destructive energy of each round more than compensates. This larger-caliber, high-velocity design is especially useful in some aircraft, since theycan take out their target even if just provided with a snapshot.
An example that goes to the far extreme is found in the 37 mm T9 cannonof the P-39. This cannon has a rate of fire of a mere 3 rounds per second(and only 30 rounds), and each projectile has a low velocity, which makesaiming with this cannon very difficult. However, each round is so destructivethat a single round is often sufficient to bring down even a light bomber. Inaddition, every other round contains an explosive charge.
Machine guns are thus often effective for finding targets or distractingenemy pilots (both human and AI), and while they can do some damage, itis cannon fire that is usually going to bring armored planes down. Machine-gun rounds are lighter and are fired much faster in comparison to cannonrounds, and due to their smaller size and weight, lots more of them are

5.1 Gunnery 92
usually loaded.
5.1.4 Angle-off and deflection shooting
There are pretty much two situations in which you can point your gun sightstraight at a target and expect to hit it: in head-on passes and from thesix-o’clock position of the targeted aircraft. Of course, if you’d like to hitthe target right where your gunsight pipper is pointing, then the target hadbetter be at a distance where your shells will all converge. The reason itis easy to hit the target from these two positions is obvious: there is littleor no difference in the direction of flight of the two aircraft. There is littledifference in the velocity vectors (not only speed but also direction) of thetwo aircraft. Angle-off shooting refers to shooting in this situation, sincethe angle is very low and therefore “off.” The relative ease of shooting fromthis position is why most pilots try to maneuver their aircraft onto the six-o’clock position of their target, despite the danger of overshooting (with theaircraft, not the bullets).
Deflection shooting refers to all of the other cases, when the directionof your flight and that of your target have an angle between them. Thiscan be restated to say that there is an appreciable difference in the velocityvectors of the attacking and target aircraft. This is usually the case, andsince bullets require some small time to travel to the target, the attackermust compensate for the angle by pointing his guns ahead of the target, sothat after the guns are fired, the target and bullets both merge at the sametime and place. This is referred to as leading the target. The amount of leadrequired in the deflection shot depends not only on the angle between thevelocity vectors of the aircraft (this includes both the relative speeds anddirections of the aircraft), but also on the velocity of the fired rounds, thedistance between the aircraft, the position of the projectile trajectory relativeto gravity, and the rate at which the aircraft are changing their direction if ina turn. In short, deflection shooting is hard stuff. No wonder so few of thefired rounds reach the target! This is also the motivation behind producingarmaments with very high rates of fire, to increase the chances of hitting thetarget.
Getting good at deflection shooting requires a lot of practice. You haveto learn to develop a feel for the thing. It helps to use a consistent conver-gence distance and learn to judge the distance of enemy aircraft. The ringsof gunsights are useful for helping to determine the distance of an enemytarget: if you know the width of the target and can see how wide it is rel-ative to the rings, you can estimate the distance of the target. But to learn

5.2 Situational awareness 93
to compensate for the factors mentioned above simply requires practice. Itwill help to set up a lot of missions offline using the QMB (section 9.8 onpage 139), and to watch tracks made by other pilots.
When making deflection shots, generally give more angle than you thinkis necessary. Usually, inexperienced pilots should give two to three times thelead they think they need. Anytime you are shooting, don’t clench the stick.Instead, hold it gently and squeeze only the trigger. Rudder pedals mighthelp a lot here since you won’t have to twist the stick if you need rudderinput.
There is a set of wonderful articles [12] written by Andy Bush that willhelp you learn a lot more about gunnery.
5.2 Situational awareness
The absolutely most valuable thing to a pilot6 is an understanding of hissurroundings and its dangers, including the condition of his own aircraft.This is true both in and out of combat; a skilled pilot is constantly gatheringinformation about his situation.
I was flying over the Coral Sea with Honda and Yonekawa as mywingmen. After some fifteen minutes of patrolling we noticed alone Airacobra flying about 3,000 feet over our fighters, cruisingslowly. The pilot seemed oblivious to everything; he maintainedhis course as we approached from behind and below. . . . Incredibly,the P-39 allowed me to close in. He had not the slightest idea thatI was coming up on him. I kept narrowing the distance until Iwas less than twenty yards beneath the enemy fighter. He still hadno idea I was there! The opportunity was too good to waste: Isnapped several pictures with my Leica. . . . The amazing formationflight of my Zero and the P-39 continued. . . I climbed slowly untilI was off to the right and slightly behind the enemy plane. I couldsee the pilot clearly and I still could not understand his stupidity innot searching the sky around him. He was a big man, wearing awhite cap. I studied him for several seconds, then dropped belowhis fighter.
I aimed carefully before firing, then jabbed lightly for a momenton the cannon trigger. There was a cough and (I discovered later)
6beyond a bullet-proof aircraft

5.2 Situational awareness 94
two shells from each weapon burst out. I saw two quick explosionsalong the bottom of the P-39’s right wing, and two others in thecenter of the fuselage. The P-39 broke in two! The two fuselagehalves tumbled crazily as they fell, then disintegrated into smallerpieces. The pilot did not bail out.
— Saburo Sakai [13]
Not surprisingly, there are good ways of increasing awareness, and thenthere are better ways. You are surely aware by now that there is no smallamount of information available. Obviously the various tidbits of informa-tion must also be given a priority, and the priority changes depending onhow the situation develops. Beyond that, once the information has beengathered something has to be done with it.
You’ve known this all along, of course. It’s intuitive. However, in combatthings can get “a little stressy,” and considering beforehand what informa-tion to gather and practicing gathering it will help build up a little discipline.You want to train your mind to constantly be observing the information rel-evant to your situation. If you’d like to better appreciate the high level ofawareness that combat pilots had, just read some of their combat reports.Among the more relevant aspects7 of situational awareness in combat are:
• Altitude
• Airspeed
• Engine power setting
• Condition of the engine and general engine management
• Position of gear, flaps, radiator/cowl flaps, propeller pitch and othersettings
• Damage to your aircraft and its impact on your capability to performmaneuvers
• Weather conditions and forecast conditions: the current and predictedvisibility, direction and strength of wind, humidity, etc., as a functionof altitude
• Position of the sun relative to you, your unit and the enemy
7It is left to you to consider which may or may not be relevant in IL-2 and to yourparticular mission.

5.2 Situational awareness 95
• Relative altitude and speed of nearby friendly and enemy aircraft andthe location of other objects (such as clouds) with respect to yourairplane
• Types of both enemy and friendly aircraft and the skill and state ofmind of the pilots
• Strengths and weaknesses of enemy aircraft relative to your own
• Location of friendly and hostile surface units
• The location and heading of your aircraft, position relative to enemylines, and land features that may be of help or hindrance
• Amount of fuel left, and how much required to return
• Whether the mission parameters have been fulfilled
It is a common mistake among those who innocently set themselves inthe virtual combat cockpit to only consider a couple of these critical data,and almost certainly not at once. It is natural to concentrate primarily on therelative position of the enemy aircraft, and be preoccupied with worry aboutwhose guns are pointing at who. The beginner might consider altitude atthe beginning of the engagement, or airspeed when there are no enemiesclose by to shoot at, and when a desperate getaway is in order.
With time you will learn to consider and process a lot of information atonce, because it has become built-in routine. However, observation is onlythe first step on the road to victory. We have already mentioned that some-thing has to be done with the information gathered. What has to happenbetween observing and acting on the information gathered?
After his experience in the Korean War, Col. John Boyd developed a The OODA cycle
now-famous theory involving a continual process he named the OODA timecycle (or loop):
observe yourself and the physical environmentorient yourself by making a mental image of the situationdecide based on all factors present in the orientationact on your decision without hesitating
You are going through this time cycle, which is also referred to as the Boydcycle, all the time whether you know it or not. All combat is time sensitiveand as described by Col. Boyd, whoever can process this cycle more quicklythan the opponent, or stay inside the enemy’s OODA loop, will have a hugeadvantage and should emerge victorious. If you can process that loop faster,

5.3 Detection and closing 96
the enemy’s observations and orientation will be slower and thus his deci-sions and actions will be increasingly ineffective as you get further insidehis loop, keeping him on the defensive. Keeping a good OODA cycle is thefoundation of situational awareness, and because situational awareness is socritical to success in aerial combat, you would do well to study this conceptfurther. [14, 15, 16]
Since the key to success lies in your OODA loop being faster than theenemy’s, you will want to train yourself to accurately and efficiently ob-serve, instantly orient yourself to the new information, make lightning-fastdecisions, and act without hesitation. If your goal is to become a superiorfighter pilot, you might decide to find or set up a program to train yourself.In this guide we hope to provide you with information that will help makeyou more aware of what you need, but it is up to you to train.
5.3 Detection and closing
The OODA process teaches us that you have to be able to make observationsand orient yourself faster than the enemy. You also want to detect the en-emy and maneuver to a position of advantage before he does. You will gothrough the OODA cycle several times while doing this, but detection andclosing are the first two steps in an engagement, just like observation andorientation are the first two steps in the Boyd cycle. Detection of the enemyis a simple concept: see the other guy before he sees you. This requiresa constant scanning of the sky, working with a knowledge of the enemieshabits and preferences. Closing involves maneuvering your aircraft to a po-sition of advantage, nearly always above and often, if possible, behind theenemy.
Simple as that may seem, there is a lot involved in this competition tospot the enemy first, and as much or more in maneuvering to an advantage.Detection has a lot to do with the viewing systems discussed in the nextsection.
5.4 Viewing systems
There is rarely a better way to raise and maintain situational awareness (SA)than to have a look around. The viewing system determines to a large extenthow well you can do that. The goal of this section is twofold: to provideyou with a nearly comprehensive overview of all available viewing systems

5.4 Viewing systems 97
and their options at once, to describe the pros and cons of the systems andraise some issues that are commonly debated, and to give some tips on howthe aids might best gainfully employed to keep your situational awarenesshigh. A few important SA aids that are not actual visual aids are groupedin this section together with the visual aids; they are considered as a part ofthe viewing systems and sometimes described as visual aids.
The viewing systems and SA aids can be divided into two categories inIL-2 : those that are commonly available and those that can be set in thedifficulty settings. Some of the common aids that are not available as op-tions in the difficulty settings can however be disabled. The common visualaids are: panning with the mouse (mouse look), panning with a joystick hatswitch or key commands, snap view with a joystick hat switch or key com-mands, width of view, toggle gunsight, in-flight map, speed bar, heads-updisplay (HUD) and subtitles. The visual aids that can be disabled throughdifficulty settings, let’s call them “difficulty-setting visual aids,” are: icons(both friendly and enemy), aircraft and ground-object padlock, turning thecockpit on or off, external views and map icons. These are all described inthe following sections and summarized in Table 5.4.
5.4.1 Common visual aids
Most of the visual aids that are commonly available stem from the a realpilot’s ability to move his head and eyes. Others allow you to gather infor-mation that is typically available in the cockpit without having to fight theviewing system to actually study the cockpit, and also to receive importantinformation from the simulator. Many of these aids can also be disabled tosuit your taste.
Pan and snap views
It would be a pretty hard life as a combat pilot if you could only ever justlook straight ahead. A real pilot is able to move his head to the side andforward in addition to swiveling it about on his neck, although this is greatlyhindered and highly stressful during high-G maneuvers. His eyes have avery high resolution, over 500 pixels per inch compared to a monitor’s 96dpi [17]. He has binocular vision—the offset of his two eyes allows him tosee somewhat around nearer objects while fixing vision on objects furtheraway. His ability to turn his torso about in the cockpit is usually restrictedby a double-strap safety belt that keeps him in his seat during G-maneuvers,but he did have the option to take the time to remove this and squirm about.

5.4 Viewing systems 98
View system Control DescriptionMouse look Mouse movement Pan view with the mousePan view Hat switch or key commands Pan between fixed viewpointsSnap view Hat switch or key commands Snap between fixed viewpointsWidth of view Page Down, End, Delete Wide, normal and gunsight view widthsToggle gunsight Shift+F1 Toggle centered and gunsight viewIn-flight map M In-flight “kneeboard” mapSpeed bar Toggle, user-defined Displays airspeed, altitude and headingHUD Setting in conf.ini Aircraft- and simulation-relevant messagesSubtitles Setting in conf.ini Translation of radio transmissionsIcons Toggle icon types,
user-definedColored text beside aircraft and groundtargets; provides distance and identity
Padlock F4, Shift+F4, F5, Shift+F5,U, Y
Point-of-view follows selected target
Cockpit on/off F1, Ctrl+F1 Switches between virtual cockpit andno-cockpit views
External views F1, F2, Shift+F2, Ctrl+F2,F3, F8, Shift+F8, Ctrl+F8
External pan and chase views for all aircraft
Map icons M toggles in-flight map Displays map icons for all aircraft andground-objects
Table 5.1: View systems

5.4 Viewing systems 99
In comparison to real-life visibility, the ability to change the pilot pointof view (POV) is fairly limited in IL-2 . You can swivel the POV around asingle point, you can lean closer to the gunsight, and, unlike a real pilot,you can change the width of your view. In some conditions turbulence onthe airframe or G-forces will shake or move your POV in a realistic way, andprobably in a way that’s not very convenient. That’s about it. Well, IL-2isn’t real life; the view systems are adaptable to help compensate for that,and agreeing on how to compensate is what difficulty settings are all about.First let’s look at how to change the POV “manually.”
In order to change the POV you can use pan mode or snap mode. Youcan switch between these two modes at any time in flight by pressing F9.There are two possibilities for panning, one with the mouse and one withthe joystick hat switch or key commands. The mouse view is the smoothestand allows for the manual adjustment of any POV within the limits of thepanning range. Its major disadvantage is that usually both hands are usuallyneeded for flying; it is difficult to use the mouse while piloting. To overcomethis difficulty, some use one hand on the joystick and one on the mouse,moving the mouse to the far side of the joystick for faster access. Othersuse a track-ball mouse that can be manipulated with a thumb, leaving therest of the hand free. Still others use special hands-free viewing hardware—TrackIR is by far the most popular. See section 10.7 for more information.Although the mouse or mouse-emulation solution may be complicated, theview itself isn’t: you move the view freely about. The view will remain atthe POV where it was last told to look until a new input is given.
The other option is to pan between fixed viewpoints. You can use thejoystick hat switch to move one fixed POV to the right, left, up or down. ThePOVs are located every 45◦. Starting from the straight-on POV, press onceto the right and once up and you will be looking 45◦ to the right and 45◦
up. You can alternatively push the hat switch once to the position betweenright and up, which is the equivalent of pushing once to the right and onceup. (This takes some skill to master.) If you don’t have a joystick hat switch,you can achieve the same results with key strokes. Look in the Controlssubmenu from the main menu or on the Quick Reference card to learn thekey strokes.
The pan mode allows you to move to a POV and leave the view there.It also allows you to move the view up and down. Sometimes when youare panning you will need to immediately regain the straight-on POV, with-out having to think about what mouse movement, button sequence or keystrokes are necessary to get you there. To this end there is a command as-signment available in Controls under the section PAN VIEW called Center

5.4 Viewing systems 100
View. The default key assignment is NumPad 5. You might consider assign-ing a joystick button to this command, as it is very practical in pan mode.It can also be used with TrackIR to help recenter the view. You might alsowant to assign the same joystick button to Look Forward in the SNAP VIEWsection; it is possible to assign the same key or button to both due to themutual exclusivity of the two modes.
Snap mode switches to a new POV only so long as you hold the button orkey for that position, and returns the view straight ahead when the buttonor key is released. The default snap views assignments allow you to snap toPOVs in the horizontal (relative to the aircraft of course). If you want to beable to snap to POVS that look up or down, then you need to assign themyourself. This can be practical if your joystick supports shift functions, sothat many or all snap views can be assigned. Again, the same result can beachieved with key assignments.
Toggle gunsight
In order to look through the gunsight reticle, pilots often had to lean theirhead .
In-flight map
Speed bar
Heads-up display
Subtitles
5.4.2 Difficulty-setting visual aids
The visual aids that can be disabled through difficulty settings, or “difficulty-setting visual aids” are: icons (both friendly and enemy), aircraft andground-object padlock, turning the cockpit on or off, external views andmap icons
icons (mp_dotrange)
Padlock
know that if you padlock an aircraft with icons off, you get a green trianglearound it. If you toggle the icon types you can turn the triangle off andjust have the padlock function. I think if icons are on you get a red or bluetriangle (or color corresponding to team color).

5.5 Engine management 101
I like the padlock and I don’t like the padlock. I used to use it a lot beforeI got TrackIR, now I try to always only use the TIR, even if padlock would beeasier. What’s good about padlock is that it helps negate an advantage TIRusers would have in online combat. There are at least two things I don’t likeabout padlock. One is that it allows a sort-of radar function to see planesyou otherwise wouldn’t see when map icons and icons are off. It’s very hardto not use this, and it makes you very lazy about scanning the sky with yourown eyes. The other thing is the way that the view bobs about when thepadlocked target gets behind, below or above you. It makes it hard to keepan idea of your flight attitude. I can deal with not having a view of my nose,but the back and forth is often too much.
Another issue is that when icons are off it simply locks on to the nextaircraft, friend or foe. However, this is a question of laziness. I feel padlockshould be used to track a bandit you are pursuing or evading. You should notuse it until you are close enough to id the bogey as a bandit (or friendly) andare engaged. However, when you are close enough to engage, the aircraftare close together and it picks up the wrong target, that’s annoying andinhibitive.
5.5 Engine management
Our discussion of engine management will be limited to those aspects re-lated to combat. Success and failure in combat hang on aircraft perfor-mance. In turn, aircraft performance depends on at least the followingfactors: pilot performance; airframe design, configuration and condition;weight; and engine performance. Pilot performance and engine perfor-mance are probably the two most critical factors, and this section deals pri-marily with the latter. Combat places many special requirements on aircraftcontrol, and is where engine management becomes the most critical anddynamic.
Engine management is not overly complicated in IL-2 . The propeller,mixture, turbo- and/or supercharger, and other systems are all greatly sim-plified or not controllable by the pilot. This leaves principally the throttlecontrol, radiator and war-emergency-power (WEP) system available for en-gine management. These systems are discussed in the following sections,followed by a discussion of possible application tactics in combat.

5.5 Engine management 102
5.5.1 Throttle
Incorporate material from the CEM guide on throttle and power here.
5.5.2 WEP
An engine is normally designed to run at a certain nominal level of operationfor prolonged periods of time without damage. Aircraft engines are typicallyable to run like this at full rpm and throttle. In fighter aircraft, many engines“make metal” if run too hard (bits of metal start showing up in the oil), andtheir expected life is measured in hours of operation, with a typical valuebeing around 100 hours. However, combat pilots have a knack for gettingthemselves into a pinch, and of course they need a trick to help them getout of it. Engine designers obligingly develop ways for pilots to get extrapower out of their engine, but at the cost of engine wear. Most WEP systemswork by increasing the pressure inside the engine, also increasing stressand operational temperature. The amount of time that the WEP systemcan be engaged without damaging the engine permanently is dependent ondesign, and thus different for each aircraft. It also depends on the enginetemperatures before engaging WEP. Typical WEP engagement times are onthe order of only a few minutes. Pilots are strictly warned that this extrapower can only be had for short periods of time, and since it can do seriousengine damage, it is considered to be emergency power. Many pilot accountsindicate that they use it rarely. After all, you have a crew chief to accountto.
It is a simple matter to engage the emergency power, simply use the Wkey or assign it to a button in the Controls menu.
Since engaging the WEP system for too long costs you in terms of enginedegradation, it is best to use it only when it will give you maximum gainin return. You will get the best gain from WEP when you are slow, becauseit provides better acceleration at low speeds than it does at high speeds.Most WEP types provide you with extra power for only a relatively shorttime before crippling or frying your engine, so you get the most benefitwhen you need to accelerate back to a good maneuvering speed or to climbquickly. It is therefore best saved for those tight moments when the extrapower will save your neck, which might be boosting turn performance at acritical point, catching someone at the end of a vertical climb, and so on.With experience you will learn to judge when you need power most. Again,running WEP can be the main cause of overheating your engine, in whichcase it will run worse than if you had never engaged WEP.

5.5 Engine management 103
WEP brings a small increase in top speed (perhaps around 10 kph IAS),which can be useful when you are desperate to catch someone or leave thembehind, but again since it quickly overheats the engine this is of minimalbenefit. Long chase scenes are more often won by whoever can keep theirengine running at maximal long-term performance.
In the end you have to decide how you will distinguish between realaircraft practice and what performance you can get in the game. Some pilotswill disregard historical tactics and try to use WEP and radiators to ride theedge of engine damage. They may have it down to a science, and that isof course a valid approach. The engines in IL-2 are not fully modeled, andyou can get away with a lot that you can’t with real engines. For instance,you can use WEP fairly recklessly during a period after engine warm-upand normal operational range. A lot of pilots use it during take-off and thebeginning stage of their climb to altitude. The only side-effect appears to bethat the engine gets warm faster.
5.5.3 Radiator
Aircraft engines are cooled either with air, or air and liquid engine coolant.Air-cooled engines work by allowing air intake to flow over the engine andout through cowling or radiator flaps. Liquid-cooled engines cool the engineby circulating engine coolant liquid through the engine, and then coolingthe liquid in the radiator with air flow. In both cases, the rate at which airflows over the engine or radiator determines how quickly the engine can becooled. The rate of air flow is controlled by flaps on the cowling (cowl flaps)or near the radiator (radiator flaps). Opening these flaps permits more airflow, but at the cost of drag on the aircraft, which slows it. If the engine isnot sufficiently cooled, it will of course tend to overheat.
In real aircraft, cowl or radiator flaps can normally be set at any posi-tion between two extremes by the operation of a lever in the cockpit. InIL-2 aircraft, this system is simplified to two settings: closed, meaning min-imal airflow, and open/automatic, meaning fully open or open to the extentdetermined necessary. Therefore, the pilot is essentially presented with asimple choice: open and cool faster at the cost of drag, or closed and let theengine temperature rise or, at best, cool slowly.
5.5.4 Propeller system
The propeller systems represented in IL-2 are greatly simplified. Most of theaircraft historically used by the VVS use constant-speed propellers, and the

5.5 Engine management 104
Luftwaffe machines used variable-speed, constant-speed or aeromechanicalprops. With the exception of variable-speed props, which control the pro-peller blade angle directly, these systems automatically control the propellerblade angle in order to achieve a desired rpm. The desired rpm is selected bythe propeller control. In IL-2 , the propeller control is automatically linkedto the throttle control. This automatic linkage works by adjusting the propcontrol proportionally to the throttle, from idle through the WEP range.Thus, changes in the throttle setting are accompanied by a correspondingchange in engine rpm.
The propeller control may be de-linked for such purposes as cruise. Avalue of Prop. Pitch0 (see the Controls menu) corresponds to the small-est blade angle, which will unload the engine and result in higher rpm. Avalue of Prop. Pitch9 corresponds to the largest blade angle, which loadsthe engine and results in lower rpm. However, for maximum performanceit is best left on automatic, or Prop. PitchAuto under Controls, meaningthe prop control is linked to throttle. This leads to the main conclusion outof this discussion: the pilot is relieved of operating the propeller system asa separate control during combat.
As the aircraft speeds up the propeller windmills, which means that theincreased rush of air over the propeller causes it to speed up, so that therpm increases. When this happens, the rpm governor automatically adjustspropeller pitch (blade angle) to maintain rpm. At high speeds, it runs intoa limit in the range of prop pitch and can no longer limit rpm, so that therpm may increase above the selected value. If the selected rpm is close tothe maximum allowed rpm (this is usually the case at full power), the resultis overspeeding of the engine. Although this effect can destroy engines, itappears to have no effect on the engines in IL-2 except to accelerate tem-perature increase.
5.5.5 Application in combat
A large portion of combat-related engine management revolves around themanagement of engine temperatures.
Mostly what is required is the highest power settings in order to main-tain an energy advantage (speed and altitude). The highest non-emergencypower setting is of course 100% throttle. You can also use WEP judiciously,as previously described. The art of engine management in combat is keepingyour engine in a condition to give you high power at the critical momentswhen you really need it. Let the other fellow burn up his engine instead!
More to come in this section.

5.6 Navigation 105
5.6 Navigation
Mission success is often critically dependent on your flight being able toreach the mission area in a timely fashion, at the right altitude and from agiven direction. This is especially the case in bombing, intercept and groundattack missions. Furthermore, after the mission is over you will need toreturn to base, often abbreviated as RTB. All of this requires navigationskills.
There are various levels of navigation that can be engaged. The mostobvious and easiest, which many people prefer to use, is to engage the au-topilot. The autopilot will usually do a good job of carrying you in formationalong the waypoints at the specified airspeed. If you are leading the forma-tion your plane will follow the waypoints and your flight will follow you. Ifyou are a wingman, your aircraft will follow the plane in front of you in for-mation. If you are not interested in saving the track (see section 9.6), thenyou can also speed up the time in flight to and from target by using timeacceleration. (The [ and ] keys accelerate and decelerate time.) However,the autopilot will also fight for you and make bad decisions, so if you do useit consider disengaging it before you think you need to. Be aware that whenyou disengage the autopilot the controls suddenly relax and your plane mayfall sharply out of formation.
The autopilot also shows a tendency to be unreliable. Many have experi-enced it flying you into the side of a hill, or abruptly performing a nosediveinto the ground. If you are using it to save time, that’s one thing. (Haveyou tried flying manually at 8x?) If you are using it for navigation, that’sanother. Either way, it’s not very immersive and probably less fun. Afterall, you’re in a flight simulator, why should you let the computer fly insteadof yourself? In IL-2 you are perfectly capable of navigating without theautopilot.
A second possibility is simply to use the in-flight map to follow the pathsbetween waypoints, which are clearly marked. (If you have map icons en-abled, this will also tell you where both friendly and enemy aircraft are. Forfull immersion, turn them off. Unfortunately, you can’t turn your own air-craft icon off.) As soon as you pass through, or sometimes near, a waypointyou will see a line extending from your aircraft icon to the next waypoint.By following this line you will easily be able to navigate to the intendedareas of your mission. It is important to recognize that your flight will alsofollow these waypoints, and that if you are flight leader you can commandyour flight to remain at a given waypoint or proceed to the next one. Themap does not inform you at what altitude and airspeed the flight should be.

5.6 Navigation 106
Many of the aircraft have a repeater compass that indicates the directionto the next waypoint. By aligning your heading with this direction you willbe able to navigate to the next waypoint without needing to rely on yourin-flight map. The repeater compass does not indicate how far you are fromthe next waypoint, but the closer you are to the waypoint, the further theneedle will swing when small excursions are made from the correct heading.
A third possibility, which can be very demanding and satisfying, is toabandon both the autopilot and in-flight map and use visual flying rules(VFR). In this method you will compare the landscape with a map to locateyour position and choose your heading. Since in IL-2 you cannot turn offyour own map icon, you might consider printing out a map of the area ofoperations. Example maps can be found at Eastern Skies on the Maps page.
Here are some tips for VFR navigation. Always study the map in detailbefore a mission. (This is generally a good idea anyway.) Know where yourbase is relative to the front lines, and relative to the mission area. This wayyou at least know in which general direction to head to get back to base(north, east, southeast, etc.). Your map will show you where your targetarea (you may need to mark it beforehand) and base are located. Afterthat, you can use rivers, patches of forest, lakes, cities, mountains, coastlineand whatever else you find useful to determine your location. Rivers areusually plentiful, and specially shaped rivers are very helpful for confirminglocation. Don’t be afraid to go off your guessed course to make sure you arein the location you think you are.
If you are on the way home and really can’t make out where you are, tryusing the radio to request a heading to base. Be prepared to listen carefullyto the reply in German or Russian unless you haven’t disabled the subtitles(see section 10.3.2) or you have a language pack you understand installed.For full immersion, always make sure you get back across enemy lines. Thenif you run out of fuel or your plane is hopelessly damaged and the enginequits or is about to explode you can crash land or bail.
If your cockpit is completely shot up or you are in a cockpit that has anobstructed view of the compass, you will have to find an alternative headingindicator. There are at least two possibilities here. One is the speed bar,located in the lower left-hand side of the screen in the form of a red lettersand numbers. The speed bar can be be assigned a key (see section 9.2.1)and toggled on and off. On the speed bar there is the entry HDG, whichprovides the compass heading in degrees. Another alternative is the sun.During day missions this is a handy reference and hard to miss. Of courseat high noon it gets difficult, even in western Russia.
This visual navigation is not only challenging, it is absolutely a heap of

5.7 Radio commands 107
fun and very satisfying after a mission. Don’t forget to keep an eye out forenemy planes while navigating.
If you find you like navigating, you can create a mission for yourself tofly around and learn the area better. For instance, if you are in the L’vovmap, you can fly around until you are able to recognize towns and specialrivers. (There are more river branches in L’vov than probably anywhere elseon earth.) This can really add to immersion.
But whatever you do, don’t count on your autopilot to get you home,unless you like repeating missions and losing results. At best you can engagethe autopilot for about 10–20 seconds, until it gets you on course for home,then take the controls again. Keep in mind the autopilot will set the coursefor the next waypoint, not necessarily the base.
5.7 Radio commands
5.8 Emergency procedures
Flak. Twenty-millimeter cannon. An unusable airframe. A dead or burn-ing engine. An unrecoverable spin. No fuel. All reasons for you to thinkcritically about how to get home safely. Sometimes you can set her down,sometimes you have to hit the silk. How do you know when to do what?
5.8.1 Bailing out
You hope you never have to do it, but it happened to the best, and oftenmore than once. Sometimes your baby is not salvageable, and you’ve got tobail. The command for this in IL-2 is the key combination Ctrl+E. After adelay the pilot will open the canopy and jump from the plane.
5.8.2 Forced landings
5.9 Combat training
So much to read, so much to learn, so much to do! But how do I actuallyget started practicing and training?! This section offers some hints for thenew combat pilot about how to get started, especially with gunnery andmaneuvering.
The first step is actually to get properly patched up to the final versionof IL-2 , as described in section 9.14. There’s nothing worse than learning

5.9 Combat training 108
an aircraft and its handling and gunnery, only to discover later with a patchthat something has changed and you have to relearn it. With the patchesyou will of course get many bug fixes, but also new aircraft and features. Itcan be argued that some patches made certain aspects worse; for example itmight be argued that patch version 1.04 has the most accurate aerodynam-ics. However, the final version is overall the best version, and the versionanyone you meet online will be flying.
Once you have learned how to control the aircraft using the basics in thechapter on flight, gunnery is truly the next step. This is because gunneryrequires learning to maneuver, hold the aircraft steady, and learn to judgethe shot. The best way to train gunnery is to progress in small steps. TheQuick Mission Builder (see page 139) is an invaluable tool for this job.
Choose any old aircraft with guns to fly and take your first step by settingone or more friendly bombers or transports in your flight, and set theirSkill setting to Rookie so that they won’t fire back or maneuver as muchunder fire. Nice-sized aircraft such as the Pe-8, Me-323, Ju-52 and He-111 will do nicely. Don’t select any enemy aircraft. Before starting, goto the difficulty section and click on Realistic. Then deselect LimitedAmmo, so that you’ll be able to shoot as long as you want, and also selectany of the visual aids that you might desire, depending on how good youare at spotting enemy aircraft. Icons, map icons and padlock can come inhandy when you are just starting out. Experiment with leaving cockpit andexternals on or off. Again, it is recommended to leave all of the settingsaffecting physics, such as Stalls & Spins, Torque & Gyro Effects, etc.on, in order to get a feel for the physics of flight, which after all is wherethe most fun is. Click Back, choose any map, weather, altitude and otherchanges you’d like to try out, then Fly. Try to find the friendly bombers,and then shoot them down! Ignore all pleas over the radio to stop shootingat friendlies. Have fun tearing up these virtual aircraft.
Start out by lining yourself up directly behind them. Learn to matchtheir speed, altitude and heading and fly behind them varying from 0.05 to1.0 kilometers (icons will come in handy here). Practice firing from thesedistances while matching their flight. Aim for different parts of the aircraft—the wings, then engine nacelles, the tail section and the wing roots—andnote how gravity and convergence have an effect depending on distancefrom the aircraft. Restart the mission to get more bombers if need be, andkeep at it.
Next try firing at them from angles—from below, below and to one side,a slashing attack from above, then a slashing attack at some angle, fromdead astern (from the side), from head on and so on—and note just how

5.9 Combat training 109
much deflection is needed. Remember from section 5.1.4 just how compli-cated deflection shooting is! Work hard at being able to hit these large, slowtargets from all angles, and then work on focusing on specific parts of theaircraft. This may seem like tedious work, but the training will pay off be-cause you are learning a most fundamental skill that many pilots overlook.
Once you have done this, select a different aircraft and repeat the pro-cess. This is important! Only in this way will you learn to compare theeffect of different armaments, and why they are so important. Can you takea Pe-8 out the same way with a Yak-1 as with a Bf-109, P-39, IL-2 or witha FW-190? Doing this will also help you learn which aircraft have whatarmament.
Now that you have mastered hitting large, slow targets, give yourself abit of a challenge: make it an enemy rookie bomber, so that it fires back.Now you will have to learn how to line up a shot while evading enemy fire,and you will immediately learn the value of setting up slashing attacks andbeing able to hit the bomber from odd angles.
After you have become adept at this, increase the Skill setting of theAI aircraft. They will get better at evading and shooting back—too muchin fact for your comfort. Also try using smaller bombers, such as the Pe-2and even the Ju-87. Your confidence has grown, but can you hit the smallertargets? You may get the feeling that all of this training could take manyhours and days of effort. Well, it is a training program, isn’t it?
Once you can hit enemy bombers of various sizes consistently and sat-isfactorily from various approaches, remove some of your aids. First takeaway limited ammo, and find out how much some of the various aircrafthave to spend. This is important, since unlimited ammo is a difficulty set-ting that is unpopular (online), highly unrealistic and, ultimately, un-fun.Next, take away some of the visual aids. See how well you can get alongwithout them. Force yourself to become adept at doing without them. Youwill find that if you are able to do well both with and without them, youwill become a much better and well-rounded combat pilot. Now you’re abomber buster.
Congratulations, you are ready for the real test: fighters! These makedifficult targets because they are smaller, faster and nimbler. Use the sameapproach in the QMB, selecting friendly fighters at the rookie setting andusing unlimited ammo at first. Practice shooting them down from directlybehind and all the other various angles. Next try varying this simple themeby flying a different aircraft, and then shooting at some different fighters.Once you feel you are getting good and are up for the next challenge, trythis out: use the radio to command the friendlies to cover you. To do this,

5.9 Combat training 110
use the keys Tab, 2 and 1, which works if the friendlies are in your flight.If they are in another flight, use the keys Tab, 6 and 1, which commandsthe whole Escadrilia (3–5 zvenos, or flights). This command causes all ofthe friendly aircraft to fly behind you, which will offer you the opportunityto shoot them down while they are trying to maneuver on you, but withoutthem trying to shoot you down. Keep varying things. Increase the AI Skillsetting, and take away the visual aids and unlimited ammo difficulty setting.
Finally, set up a scenario with a single enemy fighter on a low AI setting.You should have learned some useful maneuvers and gunnery skills by now,so you should be up to it! Try a few different fighters to fly in and against.If you feel confident, fight two enemies, then try it with a wingman. Evenafter lots and lots of practice, that first experience when the enemy is tryingto shoot you down is a rush! Enjoy it. As you become more competent inshooting down AI enemies, keep in mind that they are nothing like humanenemies. Although the AI in large use more realistic tactics than onlinehuman players, the element of human unpredictability brings a challengeand enjoyment like no other. Come on out and fly with us.
Practicing ground attack works in quite a similar way to practicing gun-nery skills: use the QMB. You can set targets in the Target pull-down menu,or set up large targets such as ships or large formations of ground vehiclesusing the FMB (section 9.12). Practice different attacks as described in chap-ter 7. You can also hop in the rear seat and work on learning to shoot downenemy fighters. Work up the scale gradually. Try out flying online, you’ll un-doubtedly find that ground attack with and against human opponents canbe more exciting by far than offline.
CHAPTER 6
Fighter combat maneuvers andtactics
6.1 Turns
6.1.1 Turn performance
Parameters affecting performance
6.1.2 Types of turns
Types of turns (corner, sustained, nose position, lead, lag, etc.)
6.2 Pursuit
Pursuit (although classified by Shaw as BFMs)

6.3 Basic flight maneuvers (BFM) 112
6.2.1 Pure
6.2.2 Lead
6.2.3 Lag
6.3 Basic flight maneuvers (BFM)
6.3.1 High and low yo-yos
6.3.2 Nose-to-nose and nose-to-tail turns
6.3.3 Vertical and oblique turns
6.3.4 Rolling scissors
6.4 Angle and energy tactics
6.5 Section tactics
6.5.1 Comms and brevity
6.5.2 Wing doctrines
6.5.3 Tips

CHAPTER 7
Ground pounding
Ground attack, or ground pounding, is the pinpoint attack of targets on thebattlefield. In principle, any aeroplane carrying a weapon load can be usedfor ground attack. In the First World War, fighter pilots soon realized theirground attack potential. They adapted their fighters by adding a small bombload, supplementing their machine guns for the attack of enemy troops,artillery, trenches and transport columns.
The idea was successful, and the fighter-bomber was extensively used inthe Second World War by all major air forces. Planes such as the FW 190had variations purpose built for the ground attack role, but any fighter couldbe used for ground attack.
An alternative approach (?) to ground attack was the use of the lightbomber, the Ju 87 Stuka dive bomber being the most famous example. TheStuka was a key component of the early success of the German Blitzkrieg in1940.
The Soviets produced the unique Il-2, a specialist ground attack planewhich carried a diverse range of bombs, rockets and guns. This heavilyarmored aircraft was the terror of the German tank divisions on the EasternFront.
7.1 Desirable aircraft features
Good armor and robustness Statistically, ground attack is one of the mostperilous activities a combat pilot can undertake. The principal hazard is the

7.2 Delivering the payload 114
flak: Ground attack requires the pilot to get low and close to targets oftenwell defended by Anti Aircraft artillery. It is likely that a ground attackaircraft will be hit by the AA barrage, so a plane structure and engine thatcan sustain damage and still function are advantageous, and ample armorplating of important areas (principally the pilot and the engine) is typicallyused.
Wide variety of payloads Rockets with various warheads, bombs of var-ious types, and large caliber weapons (typically 20 mm or more) can all beuseful, depending on the nature of the target, in ground attack. The abil-ity to carry considerable weight, and adaptability to different loadouts, aretherefore advantageous.
Speed Spending as little time as possible in a ground attack plane in theflak zone tends to keep pilots healthier. Speed also assists in reaching andleaving the target area unmolested by enemy fighters. Don’t make yourselfan easy target.
Stability Ground attack targets are usually small, and since they are slowand thus static relative to your aircraft, closing speed is high. Therefore theability to fly a precise and steady flight path towards the target is essential.Launching rockets or firing high-caliber weapons can shake a plane, so astable gun platform will increase the likelihood of getting hits. Using trimcorrectly will help you make the most of the stability of your plane.
7.2 Delivering the payload
7.2.1 Level bombing
Without a specialist bomb sight (these are available in Forgotten Battles),even remotely accurate level bombing takes a good deal of practice. Oncereleased, your bombs will travel forward at the same speed as your plane(minus loss of speed from drag), so you should aim to be directly over yourtarget at the time of impact. You have to get as low as possible to achieveaccuracy with level bombing. The lower you are, the later you leave bombrelease. Of course since you are over the target at time of impact it is impor-tant that you have a bomb delay of at least three seconds to give you timeto escape. If your target is moving, this means that you will have to aim fora point well in front of your target.

7.2 Delivering the payload 115
As an example, suppose you are flying at 10 meters above the ground(rooftop height) with an airspeed of 300 kph, or 83 m/s. Your bombs willtake approximately one second to reach the ground. You should thereforerelease them when you are 83 meters from your desired impact point—thatannoying tank that just sniped your front lines. At such a low height youcan actually lob the bomb into the side of large targets such as ships andaircraft hangars. Use the track record facility to review your accuracy andlearn the correct timing. If you make your bomb runs at a standard speed,this training will be even more profitable.
7.2.2 Dive bombing
The time of bomb release is critical to level bombing accuracy. However,if you dive in your attack, the criticality of timing is reduced, and this isthe idea behind the specially designed dive bomber types. The ideal in divebombing is a ninety-degree (i.e., vertical) dive. In this case, as long asyou are directly over the target and descending vertically downwards, whenyou release your bombs, the bomb cannot do anything else but fall directlyonto it (unless the wind has something to say about it). It is desirable todelay bomb release as you will be able to line up more precisely on yourtarget the closer you dive to it. In classic dive bombing, your dive should bebetween 75–90◦. The further off vertical you are, the more you will have tocompensate for your dive angle.
Though you can use dive bombing techniques in any bomb-equippedplane in IL-2 , the Stuka is specially designed for it, and we will discussStuka technique in some detail. Dive bombing is, however, broadly the samein any plane. You should begin your dive at least 1300 m above target level.The higher you begin, the longer you will have to adjust your line-up on thetarget. Ideally you will be directly over your target when you begin yourdive. Acquire your target through the window in the floor of your Stukacockpit. Let the target disappear past the rear of the floor window, so thatit is directly under you. At this point, roll onto your back, cut the throttle,apply the dive brakes and slowly and smoothly pull the nose down to lineup on the target. Practice this procedure with a bomb load until you can doit quickly and automatically. The air brakes should give you plenty of timeto line up, so keep your adjustments in the dive small. It is very easy to overcorrect. First, roll so that the target is directly ahead of you. Then use smallamounts of elevator so that you are aiming directly at the target. As you getcloser, you can fine-tune your aim by repeating this procedure.
In reality the Stuka had a sophisticated dive bombing sight, but in IL-

7.2 Delivering the payload 116
2 you have to use the gunsight as your reference point, as was the casein fighters adapted for dive-bombing. Note that your line of flight is notexactly the same as the line of fire indicated by your gunsight. You will findthat as you dive, the point on the ground you are heading towards will beabove your gunsight. Test this by watching carefully what happens as youdive without altering your dive angle by adjusting the controls. The terrainbeyond the point at which you are diving will appear to recede and moveup the screen, and conversely the terrain on your side of the aiming pointwill appear to move down the screen, disappearing under the nose of yourplane. The still point from which the terrain appears to expand is the truepoint towards which you are flying. You can use the top of the reflectorgunsight glass as a rough guide for my aiming point in a dive.
As you near the target, the difference between the point under yourgunsight pipper and your true aiming point will decrease. This means thatyou will see your target slowly drift down towards, then through, your gun-sight. Let this happen naturally: keep the angle of the dive constant. Makesure that when you release your bombs, you are descending along a dead-straight line. Any yaw or pitch will wreck your aim. When the altitudewarning horn sounds, the gunsight should be approximately on the target.If you are descending vertically, simply release your bombs, disengage thedive brakes and pull out. If, however, you are diving at an angle less than90◦, your bombs will undershoot unless you compensate for the effect ofgravity pulling the bombs down and away from the straight line of yourdive. This compensation is known as the bombing angle—you begin to pullout before bomb release, which will correct for the lag caused by gravity.The amount of rotation to allow before bomb release will depend on thespeed of dive, the height of the release point (the lower the release point,the smaller the required correction) and dive angle (the further off vertical,the larger the required correction). It will be readily appreciated that thevertical dive is a considerable help to accuracy, but failing that, training todive at a set angle and releasing at a set altitude makes accurate bombingeasier. Without controlling the variables in this way, it is very difficult tocalculate the bombing angle for a given dive. A commonly used method isto release the bombs when the target begins to disappear under the nose ofthe aircraft during your pullout.
In IL-2 the Stuka will automatically pull out the moment you releasethe bombs. In Forgotten Battles, you will need to manually disengage theairbrake as well. Be careful that you do not pull out too late and follow yourbombs into the ground, particularly if you are not using a Stuka and do nothave automatic pullout. Try trimming your fighter-bomber tail heavy and

7.2 Delivering the payload 117
push your stick forward during the dive to stay straight: this will make yourpullout more rapid and reliable, even if you black out.
Here is a list of dive-bombing tips:
• It’s worth setting up your controls especially for the Stuka—for in-stance, map bomb release and the airbrake to joystick buttons. (InForgotten Battles, if you use buttons next to each other, it’s easy topress both at once, thus giving you simultaneous bomb release andpullout.)
• Use the sideways snap view (preferably with your joystick hat-button)to check your dive angle with the windscreen angle markings: theline in parallel with the horizon indicates your dive angle in degrees.Remember, the shallower your dive, the more you will have to aimbeyond your target to compensate for gravity lag.
• When beginning dive-bomb training, use the [ key to slow the gamedown. This gives you more time to line up and think about the bomb-ing angle you will need.
• Fighters do not have the advantage of dive brakes, so in them tryusing flaps to slow and steady your dive. In any case you will want tothrottle back. Certain flap settings might disturb your trim, making asteady dive difficult or impossible, or your flaps might jam if you divetoo quickly, so don’t start the dive with a high speed. Experiment tofind what works for a particular aircraft.
• This discussion has assumed a stationary target and no wind. If yourtarget is moving you will have to offset your aiming point accordingly,and if there is wind you will also need to anticipate the drift of yourown aircraft.
7.2.3 Rocket attack
You have no option to launch all rockets simultaneously in IL-2 , and thedelay between rocket launches means that ripple firing is probably not astrong option. Fire one or two salvos of rockets, exit, observe the effectsof your attack, and re-engage as appropriate, even if that means followingyour ever-cursing flight leader.
Just as with bullets, gravity causes the trajectory of rockets to drop: be-ginners at rocket attack often find their rockets falling short, so learn to aimbeyond the target. The further from your target you are when you launchyour rockets, the more you will have to compensate for gravity, so get as

7.3 Exiting 118
close as you can without taking damage from the rocket burst yourself. In aclose-in, horizontal or shallow-dive rocket attack, try aiming at the roof ofyour target, or just above it. Alternatively, you can choose a steep dive tolessen the effect, just as in dive bombing.
7.2.4 Torpedo attack
IL-2 is quite forgiving in all respects of torpedo launch. Unlike a realship, which would likely maneuver to frustrate your aiming, your targetwill maintain a steady speed and course, and torpedoes nearly always runsuccessfully as long as you fly straight, as low as you can and at a steadyspeed.1 Approach the target at a right angle to the course of your targetwith your flight path intersecting the ship’s direction ahead of the ship. Thefurther away you release your torpedo, the further ahead of the target youwill need to release your torpedo. As is usually the case in ground attack,firing from as close as possible is advantageous. You are more likely to givetoo little offset than too much—ships are deceptively speedy.
7.2.5 Skip bombing
You can also try your hand at releasing heavy bombs into ships. Conven-tional dive bombing or mast height bombing runs are options, but you canalso use skip bombing. If you fly as low as possible when releasing yourbomb, it strikes the water surface quite obliquely and will bounce a consider-able distance. The technique here is similar to a classic torpedo run, exceptthat less offset is required as the bouncing bomb will travel faster throughthe air after skipping than a torpedo through water. When the bomb strikesthe hull of the ship it will be arrested and begin sinking. Set your bombdelay to zero, so the bomb explodes as close to the ship as possible.
7.3 Exiting
Once you have made your attack you can concentrate on surviving your exitfrom the target area. Anti-aircraft fire is probably much more accurate thanwas really the case, and this is deliberate. Fewer guns are needed to create arealistically dangerous flak screen, thus easing the load on the game engine.This means that AA guns needed to be treated with a great deal of respect.
1In fact, torpedoes seem to not care about physics in IL-2 , and will travel happily throughthe water regardless of the release height, angle or speed.

7.4 Targets 119
The preferable exit method is often to stay low and to get out as fastas you possibly can. You should plan your exit before you start your attackrun. Look for villages, forests or high ground that you can duck behind toscreen you from any anti-aircraft fire. Without this extra cover you will bevulnerable to fire regardless of how low you fly. Do not stay on a continuouscourse—you should jink to throw off the AA. The artificial intelligence isvery accurate, but unimaginative: for instance, it will not anticipate yourevasive maneuvers or learn from your tactics as human AA gunners might.Keep your evasive maneuvers small to maintain your speed. Small balancedturns and/or skids will usually keep you out of AA sights. At the end of theday though, if there is no significant cover to use around the target, escapeis something of a lottery. When you are so low, your chances of bailingout successfully are minimal to zero. Use your speed to zoom climb beforebailing if you think you are critically hit and cannot escape or successfullycrash land.
An alternative to the low exit is to climb hard following an attack. Thiswas a commonly used tactic in the second World War. Low-level flying is in-herently dangerous, and regaining height quickly lessens your vulnerabilityto enemy aircraft. In the real world, putting vertical and horizontal distancebetween you and the anti-aircraft guns also makes the firing solution harderto find than if you are flying in the vertical plane at a constant speed. Un-fortunately for us this tactic is less useful in the game—computers are muchbetter at this kind of deflection shooting problem than human gunners. Amajor real-world benefit to the high exit was that climbing into the sun,through haze, or into cloud, all successful ways of throwing off anti-aircraftfire. Again, none of these factors will impede the accuracy of the AAA inthe game: the only environmental element you can use to your advantageis physical obstruction between you and the bullets firing at you. Fire caneven hit you if there is no line of sight between you and the gun firing—atlong range, anti-aircraft will lob its fire high, over intervening obstacles, anddown onto you. Don’t assume you’re safe once you can’t see the defensivebatteries.
7.4 Targets
It is important to use an appropriate weapon for a given target. Themain types of target you will encounter, listed in roughly ascending orderof toughness, are anti-aircraft guns, soft-skinned vehicles, parked aircraft,boats, armored vehicles, buildings and structures (in IL-2 this category is

7.4 Targets 120
essentially confined to bridges) and ships.The following targets are listed beginning with the weakest:
Anti-Aircraft guns AA, also known as AAA (anti-aircraft artillery) or flak(German for Flieger Abwehr Kanone). Anti-aircraft guns, whetherheavy or light flak can be destroyed easily with almost any weaponfrom machine-gun upwards: a short burst of fire is usually sufficient,especially if it is cannon. Of course, they have the unpleasant habit offiring back and are quite small and hard to hit. Techniques for surviv-ing flak are dealt with later in this section. When you are staring downthe barrel of flak in order to take it out, jinking is not an option: youmust stay absolutely steady in your approach. The section on dealingwith flak below will help you to minimise exposure in this unpleasantsituation.
Soft-skinned vehicles Soft-skinned vehicles are those without significantarmor. The most common soft-skinned vehicles you will encounterare trucks, cars and motorcycle/sidecar combinations. A few roundsof accurate cannon or even machine-gun fire will suffice to destroysoft-skinned vehicles.
Parked or grounded aircraft Heavy cannon fire is a good weapon againstplanes on the ground, but a good deal of damage has to be inflictedto score a kill. When attacking a flying plane, disabling flying sur-faces or engines will allow gravity to finish off your prey. When theyare already on the ground, you need major structural damage or fire.Therefore weapons such as bombs and rockets are justified againstplanes—larger planes such as bombers demand heavier ordnance.
Boats and subs Rockets, medium bombs, sustained cannon fire, and obvi-ously torpedoes will all sink boats and subs.
Armored vehicles and tanks Heavy cannon may be adequate against tar-gets with light or medium armor such as half-tracks. The realheadaches start when you have to face tanks. Tanks are one of themost historically important ground targets in the eastern theater, andone of the toughest nuts to crack in IL-2 .
Different armor strengths are accurately modeled for different makesof tank, but in practice it is difficult to distinguish between differentkinds of tanks from the air. So, you will probably employ the same gen-eral technique. Tanks can be distinguished from soft-skinned targets

7.5 Team tactics 121
by the considerable amount of dust that surrounds them—an extradifficulty for the ground-attack pilot. They typically travel in groupsof four, in line astern. When travelling cross-country they will oftenadopt a diamond pattern when an enemy pilot approaches, thus com-plicating your attack pass. In this case, aim for either the leading ortrailing tank.
Always attack tanks from behind, where the armor is weakest. Rocketsand bombs are the weapons of choice against tanks. You will have tohit the target dead on to get a kill: IL-2 has an all-or-nothing damagemodel for ground targets. You cannot disable a tank by, for instance,causing it to throw a track.
The ability of tanks to hit attacking planes with their main armamentis disconcerting; it is also generally acknowledged as unrealistic. A sin-gle hit by a tank’s main armament will either disintegrate your planeor cause you to instantly explode. Either way, you are not likely tosurvive. Watch the turrets of tanks—if they have revolved to aim atyou and you are being cautious, consider breaking off the attack. Onceyou have attacked, change direction slightly, forcing the tanks to usedeflection when shooting at you.
Buildings, structures and bridges Some structures are destructible in IL-2 , some are not. The only ones with tactical significance are bridges:an example of this is in the first mission in the Il-2 campaign, in whichthe German armor can be prevented from reaching the station you aredefending by destroying the bridge. Use bombs or rockets to destroybridges.
Ships Ships are very difficult targets to destroy. You are likely to have themost success with torpedoes.
7.5 Team tactics
If you are flying as part of a team, either human or AI, teamwork can sub-stantially improve your chances of destroying ground targets and escapingsuccessfully. If you are flying offline, be ruthless in using your AI wingmen.War is a tough business, after all. If you are flight leader, you can order yourAI planes to attack your target, and follow them in once the flak has lockedonto them, giving you a clearer run. This might get you court-martialed

7.5 Team tactics 122
in a real war, but a common tactic was to send in flights to suppress anti-aircraft artillery before the main target was attacked—this is an ideal jobfor your accurate, steel-nerved and unimaginative AI pilots. Specify AAA astheir ground target while you stand off and observe results. If time, fuel andenemy fighter activity permits, keep repeating the order until the flak is sub-dued, making the attack on the main target by yourself and any remainingwingmen more survivable.
If visibility is poor, you may choose to fly over the target area to pickout your targets in advance—for instance, to distinguish armored from soft-skinned vehicles. You can then use your payload (rockets and bombs) on thetougher targets, leaving soft-skinned vehicles to be mopped up by machine-gun or cannon fire. The weakness of this method is that AA will be alert andwaiting when you re-approach your target for your attack proper. If flakis strong, there is a strong case for making a hard and hopefully accurateattack and then departing immediately. If you adopt this prudent attitude,a simultaneous attack maximises your survival chances. It makes sense tobring the maximum ordnance to bear in the first pass, by having all planesin your flight attack simultaneously. A line abreast formation is ideal forthis technique, which suits a widely distributed target such as an airfield.Another variation on simultaneous attack was the ’converging attack’ of tor-pedo bombers, designed to trap an enemy ship in a converging circle oftorpedoes and thus defeat its evading maneuvers.
Sequential attack is nevertheless in some circumstances your best bet. Atransport column lends itself to a sequential attack by planes in a line asternformation. But perhaps the most famous variation of sequential attack is thecarousel or Circle of Death used by the Il-2. The AI in IL-2 will sometime usethis technique, so if you are following an AI flight leader watch out for yourflight moving into a line-astern formation. Then simply follow the planeahead of you. As each plane approaches the target it puts its nose down intodive of perhaps 45◦, and attacks with whatever weapons are available: rock-ets, bombs or guns. The plane then climbs back into the circle. This attack istypically maintained until ammunition is exhausted or the target sufficientlyannihilated. The carousel is designed to keep the enemy under continuousattack (though the advantage of this in terms of shattering morale and sup-pressing enemy movement and effectiveness is less meaningful against AItargets). It does however have some use in dividing flak, as flak is forced tochoose between three targets: one running up to the dive, one diving, andone climbing in its exit.

7.6 Summary 123
7.6 Summary
In order to be successful in ground attack in IL-2 you need considerablepractice, an awareness of the particular characteristics of each plane, andsustained concentration in all phases of the attack. If you invest this effort,you will be rewarded with the satisfaction of destroyed targets on most ofyour ground attack missions. Good luck, and remember—the most impor-tant factor in any mission is not the number of kills obtained, but gettinghome in one piece!

CHAPTER 8
Flying online
Flying online is a rewarding experience because it exposes you to the ideasand skills of human wingmates and opponents. Most online pilots currentlyfly online using Forgotten Battles, and few are left who fly IL-2 . This is anatural progression, but this guide is for IL-2 . The methods used to connectfor online gameplay are essentially identical, so there is no great loss bydescribing only IL-2 in this guide.
If you would like to host a game and invite others or are invited tofly with a host, then the host must provide his IP address. The host andguests must then use the in-game Multiplay menu to set up the connectionas described in section 9.11. Basically, the host must first set up the server,selecting the type of multiplay (dogfight or coop), select the mission anddifficulty settings, and then load it. The clients (guests) may then enter thehost IP address, and the mission details will be loaded by Internet and theclient will be added to the game. There are better ways of connecting ofcourse, and these will be briefly discussed in the next section, but this basicmechanism often comes in handy.
8.1 Finding online hosts
The more sophisticated and practical way of connecting to hosts is throughan additional game lobby. The word lobby means a large entrance or recep-tion room, and game lobbies are just that: an electronic waiting area wherepilots can communicate and join up together. The lobbies allow pilots to
8.1 Finding online hosts 125
meet up, see who else is doing what, communicate with each other andestablish the host and allow others to join, all before IL-2 is launched.
8.1.1 Ubi.com
IL-2 comes with a program that asks for permission to be installed whenIL-2 is installed. This program is a dedicated IL-2 game lobby that allowshosts and clients to connect to each other for online gaming. Further docu-mentation
8.1.2 HyperLobby
A useful and very popular method of arranging online sessions comes fromthe Czech Republic through the online game lobby named HyperLobby, writ-ten and maintained by Jiri Fojtasek. This program is free to download anduse and is hosted at http://hyperfighter.jinak.cz/. Installation is sim-ple and it is very user friendly and uses an intuitive method of establishingconnections between host and participants. It is easy to host sessions andjoin servers, track others who are online using HyperLobby, and includes apager system for exchanging messages. Several different rooms are avail-able, some dedicated for use of online wars.
To use HyperLobby, you must download the most current version of theprogram and install it. Then close IL-2 if open and launch the HyperLobbyprogram. You will have to register a new account the first time you useit. You can now select the game (IL-2 Sturmovik) and login. This mustbe done either manually or automatically each time you connect to Hyper-Lobby. Once in, you will see the main room with menus of dogfight andcoop servers, together with the delay time from your machine to the server.These servers are clickable to find more information about the server, suchas the players present and the difficulty settings. Try joining some servers,and enjoy! Further documentation is available at the main site.

8.2 Coop and dogfight servers 126
8.2 Coop and dogfight servers
8.3 Difficulty settings
8.4 Online etiquette
So you’ve decided to go online and test your mettle against actual humanpilots, but don’t want to come off as either a complete “n00b” or breakthe “rules” of online play. This section is meant to provide some basicsconcerning what is expected behavior, and to outline a few conventions ofcourtesy.
Before we get to the finer points of saluting, let’s get to the heart ofonline etiquette, the one rule that goes before all else:
Don’t be a Jerk.
If you can remember that, chances are the rest of this section is reallyjust window-dressing. There are a few other things you should know to befurther appreciated, and probably should know online. For lack of a betterorder, here are a few important ones in “alphabetical order.”
Ask questions If you don’t know what you’re doing, ask! Lots of folks willbe more than happy to answer you in a polite manner. Don’t constantlyapologize for not knowing what you’re doing. If somebody asks a questionthat you know the answer to, answer it politely, and don’t be smug.
Cheating There are two aspects to cheating that you must be aware of.The first is the Cheating Detected message that appears in the upper-right- Cheating
Detected!hand corner of the screen. It has nothing to do with cheating at all, but ev-erything to do with Internet connections. That message essentially indicatesthat there is a fair amount of lag going on. Lag is a time delay between thehost server and the individual player machines connected to it. A certainnumber of people have found that they can alter their connection speed inorder to intentionally induce lag and thus warp around a server. To fix this,an autokick feature was introduced to servers that works based on excessivelag and, rather unfortunately, uses the on-screen text Cheating Detectedto indicate this condition. Few people really try to cheat this way, so pleaselearn to interpret this message as the simple presence of lag.

8.4 Online etiquette 127
The second aspect is accusation. Never accuse anyone of cheating. If thepilot in question is an experienced player who who’s really into flight sims,they’ll probably take a screen shot and use it as proof of their skill—thereis no higher compliment than being accused of cheating in a sim wherethe flight and damage models are closed. If the pilot is not so experiencedor have an over-developed “serious gland,” they’re likely to become veryupset and you’ll have made an enemy rather than a friend. The flight-simcommunity is a close one, and you’re likely to be seeing the same people fora very long time in a lot of other sims. Accuse a lot of people of cheatingoften and your reputation may follow you, probably resulting in you gettingbooted from servers for causing trouble.
Never assume that just because externals are on in a server that folksare using it as “radar” to detect you before seeing you–it’s not only impoliteto accuse people of doing so, it could very well be completely false. Thisappropriately leads into the next section.
Complaining This is a High Crime. The server settings are available forreview before you enter a server; it is your responsibility to look at them.Likewise, you must read the briefing at the start of the mission and obey theserver rules. Entering a “full real” server (one with all difficulty settings en-abled) and berating the host for not enabling padlock or icons will gain youno sympathy and, if you persist, booted out of the server. What? You don’tlike “all planes” servers with icons, optional cockpit and no AA protectionfor the airfields? Very well, exit to find a new one—but don’t forget to typesomething like “Salute! Thanks for hosting!” before doing so. (This will beyour secret code phrase for “Arcade weenies!”) You can ask for a change insettings on the server where you are; some hosts will do so if others chimein as well. But be polite.
If somebody’s shooting you down a lot, don’t gripe about it. Learn toavoid that player, as he’s an ace of sorts! Or, better yet, start to play as partof a team (see below).
Cursing Don’t curse in the chat buffer. It irritates everyone and reallymakes those with kids mad. A seven-year-old sitting behind his dad towatch while he plays online does not need to read the “F-word,” thank you.Some regular dogfight-server hosts will give one warning and then boot fora second offense. Other hosts have a “no swearing” warning as part of themission briefing, and will boot on the first offense.

8.4 Online etiquette 128
Know your skill level If you can’t tell a FW-190 from a P-39, perhaps ano-icon server isn’t for you. These things come with time. If you’re in aserver where you’re hopelessly lost or having so much difficulty that it’s nofun, then give a ”Salute!” and move on. There’s no patented “right” way toplay the game.
Matching plane sets Many dogfight servers are “all planes,” meaning thatjust about every plane in the sim is available. Look to see who’s flying whatby pressing the S key once you’ve started out, in order to see what folksare flying. If fifteen of sixteen players are all in 1942 planes, perhaps youshould rethink your selection of the ME-262 or LA-7. It’s not “wrong” topick a plane that’s “superior” to the others, but you’ll find that everyone willappreciate you being a good sport.
Play as part of a team Just because you find yourself in a dogfight serverdoesn’t mean you can’t show some team spirit! Fly along with others onyour side, escort a bomber, call for help and let folks know where the badguys are. Assist in kills, watch the other fellow’s six, take out anti-air guns,and get in the game. You’ll not only make everyone glad you’re there, you’llhave more fun. If others don’t want to play as part of a team, ignore themand find others that do. In coop missions, team play will be essential toachieving the mission goals.
Salute! Typing Salute!, <S>, S! or the “russified” C! into the chat bufferindicates that you are saluting the other players. This is not only a greeting,but also a common response after shooting someone down or being shotdown yourself. It means the battle was won fairly, that you respect theother player even though, for example, you just fooled them into divingafter you and losing all of their control surfaces, or that you respect the factthat they fooled you into diving too fast! It can also mean, “No hard feelings,I’ll get you the next time!” “Good gravy, man, I’m in a TB-3. It’s not like Ican maneuver out of the way of your head-on pass, try not to ram me nexttime,” “Great battle, I really thought you’d get me (or, I’d never get you).”
Pilots commonly salute when entering or leaving a server. In short, theS! is a sign of respect to the host for putting up a server and to other pilots.Keep in mind that it is not required—you are not necessarily snubbing any-body if you don’t use it, nor is anyone else who doesn’t use it snubbing you.In addition, use of the S! is interpreted by some as gloating or smugness. Itisn’t. If it is, shrug it off.

8.4 Online etiquette 129
Shooting bailed pilots While some think nothing bad of it, many playersdo, particularly in scripted servers or tournaments. The best course of actionis to simply not shoot parachutes. It doesn’t hurt or help you to do so. Itadds insult to injury for most people. Doing this is can get you booted onsome servers, and if you do it you take the risk of taking the fight beyondthe virtual skies.
Skill Some players are very skillful. Others are not. Never tell someonethey stink at flying! If they do, they probably know it. Only offer help once;nobody likes somebody critiquing them constantly in a game. If you stink atit, don’t worry about it. There are no cash prizes for shooting planes down,just see improvement as an interesting challenge. Don’t single out new orpoor players. Go after the more skillful first, and allow the inexperiencedpilot a chance to figure things out and learn that people fly differently thanthe AI. If you can, help the other player out in non-verbal ways, such as usingmaneuvers that they have a better chance of keeping up with and learningfrom. Only taunt players whom you know well—and be mild about it andclearly humorous. Remember that messages in the chat don’t always conveyyour intended good humor.
Stealing kills If you see two pilots fighting and one has the upper hand(and is on your side), orbit around, take up a number-two slot behind himor maneuver in a perpendicular plane to establish a higher energy state, butdon’t shoot. Let the guy that has done all the work finish him off. You canalways ask if he needs help; chances are he’ll say yes and move off so youcan get the shot. If you do shoot down a heavily damaged plane in a bigfurball, consider typing “Salute! Team!” or something similar, which is avery nice way of saying that it was you that put the last bullet in the plane,but not most of them. You might also follow up with an explanation, such as“That was XXX’s kill, not mine. Great flying XXX!” You’ll make friends andbe appreciated for it.
Squadrons Those funny numbers and letters in front of everyone’s namesrepresent virtual squadrons. A squadron is essentially a club of sorts whereguys get together at the same time and fly. Sometimes they practice witheach other. Squadrons allow you to gain entry into tournaments, onlinewars, etc. They are often based on a historically unit or squadron, but notalways. There are players that just stick something in front of their namesto avoid looking like mercenaries. A mercenary is the term for independent

8.4 Online etiquette 130
flyers as they’re often invited to join tournaments as part of a squadronwithout formally joining one.
If you see a coop forming that’s all one squadron or has“XXX Squad Practice” in the title of a dogfight server, ask before taking aslot or when first joining it to find out whether you’re welcome. If the serveris private it will probably be password-protected, but not always. Chancesare you will be welcome, but if they ask you to please not join, do so witha “Salute!” (In this case the salute will be your secret code for saying “Fine,you arrogant elitists, I’ll go play elsewhere since you’re not worthy of myskills.”) They’ll remember you were respectful and chances are invite youin next time. They might also invite you in to play the “spoiler” in theirserver as they practice. Be warned, though, they’re almost sure to be onvoice comms and are probably practicing team tactics—you will most likelybe ganged up on. They may even invite you to join at some point, as mostsquads recruit based on personality rather than skill.
In conclusion, just be nice, be yourself, relax, and have fun. Be respectfulof others, and they’ll be respectful of you. And if all else fails, remember thatyou can host servers and missions yourself!

CHAPTER 9
IL-2 features and references
This chapter is organized into sections based on the selection possibilitiesof the main screen of IL-2 . It goes beyond a simple description of the basicfeatures to make some suggestions based on user experience. There is alsoa section on the demo version, which allows you to evaluate the game forfree, and one on patches, or game updates, that will help anyone who hasjust bought the game get up to speed on the current and last version of thesim.
9.1 Pilot
This screen allows you to create, remove and select pilots from a register.When you create a new pilot you can give him or her a nickname. Thenickname of the selected pilot will represent you when flying online. Foreach pilot on the register, the individual control settings will be stored, sowhen creating a new pilot you will either have to reassign all commands orcopy the existing pilot settings from another account that has already beenconfigured. Pilot settings can be done by replacing the settings.ini fileof the new pilot’s folder with the settings.ini file of another under theIL-2 Sturmovik\Users folder. (verify)

9.2 Controls 132
9.2 Controls
Your controls are the interface between yourself and the simulator. Thisincludes keyboard commands, the mouse, joystick assignments, rudder ped-als and any viewing system (such as TrackIR) and other hardware you’vebought or made. Just about everybody will at some time or another want tochange their settings to match their flying preferences.
9.2.1 Commands
Reaction time can mean the difference between life and death. You don’twant to have to delay a reaction because you don’t know how to implementit. There are 137 commands listed under Control Keys Reference in the fold-out sheet that comes with IL-2 .1 Many of these are for views or settings in ascale such as for throttle, but there are a lot of commands, and a quick lookat the cockpits will remind you why.
It is worth mentioning that you can choose to do things your way, thatis, reassign the keys and joystick buttons to your heart’s content. From themain screen, click on Controls, then choose the right-hand column of theappropriate entry. A tap of the new key or joystick-button assignment willregister the new command assignment. Be very careful, though, assigninga key or joystick button that is already assigned somewhere else will re-move the original assignment2 without a notification, and there is no wayto automatically cancel the reassignment. Even if you realize (too late) thata reassignment occurred, to get it back you either have to know what theoriginal assignment was or reset all of the default settings and start all newassignments from scratch.
You can also make one or two assignments to the same control function,or leave it unassigned. Leaving it unassigned can be useful if you reallyintend never to use it, so that you never accidentally engage that function.Making two assignments for the same function can be useful in that you canbackup joystick buttons from the keyboard.
A word to the wise: decide on your system of special control assignmentsas you learn your own needs and know it well, but be careful not to makemore work for yourself than you save. Each pilot that you create can havehis own set of customized commands, and indeed each time you create anew pilot he starts out with the set of default commands. This could come
1Some reduced-price versions do not come with printed material, only the CDROM.2The original assignment is not deleted if the two assignments do not conflict, such as
Look Forward under snap view assignments and Center View under pan view assignments.

9.2 Controls 133
as a shock if you don’t discover it before the heat of battle. Creating a newpilot simply means that you will have to make all of your changes again. Ifyou have very many customized settings at all, it is advisable to create a listof them for yourself so that you can re-implement the changes quickly.
You might consider creating a test pilot, perhaps name him Test ‘Con-trol’ Settings, and practice implementing any changes on him before you gomessing with your own settings.
Before we move on, here are some suggestions for useful reassignmentsto make if you have a joystick with a throttle slider and a few buttons:Prop. Pitch 0-9 Keys 0–9 (throttle settings not needed)Weapon 1-4 Assigning to joystick buttons frees Enter,
Backspace, Space keysRudder, Aileron Trim Arrow keys without Ctrl keyLook Forward Joystick buttonCenter View Same joystick button as for Look ForwardElevator Trim Positive Joystick button of choiceElevator Trim Negative Joystick button of choice
9.2.2 HOTAS
HOTAS stands for “hands on throttle and stick.” These are the controls inIL-2 that you can control with a device that has smooth, continuous input,generally referred to as a slider. An example that everybody knows is thethrottle slider found on almost all joysticks. If you have a joystick installed,the Power HOTAS control probably already says something like -U Slideraxis. The Aileron and Elevator controls should likewise be assigned, andRudder as well if you have a twist function on the joystick, or much better,rudder pedals (see section ).
In addition to these, you can assign smooth, continuous control to Flaps,Brakes, Prop Pitch, and the various trims. There is significance in thefact that the maker of the sim chose these specific control assignments forsmooth control. . .
9.2.3 Joystick settings
Tully has also offered to write some things here, though he might not touchon all topics.

9.3 View objects 134
9.3 View objects
This screen is useful for a few things. One obvious help is to learn what theaircraft, ships, ground vehicles and artillery are in the game, and to familiar-ize yourself with their external appearance. Learning to distinguish betweenaircraft types is extremely important, and for surface attack quickly identi-fying ground vehicles and ships is important. Artillery is less important—they’re not highly visible and you’ll get to know them by what they throw atyou.
Another use of this screen is the text information written for each ofthe objects. It will help you to learn the strengths, weaknesses, history andspecifications of each of the objects, notably the aircraft. You will certainlynot want to read all of this info at once. However, do not underestimatethe usefulness of this resource. New users won’t understand the value atfirst, but you may well find yourself going there time and again. There is anentire book’s worth of carefully researched information there! It is true thatyou won’t find every specification or other piece of information your heartmay desire, and there are complaints that some of the basic performance in-formation is missing. It is what it is, you can take issues up with the creatorsof the game. As it stands, they’ve provided a wealth of information. You canfind similar information for the aircraft at the official website. (The officialsite now also includes information on the aircraft in Forgotten Battles.)
9.4 Credits
This section is pretty self-explanatory. If you integrate yourself into the on-line IL-2 community, you might start to recognize some of the names men-tioned here.
9.5 Hardware setup
9.5.1 Video modes
These settings are directly related to your hardware, specifically the graphicscard and monitor. They affect the quality of graphical rendering by tellingthe hardware how to use its resources. The ability to change these settingsin this menu is merely a convenience, because the settings you can changehere are the same as several of the options available in il2setup.exe. Sinceyou can alter some but not all of the settings here, il2setup.exe gives you

9.5 Hardware setup 135
the full overview, or at least the fullest graphical interface that comes withthe game. In order to avoid repeating the information, these settings arenot described here. Refer to section 10.3 instead for a detailed descriptionof what all of the options under il2setup.exe can do for you.
9.5.2 Video options
These settings are not available in il2setup.exe, and instead of telling thehardware what to do with its resources, they tell the game what level ofgraphical quality should be sent to the hardware for rendering. There aretwo modes of setting the picture quality: simple and custom. The simplemode gives no control over the individual setup items, but makes sweepingchanges with a single selection. The custom mode permits individual set-tings, and is the more flexible and, generally speaking, more useful mode.
Texture Quality
Visibility Distance
Objects Lighting
Objects Detail
Landscape Lighting Excellent may not be selected if XXX feature is notavailable from. . .
Landscape Detail
Clouds Detail Clouds in IL-2 are marvelous, but they do take a lot of re-sources. If your system suffers in performance, this is one setting youmight consider turning back. But oh, those beautiful, highly detailedclouds.
Clicking on Apply applies any changes you have made, whereas clickingon Back without first clicking on Apply cancels any changes.

9.6 Tracks 136
9.5.3 Sound setup
9.5.4 Input
9.5.5 Network
9.6 Tracks
The ability to make tracks in IL-2 is a great feature, allowing the gameengine to play back missions exactly as they occurred.
9.6.1 Capturing tracks
9.6.2 Reviewing tracks
9.6.3 Sharing tracks
9.6.4 Track woes
The track recording system does not always deliver perfect results.
9.7 Training
This section allows you to use the track feature of IL-2 to see flight demon-strations with accompanying text. This feature can be extremely helpful topilots who wish to learn new techniques such as take-off, landing, gunnery,maneuvers and even fighting tactics. It also allows third parties to con-tribute performances that demonstrate basic techniques or tactics, while atthe same time explaining what his being done. When the pilot-in-traininghas reviewed the track, he has the option to play it again and, at the momentof his own choice, pause the action and take over the controls himself.
In essence a training mission is a track that is no different from an ordi-nary track, except that it is stored in a special location and has an associatedtext file with the messages to be displayed and the track time at which theyshould be displayed. As was mentioned, another important difference isthe the ability for the pilot to take control during the track. Several welldone training missions come with the boxed version of IL-2 . However, aswith normal tracks the training tracks are dependent on computer perfor-mance and in particular on the patched game version (see section 9.6.4).Since the flight and damage models and other important factors influencingtrack playback are different between the various patched versions, you are

9.7 Training 137
very unlikely to be able to see the intended action in a training track madeunder a previous version when using a patched version of the game. Thismeans that once you have patched the game to say version 1.2, you willnot be able to view the training tracks that come with the game. Actuallyyou will be able to view them, but you are likely to see aircraft collidingwith the ground, missing targets and other erratic, unintended behavior. Insection 9.14.1 a method of installing parallel versions is described that al-lows you to view training tracks from previous versions without having toreinstall and re-patch the game.
9.7.1 Installing new training tracks
It is relatively simple to install training tracks that have been sent to youor that you have downloaded over the Internet. It is a simple matter of in-stalling a couple of files and editing one line in a text file. Training tracks arelocated in theIL2 Sturmovik\Training directory and consist of two files:the .trk (track) file and the .msg (message) file. To add a training track,you must place the .trk and .msg files in the IL2 Sturmovik\Trainingfolder. In order for the IL-2 program to know about a training track andappear for selection in IL-2 , its name has to be added to the list of trainingtrack files. To do this, open the fileIL2 Sturmovik\Training\all.ini andadd a line in the list with the name of the track. It is important that thisline match the filename (without extension) of your .trk and .msg files.Training tracks available at the Eastern Skies website contain a readme.txtfile highlighting this procedure.
9.7.2 Making training tracks
Making training tracks is not much more complicated than making a regulartrack. However, making a good quality of training track can become verytime consuming, and not many invest this time. The first step is to make atrack that is useful but not too long. In order to make the quality of the trackhigh and its length short, you might consider using the Full Mission Builderto design a mission for yourself. 3 It is advisable to place a few stationarycameras in order to make interesting views. Once your mission is ready youmay need to fly the mission a few times to get it to your satisfaction (orcorrect the mission design), and once you have what you want you shouldrename the best version of the track to something recognizable.
3If you do this, you also might consider including the mission with the training track fordistribution, though this not be of interest to a large number of people.

9.7 Training 138
Now that you have the track ready, play it back with Inflight Messagesenabled and be careful to write down the time in minutes and seconds wheninteresting events take place. Be as thorough as you can to save yourselffrom having to review the track over and over. Once you have written downthe timing of important events, you can start writing messages for the stu-dent to read in the .msg file. The file should start with a line consisting ofthe text [all], and each line after that should contain a time followed bythe message, for instance:
0:01 Hello, pilot.
Once you think you have some useful messages, it is time to put the fin-ishing touches on your track. Play the track back again and consider whatviews you would like. Feel free to experiment with editing the views so thatthe track becomes more interesting to watch. Be sure to always keep a copyof your original track so that you preserve a copy of the views as you sawthem when flying. Use external and fly-by views, and if there are otheraircraft or ground perspectives, show them as well using Shift+F2 andCtrl+F2 for external views and the stationary cameras you have planted.When you are finished, stop track playback (or let the track finish) and savethe track with a new filename.
As you change views and add comments you are likely to get ideas abouthow to place views and comments together to highlight aspects of the train-ing method you wish to bring across. You might want to pan around theinstrument panel, show the attitude of the airplane during a maneuver, orzoom in and out, all the while making comments. Be sure to leave the stu-dent enough time to read the comments. It is likely that you will need tomake several tries to get the views just the way you’d like them.
Another consideration about using the viewing system is at what pointyou would like to enable manual viewing. You might leave Manual ViewControl disabled (radio button in the down position) and then enable it atsome point in the track (press Esc to get the menu to do this). Once youenable manual viewing while playing back a track, you will not be able toget back the views you had while you were flying. The best you can do is totry to recreate them.
Once you have mastered the viewing and gotten the .msg file complete,you are finished. Write up a readme.txt file to accompany them and explainhow to install them, zip them together and send them or upload them. Thinkof having someone review them for you if you feel brave.

9.8 Quick Mission Builder (QMB) 139
9.8 Quick Mission Builder (QMB)
For some people this interface is completely intuitive, for others confusing.The great thing about the Quick Mission Builder, or QMB, is that it is, well,quick, and easy to learn to manipulate. The down side is that it isn’t veryflexible: only a handful of the several maps are available there. The QMBas a tool is primarily useful for designing and hopping straight into quickencounters or training sessions, without any bother about historical accu-racy or a higher level of immersion. A more flexible 3rd party tool, the UberQuick Mission Generator (UQMG), has been developed by UberDemon.
The QMB works as follows. In the upper right-hand corner there is atoggle switch that allows you to select whether your side will fly as red (redstar) or blue (iron cross), the default being red. This will determine thecolor of icons and set you to be either Russian or German by default. Belowthis, the screen is divided into two sides of four flights each, beginning withthe flight you will lead. The first side is made up of Your Flight and threeflights under Friendly. There are then four enemy flights under Hostile.Each of the flights on both sides is able to contain zero to four aircraft, fora total of maximum 16 aircraft per side or 32 aircraft total. From the pull-down menus you can select the number of aircraft in each flight, the AI skilllevel of the flight, the aircraft type and the loadout. All aircraft in the flightwill share these characteristics. This means for example that, per side, thereis a maximum of four different aircraft types available.
Besides the aircraft selections, you can set the environment and limitedmission parameters. Altitude, weather and time of day are understood easilyenough.
The map selection is limited to the Smolensk, Moscow 1 (winter as op-posed to summer) and the Crimea maps. The basic reason for this is becausethere is a lot of work involved in preparing all of the possible waypoints andaircraft permutations possible in the QMB for each map, so a limit was setat three maps. The disadvantage of this is that other maps are inaccessibleexcept through use of the FMB or campaigns/single missions. The UQMGand downloadable missions helps make these maps more readily accessible.It is also possible to download 3rd party campaigns or to purchase campaignpackages.
QMB missions always start in the air, usually with the two sides not quiteable to see each other and separated by perhaps 7 km. Flights on the sameside will begin in formation with the same heading and grouped together.The opposing flights will also be in formation and heading toward you. Theoptions advantage or disadvantage under Situation apply to your side. If

9.9 Single missions 140
you select advantage, all flights on your side will have an altitude advantageof some few hundred meters over the other side. If disadvantage is selected,you will be lower, and if none is selected, you will each start at the samealtitude.
The QMB assigns waypoints in a standard way that provides for engage-ment of the opposing sides, and then leads the aircraft back to an assignedairbase, the red airbase located to the east and the blue airbase to the west.Aircraft that survive the encounter will thus follow the waypoints and land.Selecting an item from the pull-down menu Target will create waypointsaround either an armored column, bridge or airbase at a predetermined lo-cation on the map. This will give ground attack aircraft on your team some-thing to shoot at, and the aircraft on the opposing side something to defend.Selecting the default value of none means that there will be no ground tar-gets, and the aircraft will maintain altitude until engaged or commanded byyourself, or until they descend to land.
Selecting AAA under Defence will generate anti-aircraft batteries aroundthe area of engagement.
The buttons at the bottom of the menu are as follows: Back returns tothe main IL-2 menu; clicking on Load takes you to a menu where you canload previously saved QMB mission selections; clicking on Save takes you tothe same menu and allows you to save the current QMB selections under a”Quick Mission Name”; the Difficulty button takes you to a screen whereyou can specify the difficulty settings for the mission; and clicking Fly loadsand starts you flying the mission.
Whenever you would like to exit the mission, press the Esc key. Fromthat menu, select Quit Mission. From that menu you have the possibilityto change most of the video, sound and control settings, or to return to themission. Once you have clicked on Quit Mission, you are presented with aquantitative summary of the mission results. You also have the opportunityto save a track of the mission for future playback, to refly the mission exactlyas it was generated before, or, by clicking Done, to return to the QMB menuto make changes or return to the main menu.
9.9 Single missions
Single missions are missions without a larger context, that is, that do notbelong to a campaign. Otherwise, single and campaign missions are identi-cal in their structure. To fly a single mission is trivially simple. Click SingleMissions from the main menu, use the country and mission type filters,

9.9 Single missions 141
select the desired mission by left-clicking it, and click Brief. This bringsyou to the briefing screen, where you will see a map with your waypointsand mission objectives, accompanied by a briefing text. You can also set thedifficulty settings for the mission and, under Arming, change the payload,weapons convergences and delays and fuel. When ready to fly the mission,check all systems, strap on your harness and click Fly.
A number of well-designed single missions are included in IL-2 , and amuch larger number are available for download at various sites or fromindividuals online. Additionally, you can create your own single missionsusing the FMB (see section 9.12. This leaves the question of where to putthe things once you’ve gotten them.
In the IL-2 root folder, there is a folder called Missions. If you can,go ahead and open up a file manager and have a look at the Missionsfolder. This folder has a specific subfolder hierarchy, and contains in itsfirst level three folders: Campaign, Net, and Single. You can guess whatgoes in the Campaign folder; more on that later. The Net folder containsfurther folders for online missions, of which there are two types: coop anddogfight. The Single folder is the folder we are currently interested in,the one for offline single missions. Under the Single folder are nationalityfolders, originally in IL-2 there is DE for Deutschland (Germany) and RUfor Russia.4 Under these nationality folders there are further folders—thedefault folders represent the aircraft you are meant to fly in the mission.This is, however, not restrictive: you can add as many additional folders atthis level as you wish, and call them anything you like (within the acceptedcharacter conventions). That is to say, at this level you can organize yourmissions into categories according to your own purposes. It is into thesefolders that the single mission files should be written. (See below for moreinformation on the files.)
The Mission subfolder hierarchy is strictly fixed to into the three cat-egories, the Single folder is divided into countries (although this couldtechnically be represented as some other category), and in each countryany number of desired categories can be introduced. There is a restric-tion that this subcategory can only be one level deep. Subfolders suchas Missions\Single\RU\IL-2\training will be ignored. The subfoldertraining is too deep, and mission files located there will not be found bythe program.
From this hierarchy it should become clear that in the Single Missions
4It is actually possible to create new nationalities at this level, although there is more toit than just adding a folder.

9.10 Pilot career: campaigns 142
menu the player simply specifies where the program should look for themissions. The program will start looking in the Missions\Single folder,and produce a pull-down menu corresponding to the country folders thatare present. Once this is selected, the Mission Type list consists of thesubfolders under the country that exist, and for the selected Mission Typefolder, the mission files present in that folder are listed. When saving andloading files in the FMB, this hierarchy must be respected. In addition, thefolders must exist before IL-2 is started in order for them to be read.
There are two files associated with each mission: the *.mis (mission) fileand the *.properties file. These are ASCII text files with a common basename (e.g., mymission.mis and mymission.properties) that can be readand edited in a text editor, and are generated by the Full Mission Builder.They belong together in the same directory. The properties file containsthe mission description and briefing displayed in IL-2 , and the mission filecontains all other, such as the environmental conditions, objects used andtheir locations, waypoints, etc.
9.10 Pilot career: campaigns
The campaigns in IL-2 are covered in some basic detail in the IL-2 UserManual [7], with introductory text providing overviews of the battles inthe campaign setting, beginning on page 46. On pages 58–63, the manualdescribes: how to start a pilot career, how to interpret the mission briefings,prepare the aircraft with arming settings, give commands to wingmen, andthe difficulty settings.
One reason why so little information about campaigns is provided is thatthere is very little to the them, in the sense that they are quite static. Thismeans that the missions you fly are prepared in advance, and the sequenceis completely fixed in the structure of the campaign. The only variation isthat a given mission slot may be filled by one of two or three alternativemissions that can be used instead of just one. The missions have variety, arewell designed and fairly imaginative, and will still provide you with actionand realistic challenges. However, there is no dynamic nature to them what-soever, and this is generally regarded as a major weakness of the campaigns.The wonderful detail of the flight and damage models, along with the dy-namic and difficult nature of air combat help compensate for this static cam-paign structure, but if you do a lot of offline campaigns, sooner or later itwill not be enough. There are several very wonderful campaigns availablefor download and purchase, but you will not be able to fly a dynamic cam-

9.10 Pilot career: campaigns 143
paign, wherein the results of the previous mission affect the status and goalsof the current mission.
9.10.1 Campaign hints
Think carefully about what difficulty settings you choose at the beginningof the campaign, as you won’t be able to change them during the campaign.The campaigns.ini file in the pilot folder that determines the settings can-not be edited except by the IL-2 program.
All of the missions involve flying to and from the target area, usuallyby means of the waypoints provided. For most missions this involves notmuch more than a short hop. By the standards of the Pacific Theater, a 50-minute flight to target is almost desperately close, but on the Eastern Fronta 50-minute flight to target is abnormally long: the air forces were usedto support the front lines and kept within close striking distances. I havelearned to derive great pleasure from flying the aircraft to the engagementarea, and some of the most exciting moments come from coaxing a damagedcrate back to a friendly airstrip or workable crash site that can get yourpilot home safely. Still, the virtual pilot is not a full-time pilot, and doesn’talways want to spend 5–20 minutes to the target and then the same stretchback. What’s more, there is a logical error in many of the campaign missionsthat causes your flight to climb and cruise at nearly maximum performance.This makes it difficult for the aircraft to form up and fly together to target,especially when you are not the flight leader. The AI-controlled aircraft donot have the same modeling and can fly without overheating, but not soyour aircraft. It’s not such a “hot” idea to fly at max power and arrive at theengagement area with a nearly overheated engine.
You can compensate for time-to-target and formation/overheating prob-lems by using autopilot and time acceleration. Although this really doesn’tgive you the feeling of being a pilot flying over the front lines, it can savesome nerves when you are having trouble keeping up with your group orspending more time than you’d like getting to and from target. However,be warned. The autopilot is known to occasionally fly you straight into theground or a mountain, and can even cause aircraft to crash while in forma-tion. Time acceleration can be dangerous too, especially at high speeds. It’seasier for bandits or even the engagement area to sneak up on you (unlessyou’re watching icons on the map) at higher time acceleration. In addi-tion, the tracks often do not always play back correctly when recorded atthe higher time accelerations. This may or may not be computer-systemdependent.

9.11 Multiplay: flying online 144
9.10.2 Campaign installation
Concerning the installation of campaigns, these should always come withexplicit installation instructions. If they do not, write to the campaign au-thor(s) and ask for them. Installation is usually not difficult at all, but cannotbe taken for granted. The structure for campaign missions is identical for allcampaigns, but different authors sometimes have special touches that theyadd on.
The file structure of the campaign is quite similar to that of single mis-sions in section 9.9. Under the folder location Missions\Campaign comecountry folders, by default only DE and RU. In the country folders are sev-eral files, including all.ini (containing a listing of the installed campaignfolders) and several award and rank (promotion) files. Under the coun-try folders are also the campaign folders themselves. IL-2 comes with onlythree campaigns: one for the Luftwaffe fighters (starting with the Bf-109),one for the VVS ground-attack aircraft (Il-2) and one for the VVS fighters(starting with the LaGG-3). In the version 1.04 patch, a campaign for thenewly introduced Bi-1 rocket was added. Additional campaigns will requirean additional folder and identically named entry in the all.ini file. Insideof the campaign folder come all of the mission and corresponding propertiesfiles used in the campaign, plus an info.properties file that provides anintroductory text and a campaign.ini describing the order of the missions(and any random substitution in a mission slot), plus the tracks to be playedbetween missions. These tracks should be installed in the Intros folder,located under the root IL-2 folder.
9.11 Multiplay: flying online
9.11.1 Dogfights
9.11.2 Coops
9.12 Full Mission Builder (FMB)
The Full Mission Builder, or FMB, is the tool to use for creating new missionsof all levels of complexity, including simple maps for your own use, onlinedogfight maps, coop missions, and full-blown campaigns. Unless you fly asingle mission, campaign, or other mission prepared in advance by someoneelse, this is the only method you have for accessing the Berlin, Kuban, Kursk,L’vov, Moscow (summer), Prokhorovka, Stalingrad and online maps, since

9.13 Demo 145
only the Smolensk, Crimea and Moscow (winter) maps are available fromthe QMB.
If you start out using only the official notes from the IL-2 User Man-ual, you will be able to create missions, but the interface is often counter-intuitive and you will unnecessarily spend a lot of time to figure things out.What is needed is a more detailed, user-friendly description, but a descrip-tion of the basic user interface, features, tips and tricks of the FMB requiresa fair amount of written material. An online guide5 has been provided thatattempts to cover the necessary basics and add a few helpful tips. The bulkof the guide was both written and compiled by Pomak249, with some edit-ing and a couple of sections contributed by michapma. It is available on thehost site Eastern Skies. Unfortunately, the material there does not providean ideally user-friendly description and has not developed into the defini-tive guide to the FMB, but should nevertheless provide a good springboardto the powerful, fascinating and addictive FMB. Questions not covered bythe guide, and hopefully these won’t be basic, can be asked at the MissionBuilder Forum (see section 11.1).
9.13 Demo
There was a lot of anticipation of IL-2 prior to its release. A part of the evan-gelical efforts of the 1C:Maddox team was the release of a demonstrativeversion (demo) with a limited number of features that could be downloadedand installed for free, with the goal of enticing the curious to purchase thegame. An updated version of the demo is still available to those unsure ofwhether they would like the game. The download is about 150 MB, andlinks to locations where the demo can be downloaded are found on theofficial website.
9.14 Patches
Since its release in November 2001, a regular series of game updates werereleased, the final one before Forgotten Battles being version 1.2ov (version1.2 is nearly the same). These so-called patches make a great number ofcorrections, including flight- and damage-model tweaks, changes in sound,the introduction of new aircraft, etc. A complete list is available on the
5Previously, an excellent guide to the FMB had been written by Sotka and was hosted atSturmovik Technika. When that site closed, the guide was closed with it.

9.14 Patches 146
official site. This list also provides links to locations where the patches areavailable for download.
How to install the patches(this patch file is meant to patch over version 1.0, the boxed version)Why I should install the patches.
9.14.1 Installing parallel patch versions
For reasons of viewing tracks, continuing campaigns using consistent flightand damage models, or comparing the various patched versions, you mightconsider installing more than one patched version of IL-2 on your computer.This is fairly easy to do. It is usually not at all necessary to reinstall theprogram. IL-2 is not dependent on entries in the Windows registry. To makeparallel installations, simply create a parallel IL-2 folder in a new location(such as in the Ubi Soft folder) and copy the entire contents of the existingversion of IL-2 that you would like to use as a basis for the new version.This is probably best understood through an example.
Let’s assume that you have installed IL-2 from the box and enjoyed fly-ing partway through a campaign, but have now discovered that you canpatch to version 1.2. What to do? In this example, make a new folder un-der C:\Program Files\Ubi Soft named IL2 Sturmovik 1.2, which willbe parallel to the original installation folder IL Sturmovik. Next, copy(not move) all of the files in the folder IL Sturmovik into the new folderIL2 Sturmovik 1.2. Voila! You now have two parallel installations of IL-2 .To actually make the new version into version 1.2, you should apply the ap-propriate patches to folder IL2 Sturmovik 1.2. Namely, you should down-load and execute first patch file il2upgrade 1.1a.exe and then the patchfile il2upgrade 1.2.exe to folder IL2 Sturmovik 1.2. These two versionsof IL-2 will now be completely independent of one another. However, youshould be careful to update the links located on your desktop and/or underStart . Programs.
CHAPTER 10
Technical hints
You’ve just bought the sim, excitedly install it, and start it up. Oh man, this isjust gonna be so . . . what the? It doesn’t work? Smeared graphics? Stutter!Three frames per second? What kind of stupid game is this?! And how doI take a screenshot and look at it? Don’t worry, you aren’t the first to havetechnical issues. It’s happened to a good many of us, and here’s the goodnews: assuming your machine is powerful enough to handle the program,you can get it up and running smoothly.
10.1 Screenshots
Taking screenshots in IL-2 is easy, you just press the PrtScr key while theaction is right. Of course taking good screenshots is a bit of an art: find-ing the right angle for the shot, getting the graphics settings right and soon. Some tips are to use tracks to play back the action (this can take somepatience on longer missions while waiting for the track to play back to theright point), slow down the action (use the [ key to get just the right mo-ment and then pause (P). You should use F2 and F8 to get the right externalshots.
Now for the technical side. The shots themselves are dumped by thegame to the system root folder, the default location is
C:\Program Files\Ubi Soft\IL-2 SturmovikThey will be in the Truevision Targa (TGA) format and listed sequentially asgrab0000.TGA, grab0001.TGA, etc. This format is an uncompressed bitmap

10.2 Terminology 148
of the screen image and gives a very accurate representation of what wason the screen. Its disadvantage is that the file size can be enormous; as anexample, a 1280×960 resolution with 24 bits per pixel renders a file sizeof 3.5 MB. A simple conversion to a compressed file format such as JPEG(without compression or smoothing) results in much smaller file sizes, de-pending on the compressibility of the image. A shot that contains mostlyblue sky will compress much better than one from a cockpit with a land-scape outside. A typical conversion size for the above example is around400 kB. There are several good quality freewares available on the Internetfor conversion from the TGA type.
Another very important note about screenshots is that the screenshotsequence counter is reset when the IL-2 program is restarted. This meansthat if you leave the program and restart, the first screenshot you makewill be named grab0000.TGA. If previous screenshots have not been movedfrom the root folder or at least renamed, they will be overwritten. It isa good idea is to create a folder structure in a safe place (preferably in adifferent location than the IL-2 program folders) and an equally good habitto develop is to move all screenshots from the root folder every time you exitIL-2 . You might consider structuring your screenshot directories accordingto date, campaign, or whatever is logical for you. If you like most take largenumbers of screenshots but don’t feel like editing and converting every oneof them, it is relatively low maintenance to compress them for archiving(such as with WinZip) them and write them to a permanent backup mediumsuch as a CD. The TGA format compresses quite well, again depending onthe nature of the information in the screenshot.
Note that excessive screenshot capturing during online play can causesevere lag. A limitation of about one screenshot per 10 seconds has been setto reduce this problem. (In Forgotten Battles the capture of online screen-shots without inducing lag has been largely facilitated by the introductionof online tracks, so that screenshots can be made after the action.)
10.2 Terminology
frames per second, antialiasing, anisotropic, etc.
10.3 Game settings
There are a great many game settings to “worry” about in IL-2 . In fact theyare there to help you out, not to confuse you. In general, the more powerful

10.3 Game settings 149
a tool is, the more you have to invest in learning about it at the beginning.IL-2 has great flexibility; it can perform on a wide range of systems. Thesesettings are what help you tweak performance for your own system.
As mentioned in section 9.5.1, the settings that will be discussed inthis section affect the quality of graphical rendering by telling the hard-ware how to use its resources. They are different from the in-game settingsfound under the Video Options menu. The principal tool to work with isil2setup.exe, or just il2setup, and it has a straightforward graphical userinterface (GUI) and is located in the IL-2 Sturmovik root folder. You can’tdo everything with that program, however. As a matter of fact, much ofwhat the program does is make changes to text file named conf.ini, alsolocated in the root folder. If you open this file in a text editor, you will beable to edit it and make a great deal more changes.
10.3.1 il2setup.exe
The discussion of this tool is divided into its tab menus. The setting Introdoesn’t belong to any of the menus, and is located at the bottom left of thedialog. If this is checked, the introduction track will play when you startIL-2 up. It’s novel at the beginning, but after a while you will probably wantto get rid of it.
Driver
Here you will choose information about which (graphics) provider you wantto run the game under, and what video mode to run in. OpenGL and DirectXare the two choices you have for application programming interfaces (API),and there are a certain number of previously determined graphics modes tochoose from.
The game is optimized to run under OpenGL, and with most systemsyou will get higher framerates with it. DirectX, although better supportedby Microsoft of course, may or may not make sense, depending on yoursystem. The appearance of the graphics is definitely affected by the choiceof API (it is strongly affected by the graphics card), so just experiment withboth and see which you prefer. Whichever one you do choose, keep in mindthat it will directly affect the best choice of video settings.
You definitely want to run the game in full-screen mode. When runningin windowed mode, the system still has to worry about rendering graphicsfor other elements outside the window, eating up precious resources.
10.3 Game settings 150
If you don’t see the video mode in the list that you would like to have,don’t worry, you can set whatever you want in conf.ini. See the nextsection.
Stencil buffer. . .
Video
Settings
Texture quality
Texture mipmap filter
Texture compression
Detailed land textures
Use alpha
Use index
Polygon stipple
Use dither
Use clamped sprites
Draw land by triangles
Use vertex arrays
Disable API extensions Extensions:
Multitexture
Combine

10.3 Game settings 151
Secondary color
Vertex array extension
Clip hint
Use palette
Texture anisotropic extension
Texture compress ARB extension
Joystick
There’s not much to this one. Here you can enable the use of your joystick,and by clicking on the Properties button open the Windows Gaming Optionsdialog, where you can calibrate your joystick and rudder pedals (if you havethem, and you should).
If you don’t have a joystick available yet, get one as soon as you can. Itis a question of personal taste whether you want to get the cheapest joystickavailable, a more reasonably performing joystick, a force feedback stick orthe latest HOTAS stick. You can spend anywhere from $30–$300, so suityourself. If you decide to try and control your aircraft with the keyboard,you very probably don’t need this guide.
Sound
Sound is a resources hog. If you’re having frame rate troubles, one of thefirst things you should try as an experiment is turning off sound. You canalso disable or reduce the hardware sound acceleration level. If you areusing DirectX as a sound engine, you can do this by running dxdiag andadjusting under the Sound tab.

10.4 Flight model 152
Network
10.3.2 conf.ini
[window] [game]width=800 Arcade=0height=600 HighGore=1ColourBits=16 HakenAllowed=1DepthBits=16 mapPadX=0.6689453StencilBits=0 mapPadY=-0.046875ChangeScreenRes=1 viewSet=3FullScreen=1 Intro=0DrawIfNotFocused=0 NoSubtitles=0EnableResize=0 NoChatter=0EnableClose=1 NoHudLog=0
NoLensFlare=0
10.4 Flight model
Editor’s note: taken directly from a forum post by Tully , this section needsediting but can be useful anyway.
There are a bunch of different ways to arrive at more or less the sameresult, all demanding different amounts of calculations. The more closelyyou require the sim to match real performance, the more calculation yourequire and the more powerful the PC you need to do it without sufferingan unacceptable performance hit.
Most sims to date have take a short cut by working out a “cheat sheet”of average figures for things climb rate and acceleration at different rangesof speed and altitude. This means that within any given altitude range,performance will not vary.
In order to make the performance in this type of sim realistic, the cheatsheets get very big and have a lot of different performance characteristicsrecorded. For simple models it provides a huge computer performance ad-vantage, but as the performance gets more realistic, the cheat sheets (in theform of a table) begin to take too much RAM.
Another approach is to use mathematical formula to calculate lift, drag,the effects of control inputs etc. on the fly. This uses much less memory, asonly the formulae have to be loaded, but hundreds of time a second for everyplane in the mission, the CPU must work out the answer to every formulain use, so you need a much more powerful computer. IL-2 uses this sort of

10.4 Flight model 153
method. Again, simple models that “gloss over” rarely encountered flightconditions take less computing power, while models that take into accountthings like ground effect, leading edge slats, undercarriage drag, change inweight and centre of gravity due to fuel and ordnance being expended willrequire many more calculations and more computing power.
The sim programmers must choose what level of detail will provide themost detail in the flight model without slowing the computer down so muchthat the game is unplayable. It doesn’t matter how fast your video card isif the computer can’t tell it where the objects are often enough. You’ll getperfectly clear pictures at high frame rates of a warpy slide show if the CPUisn’t up to the task.
This compromise between the level of detail of the flight model and thecomputer’s ability to keep up accounts for a lot of the difference betweensims. It also explains why 1C:Maddox chose to simplify the flight model forthe AI. Making it simpler allows more AI aircraft to be put in the missionwithout slowing down the computer too much.
A third source of differences comes from the quality of the programmershistorical sources. A properly conducted flight test series is more that justthe combat envelop graph and list of a dozen or so speed and climb figures.Full test reports can run to hundreds of pages, more than half of which aretables of figures. Developing formulae to model the physics in sufficientdetail to achieve results that match the performance tests in every detailsis extremely demanding on a computer. Full military simulators use all thecomputing power of a very powerful computer (often multiprocessor) tomodel just one plane. We are (quite unreasonably) hoping that Oleg canperform the same level of detail on machines that run many times slowerand for many planes at once. Compromises have to be made and accepted.
If the aim were to simply have a plane that flew like the real thing, withno scenery, gunnery or other planes, you would find that many of the com-promises would be less obvious or not necessary at all, but we also demandphoto realistic scenery, with both ground and air objects that behave some-thing like realistically and register damage when we shoot at them. Consid-ering what we’re asking of our humble desktops, I think we’re getting verygood results.
Some of the graphical data is calculated by the CPU (position and ori-entation of objects relative to the aircraft as a result of pilot input changingthe aircraft position). User settings like view distance allow the user totake some the load off the CPU. Objects outside the chosen view distanceonly need to have distance calculated. As long as the distance is greaterthan maximum view, only that figure is needed. For objects inside the view

10.5 System performance 154
range, distance, angle, orientation and apparent size all have to be calcu-lated. Obviously, turning down setting like this drastically reduce the num-ber calculation required of the CPU. In this way the developers can build insome user scalable over engineering.
Another aspect of this shows up in tracks. A lot of tracks I’ve downloadeddidn’t work right on my old PC (a P3 500). I’m almost certain that this isbecause it couldn’t keep up with the data handling, and consequently someof the recorded control inputs were skipped or applied late. In a mission,the same factor would mean a small (un-noticable to the pilot, particularlyat low fps) delay in response to some control inputs while the CPU finisheswhat it was doing at the time. In really busy online missions you also seeslow PC’s flying a little unevenly when things get busy. This is because netupdates are delayed in the same way on overwhelmed machines.
10.4.1 Known issues
Overbanking, bank angle/dihedral effect and accelerated stall/spin suscep-tibility, whatever else . . . could compile a list.
10.5 System performance
10.5.1 System requirements
10.5.2 CPU
10.5.3 RAM
10.5.4 Graphics card
10.5.5 Hard disk
10.6 Multiplayer lag
This interesting post was made on the forums by RAF74 Wall-dog. It hasn’tbeen edited but is also deemed interesting as an example of the kind of advicethat can be provided here.
S! All!When you start getting into network topics such as lag in a flight sim-
ulator, you start getting into some pretty murky waters. How it works isactually entirely up to the code. Il2 however does it the ”easy” way - which

10.6 Multiplayer lag 155
is to let the computer doing the shooting determine whether or not it regis-tered any hits (as someone else mentioned). There are pluses and minusesto this approach.
The plus is that if you see something you can hit it. If the player com-puter only sent the server where it fired bulletts and let the server decidebased on plane positions what was a hit (which is another way a game coulddo this) then lag would be a huge issue because you would have to leadyour target by enough not only to make up for your target’s speed but alsoto make up for your lag. And while lag may be somewhat stable it DOESchange so you would never really know how much you needed to lead.
In a nutshell, you see the player shooting behind you because he is shoot-ing at where you were on his computer when he fired rather than where youare on your computer when he fired. And with a 400 MS lag time plus theother player’s lag of say 100 MS, he is firing at where you were on yourcomputer roughly 500 MS earlier. If two players BOTH have 400 MS lagtimes, then the difference between them is a whopping 800 MS!
Lag makes it harder to evade other people rather than harder to hit them.The reason is that you are seeing the same effect your enemy is seeing - heappears to be 500 MS (in our exaple from above) behind where he is on hiscomputer. So your evasion is occuring 500 MS after whatever your opponentis doing. 500 MS may not sound like much, but consider that if he is closeand shooting at you, you will be taking hits before you see him shoot. Theonly ”good thing” about high lag is that it cuts both ways - you get the sameeffect against your opponents that they get against you.
Another issue - and I don’t know if anyone has done this for IL2/FB(but it was certainly done for RB3D) - is that you can make a ”god gun”by recording the packets your computer sends when it scores a hit, figuringout what part of the packets says ”hit,” and then modifying the packets yousend when you fire at other planes to say ”hit” regardless of whether or notyou are really hitting anyone. If you think of the packets as saying basically”I’m at location XY, shooting at plane 123, and missing with 100 % of mybullets” you would simply alter your packets to take out the part that saysyou are ”missing with 100% of my bullets” and insert something that says”hitting with 100% of my bullets.”
Now, that’s a major over-simplification of how a ”god gun” can be createdfor a flight simulator (luckily it’s not as easy as that makes it sounds!), but itis how it is done. Hopefully Oleg has software within the game’s server codethat looks for this kind of thing. Red Baron 3D did not have any code on theserver that looked for ”god guns” and consequently a number of people hadthem. It isn’t hard to imagine a person programming a hot-key to turn their

10.6 Multiplayer lag 156
”god gun” on and off. When they want to force a hit, they simply hit thehot-key to turn it ”on” and then whatever they shoot at they hit - and theyhit with 100% of their bullets (I’ve been using my parser for over a year nowand can see conclusively that the BETTER online pilots only hit with 10% orso of their bulletts - so do the math). Even if Oleg has code to try to catch”god guns” though, it’s a game of cat and mouse with the hackers trying tofigure out how to cheat without the server picking it up.
Other things that are possible by the server letting the planes tell it wherethey are is the intentional lag-warp that players do. That program has beenout for a long time, and I’m sure that it works with FB just as well as itworked with IL2. There was a flag in IL2 that would set a lag limit that madethe lag-warp program less effective, but even then people could still use itas long as they didn’t exceed the tolerance the server set. If the server didsome of the math to determine where planes were then lag-warp weaponswouldn’t work because the server would know basically within a ”bubble”where a plane COULD be and if someone tried to update their location andthe server saw that they were trying to go outside that ”bubble” then theserver would know it and could boot them. IL2 did that to a certain degree(hence the ”cheating detected” message) but IL2 seemed to do it based onlag rather than by making some kind of ”bubble” around a plane’s positionrepresenting where it is possible for that plane to be when it update’s it’slocation. I don’t know how FB does it, if it does it at all (when you tell Olegnot to announce ”cheat” you are discouraging him from building anti-cheatmechanisms into his code - and a lot of people have done that).
The downside of using the server for this stuff is that the algorithms in-volved would be really complex and would be a big drain on the server.So by letting the player computer control position and ”hits” relativelyunchecked, you increase performance but you also make it easier to ”cheat.”Pick your poison. Personally, I’d be willing to tolerate the extra demandsplaced on servers to know that I had a cheat-free game, and I’m willing toput up with false ”cheat” messages if it will help to the end or preventingcheating.
Cheaters are slugs. It’s a good thing that most of the people with theskill to write cheat programs would rather write ”good” programs like Low-ingrin’s or Starshoy’s dynamic campaign programs or like Sturmolog orTonkin’s Mission Saver (or like the RAF74 IL2/FB Dynamic Campaign Sys-tem!!) or like any of the other wonderful user-mods out there. But it onlytakes one programmer who would rather use his skill to destroy a game bycheating rather than to use his skill to enhance a game. Once the program iswritten it starts getting passed around. I always laugh when I see someone

10.6 Multiplayer lag 157
bragging about how they can do this or they can do that when you know thatall they are doing is reading instructions on how to use a program someoneelse wrote. Like it makes them a better person because they can cheat atRed Baron 3D or something. Get a life.
Now I know someone is going to read this and think that I’m telling theworld how to cheat. To an extent I am, but you can imagine that the peoplewith the skill to utilize this stuff already know how to do it (it isn’t rocketscience). I think the community SHOULD know how it’s possible to cheat sothat they also know what to look for and we can have rational discussionsabout it rather than arguments that look like religions discussions ratherthan logical debates.
In my case, if I see someone who is scoring like 20% or 40% hits overa course of time when I know that the BEST online pilots are only around10% (the parser/reporting section of the RAF74 IL2/FB Dynamic CampaignSystem tells me this) then I know I should be suspicious. Luckily I’ve neverseen this happen. I’ve seen players have high hit-rates in individual mis-sions, but I’ve also seen the same pilots have much lower hit rates in othermissions.
And that is the problem! How do you really know what is happening?There IS a lag cheat program out there and there may well be a ”god gun”program. But though you can post that it’s possible to make these programsyou can’t prove based on an individual case that someone is using themunless they tell you that they are.
But of course hackers like to tell everyone how clever they are (and itseems that the less skilled they are the more important it is to them to makepeople think they are clever). So over time we know who they are. Howmany times for example have you seen individual pilots telling everyonehow great the trim-cheat was? Do you think the same pilots would hesitatebefore using a lag cheat or a ”god gun?” No. And they would brag to peoplewithin servers that they were doing it. Nobody knows how clever they areunless they get caught. Such is the beauty of the human ego. I say thatif someone tells the community that they are a cheat than we should takethem at their word and label them as such. All of the cheaters eventuallytell people that they are cheaters - and when they do we should take themat their word. I’m not going to post any names here, but all of us who havebeen around for a while know who they are. Knowing what to look for onlymakes it easier to see when someone is doing it.
Anyway I digress. The point is that lag does matter but not in the waysthat most pilots think that it does. As long as it’s stable it’s not that big anissue, but it does make it easier to hit targets and harder to evade targets

10.7 Useful external hardware 158
thanks to the way plane positions and hits are done. And of course it makesit easier to cheat.
10.7 Useful external hardware
Joystick, throttles, rudder pedals, TrackIR
10.8 Further help
This chapter may have helped to clear some things up for you, but chancesare it hasn’t you still have some great, unsolvable problems to solve. Com-petent help is not far off. After you have tried to understand the problemand gathered information about it, head on over to the Technical Supportforum at the Ubi forums, which is described in the first section of the nextchapter (section 11.1).
CHAPTER 11
The IL-2 community
11.1 The official forums
Some (serious) comments about what can be expected to be found at theUbi Soft forums. These forums are also linked from the official site and arelocated here:
• General Discussion
• IL-2 Squadrons
• IL-2 Community Help
• Oleg’s Ready Room
• Paint Schemes Forum
• Mission Builder Forum
• Movie Makers’ Forum
• Chat Room
11.2 Online resources
It is possible that short reviews of relevant websites and online resourcesare beneficial here. There is a short list of links at Eastern Skies, which willat least lead to sites with more complete list of links.

11.3 How much is too much? 160
11.3 How much is too much?
The sim bug has a nasty bite. You might want to get that looked at. Otherswho have gone before you have found their answers to the question. “Youknow you play too much IL-2 when. . . ”
• you feel uneasy when travelling under 160 kph. (YaksKill 12/28/01)
• you try to explain to people how the nose cannon in a Bf-109 can’thold a candle to the quad 20 mm cannons in a FW-190, and can’tseem to get through to them. . . (Harry14843 12/28/01)
• you see a girl walking by and you hate RL [real life] for not havingzoom (weasel75 2/15/03)
• someone changes lanes to get behind you and you instinctively try toget behind HIM. (mllaneza 2/15/03)
• your car pulls to the left due to bad alignment, and you look for therudder trim knob to correct for it. (I really did this!) (Metlushko2/16/03)
• you pull into the driveway, park your car, leap out and run 50 yardsand throw yourself on the ground cos there’s always a vulcher some-where. (LvT)
• you are lost in thoughts (about IL-2 , sure) and yr wife shouts suddenly“you are flying again, aren’t you?” (Jurinko)
• . . . you get nervous when you hear the song ”Yakkity Yak.”(STRIDER EB 04/03/03)
• your passenger airliner makes some hair-raising corrections at landingand you love every minute of it. (Spiffae 04/03/03)
11.4 Squadrons
Some of the best online experience comes from flying with pilots you know.You can do this by chatting with others in dogfight and coop servers, anddiscussing on the forums and making arrangements to fly and even get oncomms. For a regular online experience though, it is hard to beat partici-pating in a squadron. In a squadron you will undoubtedly learn a lot about
11.4 Squadrons 161
many subjects from more experienced pilots, but more importantly you willhave fun. And this is what squadron participation is all about. Differentpeople have fun in different ways of course. Some enjoy themselves bysimulating historic conflicts and using the tactics they read about from thewar. Others just want to get up in the air and go crazy. There is no rightway, so once you’ve found out what you like to do, talk to others and find asquadron that you think you’d like to join.
Most squadrons have a trial period for new people applying for member-ship, something like a few weeks. This is not really a trial in which you haveto prove yourself, but more like a period of time in which you get to knowthe squadron and observe their activities. The purpose is usually to providepotential members with an opportunity to graciously back out if they findout for any reason that squadron activities aren’t what they had hoped for.There are enough squadrons out there, so make sure you find one suitableto you. You’ll be happy you did.
There are a few other advantages to belonging to a squadron besidesregular online activity and having a group to learn, joke around and conspirewith. One big plus is teamwork and immersion. The use of online voicecomms can be very immersive, and learning and employing team tactics isone of the most challenging and enjoyable aspects of air combat. Squadronscan also participate in public and private competitions and online wars, andsquadron activity opens doors to meeting pilots from other squadrons. Thereare of course potential disadvantages to squadron participation too. Forexample, most squadrons require some minimal regular activity from theirmembers. However, squadron leaders understand that real life comes first,and are flexible.

BIBLIOGRAPHY
[1] E. Angelucci, ed., The Rand McNally Encyclopedia of Military Aircraft,1914–1980. The Military Press, 1981. 2, 2.1.1, 2.2.2
[2] D. Loza and J. F. ed. Gebhardt, Attack of the Airacobras: Soviet Aces,American P-39s, and the Air War against Germany. University Press ofKansas, 2000. 2.1.1
[3] C. Catton and H. Wilson, eds., Warplanes of WWII. Chartwell Books,Inc., 2001. 2.1.1, 2.1.2
[4] G. Goebel, “Air Vectors.” http://www.vectorsite.net/indexav.html, 2004. 2.1.1
[5] M. Spick, ed., The Illustrated Directory of Fighters. Chartwell Books,Inc., 2001. 2.1.1
[6] J. Long, “Sturmvogel.” http://www.geocities.com/CapeCanaveral/2072/. 2.2.1, 2.2.1
[7] 1C:Maddox Games, “IL-2 Sturmovik: WWII Combat Simulator, UserManual.” Ubi Soft Entertainment software manual, 2001. 3, 9.10
[8] J. S. Denker, See How It Flies. online book, http://www.monmouth.com/∼jsd/how/, 1996. 3, 3.6, 7, 3.6, 3.7.2, 4.2, 9, 4.9
[9] EURO Snoopy and Hunter82, “Mudmovers.” http://www.mudmovers.com/, 2003. 3.2

BIBLIOGRAPHY 163
[10] U. S. Army, “Pilot’s Flight Operating Instructions for Army Model P-39Q-1 Airplane.” Pilot’s notes, 1942. 3.5
[11] A. Bush, “Secondary flight controls – flaps.” http://www.simhq.com/air/air 002a.html, 2002. 9
[12] A. Bush, “Air to air gunnery – theory and application, parts 1–3.” http://www.simhq.com/ air/air 028a.html, 2000. 5.1.4
[13] S. Sakai, M. Caidin, and F. Sato, Samurai! ibooks, inc., 2001. 5.2
[14] J. Boyd, “Patterns of conflict.” http://www.d-n-i.net/boyd/pdf/poc.pdf, 1986. 5.2
[15] J. Boyd, “Organic design for command and control.” http://www.d-n-i.net/boyd/pdf/c&c.pdf, 1986. 5.2
[16] K. J. Good, “Got a second? boyd’s cyle – OODA cycle.” http://www.patrolandbeyond.com/tactical notes/ooda cycle.htm. 5.2
[17] R. N. Clark, “Notes on the resolution of the human eye.” http://clarkvision.com/imagedetail/eye-resolution.html, 2003. 5.4.1