Embed Size (px)
Citation preview
1
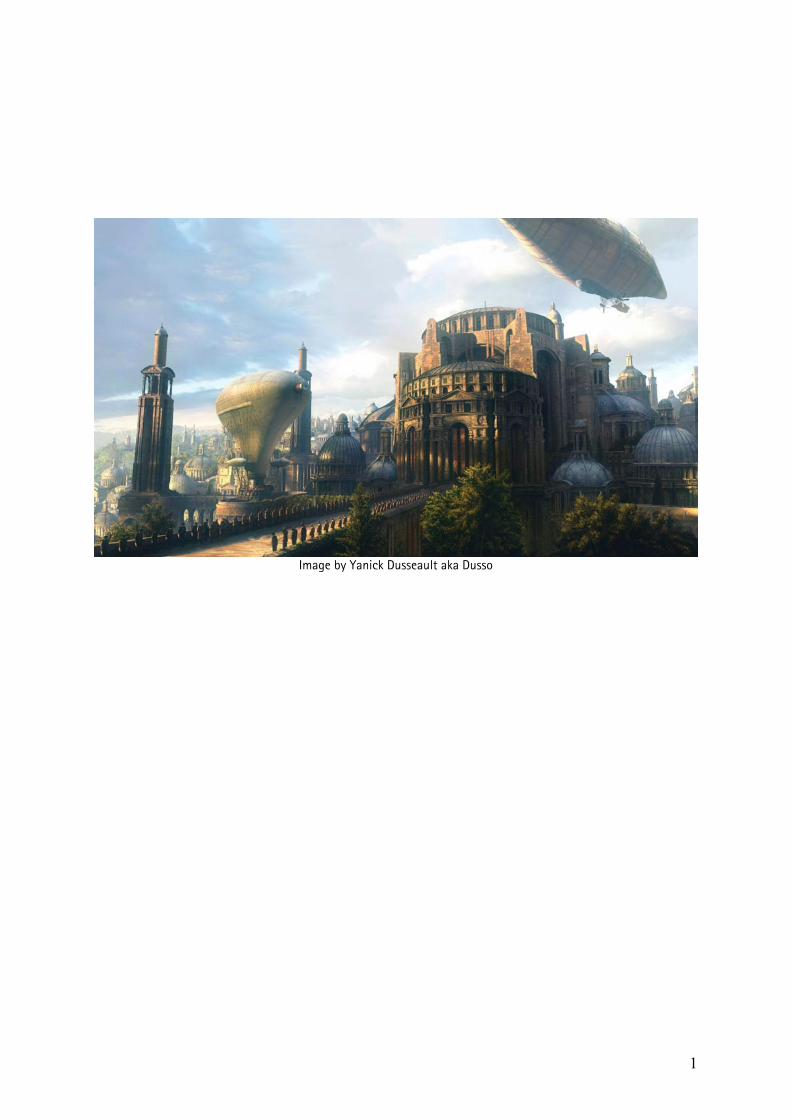
Image by Yanick Dusseault aka Dusso
1
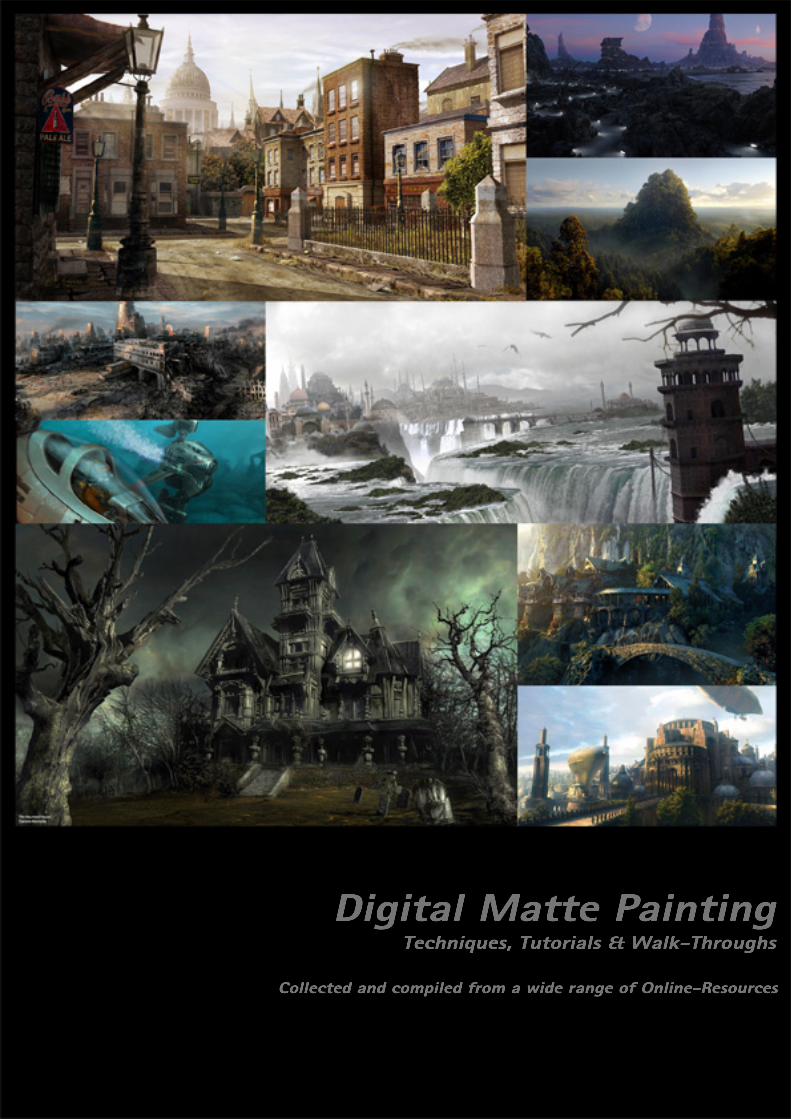
Digital Matte Painting Techniques, Tutorials & Walk-Throughs
Collected and Compiled from a wide range of Online-Resources Being in love with the art of Matte Painting, I collected these tutorials over one year from numerous online-resources and eventually compiled them into this document. Originally intended for personal use only, I thought that maybe some people out there might be interested too, so I deceided to relase them to the public. No big thing, and defenitely nothing new – I just gathered these tutorials to have them all in one place. And if any – or all – of these tutorials happen to be new to you – even better! A great thanks goes out to all the artist who put a lot of their time and energy into the creation of these tutorials.
Happy painting!
MBP aka Bass.T , 12/04
2
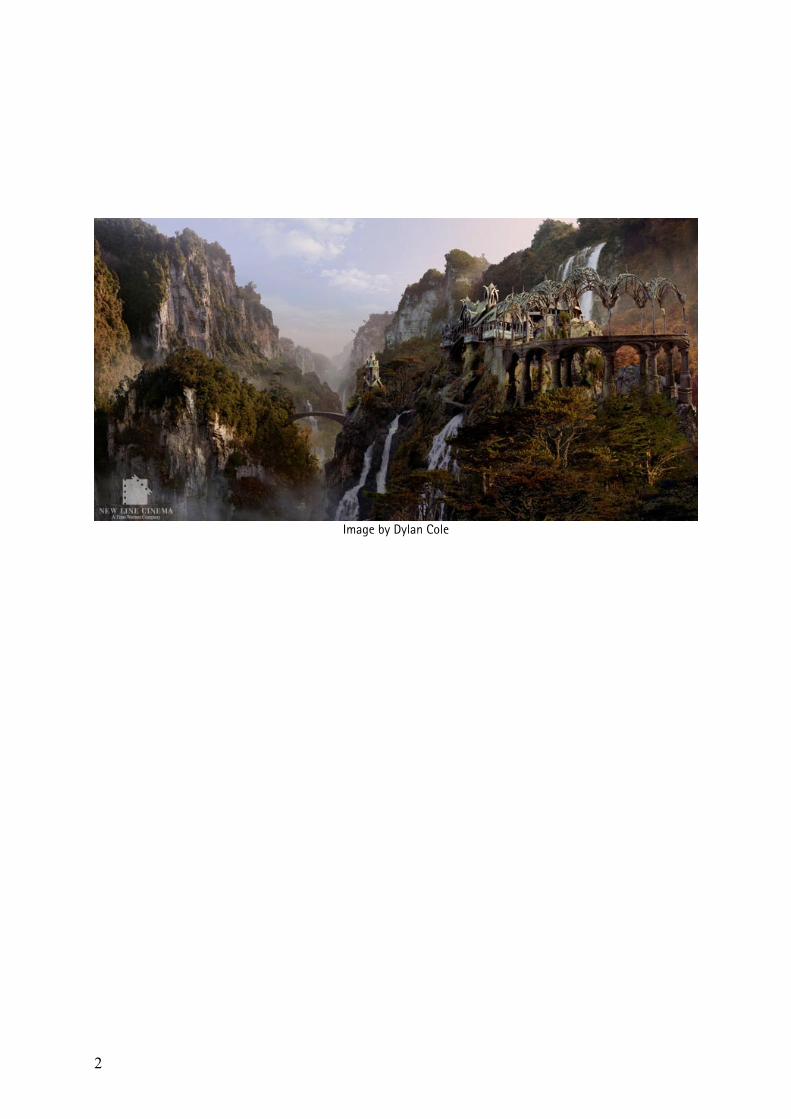
Image by Dylan Cole
3
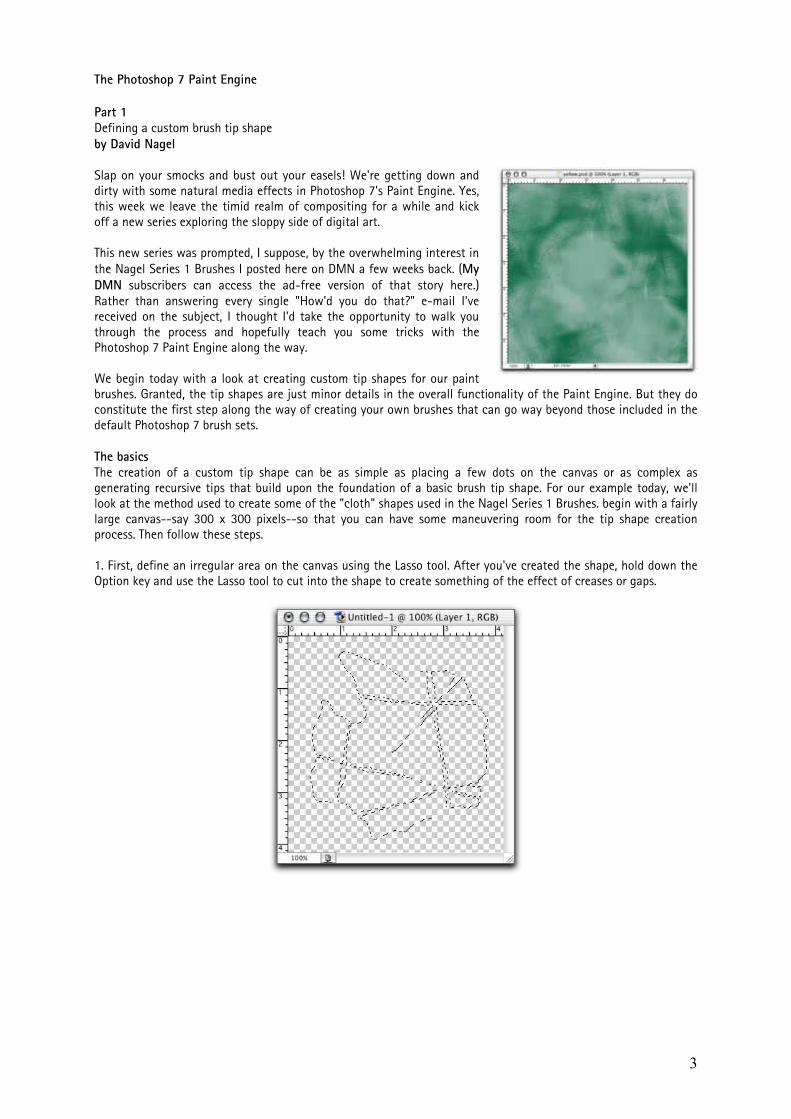
The Photoshop 7 Paint Engine Part 1 Defining a custom brush tip shape by David Nagel Slap on your smocks and bust out your easels! We're getting down and dirty with some natural media effects in Photoshop 7's Paint Engine. Yes, this week we leave the timid realm of compositing for a while and kick off a new series exploring the sloppy side of digital art. This new series was prompted, I suppose, by the overwhelming interest in the Nagel Series 1 Brushes I posted here on DMN a few weeks back. (My DMN subscribers can access the ad-free version of that story here.) Rather than answering every single "How'd you do that?" e-mail I've received on the subject, I thought I'd take the opportunity to walk you through the process and hopefully teach you some tricks with the Photoshop 7 Paint Engine along the way. We begin today with a look at creating custom tip shapes for our paint brushes. Granted, the tip shapes are just minor details in the overall functionality of the Paint Engine. But they do constitute the first step along the way of creating your own brushes that can go way beyond those included in the default Photoshop 7 brush sets. The basics The creation of a custom tip shape can be as simple as placing a few dots on the canvas or as complex as generating recursive tips that build upon the foundation of a basic brush tip shape. For our example today, we'll look at the method used to create some of the "cloth" shapes used in the Nagel Series 1 Brushes. begin with a fairly large canvas--say 300 x 300 pixels--so that you can have some maneuvering room for the tip shape creation process. Then follow these steps. 1. First, define an irregular area on the canvas using the Lasso tool. After you've created the shape, hold down the Option key and use the Lasso tool to cut into the shape to create something of the effect of creases or gaps.
4
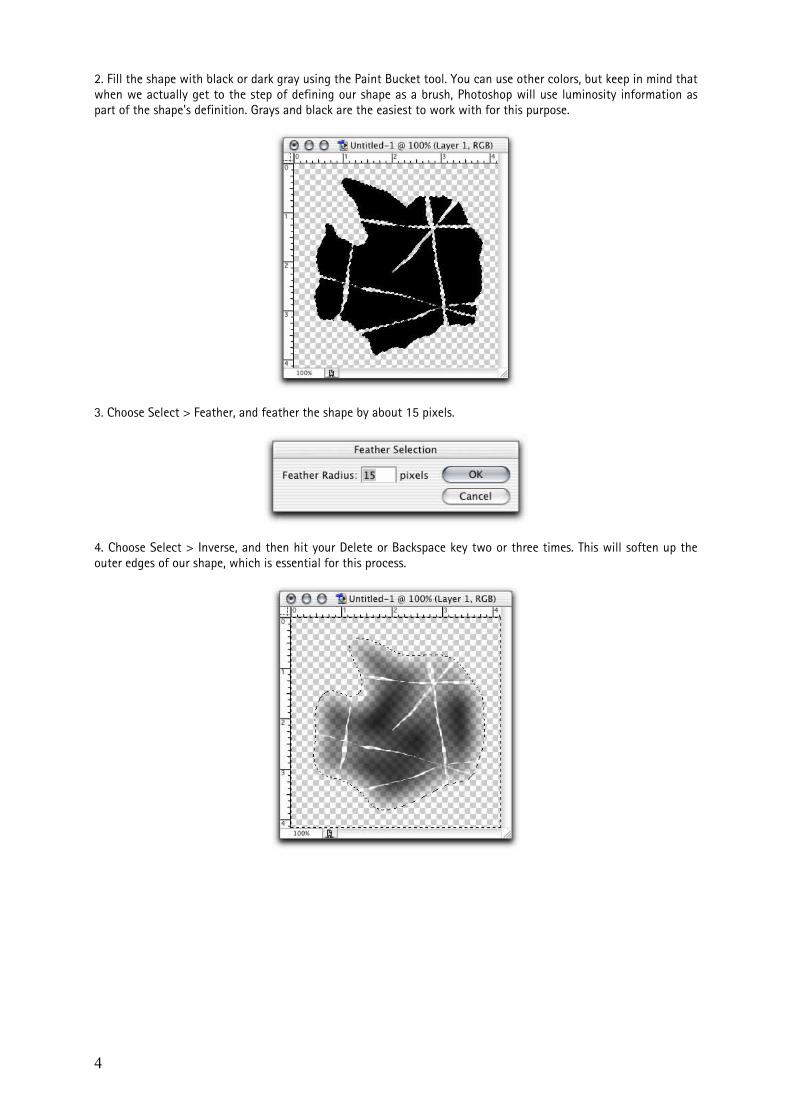
2. Fill the shape with black or dark gray using the Paint Bucket tool. You can use other colors, but keep in mind that when we actually get to the step of defining our shape as a brush, Photoshop will use luminosity information as part of the shape's definition. Grays and black are the easiest to work with for this purpose.
3. Choose Select > Feather, and feather the shape by about 15 pixels.
4. Choose Select > Inverse, and then hit your Delete or Backspace key two or three times. This will soften up the outer edges of our shape, which is essential for this process.

5
5. Do some touch-up work. Go in with your Eraser tool to soften up the inner edges a bit. A well defined shape is not going to work well for our purposes, so try to create some subtle gradations on the creases, while leaving others intact. You might also go in with a soft-edged brush and add some black back into the shape.
6. Run a few filters on the current image. I like the Grain filter (Filter > Texture > Grain). I'll run it once with the "Vertical" setting and once with the "Horizontal" setting. Then I'll apply the Texturizer filter to the image (Filter > Texture > Texturizer) using the Canvas texture. Apply whatever other filters you think might make for a decent cloth look. 7. Now choose Edit > Define Brush. When the dialog box pops up, name it "Phase 1," owing to the fact that we're not done yet. At this stage, you now have a fully functional cloth-like brush.

6
Getting recursive Now we want to do more with this tip shape, so we'll do a little recursion. There are several ways to accomplish this, and I'm not going to get to all of them here. I want to save some of this for future installments in this series. Now, what do I mean by "recursion?" I mean we want to use our "Phase 1" brush as the basis for building a more interesting tip shape. It's decent in and of itself, but we can certainly create variations with more detail and less of a pre-defined look. To begin, save your current document in case you want to work on it more later. Then open up a new, blank document with transparency. You might want to make this one a little bigger than the first, say 500 x 500 pixels to give yourself more arbeitsraum. The first method you can use is to paint on your canvas using the Phase 1 brush. Just draw a few overlapping strokes, trying to obliterate some of the repetitive details in the process.
When you're done, once again choose Edit > Define Brush, and call it "Phase 2." You'll have a whole new tip shape based on the first tip shape. Another method--and one that I much prefer--is to play with Photoshop's dynamics before doing this. I'll give you three good methods for doing this. Open up your Brushes palette, and choose "Shape Dynamics." Set "Size Jitter" down to 0%, but crank "Angle Jitter" up to 100%. Next, go to the Scattering settings in the Brushes palette, and turn on Scattering. Leave it around 90% to 100%. You don't want to go nuts with this, or your brushes will go off the canvas, and you'll be left with hard edges. Finally, go to Opacity Jitter in the Brushes palette. If you have a Wacom tablet, turn the jitter to 0%, but set the control to "Pen Pressure." This will allow you to control the opacity of your stroke with your pen. If you don't have a tablet, turn the control off, but set the jitter to some value between 50% and 100%.
7
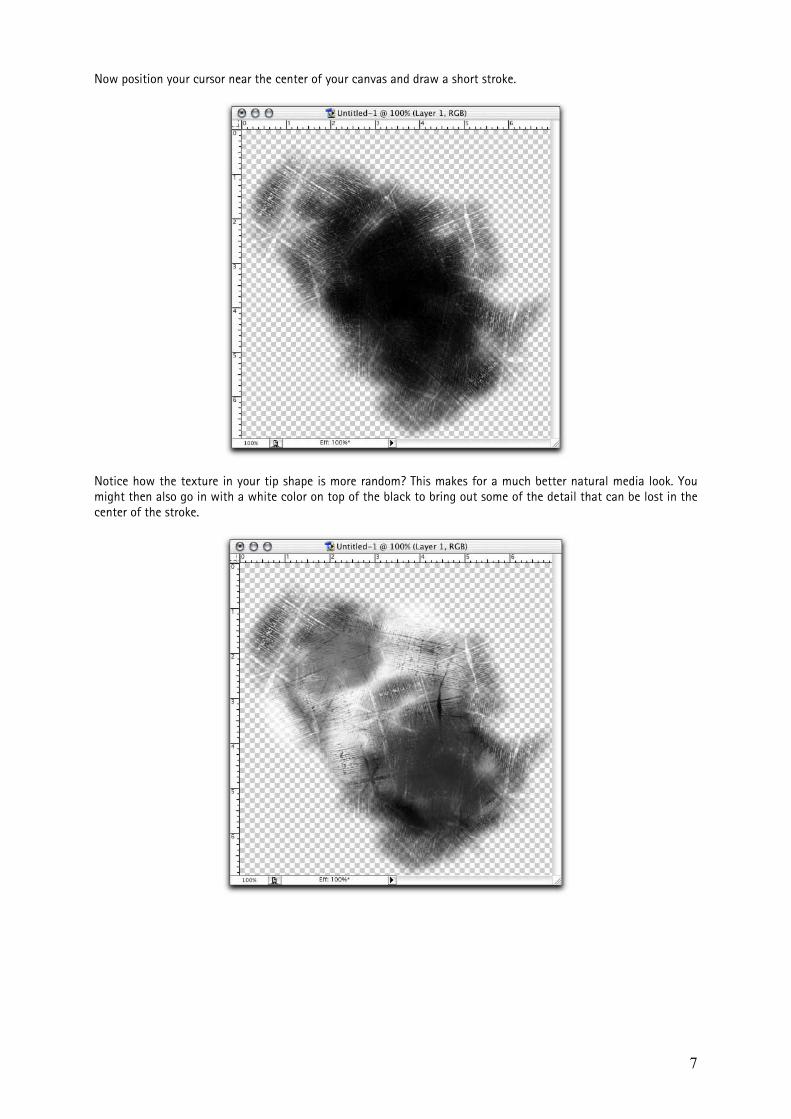
Now position your cursor near the center of your canvas and draw a short stroke.
Notice how the texture in your tip shape is more random? This makes for a much better natural media look. You might then also go in with a white color on top of the black to bring out some of the detail that can be lost in the center of the stroke.

8
When you're done, select Edit > Define Brush, and call it "Phase 3." Using this new brush, you can now produce some pretty decent natural media effects.
Be sure to experiment with these techniques to create other shapes as well.
9
Part 2 Dual brush dynamics Last time around in our exploration of the Photoshop Paint Engine, we looked at methods for creating custom brush tip shapes using paint tools and filters. Now we'll begin a new section covering paint brush dynamics, a set of features that help to make the Paint Engine in Photoshop 7 far superior to anything seen in Photoshop previously for creating custom brushes for emulating "natural" media (as if chemical-based paints were any more natural than digital paint tools).
Why?
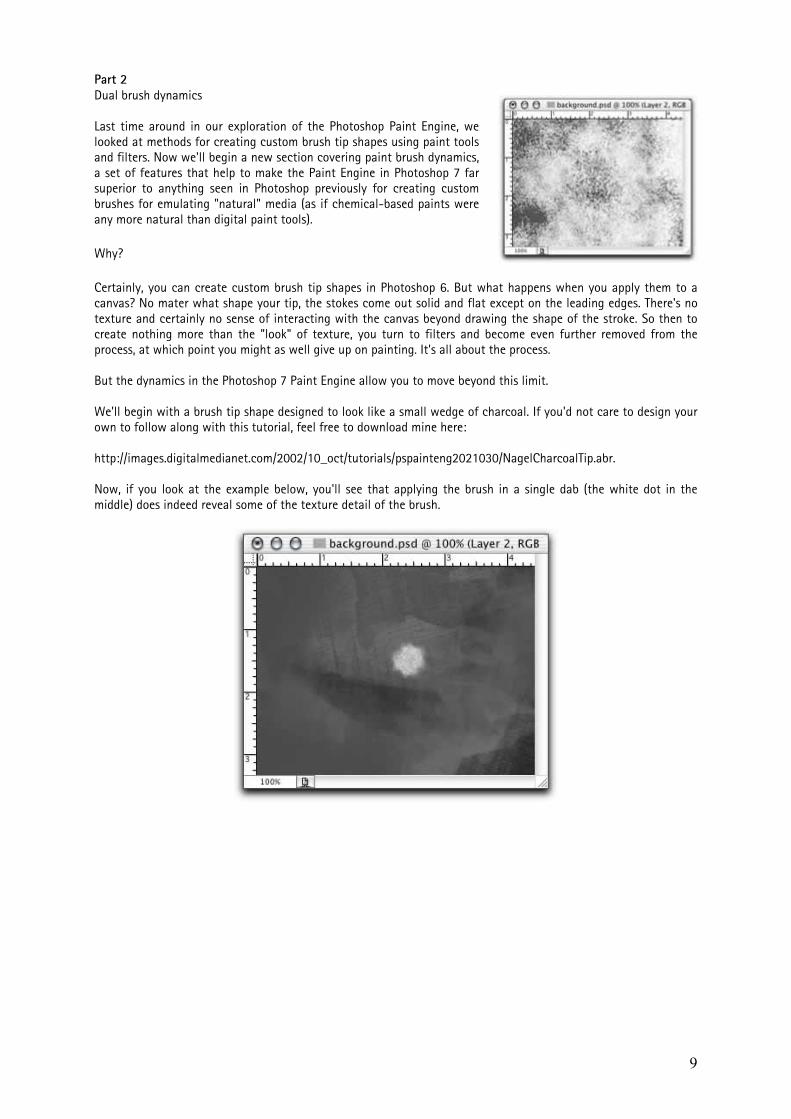
Certainly, you can create custom brush tip shapes in Photoshop 6. But what happens when you apply them to a canvas? No mater what shape your tip, the stokes come out solid and flat except on the leading edges. There's no texture and certainly no sense of interacting with the canvas beyond drawing the shape of the stroke. So then to create nothing more than the "look" of texture, you turn to filters and become even further removed from the process, at which point you might as well give up on painting. It's all about the process. But the dynamics in the Photoshop 7 Paint Engine allow you to move beyond this limit. We'll begin with a brush tip shape designed to look like a small wedge of charcoal. If you'd not care to design your own to follow along with this tutorial, feel free to download mine here: http://images.digitalmedianet.com/2002/10_oct/tutorials/pspainteng2021030/NagelCharcoalTip.abr. Now, if you look at the example below, you'll see that applying the brush in a single dab (the white dot in the middle) does indeed reveal some of the texture detail of the brush.
10
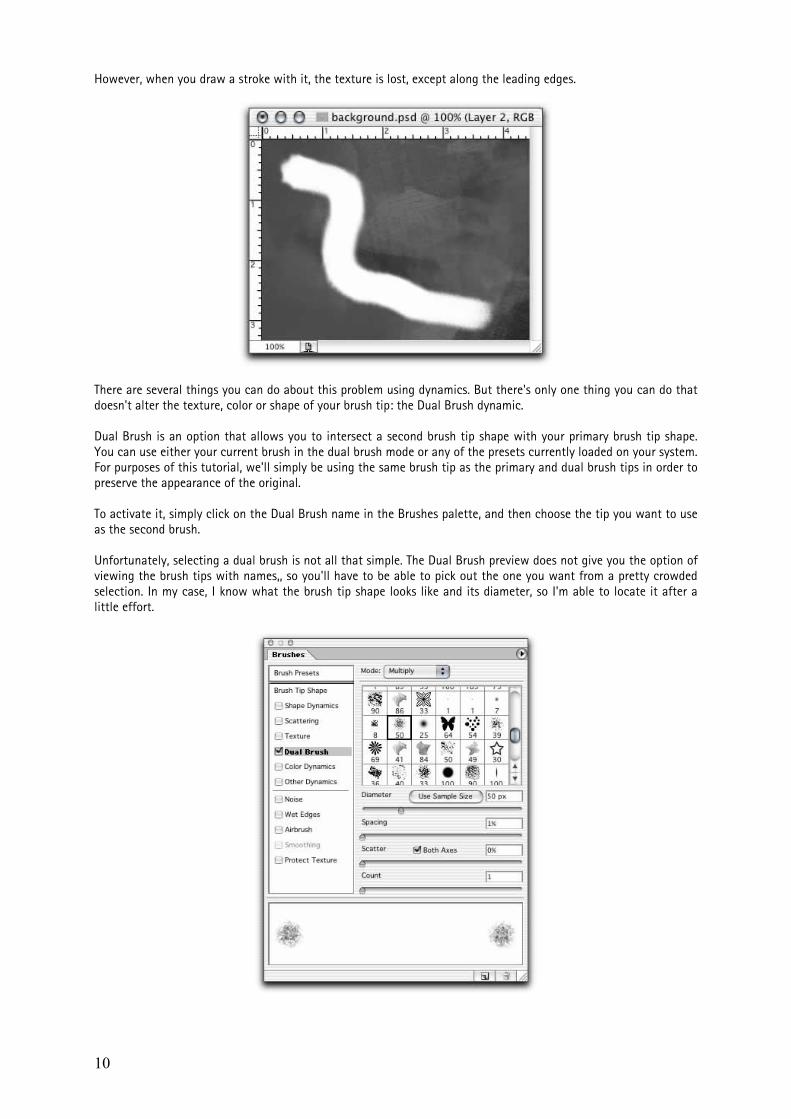
However, when you draw a stroke with it, the texture is lost, except along the leading edges.
There are several things you can do about this problem using dynamics. But there's only one thing you can do that doesn't alter the texture, color or shape of your brush tip: the Dual Brush dynamic. Dual Brush is an option that allows you to intersect a second brush tip shape with your primary brush tip shape. You can use either your current brush in the dual brush mode or any of the presets currently loaded on your system. For purposes of this tutorial, we'll simply be using the same brush tip as the primary and dual brush tips in order to preserve the appearance of the original. To activate it, simply click on the Dual Brush name in the Brushes palette, and then choose the tip you want to use as the second brush. Unfortunately, selecting a dual brush is not all that simple. The Dual Brush preview does not give you the option of viewing the brush tips with names,, so you'll have to be able to pick out the one you want from a pretty crowded selection. In my case, I know what the brush tip shape looks like and its diameter, so I'm able to locate it after a little effort.
11
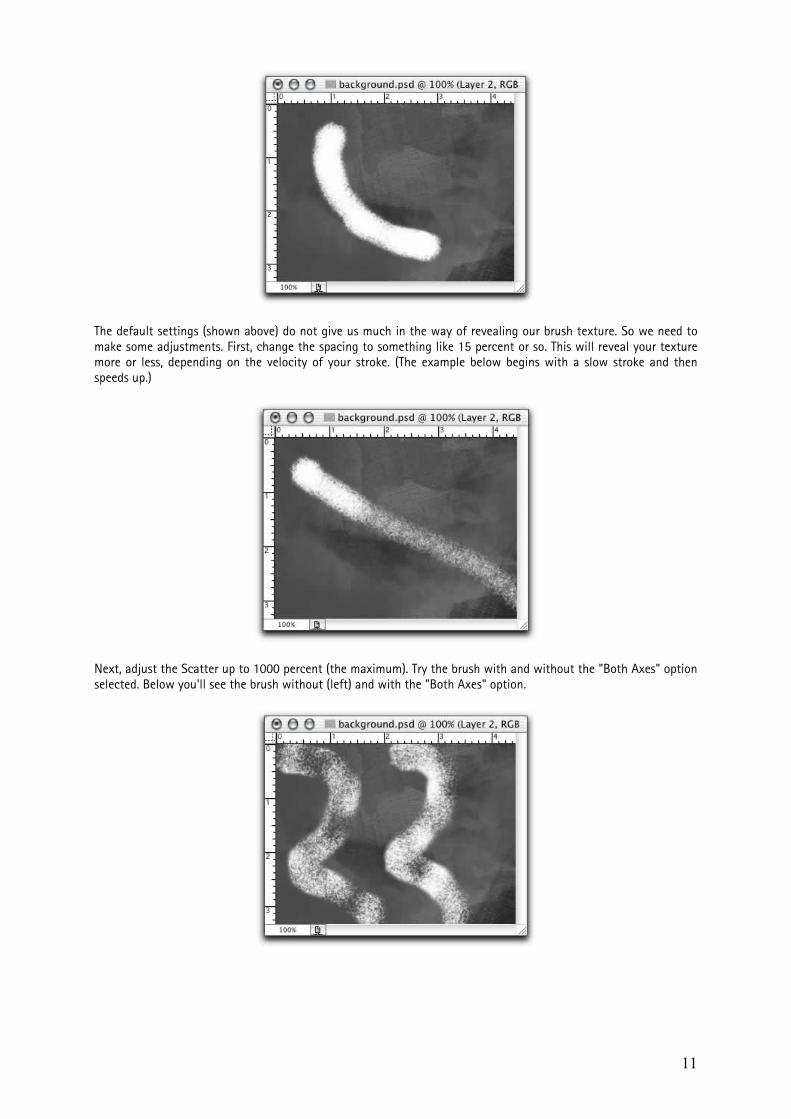
The default settings (shown above) do not give us much in the way of revealing our brush texture. So we need to make some adjustments. First, change the spacing to something like 15 percent or so. This will reveal your texture more or less, depending on the velocity of your stroke. (The example below begins with a slow stroke and then speeds up.)
Next, adjust the Scatter up to 1000 percent (the maximum). Try the brush with and without the "Both Axes" option selected. Below you'll see the brush without (left) and with the "Both Axes" option.

12
You can also reduce or enlarge the diameter of the dual brush in order to reveal the texture of the brush in patterns. Here's I've reduced the dual brush diameter to 10 pixels, creating a dotted effect.
Finally, you can change the "Mode" of the dual brush to create variations. Each one changes the way in which the underlying dual brush reveals the primary brush. Below, from left to right, you'll see Multiply (default), Darken, Overlay, Color Dodge, Color Burn, Linear Burn and Hard Mix.
Note that scattering affects the ways in which the blending modes change your brush's appearance, as does the particular dual brush tip involved. But the most dramatic difference can be seen when adjusting the primary brush tip's spacing, which you can access in the "Brush Tip Shape" parameter. Bellow are the same examples as above, but with the primary brush tip's spacing set to 62 percent.
13
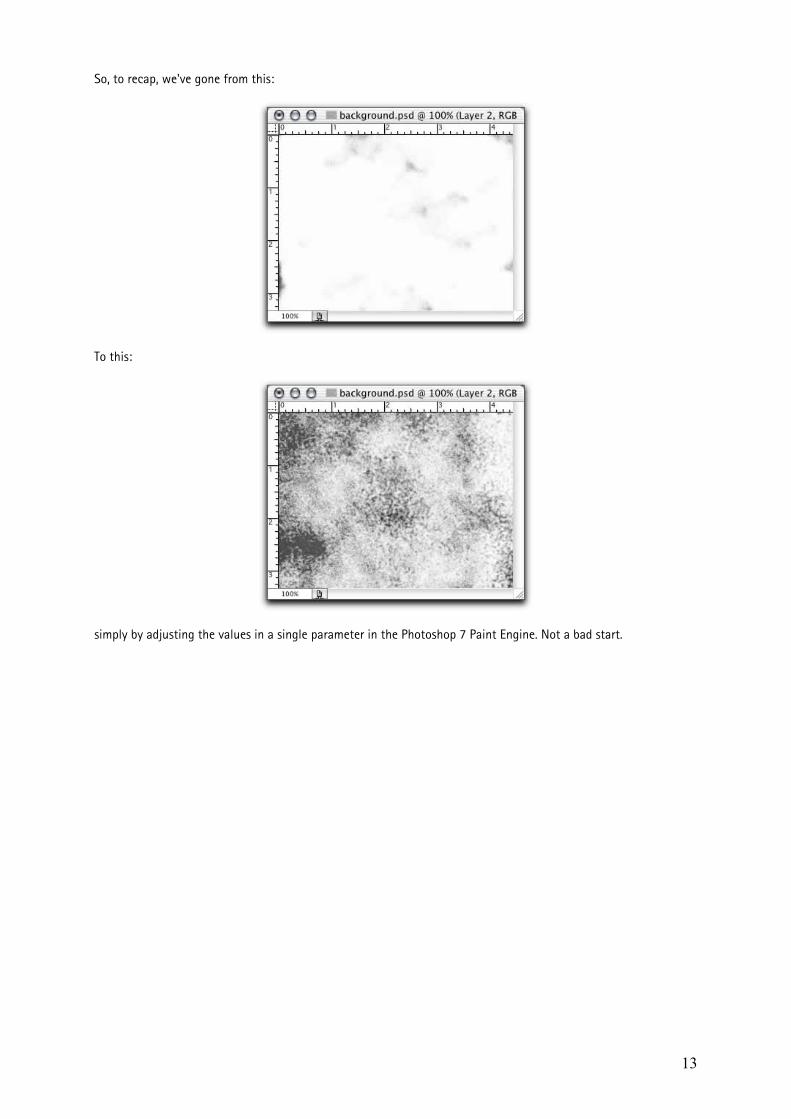
So, to recap, we've gone from this:
To this:
simply by adjusting the values in a single parameter in the Photoshop 7 Paint Engine. Not a bad start.
14
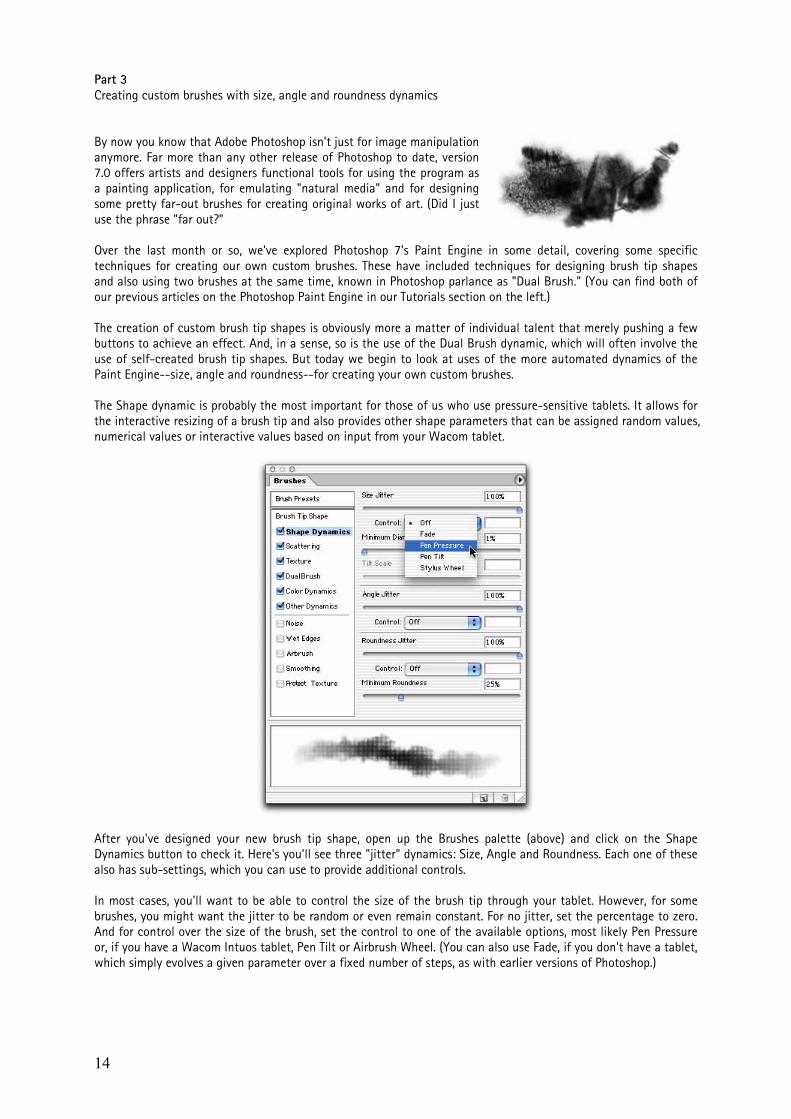
Part 3 Creating custom brushes with size, angle and roundness dynamics By now you know that Adobe Photoshop isn't just for image manipulation anymore. Far more than any other release of Photoshop to date, version 7.0 offers artists and designers functional tools for using the program as a painting application, for emulating "natural media" and for designing some pretty far-out brushes for creating original works of art. (Did I just use the phrase "far out?" Over the last month or so, we've explored Photoshop 7's Paint Engine in some detail, covering some specific techniques for creating our own custom brushes. These have included techniques for designing brush tip shapes and also using two brushes at the same time, known in Photoshop parlance as "Dual Brush." (You can find both of our previous articles on the Photoshop Paint Engine in our Tutorials section on the left.) The creation of custom brush tip shapes is obviously more a matter of individual talent that merely pushing a few buttons to achieve an effect. And, in a sense, so is the use of the Dual Brush dynamic, which will often involve the use of self-created brush tip shapes. But today we begin to look at uses of the more automated dynamics of the Paint Engine--size, angle and roundness--for creating your own custom brushes. The Shape dynamic is probably the most important for those of us who use pressure-sensitive tablets. It allows for the interactive resizing of a brush tip and also provides other shape parameters that can be assigned random values, numerical values or interactive values based on input from your Wacom tablet.
After you've designed your new brush tip shape, open up the Brushes palette (above) and click on the Shape Dynamics button to check it. Here's you'll see three "jitter" dynamics: Size, Angle and Roundness. Each one of these also has sub-settings, which you can use to provide additional controls. In most cases, you'll want to be able to control the size of the brush tip through your tablet. However, for some brushes, you might want the jitter to be random or even remain constant. For no jitter, set the percentage to zero. And for control over the size of the brush, set the control to one of the available options, most likely Pen Pressure or, if you have a Wacom Intuos tablet, Pen Tilt or Airbrush Wheel. (You can also use Fade, if you don't have a tablet, which simply evolves a given parameter over a fixed number of steps, as with earlier versions of Photoshop.)

15
But that's fairly obvious. What isn't as obvious is that you can also use jitter in combination with pen pressure or tilt to vary the size of the brush tip even as you're controlling it with an input device. This means that, as you use pressure (or tilt), the jitter of the size of the tip will tend toward the size of the stroke indicated by your input device. More pressure will provide a larger stroke with some jitter on the large side, while less pressure will do the inverse.
(Note that if you use tilt as the controlling parameter, you can also adjust the "Scale" of the tilt to increase or decrease Photoshop's tilt sensitivity. Now, to expand on shape dynamics, you can also add controls for angle and roundness. Roundness determines the obliqueness of the brush tip and can be controlled in the same ways as size. So, in other words, you can create random roundness, pressure-controlled roundness or a combination of the two.
And then, probably the most useful of all parameters for emulating natural media, we also have angle jitter. Now, the angle of your brush tip will be more or less apparent depending on the shape of the tip, of course, but you can also combine the angle dynamic with roundness for a more natural-looking stroke and a stroke with better differentiation in directionality.
16
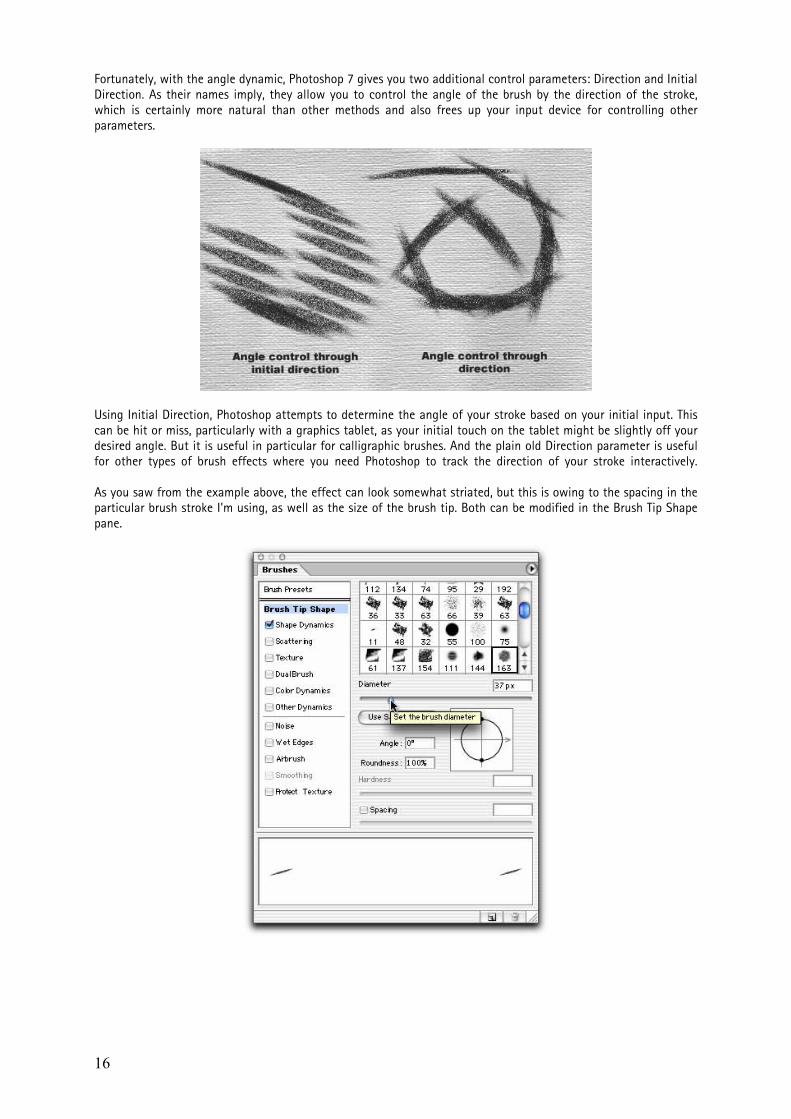
Fortunately, with the angle dynamic, Photoshop 7 gives you two additional control parameters: Direction and Initial Direction. As their names imply, they allow you to control the angle of the brush by the direction of the stroke, which is certainly more natural than other methods and also frees up your input device for controlling other parameters.
Using Initial Direction, Photoshop attempts to determine the angle of your stroke based on your initial input. This can be hit or miss, particularly with a graphics tablet, as your initial touch on the tablet might be slightly off your desired angle. But it is useful in particular for calligraphic brushes. And the plain old Direction parameter is useful for other types of brush effects where you need Photoshop to track the direction of your stroke interactively. As you saw from the example above, the effect can look somewhat striated, but this is owing to the spacing in the particular brush stroke I'm using, as well as the size of the brush tip. Both can be modified in the Brush Tip Shape pane.
17
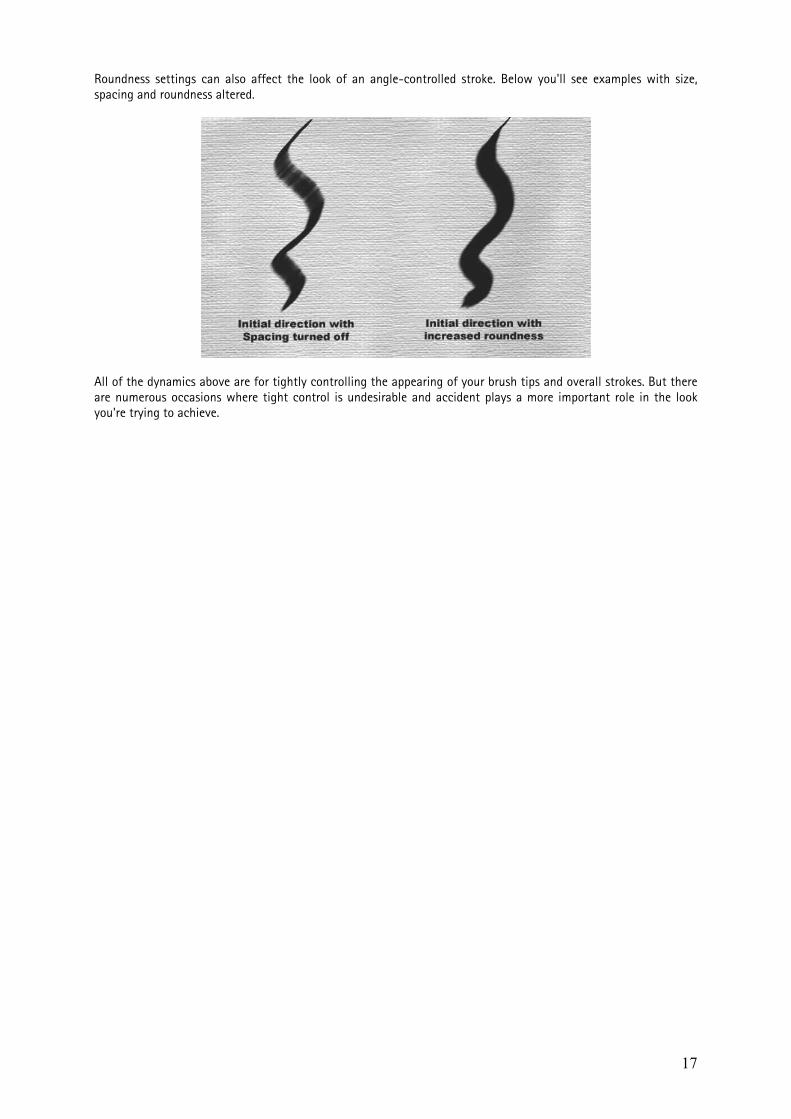
Roundness settings can also affect the look of an angle-controlled stroke. Below you'll see examples with size, spacing and roundness altered.
All of the dynamics above are for tightly controlling the appearing of your brush tips and overall strokes. But there are numerous occasions where tight control is undesirable and accident plays a more important role in the look you're trying to achieve.

18
Part 4 Working with color dynamics to preserve texture and add depth It's difficult to say which aspect of Photoshop's Paint Engine is the most important. Custom brush tip shapes, textures, shape dynamics: They're all important for creating custom brushes, especially for natural media emulation. But what do all of these matter if you lose the texture and shape of your brush when you're painting?
Enter Color dynamics.
Let me give you an example of what I'm talking about. Let's say you go to the trouble of creating a brush tip that's designed to resemble cloth. You get it looking just right, apply some shape and dual-brush dynamics to it, and then start painting. But what happens?
You go from this starting brush:
To this flat painting:
But using Color dynamics with your brush, you can avoid this mess and preserve all or some of your original brush tip shape.

19
Start by opening up a brush that you've creating using any of our previous tutorials, which you can access by clicking the Tutorials button on the left. Then open up the Brushes palette, and click on the Color Dynamics option.
Here you'll find a number of settings for modifying the color of your strokes, each one valuable for different purposes. Each of the "Jitter" settings allows you to modify the color of your stroke. With the Foreground/Background setting, you can set your strokes to fade between foreground and background colors, and you can also set the amount of fade to be based upon input from your drawing device (such as a pressure-sensitive tablet) through pressure, tilt or airbrush wheel. You can also set it to fade over a set number of steps. Setting the jitter to zero will cause Photoshop to blend between the foreground and background only through your specified control. Increasing the jitter will through randomness into the blending in addition to any controls you've set. Or, if you se the controls to "off," you can have a purely random jitter. In the example below, you see the foreground (red) blending with the background (blue) resulting in purple with a medium amount of pen pressure.
20
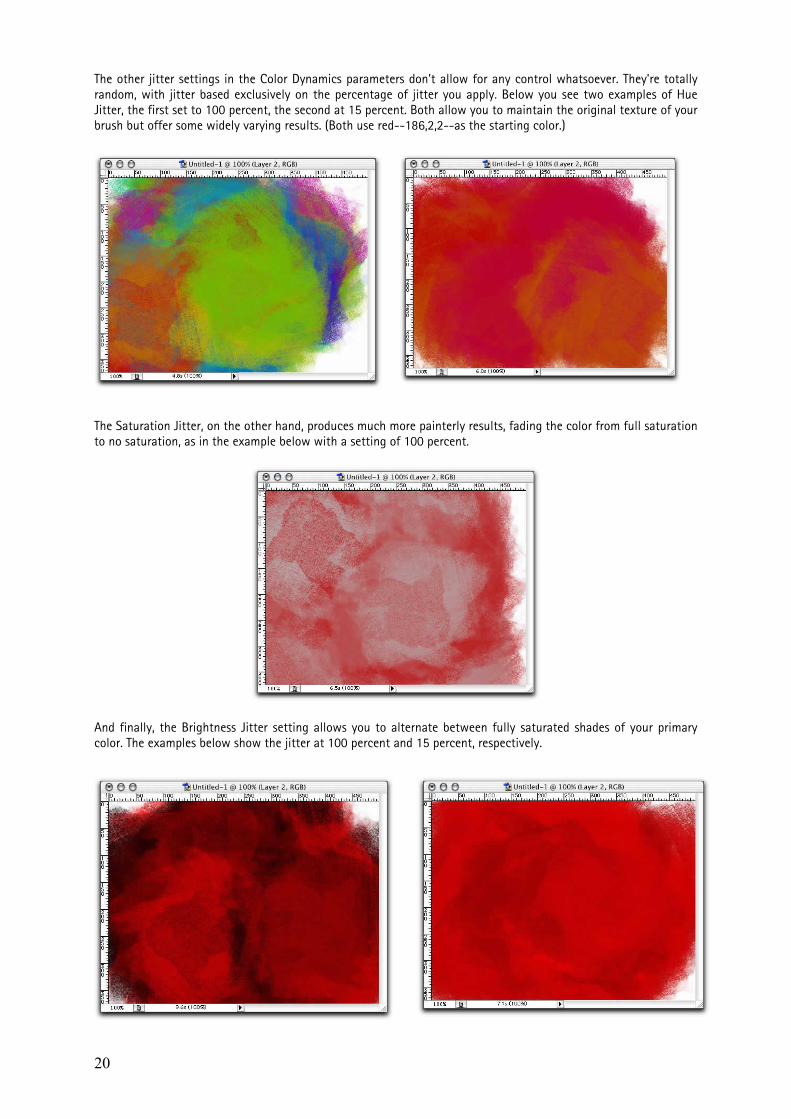
The other jitter settings in the Color Dynamics parameters don't allow for any control whatsoever. They're totally random, with jitter based exclusively on the percentage of jitter you apply. Below you see two examples of Hue Jitter, the first set to 100 percent, the second at 15 percent. Both allow you to maintain the original texture of your brush but offer some widely varying results. (Both use red--186,2,2--as the starting color.)
The Saturation Jitter, on the other hand, produces much more painterly results, fading the color from full saturation to no saturation, as in the example below with a setting of 100 percent.
And finally, the Brightness Jitter setting allows you to alternate between fully saturated shades of your primary color. The examples below show the jitter at 100 percent and 15 percent, respectively.
21
All of these jitters can be used in conjunction with one another not only to preserve the look and texture of your custom brush, but also to create a feeling of depth with very few strokes. The following example is a single short stroke over a white background using a red color. The settings are: Hue Jitter, 6; Saturation Jitter, 67; Brightness Jitter, 17.
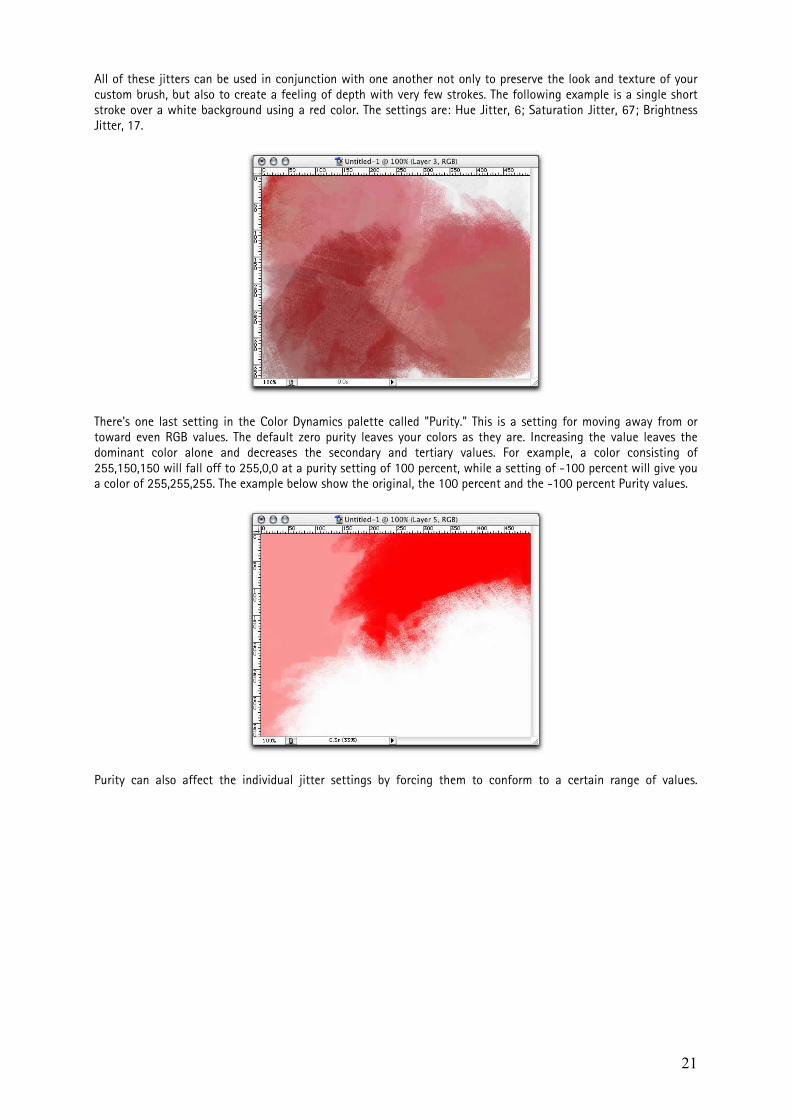
There's one last setting in the Color Dynamics palette called "Purity." This is a setting for moving away from or toward even RGB values. The default zero purity leaves your colors as they are. Increasing the value leaves the dominant color alone and decreases the secondary and tertiary values. For example, a color consisting of 255,150,150 will fall off to 255,0,0 at a purity setting of 100 percent, while a setting of -100 percent will give you a color of 255,255,255. The example below show the original, the 100 percent and the -100 percent Purity values.
Purity can also affect the individual jitter settings by forcing them to conform to a certain range of values.

22
Part 5 Delving into directionality to create 'Spirographic' brushes This is our fifth exploration into the Paint Engine in Adobe Photoshop 7. Since so many of the remaining parameters in this program are self-explanatory, I thought we'd break away for a while from simple feature explanations to a more practical look at what you can do with some of the Paint Engine's dynamics--in this case directionality for creating geometric and "Spirographic" line effects.
The goal of this particular tutorial is to work with various directionality settings in Photoshop 7 to create two sorts of effects: intertwining lines and "Spirographic" patterns, similar to what you could produce with a Hasbro Spirograph game. That is, effects that produce repeating, overlapping lines like meshes. This needn't be applied simply to lines, however. You can use this same trick on ore complex brushes for producing repeating, but shifting patterns out of any brush tip shape, including images. In the end, we'll wind up with a paint brush that can accomplish this effect interactively by simple freehand drawing or through path stroking.
Creating line-effect brushes
Since the goal of this tutorial is to produce brushes that create line effects, we'll begin with the creation of a single-pixel-wide brush. But, again, you can use any brush tip shape for this process. (Later in this tutorial we'll look at more "Spirographic" brushes as well.)
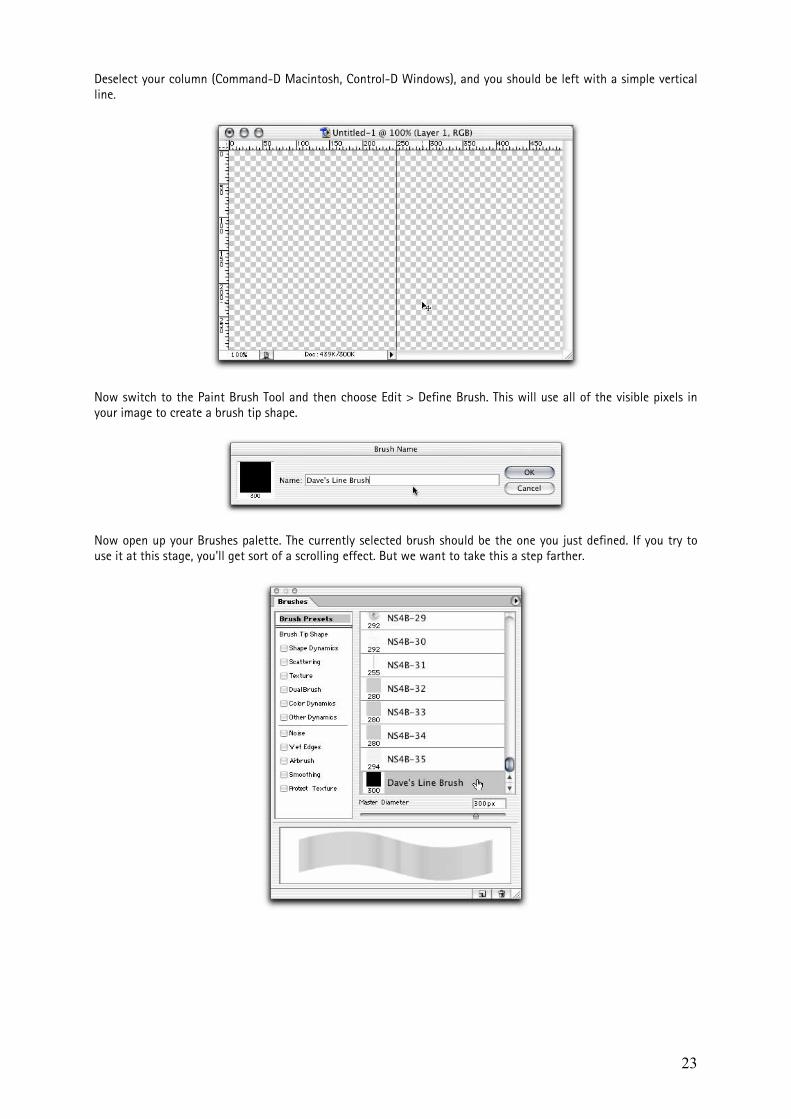
Open Photoshop, and create a new document. Switch to the Single-Column Marquee Tool, and click somewhere in your canvas. Then choose Edit > Stroke. In the dialog that pops up, enter a one-pixel stroke width using black as the stroke color.
23
Deselect your column (Command-D Macintosh, Control-D Windows), and you should be left with a simple vertical line.
Now switch to the Paint Brush Tool and then choose Edit > Define Brush. This will use all of the visible pixels in your image to create a brush tip shape.
Now open up your Brushes palette. The currently selected brush should be the one you just defined. If you try to use it at this stage, you'll get sort of a scrolling effect. But we want to take this a step farther.
24
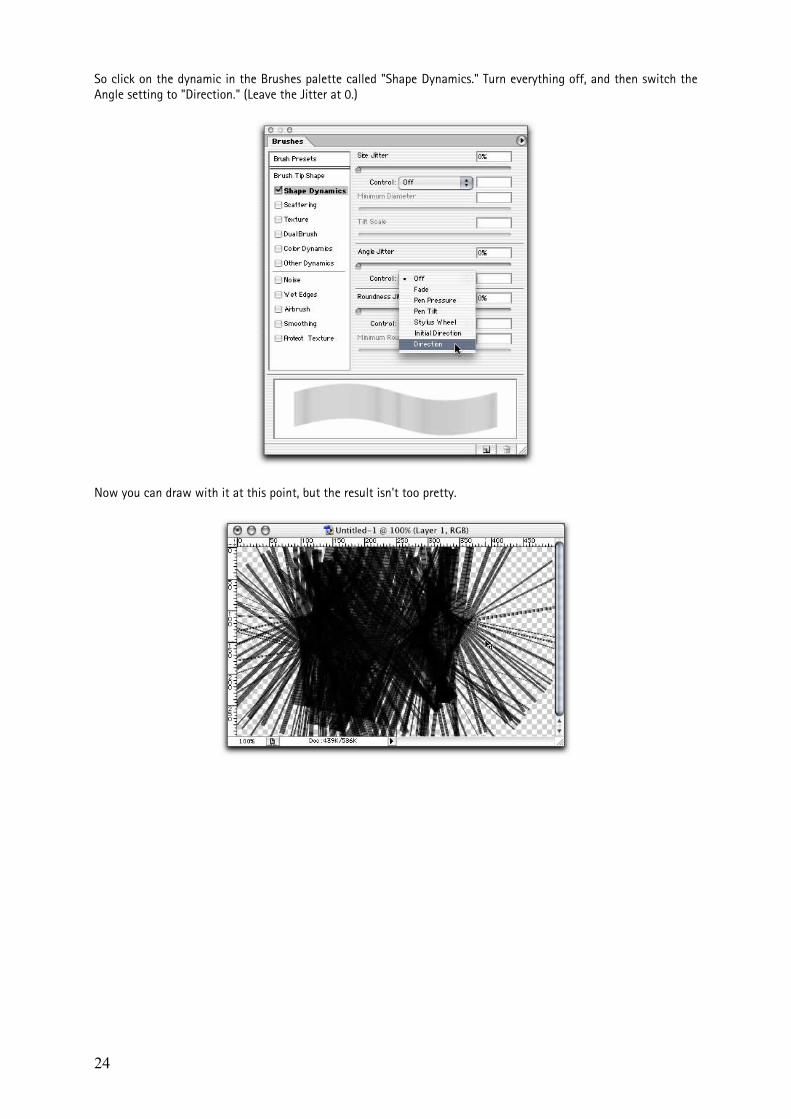
So click on the dynamic in the Brushes palette called "Shape Dynamics." Turn everything off, and then switch the Angle setting to "Direction." (Leave the Jitter at 0.)
Now you can draw with it at this point, but the result isn't too pretty.
25
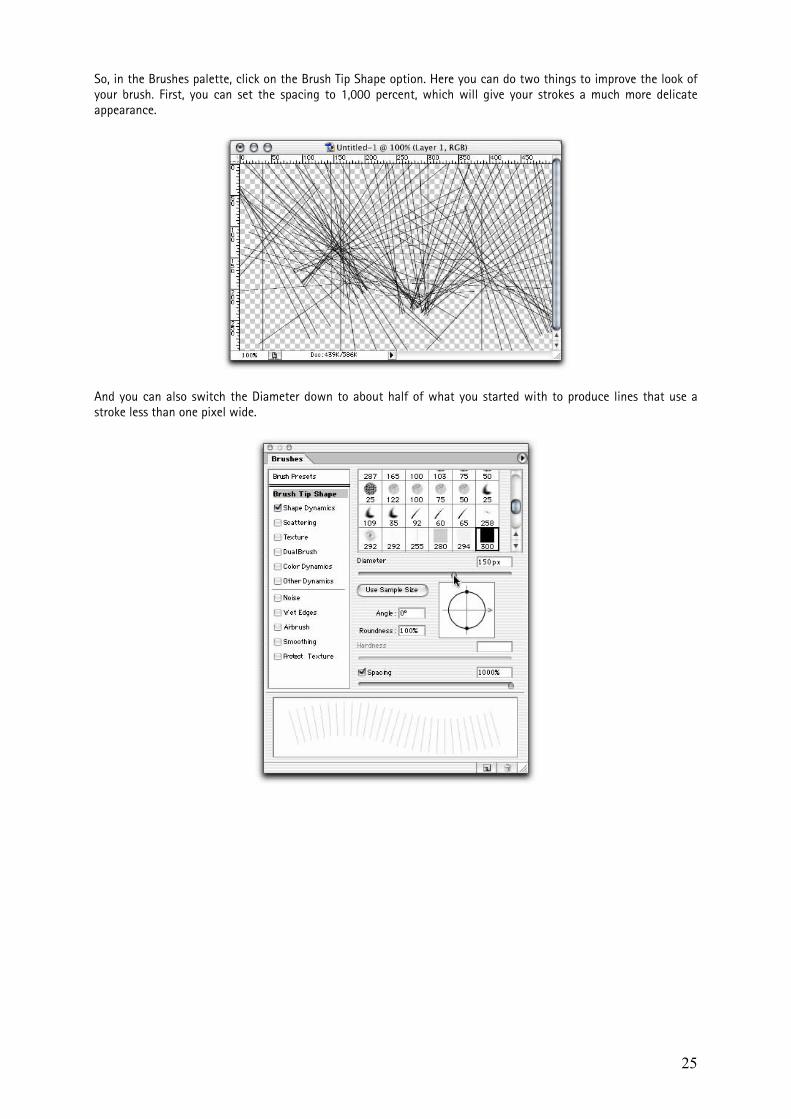
So, in the Brushes palette, click on the Brush Tip Shape option. Here you can do two things to improve the look of your brush. First, you can set the spacing to 1,000 percent, which will give your strokes a much more delicate appearance.
And you can also switch the Diameter down to about half of what you started with to produce lines that use a stroke less than one pixel wide.

26
And, finally, if you want to cover a wide area with your line-effect brush, you can select the Scattering dynamic. Set it to "Both Axes," and adjust the amount of scatter to about 400 percent. Set the "Count" to 8 or so. Now when you draw on your canvas with a couple of curly strokes, you quickly wind up with an image full of web-like, intersecting lines.
Very nice. But maybe a bit less mesh-like than what you had hoped for. This is owing to the fact that we used a single-line brush tip shape in our initial brush tip shape creation phase. But we can apply limitless variations to this. For example, instead of a simple line, we could create an X-shaped brush tip to produce this effect with a single stroke. (Of course, you'd want Scattering turned off for this.)
27
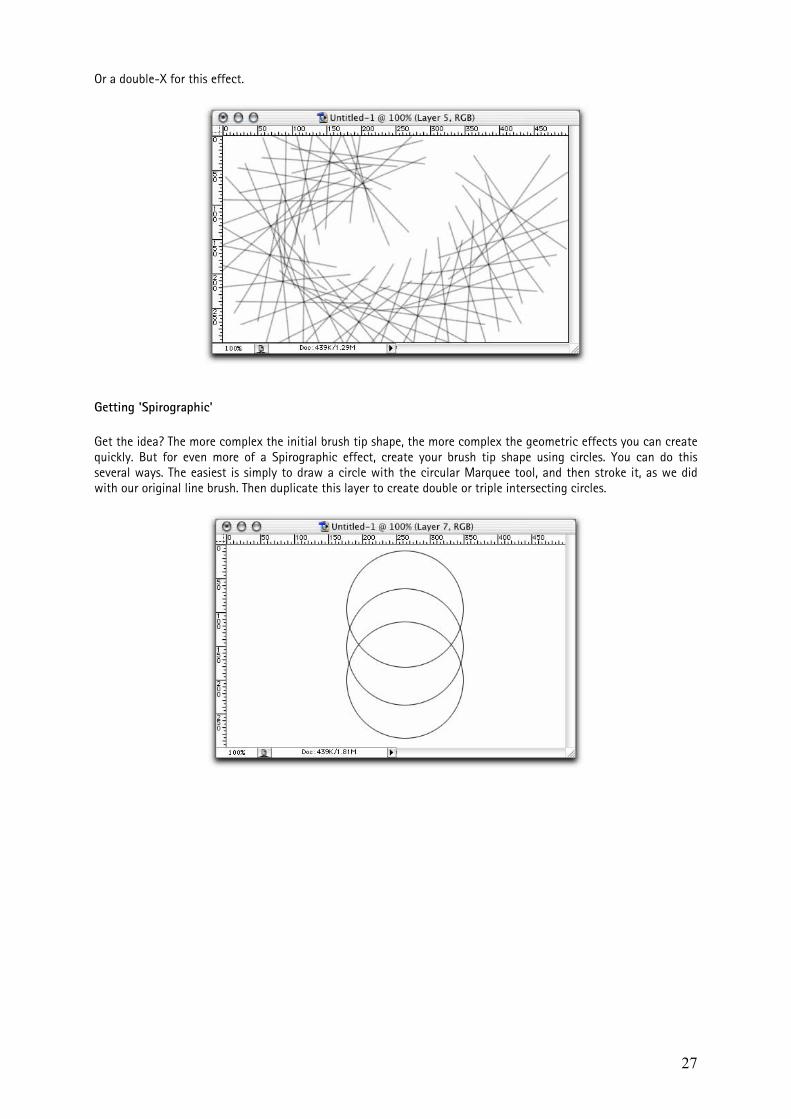
Or a double-X for this effect.
Getting 'Spirographic'
Get the idea? The more complex the initial brush tip shape, the more complex the geometric effects you can create quickly. But for even more of a Spirographic effect, create your brush tip shape using circles. You can do this several ways. The easiest is simply to draw a circle with the circular Marquee tool, and then stroke it, as we did with our original line brush. Then duplicate this layer to create double or triple intersecting circles.

28
Now, making sure that only the layers containing your circles are visible, choose Edit > Define Brush. And, again, apply your Brush Tip Shape options to make the circles more delicate, and apply your directionality setting in the Shape Dynamics parameter. You may or may not want to adjust spacing, but that's up to you.
And you will hopefully wind up with a brush that can create an effect like this.


![INTERMEDIATE - preview.kingborn.netpreview.kingborn.net/920000/4344e7e68c624fa98fe9d9d76dffe1c1.pdf · FASB CODIFICATION FASB Codification References [1] FASB ASC 350-10-05. [Predecessor](https://img.pdfslide.net/doc/110x75/5b892df67f8b9a770a8cf6c0/intermediate-fasb-codification-fasb-codification-references-1-fasb-asc-350-10-05.jpg)