Embed Size (px)
Citation preview

imageRUNNER C1225/1225iF ; Frequently Asked Questions (FAQs)
1. Paper Handling
2. Specifying Paper Size and Type
3. Loading Paper in the Paper Drawer
4. Loading Paper in the Multi-Purpose Tray
5. Replacing Toner Cartridges
6. Placing Documents
7. Maintenance and Inspections
8. Registering/Editing/Deleting Destinations in/from Favorites
9. Registering/Editing/Deleting Destinations in the Address Book
10. Storing/Editing Destinations in Group Dial
11. Printing Reports and Lists
12. Customizing the Home Screen Buttons
13. Connecting the Telephone Line (imageRUNNER C1225iF)
14. Receiving Faxes (imageRUNNER C1225iF)
15. If You Cannot Receive a Fax (imageRUNNER C1225iF)
16. If You Cannot Send a Fax (imageRUNNER C1225iF)
17. Select Line Type (imageRUNNER C1225iF)
18. Checking and Deleting Documents in Memory (imageRUNNER C1225iF)
19. 2-Sided Copying
20. Streaks Appear on Printouts
21. Printing a Document Secured by a PIN (Secure Print)
22. Correcting the Gradation
- 1 -

23. Adjusting Color Balance
24. Installing the Driver/Software Via USB for Windows
25. Installing the Driver/Software Via Network for Windows
26. Setting IP Addresses
27. Installing the Driver/Software Via USB for Macintosh
28. Installing the Driver/Software Via Network for Macintosh
29. Clearing Jams
30. If the Message <Paper Size & Settings Mismatch> Appears
31. If the Message <The memory is full. Enter the original type settings again.> Appears
32. Printing onto Custom Size Paper or Envelope
33. System Manager ID and PIN Factory Default Settings
- 2 -

Paper HandlingSolution
Supported Document Types
Scan Area
Supported Paper Sizes
Paper Type and Paper Source Capacity
Printable Area
Supported Document Types
Platen Glass Feeder
TypePlain paper/Heavy paper/Photograph/Small documents (for example, index cards)/Special types of paper (for example, tracing paper, transparencies, etc.)/Booklet
Plain paper (one-page document/Multi-page documents of the same size, thickness and weight)
Size (W x L) Up to 215.9 x 355.6 mm Maximum size: 215.9 x 355.6 mm
Minimum size: 139.7 x 128 mm
Weight Up to 2 kg 50 to 105 g/㎡
Paper Capacity 1 sheet Up to 50 sheets (A4, 80 g/㎡)
Scan Area
The shaded areas in the table below indicate the scan area of the document. Make sure that text and images in your
documents fit within the shaded area. The scan area varies depending on the function used and where documents
are placed (in the feeder or on the platen glass).
Platen Glass Feeder
Copy
The scan area for copying may differ from the printable area.
The scan area for copying may differ from the printable area.
Fax (imageRUNNER C1225iF)
Saving in a Computer Saving in a Computer
- 3 -

ScanSaving in a USB Memory Saving in a USB Memory
Supported Paper Sizes
Paper sizes that can be loaded in the paper drawer, the multi-purpose tray, and optional Cassette Feeding Units are
listed below.
A4 (210.0 x 297.0 mm)*1 *2
B5 (182.0 x 257.0 mm)*1
A5 (148.0 x 210.0 mm)*1
Legal (215.9 x 355.6 mm)*1
Letter (215.9 x 279.4 mm)*1 *2
Statement (139.7 x 215.9 mm)*1
Executive (184.0 x 266.7 mm)*1
Officio (215.9 x 317.5 mm)
B-officio (215.9 x 355 mm)
M-officio (215.9 x 341 mm)
Government - Letter (203.2 x 266.7 mm)
Government - Legal (203.2 x 330.2 mm)
Foolscap (215.9 x 330.2 mm)
Australian-foolscap (206 x 338 mm)
K-LGL (190 x 268 mm)
F4A (215.9 x 342.9 mm)
Envelope COM10 (104.7 x 241.3 mm)
Envelope Monarch (98.4 x 190.5 mm)
Envelope C5 (162 x 229 mm)
Envelope DL (110 x 220 mm)
Nagagata 3 (120 x 235 mm)
Yougatanaga 3 (235 x 120 mm)
Custom Paper Size*3
*1 Automatic 2-sided printing is available without replacing paper.
*2 The machine can print received fax documents.
*3 Custom paper size of 98.4 to 216 mm in width and 148 to 355.6 mm in length can be loaded in the paper drawer.
Custom paper size of 98.4 to 216 mm in width and 190.5 to 355.6 mm in length can be loaded in the multi-purpose
- 4 -

tray.
NOTE
The default paper size of the machine is set to A4. Change the paper size setting when using a different size of paper.
Paper Type and Paper Source Capacity
Chlorine-free paper can be used with this machine.
Paper Type Paper Capacity for Paper Drawer Paper Capacity for multi-purpose tray
Plain paper*1
64 to 75 g/㎡ 640 sheets 120 sheets
76 to 90 g/㎡ 550 sheets 100 sheets
91 to 105 g/㎡ *2 *3
Heavy paper*1
106 to 128 g/㎡ *2 *3
129 to 163 g/㎡ *2 *3
164 to 220 g/㎡ *2 *3
Recycled paper*1
64 to 75 g/㎡ *2 *3
76 to 90 g/㎡ *2 *3
91 to 105 g/㎡ *2 *3
Color paper*1 60 to 74 g/㎡ *2 *3
Thin paper 60 to 63 g/㎡ *2 *3
Transparency*4 121 to 220 g/㎡ 50 sheets
Label 118 to 185 g/㎡ *2 *3
Envelope *2 *3
Pre-Punched 64 to 75 g/㎡ *2 *3
Bond 90 g/㎡ *2 *3
*1 Automatic 2-sided printing is available without replacing paper.
*2 Up to 57 mm in height.
*3 Up to 11 mm in height.
*4 Use laser printer transparencies.
IMPORTANT
Do not use the following types of paper:Wrinkled or creased paperCurled or rolled paperTorn paperDamp paperVery thin paperPaper printed by a thermal transfer printerHighly textured paperGlossy paper
Paper handling and storageStore the paper on a flat surface.Keep the paper wrapped in its original package to protect the paper from moisture or dryness.
- 5 -

Do not store the paper in such a way that may cause it to curl or fold.Do not store the paper vertically or stack too much paper.Do not store the paper in direct sunlight, or in a place subject to high humidity, dryness, or drastic changes in temperature or humidity.
NOTE
When printing on paper that has absorbed moistureSteam may emit from the paper output area, or water droplets may form on the back side of the operation panel or around the paper output area. There is nothing unusual about any of these occurrences, which occur when the heat generated from fixing toner on the paper causes moisture in the paper to evaporate (most likely to occur at low room temperatures).
Printable Area
The shaded areas in the image below indicate the printable area of the document.
A4 LTR
Related information
Specifying Paper Size and Type
Loading Paper in the Paper Drawer
Loading Paper in the Multi-Purpose Tray
Placing Documents
Target products
- 6 -

Specifying Paper Size and TypeSolution
Specifying Paper Type in the Paper Drawer
Specifying Paper Size and Type in the Multi-Purpose Tray
Registering a Custom Paper Size
Registering Default Paper Settings for the Multi-Purpose Tray
If paper other than standard paper is loaded, you must specify the paper size and type settings to match the paper
that is loaded. Make sure that the loaded paper size is correctly recognized when you load the paper that is different
from the previously loaded paper.
IMPORTANT
If the setting does not match the size and type of loaded paper, a paper jam or printing error may occur.
Specifying Paper Type in the Paper Drawer
Use the following steps when loading paper other than plain paper such as heavy paper or envelopes in the drawer.
NOTE
For paper that is not automatically recognized such as LGL or EXEC, specify the paper with <Paper Size List 1 for Recognition> or <Paper Size List 2 for Recognition> beforehand.
1. Tap <Paper Settings>.
2. Tap <Drawer 1> or <Drawer 2>.
<Drawer 2> is displayed only when the optional Cassette Feeding Unit is installed.
3. Tap <Auto>.
- 7 -

3-A. Loading Custom Paper
3-A-1. Tap <Custom Paper>.
3-A-2. Tap a registered custom paper size.
Tap <Custom> to specify a paper size.
You must first register a custom paper size.
3-B. If you set Envelope the Drawer 1
3-B-1. Tap <Envelope>.
3-B-2. Tap envelope type.
<Envelope> is selectable as a paper size only when <Drawer 1> is selected.
4. Tap the paper type.
- 8 -

Specifying Paper Size and Type in the Multi-Purpose Tray
The screen shown here is displayed when paper is loaded in the multi-purpose tray. Follow the on-screen instructions
to specify settings that match the size and type of the loaded paper.
NOTE
If the screen shown above is not displayed when paper is loadedIf you always load the same paper in the multi-purpose tray, you can skip the paper setting operations by registering the paper size and type as the default setting. When the default setting is registered, however, the screen shown above is not displayed. To display the screen, select <Off> for < Register Default Settings>.
1. Tap the paper size.
When loading custom size paper
1-1. Tap <Custom>.
1-2. Specify the length of the <X> (shorter) side.
Tap <X>.
- 9 -

Input the length of the <X> side using / , or numeric keys for inputting whole numbers and fractions, and
tap <Apply>.
1-3. Specify the length of the <Y> (longer) side.
Tap <Y>.
Input the length of the <Y> side, and tap <Apply>.
1-4. Tap <Apply>.
2. Tap the paper type.
Registering a Custom Paper Size
You can register up to three frequently used custom paper sizes.
1. Tap <Paper Settings>.
- 10 -

2. Tap <Register Custom Paper>.
3. Tap <Not Registered>.
If paper sizes <1> to <3> have already been registered, either change or delete the setting to continue. The
procedures for changing and deleting these settings are described below.
3-A. Changing a setting
3-A-1. Tap the registered size you want to change.
3-A-2. Tap <Edit> and proceed to step 4.
3-B. Deleting a setting
3-B-1. Tap the registered size you want to delete.
3-B-2. Tap <Delete>.
3-B-3. Tap <Yes>.
- 11 -

4. Specify the paper size.
4-1. Specify the length of the <X> (shorter) side.
Tap <X>.
Input the length of the <X> side using / , or numeric key for inputting whole numbers and fractions, and
tap <Apply>.
4-2. Specify the length of the <Y> (longer) side.
Tap <Y>.
Input the length of the <Y> side, and tap <Apply>.
4-3. Tap <Apply>.
5. Select the paper type.
Selecting a Registered Custom Paper Setting
The paper sizes that are registered in the procedure above are displayed on the screen for selecting the paper size.
When selecting the paper size for the paper drawer
On the screen to specify the size of the paper that is loaded in the paper drawers, the registered paper sizes are
displayed.
- 12 -

When selecting the paper size for the multi-purpose tray
When paper is loaded in the multi-purpose tray, the screen for selecting the paper size for the multi-purpose tray is
displayed. The registered paper sizes are displayed on this screen.
The registered paper sizes are displayed when you set the default paper settings for the multi-purpose tray. From the
screen, you can select one of the displayed sizes as the default paper size for the multi-purpose tray.
Registering Default Paper Settings for the Multi-Purpose Tray
You can register default paper settings for the multi-purpose tray. Registering default settings can save yourself the
effort of having to specify the settings each time you load the same paper into the multi-purpose tray.
NOTE
After the default paper setting is registered, the paper setting screen is not displayed when paper is loaded, and the same setting is always used. If you load a different paper size or type without changing the paper settings, the machine may not print properly. To avoid this problem, disable the default setting by selecting <Off> in step 3, and then load the paper.
1. Tap <Paper Settings>.
2. Tap <Multi-Purpose Tray>.
- 13 -

3. Tap <On>.
4. Tap the paper size.
Registering a custom paper size
4-1. Tap <Custom>.
4-2. Specify the length of the <X> (shorter) side.
Tap <X>.
Input the length of the <X> side using / , or numeric keys for inputting whole numbers and fractions, and
tap <Apply>.
4-3. Specify the length of the <Y> (longer) side.
Tap <Y>.
Input the length of the <Y> side, and tap <Apply>.
- 14 -

4-4. Tap <Apply>.
5. Tap the paper type.
Related information
Paper Handling
Loading Paper in the Paper Drawer
Loading Paper in the Multi-Purpose Tray
Target products
- 15 -

Loading Paper in the Paper DrawerSolution
Load the paper that you usually use in the paper drawer. When you want to print on paper that is not loaded in the
paper drawer, load the paper in the multi-purpose tray. ( Loading Paper in the Multi-Purpose Tray )
IMPORTANT
Make sure to load paper in landscape orientationPaper cannot be loaded in portrait orientation. Make sure to load the paper in landscape orientation.
NOTE
Follow the procedure below when loading paper into the optional Cassette Feeding Unit.
1. Grip the handle, and pull out the paper drawer until it stops.
2. When loading paper into the paper drawer for the first time, or when changing the paper size, adjust the position
of the paper guides.
*1 Paper Guide on Left
*2 Paper Guide at Front
2-1. Slide the paper guide on the left while squeezing it on the top to align it with the mark for the desired paper size.
2-2. Slide the paper guide at the front while squeezing it on the top to align it with the mark for the desired paper
size.
Slide the paper guides until they click into place. If the paper guides are not aligned correctly, the paper size will not
correctly appear on the display. It is also necessary to adjust the paper guides correctly to avoid causing a paper
jam, dirty prints, or making the inside of the machine dirty.
When using inch paper, remove the A4 feeder attachment attached to the paper drawer and store it in the storage
space. When using A or B series paper, make sure to attach the A4 feeder attachment to the paper drawer. And
then, select the paper series that you are going to use in <Menu> <Common Settings> <Paper Series Settings
for Auto Recognition in Drawer>.
A/B Series
- 16 -
Inch Series
3. Prepare the paper to load.
Open the packaging for the paper, and remove the paper stack.
Before loading paper, always fan the sheets several times, and align the edges to facilitate feeding.
4. Load the paper stack into the paper drawer.
4-1. Make sure that the paper size setting of the paper drawer matches the size of the paper to load in the paper
drawer.
4-2. Load the paper stack against the right wall of the paper drawer.
4-3. Gently push the paper drawer back into the machine.
Paper which is curled must be straightened out before loading it into the paper drawer. You will not be able to
make copies or print if you load paper that exceeds the load limit line ( ), or if the paper drawer is not
completely pushed into the machine.
Make sure that the height of the paper stack does not exceed the load limit line ( ).
Always check that the paper drawers are in place.
5. When loading paper into the paper drawer for the first time, or when changing the paper size, attach a paper size
label to the paper drawer.
- 17 -
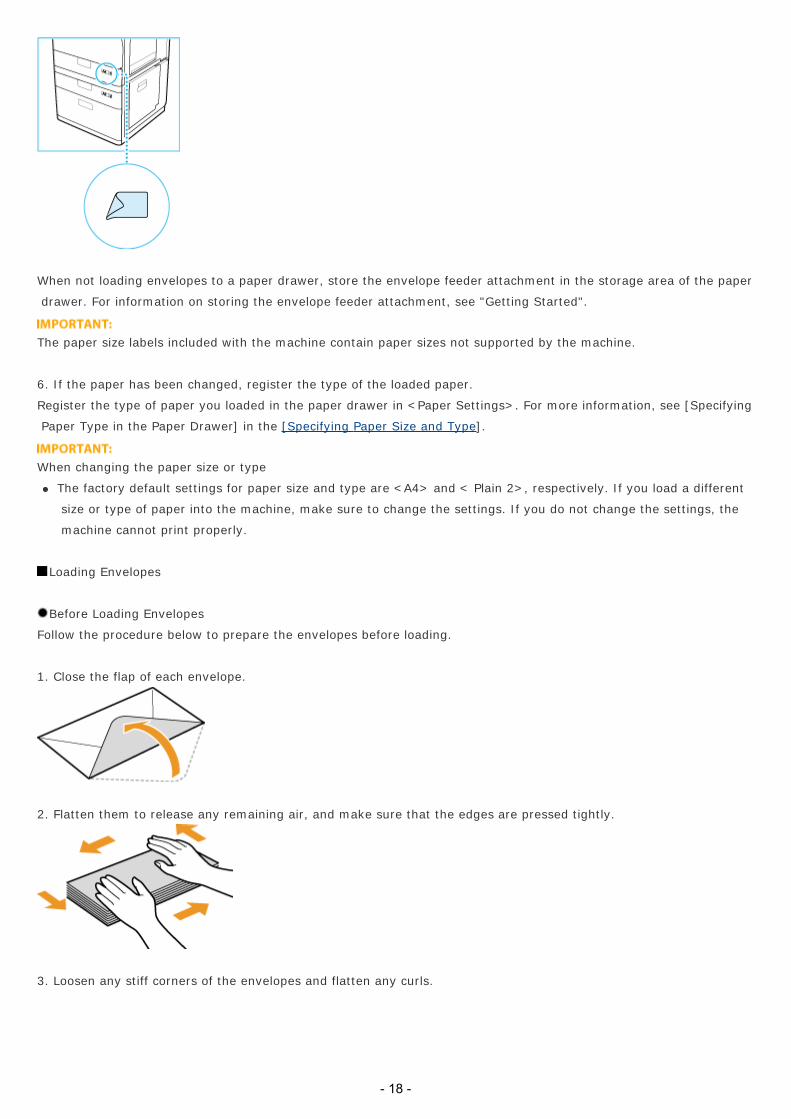
When not loading envelopes to a paper drawer, store the envelope feeder attachment in the storage area of the paper
drawer. For information on storing the envelope feeder attachment, see "Getting Started".
The paper size labels included with the machine contain paper sizes not supported by the machine.
6. If the paper has been changed, register the type of the loaded paper.
Register the type of paper you loaded in the paper drawer in <Paper Settings>. For more information, see [Specifying
Paper Type in the Paper Drawer] in the [Specifying Paper Size and Type].
When changing the paper size or type
The factory default settings for paper size and type are <A4> and < Plain 2>, respectively. If you load a different
size or type of paper into the machine, make sure to change the settings. If you do not change the settings, the
machine cannot print properly.
Loading Envelopes
Before Loading Envelopes
Follow the procedure below to prepare the envelopes before loading.
1. Close the flap of each envelope.
2. Flatten them to release any remaining air, and make sure that the edges are pressed tightly.
3. Loosen any stiff corners of the envelopes and flatten any curls.
- 18 -

4. Align the edges of the envelope on a flat surface.
If you use envelopes that have glue attached to their flaps, the glue may melt due to the heat and pressure of the
fixing unit.
Do not print on the back side of the envelopes (the side with the flap).
If the envelopes become filled with air, flatten them by hand before loading them into the Paper Drawer 1.
In the Paper Drawer
Attach the Envelope Feeder Attachment before loading envelopes to a paper drawer.
When using the ISO-C5 envelopes, the Envelope Feeder Attachment does not need to be attached.
1. Open the paper drawer 1, and remove the envelope feeder attachment.
1-1. Grip the handle, and pull out the paper drawer until it stops.
1-2. Remove the envelope feeder attachment stored inside the paper drawer.
2. Attach the envelope feeder attachment by aligning the protruding areas of the envelope feeder attachment with the
holes on the paper drawer.
Only attach the envelope feeder attachment when loading envelopes. Loading paper other than envelopes with the
envelope feeder attachment attached may cause a paper jam.
When not using the envelope feeder attachment, store it in the storage area of the paper drawer.
3. Adjust the position of the paper guides.
- 19 -

*1 Paper Guide on Left
*2 Paper Guide at Front
3-1. Slide the paper guide on the left while squeezing it on the top to align it with the mark for the desired paper size.
3-2. Slide the paper guide at the front while squeezing it on the top to align it with the mark for the desired paper
size.
Slide the paper guide until they click into place. If the paper guides are not aligned correctly, the paper size will not
correctly appear on the display. It is also necessary to adjust the paper guide correctly to avoid causing a paper jam,
dirty prints, or making the inside of the machine dirty.
4. Load the envelopes into the drawer.
4-1. Load 10 envelopes at a time with the side you want to print on facing up.
4-2. While loading the envelopes, press down on the right side of the receptacle to lock them into place.
Align the leading edges of the envelopes, and make sure that they are held in place under the claws. Make sure that
the flaps are positioned as shown in the illustrations below.
Monarch, COM10 No.10, DL, ISO-C5
Yougatanaga 3
Nagagata 3
- 20 -

When loading envelopes, make sure they are not incorrect leaning.
Envelopes which have been rolled or curled must be straightened out prior to use.
Make sure that the height of the envelope stack does not exceed the load limit line ( ).
When loading ISO-C5 envelopes, make sure that the height of the envelope stack does not exceed the load limit
line ( ).
If the flap of an envelope opens and is caught under the envelope feeder attachment, it may cause a paper jam.
If envelopes are oriented normally when loaded but wrinkle when printed, load envelopes after rotating them 180
degrees, as shown below.
Monarch, COM10 No.10, DL, ISO-C5
Yougatanaga 3
When printing, check that the orientation of the loaded paper matches the orientation shown on the print settings
screen of the printer driver. For more information, click [Help] on the printer driver screen.
When copying, load originals after rotating them 180 degrees.
5. Gently push the paper drawer back into the machine.
6. Register the type of envelope on the <Paper Settings> screen.
For instructions on registering the envelope type, see step 3 of "Specifying Paper Type in the Paper Drawer" in the
- 21 -

"Specifying Paper Size and Type".
Related information
Paper Handling
Specifying Paper Size and Type
Loading Paper in the Multi-Purpose Tray
Printing onto Custom Size Paper or Envelope
Target products
- 22 -

Loading Paper in the Multi-Purpose TraySolution
When you want to print on paper that is not loaded in the paper drawer, load the paper in the multi-purpose tray.
Load the paper that you usually use in the paper drawer ( Loading Paper in the Paper Drawer ).
IMPORTANT
Make sure to load paper in landscape orientationPaper cannot be loaded in portrait orientation. Make sure to load the paper in landscape orientation.
1. Open the multi-purpose tray.
If you are loading large size paper, pull out the tray extension.
*1 Tray Extension
If paper is loaded that is different from the size specified for the multi-purpose tray, set <Register Default Settings>
to <Off>. (See "Registering Default Paper Settings for the Multi-Purpose Tray" in the "Specifying Paper Size and
Type")
2. Load the paper into the multi-purpose tray.
* Load Limit Line
Do not exceed the load limit line when loading paper
Make sure that the height of the paper stack does not exceed the load limit line ( ).
For the procedures to load the envelopes into the multi-purpose tray.
3. Adjust the paper guides to match the size of the paper.
- 23 -

*1 Paper Guides
Align the paper guides securely against the edges of the paper
Paper guides that are too loose or too tight can cause misfeeds or paper jams.
Loading Envelopes
Before Loading Envelopes
Follow the procedure below to prepare the envelopes before loading.
1. Close the flap of each envelope.
2. Flatten them to release any remaining air, and make sure that the edges are pressed tightly.
3. Loosen any stiff corners of the envelopes and flatten any curls.
4. Align the edges of the envelope on a flat surface.
- 24 -

If you use envelopes that have glue attached to their flaps, the glue may melt due to the heat and pressure of the
fixing unit.
Do not print on the back side of the envelopes (the side with the flap).
In the Multi-Purpose Tray
If you want to load the envelopes into the multi-purpose tray, follow the procedure described below to prevent the
envelopes from becoming creased.
1. Open the multi-purpose tray.
If you are loading large size envelopes, pull out the tray extension.
*1 Tray extension
If a paper size other than envelopes is specified for the multi-purpose tray, set <Register Default Settings> to <Off>.
See "Registering Default Paper Settings for the Multi-Purpose Tray" in the "Specifying Paper Size and Type".
2. Load the envelopes into the multi-purpose tray.
Load them as shown in the figures below.
COM10 No.10 Monarch DL ISO-C5
Nagagata 3 Yougatanaga 3
Do not exceed the load limit line when loading envelopes
Make sure that the height of the envelope stack does not exceed the load limit line ( ).
3. Adjust the paper guides.
- 25 -

*1 Paper guides
Align the paper guides securely against the edges of the envelopes
Paper guides that are too loose or too tight can cause misfeeds or paper jams.
If envelopes are oriented normally when loaded but wrinkle when printed, load envelopes after rotating them 180
degrees, as shown below.
Monarch, COM10 No.10, DL, ISO-C5
Yougatanaga 3
When printing, check that the orientation of the loaded paper matches the orientation shown on the print settings
screen of the printer driver. For more information, click [Help] on the printer driver screen.
When copying, load originals after rotating them 180 degrees.
Related information
Paper Handling
Specifying Paper Size and Type
Loading Paper in the Paper Drawer
Target products
- 26 -

Replacing Toner CartridgesSolution
Consumables
How to Replace Toner Cartridges
The machine will display a message when a toner cartridge is nearly empty. You can check the remaining toner level
on the display.
Consumables
WARNING
Do not dispose of used toner cartridges and drum units in open flames. Also, do not store toner cartridges, drum units or paper in a location exposed to open flames. This may cause the toner to ignite, and result in burns or fire.If you accidentally spill or scatter toner, carefully wipe up the loose toner with a damp, soft cloth and avoid inhaling any toner dust. Do not use a vacuum cleaner that is not equipped with safety measures to prevent dust explosions to clean up loose toner. Doing so may cause damage to the vacuum cleaner or result in a dust explosion due to static discharge.
If you are using a cardiac pacemakerDrum units generate a low level magnetic flux. If you use a cardiac pacemaker and feel abnormalities, please move away from toner cartridges and consult your physician immediately.
CAUTION
Use caution not to inhale any toner. If you should inhale toner, consult a physician immediately.Use caution so that toner does not get into your eyes or mouth. If toner should get into your eyes or mouth, immediately wash with cold water and consult a physician.Use caution so that toner does not come into contact with your skin. If it should, wash with soap and cold water. If there is any irritation on your skin, consult a physician immediately.Keep the toner cartridges, drum units, and other consumables out of the reach of small children. If toner is ingested, consult a physician or poison control center immediately.Do not disassemble or modify the toner cartridges or drum units. Doing so may cause the toner to scatter.
IMPORTANT
Storing the toner cartridges and drum unitsStore toner cartridges in a cool location, away from direct sunlight. (The recommended storage conditions are temperatures below 30°C and humidity below 80%.)Store without opening until the toner cartridge is to be used.When removing the drum unit from this machine for storage, attach the protective cover for the drum, and then place the removed toner cartridge into the original protective bag or wrap it with a thick cloth.When storing the toner cartridges and drum units, do not store them upright or upside down. The toner will solidify and may not return to its original condition even if it is shaken.
Do not store the toner cartridges and drum units in the following locationsLocations exposed to open flamesLocations exposed to direct sunlight or bright light for five minutes or moreLocations exposed to excessive salty airLocations where there are corrosive gases (i.e. aerosol sprays and ammonia)Locations subject to high temperature and high humidityLocations subject to dramatic changes in temperature and humidity where condensation may easily occurLocations with a large amount of dustLocations within the reach of children
Be careful of counterfeit toner cartridges and drum units
- 27 -

Please be aware that there are counterfeit Canon toner cartridges and drum units in the marketplace. Use of counterfeit toner cartridge and drum unit may result in poor print quality or machine performance. Canon is not responsible for any malfunction, accident or damage caused by the use of counterfeit toner cartridge and drum unit. For more information, see canon.com/counterfeit.
Availability period of repair parts, toner cartridges and drum unitsRepair parts, toner cartridges and drum units for the machine will be available for at least seven (7) years after production of this machine model has been discontinued.
Drum unit packing materialsSave the protective bag for the toner cartridge and protective cover for the drum. They are required when transporting this machine.The packing materials may be changed in form or placement, or may be added or removed without notice.
TonerIf a message prompting you to replace the toner cartridge appears on the display, replace the used toner cartridge of the displayed color with a new one.Toner comes in four colors: black, cyan, magenta, and yellow.Check the toner color that you need to replace before ordering toner from your local authorized Canon dealer. Also, when replacing the toner cartridge, make sure that you replace toner of the correct color.Use only toner cartridges intended for use with this machine.For optimum print quality, using Canon genuine toner is recommended.
Drum UnitWhen you replace the drum unit with a new one, be sure to use only drum units intended for use with the machine. For optimum print quality, using Canon genuine drum unit is recommended.
Genuine ConsumablesCanon continuously develops technology innovations in Canon Toners, Drums and Cartridges, specifically designed for use in Canon Multi-Functional machines. Experience the benefits of optimal print performance, print volume and high quality outputs, achieved through Canon's new advanced technologies. Therefore, the use of Canon genuine consumables is recommended for your Canon Multi-Functional machines.
How to Replace Toner Cartridges
1. Remove the toner cartridge of the displayed color.
- 28 -

1-1. Open the front cover of the main unit.
1-2. Pull out the toner cartridge to replace.
Pull the toner cartridge out halfway, and then remove it completely while supporting it and keeping it straight with
your other hand from underneath.
WARNING
Do not burn or throw used toner cartridges into open flames, as this may cause the toner remaining inside the cartridges to ignite, resulting in burns or a fire.
2. Prepare the new toner cartridge.
2-1. Open the package of the toner cartridge, and remove the toner cartridge.
2-2. Hold the new toner cartridge in both hands as shown in the illustration, and shake it vertically approximately 10
times.
IMPORTANT
Do not shake the toner cartridge in the direction shown in the illustration. Doing so may cause the toner to not output properly.
3. Pull the toner cartridge straight up and out of the machine.
3-1. Match the new toner cartridge with the slot on the main unit as shown in the illustration.- 29 -

3-2. Push the new toner cartridge in as far as possible.
Support the new toner cartridge with your hand from underneath while pushing it into the machine with your other
hand.
4. Close the front cover of the main unit.
Related information
Target products
- 30 -

Placing DocumentsSolution
Placing Documents on the Platen Glass
Placing Documents in the Feeder
Place documents on the platen glass or in the feeder. Use the platen glass when scanning thick or bound documents
such as books. You can load two or more sheets of documents in the feeder so that they can be scanned
continuously.
IMPORTANT
Use documents that are completely dryWhen placing documents, make sure that any glue, ink, or correction fluid on the documents has completely dried.
To avoid paper jamsDo not place the following types of documents in the feeder as this may cause paper jams:
- Wrinkled or creased paper- Carbon paper or carbon-backed paper- Curled or rolled paper- Coated paper- Torn paper- Onion skin or thin paper- Stapled or clipped documents- Paper printed by a thermal transfer printer- Transparencies
NOTE
To scan documents more accuratelyDocuments placed in the feeder are scanned while being fed into the machine. On the other hand, documents placed on the platen glass remain in a fixed position while they are scanned. To ensure more accurate scanning results, placing documents on the platen glass is recommended.
To scan tracing paper or transparenciesTo scan transparent documents (for example, tracing paper or transparencies), place them on the platen glass.
Placing Documents on the Platen Glass
1. Open the feeder.
- 31 -

2. Place the document face down on the platen glass.
Align the corner of the document with the top-left corner of the platen glass.
To scan transparent documents (for example, tracing paper or transparencies), cover them with plain white paper.
3. Gently close the feeder.
The machine is ready to scan the document.
When scanning is complete, remove the document from the platen glass.
Placing Documents in the Feeder
You should use the feeder when you want to copy several originals at the same time. Place the originals into the
feeder and press . The machine automatically feeds the originals to the platen glass and scans them. Two-sided
originals can also be automatically turned over and scanned as two-sided documents.
NOTE
The following types of originals can be loaded in the feeder:Weight:
- One-sided scanning: 50 to 105 g/㎡ (When feeding one sheet: 50 to 128 g/㎡)- Two-sided scanning: 64 to 105 g/㎡
Original size:A4, A5, B5, B6, LGL, LTR, and STMTTray Capacity: 50 sheets of paper (80 g/㎡)
1. Adjust the document guides to fit the size of your originals.
2. Fan the document stack and align the edges.
Fan the document stack in small batches, and align the edges by lightly tapping the stack on a flat surface a few- 32 -

times.
3. Place the document(s) face up in the feeder.
Make sure that the document stack does not exceed the load limit lines.
The machine is ready to scan the document.
Do not load documents of various sizes at the same time.
Up to 50 sheets can be loaded at a time. If 51 or more sheets are loaded, scanning may stop or a paper jam may
occur.
Align the document guides securely against the edges of the document
Document guides that are too loose or too tight can cause misfeeds or paper jam.
While documents are being scanned
Do not add or remove documents.
When scanning is complete
Remove the scanned documents from beneath the feeder to prevent paper jams.
If the original scanning area is soiled
If a document is placed in the feeder and the original scanning area is soiled, a prompt to clean the scanning area
is displayed. Cleaning the original scanning area is recommended. You can also tap <Close> to scan the
document. For information on cleaning the original scanning area, see "Platen Glass" in the "Maintenance and
Inspections".
Related information
Target products
- 33 -

Maintenance and InspectionsSolution
Exterior
Platen Glass
Feeder
Machine Interior
Fixing Assembly
The Dust Proof Glass
Clean this machine periodically. If dust accumulates, the machine may not operate properly. When cleaning, be sure
to observe the following.
WARNING
Before cleaning, turn OFF the power and unplug the power plug from the AC power outlet. Failure to do so may result in a fire or electrical shock.Unplug the power plug periodically and clean with a dry cloth to remove dust and grime. Accumulated dust may absorb humidity in the air and may result in a fire if it comes into contact with electricity.Use a damp, well wrung-out cloth to clean the machine. Dampen cleaning cloths with water only. Do not use alcohol, benzenes, paint thinners, or other flammable substances. Do not use tissue paper or paper towels. If these substances come into contact with electrical parts inside the machine, they may generate static electricity or result in a fire or electrical shock.Check the power cord and plug periodically for damage. Check the machine for rust, dents, scratches, cracks, or excessive heat generation. Use of poorly-maintained equipment may result in a fire or electrical shock.
CAUTION
The inside of the machine has high-temperature and high-voltage components. Touching these components may result in burns. Do not touch any part of the machine that is not indicated in the manual.When loading paper or removing jammed documents or paper, be careful not to cut your hands with the edges of the paper.
IMPORTANT
When removing jammed paper or replacing toner cartridges, be careful not to get any toner on your hands or clothing. If toner gets on your hands or clothing, wash them immediately with cold water.
Exterior
Regularly wipe the exterior of the machine, to keep the machine in good condition.
1. Turn OFF the machine, and unplug the power cord from the AC power outlet.
When you turn OFF the machine, data that is waiting to be printed is deleted. Fax documents that were received
by using the Memory Reception function, faxes that are waiting to be sent, and reports that are automatically
printed after sending and receiving faxes are not deleted.
2. Clean the exterior of the machine.
Use a soft, well-wrung-out cloth dampened with water or a mild detergent diluted with water.
- 34 -

3. Wait for the exterior of machine to dry completely.
4. Reconnect the power cord and turn ON the machine.
Platen Glass
Regularly wipe off the dust from the platen glass and the underside of the feeder to prevent smudges to be printed on
documents or printouts.
NOTE
Use the glass cleaning sheet included with the machine to perform basic cleaning.When the glass cleaning sheet is dirty, rinse it with water and spread it out to let it dry.
1. Turn OFF the machine, and unplug the power cord from the AC power outlet.
When you turn OFF the machine, data that is waiting to be printed is deleted. Fax documents that were received
by using the Memory Reception function, faxes that are waiting to be sent, and reports that are automatically
printed after sending and receiving faxes are not deleted.
2. Open the feeder.
3. Clean the platen glass and the underside of the feeder.
3-1. Clean the platen glass.
Clean the machine with the glass cleaning sheet included with the machine.
For ink or other stubborn soiling, wipe with a damp, well wrung-out cloth, and then wipe with a soft, dry cloth. If
wet-wiping does not remove the soiling, first dampen the cloth with diluted mild detergent before wiping, and
then wipe with a soft dry cloth.
3-2. Clean the underside of the feeder.
Clean the machine with a cloth which is wrung after being dampened in water, and then wipe it clean with a soft, dry
cloth.
If wet-wiping does not remove the soiling, first dampen the cloth with diluted mild detergent before wiping, and- 35 -

then wipe with a soft dry cloth.
4. Clean the scanning area (thin glass strip) and the white plate.
4-1. Clean the scanning area.
Clean the machine with the glass cleaning sheet included with the machine.
For ink or other stubborn soiling, wipe with a damp, well wrung-out cloth, and then wipe with a soft, dry cloth.
4-2. Clean the white plate.
Clean the machine with a cloth which is wrung after being dampened in water, and then wipe it clean with a soft, dry
cloth.
5. Wait for the cleaned area to dry completely.
6. Gently close the feeder.
7. Reconnect the power cord and turn ON the machine.
Feeder
Dust and graphite powder may adhere to the roller inside the feeder and cause smudges to appear on printouts. To
clean the feeder, perform the following procedure. To clean the feeder, you need ten sheets of plain A4 or Letter size
paper. Set them in the feeder before performing the following procedure. [ Placing Documents ]
1. Tap <Menu>.
2. Tap <Adjustment/Maintenance>.
3. Tap <Clean Feeder>.
4. Tap <Start>.
- 36 -

Cleaning starts. The <Finished.> message is displayed approximately 30 seconds later.
If performing <Clean Feeder> does not solve the problem
Use the following procedure to clean the inside of the feeder.
1. Clean the rollers of the feeder.
1-1. Open the feeder cover.
1-2. Clean the rollers (a total of two places) inside the feeder cover.
Wipe with a well wrung-out, damp cloth while rotating the rollers, then wipe with a soft, dry cloth.
2. Clean the inside of the inner cover of the feeder.
2-1. Open the inner cover of the feeder.
2-2. Clean the transparent plastic (a total of two places).
Wipe with a well wrung-out, damp cloth while rotating the rollers, then wipe with a soft, dry cloth.
2-3. Close the inner cover of the feeder.
3. Close the feeder cover.
Machine Interior
If streaks appear on printed output, or random parts of the printed image are missing, the inside of the main unit
may be dirty. In this case, perform automatic cleaning of the inside of the main unit.
1. Tap <Menu>.
2. Tap <Adjustment/Maintenance> <Clean Device>.
- 37 -

3. Tap <Start>.
When cleaning is complete, try printing again.
Fixing Assembly
Dirt may adhere to the fixing assembly inside the machine and cause black streaks to appear on printouts. To clean
the fixing assembly, perform the following procedure. Note that you cannot clean the fixing assembly when the
machine has documents waiting to be printed. To clean the fixing assembly, you need plain A4 or Letter size paper.
Set the paper in the paper drawer or multi-purpose tray ("Loading Paper in the Paper Drawer" "Loading Paper in the
Multi-Purpose Tray") before performing the following procedure.
NOTE
Paper used for cleaning can be recycled paper, color paper, or lightweight paper.Cleaning requires toner. Make sure that there is sufficient toner remaining beforehand.If paper that cannot be used for the cleaning sheet is registered in < Register Default Settings> in <Multi-Purpose Tray> (<Paper Settings>), set <Register Default Settings> to <Off>. "Registering Default Paper Settings for the Multi-Purpose Tray" in the "Specifying Paper Size and Type".
1. Tap <Menu>.
2. Tap <Adjustment/Maintenance>.
3. Tap <Clean Fixing Assembly>.
4. Tap <OK>.
5. Tap <Start>.
The paper selected to use for cleaning is printed.
6. Open the multi-purpose tray.
- 38 -

7. Load the cleaning sheet into the multi-purpose tray with the printed side facing up, and the arrow pointing toward
the machine.
Adjust the multi-purpose tray's settings for the cleaning sheet.
8. Press .
Cleaning starts. The <Finished.> message is displayed approximately 30 seconds later.
The Dust Proof Glass
When white streaks or other print defects occur, the dust proof glass may be dirty. Follow the procedure below to
clean the dust proof glass.
1. Open the front cover of the main unit.
2. Remove the dust proof glass cleaner from the rear side of the front cover of the main unit.
3. Hold the dust proof glass cleaner so that the pad on the tip is facing down, insert it in the locations shown on the
illustration until it stops, and then move it gently back and forth.
Clean the four locations as shown below. There are marks on the main unit that indicate the cleaning locations.
Check these marks when cleaning the dust proof glass.
- 39 -

4. When you have finished cleaning the dust proof glass, gently push the dust proof glass cleaner back onto the rear
side of the front cover of the main unit.
Place the dust proof glass cleaner back on the rear side of the front cover of the main unit with its tip facing the
left direction.
5. Close the front cover of the main unit.
Related information
Target products
- 40 -

Registering/Editing/Deleting Destinations in/from FavoritesSolution
Registering Destinations for the Favorites
Editing the Content of Registered Destinations in Favorites
Deleting a Registered Destination
Registering Destinations for the Favorites
You can register frequently used destinations as Favorites in the Address Book. Destinations can be edited or deleted
after they have been registered. You can register up to 19 destinations in Favorites.
NOTE
Three-digit numbers are not assigned to Favorites.
1. Tap <Address Book>.
2. Tap <Register Dest.>.
If a screen appears prompting you to enter a PIN, enter the correct PIN using the numeric keys, and tap <Apply>.
3. Tap <Favorites>.
4. Tap <Fax> or <E-Mail>.
Tap <Fax> when registering a fax number, and tap <E-Mail> when registering an e-mail address.
Registering destinations with the LDAP server
If your office has an LDAP server installed, you can register destinations searched from the server in the Address
Book. You need to specify the settings for connecting to an LDAP server beforehand.
4-1. Tap <LDAP Server>.
4-2. Search for the destination to register.
According to the content registered in the LDAP server, the user name and the fax number/e-mail address of the
specified destination that is registered on the LDAP server will be automatically input.
4-3. Tap a destination.
- 41 -

4-4. Proceed to step 9.
5. Tap <Name>.
Registering <Name> is optional. If you register <Name>, the destination can be searched alphabetically.
6. Enter the name using the numeric keys, and tap < Apply>.
7. Tap <Fax Number> or <E-Mail Address>.
8. Enter the number or address using the numeric keys, and tap < Apply>.
9. Tap <Apply>.
Editing the Content of Registered Destinations in Favorites
After registering destinations, you can change the content of destinations such as numbers, names, and types.
1. Tap <Address Book>.
2. Tap <Details/Edit>.
3. Tap < >.
4. Tap the destination you want to edit.
5. Tap <Edit>.
If a screen appears prompting you to enter a PIN, enter the correct PIN using the numeric keys, and tap <Apply>.
6. Tap the item you want to edit perform editing <Apply>.
7. Tap <Apply>.
- 42 -

Deleting a Registered Destination
1. Tap <Address Book>.
2. Tap <Details/Edit>.
3. Tap < >.
4. Tap the destination you want to delete.
5. Tap <Delete>.
If a screen appears prompting you to enter a PIN, enter the correct PIN using the numeric keys, and tap <Apply>.
6. Tap <Yes>.
Related information
Target products
- 43 -

Registering/Editing/Deleting Destinations in the Address BookSolution
Registering Destinations in the Address Book
Editing the Content of Registered Destinations
Deleting a Registered Destination
Registering Destinations in the Address Book
Destinations can be edited or deleted after they have been registered. You can register up to 300 destinations in the
Address Book.
1. Tap <Address Book>.
2. Tap <Register Dest.>.
If a screen appears prompting you to enter a PIN, enter the correct PIN using the numeric keys, and tap <Apply>.
3. Tap <Coded Dial>.
4. Tap <Fax>, <E-Mail> or <Group>.
Tap <Fax> when registering a fax number, and tap <E-Mail> when registering an e-mail address.
Registering destinations with the LDAP server
If your office has an LDAP server installed, you can register destinations searched from the server in the Address
Book. You need to specify the settings for connecting to an LDAP server beforehand.
4-1. Tap <LDAP Server>.
4-2. Search for the destination to register.
According to the content registered in the LDAP server, the user name and the fax number/e-mail address of the
specified destination that is registered on the LDAP server will be automatically input.
4-3. Tap a destination.
4-4. Proceed to step 9.
5. Tap <Name>.
Registering <Name> is optional. If you register <Name>, the destination can be searched alphabetically.
6. Enter the name using the numeric keys, and tap < Apply>.
7. Tap <Fax Number> or <E-Mail Address>.
8. Enter the number or address using the numeric keys, and tap < Apply>.
- 44 -

9. Tap <Apply>.
A three-digit number is automatically set to destinations. The number can be edited after it has been registered.
Editing the Content of Registered Destinations
After registering destinations, you can change the content of destinations such as numbers, names, types, and coded
dial numbers.
1. Tap <Address Book>.
2. Tap <Details/Edit>.
3. Tap the tab containing the destination you want to edit.
4. Tap the destination you want to edit.
5. Tap <Edit>.
If a screen appears prompting you to enter a PIN, enter the correct PIN using the numeric keys, and tap <Apply>.
6. Tap the item you want to edit perform editing <Apply>.
7. Tap <Apply>.
Deleting a Registered Destination
1. Tap <Address Book>.
- 45 -

2. Tap <Details/Edit>.
3. Tap the tab containing the destination you want to delete.
4. Tap the destination you want to delete.
5. Tap <Delete>.
If a screen appears prompting you to enter a PIN, enter the correct PIN using the numeric keys, and tap <Apply>.
6. Tap <Yes>.
Related information
Target products
- 46 -

Storing/Editing Destinations in Group DialSolution
Registering Multiple Destinations for Group Dial
Editing the Content of Registered Groups
Deleting a Group
Registering Multiple Destinations for Group Dial
Multiple destinations can be combined into groups. After a group is registered, you can add or delete destinations.
1. Tap <Address Book>.
2. Tap <Register Dest.>.
If a screen appears prompting you to enter a PIN, enter the correct PIN using the numeric keys, and tap <Apply>.
3. Tap <Coded Dial>.
Groups can also be registered in Favorites. Tap <Favorites> to register the group as Favorites.
4. Tap <Group>.
5. Tap <Name>.
Registering <Name> is optional. If you register <Name>, the destination can be searched alphabetically.
6. Enter the name using the numeric keys, and tap < Apply>.
7. Tap <Number of Destinations>.
8. Tap <Add>.
9. Tap the number or address you want to register.
Tap a tab to search by first character or type to display a destination.
- 47 -

10. Tap <Add>.
11. Repeat steps 9 and 10 until you have registered all of the destinations that you want to register, and then tap
<Apply>.
12. Tap <Apply>.
Editing the Content of Registered Groups
After registering destinations, you can change the content of groups such as names, destinations, and coded dial
numbers.
1. Tap <Address Book>.
2. Tap <Details/Edit>.
3. Tap < >.
4. Tap the destination you want to edit.
- 48 -

5. Tap <Edit>.
If a screen appears prompting you to enter a PIN, enter the correct PIN using the numeric keys, and tap <Apply>.
6. Tap the item you want to edit perform editing <Apply>.
7. Tap <Apply>.
Deleting a Group
1. Tap <Address Book>.
2. Tap <Details/Edit>.
3. Tap < >.
4. Tap the destination you want to delete.
5. Tap <Delete>.
If a screen appears prompting you to enter a PIN, enter the correct PIN using the numeric keys, and tap <Apply>.
6. Tap <Yes>.
Related information
Target products
- 49 -

Printing Reports and ListsSolution
TX Result Report (imageRUNNER C1225iF)
Communication Management Report (imageRUNNER C1225iF)
RX Result Report (imageRUNNER C1225iF)
Department ID Management Report
Address Book List (imageRUNNER C1225iF)
User Data List/System Manager Data List
IPSec Policy List
PS/PCL Font List (imageRUNNER C1225iF)
You can check fax results and the machine settings by printing reports and lists.
TX Result Report (imageRUNNER C1225iF)
You can check the fax or e-mail logs of sent documents as well as documents scanned to a shared folder by printing a
TX Result Report. The report can be printed either every time a transmission is completed or only when a sending
error occurs.
<Menu> <Output Report> <Report Settings> <Fax TX Result Report> or <E-Mail/File TX Result Report>
Select the print setting
<Off>
Select if you do not want to print Fax TX Result Reports or E-Mail/File TX Result Reports.
<On>
Select to print a Fax TX Result Report or E-Mail/File TX Result Report every time you send a document.
<Only When Error Occurs>
Select to print a Fax TX Result Report or E-Mail/File TX Result Report only when a sending error occurs.
Example: Fax sending
- 50 -

Example: Scanning to e-mail/shared folder
Result
"OK" indicates that the transmission was completed successfully while "NG" and three digits (an error code) indicates
that the transmission failed.
Department ID
The Department ID is shown when Department ID Management is enabled.
Sent/Error
For e-mail, TX Result Reports indicate the transmission result between the machine and the mail server, not between
the machine and the destination address. Even if the transmission fails, a three-digit error code will not be printed.
To check the error code, print a Communication Management Report.
NOTE
To print a part of a fax document on the reportWhen you select <On> or <Only When Error Occurs> for <Fax TX Result Report>, a part of a fax document can be included in the report. Set < Include TX Image> to <On>.
- 51 -

Communication Management Report (imageRUNNER C1225iF)
You can check the fax and e-mail logs of sent and received documents by printing a Communication Management
Report. The report can be printed automatically after every 40 transmissions, or you can print it manually.
<Menu> <Output Report> <Report Settings> <Communication Management Report> Select the print setting
<Auto Print (40 Transmissions)>
Select <On> to print the report automatically after every 40 transmissions, or <Off> if you do not want to print the
report automatically.
<Separate TX/RX>
Select <On> to print sent and received reports separately, or < Off> to print both reports on one sheet.
Print the Report Manually
<Menu> <Output Report> <Print List> <Communication Management Report> Check that the size and type
of paper displayed on the screen is loaded in the machine <OK> <Yes>
- 52 -

Example:
Result
"OK" indicates that the transmission was completed successfully while "NG" and three digits (an error code) indicates
that the transmission failed. For e-mail, Communication Management Reports indicate the transmission result
between the machine and the mail server, not between the machine and the destination address.
RX Result Report (imageRUNNER C1225iF)
You can check the logs of received fax documents by printing an RX Result Report. The report can be printed either
every time a transmission is completed or only when a receiving error occurs.
<Menu> <Output Report> <Report Settings> <RX Result Report> Select the print setting
<Off>
Select if you do not want to print RX Result Reports.
<On>
Select to print an RX Result Report every time you receive a document.
<Only When Error Occurs>
Select to print an RX Result Report only when a receiving error occurs.
Example:
- 53 -
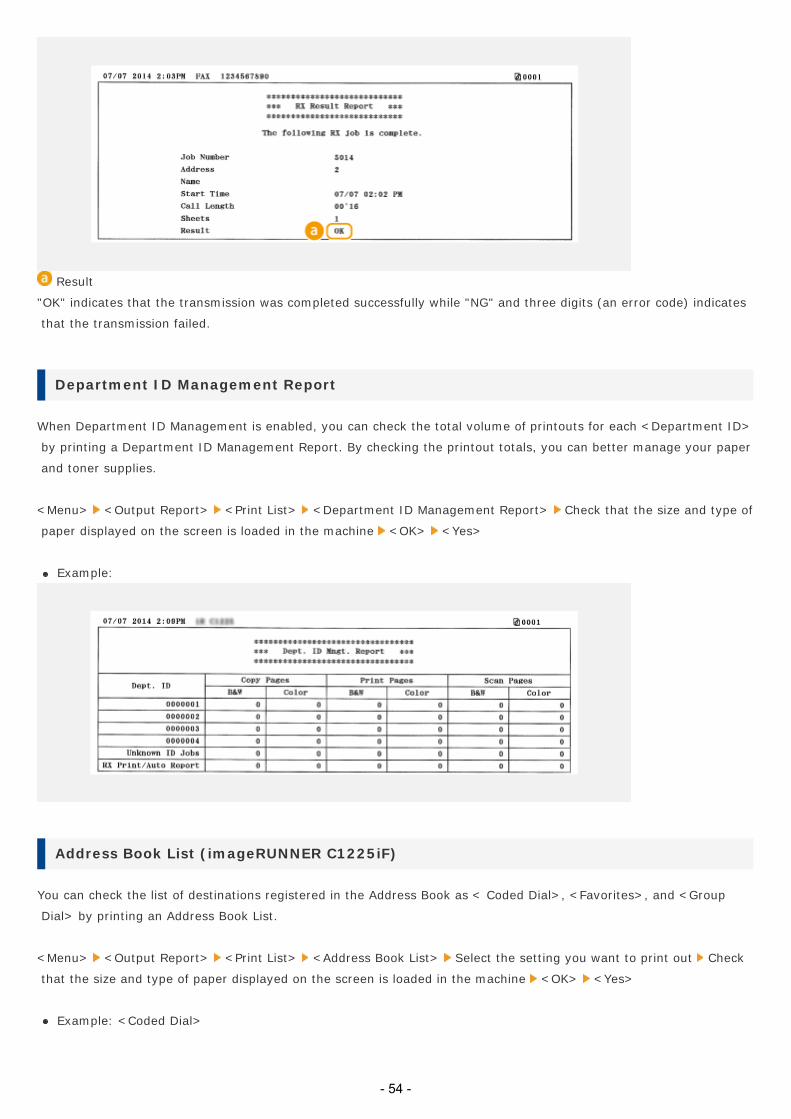
Result
"OK" indicates that the transmission was completed successfully while "NG" and three digits (an error code) indicates
that the transmission failed.
Department ID Management Report
When Department ID Management is enabled, you can check the total volume of printouts for each <Department ID>
by printing a Department ID Management Report. By checking the printout totals, you can better manage your paper
and toner supplies.
<Menu> <Output Report> <Print List> <Department ID Management Report> Check that the size and type of
paper displayed on the screen is loaded in the machine <OK> <Yes>
Example:
Address Book List (imageRUNNER C1225iF)
You can check the list of destinations registered in the Address Book as < Coded Dial>, <Favorites>, and <Group
Dial> by printing an Address Book List.
<Menu> <Output Report> <Print List> <Address Book List> Select the setting you want to print out Check
that the size and type of paper displayed on the screen is loaded in the machine <OK> <Yes>
Example: <Coded Dial>
- 54 -

Example: <Favorites>
Example: <Group Dial>
User Data List/System Manager Data List
You can check the list of the settings as well as the content that has been registered in the machine by printing a User
Data List or a System Manager Data List. Both list includes the paper size and type registered in the machine, the
print settings of <TX Result Report>, <Communication Management Report>, and <RX Result Report>.
<Menu> <Output Report> <Print List> <User Data List> or < System Manager Data List> Check that the size
and type of paper displayed on the screen is loaded in the machine <OK> <Yes>
Example:
- 55 -
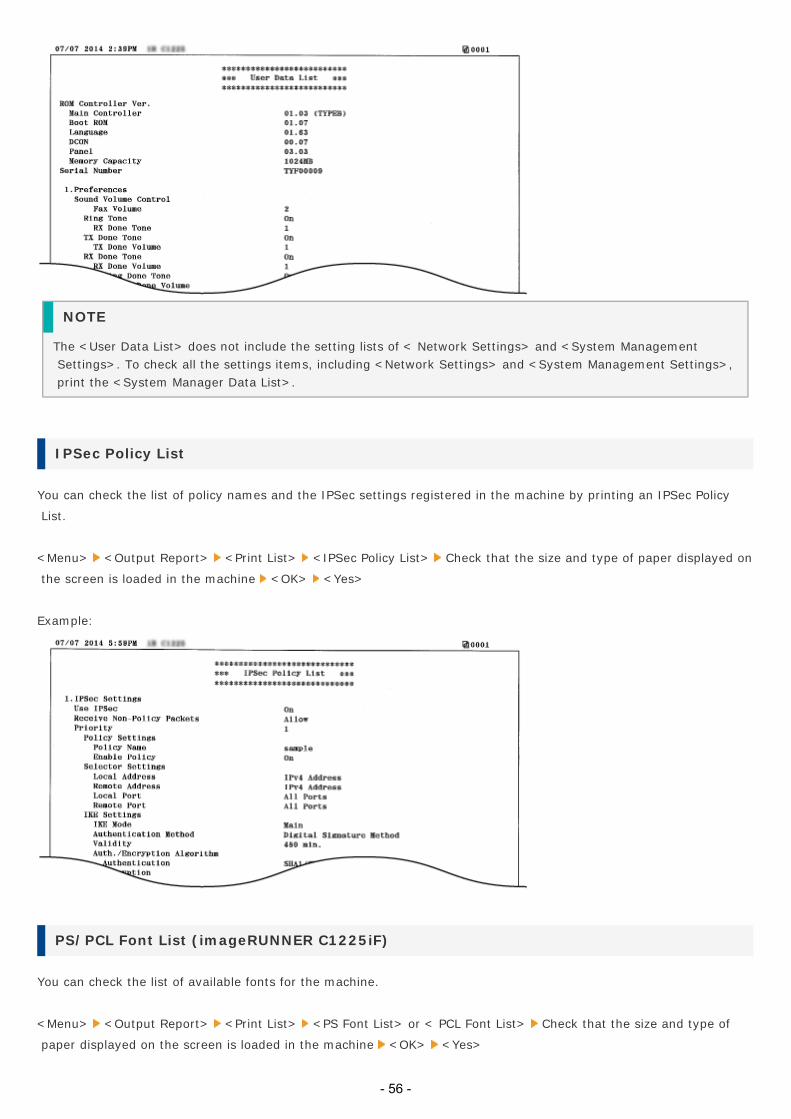
NOTE
The <User Data List> does not include the setting lists of < Network Settings> and <System Management Settings>. To check all the settings items, including <Network Settings> and <System Management Settings>, print the <System Manager Data List>.
IPSec Policy List
You can check the list of policy names and the IPSec settings registered in the machine by printing an IPSec Policy
List.
<Menu> <Output Report> <Print List> <IPSec Policy List> Check that the size and type of paper displayed on
the screen is loaded in the machine <OK> <Yes>
Example:
PS/PCL Font List (imageRUNNER C1225iF)
You can check the list of available fonts for the machine.
<Menu> <Output Report> <Print List> <PS Font List> or < PCL Font List> Check that the size and type of
paper displayed on the screen is loaded in the machine <OK> <Yes>
- 56 -

Example:
Typeface Samples
Standard Scalable Fonts (PCL)
- 57 -

- 58 -

Bitmapped Fonts (PCL)
OCR Code Scalable Fonts (PCL)
- 59 -

PS Fonts
- 60 -

- 61 -

- 62 -

- 63 -

- 64 -

- 65 -

- 66 -

- 67 -

Related information
Target products
- 68 -

Customizing the Home Screen ButtonsSolution
Adding Buttons
Deleting Buttons
Changing the Arrangement of Buttons
You can rearrange buttons that are displayed in the Home Screen so they are easier to use.
You can also add/delete buttons.
Adding Buttons
You can add frequently used settings that are registered for <Copy>, < Fax>, and <Scan> as shortcut buttons to the
Home Screen.
NOTE
You can register up to 12 frequently used settings.
Adding Buttons from < Copy> and <Fax>
When registering frequently used settings with <Copy>, <Fax>, you can specify whether to register shortcut buttons
to the Home Screen. Tap shortcut buttons in the Home Screen to display the settings in a single action.
1. Tap <Copy> or <Fax>.
2. Tap <Favorite Settings> <Register/Edit>.
3. Tap the settings to register.
- 69 -

4. Specify settings and tap <Apply>.
5. Tap <Yes> <Yes>.
If you selected settings in step 2 that were already registered, a confirmation screen for overwriting the old
settings is displayed.
6. Tap <OK>.
The button is added after the last buttons arranged on the Home Screen.
NOTE
If the Home Screen is full and no more settings can be registered, either delete spaces with <Home Screen Settings> in the Home Screen, or remove registered buttons.
Adding Buttons from < Scan>
When registering frequently used settings with <Scan>, you can specify whether to register shortcut buttons to the
Home Screen. Tap shortcut buttons in the Home Screen to display the settings in a single action.
NOTE
Frequently used settings for <Scan> can only be registered for e-mail, shared folders, and file servers.
- 70 -

1. Tap <Scan>.
2. Tap <E-Mail> or <File>.
3. Specify a destination.
4. Tap <Favorite Settings>.
5. Tap <Register> <OK>.
6. Select the settings to register.
7. Specify settings and tap <Apply>.
- 71 -

8. Tap <Yes>.
If you selected settings in step 6 that were already registered, a confirmation screen for overwriting the old
settings is displayed.
9. Tap <OK>.
The button is added after the last buttons arranged on the Home Screen.
NOTE
If the Home Screen is full and no more settings can be registered, either delete spaces with <Home Screen Settings> in the Home Screen, or remove registered buttons.
Adding Buttons from < Home Screen Settings>
You can use <Home Screen Settings> in the Home Screen to register several frequently used settings for <Copy>,
<Fax>, and <Scan> at the same time.
1. Tap <Home Screen Settings>.
If the logon screen appears, enter the correct ID and PIN using the numeric keys, and then press .
- 72 -

You can also use <Menu> <Preferences> <Display Settings> <Home Screen Button Display Settings>.
2. Tap <Select Button to Display>.
3. Tap frequently used settings in Copy/Fax/Scan.
You must first register frequently used settings for Copy, Fax, and Scan.
4. Select the check box for all settings to be displayed in the Home Screen and tap <Apply>.
Clear check boxes to cancel display of registered settings.
5. Tap <OK>.
The button is added after the last buttons arranged on the Home Screen.
NOTE
- 73 -

If the Home Screen is full and no more settings can be registered, either delete spaces with <Home Screen Settings> in the Home Screen, or remove registered buttons.
Deleting Buttons
You can cancel display of frequently used settings for <Copy>, < Fax>, or <Scan> in the Home Screen if they are no
longer used frequently.
NOTE
If you delete a frequently used setting itself that is registered to be displayed in the Home Screen for <Copy>, <Fax>, or <Scan>, the Home Screen button it is registered is also deleted.
1. Tap <Home Screen Settings>.
If a login screen is displayed, enter the ID and PIN with the numeric keys and press .
You can also use with <Menu> <Preferences> <Display Settings> <Home Screen Button Display Settings>.
2. Tap <Select Button to Display>.
3. Tap frequently used settings in Copy/Fax/Scan.
4. Clear the check box for all settings to cancel their display in the Home Screen and tap <Apply>.
- 74 -

5. Tap <OK>.
The specified button is removed, and a space appears.
NOTE
A space appears where the button was, and any buttons after it remain in theirarrangement. Tap <Home Screen Settings> <Insert and Delete Blank> to delete spaces. Tap a space and then <Delete> to delete the space and allow buttons after it to shift place.
Changing the Arrangement of Buttons
You can change where buttons in the Home Screen are displayed and on which page as needed.
1. Tap <Home Screen Settings>.
If a login screen is displayed, enter the ID and PIN with the numeric keys and press .
You can also use with <Menu> <Preferences> <Display Settings> <Home Screen Button Display Settings>.
2. Tap <Set Display Order>.
3. Change the displayed page as needed, and then tap the button to move.
- 75 -

The tapped button is highlighted.
4. Tap <Previous>/<Next> to move the button until it is displayed at the desired spot.
Long touching <Previous>/<Next> moves a button ahead or back continuously.
After a button is selected, flicking the screen or using / to change pages deselects the button.
5. Tap <Apply>.
The button's placement is confirmed.
NOTE
Adding blank buttonsInserting a space at a button's current location moves the button back one spot. Tap <Home Screen Settings> <Insert and Delete Blank> to insert spaces. Tap the button to move and then <Insert> to insert a space where the button is and move the button back one spot.
IMPORTANT
If frequently used settings are deleted or renamed from the Remote UI, tapping the button remaining in the Home Screen will not display the settings. Cancel display of the button in the Home Screen, and then register it again with a new name if necessary.
Related information
Target products
- 76 -

Connecting the Telephone Line (imageRUNNER C1225iF)Solution
Connect the telephone line to the machine.
NOTE
If you previously selected <Set Up Later> on the fax setup screen, tap <Menu> <Fax Settings> <Fax Setup Guide> to display the fax setup screen.
1. Tap <Next>.
One of the screens shown here is displayed after the receive mode has been set
2. Connect the telephone line to the machine.
Notice for Connecting the Telephone Line
This product includes the Telephone Line Cord and Adapter to connect the telephone line. Depending on your country
or region, you may need to use the provided Adapter to connect the Telephone Line Cord to the wall telephone jack.
If you use the provided Adapter, follow the instructions below to connect correctly.
If you use provided Adapter, use the Telephone Line Cord with 6 contacts connector in the package with Adapter.
Do not connect the Telephone Line Cord with 2 contacts connector to Adapter. There is the case that this product
or connected telephone does not work correctly.
Adapter to use is different depending on your country or a region. Select the proper type of Adapter which you
usually use.
Connect the telephone cable to the telephone line jack on the machine ( ) and the telephone line jack on the
wall.
If you are using a telephone or answering machine, connect it to the external telephone jack ( ).
If you are using an optional handset, connect it to the handset jack ( ).
- 77 -
If you are connecting an external telephone with fax functions, set up the telephone to receive faxes manually.
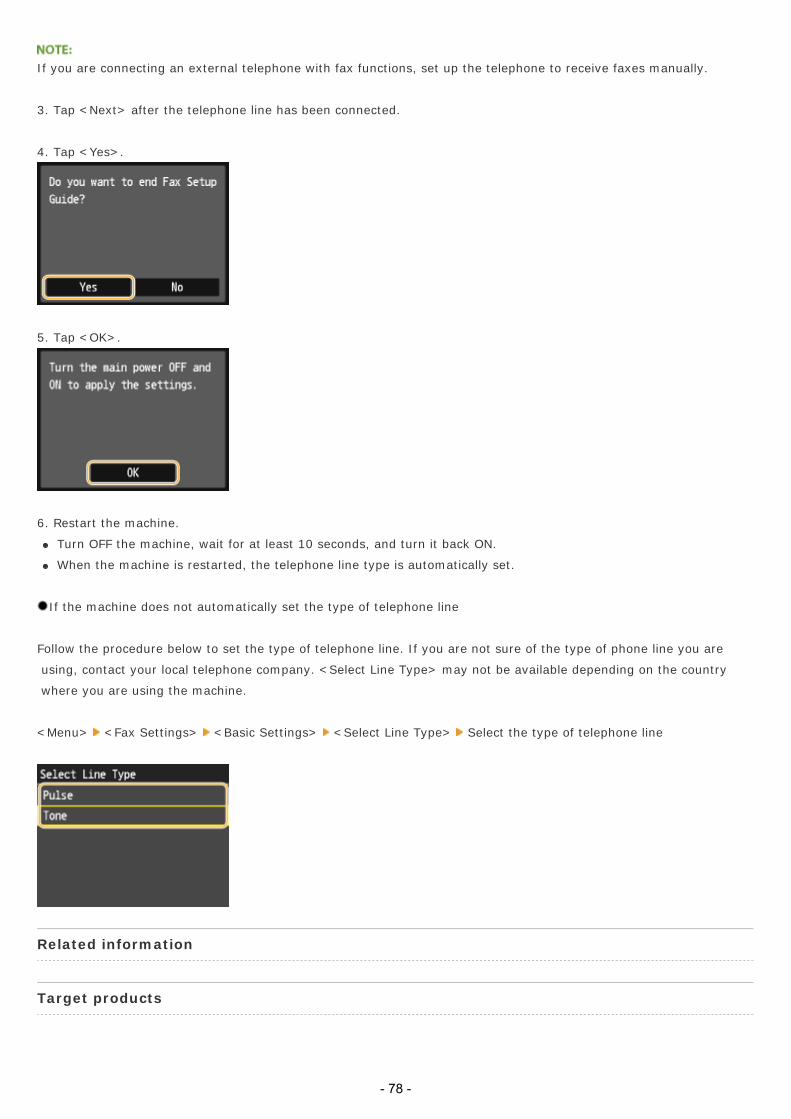
3. Tap <Next> after the telephone line has been connected.
4. Tap <Yes>.
5. Tap <OK>.
6. Restart the machine.
Turn OFF the machine, wait for at least 10 seconds, and turn it back ON.
When the machine is restarted, the telephone line type is automatically set.
If the machine does not automatically set the type of telephone line
Follow the procedure below to set the type of telephone line. If you are not sure of the type of phone line you are
using, contact your local telephone company. <Select Line Type> may not be available depending on the country
where you are using the machine.
<Menu> <Fax Settings> <Basic Settings> <Select Line Type> Select the type of telephone line
Related information
Target products
- 78 -

Receiving Faxes (imageRUNNER C1225iF)Solution
Methods for Receiving Faxes
Setting Up the Machine to Receive Faxes
Using a Telephone to Receive Faxes (Remote Reception)
This section describes the methods for receiving faxes and how to set up the machine to receive faxes. You need to
complete some procedures for using fax functions before specifying the receiving settings.
NOTE
The machine can print received fax documents on A4 or Letter size paper. If received fax documents are printed on other paper sizes, a portion of the page may not be printed or a page may be printed on two separate sheets of paper.
Methods for Receiving Faxes
The machine provides the following receiving methods. Select the method that best suits your needs and then set it
up by following the procedures.
<Auto>Dedicated to receiving faxesThe machine receives faxes automatically. Even if someone makes a call to you, you cannot talk to the caller.
<Fax/Tel Auto Switch>
When the call is a faxThe machine receives the fax automatically.When the call is a telephone callAn incoming call rings. Pick up the handset to answer the call.
You need to connect your telephone or the optional handset to the machine beforehand.
<Answering Machine>
When the call is a faxAfter an incoming call rings, the machine receives the fax automatically.When the call is a telephone callThe answering machine activates, enabling the caller to leave a message. If you pick up the handset before the answering machine starts recording a message, you can talk with the caller.
You need to connect your answering machine to the machine beforehand.Set the answering machine to answer after a few rings.We recommend that you add approximately 4 seconds of silence at the beginning of the message or set the maximum recording time to 20 seconds.
<Manual>
When the call is a faxAn incoming call rings. Pick up the handset. If you hear a beep, tap <Fax> <Start Receiving> to receive faxes.
When the call is a telephone callAn incoming call rings. Pick up the handset. If you do not hear a beep, start your conversation.
You need to connect your telephone or the optional handset to the machine beforehand.
- 79 -

You can set the machine to automatically receive faxes when an incoming call rings within a specified timeframe.
<Net Switch> The machine distinguishes between fax and telephone calls. This mode is only available for certain countries and requires subscription to a network switch service.
You need to connect your telephone or the optional handset to the machine beforehand.
NOTE
Depending on the type of telephone connected to it, the machine may not be able to send or receive faxes properly.If you are connecting an external telephone with fax functions, set the telephone to not receive faxes automatically.If you pick up the telephone handset and hear a beep, the call is a fax. You can receive the fax just by using the telephone to enter a specific ID number.
Setting Up the Machine to Receive Faxes
1. Tap <Fax>.
2. Tap <RX Mode>.
3. Tap the receiving method.
When selecting < Fax/Tel Auto Switch>
Specify the following three settings as necessary. When the setting is complete, tap <Apply>.
- 80 -

<Ring Start Time>
Enables you to specify the duration during which the machine determines whether an incoming call is a fax or a
telephone call. (Setting values: 5 to 30 seconds; default setting: 8 seconds)
<Incoming Ring Time>
Enables you to specify the duration during which an incoming call rings for a telephone call. (Setting values: 15 to
300 seconds; default setting: 22 seconds)
<After Ring>
Enables you to specify how the machine operates if you do not pick up the handset while an incoming call is ringing.
Tap <End> to disconnect the call or <Receive> to receive an incoming fax. (Default setting: < Receive>)
Using a Telephone to Receive Faxes (Remote Reception)
When you pick up the telephone and get a fax signal, you do not need to go to the machine to receive the fax. Just
enter a specific ID number (default setting: 25) with the telephone, and you can start receiving the fax.
1. When an incoming call rings, pick up the telephone handset.
2. If you hear a beep, enter the ID number for Remote Reception with the telephone.
The ID number is set to 25 by default. You can change this number as necessary.
3. Hang up the handset.
Related information
Target products
- 81 -

If You Cannot Receive a Fax (imageRUNNER C1225iF)Issue
You cannot receive faxes. Machine does not switch automatically between telephone and fax calls. You cannot receive
faxes and an error report is printed.
Cause and Solution
If you cannot receive faxes, check the following.
Is a Telephone Line Set Correctly?
Is the Machine Set to Receive or Switch Telephone and Fax Automatically?
Free space in memory may be running low.
Has an Error Occurred During Reception?
Is Paper Loaded in the Paper Drawer?
Is a Fax Received Using an Optical Fiber Line?
Is a Telephone Line Set Correctly?
Make sure the line is connected properly. (See "Connecting the Telephone Line (imageRUNNER C1225iF).")
Is the Machine Set to Receive or Switch Telephone and Fax Automatically?
Make sure that the receive mode is set to <Auto>, < Fax/Tel Auto Switch>, <Answering Machine>, or <Net Switch>.
If you have set <Answering Machine>, confirm that an answering machine is connected to the machine and that it is
turned on with an outgoing message properly recorded. (See "Receiving Faxes (imageRUNNER C1225iF).")
Free space in memory may be running low.
If <Memory Lock Settings> in <Communication Management Settings> in <System Management Settings> of the
setting menu is set to <On>, follow the procedures below to output the documents in memory.
<Menu> <System Management Settings> <Communication Management Settings> <Memory Lock Settings>
<Off>
Print, send, or delete any documents stored in memory. For instructions on how to check or delete jobs stored in
memory, see "Checking and Deleting Documents in Memory (imageRUNNER C1225iF)."
- 82 -

Has an Error Occurred During Reception?
Check the display for an error message.
Print a RX Result Report and check for an error. (See "Printing Reports and Lists.")
Is Paper Loaded in the Paper Drawer?
Make sure paper is loaded in the paper drawer. (See "Loading Paper in the Paper Drawer.")
Is a Fax Received Using an Optical Fiber Line?
When using an optical fiber line or IP phone line, the machine may not work correctly depending on the connection
environment or connected devices. In such a case, contact the provider of the optical fiber line or IP phone.
Related information
Target products
- 83 -

If You Cannot Send a Fax (imageRUNNER C1225iF)Issue
You cannot send a fax. An error message appears on the display when you send faxes.
Cause and Solution
If you cannot send faxes, check the following.
Did You Just Turn ON the Power Switch?
Is the Machine Set for the Correct Telephone Line Type?
Is Your Machine in the Fax Mode?
Is the Document Loaded Correctly?
Is the Specified Destination Registered Correctly?
Did You Dial the Correct Number?
Is the Machine in the Sleep Mode?
Is the Recipient's Machine Out of Paper?
Are there other Documents being Sent from Memory?
Has an Error Occurred During Transmission?
Is the Telephone Cable Connected Properly?
Is the Telephone Line Working Properly?
Is the Recipient's Machine a G3 Fax Machine?
Is an Error Code #018 Shown on the TX ERROR REPORT?
Did the Recipient's Machine Answer within 35 Seconds (After All Automatic Redialing Attempts)?
Is the [Processing/Data] Indicator Blinking?
Is the Machine Overheated?
Is a Fax Sent Using an Optical Fiber Line?
Did You Just Turn ON the Power Switch?
Wait for a while. After turning ON the power switch, the machine cannot scan documents immediately.
Is the Machine Set for the Correct Telephone Line Type?
Make sure the machine is set for the correct telephone line type. If you do not know the telephone line type, contact
your local telephone company.
For instructions on how to set the telephone line type, see "Connecting the Telephone Line (imageRUNNER C1225iF)."
- 84 -

Is Your Machine in the Fax Mode?
Tap <Fax> to show the fax standby display.
Is the Document Loaded Correctly?
Make sure the originals are correctly loaded. (See "Placing Documents.")
Is the Specified Destination Registered Correctly?
Check that the Address Book settings are registered correctly. (See "Registering/Editing/Deleting Destinations in the
Address Book".)
Did You Dial the Correct Number?
Check that you have the correct number.
Is the Machine in the Sleep Mode?
The machine does not scan originals if it is in the Sleep mode. To take the machine out of the Sleep mode, press
on the operation panel.
Is the Recipient's Machine Out of Paper?
Ask the recipient to make sure paper is loaded in the machine.
Are there other Documents being Sent from Memory?
Allow time for the documents to finish sending.
Has an Error Occurred During Transmission?
Check the display for an error message.
Print a TX Result Report and check for an error. (See "Printing Reports and Lists.")
Is the Telephone Cable Connected Properly?
Make sure the cable is connected properly. (See "Connecting the Telephone Line (imageRUNNER C1225iF).")
Is the Telephone Line Working Properly?
- 85 -

Make sure there is a dial tone when you press [Hook] or when you lift the handset of any external telephone
connected to the machine. If there is no dial tone, contact your local telephone company.
Is the Recipient's Machine a G3 Fax Machine?
Make sure the recipient's machine is compatible with your machine.
Is an Error Code #018 Shown on the TX ERROR REPORT?
The fax number you dialed is busy. Try sending the document later.
Did the Recipient's Machine Answer within 35 Seconds (After All Automatic Redialing Attempts)?
Ask the recipient to check the fax machine. When sending the fax overseas, insert pauses in the fax number.
Is the [Processing/Data] Indicator Blinking?
The external phone is busy. Please wait until the external phone becomes free.
Is the Machine Overheated?
Unplug the machine and let it cool for about 5 minutes. Then plug in the machine and try sending again.
Is a Fax Sent Using an Optical Fiber Line?
When using an optical fiber line or IP phone line, the machine may not work correctly depending on the connection
environment or connected devices. In such a case, contact the provider of the optical fiber line or IP phone.
Related information
Target products
- 86 -

Select Line Type (imageRUNNER C1225iF)Solution
If the machine does not automatically set the type of telephone line.
Follow the procedure below to set the type of telephone line. If you are not sure of the type of phone line you are
using, contact your local telephone company. <Select Line Type> may not be available depending on the country
where you are using the machine.
<Menu> <Fax Settings> <Basic Settings> <Select Line Type> Select the type of telephone line
Related information
Target products
- 87 -

Checking and Deleting Documents in Memory (imageRUNNER C1225iF)Solution
Storing Documents into Memory
Printing Documents in Memory
Checking/Deleting Documents in Memory
You can store received faxes into memory without printing them as soon as you receive them. The documents in
memory can be printed at any time.
NOTE
The documents in memory can be also forwarded to a destination.
Storing Documents into Memory
To store received documents into memory, set <Memory Lock Settings> to <On>. You can also specify optional
settings such as a security setting that makes a password necessary to unlock the feature and a time setting that
specifies a period of time during the day in which received documents are stored in memory.
<Menu> <System Management Settings> <Communication Management Settings> <Memory Lock Settings>
<On> Specify each setting <Apply>
<Memory Lock PIN>
Enables you to register a password of up to seven digits. To register a password, use the numeric keys to enter a
password, and tap <Apply>. Enter the same numbers again for confirmation, and tap <Apply>. This password is
necessary when you change the memory reception settings or when you deactivate the Memory Reception feature to
print all the stored documents. If you do not want to register a password, just tap <Apply> without entering
anything.
Passwords with only zeros, as in "00" or "0000000", are not allowed.
- 88 -

<Report Print>
Enables you to print RX Result reports every time documents are stored into memory. To print reports, tap <On>.
You also need to set <RX Result Report> to <On>.
<Memory Lock Time>
Specify a period of time during the day in which received documents are stored in memory. If you do not set a period
of time, the machine stores every document into memory when Memory Reception is turned on.
Printing Documents in Memory
To print received documents in memory, set <Memory Lock Settings> to < Off>. All the documents in memory are
printed.
NOTE
You cannot select a specific document for printing.If a time for the feature to deactivate has been specified, the documents are automatically printed at the specified time.
<Menu> <System Management Settings> <Communication Management Settings> <Memory Lock Settings>
<Off>
Checking/Deleting Documents in Memory
You can check detailed information about the documents stored in memory, including sender fax numbers and
number of pages sent, and then delete unnecessary documents.
1. Press .
2. Tap <RX Job>.
3. Tap <Job Status>.- 89 -

4. Tap the document you want to check.
To delete the checked document
4-1. Tap <Delete>.
4-2. Tap <Yes>.
Related information
Target products
- 90 -

2-Sided CopyingSolution
You can copy two pages of a document on both sides of the paper. You can also copy a two-sided document on both
sides of the paper, or on two separate pages.
NOTE
<2-Sided> may not be available with some sizes and types of paper.<2-Sided> is not available when using <ID Card Copy>.
<Copy> <2-Sided> Tap the type of 2-sided copying
Types of 2-sided copying
The illustration below shows the types of 2-sided copying.
1-Sided->2-Sided
2-Sided->2-Sided
2-Sided->1-Sided
<Original/Finishing Type>
Specify if you want to change the binding, such as when copying book-type documents in calendar-type format.
1-Sided->2-Sided
If you want to copy portrait-oriented documents in calendar-type format (short-edge binding)
<Original/Finishing Type> <1-Sided->2-Sided> <Portrait> <Calendar Type>
- 91 -

If you want to copy landscape-oriented documents in book-type format (short-edge binding)
<Original/Finishing Type> <1-Sided->2-Sided> <Landscape> <Book Type>
2-Sided->2-Sided
If you want to create copies with a different binding type than the original
<Original/Finishing Type> <2-Sided->2-Sided> Tap the original orientation Tap the original binding type Tap
the binding type for the finished copy, which is different from that of the original document.
2-Sided->1-Sided
This setting enables you to align the direction of the output paper.
When a 2-sided document is in portrait-oriented calendar-type format (short-edge binding)
<Original/Finishing Type> <2-Sided->1-Sided> <Portrait> <Calendar Type>
When a 2-sided document is in landscape-oriented book-type format (short-edge binding)
<Original/Finishing Type> <2-Sided->1-Sided> <Landscape> <Book Type>
Related information
Paper Handling
Specifying Paper Size and Type
Placing Documents
Target products- 92 -

- 93 -

Streaks Appear on PrintoutsIssue
Smudge marks appear on the bottom edge of printouts or lines, streaks, or toner splatter appears on printouts.
Cause and Solution
Dirt inside the machine may affect printing results. Perform care and cleaning to the machine first.
Are you using appropriate paper?
Do you print data without margins?
Are you using appropriate paper?
Check usable paper, and replace with appropriate paper.
Do you print data without margins?
This symptom occurs if a margin is set to none in the printer driver. A margin of 5 mm or less around the edge of
paper or 10 mm or less around the edge of envelopes is not printable with the machine. Make sure to have margins
around the document to print.
[Finishing] tab [Advanced Settings] [Expand Print Region and Print] [Off]
Related information
Target products
- 94 -

Printing a Document Secured by a PIN (Secure Print)Solution
Sending a Secured Document from a Computer to the Machine
Printing Out Secured Documents
Changing the Valid Time Period for Secured Documents
By setting a PIN to a document when printing from a computer, the document is held in the memory of the machine,
and is not printed until the correct PIN is entered on the operation panel of the machine. This function is called
"Secure Print," and the document that is protected by a PIN is called a "secured document." Using Secure Print keeps
printouts of confidential documents from being left unattended.
Sending a Secured Document from a Computer to the Machine
1. Open a document in an application and display the print dialog box.
How to display the print dialog box differs for each application. For more information, see the instruction manual
for the application you are using.
2. Select the printer driver for the machine, and click [Preferences] (or [Properties]).
3. Select [Secured Print] in [Output Method].
Click [Yes] or [No] on the [Information] pop-up screen.
If you want to use the same user name and PIN every time, click [Yes]. To change the user name and PIN every
time, click [No].
- 95 -

If you selected [Yes]
Enter the user name for [User Name] and PIN for [PIN], and click [OK].
The computer name (logon name) of your computer is displayed in [User Name]. If you want to change the user
name, enter up to 32 alphanumeric characters for a new user name.
Enter the PIN of up to seven digits.
4. Specify the print settings, and click [OK].
Click the [Basic Settings], [Page Setup], [Finishing], [Paper Source], or [Quality] tabs to specify the print settings
on each screen as necessary.
5. Click [Print] (or [OK]).
- 96 -

6. Check the document name, user name, and PIN and click [OK].
[Document Name]
The document name is automatically set based on the information from the application. If you want to change the
document name, enter up to 32 alphanumeric characters for a new document name.
[User Name]
If you specified the user name in step 3
- The specified user name is displayed.
If you did not specify the user name in step 3
- The computer name or logon name is displayed. If you want to change the user name, enter up to 32 alphanumeric
characters for a new user name.
[PIN]
If you specified the PIN in step 3
- The specified PIN is already entered. The PIN is displayed in symbols.
If you did not specify the PIN in step 3
- Enter the PIN of up to seven digits. The entered PIN is displayed in symbols.
After the secured document is sent to the machine, it is held in the memory of the machine waiting to be printed.
Printing Out Secured Documents
After you send the secured document to the machine, print it out within 30 minutes. After that, the secured document
will be deleted from the memory of the machine and can no longer be printed.
NOTE
If secured documents are left unprinted, they occupy the memory and may prevent the machine from printing even ordinary (not secured) documents. Make sure that you print your secured documents as soon as you can.
You can check how much memory is being used for secured documents. <Device Status> <Secure Print Memory Usage>You can change the valid time period for secured documents.
- 97 -

1. Tap <Secure Print>.
You cannot proceed to the next step if the <Remote Scanner> screen shown below is displayed. In this case, press
(Back) to close the screen, and tap <Secure Print> again.
2. Tap the secured document to print.
If the <Select User> screen is displayed
If secured documents from two or more users are being held in memory, the < Select User> screen is displayed
prior to the <Select File> screen. Tap your user name.
3. Enter the PIN using numeric keys, and then tap <Apply>.
- 98 -

Printing starts.
Tap the document to cancel printing <Cancel> <Yes>.
Changing the Valid Time Period for Secured Documents
The machine at purchase is set to delete secured documents 30 minutes after receiving them unless they are printed,
but you can change this setting.
1. Tap <Menu>.
2. Tap <System Management Settings>.
If the logon screen appears, enter the correct ID and PIN using numeric keys, and then press .
3. Tap <Secure Print Settings>.
4. Tap <On>.
Disabling Secure Print
Tap <Off> and restart the machine.
5. Specify how long the machine holds secured documents, and tap < Apply>.
Use / or the numeric keys to enter the time.
The secured document is erased from the memory of the machine when the time specified here elapses.
6. Restart the machine.
Turn OFF the machine, wait for at least 10 seconds, and turn it back ON.
Related information
Target products
- 99 -

Correcting the GradationSolution
Full Adjust
Quick Adjust
Adjust Copy Image
Gradation refers to the dark to light continuum of shades of a color. The more shades in the gradations of colors that
are printed, the more natural printouts seem. If color reproducibility becomes poor and the density and brightness of
printouts differs markedly from the originals, perform the appropriate auto adjustment. Before adjusting the
gradation, check the remaining toner level. Gradation adjustments require significant toner. There are three types of
adjustments: Full Adjust, Quick Adjust, and Adjust Copy Image.
Fewer shades in the gradations
More shades in the gradations
NOTE
Adjustments may not be performed effectively if there is not sufficient toner.
Full Adjust
This adjustment optimizes reproducibility for color printing. When the machine performs full adjustment, it obtains
information to optimize color reproducibility. The machine maintains this information until the next time you perform
full adjustment. For making full adjustment, an adjustment image will be printed twice and scanned twice. Note that
you cannot perform this adjustment while performing some functions, including, scanning, and printing.
NOTE
This machine adjusts the toner and print speed according to the paper type. To make effective adjustments, select the correct paper type.
1. Tap <Menu>.
- 100 -

2. Tap <Adjustment/Maintenance>.
3. Tap <Auto Adjust Gradation> <Full Adjust (Plain Paper 1/2)>, <Full Adjust (Plain Paper 3)>, or <Full Adjust
(Heavy Paper)>.
4. Check that the size and type of paper displayed on the screen is loaded in the machine, and tap <OK>.
5. Confirm the procedure tap <Start>.
Adjustment starts. In a few minutes, an adjustment image is printed.
6. Open the feeder after the screen displayed during printing disappears.
7. Place the adjustment image on the platen glass with the print side face down.
* Place the test page face down on the platen glass, with the black bar along the inner edge of the platen glass.
8. Gently close the feeder.
- 101 -
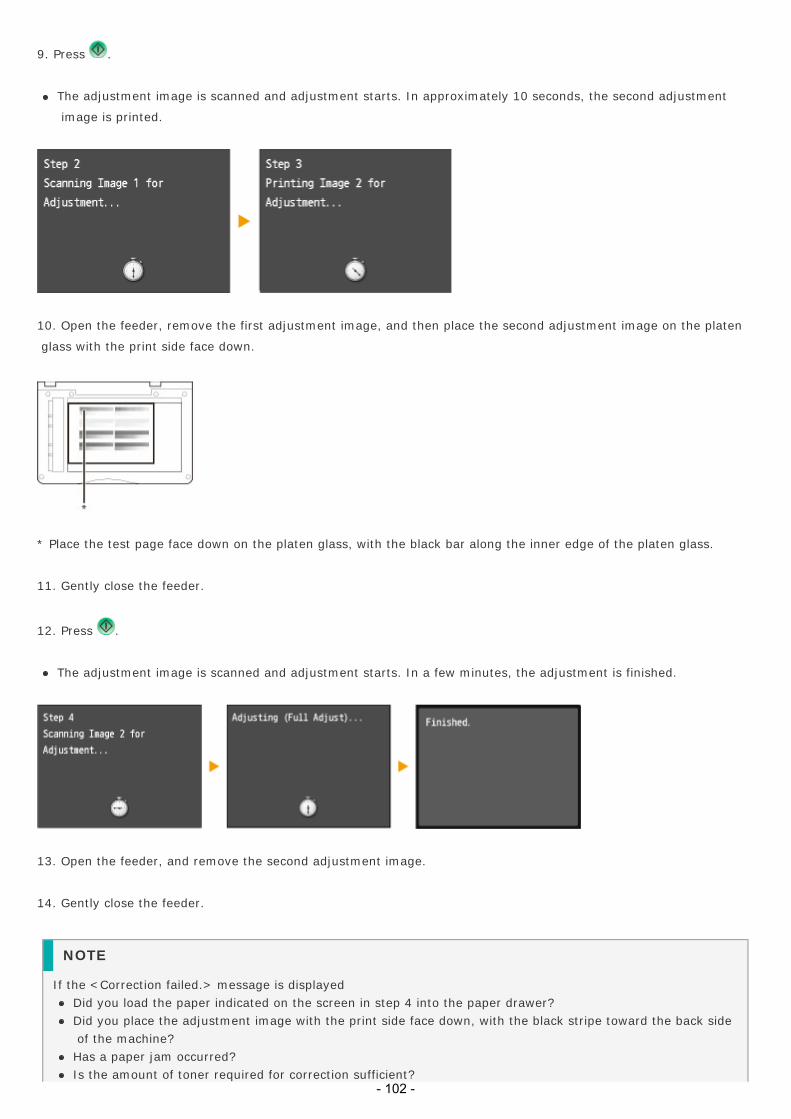
9. Press .
The adjustment image is scanned and adjustment starts. In approximately 10 seconds, the second adjustment
image is printed.
10. Open the feeder, remove the first adjustment image, and then place the second adjustment image on the platen
glass with the print side face down.
* Place the test page face down on the platen glass, with the black bar along the inner edge of the platen glass.
11. Gently close the feeder.
12. Press .
The adjustment image is scanned and adjustment starts. In a few minutes, the adjustment is finished.
13. Open the feeder, and remove the second adjustment image.
14. Gently close the feeder.
NOTE
If the <Correction failed.> message is displayedDid you load the paper indicated on the screen in step 4 into the paper drawer?Did you place the adjustment image with the print side face down, with the black stripe toward the back side of the machine?Has a paper jam occurred?Is the amount of toner required for correction sufficient?
- 102 -

Quick Adjust
This adjustment maintains the optimized status that was acquired by < Full Adjust>. Note that you cannot perform
this adjustment while performing some functions, including, scanning, and printing. If the result of this adjustment is
not satisfactory, perform <Full Adjust>. This adjustment may be automatically performed after you replace a toner
cartridge.
1. Tap <Menu>.
2. Tap <Adjustment/Maintenance>.
3. Tap <Auto Adjust Gradation> <Quick Adjust>.
4. Tap <Start>.
Adjustment starts. In a few minutes, the adjustment is finished.
NOTE
You can set the machine to perform this adjustment automatically after the power is turned ON.
Adjust Copy Image
This adjustment improves the result of copies and printing from a USB memory device. For correcting copy images,
an adjustment image will be printed and scanned. Note that you cannot perform this adjustment while performing
some functions, including, scanning, and printing.
1. Tap <Menu>.
- 103 -

2. Tap <Adjustment/Maintenance>.
3. Tap <Auto Adjust Gradation> <Adjust Copy Image>.
4. Check that the size and type of paper displayed on the screen is loaded in the machine, and tap <OK>.
5. Confirm the procedure, and tap <Start>.
Adjustment starts. In a few minutes, an adjustment image is printed.
6. Open the feeder after the screen displayed during printing disappears.
7. Place the adjustment image on the platen glass with the print side face down.
* Place the test page face down on the platen glass, with the black bar along the inner edge of the platen glass.
8. Gently close the feeder.
- 104 -

9. Press .
The adjustment image is scanned and adjustment starts. In a few minutes, the adjustment is finished.
10. Open the feeder, and remove the adjustment image.
11. Gently close the feeder.
NOTE
If the <Correction failed.> message is displayedDid you load the paper indicated on the screen in step 4 into the paper drawer?Did you place the adjustment image with the print side face down, with the black stripe toward the back side of the machine?Has a paper jam occurred?Is the amount of toner required for correction sufficient?
Related information
Target products
- 105 -
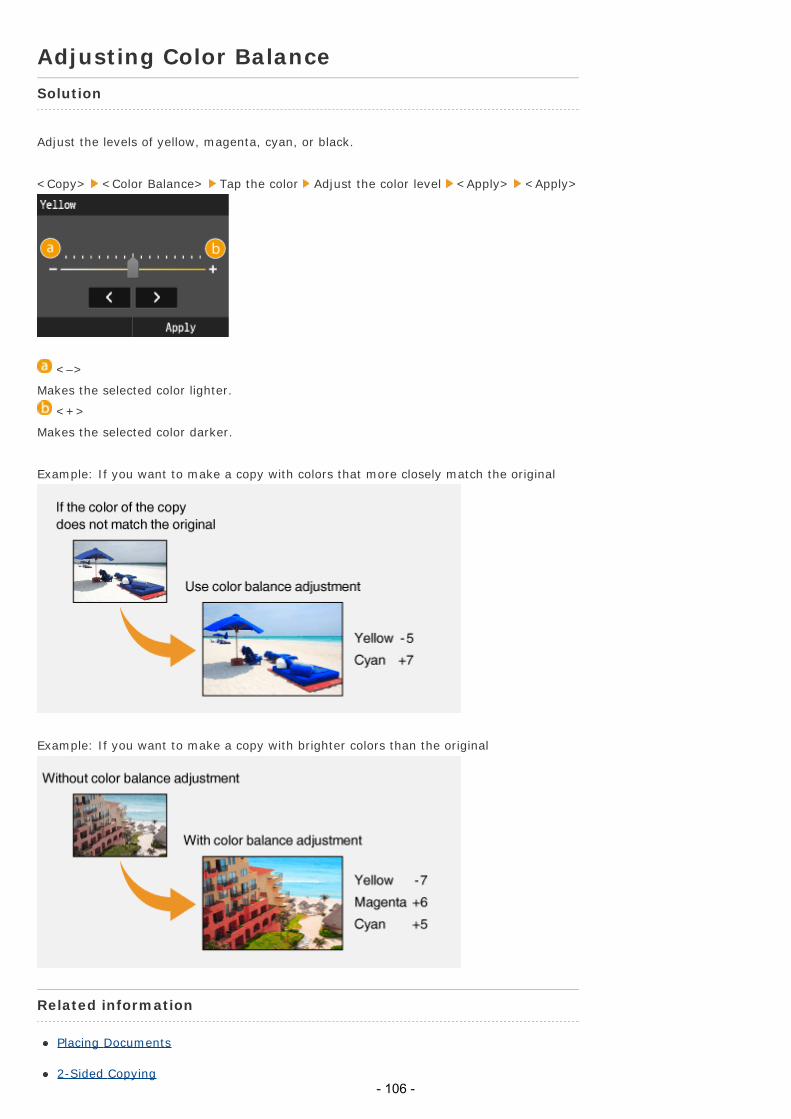
Adjusting Color BalanceSolution
Adjust the levels of yellow, magenta, cyan, or black.
<Copy> <Color Balance> Tap the color Adjust the color level <Apply> <Apply>
<–>
Makes the selected color lighter.
<+>
Makes the selected color darker.
Example: If you want to make a copy with colors that more closely match the original
Example: If you want to make a copy with brighter colors than the original
Related information
Placing Documents
2-Sided Copying- 106 -

Target products
- 107 -

Installing the Driver/Software Via USB for WindowsSolution
Installing with [Easy Installation]
Installing with [Custom Installation]
USB Cable Connection (Only when Connecting with USB)
Checking the Results of the Installation
This section explains how to install the MF Drivers so the machine is ready to print from a computer.
IMPORTANT
If you are connecting the machine and a computer via a USB cable, install the software before connecting the USB cable. A USB cable is not included with the machine. Prepare one separately.
NOTE
The options to be displayed differ depending on your country or region.
You can choose to install standard software and the e-Manual with [Easy Installation], or specify the software and
manuals to install with [Custom Installation].
Installing with [Easy Installation]
1. Log on to the computer with an administrator account.
2. Insert the User Software and Manuals CD-ROM/DVD-ROM into the drive on the computer.
3. Click [Easy Installation].
If the above screen does not appear
- Windows XP/Server 2003
[Start] select [Run] enter "D:\MInst.exe" click [OK].
- Windows Vista/7/Server 2008/Server 2008 R2
[Start] enter "D:\MInst.exe" in [Search programs and files] or [Start Search] press the [ENTER] key on the
- 108 -

keyboard.
- Windows 8/Server 2012
Right-click the lower-left corner of the screen select [Run] enter "D:\MInst.exe" click [OK].
- Windows 8.1/Server 2012 R2
Right-click [Start] select [Run] enter "D:\MInst.exe" click [OK].
* This following example uses "D:" as the name of the CD-ROM/DVD-ROM drive. The CD-ROM/DVD-ROM drive name
may be different on your computer.
If you do not want to install the e-Manual on your computer or want to customize installed software, click [Custom
Installation].
If [AutoPlay] is displayed, click [Run MInst.exe].
4. Select [USB Connection], and click [Next].
In Server 2003/Server 2008/Server 2008 R2/Server 2012/Server 2012 R2, this screen is not displayed. Proceed to
the following procedure.
5. Click [Install].
6. Read the License Agreement, and click [Yes] to agree.
- 109 -

7. Click [Next].
When the following screen appears, click [Yes].
8. Click [Exit].
9. Follow the on-screen instructions to install the e-Manual.
10. Read the information in the following screen carefully, select [Accept] or [Do Not Accept], and click [Next].
The screen may not appear depending on the model you are using.
- 110 -

If you select [Accept], the Product Extended Survey Program is installed.
The Product Extended Survey Program is a program to send basic information related to installation and usage of
the machine to Canon every month for 10 years. It does not send any other information, including your personal
information. You can uninstall the Product Extended Survey Program at any time.
11. Click [Next].
12. Select the [Restart Computer Now (Recommended)] check box, and click [Restart] after removing the CD-
ROM/DVD-ROM.
Installing with [Custom Installation]
1. Log on to the computer with an administrator account.
2. Insert the User Software and Manuals CD-ROM/DVD-ROM into the drive on the computer.
3. Click [Custom Installation].
If the above screen does not appear
- 111 -

- Windows XP/Server 2003
[Start] select [Run] enter "D:\MInst.exe" click [OK].
- Windows Vista/7/Server 2008/Server 2008 R2
[Start] enter "D:\MInst.exe" in [Search programs and files] or [Start Search] press the [ENTER] key on the
keyboard.
- Windows 8/Server 2012
Right-click the lower-left corner of the screen select [Run] enter "D:\MInst.exe" click [OK].
- Windows 8.1/Server 2012 R2
Right-click [Start] select [Run] enter "D:\MInst.exe" click [OK].
* This following example uses "D:" as the name of the CD-ROM/DVD-ROM drive. The CD-ROM/DVD-ROM drive name
may be different on your computer.
If you want to install standard software and the e-Manual on your computer, click [Easy Installation].
If [AutoPlay] is displayed, click [Run MInst.exe].
4. Select [USB Connection], and click [Next].
In Server 2003/Server 2008/Server 2008 R2/Server 2012/Server 2012 R2, this screen is not displayed. Proceed to
the following procedure.
5. Select the check box next to the application you want to install, and click [Install].
6. Read the License Agreement, and click [Yes] to agree.
- 112 -

7. Click [Next].
When the following screen appears, click [Yes].
8. Click [Exit].
9. Follow the on-screen instructions to install Presto! PageManager and the e-Manual.
10. Read the information in the following screen carefully, select [Accept] or [Do Not Accept], and click [Next].
The screen may not appear depending on the model you are using.
- 113 -

If you select [Accept], the Product Extended Survey Program is installed.
The Product Extended Survey Program is a program to send basic information related to installation and usage of
the machine to Canon every month for 10 years. It does not send any other information, including your personal
information. You can uninstall the Product Extended Survey Program at any time.
11. Click [Next].
12. Select the [Restart Computer Now (Recommended)] check box, and click [Restart] after removing the CD-
ROM/DVD-ROM.
USB Cable Connection (Only when Connecting with USB)
1. Connect the USB cable.
Checking the Results of the Installation
You can check whether the MF Drivers and e-Manual are installed correctly or not by whether the icons appear.
Printer driver- 114 -
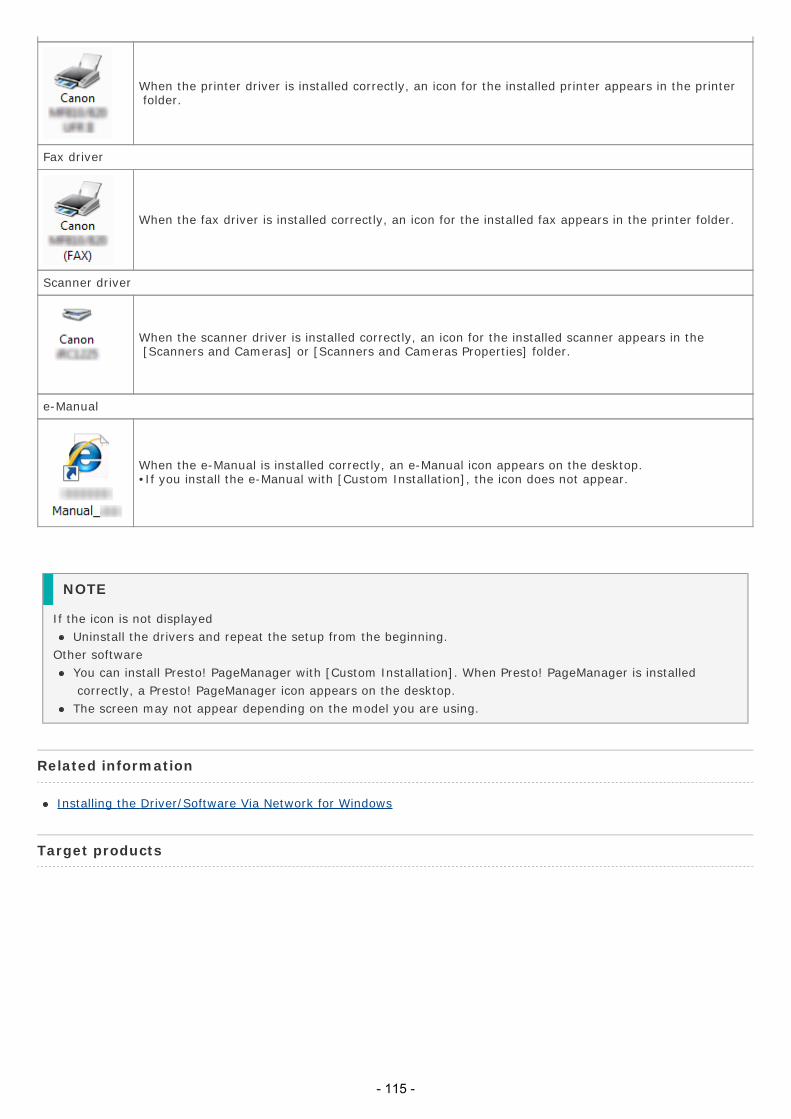
When the printer driver is installed correctly, an icon for the installed printer appears in the printer folder.
Fax driver
When the fax driver is installed correctly, an icon for the installed fax appears in the printer folder.
Scanner driver
When the scanner driver is installed correctly, an icon for the installed scanner appears in the [Scanners and Cameras] or [Scanners and Cameras Properties] folder.
e-Manual
When the e-Manual is installed correctly, an e-Manual icon appears on the desktop.•If you install the e-Manual with [Custom Installation], the icon does not appear.
NOTE
If the icon is not displayedUninstall the drivers and repeat the setup from the beginning.
Other softwareYou can install Presto! PageManager with [Custom Installation]. When Presto! PageManager is installed correctly, a Presto! PageManager icon appears on the desktop.The screen may not appear depending on the model you are using.
Related information
Installing the Driver/Software Via Network for Windows
Target products
- 115 -

Installing the Driver/Software Via Network for WindowsSolution
Installing with [Easy Installation]
Installing with [Custom Installation]
Checking the Results of the Installation
This section explains how to install the MF Drivers so the machine is ready to print from a computer.
NOTE
The options to be displayed differ depending on your country or region.
You can choose to install standard software and the e-Manual with [Easy Installation], or specify the software and
manuals to install with [Custom Installation].
Installing with [Easy Installation]
1. Log on to the computer with an administrator account.
2. Insert the User Software and Manuals CD-ROM/DVD-ROM into the drive on the computer.
3. Click [Easy Installation].
If the above screen does not appear
- Windows XP/Server 2003
[Start] select [Run] enter "D:\MInst.exe" click [OK].
- Windows Vista/7/Server 2008/Server 2008 R2
[Start] enter "D:\MInst.exe" in [Search programs and files] or [Start Search] press the [ENTER] key on the
keyboard.
- Windows 8/Server 2012
Right-click the lower-left corner of the screen select [Run] enter "D:\MInst.exe" click [OK].
- Windows 8.1/Server 2012 R2
Right-click [Start] select [Run] enter "D:\MInst.exe" click [OK].
* This following example uses "D:" as the name of the CD-ROM/DVD-ROM drive. The CD-ROM/DVD-ROM drive name
- 116 -

may be different on your computer.
If you do not want to install the e-Manual on your computer or want to customize installed software, click [Custom
Installation].
If [AutoPlay] is displayed, click [Run MInst.exe].
4. Select [Network Connection], and click [Next].
In Server 2003/Server 2008/Server 2008 R2/Server 2012/Server 2012 R2, this screen is not displayed. Proceed to
the following procedure.
5. Click [Install].
6. Read the License Agreement, and click [Yes] to agree.
- 117 -

7. Click [Next].
When the following screen appears, click [Yes].
8. Select the machine, and click [Next].
If no machines are displayed in [Device List]
Check the computer and machine connection and IP address settings (For details, see the "e-Manual" (HTML
manual) in the CD-ROM/DVD-ROM supplied with the machine.), and click [Update Device List]. If the machine is
still not displayed at all, click [Search by IP Address] enter the IP address set on the machine [OK].
- 118 -

9. Check the settings, and click [Start].
10. Click [Exit].
11. Follow the on-screen instructions to install the e-Manual.
12. Read the information in the following screen carefully, select [Accept] or [Do Not Accept], and click [Next].
The screen may not appear depending on the model you are using.
If you select [Accept], the Product Extended Survey Program is installed.
The Product Extended Survey Program is a program to send basic information related to installation and usage of
the machine to Canon every month for 10 years. It does not send any other information, including your personal
information. You can uninstall the Product Extended Survey Program at any time.
13. Click [Next].
14. Select the [Restart Computer Now (Recommended)] check box, and click [Restart] after removing the CD-
ROM/DVD-ROM.
- 119 -

Installing with [Custom Installation]
1. Log on to the computer with an administrator account.
2. Insert the User Software and Manuals CD-ROM/DVD-ROM into the drive on the computer.
3. Click [Custom Installation].
If the above screen does not appear
- Windows XP/Server 2003
[Start] select [Run] enter "D:\MInst.exe" click [OK].
- Windows Vista/7/Server 2008/Server 2008 R2
[Start] enter "D:\MInst.exe" in [Search programs and files] or [Start Search] press the [ENTER] key on the
keyboard.
- Windows 8/Server 2012
Right-click the lower-left corner of the screen select [Run] enter "D:\MInst.exe" click [OK].
- Windows 8.1/Server 2012 R2
Right-click [Start] select [Run] enter "D:\MInst.exe" click [OK].
* This following example uses "D:" as the name of the CD-ROM/DVD-ROM drive. The CD-ROM/DVD-ROM drive name
may be different on your computer.- 120 -

If you want to install standard software and the e-Manual on your computer, click [Easy Installation].
If [AutoPlay] is displayed, click [Run MInst.exe].
4. Select [Network Connection], and click [Next].
In Server 2003/Server 2008/Server 2008 R2/Server 2012/Server 2012 R2, this screen is not displayed. Proceed to
the following procedure.
5. Select the check box next to the application you want to install, and click [Install].
6. Read the License Agreement, and click [Yes] to agree.
- 121 -

7. Click [Next].
When the following screen appears, click [Yes].
8. Select the machine, and click [Next].
If no machines are displayed in [Device List]:
Check the computer and machine connection and IP address settings (For details, see the "e-Manual" (HTML
manual) in the CD-ROM/DVD-ROM supplied with the machine), and click [Update Device List]. If the machine is
still not displayed at all, click [Search by IP Address] enter the IP address set on the machine [OK].
- 122 -

9. Select the drivers to install, and click [Next].
If you did not select [Printer], proceed to step 11.
If you did not select either [Printer] or [Fax], proceed to step 12.
To obtain device information for using a print server
Select the [Canon Driver Information Assist Service] check box.
10. Select the printer drivers to install, and click [Next].
11. Specify details for each driver.
The screen below does not appear if you are using the model without a fax function.
- 123 -

[Printer Name]/[Fax Name]
Change the name as necessary.
[Use as Shared Printer]/[Use as Shared Fax]
Select the check box if you want to share the machine (using the computer where you are performing the
installation as a print server). For details, see the "e-Manual" (HTML manual) in the CD-ROM/DVD-ROM supplied
with the machine.
[Shared Name]
Change the shared name as necessary.
[Drivers to Add]
If you have selected the [Use as Shared Printer]/[Use as Shared Fax] check box, install additional drivers as
necessary. Select the operating system, and click [OK] to install additional drivers.
12. Check the displayed information, and click [Start].
13. Configure the machine normally used and make a test print.
To configure the machine as the machine normally used, select the driver, and click [Next].
To print a test page, select the driver, and click [Next].
14. Click [Exit].
15. Follow the on-screen instructions to install Presto! PageManager and the e-Manual.
16. Read the information in the following screen carefully, select [Accept] or [Do Not Accept], and click [Next].
The screen may not appear depending on the model you are using.
If you select [Accept], the Product Extended Survey Program is installed.
The Product Extended Survey Program is a program to send basic information related to installation and usage of
the machine to Canon every month for 10 years. It does not send any other information, including your personal
information. You can uninstall the Product Extended Survey Program at any time.
- 124 -

17. Click [Next].
18. Select the [Restart Computer Now (Recommended)] check box, and click [Restart] after removing the CD-
ROM/DVD-ROM.
Checking the Results of the Installation
You can check whether the MF Drivers and e-Manual are installed correctly or not by whether the icons appear.
Printer driver
When the printer driver is installed correctly, an icon for the installed printer appears in the printer folder.
Fax driver
When the fax driver is installed correctly, an icon for the installed fax appears in the printer folder.
Scanner driver
When the scanner driver is installed correctly, an icon for the installed scanner appears in the [Scanners and Cameras] or [Scanners and Cameras Properties] folder.
e-Manual
When the e-Manual is installed correctly, an e-Manual icon appears on the desktop.•If you install the e-Manual with [Custom Installation], the icon does not appear.
- 125 -

NOTE
If the icon is not displayedUninstall the drivers and repeat the setup from the beginning.
Other softwareYou can install Presto! PageManager with [Custom Installation]. When Presto! PageManager is installed correctly, a Presto! PageManager icon appears on the desktop.The screen may not appear depending on the model you are using.
Related information
Installing the Driver/Software Via USB for Windows
Target products
- 126 -

Setting IP AddressesSolution
Setting IPv4 Address
Setting IPv6 Addresses
Viewing Network Settings
Connecting the machine to a network requires a unique network IP address. Two versions of IP addresses are
available: IPv4 and IPv6. Configure these settings depending on the network environment. To use IPv6 addresses,
you need to properly configure the IPv4 address settings.
Setting IPv4 Address
The machine's IPv4 address can be either assigned automatically by a dynamic IP addressing protocol or entered
manually. Make sure that the connectors of the LAN cable are firmly inserted into the ports. You can test the network
connection if necessary.
1. Tap <Menu>.
2. Tap <Network Settings>.
If the logon screen appears, enter the correct ID and PIN using the numeric keys, and then press .
3. Tap <TCP/IP Settings> <IPv4 Settings> <IP Address Settings>.
4. Configure IP address settings.
<Auto Acquire>
Select to automatically assign an IP address via DHCP. When <Auto Acquire: On> is displayed, automatic addressing
is enabled.
<Manually Acquire>
Select to configure the IP address settings by manually entering an IP address. In order to select this option, <Auto
- 127 -

Acquire> must be set to < Off>.
<Check Settings>
Select when you want to view the current IP address settings.
Automatically assigning an IP address
4-A-1. Tap <Auto Acquire> <Select Protocol>.
4-A-2. Tap <DHCP>.
If you do not want to use DHCP to assign an IP address
Select <Off>. If you select <DHCP> when this service is unavailable, the machine will waste time and
communications resources searching the network for this service.
4-A-3. Check that <Auto IP> is set to <On>.
If <Off> is selected, change the setting to <On>.
4-A-4. Tap <Apply>.
NOTE
IP addresses assigned via DHCP override the address obtained via Auto IP.
Manually entering an IP address
4-B-1. Check that <Auto Acquire> is set to <Off>.
If <On> is displayed, tap <Auto Acquire> set both <Select Protocol> and <Auto IP> to <Off>.
4-B-2. Tap <Manually Acquire>.
- 128 -
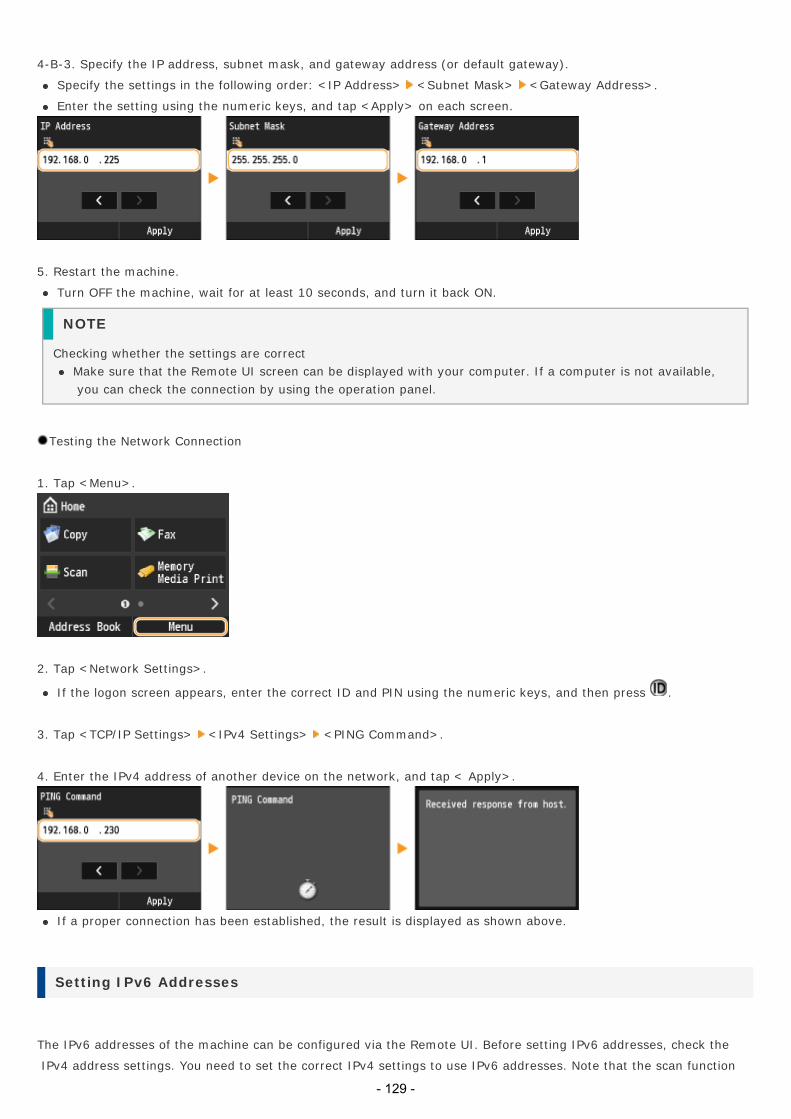
4-B-3. Specify the IP address, subnet mask, and gateway address (or default gateway).
Specify the settings in the following order: <IP Address> <Subnet Mask> <Gateway Address>.
Enter the setting using the numeric keys, and tap <Apply> on each screen.
5. Restart the machine.
Turn OFF the machine, wait for at least 10 seconds, and turn it back ON.
NOTE
Checking whether the settings are correctMake sure that the Remote UI screen can be displayed with your computer. If a computer is not available, you can check the connection by using the operation panel.
Testing the Network Connection
1. Tap <Menu>.
2. Tap <Network Settings>.
If the logon screen appears, enter the correct ID and PIN using the numeric keys, and then press .
3. Tap <TCP/IP Settings> <IPv4 Settings> <PING Command>.
4. Enter the IPv4 address of another device on the network, and tap < Apply>.
If a proper connection has been established, the result is displayed as shown above.
Setting IPv6 Addresses
The IPv6 addresses of the machine can be configured via the Remote UI. Before setting IPv6 addresses, check the
IPv4 address settings. You need to set the correct IPv4 settings to use IPv6 addresses. Note that the scan function
- 129 -
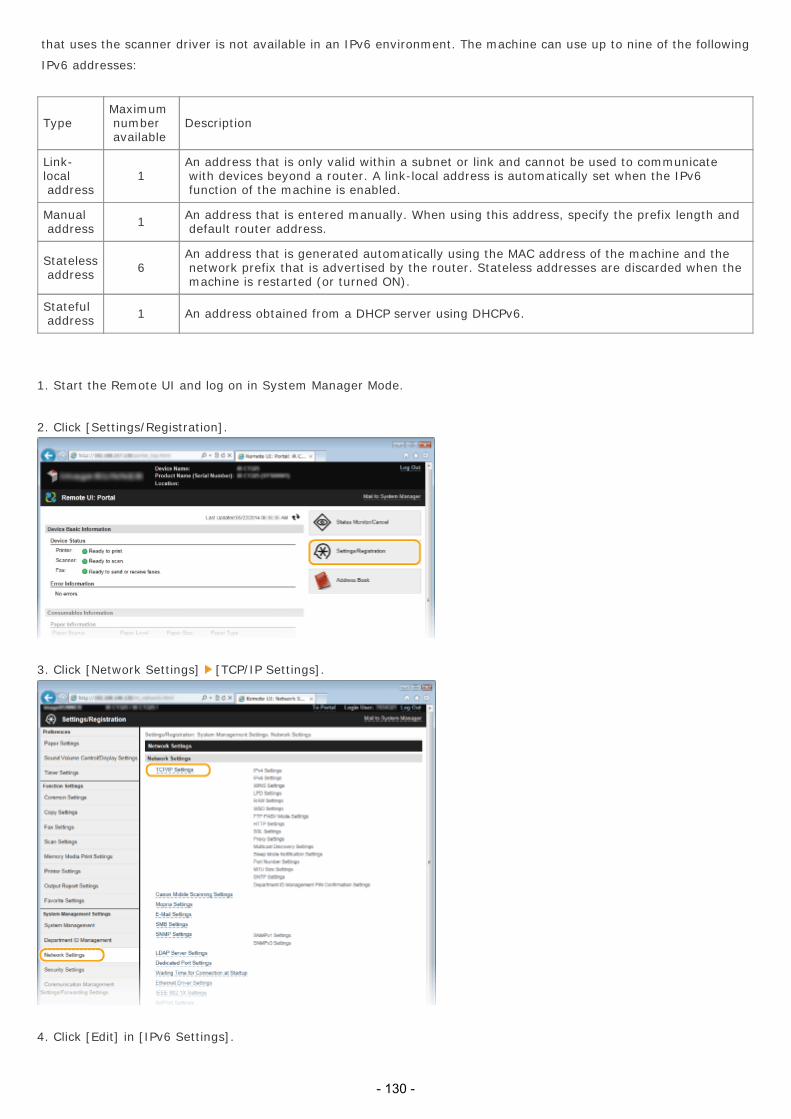
that uses the scanner driver is not available in an IPv6 environment. The machine can use up to nine of the following
IPv6 addresses:
TypeMaximum number available
Description
Link-local address
1An address that is only valid within a subnet or link and cannot be used to communicate with devices beyond a router. A link-local address is automatically set when the IPv6 function of the machine is enabled.
Manual address 1 An address that is entered manually. When using this address, specify the prefix length and
default router address.
Stateless address 6
An address that is generated automatically using the MAC address of the machine and the network prefix that is advertised by the router. Stateless addresses are discarded when the machine is restarted (or turned ON).
Stateful address 1 An address obtained from a DHCP server using DHCPv6.
1. Start the Remote UI and log on in System Manager Mode.
2. Click [Settings/Registration].
3. Click [Network Settings] [TCP/IP Settings].
4. Click [Edit] in [IPv6 Settings].
- 130 -

5. Select the [Use IPv6] check box and configure the required settings.
[Use IPv6]
Select the check box to enable IPv6 on the machine. When not using IPv6, clear the check box.
[Stateless Address]
Select the check box when using a stateless address. When not using a stateless address, clear the check box.
[Use Manual Address]
When you want to manually enter an IPv6 address, select the check box and enter the IP address, prefix length,
and default router address in the corresponding text boxes.
[IP Address]
Enter an IPv6 address. Addresses that start with "ff" (or multicast address) cannot be entered.
[Prefix Length]
Enter a number that indicates how many bits are available for the network address.
[Default Router Address]- 131 -

Specify the IPv6 address of the default router as necessary. Addresses that start with "ff" (or multicast address)
cannot be entered.
[Use DHCPv6]
Select the check box when using a stateful address. When not using DHCPv6, clear the check box.
6. Click [OK].
7. Restart the machine.
Turn OFF the machine, wait for at least 10 seconds, and turn it back ON.
NOTE
Checking whether the settings are correctMake sure that the Remote UI screen can be displayed with your computer by using the IPv6 address of the machine.
Using the operation panelIPv6 settings can also be accessed from <Menu>.
Viewing Network Settings
NOTE
The IP address is not correctly configured if it is displayed as "0.0.0.0".Connecting the machine to a switching hub or bridge may result in a connection failure even when the IP address is correctly configured. This problem can be solved by setting a certain interval before the machine starts communicating.You can print a list of the current network settings.
Viewing IPv4 Settings
<Network Information> <IPv4> Tap the setting to view
- 132 -
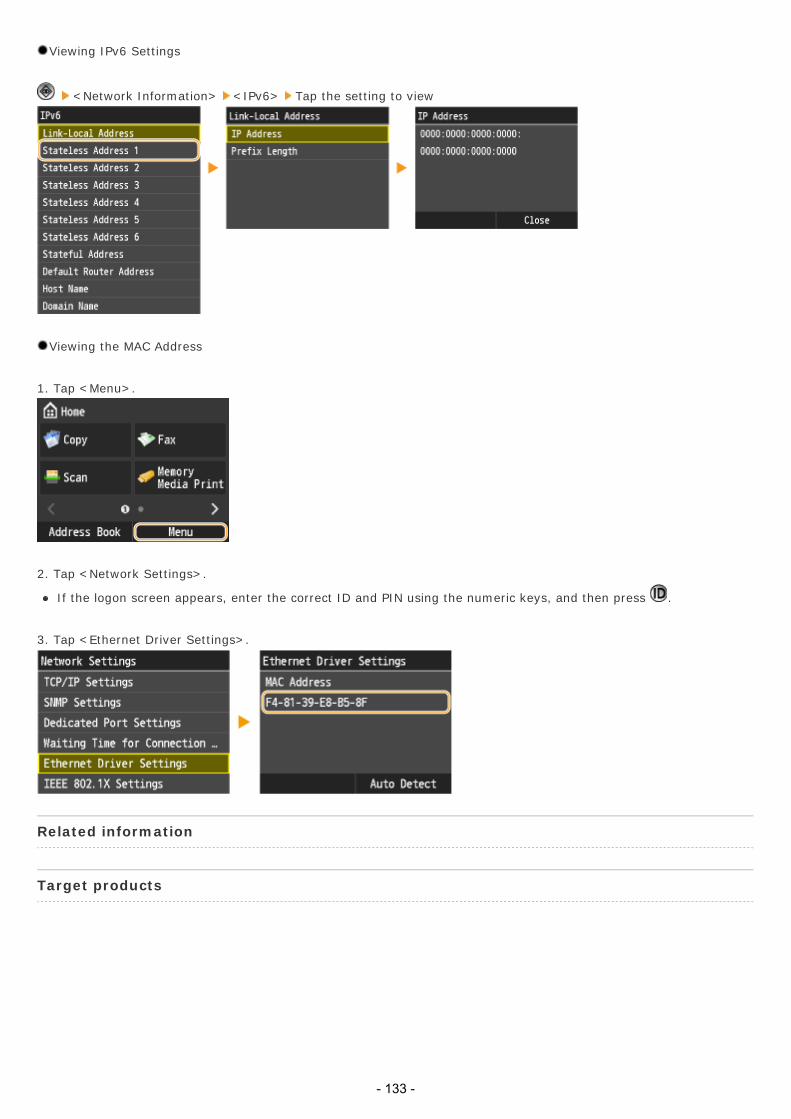
Viewing IPv6 Settings
<Network Information> <IPv6> Tap the setting to view
Viewing the MAC Address
1. Tap <Menu>.
2. Tap <Network Settings>.
If the logon screen appears, enter the correct ID and PIN using the numeric keys, and then press .
3. Tap <Ethernet Driver Settings>.
Related information
Target products
- 133 -

Installing the Driver/Software Via USB for MacintoshSolution
Install the MF Drivers from the CD-ROM/DVD-ROM that is supplied with the machine. For more information about how
to connect the machine and a computer, see "Getting Started" before starting.
CAUTION
If you are connecting the machine and a computer via a USB cable, install the software before connecting the USB cable. A USB cable is not included with the machine. Prepare one separately.
NOTE
The options to be displayed differ depending on your model.The installation screen differs depending on the version of Mac OS X.Be sure to close all applications that are running.
1. Insert the User Software and Manuals CD-ROM/DVD-ROM into the drive on the computer.
2. Turn OFF the machine.
3. Double-click the CD-ROM/DVD-ROM icon, and double-click the [Canon_Driver.pkg] icon.
4. Click [Continue].
5. Read the License Agreement, and click [Continue].
- 134 -

6. Click [Agree].
7. Click [Install].
[Change Install Location] may appear, but you cannot change the installation location.
8. Enter your [Name] and [Password], and click [OK].
If you are using Mac OS X 10.7.x or later, click [Install Software].
9. When the following screen appears, click [Close].
- 135 -

10. Connect the USB cable.
Connect the flat end ( ) to the USB port on the computer.
Connect the square end ( ) to the USB port on the machine.
11. Turn ON the machine.
12. Open [System Preferences], and click [Print & Fax], [Print & Scan], or [Printers & Scanners].
13. Check that the machine is added to the dialog box.
If the machine is added to the dialog box, installation is complete.
If the machine is not added to the dialog box, proceed to step 14.
14. Click the [+] icon.- 136 -

If another dialog box does not appear, click [Add Other Printer or Scanner] or [Add Printer or Scanner] after
clicking the [+] icon.
15. Register the printer and fax.
15-1. Click [Default], and select a printer name for which [USB] is displayed in the [Kind] column.
15-2. Select either one of the following options from [Print Using] or [Use]: [Select a driver to use], [Select Printer
Software], or [Select Software].
15-3. Select a driver that is capable for this machine from the driver list, and click [OK].
If you are using Mac OS X 10.5.x, clicking [OK] is not required.
15-4. Click [Add].
16. Check that this machine is added to the [Print & Fax], [Print & Scan], or [Printers & Scanners] dialog box.
- 137 -

Related information
Installing the Driver/Software Via Network for Macintosh
Target products
- 138 -

Installing the Driver/Software Via Network for MacintoshSolution
Install the MF Drivers from the CD-ROM/DVD-ROM that is supplied with the machine. For more information about how
to connect the machine and a computer, see "Getting Started" before starting.
NOTE
The options to be displayed differ depending on your model.The installation screen differs depending on the version of Mac OS X.Be sure to close all applications that are running.
1. Insert the User Software and Manuals CD-ROM/DVD-ROM into the drive on the computer.
2. Connect the machine to the computer.
Before starting installation of the drivers, configure network settings. For more information about how to configure
network settings, see "Getting Started".
3. Double-click the CD-ROM/DVD-ROM icon, and double-click the [Canon_Driver.pkg] icon.
4. Click [Continue].
5. Read the License Agreement, and click [Continue].
- 139 -

6. Click [Agree].
7. Click [Install].
[Change Install Location] may appear, but you cannot change the installation location.
8. Enter your [Name] and [Password], and click [OK].
If you are using Mac OS X 10.7.x or later, click [Install Software].
9. When the following screen appears, click [Close].
- 140 -

10. Open [System Preferences], and click [Print & Fax], [Print & Scan], or [Printers & Scanners].
11. Click the [+] icon.
If another dialog box does not appear, click [Add Other Printer or Scanner] or [Add Printer or Scanner] after
clicking the [+] icon.
12. Register the printer and fax.
12-A. Bonjour Connection
12-A-1. Click [Default], and select a printer name for which [Bonjour] is displayed in the [Kind] column.
12-A-2. Select either one of the following options from [Print Using] or [Use]: [Select a driver to use], [Select Printer
Software], or [Select Software].
- 141 -

12-A-3. Select a driver that is capable for this machine from the driver list, and click [OK].
If you are using Mac OS X 10.5.x, clicking [OK] is not required.
12-A-4. Click [Add].
12-B. TCP/IP Connection
12-B-1. Click [IP], and select a print protocol from [Protocol].
If you want to use the machine in an IPv6 environment, select LPD or Socket for [Protocol].
12-B-2. Enter the IP address of the machine to [Address], and select either one of the following options from [Print
Using] or [Use]: [Select a driver to use], [Select Printer Software], or [Select Software].
12-B-3. Select a driver that is capable for this machine from the driver list, and click [OK].
If you are using Mac OS X 10.5.x, clicking [OK] is not required.
12-B-4. Click [Add].
13. Check that this machine is added to the [Print & Fax], [Print & Scan], or [Printers & Scanners] dialog box.
- 142 -

Related information
Installing the Driver/Software Via USB for Macintosh
Target products
- 143 -

Clearing JamsSolution
Document Jams in the Feeder
Paper Jams in the Machine
Paper Jams in the Fixing Assembly
Paper Jams in the Paper Drawer 1
Paper Jams in the Paper Drawer 2 (Option)
If a paper jams, <Paper jammed.> is displayed on the screen. Tap < Next> to display simple solutions. If it is difficult
to understand the procedures on the display, see the following sections to clear jams.
IMPORTANT
When removing the jammed paper, do not turn OFF the machineTurning OFF the machine deletes the data that is being printed. Be especially careful when receiving fax documents.
If paper tearsRemove all the paper fragments to prevent them from becoming jammed.
If paper jams repeatedlyTap the paper stack on a flat surface to even the edges of the paper before loading it into the machine.Check that the paper is appropriate for the machine.Check that no jammed paper fragments remain in the machine.
Do not forcibly remove the jammed document or paper from the machineForcibly removing the paper may damage parts. If you are not able to remove the paper, contact your local authorized Canon dealer.
NOTE
Optional Cassette Feeding Unit are required to use Paper Drawer 2.
Document Jams in the Feeder
If there are documents placed in the feeder, remove them first. Then, follow the procedure below.
1. Remove the jammed document inside the feeder cover.
- 144 -

1-1. Open the feeder cover.
1-2. Lift the lever.
1-3. Gently pull out the document.
2. Remove the jammed document inside the inner cover of the feeder.
2-1. Open the inner cover of the feeder
2-2. Gently pull out the document.
2-3. Close the inner cover of the feeder.
3. Return the lever back in place, and close the feeder cover.
3-1. Return the lever to its original position.
3-2. Close the feeder cover.
4. Remove the jammed document in the underside of the feeder.
- 145 -

4-1. Open the feeder.
4-2. Gently pull out the document.
4-3. Close the feeder.
Paper Jams in the Machine
If any paper is loaded in the multi-purpose tray, first remove the paper. Next follow the procedure below to check for
jammed paper.
1. Grip the handle, and open the right cover of the main unit.
2. Gently pull out the paper from the paper drawer.
3. Gently pull out the paper from below the fixing assembly.
4. Gently pull out the paper from the output tray of the main unit.
5. Gently pull out the paper from the area near the feed roller.
- 146 -

6. Remove any jammed paper from the duplexing unit.
6-1. Lift the duplexing unit.
6-2. Gently pull out the paper.
6-3. Return the duplexing unit to its original position.
7. Close the right cover of the main unit.
Paper Jams in the Fixing Assembly
If any paper is loaded in the multi-purpose tray, first remove the paper. Next follow the procedure below to check for
jammed paper.
1. Grip the handle, and open the right cover of the main unit.
2. Remove the fixing assembly.
2-1. Hold the fixing assembly by the parts indicated in blue.
2-2. Remove the fixing assembly by pulling it out horizontally.
3. If jammed paper protrudes from the fixing assembly, remove it.
- 147 -

3-1. Place the fixing assembly on a flat surface.
3-2. Gently pull out the paper from the fixing assembly.
4. Install the fixing assembly.
4-1. Hold the fixing assembly by the parts indicated in blue.
4-2. Align the fixing assembly with the frame and gently slide the fixing assembly back into place horizontally.
5. Close the right cover of the main unit.
Paper Jams in the Paper Drawer 1
1. Grip the handle, and pull out the paper drawer until it stops.
2. Gently pull out the paper.
3. Gently push the paper drawer back into the machine.
Paper Jams in the Paper Drawer 2 (Option)
If any paper is loaded in the multi-purpose tray, first remove the paper. Next follow the procedure below to check for
jammed paper.- 148 -

1. Remove any jammed paper from inside the right cover of the paper drawer.
1-1. Open the right cover of the paper drawer.
1-2. Gently pull out the paper inside the right cover of the paper drawer.
1-3. Close the right cover of the paper drawer.
2. Remove any jammed paper from the paper drawer.
2-1. Pull out the paper drawer 2.
2-2. Gently pull out the paper from the paper drawer.
Paper may be jammed in a location other than the paper drawer displayed on the display. Pull out each drawer
and check whether there is any jammed paper.
3. Gently push the paper drawer back into the machine.
Related information
Paper Handling
Target products
- 149 -

If the Message <Paper Size & Settings Mismatch> AppearsIssue
If the message <Paper Size & Settings Mismatch> appears.
Cause and Solutionn
The Paper Size Setting on the Operation Panel Does Not Match the Loaded Paper Size.
Check That the Drawer Paper Guide Is Set to the Correct Position.
The Paper Size Setting on the Operation Panel Does Not Match the Loaded Paper Size.
Match the paper size setting specified in <Paper Settings> and the size of the paper that is actually loaded.
To use the loaded paper, change <Paper Settings> to match the loaded paper size.
If printing from a computer, check whether the paper size setting in the printer driver matches the loaded paper size.
To load paper without changing the settings, load paper of the size set in < Paper Settings>.
Check That the Drawer Paper Guide Is Set to the Correct Position.
Adjust the positions of the paper guides correctly with the loaded paper.
Related information
Specifying Paper Size and Type
Loading Paper in the Paper Drawer
Loading Paper in the Multi-Purpose Tray
Target products
- 150 -

If the Message <The memory is full. Enter the original type settings again.> AppearsIssue
If the message <The memory is full. Enter the original type settings again.> appears.
Cause and Solution
Cannot Scan the Original Because the Memory Became Full During Copying.
Cannot Scan the Original Because the Memory Became Full During Copying.
Set <Original Type> to <Text/Photo/Map>, then copy.
Related information
Target products
- 151 -

Printing onto Custom Size Paper or EnvelopeSolution
Loading Envelopes
Registering a Custom Paper Size
Specifying the Paper Type in the Paper Drawer
Specifying Paper Size and Type in the Multi-Purpose Tray
This section describes how to print onto custom size paper or envelopes.
Loading Envelopes
Envelopes can be loaded into Paper Drawer 1 and the multi-purpose tray. Make sure to flatten any curls on envelopes
before loading them. Also pay attention to the orientation of envelopes and which side is face up.
IMPORTANT
Do not forcefully move the paper guides of the paper drawer in the wrong direction. Doing so may damage the paper drawer.Do not print on both sides of an envelope. Doing so may cause paper jams, dirty prints, or make the inside of the machine dirty.If there is a temperature difference between the location where the envelopes are stored and the location where the envelopes are being printed, leave the envelopes in the printing location at room temperature before you use them.Correctly match the <Envelope> in <Paper Size in Drawer 1> in < Drawer 1> (Paper Settings) with the size of the envelopes being loaded. Failure to do so may cause paper jams, dirty prints, or make the inside of the machine dirty.If you are printing on envelopes, empty the output tray when up to 10 printed envelopes accumulate in the tray.Envelopes should be stored in a place away from high-temperatures and humidity.
Do not load the following type of envelopes.- Curled, creased, or folded envelopes- Very thick or thin envelopes- Damp or wet envelopes- Torn envelopes- Irregularly shaped envelopes- Envelopes with clasps or windows- Envelopes that have already been sealed- Envelopes with holes or perforations- Envelopes with specially coated surfaces- Envelopes made of surface treated colored paper- Envelopes that are self-sticking, which use ink, glue, or other substances that can melt, burn, vaporize, or emit smells under the heat of a fixing unit (approximately 200°C). Depending on the materials used for the seal, the glue may melt under the fixing unit's heat, sealing the envelopes.
Before Loading Envelopes
Follow the procedure below to prepare the envelopes before loading.
1. Close the flap of each envelope.
- 152 -

2. Flatten them to release any remaining air, and make sure that the edges are pressed tightly.
3. Loosen any stiff corners of the envelopes and flatten any curls.
4. Align the edges of the envelope on a flat surface.
If you use envelopes that have glue attached to their flaps, the glue may melt due to the heat and pressure of the
fixing unit.
Do not print on the back side of the envelopes (the side with the flap).
If the envelopes become filled with air, flatten them by hand before loading them into the Paper Drawer 1.
Loading Envelopes in the Paper Drawer
Attach the Envelope Feeder Attachment before loading envelopes to a paper drawer.
NOTE
When using the ISO-C5 envelopes, the Envelope Feeder Attachment does not need to be attached.
1. Open the paper drawer 1, and remove the envelope feeder attachment.
- 153 -

1-1. Grip the handle, and pull out the paper drawer until it stops.
1-2. Remove the envelope feeder attachment stored inside the paper drawer.
2. Attach the envelope feeder attachment by aligning the protruding areas of the envelope feeder attachment with the
holes on the paper drawer.
Only attach the envelope feeder attachment when loading envelopes. Loading paper other than envelopes with the
envelope feeder attachment attached may cause a paper jam.
When not using the envelope feeder attachment, store it in the storage area of the paper drawer.
3. Adjust the position of the paper guides.
*1 Paper Guide on Left
*2 Paper Guide at Front
3-1. Slide the paper guide on the left while squeezing it on the top to align it with the mark for the desired paper size.
3-2. Slide the paper guide at the front while squeezing it on the top to align it with the mark for the desired paper
size.
Slide the paper guide until they click into place. If the paper guides are not aligned correctly, the paper size will not
correctly appear on the display. It is also necessary to adjust the paper guide correctly to avoid causing a paper jam,
dirty prints, or making the inside of the machine dirty.
4. Load the envelopes into the drawer.
4-1. Load 10 envelopes at a time with the side you want to print on facing up.
4-2. While loading the envelopes, press down on the right side of the receptacle to lock them into place.
Align the leading edges of the envelopes, and make sure that they are held in place under the claws. Make sure that
the flaps are positioned as shown in the illustrations below.
- 154 -

Monarch, COM10 No.10, DL, ISO-C5
Yougatanaga 3
Nagagata 3
When loading envelopes, make sure they are not incorrect leaning.
Envelopes which have been rolled or curled must be straightened out prior to use.
Make sure that the height of the envelope stack does not exceed the load limit line ( ).
When loading ISO-C5 envelopes, make sure that the height of the envelope stack does not exceed the load limit
line ( ).
If the flap of an envelope opens and is caught under the envelope feeder attachment, it may cause a paper jam.
If envelopes are oriented normally when loaded but wrinkle when printed, load envelopes after rotating them 180
degrees, as shown below.
Monarch, COM10 No.10, DL, ISO-C5
- 155 -

Yougatanaga 3
When printing, check that the orientation of the loaded paper matches the orientation shown on the print settings
screen of the printer driver. For more information, click [Help] on the printer driver screen.
When copying, load originals after rotating them 180 degrees.
5. Gently push the paper drawer back into the machine.
6. Register the type of envelope on the <Paper Settings> screen.
Loading Envelopes in the Multi-Purpose Tray
If you want to load the envelopes into the multi-purpose tray, follow the procedure described below to prevent the
envelopes from becoming creased.
1. Open the multi-purpose tray.
If you are loading large size envelopes, pull out the tray extension.
*1 Tray extension
If a paper size other than envelopes is specified for the multi-purpose tray, set <Register Default Settings> to <Off>.
2. Load the envelopes into the multi-purpose tray.
Load them as shown in the figures below.
COM10 No.10 Monarch DL ISO-C5
- 156 -

Nagagata 3
Yougatanaga 3
Do not exceed the load limit line when loading envelopes
Make sure that the height of the envelope stack does not exceed the load limit line ( ).
3. Adjust the paper guides.
*1 Paper guides
Align the paper guides securely against the edges of the envelopes
Paper guides that are too loose or too tight can cause misfeeds or paper jams.
If envelopes are oriented normally when loaded but wrinkle when printed, load envelopes after rotating them 180
degrees, as shown below.
Monarch, COM10 No.10, DL, ISO-C5
Yougatanaga 3
When printing, check that the orientation of the loaded paper matches the orientation shown on the print settings
screen of the printer driver. For more information, click [Help] on the printer driver screen.
When copying, load originals after rotating them 180 degrees.
Registering a Custom Paper Size
You can register up to three frequently used custom paper sizes.
1. Tap <Paper Settings>.- 157 -

2. Tap <Register Custom Paper>.
3. Tap <Not Registered>.
If paper sizes <1> to <3> have already been registered, either change or delete the setting to continue. The
procedures for changing and deleting these settings are described below.
3-A. Changing a setting
3-A-1. Tap the registered size you want to change.
3-A-2. Tap <Edit> and proceed to step 4.
3-B. Deleting a setting
3-B-1. Tap the registered size you want to delete.
3-B-2. Tap <Delete>.
3-B-3. Tap <Yes>.
- 158 -

4. Specify the paper size.
4-1. Specify the length of the <X> (shorter) side.
Tap <X>.
Input the length of the <X> side using / , or numeric keys for inputting whole numbers and fractions, and
tap <Apply>.
4-2. Specify the length of the <Y> (longer) side.
Tap <Y>.
Input the length of the <Y> side, and tap <Apply>.
4-3. Tap <Apply>.
5. Tap the paper type.
Selecting a Registered Custom Paper Setting
The paper sizes that are registered in the procedure above are displayed on the screen for selecting the paper size.
When selecting the paper size for the paper drawer
On the screen to specify the size of the paper that is loaded in the paper drawers, the registered paper sizes are
displayed.
- 159 -

When selecting the paper size for the multi-purpose tray
When paper is loaded in the multi-purpose tray, the screen for selecting the paper size for the multi-purpose tray is
displayed. The registered paper sizes are displayed on this screen.
The registered paper sizes are displayed when you set the default paper settings for the multi-purpose tray. From the
screen, you can select one of the displayed sizes as the default paper size for the multi-purpose tray.
Specifying the Paper Type in the Paper Drawer
Use the following steps when loading paper other than plain paper such as heavy paper or envelopes in the drawer.
NOTE
For paper that is not automatically recognized such as LGL or EXEC, specify the paper with <Paper Size List 1 for Recognition> or <Paper Size List 2 for Recognition> beforehand.
1. Tap <Paper Settings>.
2. Tap <Drawer 1> or <Drawer 2>.
<Drawer 2> is displayed only when the optional Cassette Feeding Unit is installed.
- 160 -

3. Tap <Custom Paper> or <Envelope>.
3-A. Loading Custom Paper
3-A-1. Tap <Custom Paper>.
3-A-2. Tap a registered custom paper size.
Tap <Custom> to specify a paper size.
You must first register a custom paper size.
3-B. If you set Envelope the Drawer 1
3-B-1. Tap <Envelope>.
3-B-2. Tap envelope type.
<Envelope> is selectable as a paper size only when <Drawer 1> is selected.
4. Tap the paper type.
- 161 -

Specifying Paper Size and Type in the Multi-Purpose Tray
The screen shown here is displayed when paper is loaded in the multi-purpose tray. Follow the on-screen instructions
to specify settings that match the size and type of the loaded paper.
NOTE
If the screen shown above is not displayed when paper is loadedIf you always load the same paper in the multi-purpose tray, you can skip the paper setting operations by registering the paper size and type as the default setting. When the default setting is registered, however, the screen shown above is not displayed. To display the screen, select <Off> for < Register Default Settings>.
1. Tap the paper size.
When loading custom size paper
1-1. Tap <Custom>.
1-2. Specify the length of the <X> (shorter) side.
Tap <X>.
Input the length of the <X> side using / , or numeric keys for inputting whole numbers and fractions, and
tap <Apply>.
- 162 -

1-3. Specify the length of the <Y> (longer) side.
Tap <Y>.
Input the length of the <Y> side, and tap <Apply>.
1-4. Tap <Apply>.
2. Tap the paper type.
Related information
Loading Paper in the Multi-Purpose Tray
Specifying Paper Size and Type
Paper Handling
Target products
- 163 -

System Manager ID and PIN Factory Default SettingsSolution
The System Manager ID and System Manager PIN for this product are configured as follows when shipped from the
factory.
System Manager ID: 7654321
System Manager PIN: 7654321
Enter the above values if a dialog box prompts to enter the System Manager ID and System Manager PIN.
NOTE
For security purpose, change them from the default values. Refer to the manual accompanied by the product for the details of change procedure.
Related information
Target products
- 164 -