Embed Size (px)
Citation preview
7Lesson 1, InDesign CS4 Essential Skills
What you’ll learn in this lesson:
Understanding the • InDesign workspace
Working with panels • and tools
Navigating through • InDesign documents
Flowing text•
Using Styles to format • text and objects
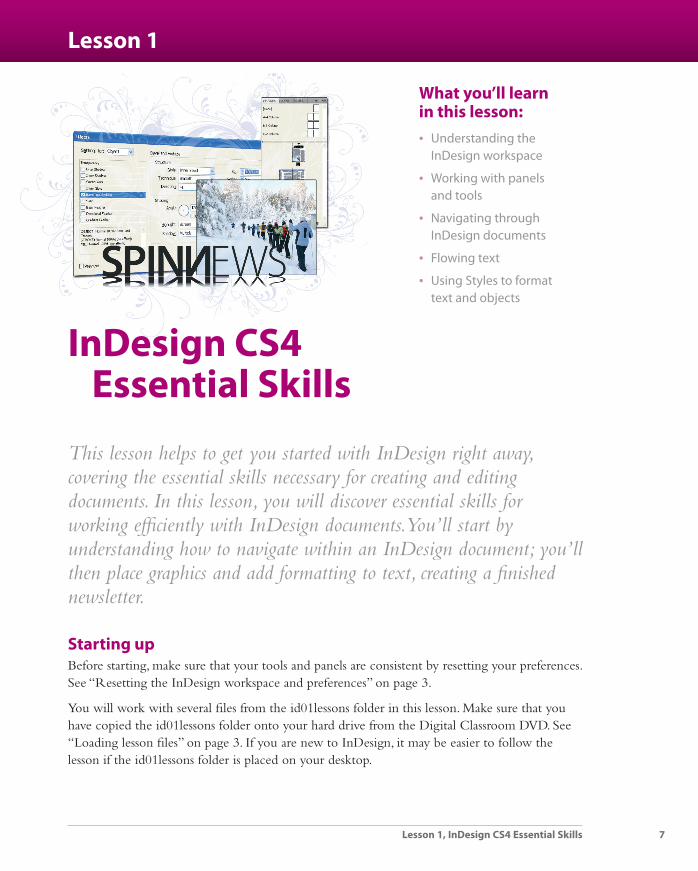
InDesign CS4 Essential Skills
This lesson helps to get you started with InDesign right away, covering the essential skills necessary for creating and editing documents. In this lesson, you will discover essential skills for working effi ciently with InDesign documents. You’ll start by understanding how to navigate within an InDesign document; you’ll then place graphics and add formatting to text, creating a fi nished newsletter.
Starting upBefore starting, make sure that your tools and panels are consistent by resetting your preferences. See “Resetting the InDesign workspace and preferences” on page 3.
You will work with several fi les from the id01lessons folder in this lesson. Make sure that you have copied the id01lessons folder onto your hard drive from the Digital Classroom DVD. See “Loading lesson fi les” on page 3. If you are new to InDesign, it may be easier to follow the lesson if the id01lessons folder is placed on your desktop.
Lesson 1
IDCS4.indb 7IDCS4.indb 7 9/9/2008 3:22:48 PM9/9/2008 3:22:48 PM
8
InDesign tools
Adobe InDesign CS4 Digital Classroom
1
See Lesson 1 in action!
Use the accompanying video to gain a better understanding of how to use some of the features shown in this lesson. The video tutorial for this lesson can be found on the included DVD.
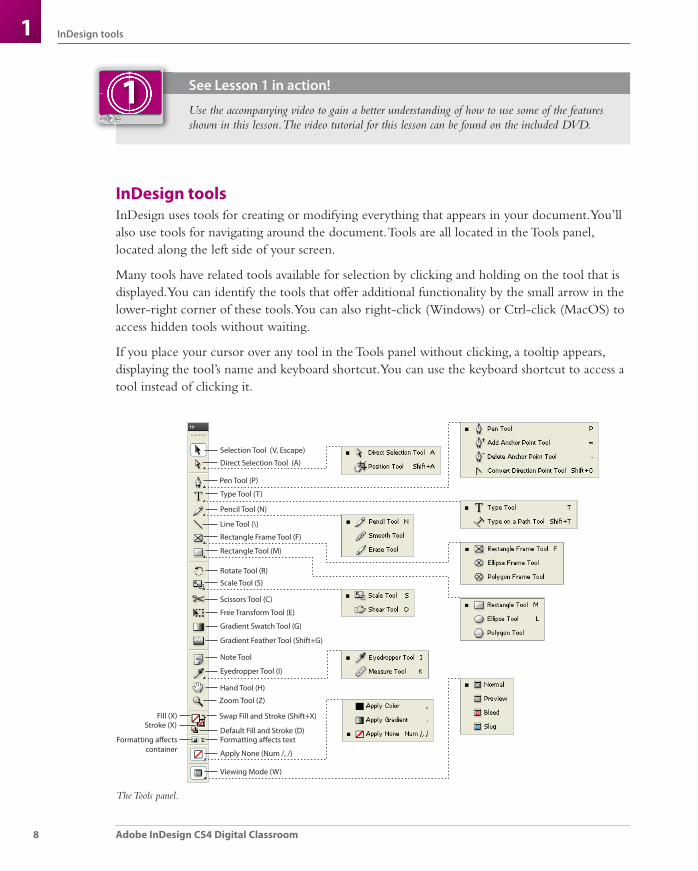
InDesign toolsInDesign uses tools for creating or modifying everything that appears in your document. You’ll also use tools for navigating around the document. Tools are all located in the Tools panel, located along the left side of your screen.
Many tools have related tools available for selection by clicking and holding on the tool that is displayed. You can identify the tools that off er additional functionality by the small arrow in the lower-right corner of these tools. You can also right-click (Windows) or Ctrl-click (MacOS) to access hidden tools without waiting.
If you place your cursor over any tool in the Tools panel without clicking, a tooltip appears, displaying the tool’s name and keyboard shortcut. You can use the keyboard shortcut to access a tool instead of clicking it.
Selection Tool (V, Escape)
Direct Selection Tool (A)
Pen Tool (P)
Type Tool (T)
Pencil Tool (N)
Line Tool (\)
Rectangle Frame Tool (F)
Rectangle Tool (M)
Rotate Tool (R)
Scale Tool (S)
Scissors Tool (C)
Free Transform Tool (E)
Gradient Swatch Tool (G)
Gradient Feather Tool (Shift+G)
Note Tool
Eyedropper Tool (I)
Hand Tool (H)
Zoom Tool (Z)
Swap Fill and Stroke (Shift+X)
Default Fill and Stroke (D)Formatting affects textFormatting affects
container
Fill (X)Stroke (X)
Apply None (Num /, /)
Viewing Mode (W)
The Tools panel.
1
IDCS4.indb 8IDCS4.indb 8 9/9/2008 3:22:48 PM9/9/2008 3:22:48 PM
The InDesign workspace
9Lesson 1, InDesign CS4 Essential Skills
1The InDesign workspaceInDesign documents are displayed in the center of the work area, while panels that let you control objects or perform specifi c tasks are displayed along the right side of the workspace in the panel docking area. InDesign has many panels that are critical to the editing and design work you perform. InDesign includes various workspaces that provide easy access to the panels and tools you’ll use for specifi c tasks. Let’s take a closer look at the InDesign workspace, including the document window and panels.
The document windowInDesign pages are displayed within a black border. Anything positioned within this area appears when the page is fi nished. The area outside of the black border is referred to as the pasteboard. Anything that is placed completely outside this black border on the pasteboard is generally not visible when the fi nal document is distributed.
You can use the pasteboard to temporarily hold elements while designing your project. You can move design elements such as images from the pasteboard to the page, trying diff erent layout variations. The pasteboard can also be useful for placing notes to colleagues—or even yourself—regarding the project. To get a better understanding of the InDesign workspace, you’ll open up the completed project, reset the workspace, and look at the work area.
1 Choose File > Open. In the Open dialog box, navigate to the id01lessons folder and select the id01_done.indd fi le. Press Open.
2 Choose Window > Workspace > Typography. Panels containing controls that help you work with type are now displayed.
You can also use the dedicated Workspace switcher, located in the Application bar above the Control panel. The Workspace switcher displays the name of the current workspace and can also be used to change between workspaces or to reset the current workspace. The selected workspace controls which panels display and which menu items are available. Fewer or more panels and menu choices are available based upon the selected workspace.
IDCS4.indb 9IDCS4.indb 9 9/9/2008 3:22:49 PM9/9/2008 3:22:49 PM

10
The InDesign workspace
Adobe InDesign CS4 Digital Classroom
13 Choose Window > Workspace > Reset Typography to reset the InDesign panels to their
default positions for the Typography workspace. This ensures that your panels are in position, making them easier to locate during this lesson.
A B
C
D
E
F
A. The document window. B. The page border (black lines). C. Bleed guides. D. Margin guides. E. Column guides. F. The pasteboard.
Using guidesNon-printing guides help you align content on your page and create an organized layout. Margin guides defi ne the space around the edge of your document—a space you generally want to keep free from objects. White space around the edge of your documents creates good design, and also eliminates the risk of content being cut off if your document is printed and trimmed to a specifi c size at a printing plant. Margin guides are displayed in magenta by default, immediately inside the page border. By default they display one-half inch inside of the page edge, but can be adjusted as you will learn in Lesson 2, “Building Documents with Master Pages.”
Individual page guides can also be added manually by dragging them from the rulers onto the page. Both page guides and margin guides are useful, but they can also be distracting when you want to see the elements of your page design. In this case, you can hide the guides.
IDCS4.indb 10IDCS4.indb 10 9/9/2008 3:22:49 PM9/9/2008 3:22:49 PM

Working with panels
11Lesson 1, InDesign CS4 Essential Skills
11 Choose View > Grids & Guides > Hide Guides, or use the keyboard shortcut Ctrl+;
(Windows) or Command+; (Mac OS), to hide all the guides in the open document.
2 Choose View > Grids & Guides > Show Guides, or use the keyboard shortcut Ctrl+; (Windows) or Command+; (Mac OS), to show all the guides in the open document.
You can show or hide guides by toggling back and forth using these options.
Viewing modesYou can also use viewing modes to hide guides and other items that will not display when the fi nal document is printed or distributed.
Just as you can hide guides, you can also have InDesign hide content that is positioned on the pasteboard. The viewing modes option lets you choose whether all content and guides display, or whether InDesign displays only content that is positioned on the page and will print. Next you’ll explore the various viewing modes.
1 At the bottom of the Tools panel, click and hold the Mode button ( ), and choose Preview from the available modes. Notice that the entire pasteboard displays as gray and all elements located on the pasteboard are hidden.
2 Click and hold the Mode button again and choose Bleed from the menu. This shows the allowable bleed area that was specifi ed when the document was created. Bleed is an area outside of the page that is intentionally used by designers so that any inaccuracies in the cutting, trimming, and binding process do not create a visible white space along the edge of an object that is intended to print all the way to the edge of a document. This mode is useful when you need to make sure that all the elements on your page extend to a specifi c bleed value.
3 Click and hold the Mode button again and return to Normal.
You can also use the shortcut key W to toggle between Preview and Normal modes in InDesign or you can use the Screen Mode button in the Application bar. Keep in mind that keyboard shortcuts do not work if you are using the Type tool and working with text inside a text frame.
Working with panelsNow that you understand the diff erent parts of the workspace, you can begin working with the interface to learn more about the diff erent panels. You can access panels by clicking on their name in the panel docking area, or choose the panel you want to access from the Window menu.
IDCS4.indb 11IDCS4.indb 11 9/9/2008 3:22:49 PM9/9/2008 3:22:49 PM
12
Working with panels
Adobe InDesign CS4 Digital Classroom
1The Tools panelThe Tools panel is located on the left side of your screen and contains all the tools necessary to draw, add, or edit type, and edit items in your document. The Tools panel appears as a single-column attached to the left side of your screen. You can modify the appearance and location of the Tools panel to accommodate your needs.
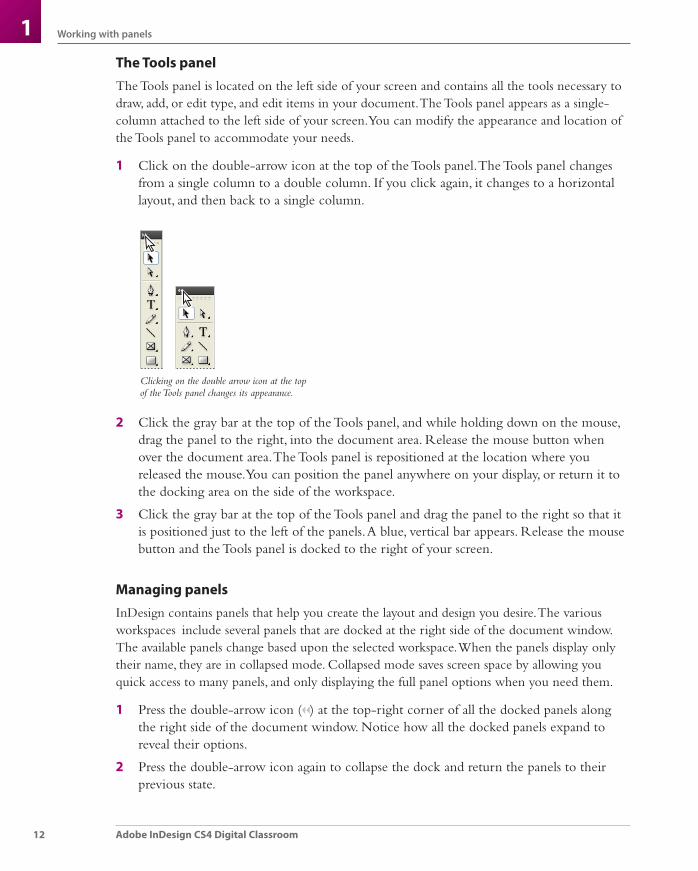
1 Click on the double-arrow icon at the top of the Tools panel. The Tools panel changes from a single column to a double column. If you click again, it changes to a horizontal layout, and then back to a single column.
Clicking on the double arrow icon at the top of the Tools panel changes its appearance.
2 Click the gray bar at the top of the Tools panel, and while holding down on the mouse, drag the panel to the right, into the document area. Release the mouse button when over the document area. The Tools panel is repositioned at the location where you released the mouse. You can position the panel anywhere on your display, or return it to the docking area on the side of the workspace.
3 Click the gray bar at the top of the Tools panel and drag the panel to the right so that it is positioned just to the left of the panels. A blue, vertical bar appears. Release the mouse button and the Tools panel is docked to the right of your screen.
Managing panelsInDesign contains panels that help you create the layout and design you desire. The various workspaces include several panels that are docked at the right side of the document window. The available panels change based upon the selected workspace. When the panels display only their name, they are in collapsed mode. Collapsed mode saves screen space by allowing you quick access to many panels, and only displaying the full panel options when you need them.
1 Press the double-arrow icon ( ) at the top-right corner of all the docked panels along the right side of the document window. Notice how all the docked panels expand to reveal their options.
2 Press the double-arrow icon again to collapse the dock and return the panels to their previous state.
IDCS4.indb 12IDCS4.indb 12 9/9/2008 3:22:49 PM9/9/2008 3:22:49 PM
Working with panels
13Lesson 1, InDesign CS4 Essential Skills
13 Press the Pages button in the dock. This reveals the entire contents of the Pages panel. By
clicking a panel button, only the individual panel expands.
4 Press the Pages button again, and the panel closes and is displayed only as a button.
5 Click and drag the Pages button, moving it to the far left side of the document window. When a vertical bar appears, release the mouse button. The Pages panel is docked to the left side of the document window.
You can place panels anywhere on your workspace, including over the document or on either side of the work area. You may customize panels in any way that makes it easier for you to work. Don’t worry if you make a mess, as you can always return to the default layout of the panels by choosing Window > Workspace > Reset.
Working with the Control panelThe Control panel appears across the top of the workspace. The panel is contextual, so the content of the panel changes depending on what tool you are using and what object you have selected.
1 Choose the Selection tool ( ) in the Tools panel. The Control panel changes based upon the tool being used and the items selected in the layout.
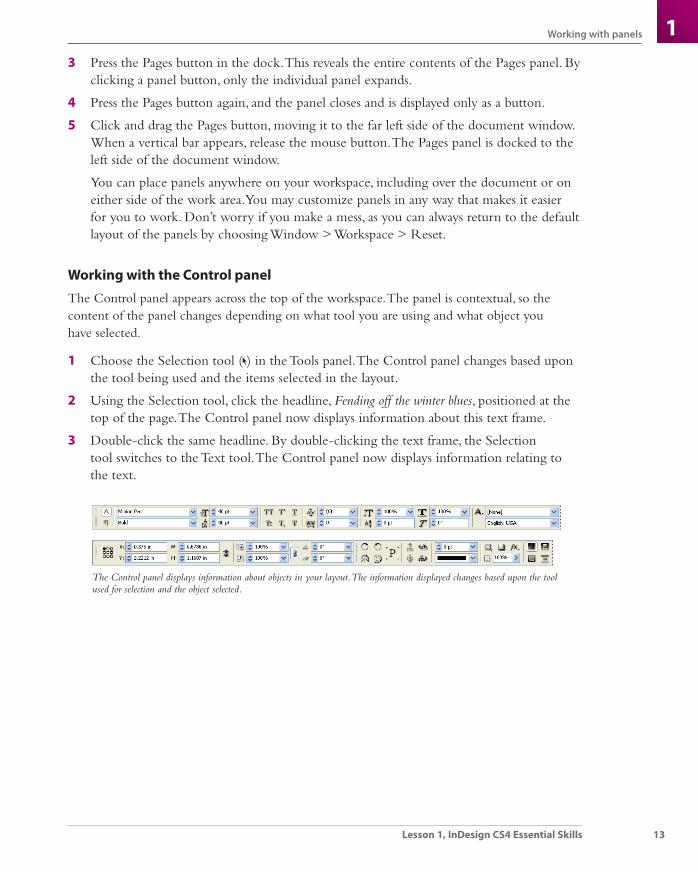
2 Using the Selection tool, click the headline, Fending off the winter blues, positioned at the top of the page. The Control panel now displays information about this text frame.
3 Double-click the same headline. By double-clicking the text frame, the Selection tool switches to the Text tool. The Control panel now displays information relating to the text.
The Control panel displays information about objects in your layout. The information displayed changes based upon the tool used for selection and the object selected.
IDCS4.indb 13IDCS4.indb 13 9/9/2008 3:22:50 PM9/9/2008 3:22:50 PM
14
Navigating through an InDesign document
Adobe InDesign CS4 Digital Classroom
1Saving your workspaceOnce you have selected the panels that you need, and positioned them in the locations that let you work most effi ciently, you can save the location and panels being used as a workspace.
Once you have saved a workspace, you can quickly access the exact panels displayed and their location by returning to the default setup of that workspace.
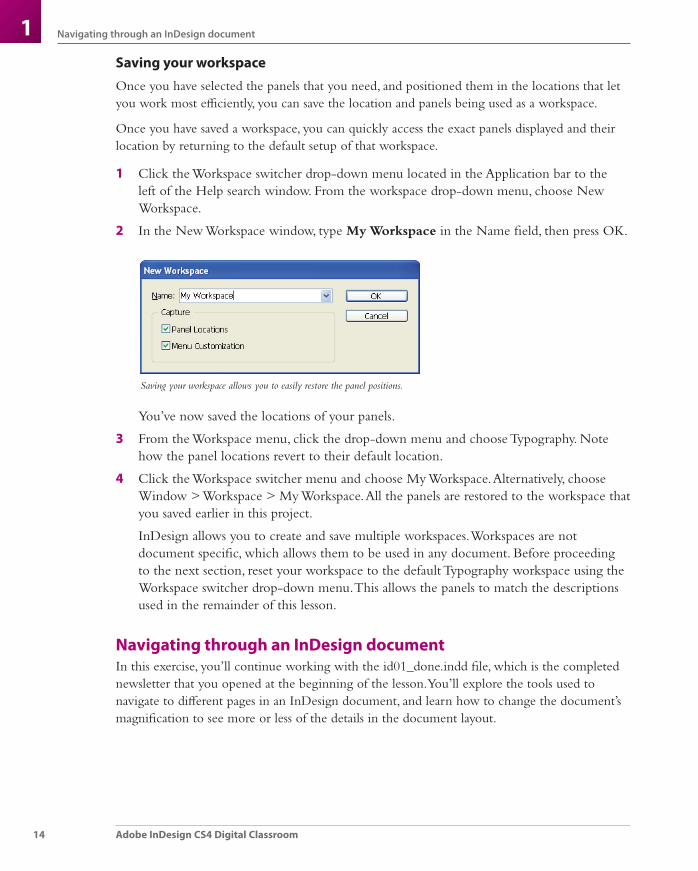
1 Click the Workspace switcher drop-down menu located in the Application bar to the left of the Help search window. From the workspace drop-down menu, choose New Workspace.
2 In the New Workspace window, type My Workspace in the Name fi eld, then press OK.
Saving your workspace allows you to easily restore the panel positions.
You’ve now saved the locations of your panels.
3 From the Workspace menu, click the drop-down menu and choose Typography. Note how the panel locations revert to their default location.
4 Click the Workspace switcher menu and choose My Workspace. Alternatively, choose Window > Workspace > My Workspace. All the panels are restored to the workspace that you saved earlier in this project.
InDesign allows you to create and save multiple workspaces. Workspaces are not document specifi c, which allows them to be used in any document. Before proceeding to the next section, reset your workspace to the default Typography workspace using the Workspace switcher drop-down menu. This allows the panels to match the descriptions used in the remainder of this lesson.
Navigating through an InDesign documentIn this exercise, you’ll continue working with the id01_done.indd fi le, which is the completed newsletter that you opened at the beginning of the lesson. You’ll explore the tools used to navigate to diff erent pages in an InDesign document, and learn how to change the document’s magnifi cation to see more or less of the details in the document layout.
IDCS4.indb 14IDCS4.indb 14 9/9/2008 3:22:50 PM9/9/2008 3:22:50 PM
Navigating through an InDesign document
15Lesson 1, InDesign CS4 Essential Skills
1Using the Pages panelThe Pages panel provides a quick overview of what is displayed on each page of an InDesign document. You can use it to navigate between document pages, rearrange pages, and also add or remove pages.
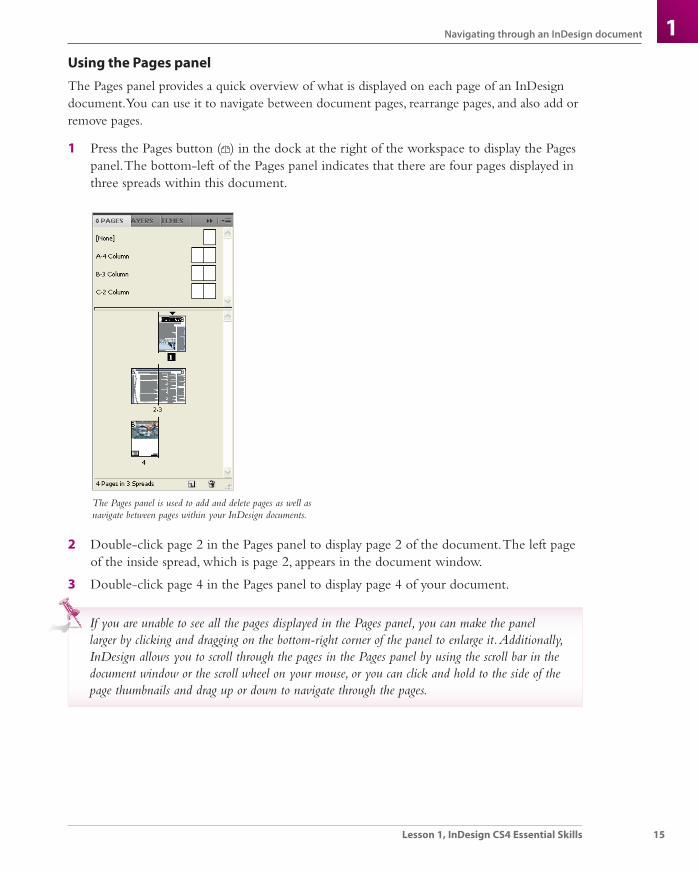
1 Press the Pages button ( ) in the dock at the right of the workspace to display the Pages panel. The bottom-left of the Pages panel indicates that there are four pages displayed in three spreads within this document.
The Pages panel is used to add and delete pages as well as navigate between pages within your InDesign documents.
2 Double-click page 2 in the Pages panel to display page 2 of the document. The left page of the inside spread, which is page 2, appears in the document window.
3 Double-click page 4 in the Pages panel to display page 4 of your document.
If you are unable to see all the pages displayed in the Pages panel, you can make the panel larger by clicking and dragging on the bottom-right corner of the panel to enlarge it. Additionally, InDesign allows you to scroll through the pages in the Pages panel by using the scroll bar in the document window or the scroll wheel on your mouse, or you can click and hold to the side of the page thumbnails and drag up or down to navigate through the pages.
IDCS4.indb 15IDCS4.indb 15 9/9/2008 3:22:50 PM9/9/2008 3:22:50 PM
16
Navigating through an InDesign document
Adobe InDesign CS4 Digital Classroom
1Changing the magnifi cation of your documentSo far, you’ve been viewing this document at the magnifi cation level that was used when the document was last saved. You may fi nd it necessary to get a closer look at parts of your document to check things such as alignment, spacing of type, or position of objects. Here you’ll fi nd that InDesign provides tools that make it easy to change the magnifi cation and inspect components of the document.
1 In the Pages panel, double-click on the page 1 icon to display the fi rst page of the document.
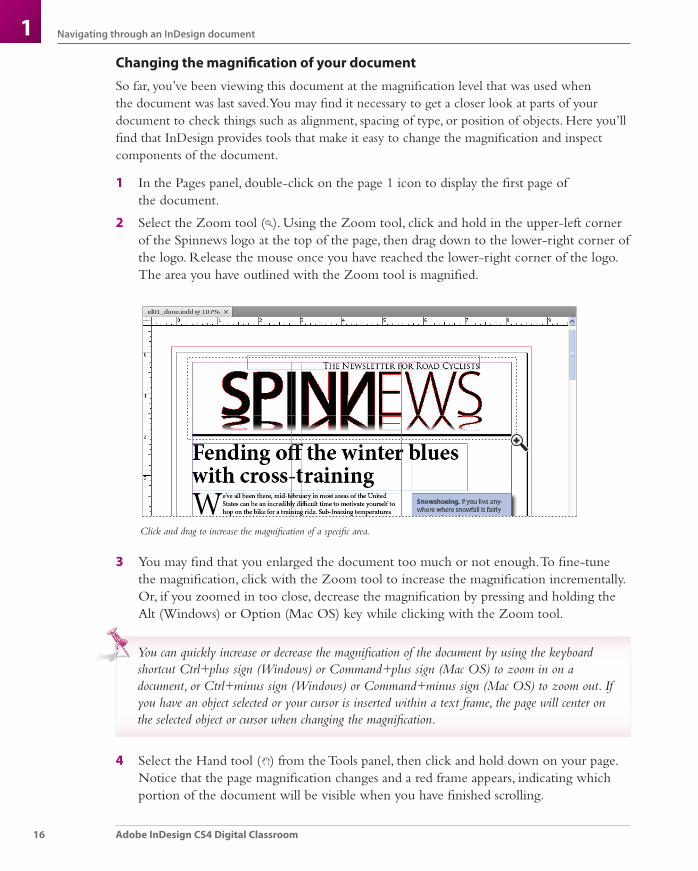
2 Select the Zoom tool ( ). Using the Zoom tool, click and hold in the upper-left corner of the Spinnews logo at the top of the page, then drag down to the lower-right corner of the logo. Release the mouse once you have reached the lower-right corner of the logo. The area you have outlined with the Zoom tool is magnifi ed.
Click and drag to increase the magnifi cation of a specifi c area.
3 You may fi nd that you enlarged the document too much or not enough. To fi ne-tune the magnifi cation, click with the Zoom tool to increase the magnifi cation incrementally. Or, if you zoomed in too close, decrease the magnifi cation by pressing and holding the Alt (Windows) or Option (Mac OS) key while clicking with the Zoom tool.
You can quickly increase or decrease the magnifi cation of the document by using the keyboard shortcut Ctrl+plus sign (Windows) or Command+plus sign (Mac OS) to zoom in on a document, or Ctrl+minus sign (Windows) or Command+minus sign (Mac OS) to zoom out. If you have an object selected or your cursor is inserted within a text frame, the page will center on the selected object or cursor when changing the magnifi cation.
4 Select the Hand tool ( ) from the Tools panel, then click and hold down on your page. Notice that the page magnifi cation changes and a red frame appears, indicating which portion of the document will be visible when you have fi nished scrolling.
IDCS4.indb 16IDCS4.indb 16 9/9/2008 3:22:51 PM9/9/2008 3:22:51 PM
Working with type
17Lesson 1, InDesign CS4 Essential Skills
15 Arrange the page so that the logo is in the center of your display. Use the Hand tool to
move the page within the document window, allowing you to focus on specifi c areas of the layout.
6 Reposition the red frame so that the entire border of the image is visible, then release the mouse. The zoom returns to its original level, focused on the portion of the page you identifi ed.
You can also access the Hand tool without selecting it from the Tools panel. Press and hold the spacebar on your keyboard and your cursor changes to the Hand tool. If you have the Type tool selected, press the Alt (Windows) or Option (Mac OS) key to access the Hand tool.
7 To make your page fi t the document window, choose View > Fit Page in Window or press Ctrl+0 (Windows) or Command+0 (Mac OS). The currently selected page is displayed inside the document window.
8 Choose File > Close to close the document. If asked to save, choose No (Windows) or Don’t Save (Mac OS).
Working with typeNow that you’ve had an overview of the InDesign workspace, you’ll move into some of the tools that are used for working with type. InDesign provides complete control over the formatting and placement of type on a page and allows you to save formatting attributes so that you can work effi ciently and your documents can maintain a consistent appearance. In this section, you’ll add the fi nishing touches to a document, completing the layout by applying formatting to text.
Entering and formatting typeMost text used in an InDesign layout is positioned inside a frame. Frames are containers that hold text or graphics within a layout. InDesign has three types of frames: text, graphic, and unassigned. In this exercise, you’ll be working with text frames.
1 Choose File > Open. In the Open dialog box, navigate to the id01lessons folder and select the id01.indd fi le. Press Open. You will use this project fi le for the remainder of the lesson.
2 Choose File > Save As. In the Save As dialog box, navigate to the id01lessons folder, or use another folder if you prefer. In the Name fi eld, type id01_work.indd, then press Save. This allows you to work without altering the original fi le.
3 If necessary, press the Pages button ( ) in the docking area along the right side of the workspace. The Pages panel opens. In the Pages panel, double-click on page 1 to center the page in the workspace.
IDCS4.indb 17IDCS4.indb 17 9/9/2008 3:22:51 PM9/9/2008 3:22:51 PM
18
Working with type
Adobe InDesign CS4 Digital Classroom
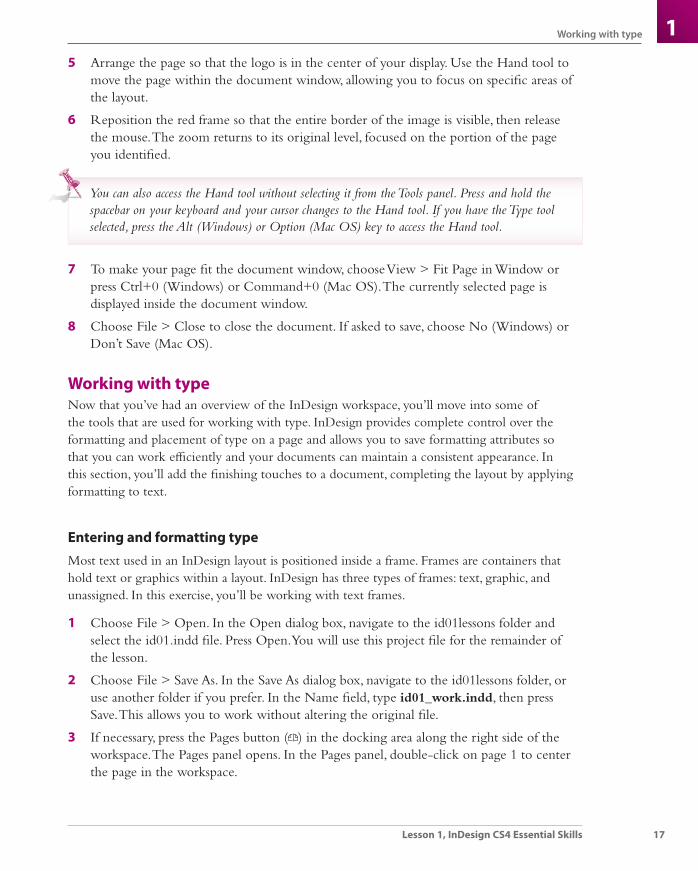
14 In the Tools panel, select the Type tool ( ). You will use the Type tool to create a new
text frame. Position your cursor along the left side of the page, where the left margin guide and the fi rst horizontal guide meet. Click and hold down, then drag down and to the right, to the location where the right margin and the second horizontal guide meet. Release the mouse button. A new text frame is created, and a cursor blinks in the top-left corner of the new frame you have created.
Use the Type tool to create a new text frame. Most text needs to be placed within a frame.
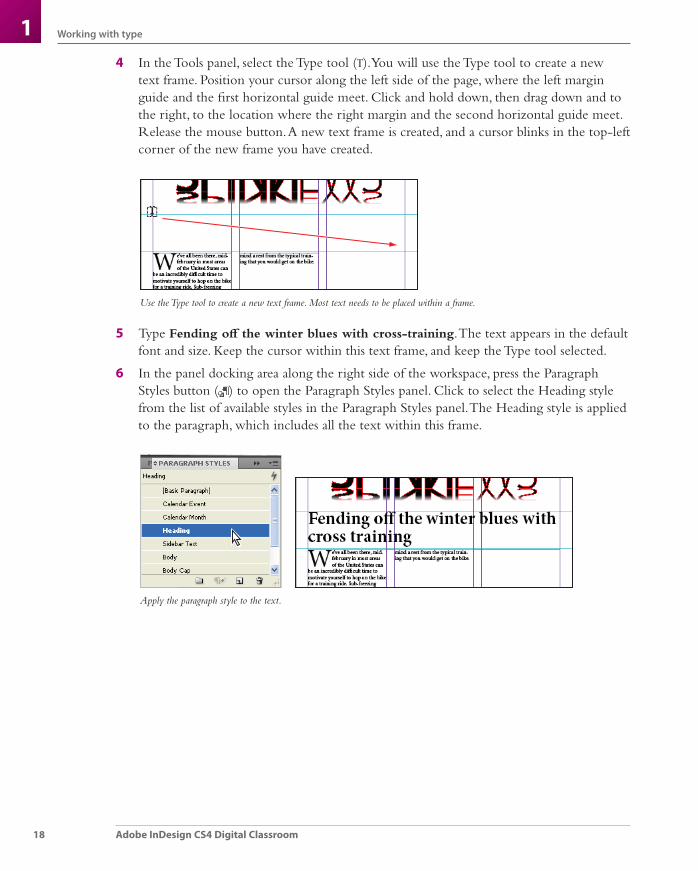
5 Type Fending off the winter blues with cross-training. The text appears in the default font and size. Keep the cursor within this text frame, and keep the Type tool selected.
6 In the panel docking area along the right side of the workspace, press the Paragraph Styles button ( ) to open the Paragraph Styles panel. Click to select the Heading style from the list of available styles in the Paragraph Styles panel. The Heading style is applied to the paragraph, which includes all the text within this frame.
Apply the paragraph style to the text.
IDCS4.indb 18IDCS4.indb 18 9/9/2008 3:22:51 PM9/9/2008 3:22:51 PM
Working with type
19Lesson 1, InDesign CS4 Essential Skills
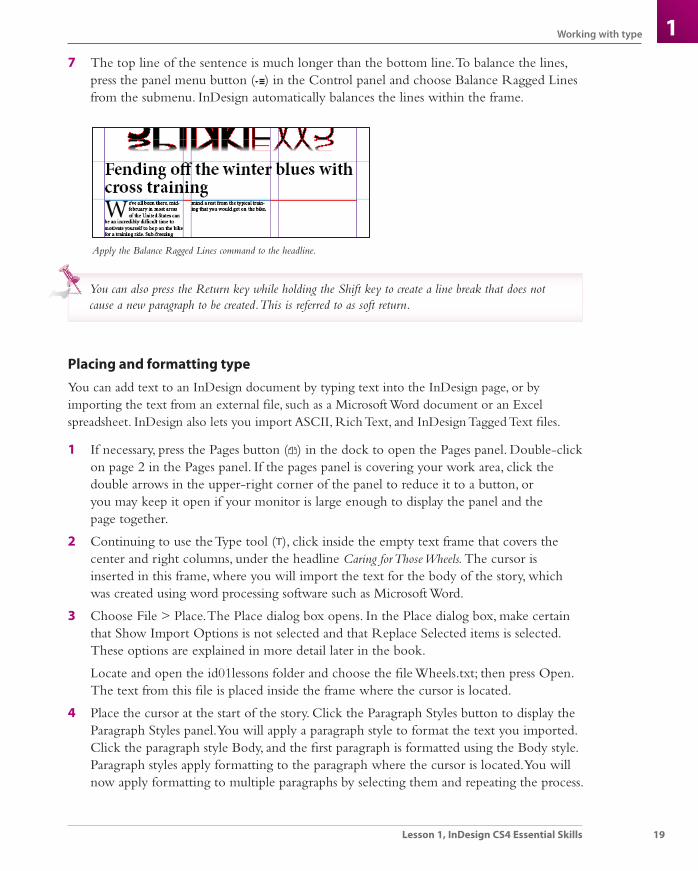
17 The top line of the sentence is much longer than the bottom line. To balance the lines,
press the panel menu button ( ) in the Control panel and choose Balance Ragged Lines from the submenu. InDesign automatically balances the lines within the frame.
Apply the Balance Ragged Lines command to the headline.
You can also press the Return key while holding the Shift key to create a line break that does not cause a new paragraph to be created. This is referred to as soft return.
Placing and formatting typeYou can add text to an InDesign document by typing text into the InDesign page, or by importing the text from an external fi le, such as a Microsoft Word document or an Excel spreadsheet. InDesign also lets you import ASCII, Rich Text, and InDesign Tagged Text fi les.
1 If necessary, press the Pages button ( ) in the dock to open the Pages panel. Double-click on page 2 in the Pages panel. If the pages panel is covering your work area, click the double arrows in the upper-right corner of the panel to reduce it to a button, or you may keep it open if your monitor is large enough to display the panel and the page together.
2 Continuing to use the Type tool ( ), click inside the empty text frame that covers the center and right columns, under the headline Caring for Those Wheels. The cursor is inserted in this frame, where you will import the text for the body of the story, which was created using word processing software such as Microsoft Word.
3 Choose File > Place. The Place dialog box opens. In the Place dialog box, make certain that Show Import Options is not selected and that Replace Selected items is selected. These options are explained in more detail later in the book.
Locate and open the id01lessons folder and choose the fi le Wheels.txt; then press Open. The text from this fi le is placed inside the frame where the cursor is located.
4 Place the cursor at the start of the story. Click the Paragraph Styles button to display the Paragraph Styles panel. You will apply a paragraph style to format the text you imported. Click the paragraph style Body, and the fi rst paragraph is formatted using the Body style. Paragraph styles apply formatting to the paragraph where the cursor is located. You will now apply formatting to multiple paragraphs by selecting them and repeating the process.
IDCS4.indb 19IDCS4.indb 19 9/9/2008 3:22:52 PM9/9/2008 3:22:52 PM
20
Working with type
Adobe InDesign CS4 Digital Classroom
15 Use the keyboard shortcut Ctrl+A (Windows) or Command+A (Mac OS) to select all
the type within the current frame. From the Paragraph Styles panel, choose Body. All the selected paragraphs are now formatted using the Body style.
6 Choose Edit > Deselect All to deselect the type.
Flowing typeStories often continue from one page or column to another. You will set up links between text frames to allow a story to fl ow into multiple columns.
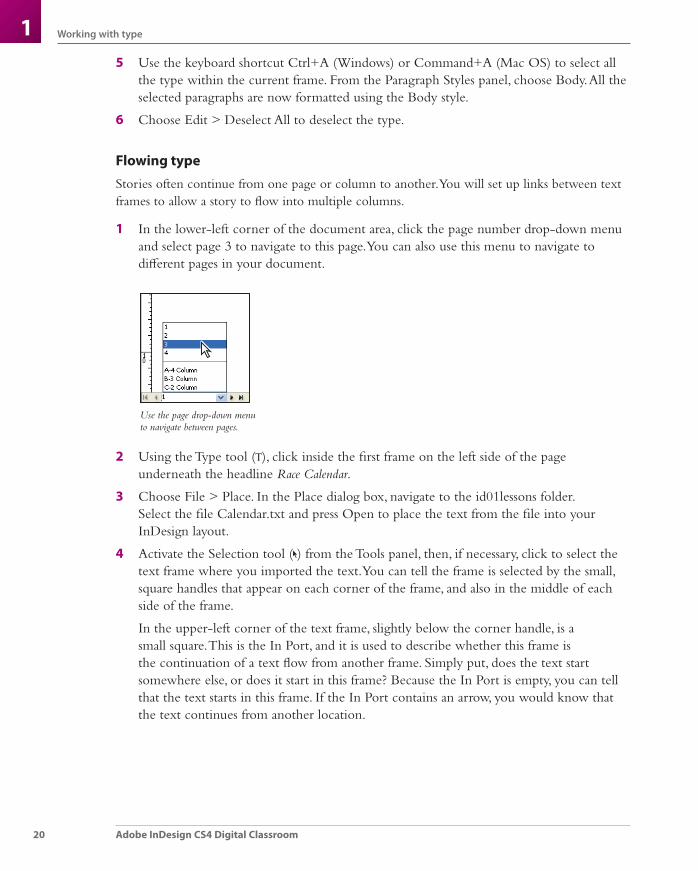
1 In the lower-left corner of the document area, click the page number drop-down menu and select page 3 to navigate to this page. You can also use this menu to navigate to diff erent pages in your document.
Use the page drop-down menu to navigate between pages.
2 Using the Type tool ( ), click inside the fi rst frame on the left side of the page underneath the headline Race Calendar.
3 Choose File > Place. In the Place dialog box, navigate to the id01lessons folder. Select the fi le Calendar.txt and press Open to place the text from the fi le into your InDesign layout.
4 Activate the Selection tool ( ) from the Tools panel, then, if necessary, click to select the text frame where you imported the text. You can tell the frame is selected by the small, square handles that appear on each corner of the frame, and also in the middle of each side of the frame.
In the upper-left corner of the text frame, slightly below the corner handle, is a small square. This is the In Port, and it is used to describe whether this frame is the continuation of a text fl ow from another frame. Simply put, does the text start somewhere else, or does it start in this frame? Because the In Port is empty, you can tell that the text starts in this frame. If the In Port contains an arrow, you would know that the text continues from another location.
IDCS4.indb 20IDCS4.indb 20 9/9/2008 3:22:53 PM9/9/2008 3:22:53 PM
Working with type
21Lesson 1, InDesign CS4 Essential Skills
1 The lower-right corner of the frame contains an Out Port. This port currently displays
a red plus sign, indicating that there is more text in the story than fi ts within the frame. You can address overset text in a number of ways:
Delete text•
Reduce the size of the text•
Make the frame larger•
Link the text to another frame•
In this case, you will link the text to another frame.
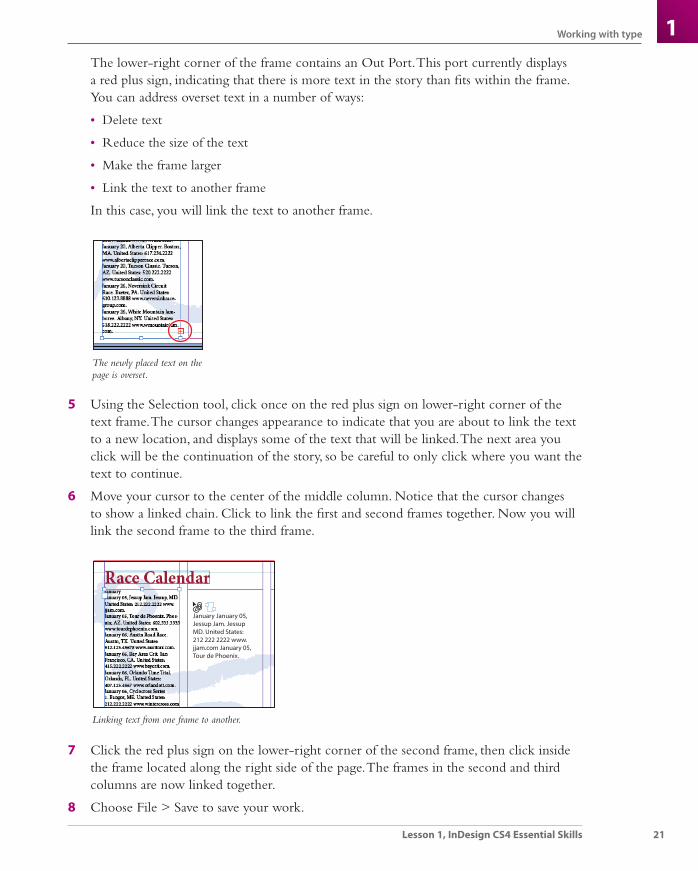
The newly placed text on the page is overset.
5 Using the Selection tool, click once on the red plus sign on lower-right corner of the text frame. The cursor changes appearance to indicate that you are about to link the text to a new location, and displays some of the text that will be linked. The next area you click will be the continuation of the story, so be careful to only click where you want the text to continue.
6 Move your cursor to the center of the middle column. Notice that the cursor changes to show a linked chain. Click to link the fi rst and second frames together. Now you will link the second frame to the third frame.
January January 05,Jessup Jam. JessupMD. United States:212 222 2222 www.jjam.com January 05,Tour de Phoenix.
Linking text from one frame to another.
7 Click the red plus sign on the lower-right corner of the second frame, then click inside the frame located along the right side of the page. The frames in the second and third columns are now linked together.
8 Choose File > Save to save your work.
IDCS4.indb 21IDCS4.indb 21 9/9/2008 3:22:53 PM9/9/2008 3:22:53 PM
22
Using styles
Adobe InDesign CS4 Digital Classroom
1Using stylesEarlier you worked with paragraph styles to format type. As you saw, these provided a method of applying consistent formatting to the text. Similarly, styles let you easily and repetitively format smaller groups of text along with entire frames and even tables. You’ll review the process of applying paragraph styles, then move into other types of styles that can be applied. Later, in Lesson 4, “Working with Styles,” you will work with styles in more detail.
Applying paragraph stylesAs you’ve seen, paragraph styles apply formatting to an entire paragraph of text, and you are not able to apply paragraph styles to an individual word within a paragraph—unless it is the only word in the paragraph, as in this example.
1 Select the Type tool ( ) from the Tools panel and click anywhere inside the word January located in the fi rst line of the frame on the left side of page 3.
2 In the Paragraph Styles panel, choose Calendar Month to apply the correct formatting to the word January. Repeat the process to format the word February, and then format March by applying the Calendar Month Paragraph Style.
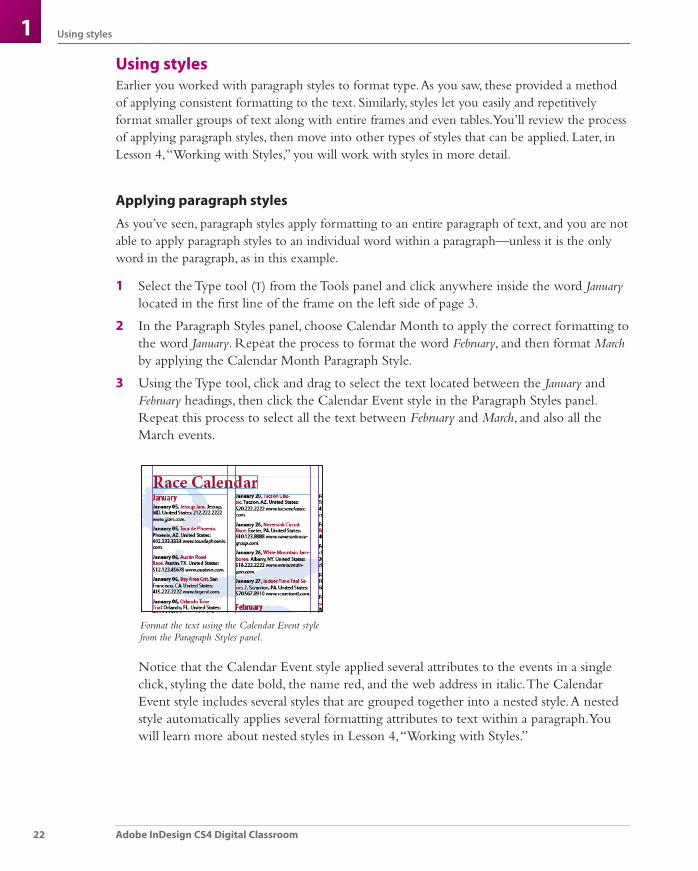
3 Using the Type tool, click and drag to select the text located between the January and February headings, then click the Calendar Event style in the Paragraph Styles panel. Repeat this process to select all the text between February and March, and also all the March events.
Format the text using the Calendar Event style from the Paragraph Styles panel.
Notice that the Calendar Event style applied several attributes to the events in a single click, styling the date bold, the name red, and the web address in italic. The Calendar Event style includes several styles that are grouped together into a nested style. A nested style automatically applies several formatting attributes to text within a paragraph. You will learn more about nested styles in Lesson 4, “Working with Styles.”
IDCS4.indb 22IDCS4.indb 22 9/9/2008 3:22:54 PM9/9/2008 3:22:54 PM
Using styles
23Lesson 1, InDesign CS4 Essential Skills
1Applying character stylesCharacter styles can be applied to individual words or characters. They are useful when applying common formatting attributes such as bold and italic. Character styles are the foundation for the nested styles that you applied to the event listings in the previous section. Here you will apply a character style to individual words.
1 Double-click on page 2 in the Pages panel to display page 2 within the workspace.
2 Using the Zoom tool ( ), increase the magnifi cation so you can easily see the fi rst paragraph of text, which starts with the text Your wheels.
3 Select the Type tool ( ) from the Tools panel and select the word wheels at the top of the fi rst paragraph. You can select the text either by clicking and dragging or by double-clicking on it.
Double-clicking on a word selects the word, triple-clicking selects the line, and quadruple-clicking (that’s four clicks) selects the paragraph.
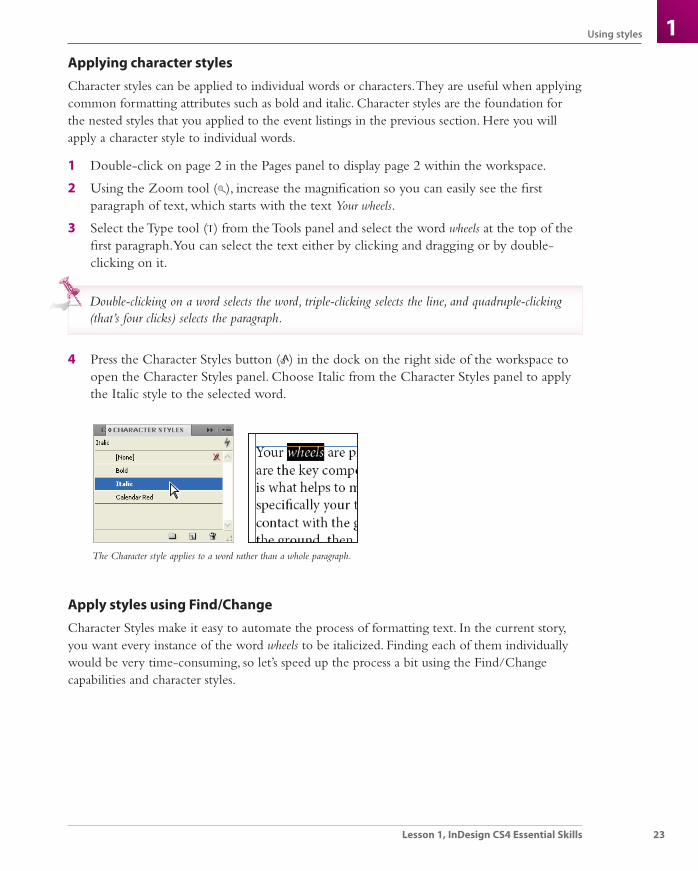
4 Press the Character Styles button ( ) in the dock on the right side of the workspace to open the Character Styles panel. Choose Italic from the Character Styles panel to apply the Italic style to the selected word.
The Character style applies to a word rather than a whole paragraph.
Apply styles using Find/ChangeCharacter Styles make it easy to automate the process of formatting text. In the current story, you want every instance of the word wheels to be italicized. Finding each of them individually would be very time-consuming, so let’s speed up the process a bit using the Find/Change capabilities and character styles.
IDCS4.indb 23IDCS4.indb 23 9/9/2008 3:22:54 PM9/9/2008 3:22:54 PM
24
Using styles
Adobe InDesign CS4 Digital Classroom
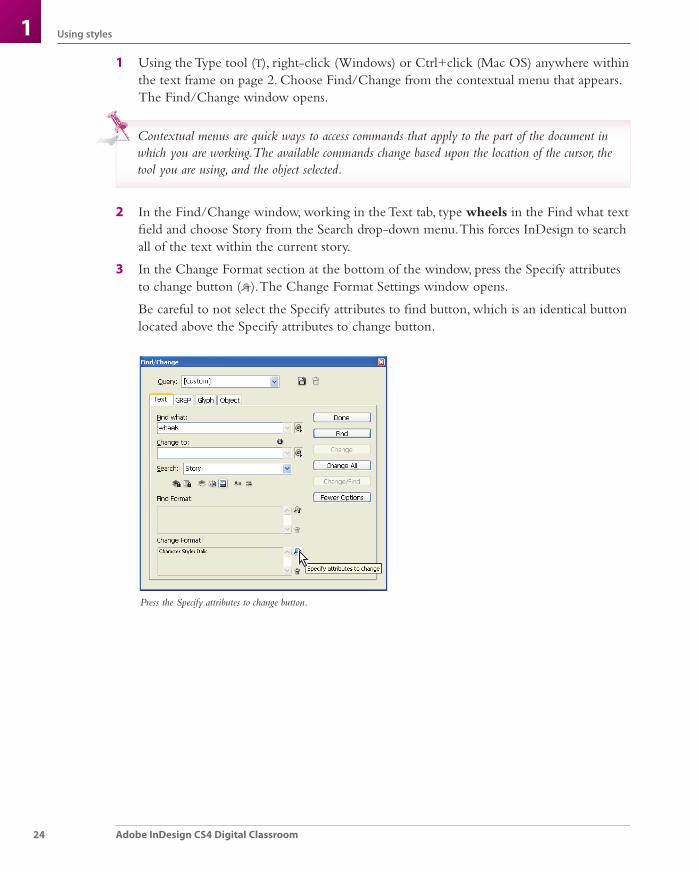
11 Using the Type tool ( ), right-click (Windows) or Ctrl+click (Mac OS) anywhere within
the text frame on page 2. Choose Find/Change from the contextual menu that appears. The Find/Change window opens.
Contextual menus are quick ways to access commands that apply to the part of the document in which you are working. The available commands change based upon the location of the cursor, the tool you are using, and the object selected.
2 In the Find/Change window, working in the Text tab, type wheels in the Find what text fi eld and choose Story from the Search drop-down menu. This forces InDesign to search all of the text within the current story.
3 In the Change Format section at the bottom of the window, press the Specify attributes to change button ( ). The Change Format Settings window opens.
Be careful to not select the Specify attributes to fi nd button, which is an identical button located above the Specify attributes to change button.
Press the Specify attributes to change button.
IDCS4.indb 24IDCS4.indb 24 9/9/2008 3:22:55 PM9/9/2008 3:22:55 PM
Using styles
25Lesson 1, InDesign CS4 Essential Skills
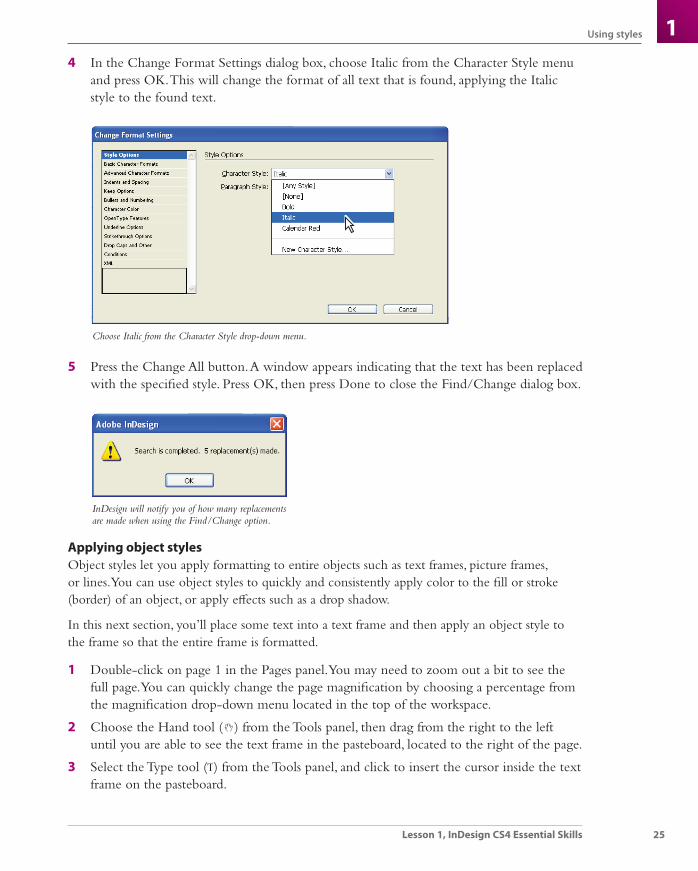
14 In the Change Format Settings dialog box, choose Italic from the Character Style menu
and press OK. This will change the format of all text that is found, applying the Italic style to the found text.
Choose Italic from the Character Style drop-down menu.
5 Press the Change All button. A window appears indicating that the text has been replaced with the specifi ed style. Press OK, then press Done to close the Find/Change dialog box.
InDesign will notify you of how many replacements are made when using the Find/Change option.
Applying object stylesObject styles let you apply formatting to entire objects such as text frames, picture frames, or lines. You can use object styles to quickly and consistently apply color to the fi ll or stroke (border) of an object, or apply eff ects such as a drop shadow.
In this next section, you’ll place some text into a text frame and then apply an object style to the frame so that the entire frame is formatted.
1 Double-click on page 1 in the Pages panel. You may need to zoom out a bit to see the full page. You can quickly change the page magnifi cation by choosing a percentage from the magnifi cation drop-down menu located in the top of the workspace.
2 Choose the Hand tool ( ) from the Tools panel, then drag from the right to the left until you are able to see the text frame in the pasteboard, located to the right of the page.
3 Select the Type tool ( ) from the Tools panel, and click to insert the cursor inside the text frame on the pasteboard.
IDCS4.indb 25IDCS4.indb 25 9/9/2008 3:22:56 PM9/9/2008 3:22:56 PM
26
Working with graphics
Adobe InDesign CS4 Digital Classroom
14 Choose File > Place. In the Place dialog box, navigate to the id01lessons folder and select
the fi le Sidebar.txt. Press Open.
5 Choose the Selection tool ( ) from the Tools panel and confi rm that the text frame is selected. If necessary, click the frame to select it.
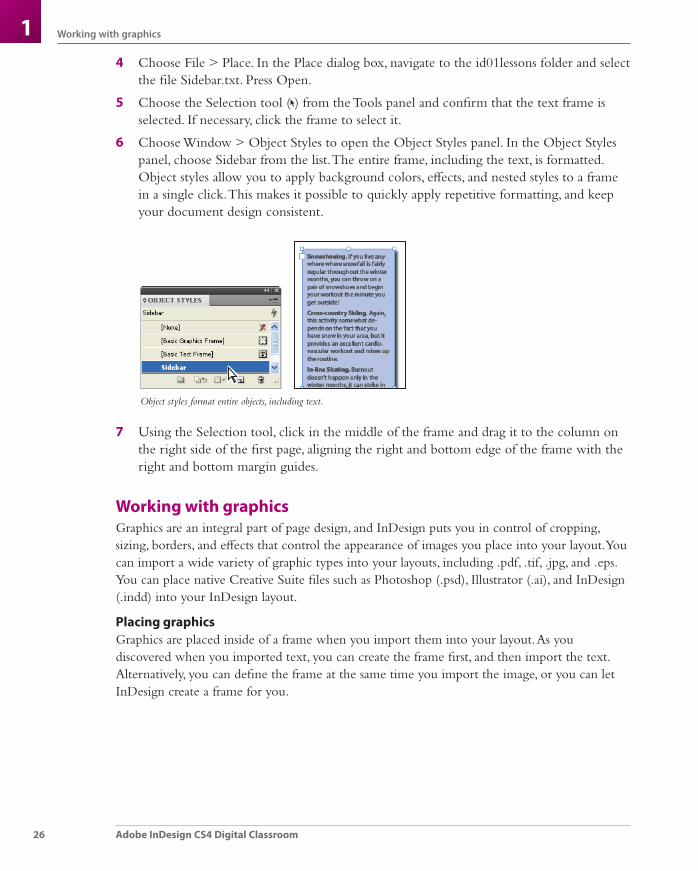
6 Choose Window > Object Styles to open the Object Styles panel. In the Object Styles panel, choose Sidebar from the list. The entire frame, including the text, is formatted.Object styles allow you to apply background colors, eff ects, and nested styles to a frame in a single click. This makes it possible to quickly apply repetitive formatting, and keep your document design consistent.
Object styles format entire objects, including text.
7 Using the Selection tool, click in the middle of the frame and drag it to the column on the right side of the fi rst page, aligning the right and bottom edge of the frame with the right and bottom margin guides.
Working with graphicsGraphics are an integral part of page design, and InDesign puts you in control of cropping, sizing, borders, and eff ects that control the appearance of images you place into your layout. You can import a wide variety of graphic types into your layouts, including .pdf, .tif, .jpg, and .eps. You can place native Creative Suite fi les such as Photoshop (.psd), Illustrator (.ai), and InDesign (.indd) into your InDesign layout.
Placing graphicsGraphics are placed inside of a frame when you import them into your layout. As you discovered when you imported text, you can create the frame fi rst, and then import the text. Alternatively, you can defi ne the frame at the same time you import the image, or you can let InDesign create a frame for you.
IDCS4.indb 26IDCS4.indb 26 9/9/2008 3:22:56 PM9/9/2008 3:22:56 PM
Working with graphics
27Lesson 1, InDesign CS4 Essential Skills
11 Double-click on page 4 in the Pages panel to display page 4 of the document, then
choose Edit > Deselect All so that no other objects are selected in the layout. If Deselect All is not available, then no objects are selected.
2 Choose File > Place. In the Place dialog box, navigate to the id01lessons folder and select the fi le cyclist.psd; then press Open. Because no frame has been selected, InDesign displays a loaded cursor indicating that the image is ready to be placed in the document.
3 Click once in the upper-left corner of the workspace where the red bleed guides intersect, outside of the page area. This places the image at its full size.
4 If the upper-left corner of the image is not correctly positioned at the intersection of the bleed guides, use the Selection tool ( ) to click and drag the image to the correct position. Next you will resize the image to cover the top half of the layout and extend (bleed) off the edges.
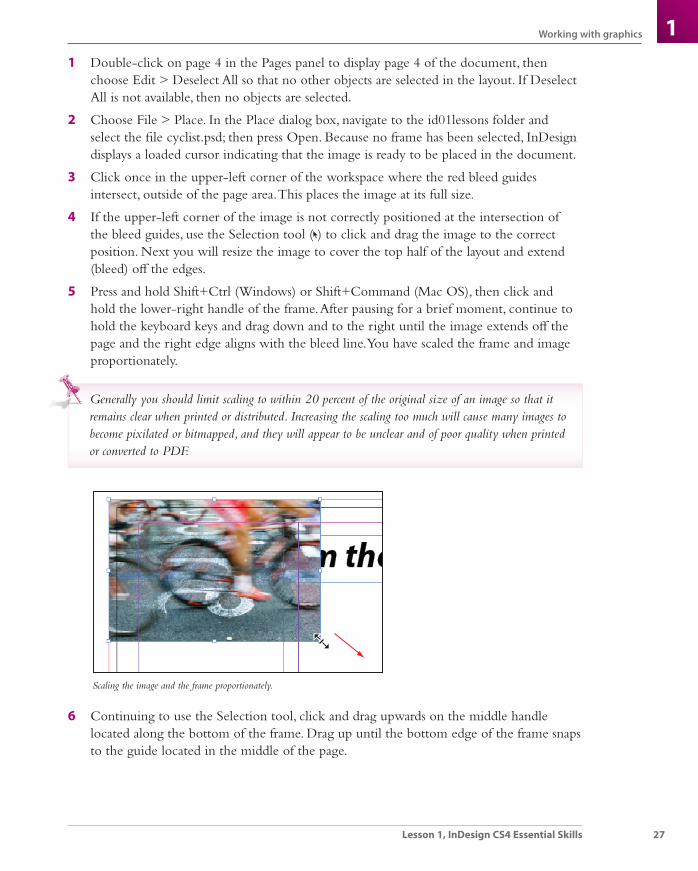
5 Press and hold Shift+Ctrl (Windows) or Shift+Command (Mac OS), then click and hold the lower-right handle of the frame. After pausing for a brief moment, continue to hold the keyboard keys and drag down and to the right until the image extends off the page and the right edge aligns with the bleed line. You have scaled the frame and image proportionately.
Generally you should limit scaling to within 20 percent of the original size of an image so that it remains clear when printed or distributed. Increasing the scaling too much will cause many images to become pixilated or bitmapped, and they will appear to be unclear and of poor quality when printed or converted to PDF.
Scaling the image and the frame proportionately.
6 Continuing to use the Selection tool, click and drag upwards on the middle handle located along the bottom of the frame. Drag up until the bottom edge of the frame snaps to the guide located in the middle of the page.
IDCS4.indb 27IDCS4.indb 27 9/9/2008 3:22:57 PM9/9/2008 3:22:57 PM
28
Working with graphics
Adobe InDesign CS4 Digital Classroom
1
Moving the handles of a frame using the Selection tool changes the size of the frame and adjusts how much of the image is displayed. Using the Shift+Ctrl (Windows) or Shift+Command (Mac OS) modifi er keys allows you to scale the image and the frame together.
7 To reveal the text that is beneath the image, position the Selection tool on the image and right-click (Windows) or Ctrl+click (Mac OS); then choose Arrange > Send to Back. The image is placed behind the text.
Positioning graphics within a frameYou may need to crop or scale images that are placed in your layout. Here you will explore some visual tools that help with the positioning and scaling of graphics.
1 Navigate to page 1 by using the page drop-down menu or the Pages panel.
2 Choose the Selection tool ( ), then click to select the graphic frame at the bottom-left corner of page 1. The frame spans the left and center columns. InDesign displays empty graphic frames with an X inside the frame.
3 Choose File > Place. In the Place dialog box, navigate to the id01lessons folder and select the snowshoe.psd image. Press Open. The image is placed inside the selected frame, and is larger than the frame. Next you will determine the size of the image and adjust it to fi t within the frame.
4 Choose the Direct Selection tool ( ) in the Tools panel and click to select the snowshoe image. The edges of the image are displayed with a light-brown border, showing the actual size of the graphic within the frame.
5 Select the Hand tool ( ) from the Tools panel. Click and hold the document. As you noticed earlier in this lesson, the page magnifi cation changes and a red frame appears when using the Hand tool.
IDCS4.indb 28IDCS4.indb 28 9/9/2008 3:22:57 PM9/9/2008 3:22:57 PM
Working with graphics
29Lesson 1, InDesign CS4 Essential Skills
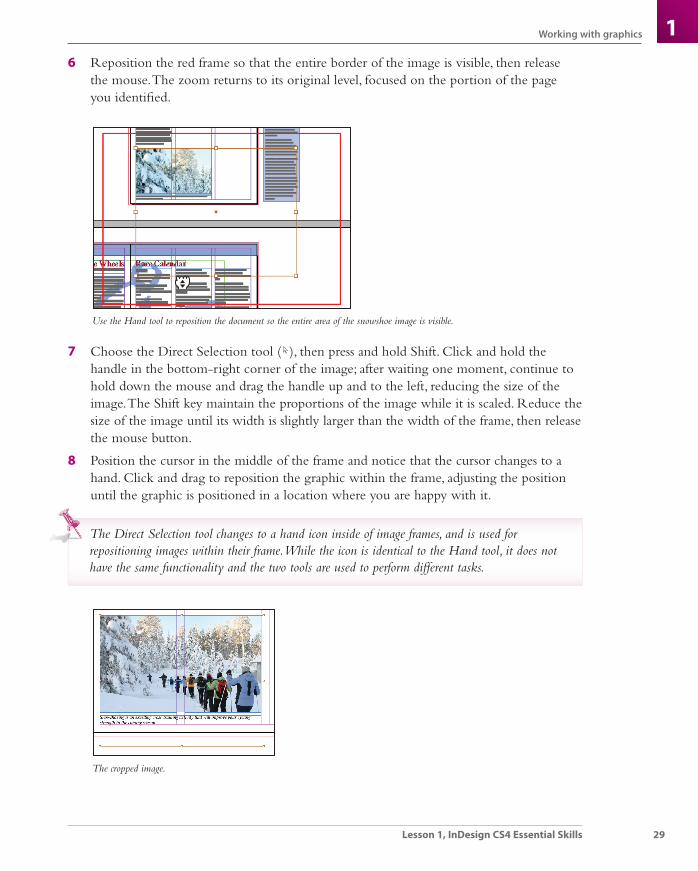
16 Reposition the red frame so that the entire border of the image is visible, then release
the mouse. The zoom returns to its original level, focused on the portion of the page you identifi ed.
Use the Hand tool to reposition the document so the entire area of the snowshoe image is visible.
7 Choose the Direct Selection tool ( ), then press and hold Shift. Click and hold the handle in the bottom-right corner of the image; after waiting one moment, continue to hold down the mouse and drag the handle up and to the left, reducing the size of the image. The Shift key maintain the proportions of the image while it is scaled. Reduce the size of the image until its width is slightly larger than the width of the frame, then release the mouse button.
8 Position the cursor in the middle of the frame and notice that the cursor changes to a hand. Click and drag to reposition the graphic within the frame, adjusting the position until the graphic is positioned in a location where you are happy with it.
The Direct Selection tool changes to a hand icon inside of image frames, and is used for repositioning images within their frame. While the icon is identical to the Hand tool, it does not have the same functionality and the two tools are used to perform diff erent tasks.
The cropped image.
IDCS4.indb 29IDCS4.indb 29 9/9/2008 3:22:57 PM9/9/2008 3:22:57 PM
30
Working with graphics
Adobe InDesign CS4 Digital Classroom
1
With the Direct Selection tool active, click with the mouse on an image and wait for a moment. After pausing, begin moving the image. You get a dynamic preview of the image as you are moving it, which is extremely useful when positioning a graphic within a frame. Pausing before repositioning the image is referred to as patient user mode, and provides benefi ts when cropping or resizing images.
9 Use the keyboard shortcut Ctrl+0 (Windows) or Command+0 (Mac OS) to fi t page 1 within the document window.
10 Choose File > Save to save your work.
Applying text wrapYou can control the position of text relative to graphics and other objects. In some cases you may want text to be placed on top of an image, while in other cases you may want text to wrap around the shape of an image or object. You’ll continue to work on the fi rst page of the brochure by applying text wrap to an image.
1 Using the Selection tool ( ), select the snowshoe image at the bottom of the page. This image is covering part of the text along the bottom part of the fi rst column. You’ll enable text wrap on the image to force the text away from the image.
2 Click the Text Wrap button in the panel docking area to open the Text Wrap panel.
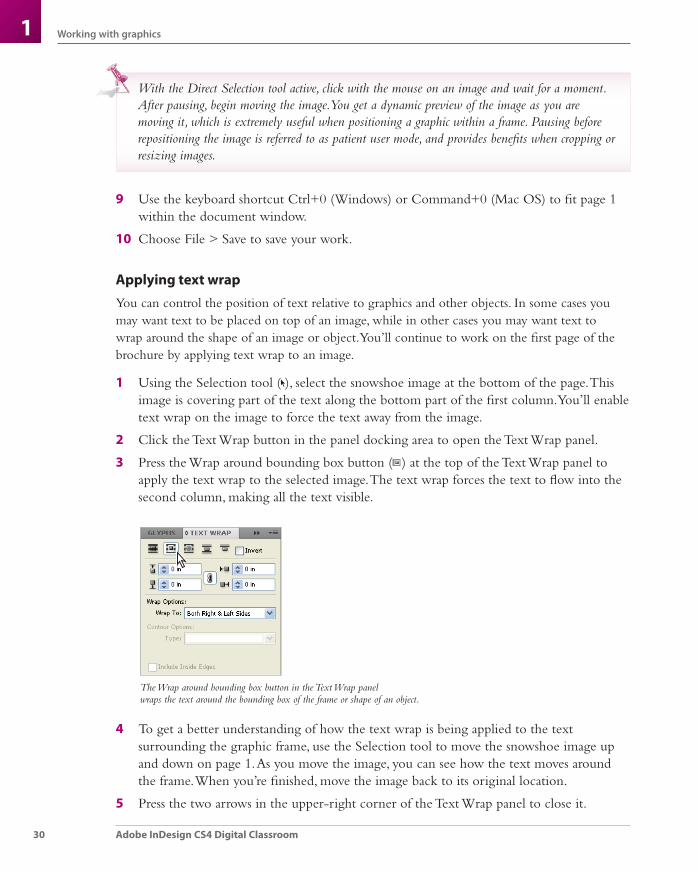
3 Press the Wrap around bounding box button ( ) at the top of the Text Wrap panel to apply the text wrap to the selected image. The text wrap forces the text to fl ow into the second column, making all the text visible.
The Wrap around bounding box button in the Text Wrap panel wraps the text around the bounding box of the frame or shape of an object.
4 To get a better understanding of how the text wrap is being applied to the text surrounding the graphic frame, use the Selection tool to move the snowshoe image up and down on page 1. As you move the image, you can see how the text moves around the frame. When you’re fi nished, move the image back to its original location.
5 Press the two arrows in the upper-right corner of the Text Wrap panel to close it.
IDCS4.indb 30IDCS4.indb 30 9/9/2008 3:22:58 PM9/9/2008 3:22:58 PM
Working with graphics
31Lesson 1, InDesign CS4 Essential Skills
1Understanding layersLayers help you organize the images and text in your layout. Layers are like transparent sheets of cellophane lying on top of each other. If you put an object on a layer that is below another layer, you can see the object as long as there aren’t any objects directly above it, regardless of how many layers are on top of it. Layers can also be used to create diff erent versions of projects, or diff erent variations of projects, such as those versions being sent to diff erent audiences or created in diff erent languages.
Layers also allow you to place text and graphics on separate layers, making it easy to proofread text without looking at graphics. Here you’ll see how layers can be used in this manner:
1 Navigate to page 2 using the Pages panel, then choose View > Fit Spread in Window to display the entire spread in the workspace. This command displays pages 2 and 3 together.
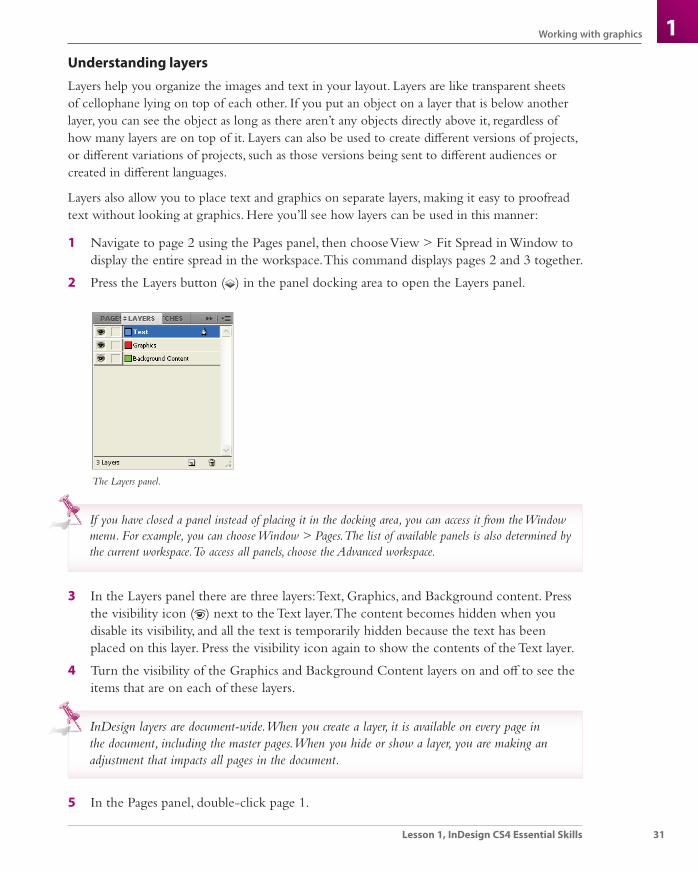
2 Press the Layers button ( ) in the panel docking area to open the Layers panel.
The Layers panel.
If you have closed a panel instead of placing it in the docking area, you can access it from the Window menu. For example, you can choose Window > Pages. The list of available panels is also determined by the current workspace. To access all panels, choose the Advanced workspace.
3 In the Layers panel there are three layers: Text, Graphics, and Background content. Press the visibility icon ( ) next to the Text layer. The content becomes hidden when you disable its visibility, and all the text is temporarily hidden because the text has been placed on this layer. Press the visibility icon again to show the contents of the Text layer.
4 Turn the visibility of the Graphics and Background Content layers on and off to see the items that are on each of these layers.
InDesign layers are document-wide. When you create a layer, it is available on every page in the document, including the master pages. When you hide or show a layer, you are making an adjustment that impacts all pages in the document.
5 In the Pages panel, double-click page 1.
IDCS4.indb 31IDCS4.indb 31 9/9/2008 3:22:59 PM9/9/2008 3:22:59 PM
32
Working with graphics
Adobe InDesign CS4 Digital Classroom
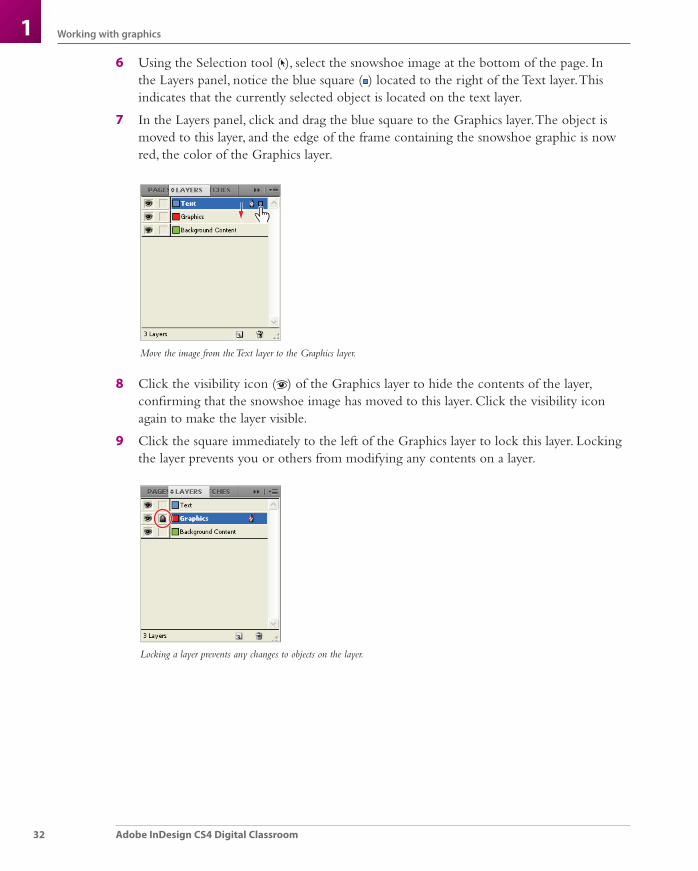
16 Using the Selection tool ( ), select the snowshoe image at the bottom of the page. In
the Layers panel, notice the blue square ( ) located to the right of the Text layer. This indicates that the currently selected object is located on the text layer.
7 In the Layers panel, click and drag the blue square to the Graphics layer. The object is moved to this layer, and the edge of the frame containing the snowshoe graphic is now red, the color of the Graphics layer.
Move the image from the Text layer to the Graphics layer.
8 Click the visibility icon ( ) of the Graphics layer to hide the contents of the layer, confi rming that the snowshoe image has moved to this layer. Click the visibility icon again to make the layer visible.
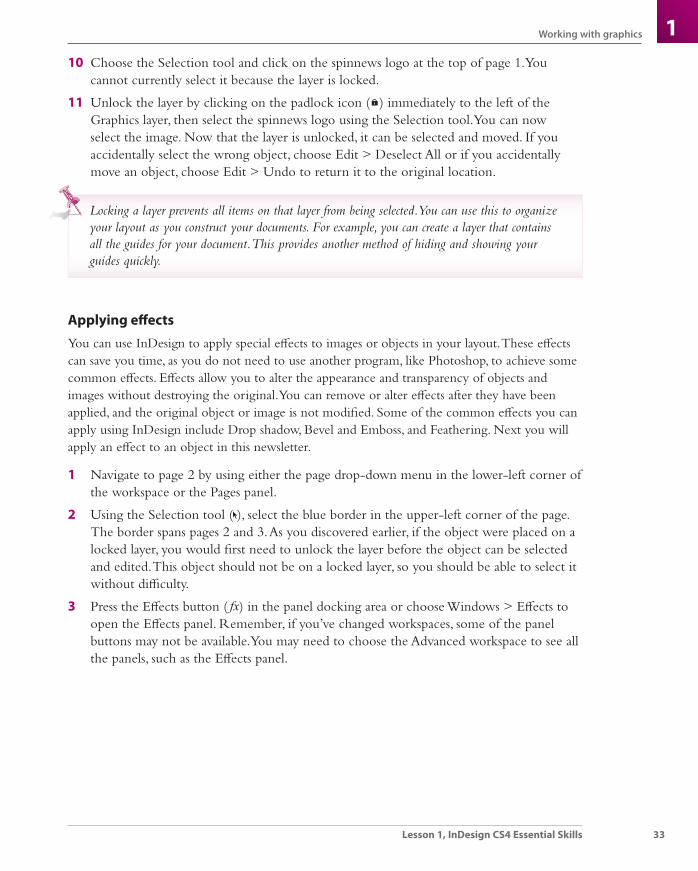
9 Click the square immediately to the left of the Graphics layer to lock this layer. Locking the layer prevents you or others from modifying any contents on a layer.
Locking a layer prevents any changes to objects on the layer.
IDCS4.indb 32IDCS4.indb 32 9/9/2008 3:23:00 PM9/9/2008 3:23:00 PM
Working with graphics
33Lesson 1, InDesign CS4 Essential Skills
110 Choose the Selection tool and click on the spinnews logo at the top of page 1. You
cannot currently select it because the layer is locked.
11 Unlock the layer by clicking on the padlock icon ( ) immediately to the left of the Graphics layer, then select the spinnews logo using the Selection tool. You can now select the image. Now that the layer is unlocked, it can be selected and moved. If you accidentally select the wrong object, choose Edit > Deselect All or if you accidentally move an object, choose Edit > Undo to return it to the original location.
Locking a layer prevents all items on that layer from being selected. You can use this to organize your layout as you construct your documents. For example, you can create a layer that contains all the guides for your document. This provides another method of hiding and showing your guides quickly.
Applying eff ectsYou can use InDesign to apply special eff ects to images or objects in your layout. These eff ects can save you time, as you do not need to use another program, like Photoshop, to achieve some common eff ects. Eff ects allow you to alter the appearance and transparency of objects and images without destroying the original. You can remove or alter eff ects after they have been applied, and the original object or image is not modifi ed. Some of the common eff ects you can apply using InDesign include Drop shadow, Bevel and Emboss, and Feathering. Next you will apply an eff ect to an object in this newsletter.
1 Navigate to page 2 by using either the page drop-down menu in the lower-left corner of the workspace or the Pages panel.
2 Using the Selection tool ( ), select the blue border in the upper-left corner of the page. The border spans pages 2 and 3. As you discovered earlier, if the object were placed on a locked layer, you would fi rst need to unlock the layer before the object can be selected and edited. This object should not be on a locked layer, so you should be able to select it without diffi culty.
3 Press the Eff ects button ( ) in the panel docking area or choose Windows > Eff ects to open the Eff ects panel. Remember, if you’ve changed workspaces, some of the panel buttons may not be available. You may need to choose the Advanced workspace to see all the panels, such as the Eff ects panel.
IDCS4.indb 33IDCS4.indb 33 9/9/2008 3:23:01 PM9/9/2008 3:23:01 PM
34
Working with graphics
Adobe InDesign CS4 Digital Classroom
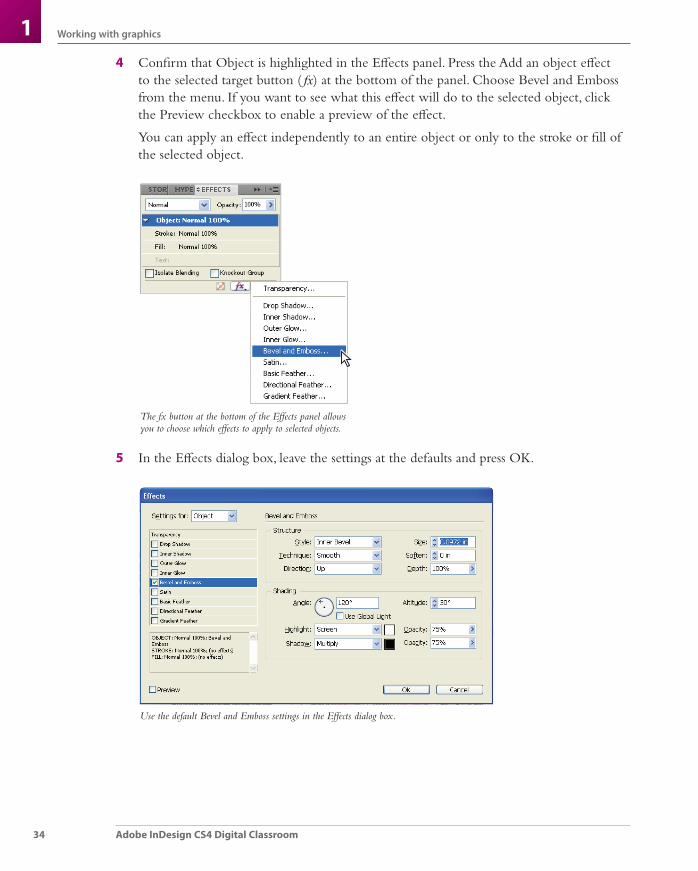
14 Confi rm that Object is highlighted in the Eff ects panel. Press the Add an object eff ect
to the selected target button ( ) at the bottom of the panel. Choose Bevel and Emboss from the menu. If you want to see what this eff ect will do to the selected object, click the Preview checkbox to enable a preview of the eff ect.
You can apply an eff ect independently to an entire object or only to the stroke or fi ll of the selected object.
The fx button at the bottom of the Eff ects panel allows you to choose which eff ects to apply to selected objects.
5 In the Eff ects dialog box, leave the settings at the defaults and press OK.
Use the default Bevel and Emboss settings in the Eff ects dialog box.
IDCS4.indb 34IDCS4.indb 34 9/9/2008 3:23:01 PM9/9/2008 3:23:01 PM

Resources for additional help
35Lesson 1, InDesign CS4 Essential Skills
16 Switch to the Preview viewing mode using the viewing mode button in the Application
bar at the top of the workspace. You can also press the keyboard shortcut W to switch the viewing mode, or access the same viewing mode controls at the bottom of the tools palette. All three options let you switch to the Preview viewing mode, which provides you with a preview of the fi nal project without displaying any of the non-printing elements.
7 Choose File > Save, then choose File > Close to close the fi le.
Congratulations! You have completed the lesson.
Resources for additional help
In-product helpInDesign includes help documentation directly within the application itself. Choose Help > InDesign Help, and InDesign launches the Adobe Help Viewer, which allows you to search by topic.
On-line helpAdobe makes the documentation for InDesign available on the Web in the form of Livedocs at http://livedocs.adobe.com/en_US/InDesign/5.0/index.html. The Livedocs help tends to be more current, as it is updated regularly. The documentation that shipped with the software was likely written months before the software was in its fi nal format, so it may not be as complete or current as the on-line help. In addition, Livedocs provides you with the ability to add comments to topics that you view, and even receive an e-mail when someone else adds a comment to the topic. You can also download many of the help fi les in PDF format for printing or future reference.
ForumsAdobe on-line forums are an excellent resource for fi nding solutions to questions you have about InDesign or how InDesign integrates with other applications. Adobe forums are contributed to by a community of beginning, intermediate, and advanced users who may be looking for the same answer as you, or who have already discovered solutions and answers to questions and are willing to share their solutions with other users.
Conferences, seminars, and trainingThe authors of this book regularly speak at conferences and seminars, and deliver instructor-led training sessions. You can learn more at agitraining.com.
IDCS4.indb 35IDCS4.indb 35 9/9/2008 3:23:02 PM9/9/2008 3:23:02 PM
36
Self study
Adobe InDesign CS4 Digital Classroom
1Self studyPlace some of your own graphics into the newsletter that you just created, then practice cropping and repositioning the graphics within their frames. Move objects to other layers and create your own layer to further refi ne the organization of the fi le.
This lesson has given you an overview of the essential capabilities available in the latest version of InDesign. For more in-depth instructions on how to perform many of these tasks in detail, read and work through the other lessons in this book.
Review
Questions1 What does a red plus sign in the lower-right corner of a text frame indicate?
2 What tool is used to reposition an image inside of a frame?
3 How can you ensure that if you reposition the panels in InDesign to your liking, you could always bring them back to that state?
4 If you cannot see panels that you need to use, how can you display these panels?
Answers1 There is more text in the frame than can be displayed within the current frame. This is
called overset text. You can fi x this by linking the text to another frame, editing the text so that it fi ts within the existing frame, or enlarging the size of the frame.
2 The Direct Selection tool is used for manipulating images within a frame.
3 Save a custom workspace by choosing Window > Workspace > New Workspace.
4 When the workspace is changed, the list of available panels also changes. Use the Advanced workspace to view all the panels. All panels can also be found under the Window menu. Simply choose the panel you want to use from the list and it will display.
IDCS4.indb 36IDCS4.indb 36 9/9/2008 3:23:02 PM9/9/2008 3:23:02 PM