Embed Size (px)
Citation preview

7/23/2019 IndigoVision4.8.1 Configration
http://slidepdf.com/reader/full/indigovision481-configration 1/17
1
Start Up Guide
JVC VN-H37/57 series V4.05 and
IndigoVision NVR-AS and ControlCenter4 July 12, 2013 JVCKENWOOD Corporation
Content
1. Setup of Camera .......................................................................................................................................... 2
1.1. Version.................................................................................................................................................. 2
1.2. Setting of IP Address ............................................................................................................................ 3
1.3. Adjusting Clock..................................................................................................................................... 4
1.4. Selecting ONVIF Mode......................................................................................................................... 5
1.5. Configuration of encoding .................................................................................................................... 6
2. Setup of IndigoVision Software.................................................................................................................... 7
2.1. Add camera to IndigoVision ................................................................................................................. 7
2.2. Camera Settings after adding the Camera......................................................................................... 10
2.3. Configuration of recording ...................................................................................................................11
2.4. Configuration of Live........................................................................................................................... 13
2.5. Configuration of Playback .................................................................................................................. 15
3. Limitations and notes ................................................................................................................................. 17

7/23/2019 IndigoVision4.8.1 Configration
http://slidepdf.com/reader/full/indigovision481-configration 2/17
2
1. Setup of Camera
1.1. Version
Available versions:
VN-H35/57 series : Version 4.05.013
IndigoVision NVR-AS : 4.8.1 May 2013
IndigoVision Control Center 4 : 4.8.1 build 4 release version
How to check Version of the camera
Start IE, enter IP address of the camera, and enter username and password.
Default IP address : 192.168.0.2
Default username : admin
Default password : jvc
(JVC-VN-SearchTool.exe is available to find IP address of JVC camera.)
Click Details button, click “Advanced Settings” -> “Maintenance” menu. Version is written in the page. If
necessary, you can update firmware on the page.
See Instructions manual for details of IE settings.

7/23/2019 IndigoVision4.8.1 Configration
http://slidepdf.com/reader/full/indigovision481-configration 3/17
3
1.2. Setting of IP Address
IP address can be changed on the Web page or IP Setting Tool.
(1) On Web page
Click Network menu, change IP address and other settings, then click OK button.
(2) By IP Setting Tool
Search cameras, select the camera in the list.Enter password of the camera.
Enter IP address, subnet mask, and default gateway.
Click Setting button.
7/23/2019 IndigoVision4.8.1 Configration
http://slidepdf.com/reader/full/indigovision481-configration 4/17
4
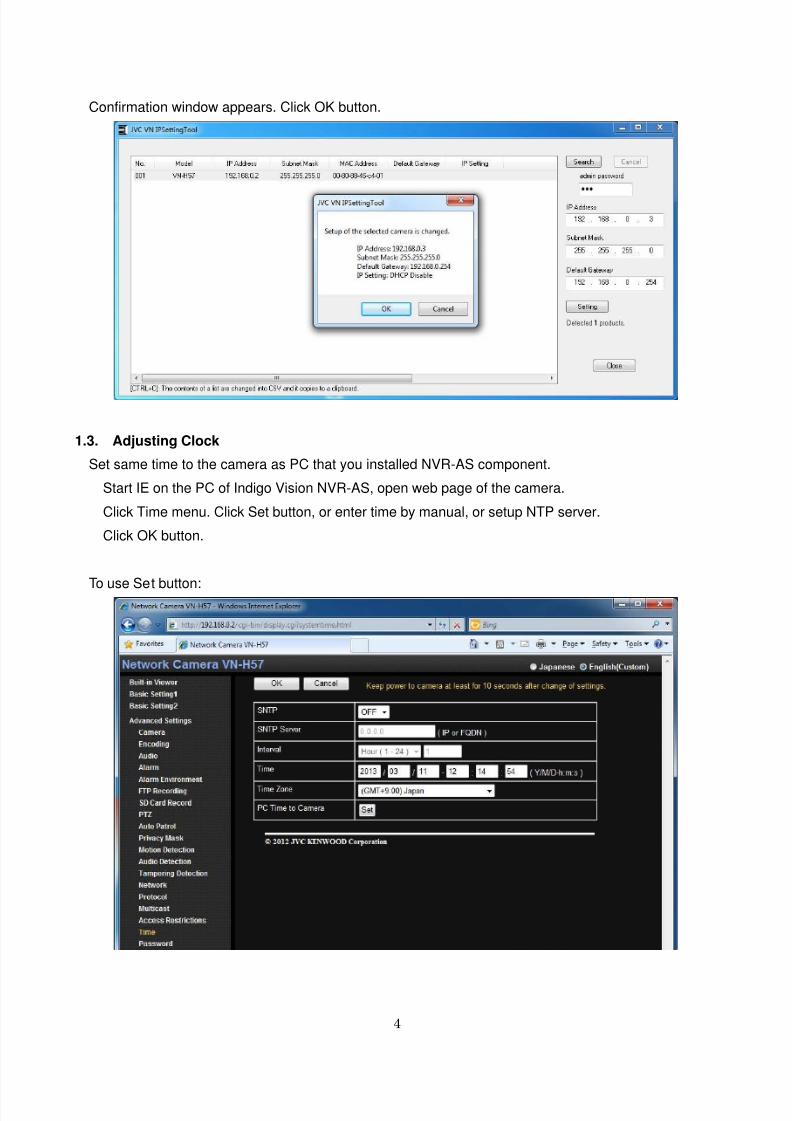
Confirmation window appears. Click OK button.
1.3. Adjusting Clock
Set same time to the camera as PC that you installed NVR-AS component.
Start IE on the PC of Indigo Vision NVR-AS, open web page of the camera.
Click Time menu. Click Set button, or enter time by manual, or setup NTP server.
Click OK button.
To use Set button:

7/23/2019 IndigoVision4.8.1 Configration
http://slidepdf.com/reader/full/indigovision481-configration 5/17
5
To use NTP server:
1.4. Selecting ONVIF Mode
Click Protocol menu, select Standard in ONVIF Mode (if it is not selected), then click OK button.
Factory default values of VN-H37U/57U series were changed from v4.02. (Default values in Instruction
manual are obsolete.) Current ONVIF related default values are:
Item Factory Defaults
PSIA/ONVIF ONVIF
ONVIF Mode Standard
7/23/2019 IndigoVision4.8.1 Configration
http://slidepdf.com/reader/full/indigovision481-configration 6/17
6
1.5. Setting of encoder
Click Encoding menu and select preferable encoder settings.
Limitations of encoder settings:
[1] Indigo Vision uses Encoder 1 only. Multiple encoders are not available.
[2] If you want high frame rate like 30 or 15 fps, do not set high bitrate 3072 kbps and over. Otherwise
live and playback will be jerky.
[3] For I frame interval setting of H.264, selecting frame rate value and fewer is recommended. Live view
will not be available if I frame interval is larger than frame rate.
[4] High resolution, high quality and high fps configuration of JPEG (Ex: 1080p, AFS Lv1, 30fps) causes
very low frame rate of live and playback.
[5] MPEG-4 is not available because it cannot be set to encoder 1.

7/23/2019 IndigoVision4.8.1 Configration
http://slidepdf.com/reader/full/indigovision481-configration 7/17
7
2. Setup of IndigoVision Software
2.1. Add camera to IndigoVision
(1) Start “IndigoVision Control Center 4.
(2) Click ‘Setup’ button. Right click “[001] Top Site” in Video tab at left, select “Add Devices…”.
“Add Devices – Top Site” window appears.
7/23/2019 IndigoVision4.8.1 Configration
http://slidepdf.com/reader/full/indigovision481-configration 8/17
8
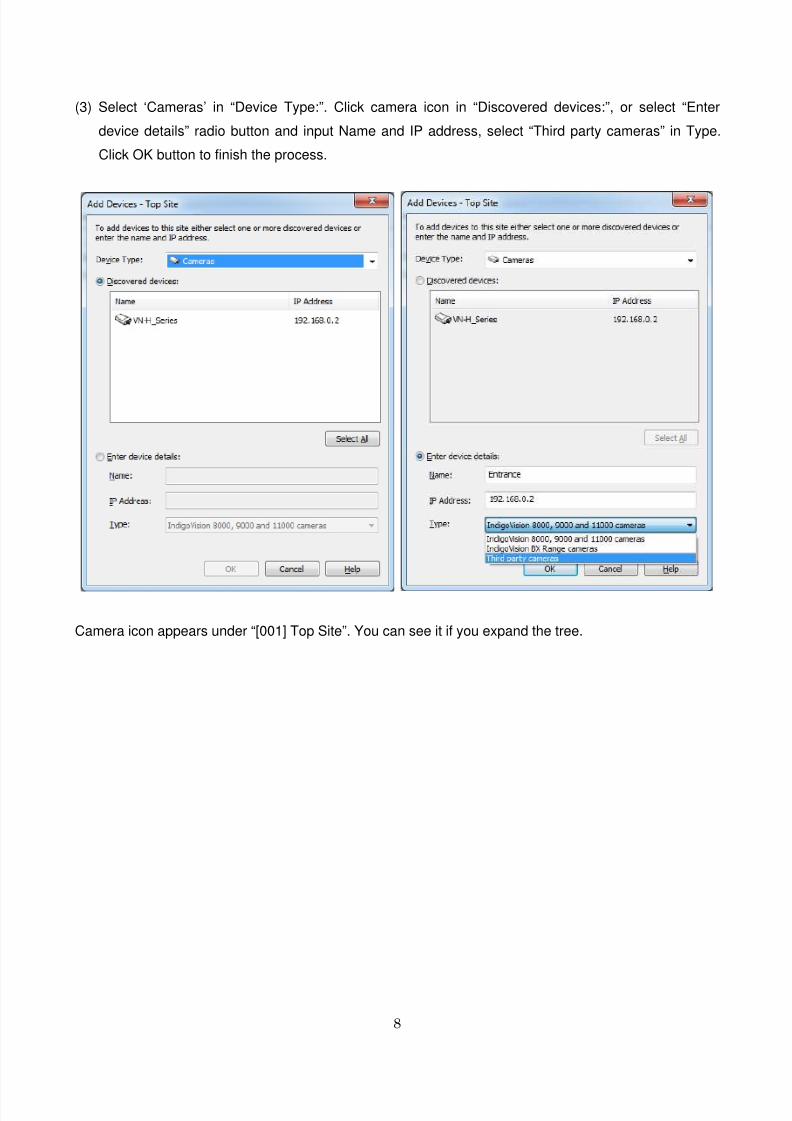
(3) Select ‘Cameras’ in “Device Type:”. Click camera icon in “Discovered devices:”, or select “Enter
device details” radio button and input Name and IP address, select “Third party cameras” in Type.
Click OK button to finish the process.
Camera icon appears under “[001] Top Site”. You can see it if you expand the tree.

7/23/2019 IndigoVision4.8.1 Configration
http://slidepdf.com/reader/full/indigovision481-configration 9/17
9
(4) Expand “[001] Top Site” tree and right click the camera and select “Properties…”. “VN-H_Series
Properties” window appears.
Select “Device Access” tab, uncheck “Use same settings as parent site” and click “Add…” button.
Confirm “Full Administrators” is selected and check “Authenticate with device”. Input “Username” and
“Password” for ONVIF (Defaults are admin and jvc) and click OK.
Note:
Warning window may appear when properties window is opened but it can be ignored. After you set
“Device Access”, the warning windows will not appear.
VN-H37/57 series have 2 sets of username and password, for Web page and ONVIF. Both sets have
same default settings, admin and jvc. To change password of Web page, use Password page. To
change password of ONVIF, use ONVIF command.
7/23/2019 IndigoVision4.8.1 Configration
http://slidepdf.com/reader/full/indigovision481-configration 10/17
10
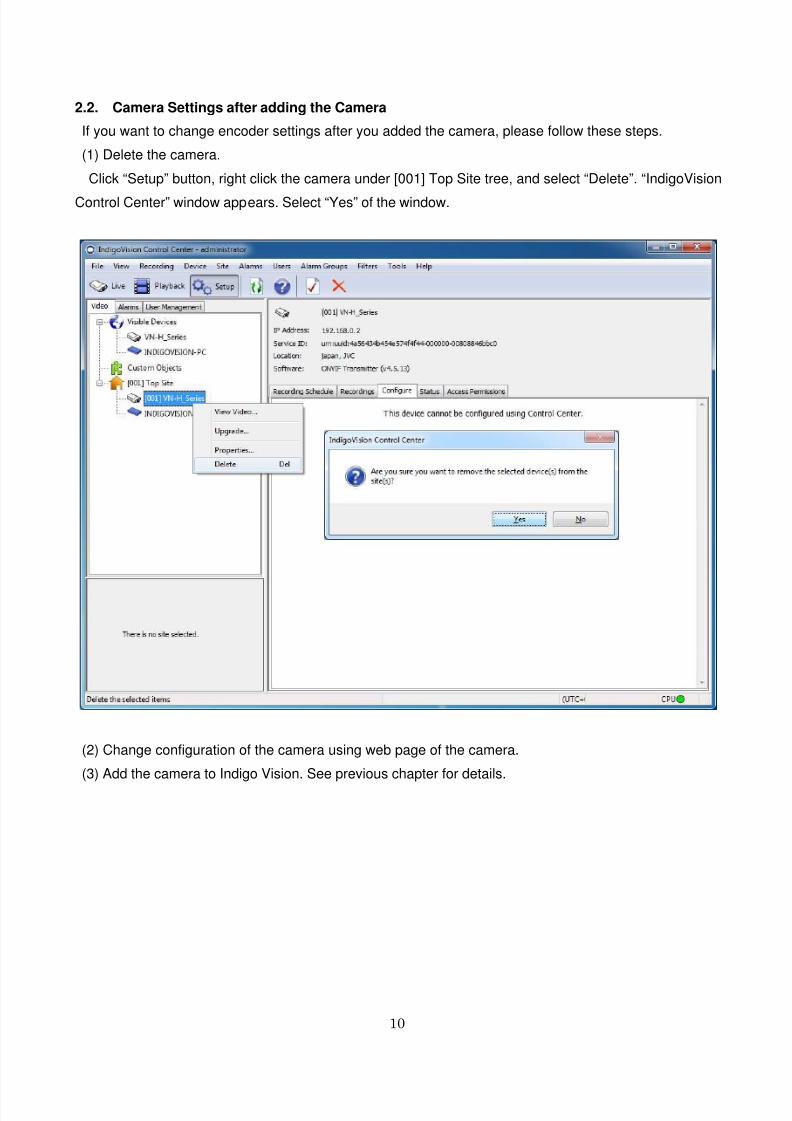
2.2. Camera Settings after adding the Camera
If you want to change encoder settings after you added the camera, please follow these steps.
(1) Delete the camera.
Click “Setup” button, right click the camera under [001] Top Site tree, and select “Delete”. “IndigoVision
Control Center” window appears. Select “Yes” of the window.
(2) Change configuration of the camera using web page of the camera.
(3) Add the camera to Indigo Vision. See previous chapter for details.

7/23/2019 IndigoVision4.8.1 Configration
http://slidepdf.com/reader/full/indigovision481-configration 11/17
11
2.3. Configuration of recording
(1) Right click “[001] Top Site” in Video tab, and select “Add Devices…” from the menu. “Add Devices –
Top Site” window appears.
(2) Select “NVRs” in “Device Type:”. Click NVR icon (blue box) in “Discovered devices:”, or select “Enter
device details” radio button and input Name and IP address. Click OK button to finish the process.
NVR icon appears under “[001] Top Site”.
Close warning window if it appears. It can be ignored.
7/23/2019 IndigoVision4.8.1 Configration
http://slidepdf.com/reader/full/indigovision481-configration 12/17
12
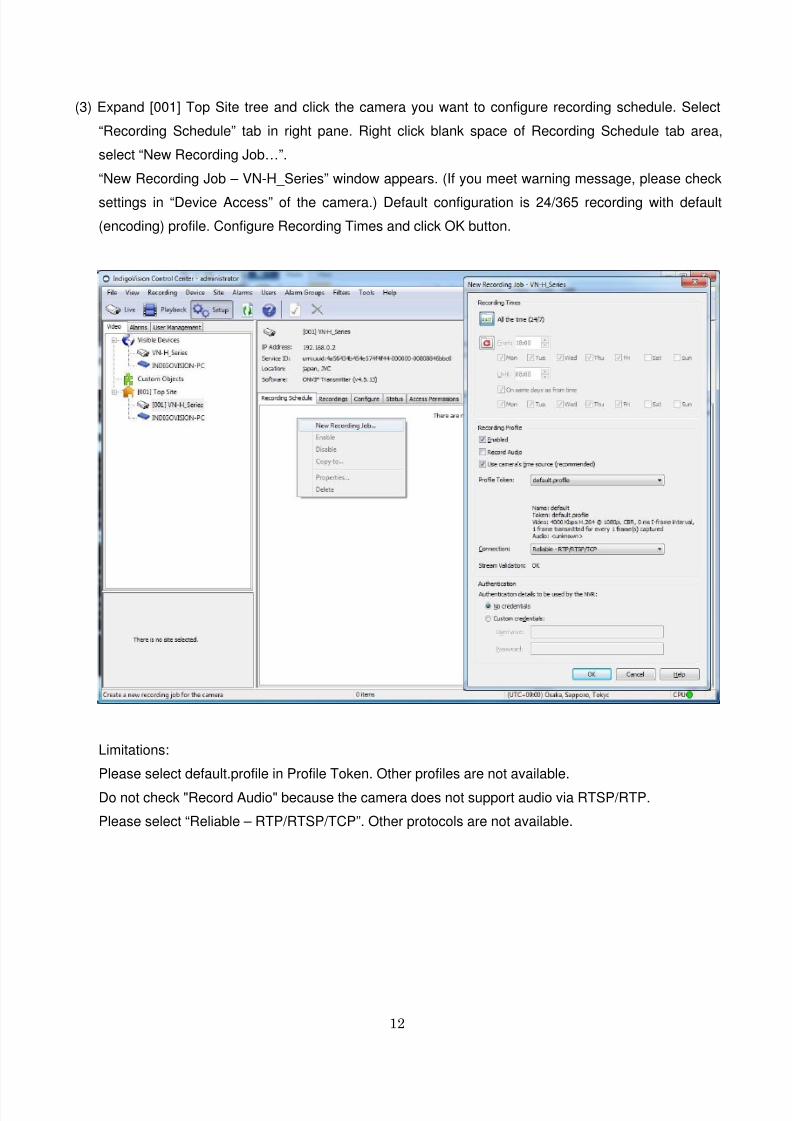
(3) Expand [001] Top Site tree and click the camera you want to configure recording schedule. Select
“Recording Schedule” tab in right pane. Right click blank space of Recording Schedule tab area,
select “New Recording Job…”.
“New Recording Job – VN-H_Series” window appears. (If you meet warning message, please check
settings in “Device Access” of the camera.) Default configuration is 24/365 recording with default
(encoding) profile. Configure Recording Times and click OK button.
Limitations:
Please select default.profile in Profile Token. Other profiles are not available.
Do not check "Record Audio" because the camera does not support audio via RTSP/RTP.
Please select “Reliable – RTP/RTSP/TCP”. Other protocols are not available.

7/23/2019 IndigoVision4.8.1 Configration
http://slidepdf.com/reader/full/indigovision481-configration 13/17
13
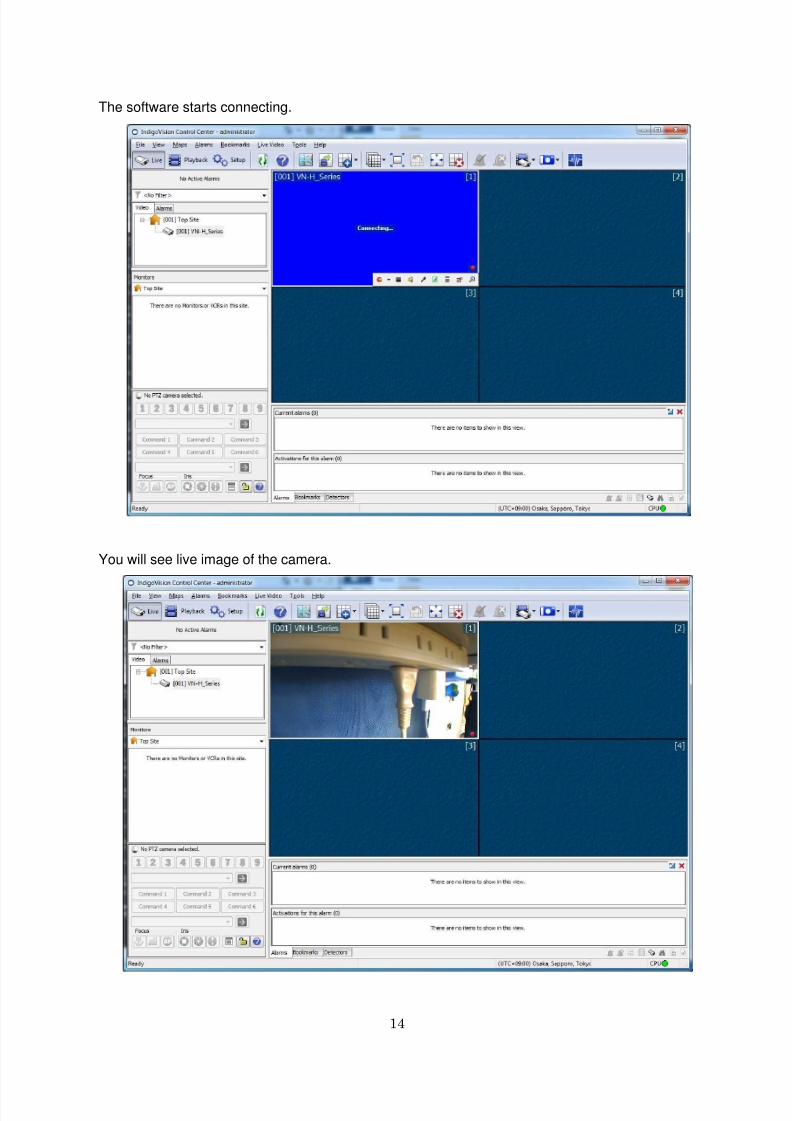
2.4. Configuration of Live
Click ‘Live’ button. Select aspect ratio and layout icon.
Drag and drop the camera icon from left pane into window area of right pane.
7/23/2019 IndigoVision4.8.1 Configration
http://slidepdf.com/reader/full/indigovision481-configration 14/17
14
The software starts connecting.
You will see live image of the camera.

7/23/2019 IndigoVision4.8.1 Configration
http://slidepdf.com/reader/full/indigovision481-configration 15/17
15
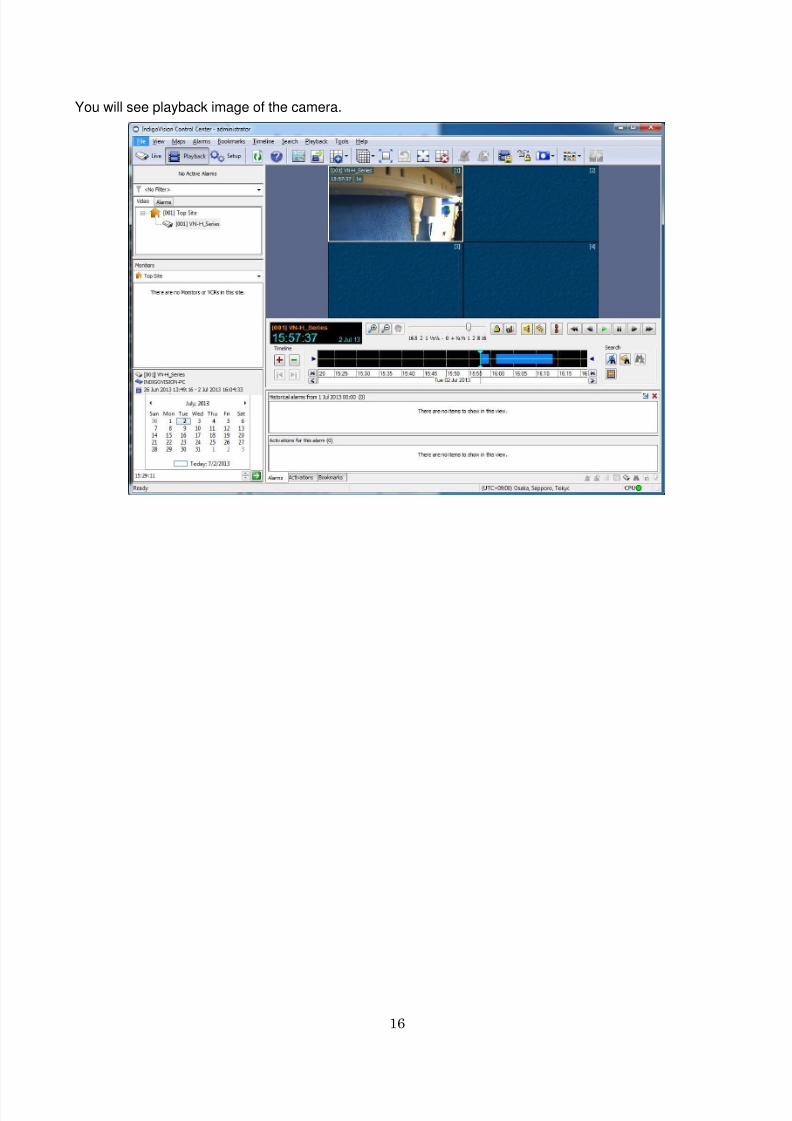
2.5. Configuration of Playback
(1) Click ‘Playback’ button. Select aspect ratio and layout icon.
(2) Drag and drop the camera icon from left pane into window area of right pane.
7/23/2019 IndigoVision4.8.1 Configration
http://slidepdf.com/reader/full/indigovision481-configration 16/17
16
You will see playback image of the camera.

7/23/2019 IndigoVision4.8.1 Configration
http://slidepdf.com/reader/full/indigovision481-configration 17/17
17
3. Limitations and notes
[1]. Motion Detect of the camera is not available. (When codec is H.264 Motion Detect of playback is
available.)
[2]. Dual stream is not available.
[3]. Alarm I/O of the camera is not available.
[4]. Audio is not available.
[5]. “Onvif Configuration Utility” is not available to change encoding settings of the camera. Please use
web page of the camera.
[6]. Live window layout does not recover automatically after power failure. You need to set live layout
again. Video recording is restarted automatically after power failure.