Embed Size (px)
Citation preview

Step by Step for CRCs and CRAs
InFormTM ITM 4.6
Part number: DC-INF46-005-000

Copyright and Trademark Notice Phase Forward is a provider of integrated enterprise-level software products, services, and hosted solutions for use in the clinical trial component of its customers' global research and development initiatives. Phase Forward is headquartered in Waltham, Massachusetts with offices in the United Kingdom, Australia, France and Japan. Additional information about Phase Forward is available at www.phaseforward.com.
Copyright © 1999 - 2007 Phase Forward Incorporated. All rights reserved. No part of this work may be reproduced or copied in any form or by any means—graphic, electronic, or mechanical, including photocopying, recording, taping, or information and retrieval systems—without written permission from the publisher:
Phase Forward 880 Winter Street Waltham, MA 02451
Phase Forward, InForm, InForm Architect, InForm Unplugged, Clintrial, Clintrace, Central Coding, Central Designer, WebVDME, WebSDM, CTSD, Empirica, the Phase Forward logo and/or other products or services of Phase Forward Incorporated are trademarks or registered trademarks of Phase Forward Incorporated in the U.S. Patent and Trademark Office and in other jurisdictions.
Third-party Trademarks Adobe Acrobat Reader, Adobe Acrobat, Adobe Flash (formerly Macromedia), are the trademarks or registered trademarks of Adobe. AMD is a trademark or registered trademark of Advanced Micro Devices, Inc. ASP.NET, Excel, Internet Explorer, IIS, Message Queuing, .NET, Office, Outlook, PowerPoint, Windows, Web Services Enhancements, Word, Visio, and Visual Studio are the trademarks or registered trademarks of Microsoft. Cognos, ReportNet, Cognos 8 Business Intelligence, Report Studio, and Query Studio are trademarks or registered trademarks of Cognos Incorporated. Intel is a trademark or registered trademark of Intel Corporation. Oracle is a trademark or registered trademark of Oracle Corporation. Red Hat Linux Advanced Server is a trademark or registered trademark of Red Hat, Inc. VMware is a trademark or registered trademark of VMware, Inc.
Any other marks may be trademarks or registered trademarks of their respective owners.
Restricted Rights Legend Use, duplication, or disclosure by the Government is available only with Restricted Rights as that term is defined in any applicable federal regulations.
Export Notice Phase Forward products and services may be subject to export controls under applicable export control regulations, including without limitation, the United States Export Administration Regulations, and you agree to comply with any such regulations. You agree not to knowingly export or re-export any Software, Documentation, technical data or know-how, directly, or indirectly, into Iran, Iraq, Libya, Cuba, North Korea, Sudan, and Syria, or to any of its nationals or to any other countries or individuals of concern to the United States government.

iii
Contents
About this guide xi Overview of this guide .................................................................................................................. xii
Audience ............................................................................................................................ xii Related information ..................................................................................................................... xiii
Documentation.................................................................................................................. xiii Training ............................................................................................................................. xiv
Chapter 1 Logging on and logging off 1 Logging on to the InForm software ................................................................................................2
If you get an "Inactive user" message when you log on ......................................................4 If you are automatically logged off .......................................................................................4
Changing your password................................................................................................................5 Guidelines for choosing a password....................................................................................5 Passwords and your study...................................................................................................5 Changing your password .....................................................................................................5
About password recovery...............................................................................................................7 Setting up password recovery information...........................................................................7 Recovering your password ..................................................................................................8
Logging off....................................................................................................................................10
Chapter 2 Navigating 11 Overview: InForm user interface ..................................................................................................12 Icons .............................................................................................................................................14
Audit trail icons...................................................................................................................14 Comment icons ..................................................................................................................14 Form navigation icon..........................................................................................................15 Freezing and locking icons ................................................................................................15 Query icons........................................................................................................................15 Patient navigation icons .....................................................................................................16 Required item symbol ........................................................................................................16 Reset value icon ................................................................................................................16 Select all checkboxes icon.................................................................................................17 Status indicator icon on form tab .......................................................................................17 Signature icons ..................................................................................................................17 Source verification icon......................................................................................................18 Visit and form status icons (traffic lights) ...........................................................................18 Flag on status icon.............................................................................................................19
Document window ........................................................................................................................20 Page indexer control ....................................................................................................................21 Form indexer control ....................................................................................................................22 Select Action list ...........................................................................................................................23 Links .............................................................................................................................................24 Using navigation shortcuts ...........................................................................................................25
Most recently used pages ..................................................................................................25 Home page Go controls .....................................................................................................25
Contents
iv InForm 4.6
Navigation modes ..............................................................................................................26 Finding a patient by patient number ..................................................................................32 Patient ordering..................................................................................................................33
Chapter 3 Taking a quick tour 35 Overview: Taking a quick tour ......................................................................................................36 Visiting CRC pages ......................................................................................................................37
Starting the tour: User mmeyer..........................................................................................37 Screening Log....................................................................................................................38 Case Books List .................................................................................................................40 Time and Events Schedule ................................................................................................41 Case Report Forms............................................................................................................43 Form views.........................................................................................................................44 Patient visit information......................................................................................................48 Form item details ...............................................................................................................49 Query Listing......................................................................................................................56 Study documentation .........................................................................................................57 Online help .........................................................................................................................61 Logging off .........................................................................................................................62
Visiting CRA pages ......................................................................................................................63 Starting the tour: User mlynch ...........................................................................................63 Case Books List .................................................................................................................64 Time and Events schedule.................................................................................................65 Source verification and monitoring screens.......................................................................66 Logging off .........................................................................................................................74
Chapter 4 Screening 75 Overview: Screening ....................................................................................................................76 Accessing candidate information .................................................................................................77 Screening a study candidate ........................................................................................................78 What to do if... ..............................................................................................................................80
Submitting results in a screening failure ............................................................................80
Chapter 5 Enrolling 81 Overview: Enrolling ......................................................................................................................82 Enrolling a study candidate ..........................................................................................................83 What to do if... ..............................................................................................................................86
Enrollment data is missing .................................................................................................86 Candidate does not meet study criteria .............................................................................89 You do not want to enroll an eligible patient ......................................................................91
Chapter 6 Entering form data 93 Overview: Entering form data.......................................................................................................94
Form types .........................................................................................................................94 Item types...........................................................................................................................94 Data-entry controls.............................................................................................................95
Entering form data........................................................................................................................97 Form submitted successfully messages ......................................................................................98 Entering a form comment .............................................................................................................99
Entering a comment on a form item...................................................................................99 Entering a comment on a form........................................................................................ 100

Contents
v
Associating forms ...................................................................................................................... 101 Creating an association .................................................................................................. 101
Adding an unscheduled visit...................................................................................................... 103 What to do if... ........................................................................................................................... 104
You find a data-entry error after submitting .................................................................... 104 Complete data is unavailable.......................................................................................... 105 A query is generated....................................................................................................... 105 An item is inapplicable, unknown, or not done ............................................................... 106 A form is not applicable, unknown, or not done.............................................................. 107 An item is not editable or visible ..................................................................................... 107
Chapter 7 Updating form data 109 Overview: Updating form data................................................................................................... 110
Data Value(s) page ......................................................................................................... 110 Audit trail ......................................................................................................................... 111
Updating form data.................................................................................................................... 112 Clearing data ............................................................................................................................. 114
Implications of clearing data ........................................................................................... 114 Clearing data from an item.............................................................................................. 114 Clearing data from a form ............................................................................................... 115
Deleting or undeleting an itemset.............................................................................................. 116 Deleting an itemset ......................................................................................................... 116 Undeleting an itemset ..................................................................................................... 117
What to do if... ........................................................................................................................... 120 The new data item value results in a query .................................................................... 120
Chapter 8 Answering queries 121 Overview: Answering queries.................................................................................................... 122
Query status.................................................................................................................... 122 Appearance of items with queries................................................................................... 122 Query Listing................................................................................................................... 123 Queries page................................................................................................................... 124 Ways to answer queries.................................................................................................. 124
Answering a query..................................................................................................................... 126 Changing the data value of the item ............................................................................... 126 Submitting answering text............................................................................................... 128
What to do if... ........................................................................................................................... 130 The new data value results in another query.................................................................. 130 A query conflict occurs.................................................................................................... 130
Chapter 9 Indicating source verification readiness 131 Overview: Indicating that a form is ready for source verification............................................... 132 Marking forms SV Ready or Not SV Ready .............................................................................. 133
Chapter 10 Performing source verification 135 About performing source verification......................................................................................... 136 Online source verification.......................................................................................................... 137 Source verifying data on an online form.................................................................................... 138 Ways to access the source verification view of a form ............................................................. 140 Accessing the form from a case book ....................................................................................... 141
Filtering for SV status in the Time and Events Schedule ............................................... 142

Contents
vi InForm 4.6
Accessing the form from the Source Verification Listing page.................................................. 144 Filtering the Source Verification listing............................................................................ 144
Freezing or locking while monitoring......................................................................................... 149 Source verifying data from a printed listing ............................................................................... 151
Printing an SV Report for offline verification ................................................................... 151 The Source Verification Listing page ........................................................................................ 153 Source verification states .......................................................................................................... 155 What to do if... ........................................................................................................................... 156
A form changes after source verification is complete ..................................................... 156
Chapter 11 Issuing queries 157 Overview: Issuing queries ......................................................................................................... 158
Automatic and manual queries ....................................................................................... 158 Query states.................................................................................................................... 158
Issuing a query .......................................................................................................................... 159 Opening a candidate query ....................................................................................................... 163 Deleting a candidate query........................................................................................................ 165 Navigating between queries and CRFs..................................................................................... 167 What to do if... ........................................................................................................................... 168
A query conflict occurs.................................................................................................... 168 You expect to see a query, but it is not there ................................................................. 168
Chapter 12 Closing queries 169 Overview: Closing queries......................................................................................................... 170 Closing queries.......................................................................................................................... 171
Finding answered queries............................................................................................... 171 Closing the query ............................................................................................................ 172
How queries appear to site users.............................................................................................. 174 Opened queries .............................................................................................................. 174 Answered queries ........................................................................................................... 174
What to do if... ........................................................................................................................... 175 The answer to a query is unacceptable .......................................................................... 175 A query conflict occurs.................................................................................................... 175
Chapter 13 Working with multiple queries 177 Overview: Working with multiple queries .................................................................................. 178 Closing or reissuing a set of answered queries ........................................................................ 179 Opening or deleting a set of candidate queries......................................................................... 182
Chapter 14 Freezing, unfreezing, locking, and unlocking 185 Overview: Freezing and locking ................................................................................................ 186
Freezing and locking icons ............................................................................................. 187 Freezing, locking, and synchronization........................................................................... 187
Freezing or locking a form......................................................................................................... 188 Freezing or locking several forms at once ................................................................................ 190
All forms in a visit ............................................................................................................ 190 Selected repeating form instances ................................................................................. 191 While monitoring ............................................................................................................. 193
Freezing or locking a case book ............................................................................................... 195 Freezing or locking with synchronization .................................................................................. 196

Contents
vii
What to do if... ........................................................................................................................... 198
Data changes after freezing or locking ........................................................................... 198
Chapter 15 Signing forms 199 Overview: Signing forms ........................................................................................................... 200
Significance of a signature.............................................................................................. 200 Form and case book signatures...................................................................................... 200 List of required signatures............................................................................................... 201 Signature groups............................................................................................................. 202 Invalidation of signature by data update or query........................................................... 203
Signing a CRF or case book ..................................................................................................... 204 Viewing signature status ........................................................................................................... 208 Viewing signature details........................................................................................................... 210 What to do if... ........................................................................................................................... 211
A form changes after signature....................................................................................... 211 Your signature fails processing....................................................................................... 211
Chapter 16 Printing 213 Printing a CRF........................................................................................................................... 214
Chapter 17 Generating data listings 217 Overview: Data listings.............................................................................................................. 218 Generating listings..................................................................................................................... 219
Creating a new listing...................................................................................................... 219 Saving a listing specification ........................................................................................... 221 Opening a saved listing specification.............................................................................. 222 Canceling a listing........................................................................................................... 222 Deleting a listing.............................................................................................................. 224 Navigating from a listing to the source form ................................................................... 225 Customizing a listing ....................................................................................................... 225
What to do if... ........................................................................................................................... 226 You cannot download a listing ........................................................................................ 226 Your session times out before a listing completes.......................................................... 226
Chapter 18 Using study documentation 227 Overview: Using study documentation...................................................................................... 228 Viewing study documentation.................................................................................................... 229 Displaying help for a form.......................................................................................................... 230 Working with FAQs.................................................................................................................... 232
Adding a FAQ.................................................................................................................. 232 Editing a FAQ................................................................................................................ 234
What to do if... ........................................................................................................................... 237 Certain forms or items always cause confusion ............................................................. 237
Chapter 19 Using InForm online help 239 Displaying online help ............................................................................................................... 240 Navigating InForm online help................................................................................................... 241
Using the Table of Contents ........................................................................................... 241

Contents
viii InForm 4.6
Using the Index ............................................................................................................... 242 Using the Search tool...................................................................................................... 242 Using other links ............................................................................................................. 243
Chapter 20 Synchronizing a trial 245 Overview: Synchronizing a trial ................................................................................................. 246 Data conflict messages on comments ...................................................................................... 247 What is synchronizing? ............................................................................................................. 250 Before you can synchronize...................................................................................................... 251 Ways to synchronize ................................................................................................................. 252 About conflicts ........................................................................................................................... 253
How a conflict could occur .............................................................................................. 253 How the InForm Unplugged software handles conflicts ................................................. 254
Synchronizing a trial manually................................................................................................... 255 Reasons to synchronize manually .................................................................................. 255
Using the Sync Message Exchange tool................................................................................... 256 Before you can use the Sync Message Exchange tool .................................................. 256 Synchronizing with the Sync Message Exchange tool ................................................... 256
Ways to synchronize manually.................................................................................................. 259 Synchronizing from within InForm Unplugged .......................................................................... 260 Transferring data as files........................................................................................................... 261
Before you can transfer by file ........................................................................................ 261 Transferring data to or from the trial ............................................................................... 261
Viewing synchronization status information .............................................................................. 264 Viewing connection status details ............................................................................................. 265
Viewing the log summary................................................................................................ 265 Viewing synchronization log details ................................................................................ 266 Viewing details about a specific transaction batch ......................................................... 266 Viewing the XML listing of a transaction batch ............................................................... 267
Resolving conflicts..................................................................................................................... 268 Resolving conflicting patient data ................................................................................... 268 Resolving query conflicts ................................................................................................ 270 Resolving study version conflicts .................................................................................... 277
What to do if... ........................................................................................................................... 281 You have problems during data exchange ..................................................................... 281
Chapter 21 Transferring patients 283 Overview: Patient record transfer.............................................................................................. 284
Audit history and patient record transfer archive ............................................................ 284 Patient record transfer flow ............................................................................................. 285 Patient status and record transfer................................................................................... 286 Patient number conflicts.................................................................................................. 287 Patient initials and DOB conflicts .................................................................................... 287 Patient transfer and study version .................................................................................. 288 Who can transfer patients? ............................................................................................. 288
How to transfer patients ............................................................................................................ 289 Transferring one patient at a time ............................................................................................. 290
If the current site is at a lower study version than the destination site ........................... 293 If the current site is at a higher study version than all other sites................................... 293 If the InForm software finds a duplicate patient number at the destination site ............. 294
Viewing the patient transfer audit trail ....................................................................................... 295 Viewing transferred patients...................................................................................................... 298 Viewing a patient archive .......................................................................................................... 300
Contents
ix
Contents of a patient archive..................................................................................................... 302
Glossary 303
If you need assistance 307
Index 309

Contents
x InForm 4.6

xi
In this preface Overview of this guide..............................................................................xii Related information.................................................................................xiii
About this guide

Step by Step for CRCs and CRAs
xii InForm 4.6
Overview of this guide
InForm Step by Step for CRCs and CRAs is an online book that describes how to use InForm software to accomplish typical tasks you would perform while running a clinical study. It contains step-by-step instructions you can use to perform electronic data entry, monitor study activity, and create and run reports.
Audience This manual is for Clinical Research Coordinators (CRCs), Clinical Research Associates (CRAs), and other clinical trial professionals who enter and update subject data, audit and query the data after entry, and sign entry forms.

About this guide
xiii
Related information
Documentation
Item Description Format InForm Installation and Configuration
Describes how to install and configure the InForm server software and Cognos Reporting.
PDF. Available on the documentation CD and Phase Forward Download Center.
Setting Up a Trial with InForm Architect and MedML
Describes how to design and implement trials in the InForm software using InForm Architect software.
PDF. Available from the documentation CD and the Phase Forward Download Center.
InForm Step by Step for CRCs and CRAs
Describes how to use the InForm software from an Internet browser, including how to:
Screen and enroll patients Enter, update, and monitor clinical
data Enter and respond to queries Run study management reports and
clinical data listings
PDF. Available from the documentation CD and the Phase Forward Download Center.
InForm Reporting and Analysis
InForm Reporting and Analysis provides an overview of the InForm Reporting and Analysis module. It provides a brief overview of the InForm Reporting and Analysis interface, illustrates how to access the ad hoc reporting feature, and describes the trial management and clinical data packages available for reporting. It also provides detailed descriptions of each of the standard reports included with your installation.
PDF. Available from the documentation CD and the Phase Forward Download Center.
InForm Utilities Guide Describes how to use the MedML Installer, InForm Data Import, InForm Data Export, and Performance Monitor tools.
PDF. Available on the documentation CD and Phase Forward Download Center.
InForm Reporting Database
Describes the InForm reporting database schema.
PDF. Available on the documentation CD and Phase Forward Download Center.
InForm Release Notes Describes enhancements introduced and problems fixed in the current release, upgrade considerations, release history, and other late-breaking information.
PDF. Available from the Phase Forward Download Center.
InForm Known Issues Detailed information about the known issues in this release, along with workarounds, if available.
PDF. Available from the Phase Forward Download Center.
InForm online help Describes how to use and administer the InForm software.
HTML. Available form the InForm user interface.

Step by Step for CRCs and CRAs
xiv InForm 4.6
Item Description Format InForm Architect online help
Describes how to design and implement trials in the InForm software using InForm Architect software.
Compiled HTML. Available from the InForm Architect user interface.
InForm MedML Installer online help
Describes how to use MedML files to define InForm trial components, and how to use the MedML Installer to parse, validate, and load MedML files into the InForm database.
Compiled HTML. Available from the MedML Installer user interface.
InForm Data Export tool online help
Describes how to export data from the InForm database in several formats.
Compiled HTML. Available from the InForm Data Export tool user interface.
InForm Data Import tool online help
Describes how to import data into the InForm database from several formats.
Compiled HTML. Available from the InForm Data Import tools user interface.
Training Contact Phase Forward for information about the following training and additional offerings for the InForm software.
Title Description Format End-user training courses InForm ITM for CRCs (Site)
InForm ITM for CRAs (Sponsor)
InForm ITM for PIs (Investigators)
How to use the InForm software to accomplish typical tasks performed while running and overseeing a clinical trial. Each course presents the tasks associated with a specific role.
Instructor-led training.
InForm ITM Reporting and Analysis
How to use the InForm software to produce reports on clinical and operational data.
Instructor-led training.
InStruct Online for CDMs
InStruct Online for CRA
InStruct Online for CRCs
InStruct Online for PIs
How to use the InForm software to accomplish typical tasks performed while running and overseeing a clinical trial. Each course presents the tasks associated with a specific role.
InStruct Online course.
Developer training courses Creating Trials Using InForm Architect
How to create forms using the InForm Architect software, including initiating a trial, setting up the trial structure (forms and visits), implementing naming conventions, creating forms and items, and documenting design decisions online.
Instructor-led training.
Adding Rules to InForm Trials How to define rules, events, contexts, dependencies, and testing.
Instructor-led training.
Creating and Managing a Customer-defined Database
Technical details about the CDD, including mappings, columns, tables, configuration, views, and extracts.
Instructor-led training.

About this guide
xv
Title Description Format Preparing to Go Live How to configure administrative data and
system settings, enable special features, prep the final build, and version a study
Instructor-led training.
Hosting InForm Trials How to prepare a server machine for the InForm software and then install the InForm software, install a trial, manage and monitor InForm components, and perform trial decommissioning activities.
Instructor-led training.
CRF Submit 2.2 Details about the functionality, architecture, request process, and work flow of CRF Submit; how to generate and interpret PDFs and the trial data included in the PDFs; how to administer and configure CRF Submit users, parameters, and settings; and how to troubleshoot the application.
Instructor-led training.
InForm End-User Train-the-Trainer
How to prepare trainers to deliver site/sponsor courses.
Instructor-led training.

Step by Step for CRCs and CRAs
xvi InForm 4.6

1
In this chapter Logging on to the InForm software ...........................................................2 Changing your password...........................................................................5 About password recovery..........................................................................7 Logging off...............................................................................................10
C H A P T E R 1
Logging on and logging off

Step by Step for CRCs and CRAs
2 InForm 4.6
Logging on to the InForm software
To log on to the InForm software:
1 Open an Internet browser.
2 Type the URL that gives access to your study, and press Enter.
The logon window appears.
3 Provide the following information.
Field Description User Name Your account/logon name. Your administrator defines
your User Name.
Password The password that is assigned to you.
After you log on, you might be required to change your password and provide password recovery information. In subsequent logons, use the new password. For more information, see If you are required to change your password (on page 5).
4 Click Log In.
The InForm software opens and displays the main window. The user interface displays all of the features to which you have access, based on your roles and rights.
Chapter 1 Logging on and logging off
3
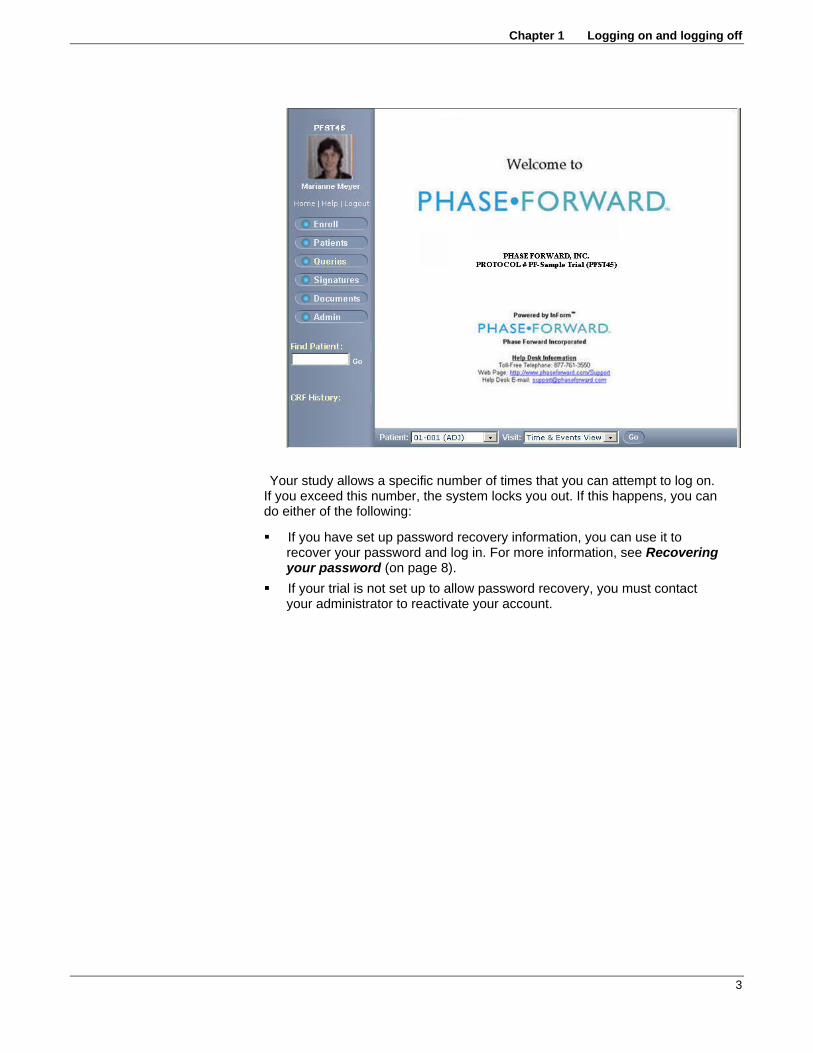
Your study allows a specific number of times that you can attempt to log on. If you exceed this number, the system locks you out. If this happens, you can do either of the following:
If you have set up password recovery information, you can use it to recover your password and log in. For more information, see Recovering your password (on page 8).
If your trial is not set up to allow password recovery, you must contact your administrator to reactivate your account.

Step by Step for CRCs and CRAs
4 InForm 4.6
If you get an "Inactive user" message when you log on The standard operating procedures for your trial determine whether you must contact an administrator to activate your account.
After you log on, the logon screen displays a message that you are an inactive user.
Contact your system administrator to activate your account. Then you can log on again and start using the InForm software.
As an inactive user, you can change your password. After the administrator activates your account, use the new password for subsequent logons. For more information, see Changing your password (on page 5).
If you are automatically logged off Study administrators can set a maximum inactivity period and a maximum usage period for the trial. These settings increase security by requiring that you provide your logon credentials if either of the following occurs:
No activity occurs in the application for a specified period of time. A session runs longer than a specified period of time, with or without
activity.
If your trial includes these settings and you are automatically logged off, the logon page appears with a message that explains what has happened.
If you receive an automatic logoff message, log on again. Any data that you are in the process of entering when you were logged off is saved until you resubmit it.

Chapter 1 Logging on and logging off
5
Changing your password
The first time you log on, use the password that is assigned to you by your study administrator. Then, immediately after you log on, change the password to a different password that only you know.
Guidelines for choosing a password If your study has specific rules for creating passwords, follow the rules. If you do not have specific rules, use the following guidelines when you create your new password:
Use six or more characters. Do not use a word or name that can be easily guessed. For example, do
not use the names of family members. Use a combination of numbers, letters, and non-alphanumeric
characters. Use a combination of uppercase and lowercase characters.
Passwords and your study You can change your password at any time after you have logged on.
Some study designs require that you change your password in certain situations, such as:
Immediately after you log on for the first time. After a certain amount of time has passed; for example, every 90 days.
If your study requires that you change your password, the Password page appears immediately after you log on with your current password. The page contains a message telling you that your password has expired and that you must change it.
Changing your password You can change your password any time after you have logged on, or when the InForm software requires you to change your password.
To change your password:
1 If you have already logged on, in the Navigation pane, click your user picture or user name.
The Change Password page appears.
Note: If your study design requires that you change your password, the Change Password page appears automatically when you log on.

Step by Step for CRCs and CRAs
6 InForm 4.6
2 Provide the following password information.
Field Description Password Your current password.
New Password The new password you want to use.
For security, use a combination of letters and numbers when you define your password. Passwords are case-sensitive.
Confirm New Password The new password again.
3 If this is the first time that you are changing your password, you also must provide information that will help you if you subsequently forget your password.
Note: The password recovery feature is available only if your study has been configured to allow it.
Field Description E-mail address Your email address. InForm uses this address to
send an email message that contains a temporary password.
Confirmation question A question that only you can answer. The answer to the question should be easy for you to remember, but difficult for others to guess.
Confirmation question response
The answer to the confirmation question.
If you have already provided recovery information, it will appear on the page. You can change the information if you want to.
4 Click Submit.

Chapter 1 Logging on and logging off
7
About password recovery
When your trial is set up, it can be configured to give you a hint if you forget your password. This section describes how to set up the hint and how to use it to obtain a temporary password that you can use to log in to InForm software.
Setting up password recovery information The Password page contains the Password Recovery Information section. If you want to specify information (also called a password hint) that will help you remember a forgotten password, complete this section.
The first time that you change your password you will also be required to provide password hint information.
Note: The password recovery feature is available only if your study has been configured to allow it.
To specify information for a password hint:
1 In the Navigation pane, click your user name.
The Change Password page appears.
2 In the Change Password section, do either of the following:
To keep your current password, leave the Change Password section blank.
To change your password, provide the following information:
Field Description Password Your current password.

Step by Step for CRCs and CRAs
8 InForm 4.6
Field Description New Password The new password you want to use.
For security, use a combination of letters and numbers when you define your password. Passwords are case-sensitive.
Confirm New Password The new password again.
3 Complete the Password Recovery Information section as follows:
Field Description E-mail address Your email address. InForm uses this address to
send an email message that contains a temporary password.
Confirmation question A question that only you can answer. The answer to the question should be easy for you to remember, but difficult for others to guess.
Confirmation question response
The answer to the confirmation question.
4 Click Submit.
Recovering your password If you have set up password recovery information, you can use it if you forget your password.
To recover your password:
1 On the logon page, in the User Name box, enter your user name.
2 At the bottom of the window, click the Forgot Your Password? link.
3 The Reset Your Password page appears, displaying your hint question.

Chapter 1 Logging on and logging off
9
4 In the Answer box, type the answer you provided when you set up the hint. Click Reset Password.
A confirmation message appears, informing you that your password has been reset and emailed to you.
5 Click Return to Log-In screen.
The email has the subject Reset Password Notification. The message text contains your temporary password.
The temporary password is case sensitive. You must enter it exactly as it appears.
6 Use the temporary password to log on.
7 Change the temporary password to a new password of your choice, and use it for subsequent logons.

Step by Step for CRCs and CRAs
10 InForm 4.6
Logging off
To log off:
1 In the Navigation pane, in the upper-left corner, under your User Name, click Logout.
A confirmation message appears.
2 Click OK.

11
In this chapter Overview: InForm user interface .............................................................12 Icons ........................................................................................................14 Document window ...................................................................................20 Page indexer control ...............................................................................21 Form indexer control ...............................................................................22 Select Action list ......................................................................................23 Links ........................................................................................................24 Using navigation shortcuts ......................................................................25
C H A P T E R 2
Navigating

Step by Step for CRCs and CRAs
12 InForm 4.6
Overview: InForm user interface
When you log on, the main application window opens. This window has three panes. As you move through the InForm software, the contents of the panes vary with your trial and the activity you are performing, but the purpose of each pane stays the same:
Navigation—Contains several features that help you navigate: A set of buttons and a list of recently visited pages. These controls
enable you to navigate throughout the InForm software. The buttons are always visible and do not change, so you can jump easily from activity to activity.
A Find Patient search box. You can enter a patient number and navigate directly to the information for that patient.
The name of the study appears above the personal photo or logo.

Chapter 2 Navigating
13
Content—Displays the screen for the current activity. For example, the content pane displays summary lists, forms, details of queries, comments, and audit trails, reports, and listings.
Content-specific—The contents of this pane vary with the information displayed in the content pane. For example, if the content pane displays a summary list of queries, the Content-specific pane contains buttons that allow you to display one page of queries at a time. If the Content pane displays a form and you have the authority to enter form data, the Content-specific pane contains buttons that allow you to submit data or cancel data entry.
Note: When you are working with the InForm software, do not use the web browser’s refresh button. This action can cause problems for the trial.

Step by Step for CRCs and CRAs
14 InForm 4.6
Icons
Icons in the InForm software let you know when more detailed information is available and give you access to that information. In general, to view the detailed information associated with an icon, click the icon. Additionally, icon colors provide status information.
For example, in the Time and Events Schedule for a patient, traffic light icons indicate the status of each CRF in each visit. If a CRF has a traffic light with a red light, there are active queries associated with the CRF. To display the CRF and track down the queries, click the traffic light. When the CRF screen appears, each item that has a query displays a yellow query icon at its right.
Audit trail icons
Icon Description
Gray icon—Appears in the far-right column of a form item.
Indicates that a value has been entered for the item, but no changes have been made to it subsequently. To view the audit trail for the initial entry, click the icon.
In the summary view of a repeating form, an audit trail icon appears in the far-right column of each instance of the form.
Yellow icon—Appears in the far-right column of a form item.
Indicates that changes have been made to the data value of the item. To view the audit trail for the item, click the icon.
In the summary view of a repeating form, an audit trail icon appears in the far-right column of each instance of the form.
Comment icons
Icon Description
Gray icon:
In the upper-right corner of a form, indicates that there is no comment on the form as a whole.
In the farthest right column of a form item, indicates that there is no comment on the item.
To enter a comment, click the icon.
Yellow icon:
In the upper-right corner of a form, indicates that a comment exists on the form as a whole.
In the farthest right column of a form item, indicates that a comment exists on the item.
To view or update the comment, click the icon.

Chapter 2 Navigating
15
Form navigation icon
Icon Description
Appears in the upper-left corner of the form. To go to the Time and Events Schedule for the current patient, click the icon.
Appears in the upper-left corner of the Data Value(s), Queries, Audit Trail and Comment tabs. To go to the form on which the query was entered, click the icon
Freezing and locking icons
Icon Description In the Case Books List, next to a visit traffic light icon, indicates
that at least one started form in the visit is frozen.
In the Time and Events Schedule, next to a form traffic light icon, indicates that the form is frozen or at least one instance of a repeating form is frozen.
In the Case Books List, next to a visit traffic light icon, indicates that at least one started form in the visit is locked.
In the Time and Events Schedule, next to a form traffic light icon, indicates that the form is locked or at least one instance of a repeating form is locked.
Query icons
Icon Description
Gray icon—Appears in the far-right column of a form item if no query has been entered against the item. To enter a query, click the icon.
This icon appears only if you have the right to issue queries.
Yellow icon—Appears in the far-right column of a form item if a query has been entered against the item and the query is not closed. To view or update the query, click the icon.
Green icon—Appears in the far-right column of a form item if the item has a history of queries.
For site users, indicates that there are no open queries. For sponsor users, indicates that all queries have been
resolved.
To view the query history, click the icon.

Step by Step for CRCs and CRAs
16 InForm 4.6
Patient navigation icons
Icon Description
Appears in the upper-right corner of the Case Books List. To display the Order Patients screen click the icon. This screen enables you to change the default ordering of patients (the order in which they were enrolled) to any order you want, for example, alphabetically.
Appears at the top of a form, in the upper-right corner of the visit navigation bar. To enter visit navigation mode, click the icon.
Appears at the top of a form, in the upper-right corner of the visit navigation bar. To enter form navigation mode, click the icon.
or Available in visit or form navigation mode. Appears at the top of a form, in the upper-right corner of the visit navigation bar. Click the icon to toggle the behavior of patient navigation when you navigate dynamic forms, dynamic visits, or alternate forms:
Displays a message when the dynamic form, dynamic visit, or alternate form for the selected patient has not been activated.
Skips patients for whom the dynamic form, dynamic visit, or alternate form has not been activated.
Available in visit or form navigation mode. Appears at the top of a form, in the upper-right corner of the visit navigation bar. Click the icon to get out of visit or form navigation mode.
Required item symbol
Icon Description
Appears on a CRF in the item number column. Indicates that the item is required.
Reset value icon
Icon Description
Located In the far right column of a form item. To clear the data value from the item before you submit the form, click the icon. Note: if any of the items on the form are marked as Hidden or Read-Only during trial design, this icon does not appear.
Located on the Data Value(s) page (used to edit data values). To clear data from a form item that has previously been submitted, click the icon.

Chapter 2 Navigating
17
Select all checkboxes icon
Icon Description
In Summary View, appears in the upper-left corner of repeating forms. In Source Verification mode, appears on all forms.
Click the icon to select or deselect every checkbox in the list. This icon is helpful when you are source verifying, locking, or freezing multiple forms.
Status indicator icon on form tab
Icon Description
Appears on a tab in the form view, to the right of the tab name. Indicates that there is work to be done on the form.
For site users, indicates that the form either Is incomplete Has open queries
For sponsor users, indicates that the form either Is incomplete. Has one or more open queries. Has one or more answered queries.
Signature icons
Icon Description
The form requires at least one signature.
The form has all required signatures
The Case Book requires at least one additional signature.
The Case Book has all required signatures.

Step by Step for CRCs and CRAs
18 InForm 4.6
Source verification icon
Icon Description Appears next to traffic light icons:
In the Time and Events Schedule, indicates those forms that have been marked source verified.
In the Case Books List, indicates those visits in which at least one form has been marked source verified.
To see this icon, you must be in a rights group that includes the Monitor right.
Visit and form status icons (traffic lights)
Icon Description
No lights:
In the Case Books List, indicates that no forms in the visit have been started.
In the Time and Events Schedule, indicates that a specific form has not been started, or no instances of a repeating form have been started.
Red light:
In the Case Books List, indicates that at least one form in the visit has one or more open queries.
In the Time and Events Schedule, indicates that a specific form has one or more open queries, or one or more instances of a repeating form have one or more open queries.
Yellow light:
In the Case Books List, indicates that at least one form in the visit has been started and has one or more missing items.
In the Time and Events Schedule, indicates that a specific form has one or more missing items, or one or more instances of a repeating form have one or more missing items.
Red and yellow lights:
In the Case Books List, indicates that at least one form in the visit has one or more open queries and at least one form has one or more missing items.
In the Time and Events Schedule, indicates that a specific form or one or more instances repeating form has one or more open queries, or one or more missing items.
Green light:
In the Case Books List, indicates that all CRFs in the visit are complete with no open queries or have been marked as NA, ND, or UNK.
In the Time and Events Schedule, indicates that all items in a specific CRF or repeating form are complete with no open queries or have been marked as NA, ND, or UNK.

Chapter 2 Navigating
19
Flag on status icon
Icon Description
The flag icon appears on visit and form status icons (traffic lights). It is visible to sponsor users.
In the Case Books list, indicates that at least one form in the visit has an answered query.
In the Time and Events schedule, indicates that a specific form has an answered query.

Step by Step for CRCs and CRAs
20 InForm 4.6
Document window
When you open a document or online help, the document window opens and displays the following panes:
Document Selection—Contains a tab for each document that you can display.
Table of Contents (abbreviated TOC)—Displays the table of contents for the study documents and online help. While you are viewing online help, you can also display an index in this pane. Use the contents and index to navigate to specific parts of the document that is displayed.
Document Text—Displays the text of the open document. Navigation—Contains buttons that let you navigate through the standard
study documents and online help, and close the document window.

Chapter 2 Navigating
21
Page indexer control
The page indexer appears on the bottom left side of the Content-specific pane on some screens. It lets you move through the pages of the screen when the information fills more than one screen. The following figure shows the parts of the page indexer control:
To use the page indexer, click the appropriate arrow, or select a page number from the drop-down list.
Step by Step for CRCs and CRAs
22 InForm 4.6
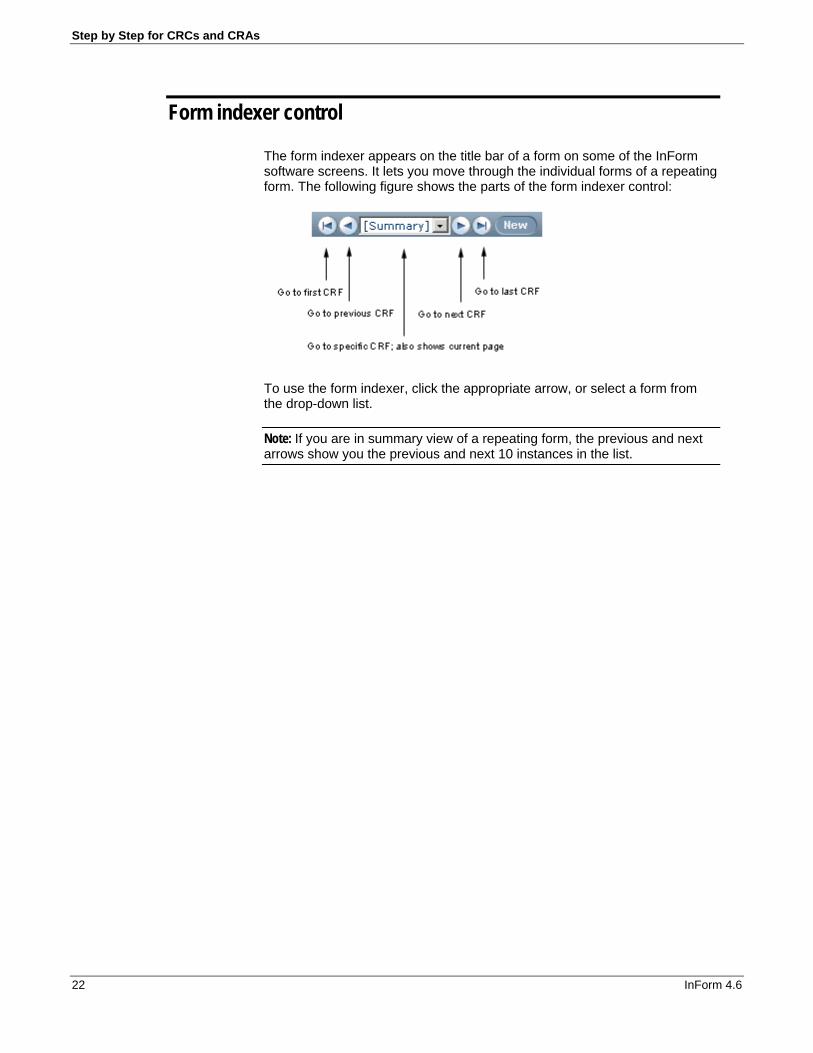
Form indexer control
The form indexer appears on the title bar of a form on some of the InForm software screens. It lets you move through the individual forms of a repeating form. The following figure shows the parts of the form indexer control:
To use the form indexer, click the appropriate arrow, or select a form from the drop-down list.
Note: If you are in summary view of a repeating form, the previous and next arrows show you the previous and next 10 instances in the list.

Chapter 2 Navigating
23
Select Action list
The Select Action list appears on the content-specific pane of a CRF along with an Apply button. This list appears next to buttons for tasks that you are most likely to perform. It contains additional actions such as Print Preview, Mark SV Ready, Clear CRF, and Freeze Visit.
To use the Select Action list, select an action, then click Apply.

Step by Step for CRCs and CRAs
24 InForm 4.6
Links
Underlined text on an InForm software screen (or in online help) indicates a link to another screen. To jump to the other screen (or topic), click the underlined text.
For example, on the Case Books List, values in the Patient and Status columns are underlined. Click any value in either of these columns and the appropriate Time and Events Schedule displays.

Chapter 2 Navigating
25
Using navigation shortcuts
This section describes shortcuts that let you locate directly the forms for a patient, instead of navigating through the Case Books List or Time and Events Schedule.
Most recently used pages You can return to a page you have recently displayed. In the main window, the bottom of the Navigation pane shows the CRF History. It lists the four CRFs you have visited most recently.
To return to any of the pages in the CRF History list, click its name in the list.
Home page Go controls Use the home page Go controls to navigate directly from your trial’s home page to CRFs for a specific patient and visit.
The home page for your trial is the window that appears when you log on. The Go controls appear at the bottom of the InForm software window in the Content-specific pane.

Step by Step for CRCs and CRAs
26 InForm 4.6
To use the Go controls:
1 From anywhere in the InForm software, in the Navigation pane, click Home.
2 If you have access to more than one site, use the Site list to select the site.
3 From the Patient list, select the patient.
4 From the Visit list, select the visit
5 Click Go.
Navigation modes The usual way to display patient forms is to select a patient from the Case Books List and select the visit and form from the Time and Events Schedule. This works well if you are recording data from different tests and visits, or if you are working with only one patient’s data in a single session. However, if you are entering the results for many patients in the same session, you can use the following alternative ways to navigate:
Visit mode—Displays the first CRF of the same visit for each patient as you navigate through the list of patients.
Form mode—Displays the same CRF for each patient as you navigate through the list of patients.
Note: Navigation modes are not available in unscheduled visits.
Visit and Form mode icons are located at the top of a CRF, in the top-right corner of the visit navigation bar.
Note: Navigation modes are optional features of the InForm software. The icons appear only if the trial is configured to enable the modes, and you have the rights to use them.
Chapter 2 Navigating
27
Visit navigation mode
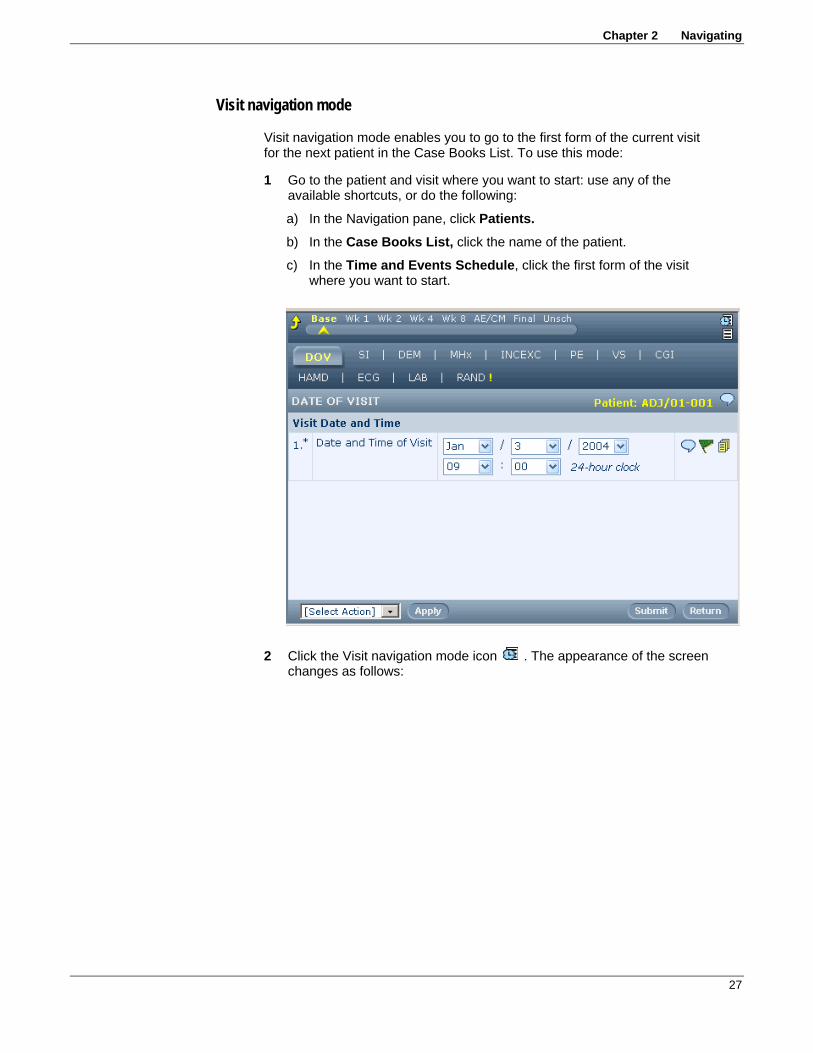
Visit navigation mode enables you to go to the first form of the current visit for the next patient in the Case Books List. To use this mode:
1 Go to the patient and visit where you want to start: use any of the available shortcuts, or do the following:
a) In the Navigation pane, click Patients.
b) In the Case Books List, click the name of the patient.
c) In the Time and Events Schedule, click the first form of the visit where you want to start.
2 Click the Visit navigation mode icon . The appearance of the screen changes as follows:

Step by Step for CRCs and CRAs
28 InForm 4.6
The browser displays the first form in the current visit.
The visit navigation bar is replaced by an indication of the current patient visit, and site, and the page indexer control is available for moving through the list of patients or selecting a specific patient.
The cancel navigation mode button enables you to return to normal navigation mode.
When you click the Next arrow in the page indexer control, the first form in the current visit appears for the next patient in the Case Books List.

Chapter 2 Navigating
29
Dynamic visits and navigation modes Dynamic visits are created in a trial only if certain conditions are met. For example, a trial could include an extension visit that appears only if a user enters data on an Eligibility form indicating that the patient is eligible to continue. In a trial that includes dynamic visits, some Case Books can include dynamic visits that have not been activated.
When you use the visit navigation mode in a trial that includes dynamic visits, you can choose to have the Patient drop-down list display patient names in either of the following ways:
Show navigation details—The list displays all patients. If you select a patient for whom a dynamic visit has not been activated, a message displays stating that the visit does not exist.
Hide navigation details—The list displays only those patients with activated dynamic visits. Patients with unactivated dynamic visits do not appear in the list.
To select the navigation method, click the toggle navigation details icon. For more information, see Patient navigation icons (on page 16).
Form navigation mode
Form navigation mode enables you to go to the current form of the current visit for the next patient in the Case Books List. To use this mode:
1 Go to the patient and form where you want to start. Use any of the available shortcuts, or do the following:
2 In the Navigation pane, click Patients.
3 In the Case Books List, click the name of the patient.
4 In the Time and Events Schedule, click the form and visit where you want to start.
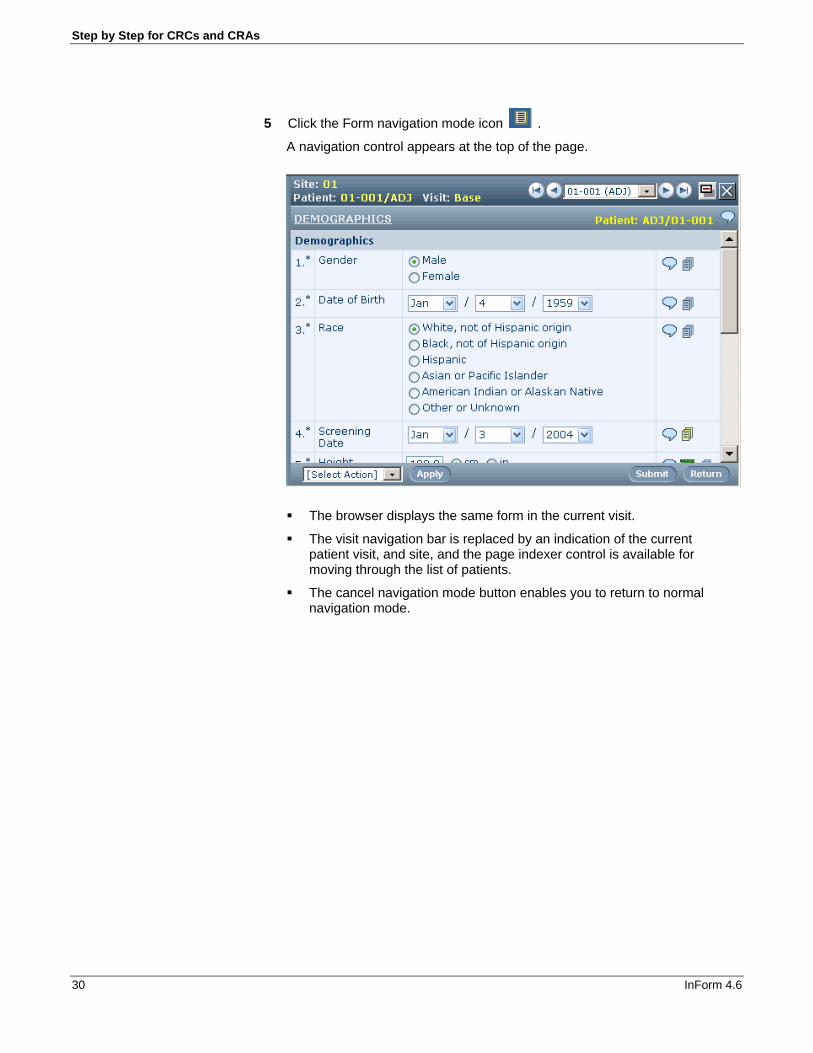
Step by Step for CRCs and CRAs
30 InForm 4.6
5 Click the Form navigation mode icon .
A navigation control appears at the top of the page.
The browser displays the same form in the current visit.
The visit navigation bar is replaced by an indication of the current patient visit, and site, and the page indexer control is available for moving through the list of patients.
The cancel navigation mode button enables you to return to normal navigation mode.

Chapter 2 Navigating
31
When you click the Next arrow in the page indexer control, the current CRF in the current visit appears for the next patient in the Case Books List.
Dynamic forms and navigation modes Dynamic forms are created in a trial only if certain conditions are met. For example, a trial can include a series of forms that appear only if a patient is female. In a trial with dynamic forms, the case books for some patients can include dynamic forms that have not been activated.
When you use the form navigation mode in a trial with dynamic forms, you can choose to have the Patient drop-down list display patient names in either of the following ways:
Show navigation details - The list displays all patients. If you select a patient for whom a dynamic form has not been activated, a message displays stating that the form does not exist.
Hide navigation details - The list displays only those patients with activated dynamic forms. Patients with unactivated dynamic forms do not appear in the list.
To select the navigation method, click the toggle navigation details (see "Patient navigation icons" on page 16) icon.

Step by Step for CRCs and CRAs
32 InForm 4.6
Alternate forms and navigation modes Alternate forms are used collect additional data on a patient after the visit in which such data would usually be recorded. For example, the sponsor decides to collect additional family history data after a patient has completed the intake visit.
To collect this additional data, a trial can include an alternate version of a form. The alternate version of the form appears in the visit where the data would have been collected originally. If a patient has started the original version of the form, both the original and the alternate form appear. You enter the new data on the alternate version of the form. In a trial that includes alternate forms, some Case Books can include alternate forms that have not been activated.
When you use the form navigation mode in a trial that includes alternate forms, you choose to have the Patient drop-down list display patient names in either of the following ways:
Show navigation details - The list displays all patients. If you select a patient for whom an alternate form has not been activated, a message displays stating that the form does not exist.
Hide navigation details - The list displays only those patients with activated alternate forms. Patients with unactivated alternate forms do not appear in the list.
To select the navigation method, click the toggle navigation details (see "Patient navigation icons" on page 16) icon.
Finding a patient by patient number You can find a patient and navigate directly to the Time and Events Schedule of the patient.
To find a patient:
1 On the Navigation pane, in the Find Patient field, type the patient number.
Note: Type only the patient number in the field. Do not include the initials.
2 Click Go. The Time and Events schedule for the patient appears.
If more than one patient with the same number is found, the content pane displays a list of case books for all sites where a matching patient number is found. You can click the underlined Patient or Status links to display the Time and Events schedule of the patient.

Chapter 2 Navigating
33
Patient ordering By default, the list of patients enrolled in a trial appears in the order in which the patients were enrolled. To make patient navigation modes most efficient, you can change the order of patients in the Case Books list to a sequence that most closely matches the order in which you are entering or reviewing data.
Note: The ability to change the order of patients is an optional feature of the InForm software. The patient order icon appears only if your trial has been configured to enable the feature, and you have the rights to use it.
The patient order icon is located in the upper-right corner of the Case Books List:
Note: Check with your administrator before you change the order of patients. If you change the order of patients, the new order appears to all users of the trial.
To change the order of patient Case Books:
1 In the Navigation pane, click Patients.
2 In the Case Books List, in the upper-right corner, click the patient order icon.
The Order Patients screen appears.
3 Select a patient.
4 Use the navigation buttons below the patient list to move the patient to the position you want.
Step by Step for CRCs and CRAs
34 InForm 4.6
5 When all patients are in the order you want, click Submit.
The Case Book reflects the order you have chosen. When you are in visit or form navigation mode, patient CRFs appear in the order that you specified.

35
In this chapter Overview: Taking a quick tour.................................................................36 Visiting CRC pages .................................................................................37 Visiting CRA pages .................................................................................63
C H A P T E R 3
Taking a quick tour

Step by Step for CRCs and CRAs
36 InForm 4.6
Overview: Taking a quick tour
This section leads you on a quick tour the InForm software.
This tour includes a sample trial and two hypothetical users. Each user is assigned different set of responsibilities and rights when the trial is set up.
This tour is based on sample trial PFST45 that is shipped with your software.
This section shows the different screens that appear as the following users log on and perform tasks that are typical of their roles in the study:
mmeyer, who is a CRC. mlynch, who is a CRA.
Many of the features that are illustrated in the CRC examples are also available to CRAs. Actual responsibilities can vary considerably from trial to trial. Trial administrators can customize assignments and rights for each trial.

Chapter 3 Taking a quick tour
37
Visiting CRC pages
Starting the tour: User mmeyer To start this part of the tour, a user who has the user name mmeyer does the following:
1 Opens an Internet browser.
2 Enters the URL for the assigned study site.
3 On the logon page, enters mmeyer and the password.
4 Clicks Log In.
The InForm software home page for the study appears. This page is customized for each study and can include many types of information.
The Navigation pane, on the left side of the screen, contains buttons that provide access to the pages you will visit.
Note: When you are working with the InForm software, do not use the web browser’s refresh button. This action can cause problems for the trial.

Step by Step for CRCs and CRAs
38 InForm 4.6
Screening Log The Screening Log displays the list of study candidates who have been screened.
To display the page:
In the Navigation pane, click Enroll.
Note: The Enroll button provides access to both screening and enrollment activities.
Things to note Screening summary information—The list of study candidates is presented
in table form. For each candidate, the list includes the screening number, patient initials, and birth and screening dates. For patients you have attempted unsuccessfully to screen or enroll, the list displays messages that indicate why the attempts failed. For candidates who were successfully enrolled, the list displays the patient number. The Enrollment column indicates enrollment status.
Symbol Description
The patient has been screened successfully. To enroll a screened patient, click this link, and a blank Enrollment form appears.

Chapter 3 Taking a quick tour
39
Symbol Description
Some screening or enrollment information has been entered for the patient, but the patient has not been screened or enrolled successfully. The Screening Failure or Enrollment Failure column indicates the reasons for failure. To make additions or corrections to the Enrollment form, click the X. To make additions or corrections to the Screening form, click the underlined screening number for the patient.
The patient has been enrolled successfully. To display the Enrollment form, click the checkmark.
Add Candidate—This button is located on the right side of the content-specific pane. To display a blank Screening form, click Add Candidate.
Page indexer—The page indexer is a multi-part control that is located on the bottom left side of the content-specific pane. By clicking different parts of the control, you can move through the pages of the Screening Log when the list of study candidates fills more than one page.
Link to screening form—Note that the screening number for the patient is underlined. Underlined text contains a link to another form. To display the Screening form, click the underlined number. If screening is incomplete or incorrect, you can make changes and resubmit the form.

Step by Step for CRCs and CRAs
40 InForm 4.6
Case Books List The Case Books List summarizes the status of forms and visits for each patient and lets you navigate to specific patients and visits. The Case Books List is a convenient place to view the log of enrolled patients.
To display the Case Books List:
In the Navigation pane, click Patients.
Chapter 3 Taking a quick tour
41
Things to note Highlight—A series of checkboxes let you filter the display of traffic light
icons for visits that contain forms that are started, incomplete, frozen, locked, or contain queries. Traffic lights for visits that contain forms that match all of your selections are highlighted
Patient status—The Status column indicates the stage at which the patient is in the study.
Visit status—Each patient has one traffic light icon for each visit. The colors of the traffic light show whether the forms for each visit are complete.
Links to patient visit—Each traffic light icon is a link to the patient forms for a visit.
Page indexer—The page indexer is a multi-part control on the bottom-left side of the content-specific pane. By clicking different parts of the control, you can move through the pages of the Case Books List when the list of study subjects fills more than one page.
Show Transferred button—This button displays a list of patients who have been transferred into or out of the sites to which you have access.
Links to Time and Events Schedule—The underlined patient number and initials and the underlined patient status indicate links to the patient’s Time and Events Schedule. To display the schedule, click the underlined text.
Time and Events Schedule The Time and Events Schedule is a list of forms and visits for a specific patient. This page lets you review the status of forms and visits, and navigate to a specific form.
To display the Time and Events schedule:
1 In the Navigation pane, click Patients.
2 Click the patient number or status of the patient.

Step by Step for CRCs and CRAs
42 InForm 4.6
Things to note Highlight—A series of checkboxes let you filter the display of traffic light
icons for forms that are started, incomplete, frozen, locked, or contain queries. Traffic lights for forms that match all of your selections are highlighted.
Visits and CRFs—The Time and Events Schedule consists of a list of visits and forms. A traffic light icon indicates which forms must be completed at each visit.
Form status—Each traffic light icon indicates the state of completion of a form at a specific visit.
Links to CRFs—Each traffic light also provides a link to a form; to display the form, click the traffic light icon.
Command buttons—The command buttons in the content-specific pane let you perform activities that affect the patient’s entire Case Book. For example, as a CRC you might be assigned the right to mark a Case Book ready for source verification by clicking the appropriate command button in the Time and Events Schedule.

Chapter 3 Taking a quick tour
43
Case Report Forms Case Report Forms enable you to enter, correct, or update data for a patient visit.
Note: Case Report Forms are referred to as forms or CRFs throughout the InForm product and documentation. Both of these terms are used interchangeably.
To display a form:
1 In the Navigation pane, click Patients.
2 Click the traffic light icon for the patient and visit.
3 Click the tab that identifies the form. If the form is defined as a repeating form, the form is first displayed in summary form. If data has been entered in one or more forms, click the traffic light icon or the number to the left of the form to see details for the visit.

Step by Step for CRCs and CRAs
44 InForm 4.6
Things to note Patient information—Patient number and initials appear at the top-right of
the form. Form comment—The comment icon is located in the detail view of the
form, in the upper-right corner. It provides access to comments about the form as a whole. To enter, display or update a comment, click the icon.
Tabs—Each tab represents a form that is used in the visit. A yellow exclamation point (!) on a tab indicates that work is required on the form, such as providing missing data or answering a query.
Form items—Form data items are listed in table format. Questions appear on the left. Data entry controls that you use to answer the question appear on the right.
Links to form help—If your trial includes a study document that gives help on form items, and the study document has been linked to the forms during trial setup, the question text or form name is underlined. To display the study document help, click the underlined question text.
Form item icons—On the detailed view of the form, the far right column of each form item contains a set of icons that provide status information about the item and enable you to display detailed item information. Information about detailed form item information appears in the section that follows.
Command buttons—The Content-specific pane of a form contains command buttons that enable you to perform activities that affect the form. Your responsibilities in the study and the rights you have been assigned determine the buttons you can see and the actions you can take. For example, if you have been assigned the right to print forms the Print Preview button appears.
Select Action list—The Select Action list contains additional commands that you can perform by selecting a command in the list and clicking the Do command button.
Form views Form views allow you to view form data in different ways.

Chapter 3 Taking a quick tour
45
Summary view
Summary view is available for repeating forms. In summary view, form data items appear in table format with each form appearing in a row. Each row has an underlined number in the leftmost column and a traffic light in the column next to it. When you click the number or the traffic light, the detailed view of that row appears. You can sort these rows by clicking the column headings. If applicable, a frozen or locked icon also appears in this column.
The far right column displays a comment and audit trail icon that provide access to comments and audit trail activity that apply to a particular instance of the form. For example, to view the audit trail of a deleted instance (indicated with each data item crossed out), click the audit trail icon for that instance.
Using summary view to initiate commands on multiple instances
The summary view is useful for performing the same action, such as locking, freezing, source verifying, or deleting, on several different form instances at the same time.
To perform one action on several forms:
1 In the summary view, click the action button you want to perform. (If the action does not appear in the row of command buttons, find it in the Select Action list and click Apply.) The summary view reappears with a column of check boxes along the left side.
2 Select the checkbox next to the form instance or instances on which you want to perform the action you selected in step 1.
3 Click the button for the action you want to perform (for example, Mark SV Ready).

Step by Step for CRCs and CRAs
46 InForm 4.6
Detailed view
Detailed view is available for instances of a repeating form. In the detailed view, form data items appear in a table format with a question on the left and the data entry controls for answering the question on the right.

Chapter 3 Taking a quick tour
47
Cross reference view
The cross reference view is for forms that are defined as associated forms during trial design. The page is divided in half horizontally, so that it displays two associated forms at the same time. The forms behave the same way whether you are in cross reference view, summary or detailed view.
Navigating between the form views
You can move between the three different views to see a list of all visits as well as detailed information for a single visit. Use this table to navigate between the different form views.
To move from To Select Summary view Standard view The number in the far-left column of
the instance you want to see.
Standard view Summary view [Summary] in the drop-down list.
Standard view Cross reference view
There is no standard view if the form can be associated with another form. The two forms always appear in cross reference view.
Summary view Cross reference view
The number in the far-left column of the instance you want to see.
Cross reference view
Summary view [Summary] in the drop-down list.

Step by Step for CRCs and CRAs
48 InForm 4.6
Patient visit information When you display the forms for a patient visit, the time line and tabs at the top of each form summarize the visits in the study. You can navigate to forms within the current visit and throughout the trial.
To view visit information:
1 In the Navigation pane, click Patients.
2 Click the traffic light icon for the patient and visit.
Things to note Visit navigation timeline—Use the timeline at the top of the page to
navigate to other visits within the trial. The name of the current visit is highlighted in yellow. To go to a different visit, click the visit name.
Form navigation tabs—Use the tabs under the timeline to display each form in the current visit. To go to a different form, click corresponding tab. The tab of the current form is highlighted in yellow.
Time and Events Schedule navigation arrow—This yellow, upward-pointing arrow is located next to the timeline. Click the arrow to go to the Time and Events Schedule.

Chapter 3 Taking a quick tour
49
Form item details
Comments
Comments are blocks of text in which you can enter any pertinent additional details about a form item. On the Comment page you can create, update, or view a comment on an individual form data item or on the entire form. You can use the Comment page to:
Add a new comment, if none currently exists. Edit the text of an existing comment. Add information to the text of an existing comment. Replace an existing comment.
Note: To enter comments, you must have the appropriate rights in the study.
The Comment page for a form or data item contains the current version of the comment text. The changes made to the comment text are tracked in the history of the comment.
To view the page:
From the detailed view of a CRF, click the comment icon in the farthest right column of a form item.
To display a form comment:
In the upper-right corner of the form, click the comment icon.
The table describes comment icons.
Icon Description
Gray icon:
In the upper-right corner of a form, indicates that there is no comment on the form as a whole.
In the farthest right column of a form item, indicates that there is no comment on the item.
To enter a comment, click the icon.
Yellow icon:
In the upper-right corner of a form, indicates that a comment exists on the form as a whole.
In the farthest right column of a form item, indicates that a comment exists on the item.
To view or update the comment, click the icon.

Step by Step for CRCs and CRAs
50 InForm 4.6
Things to note Current data value—The current value of the data item appears at the top
of the page. History—If more than one addition or update has been made to a
comment, the history list enables you to view details about each addition or update.
Comment details—The Selected Comment section provides details about the comment version selected in the History list.
Command buttons—The command buttons in the Content-specific pane enable you to submit a comment addition or update or to return to the form without saving changes.

Chapter 3 Taking a quick tour
51
Queries
The Queries page enables you to create, respond to, change the status, or review the details of queries on a specific form data item, in accordance with your responsibilities and rights in a trial. The detail page provides information about the current status and the history of queries on the item. In this tour, the CRC user can answer queries, and the examples reflect the version of the Queries page that supports this activity.
To view the page:
Click the query icon in the far-right column of a form item that has a query. The following table describes the different query icons.
Icon Description
Gray icon—Appears in the far-right column of a form item if no query has been entered against the item. To enter a query, click the icon.
This icon appears only if you have the right to issue queries.
Yellow icon—Appears in the far-right column of a form item if a query has been entered against the item and the query is not closed. To view or update the query, click the icon.
Green icon—Appears in the far-right column of a form item if the item has a history of queries.
For site users, indicates that there are no open queries. For sponsor users, indicates that all queries have been
resolved.
To view the query history, click the icon.

Step by Step for CRCs and CRAs
52 InForm 4.6
Things to note Current data value—The current value of the data item appears at the top
of the page. Query History—If more than one query has been issued on an item, the
history list enables you to view details about each query. Query details—The Query section provides details about the query
selected in the History List. The appearance of this section varies with the type of query activity for which you are responsible, and with the state of the query. For example, if you have been assigned the right to answer a query, as in this example, a row called Answer Text includes the controls for selecting or entering an answer. After you have submitted an answer, the Answer Text row becomes a read-only section in which your answer is visible, and the Query State changes to Answered. If you have been assigned the right to issue a query, the Query section includes data entry controls in the Query Text row.
Command buttons—The command buttons in the Content-specific pane enable you to submit a query response or to return to the form.
Audit Trail
The Audit Trail page enables you to review the history of changes made to a specific form data item, along with a history of query activity on the item.
To view the page:
Click the audit trail icon in the rightmost column of a form item. The following table describes the different types of audit trail icons.
Icon Description
Gray icon—Appears in the far-right column of a form item.
Indicates that a value has been entered for the item, but no changes have been made to it subsequently. To view the audit trail for the initial entry, click the icon.
In the summary view of a repeating form, an audit trail icon appears in the far-right column of each instance of the form.
Yellow icon—Appears in the far-right column of a form item.
Indicates that changes have been made to the data value of the item. To view the audit trail for the item, click the icon.
In the summary view of a repeating form, an audit trail icon appears in the far-right column of each instance of the form.

Chapter 3 Taking a quick tour
53
Things to note Current data value—The current value of the data item appears at the top
of the page. Audit trail—The history of data value changes and query activity appears
in a table that indicates the date and time of activity and the responsible user.
Links to details—Each item in the audit trail is underlined, indicating a link to more detailed information. To view details, click the underlined text.
Data Value(s)
The Data Value(s) page enables you to change the value of a specific form data item and provide a required reason for the data value change. The actual title of the page is based on the form, on which the data item appears.
To display the page:
Navigate to a form for a patient, and click the data value on the form.
Note: When you move the mouse over the item, the background color of the item darkens. To select the item, click anywhere in the darkened area.

Step by Step for CRCs and CRAs
54 InForm 4.6
Things to note Current data value—The current value of the data item appears at the top
of the page. Audit Trail selection— List of changes to the form item. Each entry consists
of the date and time of the change and the logon name of the user who made the change. The list also includes an item called Enter new value, which enables you to change the data item and enter a reason for the change. To view the details of a change, select it from this list.
Change controls—The item and its controls appear in the Data Value(s) page just as they are in the form. To change the value of a data item, enter the new value in these controls.
Clear icon—To clear the value of the data item, click the eraser-shaped icon to the right of the item.
Reason for change—Each time you change or clear a data value, you must select or enter a reason for change. This reason is recorded in the audit trail for the icon.
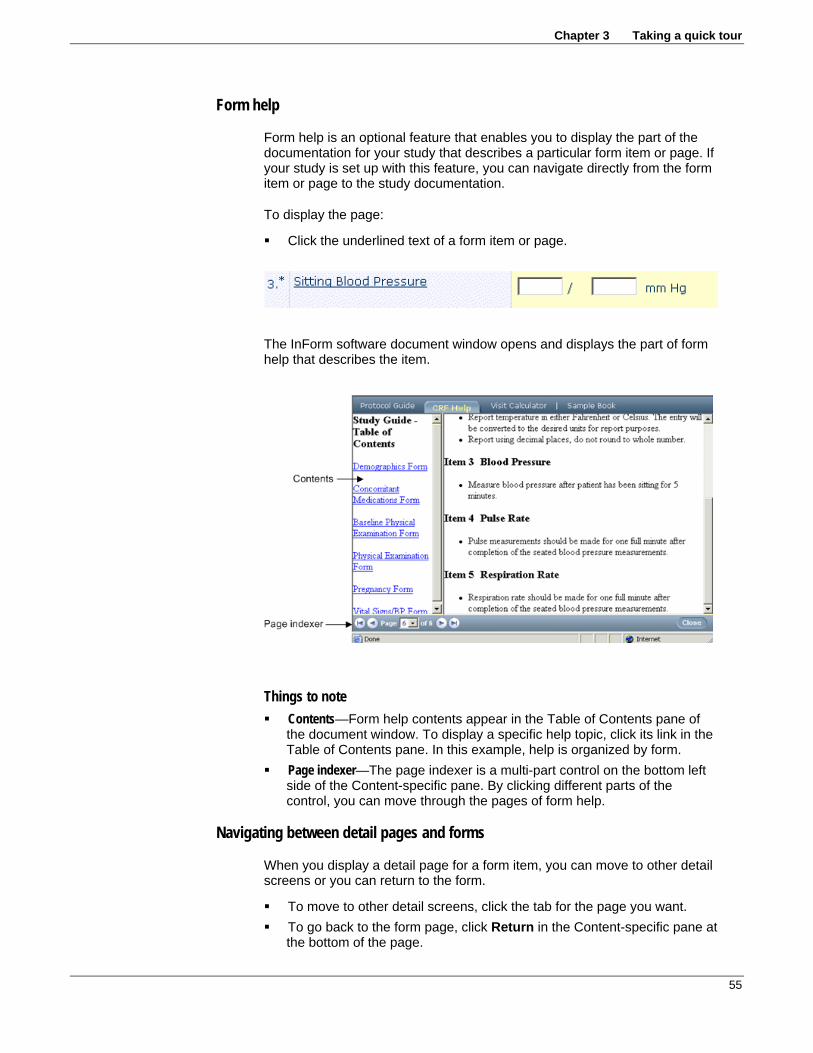
Chapter 3 Taking a quick tour
55
Form help
Form help is an optional feature that enables you to display the part of the documentation for your study that describes a particular form item or page. If your study is set up with this feature, you can navigate directly from the form item or page to the study documentation.
To display the page:
Click the underlined text of a form item or page.
The InForm software document window opens and displays the part of form help that describes the item.
Things to note Contents—Form help contents appear in the Table of Contents pane of
the document window. To display a specific help topic, click its link in the Table of Contents pane. In this example, help is organized by form.
Page indexer—The page indexer is a multi-part control on the bottom left side of the Content-specific pane. By clicking different parts of the control, you can move through the pages of form help.
Navigating between detail pages and forms
When you display a detail page for a form item, you can move to other detail screens or you can return to the form.
To move to other detail screens, click the tab for the page you want. To go back to the form page, click Return in the Content-specific pane at
the bottom of the page.

Step by Step for CRCs and CRAs
56 InForm 4.6
Query Listing The Query Listing page enables you to review a summary of all queries and to navigate to the query view of a specific form with a query. Several filters of the list are available; by making selections in the filters, you can specify the queries that you want to see in the list.
To display the page:
In the Navigation pane, click Queries.
Things to note Filters—To make it easier to find specific queries, the Query Listing page
includes a set of lists from which you can select queries for a specific patient, query status or the person who issued the query.
Query summaries—The Query Listing consists of a table in which each row is a single query, identified by site, patient, visit, CRF, item number, and issuer. When a query’s state changes—for example, when an Opened query is answered—the query’s status is updated in the table.
Links to query details—To display the detailed Query page for a specific query, click the underlined text in the query row.
Page indexer—The page indexer is a multi-part control on the bottom left side of the Content-specific pane. By clicking different parts of the control, you can move through the pages of the Query Listing when the list of queries fills more than one page.

Chapter 3 Taking a quick tour
57
Study documentation
Overview: Study documentation
This section describes the types of study documentation that can be available if they are set up by your trial administrators.
Protocol
The study protocol is the sponsor documentation that describes in detail how a study is to be conducted.
To display the study protocol:
1 In the Navigation pane, click Documents.
2 Click the Protocol Guide tab, if it is not already selected.
Things to note Contents—Protocol contents appear in the Table of Contents pane of the
document window. To display a specific protocol topic, click its link in the Table of Contents pane.
Page indexer—The page indexer is a multi-part control on the bottom left side of the navigation pane. By clicking different parts of the control, you can move through the pages of the protocol.

Step by Step for CRCs and CRAs
58 InForm 4.6
Form help
Form help provides information about how to obtain and fill in patient data in forms. If your trial is set up to accommodate direct linking from a form item to help about the item, you can display CRF help by using that method. You can also open form help from any location in the InForm software by clicking Documents in the Navigation pane. This part of the tour describes the second method of viewing form help.
To display Form help:
1 In the Navigation pane, click Documents.
2 Click the CRF Help tab, if it is not already selected.
Things to note Contents—Form help contents appear in the Table of Contents pane of
the document window. To display a specific help topic, click its link in the Table of Contents pane. In this example, help is organized by form.
Page indexer—The page indexer is a multi-part control on the bottom left side of the Content-specific pane. By clicking different parts of the control, you can move through the pages of form help.
Visit Calculator
The Visit Calculator provides a quick way to estimate visit dates based on a selected start date. After you enroll a patient, the Visit Calculator page appears and computes suggested visit dates based on the date of the enrollment visit. Afterwards, to display the Visit Calculator, use the Documents window, as described in this section.
To display the Visit Calculator:
1 In the Navigation pane, click Documents.
2 Click the Visit Calculator tab, if it is not already selected.

Chapter 3 Taking a quick tour
59
Things to note Start date—This control enables you to enter any date as the first visit
date. Subsequent visit dates are recalculated from the date that you specify.
Patient schedule—This section displays suggested visit dates based on the start date. After calculating visit dates, you can print the Visit Calculator page by using the browser’s print facility and fill in the Scheduled Date and Time column on paper.
Sample Case Book
The sample Case Book includes a copy of each form in the trial, organized by visit. This sample set of forms is for display only; you can use it to familiarize yourself with the forms in your trial.
To display the sample Case Book:
1 In the Navigation pane, click Documents.
2 Click the Sample Book tab, if it is not already selected.

Step by Step for CRCs and CRAs
60 InForm 4.6
Things to note Visit navigation controls—The controls at the top of the sample Case Book
enable you to move between visits. Form tabs—Each tab displays the corresponding sample form when you
click the tab. Return button—Returns you to the protocol view of the document window. Close button— Closes the document window.
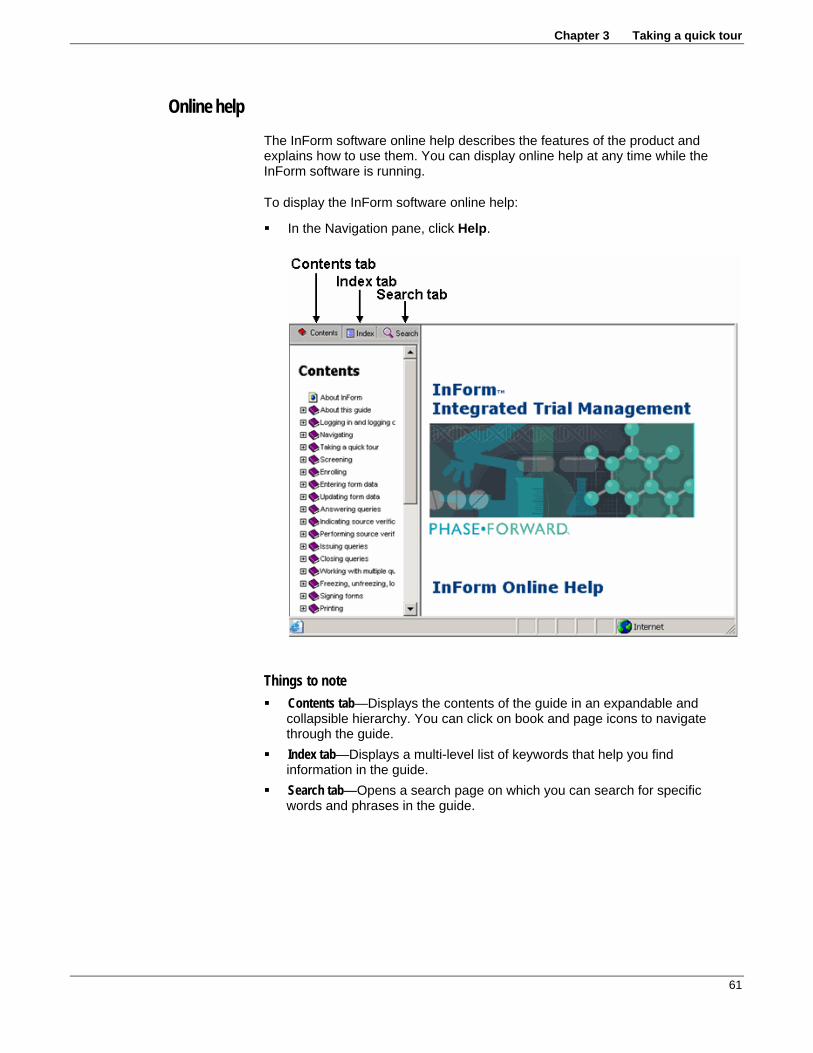
Chapter 3 Taking a quick tour
61
Online help The InForm software online help describes the features of the product and explains how to use them. You can display online help at any time while the InForm software is running.
To display the InForm software online help:
In the Navigation pane, click Help.
Things to note Contents tab—Displays the contents of the guide in an expandable and
collapsible hierarchy. You can click on book and page icons to navigate through the guide.
Index tab—Displays a multi-level list of keywords that help you find information in the guide.
Search tab—Opens a search page on which you can search for specific words and phrases in the guide.

Step by Step for CRCs and CRAs
62 InForm 4.6
Logging off This concludes the part of the tour visited as the user mmeyer.
To log off, the mmeyer user clicks Logout in the Navigation pane, then clicks Yes in the confirmation dialog box.
In the next part of the tour, you will visit some additional screens to which the sample user named mlynch has access.

Chapter 3 Taking a quick tour
63
Visiting CRA pages
Starting the tour: User mlynch In this part of the tour, a user who has the user name mlynch does the following:
1 Opens an Internet browser
2 Types the URL for the assigned study site, and presses Enter.
3 On the logon page, types mlynch and the password.
4 Clicks Log In.
The InForm software home page for the trial appears. This page is customized for each study and can include many types of information.
The Navigation pane, on the left side of the screen, contains buttons that provide access to the pages you will visit.
Note: When you are working with the InForm software, do not use the web browser’s refresh button. This action can cause problems for the trial.

Step by Step for CRCs and CRAs
64 InForm 4.6
Case Books List The Case Books List summarizes the status of forms and visits for each patient and lets you navigate to specific patients and visits. The Case Books List is a convenient place to view the log of enrolled patients.
To display the Case Books List:
In the Navigation pane, click Patients.

Chapter 3 Taking a quick tour
65
Things to note Highlight—A series of checkboxes let you filter the display of traffic light
icons for visits that contain forms that are started, incomplete, frozen, locked, or contain queries. Traffic lights for visits that contain forms that match all of your selections are highlighted
Patient status—The Status column indicates the stage at which the patient is in the study.
Visit status—Each patient has one traffic light icon for each visit. The colors of the traffic light show whether the forms for each visit are complete.
Links to patient visit—Each traffic light icon is a link to the patient forms for a visit.
Page indexer—The page indexer is a multi-part control on the bottom-left side of the content-specific pane. By clicking different parts of the control, you can move through the pages of the Case Books List when the list of study subjects fills more than one page.
Show Transferred button—This button displays a list of patients who have been transferred into or out of the sites to which you have access.
Links to Time and Events Schedule—The underlined patient number and initials and the underlined patient status indicate links to the patient’s Time and Events Schedule. To display the schedule, click the underlined text.
Flags—A yellow flag on a traffic light indicates the presence of one or more answered queries.
Time and Events schedule The Time and Events Schedule is a list of forms and visits for a specific patient. This page lets you review the status of forms and visits, and navigate to a specific form.
To display the Time and Events schedule:
1 In the Navigation pane, click Patients.
2 Click the patient number or status of the patient.

Step by Step for CRCs and CRAs
66 InForm 4.6
Things to note Highlight—A series of checkboxes let you filter the display of traffic light
icons for forms that are started, incomplete, frozen, locked, or contain queries. Traffic lights for forms that match all of your selections are highlighted. You can also filter for Source Verification status.
Visits and CRFs—The Time and Events Schedule consists of a list of visits and forms. A traffic light icon indicates which forms must be completed at each visit.
Form status—Each traffic light icon indicates the state of completion of a form at a specific visit.
Links to CRFs—Each traffic light also provides a link to a form; to display the form, click the traffic light icon.
Command buttons—The command buttons in the content-specific pane let you perform activities that affect the patient’s entire Case Book. For example, as a CRC you might be assigned the right to mark a Case Book ready for source verification by clicking the appropriate command button in the Time and Events Schedule.
Flags—A yellow flag on a traffic light indicates the presence of one or more answered queries.
Source verification and monitoring screens A user with rights to perform monitoring activities has access to screens that support source verification and site monitoring.

Chapter 3 Taking a quick tour
67
Source Verification Listing
The Source Verification Listing enables you to review the source documentation status of CRFs and to navigate to the Source Verification view of a specific CRF so that you can perform source verification. Several filters of the list are available; by making selections in the filters, you can specify which CRFs you want to see in the list.
To display the page:
In the Navigation pane, click Monitor.

Step by Step for CRCs and CRAs
68 InForm 4.6
Things to note Filters—To make it easier to find specific forms, the Source Verification
Listing includes drop-down lists from which you can choose to display a list of forms for a specific site and patient. You can also filter the list by source verification state, by CRF completion state, and by numerous content and status criteria. You can create and save custom filters. For more information, see Filtering the source verification listing (on page 144).
Check boxes—A column of check boxes allows you to select one or more forms and perform a group freeze, unfreeze, lock, or unlock on them by clicking the appropriate button in the lower right corner of the page.
Source verification summary—For each form, the Source Verification Listing displays the site, patient number and initials, visit, form abbreviation, source verification status, and CRF completion status.
Page indexer—The page indexer is a multi-part control on the bottom left side of the Content-specific pane. By clicking different parts of the control, you can move through the pages of forms in the Source Verification Listing.
Link to source verification view of form—Form names are underlined, indicating the presence of links from this page to each listed form. To display a source verification view of a form, click the underlined form name.
Freeze/Lock buttons—The buttons in the lower right corner of the page enable you to freeze, lock, unfreeze, or unlock the forms for which you have selected the check boxes.
Note: The Source Verification Listing page displays each instance of a repeating form as a separate row. The number of the instance is added to the name of the form: for example, AE[1], AE[2].
SV Report
The SV Report (Source Verification Report) is a formatted listing of one or all forms that exist for a patient. When you print the SV Report, you can obtain a complete printed copy of the forms so that you can perform source verification offline. The SV Report consists of two screens: a list of patients for whom you can generate reports, and a page on which you can select the form or forms you want to print. After generating a view of the form or forms online, you can print it by clicking the Print button.
To display the page:
1 On the Navigation pane, click Monitor.
2 Click the SV Report tab.

Chapter 3 Taking a quick tour
69
Things to note Sortable columns—You can sort the report by using the data in the Site,
Patient Number, or Patient Initials columns. To change the sort order of one of those columns, click the column heading. In the column used for the primary sort, the heading includes an arrow that indicates the sorting direction.
Page indexer control—This control enables you to move to a different page of the SV Report list when the information fills more than one page. To use the page indexer control, click the appropriate arrow, or select a page number from the drop-down list.
Print Preview link—Each Case Book in the SV Printout list has a Print Preview button that enables you to display a page on which you can select the form you want to print or specify that you want to print all forms.

Step by Step for CRCs and CRAs
70 InForm 4.6
SV Report print preview
The print preview page displays a view of a form in a format suitable for printing. From this page, you can print the form, or you can print all forms in the Case Book.
To display the page:
1 In the Navigation pane, click Monitor.
2 Click the SV Report tab.
3 Click the Print Preview link for the form you want to print.
Note: To generate a print preview of the entire Case Book, click any Print Preview link.
Things to note Navigation arrows—Use these arrows to select a different page to print.
Forms are in the same order in which they occur in the study. All button—This button displays a version of the SV report that includes
the entire Case Book. Print button—This button prints the SV Report.

Chapter 3 Taking a quick tour
71
Visit Report
The Site Visit Report is a form that enables you to prepare a site visit report. The format of this page, which is an optional feature of the InForm software, is completely customizable for each trial and is created when your trial is set up.
To display the page:
1 In the Navigation pane, click Monitor.
2 Click the Visit Reports tab.
The page lists any existing reports. To display a report, click the site name or date of the report.
3 To create a new visit report:
a) In the Content-specific pane, select the site for which you want to create the report.
b) Click New.
A visit report form appears.
c) Fill in the form and click Submit.
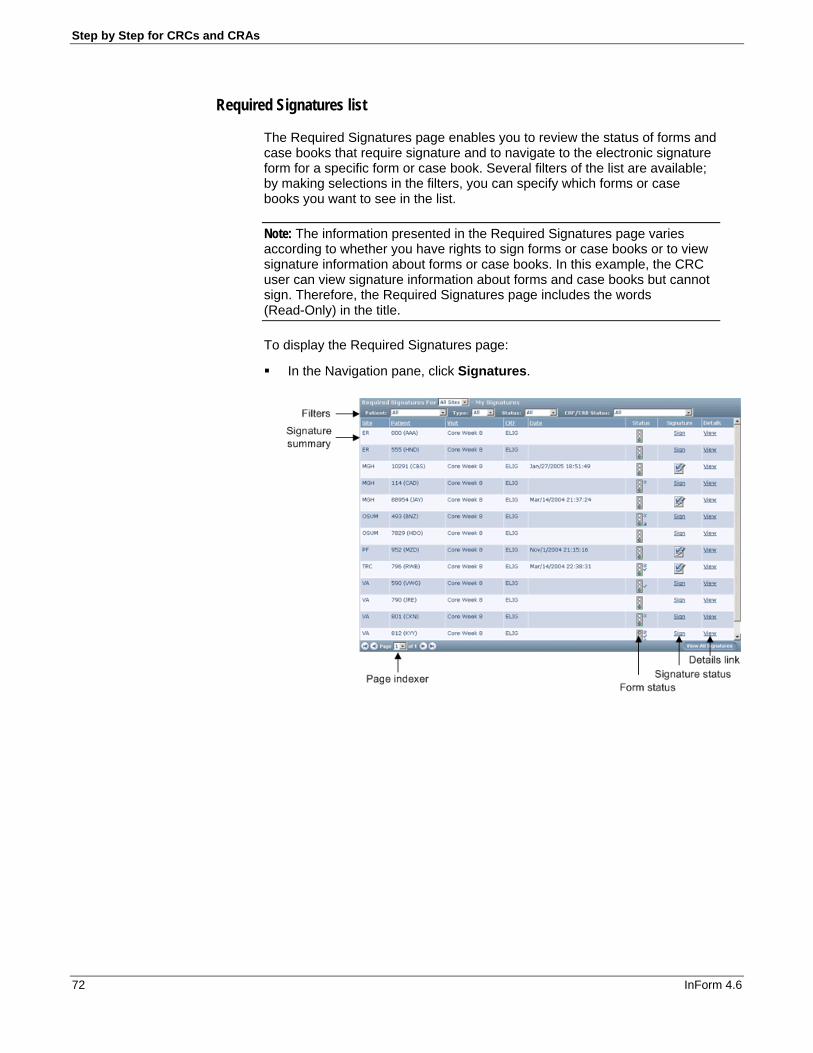
Step by Step for CRCs and CRAs
72 InForm 4.6
Required Signatures list
The Required Signatures page enables you to review the status of forms and case books that require signature and to navigate to the electronic signature form for a specific form or case book. Several filters of the list are available; by making selections in the filters, you can specify which forms or case books you want to see in the list.
Note: The information presented in the Required Signatures page varies according to whether you have rights to sign forms or case books or to view signature information about forms or case books. In this example, the CRC user can view signature information about forms and case books but cannot sign. Therefore, the Required Signatures page includes the words (Read-Only) in the title.
To display the Required Signatures page:
In the Navigation pane, click Signatures.

Chapter 3 Taking a quick tour
73
Things to note Filters—To make it easier to find information about a specific form or
case book, the Required Signatures page includes a set of lists from which you can select forms or case books for a specific site, patient, signature state (signed or unsigned), or form or case book state.
Signature summary—For each form or case book in the list, the Required Signatures page includes the site, patient number and initials, signature date (if signed), signature status, and a traffic light icon indicating form or case book completion status. Form rows also include the visit name and form abbreviation.
Page indexer—The page indexer is a multi-part control on the bottom left side of the Content-specific pane. By clicking different parts of the control, you can move through the pages of CRFs or case books in the Required Signatures list.
Form status—The Status column displays a traffic light status icon indicating the status of the form.
Signature status—The Signatures column indicates signature status. If a form or case book requires signature and a user has rights to sign forms or case books, this column contains a Sign link that displays the appropriate signature affidavits and enables the user to sign them.
Icon Description
CRF has been signed by all required signatories. This symbol is visible only if you have been assigned the right to view CRF signing information.
Case book has been signed by all required signatories. This symbol is visible only if you have been assigned the right to view case book signing information.
CRF has not been signed by all required signatories. This can mean that the CRF or Case book has never been signed or that signatures have been invalidated by data updates or query activity. This symbol is visible only if you have been assigned the right to view CRF signing information.
Case book has not been signed by all required signatories. This symbol is visible only if you have been assigned the right to view case book signing information. This can mean that the CRF or Case book has never been signed or that signatures have been invalidated by data updates or query activity.
Details link—To display the signing history of a form or case book, click the View link in the Details column.

Step by Step for CRCs and CRAs
74 InForm 4.6
Reg Docs
The Regulatory Documentation Checklist is a form that enables you to fill in a checklist describing a site’s regulatory documentation. The format of this page, which is an optional feature of the InForm software, is completely customizable for each trial and is created when your trial is set up.
To display the page:
1 In the Navigation pane, click Monitor.
2 Click the Reg Docs tab.
Things to note
Site links—To display the Regulatory Documentation Checklist for a specific site, click the underlined site name.
Logging off This concludes the part of the tour visited as the user mlynch.
To log off, the tallen user clicks Logout in the Navigation pane, then clicks Yes in the confirmation dialog box.
75
In this chapter Overview: Screening ...............................................................................76 Accessing candidate information ............................................................77 Screening a study candidate...................................................................78 What to do if... .........................................................................................80
C H A P T E R 4
Screening

Step by Step for CRCs and CRAs
76 InForm 4.6
Overview: Screening
Enrolling a patient in a trial involves the following processes:
1 Screening a candidate. Complete a screening form that records some basic candidate information and indicates whether the candidate is eligible for the trial. When you submit the screening form, the candidate is added to the Screening Log.
2 Enrolling the candidate. Enrolling is a two-step process in which you:
a) Enter data on the Enrollment form. This data records whether a screened candidate meets the enrollment criteria of the study.
Note: If some information is not available when you begin the Enrollment form, you can enter partial enrollment data and submit the incomplete form. Then, at a later time, you can return to the form, complete the data, and submit the form again.
b) Complete the enrollment of the candidate.

Chapter 4 Screening
77
Accessing candidate information
The InForm software does not set up a case book for the patient until the final phase of enrollment is complete. Until the case book is created, the only way you can access information about a candidate is through the Screening Log. Both screening and enrollment information is available through links from the Screening Log.
To display the Screening form of a candidate:
Click the candidate’s underlined screening number.
To display the Enrollment form of the candidate:
In the Enrolled column, click the symbol or button that corresponds to the candidate.

Step by Step for CRCs and CRAs
78 InForm 4.6
Screening a study candidate
To screen a study candidate:
1 In the Navigation pane, click Enroll.
The Screening Log appears.
2 Click Add Candidate.
The Screening form appears.
3 On the Screening form, enter screening data, and click Submit.

Chapter 4 Screening
79
The Screening Log reappears. The study candidate is added to the end of the list.
If screening was successful, the Enrolled column for the candidate contains an Enroll button.
If screening failed, the Enrolled column contains X, and the Screening Failure column contains information about why the screening was unsuccessful.
A checkmark indicates that the candidate has been successfully enrolled.

Step by Step for CRCs and CRAs
80 InForm 4.6
What to do if...
Submitting results in a screening failure The Screening Log lists the names of all candidates who have been screened. The Enroll column indicates the following:
Enroll column contains Meaning Enroll button Candidate has been successfully screened
X Screening failed. Candidate is not eligible for the trial.
If you believe that the candidate should be eligible for the trial, do the following:
1 In the Screening Log, look in the Screening Failure column to determine why the screening failed.
2 Click the underlined screening number for the candidate to display the screening form. Make necessary changes according to the table:
If screening failed because Do this Some screening data is missing. Complete the Screening form, then click
Submit.
The patient is ineligible for the trial. Check the data and make corrections if necessary. To correct a data value:
1 Click the entered value.
2 On the Data Value(s) page, type the correct value and select or type a reason for change.
3 Click Submit.
4 A confirmation dialog box appears. Click OK.
5 Click Return to go back to the Screening form.
3 Click Submit.

81
In this chapter Overview: Enrolling .................................................................................82 Enrolling a study candidate .....................................................................83 What to do if... .........................................................................................86
C H A P T E R 5
Enrolling

Step by Step for CRCs and CRAs
82 InForm 4.6
Overview: Enrolling
Enrolling is a two-step process in which you:
Enter data on the Enrollment form. The information is used to determine whether the patient meets the enrollment criteria of the study.
Complete the enrollment of the candidate.

Chapter 5 Enrolling
83
Enrolling a study candidate
To enroll a study candidate:
1 In the Navigation pane, click Enroll.
The Screening Log appears.
2 Locate the candidate you want to enroll.
Note: New candidates are always added to the end of the Screening Log. To advance quickly to the end of the Screening Log, use the page indexer control (on page 21).
3 In the Enrolled column, click Enroll for the selected patient.
The Enrollment form appears.

Step by Step for CRCs and CRAs
84 InForm 4.6
4 Complete the Enrollment form to record whether the candidate conforms to the inclusion and exclusion criteria for the trial.
5 Click Submit.
6 If all data is present on the Enrollment form and the candidate meets all inclusion and exclusion criteria, a message page appears, indicating that the patient meets all study criteria and can be enrolled.
For information about what to do if the patient cannot be enrolled because of missing data or nonconformance with inclusion and exclusion criteria, see What to do if... (on page 80)..
7 To complete the enrollment, click Enroll.
The InForm software processes the enrollment by:

Chapter 5 Enrolling
85
Updating the Screening Log—The InForm software adds the patient number to the Patient Number column and changes the entry in the Enrolled column to a check mark.
Changing the Enrollment form to a read-only form—After enrollment is complete, you can update enrollment data only if your trial is set up to include the enrollment data on one or more enrollment forms in a regular patient visit.
Creating the case book for the patient—After enrollment is complete, you can access patient visits and forms by clicking the Patients button in the Navigation pane.
Displaying the Visit Calculator page.
8 The initial display of the visit calculator uses the current date as the date of initial visit, and computes the remaining visit dates based on that initial visit date.
To recalculate proposed visit dates, change the Start Date by selecting a new date in the month, day, and year drop-down lists.
To print the visit calculator so that you can give it to the patient for reference, click the Print button of the browser.
9 Do one of the following:
To go directly to the first patient form, click Go to First Visit.
To return to the Screening Log, click Return.

Step by Step for CRCs and CRAs
86 InForm 4.6
What to do if...
Enrollment data is missing If all enrollment data is not available when you fill out the Enrollment form, or if you missed any required data items on the form, one of the following occurs:
If your protocol permits enrollment with incomplete enrollment data (on page 86), an enrollment override page appears. After you obtain approval from an authorized Sponsor representative, you can continue with enrollment.
If your protocol does not permit enrollment with incomplete enrollment data (on page 87), the InForm software returns you to the Screening Log after you submit the Enrollment form. The Enrollment Failure column displays “Enrollment Form Incomplete” as the reason for failure. The Enrolled column contains an X, which indicates that the candidate has not been enrolled.
Enrollment is allowed with incomplete data
To override an enrollment failure and complete the enrollment:
1 Obtain approval from the appropriate Sponsor representative to override the enrollment failure.
2 In the Navigation pane, click Enroll.
The Screening Log appears.
3 Locate the candidate you want to enroll.
4 In the Enrolled column for the candidate, click X .

Chapter 5 Enrolling
87
The Enrollment form appears.
5 Click Submit.
The enrollment override page appears.
6 Complete the Enrollment override page. You must provide information that documents your discussion with the Sponsor representative and gives the reason for the override.
7 To complete the enrollment, click Enroll.
Enrollment is not allowed with incomplete data
To provide missing data and complete the enrollment:
1 In the Navigation pane, click Enroll.
The Screening Log appears, if it is not already visible.

Step by Step for CRCs and CRAs
88 InForm 4.6
2 Locate the candidate you want to enroll.
3 In the Enrolled column for the candidate, click the X.
The Enrollment form appears.
4 Enter data in the missing items. Items with missing data have a yellow background.
5 Click Submit.
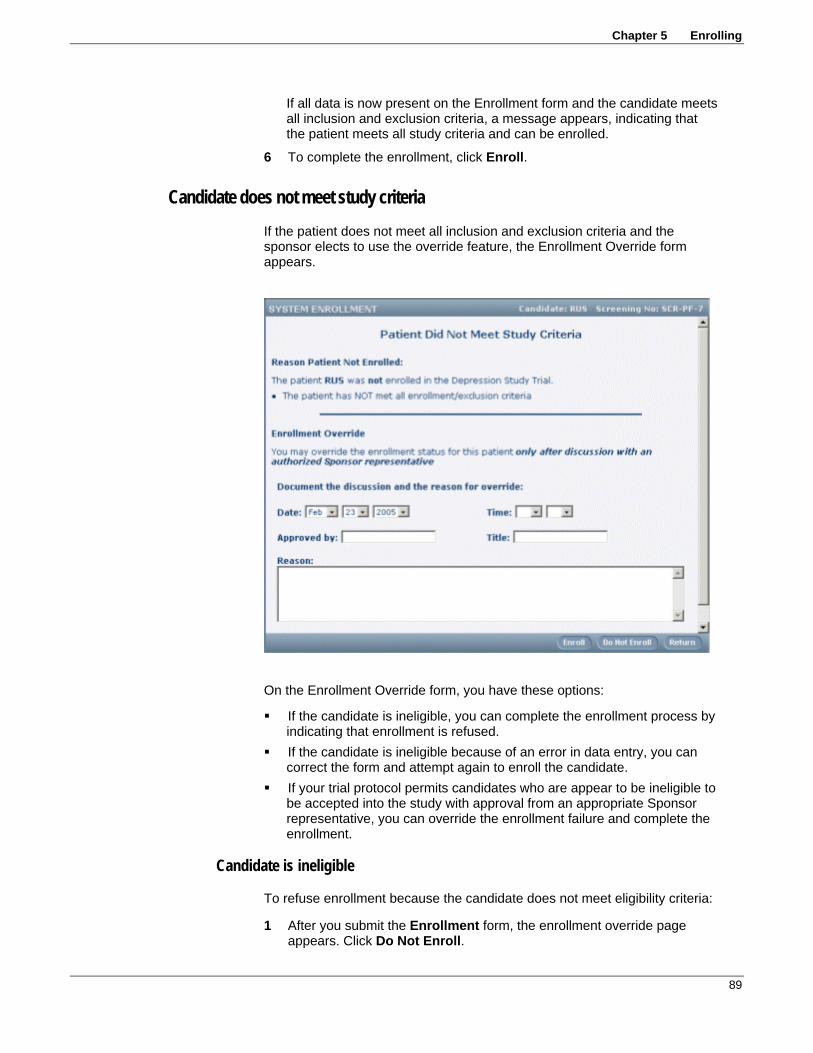
Chapter 5 Enrolling
89
If all data is now present on the Enrollment form and the candidate meets all inclusion and exclusion criteria, a message appears, indicating that the patient meets all study criteria and can be enrolled.
6 To complete the enrollment, click Enroll.
Candidate does not meet study criteria If the patient does not meet all inclusion and exclusion criteria and the sponsor elects to use the override feature, the Enrollment Override form appears.
On the Enrollment Override form, you have these options:
If the candidate is ineligible, you can complete the enrollment process by indicating that enrollment is refused.
If the candidate is ineligible because of an error in data entry, you can correct the form and attempt again to enroll the candidate.
If your trial protocol permits candidates who are appear to be ineligible to be accepted into the study with approval from an appropriate Sponsor representative, you can override the enrollment failure and complete the enrollment.
Candidate is ineligible
To refuse enrollment because the candidate does not meet eligibility criteria:
1 After you submit the Enrollment form, the enrollment override page appears. Click Do Not Enroll.

Step by Step for CRCs and CRAs
90 InForm 4.6
A message appears, asking you to confirm that you are refusing enrollment.
2 Click OK.
The Screening Log appears. The Enrollment Failure column displays the reasons the candidate is ineligible, and the Enrolled column contains an X, indicating that the candidate has not been enrolled.
Data entry error
The result of a data entry error can be that the patient fails to meet eligibility criteria.
To correct a data entry error:
1 After you submit the Enrollment form, the Enrollment override page appears. Click Return.
The Screening Log appears. The Enrollment Failure column displays the reasons the candidate is ineligible, and the Enrolled column contains an X, indicating that the candidate has not been enrolled.
2 In the Enrolled column, click X.
The Enrollment form appears.
3 Review the entries on the form, and correct any data entry errors as follows:
a) Click the entered value.
b) On the Data Value(s) page, type the correct value, and select or type a reason for change.
c) Click Submit.
A confirmation message box appears.
d) Click OK.
e) To go back to the Enrollment form, click Return.
4 On the Enrollment form, click Submit .
If the candidate now meets all inclusion and exclusion criteria, a message appears, indicating that the patient meets all study criteria and can be enrolled.
5 To complete the enrollment, click Enroll.
Enrollment failure override is permitted
An enrollment failure can be caused by either of the following reasons:
Patient did not meet eligibility criteria. Patient data is incomplete.
To override the failure and complete the enrollment, use the procedure described in Enrollment is allowed with incomplete data (on page 86).

Chapter 5 Enrolling
91
You do not want to enroll an eligible patient In some cases, even if a patient meets all eligibility criteria, the Principal Investigator for the site can decide not to enroll the patient.
To refuse enrollment to an eligible patient:
1 After you submit the Enrollment form, the Patient Meets All Study Criteria message appears. Click Do Not Enroll.
A message appears, asking you to confirm that you are refusing enrollment.
2 Click OK.
The Screening Log appears. The Enrolled column for the patient has an Enroll link, indicating that the patient has not been enrolled.

Step by Step for CRCs and CRAs
92 InForm 4.6
93
In this chapter Overview: Entering form data..................................................................94 Entering form data...................................................................................97 Form submitted successfully messages .................................................98 Entering a form comment ........................................................................99 Associating forms ..................................................................................101 Adding an unscheduled visit..................................................................103 What to do if... .......................................................................................104
C H A P T E R 6
Entering form data

Step by Step for CRCs and CRAs
94 InForm 4.6
Overview: Entering form data
This section describes forms, items, and data-entry controls that are used to record different types of patient data.
Form types The InForm software supports the following types of Case Report Forms:
Regular form—contains data that is specific to the visit in which the form occurs.
Common form—contains data that is cumulative from visit to visit. Each time the form occurs in a visit, it displays the data accumulated from all previous visits in which you collected that data, and you can add to the data in the current visit. Examples of forms that are often implemented as common forms are Concomitant Medication and Adverse Experience forms.
Each of these forms can optionally be a repeating form, or a form that contains data that is specific to two or more forms, or multiple times within the same form. If the design of your study requires you to collect the same data for multiple forms, you can collect the data for each specific form, and see all the data collected in other forms. Examples of forms that are often implemented as repeating forms are Vital Signs and Physical Examination.
If you click on the tab of a repeating form, it first appears in summary view. To display the detailed view of a form, click on the number or traffic icon to the left of the form row.
A repeating form can optionally be an associated form. Associated forms display two forms on a split page. The two forms contain data that might or might not be related.
Item types Forms can have the following types of items:
Items—Non-repeating data points on a form. Items can require you to enter or select a single value or to specify multiple choices. The following figure shows examples of regular data items.
Itemsets—Groups of items that repeat; for example, data for repeated labs. Each set of items takes one row on the form. To view each item in detailed view, click the underlined number at the beginning of the row. In detailed view, you can enter comments, queries, and rules for individual items within an itemset row and display audit trail information on an item-by-item basis.
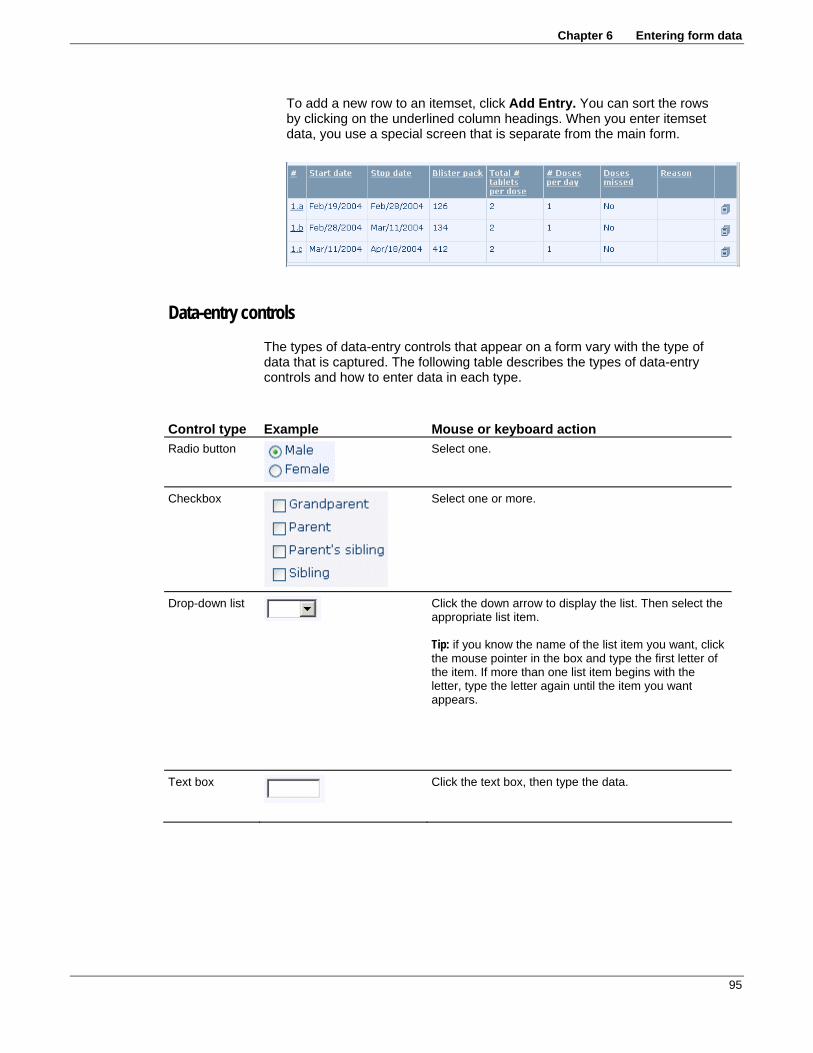
Chapter 6 Entering form data
95
To add a new row to an itemset, click Add Entry. You can sort the rows by clicking on the underlined column headings. When you enter itemset data, you use a special screen that is separate from the main form.
Data-entry controls The types of data-entry controls that appear on a form vary with the type of data that is captured. The following table describes the types of data-entry controls and how to enter data in each type.
Control type Example Mouse or keyboard action Radio button
Select one.
Checkbox
Select one or more.
Drop-down list
Click the down arrow to display the list. Then select the appropriate list item. Tip: if you know the name of the list item you want, click the mouse pointer in the box and type the first letter of the item. If more than one list item begins with the letter, type the letter again until the item you want appears.
Text box
Click the text box, then type the data.

Step by Step for CRCs and CRAs
96 InForm 4.6
Control type Example Mouse or keyboard action Date time control
or
Expanded calendar
A date time control can include some or all of the following parts: month, day, year, hour, minute, and second.
Click the calendar icon to expand the calendar. The date you select in the expanded calendar appears in the drop-down lists.
To insert the current date and time, click Today. To insert a different date, choose the month and
year by using the drop-down lists. Then click the date. The time field remains blank.
You can also use the drop-down lists to select or change the month, day, year, hour, minute, and second.
Your trial might be designed to show time parts as text boxes. In this case, enter the numerical values in each box.
Always enter time using a 24-hour clock.
Note: Some data items require you to use more than one type of control to complete the item. For example, if a checkbox is accompanied by a text box, select the checkbox, then type text in the text box. The following figure illustrates this type of compound control.

Chapter 6 Entering form data
97
Entering form data
To enter data on a form:
1 In the Navigation pane, click Patients.
2 In the Case Books List, click the traffic light icon for the patient and visit you want to use.
3 Click the tab for the form.
An empty form appears.
4 Enter data as follows:
For regular items—Enter data from the source documents into the controls on the form, using the methods described in Data-entry controls (on page 95).
For an itemset—Click Add Entry. Then, in the itemset Entry page that appears, enter data from the source documents into the Data-entry controls (on page 95).
For a repeating form—Click New. Then, on the Entry page, enter data from the source documents into the Data-entry controls (on page 95).
5 Click Submit.
You receive a confirmation message if the data is submitted successfully. Depending on the design of your study, the message appears either in the title bar of the form, or in a separate dialog box in which you click OK. For more information, see Form submitted successfully messages (on page 98).
6 Click Return.
You return to the main form from an itemset or repeating form entry page.
Step by Step for CRCs and CRAs
98 InForm 4.6
Form submitted successfully messages
After you provide data on a form, you click the Submit button. If submission is successful, the "Form Submitted Successfully" message appears.
Depending on how your trial is designed, the message could appear in either of the following ways:
As a pop-up message box If the message "Form Submitted Successfully" appears in a pop-up box, click OK to acknowledge the message and continue using the InForm software.
As a message in the title bar of the form The message "Form Submitted Successfully" appears in yellow, to the right of the title of the form. You do not have to respond to the message in any way. You can continue using the InForm software.
Depending on how your trial is designed, the message either remains for several seconds and then fades from view, or it remains visible until you perform another action on the form.

Chapter 6 Entering form data
99
Entering a form comment
You can enter a comment on a form item or on an entire form.
Entering a comment on a form item To enter a comment on a form item:
1 In the Navigation pane, click Patients.
2 In the Case Books List, click the traffic light icon for the patient and visit you want to use.
3 Click the tab for the form.
4 Do one of the following:
For an item in an itemset or repeating form—Click the row number of the itemset or repeating form instance for which you want to add a comment.
For a regular item—Skip this step.
5 Click the comment icon ( ) in the far-right column of the item.
The Comment page appears.
6 In the Comment box, enter the text of the comment.
7 Click Submit.
8 In the confirmation box, click OK.
9 Click Return..
Note: The comment icon for the form item is yellow and contains an exclamation point (!), indicating that a comment exists.

Step by Step for CRCs and CRAs
100 InForm 4.6
Entering a comment on a form To enter a comment on a whole form:
1 In the Navigation pane, click Patients.
2 In the Case Books List, click the traffic light icon for the patient and visit you want to use.
3 Click the tab for the form.
4 Click the comment icon in the upper-right corner of the form.
The Comment page appears.
5 In the Create/Edit Current Comment box, enter the text of the comment.
6 Click Submit.
7 In the update confirmation box, click OK.
8 Click Return to return to the form.
The comment icon for the form is now yellow and contains an exclamation point (!), indicating that a comment exists.

Chapter 6 Entering form data
101
Associating forms
Form association is the ability to establish a relationship between two repeating forms. Associating the information on forms can make it easier to recognize possible relationships between collected data, study drugs, adverse reactions and concomitant medication.
A form can have zero-to-many associations. Study designers define the ability to link two forms. If your study is set up with this feature the lower half of the page lists the possible instances of forms that can be associated when you create a new instance of a form.
For example, an instance of an adverse event can be linked to a concomitant medication, and that particular concomitant medication can be linked to one or more adverse events.
Creating an association To create an association:
1 Be sure that data exists on the two forms that you want to link.
2 Display the summary view of one of the forms.
3 From the summary view, select the number in the far-left column for the form you want.
The bottom half of the page displays the forms that can be linked with the form you selected.

Step by Step for CRCs and CRAs
102 InForm 4.6
4 Select the checkbox for the form instances that you want to link.
5 To save the association, click Submit.
After you have created an association between instances of two repeating forms, the summary view of each form includes the associated instance of the other form, and you can navigate from one instance to the other.

Chapter 6 Entering form data
103
Adding an unscheduled visit
If your trial has unscheduled visits, the Case Books List and Time and Events schedule include an Unscheduled column. To add an unscheduled visit for a patient:
1 Go to an Unscheduled visit for the patient. (If the patient has previous unscheduled visits, click New in the Content-specific pane of the InForm software window to display a blank visit.)
2 Type the visit date and time in the date and time item on the first CRF of the visit.
3 Click Submit.
If the visit contains more than one form, the additional forms become visible after you submit the date and time. The Time and Events Schedule is updated to show the name of the unscheduled visit.
4 Complete the rest of the visit CRFs.

Step by Step for CRCs and CRAs
104 InForm 4.6
What to do if...
You find a data-entry error after submitting A data-entry error might automatically generate a query, if it is caught by the built-in edit checks on a data-entry item. For information about how to correct a data-entry error and answer a query simultaneously, see Answering queries (on page 121).
To correct an error that does not automatically generate a query:
1 Click the entered value.
The Data Value(s) page appears.
2 Enter the correct value and select or enter a reason for change.
3 Click Submit.
You receive a Form Submitted Successfully message, either in the heading or as a message box. If a message box appears, click OK.

Chapter 6 Entering form data
105
4 Click Return.
You return to the form.
Complete data is unavailable If you cannot complete an entire form in one data-entry session, submit the form with data partially entered. The background color of incomplete items changes to yellow, so you can find them easily when you return to the form later and enter the missing data.
A query is generated A data entry might automatically generate an open query when you submit the CRF, if the entry is caught by the built-in edit checks on a data entry item. When an automated query is generated in the Opened state:
The background color of the form item changes to pink. The text of the query appears underneath the form item. The yellow query flag appears in the far right column of the item.
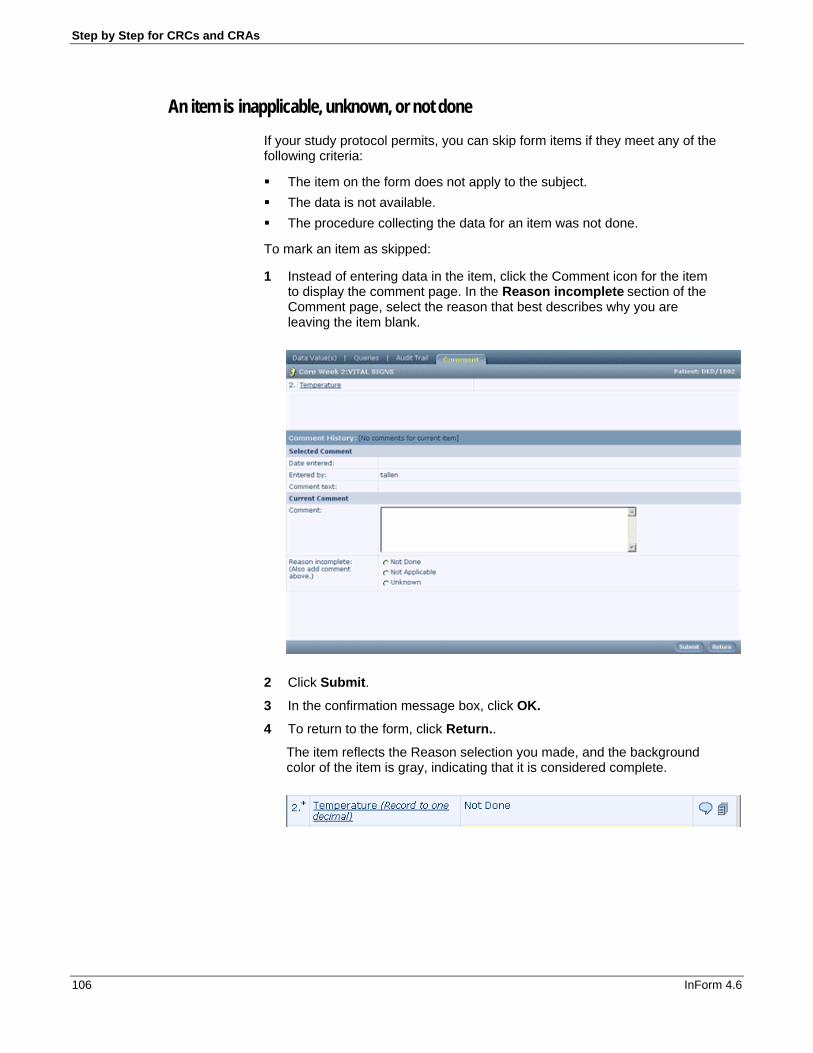
Step by Step for CRCs and CRAs
106 InForm 4.6
An item is inapplicable, unknown, or not done If your study protocol permits, you can skip form items if they meet any of the following criteria:
The item on the form does not apply to the subject. The data is not available. The procedure collecting the data for an item was not done.
To mark an item as skipped:
1 Instead of entering data in the item, click the Comment icon for the item to display the comment page. In the Reason incomplete section of the Comment page, select the reason that best describes why you are leaving the item blank.
2 Click Submit.
3 In the confirmation message box, click OK.
4 To return to the form, click Return..
The item reflects the Reason selection you made, and the background color of the item is gray, indicating that it is considered complete.

Chapter 6 Entering form data
107
A form is not applicable, unknown, or not done In some cases it might be appropriate to skip an entire form. If your study protocol permits, you can skip form for any of these reasons:
The form is not applicable. The data is not available. The procedures the form documents were not done and the data were
not collected.
To mark a form as skipped:
1 Instead of entering data in the form, enter a comment that describes the reason the form is skipped. In the If Incomplete, Reason section of the Comment page, select the reason that best describes why you are leaving the item blank.
2 Click Submit.
3 In the confirmation message box, click OK.
4 Click Return to return to the form.
The items on the form reflect the Reason selection you made, and the background color of the items is gray, indicating that they are considered complete.
An item is not editable or visible During study design, items can be marked as editable, read-only or hidden. Whether you can mark an item depends on the rights groups to which you belong. For example:
If you can not see an item on a form, you might not have rights to view that item.
If you can see an item, but are not allowed to edit, or enter data for it, you might not have rights to edit that item.
If the form is blank or empty, the items and itemsets on the form might all be designated as hidden display override.

Step by Step for CRCs and CRAs
108 InForm 4.6

109
In this chapter Overview: Updating form data...............................................................110 Updating form data................................................................................112 Clearing data .........................................................................................114 Deleting or undeleting an itemset..........................................................116 What to do if... .......................................................................................120
C H A P T E R 7
Updating form data

Step by Step for CRCs and CRAs
110 InForm 4.6
Overview: Updating form data
This section describes the following:
The Data Value(s) page, which you use to update data on a form. The audit trail, which keeps a record of all changes to data items.
Data Value(s) page The Data Value(s) page is used to update a form item. This page is linked to each data item. When you click the value that is entered in the form, the Data Value(s) page appears and displays the current value of the item. The page also includes a way to access previous values the item has held, a set of data-entry controls for changing the value of the item, and a section where you provide the reason the item is being changed.

Chapter 7 Updating form data
111
Audit trail Each time you change the value of a data item, an audit trail records the date and time of the change, the user name of the person making the change, and the reason for the change. You can review the audit trail of an item in several ways:
On the Data Value(s) page—Select a change date and time from the Audit Trail list. The details of the change appear in the Reason for Change section.
On the Data Value(s) page—Click the Audit Trail tab.
On the form—Click the audit trail icon for the item whose audit trail you want to view.
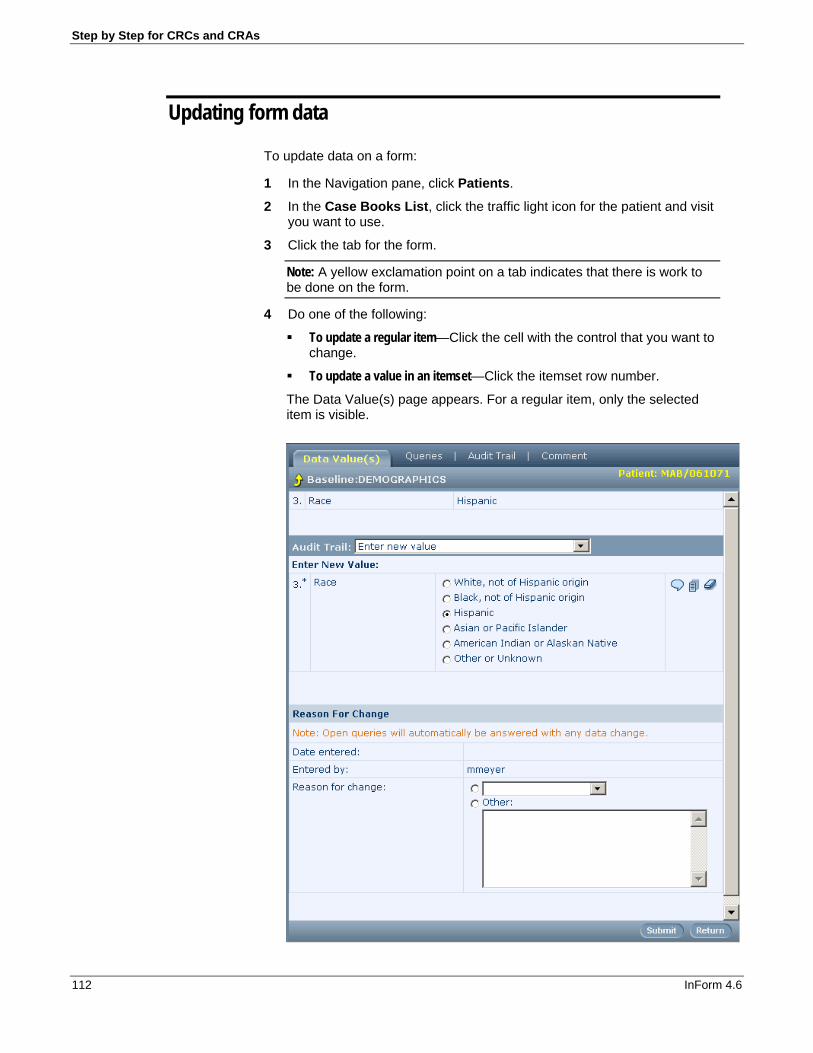
Step by Step for CRCs and CRAs
112 InForm 4.6
Updating form data
To update data on a form:
1 In the Navigation pane, click Patients.
2 In the Case Books List, click the traffic light icon for the patient and visit you want to use.
3 Click the tab for the form.
Note: A yellow exclamation point on a tab indicates that there is work to be done on the form.
4 Do one of the following:
To update a regular item—Click the cell with the control that you want to change.
To update a value in an itemset—Click the itemset row number.
The Data Value(s) page appears. For a regular item, only the selected item is visible.

Chapter 7 Updating form data
113
For an itemset, all items in the itemset are visible.
5 In the Enter New Value section of the page, select or type the new value of the item.
6 In the Reason for Change section of the page, select or type the reason you are changing the data.
7 Click Submit.
8 In the confirmation message box, click OK.
9 Click Return.
You return to the form. Note the changes of appearance in the item:
If the data change answers a query, the background color changes from pink to gray.
If the data change clears the value from the item, the item is incomplete. The background color changes from gray to yellow.
If this was the first time the data value was changed since initial data entry, the audit trail icon changes from gray to yellow to indicate the existence of additional events in the audit trial.
If you deleted an itemset:
The original itemset values are visible but crossed out.
If the itemset or item had a query, the query is cleared.
If the itemset row was part of a rule, the rule is not refreshed.

Step by Step for CRCs and CRAs
114 InForm 4.6
Clearing data
Implications of clearing data The following table describes what happens when you clear data from a form.
Affected area What happens when you clear an item Queries on a cleared item. In a regular CRF with no itemsets, the following status
changes occur:
An Automatic query is changed to Closed. For manual queries:
An Opened query is changed to Answered. A Candidate query is purged. Other queries are unchanged.
In a CRF with itemsets, queries on an itemset are treated as if the itemset were one item, and the same status changes occur as for an item.
Itemsets. If an itemset has been deleted, the deleted data is cleared. The audit trail records two entries indicating that the data was deleted and then cleared.
Calculated control. The value of the calculated control is cleared if the calculated control depends on the cleared item.
CDD mapping for a cleared item. The value mapped to the CDD is cleared along with the value of the cleared item.
Patient number. After a Patient Number is entered, it cannot be cleared.
Randomization number. After a Randomization Number is calculated, it cannot be cleared.
Clearing data from an item
To clear data from an item, use the reset value icon in the far right column of the form:
To clear data before submitting it:
Click the reset value icon in the same row as the item.
To clear data that has already been submitted:
1 Click the entered value.
2 On the Data Value(s) page, click the reset value icon and select or enter a reason for the change.
3 On the Data Value(s) page, click Submit.
The confirmation dialog box appears.

Chapter 7 Updating form data
115
4 Click OK.
The color of the item row background changes from gray to yellow, to indicate that the item is now incomplete.
Clearing data from a form To clear data from an entire form:
1 Navigate to the form that you want to clear.
2 From the Select Action drop-down list, select Clear CRF.
3 Click Apply.
The Reason for Clearance page appears.
4 In the Reason for clearing the form drop-down list or text box, select or type a reason for clearing.
5 Click Submit.
The color of each item row background changes from gray to yellow, to indicate that the item is now incomplete.

Step by Step for CRCs and CRAs
116 InForm 4.6
Deleting or undeleting an itemset To remove data from an itemset, you can do one of the following: Clear a single item. Delete an entire row before it is submitted. Delete an entire row after it has been submitted.
Deleting an itemset
Note: To clear an entire row of an itemset, do not use the reset value icon (located next to each data item). To remove a row from an itemset, you must delete the row. The audit trail for each item indicates that data has been removed by clearing or deleting.
To delete an itemset before submission:
1 Click Return.
A warning appears, informing you that data has not been submitted.
2 To confirm that you want to leave the form without submitting the data, click OK.
To delete an itemset after submission:
1 Navigate to the form that contains the itemset that you want to delete.
2 Click the underlined row number.
The Data Value(s) page for the selected itemset row appears.

Chapter 7 Updating form data
117
3 In the Reason for change drop-down list or text box, select or type a reason for the deletion.
4 Click Delete.
After you delete a row, the entries in all columns are crossed out, and the columns are colored gray to indicate that all items in the row are complete.
Undeleting an itemset To undelete an itemset:
1 Navigate to the form that contains the itemset you want to undelete.

Step by Step for CRCs and CRAs
118 InForm 4.6
2 Click the underlined row number.
The Data Value(s) page appears, displaying the itemset row that you selected.

Chapter 7 Updating form data
119
3 In the Reason for change drop-down list or text box, select or enter a reason for undeleting the itemset row.
4 Click Undelete.
A confirmation dialog box appears.
5 Click OK.
The InForm software reinstates the entries in all columns of the row, and the color of each column reflects the state of the item before the row was deleted.

Step by Step for CRCs and CRAs
120 InForm 4.6
What to do if...
The new data item value results in a query If the value to which you change a data item fails an edit check on that item, the InForm software generates an automatic query, which you can answer right away by using one of the following methods:
Changing the data value again. To use this method:
1. Check that the value was entered correctly.
2. Check that the value matches your source data.
3. Check the study documents, including form help, if it is available, to find the range of permitted values for the item.
If you find that the data is in error, change the data.
4. Click the current item value, and proceed as described in Updating form data (on page 109).
Entering answer text. To use this method, follow the instructions in Answering queries (on page 121).

121
In this chapter Overview: Answering queries................................................................122 Answering a query.................................................................................126 What to do if... .......................................................................................130
C H A P T E R 8
Answering queries

Step by Step for CRCs and CRAs
122 InForm 4.6
Overview: Answering queries
The InForm software allows two methods for creating queries:
Automatic queries—Generated when you submit data in an item with an automated server side edit check, and the data value fails the edit check. The query appears on your screen as a result of the data submission, and you can see and correct it immediately.
Manual queries—Created by CRAs, Clinical Data Managers (CDMs), or other personnel during source verification or other data review.
Query status A query can have any of the status codes listed in the following table.
Query status Description Candidate Queries that are visible only to sponsor personnel; they are
invisible to site users. A sponsor representative reviews the query and then either opens or deletes it.
Opened Queries that are visible to site users and are awaiting response.
Answered Queries for which a response has been submitted by a site user. For manual queries, when a site user responds to a query, the query enters Answered status and is ready for review by the Clinical Data Manager or CRA. The Clinical Data Manager or CRA reviews Answered queries and either closes or reopens them.
Closed Queries that have been answered by a site user and then reviewed by a Clinical Data Manager or CRA. If the Clinical Data Manager or CRA is satisfied with the query answer, he or she closes the query.
Appearance of items with queries An Opened query on a form item looks like this:
The background color of the form item is pink. The text of the query is red in color and begins with the word "Open".
The text is located underneath the form item. A yellow query flag appears in the far right column of the item.

Chapter 8 Answering queries
123
Query Listing The Query Listing displays a summary of all queries and provides links to the form items against which the queries are written.
To view the Query Listing:
In the Navigation pane, click Queries.
To display details about a specific query:
Click the underlined form name or item number.

Step by Step for CRCs and CRAs
124 InForm 4.6
Queries page The Queries page displays details about a query and enables you to enter an answer.
To display the Queries page for a specific form item:
From the form, click the underlined query text or the query flag. From the Query Listing, click the underlined query text.
Ways to answer queries You can answer a query in either of the following ways:
By changing the data value of the item on which the query was created. By submitting text that explains the data value.

Chapter 8 Answering queries
125
By changing the data value
When you submit a new data value, the InForm software:
Runs all automated edit checks that exist on the form item. If the new value fails the edit checks, the InForm software generates new queries; if the new value passes all edit checks, the InForm software closes the query.
Closes all manual queries on the item, if your trial is configured to close queries automatically when the data value changes.
Updates the appearance of the form item to indicate the new query state.
By submitting text
When you submit text to answer the query, the InForm software:
Changes the status of the query to Answered. The query must be closed manually by a data reviewer who has the right to close queries.
Updates the appearance of the form item to indicate the new query state. The background color of an item with an Answered query is gray, and the query text is removed from below the item.

Step by Step for CRCs and CRAs
126 InForm 4.6
Answering a query
You can answer a query on a form item by changing the data value or by submitting text that explains the existing data value.
Changing the data value of the item To answer a query by correcting the data value of the item:
1 In the Navigation pane, click Queries.
The Query Listing page appears. If necessary, filter the list of queries by selecting a particular patient, query status, or query issuer from the drop-down lists at the top of the page.
2 Click the underlined query text for the query that you want to answer.
The Queries page appears.

Chapter 8 Answering queries
127
3 Click the Data Value(s) tab.
The Data Value(s) page appears.

Step by Step for CRCs and CRAs
128 InForm 4.6
4 Type the new data value and the reason for change.
5 Click Submit.
Submitting answering text To submit an answer to a query:
1 In the Navigation pane, click Queries.
The Query Listing page appears.
2 If necessary, filter the list of queries by selecting a particular patient, query status, or query issuer from the drop-down lists at the top of the page.
3 Click the underlined query text for the query that you want to answer.
The Queries page appears.

Chapter 8 Answering queries
129
4 In the Reason area at the bottom of the Queries page, select a reason from the drop-down list, or select Other and type the answer to the query.
5 Click Submit.

Step by Step for CRCs and CRAs
130 InForm 4.6
What to do if...
The new data value results in another query If the InForm software generates a new automatic query when you answer a query by changing the item’s data value, you can answer the new query right away by using one of the following methods:
Changing the data value again. To change the data value again:
1. Check that the value was entered correctly.
2. Check that the value matches your source data.
3. Check the study documents, including CRF help, if it is available, to find the range of permitted values for the item.
4. If you find that the data is in error, change the data.
5. Click the current item value, and proceed as described in Changing the data value of the item (on page 126).
Entering answer text. To use this method, follow the instructions in Submitting answering text (on page 128).
A query conflict occurs Query conflicts can occur if users working on two different copies of a trial change either the text or the state of a query before the first user’s change is synchronized to the other user’s computer.
For more information, see Synchronizing a Trial (on page 245).

131
In this chapter Overview: Indicating that a form is ready for source verification...........132 Marking forms SV Ready or Not SV Ready ..........................................133
C H A P T E R 9
Indicating source verification readiness

Step by Step for CRCs and CRAs
132 InForm 4.6
Overview: Indicating that a form is ready for source verification
You can mark a form to indicate that it is ready or not ready for source verification. This information is used by monitors to determine which data is ready to be reviewed and source verified.
Forms can be marked as follows:
Not SV Ready—A form has this status: After it has been touched (after you enter data in any item or enter a
comment to indicate that the form or a data item will be left blank) and before you mark it SV Ready.
If you mark the form ready for source verification, but then change the data in an item, the InForm software changes the status of the item to Not SV Ready.
SV Ready—A form has this status after you mark it ready for source verification and before a monitor performs source verification on the form.
Note: To mark a form ready for source verification, you must have the appropriate rights.

Chapter 9 Indicating source verification readiness
133
Marking forms SV Ready or Not SV Ready
To mark a form SV Ready or not Ready:
1 In the Navigation pane, click Patients.
2 In the Case Books List, click the traffic light icon for the patient and visit you want to use.
3 Click the tab for the form.
4 In the Select Action list, choose an action.
To indicate that the form is ready for source verification, click Mark SV Ready.
To indicate that the form is not ready for source verification, click Mark Not SV Ready.
5 Click Apply.
The form does not change appearance. However, the Select Action list changes to include the opposite SV readiness command; for example, if you marked the form SV Ready, the list includes the Mark Not SV Ready command. When the monitor views the Source Verification Listing page, the SV status of the form is SV Ready or Not SV Ready, according to the action you selected.

Step by Step for CRCs and CRAs
134 InForm 4.6

135
In this chapter About performing source verification.....................................................136 Online source verification......................................................................137 Source verifying data on an online form................................................138 Ways to access the source verification view of a form .........................140 Accessing the form from a case book ...................................................141 Accessing the form from the Source Verification Listing page..............144 Freezing or locking while monitoring.....................................................149 Source verifying data from a printed listing...........................................151 The Source Verification Listing page ....................................................153 Source verification states ......................................................................155 What to do if... .......................................................................................156
C H A P T E R 1 0
Performing source verification
Step by Step for CRCs and CRAs
136 InForm 4.6
About performing source verification
You can verify the data that is entered on forms against source documents, and mark the data items you have verified to indicate that they are complete.
You can perform source verification in the following ways:
Online (on page 137). From a printed listing (on page 151).

Chapter 10 Performing source verification
137
Online source verification
You can do the following source verification tasks online:
Compare CRF data to source documents—During source verification, the InForm software displays a specialized view of forms.
Issue queries where necessary—If your review turns up errors or inconsistencies, you can navigate directly from the source verification view of the form to the Queries page, so that you can issue queries.
Record the results of your review—The source verification view of a form contains checkboxes so you can mark the items and forms that you have verified.

Step by Step for CRCs and CRAs
138 InForm 4.6
Source verifying data on an online form
To perform source verification:
1 In the source verification view of the form, verify each item for which verification is required. Items that require source document verification have a checkbox and are deselected.
Note: When you are verifying data for an itemset, one checkbox is used to mark an entire itemset row as source verified.
2 Handle each item as required, as described in the table:
Action Do this To indicate that an item is source verified
For a data item: Select the checkbox that is located in the left column of the row that contains the item. To select all checkboxes at once, click
the checkmark that is located at the upper-left corner of the form.
To deselect a checkbox, click the checkmark.
If only a few items still require verification when you finish with this form, you can select all boxes, then deselect the checkboxes for those items that still require verification.
For an itemset: Select the checkbox. One checkbox marks the entire itemset row as source verified.
To enter a query Against an item: Click the query icon that is located in the far-right column of the row. Items for which there are queries have a yellow query icon.
Against an itemset: Click the itemset row number, then click the query icon for the item you want.
To review a comment On an item: Click the comment icon that is located in the far-right column of the row.
On an itemset: Click the itemset row number, then click the comment icon for the item you want.
To review a comment on the form as a whole
Click the form-level comment icon that is located at the top-right corner of the page.
To review the audit trail Of an item: Click the audit trail icon that is located in the far-right column of the row.
Of a itemset: Click the itemset row number, then click the audit trail icon for the item you want.
3 Click Submit.

Chapter 10 Performing source verification
139
In the Source Verification listing, the SV Status entry changes for each form whose source verification state has changed. If a form becomes SV Complete, a checkmark appears next to the traffic light icon of the form, in the following places:
Source Verification Listing.
Case Books Listing.
Time and Events Schedule.
This checkmark is visible if you are in a rights group with the right to monitor CRFs.

Step by Step for CRCs and CRAs
140 InForm 4.6
Ways to access the source verification view of a form
When you perform source verification online, you can access the source verification view of forms from either of the following locations:
The Case Books list or Time and Events schedule. Accessing the source verification view of forms from a case book is useful if you want to perform source verification on all of the forms that pertain to a single patient.
If your trial is configured to allow it, you can enable SV mode. As you navigate from form to form, every form appears in source verification view, with a checkbox next to every item that requires source verification.
For more information, see Accessing the form from a case book (on page 141).
The Source Verification Listing page. On the Source Verification Listing page, you can sort the list of forms by various criteria, such as by query state, by visit, or by various status indicators. You can use one of the standard filters or design a custom filter. This is useful if you are performing an interim analysis, for example. You can select a specific form and look at that form for each patient in the list. You can filter the list to display only certain kinds of forms, then perform source verification for that form for each patient in turn.
For more information, see Accessing the form from the Source Verification Listing page (on page 144).

Chapter 10 Performing source verification
141
Accessing the form from a case book
You can perform source verification on forms that you have accessed by navigating from the Case Books List, Time and Events schedule, or patient visit.
If your trial is configured to allow it, you can display the forms in SV continuous navigation mode. You can navigate to any of the forms in the Case Book or Time and Events schedule. All of the forms are displayed in source verification view. On each form, every item that requires source verification appears with a checkbox in the left column.
SV mode remains enabled until you disable it by clicking Disable SV Mode, or until you log off.
Note: For you to be able to use this feature, your trial must be configured by the trial administrator to allow SV Continuous Navigation mode.
To access the Source Verification view of the form:
1 In the Navigation pane, click Patients.
2 In the Case Books List, display the CRF on which you want to perform source verification, by doing one of the following:
Click a traffic light that represents the patient visit whose forms you want to source verify.
To display the Time and Events schedule for a patient, click the patient number. Optionally, you can filter the display for source verification status (on page 142). Then click the traffic light that represents the appropriate visit and form.
3 Follow the instructions in the table, based on the button that appears in the Content-specific pane.
Button To access the source verification view Enable SV Mode 1 Click Enable SV Mode.
The text of the button changes to Disable SV Mode On the form, each item that can be source verified appears with a checkbox in the left column.
2 Source verify the form. For more information, see Source verifying data on an online form (on page 138)
3 Click Return.
4 Click a traffic light icon that represents the next form on which you want to perform source verification.
The form appears with checkboxes for source verification.

Step by Step for CRCs and CRAs
142 InForm 4.6
Button To access the source verification view Verify 1 Click Verify
The source verification view of the form appears.
2 Source verify the form. For more information, see Source verifying data on an online form (on page 138)
3 Click Return.
4 Click a traffic light icon that represents the next form on which you want to perform source verification.
The monitor view of the form appears.
5 Click Verify.
To disable SV mode:
In the Content-specific pane, click Disable SV Mode. Checkboxes no longer appear next to data items.
Filtering for SV status in the Time and Events Schedule Sponsor users can filter the Time and Events Schedule of a patient to find forms that have the following source verification status.
SV Ready SV Partial SV Complete
These source verification filters can be used in combination with the other filters that appear on both the Case Books list and Time and Events schedule:
Started Incomplete Contain queries Frozen Locked
When you select one or more filters, traffic lights for the forms that match all of your selections appear highlighted. For example, if you select the Frozen and the SV Ready checkboxes, only traffic lights for forms that are both Frozen and SV Ready are highlighted. The traffic light for a form that is SV Ready and not frozen displays as dimmed.
Your filter selections remain in effect as you navigate to Time and Events schedules and forms for different patients, until you log off.
To filter the Time and Events schedule for Source Verification status:
1 If the Time and Events schedule is not displayed, do the following:
a) In the Navigation pane, click Patients.

Chapter 10 Performing source verification
143
b) In the Case Books List, click a patient number.
The Time and Events Schedule appears.
2 In the Time and Events Schedule, select the checkboxes that represent the status of the forms you want to view.
Traffic light icons that meet the criteria appear highlighted.

Step by Step for CRCs and CRAs
144 InForm 4.6
Accessing the form from the Source Verification Listing page
To display the source verification view of a form:
1 If the Source Verification Listing page is not displayed, do the following:
In the Navigation pane, click Monitor.
The Source Verification listing page appears. For more information, see The Source Verification Listing (on page 153) page.
2 Optionally, filter the list of forms (on page 144).
3 Locate the row that represents the form whose data you want to source verify.
4 In the CRF column, click the abbreviation for the form.
Filtering the Source Verification listing The Source Verification Listing page displays information about all patients at all sites to which you have access. The information is displayed in a table, with each row representing one form that was used at one visit for a single patient.
You can display only the forms on which you want to perform source verification. The Source Verification Listing includes drop-down lists from which you can choose to display a list of forms for a specific site and patient. You can also filter the list by source verification state, by CRF completion state, and by numerous content and status criteria. You can create and save custom filters.
The table describes the drop-down lists.
Drop-down list Description Site Lists all the sites to which you have access. You can select all
sites or choose a specific site.
Patient Lists patient numbers based on your selection in the Site drop-down list.
To display all records from the site(s), select All. To display records for a specific patient, select the patient
number.
Filter Provides additional filters for the patient records that are listed as a result of your selections from the Site and Patient drop-down lists.
You can choose any of the following actions:
To display all records, leave the Filter drop-down blank (that is, displaying nothing).
To choose a Public filter, select its name from the drop-down list. For more information, see Public filters (on page 145).
To modify a public filter or create a custom filter, click Edit. For more information, see Custom filters (on page 146).

Chapter 10 Performing source verification
145
To use the Site and Patient drop-down lists:
1 From the Site drop-down list, do one of the following:
To display a list of forms from a specific site, choose the site name from the list.
The Source Verification listing displays a list of forms for all patients that are at the site you selected. The Patient drop-down list changes so that it contains a list of patient numbers from that site.
To display a list of forms from all sites, choose All.
The Source Verification listing displays a list of forms for all patients at all sites. The Patient drop-down list changes so that it contains a list of patient numbers from all sites.
2 From the Patient drop-down list, do one of the following:
To display a list of forms for a single patient, choose the patient number.
The Source Verification listing displays a list of forms for the patient.
To list forms for all patients, choose All.
The Source Verification listing displays a list of forms for all patients at the site or sites you chose in the Site list.
3 To apply an additional filter to the list of forms that is displayed, make a selection in the Filter drop-down list. You can choose a Public filter (on page 145) or a Custom filter (on page 146) that you created previously.
Public and Custom filters are applied to the list of patient forms that are displayed as the result of your selections in the Site and Patient drop-down lists.
For example, if you select a specific site, then select a patient number 01-003, a list of forms for patient 01-003 appears in the Source Verification listing. If you then select the Not Verified public filter, the list of forms for patient 01-003 is further narrowed to list only those CRFs that meet the Not Verified criteria.
Public filters
Use the Filter drop-down list to select a public filter. The table describes the forms that are listed when you apply the filter.
Public filter name Displays a list of Not Complete CRFs that have been started. On each CRF, one or
more required items are not complete.
Not Verified CRFs that contain items that are SV required. On each CRF, every item that is SV required has any status other than SV complete.
Step by Step for CRCs and CRAs
146 InForm 4.6
Public filter name Displays a list of Ready to Verify CRFs that have required items. On each CRF:
All required items are complete. Each required item has one of the following
states: Not SV Ready SV Ready Partial SVd
To view details about the filter criteria, click the Edit button.
To make changes, select or deselect the checkboxes, and save the filter as a Custom filter (on page 146).
Custom filters
Custom filters let you choose the exact characteristics of the forms that you want to display in the Source Verification listing. You can create a custom filter by editing an existing public filter and saving it with a new name, or by creating a new filter and specifying all filter criteria.
Custom filters appear only to you in the Filter drop-down list.
Public and Custom filters are applied to the list of patient forms that are displayed as the result of your selections in the Site and Patient drop-down lists.
For example, if you select a specific site, then select a patient number 01-003, a list of forms for patient 01-003 appears in the Source Verification listing. If you then select the Not Verified public filter, the list of forms for patient 01-003 is further narrowed to list only those CRFs that meet the Not Verified criteria.
To create a custom filter:
1 In the Filter drop-down list, do one of the following:
To modify an existing filter, select the filter name from the list.
To create a new filter, select the blank area from the list; that is, make sure that nothing is selected.
2 To the right of the Filter drop-down list, click Edit.
The Criteria dialog box appears. By default, all checkboxes are selected.
To deselect a checkbox, click in the box.
To deselect or select all checkboxes in a category, select or deselect the All checkbox.
3 Select the checkboxes for the criteria that you want the filter to use. You must make at least one selection in each category.
Note: To list all instances of a common form, select CCRF in the Visit category.

Chapter 10 Performing source verification
147
4 To view a summary of your selections, expand the Criteria dialog box by clicking the arrow icon ( ) that is located in the lower-right corner, above the Cancel button.
5 To save the filter, click Save.
6 Provide a name for the filter.
Note: If you started with an existing filter, the name of the filter appears in the dialog box.
7 To apply the filter without saving it, click Apply.
After you apply the filter, the following occurs:
The filter is applied to the list of forms that was displayed at the time you clicked Apply.
Patient records that match all of your selections appear.
The Criteria dialog box closes.
The Filter drop-down list displays one of the following, depending on whether you started with a public filter or a blank filter name:
If you started with a public filter, the name of the filter appears with the words Public Filter in parentheses, and an asterisk. For example,
Not Complete (Public Filter)*
If you started with a blank filter name, the word Custom appears.
To save a custom filter that you applied without saving
You must save the filter immediately after you apply it, or your edits will be lost.
1 The Filter drop-down list displays the filter that you applied. The name of the filter appears as either of the following:
The word Custom
The name of the public filter that you edited, followed by the words Public Filter in parentheses, and an asterisk. For example,
Not Verified (Public Filter)*
2 Click Edit.
The Criteria dialog displays the criteria that is used by the filter.
3 Click Save.
4 Type a name for the filter, then click Save.
Note: If you make any changes to the criteria and apply the filter before you save it, the filter appears with the new criteria.
To delete a custom filter:
1 In the Filter drop-down list, select the name of the filter you want to delete.
2 Click Edit.
Step by Step for CRCs and CRAs
148 InForm 4.6
The Criteria dialog appears.
3 Click Delete.
4 In the confirmation dialog box that appears, click OK to confirm the deletion.

Chapter 10 Performing source verification
149
Freezing or locking while monitoring
You can freeze or lock multiple forms in one action from the Source Verification Listing page. Similarly, you can unfreeze or unlock a form that previously was frozen or locked.
To do any of these actions:
1 In the Navigation pane, click Monitor.
The Source Verification Listing page appears.
2 Optionally, filter the list of patient forms.
The Source Verification Listing includes drop-down lists from which you can choose to display a list of forms for a specific site and patient. You can also filter the list by source verification state, by CRF completion state, and by numerous content and status criteria. You can create and save custom filters. For more information, see Filtering the Source Verification listing (on page 144).
To display entries for a Select from the Site Site list
Patient Patient list
Source verification status (partially verified, completely verified, not verified, ready for verification, not ready for verification)
SV Status list
CRF data entry status (complete, missing data, missing data and queries, queries, frozen or not frozen, locked or not locked)
CRF Status list

Step by Step for CRCs and CRAs
150 InForm 4.6
3 Select the checkbox on the left of each form you want to freeze or lock.
4 Do one of the following:
To freeze or lock the forms—Click Freeze or Lock.
To unfreeze or unlock the forms—Click Unfreeze or Unlock.

Chapter 10 Performing source verification
151
Source verifying data from a printed listing
If you do not have access to a computer when you perform source verification, you can print copies of CRFs. You can then verify the data offline. After you complete your review, do the following:
Log on to the InForm software. Issue queries where necessary. Record the results of your review. Use the source verification view of the
CRFs that you checked.
Printing an SV Report for offline verification To perform source verification offline, you can print a copy of the forms for a patient:
1 In the Navigation pane, click Monitor.
2 Click the SV Report tab.
The Source Verification Reports page appears.
3 Optionally, to more easily locate a patient, click the column heading of the Site, Patient Number, or Patient Initials columns to change the sort order.
4 If the report occupies more than one page, use the page indexer control to navigate to the page containing data for the patient for whom you want to print CRFs.
5 Click Print Preview for the patient for whom you want to print CRFs.

Step by Step for CRCs and CRAs
152 InForm 4.6
The InForm software displays a ready-to-print view of the first form in the first visit for the patient.
6 Display the form or forms you want to print:
To generate a report consisting of all forms, click All.
To navigate to a specific form, use the navigation buttons in the Content-specific pane at the bottom of the page.
7 Click Print.
8 Click Return.
The Source Verification Reports appears.

Chapter 10 Performing source verification
153
The Source Verification Listing page
The Source Verification Listing page displays a summary of the CRFs for each patient. You can use the Source Verification Listing page to:
Determine the source verification status (on page 155) and data entry status of forms.
Display the source verification view of a particular form. Filter the list of forms. Freeze or lock selected forms.
The Source Verification Listing page displays information about all patients at all sites to which you have access. The information is displayed in a table, with each row representing one form that was used at one visit for a single patient.
For example, for patient 01-001, the table lists one row for the CGI form that was used at the Baseline visit, another row for the DEM form that was used at the Baseline visit, and so on.
Note: The Source Verification Listing page displays each instance of a repeating form as a separate row. The number of the instance is added to the name of the form: for example, AE[1], AE[2].
To display the Source Verification Listing page:
In the Navigation pane, click Monitor. The Source Verification listing page appears.

Step by Step for CRCs and CRAs
154 InForm 4.6
The Source Verification Listing includes drop-down lists from which you can choose to display a list of forms for a specific site and patient. You can also filter the list by source verification state, by CRF completion state, and by numerous content and status criteria. You can create and save custom filters.
For more information, see Filtering the Source Verification Listing (on page 144).

Chapter 10 Performing source verification
155
Source verification states
On the Source Verification Listing page, the SV Status column shows the following states:
Status Listing includes All All forms in which at least one data item has been touched
or a form-level comment has been added.
SV Complete Forms for which source verification has been performed on all data items.
If a user changes a data item or adds a comment to a form that is SV Complete, the state of the form reverts to SV Partial.
SV Partial Forms for which source verification has been performed on one or more items but not all items.
SV Ready Forms that a user has marked ready for source verification.
Not SV Ready Forms in which either of the following is true:
At least one data item has been touched or a form-level comment has been added, but that a user has not marked ready for source verification.
A user has marked the form Not SV Ready.
Not SVd All forms that are not SV Complete.

Step by Step for CRCs and CRAs
156 InForm 4.6
What to do if...
A form changes after source verification is complete If the value of a data item on a form changes or a query is issued against the item after source verification is complete, the InForm software makes the following changes to highlight the item so that you can re-verify it:
The source verification status of the form changes to a status that indicates source verification is incomplete. You can see this change in the Source Verification Listing, and you can use the filter lists to highlight forms that have an incomplete source verification status.
If a query is issued against an item, the status of the form changes, and the traffic light icon in the Source Verification Listing page shows the opened query status.
In the source verification view of the form, the following occurs: The checkmark of the item is cleared.
The background color of the item changes, as follows.
Item change Color changes to: Required item deleted. Yellow checkbox cell, yellow data cell.
Required item changed. Yellow checkbox cell, gray data cell.
Query issued on required item. Yellow checkbox cell, pink query text cell, gray data cell.
Query issued on required item containing no data.
Yellow checkbox cell, pink query text cell, yellow data cell.
If you have any unverified items, repeat the source verification procedure.

157
In this chapter Overview: Issuing queries .....................................................................158 Issuing a query ......................................................................................159 Opening a candidate query ...................................................................163 Deleting a candidate query....................................................................165 Navigating between queries and CRFs.................................................167 What to do if... .......................................................................................168
C H A P T E R 1 1
Issuing queries

Step by Step for CRCs and CRAs
158 InForm 4.6
Overview: Issuing queries
This section describes how to issue queries.
Automatic and manual queries The InForm software provides the capability for both automatic and manual queries:
Automatic queries—Issued when a submitted data value fails a predefined edit check. These queries appear immediately after data submission, and site users can respond to them before any data review occurs.
Manual queries—Issued as a result of review activities. You enter a manual query by using query pages, site users respond to the queries, and you monitor the responses. The query procedures described in this chapter deal only with manual queries.
Query states Your trial can be set up to allow you to issue queries in either or both of the following states:
Opened—Queries are immediately visible to site users and available for response.
Candidate—Queries are preliminary and are invisible to site users. If your trial is set up to enable Candidate queries, there might be a step in which a senior CRA reviews Candidate queries before opening them. When you change the state of a Candidate query to Opened, it becomes visible to site users.

Chapter 11 Issuing queries
159
Issuing a query
To issue a query:
1 In the Navigation pane, click Patients.
The Case Books List appears.
2 Click the traffic light icon for the patient and visit in which you want to create a query.
3 Click the tab for the form on which you want to issue a query.
The form appears.
Step by Step for CRCs and CRAs
160 InForm 4.6
4 Do one of the following:
For a regular item—Click the query icon in the farthest-right column of the item for which you want to create a query.
For an item in an itemset or a repeating form instance—Click the itemset or repeating form instance row number, then click the query icon in the farthest-right column of the item for which you want to create a query.
The Queries page appears. If the item has no queries, the Queries page is blank. If the item has at least one query, the most recent query appears.
Note: Your trial may be configured so that when you click the query icon for an item that has no queries, a blank query form appears; you do not need to click Create Query. Go to Step 6.

Chapter 11 Issuing queries
161
Note: If you are performing source verification on a CRF, you can navigate to the Queries page. In the source verification view of the CRF, in the far-right column, click the query icon.
5 Click Create Query.
6 If you have rights to create a query in either Candidate or Opened state, use the Action drop-down list to select the state.

Step by Step for CRCs and CRAs
162 InForm 4.6
Note: If you have only one of these access rights, the state will be preselected.
7 For Reason, select or type the query text by doing one of the following:
Select the appropriate text from the drop-down control.
Select Other and type the reason in the text box.
8 Click Submit.
The form on which you entered the query appears. The appearance of the item changes as follows:
If you issued an Opened query:
The background color of the item changes to pink.
The query text appears below the item.
The query flag in the far-right column of the item is yellow.
To open the Queries page and view detailed information, click the query text.
If you issued a Candidate query:
The query flag turns yellow (if it was not already yellow).
The background color and query text do not change until the query status is changed to Opened by a user with the rights to make that change.
Note: A Candidate query is invisible to site users until the query is opened.
9 In the Navigation pane, click Queries to return to the Queries page.
10 To see the status of all queries on this item, use the Query drop-down list. To choose a different action, select it from the Action drop-down list.

Chapter 11 Issuing queries
163
Opening a candidate query
To change a candidate query to an opened query:
1 In the Navigation pane, click Queries.
The Query Listing page appears.
2 From the Query Status drop-down list at the top of the page, select Candidate. Optionally, filter the list of queries to display queries for a specific site or patient by using the drop-down lists.

Step by Step for CRCs and CRAs
164 InForm 4.6
3 Click the query you want to open.
The Queries page for the item appears.
4 From the Action drop-down list, select Place Query in Opened State.
5 From the Reason drop-down list, select a reason, or select Other and type a reason.
6 Click Submit. The form reappears with the opened query.

Chapter 11 Issuing queries
165
Deleting a candidate query
To delete a candidate query:
1 In the Navigation pane, click Queries.
The Query Listing page appears.
2 From the Query Status drop-down list at the top of the page, select Candidate. Optionally, filter the list of queries to display queries for a specific site or patient, by using the drop-down lists.

Step by Step for CRCs and CRAs
166 InForm 4.6
3 Click the query you want to open.
The Queries page for the item appears.
4 From the Action drop-down list, select Delete Query.
5 From the Reason drop-down list, select a reason, or select Other and type a reason.
6 Click Submit. The form reappears with the opened query.

Chapter 11 Issuing queries
167
Navigating between queries and CRFs
There are links that allow you to navigate between the Query Listing the details of the query and the form on which the query is located. Use the table below to navigate between these InForm pages.
To navigate from To the Click Query page Form on which the query
was entered. Arrow icon.
CRF Query page. The underlined text of the query.
Query Listings page Query page. The underlined text of the query.
Query page Query Listing. Return.

Step by Step for CRCs and CRAs
168 InForm 4.6
What to do if...
A query conflict occurs Query conflicts can occur if users working on two different copies of a trial change either the text or the state of a query before the change made by the first user is synchronized to the computer used by the other user.
For more information, see Synchronizing a Trial (on page 245).
You expect to see a query, but it is not there That item is marked as hidden for your user group. If during trial design an individual item is marked as hidden for your user group and a query appears for that item, the query will not be visible to you.

169
In this chapter Overview: Closing queries.....................................................................170 Closing queries......................................................................................171 How queries appear to site users..........................................................174 What to do if... .......................................................................................175
C H A P T E R 1 2
Closing queries

Step by Step for CRCs and CRAs
170 InForm 4.6
Overview: Closing queries
The InForm software enables closing queries in the following ways:
Automatic query generated by the failure of an edit check—When a user enters a new data value that passes the edit check, the InForm software closes the query. If the new data value fails the edit check, the InForm software redisplays the query. When an automatic query is answered with explanatory text, the query can only be closed when an authorized sponsor user closes it.
Manual query—When a user submits an answer to a manual query, the InForm software changes the query state to answered. A sponsor user with query closing rights must close answered queries manually.

Chapter 12 Closing queries
171
Closing queries
Finding answered queries You can navigate to an answered query from the Query listing or the Case Book List.
From the Query Listing
To locate an answered query:
1 In the Navigation pane, click Queries.
The Query Listing appears.
2 From the Query Status drop-down list at the top of the page, select Answered. Optionally, filter the list of queries to display queries for a specific site or patient, by using the drop-down lists.

Step by Step for CRCs and CRAs
172 InForm 4.6
3 Locate the query that you want to open.
From the Case Books list
To locate an answered query:
1 In the Navigation pane, click Patients. Or, use the Find Patient field to locate a specific patient.
2 In the Case Books List, click the patient number for a patient who has one or more traffic lights displayed with a yellow flag.
3 In the case book, click a traffic light icon that displays a yellow flag.
The form that contains the answered query is displayed.
Closing the query To close an answered query:
1 Click the underlined text of the query.
The Queries page for the item appears.

Chapter 12 Closing queries
173
2 Review the appropriateness and validity of the answer.
3 From the Action drop-down list, select Close Query.
4 From the Reason drop-down list, select a reason, or select Other and type a reason.
5 Click Submit.
The InForm software updates the status of the query. The Queries and Query Listing pages show the updated status.

Step by Step for CRCs and CRAs
174 InForm 4.6
How queries appear to site users
Opened and Answered queries differ in appearance.
Opened queries An Opened query on a form item looks like this:
The background color of the form item is pink. The text of the query is red in color and begins with the word "Open".
The text is located underneath the form item. A yellow query flag appears in the far right column of the item.
Answered queries An Answered query looks like this:
The background color is pink. The text of the query is black in color and begins with the word "Ans'd".
To view query details, click the red arrow that is located to the right of the query text. The query expands to show the following information:
The date that the query was answered. The name of the person who answered the query. The answer to the query.

Chapter 12 Closing queries
175
What to do if...
The answer to a query is unacceptable If a response to a query does not resolve the issue that the query points out, you can reissue the query as follows:
1 Navigate to the Query page for the item you are reviewing, as described in Closing a query (see "Closing the query" on page 172).
2 From the Action drop-down list, select Reissue Query in Open State.
3 From the Reason drop-down list, select a reason for reopening the query, or select Other and type a reason.
4 Click Submit.
A query conflict occurs Query conflicts can occur if users working on two different copies of a trial change either the text or the state of a query before the change made by the first user is synchronized to the computer used by the other user.
For more information, see Synchronizing a Trial (on page 245).

Step by Step for CRCs and CRAs
176 InForm 4.6

177
In this chapter Overview: Working with multiple queries ..............................................178 Closing or reissuing a set of answered queries ....................................179 Opening or deleting a set of candidate queries ....................................182
C H A P T E R 1 3
Working with multiple queries

Step by Step for CRCs and CRAs
178 InForm 4.6
Overview: Working with multiple queries
You can perform an action on a set of selected queries by using a special view of the Query Listing page. The Query Listing has two modes in which to view the list of queries: list view and action view.
List view mode—The list view mode of the Query Listings page allows you to view the details of all the queries, or a filtered list of queries.
Action view mode—While in action view mode, you can perform one action on a specified set of queries, and apply the same reason for change to all these queries. The Action View button is not available until a status other than All is selected in Query Status.
Note: You can change the display from the action view to the list view by clicking the List View button when in action view and clicking the Action View button when in list view.
When you are in action view mode, you can perform the following actions:
Query Status filter on Query Listings page
Available actions on selected queries
Answered Reissue or close query.
Candidate Open or delete query.

Chapter 13 Working with multiple queries
179
Closing or reissuing a set of answered queries
To close or reissue a set of answered queries:
1 In the Navigation pane, click Queries.
The Query Listing appears.
2 In Query Status, select Answered.

Step by Step for CRCs and CRAs
180 InForm 4.6
3 Click Action View.
A checkbox appears to the left of each query, and the Action and Reason fields appear at the bottom of the page.
4 Click the checkboxes to the left of the queries with which you want to work.

Chapter 13 Working with multiple queries
181
Note: To select all queries at once, click the check Select all checkboxes icon that is located at the top of the page ( ).
5 For Action, select the action you want to perform. The rights you have as a user of the InForm software determine the actions that appear.
6 For Reason, select a reason from the drop-down list, or type a reason for the change.
7 Click Submit.

Step by Step for CRCs and CRAs
182 InForm 4.6
Opening or deleting a set of candidate queries
To open or delete a set of candidate queries:
1 In the Navigation pane, click Queries.
The Query Listing appears.
2 In Query Status, select Candidate to filter only the candidate queries.

Chapter 13 Working with multiple queries
183
3 Click Action View.
A checkbox appears to the left of each query and the Action and Reason fields appear at the bottom of the page.
4 Select the checkboxes to the left of the queries with which you want to work.

Step by Step for CRCs and CRAs
184 InForm 4.6
Note: To select all queries at once, check Select all checkboxes icon at the top of the page ( ).
5 For Action, select the action you want to perform. The rights you have as a user of the InForm software determine which actions appear in the drop-down list.
6 For Reason, select a reason from the drop-down list or enter a textual reason for the change.
7 Click Submit.

185
In this chapter Overview: Freezing and locking ............................................................186 Freezing or locking a form.....................................................................188 Freezing or locking several forms at once ............................................190 Freezing or locking a case book ...........................................................195 Freezing or locking with synchronization ..............................................196 What to do if... .......................................................................................198
C H A P T E R 1 4
Freezing, unfreezing, locking, and unlocking

Step by Step for CRCs and CRAs
186 InForm 4.6
Overview: Freezing and locking
Freezing and locking data enables you to prevent changes in forms, either temporarily during a study or permanently at the end of a study.
You can freeze and lock:
Forms Visits Case Books
Note: You can freeze or lock only a form in which a user has entered at least one data item or comment. If you freeze or lock a Case Book, freeze or lock icons appear only on started forms; however, all forms in the Case Book are frozen or locked. The activities that are allowed or not allowed, as listed in the following table, pertain to all forms.
When you freeze or lock a form or Case Book, the following rules are in place:
Activity allowed?
CRF frozen Case Book frozen
CRF locked Case Book locked
Add/update patient data
Not on a frozen form, unless allowed.*
No, unless allowed.*
Not on a locked CRF.
No.
Add/update comments
Not on a frozen form, unless allowed.*
No, unless allowed.*
Not on a locked CRF.
No.
Open queries Yes. Yes. Not on a locked CRF.
No.
Answer queries Yes, but can change data value in frozen CRF only if allowed.*
Yes, but can change data value only if allowed.*
Not on a locked CRF.
No.
Close queries Yes. Yes. Not on a locked CRF.
No.
Mark SV ready Yes. Yes. Not on a locked CRF.
No.
Source verify Yes. Yes. Not on a locked CRF.
No.
Sign CRF Yes. Yes. Yes. Yes.
Sign case book Yes. Yes. Yes. Yes.
*Sponsor users can perform this activity only if the trial has been configured to allow sponsor users to update forms after they are frozen.

Chapter 14 Freezing, unfreezing, locking, and unlocking
187
Freezing and locking icons When you freeze or lock a form or case book, a freeze icon (snowflake ) or a lock icon (padlock ) appears next to the CRF or case book traffic lights on the Case Books List, Time and Events Schedule, Source Verification Listing, and Required Signatures form.
If a form or case book is both frozen and locked, both icons appear next to its corresponding traffic light.
Freezing, locking, and synchronization If you are using the InForm Unplugged software module to synchronize data between users who are working offline (that is, they have their own copy of the trial and are not connected at all times to a central computer through a browser), freezing and locking perform the same functions as described in this section. However, the timing of when freezing and locking takes effect during synchronization is different from the timing described in this section.
For more information, see Freezing and locking with synchronization (see "Freezing or locking with synchronization" on page 196).

Step by Step for CRCs and CRAs
188 InForm 4.6
Freezing or locking a form
To freeze, unfreeze, lock, or unlock a single form:
1 Navigate to the form you want to freeze, unfreeze, lock, or unlock.
The buttons you see at the bottom of the form depend on the rights you have been assigned and the state of the form. For example, if you have the right to freeze a form but not to lock it, only the Freeze button is present.
The Freeze/Unfreeze buttons, and the Lock/Unlock buttons are toggles. Only one of each pair is present, depending on the state of the form. For example, if a form is not frozen, the Freeze button is present, but the Unfreeze button is not present. If the form is frozen, the Unfreeze button is present. Similarly, if a form is unlocked, the Lock button is present. If a form is locked, the Unlock button is present.
2 Click one of the following:
Freeze
Unfreeze
Lock
Unlock

Chapter 14 Freezing, unfreezing, locking, and unlocking
189
Note: When you freeze, unfreeze, lock, or unlock a common form, the InForm software updates the traffic light icon that represents the form in the Time and Events Schedule in all visits where the form occurs. However, the traffic light icon for a common form in an unscheduled visit is not updated until a user creates at least one unscheduled visit.

Step by Step for CRCs and CRAs
190 InForm 4.6
Freezing or locking several forms at once
You can freeze, unfreeze, lock, or unlock several forms at one time:
To freeze, unfreeze, lock, or unlock Use the buttons on All forms in a visit. Any view of the form.
Selected repeating form instances. The Summary view of the form.
Any selected forms. The Source Verification Listing page.
All forms in a visit To freeze, unfreeze, lock, or unlock all forms in a visit:
1 Navigate to any form within the desired visit.
2 In the Select Action drop-down list, click one of the following:
Freeze Visit—To freeze all forms in the visit.
Unfreeze Visit—To unfreeze all forms in the visit.
Lock Visit—To lock all forms in the visit.
Unlock Visit—To unlock all forms in the visit.

Chapter 14 Freezing, unfreezing, locking, and unlocking
191
Note: The selections in the Select Action list depend on the rights you have been assigned. For example, if you have the right to freeze a visit but not to lock it, only the Freeze Visit and Unfreeze Visit selection are present.
3 Click Apply.
A message appears, indicating the number of forms that were affected. Additionally, freeze or lock icons are added or removed as follows.
Action Changes to the display of icons Freeze Visit In the Time and Events Schedule, the freeze icon appears next to
the traffic light for each non-common, started CRF in the visit. The freeze icon also appears next to the traffic light for the visit in the Case Books List.
Unfreeze Visit The InForm software removes the freeze icons from the non-common forms in the Time and Events Schedule. The InForm software also removes the freeze icon from the visit in the Case Books List.
Lock Visit In the Time and Events Schedule, the lock icon appears next to the traffic light for each non-common, started CRF in the visit. The lock icon also appears next to the traffic light for the visit in the Case Books List.
Unlock Visit The InForm software removes the lock icons from non-common forms in the Time and Events Schedule. The InForm software also removes the lock icon from the visit in the Case Books List.
Note: When you freeze, unfreeze, lock, or unlock a visit, the status of any common forms in the visit does not change. Freeze, unfreeze, lock, or unlock a common form at the form or case book level.
Selected repeating form instances You can use the Summary view (on page 45) of a repeating form to select multiple instances of the form and freeze, unfreeze, lock, or unlock them.
To perform one action on several instances of a form:
1 Navigate to the summary view of a repeating form.

Step by Step for CRCs and CRAs
192 InForm 4.6
2 While in summary view, click the action button you want to perform:
Freeze—To freeze form instances.
Unfreeze—To unfreeze form instances.
Lock—To lock form instances.
Unlock—To unlock form instances.
The summary view reappears with a column of checkboxes along the left side.
3 Select the box next to each form instance on which you want to perform the action you selected in step 2.
4 Click the button for the action you selected:
Freeze—To freeze the selected form instances.
Unfreeze—To unfreeze the selected form instances.
Lock—To lock the selected form instances.
Unlock—To unlock the selected form instances.
The InForm software adds or removes freeze or lock icons next to the traffic light for each form instance you selected. It also adds or removes icons on the Time and Events Schedule and the Case Book List to reflect the actions you have taken.
Chapter 14 Freezing, unfreezing, locking, and unlocking
193
While monitoring You can freeze or lock multiple forms in one action from the Source Verification Listing page. Similarly, you can unfreeze or unlock a form that previously was frozen or locked.
To do any of these actions:
1 In the Navigation pane, click Monitor.
The Source Verification Listing page appears.
2 Optionally, filter the list of patient forms.
The Source Verification Listing includes drop-down lists from which you can choose to display a list of forms for a specific site and patient. You can also filter the list by source verification state, by CRF completion state, and by numerous content and status criteria. You can create and save custom filters. For more information, see Filtering the Source Verification listing (on page 144).

Step by Step for CRCs and CRAs
194 InForm 4.6
To display entries for a Select from the Site Site list
Patient Patient list
Source verification status (partially verified, completely verified, not verified, ready for verification, not ready for verification)
SV Status list
CRF data entry status (complete, missing data, missing data and queries, queries, frozen or not frozen, locked or not locked)
CRF Status list
3 Select the checkbox on the left of each form you want to freeze or lock.
4 Do one of the following:
To freeze or lock the forms—Click Freeze or Lock.
To unfreeze or unlock the forms—Click Unfreeze or Unlock.
Chapter 14 Freezing, unfreezing, locking, and unlocking
195
Freezing or locking a case book
To freeze, unfreeze, lock, or unlock a case book:
1 Go to the Time and Events Schedule for a patient
2 Click one of the following:
Freeze Book.
Unfreeze Book.
Lock Book.
Unlock Book.
Note: You can freeze a case book that includes forms that were frozen previously.
When you unfreeze or unlock a case book, the InForm software unfreezes or unlocks all previously frozen or locked forms.

Step by Step for CRCs and CRAs
196 InForm 4.6
Freezing or locking with synchronization
When you freeze or lock a form or case book in an environment when data is being synchronized across multiple copies of a trial—for example, if some CRAs are working unconnected to a network and then updating a central computer with their changes—the timing of when each CRA freezes or locks items becomes important.
Each time patient data is added or updated, the InForm software associates the data with the current date and time. If users update the same data item for the same patient on different copies of the trial, the software must determine which value is the current value when the trial information is synchronized. It uses the date and time to make the determination and follows the rule that the latest value is the current one and is displayed on all copies of the trial after synchronization.
Just as the same data could be updated at different times because one user does not know what another is doing on a different copy of the trial, a conflict could occur over the timing of freezing and locking. Consider the following scenario:
At noon, a CRA using the InForm software on a laptop that is not connected to the network freezes the DEM form for Patient A. At 12:15, a CRC connected to a site through a browser changes a data item on the DEM form. Because the site computer does not know about the freeze, the change goes through. When the CRA synchronizes with the site computer, the InForm software must handle the fact that the data item was changed after the form was frozen.

Chapter 14 Freezing, unfreezing, locking, and unlocking
197
The InForm software resolves timing differences in freezing, locking, and data entry and update activities by using the rule that freezing and locking actions do not apply until the freeze or lock is synchronized throughout the entire trial. After a freeze or lock, activities that affect data continue to be accepted from all users until the form or case book is frozen or locked on every copy of the trial. This prevents data from being lost because the computer it was entered on did not yet know about the freeze or lock.
Note: This rule applies only in an environment where synchronization is taking place between computers that are running different copies of the trial; in an environment where everyone connects to a single server through a browser, freezing and locking takes effect immediately.

Step by Step for CRCs and CRAs
198 InForm 4.6
What to do if...
Data changes after freezing or locking If a new or changed result comes in on a patient whose form is frozen or locked:
1 Contact a sponsor representative who is authorized to unfreeze or unlock the form.
2 Update the appropriate form or forms.
3 Notify the sponsor representative when the addition or update is complete.

199
In this chapter Overview: Signing forms .......................................................................200 Signing a CRF or case book .................................................................204 Viewing signature status .......................................................................208 Viewing signature details.......................................................................210 What to do if... .......................................................................................211
C H A P T E R 1 5
Signing forms

Step by Step for CRCs and CRAs
200 InForm 4.6
Overview: Signing forms
This section describes concepts of which you should be aware when signing a form or Case Book.
Significance of a signature Generally, signing a form or case book is done with the expectation that the form or case book is complete, and data is not expected to change. The exact significance of a signature can vary from trial to trial; for example, a Principal Investigator (PI) could sign a form to indicate responsibility for the accuracy and completeness of the data, and a CRA could sign the same form to indicate that the review is complete. Additional meanings of a signature could include authorship or approval of a form.
The language of the affidavit page on which a signer enters signature information indicates what the signature is intended to convey. A brief definition or summary of the affidavit might appear in the meaning column of the signature section on all forms that require signatures.
Form and case book signatures The InForm software enables trials to be configured so that your signature is attached to a single form, several forms, or an entire case book. For example, a trial could be configured to require a signature on certain key forms for each patient and also to require a signature on the case book for each patient.
When a trial is set up, specific forms are designated as signing CRFs. Additionally, if signing is required for a complete case book, a single form is designated as the signing CRF for the case book.

Chapter 15 Signing forms
201
List of required signatures A list of required and applied signatures is displayed on the electronic, printed and PDF versions of a form. For a signed case book, the list of signatures is displayed on the CRF that is designated as the case book signing CRF.
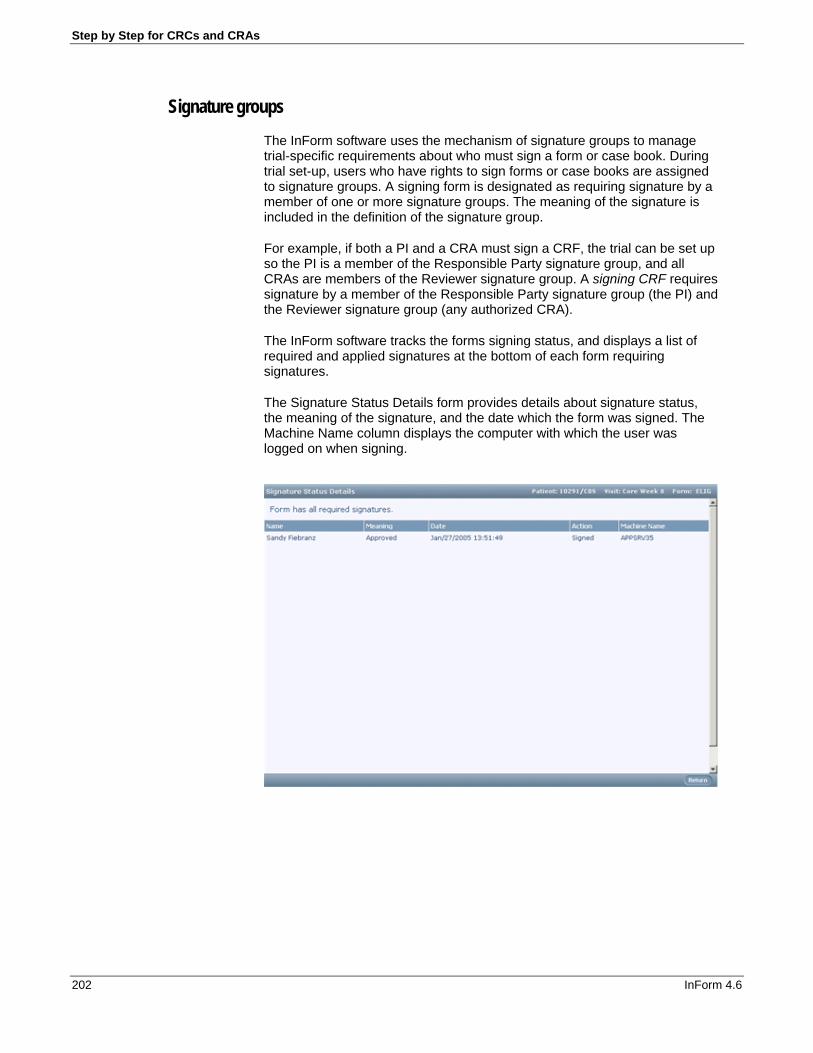
Step by Step for CRCs and CRAs
202 InForm 4.6
Signature groups The InForm software uses the mechanism of signature groups to manage trial-specific requirements about who must sign a form or case book. During trial set-up, users who have rights to sign forms or case books are assigned to signature groups. A signing form is designated as requiring signature by a member of one or more signature groups. The meaning of the signature is included in the definition of the signature group.
For example, if both a PI and a CRA must sign a CRF, the trial can be set up so the PI is a member of the Responsible Party signature group, and all CRAs are members of the Reviewer signature group. A signing CRF requires signature by a member of the Responsible Party signature group (the PI) and the Reviewer signature group (any authorized CRA).
The InForm software tracks the forms signing status, and displays a list of required and applied signatures at the bottom of each form requiring signatures.
The Signature Status Details form provides details about signature status, the meaning of the signature, and the date which the form was signed. The Machine Name column displays the computer with which the user was logged on when signing.

Chapter 15 Signing forms
203
Invalidation of signature by data update or query When a form or case book is signed, it is expected that data entry is complete, source verification has been performed, and all queries are resolved and closed. However, later information can result in data entry changes or new queries after the form or case book has been signed.
When this happens, InForm software invalidates the previous signature or signatures and updates the signature listings and each form to indicate that the form or case book must be signed again.
Data that has been exported from InForm software by using AutoCode or Central Coding functionality and reimported after coding has special invalidation considerations. Coded data is often designed to be hidden on a form; if the import of coded data invalidates a signature, it might not be possible to see which item caused the invalidation. Therefore, study designers can specify whether imported data invalidates a signature.

Step by Step for CRCs and CRAs
204 InForm 4.6
Signing a CRF or case book
The procedures for signing a CRF or a case book are the same, with the following exceptions:
To sign a case book, you sign the form designated as the form on which a signature represents a signature on the entire case book.
The buttons and controls used to sign a form and a case book are labeled differently; you can access the form signature page from a Sign button or link, but you access the case book signature page from a Sign Book button or link.
Before you can sign a CRF, the following conditions must be true:
The CRF is set up as a signing form. You have the right to sign CRFs. You are in the same signature group as the CRF. No other user in the signature group has already signed the CRF. The CRF has at least one data item entered.
Before you can sign a case book, the following conditions must be true:
A CRF has been set up as the form used to sign case books. You have the right to sign case books. You are in the same signature group as the case book. No other user in the signature group has already signed the case book. At least one data item is entered in the final CRF of the case book.
To sign a CRF or case book:
1 In the Navigation pane, click Signatures.
The Required Signatures page appears.

Chapter 15 Signing forms
205
2 Use the drop-down lists at the top of the page to select the CRF or case book signing information you need. The following table summarizes the criteria you can select. In addition to these selection criteria, you can select All to display all forms or case books in the category.
To display forms or case books for a …
Select from the …
Site. Site list. This list is visible if you have rights to view information for more than one site.
Patient. Patient list.
CRF or case book signature. Type list.
Signing status (signed or unsigned). Status list.
Form or case book completion status (All, All Signatures Complete, Not All Signatures Complete, With Queries, With Missing Values, Missing & Queries, Frozen, Locked, Ready for SV, Completed SV, SVed and Complete, Complete, Not Done, Deleted).
CRF/Book status list. Note that the InForm software ignores filters that do not apply to the selected Type. For example, if you select case book from the Type list and select Ready for SV in the CRF/Book status list, the InForm software ignores the Ready for SV filter, since SV readiness applies only at the CRF level.
Note: Use the page indexer control to navigate through multiple pages of the Required Signatures page.
3 Click the Sign or Sign Book link for the form you want to sign.

Step by Step for CRCs and CRAs
206 InForm 4.6
The signing affidavit appears.
4 Read the affidavit. In the User name and Password boxes type your InForm software username and password.
Note: You need to enter both username and password only the first time you sign the form during an InForm session. If you need to re-sign a form because of intervening activity that causes the form to become unsigned, enter only your password.
5 Click Submit.
The InForm software updates the signing status on the Required Signatures page, on the Signature Status Details page, and on the CRF.

Chapter 15 Signing forms
207
Note: Another way to access the signing affidavit for a signing CRF, without going through the Required Signatures list, is to click Sign CRF on the signing CRF. Another way to access the signing affidavit for the CRF designated for signing case books is to click Sign Book on the Time and Events Schedule or on the form.

Step by Step for CRCs and CRAs
208 InForm 4.6
Viewing signature status
To review signature status, use the Required Signatures page. Two versions of this page are available:
My signatures All signatures
My signatures
This version of the Required Signatures page displays the signature status of CRFs and case books that require signature by a member of your signature group. This version is available and is the default view if you have been assigned the right to sign CRFs or case books and you are a member of a signature group. In this version, Signature column indicates the signing status of the CRFs or case books for which your signature group is responsible.
To review signatures by using this version of the Required Signatures page:
1 In the Navigation pane, click Signatures.
2 Optionally, filter the list of documents that require signatures by using the desired drop-down lists.
3 Review the Signature column. The icon or signing link indicates the signing status of the document.
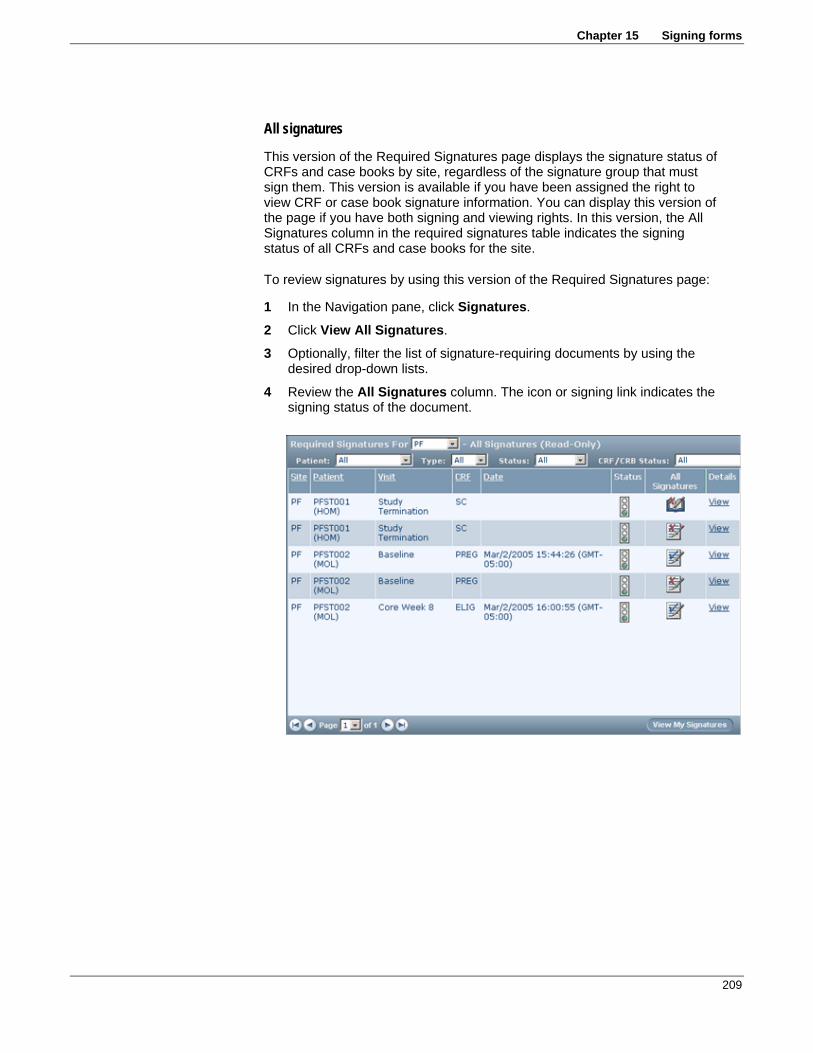
Chapter 15 Signing forms
209
All signatures
This version of the Required Signatures page displays the signature status of CRFs and case books by site, regardless of the signature group that must sign them. This version is available if you have been assigned the right to view CRF or case book signature information. You can display this version of the page if you have both signing and viewing rights. In this version, the All Signatures column in the required signatures table indicates the signing status of all CRFs and case books for the site.
To review signatures by using this version of the Required Signatures page:
1 In the Navigation pane, click Signatures.
2 Click View All Signatures.
3 Optionally, filter the list of signature-requiring documents by using the desired drop-down lists.
4 Review the All Signatures column. The icon or signing link indicates the signing status of the document.

Step by Step for CRCs and CRAs
210 InForm 4.6
Viewing signature details 1 In the Navigation pane, click Signatures.
2 Optionally, to filter the list of documents that require signatures, use the drop-down lists.
3 In the Details column of the list, click the View link for the patient and CRF or case book for which you want to review signature history.

Chapter 15 Signing forms
211
What to do if...
A form changes after signature If it is necessary for a query to be issued or a data update to be made after a form has been signed, the InForm software automatically invalidates the previous signature or signatures and resets the signing status as follows:
Single signed CRF—The InForm software sets the signing status to unsigned, and the form must be re-signed by all required signature authorities, often after the appropriate source verification and query resolution activities.
Signed CRF in a signed case book—If a user enters data in a CRF that requires individual signature, the InForm software sets the signing status of the CRF to unsigned, and the CRF must be re-signed by all required signature authorities, after the appropriate source verification and query resolution activities. Additionally, the signing status of the case book is set to unsigned, and the case book must be signed again.
Unsigned CRF in a signed case book—If a user enters data in any CRF that does not require signature, the InForm software sets the signing status of the case book to unsigned, and the case book must be re-signed after the appropriate source verification and query resolution activities. If the case book also contains individually signed CRFs, those CRFs are not considered unsigned and do not need to be re-signed.
The Sign or Sign Book link for the form reappears in the Signature column of the Required Signatures page. The Signature Status Details page maintains an audit trail on the previous signatures, and the message at the top of the page indicates the signature groups from which a member must re-sign the form.
When a signature is invalidated and must be obtained again, follow the steps in Signing a CRF or case book (on page 204) to repeat the signing process.
Your signature fails processing If you enter an incorrect user name or password while signing, try to re-enter your user name and password, just as you would when logging on to the InForm software. You have the same number of tries as you would when you log on; this number is set up for your trial.
If you fail to enter the correct user name and password after the configured number of tries, the InForm software logs you out and inactivates your user account. To be reinstated, you must contact the system administrator for your trial.

Step by Step for CRCs and CRAs
212 InForm 4.6

213
In this chapter Printing a CRF.......................................................................................214
C H A P T E R 1 6
Printing

Step by Step for CRCs and CRAs
214 InForm 4.6
Printing a CRF
To print a CRF:
1 Navigate to the CRF you want to print.
2 In the Select Action drop-down list, select Print Preview, and then click Apply.
The InForm software displays a preview of the CRF.

Chapter 16 Printing
215
3 Click Print.
For more information, see Printing an SV Report for offline verification (on page 151).

Step by Step for CRCs and CRAs
216 InForm 4.6

217
In this chapter Overview: Data listings..........................................................................218 Generating listings.................................................................................219 What to do if... .......................................................................................226
C H A P T E R 1 7
Generating data listings

Step by Step for CRCs and CRAs
218 InForm 4.6
Overview: Data listings
Listings enable you to take a snapshot of patient data and download it. Downloaded listings are in a file of comma-separated values (a CSV file) that you can open in a Microsoft Excel spreadsheet or in another program that reads CSV files.
You choose the sites and the data items you want to capture, and the InForm software generates a listing of each data item for each patient in the database. After generating a listing, and opening it in a Microsoft Excel spreadsheet, you can navigate back from the spreadsheet to the CRF that is the source of the data.
If you need to generate the same selection of data items multiple times, you can save the selection and recall it at a later date to run again.
Note: To generate data listings, you need the Data Export Listings right in InForm Administration.

Chapter 17 Generating data listings
219
Generating listings
Creating a new listing To create a listing:
1 In the Navigation pane, click Listings.
The Listings Export Tool window appears.
2 Select listings options by using the checkboxes at the top of the page:
Select this option To Global Save Allow any user with the right to generate listings to open a
saved listing definition. If you do not select this option, only you can view a listing definition that you have saved.
HTTP Links Generate links that enable you to click a cell in Microsoft Excel spreadsheet created from a listing and navigate back to the form and data item in the InForm software.
Comments Include comments as well as data items in the listing.
3 From the Site list, select the site for which you want to run the listing. The default is All Sites.
4 In the list of forms and form items, select the checkbox at the left of each item for which you want to generate a listing.
5 Each form includes a set of checkboxes indicating the visits in which the form occurs in the Time and Events Schedule. Select each visit for which you want to extract the items you selected in the previous step.
Tips:

Step by Step for CRCs and CRAs
220 InForm 4.6
To specify that you want all visits in which the form occurs, select the All checkbox.
To select all item and visit checkboxes at once, click the check button that is located in the upper-left corner of the pane.
To clear the Listings Extract Tool page of all data selections, click New.
6 Click Generate.
As the listing runs, the InForm software displays the progress of the listing as a percentage of completion.
When the listing is complete, the InForm software displays a window instructing you to click Download or Delete:
To download the listing to a Microsoft Excel Comma Separated Values (CSV) file:
Click Download.
The InForm software displays a message box prompting you to save the extracted data file on your local computer or specify that you want to open it without saving it.

Chapter 17 Generating data listings
221
Note: If you do not have Microsoft Excel on your computer, do not open the file (do not click Open).
In this message box, click Save, and in the dialog box that appears, specify where you want it saved.
To delete the listing:
Click Delete.
7 If you chose Download, when the file finishes downloading to the specified folder, you can open it with Microsoft Excel from the folder where you saved it.
In the spreadsheet, each column contains the value of the patient data for one of the data items you selected. The column heading identifies the data item and the visit and form it comes from.
Note: If Microsoft Excel is not installed on your computer, when you open the file from the folder where you saved it, the file opens as a comma-separated text file in the application to which .csv files are mapped in your Microsoft Windows Folder Options.
Saving a listing specification If you expect to generate the same data listing multiple times, you can save the listing specification and run it later using the name you give it.
To save a listing specification:
1 Create a new listing (see "Creating a new listing" on page 219), but do not generate the new listing.
2 Click Save or Save As.
A dialog box appears so that you can specify a name for the listing specification.

Step by Step for CRCs and CRAs
222 InForm 4.6
3 Type a name for the listing specification in the text box.
4 Click OK.
After you save the listing specification, you can do either of the following:
Click Generate to generate the listing.
Open it (see "Opening a saved listing specification" on page 222) at any later time to generate the same information without having to re-specify it.
Note: You can create a listing specification, open it, refine it, and save it under another name by using the Save As button.
Opening a saved listing specification After you have saved a listing specification, you can open and run it at any time.
To open a saved listing specification:
1 In the Navigation pane, click Listings.
2 In the Listings Report list at the bottom of the page, select the listing specification you want to run.
3 Click Open.
Canceling a listing Generating a listing can take a substantial amount of time. If you realize that you made a mistake in submitting a listing request, or you do not want to wait for a listing to complete, you can cancel it.
To cancel a listing while the listing is processing:
1 At the bottom of the Listings page, click Cancel.
2 Confirm the cancellation in the cancellation message box.
The InForm software displays a window prompting you to download or delete the listing

Chapter 17 Generating data listings
223
3 Do either of the following:
To download the listing to a Microsoft Excel Comma Separated Values (CSV) file:
Click Download.
The InForm software displays a message box prompting you to save the extracted data file on your local computer or specify that you want to open it without saving it.
Note: If you do not have Microsoft Excel on your computer, do not open the file (do not click Open).
In this message box, click Save, and in the dialog box that appears, specify where you want it saved.
To delete the listing:
Click Delete.

Step by Step for CRCs and CRAs
224 InForm 4.6
Deleting a listing If you start a listing and then move away from the Listings page or close the browser window before it completes, or if the listing does not complete before the session times out, the InForm software continues to process the listing on the server. The next time you click the Listings button, the listing that was in process is available for resolution. If the listing has completed, you can download or delete it.
Deleting a completed listing
When you log back on to the InForm software after leaving a listing in process, or when a listing completes during your InForm software session, a window appears prompting you to download or delete the listing.
To delete a completed listing:
At the bottom of the page, click Delete. You must delete a completed listing before you can generate a new one.
Deleting a saved listing specification
To delete a saved listing specification:
1 In the Navigation pane, click Listings.
2 Open the listing specification you want to delete. For more information, see Opening a saved listing specification (on page 222).
3 Click Delete.
A prompt box opens, containing the name of the listing specification.
4 Click OK.
Note: If you know the name of the listing specification you want to delete, skip step 2, and type the name of the listing specification in the prompt box.

Chapter 17 Generating data listings
225
Navigating from a listing to the source form To navigate from a data cell in a generated listing spreadsheet to the corresponding data item in a form:
1 Generate a listing (see "Creating a new listing" on page 219) with the HTTP Links option selected.
2 Open the generated CSV file in Microsoft Excel.
3 Click the cell displaying the data in the spreadsheet.
4 In the browser window that appears, log on to the InForm software.
The InForm software opens, and the form containing the data item appears.
Customizing a listing To further customize the listing in Microsoft Excel:
1 From the Data menu choose Filter/AutoFilter. A drop-down list appears in the column heading
2 Open the drop-down list and select a predefined filter, or choose Custom.
3 If you choose Custom, a dialog box opens in which you can specify a custom filter parameter through which to view the data.

Step by Step for CRCs and CRAs
226 InForm 4.6
What to do if...
You cannot download a listing Before you can generate listings, an administrator must configure the computer on which you are running the InForm software through a browser for listing generation.
Note: You must have Microsoft Excel spreadsheet software installed on your computer to view data listing files.
Your session times out before a listing completes If your session times out before a listing completes, the InForm software continues to process the listing on the server. The next time you click Listings, you see a message indicating the status of the listing you started. When you click OK in the message window, you can:
Cancel an incomplete listing or wait for it to complete. Download or delete a completed listing.

227
In this chapter Overview: Using study documentation..................................................228 Viewing study documentation ...............................................................229 Displaying help for a form......................................................................230 Working with FAQs................................................................................232 What to do if... .......................................................................................237
C H A P T E R 1 8
Using study documentation
Step by Step for CRCs and CRAs
228 InForm 4.6
Overview: Using study documentation
Online study documentation is an optional feature of the InForm software. Depending on the way your trial is set up, you can have access to one or more of the following types of study documentation:
Protocol—A copy of the sponsor’s trial protocol, formatted for online viewing.
CRF help—A set of instructions and other details about specific CRF data items or about an entire CRF. CRF help can also include: Information about the edit checks on CRF items.
Frequently Asked Questions (FAQs), which provide answers to questions about CRF items. FAQs are responses to questions and issues that come up when users enter data in CRFs. Based on the experiences of users who are entering data, a FAQ can clarify instructions, provide additional details, or point users to resources that might be useful. FAQs are associated with specific data items on CRFs. Users with rights to maintain FAQs can add or update them in response to questions that come up during the course of a trial.
Visit calculator—A copy of the Visit Calculator page that appears at the end of the enrollment process. The Visit Calculator page computes suggested visit dates based on the date of the enrollment visit. You can edit the start date to determine suggested visit dates that conform to the visit timing specified in the study protocol.
Sample trial case book—A complete set of read-only blank CRFs that you can use to familiarize yourself with the layout of the forms and visits.
As well as giving access to study documentation through the document window, the InForm software enables you to link directly to CRF help on a CRF or CRF item, if your trial is set up to provide those links. If these links are set up, the CRF name and the item descriptions in a CRF are underlined. As you pass the mouse cursor over a link, the cursor changes to a pointing-hand icon.
To display the CRF help for a CRF or CRF item:
Click the underlined CRF name or item text.
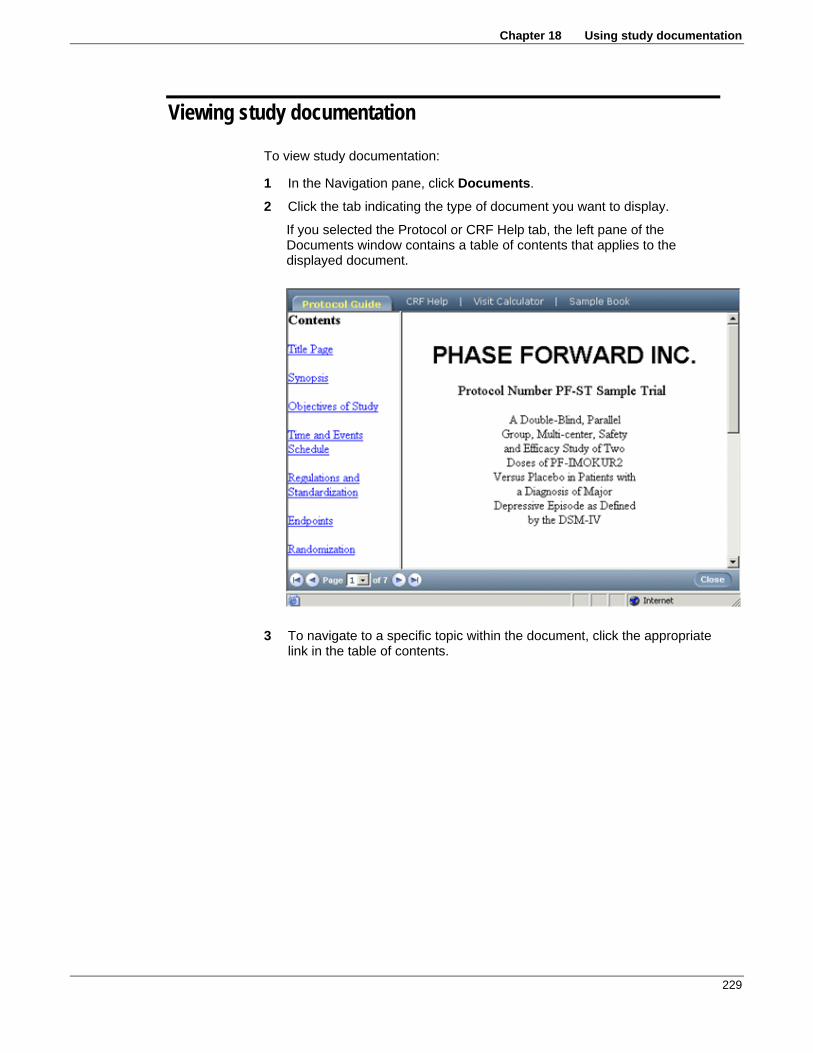
Chapter 18 Using study documentation
229
Viewing study documentation
To view study documentation:
1 In the Navigation pane, click Documents.
2 Click the tab indicating the type of document you want to display.
If you selected the Protocol or CRF Help tab, the left pane of the Documents window contains a table of contents that applies to the displayed document.
3 To navigate to a specific topic within the document, click the appropriate link in the table of contents.

Step by Step for CRCs and CRAs
230 InForm 4.6
Displaying help for a form
If your trial is set up to support this method, you can navigate from a form to the applicable part of CRF help:
Note: If your trial supports this type of navigation to form help, the text of the CRF name and item descriptions are underlined.
1 In the Navigation pane of the InForm window, click Patients.
2 In the Case Books List, click the traffic light icon for the patient and visit.
3 Click the tab for the form.
4 Do one of the following:
To view form help on the entire form—At the top of the page, click the underlined form name.
To view form help on a specific form item—Click the underlined item description.

Chapter 18 Using study documentation
231
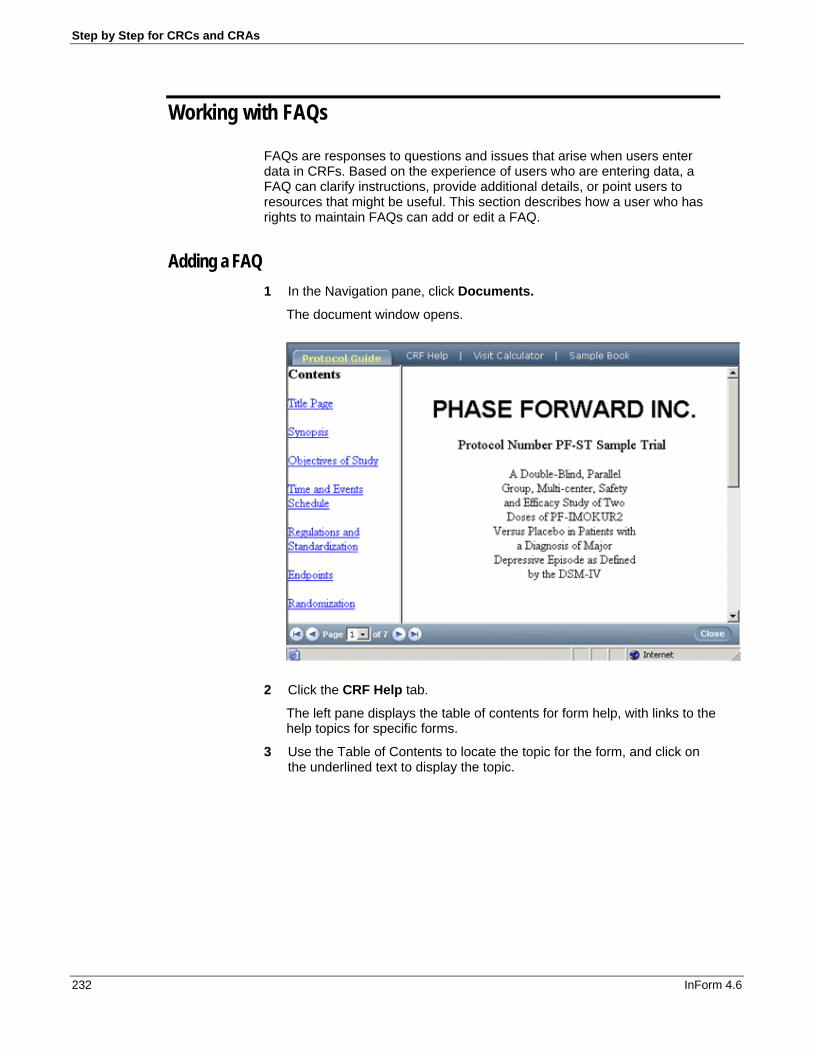
Step by Step for CRCs and CRAs
232 InForm 4.6
Working with FAQs
FAQs are responses to questions and issues that arise when users enter data in CRFs. Based on the experience of users who are entering data, a FAQ can clarify instructions, provide additional details, or point users to resources that might be useful. This section describes how a user who has rights to maintain FAQs can add or edit a FAQ.
Adding a FAQ 1 In the Navigation pane, click Documents.
The document window opens.
2 Click the CRF Help tab.
The left pane displays the table of contents for form help, with links to the help topics for specific forms.
3 Use the Table of Contents to locate the topic for the form, and click on the underlined text to display the topic.

Chapter 18 Using study documentation
233
4 In the document window, click Add/Edit FAQ.
The document text pane splits in half. The top half displays the text of the form help, broken down by items. Each item is labeled. The bottom half displays the FAQ Entry form.
5 In the Item list on the FAQ Entry form, select the item for which to add a
FAQ.
6 In the FAQ box, enter the text of the FAQ.
7 Click Submit FAQ.

Step by Step for CRCs and CRAs
234 InForm 4.6
The InForm software adds a FAQ to the form help for the item, along with an audit trail indicating the date and time it was added and the user who created it.
Editing a FAQ 1 In the Navigation pane, click Documents.
The document window opens.
2 Click the CRF Help tab.

Chapter 18 Using study documentation
235
The left pane displays the table of contents for form help, with links to the help topics for specific forms.
3 Use the Table of Contents to locate the topic for the form, and click on the underlined text to display the topic.
4 In the document window, click Add/Edit FAQ.
The document text pane splits in half. The top half displays the text of the form help, broken down by items. Each item is labeled. The bottom half displays the FAQ Entry form.

Step by Step for CRCs and CRAs
236 InForm 4.6
5 In the Item list on the FAQ Entry form, select the item for which to edit a FAQ.
6 Click Edit FAQ.
The InForm software displays the current text of the FAQ.
7 In the FAQ box, edit the text of the FAQ.
8 Click Submit FAQ.

Chapter 18 Using study documentation
237
What to do if...
Certain forms or items always cause confusion If certain forms or items are particularly confusing, or generate many queries, ask your trial administrator to do one or both of the following:
Create additional form help for the forms or items. Create a FAQ that covers the forms or items.

Step by Step for CRCs and CRAs
238 InForm 4.6
239
In this chapter Displaying online help ...........................................................................240 Navigating InForm online help ..............................................................241
C H A P T E R 1 9
Using InForm online help

Step by Step for CRCs and CRAs
240 InForm 4.6
Displaying online help
Online help appears in a separate browser window from the study.
To open the online help window:
In the Navigation pane, click Help.

Chapter 19 Using InForm online help
241
Navigating InForm online help
Within the online help window, you can find topics of interest and display them from several points of reference.
Using the Table of Contents The Table of Contents is an expanding and collapsing hierarchical list of all of the topics in the online help system. When you open the online help window, the Table of Contents is visible.
To display any topic:
In the Table of Contents, click the name of the topic. The topic appears in the right pane of the online help window, and a box appears around its name in the Table of Contents to mark your place.
To expand a book and display its related topics:
Click the plus icon.
To collapse a group of topics and display only the book topic:
Click the minus icon.

Step by Step for CRCs and CRAs
242 InForm 4.6
To display the Table of Contents when the Index page is visible:
Click the Contents tab at the top of either the left or the right pane of the online help window.
Using the Index The Index is an alphabetical listing of keywords that refer to topics in the online help.
To Click the Jump to the topics for a particular letter of the alphabet.
Letter in the alphabet box at the top of the Index page.
Jump to a topic listed in the Index. Topic name.
Display the Index when the Table of Contents is visible.
Contents tab at the top of either the left or the right pane of the online help window.
Using the Search tool The Search tool enables you to find topics based on search text that you enter. To use the Search tool:
1 Click Search at the top of the help window.
2 Type a keyword or phrase in the text box.
3 Press Enter.

Chapter 19 Using InForm online help
243
The help window displays the results of the search. If the keyword or phrase appears in a topic title, the window displays the title. If the keyword or phrase appears in the text of a topic, the window displays the topic title and the text containing the keyword or phrase. To display a topic in the search results list, click the underlined text.
Using other links In addition to the Table of Contents and Index, you can use links within topics to navigate the online help system.
In-topic navigation buttons
A set of navigation buttons appears at the top of each topic. You can use these buttons to move through the online help system.

Step by Step for CRCs and CRAs
244 InForm 4.6
In This Chapter lists
Each book topic includes a list of related topics. To display one of these topics, click its name in the In This Chapter list.
Links within topics
Some topics contain links to other topics. These links appear as underlined text. To display the topic referred to by the link, click the underlined text.

245
In this chapter Overview: Synchronizing a trial .............................................................246 Data conflict messages on comments ..................................................247 What is synchronizing? .........................................................................250 Before you can synchronize..................................................................251 Ways to synchronize .............................................................................252 About conflicts .......................................................................................253 Synchronizing a trial manually ..............................................................255 Using the Sync Message Exchange tool...............................................256 Ways to synchronize manually..............................................................259 Synchronizing from within InForm Unplugged ......................................260 Transferring data as files.......................................................................261 Viewing synchronization status information ..........................................264 Viewing connection status details .........................................................265 Resolving conflicts.................................................................................268 What to do if... .......................................................................................281
C H A P T E R 2 0
Synchronizing a trial

Step by Step for CRCs and CRAs
246 InForm 4.6
Overview: Synchronizing a trial
The InForm Unplugged module of the InForm software enables users in different locations to work on copies of a trial that run on separate computers. By using this version of the InForm software, users can carry a trial database and the InForm software on a laptop or other mobile computer and work without being connected through a browser to a central database.
Of course, if multiple users are updating different copies of the InForm database, those databases become more and more out of sync over time. The synchronization service of the InForm Unplugged software keeps the copies of the InForm database synchronized by copying new and changed data across specific connections between the different computers that are running the trial. This chapter describes several ways to exchange data between copies of a trial that run independently on multiple computers.

Chapter 20 Synchronizing a trial
247
Data conflict messages on comments
Like patient data values, comments can be in conflict when users who are working on the same patient with different copies of the trial attempt to synchronize the trial. If configured to issue data conflict messages, the InForm Unplugged software issues a data conflict message when comments are in conflict. The item or form that gets the data conflict message depends on the comment:
If the conflict occurs on a data item, the InForm Unplugged software generates the data conflict message on the data item. In this example, both BJ Smith and ME Miller entered comments documenting the fact that the results of the test could not be obtained.
If the conflict occurs on a form-level comment, the InForm Unplugged software generates the data conflict message on the first item on the CRF. In this example, BJ Smith and ME Miller each entered a form-level comment documenting the fact that the physical examination covered by the PE form was conducted a few days later than the date called for in the protocol. The data conflict message generated by these actions appears on the first item of the form.
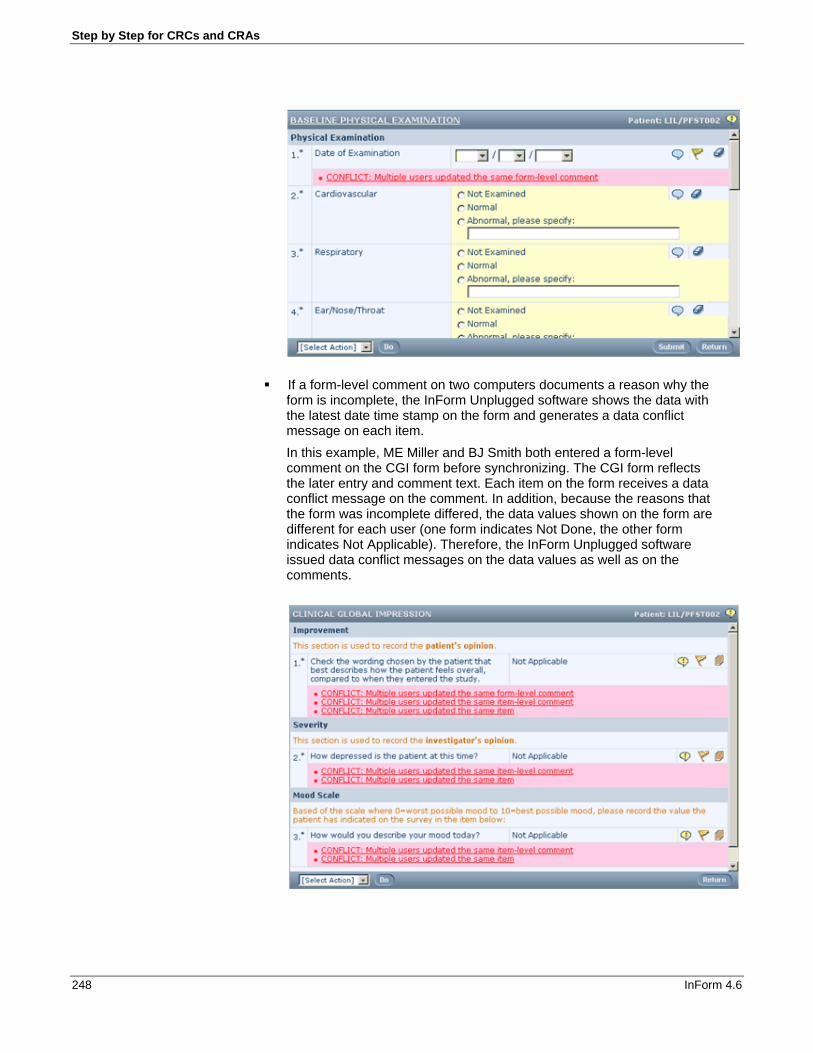
Step by Step for CRCs and CRAs
248 InForm 4.6
If a form-level comment on two computers documents a reason why the form is incomplete, the InForm Unplugged software shows the data with the latest date time stamp on the form and generates a data conflict message on each item. In this example, ME Miller and BJ Smith both entered a form-level comment on the CGI form before synchronizing. The CGI form reflects the later entry and comment text. Each item on the form receives a data conflict message on the comment. In addition, because the reasons that the form was incomplete differed, the data values shown on the form are different for each user (one form indicates Not Done, the other form indicates Not Applicable). Therefore, the InForm Unplugged software issued data conflict messages on the data values as well as on the comments.

Chapter 20 Synchronizing a trial
249
To resolve data conflict messages on comments, use the same process that you would use to resolve a data conflict message on a data item:
Consult to agree on the appropriate comment text. Answer the data conflict message. If the appropriate comment text is other than the latest value displayed in
the Comments page, update the comment text appropriately.
For more information, see Answering queries (on page 121) and Updating form data (on page 109).

Step by Step for CRCs and CRAs
250 InForm 4.6
What is synchronizing?
Synchronizing is a mechanism that is used to create identical copies of a trial on multiple computers. It is the process of copying trial definition and patient data from a source computer to a destination computer along a predefined connection.

Chapter 20 Synchronizing a trial
251
Before you can synchronize
Before you can synchronize data between two computers in your system, the following prerequisites must be satisfied:
The InForm Unplugged software must be installed on both computers. An administrator must set up a connection definition between the
computers.

Step by Step for CRCs and CRAs
252 InForm 4.6
Ways to synchronize
The InForm Unplugged software module enables you to synchronize automatically, on a schedule specified in a connection definition, or manually. When you allow synchronization to occur automatically on the defined schedule, data is transferred in one direction—from the source computer to the destination. If the connection definitions on both computers have the same schedules, synchronization occurs in both directions at nearly the same time, in two, opposite, one-way synchronization actions.
However, if you synchronize manually by using the Synchronize New Data button in the Admin feature of the InForm Unplugged software, the source computer sends a message to the destination computer to tell it to synchronize back. Therefore, in this manual synchronization mode, two-way synchronization occurs on the initiation of the user at the source computer. The Sync Message Exchange tool, which enables mobile computer users to synchronize to a central computer with a static IP address, also performs a two-way synchronization. A third way to synchronize is to transfer new data to a set of files and email the files to the person using the computer you want to synchronize with.

Chapter 20 Synchronizing a trial
253
About conflicts
Conflict resolution is the process that the InForm Unplugged software uses to handle the possibility that multiple users might have updated the same object, potentially with different data values, between synchronizations.
How a conflict could occur Consider the following scenario:
A CRA on the road enters the text of a query, inadvertently making a typographical error. Arriving at the next site, the CRA performs a synchronization with the home computer.
Back at the home office, a CDM reviews the query text, notices the typo, and corrects it.
That night in the hotel room, the CRA reviews the previous day’s work, notices the same typo, also corrects it, and adds an additional note.
The CRA performs another synchronization with the home computer, and a conflict situation exists. The CRA and CDM have updated the same data before synchronization, and the InForm Unplugged software must resolve the conflict.
Note: When performing conflict resolution, the InForm Unplugged software determines which version is current without regard to the actual value of the data that was changed. Thus, even if the value of the data is the same in both versions, performing a synchronization results in choosing one of the versions as the current version.

Step by Step for CRCs and CRAs
254 InForm 4.6
How the InForm Unplugged software handles conflicts The InForm Unplugged software uses a set of rules to determine how to handle the synchronization of objects that have been updated on both the source and destination computers in a synchronization connection.
The first rule that applies in all situations is that data entered on any computer in the synchronization topology is never discarded, and the InForm Unplugged software maintains an audit trail of all data entries and updates.
The second rule is that the latest data value entered on any computer is considered the current value after synchronization.
When a conflict exists, the InForm Unplugged software highlights the fact and depends on users to communicate with each other, identify the true current value, and update the CRFs in the appropriate manner. The software uses the following methods to highlight the existence of a conflict:
If two users update the same patient data item or comment on two different copies of the trial, the InForm Unplugged software issues a data conflict message in the form of a query, if the trial is configured to do so.
If two users change the state of the same query in different ways, the InForm Unplugged software identifies a query conflict if it cannot automatically resolve the state.
If two users change the text of the same query in different ways, the InForm Unplugged software identifies a query conflict.
If two users update the same patient data item on two different versions of the same form (if a form has been revised and the revision has not been synchronized before the data entry occurs), the software creates a conflict visit and form.
When conflicts occur, the users whose data updates are in conflict must resolve the conflicts manually. For more information, see Resolving conflicts.

Chapter 20 Synchronizing a trial
255
Synchronizing a trial manually
For the most part, synchronization happens automatically on the schedules that administrators define. However, there might be times when it is advantageous to synchronize without waiting for the next automatic synchronization. In these cases, you can override the schedule defined in your computer’s synchronization connections by starting a synchronization manually. If a connection is defined with no schedule, manual synchronization is the only way that synchronization can occur.
Note: It is anticipated that most CRCs will run the InForm software through a browser connected to a server on which synchronization occurs automatically on schedule. CRAs who travel between sites might find it advantageous to work offline and synchronize manually when an internet connection is available.
Reasons to synchronize manually Examples of reasons to synchronize manually:
A trial developer has created a new version of a CRF to reflect a change in the trial protocol.
You are a CDM and you just froze a case book. You are a PI and you signed several CRFs. You travel with a mobile computer that has no defined synchronization
schedule.
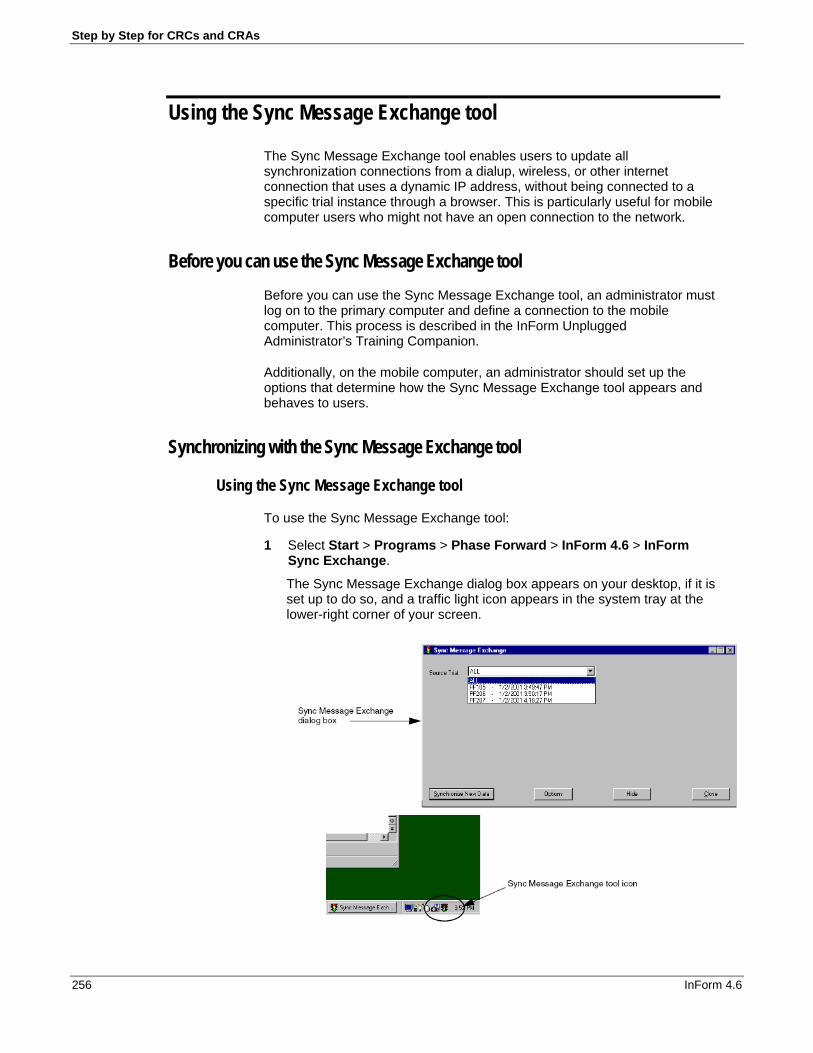
Step by Step for CRCs and CRAs
256 InForm 4.6
Using the Sync Message Exchange tool
The Sync Message Exchange tool enables users to update all synchronization connections from a dialup, wireless, or other internet connection that uses a dynamic IP address, without being connected to a specific trial instance through a browser. This is particularly useful for mobile computer users who might not have an open connection to the network.
Before you can use the Sync Message Exchange tool Before you can use the Sync Message Exchange tool, an administrator must log on to the primary computer and define a connection to the mobile computer. This process is described in the InForm Unplugged Administrator’s Training Companion.
Additionally, on the mobile computer, an administrator should set up the options that determine how the Sync Message Exchange tool appears and behaves to users.
Synchronizing with the Sync Message Exchange tool
Using the Sync Message Exchange tool
To use the Sync Message Exchange tool:
1 Select Start > Programs > Phase Forward > InForm 4.6 > InForm Sync Exchange.
The Sync Message Exchange dialog box appears on your desktop, if it is set up to do so, and a traffic light icon appears in the system tray at the lower-right corner of your screen.
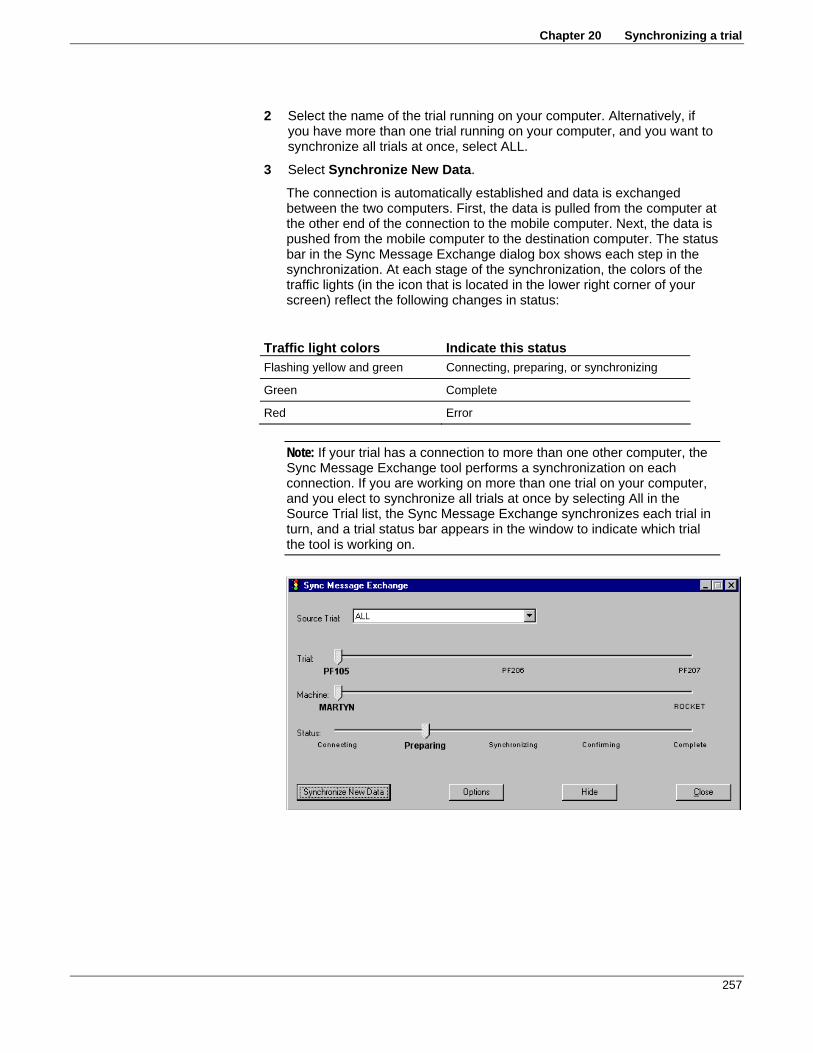
Chapter 20 Synchronizing a trial
257
2 Select the name of the trial running on your computer. Alternatively, if you have more than one trial running on your computer, and you want to synchronize all trials at once, select ALL.
3 Select Synchronize New Data.
The connection is automatically established and data is exchanged between the two computers. First, the data is pulled from the computer at the other end of the connection to the mobile computer. Next, the data is pushed from the mobile computer to the destination computer. The status bar in the Sync Message Exchange dialog box shows each step in the synchronization. At each stage of the synchronization, the colors of the traffic lights (in the icon that is located in the lower right corner of your screen) reflect the following changes in status:
Traffic light colors Indicate this status Flashing yellow and green Connecting, preparing, or synchronizing
Green Complete
Red Error
Note: If your trial has a connection to more than one other computer, the Sync Message Exchange tool performs a synchronization on each connection. If you are working on more than one trial on your computer, and you elect to synchronize all trials at once by selecting All in the Source Trial list, the Sync Message Exchange synchronizes each trial in turn, and a trial status bar appears in the window to indicate which trial the tool is working on.

Step by Step for CRCs and CRAs
258 InForm 4.6
Hiding the Sync Message Exchange tool
For your convenience, you can hide the Sync Message Exchange dialog box while the tool is working.
To hide the Sync Message Exchange tool:
Click Hide.
Note: An administrator of your computer can make this hidden mode the default.
To make the Sync Message Exchange tool visible:
In the lower-right corner of your screen, right-click the traffic light icon, and select Show Detail Window.

Chapter 20 Synchronizing a trial
259
Ways to synchronize manually
The InForm Unplugged module provides the following ways to synchronize manually:
Use the Sync Message Exchange tool. This tool is a separate utility that runs on your computer desktop and enables you to synchronize if you can connect to another computer by using a dialup, wireless, or other internet connection. If you are a mobile computer user, this method is recommended.
Use the Synchronize New Data button within the InForm Unplugged software. This method is useful if you are running the InForm software on a network computer and you have performed a critical update activity that should be synchronized throughout the system as soon as possible.
Use the file transfer utility to copy new data to media that can be mailed to another user for uploading. This method provides a backup form of transport if no other methods of synchronizing are practical or available.

Step by Step for CRCs and CRAs
260 InForm 4.6
Synchronizing from within InForm Unplugged
To synchronize a trial:
1 In the Navigation pane, click Admin.
2 Click Synchronization.
The Synchronization Connections page appears.
3 Find the name of the server with which you want to synchronize and click the checkbox to the left of that row.
4 Click Synchronize New Data. On the computer where you are initiating the synchronization, the InForm Unplugged software collects any data that has been added or updated since the last synchronization, puts it into a queue, and copies it to the server to which you are connected. The destination computer performs the same actions in reverse with data that has been added or updated since the last synchronization.
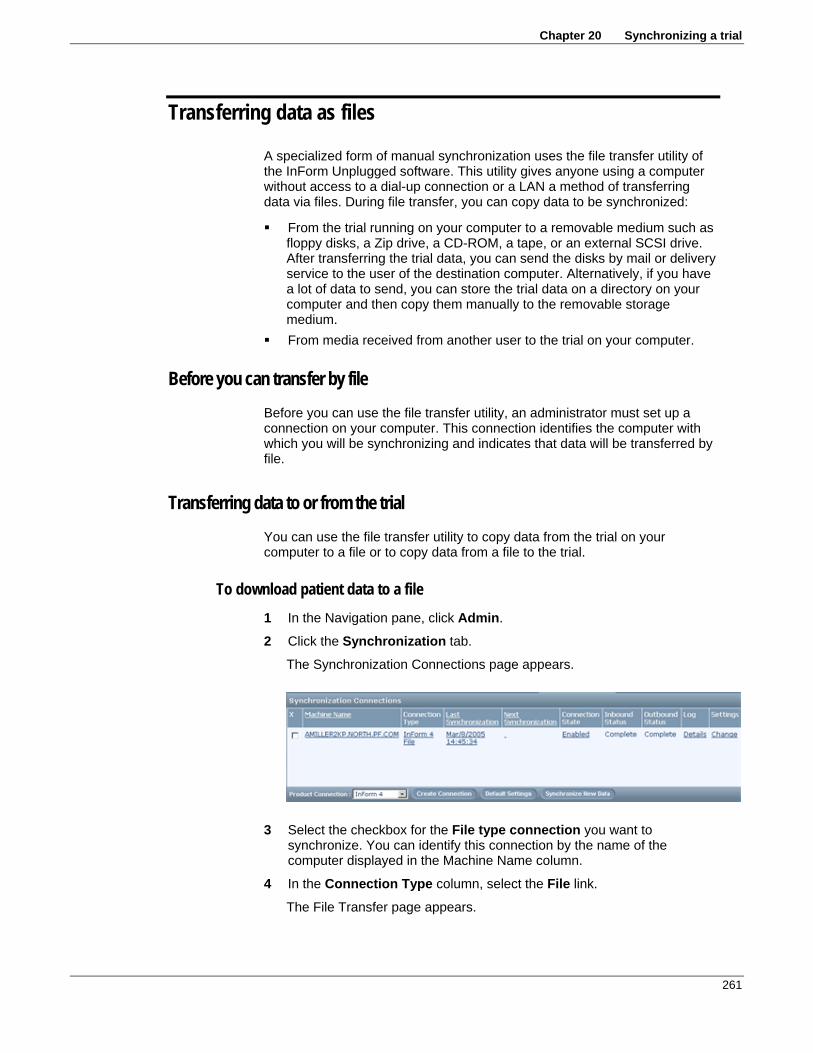
Chapter 20 Synchronizing a trial
261
Transferring data as files
A specialized form of manual synchronization uses the file transfer utility of the InForm Unplugged software. This utility gives anyone using a computer without access to a dial-up connection or a LAN a method of transferring data via files. During file transfer, you can copy data to be synchronized:
From the trial running on your computer to a removable medium such as floppy disks, a Zip drive, a CD-ROM, a tape, or an external SCSI drive. After transferring the trial data, you can send the disks by mail or delivery service to the user of the destination computer. Alternatively, if you have a lot of data to send, you can store the trial data on a directory on your computer and then copy them manually to the removable storage medium.
From media received from another user to the trial on your computer.
Before you can transfer by file Before you can use the file transfer utility, an administrator must set up a connection on your computer. This connection identifies the computer with which you will be synchronizing and indicates that data will be transferred by file.
Transferring data to or from the trial You can use the file transfer utility to copy data from the trial on your computer to a file or to copy data from a file to the trial.
To download patient data to a file 1 In the Navigation pane, click Admin.
2 Click the Synchronization tab.
The Synchronization Connections page appears.
3 Select the checkbox for the File type connection you want to synchronize. You can identify this connection by the name of the computer displayed in the Machine Name column.
4 In the Connection Type column, select the File link.
The File Transfer page appears.

Step by Step for CRCs and CRAs
262 InForm 4.6
5 In the File Transfer Media text box, enter the drive and directory path where you want the trial data copied. This can be an external drive (for example, A:\) or a hard drive on your computer.
If you are copying to the floppy drive, make sure the first disk is in the disk drive and ready to receive data.
6 Click Download.
The status field appears and tells you the progress of the download.
If the data you are exchanging does not fit on one floppy disk, the InForm Unplugged software prompts you to insert additional disks.
Note: If you are using floppy disks, make sure you number the floppy disks as the InForm Unplugged software copies data to them. The user who receives them must load the disks onto the destination computer in the same order in which the data is copied from the source computer.
To copy patient data from a file to your trial database 1 In the Navigation pane, click Admin.
2 Click the Synchronization tab.
3 In the Connection Type column, select File for the connection you want to synchronize. You can identify this connection by the name of the computer displayed in the Machine Name column.
The File Transfer window appears.

Chapter 20 Synchronizing a trial
263
4 In the File Transfer Media text box, enter the drive where the files you want to copy to your trial are stored. This could be an external driver (for example, A:\) or a network drive to which you have access.
5 Make sure the first disk or other media is in the specified drive.
6 Click Upload.
The status field appears and tells you the progress of the upload.
If the data you are exchanging is on more than one floppy disk, the InForm Unplugged software prompts you to insert additional disks.
Note: The floppy disks must be inserted in the same order in which data was copied to them by the source computer. If the floppy disks are inserted in the wrong order, the synchronization process stops and resumes only when the missing information arrives.

Step by Step for CRCs and CRAs
264 InForm 4.6
Viewing synchronization status information
You can see a summary of each specific connection state on the Synchronization Connections window, including:
Name of the computer with which the connection is established. Type of connection (HTTP or file). Date and time of the last synchronization. Date and time of the next scheduled synchronization. Connection state (enabled or disabled). Status of the last synchronization:
Initializing
Processing
New Data
Error
Complete
Additionally, for each connection definition, you can view a synchronization status log.

Chapter 20 Synchronizing a trial
265
Viewing connection status details
The synchronization log screens enable you to view connection status history at a summary and detailed level. You can use these screens to:
Resend data that has not been received in a synchronization. Display and capture information about the synchronization transmission
for the help desk.
Viewing the log summary To view the log summary:
1 Click Admin and then the Synchronization tab.
The Synchronization Connections page appears.
2 In the Log column for the connection you want to examine, click Details.
The Log Summary page appears, showing how many messages have been:
Queued for processing at the source computer.
Sent through the connection.
Received at the destination computer.
Confirmed as processed by the destination computer.
This log is cumulative over all transmissions.

Step by Step for CRCs and CRAs
266 InForm 4.6
Viewing synchronization log details For additional details about transmitted messages:
1 Click Admin and then the Synchronization tab.
The Synchronization Connections page appears.
2 In the Log column for the connection you want to examine, click Details.
3 Click Log Detail.
The log detail page appears and displays status information about each message. For each message, you can see:
Transaction type—Incoming or outgoing at the local computer.
Status
Date and time that the message was sent from the source computer.
Note: If you have the Synchronize All/Re-Send Message right, you can resend all or selected messages from the log detail page. For more information, see If you have problems during data exchange (see "You have problems during data exchange" on page 281).
Viewing details about a specific transaction batch To view details about a specific transaction batch:
1 Click Admin and then the Synchronization tab.
The Synchronization Connections page appears.
2 In the Log column for the connection you want to examine, click Details.
3 Click Log Detail.
4 On the Log Detail page, click an underlined message.
The Log page appears and provides the following information:
Source and destination computer and the InForm server names.
Synchronization date and time.
Number of transactions in the transaction batch.
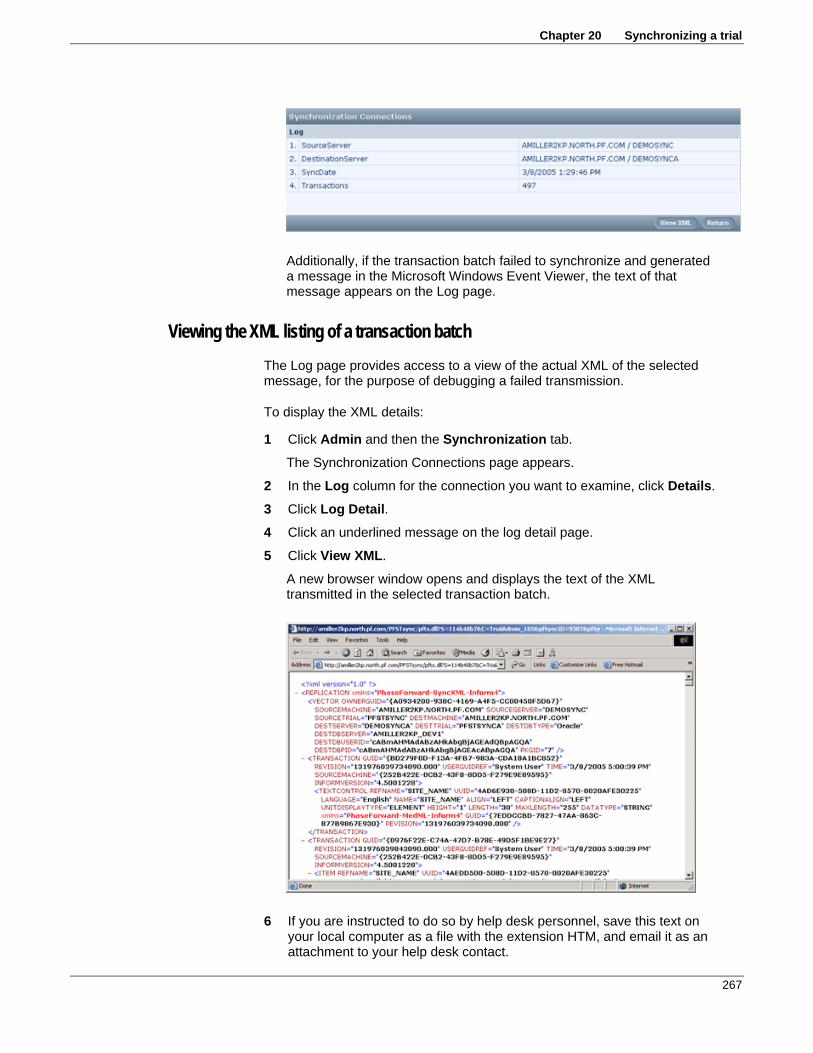
Chapter 20 Synchronizing a trial
267
Additionally, if the transaction batch failed to synchronize and generated a message in the Microsoft Windows Event Viewer, the text of that message appears on the Log page.
Viewing the XML listing of a transaction batch The Log page provides access to a view of the actual XML of the selected message, for the purpose of debugging a failed transmission.
To display the XML details:
1 Click Admin and then the Synchronization tab.
The Synchronization Connections page appears.
2 In the Log column for the connection you want to examine, click Details.
3 Click Log Detail.
4 Click an underlined message on the log detail page.
5 Click View XML.
A new browser window opens and displays the text of the XML transmitted in the selected transaction batch.
6 If you are instructed to do so by help desk personnel, save this text on your local computer as a file with the extension HTM, and email it as an attachment to your help desk contact.

Step by Step for CRCs and CRAs
268 InForm 4.6
Resolving conflicts
This section describes how to deal with conflicts that arise when any of the following situations occur with two users who are working on different copies of a trial:
The users update the same data item before synchronizing. The users change the state of the same query in different ways. The users change the text of the same query in different ways. One trial has a newer version of a form than the other, and the two users
update data on the same form before the form change is synchronized.
Resolving conflicting patient data If your trial is configured to issue queries when data conflicts arise, the InForm Unplugged software opens a query if two users working with different copies of the trial update the same patient data item or comment before the trial copies are synchronized.
The queries alert you that a conflict exists; they do not automatically resolve the conflict. If the InForm Unplugged software issues a query on conflicting patient data, do the following:
1 Contact the other user who updated the same data item.
2 Determine the correct value.
3 Update the data value if necessary.
4 Answer the data conflict message.
Note: The InForm Unplugged software initially creates the data conflict message on the computer where the data was first changed. Then it copies the data conflict message across the synchronization connection. Depending on synchronization timing, the copies of the data conflict message might not appear until the following synchronization.
Queries on data items
The following example illustrates a situation that results in a data conflict message on a patient data item.
1 A user named BJ Smith starts patient LIL on the DOV form of the Baseline visit. BJ Smith is running the trial on a computer called Boston AC Unit and has a connection to the Waltham AC Unit computer.
2 Before BJ Smith has a chance to synchronize to the trial that is running on the Waltham AC Unit computer, a user named ME Miller starts the same patient by entering data in the DOV form of the Baseline visit.

Chapter 20 Synchronizing a trial
269
When the two computers synchronize:
The InForm Unplugged software sets the date to the value ME Miller entered, since it is the date and time of entry is later than the date and time BJ Smith entered the data.
The Audit trail shows both updates.

Step by Step for CRCs and CRAs
270 InForm 4.6
The InForm Unplugged software issues a data conflict message against the data item.
As a result of the data conflict, the following things should happen:
ME Miller and BJ Smith consult to see which value is the appropriate value.
One of them answers the data conflict message. If the correct data value differs from the latest data value that is
displayed in the audit trail, the user updates the data item to reflect the correct value.
For more information, see Answering queries (on page 121) and Updating form data (on page 109).
Resolving query conflicts The previous section describes data conflict messages issued by the InForm Unplugged software in response to data entry and data update actions taken by users on different copies of a trial. Similar conflicts can occur during data review and correction if more than one user opens, answers, reissues, closes, or deletes the same query before synchronizing different copies of a trial.
As with data entry and data update conflicts, query conflicts require manual resolution by users who have the right to resolve them.

Chapter 20 Synchronizing a trial
271
How query conflicts can occur
Query conflicts can occur if users working on two different copies of a trial change either of the following before the first user’s change is synchronized to the other user’s computer:
The text of a query. The state of a query.
Query text conflicts
Query text conflicts arise when two users on different copies of a trial do any of the following and choose different query text:
Open the same Candidate query. Answer the same Opened query. Reissue the same Answered query.

Step by Step for CRCs and CRAs
272 InForm 4.6
Query state conflicts
Under normal circumstances, as a query progresses from the time it is first issued until it is resolved, the status of the query changes.
When a query first issued, it can be in Candidate or Opened state. A Candidate query can be opened or deleted.
After a query is placed in Opened state, it must be answered. An Answered query can be reissued or closed. A reissued query can be in Candidate or Opened state.
Any time a user performs an action that changes the state of a query, the opportunity for a conflict arises if another user working on a different copy of the trial works with the same query.
A conflict occurs if both users change the query to different states—for example, if one user changes a Candidate query to Opened and the other deletes it.
When a query conflict occurs, the InForm software updates the Query Listing page to show the query in a conflict state.

Chapter 20 Synchronizing a trial
273
Additionally, the Queries page for the specific query shows both versions of the query so that a user with the authority to resolve the conflict can do so.
Before a query with a conflict can progress to the next step in resolution, the conflict must be resolved. In this case, before a site user can answer the query, a sponsor with the right to resolve queries must decide which version of the query to use.
Site and sponsor conflicts
Query conflicts can be either site or sponsor conflicts. This is important because only a site user can resolve a site conflict, and only a sponsor user can resolve a sponsor conflict.
Site conflicts occur when two users on different copies of a trial answer the same query and select or type different query text. The following example illustrates a site conflict: users ME Miller and BJ Smith have both answered the same query but have used different query answer text.

Step by Step for CRCs and CRAs
274 InForm 4.6
Sponsor conflicts occur when two users on different copies of a trial do any of the following to the same query: Reissue the query in different states.
Open the query with different query text.
Reissue the query with different query text.
The following example illustrates a sponsor conflict: users Tom Allen and Susan Merkel have taken different actions on the same answered query: Tom Allen has reissued it in the candidate state, and Susan Merkel has closed it.

Chapter 20 Synchronizing a trial
275
Resolving a query conflict
The procedure for resolving either site or sponsor query conflicts is the same:
1 Log on to the InForm software as a user who has the right to resolve a query conflict.
2 In the Navigation pane, click Queries.
The Query Listing appears. When a query must be resolved, the listing includes the label SiteConflict or SponsorConflict in the Status column.
Note: To resolve a query that has the label SiteConflict, you must be a site user. To resolve a query that has the label SponsorConflict, you must be a sponsor user.
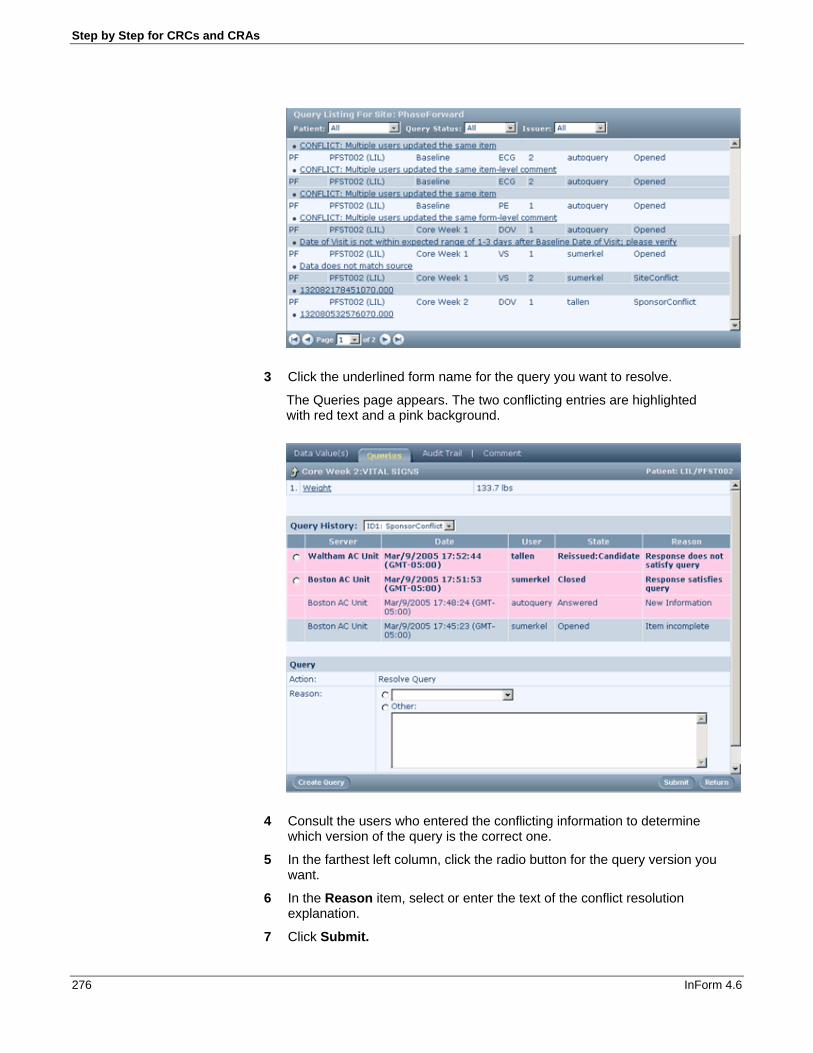
Step by Step for CRCs and CRAs
276 InForm 4.6
3 Click the underlined form name for the query you want to resolve.
The Queries page appears. The two conflicting entries are highlighted with red text and a pink background.
4 Consult the users who entered the conflicting information to determine which version of the query is the correct one.
5 In the farthest left column, click the radio button for the query version you want.
6 In the Reason item, select or enter the text of the conflict resolution explanation.
7 Click Submit.

Chapter 20 Synchronizing a trial
277
The InForm software updates the query history to show the resolution date, time, user, and reason, along with the server where the correct version was entered.
Additionally, the Status column in the Queries Listing indicates the resolved state of the query.
Resolving study version conflicts Recall that the InForm software handles the possibility that multiple versions of the same form can exist in the same copy of a trial. Once a form for a patient is started, the patient keeps that form version even if the form changes midway through a trial. When the new version of the form is added to the trial, patients for whom that form’s data has not been collected get the new version of the form. The same rule applies in a synchronization environment.

Step by Step for CRCs and CRAs
278 InForm 4.6
How a study version conflict can occur
When synchronization enters the picture, it is possible for the same patient to be started on different versions of a CRF. For example:
1 BJ Smith, a CRC working remotely, enters data for patient LIL in the Clinical Global Impression (CGI) form.
2 Meanwhile, in the home office, the CGI form is updated to capture an additional data item.
3 ME Miller, a CRC connected to the home office computer, starts patient LIL on the new CGI form.
4 The traveling CRC synchronizes to the home office.
The versions of the CGI form are in conflict. There is no way to know whether the data entered on the old version of the form is appropriate to the new version. If the synchronization accepts the data associated with the latest version of the form as current, valid data entered in the earlier version could be lost.

Chapter 20 Synchronizing a trial
279
The InForm Unplugged software resolves this situation by:
Updating both copies of the trial with the most recent version of the CRF, along with the data entered on it.
Creating a special visit and form in both copies of the trial to hold the data entered in the old version. This visit is called Conflict; it appears on the timeline above the CRF, in the Time and Events Schedule, and in the Case Books List.
Working with the Conflict visit
The Conflict visit contains the original version of the updated form. In the example scenario, the Clinical Global Impression form in the Conflict visit contains the data as it was entered by BJ Smith.

Step by Step for CRCs and CRAs
280 InForm 4.6
Although the two copies of the trial have been synchronized to the most recent data entry done by ME Miller, the InForm Unplugged software retains the original version in the Conflict visit version of the form so the differences can be resolved.
To resolve a data entry difference that results from a study version conflict, a user with the authority to update CRF data should:
1 Consult the users who updated the two versions of the form to determine which values are correct.
2 Update the form to reflect the correct values. If the correct values are the ones entered on the new version of the form, no change is necessary.

Chapter 20 Synchronizing a trial
281
What to do if...
You have problems during data exchange If you have problems during data exchange, you can check on the status of your transactions and resend those that are having problems. View the status of individual transactions on the Log Detail window. If any of the transactions have a status of Send Failed, you can manually resend them.
Resending transactions
To resend transactions:
1 Open the Log Detail window for the connection with which you are exchanging data.
2 Check the boxes to the left of the transactions you want to resend.
3 Click Resend.
Resending all the transactions
To resend all the transactions:
1 Open the Log Detail window for the connection with which you are exchanging data.
2 Select Resend All Data.

Step by Step for CRCs and CRAs
282 InForm 4.6

283
In this chapter Overview: Patient record transfer..........................................................284 How to transfer patients ........................................................................289 Transferring one patient at a time .........................................................290 Viewing the patient transfer audit trail ...................................................295 Viewing transferred patients..................................................................298 Viewing a patient archive ......................................................................300 Contents of a patient archive.................................................................302
C H A P T E R 2 1
Transferring patients

Step by Step for CRCs and CRAs
284 InForm 4.6
Overview: Patient record transfer
The patient record transfer feature of InForm allows you to transfer a patient's information from one site to another.
You can transfer patients one at a time using the InForm software user interface. You can also transfer patients in bulk using InForm Data Import.
Use the InForm software user interface to transfer patients who meet any of the following criteria:
Change permanent address before completing the study. Have multiple residences throughout the course of the study. Were initially assigned to the wrong sites or to an investigator who is no
longer with the study.
Use the InForm Data Import tool to transfer of patients if for any reason you need to transfer several patients from one site to another at the same time. You might need to do a bulk-transfer if, for instance, a site is closed down within the course of a study.
Whether you transfer patients individually, or transfer them in bulk, keep in mind that:
The InForm software allows you to transfer patients from one site to another only if the study version at the destination site is the same or greater than the study version at the patient's current site. (Note: To see what study version is in effect for a site, display its detail page, available from the Sites tab of the InForm software Admin interface.)
You can transfer only patients who are fully enrolled; you cannot transfer a patient who is screened but not enrolled or a patient who has failed enrollment.
You cannot use the patient record transfer feature if you are also using the site filtering feature of the` InForm Unplugged software.
Audit history and patient record transfer archive When you transfer a patient, the InForm software transfers all of the data of the patient that is associated with the current site to the destination site. When you initiate the patient record transfer, the InForm software automatically creates:
Patient transfer audit history—Audit trail information shows the date and time of the transfer, the originating and destination site, the time zone of the destination site, the user who performed the transfer, and the reason for the transfer.
Patient transfer archive—The InForm software creates an XML archive of the history of the patient, up to and including the patient record transfer. You can use the patient archive for submission to regulatory authorities or for a site audit.

Chapter 21 Transferring patients
285
Patient record transfer flow When you transfer a patient, InForm software transfers all of the data associated with the current site to the destination site. When you initiate the patient transfer, InForm software automatically creates:
Patient transfer audit history—Audit trail information includes such information as the date and time of the transfer, the originating and destination site, time zone of the destination site, and the reason for the transfer.
Patient transfer archive—The InForm software creates an XML archive of the history of the patient, up to and including the patient record transfer. You can use the patient archive should the originating site need to submit patient data to the FDA (via CRF submit).
The following table illustrates patient record transfer flow. The example follows the transfer of patient XYZ from:
Site A to Site B Site B to Site C Site C back to site A
Site A Site B Site C Step 1: Enroll patient XYZ.
Step 2: Add data for patient XYZ.
Step 3: Initiate transfer for patient XYZ to Site B.
The InForm software creates an archive that includes all forms for the patient as well as the audit history up to and including the patient transfer. Site A can no longer edit the patient's data.
Step 4: The InForm software transfers patient XYZ to Site B. Site B has edit access and control over all data for Patient XYZ.
Step 5: Add more data for patient.
Step 6: Initiate transfer for patient XYZ to Site C.
The InForm software creates an archive that includes all patient data from both Site A and Site B, up to and including the most recent patient transfer. Site B can no longer edit the data of the patient.
Step 7: The InForm software transfers patient XYZ to Site C. Site C has edit access and control over all data for patient XYZ.
Step 8: Add more data for patient.

Step by Step for CRCs and CRAs
286 InForm 4.6
Site A Site B Site C Step 9: Initiate transfer for patient
XYZ back to site A.
The InForm software creates an archive that includes all patient data from Site A, Site B, and Site C, up to and including the most recent patient transfer. Site C can no longer edit the data of the patient.
Step 10: Data for patient XYZ successfully transferred to Site A. Site A regains edit access and control over all data for patient XYZ.
Patient status and record transfer Study sponsors develop and maintain their own practices regarding patient status and transferring patient records to another site. When you use the InForm software user interface to transfer patients, the InForm software displays patient status, so that sponsors can view patient status before they execute the transfer. The InForm software displays the following patient status information:
Signature status—The number of required signatures that are missing for the patient.
Query status—The number of queries that are open for the patient. Source verification status—The number of forms that have yet to be
source-verified for the patient. A form is counted as needing source verification if any entered items on the form have not been source verified.
Note: While it might be good practice to ensure that all forms for a patient are signed and source-verified, and that all queries a resolved before transferring a patient, Phase Forward acknowledges that each study might have different processes and procedures. The InForm software does not prevent the transfer of a patient with outstanding queries, outstanding required signatures, or forms that are not source-verified.

Chapter 21 Transferring patients
287
Patient number conflicts The patient number is an identifier assigned to each patient at enrollment. If your study is configured to require unique patient numbers at a site, the patient record transfer feature prevents the creation of duplicate patient numbers at the destination site.
If you transfer patients using the InForm interface—When you begin transferring a patient, the InForm software assumes no patient number conflict on the destination site and automatically retains the current number of the patient for the transfer.
When you submit the transaction, the InForm software checks for any patient number conflict at the destination site:
If no conflict is found at the destination site, the InForm software completes the transfer and the patient retains his or her original patient number after moving to the destination site.
If a conflict is found at the destination site, the InForm software allows you to change the patient number and resubmit the transaction.
If you transfer patients using the InForm Data Import tool—To transfer patients in bulk using the InForm Data Import tool, you load a MedML file that specifies details of the patient transfer. During the load process, the InForm software checks for patient number conflicts at the destination site. If a conflict is found, processing stops for that patient, and the following error message appears for the patient: Patient number is not unique. Site for patient not changed.
Processing continues with the next patient in the file.
Note: Patient screening numbers do not change when a patient transfers to another site.
Patient initials and DOB conflicts Study designers can configure a study to require that the combination of patient initials and date of birth be unique within a site or throughout the study. If your study requires unique initials and date of birth only within a site, it is possible to have patients at different sites with the same combination of initials and date of birth.
If you transfer a patient to a site where another patient exists with the same initials and date of birth, and your study requires unique initials and date of birth at the site, the patient transfer fails. You must change the patient initials to make the combination unique.

Step by Step for CRCs and CRAs
288 InForm 4.6
Patient transfer and study version The InForm software allows you to transfer patients to only those sites running a study version that is the same or greater than the one run at the current site. When you transfer a patient to a site at a different study version, the InForm software follows the same versioning rules as when any site moves to a new study version:
If the study version at the destination site includes a new item on a form, the new item appears only for patients who had not started the form in the source site.
If the study version at the destination includes a new form, the new form appears only for patients added after the new version is implemented.
If you are transferring patients using the InForm software user interface—The InForm software filters the list of destination sites, displaying only those who meet this study version criteria. You cannot choose a site that has an unacceptable study version.
Note: To see what study version is in effect for a site, display its detail page, available from the Sites tab of the InForm software Admin interface.
If you are transferring several patients using the InForm Data Import tool—If the patient transfer MedML file specifies a destination site with an unacceptable study version, processing stops for that patient, and the following error message appears for the patient: Error: A patient cannot be moved to a site which is using an older study version. Site for patient not changed.
The patient transfer process continues with the next patient in the file.
Who can transfer patients? To be able to transfer patients from one site to another, users must:
Have access to all data for the patient, including any items that are hidden from sponsor users. This ensures that a complete archive of the patient data is available to the originating site.
Be assigned to an InForm rights group that enables the right to transfer patient records.
Be associated with both the originating and destination sites.

Chapter 21 Transferring patients
289
How to transfer patients
The InForm software provides two different methods for transferring patients to new sites. The method you use depends on whether you want to transfer a single patient, or whether you want to transfer patient records in bulk.
Transferring one patient at a time by using the InForm software Admin interface. This option is described in this document.
Transferring several patients at once by using the InForm Data Import tool. This option is described in the InForm Utilities Guide and in the online help for the InForm Data Import tool.
Note: To transfer patients by using the InForm software user interface, you must have appropriate InForm access rights to be able to transfer patient records. In addition, you must have access to both the originating site and the destination site.

Step by Step for CRCs and CRAs
290 InForm 4.6
Transferring one patient at a time
To transfer a single patient record to a different site:
1 In the Navigation pane, click Admin.
2 Click the Sites tab.
A list of sites appears. The tab also displays the site abbreviation, the email address for the site contact, and a Patients column.
3 Identify the current site for the patient you want to move. In the Patients column for that site, click Transfer.
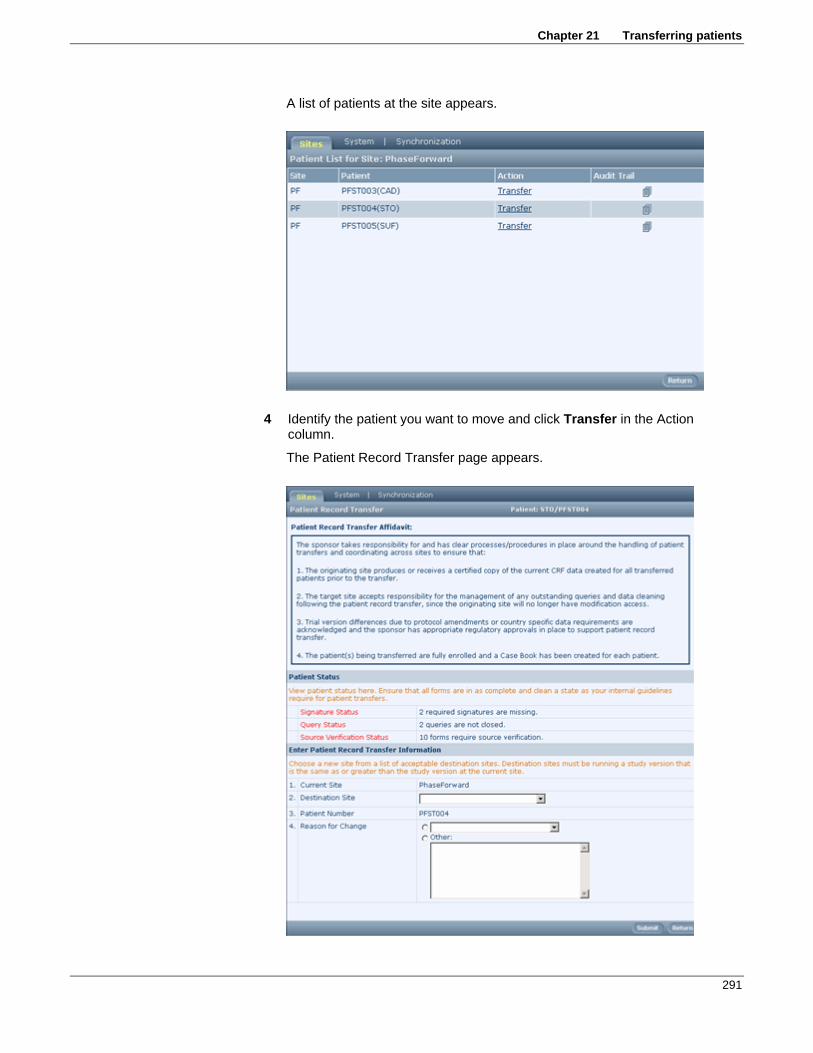
Chapter 21 Transferring patients
291
A list of patients at the site appears.
4 Identify the patient you want to move and click Transfer in the Action column.
The Patient Record Transfer page appears.

Step by Step for CRCs and CRAs
292 InForm 4.6
5 Read and understand the information in these sections of this page:
Patient Record Transfer Affidavit—This section is customized for your trial. It provides guidance on the responsibility of the administrative user regarding moving a patient from one site to another.
Patient Status—This section makes you aware if any of the following are outstanding for the patient: missing required signatures, queries that are not closed, or forms that require source verification.
After reading these sections of the page, you can choose to continue with the patient transfer, or to cancel. If you choose to continue, you are assuming responsibility for the patient transfer as described in the affidavit.
6 Complete the fields in the Enter Patient Record Transfer Information section of the page, as follows:
Field Description Current Site Display only. The current site to which the patient belongs.
Destination Site Choose a destination site from the drop-down list. The Destination Site list includes only those sites that you have access to and that are running study versions that are the same as or greater than the study version at the current site.
Patient number The patient number. This read-only field defaults to the patient number used at the current site. If the InForm software finds no patient number conflict at the destination site, the patient will retain his or her patient number when the transfer is complete.
If, however, the InForm software finds a conflict after you submit this transaction, this screen appears again, allowing you to edit the Patient number field.
Reason for change Indicate the reason for the patient transfer by selecting one of these radio buttons:
Select the top radio button and choose one of these predefined reason for the transfer. Patient change of address. Patient is a seasonal resident. Investigator no longer with study.
Select the Other radio button. In the text box, type a description of the reason for the transfer.
7 Click Submit, then OK to confirm the transfer.
8 The InForm software checks the study versions at the current and destination sites:
If the current site is at a lower study version than the destination site—The InForm software prompts you to confirm the transfer by resubmitting it.
If the current site is at a higher study version than the destination site—You cannot complete the transfer.

Chapter 21 Transferring patients
293
9 The InForm software checks to ensure there is no conflict with the patient number at the destination site:
If the InForm software finds no conflict at the destination site—The transfer completes.
If the InForm software finds a duplicate patient number at the destination site—The transfer stops until you resolve the patient number conflict, as duplicate patient numbers at a site are not permitted in patient record transfers. The Patient Record Transfer page displays again, allowing you to edit the patient number and resubmit the transaction.
If the current site is at a lower study version than the destination site You can transfer a patient only to those sites running a study version that is the same as or greater than the version run at the current site. If the destination site for a patient transfer is at a higher study version than the current site, the InForm software displays a message prompting you to confirm the transfer by resubmitting it.
To resubmit:
1 Click OK to clear the message.
2 Click Submit.
3 In the confirmation message, click OK.
If the current site is at a higher study version than all other sites You can transfer a patient only to those sites running a study version that is the same as or greater than the version run at the current site.
When you begin transferring a patient from the Patient Record Transfer page, the InForm software displays only the sites that you have access to and that meet this study version criteria.
If no sites participating in the study meet the study version criteria, the Patient Record Transfer page displays a message indicating there are no acceptable sites to which to transfer the patient.
Step by Step for CRCs and CRAs
294 InForm 4.6
If the InForm software finds a duplicate patient number at the destination site After you submit the patient transfer transaction, the InForm software determines whether there is a patient number conflict at the destination site. If a duplicate patient number exists at the destination site, the transfer stops until you resolve the patient number conflict; duplicate patient numbers at a site are not permitted in patient record transfers. Follow these steps to change the patient number.
1 Complete the Patient Record Transfer page. For more information, see Transferring one patient at a time.
If the InForm software finds a conflict, an error message appears.
2 Click OK.
The Patient Record Transfer page appears again.
Note: The Patient Number field is now editable.
3 Change the Patient Number field to a number that is not currently used at the destination site.
4 Click Submit.
The patient transfer transaction is complete.

Chapter 21 Transferring patients
295
Viewing the patient transfer audit trail
Users who are authorized to transfer patients or to manage site information can view the audit trail that the InForm software creates when a patient is transferred.
To view the audit trail for transferred patients:
1 In the Navigation pane, click Admin.
The InForm software Admin interface appears.
2 Click the Sites tab.
A list of sites appears. The tab also displays the site abbreviation, the email address for the site contact, and a Patients column.

Step by Step for CRCs and CRAs
296 InForm 4.6
3 Identify the site at which the patient whose audit trail you wish to see is currently enrolled and click the link in the Patients column for that site. (Depending on your rights, the link might be labeled Transfer or List). A list of patients at the site appears.
4 Click the audit trail icon (in the Audit Trail column) for the patient.
The Site Audit Trail for Patient page appears.
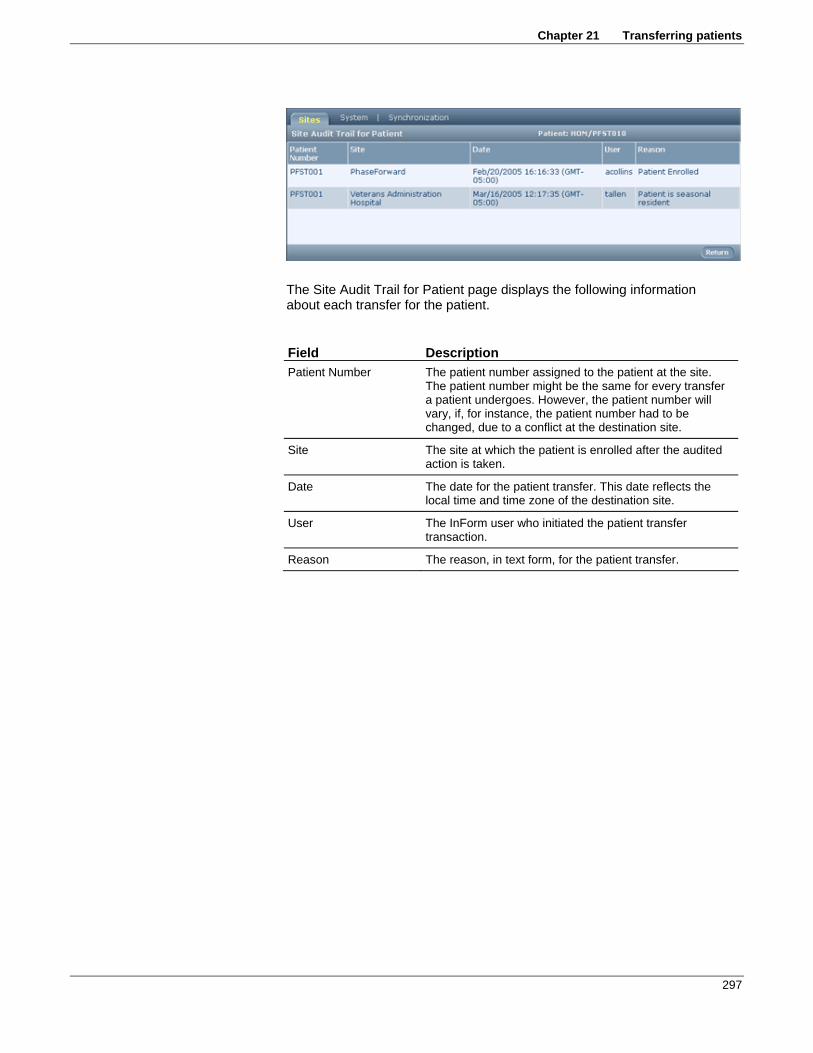
Chapter 21 Transferring patients
297
The Site Audit Trail for Patient page displays the following information about each transfer for the patient.
Field Description Patient Number The patient number assigned to the patient at the site.
The patient number might be the same for every transfer a patient undergoes. However, the patient number will vary, if, for instance, the patient number had to be changed, due to a conflict at the destination site.
Site The site at which the patient is enrolled after the audited action is taken.
Date The date for the patient transfer. This date reflects the local time and time zone of the destination site.
User The InForm user who initiated the patient transfer transaction.
Reason The reason, in text form, for the patient transfer.

Step by Step for CRCs and CRAs
298 InForm 4.6
Viewing transferred patients
All users can see a list of all patients who have been moved to or from the current site.
To view patients that have been transferred:
1 In the Navigation pane, click Patients.
The Case Books List appears. If you have access to more than one site, the Site filter list includes the sites to which you have access. The Case Books List displays only the patients currently enrolled in the site or sites to which you have access.
Note: If you want to filter the display to show patients transferred to and from a particular site, use the Site filter drop-down list.
2 Click Show Transferred.
The Transferred Patients page appears. It displays the patients who have been transferred to or from the site or sites.

Chapter 21 Transferring patients
299
Note: If you filtered the Case Books List, the same filter is applied to the Transferred Patients page. If you have access to more than one site, you can filter the data again on the Transferred Patients page.
The following table describes the columns on the Transferred Patients page:
Field Description Patient Patient number at the current site.
From site The current, or originating site for the patient, before the patient transfer transaction.
To site The destination site.
If you had to change the patient number because of a conflict at the destination site, the new patient number also appears enclosed in square brackets.
If no patient number is appended on the end of the To site value, the same patient number is used at both the originating site and the destination site.
Date (GMT) The date on which the patient transfer occurred. Note that this date is expressed in Greenwich Mean Time (GMT).
Archive A link to the archive of the case book of the patient. The archive shows the data that was entered before the transfer.

Step by Step for CRCs and CRAs
300 InForm 4.6
Viewing a patient archive
When you transfer a patient to a new site, the InForm software generates an archive of the case book of the patient at the originating site.
To view this archive:
1 Display the list of transferred patients. For more information, see Viewing transferred patients (on page 298).
2 Click the View link for the patient whose case book you want to review.
A new browser window opens, displaying the initials and patient number of the transferred patient, along with links to each form in the case book, organized by visit. Common forms appear at the end of the list of links.
3 To display the archive of a particular form, click its link.
An image of the form appears, along with links to whatever detailed information is available.

Chapter 21 Transferring patients
301
4 To display details about a form or item, click the link for the details you want.
5 To navigate to the previous location in the archive, click Back in your browser window.
Step by Step for CRCs and CRAs
302 InForm 4.6
Contents of a patient archive
Each CRF page in a patient archive can contain the following data:
Form and item comments. Signature history. Item audit trail.
The CRF page includes links to the following types of detailed information:
Click this link Link location To display the Association Summary Right column of
repeating form instance
Summary of repeating form instances associated with the instance where the link appears. From the association summary table, you can navigate to either association audit history or each of the individual associated pages.
Audit Trail Right column of item Audit trail of data changes and query activity for the item.
Comments Right column of item Audit trail of comments made on the item.
eCRF Audit Trail history Top of form Audit summary for the entire form showing data changes and query activity for each item in the form.
Form Comments Top of form Audit trail of comments made on the form.
Initial Entry Right column of item Record of the initial entry of data on the item. This link is visible only if no activity has occurred since the initial entry. If the item data has changed or includes query activity, the initial entry is included in the Audit Trail of the item.
Repeating Pages Right column of repeating form instance
Snapshot of current data values in the repeating form instance.
Deleted items
Within the InForm software, items that are deleted appear crossed out. If you create an archive for a form that contains a deleted item, the item appears with the word DELETED in bold above it.
Repeating forms
Repeating forms are displayed individually and in summary form. The summary page shows only the data for the first key items in a single table. The details of each form appear in following tables. For example, for the Adverse Events section, a summarized version of the form appears first, with a list of all the adverse events entered. The details of each instance follow the list.

303
A Ad Hoc Reporting The InForm Reporting and Analysis module, which allows you to create, run, and save customized reports on clinical and trial-management data.
adverse event (AE) An undesirable symptom or occurrence that a trial subject experiences during or after a clinical trial.
association The many-to-many relationship that can exist between two repeating forms.
audit trail A complete record of changes that are made in the trial database.
C case book The collection of all case record forms (CRFs) for a single trial participant. Also called a case record book (CRB).
case record form (CRF) A form that is used to record clinical data about trial participants.
clinical data The data that is entered on a CRF.
clinical data manager (CDM) A person who is responsible for preparing and maintaining a clinical trial database and for reviewing data.
clinical project manager A person who is responsible for all aspects of one or more clinical trials or for the entire clinical plan for a drug, device, or procedure.
clinical reporting package An Ad Hoc Reporting package that provides access to both clinical and trial-management data for reporting. Clinical reporting packages are unique for each trial.
clinical research associate (CRA) A person who is hired by a sponsor to supervise and monitor the progress of sites that are participating in a trial. CRAs are also known as monitors or site monitors.
clinical research coordinator (CRC) An assistant to the investigator at a site. CRCs are also known as trial coordinators.
clinical trial See trial (on page 306).
coding dictionary A standardized collection of terms and the codes that correspond to those terms.
common form A form that occurs in multiple visits and contains cumulative data.
content pane The area that is located on the right side of the InForm window that displays CRFs, summary lists, CRF item details, and so on.
Glossary

Step by Step for CRCs and CRAs
304 InForm 4.6
content-specific pane The bar that is located at the bottom of the page that displays command buttons and navigation controls, which vary depending on what is displayed in the content pane.
control A generic term for a form component, such as a radio button, checkbox, or drop-down list, in which you select or enter data.
control path A sequence of IDs that define the physical location of a data point in the InForm database.
CRF help A study document that contains details about how to complete the items on a form.
customer-defined database (CDD) An extract of the trial database that gives sponsor personnel access to the clinical data that is collected before the trial is completed.
D design note A comment about a form component.
display override A property of items that can be set to Editable, Read-Only, or Hidden. Also called item blinding.
dynamic form A form that is created in a trial only if certain conditions are met.
E element An option that you can select from a drop-down list, checkbox group, or radio group.
event A component that specifies the action to take when a rule fails.
exclusion criteria A list of admission criteria, any one of which excludes a potential subject from participation in a clinical trial.
execution plan A script that is associated with an event, and that sends an email message or writes to the Windows event log.
expected form A form that appears in the Time and Events Schedule for a subject, based on current known subject data. An expected form is a dynamic form that has been activated, or appears within a scheduled visit or a started unscheduled visit.
F form The data collection mechanism that is used in a clinical trial to gather patient data.
G generic rule A rule that the trial developer can attach to multiple items.
H home page The page that appears when you log on to an application.
I inclusion criteria A list of admission criteria that potential subjects must meet to be eligible for participation in a trial.
InForm Reporting and Analysis A reporting application, developed by Cognos Corporation, which has been customized and integrated into the InForm software by Phase Forward.

Glossary
305
InForm Trial Management package An Ad Hoc Reporting package that provides access to trial management data for reporting and allows users to share reports across trials.
Institutional Review Board (IRB) A group that reviews biomedical research that involves human subjects.
investigator In a clinical study, the clinician who is responsible for treating subjects, executing the protocol of a study at a specific site, and filling out case report forms (CRFs) for subjects.
itemset A collection of repeating items on a form.
M medical monitor A person who designs the trial protocol and reviews data.
N navigation pane The left side of the InForm window, which displays navigation buttons that you use to enter the functional areas of the InForm software.
P package A grouping of reporting elements from one or more data models. Two reporting packages are installed with every InForm trial: the InForm Trial Management package and a trial-specific clinical reporting package.
protocol The detailed plan for a clinical study.
Q query A question that is automatically generated by the InForm software or manually issued by a CRA.
R RefName A name that uniquely identifies a trial component definition.
regular form A CRF that is used to collect data that is specific to the visit in which the form occurs.
repeating form A form that can have multiple instances within a visit.
rule A script that checks whether data is valid or that sets the value of an item based on a calculation.
rule dependency An additional item that is required for rule processing.
S screening and enrollment The process of adding a subject to a study.
serious adverse event An adverse medical occurrence that is life-threatening, or results in death or persistent or significant disability or incapacity; involves an overdose or the development of cancer, a congenital anomaly, or a birth defect; requires inpatient hospitalization, or lengthens a hospital stay.
signature group A group of users who are authorized to sign a specific set of CRFs.
source verification The process of comparing data that is on forms to data on source documents, checking for inconsistencies or errors, and recording the results of the review.

Step by Step for CRCs and CRAs
306 InForm 4.6
sponsor The individual, company, or organization that is responsible for the initiation, management, or financing of a clinical study.
standard report A report that is included within all InForm Reporting and Analysis installations.
started form A CRF that is submitted or that contains data, a query, or a comment.
started visit A visit in which at least one non-common expected form has been started.
SV Report A printed version of one or more CRFs that CRAs use to perform offline source verification.
T trial The systematic study of a test article (a treatment, drug, or device) in human subjects.
trial management data The metric and status data pertaining to a study, which is used to report on the status of a study relative to its completion.
trial-specific clinical model An Ad Hoc Reporting data model that is specific to a trial, and that contains references to subject data that site users enter on forms.
U unscheduled visit A visit that occurs in addition to the visits prescribed by the study protocol.
V visit A subject evaluation checkpoint when data is collected.
visit calculator A scheduling aid that enables you to compute and print suggested visit dates based on the patient start date. The visit calculator page appears when a patient is enrolled and is also available as part of the trial documents.

307
If you are a Phase Forward customer with a maintenance agreement, you can contact the Global Support Center for assistance with product, user management, provisioning, site assessment, or technical issues.
Your maintenance agreement indicates the type of support you are eligible to receive and describes how to contact Phase Forward. Additionally, the Phase Forward website lists the toll-free support number for your product, location, and support level: http://www.phaseforward.com/support/
In the event that our toll-free telephone service is interrupted, please use either of the following methods to contact the Global Support Center:
Email [email protected]
Telephone In the US: 781-902-4900
Outside of the US: +44 (0) 1628 640794
If you need assistance

Step by Step for CRCs and CRAs
308 InForm 4.6

309
A adding a FAQ • 232 affidavit for signing • 204 answering a query
concepts • 124 methods • 124 procedure • 126
archive, patient record transfer • 302 association, form • 101 audit trail • 111 audit trail icons • 14 Audit Trail page • 52 automatic query • 170
C cancel navigation mode icon • 16 Case Book
freezing • 195 sample • 228 signatures • 200 unfreezing • 195 unlocking • 195
Case Book list • 40 changing data • 110 changing password • 2 check box • 95 clearing data • 112 closing queries
concepts • 170 procedure • 172
comment description of • 49 entering • 99 icons • 14 queries on • 247
Comments page • 49 common CRF • 94 concepts
acting on multiple queries • 178 answering a query • 124 changing data • 110 closing queries • 170 data entry • 94 data listings • 218 data update • 110 enrolling • 82
entering data • 94 freezing and locking • 186 InForm user interface • 12 issuing a query • 158 listings • 218 marking source verified • 132 online help • 240 patient record transfer • 284 screening • 76 signatures • 200 source verification • 136 study documentation • 228 synchronizing • 246 transferring patients • 284 updating data • 110
conflict resolution conflict visits • 279 on queries • 270 overview • 253 query conflicts • 275 query state • 271 query text • 271 rules for • 254 site conflicts • 273 sponsor conflicts • 273 study version conflicts • 277
conflict resolution queries • 268 conflict visit • 279 conflicts
patient data • 268 query • 268 types of • 268
content pane • 12 content-specific pane • 12 controls, data entry • 95 CRF
associated • 101 common • 94 cross-reference • 47 data entry controls, types of • 95 data update • 110 freezing • 188 help on items in • 228 item details • 49 items, types of • 94 itemsets • 94 linking to CRF item help • 230 printing • 214
Index

Step by Step for CRCs and CRAs
310 InForm 4.6
regular • 94 signatures • 200 status icons • 18 types of • 94
CRF help linking to • 230 viewing • 230
CRF indexer control • 22 cross reference view • 47
D data entry
concepts • 94 controls • 95 procedure • 97
data listings • 218 data listings, running • 219 Data Value(s) page • 53 deleting a candidate query • 165 deleting an itemset • 116 detailed view • 46 document selection pane • 20 document text pane • 20
E editing a FAQ • 234 enrolling
concepts • 76 procedure • 83
entering data comments • 99 concepts • 94 procedure • 97
eraser icon • 16 erasing data • 112
F FAQ
adding • 232 definition of • 232 editing • 234 overview • 228
file transfer synchronization • 261 filters
on Required Signatures screen • 204 form help • 55 form indexer control • 22 form navigation mode • 26, 29 form types • 94 freeze icon • 15 freezing and locking
about • 186 activities prohibited by • 186 all foms in a visit • 190 Case Book • 195 CRF • 188
icons for • 187 repeating form instances • 191 while monitoring • 193 with synchronization • 196
freezing and locking icons • 15 Frequently Asked Questions. See FAQ • 228
G generating listings • 219 Go controls, home page • 25 group, signature • 202
H help topics, related • 243 help, CRF • 55, 228 help, online
concepts • 240 procedures • 241
hidden items • 107 home page Go controls • 25
I icons • 14, 16, 17
audit trail • 14 cancel navigation mode • 16 comment • 14 eraser • 16 form navigation • 15 freezing and locking • 15 patient navigation mode • 16 patient order • 16 query • 15 reset value • 16 signature status • 72 traffic light • 18 visit and CRF status • 18 visit navigation mode • 16
InForm logging in to • 2 logging out of • 62 stopping • 62
issuing a query • 159 item • 94 itemset • 94
L linking to CRF help • 230 links, navigation • 24 listings
overview • 218 running • 219
lock icon • 15 locking
Case Book • 195 CRF • 188

Index
311
Log Summary screen • 265 logging in • 2 logging off • 62 logout, automatic • 4
M manual query • 170 manual synchronization • 255 maximum inactivity period • 4 maximum usage period • 4 meaning, signatures • 200 monitoring
closing queries • 170 freezing and locking • 186 issuing queries • 158 multiple queries • 178 source verifying • 136
most recently used pages • 25
N navigation modes • 26, 27, 29, 33
icons • 16 navigation pane • 20 navigation shortcuts • 25
O offline source verification • 151 one-way synchronization • 252 online help
concepts • 240 navigating in • 241 window • 61
online source verification • 137 opening a candidate query • 163 ordering patients • 33
P page indexer control • 21 panes
content • 12 document selection • 20 document text • 20 navigation • 20 table of contents • 20
password, changing • 2 changing • 5 hint • 7 password hint • 7
patient data conflicts • 268 patient navigation icons • 16 patient navigation mode icon • 16 patient navigation modes • 26 patient order • 33 patient order icon • 15, 16 patient record transfer
archive contents • 302 audit trail • 295 overview • 284 procedure • 290 viewing transferred patients • 298
patient visit information • 48 printing
printing a CRF • 214 protocol • 228 Protocol page • 57 Protocol window • 57 pulldown list • 95
Q queries
and item appearance • 122 answering, methods for • 124 answering, procedure • 126 automatic • 170 closing queries, overview • 170 closing queries, procedure • 172 conflict resolution • 268 conflicts on • 270 manual • 170 on comments • 247 site conflicts • 273 sponsor conflicts • 273 state conflicts • 271 text conflicts • 271
Queries page • 51 query icons • 15 Query Listing page • 56
R radio button • 95 read-only items • 107 recent page list • 25 Reg Docs page • 74 regular CRF • 94 regular item • 94 Required Signature page • 72 resending transactions • 281 reset value icon • 16 resolving conflicts • 268 running listings • 219
S sample Case Book • 228 Sample Case Book • 59 screening
concepts • 76 failure • 80 procedure • 78
Screening Log page • 38 Select Action list • 23 select all checkboxes icon • 17
Step by Step for CRCs and CRAs
312 InForm 4.6
shortcuts, navigation • 25 signature group • 202 signatures
affidavit • 204 concepts • 200 CRF and Case Book • 200 invalidation of • 203 meaning • 200 signing a CRF or Case Book • 204 viewing signature details • 210 viewing signature status • 208
signing a CRF or Case Book • 204 signing affidavit • 204 site conflicts on queries • 273 source verification
freezing or locking while source verifying • 149
marking SV ready • 132 offline • 151 online • 137
Source Verification Listing • 67 sponsor conflicts on queries • 273 spreadsheet, downloading data to • 218 status of synchronization • 264 stopping InForm • 62 study documentation
concepts • 228 description of • 57 procedures • 229
study protocol • 228 study version conflicts • 277 summary view • 45 SV Report page • 70 Sync Message Exchange tool • 256 synchronization
comment conflicts • 247 conflict resolution • 268 conflict resolution rules • 254 conflict visit • 279 conflicts with • 253 definition of • 250 file transfer utility • 261 freezing and locking with • 196 manual • 255 methods of • 252 one-way • 252 prerequisites for • 251 query conflicts • 270 resending transactions • 281 status information about • 264 Sync Message Exchange Tool • 256 two-way • 252
synchronization log details • 266 synchronization logs • 264
T table of contents pane • 20 text box • 95 Time and Events Schedule • 41 traffic light icons • 16, 18 transactions, resending • 281 transferring patients
archive contents • 302 audit trail • 295 overview • 284 procedure • 290 viewing transferred patients • 298
two-way synchronization • 252
U undeleting an itemset • 116 unfreezing
Case Book • 195 CRF • 188
unlocking Case Book • 195 CRF • 188
unscheduled visit • 103 updating data
concepts • 110 deleting or undeleting an itemset • 116 procedure • 112
URL of trial • 2
V verification, source • 136 view
cross-reference • 47 detailed • 46 summary • 45
view, cross reference • 47 viewing
CRF help • 230 online help • 241 study documentation • 229 viewing • 295 viewing transferred patients • 298
visit calculator • 228 Visit Calculator • 58 visit navigation mode • 26, 27 visit navigation mode icon • 16 Visit Report page • 71 visit status icons • 18 visit tabs • 48 visits
conflict • 279 unscheduled • 103

Index
313
W what to do if
candidate ineligible • 89 data changes after freezing or locking • 198 data entry error • 104 data not available • 105 data update results in a query • 120 disallow enrollment • 91 enrollment data missing • 86 enrollment failure override permitted • 90 enrollment not allowed with incomplete data •
87 form changes after signature • 211 form changes after source verification • 156 form N/A, unknown, not done • 107 item N/A, unknown, not done • 106 item not editable • 107 query answer opens another query • 130 query conflict • 168 query generated • 105 signature fails processing • 211 submitting results in a • 80 synchronization fails • 281
X XML listing of a transaction batch • 267