Embed Size (px)
Citation preview
Fedora 24
Installation GuideInstalling Fedora 24 on 32 and 64-bit AMD and Intel
Fedora Documentation Project

Installation Guide
Fedora 24 Installation GuideInstalling Fedora 24 on 32 and 64-bit AMD and IntelEdition 1
Author Fedora Documentation Project
Copyright © 2015 Red Hat, Inc. and others.
The text of and illustrations in this document are licensed by Red Hat under a Creative CommonsAttribution–Share Alike 3.0 Unported license ("CC-BY-SA"). An explanation of CC-BY-SA is availableat http://creativecommons.org/licenses/by-sa/3.0/. The original authors of this document, and Red Hat,designate the Fedora Project as the "Attribution Party" for purposes of CC-BY-SA. In accordance withCC-BY-SA, if you distribute this document or an adaptation of it, you must provide the URL for theoriginal version.
Red Hat, as the licensor of this document, waives the right to enforce, and agrees not to assert,Section 4d of CC-BY-SA to the fullest extent permitted by applicable law.
Red Hat, Red Hat Enterprise Linux, the Shadowman logo, JBoss, MetaMatrix, Fedora, the InfinityLogo, and RHCE are trademarks of Red Hat, Inc., registered in the United States and other countries.
For guidelines on the permitted uses of the Fedora trademarks, refer to https://fedoraproject.org/wiki/Legal:Trademark_guidelines.
Linux® is the registered trademark of Linus Torvalds in the United States and other countries.
Java® is a registered trademark of Oracle and/or its affiliates.
XFS® is a trademark of Silicon Graphics International Corp. or its subsidiaries in the United Statesand/or other countries.
MySQL® is a registered trademark of MySQL AB in the United States, the European Union and othercountries.
All other trademarks are the property of their respective owners.
This manual explains how to boot the Fedora installation program, Anaconda, and how to installFedora 24 on 32 and 64-bit AMD and Intel systems. It also covers advanced installation methods suchas automated Kickstart installations, booting the installation from a network location, remote accessto the installation system using VNC, and system upgrades from previous versions of Fedora. It alsodescribes common post-installation tasks and explains how to troubleshoot common issues related tothe installation.

iii
Preface vii1. Document Conventions .................................................................................................. vii
1.1. Typographic Conventions .................................................................................... vii1.2. Pull-quote Conventions ....................................................................................... viii1.3. Notes and Warnings ............................................................................................ ix
2. We Need Feedback! ....................................................................................................... ix3. Acknowledgments ........................................................................................................... x
1. Introduction 11.1. Background .................................................................................................................. 1
1.1.1. About Fedora .................................................................................................... 11.1.2. Getting Additional Help ...................................................................................... 1
1.2. About This Document ................................................................................................... 11.2.1. Goals ................................................................................................................ 11.2.2. Target Audience ................................................................................................ 2
2. Downloading Fedora 3
I. Installing Fedora 5
3. Preparing for Installation 73.1. Upgrade or Install? ............................................................................................... 73.2. Downloading Boot and Installation Images ............................................................. 73.3. Verifying the Downloaded Image ........................................................................... 7
3.3.1. Verifying checksums on Windows systems .................................................. 83.3.2. Verifying checksums on Linux and OSX systems ......................................... 9
3.4. Preparing Boot Media ........................................................................................... 9
4. Booting the Installation 134.1. Preparing to Boot ............................................................................................... 134.2. The Boot Menu .................................................................................................. 14
5. Installing Using Anaconda 175.1. Introduction to Anaconda .................................................................................... 175.2. Consoles and Logging During the Installation ....................................................... 17
5.2.1. Accessing Consoles ................................................................................. 175.2.2. Saving Screenshots ................................................................................. 18
5.3. Installing in Text Mode ........................................................................................ 195.4. Installing in the Graphical User Interface .............................................................. 20
5.4.1. Welcome Screen and Language Selection ................................................ 205.4.2. Installation Summary ................................................................................ 225.4.3. Date & Time ............................................................................................ 235.4.4. Keyboard Layout ..................................................................................... 255.4.5. Language Support ................................................................................... 275.4.6. Installation Source ................................................................................... 285.4.7. Software Selection ................................................................................... 305.4.8. Installation Destination ............................................................................. 325.4.9. Installation Destination - Specialized & Network Disks ................................ 365.4.10. Manual Partitioning ................................................................................ 415.4.11. Kdump .................................................................................................. 585.4.12. Network & Hostname ............................................................................. 595.4.13. Configuration and Installation Progress ................................................... 635.4.14. Root Password ...................................................................................... 645.4.15. Create User ........................................................................................... 65
6. After the Installation 69
Installation Guide
iv
6.1. Initial Setup ........................................................................................................ 696.2. GNOME Initial Setup .......................................................................................... 716.3. Common Post-installation Tasks .......................................................................... 72
7. Troubleshooting 757.1. Getting Help ....................................................................................................... 75
7.1.1. Log Files Generated During the Installation ............................................... 757.1.2. Transferring Log Files from the Installation System .................................... 76
7.2. Trouble Beginning the Installation ........................................................................ 787.2.1. Problems with Booting into the Graphical Installation .................................. 787.2.2. Serial Console Not Detected .................................................................... 78
7.3. Trouble During the Installation ............................................................................. 797.3.1. No Disks Detected ................................................................................... 79
7.4. Problems After Installation .................................................................................. 797.4.1. Resetting the Root Password ................................................................... 797.4.2. Are You Unable to Boot With Your RAID Card? ......................................... 807.4.3. Trouble With the Graphical Boot Sequence ............................................... 807.4.4. Booting into a Graphical Environment ....................................................... 817.4.5. No Graphical User Interface Present ......................................................... 827.4.6. X Server Crashing After User Logs In ....................................................... 827.4.7. Is Your RAM Not Being Recognized? ........................................................ 82
II. Advanced Installation Options 85
8. Boot Options 878.1. Configuring the Installation System at the Boot Menu ........................................... 878.2. Available Boot Options ....................................................................................... 87
8.2.1. Specifying the Installation Source ............................................................. 878.2.2. Kickstart Boot Options ............................................................................. 898.2.3. Console, Environment and Display Options ............................................... 908.2.4. Network Boot Options .............................................................................. 928.2.5. Advanced Installation Options ................................................................... 948.2.6. Enabling Remote Access Using VNC ........................................................ 958.2.7. Debugging and Troubleshooting ............................................................... 96
8.3. Deprecated Boot Options .................................................................................... 978.4. Removed Boot Options ....................................................................................... 988.5. Using the Maintenance Boot Modes .................................................................... 99
8.5.1. Loading the Memory (RAM) Testing Mode ................................................. 998.5.2. Verifying Boot Media .............................................................................. 1018.5.3. Booting Your Computer in Rescue Mode ................................................. 101
9. Automating the Installation with Kickstart 1039.1. How to Perform a Kickstart Installation ............................................................... 103
9.1.1. Creating a Kickstart File ......................................................................... 1039.1.2. Verifying the Kickstart File ...................................................................... 1049.1.3. Making the Kickstart File Available .......................................................... 1049.1.4. Starting the Kickstart Installation ............................................................. 105
10. Setting Up an Installation Server 10710.1. PXE Installation Overview ............................................................................... 10710.2. DHCP Server Configuration ............................................................................. 10810.3. Installing the tftp server ................................................................................... 10910.4. Providing and configuring bootloaders for PXE clients ....................................... 10910.5. Getting the kernel and initrd ............................................................................ 11110.6. Providing repositories ...................................................................................... 111
v
10.7. Advanced network installations with Cobbler .................................................... 111
11. Installing Using VNC 11311.1. Installing a VNC Viewer .................................................................................. 11311.2. Performing a VNC Installation ......................................................................... 113
11.2.1. Choosing a VNC Installation Mode ........................................................ 11411.2.2. Installing in VNC Direct Mode ............................................................... 11411.2.3. Installing in VNC Connect Mode ........................................................... 116
11.3. Kickstart Considerations .................................................................................. 11711.4. Considerations for Headless Systems .............................................................. 118
12. Upgrading Your Current System 11912.1. Manual System Upgrade or Reinstallation ........................................................ 119
III. Technical Appendixes 121
A. Kickstart Syntax Reference 123A.1. Installation Methods and Sources ...................................................................... 124
A.1.1. device (optional) - Install Extra Device Drivers ......................................... 124A.1.2. driverdisk (optional) - Use a Driver Disk .................................................. 124A.1.3. install (required) - Configure Installation Method ...................................... 125A.1.4. mediacheck (optional) - Verify Installation Media Integrity ......................... 126A.1.5. ostreesetup (optional) - Install from an OSTree ........................................ 126A.1.6. repo (optional) - Configure Additional Repositories ................................... 127
A.2. Storage and Partitioning ................................................................................... 128A.2.1. autopart (optional) - Automatic Partitioning .............................................. 128A.2.2. bootloader (required) - Configure Boot Loader ......................................... 129A.2.3. btrfs (optional) - Create Btrfs Volume or Subvolume ................................. 131A.2.4. clearpart (optional) - Remove All Existing Partitions ................................. 132A.2.5. fcoe (optional) - Configure Fibre Channel Over Ethernet Devices .............. 134A.2.6. ignoredisk (optional) - Ignore Specified Disks .......................................... 134A.2.7. iscsi (optional) - Configure iSCSI Devices ............................................... 135A.2.8. iscsiname (optional) - Assign Name to iSCSI Device ................................ 136A.2.9. logvol (optional) - Create LVM Logical Volume ......................................... 136A.2.10. part (required) - Create Physical Partition .............................................. 140A.2.11. raid (optional) - Create Software RAID .................................................. 144A.2.12. reqpart (optional) - Create Required Partitions ....................................... 146A.2.13. volgroup (optional) - Create LVM Volume Group .................................... 147A.2.14. zerombr (optional) - Reinitialize Partition Tables ..................................... 148A.2.15. zfcp (optional) - Configure Fibre Channel Device ................................... 148
A.3. Network Configuration ...................................................................................... 149A.3.1. firewall (optional) - Configure Firewall ..................................................... 149A.3.2. network (optional) - Configure Network Interfaces .................................... 150
A.4. Console and Environment ................................................................................. 154A.4.1. keyboard (optional) - Configure Keyboard Layouts ................................... 154A.4.2. lang (optional) - Configure Language During Installation ........................... 154A.4.3. services (optional) - Configure Services .................................................. 155A.4.4. skipx (optional) - Do Not Configure X Window System ............................. 155A.4.5. timezone (optional) - Configure Time Zone .............................................. 156A.4.6. xconfig (optional) - Configure X Window System ...................................... 156
A.5. Users, Groups and Authentication ..................................................................... 156A.5.1. auth or authconfig (optional) - Configure Authentication ............................ 156A.5.2. group (optional) - Create User Group ...................................................... 158A.5.3. pwpolicy (optional) - Change the Default Password Policy ........................ 159A.5.4. realm (optional) - Join an Active Directory or IPA Domain ......................... 160

Installation Guide
vi
A.5.5. rootpw (required) - Set Root Password ................................................... 160A.5.6. selinux (optional) - Configure SELinux .................................................... 161A.5.7. sshkey (optional) - Add an Authorized SSH Key ...................................... 161A.5.8. user (optional) - Create User Account ..................................................... 161
A.6. Installation Environment .................................................................................... 162A.6.1. autostep (optional) - Go Through Every Screen ....................................... 162A.6.2. cmdline (optional) - Perform Installation in Command Line Mode ............... 163A.6.3. graphical (optional) - Perform Installation in Graphical Mode ..................... 163A.6.4. logging (optional) - Configure Error Logging During Installation ................. 163A.6.5. rescue (optional) - Rescue Mode ............................................................ 163A.6.6. sshpw (optional) - Restrict ssh Access During Installation ......................... 164A.6.7. text (optional) - Perform Installation in Text Mode ..................................... 165A.6.8. unsupported_hardware (optional) - Suppress Unsupported HardwareAlerts .............................................................................................................. 165A.6.9. vnc (optional) - Configure VNC Access ................................................... 165
A.7. After the Installation ......................................................................................... 165A.7.1. %addon com_redhat_kdump (optional) - Configure kdump ....................... 166A.7.2. firstboot (optional) - Enable or Disable Initial Setup .................................. 166A.7.3. halt (optional) - Halt System After Installation .......................................... 167A.7.4. poweroff (optional) - Power Off After Installation ...................................... 167A.7.5. reboot (optional) - Reboot After Installation .............................................. 167A.7.6. shutdown (optional) - Shut Down After Installation ................................... 168
A.8. %addon (optional) - Include an Anaconda Add-on .............................................. 168A.9. %anaconda (optional) - Additional Anaconda Configuration ................................. 168A.10. %include (optional) - Include Contents of Another File ...................................... 169A.11. %ksappend (optional) - Append Contents of Another File .................................. 169A.12. %packages (required) - Package Selection ...................................................... 169A.13. %pre (optional) - Pre-installation Script ............................................................ 172A.14. %post (optional) - Post-installation Script ......................................................... 173A.15. Example Kickstart Configurations .................................................................... 174
A.15.1. Advanced Partitioning Example ............................................................ 174A.15.2. Example Pre-installation Script ............................................................. 175A.15.3. Example Post-installation Script ............................................................ 176
B. An Introduction to Disk Partitions 177B.1. Hard Disk Basic Concepts ................................................................................ 177
B.1.1. File Systems ......................................................................................... 177B.1.2. Partitions: Turning One Drive Into Many .................................................. 178B.1.3. Partitions Within Partitions - An Overview of Extended Partitions ............... 180B.1.4. GUID Partition Table (GPT) .................................................................... 181
B.2. Strategies for Disk Repartitioning ...................................................................... 182B.2.1. Using Unpartitioned Free Space ............................................................. 182B.2.2. Using Space from an Unused Partition ................................................... 182B.2.3. Using Free Space from an Active Partition .............................................. 183
B.3. Partition Naming Schemes and Mount Points ..................................................... 185B.3.1. Partition Naming Scheme ....................................................................... 185B.3.2. Disk Partitions and Mount Points ............................................................ 186B.3.3. How Many Partitions? ............................................................................ 186
C. Understanding LVM 187
D. Revision History 189
Index 191

vii
Preface
1. Document ConventionsThis manual uses several conventions to highlight certain words and phrases and draw attention tospecific pieces of information.
In PDF and paper editions, this manual uses typefaces drawn from the Liberation Fonts1 set. TheLiberation Fonts set is also used in HTML editions if the set is installed on your system. If not,alternative but equivalent typefaces are displayed. Note: Red Hat Enterprise Linux 5 and later includesthe Liberation Fonts set by default.
1.1. Typographic ConventionsFour typographic conventions are used to call attention to specific words and phrases. Theseconventions, and the circumstances they apply to, are as follows.
Mono-spaced Bold
Used to highlight system input, including shell commands, file names and paths. Also used to highlightkeycaps and key combinations. For example:
To see the contents of the file my_next_bestselling_novel in your currentworking directory, enter the cat my_next_bestselling_novel command at theshell prompt and press Enter to execute the command.
The above includes a file name, a shell command and a keycap, all presented in mono-spaced boldand all distinguishable thanks to context.
Key combinations can be distinguished from keycaps by the hyphen connecting each part of a keycombination. For example:
Press Enter to execute the command.
Press Ctrl+Alt+F2 to switch to the first virtual terminal. Press Ctrl+Alt+F1 toreturn to your X-Windows session.
The first paragraph highlights the particular keycap to press. The second highlights two keycombinations (each a set of three keycaps with each set pressed simultaneously).
If source code is discussed, class names, methods, functions, variable names and returned valuesmentioned within a paragraph will be presented as above, in mono-spaced bold. For example:
File-related classes include filesystem for file systems, file for files, and dir fordirectories. Each class has its own associated set of permissions.
Proportional Bold
This denotes words or phrases encountered on a system, including application names; dialog box text;labeled buttons; check-box and radio button labels; menu titles and sub-menu titles. For example:
Choose System → Preferences → Mouse from the main menu bar to launch MousePreferences. In the Buttons tab, click the Left-handed mouse check box and click
1 https://fedorahosted.org/liberation-fonts/

Preface
viii
Close to switch the primary mouse button from the left to the right (making the mousesuitable for use in the left hand).
To insert a special character into a gedit file, choose Applications → Accessories→ Character Map from the main menu bar. Next, choose Search → Find… from theCharacter Map menu bar, type the name of the character in the Search field and clickNext. The character you sought will be highlighted in the Character Table. Double-click this highlighted character to place it in the Text to copy field and then click the
Copy button. Now switch back to your document and choose Edit → Paste from thegedit menu bar.
The above text includes application names; system-wide menu names and items; application-specificmenu names; and buttons and text found within a GUI interface, all presented in proportional bold andall distinguishable by context.
Mono-spaced Bold Italic or Proportional Bold Italic
Whether mono-spaced bold or proportional bold, the addition of italics indicates replaceable orvariable text. Italics denotes text you do not input literally or displayed text that changes depending oncircumstance. For example:
To connect to a remote machine using ssh, type ssh [email protected] ata shell prompt. If the remote machine is example.com and your username on thatmachine is john, type ssh [email protected].
The mount -o remount file-system command remounts the named filesystem. For example, to remount the /home file system, the command is mount -oremount /home.
To see the version of a currently installed package, use the rpm -q packagecommand. It will return a result as follows: package-version-release.
Note the words in bold italics above — username, domain.name, file-system, package, version andrelease. Each word is a placeholder, either for text you enter when issuing a command or for textdisplayed by the system.
Aside from standard usage for presenting the title of a work, italics denotes the first use of a new andimportant term. For example:
Publican is a DocBook publishing system.
1.2. Pull-quote ConventionsTerminal output and source code listings are set off visually from the surrounding text.
Output sent to a terminal is set in mono-spaced roman and presented thus:
books Desktop documentation drafts mss photos stuff svnbooks_tests Desktop1 downloads images notes scripts svgs
Source-code listings are also set in mono-spaced roman but add syntax highlighting as follows:
package org.jboss.book.jca.ex1;
import javax.naming.InitialContext;
Notes and Warnings
ix
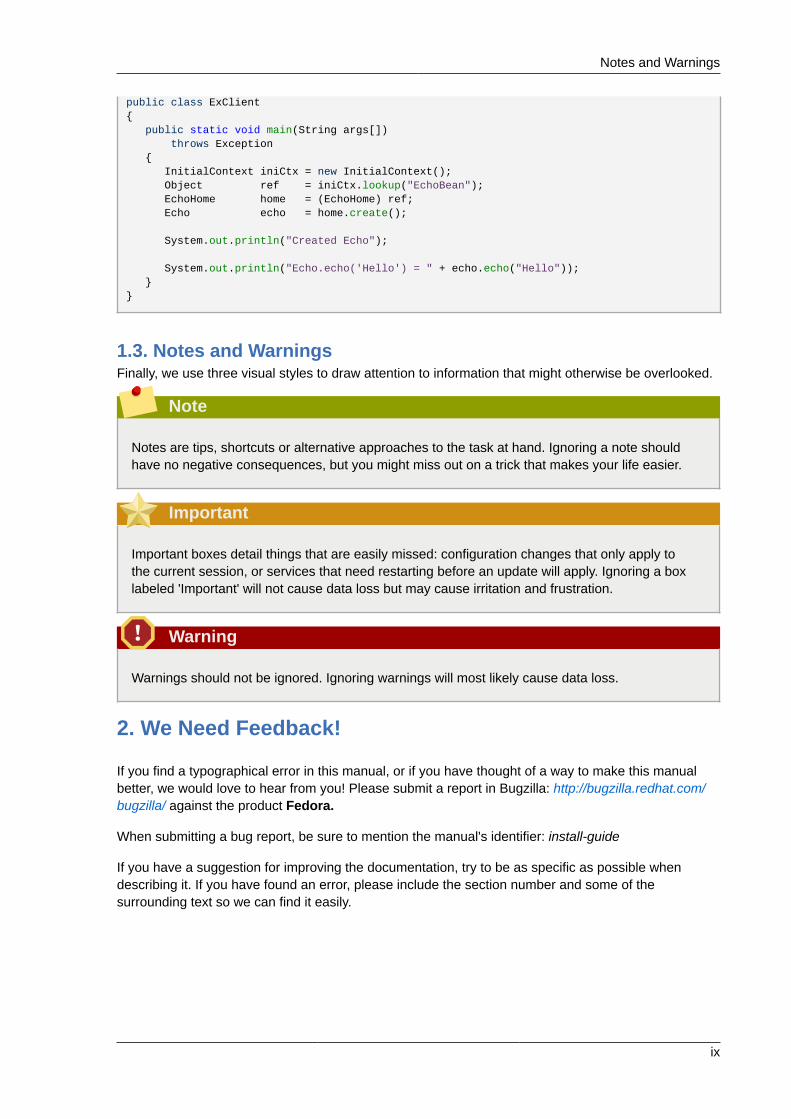
public class ExClient{ public static void main(String args[]) throws Exception { InitialContext iniCtx = new InitialContext(); Object ref = iniCtx.lookup("EchoBean"); EchoHome home = (EchoHome) ref; Echo echo = home.create();
System.out.println("Created Echo");
System.out.println("Echo.echo('Hello') = " + echo.echo("Hello")); }}
1.3. Notes and WarningsFinally, we use three visual styles to draw attention to information that might otherwise be overlooked.
Note
Notes are tips, shortcuts or alternative approaches to the task at hand. Ignoring a note shouldhave no negative consequences, but you might miss out on a trick that makes your life easier.
Important
Important boxes detail things that are easily missed: configuration changes that only apply tothe current session, or services that need restarting before an update will apply. Ignoring a boxlabeled 'Important' will not cause data loss but may cause irritation and frustration.
Warning
Warnings should not be ignored. Ignoring warnings will most likely cause data loss.
2. We Need Feedback!
If you find a typographical error in this manual, or if you have thought of a way to make this manualbetter, we would love to hear from you! Please submit a report in Bugzilla: http://bugzilla.redhat.com/bugzilla/ against the product Fedora.
When submitting a bug report, be sure to mention the manual's identifier: install-guide
If you have a suggestion for improving the documentation, try to be as specific as possible whendescribing it. If you have found an error, please include the section number and some of thesurrounding text so we can find it easily.

Preface
x
3. AcknowledgmentsCertain portions of this text first appeared in the Red Hat Enterprise Linux Installation Guide, copyright© 2014 Red Hat, Inc. and others, published by Red Hat at https://access.redhat.com/documentation/en-US/Red_Hat_Enterprise_Linux/.
Chapter 1.
1
IntroductionThis guide covers installation of Fedora, a Linux distribution built on free and open source software.This manual helps you install Fedora on desktops, laptops, and servers. The installation system iseasy to use even if you lack previous knowledge of Linux or computer networks. If you select defaultoptions, Fedora provides a complete desktop operating system, including productivity applications,Internet utilities, and desktop tools.
This document details the full range of installation options, including those that apply only in limitedor unusual circumstances. Understanding of all topics described in this document is not necessary tosuccessfully perform the installation in most cases.
1.1. Background
1.1.1. About FedoraTo find out more about Fedora, visit the Fedora Project Website1. Other documentation describingadditional topics related to Fedora is available at Fedora Documentation2. Also see the Fedora ProjectWiki3.
1.1.2. Getting Additional HelpIf you encounter any problems which are not described in documentation, you might get help frommembers of the community - developers, users, and others. There are many ways to get help: theAsk Fedora website, mailing lists, forums, or IRC. For a summary of available resources, see theCommunicating and Getting Help4 page on the Fedora wiki.
1.2. About This Document
1.2.1. GoalsThis guide helps a reader:
• Understand how to locate the Fedora distribution online
• Create configuration data that allows a computer to boot Fedora
• Understand and interact with the Fedora installation program
• Complete basic post-installation configuration of a Fedora system
1 http://fedoraproject.org/2 http://docs.fedoraproject.org/3 https://fedoraproject.org/wiki/Fedora_Project_Wiki4 https://fedoraproject.org/wiki/Communicating_and_getting_help

Chapter 1. Introduction
2
Note
This guide does not cover use of Fedora. To learn how to use an installed Fedora system, seethe other manuals available at Fedora Documentation5.
1.2.2. Target AudienceThis guide is intended for Fedora users of all levels of experience. However, it describes theinstallation process and its many options in far greater detail than most users are likely to require.You do not need to read and understand this entire document to install Fedora on a computer. Thisdocument is most likely to help experienced users perform advanced and unusual installations.
5 http://docs.fedoraproject.org/
Chapter 2.
3
Downloading Fedora
Fedora FlavorsFedora provides three primary flavors tailored for some specific use cases. https://getfedora.org offersFedora Cloud for scalable infrastructure, Fedora Server for organizational infrastructure, and FedoraWorkstation for the developer and desktop user.
For alternative desktop environments or media built for more niche purposes, check out FedoraSpins1.
Each of these downloads provides a different set of default packages, but you can add to your systemafter the initial installation to customize it for your needs. The installation process is the same for allspins and flavors, so you can use this guide for any choice you make.
Which Architecture Is My Computer?Most modern systems are 64 bit x86 architecture. If your computer was manufactured after 2007, oryou aren't sure, you probably have a x86_64 system.
Changing a Fedora installation from one architecture to another is not supported. Use the followingtable to determine the architecture of your computer according to the type of processor. Consult yourmanufacturer's documentation for details on your processor, or resources such as http://ark.intel.com/or http://products.amd.com/, if necessary.
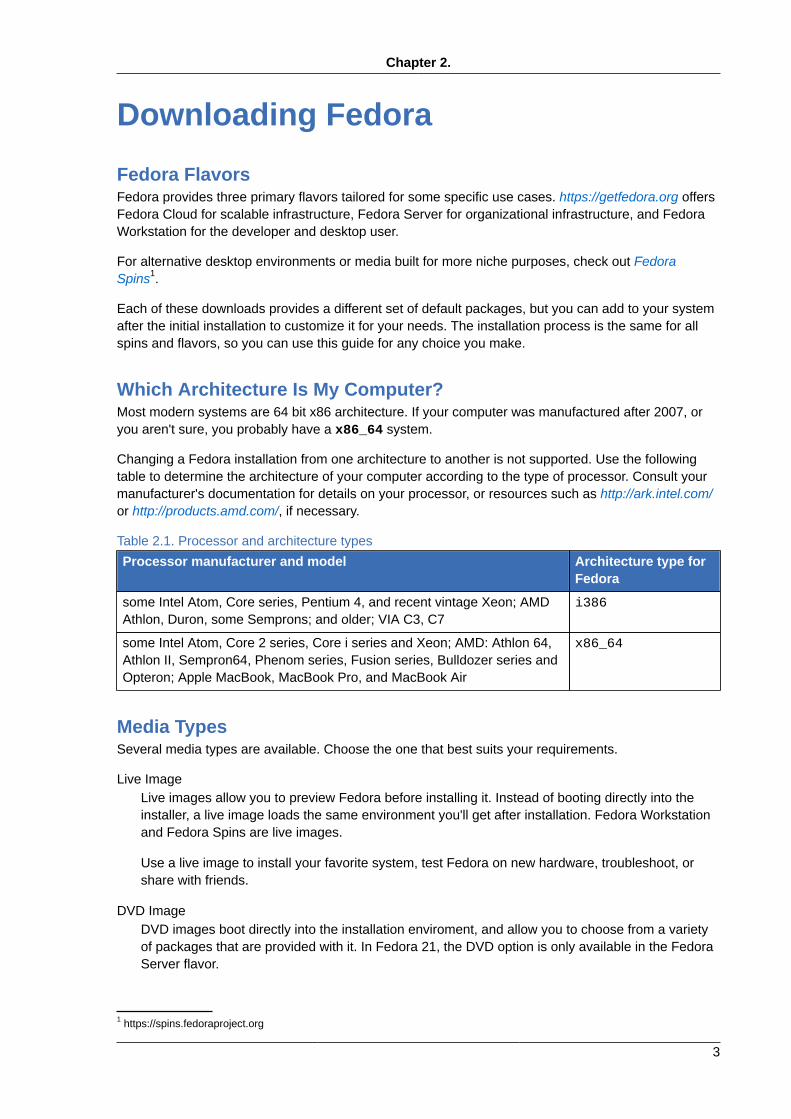
Table 2.1. Processor and architecture types
Processor manufacturer and model Architecture type forFedora
some Intel Atom, Core series, Pentium 4, and recent vintage Xeon; AMDAthlon, Duron, some Semprons; and older; VIA C3, C7
i386
some Intel Atom, Core 2 series, Core i series and Xeon; AMD: Athlon 64,Athlon II, Sempron64, Phenom series, Fusion series, Bulldozer series andOpteron; Apple MacBook, MacBook Pro, and MacBook Air
x86_64
Media TypesSeveral media types are available. Choose the one that best suits your requirements.
Live ImageLive images allow you to preview Fedora before installing it. Instead of booting directly into theinstaller, a live image loads the same environment you'll get after installation. Fedora Workstationand Fedora Spins are live images.
Use a live image to install your favorite system, test Fedora on new hardware, troubleshoot, orshare with friends.
DVD ImageDVD images boot directly into the installation enviroment, and allow you to choose from a varietyof packages that are provided with it. In Fedora 21, the DVD option is only available in the FedoraServer flavor.
1 https://spins.fedoraproject.org
Chapter 2. Downloading Fedora
4
Use the Fedora Server DVD image when you want customized Fedora Server installations usingan offline installation source.
netinstall ImageThe netinstall image boots directly into the installation environment, and uses the online Fedorapackage repositories as the installation source. With a netinstall image, you can select a widevariety of packages to create a customized installation of Fedora.
The Fedora Server netinstall image is a universal one, and can be used to install any Fedoraflavor or your own set of favorite packages.
ARM imagesFor many ARM systems, Fedora provides preconfigured filesystem images. Write the image toremovable media and boot directly into a Fedora installation that's ready to use.
ARM devices often require special setup procedures that aren't covered in this guide. Startlearning about Fedora ARM at https://fedoraproject.org/wiki/Architectures/ARM
Cloud ImagesFedora Cloud images are preconfigured filesystem images with very few packages installed bydefault. They include special tools for interacting with cloud platforms, and are not intended to beused outside of cloud environments.
Fedora Cloud comes in several varieties. The Fedora Cloud Base image is a minimal base forcloud deployments. The Fedora Cloud Atomic image is a Docker container host that uses ProjectAtomic2 technology for updates. A Docker base image for Fedora is also available.
Cloud images are preconfigured and do not require installation as described in this guide. Getstarted using Fedora Cloud at http://fedoraproject.org/wiki/Cloud
Boot ImagesThe tiny images at https://boot.fedoraproject.org/ are written to CDs, USB drives, or even floppydisks. The BFO image loads installation media from Fedora's servers and directly loads aninstallation environment, like the netinstall ISO.
BFO images work like PXE deployments, without having to set up a server.
2 http://www.projectatomic.io/

Part I. Installing FedoraThis part of the Fedora Installation Guide details the installation process itself, starting with the stepsyou must take to prepare for the installation, and ending with the steps you need to take immediatelyafter the installation finishes and your system reboots for the first time. It also includes a sectionabout troubleshooting common problems which may appear before, during or immediately after theinstallation.

Chapter 3.
7
Preparing for InstallationThis chapter describes the steps you need take before you begin the installation. Not every stepmust be strictly followed - for example, if you plan to use the default installation settings, you do notneed to gather system information such as disk device labels/UUIDs or network information such asthe system's IP address. However, you should still go through this chapter, as it also describes theavailable types of installation media and how to prepare boot media and installation sources.
3.1. Upgrade or Install?If you already have Fedora installed and want to upgrade your installation to the current version, thereare two basic ways to do so:
Automatic upgrade using dnf system upgradeThe preferred way to upgrade your system is an automatic upgrade using the dnf systemupgrade utility. For information on performing an automatic upgrade, see Fedora Wiki dnf systemupgrade1.
Manual ReinstallationYou can upgrade to the latest version of Fedora manually instead of relying on dnf systemupgrade. This involves booting the installer as if you were performing a clean installation, lettingit detect your existing Fedora system, and overwriting the root partition while preserving data onother partitions and volumes. The same process can also be used to reinstall the system, if youneed to. For detailed information, see Section 12.1, “Manual System Upgrade or Reinstallation”.
Warning
Always back up your data before performing an upgrade or reinstalling your system, no matterwhich method you choose.
3.2. Downloading Boot and Installation ImagesThe Fedora Project offers different flavors tailored for some specific use cases. Choose the Fedoraflavor best for you, or you can build your own by customizing after the installation, or by using akickstart file as described in Section 9.1.1, “Creating a Kickstart File”. Kickstart installation requiresthe netinstall media type, or a direct installation booting method such as PXE; kickstarts are notsupported with live images.
Read more about Fedora Workstation, Fedora Cloud, Fedora Server and the available media types inChapter 2, Downloading Fedora.
You can also choose a Fedora Spin featuring favorite alternative desktops or tools for specializedtasks at http://spins.fedoraproject.org.
3.3. Verifying the Downloaded ImageBecause transmission errors or other problems may corrupt the Fedora image you have downloaded,it is important to verify the file's integrity. After the images are created, an operation is performed
1 https://fedoraproject.org/wiki/DNF_system_upgrade
Chapter 3. Preparing for Installation
8
on the file that produces a value called a checksum using a complex mathematical algorithm. Theoperation is sufficiently complex that any change to the original file will produce a different checksum.
By calculating the image's checksum on your own computer and comparing it to the originalchecksum, you can verify the image has not been tampered with or corrupted. The original checksumvalues are provided at https://fedoraproject.org/verify, and are gpg signed to demonstrate theirintegrity.
3.3.1. Verifying checksums on Windows systems
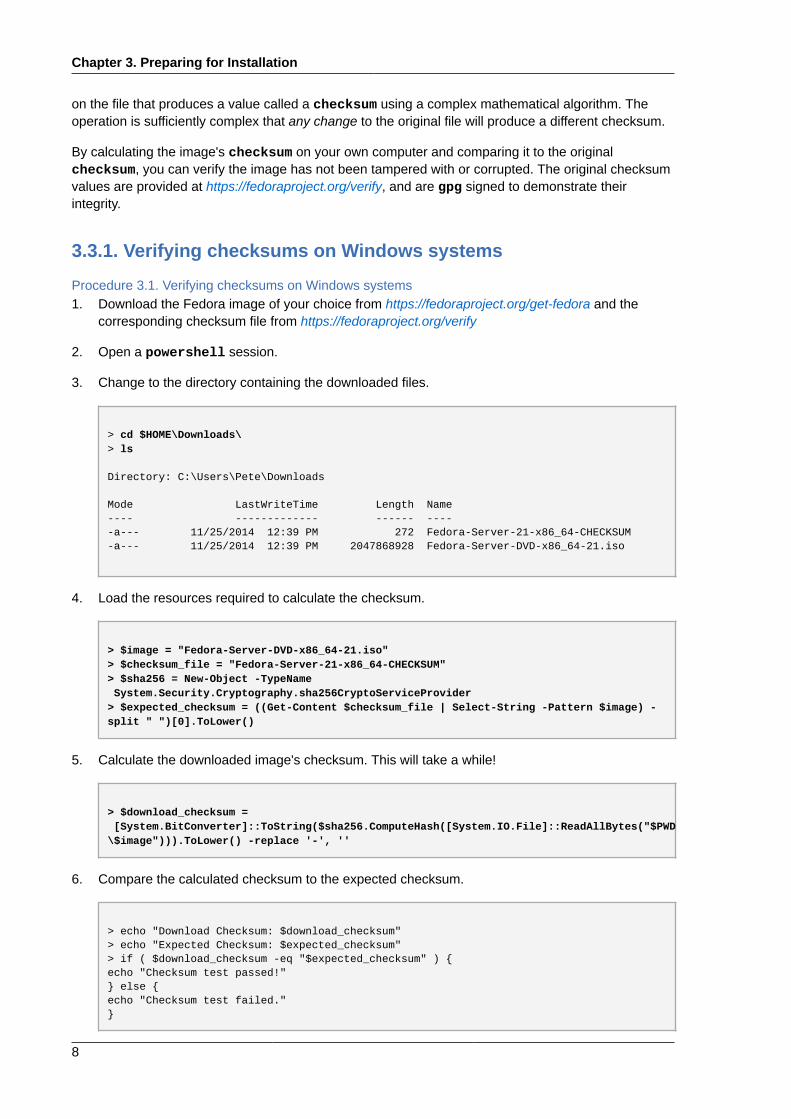
Procedure 3.1. Verifying checksums on Windows systems1. Download the Fedora image of your choice from https://fedoraproject.org/get-fedora and the
corresponding checksum file from https://fedoraproject.org/verify
2. Open a powershell session.
3. Change to the directory containing the downloaded files.
> cd $HOME\Downloads\> ls
Directory: C:\Users\Pete\Downloads
Mode LastWriteTime Length Name---- ------------- ------ -----a--- 11/25/2014 12:39 PM 272 Fedora-Server-21-x86_64-CHECKSUM-a--- 11/25/2014 12:39 PM 2047868928 Fedora-Server-DVD-x86_64-21.iso
4. Load the resources required to calculate the checksum.
> $image = "Fedora-Server-DVD-x86_64-21.iso"> $checksum_file = "Fedora-Server-21-x86_64-CHECKSUM"> $sha256 = New-Object -TypeName System.Security.Cryptography.sha256CryptoServiceProvider> $expected_checksum = ((Get-Content $checksum_file | Select-String -Pattern $image) -split " ")[0].ToLower()
5. Calculate the downloaded image's checksum. This will take a while!
> $download_checksum = [System.BitConverter]::ToString($sha256.ComputeHash([System.IO.File]::ReadAllBytes("$PWD\$image"))).ToLower() -replace '-', ''
6. Compare the calculated checksum to the expected checksum.
> echo "Download Checksum: $download_checksum"> echo "Expected Checksum: $expected_checksum"> if ( $download_checksum -eq "$expected_checksum" ) {echo "Checksum test passed!"} else {echo "Checksum test failed."}
Verifying checksums on Linux and OSX systems
9
3.3.2. Verifying checksums on Linux and OSX systems
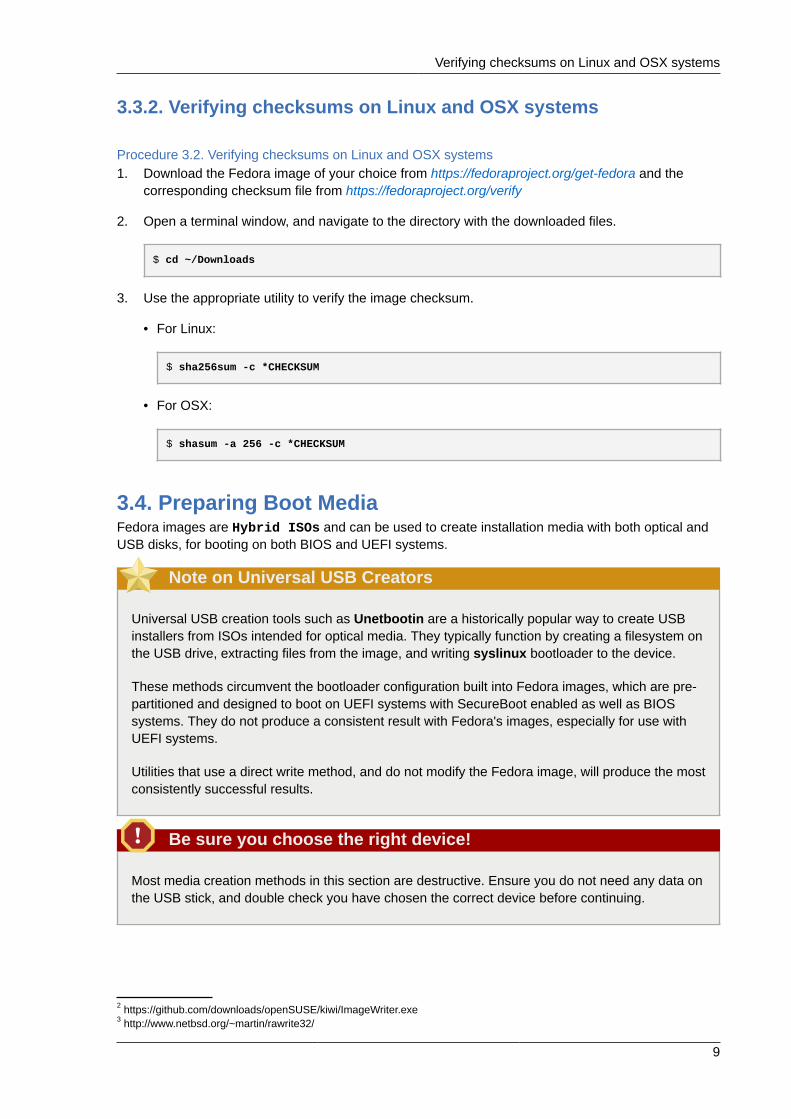
Procedure 3.2. Verifying checksums on Linux and OSX systems1. Download the Fedora image of your choice from https://fedoraproject.org/get-fedora and the
corresponding checksum file from https://fedoraproject.org/verify
2. Open a terminal window, and navigate to the directory with the downloaded files.
$ cd ~/Downloads
3. Use the appropriate utility to verify the image checksum.
• For Linux:
$ sha256sum -c *CHECKSUM
• For OSX:
$ shasum -a 256 -c *CHECKSUM
3.4. Preparing Boot MediaFedora images are Hybrid ISOs and can be used to create installation media with both optical andUSB disks, for booting on both BIOS and UEFI systems.
Note on Universal USB Creators
Universal USB creation tools such as Unetbootin are a historically popular way to create USBinstallers from ISOs intended for optical media. They typically function by creating a filesystem onthe USB drive, extracting files from the image, and writing syslinux bootloader to the device.
These methods circumvent the bootloader configuration built into Fedora images, which are pre-partitioned and designed to boot on UEFI systems with SecureBoot enabled as well as BIOSsystems. They do not produce a consistent result with Fedora's images, especially for use withUEFI systems.
Utilities that use a direct write method, and do not modify the Fedora image, will produce the mostconsistently successful results.
Be sure you choose the right device!
Most media creation methods in this section are destructive. Ensure you do not need any data onthe USB stick, and double check you have chosen the correct device before continuing.
2 https://github.com/downloads/openSUSE/kiwi/ImageWriter.exe3 http://www.netbsd.org/~martin/rawrite32/
Chapter 3. Preparing for Installation
10
Procedure 3.3. Creating USB Media on Windows1. Download and run the SUSE Studio ImageWriter2 or Rawrite323.
2. Choose the downloaded Fedora image. You may have to change the file selection dialog's optionsto view ISO or all file types.
3. Choose the USB device you wish to convert to installation media.
4. Continue with media creation using the appropriate button. After a few minutes, it will report theprocess is complete and your installation media will be ready to use.
Procedure 3.4. Creating USB media with GNOME Disks1. On a system with GNOME, or with the gnome-disk-utility package installed, open Disks using the
system menu.
2. Click your USB device in the left column.
3. Click the menu icon in the upper right corner of the window, and choose the Restore Disk Imageoption.
4. Navigate to your image file and click Start Restoring. After a few minutes, it will report theprocess is complete and your installation media will be ready to use.
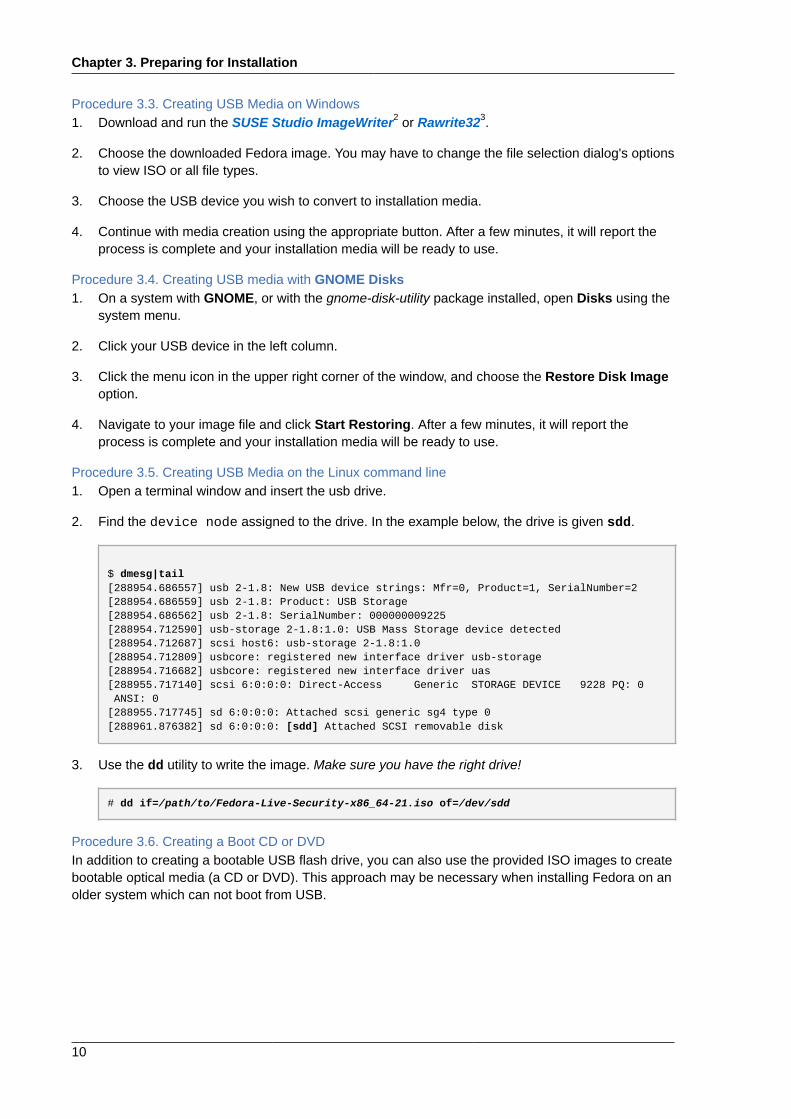
Procedure 3.5. Creating USB Media on the Linux command line1. Open a terminal window and insert the usb drive.
2. Find the device node assigned to the drive. In the example below, the drive is given sdd.
$ dmesg|tail[288954.686557] usb 2-1.8: New USB device strings: Mfr=0, Product=1, SerialNumber=2[288954.686559] usb 2-1.8: Product: USB Storage[288954.686562] usb 2-1.8: SerialNumber: 000000009225[288954.712590] usb-storage 2-1.8:1.0: USB Mass Storage device detected[288954.712687] scsi host6: usb-storage 2-1.8:1.0[288954.712809] usbcore: registered new interface driver usb-storage[288954.716682] usbcore: registered new interface driver uas[288955.717140] scsi 6:0:0:0: Direct-Access Generic STORAGE DEVICE 9228 PQ: 0 ANSI: 0[288955.717745] sd 6:0:0:0: Attached scsi generic sg4 type 0[288961.876382] sd 6:0:0:0: [sdd] Attached SCSI removable disk
3. Use the dd utility to write the image. Make sure you have the right drive!
# dd if=/path/to/Fedora-Live-Security-x86_64-21.iso of=/dev/sdd
Procedure 3.6. Creating a Boot CD or DVDIn addition to creating a bootable USB flash drive, you can also use the provided ISO images to createbootable optical media (a CD or DVD). This approach may be necessary when installing Fedora on anolder system which can not boot from USB.

Preparing Boot Media
11
Note
The exact steps you need to take to burn a bootable CD or DVD from an ISO image will varydepending on what disc burning software you use. This procedure only offers a general overview.
1. Insert a blank CD or DVD into your system's CD or DVD burner.
2. Open your system's burning software - for example, Brasero on Fedora systems with GNOMEdesktop environment, or Nero on Windows systems. In the software's main menu, find an optionwhich lets you burn an ISO image to a disc. For example, in Brasero, this option is Burn imagein the main menu on the left side of the window.
3. When prompted, select the ISO image of Fedora to be burned, and the CD or DVD burner with ablank disc inside (if you have more than one drive).
4. Confirm your selection, and wait for the disc to be burned.

12

Chapter 4.
13
Booting the InstallationThis chapter will explain how to boot the installer from local media or a network server as well as howto navigate the boot menu and use custom options.
4.1. Preparing to BootAfter you have made a bootable USB flash drive or a CD or DVD using the steps described inSection 3.4, “Preparing Boot Media”, you are ready to boot the installation. Note that the stepsdescribed below are generic and the exact steps will vary somewhat depending on your system -particularly on your motherboard manufacturer.
Warning
There are no separate media provided for BIOS and UEFI systems; all of them can boot fromthe same ISO image. However, once you install Fedora, you can not switch between UEFI andBIOS. The system must run on the same firmware it was installed on; if you, for example, performthe installation on an UEFI system in UEFI mode, and then switch it to BIOS compatibility mode,Fedora will no longer boot and will require a reinstallation.
Important
Fedora does not support UEFI booting for 32-bit x86 systems. Only BIOS boot is supported onthese systems.
Also note that Fedora only fully supports version 2.2 of the UEFI specification. Hardware thatsupports version 2.3 or later will boot and work normally, but the additional functionality definedby these later specifications will not be available. The UEFI specifications are available fromhttp://www.uefi.org/specs/agreement/.
To boot the Fedora installer, follow these steps:
Procedure 4.1. Booting the Fedora Installer1. Plug in the boot USB drive, or insert the boot CD or DVD into your computer's optical disc drive.
Alternatively, if you plan on booting from a network boot (PXE) server, make sure that the networkcable is plugged in.
2. Restart the system. Once it starts rebooting, it should display a prompt similar to the following(usually at the bottom of the screen):
Press F12 to select boot device, or Del to enter SETUP
Follow the on-screen instructions to access the boot menu. If no instructions are displayed (somesystems only display a graphical logo during early stages of boot), try pressing F12, F11, F10 orDel several times; these are most commonly used keys. Note that there is usually a very shorttime window provided to access the menu; once it passes, you need to restart the system and tryagain.
Chapter 4. Booting the Installation
14
Note
Some older systems may not support choosing a boot device at startup. In that case, enterthe system's SETUP (BIOS), and change the default boot order so that your boot media (CD,DVD, USB or network) has higher priority than internal hard drives.
On Mac hardware, hold down the Option key to enter the boot media selection menu.
3. When your system's boot menu opens, select an entry such as Boot from USB if you created abootable USB drive, Boot from CD/DVD if you are using an optical disc to install Fedora, or Bootfrom PXE if you want to boot from a network location.
4. Wait until the boot menu is displayed. The boot menu is described further in this chapter.
4.2. The Boot MenuIn most cases, when you boot the Fedora installer from your prepared boot media or server, the bootmenu will be the first thing that appears. From this menu, you can either start the actual installation, oryou can use the boot media to rescue an existing system.
The way the boot menu will look and function will vary somewhat depending on your system'sfirmware - BIOS systems use the SYSLINUX boot loader, and UEFI systems use GRUB2. However,both of the menus described below function very similarly from a user's point of view.
Use arrow keys to select an entry in the menu, and Enter to confirm your selection. The first twoentries in the list will both proceed with the installation; the first one will start the installer directly, andthe second one will verify the integrity of the boot media before starting the installation.
The final entry in the list is Troubleshooting; this is a submenu. Selecting this entry and pressingEnter will display a new set of selections, where you can choose to install in basic graphics mode(useful if you want to do a manual graphical installation but your system has issues with the defaultgraphical installer), rescue an existing system, or test your system's memory modules for errors(on BIOS systems only). The troubleshooting menu also allows you to exit the boot menu and bootnormally from your system's hard drive via the Boot from local drive option.
Every menu entry in the list is a predefined set of boot options, and these options can be customizedto change some aspects of the installer's behavior. To edit the default set of boot options, press Tabon BIOS systems, or e on UEFI systems. The key to use is also displayed at the bottom of the screen.
Note
Editing boot options in GRUB2 (on UEFI systems) will display the entire configuration for theselected entry. Actual boot options are configured on the line which starts with the linux (orlinux16 or linuxefi) keyword. Do not modify any other lines in the configuration.
On systems with BIOS firmware, only the actual boot options are displayed when you press Tab.
The Boot Menu
15
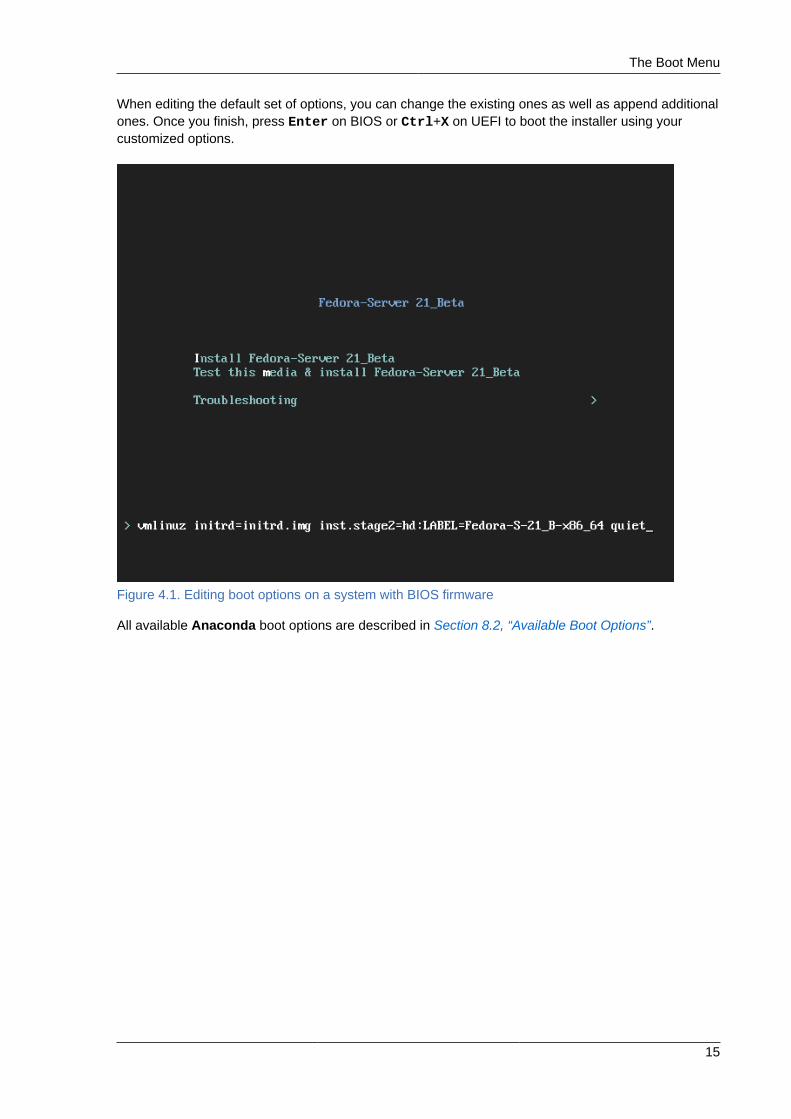
When editing the default set of options, you can change the existing ones as well as append additionalones. Once you finish, press Enter on BIOS or Ctrl+X on UEFI to boot the installer using yourcustomized options.
Figure 4.1. Editing boot options on a system with BIOS firmware
All available Anaconda boot options are described in Section 8.2, “Available Boot Options”.

16

Chapter 5.
17
Installing Using AnacondaThis chapter provides step-by-step instructions for installing Fedora using the Anaconda installer.The bulk of this chapter describes installation using the graphical user interface. A text mode is alsoavailable for systems with no graphical display, but this mode is limited in certain aspects (for example,custom partitioning is not possible in text mode).
If your system does not have the ability to use the graphical mode, you can:
• Use Kickstart to automate the installation as described in Chapter 9, Automating the Installation withKickstart
• Perform the graphical installation remotely by connecting to the installation system from anothercomputer with a graphical display using the VNC (Virtual Network Computing) protocol - seeChapter 11, Installing Using VNC
5.1. Introduction to AnacondaThe Fedora installer, Anaconda, is different from most other operating system installation programsdue to its parallel nature. Most installers follow a fixed path: you must choose your language first, thenyou configure network, then installation type, then partitioning, etc. There is usually only one way toproceed at any given time.
In Anaconda you are only required to select your language and locale first, and then you arepresented with a central screen, where you can configure most aspects of the installation in anyorder you like. This does not apply to all parts of the installation process, however - for example,when installing from a network location, you must configure the network before you can select whichpackages to install.
Some screens will be automatically configured depending on your hardware and the type of mediayou used to start the installation. You can still change the detected settings in any screen. Screenswhich have not been automatically configured, and therefore require your attention before you beginthe installation, are marked by an exclamation mark. You can not start the actual installation processbefore you finish configuring these settings.
Additional differences appear in certain screens; notably the custom partitioning process is verydifferent from other Linux distributions. These differences are described in each screen's subsection.
5.2. Consoles and Logging During the InstallationThe following sections describe how to access logs and an interactive shell during the installation. Thisis useful when troubleshooting problems, but should not be necessary in most cases.
5.2.1. Accessing ConsolesThe Fedora installer uses the tmux terminal multiplexer to display and control several windows youcan use in addition to the main interface. Each of these windows serves a different purpose - theydisplay several different logs, which can be used to troubleshoot any issues during the installation, andone of the windows provides an interactive shell prompt with root privileges, unless this prompt wasspecifically disabled using a boot option or a Kickstart command.

Chapter 5. Installing Using Anaconda
18
Note
In general, there is no reason to leave the default graphical installation environment unless youneed to diagnose an installation problem.
The terminal multiplexer is running in virtual console 1. To switch from the actual installationenvironment to tmux, press Ctrl+Alt+F1. To go back to the main installation interface which runs invirtual console 6, press Ctrl+Alt+F6.
Note
If you choose text mode installation, you will start in virtual console 1 (tmux), and switching toconsole 6 will open a shell prompt instead of a graphical interface.
The console running tmux has 5 available windows; their contents are described in the table below,along with keyboard shortcuts used to access them. Note that the keyboard shortcuts are two-part:first press Ctrl+b, then release both keys, and press the number key for the window you want to use.
You can also use Ctrl+b n and Ctrl+b p to switch to the next or previous tmux window,respectively.
Table 5.1. Available tmux Windows
Shortcut Contents
Ctrl+b 1 Main installation program window. Contains text-based prompts (during text modeinstallation or if you use VNC direct mode), and also some debugging information.
Ctrl+b 2 Interactive shell prompt with root privileges.
Ctrl+b 3 Installation log; displays messages stored in /tmp/anaconda.log.
Ctrl+b 4 Storage log; displays messages related storage devices from kernel and systemservices, stored in /tmp/storage.log.
Ctrl+b 5 Program log; displays messages from other system utilities, stored in /tmp/program.log.
In addition to displaying diagnostic information in tmux windows, Anaconda also generates severallog files, which can be transferred from the installation system. These log files are described inSection 7.1.1, “Log Files Generated During the Installation”, and directions for transferring them fromthe installation system are available in Section 7.1.2, “Transferring Log Files from the InstallationSystem”.
5.2.2. Saving ScreenshotsYou can press Shift+Print Screen at any time during the graphical installation to capture thecurrent screen. These screenshots are saved to /tmp/anaconda-screenshots.
Additionally, you can use the autostep --autoscreenshot command in a Kickstart file to captureand save each step of the installation automatically. See Section A.6.1, “autostep (optional) - GoThrough Every Screen” for details.

Installing in Text Mode
19
5.3. Installing in Text ModeText mode installation offers an interactive, non-graphical interface for installing Fedora. This may beuseful on systems with no graphical capabilities; however, you should always consider the availablealternatives before starting a text-based installation. Text mode is limited in the amount of choices youcan make during the installation.
There are two alternatives to text mode which can both be used even if the installation system doesnot have a graphical display. You can either connect to the installation system using VNC and performan interactive graphical installation remotely (see Chapter 11, Installing Using VNC), or you can createa Kickstart file to perform the installation automatically (see Chapter 9, Automating the Installation withKickstart).
Figure 5.1. Text Mode Installation
Installation in text mode follows a pattern similar to the graphical installation: There is no single fixedprogression; you can configure many settings in any order you want using the main status screen.Screens which have already been configured, either automatically or by you, are marked as [x], andscreens which require your attention before the installation can begin are marked with [!]. Availablecommands are displayed below the list of available options.
Limits of interactive text mode installation include:
• The installer will always use the English language and the US English keyboard layout. You canconfigure your language and keyboard settings, but these settings will only apply to the installedsystem, not to the installation.
• You can not configure any advanced storage methods (LVM, software RAID, FCoE, zFCP andiSCSI).

Chapter 5. Installing Using Anaconda
20
• It is not possible to configure custom partitioning; you must use one of the automatic partitioningsettings. You also cannot configure where the boot loader will be installed.
To start a text mode installation, boot the installation with the inst.text boot option used either atthe boot command line in the boot menu, or in your PXE server configuration. See Chapter 4, Bootingthe Installation for information about booting and using boot options.
5.4. Installing in the Graphical User InterfaceThe graphical installation interface is the preferred method of manually installing Fedora. It allowsyou full control over all available settings, including custom partitioning and advanced storageconfiguration, and it is also localized to many languages other than English, allowing you to performthe entire installation in a different language. The graphical mode is used by default when you boot thesystem from local media (a CD, DVD or a USB flash drive).
The sections below discuss each screen available in the installation process. Note that due to theinstaller's parallel nature, most of the screens do not have to be completed in the order in which theyare described here.
Each screen in the graphical interface contains a Help button. This button opens the Yelp helpbrowser displaying the section of the [Fedora Installation Guide] relevant to the current screen.
You can also control the graphical installer with your keyboard. Use Tab and Shift+Tab to cyclethrough active control elements (buttons, check boxes, etc.) on the current screen, Up and Down arrowkeys to scroll through lists, and Left and Right to scroll through horizontal toolbars or table entries.Space or Enter can be used to select or remove a highlighted item from selection and to expand andcollapse drop-down menus.
Additionally, elements in each screen can be toggled using their respective shortcuts. These shortcutsare highlighted (underlined) when you hold down the Alt key; to toggle that element, press Alt+X,where X is the highlighted letter.
Your current keyboard layout is displayed in the top right hand corner. Only one layout is configured bydefault; if you configure more than layout in the Keyboard Layout screen (Section 5.4.4, “KeyboardLayout”), you can switch between them by clicking the layout indicator.
5.4.1. Welcome Screen and Language SelectionThe first screen displayed immediately after the graphical installer starts is the Welcome screen.
Welcome Screen and Language Selection
21
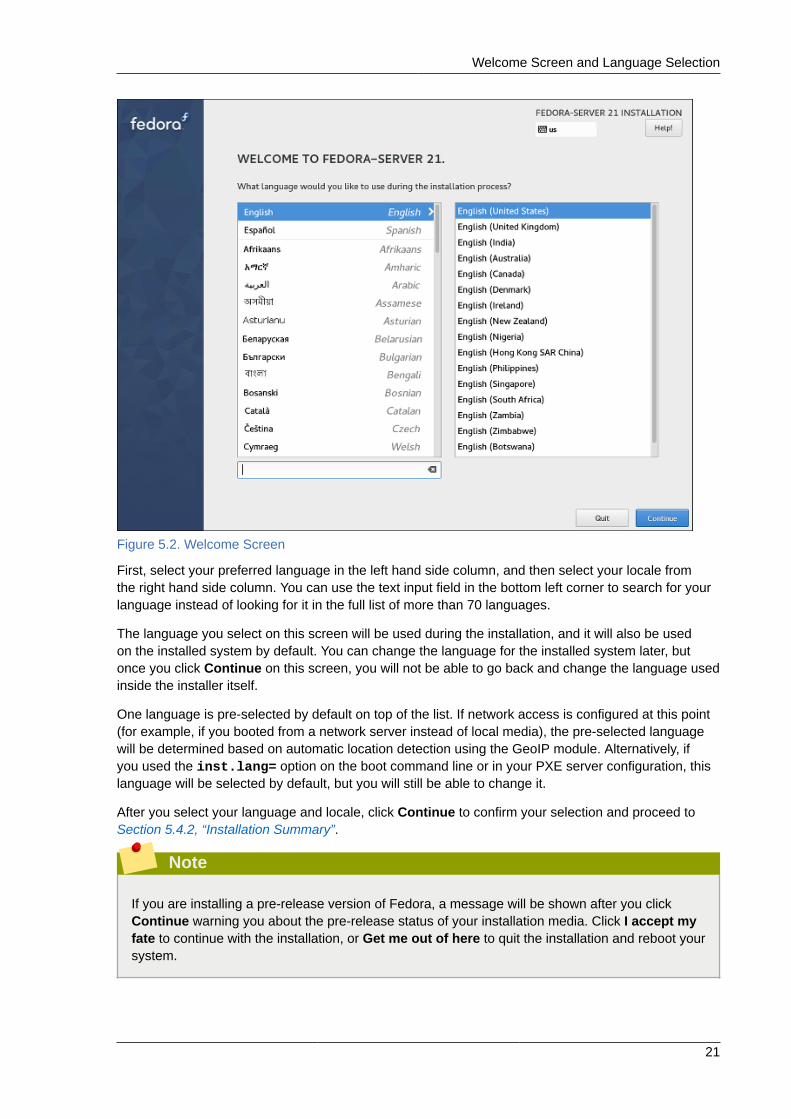
Figure 5.2. Welcome Screen
First, select your preferred language in the left hand side column, and then select your locale fromthe right hand side column. You can use the text input field in the bottom left corner to search for yourlanguage instead of looking for it in the full list of more than 70 languages.
The language you select on this screen will be used during the installation, and it will also be usedon the installed system by default. You can change the language for the installed system later, butonce you click Continue on this screen, you will not be able to go back and change the language usedinside the installer itself.
One language is pre-selected by default on top of the list. If network access is configured at this point(for example, if you booted from a network server instead of local media), the pre-selected languagewill be determined based on automatic location detection using the GeoIP module. Alternatively, ifyou used the inst.lang= option on the boot command line or in your PXE server configuration, thislanguage will be selected by default, but you will still be able to change it.
After you select your language and locale, click Continue to confirm your selection and proceed toSection 5.4.2, “Installation Summary”.
Note
If you are installing a pre-release version of Fedora, a message will be shown after you clickContinue warning you about the pre-release status of your installation media. Click I accept myfate to continue with the installation, or Get me out of here to quit the installation and reboot yoursystem.
Chapter 5. Installing Using Anaconda
22
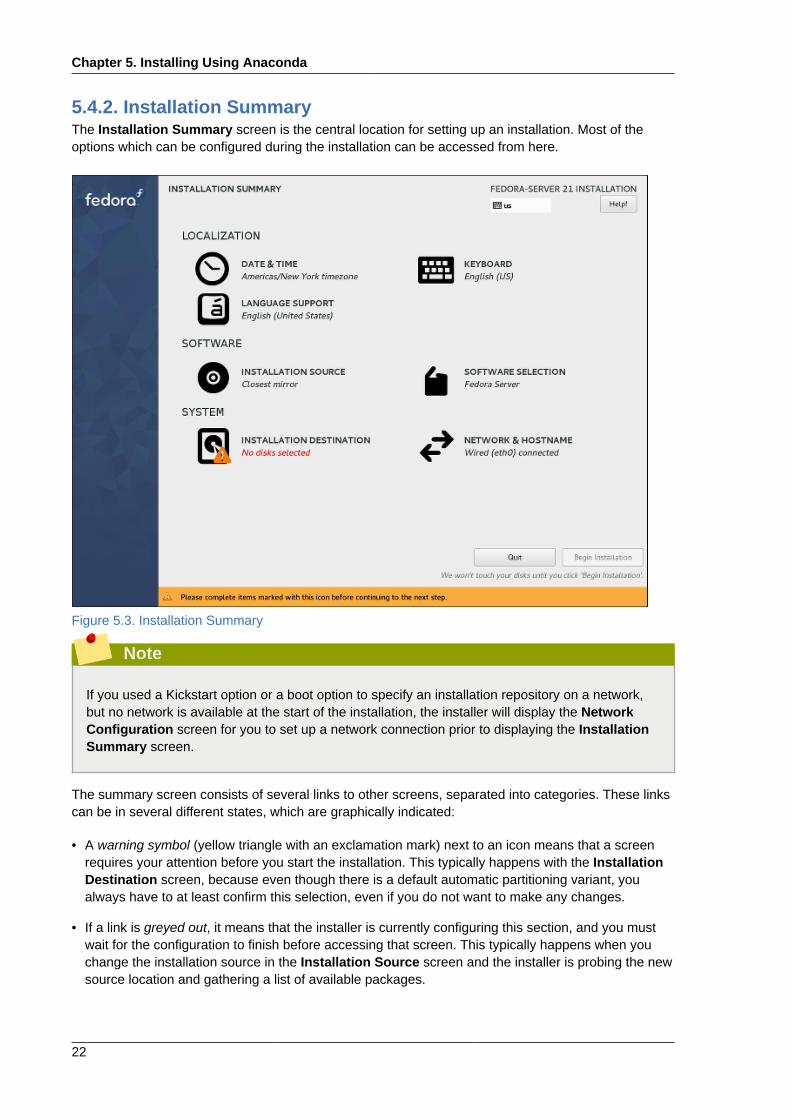
5.4.2. Installation SummaryThe Installation Summary screen is the central location for setting up an installation. Most of theoptions which can be configured during the installation can be accessed from here.
Figure 5.3. Installation Summary
Note
If you used a Kickstart option or a boot option to specify an installation repository on a network,but no network is available at the start of the installation, the installer will display the NetworkConfiguration screen for you to set up a network connection prior to displaying the InstallationSummary screen.
The summary screen consists of several links to other screens, separated into categories. These linkscan be in several different states, which are graphically indicated:
• A warning symbol (yellow triangle with an exclamation mark) next to an icon means that a screenrequires your attention before you start the installation. This typically happens with the InstallationDestination screen, because even though there is a default automatic partitioning variant, youalways have to at least confirm this selection, even if you do not want to make any changes.
• If a link is greyed out, it means that the installer is currently configuring this section, and you mustwait for the configuration to finish before accessing that screen. This typically happens when youchange the installation source in the Installation Source screen and the installer is probing the newsource location and gathering a list of available packages.
Date & Time
23
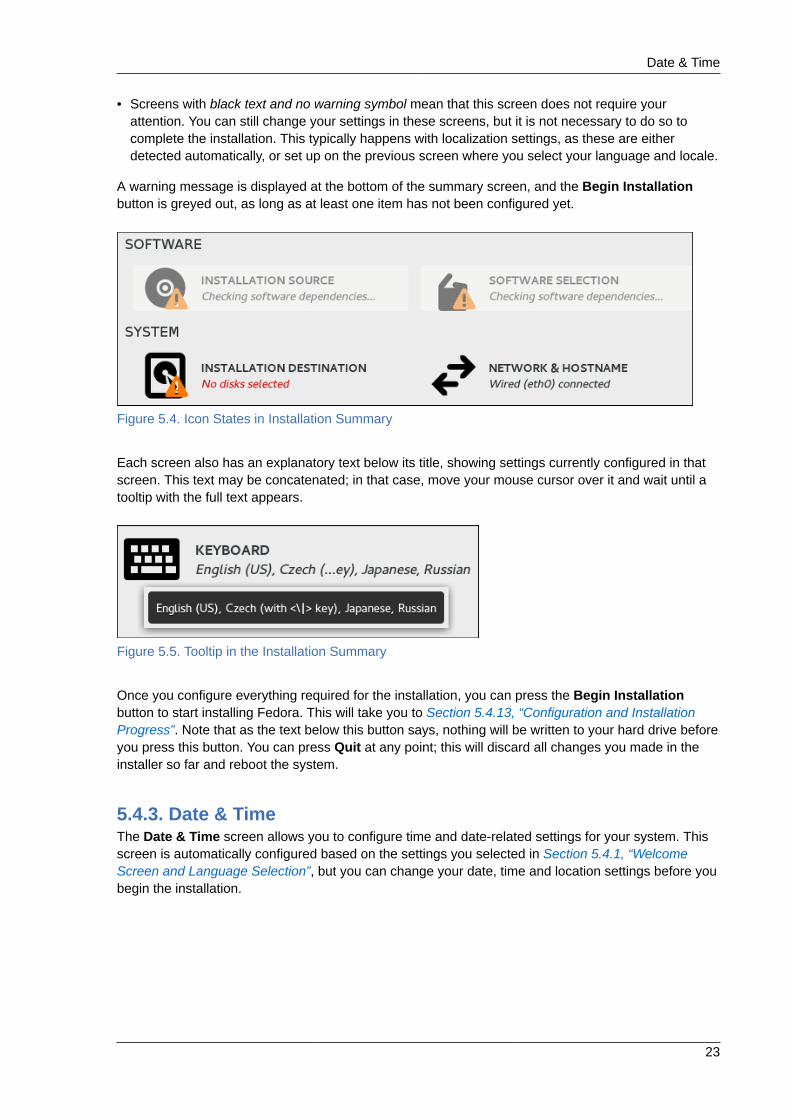
• Screens with black text and no warning symbol mean that this screen does not require yourattention. You can still change your settings in these screens, but it is not necessary to do so tocomplete the installation. This typically happens with localization settings, as these are eitherdetected automatically, or set up on the previous screen where you select your language and locale.
A warning message is displayed at the bottom of the summary screen, and the Begin Installationbutton is greyed out, as long as at least one item has not been configured yet.
Figure 5.4. Icon States in Installation Summary
Each screen also has an explanatory text below its title, showing settings currently configured in thatscreen. This text may be concatenated; in that case, move your mouse cursor over it and wait until atooltip with the full text appears.
Figure 5.5. Tooltip in the Installation Summary
Once you configure everything required for the installation, you can press the Begin Installationbutton to start installing Fedora. This will take you to Section 5.4.13, “Configuration and InstallationProgress”. Note that as the text below this button says, nothing will be written to your hard drive beforeyou press this button. You can press Quit at any point; this will discard all changes you made in theinstaller so far and reboot the system.
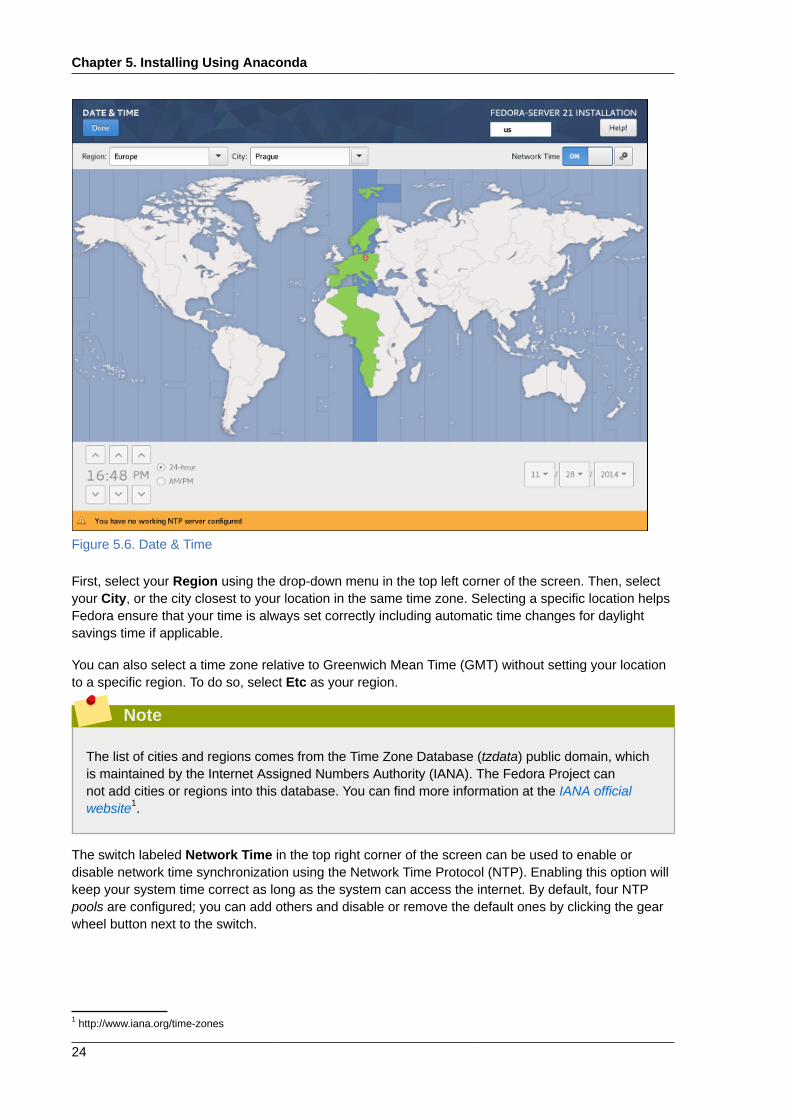
5.4.3. Date & TimeThe Date & Time screen allows you to configure time and date-related settings for your system. Thisscreen is automatically configured based on the settings you selected in Section 5.4.1, “WelcomeScreen and Language Selection”, but you can change your date, time and location settings before youbegin the installation.
Chapter 5. Installing Using Anaconda
24
Figure 5.6. Date & Time
First, select your Region using the drop-down menu in the top left corner of the screen. Then, selectyour City, or the city closest to your location in the same time zone. Selecting a specific location helpsFedora ensure that your time is always set correctly including automatic time changes for daylightsavings time if applicable.
You can also select a time zone relative to Greenwich Mean Time (GMT) without setting your locationto a specific region. To do so, select Etc as your region.
Note
The list of cities and regions comes from the Time Zone Database (tzdata) public domain, whichis maintained by the Internet Assigned Numbers Authority (IANA). The Fedora Project cannot add cities or regions into this database. You can find more information at the IANA officialwebsite1.
The switch labeled Network Time in the top right corner of the screen can be used to enable ordisable network time synchronization using the Network Time Protocol (NTP). Enabling this option willkeep your system time correct as long as the system can access the internet. By default, four NTPpools are configured; you can add others and disable or remove the default ones by clicking the gearwheel button next to the switch.
1 http://www.iana.org/time-zones
Keyboard Layout
25
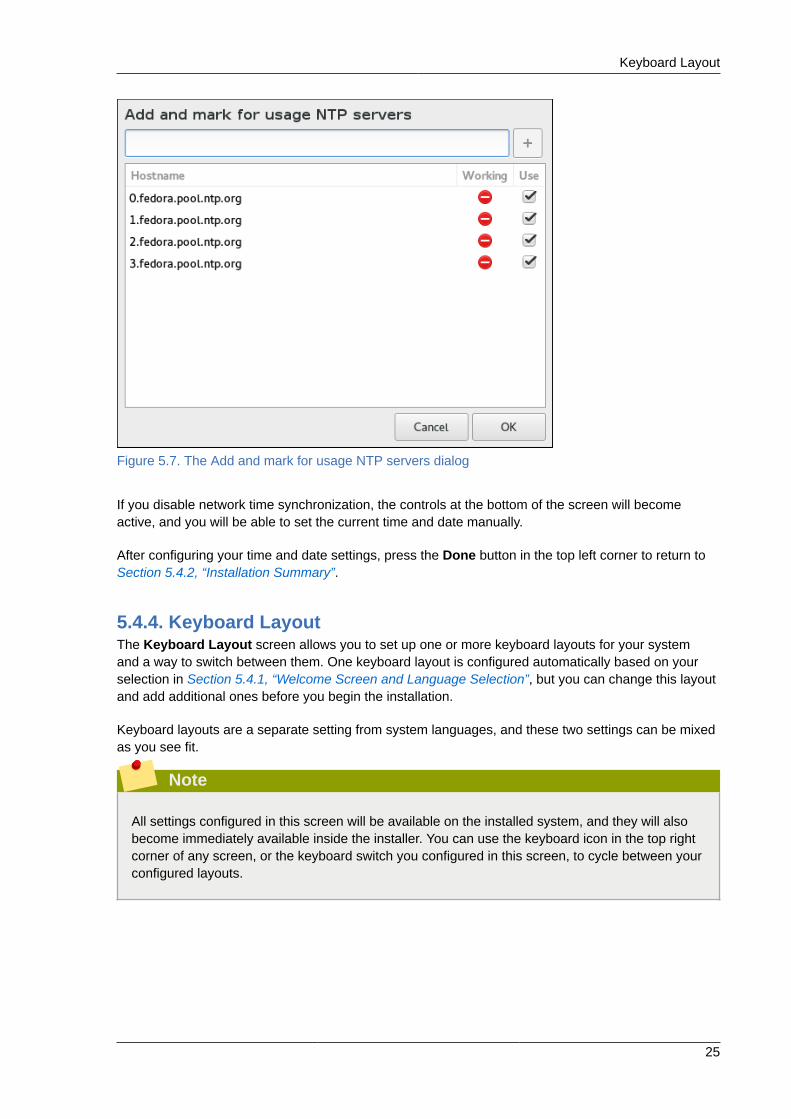
Figure 5.7. The Add and mark for usage NTP servers dialog
If you disable network time synchronization, the controls at the bottom of the screen will becomeactive, and you will be able to set the current time and date manually.
After configuring your time and date settings, press the Done button in the top left corner to return toSection 5.4.2, “Installation Summary”.
5.4.4. Keyboard LayoutThe Keyboard Layout screen allows you to set up one or more keyboard layouts for your systemand a way to switch between them. One keyboard layout is configured automatically based on yourselection in Section 5.4.1, “Welcome Screen and Language Selection”, but you can change this layoutand add additional ones before you begin the installation.
Keyboard layouts are a separate setting from system languages, and these two settings can be mixedas you see fit.
Note
All settings configured in this screen will be available on the installed system, and they will alsobecome immediately available inside the installer. You can use the keyboard icon in the top rightcorner of any screen, or the keyboard switch you configured in this screen, to cycle between yourconfigured layouts.
Chapter 5. Installing Using Anaconda
26
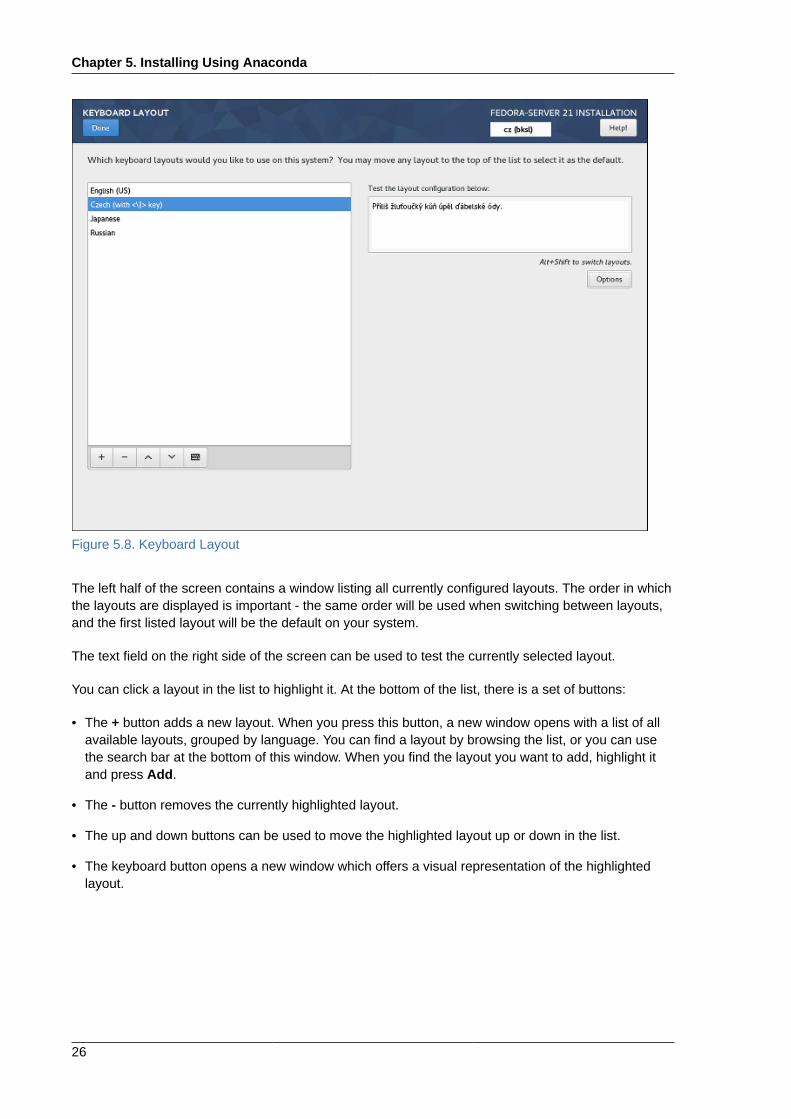
Figure 5.8. Keyboard Layout
The left half of the screen contains a window listing all currently configured layouts. The order in whichthe layouts are displayed is important - the same order will be used when switching between layouts,and the first listed layout will be the default on your system.
The text field on the right side of the screen can be used to test the currently selected layout.
You can click a layout in the list to highlight it. At the bottom of the list, there is a set of buttons:
• The + button adds a new layout. When you press this button, a new window opens with a list of allavailable layouts, grouped by language. You can find a layout by browsing the list, or you can usethe search bar at the bottom of this window. When you find the layout you want to add, highlight itand press Add.
• The - button removes the currently highlighted layout.
• The up and down buttons can be used to move the highlighted layout up or down in the list.
• The keyboard button opens a new window which offers a visual representation of the highlightedlayout.
Language Support
27
Important
If you use a layout that cannot accept Latin characters, such as Russian, you are advised to alsoadd the English (United States) layout and configure a keyboard combination to switch betweenthe two layouts. If you only select a layout without Latin characters, you may be unable to enter avalid root password and user credentials later in the installation process. This may prevent youfrom completing the installation.
You can also optionally configure a keyboard switch which can be used to cycle between availablelayouts. To do so, click the Options button on the right side of the screen. The Layout SwitchingOptions dialog will open, allowing you to configure one or more keys or key combinations forswitching. Select one or more key combinations using the check boxes next to them, and click OK toconfirm your selection.
After you finish configuring keyboard layouts and switches, click Done in the top left corner to return toSection 5.4.2, “Installation Summary”.
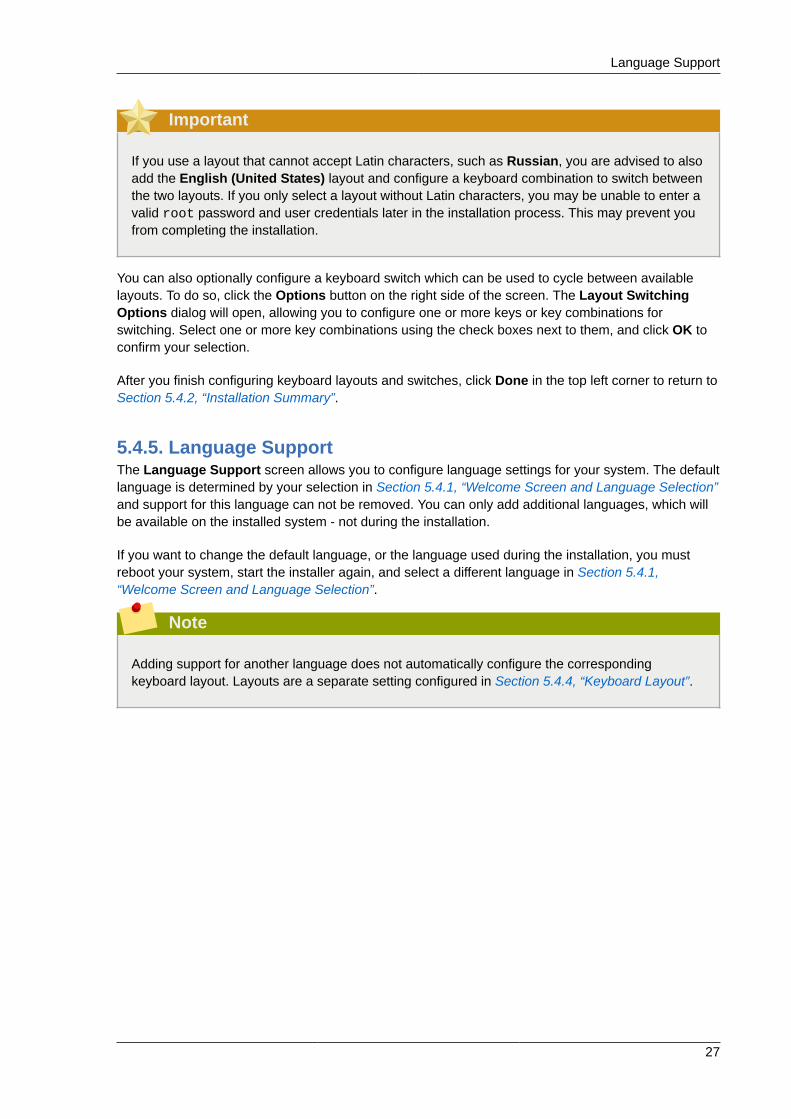
5.4.5. Language SupportThe Language Support screen allows you to configure language settings for your system. The defaultlanguage is determined by your selection in Section 5.4.1, “Welcome Screen and Language Selection”and support for this language can not be removed. You can only add additional languages, which willbe available on the installed system - not during the installation.
If you want to change the default language, or the language used during the installation, you mustreboot your system, start the installer again, and select a different language in Section 5.4.1,“Welcome Screen and Language Selection”.
Note
Adding support for another language does not automatically configure the correspondingkeyboard layout. Layouts are a separate setting configured in Section 5.4.4, “Keyboard Layout”.
Chapter 5. Installing Using Anaconda
28
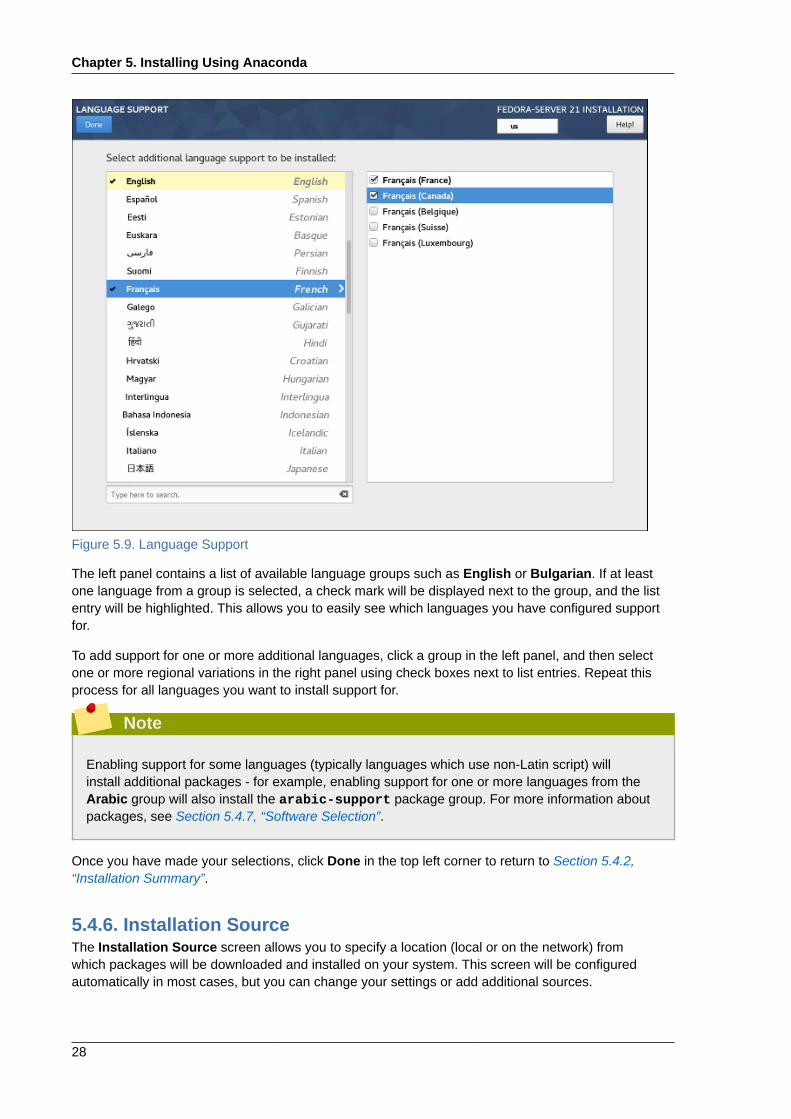
Figure 5.9. Language Support
The left panel contains a list of available language groups such as English or Bulgarian. If at leastone language from a group is selected, a check mark will be displayed next to the group, and the listentry will be highlighted. This allows you to easily see which languages you have configured supportfor.
To add support for one or more additional languages, click a group in the left panel, and then selectone or more regional variations in the right panel using check boxes next to list entries. Repeat thisprocess for all languages you want to install support for.
Note
Enabling support for some languages (typically languages which use non-Latin script) willinstall additional packages - for example, enabling support for one or more languages from theArabic group will also install the arabic-support package group. For more information aboutpackages, see Section 5.4.7, “Software Selection”.
Once you have made your selections, click Done in the top left corner to return to Section 5.4.2,“Installation Summary”.
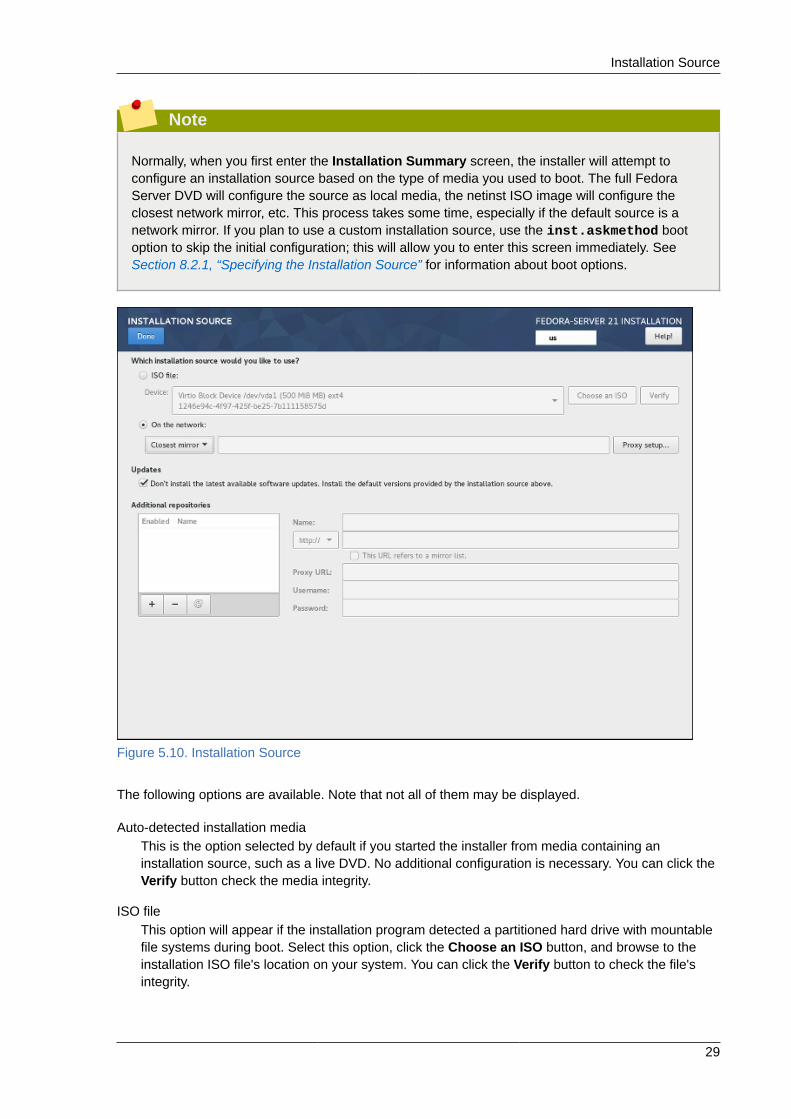
5.4.6. Installation SourceThe Installation Source screen allows you to specify a location (local or on the network) fromwhich packages will be downloaded and installed on your system. This screen will be configuredautomatically in most cases, but you can change your settings or add additional sources.
Installation Source
29
Note
Normally, when you first enter the Installation Summary screen, the installer will attempt toconfigure an installation source based on the type of media you used to boot. The full FedoraServer DVD will configure the source as local media, the netinst ISO image will configure theclosest network mirror, etc. This process takes some time, especially if the default source is anetwork mirror. If you plan to use a custom installation source, use the inst.askmethod bootoption to skip the initial configuration; this will allow you to enter this screen immediately. SeeSection 8.2.1, “Specifying the Installation Source” for information about boot options.
Figure 5.10. Installation Source
The following options are available. Note that not all of them may be displayed.
Auto-detected installation mediaThis is the option selected by default if you started the installer from media containing aninstallation source, such as a live DVD. No additional configuration is necessary. You can click theVerify button check the media integrity.
ISO fileThis option will appear if the installation program detected a partitioned hard drive with mountablefile systems during boot. Select this option, click the Choose an ISO button, and browse to theinstallation ISO file's location on your system. You can click the Verify button to check the file'sintegrity.
Chapter 5. Installing Using Anaconda
30
On the networkUse this option to download packages to be installed from a network location instead of localmedia. This is the default selection on network installation media.
In most cases, the Closest mirror option available from the protocol selection drop-down menu ispreferable. If this option is selected, packages for your system will be downloaded from the mostsuitable location (mirror).
To manually configure a network-based installation source, use the drop-down menu to specify theprotocol to be used when downloading packages. This setting depends on the server you wantto use. Then, type the server address (without the protocol) into the address field. If you chooseNFS, a second input field will appear where you can specify custom NFS mount options.
Important
When selecting an NFS installation source, you must specify the address with a colon (:)character separating the host name from the path. For example:
server.example.com:/path/to/directory
To configure a proxy for an HTTP or HTTPS source, click the Proxy setup button. CheckEnable HTTP proxy and type the URL into the Proxy URL box. If the proxy server requiresauthentication, check Use Authentication and enter your user name and password. Click OK tofinish the configuration.
If your HTTP or HTTPS URL refers to a repository mirror list, mark the check box under theaddress field.
You can also specify additional repositories in the Additional repositories section to gain access tomore installation environments and software add-ons. All environments and add-ons will be availablefor selection in Section 5.4.7, “Software Selection” once you finish configuring the sources.
To add a repository, click the + button. To delete a repository, select one in the list and click the -button. Click the arrow icon to revert to the previous list of repositories, i.e. to replace current entrieswith those that were present at the time you entered the Installation Source screen. To activate ordeactivate a repository, click the check box in the Enabled column at each entry in the list.
You can name your additional repository and configure it the same way as the primary repository onthe network using the input fields on the right side of the section.
Once you have selected your installation source, click Done in the top left corner to return toSection 5.4.2, “Installation Summary”.
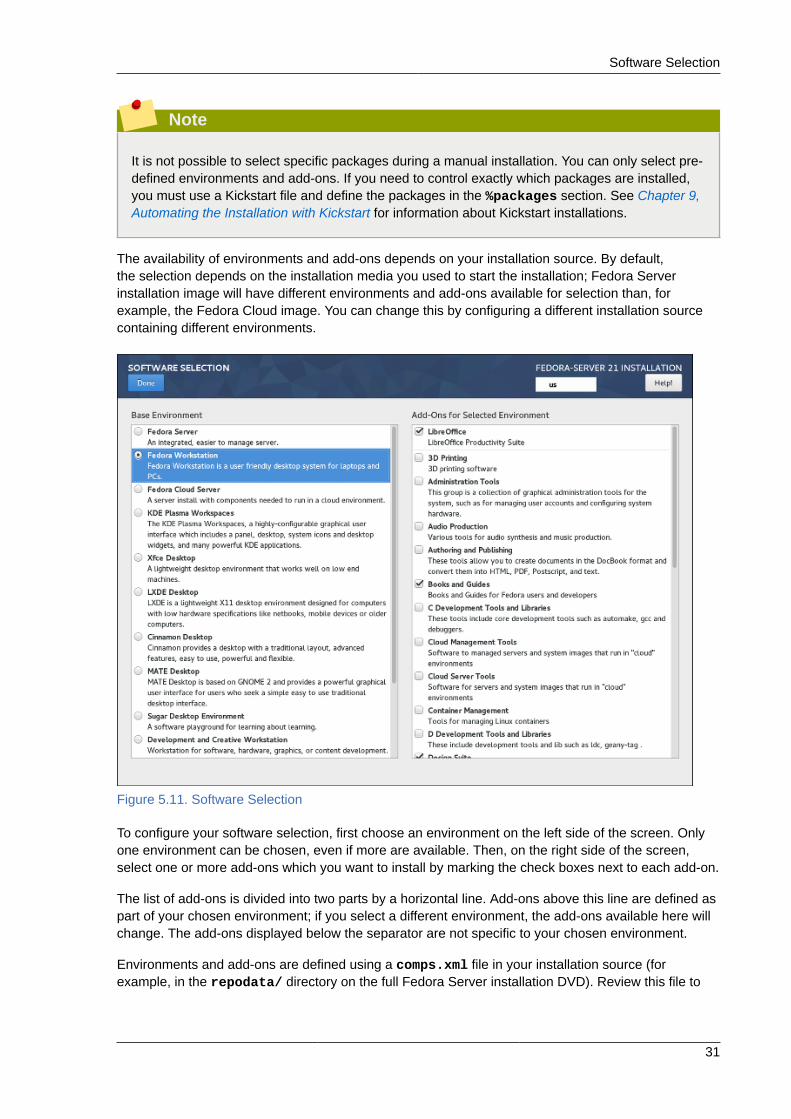
5.4.7. Software SelectionThe Software Selection screen allows you to choose a Base Environment and Add-ons. Theseoptions control which software packages will be installed on your system during the installationprocess.
This screen is only available if Section 5.4.6, “Installation Source” is properly configured and only afterthe installer has downloaded package metadata from the source.
Software Selection
31
Note
It is not possible to select specific packages during a manual installation. You can only select pre-defined environments and add-ons. If you need to control exactly which packages are installed,you must use a Kickstart file and define the packages in the %packages section. See Chapter 9,Automating the Installation with Kickstart for information about Kickstart installations.
The availability of environments and add-ons depends on your installation source. By default,the selection depends on the installation media you used to start the installation; Fedora Serverinstallation image will have different environments and add-ons available for selection than, forexample, the Fedora Cloud image. You can change this by configuring a different installation sourcecontaining different environments.
Figure 5.11. Software Selection
To configure your software selection, first choose an environment on the left side of the screen. Onlyone environment can be chosen, even if more are available. Then, on the right side of the screen,select one or more add-ons which you want to install by marking the check boxes next to each add-on.
The list of add-ons is divided into two parts by a horizontal line. Add-ons above this line are defined aspart of your chosen environment; if you select a different environment, the add-ons available here willchange. The add-ons displayed below the separator are not specific to your chosen environment.
Environments and add-ons are defined using a comps.xml file in your installation source (forexample, in the repodata/ directory on the full Fedora Server installation DVD). Review this file to
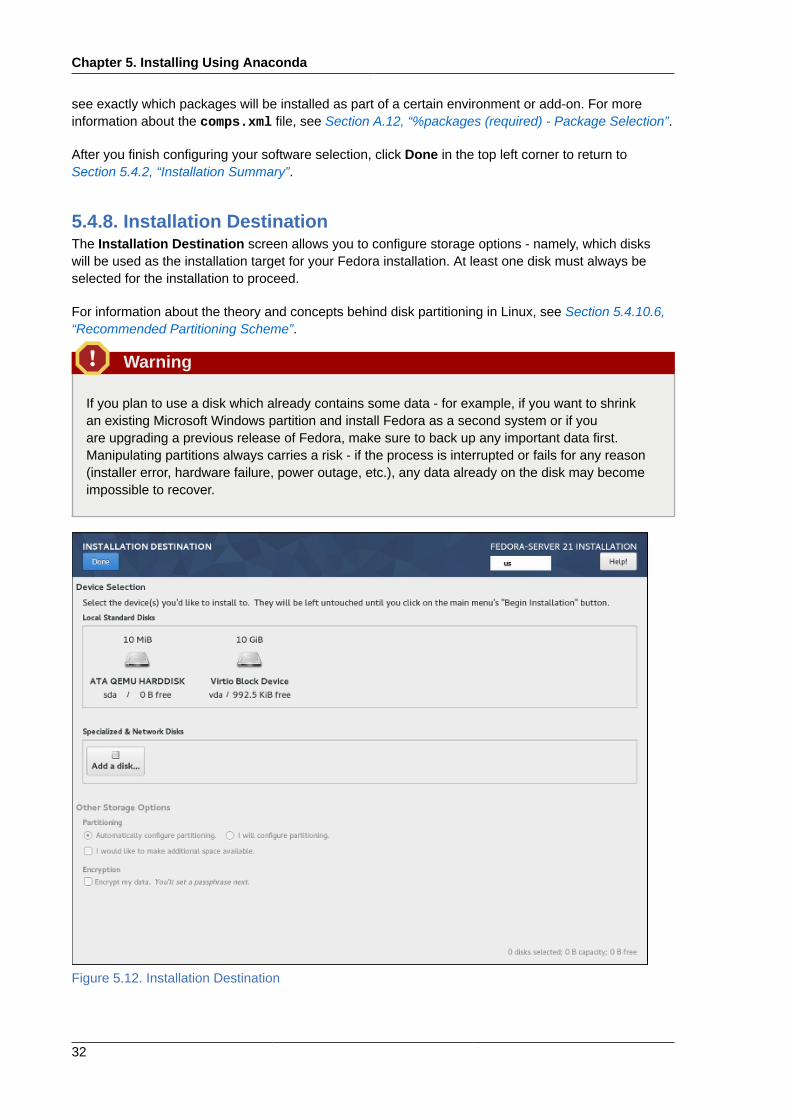
Chapter 5. Installing Using Anaconda
32
see exactly which packages will be installed as part of a certain environment or add-on. For moreinformation about the comps.xml file, see Section A.12, “%packages (required) - Package Selection”.
After you finish configuring your software selection, click Done in the top left corner to return toSection 5.4.2, “Installation Summary”.
5.4.8. Installation DestinationThe Installation Destination screen allows you to configure storage options - namely, which diskswill be used as the installation target for your Fedora installation. At least one disk must always beselected for the installation to proceed.
For information about the theory and concepts behind disk partitioning in Linux, see Section 5.4.10.6,“Recommended Partitioning Scheme”.
Warning
If you plan to use a disk which already contains some data - for example, if you want to shrinkan existing Microsoft Windows partition and install Fedora as a second system or if youare upgrading a previous release of Fedora, make sure to back up any important data first.Manipulating partitions always carries a risk - if the process is interrupted or fails for any reason(installer error, hardware failure, power outage, etc.), any data already on the disk may becomeimpossible to recover.
Figure 5.12. Installation Destination
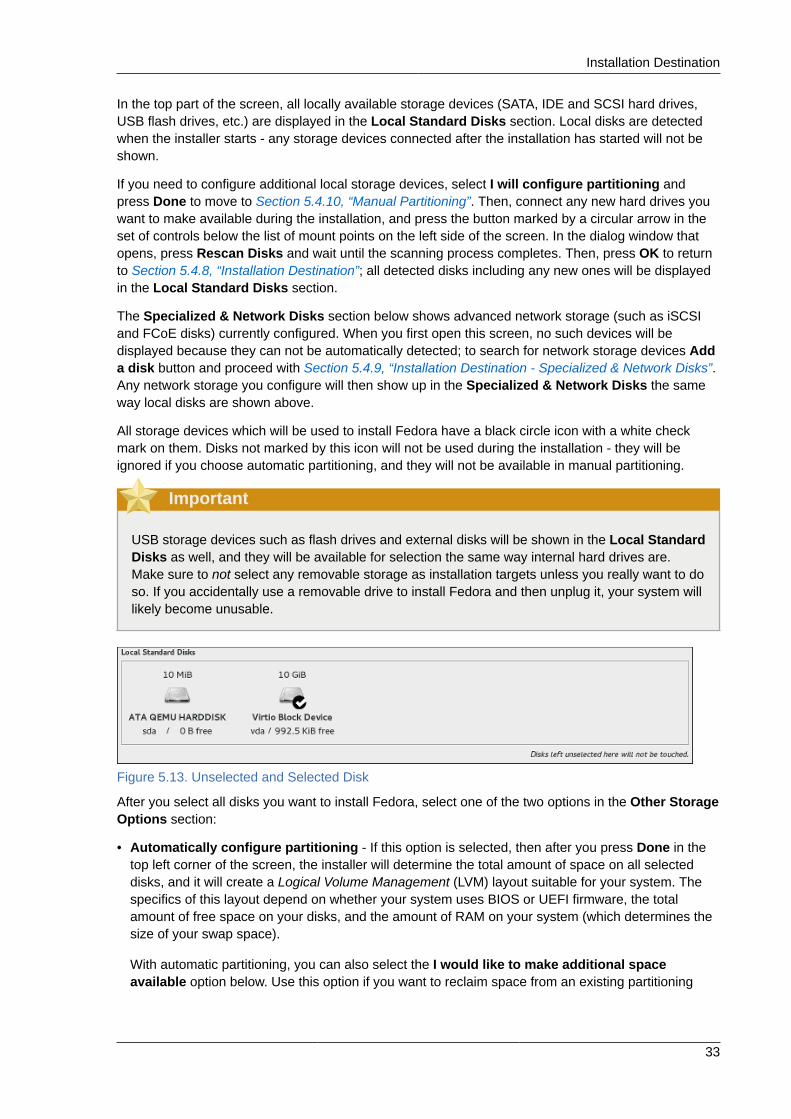
Installation Destination
33
In the top part of the screen, all locally available storage devices (SATA, IDE and SCSI hard drives,USB flash drives, etc.) are displayed in the Local Standard Disks section. Local disks are detectedwhen the installer starts - any storage devices connected after the installation has started will not beshown.
If you need to configure additional local storage devices, select I will configure partitioning andpress Done to move to Section 5.4.10, “Manual Partitioning”. Then, connect any new hard drives youwant to make available during the installation, and press the button marked by a circular arrow in theset of controls below the list of mount points on the left side of the screen. In the dialog window thatopens, press Rescan Disks and wait until the scanning process completes. Then, press OK to returnto Section 5.4.8, “Installation Destination”; all detected disks including any new ones will be displayedin the Local Standard Disks section.
The Specialized & Network Disks section below shows advanced network storage (such as iSCSIand FCoE disks) currently configured. When you first open this screen, no such devices will bedisplayed because they can not be automatically detected; to search for network storage devices Adda disk button and proceed with Section 5.4.9, “Installation Destination - Specialized & Network Disks”.Any network storage you configure will then show up in the Specialized & Network Disks the sameway local disks are shown above.
All storage devices which will be used to install Fedora have a black circle icon with a white checkmark on them. Disks not marked by this icon will not be used during the installation - they will beignored if you choose automatic partitioning, and they will not be available in manual partitioning.
Important
USB storage devices such as flash drives and external disks will be shown in the Local StandardDisks as well, and they will be available for selection the same way internal hard drives are.Make sure to not select any removable storage as installation targets unless you really want to doso. If you accidentally use a removable drive to install Fedora and then unplug it, your system willlikely become unusable.
Figure 5.13. Unselected and Selected Disk
After you select all disks you want to install Fedora, select one of the two options in the Other StorageOptions section:
• Automatically configure partitioning - If this option is selected, then after you press Done in thetop left corner of the screen, the installer will determine the total amount of space on all selecteddisks, and it will create a Logical Volume Management (LVM) layout suitable for your system. Thespecifics of this layout depend on whether your system uses BIOS or UEFI firmware, the totalamount of free space on your disks, and the amount of RAM on your system (which determines thesize of your swap space).
With automatic partitioning, you can also select the I would like to make additional spaceavailable option below. Use this option if you want to reclaim space from an existing partitioning

Chapter 5. Installing Using Anaconda
34
layout - for example, if a disk you want to use already contains a different operating system, and youwant to make this system's partitions smaller to allow more room for Fedora. The Reclaim spacedialog which opens if this option is selected is described later in this section.
• I will configure partitioning - Select this option and press Done in the top left corner of the screento configure your system's partitioning layout manually. This requires some knowledge of the theorybehind disk partitions and related concepts, but gives you full control over the way the system will beinstalled. For instructions for manual partitioning, see Section 5.4.10, “Manual Partitioning”.
Additionally, you can select Encrypt my data; this will encrypt all partitions except the ones needed toboot the system (such as /boot) using Linux Unified Key Setup (LUKS). Encrypting your hard driveis recommended. For detailed information about LUKS encryption, see the Fedora Security Guide,available at http://docs.fedoraproject.org/.
Warning
If you lose the LUKS passphrase, any encrypted partitions and the data on them will becomecompletely inaccessible. There is no way to recover a lost passphrase. However, if you performa Kickstart installation, you can save encryption passphrases and create backup encryptionpassphrases during the installation. See Chapter 9, Automating the Installation with Kickstart forinformation about Kickstart installations.
To control which one of your selected storage devices will contain the boot loader, click the Full disksummary and bootloader link in the bottom left corner of the screen, and follow the instructions inSection 5.4.8.1, “Boot Loader Installation”. Note that while in most cases it is sufficient to leave theboot loader in the default location, some configurations (for example, systems which require chainloading from another boot loader) will require the boot drive to be specified manually.
After you select storage devices, choose between automatic and manual partitioning, configureencryption and boot loader location, press Done in the top left corner of the screen. Then, dependingon your settings, the following will happen:
• If you chose to encrypt your hard drive, the Disk Encryption Passphrase dialog will appear. Enteryour chosen passphrase into the Passphrase and Confirm fields. When you do so, the passphrasewill be automatically evaluated and its strength will be displayed, along with suggestions on how tomake it stronger if the installer has determined it to be weak. For information about creating strongpasswords, see Fedora Security Guide.
• If you selected automatic partitioning and the I would like to make additional space available,or if there is not enough free space on your selected hard drives to install Fedora, the ReclaimSpace dialog will appear. This dialog lists all disk devices you have configured and all partitions onthose devices. The bottom right corner of the dialog displays information about how much space thesystem needs for at least a minimal installation and how much space you have reclaimed.
Warning
If you use the Reclaim Space dialog to delete a partition, all data on that partition will be lost. Ifyou want to preserve your data, use the Shrink option, not the Delete option.
Installation Destination
35
First, review the displayed list of available storage devices. The Reclaimable Space column showshow much space can be reclaimed from each entry. To reclaim space, select a disk or partition, andpress either the Delete button to delete that partition (or all partitions on a selected disk), or Shrinkto use free space on a partition while preserving existing data. Alternatively, you can press Deleteall in the bottom right corner; this will delete all existing partitions on all disks and make this spaceavailable to Fedora, but all existing data on all disks will be lost.
After you free enough space for your Fedora installation, press Reclaim space to finish.
Note
No changes to any disks will be made until you press Begin Installation in Section 5.4.2,“Installation Summary”. The Reclaim Space dialog only marks partitions for resizing ordeletion, but no such action is performed immediately.
• If you selected the I will configure partitioning option, pressing Done will open the ManualPartitioning screen. See Section 5.4.10, “Manual Partitioning” for further instructions.
5.4.8.1. Boot Loader InstallationFedora uses GRUB2 (GRand Unified Bootloader version 2) as its boot loader. The boot loader isthe first program that runs when the computer starts and is responsible for loading and transferringcontrol to an operating system. GRUB2 can boot any compatible operating system (including MicrosoftWindows) and can also use chain loading to transfer control to other boot loaders for unsupportedoperating systems.
Warning
Installing GRUB2 may overwrite your existing boot loader.
If you have other operating systems already installed, the Fedora installer will attempt to automaticallydetect and configure the boot loader to start them. You can manually configure any additionaloperating systems after you finish the installation, if they are not detected properly. For instructionson editing GRUB2 configuration, see the Fedora System Administrator's Guide, available at http://docs.fedoraproject.org/
If you are installing Fedora system with more than one disk, you may want to manually specify wherethe bootloader should be installed. Click the Full disk summary and bootloader link at the bottomof the Installation Destination screen. The Selected Disks dialog will appear. The bootloader willbe installed on the device of your choice, or on a UEFI system, the EFI system partition will becreated on that device during guided partitioning.
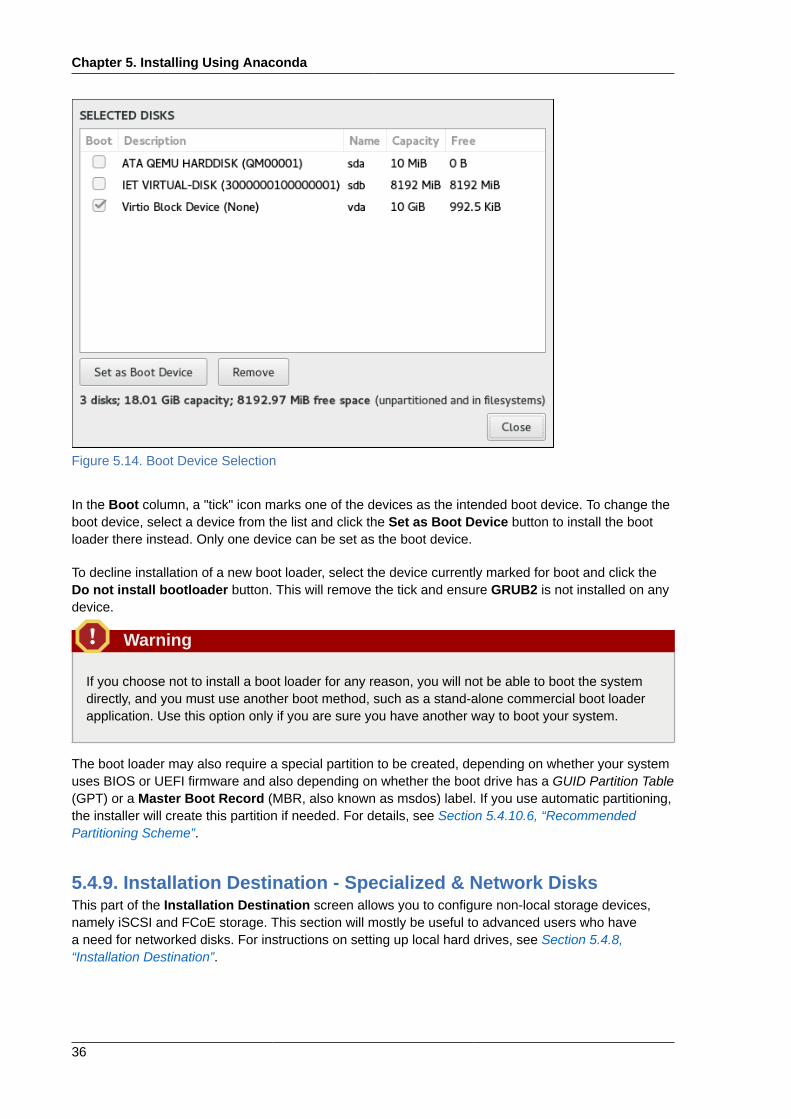
Chapter 5. Installing Using Anaconda
36
Figure 5.14. Boot Device Selection
In the Boot column, a "tick" icon marks one of the devices as the intended boot device. To change theboot device, select a device from the list and click the Set as Boot Device button to install the bootloader there instead. Only one device can be set as the boot device.
To decline installation of a new boot loader, select the device currently marked for boot and click theDo not install bootloader button. This will remove the tick and ensure GRUB2 is not installed on anydevice.
Warning
If you choose not to install a boot loader for any reason, you will not be able to boot the systemdirectly, and you must use another boot method, such as a stand-alone commercial boot loaderapplication. Use this option only if you are sure you have another way to boot your system.
The boot loader may also require a special partition to be created, depending on whether your systemuses BIOS or UEFI firmware and also depending on whether the boot drive has a GUID Partition Table(GPT) or a Master Boot Record (MBR, also known as msdos) label. If you use automatic partitioning,the installer will create this partition if needed. For details, see Section 5.4.10.6, “RecommendedPartitioning Scheme”.
5.4.9. Installation Destination - Specialized & Network DisksThis part of the Installation Destination screen allows you to configure non-local storage devices,namely iSCSI and FCoE storage. This section will mostly be useful to advanced users who havea need for networked disks. For instructions on setting up local hard drives, see Section 5.4.8,“Installation Destination”.
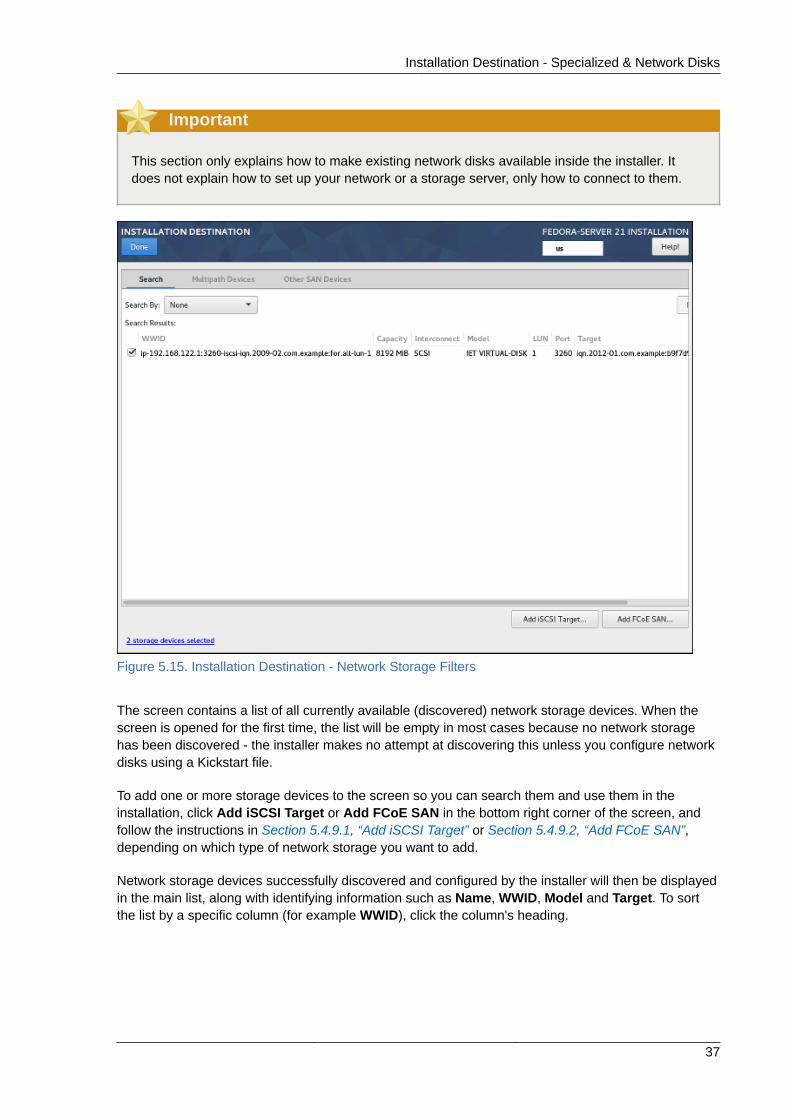
Installation Destination - Specialized & Network Disks
37
Important
This section only explains how to make existing network disks available inside the installer. Itdoes not explain how to set up your network or a storage server, only how to connect to them.
Figure 5.15. Installation Destination - Network Storage Filters
The screen contains a list of all currently available (discovered) network storage devices. When thescreen is opened for the first time, the list will be empty in most cases because no network storagehas been discovered - the installer makes no attempt at discovering this unless you configure networkdisks using a Kickstart file.
To add one or more storage devices to the screen so you can search them and use them in theinstallation, click Add iSCSI Target or Add FCoE SAN in the bottom right corner of the screen, andfollow the instructions in Section 5.4.9.1, “Add iSCSI Target” or Section 5.4.9.2, “Add FCoE SAN”,depending on which type of network storage you want to add.
Network storage devices successfully discovered and configured by the installer will then be displayedin the main list, along with identifying information such as Name, WWID, Model and Target. To sortthe list by a specific column (for example WWID), click the column's heading.
Chapter 5. Installing Using Anaconda
38
Note
On lower display resolutions, the list may be too wide to fit on the screen, and some of thecolumns or buttons may be hidden initially. Use the horizontal scroll bar at the bottom of the list tomove your view and see all available table columns and controls.
There are three tabs on the top of the list, which display different information:
SearchDisplays all available devices, regardless of their type, and allows you to filter them either by theirWorld Wide Identifier (WWID) or by the port, target, or logical unit number (LUN) at which they areaccessed.
Multipath DevicesStorage devices accessible through more than one path, such as through multiple SCSIcontrollers or Fiber Channel ports on the same system.
Important
The installation program only detects multipath storage devices with serial numbers that are16 or 32 characters long.
Other SAN DevicesDevices available on a Storage Area Network (SAN).
Depending on the tab you are currently in, you can filter the discovered devices by using the FilterBy field. Some of the filtering options are automatically populated based on discovered devices (forexample, if you select Filter By: Vendor, another drop-down menu will appear showing all vendorsof all discovered devices). Other filters require your input (for example when filtering by WWID), andpresent you with a text input field instead of a drop-down menu.
In the list (regardless of how it is filtered), each device is presented on a separate row, with a checkbox to its left. Mark the check box to make the device available during the installation process; this willcause this device (node) to be shown in the Specialized & Network Disks section in Section 5.4.8,“Installation Destination”. There, you can select the disk as an installation target and proceed witheither manual or automatic partitioning.
Note
Devices that you select here are not automatically wiped by the installation process. Selectinga device on this screen does not, in itself, place data stored on the device at risk. Also note thatany devices that you do not select here to form part of the installed system can be added to thesystem after installation by modifying the /etc/fstab file.
Installation Destination - Specialized & Network Disks
39
When you have selected the storage devices to make available during installation, click Done to returnto Section 5.4.8, “Installation Destination”.
5.4.9.1. Add iSCSI TargetTo use iSCSI storage devices, the installer must be able to discover them as iSCSI targets and beable to create an iSCSI session to access them. Both of these steps may require a user name andpassword for Challenge Handshake Authentication Protocol (CHAP) authentication.
You can also configure an iSCSI target to authenticate the iSCSI initiator on the system to which thetarget is attached (reverse CHAP), both for discovery and for the session. Used together, CHAP andreverse CHAP are called mutual CHAP or two-way CHAP. Mutual CHAP provides the greatest levelof security for iSCSI connections, particularly if the user name and password are different for CHAPauthentication and reverse CHAP authentication.
Follow the procedure below to add an iSCSI storage target to your system.
Procedure 5.1. Add iSCSI Target1. Click the Add iSCSI Target button in the bottom right corner of the Section 5.4.9, “Installation
Destination - Specialized & Network Disks” screen. A new dialog window titled Add iSCSIStorage Target will open.
2. Enter the IP address of the iSCSI target in the Target IP Address field.
3. Provide a name in the iSCSI Initiator Name field for the iSCSI initiator in iSCSI Qualified Name(IQN) format. A valid IQN entry contains:
• The string iqn. (including the period).
• A date code specifying the year and month in which your organization's Internet domain orsubdomain name was registered, represented as four digits for the year, a dash, and two digitsfor the month, followed by a period. For example, represent September 2010 as 2010-09.
• Your organization's Internet domain or subdomain name, presented in reverse order (withthe top-level domain first). For example, represent the subdomain storage.example.com ascom.example.storage.
• A colon (:) followed by a string which uniquely identifies this particular iSCSI initiator withinyour domain or subdomain. For example, :diskarrays-sn-a8675309
A complete IQN will therefore look as follows:
iqn.2010-09.com.example.storage:diskarrays-sn-a8675309
An example using the correct format is also displayed below the input field for reference.
For more information about IQNs, see 3.2.6. iSCSI Names in RFC 3720 - Internet SmallComputer Systems Interface (iSCSI), available from http://tools.ietf.org/html/rfc3720#section-3.2.6and 1. iSCSI Names and Addresses in RFC 3721 - Internet Small Computer Systems Interface(iSCSI) Naming and Discovery, available from http://tools.ietf.org/html/rfc3721#section-1.
4. Specify the type of authentication to use for iSCSI discovery using the Discovery AuthenticationType drop-down menu. Depending on which type of authentication you selected, additional inputfields (such as CHAP Username and CHAP Password may then become visible. Fill in yourauthentication credentials; these should be provided by your organization.

Chapter 5. Installing Using Anaconda
40
5. Click the Start Discovery button. The installer will now attempt to discover an iSCSI target basedon the information you provided, and if the target requires CHAP or reverse CHAP authentication,it will attempt to use the credentials you provided. This process may take some time (generallyless than 30 seconds), depending on your network.
If the discovery was not successful, an error message will be displayed in the dialog window.This message will vary based on which part of the discovery failed. If the installer did not find thetarget you specified at all, you should check the IP address; if the problem is an authenticationerror, make sure you entered all CHAP and reverse CHAP credentials correctly and that you haveaccess to the iSCSI target.
Note
The No nodes discovered error message may also mean that all nodes on the address youspecified are already configured. During discovery, Anaconda ignores nodes which havealready been added.
If the discovery was successful, you will see a list of all discovered nodes.
6. Select one or more nodes you want to log in to by marking or unmarking the check box next toeach node discovered on the target. Below the list, select again the type of authentication youwant to use; you can also select the Use the credentials from discovery option if the CHAP/reverse CHAP user name and password you used to discover the target are also valid for loggingin to it.
After selecting all nodes you want to use, click Log In to initiate an iSCSI session. Anaconda willattempt to log in to all selected nodes. If the login process is succesful, the Add iSCSI StorageTarget dialog will close, and all nodes you have configured will now be shown in the list ofnetwork disks in Section 5.4.9, “Installation Destination - Specialized & Network Disks”.
You can repeat this procedure to discover additional iSCSI targets, or to add more nodes from apreviously configured target. However, note that once you click the Start Discovery button for the firsttime, you will not be able to change the iSCSI Initiator Name. If you made an error when configuringthe initiator name, you must restart the installation.
5.4.9.2. Add FCoE SANThe following procedure explains how to add Fibre Channel over Ethernet (FCoE) storage devices andmake them available during the installation:
Procedure 5.2. Add FCoE Target1. Click the Add FCoE SAN button in the bottom right corner of Section 5.4.9, “Installation
Destination - Specialized & Network Disks”. A new dialog window will open.
2. Select the network interface (NIC) which is connected to your FCoE switch from the drop-downmenu. Note that this network interface must be configured and connected - see Section 5.4.12,“Network & Hostname”.
3. Below the NIC drop-down menu are two choices:
Manual Partitioning
41
Use DCBData Center Bridging (DCB) is a set of enhancements to the Ethernet protocols designedto increase the efficiency of Ethernet connections in storage networks and clusters. Thisoption should only be enabled for network interfaces that require a host-based DCBX client.Configurations on interfaces that implement a hardware DCBX client should leave this checkbox empty.
Use auto vlanThis option indicates whether VLAN discovery should be performed. If this box is checked,then the FCoE Initiation Protocol (FIP) VLAN discovery protocol will run on the Ethernetinterface once the link configuration has been validated. If they are not already configured,network interfaces for any discovered FCoE VLANs will be automatically created and FCoEinstances will be created on the VLAN interfaces. This option is enabled by default.
4. After you select which interface and options to use, click Add FCoE Disk(s). Discovered FCoEstorage devices will be displayed under the Other SAN Devices tab in Section 5.4.9, “InstallationDestination - Specialized & Network Disks”.
5.4.10. Manual PartitioningThe Manual Partitioning screen allows you to create a storage configuration for your Fedora systemmanually, giving you a greater control over your system's storage.
In most other installers for both Linux and other operating systems, disk partitioning usually takes a"bottom-up" approach. In these installers, you first create underlying devices such as LVM physicalvolumes, then you create a layout such as LVM on top of them, then you create file systems on top oflogical volumes, and the last step is usually assigning a mount point to each volume as needed.
Anaconda uses an opposite approach. First, you create all separate mount points you need, andeverything needed to create them (creating a volume group, logical volumes inside it, and physicalvolumes where the volume group will reside) is performed automatically. You can then adjust theautomatic settings as you require.
Note
No permanent changes will be made to your disks during the actual partitioning process. Theconfiguration you have selected will only be written to your system after you press the Begininstallation button in Section 5.4.2, “Installation Summary”.
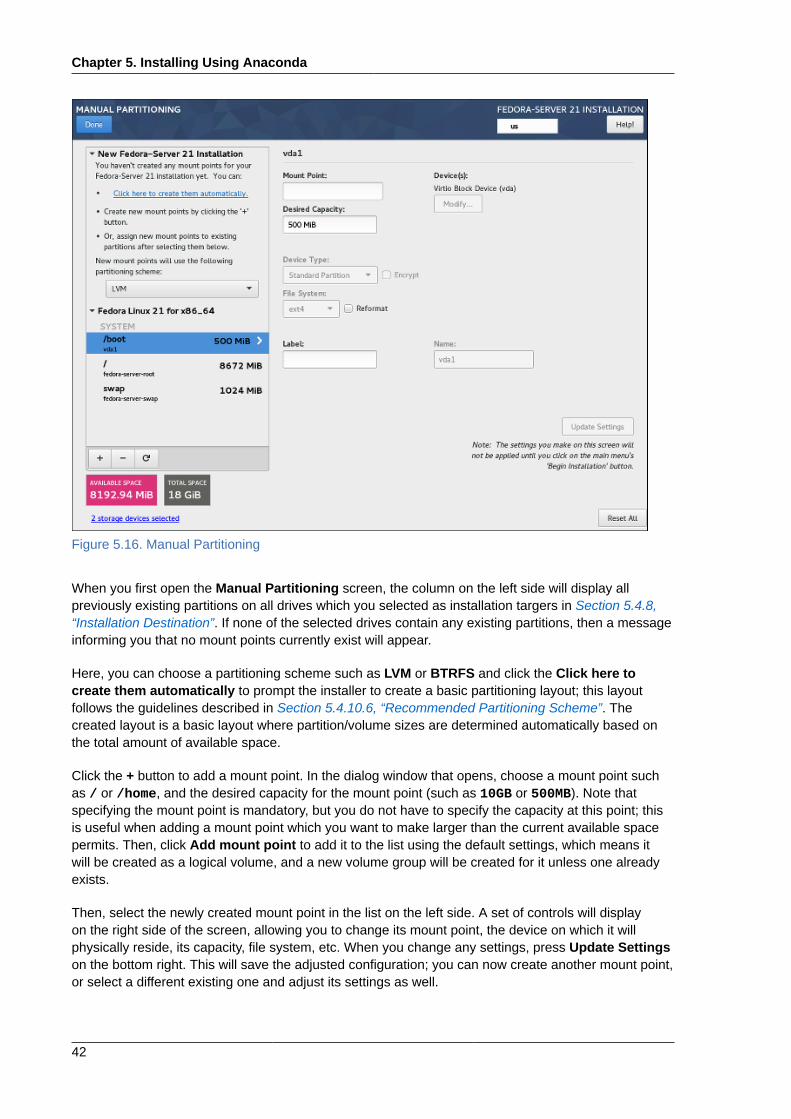
Chapter 5. Installing Using Anaconda
42
Figure 5.16. Manual Partitioning
When you first open the Manual Partitioning screen, the column on the left side will display allpreviously existing partitions on all drives which you selected as installation targers in Section 5.4.8,“Installation Destination”. If none of the selected drives contain any existing partitions, then a messageinforming you that no mount points currently exist will appear.
Here, you can choose a partitioning scheme such as LVM or BTRFS and click the Click here tocreate them automatically to prompt the installer to create a basic partitioning layout; this layoutfollows the guidelines described in Section 5.4.10.6, “Recommended Partitioning Scheme”. Thecreated layout is a basic layout where partition/volume sizes are determined automatically based onthe total amount of available space.
Click the + button to add a mount point. In the dialog window that opens, choose a mount point suchas / or /home, and the desired capacity for the mount point (such as 10GB or 500MB). Note thatspecifying the mount point is mandatory, but you do not have to specify the capacity at this point; thisis useful when adding a mount point which you want to make larger than the current available spacepermits. Then, click Add mount point to add it to the list using the default settings, which means itwill be created as a logical volume, and a new volume group will be created for it unless one alreadyexists.
Then, select the newly created mount point in the list on the left side. A set of controls will displayon the right side of the screen, allowing you to change its mount point, the device on which it willphysically reside, its capacity, file system, etc. When you change any settings, press Update Settingson the bottom right. This will save the adjusted configuration; you can now create another mount point,or select a different existing one and adjust its settings as well.

Manual Partitioning
43
Note
For a description of available device and file system types, see Section 5.4.10.5, “Device, FileSystem and RAID Types”.
To remove a mount point, select it in the list and press the - button below.
The exact steps for configuring your storage depend on your specific needs and your systemconfiguration. Procedures for creating specific layouts are described further in this chapter. Beforeyou start, you should also review Section 5.4.10.6, “Recommended Partitioning Scheme” andSection 5.4.10.7, “Advice on Partitions” for a list of requirements and tips for partitioning your disks forFedora.
Below the list of existing mount points are two fields, showing you how much free space is left on yourstorage devices and how much total space they have.
Click the X storage devices selected to view a summary of currently selected storage devices; thismay help you with orientation in more complicated storage schemas. Devices displayed here are theones you have selected in Section 5.4.8, “Installation Destination”. If you want to add or remove anystorage devices from your configuration, return to that screen and change your selection.
You can press the Reset All button in the bottom right corner at any time to reset the storageconfiguration to the state it was in when you last opened the Manual Partitioning screen. This meansthat if you modify the storage configuration, leave the screen, and then come back, the Reset buttonwill reset the configuration back to the already modified state, discarding only the changes you havemade recently, not all changes to the storage configuration since you booted the installer.
To discard all changes, and to also detect any new drives which have not been detected when theinstaller started (usually when you attached a new drive after you started), press the button markedby a circular arrow in the set of controls below the list of mount points on the left side of the screen.In the dialog window that opens, press Rescan Disks and wait until the scanning process completes.Then, press OK to return to Section 5.4.8, “Installation Destination”; all detected disks including anynew ones will be displayed in the Local Standard Disks section.
Figure 5.17. Rescan Disks

Chapter 5. Installing Using Anaconda
44
After you finish configuring your system storage, press Done in the top left corner to save theconfiguration and return to the Installation Summary screen. At this point, the installer will checkif your storage configuration is valid. If an error was detected, a message will be displayed at thebottom of the screen. Click the message to open a dialog window explaining what kind of error hasbeen detected (for example, you put /boot on a Btrfs subvolume, or you did not create a BIOS Bootpartition when your system requires one).
If such a message is displayed, go back and fix any issues found by the installer; otherwise youwill not be able to proceed with the installation. You can also press Done again to return to theInstallation Summary anyway, but a storage configuration error will prevent you from starting theactual installation process.
If no error message is displayed and if you made any changes since the last time you have visited thisscreen, a summary dialog will appear, displaying a detailed list of the changes you made. Review thelist and click Accept Changes to proceed with Section 5.4.2, “Installation Summary”, or click Cancel& Return to Custom Partitioning if you want to make any more changes.
5.4.10.1. Creating Standard PartitionsStandard partitions are the most common type of partition, with the widest support across operatingsystems. For example, Microsoft Windows uses exclusively physical partitions and can not nativelywork with LVM or Btrfs. Most Fedora partitioning setups will also require at least one standard partitionfor the /boot directory, and possibly also another standard partition with the BIOS Boot or EFI Systemfile system to store the boot loader.
See Appendix B, An Introduction to Disk Partitions for additional information about the conceptsbehind physical partitions.
Figure 5.18. Create Standard Partition
Manual Partitioning
45
Follow the procedure below to create mount points on standard physical partitions:
Procedure 5.3. Creating Standard Partitions1. Click the + button at the bottom of the list showing existing mount points. A new dialog window will
open.
2. In the new dialog window, specify a mount point for which you want to create a separate mountpoint - for example, /. Optionally, specify a size for the partition using standard units such as MBor GB (for example, 50GB). Then, click Add mount point to add the mount point and return to themain partitioning screen.
Note
When creating a swap partition, specify the mount point as swap. For a BIOS Boot partition,use biosboot. For an EFI System Partition, use /boot/efi.
For information about these partition types, see Section 5.4.10.6, “RecommendedPartitioning Scheme”.
3. The mount point has now been created using the default settings, which means it has beencreated as an LVM logical volume. Select the newly created mount point in the left pane toconfigure it further, and convert it to a physical partition by changing the Device Type option toStandard Partition. Then, click Update Settings in the bottom right corner of the screen.
4. In the Device(s) section on the right side of the screen, you can see that the partition has beenassigned to one or more hard drives. Click the Modify button to configure on which drive thispartition will be created.
5. In the Configure Mount Point dialog, you can specify which physical devices (disks) this volumemay reside on. You can select one or more disks which will be used to hold this volume by holdingdown Ctrl and clicking each disk in the list. If you select multiple disks here, Anaconda willdetermine where exactly the partition should be created based on how you configured the restof the installation. If you want to make sure that this partition is placed on a specific hard drive,select only that drive and unselect all others.
After you finish configuring the partition's location, click Save to return to the main ManualPartitioning screen.
6. Configure other settings specific to the partition - its Mount Point, Desired Capacity, and FileSystem. Press Update Settings to apply any changes to the configuration.
Repeat this procedure for any additional standard partitions you want to create.
5.4.10.2. Creating Software RAIDRedundant arrays of independent disks (RAIDs) are constructed from multiple storage devices that arearranged to provide increased performance and, in some configurations, greater fault tolerance. SeeSection 5.4.10.5, “Device, File System and RAID Types” a description of different kinds of RAIDs.
A RAID device is created in one step, and disks are added or removed as necessary. One RAIDpartition per physical disk is allowed for each device, so the number of disks available to theinstallation program determines which levels of RAID device are available to you. For example, if your
Chapter 5. Installing Using Anaconda
46
system has two hard drives, the installation program will not allow you to create a RAID10 device,which requires 4 separate partitions.
Important
This section only explains how to create software RAID with standard (physical) partitions.However, you can also configure LVM volume groups and Btrfs volumes to use RAID andplace their logical volumes or Btrfs subvolumes on top of this RAID array. See Section 5.4.10.3,“Creating a Logical Volume Managament (LVM) Layout” and Section 5.4.10.4, “Creating a BtrfsLayout” for instructions on creating RAID in LVM and Btrfs.
Figure 5.19. Create Software RAID
Note
RAID configuration options are only visible if you have selected two or more disks for installation.At least two disks are required to create a RAID device, and some RAID layouts will require more.Requirements for different types of RAID are described in Section 5.4.10.5, “Device, File Systemand RAID Types”.
Follow the procedure below to create software RAID:
Procedure 5.4. Creating Software RAID1. Click the + button at the bottom of the list showing existing mount points. A new dialog window will
open.
2. In the new dialog window, specify a mount point for which you want to create a separate softwareRAID partition - for example, /. Optionally, specify a size for the new partition using standard unitssuch as MB or GB (for example, 50GB). Then, click Add mount point to add the mount point andreturn to the main partitioning screen.
Note
When creating a mount point for swap on software RAID, specify the mount point as swap.
3. The mount point has now been created using the default settings, which means it has beencreated as an LVM logical volume. Select the newly created mount point in the left pane toconfigure it further, and convert it to a software RAID partition by changing the Device Typeoption to RAID.
4. Choose a RAID type from the RAID Level drop-down menu. Available RAID types and theirrequirements are described in Section 5.4.10.5, “Device, File System and RAID Types”.

Manual Partitioning
47
5. In the Device(s) section on the right side of the screen, you can see that the partition has beenassigned to several physical disks. Click the Modify button to configure on which drives thispartition will be created.
6. In the Configure Mount Point dialog, you can specify which physical devices (disks) this partitionmay reside on. You can select one or more disks which will be used to hold this partition byholding down Ctrl and clicking each disk in the list. If you want to make sure that this partition isplaced on a specific set of hard drives, select only those drives and unselect all others.
After you finish configuring the partition's location, click Save to return to the main ManualPartitioning screen.
7. Configure other settings specific to the partition - its Mount Point, Desired Capacity, and FileSystem. Press Update Settings to apply any changes to the configuration.
Repeat this procedure for any additional standard partitions with software RAID you want to create.
5.4.10.3. Creating a Logical Volume Managament (LVM) LayoutLogical Volume Management (LVM) presents a simple logical view of underlying physical storagespace, such as hard drives or LUNs. Partitions on physical storage are represented as physicalvolumes that can be grouped together into volume groups. Each volume group can be divided intomultiple logical volumes, each of which is analogous to a standard disk partition. Therefore, LVMlogical volumes function as partitions which can span multiple physical disks.
See Appendix C, Understanding LVM for additional information about the concepts behind LogicalVolume Management.
Warning
Some partition types - notably the /boot directory and the BIOS Boot and EFI partitions - cannot be placed on logical volumes. Use standard physical volumes for them. See Section 5.4.10.6,“Recommended Partitioning Scheme” for more information.
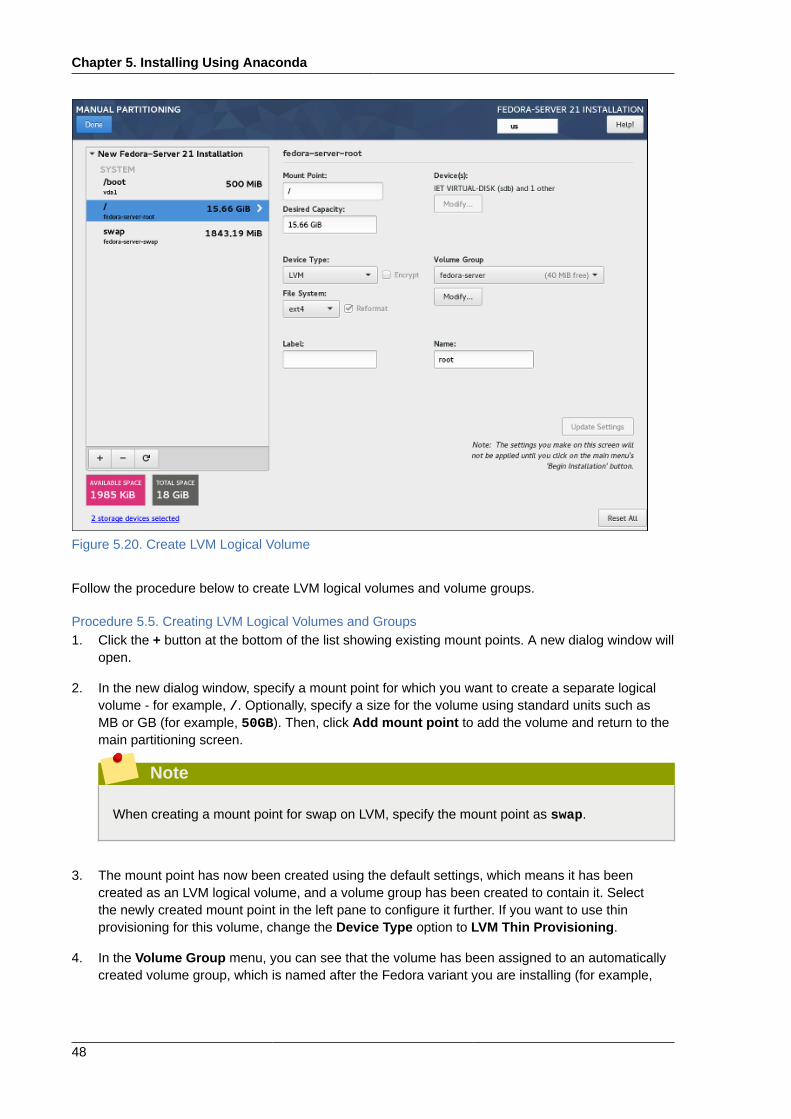
Chapter 5. Installing Using Anaconda
48
Figure 5.20. Create LVM Logical Volume
Follow the procedure below to create LVM logical volumes and volume groups.
Procedure 5.5. Creating LVM Logical Volumes and Groups1. Click the + button at the bottom of the list showing existing mount points. A new dialog window will
open.
2. In the new dialog window, specify a mount point for which you want to create a separate logicalvolume - for example, /. Optionally, specify a size for the volume using standard units such asMB or GB (for example, 50GB). Then, click Add mount point to add the volume and return to themain partitioning screen.
Note
When creating a mount point for swap on LVM, specify the mount point as swap.
3. The mount point has now been created using the default settings, which means it has beencreated as an LVM logical volume, and a volume group has been created to contain it. Selectthe newly created mount point in the left pane to configure it further. If you want to use thinprovisioning for this volume, change the Device Type option to LVM Thin Provisioning.
4. In the Volume Group menu, you can see that the volume has been assigned to an automaticallycreated volume group, which is named after the Fedora variant you are installing (for example,

Manual Partitioning
49
fedora-server. Click the Modify button under the drop-down menu to access the volumegroup settings.
5. In the Configure Volume Group dialog, you can change the volume group's name, its RAIDlevel (see Section 5.4.10.5, “Device, File System and RAID Types” for information about availableRAID types), and you can also specify which physical devices (disks) this volume group shouldreside on. You can select one or more disks which will be used to hold this volume group byholding down Ctrl and clicking each disk in the list.
Note
If you select a redundant RAID type (such as RAID1 (Redundancy)), the volume group willtake up twice its actual size on your disks. A 5 GB volume group with RAID1 will take up 10GB of space.
You can also make sure that the volume group is encrypted by selecting the Encrypt option;this will enable LUKS encryption for the entire volume group. See the Fedora Security Guide,available at http://docs.fedoraproject.org/, for information about LUKS disk encryption.
Additionally, you can set a fixed size for the volume group by selecting the Fixed option from theSize policy menu and entering a size for the volume group.
After you finish configuring the volume group settings, click Save to return to the main ManualPartitioning screen.
Note
The configuration dialog does not allow you to specify the size of the volume group's physicalextents. The size will always be set to the default value of 4 MiB. If you want to create avolume group with different physical extents, create it manually by switching to an interactiveshell and using the vgcreate command, or use a Kickstart file with the volgroup --pesize=size command.
6. If you need to create more than one volume group, open the Volume Group drop-down menuand select the Create a new volume group option. A new dialog window will open, identicalto the one described in the previous step. Again, select a name, storage devices, encryptionsettings, RAID level and size policy for the new group, and click Save. The new volume groupwill then become available in the Volume Group drop-down menu; you can then go through yourexisting mount points and change this setting to assign them to a different volume group.
7. Configure other settings specific to the logical volume - its Mount Point, Desired Capacity, FileSystem, and Name. Press Update Settings to apply any changes to the configuration.
Repeat this procedure for any additional logical volumes you want to create. Note that when creatingadditional LVM logical volumes, a new volume group is not automatically created each time; instead,any additional volumes are assigned to an existing group.
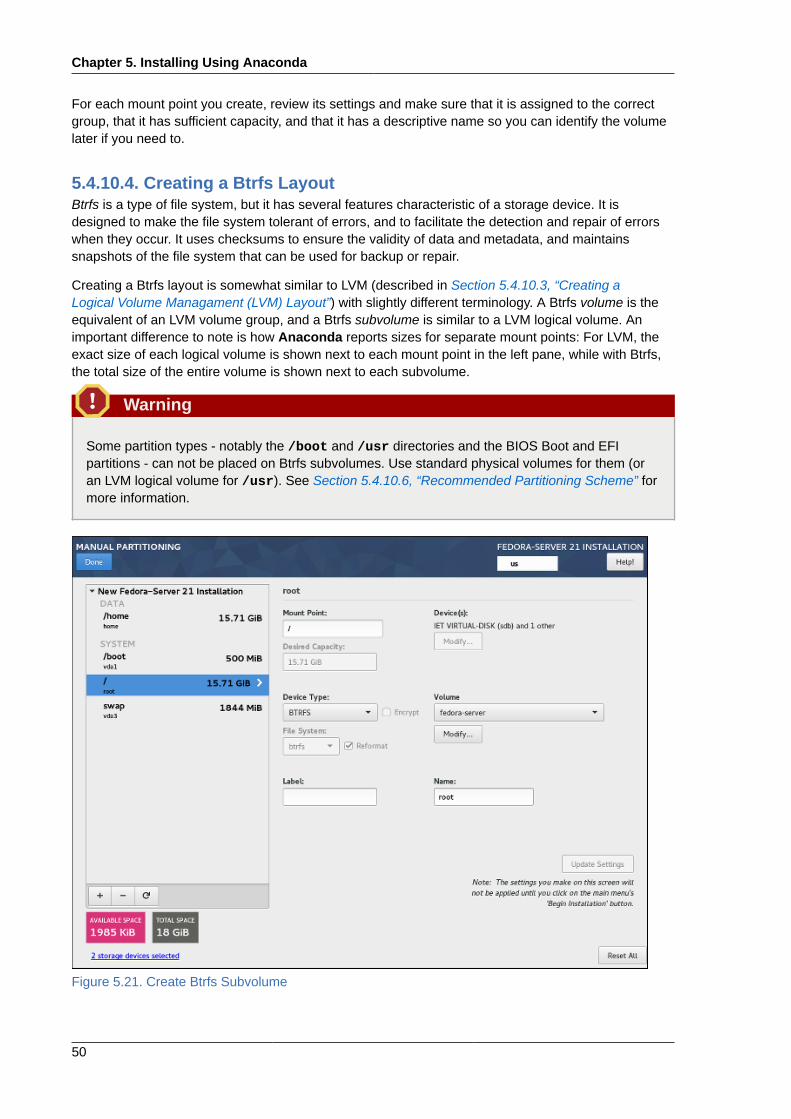
Chapter 5. Installing Using Anaconda
50
For each mount point you create, review its settings and make sure that it is assigned to the correctgroup, that it has sufficient capacity, and that it has a descriptive name so you can identify the volumelater if you need to.
5.4.10.4. Creating a Btrfs LayoutBtrfs is a type of file system, but it has several features characteristic of a storage device. It isdesigned to make the file system tolerant of errors, and to facilitate the detection and repair of errorswhen they occur. It uses checksums to ensure the validity of data and metadata, and maintainssnapshots of the file system that can be used for backup or repair.
Creating a Btrfs layout is somewhat similar to LVM (described in Section 5.4.10.3, “Creating aLogical Volume Managament (LVM) Layout”) with slightly different terminology. A Btrfs volume is theequivalent of an LVM volume group, and a Btrfs subvolume is similar to a LVM logical volume. Animportant difference to note is how Anaconda reports sizes for separate mount points: For LVM, theexact size of each logical volume is shown next to each mount point in the left pane, while with Btrfs,the total size of the entire volume is shown next to each subvolume.
Warning
Some partition types - notably the /boot and /usr directories and the BIOS Boot and EFIpartitions - can not be placed on Btrfs subvolumes. Use standard physical volumes for them (oran LVM logical volume for /usr). See Section 5.4.10.6, “Recommended Partitioning Scheme” formore information.
Figure 5.21. Create Btrfs Subvolume

Manual Partitioning
51
Follow the procedure below to create Btrfs volumes and subvolumes:
Procedure 5.6. Creating Btrfs Subvolumes and Volumes1. Click the + button at the bottom of the list showing existing mount points. A new dialog window will
open.
2. In the new dialog window, specify a mount point for which you want to create a separate logicalvolume - for example, /. Optionally, specify a size for the volume using standard units such asMB or GB (for example, 50GB). Then, click Add mount point to add the volume and return to themain partitioning screen.
Note
When creating a mount point for swap on Btrfs, specify the mount point as swap.
3. The mount point has now been created using the default settings, which means it has beencreated as an LVM logical volume. Select the newly created mount point in the left pane toconfigure it further, and convert it to a Btrfs subvolume by changing the Device Type option toBtrfs. Then, click Update Settings in the bottom right corner of the screen.
4. In the Volume menu, you can see that the subvolume has been assigned to an automaticallycreated volume, which is named after the Fedora variant you are installing (for example, fedora-server00. Click the Modify button under the drop-down menu to access the volume settings.
5. In the Configure Volume dialog, you can change the volume's name, its RAID level (seeSection 5.4.10.5, “Device, File System and RAID Types” for information about available RAIDtypes), and you can also specify which physical devices (disks) this volume should reside on. Youcan select one or more disks which will be used to hold this volume by holding down Ctrl andclicking each disk in the list.
Note
If you select a redundant RAID type (such as RAID1 (Redundancy)), the volume will take uptwice its actual size on your disks. A 5 GB volume with RAID1 will take up 10 GB of space.
You can also make sure that the volume is encrypted by selecting the Encrypt option; this willenable LUKS encryption for the entire volume. See the Fedora Security Guide, available at http://docs.fedoraproject.org/, for information about LUKS disk encryption.
Additionally, you can set a fixed size for the volume by selecting the Fixed option from the Sizepolicy menu and entering a size for the volume group.
After you finish configuring the Btrfs volume settings, click Save to return to the main ManualPartitioning screen.
6. If you need to create more than one Btrfs volume, open the Volume drop-down menu and selectthe Create a new volume group option. A new dialog window will open, identical to the onedescribed in the previous step. Again, select a name, storage devices, encryption settings, RAID

Chapter 5. Installing Using Anaconda
52
level and size policy for the new volume, and click Save. The new volume will then becomeavailable in the Volume Group drop-down menu; you can then go through your existing mountpoints and change this setting to assign them to a different volume.
7. Configure other settings specific to the subvolume - its Mount Point, Desired Capacity, FileSystem, and Name. Press Update Settings to apply any changes to the configuration.
Repeat this procedure for any additional Btrfs subvolumes you want to create. Note that when creatingadditional subvolumes, a new volume is not automatically created each time; instead, any additionalsubvolumes are assigned to an existing volume.
For each mount point you create, review its settings and make sure that it is assigned to the correctvolume, that it has sufficient capacity, and that it has a descriptive name so you can identify thesubvolume later if you need to.
5.4.10.5. Device, File System and RAID TypesFedora supports multiple types of devices and file systems. The lists below offer a short description ofeach available device, file system and RAID type and notes on their usage.
To select a device type or a file system of a partition or a logical volume, select it in the list inSection 5.4.10, “Manual Partitioning” and select a Device Type and a File System from theirrespective drop-down menus on the right side of the screen. Then, click Update Settings and repeatthis process for all mount points you want to modify.
To configure software RAID, make sure that you have enough physical hard drives selected asinstallation targets (the number of separate drives required for each type of RAID is noted in itsdescription). Then, choose a RAID level when creating or modifying a Btrfs volume or LVM volumegroup, or select Software RAID as the device type to create software RAID with standard partitions.For detailed instructions, see Section 5.4.10.4, “Creating a Btrfs Layout”, Section 5.4.10.3, “Creatinga Logical Volume Managament (LVM) Layout”, and Section 5.4.10.2, “Creating Software RAID” asneeded.
Device Types• Standard Partition - A standard partition can contain a file system or swap space. Standard
partitions are most commonly used for /boot and the BIOS Boot and EFI System partitions. LVMlogical volumes or Btrfs subvolumes are recommended for most other uses. See Appendix B,An Introduction to Disk Partitions for additional information about the concepts behind physicalpartitions.
• LVM - Choosing LVM as the Device Type creates an LVM logical volume and a volume groupto contain it (unless one already exists, in which case the new volume is assigned to theexisting group). LVM can improve performance when using physical disks and allows you to usemultiple disks for a single mount point. For information on how to create a logical volume, seeSection 5.4.10.3, “Creating a Logical Volume Managament (LVM) Layout”. Also see Appendix C,Understanding LVM for some additional information about LVM in general.
• LVM Thin Provisioning - Using thin provisioning, you can manage a storage pool of free space,known as a thin pool, which can be allocated to an arbitrary number of devices when needed byapplications. The thin pool can be expanded dynamically when needed for cost-effective allocationof storage space.
• RAID - Creating two or more software RAID partitions allows you to create a software RAIDdevice. One RAID partition is assigned to each disk on the system. See Section 5.4.10.2, “CreatingSoftware RAID” for instructions on creating software RAID.

Manual Partitioning
53
• BTRFS - Btrfs is a file system with several device-like features. It is capable of addressing andmanaging more files, larger files, and larger volumes than the ext2, ext3, and ext4 file systems. SeeSection 5.4.10.4, “Creating a Btrfs Layout” for more information about creating Btrfs volumes.
File Systems• ext4 - The ext4 file system is based on the ext3 file system and features a number of improvements.
These include support for larger file systems and larger files, faster and more efficient allocation ofdisk space, no limit on the number of subdirectories within a directory, faster file system checking,and more robust journaling. Ext4 is the default and recommended file system used by FedoraWorkstation and Cloud. The maximum supported size of a single ext4 file system is 50 TB.
• ext3 - The ext3 file system is based on the ext2 file system and has one main advantage -journaling. Using a journaling file system reduces time spent recovering a file system after a crash,as there is no need to check the file system for metadata consistency by running the fsck utilityevery time a crash occurs.
• ext2 - An ext2 file system supports standard Unix file types, including regular files, directories, orsymbolic links. It provides the ability to assign long file names, up to 255 characters.
• swap - Swap partitions are used to support virtual memory. In other words, data is written to aswap partition when there is not enough RAM to store the data your system is processing. A swappartition should always be created; see Section 5.4.10.6, “Recommended Partitioning Scheme” fordetails such as the recommended size.
• xfs - XFS is a highly scalable, high-performance file system that supports file systems up to 16exabytes (approximately 16 million terabytes), files up to 8 exabytes (approximately 8 millionterabytes), and directory structures containing tens of millions of entries. XFS also supportsmetadata journaling, which facilitates quicker crash recovery. The maximum supported size of asingle XFS file system is 500 TB. Starting with Fedora 22, XFS is the default and recommended filesystem on Fedora Server.
Important
Note that the size of an XFS file system can not currently be reduced without destroyingand recreating the file system. If you expect that you will need to adjust the sizes of your filesystems often, using XFS is not recommended, as it makes administration substantially moretime-consuming.
• vfat - The VFAT file system is a Linux file system that is compatible with Microsoft Windows long filenames on the FAT file system.
• BIOS Boot - A very small partition required for booting from a device with a GUID partition table(GPT) on BIOS systems and UEFI systems in BIOS compatibility mode. See Section 5.4.10.6,“Recommended Partitioning Scheme” for details.
• EFI System Partition - A small partition required for booting a device with a GUID partition table(GPT) on a UEFI system. See Section 5.4.10.6, “Recommended Partitioning Scheme” for details.
Software RAID Types• RAID0 (Performance) - Distributes data across multiple disks. Level 0 RAID offers increased
performance over standard partitions and can be used to pool the storage of multiple disks into one

Chapter 5. Installing Using Anaconda
54
large virtual device. Note that Level 0 RAIDs offer no redundancy and that the failure of one devicein the array destroys data in the entire array. RAID 0 requires at least two disks.
• RAID1 (Redundancy) - Mirrors all data from one partition onto one or more other disks. Additionaldevices in the array provide increasing levels of redundancy. RAID 1 requires at least two disks.
• RAID4 (Error Checking) - Distributes data across multiple disks and uses one disk in the array tostore parity information which safeguards the array in case any disk within the array fails. Becauseall parity information is stored on one disk, access to this disk creates a "bottleneck" in the array'sperformance. Level 4 RAID requires at least three disks.
• RAID5 (Distributed Error Checking) - Distributes data and parity information across multiple disks.Level 5 RAIDs therefore offer the performance advantages of distributing data across multiple disks,but do not share the performance bottleneck of level 4 RAIDs because the parity information is alsodistributed through the array. RAID 5 requires at least three disks.
• RAID6 (Redundant Error Checking) - Level 6 RAIDs are similar to level 5 RAIDs, but instead ofstoring only one set of parity data, they store two sets. RAID 6 requires at least four disks.
• RAID10 (Performance, Redundancy) - Level 10 RAIDs are nested RAIDs or hybrid RAIDs. Theyare constructed by distributing data over mirrored sets of disks. For example, a level 10 RAID arrayconstructed from four RAID partitions consists of two mirrored pairs of striped partitions. RAID 10requires at least four disks.
5.4.10.6. Recommended Partitioning SchemeIn most cases, at least the following mount points should always be created:
/boot - 500 MBThis partition contains the operating system kernel, which allows Fedora to boot. It also containsother files used during the bootstrap process. Due to the limitations of most firmware, creating aseparate, small standard partition for this directory is recommended. In most scenarios, a 500 MB/boot partition is adequate.
Important
If your system has a hardware RAID controller, be aware that some BIOS types do notsupport booting from it. In that case, the /boot partition must be created on a partitionoutside of the RAID array, such as on a separate hard drive.
Also note that the /boot directory can not be placed on a LVM logical volume or a Btrfssubvolume. Use a standard partition.
/ (root) - 10 GBThis is where the root directory is located. The root directory is the top level of the directorystructure. By default, all files are written to this partition unless a different partition is mounted inthe path being written to (for example, /boot or /home). If you follow the recommended schemedescribed in this section, this will be the partition where most software packages will be installed.
For a minimal installation, a 5 GB root partition will be sufficient. However, for most commoninstallations which include extra packages and a graphical user interface, the root partition shouldbe at least 10 GB; with 20 GB being sufficient for most common use cases.

Manual Partitioning
55
Note
The / mount point is the top of the Linux Filesystem Hierarchy, and is referred to as the rootfile system, or root. The /root directory, sometimes pronounced "slash-root", is the homedirectory for the root user.
/home - at least 10 GBTo store user data separately from system data, create a dedicated mount point for the /homedirectory. This partition should be sized based on the amount of data that will be stored locally,number of users, and so on. This will allow you to upgrade or reinstall Fedora without erasing userdata files. During the installation, a separate /home partition will be created if there are 50 GB ormore free space for your Fedora installation.
When using Fedora as a workstation for normal use with a graphical environment, this mount pointshould have the most disk space assigned to it, as it will likely hold the most data (user settings,images, videos, etc).
swap - based on your system parametersSwap partitions support virtual memory; data is written to them when there is not enough RAMto store the data your system is processing. This partition's size is a function of system memoryworkload, not total system memory, and therefore is not equal to the total system memory size.Therefore, it is important to analyze what applications a system will be running and the load thoseapplications will serve in order to determine the system memory workload. Application providersand developers should be able to provide some guidance.
When the system runs out of swap space, the kernel terminates processes as the systemRAM memory is exhausted. Configuring too much swap space results in storage devices beingallocated but idle and is a poor use of resources. Too much swap space can also hide memoryleaks. The maximum size for a swap partition and other additional information can be found in themkswap(8) man page.
The table below provides the recommended size of a swap partition depending on the amountof RAM in your system and whether you want sufficient memory for your system to hibernate. Ifyou let the installation program partition your system automatically, the swap partition size will beestablished using these guidelines. Automatic partitioning setup assumes hibernation is not in use,and the maximum size of the swap partition is limited to 10% of the total size of the hard drive.If you want to set up enough swap space to allow for hibernation, or if you want to set the swappartition size to more than 10% of the system's storage space, you must edit the partitioning layoutmanually.
Table 5.2. Recommended System Swap Space
Amount of RAM in thesystem
Recommended swap space Recommended swap spaceif allowing for hibernation
less than 2 GB 2 times the amount of RAM 3 times the amount of RAM
2 GB - 8 GB Equal to the amount of RAM 2 times the amount of RAM
8 GB - 64 GB 0.5 times the amount of RAM 1.5 times the amount of RAM
more than 64 GB workload dependent hibernation not recommended
At the border between each range listed above (for example, a system with 2 GB, 8 GB, or 64 GBof system RAM), discretion can be exercised with regard to chosen swap space and hibernation
Chapter 5. Installing Using Anaconda
56
support. If your system resources allow for it, increasing the swap space may lead to betterperformance.
Distributing swap space over multiple storage devices - particularly on systems with fast drives,controllers and interfaces - also improves swap space performance.
BIOS Boot (1 MB) or EFI System Partition (200 MB)The GRUB2 boot loader can be installed either in the Master Boot Record (MBR) or the GUIDPartition Table (GPT) of the boot device. In order to determine which of these methods to use, theinstallation program considers the following variations:
Systems with BIOS firmware and UEFI systems in BIOS compatibility modeIf the disk is already formatted, the partitioning scheme is retained. If the disk is not formatted,or you have erased all existing partitions from the disk, the installer will choose the following:
• MBR if the size of the disk is less than 2 TB (terabytes)
• GPT if the size of the disk is more than 2 TB
Note
You can force the installer to use GPT on disks smaller than 2 TB by using theinst.gpt boot option as described in Chapter 8, Boot Options. However, the opposite isnot possible - you can not use MBR on disks larger than 2 TB.
You need to create a BIOS Boot partition with a size of 1 MB to install on a system with BIOSfirmware if the disk containing the boot loader uses GPT. If the disk uses a MBR, no specialpartition is necessary on a BIOS system.
Systems with UEFI firmwareOnly GPT is allowed on UEFI systems. In order to install on a formatted disk with a MBR, itmust be reformated and relabeled. All data currently on the disk will be lost.
UEFI-based systems require an EFI System Partition at least 50 MB in size (recommendedsize is 200 MB), regardless of the partitioning scheme.
Important
If your system requires either a BIOS Boot partition or an EFI System Partition based on therequirements detailed above, this partition must be created as a standard physical partition. Itcan not reside on an LVM volume or a Btrfs subvolume.
Also note that if your system does not require any of these partitions, they will not be shownin the File System menu in mount point options.
Many systems have more partitions than the minimum listed above. Choose partitions based on yourparticular needs. See Section 5.4.10.7, “Advice on Partitions” for additional information and advice.

Manual Partitioning
57
Note
Only assign storage capacity to those partitions you require immediately. You may allocate freespace at any time, to meet needs as they occur.
If you are not sure how best to configure the partitions for your computer, accept the automaticdefault partition layout provided by the installation program as described in Section 5.4.8, “InstallationDestination”.
5.4.10.7. Advice on PartitionsThere is no best way to partition every system; the optimal setup depends on how you plan to usethe system being installed. However, the following tips may help you find the optimal layout for yourneeds:
• Consider encrypting any partitions and volumes which might contain sensitive data. Encryptionprevents unauthorized people from accessing the data on the partitions, even if they have access tothe physical storage device. In most cases, you should at least encrypt the /home partition, whichcontains user data.
• In some cases, creating separate mount points for directories other than /, /boot and /home maybe useful; for example, on a server running a MySQL database, having a separate mount point for/var/lib/mysql will allow you to preserve the database during a reinstallation without having torestore it from backup afterwards. However, having unnecessary separate mount points will makestorage administration more difficult.
• Some special restrictions apply to certain directories with regards on which partitioning layouts canthey be placed. Notably, the /boot directory must always be on a physical partition (not on an LVMvolume or a Btrfs subvolume), and /usr can not be on a Btrfs subvolume.
• If you are new to Linux, consider reviewing the Linux Filesystem Hierarchy Standard at http://refspecs.linuxfoundation.org/FHS_2.3/fhs-2.3.html for information about various system directoriesand their contents.
• Each kernel installed on your system requires approximately 20 MB on the /boot partition. Thedefault partition size of 500 MB for /boot should suffice for most common uses; increase the sizeof this partition if you plan to keep many kernels installed at the same time.
• The /var directory holds content for a number of applications, including the Apache web server,and is used by the DNF package manager to temporarily store downloaded package updates. Makesure that the partition or volume containing /var has at least 3 GB.
• The contents of the /var directory usually change very often. This may cause problems with oldersolid state drives (SSDs), as they can handle a lower number of read/write cycles before becomingunusable. If your system root is on an SSD, consider creating a separate mount point for /var on aclassic (platter) HDD.
• The /usr directory holds the majority of software on a typical Fedora installation. The partition orvolume containing this directory should therefore be at least 5 GB for minimal installations, and atleast 10 GB for installations with a graphical environment.
Chapter 5. Installing Using Anaconda
58
• If /usr or /var is partitioned separately from the rest of the root volume, the boot process becomesmuch more complex because these directories contain boot-critical components. In some situations,such as when these directories are placed on an iSCSI drive or an FCoE location, the systemmay either be unable to boot, or it may hang with a Device is busy error when powering off orrebooting.
This limitation only applies to /usr or /var, not to directories below them. For example, a separatepartition for /var/www will work without issues.
• Consider leaving a portion of the space in an LVM volume group unallocated. This unallocatedspace gives you flexibility if your space requirements change but you do not wish to remove datafrom other volumes. You can also select the Thin provisioning device type for the partition to havethe unused space handled automatically by the volume.
• The size of an XFS file system can not be reduced - if you need to make a partition or volume withthis file system smaller, you must back up your data, destroy the file system, and create a new,smaller one in its place. Therefore, if you expect needing to manipulate your partitioning layout later,you should use the ext4 file system instead.
• Use Logical Volume Management (LVM) if you anticipate expanding your storage by adding morehard drives after the installation. With LVM, you can create physical volumes on the new drives,and then assign them to any volume group and logical volume as you see fit - for example, you caneasily expand your system's /home (or any other directory residing on a logical volume).
• Creating a BIOS Boot partition or an EFI System Partition may be necessary, depending on yoursystem's firmware, boot drive size, and boot drive disk label. See Section 5.4.10.6, “RecommendedPartitioning Scheme” for information about these partitions. Note that the graphical installer will notlet you create a BIOS Boot or EFI System Partition if your system does not require one - in thatcase, they will be hidden from the menu.
• If you need to make any changes to your storage configuration after the installation, Fedorarepositories offer several different tools which can help you do this. If you prefer a command linetool, try system-storage-manager.
5.4.11. Kdump
Note
This screen is disabled by default. To enable it during the installation, you must use theinst.kdump_addon=on option at the boot menu. See Section 8.2.5, “Advanced InstallationOptions” for details, and Section 4.2, “The Boot Menu” for instructions on using custom bootoptions.
Use this screen to select whether or not Kdump will be activated on the installed system, and howmuch memory will be reserved for it if enabled.

Network & Hostname
59
Figure 5.22. Kdump
Kdump is a kernel crash dumping mechanism which, in the event of a system crash, captures thecontents of the system memory at the moment of failure. This captured memory can then be analyzedto find the cause of the crash. If Kdump is enabled, it must have a small portion of the system'smemory (RAM) reserved to itself. This reserved memory will not be accessible to the main kernel.
To enable Kdump on the installed system, check Enabled. Then, select either Automatic or Manualmemory reservation settings, and if you selected Manual, enter the amount of memory to be reservedin megabytes into the Memory to be reserved field.
The amount of memory which you should reserve is determined based on your system's architecture(AMD64 and Intel 64 will have different requirements than IBM Power, for example) as well as thetotal amount of system memory. In most cases, automatic reservation will be satisfactory. If you insiston manual settings, see the Red Hat Enterprise Linux 7 Kernel Crash Dump Guide2 for guidelines.This document also contains more in-depth information about how Kdump works, how to configureadditional settings, and how to analyze a saved crash dump.
The Usable System Memory readout below the reservation input field shows how much memory willbe accessible to your main system once your selected amount of RAM is reserved.
Note
Additional settings, such as the location where kernel crash dumps will be saved, can only beconfigured after the installation using either the system-config-kdump graphical interface, ormanually in the /etc/kdump.conf configuration file.
After configuring Kdump settings, click Done in the top left corner to return to Section 5.4.2,“Installation Summary”.
5.4.12. Network & HostnameThe Network & Hostname screen is used to configure network interfaces. Options selected here willbe available both during the installation (if needed for tasks such as downloading packages from aremote location) and on the installed system.
2 https://access.redhat.com/documentation/en-US/Red_Hat_Enterprise_Linux/7/html/Kernel_Crash_Dump_Guide/appe-supported-kdump-configurations-and-targets.html#sect-kdump-memory-requirements
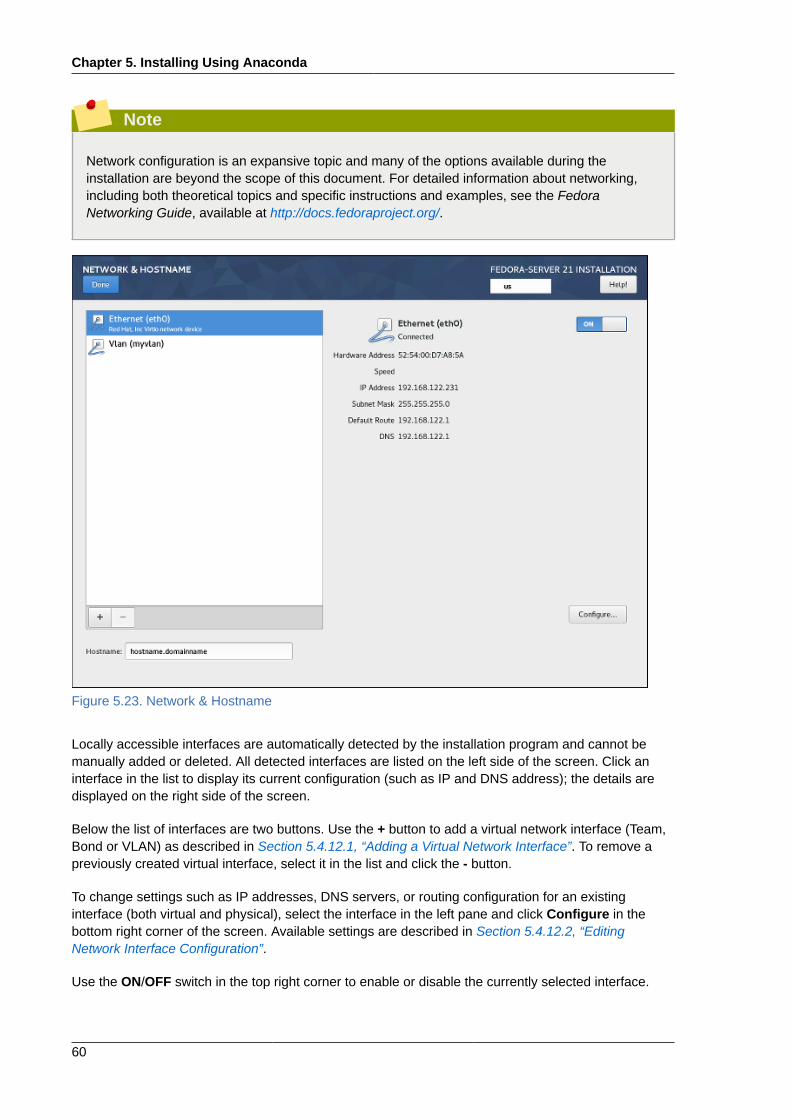
Chapter 5. Installing Using Anaconda
60
Note
Network configuration is an expansive topic and many of the options available during theinstallation are beyond the scope of this document. For detailed information about networking,including both theoretical topics and specific instructions and examples, see the FedoraNetworking Guide, available at http://docs.fedoraproject.org/.
Figure 5.23. Network & Hostname
Locally accessible interfaces are automatically detected by the installation program and cannot bemanually added or deleted. All detected interfaces are listed on the left side of the screen. Click aninterface in the list to display its current configuration (such as IP and DNS address); the details aredisplayed on the right side of the screen.
Below the list of interfaces are two buttons. Use the + button to add a virtual network interface (Team,Bond or VLAN) as described in Section 5.4.12.1, “Adding a Virtual Network Interface”. To remove apreviously created virtual interface, select it in the list and click the - button.
To change settings such as IP addresses, DNS servers, or routing configuration for an existinginterface (both virtual and physical), select the interface in the left pane and click Configure in thebottom right corner of the screen. Available settings are described in Section 5.4.12.2, “EditingNetwork Interface Configuration”.
Use the ON/OFF switch in the top right corner to enable or disable the currently selected interface.
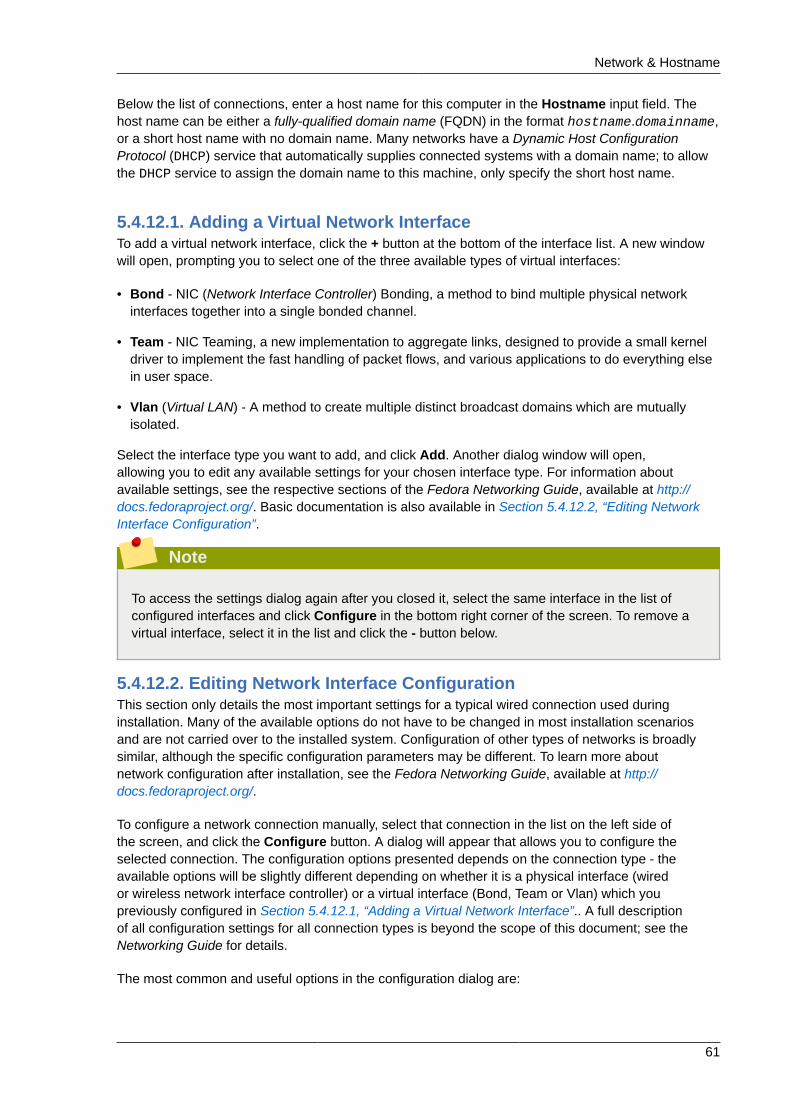
Network & Hostname
61
Below the list of connections, enter a host name for this computer in the Hostname input field. Thehost name can be either a fully-qualified domain name (FQDN) in the format hostname.domainname,or a short host name with no domain name. Many networks have a Dynamic Host ConfigurationProtocol (DHCP) service that automatically supplies connected systems with a domain name; to allowthe DHCP service to assign the domain name to this machine, only specify the short host name.
5.4.12.1. Adding a Virtual Network InterfaceTo add a virtual network interface, click the + button at the bottom of the interface list. A new windowwill open, prompting you to select one of the three available types of virtual interfaces:
• Bond - NIC (Network Interface Controller) Bonding, a method to bind multiple physical networkinterfaces together into a single bonded channel.
• Team - NIC Teaming, a new implementation to aggregate links, designed to provide a small kerneldriver to implement the fast handling of packet flows, and various applications to do everything elsein user space.
• Vlan (Virtual LAN) - A method to create multiple distinct broadcast domains which are mutuallyisolated.
Select the interface type you want to add, and click Add. Another dialog window will open,allowing you to edit any available settings for your chosen interface type. For information aboutavailable settings, see the respective sections of the Fedora Networking Guide, available at http://docs.fedoraproject.org/. Basic documentation is also available in Section 5.4.12.2, “Editing NetworkInterface Configuration”.
Note
To access the settings dialog again after you closed it, select the same interface in the list ofconfigured interfaces and click Configure in the bottom right corner of the screen. To remove avirtual interface, select it in the list and click the - button below.
5.4.12.2. Editing Network Interface ConfigurationThis section only details the most important settings for a typical wired connection used duringinstallation. Many of the available options do not have to be changed in most installation scenariosand are not carried over to the installed system. Configuration of other types of networks is broadlysimilar, although the specific configuration parameters may be different. To learn more aboutnetwork configuration after installation, see the Fedora Networking Guide, available at http://docs.fedoraproject.org/.
To configure a network connection manually, select that connection in the list on the left side ofthe screen, and click the Configure button. A dialog will appear that allows you to configure theselected connection. The configuration options presented depends on the connection type - theavailable options will be slightly different depending on whether it is a physical interface (wiredor wireless network interface controller) or a virtual interface (Bond, Team or Vlan) which youpreviously configured in Section 5.4.12.1, “Adding a Virtual Network Interface”.. A full descriptionof all configuration settings for all connection types is beyond the scope of this document; see theNetworking Guide for details.
The most common and useful options in the configuration dialog are:
Chapter 5. Installing Using Anaconda
62
Enable or disable the connection by defaultIn the General tab of the configuration dialog, you can select or unselect the Automaticallyconnect to this network when it is available check box to allow or disallow this connection toconnect by default. When enabled on a wired connection, this means the system will typicallyconnect during startup (unless you unplug the network cable); on a wireless connection, it meansthat the interface will attempt to connect to any known wireless networks in range.
Additionally, you can allow or disallow all users on the system from connecting to this networkusing the All users may connect to this network option. If you disable this option, only root willbe able to connect to this network.
Note
It is not possible to only allow a specific user other than root to use this interface, becauseno other users are created at this point during the installation. If you need a connection for adifferent user, you must configure it after the installation.
Set up static IPv4 or IPv6 settingsBy default, both IPv4 and IPv6 are set to automatic configuration depending on current networksettings. This means that addresses such as the local IP address, DNS address, and othersettings will be detected automatically each time the interface connects to a network. In manycases, this is sufficient, but you can also provide static configuration in the IPv4 Settings and IPv6Settings, respectively.
To set static network configuration, navigate to one of the settings tabs and select a method otherthan Automatic (for example, Manual) from the Method drop-down menu. This will enable theAddresses field below.
Note
In the IPv6 Settings tab, you can also set the method to Ignore to disable IPv6 on thisinterface.
Then, click Add on the right side and add a set of settings: Address, Netmask (for IPv4), Prefix(for IPv6), and Gateway.
The DNS servers field accepts one or more IP addresses of DNS servers - for example,10.0.0.1,10.0.0.8.
The final option in both tabs is Require IPvX addressing for this connection to complete.Select this option in the IPv4 tab to only allow this connection if IPv4 was successful; the sameprinciple applies to this setting in the IPv6 tab. If this option remains disabled for both IPv4 andIPv6, the interface will be able to connect if configuration succeeds on either IP protocol.
Configure routesIn the IPv4 Settings and IPv4 Settings tabs, click the Routes button in the bottom right cornerto configure routing settings for a specific IP protocol on an interface. A new dialog will open,allowing you to Add a specific route.
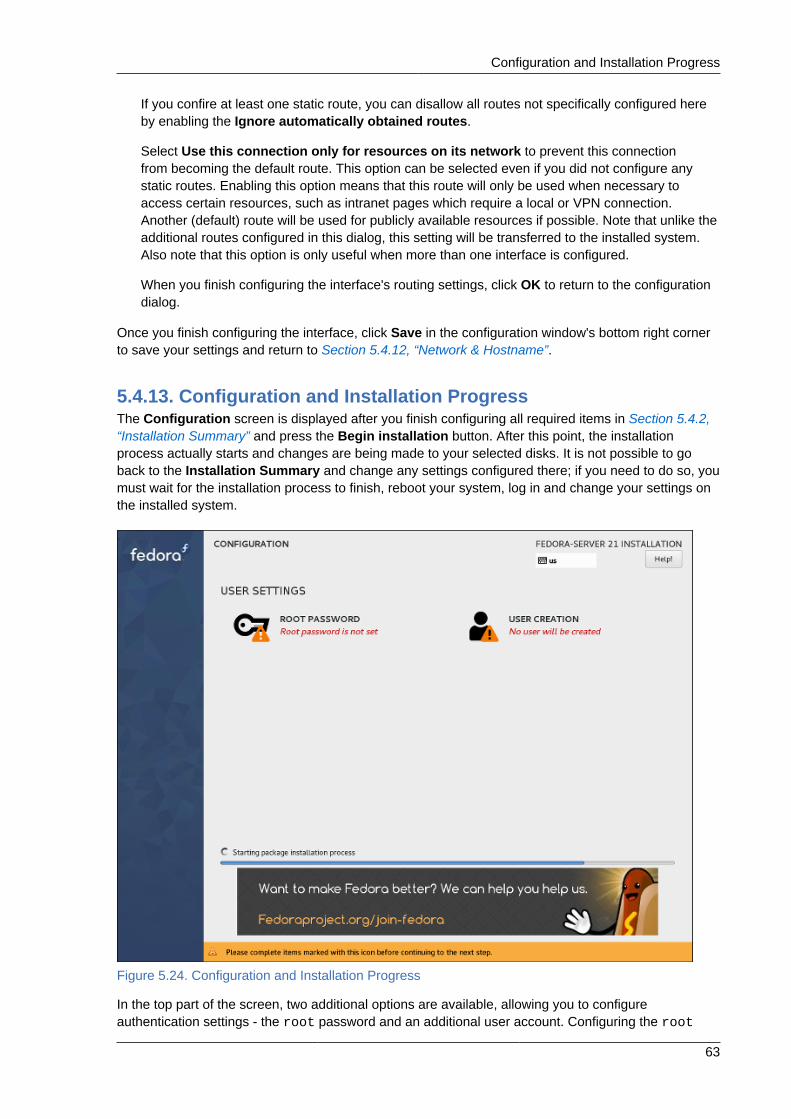
Configuration and Installation Progress
63
If you confire at least one static route, you can disallow all routes not specifically configured hereby enabling the Ignore automatically obtained routes.
Select Use this connection only for resources on its network to prevent this connectionfrom becoming the default route. This option can be selected even if you did not configure anystatic routes. Enabling this option means that this route will only be used when necessary toaccess certain resources, such as intranet pages which require a local or VPN connection.Another (default) route will be used for publicly available resources if possible. Note that unlike theadditional routes configured in this dialog, this setting will be transferred to the installed system.Also note that this option is only useful when more than one interface is configured.
When you finish configuring the interface's routing settings, click OK to return to the configurationdialog.
Once you finish configuring the interface, click Save in the configuration window's bottom right cornerto save your settings and return to Section 5.4.12, “Network & Hostname”.
5.4.13. Configuration and Installation ProgressThe Configuration screen is displayed after you finish configuring all required items in Section 5.4.2,“Installation Summary” and press the Begin installation button. After this point, the installationprocess actually starts and changes are being made to your selected disks. It is not possible to goback to the Installation Summary and change any settings configured there; if you need to do so, youmust wait for the installation process to finish, reboot your system, log in and change your settings onthe installed system.
Figure 5.24. Configuration and Installation Progress
In the top part of the screen, two additional options are available, allowing you to configureauthentication settings - the root password and an additional user account. Configuring the root
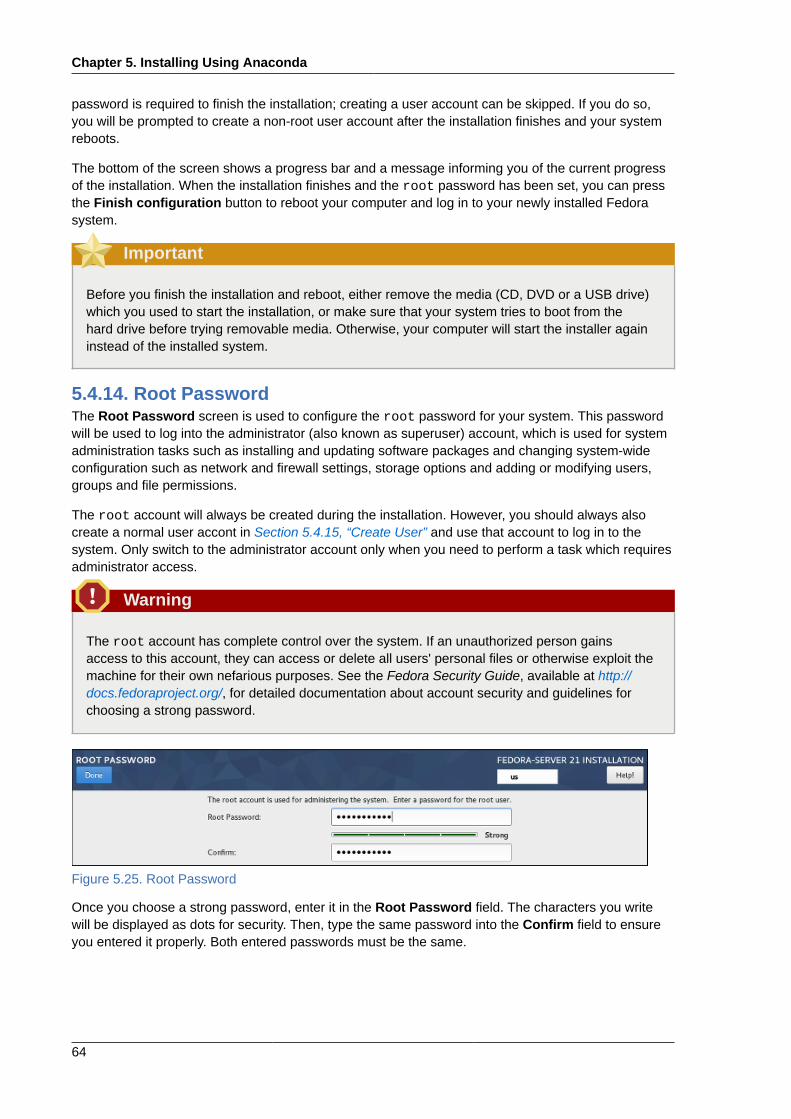
Chapter 5. Installing Using Anaconda
64
password is required to finish the installation; creating a user account can be skipped. If you do so,you will be prompted to create a non-root user account after the installation finishes and your systemreboots.
The bottom of the screen shows a progress bar and a message informing you of the current progressof the installation. When the installation finishes and the root password has been set, you can pressthe Finish configuration button to reboot your computer and log in to your newly installed Fedorasystem.
Important
Before you finish the installation and reboot, either remove the media (CD, DVD or a USB drive)which you used to start the installation, or make sure that your system tries to boot from thehard drive before trying removable media. Otherwise, your computer will start the installer againinstead of the installed system.
5.4.14. Root PasswordThe Root Password screen is used to configure the root password for your system. This passwordwill be used to log into the administrator (also known as superuser) account, which is used for systemadministration tasks such as installing and updating software packages and changing system-wideconfiguration such as network and firewall settings, storage options and adding or modifying users,groups and file permissions.
The root account will always be created during the installation. However, you should always alsocreate a normal user accont in Section 5.4.15, “Create User” and use that account to log in to thesystem. Only switch to the administrator account only when you need to perform a task which requiresadministrator access.
Warning
The root account has complete control over the system. If an unauthorized person gainsaccess to this account, they can access or delete all users' personal files or otherwise exploit themachine for their own nefarious purposes. See the Fedora Security Guide, available at http://docs.fedoraproject.org/, for detailed documentation about account security and guidelines forchoosing a strong password.
Figure 5.25. Root Password
Once you choose a strong password, enter it in the Root Password field. The characters you writewill be displayed as dots for security. Then, type the same password into the Confirm field to ensureyou entered it properly. Both entered passwords must be the same.
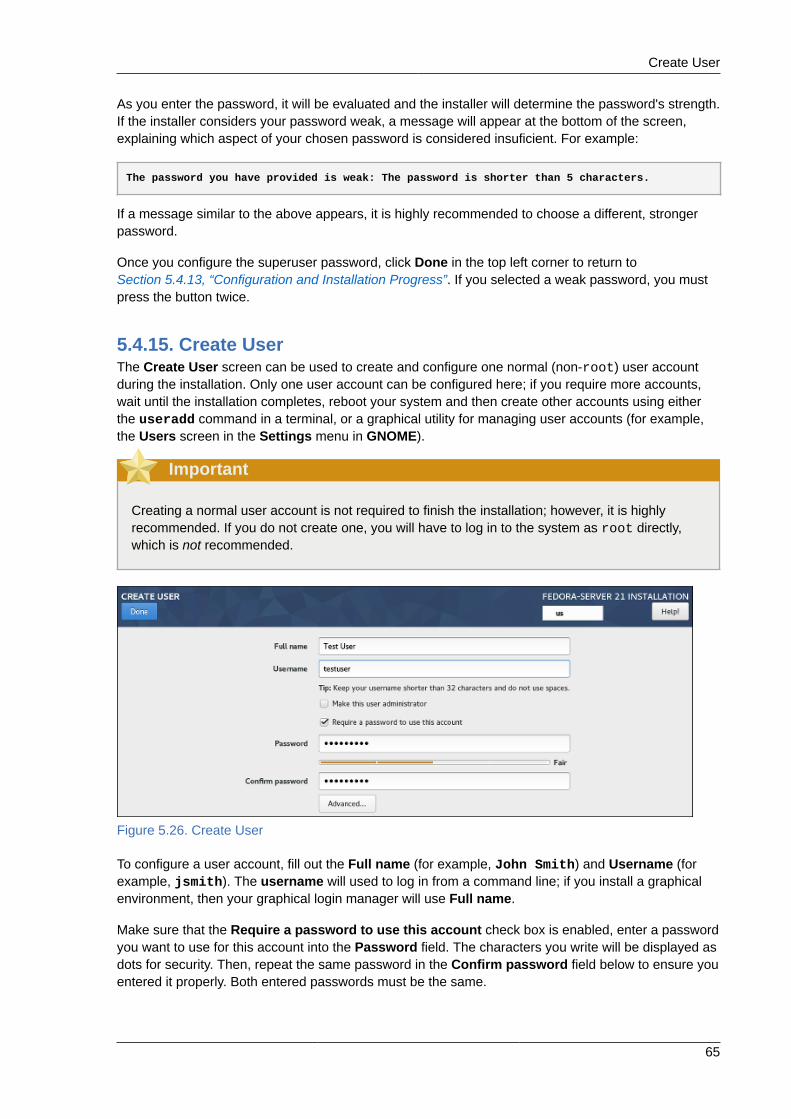
Create User
65
As you enter the password, it will be evaluated and the installer will determine the password's strength.If the installer considers your password weak, a message will appear at the bottom of the screen,explaining which aspect of your chosen password is considered insuficient. For example:
The password you have provided is weak: The password is shorter than 5 characters.
If a message similar to the above appears, it is highly recommended to choose a different, strongerpassword.
Once you configure the superuser password, click Done in the top left corner to return toSection 5.4.13, “Configuration and Installation Progress”. If you selected a weak password, you mustpress the button twice.
5.4.15. Create UserThe Create User screen can be used to create and configure one normal (non-root) user accountduring the installation. Only one user account can be configured here; if you require more accounts,wait until the installation completes, reboot your system and then create other accounts using eitherthe useradd command in a terminal, or a graphical utility for managing user accounts (for example,the Users screen in the Settings menu in GNOME).
Important
Creating a normal user account is not required to finish the installation; however, it is highlyrecommended. If you do not create one, you will have to log in to the system as root directly,which is not recommended.
Figure 5.26. Create User
To configure a user account, fill out the Full name (for example, John Smith) and Username (forexample, jsmith). The username will used to log in from a command line; if you install a graphicalenvironment, then your graphical login manager will use Full name.
Make sure that the Require a password to use this account check box is enabled, enter a passwordyou want to use for this account into the Password field. The characters you write will be displayed asdots for security. Then, repeat the same password in the Confirm password field below to ensure youentered it properly. Both entered passwords must be the same.
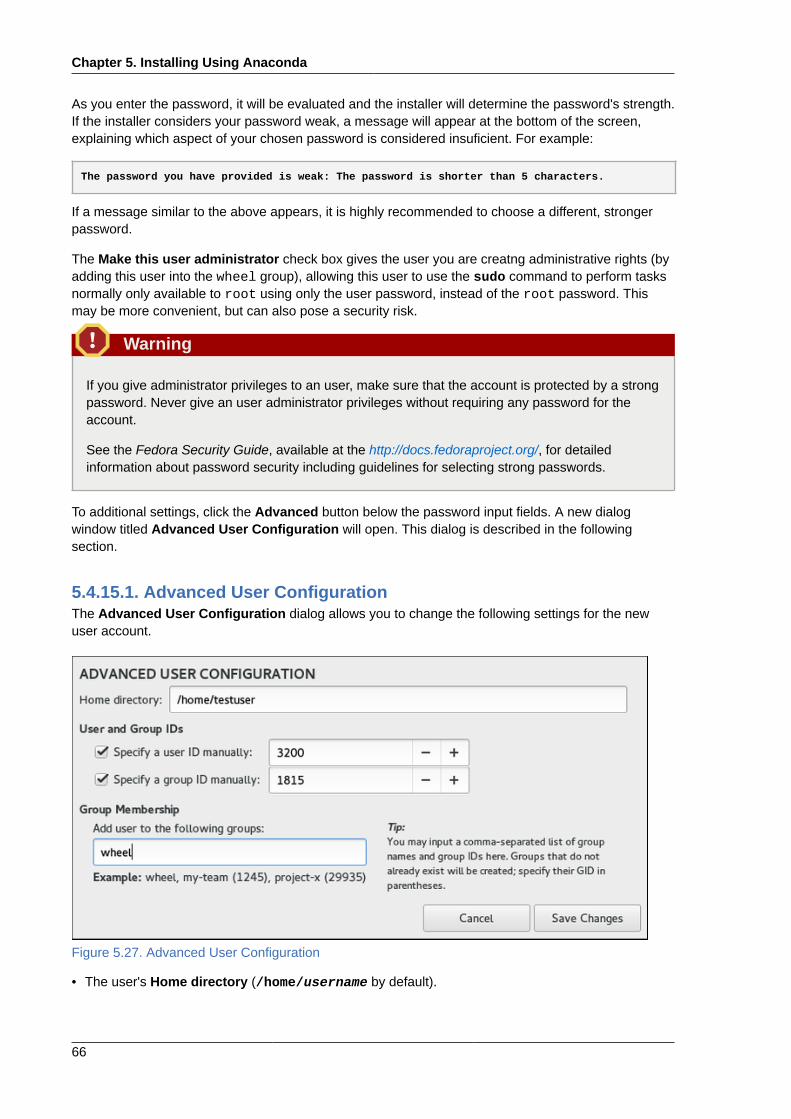
Chapter 5. Installing Using Anaconda
66
As you enter the password, it will be evaluated and the installer will determine the password's strength.If the installer considers your password weak, a message will appear at the bottom of the screen,explaining which aspect of your chosen password is considered insuficient. For example:
The password you have provided is weak: The password is shorter than 5 characters.
If a message similar to the above appears, it is highly recommended to choose a different, strongerpassword.
The Make this user administrator check box gives the user you are creatng administrative rights (byadding this user into the wheel group), allowing this user to use the sudo command to perform tasksnormally only available to root using only the user password, instead of the root password. Thismay be more convenient, but can also pose a security risk.
Warning
If you give administrator privileges to an user, make sure that the account is protected by a strongpassword. Never give an user administrator privileges without requiring any password for theaccount.
See the Fedora Security Guide, available at the http://docs.fedoraproject.org/, for detailedinformation about password security including guidelines for selecting strong passwords.
To additional settings, click the Advanced button below the password input fields. A new dialogwindow titled Advanced User Configuration will open. This dialog is described in the followingsection.
5.4.15.1. Advanced User ConfigurationThe Advanced User Configuration dialog allows you to change the following settings for the newuser account.
Figure 5.27. Advanced User Configuration
• The user's Home directory (/home/username by default).

Create User
67
• The user's ID (UID). The default value is 1000. UIDs 0-999 are reserved by the system so they cannot be assigned to an user.
• The the group ID (GID) of the user's default group. The default group name will be the same as theuser name, and its default GID is 1000. GIDs 0-999 are reserved by the system so they can not beassigned to an user's group.
• The user's group membership. The user account you are creating will always have one defaultgroup membership (the user's default group with an ID set in the Specify a group ID manuallyfield). In the Group Membership field, you can specify additional groups as a comma-separatedlist. Groups which do not already exist will be created; you can specify custom GIDs for them inparentheses. If you do not specify a custom GID for a new group, it will be assigned automatically.

68

Chapter 6.
69
After the InstallationThis chapter describes the initial setup tools which open after you finish the installation, reboot thesystem, and log in for the first time.
Two separate configuration tools are part of Fedora. If you installed the GNOME desktop environment(the default Fedora environment, installed for example as part of the Fedora Workstation flavor), theGNOME Initial Setup utility will open; for all other graphical environments, the Initial Setup toolserves the same purpose.
Both of these tools will allow you to configure user-specific settings which have not been configuredduring the installation. Some of the settings are available both in the graphical installer (or as Kickstartcommands) as well as in the initial-setup utilities; in that case, they will only be displayed after thefirst reboot if you skipped them during the installation. This means that, for example, if you configureda user account before the installation finished, you will not be prompted to do so again after theinstallation completes.
6.1. Initial SetupThe Initial Setup screen is shown after the installation finishes and the installed system boots for thefirst time, before the first login, assuming the following conditions have been met:
• Your software selection contained a graphical environment (for example, you installed the systemusing a Fedora Workstation live image).
• The graphical environment you have installed is not GNOME Desktop Environment (it provides itsown initial setup utility which is described in Section 6.2, “GNOME Initial Setup”).
• The initial-setup package has been installed.
• You have not configured every screen available in the graphical installer.
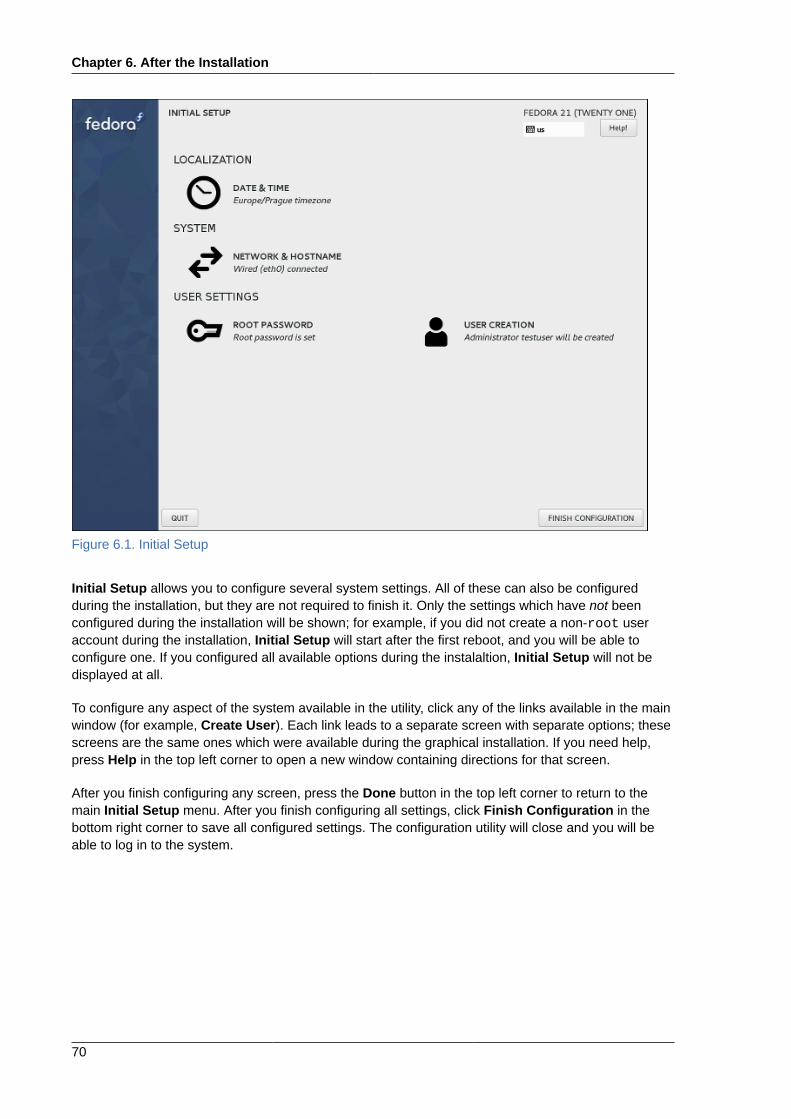
Chapter 6. After the Installation
70
Figure 6.1. Initial Setup
Initial Setup allows you to configure several system settings. All of these can also be configuredduring the installation, but they are not required to finish it. Only the settings which have not beenconfigured during the installation will be shown; for example, if you did not create a non-root useraccount during the installation, Initial Setup will start after the first reboot, and you will be able toconfigure one. If you configured all available options during the instalaltion, Initial Setup will not bedisplayed at all.
To configure any aspect of the system available in the utility, click any of the links available in the mainwindow (for example, Create User). Each link leads to a separate screen with separate options; thesescreens are the same ones which were available during the graphical installation. If you need help,press Help in the top left corner to open a new window containing directions for that screen.
After you finish configuring any screen, press the Done button in the top left corner to return to themain Initial Setup menu. After you finish configuring all settings, click Finish Configuration in thebottom right corner to save all configured settings. The configuration utility will close and you will beable to log in to the system.
GNOME Initial Setup
71
Note
It is possible to configure Initial Setup to display all available options, even if they have beenalready configured during the installation. To do so, you must use a Kickstart file at the start of theinstallation, and this file must contain the following command:
firstboot --enable --reconfig
The --reconfig option specifies that all options should be displayed. See Chapter 9,Automating the Installation with Kickstart for information about Kickstart installations.
Note
Normally, it is not possible to return to Initial Setup after you close it and log in to the system.You can make it display again (after the next reboot, before a login prompt is displayed), byexecuting the following command as root:
# systemctl enable initial-setup-graphical.service
Then, reboot your system.
6.2. GNOME Initial SetupThe GNOME Initial Setup utility will be displayed after you log in for the first time with any useraccount, as long as your first login is in the GNOME desktop environment.
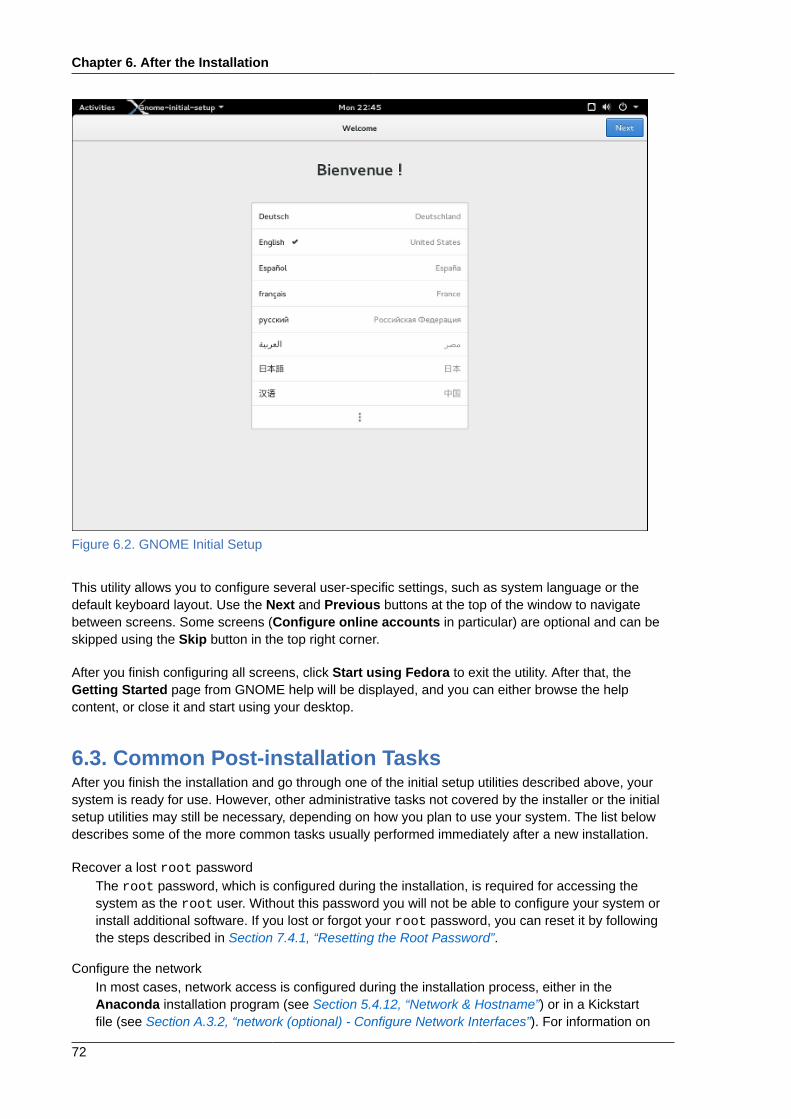
Chapter 6. After the Installation
72
Figure 6.2. GNOME Initial Setup
This utility allows you to configure several user-specific settings, such as system language or thedefault keyboard layout. Use the Next and Previous buttons at the top of the window to navigatebetween screens. Some screens (Configure online accounts in particular) are optional and can beskipped using the Skip button in the top right corner.
After you finish configuring all screens, click Start using Fedora to exit the utility. After that, theGetting Started page from GNOME help will be displayed, and you can either browse the helpcontent, or close it and start using your desktop.
6.3. Common Post-installation TasksAfter you finish the installation and go through one of the initial setup utilities described above, yoursystem is ready for use. However, other administrative tasks not covered by the installer or the initialsetup utilities may still be necessary, depending on how you plan to use your system. The list belowdescribes some of the more common tasks usually performed immediately after a new installation.
Recover a lost root passwordThe root password, which is configured during the installation, is required for accessing thesystem as the root user. Without this password you will not be able to configure your system orinstall additional software. If you lost or forgot your root password, you can reset it by followingthe steps described in Section 7.4.1, “Resetting the Root Password”.
Configure the networkIn most cases, network access is configured during the installation process, either in theAnaconda installation program (see Section 5.4.12, “Network & Hostname”) or in a Kickstartfile (see Section A.3.2, “network (optional) - Configure Network Interfaces”). For information on
Common Post-installation Tasks
73
configuring the network after the installation, see the Fedora Networking Guide, available at http://docs.fedoraproject.org/.
Perform an initial system updateIf you installed Fedora from a full installation ISO image (such as the Workstation live image orfull Server DVD), it is recommended to perform an initial system update, because your installationmedia likely contained older versions of software packages. During the initial update, all installedpackages are updated to their latest available versions. Updates to packages provide securityfixes, bug fixes and enhancements.
The DNF package manager is used for updating installed packages. For more information aboutupdating your system with DNF, see the Fedora System Administrator's Guide, available at http://docs.fedoraproject.org/.
Install driver updatesUsually, drivers for system devices are already supported in the kernel provided by Red HatEnterprise Linux. However, occasionally, support for devices that have been released recentlycould be missing. In these cases, a driver update enabling your device may be available.
Devices necessary to complete the installation can have driver updates provided before theinstallation begins. If a device is missing a driver, but it is not essential during the installation,it is recommended to wait until after the installation completes, and install additional driversafterwards. For instructions on installing and enabling additional drivers on the installedsystem using RPM and DNF, see the Fedora System Administrator's Guide, available at http://docs.fedoraproject.org/.
Configure additional repositoriesNew software is installed from package repositories. Package repositories are organized sets ofsoftware and metadata that can be accessed by the DNF package manager. By default, severalupdate repositories provided by Fedora are configured automatically and you can install updatesand additional software from those. However, if you want to set up additional repositories, forexample ones containing your own software, some extra steps are needed.
For information about configuring additional software repositories, see the Fedora SystemAdministrator's Guide, available at http://docs.fedoraproject.org/.
Install additional packagesYou can control which packages will be installed by selecting an environment in the SoftwareSelection dialog in the graphical installation (see Section 5.4.7, “Software Selection”). Thisdialog does not provide a way to choose individual packages, only predefined sets. However,you can use the DNF package manager to install additional packages after the installation. Seethe Fedora System Administrator's Guide, available at http://docs.fedoraproject.org/, for moreinformation.
Switch to a graphical loginDepending on the options you chose during the installation process, it is possible that your systemdoes not have a graphical interface, instead offering only a text-based prompt. If this is the caseand you wish to enable a graphical desktop after the installation, you must install the X WindowSystem and your preferred desktop environment (either GNOME or KDE).
As with all other software, these packages can be installed using the DNF package manager. Forinformation about using DNF to install new packages, see the Fedora System Administrator'sGuide, available at http://docs.fedoraproject.org/. For information on how to enable graphical loginby default, see Section 7.4.4, “Booting into a Graphical Environment”.

74
Chapter 7.
75
TroubleshootingThis chapter offers some pointers on how to get help when something goes wrong. It also discussessome common installation problems and their solutions.
7.1. Getting HelpThere are many places on the internet which can help you when you encounter a problem notdescribed in this chapter: discussion boards, blogs, IRC, and more. Some of the more popular placeswhere you can find help include:
• Ask Fedora1 - Fedora's knowledge base, available in multiple languages
• The #fedora IRC channel on FreeNode2 - one of the main IRC channels used by Fedora users,English only
• Fedora Project Wiki3 - the official wiki for Fedora Project
• Stack Exchange4 - an English language Q&A board, not specific to Fedora
Note
The above list is by no means complete - you can find help in many other places as well.Additional information about available resources such as IRC channels and mailing lists isavailable at https://fedoraproject.org/wiki/Communicating_and_getting_help.
Before you open a new discussion or ask anyone for help on IRC, you should always do someresearch on your own. If you are encountering an issue, there is usually a good chance that someoneelse ran into the same problem before you and published a solution somewhere. Opening a discussionabout something already explained elsewhere, or asking a common question which has beenanswered many times before, is not likely to result in a friendly, constructive response.
When you ask for help troubleshooting problems related to the installation, you may be asked toprovide log files generated by the installer. The sections below explain which files are generated, whattheir contents are, and how to transfer them from the installation system.
7.1.1. Log Files Generated During the InstallationFor debugging purposes, Anaconda logs installation actions into files in the /tmp directory. Thesefiles are listed in the following table.
Table 7.1. Log Files and Their Contents
Log file Contents
/tmp/anaconda.log general Anaconda messages
/tmp/program.log all external programs run during the installation
1 https://ask.fedoraproject.org/en/questions/2 http://freenode.net/3 https://fedoraproject.org/wiki/4 http://unix.stackexchange.com/

Chapter 7. Troubleshooting
76
Log file Contents
/tmp/storage.log extensive storage module information
/tmp/packaging.log dnf and rpm package installation messages
/tmp/syslog hardware-related system messages
If the installation fails, the messages from these files are consolidated into /tmp/anaconda-tb-identifier, where identifier is a random string.
7.1.2. Transferring Log Files from the Installation SystemAll of the files described in Section 7.1.1, “Log Files Generated During the Installation” reside in theinstallation program's RAM disk, which means they are not saved permamently and will be lost oncethe system is powered down. To store them permanently, copy those files to another system on thenetwork using scp on the system running the installation program, or copy them to a mounted storagedevice (such as an USB flash drive). Details on how to transfer the log files are below. Note that if youuse an USB flash drive or other removable media, you should make sure to back up any data on itbefore starting the procedure.
7.1.2.1. Transferring Log Files Onto a USB Drive
1. On the system you are installing, press Ctrl+Alt+F2 to access a shell prompt. You will belogged into a root account and you will have access to the installation program's temporary filesystem.
2. Connect a USB flash drive to the system and execute the dmesg command. A log detailing allrecent events will be displayed. At the bottom of this log, you will see a set of messages causedby the USB flash drive you just connected. It will look like a set of lines similar to the following:
[ 170.171135] sd 5:0:0:0: [sdb] Attached SCSI removable disk
Note the name of the connected device - in the above example, it is sdb.
3. Go to the /mnt directory and once there, create new directory which will serve as the mounttarget for the USB drive. The name of the directory does not matter; this example uses the nameusb.
# mkdir usb
4. Mount the USB flash drive onto the newly created directory. Note that in most cases, you do notwant to mount the whole drive, but a partition on it. Therefore, do not use the name sdb - use thename of the partition you want to write the log files to. In this example, the name sdb1 is used.
# mount /dev/sdb1 /mnt/usb
You can now verify that you mounted the correct device and partition by accessing it and listing itscontents - the list should match what you expect to be on the drive.
# cd /mnt/usb
# ls
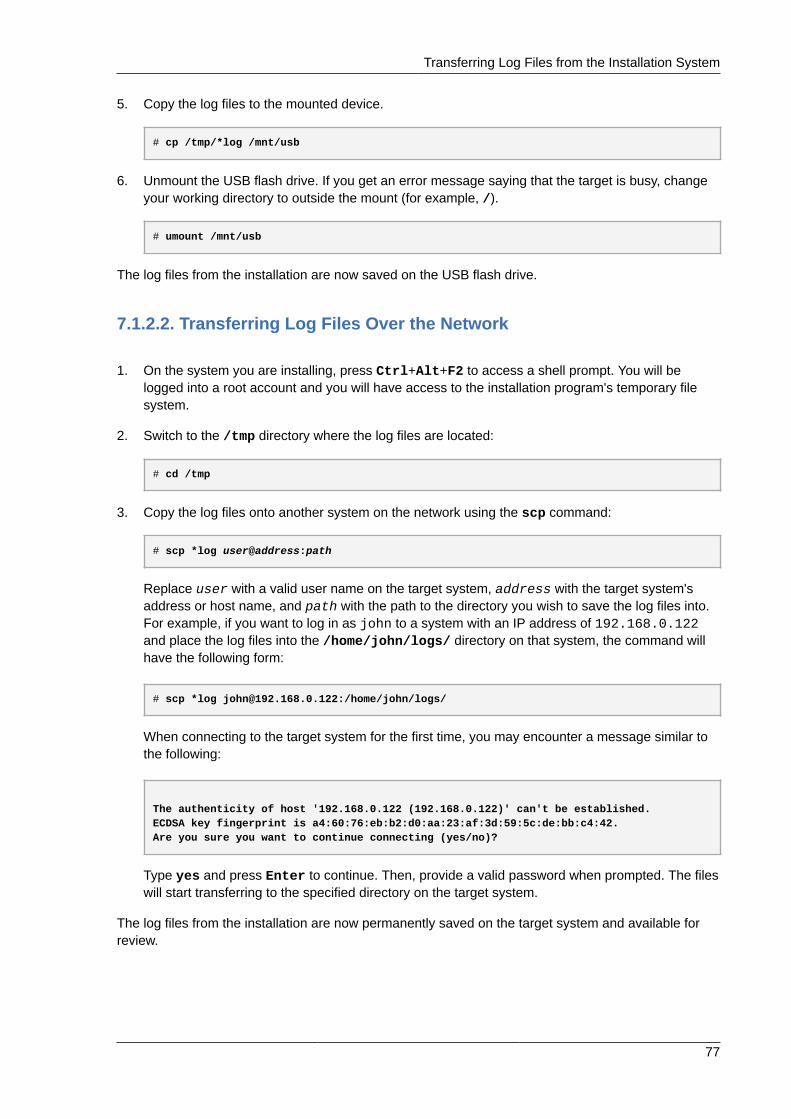
Transferring Log Files from the Installation System
77
5. Copy the log files to the mounted device.
# cp /tmp/*log /mnt/usb
6. Unmount the USB flash drive. If you get an error message saying that the target is busy, changeyour working directory to outside the mount (for example, /).
# umount /mnt/usb
The log files from the installation are now saved on the USB flash drive.
7.1.2.2. Transferring Log Files Over the Network
1. On the system you are installing, press Ctrl+Alt+F2 to access a shell prompt. You will belogged into a root account and you will have access to the installation program's temporary filesystem.
2. Switch to the /tmp directory where the log files are located:
# cd /tmp
3. Copy the log files onto another system on the network using the scp command:
# scp *log user@address:path
Replace user with a valid user name on the target system, address with the target system'saddress or host name, and path with the path to the directory you wish to save the log files into.For example, if you want to log in as john to a system with an IP address of 192.168.0.122and place the log files into the /home/john/logs/ directory on that system, the command willhave the following form:
# scp *log [email protected]:/home/john/logs/
When connecting to the target system for the first time, you may encounter a message similar tothe following:
The authenticity of host '192.168.0.122 (192.168.0.122)' can't be established.ECDSA key fingerprint is a4:60:76:eb:b2:d0:aa:23:af:3d:59:5c:de:bb:c4:42.Are you sure you want to continue connecting (yes/no)?
Type yes and press Enter to continue. Then, provide a valid password when prompted. The fileswill start transferring to the specified directory on the target system.
The log files from the installation are now permanently saved on the target system and available forreview.
Chapter 7. Troubleshooting
78
7.2. Trouble Beginning the Installation
7.2.1. Problems with Booting into the Graphical InstallationSystems with some video cards have trouble booting into the graphical installation program. If theinstallation program does not run using its default settings, it attempts to run in a lower resolutionmode. If that still fails, the installation program attempts to run in text mode.
There are several possible solutions to display issues, most of which involve specifying custom bootoptions. For more information, see Section 8.1, “Configuring the Installation System at the Boot Menu”.
Use the basic graphics modeYou can attempt to perform the installation using the basic graphics driver. To do this, edit theinstallation program's boot options and append inst.xdriver=vesa at the end of the commandline.
Specify the display resolution manuallyIf the installation program fails to detect your screen resolution, you can override the automaticdetection and specify it manually. To do this, append the inst.resolution=x option at the bootmenu, where x is your display's resolution (for example, 1024x768).
Use an alternate video driverYou can also attempt to specify a custom video driver, overriding the installation program'sautomatic detection. To specify a driver, use the inst.xdriver=x option, where x is the devicedriver you want to use (for example, nouveau).
Note
If specifying a custom video driver solves your problem, you should report it as a bug athttps://bugzilla.redhat.com under the anaconda component. Anaconda should be able todetect your hardware automatically and use the appropriate driver without your intervention.
Perform the installation using VNCIf the above options fail, you can use a separate system to access the graphical installation overthe network, using the Virtual Network Computing (VNC) protocol. For details on installing usingVNC, see Chapter 11, Installing Using VNC.
7.2.2. Serial Console Not DetectedIn some cases, attempting to install in text mode using a serial console will result in no output onthe console. This happens on systems which have a graphics card, but no monitor connected.If Anaconda detects a graphics card, it will attempt to use it for a display, even if no display isconnected.
If you want to perform a text-based installation on a serial console, use the inst.text andconsole= boot options. See Chapter 8, Boot Options for more details.
Trouble During the Installation
79
7.3. Trouble During the Installation
7.3.1. No Disks DetectedIn the Installation Destination screen, the following error message may appear at the bottom: Nodisks detected. Please shut down the computer, connect at least one disk, and restart tocomplete installation.
The message indicates that Anaconda did not find any writable storage devices to install to. In thatcase, first make sure that your system does have at least one storage device attached.
If your system uses a hardware RAID controller, verify that the controller is properly configured andworking. See your controller's documentation for instructions.
If you are installing into one or more iSCSI devices and there is no local storage present on thesystem, make sure that all required LUNs (Logical Unit Numbers) are being presented to theappropriate HBA (Host Bus Adapter).
If you made sure you have a connected and properly configured storage device and the messagestill appears after you reboot the system and start the installation again, it means that the installationprogram failed to detect the storage. In most cases this message appears when you attempt to installon an SCSI device which has not been recognized by the installation program.
7.4. Problems After Installation
7.4.1. Resetting the Root PasswordIf you lost the root password to the system and you have access to the boot loader, you can reset thepassword by editing the GRUB2 configuration.
Procedure 7.1. Resetting the Root Password1. Boot your system and wait until the GRUB2 menu appears.
2. In the boot loader menu, highlight any entry and press e to edit it.
3. Find the line beginning with linux. At the end of this line, append the following:
init=/bin/sh
4. Press F10 or Ctrl+X to boot the system using the options you just edited.
Once the system boots, you will be presented with a shell prompt without having to enter any username or password:
sh-4.2#
5. Load the installed SELinux policy:
sh-4.2# /usr/sbin/load_policy -i
6. Execute the following command to remount your root partition:
sh4.2# mount -o remount,rw /

Chapter 7. Troubleshooting
80
7. Reset the root password:
sh4.2# passwd root
When prompted to, enter your new root password and confirm by pressing the Enter key. Enterthe password for the second time to make sure you typed it correctly and confirm with Enteragain. If both passwords match, a message informing you of a successful root password changewill appear.
8. Remount the root partition again, this time as read-only:
sh4.2# mount -o remount,ro /
9. Reboot the system. From now on, you will be able to log in as the root user using the newpassword set up during this procedure.
7.4.2. Are You Unable to Boot With Your RAID Card?If you have performed an installation and cannot boot your system properly, you may need to reinstalland partition your system's storage differently.
Some BIOS types do not support booting from RAID cards. After you finish the installation and rebootthe system for the first time, a text-based screen showing the boot loader prompt (for example, grub>)and a flashing cursor may be all that appears. If this is the case, you must repartition your system andmove your /boot partition and the boot loader outside the RAID array. The /boot partition and theboot loader must be on the same drive.
Once these changes have been made, you should be able to finish your installation and boot thesystem properly. For more information about partitioning, see Section 5.4.8, “Installation Destination”.
7.4.3. Trouble With the Graphical Boot SequenceAfter you finish the installation and reboot your system for the first time, it is possible that the systemstops responding during the graphical boot sequence, requiring a reset. In this case, the boot loaderis displayed successfully, but selecting any entry and attempting to boot the system results in a halt.This usually means a problem with the graphical boot sequence; to solve this issue, you must disablegraphical boot. To do this, temporarily alter the setting at boot time before changing it permanently.
Procedure 7.2. Disabling Graphical Boot Temporarily1. Start your computer and wait until the boot loader menu appears. If you set your boot loader
timeout period to 0, hold down the Esc key to access it.
2. When the boot loader menu appears, use your cursor keys to highlight the entry you want to bootand press the e key to edit this entry's options.
3. In the list of options, find the kernel line - that is, the line beginning with the keyword linux (or,in some cases, linux16 or linuxefi). On this line, locate the rhgb option and delete it. Theoption may not be immediately visible; use the cursor keys to scroll up and down.
4. Press F10 or Ctrl+X to boot your system with the edited options.
If the system started successfully, you can log in normally. Then you will need to disable the graphicalboot permanently - otherwise you will have to perform the previous procedure every time the systemboots. To permanently change boot options, do the following.
Booting into a Graphical Environment
81
Procedure 7.3. Disabling Graphical Boot Permanently1. Log in to the root account using the su - command:
$ su -
2. Open the /etc/default/grub configuration file using a plain text editor such as vim.
3. Within the grub file, locate the line beginning with GRUB_CMDLINE_LINUX. The line should looksimilar to the following:
GRUB_CMDLINE_LINUX="rd.lvm.lv=rhel/root rd.md=0 rd.dm=0 vconsole.keymap=us $([ -x /usr/sbin/rhcrashkernel-param ] && /usr/sbin/rhcrashkernel-param || :) rd.luks=0 vconsole.font=latarcyrheb-sun16 rd.lvm.lv=vg_rhel/swap rhgb quiet"
On this line, delete the rhgb option.
4. Save the edited configuration file.
5. Refresh the boot loader configuration by executing the following command:
# grub2-mkconfig --output=/boot/grub2/grub.cfg
After you finish this procedure, you can reboot your computer. Fedora will not use the graphical bootsequence any more. If you wish to enable graphical boot, follow the same procedure, add the rhgboption to the GRUB_CMDLINE_LINUX line in the /etc/default/grub file and refresh the bootloader configuration again using the grub2-mkconfig command.
See the Fedora System Administrator's Guide, available at http://docs.fedoraproject.org/, for moreinformation about working with the GRUB2 boot loader.
7.4.4. Booting into a Graphical EnvironmentIf you have installed the X Window System and a desktop environment such as GNOME, but are notseeing a graphical desktop environment once you log into your system, you can start it manually usingthe startx command. Note, however, that this is just a one-time fix and does not change the log inprocess for future log ins.
To set up your system so that you can log in at a graphical login screen, you must change the defaultsystemd target to graphical.target. When you are finished, reboot the computer. You willpresented with a graphical login prompt after the system restarts.
Procedure 7.4. Setting Graphical Login as Default1. Open a shell prompt. If you are in your user account, become root by typing the su - command.
2. Change the default target to graphical.target. To do this, execute the following command:
# systemctl set-default graphical.target
Graphical login is now enabled by default - you will be presented with a graphical login prompt afterthe next reboot. If you want to reverse this change and keep using the text-based login prompt,execute the following command as root:
# systemctl set-default multi-user.target
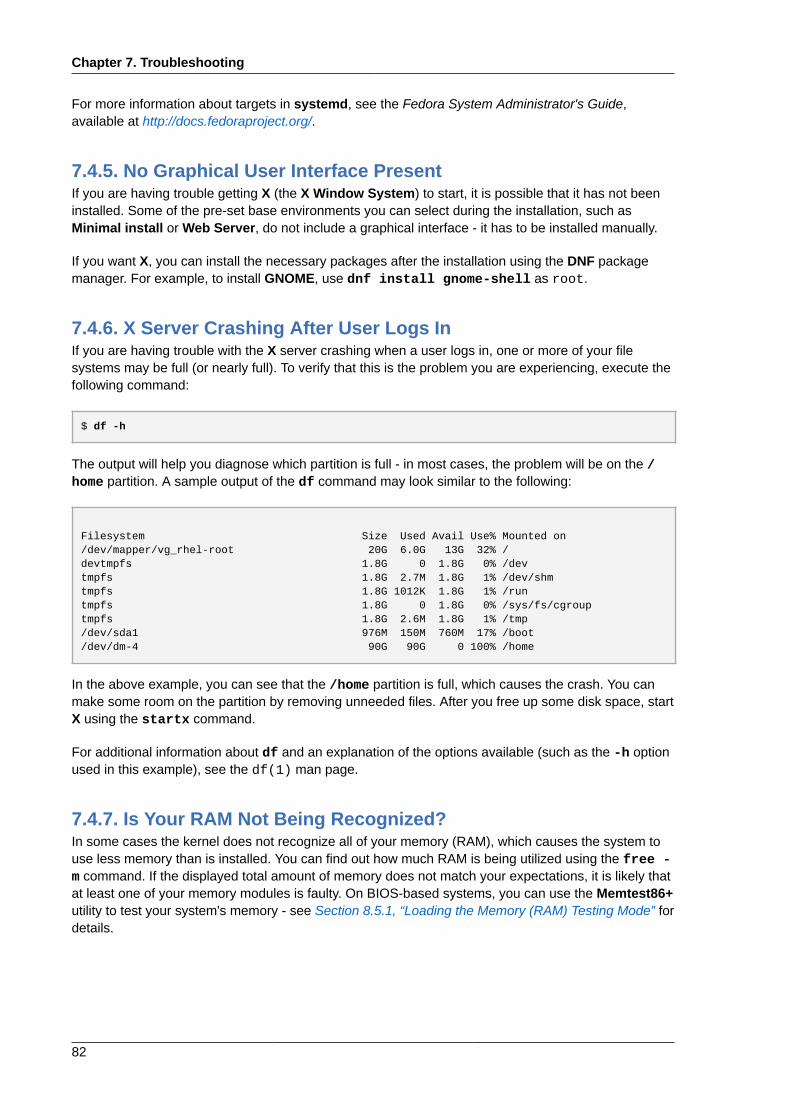
Chapter 7. Troubleshooting
82
For more information about targets in systemd, see the Fedora System Administrator's Guide,available at http://docs.fedoraproject.org/.
7.4.5. No Graphical User Interface PresentIf you are having trouble getting X (the X Window System) to start, it is possible that it has not beeninstalled. Some of the pre-set base environments you can select during the installation, such asMinimal install or Web Server, do not include a graphical interface - it has to be installed manually.
If you want X, you can install the necessary packages after the installation using the DNF packagemanager. For example, to install GNOME, use dnf install gnome-shell as root.
7.4.6. X Server Crashing After User Logs InIf you are having trouble with the X server crashing when a user logs in, one or more of your filesystems may be full (or nearly full). To verify that this is the problem you are experiencing, execute thefollowing command:
$ df -h
The output will help you diagnose which partition is full - in most cases, the problem will be on the /home partition. A sample output of the df command may look similar to the following:
Filesystem Size Used Avail Use% Mounted on/dev/mapper/vg_rhel-root 20G 6.0G 13G 32% /devtmpfs 1.8G 0 1.8G 0% /devtmpfs 1.8G 2.7M 1.8G 1% /dev/shmtmpfs 1.8G 1012K 1.8G 1% /runtmpfs 1.8G 0 1.8G 0% /sys/fs/cgrouptmpfs 1.8G 2.6M 1.8G 1% /tmp/dev/sda1 976M 150M 760M 17% /boot/dev/dm-4 90G 90G 0 100% /home
In the above example, you can see that the /home partition is full, which causes the crash. You canmake some room on the partition by removing unneeded files. After you free up some disk space, startX using the startx command.
For additional information about df and an explanation of the options available (such as the -h optionused in this example), see the df(1) man page.
7.4.7. Is Your RAM Not Being Recognized?In some cases the kernel does not recognize all of your memory (RAM), which causes the system touse less memory than is installed. You can find out how much RAM is being utilized using the free -m command. If the displayed total amount of memory does not match your expectations, it is likely thatat least one of your memory modules is faulty. On BIOS-based systems, you can use the Memtest86+utility to test your system's memory - see Section 8.5.1, “Loading the Memory (RAM) Testing Mode” fordetails.
Is Your RAM Not Being Recognized?
83
Note
If you have 4GB or more memory installed, but Fedora only shows around 3.5GB or 3.7GB, youhave probably installed a 32-bit version of Fedora on a 64bit kernel. For modern systems, use the64-bit (x86_64) version.
Some hardware configurations have a part of the system's RAM reserved and unavailable to themain system. Notably, laptop computers with integrated graphics cards will reserve some memoryfor the GPU. For example, a laptop with 4 GB of RAM and an integrated Intel graphics card willshow only roughly 3.7 GB of available memory, even with a 64-bit system.
Additionally, the kdump crash kernel dumping mechanism reserves some memory for thesecondary kernel used in case of the primary kernel crashing. This reserved memory will alsonot be displayed as available when using the free command. For details about kdump andits memory requirements, see the Fedora System Administrator's Guide, available at http://docs.fedoraproject.org/.
If you made sure that your memory does not have any issues, you can try and set the amount ofmemory manually using the mem= kernel option.
Procedure 7.5. Configuring the Memory Manually1. Start your computer and wait until the boot loader menu appears. If you set your boot loader
timeout period to 0, hold down the Esc key to access it.
2. When the boot loader menu appears, use your cursor keys to highlight the entry you want to bootand press the e key to edit this entry's options.
3. In the list of options, find the kernel line - that is, the line beginning with the keyword linux (or, insome cases, linux16). Append the following option to the end of this line:
mem=xxM
Replace xx with the amount of RAM you have in megabytes.
4. Press F10 or Ctrl+X to boot your system with the edited options.
5. Wait for the system to boot and log in. Then, open a command line and execute the free -mcommand again. If total amount of RAM displayed by the command matches your expectations,append the following to the line beginning with GRUB_CMDLINE_LINUX in the /etc/default/grub file to make the change permanent:
mem=xxM
Replace xx with the amount of RAM you have in megabytes.
6. After you updated the file and saved it, refresh the boot loader configuration so that the changewill take effect. Run the following command with root privileges:
# grub2-mkconfig --output=/boot/grub2/grub.cfg
In /etc/default/grub, the above example would look similar to the following:

Chapter 7. Troubleshooting
84
GRUB_TIMEOUT=5GRUB_DISTRIBUTOR="$(sed 's, release.*$,,g' /etc/system-release)"GRUB_DEFAULT=savedGRUB_DISABLE_SUBMENU=trueGRUB_TERMINAL_OUTPUT="console"GRUB_CMDLINE_LINUX="rd.lvm.lv=rhel/root vconsole.font=latarcyrheb-sun16 rd.lvm.lv=rhel/swap $([ -x /usr/sbin/rhcrashkernel.param ] && /usr/sbin/rhcrashkernel-param || :) vconsole.keymap=us rhgb quiet mem=1024M"GRUB_DISABLE_RECOVERY="true"
See the Fedora System Administrator's Guide, available at http://docs.fedoraproject.org/, for moreinformation about working with the GRUB2 boot loader.

Part II. Advanced Installation OptionsThis part of the Fedora Installation Guide covers more advanced topics, which will be useful to userswho need to perform a non-standard installation. It contains information about custom boot options,automating the installation using Kickstart, booting from a network location instead of local media, etc.

Chapter 8.
87
Boot OptionsThe Anaconda installer includes a range of boot options for administrators, which modify the defaultbehavior of the installation program by enabling or disabling certain functions. To use one or more bootoptions, you either have to boot from installation media and append these options at the boot menu(see Section 4.2, “The Boot Menu”), or you must add them into your PXE server configuration file ifyou are booting from a network (see Chapter 10, Setting Up an Installation Server).
You can use multiple options at the same time; in that case, separate them by a single space.
There are two basic types of options described in this chapter:
• Options presented as ending with an "equals" sign (=) require a value to be specified - they cannotbe used on their own. For example, the inst.vncpassword= option must also contain a value (inthis case, a password). The correct form is therefore inst.vncpassword=password. On its own,without a password specified, the option is invalid.
• Options presented without the "=" sign do not accept any values or parameters. For example,the rd.live.check option forces Anaconda to verify the installation media before starting theinstallation; if this option is present, the check will be performed, and if it is not present, the checkwill be skipped.
In addition to the options described in this chapter, the boot prompt also accepts dracut kerneloptions. A list of these options is available as the dracut.cmdline(7) man page.
Note
Boot options specific to the installation program always start with inst. in this guide. Currently,this prefix is optional - for example, resolution=1024x768 will work exactly the same asinst.resolution=1024x768. However, it is expected that the inst. prefix will be mandatoryin future releases.
8.1. Configuring the Installation System at the Boot MenuThe exact way to specify custom boot options is differs based on your system's architecture, firmwareand the method you use to boot the installation. If you are booting from local media, you can specifyoptions in the boot menu, before you begin the installation; if you are booting from a network usinga PXE server, you must add boot options into the boot loader configuration file before you boot theinstallation system. For specific instructions, see Section 4.2, “The Boot Menu” if you are booting fromlocal media, and Chapter 10, Setting Up an Installation Server if you are booting from a server.
8.2. Available Boot OptionsThe following options are available in Fedora:
8.2.1. Specifying the Installation Sourceinst.repo=
Specifies the installation source - that is, a location where the installation program can find theimages and packages it requires. For example:
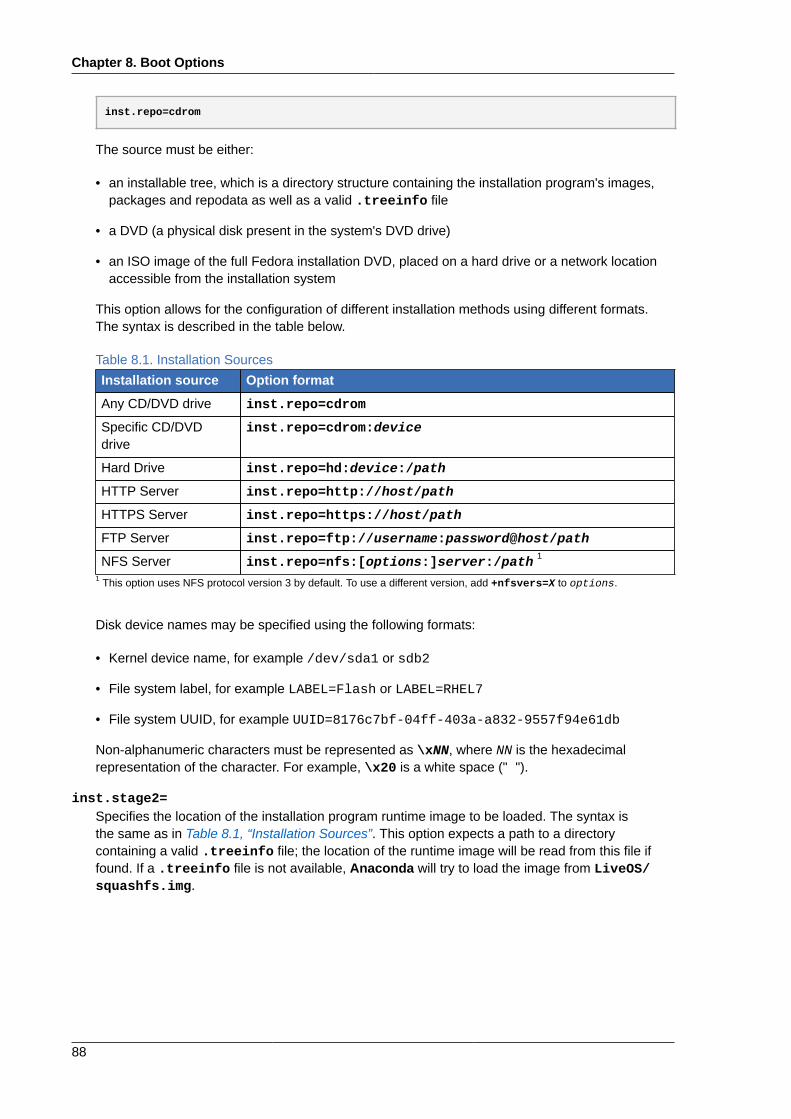
Chapter 8. Boot Options
88
inst.repo=cdrom
The source must be either:
• an installable tree, which is a directory structure containing the installation program's images,packages and repodata as well as a valid .treeinfo file
• a DVD (a physical disk present in the system's DVD drive)
• an ISO image of the full Fedora installation DVD, placed on a hard drive or a network locationaccessible from the installation system
This option allows for the configuration of different installation methods using different formats.The syntax is described in the table below.
Table 8.1. Installation Sources
Installation source Option format
Any CD/DVD drive inst.repo=cdrom
Specific CD/DVDdrive
inst.repo=cdrom:device
Hard Drive inst.repo=hd:device:/path
HTTP Server inst.repo=http://host/path
HTTPS Server inst.repo=https://host/path
FTP Server inst.repo=ftp://username:password@host/path
NFS Server inst.repo=nfs:[options:]server:/path 1
1 This option uses NFS protocol version 3 by default. To use a different version, add +nfsvers=X to options.
Disk device names may be specified using the following formats:
• Kernel device name, for example /dev/sda1 or sdb2
• File system label, for example LABEL=Flash or LABEL=RHEL7
• File system UUID, for example UUID=8176c7bf-04ff-403a-a832-9557f94e61db
Non-alphanumeric characters must be represented as \xNN, where NN is the hexadecimalrepresentation of the character. For example, \x20 is a white space (" ").
inst.stage2=Specifies the location of the installation program runtime image to be loaded. The syntax isthe same as in Table 8.1, “Installation Sources”. This option expects a path to a directorycontaining a valid .treeinfo file; the location of the runtime image will be read from this file iffound. If a .treeinfo file is not available, Anaconda will try to load the image from LiveOS/squashfs.img.

Kickstart Boot Options
89
Note
By default, this boot option is used on the installation media and set to a specific label (forexample, inst.stage2=hd:LABEL=F21\x20Server.x86_64). If you modify the defaultlabel of the file system containing the runtime image, you must also edit this option to matchthe new label.
inst.dd=If you need to perform a driver update during the installation, use the inst.dd= option. It canbe used multiple times. The location of a driver RPM package can be specified using any of theformats described in Table 8.1, “Installation Sources”. With the exception of the inst.dd=cdromoption, the device name must always be specified. For example:
inst.dd=hd:/dev/sdb1:/driver.rpm
Using this option without any parameters (only as inst.dd) will prompt the installation program toask you for a driver update disk with an interactive menu.
Important
You should never attempt to perform a driver update during the installation unless a missingour faulty driver is preventing you from completing the installation. Updating drivers which arenot essential during the installation should always be performed after the system is installed.
inst.askmethodPrevents the installer from trying to automatically configure an installation source.
Normally, when you first enter the Installation Summary screen, the installer will attempt toconfigure an installation source based on the type of media you used to boot. The full FedoraServer DVD will configure the source as local media, the netinst ISO image will configure theclosest network mirror, etc. This process takes time; therefore, if you plan to use a different sourcethan the default, this option will allow you to enter the Installation Source screen immediatelywithout having to wait for the initial configuration to finish.
Using this option will leave the installation source configuration in an error state - you mustmanually specify a source in the Installation Source screen to proceed with the installation.Alternatively, you can use the inst.repo= option described above to configure a specific sourcedirectly in the boot menu.
8.2.2. Kickstart Boot Optionsinst.ks=
Gives the location of a Kickstart file to be used to automate the installation. Locations can bespecified using any of the formats valid for inst.repo=. See Table 8.1, “Installation Sources” forvalid formats.
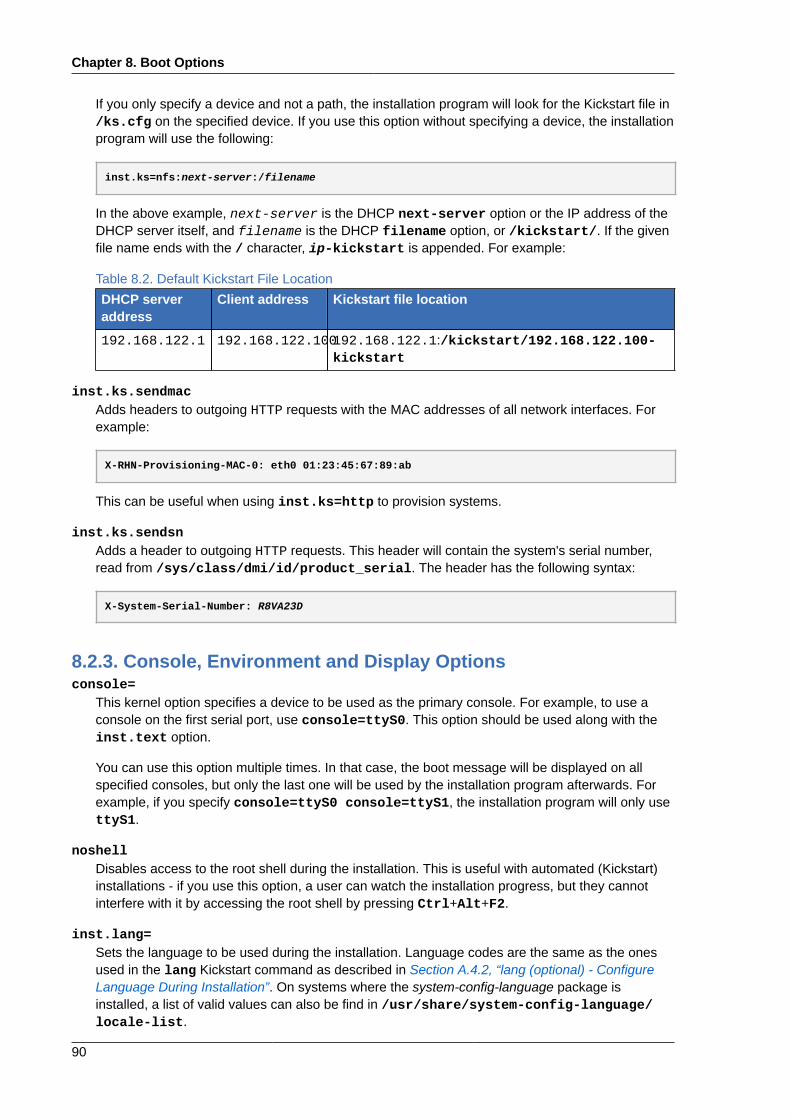
Chapter 8. Boot Options
90
If you only specify a device and not a path, the installation program will look for the Kickstart file in/ks.cfg on the specified device. If you use this option without specifying a device, the installationprogram will use the following:
inst.ks=nfs:next-server:/filename
In the above example, next-server is the DHCP next-server option or the IP address of theDHCP server itself, and filename is the DHCP filename option, or /kickstart/. If the givenfile name ends with the / character, ip-kickstart is appended. For example:
Table 8.2. Default Kickstart File Location
DHCP serveraddress
Client address Kickstart file location
192.168.122.1 192.168.122.100192.168.122.1:/kickstart/192.168.122.100-kickstart
inst.ks.sendmacAdds headers to outgoing HTTP requests with the MAC addresses of all network interfaces. Forexample:
X-RHN-Provisioning-MAC-0: eth0 01:23:45:67:89:ab
This can be useful when using inst.ks=http to provision systems.
inst.ks.sendsnAdds a header to outgoing HTTP requests. This header will contain the system's serial number,read from /sys/class/dmi/id/product_serial. The header has the following syntax:
X-System-Serial-Number: R8VA23D
8.2.3. Console, Environment and Display Optionsconsole=
This kernel option specifies a device to be used as the primary console. For example, to use aconsole on the first serial port, use console=ttyS0. This option should be used along with theinst.text option.
You can use this option multiple times. In that case, the boot message will be displayed on allspecified consoles, but only the last one will be used by the installation program afterwards. Forexample, if you specify console=ttyS0 console=ttyS1, the installation program will only usettyS1.
noshellDisables access to the root shell during the installation. This is useful with automated (Kickstart)installations - if you use this option, a user can watch the installation progress, but they cannotinterfere with it by accessing the root shell by pressing Ctrl+Alt+F2.
inst.lang=Sets the language to be used during the installation. Language codes are the same as the onesused in the lang Kickstart command as described in Section A.4.2, “lang (optional) - ConfigureLanguage During Installation”. On systems where the system-config-language package isinstalled, a list of valid values can also be find in /usr/share/system-config-language/locale-list.
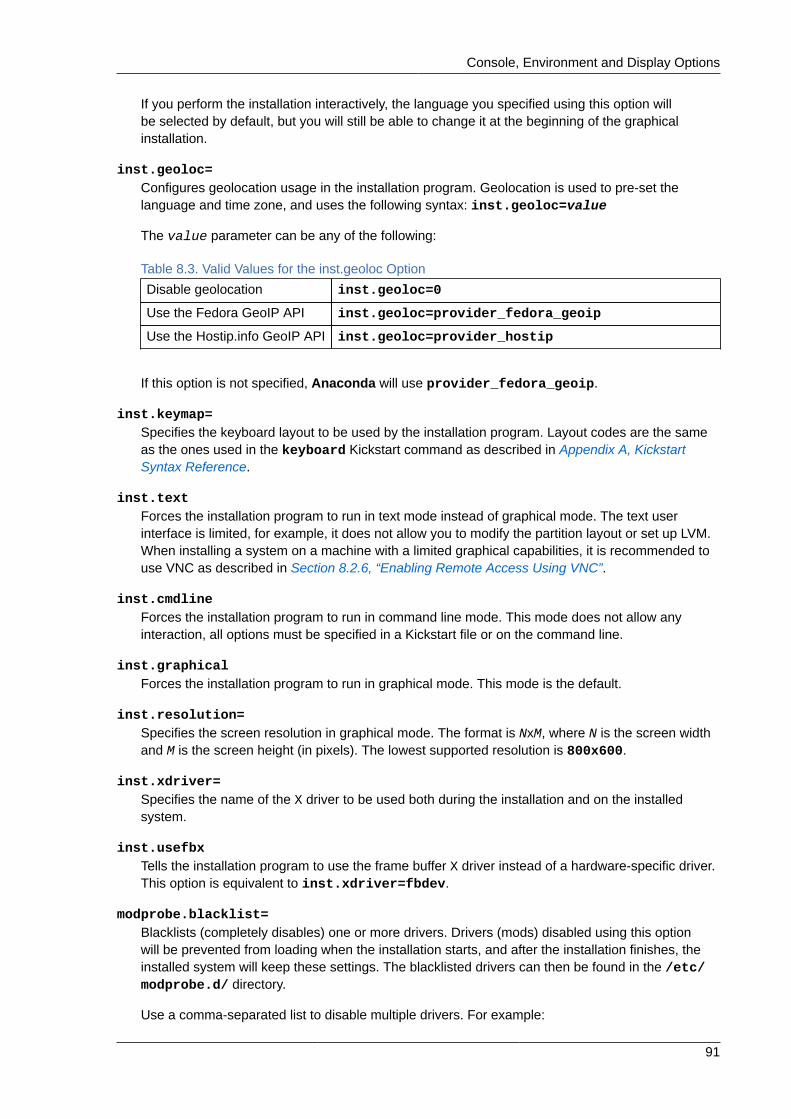
Console, Environment and Display Options
91
If you perform the installation interactively, the language you specified using this option willbe selected by default, but you will still be able to change it at the beginning of the graphicalinstallation.
inst.geoloc=Configures geolocation usage in the installation program. Geolocation is used to pre-set thelanguage and time zone, and uses the following syntax: inst.geoloc=value
The value parameter can be any of the following:
Table 8.3. Valid Values for the inst.geoloc Option
Disable geolocation inst.geoloc=0
Use the Fedora GeoIP API inst.geoloc=provider_fedora_geoip
Use the Hostip.info GeoIP API inst.geoloc=provider_hostip
If this option is not specified, Anaconda will use provider_fedora_geoip.
inst.keymap=Specifies the keyboard layout to be used by the installation program. Layout codes are the sameas the ones used in the keyboard Kickstart command as described in Appendix A, KickstartSyntax Reference.
inst.textForces the installation program to run in text mode instead of graphical mode. The text userinterface is limited, for example, it does not allow you to modify the partition layout or set up LVM.When installing a system on a machine with a limited graphical capabilities, it is recommended touse VNC as described in Section 8.2.6, “Enabling Remote Access Using VNC”.
inst.cmdlineForces the installation program to run in command line mode. This mode does not allow anyinteraction, all options must be specified in a Kickstart file or on the command line.
inst.graphicalForces the installation program to run in graphical mode. This mode is the default.
inst.resolution=Specifies the screen resolution in graphical mode. The format is NxM, where N is the screen widthand M is the screen height (in pixels). The lowest supported resolution is 800x600.
inst.xdriver=Specifies the name of the X driver to be used both during the installation and on the installedsystem.
inst.usefbxTells the installation program to use the frame buffer X driver instead of a hardware-specific driver.This option is equivalent to inst.xdriver=fbdev.
modprobe.blacklist=Blacklists (completely disables) one or more drivers. Drivers (mods) disabled using this optionwill be prevented from loading when the installation starts, and after the installation finishes, theinstalled system will keep these settings. The blacklisted drivers can then be found in the /etc/modprobe.d/ directory.
Use a comma-separated list to disable multiple drivers. For example:
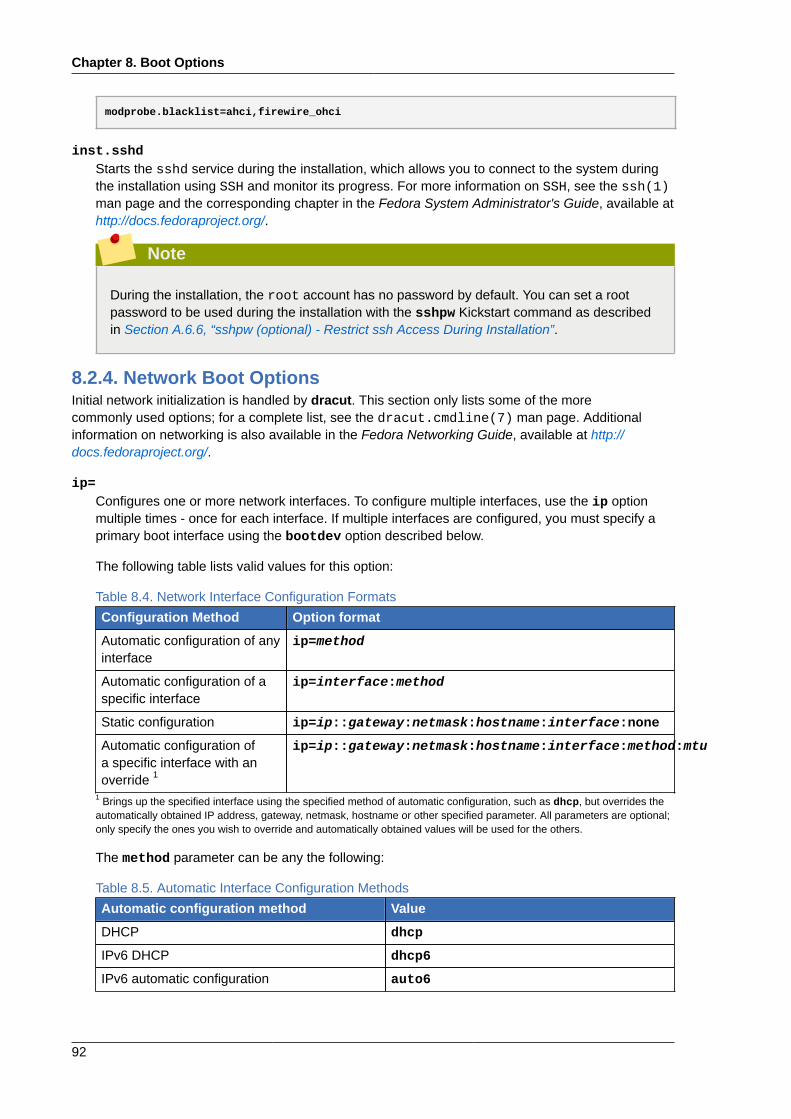
Chapter 8. Boot Options
92
modprobe.blacklist=ahci,firewire_ohci
inst.sshdStarts the sshd service during the installation, which allows you to connect to the system duringthe installation using SSH and monitor its progress. For more information on SSH, see the ssh(1)man page and the corresponding chapter in the Fedora System Administrator's Guide, available athttp://docs.fedoraproject.org/.
Note
During the installation, the root account has no password by default. You can set a rootpassword to be used during the installation with the sshpw Kickstart command as describedin Section A.6.6, “sshpw (optional) - Restrict ssh Access During Installation”.
8.2.4. Network Boot OptionsInitial network initialization is handled by dracut. This section only lists some of the morecommonly used options; for a complete list, see the dracut.cmdline(7) man page. Additionalinformation on networking is also available in the Fedora Networking Guide, available at http://docs.fedoraproject.org/.
ip=Configures one or more network interfaces. To configure multiple interfaces, use the ip optionmultiple times - once for each interface. If multiple interfaces are configured, you must specify aprimary boot interface using the bootdev option described below.
The following table lists valid values for this option:
Table 8.4. Network Interface Configuration Formats
Configuration Method Option format
Automatic configuration of anyinterface
ip=method
Automatic configuration of aspecific interface
ip=interface:method
Static configuration ip=ip::gateway:netmask:hostname:interface:none
Automatic configuration ofa specific interface with anoverride 1
ip=ip::gateway:netmask:hostname:interface:method:mtu
1 Brings up the specified interface using the specified method of automatic configuration, such as dhcp, but overrides theautomatically obtained IP address, gateway, netmask, hostname or other specified parameter. All parameters are optional;only specify the ones you wish to override and automatically obtained values will be used for the others.
The method parameter can be any the following:
Table 8.5. Automatic Interface Configuration Methods
Automatic configuration method Value
DHCP dhcp
IPv6 DHCP dhcp6
IPv6 automatic configuration auto6
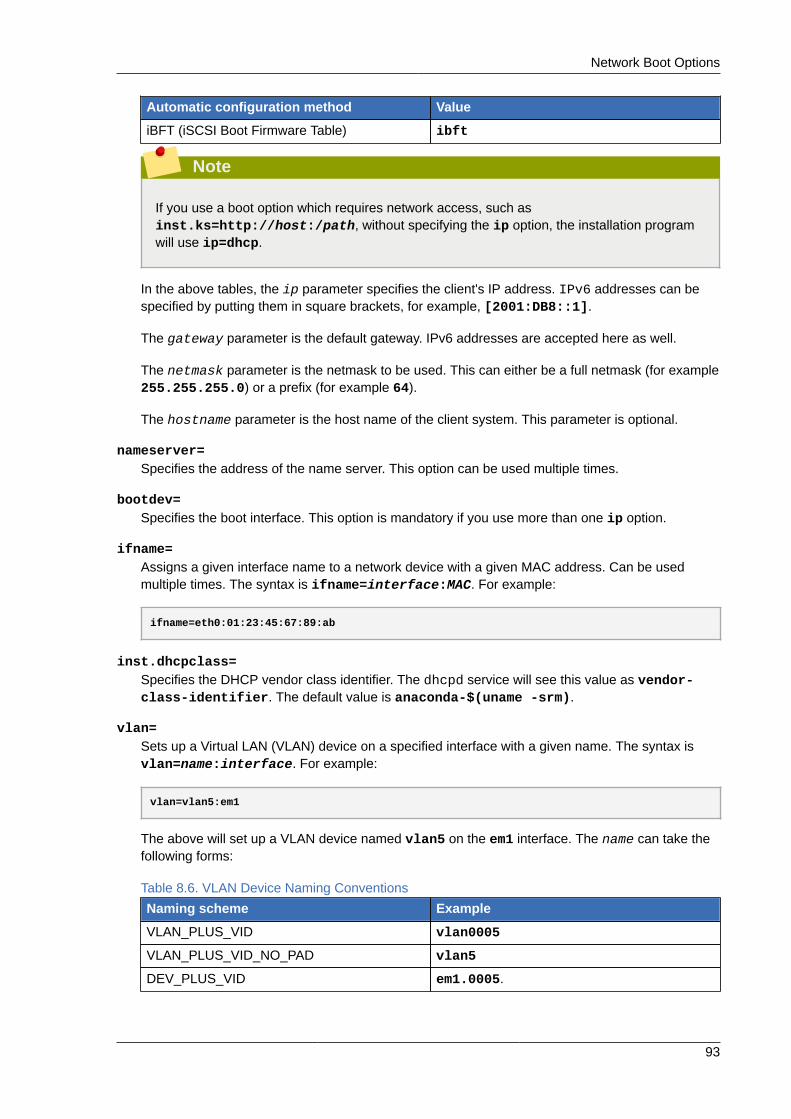
Network Boot Options
93
Automatic configuration method Value
iBFT (iSCSI Boot Firmware Table) ibft
Note
If you use a boot option which requires network access, such asinst.ks=http://host:/path, without specifying the ip option, the installation programwill use ip=dhcp.
In the above tables, the ip parameter specifies the client's IP address. IPv6 addresses can bespecified by putting them in square brackets, for example, [2001:DB8::1].
The gateway parameter is the default gateway. IPv6 addresses are accepted here as well.
The netmask parameter is the netmask to be used. This can either be a full netmask (for example255.255.255.0) or a prefix (for example 64).
The hostname parameter is the host name of the client system. This parameter is optional.
nameserver=Specifies the address of the name server. This option can be used multiple times.
bootdev=Specifies the boot interface. This option is mandatory if you use more than one ip option.
ifname=Assigns a given interface name to a network device with a given MAC address. Can be usedmultiple times. The syntax is ifname=interface:MAC. For example:
ifname=eth0:01:23:45:67:89:ab
inst.dhcpclass=Specifies the DHCP vendor class identifier. The dhcpd service will see this value as vendor-class-identifier. The default value is anaconda-$(uname -srm).
vlan=Sets up a Virtual LAN (VLAN) device on a specified interface with a given name. The syntax isvlan=name:interface. For example:
vlan=vlan5:em1
The above will set up a VLAN device named vlan5 on the em1 interface. The name can take thefollowing forms:
Table 8.6. VLAN Device Naming Conventions
Naming scheme Example
VLAN_PLUS_VID vlan0005
VLAN_PLUS_VID_NO_PAD vlan5
DEV_PLUS_VID em1.0005.

Chapter 8. Boot Options
94
Naming scheme Example
DEV_PLUS_VID_NO_PAD em1.5.
bond=Set up a bonding device with the following syntax: bond=name[:slaves][:options]. Replacename with the bonding device name, slaves with a comma-separated list of physical (ethernet)interfaces, and options with a comma-separated list of bonding options. For example:
bond=bond0:em1,em2:mode=active-backup,tx_queues=32,downdelay=5000
For a list of available options, execute the modinfo bonding command.
Using this option without any parameters will assumebond=bond0:eth0,eth1:mode=balance-rr.
team=Set up a team device with the following syntax: team=master:slaves. Replace masterwith the name of the master team device and slaves with a comma-separated list of physical(ethernet) devices to be used as slaves in the team device. For example:
team=team0:em1,em2
8.2.5. Advanced Installation Optionsinst.multilib
Configure the system for multilib packages (that is, to allow installing 32-bit packages on a 64-bitx86 system) and install packages specified in this section as such.
Normally, on an AMD64 or Intel 64 system, only packages for this architecture (marked asx86_64) and packages for all architectures (marked as noarch would be installed. When youuse this option, packages for 32-bit AMD or Intel systems (marked as i686) will be automaticallyinstalled as well if available.
This only applies to packages directly specified in the %packages section. If a package is onlyinstalled as a dependency, only the exact specified dependency will be installed. For example,if you are installing package foo which depends on package bar, the former will be installed inmultiple variants, while the latter will only be installed in variants specifically required.
inst.gptForce the installation program to install partition information into a GUID Partition Table (GPT)instead of a Master Boot Record (MBR). This option is meaningless on UEFI-based systems,unless they are in BIOS compatibility mode.
Normally, BIOS-based systems and UEFI-based systems in BIOS compatibility mode will attemptto use the MBR schema for storing partitioning information, unless the disk is larger than 2 TB.Using this option will change this behavior, allowing a GPT to be written even to disks smaller than2 TB.
See Section 5.4.10.6, “Recommended Partitioning Scheme” for more information about GPT andMBR, and Section B.1.4, “GUID Partition Table (GPT)” for more general information about GPT,MBR and disk partitioning in general.
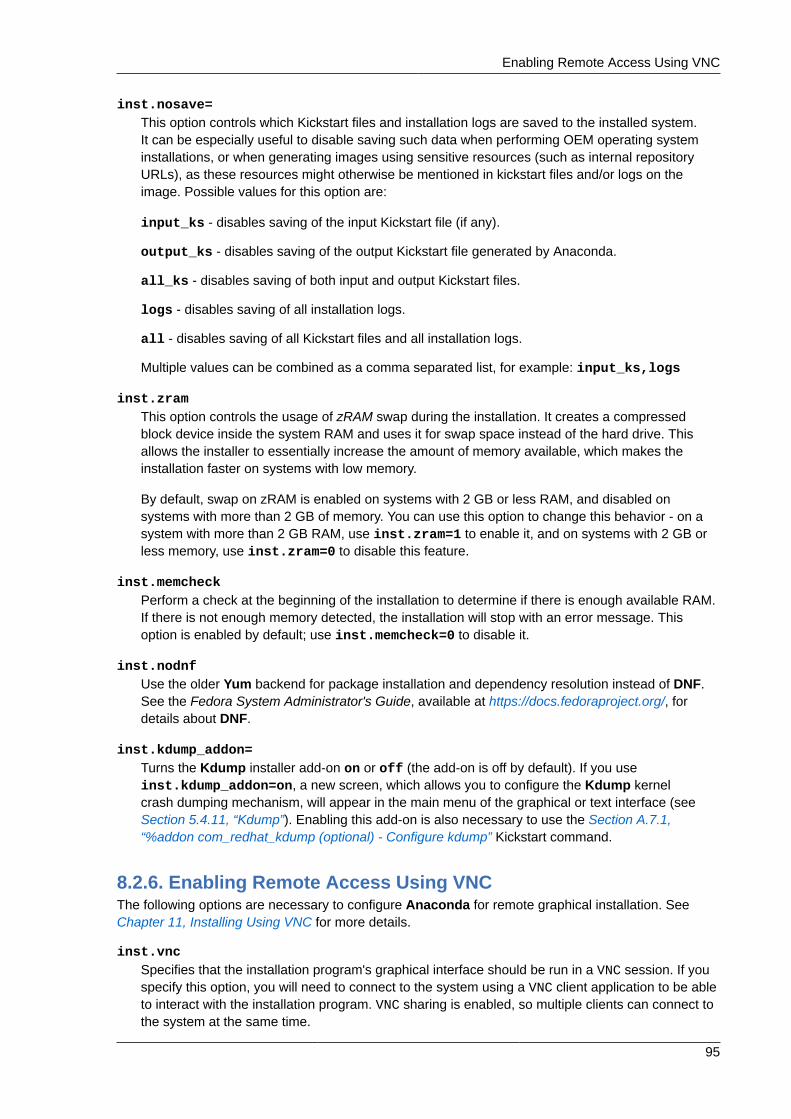
Enabling Remote Access Using VNC
95
inst.nosave=This option controls which Kickstart files and installation logs are saved to the installed system.It can be especially useful to disable saving such data when performing OEM operating systeminstallations, or when generating images using sensitive resources (such as internal repositoryURLs), as these resources might otherwise be mentioned in kickstart files and/or logs on theimage. Possible values for this option are:
input_ks - disables saving of the input Kickstart file (if any).
output_ks - disables saving of the output Kickstart file generated by Anaconda.
all_ks - disables saving of both input and output Kickstart files.
logs - disables saving of all installation logs.
all - disables saving of all Kickstart files and all installation logs.
Multiple values can be combined as a comma separated list, for example: input_ks,logs
inst.zramThis option controls the usage of zRAM swap during the installation. It creates a compressedblock device inside the system RAM and uses it for swap space instead of the hard drive. Thisallows the installer to essentially increase the amount of memory available, which makes theinstallation faster on systems with low memory.
By default, swap on zRAM is enabled on systems with 2 GB or less RAM, and disabled onsystems with more than 2 GB of memory. You can use this option to change this behavior - on asystem with more than 2 GB RAM, use inst.zram=1 to enable it, and on systems with 2 GB orless memory, use inst.zram=0 to disable this feature.
inst.memcheckPerform a check at the beginning of the installation to determine if there is enough available RAM.If there is not enough memory detected, the installation will stop with an error message. Thisoption is enabled by default; use inst.memcheck=0 to disable it.
inst.nodnfUse the older Yum backend for package installation and dependency resolution instead of DNF.See the Fedora System Administrator's Guide, available at https://docs.fedoraproject.org/, fordetails about DNF.
inst.kdump_addon=Turns the Kdump installer add-on on or off (the add-on is off by default). If you useinst.kdump_addon=on, a new screen, which allows you to configure the Kdump kernelcrash dumping mechanism, will appear in the main menu of the graphical or text interface (seeSection 5.4.11, “Kdump”). Enabling this add-on is also necessary to use the Section A.7.1,“%addon com_redhat_kdump (optional) - Configure kdump” Kickstart command.
8.2.6. Enabling Remote Access Using VNCThe following options are necessary to configure Anaconda for remote graphical installation. SeeChapter 11, Installing Using VNC for more details.
inst.vncSpecifies that the installation program's graphical interface should be run in a VNC session. If youspecify this option, you will need to connect to the system using a VNC client application to be ableto interact with the installation program. VNC sharing is enabled, so multiple clients can connect tothe system at the same time.
Chapter 8. Boot Options
96
Note
A system installed using VNC will start in text mode by default.
inst.vncpassword=VNC server used by the installation program. Any VNC client attempting to connect tothe system will have to provide the correct password to gain access. For example,inst.vncpassword=testpwd will set the password to testpwd. The password must bebetween 6 and 8 characters long.
Note
If you specify an invalid password (one that is too short or too long), you will be prompted tospecify a new one by a message from the installation program:
VNC password must be six to eight characters long.Please enter a new one, or leave blank for no password.
Password:
inst.vncconnect=Connect to a listening VNC client at a specified host and port once the installation starts. Thecorrect syntax is inst.vncconnect=host:port. The port parameter is optional - if you do notspecify one, the installation program will use 5900.
8.2.7. Debugging and Troubleshootinginst.updates=
Specifies the location of the updates.img file to be applied to the installation program runtime.The syntax is the same as in the inst.repo option - see Table 8.1, “Installation Sources” fordetails. In all formats, if you do not specify a file name but only a directory, the installation programwill look for a file named updates.img.
inst.loglevel=Specifies the minimum level for messages to be logged on a terminal. This only concerns real-timelogging in a terminal; log files will always contain messages of all levels.
Possible values for this option from the lowest to highest level are: debug, info, warning,error and critical. The default value is info, which means that by default, the loggingterminal will display messages ranging from info to critical, but not debug.
inst.syslog=Once the installation starts, this option sends log messages to the syslog process on the specifiedhost. The remote syslog process must be configured to accept incoming connections.
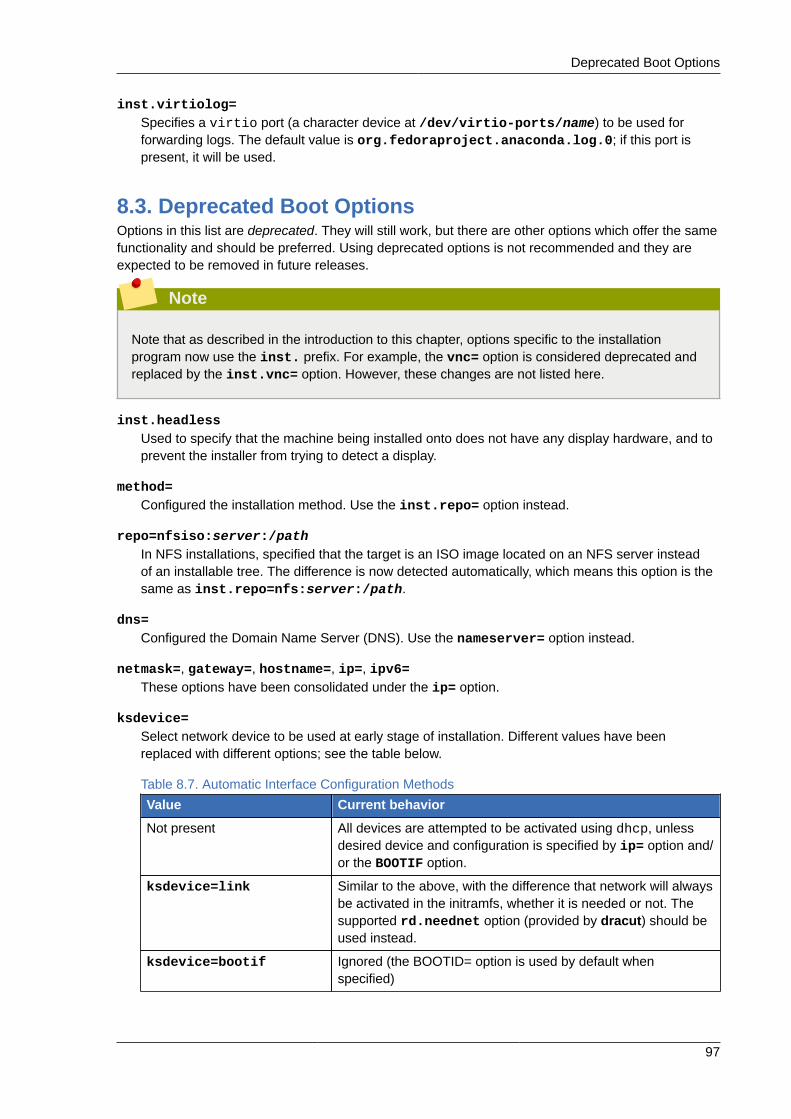
Deprecated Boot Options
97
inst.virtiolog=Specifies a virtio port (a character device at /dev/virtio-ports/name) to be used forforwarding logs. The default value is org.fedoraproject.anaconda.log.0; if this port ispresent, it will be used.
8.3. Deprecated Boot OptionsOptions in this list are deprecated. They will still work, but there are other options which offer the samefunctionality and should be preferred. Using deprecated options is not recommended and they areexpected to be removed in future releases.
Note
Note that as described in the introduction to this chapter, options specific to the installationprogram now use the inst. prefix. For example, the vnc= option is considered deprecated andreplaced by the inst.vnc= option. However, these changes are not listed here.
inst.headlessUsed to specify that the machine being installed onto does not have any display hardware, and toprevent the installer from trying to detect a display.
method=Configured the installation method. Use the inst.repo= option instead.
repo=nfsiso:server:/pathIn NFS installations, specified that the target is an ISO image located on an NFS server insteadof an installable tree. The difference is now detected automatically, which means this option is thesame as inst.repo=nfs:server:/path.
dns=Configured the Domain Name Server (DNS). Use the nameserver= option instead.
netmask=, gateway=, hostname=, ip=, ipv6=These options have been consolidated under the ip= option.
ksdevice=Select network device to be used at early stage of installation. Different values have beenreplaced with different options; see the table below.
Table 8.7. Automatic Interface Configuration Methods
Value Current behavior
Not present All devices are attempted to be activated using dhcp, unlessdesired device and configuration is specified by ip= option and/or the BOOTIF option.
ksdevice=link Similar to the above, with the difference that network will alwaysbe activated in the initramfs, whether it is needed or not. Thesupported rd.neednet option (provided by dracut) should beused instead.
ksdevice=bootif Ignored (the BOOTID= option is used by default whenspecified)
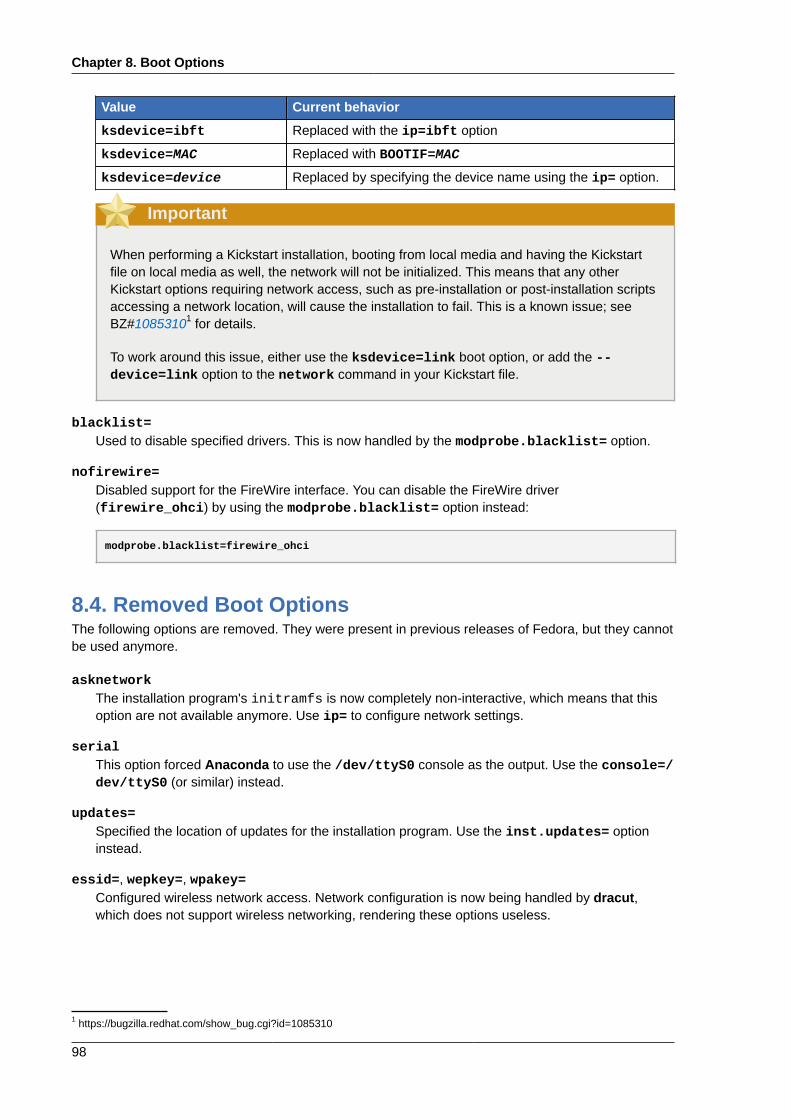
Chapter 8. Boot Options
98
Value Current behavior
ksdevice=ibft Replaced with the ip=ibft option
ksdevice=MAC Replaced with BOOTIF=MAC
ksdevice=device Replaced by specifying the device name using the ip= option.
Important
When performing a Kickstart installation, booting from local media and having the Kickstartfile on local media as well, the network will not be initialized. This means that any otherKickstart options requiring network access, such as pre-installation or post-installation scriptsaccessing a network location, will cause the installation to fail. This is a known issue; seeBZ#10853101 for details.
To work around this issue, either use the ksdevice=link boot option, or add the --device=link option to the network command in your Kickstart file.
blacklist=Used to disable specified drivers. This is now handled by the modprobe.blacklist= option.
nofirewire=Disabled support for the FireWire interface. You can disable the FireWire driver(firewire_ohci) by using the modprobe.blacklist= option instead:
modprobe.blacklist=firewire_ohci
8.4. Removed Boot OptionsThe following options are removed. They were present in previous releases of Fedora, but they cannotbe used anymore.
asknetworkThe installation program's initramfs is now completely non-interactive, which means that thisoption are not available anymore. Use ip= to configure network settings.
serialThis option forced Anaconda to use the /dev/ttyS0 console as the output. Use the console=/dev/ttyS0 (or similar) instead.
updates=Specified the location of updates for the installation program. Use the inst.updates= optioninstead.
essid=, wepkey=, wpakey=Configured wireless network access. Network configuration is now being handled by dracut,which does not support wireless networking, rendering these options useless.
1 https://bugzilla.redhat.com/show_bug.cgi?id=1085310

Using the Maintenance Boot Modes
99
ethtool=Used in the past to configure additional low-level network settings. All network settings are nowhandled by the ip= option.
gdbAllowed you to debug the loader. Use rd.debug instead.
mediacheckVerified the installation media before starting the installation. Replaced with the rd.live.checkoption.
ks=floppySpecified a floppy disk as the Kickstart file source. Floppy drives are not supported anymore.
display=Configured a remote display. Replaced with the inst.vnc option.
utf8Added UTF8 support when installing in text mode. UTF8 support now works automatically.
noipv6Used to disable IPv6 support in the installation program. IPv6 is now built into the kernel so thedriver cannot be blacklisted; however, it is possible to disable IPv6 using the ipv6.disableoption.
upgradeanyUpgrades are done in a different way in current Fedora releases. For more information aboutupgrading your system, see Chapter 12, Upgrading Your Current System.
vlanid=Used to configure Virtual LAN (802.1q tag) devices. Use the vlan= option instead.
inst.dnfUsed to enable DNF to handle package installation and dependency resolution in Fedora 21. DNFis now used by default and this option has been replaced with inst.nodnf, which reverts back toYum.
8.5. Using the Maintenance Boot Modes
8.5.1. Loading the Memory (RAM) Testing ModeFaults in memory (RAM) modules may cause your system to freeze or crash unpredictably. In somecases, memory faults may only cause errors with particular combinations of software. For this reason,you should test the memory of a computer before you install Fedora for the first time, even if it haspreviously run other operating systems.
Fedora includes the Memtest86+ memory testing application. To start memory testing mode,choose Troubleshooting > Memory test at the boot menu. Testing will begin immediately. Bydefault, Memtest86+ carries out ten tests in every pass; a different configuration can be specifiedby accessing the configuration screen using the c key. After the first pass completes, a message willappear at the bottom informing you of the current status, and another pass will start automatically.

Chapter 8. Boot Options
100
Note
Memtest86+ only works on systems with BIOS firmware. Support for UEFI systems is currentlyunavailable.
Figure 8.1. Memory Check Using Memtest86+
The main screen displayed while testing is in progress is divided into three main areas:
• The upper left corner shows information about your system's memory configuration - the amountof detected memory and processor cache and their throughputs and processor and chipsetinformation. This information is detected when Memtest86+ starts.
• The upper right corner displays information about the tests - progress of the current pass and thecurrently running test in that pass as well as a description of the test.
• The central part of the screen is used to display information about the entire set of tests from themoment when the tool has started, such as the total time, the number of completed passes, numberof detected errors and your test selection. On some systems, detailed information about the installedmemory (such as the number of installed modules, their manufacturer, frequency and latency) willbe also displayed here. After the each pass completes, a short summary will appear in this location.For example:
** Pass complete, no errors, press Esc to exit **
If Memtest86+ detects an error, it will also be displayed in this area and highlighted red. Themessage will include detailed information such as which test detected a problem, the memorylocation which is failing, and others.
In most cases, a single successful pass (that is, a single run of all 10 tests) is sufficient to verify thatyour RAM is in good condition. In some rare circumstances, however, errors that went undetected on
Verifying Boot Media
101
the first pass might appear on subsequent passes. To perform a thorough test on an important system,leave the tests running overnight or even for a few days in order to complete multiple passes.
Note
The amount of time it takes to complete a single full pass of Memtest86+ varies depending onyour system's configuration (notably the RAM size and speed). For example, on a system with2 GB of DDR2 memory at 667 MHz, a single pass will take roughly 20 minutes to complete.
To halt the tests and reboot your computer, press the Esc key at any time.
For more information about using Memtest86+, see the official website at http://www.memtest.org/. AREADME file is also located in /usr/share/doc/memtest86+-version/ on Fedora systems withthe memtest86+ package installed.
8.5.2. Verifying Boot MediaYou can test the integrity of an ISO-based installation source before using it to install Fedora. Thesesources include DVDs and ISO images stored on a local hard drive or NFS server. Verifying thatthe ISO images are intact before you attempt an installation helps to avoid problems that are oftenencountered during installation.
To test the integrity of an ISO image, append the rd.live.check to the boot loader command line.Note that this option is used automatically if you select the default installation option from the bootmenu (Test this media & install Fedora).
8.5.3. Booting Your Computer in Rescue ModeYou may boot a command-line Linux system from an installation disc without actually installing Fedoraon the computer. This enables you to use the utilities and functions of a running Linux system tomodify or repair already installed operating systems.
To load the rescue system with the installation disk or USB drive, choose Rescue a Fedora systemfrom the Troubleshooting submenu in the boot menu, or use the inst.rescue boot option.
Specify the language, keyboard layout and network settings for the rescue system with the screensthat follow. The final setup screen configures access to the existing system on your computer.
By default, rescue mode attaches an existing operating system to the rescue system under thedirectory /mnt/sysimage/.

102

Chapter 9.
103
Automating the Installation withKickstartKickstart installations offer a means to automate the installation process, either partially or fully.Kickstart files contain answers to all questions normally asked by the installation program, suchas what time zone do you want the system to use, how should the drives be partitioned or whichpackages should be installed. Providing a prepared Kickstart file when the installation begins thereforeallows the you to perform the installation automatically, without need for any intervention from the user.This is especially useful when deploying Fedora on a large number of systems at once.
All Kickstart scripts and the log files of their execution are stored in the /tmp directory to assist withdebugging installation issues.
9.1. How to Perform a Kickstart InstallationKickstart installations can be performed using a local DVD, a local hard drive, or via NFS, FTP, HTTP,or HTTPS.
To use Kickstart, you must:
1. Create a Kickstart file.
2. Create boot media or configure a network boot (PXE) server which will be used to begin theinstallation.
3. Make the Kickstart file available on removable media, a hard drive, or a network location.
4. Start the Kickstart installation by booting the installer and using a boot option to tell the installerwhere to find the Kickstart file.
This chapter explains these steps in detail.
9.1.1. Creating a Kickstart FileThe Kickstart file itself is a plain text file, containing keywords listed in Appendix A, Kickstart SyntaxReference, which serve as directions for the installation. Any text editor able to save files as ASCII text(such as Gedit or vim on Linux systems or Notepad on Windows systems) can be used to create andedit Kickstart files.
The recommended approach to creating Kickstart files is to perform a manual installation on onesystem first. After the installation completes, all choices made during the installation are saved intoa file named anaconda-ks.cfg, located in the /root/ directory on the installed system. You canthen copy this file, make any changes you need, and use the resulting configuration file in furtherinstallations.
When creating a Kickstart file, keep in mind the following:
• Lines starting with a pound sign (#) are treated as comments and are ignored.
• Sections must be specified in order. Items within the sections do not have to be in a specific orderunless otherwise specified. The correct section order is:
• The command section which contains actual Kickstart commands and options as listed inAppendix A, Kickstart Syntax Reference. Note that some commands, such as install, aremandatory, but most commands are optional.
Chapter 9. Automating the Installation with Kickstart
104
• The %packages section which contains a list of packages and package groups to be installed.See Section A.12, “%packages (required) - Package Selection” for details.
• The %pre and %post sections, containing a pre-installation and post-installation scripts. Thesetwo sections can be in any order and are not mandatory. See Section A.13, “%pre (optional) - Pre-installation Script” and Section A.14, “%post (optional) - Post-installation Script” for details.
Important
The %packages, %pre and %post sections must end with %end, otherwise the installationprogram will refuse the Kickstart file. The main command section has no special endingstatement.
• Omitting any required item results in the installation program prompting the user for an answer tothe related item, just as the user would be prompted during a typical installation. Once the answer isgiven, the installation will continue. Note that if the system you are installing has no display, you willnot be able to see the prompt, and the installation will appear to have failed.
9.1.2. Verifying the Kickstart FileWhen creating or customizing your kickstart file, it is useful to verify that it is valid before attemptingto use it in an installation. Fedora includes the ksvalidator command line utility which can be usedto do this. This tool is a part of the pykickstart package. To install this package, execute the followingcommand:
# dnf install pykickstart
After installing the package, you can validate a Kickstart file using the following command:
$ ksvalidator /path/to/kickstart.ks
Replace /path/to/kickstart.ks with the path to the Kickstart file you want to verify.
For more information about this tool, see the ksvalidator(1) man page.
Important
Keep in mind that the validation tool has its limitations. The Kickstart file can be very complicated;ksvalidator can make sure the syntax is correct and that the file does not include removedoptions, but it cannot guarantee the installation will be successful. It also does not attempt tovalidate the %pre, %post and %packages sections of the Kickstart file.
9.1.3. Making the Kickstart File AvailableOnce you create a Kickstart file, you can place it in one of the following locations:
• On removable media, such as a DVD or USB flash drive connected to the installation system
Starting the Kickstart Installation
105
• On a hard drive connected to the installation system
• On a network share reachable from the installation system
Normally, a Kickstart file is copied to removable media or a hard drive, or made available onthe network. Placing the file in a network location complements the usual approach to Kickstartinstallations, which is also network-based: the system is booted using a PXE server, the Kickstart fileis downloaded from a network share, and software packages specified in the file are downloaded fromremote repositories.
Chapter 10, Setting Up an Installation Server offers some additional information about preparing for anetwork-based installation.
9.1.4. Starting the Kickstart InstallationOnce you have everything ready - you have created a valid Kickstart file and you have either localboot media or a PXE server available, you can start the Kickstart installation. You need to use theinst.ks= boot option either in the boot menu (when booting from local media), or add this option toyour PXE server configuration. For information about boot options used in Kickstart installations, seeSection 8.2.2, “Kickstart Boot Options”.

106
Chapter 10.
107
Setting Up an Installation ServerNote
This appendix is intended for users with previous Linux experience. If you are a new user, youmay want to install using minimal boot media or the distribution DVD instead.
10.1. PXE Installation OverviewPreboot Execution Environment, or PXE, is a techonology that allows computers to boot directlyfrom resources provided over the network. Installing Fedora over the network means you don't haveto create media, and you can install to multiple computers or virtual machine simultaneously. Theprocess involves a number of components and features working together to provide the resourcesrequired.
PXE-capable computerMost modern computers have the capability to network boot. Typically, a function key pressed duringboot will bring up a boot selection menu. In environments designed for unattended administration,systems will often be configured to first attempt booting from the network, then boot from local storage,and the installation server is configured to only offer the installation when required. Your computer'smanual will provide specific instructions on setting boot priorities.
DHCP ServerWhen a system requests an address during network booting, the DHCP server also provides thelocation of files to boot. A network should have only one DHCP server.
TFTP ServerBecause the pre-boot environment is very simple, files must be provided in a very simple way. TrivialFile Transfer Protocol, or TFTP, provides the system with the bootloader required to continue theinstallation process.
BootloaderBecause the job of booting an operating system is too complex for the pre-boot environment, abootloader is used to load the kernel and related files. It also provides configuration information to theinstaller, and can offer a menu to select from different configurations.
Kernel and InitramfsThe kernel is the core of any Linux operating system, and the initramfs provides the kernel withrequired tools and resources. These files are also provided by tftp.
Package repositoryA Fedora repository must be available for the installation. The example in this section uses the publicFedora mirrors as the repository source, but you can also use a repo on the local network providedby NFS, FTP, or HTTP. Repositories can be configured using the inst.repo= boot option; seeSection 8.2.1, “Specifying the Installation Source” for details.
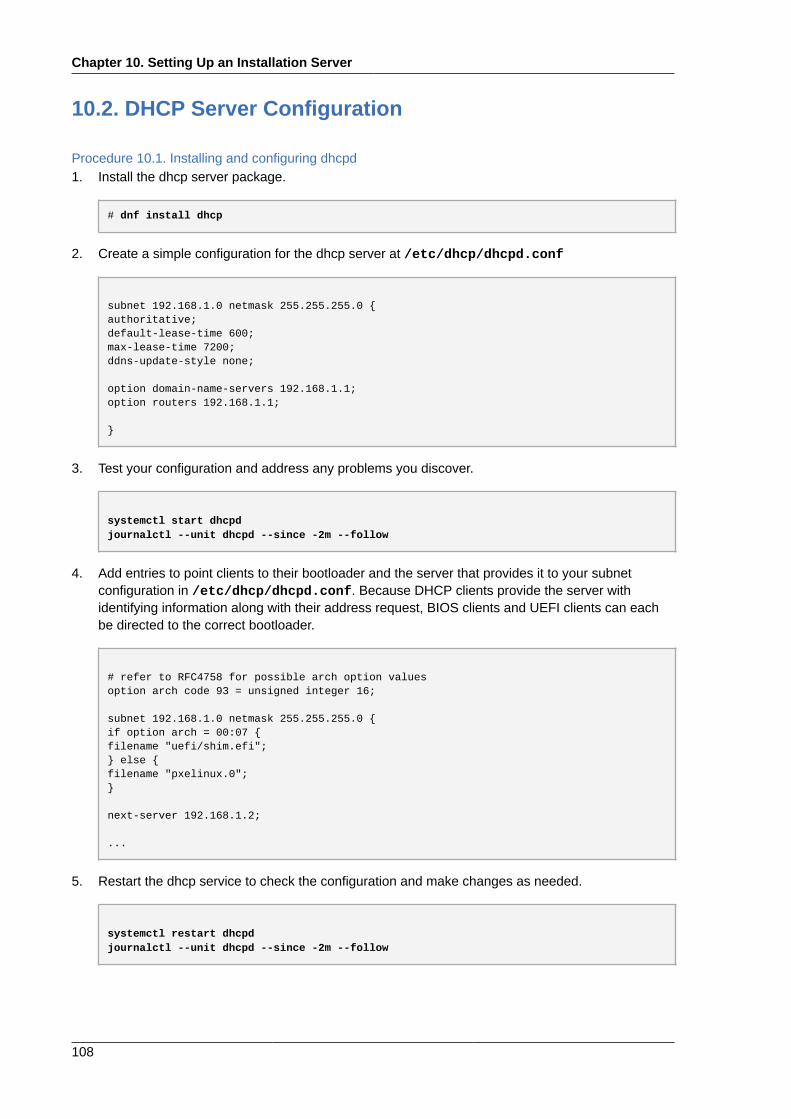
Chapter 10. Setting Up an Installation Server
108
10.2. DHCP Server Configuration
Procedure 10.1. Installing and configuring dhcpd1. Install the dhcp server package.
# dnf install dhcp
2. Create a simple configuration for the dhcp server at /etc/dhcp/dhcpd.conf
subnet 192.168.1.0 netmask 255.255.255.0 {authoritative;default-lease-time 600;max-lease-time 7200;ddns-update-style none;
option domain-name-servers 192.168.1.1;option routers 192.168.1.1;
}
3. Test your configuration and address any problems you discover.
systemctl start dhcpdjournalctl --unit dhcpd --since -2m --follow
4. Add entries to point clients to their bootloader and the server that provides it to your subnetconfiguration in /etc/dhcp/dhcpd.conf. Because DHCP clients provide the server withidentifying information along with their address request, BIOS clients and UEFI clients can eachbe directed to the correct bootloader.
# refer to RFC4758 for possible arch option valuesoption arch code 93 = unsigned integer 16;
subnet 192.168.1.0 netmask 255.255.255.0 {if option arch = 00:07 {filename "uefi/shim.efi";} else {filename "pxelinux.0";}
next-server 192.168.1.2;
...
5. Restart the dhcp service to check the configuration and make changes as needed.
systemctl restart dhcpdjournalctl --unit dhcpd --since -2m --follow
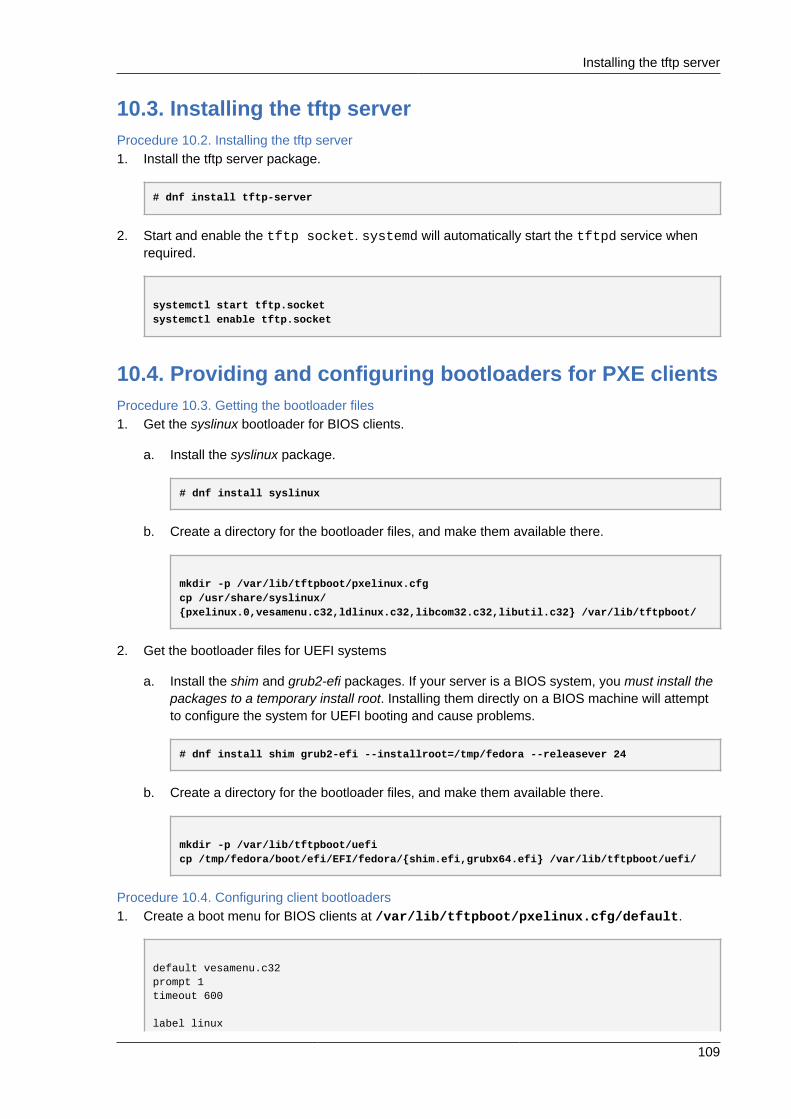
Installing the tftp server
109
10.3. Installing the tftp serverProcedure 10.2. Installing the tftp server1. Install the tftp server package.
# dnf install tftp-server
2. Start and enable the tftp socket. systemd will automatically start the tftpd service whenrequired.
systemctl start tftp.socketsystemctl enable tftp.socket
10.4. Providing and configuring bootloaders for PXE clientsProcedure 10.3. Getting the bootloader files1. Get the syslinux bootloader for BIOS clients.
a. Install the syslinux package.
# dnf install syslinux
b. Create a directory for the bootloader files, and make them available there.
mkdir -p /var/lib/tftpboot/pxelinux.cfgcp /usr/share/syslinux/{pxelinux.0,vesamenu.c32,ldlinux.c32,libcom32.c32,libutil.c32} /var/lib/tftpboot/
2. Get the bootloader files for UEFI systems
a. Install the shim and grub2-efi packages. If your server is a BIOS system, you must install thepackages to a temporary install root. Installing them directly on a BIOS machine will attemptto configure the system for UEFI booting and cause problems.
# dnf install shim grub2-efi --installroot=/tmp/fedora --releasever 24
b. Create a directory for the bootloader files, and make them available there.
mkdir -p /var/lib/tftpboot/ueficp /tmp/fedora/boot/efi/EFI/fedora/{shim.efi,grubx64.efi} /var/lib/tftpboot/uefi/
Procedure 10.4. Configuring client bootloaders1. Create a boot menu for BIOS clients at /var/lib/tftpboot/pxelinux.cfg/default.
default vesamenu.c32prompt 1timeout 600
label linux
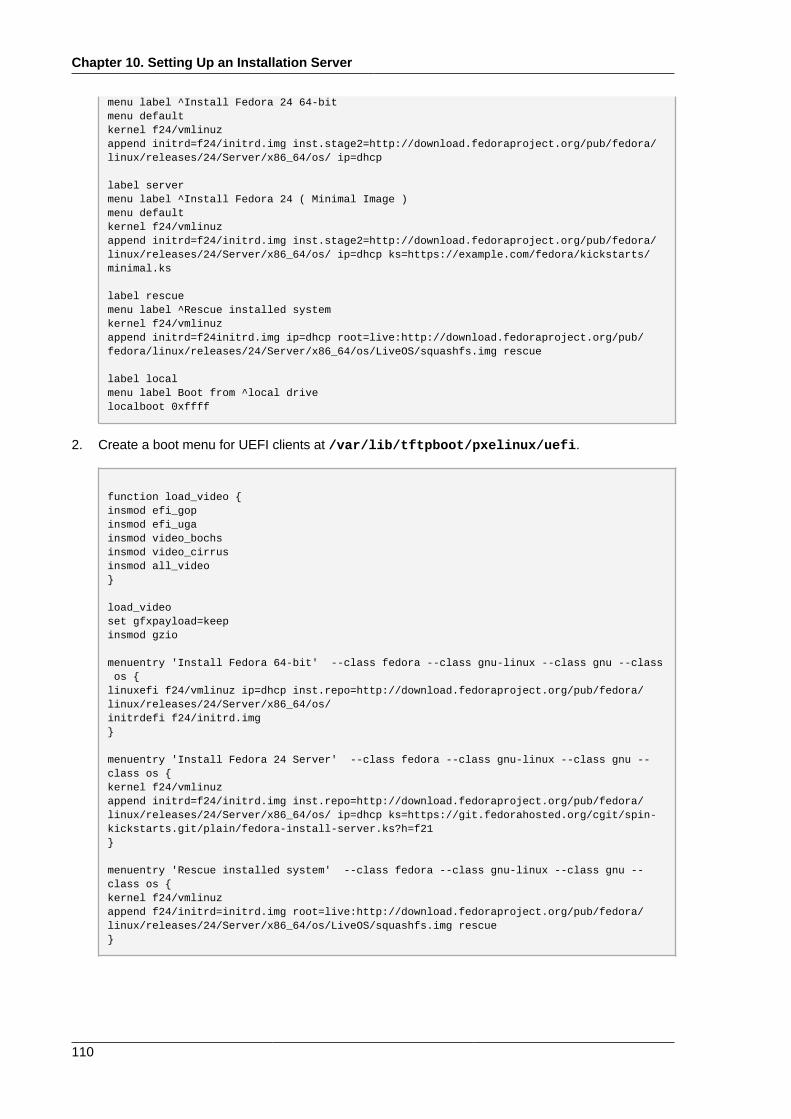
Chapter 10. Setting Up an Installation Server
110
menu label ^Install Fedora 24 64-bitmenu defaultkernel f24/vmlinuzappend initrd=f24/initrd.img inst.stage2=http://download.fedoraproject.org/pub/fedora/linux/releases/24/Server/x86_64/os/ ip=dhcp
label servermenu label ^Install Fedora 24 ( Minimal Image )menu defaultkernel f24/vmlinuzappend initrd=f24/initrd.img inst.stage2=http://download.fedoraproject.org/pub/fedora/linux/releases/24/Server/x86_64/os/ ip=dhcp ks=https://example.com/fedora/kickstarts/minimal.ks
label rescuemenu label ^Rescue installed systemkernel f24/vmlinuzappend initrd=f24initrd.img ip=dhcp root=live:http://download.fedoraproject.org/pub/fedora/linux/releases/24/Server/x86_64/os/LiveOS/squashfs.img rescue
label localmenu label Boot from ^local drivelocalboot 0xffff
2. Create a boot menu for UEFI clients at /var/lib/tftpboot/pxelinux/uefi.
function load_video {insmod efi_gopinsmod efi_ugainsmod video_bochsinsmod video_cirrusinsmod all_video}
load_videoset gfxpayload=keepinsmod gzio
menuentry 'Install Fedora 64-bit' --class fedora --class gnu-linux --class gnu --class os {linuxefi f24/vmlinuz ip=dhcp inst.repo=http://download.fedoraproject.org/pub/fedora/linux/releases/24/Server/x86_64/os/initrdefi f24/initrd.img}
menuentry 'Install Fedora 24 Server' --class fedora --class gnu-linux --class gnu --class os {kernel f24/vmlinuzappend initrd=f24/initrd.img inst.repo=http://download.fedoraproject.org/pub/fedora/linux/releases/24/Server/x86_64/os/ ip=dhcp ks=https://git.fedorahosted.org/cgit/spin-kickstarts.git/plain/fedora-install-server.ks?h=f21}
menuentry 'Rescue installed system' --class fedora --class gnu-linux --class gnu --class os {kernel f24/vmlinuzappend f24/initrd=initrd.img root=live:http://download.fedoraproject.org/pub/fedora/linux/releases/24/Server/x86_64/os/LiveOS/squashfs.img rescue}
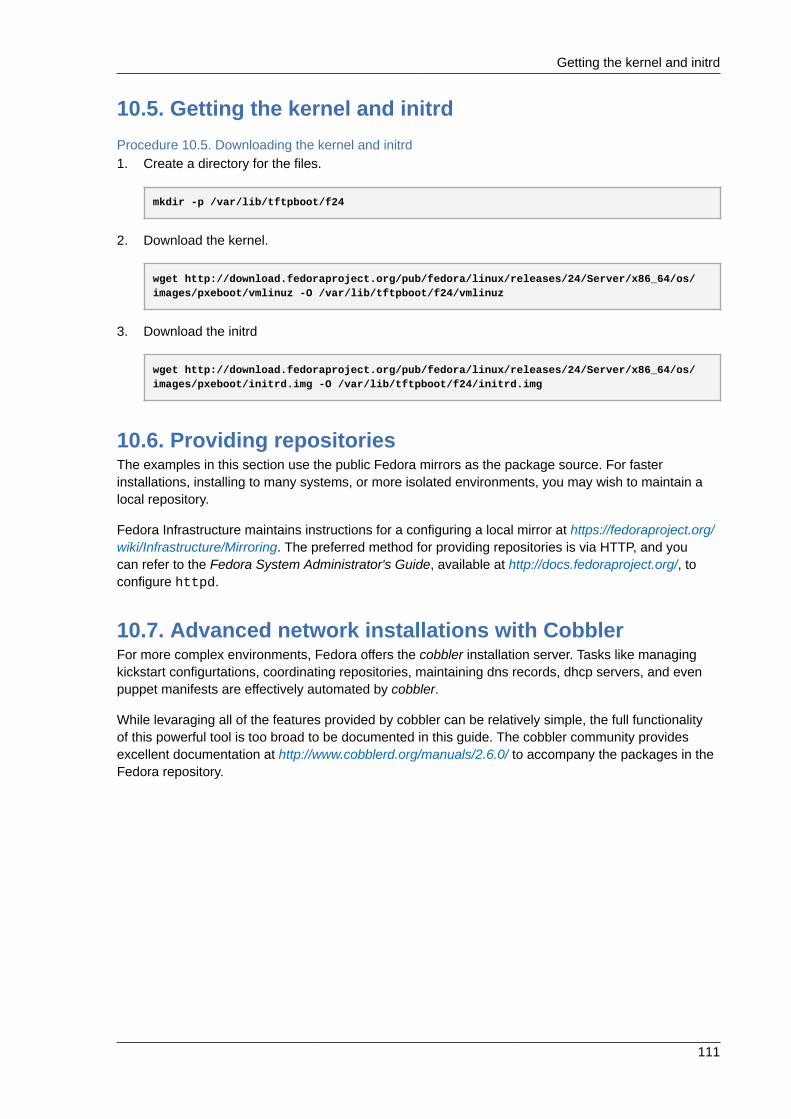
Getting the kernel and initrd
111
10.5. Getting the kernel and initrdProcedure 10.5. Downloading the kernel and initrd1. Create a directory for the files.
mkdir -p /var/lib/tftpboot/f24
2. Download the kernel.
wget http://download.fedoraproject.org/pub/fedora/linux/releases/24/Server/x86_64/os/images/pxeboot/vmlinuz -O /var/lib/tftpboot/f24/vmlinuz
3. Download the initrd
wget http://download.fedoraproject.org/pub/fedora/linux/releases/24/Server/x86_64/os/images/pxeboot/initrd.img -O /var/lib/tftpboot/f24/initrd.img
10.6. Providing repositoriesThe examples in this section use the public Fedora mirrors as the package source. For fasterinstallations, installing to many systems, or more isolated environments, you may wish to maintain alocal repository.
Fedora Infrastructure maintains instructions for a configuring a local mirror at https://fedoraproject.org/wiki/Infrastructure/Mirroring. The preferred method for providing repositories is via HTTP, and youcan refer to the Fedora System Administrator's Guide, available at http://docs.fedoraproject.org/, toconfigure httpd.
10.7. Advanced network installations with CobblerFor more complex environments, Fedora offers the cobbler installation server. Tasks like managingkickstart configurtations, coordinating repositories, maintaining dns records, dhcp servers, and evenpuppet manifests are effectively automated by cobbler.
While levaraging all of the features provided by cobbler can be relatively simple, the full functionalityof this powerful tool is too broad to be documented in this guide. The cobbler community providesexcellent documentation at http://www.cobblerd.org/manuals/2.6.0/ to accompany the packages in theFedora repository.

112
Chapter 11.
113
Installing Using VNCThe graphical installation interface is the recommended method of installing Fedora. However, insome cases, accessing the graphical interface directly is difficult or impossible. Some systems lack thecapability to connect a display and a keyboard, making VNC a necessity for manual (non-Kickstart)installations.
To allow manual installations on headless systems (systems without a directly connected display,keyboard and mouse), the Anaconda installation program includes a Virtual Network Computing(VNC) mode which allows the graphical mode of the installation program to run locally, but displayon another system connected to the network. The VNC installation provides you with the full range ofinstallation options.
This chapter provides instructions on activating VNC mode on the installation system and connectingto it using a VNC viewer.
11.1. Installing a VNC ViewerPerforming a VNC installation requires a VNC viewer running on your workstation or another terminalcomputer. VNC viewers are available in the repositories of most Linux distributions; free VNC viewersare also available for other operating systems such as Windows. On Linux systems, use your packagemanager to search for a viewer for your distribution.
The following VNC viewers are available in Fedora:
• TigerVNC - A basic viewer independent of your desktop environment. Installed as the tigervncpackage.
• Vinagre - A viewer for the GNOME desktop environment. Installed as the vinagre package.
• KRDC - A viewer integrated with the KDE desktop environment. Installed as the kdenetwork-krdcpackage.
To install any of the viewers listed above, execute the following command as root:
# dnf install package
Replace package with the package name of the viewer you want to use (for example, tigervnc).
Note
Procedures in this chapter assume you are using TigerVNC as your VNC viewer. Specificinstructions for other viewers may differ, but the general principles still apply.
11.2. Performing a VNC InstallationThe Anaconda installation program offers two modes for VNC installation: Direct mode and Connectmode. The modes differ in the way the connection between the server and viewer is established. Afteryou successfully connect, the installation will progress the same way regardless of the mode youused.

Chapter 11. Installing Using VNC
114
Direct ModeIn this mode, Anaconda is configured to start the installation and wait for an incoming connectionfrom VNC viewer before proceeding. While waiting for an incoming connection, the system's IPaddress and the port on which the installer expects the connection is displayed on the displayor console if available; this implies that you need at least a serial console to connect using thismode, but you can work around this limitation if you know the default VNC port and the system'sIP address.
Connect ModeIn this mode, the VNC viewer is started on the remote system in listening mode. The VNC viewerwaits for an incoming connection on a specified port. Then, Anaconda is started and the hostname/IP address and port number of the viewer are provided using a boot option or a Kickstartcommand. When the installation begins, the installation program establishes a connection withthe listening VNC viewer using the specified host name/IP address and port number. Connectmode is therefore easier to use on systems with no local display or console, but it also may requireadditional preparation, because the viewer system must be able to accept incoming connectionson the specified port, which usually requires changing firewall settings.
11.2.1. Choosing a VNC Installation Mode• Visual and Interactive access to the system
• If visual and interactive access to the system being installed is not available, then you should useConnect Mode.
• Network Connection Rules and Firewalls
• If the system being installed is not allowed inbound connections by a firewall, then you must useConnect Mode or disable the firewall. Disabling a firewall may have security implications.
• If the remote system running the VNC viewer is not allowed incoming connections by a firewall,then you must use Direct Mode, or disable the firewall. Disabling a firewall may have securityimplications.
11.2.2. Installing in VNC Direct ModeVNC Direct Mode is when the VNC viewer initiates a connection to the system being installed.Anaconda will tell you when to initiate this connection.

Installing in VNC Direct Mode
115
Procedure 11.1. Starting VNC in Direct Mode1. Open the VNC viewer (for example, TigerVNC) on the workstation you will be using to connect to
the system being installed. A window similar to Figure 11.1, “TigerVNC Connection Details” will bedisplayed with an input field allowing you to specify an IP address.
Figure 11.1. TigerVNC Connection Details
2. Boot the installation system and wait for the boot menu to appear. In the menu, edit boot options(see Section 4.2, “The Boot Menu”) and append the inst.vnc option to the end of the commandline.
Optionally, if you want to restrict VNC access to the installation system, add theinst.vncpassword=PASSWORD boot option as well. Replace PASSWORD with the password youwant to use for the installation. The VNC password must be between 6 and 8 characters long.
Important
Use a temporary password for the inst.vncpassword= option. It should not be a real orroot password you use on any system.
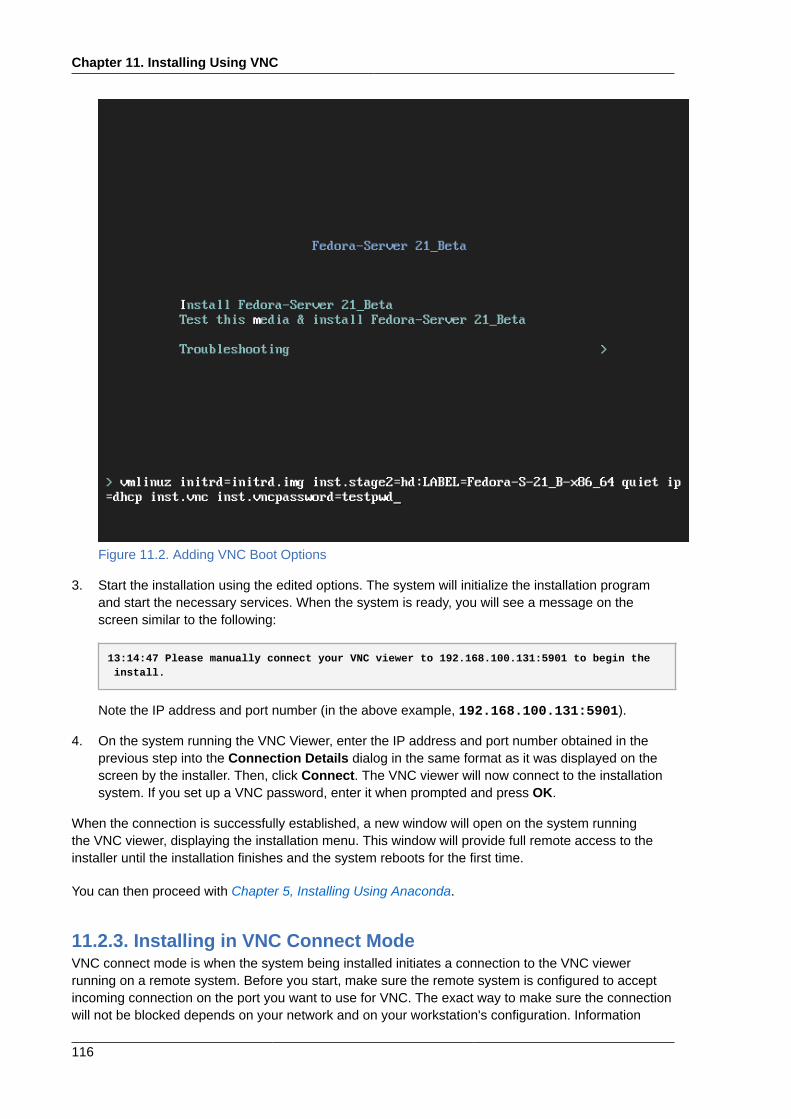
Chapter 11. Installing Using VNC
116
Figure 11.2. Adding VNC Boot Options
3. Start the installation using the edited options. The system will initialize the installation programand start the necessary services. When the system is ready, you will see a message on thescreen similar to the following:
13:14:47 Please manually connect your VNC viewer to 192.168.100.131:5901 to begin the install.
Note the IP address and port number (in the above example, 192.168.100.131:5901).
4. On the system running the VNC Viewer, enter the IP address and port number obtained in theprevious step into the Connection Details dialog in the same format as it was displayed on thescreen by the installer. Then, click Connect. The VNC viewer will now connect to the installationsystem. If you set up a VNC password, enter it when prompted and press OK.
When the connection is successfully established, a new window will open on the system runningthe VNC viewer, displaying the installation menu. This window will provide full remote access to theinstaller until the installation finishes and the system reboots for the first time.
You can then proceed with Chapter 5, Installing Using Anaconda.
11.2.3. Installing in VNC Connect ModeVNC connect mode is when the system being installed initiates a connection to the VNC viewerrunning on a remote system. Before you start, make sure the remote system is configured to acceptincoming connection on the port you want to use for VNC. The exact way to make sure the connectionwill not be blocked depends on your network and on your workstation's configuration. Information
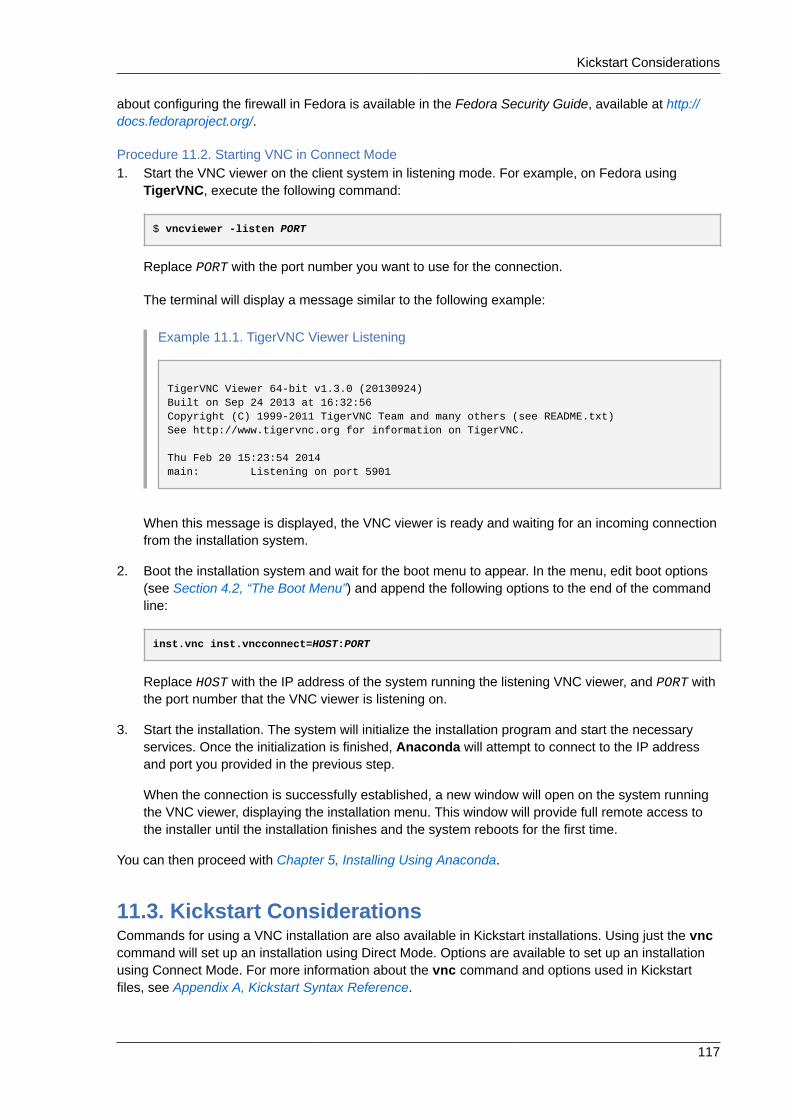
Kickstart Considerations
117
about configuring the firewall in Fedora is available in the Fedora Security Guide, available at http://docs.fedoraproject.org/.
Procedure 11.2. Starting VNC in Connect Mode1. Start the VNC viewer on the client system in listening mode. For example, on Fedora using
TigerVNC, execute the following command:
$ vncviewer -listen PORT
Replace PORT with the port number you want to use for the connection.
The terminal will display a message similar to the following example:
Example 11.1. TigerVNC Viewer Listening
TigerVNC Viewer 64-bit v1.3.0 (20130924)Built on Sep 24 2013 at 16:32:56Copyright (C) 1999-2011 TigerVNC Team and many others (see README.txt)See http://www.tigervnc.org for information on TigerVNC.
Thu Feb 20 15:23:54 2014main: Listening on port 5901
When this message is displayed, the VNC viewer is ready and waiting for an incoming connectionfrom the installation system.
2. Boot the installation system and wait for the boot menu to appear. In the menu, edit boot options(see Section 4.2, “The Boot Menu”) and append the following options to the end of the commandline:
inst.vnc inst.vncconnect=HOST:PORT
Replace HOST with the IP address of the system running the listening VNC viewer, and PORT withthe port number that the VNC viewer is listening on.
3. Start the installation. The system will initialize the installation program and start the necessaryservices. Once the initialization is finished, Anaconda will attempt to connect to the IP addressand port you provided in the previous step.
When the connection is successfully established, a new window will open on the system runningthe VNC viewer, displaying the installation menu. This window will provide full remote access tothe installer until the installation finishes and the system reboots for the first time.
You can then proceed with Chapter 5, Installing Using Anaconda.
11.3. Kickstart ConsiderationsCommands for using a VNC installation are also available in Kickstart installations. Using just the vnccommand will set up an installation using Direct Mode. Options are available to set up an installationusing Connect Mode. For more information about the vnc command and options used in Kickstartfiles, see Appendix A, Kickstart Syntax Reference.

Chapter 11. Installing Using VNC
118
11.4. Considerations for Headless SystemsWhen installing headless systems, the only choices are an automated Kickstart installation or aninteractive VNC installation using connect mode. For more information about automated Kickstartinstallation, see Appendix A, Kickstart Syntax Reference. The general process for an interactive VNCinstallation is described below.
1. Set up a PXE server that will be used to start the installation. Information about installing andperforming basic configurating of a PXE server can be found in Chapter 10, Setting Up anInstallation Server.
2. Configure the PXE server to use the boot options for a connect mode VNC installation. Forinformation on these boot options, see Section 11.2.3, “Installing in VNC Connect Mode”.
3. Follow the procedure for a VNC Installation using connect mode as described in theProcedure 11.2, “Starting VNC in Connect Mode”. However, when directed to boot the system,boot it from the PXE server.

Chapter 12.
119
Upgrading Your Current SystemThis chapter explains how to upgrade your existing Fedora installation to the current release. Thereare two basic ways to do so:
Automatic upgrade using dnf system upgradeThe preferred way to upgrade your system is an automatic upgrade using the dnf systemupgrade utility. For information on performing an automatic upgrade, see Fedora Wiki DNFsystem upgrade1.
Manual ReinstallationYou can upgrade to the latest version of Fedora manually instead of relying on dnf systemupgrade. This involves booting the installer as if you were performing a clean installation, lettingit detect your existing Fedora system, and overwriting the root partition while preserving data onother partitions and volumes. The same process can also be used to reinstall the system, if youneed to. For detailed information, see Section 12.1, “Manual System Upgrade or Reinstallation”.
Warning
Always back up your data before performing an upgrade or reinstalling your system, no matterwhich method you choose.
12.1. Manual System Upgrade or ReinstallationUnfortunately, we have not written this chapter yet, and there is no dedicated documentation abouta manual reinstall on the Wiki, either. In the meantime before we fix this, you can try to start theinstallation normally (from a boot CD/DVD/USB), select manual partitioning in your installer, andreuse existing partitions instead of destroying them and creating new ones. The instructions atSection 5.4.10, “Manual Partitioning” should in most cases be easy to adapt for this.
1 https://fedoraproject.org/wiki/DNF_system_upgrade

120

Part III. Technical AppendixesThe following appendixes do not contain instructions that tell you how to install Fedora. Instead, theyprovide technical background that you might find helpful to understand the options that Fedora offersyou at various points in the installation process.

123
Appendix A. Kickstart SyntaxReferenceThis appendix describes commands and options available in Kickstart installations. For generalinformation about Kickstart, see Chapter 9, Automating the Installation with Kickstart.
Important
Device names are not guaranteed to be consistent across reboots, which can complicate usagein Kickstart scripts. When a Kickstart option calls for a device node name (such as sda), you caninstead use any item from /dev/disk. For example, instead of:
part / --fstype=xfs --onpart=sda1
You could use an entry similar to one of the following:
part / --fstype=xfs --onpart=/dev/disk/by-path/pci-0000:00:05.0-scsi-0:0:0:0-part1part / --fstype=xfs --onpart=/dev/disk/by-id/ata-ST3160815AS_6RA0C882-part1
This provides a consistent way to refer to disks that is more meaningful than just sda. This isespecially useful in large storage environments.
While the general principles of Kickstart installations tend to stay the same, the commands andoptions can change between major releases. You can use the ksverdiff command to display thedifferences between two versions of the Kickstart syntax. This is useful when updating an existingKickstart file to be used with a new release. To display a list of changes in syntax between Fedora 23and 24, use the following command:
$ ksverdiff -f F23 -t F24
The -f option specifies the release to start the comparison with, and the -t option to specify therelease to end with. For additional information, see the ksverdiff(1) man page. Also note thatyou can not use this to display changes in a release that is newer than your system - the version ofpykickstart on Fedora 23 can not display changes in Fedora 24.
Additionally, you can review the Fedora 24 Release Notes, available at http://docs.fedoraproject.org/,for a list of changes.
Note
In the following sections, if an option is followed by an equals mark (=), a value must be specifiedafter it. In the example commands, options in square brackets ([ ]) are optional arguments forthe command.

Appendix A. Kickstart Syntax Reference
124
A.1. Installation Methods and SourcesThe following commands control the way Fedora will be installed.
A.1.1. device (optional) - Install Extra Device DriversOn most PCI systems, the installation program will automatically detect Ethernet and SCSI cards.However, on older systems and some PCI systems, Kickstart requires a hint to find the proper devices.The device command, which tells the installation program to install extra modules, uses the followingformat:
device moduleName [--opts=]
Replace moduleName with the name of the kernel module which should be installed.
--opts=Options to pass to the installed kernel module. For example:
device i2c_piix4 --opts="aic152x=0x340 io=11"
A.1.2. driverdisk (optional) - Use a Driver DiskDriver disks can be used during Kickstart installations to provide additional drivers not included bydefault. You must copy the driver disks's contents to the root directory of a partition on the system'shard drive. Then, you must use the driverdisk command to specify that the installation programshould look for a driver disk and its location.
driverdisk partition | --source= | --biospart=
partitionSearch for the driver disk image on a local partition. Replace partition with the name of thepartition containing the driver disk. Note that the partition must be specified as a full path. Forexample:
driverdisk /dev/sdb1
--source=Search for the driver disk in a network location instead of a local partition. For example:
driverdisk --source=ftp://path/to/dd.img
driverdisk --source=http://path/to/dd.img
driverdisk --source=nfs:hostname:/path/to/dd.img
--biospart=BIOS partition containing the driver disk (for example, 82p2).
install (required) - Configure Installation Method
125
A.1.3. install (required) - Configure Installation MethodThe default installation mode. You must specify the type of installation from cdrom, harddrive,nfs, liveimg, or url. The install command and the installation method command must be onseparate lines. For example:
installliveimg --url=file:///images/install/squashfs.img --noverifyssl
The installation method commands are:
cdromInstall from the first optical (DVD) drive on the system.
harddriveInstall from a tree or full installation ISO image on a local hard drive. The tree or ISO image mustbe on a file system which is mountable in the installation environment. Supported file systems areext2, ext3, ext4, vfat, or xfs.
installharddrive --partition= | --biospart= [--dir=]
--partition=Partition to install from (such as sdb2).
--biospart=BIOS partition to install from (such as 82p2).
--dir=Directory containing the installation tree or ISO image.
liveimgInstall from a disk image instead of packages. The image can be the squashfs.img file from alive ISO image, or any file system that the installation media can mount. Supported file systemsare ext2, ext3, ext4, vfat, and xfs.
This command also supports installation from tar archives of the root file system. In that case, thefile name must end with .tar, .tbz, .tgz, .txz, .tar.bz2, tar.gz, or tar.xz.
installliveimg --url= [--proxy= | --checksum= | --noverifyssl=]
--url=The location to install from. Supported protocols are HTTP, HTTPS, FTP, and file.
--proxy=Specify an HTTP, HTTPS or FTP proxy to use while performing the installation.
--checksum=An optional argument with the SHA256 checksum of the image file, used for integrityverification. If you are using a live image provided by Fedora Project, you can find a list ofchecksums at https://fedoraproject.org/en/verify.

Appendix A. Kickstart Syntax Reference
126
--noverifysslDisable SSL verification when connecting to an HTTPS server.
nfsInstall from an NFS server specified. The NFS server must be exporting the full installation ISOimage (such as the Fedora Server DVD) or its extracted contents.
installnfs --server= [--dir=] [--opts= ]
--server=Host name of the server.
--dir=Directory containing the installation tree or ISO image.
--opts=Mount options to use for mounting the NFS export.
urlInstall from a tree on a remote server via HTTP, HTTPS, or FTP.
installurl --url= | --mirrorlist= [--proxy= | --noverifyssl]
--url=The location to install from. Supported protocols are http, https, ftp, and file.
--mirrorlist=The mirror URL to install from.
--proxy=Specify an HTTP, HTTPS or FTP proxy to use while performing the installation.
--noverifysslDisable SSL verification when connecting to an HTTPS server.
A.1.4. mediacheck (optional) - Verify Installation Media IntegrityThis command will force the installation program to perform a media check before starting theinstallation, similarly to the rd.live.check boot option (see Section 8.5.2, “Verifying Boot Media”.This command requires that installations be attended, so it is disabled by default.
A.1.5. ostreesetup (optional) - Install from an OSTreeUsed for OSTree installations. See https://wiki.gnome.org/action/show/Projects/OSTree for moreinformation about OSTree. Available options are:
--osname=Management root for OS installation (required).
--remote=Management root for OS installation (optional).
repo (optional) - Configure Additional Repositories
127
--url=Repository URL (required).
--ref=Name of branch inside the repository (required).
--nogpgcheckDisable GPG key verification (optional).
A.1.6. repo (optional) - Configure Additional RepositoriesConfigures additional DNF repositories that may be used as sources for package installation. Thiscommand can be used multiple times in a single Kickstart file.
See the Fedora System Administrator's Guide, available at http://docs.fedoraproject.org/, forinformation about the DNF package manager.
Important
Repositories used for installation must be stable. The installation may fail if a repository ismodified before the installation concludes.
--name=The repository ID. This option is required. If a repository has a name which conflicts with anotherpreviously added repository, it will be ignored. Because the installation program uses a list of pre-configured repositories, this means that you cannot add repositories with the same names as thepreconfigured ones.
--baseurl=The repository URL. The variables that may be used in DNF repo configuration files are notsupported. You may use one of either this option or --mirrorlist, not both.
--mirrorlist=The URL pointing at a list of mirrors for the repository. The variables that may normally be used indnf repository configuration files are not supported here. You may use one of either this option or--baseurl, not both.
--installMake the repository configured in the Kickstart file available on the system after the installationas well. Creates a configuration file for the repository in /etc/yum.repos.d/ on the installedsystem.
--cost=An integer value to assign a cost to this repository. If multiple repositories provide the samepackages, this number will be used to prioritize which repository will be used before another.Repositories with a lower cost take priority over repositories with higher cost.
--excludepkgs=A comma-separated list of package names that must not be pulled from this repository. This isuseful if multiple repositories provide the same package and you want to make sure it comes froma particular repository. Both full package names (such as publican) and globs (such as gnome-*) are accepted.
Appendix A. Kickstart Syntax Reference
128
--includepkgs=A comma-separated list of package names and globs that must be pulled from this repository. Thisis useful if multiple repositories provide the same package and you want to make sure it comesfrom this repository.
--proxy=Specify an HTTP, HTTPS or FTP proxy server to use when accessing this repository. This settingdoes not affect any other repositories or installation sources.
--ignoregroups=trueThis option is used when composing installation trees and has no effect on the installation processitself. It tells the compose tools to not look at the package group information when mirroring treesso as to avoid mirroring large amounts of unnecessary data.
--noverifysslDisable SSL verification when connecting to an HTTPS server.
A.2. Storage and PartitioningCommands in this section are used to determine your system's storage options and partitioning.
A.2.1. autopart (optional) - Automatic PartitioningAutomatically creates partitions: a root (/) partition (1 GB or larger), a swap partition, and anappropriate /boot partition for the architecture. On large enough drives (50 GB and larger), this alsocreates a /home partition.
Important
The autopart option cannot be used together with the part/partition, raid, logvol, orvolgroup options in the same Kickstart file.
--type=Selects one of the predefined automatic partitioning schemes you want to use. Accepts thefollowing values:
• lvm: The LVM partitioning scheme.
• btrfs: The Btrfs partitioning scheme.
• plain: Regular partitions with no LVM or Btrfs.
• thinp: The LVM Thin Provisioning partitioning scheme.
The created partitioning scheme will follow the recommended scheme described atSection 5.4.10.6, “Recommended Partitioning Scheme”.
--fstype=Specify a supported file system (such as ext4 or xfs) to replace the default when doingautomatic partitioning.
bootloader (required) - Configure Boot Loader
129
--nolvmDo not use LVM or Btrfs for automatic partitioning. This option is equal to --type=plain.
--encryptedEncrypts all partitions. This is equivalent to checking the Encrypt partitions check box on theinitial partitioning screen during a manual graphical installation.
--passphrase=Provides a default system-wide passphrase for all encrypted devices.
--escrowcert=URL_of_X.509_certificateStores data encryption keys of all encrypted volumes as files in /root, encrypted using the X.509certificate from the URL specified with URL_of_X.509_certificate. The keys are storedas a separate file for each encrypted volume. This option is only meaningful if --encrypted isspecified.
--backuppassphraseAdds a randomly-generated passphrase to each encrypted volume. Store these passphrases inseparate files in /root, encrypted using the X.509 certificate specified with --escrowcert. Thisoption is only meaningful if --escrowcert is specified.
--cipher=Specifies which type of encryption will be used if the Anaconda default aes-xts-plain64is not satisfactory. You must use this option together with the --encrypted option; by itself ithas no effect. Available types of encryption are listed in the Fedora Security Guide, available athttp://docs.fedoraproject.org/. Using either aes-xts-plain64 or aes-cbc-essiv:sha256 isstrongly recommended.
A.2.2. bootloader (required) - Configure Boot LoaderSpecifies how the boot loader should be installed.
Important
You should always use a password to protect your boot loader. An unprotected boot loader canallow a potential attacker to modify the system's boot options and gain unauthorized access tothe system.
Important
Some systems require a special partition for installing the boot loader. The type and size ofthis partition depends on whether the disk you are installing the boot loader to uses the MasterBoot Record (MBR) or a GUID Partition Table (GPT) schema. For more information, seeSection 5.4.8.1, “Boot Loader Installation”.
--append=Specifies additional kernel parameters. To specify multiple parameters, separate them withspaces. For example:

Appendix A. Kickstart Syntax Reference
130
bootloader --location=mbr --append="hdd=ide-scsi ide=nodma"
The rhgb and quiet parameters are always used, even if you do not specify them here or do notuse the --append= command at all.
--boot-drive=Specifies which drive the boot loader should be written to, and therefore which drive the computerwill boot from. If you use a multipath device as the boot drive, specify only one member of thedevice.
Important
The --boot-drive= option is currently being ignored in Fedora installations on IBMSystem z systems using the zipl boot loader. When zipl is installed, it determines the bootdrive on its own.
--leavebootorderPrevents the installation program from making changes to the existing list of bootable images onUEFI or ISeries/PSeries systems.
--driveorder=Specifies which drive is first in the BIOS boot order. For example:
bootloader --driveorder=sda,hda
--location=Specifies where the boot record is written. Valid values are the following:
• mbr - The default option. Depends on whether the drive uses the Master Boot Record (MBR) orGUID Partition Table (GPT) scheme:
• On a GPT-formatted disk, this option will install stage 1.5 of the boot loader into the BIOSboot partition.
• On an MBR-formatted disk, stage 1.5 will be installed into the empty space between the MBRand the first partition.
• partition - Install the boot loader on the first sector of the partition containing the kernel.
• none - Do not install the boot loader.
In most cases, this option does not need to be specified.
--password=If using GRUB2 as the boot loader, sets the boot loader password to the one specified with thisoption. This should be used to restrict access to the GRUB2 shell, where arbitrary kernel optionscan be passed.
If a password is specified, GRUB2 will also ask for a user name. The user name is always root.
btrfs (optional) - Create Btrfs Volume or Subvolume
131
--iscryptedNormally, when you specify a boot loader password using the --password= option, it will bestored in the Kickstart file in plain text. If you want to encrypt the password, use this option and anencrypted password.
To generate an encrypted password, use the grub2-mkpasswd-pbkdf2 command, enter thepassword you want to use, and copy the command's output (the hash starting with grub.pbkdf2)into the Kickstart file. An example bootloader Kickstart entry with an encrypted password willlook similar to the following:
bootloader --iscrypted --password=grub.pbkdf2.sha512.10000.5520C6C9832F3AC3D149AC0B24BE69E2D4FB0DBEEDBD29CA1D30A044DE2645C4C7A291E585D4DC43F8A4D82479F8B95CA4BA4381F8550510B75E8E0BB2938990.C688B6F0EF935701FF9BD1A8EC7FE5BD2333799C98F28420C5CC8F1A2A233DE22C83705BB614EA17F3FDFDF4AC2161CEA3384E56EB38A2E39102F5334C47405E
--timeout=Specifies the amount of time the boot loader will wait before booting the default option (inseconds).
--default=Sets the default boot image in the boot loader configuration.
--extlinuxUse the extlinux boot loader instead of GRUB2. This option only works on systems supported byextlinux.
--disabledDo not attempt to install a boot loader. This option overrides all other boot loader configuration; allother boot loader options will be ignored and no boot loader packages will be installed.
--nombrInstall the boot loader configuration and support files, but do not modify the MBR.
A.2.3. btrfs (optional) - Create Btrfs Volume or SubvolumeCreate a Btrfs volume or subvolume. For a volume, the syntax is:
btrfs mntpoint --data=level --metadata=level [--label=] partitions
One or more partitions can be specified in partitions. When specifying more than one partitions,the entries must be separated by a single space. See Example A.1, “Creating Btrfs Volumes andSubvolumes” for a demonstration.
For a subvolume, the syntax is:
btrfs mntpoint --subvol --name=name parent
parent should be the identifier of the subvolume's parent volume, name with a name for thesubvolume, and mntpoint is the location where the file system is mounted.
--data=RAID level to use for file system data (such as 0, 1, or 10). This parameter is optional, has nomeaning for subvolumes, and requires more than one physical disk.
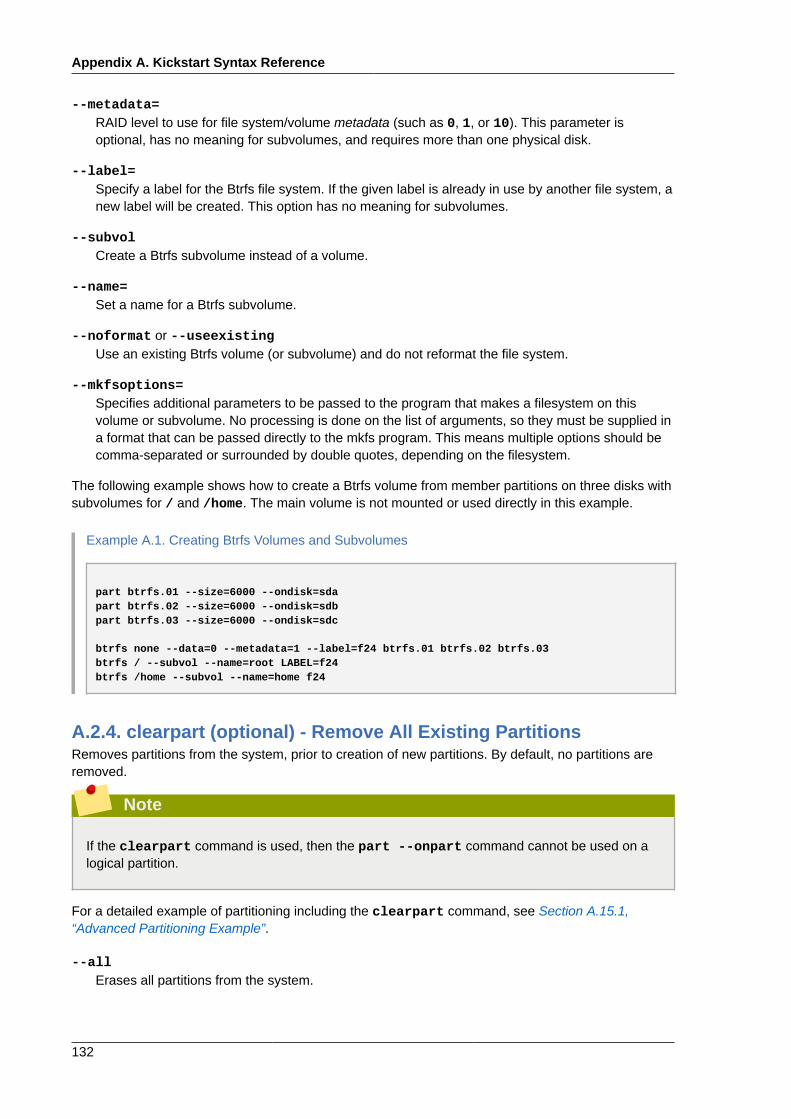
Appendix A. Kickstart Syntax Reference
132
--metadata=RAID level to use for file system/volume metadata (such as 0, 1, or 10). This parameter isoptional, has no meaning for subvolumes, and requires more than one physical disk.
--label=Specify a label for the Btrfs file system. If the given label is already in use by another file system, anew label will be created. This option has no meaning for subvolumes.
--subvolCreate a Btrfs subvolume instead of a volume.
--name=Set a name for a Btrfs subvolume.
--noformat or --useexistingUse an existing Btrfs volume (or subvolume) and do not reformat the file system.
--mkfsoptions=Specifies additional parameters to be passed to the program that makes a filesystem on thisvolume or subvolume. No processing is done on the list of arguments, so they must be supplied ina format that can be passed directly to the mkfs program. This means multiple options should becomma-separated or surrounded by double quotes, depending on the filesystem.
The following example shows how to create a Btrfs volume from member partitions on three disks withsubvolumes for / and /home. The main volume is not mounted or used directly in this example.
Example A.1. Creating Btrfs Volumes and Subvolumes
part btrfs.01 --size=6000 --ondisk=sdapart btrfs.02 --size=6000 --ondisk=sdbpart btrfs.03 --size=6000 --ondisk=sdc
btrfs none --data=0 --metadata=1 --label=f24 btrfs.01 btrfs.02 btrfs.03btrfs / --subvol --name=root LABEL=f24btrfs /home --subvol --name=home f24
A.2.4. clearpart (optional) - Remove All Existing PartitionsRemoves partitions from the system, prior to creation of new partitions. By default, no partitions areremoved.
Note
If the clearpart command is used, then the part --onpart command cannot be used on alogical partition.
For a detailed example of partitioning including the clearpart command, see Section A.15.1,“Advanced Partitioning Example”.
--allErases all partitions from the system.

clearpart (optional) - Remove All Existing Partitions
133
Warning
This option will erase all disks which can be reached by the installer, including any attachednetwork storage. Use this option with caution.
--drives=Specifies which drives to clear partitions from. For example, the following clears all the partitionson the first two drives on the primary IDE controller:
clearpart --drives=hda,hdb --all
To clear a multipath device, use the format disk/by-id/scsi-WWID, where WWIDis the world-wide identifier for the device. For example, to clear a disk with WWID58095BEC5510947BE8C0360F604351918, use:
clearpart --drives=disk/by-id/scsi-58095BEC5510947BE8C0360F604351918
This format is preferable for all multipath devices, but if errors arise, multipath devices that do notuse logical volume management (LVM) can also be cleared using the format disk/by-id/dm-uuid-mpath-WWID, where WWID is the world-wide identifier for the device. For example, to cleara disk with WWID 2416CD96995134CA5D787F00A5AA11017, use:
clearpart --drives=disk/by-id/dm-uuid-mpath-2416CD96995134CA5D787F00A5AA11017
Warning
Never specify multipath devices by device names like mpatha. Device names such as thisare not specific to a particular disk. The disk named /dev/mpatha during installation mightnot be the one that you expect it to be. Therefore, the clearpart command could target thewrong disk.
--list=Specifies which partitions to clear. This option overrides the --all and --linux options if used.Can be used across different drives. For example:
clearpart --list=sda2,sda3,sdb1
--disklabel=Create a set disk label when relabeling a disk.
--linuxErases all Linux partitions.

Appendix A. Kickstart Syntax Reference
134
--noneDo not remove any partitions. This is the default behavior - using this option is the same as notusing the clearpart command at all.
Note
Using the clearpart --all command in a Kickstart file to remove all existing partitions duringthe installation will cause Anaconda to pause and prompt you for a confirmation. If you needto perform the installation automatically with no interaction, add the zerombr command to yourKickstart file.
A.2.5. fcoe (optional) - Configure Fibre Channel Over EthernetDevicesSpecify which FCoE devices should be activated automatically in addition to those discovered byEnhanced Disk Drive Services (EDD).
fcoe --nic=name [--dcp= | --autovlan]
--nic= (required)Name of the device to be activated.
--dcb=Establish Data Center Bridging (DCB) settings.
--autovlanDiscover VLANs automatically.
A.2.6. ignoredisk (optional) - Ignore Specified DisksCauses the installation program to ignore the specified disks. This is useful if you use autopartition andwant to be sure that some disks are ignored. For example, without ignoredisk, attempting to deployon a SAN cluster the Kickstart would fail, as the installation program detects passive paths to the SANthat return no partition table.
ignoredisk --drives= | --only-use= [--interactive]
--drives=Specify one or more drives to ignore. Multiple drives can be specified as a comma-separated list.For example:
ignoredisk --drives=sda,sdc
To ignore a multipath device that does not use logical volume management (LVM), use the formatdisk/by-id/dm-uuid-mpath-WWID, where WWID is the world-wide identifier for the device. Forexample, to ignore a disk with WWID 2416CD96995134CA5D787F00A5AA11017, use:
ignoredisk --drives=disk/by-id/dm-uuid-mpath-2416CD96995134CA5D787F00A5AA11017
Multipath devices that use LVM are not assembled until after Anaconda has parsed the Kickstartfile. Therefore, you cannot specify these devices in the format dm-uuid-mpath. Instead, to
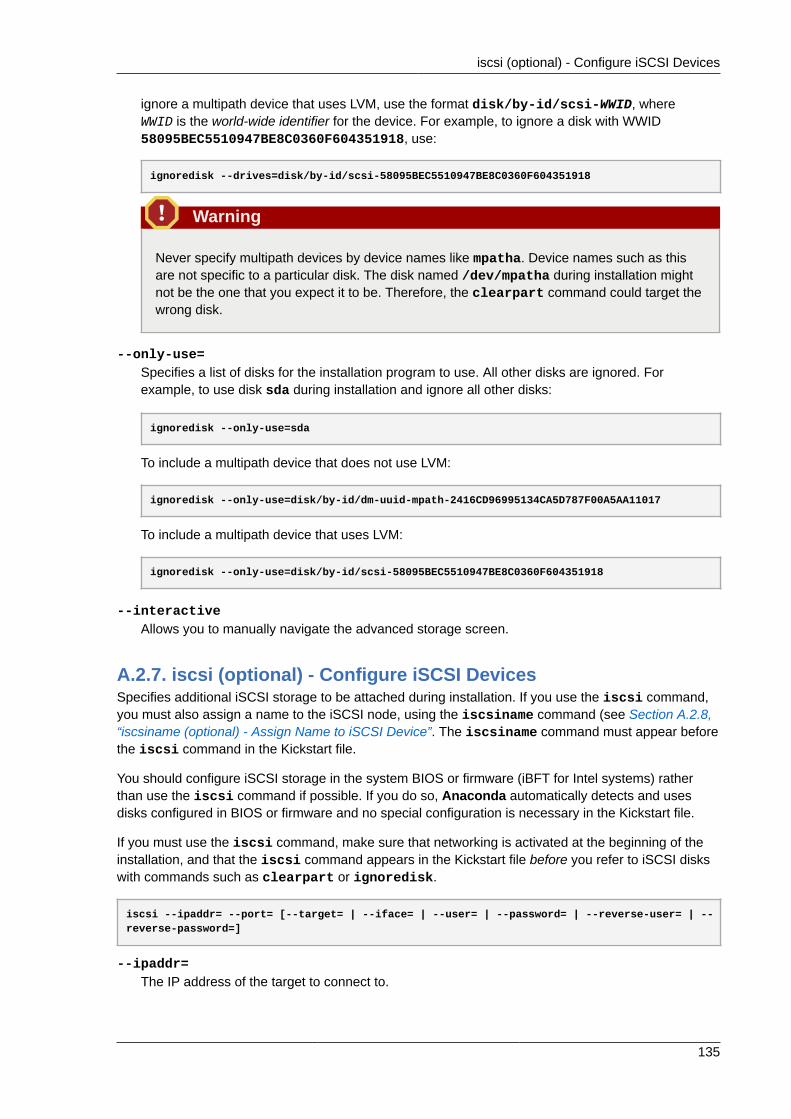
iscsi (optional) - Configure iSCSI Devices
135
ignore a multipath device that uses LVM, use the format disk/by-id/scsi-WWID, whereWWID is the world-wide identifier for the device. For example, to ignore a disk with WWID58095BEC5510947BE8C0360F604351918, use:
ignoredisk --drives=disk/by-id/scsi-58095BEC5510947BE8C0360F604351918
Warning
Never specify multipath devices by device names like mpatha. Device names such as thisare not specific to a particular disk. The disk named /dev/mpatha during installation mightnot be the one that you expect it to be. Therefore, the clearpart command could target thewrong disk.
--only-use=Specifies a list of disks for the installation program to use. All other disks are ignored. Forexample, to use disk sda during installation and ignore all other disks:
ignoredisk --only-use=sda
To include a multipath device that does not use LVM:
ignoredisk --only-use=disk/by-id/dm-uuid-mpath-2416CD96995134CA5D787F00A5AA11017
To include a multipath device that uses LVM:
ignoredisk --only-use=disk/by-id/scsi-58095BEC5510947BE8C0360F604351918
--interactiveAllows you to manually navigate the advanced storage screen.
A.2.7. iscsi (optional) - Configure iSCSI DevicesSpecifies additional iSCSI storage to be attached during installation. If you use the iscsi command,you must also assign a name to the iSCSI node, using the iscsiname command (see Section A.2.8,“iscsiname (optional) - Assign Name to iSCSI Device”. The iscsiname command must appear beforethe iscsi command in the Kickstart file.
You should configure iSCSI storage in the system BIOS or firmware (iBFT for Intel systems) ratherthan use the iscsi command if possible. If you do so, Anaconda automatically detects and usesdisks configured in BIOS or firmware and no special configuration is necessary in the Kickstart file.
If you must use the iscsi command, make sure that networking is activated at the beginning of theinstallation, and that the iscsi command appears in the Kickstart file before you refer to iSCSI diskswith commands such as clearpart or ignoredisk.
iscsi --ipaddr= --port= [--target= | --iface= | --user= | --password= | --reverse-user= | --reverse-password=]
--ipaddr=The IP address of the target to connect to.

Appendix A. Kickstart Syntax Reference
136
--port=The port number (typically 3260).
--target=Target IQN (iSCSI Qualified Name).
--iface=Bind the connection to a specific network interface instead of using the default one determined bythe network layer. Once used, it must be specified in all instances of the iscsi command in theentire Kickstart file.
--user=User name required to authenticate with the target.
--password=Password that corresponds with the user name specified for the target.
--reverse-user=User name required to authenticate with the initiator from a target using reverse CHAPauthentication.
--reverse-password=Password that corresponds with the user name specified for the initiator.
A.2.8. iscsiname (optional) - Assign Name to iSCSI DeviceAssigns a name to an iSCSI node specified by the iscsi command (Section A.2.7, “iscsi (optional) -Configure iSCSI Devices”). This command is mandatory if you use the iscsi command, and it mustbe specified before you use iscsi.
iscsiname iqn
A.2.9. logvol (optional) - Create LVM Logical VolumeCreate a logical volume for Logical Volume Management (LVM) with the syntax:
logvol mntpoint --vgname= --name= [options]
Note
Do not use the dash (-) character in logical volume and volume group names when installingFedora using Kickstart. If this character is used, the installation will finish normally, but the /dev/mapper/ directory will list these volumes and volume groups with every dash doubled. Forexample, a volume group named volgrp-01 containing a logical volume named logvol-01will be listed as /dev/mapper/volgrp--01-logvol--01.
This limitation only applies to newly created logical volume and volume group names. If you arereusing existing ones using the --noformat or --useexisting option, their names will not bechanged.
For a detailed example of logvol in action, see Section A.15.1, “Advanced Partitioning Example”.
logvol (optional) - Create LVM Logical Volume
137
mntpointReplace with the volume's mount point. This name can take the following forms:
/pathA path to the mount point - for example, / or /home
swapThe partition is used as swap space.
To determine the size of the swap partition automatically, use the --recommended option:
swap --recommended
To determine the size of the swap partition automatically but also allow extra space for yoursystem to hibernate, use the --hibernation option:
swap --hibernation
The size assigned will be equivalent to the swap space assigned by --recommended plus theamount of RAM on your system.
For the swap sizes assigned by these commands, see the section describing swap inSection 5.4.10.6, “Recommended Partitioning Scheme”.
noneUsed only when creating a thin pool volume.
--noformatUse an existing logical volume and do not format it.
--useexistingUse an existing logical volume and format it.
--fstype=Sets the file system type for the logical volume. Valid values are xfs, ext2, ext3, ext4, swap,and vfat. See Section 5.4.10.5, “Device, File System and RAID Types” for information aboutavailable file systems.
--fsoptions=Specifies a free form string of options to be used when mounting the filesystem. This string will becopied into the /etc/fstab file of the installed system and should be enclosed in quotes. Forexample:
--fsoptions="ro, x-systemd.device-timeout=0"
--mkfsoptions=Specifies additional parameters to be passed to the program that makes a filesystem on thislogical volume. No processing is done on the list of arguments, so they must be supplied in aformat that can be passed directly to the mkfs program. This means multiple options should becomma-separated or surrounded by double quotes, depending on the filesystem.
--label=Sets a label for the logical volume.
Appendix A. Kickstart Syntax Reference
138
--growGrow the volume to fill available space (if any), or up to the limit set by the --maxsize= option.
--size=The size of the logical volume in megabytes. This option can not be used together with the --percent= option.
--percent=Specify the amount by which to grow the logical volume, as a percentage of the free space in thevolume group after any statically-sized logical volumes are taken into account. This option can notbe used together with the --size= and --grow options.
Important
When creating a new logical volume, you must either specify its size statically using the --size= option, or as a percentage of remaining free space using the --percent= option.You can not use both of these options on the same logical volume.
--maxsize=The maximum size in megabytes when the logical volume is set to grow. Specify an integer valuehere such as 500 (do not include the unit).
--recommendedUse this option when creating a swap logical volume to determine the size of this volumeautomatically, based on your system's hardware. For details about the recommended scheme, seeSection 5.4.10.6, “Recommended Partitioning Scheme”.
Important
This option can only be used for partitions which result in a file system such as the /bootpartition and swap space. It can not be used to create partitionsm, LVM physical or logicalvolumes or RAID members.
--resizeResize an existing logical volume. If you use this option, you must also specify --useexistingand --size.
--encryptedSpecifies that this logical volume should be encrypted, using the passphrase provided in the --passphrase= option. If you do not specify a passphrase, the installation program will use thedefault, system-wide passphrase set with the autopart --passphrase command, or stop theinstallation and prompt you to provide a passphrase if no default is set.
--passphrase=Specifies the passphrase to use when encrypting this logical volume. You must use this optiontogether with the --encrypted option. This option has no effect by itself.

logvol (optional) - Create LVM Logical Volume
139
--cipher=Specifies which type of encryption will be used if the Anaconda default aes-xts-plain64is not satisfactory. You must use this option together with the --encrypted option; by itself ithas no effect. Available types of encryption are listed in the Fedora Security Guide, available athttp://docs.fedoraproject.org/. Using either aes-xts-plain64 or aes-cbc-essiv:sha256 isstrongly recommended.
--escrowcert=URL_of_X.509_certificateStore data encryption keys of all encrypted volumes as files in /root, encrypted using the X.509certificate from the URL specified with URL_of_X.509_certificate. The keys are storedas a separate file for each encrypted volume. This option is only meaningful if --encrypted isspecified.
--backuppassphraseAdd a randomly-generated passphrase to each encrypted volume. Store these passphrases inseparate files in /root, encrypted using the X.509 certificate specified with --escrowcert. Thisoption is only meaningful if --escrowcert is specified.
--thinpoolCreates a thin pool logical volume. (Use a mount point of none)
--metadatasize=Metadata area size (in MiB) for a new thin pool device.
--chunksize=Chunk size (in KiB) for a new thin pool device.
--thinCreate a thin logical volume. (Requires use of --poolname)
--poolname=Specify the name of the thin pool in which to create a thin logical volume. Requires the --thinoption.
--profile=Specify the configuration profile name to use with thin logical volumes. If used, the name will alsobe included in the metadata for the given logical volume. By default, the available profiles aredefault and thin-performance and are defined in the /etc/lvm/profile directory. Seethe lvm(8) man page for additional information.
--cachepvs=A comma-separated list of (fast) physical volumes which should be used for LVM cache.
--cachesize=Requested size of cache attached to the logical volume, in MiB. (Requires the --cachepvs=option.)
--cachemode=Mode to be used for LVM cache (either writeback or writethrough).
Appendix A. Kickstart Syntax Reference
140
Note
The --cachepvs=, --cachesize=, and --cachemode= options listed above are used toconfigure LVM caching. For more information, see the lvmcache(7) man page.
Create one or more partitions first using Section A.2.10, “part (required) - Create Physical Partition”,create the logical volume group (Section A.2.13, “volgroup (optional) - Create LVM Volume Group”),and then create logical volumes. For example:
part pv.01 --size 3000volgroup myvg pv.01logvol / --vgname=myvg --size=2000 --name=rootvol
A.2.10. part (required) - Create Physical PartitionCreates a partition on the system.
For a detailed example of part in action, see Section A.15.1, “Advanced Partitioning Example”.
part|partition mntpoint --name=name --device=device --rule=rule [options]
Warning
All partitions created are formatted as part of the installation process unless --noformat and --onpart= are used.
Note
If partitioning fails for any reason, diagnostic messages appear on virtual console 3.
mntpointWhere the partition is mounted. The value must be of one of the following:
/pathA path to the mount point - for example, / or /home
swapThe partition is used as swap space.
To determine the size of the swap partition automatically, use the --recommended option:
part (required) - Create Physical Partition
141
swap --recommended
The size assigned will be effective but not precisely calibrated for your system.
To determine the size of the swap partition automatically but also allow extra space for yoursystem to hibernate, use the --hibernation option:
swap--hibernation
The size assigned will be equivalent to the swap space assigned by --recommended plus theamount of RAM on your system.
For the swap sizes assigned by these commands, see the section describing swap inSection 5.4.10.6, “Recommended Partitioning Scheme”.
raid.idThe partition is used for software RAID (see raid).
pv.idThe partition is used for LVM (see Section A.2.10, “part (required) - Create Physical Partition”).
biosbootThe partition will be used for a BIOS Boot partition. A 1 MB BIOS boot partition is necessaryon BIOS-based systems using a GUID Partition Table (GPT); the boot loader will be installedinto it. It is not necessary on UEFI systems. Also see Section A.2.10, “part (required) - CreatePhysical Partition”.
/boot/efiAn EFI System Partition. An EFI partition at least 50 MB in size is necessary on UEFI-basedsystems; the recommended size is 200 MB. It is not necessary on BIOS systems. Also seeSection A.2.10, “part (required) - Create Physical Partition”.
--size=The minimum partition size in megabytes. Specify an integer value here such as 500 (do notinclude the unit).
Important
If the --size value is too small, the installation will fail. Set the --size value as theminimum amount of space you require. For size recommendations, see Section 5.4.10.6,“Recommended Partitioning Scheme”.
--maxsize=The maximum partition size in megabytes when the partition is set to grow. Specify an integervalue here such as 500 (do not include the unit).
--resizeResize an existing partition. When using this option, specify the new size (in megabytes) using the--size= option and the target partition using the --onpart= option.
--growTells the partition to grow to fill available space (if any), or up to the maximum size setting.
Appendix A. Kickstart Syntax Reference
142
Note
If you use --grow= without setting --maxsize= on a swap partition, Anaconda will limitthe maximum size of the swap partition. For systems that have less than 2 GB of physicalmemory, the imposed limit is twice the amount of physical memory. For systems with morethan 2 GB, the imposed limit is the size of physical memory plus 2 GB.
--noformatSpecifies that the partition should not be formatted, for use with the --onpart command.
--onpart= or --usepart=Specifies the device on which to place the partition. For example:
partition /home --onpart=hda1
The above puts /home on /dev/hda1.
These options can also add a partition to a logical volume. For example:
partition pv.1 --onpart=hda2
The device must already exist on the system; the --onpart option will not create it.
--ondisk= or --ondrive=Forces the partition to be created on a particular disk. For example, --ondisk=sdb puts thepartition on the second SCSI disk on the system.
To specify a multipath device that does not use logical volume management (LVM), use the formatdisk/by-id/dm-uuid-mpath-WWID, where WWID is the world-wide identifier for the device. Forexample, to specify a disk with WWID 2416CD96995134CA5D787F00A5AA11017, use:
part / --fstype=xfs --grow --asprimary --size=8192 --ondisk=disk/by-id/dm-uuid-mpath-2416CD96995134CA5D787F00A5AA11017
Multipath devices that use LVM are not assembled until after Anaconda has parsed the Kickstartfile. Therefore, you cannot specify these devices in the format dm-uuid-mpath. Instead, tospecify a multipath device that uses LVM, use the format disk/by-id/scsi-WWID, whereWWID is the world-wide identifier for the device. For example, to specify a disk with WWID58095BEC5510947BE8C0360F604351918, use:
part / --fstype=xfs --grow --asprimary --size=8192 --ondisk=disk/by-id/scsi-58095BEC5510947BE8C0360F604351918

part (required) - Create Physical Partition
143
Warning
Never specify multipath devices by device names like mpatha. Device names such as thisare not specific to a particular disk. The disk named /dev/mpatha during installation mightnot be the one that you expect it to be. Therefore, the clearpart command could target thewrong disk.
--asprimaryForces the partition to be allocated as a primary partition. If the partition cannot be allocatedas primary (usually due to too many primary partitions being already allocated), the partitioningprocess will fail. This option only makes sense when the disk uses a Master Boot Record (MBR);for GUID Partition Table (GPT)-labeled disks this option has no meaning. For information aboutprimary (and extended) partitions, see Section 5.4.10.6, “Recommended Partitioning Scheme”.
--fsprofile=Specifies a usage type to be passed to the program that makes a filesystem on this partition.A usage type defines a variety of tuning parameters to be used when making a filesystem. Forthis option to work, the filesystem must support the concept of usage types and there must bea configuration file that lists valid types. For ext2, ext3, ext4, this configuration file is /etc/mke2fs.conf.
--fstype=Sets the file system type for the partition. Valid values are xfs, ext2, ext3, ext4, swap, vfat,efi and biosboot. For information about supported file systems, see Section 5.4.10.5, “Device,File System and RAID Types”.
--fsoptions=Specifies a free form string of options to be used when mounting the filesystem. This string will becopied into the /etc/fstab file of the installed system and should be enclosed in quotes. Forexample:
--fsoptions="ro, x-systemd.device-timeout=0"
--mkfsoptions=Specifies additional parameters to be passed to the program that makes a filesystem on thispartition. No processing is done on the list of arguments, so they must be supplied in a formatthat can be passed directly to the mkfs program. This means multiple options should be comma-separated or surrounded by double quotes, depending on the filesystem.
--label=Assign a label to an individual partition.
--recommendedDetermine the size of the partition automatically. For details about the recommended scheme, seeSection 5.4.10.6, “Recommended Partitioning Scheme”.
Appendix A. Kickstart Syntax Reference
144
Important
This option can only be used for partitions which result in a file system such as the /bootpartition and swap space. It can not be used to create partitionsm, LVM physical or logicalvolumes or RAID members.
--onbiosdiskForces the partition to be created on a particular disk as discovered by the BIOS.
--encryptedSpecifies that this partition should be encrypted, using the passphrase provided in the --passphrase option. If you do not specify a passphrase, Anaconda uses the default, system-wide passphrase set with the autopart --passphrase command, or stops the installation andprompts you to provide a passphrase if no default is set.
--passphrase=Specifies the passphrase to use when encrypting this partition. You must use this option togetherwith the --encrypted option; by itself it has no effect.
--cipher=Specifies which type of encryption will be used if the Anaconda default aes-xts-plain64is not satisfactory. You must use this option together with the --encrypted option; by itself ithas no effect. Available types of encryption are listed in the Fedora Security Guide, available athttp://docs.fedoraproject.org/. Using either aes-xts-plain64 or aes-cbc-essiv:sha256 isstrongly recommended.
--escrowcert=URL_of_X.509_certificateStores data encryption keys of all encrypted volumes as files in /root, encrypted using the X.509certificate from the URL specified with URL_of_X.509_certificate. The keys are storedas a separate file for each encrypted volume. This option is only meaningful if --encrypted isspecified.
--backuppassphraseAdd a randomly-generated passphrase to each encrypted partition. Store these passphrases inseparate files in /root, encrypted using the X.509 certificate specified with --escrowcert. Thisoption is only meaningful if --escrowcert is specified.
A.2.11. raid (optional) - Create Software RAIDAssembles a software RAID device. This command is of the form:
raid mntpoint --level=level --device=mddevice partitions*
For a detailed example of raid in action, see Section A.15.1, “Advanced Partitioning Example”.
mntpointLocation where the RAID file system is mounted. If it is /, the RAID level must be 1 unless a bootpartition (/boot) is present. If a boot partition is present, the /boot partition must be level 1 andthe root (/) partition can be any of the available types. The partitions* (which denotes thatmultiple partitions can be listed) lists the RAID identifiers to add to the RAID array.
raid (optional) - Create Software RAID
145
--level=RAID level to use (0, 1, 4, 5, 6, or 10). See Section 5.4.10.5, “Device, File System and RAIDTypes” for information about various RAID types and their requirements.
--device=Name of the RAID device to use. As of Fedora 24, RAID devices are no longer referred to bynames like md0. If you have an old (v0.90 metadata) array that you cannot assign a name to, youcan specify the array by a filesystem label or UUID (for example, --device=rhel7-root --label=rhel7-root).
--spares=Specifies the number of spare drives allocated for the RAID array. Spare drives are used to rebuildthe array in case of drive failure.
--fsprofile=Specifies a usage type to be passed to the program that makes a filesystem on this partition.A usage type defines a variety of tuning parameters to be used when making a filesystem. Forthis option to work, the filesystem must support the concept of usage types and there must bea configuration file that lists valid types. For ext2, ext3, ext4, this configuration file is /etc/mke2fs.conf.
--fstype=Sets the file system type for the partition. Valid values are xfs, ext2, ext3, ext4, swap, vfat,efi and biosboot. For information about supported file systems, see Section 5.4.10.5, “Device,File System and RAID Types”.
--fsoptions=Specifies a free form string of options to be used when mounting the filesystem. This string will becopied into the /etc/fstab file of the installed system and should be enclosed in quotes. Forexample:
--fsoptions="ro, x-systemd.device-timeout=0"
--mkfsoptions=Specifies additional parameters to be passed to the program that makes a filesystem on thispartition. No processing is done on the list of arguments, so they must be supplied in a formatthat can be passed directly to the mkfs program. This means multiple options should be comma-separated or surrounded by double quotes, depending on the filesystem.
--label=Specify the label to give to the filesystem to be made. If the given label is already in use byanother filesystem, a new label will be created.
--noformatUse an existing RAID device and do not format it.
--useexistingUse an existing RAID device and reformat it.
--encryptedSpecifies that this array should be encrypted, using the passphrase provided in the --passphrase option. If you do not specify a passphrase, Anaconda uses the default, system-wide passphrase set with the autopart --passphrase command, or stops the installation andprompts you to provide a passphrase if no default is set.

Appendix A. Kickstart Syntax Reference
146
--passphrase=Specifies the passphrase to use when encrypting this partition. You must use this option togetherwith the --encrypted option; by itself it has no effect.
--cipher=Specifies which type of encryption will be used if the Anaconda default aes-xts-plain64is not satisfactory. You must use this option together with the --encrypted option; by itself ithas no effect. Available types of encryption are listed in the Fedora Security Guide, available athttp://docs.fedoraproject.org/. Using either aes-xts-plain64 or aes-cbc-essiv:sha256 isstrongly recommended.
--escrowcert=URL_of_X.509_certificateStores data encryption keys of all encrypted volumes as files in /root, encrypted using the X.509certificate from the URL specified with URL_of_X.509_certificate. The keys are storedas a separate file for each encrypted volume. This option is only meaningful if --encrypted isspecified.
--backuppassphraseAdd a randomly-generated passphrase to each encrypted partition. Store these passphrases inseparate files in /root, encrypted using the X.509 certificate specified with --escrowcert. Thisoption is only meaningful if --escrowcert is specified.
The following example shows how to create a RAID level 1 partition for /, and a RAID level 5 for /home, assuming there are three SCSI disks on the system. It also creates three swap partitions, oneon each drive.
Example A.2. Creating a RAID array in Kickstart
part raid.01 --size=6000 --ondisk=sdapart raid.02 --size=6000 --ondisk=sdbpart raid.03 --size=6000 --ondisk=sdc
part swap --size=512 --ondisk=sdapart swap --size=512 --ondisk=sdbpart swap --size=512 --ondisk=sdc
part raid.11 --size=1 --grow --ondisk=sdapart raid.12 --size=1 --grow --ondisk=sdbpart raid.13 --size=1 --grow --ondisk=sdc
raid / --level=1 --device=f24-root --label=f24-root raid.01 raid.02 raid.03raid /home --level=5 --device=f24-home --label=f24-home raid.11 raid.12 raid.13
A.2.12. reqpart (optional) - Create Required PartitionsAutomatically create partitions required by your hardware platform. These include a /boot/efi forx86_64 and Aarch64 systems with UEFI firmware, biosboot for x86_64 systems with BIOS firmwareand GPT (GUID Partition Table), and PRePBoot for IBM Power Systems.
volgroup (optional) - Create LVM Volume Group
147
Note
This command can not be used together with autopart, because autopart does the sameand creates other partitions or logical volumes such as / and swap on top. In contrast withautopart, this command only creates platform-specific partitions and leaves the rest of the driveempty, allowing you to create a custom layout.
reqpart [--add-boot]
--add-bootCreate a separate /boot partition in addition to the platform-specific partition created by the basecommand.
A.2.13. volgroup (optional) - Create LVM Volume GroupCreates a Logical Volume Management (LVM) volume group.
volgroup name partition [options]
Important
Do not use the dash (-) character in logical volume and volume group names when installingFedora using Kickstart. If this character is used, the installation will finish normally, but the /dev/mapper/ directory will list these volumes and volume groups with every dash doubled. Forexample, a volume group named volgrp-01 containing a logical volume named logvol-01will be listed as /dev/mapper/volgrp--01-logvol--01.
This limitation only applies to newly created logical volume and volume group names. If you arereusing existing ones using the --noformat or --noformat option, their names will not bechanged.
For a detailed partitioning example including volgroup, see Section A.15.1, “Advanced PartitioningExample”.
--noformatUse an existing volume group and do not format it.
--useexistingUse an existing volume group and reformat it.
--pesize=Set the size of the physical extents. The default size for Kickstart installations is 4 MiB.
--reserved-space=Specify an amount of space to leave unused in a volume group in megabytes. Applicable only tonewly created volume groups.

Appendix A. Kickstart Syntax Reference
148
--reserved-percent=Specify a percentage of total volume group space to leave unused. Applicable only to newlycreated volume groups.
Create one or more partitions first using Section A.2.10, “part (required) - Create Physical Partition”,create the logical volume group (Section A.2.13, “volgroup (optional) - Create LVM Volume Group”),and then create logical volumes. For example:
part pv.01 --size 3000volgroup myvg pv.01logvol / --vgname=myvg --size=2000 --name=rootvol
A.2.14. zerombr (optional) - Reinitialize Partition TablesIf zerombr is specified, any invalid partition tables found on disks are initialized. This destroys allof the contents of disks with invalid partition tables. This command is required when performing anunattended installation on a system with previously initialized disks.
Warning
On IBM System z, if zerombr is specified, any Direct Access Storage Device (DASD) visibleto the installation program which is not already low-level formatted is automatically low-levelformatted with dasdfmt. The command also prevents user choice during interactive installations.
If zerombr is not specified and there is at least one unformatted DASD visible to the installationprogram, a non-interactive Kickstart installation will exit unsuccessfully.
If zerombr is not specified and there is at least one unformatted DASD visible to the installationprogram, an interactive installation exits if the user does not agree to format all visible andunformatted DASDs. To circumvent this, only activate those DASDs that you will use duringinstallation. You can always add more DASDs after installation is complete.
A.2.15. zfcp (optional) - Configure Fibre Channel DeviceDefine a Fibre channel device. This option only applies on IBM System z. All of the options describedbelow must be specified.
zfcp --devnum=devnum --wwpn=wwpn --fcplun=lun
--devnumThe device number (zFCP adaptor device bus ID).
--wwpnThe device's World Wide Port Name (WWPN). Takes the form of a 16-digit number, preceded by0x.
--fcplunThe device's Logical Unit Number (LUN). Takes the form of a 16-digit number, preceded by 0x.
For example:
Network Configuration
149
zfcp --devnum=0.0.4000 --wwpn=0x5005076300C213e9 --fcplun=0x5022000000000000
A.3. Network ConfigurationCommands in this chapter are used for network configuration.
A.3.1. firewall (optional) - Configure FirewallSpecify the firewall configuration for the installed system.
firewall --enabled | --disabled device [--trust= | --ssh | --smtp | --http | --ftp | --port= | --service=]
--enabled or --enableReject incoming connections that are not in response to outbound requests, such as DNS repliesor DHCP requests. If access to services running on this machine is needed, you can choose toallow specific services through the firewall.
--disabled or --disableDisable the firewall.
--trust=Listing a device here, such as em1, allows all traffic coming to and from that device to go throughthe firewall. To list more than one device, use this option again - for example:
firewall --enable --trust=em1 --trust=em2
Do not use a comma-separated format such as --trust em1, em2.
incomingReplace with one or more of the following to allow the specified services through the firewall:
• --ssh
• --smtp
• --http
• --ftp
--port=You can specify that ports be allowed through the firewall using the port:protocol format. Forexample, to allow IMAP access through your firewall, specify imap:tcp. Numeric ports canalso be specified explicitly; for example, to allow UDP packets on port 1234 through, specify1234:udp. To specify multiple ports, separate them by commas.
--service=This option provides a higher-level way to allow services through the firewall. Some services (likecups, avahi, etc.) require multiple ports to be open or other special configuration in order forthe service to work. You can specify each individual port with the --port option, or specify --service= and open them all at once.
Valid options are anything recognized by the firewall-offline-cmd program in the firewalldpackage. If firewalld is running, firewall-cmd --get-services will provide a list ofknown service names.

Appendix A. Kickstart Syntax Reference
150
A.3.2. network (optional) - Configure Network InterfacesConfigures network information for the target system and activates network devices in the installationenvironment. The device specified in the first network command is activated automatically. Activationof the device can be also explicitly required by the --activate option.
--activateIf you use the --activate option on a device that has already been activated (for example, aninterface you configured with boot options so that the system could retrieve the Kickstart file) thedevice is reactivated to use the details specified in the Kickstart file.
Use the --nodefroute option to prevent the device from using the default route.
--bootproto=One of dhcp, bootp, ibft, or static. The default option is dhcp; the dhcp and bootp optionsare treated the same.
The DHCP method uses a DHCP server system to obtain its networking configuration. TheBOOTP method is similar, requiring a BOOTP server to supply the networking configuration. Todirect a system to use DHCP:
network --bootproto=dhcp
To direct a machine to use BOOTP to obtain its networking configuration, use the following line inthe Kickstart file:
network --bootproto=bootp
To direct a machine to use the configuration specified in iBFT, use:
network --bootproto=ibft
The static method requires that you specify the IP address, netmask, gateway, and nameserverin the Kickstart file. This information is static and is used during and after the installation.
All static networking configuration information must be specified on one line; you cannot wrap linesusing a backslash (\) as you can on a command line.
network --bootproto=static --ip=10.0.2.15 --netmask=255.255.255.0 --gateway=10.0.2.254 --nameserver=10.0.2.1
You can also configure multiple nameservers at the same time. To do so, use the --nameserver= options once for each name server you want to configure:
network --bootproto=static --ip=10.0.2.15 --netmask=255.255.255.0 --gateway=10.0.2.254 --nameserver=192.168.2.1 --nameserver=192.168.3.1
--device=Specifies the device to be configured (and eventually activated in Anaconda) with the networkcommand.
If the --device= option is missing on the first use of the network command, the value of theksdevice= Anaconda boot option is used, if available. Note that this is considered deprecatedbehavior; in most cases, you should always specify a --device= for every network command.
network (optional) - Configure Network Interfaces
151
The behavior of any subsequent network command in the same Kickstart file is unspecified ifits --device= option is missing. Make sure you specify this option for any network commandbeyond the first.
You can specify a device to be activated in any of the following ways:
• the device name of the interface, for example, em1
• the MAC address of the interface, for example, 01:23:45:67:89:ab
• the keyword link, which specifies the first interface with its link in the up state
• the keyword bootif, which uses the MAC address that pxelinux set in the BOOTIF variable.Set IPAPPEND 2 in your pxelinux.cfg file to have pxelinux set the BOOTIF variable.
For example:
network --bootproto=dhcp --device=em1
--ip=IP address of the device.
--ipv6=IPv6 address of the device, in the form of address[/prefix length] - for example,3ffe:ffff:0:1::1/128 . If prefix is omitted, 64 will be used. You can also use auto forautomatic configuration, or dhcp for DHCPv6-only configuration (no router advertisements).
--gateway=Default gateway as a single IPv4 address.
--ipv6gateway=Default gateway as a single IPv6 address.
--nodefroutePrevents the interface being set as the default route. Use this option when you activate additionaldevices with the --activate= option, for example, a NIC on a separate subnet for an iSCSItarget.
--nameserver=DNS name server, as an IP address. To specify more than one name server, use this parametermultiple times. For example:
network --bootproto=static --ip=10.0.2.15 --netmask=255.255.255.0 --gateway=10.0.2.254 --nameserver=192.168.2.1 --nameserver=192.168.3.1
--nodnsDo not configure any DNS server.
--netmask=Network mask for the installed system.
--hostname=Host name for the installed system. The host name can be either a fully-qualified domain name(FQDN) in the format hostname.domainname, or a short host name with no domain name. Manynetworks have a Dynamic Host Configuration Protocol (DHCP) service that automatically supplies

Appendix A. Kickstart Syntax Reference
152
connected systems with a domain name; to allow the DHCP service to assign the domain name tothis machine, only specify the short host name.
--ethtool=Specifies additional low-level settings for the network device which will be passed to the ethtoolprogram.
--essid=The network ID for wireless networks.
--wepkey=The WEP encryption key for wireless networks.
--wpakey=The WPA encryption key for wireless networks.
--onboot=Whether or not to enable the device at boot time.
--dhcpclass=The DHCP class.
--mtu=The MTU of the device.
--noipv4Disable IPv4 on this device.
--noipv6Disable IPv6 on this device.
--bondslaves=When this option is used, the network device specified in the --device= option will be createdusing slaves defined in the --bondslaves= option. For example:
network --device=mynetwork --bondslaves=em1,em2
The above command will create a bond device named mynetwork using the em1 and em2interfaces as its slaves.
--bondopts=A list of optional parameters for a bonded interface, which is specified using the --bondslaves=and --device= options. Options in this list must be separated by commas (",") or semicolons(";"). If an option itself contains a comma, use a semicolon to separate the options. For example:
network --bondopts=mode=active-backup,balance-rr;primary=eth1
Available optional parameters are listed in the Working with Kernel Modules chapter of the FedoraSystem Administrator's Guide, available at http://docs.fedoraproject.org/.
network (optional) - Configure Network Interfaces
153
Important
The --bondopts=mode= parameter only supports full mode names such as balance-rror broadcast, not their numerical representations such as 0 or 3.
--vlanid=Specifies virtual LAN (VLAN) ID number (802.1q tag) for the device created using the devicespecified in --device= as a parent. For example, network --device=em1 --vlanid=171will create a virtual LAN device em1.171.
--interfacename=Specify a custom interface name for a virtual LAN device. This option should be used when thedefault name generated by the --vlanid= option is not desirable. This option must be usedalong with --vlanid=. For example:
network --device=em1 --vlanid=171 --interfacename=vlan171
The above command will create a virtual LAN interface named vlan171 on the em1 device withan ID of 171.
The interface name can be arbitrary (for example, my-vlan), but in specific cases, the followingconventions must be followed:
• If the name contains a dot (.), it must take the form of NAME.ID. The NAME is arbitrary, but theID must be the VLAN ID. For example: em1.171 or my-vlan.171.
• Names starting with vlan must take the form of vlanID - for example, vlan171.
--teamslaves=Team device specified by the --device= option will be created using slaves specified in thisoption. Slaves are separated by commas. A slave can be followed by its configuration, which is asingle-quoted JSON string with double quotes escaped by the \ character. For example:
network --teamslaves="p3p1'{\"prio\": -10, \"sticky\": true}',p3p2'{\"prio\": 100}'"
See also the --teamconfig= option.
--teamconfig=Double-quoted team device configuration which is a single-quoted JSON string with double quotesescaped by the \ character. The device name is specified by --device= option and its slavesand their configuration by --teamslaves= option. For example:
network --device team0 --activate --bootproto static --ip=10.34.102.222 --netmask=255.255.255.0 --gateway=10.34.102.254 --nameserver=10.34.39.2 --teamslaves="p3p1'{\"prio\": -10, \"sticky\": true}',p3p2'{\"prio\": 100}'" --teamconfig="{\"runner\": {\"name\": \"activebackup\"}}"
Appendix A. Kickstart Syntax Reference
154
--bridgeslaves=When this option is used, the network bridge with device name specified using the --device=option will be created and devices defined in the --bridgeslaves= option will be added to thebridge. For example:
network --device=bridge0 --bridgeslaves=em1
--bridgeopts=An optional comma-separated list of parameters for the bridged interface. Available values arestp, priority, forward-delay, hello-time, max-age, and ageing-time. For informationabout these parameters, see the bridge setting table in the nm-settings(5) man page orat https://developer.gnome.org/NetworkManager/0.9/ref-settings.html. Also see the FedoraNetworking Guide, available at http://docs.fedoraproject.org/, for general information aboutnetwork bridging.
A.4. Console and EnvironmentThe following commands control the environment of the system after the installation finishes -language, keyboard layouts, or the graphical interface.
A.4.1. keyboard (optional) - Configure Keyboard LayoutsSets one or more available keyboard layouts for the system.
keyboard --vckeymap= | --xlayouts= [--switch=]
--vckeymap=Specify a VConsole keymap which should be used. Valid names correspond to the list of files inthe /usr/lib/kbd/keymaps/* directory, without the .map.gz extension.
--xlayouts=Specify a list of X layouts that should be used as a comma-separated list without spaces. Acceptsvalues in the same format as setxkbmap(1), either in the layout format (such as cz), or in thelayout (variant) format (such as cz (qwerty)).
All available layouts can be viewed on the xkeyboard-config(7) man page under Layouts.
--switch=Specify a list of layout-switching options (shortcuts for switching between multiple keyboardlayouts). Multiple options must be separated by commas without spaces. Accepts values in thesame format as setxkbmap(1).
Available switching options can be viewed on the xkeyboard-config(7) man page underOptions.
The following example sets up two keyboard layouts (English (US) and Czech (qwerty)) usingthe --xlayouts= option, and allows to switch between them using Alt+Shift:
keyboard --xlayouts=us,'cz (qwerty)' --switch=grp:alt_shift_toggle
A.4.2. lang (optional) - Configure Language During InstallationSets the language to use during installation and the default language to use on the installed system.
services (optional) - Configure Services
155
lang language [--addsupport=]
The file /usr/share/system-config-language/locale-list provides a list of the validlanguage codes in the first column of each line and is part of the system-config-language package.
Certain languages (for example, Chinese, Japanese, Korean, and Indic languages) are not supportedduring text-mode installation. If you specify one of these languages with the lang command anduse text mode, the installation process will continue in English, but the installed system will use yourselection as its default language.
--addsupport=Add support for additional languages. Takes the form of comma-separated list without spaces. Forexample:
lang en_US --addsupport=cs_CZ,de_DE,en_UK
A.4.3. services (optional) - Configure ServicesModifies the default set of services that will run under the default systemd target. The list of disabledservices is processed before the list of enabled services - therefore, if a service appears on both lists,it will be enabled.
services [--disabled=list] [--enabled=list]
Do not include spaces in the list of services. If you do, Kickstart will enable or disable only the servicesup to the first space. For example:
services --disabled=auditd, cups,smartd, nfslock
The above will disable only the auditd service. To disable all four services, the entry should includeno spaces:
services --disabled=auditd,cups,smartd,nfslock
--disabled=Disable the services given in the comma separated list.
--enabled=Enable the services given in the comma separated list.
A.4.4. skipx (optional) - Do Not Configure X Window SystemIf present, X will not be configured on the installed system.
Important
If you install a display manager among your package selection options, this package will createan X configuration, and the installed system will default to graphical.target. The effect of theskipx option will be overridden.

Appendix A. Kickstart Syntax Reference
156
A.4.5. timezone (optional) - Configure Time ZoneSets the system time zone to timezone. To view a list of available time zones, use the timedatectllist-timezones command.
timezone timezone [options]
--utcIf present, the system assumes the hardware clock is set to UTC (Greenwich Mean) time.
--nontpDisable the NTP service automatic starting.
--ntpservers=Specify a list of NTP servers to be used as a comma-separated list without spaces.
A.4.6. xconfig (optional) - Configure X Window SystemConfigures the X Window System. If you install the X Window System with a Kickstart file that doesnot include the xconfig command, you must provide the X configuration manually during installation.
Do not use this command in a Kickstart file that does not install the X Window System.
--defaultdesktop=Specify either GNOME or KDE to set the default desktop (assumes that GNOME DesktopEnvironment and/or KDE Desktop Environment has been installed in the %packages section).
--startxonbootUse a graphical login on the installed system.
A.5. Users, Groups and AuthenticationThe commands below are used to control user accounts, groups, and related areas.
A.5.1. auth or authconfig (optional) - Configure AuthenticationSets up the authentication options for the system using the authconfig command, which can alsobe run on a command line after the installation finishes. See the authconfig(8) manual page andthe authconfig --help command for more details. Passwords are shadowed by default.
auth [--enablenis | --nisdomain= | --nisserver= | --enableshadow | --enableldap | --enableldapauth | --ldapserver= | --ldapbasedn= | --enableldaptls | --disableldaptls | --enablekrb5 | --krb5realm= | --krb5kdc= | --krb5adminserver= | --enablehesiod | --hesiodlhs= | --hesiodrhs= | --enablesmbauth | --smbservers= | --smbworkgroup= | --enablecache | --passalgo=]
--enablenisTurns on NIS support. By default, --enablenis uses whatever domain it finds on the network. Adomain should almost always be set by hand with the --nisdomain= option.
--nisdomain=NIS domain name to use for NIS services.
--nisserver=Server to use for NIS services (broadcasts by default).

auth or authconfig (optional) - Configure Authentication
157
--useshadowor --enableshadowUse shadow passwords. Active by default.
--enableldapTurns on LDAP support in /etc/nsswitch.conf, allowing your system to retrieve informationabout users (for example, their UIDs, home directories, and shells) from an LDAP directory. Touse this option, you must install the nss-pam-ldapd package. You must also specify a server and abase DN (distinguished name) with --ldapserver= and --ldapbasedn=.
--enableldapauthUse LDAP as an authentication method. This enables the pam_ldap module for authenticationand changing passwords, using an LDAP directory. To use this option, you must have thenss-pam-ldapd package installed. You must also specify a server and a base DN with --ldapserver= and --ldapbasedn=. If your environment does not use TLS (Transport LayerSecurity), use the --disableldaptls switch to ensure that the resulting configuration file works.
--ldapserver=If you specified either --enableldap or --enableldapauth, use this option to specify thename of the LDAP server to use. This option is set in the /etc/ldap.conf file.
--ldapbasedn=If you specified either --enableldap or --enableldapauth, use this option to specify the DNin your LDAP directory tree under which user information is stored. This option is set in the /etc/ldap.conf file.
--enableldaptlsUse TLS (Transport Layer Security) lookups. This option allows LDAP to send encryptedusernames and passwords to an LDAP server before authentication.
--disableldaptlsDo not use TLS (Transport Layer Security) lookups in an environment that uses LDAP forauthentication.
--enablekrb5Use Kerberos 5 for authenticating users. Kerberos itself does not know about home directories,UIDs, or shells. If you enable Kerberos, you must make users' accounts known to this workstationby enabling LDAP, NIS, or Hesiod or by using the useradd command. If you use this option, youmust have the pam_krb5 package installed.
--krb5realm=The Kerberos 5 realm to which your workstation belongs.
--krb5kdc=The KDC (or KDCs) that serve requests for the realm. If you have multiple KDCs in your realm,use a comma-separated list without spaces.
--krb5adminserver=The KDC in your realm that is also running kadmind. This server handles password changing andother administrative requests. This server must be run on the master KDC if you have more thanone KDC.
--enablehesiodEnables Hesiod support for looking up user home directories, UIDs, and shells. More informationon setting up and using Hesiod on your network is in /usr/share/doc/glibc-2.x.x/

Appendix A. Kickstart Syntax Reference
158
README.hesiod, which is included in the glibc package. Hesiod is an extension of DNS that usesDNS records to store information about users, groups, and various other items.
--hesiodlhs= and --hesiodrhs=The Hesiod LHS (left-hand side) and RHS (right-hand side) values, set in /etc/hesiod.conf.The Hesiod library uses these values to search DNS for a name, similar to the way that LDAPuses a base DN.
To look up user information for the username jim, the Hesiod library looks upjim.passwdLHSRHS, which should resolve to a TXT record that contains a string identical to anentry for that user in the passwd file: jim:*:501:501:Jungle Jim:/home/jim:/bin/bash.To look up groups, the Hesiod library looks up jim.groupLHSRHS instead.
To look up users and groups by number, make 501.uid a CNAME for jim.passwd, and501.gid a CNAME for jim.group. Note that the library does not place a period (.) in front ofthe LHS and RHS values when performing a search. Therefore, if the LHS and RHS values needto have a period placed in front of them, you must include the period in the values you set for --hesiodlhs= and --hesiodrhs=.
--enablesmbauthEnables authentication of users against an SMB server (typically a Samba or Windows server).SMB authentication support does not know about home directories, UIDs, or shells. If you enableSMB, you must make users' accounts known to the workstation by enabling LDAP, NIS, or Hesiodor by using the useradd command.
--smbservers=The name of the servers to use for SMB authentication. To specify more than one server, separatethe names with commas (,).
--smbworkgroup=The name of the workgroup for the SMB servers.
--enablecacheEnables the nscd service. The nscd service caches information about users, groups, and variousother types of information. Caching is especially helpful if you choose to distribute informationabout users and groups over your network using NIS, LDAP, or Hesiod.
--passalgo=Specify sha256 to set up the SHA-256 hashing algorithm or sha512 to set up the SHA-512hashing algorithm.
A.5.2. group (optional) - Create User GroupCreates a new user group on the system. If a group with the given name or GID already exists, thiscommand will fail. In addition, the user command can be used to create a new group for the newlycreated user.
group --name=name [--gid=gid]
--name=Provides the name of the group.
--gid=The group ID (GID). If not provided, defaults to the next available non-system GID.
pwpolicy (optional) - Change the Default Password Policy
159
A.5.3. pwpolicy (optional) - Change the Default Password PolicyThis command can be used to set custom requirements (policy) such as length and strengthfor passwords set during the installation - the root password, user passwords and LUKS (diskencryption) password.
pwpolicy name [--minlen=length] [--minquality=quality] [--strict|nostrict] [--emptyok|noempty] [--changesok|nochanges]
The libpwquality library is used to check minimum password requirements (length and quality).You can use the pwscore and pwmake commands provided by the libpwquality package to check thequality score of your chosen password, or to create a random password with a given score. See thepwscore(1) and pwmake(1) man pages for details about these commands.
Important
This command must be used inside the %anaconda section. See Section A.9, “%anaconda(optional) - Additional Anaconda Configuration” for details.
nameName of the password entry. Supported values are root, user and luks for root password,user passwords and LUKS password, respectively.
--minlen=Sets the minimum allowed password length. The default minimum length is 8.
--minquality=Sets the minimum allowed password quality as defined by the libpwquality library. The defaultvalue is 50.
--strictStrict password enforcement. Passwords not meeting the quality requirements specified in --minquality= will not be allowed. Enabled by default.
--notstrictPasswords not meeting the minimum quality requirements specified in --minquality= will beallowed after Done is clicked twice.
--emptyokAllow empty passwords. Enabled by default.
--notemptyDo not allow empty passwords.
--changesokAllow changing the password in the user interface, even if the Kickstart file already specifies apassword.
--nochangesDo not allow changing passwords which are already set in the Kickstart file. Enabled by default.
An example use of the pwpolicy command is below:
Appendix A. Kickstart Syntax Reference
160
%anacondapwpolicy root --minlen=10 --minquality=60 --strict --notempty --nochanges%end
A.5.4. realm (optional) - Join an Active Directory or IPA DomainJoin an Active Directory or IPA domain. For more information about this command, see the joinsection of the realm(8) man page.
realm join domain [options]
--computer-ou=OU=Provide the distinguished name of an organizational unit in order to create the computer account.The exact format of the distinguished name depends on the client software and membershipsoftware. The root DSE portion of the distinguished name can usually be left out.
--no-passwordJoin automatically without a password.
--one-time-password=Join using a one-time password. This is not possible with all types of realm.
--client-software=Only join realms which can run this client software. Valid values include sssd and winbind. Notall realms support all values. By default, the client software is chosen automatically.
--server-software=Only join realms which can run this server software. Possible values include active-directoryor freeipa.
--membership-software=Use this software when joining the realm. Valid values include samba and adcli. Not all realmssupport all values. By default, the membership software is chosen automatically.
A.5.5. rootpw (required) - Set Root PasswordSets the system's root password to the password argument.
rootpw [--iscrypted|--plaintext] [--lock] password
--iscryptedIf this option is present, the password argument is assumed to already be encrypted. This option ismutually exclusive with --plaintext. To create an encrypted password, you can use Python:
$ python -c 'import crypt; print(crypt.crypt("My Password", "$6$My Salt"))'
This will generate a SHA512 crypt of your password using your provided salt.
--plaintextIf this option is present, the password argument is assumed to be in plain text. This option ismutually exclusive with --iscrypted.
selinux (optional) - Configure SELinux
161
--lockIf this option is present, the root account is locked by default. This means that the root user will notbe able to log in from the console.
A.5.6. selinux (optional) - Configure SELinuxSets the state of SELinux on the installed system. The default policy is enforcing. For moreinformation regarding SELinux in Fedora, see the Fedora SELinux User's and Administrator's Guide,available at http://docs.fedoraproject.org/.
selinux [--disabled|--enforcing|--permissive]
--enforcingEnables SELinux with the default targeted policy being enforcing.
--permissiveEnables SELinux with the default targeted policy being permissive. This policy outputs warningsbased on the SELinux policy, but does not actually enforce the policy.
--disabledDisables SELinux completely.
A.5.7. sshkey (optional) - Add an Authorized SSH KeyUse this command to add a specified SSH key to an user's authorized_keys file. The specified usermust either be root, or it must be created in the Kickstart file - either automatically by an installedpackage, or using Section A.5.8, “user (optional) - Create User Account”.
sshkey --username=user "ssh_key"
The ssh_key must be a full SSH key fingerprint, and it must be enclosed in quotes ("") because thekey may contain spaces.
--username=The name of the user account to which you want to install the SSH key.
A.5.8. user (optional) - Create User AccountCreates a new user on the system.
user --name=username [options]
--name=Provides the name of the user. This option is required.
--gecos=Provides the GECOS information for the user. This is a string of various system-specific fieldsseparated by a comma. It is frequently used to specify the user's full name, office number, etc. Seethe passwd(5) man page for more details.
--groups=In addition to the default group, a comma separated list of group names the user should belong to.The groups must exist before the user account is created. See Section A.5.2, “group (optional) -Create User Group”.
Appendix A. Kickstart Syntax Reference
162
--homedir=The home directory for the user. If not provided, this defaults to /home/username.
--lockIf this option is present, this account is locked by default. This means that the user will not be ableto log in from the console.
--password=The new user's password. If no password is provided, the account will be locked.
--iscryptedIf this option is present, the password argument is assumed to already be encrypted. This option ismutually exclusive with --plaintext. To create an encrypted password, you can use Python:
$ python -c 'import crypt; print(crypt.crypt("My Password", "$6$My Salt"))'
This will generate a SHA512 crypt of your password using your provided salt.
--plaintextIf this option is present, the password argument is assumed to be in plain text. This option ismutually exclusive with --iscrypted.
--shell=The user's login shell. If not provided, the system default will be used.
--uid=The UID (User ID). If not provided, this defaults to the next available non-system UID.
--gid=The GID (Group ID) to be used for the user's default group. If not provided, this defaults to thenext available non-system group ID.
A.6. Installation EnvironmentThe following commands control how the system will behave during the installation.
A.6.1. autostep (optional) - Go Through Every ScreenNormally, Kickstart installations skip unnecessary screens. This option makes the installation programstep through every screen, displaying each briefly. This option should not be used when deploying asystem because it may disrupt package installation.
autostep [--autoscreenshot]
--autoscreenshotTake a screenshot at every step during installation. These screenshots are stored in /tmp/anaconda-screenshots during the installation, and after the installation finishes you can findthem in /root/anaconda-screenshots.
Each screen is only captured right before the installer switches to the next one. This is important,because if you do not use all required Kickstart options and the installation therefore does notbegin automatically, you can go to the screens which were not automatically configured, performany configuration you want. Then, when you press Done to continue, the screen will be capturedincluding the configuration you just provided.
cmdline (optional) - Perform Installation in Command Line Mode
163
A.6.2. cmdline (optional) - Perform Installation in Command LineModePerform the installation in a completely non-interactive command line mode. Any prompts forinteraction halts the install. This mode is useful on IBM System z systems with the x3270 terminal.
Important
For a fully automatic installation, you must either specify one of the available modes(graphical, text, or cmdline) in the Kickstart file, or you must use the console= bootoption as described in Section 8.2.3, “Console, Environment and Display Options”. Otherwise thesystem will halt and ask you to choose a mode.
A.6.3. graphical (optional) - Perform Installation in Graphical ModePerform the installation in graphical mode. This is the default. This command takes no options.
Important
For a fully automatic installation, you must either specify one of the available modes(graphical, text, or cmdline) in the Kickstart file, or you must use the console= bootoption as described in Section 8.2.3, “Console, Environment and Display Options”. Otherwise thesystem will halt and ask you to choose a mode.
A.6.4. logging (optional) - Configure Error Logging DuringInstallationControls the error logging of Anaconda during installation. It has no effect on the installed system.
logging [--host= | --port= | --level=]
--host=Send logging information to the given remote host, which must be running a syslogd processconfigured to accept remote logging.
--port=If the remote syslogd process uses a port other than the default, it may be specified with thisoption.
--level=Specify the minimum level of messages that appear on virtual console 3 (tty3). This only affectsmessages printed to the console; log files will contain messages of all levels. Possible values aredebug, info, warning, error, or critical.
A.6.5. rescue (optional) - Rescue ModeAutomatically enters the installation program's rescue mode. This gives you a chance to repair thesystem in case of any problems.
Appendix A. Kickstart Syntax Reference
164
rescue [--nomount|--romount]
--nomount or --romountControls how the installed system is mounted in the rescue environment. By default, theinstallation program will find your system and mount it in read-write mode, telling you where it hasperformed this mount. You may optionally choose to not mount anything (the --nomount option)or mount in read-only mode (the --romount option). Only one of these two options may be used.
A.6.6. sshpw (optional) - Restrict ssh Access During InstallationDuring the installation, you can interact with the installation program and monitor its progress overan SSH connection. Use the sshpw command to create temporary accounts through which to logon. Each instance of the command creates a separate account that exists only in the installationenvironment. These accounts are not transferred to the installed system.
sshpw --username=name password [--iscrypted|--plaintext] [--lock]
Important
By default, the ssh server is not started during the installation. To make ssh available duringthe installation, boot the system with the kernel boot option inst.sshd. See Section 8.2.3,“Console, Environment and Display Options” for details.
Note
If you want to disable root ssh access to your hardware during installation, use the following:
sshpw --username=root --lock
--usernameProvides the name of the user. This option is required.
--iscryptedIf this option is present, the password argument is assumed to already be encrypted. This option ismutually exclusive with --plaintext. To create an encrypted password, you can use Python:
$ python -c 'import crypt; print(crypt.crypt("My Password", "$6$My Salt"))'
This will generate a SHA512 crypt of your password using your provided salt.
--plaintextIf this option is present, the password argument is assumed to be in plain text. This option ismutually exclusive with --iscrypted
text (optional) - Perform Installation in Text Mode
165
--lockIf this option is present, this account is locked by default. This means that the user will not be ableto log in from the console.
A.6.7. text (optional) - Perform Installation in Text ModePerform the Kickstart installation in text mode. Kickstart installations are performed in graphical modeby default.
Important
For a fully automatic installation, you must either specify one of the available modes(graphical, text, or cmdline) in the Kickstart file, or you must use the console= bootoption as described in Section 8.2.3, “Console, Environment and Display Options”. Otherwise thesystem will halt and ask you to choose a mode.
A.6.8. unsupported_hardware (optional) - Suppress UnsupportedHardware AlertsSuppress the Unsupported Hardware Detected alert. If this command is not included andunsupported hardware is detected, the installation will stall at this alert.
A.6.9. vnc (optional) - Configure VNC AccessAllows the graphical installation to be viewed remotely via VNC. This method is usually preferred overtext mode, as there are some size and language limitations in text installations. With no additionaloptions, this command will start a VNC server on the installation system with no password and willdisplay the details required to connect to it.
vnc [--host=hostname] [--port=port] [--password=password]
For more information about VNC installations, including instructions on how to connect to theinstallation system, see Chapter 11, Installing Using VNC.
--host=Connect to a VNC viewer listening on the given hostname.
--port=Provide a port that the remote VNC viewer process is listening on. If not provided, the VNC default(5900) will be used.
--password=Set a password which must be provided to connect to the VNC session. This is optional, butrecommended.
A.7. After the InstallationThis section contains commands which control the system's behavior immediately after the installationfinishes.
Appendix A. Kickstart Syntax Reference
166
A.7.1. %addon com_redhat_kdump (optional) - Configure kdumpThis command configures the kdump kernel crash dumping mechanism.
Note
The syntax for this command is unusual because it is an add-on rather than a built-in Kickstartcommand. For more information about add-ons, see Section A.8, “%addon (optional) - Include anAnaconda Add-on”.
Kdump is a kernel crash dumping mechanism that allows you to save the contents of the system'smemory for later analysis. It relies on kexec, which can be used to start a Linux kernel from thecontext of another kernel without rebooting the system and preserve the contents of the first kernelmemory that would otherwise be lost.
In case of a system crash, kexec starts a second kernel (a capture kernel). This capture kernelresides in a reserved part of the system memory that is inaccessible to the main kernel. Kdump thencaptures the contents of the crashed kernel's memory (a crash dump) and saves it to a specifiedlocation. This location can not be configured using Kickstart; it must be specified after the installationby editing the /etc/kdump.conf configuration file.
Available options are:
--enableEnable Kdump on the installed system.
--disableDo not enable Kdump on the installed system.
--reserve-mb=The amount of memory you want to reserve for Kdump in megabytes. For example:
%addon com_redhat_kdump --enable --reserve-mb=128%end
You can also specify auto instead of a numeric value. In that case the installer will determine theamount of RAM to reserve for kdump automatically, based on your system architecture and thetotal amount of memory on the system.
If you enable Kdump and do not specify the --reserve-mb= option, the auto value will beused.
--enablefadumpEnable firmware-assisted dumping on systems which allow it (notably IBM Power Systemsservers).
A.7.2. firstboot (optional) - Enable or Disable Initial SetupDetermine whether the Initial Setup application starts the first time the system is booted. If enabled,the initial-setup package must be installed. If not specified, this option is disabled by default. For moreinformation about Initial Setup, see Section 6.1, “Initial Setup”.
halt (optional) - Halt System After Installation
167
firstboot --enable|--disable [--reconfig]
--enable or --enabledInitial Setup will be started the first time the installed system boots.
--disable or --disabledInitial Setup will be disabled.
--reconfigInitial Setup will start after the reboot in reconfiguration mode. This mode enables the language,mouse, keyboard, root password, security level, time zone and networking configuration options inaddition to the default ones.
A.7.3. halt (optional) - Halt System After InstallationHalt the system after the installation has successfully completed. This is similar to a manualinstallation, where after the installation finishes, the installer displays a message and waits for the userto press a key before rebooting. During a Kickstart installation, if no completion method is specified,this option is used as the default.
For other completion methods, see the poweroff, reboot, and shutdown commands.
A.7.4. poweroff (optional) - Power Off After InstallationShut down and power off the system after the installation has successfully completed.
Note
The poweroff command is highly dependent on the system hardware in use. Specifically,certain hardware components such as the BIOS, APM (advanced power management), andACPI (advanced configuration and power interface) must be able to interact with the systemkernel. Consult your hardware documentation for more information on you system's APM/ACPIabilities.
For other completion methods, see the halt, reboot, and shutdown Kickstart commands.
A.7.5. reboot (optional) - Reboot After InstallationReboot after the installation is successfully completed. If you are installing Fedora on IBM System z incommand line mode (using Section A.6.2, “cmdline (optional) - Perform Installation in Command LineMode”), this command is necessary for a fully automated installation.
For other completion methods, see the halt, poweroff, and shutdown Kickstart options.
Appendix A. Kickstart Syntax Reference
168
Important
Use of the reboot command may result in an endless installation loop, depending on theinstallation media and method.
--ejectAttempt to eject the installation media (if installing from a DVD) before rebooting.
--kexecUse this option to reboot into the new system using the kexec kernel switching mechanisminstead of a full reboot, bypassing the BIOS/Firmware and boot loader.
A.7.6. shutdown (optional) - Shut Down After InstallationShut down the system after the installation has successfully completed.
For other completion methods, see the halt, poweroff, and reboot Kickstart options.
A.8. %addon (optional) - Include an Anaconda Add-onYou can expand the basic Anaconda and Kickstart functionality by using custom add-ons specifiedusing the %addon section.
To use an add-on in your Kickstart file, add the %addon addon_name options command. Thesection must be closed with an %end statement. For example, to use the Kdump add-on, which isincluded by default on some installations, use the following block:
%addon com_redhat_kdump --enable --reserve-mb=128%end
The %addon section does not have any options of its own; all options depend on the add-on beingused.
For more information about Anaconda add-ons, see the Fedora Anaconda Addon DevelopmentGuide1.
A.9. %anaconda (optional) - Additional AnacondaConfigurationThis section, introduced in Fedora 22, is used to specify additional configuration options for theinstaller. Commands inside this section only control the behavior during installation, not on theinstalled system. The only command currently available inside this section is Section A.5.3, “pwpolicy(optional) - Change the Default Password Policy”. The %anaconda section must end with %end.
In interactive installations (using the graphical or text interface), the /usr/share/anaconda/interactive-defaults.ks file contains the default %anaconda section. To change the defaults,
1 https://vpodzime.fedorapeople.org/anaconda-addon-development-guide/
%include (optional) - Include Contents of Another File
169
you must create a product.img file with a Kickstart file replacing the default one, and pass this file toAnaconda using a boot option.
When using a Kickstart file, you can override the default %anaconda section by using the sectionagain in your custom Kickstart.
A.10. %include (optional) - Include Contents of Another FileUse the %include /path/to/file command to include the contents of another file in the Kickstartfile as though the contents were at the location of the %include command in the Kickstart file.
A.11. %ksappend (optional) - Append Contents of AnotherFileThe %ksappend url directive is very similar to Section A.10, “%include (optional) - Include Contentsof Another File” in that it is used to include the contents of additional files as though they were at thelocation of the %ksappend command. The difference is in when the two directives are processed.
%ksappend is processed in an initial pass, before any other part of the Kickstart file. Then, thisexpanded Kickstart file is passed to the rest of Anaconda where all %pre scripts are handled, andthen finally the rest of the Kickstart file is processed in order, which includes %include directives.
Therefore, %ksappend provides a way to include a file containing %pre scripts, while %include doesnot.
A.12. %packages (required) - Package SelectionUse the %packages command to begin a Kickstart section which describes the software packages tobe installed. This section must end with an %end statement.
You can specify packages by environment, group, or by their package names. Several environmentsand groups that contain related packages are defined. See the repodata/comps.xml file in yourinstallation source for environment and group definitions.
The comps.xml file contains a structure describing available environments (marked by the<environment> tag) and groups (the <group> tag). Each entry has an ID, user visibility value,name, description, and package list. If the group is selected for installation, the packages markedmandatory in the package list are always installed, the packages marked default are installed ifthey are not specifically excluded, and the packages marked optional must be specifically includedeven when the group is selected.
You can specify a package group or environment using either its ID (the <id> tag) or name (the<name> tag).
Important
To install a 32-bit package on a 64-bit system, you will need to append the package namewith the 32-bit architecture for which the package was built - for example, glibc.i686. The --multilib option also must be specified in the Kickstart file; see the available options below.

Appendix A. Kickstart Syntax Reference
170
Important
Initial Setup does not run after a system is installed from a Kickstart file unless a desktopenvironment and the X Window System were included in the installation and graphical login wasenabled. This means that by default, no users except for root will be created. You can eithercreate a user with the user option in the Kickstart file before installing additional systems fromit (see Section A.5.8, “user (optional) - Create User Account” for details) or log into the installedsystem with a virtual console as root and add users with the useradd command.
Specifying Environments, Groups and PackagesSpecifying an Environment
In addition to groups, you specify an entire environment to be installed:
%packages@^Infrastructure Server%end
This command will install all packages which are part of the Infrastracture Server environment.All available environments are described in the comps.xml file.
Specifying GroupsSpecify groups, one entry to a line, starting with an @ symbol, and then the full group name orgroup id as given in the comps.xml file. For example:
%packages@X Window System@Desktop@Sound and Video%end
The Core and Base groups are always selected - it is not necessary to specify them in the%packages section.
The comps.xml file also defines groups called Conflicts (variant) for each variant ofFedora. This group contains all packages which are known to cause file conflicts, and is intendedto be excluded.
Specifying Individual PackagesSpecify individual packages by name, one entry to a line. You can use the asterisk character (*)as a wildcard in package names. For example:
%packagessqlitecurlaspelldocbook*%end
%packages (required) - Package Selection
171
The docbook* entry includes the packages docbook-dtds, docbook-simple, docbook-slides andothers that match the pattern represented with the wildcard.
Excluding Environments, Groups, or PackagesUse a leading dash (-) to specify packages or groups to exclude from the installation. Forexample:
%packages-@Graphical Internet-autofs-ipa*fonts%end
Important
Installing all available packages using only * in a Kickstart file is not supported, even if youexclude the @Conflicts (variant) group.
You can change the default behavior of the %packages section by using several options. Someoptions work for the entire package selection, others are used with only specific groups.
Common Package Selection OptionsThe following options are available for the %packages. To use an option, append it to the start of thepackage selection section. For example:
%packages --multilib --ignoremissing
--nocoreDo not install the @Core group.
--ignoremissingIgnore any packages, groups and environments missing in the installation source, instead ofhalting the installation to ask if the installation should be aborted or continued.
--excludedocsDo not install any documentation contained within packages. In most cases, this will exclude anyfiles normally installed in the /usr/share/doc* directory, but the specific files to be excludeddepend on individual packages.
--multilibConfigure the installed system for multilib packages (that is, to allow installing 32-bit packages ona 64-bit system) and install packages specified in this section as such.
Normally, on a 64-bit system, only packages for this architecture (marked as x86_64) andpackages for all architectures (marked as noarch) would be installed. When you use this option,packages for 32-bit systems (marked as i686) will be automatically installed as well, if available.
This only applies to packages explicitly specified in the %packages section. Packages whichare only being installed as dependencies without being specified in the Kickstart file will only beinstalled in architecture versions in which they are needed, even if they are available for morearchitectures.
Appendix A. Kickstart Syntax Reference
172
Options for Specific Package GroupsThe options in this list only apply to a single package group. Instead of using them at the %packagescommand in the Kickstart file, append them to the group name. For example:
%packages@Graphical Internet --optional%end
--nodefaultsOnly install the group's mandatory packages, not the default selections.
--optionalInstall packages marked as optional in the group definition in the comps.xml file, in addition toinstalling the default selections.
Note that some package groups, such as Scientific Support, do not have any mandatoryor default packages specified - only optional packages. In this case the --optional option mustalways be used, otherwise no packages from this group will be installed.
A.13. %pre (optional) - Pre-installation ScriptYou can add commands to run on the system immediately after the Kickstart file has been parsed,but before the installation begins. This section must be placed towards the end of the Kickstart file,after the actual Kickstart commands, and must start with %pre and end with %end. If your Kickstart filealso includes a %post section, the order in which the %pre and %post sections are included does notmatter.
You can access the network in the %pre section. However, the name service has not been configuredat this point, so only IP addresses work, not URLs.
The pre-installation script section of Kickstart cannot manage multiple install trees or source media.This information must be included for each created Kickstart file, as the pre-installation script occursduring the second stage of the installation process.
Note
Unlike the post-installation script, the pre-installation script is not run in the chroot environment.
The following options can be used to change the behavior of pre-installation scripts. To use an option,append it to the %pre line at the beginning of the script. For example:
%pre --interpreter=/usr/bin/python--- Python script omitted --%end
--interpreter=Allows you to specify a different scripting language, such as Python. Any scripting languageavailable on the system can be used; in most cases, these will be /usr/bin/sh, /usr/bin/bash, and /usr/bin/python.
%post (optional) - Post-installation Script
173
--erroronfailDisplay an error and halt the installation if the script fails. The error message will direct you towhere the cause of the failure is logged.
--log=Logs the script's output into the specified log file. For example:
%pre --log=/mnt/sysimage/root/ks-pre.log
For an example of a pre-installation script, see Section A.15.2, “Example Pre-installation Script”.
A.14. %post (optional) - Post-installation ScriptYou have the option of adding commands to run on the system once the installation is complete, butbefore the system is rebooted for the first time. This section must be placed towards the end of theKickstart file, after the actual Kickstart commands, and must start with %post and end with %end. Ifyour Kickstart file also includes a %pre section, the order of the %pre and %post sections does notmatter.
This section is useful for functions such as installing additional software or configuring an additionalname server. The post-install script is run in a chroot environment, therefore, performing tasks such ascopying scripts or RPM packages from the installation media do not work by default. You can changethis behavior using the --nochroot option as described below.
Important
If you configured the network with static IP information, including a name server, you can accessthe network and resolve IP addresses in the %post section. If you configured the network forDHCP, the /etc/resolv.conf file has not been completed when the installation executes the%post section. You can access the network, but you cannot resolve IP addresses. Thus, if youare using DHCP, you must specify IP addresses in the %post section.
The following options can be used to change the behavior of post-installation scripts. To use an option,append it to the %post line at the beginning of the script. For example:
%post --interpreter=/usr/bin/python--- Python script omitted --%end
--interpreter=Allows you to specify a different scripting language, such as Python. For example:
%post --interpreter=/usr/bin/python
Any scripting language available on the system can be used; in most cases, these will be /usr/bin/sh, /usr/bin/bash, and /usr/bin/python.
--nochrootAllows you to specify commands that you would like to run outside of the chroot environment.
Appendix A. Kickstart Syntax Reference
174
The following example copies the file /etc/resolv.conf to the file system that was justinstalled.
%post --nochrootcp /etc/resolv.conf /mnt/sysimage/etc/resolv.conf%end
--erroronfailDisplay an error and halt the installation if the script fails. The error message will direct you towhere the cause of the failure is logged.
--log=Logs the script's output into the specified log file. Note that the path of the log file must take intoaccount whether or not you use the --nochroot option. For example, without --nochroot:
%post --log=/root/ks-post.log
with --nochroot:
%post --nochroot --log=/mnt/sysimage/root/ks-post.log
For an example of a post-installation script, see Section A.15.3, “Example Post-installation Script”.
A.15. Example Kickstart Configurations
A.15.1. Advanced Partitioning ExampleThe following is an integrated example showing the clearpart, zerombr, part, raid, volgroup,and logvol Kickstart options in action:
Example A.3. Advanced Partitioning Example
clearpart --drives=hda,hdczerombr# Raid 1 IDE configpart raid.11 --size 1000 --asprimary --ondrive=hdapart raid.12 --size 1000 --asprimary --ondrive=hdapart raid.13 --size 2000 --asprimary --ondrive=hdapart raid.14 --size 8000 --ondrive=hdapart raid.15 --size 16384 --grow --ondrive=hdapart raid.21 --size 1000 --asprimary --ondrive=hdcpart raid.22 --size 1000 --asprimary --ondrive=hdcpart raid.23 --size 2000 --asprimary --ondrive=hdcpart raid.24 --size 8000 --ondrive=hdcpart raid.25 --size 16384 --grow --ondrive=hdc
# You can add --spares=xraid / --fstype xfs --device root --level=RAID1 raid.11 raid.21raid /safe --fstype xfs --device safe --level=RAID1 raid.12 raid.22raid swap --fstype swap --device swap --level=RAID1 raid.13 raid.23raid /usr --fstype xfs --device usr --level=RAID1 raid.14 raid.24raid pv.01 --fstype xfs --device pv.01 --level=RAID1 raid.15 raid.25
# LVM configuration so that we can resize /var and /usr/local later
Example Pre-installation Script
175
volgroup sysvg pv.01logvol /var --vgname=sysvg --size=8000 --name=varlogvol /var/freespace --vgname=sysvg --size=8000 --name=freespacetouselogvol /usr/local --vgname=sysvg --size=1 --grow --name=usrlocal
This advanced example implements LVM over RAID, as well as the ability to resize various directoriesfor future growth.
First, the clearpart command is used on drives hda and hdc to wipe them. The zerombrcommand initializes unused partition tables.
Then, the two drives are partitioned to prepare them for RAID configuration. Each drive is divided intofive partitions, and each drive is partitioned into an identical layout.
The next part uses these pairs of physical partitions to create a software RAID device with RAID1 level(mirroring). The first four RAID devices are used for / (root), /safe, swap and /usr. The fifth, largestpair of partitions is named pv.01 and will be used in the following part as a physical volume for LVM.
Finally, the last set of commands first creates a volume group named sysvg on the pv.01 physicalvolume. Then, three logical volumes (/var, /var/freespace and /usr/local) are created andadded to the sysvg volume group. The /var and /var/freespace volumes have a set size of 8GB, and the /usr/local volume uses the --grow option to fill all remaining available space.
Important
The above example uses identifiers hda and hdc to identify disk drives. You should use uniqueidentifiers, such as a disk labels or an UUIDs, to identify disk drives. See the note in introductionto this appendix.
A.15.2. Example Pre-installation ScriptThe following is an example %pre section:
Example A.4. Sample %pre Script
%pre#!/bin/shhds=""mymedia=""for file in /proc/ide/h* domymedia=`cat $file/media`if [ $mymedia == "disk" ] ; thenhds="$hds `basename $file`"fidoneset $hdsnumhd=`echo $#`drive1=`echo $hds | cut -d' ' -f1`drive2=`echo $hds | cut -d' ' -f2`
#Write out partition scheme based on whether there are 1 or 2 hard drivesif [ $numhd == "2" ] ; then#2 drivesecho "#partitioning scheme generated in %pre for 2 drives" > /tmp/part-includeecho "clearpart --all" >> /tmp/part-include

Appendix A. Kickstart Syntax Reference
176
echo "part /boot --fstype xfs --size 75 --ondisk hda" >> /tmp/part-includeecho "part / --fstype xfs --size 1 --grow --ondisk hda" >> /tmp/part-includeecho "part swap --recommended --ondisk $drive1" >> /tmp/part-includeecho "part /home --fstype xfs --size 1 --grow --ondisk hdb" >> /tmp/part-includeelse#1 driveecho "#partitioning scheme generated in %pre for 1 drive" > /tmp/part-includeecho "clearpart --all" >> /tmp/part-includeecho "part /boot --fstype xfs --size 75" >> /tmp/part-includeecho "part swap --recommended" >> /tmp/part-includeecho "part / --fstype xfs --size 2048" >> /tmp/part-includeecho "part /home --fstype xfs --size 2048 --grow" >> /tmp/part-includefi%end
This script determines the number of hard drives in the system and writes a text file with a differentpartitioning scheme depending on whether it has one or two drives. Instead of having a set ofpartitioning commands in the Kickstart file, include the following line:
%include /tmp/part-include
The partitioning commands selected in the script will be used.
A.15.3. Example Post-installation ScriptThe following is an example %post section:
Example A.5. Sample %post Script
# Start of the %post section with logging into /root/ks-post.log%post --log=/root/ks-post.log
# Mount an NFS sharemkdir /mnt/tempmount -o nolock 10.10.0.2:/usr/new-machines /mnt/tempopenvt -s -w -- /mnt/temp/runmeumount /mnt/temp
# End of the %post section%end
The above example mounts an NFS share and executes a script named runme located at /usr/new-machines/ on the share. Note that NFS file locking is not supported while in Kickstart mode,therefore the -o nolock option is required.
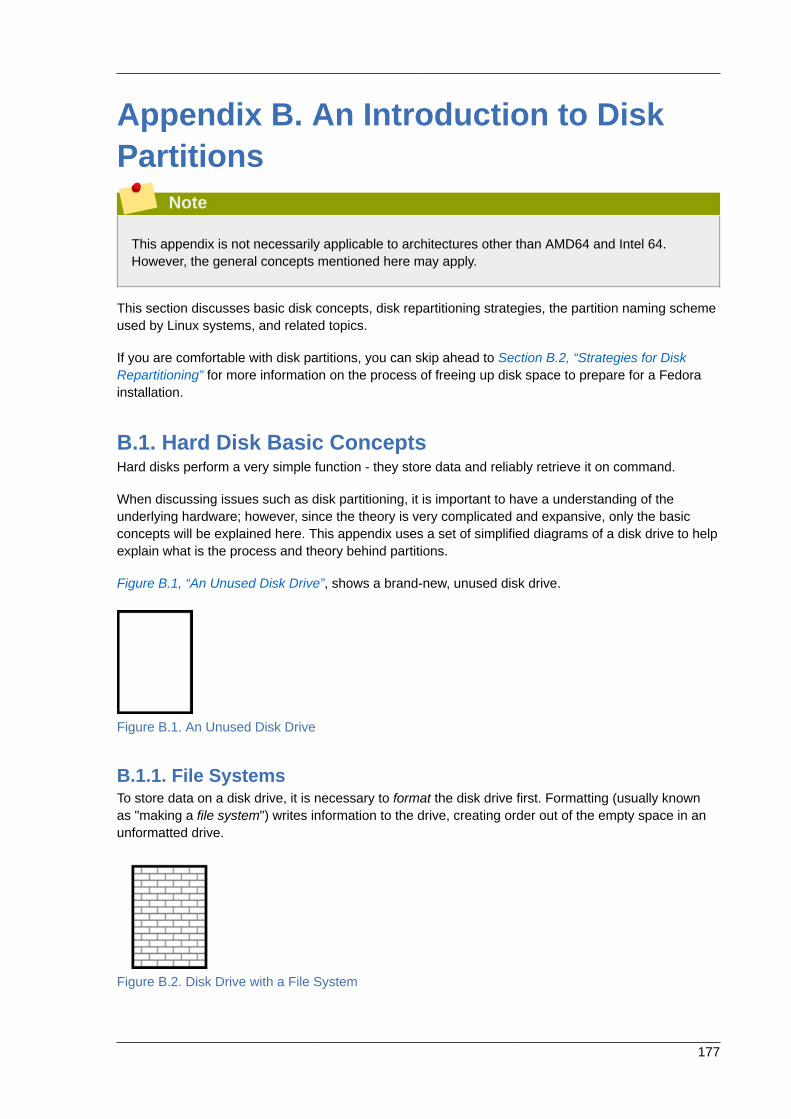
177
Appendix B. An Introduction to DiskPartitions
Note
This appendix is not necessarily applicable to architectures other than AMD64 and Intel 64.However, the general concepts mentioned here may apply.
This section discusses basic disk concepts, disk repartitioning strategies, the partition naming schemeused by Linux systems, and related topics.
If you are comfortable with disk partitions, you can skip ahead to Section B.2, “Strategies for DiskRepartitioning” for more information on the process of freeing up disk space to prepare for a Fedorainstallation.
B.1. Hard Disk Basic ConceptsHard disks perform a very simple function - they store data and reliably retrieve it on command.
When discussing issues such as disk partitioning, it is important to have a understanding of theunderlying hardware; however, since the theory is very complicated and expansive, only the basicconcepts will be explained here. This appendix uses a set of simplified diagrams of a disk drive to helpexplain what is the process and theory behind partitions.
Figure B.1, “An Unused Disk Drive”, shows a brand-new, unused disk drive.
Figure B.1. An Unused Disk Drive
B.1.1. File SystemsTo store data on a disk drive, it is necessary to format the disk drive first. Formatting (usually knownas "making a file system") writes information to the drive, creating order out of the empty space in anunformatted drive.
Figure B.2. Disk Drive with a File System
Appendix B. An Introduction to Disk Partitions
178
As Figure B.2, “Disk Drive with a File System”, implies, the order imposed by a file system involvessome trade-offs:
• A small percentage of the driver's available space is used to store file system-related data and canbe considered as overhead.
• A file system splits the remaining space into small, consistently-sized segments. For Linux, thesesegments are known as blocks. 1
Note that there is no single, universal file system. As Figure B.3, “Disk Drive with a Different FileSystem”, shows, a disk drive may have one of many different file systems written on it. Differentfile systems tend to be incompatible; that is, an operating system that supports one file system (ora handful of related file system types) may not support another. However, Fedora supports a widevariety of file systems (including many commonly used by other operating systems such as MicrosoftWindows), making data interchange between different file systems easy.
Figure B.3. Disk Drive with a Different File System
Writing a file system to disk is only the first step. The goal of this process is to actually store andretrieve data. The figure below shows a drive disk after some data have been written to it:
Figure B.4. Disk Drive with Data Written to It
As Figure B.4, “Disk Drive with Data Written to It”, shows, some of the previously-empty blocks arenow holding data. However, by just looking at this picture, we cannot determine exactly how many filesreside on this drive. There may only be one file or many, as all files use at least one block and somefiles use multiple blocks. Another important point to note is that the used blocks do not have to forma contiguous region; used and unused blocks may be interspersed. This is known as fragmentation.Fragmentation can play a part when attempting to resize an existing partition.
As with most computer-related technologies, disk drives changed over time after their introduction. Inparticular, they got bigger. Not larger in physical size, but bigger in their capacity to store information.And, this additional capacity drove a fundamental change in the way disk drives were used.
B.1.2. Partitions: Turning One Drive Into ManyDisk drives can be divided into partitions. Each partition can be accessed as if it was a separate disk.This is done through the addition of a partition table.
1 Blocks really are consistently sized, unlike our illustrations. Keep in mind, also, that an average disk drive contains thousandsof blocks. The picture is simplified for the purposes of this discussion.
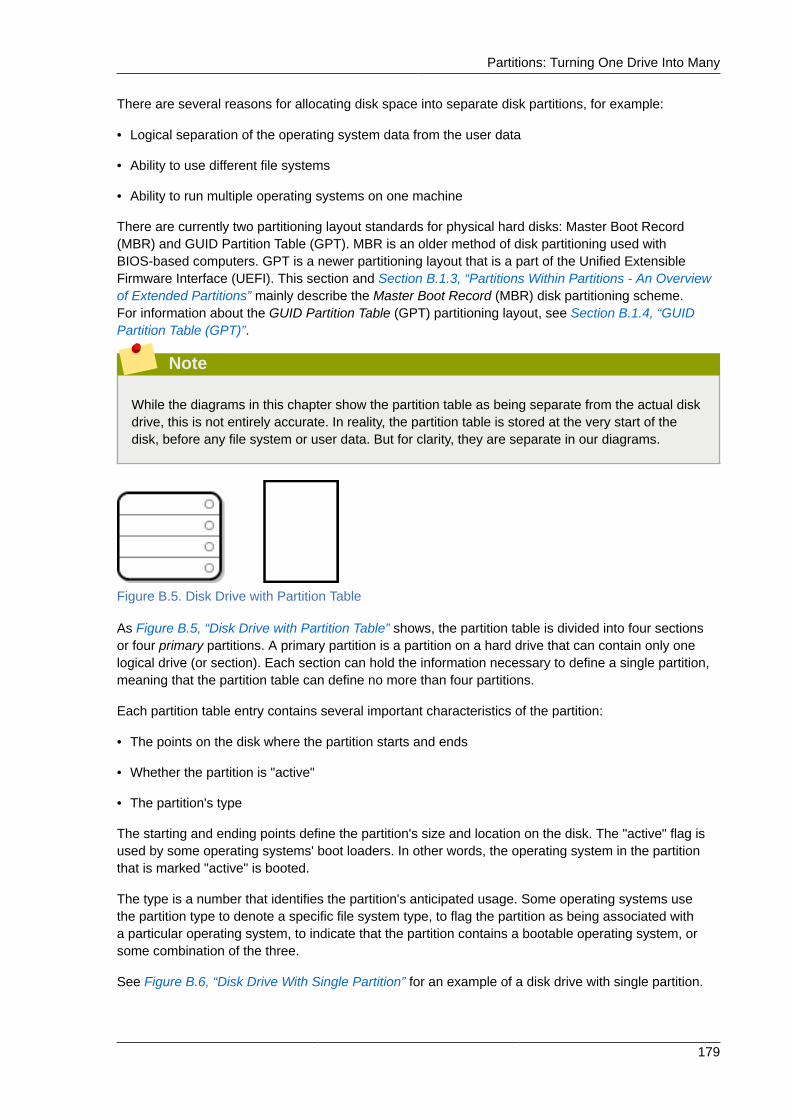
Partitions: Turning One Drive Into Many
179
There are several reasons for allocating disk space into separate disk partitions, for example:
• Logical separation of the operating system data from the user data
• Ability to use different file systems
• Ability to run multiple operating systems on one machine
There are currently two partitioning layout standards for physical hard disks: Master Boot Record(MBR) and GUID Partition Table (GPT). MBR is an older method of disk partitioning used withBIOS-based computers. GPT is a newer partitioning layout that is a part of the Unified ExtensibleFirmware Interface (UEFI). This section and Section B.1.3, “Partitions Within Partitions - An Overviewof Extended Partitions” mainly describe the Master Boot Record (MBR) disk partitioning scheme.For information about the GUID Partition Table (GPT) partitioning layout, see Section B.1.4, “GUIDPartition Table (GPT)”.
Note
While the diagrams in this chapter show the partition table as being separate from the actual diskdrive, this is not entirely accurate. In reality, the partition table is stored at the very start of thedisk, before any file system or user data. But for clarity, they are separate in our diagrams.
Figure B.5. Disk Drive with Partition Table
As Figure B.5, “Disk Drive with Partition Table” shows, the partition table is divided into four sectionsor four primary partitions. A primary partition is a partition on a hard drive that can contain only onelogical drive (or section). Each section can hold the information necessary to define a single partition,meaning that the partition table can define no more than four partitions.
Each partition table entry contains several important characteristics of the partition:
• The points on the disk where the partition starts and ends
• Whether the partition is "active"
• The partition's type
The starting and ending points define the partition's size and location on the disk. The "active" flag isused by some operating systems' boot loaders. In other words, the operating system in the partitionthat is marked "active" is booted.
The type is a number that identifies the partition's anticipated usage. Some operating systems usethe partition type to denote a specific file system type, to flag the partition as being associated witha particular operating system, to indicate that the partition contains a bootable operating system, orsome combination of the three.
See Figure B.6, “Disk Drive With Single Partition” for an example of a disk drive with single partition.

Appendix B. An Introduction to Disk Partitions
180
Figure B.6. Disk Drive With Single Partition
The single partition in this example is labeled as DOS. This label shows the partition type, with DOSbeing one of the most common ones. The table below shows a list of some of the commonly usedpartition types and hexadecimal numbers used to represent them.
Table B.1. Partition Types
Partition Type Value Partition Type Value
Empty 00 Novell Netware 386 65
DOS 12-bit FAT 01 PIC/IX 75
XENIX root 02 Old MINIX 80
XENIX usr 03 Linux/MINUX 81
DOS 16-bit <=32M 04 Linux swap 82
Extended 05 Linux native 83
DOS 16-bit >=32 06 Linux extended 85
OS/2 HPFS 07 Amoeba 93
AIX 08 Amoeba BBT 94
AIX bootable 09 BSD/386 a5
OS/2 Boot Manager 0a OpenBSD a6
Win95 FAT32 0b NEXTSTEP a7
Win95 FAT32 (LBA) 0c BSDI fs b7
Win95 FAT16 (LBA) 0e BSDI swap b8
Win95 Extended (LBA) 0f Syrinx c7
Venix 80286 40 CP/M db
Novell 51 DOS access e1
PReP Boot 41 DOS R/O e3
GNU HURD 63 DOS secondary f2
Novell Netware 286 64 BBT ff
B.1.3. Partitions Within Partitions - An Overview of ExtendedPartitionsIn case four partitions are insufficient for your needs, you can use extended partitions to create upadditional partitions. You do this by setting the type of a partition to "Extended".
An extended partition is like a disk drive in its own right - it has its own partition table which pointsto one or more partitions (now called logical partitions, as opposed to the four primary partitions)contained entirely within the extended partition itself. Figure B.7, “Disk Drive With Extended Partition”,shows a disk drive with one primary partition and one extended partition containing two logicalpartitions (along with some unpartitioned free space).
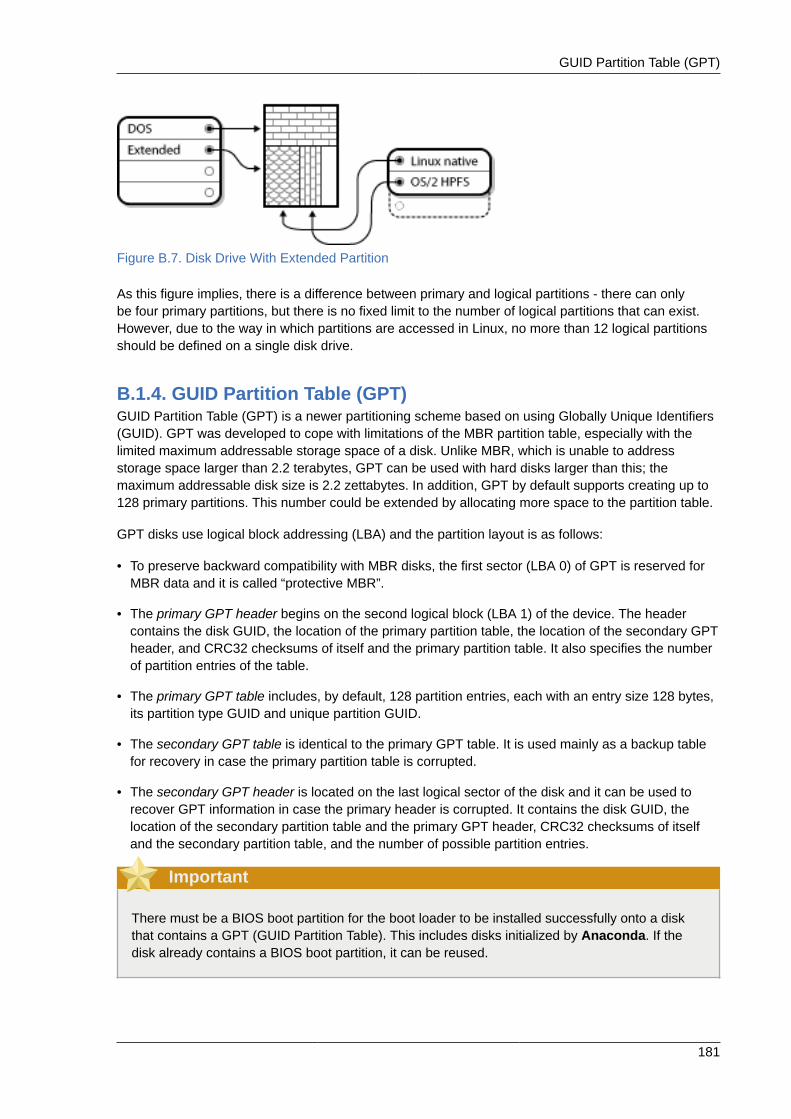
GUID Partition Table (GPT)
181
Figure B.7. Disk Drive With Extended Partition
As this figure implies, there is a difference between primary and logical partitions - there can onlybe four primary partitions, but there is no fixed limit to the number of logical partitions that can exist.However, due to the way in which partitions are accessed in Linux, no more than 12 logical partitionsshould be defined on a single disk drive.
B.1.4. GUID Partition Table (GPT)GUID Partition Table (GPT) is a newer partitioning scheme based on using Globally Unique Identifiers(GUID). GPT was developed to cope with limitations of the MBR partition table, especially with thelimited maximum addressable storage space of a disk. Unlike MBR, which is unable to addressstorage space larger than 2.2 terabytes, GPT can be used with hard disks larger than this; themaximum addressable disk size is 2.2 zettabytes. In addition, GPT by default supports creating up to128 primary partitions. This number could be extended by allocating more space to the partition table.
GPT disks use logical block addressing (LBA) and the partition layout is as follows:
• To preserve backward compatibility with MBR disks, the first sector (LBA 0) of GPT is reserved forMBR data and it is called “protective MBR”.
• The primary GPT header begins on the second logical block (LBA 1) of the device. The headercontains the disk GUID, the location of the primary partition table, the location of the secondary GPTheader, and CRC32 checksums of itself and the primary partition table. It also specifies the numberof partition entries of the table.
• The primary GPT table includes, by default, 128 partition entries, each with an entry size 128 bytes,its partition type GUID and unique partition GUID.
• The secondary GPT table is identical to the primary GPT table. It is used mainly as a backup tablefor recovery in case the primary partition table is corrupted.
• The secondary GPT header is located on the last logical sector of the disk and it can be used torecover GPT information in case the primary header is corrupted. It contains the disk GUID, thelocation of the secondary partition table and the primary GPT header, CRC32 checksums of itselfand the secondary partition table, and the number of possible partition entries.
Important
There must be a BIOS boot partition for the boot loader to be installed successfully onto a diskthat contains a GPT (GUID Partition Table). This includes disks initialized by Anaconda. If thedisk already contains a BIOS boot partition, it can be reused.
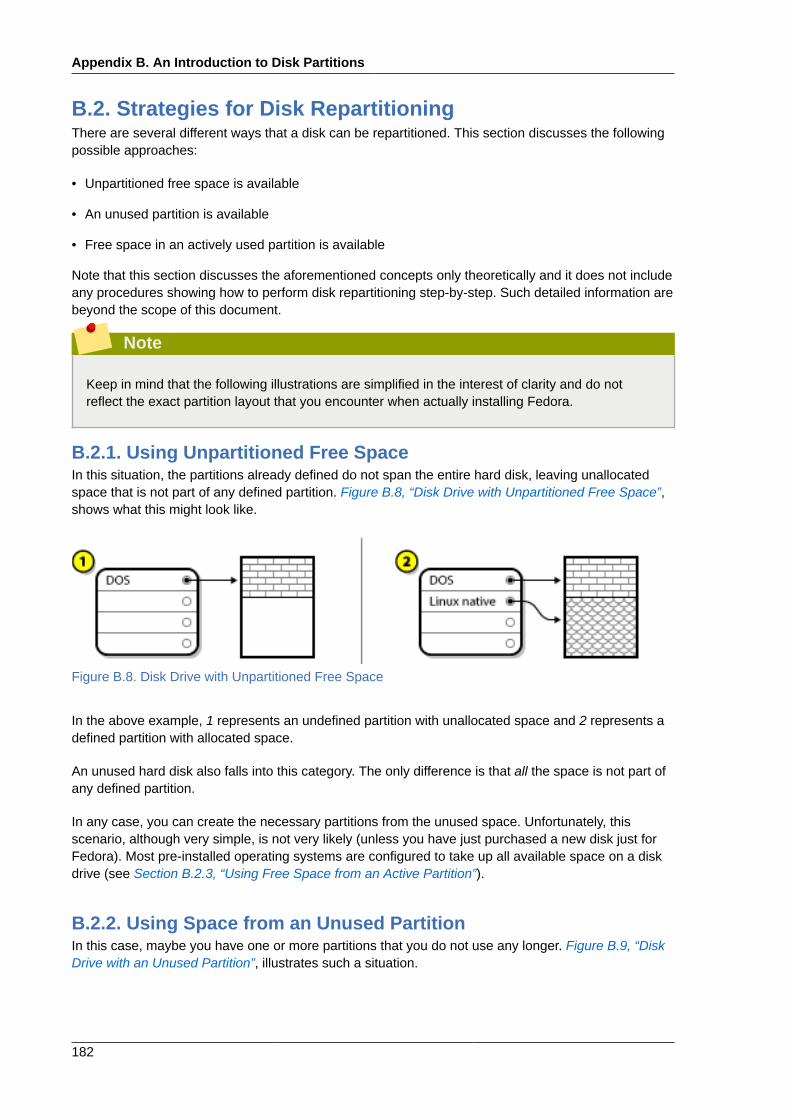
Appendix B. An Introduction to Disk Partitions
182
B.2. Strategies for Disk RepartitioningThere are several different ways that a disk can be repartitioned. This section discusses the followingpossible approaches:
• Unpartitioned free space is available
• An unused partition is available
• Free space in an actively used partition is available
Note that this section discusses the aforementioned concepts only theoretically and it does not includeany procedures showing how to perform disk repartitioning step-by-step. Such detailed information arebeyond the scope of this document.
Note
Keep in mind that the following illustrations are simplified in the interest of clarity and do notreflect the exact partition layout that you encounter when actually installing Fedora.
B.2.1. Using Unpartitioned Free SpaceIn this situation, the partitions already defined do not span the entire hard disk, leaving unallocatedspace that is not part of any defined partition. Figure B.8, “Disk Drive with Unpartitioned Free Space”,shows what this might look like.
Figure B.8. Disk Drive with Unpartitioned Free Space
In the above example, 1 represents an undefined partition with unallocated space and 2 represents adefined partition with allocated space.
An unused hard disk also falls into this category. The only difference is that all the space is not part ofany defined partition.
In any case, you can create the necessary partitions from the unused space. Unfortunately, thisscenario, although very simple, is not very likely (unless you have just purchased a new disk just forFedora). Most pre-installed operating systems are configured to take up all available space on a diskdrive (see Section B.2.3, “Using Free Space from an Active Partition”).
B.2.2. Using Space from an Unused PartitionIn this case, maybe you have one or more partitions that you do not use any longer. Figure B.9, “DiskDrive with an Unused Partition”, illustrates such a situation.

Using Free Space from an Active Partition
183
Figure B.9. Disk Drive with an Unused Partition
In the above example, 1 represents an unused partition and 2 represents reallocating an unusedpartition for Linux.
In this situation, you can use the space allocated to the unused partition. You first must delete thepartition and then create the appropriate Linux partition(s) in its place. You can delete the unusedpartition and manually create new partitions during the installation process.
B.2.3. Using Free Space from an Active PartitionThis is the most common situation. It is also, unfortunately, the hardest to handle. The main problem isthat, even if you have enough free space, it is presently allocated to a partition that is already in use.If you purchased a computer with pre-installed software, the hard disk most likely has one massivepartition holding the operating system and data.
Aside from adding a new hard drive to your system, you have two choices:
Destructive RepartitioningIn this case, the single large partition is deleted and several smaller ones are created instead.Any data held in the original partition is destroyed. This means that making a complete backupis necessary. It is highly recommended to make two backups, use verification (if available in yourbackup software), and try to read data from the backup before deleting the partition.
Warning
If an operating system was installed on that partition, it must be reinstalled if you want to usethat system as well. Be aware that some computers sold with pre-installed operating systemsmay not include the installation media to reinstall the original operating system. You shouldcheck whether this applies to your system is before you destroy your original partition and itsoperating system installation.
After creating a smaller partition for your existing operating system, you can reinstall software,restore your data, and start the installation. Figure B.10, “Disk Drive Being DestructivelyRepartitioned” shows this being done.
Figure B.10. Disk Drive Being Destructively Repartitioned
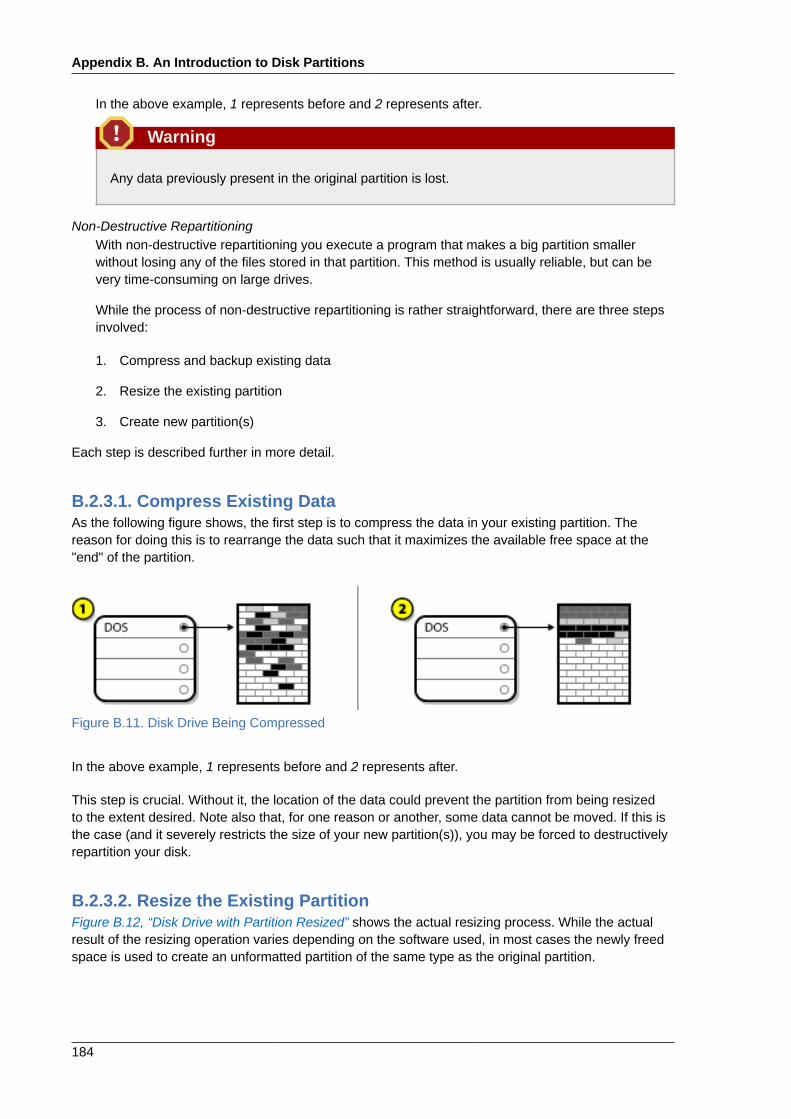
Appendix B. An Introduction to Disk Partitions
184
In the above example, 1 represents before and 2 represents after.
Warning
Any data previously present in the original partition is lost.
Non-Destructive RepartitioningWith non-destructive repartitioning you execute a program that makes a big partition smallerwithout losing any of the files stored in that partition. This method is usually reliable, but can bevery time-consuming on large drives.
While the process of non-destructive repartitioning is rather straightforward, there are three stepsinvolved:
1. Compress and backup existing data
2. Resize the existing partition
3. Create new partition(s)
Each step is described further in more detail.
B.2.3.1. Compress Existing DataAs the following figure shows, the first step is to compress the data in your existing partition. Thereason for doing this is to rearrange the data such that it maximizes the available free space at the"end" of the partition.
Figure B.11. Disk Drive Being Compressed
In the above example, 1 represents before and 2 represents after.
This step is crucial. Without it, the location of the data could prevent the partition from being resizedto the extent desired. Note also that, for one reason or another, some data cannot be moved. If this isthe case (and it severely restricts the size of your new partition(s)), you may be forced to destructivelyrepartition your disk.
B.2.3.2. Resize the Existing PartitionFigure B.12, “Disk Drive with Partition Resized” shows the actual resizing process. While the actualresult of the resizing operation varies depending on the software used, in most cases the newly freedspace is used to create an unformatted partition of the same type as the original partition.
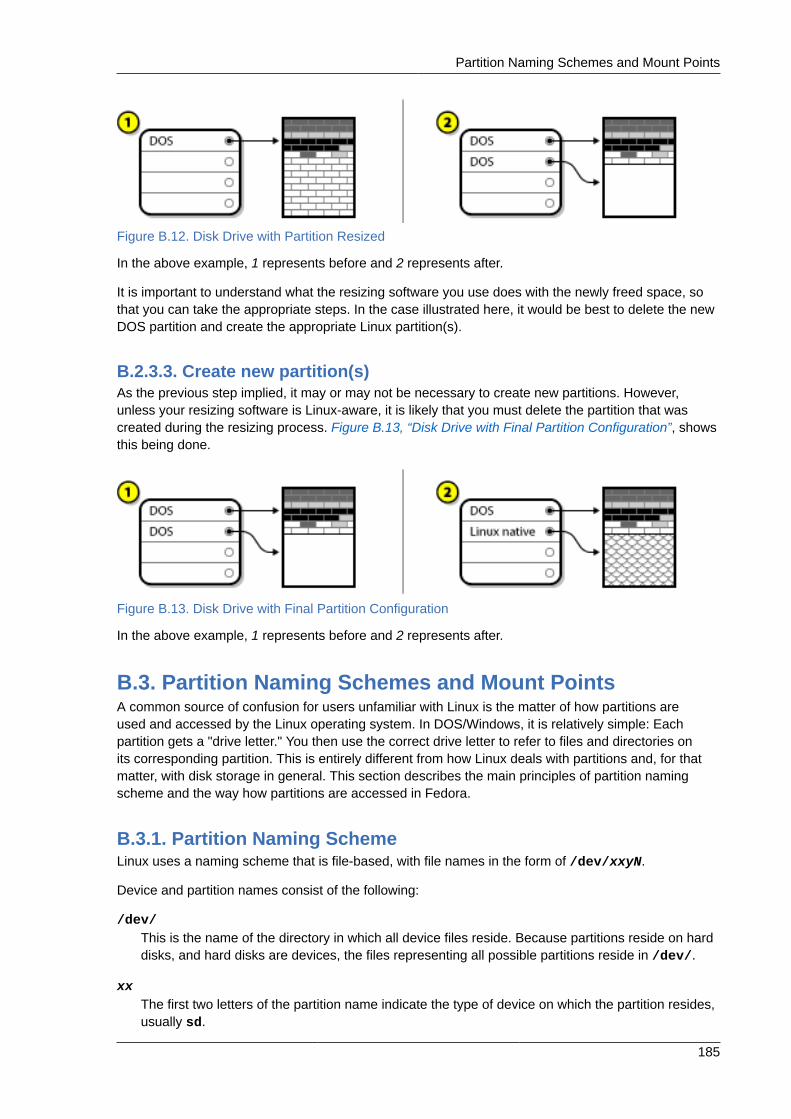
Partition Naming Schemes and Mount Points
185
Figure B.12. Disk Drive with Partition Resized
In the above example, 1 represents before and 2 represents after.
It is important to understand what the resizing software you use does with the newly freed space, sothat you can take the appropriate steps. In the case illustrated here, it would be best to delete the newDOS partition and create the appropriate Linux partition(s).
B.2.3.3. Create new partition(s)As the previous step implied, it may or may not be necessary to create new partitions. However,unless your resizing software is Linux-aware, it is likely that you must delete the partition that wascreated during the resizing process. Figure B.13, “Disk Drive with Final Partition Configuration”, showsthis being done.
Figure B.13. Disk Drive with Final Partition Configuration
In the above example, 1 represents before and 2 represents after.
B.3. Partition Naming Schemes and Mount PointsA common source of confusion for users unfamiliar with Linux is the matter of how partitions areused and accessed by the Linux operating system. In DOS/Windows, it is relatively simple: Eachpartition gets a "drive letter." You then use the correct drive letter to refer to files and directories onits corresponding partition. This is entirely different from how Linux deals with partitions and, for thatmatter, with disk storage in general. This section describes the main principles of partition namingscheme and the way how partitions are accessed in Fedora.
B.3.1. Partition Naming SchemeLinux uses a naming scheme that is file-based, with file names in the form of /dev/xxyN.
Device and partition names consist of the following:
/dev/This is the name of the directory in which all device files reside. Because partitions reside on harddisks, and hard disks are devices, the files representing all possible partitions reside in /dev/.
xxThe first two letters of the partition name indicate the type of device on which the partition resides,usually sd.
Appendix B. An Introduction to Disk Partitions
186
yThis letter indicates which device the partition is on. For example, /dev/sda for the first harddisk, /dev/sdb for the second, and so on.
NThe final number denotes the partition. The first four (primary or extended) partitions arenumbered 1 through 4. Logical partitions start at 5. So, for example, /dev/sda3 is the thirdprimary or extended partition on the first hard disk, and /dev/sdb6 is the second logical partitionon the second hard disk.
Note
Even if your system can identify and refer to all types of disk partitions, it might not be able toread the file system and therefore access stored data on every partition type. However, in manycases, it is possible to successfully access data on a partition dedicated to another operatingsystem.
B.3.2. Disk Partitions and Mount PointsEach partition is used to form part of the storage necessary to support a single set of files anddirectories. This is done by associating a partition with a directory through a process known asmounting. Mounting a partition makes its storage available starting at the specified directory (known asa mount point).
For example, if partition /dev/sda5 is mounted on /usr/, that would mean that all files anddirectories under /usr/ physically reside on /dev/sda5. So the file /usr/share/doc/FAQ/txt/Linux-FAQ would be stored on /dev/sda5, while the file /etc/gdm/custom.conf would not.
Continuing the example, it is also possible that one or more directories below /usr/ would be mountpoints for other partitions. For instance, a partition (say, /dev/sda7) could be mounted on /usr/local/, meaning that /usr/local/man/whatis would then reside on /dev/sda7 rather than /dev/sda5.
B.3.3. How Many Partitions?At this point in the process of preparing to install Fedora, you should give some consideration to thenumber and size of the partitions to be used by your new operating system. However, there is no oneright answer to this question. It depends on your needs and requirements.
Unless you have a reason for doing otherwise, you should at least create a /boot partition and a/ (root) partition. Depending on your system's hardware specifications, additional partitions may benecessary, such as /boot/efi for 64-bit AMD and Intel systems with UEFI firmware, a biosbootpartition for AMD and Intel systems with a GUID Partition Table (GPT) label on the system disk, or aPReP Boot partition on IBM Power Systems servers.
See Section 5.4.10.6, “Recommended Partitioning Scheme” for more information about therecommended partitioning scheme.

187
Appendix C. Understanding LVMLVM (Logical Volume Management) partitions provide a number of advantages over standardpartitions. LVM partitions are formatted as physical volumes. One or more physical volumes arecombined to form a volume group. Each volume group's total storage is then divided into one or morelogical volumes. The logical volumes function much like standard partitions. They have a file systemtype, such as ext4, and a mount point.
Important
The boot loader cannot read LVM volumes. You must make a standard, non-LVM disk partition foryour /boot partition.
By default, the installation process always creates the / and swap partitions within LVM volumes,with a separate /boot on a standard partition. See Section 5.4.10.6, “Recommended PartitioningScheme” for details.
To understand LVM better, imagine the physical volume as a pile of blocks. A block is a storageunit used to store data. Several piles of blocks can be combined to make a much larger pile, just asphysical volumes are combined to make a volume group. The resulting pile can be subdivided intoseveral smaller piles of arbitrary size, just as a volume group is allocated to several logical volumes.
An administrator may grow or shrink logical volumes without destroying data, unlike standard diskpartitions. If the physical volumes in a volume group are on separate drives or RAID arrays thenadministrators may also spread a logical volume across the storage devices.
You may lose data if you shrink a logical volume to a smaller capacity than the data on the volumerequires. To ensure maximum flexibility, create logical volumes to meet your current needs, and leaveexcess storage capacity unallocated. You may safely grow logical volumes to use unallocated space,as your needs dictate.

188

189
Appendix D. Revision HistoryNote that revision numbers relate to the edition of this manual, not to version numbers of Fedora.
Revision 1.4-0 Mon Jun 20 2016 Clayton Spicer [email protected] 24 Final releaseAdded boot option inst.nosave=Typo fixes
Revision 1.3-0 Mon Nov 02 2015 Petr Bokoč [email protected] 23 Final releaseKickstart commands and boot options updated for F23Many typo fixes
Revision 1.2-0 Mon May 25 2015 Petr Bokoč [email protected] 22 Final releaseReferences to Yum replaced with DNF (the new default package manager)Updates in boot options: inst.dnf replaced with inst.nodnf, added inst.kdump_addon=Updates in Kickstart: %anaconda, %addon, sshkey, pwpolicyAdded the Kdump screen to the GUI docs
Revision 1.1-2 Sun Dec 21 2014 Zach Oglesby [email protected] Windows checksum steps, BZ#1175759
Revision 1.1-1 Mon Dec 15 2014 Petr Bokoč [email protected] in Boot Options: inst.headless is deprecated, inst.askmethod moved from removed toInstallation SourceParts of the network boot setup chapter have been updated with correct URLsUpdates in Recommended Partitioning Scheme and Advice on Partitions in the Manual Partitioningsection of the installation chapter
Revision 1.1-0 Mon Dec 8 2014 Petr Bokoč [email protected] for Fedora 21
Revision 1.0-1 Mon Dec 8 2014 Pete [email protected]
added info on media types
Revision 1.0-0 Tue Dec 17 2013 Petr Bokoč [email protected] for Fedora 20

190

191
Index
Ffeedback
contact information for this manual, ix

192