Embed Size (px)
Citation preview
Esa/Gv s.r.l.elettrosistemiapplicati24 via canale Carpi, CP 43 I 41011 Campogalliano Modenatelephone 059/851414 - telefax 059/851313E-MAIL [email protected]
Installing Manual forKVARA PC
Installation Guide (GI)Manufacturer's Documentation
Valid for:
Product: PCfrom version 3.0
Edition: July 99Code: 91734.GI.0.GB
91734.GI.0.GB Esa/Gvii
Restrictions Duplication, transmission and use of this document or its contents shall be consideredprohitibed unless prior authorization has been received from Esa/Gv. All rights arereserved.Even when authorized, modification of this document (either by computer or on paper)voids the guarantees specified below.
Guarantees The product may offer performances that are not described in these manuals. Esa/Gvshall neither be obliged to maintain these functions in new versions of the product norto guarantee the relative assistance.
Checks have been carried out in order to ensure that the contents of these manualscorrespond to the documented product. Despite this fact, there may be discrepancies.Esa/Gv therefore offers no guarantees as to the full compliance and completeness of thetexts.The information in this document is periodically revised and new editions are issuedwhen necessary.
This manual has been compiled in partial compliance with ANSI/IEEE std 1063-1987“IEEE Standard for software User Documentation”.
Editions This document is liable to be modified without prior notice. These modifications mayinvolve further editions or revisions of the document.Further editions imply complete substitution of the document.Revision involves replacement/addition/elimination of pages of the document.Each page is identified by the code of the document at the bottom.
NotesMS-DOS® Trademark registered by Microsoft Corporation.
Esa/Gv 91734.GI.0.GB iii
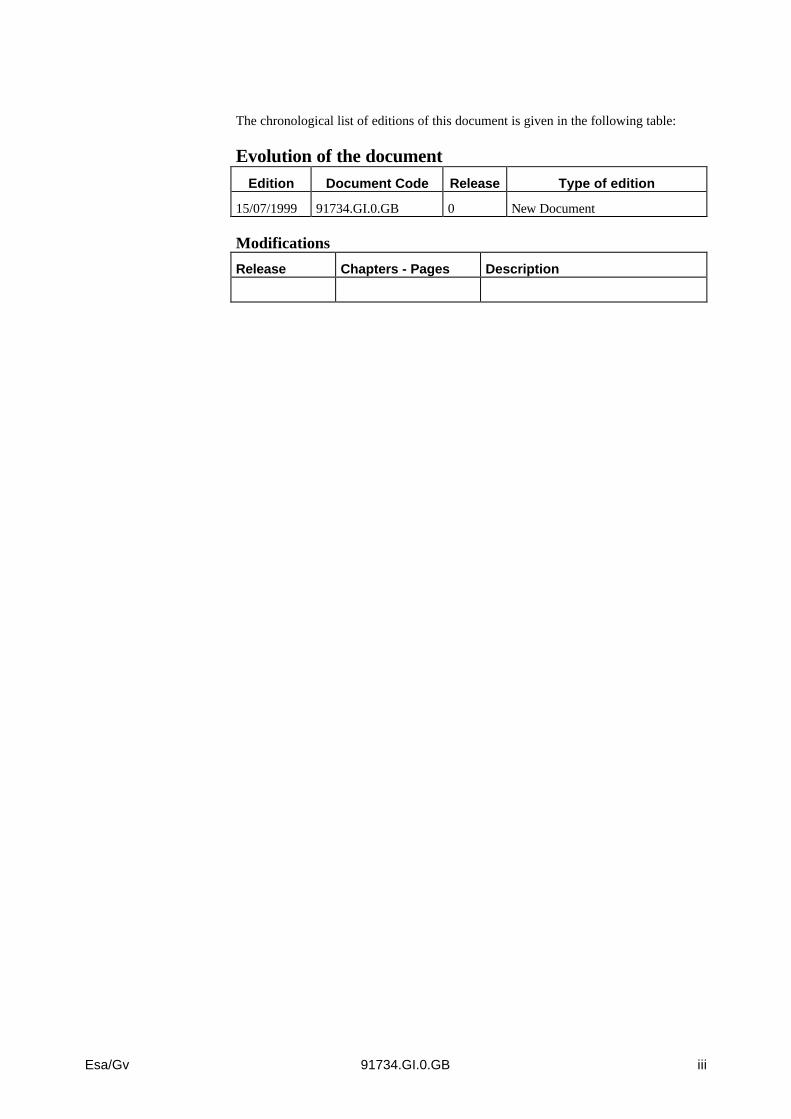
The chronological list of editions of this document is given in the following table:
Evolution of the documentEdition Document Code Release Type of edition
15/07/1999 91734.GI.0.GB 0 New Document
Modifications
Release Chapters - Pages Description

91734.GI.0.GB Esa/Gviv
GI Installation Guide
Esa/Gv 91734.GI.0.GB i
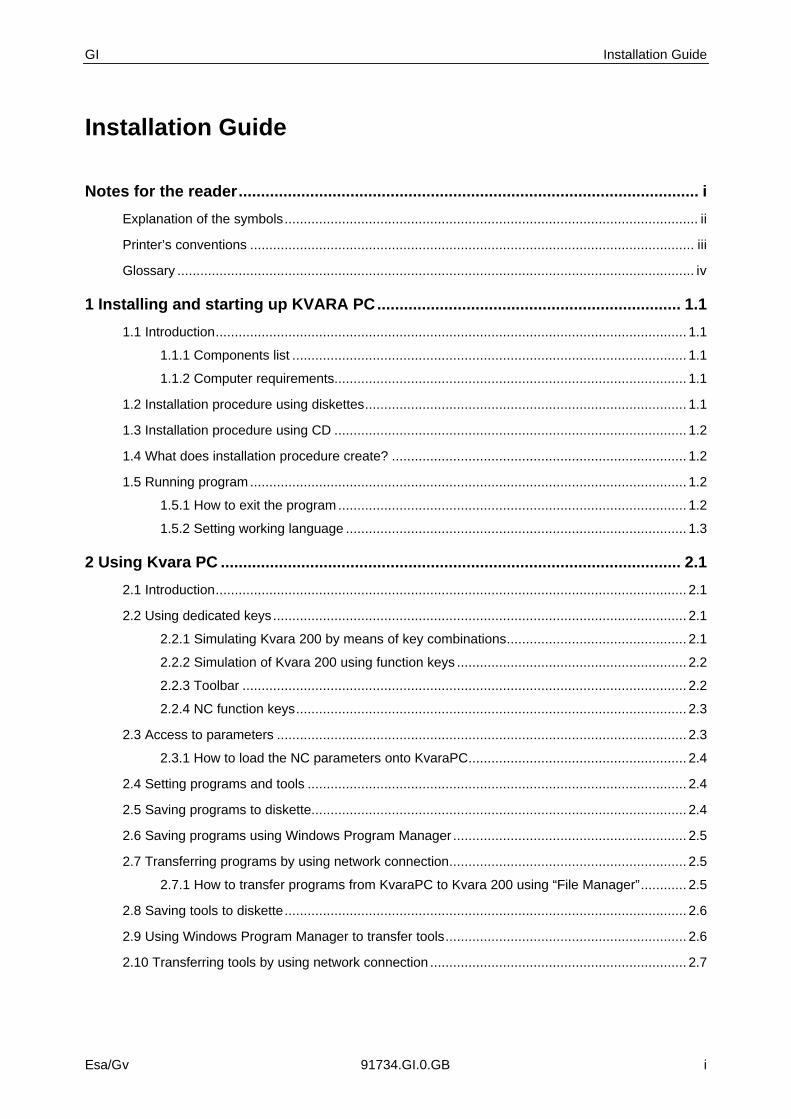
Installation Guide
Notes for the reader....................................................................................................... i
Explanation of the symbols............................................................................................................ ii
Printer’s conventions .................................................................................................................... iii
Glossary ....................................................................................................................................... iv
1 Installing and starting up KVARA PC.................................................................... 1.1
1.1 Introduction........................................................................................................................... 1.1
1.1.1 Components list ....................................................................................................... 1.1
1.1.2 Computer requirements............................................................................................ 1.1
1.2 Installation procedure using diskettes.................................................................................... 1.1
1.3 Installation procedure using CD ............................................................................................ 1.2
1.4 What does installation procedure create? ............................................................................. 1.2
1.5 Running program .................................................................................................................. 1.2
1.5.1 How to exit the program ........................................................................................... 1.2
1.5.2 Setting working language ......................................................................................... 1.3
2 Using Kvara PC ....................................................................................................... 2.1
2.1 Introduction........................................................................................................................... 2.1
2.2 Using dedicated keys............................................................................................................ 2.1
2.2.1 Simulating Kvara 200 by means of key combinations............................................... 2.1
2.2.2 Simulation of Kvara 200 using function keys ............................................................ 2.2
2.2.3 Toolbar .................................................................................................................... 2.2
2.2.4 NC function keys...................................................................................................... 2.3
2.3 Access to parameters ........................................................................................................... 2.3
2.3.1 How to load the NC parameters onto KvaraPC......................................................... 2.4
2.4 Setting programs and tools ................................................................................................... 2.4
2.5 Saving programs to diskette.................................................................................................. 2.4
2.6 Saving programs using Windows Program Manager ............................................................. 2.5
2.7 Transferring programs by using network connection.............................................................. 2.5
2.7.1 How to transfer programs from KvaraPC to Kvara 200 using “File Manager”............ 2.5
2.8 Saving tools to diskette......................................................................................................... 2.6
2.9 Using Windows Program Manager to transfer tools............................................................... 2.6
2.10 Transferring tools by using network connection ................................................................... 2.7

Installation Guide GI
91734.GI.0.GB Esa/Gvii
2.10.1 How to transfer dies from KvaraPC to Kvara 200 using “File Manager” ................. 2.7
2.10.2 How to transfer punches from KvaraPC to Kvara 200 using “File Manager”............ 2.7
END OF SUMMARY

GI Notes for the reader
Esa/Gv 91734.GI.0.GB i
Notes for the reader
General information The information in this manual only applies to the software versions indicated on thefrontispiece.
Not all the available functions may be described in this manual. In these cases, Esa/Gvshall be obliged to neither guarantee these functions nor include them in futureversions.
Purpose The purpose of this document is to help the technician when the product described onthe frontispiece is installed.
Users This document contains information for:
ù specialized installer technicians/test technicians with a working knowledge of thenumeric control, the machine and the processing technology. Basic knowledge ofelectromechanics and indusCNl control panels.
Use of the document The document is divided into chapters that describe certain of the installation phases:
ù characteristics of the numeric control;
ù description of the numeric control;
ù connections;
ù setting at work;
ù SW description dedicated to test technicians;
ù restrictions and precautions to take when using the numeric control.
Notification ofdifficulties
Please contact Esa/Gv if any difficulties should arise when this manual is used.

Notes for the reader GI
91734.GI.0.GB Esa/Gvii
Explanation of the symbols
Graphic symbols may appear beside the text. These are used to emphasize informationof particular importance.
AttentionThis symbol is used when failure to take the appropriate precautions could causeslight damage to persons and property.
DangerThis symbol appears when failure to take the appropriate precautions oraccomplishment of incorrect manoeuvres could cause serious damage to personsand/or property.
ImportantThis symbol appears in the manual to indicate information of particular importance. Itis essential to read these sections in order to fully understand the manual.
OptionThis symbol indicates sections of the manual that describe optional functions or parts.Use of optional performances must be established with the machine manufacturer.
ManufacturerThis symbol indicates those sections of the manual reserved to the machinemanufacturer.
PasswordThis symbol indicates sections of the manual that describe functions access to which issafeguarded by software passwords.
CNThis symbol indicates sections of the manual that describe functions only available inCN and not in the PC.
PCThis symbol indicates sections of the manual that describe functions only available inthe PC and not in CN.
GI Notes for the reader
Esa/Gv 91734.GI.0.GB iii
Printer’s conventions
Particular printer’s conventions are used to make it easier to identify the information inthis manual. These conventions are illustrated below.
Keyboard and video The following conventions are used.
ù The names of the screen-printed keys are indicated in boldface and are enclosedwithin square brackets. If the name of the key is preceded by “button”, reference isbeing made to a key on the push button panel.
− [ENTER]. Identifies the key that bears the word ENTER.
− [+] indicates the + key of the keyboard, while button [+] indicates the + key ofthe push button panel.
ù The names of the function keys are indicated in boldface italics and are enclosedwithin square brackets.
− [Plc Menu]. Identifies the function key that bears the words Plc Menu.
ù References to fields and/or messages on the video are written in boldface italics.
ù The specific text to be digitized by the user is underlined.
− If the manual indicates “digitize ok, the user must digitize exactly “ok”.
ù DIRECTION or DIRECTIONAL keys is the collective name used to indicate theUP, DOWN, LEFT and RIGHT keys.
ù Pressure, in sequence, on a series of keys is written by separating the identifiers ofthe required keys with the “>“ character.
− [Manual] > [START]. Describes pressure, in sequence, on the [Manual] and[START] keys.
ù Pressure on several keys at the same time is indicated by separating the identifiersof the keys themselves with the “+” character.
− [SHIFT] + [àà] Describes contemporaneous pressure on the [SHIFT] and [àà]keys.
Text The following conventions are used.
ù Italics are used to identify specialistic terms.
ù Boldface is used to emphasize words of particular importance.
Notes for the reader GI
91734.GI.0.GB Esa/Gviv
Glossary
CNC This is an abbreviation of Computerized Numerical Control and indicates theinstrument that governs the machine, i.e. the electronic device through which themachining cycles are programmed, the axes moved, etc..It corresponds to one of the devices whose operation is described in this manual.
NC Represents the Normally Closed status of an input or an output.
NO Represents the Normally Open status of an input or an output.
END OF PREFACE
GI Installing and starting up KVARA PC
Esa/Gv 91734.GI.0.GB 1.1
1 Installing and starting up KVARA PC
1.1 Introduction
The KvaraPC program enables bending programming and simulation that is normallycarried out on the numerically controlled Kvara200 to be created in the design office. Italso enables the programs created in the design office to be transferred to the NC.
1.1.1 Components list
ù Four 3.5”, 1.44Mb diskettes or 1 CD-ROM
1.1.2 Computer requirements
For installation and demo, the following are required:
ù PC 486 100% compatible or greater (Pentium™ is recommended)
ù 8 Mb Ram (16Mb are recommended)
ù HD with 8Mb available
ù SVGA 640x480 65,000 colour card (800x600 is much better)
ù Windows 95 operating system
1.2 Installation procedure using diskettes
ù insert disk 1 of 4 into the unit;
ù ù enter File Manager and select disk unit (this is normally described as:3.5 inch diskette (A:) or 31/2
diskette (A:);
ù run Setup.exe program on diskette to start guided installation. 5 windows willappear in sequence.
− Select language: this is the language of the installation program and will nottherefore modify the KvaraPC program. Select the installation language andpress [OK].
− 'Start of installation' message: it is advisable to close down all openapplications; press [FORWARD].
− Information on user: this is the user's name and the user's company. Confirmentry or enter correct data and press [FORWARD].
− Select program folders: press [FORWARD] to confirm EsaGv.
ù Insert the other diskettes when they are requested by the installation procedure;after the last diskette has been installed, this window will appear:
− 'Installation complete' message: installation has been carried out correctly:press [END].
Installing and starting up KVARA PC GI
91734.GI.0.GB Esa/Gv1.2
1.3 Installation procedure using CD
ù insert CD into reader
ù enter File manager and select unit (normally called )
ù run Setup.exe on CD to start guided installation: 5 windows will appear insequence.
− Select language: this is the language of the installation program and will nottherefore modify the KvaraPC program. Select the installation program andpress [OK].
− Start of installation message: it is advisable to close down all open applications;press [FORWARD].
− Information on user: this is the user's name and the user's company. Confirmentry or enter correct data and press [FORWARD].
− Select program folders: press [FORWARD] to confirm EsaGv folder.
− 'Installation complete' message: installation has been carried out correctly:press [END].
1.4 What does installation procedure create?
Correct installation produces three folders in disk C. They are called:
ù Date
ù Kvara
ù Kvfile
This file is also created:
ù Kvara.ini
To ensure correct operation of KvaraPC, these folders and this file must stay in mainfolder C: and they cannot be modified or renamed.
1.5 Running program
The installation procedure creates an icon on the desktop: to run theKvaraPC program, click twice on this icon.Immediately after installation the program may produce error messages that warn thatcertain files are missing. In this case, REBOOT the Windows95 operating system andif problems persist, contact service engineers.
1.5.1 How to exit the program
To terminate the KvaraPC program, activate the second menu “Main Menu” andselect [Exit].
See paragraph “Using special keys” to activate Main Menu.

GI Installing and starting up KVARA PC
Esa/Gv 91734.GI.0.GB 1.3
1.5.2 Setting working language
To set a working language other than Italian (language that appears immediately afterinstallation), follow this procedure:Select the menu [KEY 3] (see paragraph “Using special keys')
ù Press key [6]
ù Select required language by clicking on it with the mouse
ù Exit program (see paragraph 1.5.1) and reboot it (see paragraph 1.5).
From this moment, the work language will be the language that has just been selected.
END OF CHAPTER

Installing and starting up KVARA PC GI
91734.GI.0.GB Esa/Gv1.4
GI Using Kvara PC
Esa/Gv 91734.GI.0.GB 2.1
2 Using Kvara PC
2.1 Introduction
The KvaraPC program has all the functions contained in the Kvara 200 control systemof EsaGv: it can be used to set punches, dies and work programs, calculate the bendingsequence, check for collisions and simulate machining.Key combinations or the mouse can be used to simulate ALL the dedicated NumericControl keys. This enables the operator who uses both Kvara 200 and KvaraPC tooperate in the same way.Once they have been defined, the programs and tools generated by KvaraPC can betransferred to the NC by means of a diskette or network (if installed).
2.2 Using dedicated keys
There follows a description of how to use the KvaraPC program to simulate certainfunctions that are controlled by the dedicated keyboard on the Kvara 200 (e.g. the keyselector). The meanings of the icons on the tool bar to the right of the screen are alsoexplained.
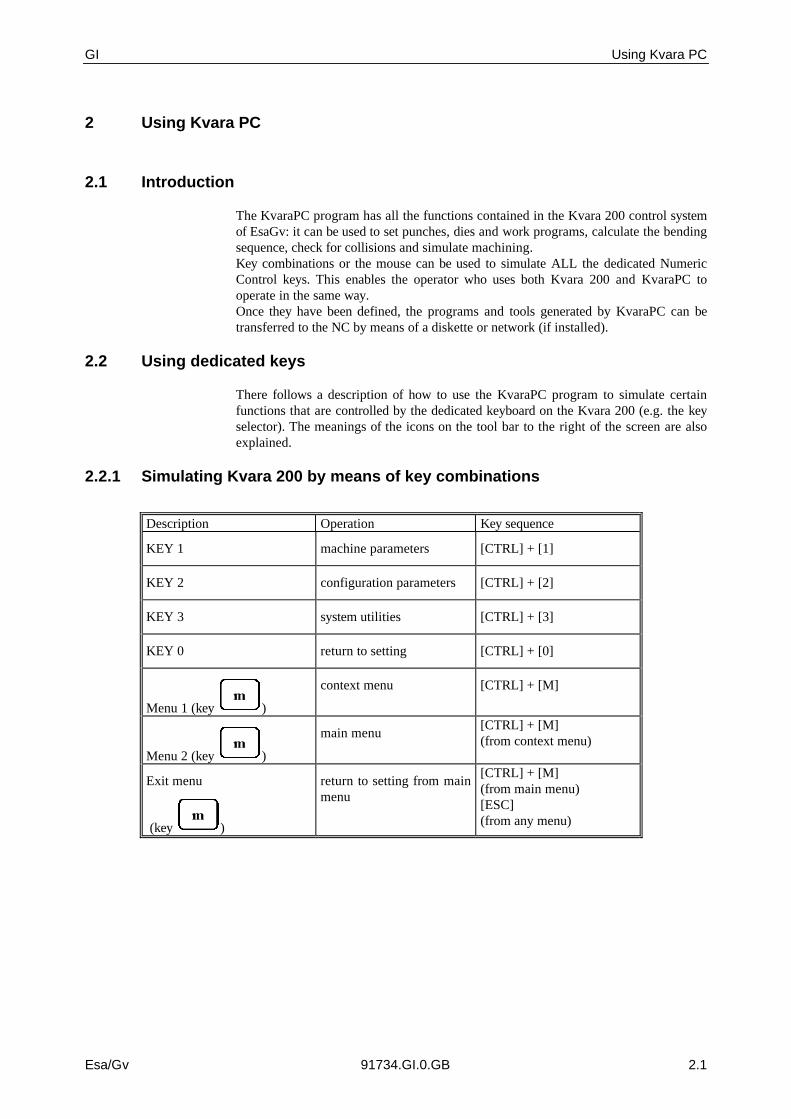
2.2.1 Simulating Kvara 200 by means of key combinations
Description Operation Key sequence
KEY 1 machine parameters [CTRL] + [1]
KEY 2 configuration parameters [CTRL] + [2]
KEY 3 system utilities [CTRL] + [3]
KEY 0 return to setting [CTRL] + [0]
Menu 1 (key )
context menu [CTRL] + [M]
Menu 2 (key )
main menu[CTRL] + [M](from context menu)
Exit menu
(key )
return to setting from mainmenu
[CTRL] + [M](from main menu)[ESC](from any menu)
Using Kvara PC GI
91734.GI.0.GB Esa/Gv2.2
2.2.2 Simulation of Kvara 200 using function keys
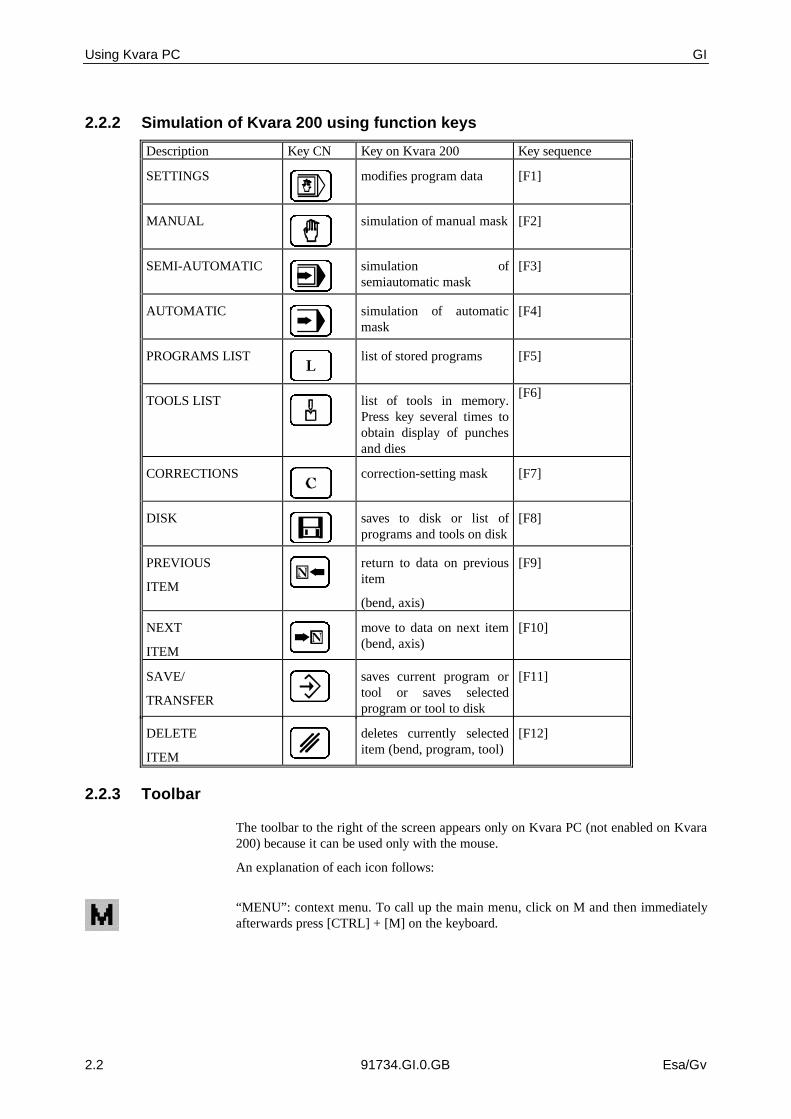
Description Key CN Key on Kvara 200 Key sequence
SETTINGS modifies program data [F1]
MANUAL simulation of manual mask [F2]
SEMI-AUTOMATIC simulation ofsemiautomatic mask
[F3]
AUTOMATIC simulation of automaticmask
[F4]
PROGRAMS LIST list of stored programs [F5]
TOOLS LIST list of tools in memory.Press key several times toobtain display of punchesand dies
[F6]
CORRECTIONS correction-setting mask [F7]
DISK saves to disk or list ofprograms and tools on disk
[F8]
PREVIOUS
ITEM
return to data on previousitem
(bend, axis)
[F9]
NEXT
ITEM
move to data on next item(bend, axis)
[F10]
SAVE/
TRANSFER
saves current program ortool or saves selectedprogram or tool to disk
[F11]
DELETE
ITEM
deletes currently selecteditem (bend, program, tool)
[F12]
2.2.3 Toolbar
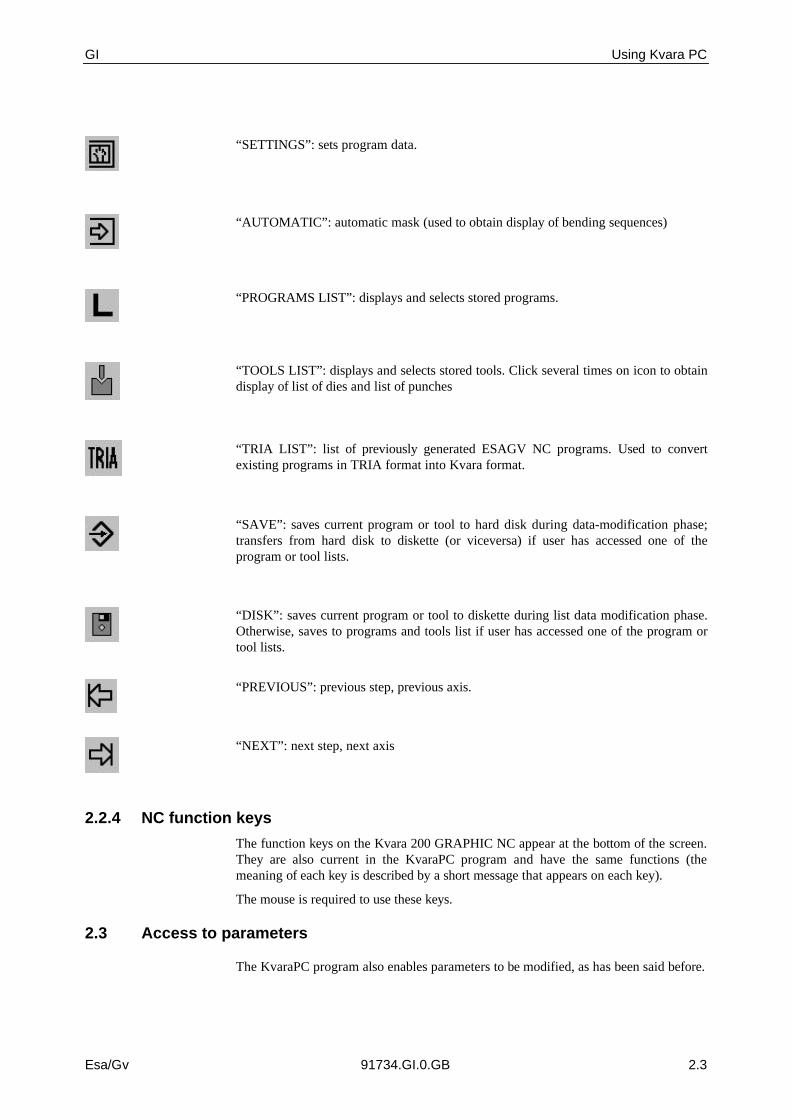
The toolbar to the right of the screen appears only on Kvara PC (not enabled on Kvara200) because it can be used only with the mouse.
An explanation of each icon follows:
“MENU”: context menu. To call up the main menu, click on M and then immediatelyafterwards press [CTRL] + [M] on the keyboard.
GI Using Kvara PC
Esa/Gv 91734.GI.0.GB 2.3
“SETTINGS”: sets program data.
“AUTOMATIC”: automatic mask (used to obtain display of bending sequences)
“PROGRAMS LIST”: displays and selects stored programs.
“TOOLS LIST”: displays and selects stored tools. Click several times on icon to obtaindisplay of list of dies and list of punches
“TRIA LIST”: list of previously generated ESAGV NC programs. Used to convertexisting programs in TRIA format into Kvara format.
“SAVE”: saves current program or tool to hard disk during data-modification phase;transfers from hard disk to diskette (or viceversa) if user has accessed one of theprogram or tool lists.
“DISK”: saves current program or tool to diskette during list data modification phase.Otherwise, saves to programs and tools list if user has accessed one of the program ortool lists.
“PREVIOUS”: previous step, previous axis.
“NEXT”: next step, next axis
2.2.4 NC function keys
The function keys on the Kvara 200 GRAPHIC NC appear at the bottom of the screen.They are also current in the KvaraPC program and have the same functions (themeaning of each key is described by a short message that appears on each key).
The mouse is required to use these keys.
2.3 Access to parameters
The KvaraPC program also enables parameters to be modified, as has been said before.

Using Kvara PC GI
91734.GI.0.GB Esa/Gv2.4
The KvaraPC should have the same configuration as your Kvara 200 NC. This ensuresthat feasibility studies and program accuracy checks are the same as those conductedby the NC.
2.3.1 How to load the NC parameters onto KvaraPC
ù Insert the parameters diskette for Kvara 200 into your computer's diskette drive.Take care to protect diskette.
ù Press [CTRL] + [2] on the keyboard.
ù Click on function key [Load ALL] with mouse.
All press-bender parameters will be loaded onto the computer's hard disk; from now onthe parameters are automatically loaded each time that KvaraPC is run, without anyneed to reset them.
2.4 Setting programs and tools
The KvaraPC enables work and tool programs to be set in the same way as for Kvara200 (see relative chapter in the Short Guide).After the new program has been set and the bending sequence has been calculated, theprogram should be checked to make sure that it is correct. To check the program, click
on the icon on the toolbar to enter AUTOMATIC mode or else enterSETTINGS mask and click on the function key [Check data] to view the program errormessages once at a time (normally, only targets that are outside the maximum axislimits will be displayed). Otherwise the message 'Program correct' will appear.
2.5 Saving programs to diskette
To save programs to diskette that have been set using KvaraPC, follow this procedure:
1) if you are on the programs list mask:
− use the arrow keys to select the program that you wish to save
− press key [F11] on the keyboard (repeat this operation if you wish to save morethan one program to the diskette).
2) if you are on the program data setting mask:
− click on toolbar icon To save the programs that have just been saved to Kvara 200 NC, follow thisprocedure:
ù insert diskette into drive
ù press key [F5] on the keyboard or click on icon on the toolbar
ù press key [F8] on the keyboard or click on icon on the toolbar to view theprograms that you have just saved to the diskette
ù use the arrow keys to select the program to be saved to Kvara 200
GI Using Kvara PC
Esa/Gv 91734.GI.0.GB 2.5
ù press key [F11] on the keyboard or click on icon on the toolbar (if you repeatthis operation for the different programs you can save more than one at a time tothe numeric control).
2.6 Saving programs using Windows Program Manager
If you wish to transfer programs from the hard disk to the diskette (and from there tothe NC) using the “Program Manager” of Windows, remember that the programKvaraPC and the Kvara 200 NC work both on a hard disk and on a diskette with pre-set work folders. These are:
C:\KVFILE\PGM: for work programs
In order to ensure that the diskette can be read by Kvara 200 work folders musttherefore be created and the programs that are to be transferred must be copied tothem.
The saved programs must be copied to the folders of the hard disk of Kvara 200.
2.7 Transferring programs by using network connection
For operation of network cards, connections and configurations, see manuals supplied byyour dealer.
For a more functional use of the connection, it is advisable to configure the hard disk ofKvara 200 as a network disk (e.g.: “H:\” or “G:\”.etc) so that it can also be viewed bythe “File Manager” in the KvaraPC program. If it is configured like a simplenetworked computer, programs can only be transferred via Window's “NetworkNeighborhood”.
2.7.1 How to transfer programs from KvaraPC to Kvara 200 using “FileManager”
To transfer programs using File Manager:
ù select Menu KEY 3 ([CTRL] + [3])
ù press key 3; two windows will appear; the files can be transferred from onewindow to the next;
ù select folder C:\KVFILE\PGM from the window on the left,
ù use [Tab] key or right-hand arrow key to move cursor to right-hand window
ù click with mouse on function key [Change drive]
ù select name of network disk assigned to Kvara 200 (e.g.: “H:\” or “G:\”....etc);
ù select folder \KVFILE\PGM from the window on the right;
ù move to the window on the left
ù click on program that you wish to copy (if you wish to copy more than oneprogram, click on each one and press key [INS]; the programs will be selectedautomatically)
Using Kvara PC GI
91734.GI.0.GB Esa/Gv2.6
ù to copy to Kvara 200 disk, click on function key [COPY].
:
If program is graphic, each program consists of two rows with different extensions.
For example, program 10 comprises the files 10.PRG and 10.PRN (the numericprograms comprise a single file with the extension PRN). Both files have to be copiedto ensure correct operation.
To select both files simultaneously, follow this procedure:
ù click on function key [Filtered selection]
ù write name of the program to be copied followed by .* (e.g. 10.*) and pressENTER; the two files will be automatically selected.
2.8 Saving tools to diskette
To save tools set with KvaraPC to diskette, follow this procedure:
1) if you are on the TOOLS LIST mask:
− use arrow keys to select the die or punch that you wish to save
− press key [F11] on the keyboard (if you repeat this operation you can save morethan one tool at a time to diskette)
2) if you are on the punch or die setting mask;
− click on toolbar icon To save to the Kvara 200 the tools that have just been saved, follow this procedure:
ù insert diskette into drive
ù press key [F5] on the keyboard or click on icon on the toolbar
ù press key [F8] on the keyboard or click on icon on the toolbar; the list of thetools on the disk will be displayed (tools that you have just saved)
ù use the arrow keys to select the punch or die to save to Kvara 200
ù press key [F11] on the keyboard or click on icon on the toolbar (if you repeatthis operation for several tools you can save more than one at a time to NumericControl)
2.9 Using Windows Program Manager to transfer tools
If you use Windows Program Manager to transfer the tools from the hard disk to thediskette (and from the diskette to the NC), remember that the program KvaraPC andthe Kvara 200 NC work both on a hard disk and diskette with pre-set work folders.These are:
C:\KVFILE\PNZ: for the punches
GI Using Kvara PC
Esa/Gv 91734.GI.0.GB 2.7
C:\KVFILE\MAT: for the dies
In order to ensure that the diskette can be read by Kvara 200 work folders musttherefore be created and the programs that are to be transferred must be copied tothem.
The saved programs must be copied to the folders of the hard disk of Kvara 200.
2.10 Transferring tools by using network connection
For operation of network cards, connections and configurations, see manuals suppliedby your dealer.For a more functional use of the connection, it is advisable to configure the hard diskof Kvara 200 like a network disk (e.g.: “H:\” or “G:\”....etc) so that it can also beviewed by the “File Manager” in the KvaraPC program. If it is configured like asimple networked computer, programs can only be transferred via Window's “NetworkNeighborhood” di Windows.
2.10.1 How to transfer dies from KvaraPC to Kvara 200 using “File Manager”
Transferring dies using File Manager:
ù select Menu KEY 3 ([CTRL] + [3])
ù press key 3; two windows will appear; the files can be transferred from onewindow to another
ù select folder C:\KVFILE\MAT from the window on the left
ù use [Tab] key or right-hand arrow key to move cursor to right-hand window
ù click with mouse on function key [Change drive]
ù select name of network disk assigned to Kvara 200 (e.g.: “H:\” or “G:\”....etc);
ù select folder \KVFILE\MAT from the window on the right;
ù move to the window on the left
ù click on program that you wish to copy (if you wish to copy more than oneprogram, click on each one and press key [INS]; the programs will be selectedautomatically)
ù to copy onto disk of Kvara 200, click on function key [COPY].
2.10.2 How to transfer punches from KvaraPC to Kvara 200 using “File Manager”
To transfer punches using File Manager:
ù select Menu KEY 3 ([CTRL] + [3])
ù press key 3; two windows will appear; the files can be transferred from onewindow to another
ù select folder C:\KVFILE\PNZ from the window on the left
ù enter the right-hand window by using [Tab] or the right-hand arrow key
ù click with mouse on function key [Change drive]
ù select name of network disk assigned to Kvara 200 (e.g.: “H:\” or “G:\”....etc);
Using Kvara PC GI
91734.GI.0.GB Esa/Gv2.8
ù select folder \KVFILE\PNZ from the window on the right;
ù move to the window on the left
ù click on program that you wish to copy (if you wish to copy more than oneprogram, click on each one and press key [INS]; the programs will be selectedautomatically)
ù to copy onto disk of Kvara 200, click on function key [COPY].
END OF CHAPTER
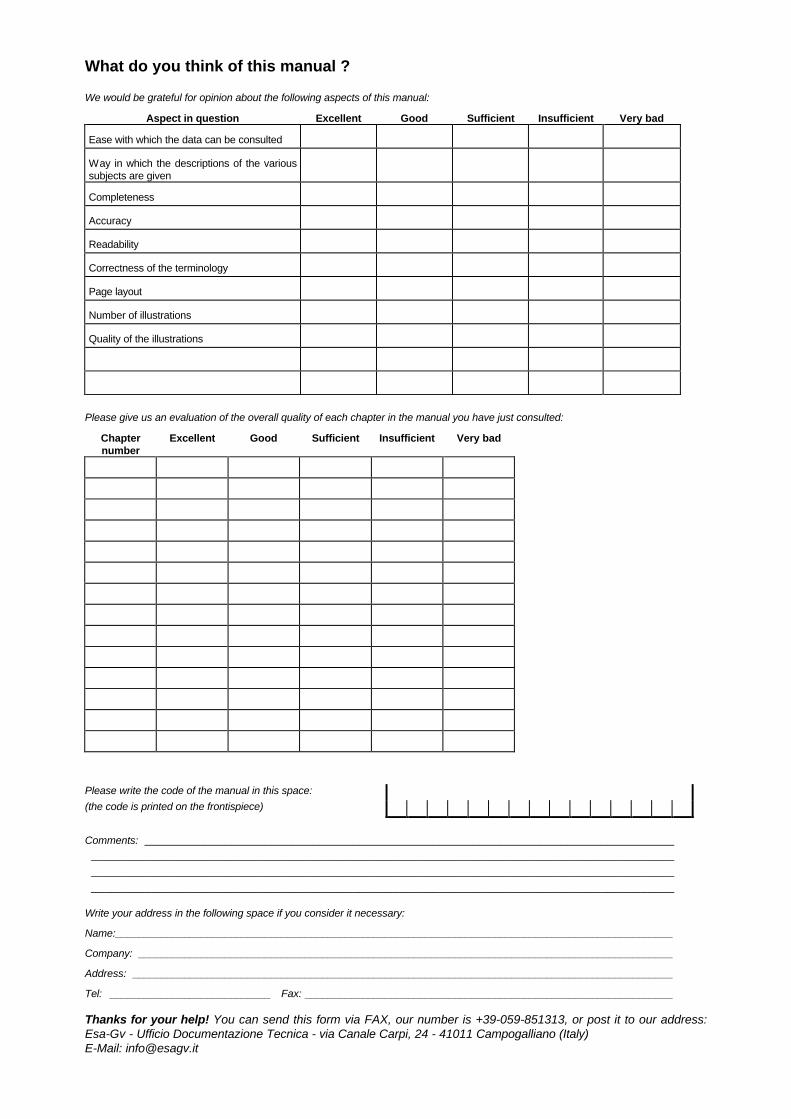
What do you think of this manual ?
We would be grateful for opinion about the following aspects of this manual:
Aspect in question Excellent Good Sufficient Insufficient Very bad
Ease with which the data can be consulted
Way in which the descriptions of the varioussubjects are given
Completeness
Accuracy
Readability
Correctness of the terminology
Page layout
Number of illustrations
Quality of the illustrations
Please give us an evaluation of the overall quality of each chapter in the manual you have just consulted:
Chapternumber
Excellent Good Sufficient Insufficient Very bad
Please write the code of the manual in this space:
(the code is printed on the frontispiece)
Comments: ____________________________________________________________________________________________________________________________________________________________________________________________________________________________________________________________________________________________________________________________________________________
Write your address in the following space if you consider it necessary:
Name:_________________________________________________________________________________________________
Company: _____________________________________________________________________________________________
Address: ______________________________________________________________________________________________
Tel: ____________________________ Fax: ________________________________________________________________
Thanks for your help! You can send this form via FAX, our number is +39-059-851313, or post it to our address:Esa-Gv - Ufficio Documentazione Tecnica - via Canale Carpi, 24 - 41011 Campogalliano (Italy)E-Mail: [email protected]