Embed Size (px)
Citation preview
Oracle® Fail SafeInstallation Guide
Release 4.1 for Microsoft Windows
E24700-01
December 2012

Oracle Fail Safe Installation Guide, Release 4.1 for Microsoft Windows
E24700-01
Copyright © 2012, Oracle and/or its affiliates. All rights reserved.
Primary Author: Ashmita Bose
Contributing Author: Janelle Simmons
Contributor: Paul Mead
This software and related documentation are provided under a license agreement containing restrictions on use and disclosure and are protected by intellectual property laws. Except as expressly permitted in your license agreement or allowed by law, you may not use, copy, reproduce, translate, broadcast, modify, license, transmit, distribute, exhibit, perform, publish, or display any part, in any form, or by any means. Reverse engineering, disassembly, or decompilation of this software, unless required by law for interoperability, is prohibited.
The information contained herein is subject to change without notice and is not warranted to be error-free. If you find any errors, please report them to us in writing.
If this is software or related documentation that is delivered to the U.S. Government or anyone licensing it on behalf of the U.S. Government, the following notice is applicable:
U.S. GOVERNMENT END USERS: Oracle programs, including any operating system, integrated software, any programs installed on the hardware, and/or documentation, delivered to U.S. Government end users are "commercial computer software" pursuant to the applicable Federal Acquisition Regulation and agency-specific supplemental regulations. As such, use, duplication, disclosure, modification, and adaptation of the programs, including any operating system, integrated software, any programs installed on the hardware, and/or documentation, shall be subject to license terms and license restrictions applicable to the programs. No other rights are granted to the U.S. Government.
This software or hardware is developed for general use in a variety of information management applications. It is not developed or intended for use in any inherently dangerous applications, including applications that may create a risk of personal injury. If you use this software or hardware in dangerous applications, then you shall be responsible to take all appropriate fail-safe, backup, redundancy, and other measures to ensure its safe use. Oracle Corporation and its affiliates disclaim any liability for any damages caused by use of this software or hardware in dangerous applications.
Oracle and Java are registered trademarks of Oracle and/or its affiliates. Other names may be trademarks of their respective owners.
Intel and Intel Xeon are trademarks or registered trademarks of Intel Corporation. All SPARC trademarks are used under license and are trademarks or registered trademarks of SPARC International, Inc. AMD, Opteron, the AMD logo, and the AMD Opteron logo are trademarks or registered trademarks of Advanced Micro Devices. UNIX is a registered trademark of The Open Group.
This software or hardware and documentation may provide access to or information on content, products, and services from third parties. Oracle Corporation and its affiliates are not responsible for and expressly disclaim all warranties of any kind with respect to third-party content, products, and services. Oracle Corporation and its affiliates will not be responsible for any loss, costs, or damages incurred due to your access to or use of third-party content, products, or services.
iii
Contents
Preface ................................................................................................................................................................ vii
Audience...................................................................................................................................................... viiDocumentation Accessibility .................................................................................................................... viiRelated Documents .................................................................................................................................... viiConventions ............................................................................................................................................... viii
1 Introduction and Preinstallation Checklist
1.1 Cluster Setup Prerequisites ....................................................................................................... 1-11.2 Software Compatibility .............................................................................................................. 1-21.3 Disk Space Requirements .......................................................................................................... 1-21.4 Installation and Configuration.................................................................................................. 1-21.5 Recommended Order for Software Installation ..................................................................... 1-31.6 Adding a Node to an Existing Cluster..................................................................................... 1-51.7 Adding a Sample Database ....................................................................................................... 1-51.8 Postinstallation Procedures ....................................................................................................... 1-6
2 Installing Oracle Fail Safe
2.1 Reviewing the Preinstallation Checklist.................................................................................. 2-12.2 Installing Oracle Fail Safe Software.......................................................................................... 2-2
3 Getting Started
3.1 About Starting the Manager and Completing Oracle Fail Safe Installation....................... 3-13.1.1 Starting Oracle Fail Safe Manager ..................................................................................... 3-13.1.2 Completing the Installation of Oracle Fail Safe Manager.............................................. 3-13.1.3 Connecting to a Known Cluster ........................................................................................ 3-23.2 Adding a Cluster......................................................................................................................... 3-23.3 Accessing Oracle Fail Safe Manager Tutorial and Online Help........................................... 3-4
4 Deinstalling Oracle Fail Safe
4.1 Deinstalling Oracle Fail Safe Software..................................................................................... 4-1
5 Troubleshooting Installation Problems
5.1 Overview of Problems With the FSCMD Command After an Upgrade ............................ 5-15.2 Overview of Problems Installing Oracle Fail Safe ................................................................. 5-1
iv
5.3 Verifying Oracle Fail Safe Service Entry.................................................................................. 5-15.4 Verifying Oracle Fail Safe in the Cluster Group..................................................................... 5-25.5 Verifying Whether Oracle Resources are Registered with Microsoft Windows Failover
Clusters 5-2
A Rolling Upgrades and Patches
A.1 Preparing Users for the Upgrade............................................................................................. A-1A.2 Recommended Order for Upgrading Software..................................................................... A-2A.3 Upgrading the Oracle Fail Safe Software and Installing Patches ....................................... A-2A.4 Upgrading or Patching a Highly Available Oracle Database ............................................. A-4A.4.1 Upgrading a Database Configured for High Availability ............................................ A-4A.4.2 Patching an Oracle Database Configured for High Availability ................................. A-5A.5 Upgrading Other Oracle Product Software ........................................................................... A-8
B Silent Mode Installations and Deinstallations
B.1 Introducing Silent Mode Installations and Deinstallations of Oracle Fail Safe ................ B-1B.1.1 Selecting a Response File ................................................................................................... B-1B.2 Performing Steps for a Silent Mode Installation or Deinstallation..................................... B-2B.3 Contents of a Response File ..................................................................................................... B-4
Index

v
List of Figures
1–1 Recommended Order for Installing Software on a Two-Node Cluster .............................. 1-31–2 Software Installed on Private, Shared-Nothing Cluster Disks............................................. 1-53–1 The New Installation Needs to be Completed........................................................................ 3-13–2 Adding a Cluster to the Clusters List....................................................................................... 3-33–3 Entering the Name of the Cluster............................................................................................. 3-3

vi
List of Tables
A–1 Steps Required to Upgrade to Oracle Fail Safe..................................................................... A-3A–2 Steps for Upgrading a Database Configured for High Availability.................................. A-5A–3 Steps for Patching a Database Configured for High Availability...................................... A-6A–4 Steps for Starting Up a Database with the MIGRATE Option ........................................... A-8A–5 Steps Required to Upgrade Other Oracle Product Software.............................................. A-9
vii
Preface
This guide provides step-by-step procedures to help you install, deinstall, and upgrade Oracle Fail Safe.
AudienceThis document is intended for anyone who must perform the initial setup and installation of Oracle Fail Safe on Microsoft Windows systems.
In general, this book defines technical terms and concepts when they are introduced. However, it assumes that you know the underlying operating system and are familiar with basic system administration tasks. Also, you should be familiar with Microsoft Windows Failover Clusters.
Documentation AccessibilityFor information about Oracle's commitment to accessibility, visit the Oracle Accessibility Program website at http://www.oracle.com/pls/topic/lookup?ctx=acc&id=docacc.
Access to Oracle SupportOracle customers have access to electronic support through My Oracle Support. For information, visit http://www.oracle.com/pls/topic/lookup?ctx=acc&id=info or visit http://www.oracle.com/pls/topic/lookup?ctx=acc&id=trs if you are hearing impaired.
Related DocumentsFor more information, see the following documents in the Oracle Fail Safe documentation set:
■ Oracle Fail Safe Release Notes for Microsoft Windows
■ Oracle Fail Safe Concepts and Administration Guide for Microsoft Windows
■ Oracle Fail Safe Error Messages for Microsoft Windows
■ For online assistance, Oracle Fail Safe Manager provides online help topics and a link to the online documentation set. To access the online help topics, select Help Topics from the Help menu bar in Oracle Fail Safe Manager.
For information about related products, refer to the following documentation:
viii
■ For more information about cluster systems, see the Microsoft Windows Failover Clusters documentation.
■ For more information about other related products, see the documentation for those products.
ConventionsThe following text conventions are used in this document:
Convention Meaning
boldface Boldface type indicates graphical user interface elements associated with an action, or terms defined in text or the glossary.
italic Italic type indicates book titles, emphasis, or placeholder variables for which you supply particular values.
monospace Monospace type indicates commands within a paragraph, URLs, code in examples, text that appears on the screen, or text that you enter.
1
Introduction and Preinstallation Checklist 1-1
1Introduction and Preinstallation Checklist
This guide uses a step-by-step approach to assist you with the installation of Oracle Fail Safe. Oracle Fail Safe installation provides the option for installing Oracle Fail Safe Manager, Oracle Fail Safe Server, and Oracle Fail Safe documentation. Typically, you would install all three components but you may want to customize the installation depending on your needs. For example, if you have a single desktop system that you want to use to manage all your clusters, then you may want to install Oracle Fail Safe Manager and Oracle Fail Safe documentation on that system.
Oracle Fail Safe Manager is a graphical user interface for configuring and managing Oracle single-instance databases, Oracle Management Agent, generic services, and so on for high availability in Microsoft Windows Failover Cluster. Oracle Fail Safe is the main server component.
You perform the installation using Oracle Universal Installer graphical user interface. If you perform the same installation on multiple systems, you may run Oracle Universal Installer in silent mode to automate the installation process in batch files or scripts. Silent installations are described in Appendix B.
The following topics are discussed in this chapter:
■ Cluster Setup Prerequisites
■ Software Compatibility
■ Disk Space Requirements
■ Installation and Configuration
■ Recommended Order for Software Installation
■ Adding a Node to an Existing Cluster
■ Adding a Sample Database
■ Postinstallation Procedures
1.1 Cluster Setup PrerequisitesYou must perform the following configuration tasks before the installation of Oracle Fail Safe:
■ Select Validate This Cluster action found in the Actions menu of Microsoft Windows Failover Cluster Manager and then review the results by running View Validation Report action. Resolve any issues found during Microsoft Windows Failover Cluster validation process before proceeding.
■ Check that each system has the proper Oracle Net tnsnames.ora configuration to allow the system to connect to its local database.
Software Compatibility
1-2 Oracle Fail Safe Installation Guide
■ If you install Oracle Fail Safe on a subset of the nodes in the cluster, check that the Cluster Group is running on one of the nodes where you installed Oracle Fail Safe. You can view or change the location of the Cluster Group using Microsoft Windows Failover Cluster Manager. Oracle Fail Safe will not function properly if the Cluster Group is moved to a node that does not have Oracle Fail Safe installed.
■ Ensure that Microsoft Windows Event Viewer is not running while installing Oracle Fail Safe. This is an issue only if installing on top of an existing installation (in-place upgrade).
1.2 Software CompatibilityRefer to Oracle Fail Safe Release Notes for Microsoft Windows for information on current software compatibility for different operating systems.
1.3 Disk Space RequirementsThe following table describes the disk space requirements for each installation type:
1.4 Installation and ConfigurationOracle Fail Safe Manager requires Microsoft .NET 3.5 Service Pack 1. If .NET 3.5 Service Pack 1 is not installed on Windows Server 2008 R2 and later, then ensure that you add it either using Server Manager Interface or PowerShell as described here:
Using Server Manager Interface1. In the Server Manager interface, select Add Features to display a list of possible
features.
2. In the Select Features interface, expand .NET Framework 3.5.1 Features.
3. Once you expand .NET Framework 3.5.1 Features, you will see two check boxes. One for .NET Framework 3.5.1 and the other for WCF Activation. Select the box next to .NET Framework 3.5.1 and click Next.
Note: If you attempt to install Oracle Fail Safe while the Microsoft Windows Event Viewer is running, the installation procedure may return an error indicating that it cannot copy the fsus.dll file (fsja.dll on Japanese systems) and asks you to retry, ignore, or cancel. You can continue the installation if you stop the Microsoft Windows Event Viewer and then click Retry in the Oracle Fail Safe installation Error window.
Installation Type Disk Space (MB)
Typical Install 188
Client Only Install 177
Recommended Order for Software Installation
Introduction and Preinstallation Checklist 1-3
4. In the Confirm Installation Selections interface, review the selections and then click Install.
5. Allow the installation process to complete and then click Close.
Using Windows PowerShell1. From the Start menu, select All Programs, then select Accessories.
2. Expand and right-click Windows PowerShell, then select Run as administrator. Click Yes on the User Account Control box.
3. At the PowerShell command prompt, type the following commands, and then press Enter after each command:
■ Import-Module ServerManager
■ Add-WindowsFeature as-net-framework
1.5 Recommended Order for Software InstallationAlthough this guide describes the Oracle Fail Safe installation in detail, other products must also be installed to implement the Oracle Fail Safe environment. Figure 1–1 shows the recommended order for installing software on a two-node cluster
Figure 1–1 Recommended Order for Installing Software on a Two-Node Cluster
Note: If you do not expand .NET Framework 3.5.1 Features and select it, then you will get a pop-up titled Add Features Wizard.
Click Cancel and expand .NET Framework 3.5.1 Features and then check .NET Framework 3.5.1 check box below it.
You cannot install .NET Framework 3.5.1 Features unless the required role services and features are also installed.
Note: The numbers in Figure 1–1 do not correspond to the numbered steps in the subsequent list because the list contains more detailed information than the figure.
Recommended Order for Software Installation
1-4 Oracle Fail Safe Installation Guide
This is a text description of nu-fsinstall.gif, which shows the recommended order for installing software. The text following this image gives detailed instructions on the recommended procedure for installation.
***********************************************************************************************
The following list provides more detail about the installation order and other tasks to help you get started with Oracle Fail Safe:
1. On each cluster node, add and configure the Microsoft Windows Failover Cluster feature.
See Oracle Fail Safe Release Notes for Microsoft Windows for information about the versions of Microsoft Windows that can be used with Oracle Fail Safe.
2. On each cluster node, install the optional Oracle software (Oracle Database and other applications) that you plan to use with Oracle Fail Safe. Place all application and database data, control, and log files on shared cluster disks so that they can fail over. If you add an Oracle product after Oracle Fail Safe has started, then you must restart Oracle Fail Safe so it can identify the new installation. This can be done by restarting the Cluster Service action on each node in the cluster. Note that restarting the Cluster Service will force all cluster groups on a node to failover to another node.
If you are installing Oracle Database software, you can create the database before or after you install Oracle Fail Safe. Create the database as you would in a noncluster environment, including the database listener. However, the database must be created on a cluster disk or disks.
3. On each cluster node, install the server component of Oracle Fail Safe.
See Chapter 2 for complete information about installing Oracle Fail Safe.
4. On one or more client systems, optionally, install Oracle Fail Safe Manager (for example, to set up additional management consoles).
Figure 1–2 lists the software and the files that should be installed on private disks and shared-nothing cluster disks.
Adding a Sample Database
Introduction and Preinstallation Checklist 1-5
Figure 1–2 Software Installed on Private, Shared-Nothing Cluster Disks
This is a text description of nu-fsinstall2.gif, which shows the locations of software and files installed in the installation process. The cluster disks contain application data and log files (database data files, database control files, database log files, and HTML files). Each node has a private disk, which contains executable application files for Oracle Fail Safe, Microsoft Windows, MSCS, the Oracle HTTP Server, and other third-party software.
***********************************************************************************************
1.6 Adding a Node to an Existing ClusterIf you want to add a node to an existing cluster, perform the following operations:
1. Follow Microsoft's instructions to add a node to a cluster.
2. On the new node, install any desired optional Oracle software (Oracle Database and other applications) that you plan to use with Oracle Fail Safe. Install executable application files located on private disks (for example, on the system disk for each node).
3. On the new node, install the server component of Oracle Fail Safe. You can install Oracle Fail Safe Manager at the same time.
1.7 Adding a Sample DatabaseOracle Fail Safe includes a Create Sample Database command that installs a preconfigured sample database on a cluster disk specified by the user. The sample database has limited functions and is intended only for testing purposes and for use with the online Oracle Fail Safe Tutorial for Microsoft Windows. The sample database should not be used for production. To create a database for production, use Database Configuration Assistant or create the database manually.
Postinstallation Procedures
1-6 Oracle Fail Safe Installation Guide
1.8 Postinstallation ProceduresAfter you have successfully installed Oracle Fail Safe, perform the following tasks:
1. If you have installed optional Oracle software:
■ Configure application data and log files on the shared cluster disks.
■ Configure alert and trace files on either the shared cluster disks or on the private disk.
Configuring alert and trace files on private disks allows the administrator to determine the node on which problems occur, but requires that you maintain multiple sets of files. Placing parameter files on private disks is recommended only when you want the parameters to be different on each cluster node. For example, this can be useful if you want a database to use fewer resources on its failover node than on its primary node (such as when you know that another application or database on the failover node needs resources).
For information about re-creating databases on cluster disks, refer to the Import and Export documentation that is specific to your database.
2. Start Oracle Fail Safe Manager, connect to the cluster alias with a domain account that has Administrator privileges on each cluster node. You must confirm that the installation is completed when prompted. If you perform a silent installation, then you can complete the installation by running an fscmd verifycluster command or the PowerShell command Test-OracleCluster.
See Oracle Fail Safe Concepts and Administration Guide for Microsoft Windows for more information about the command line utilities.
See Chapter 3 for information to help you get started with Oracle Fail Safe.
3. Refer to the Oracle Fail Safe Tutorial for Microsoft Windows for step-by-step information about creating a group and adding resources to it.
2
Installing Oracle Fail Safe 2-1
2Installing Oracle Fail Safe
This chapter provides step-by-step instructions for installing Oracle Fail Safe Manager, Oracle Fail Safe, and additional server components specific to Oracle Fail Safe.
The discussions in this chapter assume that you have set up your hardware configuration, installed Microsoft Windows, and configured Microsoft Windows Failover Clusters. To configure Oracle products or other components with Oracle Fail Safe, install the component software before installing Oracle Fail Safe.
The following topics are discussed in this chapter:
■ Reviewing the Preinstallation Checklist
■ Installing Oracle Fail Safe Software
2.1 Reviewing the Preinstallation ChecklistPerform the following preinstallation checks:
■ Verify the release of any other Oracle software or third-party software that you plan to use with Oracle Fail Safe against the software compatibility guidelines that are documented in Oracle Fail Safe Release Notes for Microsoft Windows.
■ If necessary, configure Microsoft Windows Failover Clusters and configure MSDTC.
■ If necessary, install the Microsoft Remote Server Administration Tools (RSAT) for client only installations.
■ Verify that the cluster is up and running on all nodes.
■ Remove the previous version of Oracle Fail Safe, if necessary.
■ Install additional components that you want to configure with Oracle Fail Safe (such as Oracle Database and so on).
■ If necessary, install Oracle Enterprise Manager.
■ Log on to the cluster nodes using the same domain user account that has Administrator privileges. The account from which you run Oracle Universal Installer must have Administrator privileges.
■ Choose a domain account that has Administrator privileges on each cluster node that will be used by the Oracle Fail Safe Server.
Note: If you are upgrading Oracle Fail Safe from an earlier release, see Appendix A for information about performing a rolling upgrade.
Installing Oracle Fail Safe Software
2-2 Oracle Fail Safe Installation Guide
2.2 Installing Oracle Fail Safe SoftwareAfter you have installed Microsoft Windows Server, and have configured and validated the Microsoft Windows Failover Clusters as described in the Microsoft documentation, you are ready to install Oracle Fail Safe. Install Oracle Fail Safe on all cluster nodes, but perform the Oracle Fail Safe installation sequentially on only one node at a time. Optionally, you can install Oracle Fail Safe Manager on the cluster nodes at the same time.
To install Oracle Fail Safe Manager on client systems, you must be running Microsoft Windows. If Oracle Fail Safe detects that the Microsoft Windows Failover Cluster Manager is installed, then it creates an MMC console named Cluster Tools. This console contains both the Microsoft Windows Failover Cluster Manager and the Oracle Fail Safe Manager MMC snap-ins. It also provides the ability to use both the tools in a single interface.
See Oracle Fail Safe Release Notes for Microsoft Windows for information about the required versions of Microsoft Windows Server.
Perform the following steps to install Oracle Fail Safe.
Step 1 Start Oracle Universal Installer.Use Oracle Universal Installer, which is included in the Oracle Fail Safe software kit, to install Oracle Fail Safe.
Oracle Universal Installer automatically performs the installation procedure in the same language used by the operating system. For example, if the node operating system is in Japanese, then Oracle Universal Installer automatically performs the installation in Japanese.
When Oracle Universal Installer begins, a command interpreter window opens, indicating that the installer is checking prerequisites. If all prerequisites are met, then the Welcome window opens. If some or all prerequisite checks fail, then you are asked whether you want to continue. If you choose to continue, then the installation may fail.
Step 2 Welcome Window: Verify installed components and Oracle homes.When the Welcome window opens, you can optionally click Installed Products to view the Oracle components that are installed and the Oracle homes where they reside. Click Next when ready to proceed.
Step 3 Select Installation Type Window: Select an installation type.In the Installation Types window, specify the type of installation to perform, as follows:
1. Select an installation type:
■ Select Typical to install Oracle Fail Safe Manager and Oracle Fail Safe server. Typical is the default installation type.
■ Select Client Only to install Oracle Fail Safe Manager.
Note: If you decide to update a Microsoft Windows service pack from one supported version to another, you can do so regardless of whether Oracle Fail Safe or the software for resources that Oracle Fail Safe supports has been installed.
Installing Oracle Fail Safe Software
Installing Oracle Fail Safe 2-3
■ Select Custom or Reinstall to specify each components that you want to install or reinstall.
2. Click Next.
Step 4 Specify Home Details Window: Specify the Oracle home directory for the Oracle Fail Safe installation.In the Specify Home Details window, specify the Oracle home and its destination path, as follows:
1. Under Destination, in the Name field, enter a unique name for the Oracle home where you want to install the Oracle Fail Safe software.
2. Under Destination, in the Path field, enter the directory specification for the Oracle home entered in the previous step.
3. Click Next.
Step 5 Available Product Components Window: Select components.If you have selected Typical installation in Step 3, then proceed to Step 6. If you have selected Client Only in Step 3, then proceed to Step 9. If you have selected Custom or Reinstall in Step 3, then this window lets you specify which components to install, as follows:
By default, all Oracle Fail Safe components are selected. You must deselect the components that you do not want to install.
Note that, you can deselect Oracle Fail Safe Server 4.1.0.0.0 or Oracle Fail Safe Manager 4.1.0.0.0. But you cannot deselect Java Runtime Environment 1.6.0.11.0. If you select Deselect All, then it shows an error message stating "OUI-10088: This is a required component. You cannot deselect a required component." Click OK to continue or click Show Details to see the required components.
Once you select the required Oracle Fail Safe components, click Next.
Step 6 Cluster Service Will be Restarted Window: Fails over any cluster resources running on the node.Oracle Universal Installer displays a window informing you that the Cluster Service service will be restarted. This means that any cluster resources that currently reside on the node will be failed over to other nodes in the cluster.
Step 7 Oracle Fail Safe Server Username Window: Enter a domain user account for Oracle Fail Safe.If you chose to install the Oracle Fail Safe server in Step 3, then this window lets you specify the username as follows:
In the Oracle Fail Safe Server Username window enter:
1. A value in the Username box for a user account that has Administrator privileges.
Note:
■ You must install Oracle Fail Safe on a private disk, not on a shared cluster disk.
■ You must install Oracle Fail Safe server software using the same home name and path on each cluster node.
Installing Oracle Fail Safe Software
2-4 Oracle Fail Safe Installation Guide
For example, if you are using the EXAMPLEDOMAIN and your user name is admin, then enter EXAMPLEDOMAIN\admin.
2. Click Next.
Oracle Fail Safe uses the account you specify to access the cluster. Oracle Fail Safe runs as a Microsoft Windows service (called Oracle Fail Safe) under a user account that must be a domain user account (not the system account) that has Administrator privileges on all nodes of this cluster. The account must be the same on all nodes of this cluster, otherwise you will recieve an error message when you try to attempt clusterwide operations, such as Verify Configuration of the Oracle Resources, Add This Resource to a group, and so on.
Step 8 Oracle Fail Safe Server Password Window: Enter the password for the domain user account for Oracle Fail Safe.If you chose to install the Oracle Fail Safe server in Step 3, then this window lets you specify the password as follows:
In the Oracle Fail Safe Server Password window enter:
1. The password for the account in the Enter Password and Confirm Password boxes.
2. Click Next.
Step 9 Summary Window: Verify the component installations.The Summary window lists the components selected for this installation.
Verify that the information in the Summary window is correct. If the summary includes a component that you do not want to install, then click Back button to go back to the installation dialog box and deselect the component.
If the information in the Summary window is correct, then click Install to start the installation.
Step 10 Install Window: Shows the progress of the installation.The Install window displays the progress of the installation.
Typically, the installation completes in 1 to 5 minutes.
Step 11 Configuration Assistants Window: Configures and starts the selected components.If the installation is successful, then the Configuration Assistants window opens displaying the tool name, status of the configuration process, and type.
Step 12 End of Installation Window: Confirm the Installation.Oracle Universal Installer displays the End of Installation window. To confirm the installation of Oracle Fail Safe and any additional components, click Installed Products.
Step 13 Verify the Oracle Fail Safe installation.See Chapter 3 for information about verifying the Oracle Fail Safe installation.
Note: If your system does not have sufficient space to perform the installation, then the text below Space Requirements is displayed in red.

Installing Oracle Fail Safe Software
Installing Oracle Fail Safe 2-5

Installing Oracle Fail Safe Software
2-6 Oracle Fail Safe Installation Guide
3
Getting Started 3-1
3Getting Started
This chapter contains the following topics to help you connect to a cluster and start using Oracle Fail Safe Manager:
■ About Starting the Manager and Completing Oracle Fail Safe Installation
■ Accessing Oracle Fail Safe Manager Tutorial and Online Help
3.1 About Starting the Manager and Completing Oracle Fail Safe Installation
This section describes how to complete the installation of Oracle Fail Safe Manager, verify the cluster, start Oracle Fail Safe Manager, add a cluster, and connect to a known cluster.
3.1.1 Starting Oracle Fail Safe ManagerAfter the installation and verification process completes, start Oracle Fail Safe Manager from the Microsoft Windows taskbar by selecting All Programs from the Windows Start menu, then Oracle - ORACLE_HOME, then Oracle Fail Safe Manager. (ORACLE_HOME is the name of the Oracle home where you installed Oracle Fail Safe.)
3.1.2 Completing the Installation of Oracle Fail Safe ManagerAfter you install the Oracle Fail Safe software on all nodes of the cluster, you must complete the installation. When the Oracle Fail Safe Manager connects to a cluster that has a new server installation, it detects that the installation needs to be finished and prompts you to finish the installation. A dialog box appears as shown in Figure 3–1.
Figure 3–1 The New Installation Needs to be Completed
This is a text description of new_install.gif, which shows the dialog box prompting you to complete the new installation of Oracle Fail Safe.
***********************************************************************************************
Adding a Cluster
3-2 Oracle Fail Safe Installation Guide
When you click OK, Oracle Fail Safe verifies the cluster to complete the registration of the Oracle cluster resource types.
You can verify the cluster at any time by selecting the Verify action and should run it whenever the cluster configuration changes.
Verify cluster performs operations to verify that:
■ The Oracle homes are identical on all nodes
■ The Oracle Fail Safe release is identical on all nodes
■ The resource providers are configured identically on all nodes
■ The resource providers are disabled if the required software has not been installed
Verify cluster action also registers with Microsoft Windows Failover Clusters the resource DLLs for the resource types that Oracle Fail Safe supports.
For more information about Verify cluster action, refer to Oracle Fail Safe Concepts and Administration Guide for Microsoft Windows.
3.1.3 Connecting to a Known ClusterAfter you add a cluster to the list of known clusters, Oracle Fail Safe Manager automatically establishes a connection with the cluster.
If a cluster is present in the cluster list but shows as disconnected, select Connect from the Actions menu on the right pane of the cluster page. It immediately connects to the known cluster.
3.2 Adding a ClusterWhen Oracle Fail Safe Manager opens, if you are running the Fail Safe Manager from a cluster node, then it will automatically connect to the cluster, otherwise, if you are running Fail Safe Manager from a standalone node, then you will need to add a cluster to the list of clusters known by the Fail Safe Manager. Select the Add Cluster action under the Actions menu of Oracle Fail Safe Manager main page as shown in Figure 3–2.

Adding a Cluster
Getting Started 3-3
Figure 3–2 Adding a Cluster to the Clusters List
This is a text description of add_cluster_to_tree.gif, which shows the Oracle Fail Safe Manager window with the tree view containing only the Fail Safe Manager folder. In addition, the Add Cluster action item can be seen on the right-pane of the window.
***********************************************************************************************
A dialog box appears that prompts you for the name of the cluster that you would like to manage. Enter the name of the cluster as shown in Figure 3–3.
Figure 3–3 Entering the Name of the Cluster
This is a text description of cluster_added.gif, which shows the dialog box prompting you for the name of the cluster that you would like to manage. The name must be entered in the Cluster Alias field.
***********************************************************************************************

Accessing Oracle Fail Safe Manager Tutorial and Online Help
3-4 Oracle Fail Safe Installation Guide
3.3 Accessing Oracle Fail Safe Manager Tutorial and Online HelpFor detailed step-by-step instructions about using Oracle Fail Safe Manager, refer to the Oracle Fail Safe Tutorial for Microsoft Windows and online help.
To access the tutorial, go to the first page of Oracle Fail Safe Manager and select Fail Safe Documentation, or go to Windows Start menu and then select Oracle Fail Safe Documentation for step-by-step instructions.
The online help document provides information on how to use the Oracle Fail Safe Manager while the other documents in the Oracle Fail Safe documentation set provides more in-depth information on using Oracle resources in Microsoft Windows Failover Clusters. To access the online help, click the Help button in the Oracle Fail Safe pages.
4
Deinstalling Oracle Fail Safe 4-1
4Deinstalling Oracle Fail Safe
This chapter provides step-by-step instructions for deinstalling Oracle Fail Safe software.
You might want to deinstall Oracle Fail Safe, for example, to remove older software or to move Oracle Fail Safe software to another Oracle home. However, do not use the deinstallation instructions in this chapter as a method for upgrading the Oracle Fail Safe software to the current release. See Appendix A for information about performing a rolling upgrade. See Appendix B for information about performing a silent mode deinstallation.
4.1 Deinstalling Oracle Fail Safe SoftwareDeinstalling Oracle Fail Safe software involves removing resources from groups and reconfiguring them to run on a specific cluster node.
Perform the following steps to remove Oracle Fail Safe software.
Step 1 Close Event ViewerIf you run the Windows Event Viewer and display any Oracle Fail Safe events, then you should close the Event Viewer before deinstalling Oracle Fail Safe.
Step 2 Remove Oracle resources from the cluster groups.Using Oracle Fail Safe Manager, perform the following tasks:
1. Move each group to the node that will host the standalone Oracle resources after Oracle Fail Safe is deinstalled.
2. Remove all Oracle resources from your groups.
Note: Deinstalling Oracle Fail Safe will restart the "Cluster Service" service which will cause all cluster groups currently running on that node to failover to another node in the cluster.
Caution: Do not evict a node from a cluster without first deinstalling Oracle Fail Safe. Evicting a node that has Oracle Fail Safe installed will cause the cluster metadata for Oracle resources to become inconsistent and deinstallation of Oracle Fail Safe from the evicted node impossible. If a node is evicted before deinstalling Oracle Fail Safe from the node then add that node back into the cluster, deinstall Oracle Fail Safe, and then evict the node.
Deinstalling Oracle Fail Safe Software
4-2 Oracle Fail Safe Installation Guide
3. Exit Oracle Fail Safe Manager.
Step 3 Start Oracle Universal Installer and deinstall software.Start Oracle Universal Installer and perform the following tasks:
1. Click Deinstall Products to display Inventory dialog box.
2. Select the Oracle home that contains the Oracle Fail Safe software.
3. Expand the tree view and select the check box next to Oracle Fail Safe.
4. Click Remove.
Step 4 Confirm the deinstallation of software.There is a Confirmation dialog box prompting the user whether he wants to continue with the deinstallation of the product. The dialog box states the following message:
"Are you sure you want to deinstall the following products and their dependent components?"
If the user clicks Yes, then it progresses to the Remove dialog box showing the progress of the deinstallation process. Click No to stop the deinstallation process.
Step 5 Exit Oracle Universal Installer.Click Exit to exit Oracle Universal Installer.
5
Troubleshooting Installation Problems 5-1
5Troubleshooting Installation Problems
This chapter provides general information to help you troubleshoot problems with Oracle Fail Safe installations and deinstallations. The following topics are covered in this chapter:
■ Overview of Problems With the FSCMD Command After an Upgrade
■ Overview of Problems Installing Oracle Fail Safe
■ Verifying Oracle Fail Safe Service Entry
■ Verifying Oracle Fail Safe in the Cluster Group
■ Verifying Whether Oracle Resources are Registered with Microsoft Windows Failover Clusters
5.1 Overview of Problems With the FSCMD Command After an UpgradePrior to release 3.4.2 the Oracle Fail Safe client directory was included in the system path environment variable, thus a full directory specification was not needed to start the FSCMD command. In 3.4.2 and later, the directory is no longer in the system path environment variable.
The FSCMD executable is located in ORACLE_HOME\FailSafe\Client directory, where ORACLE_HOME is the Oracle Fail Safe home directory. If you have not set your directory to ORACLE_HOME\FailSafe\Client, you must specify the full path when running the FSCMD command.
5.2 Overview of Problems Installing Oracle Fail SafeIf you are running Oracle Universal Installer on a system that does not have Microsoft Windows Failover Cluster configured (such as a client system) and you try to install Oracle Fail Safe, then the installer will open an error window to display an error that states that the Oracle Fail Safe must be installed on a system running Microsoft Windows Failover Clusters. You must configure Microsoft Windows Failover Cluster prior to installing Oracle Fail Safe.
If such a message is displayed, do not continue with the installation. Click OK to go back to the installation windows and choose a Client Only installation. See Chapter 2 for more information about Client Only installation.
5.3 Verifying Oracle Fail Safe Service EntryOn successful installation and verification of Oracle Fail Safe, the Services Control Panel on each cluster node must include a new service entry named Oracle Fail Safe.
Verifying Oracle Fail Safe in the Cluster Group
5-2 Oracle Fail Safe Installation Guide
To verify the Oracle Fail Safe entry in the Services Control Panel:
1. Open the Windows Services Window.
2. Scroll down to the Oracle service listings and locate the Oracle Fail Safe entry.
The Startup status for Oracle Fail Safe is displayed as Started on the node where the Cluster Group resides, and it is displayed as Manual on the other cluster nodes.
3. Perform steps 1 and 2 on each cluster node.
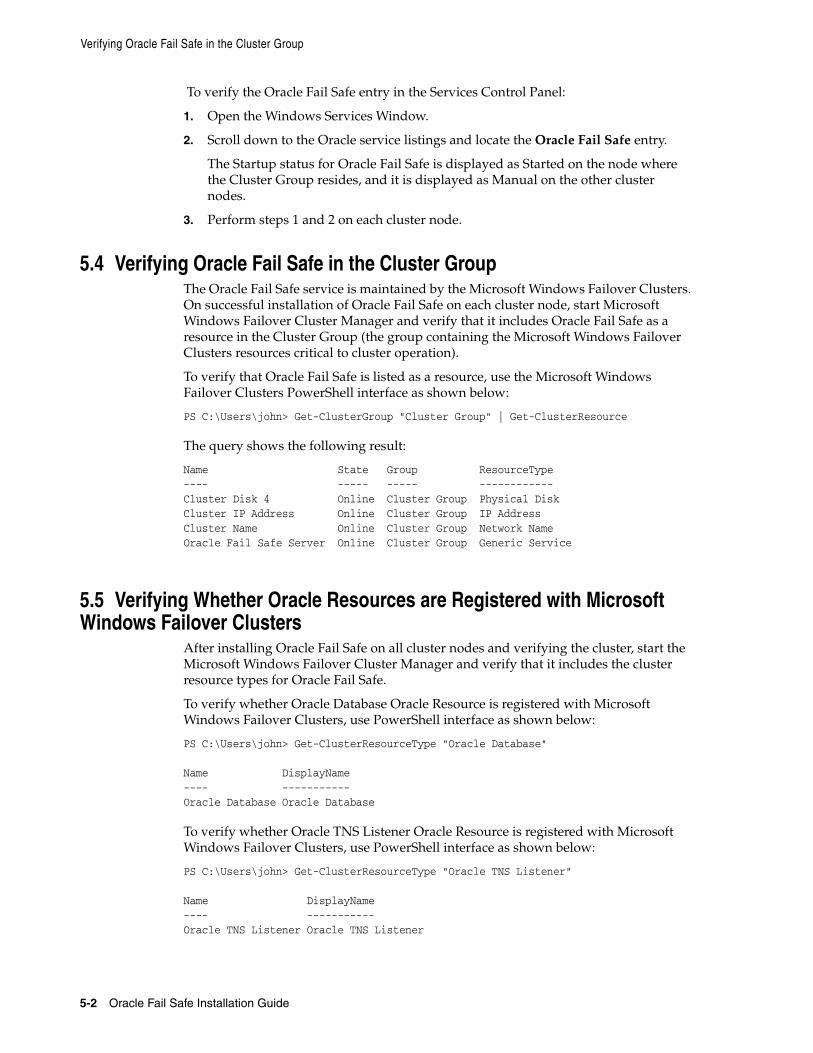
5.4 Verifying Oracle Fail Safe in the Cluster GroupThe Oracle Fail Safe service is maintained by the Microsoft Windows Failover Clusters. On successful installation of Oracle Fail Safe on each cluster node, start Microsoft Windows Failover Cluster Manager and verify that it includes Oracle Fail Safe as a resource in the Cluster Group (the group containing the Microsoft Windows Failover Clusters resources critical to cluster operation).
To verify that Oracle Fail Safe is listed as a resource, use the Microsoft Windows Failover Clusters PowerShell interface as shown below:
PS C:\Users\john> Get-ClusterGroup "Cluster Group" | Get-ClusterResource
The query shows the following result:
Name State Group ResourceType---- ----- ----- ------------Cluster Disk 4 Online Cluster Group Physical DiskCluster IP Address Online Cluster Group IP AddressCluster Name Online Cluster Group Network NameOracle Fail Safe Server Online Cluster Group Generic Service
5.5 Verifying Whether Oracle Resources are Registered with Microsoft Windows Failover Clusters
After installing Oracle Fail Safe on all cluster nodes and verifying the cluster, start the Microsoft Windows Failover Cluster Manager and verify that it includes the cluster resource types for Oracle Fail Safe.
To verify whether Oracle Database Oracle Resource is registered with Microsoft Windows Failover Clusters, use PowerShell interface as shown below:
PS C:\Users\john> Get-ClusterResourceType "Oracle Database"
Name DisplayName---- -----------Oracle Database Oracle Database
To verify whether Oracle TNS Listener Oracle Resource is registered with Microsoft Windows Failover Clusters, use PowerShell interface as shown below:
PS C:\Users\john> Get-ClusterResourceType "Oracle TNS Listener"
Name DisplayName---- -----------Oracle TNS Listener Oracle TNS Listener
A
Rolling Upgrades and Patches A-1
A Rolling Upgrades and Patches
Oracle Fail Safe allows a cluster system to continue to provide service while the software is being upgraded to the next release. This process is called a rolling upgrade because each node is upgraded and restarted in turn, until all server nodes and all client nodes have been upgraded. You might want to perform a rolling upgrade for the following reasons:
■ To upgrade the Oracle Fail Safe software or install patches
■ To upgrade or patch a highly available Oracle single-instance database
■ To upgrade or patch other Oracle software
When you upgrade Oracle software, do not start the installation procedure while any Oracle Fail Safe Manager operations or Microsoft Windows Failover Cluster Manager operations are in progress on groups. You must wait for a quiet period in cluster operations before you proceed with the steps described in this appendix.
This appendix includes the following topics:
■ Preparing Users for the Upgrade
■ Recommended Order for Upgrading Software
■ Upgrading the Oracle Fail Safe Software and Installing Patches
■ Upgrading or Patching a Highly Available Oracle Database
■ Upgrading Other Oracle Product Software
A.1 Preparing Users for the UpgradeDuring a rolling upgrade, you need to perform a planned failover to make the cluster resources running on one node move to another node. Each planned failover will disconnect users and cause a rollback of any interrupted, uncommitted work if a database is involved in the operation.
This brief outage typically is less than 1 minute and always is less than the downtime that would be experienced by users if Oracle Fail Safe was not installed. To prevent loss of work, notify users that you plan to shut down the system, and have all users
Note: To ensure minimal downtime and to identify any potential issues with other software that might be running on the cluster, Oracle recommends that you test the operations described in this appendix on an identically configured test cluster before you upgrade the production cluster.
Recommended Order for Upgrading Software
A-2 Oracle Fail Safe Installation Guide
commit their work and log off before you perform the failover. Advise users when they can reconnect and resume work after the database fails over to another cluster node.
While you are performing upgrades to a two-node cluster, remember that failback is disabled and your cluster is not protected against failures. In addition, each time that you stop and restart the cluster service on a node (with Microsoft Windows Failover Cluster Manager), all remaining cluster resources running on the node fail over to another node with a similar brief loss of service.
A.2 Recommended Order for Upgrading SoftwareOracle recommends the following procedure for upgrading software on your cluster when just the database software or both the database software and Oracle Fail Safe software must be upgraded.
1. Remove each database from its group.
2. Upgrade the Oracle Database software and the Oracle Fail Safe software if required. The order in which you perform these two upgrades is not important.
3. Add each database back to its group.
If you are only performing an Oracle Fail Safe software upgrade or applying a patch to the database software (but you are not going to upgrade the database software), then you do not need to remove any database from its group prior to doing an upgrade or applying the patch.
Patching typically involves updating the software from one release to another where only the fourth or fifth digit in the release number changes, for example, 11.1.0.6 to 11.1.0.7. An upgrade is required when the first, second, or third digit in the release number changes, for example 11.1.0 to 11.2.0 or 11.2.0 to 12.1.0.
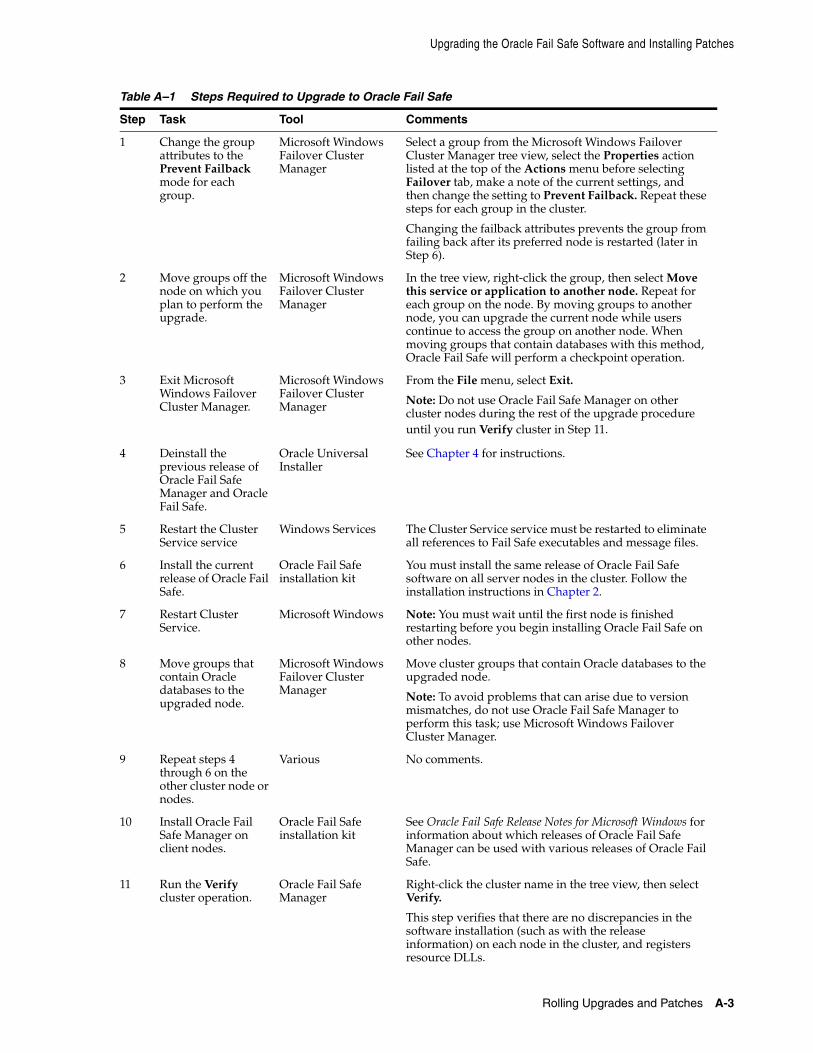
A.3 Upgrading the Oracle Fail Safe Software and Installing PatchesThis section describes how to perform a rolling upgrade when you want to upgrade the Oracle Fail Safe software on a cluster that is currently running Oracle Fail Safe (for example, to upgrade the cluster from Oracle Fail Safe release 3.3.2 to release 3.3.3). The tasks described in this section apply to upgrades from any Oracle Fail Safe release before the current Oracle Fail Safe release.
If you are performing a rolling upgrade of the Oracle Fail Safe software, then you must upgrade the Oracle Fail Safe and Oracle Fail Safe Manager software clusterwide. You cannot run multiple releases of the Oracle Fail Safe software on the same cluster. See Oracle Fail Safe Release Notes for Microsoft Windows for information about the compatibility of various Oracle Fail Safe Manager releases with various releases of Oracle Fail Safe Server or Oracle Fail Safe.
Perform the steps described in Table A–1 on only one cluster node at a time.
See Also: Oracle Database Upgrade Guide for information about prerequisites for preparing a new Oracle home on Windows
Upgrading the Oracle Fail Safe Software and Installing Patches
Rolling Upgrades and Patches A-3
Table A–1 Steps Required to Upgrade to Oracle Fail Safe
Step Task Tool Comments
1 Change the group attributes to the Prevent Failback mode for each group.
Microsoft Windows Failover Cluster Manager
Select a group from the Microsoft Windows Failover Cluster Manager tree view, select the Properties action listed at the top of the Actions menu before selecting Failover tab, make a note of the current settings, and then change the setting to Prevent Failback. Repeat these steps for each group in the cluster.
Changing the failback attributes prevents the group from failing back after its preferred node is restarted (later in Step 6).
2 Move groups off the node on which you plan to perform the upgrade.
Microsoft Windows Failover Cluster Manager
In the tree view, right-click the group, then select Move this service or application to another node. Repeat for each group on the node. By moving groups to another node, you can upgrade the current node while users continue to access the group on another node. When moving groups that contain databases with this method, Oracle Fail Safe will perform a checkpoint operation.
3 Exit Microsoft Windows Failover Cluster Manager.
Microsoft Windows Failover Cluster Manager
From the File menu, select Exit.
Note: Do not use Oracle Fail Safe Manager on other cluster nodes during the rest of the upgrade procedure until you run Verify cluster in Step 11.
4 Deinstall the previous release of Oracle Fail Safe Manager and Oracle Fail Safe.
Oracle Universal Installer
See Chapter 4 for instructions.
5 Restart the Cluster Service service
Windows Services The Cluster Service service must be restarted to eliminate all references to Fail Safe executables and message files.
6 Install the current release of Oracle Fail Safe.
Oracle Fail Safe installation kit
You must install the same release of Oracle Fail Safe software on all server nodes in the cluster. Follow the installation instructions in Chapter 2.
7 Restart Cluster Service.
Microsoft Windows Note: You must wait until the first node is finished restarting before you begin installing Oracle Fail Safe on other nodes.
8 Move groups that contain Oracle databases to the upgraded node.
Microsoft Windows Failover Cluster Manager
Move cluster groups that contain Oracle databases to the upgraded node.
Note: To avoid problems that can arise due to version mismatches, do not use Oracle Fail Safe Manager to perform this task; use Microsoft Windows Failover Cluster Manager.
9 Repeat steps 4 through 6 on the other cluster node or nodes.
Various No comments.
10 Install Oracle Fail Safe Manager on client nodes.
Oracle Fail Safe installation kit
See Oracle Fail Safe Release Notes for Microsoft Windows for information about which releases of Oracle Fail Safe Manager can be used with various releases of Oracle Fail Safe.
11 Run the Verify cluster operation.
Oracle Fail Safe Manager
Right-click the cluster name in the tree view, then select Verify.
This step verifies that there are no discrepancies in the software installation (such as with the release information) on each node in the cluster, and registers resource DLLs.
Upgrading or Patching a Highly Available Oracle Database
A-4 Oracle Fail Safe Installation Guide
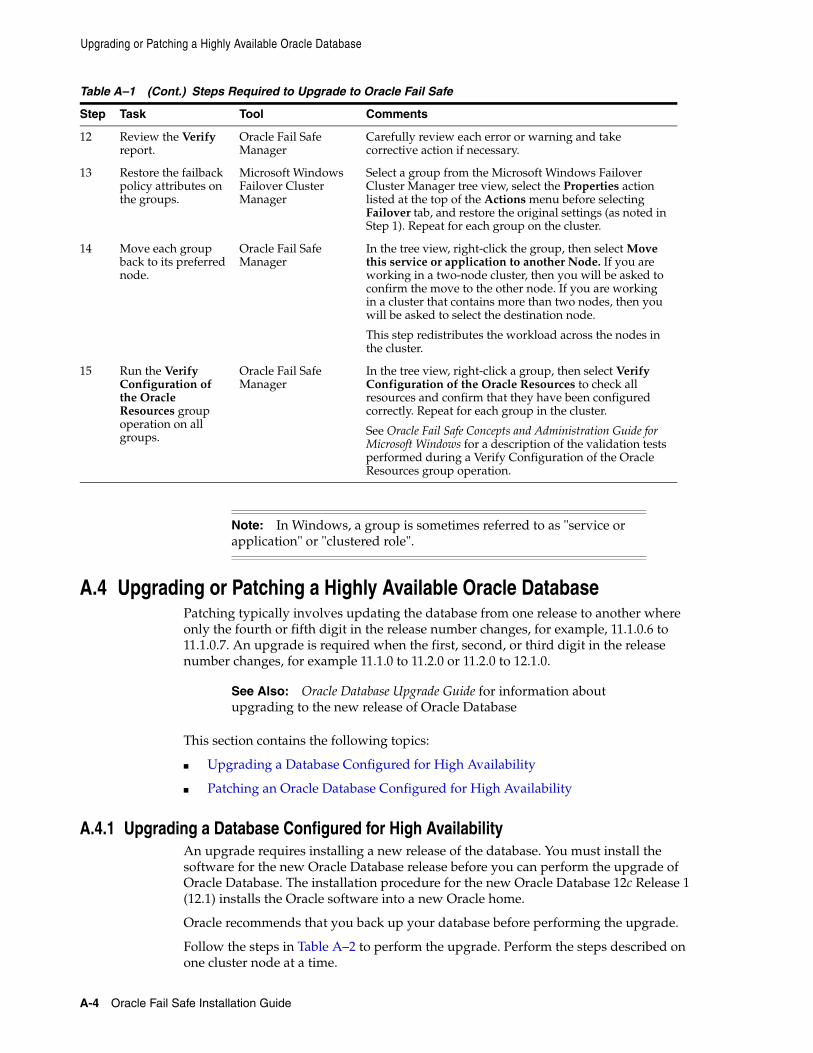
A.4 Upgrading or Patching a Highly Available Oracle DatabasePatching typically involves updating the database from one release to another where only the fourth or fifth digit in the release number changes, for example, 11.1.0.6 to 11.1.0.7. An upgrade is required when the first, second, or third digit in the release number changes, for example 11.1.0 to 11.2.0 or 11.2.0 to 12.1.0.
This section contains the following topics:
■ Upgrading a Database Configured for High Availability
■ Patching an Oracle Database Configured for High Availability
A.4.1 Upgrading a Database Configured for High AvailabilityAn upgrade requires installing a new release of the database. You must install the software for the new Oracle Database release before you can perform the upgrade of Oracle Database. The installation procedure for the new Oracle Database 12c Release 1 (12.1) installs the Oracle software into a new Oracle home.
Oracle recommends that you back up your database before performing the upgrade.
Follow the steps in Table A–2 to perform the upgrade. Perform the steps described on one cluster node at a time.
12 Review the Verify report.
Oracle Fail Safe Manager
Carefully review each error or warning and take corrective action if necessary.
13 Restore the failback policy attributes on the groups.
Microsoft Windows Failover Cluster Manager
Select a group from the Microsoft Windows Failover Cluster Manager tree view, select the Properties action listed at the top of the Actions menu before selecting Failover tab, and restore the original settings (as noted in Step 1). Repeat for each group on the cluster.
14 Move each group back to its preferred node.
Oracle Fail Safe Manager
In the tree view, right-click the group, then select Move this service or application to another Node. If you are working in a two-node cluster, then you will be asked to confirm the move to the other node. If you are working in a cluster that contains more than two nodes, then you will be asked to select the destination node.
This step redistributes the workload across the nodes in the cluster.
15 Run the Verify Configuration of the Oracle Resources group operation on all groups.
Oracle Fail Safe Manager
In the tree view, right-click a group, then select Verify Configuration of the Oracle Resources to check all resources and confirm that they have been configured correctly. Repeat for each group in the cluster.
See Oracle Fail Safe Concepts and Administration Guide for Microsoft Windows for a description of the validation tests performed during a Verify Configuration of the Oracle Resources group operation.
Note: In Windows, a group is sometimes referred to as "service or application" or "clustered role".
See Also: Oracle Database Upgrade Guide for information about upgrading to the new release of Oracle Database
Table A–1 (Cont.) Steps Required to Upgrade to Oracle Fail Safe
Step Task Tool Comments

Upgrading or Patching a Highly Available Oracle Database
Rolling Upgrades and Patches A-5
A.4.2 Patching an Oracle Database Configured for High AvailabilityWhen you patch a database that has been configured for high availability, it is not necessary to remove the database from the group prior to applying the patch.
Oracle Database 12c Release 1 (12.1) is a full release that includes all the latest patches and updates for Oracle Database. It is not necessary to check for patch set updates before proceeding with the upgrade process for this release. However, Oracle recommends that you periodically check for patches and patch set updates as a part of database administration.
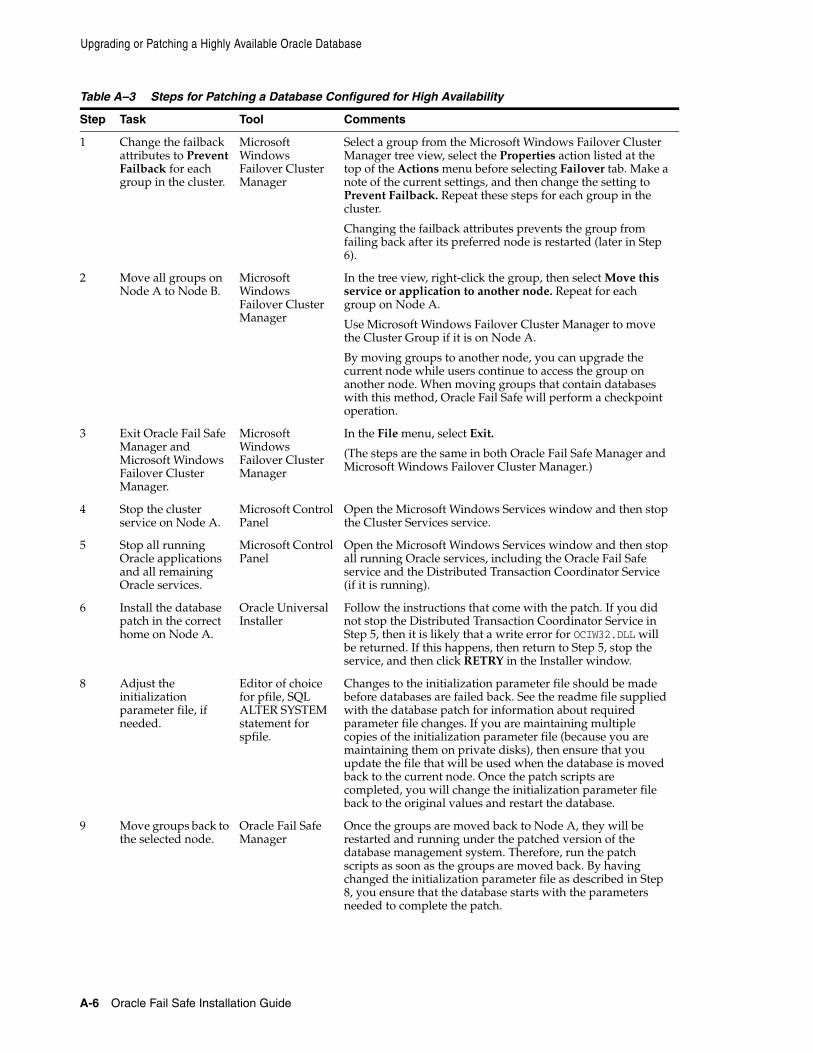
Table A–3 describes how to patch databases configured for high availability in a two-node cluster. These steps assume that there are two nodes, Node A and Node B, and that Node A is the first node that will be patched. Perform these steps on only one cluster node at a time.
Table A–2 Steps for Upgrading a Database Configured for High Availability
Step Task Tool Comments
1 Check compatibility Not applicable Ensure that the release of the database to which you plan to upgrade is compatible with the version of Oracle Fail Safe you are running. See the section on software compatibility in the Oracle Fail Safe Release Notes for Microsoft Windows. If the Oracle Database release and the Oracle Fail Safe software release are not compatible, then see Section A.3.
2 Install the Oracle Database software on each cluster node.
Oracle Universal Installer
Use the same directory and Oracle home name on each cluster node.
3 Remove each database from its group.
Oracle Fail Safe Manager
In the tree view, choose Oracle Resources, select the database from the Oracle Resources in Cluster list, and then select the Remove This Resource From the Group action from the Actions menu.
4 Upgrade each database.
Database Migration Assistant (or perform manually)
Instructions for performing the upgrade are included in the database upgrade (or migration) manual for the release to which you are upgrading.
5 Verify each standalone database
Oracle Fail Safe Manager
In the tree view, choose Oracle Resources, select the database from the Available Oracle Resources list, and then select the Verify Standalone Database action from the Actions menu.
6 Add each database back to its original group.
Oracle Fail Safe Manager
In the tree view, choose Oracle Resources, select the database from the Available Oracle Resources list, and then select the Add This Resource to a Group action from the Actions menu and follow the steps through the Add Resource to Group wizard.
Upgrading or Patching a Highly Available Oracle Database
A-6 Oracle Fail Safe Installation Guide
Table A–3 Steps for Patching a Database Configured for High Availability
Step Task Tool Comments
1 Change the failback attributes to Prevent Failback for each group in the cluster.
Microsoft Windows Failover Cluster Manager
Select a group from the Microsoft Windows Failover Cluster Manager tree view, select the Properties action listed at the top of the Actions menu before selecting Failover tab. Make a note of the current settings, and then change the setting to Prevent Failback. Repeat these steps for each group in the cluster.
Changing the failback attributes prevents the group from failing back after its preferred node is restarted (later in Step 6).
2 Move all groups on Node A to Node B.
Microsoft Windows Failover Cluster Manager
In the tree view, right-click the group, then select Move this service or application to another node. Repeat for each group on Node A.
Use Microsoft Windows Failover Cluster Manager to move the Cluster Group if it is on Node A.
By moving groups to another node, you can upgrade the current node while users continue to access the group on another node. When moving groups that contain databases with this method, Oracle Fail Safe will perform a checkpoint operation.
3 Exit Oracle Fail Safe Manager and Microsoft Windows Failover Cluster Manager.
Microsoft Windows Failover Cluster Manager
In the File menu, select Exit.
(The steps are the same in both Oracle Fail Safe Manager and Microsoft Windows Failover Cluster Manager.)
4 Stop the cluster service on Node A.
Microsoft Control Panel
Open the Microsoft Windows Services window and then stop the Cluster Services service.
5 Stop all running Oracle applications and all remaining Oracle services.
Microsoft Control Panel
Open the Microsoft Windows Services window and then stop all running Oracle services, including the Oracle Fail Safe service and the Distributed Transaction Coordinator Service (if it is running).
6 Install the database patch in the correct home on Node A.
Oracle Universal Installer
Follow the instructions that come with the patch. If you did not stop the Distributed Transaction Coordinator Service in Step 5, then it is likely that a write error for OCIW32.DLL will be returned. If this happens, then return to Step 5, stop the service, and then click RETRY in the Installer window.
8 Adjust the initialization parameter file, if needed.
Editor of choice for pfile, SQL ALTER SYSTEM statement for spfile.
Changes to the initialization parameter file should be made before databases are failed back. See the readme file supplied with the database patch for information about required parameter file changes. If you are maintaining multiple copies of the initialization parameter file (because you are maintaining them on private disks), then ensure that you update the file that will be used when the database is moved back to the current node. Once the patch scripts are completed, you will change the initialization parameter file back to the original values and restart the database.
9 Move groups back to the selected node.
Oracle Fail Safe Manager
Once the groups are moved back to Node A, they will be restarted and running under the patched version of the database management system. Therefore, run the patch scripts as soon as the groups are moved back. By having changed the initialization parameter file as described in Step 8, you ensure that the database starts with the parameters needed to complete the patch.
Upgrading or Patching a Highly Available Oracle Database
Rolling Upgrades and Patches A-7
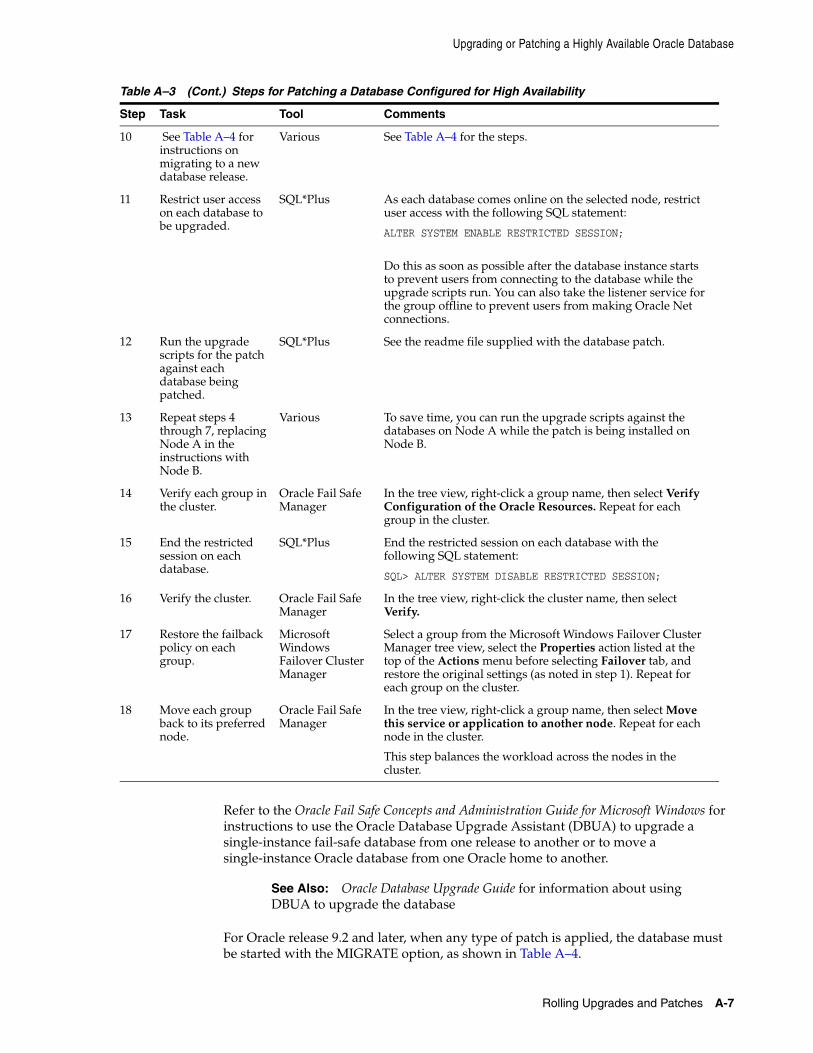
Refer to the Oracle Fail Safe Concepts and Administration Guide for Microsoft Windows for instructions to use the Oracle Database Upgrade Assistant (DBUA) to upgrade a single-instance fail-safe database from one release to another or to move a single-instance Oracle database from one Oracle home to another.
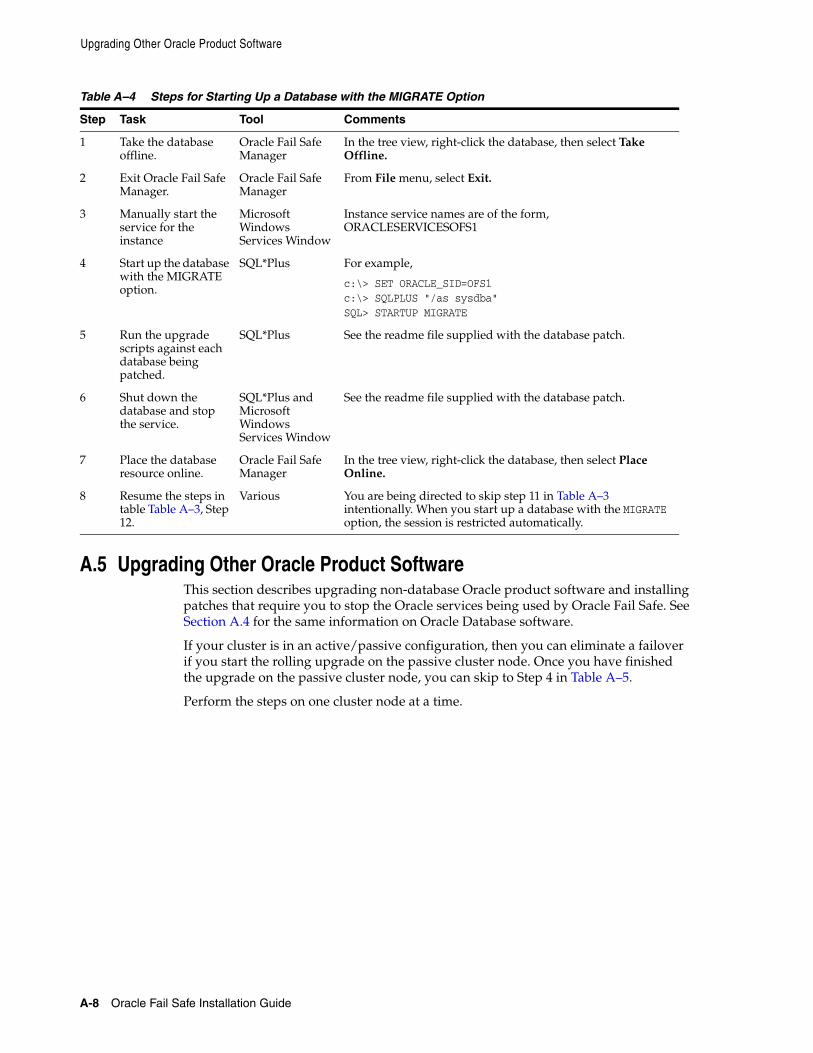
For Oracle release 9.2 and later, when any type of patch is applied, the database must be started with the MIGRATE option, as shown in Table A–4.
10 See Table A–4 for instructions on migrating to a new database release.
Various See Table A–4 for the steps.
11 Restrict user access on each database to be upgraded.
SQL*Plus As each database comes online on the selected node, restrict user access with the following SQL statement:
ALTER SYSTEM ENABLE RESTRICTED SESSION;
Do this as soon as possible after the database instance starts to prevent users from connecting to the database while the upgrade scripts run. You can also take the listener service for the group offline to prevent users from making Oracle Net connections.
12 Run the upgrade scripts for the patch against each database being patched.
SQL*Plus See the readme file supplied with the database patch.
13 Repeat steps 4 through 7, replacing Node A in the instructions with Node B.
Various To save time, you can run the upgrade scripts against the databases on Node A while the patch is being installed on Node B.
14 Verify each group in the cluster.
Oracle Fail Safe Manager
In the tree view, right-click a group name, then select Verify Configuration of the Oracle Resources. Repeat for each group in the cluster.
15 End the restricted session on each database.
SQL*Plus End the restricted session on each database with the following SQL statement:
SQL> ALTER SYSTEM DISABLE RESTRICTED SESSION;
16 Verify the cluster. Oracle Fail Safe Manager
In the tree view, right-click the cluster name, then select Verify.
17 Restore the failback policy on each group.
Microsoft Windows Failover Cluster Manager
Select a group from the Microsoft Windows Failover Cluster Manager tree view, select the Properties action listed at the top of the Actions menu before selecting Failover tab, and restore the original settings (as noted in step 1). Repeat for each group on the cluster.
18 Move each group back to its preferred node.
Oracle Fail Safe Manager
In the tree view, right-click a group name, then select Move this service or application to another node. Repeat for each node in the cluster.
This step balances the workload across the nodes in the cluster.
See Also: Oracle Database Upgrade Guide for information about using DBUA to upgrade the database
Table A–3 (Cont.) Steps for Patching a Database Configured for High Availability
Step Task Tool Comments
Upgrading Other Oracle Product Software
A-8 Oracle Fail Safe Installation Guide
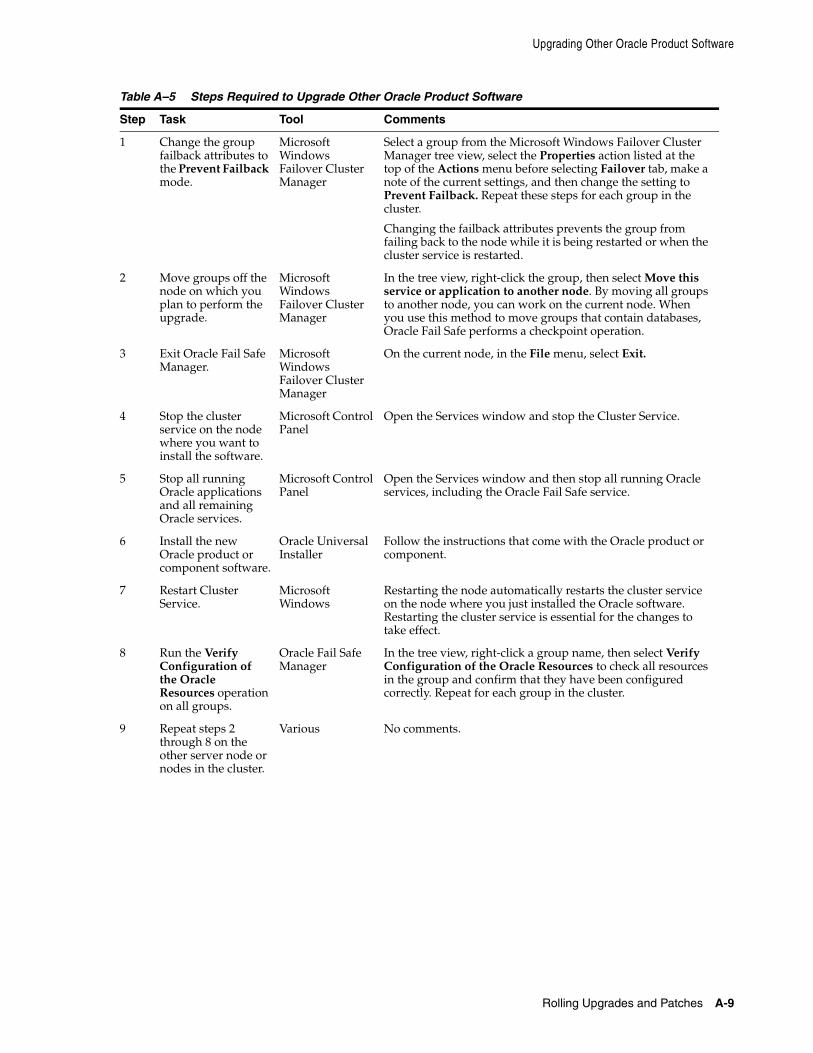
A.5 Upgrading Other Oracle Product SoftwareThis section describes upgrading non-database Oracle product software and installing patches that require you to stop the Oracle services being used by Oracle Fail Safe. See Section A.4 for the same information on Oracle Database software.
If your cluster is in an active/passive configuration, then you can eliminate a failover if you start the rolling upgrade on the passive cluster node. Once you have finished the upgrade on the passive cluster node, you can skip to Step 4 in Table A–5.
Perform the steps on one cluster node at a time.
Table A–4 Steps for Starting Up a Database with the MIGRATE Option
Step Task Tool Comments
1 Take the database offline.
Oracle Fail Safe Manager
In the tree view, right-click the database, then select Take Offline.
2 Exit Oracle Fail Safe Manager.
Oracle Fail Safe Manager
From File menu, select Exit.
3 Manually start the service for the instance
Microsoft Windows Services Window
Instance service names are of the form, ORACLESERVICESOFS1
4 Start up the database with the MIGRATE option.
SQL*Plus For example,
c:\> SET ORACLE_SID=OFS1c:\> SQLPLUS "/as sysdba"SQL> STARTUP MIGRATE
5 Run the upgrade scripts against each database being patched.
SQL*Plus See the readme file supplied with the database patch.
6 Shut down the database and stop the service.
SQL*Plus and Microsoft Windows Services Window
See the readme file supplied with the database patch.
7 Place the database resource online.
Oracle Fail Safe Manager
In the tree view, right-click the database, then select Place Online.
8 Resume the steps in table Table A–3, Step 12.
Various You are being directed to skip step 11 in Table A–3 intentionally. When you start up a database with the MIGRATE option, the session is restricted automatically.
Upgrading Other Oracle Product Software
Rolling Upgrades and Patches A-9
Table A–5 Steps Required to Upgrade Other Oracle Product Software
Step Task Tool Comments
1 Change the group failback attributes to the Prevent Failback mode.
Microsoft Windows Failover Cluster Manager
Select a group from the Microsoft Windows Failover Cluster Manager tree view, select the Properties action listed at the top of the Actions menu before selecting Failover tab, make a note of the current settings, and then change the setting to Prevent Failback. Repeat these steps for each group in the cluster.
Changing the failback attributes prevents the group from failing back to the node while it is being restarted or when the cluster service is restarted.
2 Move groups off the node on which you plan to perform the upgrade.
Microsoft Windows Failover Cluster Manager
In the tree view, right-click the group, then select Move this service or application to another node. By moving all groups to another node, you can work on the current node. When you use this method to move groups that contain databases, Oracle Fail Safe performs a checkpoint operation.
3 Exit Oracle Fail Safe Manager.
Microsoft Windows Failover Cluster Manager
On the current node, in the File menu, select Exit.
4 Stop the cluster service on the node where you want to install the software.
Microsoft Control Panel
Open the Services window and stop the Cluster Service.
5 Stop all running Oracle applications and all remaining Oracle services.
Microsoft Control Panel
Open the Services window and then stop all running Oracle services, including the Oracle Fail Safe service.
6 Install the new Oracle product or component software.
Oracle Universal Installer
Follow the instructions that come with the Oracle product or component.
7 Restart Cluster Service.
Microsoft Windows
Restarting the node automatically restarts the cluster service on the node where you just installed the Oracle software. Restarting the cluster service is essential for the changes to take effect.
8 Run the Verify Configuration of the Oracle Resources operation on all groups.
Oracle Fail Safe Manager
In the tree view, right-click a group name, then select Verify Configuration of the Oracle Resources to check all resources in the group and confirm that they have been configured correctly. Repeat for each group in the cluster.
9 Repeat steps 2 through 8 on the other server node or nodes in the cluster.
Various No comments.
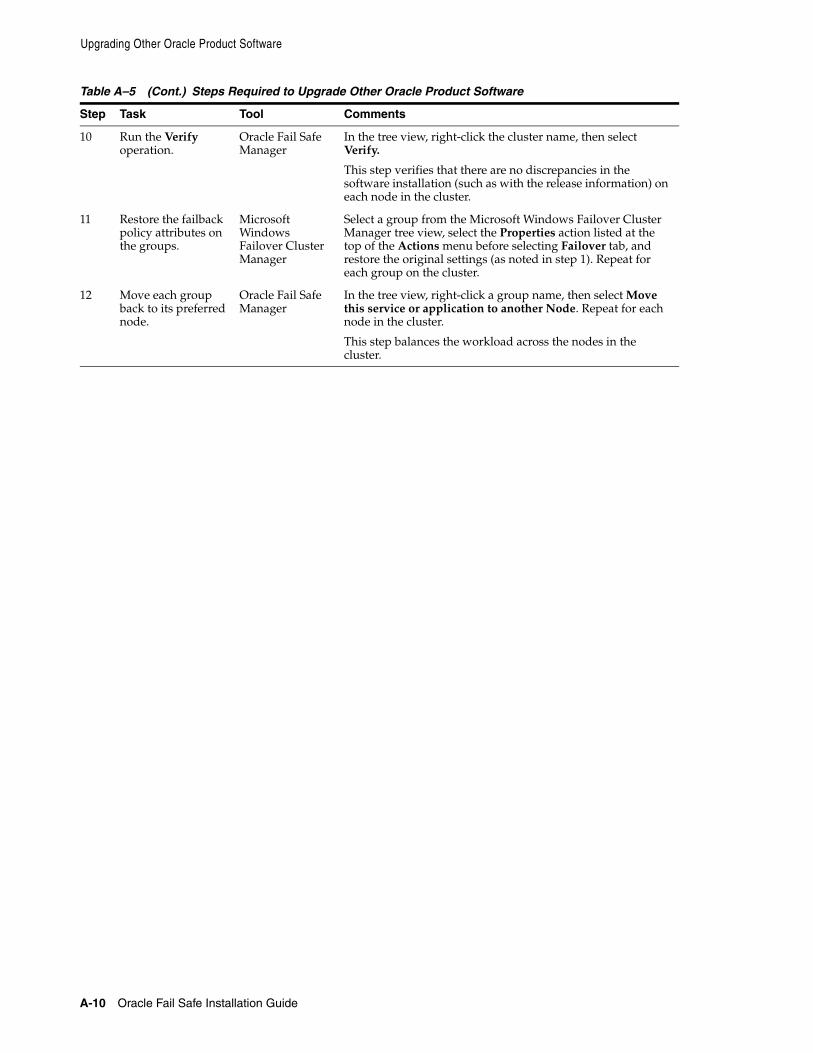
Upgrading Other Oracle Product Software
A-10 Oracle Fail Safe Installation Guide
10 Run the Verify operation.
Oracle Fail Safe Manager
In the tree view, right-click the cluster name, then select Verify.
This step verifies that there are no discrepancies in the software installation (such as with the release information) on each node in the cluster.
11 Restore the failback policy attributes on the groups.
Microsoft Windows Failover Cluster Manager
Select a group from the Microsoft Windows Failover Cluster Manager tree view, select the Properties action listed at the top of the Actions menu before selecting Failover tab, and restore the original settings (as noted in step 1). Repeat for each group on the cluster.
12 Move each group back to its preferred node.
Oracle Fail Safe Manager
In the tree view, right-click a group name, then select Move this service or application to another Node. Repeat for each node in the cluster.
This step balances the workload across the nodes in the cluster.
Table A–5 (Cont.) Steps Required to Upgrade Other Oracle Product Software
Step Task Tool Comments
B
Silent Mode Installations and Deinstallations B-1
BSilent Mode Installations and Deinstallations
This appendix describes how to perform a silent mode installation or deinstallation of Oracle Fail Safe.
The following topics are discussed in this appendix:
■ Introducing Silent Mode Installations and Deinstallations of Oracle Fail Safe
■ Performing Steps for a Silent Mode Installation or Deinstallation
■ Contents of a Response File
B.1 Introducing Silent Mode Installations and Deinstallations of Oracle Fail Safe
A silent mode installation is a mode that lets you install software by supplying input to Oracle Universal Installer in a file, rather than through Oracle Universal Installer graphical user interface (GUI).
Starting with Oracle Database 12c Release 1 (12.1), the deinstallation tool is integrated with Oracle Universal Installer (OUI). You can perform a deinstallation by running the setup.exe command with the -deinstall and -home options from the base directory of the Oracle Database. The deinstallation tool is also available as a separate command (deinstall) in Oracle home directories after installation. It is located in ORACLE_HOME\deinstall. The deinstallation tool uses the information you provide and the information gathered from the software home to create a response file. Alternatively, you can supply a response file generated previously by the deinstall command using the –checkonly option, or by editing the response file template.
If you are performing multiple installations of Oracle Fail Safe that are identical or similar to each other, you may want to run Oracle Universal Installer in silent mode to automate the process. You do this by editing a file, called a response file, that is supplied with Oracle Fail Safe. Use the -silent flag to run the deinstallation tool in noninteractive mode. This option requires a working system that it can access to determine the installation and configuration information and a response file that contains the configuration values for the Oracle home that is being deinstalled or deconfigured.
B.1.1 Selecting a Response FileThree different response file templates are available in the Oracle Fail Safe installation kit. These response files help you to set up Oracle Fail Safe installations in silent mode. Although each template file performs a different type of installation, you can use any one of them to perform a deinstallation.
Performing Steps for a Silent Mode Installation or Deinstallation
B-2 Oracle Fail Safe Installation Guide
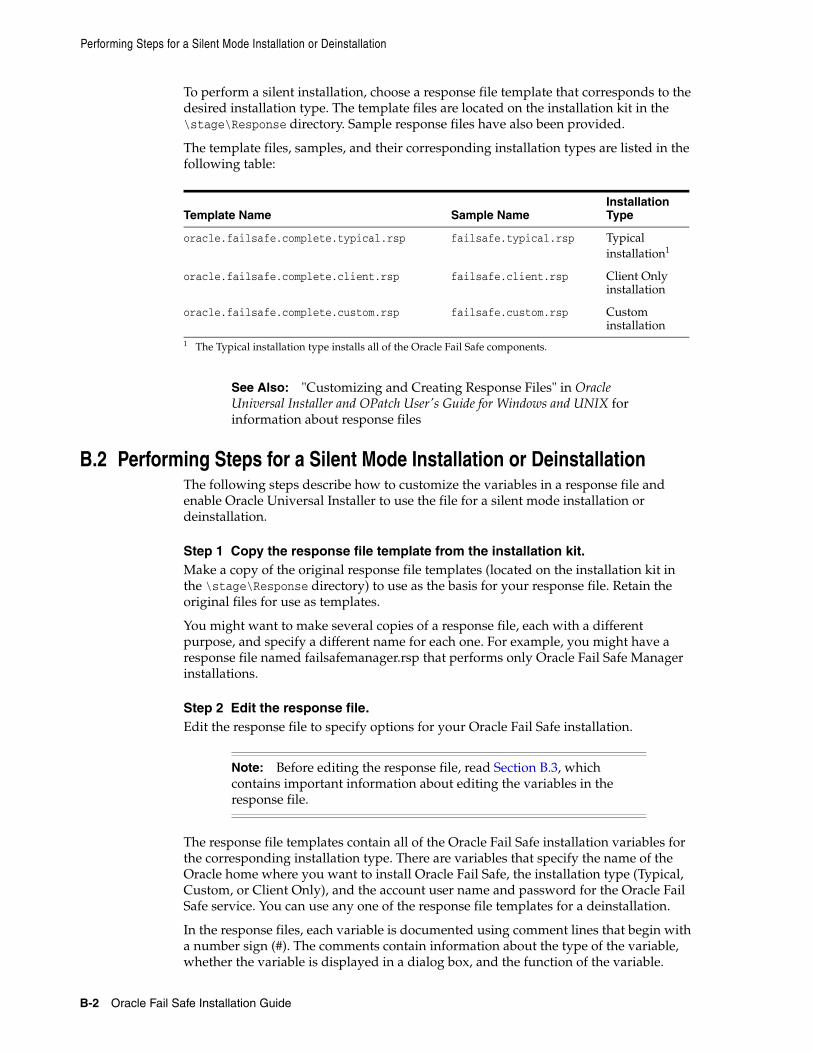
To perform a silent installation, choose a response file template that corresponds to the desired installation type. The template files are located on the installation kit in the \stage\Response directory. Sample response files have also been provided.
The template files, samples, and their corresponding installation types are listed in the following table:
B.2 Performing Steps for a Silent Mode Installation or DeinstallationThe following steps describe how to customize the variables in a response file and enable Oracle Universal Installer to use the file for a silent mode installation or deinstallation.
Step 1 Copy the response file template from the installation kit.Make a copy of the original response file templates (located on the installation kit in the \stage\Response directory) to use as the basis for your response file. Retain the original files for use as templates.
You might want to make several copies of a response file, each with a different purpose, and specify a different name for each one. For example, you might have a response file named failsafemanager.rsp that performs only Oracle Fail Safe Manager installations.
Step 2 Edit the response file.Edit the response file to specify options for your Oracle Fail Safe installation.
The response file templates contain all of the Oracle Fail Safe installation variables for the corresponding installation type. There are variables that specify the name of the Oracle home where you want to install Oracle Fail Safe, the installation type (Typical, Custom, or Client Only), and the account user name and password for the Oracle Fail Safe service. You can use any one of the response file templates for a deinstallation.
In the response files, each variable is documented using comment lines that begin with a number sign (#). The comments contain information about the type of the variable, whether the variable is displayed in a dialog box, and the function of the variable.
Template Name Sample NameInstallation Type
oracle.failsafe.complete.typical.rsp failsafe.typical.rsp Typical installation1
1 The Typical installation type installs all of the Oracle Fail Safe components.
oracle.failsafe.complete.client.rsp failsafe.client.rsp Client Only installation
oracle.failsafe.complete.custom.rsp failsafe.custom.rsp Custom installation
See Also: "Customizing and Creating Response Files" in Oracle Universal Installer and OPatch User's Guide for Windows and UNIX for information about response files
Note: Before editing the response file, read Section B.3, which contains important information about editing the variables in the response file.
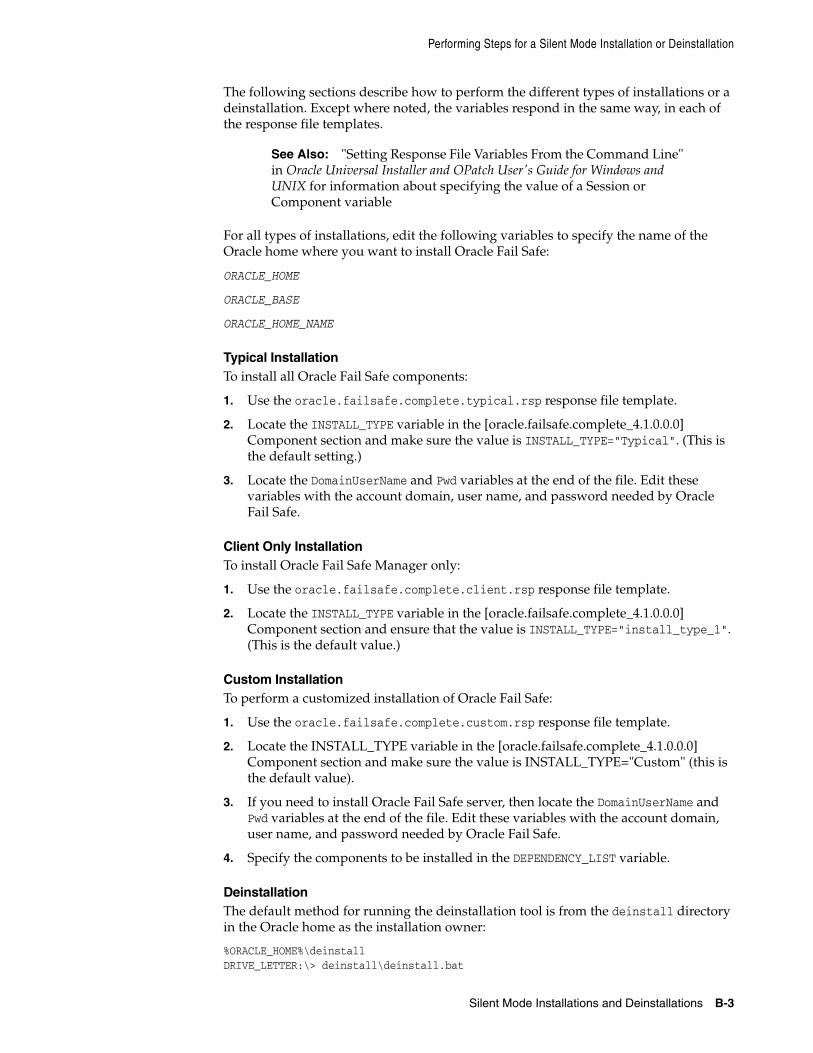
Performing Steps for a Silent Mode Installation or Deinstallation
Silent Mode Installations and Deinstallations B-3
The following sections describe how to perform the different types of installations or a deinstallation. Except where noted, the variables respond in the same way, in each of the response file templates.
For all types of installations, edit the following variables to specify the name of the Oracle home where you want to install Oracle Fail Safe:
ORACLE_HOME
ORACLE_BASE
ORACLE_HOME_NAME
Typical InstallationTo install all Oracle Fail Safe components:
1. Use the oracle.failsafe.complete.typical.rsp response file template.
2. Locate the INSTALL_TYPE variable in the [oracle.failsafe.complete_4.1.0.0.0] Component section and make sure the value is INSTALL_TYPE="Typical". (This is the default setting.)
3. Locate the DomainUserName and Pwd variables at the end of the file. Edit these variables with the account domain, user name, and password needed by Oracle Fail Safe.
Client Only InstallationTo install Oracle Fail Safe Manager only:
1. Use the oracle.failsafe.complete.client.rsp response file template.
2. Locate the INSTALL_TYPE variable in the [oracle.failsafe.complete_4.1.0.0.0] Component section and ensure that the value is INSTALL_TYPE="install_type_1". (This is the default value.)
Custom InstallationTo perform a customized installation of Oracle Fail Safe:
1. Use the oracle.failsafe.complete.custom.rsp response file template.
2. Locate the INSTALL_TYPE variable in the [oracle.failsafe.complete_4.1.0.0.0] Component section and make sure the value is INSTALL_TYPE="Custom" (this is the default value).
3. If you need to install Oracle Fail Safe server, then locate the DomainUserName and Pwd variables at the end of the file. Edit these variables with the account domain, user name, and password needed by Oracle Fail Safe.
4. Specify the components to be installed in the DEPENDENCY_LIST variable.
DeinstallationThe default method for running the deinstallation tool is from the deinstall directory in the Oracle home as the installation owner:
%ORACLE_HOME%\deinstallDRIVE_LETTER:\> deinstall\deinstall.bat
See Also: "Setting Response File Variables From the Command Line" in Oracle Universal Installer and OPatch User's Guide for Windows and UNIX for information about specifying the value of a Session or Component variable
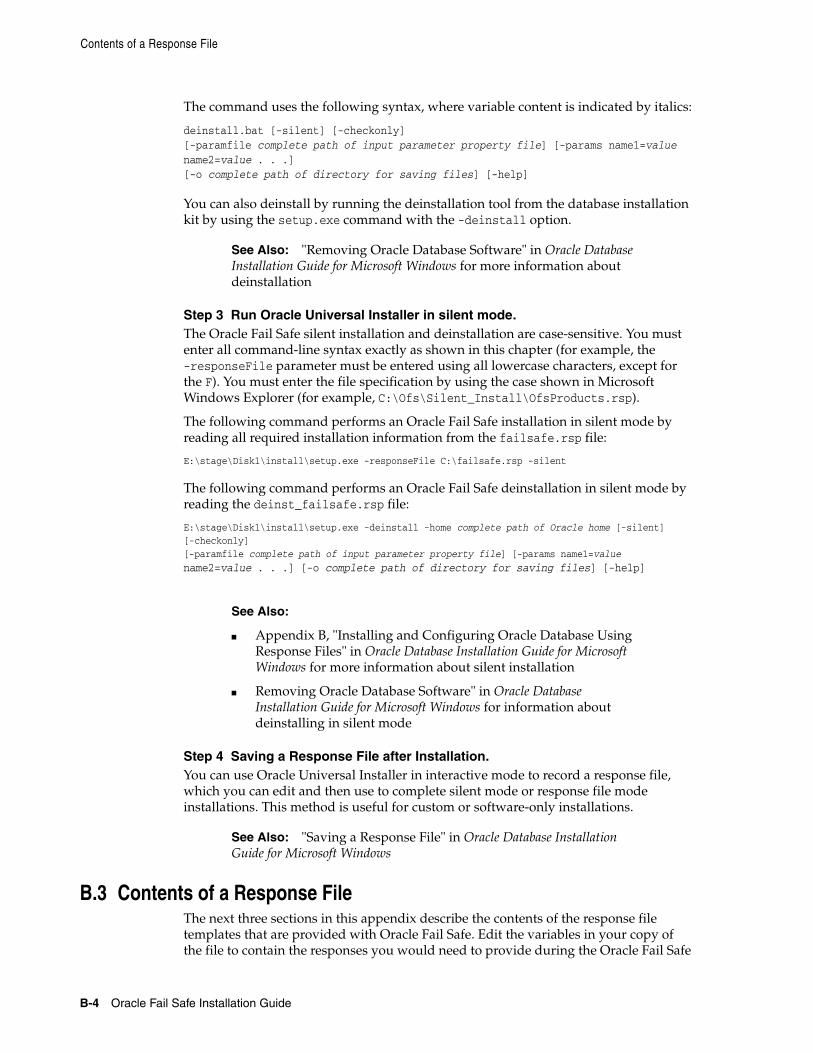
Contents of a Response File
B-4 Oracle Fail Safe Installation Guide
The command uses the following syntax, where variable content is indicated by italics:
deinstall.bat [-silent] [-checkonly][-paramfile complete path of input parameter property file] [-params name1=value name2=value . . .][-o complete path of directory for saving files] [-help]
You can also deinstall by running the deinstallation tool from the database installation kit by using the setup.exe command with the -deinstall option.
Step 3 Run Oracle Universal Installer in silent mode.The Oracle Fail Safe silent installation and deinstallation are case-sensitive. You must enter all command-line syntax exactly as shown in this chapter (for example, the -responseFile parameter must be entered using all lowercase characters, except for the F). You must enter the file specification by using the case shown in Microsoft Windows Explorer (for example, C:\Ofs\Silent_Install\OfsProducts.rsp).
The following command performs an Oracle Fail Safe installation in silent mode by reading all required installation information from the failsafe.rsp file:
E:\stage\Disk1\install\setup.exe -responseFile C:\failsafe.rsp -silent
The following command performs an Oracle Fail Safe deinstallation in silent mode by reading the deinst_failsafe.rsp file:
E:\stage\Disk1\install\setup.exe -deinstall -home complete path of Oracle home [-silent] [-checkonly][-paramfile complete path of input parameter property file] [-params name1=value
name2=value . . .] [-o complete path of directory for saving files] [-help]
Step 4 Saving a Response File after Installation.You can use Oracle Universal Installer in interactive mode to record a response file, which you can edit and then use to complete silent mode or response file mode installations. This method is useful for custom or software-only installations.
B.3 Contents of a Response File The next three sections in this appendix describe the contents of the response file templates that are provided with Oracle Fail Safe. Edit the variables in your copy of the file to contain the responses you would need to provide during the Oracle Fail Safe
See Also: "Removing Oracle Database Software" in Oracle Database Installation Guide for Microsoft Windows for more information about deinstallation
See Also:
■ Appendix B, "Installing and Configuring Oracle Database Using Response Files" in Oracle Database Installation Guide for Microsoft Windows for more information about silent installation
■ Removing Oracle Database Software" in Oracle Database Installation Guide for Microsoft Windows for information about deinstalling in silent mode
See Also: "Saving a Response File" in Oracle Database Installation Guide for Microsoft Windows

Contents of a Response File
Silent Mode Installations and Deinstallations B-5
installation session. Use the following format when you specify values for variables in the response file:
variable name = recommendation : value
With Oracle Universal Installer 2.1 and higher, you can specify the value of certain variables when you start Oracle Universal Installer from the command line. Specifically, you can specify session and component variables.
See Also:
■ "Setting the Recommendation Value" in Oracle Universal Installer and OPatch User's Guide for Windows and UNIX for information about recommendation parameter that can be specified as Forced or Default
■ "Setting Response File Variables From the Command Line" in Oracle Universal Installer and OPatch User's Guide for Windows and UNIX for information about specifying the value of a Session or Component variable
Note: Use a response file only to perform silent installations for Oracle Fail Safe. Do not use the response files that are provided with Oracle Fail Safe to install any other products.

Contents of a Response File
B-6 Oracle Fail Safe Installation Guide

Index-1
Index
AAdd a cluster, 3-2adding
a new node to the cluster, 1-5administration
deinstalling software on a cluster, 4-1installing Oracle Fail Safe, 2-1patching software, A-1starting Oracle Fail Safe Manager, 3-1troubleshooting installation problems, 5-1upgrading software, A-1
Administrator privileges, 2-1required for cluster alias, 1-6
alert fileslocation, 1-6
application data filesinstalling, 1-6
applicationsfiles on private disks, 1-4files on shared storage devices, 1-4
authenticationfor an Oracle Fail Safe installation, 2-1
Cchecklists
cluster setup, 1-1installation order, 1-4preinstallation of Oracle Fail Safe software, 2-1
Client Only installationsample file, B-2specifying, 2-2template file, B-2
clientspreparing for upgrades, A-1
cluster aliasconnecting to, 1-6
cluster diskssoftware and file installations, 1-4
Cluster GroupOracle Services for Windows failover clusters
and, 5-2cluster nodes
adding, 1-5, 3-2connecting to, 3-2
insufficient space, 2-4order of software installations, 1-4setting up, 1-1upgrading software on, A-1verifying, 3-2
cluster systemsmetadata, 4-1verifying after an installation, 3-2
componentsinstalling, 2-2
Connect to a known cluster, 3-2Custom installation
sample file, B-2template file, B-2
Ddeinstallations
Oracle Fail Safe release 3.0, 4-1reasons for, 4-1silent mode, B-1steps, 4-1Windows Failover Clusters, 4-1
disk devicesinsufficient space for installations, 2-4private and cluster installations, 1-4
domainlog on to install Oracle Fail Safe, 2-1
DomainUserName variable, B-3
Eerrors
See troubleshootingexecutable application files
installing, 1-5
Ffailback policy, A-7failover
planned, A-7
Ggroups

Index-2
removing resources from before deinstallation, 4-1
HHelp
invoking Oracle Fail Safe tutorial with, 1-6Oracle Fail Safe Manager, 3-4
IINSTALL_TYPE variable
Custom value, B-3install_type_1 value, B-3Typical value, B-3
installationsalert and trace files, 1-6application data, 1-6executable application files, 1-5log files, 1-6Oracle Fail Safe, 2-1 to 2-4preparation for, 1-1recommended order for software, 1-3silent mode, B-1trace files, 1-6troubleshooting Windows failover clusters, 5-1Web server components, 2-3See also Oracle Installer, Oracle Universal Installer
Llog files
installing on a cluster, 1-6
Mmanaging Oracle Fail Safe, 3-2Microsoft Windows Failover Cluster Manager
Oracle Services for Windows failover clusters resource in Cluster Group, 5-2
starting, 5-2Microsoft Windows Failover Clusters
prerequisites for installing, 1-1See Microsoft Windows Failover Clusters
Nnew nodes
adding to a cluster, 1-5
Oonline help, 3-4Oracle Database software
patching, A-5special considerations for patching, A-7steps for patching, A-6steps for starting up with the MIGRATE
options, A-8steps for upgrading, A-5
Oracle Fail Safe Server service
verifying, 5-2Oracle Fail Safe software
patching, A-2requirements for upgrading, A-2upgrading, A-2
Oracle Netconfiguration, 1-1
Oracle Universal Installer, 1-1deinstallations, 4-2invoking at the command-line prompt, B-4starting, 2-2
ORACLE_BASE variable, B-3ORACLE_HOME variable, B-3ORACLE_HOME_NAME variable, B-3
Ppatch steps
Oracle Database software, A-6patches
highly available Oracle Databases, A-4Oracle Database software, A-5
special considerations, A-7Oracle Fail Safe software, A-2
planned failover, A-7prior to a rolling upgrade, A-1
prerequisitesfor installing Microsoft Windows Failover
Clusters, 1-1for installing Oracle Fail Safe, 2-1for installing Windows failover clusters, 1-1
private disksalert files on, 1-6software and file installations, 1-4trace files on, 1-6
Pwd variable, B-3
Rresponse file template
for deinstallation, B-1response file templates
for installation, B-1response files
copying, B-2editing, B-2invoking, B-4
rolling upgradesSee upgrades
Sservices
verifying Oracle Fail Safe Server service entry, 5-1
Services Control Panelstartup status for Oracle Fail Safe, 5-2
shared storage devicesalert and trace files, 1-6
silent deinstallationinvoking, B-4

Index-3
silent installationinvoking, B-4
software installations and upgradespreparing cluster for, 1-1recommended order, 1-3
space requirementsfor installations, 2-4
startingOracle Fail Safe Manager, 3-1Oracle Universal Installer, B-4
Ttemplates
for response files, B-1tnsnames.ora file
checking Oracle Net configuration data, 1-1trace files
location, 1-6troubleshooting
FSCMD scripts, 5-1installations, 5-1Oracle Services for Windows failover clusters
installations, 5-1Windows failover clusters installations, 5-1
tutorial, 3-4invoking, 1-6
Typical installationsample file, B-2template file, B-2
Uupgrade steps
Oracle Database software, A-5other Oracle product software, A-9
upgradeshighly available Oracle Databases, A-4Oracle Fail Safe software, A-2other Oracle products, A-8performing, A-1preparing users for, A-1recommended order of, A-2rolling, A-1steps for other Oracle products, A-9
Vvariables
DomainUserName, B-3INSTALL_TYPE, B-3ORACLE_BASE, B-3ORACLE_HOME, B-3ORACLE_HOME_NAME, B-3Pwd, B-3
Verify Cluster actionrunning after installation, 3-2
WWeb server
installing components for, 2-3Windows Failover Clusters
deinstallation, 4-1 to ??

Index-4