Embed Size (px)
Citation preview
Installation Instructions for:
Radix-NI
Supercharger System2003 - 2006
Chevrolet Silverado1500 & GMC Sierra 1500Light Duty Sport Trucks
Magnuson Products Inc1990 Knoll Drive, Ventura, CA 93003
(805) 289-0044 phone * (805) 677-4897 faxmagnusonproducts.com * magnacharger.com
Step-by-step instructions for installing the best insupercharger systems.
Use distilled or
de-ionized water
89-89-59-003 Rev C
INSTALLATION MANUALMagna ChargerRadix Non-Intercooled Supercharger SystemGM 4.8 & 5.3 liter engines
We encourage you to read this manual thoroughly before you begin work, for a few reasons:
A quick parts check to make certain your kit is complete (see shipper parts list in this manual). If youdiscover shipping damage or shortage, please call our office immediately.
Take a look at exactly what you are going to need in terms of tools, time, and experience.
Review our limited warranty with care.
Make sure to have 91or higher octane fuel in the tank.
When unpacking the supercharger kit lift the supercharger assembly by the black plasticbypass actuator. This is from the factory and can be altered if used as a lifting point!
DO NOTpre-set
Tools Required
� Safety glasses
Metric wrench set
1/4” drill bit
1/4”, 3/8”, & 1/2” drive metric socket set (standard and deep)
8mm hex (Allen) wrench
3/8” and 1/2” drive foot pound and inch pound torque wrenches
Belt tensioner wrench or 1/2” breaker bar
7/32” socket
Drill and 5/16” drill bit
Phillips and flat head screwdrivers
Fuel quick disconnect tools (included in kit)
E5 inverted Torx socket
Small or angled 3/8” drill motor
Drain pan
Compressed air
�
�
�
�
�
�
�
�
�
�
�
�
�
�
12/05
Page 2Radix...the root of power
2003-2006 Radix NI GM 1500 Truck Supercharger Installation Instructions magnacharger.com

Important
Our Magna Charger kits are designed forwith stock components in good mechanical condition only, which will not be used for towing or anyother heavy duty applications. Installation on 6.0 liter, SUV, 2500 series vehicles, worn or damagedengines is not recommended and may result in engine failure, for which we are not responsible. MagnaCharger is not responsible for the engine or consequential damages.
Aftermarket engine re-calibration devices that modify fuel and spark curve (i.e.. programmers) are notrecommended and may cause engine damage or failure. If you have any questions, call us!
Relieve the fuel system pressure before servicing fuel system components inorder to reduce the risk of fire and personal injury. After relieving the system pressure, a small amountof fuel may be released when servicing the fuel lines or connections. In order to reduce the risk ofpersonal injury, cover the regulator and fuel line fittings with a shop towel before disconnecting. Thiswill catch any fuel that may leak out. Place the towel in an approved container when the job iscomplete, and of course, no smoking.
Magna Charger strongly recommends the following:
Clean your engine compartment before starting any engine disassembly.
stock 4.8 and 5.3 liter engines in light duty sport trucks
Caution:
�
�
�
�
�
�
You must have a clean fuel filter - check and replace as needed before installation.
You must have a clean air filter - this system comes with a new air filter for your convenience.
OE type/Stock spark plugs and stock plug gap is recommended.
Start with and use only 91 octane fuel or higher.
Drive belt is a Gates #K061120.
Please remember to follow all safety rules that apply when working, including:
Wear eye protection at all times.
Do not work on a hot engine.
Be careful around fuel - use shop towels to catch any spills and dispose of
towels properly.
�
�
�
After you finish your installation and road test your vehicle, please fill out andmail the limited warranty card, so we can add you to our files (this is importantfor your protection).
12/05
Page 3Radix...the root of power
2003-2006 Radix NI GM 1500 Truck Supercharger Installation Instructions magnacharger.com

1. Exercise extreme caution and commonsense when working around gasoline.Extinguish all open flame or other sourcesof ignition and be sure to perform thefollowing steps in an area with adequateventilation. Personal protection in the formof eye protection and fuel resistant glovesare strongly recommended.
2. On the right (passenger) side of theintake manifold, locate the fuel pressuretest port. CAUTION! The fuel in thesystem is under pressure! Relieve thepressure in the fuel system by depressingthe check valve with a screwdriver andcollecting the fuel with a shop towel.
3. Relieve the pressure in the fuel tank byremoving the fuel filler cap.
4. With a 8mm wrench disconnect the (-)negative battery cable. Make sure thecable is far enough away from the batterythat it does not accidentally touch thebattery and make connection during theinstallation. (Wrap negative cableconnector with electrical tape.)
12/05
Page 4Radix...the root of power
2003-2006 Radix NI GM 1500 Truck Supercharger Installation Instructions magnacharger.com

5. With a cool engine remove the radiatorcap. (Be careful not to remove the cap ifthe engine is still hot.)
6. Open radiator petcock and drain coolantinto a clean drain pan. Save coolant forreuse later on.
7 Remove the plastic sight shield boltusing a 10mm socket wrench.
.
8. Lift plastic shield from top of engine.
12/05
Page 5Radix...the root of power
2003-2006 Radix NI GM 1500 Truck Supercharger Installation Instructions magnacharger.com

9. Using a 8mm nut driver loosen the twolarge hose clamps holding the air cleanerduct assembly.
10. Remove the duct assembly by lifting itout. Sight shield and duct assembly will notbe reused.
11. Unplug the electrical connector to theMAF sensor.
12. Firmly grasp the air intake box and pullup removing it from the vehicle.
12/05
Page 6Radix...the root of power
2003-2006 Radix NI GM 1500 Truck Supercharger Installation Instructions magnacharger.com

13. To prevent foam from escaping, insertthe black plastic plug supplied in the holelocated in the upper edge of the right(passenger) side wheelwell.
15. Using a long pair of pliers, remove thecoolant hoses from the bottom of thethrottle body.
14. Locate the can of expansion foam inyour kit. Follow the directions on the backof the can. Insert the end of the straw intothe hole and dispense the foam into thehole for 10 to 12 seconds. In the existinghole that is just to the rear of the slot thatthe coolant tank sits in, again dispense thefoam into the hole for 10 to 12 seconds.You will not need the entire can. Do notattempt to over fill the fender. (Note: donot disturb foam for 8 hours.) Noise levelswill be drastically reduced when foam hasset.
16. Remove the PCV vent hose from thethrottle body or intake manifold onpassenger side. (Depending on year.)
12/05
Page 7Radix...the root of power
2003-2006 Radix NI GM 1500 Truck Supercharger Installation Instructions magnacharger.com

17. Using a 10mm socket wrench, removethe three bolts that fasten the cover supportbracket from the top of the intake manifold.
18 pen the large electrical harnessretainer clip, then using a 10mm socketwrench remove the bolts holding the plasticwire harness retainer to the intake manifold.
. O
19 Disconnect the following electrical andhose connections from the intake manifoldarea.
.
20. Disconnect the eight fuel injectorconnections by gently pulling up on the grayplastic release trigger on the connector andthen pulling firmly on the connector itself.
12/05
Page 8Radix...the root of power
2003-2006 Radix NI GM 1500 Truck Supercharger Installation Instructions magnacharger.com

21 Disconnect Electrical Throttle Control(ETC) connector from the throttle body byremoving the gray plastic locking tab first,then squeeze and pull free the ETCconnector itself.
.
22 At the rear of the of the intake manifolddisconnect the Manifold Absolute Pressure(MAP) sensor connector by gently raisingthe gray plastic retaining clip and then pullfree the connector itself.
.
Knock Sensor
23 Disconnect the engine knock sensorconnector and steel-mounting clip from theintake manifold by prying it free with a smallscrewdriver. Next, gently raise the blackplastic retaining clip and then pull free theconnector from the harness.
.
24 Disconnect the evaporative purgesolenoid EVAP connector by raising theblack plastic retaining clip and then pull freethe connector itself.
.
EVAP Connector
12/05
Page 9Radix...the root of power
2003-2006 Radix NI GM 1500 Truck Supercharger Installation Instructions magnacharger.com

25 ift the electrical harness from the topof the engine and set off to the side.
. L
26 Remove the power brake hose fromthe control valve. (Some vehicles havehydraulic assist and do not have this hose.)
.
27 With the fuel line disconnect toolsupplied, remove the fuel line from the fuelrail. Caution! The system may be underpressure. Avoid open flame or othersources of ignition.
.
28 sconnect the EVAP vent tube fromthe solenoid by squeezing the retainer, thenrelease the tube from the solenoid. Followthe same procedure on the other end of theEVAP vent tube and remove the tube fromthe vehicle.
. Di
12/05
Page 10Radix...the root of power
2003-2006 Radix NI GM 1500 Truck Supercharger Installation Instructions magnacharger.com
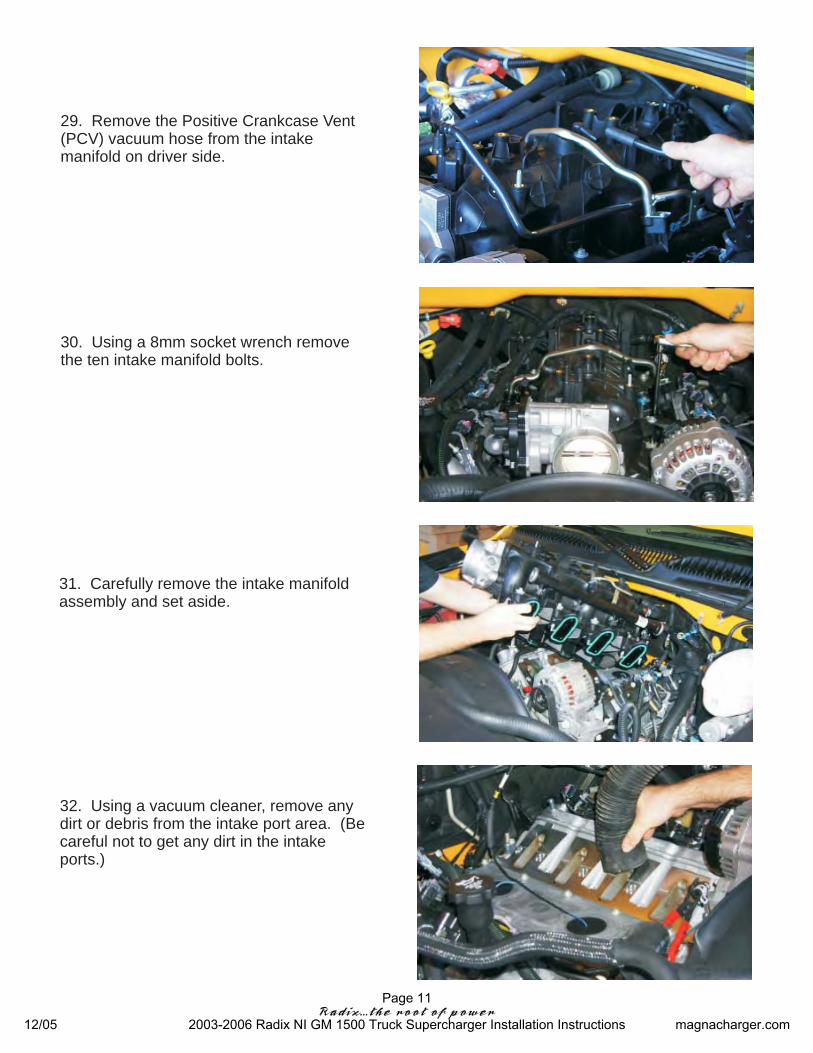
29 Remove the Positive Crankcase Vent(PCV) vacuum hose from the intakemanifold on driver side.
.
30 Using a 8mm socket wrench removethe ten intake manifold bolts.
.
31 Carefully remove the intake manifoldassembly and set aside.
.
32 Using a vacuum cleaner, remove anydirt or debris from the intake port area. (Becareful not to get any dirt in the intakeports.)
.
12/05
Page 11Radix...the root of power
2003-2006 Radix NI GM 1500 Truck Supercharger Installation Instructions magnacharger.com

33 Cover the intake ports with tape orclean rags to keep dirt and objects fromentering the engine. (Remember, beclean.)
.
34 Using a 15mm wrench, remove thesteel bracket from the rear of the driver sidecylinder head. This will not be reused.
.
35 Using a 10mm socket wrench removethe two coolant vent pipe bolts.
.
36 Remove the vent pipe assembly.(Make sure that the O-ring gaskets did notstick to the cylinder heads, if so removethem.)
.
12/05
Page 12Radix...the root of power
2003-2006 Radix NI GM 1500 Truck Supercharger Installation Instructions magnacharger.com

37 Using a 15mm tensioner wrench orbreaker bar, remove the stock serpentinebelt from the vehicle. The belt will not bereused.
.
38 Using a 15mm socket wrench removethe three bolts holding the factory belttensioner to the bracket and remove thetensioner.
.
39. Using a 10mm wrench disconnect thebattery positive terminal from the back ofthe alternator.
40 With a 15mm socket wrench removethe two bolts holding the alternator to thealternator bracket. Remove the alternator.
.
12/05
Page 13Radix...the root of power
2003-2006 Radix NI GM 1500 Truck Supercharger Installation Instructions magnacharger.com

41. Remove the long oil filler neck from thevalve cover by rotating it 180 degreescounter clock-wise and pulling it out.
42 Install the short oil filler neck suppliedby inserting it into the valve cover androtating it 180 degrees clock-wise. Transferthe oil fill cap from the long neck to the newshort one.
.
43 Take the new supplied coolant ventpipe and test fit to the front of the cylinderheads. Check for clearance between thepipe and the alternator bracket as shown.
.
44 Use a felt tip marker and mark thealternator bracket were the coolant ventpipe hits as shown.
.
12/05
Page 14Radix...the root of power
2003-2006 Radix NI GM 1500 Truck Supercharger Installation Instructions magnacharger.com

45 Using a file or die grinder, removematerial from the alternator mountingbracket marked in the previous step. Onceclearance is achieved, recheck with the newvent pipe. Ensure that the vent pipe doesnot touch the alternator bracket.
.
46 Using the stock bolts removed in step35 install the new coolant vent pipesupplied. Ensure that the O-ring seals areinstalled correctly. Torque the bolts with atorque wrench and 10mm socket to 106 lb-in.
.
47. Using the new supplied 16” x 3/8” PCVvacuum hose, connect one end to the PCVvalve as shown and lay the other end of thehose off to the driver side, out of the way.(To be connected in a later step.)
48. Install the intake manifold gasketssupplied onto the supercharger manifold.Ensure that the gaskets are fully seated intothe reliefs in the manifold.
12/05
Page 15Radix...the root of power
2003-2006 Radix NI GM 1500 Truck Supercharger Installation Instructions magnacharger.com

49 Remove the stock MAP sensor fromthe stock intake manifold by pulling back onthe two tabs and lifting the sensor out.Ensure that the orange MAP sensor seal isnot damaged, as it will be used.
.
50 ut some lubricant on the MAP sensorseal and press the MAP sensor into theprovided hole in the supercharger manifoldas shown.
. P
51 Using a 4mm allen wrench, install theMAP sensor retaining clip with the provided6mm button head screw as shown.
.
52 Remove the power brake hose andclamp from the stock intake manifold.
.
12/05
Page 16Radix...the root of power
2003-2006 Radix NI GM 1500 Truck Supercharger Installation Instructions magnacharger.com

53 Install the power brake hose and clampremoved in the previous step to the largehose barb on the rear of the superchargerinlet manifold. Remove the cap from theremaining barb for the PCV hose to beinstalled in a later step.
.
55. Make sure that the two O-rings and thescreen filter is complete as shown.
54. Remove the stock fuel pressureregulator from the fuel rail by disconnectingthe vacuum hose, pulling off the spring clipand pulling the regulator out. Be careful notto lose any of the small O-rings on theregulator.
56. Using a small amount of grease or oillubricate the two O-rings on the fuelpressure regulator and push it into the newsupplied fuel manifold as shown.
12/05
Page 17Radix...the root of power
2003-2006 Radix NI GM 1500 Truck Supercharger Installation Instructions magnacharger.com

57. Using a pair of C-clip pliers install thenew supplied C-clip into the fuel manifoldas shown. (Make sure that the clip seatsinto the machined grove in the manifold.)
58 Apply a small amount of grease to thenew supplied fuel manifold O-ring and set inthe machined recessed area on the newdriver side fuel rail as shown.
.
59 Install the assembled fuel manifold tothe driver side fuel rail using the two newsupplied 6mm bolts. Using a 10mm socketwrench torque the bolts to 106 lb-in. (Becareful not to pinch the O-ring.)
.
60 Using the small 3/16” hose supplied,connect one end to the small barb on thepressure regulator. Connect the remainingend of the hose to the barb at the left rear ofthe supercharger manifold.
.
Pressureregulatorbarb
Manifoldbarb
12/05
Page 18Radix...the root of power
2003-2006 Radix NI GM 1500 Truck Supercharger Installation Instructions magnacharger.com

61 Using a 10mm socket wrench removethe stock throttle body from the stock intakemanifold. Next, using a #5 internal Torxsocket remove the three mounting studsfrom the stock intake manifold.
.
62 Install the three studs removed in theprevious step into the new superchargerinlet manifold using a #5 internal Torxsocket and wrench.
.
63 Remove the EVAP solenoid from thestock manifold with a 10mm socket wrench.
.
64 Lubricate the O-ring with the suppliedgrease.
.
12/05
Page 19Radix...the root of power
2003-2006 Radix NI GM 1500 Truck Supercharger Installation Instructions magnacharger.com

65 Mount EVAP solenoid on front of intakemanifold.
.
66 Remove the one bolt directly below thealternator and factory GM idler with a 15mmsocket wrench.
.
67 Here is the new tensioner supportbracket and hardware. The new bracket willlocate in the original tensioner location.Note: The different fasteners and theirlocations.
.
68 In the original tensioner location, installthe new tensioner support bracket. Torqueall mounting fasteners to 40 lb-ft.
.
12/05
Page 20Radix...the root of power
2003-2006 Radix NI GM 1500 Truck Supercharger Installation Instructions magnacharger.com
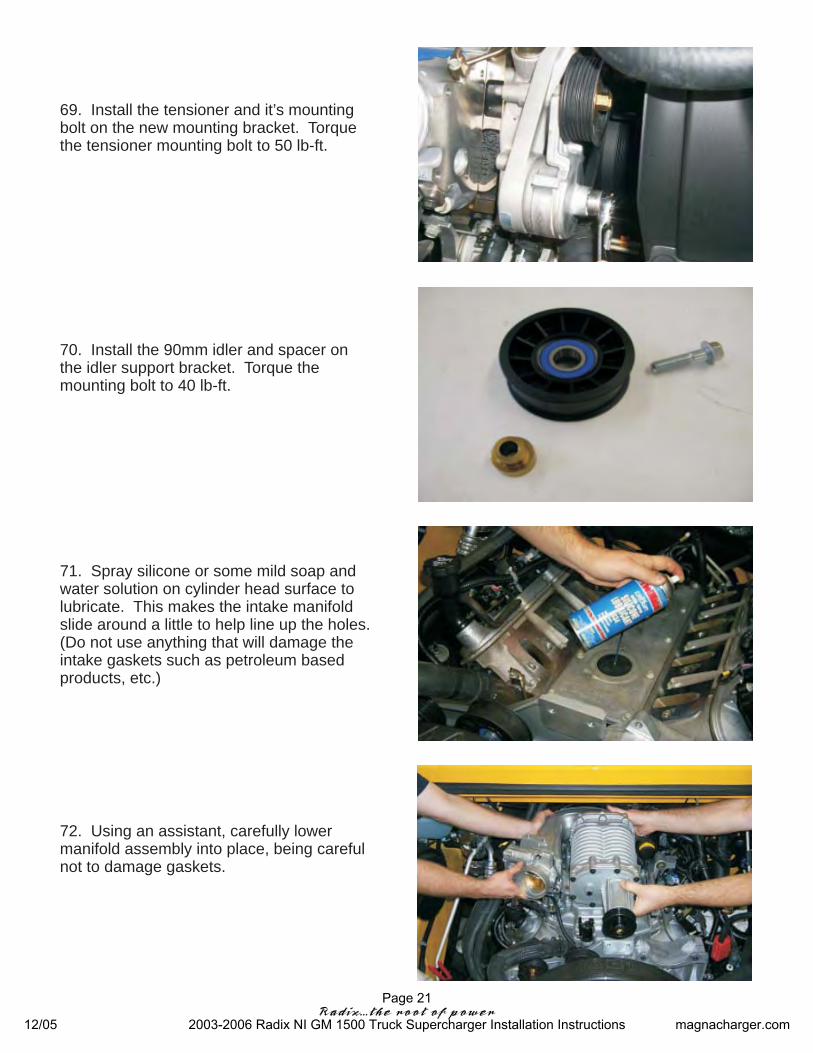
69 Install the tensioner and it’s mountingbolt on the new mounting bracket. Torquethe tensioner mounting bolt to 50 lb-ft.
.
70. Install the 90mm idler and spacer onthe idler support bracket. Torque themounting bolt to 40 lb-ft.
71 Spray silicone or some mild soap andwater solution on cylinder head surface tolubricate. This makes the intake manifoldslide around a little to help line up the holes.(Do not use anything that will damage theintake gaskets such as petroleum basedproducts, etc.)
.
72 Using an assistant, carefully lowermanifold assembly into place, being carefulnot to damage gaskets.
.
12/05
Page 21Radix...the root of power
2003-2006 Radix NI GM 1500 Truck Supercharger Installation Instructions magnacharger.com

73. Remove the 10 spilt looms that supportthe fasteners. Start all by hand.ten bolts
74 Torque all 10 bolts gradually and evenlyto a torque of 89 in-lbs.
.
75 Push the fuel line connector on to thefuel manifold. Ensure that the fuel line ispushed all the way on. Pull on theconnector to check that it is secure, youshould not be able to remove the connectorunless you use the removal tool.
.
76 Using supplied gasket, mount throttlebody using stock nuts and torgue them to89in-lbs.
.
12/05
Page 22Radix...the root of power
2003-2006 Radix NI GM 1500 Truck Supercharger Installation Instructions magnacharger.com

77 Remove the wiring harness from theoriginal bracket.
.
78 Route the wiring harness over the leftside fuel rail and attach it to thesupercharger manifold as shown, using theAdel clamp and bolt supplied.
.
Adel Clamp
79 Plug in the electrical connectors for thefollowing components, the Fuel Injectors,Electronic Throttle Control, Map Sensor,Knock Sensor and EVAP Solenoid.
.
80 Attach one end of the ¼” coolant hosesupplied to the new steam vent pipe andthe other end to the barb on the bottom ofthe throttle body with the clamps supplied.Attach the original steam vent hose andclamp from the radiator to the remainingbarb on the bottom of the throttle body.
.
Refill the cooling system with either thecoolant you removed in step 6 or with freshcoolant. Securely tighten the reservoir cap.
Coolanthose
12/05
Page 23Radix...the root of power
2003-2006 Radix NI GM 1500 Truck Supercharger Installation Instructions magnacharger.com

81 Mount the nose support and torque thefasteners 15-17 ft-lbs.
.
82 Reinstall the EVAP tube on the EVAPsolenoid at the front of the superchargermanifold. Route the tube under thesupercharger nose and along the inside ofthe left fuel rail to the EVAP connectionbetween the cylinder head and the firewall.
.
83 Install the Radix information sticker onthe black plastic radiator cover below theGM factory-warning sticker.
.
84. Install alternator on the stock bracketand torque the fasteners to 40 ft-lb.
12/05
Page 24Radix...the root of power
2003-2006 Radix NI GM 1500 Truck Supercharger Installation Instructions magnacharger.com

85 Reattach the battery cable to thealternator terminal.
.
87. Using a screwdriver, remove the fourscrews that secure the top cover to thebase of the air box assembly.
86 Using belt routing decal, install belt.Please double check your routing beforemoving to the next step.
.
88 Remove and discard the stock paperair filter.
.
12/05
Page 25Radix...the root of power
2003-2006 Radix NI GM 1500 Truck Supercharger Installation Instructions magnacharger.com

89 Remove the stock air box gasket andreplace it with the new gasket supplied withthe K&N air filter.
.
90 Install K&N air filter and reassemblethe air box assembly. Reinstall thecompleted unit on the vehicle.
.
Bellows Air TubeCoupler
Clamps Brass Barbs Grease
90 Here is the air tube and it’scomponents.
.
92 Assemble the bellows and coupler tothe air tube. Note: The position of theclamp screws. The screws must be facingup so that you can install the assembly onthe vehicle.
.
12/05
Page 26Radix...the root of power
2003-2006 Radix NI GM 1500 Truck Supercharger Installation Instructions magnacharger.com

93 Install the brass barb into the threadedport in the bottom of the air tube with a14mm wrench. Do not over tighten!
.
94 Using some of the O-ring greasesupplied, apply a light coating of grease onthe inside of the coupler.
.
95 Push the bellows end of the air tubeassembly on to the air box first, and theninstall the remaining end with the coupler onto the throttle body. Tighten all clampscrews securely.
.
96 Attach the PCV hose from the right(passenger) side valve cover to the brassbarb on the bottom of the air tube. Connectthe PCV hose from step 47 to the remainingbarb next to the power brake hoseconnection on the back of the inletmanifold. Connect the power brake hose tothe control valve shown in step 26.
.
12/05
Page 27Radix...the root of power
2003-2006 Radix NI GM 1500 Truck Supercharger Installation Instructions magnacharger.com

98. Cut the tan & black wiresapproximately 1” from the MAF connector.
To computer
To MAFNo longerused
99. Using the new IAT harness andcrimp/shrink connectors supplied, connecteither white wire of the new harness to thetan wire and the black wire that run to thevehicles computer.
Strip about ¼” ofinsulation from the ends of the black andtan wires to the computer and the IATharness, then crimp the connectors on.Using a heat gun or blow dryer set onHIGH; shrink the insulation on theconnectors so that it contracts around thewires completely.
The wires to the MAFwill no longer be used.
You must shrink theinsulation, as crimping the connectors aloneis not enough to secure them!
100. Plug the IAT harness into the IATsensor located under the superchargernose.
97. Locate MAF cable, pull back flex loomapproximately 8 inches. Separate the tan &black wires from this harness.
12/05
Page 28Radix...the root of power
2003-2006 Radix NI GM 1500 Truck Supercharger Installation Instructions magnacharger.com

111. Ensure vehicle is off and the keys areout of the ignition. Locate the interior fusepanel inside the driver door as shown.
113. Remove the cover from the "ExteriorFuse Panel" located under the hood on thedrivers (left) side. Remove the six fuseslabeled SEO B1, SEO IGN, INFO, SEO B2,RADIO and RADIO AMP. Download theMicro Tuner following the instructions thatcame with the Micro Tuner.
112. Remove the 10 AMP “SEO ACCY"fuse in the top middle section of the fusebox as shown.
WARNING! Before downloading the new software into your vehicles compute (PCM), make sureto turn off all power consuming accessories: heater, A/C, radio, dome light, etc. Turn off thedaytime running rights by applying the emergency brake or by turning the head lamp switchcounter-clockwise. Follow the steps below to remove all recommended fuses and any additionalpower fuses from all aftermarket add-on accessories i.e.: stereo amplifiers, DVD players, TVmonitors, MP3 players and anti-theft equipment. Keep all doors closed during programming.Never remove the programming cable during programming and always follow the instructions onthe handheld unit display. Failure of any of the above instructions can cause a "NO RESPONSE"from the PCM or permanent damage to the vehicle PCM.
12/05
Page 29Radix...the root of power
2003-2006 Radix NI GM 1500 Truck Supercharger Installation Instructions magnacharger.com

114. Vehicle Programing Instructions For the Micro Tuner:
IMPORTANT! To ensure trouble-free programming of your vehicle’s computer:* Make sure the vehicle’s battery is sufficiently charged.* Turn off all accessories & close doors to prevent unnecessary drain on the battery.* Do not attempt to program your vehicle while a battery charger is connected.* Improper battery voltage will result in failure of the programming process.* Do not disconnect the cable or turn off the ignition during programming.* Reconnect battery ground (-) cable.
C. Turn the ignition key to the on or runposition but do not start the vehicle.
D. To begin programming your vehicle,you must press the YES button.
E. You only need to press the YESbutton once to start the programmingcycle. The programming processonly takes about a minute.
In the event that the vehicle needs to be returned to its original calibration, follow the directions asdescribed above. The handheld unit will prompt you that you have already modified the vehicle’scomputer. Select YES to return you vehicle’s computer back to the stock calibration. Wait for thehandheld to finish, then disconnect cable as described above.
ALDL
A. Connect the supplied cable to the 9-pin connector at the top of thehandheld unit. Use the thumbscrewsto secure the cable to connector.
B. Connect the other end to your ALDLconnector located under the dashnear the steering column. Make surethis connection is seated all the wayin and that it is secure. You do notwant this cable coming out of theconnector during programming.
*DO NOT DISTURB THE CABLE OR TURNTHE IGNITION OFF DURING THIS TIME! IFTHE PROGRAMMING IS DISRUPTED YOURCOMPUTER WILL NOT START OR RUNYOUR VEHICLE!
F. The handheld unit will inform youthat the programming process hascompleted and to turn the ignition offand disconnect the cable. Only atthis time should the ignition beturned off and the cable removed.
12/05
Page 30Radix...the root of power
2003-2006 Radix NI GM 1500 Truck Supercharger Installation Instructions magnacharger.com

Fill holes
116. Start the vehicle for 5 seconds and shut off, once again check for fuel leaks and fan-supercharger belt alignment.
117. Test drive vehicle for the first few miles under normal driving conditions, listen for any noises,vibrations, engine missfire or anything that does not seem normal. The supercharger does have aslight whining noise under boost conditions, which is normal. Check coolant reservoir level.
118. After the initial test drive gradually work the vehicle to wide open throttle runs, listen for anyengine detonation (Pinging). If engine detonation is present let up on the throttle immediately.Most detonation causes are low octane gasoline still in the tank. If you have questions about yourvehicles performance, please check with your installation facility or call Magna Charger at (805)289-0044, Monday through Friday, 8am to 4:30pm.
Please enjoy your “Magna Charged”performance responsibly.
IN THE NEWS...IN THE NEWS...IN THE INTHE NEWS...IN THE NEWS...IN THENEWS. . . IN THE NEWS. . . IN THENEWS...IN THE NEWS....NEWS...IN THENEWS. . . IN THE NEWS. . . IN THENEWS.. . . IN THE NEWS.. . IN THENEWS. . . IN THE NEWS. . . IN THENEWS. . . IN THE NEWS. . . IN THENEWS.. . . IN THE NEWS.. . IN THENEWS. . . IN THE NEWS. . . IN THE
Ventura, CA (November 21, 2002) MagnaCharger, manufacturer of superchargers andsupercharger systems for foreign anddomestic vehicles, was presented theprestigious award at the annual SpecialtyEquipment Market Association Show (SEMA)in Las Vegas, Nevada.
Sponsored by General Motors Corporation,the 2002 SEMA Design Award for the “MostI n n o v a t i v e P r o d u c t ”
was awarded to Magna Charger andrecognized by the all-star team of judges fortheir outstanding and innovative designachievement. The criteria used by the judgesincluded innovation, technical achievement,quality and workmanship.
The award was presented for the Radix®Intercooled supercharger system, designedfor the Chevrolet, GMC and Cadillac, 4.8L,5.3L and 6.0L General Motors Trucks andSUV's including the new H2.
115. Once programing is completed,ensure the vehicle is off and the keys areout of the ignition. Install the fuses backinto their correct locations and reinstall thecovers.
12/05
Page 31Radix...the root of power
2003-2006 Radix NI GM 1500 Truck Supercharger Installation Instructions magnacharger.com