Embed Size (px)
Citation preview
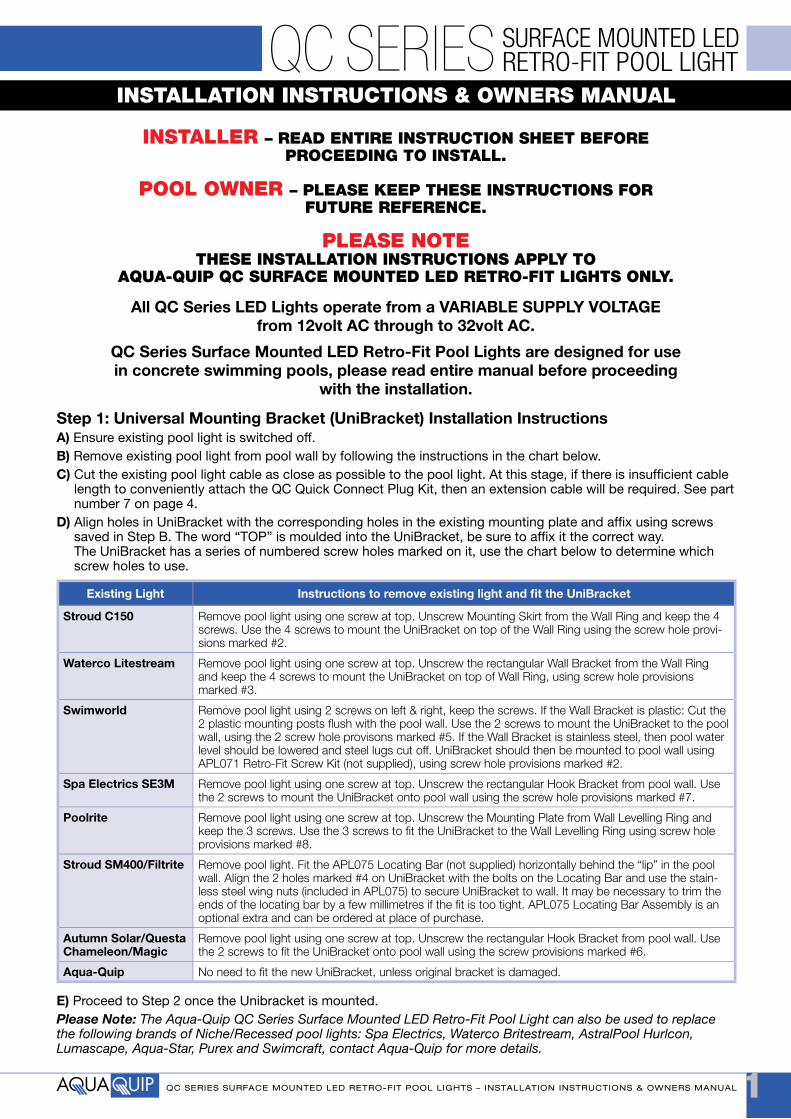
1QC SERIES SURFACE MOUNTED LED RETRO-FIT POOL LIGHTS – INSTALLATION INSTRUCTIONS & OWNERS MANUAL
INSTALLATION INSTRUCTIONS & OWNERS MANUAL
INSTALLER – READ ENTIRE INSTRUCTION SHEET BEFORE PROCEEDING TO INSTALL.
POOL OWNER – PLEASE KEEP THESE INSTRUCTIONS FOR FUTURE REFERENCE.
PLEASE NOTETHESE INSTALLATION INSTRUCTIONS APPLY TO
AQUA-QUIP QC SURFACE MOUNTED LED RETRO-FIT LIGHTS ONLY.
QC SERIES SURFACE MOUNTED LED RETRO-FIT POOL LIGHT
All QC Series LED Lights operate from a VARIABLE SUPPLY VOLTAGE from 12volt AC through to 32volt AC.
QC Series Surface Mounted LED Retro-Fit Pool Lights are designed for use in concrete swimming pools, please read entire manual before proceeding
with the installation.
Step 1: Universal Mounting Bracket (UniBracket) Installation InstructionsA) Ensure existing pool light is switched off.B) Remove existing pool light from pool wall by following the instructions in the chart below.C) Cut the existing pool light cable as close as possible to the pool light. At this stage, if there is insufficient cable
length to conveniently attach the QC Quick Connect Plug Kit, then an extension cable will be required. See part number 7 on page 4.
D) Align holes in UniBracket with the corresponding holes in the existing mounting plate and affix using screws saved in Step B. The word “TOP” is moulded into the UniBracket, be sure to affix it the correct way. The UniBracket has a series of numbered screw holes marked on it, use the chart below to determine which screw holes to use.
Existing Light Instructions to remove existing light and fit the UniBracket
Stroud C150 Remove pool light using one screw at top. Unscrew Mounting Skirt from the Wall Ring and keep the 4 screws. Use the 4 screws to mount the UniBracket on top of the Wall Ring using the screw hole provi-sions marked #2.
Waterco Litestream Remove pool light using one screw at top. Unscrew the rectangular Wall Bracket from the Wall Ring and keep the 4 screws to mount the UniBracket on top of Wall Ring, using screw hole provisions marked #3.
Swimworld Remove pool light using 2 screws on left & right, keep the screws. If the Wall Bracket is plastic: Cut the 2 plastic mounting posts flush with the pool wall. Use the 2 screws to mount the UniBracket to the pool wall, using the 2 screw hole provisons marked #5. If the Wall Bracket is stainless steel, then pool water level should be lowered and steel lugs cut off. UniBracket should then be mounted to pool wall using APL071 Retro-Fit Screw Kit (not supplied), using screw hole provisions marked #2.
Spa Electrics SE3M Remove pool light using one screw at top. Unscrew the rectangular Hook Bracket from pool wall. Use the 2 screws to mount the UniBracket onto pool wall using the screw hole provisions marked #7.
Poolrite Remove pool light using one screw at top. Unscrew the Mounting Plate from Wall Levelling Ring and keep the 3 screws. Use the 3 screws to fit the UniBracket to the Wall Levelling Ring using screw hole provisions marked #8.
Stroud SM400/Filtrite Remove pool light. Fit the APL075 Locating Bar (not supplied) horizontally behind the “lip” in the pool wall. Align the 2 holes marked #4 on UniBracket with the bolts on the Locating Bar and use the stain-less steel wing nuts (included in APL075) to secure UniBracket to wall. It may be necessary to trim the ends of the locating bar by a few millimetres if the fit is too tight. APL075 Locating Bar Assembly is an optional extra and can be ordered at place of purchase.
Autumn Solar/QuestaChameleon/Magic
Remove pool light using one screw at top. Unscrew the rectangular Hook Bracket from pool wall. Use the 2 screws to fit the UniBracket onto pool wall using the screw provisions marked #6.
Aqua-Quip No need to fit the new UniBracket, unless original bracket is damaged.
E) Proceed to Step 2 once the Unibracket is mounted.Please Note: The Aqua-Quip QC Series Surface Mounted LED Retro-Fit Pool Light can also be used to replace the following brands of Niche/Recessed pool lights: Spa Electrics, Waterco Britestream, AstralPool Hurlcon, Lumascape, Aqua-Star, Purex and Swimcraft, contact Aqua-Quip for more details.
QC SERIES SURFACE MOUNTED LED RETRO-FIT POOL LIGHTS – INSTALLATION INSTRUCTIONS & OWNERS MANUAL
QC SERIES SURFACE MOUNTED LED RETRO-FIT POOL LIGHT
2
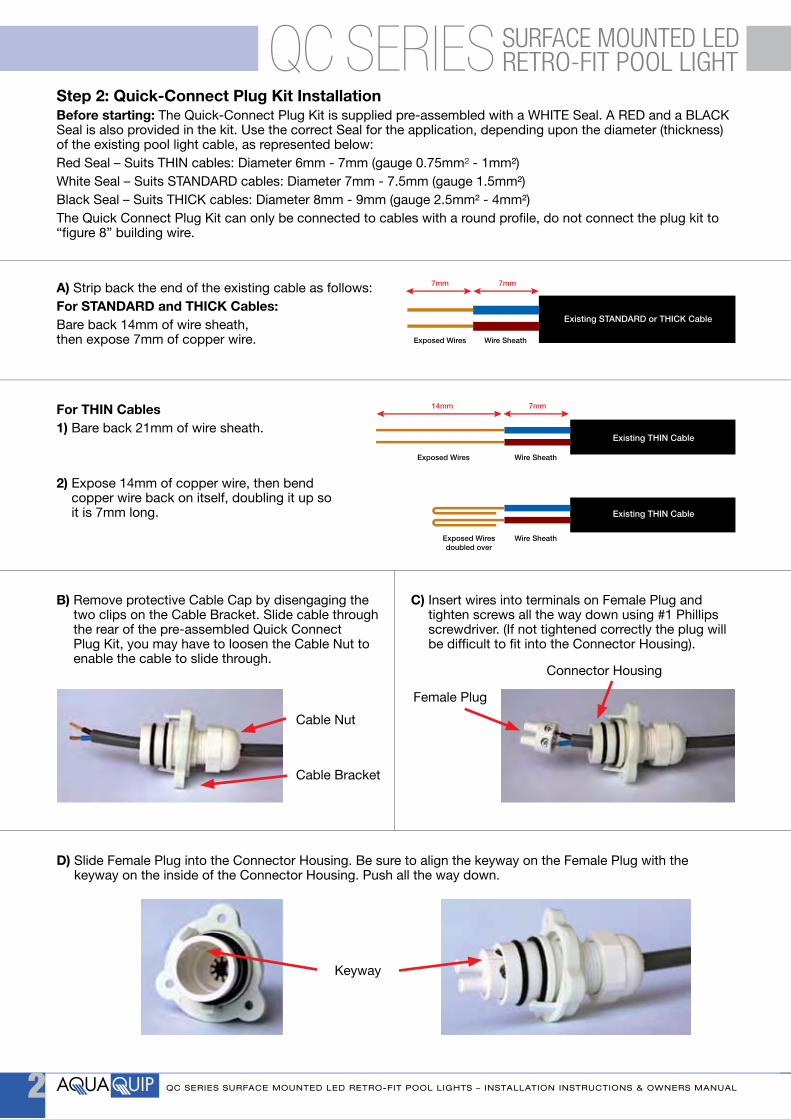
Step 2: Quick-Connect Plug Kit InstallationBefore starting: The Quick-Connect Plug Kit is supplied pre-assembled with a WHITE Seal. A RED and a BLACK Seal is also provided in the kit. Use the correct Seal for the application, depending upon the diameter (thickness) of the existing pool light cable, as represented below:Red Seal – Suits THIN cables: Diameter 6mm - 7mm (gauge 0.75mm² - 1mm²)White Seal – Suits STANDARD cables: Diameter 7mm - 7.5mm (gauge 1.5mm²)Black Seal – Suits THICK cables: Diameter 8mm - 9mm (gauge 2.5mm² - 4mm²)The Quick Connect Plug Kit can only be connected to cables with a round profile, do not connect the plug kit to “figure 8” building wire.
A) Strip back the end of the existing cable as follows:For STANDARD and THICK Cables:Bare back 14mm of wire sheath, then expose 7mm of copper wire.
For THIN Cables1) Bare back 21mm of wire sheath.
2) Expose 14mm of copper wire, then bend copper wire back on itself, doubling it up so it is 7mm long.
D) Slide Female Plug into the Connector Housing. Be sure to align the keyway on the Female Plug with the keyway on the inside of the Connector Housing. Push all the way down.
Existing STANDARD or THICK Cable
Exposed Wires Wire Sheath
7mm
Existing THIN Cable
Existing THIN Cable
7mm
Exposed Wires Wire Sheath
Exposed Wiresdoubled over
Wire Sheath
7mm14mm
B) Remove protective Cable Cap by disengaging the two clips on the Cable Bracket. Slide cable through the rear of the pre-assembled Quick Connect Plug Kit, you may have to loosen the Cable Nut to enable the cable to slide through.
C) Insert wires into terminals on Female Plug and tighten screws all the way down using #1 Phillips screwdriver. (If not tightened correctly the plug will be difficult to fit into the Connector Housing).
Cable Nut
Cable Bracket
Female Plug
Connector Housing
Keyway
QC SERIES SURFACE MOUNTED LED RETRO-FIT POOL LIGHTS – INSTALLATION INSTRUCTIONS & OWNERS MANUAL
QC SERIES SURFACE MOUNTED LED RETRO-FIT POOL LIGHT
F) The Quick Connect Plug Kit is now ready to be inserted into the receptacle on the rear of the new QC Series LED light. The two O-rings are factory-lubricated, ensure they are free from dust and grit. Align the Female Plug with the exposed metal pins in the receptacle and push into place. Push the Cable Bracket towards the light until the clips engage into place. Use a #1 Phillips screwdriver and 3 x stainless steel screws provided and affix the Cable Bracket into the three screw holes. Do not overtighten.
G) Wind up excess cable around the hooks on the rear of the QC Series LED light. Use the three PE6 screws provided to mount the QC Series LED Pool Light onto the three posts on the Universal Mounting Bracket.
3
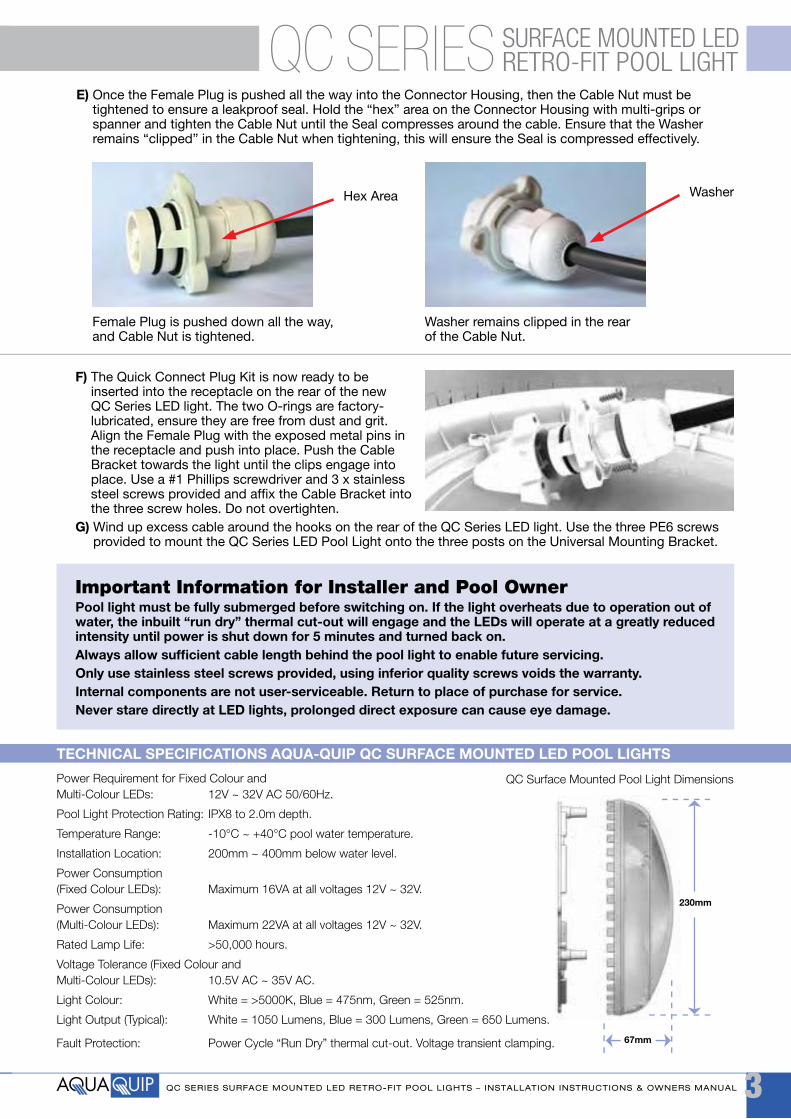
E) Once the Female Plug is pushed all the way into the Connector Housing, then the Cable Nut must be tightened to ensure a leakproof seal. Hold the “hex” area on the Connector Housing with multi-grips or spanner and tighten the Cable Nut until the Seal compresses around the cable. Ensure that the Washer remains “clipped” in the Cable Nut when tightening, this will ensure the Seal is compressed effectively.
TECHNICAL SPECIFICATIONS AQUA-QUIP QC SURFACE MOUNTED LED POOL LIGHTS
Power Requirement for Fixed Colour and Multi-Colour LEDs: 12V ~ 32V AC 50/60Hz.
Pool Light Protection Rating: IPX8 to 2.0m depth.
Temperature Range: -10°C ~ +40°C pool water temperature.
Installation Location: 200mm ~ 400mm below water level.
Power Consumption (Fixed Colour LEDs): Maximum 16VA at all voltages 12V ~ 32V.
Power Consumption (Multi-Colour LEDs): Maximum 22VA at all voltages 12V ~ 32V.
Rated Lamp Life: >50,000 hours.
Voltage Tolerance (Fixed Colour and Multi-Colour LEDs): 10.5V AC ~ 35V AC.
Light Colour: White = >5000K, Blue = 475nm, Green = 525nm.
Light Output (Typical): White = 1050 Lumens, Blue = 300 Lumens, Green = 650 Lumens.
Fault Protection: Power Cycle “Run Dry” thermal cut-out. Voltage transient clamping.
QC Surface Mounted Pool Light Dimensions
230mm
67mm
Female Plug is pushed down all the way, and Cable Nut is tightened.
Washer remains clipped in the rear of the Cable Nut.
Hex Area Washer
Important Information for Installer and Pool OwnerPool light must be fully submerged before switching on. If the light overheats due to operation out of water, the inbuilt “run dry” thermal cut-out will engage and the LEDs will operate at a greatly reduced intensity until power is shut down for 5 minutes and turned back on.Always allow sufficient cable length behind the pool light to enable future servicing.Only use stainless steel screws provided, using inferior quality screws voids the warranty.Internal components are not user-serviceable. Return to place of purchase for service.Never stare directly at LED lights, prolonged direct exposure can cause eye damage.
QC SERIES SURFACE MOUNTED LED RETRO-FIT POOL LIGHTS – INSTALLATION INSTRUCTIONS & OWNERS MANUAL
QC SERIES SURFACE MOUNTED LED RETRO-FIT POOL LIGHT
4
Automatic Pool Cleaners (Australia) Pty Ltd40 Percy Street, Auburn NSW 2144Ph: 02 9643 8338 Fax: 02 9643 8448www.aquaquip.com.au
COPYRIGHT AUTOMATIC POOL CLEANERS (AUSTRALIA) PTY LTD QCRM4p_1211
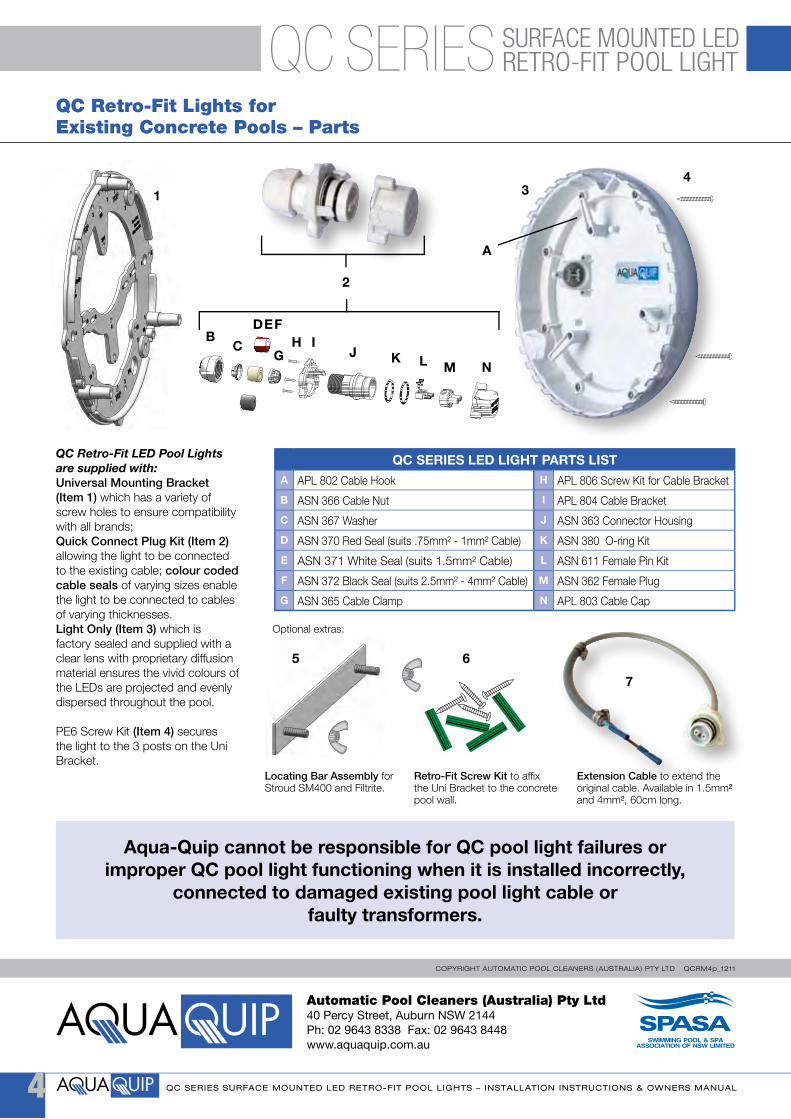
QC Retro-Fit Lights for Existing Concrete Pools – Parts
QC SERIES LED LIGHT PARTS LISTA APL 802 Cable Hook H APL 806 Screw Kit for Cable Bracket
B ASN 366 Cable Nut I APL 804 Cable Bracket
C ASN 367 Washer J ASN 363 Connector Housing
D ASN 370 Red Seal (suits .75mm² - 1mm² Cable) K ASN 380 O-ring Kit
E ASN 371 White Seal (suits 1.5mm² Cable) L ASN 611 Female Pin Kit
F ASN 372 Black Seal (suits 2.5mm² - 4mm² Cable) M ASN 362 Female Plug
G ASN 365 Cable Clamp N APL 803 Cable Cap
Optional extras:
QC Retro-Fit LED Pool Lights are supplied with:Universal Mounting Bracket (Item 1) which has a variety of screw holes to ensure compatibility with all brands; Quick Connect Plug Kit (Item 2) allowing the light to be connected to the existing cable; colour coded cable seals of varying sizes enable the light to be connected to cables of varying thicknesses. Light Only (Item 3) which is factory sealed and supplied with a clear lens with proprietary diffusion material ensures the vivid colours of the LEDs are projected and evenly dispersed throughout the pool.
PE6 Screw Kit (Item 4) secures the light to the 3 posts on the Uni Bracket.
1
2
34
CG
H IJ
A
K L M N
DEFB
5 6
7
Aqua-Quip cannot be responsible for QC pool light failures or improper QC pool light functioning when it is installed incorrectly,
connected to damaged existing pool light cable or faulty transformers.
Locating Bar Assembly for Stroud SM400 and Filtrite.
Retro-Fit Screw Kit to affix the Uni Bracket to the concrete pool wall.
Extension Cable to extend the original cable. Available in 1.5mm² and 4mm², 60cm long.