Embed Size (px)
Citation preview
Copyright ©
Page - 1 - of 35
244D1015 Rev 1.00 Installation Instructions Honda CRZ Supercharger system with EGR
SPRINTEX® HONDA CRZ 1.5L
SUPERCHARGER SYSTEM WITH EGR
244D1015
INSTALLATION INSTRUCTIONS
Kit Serial # _____________________________________________
Supercharger Serial # _______________________________________
ECU Serial # _____________________________________________
Copyright ©
Page - 2 - of 35
244D1015 Rev 1.00 Installation Instructions Honda CRZ Supercharger system with EGR
Table of Contents
INTELLECTUAL PROPERTY USED IN THIS PUBLICATION _____________________ - 4 -
IMPORTANT INFORMATION ______________________________________________ - 5 -
SAFETY WARNING ______________________________________________________ - 5 -
CHANGES TO FACTORY SPECIFICATIONS _________________________________ - 6 -
TOOLS AND CONSUMABLES REQUIRED TO COMPLETE INSTALLATION _________ - 7 -
RECORD OF AMENDMENTS ______________________________________________ - 8 -
PARTS SUPPLIED (FULL SYSTEM) ________________________________________ - 9 -
PARTS SUPPLIED (HARDWARE ONLY) ____________________________________ - 10 -
DISASSEMBLY INSTRUCTIONS __________________________________________ - 11 -
1. PREPARATION AND DISASSEMBLY _____________________________ - 12 -
2. RELIEVE FUEL PRESSURE & DISCONNECT BATTERY ________________ - 13 -
3. AIR BOX REMOVAL __________________________________________ - 14 -
4. THROTTLE BODY REMOVAL ___________________________________ - 15 -
5. INTAKE MANIFOLD REMOVAL _________________________________ - 16 -
6. FUEL LINE REMOVAL (THIS STEP IS NOT REQUIRED FOR HARDWARE ONLY KIT) - 17 -
7. FUEL RAIL MODIFICATION ___________________________________ - 18 -
8. ENGINE ACCESSORY DRIVE BELT REMOVAL ______________________ - 18 -
INSTALLATION INSTRUCTIONS __________________________________________ - 19 -
1. INSTALL T- MAP SENSOR TO THE MANIFOLD (IF SUPPLIED) _________ - 20 -
2. INSTALL SUPERCHARGER MANIFOLD ___________________________ - 20 -
3. INSTALL AND SECURE NEW PCV VALVE LINE ______________________ - 21 -
4. FIT EGR VALVE TO THE EGR BLOCK _____________________________ - 21 -
5. INSTALL SUPERCHARGER ASSEMBLY TO MANIFOLD ________________ - 21 -
6. FIT SUPERCHARGER INTAKE PIPE TO ASSEMBLY __________________ - 22 -
7. ATTACH THROTTLE BODY TO INTAKE PIPE _______________________ - 23 -
Copyright ©
Page - 3 - of 35
244D1015 Rev 1.00 Installation Instructions Honda CRZ Supercharger system with EGR
8. FIT FUEL LINE TO INTAKE PIPE (OPTIONAL- IF SUPPLIED) __________ - 23 -
9. REFIT AIR BOX ASSEMBLY ____________________________________ - 24 -
10. SUPPLEMENTARY ECU AND HARDWARE (IF SUPPLIED) ___________ - 25 -
11. CONNECT PCV VALVE HOSE TO INTAKE HOUSING ________________ - 29 -
12. FIT NEW IDLER BRACKET ___________________________________ - 29 -
13. FIT NEW ACCESSORY DRIVE BELT ____________________________ - 30 -
14. SECURE FLEXIBLE A/C HOSE TO CLEAR NEW BELT ROUTING _______ - 30 -
PRE TEST-DRIVE INSPECTION __________________________________________ - 31 -
1. PRE-START INSPECTION _____________________________________ - 32 -
2. ENGINE WARM UP __________________________________________ - 32 -
3. ROAD TEST VEHICLE ________________________________________ - 32 -
4. USE OF GENERIC SCAN TOOL __________________________________ - 33 -
MAINTENANCE INSTRUCTIONS __________________________________________ - 34 -
1. SUPERCHARGER DRIVE BELT REPLACEMENT ______________________ - 35 -
2. SUPERCHARGER REMOVAL ___________________________________ - 35 -
3. SUPERCHARGED CRZ LUBRICATION SERVICE _____________________ - 35 -
4. SPARK PLUGS ______________________________________________ - 35 -
Copyright ©
Page - 4 - of 35
244D1015 Rev 1.00 Installation Instructions Honda CRZ Supercharger system with EGR
Intellectual Property used in this Publication
This document is copyright of Sprintex Ltd, a company incorporated in Australia. This document may not be re-sold, copied or distributed in any way without prior written authorisation of a director of Sprintex Ltd.
Copyrights / Trademarks: Sprintex® is a registered trademark of Sprintex Limited, an Australian company ACN: 106 337 599 (“Sprintex”). Sprintex has patents for its superchargers. Any unauthorised copying or modification of the system may result in legal action. Loctite® and Grey Maxx® are a registered trademark of Henkel KGaA, a company incorporated in Germany. Other than commercial supply arrangements, Henkel KGaA does not have any association with Sprintex.
RedLine® is a registered trademark of RedLine Synthetic Oil Corporation, a company incorporated in United States of America. Other than commercial supply arrangements, Redline and RedLine Synthetic Oil Corporation do not have any association with Sprintex. Honda, Honda CRZ are registered trademarks of Honda Motor Co, a company incorporated in Japan (http://world.honda.com/automobile) SAE is a trademark of SAE International (www.sae.org), global technology information and standards setting resource organisation for the design, manufacturing, operation, and maintenance industry. Gates is a registered trademark of the Gates Rubber Company, a subsidiary of Tomkins Plc, incorporated in London, United Kingdom. Other than commercial supply arrangements, Gates and Tomkins Plc do not have any association with Sprintex Limited.
Copyright ©
Page - 5 - of 35
244D1015 Rev 1.00 Installation Instructions Honda CRZ Supercharger system with EGR
IMPORTANT INFORMATION
PRODUCT WARNING
Installation of the Sprintex Supercharger kit on your Honda CRZ vehicle may void all or parts of Honda’s Warranty. Customers should consult their Honda dealer for details. Sprintex makes no representation that installation and use of the Sprintex supercharger system is legal for public road use worldwide. Customers should check that installation and use of the Sprintex supercharger system on their vehicle is legal by contacting the relevant statutory authority in their jurisdiction prior to use on roads.
Sprintex supports safe driving. Always remember to observe all speed limits and road rules relevant to your state, city or other local jurisdiction.
Provided in this installation manual are detailed instructions to the installer on how to install the Sprintex supercharger kit to the Honda CRZ vehicle. The instructions are aimed at being simple yet informative, and are aided with well-presented
pictures to make installations as simple, fast, and problem free as possible. Please read the entire instruction manual prior to beginning the installation procedure. Pictures and descriptions may vary slightly from model to model.
It is recommended that all wiring harness connectors, and vacuum hoses are labelled at the time of removal for easy and correct refitting. Some components that are removed and are to be refitted are fragile, and should be stored safely to prevent damage to these components. Sprintex recommends performing the following vehicle checks prior to installing the supercharger.
1) Check that the factory fuel system is operating correctly. 2) Inspect the factory exhaust catalyst for blocks or damage. 3) Check fuel quality in fuel tank ensuring that it is not stale or low octane fuel. Replace with a higher octane, Premium Unleaded Gasoline / Fuel (Refer details on the next page) as required. It is also recommended to replace the fuel filter if the vehicle has travelled more than 50,000 Km.
Sprintex will not be liable for any loss, damage, payment, costs, expenses or other liability, not expressly stated in this document. In particular, Sprintex shall not be liable to any person for any consequential, indirect or economic loss or punitive or exemplary damages of any kind. Sprintex reserves the right to change specifications from time to time and will not be liable to any person for doing so. Sprintex believes that information in this document is correct at time of print. Sprintex limits its liability to the maximum extent permissible at law with regard to the reliance which any person places on anything in this document.
THIS SPRINTEX INSTALLATION REQUIRES THAT THE VEHICLE IS FITTED WITH A STANDARD HONDA FACTORY ECU AND CALIBRATION. FAILURE TO ENSURE THIS WILL AFFECT THE PERFORMANCE AND MAY VOID WARRANTY. SHOULD YOU BE UNSURE, RETURN YOUR MOTOR VEHICLE TO YOUR NEAREST HONDA DEALER TO ENSURE THE STANDARD CALIBRATION HAS BEEN REINSTATED AND IS OPERATING CORRECTLY.
SAFETY WARNING No unauthorised service or alteration may be undertaken to the Sprintex supercharger. Installation should be carried out in a workshop which is a safe and ventilated working environment with equipment and procedures compliant with local authority guidelines and legal requirements. Installers should ensure adequate hearing, eye, and physical protection is used at all times during the installation process. Installers should take reasonable precautions to avoid fatigue and closely follow the installation instructions during every installation. Sprintex recommends installation should not be carried out unsupervised. Sprintex, its directors, employees and agents will not accept liability for damage accident or injury resulting from the installation process. Safety warnings are also provided throughout this document.
Copyright ©
Page - 6 - of 35
244D1015 Rev 1.00 Installation Instructions Honda CRZ Supercharger system with EGR
CHANGES TO FACTORY SPECIFICATIONS
FUEL: MINIMUM 95 OCTANE PREMIUM UNLEADED GASOLINE/FUEL TO BE USED AT ALL TIMES. NEVER
ALLOW THE ENGINE TO KNOCK OR DETONATE AS SERIOUS ENGINE DAMAGE MAY OCCUR.
RECOMMENDED MINIMUM FUEL SPECIFICATION
China Minimum 93 OCTANE Premium Unleaded Gasoline / Fuel USA Minimum 93 OCTANE Premium Unleaded Gasoline / Fuel Europe Minimum 95 RON Premium Unleaded Petrol Australia Minimum 95 RON Premium Unleaded Petrol New Zealand Minimum 95 RON Premium Unleaded Petrol
WARNING TUNE SUPPLIED IS BASED ON 95 OCTANE PREMIUM UNLEADED PETROL. SPRINTEX ADVISES THAT THE USE OF ETHANOL BLENDED FUELS MAY CAUSE DAMAGE TO YOUR ENGINE AND THEREFORE USE OF ETHANOL BASED FUELS IS NOT RECOMMENDED.
IN CIRCUMSTANCES WHERE ETHANOL BLENDED FUELS ARE UNAVOIDABLE, SPRINTEX RECOMMENDS THAT THE USER MODIFIY THEIR DRIVING STYLE ACCORDINGLY AS WARRANTY DOES NOT EXTEND TO DAMAGE CAUSED BY THE USE OF ETHANOL BLENDED FUELS.
SPARK PLUGS: NGK IZFR6K13 SPARK PLUGS (GAP SET AT FACTORY).
REQUIRED SERVICE: (SEE MAINTENANCE SECTION OF MANUAL)
1. INSPECT SUPERCHARGER DRIVE BELT AT EVERY ROUTINE SERVICE AND REPLACE WHEN
REQUIRED.
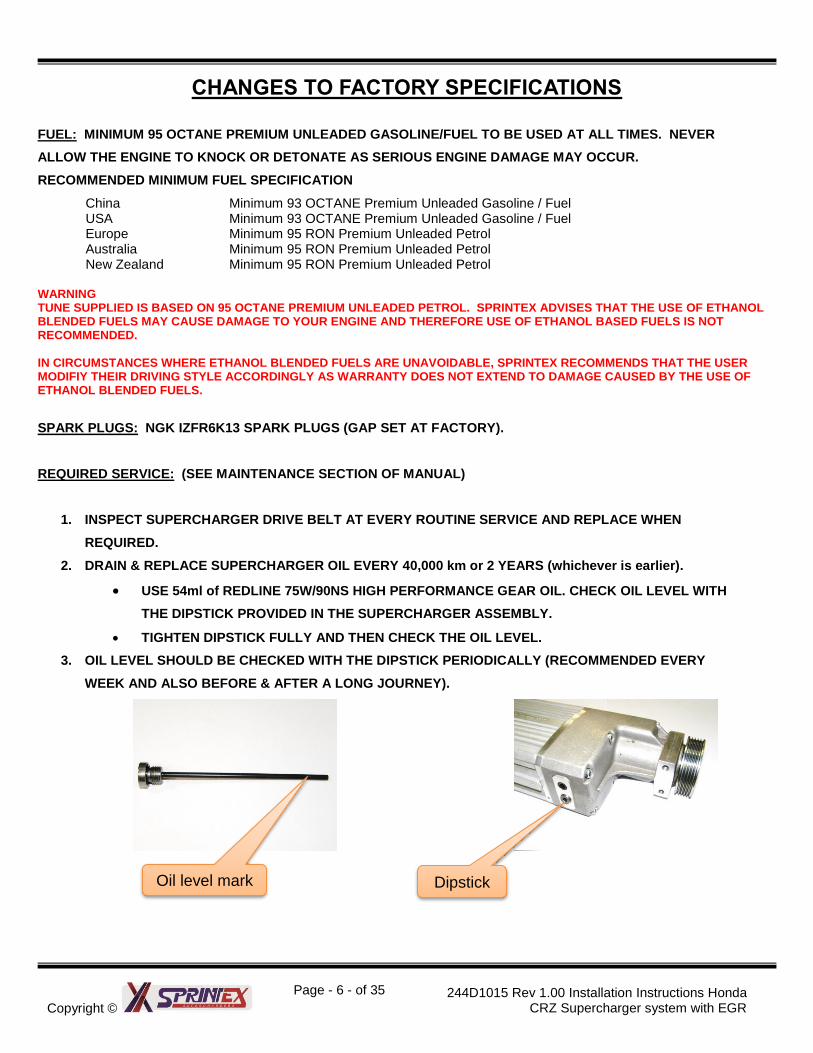
2. DRAIN & REPLACE SUPERCHARGER OIL EVERY 40,000 km or 2 YEARS (whichever is earlier).
USE 54ml of REDLINE 75W/90NS HIGH PERFORMANCE GEAR OIL. CHECK OIL LEVEL WITH
THE DIPSTICK PROVIDED IN THE SUPERCHARGER ASSEMBLY.
TIGHTEN DIPSTICK FULLY AND THEN CHECK THE OIL LEVEL.
3. OIL LEVEL SHOULD BE CHECKED WITH THE DIPSTICK PERIODICALLY (RECOMMENDED EVERY
WEEK AND ALSO BEFORE & AFTER A LONG JOURNEY).
Dipstick Oil level mark

Copyright ©
Page - 7 - of 35
244D1015 Rev 1.00 Installation Instructions Honda CRZ Supercharger system with EGR
Tools and Consumables Required to Complete Installation
Metric Wrenches and Socket sets Cable Ties Electrical circuit tester
Flat and Philips Screwdrivers Electrical Tape Rubber grease
Metric Allen Keys Sealant, thread locker Pliers and Side Cutters
Solder and Soldering Gun Wire stripper
Copyright ©
Page - 8 - of 35
244D1015 Rev 1.00 Installation Instructions Honda CRZ Supercharger system with EGR
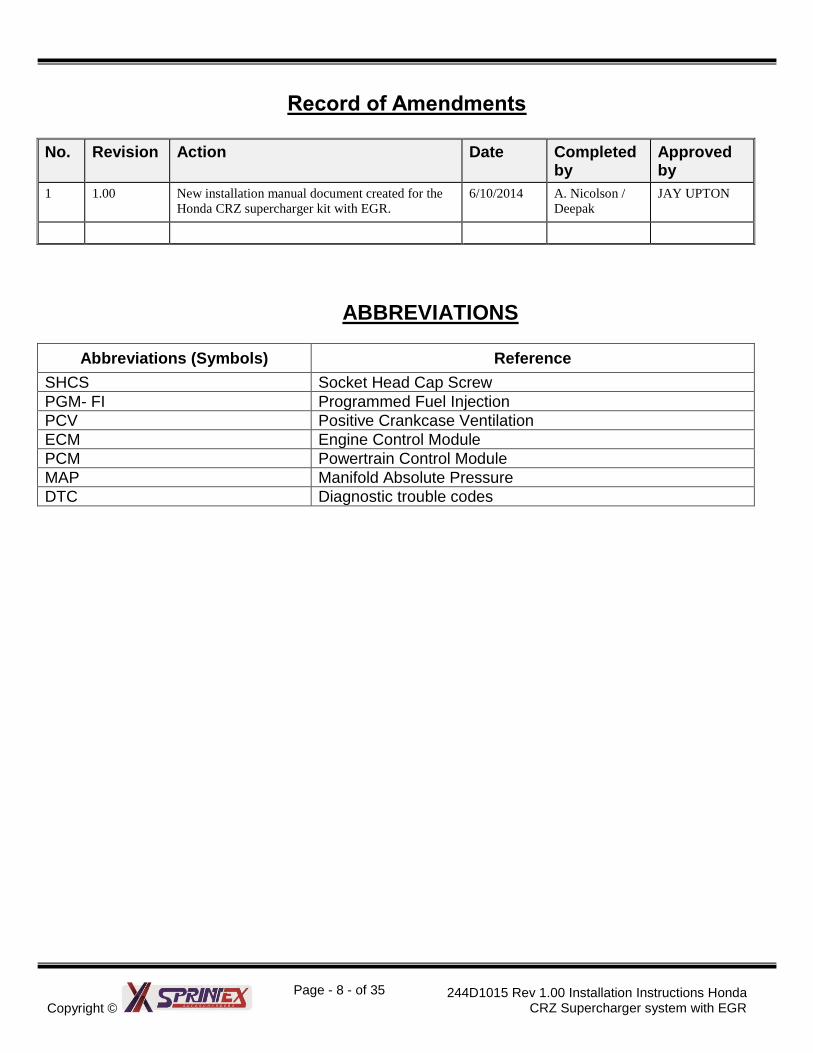
Record of Amendments
No. Revision Action Date Completed by
Approved by
1 1.00 New installation manual document created for the
Honda CRZ supercharger kit with EGR.
6/10/2014 A. Nicolson /
Deepak
JAY UPTON
ABBREVIATIONS
Abbreviations (Symbols) Reference
SHCS Socket Head Cap Screw
PGM- FI Programmed Fuel Injection
PCV Positive Crankcase Ventilation
ECM Engine Control Module
PCM Powertrain Control Module
MAP Manifold Absolute Pressure
DTC Diagnostic trouble codes
Copyright ©
Page - 9 - of 35
244D1015 Rev 1.00 Installation Instructions Honda CRZ Supercharger system with EGR
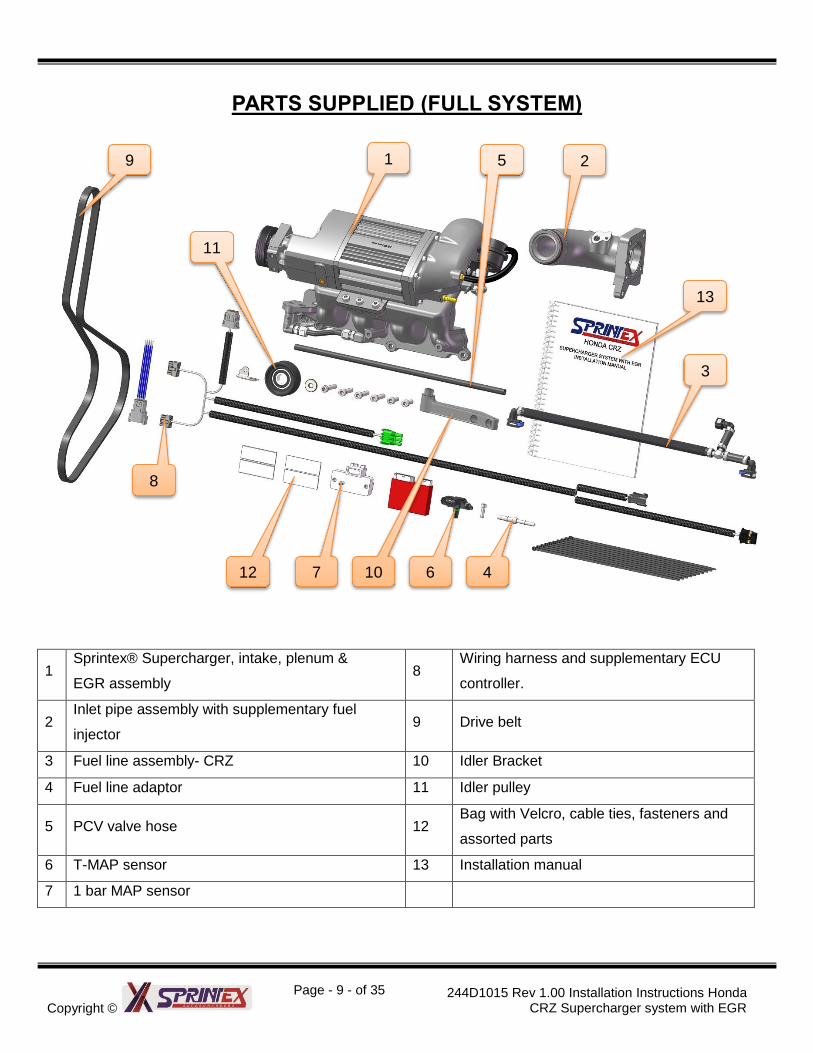
PARTS SUPPLIED (FULL SYSTEM)
1 Sprintex® Supercharger, intake, plenum &
EGR assembly 8
Wiring harness and supplementary ECU
controller.
2 Inlet pipe assembly with supplementary fuel
injector 9 Drive belt
3 Fuel line assembly- CRZ 10 Idler Bracket
4 Fuel line adaptor 11 Idler pulley
5 PCV valve hose 12 Bag with Velcro, cable ties, fasteners and
assorted parts
6 T-MAP sensor 13 Installation manual
7 1 bar MAP sensor
1 2
3
4
5
6 7
8
9
12 10
11
13
Copyright ©
Page - 10 - of 35
244D1015 Rev 1.00 Installation Instructions Honda CRZ Supercharger system with EGR
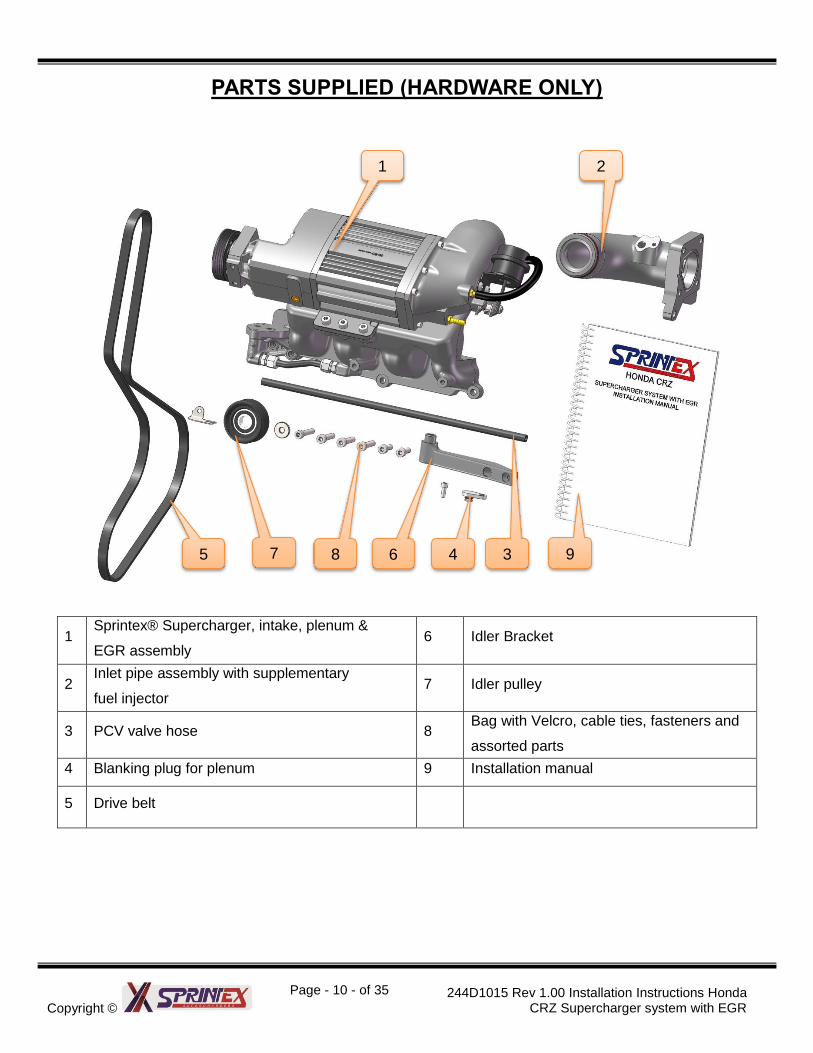
PARTS SUPPLIED (HARDWARE ONLY)
1 Sprintex® Supercharger, intake, plenum &
EGR assembly 6 Idler Bracket
2 Inlet pipe assembly with supplementary
fuel injector 7 Idler pulley
3 PCV valve hose 8 Bag with Velcro, cable ties, fasteners and
assorted parts
4 Blanking plug for plenum 9 Installation manual
5 Drive belt
1 2
3 4 5 6 7 8 9
Copyright ©
Page - 11 - of 35
244D1015 Rev 1.00 Installation Instructions Honda CRZ Supercharger system with EGR
HONDA CRZ 1.5L SUPERCHARGER SYSTEM WITH EGR
SECTION 1
DISASSEMBLY INSTRUCTIONS
SAFETY WARNING No unauthorised service or alteration may be undertaken to the Sprintex supercharger. Installation should be carried out in a workshop which is a safe and ventilated working environment with equipment and procedures compliant with local authority guidelines and legal requirements. Installers should ensure adequate hearing, eye, and physical protection is used at all times during the installation process. Installers should take reasonable precautions to avoid fatigue and closely follow the installation instructions during every installation. Sprintex recommends installation should not be carried out unsupervised. Sprintex, its directors, employees and agents will not accept liability for damage accident or injury resulting from the installation process. Safety warnings are also provided throughout this document.
Copyright ©
Page - 12 - of 35
244D1015 Rev 1.00 Installation Instructions Honda CRZ Supercharger system with EGR
1. Preparation and disassembly
Ensure that all components required to install the supercharger are available. Refer to the Parts supplied section provided earlier.
Ensure that all required tools are available.
Please read the entire instruction manual prior to beginning the installation procedure.
Ensure vehicle is located in a secure position with vehicle tyres secured and handbrake applied. Sprintex® recommends to avoid injury you should use a vehicle lift or axle stands when the vehicle is required to be lifted for access. Stands should be positioned as per the Manufacturers Owners Handbook.
SAFETY WARNING: Use personal protective equipment such as safety glasses, gloves etc. when necessary.
SAFETY WARNING: Allow engine to cool prior to proceeding with disassembly to prevent scalding.
SAFETY WARNING: The fuel system is under high pressure. Ensure to take care and follow procedures as mentioned in the vehicle’s workshop manual while working with the fuel system.
Note: During disassembly and removal of components, take notes and ensure to label and store them safely; this will help with the reassembly. Note: Many of the photos shown in this document are of a typical Honda CRZ right hand drive vehicle.
Copyright ©
Page - 13 - of 35
244D1015 Rev 1.00 Installation Instructions Honda CRZ Supercharger system with EGR
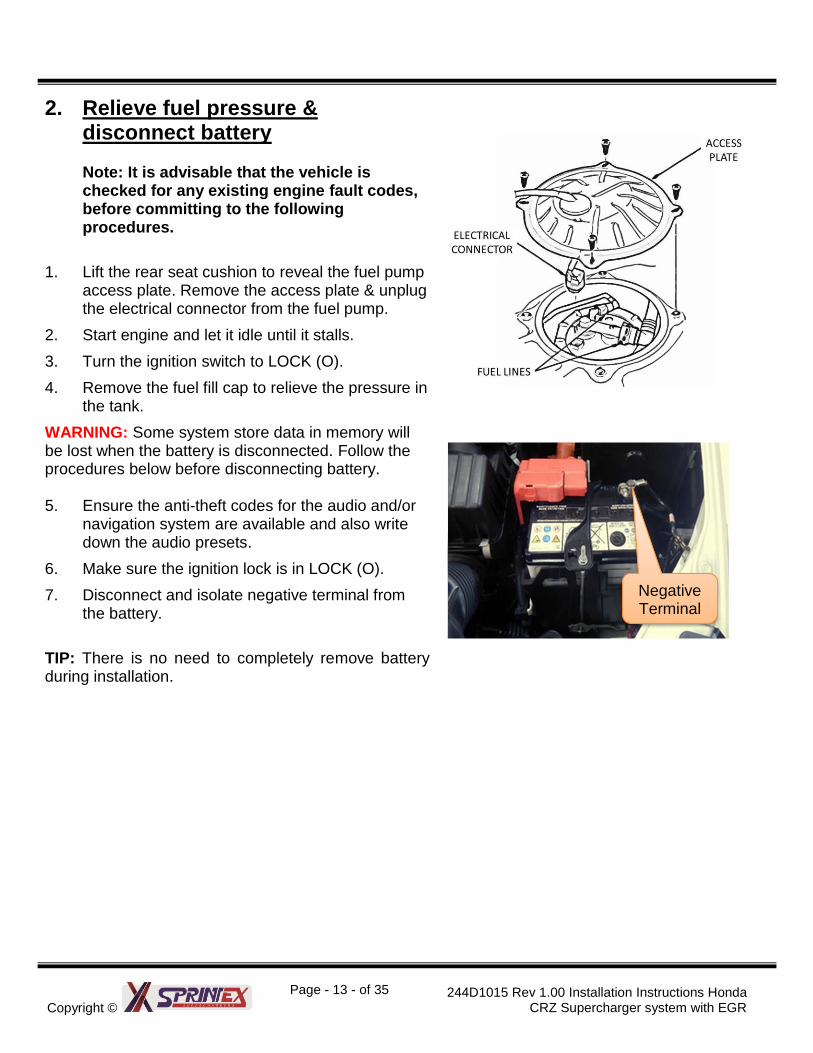
2. Relieve fuel pressure & disconnect battery
Note: It is advisable that the vehicle is checked for any existing engine fault codes, before committing to the following procedures.
1. Lift the rear seat cushion to reveal the fuel pump access plate. Remove the access plate & unplug the electrical connector from the fuel pump.
2. Start engine and let it idle until it stalls.
3. Turn the ignition switch to LOCK (O).
4. Remove the fuel fill cap to relieve the pressure in the tank.
WARNING: Some system store data in memory will be lost when the battery is disconnected. Follow the procedures below before disconnecting battery. 5. Ensure the anti-theft codes for the audio and/or
navigation system are available and also write down the audio presets.
6. Make sure the ignition lock is in LOCK (O).
7. Disconnect and isolate negative terminal from the battery.
TIP: There is no need to completely remove battery during installation.
Negative Terminal
Copyright ©
Page - 14 - of 35
244D1015 Rev 1.00 Installation Instructions Honda CRZ Supercharger system with EGR
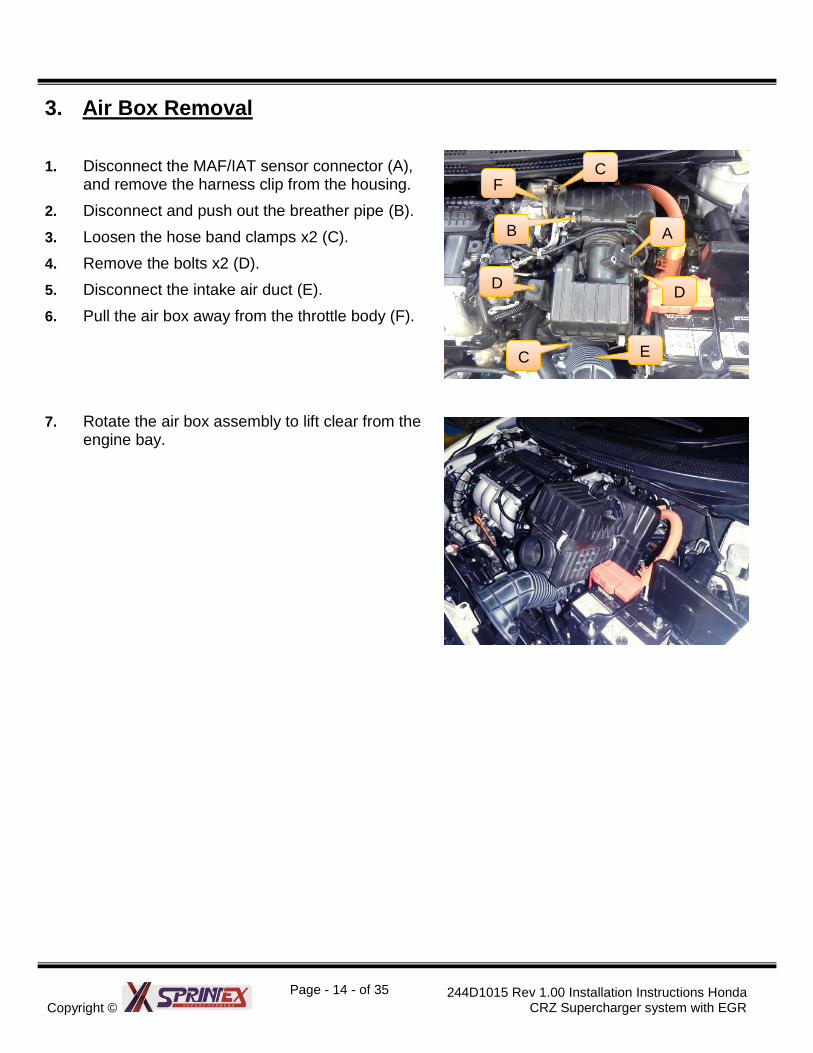
3. Air Box Removal 1. Disconnect the MAF/IAT sensor connector (A),
and remove the harness clip from the housing.
2. Disconnect and push out the breather pipe (B).
3. Loosen the hose band clamps x2 (C).
4. Remove the bolts x2 (D).
5. Disconnect the intake air duct (E).
6. Pull the air box away from the throttle body (F).
7. Rotate the air box assembly to lift clear from the engine bay.
A
4
D
B4
C4
C4
D4
D4
E4
F4
Copyright ©
Page - 15 - of 35
244D1015 Rev 1.00 Installation Instructions Honda CRZ Supercharger system with EGR
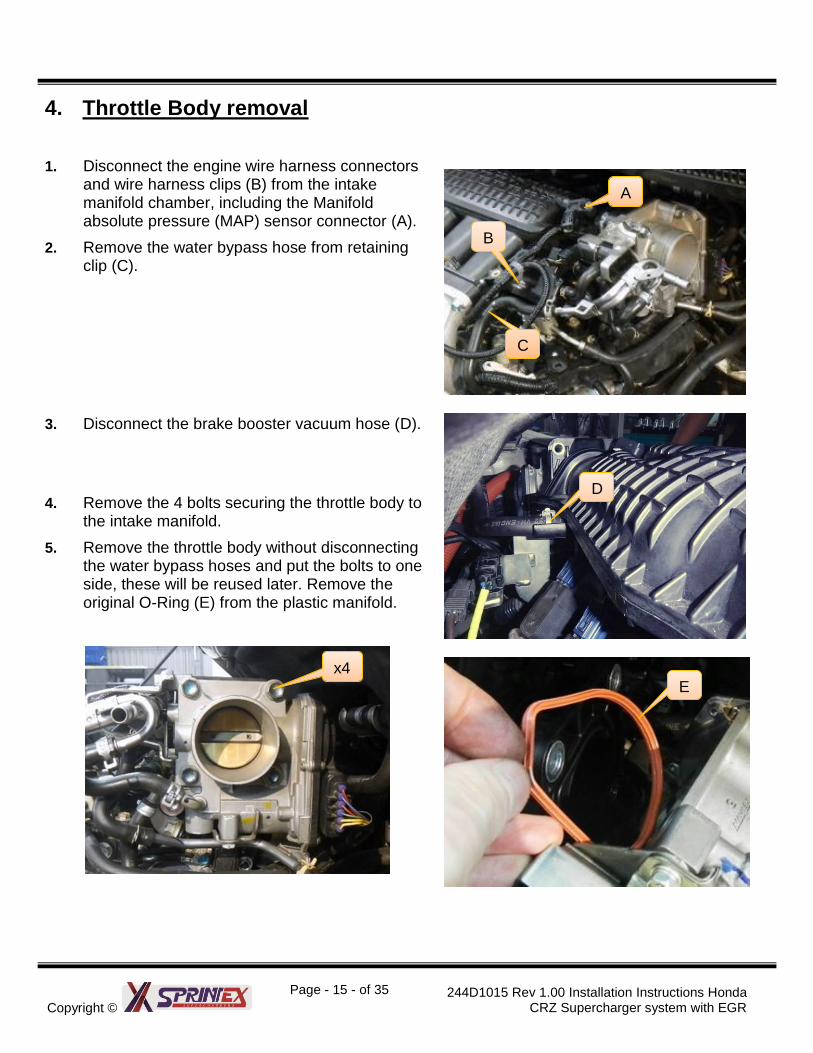
4. Throttle Body removal 1. Disconnect the engine wire harness connectors
and wire harness clips (B) from the intake manifold chamber, including the Manifold absolute pressure (MAP) sensor connector (A).
2. Remove the water bypass hose from retaining clip (C).
3. Disconnect the brake booster vacuum hose (D).
4. Remove the 4 bolts securing the throttle body to the intake manifold.
5. Remove the throttle body without disconnecting the water bypass hoses and put the bolts to one side, these will be reused later. Remove the original O-Ring (E) from the plastic manifold.
x44
D4
E4
A4
B4
C4

Copyright ©
Page - 16 - of 35
244D1015 Rev 1.00 Installation Instructions Honda CRZ Supercharger system with EGR
5. Intake Manifold removal 1. Remove the intake manifold bracket mounting
bolts (x3) and put to one side, these will be reused later.
2. Unbolt the front harness holder (A) including support clip and put the bolts (x2) and clip to one side, these bolts will be reused later.
3. Disconnect the EGR valve connector.
4. Disconnect (PCV) hose from the manifold &
remove hose from (PCV) valve, this will be replaced later.
5. Remove the bolts (x5) & nuts (x2) securing the
intake manifold to the cylinder head. Pull the intake manifold away from the engine.
x2
x1
A
x2
x5
Copyright ©
Page - 17 - of 35
244D1015 Rev 1.00 Installation Instructions Honda CRZ Supercharger system with EGR
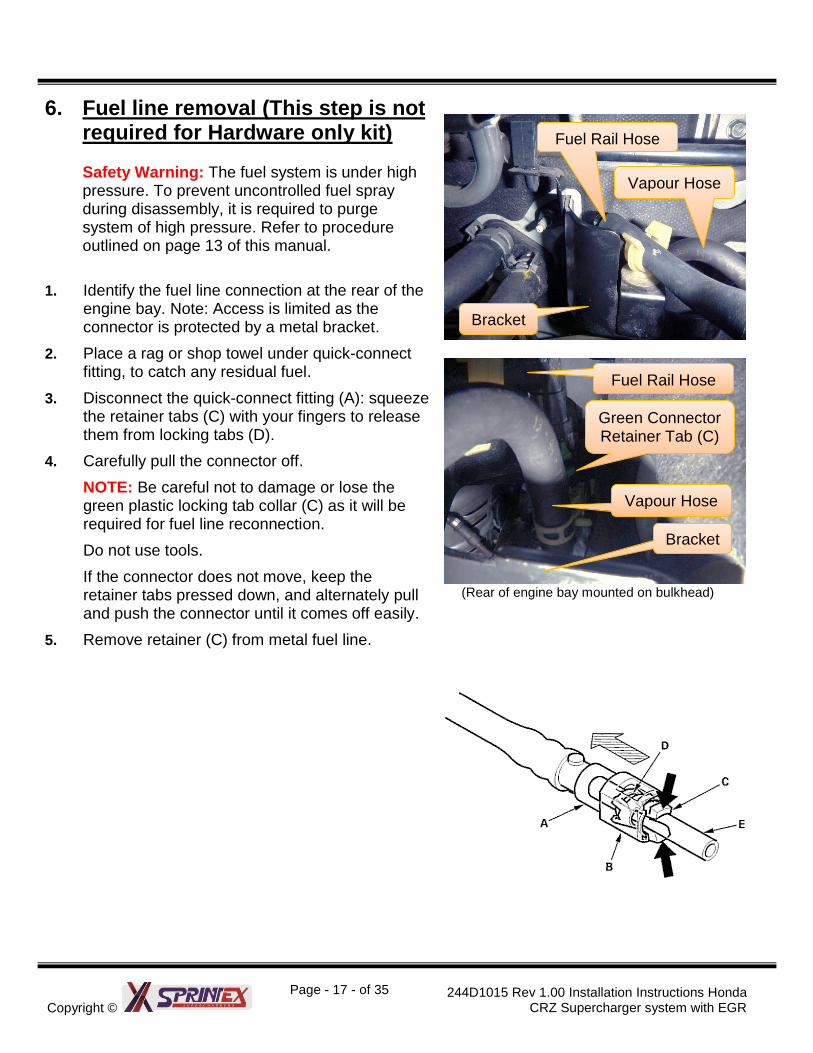
6. Fuel line removal (This step is not required for Hardware only kit)
Safety Warning: The fuel system is under high pressure. To prevent uncontrolled fuel spray during disassembly, it is required to purge system of high pressure. Refer to procedure outlined on page 13 of this manual.
1. Identify the fuel line connection at the rear of the
engine bay. Note: Access is limited as the connector is protected by a metal bracket.
2. Place a rag or shop towel under quick-connect fitting, to catch any residual fuel.
3. Disconnect the quick-connect fitting (A): squeeze the retainer tabs (C) with your fingers to release them from locking tabs (D).
4. Carefully pull the connector off.
NOTE: Be careful not to damage or lose the green plastic locking tab collar (C) as it will be required for fuel line reconnection.
Do not use tools.
If the connector does not move, keep the retainer tabs pressed down, and alternately pull and push the connector until it comes off easily.
5. Remove retainer (C) from metal fuel line.
(Rear of engine bay mounted on bulkhead)
Fuel Rail Hose
Bracket
Vapour Hose
Green Connector Retainer Tab (C)
Fuel Rail Hose
Bracket
Vapour Hose
Copyright ©
Page - 18 - of 35
244D1015 Rev 1.00 Installation Instructions Honda CRZ Supercharger system with EGR
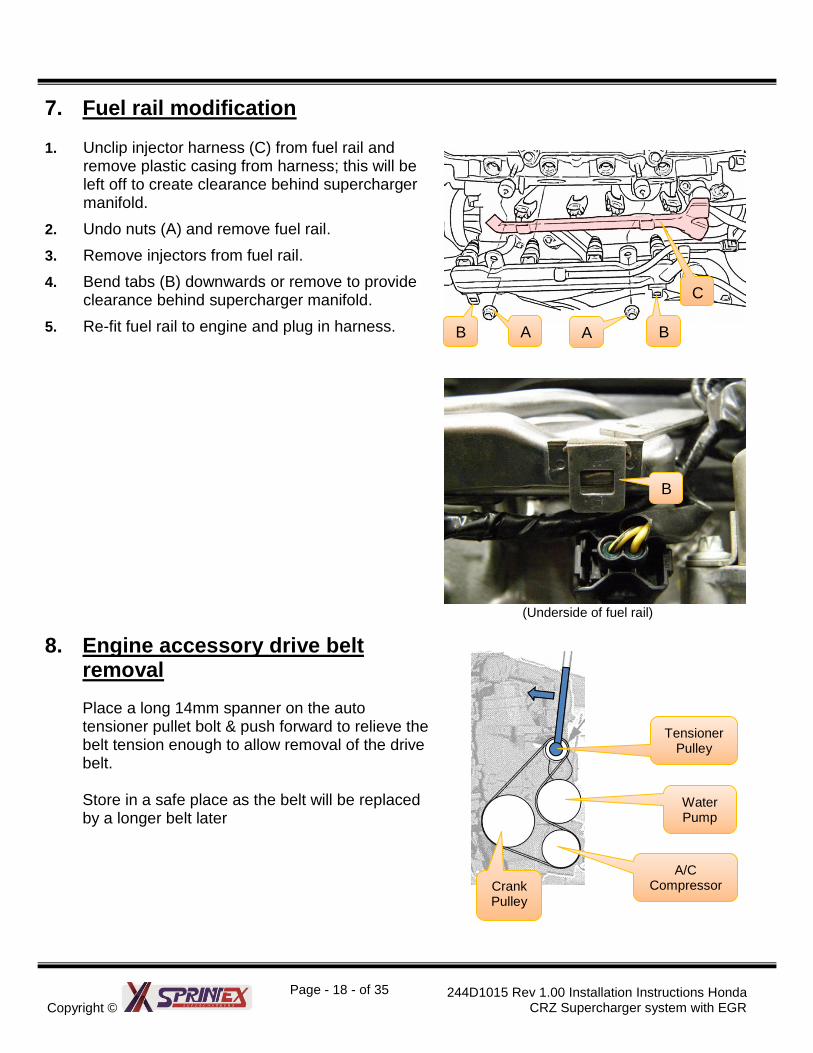
7. Fuel rail modification 1. Unclip injector harness (C) from fuel rail and
remove plastic casing from harness; this will be left off to create clearance behind supercharger manifold.
2. Undo nuts (A) and remove fuel rail.
3. Remove injectors from fuel rail.
4. Bend tabs (B) downwards or remove to provide clearance behind supercharger manifold.
5. Re-fit fuel rail to engine and plug in harness.
(Underside of fuel rail)
8. Engine accessory drive belt removal
Place a long 14mm spanner on the auto tensioner pullet bolt & push forward to relieve the belt tension enough to allow removal of the drive belt. Store in a safe place as the belt will be replaced by a longer belt later
A B A
B
C
B
Water Pump
A/C Compressor Crank
Pulley
Tensioner Pulley
Copyright ©
Page - 19 - of 35
244D1015 Rev 1.00 Installation Instructions Honda CRZ Supercharger system with EGR
HONDA CRZ 1.5L SUPERCHARGER SYSTEM WITH EGR
SECTION 2
INSTALLATION INSTRUCTIONS
SAFETY WARNING No unauthorised service or alteration may be undertaken to the Sprintex supercharger. Installation should be carried out in a workshop which is a safe and ventilated working environment with equipment and procedures compliant with local authority guidelines and legal requirements. Installers should ensure adequate hearing, eye, and physical protection is used at all times during the installation process. Installers should take reasonable precautions to avoid fatigue and closely follow the installation instructions during every installation. Sprintex recommends installation should not be carried out unsupervised. Sprintex, its directors, employees and agents will not accept liability for damage accident or injury resulting from the installation process. Safety warnings are also provided throughout this document.
Copyright ©
Page - 20 - of 35
244D1015 Rev 1.00 Installation Instructions Honda CRZ Supercharger system with EGR
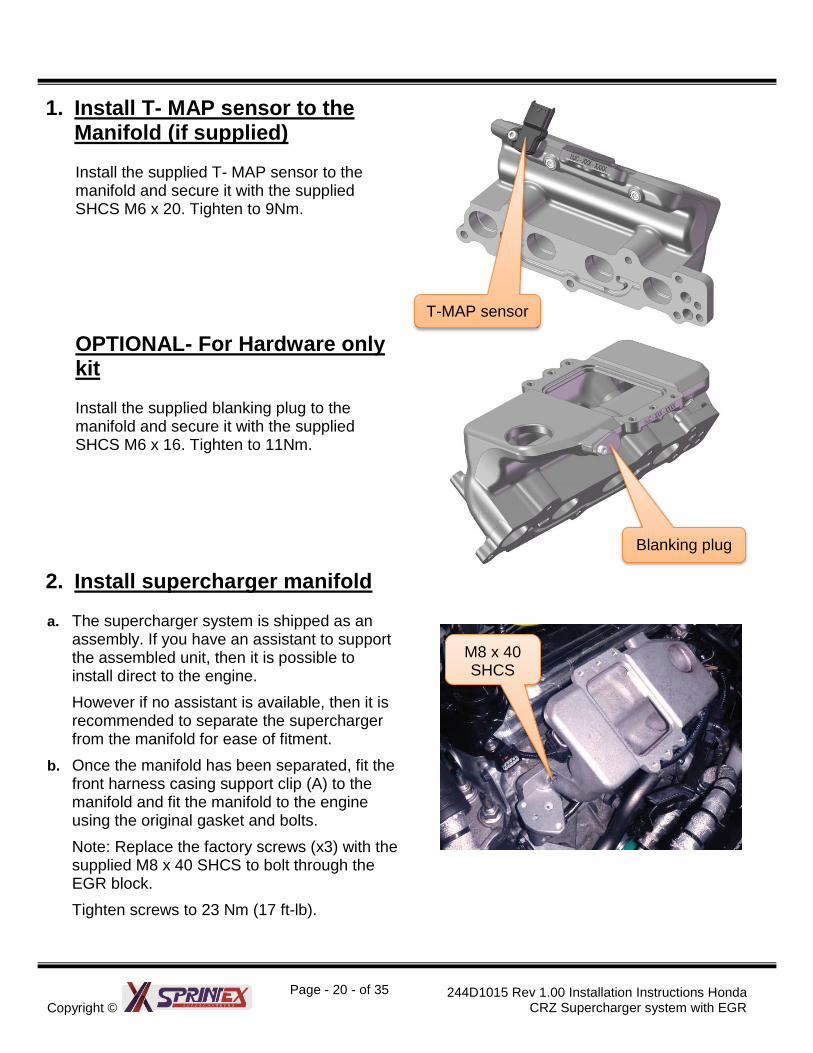
1. Install T- MAP sensor to the Manifold (if supplied)
Install the supplied T- MAP sensor to the manifold and secure it with the supplied SHCS M6 x 20. Tighten to 9Nm.
OPTIONAL- For Hardware only kit
Install the supplied blanking plug to the manifold and secure it with the supplied SHCS M6 x 16. Tighten to 11Nm.
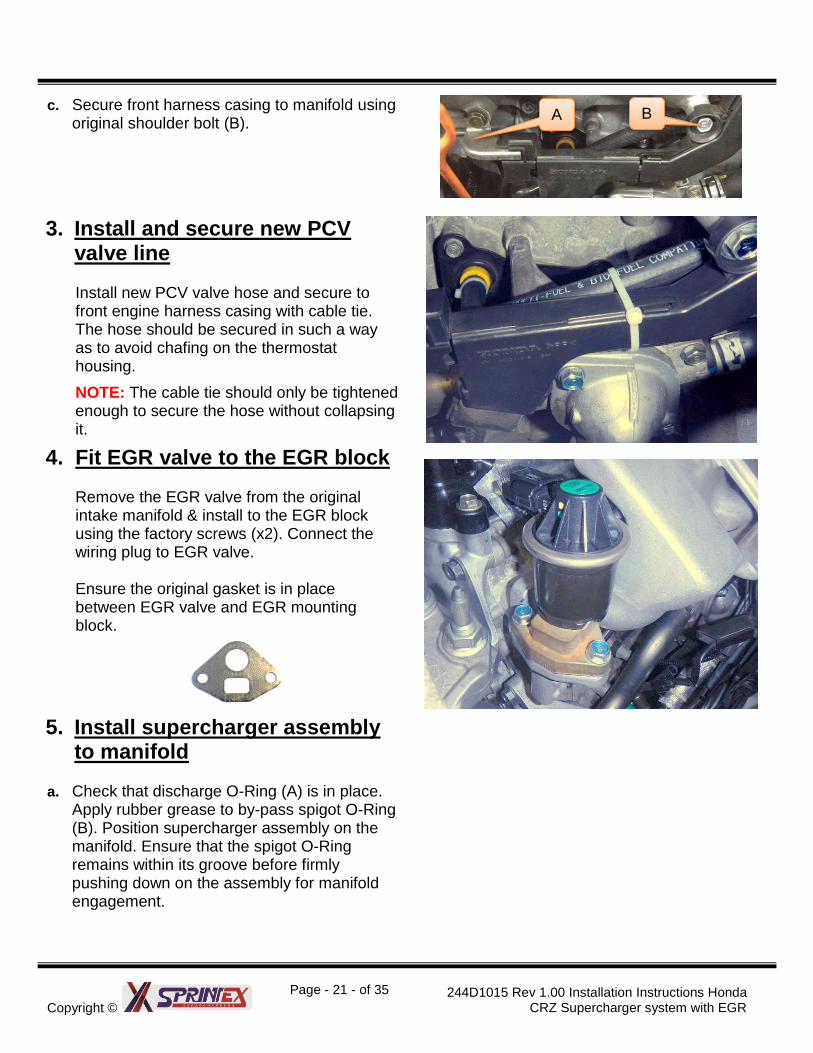
2. Install supercharger manifold
a. The supercharger system is shipped as an assembly. If you have an assistant to support the assembled unit, then it is possible to install direct to the engine.
However if no assistant is available, then it is recommended to separate the supercharger from the manifold for ease of fitment.
b. Once the manifold has been separated, fit the front harness casing support clip (A) to the manifold and fit the manifold to the engine using the original gasket and bolts.
Note: Replace the factory screws (x3) with the supplied M8 x 40 SHCS to bolt through the EGR block.
Tighten screws to 23 Nm (17 ft-lb).
M8 x 40 SHCS
T-MAP sensor
Blanking plug
Copyright ©
Page - 21 - of 35
244D1015 Rev 1.00 Installation Instructions Honda CRZ Supercharger system with EGR
c. Secure front harness casing to manifold using original shoulder bolt (B).
3. Install and secure new PCV valve line
Install new PCV valve hose and secure to front engine harness casing with cable tie. The hose should be secured in such a way as to avoid chafing on the thermostat housing.
NOTE: The cable tie should only be tightened enough to secure the hose without collapsing it.
4. Fit EGR valve to the EGR block Remove the EGR valve from the original intake manifold & install to the EGR block using the factory screws (x2). Connect the wiring plug to EGR valve. Ensure the original gasket is in place between EGR valve and EGR mounting block.
5. Install supercharger assembly to manifold
a. Check that discharge O-Ring (A) is in place.
Apply rubber grease to by-pass spigot O-Ring (B). Position supercharger assembly on the manifold. Ensure that the spigot O-Ring remains within its groove before firmly pushing down on the assembly for manifold engagement.
A
B
Copyright ©
Page - 22 - of 35
244D1015 Rev 1.00 Installation Instructions Honda CRZ Supercharger system with EGR
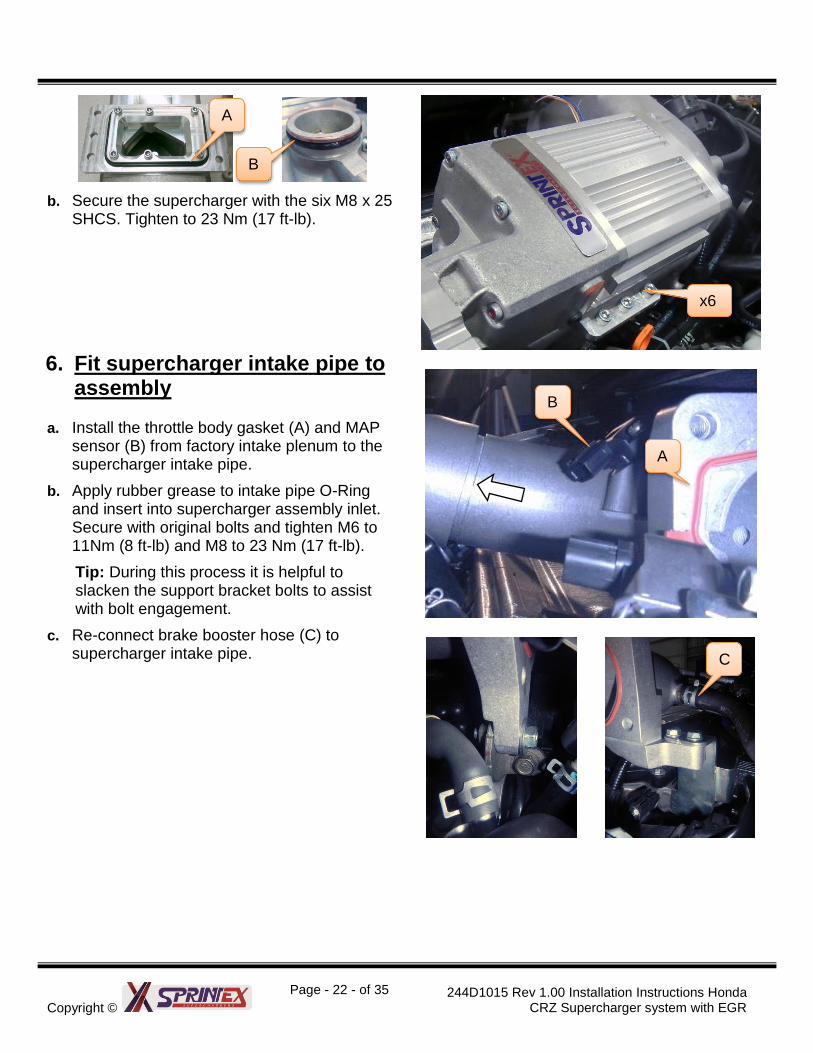
b. Secure the supercharger with the six M8 x 25 SHCS. Tighten to 23 Nm (17 ft-lb).
6. Fit supercharger intake pipe to assembly
a. Install the throttle body gasket (A) and MAP
sensor (B) from factory intake plenum to the supercharger intake pipe.
b. Apply rubber grease to intake pipe O-Ring and insert into supercharger assembly inlet. Secure with original bolts and tighten M6 to 11Nm (8 ft-lb) and M8 to 23 Nm (17 ft-lb).
Tip: During this process it is helpful to slacken the support bracket bolts to assist with bolt engagement.
c. Re-connect brake booster hose (C) to supercharger intake pipe.
x6
A
B
A
B
C

Copyright ©
Page - 23 - of 35
244D1015 Rev 1.00 Installation Instructions Honda CRZ Supercharger system with EGR
7. Attach throttle body to intake pipe
Attach throttle body to supercharger intake pipe using the 4 original M8 bolts & tighten to 23 Nm (17 ft-lb).
8. Fit fuel line to intake pipe (Optional- if supplied)
a. Fit the longest hose of the supplied fuel line
assembly to supplementary injector.
b. Check that the connector firmly clicks in place and locked by pushing the blue tab flush with the connector body.
c. Route the fuel hose downwards between the heater hoses & back up to the fuel pipe supply spigot mounted on the bulkhead behind the protective bracket.
Copyright ©
Page - 24 - of 35
244D1015 Rev 1.00 Installation Instructions Honda CRZ Supercharger system with EGR
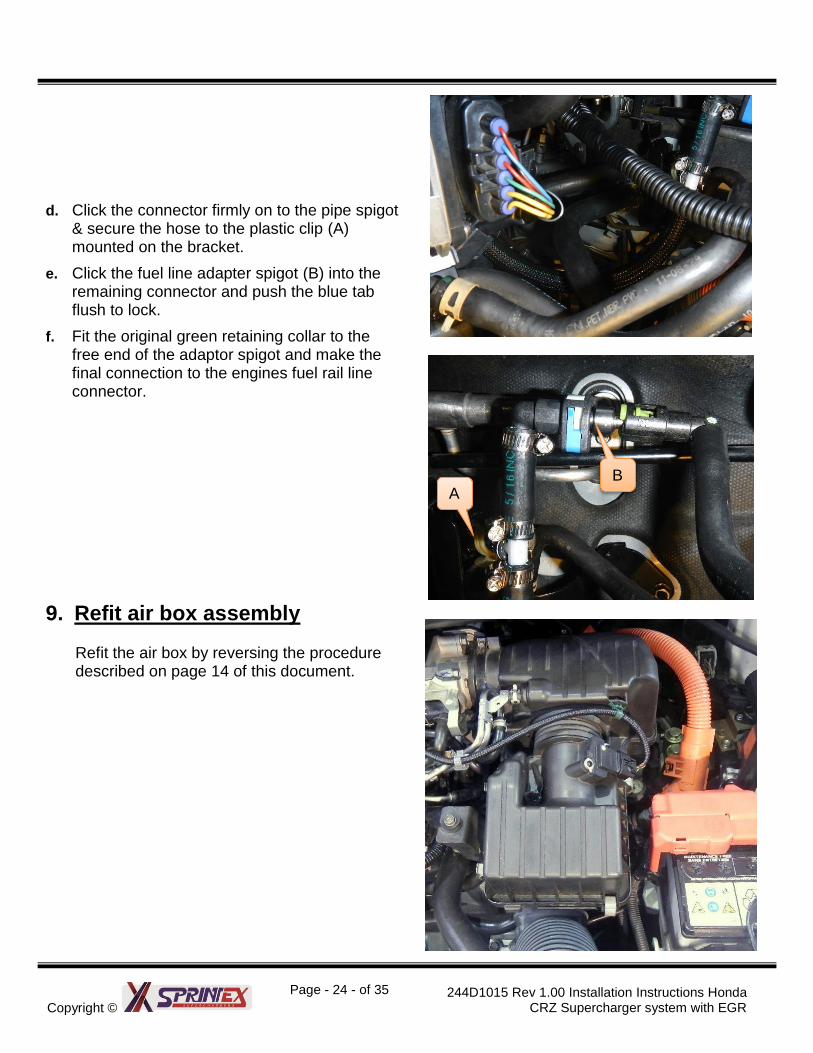
d. Click the connector firmly on to the pipe spigot & secure the hose to the plastic clip (A) mounted on the bracket.
e. Click the fuel line adapter spigot (B) into the remaining connector and push the blue tab flush to lock.
f. Fit the original green retaining collar to the free end of the adaptor spigot and make the final connection to the engines fuel rail line connector.
9. Refit air box assembly
Refit the air box by reversing the procedure described on page 14 of this document.
A
B
Copyright ©
Page - 25 - of 35
244D1015 Rev 1.00 Installation Instructions Honda CRZ Supercharger system with EGR
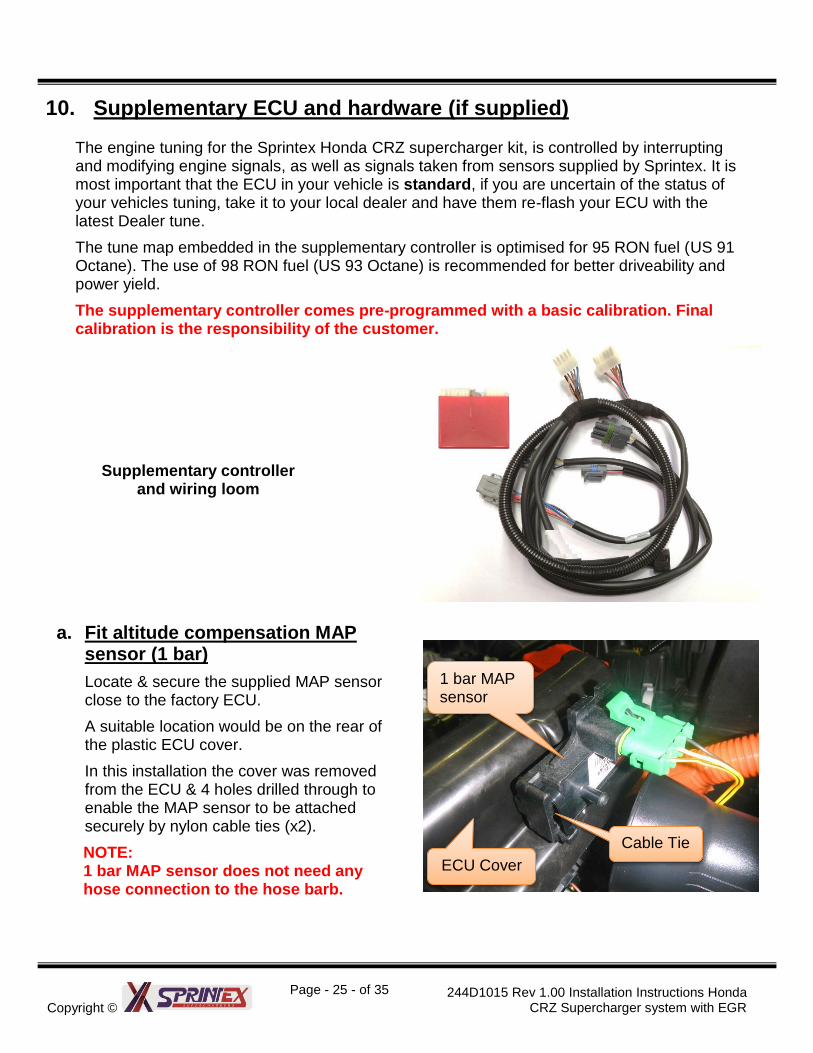
10. Supplementary ECU and hardware (if supplied)
The engine tuning for the Sprintex Honda CRZ supercharger kit, is controlled by interrupting and modifying engine signals, as well as signals taken from sensors supplied by Sprintex. It is most important that the ECU in your vehicle is standard, if you are uncertain of the status of your vehicles tuning, take it to your local dealer and have them re-flash your ECU with the latest Dealer tune.
The tune map embedded in the supplementary controller is optimised for 95 RON fuel (US 91 Octane). The use of 98 RON fuel (US 93 Octane) is recommended for better driveability and power yield.
The supplementary controller comes pre-programmed with a basic calibration. Final calibration is the responsibility of the customer.
Supplementary controller and wiring loom
a. Fit altitude compensation MAP sensor (1 bar)
Locate & secure the supplied MAP sensor close to the factory ECU.
A suitable location would be on the rear of the plastic ECU cover.
In this installation the cover was removed from the ECU & 4 holes drilled through to enable the MAP sensor to be attached securely by nylon cable ties (x2).
NOTE: 1 bar MAP sensor does not need any hose connection to the hose barb.
1 bar MAP sensor
Cable Tie ECU Cover
Copyright ©
Page - 26 - of 35
244D1015 Rev 1.00 Installation Instructions Honda CRZ Supercharger system with EGR
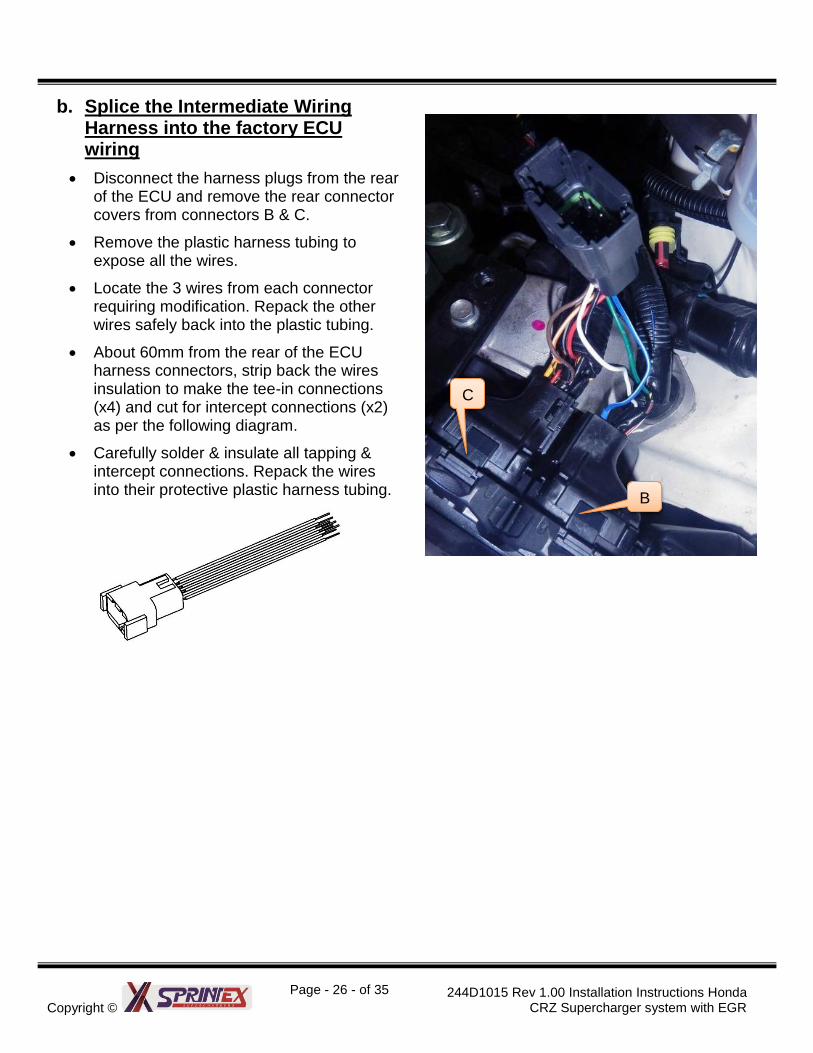
b. Splice the Intermediate Wiring Harness into the factory ECU wiring
Disconnect the harness plugs from the rear of the ECU and remove the rear connector covers from connectors B & C.
Remove the plastic harness tubing to expose all the wires.
Locate the 3 wires from each connector requiring modification. Repack the other wires safely back into the plastic tubing.
About 60mm from the rear of the ECU harness connectors, strip back the wires insulation to make the tee-in connections (x4) and cut for intercept connections (x2) as per the following diagram.
Carefully solder & insulate all tapping & intercept connections. Repack the wires into their protective plastic harness tubing.
B
C
Copyright ©
Page - 27 - of 35
244D1015 Rev 1.00 Installation Instructions Honda CRZ Supercharger system with EGR
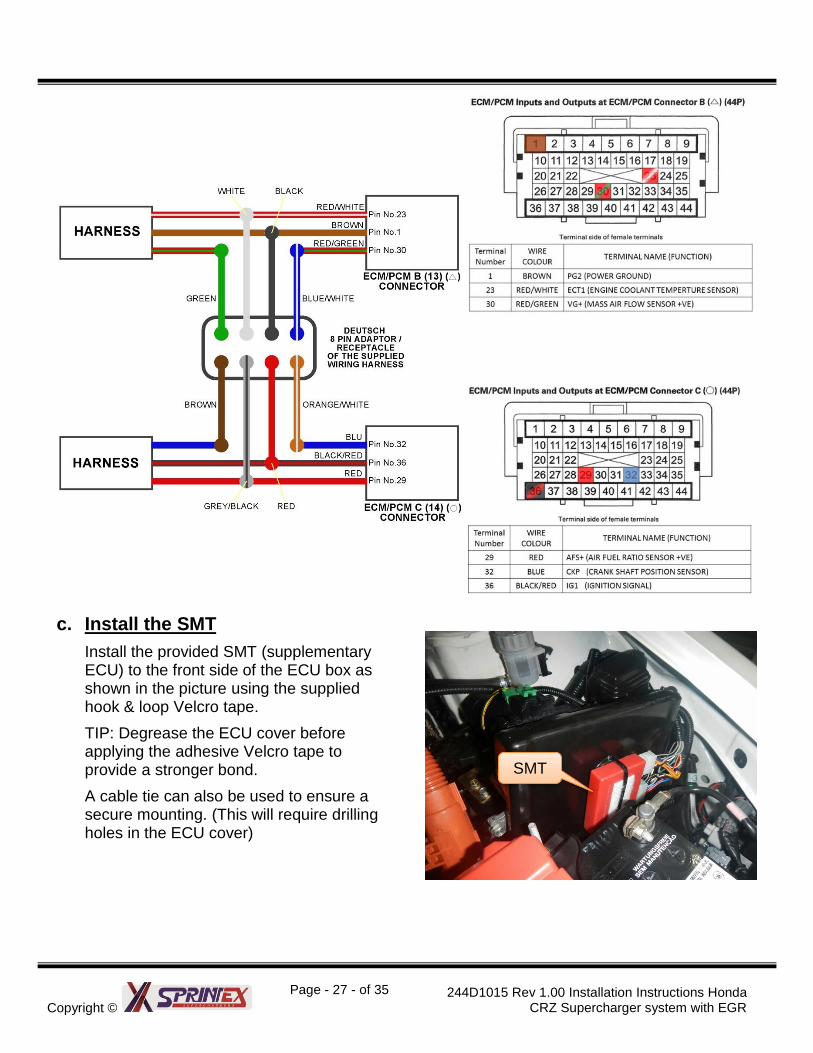
c. Install the SMT
Install the provided SMT (supplementary ECU) to the front side of the ECU box as shown in the picture using the supplied hook & loop Velcro tape.
TIP: Degrease the ECU cover before applying the adhesive Velcro tape to provide a stronger bond.
A cable tie can also be used to ensure a secure mounting. (This will require drilling holes in the ECU cover)
SMT
Copyright ©
Page - 28 - of 35
244D1015 Rev 1.00 Installation Instructions Honda CRZ Supercharger system with EGR
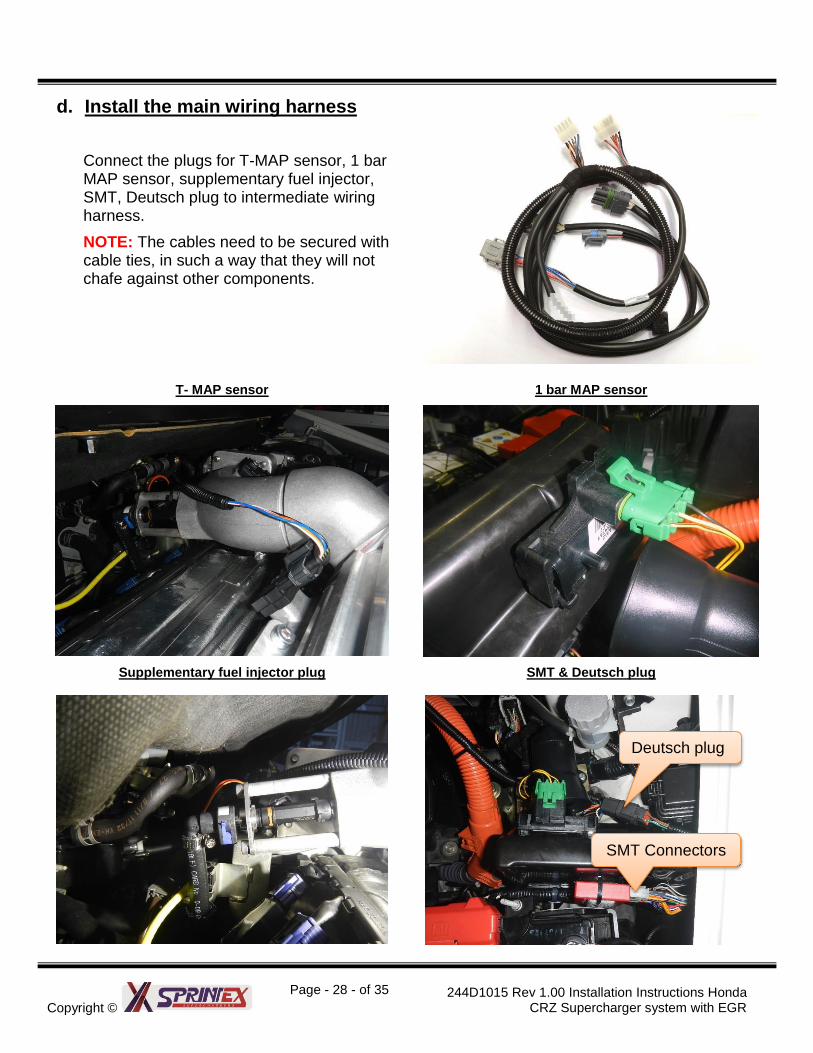
d. Install the main wiring harness
Connect the plugs for T-MAP sensor, 1 bar MAP sensor, supplementary fuel injector, SMT, Deutsch plug to intermediate wiring harness.
NOTE: The cables need to be secured with cable ties, in such a way that they will not chafe against other components.
T- MAP sensor
1 bar MAP sensor
Supplementary fuel injector plug
SMT & Deutsch plug
Deutsch plug
SMT Connectors
Copyright ©
Page - 29 - of 35
244D1015 Rev 1.00 Installation Instructions Honda CRZ Supercharger system with EGR
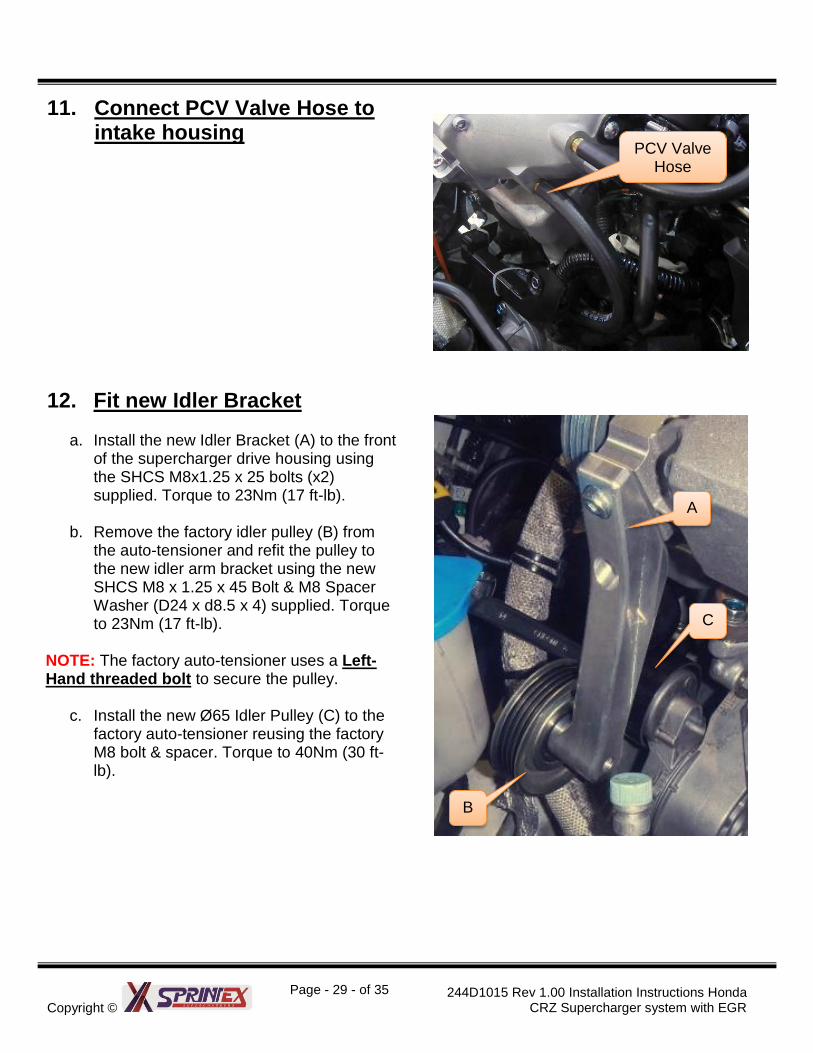
11. Connect PCV Valve Hose to intake housing
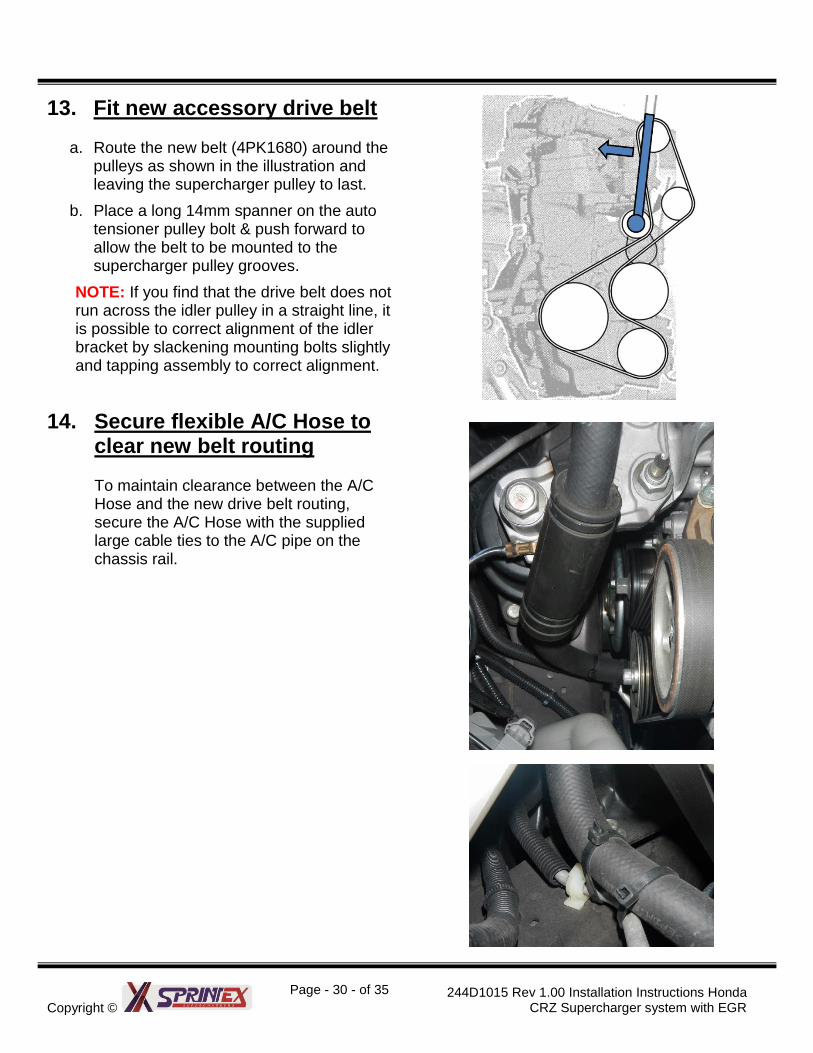
12. Fit new Idler Bracket
a. Install the new Idler Bracket (A) to the front of the supercharger drive housing using the SHCS M8x1.25 x 25 bolts (x2) supplied. Torque to 23Nm (17 ft-lb).
b. Remove the factory idler pulley (B) from
the auto-tensioner and refit the pulley to the new idler arm bracket using the new SHCS M8 x 1.25 x 45 Bolt & M8 Spacer Washer (D24 x d8.5 x 4) supplied. Torque to 23Nm (17 ft-lb).
NOTE: The factory auto-tensioner uses a Left-Hand threaded bolt to secure the pulley.
c. Install the new Ø65 Idler Pulley (C) to the
factory auto-tensioner reusing the factory M8 bolt & spacer. Torque to 40Nm (30 ft-lb).
PCV Valve Hose
A
B
C
Copyright ©
Page - 30 - of 35
244D1015 Rev 1.00 Installation Instructions Honda CRZ Supercharger system with EGR
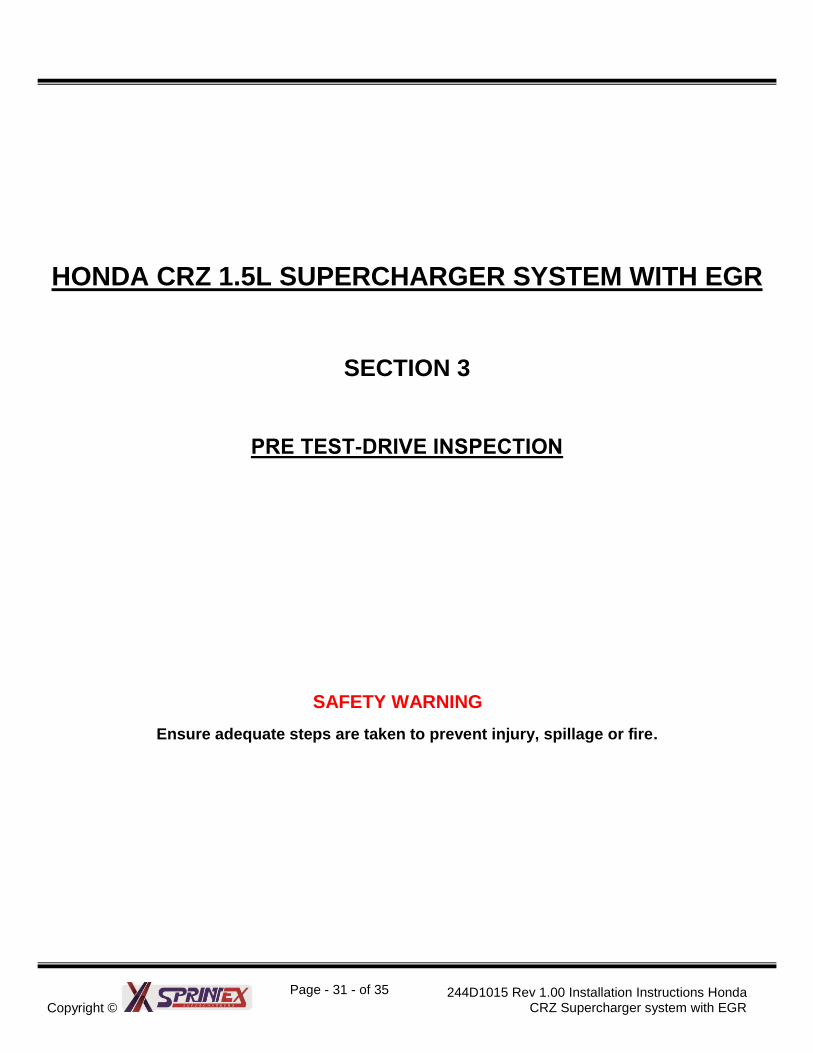
13. Fit new accessory drive belt
a. Route the new belt (4PK1680) around the pulleys as shown in the illustration and leaving the supercharger pulley to last.
b. Place a long 14mm spanner on the auto tensioner pulley bolt & push forward to allow the belt to be mounted to the supercharger pulley grooves.
NOTE: If you find that the drive belt does not run across the idler pulley in a straight line, it is possible to correct alignment of the idler bracket by slackening mounting bolts slightly and tapping assembly to correct alignment.
14. Secure flexible A/C Hose to clear new belt routing
To maintain clearance between the A/C Hose and the new drive belt routing, secure the A/C Hose with the supplied large cable ties to the A/C pipe on the chassis rail.
Copyright ©
Page - 31 - of 35
244D1015 Rev 1.00 Installation Instructions Honda CRZ Supercharger system with EGR
HONDA CRZ 1.5L SUPERCHARGER SYSTEM WITH EGR
SECTION 3
PRE TEST-DRIVE INSPECTION
SAFETY WARNING
Ensure adequate steps are taken to prevent injury, spillage or fire.
Copyright ©
Page - 32 - of 35
244D1015 Rev 1.00 Installation Instructions Honda CRZ Supercharger system with EGR
1. Pre-Start inspection
Ensure coolant is at correct level.
Ensure engine oil is at correct level.
Ensure vehicle has fresh 95 Octane fuel.
Ensure the belt is aligned.
Ensure the air filter is clean
Check & replace spark plugs if necessary. Set the gaps to factory spec.
WARNING: The Honda CRZ features Electric Power Assisted Steering; this circuit can draw as much as 60 AMPS of power. It is most important that the battery earth lead is secured correctly at all times.
2. Engine Warm Up
Start the engine and allow it to run until it reaches normal operating temperature.
Check for oil leaks.
With engine stopped, check the position of the auto-tensioner indicators.
Pointer (A) is within the standard range (B).
Check the engine coolant level & top up if necessary.
3. Road test vehicle
Road test the vehicle.
Recheck all joints and connections for leaks & rectify if required.
NOTE: The HONDA fuel system is a non-return system. It is important that during the initial test dive, mild applications of the throttle are employed. This will enable the fuel system to self-purge any air from the supplementary injector line.
A
B
B
Copyright ©
Page - 33 - of 35
244D1015 Rev 1.00 Installation Instructions Honda CRZ Supercharger system with EGR
4. Use of generic scan tool
If you are using a generic scan tool to clear DTCs, be aware that there is only one setting for clearing the ECM / PCM and it clears all DTCs and learned values at the same time. (CKP pattern learn, idle learn, freeze data, on-board snapshot and DTC’s). After clearing all commands, the following procedures need to be carried out in order.
a) Idle Control System learn procedure
1. Make sure all electrical items (A/C, audio, lights, etc.) are off.
2. Reset the ECM / PCM.
3. Turn the ignition switch to ON (II) and wait 2 seconds.
4. Start the engine. Hold the engine speed at 3,000 rpm without load (A/T in P or N, M/T in neutral) until the radiator fan comes on, or until the engine coolant temperature reaches 90°C (194°F).
5. Let the engine idle for about 5 minutes with the throttle fully closed.
NOTE: If the radiator fan comes on, do not include its running time in the 5 minutes.
b) CKP pattern learn procedure (crankshaft position sensor) without HDS (Honda Diagnostic System)
1. Start the engine. Hold the engine speed at 3,000 rpm without load (A/T in P or N, M/T in neutral) until the radiator fan comes on.
2. Test-drive the vehicle on a level road. Decelerate (with the throttle fully closed) from an engine speed of 2,500 rpm down to 1,000 rpm (with the A/T in position 2, or the M/T in 1st gear).
3. Repeat step 2 several times.
4. Turn the ignition switch to LOCK (O).
5. Turn the ignition switch to ON (II) and wait 30 seconds. The CKP patterns learn procedure is complete.
NOTE: The procedures described above will not stop the vehicle from running correctly. They mainly impact on the lean running fuel economy mode, which is one of the features designed into the Honda factory tune. If you are not confident with these procedures, take the vehicle to your Honda dealer and have the ECU reset with the Honda diagnostics tool.

Copyright ©
Page - 34 - of 35
244D1015 Rev 1.00 Installation Instructions Honda CRZ Supercharger system with EGR
HONDA CRZ 1.5L SUPERCHARGER SYSTEM WITH EGR
SECTION 4
MAINTENANCE INSTRUCTIONS
Copyright ©
Page - 35 - of 35
244D1015 Rev 1.00 Installation Instructions Honda CRZ Supercharger system with EGR
1. Supercharger Drive Belt Replacement
a) It is recommended that the supercharger drive belt be checked at every regular service and be replaced at 50,000 km or 2 years, whichever occurs first.
b) Refer page- 29 of this manual for belt replacement.
2. Supercharger Removal
This is the reversal of installation steps.
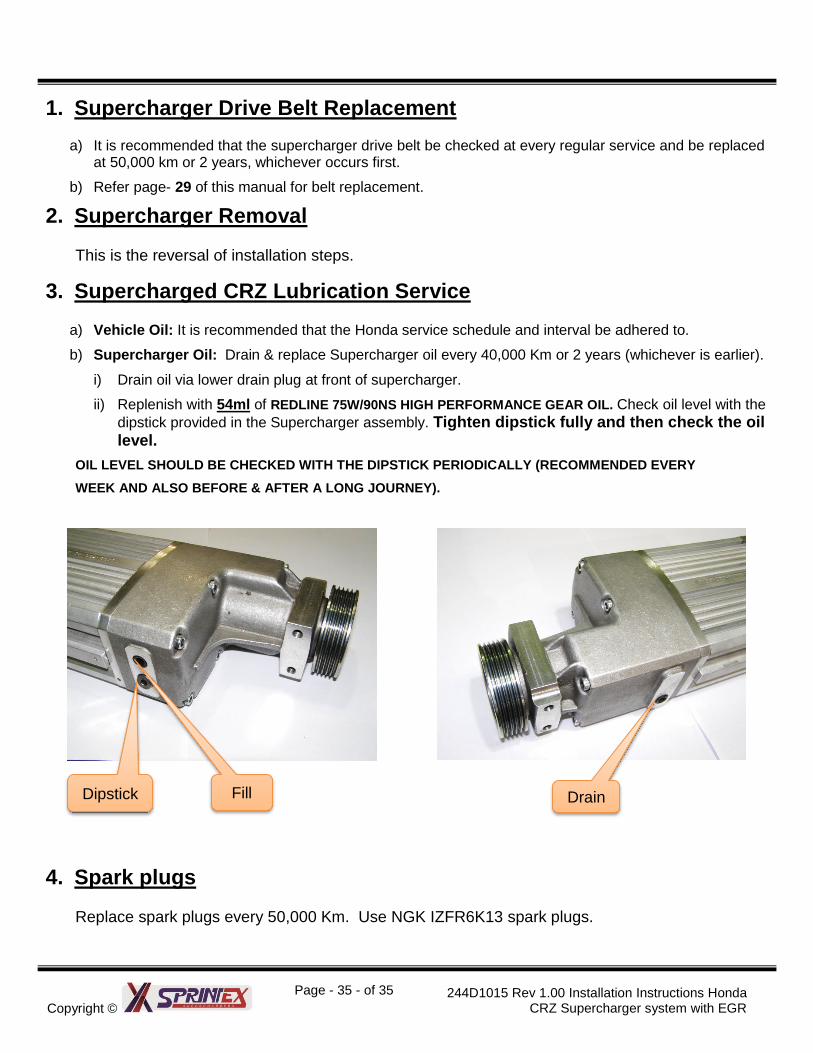
3. Supercharged CRZ Lubrication Service
a) Vehicle Oil: It is recommended that the Honda service schedule and interval be adhered to.
b) Supercharger Oil: Drain & replace Supercharger oil every 40,000 Km or 2 years (whichever is earlier).
i) Drain oil via lower drain plug at front of supercharger.
ii) Replenish with 54ml of REDLINE 75W/90NS HIGH PERFORMANCE GEAR OIL. Check oil level with the
dipstick provided in the Supercharger assembly. Tighten dipstick fully and then check the oil level.
OIL LEVEL SHOULD BE CHECKED WITH THE DIPSTICK PERIODICALLY (RECOMMENDED EVERY
WEEK AND ALSO BEFORE & AFTER A LONG JOURNEY).
4. Spark plugs
Replace spark plugs every 50,000 Km. Use NGK IZFR6K13 spark plugs.
Dipstick Fill Drain