Embed Size (px)
Citation preview
D-LOX®
Installation manual
EN
2 18/01/11 – D-LOX® Installation Manual
0. Content
1. Components of the fencing system1. The posts 2. The panels3. The panel clamps4. The cover plates5. The corner clamps
2. Installation of D-LOX®
1. Foundations2. Install posts3. Install panels4. Special cases
3. Maintenance
3 18/01/11 – D-LOX® Installation Manual
1. Components of the fencing system1. The posts 2. The panels3. The panel clamps4. The cover plates5. The corner clamps
2. Installation of D-LOX®
1. Foundations2. Install posts3. Install panels4. Special cases
3. Maintenance
4 18/01/11 – D-LOX® Installation Manual
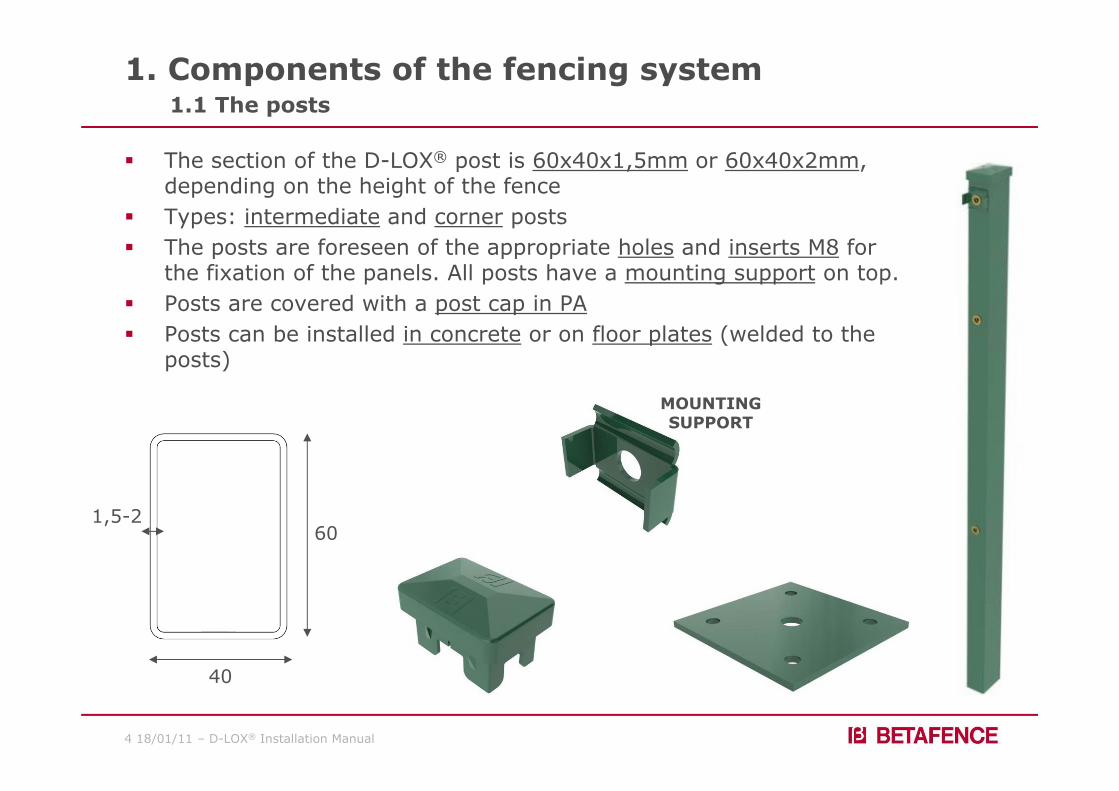
1. Components of the fencing system1.1 The posts
The section of the D-LOX® post is 60x40x1,5mm or 60x40x2mm, depending on the height of the fence
Types: intermediate and corner posts The posts are foreseen of the appropriate holes and inserts M8 for
the fixation of the panels. All posts have a mounting support on top. Posts are covered with a post cap in PA Posts can be installed in concrete or on floor plates (welded to the
posts)
1,5-2
40
60
MOUNTING SUPPORT
5 18/01/11 – D-LOX® Installation Manual
1. Components of the fencing system
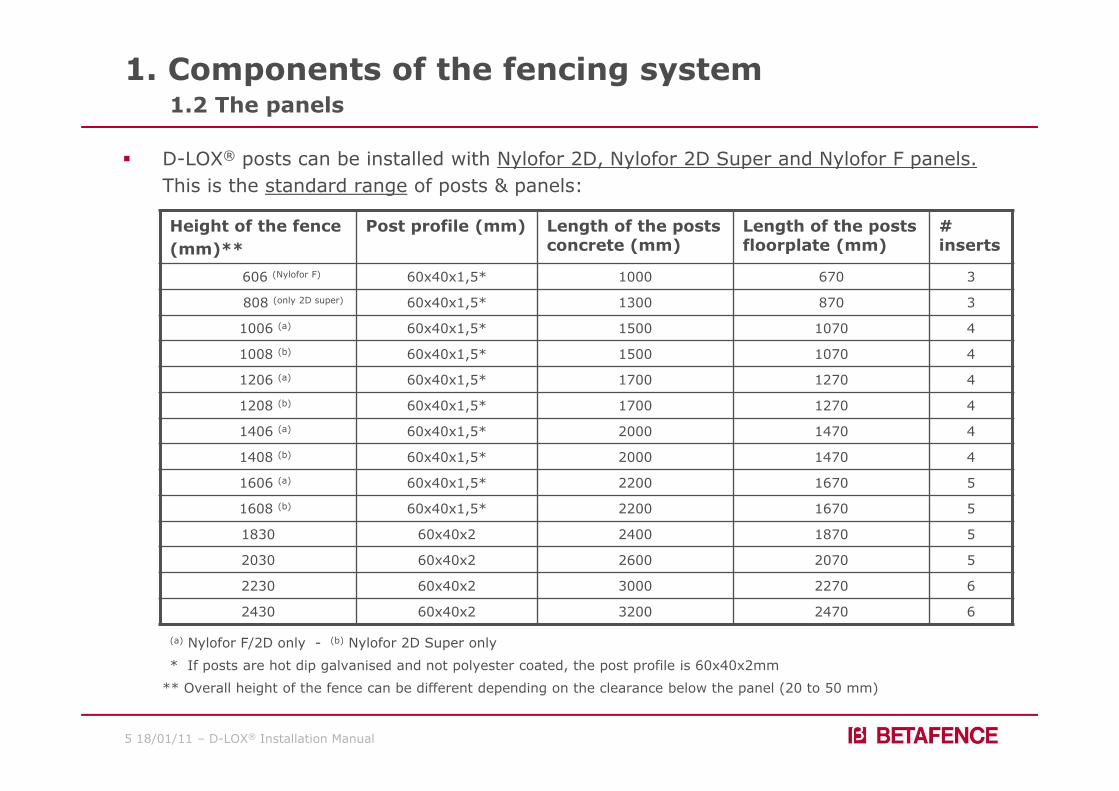
D-LOX® posts can be installed with Nylofor 2D, Nylofor 2D Super and Nylofor F panels.This is the standard range of posts & panels:
Height of the fence(mm)**
Post profile (mm) Length of the posts concrete (mm)
Length of the posts floorplate (mm)
# inserts
606 (Nylofor F) 60x40x1,5* 1000 670 3
808 (only 2D super) 60x40x1,5* 1300 870 3
1006 (a) 60x40x1,5* 1500 1070 4
1008 (b) 60x40x1,5* 1500 1070 4
1206 (a) 60x40x1,5* 1700 1270 4
1208 (b) 60x40x1,5* 1700 1270 4
1406 (a) 60x40x1,5* 2000 1470 4
1408 (b) 60x40x1,5* 2000 1470 4
1606 (a) 60x40x1,5* 2200 1670 5
1608 (b) 60x40x1,5* 2200 1670 5
1830 60x40x2 2400 1870 5
2030 60x40x2 2600 2070 5
2230 60x40x2 3000 2270 6
2430 60x40x2 3200 2470 6
1.2 The panels
* If posts are hot dip galvanised and not polyester coated, the post profile is 60x40x2mm
** Overall height of the fence can be different depending on the clearance below the panel (20 to 50 mm)
(a) Nylofor F/2D only - (b) Nylofor 2D Super only
6 18/01/11 – D-LOX® Installation Manual
1. Components of the fencing system
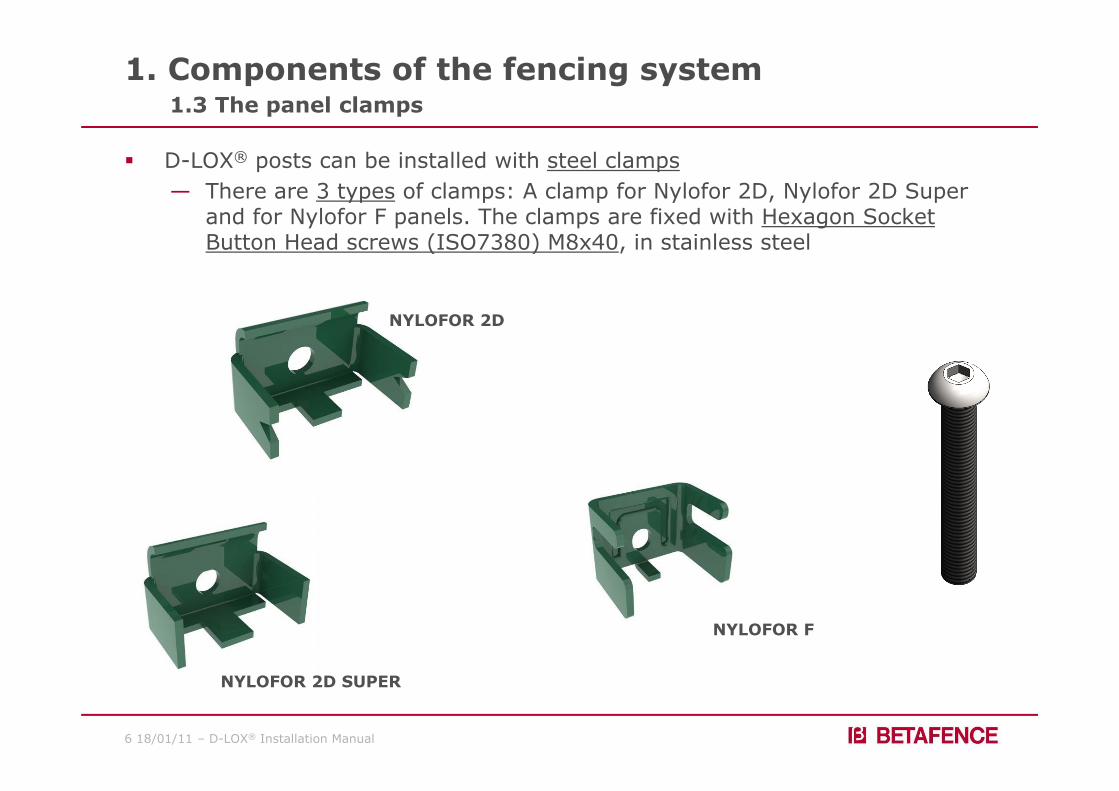
D-LOX® posts can be installed with steel clamps— There are 3 types of clamps: A clamp for Nylofor 2D, Nylofor 2D Super
and for Nylofor F panels. The clamps are fixed with Hexagon Socket Button Head screws (ISO7380) M8x40, in stainless steel
1.3 The panel clamps
NYLOFOR 2D SUPER
NYLOFOR F
NYLOFOR 2D

7 18/01/11 – D-LOX® Installation Manual
1. Components of the fencing system
D-LOX® posts can also be installed with steel cover plates 25x44x25x2mm— The cover plates are fixed with Hexagon Socket Button Head screws
(ISO7380) M8x60, in stainless steel
1.4 The cover plates
44
252

8 18/01/11 – D-LOX® Installation Manual
1. Components of the fencing system
In case of a corner different from 90°, corner clamps are used— The corner clamps are fixed with Mushroom Head Square Neck bolts
(DIN603) M8x25, in stainless steel
1.5 The corner clamps
VARIABLE CORNERS

9 18/01/11 – D-LOX® Installation Manual
1. Components of the fencing system1. The posts 2. The panels3. The panel clamps4. The cover plates5. The corner clamps
2. Installation of D-LOX®
1. Foundations2. Install posts3. Install panels4. Special cases
3. Maintenance
10 18/01/11 – D-LOX® Installation Manual
2. Installation of D-LOX®
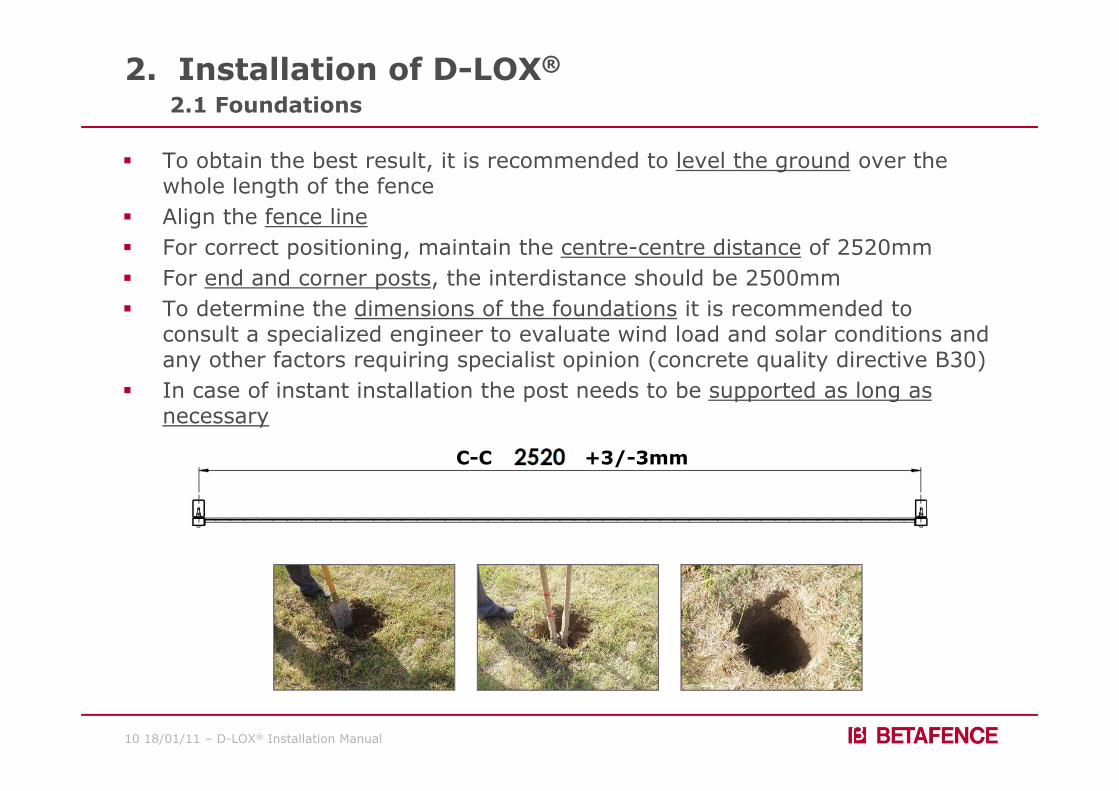
To obtain the best result, it is recommended to level the ground over the whole length of the fence
Align the fence line For correct positioning, maintain the centre-centre distance of 2520mm For end and corner posts, the interdistance should be 2500mm To determine the dimensions of the foundations it is recommended to
consult a specialized engineer to evaluate wind load and solar conditions and any other factors requiring specialist opinion (concrete quality directive B30)
In case of instant installation the post needs to be supported as long as necessary
2.1 Foundations
C-C +3/-3mm
11 18/01/11 – D-LOX® Installation Manual
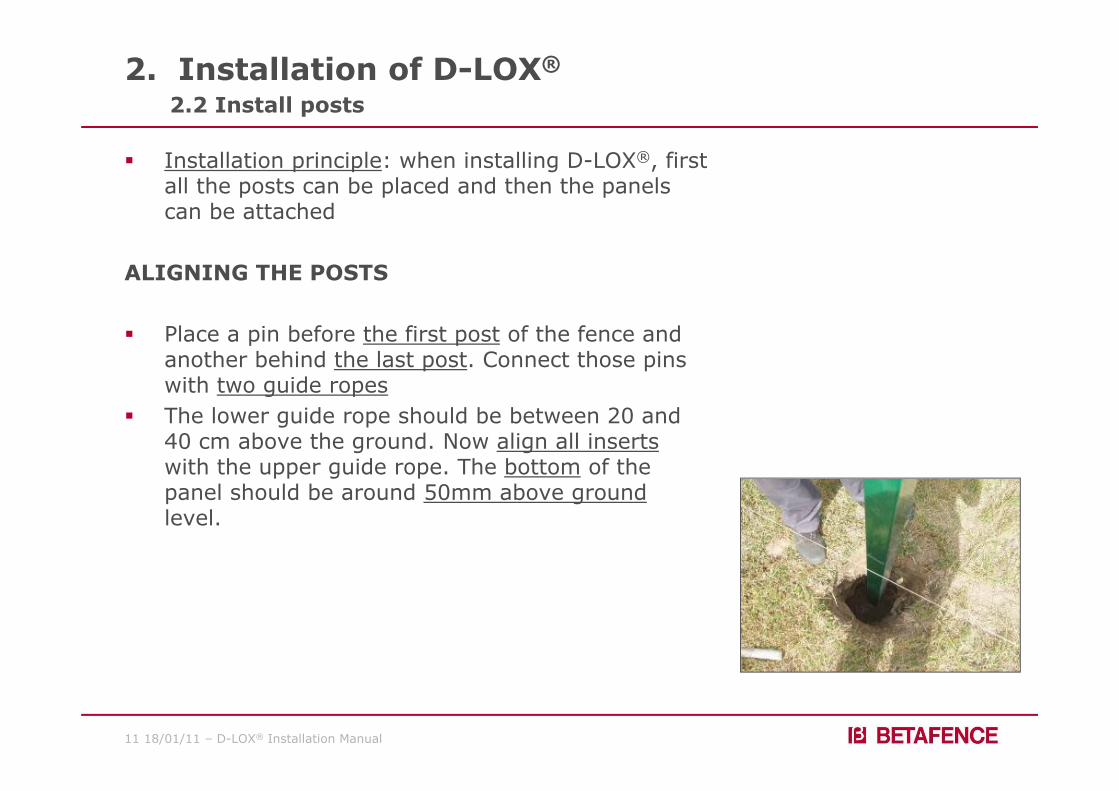
Installation principle: when installing D-LOX®, first all the posts can be placed and then the panels can be attached
ALIGNING THE POSTS
Place a pin before the first post of the fence and another behind the last post. Connect those pins with two guide ropes
The lower guide rope should be between 20 and 40 cm above the ground. Now align all insertswith the upper guide rope. The bottom of the panel should be around 50mm above groundlevel.
2.2 Install posts2. Installation of D-LOX®
12 18/01/11 – D-LOX® Installation Manual
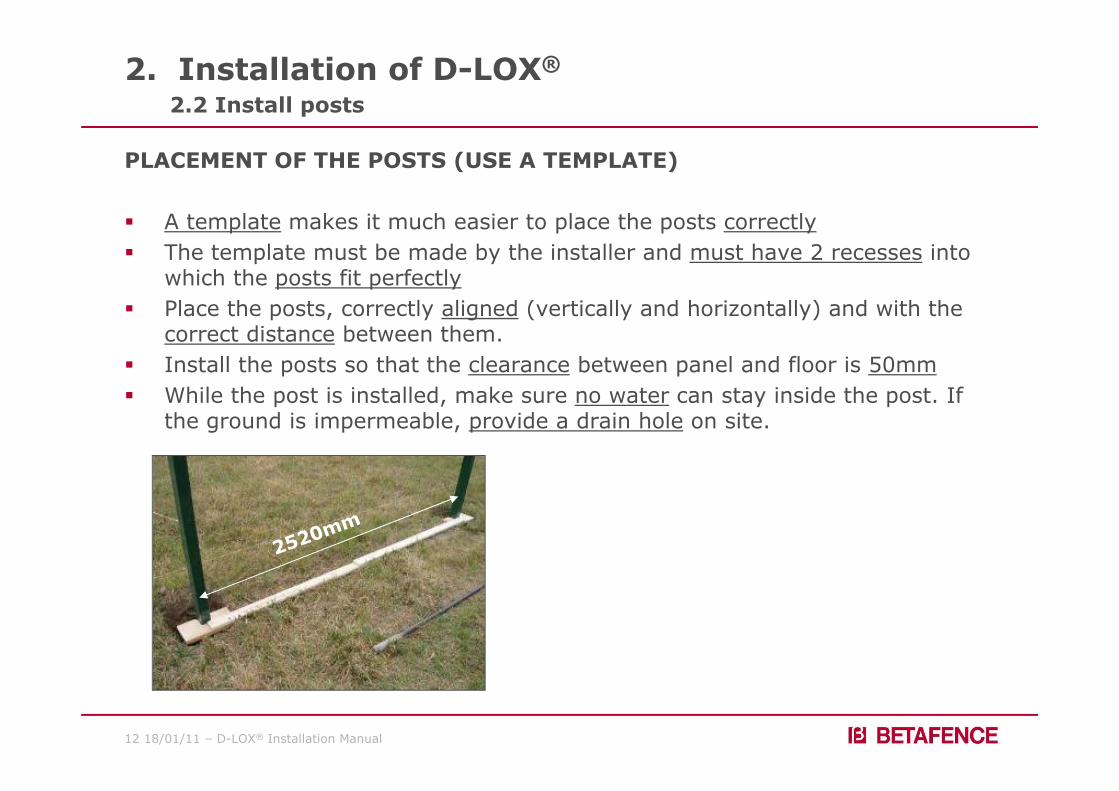
PLACEMENT OF THE POSTS (USE A TEMPLATE)
A template makes it much easier to place the posts correctly The template must be made by the installer and must have 2 recesses into
which the posts fit perfectly Place the posts, correctly aligned (vertically and horizontally) and with the
correct distance between them. Install the posts so that the clearance between panel and floor is 50mm While the post is installed, make sure no water can stay inside the post. If
the ground is impermeable, provide a drain hole on site.
2.2 Install posts2. Installation of D-LOX®
13 18/01/11 – D-LOX® Installation Manual
2.3 Install panels
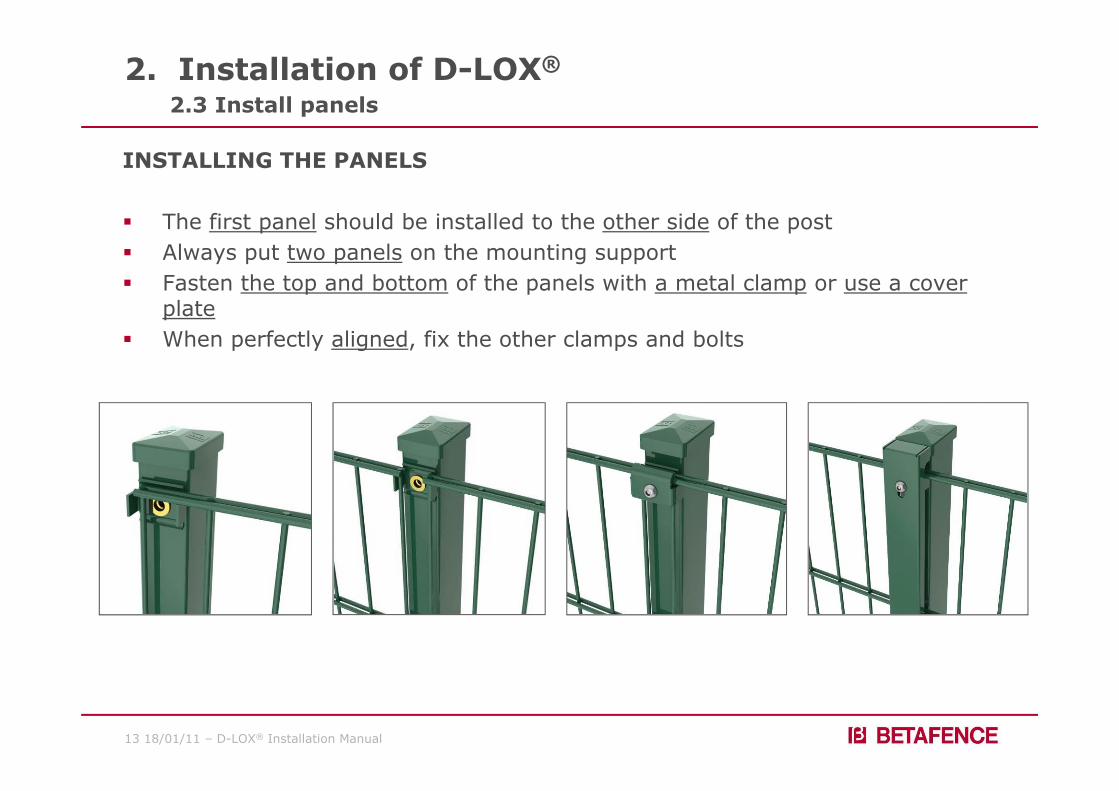
INSTALLING THE PANELS
The first panel should be installed to the other side of the post Always put two panels on the mounting support Fasten the top and bottom of the panels with a metal clamp or use a cover
plate When perfectly aligned, fix the other clamps and bolts
2. Installation of D-LOX®
14 18/01/11 – D-LOX® Installation Manual
2.4 Special cases
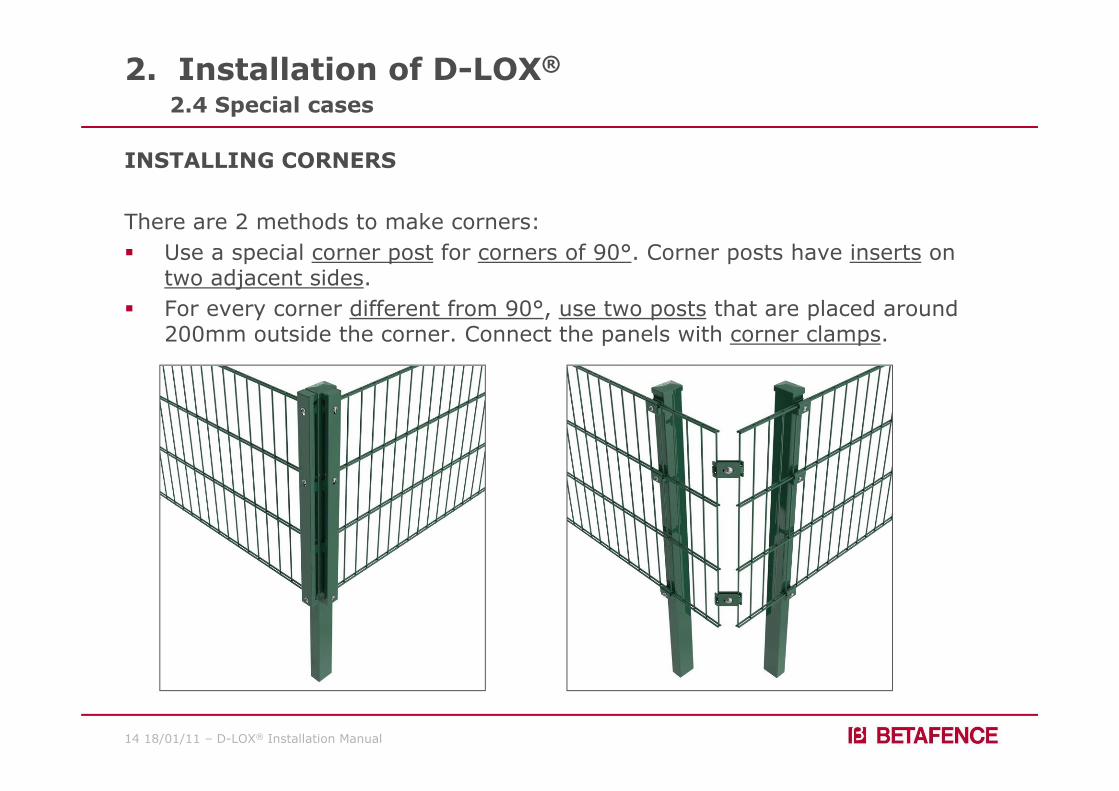
INSTALLING CORNERS
There are 2 methods to make corners: Use a special corner post for corners of 90°. Corner posts have inserts on
two adjacent sides. For every corner different from 90°, use two posts that are placed around
200mm outside the corner. Connect the panels with corner clamps.
2. Installation of D-LOX®
15 18/01/11 – D-LOX® Installation Manual
2.4 Special cases
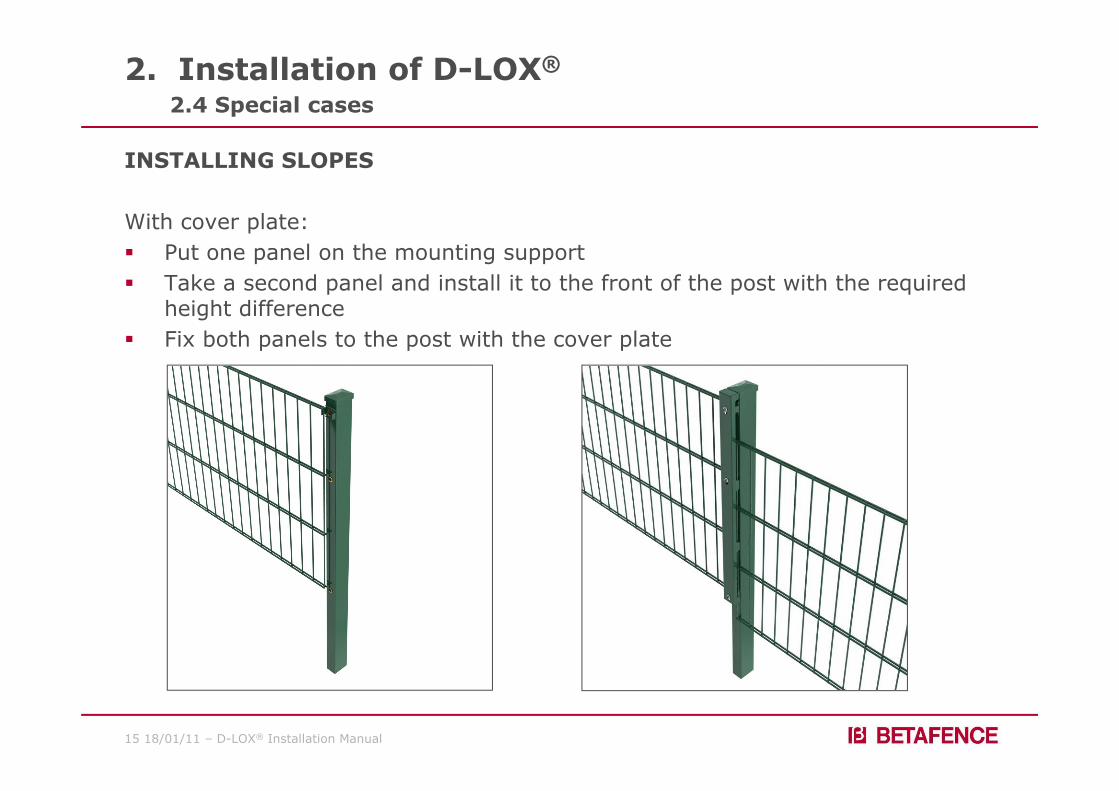
INSTALLING SLOPES
With cover plate: Put one panel on the mounting support Take a second panel and install it to the front of the post with the required
height difference Fix both panels to the post with the cover plate
2. Installation of D-LOX®
16 18/01/11 – D-LOX® Installation Manual
All Betafence panels and posts are maintenance free but it is recommended that the fence line would be checked every 4 months to make sure that all the connection screws are tightened and all the posts caps are in place. If screws or post caps are missing or broken those should be replaced or tightened immediately
If there are visible scratches / damages on the coating, those should be re-sprayed immediately with a similar color paint
If necessary the fence and posts can be washed with a light soap water and rinse afterwords with a low water pressure
3. Maintenance