Embed Size (px)
Citation preview

Form I-RA/RAD 150/250, P/N 234817R7, Page 1
Form I-RA/RAD 150/250
REZNOR® USED-OIL-FIRED HEATERS AND BOILERS
Installation/Operation/Maintenance Manual and
Reference Guide
CSA Certified to Electrical and Fuel Burning requirements only.
Heater Models RA 150
RA 250
RAD 150
RAD 250
Form I-RA/RAD 150/250, P/N 234817R7, Page 2
IMPORTANTNotice to Owner
and InstallerTo ensure the long term benefits of burning your used oil in a Reznor® Used-Oil-Fired Heater, it is necessary to become familiar with the correct installation and maintenance of your new furnace. Before installing or operating this heater, make sure you have read and understand this manual.
IMPROPER INSTALLATION OR LACK OF MAINTENANCE WILL VOID THE WARRANTY.
The most critical sections of this manual are• Correct Draft Over Fire - Page 21• General Maintenance Requirements - Page 24
Identical to any gas or oil burner, without adequate draft over the fire, the com-bustion gases cannot escape resulting in an overheated combustion chamber. Even if the burner is installed correctly and adequate draft achieved, a flue passage blockage will affect the draft. Burning used oil is similar to burning wood. A fine gray ash accumulates in the chamber and flue passages. This accumulation of ash will eventually affect the draft. It is important to remove this ash before the draft is affected.These topics are discussed in detail on the pages listed above. Please famil-iarize yourself with these sections of your manual. Spending a few minutes to review this material will assure that you receive the return on investment that you expect from your heater.
Form I-RA/RAD 150/250, P/N 234817R7, Page 3
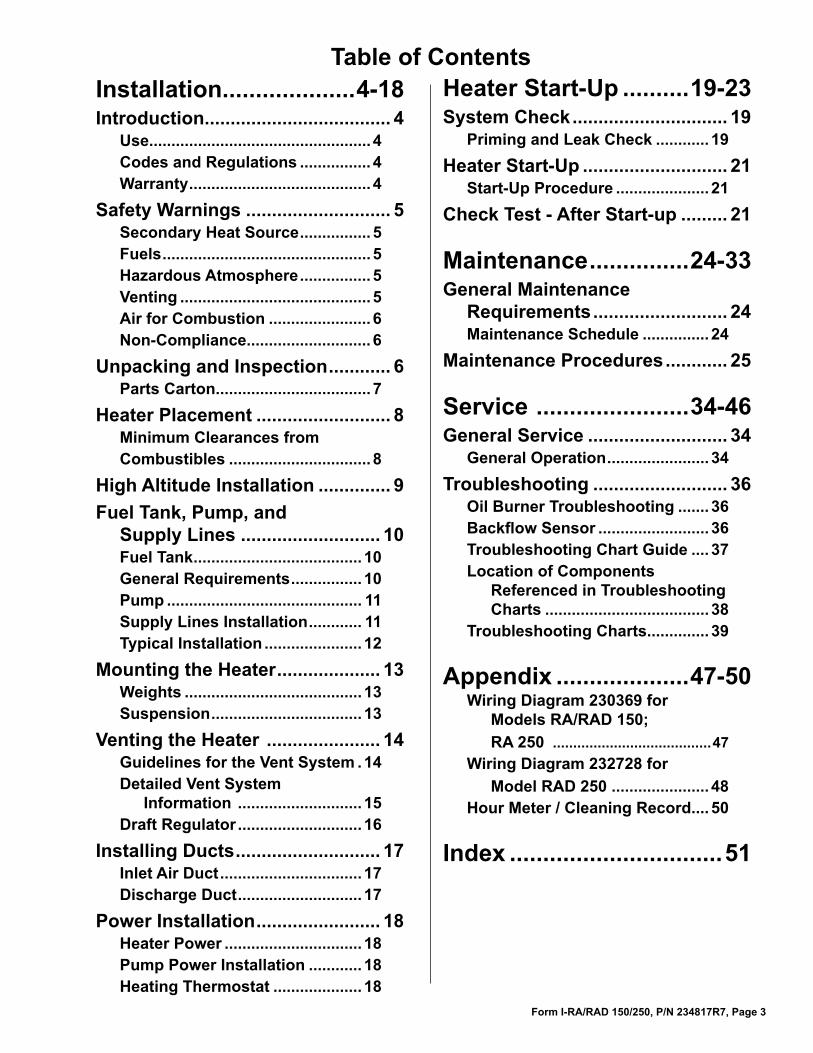
Table of ContentsInstallation ....................4-18Introduction .................................... 4
Use..................................................4Codes and Regulations ................4Warranty .........................................4
Safety Warnings ............................ 5Secondary Heat Source ................5Fuels ...............................................5Hazardous Atmosphere ................5Venting ...........................................5Air for Combustion .......................6Non-Compliance ............................6
Unpacking and Inspection ............ 6Parts Carton...................................7
Heater Placement .......................... 8Minimum Clearances from Combustibles ................................8
High Altitude Installation .............. 9Fuel Tank, Pump, and
Supply Lines ........................... 10Fuel Tank ......................................10General Requirements ................10Pump ............................................ 11Supply Lines Installation ............ 11Typical Installation ......................12
Mounting the Heater .................... 13Weights ........................................13 Suspension ..................................13
Venting the Heater ...................... 14Guidelines for the Vent System .14Detailed Vent System
Information ............................15Draft Regulator ............................16
Installing Ducts ............................ 17Inlet Air Duct ................................17Discharge Duct ............................17
Power Installation ........................ 18Heater Power ...............................18Pump Power Installation ............18Heating Thermostat ....................18
Heater Start-Up ..........19-23System Check .............................. 19
Priming and Leak Check ............19Heater Start-Up ............................ 21
Start-Up Procedure .....................21Check Test - After Start-up ......... 21
Maintenance ...............24-33General Maintenance
Requirements .......................... 24Maintenance Schedule ...............24
Maintenance Procedures ............ 25
Service .......................34-46General Service ........................... 34
General Operation .......................34Troubleshooting .......................... 36
Oil Burner Troubleshooting .......36Backflow Sensor .........................36Troubleshooting Chart Guide ....37Location of Components
Referenced in Troubleshooting Charts .....................................38
Troubleshooting Charts ..............39
Appendix ....................47-50Wiring Diagram 230369 for
Models RA/RAD 150; RA 250 .......................................47
Wiring Diagram 232728 for Model RAD 250 ......................48
Hour Meter / Cleaning Record ....50
Index ................................51

Form I-RA/RAD 150/250, P/N 234817R7, Page 4
InstallationUseThis heater is for commercial or industrial use only.The heater should be installed by an experienced installer thoroughly trained and experienced with the installation of oil-fired appliances. The installer should be familiar with the special precautions neces-sary in the handling and storage of used automotive oils which may contain small amounts of gasoline.
Installation must comply with:
In the United States ■ The Standard for the Installation of Oil Burning Equipment NFPA 31
■ The National Electrical Code NFPA 70 ■ Federal, State, and local municipal codes
In Canada ■ CSA Standard B139-M91, Installation Code for Oil Burning Equipment
■ CSA Standard C22.1-Canadian Electrical Code, Part 1 ■ Federal, Provincial, and local municipal codes ■ Installation, operating and maintenance permits may be required from regulation authorities covering environmental quality, fuel, fire and electrical safety. Municipal permits may also be required.
■ Regulation requires that only used oil generated on the premises of the owner may be burned in this equipment unless written authorization is obtained from the regulatory authority.
WARRANTY IS VOID IF ....1. Heater is not installed in accordance with these instructions
and applicable codes and ordinances.2. Wiring is not in accordance with diagram furnished with the
heater.3. Heater is operated in presence of chlorinated vapors.4. Air through the heater is not in accordance with the rating
plate.5. Ducts are attached to RA (fan) model6. Heater is not maintained in accordance with maintenance
requirements. FAILURE TO CLEAN THE COMBUSTION CHAMBER ON A REGULAR BASIS.
7. Other-than-specified fuel is burned.8. Heater is operated at elevations greater than 3,000 ft (914M)
above sea level without factory approved modifications.9. Fuel input capacity is altered.
Introduction
Codes and Regulations
WarrantyFor Warranty information, refer to the Limited Warranty form in the Literature Bag.

Form I-RA/RAD 150/250, P/N 234817R7, Page 5
Conventions Used in this ManualHazard Intensity LevelsDANGER: Failure to comply will result in severe personal injury or death, and/or property damage.WARNING: Failure to comply can result in severe personal injury or death and/or property damage.CAUTION: Failure to comply could result in minor personal injury and or personal damage.
NOTE: Additional Warnings are also included throughout this manual.
CAUTION: These heaters are designed to provide economic disposal of used oils. Used oil is an inconsistent fuel and may contain water and/or foreign materials which may cause the unit to shut down. A secondary source of heat should always be provided to the building; do not depend on used oil as your only source of heat. This will prevent building damage should the heater become inoperable during subfreezing weather.
WARNING: Approved fuels are No. 2 fuel oil and used automotive transmission fluid and crankcase oils up to 50 weight. Do not attempt to burn any grade of gasoline, paint thinner, or non-approved fluids. Adequate ventilation must be provided in any enclosure where storage tanks, pumps, or accessories are installed.
This heater is not designed for use in hazardous atmospheres contain-ing flammable vapors or combustible dust, or atmospheres containing chlorinated or halogenated hydrocarbons.
WARNING: Failure to provide proper venting could result in death, serious injury, and/or property damage. Units must be installed with a flue connection, draft regulator and proper vent to the outside of the building. Safe operation of any gravity vented heating equipment requires a properly operating vent system, correct provision for combustion air, and regular maintenance and inspection.
Safety Warnings
Secondary Heat Source
!
Venting
Fuels
Hazardous Atmosphere

Form I-RA/RAD 150/250, P/N 234817R7, Page 6
Safety Warnings Continued
Unpacking and Inspection
Check the heater for any damage that may have occurred in ship-ment!If damage is found, file a claim with the transport company. Your unit was inspected and tested at the factory prior to crating and was in perfect condition at that time. Open the boxes and verify receipt of all parts.To protect the unit during shipping, the blower model (RAD) has spe-cial supports that must be removed before installation.
• Blower support legs - Remove the four blower support legs and screws.
• Check Belt Tension - Belt should be able to be depressed 1/2”- 3/4” (13-19mm) - See illustration. If the belt does not
have proper tension, adjust by means of the adjusting screw on the motor base. After proper tension is achieved, tighten the lock nut on the adjusting screw. Replace the belt guard.
WARNING: Care should be exercised to ensure that an adequate supply of combustion air is available and free to enter the air openings on all units. Room openings must equal one square inch per each 1,000 BTU heat input.
�����������
Fan Models (RA) use plastic cable ties to support the fan motors during shipment. Cut and remove prior to installation.
Air for Combustion
Non-Compliance
Failure to install or maintain this heater properly will void the war-ranty.

Form I-RA/RAD 150/250, P/N 234817R7, Page 7
Parts Carton Item Part No. Description1 255350 Thermostat2 96388 Oil Filter3 135986 Vacuum Gauge4 110320 Foot Valve5 130952 Oil Pump Inlet Manifold6 37866 Draft Regulator7 121030 Recycling Window Decal8 121603 Warning label (for inlet to fuel
storage system/tank) 9 136864 Foot Valve Strainer
Pump
91
6
8
3
5
4
27
Additional PartsShipped with each heater is a remote fuel pump and a carton of parts. The carton contains parts required for installation. Before beginning actual installation, verify that the remote fuel pump and the parts listed below are at the installation site.

Form I-RA/RAD 150/250, P/N 234817R7, Page 8
Heater Placement
Do not attempt to install this heater until you have read and understand this manual!Placement is critical to the efficient operation of this heater.Measure all distances to comply with the specific code requirements and minimum clearances listed below.Refer to the section on Venting your heater for vent requirements and recommendations.Locate the heater so that suitable means shall be provided to facili-tate regular cleaning and maintenance of the heater (i.e. permanent platform, portable stairs, ladder, etc.).
WARNING: You must comply with all requirements on distance from heater to combustibles.
Fan Models Blower ModelsRA150/250 RAD150/250
inches mm inches mmTop 6 152 6 152Front 48 1219 48 1219Side (Burner)*
Canada 6 152 6 152United States 18 457 18 457
Side (Opposite Burner)*
Canada 6 152 6 152United States 18 457 18 457
Rear* 18 457 6 152Bottom 3 76 3 76Flue Pipe 9 229 9 229*Allow for service access.
In Canada, for additional information on installation clearances, refer to CAN/CSA-B139-M91, “Installation Code for Oil Burning Equipment,” Clause 7.0 - Installation Clearances.
WARNING: Clearances apply to all combustibles. Do not leave paper, rags, or any moveable combustibles near the heater or store gasoline or any other flammable fluid near this appliance.
Minimum Clearances from Combustibles

Form I-RA/RAD 150/250, P/N 234817R7, Page 9
High Altitude InstallationStandard Model RA/RAD 150 and 250 used-oil-fired heaters are designed for use from sea level up to elevations of 3,000 ft. Without proper modifications severe overheating of the combustion chamber and heat exchanger will occur if installed above 3,000 ft. Also, the on-board air compressor will not deliver the correct amount of atomizing air to the fuel nozzle, resulting in poor combustion. Factory-built high altitude heaters are identified with the suffix “H” (i.e. RA-250-H).
WARNING: Standard model used oil units installed above 3,000 ft (914M) elevation will overheat, damaging the heat exchanger assembly. Use of standard model heater above 5,000 ft (1514M) elevation may result in incomplete combustion and formation of carbon monoxide (CO). Elevations above 3,000 ft (914M) elevation require installation of a heater that is either factory-built or field converted for use at high elevation. Failure to comply can result in severe personal injury or death and/or property damage and will void the warranty.
Check the rating plate for the approved elevations.
High Altitude Installation
If the heater is being installed above 3,000 ft, it must either be factory built (Model 150-H) for that elevation or be changed in the field. Check the rating plate for Model and approved elevation. (High altitude kits for field conversion are available only for RA/RAD 250.)The high altitude conversion affects both the remote pump and the heater. When doing a field conversion, install the high altitude kit prior to pump and heater installation.
Models RA/RAD150Elevation
Fuel Input Heat Input Heat OutputGPH LPH BTUH kw BTUH kw
0-3,000 ft 1.06 4.0 148,000 43.4 118,400 34.7>3,000 to 7,000 ft 0.8 3.6 112,000 32.8 89,600 26.1
Models RA/RAD250Elevation
Fuel Input Heat Input Heat OutputGPH LPH BTUH kw BTUH kw
0-3,000 ft 1.78 6.7 250,000 73.3 200,000 58.6>3,000 to 7,000 ft 1.45 6.6 203,000 59.4 162,400 47.6
>7,000 ft 1.24 5.6 173,600 50.8 138,880 40.7

Form I-RA/RAD 150/250, P/N 234817R7, Page 10
Fuel Tank, Pump, and Supply Lines
General RequirementsModel RA/RAD 150 and RA/RAD 250 heaters are approved to burn used crankcase oil, transmission fluid, and No. 2 fuel oil. Maximum fuel input for a Model 150 is 1.06 GPH (4.0 L/H). Maximum fuel input for a Model 250 is 1.78 GPH (6.7 L/H).The oil supply tank and fuel lines must be installed in accordance with the National Board of Fire Underwriters requirements and all local ordinances. A UL-listed tank such as Reznor® Model OT-250 or equivalent must be used.In the U.S., regulations require that storage tanks located inside buildings shall not exceed 275 gallons (1,041 L) individual capacity or 550 gallons (2,082 L) aggregate capacity in one building.In Canada, regulations require storage tanks located inside buildings shall not exceed 550 gallons (2,082 L) individual capacity or 1,100 gallons (4,164 L) aggregate in one building.Check with the local Fire Marshall to assure compliance with local ordinances and codes. Installation of the tank and supply lines is the responsibility of the installer.
Fuel TankCAUTION: It is recommended that used oil be at a temperature of 50°F or higher when it enters the pump. At a temperature below 50°F, oil becomes more viscous and difficult to pump. The heater may fire at a reduced rate and become erratic resulting in nuisance shutdowns.
Install either a UL listed Reznor® Model OT-250 oil supply tank or a field-supplied equivalent indoor storage tank.
• If installing a Model OT-250 tank, follow the installation requirements and instructions on the tank.
• If installing a field-supplied tank, follow the manufacturer’s instructions.
• Height from the pump to the bottom of the heater should be no more than 15 ft (4.5M). The used oil supply line must be 3/8” o.d. and a maximum of 100 ft (30.5M) in length.
Although maximum height from the pump to the heater is 15 ft (4.5 M), we recommend that ease of service be considered when determining heater location. A service height of eight feet (2.5 M) is recommended. See the illustrations on pages 12 and 13 for examples of tank and line installation.
WARNINGS: Never pour gasoline or used oil containing gasoline into the supply tank. Adequate ventilation must be provided in any enclosures where storage tanks, pumps, or accessories are installed.
Fuel Tank

Form I-RA/RAD 150/250, P/N 234817R7, Page 11
Remote Fuel PumpThe Model OT-250 tank has a platform designed for attaching the remote fuel pump.
• Attach the fuel pump legs permanently either on the platform, directly to a field-supplied tank, or in a location very near to the oil tank.
• Mount the remote pump assembly in an upright, horizontal position as shown in the illustration. (NOTE: Motor enclosure appearance may be different than illustrated but must always be mounted in this upright position.)
CAUTION: Do not mount the pump assembly in a vertical or inverted position.
Pump
Supply Lines Installation
CAUTION: Do not use TEFLON® based pipe dope or TEFLON® tape to seal any pipe connections. Use of TEFLON® based pipe dope or TEFLON® tape will void the pump warranty.
�����������������
���������� � ���������
������������������
�������������������� ����������������������
������������������������������������
��������� ������ ��
������������������� ��
���������������
���������������������� ��������
���������� ������������������
����������������������
��
� ���������������������������
��� �����
���������������
� �����������������������������������������������������������������������������������������������������
Supply LinesRead this section carefully before installing any supply lines. Since a suction line leak is nearly im-possible to find, take your time to assure all connections are leak-free during installation. Supply lines and fittings are furnished by the installer. See the following illustration for minimum fittings required. Length of pipe and tubing depends on the installation.
Run the suction line, using 1/2” standard black iron pipe, between the inlet side of the filter and the foot valve. (Refer to the illustration.) A fuel line filter with a cleanable strainer, a foot valve, a foot valve strainer, and a vacuum gauge are provided with the heater. To pre-vent air from entering the line, do not use union connections. Install
Suction Line (portion of supply line from foot valve to pump)

Form I-RA/RAD 150/250, P/N 234817R7, Page 12
�������������������������
������� ����������������������������������������������������
�����������������
������������������������
��������������������
���
���������������������������� �����
����� ��������
�������������
�����������������
���������������������
����������
������������������� ������������
������������������������������������������������
����������������
�������������
������������
��������� �����
���������������
Typical Installation
Supply Lines Installation Continued
the suction line components as illustrated. With the vacuum gauge mounted on the outlet side of the filter, the gauge will indicate any suction line restriction including a dirty filter. A pump inlet manifold is supplied for direct connection of the filter to the inlet of the pump.The 50 psi relief valve supplied with the pump and a return line of 1/8” NPT black iron pipe must be installed as illustrated.The discharge line between the valve on the outlet side of the fuel pump and the heater should be 3/8” O.D. copper tubing with a mini-mum of 1/32” wall thickness with 45° flare fittings. The discharge line must continually rise. A lift height of up to 15 ft (4.5 M) is acceptable with a maximum total length of 100 feet (30.5 M) of tubing. (NOTE: Do not use 1/2” o.d. tubing in the supply line for these models.)Do not install manual valves in the supply line.Connect the fuel line to the heater at the connection on the corner of the service tray.All piping should be protected from possible damage and be rigidly fastened in place in a workmanlike manner. Do not use TEFLON® based pipe dope or TEFLON® tape at the connections in an oil line. Use an oil-resistant pipe dope. Do not use union connections in the suction line (line between the oil supply and the remote pump). NOTE: Care must be exercised to ensure airtight connections.
Return Line
Discharge Line (por-tion of supply line from pump to heater)
Supply Line Connections and Support
Suction Line (cont’d)

Form I-RA/RAD 150/250, P/N 234817R7, Page 13
Mounting the Heater
WeightsBefore suspending the unit, check the supporting structure to ensure it has sufficient load-carrying capacity to support the weight of the heater.
�����������������
�������������
������ �������
�������� �������� ���� �����������
������ �������
����� �����
��������������
������������������
�����������
������������������
ModelNet Weight
lbs kgRA150 320 145RA250 370 168RAD150 360 163RAD250 430 195
Use four 1/2”-13 diameter threaded rods. Lock each threaded rod using a washer and nut as shown in the illustration below. Or, use optional swivel connections (Option CK10) and field-provided 1” threaded pipe. Lock swivel connections as shown in the illustration. Remove the shipping crate bottom from the unit.Remove the angle clips and re-insert the screws into the heater cabinet.
Suspension
WARNING: This heater must be supported level for proper operation. Do not place or add additional weight to the suspended heater.
Mounting on an Optional Heater Stand - Model RA only
When accompanied with a Reznor Model OT Work Bench Fuel Tank (OT-250) and an Optional Heater Stand (Option HS-1), a Model RA 150 or 250 heater may be mounted on the heater stand.Follow the instructions packaged with the optional stand.
Vertical Louvers Optional vertical louvers are in addition to the standard horizontal louvers and are designed to direct the discharge air to provide a wider throw pattern. If vertical louvers (Option CD1) are part of the installation, install the louvers before lifting the unit to its installation height. Follow the illustrated instructions that are included in the louver package.

Form I-RA/RAD 150/250, P/N 234817R7, Page 14
Venting the Heater
WARNING: Failure to provide proper venting could result in death, serious injury, and/or property damage. Units must be installed with a flue connection and proper vent to the outside of the building. Safe operation of any gravity vented heating equipment requires a properly operating vent system, correct provision for combustion air, and regular maintenance and inspection.
The vent system must comply with all local codes and in the event that local codes do not exist, the vent system must comply with a regional or national code.
Guidelines for the Vent System
������������������
������� ���������������������������������������������������
�����������������������������������������������
������� ���������������������������
������������������������
�����������������
������������������������������������������������������������������
��������������������������
�����������������������
����������������
�������������������
The requirements for the vent system are dependent on (1) the loca-tion of the heater within a building and (2) the type of building.• If the heater and the vent system are within the same heated
space, single wall pipe may be used inside the building. The portion of the vent system outside the building must be a factory-built vent that is approved to Standard UL 641. See illustration below.

Form I-RA/RAD 150/250, P/N 234817R7, Page 15
��������������������������
�� �������������
������������������������������ ������������������������������
����������������
������������� ����������
��� ����������� ��� ������
������������������
��� ��������������������������� ��������� ����� �����������������
�� ���������������
�� ���������������
������������������� ���������������������������
�������������������������������������
Detailed Vent System Information (NOTE: Read all before beginning installation.)
• Any portion of the vent system that passes through an unheated space or a concealed area such as an “attic” must be a factory-built vent that is approved to Standard UL 641. See illustration . . . . .
• The heater may be vented into a masonry chimney that complies with the BOCA Nation-al Mechanical Code for low-heat applianc-es or other building code requirements for low-heat appliances.
• Pipe/Joints/Clearance Requirements: Single-wall pipe must be a minimum of 24 gauge galvanized steel for 8” or 9” diameter pipe and 22 gauge for 10” or 12” diameter pipe. Each joint must be secured with three screws or rivets. If installing a factory-built vent, follow the manufacturer’s instructions.If the vent system passes through a combustible wall, material or roof, for single wall pipe, maintain 18” (457mm) clearance or install a ventilated thimble that is not less than 12” (305mm) larger than the diameter of the vent pipe. If installing factory-built vent, follow the manufacturer’s instructions.
• Horizontal Vent Length and Slope Guidelines: See the table below for guidelines concerning the maximum length of the portion of vent that is horizontal. Horizontal vent length must be sloped upward 1/4” for each foot of pipe and must have no more than two elbows. If installation conditions require a horizontal length in excess of the guideline in the table, a draft inducer may be required. IMPORTANT NOTE: This information is a recommendation only. Draft must always be verified with instrument readings; see instructions on page 21. Draft measurement must read at least a negative .01” w.c. to negative .02” w.c. Adequate draft is required.
Vent Pipe
Diameter
Model Size and Vertical Length Length of Horizontal Pipe
Guideline: Vertical vent length should be at least 2 times the length of the horizontal vent.
8” 150 with 8 ft (2.4M) of vertical pipe 4 ft (1.2M) or less
8” 250 with 8 ft (2.4M) of vertical pipe 4 ft (1.2M) or less
8” 250 with 10 ft (3M) of vertical pipe 5 ft (1.5M) or less

Form I-RA/RAD 150/250, P/N 234817R7, Page 16
Draft Regulator
�������������������������������������������
��������
��������
• Vent Size Requirement: The vent system must be at least 8” in diameter.
• Barometric Draft Regulator Requirement: A barometric draft regulator which is the same diameter as the vent pipe must be used, and it should be located close to the heater. See page 16. Do not install a manual damper or any other device that will obstruct the free flow of the flue gases.
• Support: The vent system must be adequately supported using non-combustible strapping or supports to carry the weight of the vent and wind load. Do not use the heater to provide support for the vent system.
• Vertical Vent: If installing a factory-built vent, follow the manufacturer’s instructions. If a masonry chimney is used, a thimble that is permanently cemented in place with high temperature cement should be used to permit easy cleaning of the chimney. The end of the vent pipe must not extend past the inside wall of the chimney.
• Draft Inducer: If a draft inducer is used, follow the manufacturer’s instructions and wire the inducer according to the wiring diagram provided.
• Terminal End: The vent must terminate at least 3 ft (914mm) above the highest point of exit and at least 2 ft (610mm) higher than any portion of a building or obstruction within 10 ft (3M) of the chimney. Install a vent cap on the terminal end of the vent. A Reznor (Option CC1) or Type L Breidert Air-x-hauster® vent cap is recommended. A different style of vent cap could cause nuisance problems.
A barometric draft regulator is shipped with this heater and MUST be installed in the flue near the heater flue opening.Refer to the illustrations on pages 14 and 15 for recommended lo-cations. To install, follow the manufacturer’s instructions packaged with the draft regulator.
Detailed Vent System Information (cont’d) (NOTE: Read all before beginning installation.)

Form I-RA/RAD 150/250, P/N 234817R7, Page 17
Installing Ducts
Inlet Air DuctAn inlet air duct flange (return air system) is available for the Model RAD heaters. The optional duct flange is shipped separately for field installation. Inlet duct dimensions (inside) are:Duct Flange RAD150 RAD250Height 26-3/4” (679mm) 26-3/4” (679mm)Width 24” (610mm) 28” (711mm)
�����������
���������
��������
�����������
�����������
�����������
�RAD A Minimum B150 30” (762mm) 15” (381mm)250 40” (1016mm) 20” (508mm)
Model RAD 150 250CFM (free air) 2050 3150
Air throw (9ft suspension)
55 ft 70 ft
(17M) (21M)CFM .25" ESP 160 2850
Discharge DuctA discharge duct may be attached to a Model RAD heater. To con-nect the duct to the heater,
• Remove the louvers from the furnace.• Field fabricate a duct transition as illustrated.• Attach duct transition to the heater using 1/2” long sheetmetal
screws
IMPORTANT: Never reduce the furnace opening size abruptly. Always use a tapered transition like the one illustrated.
Inlet Duct Flange Instructions
1. Remove the screws across the top back of the cabinet. Position the top duct flange with the flange toward the edge of the cabinet. Re-insert the screws to attach. Repeat the procedure to install the bottom duct flange.
2. Position the side flange along the edge of the cabinet with the flange toward the outside. Attach with the self-drilling screws pro-vided. Repeat the procedure to attach the other side duct flange.
3. Slip the ductwork over the flange and attach using 1/2” long sheet metal screws.

Form I-RA/RAD 150/250, P/N 234817R7, Page 18
Heating Thermostat
Pump Power Installation
Pump PowerTo connect the electrical power from the heater to the pump,
• Use a 3 conductor, 14 gauge wire system - two 115 volt conductors and a ground. Use BX if permitted, but make certain to follow local codes for running conduit.
• Refer to the wiring diagram for connecting terminals.
Power Installation
Heater Power To install main power to the system (check the table below and the rating plate on the furnace for current requirements),
• Use #12 gauge stranded copper wire for RA and #8 gauge for RAD to run a dedicated 115 volt, single phase, line from the power source to a junction box mounted on the wall behind the heater or as required by appropriate codes.
• Run the length of appropriate conduit from the heater to the junction box.
• Connect the black wire to the hot lead. • Connect the white wire to the neutral lead.• Connect the green wire to the ground lead.• Install a fused manual reset, line voltage switch (field supplied)
in this main line• Electrical
Ratings
A 24-volt thermostat is furnished as standard equipment.DO NOT attempt to wire relays or other accessories to the thermostat connections as these are not load terminals.DO NOT install on or suspend the thermostat from the heaterDO NOT install thermostat on a cold outside wall To install the thermostat,
• Locate the thermostat five feet above the floor on an inside wall, not in the path of warm or cold air currents nor in corners where air may be pocketed
• Remove the thermostat cover• Make sure the heat anticipator dial is set at 0.2 amps• Connect the wires through the back of the thermostat to the R
& W terminals• Set the ON/OFF switch on the heater electrical box to the
“OFF” position and connect the thermostat wires to the two “T” terminals on the ignition controller.
ModelTotal
Current Amperes
Minimum Circuit
Ampacity
Maximum Fuse Size (Supply)
RA150 11 14 20RAD150 15 18 20RA250 14 17 30RAD250 18 23 30
DANGER: Make sure that the main circuit is OFF before making any wiring connections. All wiring must be done in accordance with appropriate Codes!

Form I-RA/RAD 150/250, P/N 234817R7, Page 19
Priming and Leak CheckFor control locations, refer to illustration on page 38
Priming and Checking the SystemThe oil supply line to the heater must be full of oil and free of air for proper heater operation.NOTE: Priming the oil line could take up to 30 minutes depending on the length of the line.Follow the procedure below to fill the oil line.
1. Be sure the oil tank is filled to at least six inches above the top of the foot valve.
Burner Start-Up System Check
Check Test - Prior to Start-UpYou should check your system completely before operating it.
Check clearances from combustibles. Be certain that the clearances are in compliance with the appropriate Codes.
Check hangers and supports. Be certain that all hangers, supports, and arms are adequately anchored and that all unions or threaded fittings are snug and do not rotate. Heater must be level.
Check to make sure all shipping supports have been removed.
Check the electrical supply. Be sure that all wire gauges are as recommended and that the supply voltage is as stated on the heater. Determine that fusing or circuit breakers are adequate for the load.
Check vents. Be sure that vent pipe and chimney meet the requirements and appropriate codes. A UL or CSA/UL listed draft regulator is required. A Reznor® (Option CC1) or Type L Breidert Air-X-hauster® vent cap is recommended. (Type L Air-X-hauster® is a trademark of The G. C. Breidert Company.)
Check the oil supply. Fill the supply tank to at least six inches from the top of the foot valve. NOTE: Always screen used oil with a 70-80 mesh strainer when filling the supply tank.
Canadian RAD (blower model) installation only -- Be sure an inlet air duct is installed in compliance with Codes.
Heater Start-Up

Form I-RA/RAD 150/250, P/N 234817R7, Page 20
2. Set manual disconnect switch to the ON position.3. Fill the suction line (line between the supply tank and the
pump) with clean used oil. (Do not use new motor oil.)4. Locate the rubber tubing connecting the pressure switch in
the main control box and the compressor.• Disconnect the tubing at the fitting on the compressor. This will
prevent oil from flowing to the burner.5. Remove the cad-cell wire from the F1-F2 terminals of the
ignition controller.• Either attach a piece of tubing to the bleeder valve on the
strainer tee (see page 26) on the burner assembly or place a container underneath to collect oil.
• Loosen the bleeder valve.6. Set the thermostat to a temperature above room temperature.
NOTE: On initial start-up it will take approximately ten minutes to heat the oil. Once the oil is warm enough, the green light will come on and the unit will be ready to start. This delay only occurs on initial start-up or when the disconnect switch has been turned off for an extended time.
• After the motor starts, place a jumper across the cad-cell terminals (F1-F2) on the ignition controller.
• Observe the remote fuel pump motor to make certain it is running.
• Open the bleeder valve on the remote pump and wait until a full flow of oil is obtained without any air.
IMPORTANT NOTE: If air bubbles are present and do not stop, there is a suction line leak.
• Check the piping between the tank and the pump and correct the leak.
• Once a full flow of oil is present without any sign of air, close the bleeder valve on the remote pump.
• Observe the bleeder valve at the strainer tee and wait until a full flow of oil is obtained without any air.
• Tighten the bleeder valve on the strainer tee and remove the oil container.
NOTE: DO NOT replace the rubber tubing previously disconnected from the compressor and DO NOT re-connect the cad-cell wires.
7. Allow the system to operate for several minutes.• Check the system for leaks at all connections.• Observe the return line to the tank - oil should be flowing.• Correct all leaks and re-test the system.
8. When the system checks out as having no leaks, turn disconnect OFF, replace the rubber tubing and cad-cell wires removed earlier.
9. Remove the jumper from the F1-F2 terminals of the ignition controller.
Priming and Leak Check ContinuedFor control locations, refer to illustration on page 38
You are now ready to start your system.

Form I-RA/RAD 150/250, P/N 234817R7, Page 21
Check-Test Check Test - After Start-upCheck that there is sufficient draft for proper combustion. A negative draft of .01”-.02” w.c. is required in the combustion chamber over the fire.NOTE: Draft measurements must be checked anytime there is a change in the air band setting.
Instructions for Measuring Draft Over Fire:• Remove the metal plug in the observation door.• Insert draft gauge (such as Dwyer pressure gauge). Measurement
must read at least a negative .01” w.c. to negative .02” w.c.• If measurement is not as required, adjust draft regulator until
measurement is within the proper limits (see page 16).• Replace metal plug in the observation door.
Heater Start-Up
Start-Up ProcedureAfter installing and testing your unit, follow the procedure below to start the system.
• Turn on the main electrical supply to the heater.• Set the manual disconnect switch to the “ON” position.• Set the thermostat to a temperature above room temperature.
NOTE: When the low oil temperature limit senses the proper oil temperature, the green light on the burner junction box will come on and the heater will fire.A 10-minute delay may occur before firing depending on the system and the oil temperature. The delay only occurs on initial start-up or after an electrical power interruption.If the system does not automatically try to re-light, then the controller is in the “lockout” condition and must be reset by depressing the red button on the controller and holding it down for three seconds.Once the system is purged of all air and oil reaches the nozzle, igni-tion will occur.
Observation Door - Remove plug;
insert draft gauge into port.

Form I-RA/RAD 150/250, P/N 234817R7, Page 22
Air Shutter Guide
Check-Test Continued
WARNING: If there is insufficient draft, it will create a back pressure resulting in oil fumes in the building and/or pulsating when the burner starts and stops. It may cause excess deposits of soot and overheat the heat exchanger resulting in premature failure of the chamber. THIS TYPE OF FAILURE IS NOT COVERED UNDER THE WARRANTY.
To correct this problem, the height of the chimney may need increased and/or a UL or CSA/ULC listed draft inducer may be installed. If a draft inducer is used, a draft proving switch must be installed to shut off the fuel supply to the burner in the event of the failure of the draft inducer.
CAUTION: If there is a backdraft or downdraft, do not continue operation of the heater until the situation is corrected. Equipment and/or property damage could result. Back pressure (backdraft or downdraft) may be caused by the chimney being lower than surrounding objects, such as buildings, hills, trees, rooftops, etc. It may be caused by an exhaust fan in the building. The air intake in the room where the heater is installed must be of sufficient size so that there is no change in the draft reading in the flue with the exhaust fan running.
If there is too much draft, it could cause ignition problems, erratic burner, and loss of thermal efficiency. To correct this problem adjust the barometric damper to reduce the draft.
■ Combustion air shutter and air band settings.Certain installation conditions may necessitate a change in these settings. We recommend that the need for a change be determined by the use of in-struments. When obtaining the CO2 readings, do so with a hot system that has the correct draft settings. With a clean heat exchanger, these settings should result in Bacharach smoke readings not greater than No. 1 and CO2 reading in the range listed.IMPORTANT: If it is necessary to change the air band and air shutter settings, the draft measure-ment must be rechecked.
Point for adjusting the Air Band
Reference Air Shutter and Air Band SettingsSize Air Shutter Air Band CO2 Range150 #0 #1 9.5 - 10.5%250 #0 #2 10.5 - 11.5%
These are settings from which a qualified service person or installer must make adjustments.
Indicator Numbers

Form I-RA/RAD 150/250, P/N 234817R7, Page 23
Check-Test Continued
■ Check Discharge Air Temperature - Model RAD with discharge ductwork only.
This heater is designed for a maximum of .25” w.c. static pressure and for discharge air temperature rises from 40° to 50°F. If the heater has been equipped with a duct, the discharge air tem-perature should be checked.• Place a thermometer or a thermocouple in the middle of the
outlet or at the end of the discharge duct and measure the discharge air temperature after the heater has operated for at least 20 minutes.
If the temperature rise is not within the specified range, the blower speed will have to be adjusted to achieve the correct temperature rise. If the blower motor maximum amp rating is exceeded, the duc-twork must be altered to reduce the static pressure (resistance of the air flow). Follow these instructions to adjust blower speed.
• Turn off the electrical power.• Loosen belt tension and remove belt.• Loosen the set screw on the side of the pulley away from the
motor.To increase blower speed, decreasing outlet temperature
• Turn the adjustable half of the pulley inward.To decrease blower speed, increasing outlet temperature
• Turn the adjustable half of the pulley outward.One turn of the pulley will change the speed 8-10%.
• Tighten the set screw on the flat portion of the pulley shaft.• Replace the belt and adjust the belt tension.
Belt tension is adjusted by means of the adjusting screw on the motor base. Adjust until the belt can be depressed 1/2-3/4”.
• Tighten the lock nut on the adjusting screw.• Turn on the electric power.• Start the heater by turning the thermostat to a setting higher
than room temperature.• Check motor amps with an amp meter. The maximum motor
amp rating on the motor nameplate must not be exceeded.
CAUTION: An external duct system static pressure not within the limitation on the heater rating plate and/or improper adjustment of the motor pulley or belt may overload the motor or cause overheating of the heat exchanger.
• While the pump is running, record the vacuum gauge reading and post it on or near the remote pump assembly.The maximum allowable vacuum rise is 10” Hg. (Example: With a new oil filter, if the vacuum gauge indicates a suction line vacuum of 3” Hg, the maximum gauge reading is 13” Hg.)
• Display adhesive “Waste Oil Recycling” decal on entry door or window.
• Adhere tank warning label at location visible when filling the tank or at a point where fuel is first introduced to a transfer piping system.
• Complete the information on page 52. Return all instruction manuals to the “Literature Bag”. Give the manuals to the owner to keep for future reference.

Form I-RA/RAD 150/250, P/N 234817R7, Page 24
��������������
������������� ��������
General Maintenance Requirements
WARNING: Turn off electric power to the unit before doing any service or maintenance on the heater.
When burning used automotive diesel and truck oils, this heater will require more frequent service than conventional heating equipment. All used oils contain a small amount of ash. This ash is similar in texture to that found in wood burning fireplaces, and varies with the types of oil used. FAILURE TO REMOVE THIS ASH ON A REGULAR BASIS WILL VOID THE WARRANTY.Do not let your oil supply tank run out of fuel. Check the oil level in the supply tank daily to be certain an adequate supply is available. Running out of fuel will require you to re-prime the system.The following are starting points for tailoring a maintenance schedule to fit the application. When performing the maintenance procedures listed below, note the hours on the hour meter. After one or two cleanings, the maintenance schedule may be altered based on the hours of operation. However, if there is a major change in the type of used oil being burned, maintenance requirements can be affected. Any time there is a major change in fuel, return to the schedule listed below and note the hour meter readings to re-tailor the maintenance schedule.At the end of the heating season or whenever the heater will be shut down for a long period, always turn off the power. Clean the heat exchanger/combustion chamber and the flue pipe. Before restarting, perform all maintenance checks.
Weekly:• Check the vacuum gauge on the filter for an indication that the
oil line filter needs replaced and/or motor pump screen needs cleaning. The maximum vacuum rise is 10”Hg; the maximum reading is 15”Hg.
• Inspect the combustion chamber and heat exchanger tubes. If cleaning is needed, follow the instructions on page 28. Record the hour meter reading for future reference. A Mainte-nance Record Chart is provided in the Appendix for this record.
WARNING: Wear protective clothing, including gloves and a face mask or respirator. Dispose of ash properly. See the warning statement on cleaning the combustion chamber.
Monthly:• Drain water from the bottom of the supply tank until a steady
stream of oil is obtained.• Clean the backflow/ash sensor switch. Remove any soot from
the sensor. Check the electrical connections.
Maintenance
Maintenance Schedule

Form I-RA/RAD 150/250, P/N 234817R7, Page 25
Every Six months:• Clean the oil strainer at the burner.• Clean the foot valve screen.• Replace the air filter.• Clean the end cone.• Replace the oil nozzle.• Clean the external surfaces of the combustion chamber/heat
exchanger.• Clean the fan or blower.• Check for oil leaks.• Check blower belt for tension and wear.• Inspect the electrodes• Clean the pre-heater.
NOTE: A maintenance record chart is provided in the Appendix.
Replace the Supply Line Filter and Clean Internal Pump ScreenReplacing the filter and cleaning the pump screen requires breaking the suction line. The suction line is the portion of the supply line from the tank to the remote pump. If air leaks develop in the suction line, the heater will not operate properly.Follow all instructions, including “recharging the Suction Line,” (page 26) to avoid creating an air leak.
Replacing the Supply Line Filter1. Remove the old filter canister.
• Carefully unscrew and remove the filter canister. Dispose of properly.
2. Replace the filter canister.• Attach a replacement filter canister, P/N 176535.
Maintenance Procedures
Supply Line Filter with Replacement Canister
Cleaning the Internal Pump Screen1. Check the Screen
• Disconnect the inlet oil line from the pump.• Using a flashlight, look into the pump inlet.
a) If the portion of screen visible at the inlet appears to be clogged, go to Step 2.
b) If the screen appears unclogged, reconnect the inlet line making sure that the connection is tight. Do not

Form I-RA/RAD 150/250, P/N 234817R7, Page 26
Pump
Screen
Gasket
Cover
Bolts
remove the pump cover. Go to the instructions for “Recharging the Suction Line” (below).
2. Remove and Clean the Screen• To access the screen, the pump cover must
be removed.• Remove the four bolts that hold the pump
cover. (Be careful, pump is full of oil).• Remove the cover being careful not to lose or
damage the gasket.• Remove the circular screen and clean with a
solvent and compressed air.NOTE: If the screen is damaged during cleaning, replace it with Reznor P/N 123450.
3. Reassemble the pump• Check the gasket and if a replacement is
needed, replace it with Reznor P/N 123451.• Re-assemble the pump and reconnect the
inlet oil line being sure that the connection is tight.
Cleaning the Pump Cont’d
Recharging the Suction Line• Remove the fill plug from the inlet manifold and slowly fill the suction line with oil (allow time
for air to escape).• Replace the plug.• Check vacuum gauge connections and filter housing to be sure that everything is tight. The
suction line must be full of oil and all connections tight for the heater to operate properly.NOTE: Refer to the section, “priming and Leak check” (starting on page 19) for check list and instruc-tions.
Cleaning the Burner Oil StrainerInstructions for cleaning the burner oil strainer:
• Remove the hex nut from the end of the strainer tee, being careful not to lose the “O” ring.
• Remove the spring and strainer from the inside of the tee. Clean by washing both the spring and screen with a solvent.
• Reinsert the cleaned screen and spring into the tee. With the “O” ring in place, re-attach the hex nut.
Oil Strainer Tee
Remove Hex Nut, Strainer Screen & Spring
Hex Nut &“O” Ring
Strainer Screen
Spring
• Identify the strainer tee located in the fuel line just upstream from the burner.

Form I-RA/RAD 150/250, P/N 234817R7, Page 27
Cleaning Combustion Chamber, Heat Exchanger Tubes, and Flue PipeWARNING: Used oils may contain engine-wear metal compounds and foreign materials. When burned, these compounds are deposited within or exhausted from this heater. Therefore, care should be taken when using, cleaning and maintaining this equipment.
Whenever any cleaning including the flue pipe and exhaust stack is done, proper protective equipment, including gloves and a face mask or respirator, must be worn.
WARNING: Turn off electric power before inspecting or cleaning the unit. Allow unit to cool.
To determine need for cleaning, inspect the heat exchanger tubes through the access door on the end of the heater opposite the burner.
• Remove the door panel by lifting upward and outward on the door handle.
• Open the hinged inner door.• Shine a flashlight into the heat exchanger tubes (see
illustration on page 28).• If tubes are 25% blocked, leave covers off and proceed
with cleaning.Important NOTE: You cannot adequately make this determination through the flame observation door. The majority of the settlement of ash accumulates in the heat exchanger tubes which are visible with the doors open.
Inspection
View of Hinged Inner Door with the Outer Access Door
Removed
Outer Door Panel on End of Heater

Form I-RA/RAD 150/250, P/N 234817R7, Page 28
Removing Soot and Ash from the Combustion Chamber, Heat Exchanger Tubes, and Flue Pipe
Maintenance Continued
Inspecting and Cleaning the Heat Exchanger/Combustion Chamber (cont’d)
View with Inner Access Door
Open.
1. On the burner end of the heater (left), remove the access panel underneath the vent pipe connection
• Turn the latches and pull the door panel straight out from the heater.
2. Remove the inner access panel (exhaust cover) and disconnect the vent pipe.
• Using a 1/2” wrench, remove the nuts and washers from the inner exhaust cover.
• Pull the cover directly off the studs.3. Clean the combustion chamber (illustrated
above), the heat exchanger tubes (see above and left), and the flue pipe
• Use a stiff brush.• Remove ash with a shop vacuum.
WARNING: The ash that is removed from this heater may contain heavy metal compounds that are environmentally undesirable and should be disposed of in a conscientious manner.
4. Check Gaskets• Check all access panel gaskets. If
replacement gasket(s) are needed, use gaskets identical to the original equipment.
5. Re-assemble. Record cleaning on page 50.
Combustion Chamber
Heat Exchanger TubesIf tubes are 25% blocked,
proceed with cleaning. Follow instructions below.
4) Clean the combustion chamber, heat exchanger tubes, and the flue pipe.
3) Disconnect the vent pipe.
1) Remove the outer access panel.
2) Remove the exhaust cover.

Form I-RA/RAD 150/250, P/N 234817R7, Page 29
Compressor Air Filter
Maintenance Procedures Continued
Accessing Burner and Cleaning End Cone, Nozzle, and Electrodes
Replacing the Compressor Air FilterLocate the compressor air filter.
• Remove the wing nut, the cover plate, and the filter.• Properly discard the old filter and replace with a new filter
(Reznor P/N 107216, Wix Filter No. 43274, or NAPA No. 2374).
• Fasten with cover and wing nut.
WARNING: Turn off the electric power before burner is removed for service.To gain access to the end cone, the burner must be removed.
1. To Access Burner• Locate the two yellow wires that go
from the burner to the ignition controller.• Disconnect these wires at the terminals
on the ignition controller.• Remove the three nuts and washers
that retain the burner to the heater.• Slide the burner off the bolts and rotate
as illustrated.2. To Remove/Clean the End Cone• Remove the screws that hold the end
cone to the burner tube.• Remove and clean the end cone using
a stiff wire brush.• Check the end cone for deterioration
and replace if deterioration exists.3. To Remove the Nozzle (requires both a
1” and a 5/8” open-end wrench)• To prevent the fuel line assembly from
twisting, use a 1” open-end wrench to hold the nozzle adapter while removing the nozzle with a 5/8” open-end wrench.

Form I-RA/RAD 150/250, P/N 234817R7, Page 30
Removing Fuel Line Assembly to Service Controls and Spark Electrodes (Alternate method for servicing nozzle)
Escutcheon Plate
Maintenance Procedures Continued
• Clean nozzle by disassembling, washing thoroughly, and blowing dry with compressed air.
• If nozzle face appears worn, replace the oil nozzle with P/N 102997. Annual nozzle replacement is recommended. This nozzle is custom designed. Do not substitute nozzle.
• Replace the end cone.NOTE: Be sure NOT to damage the “O” ring on the nozzle. If
the “O” ring appears damaged, replace the nozzle.4. Inspect the Electrodes• The electrode porcelain insulators must be free from carbon,
oil, dirt, pinhole leaks, cracks, moisture and evidence of over-the-surface arc tracking. Otherwise, short circuiting could cause ignition problems. If any of these conditions exist, replace with new porcelain insulators (Replacement kit P/N 269820).
• If a need for service or replacement is determined, see instructions on page 31.
5. Reassemble• Check the gasket. If in tact, position it over the studs. If
damaged, replace with like replacement.• Line the burner up with the studs and slide the tube into the
heater.• Using the nuts and washers, attach the burner mounting
flange.• Re-connect the yellow wires to the ignition controller.
Removing Burner and Cleaning End Cone, Nozzle and Electrodes Continued
WARNING: Turn off the electric power before remov-ing the fuel line assembly.
NOTE: In order to service the fuel line assembly controls and spark electrodes, it is necessary to remove the fuel line assembly.
Removing the Fuel Line Assembly1. Loosen the connection nut one or two turns.2. Disconnect the fuel connection assembly by loosening the
5/16” inverted flare fitting. Do not change the position of the escutcheon plate.
• Pull the fuel connection assembly clear of the burner housing.3. Loosen the two transformer hold-down screws.
• Lift the hinged transformer to its open position.4. There are eight wires in the fuel line assembly wire bundle.
• Mark and disconnect the wires from their terminals in the burner junction box.
5. Disconnect the nozzle air hose from the fitting at the air compressor.
• Pull the hose through the opening “into” the burner housing.

Form I-RA/RAD 150/250, P/N 234817R7, Page 31
Maintenance Procedures Continued
Transformer in the “open” position
Fuel Connection
6. The fuel line assembly may now be removed by either• Pulling the assembly up slightly and toward the rear of the
burner housing.• OR removing the burner and end cone and pulling straight out
of the blast tube. See pages 29-30 for details.
Servicing/Replacing Spark ElectrodesTo service or replace the Spark ElectrodesRemove any carbon formation on the spark electrodes.
• Check the electrodes for deterioration and the insulators for cracks or damage.• Replace the electrode assemblies with kit P/N 269820 if any damage or deterioration
exists.• After service or replacement, check the position of the electrodes.• Adjust the electrode location precisely.
Electrode AdjustmentCheck the placement of the electrodes according to the illustration below. If adjustments are required, loosen the 1/4” screw. Make adjustments in the order listed below. Recheck, and if necessary, re-adjust until electrodes are in proper position.1) From center of nozzle orifice to electrode - up 3/8” (9.5mm)2) Electrode Gap (distance between electrodes - 1/8” (3.2mm)
������������ �������������������� �����
������������
3) Relationship of the end of the electrodes to the tip of the nozzle - 1/16” (1.6mm) ahead
4) Relationship of the tip of the nozzle to the inside radius of the end cone -- Flush to 1/16” (1.6mm) ahead - NEVER BEHIND
Fuel Line Assembly Removed

Form I-RA/RAD 150/250, P/N 234817R7, Page 32
Cleaning Oil Pre-Heater SystemWARNING: Turn off the electric power and allow the pre-heater to cool before servicing.
1. Remove the Burner• Locate the two yellow wires that go from the burner to the
ignition controller. Disconnect these wires at the terminals on the ignition controller.
• Remove the three nuts and washers that retain the burner to the heater. Slide the burner off the bolts and rotate.
Maintenance Procedures Continued
Reassembling the Fuel Line Assembly1. To reassemble the Fuel Line Assembly
• Slide the fuel line assembly into the burner housing and the burner tube.
2. Connect the fuel connection assembly to the fuel line assembly.
• Tighten the 5/16” inverted flare nut firmly. Then tighten the connection nut. Do not move the escutcheon plate.
• Check the spacing between the oil nozzle and the end cone. Refer to Electrode Adjustment” #4 (page 31).
3. Connect the eight wires in the fuel line assembly wiring bundle. Refer to the wiring diagram in the Appendix of this manual or the wiring diagram on the heater.
4. Push the air line hose out through the burner housing and reconnect it to the air compressor.
5. Close the spark transformer cover and attach with the two screws. Be certain transformer clips make contact with the electrodes.
NOTE: Once assembly is in place, verify that the nozzle, end cone, and electrodes are correctly located.
Pre-Heater Box
Pre-Heater Controls
2. Remove the Pre-Heater from the Pre-Heater Box• Remove the corner panel from the end of the
box. The pre-heater controls are visible.• Disconnect the fuel lines at the inlet and outlet
connections. NOTE: There will be oil in the lines.• Disconnect wires to the temperature controls.• Disconnect the heating element wires.• Remove the screw that attaches the pre-heater
front support to the bottom of the box.• Slide the cylindrical aluminium pre-heater out of
the box.

Form I-RA/RAD 150/250, P/N 234817R7, Page 33
Outer CylinderInner
Cylinder
Maintenance Procedures ContinuedCleaning Oil Pre-Heater Sys-tem Continued
3. Clean the Pre-heater• Place the pre-heater in a vice and carefully remove the outer
cylinder and the “O” ring. NOTE: There will be oil in the pre-heater.
• Clean the inner section with a cloth and degreaser such as carburetor cleaner. Be careful not to “clean” the electrical controls. Do not immerse in cleaning fluid.
• Clean the outer portion of the cylinder with degreaser.
4. Reassemble the Pre-Heater and the heater.• Check the “O” ring. If a new one is required, replace with P/N 132224.• Reassemble the cylinder pieces with “O” ring in place.• Slide the pre-heater in the box and attach the front support. Reconnect the wires and the
fuel lines and close the corner cover.• Replace the burner assembly and reconnect the ignition controller.
Cleaning Exterior Surfaces of Combustion Chamber, Heat Exchanger, and Air Moving Device
WARNING: Turn off the electric power before cleaning heater.To gain access to the front side of the combustion chamber/heat exchanger, remove the discharge louvers.To access the rear side, remove the fan assembly or blower assembly.To remove the air moving device, disconnect the wiring in the fan/blower junction box and the flexible conduit.
• Use a stiff brush and a shop vacuum to clean the accumulated dust and dirt from the exterior surface of the combustion chamber and the heat exchanger.
• Clean the air moving device (fan or blower). Use a brush and a shop vacuum, being careful not to bend or damage either the fan blade or the blower wheel. Use a shop vacuum to remove accumulated dirt from the motor.
• Replace the air moving device and the discharge louvers.• Connect the flexible conduit and wiring.
Check operation.Cleaning ensures maximum efficiency and eliminates the possibility of the heater cycling on the limit switch from lack of air flow.

Form I-RA/RAD 150/250, P/N 234817R7, Page 34
General Service
Reznor® used-oil-fired heaters have been designed and manufac-tured to provide years of trouble free operation.However, as with any type of mechanical equipment, it can mal-function. For your safety, we suggest that if you are unfamiliar with servicing this type of equipment, contact a qualified service person. The material contained in this section is prepared to aid an experienced service person in diagnosing and repairing Reznor Model RA/RAD used oil heaters.
How a Reznor® Model RA/RAD Used-Oil-Fired Heater OperatesWhen service is necessary, it is always helpful to understand the op-eration of the device being serviced. With this in mind, the following information has been prepared. Because of the many unique features of the heater, we as the designer and manufacturer believe that it will be worth your time to read this information before beginning any service function.The RA/RAD heaters differ from most residential and commercial oil furnaces and used oil heaters in that the oil pump meters the volume of oil supplied to the burner. A constant volume of oil is delivered by the pump to the burner regardless of the oil viscosity. Oil pressure at the outlet of the pump will vary depending upon oil grade, the length and height of the supply line, and the oil temperature.If a pressure in excess of 50 psi is experienced at the pump, a relief valve will open and return the oil to the supply tank.Oil pressure at the atomizing nozzle will vary from .25 psi to 4 psi depending on the type of oil being burned. Nozzle oil pressure is not critical because compressed air is used to atomize the oil.The solenoid valve located adjacent to the burner housing performs two tasks. The primary task is to prevent oil from flowing into the combustion chamber due to oil expansion in the heater. The second task is to assist in preventing oil from flowing backwards. Both the solenoid valve and the pump motor are turned on and off by the ignition controller. The check valve at the pump prevents backwards flow of oil in both the heater supply line and the suction line to the pump. To properly atomize the different types of used oil, the oil must be heated. The oil flows through an aluminum heat exchanger (pre-heat-er) with a 300 watt heating element. This oil heater which is external to the burner preheats the oil to approximately 175°F. A pair of 30 watt heating elements on the fuel line and nozzle assembly within the burner maintain an oil atomizing temperature of 160°F. Temperature sensors prevent burner operation until the proper temperatures are attained. Oil temperature is maintained continuously as long as the electrical power is on to the heater.
General Operation
Service Notes

Form I-RA/RAD 150/250, P/N 234817R7, Page 35
Compressed air for atomizing the used oil is supplied by a piston-type compressor mounted on the service tray. Model RA/RAD 150 and 250 heaters require air pressure within a 9 to 12 psi range for proper oil atomization. To assure that the correct atomizing air pressure is available, a pressure switch permits oil flow to the nozzle only when a minimum of 9 psi is sensed. Combustion air is supplied by a blower contained in the burner hous-ing. An adjustable air shutter and air band located on the outside of the burner housing control the quantity of combustion air. Both are preset at the factory and should be changed only if the CO2 measurement indicates the need to do so. See Check-Test-Start, for instructions for measuring CO2.Ignition of the atomized oil and combustion air mixture is accom-plished by a high voltage spark across the two electrodes located near the atomizing nozzle. Ignition of the oil is detected by a cadmium sulfide flame sensor. Light produced by the flame lowers the electri-cal resistance of the cad cell. This change is sensed by the ignition controller which allows a continued flow of oil and shuts off the spark transformer after a 30-second trial-for-ignition period.If for some reason, ignition does not occur or the flame goes out during the trial period, the primary control will lockout. To restart, the safety switch must be manually reset by pushing the red reset button on the ignition control. Depress and hold the reset button for three seconds. If the heater does not ignite, contact your service person.If the instructions in this manual are followed, excessive amounts of unburned oil will not accumulate inside the combustion chamber. If the caution statement about resetting the controller more than one time is not heeded, then unburned oil will accumulate in the combus-tion chamber. If unburned oil accumulates, DO NOT attempt to fire the heater and burn off the oil. Remove the combustion chamber access panels as described in Maintenance Section, “Inspecting and Removing Soot and Ash from the Combustion Chamber/Heat Exchanger”. Wipe out any accumulated oil with cloth rags. Properly dispose of the rags.If the flame fails during normal operation, the heater will go into lockout requiring manual reset of the primary controller. Depress and hold the reset button for three seconds. If the heater does not ignite, contact your service person.If power fails, the heater will shut down and normal trial for ignition will begin on call for heat when the power is restored.Approximately 1-1/2 to 2 minutes after the thermostat calls for heat and ignition is established, the circulating fan or blower will come on. The circulating airflow will continue about three minutes after the burner shuts down.
General Operation Continued
CAUTION: Do not reset the primary control more than one time. If the heater does not ignite, contact your service person.

Form I-RA/RAD 150/250, P/N 234817R7, Page 36
Oil Burner TroubleshootingTo diagnose malfunctions properly, the following test equipment is required:1) An electrical test meter that can measure AC volts, ohms, and
amps;2) A combustion analyzer kit to measure oxygen and/or carbon
dioxide, smoke, stack temperature, and draft; and3) Two pressure gauges with scales of 0-100 PSIG and 0-30 PSIG.Before test firing any heater, check the combustion chamber for an excessive accumulation of unburned oil and restore to safe condition before firing. (See page 35.)
WARNING: Do not attempt to start the burner when excess oil has accumulated, when the furnace is full of vapor, or when the combustion chamber is very hot.
NOTE: Refer to the troubleshooting guide on page 37 to select the appropriate troubleshooting chart.
Check the Indicator LightsLight Location (on the
Electrical Box Function
GREEN On the side next to the disconnect (on/off) switch
Indicates that the main power is on to the heater
GREEN On the bottom of the electrical box
Indicates that all limits have been satisfied and the unit is ready to operate
Troubleshooting
�������������
���������������� ���
Viewport Cover
Backflow Sensor Switch Description/Application - The backflow sensor is a temperature-sen-sitive switch that is designed to shutdown the heater when there is a positive pressure in the combustion chamber The heater is designed to operate with an overfire draft of -0.01” to -0.02” w.c. Prolonged operation at a positive pressure (greater than or equal to 0.00” w.c.) can cause overheating and accidental component failure. Undesirable positive furnace pressure can be caused by any one or a combination of the following conditions:
• Totally or partially blocked flue gas venting system• Improperly designed venting system• Improper fuel-to-air ratio for combustion• Excessive ash buildup on interior heat exchanger surfaces• Blocked heat exchanger passages• Improper atomization of the fuel• Plugged or defective fuel nozzle• Improperly adjusted fuel nozzle assembly
Backflow Sensor

Form I-RA/RAD 150/250, P/N 234817R7, Page 37
• Burning off-specification fuel• Changes in outside ambient temperature
Location - The backflow sensor switch is mounted on a bracket on the hinged viewport cover on the control side of the heater. The lo-cation is important in the operation of this switch. Except for limited observation, the viewport cover must be kept closed for the sensor (and heater) to operate properly.Operation - Underneath the sensor bracket, the viewport cover has a 3/8” diameter hole. Under normal negative overfire operating conditions, room air is constantly drawn into that small opening. The temperature-sensitive backflow sensor is “cooled” by the air flow. If for any of the reasons listed, the furnace pressure becomes zero, or slightly positive, the flow of air decreases. If this condition persists (10 minutes maximum) the “uncooled” backflow sensor activates interrupting power to the ignition controller. The green limit status light will go out; the heater will go through the normal post purge and cool down cycle.After the problem has been determined and corrected, push the manual reset button on the backflow sensor, and follow the instruc-tions to relight the heater. Check for proper operation.Maintenance - A thin film of soot will form on the face of the backflow sensor. At least once a month and during any routine heater cleaning, open the viewport cover and clean the soot from the sensor. Check the wire connections during scheduled maintenance inspections.
Troubleshooting Chart GuideSymptoms Follow Troubleshooting ChartWith thermostat calling for heat, burner motor never attempts to run (Green “power on” light is lit; Green “system ready” light is not lit). ... Chart No. 1, page 39
Chart 1 check completed, but burner motor never attempts to run. With thermostat calling for heat, burner motor runs momentarily. ............ Chart No. 2, page 41
System does not attempt to ignite. ........................................................... Chart No. 3, page 42
Burner ignites and burns steadily until system goes into lockout. ............ Chart No. 4, page 43
Burner operation erratic/unstable flame pattern. ...................................... Chart No. 5, page 44
High temperature limit cycles. .................................................................. Chart No, 6, page 45
Oil delivery system troubleshooting. ......................................................... Chart No. 7, page 46
CAUTION: The items on the Troubleshooting Charts that are marked with an asterisk represent events that have occurred due to the improper functioning of the heater. It is necessary to observe the operation of the heater to determine what caused these events to occur.
Backflow Sensor Switch Continued

Form I-RA/RAD 150/250, P/N 234817R7, Page 38
Troubleshooting ContinuedLocation of Components Referenced in Troubleshooting Charts
Backflow Sensor Switch on the Viewport Door
Transformer (NOTE: To access cad cell, open transformer.)
10 amp fuse
Ignition Controller
Green Light: Limits are
satisfied; heater is ready to
operate.
Ignition Controller Reset
Air pressure switch is inside the main electrical box.
115V Terminal Connections 1-9 and 20-22 are inside the
main electrical box.
Green Indicator Light (”power on”)
Manual Disconnect Switch
Oil Inlet Connection
115V Terminal Connections 11 and 13-19 are in the burner junction box.
Piston-type Air Compressor with replaceable filter
Box contains oil heat exchanger (pre-heater) with 300 watt heating element and temperature controls. Remove cover to access.
Burner Motor Reset Button
Burner Tee with Strainer

Form I-RA/RAD 150/250, P/N 234817R7, Page 39
Troubleshooting Charts
Chart No. 1 - Thermostat calling for heat; Burner motor never attempts to run.
Determine and correct thereason the backflow sensor
was activated. Once theproblem has been corrected,push the manual reset button
on the backflow sensor andfollow the instructions to
relight the heater.
Replace the oilpreheater high limit.
YES
NO
Has therebeen line voltage across
Terminals 1 and 2 for at least15 minutes?
Check for linevoltage across Terminals
15 and 11. Is voltageread?
Is inlet nozzleadapter warm to the
touch?
Check for linevoltage across Terminals
17 and 2. Is voltageread?
Check for linevoltage across Terminals
16 and 2. Is voltageread?
Check for linevoltage across Terminals
3 and 2. Is voltageread?
Measure the resistanceacross the F-F
terminals on theignition controller.
Is theresistance zero?
Correctshort circuit.
Is theresistance greater than
1500 ohms?
Clean cell faceand seat firmly
into holder.
Is resistancegreater than 1500
ohms?
Is the overfiredraft correct?
Is the CO2correct?
Replacethe cad cell.
Adjust forproper CO2.
Adjustbarometric
damper.
Cad cell andignition controller
are OK.
Replace hightemperaturelimit control.
Replace nozzlelow oil
temperature limit.
Check forline voltage across "Tan"
oil heater wires and Terminal11. Is voltage read?
Check continuity of300 watt element. Is there
sufficient ohms?
Replace oil heatertemperature control
(pre-heater).
Replace oilheating element
(pre-heater).
Replace oil heaterlow temperaturelimit (pre-heater).
Check forline voltage across 14
and 11. Is voltageread?
Checkfor continuity of 30
watt heating elements. Iscontinuity read?
Is coldair discharging
from burnertube?
Add draftinducer
Replace 30 wattheatingelements.
Replace nozzletemperature
control.
Is the oilpreheater hot to the
touch?
Replace the oilpreheater
temperature control.
Check for linevoltage at the manualdisconnect switch. Is
voltage read?
Replace manualdisconnect
(on/off) switch.
Turn on or correctsupply. Wait 15
minutes for heater towarm up.
YES
NO
YES
NO
YES
NO
YES
NO
YES
NO
YES NO
YES
NO
YES
NO
YESNO
YES
NO
YESNO
YES
NO
YES
NO
YES
NO
YES
NO
NOYES
YES
NO
YES
YES
NO
Does thebackflow sensor need
reset?
Replace fan back highlimit.
Check for linevoltage across Terminals
4 and 2. Is voltageread?
NO
YES
FIRST, turn on the main power to the unit at the disconnect switch and wait at least 15 minutes before proceeding. • If GREEN “system
ready” light is NOT LIT, continue with the troubleshooting guide in Chart No. 1, left.
• If GREEN “system ready” light is “ON”, skip to Chart No. 2, page 41.
Refer to illustrations on page 38 and 40.

Form I-RA/RAD 150/250, P/N 234817R7, Page 40
Oil Heat Exchanger and Fuel Line Assembly Reference Chart No. 1
To remove the heating element, remove retainers/support and pull heating element forward.
Oil Temperature Control (blue leads)
Low Oil Temperature Limit (black leads)
High Oil Temperature Limit Switch (yellow
leads)
Remove limit switches with open-end wrench. Do not rotate using terminals.
Locations and Replacement Instructions for Heating Element and Temperature Controls on Oil Pre-heat Heat Exchanger
Retainer Support
Nozzle Low Oil Temperature Limit (Black Wires)
Electrode
Ceramic Insulator
Buss Bar
Static PlateNozzle Temperature Control (Red Wires)
Nozzle AdapterNozzle
Inlet Heater Remove the sili-cone rubber to free heating element (30 watt). When replacing, use silicone rubber to retain the new ele-ment.
The nozzle adapter contains a 30 watt heating element. To replace the element:1) Remove the buss bars.2) Unscrew the inlet heater and
slide the black insulation rearward. Loosen set screw which retains the static plate and slide rearward. This will expose the heating element.
Locations and Replacement Instructions for the Two 30 Watt Heating Elements in the Fuel Line Assembly
Refer to illustra-tion on page 38.
Troubleshooting Continued

Form I-RA/RAD 150/250, P/N 234817R7, Page 41
Troubleshooting Continued
Check for linevoltage across Terminals
5 and 2. Is voltageread?
Check for linevoltage across Terminals
13 and 11. Is voltageread?
*Is burnermotor reset button
tripped?
Reset and checkfor properoperation.
Replace burnermotor.
Replace fuse.
Replace ignitioncontroller.
YES
NO
YES
NO
YES
NO
Chart No. 2 - Thermostat calling for heat, burner motor never attempts to run (green light is lit) indicating “System Ready”. Chart No. 1 has been successfully completed.NOTE: After ignition control is reset, you will have 30 SECONDS to perform the tests shown below before the controller locks out.Reset ignition control: Press the RED BUTTON, hold for four sec-onds, and release. DO NOT RESET MORE THAN ONE TIME.
*Reset button on the motor activates when the motor is overheated. Motor amp draw must be less than the full load amps on the motor rating plate. Verify the motor is operating correctly.
Refer to illustra-tion on page 38.

Form I-RA/RAD 150/250, P/N 234817R7, Page 42
Troubleshooting Continued
Check
for line voltage across Terminals 8 and
11. Is voltage read?
Are electrodes and insulators
OK?
Check for line voltage
across Terminals 12 and 11. Is voltage
read?
Is pressure of
compressed air as required?
Check for line voltage
across Terminals 12 and 11. Is voltage
read?
Are there leaks in
the air connections or lines?
Replace ignition
controller.
Is ignition transformer producing
spark?
Replace electrode
assembly.
Is electrode position correct?
Adjustelectrodes.
Replace ignition
transformer.
Remove air filter and operate the burner motor.
Install new air filter.
Replace air pressure switch located in
the main junction box.
Replace airtubing and tighten
connections.
Rebuildcompressor.
NO
YES
NO
NO
NO
NO
NONO
NO
YES
YES
YES
YES YES
YES
Chart No. 3 - Thermostat is calling for heat. Burner motor runs for about 30-45 seconds. System does not attempt to ignite.
Transformer and Electrode Checks:Measure voltage between transformer/primary lead and neutral connection. Check transformer, insulators, and electrodes.The secondary terminals of a good transformer deliver 5000 volts arc to ground, for a total of 10,000 volts between terminals. Measure this with a transformer tester or use a well insulated screwdriver to draw an arc across the two springs. This should be at least 3/4” in length.Check each secondary output terminal by draw-ing a strong arc between the spring and base. If the arc is erratic, weak, or unbalanced between the two terminals, replace the transformer.Replace electrodes when the tips become worn or eroded.
First, check combustion chamber for excess oil.NOTE: After ignition control is reset, you will have 30 SECONDS o perform the tests shown below before the controller locks out.Reset ignition control: Press the RED BUT-TON, hold for three seconds, and release. DO NOT RESET MORE THAN ONE TIME.
Replace any insulators that are question-able.Transformer failures and ignition problem can be caused by the following:
• Excessive gap on the ignition electrodes. Gap should be 3/32”.
• High ambient temperatures• High humidity• Carbon residue on the porcelain
bushings• Low input line voltage• Arcing between the ignition
electrodes and the transformer springs. They must have good contact.
• Carbon residue, moisture, crazing or pin holes on the insulators
• Improper positioning of nozzle in relation to the radius of the end cone
• Carbon residue on electrode parts

Form I-RA/RAD 150/250, P/N 234817R7, Page 43
Troubleshooting Continued
Chart No. 4 - Burner ignites and burns steadily until the system goes into lockout.
NOTE: If the flame goes out during this test and the burner continues to operate, go to Chart No. 5.
1. Remove cad cell wires from the ignition controller.2. Start the burner.3. Jumper F-F terminals on the ignition controller.
Does ignitioncontrollerlockout?
Replaceignitioncontroller.
Measure resistance across cell leads (F-Fterminals on the ignition controller).
Is resistancezero?
Is resistancegreater than1500 ohms?
Is the over firedraft correct?
Is resistancegreater than1500 ohms?
Is resistancegreater than1500 ohms?
Is the CO2correct?
Correctshort
circuit.
Cad celland
ignitioncontrollerare OK.
Open transformerand clean cell faceand seat firmly into
holder.
Adjust forproper CO2.
Replace the cad cell.
YES
NO
NO
NO
NO
NO
NO
YES
YES
YES
YES
YES
Adjust barometric pressure.
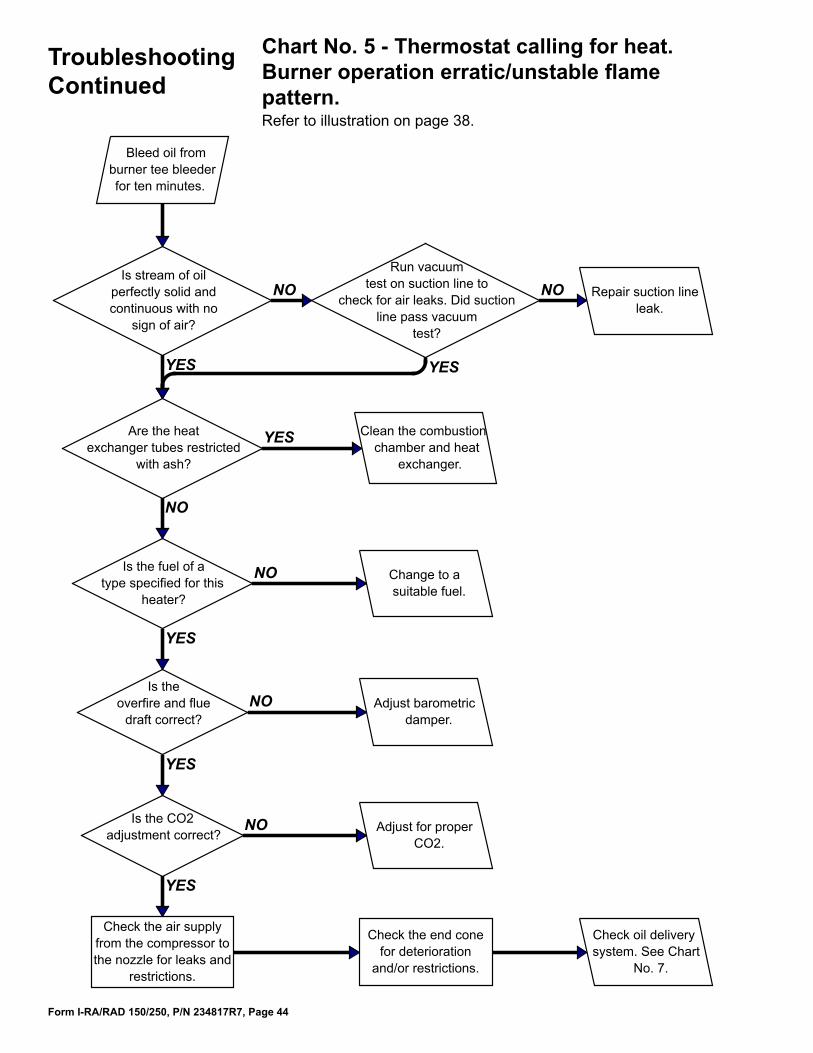
Form I-RA/RAD 150/250, P/N 234817R7, Page 44
Bleed oil fromburner tee bleederfor ten minutes.
Is stream of oilperfectly solid andcontinuous with no
sign of air?
Are the heatexchanger tubes restricted
with ash?
Clean the combustionchamber and heat
exchanger.
Is the fuel of atype specified for this
heater?
Is theoverfire and flue
draft correct?
Is the CO2adjustment correct?
Check the air supplyfrom the compressor tothe nozzle for leaks and
restrictions.
Check the end conefor deterioration
and/or restrictions.
Check oil deliverysystem. See Chart
No. 7.
Adjust for properCO2.
Adjust barometricdamper.
Change to asuitable fuel.
Run vacuumtest on suction line to
check for air leaks. Did suctionline pass vacuum
test?
Repair suction lineleak.
YES
NO
YES
NO
YES
NO
YES
NO
YES
NO
YES
NO
Chart No. 5 - Thermostat calling for heat. Burner operation erratic/unstable flame pattern.Refer to illustration on page 38.
Troubleshooting Continued

Form I-RA/RAD 150/250, P/N 234817R7, Page 45
Does the
fan/blower operate?
Check for line
voltage across fan/blower leads.
Is voltage read?
Check for line voltage
across Terminals 1 and 2. Is
voltage read?
Are the heat exchanger
surfaces and/or fan blades or blower
covered with dirt?
Have ducts or air
deflectors been added to a fan (RA) model? Is the temperature rise of blower
model (RAD) above 70°F?
Replacefan/blower
motor.
Replace fan time
delay relay.
Check wiring.
Replace hightemperaturelimit control.
Clean the heatexchanger and fan/blower. Remove ducts or deflectors from fan model.
Lower temperature rise on blower model.
YESYES
YES
YES
NO
NONO
NO
NO
YES
Chart No. 6 - High Temperature Limit Cycles*
*High temperature limit cycles when internal temperature exceeds limit setpoint. Cause must be found and corrected for heater to function safely/properly.
High Temperature Limit (For easier access,
remove spring-mounted louver.)Fan Failure Limit Location
RA150 (illustrated) - Remove fan/motor assembly to access.RA250 - Remove fan guard to access. RAD 150/250 - Limit is easily accessible above the blower.
Limit ControlsModel RA/RAD 150 and 250 heaters are equipped with a fan failure limit control and a high tempera-ture limit control. Both limits are nonadjustable with automatic reset. The fan failure limit is ac-cessible from the back of the unit. The high limit control is accessible by removing a louver in the front of the heater.The fan failure limit switch on the back of the heater is nonadjustable and automatically cycles when the internal temperature exceeds the set-point. For the heater to operate properly and safely, the cause for the temperature exceeding the limit setpoint must be corrected.
The high temperature limit switch on the front of the heater provides redundant control and is calibrated to open at a higher temperature than the fan failure limit switch. It also is nonadjustable and automatically cycles when the temperature of the discharge air exceeds the setpoint. For the heater to operate properly and safely, the cause for the temperature exceeding the limit setpoint must be corrected.

Form I-RA/RAD 150/250, P/N 234817R7, Page 46
Troubleshooting Continued
Is there sufficient oil in the
supply tank?
Is the pump
turning?
Check pump and
motor drive compo-nents and set screws.
Are they OK?
Is there line voltage across
motor leads?
Is the vacuum gauge
reading over 10” hg.?
Is the oil flow rate approximately 2.3 oz per
minute for Size 150 or 3.8 oz per minute for a Size
250?
Reconnect oil supply line and bleed oil from
burner tee bleeder.
Is the flow
adequate?
Is the supply line blocked?
Is the oil flow in the
aluminum oil pre-heater
blocked?
Is the burner tee strainer
blocked?
Does the fuel valve open when
energized?
Is there oil flowing the return
line?
Fill oil tank.
Replace or repair.
Replace fuel pump motor.
Check wiring and connections.
Check/clean oil pump filter, foot valve, and foot valve strainer.
Disconnect oil supplyline at the pump.
Establish constant pumpoperation. See Priming and Oil Leaks, page 19.
Remove the fuel pump.
Start the heater. Check for proper
operation.
Clear blockageor replace line.
Disassemble andclean the aluminum
oil pre-heater.
Remove and clean the strainer.
Replace the fuel valve.Start the unit.
Check for properoperation.
Replace the relief valve.
YES
YES
YES
YES YES
YES
YES
YES
YES
YES
YES YES
NO NO
NO
NO
NO
NO
NO
NO
NO
NO
NO
NO
Chart No. 7 - Oil Delivery System CAUTION: If the heater will be shut down for a long period, turn off the electric power.

Form I-RA/RAD 150/250, P/N 234817R7, Page 47
Wiri
ng D
iagr
am 2
3036
9 fo
r Mod
els
RA
/RA
D 1
50; R
A 25
0 (S
ee p
age
2 of
this
W.D
. on
page
49.
)
Appendix115/1/6O
MA
NU
AL
DIS
CO
NN
ECT
SWIT
CH
THERMOSTAT
T
Y
FF
Y
T
CA
D C
ELL
G
SPA
RK G
AP
IGN
ITIO
N C
ON
TRO
LLER
HO
URS
GG
ND
#12
GA
. W
#12
GA
. BK
BL
1
R
1 18
14
9
2013
BK
L#1
4 G
A.
WB
KB
K2 2
BU
RNER
MO
TOR
POST
PURG
E RE
LAY
CO
NTA
CTS
(15)
R
OB
K
5
42
BK
11O
W
BL
BL
BR
H
W11
BR
W
O
RR
RR
W
OIL
HEA
TER
SEE
CH
AR
T
INLE
T H
EATE
R3O
WAT
T
R11 11
RR
NO
ZZ
LE H
EATE
R3O
WAT
T
R
YB
KB
KB
KB
K
L
YY
Y
L
R
LOW
TEM
PLI
MIT
OIL
HEA
TER
1716
224
WB
K
LIM
IT S
TATU
SLI
GH
T
8B
LB
L
IGN
ITIO
NTR
AN
SFO
RMER
11W
O
FUSE
HO
LDER
#6O
241
1OM
DA
FU
SE
52
52
OW
EXH
AU
ST F
LOW
SWIT
CH
(IF
USE
D)
AIR
PRE
SSU
RESW
ITC
H
P
BK
W6
G/Y
GG
6
11O
JU
MPE
R
REM
OV
E IF
O
PTIO
NA
L FL
OW
SWIT
CH
INST
ALL
ED
RR
2
P
BK
BK
P
W
6
CH
ASS
IS G
ND
.
CH
ASS
IS G
ND
.
GG
ND
.
13
BL
BL
W
3 4 5 6 7 8 9 1O 11 12 13 14 15 16 17 18 19 2O 21 22 23
PURG
E RE
LAY
CO
ILB
URN
ER M
OTO
R PO
ST
5 - 6
L HP
CO
NN
ECTI
ON
IN F
AN
/BLO
WER
JU
NC
TIO
N B
OX
CO
NN
ECTI
ON
IN O
IL H
EATE
R C
OM
PAR
TMEN
T
CO
NN
ECTI
ON
IN P
UM
P EN
CLO
SURE
TERM
INA
L B
LOC
K -
MA
IN C
ON
TRO
L B
OX
FAC
TORY
WIR
ING
FIEL
D W
IRIN
G
WIR
ING
CO
DE
BLA
CK
- B
KB
ROW
N -
BR
RED
- R
OR
AN
GE
- OYE
LLO
W -
YG
REEN
- G
BLU
E - B
LPU
RPLE
- PR
WH
ITE
- W
FAN
/BLO
WER
MO
TOR
BO
OST
ER M
OTO
RO
PTIO
NA
L D
RA
FT
MO
TOR
BU
RNER
OIL
HEA
TER
300
WAT
T
INLE
T H
EATE
R3O
WAT
T
NO
ZZ
LE H
EATE
R3O
WAT
T
LIM
IT S
TATU
SLI
GH
T
HO
UR
MET
ER
AIR
CO
MPR
ESSO
RM
OTO
R
FUEL
VALV
E
REM
OTE
FU
ELPU
MP
#12
GA
.W
#12
GA
.B
K
CA
UTI
ON
: IF
AN
Y O
F TH
E O
RIG
INA
L W
IRE
AS
SUPP
LIED
WIT
H T
HE
APP
LIA
NC
E M
UST
BE
REPL
AC
ED,
IT M
UST
BE
REPL
AC
ED W
ITH
WIR
ING
MAT
ERIA
L H
AV
ING
A T
EMPE
RAT
URE
RAT
ING
OF
AT L
EAST
105
°C.
EXC
EPT
FOR
HEA
TIN
G E
LEM
ENT,
FA
N C
ON
TRO
L A
ND
LIM
IT W
IRIN
G W
HIC
H M
UST
BE
150°
C.
OIL
HEA
TER
HIG
H L
IMIT
OIL
HEA
TER
TEM
PER
ATU
RE C
ON
TRO
L
NO
ZZ
LE T
EMPE
RAT
URE
CO
NTR
OL
NO
ZZ
LE L
OW
OIL
TEM
P LI
MIT
HIG
H L
IMIT
MA
IN P
OW
ERIN
DIC
ATO
R LI
GH
T
BK
GW
2IN
DIC
ATO
R LI
GH
TM
AIN
PO
WER
BK
1
O
TERM
INA
L ST
RIP
- BU
RNER
JU
NC
TIO
N B
OX
Y
MA
IN C
ON
TRO
LB
OX
BU
RNER
JU
NC
TIO
NB
OX
G G
G
SHEE
T #1
2
VIE
WPO
RT
LIM
IT
BL
BK
21
W2
GN
DG
GN
D G
19
Y
BL
Y
MA
NU
AL
RESE
TH
HH
BK
OO
2303
69
CO
NTA
CTS
FAN
TD
13
1 18
HH
TIM
E D
ELAY
RELA
Y C
OIL
R15
R
62
OW
Y
H
R W
R WFIELD WIRING
TERMINAL STRIP
FACTORY WIRING
R
W
FAN
BA
CK
Y3
YY
HIG
H L
IMIT

Form I-RA/RAD 150/250, P/N 234817R7, Page 48
Wiri
ng D
iagr
am 2
3272
8 fo
r Mod
el R
AD
250
(S
ee p
age
2 of
this
W.D
. on
page
49.
) Appendix (cont’d)
115/1/6O
MA
NU
AL
DIS
CO
NN
ECT
SWIT
CH
THERMOSTAT
T
Y
FF
Y
T
CA
D C
ELL
G
SPA
RK G
AP
IGN
ITIO
N C
ON
TRO
LLER
HO
URS
GG
ND
BL
R
1 18
14
9
2013
RW
R2 2
BU
RNER
MO
TOR
POST
PUR
GE
RELA
Y C
ON
TAC
TS (1
6)
R
OB
K
5
42
BK
11O
W
BL
BL
BR
H
W11
BR
W
O
RR
RR
W
OIL
HEA
TER
SEE
CH
AR
T
INLE
T H
EATE
R3O
WAT
T
R11 11
RR
NO
ZZ
LE H
EATE
R3O
WAT
T
R
YB
KB
KB
KB
K
L
YY
Y
L
R
LOW
TEM
PLI
MIT
OIL
HEA
TER
1716
224
WB
K
LIM
IT S
TATU
SLI
GH
T
8B
LB
L
IGN
ITIO
NTR
AN
SFO
RMER
11W
O
FUSE
HO
LDER
#6O
241
1OM
DA
FU
SE
52
52
OW
EXH
AU
ST F
LOW
SWIT
CH
(IF
USE
D)
AIR
PRE
SSU
RESW
ITC
H
P
BK
W6
G/Y
GG
6
11O
JU
MPE
R
REM
OV
E IF
O
PTIO
NA
L FL
OW
SWIT
CH
INST
ALL
ED
RR
2
P
BK
BK
P
W
6
CH
ASS
IS G
ND
.
CH
ASS
IS G
ND
.
GG
ND
.
13
BL
BL
W
3 4 5 6 7 8 9 1O 11 12 13 14 15 16 17 18 19 2O 21 22 23
PUR
GE
RELA
Y C
OIL
BU
RNER
MO
TOR
POST
6 - 7
L HP
CO
NN
ECTI
ON
IN F
AN
/BLO
WER
JU
NC
TIO
N B
OX
CO
NN
ECTI
ON
IN O
IL H
EATE
R C
OM
PAR
TMEN
T
CO
NN
ECTI
ON
IN P
UM
P EN
CLO
SURE
TERM
INA
L B
LOC
K -
MA
IN C
ON
TRO
L B
OX
FAC
TORY
WIR
ING
FIEL
D W
IRIN
G
WIR
ING
CO
DE
BLA
CK
- B
KB
RO
WN
- B
R
RED
- R
OR
AN
GE
- OY
ELLO
W -
YG
REEN
- G
BLU
E - B
LPU
RPLE
- PR
WH
ITE
- W
BO
OST
ER M
OTO
RO
PTIO
NA
L D
RA
FT
MO
TOR
BU
RNER
OIL
HEA
TER
300
WAT
T
INLE
T H
EATE
R3O
WAT
T
NO
ZZ
LE H
EATE
R3O
WAT
T
LIM
IT S
TATU
SLI
GH
T
HO
UR
MET
ER
AIR
CO
MPR
ESSO
RM
OTO
R
FUEL
VALV
E
REM
OTE
FU
ELPU
MP
#12
GA
.W
#12
GA
.B
K
CA
UTI
ON
: IF
AN
Y O
F TH
E O
RIG
INA
L W
IRE
AS
SUPP
LIED
WIT
H T
HE
APP
LIA
NC
E M
UST
BE
REPL
AC
ED,
IT M
UST
BE
REPL
AC
ED W
ITH
WIR
ING
MAT
ERIA
L H
AV
ING
A T
EMPE
RAT
URE
RAT
ING
OF
AT L
EAST
105
°C.
EXC
EPT
FOR
HEA
TIN
G E
LEM
ENT,
FA
N C
ON
TRO
L A
ND
LIM
IT W
IRIN
G W
HIC
H M
UST
BE
150°
C.
OIL
HEA
TER
HIG
H L
IMIT
OIL
HEA
TER
TEM
PER
ATU
RE C
ON
TRO
L
NO
ZZ
LE T
EMPE
RAT
URE
CO
NTR
OL
NO
ZZ
LE L
OW
OIL
TEM
P LI
MIT
HIG
H L
IMIT
MA
IN P
OW
ERIN
DIC
ATO
R LI
GH
T
BK
GW
2IN
DIC
ATO
R LI
GH
TM
AIN
PO
WER
BK
1
O
TERM
INA
L ST
RIP
- BU
RNER
JU
NC
TIO
N B
OX
Y
MA
IN C
ON
TRO
LB
OX
BU
RNER
JU
NC
TIO
NB
OX
G G
G
SHEE
T #1
2
VIE
WPO
RT
LIM
IT
BL
BK
21
W2
GN
D G
19
Y
BL
Y
MA
NU
AL
RESE
TH
HH
BK
OO
2327
28
CO
NTA
CTS
FAN
TD
13
1 18
HH
TIM
E D
ELAY
RELA
Y C
OIL
R15
R
62
OW
Y
H
R W
R WFIELD WIRING
TERMINAL STRIP
FACTORY WIRING
R
W
FAN
BA
CK
Y3
YY
HIG
H L
IMIT
L1 L3 L2CO
NTA
CTS
BLO
WER
MO
TOR
CO
NTA
CTO
R T2T3T1B
K W
INTE
RNA
LLY
MO
TOR
BLO
WER
PRO
TEC
TED
W2
CO
NTA
CTO
R C
OIL
BLO
WER
MO
TOR
1 - 2
- 3
1 2
1
2
#12
GA
.B
K
#12
GA
.W
BK W
#14
GA
.
#14
GA
.
#14
GA
.
#14
GA
.

Form I-RA/RAD 150/250, P/N 234817R7, Page 49
115 V POWER SUPPLY
115 V POWER SUPPLY
115 V POWER SUPPLY
REMOTE PUMPREMOTE PUMPREMOTE PUMPTHERMOSTATTHERMOSTATOPT. EXHAUST BOOSTEROPT. EXHAUST BOOSTEROPT. EXHAUST BOOSTER
MAIN JUNCTION BOX
MAIN JUNCTION BOX
MAIN JUNCTION BOX
MAIN JUNCTION BOXMAIN JUNCTION BOXMAIN JUNCTION BOXTERMINAL STRIP - MAIN JCTN BOXTERMINAL STRIP - MAIN JCTN BOXMAIN JUNCTION BOXMAIN JUNCTION BOXMAIN JUNCTION BOX
BLACK
WHITE
BARE/GRN
BLACKWHITEBARE/GRNWHITEREDBLACKWHITEBARE/GRN
WIRE NUT--BLACK WIRE
WIRE NUT--WHITE WIRE
WIRE NUT--GREEN WIRE
TERMINAL BLOCK 6TERMINAL BLOCK 2GROUND TERMINALTERMINAL WTERMINAL RTERMINAL BLOCK 19TERMINAL BLOCK 2GROUND TERMINAL
RA 12 MINIMUM
RA 12 MINIMUM
RA 12 MINIMUM
14 MINIMUM14 MINIMUM14 MINIMUM18 MINIMUM18 MINIMUM14 MINIMUM14 MINIMUM14 MINIMUM
SOURCE TO LOCATION COLOR CONNECTION TYPE GAUGE
FIELD CONNECTION CHART
SHORTENED SEQUENCE OF OPERATIONSEE INSTALLATION & OPERATION INSTRUCTIONS FOR FULL DETAILS
1. WITH POWER SUPPLIED AND DISCONNECT SWITCH "ON", OIL HEATERS PREHEAT OIL.2. ON CALL FOR HEAT, THERMOSTAT CLOSES CAUSING IGNITION CONTROLLER TO ENERGIZE BURNER MOTOR, ATOMIZING AIR COMPRESSOR, REMOTE OIL PUMP AND IGNITION TRANSFORMER.3. OIL IS IGNITED AND FLAME ESTABLISHED.4. 3O - 45 SECONDS AFTER BEGINNING OF SEQUENCE, THE FAN TIME DELAY RELAY ACTIVATES THE FAN OR BLOWER.5. WHEN THERMOSTAT IS SATISFIED, POWER IS REMOVED FROM IGNITION CONTROLLER, DE-ENERGIZING BURNER MOTOR, ATOMIZING AIR COMPRESSOR AND REMOTE OIL PUMP.6. AIR MOVING DEVICE (FAN OR BLOWER) CONTINUES TO OPERATE UNTIL THE TIME DELAY RELAY CONTACTS OPEN (NOMINAL 3 MINUTES).7. IF IGNITION DOES NOT OCCUR WITHIN 30 SECONDS THE IGNITION CONTROLLER WILL LOCK OUT. IF THE UNIT LOCKS OUT, RESET THE CONTROLLER BY PRESSING AND HOLDING DOWN ON THE RED RESET BUTTON FOR (4) SECONDS AND THEN RELEASING IT. DO NOT RESET MORE THAN ONE TIME !
230369
OIL PREHEATER HIGH LIMIT
OIL PREHEATER TEMP CONTROL
NOZZLE TEMP CONTROLOIL PREHEATER LOW TEMP LIMIT
NOZZLE LOW OIL TEMP LIMIT
FAN BACK HIGH LIMIT
HIGH LIMIT (MODEL 15O)
HIGH LIMIT (MODEL 25O)
NC
NC
NCNO
NO
NC
NC
NC
220° F
170° F
160° F155° F
145° F
150° F
155° F
180° F
120° F
155° F
150° F140° F
105° F
125° F 135° F
150° F
CONTROL STYLE ACTIVATE RESET
CONTROL TEMPERATURE LIMITS
MANUAL RESET VIEWPORT LIMIT NC 275° F 45° F
SHEET #2
RAD 8 MINIMUM
RAD 8 MINIMUM
RAD 8 MINIMUM
232728
Page 2 of Wiring Diagram 230369 for Models RA/RAD 150; RA 250 and Page 2 of Wiring Diagram 232728 for Model RAD 250

Form I-RA/RAD 150/250, P/N 234817R7, Page 50
Hour Meter / Cleaning RecordCleaning Date Meter Reading Initials Cleaning Date Meter Reading Initials

Form I-RA/RAD 150/250, P/N 234817R7, Page 51
IndexAAfter Start-up 21Air Band Setting 22Air Compressor 38Air for Combustion 6Air pressure switch 38Air ShutterGuide 22
BBackflow Sensor 36, 38Burner 29Burner Oil Strainer 26Burner operation erratic 44
CCleaning Oil Pre-Heater 33Cleaning Record 50Cleaning the Heat Exchanger/
Combustion Chamber 28Clearances from Combustibles
8Codes and Regulations 4Compressor Air Filter 29Line Connections 12
DDischarge Air Temperature 23Discharge Duct 17Discharge Line 12Draft Regulator 7, 16Ducts 17
EElectrode 40Electrode Adjustment 31Electrode Gap 31Electrodes 30Spark Electrodes 31End Cone 29
FOil Filter 7Foot Valve 7Foot Valve Strainer 7Fuel Connection 31Fuel Line Assembly 30, 40Fuels 5Fuel Tank 10Fuse 38Fuse Size 18
GGreen Light 38
HHazard Intensity Levels 5Hazardous Atmosphere 5Heater Stand 13Heat Exchanger 27Heating element 40High Altitude Installation 9High Oil Temperature Limit
Switch 40High Temperature Limit Cycles
45
IIgnition Controller 38Inlet Duct Flange 17Inlet Heater 40Inlet Manifold 7Inspect the heat exchanger
tubes 27Internal Pump Screen 25
LIndicator Lights 36Limit Controls 45Location of Components 38Lockout 43Low Oil Temperature Limit 40
MMaintenance Procedures 25Maintenance Requirements 24Maintenance Schedule 24Manual Disconnect Switch 38Measuring Draft Over Fire 21Motor 38Mounting the Heater 13
NNon-Compliance 6Notice to Owner and Installer 2Nozzle 30, 40Nozzle Low Oil Temperature
Limit 40Nozzle Temperature Control 40
OObservation Door 21Oil Burner Troubleshooting 36Oil Delivery System 46Oil Heat Exchanger 40Oil Pre-Heater 32Oil Temperature Control 40Operation 34
PAdditional Parts 7Parts Carton 7Heater Placement 8Power Installation 18Pre-Heater Controls 32Priming and Leak Check 19Pump 7, 10, 11Pump Power 18
RRecharging the Suction Line 26Removing Soot and Ash 28Return Line 12
SSecondary Heat Source 5Service 34Start-Up 19Start-Up Procedure 21Suction Line 11Supply Line Filter 25Supply Lines 11Suspension 13
TTerminal Connections 38Thermostat 7, 18Transformer 31, 38Troubleshooting 36Troubleshooting Chart Guide 37Troubleshooting Charts 39Typical Installation 12
UUnpacking 6
VVacuum Gauge 7Venting 5Venting the Heater 14Vertical Louvers 13Viewport Cover 36
WWarning label 7Safety Warnings 5Warranty 4Weights 13Window Decal 7Wiring Diagram 47

Form I-RA/RAD 150/250, P/N 234817R7, Page 52
www.ReznorHVAC.com; (800) 695-1901©2015 Reznor, LLC. All rights reserved.Trademark Note: Reznor® is registered in at least the United States.
0515 Form I-RA/RAD 150/250 (Version 0.7)
AG
ENCY PROCESS
STA
RT-
UP
PRODUCT
CU
STOM
ER
WARRANTY
CONVERGENT
QUALITY SYSTEM
CQSCQS
CAUTION: DO NOT TAMPER WITH THE UNIT OR CONTROLS. CALL YOUR SERVICE PERSON.
Installer: Name ________________________________________________________ Company ________________________________________________________ Address ________________________________________________________ ________________________________________________________ ________________________________________________________ Phone _________________________________
Distributor (company from which the unit was purchased): Company ________________________________________________________ Contact ________________________________________________________ Address ________________________________________________________ ________________________________________________________ ________________________________________________________ Phone _________________________________
Model ____________ Serial No._____________________Date of Installation ____________
SPECIFIC INSTALLATION NOTES: (i.e. Location, Amps, Temperature, Voltage, Adjustments, Warranty, etc.)
____________________________________________________________________________
____________________________________________________________________________
____________________________________________________________________________
____________________________________________________________________________
BUILDING OWNER OR MAINTENANCE PERSONNEL:For service or repair• Contact the installer listed above. • If you need additional assistance, contact the Reznor Distributor listed above.• For more information, contact your Reznor Representative by calling (800) 695-1901. Reznor, LLC 150 McKinley Avenue Mercer, PA 16137
INSTALLER MUST COMPLETE THE FOLLOWING:
�