Embed Size (px)
Citation preview

Installing RHEL on a standalone UCS C240M5 server. Contents
IntroductionSetup UsedPrerequisites Procedure
Introduction
This article outlines the procedure for installing RHEL on local RAID configuration in a standalone UCSC C240 M5server.
Setup Used
UCSC-C240-M5LRAID Controller: Cisco 12G SAS HBA (UCSC-SAS-M5)4K sector HDDsCIMC: 3.1(3a)OS: RHEL 7.3
Prerequisites
1. Download the RHEL ISO and the Controller Driver ISO:
RHEL: rhel-server-7.3-x86_64-boot.iso
Driver ISO: ucs-cxxx-drivers-linux.3.1.3.iso
(In the ISO, navigate to Storage -> LS -> UCSC-SAS-M5 -> RHEL -> RHEL7.3 -> mpt3sas-23.00.00.00_el7.3-1.x86_64.iso.gz )
2. If you extract the mpt3sas-23.00.00.00_el7.3-1.x86_64.iso.gz file, you will get the driver ISO -> mpt3sas-23.00.00.00_el7.3-1.x86_64.iso
3. Similarly, if you are using a UCSC-RAID-M5 controller in your server, you can navigate to its corresponding driver.
Procedure
Step 1. Since the server has 4k sector drives, we will do a UEFI boot. The Boot Order should looklike below:

Step 2. Open the KVM and map the RHEL ISO:
Step 3. Press F6 and boot from the UEFI: Cisco vKVM-Mapped vDVD1.24

Step 4.Select the “Install Red Hat Enterprise Linux 7.3” option and press ‘e’
Step 5. You will see the below screen:
Step 6. Enter the command “linux dd” and do a Ctrl + x

Step 7. The above command will start the Interactive mode:
Step 8. Unmap the RHEL ISO and map the controller driver ISO:

Step 9. Type ‘r’ to refresh the driver disk list:

Step 10. You will now see the controller driver ISO listed. Type ‘7’ and make the selection:

Step 11. Enter ‘1’ and then ‘c’ to continue:

Step 12. The .rpm driver is inside the .iso file. You may get a warning that “DD repo content not a file”, but it is only awarning – the driver would have been installed.
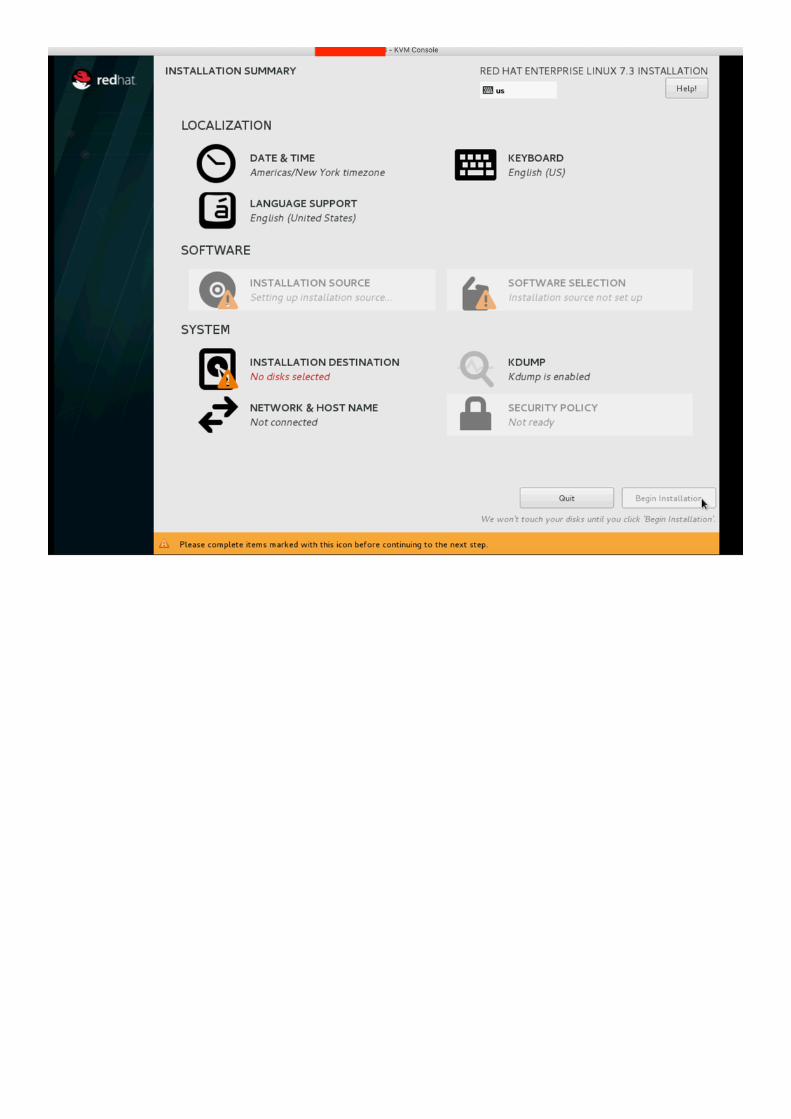
Step 13. You should be at the “Driver disk device selection” menu again. Unmap the driver ISO and map your RHEL ISOagain. Press ‘r’ to refresh and then – press ‘c’ to continue with the RHEL installation. The installer should be able torecognise the RAID controller and the disks managed by it.


![Zggh]hPH>new.groteck.ru/images/catalog/40429/9deec18637ee6ecbb5a6ae0a1… · UCS 6200 Series Fabric Interconnect UCS Manager UCS C240 M3/M4 Series Rack Server UCS Integrated Infrastructure](https://img.pdfslide.net/doc/110x75/5fcc7e22130a463bbb0b3c57/zgghhphnew-ucs-6200-series-fabric-interconnect-ucs-manager-ucs-c240-m3m4.jpg)