Embed Size (px)
Citation preview
1 | P a g e
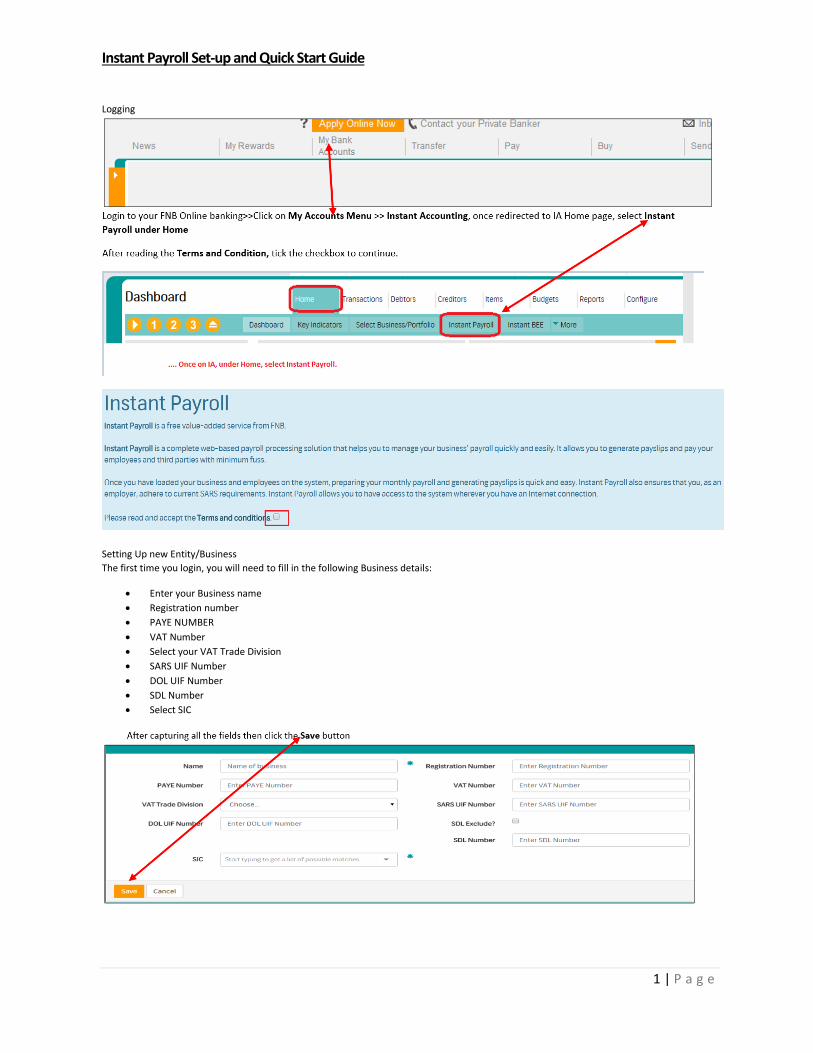
Instant Payroll Set-up and Quick Start Guide
Logging
Setting Up new Entity/Business
The first time you login, you will need to fill in the following Business details:
Enter your Business name
Registration number
PAYE NUMBER
VAT Number
Select your VAT Trade Division
SARS UIF Number
DOL UIF Number
SDL Number
Select SIC
2 | P a g e
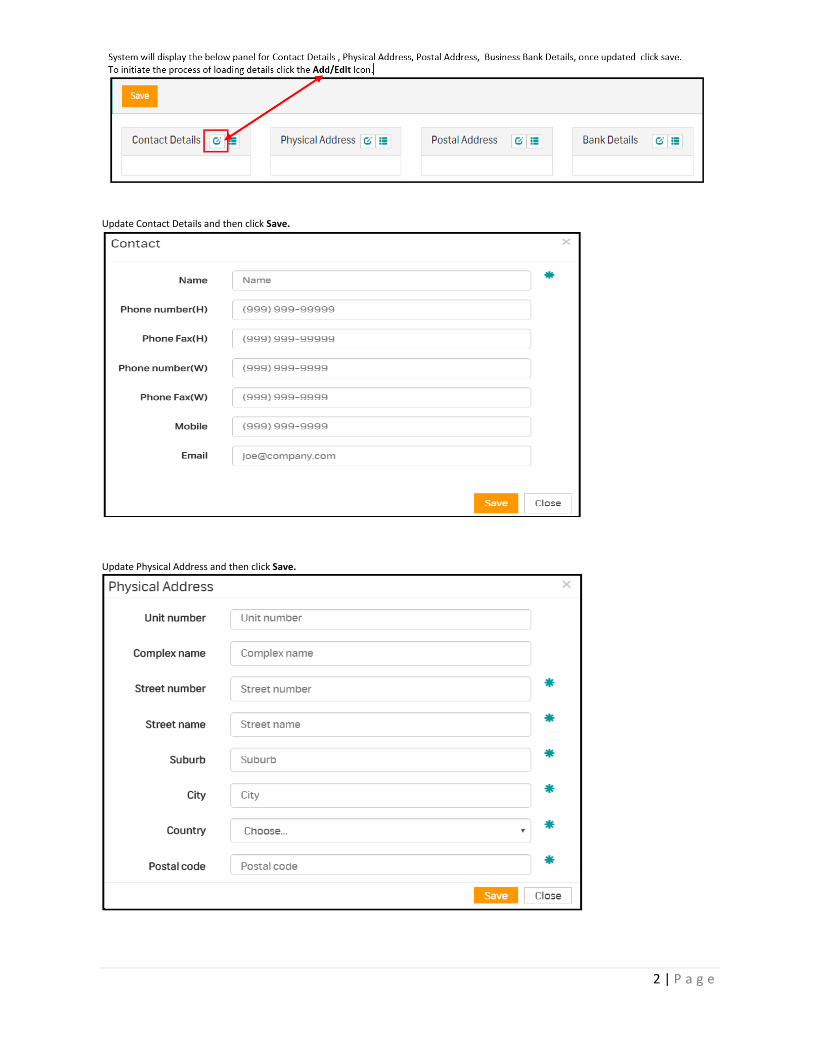
Update Contact Details and then click Save.
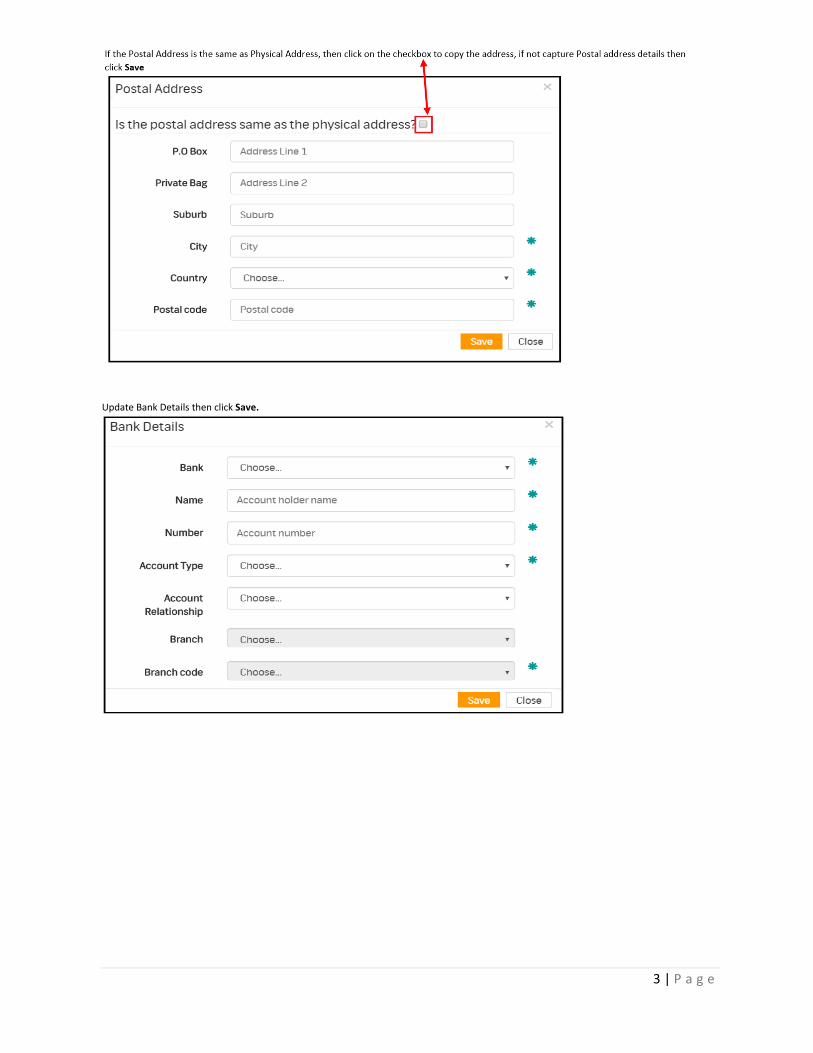
Update Physical Address and then click Save.
3 | P a g e
Update Bank Details then click Save.
4 | P a g e
Create Employees
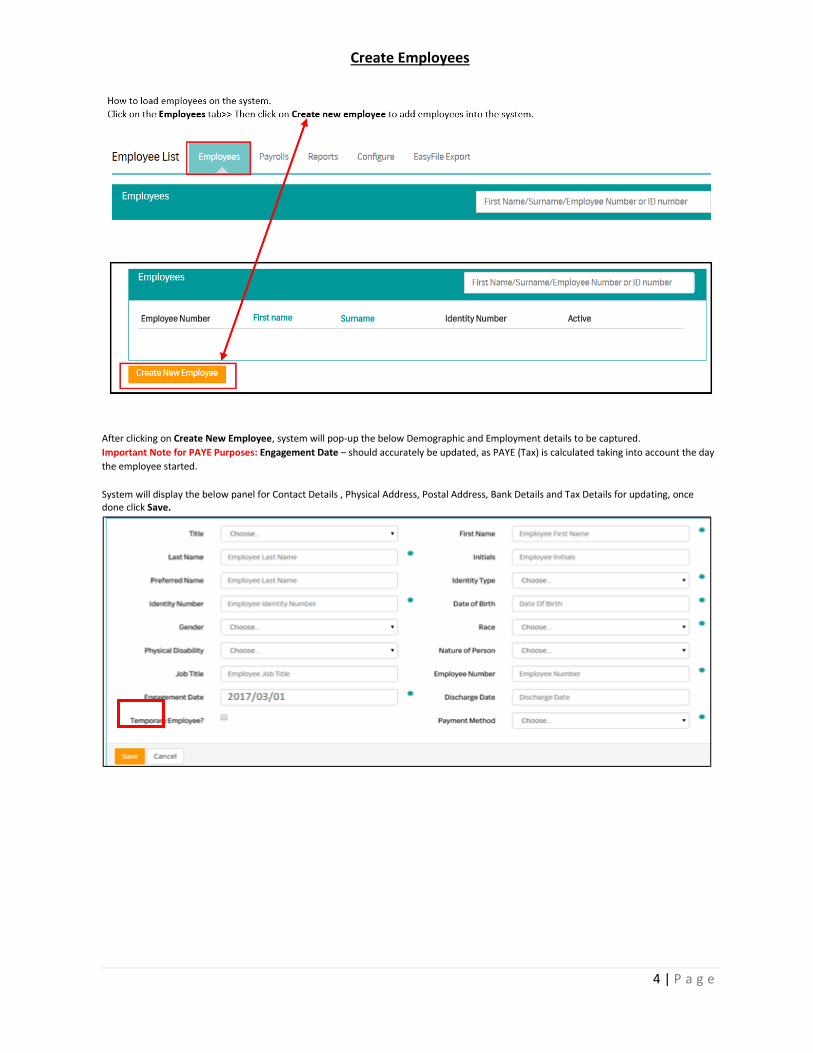
After clicking on Create New Employee, system will pop-up the below Demographic and Employment details to be captured.
Important Note for PAYE Purposes: Engagement Date – should accurately be updated, as PAYE (Tax) is calculated taking into account the day
the employee started.
System will display the below panel for Contact Details , Physical Address, Postal Address, Bank Details and Tax Details for updating, once done click Save.
5 | P a g e
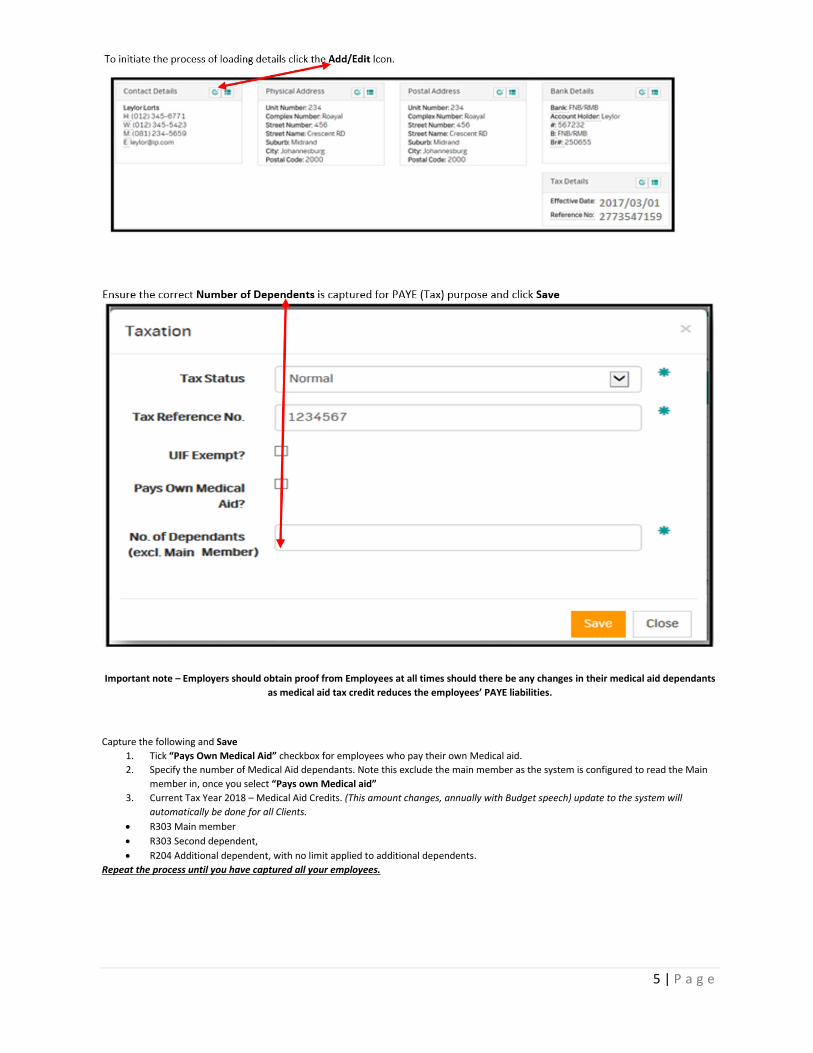
Important note – Employers should obtain proof from Employees at all times should there be any changes in their medical aid dependants
as medical aid tax credit reduces the employees’ PAYE liabilities.
Capture the following and Save
1. Tick “Pays Own Medical Aid” checkbox for employees who pay their own Medical aid.
2. Specify the number of Medical Aid dependants. Note this exclude the main member as the system is configured to read the Main
member in, once you select “Pays own Medical aid”
3. Current Tax Year 2018 – Medical Aid Credits. (This amount changes, annually with Budget speech) update to the system will
automatically be done for all Clients.
R303 Main member
R303 Second dependent,
R204 Additional dependent, with no limit applied to additional dependents.
Repeat the process until you have captured all your employees.
6 | P a g e
Upload Employee’s List
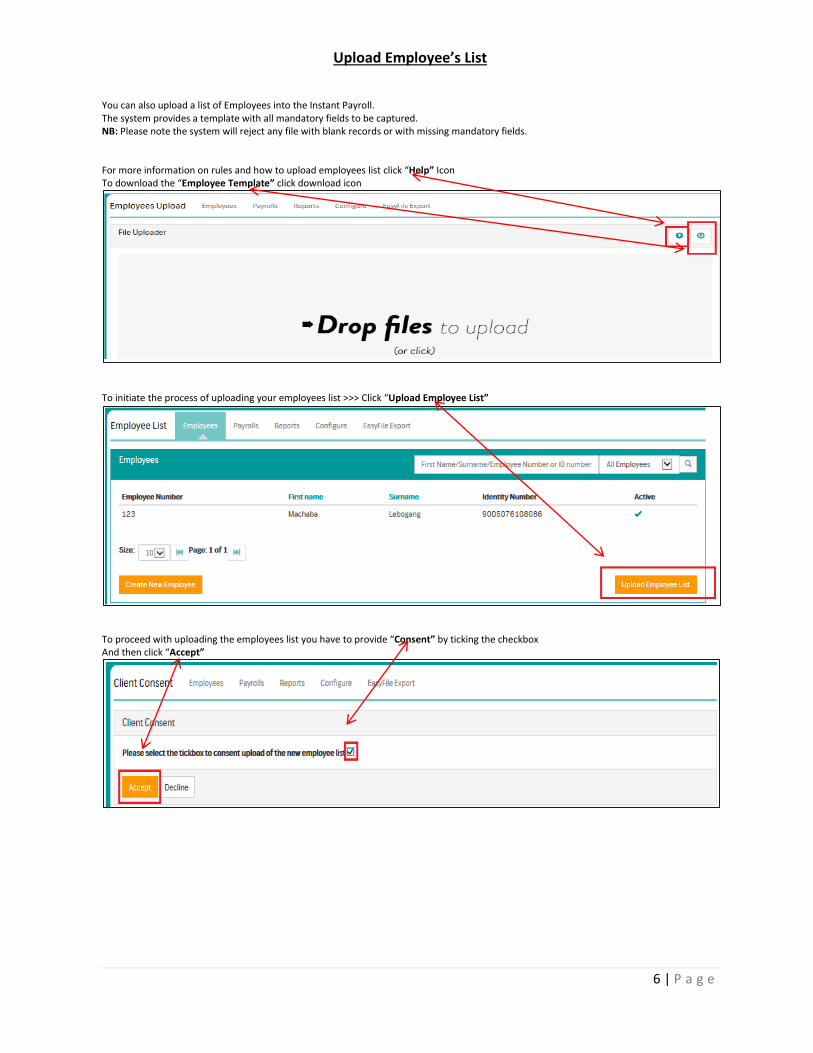
You can also upload a list of Employees into the Instant Payroll. The system provides a template with all mandatory fields to be captured. NB: Please note the system will reject any file with blank records or with missing mandatory fields. For more information on rules and how to upload employees list click “Help” Icon To download the “Employee Template” click download icon
To initiate the process of uploading your employees list >>> Click “Upload Employee List”
To proceed with uploading the employees list you have to provide “Consent” by ticking the checkbox And then click “Accept”
7 | P a g e
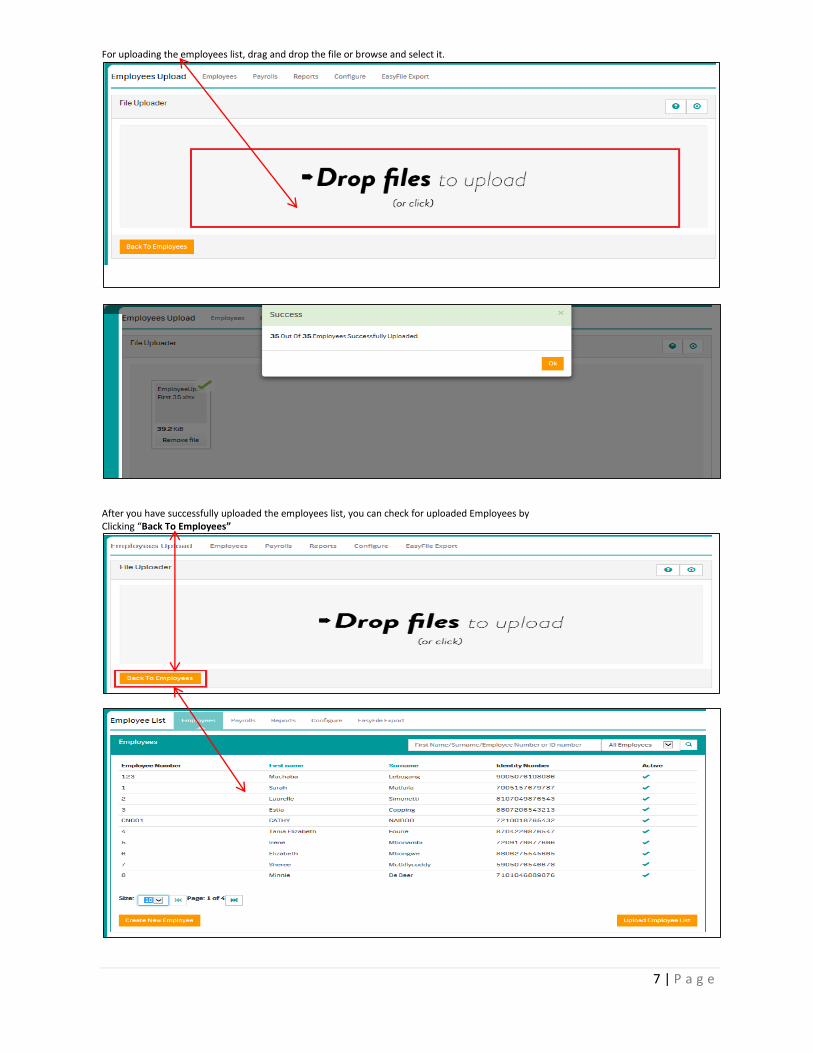
For uploading the employees list, drag and drop the file or browse and select it.
After you have successfully uploaded the employees list, you can check for uploaded Employees by Clicking “Back To Employees”
8 | P a g e
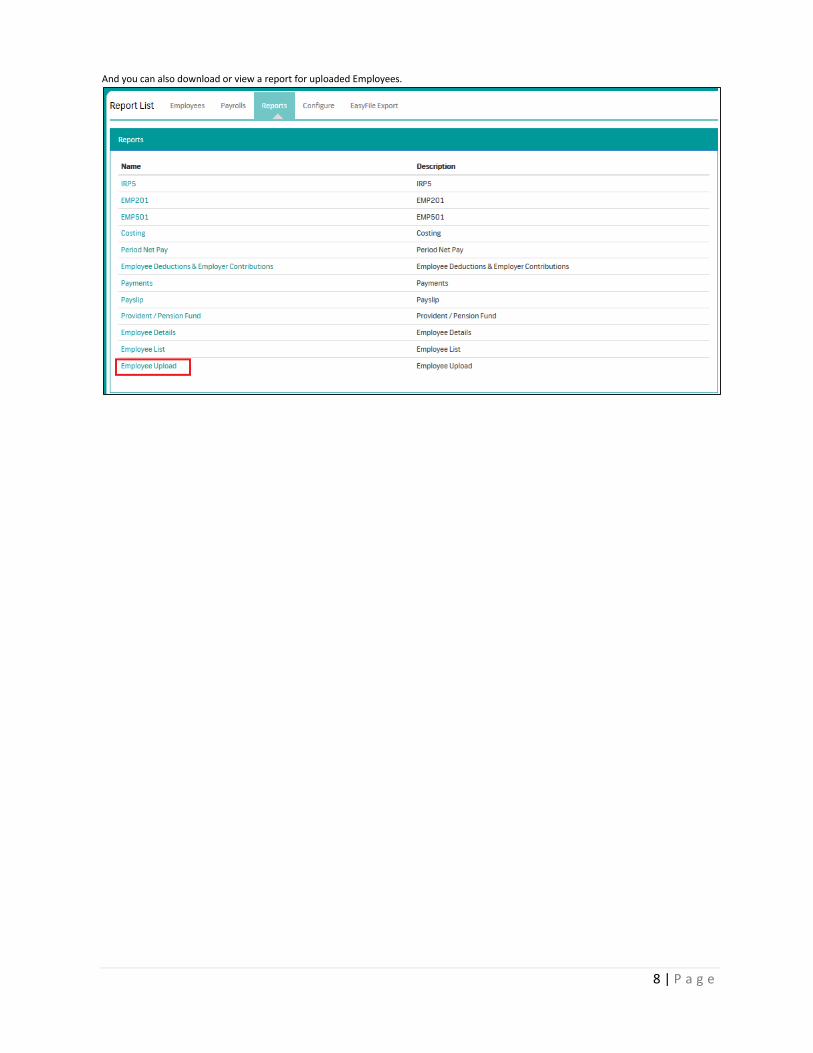
And you can also download or view a report for uploaded Employees.
9 | P a g e
Payroll & Payrun
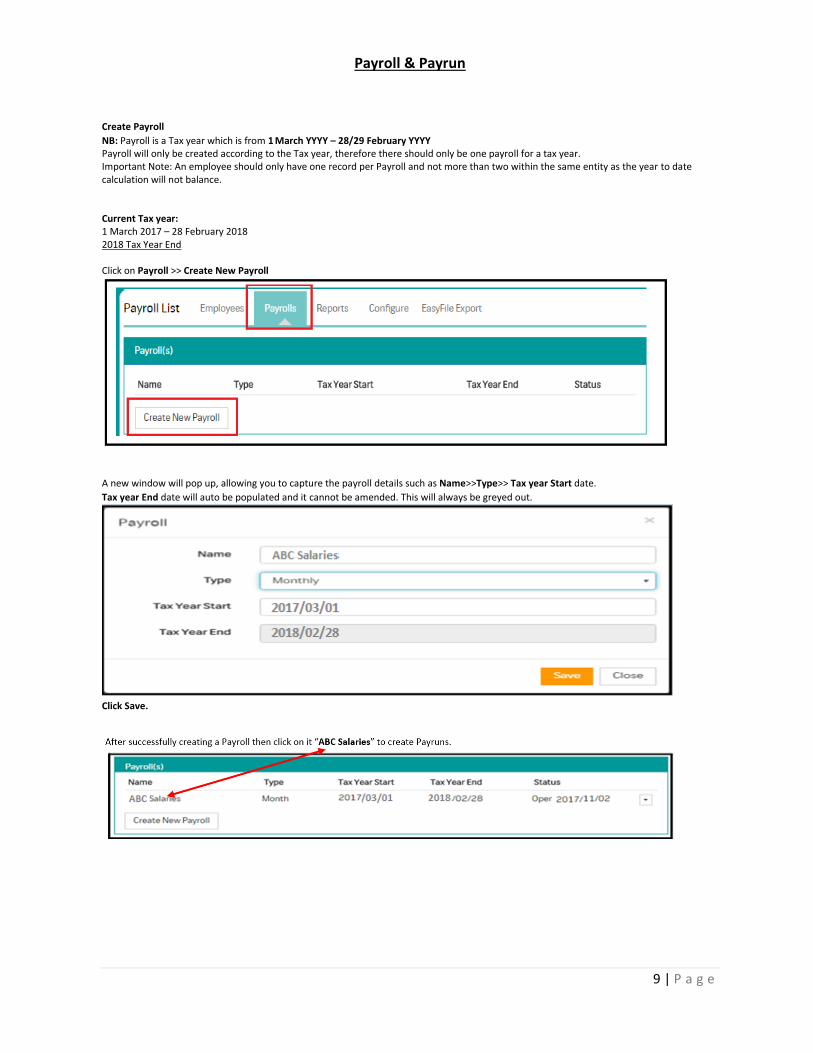
Create Payroll
NB: Payroll is a Tax year which is from 1 March YYYY – 28/29 February YYYY Payroll will only be created according to the Tax year, therefore there should only be one payroll for a tax year. Important Note: An employee should only have one record per Payroll and not more than two within the same entity as the year to date calculation will not balance. Current Tax year: 1 March 2017 – 28 February 2018 2018 Tax Year End Click on Payroll >> Create New Payroll
A new window will pop up, allowing you to capture the payroll details such as Name>>Type>> Tax year Start date.
Tax year End date will auto be populated and it cannot be amended. This will always be greyed out.
Click Save.
10 | P a g e
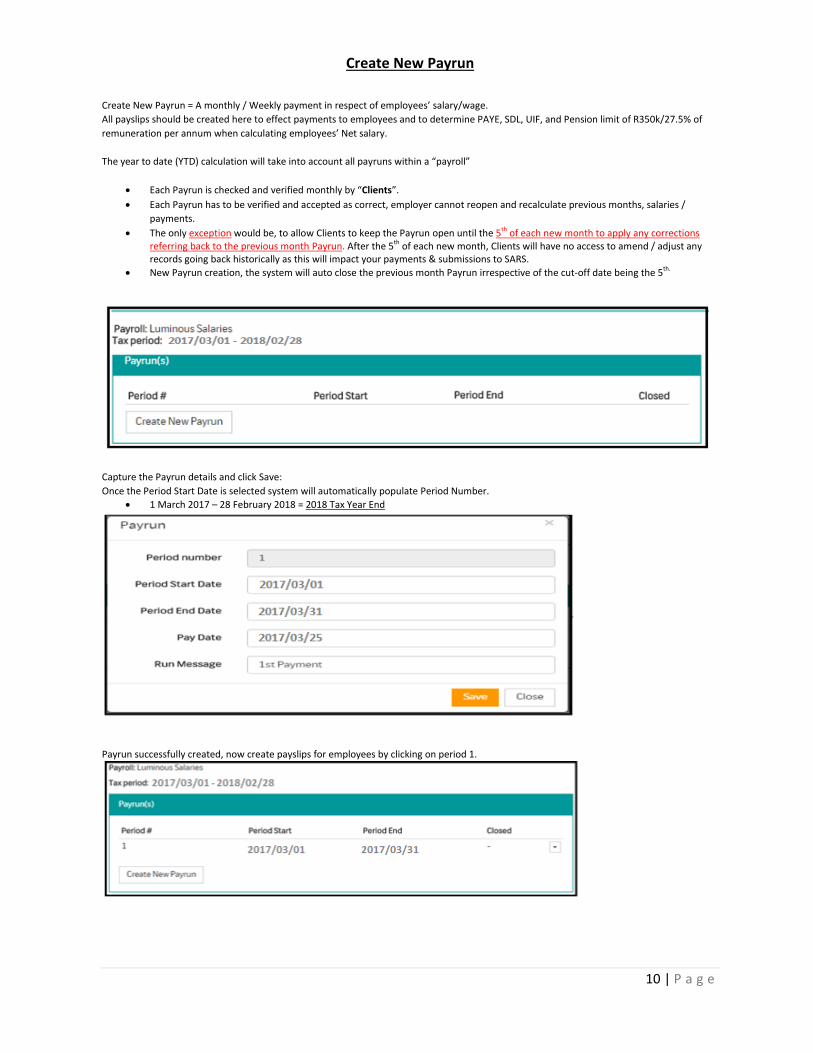
Create New Payrun
Create New Payrun = A monthly / Weekly payment in respect of employees’ salary/wage.
All payslips should be created here to effect payments to employees and to determine PAYE, SDL, UIF, and Pension limit of R350k/27.5% of
remuneration per annum when calculating employees’ Net salary.
The year to date (YTD) calculation will take into account all payruns within a “payroll”
Each Payrun is checked and verified monthly by “Clients”.
Each Payrun has to be verified and accepted as correct, employer cannot reopen and recalculate previous months, salaries /
payments.
The only exception would be, to allow Clients to keep the Payrun open until the 5th of each new month to apply any corrections referring back to the previous month Payrun. After the 5th of each new month, Clients will have no access to amend / adjust any records going back historically as this will impact your payments & submissions to SARS.
New Payrun creation, the system will auto close the previous month Payrun irrespective of the cut-off date being the 5th.
Capture the Payrun details and click Save:
Once the Period Start Date is selected system will automatically populate Period Number.
1 March 2017 – 28 February 2018 = 2018 Tax Year End
Payrun successfully created, now create payslips for employees by clicking on period 1.
11 | P a g e
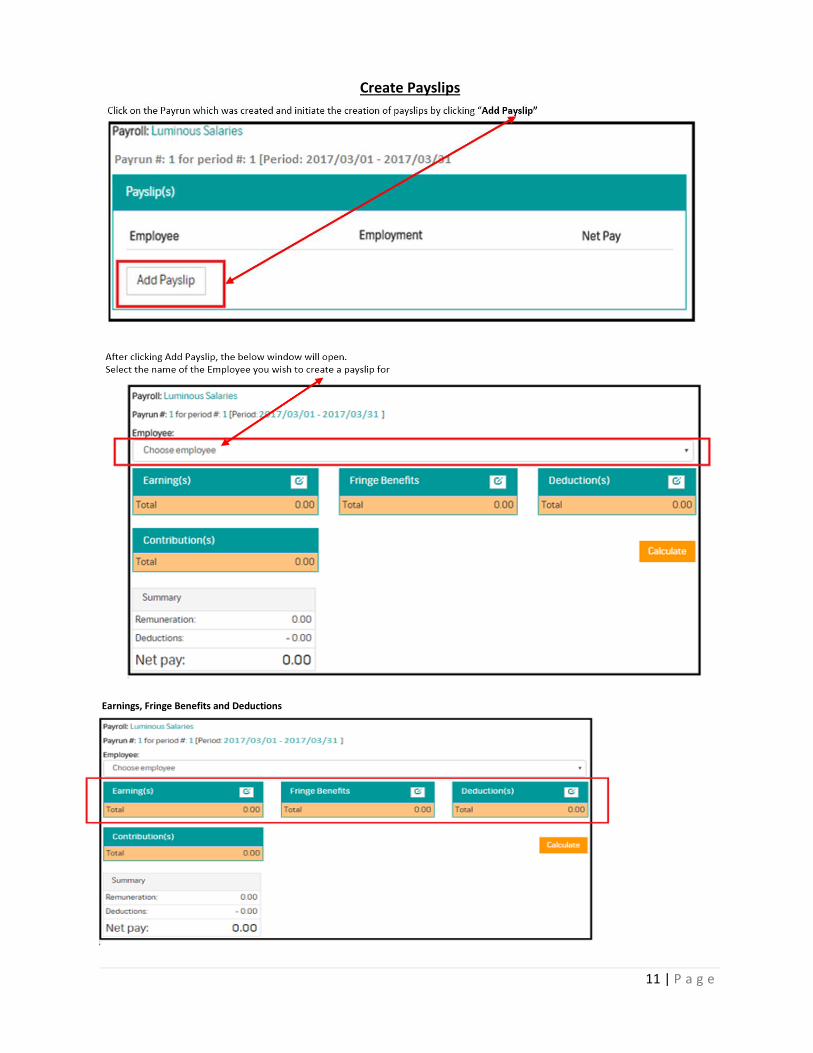
Create Payslips
Earnings, Fringe Benefits and Deductions
12 | P a g e
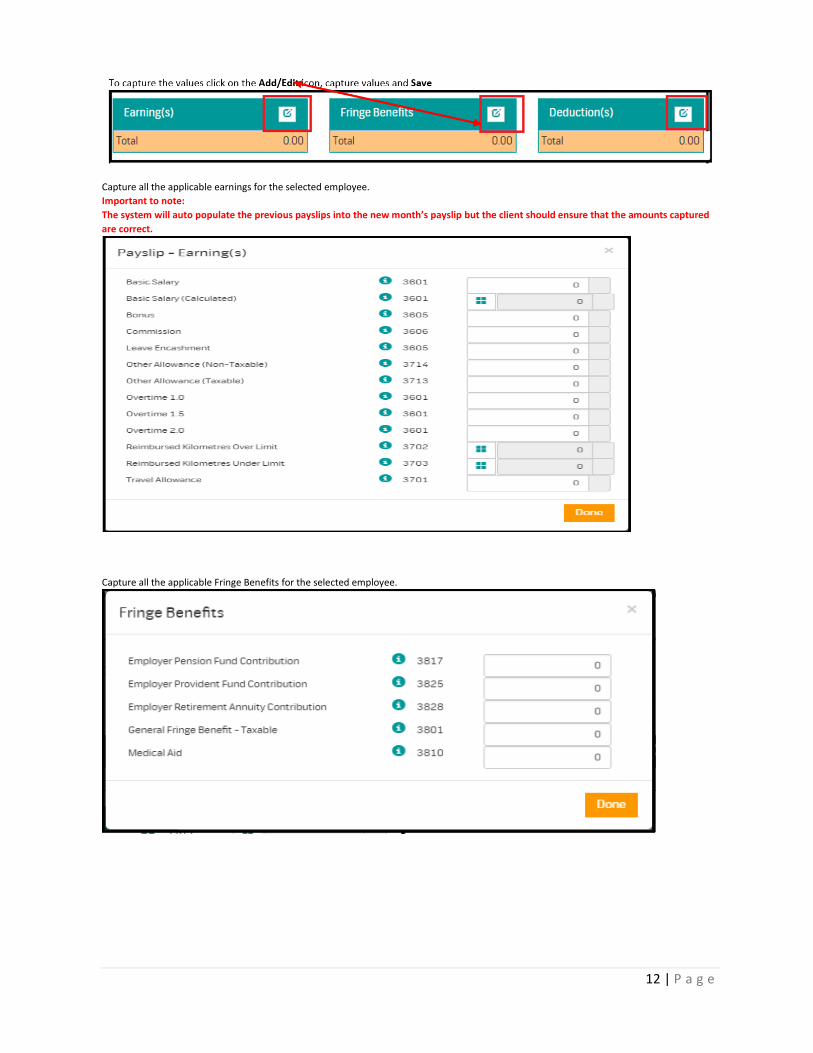
Capture all the applicable earnings for the selected employee.
Important to note:
The system will auto populate the previous payslips into the new month’s payslip but the client should ensure that the amounts captured
are correct.
Capture all the applicable Fringe Benefits for the selected employee.
13 | P a g e
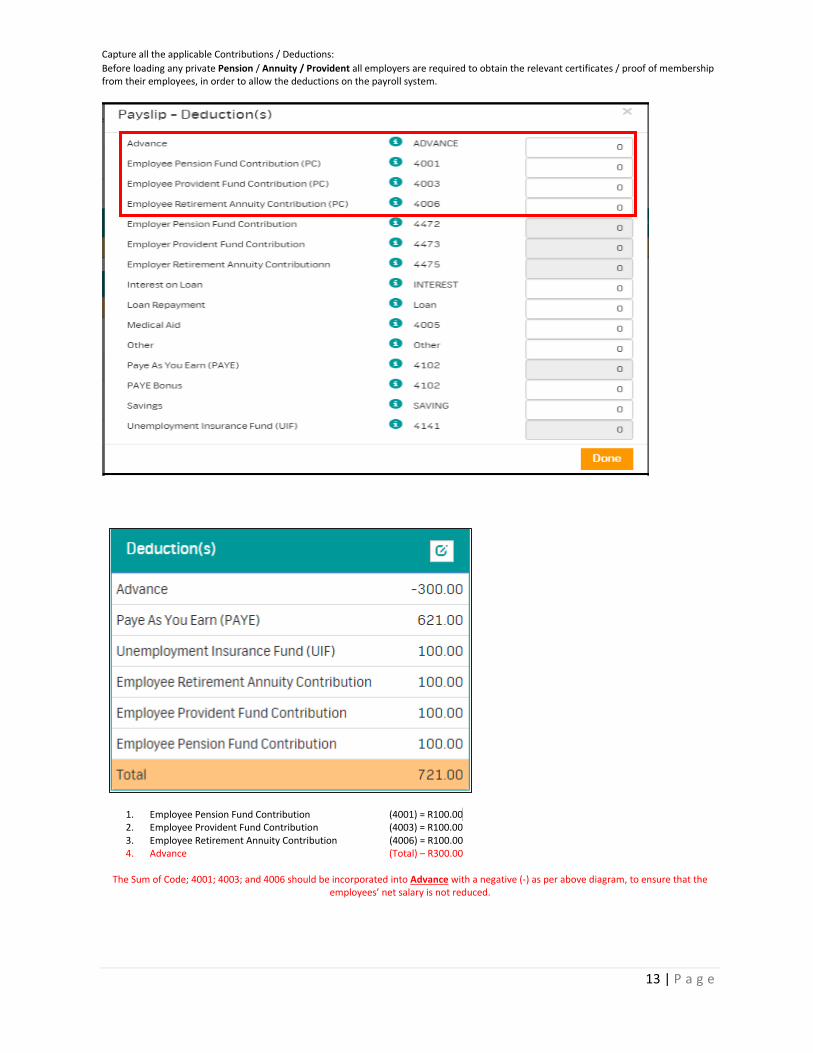
Capture all the applicable Contributions / Deductions:
Before loading any private Pension / Annuity / Provident all employers are required to obtain the relevant certificates / proof of membership from their employees, in order to allow the deductions on the payroll system.
1. Employee Pension Fund Contribution (4001) = R100.00 2. Employee Provident Fund Contribution (4003) = R100.00 3. Employee Retirement Annuity Contribution (4006) = R100.00 4. Advance (Total) – R300.00
The Sum of Code; 4001; 4003; and 4006 should be incorporated into Advance with a negative (-) as per above diagram, to ensure that the
employees’ net salary is not reduced.
14 | P a g e
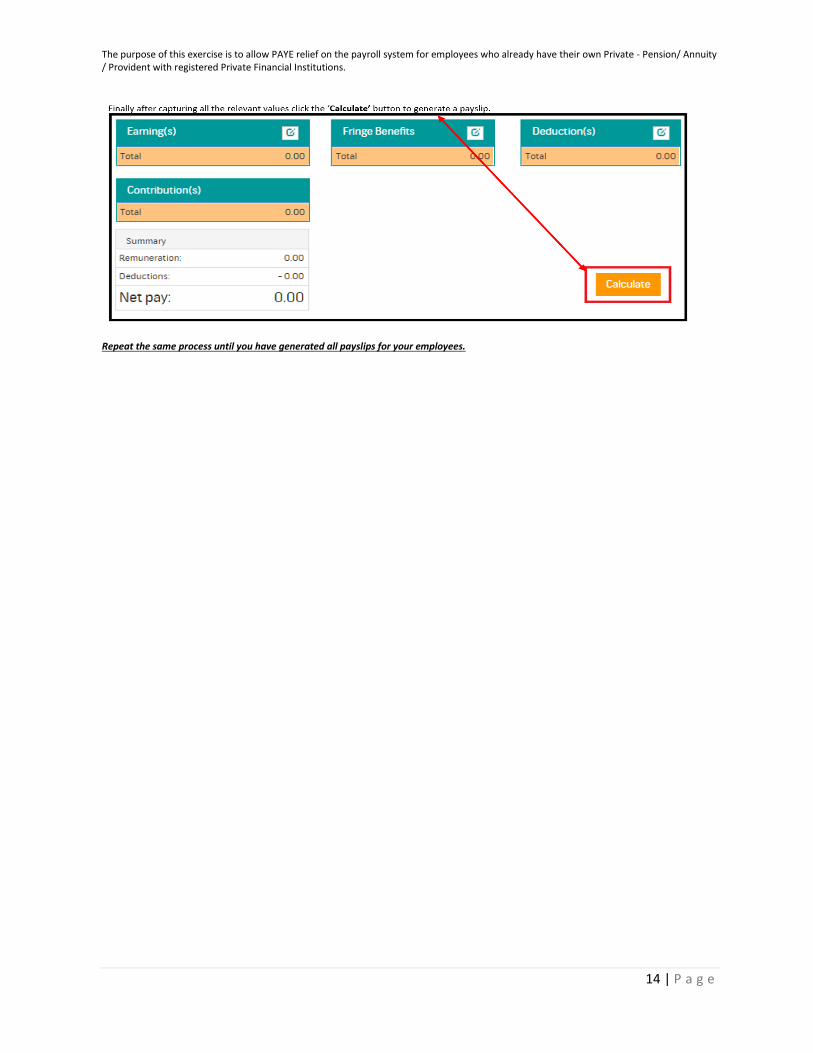
The purpose of this exercise is to allow PAYE relief on the payroll system for employees who already have their own Private - Pension/ Annuity / Provident with registered Private Financial Institutions.
Repeat the same process until you have generated all payslips for your employees.
15 | P a g e
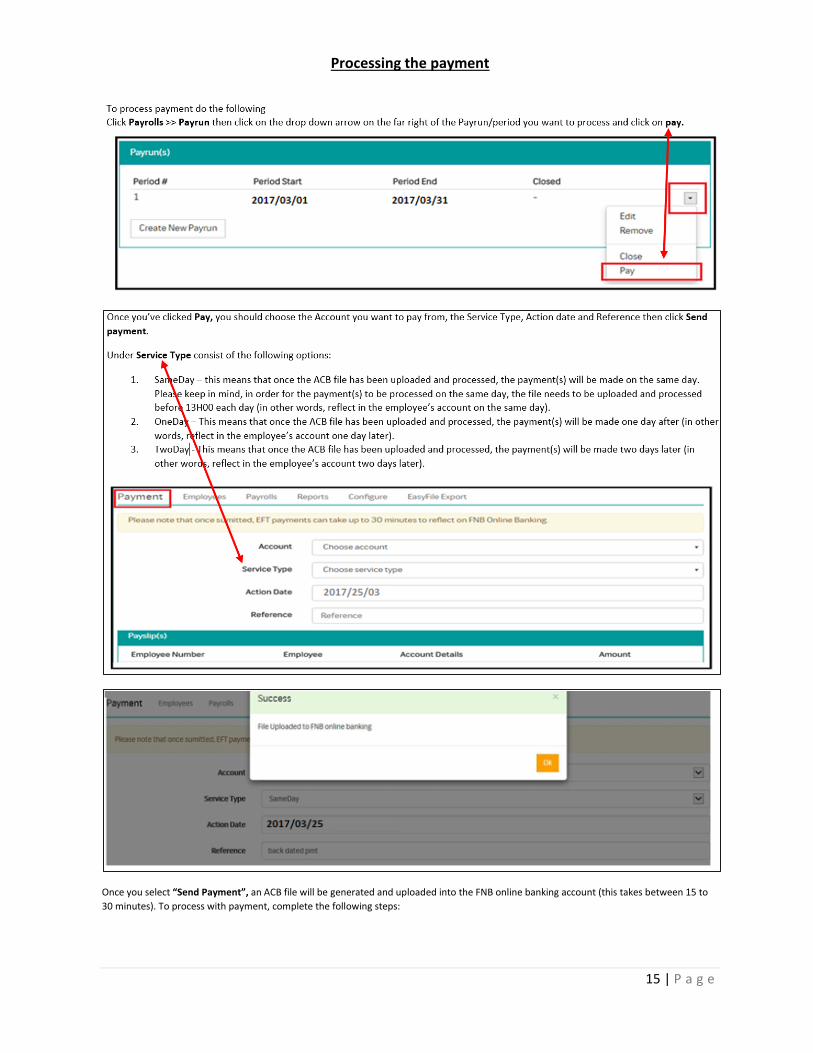
Processing the payment
Once you select “Send Payment”, an ACB file will be generated and uploaded into the FNB online banking account (this takes between 15 to
30 minutes). To process with payment, complete the following steps:
16 | P a g e
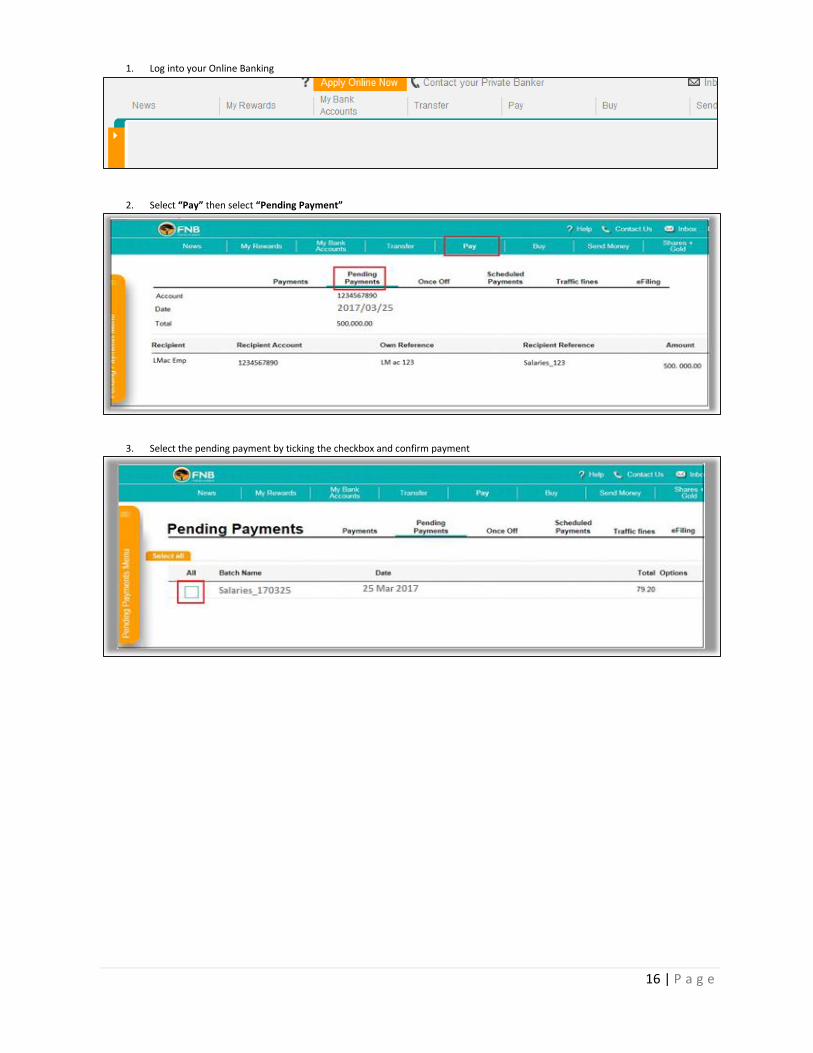
1. Log into your Online Banking
2. Select “Pay” then select “Pending Payment”
3. Select the pending payment by ticking the checkbox and confirm payment
17 | P a g e
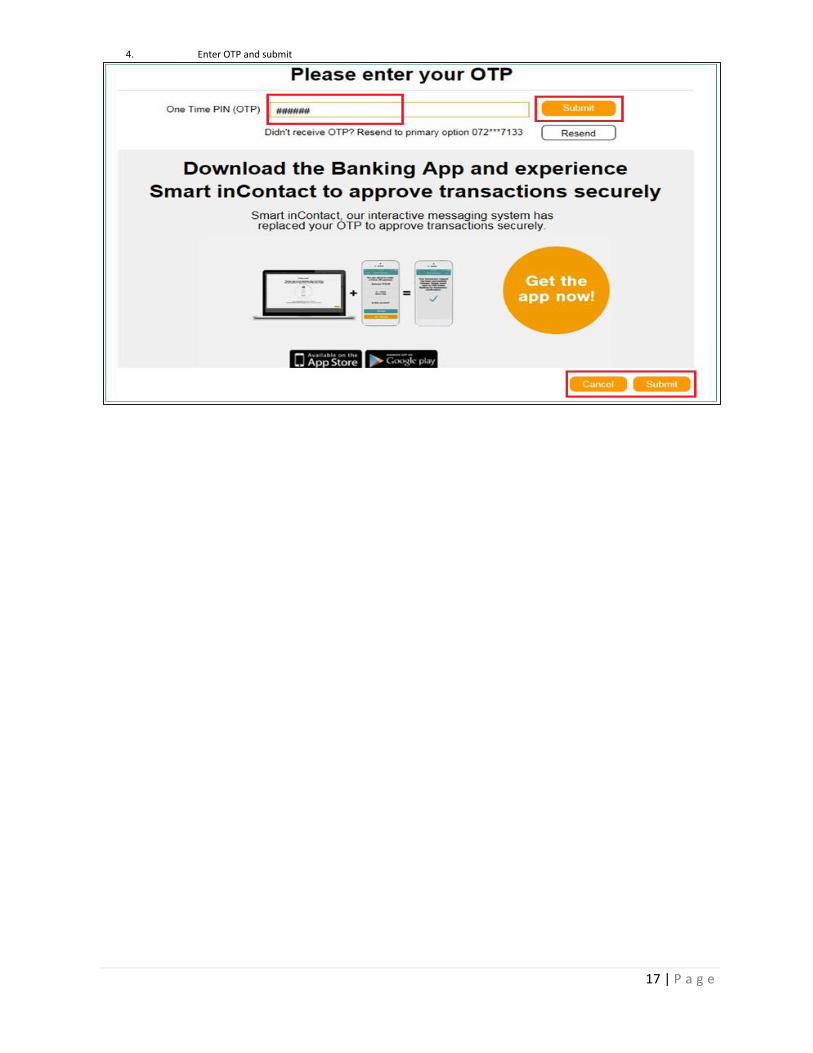
4. Enter OTP and submit
18 | P a g e
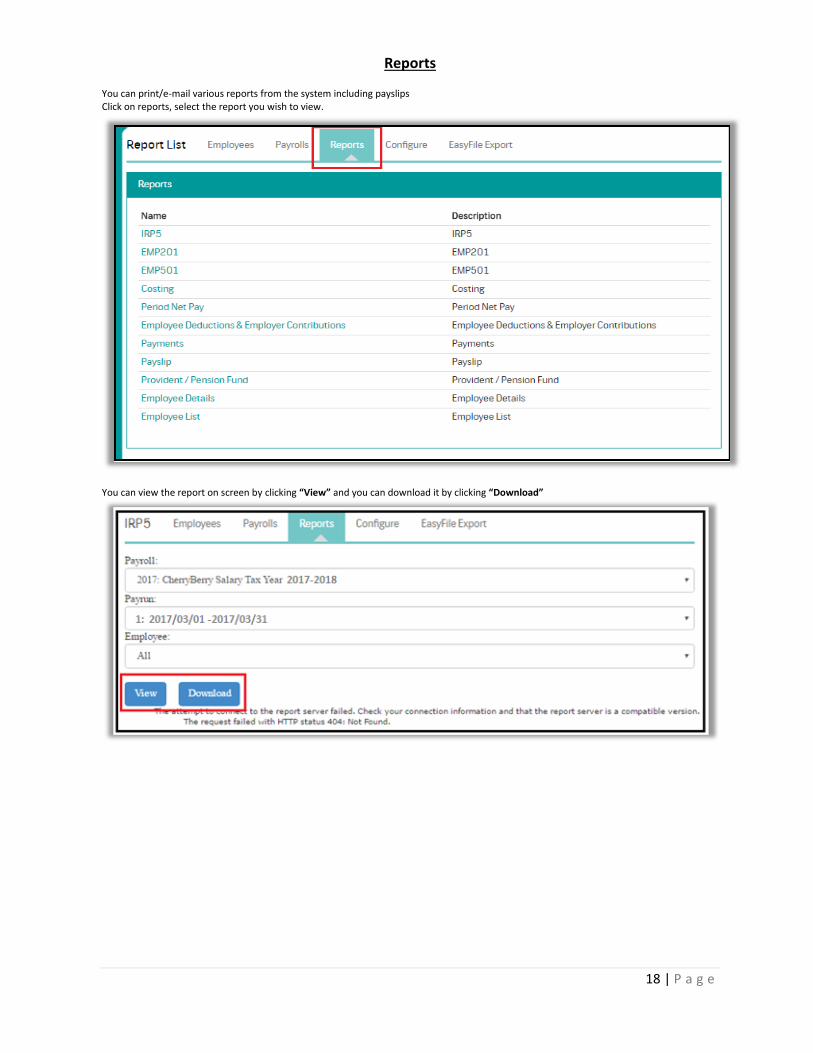
Reports You can print/e-mail various reports from the system including payslips Click on reports, select the report you wish to view.
You can view the report on screen by clicking “View” and you can download it by clicking “Download”
19 | P a g e
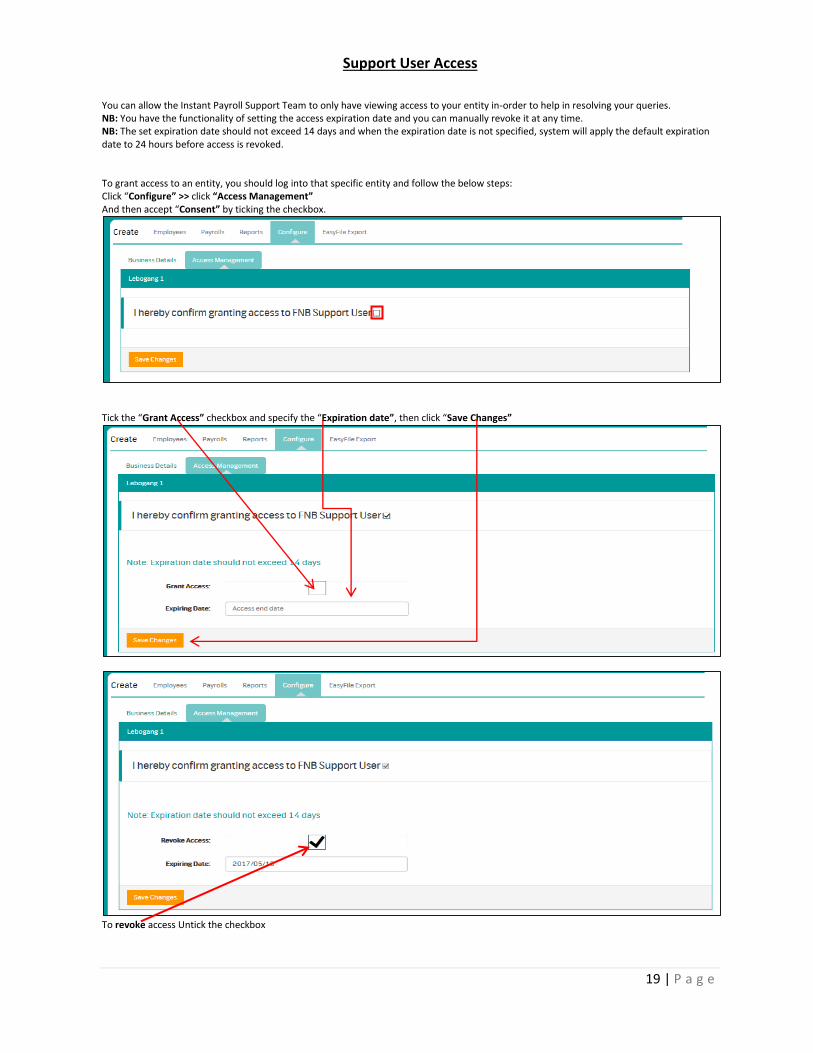
Support User Access
You can allow the Instant Payroll Support Team to only have viewing access to your entity in-order to help in resolving your queries. NB: You have the functionality of setting the access expiration date and you can manually revoke it at any time. NB: The set expiration date should not exceed 14 days and when the expiration date is not specified, system will apply the default expiration date to 24 hours before access is revoked. To grant access to an entity, you should log into that specific entity and follow the below steps: Click “Configure” >> click “Access Management” And then accept “Consent” by ticking the checkbox.
Tick the “Grant Access” checkbox and specify the “Expiration date”, then click “Save Changes”
To revoke access Untick the checkbox
20 | P a g e
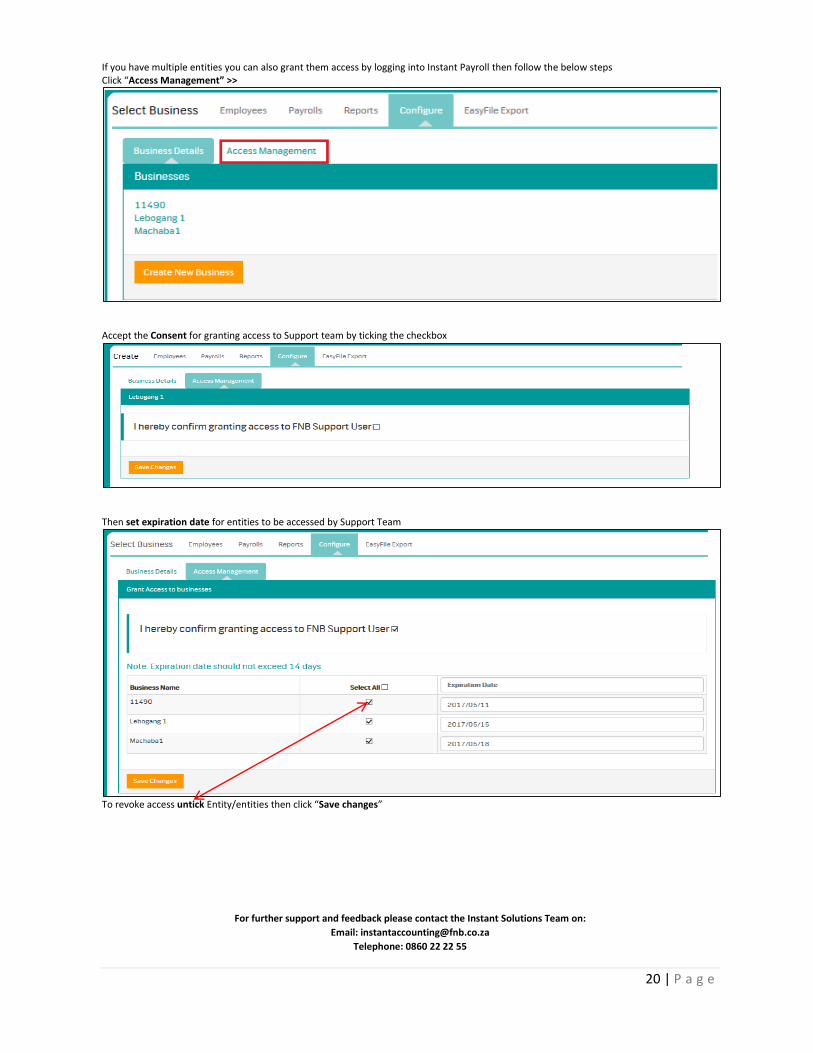
If you have multiple entities you can also grant them access by logging into Instant Payroll then follow the below steps Click “Access Management” >>
Accept the Consent for granting access to Support team by ticking the checkbox
Then set expiration date for entities to be accessed by Support Team
To revoke access untick Entity/entities then click “Save changes”
For further support and feedback please contact the Instant Solutions Team on:
Email: [email protected]
Telephone: 0860 22 22 55