Embed Size (px)
Citation preview

701 S. RIDGE AVENUE TROY, OHIO 45374-0001
937 332-3000
www.hobartcorp.com
INSTRUCTION MANUAL
MODELS
HL600 & HL662
ML-141104 ML-141105
F45239 Rev. A (January 2017)
– 2 –
TABLE OF CONTENTS
GENERAL. . . . . . . . . . . . . . . . . . . . . . . . . . . . . . . . . . . . . . . . . . . . . . . . . . . . . 3
INSTALLATION. . . . . . . . . . . . . . . . . . . . . . . . . . . . . . . . . . . . . . . . . . . . . . . . . 4Unpacking . . . . . . . . . . . . . . . . . . . . . . . . . . . . . . . . . . . . . . . . . . . . . .. . . 4Location. . . . . . . . . . . . . . . . . . . . . . . . . . . . . . . . . . . . . . . . . . . . . . . . . . . 4Electrical Connections. . . . . . . . . . . . . . . . . . . . . . . . . . . . . . . . . . . . . . . . 5
OPERATION. . . . . . . . . . . . . . . . . . . . . . . . . . . . . . . . . . . . . . . . . . . . . . . . . . 6Controls. . . . . . . . . . . . . . . . . . . . . . . . . . . . . . . . . . . . . . . . . . . . . . . . . . 7Bowl Placement. . . . . . . . . . . . . . . . . . . . . . . . . . . . . . . . . . . . . . . . . . . . 9Agitator. . . . . . . . . . . . . . . . . . . . . . . . . . . . . . . . . . . . . . . . . . . . . . . . . . . . 9Power Bowl Lift . . . . . . . . . . . . . . . . . . . . . . . . . . . . . . . . . . . . . . . . . . . . . 9Prepare for Mixing. . . . . . . . . . . . . . . . . . . . . . . . . . . . . . . . . . . . . . . . . . . 10Timer Operation. . . . . . . . . . . . . . . . . . . . . . . . . . . . . . . . . . . . . . . . . . . . . 11Operating Notes. . . . . . . . . . . . . . . . . . . . . . . . . . . . . . . . . . . . . . . . . . . . . 11Unloading. . . . . . . . . . . . . . . . . . . . . . . . . . . . . . . . . . . . . . . . . . . . . . . . . . 12Wire Cage . . . . . . . . . . . . . . . . . . . . . . . . . . . . . . . . . . . . . . . . . . . . . . . . . 12Agitators and Attachments. . . . . . . . . . . . . . . . . . . . . . . . . . . . . . . . . . . . . 13
CLEANING. . . . . . . . . . . . . . . . . . . . .. . . . . . . . . . . . . . . . . . . . . . . . . . . . . . . 14
MAINTENANCE. . . . . . . . . . . . . . . . . . . . . . . . . . . . . . . . . . . . . . . . . . . . . . . . 15Lubrication. . . . . . . . . . . . . . . . . . . . . . . . . . . . . . . . . . . . . . . . . . . . . . . . . 15Adjustments. . . . . . . . . . . . . . . . . . . . . . . . . . . . . . . . . . . . . . . . . . . . . . . . 16
TROUBLESHOOTING. . . . . . . . . . . . . . . . . . . . . . . . . . . . . . . . . . . . . . . . . . . 18Service. . . . . . . . . . . . . . . . . . . . . . . . . . . . . . . . . . . . . . . . . . . . . . .. . . . . 19
© HOBART, 2013
– 3 –
INSTALLATION, OPERATION AND CARE OFLEGACY® 60 QUART MIXERS
SAVE THESE INSTRUCTIONS
GENERAL
The Legacy® 60 quart mixer series are heavy-duty mixers which feature a 2.7 horsepower motor, SmartTimer™, a power bowl lift and a #12 attachment hub as standard equipment.
The Legacy® series is available in three models:
• The HL600 is equipped with Stir, plus four mixing speeds.• The HL662 is equipped with two mixing speeds.
A 40 quart bowl and agitators are also available.
A variety of attachments, agitators and accessories are available. These are described in a separate Use and Applications Handbook, which is furnished on the Legacy® Mixer Operator Training CD provided with each mixer.
– 4 –
INSTALLATIONUNPACKINGImmediately after unpacking the mixer, check for possible shipping damage. If this machine is found to be damaged after unpacking, save the packaging material and contact the carrier within 15 days of delivery.
LOCATION
data plate.
Place the mixer in its operating location. There should be adequate space around the mixer for the user to operate the controls and to install and remove bowls. The area above and to the right side of the mixer should allow the top and side covers to be removed for routine maintenance and servicing.
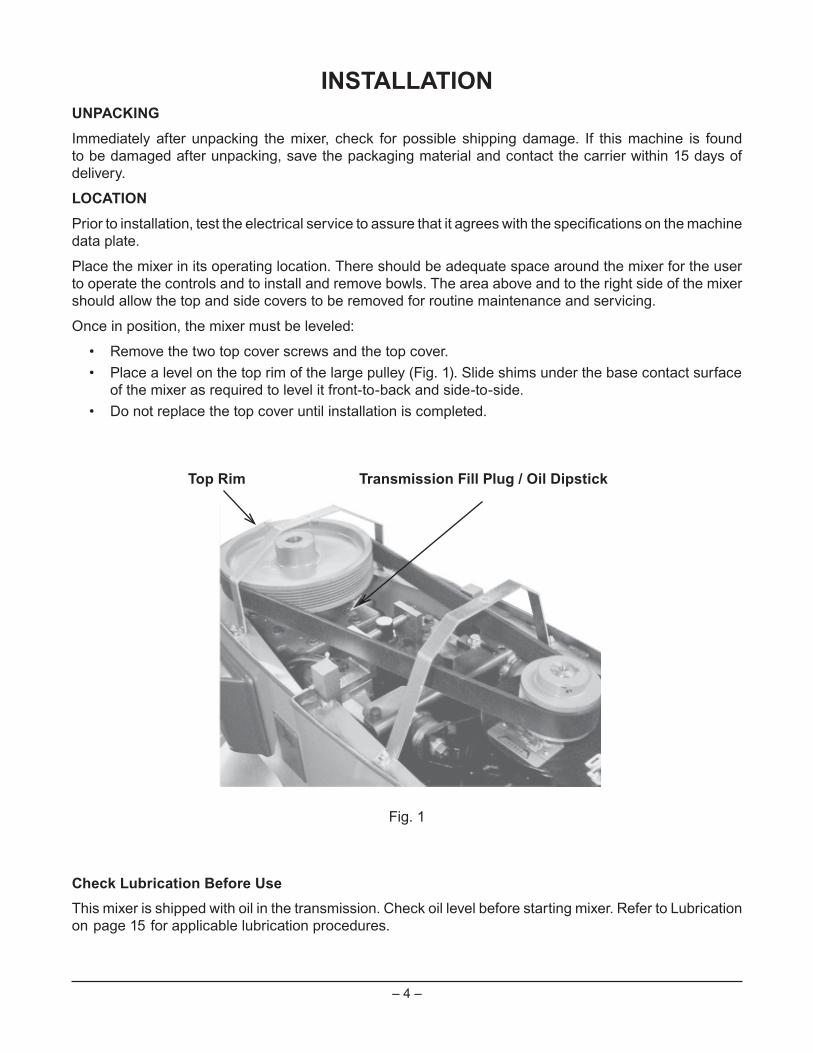
Once in position, the mixer must be leveled:
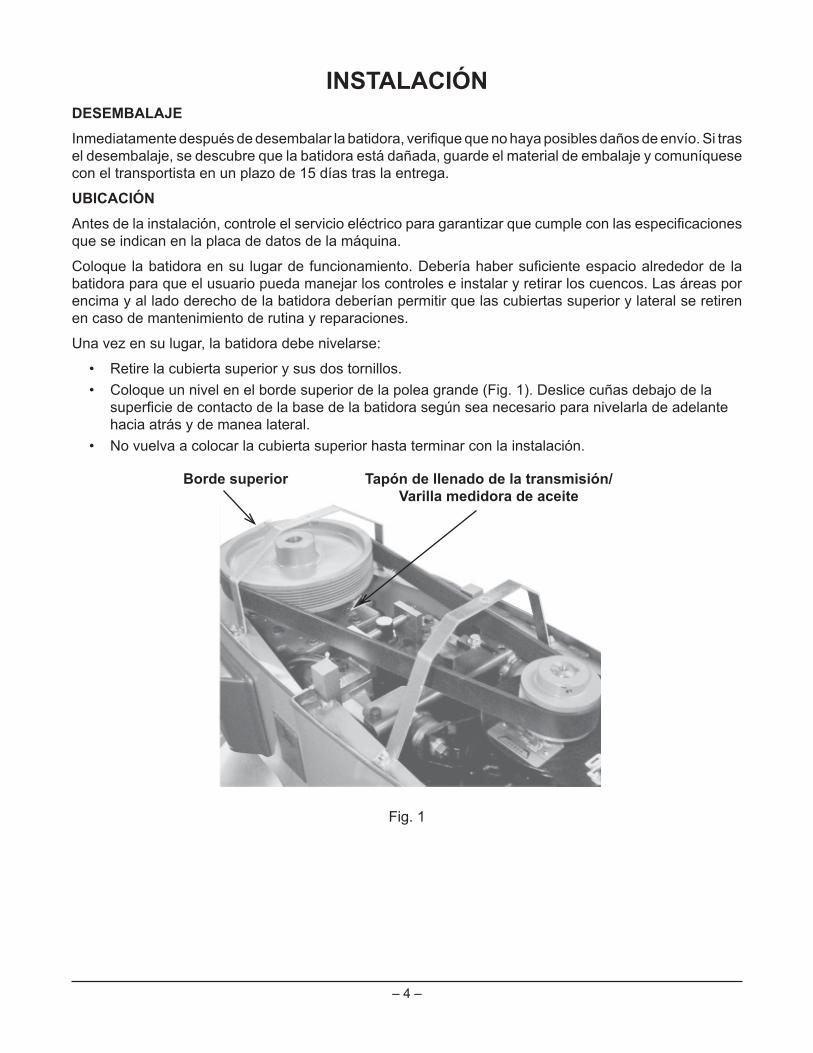
• Remove the two top cover screws and the top cover.• Place a level on the top rim of the large pulley (Fig. 1). Slide shims under the base contact surface
of the mixer as required to level it front-to-back and side-to-side.• Do not replace the top cover until installation is completed.
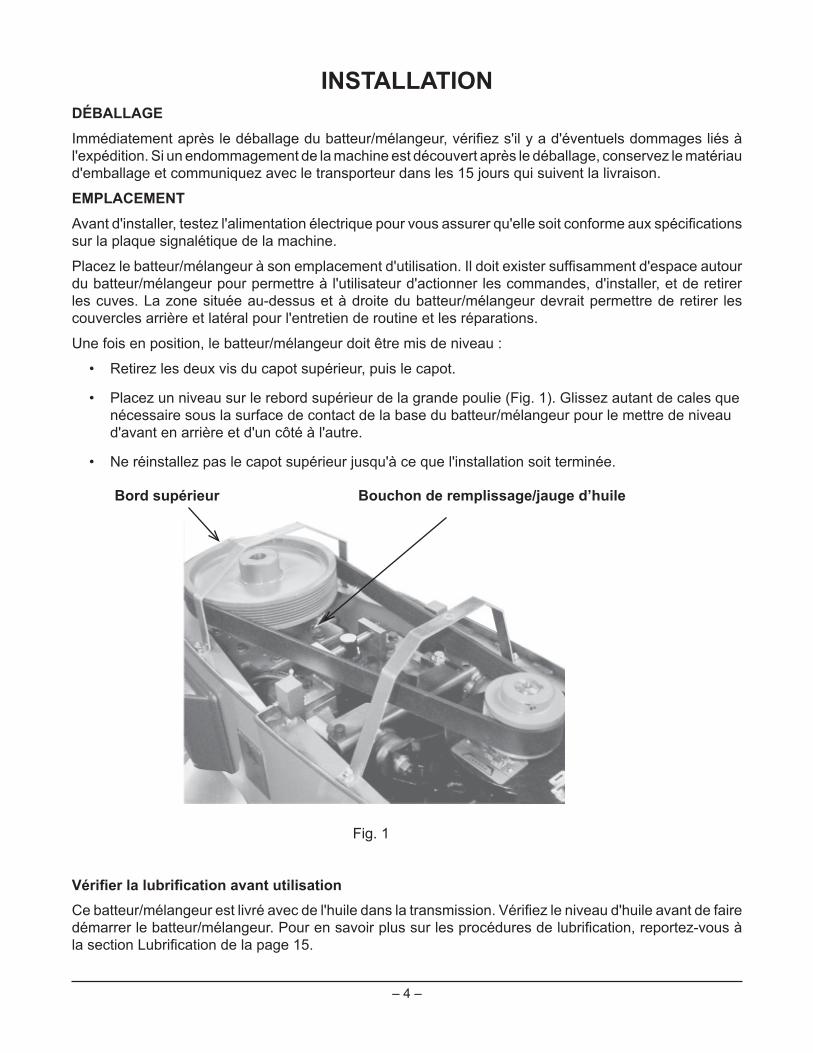
Check Lubrication Before UseThis mixer is shipped with oil in the transmission. Check oil level before starting mixer. Refer to Lubrication on page 15 for applicable lubrication procedures.
Transmission Fill Plug / Oil Dipstick
Fig. 1
Top Rim
– 5 –
ELECTRICAL CONNECTIONS
Electrical and grounding connections must comply with the applicable portion of the National Electrical Code and/or other local electrical codes.
DISCONNECT the ELECTRICAL POWER to the machine and follow lockout / tagout procedures.
A hole for 3/4"-trade-size conduit is located at the top of the pedestal. Make electrical connections per the wiring diagram located on the inside of the top cover.
Single-Phase Mixer:
• Connect ground wire to ground lug on the mixer.• Cut off stripped portion of L3 on Legacy® Mixer and wrap securely with electrical tape to insulate
the exposed conductor.
Three-Phase Mixer:
• Connect ground wire to ground lug on the mixer.
Check Initial Operation1. Apply power to the mixer.2. Turn the SPEED dial pointer to STIR for the HL600 and to 1 for the HL662.3. Install the bowl and lock into mix position, with the Bowl Support all the way up and bowl guard
closed. Momentarily run the machine by pushing the START and then STOP buttons.
– 6 –
OPERATION
Moving agitator in bowl, keep hands, clothing and utensils out while in operation. Do not use without interlocked guard.
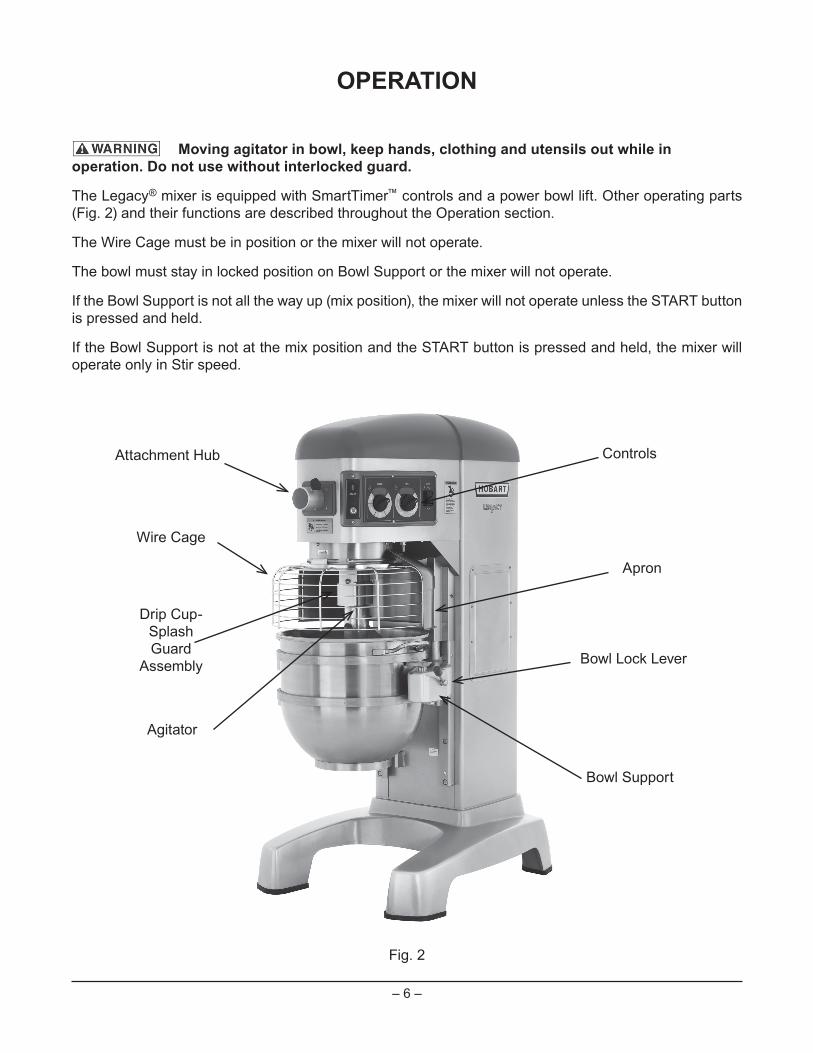
The Legacy® mixer is equipped with SmartTimer™ controls and a power bowl lift. Other operating parts (Fig. 2) and their functions are described throughout the Operation section.
The Wire Cage must be in position or the mixer will not operate.
The bowl must stay in locked position on Bowl Support or the mixer will not operate.
If the Bowl Support is not all the way up (mix position), the mixer will not operate unless the START button is pressed and held.
If the Bowl Support is not at the mix position and the START button is pressed and held, the mixer will operate only in Stir speed.
Fig. 2
ControlsAttachment Hub
Wire Cage
Drip Cup-Splash Guard
Assembly
Agitator
Apron
Bowl Lock Lever
Bowl Support
– 7 –
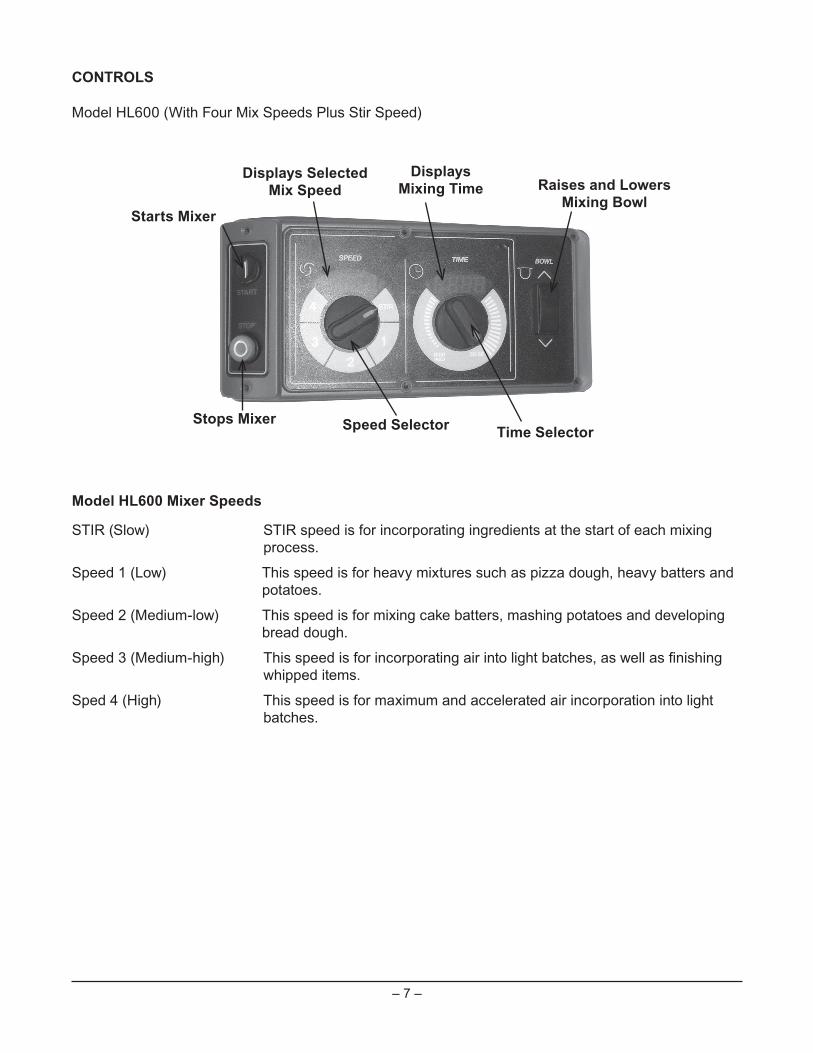
CONTROLS
Model HL600 (With Four Mix Speeds Plus Stir Speed)
Model HL600 Mixer Speeds
STIR (Slow) STIR speed is for incorporating ingredients at the start of each mixing process.
Speed 1 (Low) This speed is for heavy mixtures such as pizza dough, heavy batters and potatoes.
Speed 2 (Medium-low) This speed is for mixing cake batters, mashing potatoes and developing bread dough.
whipped items.
Sped 4 (High) This speed is for maximum and accelerated air incorporation into light batches.
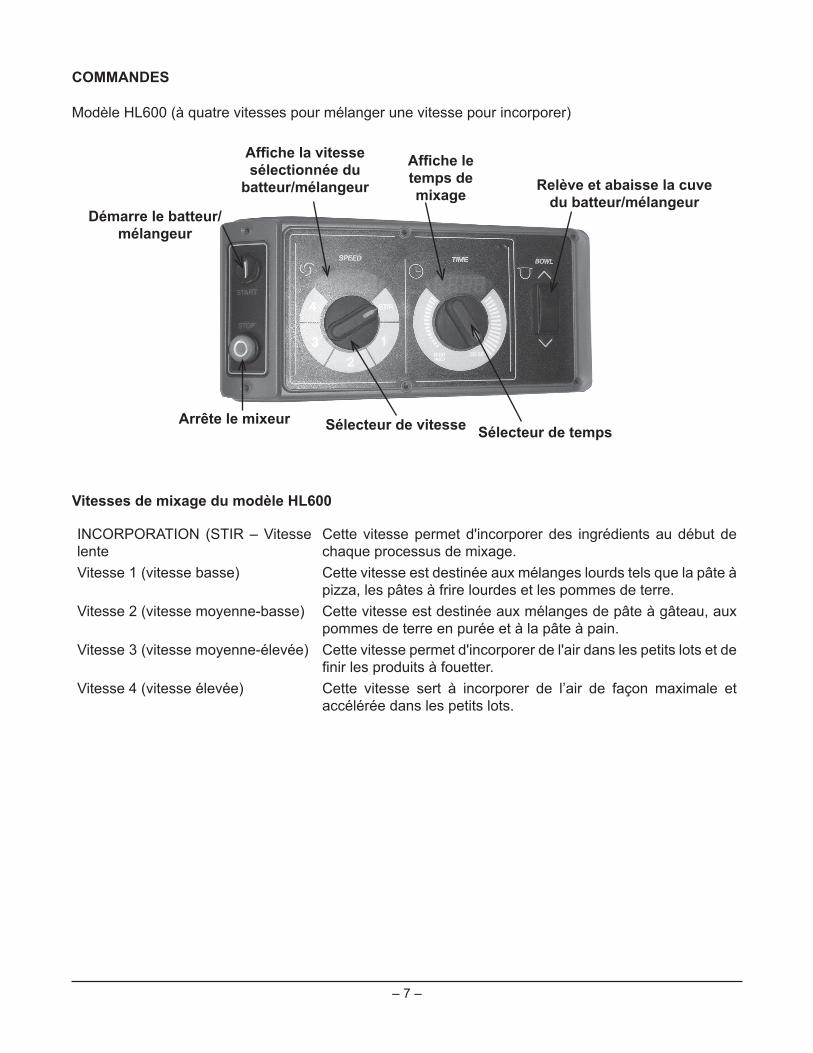
Starts Mixer
Stops Mixer Speed Selector Time Selector
Raises and Lowers Mixing Bowl
Displays Selected Mix Speed
Displays Mixing Time

– 8 –
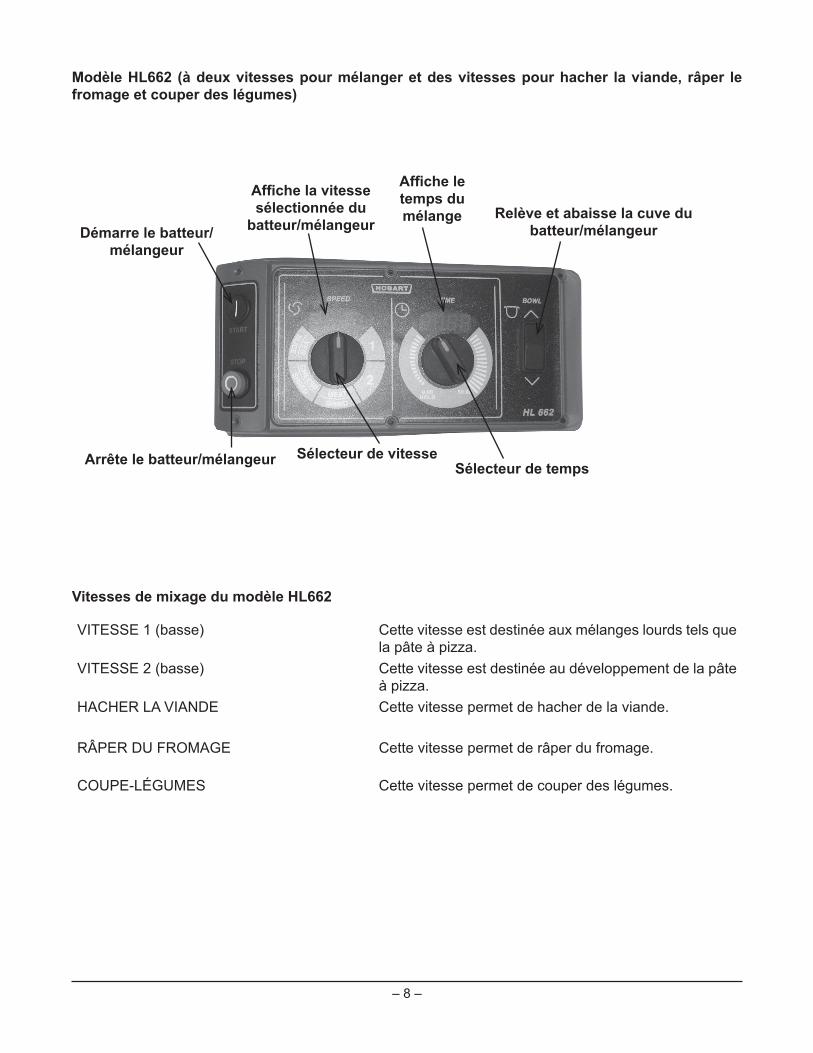
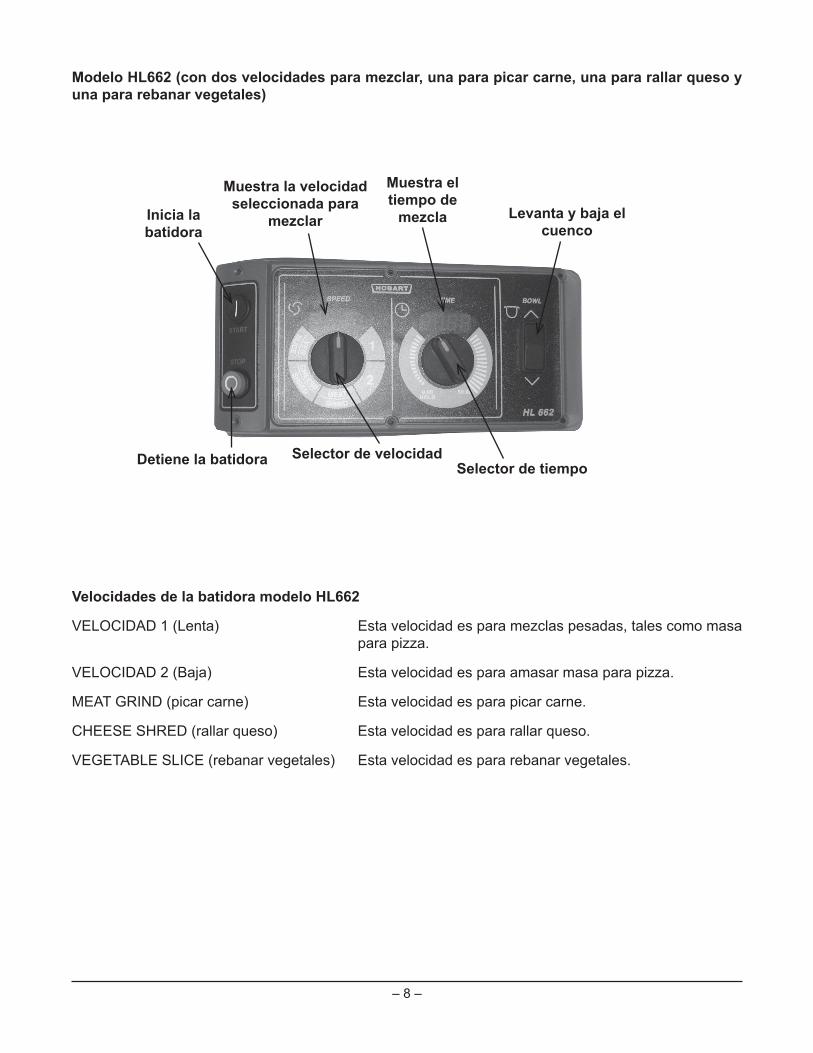
Model HL662 (With Two Mix Speeds Plus Meat Grind, Cheese Shred, Vegetable Slice Speeds)
Model HL662 Mixer Speeds
SPEED 1 (Slow) This speed is for heavy mixtures such as pizza dough.
SPEED 2 (Low) This speed is for developing pizza dough.
MEAT GRIND This speed is for grinding meat.
CHEESE SHRED This speed is for shredding cheese.
VEGETABLE SLICE This speed is for slicing vegetables.
Starts Mixer
Stops Mixer
Displays Selected Mix Speed
Displays Mixing Time
Speed SelectorTime Selector
Raises and Lowers Mixing Bowl
– 9 –
BOWL PLACEMENTThe bowl must be installed before the agitator is installed.
To install the bowl, fully lower the bowl support. Position bowl so the alignment pins on the left side of the
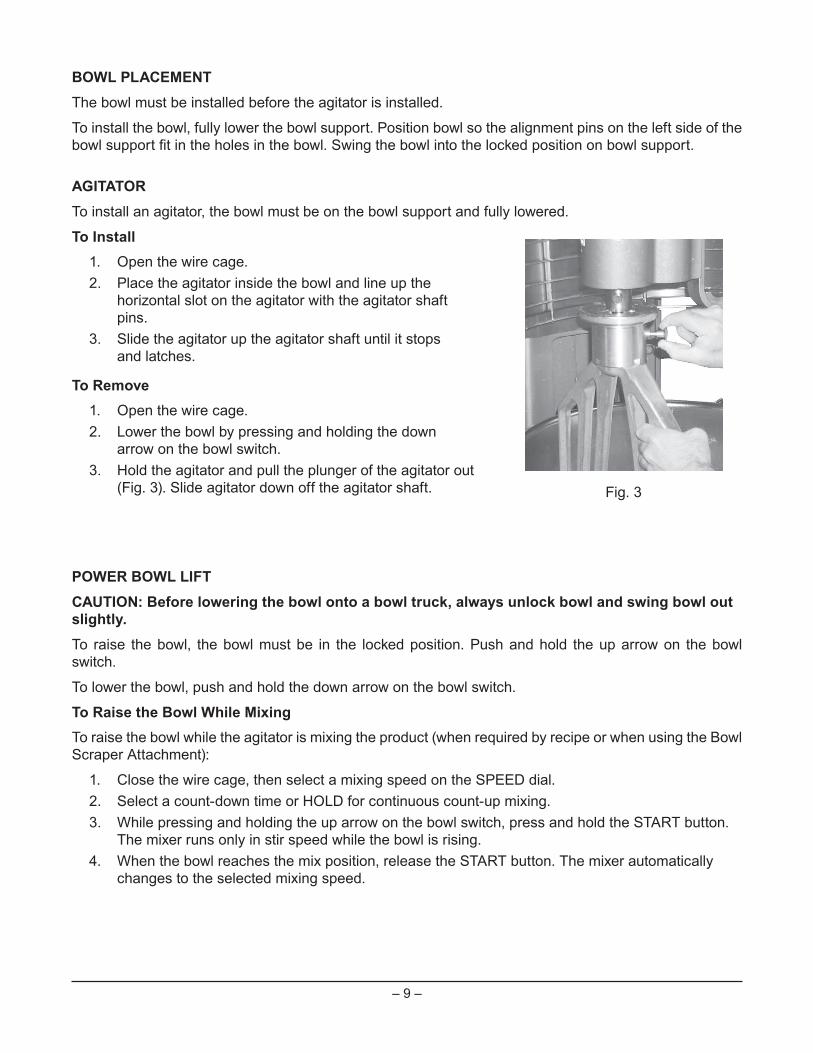
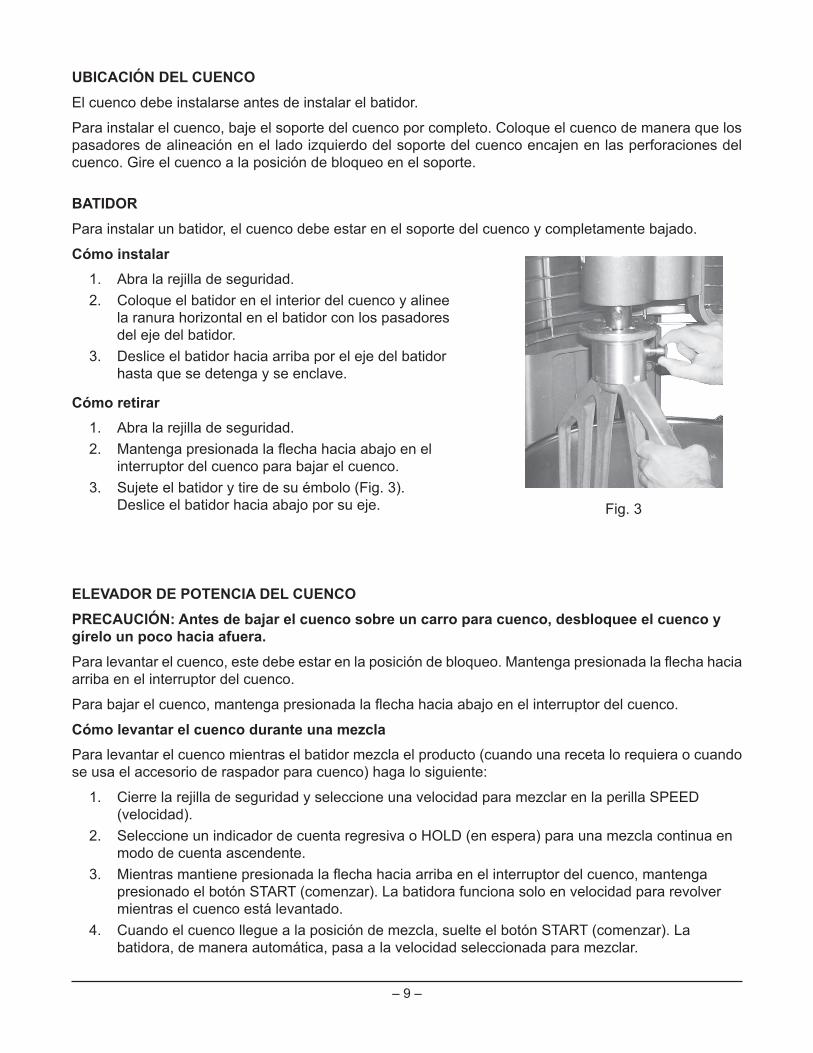
AGITATORTo install an agitator, the bowl must be on the bowl support and fully lowered.
To Install1. Open the wire cage.2. Place the agitator inside the bowl and line up the
horizontal slot on the agitator with the agitator shaft pins.
3. Slide the agitator up the agitator shaft until it stops and latches.
To Remove1. Open the wire cage.2. Lower the bowl by pressing and holding the down
arrow on the bowl switch.3. Hold the agitator and pull the plunger of the agitator out
(Fig. 3). Slide agitator down off the agitator shaft.
POWER BOWL LIFTCAUTION: Before lowering the bowl onto a bowl truck, always unlock bowl and swing bowl out slightly.To raise the bowl, the bowl must be in the locked position. Push and hold the up arrow on the bowl switch.
To lower the bowl, push and hold the down arrow on the bowl switch.
To Raise the Bowl While MixingTo raise the bowl while the agitator is mixing the product (when required by recipe or when using the Bowl Scraper Attachment):
1. Close the wire cage, then select a mixing speed on the SPEED dial.2. Select a count-down time or HOLD for continuous count-up mixing.3. While pressing and holding the up arrow on the bowl switch, press and hold the START button.
The mixer runs only in stir speed while the bowl is rising.4. When the bowl reaches the mix position, release the START button. The mixer automatically
changes to the selected mixing speed.
Fig. 3
– 10 –
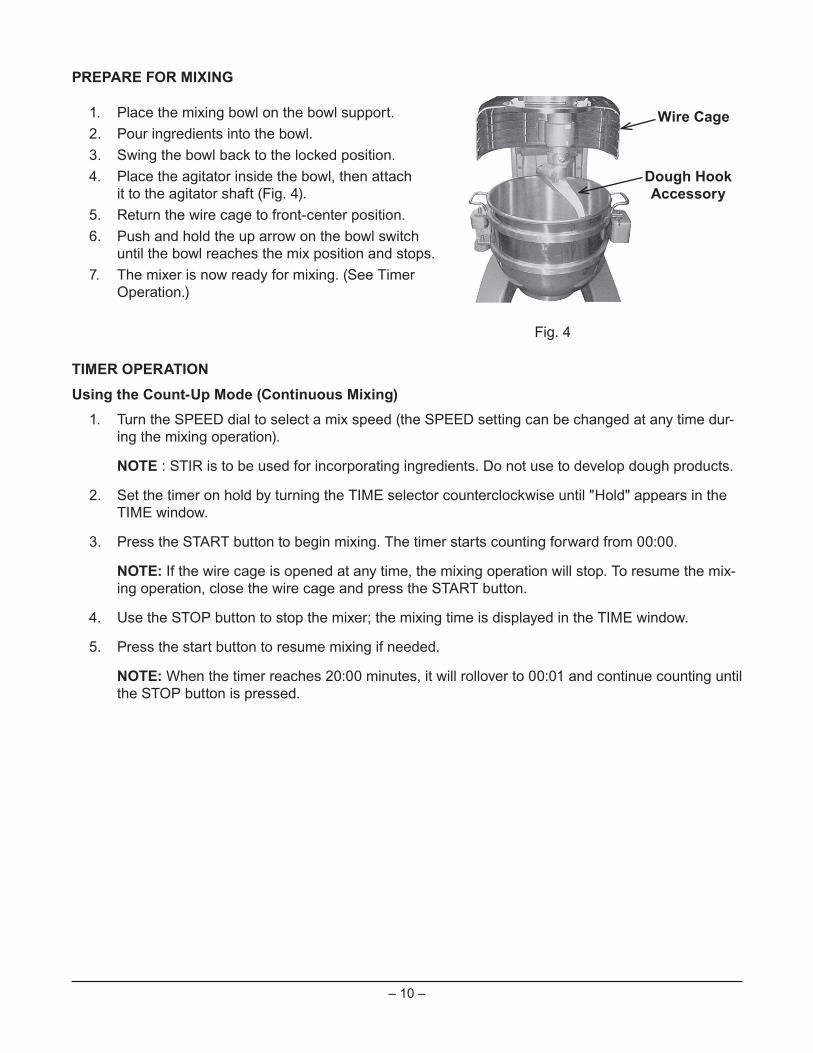
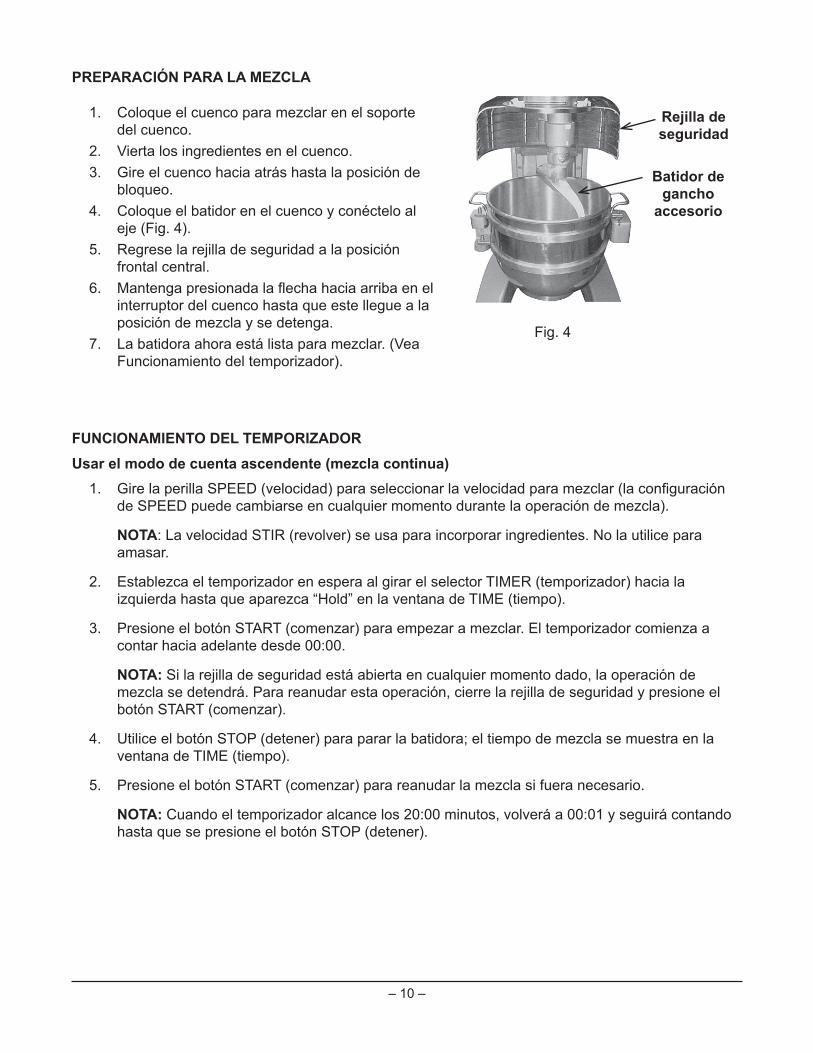
PREPARE FOR MIXING
1. Place the mixing bowl on the bowl support.2. Pour ingredients into the bowl.3. Swing the bowl back to the locked position.4. Place the agitator inside the bowl, then attach
it to the agitator shaft (Fig. 4).5. Return the wire cage to front-center position.6. Push and hold the up arrow on the bowl switch
until the bowl reaches the mix position and stops.7. The mixer is now ready for mixing. (See Timer
Operation.)
TIMER OPERATIONUsing the Count-Up Mode (Continuous Mixing)
1. Turn the SPEED dial to select a mix speed (the SPEED setting can be changed at any time dur-ing the mixing operation).
NOTE : STIR is to be used for incorporating ingredients. Do not use to develop dough products.
2. Set the timer on hold by turning the TIME selector counterclockwise until "Hold" appears in the TIME window.
3. Press the START button to begin mixing. The timer starts counting forward from 00:00.
NOTE: If the wire cage is opened at any time, the mixing operation will stop. To resume the mix-ing operation, close the wire cage and press the START button.
4. Use the STOP button to stop the mixer; the mixing time is displayed in the TIME window.
5. Press the start button to resume mixing if needed.
NOTE: When the timer reaches 20:00 minutes, it will rollover to 00:01 and continue counting until the STOP button is pressed.
Wire Cage
Dough Hook Accessory
Fig. 4

– 11 –
Using the Count-Down Mode (Timed Mixing)1. Turn the SPEED dial to select a mix speed. a. If the count-up mode was used for the previous batch, the desired time needs to be entered.
b. If the count-down mode was used for the previous batch, the previous time will be displayed. If a different time is needed, turn the TIME selector to the desired time.
2. Press the START button to begin mixing; the timer starts counting down from the set time.
a. To stop the mixer at any time, press the STOP button. To resume mixing, press the START button. For example: The mixer is started at SPEED 1 for 30 seconds and is stopped after 10 seconds. Pressing the START button will resume the mixing operation.
b. If the mixer is stopped and a new time setting is entered, pressing the START button saves the new time setting on the current speed selection. For example: The mixer is started at SPEED 1 for 30 seconds and is stopped after 10 seconds. A new time is entered by turning the TIME selector. The new time will replace the initial 30 seconds for SPEED 1 after the START button is pressed.
c. If the time is changed while mixing, the mixer will operate until the new time expires. The adjustment to the time will not be stored.
d. If speed is changed while mixing, the time will change to the previous time for the selected speed and count down.
NOTE: If the wire cage is opened at any time, the mixing operation will stop. To resume the mix-ing operation, close the wire cage and press the START button.
3. When the timer reaches 00:00, the mixer stops; a beeper sounds for 3 seconds. The count-down timer displays the last-entered time.
OPERATING NOTES• STIR is to be used for incorporating ingredients. Do not use it to develop dough products.
• If the mixer is stopped during a mixing operation, the timer also stops. The timer starts again where it left off when the START button is pressed.
• The SPEED window will display the SPEED dial's current speed selection. Turn the Time selector clockwise to take the mixer out of the hold mode.
– 12 –
UNLOADING1. Unlock the bowl and swing-out slightly. Press and hold the down arrow on the bowl switch to
lower the bowl.2. Open the wire cage assembly.3. Remove the agitator from the agitator shaft.4. Remove the bowl from the bowl support.
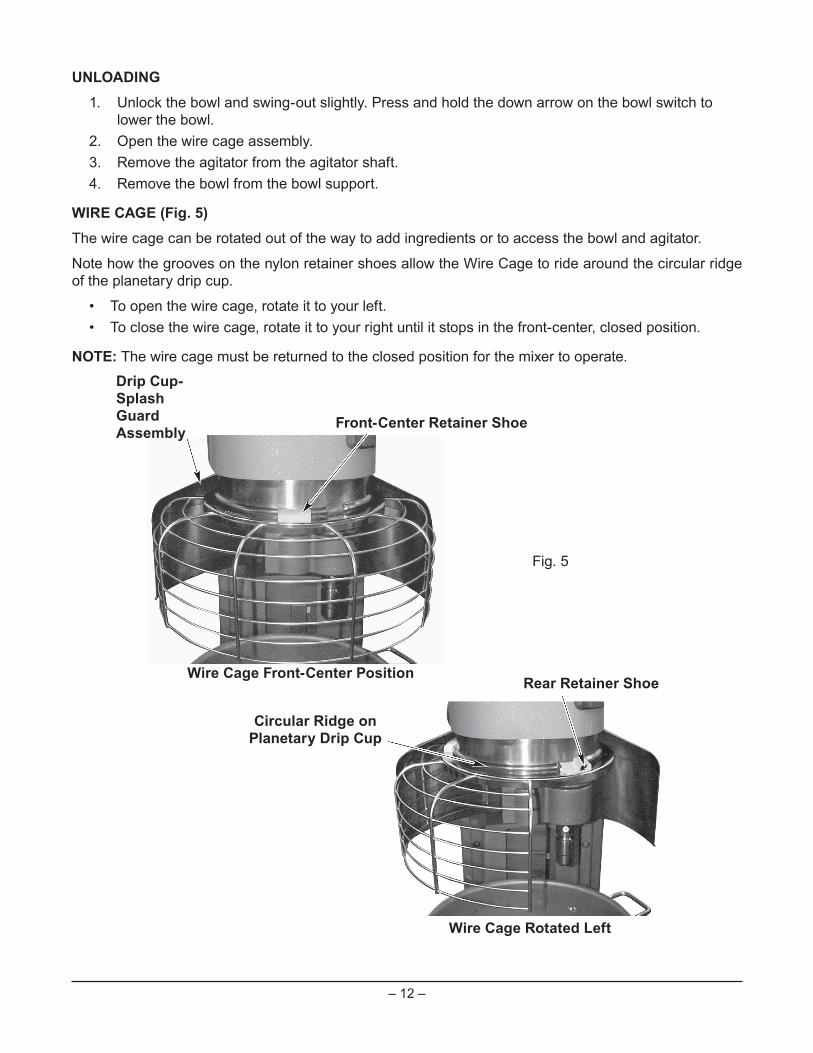
WIRE CAGE (Fig. 5)The wire cage can be rotated out of the way to add ingredients or to access the bowl and agitator.
Note how the grooves on the nylon retainer shoes allow the Wire Cage to ride around the circular ridge of the planetary drip cup.
• To open the wire cage, rotate it to your left.• To close the wire cage, rotate it to your right until it stops in the front-center, closed position.
NOTE: The wire cage must be returned to the closed position for the mixer to operate.
Front-Center Retainer Shoe
Drip Cup-Splash Guard Assembly
Wire Cage Front-Center PositionRear Retainer Shoe
Circular Ridge on Planetary Drip Cup
Wire Cage Rotated Left
Fig. 5
– 13 –
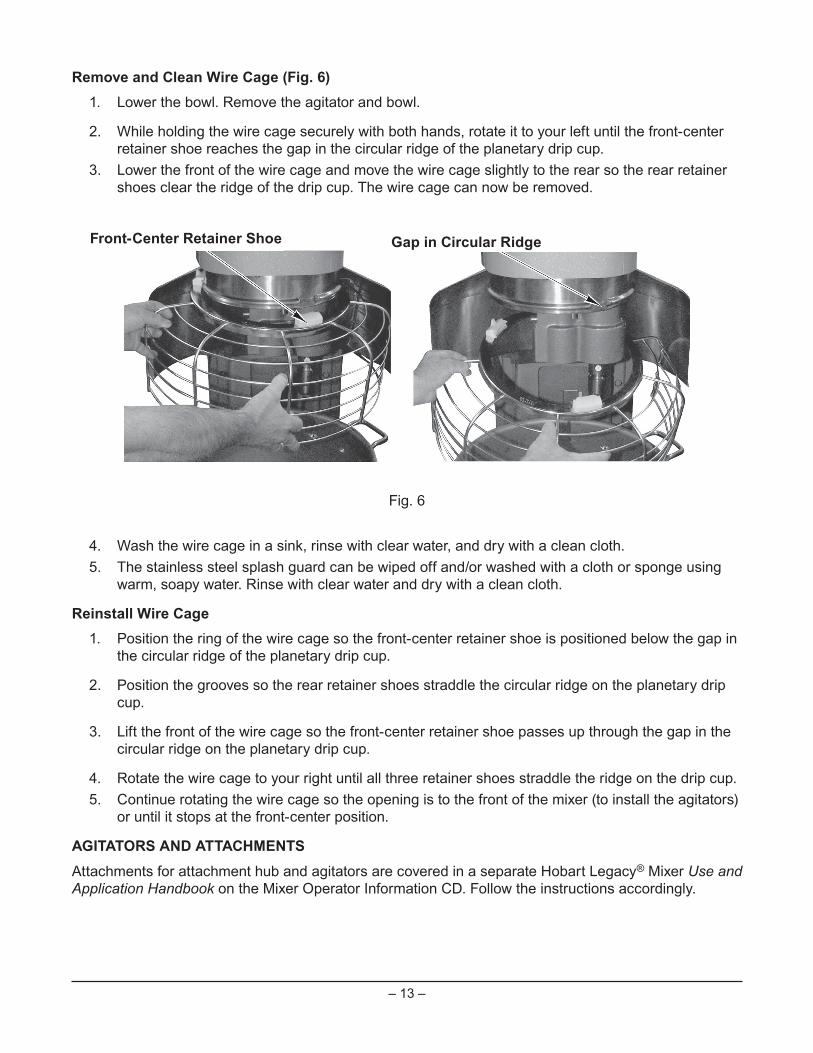
Remove and Clean Wire Cage (Fig. 6)1. Lower the bowl. Remove the agitator and bowl.
2. While holding the wire cage securely with both hands, rotate it to your left until the front-center retainer shoe reaches the gap in the circular ridge of the planetary drip cup.
3. Lower the front of the wire cage and move the wire cage slightly to the rear so the rear retainer shoes clear the ridge of the drip cup. The wire cage can now be removed.
4. Wash the wire cage in a sink, rinse with clear water, and dry with a clean cloth.5. The stainless steel splash guard can be wiped off and/or washed with a cloth or sponge using
warm, soapy water. Rinse with clear water and dry with a clean cloth.
Reinstall Wire Cage1. Position the ring of the wire cage so the front-center retainer shoe is positioned below the gap in
the circular ridge of the planetary drip cup.
2. Position the grooves so the rear retainer shoes straddle the circular ridge on the planetary drip cup.
3. Lift the front of the wire cage so the front-center retainer shoe passes up through the gap in the circular ridge on the planetary drip cup.
4. Rotate the wire cage to your right until all three retainer shoes straddle the ridge on the drip cup.5. Continue rotating the wire cage so the opening is to the front of the mixer (to install the agitators)
or until it stops at the front-center position.
AGITATORS AND ATTACHMENTSAttachments for attachment hub and agitators are covered in a separate Hobart Legacy® Mixer Use and Application Handbook on the Mixer Operator Information CD. Follow the instructions accordingly.
Front-Center Retainer Shoe Gap in Circular Ridge
Fig. 6
– 14 –
CLEANING
DISCONNECT the ELECTRICAL POWER to the machine and follow lockout / tagout procedures.
New mixer bowls and accessories (beaters, whips and dough arms) should be thoroughly washed with hot water and a mild soap solution, rinsed with either a mild soda or vinegar solution and thoroughly rinsed with clear water before being used. This cleaning procedure should also be followed for bowls and agitators before whipping egg whites or whole eggs.
The mixer should be thoroughly cleaned daily. DO NOT use a hose to clean the mixer; it should be washed with a clean, damp cloth. The base allows ample room for cleaning under the mixer. The apron (Fig. 2, page 6) may be removed for cleaning by loosening the thumb screws.
The drip cup-splash guard assembly (Fig. 2, page 6) should be removed periodically and wiped clean.
For cleaning the Wire Cage refer to page 13.
– 15 –
MAINTENANCE
DISCONNECT the ELECTRICAL POWER to the machine and follow lockout / tagout procedures.
LUBRICATION
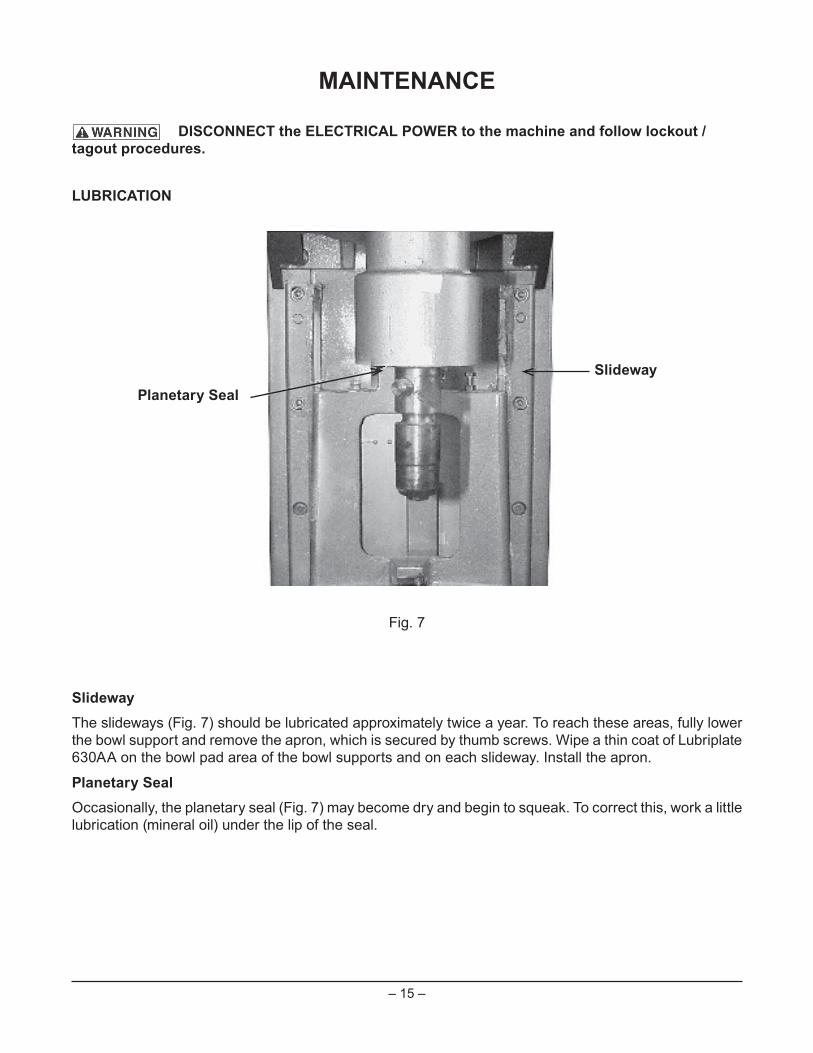
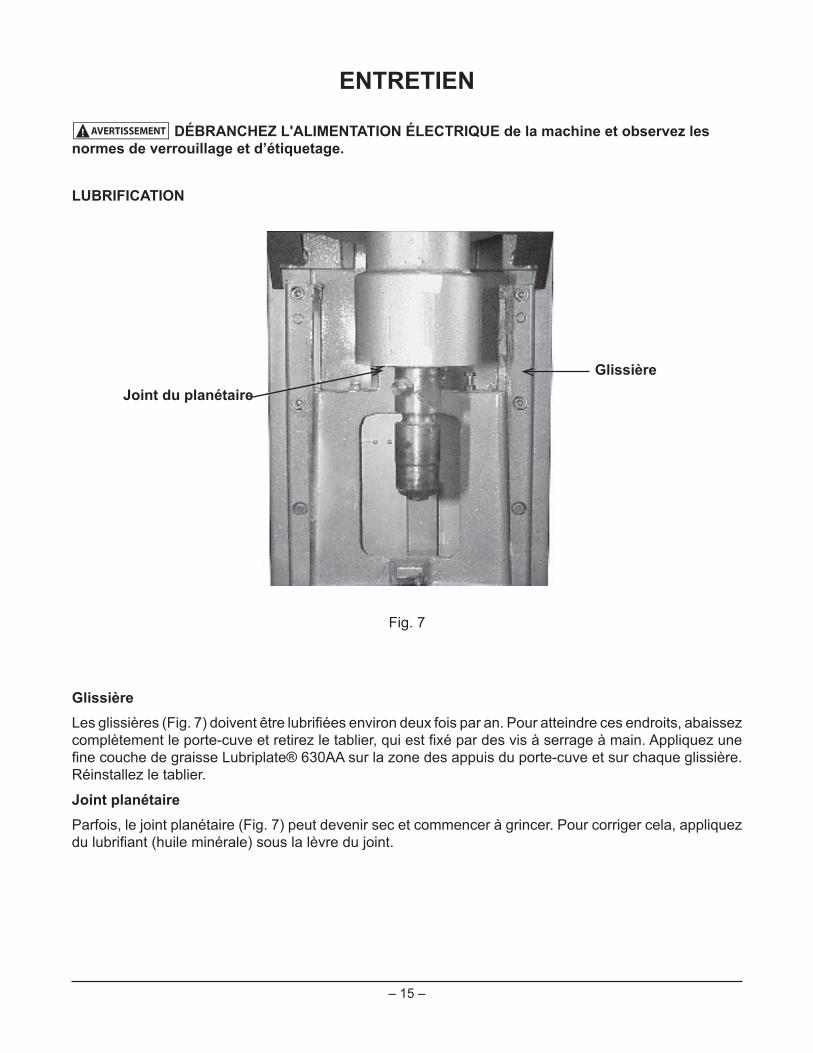
SlidewayThe slideways (Fig. 7) should be lubricated approximately twice a year. To reach these areas, fully lower the bowl support and remove the apron, which is secured by thumb screws. Wipe a thin coat of Lubriplate 630AA on the bowl pad area of the bowl supports and on each slideway. Install the apron.
Planetary SealOccasionally, the planetary seal (Fig. 7) may become dry and begin to squeak. To correct this, work a little lubrication (mineral oil) under the lip of the seal.
Planetary SealSlideway
Fig. 7
– 16 –
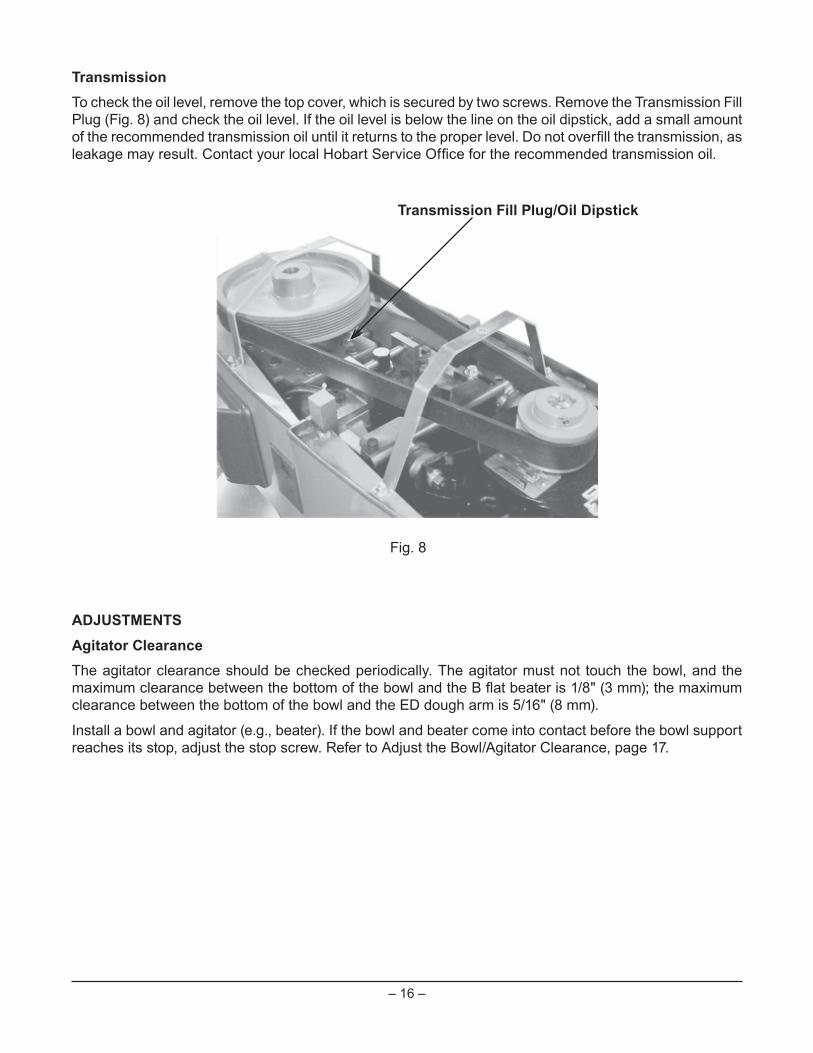
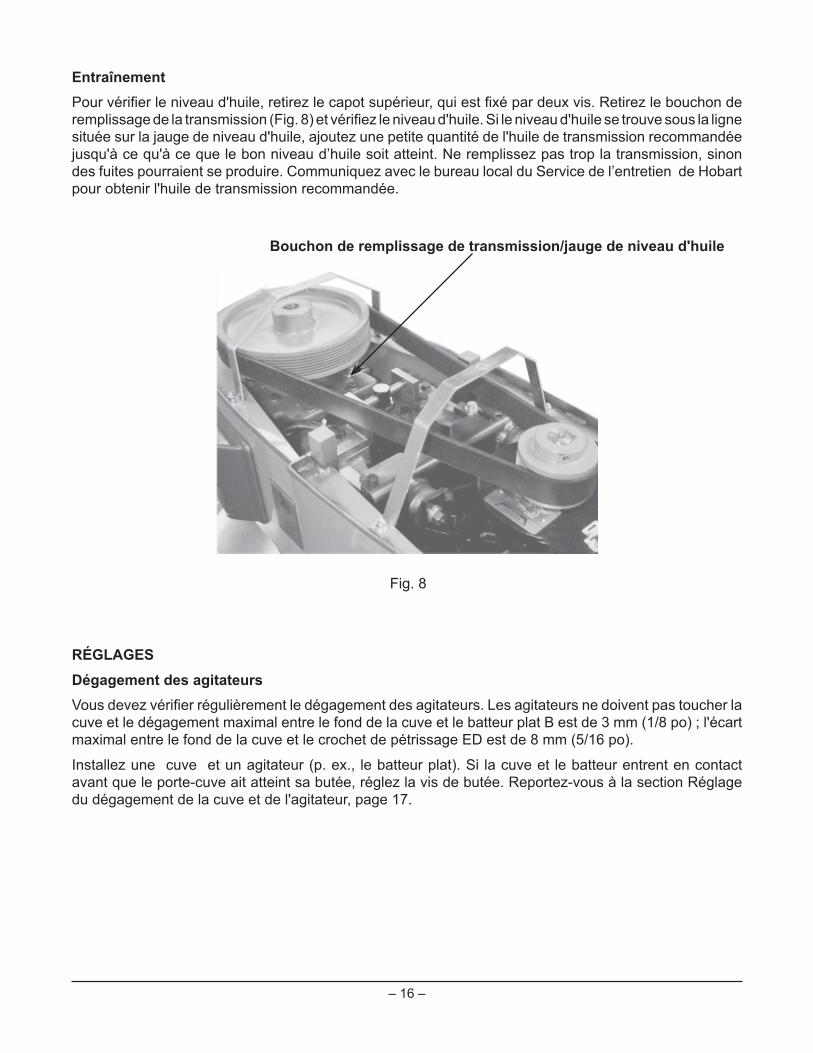
TransmissionTo check the oil level, remove the top cover, which is secured by two screws. Remove the Transmission Fill Plug (Fig. 8) and check the oil level. If the oil level is below the line on the oil dipstick, add a small amount
ADJUSTMENTSAgitator ClearanceThe agitator clearance should be checked periodically. The agitator must not touch the bowl, and the
clearance between the bottom of the bowl and the ED dough arm is 5/16" (8 mm).
Install a bowl and agitator (e.g., beater). If the bowl and beater come into contact before the bowl support reaches its stop, adjust the stop screw. Refer to Adjust the Bowl/Agitator Clearance, page 17.
Transmission Fill Plug/Oil Dipstick
Fig. 8
– 17 –
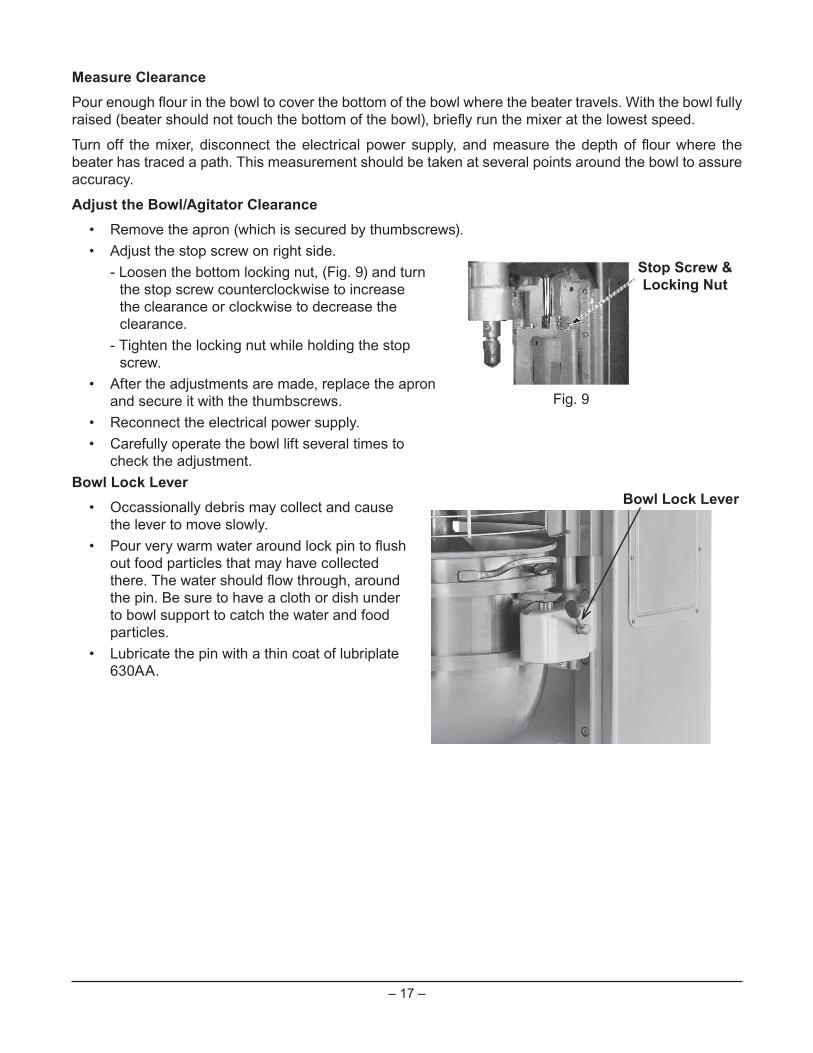
Measure Clearance
beater has traced a path. This measurement should be taken at several points around the bowl to assure accuracy.
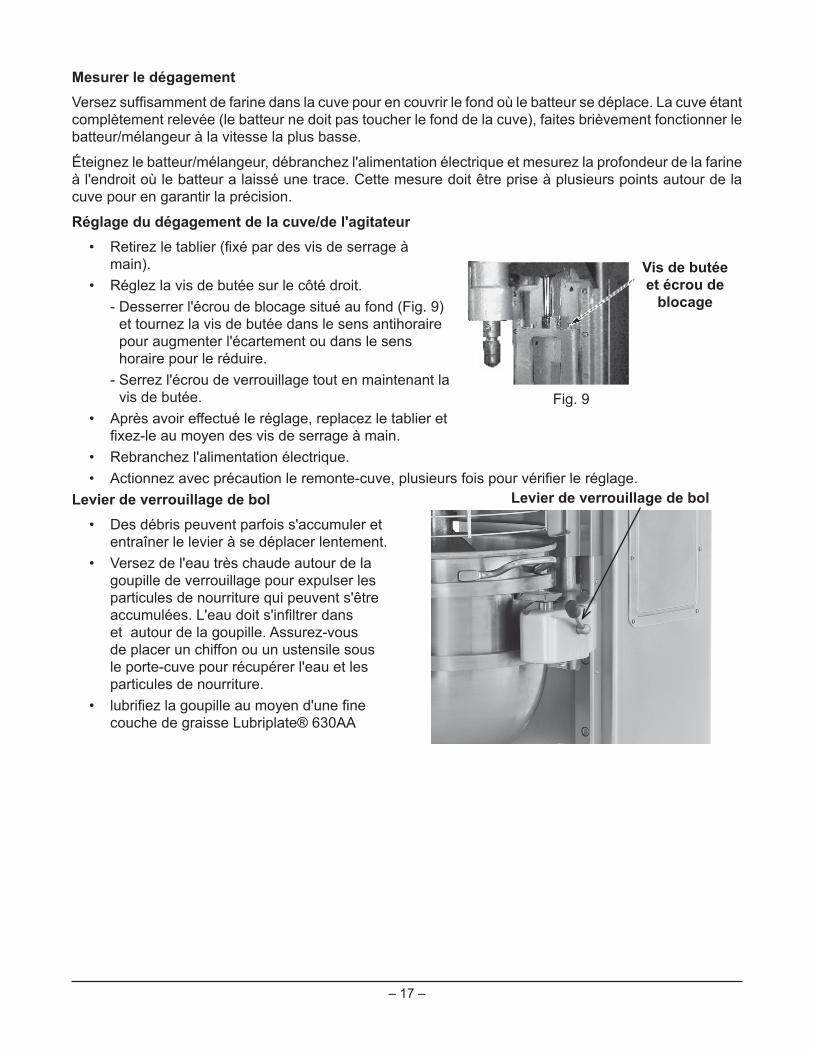
Adjust the Bowl/Agitator Clearance• Remove the apron (which is secured by thumbscrews).• Adjust the stop screw on right side. - Loosen the bottom locking nut, (Fig. 9) and turn
the stop screw counterclockwise to increase the clearance or clockwise to decrease the clearance.
- Tighten the locking nut while holding the stop screw.
• After the adjustments are made, replace the apron and secure it with the thumbscrews.
• Reconnect the electrical power supply.• Carefully operate the bowl lift several times to
check the adjustment.Bowl Lock Lever
• Occassionally debris may collect and cause the lever to move slowly.
out food particles that may have collected
the pin. Be sure to have a cloth or dish under to bowl support to catch the water and food particles.
• Lubricate the pin with a thin coat of lubriplate 630AA.
Stop Screw & Locking Nut
Fig. 9
Bowl Lock Lever
– 18 –
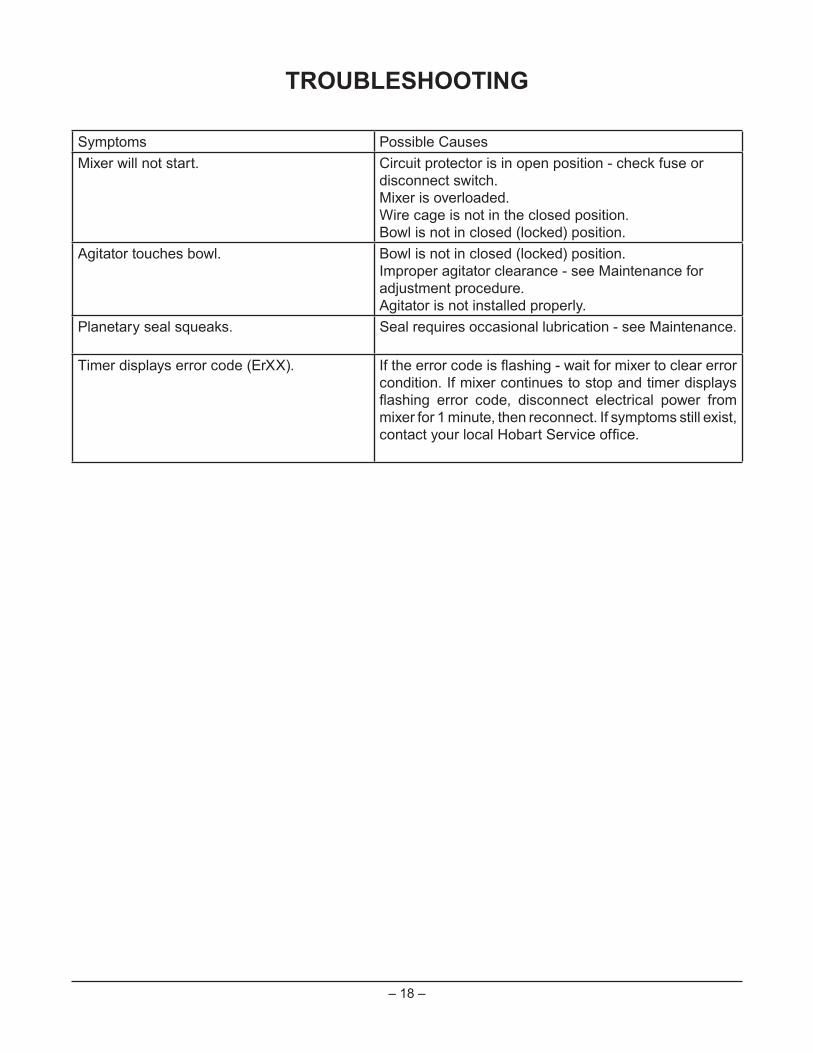
TROUBLESHOOTING
Symptoms Possible CausesMixer will not start. Circuit protector is in open position - check fuse or
disconnect switch. Mixer is overloaded. Wire cage is not in the closed position. Bowl is not in closed (locked) position.
Agitator touches bowl. Bowl is not in closed (locked) position. Improper agitator clearance - see Maintenance for adjustment procedure. Agitator is not installed properly.
Planetary seal squeaks. Seal requires occasional lubrication - see Maintenance.
Timer displays error code (ErXX). condition. If mixer continues to stop and timer displays
mixer for 1 minute, then reconnect. If symptoms still exist,

– 19 –
SERVICE

– 20 –F45239 Rev. A (January 2017) PRINTED IN U.S.A.
NOTES
701 AVENUE RIDGE S.TROY, OHIO 45374-0001
937 332-3000
www.hobartcorp.com
MODE D'EMPLOI
MODÈLES
HL600 et HL662
ML-141104 ML-141105
F45239 Rév. A (janvier 2017)

– 2 –
TABLE DES MATIÈRES
GÉNÉRALITÉS .........................................................................................................................................................3
INSTALLATION .........................................................................................................................................................4Déballage ............................................................................................................................................................4Emplacement ......................................................................................................................................................4Connexions électriques .......................................................................................................................................5
FONCTIONNEMENT .................................................................................................................................................6Les commandes. .................................................................................................................................................7Mise en place de la cuve ....................................................................................................................................9Les agitateurs .....................................................................................................................................................9Relevage motorisé de la cuve .............................................................................................................................9Se préparer à mélanger ....................................................................................................................................10Fonctionnement de la minuterie ........................................................................................................................11Notes de fonctionnement ..................................................................................................................................11Déchargement ..................................................................................................................................................12Grille de protection ............................................................................................................................................12Agitateurs et accessoires ..................................................................................................................................13
NETTOYAGE ...........................................................................................................................................................14
ENTRETIEN ............................................................................................................................................................15 .......................................................................................................................................................15
Réglages ...........................................................................................................................................................16
DÉPANNAGE ..........................................................................................................................................................16Service de l’entretien ........................................................................................................................................16
© HOBART, 2013

– 3 –
INSTALLATION, FONCTIONNEMENT ET ENTRETIEN DES BATTEURS/MÉLANGEURS LEGACY ® DE 60 PINTES
CONSERVEZ CES INSTRUCTIONS
GÉNÉRALITÉS
Les batteurs/mélangeurs de la gamme Legacy® de 60 pintes sont des appareils robustes livrés de série dotés d'un moteur de 2,7 ch, de la minuterie SmartTimerMD, d'un dispositif de relevage de cuve motorisé et d'une prise d’accessoire nº 12.
La gamme Legacy® est livrable en trois modèles :
• Le modèle HL600 est équipé d'une vitesse d'incorporation et de quatre vitesses pour battre et mélanger.
• Le modèle HL662 est équipé de deux vitesses pour battre et mélanger.
Une cuve et des agitateurs de 40 pintes sont également disponibles.
Plusieurs outils, agitateurs et accessoires sont disponibles. Ils sont décrits dans un manuel d'utilisation et d'application séparé, qui est compris dans le CD de formation de l'opérateur des batteurs/mélangeurs Legacy® qui accompagne chaque appareil.
– 4 –
INSTALLATIONDÉBALLAGE
EMPLACEMENT
sur la plaque signalétique de la machine.
du batteur/mélangeur pour permettre à l'utilisateur d'actionner les commandes, d'installer, et de retirer
couvercles arrière et latéral pour l'entretien de routine et les réparations.
Une fois en position, le batteur/mélangeur doit être mis de niveau :
nécessaire sous la surface de contact de la base du batteur/mélangeur pour le mettre de niveau d'avant en arrière et d'un côté à l'autre.
Fig. 1
– 5 –
CONNECTIONS ÉLECTRIQUES
AVERTISSEMENT!
AVERTISSEMENT!
les connexions électriques suivant le schéma de câblage situé à l'intérieur du capot supérieur.
Batteur/mélangeur monophasé :
sécuritaire avec du ruban électrique pour isoler le conducteur exposé.
Batteur/mélangeur triphasé :
HL600 et à la vitesse 1 pour le modèle HL662.
haut et la grille de protection de la cuve fermée. Faites fonctionner brièvement la machine en appuyant sur les boutons DÉMARRER (START), puis ARRÊT (STOP).
– 6 –
FONCTIONNEMENT
AVERTISSEMENT!
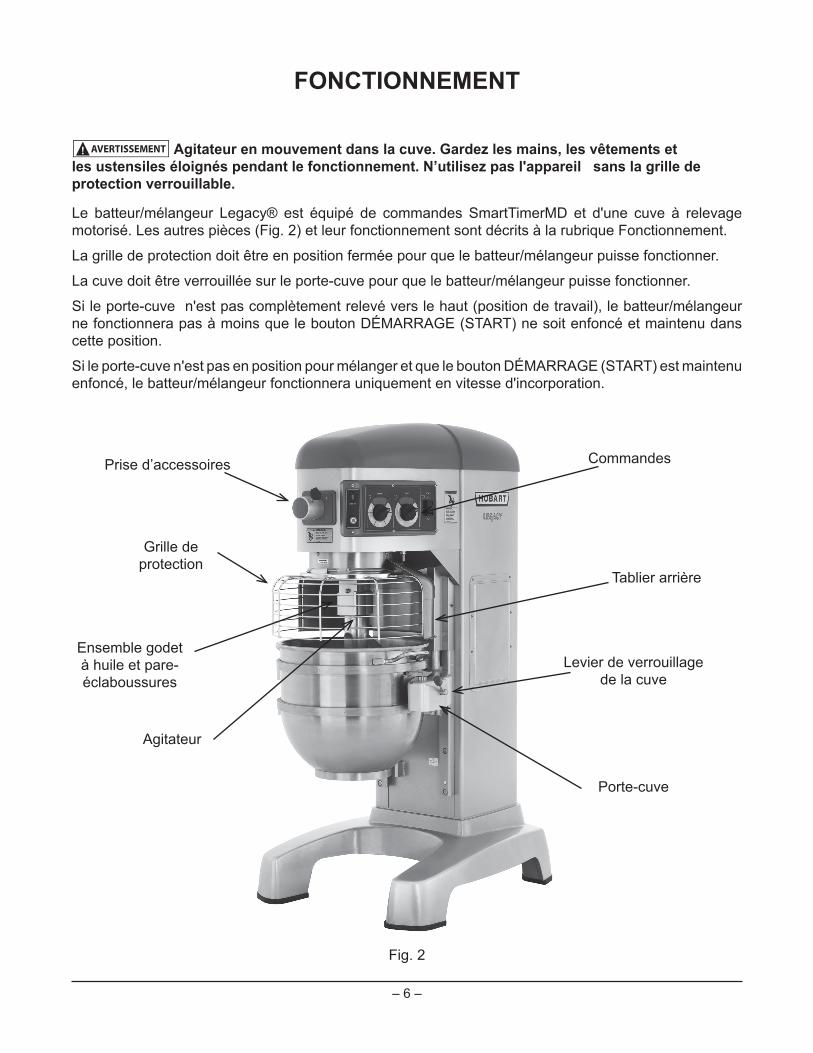
Le batteur/mélangeur Legacy® est équipé de commandes SmartTimerMD et d'une cuve à relevage motorisé. Les autres pièces (Fig. 2) et leur fonctionnement sont décrits à la rubrique Fonctionnement.
La grille de protection doit être en position fermée pour que le batteur/mélangeur puisse fonctionner.
La cuve doit être verrouillée sur le porte-cuve pour que le batteur/mélangeur puisse fonctionner.
Si le porte-cuve n'est pas complètement relevé vers le haut (position de travail), le batteur/mélangeur ne fonctionnera pas à moins que le bouton DÉMARRAGE (START) ne soit enfoncé et maintenu dans cette position.
Si le porte-cuve n'est pas en position pour mélanger et que le bouton DÉMARRAGE (START) est maintenu enfoncé, le batteur/mélangeur fonctionnera uniquement en vitesse d'incorporation.
Fig. 2
CommandesPrise d’accessoires
Grille de protection
Ensemble godet à huile et pare-éclaboussures
Agitateur
Tablier arrière
Levier de verrouillage de la cuve
Porte-cuve
– 7 –
COMMANDES
Modèle HL600 (à quatre vitesses pour mélanger une vitesse pour incorporer)
INCORPORATION (STIR – Vitesse lente
Cette vitesse permet d'incorporer des ingrédients au début de chaque processus de mixage.
Vitesse 1 (vitesse basse) Cette vitesse est destinée aux mélanges lourds tels que la pâte à
Vitesse 2 (vitesse moyenne-basse) Cette vitesse est destinée aux mélanges de pâte à gâteau, aux pommes de terre en purée et à la pâte à pain.
Vitesse 3 (vitesse moyenne-élevée) Cette vitesse permet d'incorporer de l'air dans les petits lots et de
Vitesse 4 (vitesse élevée)accélérée dans les petits lots.
– 8 –
VITESSE 1 (basse) Cette vitesse est destinée aux mélanges lourds tels que
VITESSE 2 (basse) Cette vitesse est destinée au développement de la pâte
HACHER LA VIANDE Cette vitesse permet de hacher de la viande.
RÂPER DU FROMAGE Cette vitesse permet de râper du fromage.
COUPE-LÉGUMES Cette vitesse permet de couper des légumes.
– 9 –
POSITION DE LA CUVELa cuve doit être installée avant l'agitateur.
d'alignement situées sur le côté gauche du porte-cuve se logent dans les trous situés dans la languette de la cuve. Faites pivoter la cuve en position verrouillée sur le porte-cuve.
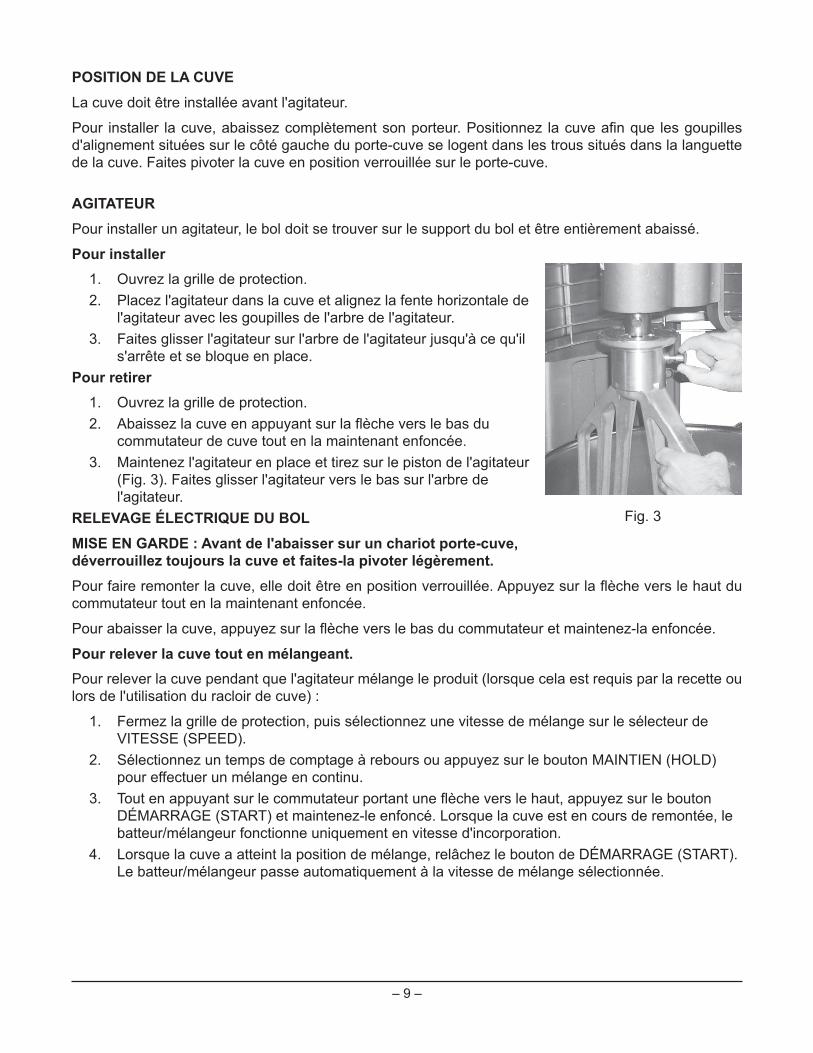
AGITATEURPour installer un agitateur, le bol doit se trouver sur le support du bol et être entièrement abaissé.
l'agitateur avec les goupilles de l'arbre de l'agitateur. 3. Faites glisser l'agitateur sur l'arbre de l'agitateur jusqu'à ce qu'il
s'arrête et se bloque en place.
commutateur de cuve tout en la maintenant enfoncée.
(Fig. 3). Faites glisser l'agitateur vers le bas sur l'arbre de l'agitateur.
RELEVAGE ÉLECTRIQUE DU BOL
commutateur tout en la maintenant enfoncée.
Pour relever la cuve pendant que l'agitateur mélange le produit (lorsque cela est requis par la recette ou lors de l'utilisation du racloir de cuve) :
VITESSE (SPEED).
pour effectuer un mélange en continu.
batteur/mélangeur fonctionne uniquement en vitesse d'incorporation.
Le batteur/mélangeur passe automatiquement à la vitesse de mélange sélectionnée.
Fig. 3
– 10 –
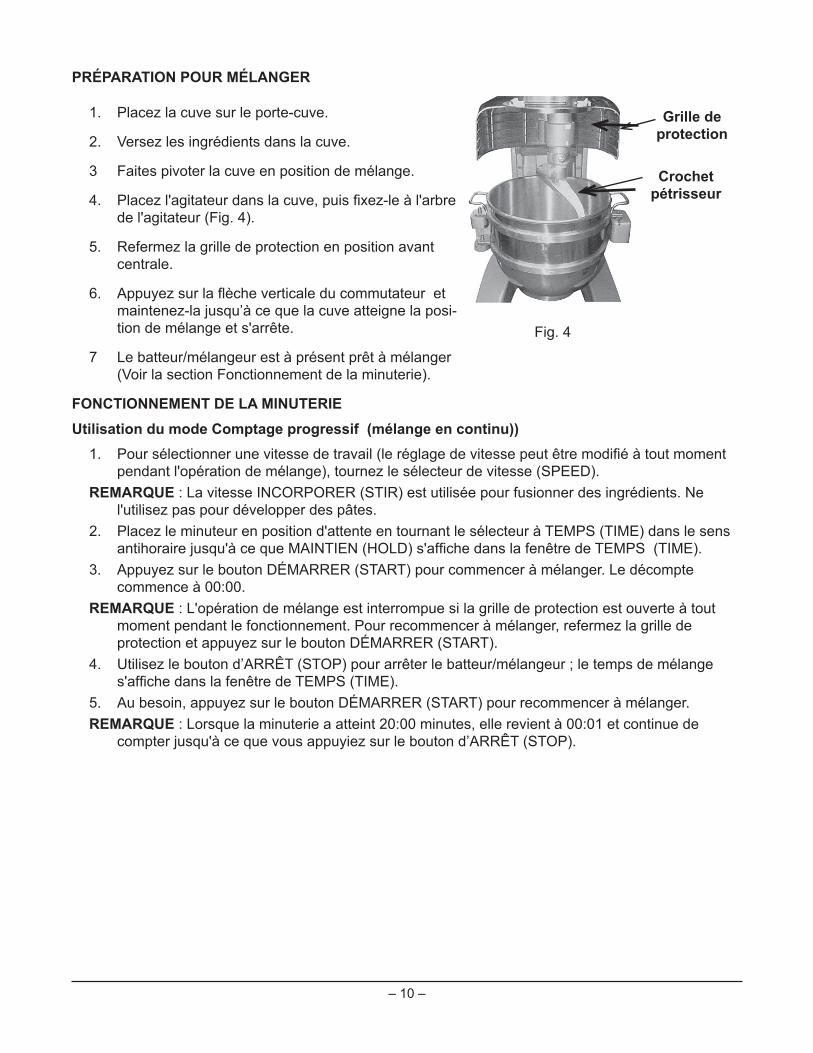
PRÉPARATION POUR MÉLANGER
3 Faites pivoter la cuve en position de mélange.
de l'agitateur (Fig. 4).
centrale.
-tion de mélange et s'arrête.
7 Le batteur/mélangeur est à présent prêt à mélanger (Voir la section Fonctionnement de la minuterie).
FONCTIONNEMENT DE LA MINUTERIE
REMARQUE : La vitesse INCORPORER (STIR) est utilisée pour fusionner des ingrédients. Ne
commence à 00:00. REMARQUE : L'opération de mélange est interrompue si la grille de protection est ouverte à tout
REMARQUE : Lorsque la minuterie a atteint 20:00 minutes, elle revient à 00:01 et continue de
Fig. 4
– 11 –
temps souhaité. b. Si le mode de mélange avec minuterie a été utilisé lors du lot précédent, le temps
temps au temps souhaité. -
re le compte à rebours à partir du temps réglé.
: le batteur/mélangeur démarre à la VITESSE 1 (SPEED 1) pendant 30 secondes et s'arrête après 10 secondes. En appuyant sur le bouton DÉMARRER (START), l’appareil recommence à mélanger.
d'appuyer sur le bouton DÉMARRER (START) enregistre le nouveau réglage de temps à la vitesse en cours. Par exemple : le batteur/mélangeur démarre à la VITESSE 1 (SPEED
temps en tournant le sélecteur de TEMPS (TIME). Le nouveau temps remplacera les 30 premières secondes du réglage à la VITESSE 1 (SPEED 1) après avoir appuyé sur le bouton DÉMARRER (START).
fonctionnera jusqu'à ce que le nouveau temps soit expiré. Le réglage de ce temps ne sera pas enregistré.
précédent pour la vitesse et le compte à rebours sélectionnés. REMARQUE : Le mélange est interrompu si la grille de protection est ouverte à tout moment pen-
3 Lorsque la minuterie atteint 00:00, le batteur/mélangeur s'arrête et un signal sonore retentit pen-
NOTES DE FONCTIONNEMENT
pour développer des pâtes.
bouton DÉMARRER (START).
temps dans le sens horaire pour que le batteur/mélangeur quitte le mode de MAINTIEN (HOLD).

– 12 –
et à l'agitateur.
circuler autour de l’arête du godet à huile alentour du planétaire.
•REMARQUE : la grille de protection doit être refermée pour que le batteur/mélangeur fonctionne
Fig. 5
– 13 –
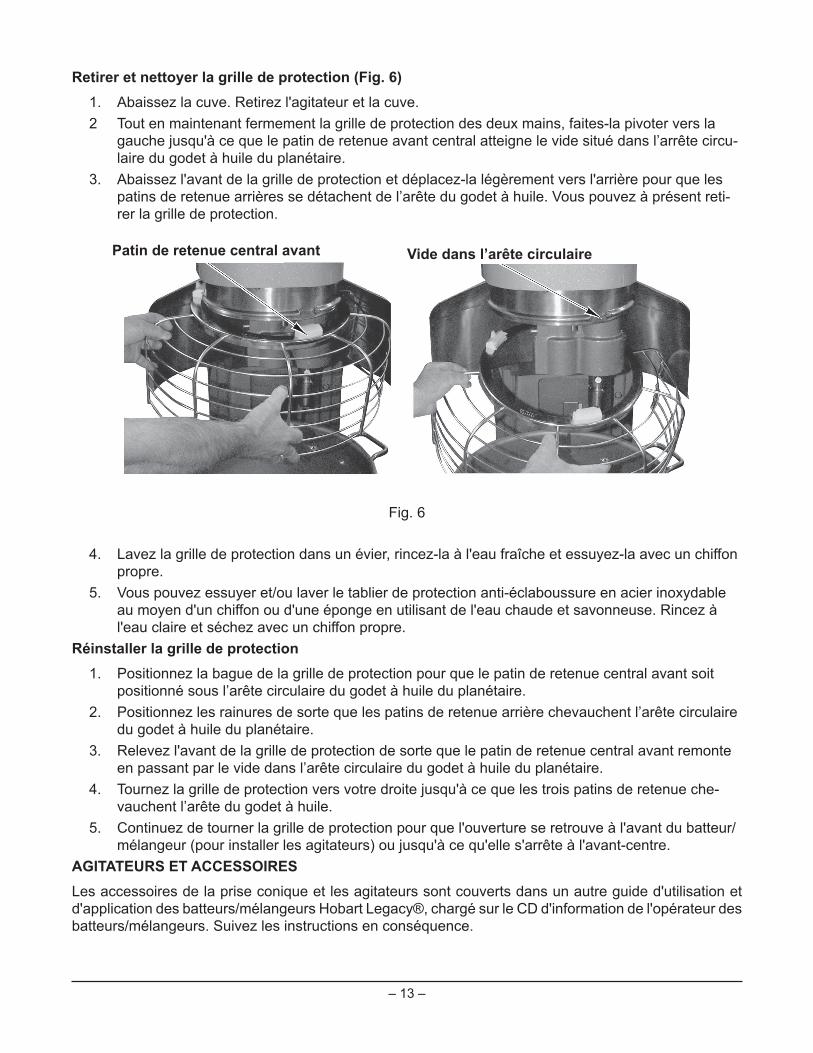
2 Tout en maintenant fermement la grille de protection des deux mains, faites-la pivoter vers la gauche jusqu'à ce que le patin de retenue avant central atteigne le vide situé dans l’arrête circu-laire du godet à huile du planétaire.
-rer la grille de protection.
propre.
positionné sous l’arête circulaire du godet à huile du planétaire.
du godet à huile du planétaire.
en passant par le vide dans l’arête circulaire du godet à huile du planétaire. -
vauchent l’arête du godet à huile.
mélangeur (pour installer les agitateurs) ou jusqu'à ce qu'elle s'arrête à l'avant-centre.AGITATEURS ET ACCESSOIRESLes accessoires de la prise conique et les agitateurs sont couverts dans un autre guide d'utilisation et d'application des batteurs/mélangeurs Hobart Legacy®, chargé sur le CD d'information de l'opérateur des
Fig. 6
– 14 –
NETTOYAGE
AVERTISSEMENT!
Les cuves et les outils du nouveau batteur/mélangeur (les batteurs, les fouets, et les crochets pétrisseurs) doivent être lavés soigneusement avec de l'eau chaude et une solution savonneuse douce, rincés avec une solution de soude douce ou de vinaigre, puis rincés soigneusement à l'eau claire avant de les utiliser.
fouetter des blancs d'œufs ou des œufs entiers.
page 6) pour le nettoyer en desserrant les vis de serrage à main.
– 15 –
ENTRETIEN
AVERTISSEMENT!
LUBRIFICATION
Fig. 7
– 16 –
pour obtenir l'huile de transmission recommandée.
RÉGLAGES
maximal entre le fond de la cuve et le crochet de pétrissage ED est de 8 mm (5/16 po).
du dégagement de la cuve et de l'agitateur, page 17.
Fig. 8
– 17 –
complètement relevée (le batteur ne doit pas toucher le fond de la cuve), faites brièvement fonctionner le batteur/mélangeur à la vitesse la plus basse.
à l'endroit où le batteur a laissé une trace. Cette mesure doit être prise à plusieurs points autour de la cuve pour en garantir la précision.
main).
- Desserrer l'écrou de blocage situé au fond (Fig. 9)
pour augmenter l'écartement ou dans le sens horaire pour le réduire.
vis de butée.
• Des débris peuvent parfois s'accumuler et
goupille de verrouillage pour expulser les particules de nourriture qui peuvent s'être
de placer un chiffon ou un ustensile sous le porte-cuve pour récupérer l'eau et les particules de nourriture.
couche de graisse Lubriplate® 630AA
Fig. 9
– 18 –
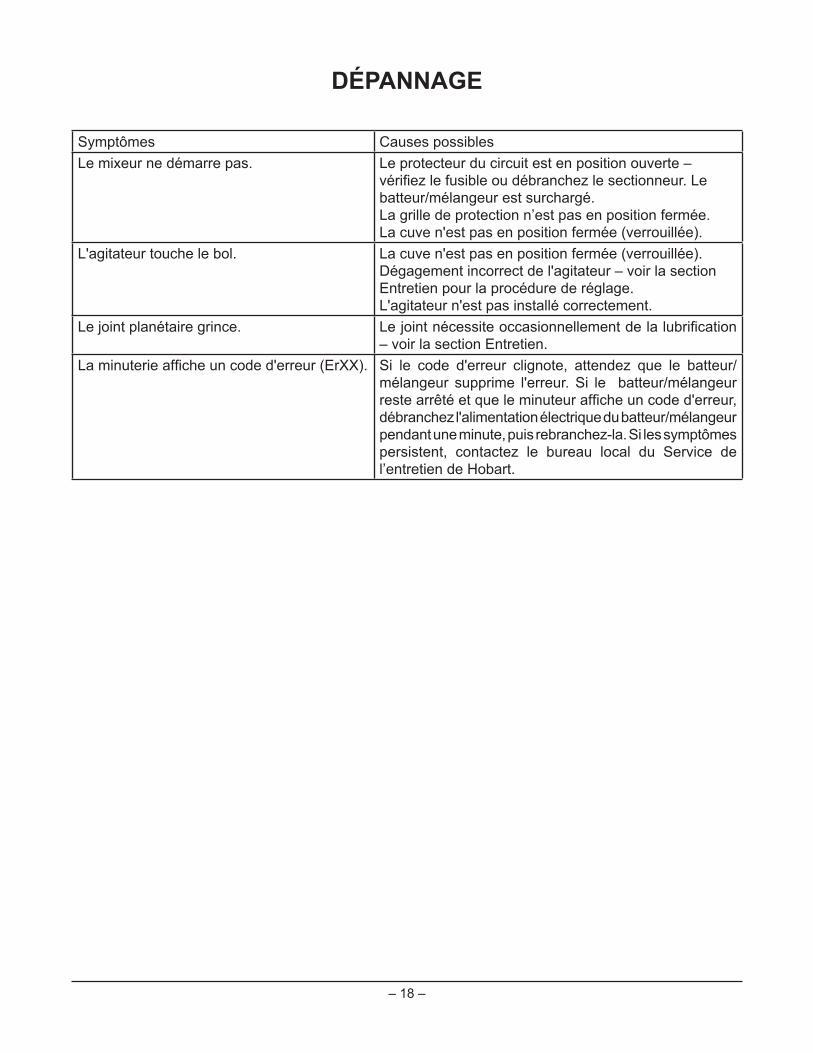
DÉPANNAGE
Symptômes Causes possiblesLe mixeur ne démarre pas. Le protecteur du circuit est en position ouverte –
batteur/mélangeur est surchargé. La grille de protection n’est pas en position fermée.La cuve n'est pas en position fermée (verrouillée).
L'agitateur touche le bol. La cuve n'est pas en position fermée (verrouillée). Dégagement incorrect de l'agitateur – voir la section Entretien pour la procédure de réglage.L'agitateur n'est pas installé correctement.
Le joint planétaire grince. – voir la section Entretien.
mélangeur supprime l'erreur. Si le batteur/mélangeur
l’entretien de Hobart.

– 19 –
RÉPARATIONS
de Hobart.

– 20 –
REMARQUES
701 S. RIDGE AVENUE TROY, OHIO 45374-0001
937 332-3000
www.hobartcorp.com
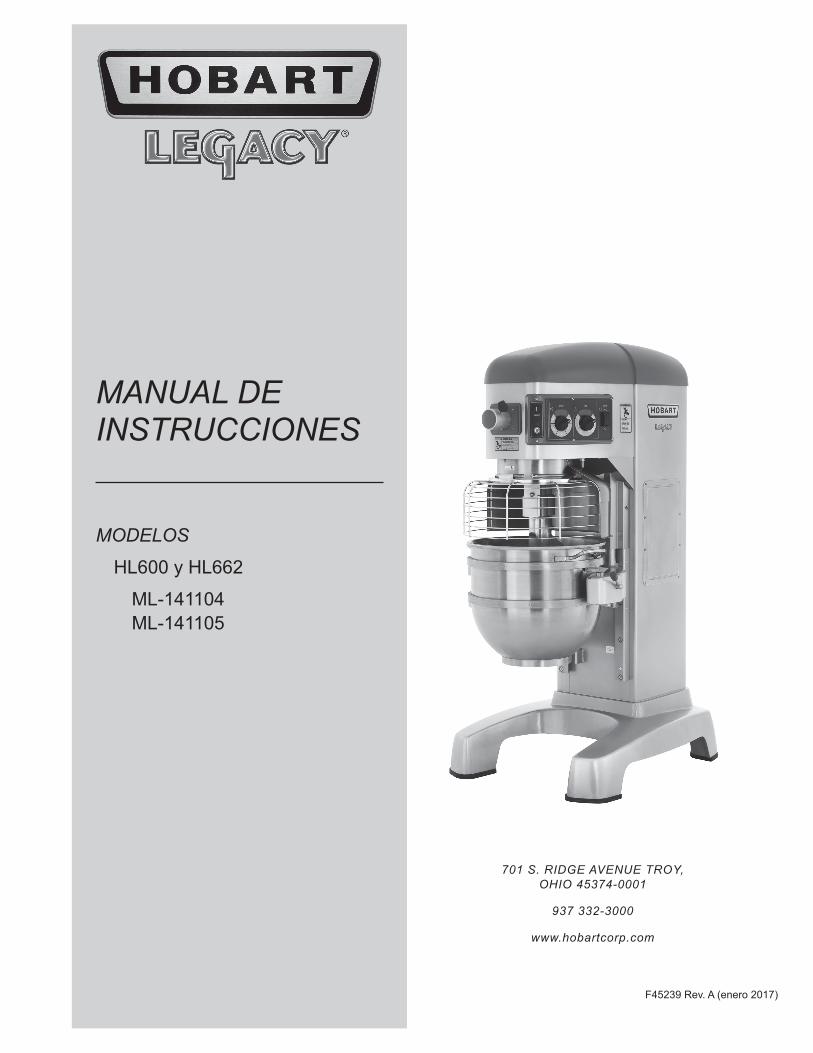
MANUAL DE INSTRUCCIONES
MODELOS
HL600 y HL662
ML-141104 ML-141105
F45239 Rev. A (enero 2017)
– 2 –
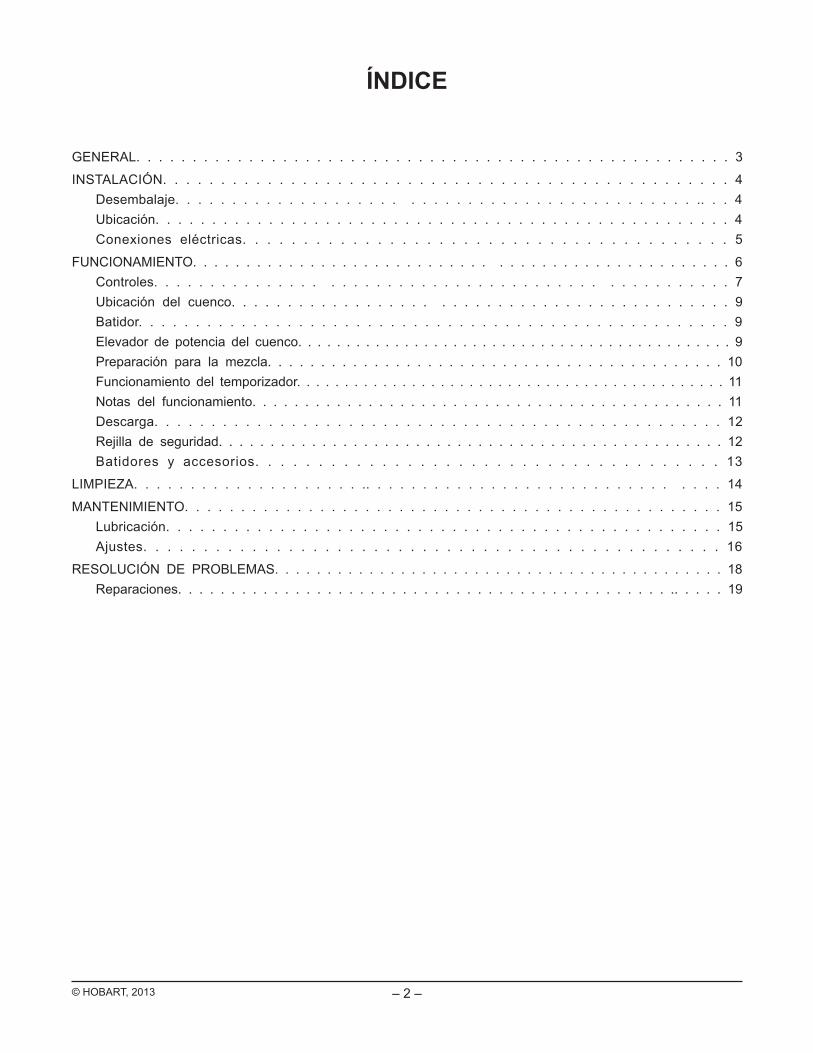
ÍNDICE
GENERAL. . . . . . . . . . . . . . . . . . . . . . . . . . . . . . . . . . . . . . . . . . . . . . . . . . . . . 3
INSTALACIÓN. . . . . . . . . . . . . . . . . . . . . . . . . . . . . . . . . . . . . . . . . . . . . . . . . 4Desembalaje. . . . . . . . . . . . . . . . . . . . . . . . . . . . . . . . . . . . . . . . . . . . . .. . . 4Ubicación. . . . . . . . . . . . . . . . . . . . . . . . . . . . . . . . . . . . . . . . . . . . . . . . . . . 4Conexiones eléctricas. . . . . . . . . . . . . . . . . . . . . . . . . . . . . . . . . . . . . . . . 5
FUNCIONAMIENTO. . . . . . . . . . . . . . . . . . . . . . . . . . . . . . . . . . . . . . . . . . . . . . . . . . 6Controles. . . . . . . . . . . . . . . . . . . . . . . . . . . . . . . . . . . . . . . . . . . . . . . . . . 7Ubicación del cuenco. . . . . . . . . . . . . . . . . . . . . . . . . . . . . . . . . . . . . . . . . . . . 9Batidor. . . . . . . . . . . . . . . . . . . . . . . . . . . . . . . . . . . . . . . . . . . . . . . . . . . . 9Elevador de potencia del cuenco. . . . . . . . . . . . . . . . . . . . . . . . . . . . . . . . . . . . . . . . . . . . . 9Preparación para la mezcla. . . . . . . . . . . . . . . . . . . . . . . . . . . . . . . . . . . . . . . . . . . 10Funcionamiento del temporizador. . . . . . . . . . . . . . . . . . . . . . . . . . . . . . . . . . . . . . . . . . . . . 11Notas del funcionamiento. . . . . . . . . . . . . . . . . . . . . . . . . . . . . . . . . . . . . . . . . . . . . 11Descarga. . . . . . . . . . . . . . . . . . . . . . . . . . . . . . . . . . . . . . . . . . . . . . . . . . 12Rejilla de seguridad. . . . . . . . . . . . . . . . . . . . . . . . . . . . . . . . . . . . . . . . . . . . . . . . . 12Batidores y accesorios. . . . . . . . . . . . . . . . . . . . . . . . . . . . . . . . . . . . . 13
LIMPIEZA. . . . . . . . . . . . . . . . . . . . .. . . . . . . . . . . . . . . . . . . . . . . . . . . . . . . 14
MANTENIMIENTO. . . . . . . . . . . . . . . . . . . . . . . . . . . . . . . . . . . . . . . . . . . . . . . . 15Lubricación. . . . . . . . . . . . . . . . . . . . . . . . . . . . . . . . . . . . . . . . . . . . . . . . . 15Ajustes. . . . . . . . . . . . . . . . . . . . . . . . . . . . . . . . . . . . . . . . . . . . . . . . 16
RESOLUCIÓN DE PROBLEMAS. . . . . . . . . . . . . . . . . . . . . . . . . . . . . . . . . . . . . . . . . . . 18Reparaciones. . . . . . . . . . . . . . . . . . . . . . . . . . . . . . . . . . . . . . . . . . . . . . .. . . . . 19
© HOBART, 2013
– 3 –
INSTALACIÓN, FUNCIONAMIENTO Y CUIDADO DE LAS BATIDORAS LEGACY® DE 60 CUARTOS DE GALÓN
GUARDE ESTAS INSTRUCCIONES
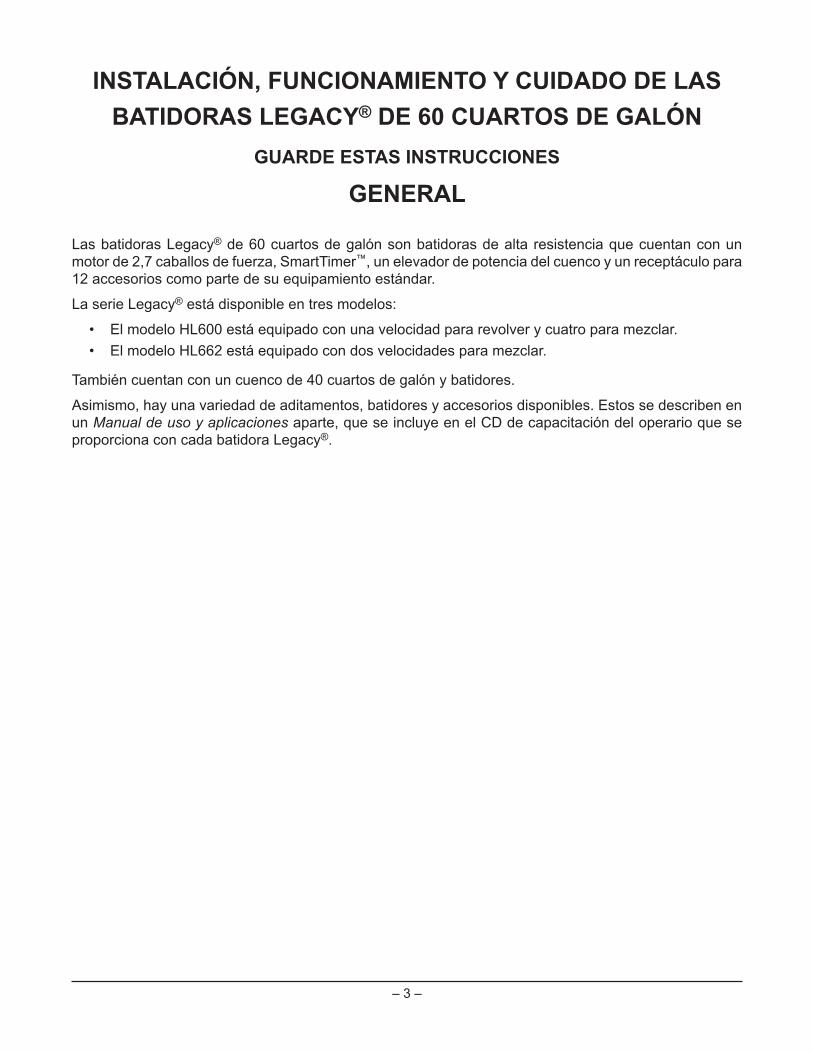
GENERAL
Las batidoras Legacy® de 60 cuartos de galón son batidoras de alta resistencia que cuentan con un motor de 2,7 caballos de fuerza, SmartTimer™, un elevador de potencia del cuenco y un receptáculo para 12 accesorios como parte de su equipamiento estándar.
La serie Legacy® está disponible en tres modelos:
• El modelo HL600 está equipado con una velocidad para revolver y cuatro para mezclar.• El modelo HL662 está equipado con dos velocidades para mezclar.
También cuentan con un cuenco de 40 cuartos de galón y batidores.
Asimismo, hay una variedad de aditamentos, batidores y accesorios disponibles. Estos se describen en un Manual de uso y aplicaciones aparte, que se incluye en el CD de capacitación del operario que se proporciona con cada batidora Legacy®.
– 4 –
INSTALACIÓNDESEMBALAJE
UBICACIÓN
que se indican en la placa de datos de la máquina.
batidora para que el usuario pueda manejar los controles e instalar y retirar los cuencos. Las áreas por
en caso de mantenimiento de rutina y reparaciones.
Una vez en su lugar, la batidora debe nivelarse:
• Retire la cubierta superior y sus dos tornillos.
hacia atrás y de manea lateral.• No vuelva a colocar la cubierta superior hasta terminar con la instalación.
Tapón de llenado de la transmisión/Varilla medidora de aceite
Fig. 1
Borde superior
– 5 –
batidora. Consulte la sección de Lubricación en la página 15 para ver los procedimientos de lubricación correspondientes.
Conexiones eléctricas
Código Eléctrico Nacional y otros códigos eléctricos locales.
DESCONECTE la ENERGÍA ELÉCTRICA de la máquina y siga los
Hay una perforación para tubo conduit de 3/4 pulgadas en la parte superior del pedestal. Haga las
Batidora monofásica:
• Conecte los cables conductores de suministro de campo con L1 y L2.• Conecte el cable a tierra al terminal a tierra en la batidora.• Corte una parte sin revestimiento de L3 en la batidora Legacy®
aislante para aislar el conductor expuesto.
Batidora trifásica:
• Conecte los cables conductores de suministro de campo con L1, L2 y L3.• Conecte el cable a tierra al terminal a tierra en la batidora.
1. Encienda la batidora.2. Gire la perilla SPEED (velocidad) hasta STIR (revolver) en el caso del modelo HL600 y hasta 1
en el caso del modelo HL662.
completamente hacia arriba y la protección del cuenco cerrada. Haga funcionar momentáneamente la máquina al presionar los botones START (comenzar) y, luego, STOP (detener).
– 6 –
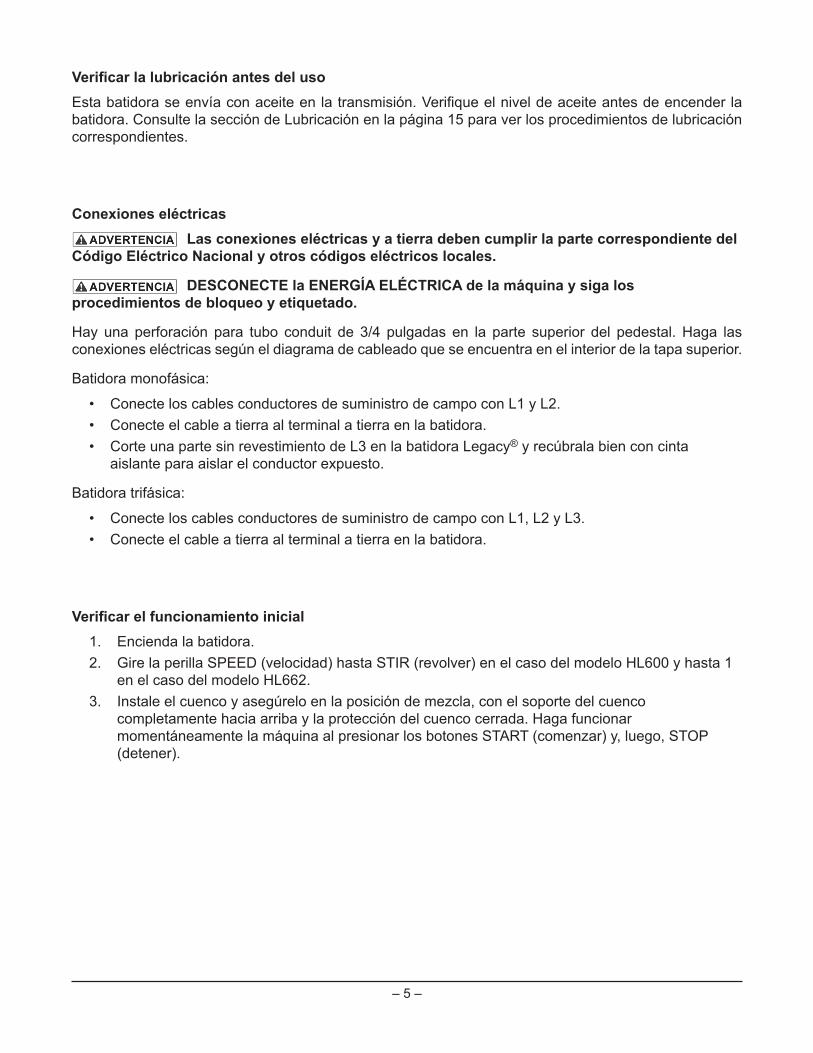
FUNCIONAMIENTO
La batidora Legacy® está equipada con controles SmartTimer™ y un elevador de potencia del cuenco. Las otras piezas de funcionamiento (Fig. 2) y sus funciones se describen en la sección Funcionamiento.
La rejilla de seguridad debe estar en posición o, de lo contrario, la batidora no funcionará.
El cuenco debe permanecer en la posición de bloqueo en el soporte del cuenco o la batidora no funcionará.
Si el soporte del cuenco no está completamente hacia arriba (posición de mezcla), la batidora no funcionará a menos que se mantenga presionado el botón START (comenzar).
Si el soporte del cuenco no está en la posición de mezcla y se mantiene presionado el botón START (comenzar), la batidora funcionará solo en la velocidad para revolver.
Fig. 2
ControlesReceptáculo para accesorios
Rejilla de seguridad
Ensamble de protección contra salpicaduras de la copa retenedora
de goteo
Batidor
Cubierta
Palanca de bloqueo del
cuenco
Soporte del cuenco
– 7 –
CONTROLES
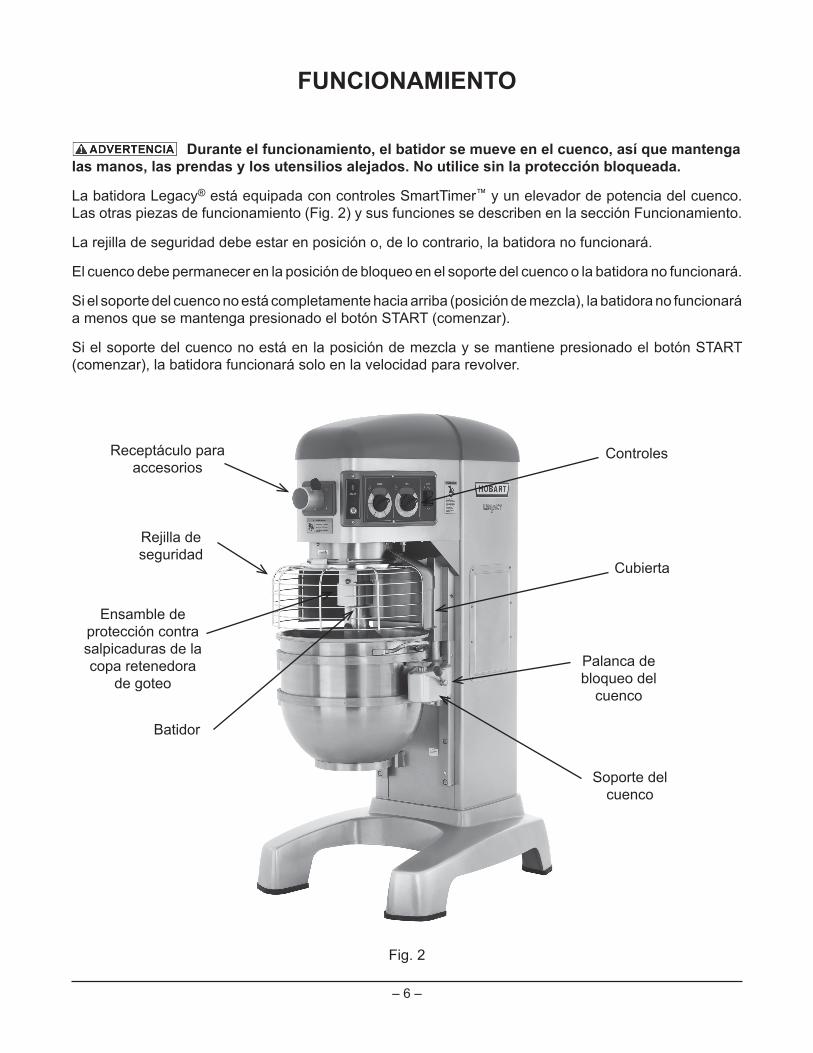
Modelo HL600 (con cuatro velocidades para mezclar y una velocidad para revolver)
STIR (revolver) (Lento) La velocidad STIR (revolver) sirve para incorporar ingredientes en el comienzo de cada proceso de mezcla.
papas y amasar pan.
terminar productos batidos.
en preparaciones livianas.
Selector de tiempo
el cuencoseleccionada para
mezclar
Muestra el tiempo de
mezcla
– 8 –
para pizza.
MEAT GRIND (picar carne) Esta velocidad es para picar carne.
CHEESE SHRED (rallar queso) Esta velocidad es para rallar queso.
Inicia la seleccionada para
mezclar
Muestra el tiempo de
mezcla
Selector de tiempo
cuenco
– 9 –
UBICACIÓN DEL CUENCOEl cuenco debe instalarse antes de instalar el batidor.
Para instalar el cuenco, baje el soporte del cuenco por completo. Coloque el cuenco de manera que los pasadores de alineación en el lado izquierdo del soporte del cuenco encajen en las perforaciones del cuenco. Gire el cuenco a la posición de bloqueo en el soporte.
BATIDORPara instalar un batidor, el cuenco debe estar en el soporte del cuenco y completamente bajado.
Cómo instalar1. Abra la rejilla de seguridad.2. Coloque el batidor en el interior del cuenco y alinee
la ranura horizontal en el batidor con los pasadores del eje del batidor.
3. Deslice el batidor hacia arriba por el eje del batidor hasta que se detenga y se enclave.
Cómo retirar1. Abra la rejilla de seguridad.
interruptor del cuenco para bajar el cuenco.3. Sujete el batidor y tire de su émbolo (Fig. 3).
Deslice el batidor hacia abajo por su eje.
ELEVADOR DE POTENCIA DEL CUENCO
arriba en el interruptor del cuenco.
Para levantar el cuenco mientras el batidor mezcla el producto (cuando una receta lo requiera o cuando se usa el accesorio de raspador para cuenco) haga lo siguiente:
1. Cierre la rejilla de seguridad y seleccione una velocidad para mezclar en la perilla SPEED (velocidad).
2. Seleccione un indicador de cuenta regresiva o HOLD (en espera) para una mezcla continua en modo de cuenta ascendente.
presionado el botón START (comenzar). La batidora funciona solo en velocidad para revolver mientras el cuenco está levantado.
4. Cuando el cuenco llegue a la posición de mezcla, suelte el botón START (comenzar). La batidora, de manera automática, pasa a la velocidad seleccionada para mezclar.
Fig. 3
– 10 –
PREPARACIÓN PARA LA MEZCLA
1. Coloque el cuenco para mezclar en el soporte del cuenco.
3. Gire el cuenco hacia atrás hasta la posición de bloqueo.
4. Coloque el batidor en el cuenco y conéctelo al eje (Fig. 4).
5. Regrese la rejilla de seguridad a la posición frontal central.
interruptor del cuenco hasta que este llegue a la posición de mezcla y se detenga.
Funcionamiento del temporizador).
FUNCIONAMIENTO DEL TEMPORIZADOR
de SPEED puede cambiarse en cualquier momento durante la operación de mezcla).
NOTA: La velocidad STIR (revolver) se usa para incorporar ingredientes. No la utilice para amasar.
2. Establezca el temporizador en espera al girar el selector TIMER (temporizador) hacia la izquierda hasta que aparezca “Hold” en la ventana de TIME (tiempo).
3. Presione el botón START (comenzar) para empezar a mezclar. El temporizador comienza a contar hacia adelante desde 00:00.
NOTA: Si la rejilla de seguridad está abierta en cualquier momento dado, la operación de mezcla se detendrá. Para reanudar esta operación, cierre la rejilla de seguridad y presione el botón START (comenzar).
4. Utilice el botón STOP (detener) para parar la batidora; el tiempo de mezcla se muestra en la ventana de TIME (tiempo).
5. Presione el botón START (comenzar) para reanudar la mezcla si fuera necesario.
NOTA: Cuando el temporizador alcance los 20:00 minutos, volverá a 00:01 y seguirá contando hasta que se presione el botón STOP (detener).
Rejilla de seguridad
Batidor de
accesorio
Fig. 4
– 11 –
1. Gire la perilla SPEED (velocidad) para seleccionar una velocidad para mezclar. a. Si se utilizó el modo de cuenta ascendente para la preparación anterior, debe volver a
ingresar el tiempo deseado.
b. Si se utilizó el modo de cuenta regresiva para la preparación anterior, se mostrará el tiempo anterior. Si se necesita un tiempo diferente, gire el selector TIME (tiempo) hasta el tiempo deseado.
2. Presione el botón START (comenzar) para comenzar a mezclar; el temporizador empieza a contar hacia atrás desde el tiempo establecido.
a. Para detener la batidora en cualquier momento, presione el botón STOP (detener). Para reanudar la mezcla, presione el botón START (comenzar). Por ejemplo: La batidora inicia en
START (comenzar), reanudará la operación de mezcla.
detiene tras 10 segundos. Para ingresar un nuevo tiempo, gire el selector TIME (tiempo). El
botón START (comenzar).
c. Si se cambia el tiempo mientras se mezcla, la batidora funcionará hasta que expire el nuevo tiempo. El ajuste del tiempo no se almacenará.
d. Si se cambia la velocidad mientras se mezcla, el tiempo regresará al tiempo anterior para la velocidad seleccionada y la cuenta regresiva.
NOTA: Si la rejilla de seguridad está abierta en cualquier momento dado, la operación de mezcla se detendrá. Para reanudar esta operación, cierre la rejilla de seguridad y presione el botón START (comenzar).
3. Cuando el temporizador alcanza 00:00, la batidora se detiene y suena una alarma durante
NOTAS DEL FUNCIONAMIENTO• La velocidad STIR (revolver) se usa para incorporar ingredientes. No la utilice para amasar.
• Si la batidora se detiene durante una operación de mezcla, el temporizador también se detiene. El temporizador arranca nuevamente donde dejó cuando se presione el botón START (comenzar).
• La ventana SPEED (velocidad) mostrará la selección actual de velocidad de la perilla SPEED. Gire el selector TIME (tiempo) hacia la derecha para que la batidora salga del modo en espera.
– 12 –
DESCARGA
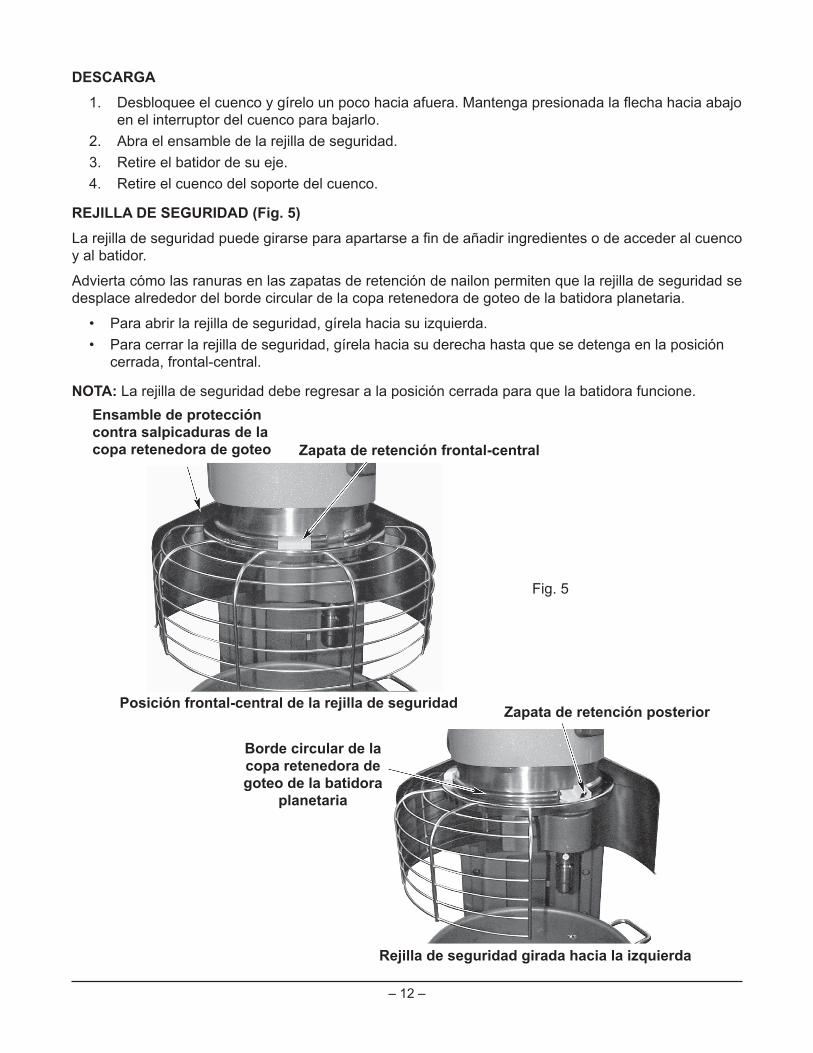
en el interruptor del cuenco para bajarlo.2. Abra el ensamble de la rejilla de seguridad.3. Retire el batidor de su eje.4. Retire el cuenco del soporte del cuenco.
Fig
y al batidor.
Advierta cómo las ranuras en las zapatas de retención de nailon permiten que la rejilla de seguridad se desplace alrededor del borde circular de la copa retenedora de goteo de la batidora planetaria.
cerrada, frontal-central.
NOTA: La rejilla de seguridad debe regresar a la posición cerrada para que la batidora funcione.
contra salpicaduras de la copa retenedora de goteo
Zapata de retención posterior
Borde circular de la copa retenedora de
planetaria
Fig. 5
– 13 –
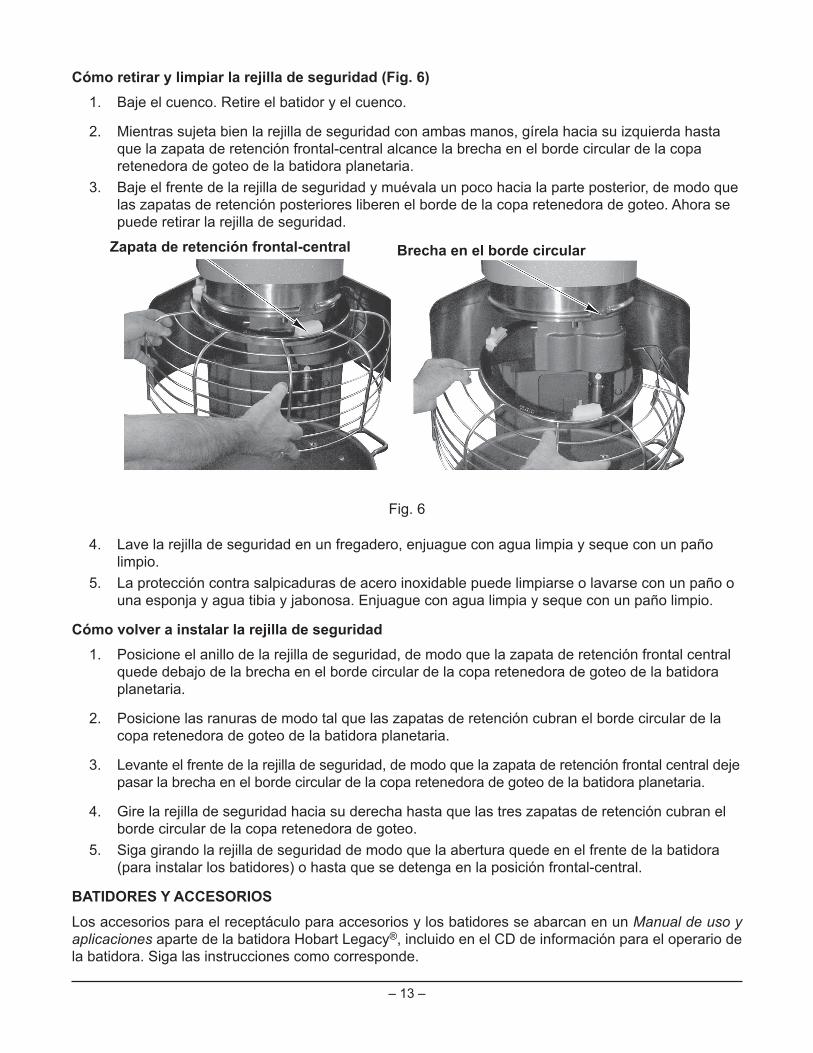
1. Baje el cuenco. Retire el batidor y el cuenco.
que la zapata de retención frontal-central alcance la brecha en el borde circular de la copa retenedora de goteo de la batidora planetaria.
3. Baje el frente de la rejilla de seguridad y muévala un poco hacia la parte posterior, de modo que las zapatas de retención posteriores liberen el borde de la copa retenedora de goteo. Ahora se puede retirar la rejilla de seguridad.
limpio.
1. Posicione el anillo de la rejilla de seguridad, de modo que la zapata de retención frontal central quede debajo de la brecha en el borde circular de la copa retenedora de goteo de la batidora planetaria.
2. Posicione las ranuras de modo tal que las zapatas de retención cubran el borde circular de la copa retenedora de goteo de la batidora planetaria.
3. Levante el frente de la rejilla de seguridad, de modo que la zapata de retención frontal central deje pasar la brecha en el borde circular de la copa retenedora de goteo de la batidora planetaria.
4. Gire la rejilla de seguridad hacia su derecha hasta que las tres zapatas de retención cubran el borde circular de la copa retenedora de goteo.
5. Siga girando la rejilla de seguridad de modo que la abertura quede en el frente de la batidora (para instalar los batidores) o hasta que se detenga en la posición frontal-central.
BATIDORES Y ACCESORIOSLos accesorios para el receptáculo para accesorios y los batidores se abarcan en un Manual de uso y aplicaciones aparte de la batidora Hobart Legacy®, incluido en el CD de información para el operario de la batidora. Siga las instrucciones como corresponde.
Fig. 6
– 14 –
LIMPIEZA
DESCONECTE la ENERGÍA ELÉCTRICA de la máquina y siga los
Tanto los accesorios (paletas batidoras, batidor de alambres y ganchos amasadores) como los cuencos nuevos de la batidora deben lavarse minuciosamente con agua caliente y una solución de detergente suave, enjuagarse con una solución suave de sosa o vinagre y enjuagarse bien con agua limpia antes
batir claras de huevos o huevos enteros.
manual.
Para conocer cómo limpiar la rejilla de seguridad, consulte la página 13.
– 15 –
MANTENIMIENTO
DESCONECTE la ENERGÍA ELÉCTRICA de la máquina y siga los
LUBRICACIÓN
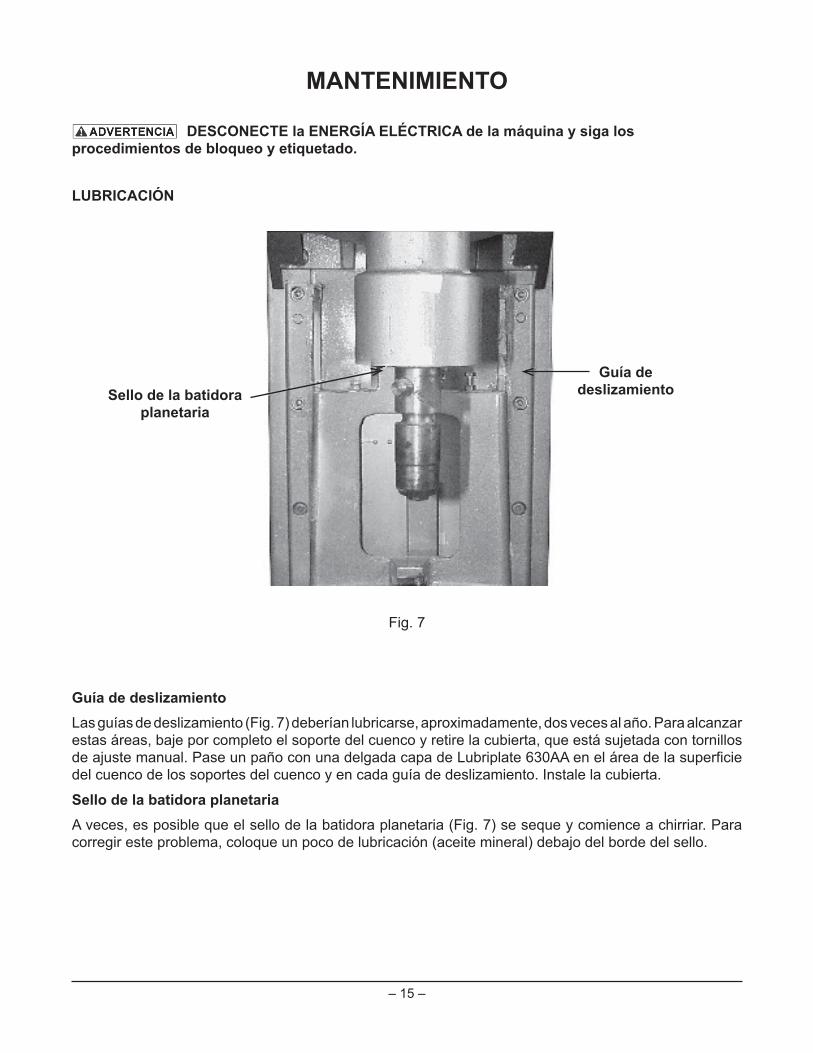
estas áreas, baje por completo el soporte del cuenco y retire la cubierta, que está sujetada con tornillos
A veces, es posible que el sello de la batidora planetaria (Fig. 7) se seque y comience a chirriar. Para corregir este problema, coloque un poco de lubricación (aceite mineral) debajo del borde del sello.
planetariadeslizamiento
Fig. 7
– 16 –
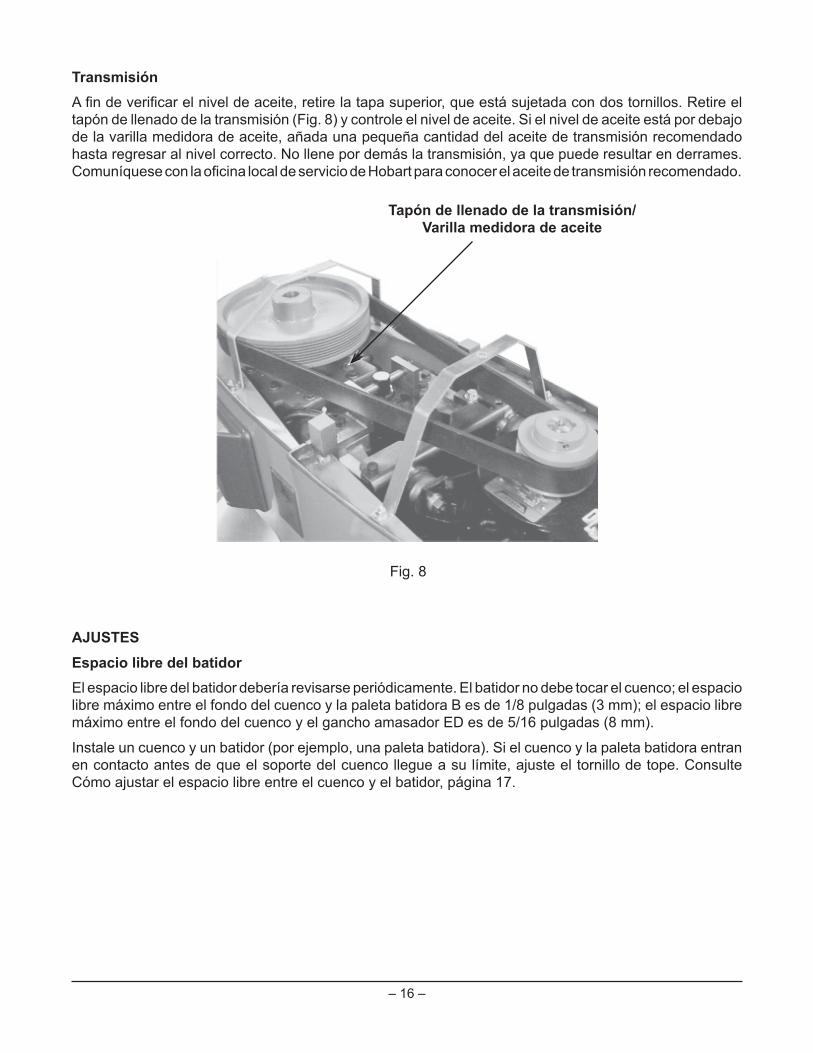
Transmisión
tapón de llenado de la transmisión (Fig. 8) y controle el nivel de aceite. Si el nivel de aceite está por debajo
hasta regresar al nivel correcto. No llene por demás la transmisión, ya que puede resultar en derrames.
AJUSTES
libre máximo entre el fondo del cuenco y la paleta batidora B es de 1/8 pulgadas (3 mm); el espacio libre máximo entre el fondo del cuenco y el gancho amasador ED es de 5/16 pulgadas (8 mm).
Instale un cuenco y un batidor (por ejemplo, una paleta batidora). Si el cuenco y la paleta batidora entran
Cómo ajustar el espacio libre entre el cuenco y el batidor, página 17.
Tapón de llenado de la transmisión/Varilla medidora de aceite
Fig. 8
– 17 –
funcionar brevemente la batidora en la velocidad más baja.
cuenco para garantizar la precisión.
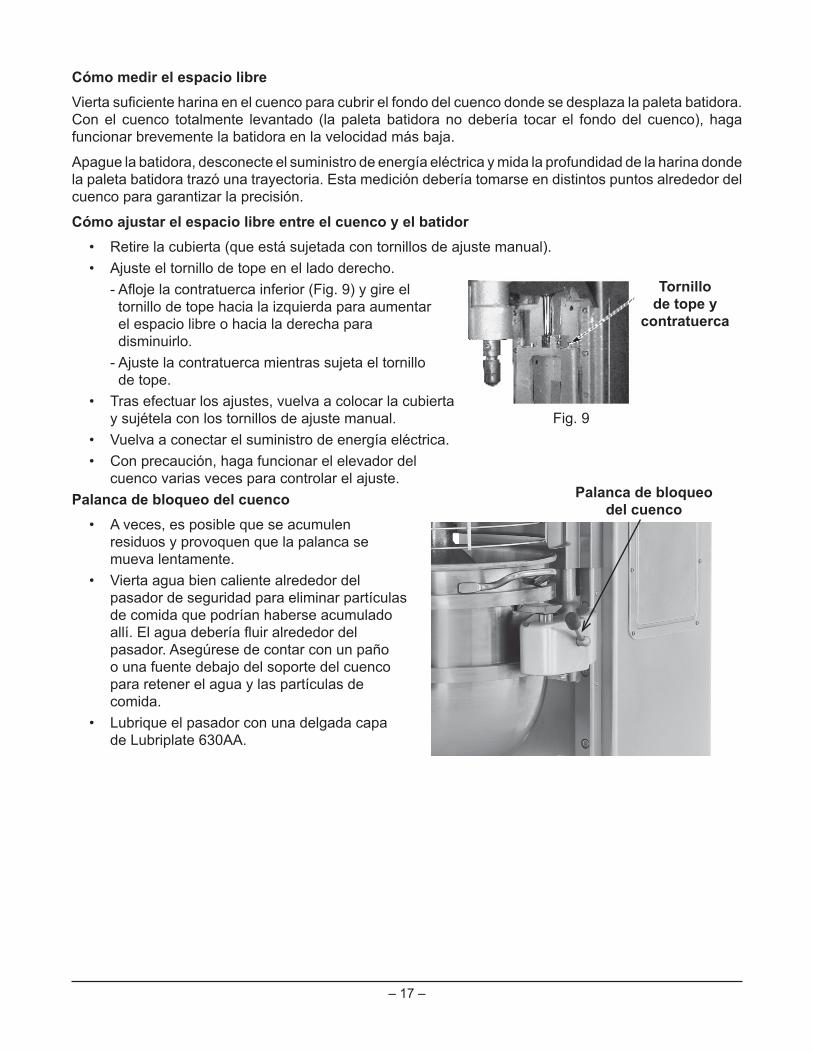
• Retire la cubierta (que está sujetada con tornillos de ajuste manual).• Ajuste el tornillo de tope en el lado derecho.
tornillo de tope hacia la izquierda para aumentar el espacio libre o hacia la derecha para disminuirlo.
- Ajuste la contratuerca mientras sujeta el tornillo de tope.
• Tras efectuar los ajustes, vuelva a colocar la cubierta y sujétela con los tornillos de ajuste manual.
• Con precaución, haga funcionar el elevador del cuenco varias veces para controlar el ajuste.
• A veces, es posible que se acumulen residuos y provoquen que la palanca se mueva lentamente.
o una fuente debajo del soporte del cuenco
comida.• Lubrique el pasador con una delgada capa
de Lubriplate 630AA.
Tornillo de tope y
contratuerca
Fig. 9
del cuenco
– 18 –
RESOLUCIÓN DE PROBLEMAS
Causas posiblesLa batidora no arranca. El protector del circuito está en posición abierta.
Controle el fusil o desconecte el interruptor. La batidora está sobrecargada. La rejilla de seguridad no está en la posición cerrada. El cuenco no está en la posición cerrada (de bloqueo).
El batidor toca el cuenco. El cuenco no está en la posición cerrada (de bloqueo). Espacio libre incorrecto del batidor. Consulte Mantenimiento para conocer el procedimiento de ajuste. El batidor no está bien instalado.El sello requiere lubricación ocasional. Consulte Mantenimiento.
El temporizador muestra un código de error (ErXX).
Si el código de error parpadea, espere que la batidora elimine el estado de error. Si la batidora sigue deteniéndose y el temporizador muestra un código de
batidora durante un minuto y, luego, vuelva a conectarla.
de servicio de Hobart.

– 19 –
REPARACIONES

– 20 –F45239 Rev. A (enero 2017) IMPRESO EN EE. UU.
NOTAS