Embed Size (px)
Citation preview

CytoFlex vFCTM Set up 191127
1
Vesicle Flow Cytometry Analysis Kit FOR VESICLE COUNTING AND SIZING
Instrument Setup:
Beckman Coulter CytoFlexS™

CytoFlex vFCTM Set up 191127
2
Instrument Setup - Beckman Coulter CytoFlex™ Prior to running the vFC Assay, configure the CytoFlex with the appropriate filters and create an Acquisition Template. Typically, this will only need to be performed once, and the saved Template and Experiments used for future experiments. Filter configuration. Configure the CytoFlex™ for Violet Side Scatter (VSSC) detection. If using a core instrument you will need permission from the core manager. A detailed description of how to perform this operation can be found in the CytoFlex Operation Manual. Briefly, you will access the Violet laser optical filters inside the instrument, place the Violet 405nm filter in position 2, the Violet 450nm filter in position 3, and an unused filter in position 1. Acquisition Template. The CytoFlex acquisition settings are stored in a .xitm file, which contains data acquisition setting as well as the file and group naming rules applied to file names and Sample IDs. Frequently used plate layouts can be saved and used as templates for future experiments.
To configure an initial Acquisition Template (.xitm file): 1. Configure detectors 2. Define plate and sample wells 3. Set Acquisition conditions 4. Adjust Trigger channel threshold
For subsequent runs, recall the vFC Assay Template and:
1. Define a new Plate and Sample wells 2. Set new File and Group Names

CytoFlex vFCTM Set up 191127
3
1. Detector configuration. From the CytExpert software, create a new Detector Configuration (Cytometer>Detector Configuration> New) and populate the Fluorophore and Filter fields in the Filter Diagramiagram. You will need to Add a Fluorophore named vFRed with center band of 690 nm to the Fluorophore list. Finally, right click on the 405nm channel and select Set SSC. Save the Template as vFC Assay and select Set as Current.
2. Define plate and select sample wells to run.
From the Tube dialogue, select the Add Plate icon and specify 96 well v-bottom plates.
Highlight the relevant rows identified in the Protocol Plate Map and set as Sample Wells.
Specify the Run Order to be by Columns ↓↓↓.
CytoFlex vFCTM Set up 191127
4
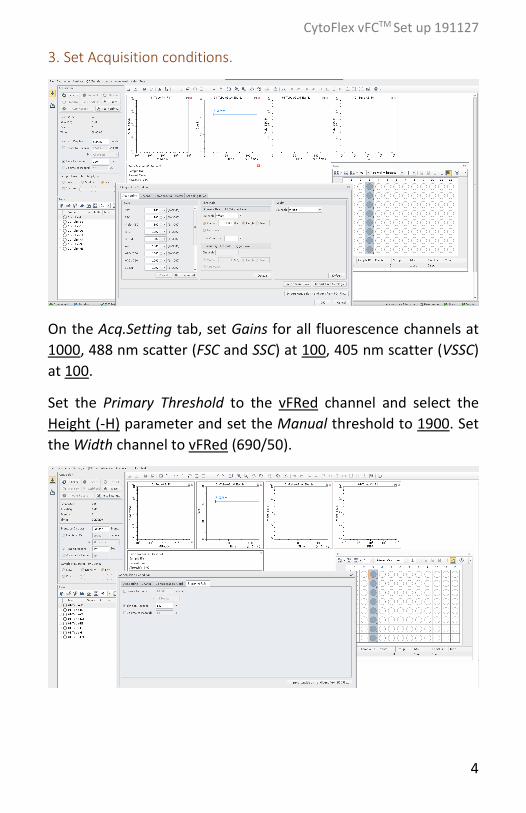
3. Set Acquisition conditions.
On the Acq.Setting tab, set Gains for all fluorescence channels at 1000, 488 nm scatter (FSC and SSC) at 100, 405 nm scatter (VSSC) at 100.
Set the Primary Threshold to the vFRed channel and select the Height (-H) parameter and set the Manual threshold to 1900. Set the Width channel to vFRed (690/50).

CytoFlex vFCTM Set up 191127
5
On the Stopping Rules tab, check Time to Record and enter 120 seconds. Uncheck Events to Record. At High Sample Speed (~60 uL/min) on the CytoFlex, this will collect data from 120 ul of sample.
Note: Typically, data from the first 20 ul (20 seconds) are discarded, due to high background that frequently occurs at the beginning of a well, so that data from 100 uL is analyzed for each sample. This gating will happen automatically using the vFCTM Data Analysis Layout.
In the Acquisition dialogue, set Events to Display to 500,000.
4. Adjust Trigger Channel Threshold. Load a well of VFC Staining Buffer and allow system to run for 15 seconds on high flow rate (60ul/min). Set the instrument to trigger from the blue laser-excited, 690/50-H (vFRed) fluorescence channel at 1900, then adjust the manual threshold until you get 10-15 events/second in a Buffer Only sample. Apply this threshold to all wells and save template file (.xitm) for future use. In general, once optimized the threshold does not need to be changed from day to day.
Save Template as vFC Assay.

CytoFlex vFCTM Set up 191127
6
5. Set File and Group names.
Highlight wells and define Names as yearmonthdate (eg. 20190704) and Set Group names as defined in “staining wells” on the relevant Protocol Plate Map.
6. Auto Record data. You are now ready to run samples. Click Auto Record to run the selected Sample wells.

CytoFlex vFCTM Set up 191127
7
Notes