Embed Size (px)
Citation preview

Integration Best Practices
Volume 2
CA TECHNOLOGIES GREEN BOOKS
CA Service Desk Manager
INTEGRATION OPTIONS AND APPROACHES
CA PROCESS AUTOMATION

LEGAL NOTICE
This publication is based on current information and resource allocations as of its date of publication and is subject to change or withdrawal by CA at any time without notice. The information in this publication could include typographical errors or technical inaccuracies. CA may make modifications to any CA product, software program, method or procedure described in this publication at any time without notice.
Any reference in this publication to non-CA products and non-CA websites are provided for convenience only and shall not serve as CA’s endorsement of such products or websites. Your use of such products, websites, and any information regarding such products or any materials provided with such products or at such websites shall be at your own risk.
Notwithstanding anything in this publication to the contrary, this publication shall not (i) constitute product documentation or specifications under any existing or future written license agreement or services agreement relating to any CA software product, or be subject to any warranty set forth in any such written agreement; (ii) serve to affect the rights and/or obligations of CA or its licensees under any existing or future written license agreement or services agreement relating to any CA software product; or (iii) serve to amend any product documentation or specifications for any CA software product. The development, release and timing of any features or functionality described in this publication remain at CA’s sole discretion.
The information in this publication is based upon CA’s experiences with the referenced software products in a variety of development and customer environments. Past performance of the software products in such development and customer environments is not indicative of the future performance of such software products in identical, similar or different environments. CA does not warrant that the software products will operate as specifically set forth in this publication. CA will support only the referenced products in accordance with (i) the documentation and specifications provided with the referenced product, and (ii) CA’s then-current maintenance and support policy for the referenced product.
Certain information in this publication may outline CA’s general product direction. All information in this publication is for your informational purposes only and may not be incorporated into any contract. CA assumes no responsibility for the accuracy or completeness of the information. To the extent permitted by applicable law, CA provides this document “AS IS” without warranty of any kind, including, without limitation, any implied warranties of merchantability, fitness for a particular purpose, or non-infringement. In no event will CA be liable for any loss or damage, direct or indirect, from the use of this document, including, without limitation, lost profits, lost investment, business interruption, goodwill or lost data, even if CA is expressly advised of the possibility of such damages.
COPYRIGHT LICENSE AND NOTICE:
This publication may contain sample application programming code and/or language which illustrate programming techniques on various operating systems. Notwithstanding anything to the contrary contained in this publication, such sample code does not constitute licensed products or software under any CA license or services agreement. You may copy, modify and use this sample code for the purposes of performing the installation methods and routines described in this document. These samples have not been tested. CA does not make, and you may not rely on, any promise, express or implied, of reliability, serviceability or function of the sample code.
Copyright © 2012 CA. All rights reserved. All trademarks, trade names, service marks and logos referenced herein belong to their respective companies. Microsoft product screen shots reprinted with permission from Microsoft Corporation.
TITLE AND PUBLICATION DATE:
CA Service Desk Manager Green Book Volume 2 Publication Date: May 23, 2012

ACKNOWLEDGEMENTS
Principal Authors
Tyson Bell
Amy Chenard
Christy Druzynski
Shawn Walsh
The principal authors and CA Technologies would like to thank the following contributors:
Harish Goteti
Tom Kouhsari
Randal Locke
Anders Magnusson
Malcolm Ryder
Lao-Tan Scotto
CA Technologies Support
Third-Party Acknowledgments
Microsoft product screens are reprinted with permission from Microsoft Corporation. Microsoft,
SQL Server, and Windows are registered trademarks of Microsoft Corporation in the United
States and other countries.
Oracle and Java are registered trademarks of Oracle and/or its affiliates. Other names may be
trademarks of their respective owners.
Pentaho is a registered trademark of Pentaho Corporation.
Forward, Inc. Legal Notice
Forward, Inc. is a fictitious company name which is used strictly for instructional purposes only
and is not meant to reference an existing company.
CA TECHNOLOGIES PRODUCT REFERENCES
This document references the following CA Technologies products:
■ CA Application Performance Management
■ CA Asset Portfolio Management (included with the CA IT Asset Manager solution)
■ CA Business Intelligence
■ CA Business Service Insight (CA BSI) – formerly known as CA Oblicore Guarantee™
■ CA Clarity™ Project and Portfolio Manager (CA Clarity PPM)
■ CA Configuration Automation – formerly known as CA Cohesion Application Configuration
Manager (CA Cohesion ACM)
■ CA Customer Experience Manager (CA SOI)
■ CA ecoMeter
■ CA Embedded Entitlements Manager (CA EEM)
■ CA eHealth® (CA eHealth)
■ CA Identity Manager
■ CA Introscope
■ CA IT Client Manager (CA ITCM)
■ CA Management Database (CA MDB)
■ CA Network and Systems Management (CA NSM)
■ CA Process Automation (formerly CA IT Process Automation Manager, CA IT PAM)
■ CA Role and Compliance Manager (CA RCM)
■ CA Service Catalog (which includes CA Service Accounting)
■ CA Service Desk Manager (CA SDM)
■ CA Service Operations Insight (CA SOI) – formerly known as CA Spectrum Service Assurance
(CA SSA)
■ CA SiteMinder® (CA SiteMinder)
■ CA Software Change Manager (CA SCM)

■ CA Spectrum® (CA Spectrum IM)
■ CA Spectrum Service Assurance (CA SSA)
■ CA Workflow
FEEDBACK
Please email us at [email protected] to share your feedback on this publication. Please
include the title of this publication in the subject of your email response. For technical assistance
with a CA Technologies product, please contact CA Support at http://ca.com/support. For
assistance with support specific to Japanese operating systems, please contact CA Technologies
at http://www.casupport.jp.


CA Service Desk Manager 7
Contents Chapter 1: Introduction 11
Who Should Read This Book ....................................................................................................................... 13
Chapter 2: ITIL® V3 Service Lifecycle Support 15 Service Strategy........................................................................................................................................... 15
Demand Management ............................................................................................................................ 15 Financial Management ............................................................................................................................ 16 Service Portfolio Management ................................................................................................................ 17 Service Strategy ....................................................................................................................................... 18
Service Design ............................................................................................................................................. 19 Availability Management ........................................................................................................................ 19 Capacity Management ............................................................................................................................ 20 Information Security Management ......................................................................................................... 22 IT Service Continuity Management ......................................................................................................... 23 Service Catalog Management .................................................................................................................. 24 Service Level Management ..................................................................................................................... 25 Supplier Management ............................................................................................................................. 26
Service Transition ........................................................................................................................................ 27 Change Management .............................................................................................................................. 27 Evaluation ................................................................................................................................................ 28 Knowledge Management ........................................................................................................................ 28 Release and Deployment Management .................................................................................................. 29 Service Asset and Configuration Management ....................................................................................... 30 Service Validation and Testing ................................................................................................................ 32 Transition Planning and Support ............................................................................................................. 33
Service Operation ........................................................................................................................................ 34 Access Management ............................................................................................................................... 34 Event Management ................................................................................................................................. 34 Incident Management ............................................................................................................................. 35 Problem Management ............................................................................................................................ 36 Request Fulfillment ................................................................................................................................. 37
Continual Service Improvement .................................................................................................................. 38 Seven-Step Improvement Process ........................................................................................................... 38
Chapter 3: Integration Options and Approaches 41 CA SDM Integration Methods ..................................................................................................................... 41
Web Services Application Programming Interface (API) ......................................................................... 43 Web Services ........................................................................................................................................... 44 Service Aware .......................................................................................................................................... 45
CA SDM Web Services ................................................................................................................................. 46 Business Challenges ................................................................................................................................ 46 CA Technologies Approach ...................................................................................................................... 46 Best Practice ............................................................................................................................................ 46 Configuring the Solution .......................................................................................................................... 47

8 Contents
Enabling the Solution ............................................................................................................................... 47 API TouchPoints and Value ...................................................................................................................... 47 Support Disclaimer ................................................................................................................................... 47 Accessing the Web Service ...................................................................................................................... 48 Authentication ......................................................................................................................................... 48 Working with the Object Layer ................................................................................................................ 49 Technology ............................................................................................................................................... 49 Web Services Methods ............................................................................................................................ 49 Web Services Typical Tasks ...................................................................................................................... 51 Using Public Key Infrastructure Authentication and Interacting with the Web Interface........................ 64 Common Mistakes ................................................................................................................................... 69 Troubleshooting Failed Web Services Method Call ................................................................................. 70 Troubleshooting Problems When Tomcat Hangs or Crashes ................................................................... 73
Web Services API Best Practices .................................................................................................................. 79 bop_cmd Command .................................................................................................................................... 81
How bop_cmd Works............................................................................................................................... 81 Business Challenge Example .................................................................................................................... 82 CA Technologies Approach ...................................................................................................................... 82 bop_cmd Command Best Practices ......................................................................................................... 82 Configuring the Solution .......................................................................................................................... 82 Updating a Request .................................................................................................................................. 84 Testing the Solution ................................................................................................................................. 86 Troubleshooting ....................................................................................................................................... 86 Bop_logging and pdm_trace .................................................................................................................... 86 Automated Updates of CA SDM Using Sutility ......................................................................................... 88
Text API Method .......................................................................................................................................... 90 Accessing the Text API ............................................................................................................................. 90 How the Text API Works from the Command Line .................................................................................. 91 Business Challenge ................................................................................................................................... 91 CA Technologies Approach ...................................................................................................................... 91 Best Practices ........................................................................................................................................... 91 Configuring the Solution .......................................................................................................................... 92 Text API Summary .................................................................................................................................... 92 Troubleshooting ....................................................................................................................................... 92
Database-level Data Integration .................................................................................................................. 93 pdm_load ..................................................................................................................................................... 94 pdm_extract ................................................................................................................................................ 94 pdm_deref ................................................................................................................................................... 94
Business Challenge ................................................................................................................................... 94 CA Technologies Approach ...................................................................................................................... 95 Configuring the Solution .......................................................................................................................... 95 Summary .................................................................................................................................................. 97
Email Interface Method ............................................................................................................................... 97 Process Flow for Maileater ...................................................................................................................... 98 Enabling the Solution ............................................................................................................................... 99 Testing the Solution ............................................................................................................................... 104 Summary ................................................................................................................................................ 104
Outgoing Notifications Method ................................................................................................................. 104

CA Service Desk Manager 9
Business Challenge ................................................................................................................................ 105 CA Technologies Approach .................................................................................................................... 105 Best Practices ........................................................................................................................................ 106 Configuring the Solution ........................................................................................................................ 107 Configuring Outbound Notification Using a Telealert Message ............................................................ 109 Testing the Notification – for Action "Initial" ........................................................................................ 109 How the Method Works ........................................................................................................................ 110 How to Overcome Environment Problems ............................................................................................ 111 Notification Method Variables .............................................................................................................. 112 Summary ............................................................................................................................................... 114
Remote Reference Method ....................................................................................................................... 115 CTI Integration Method ............................................................................................................................. 115
Integration Value ................................................................................................................................... 115 How the Integration Works ................................................................................................................... 116 CA Technologies Approach .................................................................................................................... 117 Best Practice .......................................................................................................................................... 119 Configuring the Solution ........................................................................................................................ 120 Enabling the Solution ............................................................................................................................ 121 Testing the Solution .............................................................................................................................. 121 Troubleshooting .................................................................................................................................... 121 Integration Summary ............................................................................................................................ 121
URL Integration Method ........................................................................................................................... 122 External Authentication Method .............................................................................................................. 122 Majic Triggers ............................................................................................................................................ 122
The Domsrvr .......................................................................................................................................... 122 What is Majic? ....................................................................................................................................... 124 What is Spel? ......................................................................................................................................... 124 Summary ............................................................................................................................................... 125
Chapter 4: CA Process Automation 127 CA Process Automation Integration .......................................................................................................... 127 What is CA Process Automation ................................................................................................................ 127 Integration Details..................................................................................................................................... 128
Integration Points and Functionality from CA SDM ............................................................................... 128 Integration Points from CA Process Automation to CA SDM ................................................................ 128 Integration Value ................................................................................................................................... 128 How the Integration Works ................................................................................................................... 129 Getting Started with Top Ten CA Process Automation Basic Terminology ........................................... 130
Configuring the Integration ....................................................................................................................... 133 Prerequisites for the Integration ........................................................................................................... 134 User Authentication and Authorization ................................................................................................ 135 Configure the Integration from CA Process Automation ....................................................................... 138 Configure the Integration from CA SDM ............................................................................................... 146
Before you Begin ....................................................................................................................................... 151 Process Design .......................................................................................................................................... 153
Create the Process Definition ................................................................................................................ 153 Technical Process Design ....................................................................................................................... 156
Process Design Tips ................................................................................................................................... 157

10 Contents
High-Level Process Design ..................................................................................................................... 158 CA Service Desk Connector Operators ................................................................................................... 159 Mapping Additional Process Input/Select/Base Parameters to Service Desk Attributes ....................... 172 Using Dataset Objects to Define Variables ............................................................................................ 181 Parsing XML data from CA SDM SOAP Operator Results ....................................................................... 183
Exception Handling .................................................................................................................................... 194 Requesting User Interaction ...................................................................................................................... 197
Create an Interaction Request Form ...................................................................................................... 198 Link a CA Process Automation Process Definition to CA SDM ................................................................... 201
Create a Start Request Forms ................................................................................................................ 202 Launching a Process Definition from CA Process Automation ............................................................... 206 Attach a CA Process Automation Process Definition to a Ticket Area/Category ................................... 208 Using Macros to Trigger a CA Process Automation Process Definition .................................................. 210
Create Business-Like Entries in the CA SDM Workflow Tasks Tab ............................................................. 211 Integration Example .................................................................................................................................. 213
Design View ........................................................................................................................................... 214 Setup and Configuration ........................................................................................................................ 215 Change Management Workflow in Action ............................................................................................. 221
Common Integration Errors ....................................................................................................................... 246 CA Process Automation Connection Error in the CA SDM Workflow Tasks Tab .................................... 246 Cannot View CA Process Automation SRF List ....................................................................................... 246 No option to Attach a CA Process Automation Workflow from a CA SDM Ticket Area or Category ..... 247 Login Errors when Accessing the Task List from CA Process Automation .............................................. 248
Additional Best Practices Tips and Tricks Available Online ........................................................................ 248 Integration Summary ................................................................................................................................. 248
Appendix A: Additional Information and Tips 249 Build_wsdl.bat ....................................................................................................................................... 249 ZUpdateCr Method ................................................................................................................................ 251 Build_wsdl.sh ......................................................................................................................................... 256 Pkilogin.htm ........................................................................................................................................... 260 Pkilogin.jsp ............................................................................................................................................. 262 Log4j.properties ..................................................................................................................................... 266 Perf.bat .................................................................................................................................................. 268

CA Service Desk Manager 11
Chapter 1: Introduction The CA Service Desk Manager Integration Best Practices Green Book is comprised of three
volumes. Each volume describes ways to improve the process maturity for various ITIL®
processes when CA Service Desk Manager (CA SDM) 12.6 is integrated with other CA
Technologies solutions. The following ITIL V3 IT Service Management processes are covered in
this Green Book:
■ Access Management
■ Availability Management
■ Capacity Management
■ Change Management
■ Continual Service Improvement
■ Demand Management
■ Evaluation
■ Event Management
■ Financial Management
■ Incident Management
■ Information Security Management
■ IT Service Continuity Management
■ Knowledge Management
■ Problem Management
■ Release and Deployment Management
■ Request Fulfillment
■ Service Asset and Configuration Management
■ Service Catalog Management

Who Should Read This Book
12 Chapter 1: Introduction
■ Service Level Management
■ Service Portfolio Management
■ Service Validation and Testing
■ Supplier Management
■ Transition Planning and Support
Chapter 2 highlights the key objectives and recommended product and solution integrations for
each ITIL process. These integrations can help achieve and mature the process goals. Additional
products are available that also add value to the ITIL processes. However, Chapter 2 discusses the
product-to-process mappings for the product integrations that are described in this Green Book.
The remaining chapters in each volume describe how to integrate additional CA Technologies
solutions with CA SDM. The integrations can help extend the capability of CA SDM and enhance
the management and coordination of service management business processes. This Green Book
uses a layered approach to technical integrations by starting with a point-to-point integration
with CA SDM. This Green Book then includes instructions or recommendations for introducing
one or more additional product solutions into the existing integration.
The following information is provided for each product integration:
■ An overview that describes the benefits of the integration.
■ Recommended best practices for the integration.
■ Steps to set up, configure, test, and troubleshoot the integration.
■ Steps to introduce additional solutions into the environment, if applicable.
The CA SDM integrations that are explained in this Green Book are divided into the following
volumes:
■ Volume 1
CA Service Catalog
CA Clarity™ Project and Portfolio Manager (CA Clarity PPM)
CA Business Service Insight (CA BSI)
CA Identity Manager
CA SiteMinder®

Who Should Read This Book
CA Service Desk Manager 13
■ Volume 2
CA Integration Platform
CA Process Automation
■ Volume 3
CA Asset Portfolio Management
CA IT Client Manager
CA Patch Manager
CA Cohesion Application Configuration Manager (CA Configuration Automation)
CA ecoMeter
CA NSM
CA Spectrum IM (includes CA eHealth and CA SOI)
All three volumes include the following chapters:
■ Introduction
■ ITIL V3 Service Lifecycle Support
Important! Some of the product features and functions listed in this Green Book are not
described in CA Technologies product documentation and CA Technical Support does not support
them. While the integrations described have been tested in a limited test environment, these
integrations are not fully supported. We recommend that you test the integrations carefully in a
test environment before going into production.
Who Should Read This Book
This Green Book provides the following types of users with the information necessary to
integrate CA SDM with various CA Technologies solutions:
■ Support technician
■ Software architect

Who Should Read This Book
14 Chapter 1: Introduction
■ Software developer
■ Software engineer
■ System administrator
This Green Book is intended for highly technical users who have an advanced knowledge of CA
SDM and require integration capabilities to configure and maintain their CA SDM environment
successfully.

CA Service Desk Manager 15
Chapter 2: ITIL® V3 Service Lifecycle Support CA Technologies integrated solutions support and align with the 24 processes and 4 functions in
the Service Lifecycle of ITIL V3. This chapter lists the objectives for each process and the
technologies that support them.
Service Strategy
Demand Management
Objectives
■ Influence user and customer demand of IT services.
■ Manage the impact on IT resources.
■ Develop and maintain service packages and service level packages that are based on
patterns of business activity.
How CA Technologies Solutions Help Meet the Objectives for Demand Management
The following process describes how CA eHealth, CA Clarity PPM, CA Service Catalog, and CA
SDM integrate to help improve the Demand Management process:
1. CA eHealth provides a service provider with the metrics that can be used to model service
demand. CA eHealth metrics can be tied to CA Service Catalog service offerings to enable
reporting back to the customers on how their services are used. The reporting also identifies
the costs that are associated with providing the service at the given demand.
2. When CA eHealth and CA Service Catalog are integrated with the CMDB component of CA
SDM, the relationship between the services and their supporting infrastructure can be
analyzed graphically with the CMDB Visualizer for actual and anticipated demand.
3. As improvements or details of a new service are defined, the Demand Manager documents
the details in the service package of the portfolio within CA Clarity PPM.
4. As updates are approved, CA Clarity PPM creates requests for change (RFCs) in CA SDM to
update the CA eHealth monitoring profiles and CA Service Catalog with changes to the
service and its costs.

Service Strategy
16 Chapter 2: ITIL® V3 Service Lifecycle Support
5. CA BSI integrates, at a service view, CA eHealth, CA Clarity PPM, CA Service Catalog, and CA
SDM to enable a Demand Manager to review existing and anticipated patterns of business
activity for the business.
Other CA Technologies Products that Facilitate the Demand Management Process
Demand Management is also facilitated in other CA Technologies solutions.
■ CA ecoMeter automates delivering green service and reports on green IT effectiveness. The
reports from CA ecoMeter help IT to convey the savings of having well-defined demand back
to the business.
■ CA SOI provides infrastructure that is based on demand. Specific service level packages are
modeled in CA SOI. Modeling in CA SOI helps simplify the deployment of the infrastructure
that is based on demand. A Demand Manager can use the metrics that CA SOI gathers to
model future service packages.
■ CA SDM provides statistics of incident and change requests to understand customer patterns
of business activity better.
Financial Management
Objectives
■ Quantify the value of IT services and their underlying assets by managing IT budgeting,
accounting, and charging.
How CA Technologies Solutions Help Meet the Objectives for Financial Management
The following process describes how CA Asset Portfolio Management, CA Clarity PPM, CA Service
Catalog, and CA SDM integrate to help improve the Financial Management process:
1. CA Clarity PPM helps a service provider manage the project and asset costs and evaluate
how the services are budgeted and charged to the customer.
2. The integration of CA Clarity PPM with CA Service Catalog helps in managing finances
efficiently. The accounting capabilities of CA Service Catalog provide the metrics useful to an
IT Financial Manager. The IT Financial manager uses them to model which services are
cost-effective, and to identify ways of gaining efficiencies in those services.

Service Strategy
CA Service Desk Manager 17
3. CA Clarity PPM provides the accounting capabilities of CA Service Catalog with up-to-date
costs and services that a customer can request.
4. Each individual asset that is requested through the catalog is tracked through CA SDM as
either a request or, if needed, a change order.
5. CA Asset Portfolio Management provides the cost of the assets, contracts, and vendor
information. When CA Asset Portfolio Management is integrated with CA Service Catalog, a
user sees currently available assets. An asset can be a configuration item (CI), an asset which
is associated with a user, or both a CI and a user asset. If an asset is also a CI, the asset is
managed under the full Change Process.
6. CA Asset Portfolio Management integrates into the Enterprise Resource Planning (ERP)
solution of the service provider, strengthening the IT alignment to business budgeting,
accounting, and charging.
7. CA Asset Portfolio Management provides details to CA Clarity PPM to enable up-to-date IT
financial management decisions for services.
Service Portfolio Management
Objectives
■ Provide a dynamic method for governing investments in service management across the
enterprise and managing them for value.
■ Define, analyze, approve, and offer services.
How CA Technologies Solutions Help Meet the Objectives for Service Portfolio Management
The following process describes how CA Clarity PPM, CA Service Catalog, and CA SDM integrate
to help improve the Service Portfolio Management process:
1. CA Technologies has an industry-leading Project and Portfolio Management solution, CA
Clarity PPM. Native integration to other solutions such as CA SDM and CA Service Catalog
provide three-direction feeds that provide current, planned, and historical data about how
services are used.
2. When CA Clarity PPM receives request volumes from CA Service Catalog, CA Clarity PPM can
track the frequency of a service is currently being requested, compared to the long-term
usage of the service.

Service Strategy
18 Chapter 2: ITIL® V3 Service Lifecycle Support
3. Incident and problem ticket volumes from CA SDM, together with relationships in the CA
SDM CMDB component, enable analysis of how effectively a service delivers on its
commitments.
4. The Portfolio Manager uses CA Clarity PPM to analyze all aspects of providing the service to
justify further investment.
5. In CA Clarity PPM, the approval process is modeled in a way which allows the workflow and
decision tree to retain, replace, rationalize, refactor, renew, or retire a service can be
documented, assessed, and ultimately approved.
6. Most importantly, the integration helps ensure continuous improvement to the service
without the need to recompile data that is natively integrated.
7. CA BSI provides the Service Level Management understanding that supports the Service
Portfolio. CA BSI also helps ensure that the Service Level Agreements (SLAs), Operational
Level Agreements (OLAs), and Underpinning Contracts (UCs) are being managed properly.
Service Strategy
Define the best possible value that a service can create for a customer through analysis of
competition, market space, asset use, and business capabilities.
How CA Technologies Solutions Help Meet the Objectives for Service Strategy
The following process describes how CA Clarity PPM and CA SDM integrate to help improve the
Service Strategy process:
1. CA Clarity PPM analyzes the key attributes with a number of scenarios such as comparisons
over time, costing models, resource use, and others.
2. When CA Clarity PPM is integrated with CA SDM, detailed attributes of the CIs,
organizations, resources, service use, and ties to other services are added to the analysis
within the CMDB Visualizer.
3. With the solutions integrated, CA Clarity PPM and CA SDM provide the ability to analyze
which combinations of investments provide the most benefit to the business.

Service Design
CA Service Desk Manager 19
Service Design
Availability Management
Objectives
■ Produce and maintain an availability plan that reflects the current and future needs of the
business.
■ Provide advice and guidance on all availability-related issues.
■ Help ensure that service availability achievements meet or exceed all their agreed targets by
managing the performance of services and resource-related availability.
■ Assist with the diagnosis and resolution of availability-related incidents and problems.
■ Assess the impact of all changes on the availability plan and the performance and capacity of
all services and resources.
■ Help ensure that proactive measures to improve the availability of services are
implemented, if the measures are cost-justifiable.
How CA Technologies Solutions Help Meet the Objectives for Availability Management
The following process describes how CA eHealth, CA SOI, CA NSM, CA Spectrum IM, and CA SDM
integrate to help improve the Availability Management process:
1. CA SOI allows for real-time and historical views of the customer experience of the service,
such as web page generation and data retrieval.
2. CA Introscope gathers back-end to front-end application performance metrics.
3. CA NSM provides agent level metrics on the operating system, database, and applications.
4. CA Spectrum IM provides the heuristic measurements of the network and system
availability.
5. These four solutions provide details that are sent to CA eHealth for the baseline and
real-time availability of the IT infrastructure.
6. The modeling of the infrastructure is maintained in the CMDB component of CA SDM. The
CIs the infrastructure solutions manage are imported into the CMDB component, which is
associated to a Management Database Repository (MDR), and visualized at a service layer.

Service Design
20 Chapter 2: ITIL® V3 Service Lifecycle Support
7. Incident metrics are automatically created from the tools and manually created from
customers and are added to the analysis within CA SDM.
8. The availability plans are documented as knowledge documents in the knowledge
management function of CA SDM. Knowledge management has a flexible document
lifecycle, which helps ensure that updates to the availability plan are properly managed.
Other CA Technologies Products that Facilitate Availability Management
Other CA Technologies solutions also facilitate Availability Management. The solutions are added
to the Availability Manager planning tools.
■ CA BSI automates, activates, and accelerates the management, monitoring, and reporting of
business and technology Service Level Agreements (SLAs) and service delivery agreements
for enterprises and service providers.
■ CA SOI gives a model-based view of critical application monitoring data. CA SOI pulls all the
data from domain management systems, such as CA Application Performance Management,
CA Spectrum IM, and CA eHealth, and presents it in a single view to end users. CA SOI
provides service impact analysis, service visualization, and integration to service
management through CA SDM.
■ CA Patch Manager lists computers that are not patched, which enables Availability
Management to identify potential threats to availability.
Note: CA Patch Manager uses the infrastructure and resources of the CA IT Client Manager
solution.
Capacity Management
Objectives
■ Produce and maintain an up-to-date capacity plan, which reflects the current and future
business needs.
■ Provide advice and guidance to all business and IT departments on all issues that are related
to capacity and performance.
■ Help ensure that service performance achievements meet or exceed all of their agreed
performance targets.
■ Assess the impact of all changes on the capacity plan, and the performance and capacity of
all services and resources.
Service Design
CA Service Desk Manager 21
How CA Technologies Solutions Help Meet the Objectives for Capacity Management
Capacity Management relies on metrics from the infrastructure to plan, advise, and react to
capacity needs. The metrics are used to analyze historical, current, and future availability through
visualization, alerting, and reporting. CA Technologies solutions gather the metrics about a
service provider infrastructure and add an integrated management layer to support mature
Capacity Management.
1. CA SOI allows for real-time and historical views of the customer experience of the service,
such as web page generation and data retrieval.
2. CA Introscope gathers back-end to front-end application performance metrics.
3. CA NSM provides agent-level metrics on the operating system, database, and applications.
4. CA Spectrum IM provides the heuristic measurements of the network and system
availability.
5. These four solutions provide details that are fed to CA eHealth for baseline and real-time
capacity of the IT infrastructure.
6. Final service modeling of the infrastructure is maintained in the CMDB component of CA
SDM. The CIs that the infrastructure solutions manage, are imported into the CA SDM CMDB
component. These components are associated to a Management Database Repository
(MDR) and visualized at a service layer.
7. Incident metrics are automatically created from the tools or from customers and are added
to the analysis within CA SDM.
8. The Capacity Plans are documented as knowledge documents in the knowledge
management function of CA SDM. Knowledge management has a flexible document lifecycle
to help ensure that updates to the plan are properly managed.

Service Design
22 Chapter 2: ITIL® V3 Service Lifecycle Support
Other CA Technologies Products that Facilitate Capacity Management
Other CA Technologies solutions also facilitate Capacity Management. These solutions are added
to the Capacity Manager planning tools.
■ CA BSI automates, activates, and accelerates the management, monitoring, and reporting of
business and technology SLAs in addition to service delivery agreements for enterprises and
service providers.
■ CA SOI gives a model-based view of critical application monitoring data. CA SOI pulls all the
data from domain management systems, such as CA Application Performance Management,
CA Spectrum IM, and CA eHealth, and presents it in a single view to end users. CA SOI
provides service impact analysis, service visualization, and integration to service
management through CA SDM.
■ CA ITCM and CA DCA Manager provide alerts and automated actions on desktops and
servers that are running low on disk space. CA IT Client Manager provides a set of
cross-platform product capabilities for Windows, Linux, UNIX, and MAC environments. While
CA ITCM was previously sold as a standalone product, it is now included as part of the CA
Client Automation and also as part of CA DCA Manager solutions. CA Client Automation has
focus on managing end-user devices such as desktops, laptops, and end-point devices; while
CA DCA Manager has focus on managing servers. This document refers to the functionality of
the CA ITCM product capabilities.
Information Security Management
Objectives
■ Help ensure availability, confidentiality, and integrity of data, systems, and the environments
that contain them.
■ Communicate, implement, and enforce the Information Security Policy.
How CA Technologies Solutions Help Meet the Objectives for Information Security
Management
1. CA Technologies IT Security Solutions manage the full scope of Information Security
Management as it relates to implementing, evaluating, maintaining, and controlling access,
identities, and information.
2. The Service Management solutions leverage and integrate with CA Technologies IT Security
Solution enabling a service provider to plan and design an Information Security Policy.

Service Design
CA Service Desk Manager 23
3. CA SDM tracks security incidents, assets and locations, SLAs, UCs, and OLAs that are used to
plan the security policy.
4. Information Security is published as a knowledge document in the CA SDM knowledge
management feature. An enforced review cycle maintains the Information Security.
5. The service management solution supports implementation, evaluation, maintenance, and
control through its technology stack. For example, CA EEM, a component within the IT
Security Solutions, is a core component of the Service Management solution enabling service
providers a central repository of service management application users. This solution is
integrated using LDAP and provides access to features and data within the Service
Management suite. This integration supports password reset through the CA SDM end-user
self-service interface.
6. CA ITCM, CA DCA Manager, and CA Configuration Automation feed the infrastructure
resources contained in the CMDB component of CA SDM. CA ITCM and CA DCA Manager
identify changes to desktops and servers that can introduce security threats, such as
unauthorized USB drives, inappropriate software installs, or changes to browser settings.
7. CA Configuration Automation baseline comparison lists changes to CIs that affect the
availability of service. Moreover, CA Patch Manager (which feeds CA ITCM and CA DCA
Manager) lists all desktops and servers that are not at the proper patch level. CA SDM
integrates with CA Identity Manager to enable pass-through authentication in the most
complex security architecture.
IT Service Continuity Management
Objectives
■ Maintain a set of IT Service Continuity plans and IT Recovery plans that support the overall
organizational business continuity plans.
■ Complete regular business impact analysis exercises to help ensure that all continuity plans
are maintained in line with changing business impacts and requirements.
■ Assess the impact of all changes on the IT Service Continuity plans and IT Recovery plans.
■ Negotiate and agree to the necessary supplier contracts for the provision of the recovery
capability that supports the continuity plans with Supplier Management.

Service Design
24 Chapter 2: ITIL® V3 Service Lifecycle Support
How CA Technologies Solutions Help Meet the Objectives for IT Service Continuity
Management
Helping ensure an effective IT Service Continuity Management (ITSCM) process requires a
documented and executed continuity plan. CA Technologies integrated solutions leverage all of
the solutions documented in this Green Book to provide inputs to defining the continuity plan.
This plan is ultimately published in CA SDM and managed as an ongoing project with the business
in CA Clarity PPM.
1. The integration of CA SDM with CA Process Automation can be used to automate recovery
plans by notifying key personnel, initiating failover systems, and initiating monitoring of new
facilities.
2. Functionally, CA Clarity PPM opens Change Orders in CA SDM to schedule recovery testing,
which initiates the CA Process Automation process flow to begin a recovery process.
3. Leveraging the solutions in Capacity and Availability Management, a service provider can
identify whether the service levels are being met. The service provider can then feed them
back to CA SDM and ultimately back into the ITSCM design improvements.
Service Catalog Management
Objectives
■ Provide a single source of consistent information about all the agreed services.
■ Help ensure wide availability to users who have access.
How CA Technologies Solutions Help Meet the Objectives for Service Catalog Management
The following process describes how CA SDM, CA Service Catalog, CA Clarity PPM, and CA Asset
Portfolio Management integrate to help improve the Service Catalog Management process:
1. CA Service Catalog is a solution that supports all objectives of the Service Catalog
Management process in Service Design.
2. CA SDM and CA Service Catalog share a repository of users, locations, organizations, tenants,
and CA EEM for security.

Service Design
CA Service Desk Manager 25
3. RFCs that are created in CA SDM can be linked to CA Service Catalog requests. The assets in
the CA SDM CMDB are managed in CA Asset Portfolio Management.
4. When fulfilling a request, a link directly into CA Asset Portfolio Management data is used to
assign only available assets to the request. This link helps ensure immediate CA SDM CMDB
updates on the asset or CI status for the request throughout its progress into a production
state.
5. CA Clarity PPM contains the master portfolio and helps ensure that CA Service Catalog is
given the proper service offerings and deactivates any inactive ones.
Service Level Management
Objectives
■ Define, document, agree on, monitor, measure, report, and review the level of IT services
provided.
■ Help ensure the specific and measurable targets are developed for all IT services.
■ Monitor and improve customer satisfaction with the quality of service delivered.
■ Verify that IT and the customers have a clear and unambiguous expectation of the level of
service that is delivered.
How CA Technologies Solutions Help Meet the Objectives for Service Level Management
The following process describes how CA Clarity PPM, CA eHealth, CA BSI, and CA SDM integrate
to help improve the Service Level Management process:
1. The defined and agreed levels of SLAs are developed in CA Clarity PPM and then
documented and tracked in CA BSI.
2. The Service Level Manager publishes the details of the SLAs that are maintained in CA BSI or
CA Clarity PPM as a CA SDM knowledge document. This document supports communication
to the business about the expected levels of service.
3. CA BSI and CA eHealth enforce, alert, and report on the defined levels of service.
4. When there are agreed changes to the SLA, CA Clarity PPM initiates an RFC in CA SDM
against the services. The RFC initiates a workflow in CA Process Automation to deploy the
updated service levels to CA eHealth and CA BSI for monitoring.

Service Design
26 Chapter 2: ITIL® V3 Service Lifecycle Support
Supplier Management
Objective
■ Ensure the best value of service is obtained from suppliers and contracts.
■ Ensure the underpinning contracts are aligned to business needs and SLAs.
■ Manage supplier relationships and performance.
■ Maintain a supplier and contracts database.
How CA Technologies Solutions Help Meet the Objectives for Supplier Management
The following process describes how CA BSI, CA Clarity PPM, CA eHealth, CA Asset Portfolio
Management, CA ITCM, CA DCA Manager, and CA SDM integrate to help improve the Supplier
Management process:
1. A service provider uses CA Asset Portfolio Management as the supplier and contracts
database (SCD) enabling centralized management of underpinning contracts. The database
includes a list of the providers, their products and services, and the value they bring to the
business.
2. When integrated with CA ITCM, CA DCA Manager, and CA SDM, CA Asset Portfolio
Management is able to identify quantitatively the hardware, software, and system
performance of the services that the suppliers provide. CA ITCM and CA DCA Manager
provide up-to-date inventory in a service provider environment.
3. The CA ITCM and CA DCA Manager inventory is provided to CA Asset Portfolio Management
and linked to the relevant contracts.
4. The CA SDM CMDB component and CA Asset Portfolio Management share the physical asset
and CI records that are linked back to the Supplier in CA Asset Portfolio Management.
Service contracts in CA BSI enforce service levels against the CIs that are associated to the
suppliers through automated escalation and reporting.
5. The CA SDM CMDB component contains the relationships of the services to the CIs and
assets that link to CA Asset Portfolio Management. Leveraging the integration of the CMDB
component with CA eHealth provides the visibility to the overall health and performance of
the services that a supplier provides.
6. CA Asset Portfolio Management and CA SDM ad-hoc reporting enables visibility into the
number of incidents that are opened against supplier services. This visibility can be used to
help manage supplier relationships and prove their performance.

Service Transition
CA Service Desk Manager 27
7. CA Asset Portfolio Management and CA SDM are integrated with CA Clarity PPM, which
provides the detailed costs that are associated to the service portfolio. This integration is
then used to validate and analyze the value that a supplier provides to the service provider
and business.
8. CA BSI consolidates the details from the other technologies to provide insight into how well
suppliers are meeting SLAs.
Service Transition
Change Management
Objectives
■ Help ensure that standardized methods and procedures are used for efficient and prompt
handling of all changes.
■ Record all changes to service assets and configuration items in the Configuration
Management System and optimize the overall business risk.
How CA Technologies Solutions Help Meet the Objectives for Change Management
The following process describes how CA Configuration Automation, CA SOI, CA ITCM, CA DCA
Manager, and CA SDM integrate to help improve the Change Management process:
1. RFCs are recorded, reviewed, assessed, and prioritized in CA SDM.
2. The approval process of the RFC is enforced using CA Process Automation for normal or
emergency changes.
3. For standard changes, CA Process Automation automates the end-to-end approval and
deployment, through CA ITCM and CA DCA Manager or CA SOI, of the requested change
using the inventory in the CMDB component of CA SDM.
4. When CA ITCM and CA DCA Manager are integrated with CA SDM, RFCs of unauthorized
changes are automatically logged as incidents or RFCs for further review.
5. The complex relationships of CIs and the recipients of their services are tracked in CA
Configuration Automation. CA Configuration Automation baselines help ensures the complex
interconnections of the infrastructure that supplies the service remain unchanged.
6. CA Configuration Automation is integrated into CA SDM through inventory importing, which
helps ensure that the CA SDM CMDB is up-to-date with the latest relationships between CIs.

Service Transition
28 Chapter 2: ITIL® V3 Service Lifecycle Support
Evaluation
Objectives
■ Evaluate the impact a new or changed service has on the customer perception of capacity,
resource, and performance.
■ Enable change management to be more effective in the decision about service changes.
How CA Technologies Solutions Help Meet the Objectives for Evaluation
The following process describes how CA eHealth, CA SOI, and CA SDM integrate to help improve
the evaluation process:
1. Integrating CA eHealth and CA SOI with the CA SDM CMDB and change management
functions enables a service provider to compare previous and new performance metrics.
2. CA SDM surveys gather feedback from customers on the effectiveness of a new release.
3. CA SOI enables measurements from the customer perspective of the service.
4. Using the CMDB Visualizer, together with real-time statistics from CA SOI and performance
trends of CA eHealth, a service provider can determine which portions of a change reduced
the resource performance. CA Technologies integrated solutions enable this end-to-end
visualization which facilitates effective management decisions.
Knowledge Management
Objectives
■ Enable the service provider to be more efficient and improve quality of service, reduce the
cost of service, and increase customer satisfaction.
■ Help ensure that the service provider staff has a clear and common understanding of the
following areas:
– Value that the services provide to customers.
– Benefits that are realized from the use of those services.

Service Transition
CA Service Desk Manager 29
■ Help ensure that at a given time and location, the service provider staff has adequate
information about the following areas:
– Who uses the services
– Current states of consumption
– Service delivery constraints
– Difficulties that the customer faces.
How CA Technologies Solutions Help Meet the Objectives for Knowledge Management
The following process describes how CA SDM helps improve the Knowledge Management
process:
1. CA SDM Knowledge Management centralizes the administration and management of
knowledge for service providers.
2. Integrations to other systems that can automate steps for the customer, such as CA ITCM
and CA DCA Manager scripts or CA SDM Support Automation Automated Tasks scripts, can
be called from Action Content in the knowledge document.
Release and Deployment Management
Objectives
■ Provide clear and comprehensive release and deployment plans to align with customer and
business change project activities.
■ Build, install, test, and deploy release packages efficiently and on schedule.
■ Minimize unpredicted impact on the production services, operations, and support
organization.
■ Improve the satisfaction of customers, users, and service management staff with the service
transition practices and outputs.

Service Transition
30 Chapter 2: ITIL® V3 Service Lifecycle Support
How CA Technologies Solutions Help Meet the Objectives for Release and Deployment
Management
The following process describes how CA Service Catalog, CA Clarity PPM, CA SCM, CA ITCM, CA
DCA Manager, and CA SDM integrate to help improve the Release and Deployment Management
process:
1. The Release and Deployment Management process is the culmination of the work from the
strategy, design, and remaining transition processes.
2. The service portfolio in CA Clarity PPM initiates an RFC in CA SDM, where the requested
change is classified, reviewed, and approved through a Change Management process.
3. CA Process Automation automates the process and creates the release package in CA SCM.
The documents that are related to the release package are centrally controlled in CA SCM
through approvals and a check-in and check-out process. Ultimately, the documents are
promoted through the test to production. Throughout the process, status updates are
provided to the project and the RFC.
4. CA SCM leverages its integration with CA ITCM and CA DCA Manager to initiate the
deployment of the release package. This action ensures a consistent deployment, which
results in a reduced impact to the service at the production roll-out.
5. When the release package is ready to be part of CA Service Catalog, CA SCM notifies the CA
Clarity PPM project and portfolio that the service is ready to be promoted into CA Service
Catalog.
6. When the RFC is closed, satisfaction surveys are sent to customers. Any incidents that are
related to the release can be tied back to the RFC for future analysis and the change impact.
Service Asset and Configuration Management
Objectives
■ Identify, control, record, report, audit, and verify service assets and configuration items,
including their versions, baselines, constituent components, attributes, and relationships.
■ Account for, manage, and protect the integrity of service assets and configuration items
throughout the service lifecycle by ensuring that only authorized components are used and
only authorized changes are made.
■ Help ensure the integrity of the assets and configurations that are required to control the
services and IT infrastructure by establishing and maintaining an accurate and complete
Configuration Management System.

Service Transition
CA Service Desk Manager 31
How CA Technologies Solutions Help Meet the Objectives for Service Asset and Configuration
Management
The following process describes how CA Service Catalog, CA Configuration Automation, CA Asset
Portfolio Management, CA ITCM, CA DCA Manager, and CA SDM integrate to help improve the
Service Asset and Configuration Management process:
1. CA Technologies solutions support the ability of the service provider to perform Service
Asset and Configuration Management, which includes everything from procuring a new asset
to providing final support for a service. The process helps ensure control through a
centralized CMDB component.
2. An asset is procured and logged in CA Asset Portfolio Management with the associated
contracts, licensing, and classifying attributes that enable it to be tracked throughout its life
cycle.
3. When a CA Service Catalog request is initiated, the service provider leverages the CA Asset
Portfolio Management and CA Service Catalog integration to retrieve a list of available assets
to assign to the request. Unique attributes, such as which software to install, are also
identified.
4. The CA Service Catalog request creates an RFC in CA SDM.
5. CA SDM and CA Asset Portfolio Management share the repository of assets and CIs. When an
RFC is initiated from a CA Service Catalog request, it already has the approved linked assets,
along with the desired software configuration.
6. The automation and integrated solutions help ensure that the status of the identified asset is
updated and auditable by the service provider. The automation and integration also help
ensure the continuity of the Release and Deployment Management process.
7. When an asset (for example, a server being provisioned for a particular service) is put onto
the network, CA ITCM and CA DCA Manager discover the device. CA ITCM and CA DCA
Manager deploy their agents to begin immediate management of the device and start the
deployment of required software.
8. To add to the control of the server, CA Configuration Automation identifies which part of the
service the server is providing (for example, a database server in a cluster). CA Configuration
Automation identifies the relationship, which is then sent back to the CA SDM CMDB
component. Change Manager validates the relationship on the RFC.

Service Transition
32 Chapter 2: ITIL® V3 Service Lifecycle Support
9. Baselines of the server are contained in CA ITCM, CA DCA Manager, and CA Configuration
Automation, allowing a service provider to identify any unauthorized changes to the device.
10. Any updates of software or configuration are provided to CA Asset Portfolio Management by
CA ITCM and CA DCA Manager or through updates of the CA SDM CMDB through CA
Configuration Automation.
11. As the server depreciates in its ability to provide value to the service, an RFC is created in CA
SDM to retire the device. Leveraging historical data from CA SDM (such as incidents, RFCs,
performance statistics, and memory upgrades), the service provider can show a full audit
trail for the CI over time.
Service Validation and Testing
Objectives
■ Validate that a service is "fit for use" or Warranty.
■ Validate that a service is "fit for purpose" or Utility.
■ Provide confidence that a new or changed service delivers value to the customer.
■ Confirm that the requirements for a service are correctly defined and remedy any errors or
variances early in the service lifecycle.
How CA Technologies Solutions Help Meet the Objectives for Service Validation and Testing
The following process describes how CA SCM, CA eHealth, CA SOI, and CA SDM integrate to help
improve the Service Validation and Testing process:
1. Integrating CA Clarity PPM, CA SDM, and CA SCM enables a service provider to manage the
documentation that is required to ensure a new or changed service is fit for use and fit for
that purpose.
2. CA Clarity PPM contains the quantitative attributes of what is required for the portfolio.

Service Transition
CA Service Desk Manager 33
3. CA SCM contains the documents that capture the requirements of the service as well as the
testing strategy.
4. The CA SDM CMDB Visualizer enables modeling of the test environment for impact analysis.
Note: The service model is an abstraction that shows logical elements and their
relationships. The service definition is the description of an implemented instance of a
service that has been modeled. A service map is a selective view of a service showing desired
elements and relationships from an explicit perspective. Different perspectives on a given
service generate different maps.
5. CA eHealth measures the availability and capacity of the service.
6. CA SOI automates the deployment of the test environment and testing scripts. These
integrated solutions share CI information, test plans, test package promotion and state, and
the CA Business Intelligence centralized reporting solution.
Transition Planning and Support
Objectives
■ Plan appropriate capacity and resource to package a release and to build, release, test,
deploy, and establish a new or changed service into production.
■ Provide support for the service transition teams and people.
■ Help ensure that service transition issues, risks, and deviations are reported to the
appropriate stakeholders and decision makers.
■ Coordinate activities across projects, suppliers, and service teams when required.
How CA Technologies Solutions Help Meet the Objectives for Transition Planning and Support
The following process describes how CA Clarity PPM, CA SCM, and CA SDM integrate to help
improve the Transition Planning and Support process:
1. CA Technologies integrated solutions enable effective transition planning and facilitate
support of new or changed services. For transition planning, resources are scheduled in CA
Clarity PPM against a project.
2. In CA SDM, individual work tasks are created as RFCs, incidents, or requests from the CA
Clarity PPM project workflow, depending on the work needed.

Service Operation
34 Chapter 2: ITIL® V3 Service Lifecycle Support
3. As work for developers and product teams begins, CA SDM initiates packages inside CA SCM.
CA SCM helps ensure that activity is properly coordinated, approved, and promoted through
a defined lifecycle.
4. In CA SDM, incidents are tracked against the projects providing visibility to management on
the success of the transition as well as identifying areas that could require additional
support.
Service Operation
Access Management
Objectives
■ Provide the permission for users to access services based on policies and actions defined in
security and availability management.
How CA Technologies Solutions Help Meet the Objectives for Access Management
The following process describes how CA SiteMinder, CA Identity Manager, CA Service Catalog,
and CA SDM integrate to help improve the Access Management process:
1. From CA Service Catalog, an authorized user can request to change or add security rights as
well as initiate approvals that are based on CA Process Automation workflows.
2. After a request is created, CA SDM generates an RFC so that the user profile can be updated
in the CA SDM CMDB.
3. CA SDM then initiates a workflow in CA Identity Manager, where security administrators
review and implement the security access.
4. CA SiteMinder, integrated with CA Identity Manager, helps ensure that only authorized
systems are made available to the user.
Event Management
Objectives
■ Detect events, comprehend, and determine the appropriate control action; communicate
operational information as well as warnings and exceptions.
■ Automate routine operations management activities.

Service Operation
CA Service Desk Manager 35
■ Provide a way of comparing actual performance and behavior against design standards and
Service Level Agreements.
How CA Technologies Solutions Help Meet the Objectives for Event Management
The following process describes how CA NSM, CA Spectrum IM, CA eHealth, CA SOI, CA
Introscope, and CA SDM integrate to help improve the Event Management process:
1. Event Management begins with determining the level of the service that a service provider
intends to monitor.
2. CA SOI monitors the service from the customer perspective. For any breach of service level,
CA SOI creates an incident in CA SDM.
3. As a service provider delves deeper into monitoring the application communications to
back-end systems, CA Introscope generates incidents in CA SDM.
4. For events that occur inside the applications, CA NSM agent technology generates SNMP
traps. These traps are used against a robust correlation engine, which determine whether it
is necessary to open an incident.
5. If there is an event in the environment that results in a cascading failure to multiple users or
service, CA Spectrum IM automatically creates a single incident in CA SDM instead of
multiple individual incidents for each affected resource. This single incident helps the Service
Desk to manage more effectively the queue and to stay focused on the user perception of
service. Incidents are logged for each user and linked to the parent incident.
6. CA eHealth monitors the Systems-level SLAs. CA eHealth opens incidents that are based on
general service degradation or potential service degradation. Application management and
IT operations management functions use this set of integrated solutions to manage their
responsibilities. Application managers use the metrics from these solutions to design better
services for the customer. For IT Operations Managers, these tools offer the low-level
metrics with alerting and automation to ensure day-to-day stability.
Incident Management
Objectives
■ Restore normal service operation as quickly as possible and minimize the adverse impact on
business operations.
■ Help ensure that the best possible service quality and availability are maintained.

Service Operation
36 Chapter 2: ITIL® V3 Service Lifecycle Support
How CA Technologies Solutions Meet the Objectives for Incident Management
The following process describes how CA SDM, CA eHealth, CA Spectrum IM, CA ITCM, and CA
DCA Manager integrate to help improve the Incident Management process.
1. CA SDM provides the front end to incident, problem, request, and change tickets as well as
the Knowledge Documents. The CMDB function of CA SDM integrates into all aspects of IT
operations to help ensure that CA SDM can gather facts to restore service quickly to the
customer.
2. CA eHealth and CA SOI proactively generate Incidents as a result of potential service
degradation.
3. Incidents can be analyzed against impact analysis using the CMDB Visualizer to plan
availability and capacity better.
4. CA ITCM and CA DCA Manager can generate incidents in CA SDM based on policy violations
that result in degradation of client/server ability to provide service.
5. CA Spectrum IM auto-generates incidents when there is a disruption of service.
6. The CA SDM web services application programming interface (API), email API, and native
integration with various CA Technologies solutions enable bidirectional communication that
is based on activities that are performed on the ticket. This communication helps ensure the
most effective route to restoration of service to the end user.
Problem Management
Objectives
■ Prevent problems and resulting incidents from happening.
■ Eliminate recurring incidents and minimize the impact of incidents that cannot be prevented.

Service Operation
CA Service Desk Manager 37
How CA Technologies Solutions Help Meet the Objectives for Problem Management
The following process describes how CA Spectrum IM, CA NSM, CA ITCM, CA DCA Manager, CA
Configuration Automation, and CA SDM integrate to help improve the Problem Management
process:
1. CA SDM provides a robust Problem Management solution that enables a service provider to
manage a problem throughout its lifecycle, from Incident creation and known error
recording to initiation of an RFC.
2. By leveraging the native integration of CA Spectrum IM, CA NSM and other Infrastructure
Management solutions, Problem Management can become proactive.
3. CA Spectrum IM and CA NSM monitor the infrastructure for the signs of service degradation
that automatically opens problem tickets.
4. CA ITCM and CA DCA Manager, when integrated with the CA SDM CMDB, proactively create
hardware and software based Incidents. The Problem Manager can leverage the Incidents to
perform Root Cause Analysis (RCA) of the problem.
5. CA Configuration Automation integrates with CA SDM to enable a Problem Manager to
identify deviations of a CI-based configuration change that could be the root cause of the
problem.
Request Fulfillment
Objectives
■ Provide a channel for users to request and receive standard services that have a predefined
approval and qualification process.
■ Provide information to users and customers about available services and procedures for
obtaining them.
■ Source and deliver the components of requested services.
■ Assist with general information, complaints, or comments.

Continual Service Improvement
38 Chapter 2: ITIL® V3 Service Lifecycle Support
How CA Technologies Solutions Help Meet the Objectives for Request Fulfillment
The following process describes how CA Service Catalog, CA Asset Portfolio Management, and CA
SDM integrate to help improve the Request Fulfillment process:
1. CA Service Catalog provides a list, description, and workflow of services to enable request
fulfillment.
CA Service Catalog provides the list of offerings that the user can access, the pricing, and the
expected levels of service for the offering.
2. CA Service Catalog natively integrates with CA Asset Portfolio Management. CA Asset
Portfolio Management maintains a list and status of available resources that can fulfill the
request. When Service Asset Managers fulfill the order, they link the identified resource to
the request and they create an RFC in CA SDM for deployment.
3. The CA SDM end-user self-service interface helps ensure that customers have access to the
following information:
■ Knowledge documents
■ Hours of service
■ Requests for general information (single-click access)
■ Complaints or comments
■ View into CA Service Catalog offerings
Continual Service Improvement
Seven-Step Improvement Process
CA Technologies integrated solutions collaboratively enable the Seven-Step Improvement
Process. Each solution provides metrics, measures, and process enablers that facilitate the
following process:
1. Defining what measured: CA Clarity PPM is the central tool to collect these requirements,
which are then validated through CA BSI.
2. Defining what you can measure: CA eHealth, CA Wily, and CA NSM help ensure that you can
measure all technology attributes to improve your services. CA Clarity PPM, CA BSI, and CA
SDM enable you to measure process level metrics.

Continual Service Improvement
CA Service Desk Manager 39
3. Gathering the data: CA eHealth, CA Wily, and CA NSM enable the collection of the data that
your organization identifies for technology and service level metrics. CA Clarity PPM and CA
SDM collaboratively provide process metrics.
4. Processing the data: CA Technologies uses CA BSI and CA Business Intelligence reporting to
provide a central view of the collected metrics.
5. Analyzing the data: CA Business Intelligence and CA BSI enable robust analysis of the
gathered metrics.
6. Presenting and using the data: At this stage of the Seven-Step Improvement Process, you can
take your CA Business Intelligence and CA BSI reports to your Service Manager, Continual
Service Improvement Manager, and can Process owners, to review the collected data.
7. Implementing corrective actions: Finally, you can update the status of your portfolio in CA
Clarity PPM. CA Clarity PPM creates an RFC in CA SDM and the cycle of improvement begins
again. You have continuous visibility of business objectives that are tied to critical success
factors and the underlying key performance indicators (KPIs) and metrics, all from the
integrated suite of solutions CA Technologies provides.


CA Service Desk Manager 41
Chapter 3: Integration Options and Approaches
CA SDM Integration Methods
CA SDM is designed to interact with many software solutions, including CA Technologies
solutions and third-party products. In addition, CA SDM is typically integrated with products that
have been developed in-house by CA Technologies customers.
Most of the methods that are used to integrate CA SDM with other products are described in this
chapter and summarized in the following table.
Method type Purpose Implementation point
Web Services Allow workflows and other external products to invoke internal functions of CA SDM.
Java-based calls using standards including XML for data formatting, SOAP for message exchange, and WSDL for describing the services.
TextAPI Create and update objects in CA SDM using text-based input.
Command lines in text files.
Database Directly manipulate CA SDM management database content.
Command line utilities.
Email Use email messages to query, create, or update an incident or change order.
Specially formatted email message.
URL Use URLs to access CA SDM objects. URL of the specific object is embedded in html, text file, email, or scripts.
Remote reference Insert calls to external products into the CA SDM Client interface menus and forms.
CA SDM Client uses a lookup table.
CTI Launch application screens (screen pops) in coordination with voice and data.
Using web services, in combination with opening a web browser, to launch a prepopulated CA SDM URL.
Spel / Majic Specify or trigger actions associating defined CA SDM objects with external executables.
Proprietary language for scripting, setting database triggers, and object modeling.

CA SDM Integration Methods
42 Chapter 3: Integration Options and Approaches
Method type Purpose Implementation point
Web Services Allow workflows and other external products to invoke internal functions of CA SDM.
Java-based calls using standards including XML for data formatting, SOAP for message exchange, and WSDL for describing the services.
Process Automation
Manage user interactions and automate tasks within production environments. Retrieve and validate information from any object within CA SDM, and execute logic for the information.
Executable workflow scripts using web services, Java, command line, or API calls
Some of these techniques are available only to CA Technologies developers, CA Technologies
Services, and CA Technologies certified partners, while customers can use others.
This section is not intended to provide instructions on how to use the methods. Instead, it
provides examples and explanations that help you decide whether an integration method is
suitable for your particular need. To further aid in selecting appropriate methods, consult the
text about each method for the following key points of comparison:
■ Business Challenges
■ CA Technologies Approach
■ Best Practice
■ Configuring the Solution
■ Enabling the Solution
■ TouchPoints and Value
■ Support Disclaimer
■ Authentication / Security
■ Technology
Important! Your organization is responsible for testing and maintaining any custom integration.
We recommend that you thoroughly test your integration before you implement it.

CA SDM Integration Methods
CA Service Desk Manager 43
Web Services Application Programming Interface (API)
A service orientation implies that participants in any transaction are either consumers or
providers. A service-oriented architecture (SOA) describes a loosely coupled system that uses
service orientation as its basic design principle. Service orientation implies that the services
(software functionality or capability) in a SOA are presented on a high level. The consumer of a
service does not need to understand the underlying technical implementation of the service.
Typically, this means that the service is defined in business terms rather than technical terms. In
theory, SOA does not place any requirements on the platform on which a SOA system is built. In
practice, SOA is almost exclusively built using the World Wide Web Consortium (W3C) defined
web services. Web services are well-suited to a SOA architecture for the following reasons:
■ They are standardized.
■ They are based on the ubiquitous HTTP protocol.
■ They have provisions for describing and publicizing available services.
CA SDM provides web services. When these web services were identified for inclusion, the
following goals were present:
■ Expose CA SDM functionality as much as possible. This goal aims to expose as much of the
CA SDM functionality as possible. You can provide low-level services that expose the building
blocks from which CA SDM was built. These services constitute a tool kit from which
higher-level business services can be built for a SOA. In addition, this tool kit can be used to
build specific interfaces, such as those used in some product integrations that constitute
new capabilities for a service desk.

CA SDM Integration Methods
44 Chapter 3: Integration Options and Approaches
■ Develop high-level services that can fit directly into an SOA implementation. The following
services are the examples of high-level services:
■ createRequest
■ attachChangeToRequest
Working with these high-level services and the lower-level building blocks, CA SDM can be
used to provide a loosely coupled service desk service. The service can be accessed
anywhere a web service can be used.
Important! Web services are a powerful technology that requires programming skills that CA
Technologies Technical Support does not support. Similar to other sections of this guide, this
chapter includes information that is not included in the product documentation. The manager at
your site is responsible for the testing and maintenance of web services-based project
deliverables that are built with web services. The provided samples are not production code. We
recommend that while developing your project, you follow sound software engineering
practices, such as source control and code reviews. We highly recommend ITIL release
management practices for web services projects. Verify and test your web services projects
before going into production.
Web Services
A web service is a collection of services that have been deployed over the Web. Another
application can access these services to perform a task by calling the service through the Internet
using standard protocols. The key standards are XML for data formatting, SOAP for message
exchange, and WSDL for describing the service.
The following services are the advantages of using a web service, in addition to those advantages
previously mentioned:
■ They are free of vendor-specific libraries.
■ They are the platform and language independent.
■ They are readily available for various development platforms.
For more information about web services and the associated standards, see the following web
service basics articles:
http://msdn.microsoft.com/en-us/netframework/aa663324.aspx
http://en.wikipedia.org/wiki/web_services

CA SDM Integration Methods
CA Service Desk Manager 45
Service Aware
Service Aware is a part of the CA Technologies vision for a self-managing enterprise and is part of
an on-demand strategy.
CA Technologies develops a Service Aware paradigm that attempts to achieve a self-managing
infrastructure by having applications and devices report problems directly to the service desk. By
completing this task, the application removes the end user from the equation. This task
significantly reduces reporting time, improves research and troubleshooting, and avoids
communication problems with the end user. Integration methods enable Service Aware
infrastructures.
The following diagram shows the virtual architecture of Service Aware. By using web services, the
core functions of CA SDM and knowledge base are provided to applications and devices that
consume the functions as support.
As previously illustrated, the traditional support model is still available as exceptions to
automation. The CA SDM web services are the means to deliver on-demand services in this
model.

CA SDM Web Services
46 Chapter 3: Integration Options and Approaches
CA SDM Web Services
The following sections describe the CA SDM web services:
■ Functions available in the web services.
■ Typical tasks that the web services are used to perform.
■ Common pitfalls that implementers and developers must be aware of.
Note: Various other application program interfaces (APIs) and integration alternatives are
provided. However, the web services API must always be the first option when integrating other
applications with CA SDM. The web services offer much of the functionality that is available
through the interface from outside the product. By using the web services, customers can reuse
many of the policies and business processes already created.
For more information about the web services, see the CA SDM Technical Reference Guide. In
addition, a Java language example is provided in the $NX_ROOT\samples\sdk\websvc directory.
Business Challenges
Not every IT organization has the type of resources that are able to develop and maintain custom
code. Depending on your requirements, CA Technologies Services or a CA Technologies partner is
a good fit to help you address your specific requirements. The best way to minimize the risks that
are associated with your custom code is to complete the following tasks:
■ Verify that detailed documentation is provided with any delivered custom code.
■ Arrange for some form of maintenance contract to be in effect.
CA Technologies Approach
CA SDM web services are provided as a supported mechanism for performing integrations. CA
Technologies Support does not directly support any custom created web services code. However,
the documented methods that the custom code uses are supported.
Best Practice
CA Technologies best practices caution against the use of any custom code. For a valid business
need, the Web Services API is the only API that CA Technologies supports. In addition, CA
Technologies best practice also suggests implementing a formal software development
methodology to help ensure the proper scoping, design, and maintenance of any custom code.

CA SDM Web Services
CA Service Desk Manager 47
Configuring the Solution
No special CA SDM configuration requirements exist. The web services are configured by running
pdm_configure on a CA SDM server.
Enabling the Solution
After configuring CA SDM and implementing the previously mentioned components, no further
steps are required to enable custom components to use the web services-based feature.
API TouchPoints and Value
This section provides a description of the generic CA SDM Web Services API, focusing on what
can be accomplished with this toolkit for integration purposes.
The two primary areas where the CA SDM Web Services API can be utilized in the integration are
following:
■ Separate products (both CA Technologies and third-party products).
■ New features for CA SDM.
The value of this functionality is recognized when you want to perform a custom
implementation. You can implement your solution quickly on a wide variety of platforms using
many different programming environments. Alternatively, some CA Technologies Smart-certified
partner products leverage the Web Services API to provide the desired integration to CA SDM
from a wide variety of third-party products.
This section illustrates how to use the CA SDM Web Services API to integrate a new feature into
the CA SDM web interface. In the example, a new feature is added to assist the user in more
efficiently managing the incidents and problems that have been attached to a change order.
Support Disclaimer
Important! Web services are a powerful technology that requires programming skills that CA
Technologies Technical Support does not support. Similar to other sections in this guide, this
chapter contains information that is not contained in the product documentation. Testing and
maintenance of projects that are based on web services are the responsibility of the site. This
chapter contains samples and not production code. We recommend that while developing your
project, you follow established software engineering practices such as source control and code
reviews. We highly recommend ITIL release management practices for web services projects.
Test your projects carefully before going into production.

CA SDM Web Services
48 Chapter 3: Integration Options and Approaches
Accessing the Web Service
CA SDM provides two distinct web services. One is specific to Release 11 and above, and another
is used for backward compatibility for integrations that use the CA SDM 6.0 web service. The
Release 6.0 web service does not cover the CA SDM Knowledge Tools function. Users who
integrated with the CA SDM Knowledge Tools 6.0 web services must review and update those
integrations to work with the current web service.
A list of all the methods available through both of these web services is available on a CA SDM
web server from the following URL:
http://localhost:8080/axis/servlet/AxisServlet
You can find the r12.5 /12.6-specific WSDL using the following URL, where 8080 is the default
port:
http://localhost:8080/axis/services/USD_R11_WebService?wsdl
The WSDL is a key component for integrating through the web service. The WSDL tells the other
application where the web service is located and all the associated methods of that service.
Authentication
To communicate with the web service (unless you are using certificate-based authentication), a
user must first log in to the web service with a valid CA SDM user ID and password. User security
and access are the same as it is in the CA SDM interface, which mechanisms such as access types
and data partitions define. Once users log in to the web service, they can only perform tasks and
retrieve data based on their access. This access restriction also applies to CA SDM Knowledge
Tools, which use permission groups to segment the knowledge base. Users cannot, therefore,
retrieve knowledge documents to which they do not have access.
When accessing the web service, an analyst user type or a user performing analyst functions use
a concurrent user license. When building integrations, consider this information to keep a check
on the number of licenses.
For information about certificate-based authentication, see Using Public Key Infrastructure
Authentication and Interacting with the Web Interface (see page 64).

CA SDM Web Services
CA Service Desk Manager 49
Working with the Object Layer
The web service communicates with the object layer in CA SDM. By interacting with this layer,
updates that are made through the web service trigger the appropriate business processes,
escalations, and service levels within CA SDM. Additionally, using the object layer allows
developers to work at a layer above the database and not concern themselves with those
low-level connections. Every object within CA SDM has a unique ID. At the object layer, this ID is
referred to as a handle or persistent id (PERSID). When accessing and updating objects, the
developer is often required to use the handle of an object to identify it in a method call.
Technology
The web services that are provided with CA SDM are built on Java (J2EE) technology and run on
Apache Axis and Apache Tomcat. All of the prerequisites are installed with CA SDM, and the web
services can be hosted on any of the supported server platforms for CA SDM. The use of Java,
Apache Axis, and Apache Tomcat does not limit the technology that is used to communicate with
the web service.
For information about the advantages of using a web service, see Web Services (see page 44).
Web Services Methods
Much of the same functionality that is available using the CA SDM interface is accessible through
the web service. For example, there are functions to create and update contacts, assets, and
tickets. Through the web services you can transfer or escalate tickets, notify users, and update
the CA SDM tasks. Using the same API, CA SDM Knowledge Tools functions can be accessed
including the ability to create, search, retrieve, and rate documents.
The following information includes several of the most commonly used functions:
login/logout
These functions control the session with the web service. The userid that is used to log in determines the security and access throughout the rest of that session.
doSelect/doQuery
Both methods allow querying of specific objects to retrieve data. For example, a query retrieves the ref_num IDs (ref_num) of all open tickets for a given user.

CA SDM Web Services
50 Chapter 3: Integration Options and Approaches
createRequest
The most common integration with CA SDM is to open a request or incident. This method creates a request, incident, or problem that is based on the parameters that are passed to it.
getHandleForUserid
Typically, the web service requires the handle (or unique ID) of an object that passes to a method call. This method retrieves the handle of a user, which gives their unique userid.
createTicket
Like the createRequest function, this method creates a ticket for a request, incident, or problem. However, the type of ticket that is created depends on the web service policy that a CA SDM administrator creates. This method is designed to simplify the most common integration with CA SDM by hiding some of the CA SDM-specific knowledge and complexity that is associated with other method calls.
createAttachment
When reporting an incident with another application, it is often helpful to attach a log (or other file) to the incident to improve troubleshooting.
Keyword search
This method performs a search for knowledge documents similar to how a user provides a search string using the web interface.
getDocument
This method retrieves the attributes of a knowledge document given its ID.
createDocument
This method creates a knowledge document.

CA SDM Web Services
CA Service Desk Manager 51
The Keyword search, getDocument, and createDocument methods are knowledge base functions
that use the functionality that is provided with either CA SDM Knowledge Tools or keyword
search. Keyword search is the embedded search and retrieval tool that comes with CA SDM.
Customers who do not have CA SDM Knowledge Tools can still use the web service but they only
have access to the basic embedded knowledge methods. When a Keyword Search-only customer
attempts to access a CA SDM Knowledge Tools-specific method, such as FAQ or
getDecisionTrees, the user sees the following error: Soap Exception: Keyword Search does not
support this feature.
For more information about the available web service methods, see the chapter Web Services
Methods in the CA SDM Technical Reference Guide.
Web Services Typical Tasks
This section discusses the most common tasks that are performed using the web service. The
section also provides examples and tips on how to perform these tasks.
Creating an Incident
The most common task that is performed through the web service is creating a request, incident,
or problem. You can use the createRequest method to create all of these ticket types. Other
ticket types, such as change orders and issues, use their own methods (createChangeOrder and
createIssue, respectively). Similar to the web interface, the createRequest method creates an
incident and sets all of the associated attributes and properties of that ticket.

CA SDM Web Services
52 Chapter 3: Integration Options and Approaches
Example: Create an Incident
This example discusses the steps to create an incident. After you complete this example, the
affected end user is set as employee123, the priority as 2, and the incident area or category as
applications.
Before you review this example, review the CA SDM Technical Reference Guide. This guide
describes the web service and its methods.
1. Log in.
The first step is to log in to the web service using the login method with a user ID that has
access to the following functions:
■ Create an incident.
■ Retrieve the key attribute data.
In this example, set the priority, category, and group fields. To verify that a user has the
correct level of access, test the example in the web interface and validate the access type of
the user. On the successful web service login, an integer session ID (SID) is returned, which
has a value greater than zero. A call to log in therefore fails when the returned SID is less
than or equal to zero. The SID is used in almost all other method calls to help ensure that a
valid user is accessing the methods.
2. Retrieve the handle for the affected end user.
Set the affected end user or customer attribute in the incident. Therefore, retrieve the
handle (PERSID) of that user. As previously mentioned, the affected userid of the end user is
employee123. Pass that string value and the SID to the getHandleForUserid method. This
method returns the handle for that user as a string that is used later.
3. Retrieve the handle for the applications incident area.
Retrieve the handle for the incident area to which you want to assign this incident:
Applications. The doSelect method queries CA SDM for information that you are looking for.
In this situation, you want to query all incident area objects to find the handle for one that
has a name (sym) Applications. By reviewing Chapter 2 of the CA SDM Technical Reference
Guide, you can locate the call request (cr) object which holds requests, incidents, and
problems. The incident area or category attribute of the cr object is the pcat object (problem
category). To retrieve the handle for the Applications incident area, the doSelect method call
must go against the pcat object and must have a where the clause sym — Applications. The
doSelect method returns an XML node that contains the results of the query. XML parsing is
necessary to retrieve the handle for the incident area.

CA SDM Web Services
CA Service Desk Manager 53
The following pseudocode example shows how this method call looks:
//define the attribute array to pass the return values.
String attributes[] = new String[0]
//doSelect method definition
// doSelect(SID, objectType, whereClause, maxRows, attributes[])
xmlReturn = USDWebService.doSelect(SID, "pcat", "sym = 'Applications'",
1, attributes)
4. Retrieve the handles for priority and ticket type.
To retrieve these handles, you do not have to call the web service. Instead, you can use the
documentation, which covers commonly used objects (Chapter 2 of the CA SDM Technical
Reference Guide). As previously mentioned, the cr object holds requests, incidents, and
problems. By default, the createRequest function creates a request and explicitly tells it to
create an incident. The type attribute in the request object has a value of R for the request, I
for the incident and P for the problem. However, the web service requires that you pass this
value as a handle. This type attribute is a commonly used object and is provided in the
documentation as crt:182.
5. Create the incident.
Now that you have the handles for all the incident attributes, you can create the incident. To
call the createRequest function, the method requires the following parameters:
■ SID.
■ Any of the required attributes for the request object passed in the attrVals[] array.
■ Any required property that is based on the incident area (category) in the
propertyValues[] array.
The last three parameters in the method call retrieve attributes from the ticket once it is
created. The attributes[] array is used to specify specific attributes to retrieve.
newRequestHandle and newRequestNumber retrieve the handle and ref_num of the new
ticket as string values.

CA SDM Web Services
54 Chapter 3: Integration Options and Approaches
The following pseudocode example shows how this method call looks:
// assign the name value pairs to the attrVals array of strings. The customerHandle and
categoryHandle hold the handles of values returned from the previous function calls in
this example.
String attrVals[] = ("customer", customerHandle, "category",
categoryHandle, "priority", "pri503", "type", "crt:182")
//create empty array of strings variables for properties and return attributes as we are
not passing data. The method still requires passing array of string objects in the function
call.
String propertyValues[] = new String [0]
String attributes[] = new String[0]
//create new string variables to hold return values.
String newRequestHandle = ""
String newRequestNumber = ""
//createRequest function definition
//createRequest(SID, creatorHandle, attrVals[], template, propertyValues[],
attributes[], newRequestHandle, newRequestNumber)
//actual function call, the creator handle is left blank which tells the method to default
to the logged in the user of the web service. The template parameter is left blank as we
are not setting that value.
xmlReturn = USDWebService.createRequest(SID, "", attrVals, "",
propertyValues, newRequestHandle, newRequestNumber)
6. Log out.
The logout method ends the session for the SID that was created during the login. The SID
can no longer be used.
This example is complete and a new priority 2 incident is created in CA SDM for
employee123. The incident is assigned to the applications category.
Updating an Incident
Several different methods are provided to update attributes and perform actions such as
transferring or escalating a ticket. These methods perform actions or events in CA SDM that can
trigger the support process already defined in the tool.

CA SDM Web Services
CA Service Desk Manager 55
Example: Update an Incident
This example discusses the three most often used action methods:
■ transfer
■ changeStatus
■ createActivityLog
This example discusses the steps to update the incident created in Creating an Incident (see
page 51). After you complete this example, the incident is transferred to analyst123. A log
comment activity is added and the status is changed to Work In Progress.
Follow these steps:
1. Log in.
As noted in Creating an Incident (see page 51), a valid call to log in is necessary to acquire
the SID to use in the other methods.
2. Retrieve the handles for the assignee and creator.
To transfer the ticket, you first acquire the handle for the analyst as a new assignee. The
userid of the assignee is analyst123 so you pass this string value with the SID to the
getHandleForUserid method. This method returns the handle for the assignee as a string
that you use later. In addition, you need the handle for the user (the creator) that performs
the transfer activity. To demonstrate that the transfer was completed through the web
service, you use the userid webserviceuser. Another call to the getHandleForUserid function
is required to retrieve the handle for this second user.

CA SDM Web Services
56 Chapter 3: Integration Options and Approaches
3. Transfer the incident.
With the assignee, creator, and incident handles, you now have all of the information you
must update during the transfer. The transfer method allows the update of the assignee,
group, and organization attributes. One or more of these attributes can be updated at a
time. Several Boolean parameters exist to tell the method what to update. Because you
want to set only the assignee, pass a Boolean True value in the setAssignee parameter and
False for setGroup and setOrganization.
The following pseudocode example shows how this method call looks:
//transfer method definition
//transfer(SID, creator, objectHandle, description, setAssignee, newAssigneeHandle,
setGroup, newGroupHandle, setOrganization, newOrganizationHandle)
xmlReturn = USDWebService .transfer(SID, creatorHandle,
newRequestHandle, "transfer details", True, assigneeHandle, False, "",
False, "")
4. Log a comment.
In this step, a comment is logged on the previously created incident. The createActivityLog
method can create various activities. To tell the method and the type of activity to create,
you pass the LogType. For a comment, the LogType is LOG. This LogType and others are
documented with the method description in the CA SDM Technical Reference Guide. The
method call also has parameters for TimeSpent and Internal. The TimeSpent parameter
takes an integer value for the amount of time that is spent on this individual activity. In this
example, you pass 0, which is the default. This value shows that it was part of an automated
process that is performed through the web service. The internal parameter, when set to
True, allows a comment to be visible to analyst users only.
The following pseudocode example shows how this method call looks:
//createActivityLog method definition
//createActivityLog(SID, creator, objectHandle, description, LogType, TimeSpent,
Internal)
xmlReturn = USDWebService .createActivityLog(SID, creatorHandle,
newRequestHandle, "log comment details", "LOG", 0, False)

CA SDM Web Services
CA Service Desk Manager 57
5. Retrieve the handle for the new status.
To update the status, you retrieve the handle of the new status using the doSelect method.
The new status name or sym is Work In Progress. To locate the request status object: crs, see
Chapter 2 in the CA SDM Technical Reference Guide.
The following pseudocode example shows how this method call looks:
//empty array of strings
String attributes[] = new String[0]
xmlReturn = USDWebService .doSelect(SID, "crs", "sym = 'Work In
Progress'", 1, attributes[])
6. Update the status.
The final step in this example is to change the status of the incident. By completing the
previous steps, you have handles for the creator, incident, and status. You have all of the
necessary information to call the changeStatus method.
The following pseudo code example shows how this method call looks:
//changeStatus method definition
//changeStatus(SID, creator, objectHandle, description, setStatus, newStatusHandle)
xmlReturn = USDWebService .changeStatus(SID, creatorHandle,
newTicketHandle, True, StatusHandle)
7. Log out.
Log out of the web service using the logout method and invalidate the SID.
This example is complete and the incident has a new assignee, priority, and comment. The
advantage of using the web service in this situation is that all of the notifications and
escalations occur. A service event occurs when an incident is unassigned for an hour. That
event does not trigger because of the actions that are taken through the web service.
Performing a Knowledge Search
The most common task that is performed using the knowledge-related functions is a search of
the knowledge base. The search method takes a search string as input to query the knowledge
base. The search method takes various input parameters, allowing a user to define the type of
search to be performed, and how the results are returned.

CA SDM Web Services
58 Chapter 3: Integration Options and Approaches
The following pseudocode example shows how a call to the search method is formatted and the
key parameters are explained.
String searchString = "printer toner error"
integer resultSize = 10
string propertyList = "id, Title, Summary"
integer searchType = 2 //keyword search = 2
integer matchType = 0 //'Or' search = 0
integer searchFields = 1 + 2 + 4 //title, summary and problem
integer maxDocIDs = 20
xmlReturn = USDWebService.search(SID, "printer toner error", resultSize,
propertyList, "", True, False, searchType, matchType, searchFields, "", "",
maxdocIDs)
String searchString = "printer toner error"
The goal of this example is to return knowledge documents that are relevant to the search string printer toner error. The search method call takes several key parameters that define the way search is performed and constrain the returned results.
The first parameter in the function call is the SID which designates proper access to the web service followed. The SID follows the search string, which in this example is printer toner error.
integer resultSize = 10
In this example, the resultSize variable sets the limit of knowledge documents with their appropriate attributes to return to 10. This parameter differs from the maxDocIDs variable which sets the maximum number of knowledge document IDs to return based on the search. The search method call returns the first 20 relevant document IDs, and, for the top 10 results, returns all of the attributes listed in the propertyList. The extra ten document IDs can be useful later to retrieve the additional results.
string propertyList = "id, Title, Summary"
The propertyList variable specifies the knowledge document attributes to return for the top ten documents. In this example, id, Title, and Summary are retrieved. For a list of all the knowledge document (kd) object attributes, see Chapter 2 in the CA SDM Technical Reference Guide.

CA SDM Web Services
CA Service Desk Manager 59
The next two parameters in the function call set how the results are sorted. The default search orders results by their relevance. To help ensure that the results are in ascending order, pass the next value as True. Therefore, the output of the search shows the top ten documents that are ordered from most relevant to least relevant.
The next parameter that is passed is a Boolean False value. This value tells the search method not to retrieve related categories for the returned documents. This value is helpful if the results must use or display the other categories in which the documents reside.
searchType, matchType, and searchFields all designate how the search is performed against the knowledge base.
integer searchType = 2 //keyword search = 2
searchType designates the type of search as either natural language or keyword.
integer matchType = 0 //'Or' search = 0
matchType is used to specify if the search must be an "Or," "And," or "Exact Match" search.
integer searchFields = 1 + 2 + 4 //title, summary, and problem
searchFields is an integer value that tells the method which fields to search. In this example the title, summary, and problem fields are used to find the keywords "printer toner error."
integer maxDocIDs = 20
xmlReturn = USDWebService.search(SID, "printer toner error", resultSize, propertyList, "",
True, False, searchType, matchType, searchFields, "", "", maxdocIDs)
The last two string parameters are left empty in this example to take the defaults. The first empty string can be used to limit the search to one or more knowledge categories. The default is to search all knowledge categories. The last empty string can be used to add an additional where clause on the search.
Additional Methods to Create Tickets
The Creating an Incident (see page 51) example showed how you can use the web service to
create an incident. If there are many attributes to set during the call, creating an incident can
become a tedious task. The createQuickTicket (see page 60) and createTicket (see page 60)
methods make this task much easier for simple tickets and defined integrations.

CA SDM Web Services
60 Chapter 3: Integration Options and Approaches
createQuickTicket
The createQuickTicket method is best used when you must create a simple ticket with only a
brief description. The ticket type is selected based on the preferred ticket setting for the user
with their access type. The method call only requires a SID, customer handle, and description.
These requirements make this method straightforward and easy to use, but lack the detail that
the more advanced methods provide.
createQuickTicket is best used for simple or test integrations that must only report a ticket to CA
SDM. This method is not recommended for large-scale integrations because it creates tickets
with little detail for analysts to use in troubleshooting.
createTicket
Like the createQuickTicket method, the createTicket method simplifies the process of creating a
ticket. However, createTicket uses the web service policy settings within CA SDM administration.
These policies allow a CA SDM administrator to define the ticket type, frequency, and problem
type that integration can create. As a result, the integration is simplified and it can also help
prevent ticket floods, if a problem repeatedly occurs with an integrated application.

CA SDM Web Services
CA Service Desk Manager 61
The following example shows a Sample Web Services Access Policy:
A web services policy controls the access that the user (or integrated application) has when
communicating with CA SDM through the web services. As illustrated in the previous example,
the policy defines any limitations on accessing or updating data with the web service. The Access
Control tab specifies the number of operations that can occur within an hour. For example, a
user under this policy can create a maximum of 60 tickets an hour, without a limit on creating
objects. The user cannot create attachments, query data, or cannot search the knowledge base.

CA SDM Web Services
62 Chapter 3: Integration Options and Approaches
The following example shows a sample web services problem type that defines how duplicate
tickets are handled:
A problem type links to a policy and defines the ticket type and template that is created when
this problem occurs. In addition, the problem type can define what to do when a duplicate ticket
is encountered. In this example, a new ticket is not created but an activity log is added to the
previously created ticket.

CA SDM Web Services
CA Service Desk Manager 63
The following example explains the steps to access the sample web services policy and use it to
report an account lockout error with the expense application.
1. Log in to the web service.
This login process is slightly different from the previous examples. When using policies, the
user must define the policy that they are using at login using the loginService method. In
addition to the username and password, the method requires the code of the policy that can
be used.
SID = USDWebService.loginService(username, password, "ExpenseApp")
2. Create the ticket.
To report the ticket, only one other method call is required. The createTicket method only
requires the SID and problem type. This method utilizes the web services policy and problem
types defined in CA SDM, which simplifies this process. This method can accept additional
information such as a description, asset, and end user. However, these fields are not
required.
//define the string variables for the new ticket number and handle the String.
newTickethandle, newTicketNumber
//CreateTicket method definition
//CreateTicket(SID, description, problem_type, Userid, Asset, DuplicationID,
NewTicketHandle, NewTicketNumber)
//create the new ticket using the problem type AccountLockout
xmlReturn = USDWebService.createTicket(SID, "new ticket description",
"AccountLockout", "", "", "", newTicketHandle, newTicketNumber)
This example is now complete and demonstrates the reduced amount of work that is necessary
when using web services access policies. Policies are highly recommended when a user having
little or no experience with CA SDM creates the integration. The policy hides the CA SDM
complexity and allows the user to focus on reporting the problem and letting the CA SDM
administrator define how that integration is interpreted.
For more information about web services policies and the createTicket method, see the:
■ Simplified Web Services Access section in Chapter 7 of the CA SDM Technical Reference Guide
■ Online Help in the CA SDM web interface
CA SDM Web Services
64 Chapter 3: Integration Options and Approaches
Using Public Key Infrastructure Authentication and Interacting with the Web Interface
This section explains how to use the web services advanced features for secure authentication
and interacting with the web interface. The web services Public Key Infrastructure (PKI) features
provide an additional layer of security when authenticating to CA SDM. For additional
information about PKI authentication and the loginServiceManaged method, see the CA SDM
Technical Reference Guide.
PKI Authentication Sample Overview
The following information includes detailed steps and sample code that leverages the web
services ability to generate certificates and use the generated certificates to access the web
services. Certificates are typically used in environments that require a higher level of security,
such as having external users or vendors accessing the web services.
In the following example, you complete the login process using the CA SDM certificate and then
make several common web services calls. The more interesting of the two is the getBopsid() web
services method call, which allows you to obtain a token that is linked to a specific user. This
token can be used to log in to the CA SDM web interface as the linked user without being
prompted for a password. As a result, you have a seamless integration between different
applications. The generated BOPSID token expires after approximately 10 seconds, so it must be
used promptly.
Prerequisites
Before you begin, verify the following prerequisites:
■ Verify that you use the AXIS Tool that is known as WSDL2Java to generate the required stub
classes.
If you have not previously created the stub classes, continue to the next section Generating
Stub Classes with AXIS Tool WSDL2Java. This section provides a sample script and the steps
to generate the stub classes. If you have already completed this step, continue to the section
Creating and Using a PKI Certificate (see page 66).
■ Verify that you have the short form of the CA SDM directory and the path of the Java
compiler.

CA SDM Web Services
CA Service Desk Manager 65
Generating Stub Classes with AXIS Tool WSDL2Java
Complete the following steps to generate sub classes with the AXIS Tool WSDL2Java.
1. Open a Command Prompt window and change the directory to the C:\program files\CA
directory.
2. Run the dir /x command to see the short form of the CA SDM directory.
In the following example, the short name is SERVIC~1. Note the CA SDM directory; this
information is needed later:
3. Search for javac.exe on the local drives of all of the servers. If you locate a drive, note its
path. You reference the path later in the bat file. If you do not find the executable, follow
these steps:
a. Navigate to the Oracle Java SE Downloads page at
http://java.sun.com/javase/downloads/index.jsp.
b. Locate and download Java J2SE SDK.
c. Install the SDK after the download is complete.
d. Restart the computer.
Note: CA SDM Release 12.x, when installed on Windows Server, installs with a java compiler.
The following sections include the batch files with the code required to generate stub classes. In
addition to these samples, working samples that are delivered with the product for Java and Perl
are available. You can find these samples in the following location:
$NX_ROOT\samples\sdk\websvc\. For more information about the samples, open
TableOfContents.doc in this folder location.

CA SDM Web Services
66 Chapter 3: Integration Options and Approaches
Create a .bat File (Windows Servers)
In this step, create a .bat file named build_wsdl.bat and place it in the
$NX_ROOT\bopcfg\www\CATALINA_BASE\webapps\axis\ directory.
Note: You can copy the example code that is provided in the Appendix.
Create a Script File (Linux and UNIX Servers)
In this step, create a script file named build_wsdl.sh and place it in the
$NX_ROOT\bopcfg\www\CATALINA_BASE\webapps\axis\ directory.
Note: You can copy the example code that is provided in the Appendix.
After you create the batch file, run it from the command line. Verify that you are running the file
from the $NX_ROOT\bopcfg\www\CATALINA_BASE\webapps\axis\ directory. After you run the
batch file, the stub classes are in place and compiled.
After you complete all of the previous steps, run the following commands to recycle Apache
Tomcat:
pdm_tomcat_nxd -c STOP
pdm_tomcat_nxd -c START
Note: Instead of running the previous commands, you can recycle CA SDM.
Creating and Using a PKI Certificate
1. Verify that CA SDM is up and running.
2. Open a Command Prompt window and run the following command:
pdm_pki -p DEFAULT
This command creates the DEFAULT.p12 file in the current directory. This policy has the
password equal to the web services policy name that exists in CA SDM (in this case
DEFAULT).
This command adds the public key of the certificate to the field pub_key field (public_key
attribute) in the sapolicy table/object.

CA SDM Web Services
CA Service Desk Manager 67
3. Open the CA SDM web interface and navigate to Administration, Web Services Policy, and
Policies.
4. In the DEFAULT web services policy, complete the following steps:
a. Insert the Proxy Contact (in this case ServiceDesk).
b. Confirm that the DEFAULT policy record field shows Has Key = YES.
5. Copy DEFAULT.p12 file to the $NX_ROOT\bopcfg\www\CATALINA_BASE\webapps\axis
directory.
6. Create an htm file named pkilogin in the
$NX_ROOT\bopcfg\www\CATALINA_BASE\webapps\axis directory and copy the following
code into the new file, pkilogin.htm.
Note: You can copy the example code for pkilogin.htm that is provided in the Appendix.
7. Create a JSP file named pkilogin in the
$NX_ROOT\bopcfg\www\CATALINA_BASE\webapps\axis directory and copy the following
code into the new file, pkilogin.jsp.
Note: You can copy the example code for pkilogin.jsp that is provided in the Appendix.

CA SDM Web Services
68 Chapter 3: Integration Options and Approaches
8. Open the HTML form page at (http://localhost:8080/axis/pkilogin.htm), where localhost is
the name of the CA SDM server, and 8080 is the default tomcat port. Complete the fields
and click Log me in!
The JSP page launches to run the login process to the web service using the DEFAULT access
policy and ServiceDesk userid. The values can be changed if necessary to test against other
policies and users.
Note: The Directory field is the location where the certificate file that was previously created
can be found. Use the short path name in the Directory field.
After you click the Log me in! button, a result page opens to show the details of the PKI
authentication and other web services calls. The URL that is embedded in the results page is
a hyperlink to the CA SDM web interface. This hyperlink provides a seamless login (no
login/password required) using the BOPSID functionality that is called after the login process
completed. The getBopsid method provides for opening the web interface without a login
and is often used in integrations. Click the URL for the login process to complete successfully
as the BOPSID has a limited life token of 30 seconds that is linked to a specific user. The
format of a URL using a BOPSID is:
http://servername:port/CAisd/pdmweb.exe?BOPSID=BOPSID value

CA SDM Web Services
CA Service Desk Manager 69
This URL navigates to the main page of CA SDM. Other URLs can be used to navigate directly
to other pages like the profile browser.
You can extend a BOPSID by adding a variable named @NX_BOPSID_TIMEOUT to the
$NX_ROOT\NX.env file. The default value is 30, which represents 30 seconds.
Common Mistakes
This section covers several of the common mistakes that users encounter when using the web
services.
Using Handles
The most common error that users encounter is passing a sym value to a function rather than a
persistent_id or handle.
For example, when a customer calls the createRequest function they pass a list of attributes that
can include the priority of the request or incident. The value that is passed with priority must be
a handle for that priority such as pri:502, instead of the actual priority value of 3. This mistake
often appears in the SOAP error message Bad Handle.
For a list of out-of-the-box handles, read the Perform Common Tasks section in Chapter 3 of the
CA SDM Technical Reference Guide.

CA SDM Web Services
70 Chapter 3: Integration Options and Approaches
Defining and Using Arrays Of Strings
Many of the methods in the web service require an array of strings. An array of strings is a data
type that passes data to the CA SDM web service that can hold zero or more string values.
Note: When passing data to functions that require an array of strings, the function accepts an
empty array of strings but the function does not accept a single empty string. For example,
passing "" to a function that requires an array of strings results in a data type error.
The following examples are provided to illustrate how to define an empty array of strings to pass
to a method:
C#
String[] emptyArray = new string[0];
Visual Basic .NET
Dim emptyArray As String() = {}
Java
String emptyArray[] = new String[0];
The following example shows how an array of strings showing name value pairs is formatted in
XML:
<ArrayOfString>
<String>assignee</String>
<String>cnt:38293</String>
String>description</String>
String>My new description</String>
String>priority</String>
<String>pri:38903</String>
</ArrayOfString>
Troubleshooting Failed Web Services Method Call
Using TCPMon
TCPMon is one of many ways to intercept web services traffic between the web services client
and the server. This product can provide useful data to CA Technologies Support when there is a
problem with a web services call or integration.
TCPMon is an open source utility for monitoring the data flowing on a TCP connection. TCPMon
is placed in between a client and a server. The client requests are first sent to TCPMon, which
then forwards the request to the server. TCPMon also displays the request and the response in
its own graphical user interface. You can download TCPMon from https://TCPMon.dev.java.net/.

CA SDM Web Services
CA Service Desk Manager 71
TCPMon can reside on any computer on the same network as the CA SDM web services.
Note: This product is useful when you cannot recycle CA SDM Tomcat to enable advanced AXIS
logging.
Configure TCPMon
You configure TCPMon to specify the details of the CA SDM server that you must monitor.
Configure the following fields in the Create a New TCP Monitor Connection window in TCPmon:
Local Port
Specifies the port where TCPmon runs. Use netstat to verify that the port is not already in use.
Server Port
Specifies CA SDM Tomcat port.
Server Name
Specifies the host name or IP address of the CA SDM server.
The following example shows a sample configuration on TCPMon:

CA SDM Web Services
72 Chapter 3: Integration Options and Approaches
Reconfigure the Web Services Client
You reconfigure the web services client to redirect requests to the port where TCPmon is running
as shown in the following example.
http://tcpmonhost:tcpmonport/axis/services/USD_R11_WebService
tcpmonhost
Specifies the host name of the computer where TCPmon is running.
tcpmonport
Specifies the port number where TCPmon is running. This port corresponds to the Local Port specified in the TCPmon configuration.
You can now launch the client application and monitor the output in TCPmon.

CA SDM Web Services
CA Service Desk Manager 73
The following example helps illustrate TCPMon capturing an error.
■ The bottom pane shows the Web Services Exception.
■ The top pane shows the requests that are sent to the CA SDM server.
■ The middle pane shows the response from CA SDM.
This example captured a working call. Notice the handle (persid) returned in the bottom pane.
This information is helpful to troubleshoot issues with web services. You can view the requests
that are sent to CA SDM and the response to the web services client. This information helps you
identify which method is not working as expected.
Troubleshooting Problems When Tomcat Hangs or Crashes
A web services client can expose a problem in CA SDM when Tomcat hangs or crashes. The
following sections describe the information that CA Technologies Support requires to help debug
and troubleshoot the problem. Before you open an issue with CA Technologies Support, perform
the steps in these sections.

CA SDM Web Services
74 Chapter 3: Integration Options and Approaches
Disable Existing pdf_logstate Logging
The current stdlog is cluttered with verbose logging unrelated to your issue or was left enabled
from other past activities. Execute the following command to disable all existing pdm_logstat
logging:
Pdm_logstat –vL > logstat.outputstepA
This command produces the logstat.outputstepA file. CA Technologies Support reviews the
logstat.outputstepA file and provides you with commands to disable existing logging unrelated to
this Tomcat issue.
Enable Tomcat Debug Logging
Edit the %$NX_ROOT%\bopcfg\www\CATALINA_BASE\webapps\CAisd\WEB-INF\log4j.properties
file and change the following line to configure Tomcat debug logging:
log4j.rootCategory=info, jsrvrlog TO log4j.rootCategory=debug, jsrvrlog
This command enables debug logging for Tomcat.
Create axis.log and jsrvrbop.log Files
Follow these steps:
1. Create the file:
%NX_ROOT%\bopcfg\www\CATALINA_BASE\webapps\axis\WEB-INF\classes\log4j.propertie
s.
Note: You can copy the example code that is provided in the Appendix.
2. Recycle Tomcat using the following commands:
pdm_tomcat_nxd -c stop
pdm_tomcat_nxd -c start
After you recycle Tomcat, verify that the axis.log and jsrvrbop.log files have been created in
the $NX_ROOT\log directory. If you do not find these files in this location, contact CA
Technologies Support.

CA SDM Web Services
CA Service Desk Manager 75
Enable Tracing on the CA SDM Server
Enable tracing on the CA SDM server to monitor Tomcat workflow within CA SDM.
Follow these steps:
1. Increase the stdlog file size from the default of 3 MB to 10 MB using the following command:
pdm_logfile -b 10000000
//This can increase STDLOG.x file size to 10meg each.
2. Enable verbose logging for these components by running these commands:
pdm_logstat -n sda 300
pdm_logstat -f api.spl 300
The output is written to the STDLOG.x files under $NX_ROOT\log directory.
3. Enable BP message tracing on these processes:
pdm_trace spelsrvr SIZE 10000
pdm_trace spelsrvr ON
pdm_trace domsrvr SIZE 10000
pdm_trace domsrvr ON
Pdm_trace is useful for finding the sequence of events leading up to a particular log message
or a process crash.
You can configure your system to handle Tomcat traffic on a domsrvr\spelsrv process other
than the default one. Options Manager lets you configure a specific domsrvr to handle web
services calls. For information about setting up an exclusive domsrvr/splsrvr or
domsrvr/webengine named pair, see the CA SDM Administration Guide.
The option installs an NX variable named NX_WEBSERVICES_DOMSRVR in the file $NX.env. If
you do not set this variable, the default domsrvr\spelsrvr process on the primary is used. The
previously mentioned tracing commands can be used. If set, verify your configuration and
enable message tracing on the following processes, provided they have been configured to
use the none default domsrvr\spelsrvr:
pdm_trace slump_name_of_spelsrvr SIZE 10000
pdm_trace slump_name_of_spelsrvr ON
pdm_trace slump_name_of_domsrvr SIZE 10000
pdm_trace slump_name_of_domsrvr ON
slump_name_of_domsrvr is the value specified in the $NX_WEBSERVICES_DOMSRVR
variable.

CA SDM Web Services
76 Chapter 3: Integration Options and Approaches
4. Run the following command to find the associated spelsrvr slump name pair:
slstat
Pdm_trace commands write output to a trace log file in the $NX_ROOT\log directory when
disabled.
Enable Interval Logging on the CA SDM Primary Server
Enable interval logging on your primary CA SDM installation. The following instructions are
applicable for Windows. For information about how to perform a similar logging for Linux or
UNIX, contact CA Technologies Support. The key for UNIX logging is to have process output
added, which is equivalent to pslist output on Windows (outputting CPU and Memory utilization).
Follow these steps:
1. Download Microsoft PSTools from the following
URL: http://www.microsoft.com/technet/sysinternals/utilities/pslist.mspx.
A ZIP file is downloaded.
2. Create a folder named perfout on the C Drive and unzip the downloaded file to the
C:\perfout folder.
3. Use the example perf.bat code provided in the Appendix to create a text file and save it as a
.bat file, for example, perf.bat.
4. Schedule the batch file to run every 3 minutes using Windows Task Scheduler.
The output is filtered to the C:\perfout.
Create a Dump of javaw
From the $NX_ROOT/bin directory, run the following commands:
//if you have r11.2 installed
pdm_ident sda60.dll > sda60_ident.txt
//if you have r12 installed
pdm_ident sda65.dll > sda65_ident.txt
This output is necessary for CA Technologies Development to review a dump of javaw, if
retrieved. Pdm_tomcat_nxd.exe is not the process we need pdm_ident against to be able to read
javaw dump files. Our Tomcat is javaw process not pdm_tomcat_nxd.exe. pdm_tomcat_nxd.exe
is a process that starts and stops the Tomcat javaw process.

CA SDM Web Services
CA Service Desk Manager 77
Disable Tracing
When you see the next outage, disable tracing by executing the following command:
pdm_logstat -n sda
pdm_logstat -f api.spl
Run pdm_trace slump_name on, where slump_name is the slump name of the process being
traced. For Example if the default domsrvr is used, run:
pdm_trace spelsrvr OFF
pdm_trace domsrvr OFF
Turn off the Axis logging initiated previously.
Take a Dump of the Process
You can either use the UserDump utility or the Microsoft Process Dumper utility to take a dump
of the process. However, the Microsoft Process Dumper utility dumps a process being monitored
whenever it throws an exception or crashes (terminates from the Task Manager Process list). The
Process Dumper utility does not help to determine javaw crashing. For instance, when javaw
throws exceptions, the Process Dumper utility does not necessarily crash or hang as most javaw
exceptions are not fatal. However, Process Dumper dumps javaw for every exception. Tomcat
(javaw) is stalled or hung while Task Manager is running. Hence, when the problem occurs and
you see javaw running in Task Manager, follow these steps to take the dump of the process:
Follow these steps:
1. To dump a running process that is not responsive or hanging, use the Microsoft utility
named USERDUMP.exe. Download userdump.exe from the following URL:
http://www.microsoft.com/downloads/details.aspx?FamilyID=E089CA41-6A87-40C8-BF69-2
8AC08570B7E&displaylang=en&displaylang=en
2. Install userdump.exe and run the following command:
userdump javaw
This command gets the dump without killing the process. The Javaw process crashed or
terminated and a new javaw PID starts but no dump file was produced. Verify that the
underlying operating system is configured to produce a Windows crash dump
(drwatson32.exe –h) or a UNIX core file (ulimit –a). If Javaw continues to crash and no dump
is produced, use the Microsoft Process Dumper.

CA SDM Web Services
78 Chapter 3: Integration Options and Approaches
Execute USD_WS_R12_JWS.exe to Test Tomcat Responsiveness
Execute USD_WS_R12_JWS.exe to test Tomcat responsiveness to a web service application.
Follow these steps:
1. Open the executable, click Setting, URL and specify the server name and port number.
2. Click Build URL and then click Save.
3. Click Setting, Set User.
4. Enter the Username and Password for a CA SDM Contact.
5. Click Quick Login and verify whether the session is created.
If this application responds during the problem, it indicates that Tomcat is not hanging. The
problem is with the application and not necessarily with the CA SDM Web Services.
Send the Dump and Traces to CA Technologies Support
Send the following information to CA Technologies Support when you open the issue:
■ Entire ServiceDesk log directory, $NX_ROOT\log.
■ Javaw dump file specifies who generated the dump.
■ The Process Dumper automatically generated the dump.
■ The dump was manually created by executing the userdump.exe.
■ The operating system (using drwatson) produces it automatically.
■ If this dump is from a crash, follow the Windows Dump Checklist template as much as you
can for Javaw.exe or the Core Dump Checklist template for UNIX.
■ pdm_ident output files.
■ Logstat.outputstepA (the pdm_logstat –vL output file).
■ Any hs_err_pidXXX.log files.
■ Date\time stamp of when the Tomcat problem is reported or seen.
■ C:\perfout directory.
■ The result of running USD_WS_R12_JWS.exe: success or failure.

Web Services API Best Practices
CA Service Desk Manager 79
Web Services API Best Practices
■ If you have integrated CA SDM with CA Process Automation and the integration is used
heavily, consider using a secondary CA SDM server for either the web services application or
for the integration.
■ Add a webengine/domsrvr pair for each secondary server used.
■ Consider placing the Repository Daemon on the secondary server and use the document
repository on that secondary server.
■ After every set of web services calls, the web services client must perform a logoff().
■ Each web services client who is using loginService() or loginServiceManaged() methods must
use a different CA SDM web services policy. These methods are preferred over the login()
method.
■ Each web services client must use a different login in CA SDM. Using the ServiceDesk user
login is not a good practice.
■ Avoid using wildcards such as an asterisk (*) in search methods, like doquery or getlist. This
practice helps avoid the extra overhead on the domsrvr. We strongly recommended that you
do not use searches with surrounding wildcards, for example: *string*. Expressions having
asterisk result in large table scans, which can negatively impact the performance of the
database and CA SDM.
■ Avoid requesting large data sets with the web service method calls like doSelect().
For example:
maxRows Integer Indicates the maximum number of rows to return. Specify -1 to return all rows.
Using -1 is not a good practice as it retrieves all of the rows. Test all web service calls before
moving into production environment to see whether there is an impact on performance.
■ Consult with CA Technologies Support before upgrading Tomcat. The compatibility issues
arise or special steps needed.
■ Fully test all web services clients in your own labs before moving into a production
environment. A web service client can easily impact the performance CA SDM.

Web Services API Best Practices
80 Chapter 3: Integration Options and Approaches
■ The Service Desk Web Director does not work for Web Services.
■ Increase the Tomcat Memory (JVM size) to as much as 1 GB.
For more information about common errors on Java heap size, see the tech doc: TEC418959
on http://support.ca.com.
■ Increase the Max Threads for Tomcat to 150 or 200. The Max Threads default is 75.
Locate the server.xml file from $NX_ROOT/bopcfg/www/CATALINA_BASE/conf. Find the
appropriate "connector" section and change maxproc from 75 to 150 or 200. For example:
<Connector acceptCount="100"
className="org.apache.coyote.tomcat4.CoyoteConnector"
connectionTimeout="20000" debug="0" disableUploadTimeout="true"
enableLookups="true" maxProcessors="150" minProcessors="5" port="8080"
redirectPort="8443" useURIValidationHack="false"/>
After you save the file, recycle the CA SDM Daemon Server.
■ For a new implementation, use the latest cumulative patch level for CA SDM.
■ If you are using CMDB GRLOADER in a busy CA SDM environment, run GRLOADER on a
dedicated secondary server.
■ Consult CA Workflow Best Practices in the following URL while using CA Workflow, as CA
Workflow also uses the CA SDM Web Services API:
Best Practices
https://support.ca.com/irj/portal/anonymous/phpdocs?filePath=0/7956/7956_tecdoc.html#
bestpractices
■ If you are using a secondary Tomcat instance for web services calls, the domsrvr\spelsrvr
that handles the calls uses the default domsrvr\spelsrvr processes on the CA SDM primary
server. As a result, any logging for web services issues requires bop_logging or pdm_trace on
the primary server.
■ Options Manager lets you configure a particular domsrvr for Web Services calls. Determine
the domsrvr in use for appropriate logging while debugging a web services issue. The option
installs a $NX variable named $NX_WEBSERVICES_DOMSRVR. If this variable is not set, the
default domsrvr\spelsrvr process on the primary server is used.
■ Using a dedicated domsrvr for web services is a best practice for heavy loads.

bop_cmd Command
CA Service Desk Manager 81
bop_cmd Command
The bop_cmd command is an object-oriented command-line interface that executes defined
methods for CA SDM objects. This command has great flexibility, but requires detailed
knowledge of CA SDM.
How bop_cmd Works
bop_cmd is a command line utility that can execute fragment files. Fragment files are on demand
applications written in spel code, which is a CA Technologies proprietary language. CA
Technologies spel closely resembles straight C code, with many built-in functions and features
that designed around the CA SDM architecture. The bop_cmd command executes the fragment
file which can invoke a set of parameters in the same command line.
The following example illustrates how to execute the fragment file named cnote.frg to add an
announcement in CA SDM.
From the command prompt on a CA SDM computer, enter the following command:
C:\Program Files\CA\Service Desk\bopcfg\interp>bop_cmd -f cnote_add.frg
"cnote_add (Microsoft Exchange Server is Down Tech Support is aware and
working on solving the problem!)"
You can see the announcement that was added about an outage with the Microsoft Exchange
server in the following example:

bop_cmd Command
82 Chapter 3: Integration Options and Approaches
Business Challenge Example
Michael Reed, the service desk manager at Forward, Inc., is having some difficulties managing
accurate information for the incidents and requests that have been assigned to the technicians
that travel on site. The technicians are not able to update the tickets in a timely manner from the
customer location because they cannot access CA SDM. Recently, Forward, Inc. has been
successful by providing its staff with handheld devices that are able to send Telealert messages
to update data in other applications. Knowing, Michael Reed has requested that those individuals
responsible for implementing CA SDM integrate the message center application with CA SDM.
Through the integration, service desk technicians can create or update incidents and requests
while working at a customer site.
CA Technologies Approach
CA Technologies Services have been engaged at Forward, Inc. Working together with a developer
at the client, they create two fragment files that provide a solution to the request that Michael
raises.
bop_cmd Command Best Practices
Reference these best practices when working with the bop_cmd command:
■ Become familiar with the CA SDM architecture and the way the objects and attributes are
defined and work.
■ Identify the objects and attributes to update during the fragment file execution.
■ Identify the attributes that are required to save the appropriate information in the object.
■ During the testing phase, review the CA SDM stdlogs for possible messages which can
provide notifications about inconsistencies.
Configuring the Solution
Preparing to Generate a New Incident or Request
To prepare for configuring the solution and generate a new incident or request, first read the
information about the gencr method (gencr.frg) in Appendix A of the CA SDM Implementation
Guide.
Note: The file named gencr.frg, explained in Appendix A, can be found in the following default
install directory: C:\Program Files\CA\Service Desk\samples\call_mgt.

bop_cmd Command
CA Service Desk Manager 83
Configuring the Solution from CA SDM
To configure the solution from CA SDM, copy the gencr.frg file into the following directory:
$NX_ROOT\bopcfg\interp
Configuring the Solution from the Alert Message Product
To configure the solution from the Alert Message product, configure the third-party product so
that it can to pass the required parameters. In addition, verify that the parameters are in the
following format:
bop_cmd -u user-id -f gencr.frg "gencr("""description""", """asset""",
"""""", """2""", """Work In Progress""", """Applications""",
"""assignee""", """group """, """charge back""", """impact""",
"""urgency""", """severity""", """type""")"
"""""", """2""", """Work In Progress""", """Applications""","""assignee""",
"""group """, """charge back""", """impact""", """urgency""",
"""severity""", """type""")"
Testing the Solution
Open a Command Prompt window on the computer where bop_cmd is available to test the
solution. Execute the following command on the command prompt:
bop_cmd -u ServiceDesk -f gencr.frg "gencr("""My first Incident from the
command line:-)""", """BSODEMOS1""","""""","""2-High""", """Open""",
""Applications""","""ServiceDesk""", """""", """back""", """3-Single
Group""", """3-Quickly""","""""", """Incident""")"
Important! BSODEMOS1 is an asset example. Use a valid asset/CI from your environment.
Note: The code is only provided as an example. Copy the code correctly. Copying text and
especially the special characters out of pdf documents can be error prone.
The following table describes the input for this command:
Input Description
Description My first Incident from the command line.
Asset BSODEMOSI
Request Template Name Blank
Priority 2-High
Status Work in Progress
Request Area Applications
Assignee ServiceDesk
Group Blank

bop_cmd Command
84 Chapter 3: Integration Options and Approaches
Input Description
Charge Back Back
Impact 3-Single Group
Urgency 3-Quickly
Severity Blank
Type Incident
This command returns Request number, messages.
As illustrated in the following example, incident number 14357 was created in CA SDM:
Updating a Request
Preparing to Update the Request Status and Add an Activity Log Comment
To prepare for configuring the solution, which updates the request status and adds an activity log
comment, first read the information about the ZUpdateCr method in Appendix A.

bop_cmd Command
CA Service Desk Manager 85
Configuring the Solution from CA SDM
To configure the solution from CA SDM, copy the ZUpdateCr.frg into the following directory:
$NX_ROOT\bopcfg\interp
Configuring the Solution from the Alert Message Product
To configure the solution from the Alert Message product, configure the third-party product so
that it can to pass the required parameters. Then, execute the following command:
bop_cmd -f ZUpdateCr.frg "ZUpdateCr('56', 'belldo01', 'Researching',
'Telalert Message')"
You can use the fragment to update the status of a request and add an activity log by executing
the command line using the bop_cmd command. The following information provides an
example:
Ref_Num
56
Assignee
belld01 (User who sent the message)
Status
Researching
Activity Log detail
Telalert Message

bop_cmd Command
86 Chapter 3: Integration Options and Approaches
Testing the Solution
Complete the following steps to test the solution:
1. Request number 56 is created and assigned to the analyst Donald Bell. Donald is on-site and
updates the status of the request by sending a text message to the Telealert through the
telephone.
2. Telealert creates an executable file with the following command:
bop_cmd -f ZUpdateCr.frg "ZUpdateCr('56', 'donaldbell', 'Researching',
'Telalert Message')"
3. The status of the request is updated from Work In Progress to Researching after the
command received. Activities tab adds an activity log. The activity log contains the name of
the user who sent the message, and the status change.
Troubleshooting
Having issues with fragment files that bop_cmd executes, review the stdlogs for more
information. In addition, you can use bop_logging and pdm_trace commands to debug your
fragment files, as described in the following section.
Bop_logging and pdm_trace
In the CA SDM architecture, most communication between processes, and within processes, is
performed by exchanging BPMessages. When having issues with making your fragment files work
using bop_cmd command, it is useful to trace the message flow. The following two methods
allow you to trace the message flow:
bop_logging
Writes each BPMessage send or receive by the process being logged in to a file. You can configure this method for following use:
■ A single file that grows indefinitely.
■ A set of files used in round robin fashion. Each file is permitted to grow to a specified
size before logging switches to the next file.
Important! bop_logging involves considerable overhead and noticeably slows a process. Use
bop_logging in a production environment when it is necessary.

bop_cmd Command
CA Service Desk Manager 87
pdm_trace
Stores each message send or receive by the process being logged in to internal memory. Only a specified maximum numbers of messages are kept.
Messages in memory are written to a file on a request, or when certain events occur, such as a process crash or a specified stdlog message.
CA SDM Integrations 235
Important! Pdm_trace has a low overhead and is suitable for a production environment.
Pdm_trace is ideal to determine the message flow before an unusual event.
Note: The message capacity of the memory buffer limits pdm_trace.
Both forms of logging are activated with a common line command. To determine the options
available for each command, invoke it with the –h argument:
bop_logging –h
pdm_trace –h
The output from bop_logging or pdm_trace is similar. Each message that is captured is reported
in the following format:
07/12 09:22:02.781 (+0.000) Received Msg [User usd; Session 1995107485]
From: 138.42.43.231.web:local.
To: 138.42.43.231.domsrvr.TOP [Top_Ob]
BPMessage
{
method = call_attr
arg 0 = (string) chg
arg 1 = (string) get_new_dob
arg 2 = nil
arg 3 = nil
arg 4 = gPCAAA(2references) [Group_CO]
reply object = 138.42.43.231.web:local.GHAAAA (not refcounted)
reply method = get_new_dob:0
}

bop_cmd Command
88 Chapter 3: Integration Options and Approaches
The following information is displayed for each message:
■ The date and time of the message.
■ The number of milliseconds since the previous message (parenthesized).
■ The type of action that resulted in this message, Sending, Received, or Imported.
■ The userid and session of the user that is associated with the message.
■ The sending (From) process. This process is a two-part address, consisting of the IP address
of the slump server, a dot, and the name for the process that is supplied at the slump login.
■ The receiving (To) object. This process is a three-part address. The first two parts are in the
same format as the From address. The third part is the object name. If the process
performing the logging defines the object, its name follows the C++ or Java class name in
square brackets.
■ The message invokes the name of the method.
■ The type and value of any arguments to the message.
■ The name of the object expecting a reply to the message, and the name of the reply method.
Note: You can export the required information to a text file. After you export, you can use a C++
or a Perl script to put the parameters into a bop_cmd command line format and execute it. The
following section describes an example of a Turbo C program that can complete these tasks for
you.
Automated Updates of CA SDM Using Sutility
Appendix A provides an example of a C program, sutility that reads a text input file. The text
input file contains the information to fill the parameters that are required for a fragment file
named mk_creq.frg. Then, an output file is generated and is ready to be executed to create or
update information into CA SDM.

bop_cmd Command
CA Service Desk Manager 89
sutility takes information from a text file (test.txt in the following example) having the following
entries and formats the text into a bop_cmd command syntax:
After creating the test.txt file as a tab separated file with the expected values, execute the sutility
from the command line, using the following syntax:
C:\>sutility test.txt executing.bat
The output file named executing.bat can execute to create or update information in CA SDM. You
can configure AT or scheduling commands to run the output file.
The following sample window illustrates the contents of executing.bat.

Text API Method
90 Chapter 3: Integration Options and Approaches
bop_cmd Summary
CA SDM has a command line utility which can be invoked with a file name and a set of attributes.
The type of file that works in context with the bop_cmd command is named a fragment file. The
file contains spel code that is interpreted. CA Technologies spel code is a proprietary interpreted
language closely resembling C, and is used for specifying business logic.
The command line must have the following syntax:
bop_cmd –f file.frg "function ("""parameter1""", """parameter2""",
"""parameter3""")"
External products can put the parameter information into a text file. From the text file, a Perl
script or C++ program can extract the parameters, put them into the required bop_cmd format,
and execute the command.
Text API Method
The Text API is a simple common interface that allows you to create and update objects in the CA
SDM database. Using text-based input, you can create and update objects such as issues,
requests, contacts, and assets. Using the Text API, you can set most fields that are accessible
from the Java client and the web interface.
Accessing the Text API
You can access the Text API using the following interfaces:
■ Command line
■ CA NSM
The following example illustrates how to use the Text API from the command line. Later, the
email and NSM interfaces are explained.
Note: You can use Web Services as an alternative to the Text API for cross application
integration. For more information, see the Web Services integration methods that are described
earlier in this section, or the CA SDM Technical Reference Guide.

Text API Method
CA Service Desk Manager 91
How the Text API Works from the Command Line
From the command line, you use the pdm_text_cmd command to activate the Text API
command-line interface. You specify certain information, such as the table to process and the
operation to perform, using parameters in the pdm_text_cmd command. The input to the Text
API is passed to the pdm_text_cmd command in the form of an input file or directly from STDIN.
Note: For more information about the pdm_text_cmd entry, see the reference commands in the
CA SDM Administrator Guide. You can also type pdm_text_cmd –h from the command prompt.
Business Challenge
Michael Reed is the service desk manager for Forward, Incorporation. Michael must configure CA
SDM to create a change order from information in an in-house developed Human Resource
product when a new employee is hired. Assign the Change Order to the Windows Administrators
who create all required Windows accounts for the new employee.
CA Technologies Approach
CA Technologies Services advise Michael to use the pdm_text_cmd command to create the
change order from the Human Resource product.
Best Practices
Review the following best practices when using the pdm_text_cmd command:
■ Validate that change order creation in CA SDM supports the existing process in your
organization.
■ Clearly define when the change order must be created and updated.
■ Discuss the implementation with the CA SDM Administrator.
■ Test in a development environment first.
■ Verify that all parameters sent from the change order creation source exist in CA SDM.

Text API Method
92 Chapter 3: Integration Options and Approaches
Configuring the Solution
Create a Change Order from the Command Prompt Window
Use the following steps to create a text file with the information that you want to populate into
the change order.
1. Using Notepad, create a text file named new_change.txt with the information illustrated in
the following sample window:
2. From the Command Prompt window, execute following command:
pdm_text_cmd –t CHANGE –u ServiceDesk –f new_change.txt
The following sample Command Prompt window illustrates the command:
pdm_text_cmd is interacting with text_api.cfg. As a result, a new change order is created in
CA SDM.
Text API Summary
The Text API is a simple command interface that allows you to create and update objects in CA
SDM. Using text-based input, you can create and update issues, requests, change orders,
contacts, and assets. Using the Text API, you can set any fields that are accessible from the Java
client and the web interface.
Troubleshooting
Having issues with the Text API, verify the entries in the stdlog. The stdlog provides more
information about what is wrong in your definitions.

Database-level Data Integration
CA Service Desk Manager 93
Database-level Data Integration
All CA SDM data is stored in a normalized relational database. Subject to certain restrictions and
caveats, other products can read and update this database. The restrictions include the following
points:
■ CA SDM keeps its own locks at the product level. Using the locks and dynamic screen
updates, the user is guaranteed that the data they see is the data that is updated, without
database lock contention. If updates occur outside CA SDM, that guarantee is not valid and
impact performance of the product.
■ CA SDM is designed to never deadlock and hold locks for short durations. Deadlocked rows
are managed by waiting, and eventually generating errors and abandoning the operation.
However, on high-volume production systems, deadlocking of critical tables can
catastrophically affect performance. Table locks held for any length of time almost always
have negative consequences. Therefore, carefully design any external system that works
directly with CA SDM tables to avoid prolonged locking, table locks, and deadlocks.
Given these restrictions, data level integration can work well. The first concern, data serialization,
is more theoretical than actual. In practice, occasional random updates occur outside the
software. For example, when a service representative closes an incident after a technician has
been dispatched, but before the technician has arrived on site. This transaction is effectively an
unserialized update that has nothing to do with the software. As long as integration does not
increase the number of unserialized updates, the site is typically satisfied.
The Common Registration API (CORA) and the MDB are examples of database-level integration.
All Unicenter Release 11 and later products use the common MDB schema to store and manage
their data. As the interface through which these assets are registered and as the only source for
updating these tables, CORA helps ensure that asset data flows consistently. As a result, the data
and referential integrity of the master asset data model in the MDB is supported.
CA Technologies Services can provide resources for assistance with database-level integration
engagements.

pdm_load
94 Chapter 3: Integration Options and Approaches
pdm_load
pdm_load is a database-independent utility that is supplied with CA SDM for adding, deleting,
and updating rows in the CA SDM database. pdm_load is a convenient utility for performing
batch loads and updates to CA SDM. pdm_load generates numeric IDs and incident and change
order numbers, and interacts correctly with CA SDM application locking. Typically, pdm_load is a
simple and relatively safe way to perform batch loads into CA SDM.
Note: For more information about pdm_load, see the reference commands in the CA SDM
Administrator Guide.
pdm_extract
pdm_extract is a database-independent utility that is supplied with CA SDM for extracting data
from CA SDM. The default output is in a proprietary format suitable for loading data back into CA
SDM with the pdm_load utility. Utility options are available to export data in comma-separated
value (CSV) format, which can be imported into Microsoft Office products such as Excel and
Project.
pdm_extract accepts table names to dump the entire contents of tables, and it accepts standard
basic SQL statements for joins and projections.
Note: For more information about pdm_extract, see the reference commands in the CA SDM
Administrator Guide.
pdm_deref
pdm_deref is a database-independent utility that simplifies loading normalized data. pdm_deref
converts strings to their numeric key values as part of a pdm_load, making it possible to load
foreign keys in a single step.
Note: For more information about pdm_deref, see the reference commands in the CA SDM
Administrator Guide.
Business Challenge
The service desk team at Forward, Inc. receives a request from the security department to
inactivate all customers that have not used the service desk in the last six months. The lack of use
indicates that the customer is no longer using the services or support contract.

pdm_deref
CA Service Desk Manager 95
CA Technologies Approach
CA Technologies Services have recommended using pdm_extract, pdm_deref, and pdm_load
commands to enable Forward, Inc. to identify and inactivate the appropriate customer contact
records.
Configuring the Solution
Complete the following steps to configure the solution:
1. Use pdm_extract to find all inactive customers who have been inactive for more than six
months. Customers are defined as contacts where the contact type equals customer.
This example searches for contacts in which the last_mod_date of the record in the contact
table is greater than a certain time period. Use the following command:
pdm_extract -f "Select userid, id, last_update_date FROM ca_contact WHERE
inactive=0 AND contact_type=2305 AND last_update_date < 1325376000" >
excustomers.dat
Note: In this command, the value 1166918400 is the UNIX format for the date that is
searched. In this example, the last_update_date value of 1325376000 converts to the date
and time of January 01, 2012 00:00:00. View the companion ZIP file posted with this Green
Book for a sample Excel file (UNIX Date Format.xls). The file contains a macro allowing date
information to be formatted into a UNIX format. pdm_extract works with the format
illustrated in the sample Excel file.
2. Based on the customers identified in the previous step, use pdm_deref to search in the
Call_Req table. The search identifies those customers who have never opened a call or they
do not have call activity recorded in the last six months. The condition is met if the number
of calls equals zero, where:
■ The ref_num attribute="" (NULL) in the Call_Req table.
■ The customer = id (from the output file ex-customers).
■ The last_mod_date is less than six months ago.

pdm_deref
96 Chapter 3: Integration Options and Approaches
3. Execute the following command:
pdm_deref -s correl1.spc < ex-customers.dat > inactive.dat
In this command, correl1.spc contains the following code:
Deref
{
input = id, last_update_date
output = id, ref_num
rule = "SELECT customer, id, ref_num, last_mod_dt FROM Call_Req WHERE
customer = ?"
AND last_mod_dt < ?"
}
From the Command Prompt window, use the following command to copy the inactive.dat
file to inactive2.dat as a backup activity:
copy inactive.dat inactive2.dat
4. Use the following steps to set the identified customers to inactive status:
a. Edit the inactive.dat file, which looks similar to the following code:
TABLE ca_contact
userid id ref_num
{"acarson", "177CABDF70BF164BADFCBE155ECE671F", ""}
{"requester", "EB4D86B942D7F948AC3963FEC35D8602", ""}
b. Delete the attribute named ref_num, and add the attribute named inactive with a
value of 1. The inactive.dat file looks similar to the following code:
TABLE ca_contact
userid id inactive
{"acarson", "177CABDF70BF164BADFCBE155ECE671F", "1"}
{"requester", "EB4D86B942D7F948AC3963FEC35D8602, "1"}
c. Execute pdm_load –f inactive.dat.
The customers are now inactive in CA SDM.

Email Interface Method
CA Service Desk Manager 97
Summary
CA SDM offers pdm_extract, pdm_load, and pdm_deref utilities to manipulate data.
■ pdm_extract extracts data from specified CA SDM database tables, or the entire CA SDM
database, and creates output as ASCII-formatted text.
■ pdm_load updates a CA SDM database using an input file you specify, up to a maximum of
112 attributes.
■ pdm_deref processes ASCII-formatted input to exchange data found in one database table
for data found in another database table. You can use pdm_deref to create files compatible
with pdm_userload and pdm_load from a non-CA SDM database or spreadsheet. You can
also use pdm_deref to create reports or output files for the non-CA SDM database or
spreadsheet.
Note: For more information these commands, see the reference commands in the CA SDM
Administrator Guide.
Email Interface Method
The email interface can be used to create, requests, problems, issues, and update incidents and
change orders. This method is often an easy way to implement low volume integrations that do
not require high speed.

Email Interface Method
98 Chapter 3: Integration Options and Approaches
Process Flow for Maileater
Upon startup of the CA SDM service, the pdm_maileater_nxd process reads the usp_mailbox and
usp_mailbox_rules tables. If no mailboxes are configured, the daemon watches the tables for
changes.
On the defined interval (default 30 seconds), each mailbox is read and each email is processed
individually. First the email address is checked for any policy violations and handled accordingly.
If there are no policy violations, each mailbox is compared to each mail box rule defined for that
mailbox. If a matching rule is found, then the defined action for that rule is performed. If a reply
section is defined for that rule, then a reply is returned to the user. If the system finds a matching
rule, then no other rules are tested and the system processes the next email.
The daemon sets a callback for the mailbox to process at next interval after the system processes
all the emails for an inbox. If an interval has been reached and another mailbox is being
processed, then the mailbox is queued to be processed after the current mailbox processing is
finished. In other words, only one mailbox is processed at any one time, and the intervals are
approximate times.
A mailbox rule contains a filter string that is used as a regular expression to search in the email. If
the string is found, then the system processes the defined action. For reply emails, a special
Update Object action is used. The filter string identifies the artifact that assists in mapping back
to the ticket. The artifact is translated to TextAPI notation and then sent to TextAPI for
processing.
Once complete, an optional response is sent back to the sender.
High-level steps to configure integrations using the email interface include:
1. Configure your CA SDM server to send emails by installing the necessary options that are
listed under the Email node in Options Manager. Options Manager is available in the
Administration tab when you logged in to CA SDM as an Administrator.
2. Define the incoming emails to CA SDM. Set the time of integration when they are sent from
the application. For example, the specific email address that the email is initiated from, or
specific error text in the email summary, or body that you can use to define a filter for the
email rule to use.
3. Create a contact in CA SDM for the integration to use and supply a valid email address for
that contact. The valid email address is the email from which the email initiates.
4. Create a Mailbox.

Email Interface Method
CA Service Desk Manager 99
5. Create one or more Mailbox Rules to recognize specific keywords or elements of the
incoming email messages. Perform any actions, replies, or both, that must occur for
incoming messages, which contain those keywords or elements. Associate the mailbox rules
with the created Mailbox.
Enabling the Solution
Complete the following steps to enable the solution:
1. After configuring and installing the CA SDM options managers for email, recycle CA SDM
services.
2. Create a Mailbox, using the following chart as a guideline:
Label Example Description
Name App_Errors Descriptive name of mailbox connection.
Check Interval 20 Number of seconds to check mailbox. The default is 30 seconds.
Active Active Active Flag. Mailbox is not processed if inactive.
Email Type POP3 Type of email (NONE, IMAP, or POP3).
Hostname MAILSERVER Host name or IP of the mailserver.
Port Override 110 Port to override the default for Email Type. The default is 110 for POP3 and 143 for IMAP.
Userid ServiceDesk Userid to log on to mailserver.
Password password Password for the userid.
Security Level Clear Text Security Level for connection (0=Clear Text, 1=APOP (POP3 Only), 2=NTLM and 3=MD5).
Allow Anonymous Yes Allow Anonymous users to create tickets.
Attachment Repository
Service Desk Repository for attachments that must be local to pdm_maileater_nxd. If an email repository is configured, the attachments are kept.
Attach Entire Email No Attach entire email to the ticket, which overrides the default of splitting out attachments.
Force Attachment Split out
No Forces attachment split out if attach Entire Email is set.
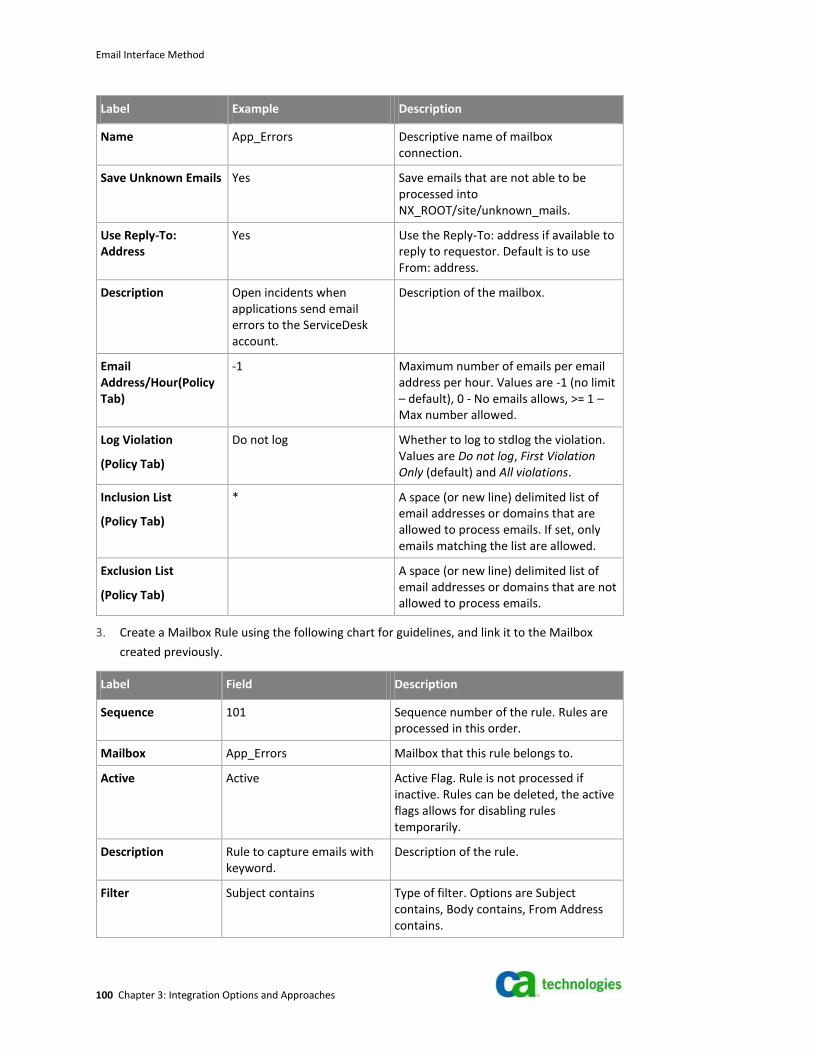
Email Interface Method
100 Chapter 3: Integration Options and Approaches
Label Example Description
Name App_Errors Descriptive name of mailbox connection.
Save Unknown Emails Yes Save emails that are not able to be processed into NX_ROOT/site/unknown_mails.
Use Reply-To: Address
Yes Use the Reply-To: address if available to reply to requestor. Default is to use From: address.
Description Open incidents when applications send email errors to the ServiceDesk account.
Description of the mailbox.
Email Address/Hour(Policy Tab)
-1 Maximum number of emails per email address per hour. Values are -1 (no limit – default), 0 - No emails allows, >= 1 – Max number allowed.
Log Violation
(Policy Tab)
Do not log Whether to log to stdlog the violation. Values are Do not log, First Violation Only (default) and All violations.
Inclusion List
(Policy Tab)
* A space (or new line) delimited list of email addresses or domains that are allowed to process emails. If set, only emails matching the list are allowed.
Exclusion List
(Policy Tab)
A space (or new line) delimited list of email addresses or domains that are not allowed to process emails.
3. Create a Mailbox Rule using the following chart for guidelines, and link it to the Mailbox
created previously.
Label Field Description
Sequence 101 Sequence number of the rule. Rules are processed in this order.
Mailbox App_Errors Mailbox that this rule belongs to.
Active Active Active Flag. Rule is not processed if inactive. Rules can be deleted, the active flags allows for disabling rules temporarily.
Description Rule to capture emails with keyword.
Description of the rule.
Filter Subject contains Type of filter. Options are Subject contains, Body contains, From Address contains.

Email Interface Method
CA Service Desk Manager 101
Label Field Description
Sequence 101 Sequence number of the rule. Rules are processed in this order.
Filter String .*Error.* Regular expression string to match against. A special placeholder {{object_id}} can be used to identify the object identifier. Using the .* combination denotes a wildcard.
Ignore Case Selected Whether to ignore case in pattern matching.
Action Create/Update Object Action to take if filter matches. See Rule Types section.
Action Object Incident Ticket object for action.
Write to Stdlog Selected Whether to write email text to stdlog when filter matches.
Log Entry Prefix Error_Emails Optional prefix to write to log. Allows for matching rules to logs.
Add Subject Line Append Add a Subject line to message body before the processing. The options are: append, prepend, or null.
TextAPI Defaults INCIDENT.CATEGORY=Applic
ation.Error
Additional defaults for the TextAPI if the filter matches. In this case, the category of the incident is set to Application Error.
TextAPI Ignore Incoming
Additional Ignore Details for the TextAPI if the filter matches.
Reply Email Notification method to send back response. If not set, no response is returned.
Reply Subject Incident has been created. Subject line to use for reply.
Reply Success Text Incident @{ref_num} was successfully created!
If the Action processing is successful, the message response to send back in text format.
Reply Success HTML Incident @{ref_num} was successfully created!
If the Action processing is successful, the message response to send back in html format.
Reply Failure Text Error creating incident. If the Action processing is unsuccessful, the message response to send back in text format.
Reply Failure HTML Error creating incident. If the Action processing is unsuccessful, the message response to send back in html format.

Email Interface Method
102 Chapter 3: Integration Options and Approaches
■ When editing Mailbox Rules that the associated Mailbox is first set to Inactive. Otherwise,
the Mailbox continues to be checked for new messages while the changes are being made.
Any messages, which are on the mail server and retrieved between when the first change is
made and the last change is made, are processed according to the existing rules at the time
of message retrieval.
■ Changing the Mailbox or Mailbox Rules reset the mail polling cycle for the affected Mailbox,
if it is Active, triggering an immediate mail check.
■ The default behavior for an incoming e-mail is to update the Ticket Description, rather than
to Log a Comment. To change this behavior, set the value UPDATE_DESC_IS_LOG=yes in file
$NX_ROOT/site/text_api.cfg. To override it on a per-message basis, begin the message with
%LOG.
Rule Types
The following table describes the processing of the rule types. Logging is always available even if
no other processing is requested. Replies are processed after the Reply configuration.
Process Description
Ignore Email Do not process the email and do not reply. This process is useful for System level messages such as Out of Office or Mail Delivery errors.
Ignore Email and Reply Do not process the email, but send a response back to the sender.
Update Object Using the filter string, determine the Object Identifier (see Text API Processing), then send the update request to TextAPI. If the Object Identifier cannot be found, then a new ticket is created if appropriate. This process handles email replies where the Object Identifier is embedded somewhere in the email.
Create/Update Object This process is the classical behavior of the Maileater where the email can or cannot contain TextAPI keywords.
Text API Processing
To update a ticket, the Object Identifier is pulled from the body or subject of the email. A special
placeholder {{object_id}} within the filter string is used to identify the object identifier. The
identifier and value are dependent upon the object that is defined for processing.
Object TextAPI Keyword Identifier
Incident %INCIDENT_ID Ref_num
Problem %PROBLEM_ID Ref_num

Email Interface Method
CA Service Desk Manager 103
Object TextAPI Keyword Identifier
Incident %INCIDENT_ID Ref_num
Request %REQUEST_ID Ref_num
Change %CHANGE_ID Chg_ref_num
Issue %ISSUE_ID Ref_num
The Maileater daemon searches the email body or subject section for the defined filter string.
When found, the value that is denoted by the placeholder along with the Object TextAPI keyword
is appended to the end of the message before sending to the TextAPI.
Example
If the filter string was set to %Incident:{{object_id}}% and the email body of:
The response to the TextAPI would be:
Normal processing of the TextAPI would then attempt to update the Incident where the incident
ref_num was equal to cr:12345.

Outgoing Notifications Method
104 Chapter 3: Integration Options and Approaches
Testing the Solution
To test the solution, initiate an email from the application you are integrating CA SDM. The email
is sent to the ServiceDesk email account. The subject of the email has text that matches the filter
defined in the mailbox rule.
Example
Summary for Error xyz.
The body of the email specifies the content.
Summary
The Mailbox functionality that is provided with CA SDM allows users and applications to create
and update tickets using email. The ticket can be an incident, request, problem, issue, or change
order. The mailbox connection logic is stored in the Mailbox, and the Mailbox rules contain the
filters for any action or replies that happen when the filter matches. CA SDM contacts create or
update a ticket by sending an email message to the CA SDM ServiceDesk email account, when
the email contains and matches a defined Mailbox Rule filter.
Outgoing Notifications Method
CA SDM notifications are emails, but the notification subsystem is an integration (getting
integrated to other products) product. An exit code that is executed when a service desk object
transitions from one state to another sends these notifications. Typically, the transitions are
related to incident, problem, request, or change order status changes, but they can be
configured to fire on many possible object state changes and timers.
When a notification fires, the exit code has access to the state of the system. Out-of-the box
notifications insert state information (such as the incident number, description, and assignee)
into predefined text. Out-of-the box notifications email the information to an address that is also
derived from the system state (such as the email address of the person who opened the
request). This mechanism provides many opportunities for outbound integration in which an
activity on CA SDM causes an action on an integrated system.

Outgoing Notifications Method
CA Service Desk Manager 105
Business Challenge
Anita Hirsch, VP of IT Services, has created a 24 x 7 service desk team that is based on the
number of Forward, Inc. branches and the number of services that the IT department offers. This
means that the CA Support Online staff must be available at any time to resolve a critical issue,
escalation, or transference to avoid service level agreement (SLA) violations.
VP needs the service desk product to notify all pertinent support staff members when critical
issues occur at any time to:
■ Control and implement this well-organized service support work process.
■ Meet the goal of delivering excellent customer service.
Mistakes, or missing escalations, or transfers are not allowed, as an SLA violation can cost
thousands of dollars to the organization.
CA Technologies Approach
CA Technologies has identified the kinds of communication methods that Forward, Inc. uses,
which include a telephone, an email, a pager, a Blackberry, a network management event
consoles, and text messages. In addition, CA Technologies Services has analyzed and designed a
notification process that is based on service types, critical events, times, people responsible for
the events, and notification methods. Once this information has been identified and categorized,
CA Technologies recommends that CA SDM outgoing notifications are implemented to allow the
system to notify service desk staff. The process uses the outbound notification methods that they
choose. This notification allows Forward, Inc. to implement the work processes that are required
for 24 x 7 support and to meet the established SLAs for service desk performance.
Outgoing Notifications Method
106 Chapter 3: Integration Options and Approaches
Best Practices
Review the following best practices when configuring the solution:
1. Based on the work process that is established, the customer must define the "who, what,
when, and how" for outgoing notification actions.
2. Determine the way that you want to deliver the notification. For example, sent to a
Blackberry, emailed to a specified address, or printed on a particular printer.
3. Determine the contents of the notification message.
4. Specify what information from the message template to include in the notification.
5. Set up a script to transmit the notification.
6. Place the script in an executable file in the path of the CA SDM server.

Outgoing Notifications Method
CA Service Desk Manager 107
Configuring the Solution
Configure Outbound Notification Using a TeleAlert Message Management System from the CA
SDM Side.
1. First notification method.
2. The notification message sent using the Telealert message management system has the
following information:
■ End user name
■ Assigned to name
■ Incident number
■ Summary of the incident description
3. The activity notification that is selected to notify is Initial, and the message template to use
for the notification is illustrated in the following sample window:
4. The script is a .bat file which contains the definitions illustrated in the following sample
window:
To implement the notification
1. Copy the telealert.bat file into the path of the CA SDM server, into the directory
$NX_ROOT\site\mods\bin.
2. From the Administration Interface, select Notification Methods from Notifications.

Outgoing Notifications Method
108 Chapter 3: Integration Options and Approaches
The Notification Method List appears.
3. Click the Create New button.
The Create New Notification Method window appears.
4. Click Save.
Note: You do not have to specify the full path in the Notification Method field. For a
Windows server, consider using the launchit.exe utility to invoke your script or program. For
more information about the launchit utility, see the book CA SDM online help. In addition,
since the notification method runs from the CA SDM server, you must put the notification
method script in a directory that can be accessed from the path on the server, or can specify
the full path to the script. On UNIX, depending on the shell you are running, you may be able
to check this by executing the pathname_to_script command.
If there is a problem with the notification methods, examine the logs in the $NX_ROOT/log
directory (UNIX) or $NX_ROOT\log (Windows).
Use the same procedure to interact with an external product. Once the information is
created, it can be caught and sent to another product.
5. Complete the configuration so that all the analysts who require notification using the
Telealert message management system can be assigned to the Telealert notification
method.
In this example, Donald (analyst) is configured to be notified using Telealert during non
business hours and in an emergency. The definition appears as follows, illustrated in the
following sample window:

Outgoing Notifications Method
CA Service Desk Manager 109
Configuring Outbound Notification Using a Telealert Message
This step could be different for the different tele-messaging product. The messaging product
must be able to send the information that CA SDM and CA SDM notification method generates.
The information is stored in the .bat file specified in the notification method field. In our
example, the output can look similar to the following output, where the Telealert can be picked
up information from the variables End User, Tell, and Message:
Testing the Notification – for Action "Initial"
Complete the following steps to test the notification, for action "Initial":
1. Create an incident.
2. Receive the notification in the Telealert message management system when the incident has
been saved. If it has not yet been configured, you receive a Command Prompt window with
the following message:

Outgoing Notifications Method
110 Chapter 3: Integration Options and Approaches
How the Method Works
Notifications (applicable to incidents, problems, issues, change orders, and requests) are
processed when the ticket is saved. If the notification method is not Notification (for example,
Email or FAXserve), the notification processor executes the notification method for each contact
in the list. This method is typically an executable or shell script, which is launched in a new
process.
Details about the notification are stored in environment variables for easy access by the
executable and script. For each notification requested, the notification processor sets the
$NX_NTF_MESSAGE and $NX_NTF_SUMMARY environment variables using the Notification
Message Title and Notification Message Body information that is provided on the Message
Template notebook page of the Activity Notifications Detail window. If the recipient is a valid
contact, additional environment variables are created using information in their Contact Detail
record. When you select the Write To File option for the notification, a text file is created with
additional information. (The notification method can use to obtain more detailed information).
A list of contacts to receive the notification is built from the information that is provided on the
Objects, Contacts, Types, and Survey notebook pages of the Activity Notifications Detail window.
For those having a notification method matching the Notify Level and the log_all_notify Options
Manager option that is installed, a notification is generated first to the notification log.
Note: For more information, see the CA SDM Administrator Guide.

Outgoing Notifications Method
CA Service Desk Manager 111
How to Overcome Environment Problems
Most notification methods invoke an executable or shell script to read the environment variables
and send the message. This method works on the UNIX servers, but facing difficulties in reading
the environment variables on a Windows server. As a workaround, you can use a Perl script on
Windows.
CA SDM includes a ready-to-use installation of the Perl interpreter named pdm_perl. Any Perl
script that is invoked with pdm_perl as a notification method can reliably obtain the environment
variables. The Perl script can read and format the environment variable values and can continue
with the rest of the notification, such as invoking a pager or sending an email.
For Windows-based servers, consider using the launchit utility. One of the functions of the utility
is to invoke your scripts or programs in a shell environment similar to the command prompt with
the proper environment variables set.
Example
When you write a Perl script named read_env.pl to read several of the environment variables,
then you can invoke it for a notification by entering the following code in the Notification
Method field on the Notification Method Detail window:
pdm_perl script_path/read_env.pl
This notification method can start the Perl interpreter and can execute the instructions in
read_env.pl script.

Outgoing Notifications Method
112 Chapter 3: Integration Options and Approaches
Launchit Utility
One of the functions of the launchit utility is to invoke your scripts or programs in a shell
environment, similar to the command prompt with the proper environment variables set.
Note: For information about the launchit.exe parameters, execute the command from the
command prompt. The following window provides the valuable information about the utility.
Notification Method Variables
Two sets of variables are created and made available to the notification method.
Basic Environment Variables
The first set of variables is created for every notification that is sent, independent of whether you
select the Write To File option for the notification. They are written to the environment as you
can access the environment variables by the notification method in the standard way. If you
choose the Write To File option for the notification method, these variables are also written to
the notification file in the notification section.
The following environment variables provide you with the basic information about the
notification. They are always defined, even if the corresponding value is empty:vironmentblescri.
Environment Variable Description
NX_NTF_MESSAGE The completed message template text, including full expansion of all variables.
NX_NTF_COMBO_NAME The completed message template header, including full expansion of all variables.

Outgoing Notifications Method
CA Service Desk Manager 113
Environment Variable Description
NX_NTF_MESSAGE The completed message template text, including full expansion of all variables.
NX_NTF_URGENCY The notification urgency (1 is low, 4 is emergency).
The following environment variables are created only if the recipient is a valid CA SDM contact, in
which case they are set using values from the recipient Contact Detail record as shown in the
following table:
Variable Contact Detail Record Fields
NX_NTF_BEEPER_PHONE Pager Number
NX_NTF_COMBO_NAME Last Name, First Name, Middle Name
NX_NTF_CONTACT Contact ID
NX_NTF_EMAIL_ADDRESS Email or Pager Email Address (depending on the notification type).
NX_NTF_FAX_PHONE Fax Number
NX_NTF_PUBLIC_PHONE Phone Number
NX_NTF_USERID System Login
NX_NTF_VOICE_PHONE Alternate Phone Number

Outgoing Notifications Method
114 Chapter 3: Integration Options and Approaches
Summary
Outbound notification methods describe how notification messages are delivered to users.
Notification methods are scripts that are invoked based on activity notifications. The scripts use
information that is supplied as variables to notify personnel or other systems of something that
has occurred. For example, you can write a script that sends voice mail to the analyst assigned to
a request to indicate that the request has just been escalated.
Notification methods can be assigned for each contact record. The system looks up the
notification method to use for specific contacts.
Note: For information about contact records, see the information about setting up users in the
CA SDM Administrator Guide.
The standard notification methods for CA SDM are as follows:
Sends messages by electronic mail directly to the recipient through Simple Mail Transport Protocol (SMTP) mail. Messages are also sent to the notification log of the recipient.
Fax
Sends messages to the recipient using FAXserve. Install the FAXserve. FAXserve is a separate product and is not part of CA SDM.
Pager email
Sends email to an address that a paging system provider manages. The email text can typically display on an alphanumeric pager.
You can also create your own notification methods. For example, you can send notification to a
particular printer for periodic collection, or to a pager. To create a notification method, create a
shell script that includes notification variables, and then enter the new notification method into
CA SDM.
Note: For information about customizing notification methods, see the CA SDM Technical
Reference Guide.

Remote Reference Method
CA Service Desk Manager 115
Remote Reference Method
The Remote Reference integration method is a table-driven system for inserting calls to external
products into the CA SDM Java Client interface menus and forms. This functionality does not
work properly in the CA SDM web interface due to the security restrictions that the browser
imposes while attempting to launch products.
CA SDM administrators can also leverage Remote References in Execute Remote Reference types
of macros. These items can then be further leveraged by Classic Workflow tasks as well as Service
Type events in managing the CA SDM policy.
CTI Integration Method
CTI integration is possible through a number of mechanisms. This integration is typically
implemented by using web services, in combination with opening a web browser, to launch a
prepopulated CA SDM URL. This process allows the display of the profile browser and incident in
context. Either existing tickets or new tickets are displayed, prepopulated with information
gathered using telephonic means such as Voice Response Units (VRUs).
Note: For more information about CTI integration, contact CA Technology Services.
Integration Value
Computer Telephony Integration (CTI) is a technology that allows interactions on customer
contact channels (voice, email, web, fax, and so forth) and computer systems to integrate or
coordinate. In this scenario, it is primarily used to launch application screens (screen pops) in
coordination with voice and data. Interactive Voice Response Units (VRUs) capture information
from a customer. This information is then used not only to forward the call to an agent desk, but
also to display information in context of the responses.
The advantage is that all relevant customer information is available to an agent by the time the
agent is ready to answer the call. CTI is also used for call routing. Information such as an account
number, request type, and area the VRU captures. This information is used to route a call to an
appropriate agent or a group of agents. Overall, CTI contributes to enhancing the customer
experience.

CTI Integration Method
116 Chapter 3: Integration Options and Approaches
How the Integration Works
The CA SDM CTI integration is based on CTI Software Server and desktop client software. The
name for the CTI server software can change from one telecom equipment provider to another.
Example
CCE Server and the Avaya desktop client are named CCE Agent software and provides Avaya CTI
Server functionality.
The PABX (or PBX) is linked with the CTI server which can receive data from the PABX. Equally,
the CTI Server can command and control the PABX. The following diagram illustrates how the CTI
integration works.
The following information applies to the previous diagram:
Follow these steps:
1. The Customer calls the Service Desk Number. The customer is presented with various
options to respond.
2. The PABX passes the captured responses and the call to the CTI Server.
3. The CTI Server finds the first available support analyst. The captured customer information is
sent to the CTI agent software of the identified support analyst.
4. At the same time, the call is routed to the support analyst phone.
5. The CTI Agent Software uses the captured information to interact with a solution such as CA
SDM.

CTI Integration Method
CA Service Desk Manager 117
6. The CTI Agent interacts with CA SDM and results in a screen pop on the support analyst
desktop. This interaction is in the context of the information that the CTI agent passes. The
support analyst now proceeds with the call and has the application information relevant to
that call.
The CTI agent software is responsible for passing information and initiation of the screen pop
from CA SDM. All the efforts surrounding the integration of CA SDM and the CTI product is
focused around the CTI Agent software. Typically, no effort is required on the CA SDM.
Identification and Acquisition of CTI software
Existing telephone infrastructure and a contract with a telephone service provider does not mean
that you have a CTI Server and the requisite CTI Agent Software. Start discussions with your
telephone vendor to acquire the software. The discussion includes the considerable expenses in
software and hardware.
IVRU Prompts
Put thought and effort in to developing IVRU prompts and call routing. Prompts are limited, but
enough to satisfy business requirement for call routing. Consult CTI to integrate the vendor in the
process.
Identification and Authentication
CTI Agent software can launch an application on behalf of a support analyst. To prepare for the
integration, answer the following questions:
■ How does the CTI Agent authenticate to the application?
■ How does it get the authentication information?
■ How often does it authenticate an application?
CA Technologies Approach
The CA SDM web interface makes life easier to launch contextual information. The CA SDM
Technical Reference Guide describes in detail how to access CA SDM information by launching a
web interface URL. Here are few examples:

CTI Integration Method
118 Chapter 3: Integration Options and Approaches
Launching a New Incident Screen
In this sample URL, BOPSID is a token that identifies a CA SDM user.
http://<host_name>:<port_number>/CAisd/pdmweb.exe?OP=CREATE_NEW+FACTORY=in+BOPSI
D=12314432874
See the following section for an explanation on how to generate a BOPSID.
Launching a New Incident Screen and Prepopulate the Fields
In this sample URL, the Customer field for the new incident record is to be preset to a contact
record with the employee number = 12345.
http://<host_name>:<port_number>/CAisd/pdmweb.exe?OP=CREATE_NEW+FACTORY=in+BOPSI
D=213123434+PRESET_REL=customer:cnt.id:contact_num:12345
Launching and Displaying the Contact Record for the Calling Customer
This URL can list the Service Desk contact record for the employee with employee number 12345.
http://<host_name>:<port_number>/CAisd/pdmweb.exe?OP=SEARCH+FACTORY=cnt+QBE.EQ.co
ntact_num=12345+BOPSID=34235543534535
Note: For more information about arguments used in Service Desk web interface URLs, see the
CA SDM Technical Reference Guide. In addition, all URLs in the previous examples require a
BOPSID to be passed as an argument.
Getting a BOPSID
Complete the following steps to get a BOPSID:
Follow these steps:
1. Log in to CA SDM using Service Desk web services. The login operation returns a Session
Identifier (SID).
2. Use the SID from the previous step to get the BOPSID. Invoke the getBopsid web services
method. The BOPSID retrieves every time a URL is launched.
Note: For more information, see the CA SDM Technical Reference Guide.

CTI Integration Method
CA Service Desk Manager 119
Best Practice
The Support Analysts must indicate to the CTI Agent software that they are available to take
phone calls. This step is typically the first step. Then, the CTI agent can route incoming calls to the
Support Analyst. The CTI agent software adapts to incorporate the CA Service Desk login and
logout in the process of the support person indicating their availability. The following diagram
illustrates the sequence of events that must happen in the CTI agent software:

CTI Integration Method
120 Chapter 3: Integration Options and Approaches
Configuring the Solution
CA SDM does not require special configuration. CA SDM web services have been configured
when you run pdm_configure.
Currently, there is no way to launch the profile browser with the contact details completed.
The Profile browser provides a nice aggregated view of client information and serves as a launch
pad to other CA SDM activities. A minor adaptation to the list_cnt.htmpl file allows searching of a
contact and displaying details for the contact in a profile browser.
The following htmpl code highlights the changes that are made to the list_cnt.htmpl.
Note: The code in bold is the adaptation that is required to the list_cnt.htmpl.
<PDM_MACRO NAME=lsStart>
<PDM_MACRO NAME=lsCol hdr=Name attr=combo_name link=yes>
<pdm_macro name=lsWrite both=yes text="if (groupOnly) {">
<PDM_MACRO NAME=lsCol hdr=Number attr=contact_num>
<pdm_macro name=lsWrite both=yes text="}">
<pdm_macro name=lsWrite both=yes text="else {">
<pdm_macro name=lsWrite both=no text="PDM_IF \"@args.KEEP.cti\" == \"1\" &&
\"@list.id\" != \"\" ">
<pdm_macro name=lsWrite both=no text="profile_browser
(\"@list.persistent_id\")
;">
<pdm_macro name=lsWrite both=no text="/PDM_IF">
<PDM_MACRO NAME=lsCol hdr="Contact Type" attr=type.sym>
<PDM_MACRO NAME=lsCol hdr="Access Type" attr=access_type>
<PDM_MACRO NAME=lsCol hdr="Contact ID" attr=contact_num>
<PDM_MACRO NAME=lsCol hdr="System Login" attr=userid>
<pdm_macro name=lsWrite both=yes text="}">
<PDM_MACRO NAME=lsCol hdr="Phone Number" attr=phone_number>
<PDM_MACRO NAME=lsCol hdr=Status attr=delete_flag>
<PDM_MACRO NAME=lsEnd>
Contact details and the profile browser with the contact details can now be launched using the
following URL:
http://<host_name>:<port_number>/CAisd/pdmweb.exe?OP=SEARCH+FACTORY=cnt+QBE.EQ.co
ntact_num=12346+KEEP.cti=1+BOPSID=324322323423
In this URL, KEEP.cti=1 drives the launching of the profile browser for the searched contact.
Note: This method works only when there is a unique contact record for the search criteria
entered. In addition, the adaptation has been tested for CA SDM.

CTI Integration Method
CA Service Desk Manager 121
Enabling the Solution
The adaptation to the CTI Agent software is required to do the following steps to enable the
solution:
Follow these steps:
1. Prompt the support analyst for the CA SDM userid and password.
2. Use CA SDM web services to log in to CA SDM.
3. Use CA SDM web services to get the BOPSID.
4. Launch the appropriate CA SDM URL with BOPSID.
Testing the Solution
CA SDM URLs can be tested without BOPSID using the following URL:
http://<host_name>:<port_number>/CAisd/pdmweb.exe?OP=SEARCH+FACTORY=cnt+QBE.EQ.co
ntact_num=12346
This URL displays the CA SDM login page. You must see the contact that is listed once you log in
to CA SDM.
Troubleshooting
Use the CA SDM log files to verify any errors that are related to the web services call.
Integration Summary
The CA SDM and CTI integration directly impacts customer perception and improves the process
of call management. Therefore, it is important and critical to understand the call handling
process being planned. CA Technologies Services can provide guidance and information to the
CTI vendor to carry out the adaptations that are required to the CTI agent.
The CTI integration discussed in this section must serve 95 percent of the client requirements.
More complicated implementations such as transfer of calls and popping of incident details with
the transfer have been implemented at customer locations, but are beyond the scope of this
section. Your local CA Technologies Services resources are available to assist with these complex
scenarios.

URL Integration Method
122 Chapter 3: Integration Options and Approaches
URL Integration Method
You can use URLs to access CA SDM objects. For example, a URL can be embedded in an email to
allow the email recipient to access the incident.
Note: For more information about the URL integration, see CTI Method, earlier in this section.
For complete details about URL integration, see the CA SDM Administrator Guide.
External Authentication Method
Using a secondary server, CA SDM can be integrated with an authentication system running on a
different system, or even on a different hardware platform.
Example
Work with the boplogin process, explained in the User Authentication section in the CA SDM
Implementation Guide.
Majic Triggers
Triggers can be defined in the CA SDM object definition language (Majic) to execute when the
value of an object attribute change. The trigger can execute code that is external to CA SDM.
Important! CA Technologies Services set up this kind of trigger that requires detailed knowledge
of the CA SDM architecture, specifically the domsrvr.
The Domsrvr
The Domain Object Server (domsrvr) is where the business objects "live". The server is the
business object repository. The objects in the domsrvr are defined and implemented in two types
of files. The majic files (*.maj and *.mod) define the schema of the objects (that is, the class
definitions). The spel files (*.spl) define the procedural behavior using interpreted C code.
Type Product Files
(bopcfg/majic)
Customer Files
(site/mods/majic)
Majic *.maj of the product.
Initial OBJECT specification Initial Customer specifications of local tables.
Majic modifications *.mod
Product temporary fixes to delivered *.maj files in bopcfg/majic.
Customer modifications to either product OBJECT or Customer OBJECT specifications.

Majic Triggers
CA Service Desk Manager 123
Type Product Files
(bopcfg/majic)
Customer Files
(site/mods/majic)
Spel *.spl Either of the following steps:
Compiled product spel
libraries.
QOxxx.spl replacements
for one or more spell
methods in product spel
libraries.
Either of the following steps:
Customer ASCII Spel methods.
Optional customer replacements for
one or more spell methods in product
Spel libraries.

Majic Triggers
124 Chapter 3: Integration Options and Approaches
What is Majic?
Majic is a CA Technologies proprietary language use to define the files that the domsrvr reads, as
follows:
Objects
An object is a rough equivalent to a database table. However, a single object can be mapped to multiple tables. For example, the CA SDM cnt (contact) object maps to MDB tables ca_contact and usp_contact. No mapping is required to an external table.
Factories
A factory is a manager for a class of objects. All objects have at least one factory, and have more than one, with the additional factories encompassing a cross section of object instances. For example, the CA SDM cst (customer) factory contains those contacts who are customers.
Attributes
Attributes are a rough equivalent to database columns. Most object attributes are mapped to database columns. The local attributes hold entirely within the domsrvr. Attributes can be scalar values, references to other objects (SRELs), or references to domsets (query results).
Triggers
Majic triggers are a rough equivalent to a database trigger, but are considerably more flexible. Triggers can be defined for either objects or attributes. The domsrvr invokes the triggers automatically at key times, such as when an attribute or object is instantiated or changed. They can be written in C++, Java, or Spel.
Methods
Methods are functions that can be invoked in the context of an object or factory.
What is Spel?
Spel is a procedural language closely resembling C, with some additional statements for handling
the Business Object Process (BOP) messaging architecture. The spel_srvr server interprets the
Spel language. The Spel interpreter executes Spel source code, whereas the primary purpose of
the spel_srvr is to execute methods that are associated with business objects defined to the
domsrvr. This source includes object, trigger and factory methods.

Majic Triggers
CA Service Desk Manager 125
Summary
By using Majic and Spel definitions, CA SDM can trigger actions to add or modify CA SDM object
behavior to fit into business process definitions that involve interactions with other CA or
third-party products.
Important! Consult the CA SDM specialists from CA Technologies Services when implementing
this type of integration.


CA Service Desk Manager 127
Chapter 4: CA Process Automation
CA Process Automation Integration
CA SDM 12.6 offers integration with the following workflow components:
■ Classic CA Service Desk Workflow, which is the embedded legacy Change Order workflow
system. This system offers a basic approach to defining and automating linear, streamlined
processes.
■ CA Workflow (introduced in Unicenter Service Desk r11), which is a generic, high
performance scalable workflow management system, that allows for the definition,
management, and execution of complex workflows.
■ CA Process Automation introduced in CA SDM r12.5. The integration provides the most
current compatibility with external systems and industry standards.
You can have all three workflow methods running in the same single instance of CA SDM.
However, only one tool can be used as an initial launch point per process.
This chapter focuses on the CA SDM integration with CA Process Automation.
What is CA Process Automation
CA Process Automation enables you to improve your operational efficiencies by automating
commonly executed tasks that would ordinarily be performed manually. CA Process Automation
frees up the resources that were previously assigned to perform those tasks. The automation
reduces the potential for inconsistencies that can occur with manual execution.
Coupled with the ability to automate tasks, CA Process Automation manages user interactions,
such as approvals and notifications for compliance and accuracy within production
environments. These functionalities make CA Process Automation an ideal candidate for
workflow management throughout the IT organization.

Integration Details
128 Chapter 4: CA Process Automation
Integration Details
Integration Points and Functionality from CA SDM
The following integration points from CA SDM allow you to do the following steps:
■ Associate a CA Process Automation process definition to a Request, Incident, Problem Area,
Change Order Category, or Issue Category in CA SDM.
Important! Attach a CA Process Automation process definition to all Ticket Types within CA
SDM. The use of term Ticket within this chapter is synonymous with either a
Request/Incident/Problem/Change Order or Issue for simplicity.
■ Associate and execute a CA Process Automation process definition to an Execute CA IT PAM
Action Macro Type. This approach permits CA Process Automation processes to be launched
for any update to a ticket, contact record, CI, or asset record.
■ Integrate CA SDM with other CA Technologies, or third-party products using web services,
Java, a command line, or the API calls.
Integration Points from CA Process Automation to CA SDM
The following integration points from CA Process Automation allow you to do the following
steps:
■ Retrieve and validate information from any object within CA SDM, execute logic for the
information, and continue the defined process flow using the new information.
■ Exchange and share information between CA SDM and other CA or third-party product.
Integration Value
Leveraging the integration between CA SDM and CA Process Automation enables your
organization to manage processes related CA SDM tickets.

Integration Details
CA Service Desk Manager 129
How the Integration Works
From CA SDM to CA Process Automation
All the communication from CA SDM to CA Process Automation is through CA Process
Automation web services. The pdm_rpc (a Java application), a CA SDM server-side daemon
performs the web service calls.
The following diagram explains the basic communication flow:
To launch a CA Process Automation Process, CA SDM invokes a CA Process Automation Web
Service: executeStartRequest. To display task information on the Workflow Tasks Tab within a
ticket, CA SDM invokes the CA Process Automation Web Service: getProcessLogs.
From CA Process Automation to CA SDM
All the communication from CA Process Automation to CA SDM is done through invoking CA SDM
Web Service calls, either through the CA Process Automation operators available with the CA
Service Desk Connector, or SOAP operators, or your own custom operators. These methods and
terms are explained later in this chapter.
Integration Details
130 Chapter 4: CA Process Automation
Getting Started with Top Ten CA Process Automation Basic Terminology
Following terms are a list of the top ten CA Process Automation Basic Terminologies that are
used throughout this chapter. If there are any terms that are referenced and not defined, you
can find more information in the CA Process Automation Online Documentation available on
support.ca.com.
Domain
The Domain is always the root container in the hierarchy, representing the CA Process Automation Domain, which is the top-level configuration boundary for CA Process Automation running in the enterprise network. All other CA Process Automation objects are contained and configured in the Domain. Environments, Orchestrators, and Agents are the child elements in a Domain. The Domain container provides default security and module settings for these child elements.
Orchestrator
The Orchestrator is the CA Process Automation Engine. An Orchestrator maps to and configures the CA Process Automation Orchestrator application running on a host computer. The Orchestrator managing the Domain is referred to as the Domain Orchestrator.
Agent
An Agent maps and configures a CA Process Automation Agent application running on a host computer.
Environment
An Environment provides a configuration and operations boundary for the Touchpoint in the Domain.
Touchpoint
A Touchpoint is an Orchestrator or Agent in the Domain. CA Process Automation Touchpoints expose modules that an Orchestrator or Agent runs. Modules schedule, execute, and monitor operations and Processes within a CA Process Automation Environment. Agent Touchpoints perform tasks on their host computers while Orchestrators manage tasks across Touchpoints in an environment.
Modules/Connectors
Modules/Connectors integrate CA and third-party products into workflow processes. The 16 modules shown in the screenshot are available with CA Process Automation 3.1 by default.
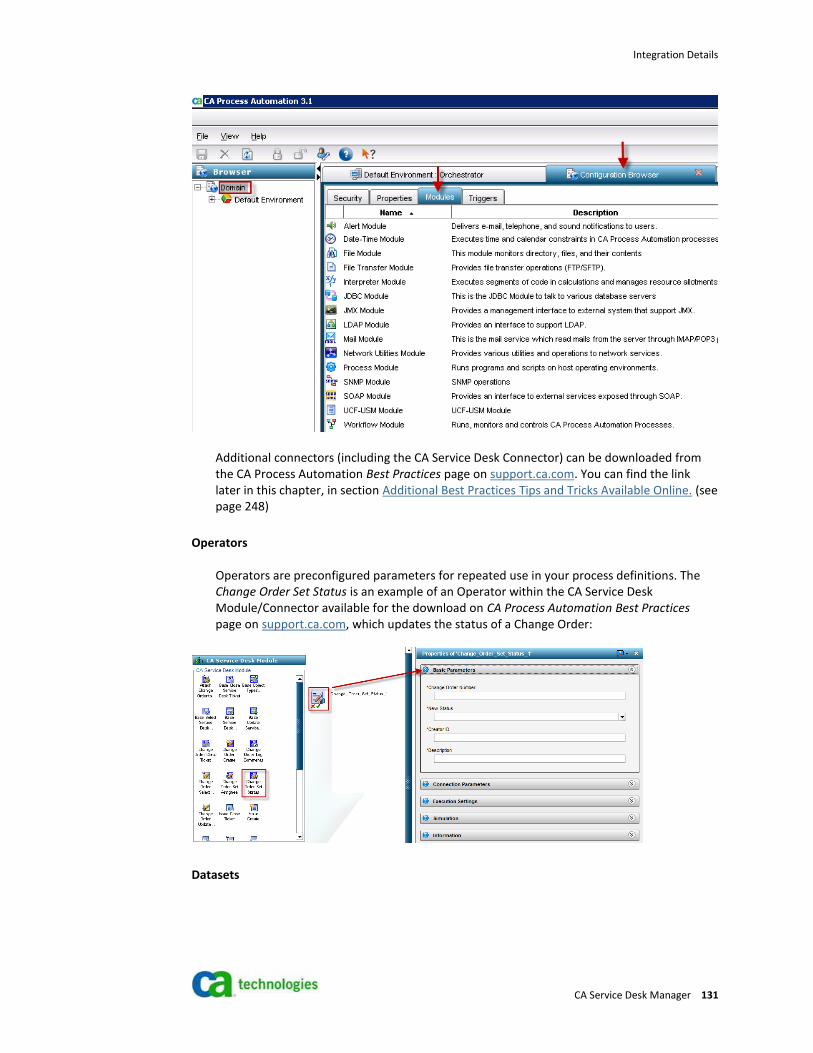
Integration Details
CA Service Desk Manager 131
Additional connectors (including the CA Service Desk Connector) can be downloaded from the CA Process Automation Best Practices page on support.ca.com. You can find the link later in this chapter, in section Additional Best Practices Tips and Tricks Available Online. (see page 248)
Operators
Operators are preconfigured parameters for repeated use in your process definitions. The Change Order Set Status is an example of an Operator within the CA Service Desk Module/Connector available for the download on CA Process Automation Best Practices page on support.ca.com, which updates the status of a Change Order:
Datasets

Integration Details
132 Chapter 4: CA Process Automation
Datasets store information that can be shared among instances of the same process or between different processes. The information defined in a dataset can be modified manually or by users or Administrators or automatically during execution of a process. For more information on the types of datasets that are used, see the section later in this Chapter Using Dataset Objects to Define Variables (see page 181).
Interaction Request Forms (IRF)
IRF provides field and other UI elements with which users can enter information that is required to execute an Operator or continue a process. As an example, an IRF is the interface that an approval form uses and that must display to an approver of a Change Order within CA SDM. For additional information, see the section later in this chapter Requesting User Interaction (see page 197).
Start Request Forms (SRF)

Configuring the Integration
CA Service Desk Manager 133
SRF is a shortcut to allow an operator to invoke processes manually using the CA Process
Automation Management Console. SRF objects define custom dialogs that prompt operators for
the values of parameters that the associated object requires. CA SDM also uses this dialog to
launch CA Process Automation Process Definitions by attaching a definition to a
Request/Incident/Problem Area, or Change Order/Issue Category. If CA SDM, the two values that
are required to be passed from CA SDM to a CA Process Automation process in order for it to be
instantiated are label and persid. This process is discussed later in this chapter, Link a CA Process
Automation Process Definition to CA SDM (see page 201).
Configuring the Integration
The following section describes the steps to integrate CA SDM and CA Process Automation.

Configuring the Integration
134 Chapter 4: CA Process Automation
Prerequisites for the Integration
This chapter assumes all of these products that are listed have been installed and are baseline
that is tested successfully. The minimum system requirements for the integration example
documented in this chapter are as follows:
For more information on CA SDM and CA Process Automation general architecture and
recommendations, see the CA Process Automation Best Practices Page available online on
support.ca.com. The direct link can be found later in this chapter, in section Additional Best
Practices Tips and Tricks Available Online (see page 248).
CA EEM 8.4 SP4
CA EEM is required when multi-tenancy is implemented. CA EEM is also required when you are planning to implement pass through authentication from CA SDM to CA Process Automation.
If CA EEM is not a part of your architecture, you need an alternate LDAP repository for CA Process Automation to leverage.
We integrate CA EEM with CA SDM later in this chapter, in section Configure Pass-Through Authentication.
CA SDM 12.6
Configure the email functionality and test the email notifications successfully. Integrate CA EEM with CA SDM later in this chapter, in section Configure Pass-Through Authentication.
CA Process Automation 3.1 CP1 (Minimum)
Install the CA Service Desk Connector if you would like to leverage the connector in your process definitions. In previous versions of CA Process Automation the installation of the CA SDM Connector was completed through the checkbox during the installation of CA Process Automation. You can leave this connector intact when upgrading from the prior versions with the connector installed, no additional installation steps are necessary. However, if you are performing a fresh connector install into a CA Process Automation instance with version r3.0 CP01 or later, use the new connector installers (r1.5 or above). The prior versions of the installer fail against newer versions of CA Process Automation. The CA Service Desk Connector (along with additional connectors) can be downloaded from the CA Process Automation Best Practices Page on support.ca.com.
The installation of the CA Service Desk Connector is discussed in detail in the section Install the CA Service Desk Connector. For our example, CA EEM is integrated with CA Process Automation. The installation is done while installing CA Process Automation by selecting CA EEM type as the Security Server type.

Configuring the Integration
CA Service Desk Manager 135
For more information on CA SDM and CA Process Automation general architecture and
recommendations, see the Product Home Pages on support.ca.com, or alternatively the CA
Process Automation Best Practices Page available online on support.ca.com. The direct link can
be found later in this chapter, in section Additional Best Practices Tips and Tricks Available Online
(see page 248).
User Authentication and Authorization
As stand-alone products, both CA Process Automation and CA SDM have individual requirements
for authentication and authorization. To support a unified Service Oriented Architecture (SOA)
strategy, and to enable pass through authentication, you can configure both products to use CA
EEM for authentication.
Pass-Through Authentication Benefits
Following scenario provides information on what pass-through authentication leveraging CA EEM
provides. For more information on how to configure, see the section Configuring Pass-Through
Authentication:
■ If a user is logged in to CA SDM, and from within the Workflow Tasks Tab of a given ticket
with a running process instance, clicks on a hyperlink that launches into CA Process
Automation Task List. This user is not prompted for a username and password.
The following list is not provided with pass through authentication leveraging CA EEM. The
following two scenarios, although achievable, require the use of an EEM token which is not
inherently available by default, or alternatively, requires integration with CA SiteMinder.
■ A user receives an email notification with a hyperlink to a CA Process Automation task, and
clicks on the hyperlink. The user is prompted for a username and password to log in to CA
Process Automation.
■ A user is logged in to CA Process Automation, and clicks on a hyperlink to a CA SDM Ticket.
The user is prompted for a username and password to log in to CA SDM.
For more information on integration with CA SiteMinder, see Volume I of the CA Service Desk
Manager Integrations Green Book.

Configuring the Integration
136 Chapter 4: CA Process Automation
Configure Pass-Through Authentication
Pass-through authentication is enabled providing that the following prerequisites have been met:
■ CA SDM and CA Process Automation are configured to use the same CA EEM installation.
■ CA SDM is configured to use CA EEM for Authentication.
■ Two Options Manager Options in CA SDM controls CA EEM Authentication, under
Administration, Options Manager, Security. Once set, a recycle of the CA SDM service is
required for changes to take effect:
■ Eiam_hostname
■ Use_eiam_authentication
■ When CA EEM uses the internal data store as its repository, the users must have either
global permissions or must belong to the same folder. Otherwise, if CA EEM references an
external user store like an external directory or CA SiteMinder, the users must be of the
same store to access pass through authentication.
■ Users who leverage this pass through authentication must:
■ Have contact records defined in the CA SDM contact table, either created manually or
automatically through LDAP. For more information on how to configure CA SDM to
access an LDAP directory, please see the CA SDM12.6 Administration Guide, Chapter 5,
Configuring User Accounts, section on LDAP Directory Data.
■ Have contact records defined in CA EEM, using either the internal data store or LDAP.
■ The Name field at the top of a CA EEM user record is the userid that must match the
userid in the CA SDM contact table.

Configuring the Integration
CA Service Desk Manager 137
■ Have the following policies that are defined within CA EEM:
When you install CA Process Automation 3.1 with CA EEM as the authentication server, the
installer creates several policies and four essential entities by default:
■ Two application users: pamadmin, pamuser
■ Two application groups: PAMAdmins, PAMUsers
Important! CA Process Automation version 3.0 and prior creates application users as itpamadmin
and itpamuser, and application groups as ITPAMAdmins and ITPAMUsers. If you are running 3.0
and prior versions, or alternatively, have upgraded to 3.1 from 3.0 or higher you see these users.
CA SDM users who use CA Process Automation can be divided into PAMAdmins and PAMUsers
group as follows:
■ CA SDM analysts must be members of the PAMUsers group when their duties entail the
following tasks:
Configuring the Integration
138 Chapter 4: CA Process Automation
■ Approve, reject, or otherwise responding to CA Process Automation Interaction Request
Forms.
■ List CA Process Automation process instances that are assigned to the user.
■ Viewing the graphical display of a running process instance by clicking the View Process
button in the Workflow Tasks Tab of a Ticket.
■ CA SDM analysts must be members of the PAMAdmins group when their duties entail the
following tasks:
■ Create and check in CA Process Automation process definitions or Interaction or Start
Request Forms.
■ Terminate process instances directly within CA Process Automation. Terminating
process instances are an administrative exception to expected integration procedures.
■ Delegate CA Process Automation process instance tasks.
■ Being defined as the Administrative user in CA SDM Options Manager for the CA Process
Automation Workflow option.
Note: Being defined in the PAMAdmins group does not automatically grant permissions
for that option of PAMUsers.
■ CA SDM users do not require privilege assignment or access to CA Process Automation when
their duties entail the following tasks:
■ Create Tickets that launch CA Process Automation instances.
■ Review the Workflow tab, which shows CA Process Automation process instance status
and task information.
■ Change the status of a ticket, which causes the termination of a CA Process Automation
process such as, cancel a Change Order.
■ Select a CA Process Automation process definition on a CA SDM Request Area or
Change/Issue Category.
Configure the Integration from CA Process Automation
Once the prerequisites have been met as outlined above, the next step is to define how the two
products communicate with each other. If you are leveraging the Service Desk Connector in your
process definitions, then set the following CA SDM Connector/Module properties through the CA
Process Automation Configuration Browser. Detailed steps on how to configure the connector
properties are described in the next sections within this Chapter.

Configuring the Integration
CA Service Desk Manager 139
Install the CA Service Desk Connector for CA Process Automation
In previous versions of CA Process Automation the installation of the CA SDM Connector was
completed through the checkbox during the installation of CA Process Automation. Leave the
checkbox intact if upgrading from prior versions with the connector installed, no additional
installation steps are necessary. Follow these steps to leverage the new connector installers (r1.5
or above), when you perform a fresh connector that is installed into a CA Process Automation
instance with version r3.0 CP01 or later.
Note: The prior versions of the installer fail against newer versions of CA Process Automation.
1. Download and unzip the CA SDM connector from the CA Process Automation Best Practices
Page on support.ca.com.
2. Stop the CA Process Automation Orchestrator Service.
3. Navigate to the directory where the connector was previously downloaded.
4. Execute the IT_PAM_connector_installer_CA_Service_Desk_1_5-w64.exe (if you are running
on a 64-bit platform, otherwise install the 32-bit version):
5. Click Next.
6. Accept the license agreement and click Next.

Configuring the Integration
140 Chapter 4: CA Process Automation
7. In our test environment, CA Process Automation was installed on the D Drive. Enter the path
after changing to the D drive and click Next.
8. Select the CA Service Desk Connector checkbox, and Click Next.

Configuring the Integration
CA Service Desk Manager 141
9. Click Finish.
10. Start the CA Process Automation Orchestrator service to verify that the connector has
installed.

Configuring the Integration
142 Chapter 4: CA Process Automation
Verify the Installed Connector
1. Open CA Process Automation Management Console locally from the CA Process Automation
Server using one of the following methods:
■ Click Start, Programs, CA, CA Process Automation Domain, Start CA Process Automation
Management Console.
■ Alternatively, you can access the following URL remotely:
http://<CAITPAMSERVER>:<CAITPAMPORT>/itpam
2. If prompted, log in with a user ID that has administrative privileges (for example, pamadmin
on a new install of CA Process Automation 3.1). For previous versions of CA Process
Automation or on an upgraded instance of 3.1, this user would be itpamadmin.
3. Open the CA Process Automation Java Client by clicking the CA Process Automation Client
link in the upper right corner of the web page.
4. Click on the Configuration Browser tab, or alternatively go to File, Configuration Browser.
5. Select the Modules tab.
6. Validate that the CA Service Desk Module (which is the connector) is loaded in CA Process
Automation:

Configuring the Integration
CA Service Desk Manager 143
Modify CA SDM Module/Connector Properties in CA Process Automation
The steps in this section assume that you are leveraging the Service Desk Connector. When you
are not using the connector, your integration settings vary and are dependent upon your
configuration. If you need more information on the CA SDM Connector, please see the CA
Process Automation Best Practices Page on support.ca.com and download the CA Service Desk
Connector Tutorial. The operators that are provided with the CA Service Desk Connector are also
discussed later in this chapter, in section CA Service Desk Connector Operators.
Follow these steps:
1. Open CA Process Automation Management Console locally from the CA Process Automation
Server using one of the following methods:
■ Click Start, Programs, CA, CA Process Automation Domain, Start CA Process Automation
Management Console.
■ Alternatively, you can access the following URL remotely:
http://<CAITPAMSERVER>:<CAITPAMPORT>/itpam
2. On prompt, log in as pamadmin on a new install of CA Process Automation 3.1. For previous
versions of CA Process Automation or on an upgraded instance of 3.1, this user would be
itpamadmin.
3. Open the CA Process Automation Java Client by clicking the CA Process Automation Client
link in the upper right corner of the web page.
4. Select File and Open Configuration Browser, or select the Configuration Browser tab in the
right pane.
The Configuration Browser opens.
5. In the left hand pane, expand Domain, Default Environment.
6. Right-click on either the Domain, or Environment for which you want to configure the
Connector, and select Lock.
The selected domain or environment is enabled for editing.
7. Click the Modules tab in the right hand pane of the same node.
8. Double-click the CA Service Desk module.
Deselect the Inherit Settings checkbox, when the changes are different from the domain
settings and you configure the settings for a specific Environment. If the Environment
settings are the same as the domain settings, select the Inherit Settings checkbox.

Configuring the Integration
144 Chapter 4: CA Process Automation
By default, these communication properties are defined for the complete Domain and the
individual Environments and Orchestrators within that Domain inherit these properties.
Note: If the properties are inherited, Orchestrators inherit values from the Environment.
Environments inherit the properties of the Domain. The Inherit setting does not appear
when modifying properties at the Domain level.
9. Update the configuration properties as needed for the CA Service Desk Module as follows:
Note: The default values for Default Web Service URL, Default User ID, and Default Password
that is specified at the CA Service Desk connector module level. Override the values entered
in the Service Desk Connection Parameters page for each individual operator.
Maximum result length (bytes)
Defines the maximum result length (in bytes) of the XML value that is received and
stored in CA Process Automation datasets. If this length is exceeded, the result is
truncated.
Default: 1048576 bytes
Default WebService URL
Defines the default value for the Service Desk Web Service.
Note: This value is NOT the CA SDM Web Services WSDL!
By default, the path is http://localhost:8080/axis/services/USD_R11_WebService.
Update this value to reflect the correct host name and port number to access the CA
SDM web services.
Default User ID
Provides a default user name that can be used to connect to CA SDM web services.
Default Password
Provides the password of the default user that is used to connect to CA SDM web
services.
Handles Configuration

Configuring the Integration
CA Service Desk Manager 145
Identifies the XML file that provides configuration information for managing the CA SDM
handles. This file contains rules on what additional service calls with user supplied data
to obtain application, or based on the session it handles the ticket information. The
default Handles the Configuration file is used for no value, HandleConfiguration.xml,
which is invoked through the connector file casdservice.jar.
Note: If needed, with the assistance of CA Services, you can modify this file to customize
the default mapping between CA Process Automation and CA SDM web service call
parameters.
The modified CA Service Desk Module Properties page can look like the following
screenshot:
10. Click Apply to save the changes.
11. Right-click the selected node in the left hand pane and select Unlock. The module properties
are now read-only.
Configuring the Integration
146 Chapter 4: CA Process Automation
Configure the Integration from CA SDM
From the CA SDM perspective, connectivity with CA Process Automation is enabled by
configuring the CA Process Automation Workflow options within Options Manager.
Perform these steps regardless of whether you are using the CA Service Desk Connector in your
process definitions or your own custom operators.
To configure Workflow options for CA Process Automation:
1. Log in to CA SDM locally from the CA SDM Server as an Administrator using one of the
following methods:
■ Click Start, Programs, CA, Service Desk Manager, Service Desk Web Client.
■ Alternatively, you can access the following URL remotely:
http://<CASDMSERVER>:<CASDMPORT>/CAisd/pdmweb.exe
2. On the Administration tab, select Options Manager, then click the CA IT PAM Workflow
Node Workflow node.
The Option List appears.
3. Right-click the name of each of the following options and select Edit from the short-cut
menu. After you configured an option, click Install and then Save.
Configure the following options:
caextwf_eem_hostname
Specifies the name of the CA EEM server. The server name must match the host name
that is returned by running the hostname command in the command prompt on your
CA EEM Server. For example:
http://<CAEEMSERVER>
This option identifies the authentication host. You install caextwf_eem_hostname only if
you configured CA Process Automation to use CA EEM as the authentication server. CA
SDM uses this value to transform a user name and password into a CA EEM token, so
that a username and password are not passed in plain text over HTTP.
Note: If the CA Process Automation installation is using CA EEM for authentication, then
place a value in the caextwf_eem_hostname option and install caextwf_eem_hostname.
Entering a false value or installing caextwf_eem_hostname when it is not necessary
causes the integration to fail.

Configuring the Integration
CA Service Desk Manager 147
caextwf_endpoint
Specifies the URL that points to the CA Process Automation web services by including
the CA Process Automation host name, port, and the mandatory /itpam/soap path. For
example:
http://<CAITPAMSERVER>:<CAITPAMPORT>/itpam/soap
This option identifies the endpoint. Installing the caextwf_eem_hostname option is
required for the integration between CA Process Automation and CA SDM to operate
properly.

Configuring the Integration
148 Chapter 4: CA Process Automation
caextwf_log_categories
By default, the messages that are displayed on the Workflow Tasks tab within a CA SDM
ticket have a 1:1 relationship with the messages that are displayed in the CA Process
Automation Process Instance logs. The entries in the CA Process Automation Process
Instance Logs are categorized into Process or Operator messages, as shown in the
following screenshot.
The default value of the caextwf_log_categories option is set to the following value:
Process, Operator
This results in the following messages displayed in the Workflow Tasks tab in CA SDM:
When you install the caextwf_log_categories option, all CA Process Automation Process
instance log messages from the Process and Operator categories appear on the
Workflow Tasks tab within a CA SDM Ticket. You can also add in your own custom
categories. Leveraging this capability, you can tailor the types of messages that are
displayed and can make them more user-friendly and relative to your business.
When you do not install caextwf_log_categories, only the CA Process Automation
process instance log messages from the Process category appear on the Workflow Tasks
tab.

Configuring the Integration
CA Service Desk Manager 149
Note: For more information about the CA Process Automation predefined log message
categories, and defining custom message categories, see the section later in this
chapter, Create Business-Like Entries in the CA SDM Workflow Tasks tab (see page 211).
Additionally, see the CA Process Automation 3.1 Reference Guide, Section CA Process
Automation System Functions.
caextwf_processdisplay_url
Specifies how to launch a graphical snapshot of a CA Process Automation Process
instance from the Workflow Tasks tab in a ticket by supplying the host name and the
mandatory /itpam/JNLPRequestProcessor?processType=startUI&roid path. For
example:
http://<CAITPAMSERVER>:<CAITPAMPORT>/itpam/JNLPRequestProcessor?processType=start
UI&roid=
On the Workflow Tasks tab of a ticket, the user selects the View Process button to see
the graphical snapshot.
Installing the caextwf_processdisplay_url option is required for the integration between
CA Process Automation and CA SDM to operate appropriately.
caextwf_worklist_url
Specifies the process instance path by supplying the host name and the mandatory
/itpam?webPage=mytaskfilter&view=tasklist path. For example:
http://<CAITPAMSERVER>:<CAITPAMPORT>/itpam?webPage=mytaskfilter&view=tasklist
This option enables CA SDM users to see a list of CA Process Automation Process
instances that require attention, through the CA Process Automation Task list. The list
appears in CA Process Automation when the CA SDM user selects a link that is
associated with any pending task in the Workflow Tasks tab of a ticket.
Installing the caextwf_worklist_url option is required for the integration between CA
Process Automation and CA SDM to operate properly.

Configuring the Integration
150 Chapter 4: CA Process Automation
caextwf_ws_user
Specifies the CA Process Automation administrative user name that is associated with
the CA Process Automation user name. CA SDM uses the user name and password to
access the CA Process Automation web service functions to perform integration
activities. These activities are selecting Start Request Forms, process definition
information, process instance information, or launching process instances. Typically this
user would be pamadmin on a new install of CA Process Automation 3.1. For previous
versions of CA Process Automation or on an upgraded instance of 3.1, this user would
typically be an itpamadmin.
Installing the caextwf_ws_user option is required for the integration between CA
Process Automation and CA SDM to work. The user must have appropriate access to CA
Process Automation. However, it is not necessary that the CA Process Automation user
name to exist as a CA SDM contact record.

Before you Begin
CA Service Desk Manager 151
caextwf_ws_password
Specifies the encrypted administrative password that is associated with the CA Process
Automation user name from the caextwf_ws_user option. CA SDM uses the user name
and password to access the CA Process Automation web service functions to perform
integration activities. These activities are selecting start request forms, process
definition information, process instance information, or launching process instances.
Installing the caextwf_ws_password option is required for the integration between CA
Process Automation and CA SDM to operate. The user name and password that you
specify requires the appropriate access to CA Process Automation. However, it is not
necessary that the CA Process Automation user name is defined as a CA SDM contact
record.
4. Once complete, your CA IT PAM Workflow Options Manager Options look like the following
list:
5. Restart the CA SDM services.
The CA SDM and CA Process Automation can communicate even though there are no
existing Process Definitions or Instances. As we walk through a sample flow later in this
chapter, under the section Integration Example (see page 213) we test the integration.
Before you Begin
Careful planning is the key to good process design. To design the appropriate process flows for
your business requirements, you can do the following steps:
■ First, design and lay out your process design requirements from a business perspective.

Before you Begin
152 Chapter 4: CA Process Automation
■ Using a Visio diagram or similar tool, clearly identify and document the process that you
want to automate at the business level. For example, if you are creating a process to
implement change management for a business critical hardware, consider having answers to
the following questions:
■ What approvals are granted?
■ Who has to give the approvals?
■ Who is notified?
■ What other CIs impact by this change?
■ Map these business requirements to technical level design for creation and implementation
within CA Process Automation.
Be sure to start small and test individual pieces as you go along in creating your broader process
definition.

Process Design
CA Service Desk Manager 153
Process Design
Create the Process Definition
After you have identified the process that you want to automate from a business perspective,
you can create the process definition.
Processes are defined through the CA Process Automation Process Designer, which lets you
graphically implement the process object model, allowing you to create management packages
with a wide range of functionality.
To create a Process Definition:
1. Open CA Process Automation Management Console.
2. If prompted, log in with a user ID that has administrative privileges (for example, pamadmin
on a new install of CA Process Automation 3.1). For previous versions of CA Process
Automation or on an upgraded instance of 3.1, this user would typically be an itpamadmin.
3. Open the CA Process Automation Java Client by clicking the CA Process Automation Client
link in the upper right corner of the web page.
4. Select File, and Open Library Browser.
The Library Browser opens.
5. Right click on the directory under which you would like to create the Process Definition.
6. Navigate to New Object, Process.
The Process appears on the right pane.
Here you can see the example of Process Designer.

Process Design
154 Chapter 4: CA Process Automation
The Process Designer window contains the following components:
■ The Designer pane, upon which you configure the Process; with tabs for editing the Process,
configuring exception handling, lanes, and variables in the Process Dataset.
■ A menu bar containing the menus File, Edit, Control, View, Select, and Help.
■ The Main toolbar have buttons for:
■ Object commands, such as saving, deleting, checking in, and checking out.
■ Edit commands for the cut, copy, paste, redo, and undo.
■ Zoom-in and zoom-out commands.
■ Commands for starting a Process.
■ Commands for debugging a Process.
■ Process properties command.
■ Toolbar buttons for adding lanes, setting and removing breakpoints, enabling and
disabling icons and help buttons.
■ The State bar shows the path and version of the process.
■ Palettes pane, which contains the Common palette as well as module-specific palettes also
contains the operators that those modules support, such as CA Service Desk.
■ Properties pane

Process Design
CA Service Desk Manager 155
The Common palette includes some simple Operators that are most likely used in each Process
you can create. These Operators define the start and end of a process as well as logical
conditions, loops, and comments. The set of palettes containing Operators that perform basic
tasks such as transferring files, making SOAP calls, setting, or getting SNMP variables, running
child Processes, sending email alerts, and other such tasks.
You can right-click the Operator you often use in its original palette to add to the Common
palette. Then select Add to Common Palette from the context menu. You can then access the
Operator from both the Common palette as well as the original palette. Similarly, you can
remove Operators that you have added to the Common palette by right-clicking the Operator in
the Common palette and selecting Remove from Common Palette.
Follow these steps:
To create a process definition in the CA Process Automation client:
1. Drag the required operators from the appropriate palette to the design sheet.
2. Connect the operators with the links.
3. Check in the process.
Note: Check-in is an important process. Else, any new running process instances do not
reflect the new updates.

Process Design
156 Chapter 4: CA Process Automation
Technical Process Design
After creating a placeholder for a process definition, you can map the different parts of that
process flow to specify what steps follow from the beginning of the process to its conclusion.
For example, consider the following sample process flow for CA SDM, which automates a process
to request a new PC:

Process Design Tips
CA Service Desk Manager 157
This example process flow consists of the following steps:
■ A Start point. This sample process definition can be instantiated from within a CA SDM
Change Order.
■ A sequence of action operators, which includes an approval process necessary to approve
the provisioning of a PC for an end user.
■ Closure of the Change Order once the approval or rejection decision is made.
■ A normal stop point.
Process Design Tips
Following process are some tips for designing an automated CA SDM process.
When designing your process, start small and test individual operators as you build out your
broader definition.

Process Design Tips
158 Chapter 4: CA Process Automation
High-Level Process Design
You can design the high-level process considering the following points:
■ Each Process is comprised of a series of tasks, or steps, which occur in an expected order and
have a defined outcome.
■ The Operator determines the type of task that is performed such as, retrieving information,
creating a request, updating a status in CA Process Automation. Each Process contains one
or more chains of Operators that are executed sequentially or in parallel.
■ The best practice is to leverage existing Operators, or create your own custom operators
where possible, as opposed to creating and invoking sub processes to group together more
complex tasks.
■ You can also determine where an Operator can be run. If you do not select a Touchpoint for
an Operator, the action that is defined within that Operator can be performed on the
Orchestrator.
■ The best practice for process design is to define at least one Touchpoint. Note which
operators must run on the orchestrator and which can run on either the Agent, or
Touchpoint, or Orchestrator.
■ Although there are many methods that CA Process Automation can leverage for
communication, the primary way that is used for communication with CA SDM integration is
through CA SDM Web Services.

Process Design Tips
CA Service Desk Manager 159
CA Service Desk Connector Operators
To select the appropriate Operator, consider the type of interactions that CA Process Automation
can have to execute against CA SDM. This interaction includes identifying the following
operators:
■ Type of objects that the CA Process Automation process has to interact with.
For example, Requests, Incidents, Problems, Change Orders, or Issues.
■ Type of actions that CA Process Automation can have to execute against CA SDM.
For example, Open, Close, Log Comment, or Update Status.
In addition to defaults CA Process Automation Operators, sample Operators are provided
through the CA Service Desk Connector that is mentioned earlier in this chapter. Leveraging
these operators automatically performs a web service login/logout for every CA SDM web service
method that is invoked. The web services SID (Session ID) is required for all web services
communication with CA SDM. Log in to CA SDM to obtain the SID. The only way to release SID is
to either allow the timeout to exceed, or to simply logout.
The use of the operators in the connector benefits the process design but negatively impact a
production environment from a performance perspective. Your implementation is highly utilized
due to the overhead of the multitude of web service calls. Do not use the operators that the
Service Desk Connector provides and create your own custom operators as well as leverage the
CA Process Automation SOAP Operator to invoke CA SDM Web Service Calls. For more
information on when to use the Service Desk Connector vs. use the CA Process Automation SOAP
Operator, see section Pros and Cons of Leveraging CA Service Desk Operators.
The Service Desk Connector enables you to use CA Process Automation to automate CA SDM
tasks. The tasks are opening an Incident in response to a specific event, modifying the status of
an existing Incident, and attaching a Change Order when required. A designated starting event or
by association with a particular category of object (for example, Request, Incident, Problem Area,
or Change Order, Issue Category) triggers these automated processes:
■ Base (generic) Operators
■ Change Order Operators
■ Issue Operators
■ Request Operator (Filtered by Type; Requests, Incidents and Problems are held in the cr
(Call_Req) object. Its type attribute distinguishes the record as an Incident, Problem, or
Request)

Process Design Tips
160 Chapter 4: CA Process Automation

Process Design Tips
CA Service Desk Manager 161
Base (Generic) Service Desk Operators
Following list is a summary of the out of box CA SDM Base Operators provided with the Service
Desk Connector. These generic operators provide the following functions:
Base Close Service Desk Ticket
Closes a ticket by supplying a ticket handle. If closing comments stating the reason for closing for closure, these tickets can appear on the activity log of the ticket.
Base Object Type Information
Retrieves the list of all attribute names for a given object type (Change Order, Issue, Request, Contact, Asset, Workflow, Property, or Property Template) along with the type information for each attribute. An example of when this operator would be used is to retrieve a list of all available properties for Change Order Categories.
Base Select Service Desk Elements
Retrieves selected user-supplied fields that match the specific data criterion (where clause). See the CA SDM 12.6 Technical Reference Guide for more details on object and attribute names.
Base Service Desk Interface
This interface is an advance operator that is based on the SOAP client operator, which exposes all operations of the CA Service Desk web service. You can use this operator to call any CA SDM web service method. The one difference is that this operator automatically does a login/logout with CA SDM. For example, when this operator would be used is to call doQuery to look up contacts in CA SDM, getRelatedListValues, to look for entries in the activity log of a Request, or notifyContacts, to send a manual notification out through CA SDM Web Services.
Base Update Service Desk Element
Updates user-specified fields from a specified object handle. An example of when this operator would be used is to update the Priority of a Request.
To simplify the integration effort and the flows, select the Operator that is specific to the object
and operation you are trying to automate. Use the Base operators to complement the specific
operators or when a specific Operator cannot be used for target operation.

Process Design Tips
162 Chapter 4: CA Process Automation
Change Order Operators
In CA SDM, Change Orders are tickets that manage changes to the supported business
infrastructure. The following Operators are specific to Change Orders:
Attach Change Order to Request
Attaches a new or existing Change Order to a specific Request. When the Change Order Number string is left blank, a new Change Order is created based on values initialized from the Request. To override these values, or set additional values, use the Updates Fields List and Corresponding Values List parameters. If a Change Order Number is specified, these fields can be ignored.
Note: A Change Order cannot be attached, when it is attached to another Request.
Change Order Close Ticket
Closes the specified Change Order. If Closing Comments are provided stating the reason for closure, they can appear in the Service Desk activity log.
Change Order Create
Creates a CA SDM Change Order.
Change Order Log Comments
Attaches log comments to a Change Order.
Change Order Select Ticket
Retrieves selected information for the specified Change Order. If the Select Fields List parameter is left blank, all value-based attributes are returned. Upon successful execution, the values of the requested attribute found in the SoapResponseBody field. See the CA SDM 12.6 Technical Reference Guide for the list of attributes.
Change Order Set Assignee
Sets Assignee ID for this Change Order.
Change Order Set Status
Sets the status for the Change Order and generates the activity log.
Change Order Update Ticket
Updates one or more attributes for the specified Change Order.

Process Design Tips
CA Service Desk Manager 163
Issue Operators
In CA SDM, Issues are the basic units of support when operating an external service desk. Issues
are tickets that are designed to handle customer questions or problems and are oriented toward
supporting products and services that the customer buys. The following Operators are specific to
Issues:
Issue Close Ticket
Closes a specific Issue. If closing comments stating the reasons for closure are provided, they can appear in the CA SDM activity log for that issue.
Issue Create
Creates a Service Desk Issue – including contact, requester, and priority information.
Issue Log Comments
Attaches log comments to an issue.
Issue Select Ticket
Retrieves information about selected attributes for a specific issue. If the list of selected fields is left blank, all value-based attributes are returned. Upon successful execution, the values of the requested attribute would be found in the SoapResponseBody field. See the CA SDM 12.6 Technical Reference Guide for the list of attributes.
Issue Set Assignee
Sets the Assignee ID for the specific Issue.
Issue Set Status
Sets the status for the specified issue.
Issue Update Ticket
Updates one or more fields on the Issue.

Process Design Tips
164 Chapter 4: CA Process Automation
Request Operators
In CA SDM, Requests handle the questions of internal employees, and are oriented toward
supporting an infrastructure that the support organization owns and administers. Incidents
handle any type of disruption in service, with a goal of restoring service as quickly as possible.
Problems handle those tickets which require further investigation.
Filtered by the Type parameter, Request Operators also apply to Incidents and Problems as well
so in terms of the descriptions below they can be used interchangeably. They include the
following operators:
Request Close Ticket
Closes the specified Request. If closing comments are provided stating the reasons for closure, they can appear in the Service Desk activity log.
Request Create
Creates a Service Desk Request, Incident, or Problem. Priority, Severity, Impact, Urgency as well as Requester and Contact ID can be specified.
Request Log Comments
Attaches log comments to a specific Request. Comments can also be flagged as Internal Use Only.
Request Select Ticket
Retrieves select information about a specific Request. If the Select Fields List is left blank, all value-based attributes are returned. Upon successful execution, the values of the requested attribute can be found in the SoapResponseBody field. See the CA SDM 12.6 Technical Reference Guide for the list of attributes.
Request Set Assignee
Sets the Assignee ID for a specific Request.
Request Set Status
Sets the status for the Request\Incident\Problem.
Request Update Ticket
Updates one or more attributes for the specified Request.

Process Design Tips
CA Service Desk Manager 165
Sample Process Definitions Leveraging the Service Desk Connector
For more information and sample process definitions that leverage the operators in the CA
Service Desk Connector, see the CA Process Automation Best Practices Page on support.ca.com.
Once there, navigate to CA Process Automation Connectors. With the download of the
connectors you get links to a Tutorial, Quick Start Documentation, and Sample Process
Definitions.
The table shows the sample process definitions that are available with Quick Start Content, and
which process definitions leverage which operators. Cross-reference is useful if you need
assistance on leveraging the operators in your own customer process definitions:
Quick Start Directory Quick Start Process Operators
Base Operation
AttachChangeOrder New request with Change Order
Attach_Change_Order_to_Request Request_Create
CloseTickets Close Ticket Base_Select_Service_Desk_Elements Base_Close_Service_Desk_Tickets
ObjectInfo Object Info Base_Object_Types_Information
QuickTicketBase Quick Ticket Base_Service_Desk_Interface
Update LowerPriority
RaisePriority
Request_Select_Ticket Base_Service_Desk_Elements Change_Order_Select_Ticket Issue_Select_Ticket Base_Update_Service_Desk_Elements
CreateType
CreateType CreateType Request_Create Change_Order_Create Issue_Create
LifeCycle
ChangeOrder ChangeOrderLifeCycle Change_Order_Create Change_Order_Log_Comments Change_Order_Set_Assignee Change_Order_Set_Status Change_Order_Update_Ticket Change_Order_Close_Ticket

Process Design Tips
166 Chapter 4: CA Process Automation
Quick Start Directory Quick Start Process Operators
Base Operation
Issue IssueLifecycle Issue_Create Issue_Log_Comments Issue_Set_Assignee Issue_Set_Status Issue_Update_Ticket Issue_Close_Ticket
Request RequestLifeCycle Request_Create Request_Log_Comments Request_Set_Assignee Request_Set_Status Request_Update_Ticket Request_Close_Ticket
MaintenanceWindow MaintenanceEnd
MaintenanceRequest
MaintenanceStart
Request_Create Request_Set_Assignee Request_Update_Ticket Change_Order_Create Change_Order_Set_Status Request_Set_Status Request_Close_Ticket
QueryingTicket
ChangeOrder Change Order Query Change_Order_Select_Ticket Change_Order_Set_Status Change_Order_Log_Comments
Issue Issue Query Issue_Select_Ticket Issue_Set_Status Issue_Log_Comments
Request Request Query Request_Select_Ticket Request_Set_Status Request_Log_Comments

Process Design Tips
CA Service Desk Manager 167
Pros and Cons of Leveraging CA Service Desk Operators
The benefit of using these CA Service Desk Operators provided with the Service Desk Connector,
is that they offer a more simplified approach to process design for CA Process Automation
processes. Each of these operators leverages CA SDM Web Services to communicate with CA
SDM, and perform a minimum of three web service calls:
■ The first call invokes the login method to log in to the web services and obtains a Session ID
(SID)
■ The second call leverages the above SID and invokes the necessary subsequent CA SDM web
service call to perform a function, such as updateStatus.
■ The third call invokes the logout, which logs out of the web services and releases the SID.
Consider a different approach to process design by invoking individual soap operators, and
leveraging exception handling to reuse SIDs, when you run a complex process that is used
extensively with heavy load in your production environment. Avoid logging in and logging out of
web services each time a task or a function is performed. This approach is helpful when multiple
web service calls are invoked one after another, such as updateStatus, followed by an immediate
notifyContact and logComment methods.
In this case, the operations take place relatively quickly and it is unlikely that the web services SID
timeouts between each call. Therefore, the SID can be reused, eliminating the need for multiple
logins/logouts. This operation is not applicable in the case where a user is prompted for
interaction. In this case, the SID times out awaiting the users response. For more information,
click the section Exception Handling (see page 194) and Integration Example (see page 213).
Note: An Options Manager Option under Administration, Options Manager, Web Service,
webservice_session_timeout controls the Web Services Session timeout value.
Custom Operators
As noted above, you can create your own Custom Operators to use in lieu or in conjunction with
the operators that the CA Service Desk Connector provides. For further information on creating
custom operators see the CA Process Automation User Guide, Chapter 9, Custom Operators
available on support.ca.com.
Note: The use case that is described later in this chapter leverages custom operators and does
not leverage the operators in the CA Service Desk Connector.

Process Design Tips
168 Chapter 4: CA Process Automation
Designating Operator Input Parameters
Operators specify the type of operation is to occur. For example, update a status, close a request,
update an activity log. The types of targeted objects are a Change Order, Incident, or Request.
Input parameters further specify how it can be performed and which specific objects are
targeted. For example, which status can be set, Incident would be affected, or what text can be
added to the activity log for a particular Request.
All the parameters that are required for process execution are specified through the Operator
Property Palettes, which are automatically displayed when you select the properties for the
Operator within in the Process (by double-clicking the operator). Some examples are as follows:
Input Parameters: Used on operators those either update existing objects, or create new ones,
for example:
Basic Parameter: This parameter is used on operators which either updates existing objects, or
create new objects, for example:

Process Design Tips
CA Service Desk Manager 169
Select Parameters
Used on all operators that query existing objects.
Depending on the specific Operator and Parameter, input values are literal strings or expressions.
Input parameters override any global settings that are defined for these parameters.
Common Input parameters
Typically one of the following attributes is used to represent the specific CA SDM object instance
being queried: persistent_id/persid/handle, chg_ref_num/ref_num.
The following table provides the detail on these attributes. The table also provides the
comparison between automatically (when the instance is instantiated through CA SDM Category
or macro) and manually (when the instance is instantiated through CA Process Automation)
obtained parameters.
CA SDM
Parameter
What is it? How it is obtained
when a process is
invoked automatically
through SDM
Category/Area/Macro
?
How it is obtained when
a process is manually
invoked in CA Process
Automation?
Persistent_id
or
Persid
CA SDM Web Services uniquely identifies an object by its handle, which is a string value of the form
Automatically passed as an input parameter when the integration is invoked, through
The value is not passed automatically in this case because the integration is not kicking off the

Process Design Tips
170 Chapter 4: CA Process Automation
CA SDM
Parameter
What is it? How it is obtained
when a process is
invoked automatically
through SDM
Category/Area/Macro
?
How it is obtained when
a process is manually
invoked in CA Process
Automation?
or
Handle
objectType:ID, where objectType is the object type (factory) name, and ID is a unique value. Each object, regardless of its type, stores this value in an object attribute named persistent_id. IE: chg:400002.
executeStartRequest CA Process Automation web service call.
process definition. To obtain the persid of any given object, you can either run a query directly in SQL, or alternatively, you can run the following from the command line on the CA SDM Primary or Secondary Server if you know the ticket number:
Pdm_extract –f select persid from Change_Request where chg_ref_num = 1234
Output is:
TABLE Change_Request
persid
{ chg:400291}
Chg_ref_num, ref_num
Change Order Number, and Request/Incident/Problem Number, IE 1234.
The value is not passed automatically. To obtain the number of an existing ticket, you first run Base_Service Desk_Elements operator from the Service Desk Connector, passing in the persid (which is automatically obtained as a part of the integration so the input would be a variable), and then as output from this node, select to return the chg_ref_num, to then pass over to the next operator through dataset that requires it as an input parameter.
The value is not passed automatically in this case because the integration is not kicking off the process definition. If you are manually starting a CA Process Automation Process Definition and pass in the Change Order Number, you can simply look it up in CA SDM and pass it over to the SRF when you instantiate the process instance.

Process Design Tips
CA Service Desk Manager 171
Information on mapping additional Input Parameters in CA Process Automation with CA Service
Desk attributes is provided in the section Mapping Additional Process Input/Select/Base
Parameters to Service Desk Attributes.

Process Design Tips
172 Chapter 4: CA Process Automation
Mapping Additional Process Input/Select/Base Parameters to Service Desk Attributes
Each Operator includes input parameters that provide the specifics of the action being
performed. For example, when a Request is created using the CA Service Desk Connector, the
input parameters define the Requester ID as well as Impact and Severity of that Request.
In specifying these input parameters, both for the operators in the default Service Desk
Connector as well as your own custom operators, it is important to understand how they relate
to CA Service Desk underlying fields, and which values are supported for those fields. For
example, consider the following Request:
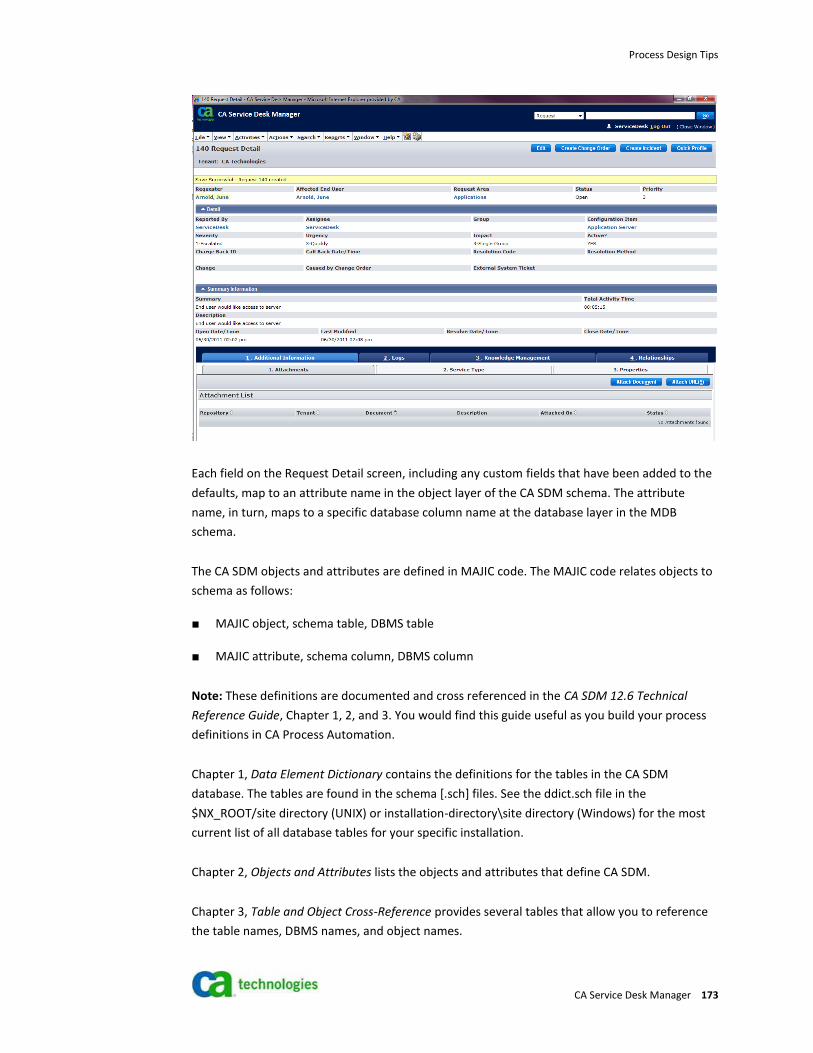
Process Design Tips
CA Service Desk Manager 173
Each field on the Request Detail screen, including any custom fields that have been added to the
defaults, map to an attribute name in the object layer of the CA SDM schema. The attribute
name, in turn, maps to a specific database column name at the database layer in the MDB
schema.
The CA SDM objects and attributes are defined in MAJIC code. The MAJIC code relates objects to
schema as follows:
■ MAJIC object, schema table, DBMS table
■ MAJIC attribute, schema column, DBMS column
Note: These definitions are documented and cross referenced in the CA SDM 12.6 Technical
Reference Guide, Chapter 1, 2, and 3. You would find this guide useful as you build your process
definitions in CA Process Automation.
Chapter 1, Data Element Dictionary contains the definitions for the tables in the CA SDM
database. The tables are found in the schema [.sch] files. See the ddict.sch file in the
$NX_ROOT/site directory (UNIX) or installation-directory\site directory (Windows) for the most
current list of all database tables for your specific installation.
Chapter 2, Objects and Attributes lists the objects and attributes that define CA SDM.
Chapter 3, Table and Object Cross-Reference provides several tables that allow you to reference
the table names, DBMS names, and object names.

Process Design Tips
174 Chapter 4: CA Process Automation
When building your process definitions in CA Process Automation, Object and Attribute names
that CA SDM Web Services manipulates data at the object layer are considered. Data Partitions
and Security are enforced, whereas they would not go directly against the database layer
(running a database query directly in SQL). The attribute name at the object layer is typically –
but not always - identical to the name of the corresponding column in the database layer.
Therefore, it is important to find the correct naming convention to use when invoking a CA
Process Automation process which manipulates data within CA SDM.
In addition to identifying the appropriate attribute names, know what type of data that is valid
for those fields. If the attribute references another table (SREL), the attribute knows what Ids
(handles) are currently valid for that attribute.
The following example walks through the process of mapping fields for a Request:
Step 1: Identify the Service Desk Fields to be Modified or Manipulated
Example
We have chosen to manipulate the Description and Request Area fields on a Request, pass these
attributes as an input parameter to a CA Process Automation Operator.

Process Design Tips
CA Service Desk Manager 175
Step 2: Map the Displayed Fields to Attributes
Map the displayed fields from the previous step to the corresponding attribute names in the CA
SDM Object Layer that the web services (and thus CA Process Automation) use to manipulate
data within CA SDM. If you know the attribute name, you can proceed directly to Step 3 and
verify the specifics about the attribute. If you do not know the attribute name, consult the CA
SDM 12.6 Technical Reference Guide. Information can be found in Chapters 1, Data Element
Dictionary; Chapter 2, Objects and Attributes, or Chapter 3, Table and Object Cross-Reference.
You can locate it using one of the following options:
■ Use Web Screen Painter:
a. Open the detail_<objectname>.htmpl form (or the form that is associated with the
ticket type you are looking for), detail_cr.htmpl, for example.
The Web Screen Painter opens file as shown in the following screenshot:
The main forms for other Service Desk ticket types are:
– detail_cr.htmpl (for Requests)detail_in.htmpl (for Incidents)
– detail_pr.htmpl (for Problems)
– detail_chg.htmpl (for Change Orders)
– detail_iss.htmpl (for Issues)

Process Design Tips
176 Chapter 4: CA Process Automation
b. Locate the field and make a note of the attribute name that appears in the
corresponding text box. For example, the attribute name for Description is
description and the attribute name for Request Area is a category.
Note: The attribute names are case-sensitive.
c. Double-click the field.f the attribute name is partially hidden.
A Properties dialog similar to the following screenshot opens, which displays the
complete attribute name:
■ Use bop_sinfo:
Alternatively, you locate the attribute name by running a utility that is called bop_sinfo –a
<object name> from a command prompt on the CA SDM Primary or Secondary Server. The
bop_sinfo utility returns all the attribute names and attribute details for a given object.
a. Run the following command from the CA SDM Primary or Secondary Server:
bop_sinfo –a object name
The utility returns all attribute names and attribute details for a given object. The object
name for a Request is cr. The example output as a result of running bop_sinfo –a cr is
displayed here:

Process Design Tips
CA Service Desk Manager 177
By the screenshot, we can see that the description field in the UI corresponds to the description
attribute. The Request Area field in the UI corresponds to the category attribute.
■ Use Majic Files:
a. Open up the majic file definition in $NX_ROOT/bopcfg/majic for the Request
Object, which is cm.maj.
The attribute names are displayed.
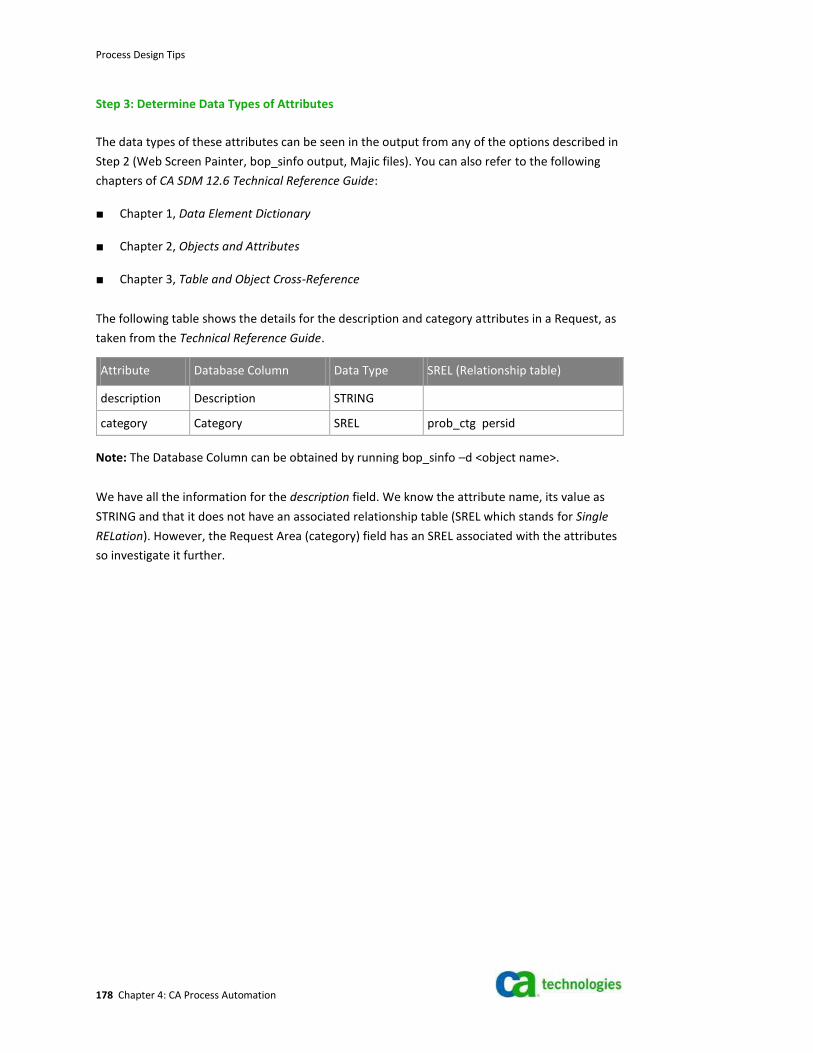
Process Design Tips
178 Chapter 4: CA Process Automation
Step 3: Determine Data Types of Attributes
The data types of these attributes can be seen in the output from any of the options described in
Step 2 (Web Screen Painter, bop_sinfo output, Majic files). You can also refer to the following
chapters of CA SDM 12.6 Technical Reference Guide:
■ Chapter 1, Data Element Dictionary
■ Chapter 2, Objects and Attributes
■ Chapter 3, Table and Object Cross-Reference
The following table shows the details for the description and category attributes in a Request, as
taken from the Technical Reference Guide.
Attribute Database Column Data Type SREL (Relationship table)
description Description STRING
category Category SREL prob_ctg persid
Note: The Database Column can be obtained by running bop_sinfo –d <object name>.
We have all the information for the description field. We know the attribute name, its value as
STRING and that it does not have an associated relationship table (SREL which stands for Single
RELation). However, the Request Area (category) field has an SREL associated with the attributes
so investigate it further.

Process Design Tips
CA Service Desk Manager 179
Step 4: Locate Valid Values in the SREL Table
When an attribute has an SREL associated with it, then its value has to match one of the valid
values specified in the corresponding SREL table. In our example of the category field on a
Request, this attribute denotes the field persid in the table prob_ctg. To list these values, use a
SQL query tool to perform the query SELECT persid, * FROM prob_ctg against the MDB (using the
SQL Table Name), or alternatively you can use Service Desk utilities such as pdm_extract (using
the Object Name). The following screenshot shows the result of the query when executed using
the Microsoft SQL Server Management Studio query tool:
The persid column includes the valid for the handles of the categories (Request Area) while the
sym column includes its corresponding display name shown on the UI.
Step 5: Use the Information Collected in the CA Process Automation Operator
The following information has now been identified for the Description and Request Area fields:
UI Name Attribute/field
name
Valid Values Values referencing to…
Description description Any String
Request Area category pcat:5100 pcat:5101 pcat:5102 pcat:5103 pcat:5104 pcat:5105 pcat:5106 pcat:5107 pcat:5108 pcat:5109
Software Hardware Networks Applications Software.Environment Software.Environment.DOS Software.Environment.OS2 Software.Environment.Windows Printer Email

Process Design Tips
180 Chapter 4: CA Process Automation
We can now use this information to update a Request leveraging an operator from the Service
Desk Connector in a CA Process Automation Process definition as follows:
When executed, this process sets the Request Area to a value of Networks and the Description
field to New description after updating Request Area.
In the example above, we hardcoded this change to our operator properties, however, we could
also change these values dynamically using Datasets.

Process Design Tips
CA Service Desk Manager 181
Using Dataset Objects to Define Variables
In CA Process Automation, a Dataset object stores information that can be shared among
instances of the same process or even between processes. Modify the information defined in a
Dataset manually (by users or administrators), or automatically during the execution of a
Process. Within a Dataset, define pages that are used to organize the various parameters or
fields that the Dataset contains.
Understand the differences in scope of different Dataset objects with in CA Process Automation.
Data that is frequently shared among multiple processes and operators is typically stored in a
Named Dataset. A Named Dataset is accessible to all processes in the Library in which it is
contained. A typical example is usernames, passwords, database, and server names for certain
applications. Storing these names in a named dataset greatly simplifies the process when any of
these parameters must be updated. An update can include anything from a simple change of
password to a situation where you have moved an application server to a new renamed server.
Process Datasets, on the other hand, define variables within the context of a process and are
included in every instance of a process object. Within the context of a particular process, this set
is also called the local Dataset. Process Datasets are accessible (and modifiable) from all
operators within the Process and can be initialized from the parent process or from external
applications. Their final value is readable from the parent process.
Operators that return information that is more complex than a binary response typically use the
operator dataset.
The best practice is to store information locally as much as possible without causing unnecessary
duplication of data. To make some parts of this information accessible to the other processes,
decide who can see this information and what data are made available. A Named Dataset is
available for the complete environment, while a Process Dataset is only available in the process
itself and its parent process.
When storing usernames, passwords, server names, or other parameters in a shared dataset, be
sure to use different variables for different logical functions. For example:
■ If Application A and Application B are both hosted on Server X, their Application Server
Name does not store in the same dataset variable. This application avoids any potential
problems in the event the applications are deployed to separate servers in the future.
■ If Application A and Application B both use root to connect to a specific function, store this
username in application-specific variables. This variable gives you better flexibility in the
event you (or your security team) can have separate user IDs for the individual applications.

Process Design Tips
182 Chapter 4: CA Process Automation
Tracking Service Desk Ticket Numbers Using Datasets
When an Operator is used to open a CA SDM ticket, their numbers are stored in dataset
variables. These numbers are critical to process the tickets with updates, updating status, setting
assignee, close, and logging comments.
Following diagram is an example of the Issue_Create Operator, which is used to open an issue:
In this example, the Operator is called Issue_Create_1. The dataset variable that keeps the Issue
number after this operator is executed is called newIssueNumber. To use this number in other
Operators, such as Issue_Log_Comments, concatenate the operator name that opened the issue
with the variable name. For example, Issue_Create_1.newIssueNumber as shown in the following
screenshot:
A similar method can be used to track the internal Request Numbers as shown in the following
screenshot:
In this case, the variable name is newRequestNumber. A Change Order variable is
newChangeNumber as shown in the following screenshot:

Process Design Tips
CA Service Desk Manager 183
Parsing XML data from CA SDM SOAP Operator Results
When using SOAP operators make a web service call to pull information from a CA SDM object, it
is necessary to parse the resulting XML and save the data needed into dataset variables. CA
Process Automation can leverage these variables. The CA SDM Web Services methods use a
standard XML structure beginning with the following root element:
<UDSObject>
The format of the XML representation is described in the following table:
XML Element Type Description
<UDSObject> N/A Identifies the root node.
<Handle> String Identifies the object handle.
<Attributes> Sequence Identifies the attribute values. This attribute holds zero or more elements for the objects attribute values.
<attrName0 DataType = "typeEnum">
String Identifies the AttrName0, which is an object attribute name as defined in the Service Desk majic (.maj) or mod (.mod) file.
This name uses dot-notation depending on the web method used.
The element value is the attribute value. An empty element indicates a null/empty value for this object attribute.
The DataType attribute is an integer indicating the attribute data type in the Service Desk environment. The value is one of the data type enumerations described in the Data Types section in this document.

Process Design Tips
184 Chapter 4: CA Process Automation
For example, a web service call to getObjectValues() can return information that is illustrated as
follow:
<?xml version="1.0" encoding="UTF-8"?>
<UDSObject>
<Handle>chg:400006</Handle>
<Attributes>
<Attribute DataType="2002">
<AttrName>web_url</AttrName>
<AttrValue>http://CASDMSERVER/CAisd/pdmweb.exe?OP=SEARCH+FACTORY=chg+SKIP
LIST=1+QBE.EQ.id=400006</AttrValue>
</Attribute>
<Attribute DataType="2004">
<AttrName>need_by</AttrName>
<AttrValue/>
</Attribute>
<Attribute DataType="2002">
<AttrName>chg_ref_num</AttrName>
<AttrValue>57</AttrValue>
</Attribute>
<Attribute DataType="2002">
<AttrName>priority.sym</AttrName>
<AttrValue>3-Medium</AttrValue>
</Attribute>
<Attribute DataType="2005">
<AttrName>affected_contact</AttrName>
<AttrValue>6531EE30E432E34FA71C0BD014622A41</AttrValue>
</Attribute>
<Attribute DataType="2002">
<AttrName>affected_contact.userid</AttrName>
<AttrValue>jarnold</AttrValue>
</Attribute>
<Attribute DataType="2002">
</Attributes>
</UDSObject>
Some methods, such as doSelect(), return a sequence of <UDSObject> elements that is contained
inside a <UDSObjectList> element. The <Lists> section holds zero or more <List> nodes. A <List>
node holds zero or more <UDSObject> nodes. <List> elements are returned only when a specific
request for list values is made, an example is as follows:
<?xml version="1.0" encoding="UTF-8"?>
<UDSObjectList>
<UDSObject>
<Handle>cr:4249712</Handle>
<Attributes>
<Attribute DataType="2005">
<AttrName>status</AttrName>
<AttrValue>OP</AttrValue>
</Attribute>
</Attributes>
</UDSObject>
</UDSObjectList>
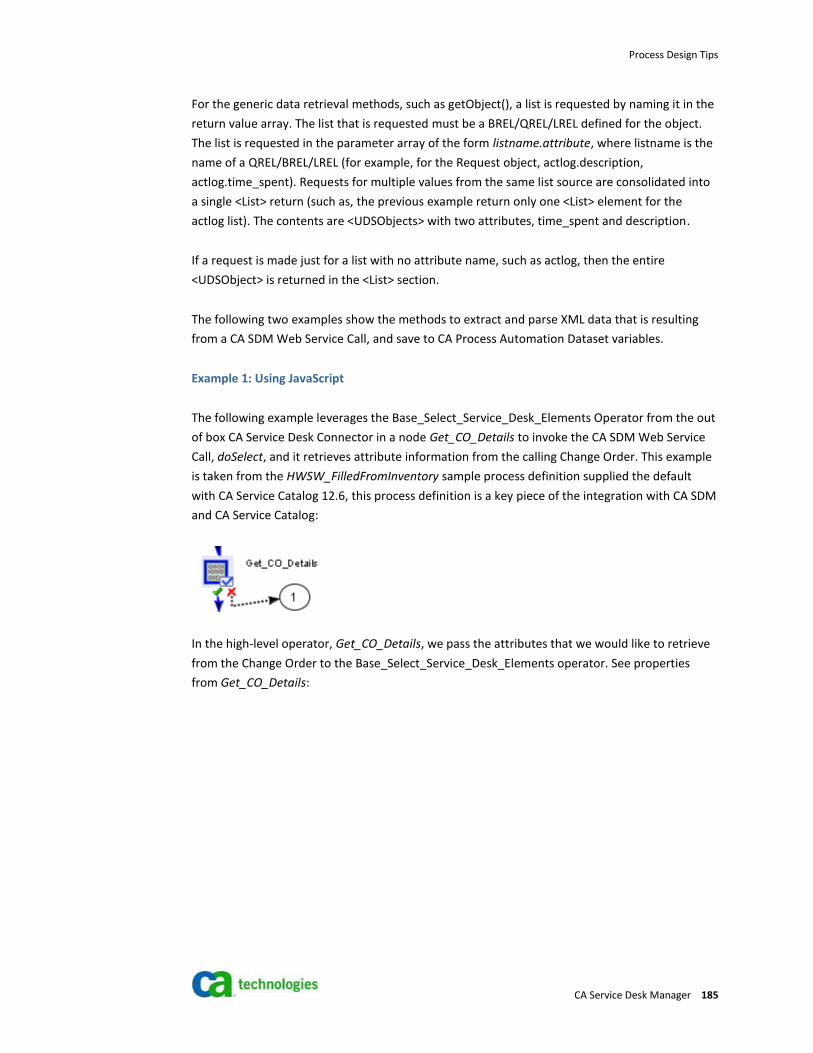
Process Design Tips
CA Service Desk Manager 185
For the generic data retrieval methods, such as getObject(), a list is requested by naming it in the
return value array. The list that is requested must be a BREL/QREL/LREL defined for the object.
The list is requested in the parameter array of the form listname.attribute, where listname is the
name of a QREL/BREL/LREL (for example, for the Request object, actlog.description,
actlog.time_spent). Requests for multiple values from the same list source are consolidated into
a single <List> return (such as, the previous example return only one <List> element for the
actlog list). The contents are <UDSObjects> with two attributes, time_spent and description.
If a request is made just for a list with no attribute name, such as actlog, then the entire
<UDSObject> is returned in the <List> section.
The following two examples show the methods to extract and parse XML data that is resulting
from a CA SDM Web Service Call, and save to CA Process Automation Dataset variables.
Example 1: Using JavaScript
The following example leverages the Base_Select_Service_Desk_Elements Operator from the out
of box CA Service Desk Connector in a node Get_CO_Details to invoke the CA SDM Web Service
Call, doSelect, and it retrieves attribute information from the calling Change Order. This example
is taken from the HWSW_FilledFromInventory sample process definition supplied the default
with CA Service Catalog 12.6, this process definition is a key piece of the integration with CA SDM
and CA Service Catalog:
In the high-level operator, Get_CO_Details, we pass the attributes that we would like to retrieve
from the Change Order to the Base_Select_Service_Desk_Elements operator. See properties
from Get_CO_Details:

Process Design Tips
186 Chapter 4: CA Process Automation
The result of this call is, saved into a Dataset variable, as ‘SoapResponseBody’, is:
<soapenv:Envelope
xmlns:soapenv="http://schemas.xmlsoap.org/soap/envelope/"
xmlns:xsd="http://www.w3.org/2001/XMLSchema"
xmlns:xsi="http://www.w3.org/2001/XMLSchema-instance">
<soapenv:Body>
<doSelectResponse>
<doSelectReturn><?xml version="1.0" encoding="UTF-8"?>
<UDSObjectList>
<UDSObject>
<Handle>chg:400076</Handle>
<Attributes>
<Attribute DataType="2001">
<AttrName>id</AttrName>
<AttrValue>400076</AttrValue>
</Attribute>
<Attribute DataType="2002">
<AttrName>chg_ref_num</AttrName>

Process Design Tips
CA Service Desk Manager 187
<AttrValue>86</AttrValue>
</Attribute>
<Attribute DataType="2002">
<AttrName>summary</AttrName>
<AttrValue>Procure Server </AttrValue>
</Attribute>
<Attribute DataType="2002">
<AttrName>assignee.userid</AttrName>
<AttrValue>spadmin</AttrValue>
</Attribute> <Attribute DataType="2002">
<AttrName>group.last_name</AttrName>
<AttrValue>IT Services</AttrValue>
</Attribute>
<Attribute DataType="2005">
<AttrName>group</AttrName>
<AttrValue>E46D064281F27B4FA9898F34A4F0FCB6</AttrValue>
</Attribute>
<Attribute DataType="2002">
<AttrName>web_url</AttrName>
<AttrValue>http://CASDMSERVER:9080/CAisd/pdmweb.exe?OP=SEARCH+FACTO
RY=chg+SKIPLIST=1+QBE.EQ.id=400076</AttrValue>
</Attribute>
<Attribute DataType="2001">
<AttrName>zusmrequestid</AttrName>
<AttrValue>10038</AttrValue>
</Attribute>
<Attribute DataType="2001">
<AttrName>zusmrequestitemid</AttrName>
<AttrValue>10372</AttrValue>
</Attribute>
</Attributes>
</UDSObject>
</UDSObjectList>
</doSelectReturn>
</doSelectResponse>
</soapenv:Body>
</soapenv:Envelope>
In order to parse the resulting data, we will need to apply JavaScript as a part of the Post
Execution Code for the Get_CO_Details node as follows, to be executed after the web service call
has completed successfully and the data is retrieved. Once this code is executed, the XML is
parsed and saved into dataset variables:
if ((Process[OpName].ResponseCode).indexOf('Failed',0) != -1) {
Process.Subject = GblMSGVals.SUBJECT_MSG20;
Process.Message = "Process: " + Process.Prefix_UserInstName__ + " "
+ GblMSGVals.SUBJECT_MSG4 +" " + OpName + " " + Process[OpName].Reason;
}
var i;
var j;
var k;

Process Design Tips
188 Chapter 4: CA Process Automation
var str;
Process.noRequestorRow = 0;
if ( typeof(Process[OpName].SelectDataResponse) == 'undefined' )
{
Process.noRequestorRow = 1;
return;
}
if ( typeof(Process[OpName].SelectDataResponse.UDSObject) == 'undefined' )
{
Process.noRequestorRow = 1;
return;
}
if ( Process[OpName].SelectDataResponse.UDSObject.length < 1 )
{
Process.noRequestorRow = 1;
return;
}
Process.MemberCount = Process[OpName].SelectDataResponse.UDSObject.length;
if ( typeof(Process[OpName].Rows) =='undefined' ){
Process[OpName].Rows = newValueMap();
}
for ( j = 0; j < Process[OpName].SelectDataResponse.UDSObject.length; j++ )
{
str = "row" + j;
Process[OpName].Rows[str] = newValueMap();
var myAttributes = new Array();
myAttributes =
Local[IconName].SelectDataResponse.UDSObject[j].Attributes[0].Attribute;
Process.CO_ID = myAttributes[0].AttrValue[0].text_;
Process.CO_Number = myAttributes[1].AttrValue[0].text_;
Process.CO_Summary = myAttributes[2].AttrValue[0].text_;
Process.CO_Analyst_UserID =
myAttributes[3].AttrValue[0].text_;
Process.CO_Group_Name =
myAttributes[4].AttrValue[0].text_;
Process.CO_Group_UUID =
myAttributes[5].AttrValue[0].text_;
Process.CO_URL = myAttributes[6].AttrValue[0].text_;
Process.CO_SLCM_ID = myAttributes[7].AttrValue[0].text_;
Process.zusmrequestitemid=
myAttributes[8].AttrValue[0].text_;
}
Process.UserInstName="SDM Fulfillment CO: " + Process.CO_Number;

Process Design Tips
CA Service Desk Manager 189
Example 2: Using XPATH
The follwoing example leverages a custom SOAP Operator Get Object Values to invoke the CA
SDM Web Service Call, getObjectValues. This custom SOAP Operator is called from a high-level
operator Get Change Order Information and it retrieves attribute information from the calling
Change Order.
This example is taken from the Order PC sample process definition and is included in the CA
Process Automation Sample Process Definitions for CA SDM posted to the CA Process
Automation Best Practices Page on support.ca.com:
In the high-level operator, Get Change Order Information, we pass the attributes that we would
like to retrieve from the Change Order to our custom operator. See the properties from Get
Change Order Information:

Process Design Tips
190 Chapter 4: CA Process Automation
See properties from our custom operator Get Object Values:
The result is, saved as SoapResponseBody, and is similar to the format noted in the first example.
However, the difference is that in this custom operator Get Object Values. We have stripped the
XML namespaces from the response. We save the result to a variable called object Values in our
custom operator properties under Call Results as shown.

Process Design Tips
CA Service Desk Manager 191
Click View, to see where this view is saved:
Once the Get Change Order Information node is executed within our Order PC Process definition,
the output of objectValues looks as follows:
<?xml version="1.0" encoding="UTF-8"?>
<UDSObject>
<Handle>chg:400276</Handle>
<Attributes>
<Attribute DataType="2002">
<AttrName>web_url</AttrName>
<AttrValue>http://CASDMSERVER/CAisd/pdmweb.exe?OP=SEARCH+FACTORY=chg+SKIP
LIST=1+QBE.EQ.id=400276</AttrValue> </Attribute>
<Attribute DataType="2004">
<AttrName>need_by</AttrName>
<AttrValue/> </Attribute>
<Attribute DataType="2002">
<AttrName>chg_ref_num</AttrName>
<AttrValue>457</AttrValue>
</Attribute>
<Attribute DataType="2002">
<AttrName>priority.sym</AttrName>
<AttrValue>None</AttrValue>
</Attribute>
<Attribute DataType="2005">
<AttrName>affected_contact</AttrName>
<AttrValue>6531EE30E432E34FA71C0BD014622A41</AttrValue>
</Attribute>
<Attribute DataType="2002">
<AttrName>affected_contact.userid</AttrName>
<AttrValue>jarnold</AttrValue>
</Attribute>
<Attribute DataType="2002">
<AttrName>affected_contact.combo_name</AttrName>
<AttrValue>Arnold, June </AttrValue>
</Attribute>
<Attribute DataType="2002">
<AttrName>requestor.userid</AttrName>
<AttrValue>jarnold</AttrValue>
</Attribute>
<Attribute DataType="2005">

Process Design Tips
192 Chapter 4: CA Process Automation
<AttrName>assignee</AttrName>
<AttrValue>08A4A894F3B53244830A9D5EDE3ACAED</AttrValue>
</Attribute>
<Attribute DataType="2002">
<AttrName>assignee.userid</AttrName>
<AttrValue>jmccarthy</AttrValue>
</Attribute>
<Attribute DataType="2002">
<AttrName>category.assignee.userid</AttrName>
<AttrValue>jmccarthy</AttrValue>
</Attribute>
<Attribute DataType="2005">
<AttrName>category.assignee</AttrName>
<AttrValue>08A4A894F3B53244830A9D5EDE3ACAED</AttrValue>
</Attribute>
<Attribute DataType="2002">
<AttrName>category.assignee.combo_name</AttrName>
<AttrValue>McCarthy, John </AttrValue>
</Attribute>
</Attributes>
</UDSObject>
We can then apply XPATH as a part of the Post Execution Code for the Get Change Order
Information node. This code executes after the web service call in our custom operator has
completed successfully and the data is retrieved. Once this code is executed, the XML is parsed
and saved into dataset variables:
Process.web_url =
applyXPath(Process[OpName].objectValues,"//AttrName[text() =
'web_url']/../AttrValue/text()" )
Process.needByDate =
applyXPath(Process[OpName].objectValues,"//AttrName[text() =
'need_by']/../AttrValue/text()" )
Process.chgRefNum =
applyXPath(Process[OpName].objectValues,"//AttrName[text() =
'chg_ref_num']/../AttrValue/text()" )
Process.priority =
applyXPath(Process[OpName].objectValues,"//AttrName[text() =
'priority.sym']/../AttrValue/text()" )
Process.endUserHandle = "cnt:" +
applyXPath(Process[OpName].objectValues,"//AttrName[text() =
'affected_contact']/../AttrValue/text()" )
Process.requestorUserID =
applyXPath(Process[OpName].objectValues,"//AttrName[text() =
'affected_contact.userid']/../AttrValue/text()" )
Process.requestorName =
applyXPath(Process[OpName].objectValues,"//AttrName[text() =
'affected_contact.combo_name']/../AttrValue/text()" )
Process.assigneeUserID =
applyXPath(Process[OpName].objectValues,"//AttrName[text() =
'assignee.userid']/../AttrValue/text()" )

Process Design Tips
CA Service Desk Manager 193
Process.defaultApproverUserID =
applyXPath(Process[OpName].objectValues,"//AttrName[text() =
'requestor.userid']/../AttrValue/text()" )
Process.categoryAssigneeUserID =
applyXPath(Process[OpName].objectValues,"//AttrName[text() =
'category.assignee.userid']/../AttrValue/text()" )
Process.approverHandle = "cnt:" +
applyXPath(Process[OpName].objectValues,"//AttrName[text() =
'category.assignee']/../AttrValue/text()" )
Process.approverUserIDList = "<xml><userid>" +
Process.categoryAssigneeUserID + "</userid><userid>" +
Process.assigneeUserID + "</userid><userid>" +
Process.defaultApproverUserID + "</userid></xml>"
if( Process.categoryAssigneeUserID.length > 0)
{
Process.approverUserID = Process.categoryAssigneeUserID;
}
else if( Process.assigneeUserID.length > 0)
{
Process.approverUserID = Process.assigneeUserID;
}
else
{
Process.approverUserID = Process.defaultApproverUserID;
}
Process.approverName =
applyXPath(Process[OpName].objectValues,"//AttrName[text() =
'category.assignee.combo_name']/../AttrValue/text()" )
Process.UserInstName = "Order PC for CO " + Process.chgRefNum

Exception Handling
194 Chapter 4: CA Process Automation
Exception Handling
When designing your Process Definition in CA Process Automation, it is important to identify
possible outcomes of each step, and to plan for exceptions.
Links determine the order in which actions are processed. Each Operator can have multiple entry
and exit links. An entry link invokes the Operator, serving as an execution order for an Operator.
Each exit link corresponds to a particular outcome of an Operator. All Operators have predefined
exit links (such as Aborted, Completed, Failed, or Successful). Operators also allow you to use a
Boolean expression to define a custom exit link that is based on the Operator results and the
value of variables accessible to Operators in a Process.
Under normal circumstances, the Process can proceed from Operator to Operator, following
each link to the expected conclusion. Sometimes, however, the Process flow encounters an
unexpected result that can create issues with the execution. As an example, what action do you
take when making a web service call to an application that has gone down? Without a
contingency plan in place, execution can simply stop until the problem is resolved.
Although you can manage special exceptions right within the main process flow, it is much more
efficient to manage the execution errors generically through the CA Process Automation
Exception Handlers. As with CA SDM connectivity parameters, CA Process Automation has a
generic Exception handler setting that leverages all the running process flows, if an error occurs.
Following list shows the three types of exceptions:
■ System Error
Example: Invalid Touchpoint Name, System Communication Problems, Unreachable Agents.
■ Unidentified Response
Example: An operator has no path to take after it has executed.
■ Aborted
Example: User or system aborts the operator.
Following list shows the three types of lane changes:
■ All to All
■ All to One
■ One to All
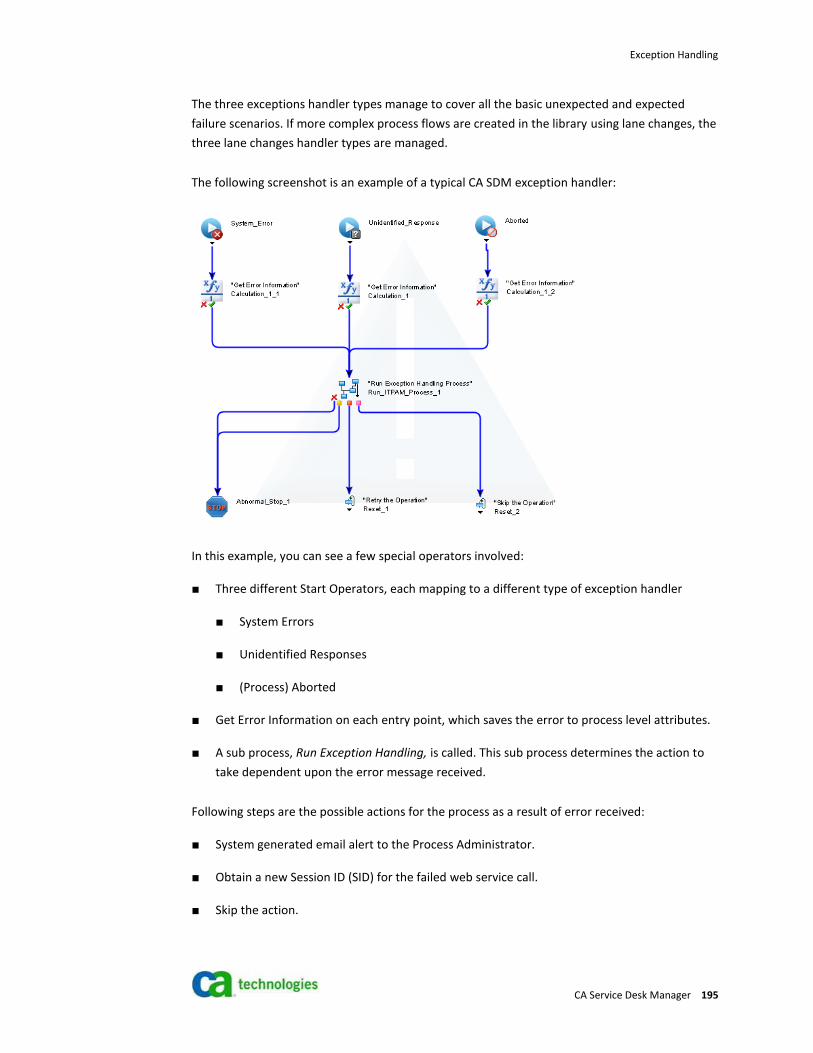
Exception Handling
CA Service Desk Manager 195
The three exceptions handler types manage to cover all the basic unexpected and expected
failure scenarios. If more complex process flows are created in the library using lane changes, the
three lane changes handler types are managed.
The following screenshot is an example of a typical CA SDM exception handler:
In this example, you can see a few special operators involved:
■ Three different Start Operators, each mapping to a different type of exception handler
■ System Errors
■ Unidentified Responses
■ (Process) Aborted
■ Get Error Information on each entry point, which saves the error to process level attributes.
■ A sub process, Run Exception Handling, is called. This sub process determines the action to
take dependent upon the error message received.
Following steps are the possible actions for the process as a result of error received:
■ System generated email alert to the Process Administrator.
■ Obtain a new Session ID (SID) for the failed web service call.
■ Skip the action.

Exception Handling
196 Chapter 4: CA Process Automation
■ Retry the action.
Important! In the exception handler, we have built in the ability to reuse Session IDs (SID), so
that every CA SDM web service call that is invoked does not require a separate login/logout of
the CA SDM Web Services to obtain a SID. The SID is built with logic that if there is no valid SID
available (due to session timeout), then the process logs back in to the Web Services to obtain a
valid SID. This process significantly drops the amount of web service calls that are made within a
process definition. The CA Service Desk Connector is not built with this logic; however the
example Change Management use case is discussed later in this chapter.
Note: The Web Services Session timeout value is controlled by an Options Manager Option under
Administration, Options Manager, Web Service, webservice_session_timeout.
If you would like to see an example of how the method of exception handling that is described
here is used within a process definition, please download the CA Process Automation Sample
Process Definitions for CA SDM Sample Process Definitions available on the CA Process
Automation Best Practices page on support.ca.com.
In this sample, there is a template that you can use to create your own custom process
definitions leveraging the exception handling noted in this section, called Template Process.

Requesting User Interaction
CA Service Desk Manager 197
Requesting User Interaction
Interaction Request Forms (IRFs) enable you to create an interface that can be used during the
execution of a process to interact with an end user in a structured manner. For example, an
Interaction Request Form can be used in the following scenarios:
■ Get approval before continuing with a process or path within a process.
■ Enable a user to select a course of action.
■ Retrieve information that is only available from a person at runtime.
■ Request performance of a manual action (for example, physically connecting a server to a
switch) and marked as completed before proceeding with a process.
The IRF object defines the pages, parameters, and other characteristics of the form. IRFs are
saved as separate objects in the Automation Library. After they have been created and checked
in, IRFs can be added to any Process using the User Interaction Operator. For more information
on the User Interaction Operator see the CA Process Automation Reference Guide. For more
information on Interaction Request Forms, refer to the Interaction Request Forms chapter in the
CA Process Automation User Guide.
The list of CA Process Automation IRFs that are waiting for user action can be viewed by selecting
an entry in the Workflow Tasks tab, which invokes the CA Process Automation Task List. The
Workflow Tasks tab of a ticket contains an audit trail of process instance messages that appear
on the CA Process Automation task list.

Requesting User Interaction
198 Chapter 4: CA Process Automation
Create an Interaction Request Form
To create an Interaction Request Form:
1. Log in to the CA Process Automation Management Console as an administrative user
(pamadmin on a new install of CA Process Automation 3.1, for example. For previous
versions of CA Process Automation or on an upgraded instance of 3.1, this user would be
itpamadmin).
2. Click on the link CA Process Automation Client on the upper right hand side.
3. Open the Library Browser by going to File, Open Library Browser.
4. Right click on the directory under which you would like to create IRF.
5. Navigate to New Object, Interaction Request Form.
The IRF appears in the right pane of CA Process Automation library. You would first need to
provide a name.
6. Double-click the IRF to open details.
7. Provide a name to the IRF, add Parameters for the data that you would like displayed on the
form. Define these parameters as Process Dataset parameters in order of data and these
fields are available to other steps in the process.
Take an example of a form which must be completed and approved before an end user is
provisioned a PC. The requirement is for the approval form to provide a link back to the
Change Order Number that requests the provisioning of the PC. Here is the definition of our
form:
If we go to our Order PC Process Definition, we have a Process Dataset Variable that is defined
for chgRefNum our Change Order Number. We have obtained the value at run time:

Requesting User Interaction
CA Service Desk Manager 199
This results in the following IRF when executed within a task:

Requesting User Interaction
200 Chapter 4: CA Process Automation
For more information on the User Interaction Operator see the CA Process Automation Reference
Guide, Chapter 17, Workflow Module, section on User Interaction Operator. For more details on
using Interaction Request Forms see Chapter 11, Interaction Request Forms in the CA Process
Automation User Guide.
The list of CA Process Automation Interaction Request Forms (IRFs) that are pending user action
can be viewed by selecting any entry in the CA SDM Ticket Workflow Tasks tab. This selection
invokes the CA Process Automation Task list. The running process instance is configured for
Create Business-Like Entries in the CA SDM Workflow Tasks tab (see page 211) that is discussed
later in this chapter. In CA Process Automation you can view IRF by the assignee of the task, if
said assignee logs in to their Task List in the CA Process Automation Client, or an Administrator
logs in to the CA Process Automation Client and can navigate to Configuration Browser, Default
Process Watch, and User Interactions.
Note: Once a form has been completed and submitted, there is no current default way to go
back and review Completed tasks, or completed Interaction Request Forms. To track this
completed data that you must refer to the Process Dataset Variables.

Link a CA Process Automation Process Definition to CA SDM
CA Service Desk Manager 201
Link a CA Process Automation Process Definition to CA SDM
In CA Process Automation, processes can be executed manually, and triggers a Start Request
Form object, called from other Processes, or triggered using FTP, SOAP calls, SNMP traps, or
SMTP (email) messages. When CA Process Automation is integrated with CA SDM, an automated
process can be added to a particular CA SDM category (for example, a Request or Issue
Category), or an Area (Request, Incident, or Problem Area). The process can also be triggered in
response to an event through Macro.

Link a CA Process Automation Process Definition to CA SDM
202 Chapter 4: CA Process Automation
Create a Start Request Forms
As mentioned above the key to the integration with CA SDM and CA Process Automation is the
CA Process Automation Start Request Form (SRF). This object ties to Service Desk and
instantiates a process definition.
When you create an SRF, you associate it with the Process definition and check in. You include
the appropriate keywords in the SRF properties. If the appropriate keyword is missing from the
SRF properties, the SRF and its associated Process definition fail to be made available to a CA
SDM Ticket Area/Category, or macro.
Follow these steps:
1. Log in to CA Process Automation Management Console as an administrative user. (For
Example pamadmin on a new install of CA Process Automation 3.1. For previous versions of
CA Process Automation or on an upgraded instance of 3.1, this user would typically be an
itpamadmin.)
a. Click on the CA Process Automation Client link on the upper right hand side.
b. Open the CA Process Automation Library Browser.
2. Right-click the directory under which you would like to create an SRF.
3. Navigate to New Object, Start Request Form.
The Start Request Form appears in the right pane of CA Process Automation library.
4. Provide a name.
5. Right-click on the SRF to open Properties.
The Library Object Properties page appears.
6. Click the General tab and modify the description of the Start Request Form. Add a
description that identifies the proper usage of the Start Request Form and the associated
Process Definition to the CA SDM Administrator.
7. Click the Keywords tab.
The Keywords tab is active.
8. Click the ab+ icon.
A row adds to the empty list.
9. Click the row.

Link a CA Process Automation Process Definition to CA SDM
CA Service Desk Manager 203
10. Enter one of the following values to associate a keyword to the appropriate ticket area or
category. For example, to make a Start Request Form available for a CA SDM Change
Category, enter the chgcat keyword.
Launch Point in CA SDM Use Keyword
Request/Incident/Problem Area pcat
Change Category chgcat
Issue Category isscat
Execute CA IT PAM Action Macro. macro

Link a CA Process Automation Process Definition to CA SDM
204 Chapter 4: CA Process Automation
When you complete the steps, it looks like the following screenshot:
1. Click OK.
CA Process Automation saves the keywords and description and closes the Library Object
Properties dialog.
2. Tie a Process definition and Parameters to the Start Request Form. To do so, double-click the
Start Request Form link that was just created.
3. With the Parameters value highlighted, rename the parameter to Input Parameters. Right
click the mouse and click Add Parameter. Add two parameters, label and persid, persid is
required and obtained automatically when the integration is leveraged.
4. Highlight Process. Click ... button on the right hand side of the pane to tie your process
definition to the SRF.

Link a CA Process Automation Process Definition to CA SDM
CA Service Desk Manager 205
5. Check in the SRF.
Note: If you fail to check in the Start Request Form, the form is not available to a CA SDM
Ticket Area/Category, or macro.
After the Start Request Form has been checked in, it appears on the CA Process Automation SRF
List within CA SDM, when you tie a Request/Incident/Problem Area, Change Category, Issue
Category, or Macro to a CA Process Automation Process Definition, depending on the keyword
used. For more information, you can refer to the Start Request Forms chapter in the CA Process
Automation User Guide.

Link a CA Process Automation Process Definition to CA SDM
206 Chapter 4: CA Process Automation
Launching a Process Definition from CA Process Automation
Before attaching a CA Process Automation Process Definition to a Ticket Area/Category or
invoking it from CA SDM, it is a good idea to have a quick test in CA Process Automation first.
To launch a process definition from CA Process Automation:
1. Log in to the CA Process Automation Management Console as an administrative user
(pamadmin on a new install of CA Process Automation 3.1, for example. For previous
versions of CA Process Automation or on an upgraded instance of 3.1, this user would
typically be an itpamadmin).
2. Click on the link CA Process Automation Client on the upper right hand side.
3. Open the Library Browser by going to File, Open Library Browser.
4. Navigate to the Start Request Form (SRF) that ties to the process you would like to launch.
5. Right-click the mouse on the SRF and click Start:
6. You are prompted for whatever parameters are defined in your SRF:

Link a CA Process Automation Process Definition to CA SDM
CA Service Desk Manager 207
7. Navigate to Default Process Watch tab, and click Running Instances, you would see your
definition running.
If this process is successful, you can now try attaching your process definition to a Ticket
Area/Category, or Macro.

Link a CA Process Automation Process Definition to CA SDM
208 Chapter 4: CA Process Automation
Attach a CA Process Automation Process Definition to a Ticket Area/Category
If the process definition tests successfully when it is instantiated within CA Process Automation,
then you can attach the process definition to a CA SDM Ticket Area/Category to be instantiated
from within CA SDM. When you attach a CA Process Automation process definition to a CA SDM
Request, Incident, Problem Area, or Change Category, you create a static connection between a
CA SDM area or category and a CA Process Automation process definition.
When a CA SDM user creates or edits a ticket and selects a ticket area or category, the associated
CA Process Automation process definition launches into a process instance. Pertinent
information about the process instance appears on the Workflow Tasks tab on the ticket from
which it was invoked.
Follow these steps:
1. Launch the CA SDM UI as an Administrator.
2. On the Administration tab, click Service Desk.
3. Navigate to Request, Incidents, Problems, or Change Orders or Issues, then drill down to
Areas or Categories.
The Area or Category List appears.
4. Create or edit a ticket area or category.
The Update page appears.
5. Click the Workflow tab.
If the CA Process Automation Workflow Options are installed in the CA SDM Options
Manager, then the Use ITPAM button is available on the Workflow tab.

Link a CA Process Automation Process Definition to CA SDM
CA Service Desk Manager 209
6. Click Use ITPAM.
The CA Process Automation Start Form Request List appears. Each row in the list is a CA
Process Automation Start Request Form as shown in the following screenshot:
The Start Request From for each process definition can appear in this list only if the
appropriate keyword has been associated with the Start Request Form.
7. Click the value in the Name column to select the SRF associated with the Process Definition
you would like to invoke.
The CA Process Automation SRF List closes. The Process definition name and Process
definition reference path appear on the Workflow tab as shown in the following screenshot:
8. Click Save.
The system saves the process settings. The next ticket that a user creates in the specified
ticket area or category automatically attaches the workflow and creates a process instance.
The ticket Workflow Tasks tab shows a summary of running the process instance
information. Additionally, a user can access additional information about the process
instance by clicking View Process on the Workflow Tasks tab, which launches CA Process
Automation in context of the running process instance.

Link a CA Process Automation Process Definition to CA SDM
210 Chapter 4: CA Process Automation
Using Macros to Trigger a CA Process Automation Process Definition
Macros are small scripts that define either conditions or actions. When Events or Behaviors
execute, they can execute one or more Action macros. Before macros are executed, you can use
a conditional macro to determine which set of Action macros to execute.
You can configure events that are attached to objects to execute configured actions. Events are
procedures that execute after a certain amount of time has elapsed. For example, an event sends
a message to a service desk analyst, if a priority one issue is not received within an hour. Other
parts of the system use events, for example, Service Types.
You can define events for Requests, Incidents, Problems, Change Orders, Issues, Contacts,
Configuration Items, and Global and Specific Tenants.
For each macro, you specify the object type that you want the macro to use. If you create a site
defined condition to verify the values of a request, you set the type to Request. When you select
macros for Events and Behaviors, CA SDM only displays macros with a type matching the type on
the Event or Behavior.
CA SDM includes an Execute CA IT PAM Action macro, which can trigger the execution of a CA
Process Automation Process.
For instructions on leveraging this macro, see Tech Doc TEC537603 Using a Service Desk Macro to
launch an ITPAM process on Support.
Important: If you instantiate a CA Process Automation Process Definition through an Execute CA
ITPAM Action macro, you do not see any tasks in the Workflow Tasks Tab within the calling CA
SDM ticket.

Create Business-Like Entries in the CA SDM Workflow Tasks Tab
CA Service Desk Manager 211
Create Business-Like Entries in the CA SDM Workflow Tasks Tab
By default, when a CA SDM ticket launches a CA Process Automation Process, the information
that is brought over from CA Process Automation in to the CA SDM Workflow Tasks Tab is taken
directly from the CA Process Automation process instance logs.
By default, the entries in CA Process Automation process instance logs are categorized as Process
or Operator, which are low-level and not user-friendly, as shown in the following screenshot:
As such, by default, CA SDM brings over entries that are categorized as Process or Operator. An
option named caextwf_log_categories controls the entry, in the Options Manager in CA SDM as
shown in the following screenshot:
If you compare the screenshot of CA Process Automation process instance logs (two preceding
screenshots), against the following screenshot of the Ticket Workflow Tasks tab in CA SDM, you
can see a 1:1 correlation between the entries:

Create Business-Like Entries in the CA SDM Workflow Tasks Tab
212 Chapter 4: CA Process Automation
If you would like to log business events, such as pending or completed tasks, you can accomplish
that by using explicit logging in your CA Process Automation process definitions. This step is done
using Pre and Postexecution Code for each CA Process Automation operator, or anywhere you
can put JavaScript code for that matter, as follows:
logEvent(level,category,message);
An example:
logEvent(1, "Task: Complete Form (Pending)", "Requester assigned to task:
Complete Change Analysis Form");
Leveraging this capability, you can tailor your process to log entries for all Pending (using
Preexecution Code) and Complete (using Post Execution Code) tasks or functions.
To create business-like entries in the CA SDM workflow Tasks tab, follow the steps.
Follow these steps:
1. In the Properties of the CA Process Automation operator, modify Pre and Post Execution
Code using logEvent as shown in the following screenshot. Pre and Post Execution Code can
be found under Execution Settings of operator properties (or alternatively anywhere
JavaScript can be instantiated:
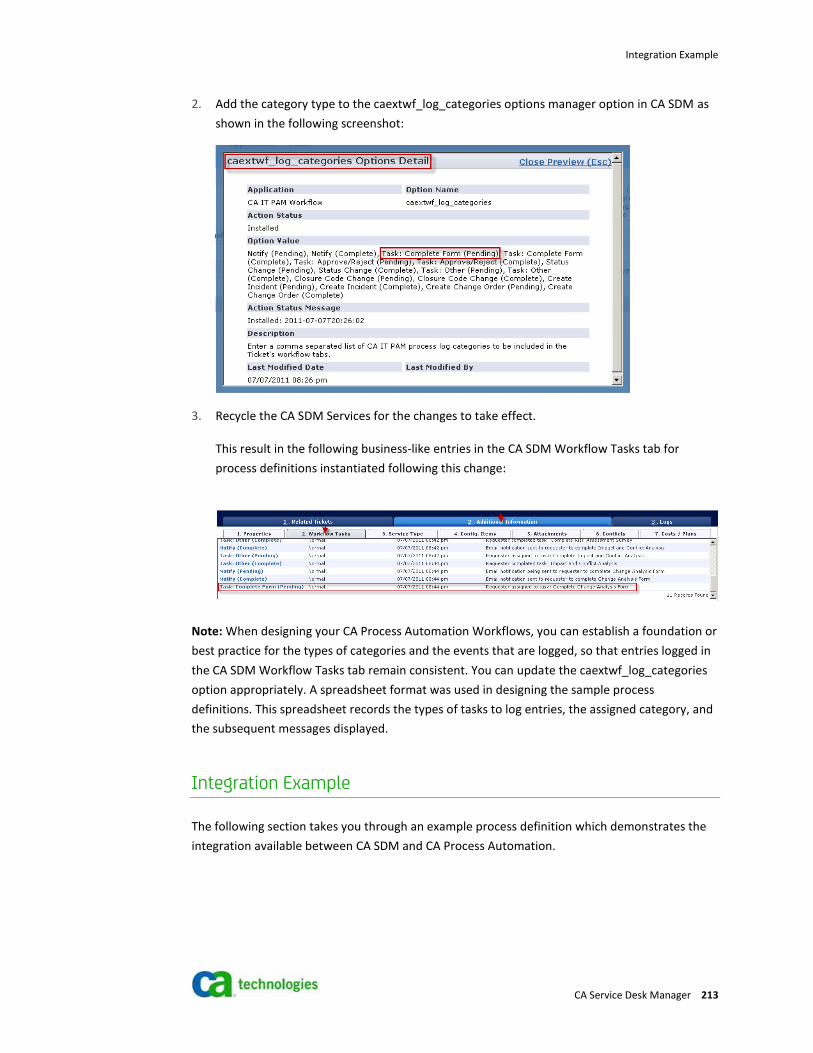
Integration Example
CA Service Desk Manager 213
2. Add the category type to the caextwf_log_categories options manager option in CA SDM as
shown in the following screenshot:
3. Recycle the CA SDM Services for the changes to take effect.
This result in the following business-like entries in the CA SDM Workflow Tasks tab for
process definitions instantiated following this change:
Note: When designing your CA Process Automation Workflows, you can establish a foundation or
best practice for the types of categories and the events that are logged, so that entries logged in
the CA SDM Workflow Tasks tab remain consistent. You can update the caextwf_log_categories
option appropriately. A spreadsheet format was used in designing the sample process
definitions. This spreadsheet records the types of tasks to log entries, the assigned category, and
the subsequent messages displayed.
Integration Example
The following section takes you through an example process definition which demonstrates the
integration available between CA SDM and CA Process Automation.

Integration Example
214 Chapter 4: CA Process Automation
Design View
The following screenshot is the Change Management Process Definition in the design view in the
CA Process Automation client. This process definition was originally created in CA Workflow, and
was available out of the box in previous and current versions of CA SDM. The Change
Management process definition has been manually converted into a Process Definition that CA
Process Automation leverages, and is available for download in the CA Process Automation Best
Practices Page on support.ca.com.

Integration Example
CA Service Desk Manager 215
Setup and Configuration
Follow the steps in section Configure the Integration to verify all prerequisites for the
integration.
Note: You are not required to install or configure the CA Service Desk Connector for this specific
example, nor for any of the examples that are provided as a part of the CA Process Automation
Sample Process Definitions for CA SDM. Although configuring the connector is a good idea in
creating your own sample flows, it is not required for this use case, as this use case leverages
custom operators.
1. Import the Change Management Sample Process Definition from the CA Process Automation
Best Practices page on support.ca.com. The Change Management Sample Process Definition
is provided as a part of the CA Process Automation Sample Process Definitions for CA SDM.
2. Configure the integration from CA Process Automation leveraging sample custom operators,
as follows:
a. In the CA Process Automation client, Library Browser, navigate to the SDM folder,
then Configuration. Here is where configuration from CA Process Automation for
this process definition is configured. There is an SRF, Start Configure Dataset, which
instantiates a Configure Dataset Process that initializes the CA SDM Server, CA
Process Automation Server, Exception Handling, and also obtains all handles for
tickets:

Integration Example
216 Chapter 4: CA Process Automation
b. Launch the Start Request Form for Start Configure Dataset:

Integration Example
CA Service Desk Manager 217
c. Verify the path to the Global Dataset (where all of the following data is saved for
other sample processes to leverage), and click Next:
d. Enter in the values for the CA SDM server, port, Administrative Username and
Password:
e. Next, enter in the values for the CA Process Automation server, and port:

Integration Example
218 Chapter 4: CA Process Automation
f. Enter in the value for CA Process Automation Process Admin and the email address.
g. Click Finish. Your CA Process Automation integration settings are now complete. All
data resulting from this process definition is saved to the CA SDM Dataset.
3. Configure the integration from CA SDM. Follow the steps in the Configuring the Integration
section in this chapter to configure CA SDM Options Manager Options for CA IT PAM
Workflow.
4. Follow the steps in the section Creating Business-Like Entries in the CA SDM Workflow Tasks
Tab to set the caextwf_log_categories option to the following tasks:
Notify (Pending), Notify (Complete), Task: Complete Form (Pending), Task: Complete Form
(Complete), Task: Approve/Reject (Pending), Task: Approve/Reject (Complete), Status Change
(Pending), Status Change (Complete), Task: Other (Pending), Task: Other (Complete), Closure
Code Change (Pending), Closure Code Change (Complete), Create Incident (Pending), Create
Incident (Complete), Create Change Order (Pending), Create Change Order (Complete).
5. Recycle the CA SDM Services for changes to the Options Manager options to take effect.
6. Complete all of the steps in the following chart to configure the data that can be used as a
part of this use case. We configure the Change Order Category that can launch our sample
process definition.
Note: The value used in the Value that is Used for this Demo column is not hard coded, you
can use any type of content for this value. In other words, the name of the analyst does not
have to be Donald Bell; it can be anyone, as long as they are defined as an Analyst.

Integration Example
CA Service Desk Manager 219
CA SDM
Object/Option
Value Used for This
Demo
Notes Complete?
Add contact (Analyst)
Donald Bell Must define in CA EEM, if you are leveraging EEM for authentication.
Donald is the Requester of the Change Order and also a member of both the CAB and Implementation Groups.
Yes
Add contact (Analyst)
Kevin Smith Must define in CA EEM, if you are leveraging EEM for authentication.
Kevin is a member of both the CAB and Implementation Groups.
Yes
Add contact (Analyst)
John McCarthy Must define in CA EEM, if you are leveraging email for authentication.
Must have an email address in CA SDM contact record as well as a notification method of email.
John is a member and manager of both the CAB and Implementation Groups.
Yes
Add an Implementation Group
Implementation Group
This group implements the Change Order. Must define in CA EEM as an Application Group. When you create this group in CA EEM, the Group Name in CA SDM must match the folder name in CA EEM. This group is not restricted to any specific name.
Yes
Add users to Implementation Group
John McCarthy
Donald Bell
Kevin Smith
This group must have more than one member.
Yes
Make a user in the Implementation Group a Manager.
John McCarthy The group must have only one manager.
Yes
Add CAB Group CAB The CAB (Change Advisory Board) which can serve as the approval group for the Change Order. Must define in CA EEM as an Application Group. When creating this group in CA EEM, the Group Name in CA SDM must match the folder name in CA EEM. This group is not restricted to any specific name.
Yes

Integration Example
220 Chapter 4: CA Process Automation
CA SDM
Object/Option
Value Used for This
Demo
Notes Complete?
Add contact (Analyst)
Donald Bell Must define in CA EEM, if you are leveraging EEM for authentication.
Donald is the Requester of the Change Order and also a member of both the CAB and Implementation Groups.
Yes
Add users to CAB Group.
John McCarthy
Donald Bell
Kevin Smith
This group must have more than one member.
Yes
Make a user in CAB Group the Manager.
John McCarthy The group must have only one manager.
Yes
Create Change Order Category.
Add.IT.Patch This category needs an Assignee (John McCarthy), a Risk Survey (General), CAB (CAB), Implementation Group (Implementation Group), and also has the Change Management CA Process Automation Process Definition Associated.
Yes
Create at least two new CIs, that have relationships established.
Apache Server 1
Apache Server 2
Apache Server 3
These CIs must have relationships that are established, as well as Change Orders that are opened against them, which are a part of Conflict Analysis.
Yes
Install Category_Defaults Option, recycle CA SDM services for changes to take effect.
Yes Install the option so that the information from the Add.IT.Patch Change Category is pulled over to the Change Order once it is created.
Yes
Modify Change Order Status
Check Make Change Order Active.
Check Make Change Order Active, such that when a Change Order enters the Backed Out status as a part of this workflow, it remains active.
Yes

Integration Example
CA Service Desk Manager 221
Change Management Workflow in Action
Forward Inc. introduces a Service Pack to all of their Apache Servers. As they follow the ITIL v3
guidelines, there is a standard process that the IT Department must follow. This includes:
■ Risk Assessment
■ Impact and Conflict Analysis
■ Approvals by both Change Manager and Change Advisory Board (CAB)
■ Implementation Assessment and Review
To ensure that the proper process is followed, they have standardized this process leveraging the
integration between CA SDM and CA Process Automation. Our Analyst, Donald Bell, creates the
Change Order, and after a series of approvals by the Change Manager and the CAB, this Request
for Change (RFC) is passed to the Implementation Group for implementation and Post
Implementation Review (PIR).
Follow these steps:
1. Log in to CA SDM as an analyst, in our case Donald Bell.
2. Create a Change Order.
3. Enter all the fields highlighted in red. Once you select the Category, and tab out of the field,
the Assignee, Implementation Group, and CAB are filled in automatically, because we have
the category_defaults option that is turned on:

Integration Example
222 Chapter 4: CA Process Automation

Integration Example
CA Service Desk Manager 223
Risk Assessment Survey
Follow these steps:
1. Click the Additional Information Tab, and then navigate to the Workflow Tasks Tab. Scroll
down through the tasks. You would see a notification has gone out to the requester (Donald
Bell) to complete the Risk Assessment Survey.
Note: No Risk value that is assigned to the Change Order.
2. Either clicks on the link that is provided through the email, or alternatively, scrolls to the
next pending task in the Workflow and click on the hyperlink for Task:

Integration Example
224 Chapter 4: CA Process Automation
3. Log in to CA Process Automation as Donald Bell. If you have the pass-through authentication
setup, you are not prompted for a login here:
4. Once logged in as Donald, you must see one pending task to complete the Risk Assessment
Survey. You would also see an I flashing in the lower right hand side of the screen, indicating
user interaction is pending. Navigate to Task and right click on the mouse. Select Reply:
5. Donald is prompted to complete the Risk Assessment Survey. Donald clicks the Risk
Assessment Survey link:

Integration Example
CA Service Desk Manager 225
6. The link brings Donald in context to the Risk Assessment Survey. The system prompts for a
login here even if you have Pass Through authentication setup. The survey which we have
assigned to the Change Category is the default General Risk Survey. Complete the Risk
Survey, answering questions in such a way that it generates a high risk as shown in the
following screenshot:

Integration Example
226 Chapter 4: CA Process Automation
7. Once the Risk Survey is complete, navigate back into CA Process Automation in context of
the task and click Finish on the Risk Assessment task. You can remain logged in to CA Process
Automation as Donald.

Integration Example
CA Service Desk Manager 227
Impact and Conflict Analysis
Follow these steps:
1. Navigate back to the Change Order. Click on the Additional Information Tab, and then
navigate to the Workflow Tasks Tab. Scroll down through the tasks. A notification has gone
out to the requester (Donald Bell) to complete Impact and Conflict Analysis.
2. To complete this task Donald can either clicks the link that is provided through email above,
or alternatively, scrolls to the next pending task in the Workflow and click the hyperlink for
Task: Other (Pending):

Integration Example
228 Chapter 4: CA Process Automation
3. Navigate back in to CA Process Automation as Donald. You would see one pending task for
Impact and Conflict Analysis. Navigate to the Task and right click on the mouse. Click Reply.
4. Click Impact and Conflict Analysis link. You can view the Change Order where Impact and
Conflict Analysis needs to be instantiated manually:
5. The first step is to perform Impact Analysis. Impact Analysis shows, which CIs is impacted if
the Apache Servers are temporarily brought down for the patch upgrade. Two ways are
there to run Impact Analysis. You can either run it through Impact Explorer which is
accessible through the Additional Information Tab, then drilling to the Config. Items tab
within a Change Order:

Integration Example
CA Service Desk Manager 229
a. And/or alternatively through CA CMDB Visualizer:
b. You can filter the Visualizer for Impact Analysis.

Integration Example
230 Chapter 4: CA Process Automation
6. Once Impact Analysis is complete, the next step is Conflict Analysis, which is also run within
context of a Change Order, beneath the Additional Information Tab, then navigate to the
Conflicts Tab. The Conflict Analysis shows if there are any Change Orders open for the same
CI in the same timeframe, thus generating conflict. If there are any conflicts, they must be
resolved before proceeding further with the Change Order:
7. Go back into CA Process Automation task and hit finish on the Impact and Conflict Analysis
Task. You can remain logged in as Donald Bell.

Integration Example
CA Service Desk Manager 231
Change Analysis
Follow these steps:
1. Navigate back to the Change Order. Click on the Additional Information Tab, and then drill
down to the Workflow Tasks Tab. Scroll down through the tasks. You can see a notification
has gone out to the requester (Donald Bell) to complete Change Analysis.
2. To complete this task Donald can either clicks on the link provided through an email, or
alternatively, can scroll to the next pending task in the Workflow and click on the hyperlink
for Task: Complete Form (Pending):

Integration Example
232 Chapter 4: CA Process Automation
3. Navigate back in to CA Process Automation as Donald Bell. You would see one pending task
for Change Analysis. Navigate to the Task and right click on the mouse. Click Reply:
a. Complete the information in the Change Analysis form and hit finish, including the
last question which did not fit in this screenshot (do not miss this step), and then
sign out of CA Process Automation as Donald.
4. Navigate back to the Change Order. The status of the Change Order goes to Approval in
progress and the CAB Approval flag is set to Yes.

Integration Example
CA Service Desk Manager 233
Change Manager Approval
Click the Additional Information Tab and then navigate to Workflow Tasks Tab. Scroll down
through the tasks. You can observe that a notification has gone out to the Change Manager, who
is the Manager of the Implementation Group, John McCarthy. John must Approve or Reject the
Change Order:
Follow these steps:
1. To complete this task John can either click the link that is provided through the email, or
alternatively, can scroll to the next pending task in the Workflow and click on the hyperlink
for Task: Approve/Reject (Pending):

Integration Example
234 Chapter 4: CA Process Automation
2. Log in to CA Process Automation as the Change Manager, John McCarthy:
3. As John, you would see one pending task to Approve/Reject the Change Order. Navigate to
Task and right click. Click Reply:

Integration Example
CA Service Desk Manager 235
4. Complete the Approval/Rejection comments. Dependent upon whether the Change
Manager Approves, Rejects, or marks the Change Order Incomplete, the Workflow takes
different paths. In our case, we mark it as Approved. You can remain logged in to CA Process
Automation as John.

Integration Example
236 Chapter 4: CA Process Automation
CAB Manager Approval
Follow these steps:
1. Navigate back to the Change Order. Click on the Additional Information Tab and then
navigate to the Workflow Tasks Tab. Scroll down through the tasks. You can see a
notification has gone out to the CAB, including the CAB Manager, who incidentally is also
John McCarthy. The CAB Manager, John, must Approve or Reject the Change Order on behalf
of the CAB:
2. To complete this task, John can either click the link that is provided through an email.
Alternatively, John can scroll to the next pending task in the Workflow and click on the
hyperlink for Task: Approve/Reject (Pending):

Integration Example
CA Service Desk Manager 237
3. As John, you would see one pending task for CAB Approval. Navigate to the Task and right
click on the mouse. Click Reply:
4. Complete CAB Date/CAB Chair, and the CAB Approval/Rejection comments. Dependent
upon whether the CAB Manager Approves, Rejects, or marks the Change Order Incomplete,
the Workflow takes different paths. In our case, we mark it as Approved. You can remain
logged in to CA Process Automation as John.

Integration Example
238 Chapter 4: CA Process Automation
Implement the Change Order
Follow these steps:
1. Navigate back to the Change Order. The Status of the Change Order is now Approved. Click
on the Additional Information Tab. Then navigate to the Workflow Tasks Tab. Scroll down
through the tasks. You can see a notification has gone out to the Implementation Group, of
which John McCarthy is a member. The Implementation Group is now responsible for
implementing the Change and applying the patches to our Islandia based Apache servers.
2. To complete this task, John can either click the link that is provided through the email, or
scroll to the next pending task in the Workflow and click the hyperlink for Task: Other
(Pending) to complete this task.

Integration Example
CA Service Desk Manager 239
3. As John, click Group Tasks on the left hand side of the pane since this task of implementing
the Change Order is assigned to the full Implementation Group.
4. Navigate to Implementation task and right click on the mouse. Click Reply.
5. The link in this task brings you directly into CA SDM in context of the Change Order once you
are logged in. Once the Implementation Group begins implementation of the patches, John
can click Finish to complete the task. You can remain logged in to CA Process Automation as
John.
6. Navigate back to the Change Order. The status has changed from Approved to
Implementation in Progress.

Integration Example
240 Chapter 4: CA Process Automation
Confirm Complete Implementation
Follow these steps:
1. Click the Additional Information tab in the Change Order.
2. Navigate to the Workflow Tasks tab. Scroll down through the tasks.
You can see a notification has gone out to all of the members of the Implementation Group,
of which John McCarthy is a member. The Implementation Group is now responsible for
confirming the successful implementation of the patches.
3. Either click the link that is provided through the email, or scroll to the next pending task in
the Workflow and click the hyperlink for Task: Complete Form (Pending) to complete this
task.

Integration Example
CA Service Desk Manager 241
4. As John, you click Group Tasks on the left hand side of the pane since this task of confirming
implementation of the Change Order is assigned to the full Implementation Group. Navigate
to Implementation Complete task and right click on the mouse. Click Reply.
5. Complete the applicable implementation notes.
Depending on whether the Implementation group successfully completed implementation of
the patches or not, they either mark the Implementation Status as Complete or Incomplete
and as a result the Workflow takes different paths.
6. Mark the status as Complete.
You can remain logged in to CA Process Automation as John.

Integration Example
242 Chapter 4: CA Process Automation

Integration Example
CA Service Desk Manager 243
Post Implementation Review
Navigate back to the Change Order. The status has changed from Implementation in Progress to
Implemented and the closure code is now set to Successful. Click the Additional Information tab.
Follow these steps:
1. Navigate to the Workflow Tasks tab. Scroll down through the tasks.
You can see that a notification has gone out to all of the members of the Implementation
Group, of which John McCarthy is a member. The Implementation Group is now responsible
for doing a Post Implementation Review (PIR).
2. Either clicks the link that is provided through the email, or alternatively, scrolls to the next
pending task in the Workflow and click on the hyperlink for Task: Complete Form (Pending)
to complete this task.

Integration Example
244 Chapter 4: CA Process Automation
3. As John, click Group Tasks on the left hand side of the pane since this task of Post
Implementation Review is assigned to the full Implementation Group.
4. Navigate to Post Implementation Review task and right click on the mouse. Click Reply.
5. Complete the PIR Form, and click Finish. Log out of CA Process Automation.

Integration Example
CA Service Desk Manager 245
6. Navigate back to the Change Order.
The status of the CO is set to Closed as all steps in the Workflow are completed and the patch
implementations were successful.

Common Integration Errors
246 Chapter 4: CA Process Automation
Common Integration Errors
Some common integration errors and typical resolution that is found when integrating CA SDM
and CA Process Automation:
CA Process Automation Connection Error in the CA SDM Workflow Tasks Tab
Symptom:
You see a CA Process Automation Connection Error (such as There is a problem accessing CA IT
PAM Workflow – please try again or contact the administrator) in the Workflow Tasks tab from a
CA SDM Ticket, or when you try to associate a CA Process Automation SRF with a CA SDM ticket,
or macro:
Solution:
To resolve this error, verify that CA Process Automation is up and running. If it is up and running,
and you are able to access the CA Process Automation UI, verify that your Options Manager
Options for CA Process Automation are correct. And the CA SDM services have been recycled
following any changes.
Cannot View CA Process Automation SRF List
Symptom:
You do not see CA Process Automation SRFs when trying to associate an SRF with a CA SDM
ticket or macro as shown in the following screenshot:
Solution:
This list usually indicates that you have no keyword that is associated with your CA Process
Automation Process Definition. For more information on keywords, see section Linking a CA
Process Automation Process Definition with CA SDM.

Common Integration Errors
CA Service Desk Manager 247
No option to Attach a CA Process Automation Workflow from a CA SDM Ticket Area or
Category
Symptom:
You do not see the option to attach a CA Process Automation Workflow from within a CA SDM
ticket Area or Category as shown in the following screenshot:
Solution:
This option usually means that you have not installed the Options Manager Options for CA
Process Automation Workflow, or have not recycled the CA SDM Services following Options
Manager Changes.

Additional Best Practices Tips and Tricks Available Online
248 Chapter 4: CA Process Automation
Login Errors when Accessing the Task List from CA Process Automation
Symptom:
You click a link to complete a task from the CA SDM Workflow Tasks tab and you see login error
as shown in the following screenshot:
Solution:
Verify that when you exit the TaskList you properly logout of CA Process Automation.
Additional Best Practices Tips and Tricks Available Online
For additional best practices information including tips and tricks on testing and troubleshooting
your CA Process Automation process definitions, see the CA Process Automation Best Practices
page in the following URL:
CA Process Automation Best Practices
Integration Summary
The integration between CA SDM and CA Process Automation enables your organization to
manage your Request, Incident, Problem, and Change Management processes.

CA Service Desk Manager 249
Appendix A: Additional Information and Tips
Build_wsdl.bat
Create a .bat file named build_wsdl.bat and save it in the
$NX_ROOT\bopcfg\www\CATALINA_BASE\webapps\axis\ directory. Update the items in bold
text as appropriate:
@ECHO off
::#############################################################################
::# Batch file to Build and run a java test program.
::# Rename to run_java_test.bat and edit the SET statements to match the
::# installation of CA Service Desk.
::# The TEST_APP variable must be set to the name of the .java test program.
::#
::# Usage: run_java_test.bat
::#############################################################################
@REM Update with the PATH to the CA Service Desk $NX_ROOT location.
@SET USD_SHORT_PATH=C:\PROGRA~1\CA\SERVIC~1
@REM Update to the path to the CA Service Desk $NX_ROOT/java/lib location.
@SET USD_JAVA=%USD_SHORT_PATH%\java\lib
@REM Update to the path to the CA Shared Components location.
@SET CASHCOMP=C:\PROGRA~1\CA\SC
@SET
CP=%USD_JAVA%\axis.jar;%USD_JAVA%\axis-ant.jar;%USD_JAVA%\commons-discove
ry.jar;%USD_JAVA%\commons-logging.jar;%USD_JAVA%\jaxrpc.jar;%USD_JAVA%\sa
aj.jar;%USD_JAVA%\log4j-1.2.8.jar;%USD_JAVA%\wsdl4j.jar;%CASHCOMP%\JRE\1.
6.0_23\lib\rt.jar;%CASHCOMP%\tomcat\5.5.25\common\lib\mail.jar;.
@REM Verify the path to java.exe and javac.exe.
@REM You can obtain this by reviewing the NX.env file.
@REM Use the @NX_JRE_INSTALL_DIR variable to derive this information.
@SET JAVA_PATH=C:/Progra~1/CA/SC/JRE/1.6.0_23
@SET JAVA_EXE=%JAVA_PATH%/bin/java.exe
@REM Update this with the PATH to the JDK javac.exe compiler.
@SET JAVAC_EXE=%JAVA_PATH%/bin/javac.exe
: NXENV_TEST
IF EXIST %USD_SHORT_PATH%\NX.env GOTO EXE_TEST1
@ECHO.
@ECHO Could not find NX.env at %USD_SHORT_PATH%. The USD_SHORT_PATH is
incorrect.
@ECHO Aborting process
@ECHO.
GOTO DONE
: EXE_TEST1
IF EXIST %JAVA_EXE% GOTO EXE_TEST2
@ECHO.

Integration Summary
250 Appendix A: Additional Information and Tips
@ECHO Could not find java.exe at %JAVA_EXE%.
@ECHO Aborting process
@ECHO.
GOTO DONE
: EXE_TEST2
IF EXIST %JAVAC_EXE% GOTO SET_STUBS
@ECHO.
@ECHO Could not find javac.exe at %JAVAC_EXE%
@ECHO Aborting process
@ECHO.
GOTO DONE
::#############################################################################
::# WSDL2Java - creates the CA Service Desk client-side stub files in STUBS_DIR.
::# -w parameter required when using Axis 1.4 that comes with r12.
::# Remove this flag if using Axis 1.1.
::#############################################################################
: SET_STUBS
@SET STUBS_DIR=com\ca\www\UnicenterServicePlus\ServiceDesk
REM Check for USD_WebService.class to see if the stubs have been compiled.
IF EXIST %STUBS_DIR%\USD_WebService.class GOTO COMPILE_APP
REM Check for USD_WebService.java to see if the stubs have been generated.
IF EXIST %STUBS_DIR%\USD_WebService.java GOTO COMPILE_STUBS
@ECHO.
@ECHO Generating the CA Service Desk Web Services stub files with WSDL2Java
@ECHO.
%JAVA_EXE% -cp %CP% org.apache.axis.wsdl.WSDL2Java -w
http://localhost:8080/axis/services/USD_R11_WebService?wsdl
::#############################################################################
::# Compile the CA Service Desk stub code.
::#############################################################################
: COMPILE_STUBS
@ECHO.
@ECHO Compiling the CA Service Desk Web Services stub files
@ECHO.
%JAVAC_EXE% -classpath %CP% -deprecation %STUBS_DIR%\ArrayOfInt.java
%JAVAC_EXE% -classpath %CP% -deprecation %STUBS_DIR%\ArrayOfString.java
%JAVAC_EXE% -classpath %CP% -deprecation %STUBS_DIR%\ListResult.java
%JAVAC_EXE% -classpath %CP% -deprecation %STUBS_DIR%\USD_WebService.java
%JAVAC_EXE% -classpath %CP% -deprecation
%STUBS_DIR%\USD_WebServiceLocator.java
%JAVAC_EXE% -classpath %CP% -deprecation
%STUBS_DIR%\USD_WebServiceSoap.java
%JAVAC_EXE% -classpath %CP% -deprecation
%STUBS_DIR%\USD_WebServiceSoapSoapBindingStub.java
: DONE

Integration Summary
CA Service Desk Manager 251
ZUpdateCr Method
Important! The following code is not provided with CA Unicenter Service Desk. It is a
customization, and therefore is not supported by CA Support. If you want to use this code and
have CA support it, you must complete a support agreement using CA Technology Services.
Otherwise, you are responsible for the support of this utility and any questions or errors related
to its use.
/////////////////////////////////////////////////////////////////////////
//////////////////////////////
//
// Method: ZUpdateCr(...)
//
// Description: This FRAG file updates the status of a Request and add activity
log comment from
// the command line using the bop_cmd command.
//
// Input: RequestNo
// User_id
// New Status
// Telealert Message
//
// All parameters are required.
// Notes : Program validates Ref_Num, User_id and New_Status
// Usage Example:
// bop_cmd -f ZUpdateCr.frg "ZUpdateCr('Ref_Num', 'User_id', 'New_Status',
'Telalert Message')"
//
/////////////////////////////////////////////////////////////////////////
//////////////////////////////
string ZUpdateCr(string RequestNo, string assignee, string status, string
message)
{
string errmsg;
string assignee_search_key;
assignee_search_key="userid";
// Fetching the CR domset
// belgl01 Comment : Validating that Request/Incident/Problem number exist
in Service Desk
send_wait(0,top_object(),"call_attr","cr","sync_fetch","RLIST_DYNAMIC",
format("ref_num ='%s'",RequestNo), -1,0);
if (msg_error()) {
errmsg=format("Cant find DOMSET '%s':
'%s'\n",RequestNo, msg[0]);
_errmsg(errmsg);

Integration Summary
252 Appendix A: Additional Information and Tips
}
object get_cr_domset;
int domset_size;
get_cr_domset = msg[0];
domset_size = msg[1];
if (domset_size != 1)
{
printf("\n");
printf("The Request doesnt exist \n");
printf("Enter a valid Request No \n");
errmsg=format("Found %d records for '%s'\n", domset_size ,
RequestNo);
_errmsg(errmsg);
}
// Get the CR dob
send_wait(0,get_cr_domset, "dob_by_index", "DEFAULT", 0,0);
if (msg_error())
{
errmsg=format("Unable to get dob for '%s':
'%s'\n",RequestNo, msg[0]);
_errmsg(errmsg);
}
object get_cr_dob;
get_cr_dob = msg[0];
// get a group leader so we can change things
send_wait(0, top_object(), "get_co_group");
if (msg_error()) {
errmsg=format("Error in get_co_group: '%s'\n",msg[0]);
_errmsg(errmsg);
}
object group_leader;
group_leader = msg[0];
//Checkout the DOB
send_wait(0,group_leader,"checkout",get_cr_dob);
if (msg_error())
{
errmsg=format("Unable to checkout: '%s'\n",msg[0]);
_errmsg(errmsg);
}

Integration Summary
CA Service Desk Manager 253
// Validate the status
send_wait(0, top_object(), "call_attr", "crs",
"val_by_key", "sym",
status, (int) 1, "code");
if (msg_error()) {
printf("Invalid status :'%s'\n",status);
printf("Please pass a valid Status");
errmsg=format("Can't find status '%s':
'%s'",status, msg[0]);
_errmsg(errmsg);
return;
}
string status_code;
status_code=msg[1];
// printf("status='%s' code='%s'\n", status, status_code);
//Update the Status
if(status !='')
{
get_cr_dob.status=status_code;
}
// get the agent who is making the log entry
// belgl01 adding code to validate and define who is making the comment
submitted by Telalert.
// Validate the assignee
send_wait(0, top_object(), "call_attr", "agt",
"val_by_key", assignee_search_key,
assignee, (int) 1, "id");
if (msg_error()) {
printf("Invalid assignee :'%s'\n",assignee);
printf("Please pass a valid Assignee");
errmsg=format("Can't find assignee '%s':
'%s'",assignee, msg[0]);
_errmsg(errmsg);
return;
}
uuid assignee_id;
assignee_id=msg[1];
string assignee_combo;
assignee_combo=expand(
format("&{'cnt:%s'=cnt.persistent_id->combo_name}", assignee_id));
printf("assignee='%s' name='%s' id='%s'\n", assignee,
assignee_combo, assignee_id);

Integration Summary
254 Appendix A: Additional Information and Tips
/////////////////////////////////////////////////////////////////////////
////////
// GET CR persid SECTION
//////////////////////////////////////////////////////////////////
///////////////
string cr_persid;
if (!is_empty(RequestNo)) {
send_wait(0, top_object(), "call_attr", "cr", "val_by_key",
"ref_num",
RequestNo, (int) 1, "persistent_id");
if ( msg_error()) {
errmsg=format("ERROR: Error with cr lookup on ref_num:
'%s'", msg[0]);
_errmsg(errmsg);
return -1;
}
cr_persid = msg[1];
}
printf("\nref_num\t\t->\t'%s'\t\t(CR_PERSID = %s)",ref_num,
cr_persid);
//////////////////////////////////////////////////////////////////
///////////////
// ACTIVITY LOG CREATE SECTION
//////////////////////////////////////////////////////////////////
///////////////
// Get new dob
object new_actlog;
send_wait(0, top_object(), "call_attr", "alg", "get_new_dob", NULL,
NULL, group_leader);
if (msg_error()) {
errmsg=format("ERROR: Error creating Activity Log dob:
'%s'",msg[0]);
_errmsg(errmsg);
return -1;
}
//printf("Got new dob\n");
new_actlog = msg[0];
new_actlog.description = message;
new_actlog.action_desc = "Activity Log entered by " + assignee + " via
the ZUpdateCr.FRG file";
new_actlog.call_req_id = cr_persid;
new_actlog.time_stamp = now();
new_actlog.analyst = assignee_id;
new_actlog.type = "LOG";
new_actlog.time_spent = 30; // 30 secs

Integration Summary
CA Service Desk Manager 255
send_wait(0, group_leader, "checkin");
if (msg_error())
{
errmsg=format("Checkin Failed: '%s\n'",msg[0]);
_errmsg(errmsg);
}
else
{
string log_msg;
log_msg += format("Status='%s' ",
get_cr_dob.status.sym,assigned_id);
printf("Successfully Changed Status and Logged Comment from Telalert
for Request# '%s' ",RequestNo);
return get_cr_dob.ref_num;
}
}
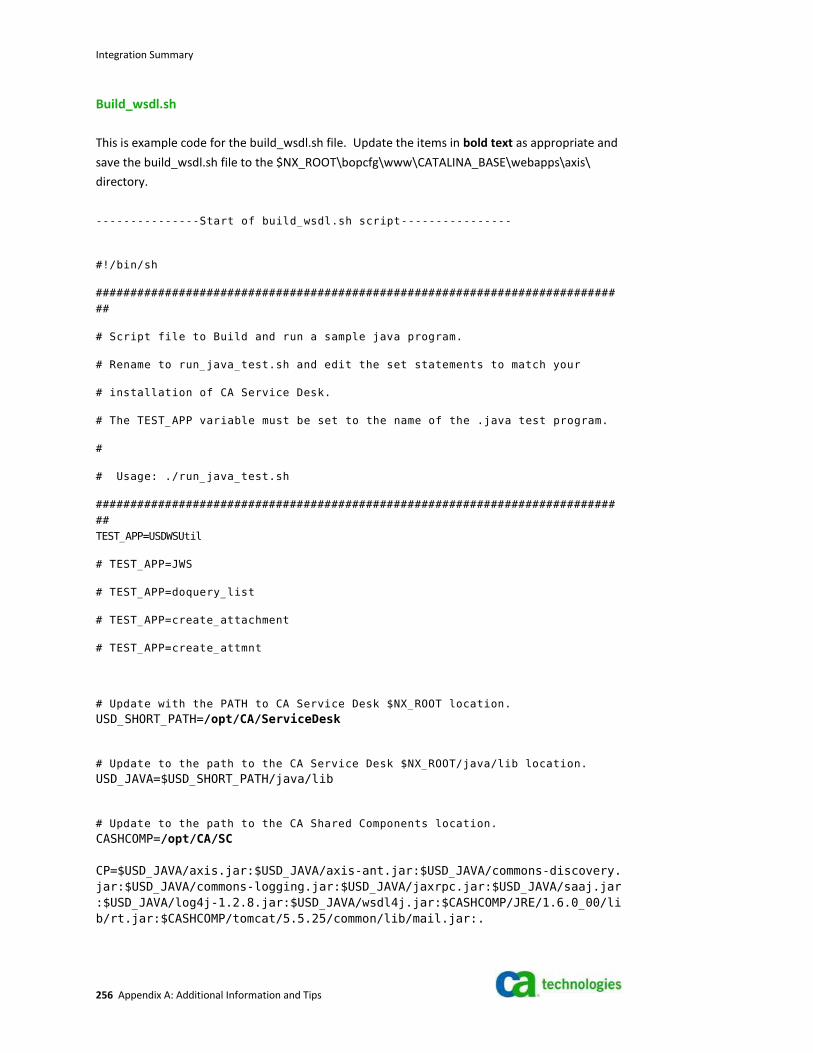
Integration Summary
256 Appendix A: Additional Information and Tips
Build_wsdl.sh
This is example code for the build_wsdl.sh file. Update the items in bold text as appropriate and
save the build_wsdl.sh file to the $NX_ROOT\bopcfg\www\CATALINA_BASE\webapps\axis\
directory.
---------------Start of build_wsdl.sh script----------------
#!/bin/sh
###########################################################################
##
# Script file to Build and run a sample java program.
# Rename to run_java_test.sh and edit the set statements to match your
# installation of CA Service Desk.
# The TEST_APP variable must be set to the name of the .java test program.
#
# Usage: ./run_java_test.sh
###########################################################################
##
TEST_APP=USDWSUtil
# TEST_APP=JWS
# TEST_APP=doquery_list
# TEST_APP=create_attachment
# TEST_APP=create_attmnt
# Update with the PATH to CA Service Desk $NX_ROOT location.
USD_SHORT_PATH=/opt/CA/ServiceDesk
# Update to the path to the CA Service Desk $NX_ROOT/java/lib location.
USD_JAVA=$USD_SHORT_PATH/java/lib
# Update to the path to the CA Shared Components location.
CASHCOMP=/opt/CA/SC
CP=$USD_JAVA/axis.jar:$USD_JAVA/axis-ant.jar:$USD_JAVA/commons-discovery.
jar:$USD_JAVA/commons-logging.jar:$USD_JAVA/jaxrpc.jar:$USD_JAVA/saaj.jar
:$USD_JAVA/log4j-1.2.8.jar:$USD_JAVA/wsdl4j.jar:$CASHCOMP/JRE/1.6.0_00/li
b/rt.jar:$CASHCOMP/tomcat/5.5.25/common/lib/mail.jar:.

Integration Summary
CA Service Desk Manager 257
# Verify the path to the java and javac executables.
# The JRE on some platforms does not include javac. In these cases, you can
need to obtain the JDK.
JAVA_PATH=/opt/CA/SC/JRE/1.6.0_00
JAVA_EXE=$JAVA_PATH/bin/java
JAVAC_EXE=$JAVA_PATH/bin/javac
# Check to see if the NX.env file is at the USD_SHORT_PATH.
ls "$USD_SHORT_PATH/NX.env" 2> /dev/null | grep "NX.env" > /dev/null
if [ $? != 0 ]
then
echo
echo "The NX.env file was not found at $USD_SHORT_PATH. The USD_SHORT_PATH
is incorrect."
echo "aborting process"
echo
exit 1
fi
# Check to see if the java executable is at JAVA_EXE.
ls "$JAVA_EXE" 2> /dev/null | grep "java" > /dev/null
if [ $? != 0 ]
then
echo
echo "The java executable was not found at $JAVA_EXE"
echo "aborting process"
echo
exit 1
fi
# Check to see if the javac executable is at JAVAC_EXE.
ls "$JAVAC_EXE" 2> /dev/null | grep "javac" > /dev/null
if [ $? != 0 ]
then
echo
echo "The javac executable was not found at $JAVAC_EXE"
echo "aborting process"
echo
exit 1
fi
###########################################################################
##
# WSDL2Java - creates the CA Service Desk client-side stub files in STUBS_DIR.
# -w parameter required when using Axis 1.4 that comes with r12.

Integration Summary
258 Appendix A: Additional Information and Tips
# Remove this flag if using Axis 1.1.
###########################################################################
##
STUBS_DIR=com/ca/www/UnicenterServicePlus/ServiceDesk
ls "$STUBS_DIR/USD_WebService.java" 2> /dev/null | grep
"$STUBS_DIR/USD_WebService.java" > /dev/null
if [ $? != 0 ]
then
echo
echo "Generating the CA Service Desk Web Services client-side stub files"
echo
$JAVA_EXE -cp $CP org.apache.axis.wsdl.WSDL2Java -w
http://localhost:8080/axis/services/USD_R11_WebService?wsdl
fi
###########################################################################
##
# Compile the CA Service Desk stub code.
###########################################################################
##
ls "$STUBS_DIR/USD_WebService.class" 2> /dev/null | grep
"$STUBS_DIR/USD_WebService.class" > /dev/null
if [ $? != 0 ]
then
echo
echo "Compiling the CA Service Desk Web Services stub files"
echo
$JAVAC_EXE -classpath $CP -deprecation $STUBS_DIR/ArrayOfInt.java
$JAVAC_EXE -classpath $CP -deprecation $STUBS_DIR/ArrayOfString.java
$JAVAC_EXE -classpath $CP -deprecation $STUBS_DIR/ListResult.java
$JAVAC_EXE -classpath $CP -deprecation $STUBS_DIR/USD_WebService.java
$JAVAC_EXE -classpath $CP -deprecation
$STUBS_DIR/USD_WebServiceLocator.java
$JAVAC_EXE -classpath $CP -deprecation $STUBS_DIR/USD_WebServiceSoap.java
$JAVAC_EXE -classpath $CP -deprecation
$STUBS_DIR/USD_WebServiceSoapSoapBindingStub.java
fi
-----------End of Script---------------

Integration Summary
CA Service Desk Manager 259
After you create the batch file, run it from the command line. Verify that you are running the file
from the $NX_ROOT\bopcfg\www\CATALINA_BASE\webapps\axis\ directory. After you run the
batch file, the stub classes are in place and compiled.
After you complete all of the previous steps, run the following commands to recycle Apache
Tomcat:
pdm_tomcat_nxd -c STOP
pdm_tomcat_nxd -c START
Note: Instead of running the previous commands, you can recycle CA SDM.

Integration Summary
260 Appendix A: Additional Information and Tips
Pkilogin.htm
The following code is an example code for the pkilogin.htm file. Copy the following code into a
new file, pkilogin.htm, and save it to the
$NX_ROOT\bopcfg\www\CATALINA_BASE\webapps\axis directory.
<html>
<head>
<title>PKI Login</title>
<style type="text/css">
TD{font-family: Verdana;}
.font1{color:#336699;font:bold 14px;}
.font2{color:#6A7A94;text-decoration:none;font:bold 11px;padding: 0px 6px
0px 6px;}
</style>
</head>
<body>
<form name="frmLoginPKI" method="post" action="pkilogin.jsp">
<table width=99% cellpadding=0 cellspacing=0>
<tr><td colspan=2><hr></td></tr>
<tr>
<td CLASS="font1" colspan=2 valign="center" align="center">Log in using PKI
and lookup User Handle</td>
</tr>
<tr><td colspan=2><hr></td></tr>
<tr><td colspan=2> </td></tr>
<tr><td colspan=2> </td></tr>
<tr>
<td CLASS="font2" align=right>Server Name:</td>
[assign the value for TD in your book]<input type=text id=server name=server
value="localhost"></td>
</tr>
<tr>
<td CLASS="font2" align=right>Port:</td>
[assign the value for TD in your book]<input type=text id=port name=port
value="8080"></td>
</tr>
<tr>
<td CLASS="font2" align=right>Directory:</td>
[assign the value for TD in your book]<input type=text id=dir name=dir
value="C:\Program Files\CA\Service
Desk\bopcfg\www\CATALINA_BASE\webapps\axis"></td>
</tr>
<tr>
<td CLASS="font2" align=right>Access Policy Name:</td>
[assign the value for TD in your book]<input type=text id=accessPolicy
name=accessPolicy value="DEFAULT"></td>
</tr>
<tr>

Integration Summary
CA Service Desk Manager 261
<td CLASS="font2" align=right>UserID to Lookup:</td>
[assign the value for TD in your book]<input type=text id=userId name=userId
value="ServiceDesk"></td>
</tr>
<tr>
<td CLASS="font2" align=right>Protocol (http/https):</td>
[assign the value for TD in your book]<input type=text id=protocol
name=protocol value="http"></td>
</tr>
<tr><td colspan=2> </td></tr>
<tr><td colspan=2> </td></tr>
<tr>
<td colspan=2 align=center><input type="submit" value="Log me in!"></td>
</tr>
</table>
</form>
</body>
</html>

Integration Summary
262 Appendix A: Additional Information and Tips
Pkilogin.jsp
Create a JSP file named pkilogin in the $NX_ROOT\bopcfg\www\CATALINA_BASE\webapps\axis
directory and copy the following example code into the new pkilogin.jsp file.
<!-- pkilogin.jsp -->
<%@ page
import="com.ca.www.UnicenterServicePlus.ServiceDesk.ArrayOfString" %>
<%@ page
import="com.ca.www.UnicenterServicePlus.ServiceDesk.USD_WebServiceLoc
ator" %>
<%@ page
import="com.ca.www.UnicenterServicePlus.ServiceDesk.USD_WebServiceSoa
p" %>
<%@ page import="java.io.FileInputStream" %>
<%@ page import="java.net.URL" %>
<%@ page import="java.security.KeyStore" %>
<%@ page import="java.security.PrivateKey" %>
<%@ page import="java.security.Signature" %>
<%@ page import="org.apache.axis.encoding.Base64" %>
<html>
<head>
<title>Login...</title>
<style type="text/css">
TD{font-family: Verdana;}
.font1{color:#336699;font:bold 14px;}
.font2{color:#6A7A94;text-decoration:none;font:bold 11px;padding: 0px
6px 0px 6px;}
</style>
</head>
<body>
<table width=99% cellpadding=0 cellspacing=0>
<tr><td colspan=2><hr></td></tr>
<tr>
<td width="10"> </td>
<td class="font1" valign="middle" align="left">Service Desk - Attempting
to Login using PKI</td>
</tr>
<tr><td colspan=2><hr></td></tr>
<tr><td colspan=2> </td></tr>
<tr>
<td width=10> </td>
<td class=font2>
<p>
<%
// Collect the variables sent from the HTML page.
String server = request.getParameter("server");
String port = request.getParameter("port");
String dir = request.getParameter("dir");

Integration Summary
CA Service Desk Manager 263
String accessPolicy = request.getParameter("accessPolicy");
String userId = request.getParameter("userId");
String protocol = request.getParameter("protocol");
// Initialize some additional variables.
String endPoint = protocol + "://" + server + ":" + port +
"/axis/services/USD_R11_WebService";
int SID;
String userHandle;
String bopSid;
// Now let's get started.
try
{
// create a new web service instance.
USD_WebServiceLocator ws = new USD_WebServiceLocator();
java.net.URL url = new java.net.URL(endPoint);
USD_WebServiceSoap usd = ws.getUSD_WebServiceSoap(url);
out.print("Created USD_WebServiceSoap object usd<p>");
// Now proceed with PKI togin.
// Getting the appropriate Keystore instance to load the .p12 file.
KeyStore ks = KeyStore.getInstance ( "PKCS12" );
// loading the certificate, the second parameter is null and refers to an optional
// password associated with the certificate, in this case there is not
ks.load( new FileInputStream( dir + "/" + accessPolicy + ".p12" ), null);
// Creating a password to be used when extracting the private key, it's the
// same as the name of the access policy.
char[] privateKeyPassword = accessPolicy.toCharArray();
// Extracting the private key, the first parameter is the alias associated
// with the key which is "servicedesk <accessPolicy>"(all lower case);
// the second parameter is the password to extract the key (this defaults to
// the Access Policy name as well ... when using pdm_pki utility).
PrivateKey key = (PrivateKey) ks.getKey("servicedesk " +
accessPolicy.toLowerCase(), privateKeyPassword);
// Creating an instance of the signature class to create a digital signature
// of the private key...must use the SHA1withRSA algorithm.
Signature s = Signature.getInstance("SHA1withRSA");

Integration Summary
264 Appendix A: Additional Information and Tips
// Initializing the signature with the private keys.initSign(key);
// Updating the signature with the access policy.
s.update(accessPolicy.getBytes());
// Creating the digital signature.
byte sig[] = s.sign();
// Converting the signature to BASE64 text format to pass into loginServiceManaged.
String encryption = Base64.encode(sig);
// Logging into Service desk using the access policy as the first parameter
// and the BASE64 text we created earlier, returning a sessionid.
String sessionid = usd.loginServiceManaged(accessPolicy,encryption);
SID=Integer.parseInt(sessionid);
out.print("Login was successful, got Session ID of '" + SID + "'<p>");
// Now lookup the UserId's handle.
userHandle = usd.getHandleForUserid(SID, userId);
out.print("Got user handle for " + userId + " of '" + userHandle + "'<p>");
// Now get a BOPSID.
bopSid = usd.getBopsid(SID, userId);
out.print("Got BOPSID for " + userId + " of '" + bopSid + "'<p>");
out.print("<a
href="+protocol+"://"+server+":"+port+"/CAisd/pdmweb.exe?BOPSID="+bop
Sid+" target=_new>Click here VERY SOON to login seamlessly using the
BOPSID as user "+userId+"</a><p>");
// Now logout.
usd.logout(SID);
out.print("Logout was successful<p>");
}
catch(Exception e)
{
out.print("Error Message: " + e.getMessage() + "<p> Additional Details:
" + e.toString());
}
%>
</td>
</tr>
<tr><td colspan=2> </td></tr>
<tr><td colspan=2> </td></tr>
<tr>
<td align="center" colspan=2>
<input onclick="window.location='pkilogin.htm';" type="button"
value="Try Again" tabindex=1>
</td>
</tr>
</table>

Integration Summary
CA Service Desk Manager 265
</body>
</html>

Integration Summary
266 Appendix A: Additional Information and Tips
Log4j.properties
Create the file
%NX_ROOT%\bopcfg\www\CATALINA_BASE\webapps\axis\WEB-INF\classes\log4j.properties by
copying/pasting the following text example into your file. Replace the path
C:/PROGRA~1/CA/SERVIC~1/log/jsrvrbop.log in the text file with the relevant path on your
system. In addition, use equivalent short name paths because long name paths with spaces do
not work.
---------------Start of
log4j.properties----------------------------------------------------
# $Id: log4j.properties.tpl,v 1.5 2005/11/01 23:35:08 kubtr01 Exp $
# Created: 03/12/04
#----------------------------------------------------------------------
# Description:
# Unicenter ServicePlus log4j configuration
# Default output is a set of ten files in $NX_ROOT/log/jsrvr.log.
# Messages of level error and above are also echoed to the console.
log4j.rootCategory=debug, axislog
log4j.appender.axislog=org.apache.log4j.RollingFileAppender
log4j.appender.axislog.File=C:/PROGRA~1/CA/SERVIC~1/log/axis.log
log4j.appender.axislog.MaxBackupIndex=9
log4j.appender.axislog.MaxFileSize=30MB
log4j.appender.axislog.layout=org.apache.log4j.PatternLayout
log4j.appender.axislog.layout.ConversionPattern=%d{MM/dd
HH:mm:ss.SSS}[%t] %-5p %c{1} %L %m %n
log4j.appender.stdout=org.apache.log4j.ConsoleAppender
log4j.appender.stdout.Threshold=error
log4j.appender.stdout.layout=org.apache.log4j.PatternLayout
log4j.appender.stdout.layout.ConversionPattern=[%t] %-5p %c{1} %L %m %n
!log4j.appender.stdout.layout.ConversionPattern=%d{MM/dd hh:mm:ss.SSS}
%t%- 5p %F %L %m %n
# Default bop_logging output from Java applications is a set of three files written to
$NX_ROOT/log/jsrvrbop.log
# Bop_logging is only produced if the loglevel is set to debug.
log4j.logger.bop_logging=info, jsrvrboplog
log4j.appender.jsrvrboplog=org.apache.log4j.RollingFileAppender
log4j.appender.jsrvrboplog.File=C:/PROGRA~1/CA/SERVIC~1/log/jsrvrbop.log
log4j.appender.jsrvrboplog.MaxBackupIndex=30
log4j.appender.jsrvrboplog.MaxFileSize=30MB
log4j.appender.jsrvrboplog.layout=org.apache.log4j.PatternLayout
log4j.appender.jsrvrboplog.layout.ConversionPattern=%m %n
# Default log level for pdm_rpc package.
log4j.logger.com.ca.ServicePlus.pdm_rpc=DEBUG

Integration Summary
CA Service Desk Manager 267
log4j.logger.usdjws65=DEBUG
---------------End of log4j.properties----------------

Integration Summary
268 Appendix A: Additional Information and Tips
Perf.bat
Copy the following example code to a text file and save it as perf.bat.
- - - - - - - - - START of perf.bat - - - - - - - - -
REM Performance Monitoring batch file.
REM You MUST download the free PSList.exe file from Microsoft to enable the
PSList functionality.
REM http://www.microsoft.com/technet/sysinternals/utilities/pslist.mspx.
REM Place this to the same folder as the batch file is saved, or to a path
location such as
REM C:\WINDOWS or similar.
REM You MUST configure MS Windows Task Scheduler to run this batch file every
three minutes in
REM in order to get benefit from it. Running it less frequently may not capture
important
REM information at the time of a problem and must only be done after
consultation with
REM CA Technical Support.
REM In general, this batch files is not expected to have an adverse effect
on a fully patched production system. The commands take only a small amount
of time to run.
echo Start time >> c:\perfout\perf.out
echo %DATE% %TIME% >> c:\perfout\perf.out
echo %DATE% %TIME% >> c:\perfout\stat.out
pdm_webstat >> c:\perfout\stat.out
slstat >> c:\perfout\stat.out
pdm_status >> c:\perfout\stat.out
echo -=-=-=-=-=-=-=-=-=-=-=-= >> c:\perfout\stat.out
echo %DATE% %TIME% >> c:\perfout\listconn.out
pdm_listconn -s -c >> c:\perfout\listconn.out
echo -=-=-=-=-=-=-=-=-=-=-=-= >> c:\perfout\listconn.out
echo %DATE% %TIME% >> c:\perfout\netstat_an.out
netstat -an >> c:\perfout\netstat_an.out
echo -=-=-=-=-=-=-=-=-=-=-=-= >> c:\perfout\netstat_an.out
echo %DATE% %TIME% >> c:\perfout\db_report.out
db_report >> c:\perfout\db_report.out
echo -=-=-=-=-=-=-=-=-=-=-=-= >> c:\perfout\db_report.out
echo %DATE% %TIME% >> c:\perfout\pdm_vdbinfo.out
pdm_vdbinfo >> c:\perfout\pdm_vdbinfo.out
echo -=-=-=-=-=-=-=-=-=-=-=-= >> c:\perfout\pdm_vdbinfo.out
echo %DATE% %TIME% >> c:\perfout\pslist_mem.out
pslist.exe -m >> c:\perfout\pslist_mem.out
echo -=-=-=-=-=-=-=-=-=-=-=-= >> c:\perfout\pslist_mem.out
echo %DATE% %TIME% >> c:\perfout\pslist_CPU.out
pslist.exe >> c:\perfout\pslist_CPU.out
echo -=-=-=-=-=-=-=-=-=-=-=-= >> c:\perfout\pslist_CPU.out
echo End time >> c:\perfout\perf.out
echo =+=+=+=+=+=+=+=+=+=+=+=+=+ >> c:\perfout\perf.out
- - - - - - - - - END - - - - - - - - -

Integration Summary
CA Service Desk Manager 269