Embed Size (px)
DESCRIPTION
USPS setup guide for IMsb.
Citation preview
INTELLIGENT MAIL® FOR SMALL BUSINESS MAILERS
(IM ® sb)
USER GUIDE
VERSION AUGUST 2013

IMsb User Guide –August 2013
Table of Contents
GETTING STARTED ...................................................................................................................3
Prerequisites .........................................................................................................................................3
Database formats allowed: ...........................................................................................................3 Business Customer Gateway- redesigned! ...................................................................................6 Log In to IMsb..............................................................................................................................7
STEP 1: CREATE NEW JOB....................................................................................................9
Mailer Information .......................................................................................................................9 Postal Wizard Information .........................................................................................................10 Service Type ID Information .....................................................................................................10 Mail Piece Information...............................................................................................................11 Additional Mailing Options .......................................................................................................11 Return Address: Optional..........................................................................................................12 Review and Confirm. .................................................................................................................12 Method of Entry .........................................................................................................................13
STEP 2: ADDRESS PROCESSING ......................................................................................13
Address Correction.....................................................................................................................13 Review........................................................................................................................................14 Duplicates...................................................................................................................................15 Confirm Affixed Postage IF using Meter Postage .....................................................................16
STEP 3: OUTPUT PROCESSING ........................................................................................17
Tray Label ..................................................................................................................................17 Tray Label Creation ...................................................................................................................17 Print Tray Labels........................................................................................................................18 Downloads:.................................................................................................................................19 Optional to save the corrected address lists: ..............................................................................20
STEP 4: SUBMIT JOB..............................................................................................................22
Review and Submit ....................................................................................................................23 ADDITIONAL FUNCTIONS: ...................................................................................................24
RESOURCES ................................................................................................................................25
1. The RIBBS Website .................................................................................................................25 2. Guides, Specifications and Manuals.......................................................................................26 3. Personal Support Resources...................................................................................................26
2

IMsb User Guide –August 2013
OVERVIEW
Intelligent Mail® for Small Business Mailers (IMsb) is an online tool which will allow you to
produce the Intelligent Mail barcode (IMb) for mailings. The IMsb Tool is available free‐of‐charge and will provide the ability to create and submit electronic postage statements to the acceptance units.
Maximum mailing size is fewer than 10,000 pieces for mailings submitted at a BMEU! Presort option
Maximum number of mail pieces per year of fewer than 250,000!
Start Simple To use the IMsb, no special software or installation is required. Users simply access the application via a Web Browser. The IMsb Tool has been specifically developed for small business mailers to meet Full‐Service requirements. The IMsb tool helps users generate their address blocks with the unique Intelligent Mail barcodes within the address block. The IMsb tool is currently designed for First‐Class and Standard Mail permit holders. The IMsb tool will generate the address blocks on the following formats:
Multiple labels
Multiple envelopes
8 ½ x 11 inch letter size paper
Mail Merge option ‐ allows you to personalize your letters.
GETTING STARTED
Prerequisites
Before using the IMsb tool, you need to make sure you have the following prerequisites completed: 1. An Excel or CSV database formatted with the following headers OR other
headers described in the user guide.
Database formats allowed:
In order to upload an address list to the IMsb, the file must be in one of the following formats:
Microsoft® Excel 2010
Microsoft® Excel 2007
3
Microsoft® Excel 2003

IMsb User Guide –August 2013
Comma Separated Value (CSV)
The Excel or CSV address database must be formatted with the following headers OR other headers described below! Excel address List/File example
For all of these formats, the first row in your file is called a header record. You will need to create the columns that will be in the header record and then determine which fields will show up in the address block of your mailpiece. The following table describes specific field names that the IMsb looks for in the first row (header record). Not all columns/fields are required. At a minimum your file must contain address, city, and state or address and city‐state‐zip header fields.
4
Field Name Description
First name First Name of recipient****note there is a blank between the qualifier (first and name)
Middle name Middle name of recipient****note there is a blank between the qualifier (middle and name)
Last name Last name of recipient****note there is a blank between the qualifier (last and name)
fname First Name of recipient****No blanks between f and name
mname Middle name of recipient
lname Last name of recipient
Name Combined recipient name, title, etc. or current resident. (entire name)
Company Optional: Company name or current resident when choosing “no address Correction” from the “Extra Service Type” option.
Urbanization Optional: Urbanization name used with some Puerto Rico addresses
Address Street address, PO Box (Example: 123 Main Street)
Sec‐Address Secondary Address information (eg. Suite #, private mail box number, etc.). Secondary address information can be included in the address column.
City City name
State State name or State name abbreviation (preferred)
Zip Optional : 5 digit ZIP Code™ or 5 digit ZIP Code™ plus ZIP + 4™ extension. If the ZIP + 4™ is provided it should be separated from the 5 digit ZIP Code™ by a dash; e.g. 12345‐6789.
City‐State‐ZIP If the column is combined containing the city name, state name, and ZIP Code™, the city state and ZIP Code™ must be separated by at least one blank. If the ZIP + 4® is provided it should be separated from the 5 digit ZIP Code™ by a dash; e.g. 12345‐6789. The city‐state‐zip field may be omitted if the last line components are provided in separate city, state and zip fields.

IMsb User Guide –August 2013
Note:
Field names are not case sensitive (e.g. name, NAME, Name, nAmE are equivalent).
There is no required order in which the field must be defined within the file; i.e. the fields can be in any order within the records as long as they are in the same position (within all records) as denoted by the header record.
The information will be included in the output address block in the following order: Name: Mr. Bill Jones company: DAISYS FLOWER SERVICE urbanization (PR addresses only) OPTIONAL sec‐address: Third Floor address: 475 LENFANT PLZA SW city, state, zip: WASHINGTON DC 20260‐0912
Your address list will be standardized by the AMS process. Some data that you provided may be corrected and/or combined. For example: suite or apartment numbers provided in the sec‐address field will likely be appended to the address field data to provide a complete primary delivery point address.
2. Mailing Permit – Mailer must have a postage permit, and use one of the following: Permit Imprint, Precanceled Stamps, Postage Meter.
The annual presort fee does not have to be current to use the tool! 3. Be registered on Business Customer Gateway!
5

IMsb User Guide –August 2013
Business Customer Gateway- redesigned!
New simplified, consolidated and streamlined registration process! Access automatically granted to the most popular services!
Intelligent Mail Small Business (IMsb) tool.
Mailer ID
Postal Wizard
Manage mailing activity o Linking of permit is required!
Improved navigation to easily see which services are accessible by the user and to request services Automatic creation of 9‐digit MID when creating a new user account CRID is now displayed when you register and on many consecutive screens within the BCG Customers who had previously created an account in the BCG will not need to register again. Existing users will maintain user name, password, access and services (including the BSA role) in the new BCG Some customers who created accounts prior to July 24th, 2011 will be prompted to create security questions for their accounts!
6

IMsb User Guide –August 2013
Log In to IMsb
7
1) Going to usps.com and select the Business Customer Gateway link (located at bottom of page). 2) Access IMsb by clicking the “Mailing Service” link on the left side of the BCG home page.
IMsb User Guide –August 2013
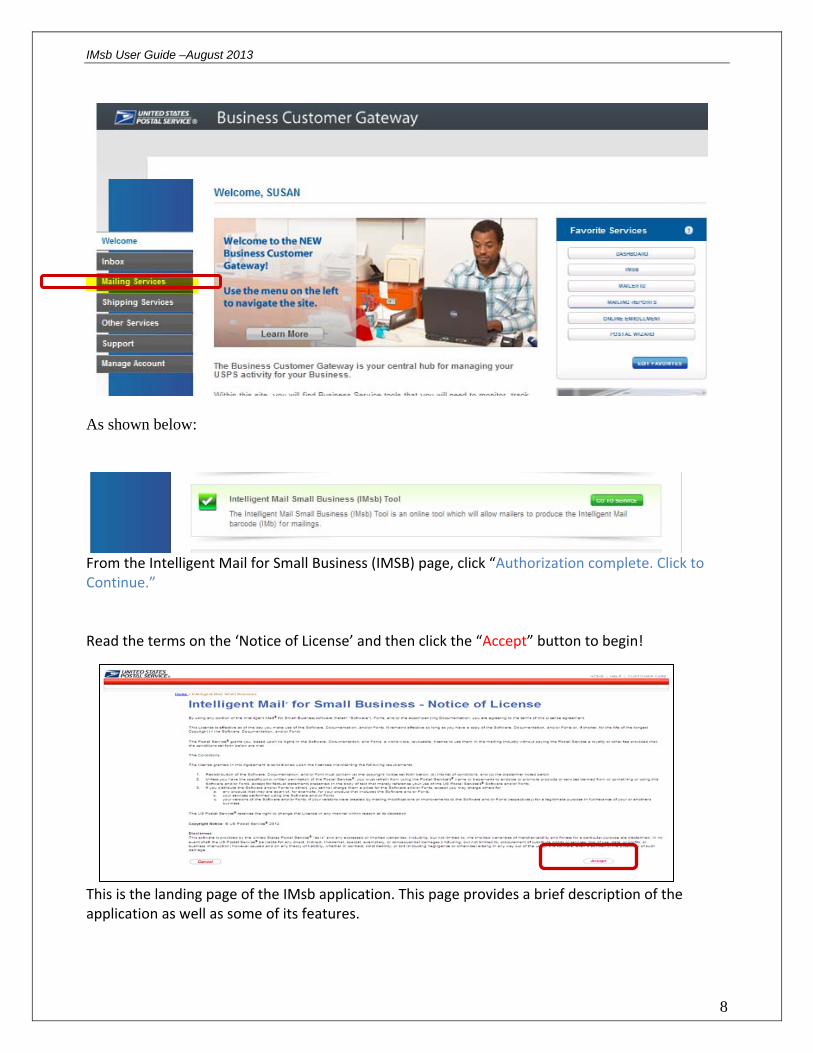
As shown below:
From the Intelligent Mail for Small Business (IMSB) page, click “Authorization complete. Click to Continue.” Read the terms on the ‘Notice of License’ and then click the “Accept” button to begin!
This is the landing page of the IMsb application. This page provides a brief description of the application as well as some of its features.
8

IMsb User Guide –August 2013
STEP 1: CREATE NEW JOB
Select “Create New Job” from the Intelligent Mail for Small Business (IMsb) Tool page.
The first screen to appear after selecting Create New Job includes the Mailer Information. Select via dropdown:
Mailer Information
1. Method of Entry: BMEU RETAIL-offered at select pilot sites
2. CRID(prepopulated) 3. Mailer ID (prepopulated)
9

IMsb User Guide –August 2013
Postal Wizard Information
1. Permit If you have multiple permits, select the permit you wish to use for this mailing.
If you have selected either a “MT” permit, you will be asked to confirm the affixed postage later in the process. Click Continue.
Service Type ID Information
You will make selections for the following: Selections are required for the following: (1) Class of Mail
First Class or
Standard (2) IM Service Type
Defaults to Full Service. (3) Extra Service Type
How do you get your Address corrections back?
Manually or Electronically (4) IM Tracing‐ defaults to destination. (5) Ancillary Service Endorsement
Select the ancillary service endorsement currently used on mailpiece if applicable. Select Continue when completed.
Select Continue when completed.
10

IMsb User Guide –August 2013
Mail Piece Information Mail Piece Information
The Mail Piece information page lets you describe the mailing piece. The Mail Piece information page lets you describe the mailing piece. 1. Processing Category ‐ select from the Drop Down menu. 1. Processing Category ‐ select from the Drop Down menu.
Letters or Letters or
Flats Flats 2. Standard Envelope Sizes 2. Standard Envelope Sizes
Other‐ mailer inputs dimensions‐ typically used for folded self‐mailers Other‐ mailer inputs dimensions‐ typically used for folded self‐mailers
#6 ¾ envelope #6 ¾ envelope
#7 envelope #7 envelope
#10 envelope #10 envelope
Note: You will have the option to select a label size if so desired in a different section of the IMsb tool.
Note: You will have the option to select a label size if so desired in a different section of the IMsb tool.
3. Enter the thickness of 50 pieces (in inches). 3. Enter the thickness of 50 pieces (in inches). 4. Enter the single piece weight of the mail (in ounces). 4. Enter the single piece weight of the mail (in ounces). 5. Select the approximate Mailing Date that you plan on bringing the mailing/job to the
Postal Service. Mailings prepared by IMsb must be received by USPS within 30 days of creating your labels or envelopes.
5. Select the approximate Mailing Date that you plan on bringing the mailing/job to the Postal Service. Mailings prepared by IMsb must be received by USPS within 30 days of creating your labels or envelopes.
6. Enter approximate number of pieces to be mailed. 6. Enter approximate number of pieces to be mailed.
Click Continue
Additional Mailing Options
1. Destination Entry Discounts DSCF
Select DSCF if you enter your mail at a Sectional Center Facility. If unsure, ask your local acceptance unit.
None 2. Move Update Service Method
Select from the drop down, the method you currently use to meet Move Update requirements!
3. Select the Price Category. Regular
11
NON PROFIT

IMsb User Guide –August 2013
4. Is this a political mailing? 5. Mailing contains windowed envelopes or windowed flats?
Click Continue
Return Address: Optional The Return address screen provides you with the option to print the return address on your mailpiece. If you already have the return address printed on your piece, you would not populate this section. Note: The IMsb tool does not have the capability of printing the indicia. Click Continue
Review and Confirm.
Review your information or make any changes. Once completed click “Accept” Upload the Address File Select “Browse” to search for your Address List file on your computer.
12

IMsb User Guide –August 2013
Select the desired address list file from the pop‐up window and click “Open”. Click “Upload” NOTE‐If and error page appears there is something incorrect with in your address database file. Please review pages 3‐5 in this guide for correct headers and column names.
The IMsb tool will display the Address File Viewer on the Address File Uploading screen. This screen is used to verify the correct address list was used and the correct fields are displayed. Click Continue
Method of Entry
Select the location where you would like to enter your mailing. Click Continue
STEP 2: ADDRESS PROCESSING
Address Correction
AMS will verify that your addresses are valid addresses with the required delivery points. Your addresses will be reformatted to conform to USPS specifications. Note: The AMS process only verifies that the address is a good delivery address; it does not check that the name/business associated with the address is accurate.
13

IMsb User Guide –August 2013
Click “ADDRESS CORRECTION COMPLETE. CLICK TO CONTINUE”
. By clicking the link above, you will be directed to the AMS Processing Summary Page. On this page, you will see data on your addresses. Each address within your address list is allocated one of four statuses by AMS.
Exact Match‐ no correction was made to the address by the USPS
Matched with changes‐ A correction was made to the address to make it correct.
Matched to a building default‐ means its missing the apartment or suite #.
Unmatched‐ Bad address according to USPS files.
Review
At this point, by selecting the “Review” button, you may review the addresses in the matched with changes, matched to building default, unmatched addresses and non‐DPV print count sections. During the review process you will have the option to take further actions regarding your address list. You also have the option to bypass the review process by selecting “Continue” if want the tool to accept the results returned.
If you select any of the review choices, you will be taken to an AMS Default Entry Editor screen where, for each address, you can choose between using the AMS supplied address, the address you originally supplied, or not to have the IMsb tool print the address.
14

IMsb User Guide –August 2013
If you choose to use an original address that does not match, it will be removed from the Delivery Point Validated (DPV) list and added to a non‐Delivery Point Address list. The non‐Delivery Point Address list will still be available for downloading; however the IMSB tool will modify those addresses STIDs to specify First‐Class Mail. The non‐DPV mailpieces will be mailed at the full single piece price.
Duplicates
Next you can utilize the duplicate elimination function to check for duplicate addresses within your address list and remove any found duplicate address. This function allows you to search for duplicates by: Address, First Name and Last Name Address and Last Name Address Only Company and Address
When you click on a button the duplicate address entries will be displayed.
If more duplicates are found than can be reasonably displayed on one screen you will need to use the controls under the display box to step through the duplicate sets.
To mark addresses for deletion simply click the check boxes next to them. Once you have reviewed all the addresses; click the Accept button and all the marked addresses will be removed from the output list.
If you wish to remove all the identified duplicates at once you can click the Delete All button. This will mark all the addresses within each duplicate group, except the first one, for deletion. Again, clicking the Accept button will cause the marked duplicates to be removed from the output list.
15

IMsb User Guide –August 2013
If you change your mind about deleting a duplicate address you must UN check the box beside it before clicking on the Accept button. Once the Accept Button has been clicked the process cannot be reversed. If you wish to deselect all of the addresses you have selected simple click the Clear All button. You may also exit the screen without performing deletions by clicking the Cancel button which will bring you back to the AMS Processing Summary page.
Click continue
Confirm Affixed Postage IF using Meter Postage
Note: Total Postage Affixed‐ this is total number of addresses after you have cleansed it in the tool
16
After you select your choice, click continue.

IMsb User Guide –August 2013
STEP 3: OUTPUT PROCESSING
Tray Label
The next step in the IMsb process is to prepare Intelligent Mail Tray labels, for Full‐Service mailings. From the Tray/ Sack Information screen:
IMsb will provide a recommended number and type of Containers (Trays or Sacks) to be used to prepare this mailing. This may be over ridden.
The IMsb tool will populate the Starting Container Label Serial Number for the Job.
Click “New Label” for the IMsb tool to generate your Unique Intelligent Mail Tray Barcode (IMtb) Label.
Note: The tray labels must be generated using card stock or a standard business card stock which is perforated at 2 x 3.5” such as an AVERY label 5371.
Select “Edit containers” if the amount of recommended containers is not sufficient. Click Continue
Tray Label Creation
Optional: Enter the Printer Line information (if applicable) as well as the Mailer’s Area information. Required: click “Create Label” to generate PDF of tray/sack label.
17
IMsb User Guide –August 2013
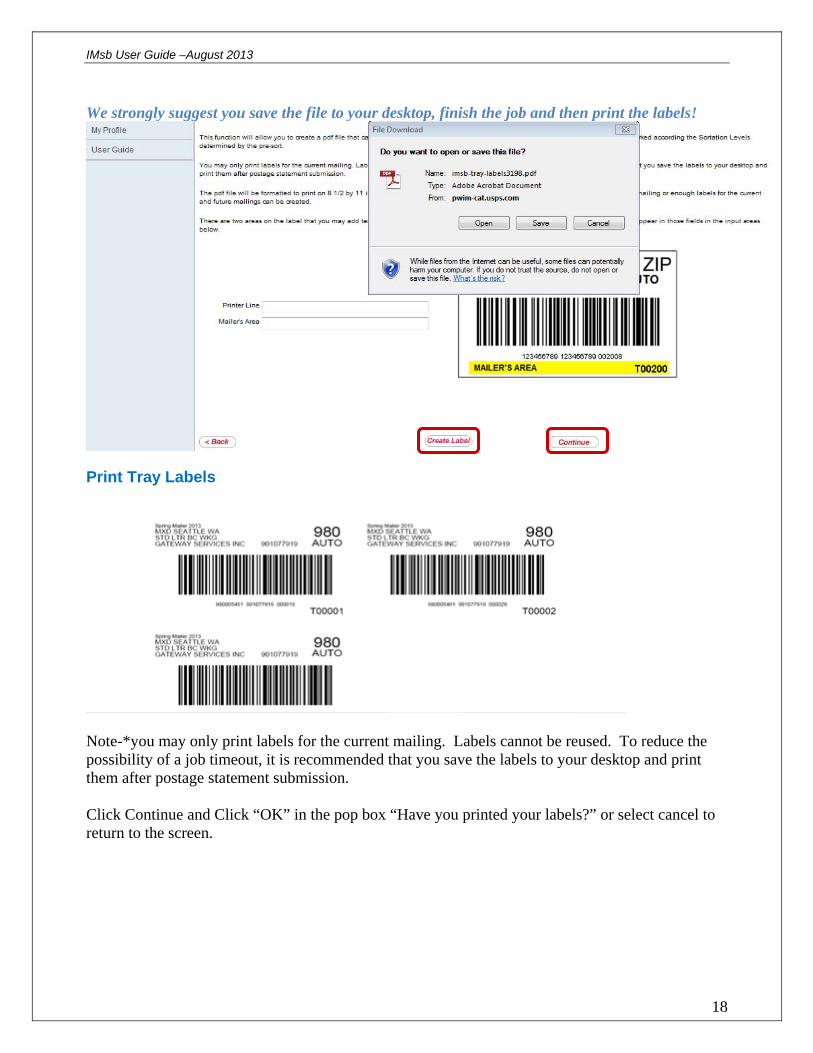
We strongly suggest you save the file to your desktop, finish the job and then print the labels!
Print Tray Labels
Note-*you may only print labels for the current mailing. Labels cannot be reused. To reduce the possibility of a job timeout, it is recommended that you save the labels to your desktop and print them after postage statement submission.
18
Click Continue and Click “OK” in the pop box “Have you printed your labels?” or select cancel to return to the screen.

IMsb User Guide –August 2013
Downloads:
The Downloads screen shown below allows you to print your addresses on labels, envelopes or inserts. The addresses are provided in a PDF file which you can either open in Adobe® Reader or save to your computer. Available label sizes are : Avery 5161 or equivalent to 1” x 4” label (Postcards/Letters only) Avery 5162 or equivalent to 1.33” x 4” label (Postcards/Letters only)
Avery 5163 or equivalent to 2” x 4” label (Postcards/Letters & Flats) Envelopes sizes available:. #6 ¾ #7 #10 Other‐ no envelope used Insert option allows you to print directly on an 8.5 x 11 insert.
The address block is configurable. Mail Merge ‐allows downloading of file to be used during mail merge option.
19

IMsb User Guide –August 2013
Below is an example of a PDF that will be generated upon choosing 1” Label as your output format. Again, we strongly suggest you save the pdf and print the files after you have submitted the job!‐
Example of user selecting Number 6 3/4 Envelope from the output format:
Optional to save the corrected address lists: Click Continue
20

IMsb User Guide –August 2013
The IMsb tool allows you to save your corrected address list for future use. The Privacy act does not allow the USPS to save your address files.
Downloading of:
1. Updated address file will provide the updated address list to be saved in either a CSV or Excel for future use. It will include in the file, the bad addresses tagged as unmatched.
2. DPV Mail Merge allows you to merge the address block into a mail merge template.
The DPS Mail Merge file includes the unique intelligent mail barcode for each piece to be inserted on your mailpiece as long as the IMb font has been installed from the RIBBs page. (https://ribbs.usps.gov/onecodesolution/download.cfm)
The USPSIMB Standard Font should be set at 16 pt font. To download the font, go to https://ribbs.usps.gov/onecodesolution/download.cfm?downloads=Office&selection=5
3. Non DPV Mail Merge file allows for printing of bad addresses that can be mailed with a
First‐Class stamp. (not recommended)
21

IMsb User Guide –August 2013
STEP 4: SUBMIT JOB
22
Click Continue
IMsb User Guide –August 2013
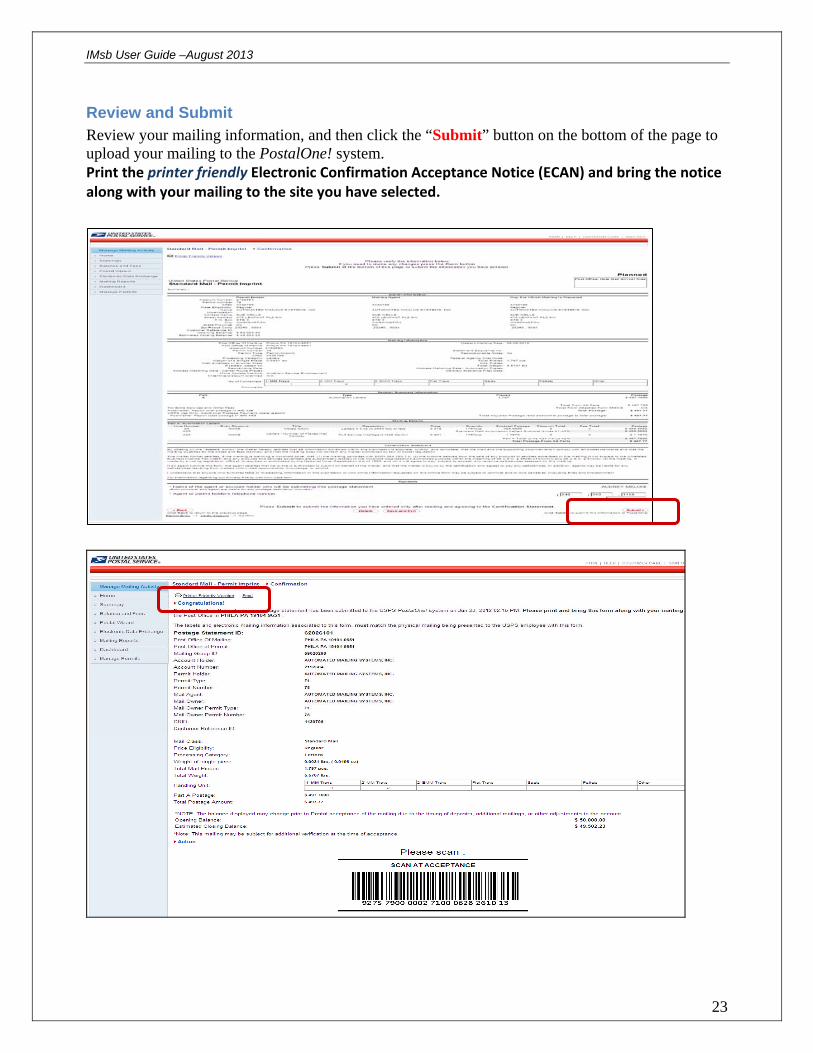
Review and Submit Review your mailing information, and then click the “Submit” button on the bottom of the page to upload your mailing to the PostalOne! system. Print the printer friendly Electronic Confirmation Acceptance Notice (ECAN) and bring the notice along with your mailing to the site you have selected.
23

IMsb User Guide –August 2013
Youarefinished!Thetoolhassubmittedyourpostagestatementandqualificationreportelectronically.
ADDITIONAL FUNCTIONS: Review Jobs contains a listing of the Jobs that the user has created on IMsb. Contains Job ID, Job Description, CRID, Mailer ID, Mailing Date, Business Name, Address and Contact. Also allows the information from a selected Job to be prepopulated into a new Job.
24

IMsb User Guide –August 2013
Help Link The “Help” link in the upper right corner provides additional information regarding the six buttons on the left side of the screen. And the User Guide on left hand side provides informaton about each screen and has other vauble informaton about the IMsb tool.
RESOURCES
1. The RIBBS Website
The USPS provides a number of technical and non‐technical guides, informative documents and presentations, and other helpful tools to make it easier for you to take full advantage of the suite of Intelligent Mail barcodes. These valuable resources can be found on the USPS RIBBS website http://ribbs.usps.gov/ Additionally, you can find resources on how to download USPS IMb standard font for Mail Merge option. (16pt font)
https://ribbs.usps.gov/onecodesolution/download.cfm?downloads=Office&selection=5
25

IMsb User Guide –August 2013
26
2. Guides, Specifications and Manuals
For those new to Intelligent Mail services, there are several guides, specifications and manuals that will get you started and give a broad overview of the fundamentals of the program. Following is a list of primary sources of information. Domestic Mail Manual (DMM) This is the USPS manual that contains standards governing U.S. domestic mail services, descriptions of the mail classes and special services and conditions governing their uses, and standards for rate eligibility and mail preparation. Domestic mail is classified by size, weight, content, service, and other factors. http://pe.usps.com/text/dmm300/dmm300_landing.htm A Resource Map to Intelligent Mail Documents This lists all the documents and source materials that you will need to transition to Intelligent Mail services. It provides explanations of each document and information on how to find and print these documents. It is a reference source that will help you as you learn the ins‐and‐outs of Intelligent Mail services. This document can be found on RIBBS at http://ribbs.usps.gov/intelligentmail_guides/documents/tech_guides/ResourceMapToIntelligentMail.pdf A Guide to Intelligent Mail for Letters and Flats This guide provides guidance on how to prepare your mail and electronic documentation and identifies the data that will be provided at no additional charge for Full‐Service option compliance. In addition, the Guide also describes what will be available in the first release of Intelligent Mail services. A Guide to Intelligent Mail for Letters and Flats can be found on RIBBS at http://ribbs.usps.gov/intelligentmail_guides/documents/tech_guides/GuidetoIntelligentMailLettersandFl ats.pdf User Access to Electronic Mailing Information and Reports Guide The purpose of this guide is to provide information regarding Intelligent Mail Full‐Service option reports and a walk through of the new Business Customer Gateway webpage, which will be accessible through the USPS.com home page. This guide is available on RIBBS at https://ribbs.usps.gov/intelligentmail_guides/documents/tech_guides/user_access/user_access.htm
3. Personal Support Resources
In addition to the guides and specifications listed above, you can also get help from USPS Intelligent Mail service experts. To find your local Business Mail Entry (BME) Manager, go to the Business Mail Acceptance page: https://ribbs.usps.gov/index.cfm?page=bma
To contact the PostalOne! Help Desk call 1‐800‐522‐9085. For additional information
about IMB Tracing please contact the National Customer Support Center at (800)238‐3150.