Embed Size (px)
Citation preview
Interfacing to C++ in Visual Studio 2010 1211b Page 1 of 9 DataRay Inc. Bella Vista, CA
(303) 543-8235 www.dataray.com
Covers: Interfacing DataRay Camera and Slit Scan Profilers to C++ in Visual Studio 2010 using the DataRay OCX.
Start in the standard software:
• As Administrator, install the DataRay software which came with your product.
• Attach the profiler product. Allow the drivers to install.
• Open the DataRay software and select your profiler in the Device pull-down menu.
• Learn to use your product in the DataRay software. Then close the software.
Add Visual Studio 2010: We do not claim to be Visual Studio ‘experts’, however we are able to create new projects in Visual Studio
that can control DataRay products. Install Visual Studio 2010 on your computer (earlier versions should work, but exact details will
change). Download the example from the DataRay website:
• Cameras: Download & unzip: http://www.dataray.com/UserFiles/file/TestingDataRayInterfaceToCPlusPlusVS2010.zip
• BeamMap2, Beam’R2, ColliMate: TBA
Build and run example: This example should build and run with no errors.
Not working? Email [email protected] or call (303)543-8235 with:
• Device name and serial number
• DataRay, Windows & Visual Studio versions which you are using.
Only Visual Studio 2010 and later are fully supported. The DataRay
OCX still works in VS2006 and VS2008, but we are only able to
provide limited support.
Overview of OCX: Your interfacing code communicates with DataRay
products through the DataRay OCX. The OCX is an ActiveX component that can
be accessed from a variety of Windows based environments. The OCX is
automatically generated and registered with the Windows operating system
upon installing the DataRay software. Once initialized, the OCX is always
running. This means that the camera is still running, even while editing GUI
elements in Visual Studio. Do not be alarmed if DataRay OCX GUI elements are active while your program is not running. This is the
expected behavior.
Some important notes:
• Read through this entire document.
• Some prior experience with C++, Windows MFC programming, and Visual Studio is required.
• The OCX is only functional as part of a GUI-based program.
• In the Resource View of VS2010, elements may appear as white boxes or as the actual GUI element they represent.
PRELIMINARY Interfacing to C++
DataRay Inc.
Interfacing to C++ in Visual Studio 2010
Interfacing to C++ in Visual Studio 2010 1211b Page 2 of 9 DataRay Inc. Bella Vista, CA
(303) 543-8235 www.dataray.com
Tutorial:
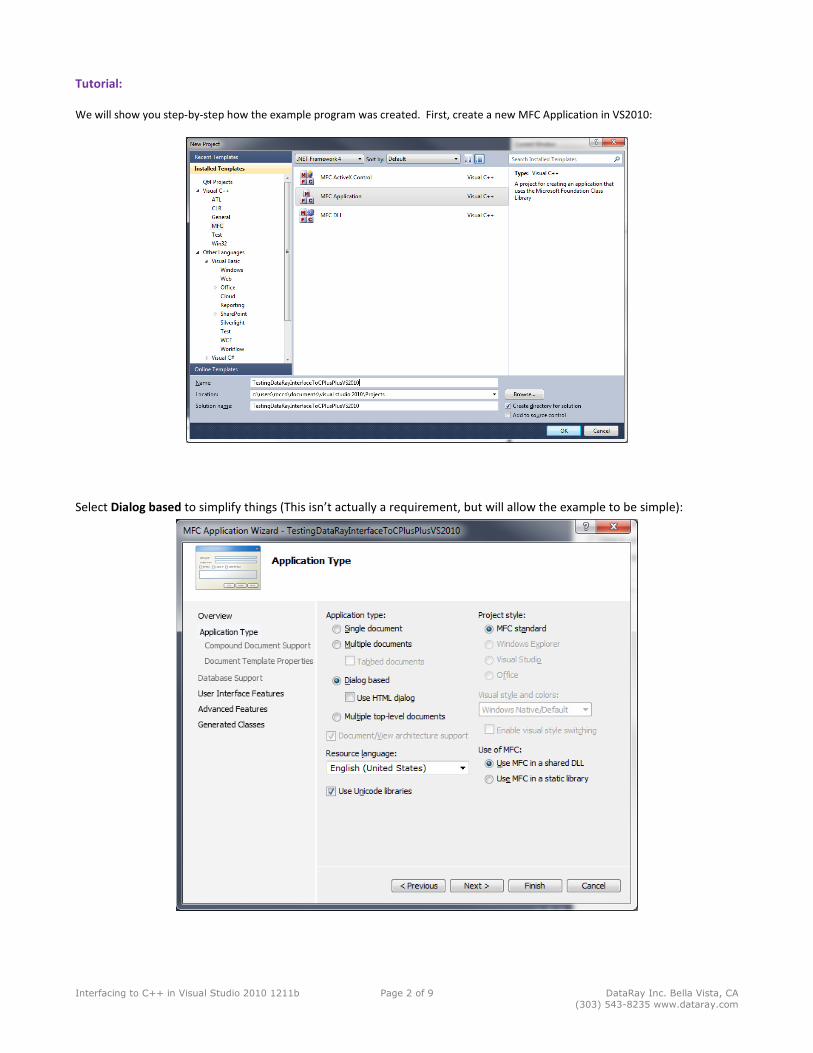
We will show you step-by-step how the example program was created. First, create a new MFC Application in VS2010:
Select Dialog based to simplify things (This isn’t actually a requirement, but will allow the example to be simple):
Interfacing to C++ in Visual Studio 2010 1211b Page 3 of 9 DataRay Inc. Bella Vista, CA
(303) 543-8235 www.dataray.com
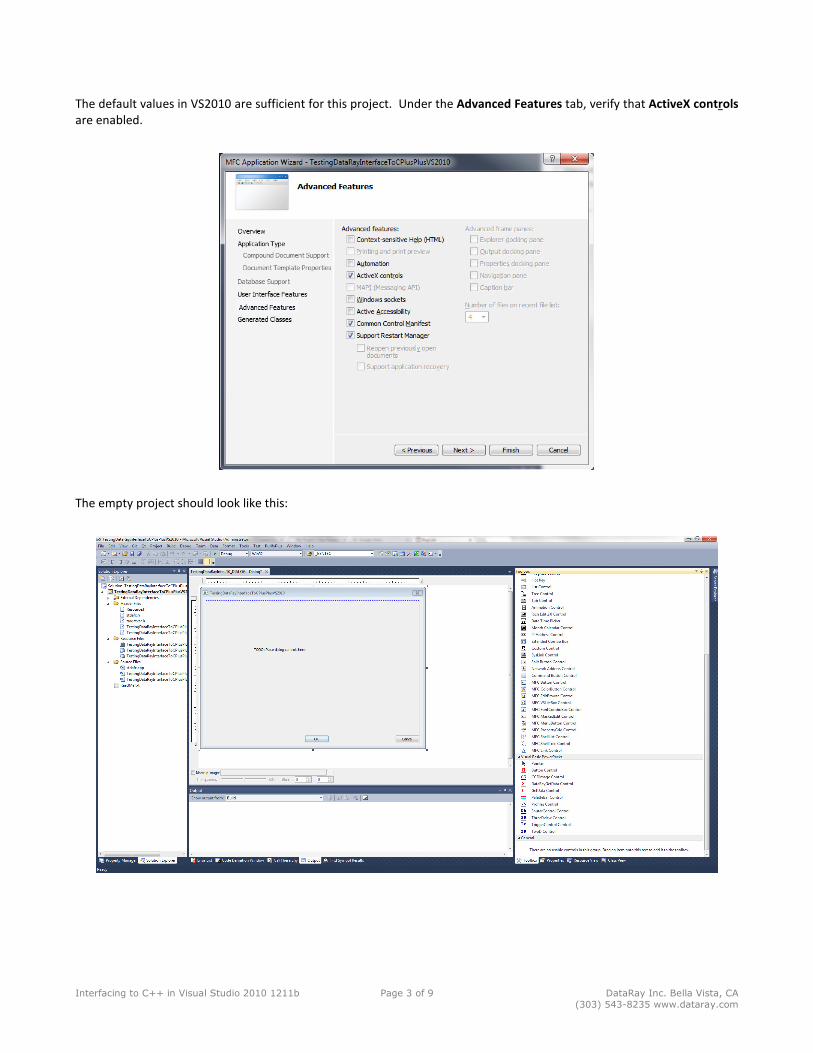
The default values in VS2010 are sufficient for this project. Under the Advanced Features tab, verify that ActiveX controls
are enabled.
The empty project should look like this:
Interfacing to C++ in Visual Studio 2010 1211b Page 4 of 9 DataRay Inc. Bella Vista, CA
(303) 543-8235 www.dataray.com
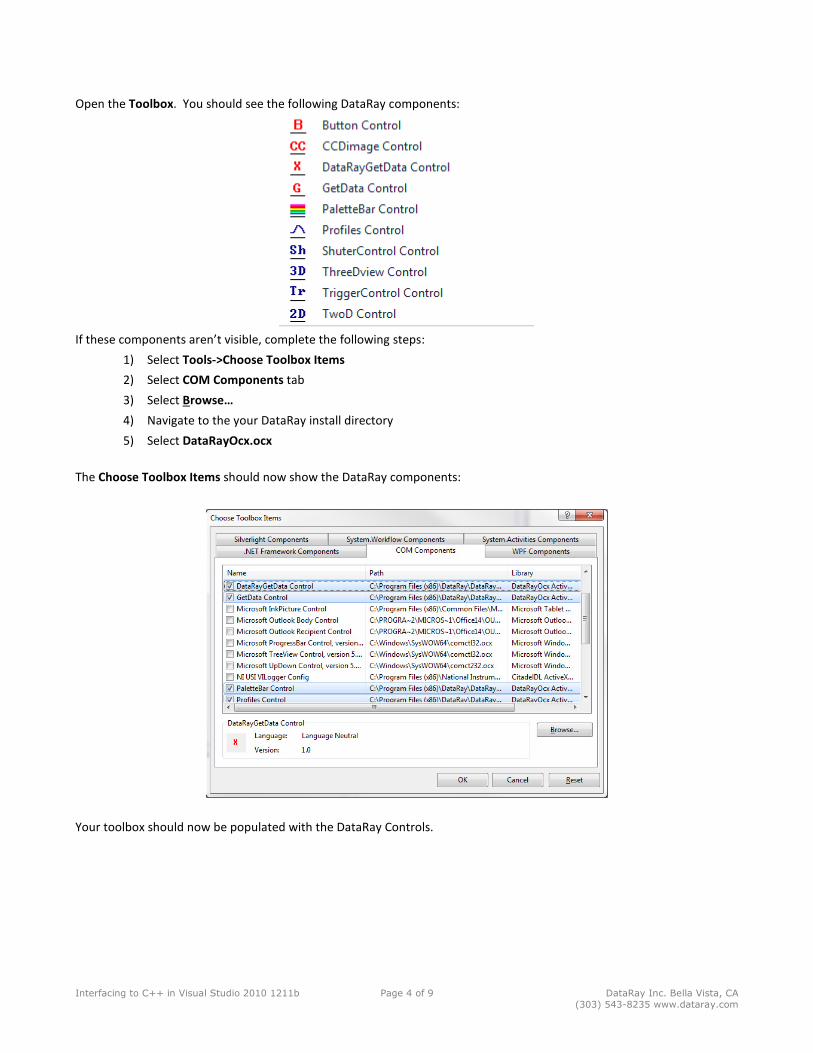
Open the Toolbox. You should see the following DataRay components:
If these components aren’t visible, complete the following steps:
1) Select Tools->Choose Toolbox Items
2) Select COM Components tab
3) Select Browse…
4) Navigate to the your DataRay install directory
5) Select DataRayOcx.ocx
The Choose Toolbox Items should now show the DataRay components:
Your toolbox should now be populated with the DataRay Controls.
Interfacing to C++ in Visual Studio 2010 1211b Page 5 of 9 DataRay Inc. Bella Vista, CA
(303) 543-8235 www.dataray.com
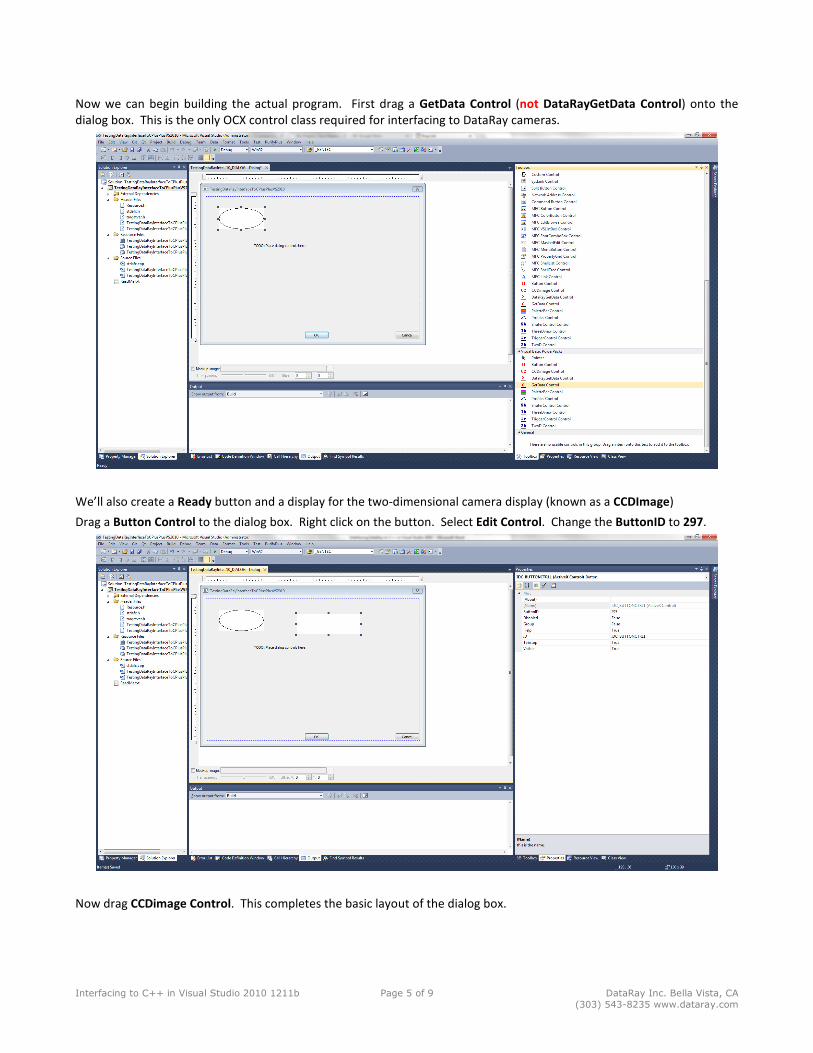
Now we can begin building the actual program. First drag a GetData Control (not DataRayGetData Control) onto the
dialog box. This is the only OCX control class required for interfacing to DataRay cameras.
We’ll also create a Ready button and a display for the two-dimensional camera display (known as a CCDImage)
Drag a Button Control to the dialog box. Right click on the button. Select Edit Control. Change the ButtonID to 297.
Now drag CCDimage Control. This completes the basic layout of the dialog box.
Interfacing to C++ in Visual Studio 2010 1211b Page 6 of 9 DataRay Inc. Bella Vista, CA
(303) 543-8235 www.dataray.com
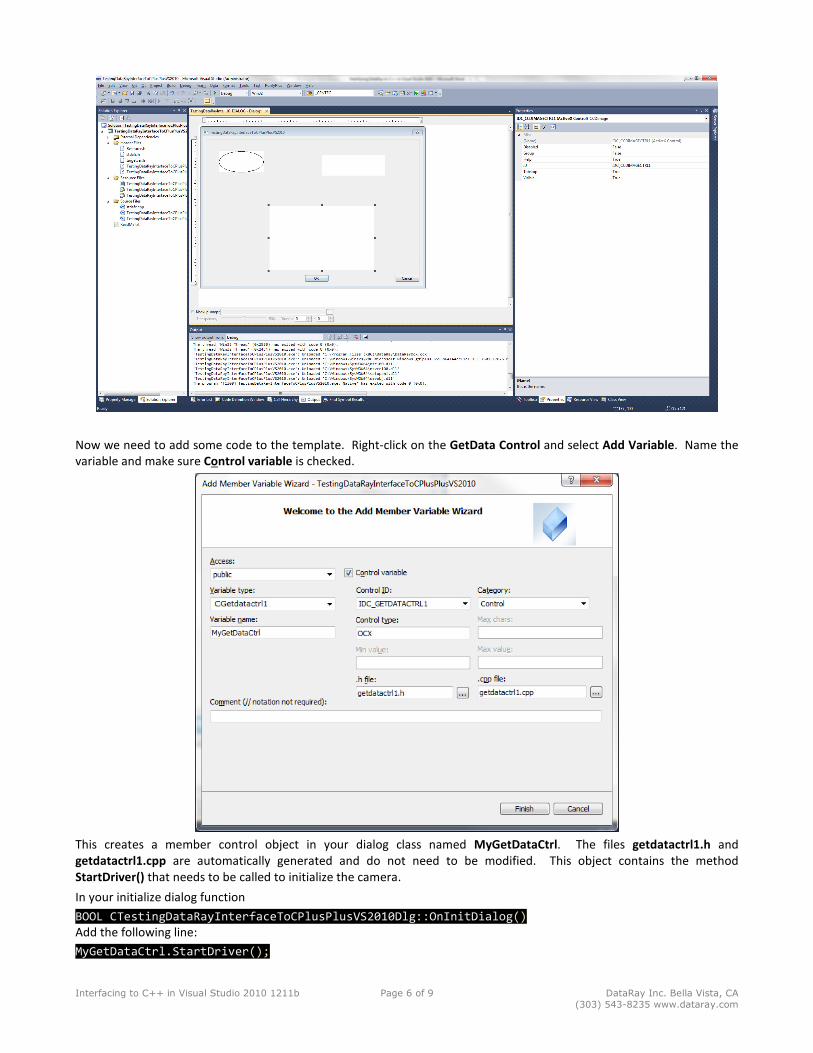
Now we need to add some code to the template. Right-click on the GetData Control and select Add Variable. Name the
variable and make sure Control variable is checked.
This creates a member control object in your dialog class named MyGetDataCtrl. The files getdatactrl1.h and
getdatactrl1.cpp are automatically generated and do not need to be modified. This object contains the method
StartDriver() that needs to be called to initialize the camera.
In your initialize dialog function
BOOL CTestingDataRayInterfaceToCPlusPlusVS2010Dlg::OnInitDialog()
Add the following line:
MyGetDataCtrl.StartDriver();
Interfacing to C++ in Visual Studio 2010 1211b Page 7 of 9 DataRay Inc. Bella Vista, CA
(303) 543-8235 www.dataray.com
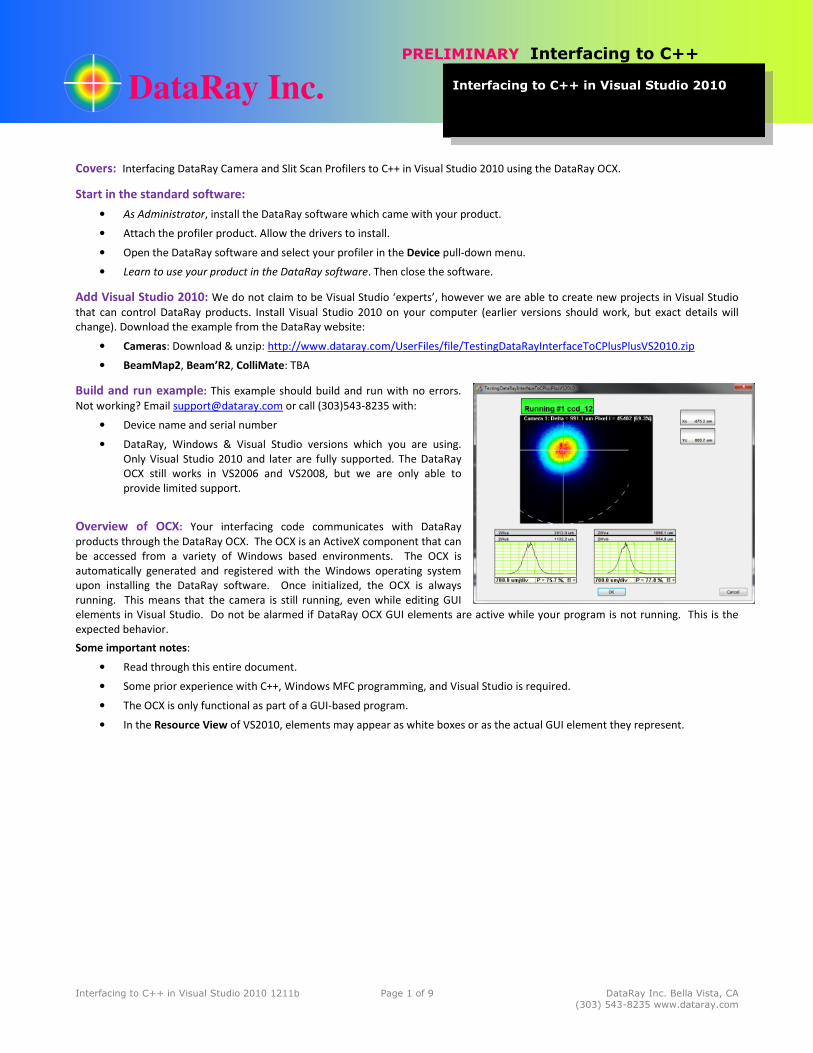
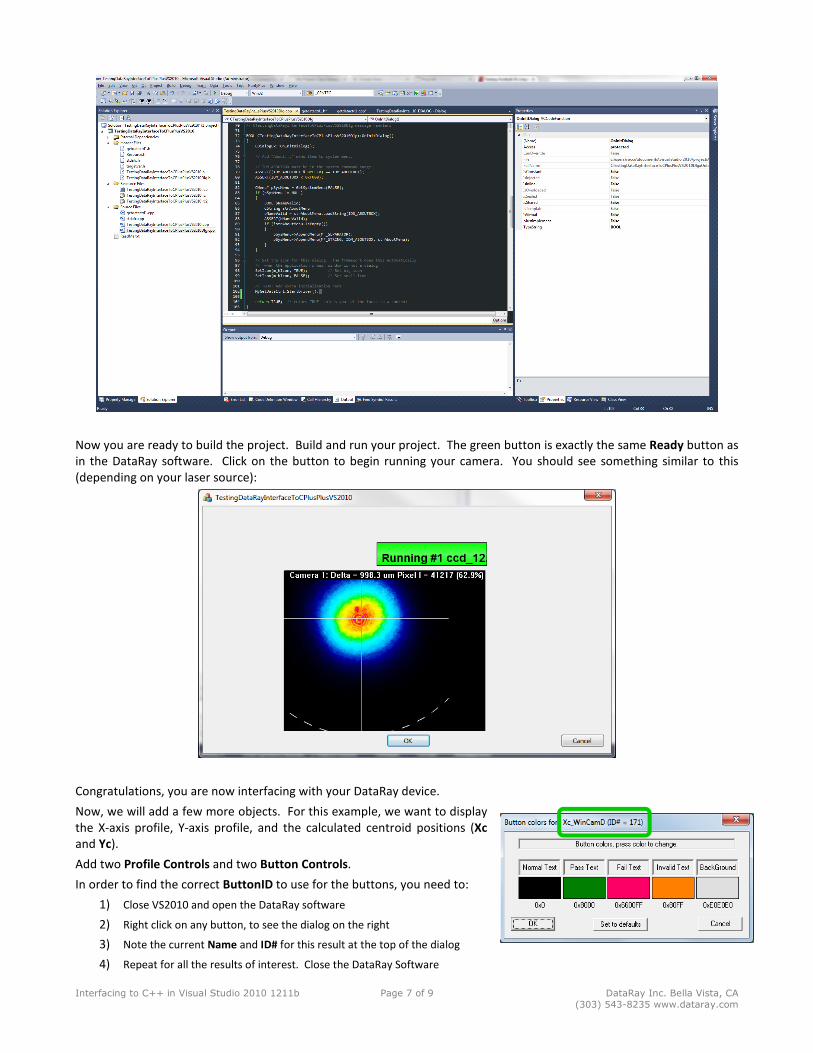
Now you are ready to build the project. Build and run your project. The green button is exactly the same Ready button as
in the DataRay software. Click on the button to begin running your camera. You should see something similar to this
(depending on your laser source):
Congratulations, you are now interfacing with your DataRay device.
Now, we will add a few more objects. For this example, we want to display
the X-axis profile, Y-axis profile, and the calculated centroid positions (Xc
and Yc).
Add two Profile Controls and two Button Controls.
In order to find the correct ButtonID to use for the buttons, you need to:
1) Close VS2010 and open the DataRay software
2) Right click on any button, to see the dialog on the right
3) Note the current Name and ID# for this result at the top of the dialog
4) Repeat for all the results of interest. Close the DataRay Software
Interfacing to C++ in Visual Studio 2010 1211b Page 8 of 9 DataRay Inc. Bella Vista, CA
(303) 543-8235 www.dataray.com
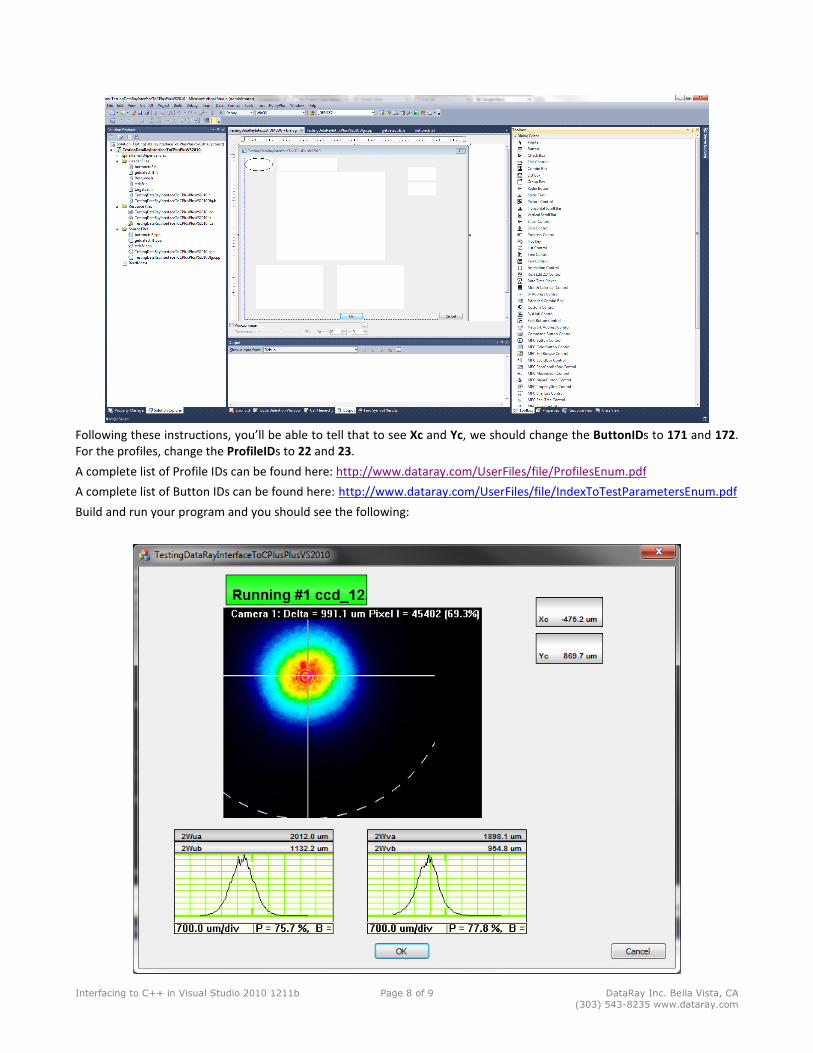
Following these instructions, you’ll be able to tell that to see Xc and Yc, we should change the ButtonIDs to 171 and 172.
For the profiles, change the ProfileIDs to 22 and 23.
A complete list of Profile IDs can be found here: http://www.dataray.com/UserFiles/file/ProfilesEnum.pdf
A complete list of Button IDs can be found here: http://www.dataray.com/UserFiles/file/IndexToTestParametersEnum.pdf
Build and run your program and you should see the following:
Interfacing to C++ in Visual Studio 2010 1211b Page 9 of 9 DataRay Inc. Bella Vista, CA
(303) 543-8235 www.dataray.com
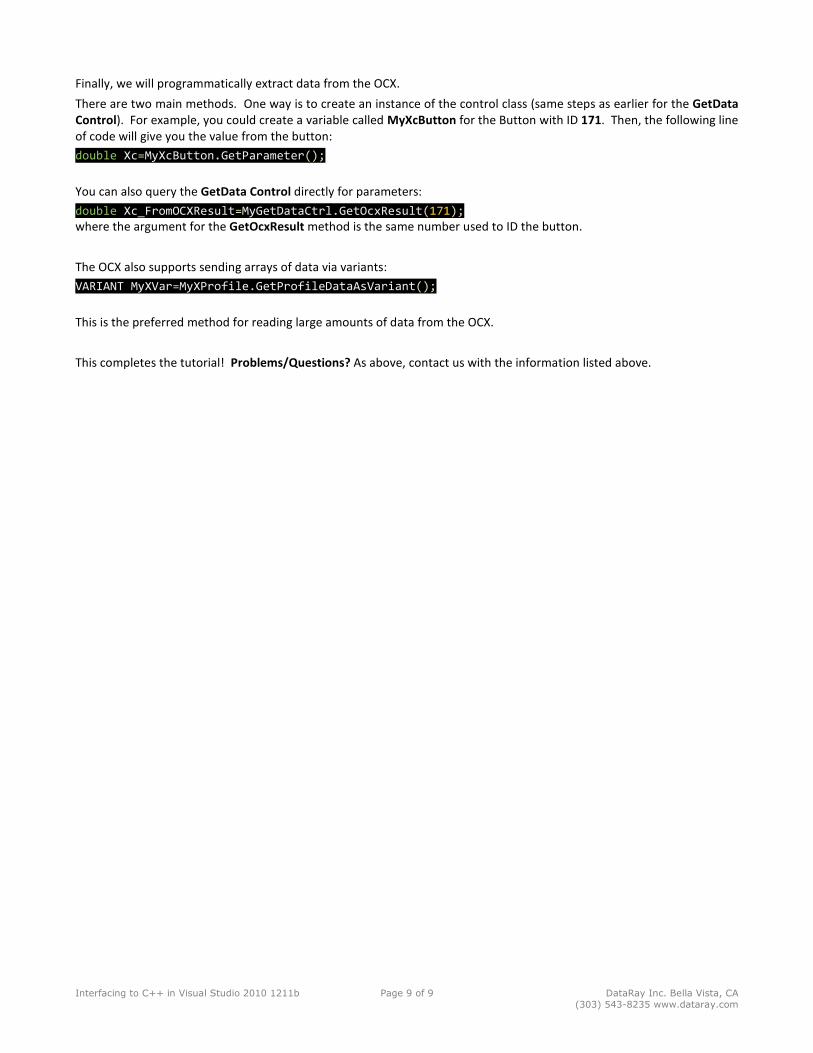
Finally, we will programmatically extract data from the OCX.
There are two main methods. One way is to create an instance of the control class (same steps as earlier for the GetData
Control). For example, you could create a variable called MyXcButton for the Button with ID 171. Then, the following line
of code will give you the value from the button:
double Xc=MyXcButton.GetParameter();
You can also query the GetData Control directly for parameters:
double Xc_FromOCXResult=MyGetDataCtrl.GetOcxResult(171);
where the argument for the GetOcxResult method is the same number used to ID the button.
The OCX also supports sending arrays of data via variants:
VARIANT MyXVar=MyXProfile.GetProfileDataAsVariant();
This is the preferred method for reading large amounts of data from the OCX.
This completes the tutorial! Problems/Questions? As above, contact us with the information listed above.