Embed Size (px)
Citation preview

INTRODUCTION TO COMPUTERSBASIC GUIDE
TECH SAVVY SENIORS
WHO IS THIS WORKSHOP FOR?
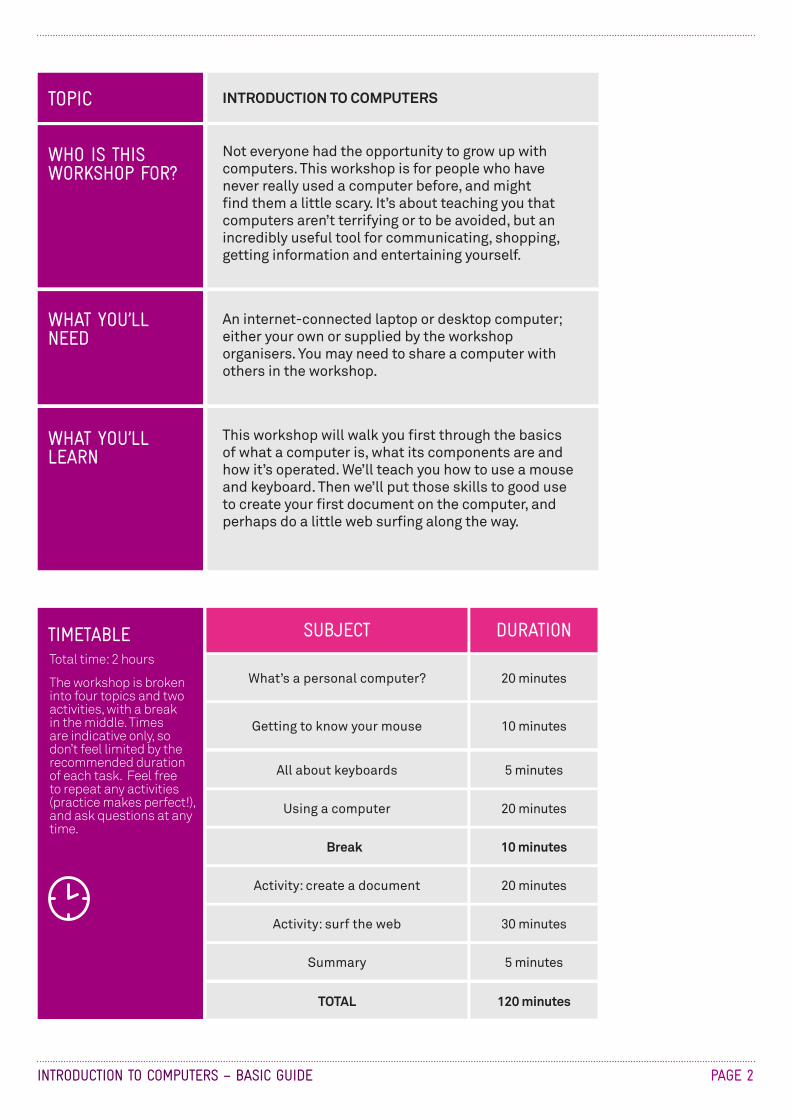
Not everyone had the opportunity to grow up with computers. This workshop is for people who have never really used a computer before, and might find them a little scary. It’s about teaching you that computers aren’t terrifying or to be avoided, but an incredibly useful tool for communicating, shopping, getting information and entertaining yourself.
INTRODUCTION TO COMPUTERS – BASIC GUIDE PAGE 2
TOPIC INTRODUCTION TO COMPUTERS
WHAT YOU’LL NEED
WHAT YOU’LL LEARN
An internet-connected laptop or desktop computer; either your own or supplied by the workshop organisers. You may need to share a computer with others in the workshop.
This workshop will walk you first through the basics of what a computer is, what its components are and how it’s operated. We’ll teach you how to use a mouse and keyboard. Then we’ll put those skills to good use to create your first document on the computer, and perhaps do a little web surfing along the way.
TIMETABLE SUBJECT
What’s a personal computer?
Getting to know your mouse
All about keyboards
Using a computer
Break
Activity: create a document
Activity: surf the web
Summary
TOTAL
20 minutes
10 minutes
5 minutes
20 minutes
10 minutes
20 minutes
30 minutes
5 minutes
120 minutes
DURATIONTotal time: 2 hours
The workshop is broken into four topics and two activities, with a break in the middle. Times are indicative only, so don’t feel limited by the recommended duration of each task. Feel free to repeat any activities (practice makes perfect!), and ask questions at any time.

INTRODUCTION TO COMPUTERS – BASIC GUIDE PAGE 3
SUBJECT
TIME
OVERVIEW
WHAT’S A PERSONAL COMPUTER?
15 minutes
Technically a lot of devices qualify as a computer these days. There’s a computer in your phone, in your TV, in your car – even in your toaster in some cases. When people talk about personal computers, however, they mean standalone devices that can be used for accessing the internet, producing documents, playing games and much more.
Personal computers (PCs) generally come in one of two forms: the desktop computer and the laptop computer, also known as a notebook computer.
A desktop computer is much bigger and requires a connection to a power point. It’s designed to be placed on or under a desk. It usually comes with separate components that make up the desktop whole. There’s a screen (called a monitor), mouse, keyboard and the computer “box” itself. Some desktop computers, known as “all-in-ones” combine the monitor and computer box into a single unit.
A laptop computer combines all those components into a single box that opens up like a clamshell, with the monitor on top and keyboard and mouse below. Laptops are portable and have battery power, which can last for a number of hours (usually about 5-10) before you need to recharge.
A desktop computer requires mains power and has discrete components
A laptop computer is portable and all the components are built in
SUBJECT
DISCUSSION
DISCUSSION POINTS
DISCUSSION
Desktops have a bigger screen and larger keyboard and mouse. They’re also typically more powerful than laptops (that is, they have a faster “engine”).
Laptops are portables, so you can take them away with you, and do things like sit in bed and use the computer.
Which do you think you would prefer: a laptop or a desktop? Why does one choice or another appeal to you?

PAGE 4
The applications for personal computers are nearly limitless. Some of the things you can do include:
Writing letters and creating spreadsheets.
Video and voice chatting with friends and family all over the planet.
Browsing the incredible library that is the World Wide Web.
Playing games with others or solo, from simple card games to complex shooters.
Doing your taxes.
Checking on news and current affairs.
Storing, sharing and browsing photo albums.
Listing to music and watching TV.
A desktop computer comes in separate parts. We’ll walk you through what each does. A laptop also has all these parts, but they’re built into the single box.
The main box
This is the body of the computer itself, where all the computing parts are stored. In it are the computer processor (the central processing unit, or CPU), memory and storage and much more. It’s the part of the computer that thinks, calculates and remembers.
The keyboard
The keyboard is what you use to type words and numbers. It also usually has extra controls for moving around a screen or document, or accessing special computer abilities.
The mouse
The mouse is known as a pointing device – it’s a way of communicating to the computer what you want to do. By moving the mouse around, a pointer on the computer monitor is moved, which lets you select things on the screen.
The monitor
The monitor is the screen that displays the computer’s output – it’s how the computer displays its information to you.
THINGS YOU CAN DO ON A COMPUTER
THE PARTS OF A COMPUTER
INTRODUCTION TO COMPUTERS – BASIC GUIDE

PAGE 5
PERIPHERALSAlthough these are the main parts of a computer, there may also be other parts. Some computers come with speakers for sound output, a device for connecting to the internet (called a modem or router), a printer to put your documents and photos on physical paper, microphones and cameras for talking to other people through the computer, and much more. There are literally thousands of different devices that can be plugged into and controlled by a computer. Collectively, they’re called peripherals.
CONNECTING A COMPUTER
Okay, we’ve talked through the different parts of a computer, now it’s time to connect the components together. They all plug into the main computer box. Of course, this only applies to desktop computers – on a laptop all the parts are already connected.
If you look at the back of a computer, you’ll likely see a dizzying array of different plugs and connectors: don’t worry, you’ll never even have to use most of them. They’re present mainly so that the computer still supports older peripherals. What’s more, all of the connectors are “keyed” – the only thing that you can plug into a connector is a matching cable that’s positioned the right way up. Essentially, where it fits is where it goes.
The first thing to do is connect the monitor to the computer. Take the cable from the monitor and plug it into a matching slot on the back of the computer. There are actually a number of different types of plugs for monitors, but the most common is one called HDMI – the same one used by flat screen TV sets.
THE PARTS OF A COMPUTER
INTRODUCTION TO COMPUTERS – BASIC GUIDE
A printer is an example of a computer peripheral
A standard HDMI connector
The software
There’s a fifth, invisible component on computers: the software. Software controls the computer and tells it what to, and also communicates with you. There are two general types of software: the operating system and applications.
The operating system (OS) runs the basic functions of the computer, like displaying things on screen and storing documents. Every computer has one – the most common operating system is called Windows. It’s the thing that lets you launch and switch between applications, find files, use the mouse and keyboard, set the speaker volume and much more.
Applications are individual pieces of software that perform specific tasks. One application might help you create letters. Another might let you play a game. Another could let you browse the internet. There are millions of different applications for different tasks.
APPLE MACINTOSHMost of the Tech Savvy Seniors guides assume you’re running the Windows operating system, with the latest version being Windows 10. If you’re using an Apple Macintosh, many of the same principles will apply, but in some cases the process for launching and using applications might be a little different (and the apps might be different as well)

PAGE 6
CONNECTING A COMPUTER
TURNING ON A COMPUTER
Then we connect the mouse and the keyboard. These will have the same kinds of connectors as each other, called USB (universal serial bus). You’ll see on the computer that there are several ports that match these plugs. You can plug the keyboard and mouse into any of them.
Finally, take the power cable and plug it into the computer. Your monitor will also have its own power connector. Turn on the power points; you should be all ready to go.
Now we just need to turn the computer on. On the front of a desktop computer, or just above the keyboard on a laptop, there will be a power button. Most computers use a common symbol for the power button – a circle broken by a vertical line through the top.
Simply press the button once and your computer should spring to life. Things will (hopefully) start whirring and a series of images will appear on screen. The computer will take a few seconds to “boot up”, during which there will be a series of different images on screen. Usually, on a computer running the Windows operating system, you’ll see first a manufacturer’s splash screen matching the maker of your computer, then a Windows boot-up screen as the Windows operating system loads itself into the computer’s memory.
Finally, you’ll see a login screen, which is where we’ll begin to start using the computer. Computers can be set up with or without a password. The password is used to lock people out who shouldn’t be using the computer.
Modern computers can also have several authorised users, each with their own unique and separate set of documents and applications. So if you login, you’ll see your documents, and if someone else logs in they’ll see their documents.
The symbol for USB. You’ll see it just below the USB connectors on the computer
A USB connector. A lot of devices use USB to connect to the computer (including the keyboard and mouse). You can plug it into any available USB port
The nearly universal symbol for the button that switches PC power on
INTRODUCTION TO COMPUTERS – BASIC GUIDE
The login screen for Windows 10

PAGE 7
MOUSING ABOUT Now that you’re at the login screen or in your operating system, you’ll be able to take control of your mouse.
Place the mouse on a flat surface – it can be anything, as long as it’s solid and smooth enough to support sliding the mouse over it without lifting the mouse up off the surface. Then slide the mouse around in any direction while looking up at the monitor. Don’t press any buttons on the mouse just yet, just practice moving it across the surface.
See a little pointer on the screen? See how it moves (within the borders of the screen) corresponding to the way you move the mouse?
This is how mouse control works. Don’t worry, it’s quite intuitive and you’ll get used to it very quickly. It’s because it’s so intuitive that we’ve been using mice to control personal computers since the 1970s. There are other ways to control the computer, with touchscreens, track balls, track pads, voice recognition and a variety of other gizmos available now, but the mouse is still the mainstay.
SUBJECT
TIME
GETTING TO KNOW YOUR MOUSE
10 minutes
INTRODUCTION TO COMPUTERS – BASIC GUIDE
This is what the mouse pointer looks like most of the time in Windows. Certain applications may change the shape of mouse pointer, however, depending on the needs of the application
A touch pad
ON LAPTOPS: THE TOUCH PADIf you’re running this workshop on a laptop rather than a desktop computer, you might not have a mouse at all. Instead you’ll have what’s called a touch pad. It will be located just below the keyboard, and have one or more buttons just above it. The buttons serve the same functions as the mouse buttons.
The pad also serves the same function as a mouse – to move the pointer around – although in the case of the touch pad, the mechanics are a little different. To move the mouse pointer with a touch pad, you glide your finger over the pad in the direction you want to move the pointer. Don’t worry if you run out of room; just lift your finger off the pad and move it back to a point where you have room. The pointer will stay in place.
If you prefer a mouse, you can attach a mouse to a laptop using any of the laptop’s USB ports.
PAGE 8INTRODUCTION TO COMPUTERS – BASIC GUIDE
MOUSING ABOUT: WHAT DOES IT DO?
MOUSING ABOUT: THE MOUSE BUTTONS AND SCROLL WHEEL
So what function does the mouse serve anyway? The mouse is used to point at things on screen. It represents a way for you to tell the computer “I want that”. It’s used to select which application you’d like to run, and also to control elements within an application, such as pressing buttons in the application.
It’s also used to navigate around documents and applications. Say you have written a letter that’s too big to be viewed on the screen at once. Some of that letter will be “off-screen”, and you can use the mouse to view the rest of the document. If you want to insert an extra word or paragraph, or change a word or paragraph, you can use the mouse pointer to select the area of the document you want to change.
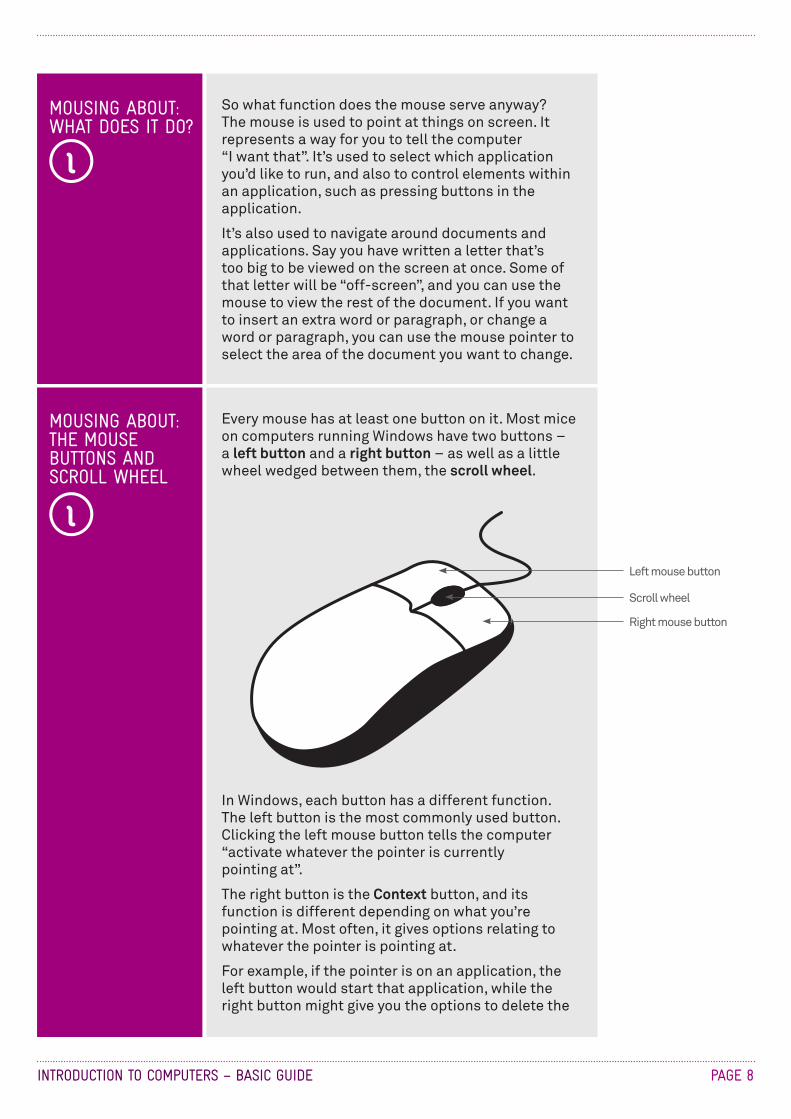
Every mouse has at least one button on it. Most mice on computers running Windows have two buttons – a left button and a right button – as well as a little wheel wedged between them, the scroll wheel.
In Windows, each button has a different function. The left button is the most commonly used button. Clicking the left mouse button tells the computer “activate whatever the pointer is currently pointing at”.
The right button is the Context button, and its function is different depending on what you’re pointing at. Most often, it gives options relating to whatever the pointer is pointing at.
For example, if the pointer is on an application, the left button would start that application, while the right button might give you the options to delete the
Left mouse button
Scroll wheel
Right mouse button

PAGE 9INTRODUCTION TO COMPUTERS – BASIC GUIDE
MOUSING ABOUT: LET’S PRACTISE
MOUSING ABOUT: THE CURSOR
application, or move it somewhere else, or close it if it’s already running.
The scroll wheel is special. In the example above, where an onscreen letter was too big to be seen all at once, the scroll wheel would be used to scroll the document down the screen, revealing the parts of it that are hidden.
Okay, let’s practise some mouse controls.
If you’re still on the Windows login screen, move the mouse pointer to a name on the screen. If there’s more than one login, you may need to ask about which to use. Then perform a single click on the left mouse button (known as a left-click). If there’s no password on the computer, then Windows should appear. What you’ll see here is called the “desktop” – it’s from here that you launch your applications.
For now, we’re not going to launch any applications or do anything (we’ll be getting to that in a bit), but
In text editors, the mouse pointer is supplemented by an element called the cursor, which is usually a vertical line that flashes continuously.
On computers, you can always jump to any point in the text and type. Extra words inserted into the middle of a paragraph will push words after them outward rather than overwrite them. You can jump into any point in a document and make edits.
The cursor tells you where in the document you’re currently editing or writing. New words that you type will appear where the cursor is. If you press the backspace button, letters just before the cursor will be deleted.
You can move the cursor using the mouse. To do that, you’d take the mouse pointer to the point in the text you’d like to place the cursor and left-click.
The cursor flashes to let you see where it is located in a document
MOUSING ABOUT: THE MOUSE BUTTONS AND SCROLL WHEEL
PAGE 10INTRODUCTION TO COMPUTERS – BASIC GUIDE
MOUSING ABOUT: LET’S PRACTISE
we can practise our mouse movements and clicking a little.
Move the mouse pointer to any blank space on the screen. Practice left-clicking and right-clicking. You’ll see, whenever you right-click, that a menu will appear on screen – this is the Context menu. To make it go away, just left-click somewhere on the screen other than on the menu. If you left-click one of the menu options, something will happen depending on what you’re pointing at.
There’s a special move that we should practise here as well. It’s called the double-click, and it takes some people a little bit of time to master. To double-click, you have to press the left button twice in very quick succession. If you’re not quick enough, it will register as two single clicks.
Double-click is often used for starting applications from the computer’s main screen. The first click selects the application. The second click starts it. You don’t always need to use double-click to launch an application, but in some cases you may need to.

PAGE 11
WHAT’S A KEYBOARD?
The keyboard is your digital typewriter. It is the way you enter text into your applications.
But it also serves other functions as well. In addition to the usual letters and numbers you might expect, there is a whole bunch of other keys whose function is not all that obvious.
Some of these include:
The Enter key
This is used to end a paragraph or signal that your typing is complete.
The Shift keys
For letters, this switches between upper and lower case. Hold down a Shift key while typing a letter, and you’ll get the upper case version of that letter. If you look on the keyboard above the number keys, as well as the punctuation keys, you’ll see extra symbols, like #,$,%, {} and so on. If you hold down the Shift key while pressing the numbers, you’ll get those symbols instead.
The Caps Lock key
Press it once, and every letter you type will thereafter be in upper case. Press it again to return to regular lower case.
The Ctrl (Control) and Alt keys
The use of these depends on the application. Like the shift key, they’re typically used in conjunction with a letter or number, where you press the Control/Alt key and the letter at the same time. Most commonly, they’re used for what are called keyboard
SUBJECT
TIME
ALL ABOUT KEYBOARDS
10 minutes
INTRODUCTION TO COMPUTERS – BASIC GUIDE
The standard layout of a QWERTY keyboard
Ctrl and Alt keys are often used for keyboard shortcuts
Shift
Ctrl Alt
Caps Lock

PAGE 12
WHAT’S A KEYBOARD?
shortcuts. Instead of taking your hand off the keyboard and using the mouse, a lot of applications let you use shortcuts to achieve certain functions. For example, pressing Control and Z at the same time in a text editor un-does the last thing you did to the document.
The Tab key
Used in some applications (like spreadsheets and web browsers) to jump to the next field.
The navigation keys – four arrow keys as well and Home, End, Pg Up (page up), Pg Dn (page down)
When working with text, these let you move the cursor without having to reach for your mouse.
The Backspace and Delete (Del) keys
If you make a mistake when typing, the Backspace key will delete that last letter you typed. The Delete key works in the opposite direction, deleting the letter after the cursor.
The F keys (F1, F2, F3 etc.)
These serve a function similar to the Control and Alt keys, letting you access certain application functions without having to reach for the mouse. F1, for example, usually brings up the Help screen.
The Esc (escape) key
This often used if you want to “back out” of whatever you’re doing. Its particular use is dependent on the application. In some cases, for example, it might close the application, or abort a particular function that you started.
Some keyboards have additional buttons as well, for controlling volume or quickly launching applications using only the keyboard.
INTRODUCTION TO COMPUTERS – BASIC GUIDE
WHY QWERTY?Most English language keyboards use what may seem like a bizarre letter layout: Qwerty (named for the first six letters on the first row of letter keys).
There are some odd historical reasons for this layout. It was originally designed for use in mechanical typewriters in the 19th century, allowing professional secretaries and typists to type faster by putting the most commonly used letters in more conveniently accessible places. But it was also designed so that typists couldn’t go too fast and cause the mechanical hammers on the typewriters to jam up.
Of course, modern electronic keyboards don’t jam up, and there are theoretically more efficient keyboard layouts that could be used. But we’ve all become so accustomed to Qwerty that it has remained in common use.
Tab
F1 F2
Delete
ESC
Backspace

PAGE 13
LAUNCHING AN APPLICATION
WHAT’S AN ICON?
Enough talk: it’s time to play. Let’s start by launching an application.
Before we get started, however, we do need to note that not all computers are alike when it comes to launching applications. It depends on your operating system. Version 10 of Windows is different from Version 8 of Windows, which is different from MacOS used in Apple Macintosh computers. Still, the principle is the same no matter what. You locate the application icon with your mouse pointer and left-click or double-click on it.
An application is represented on the screen by an icon, a graphical symbol that typically shows the logo of the application. For example, the Windows 10 Edge web browser is represented by the icon opposite:
WordPad, a text editor, is represented by the icon opposite:
In Windows 10, you can access applications in a few ways:
Click the Windows icon in the bottom left of the screen, then select All Apps. An alphbetical list of installed apps appears. Scroll to find the one you want and left-click to open.
Choose an application from the task bar at the bottom of the screen.
SUBJECT
TIME
USING A COMPUTER
20 minutes
INTRODUCTION TO COMPUTERS – BASIC GUIDE
Select All Apps in the Windows icon to view applications
The Edge logo
Choose an app from the bottom task bar

PAGE 14
WHAT’S AN ICON? Frequently used apps can be grouped for easy access in the Live Tile menu. Just drag and drop a favourite app from the list of All apps into the Live Tile menu on the right. For even quicker access, just drag and drop the app onto the main desktop.
INTRODUCTION TO COMPUTERS – BASIC GUIDE
WHAT’S A WEB BROWSER? We’ll actually take a quick walk through using a web browser in a short while, but the short explanation is that a web browser lets you explore the endless library and limitless shopping mall that is the world wide web. To access the Web, you just need to open your web browser and type in the address of a web site to view that site’s contents.
If you know the app you want, start typing it into the box next to the Windows icon in the bottom-left of the screen. When the name of the app is displayed, click Enter to launch the app.
LAUNCHING AN APPLICATION
Let’s practise launching an application. In Windows 10, find the Edge web browser icon. (If you’re using a Windows 8 or Windows 7 computer with the Internet Explorer browser, the icon is similar.)
Move your mouse so that the mouse pointer is directly on top of the icon.
Now just left-click. (Note, if the icon is on the main desktop in Windows 7, 8 or 10 you’ll have to double-click on it).
The application will launch and you’ll see it pop up on your screen, either in a “window” – which is the frame on the desktop in which the application runs – or full screen.
The Edge logo
Edge running in a window (and open to telstra.com.au)
Type the name of an app to search for it

PAGE 15INTRODUCTION TO COMPUTERS – BASIC GUIDE
CLOSING AN APPLICATION
Now let’s close the application.
If you look to the top right of the screen in Edge you’ll see a button marked with an X. This is the close button.
Move your mouse pointer over it and left-click. This will close the application.
If you’re curious, the two buttons next to it have different functions. The square button makes the application blow up to fill the whole screen. The line hides the app but does not close it – you can make it reappear again by clicking on the application icon on the bar at the bottom of the screen.
Try opening and closing Edge and any other applications installed on the workshop computers that take your fancy!
X marks the spot
MOVING WINDOWS AND MULTITASKINGMost apps you launch on a Windows computer will appear in a frame in the middle of the screen. The frame is called a window (from which the operating system gets its name).
So why does this happen? It’s because the computer is designed so that you can have several applications open at once and even on the screen at the same time; you don’t have to close one before opening another. This is called multitasking.
You can move and resize windows as you like. To move a window, take your mouse pointer to the top bar of the window, where there aren’t any buttons. Click on the left mouse button and keep the button held down. Still holding down the left button, move the mouse – you’ll see that the window moves with it. When the window is where you want it, let go of the mouse button and the window will fix in place. This is what we call “dragging and dropping”.
You can also resize windows. Move your mouse right to the edge of the frame. The mouse pointer will change to an arrow: horizontal arrows at the left and right edges; vertical at the bottom; diagonal on the bottom corners. Then, left click and hold (as above) and drag the frame outward or inward to resize the window. Practise resizing windows.
Windows alow you to have several applications open at once

PAGE 16INTRODUCTION TO COMPUTERS – BASIC GUIDE
SHUTTING DOWN A COMPUTER
We should make a special note here about shutting down a computer.
To turn a computer off, you generally shouldn’t just switch the power off. The computer needs to store the things in its memory before it does that.
To shut down in Windows 10, click on the Windows icon on the bottom left-side of the screen. A menu will appear with the option of Power not far from the Windows icon. Click it and select Shut down.
In Windows 8, move your mouse pointer to the lower left-hand corner of the screen and right-click. A menu will appear. Now move your mouse pointer to Shut down or sign out. Another menu will appear to the right of that. Move the mouse pointer to Shut Down and left-click.
In Windows 7, take the mouse pointer to the Windows icon on the bottom left of the screen. Left-click and a menu will appear. Then move the mouse pointer to the Shut Down button and click.
Thankfully, on most computers now you can also just press the power button – which has the same effect of doing the above. The computer won’t immediately switch off, but it will start the shut down process.
Try shutting down the computer and restarting it.

PAGE 17
Now let’s start actually doing something with our computer.
The first thing that we’ll do is create a document in WordPad. This will be a text document. You would create a text document if you wanted to type a letter or create a list.
Just follow these steps:
1. Launch WordPad.
In Windows 10, the quickest way to launch Word pad is to start typing the name into the Search the web and Windows box next to the Windows icon in the bottom left of the screen. As you do, a menu will pop up showing you search results, one of which will be WordPad. Click the link to load WordPad.
In Windows 8, move your mouse to the bottom left-hand corner of the screen. You’ll see a down arrow icon. Move your mouse pointer on top of it and left click. A new page will appear with an icon for all of the installed applications. Find the icon for WordPad, move your mouse pointer to it, and left-click.
2. WordPad will appear, ready to go.
On the top part of the window, you’ll see a whole host of icons: these are used for formatting, fonts, checking and moving text around. Don’t worry about those for now.
The main part of the window will be a blank white space – this is where we’ll be typing. Note the flashing cursor in the white space.
STARTING TO MAKE IT WORK
ACTIVITY
TIME
LET’S CREATE A DOCUMENT
20 minutes
Look for this icon to open WordPad
INTRODUCTION TO COMPUTERS – BASIC GUIDE
The cursor marks where you will start typing

PAGE 18
3. Start typing on the keyboard.
Try this:
Pressing the Enter key to end a paragraph.
Holding down the Shift key to make characters upper case and to access symbols.
Using the Backspace key to delete a letter you’ve just typed.
4. Entering text will start to exceed the screen.
If you enter enough text, it will start to exceed the space on the screen. Then something strange happens. A bar will appear on the right-hand side of the window. This is called a scroll bar, and it lets you scroll the document up and down.
To use the scroll bar, take your mouse pointer and move it on top of the bar. Then left-click and hold down the mouse button. Then, holding down the button, move the mouse and down to scroll the document, and release the button when you’re done. You can also use the scroll wheel on the mouse. Try rolling the scroll wheel to scroll through the document.
5. Your cursor remains at the end of the text.
Note that the cursor will stay at the end of the text you’re typing. But now we’re going to move it. Grab your mouse and move the pointer to somewhere in the text you’ve already typed (note also that the shape of the mouse pointer has changed – it will now look like a cursor itself).
Left-click in the text. You’ll see that the cursor has moved.
6. Type a letter key to see new text.
You’ll see that the new text appears where the cursor is, pushing out the old text.
7. Move the cursor by pressing the arrow keys.
Each press of an arrow key moves the cursor one character left or right, or up or down one row. Give it a try.
8. Use your mouse or the arrow keys to move the cursor back to the end of the document.
9. Save the document.
This will store the document in the computer permanently (until it’s manually deleted), so that you can open it again later. You’ll be able access the saved document even if the computer is turned off and on again.
The scroll bar
INTRODUCTION TO COMPUTERS – BASIC GUIDE
LET’S CREATE A DOCUMENT
What the mouse pointer looks like in WordPad

LET’S CREATE A DOCUMENT
PAGE 19
Down the bottom, next to File name:, you’ll see a white bar (probably with the word Document written in it). This is called a field, and where we’ll enter the name we want to give the document. To type into a field, you’d normally have to move the mouse pointer to the field and left-click on it. That will put the cursor in the field; then you can type. In this case, however, that’s already done for you by WordPad. All you really need to do is type the document’s name (eg. My Shopping List) and press Enter.
10. Close the document.
After you’ve saved your document, close WordPad by left-clicking on the X on the top right.
You could try saving the document by moving your mouse pointer to and clicking on the Save icon on the top of the screen, but we’ll try using a shortcut key instead. Hold down the Ctrl key and press S.
A Save window will pop up. This is where we will give the document we just created a name and store it.
The File name bar
INTRODUCTION TO COMPUTERS – BASIC GUIDE
FILES AND FOLDERSComputers store data – documents, photos, applications, video – as a ‘file’. Each file has a name, representing whatever the file contains.
Of course, you couldn’t just have all your files appear in one list. A computer will typically have tens of thousands of files – finding anything would be a nightmare. So it organises files into folders (also called directories). Folders can even be stored inside other folders.

PAGE 20
Now let’s try something that you’ll probably be doing a lot of once you get familiar with your PC: surfing the internet.
In this activity we’ll be opening up our web browser and visiting a website.
Describing the web in a few words is difficult. It’s like an endless library of books, all linked together and kept up to date, all accessible at any time from your home computer. There are shops and interactive elements as well, so you can buy things online, do your banking, check transport timetables, get news and current affairs and much more.
We have a separate workshops called Introduction to the Internet if you want to explore it more, but for now let’s just try opening a few pages.
1. Launch Edge. Find the icon, move your mouse pointer to it and left-click to open it.
2. Depending on how the computer is set up, a web page may open for you, or you might start with a blank page with a Search bar.
Either way, ignore what’s going on in the main part of the window for now and focus on the top of the window.
You’ll see a field there, which may have an address already in it, or it may be empty. This is the Address bar, where we type in the address of the website we want to visit.
TIME FOR SOME INTERNET
TIME FOR SOME INTERNET: GETTING STARTED
ACTIVITY
TIME
SURF THE WEB
30 minutes
INTRODUCTION TO COMPUTERS – BASIC GUIDE
3. Move the mouse pointer to the white Address bar field and left-click.
This will put the cursor in the Address bar.
If there is already something in the address bar, it will be highlighted. Press the Backspace or Del key to remove it.
The Address bar
Is the internet safe? The simple answer is yes. If you put security software on your computer and are careful about giving personal information to strangers, you can protect yourself when you go onto the web. Our Introduction to Cyber Safety workshop has more information about how to safe safe online.

PAGE 21
The Wikipedia main page
TIME FOR SOME INTERNET: GETTING STARTED
INTRODUCTION TO COMPUTERS – BASIC GUIDE
4. Now type the address en.wikipedia.org into the bar and press Enter.
5. The Wikipedia page should load into the main window.
Wikipedia is an online encyclopaedia, with articles covering hundreds of thousands of topics, some of which will be highlighted on the web page.
Note that not all the web page will be visible – there will be a Scroll bar on the right that you can use to see the rest of it.
6. Now for some internet magic.
See all those bits of blue text on the page in between the regular text? Those are called hyperlinks (or just links), and they lead you to more information on the subject highlighted.
With your mouse, move your mouse pointer over the top of one of the blue hyperlinks. The pointer will change to a hand. Then left-click.
7. Depending on the link you clicked, a new web page will open, with more blue links to more information.
It’s really endless. Try working your way through several pages. Soon you’ll discover that images can be hyperlinks too – you can tell because your mouse pointer changes when you move over them.
8. There are plenty of other sites you can try.
Go to the Address bar again, as in 3 above. Try typing in these addresses:
www.abc.net.au
www.telstra.com
www.greypath.com
www.taste.com.au
www.bbc.co.uk/webwise
bom.gov.au

PAGE 22INTRODUCTION TO COMPUTERS – BASIC GUIDE
You should now be able to:
Identify the main parts of a computer
Plug one in and turn it on
Be able to launch an application
Be able to create and save a document in WordPad
Be able to launch and use a web browser.
If you want to further explore computers and the internet, we have several other workshops that can help extend knowledge. These include:
Introduction to Email
Introduction to the Internet
Introduction to Online Shopping and Banking
Introduction to Social Media
Introduction to Cyber Safety
RECAP
ADDITIONALWORKSHOPS
With your new found internet skills, here are a few sites for computer beginners you might find useful:
A guide to computer (and other) basics www.explainthatstuff.com
A great site for internet beginners www.bbc.co.uk/webwise/
For ‘know how’ video demonstrations www.youtube.com/telstra
A site with a basic guide to computers www.gcflearnfree.org/computerbasics/1
USEFUL WEBSITES
TIME 5 minutes
That was a lot, we know! But hopefully you should now know some of the basics of using computers – and realise that they’re not so scary or easily breakable as you thought.
SUMMARY

PAGE 23INTRODUCTION TO COMPUTERS – BASIC GUIDE
DEFINITIONS
LINK (OR HYPERLINK)
OPERATING SYSTEM (OS)
PERIPHERAL
WEB PAGE
WEBSITE
WINDOWS
A shortcut that connects one web page to another.
The software that runs the basic functions of the computer.
Equipment that connects to a computer, such as a printer, mouse, keyboard.
A document on the internet.
A collection of web pages about the same subject that are published by the same person or organisation.
The world’s most common operating system for personal computers.
GLOSSARY TERM EXPLANATION
LAPTOP COMPUTER
DESKTOP COMPUTER
BROWSER
INTERNET
A portable computer that integrate the screen and keyboard in to a form that opens like a clamshell. Works on mains or battery power.
A computer comprising several separate components, including a monitor, keyboard and central computing ‘box’. Requires mains power.
A program used for viewing web pages.
A worldwide network that allows computers to exchange information with each other.
APPLICATION Software that performs specific tasks on a computer.

PAGE 24INTRODUCTION TO COMPUTERS – BASIC GUIDE
DISCLAIMERThe information contained in this publication and any accompanying materials is strictly for educational and informational purposes. The publication and any accompanying materials do not constitute the promotion, endorsement or approval of any product or service referred to, shown or demonstrated in the publication and any accompanying materials.
The publication and any accompanying materials are designed to be used as an initial reference only. They are not intended to be a comprehensive guide or to apply in all situations.
Reasonable endeavours have been made to ensure that information appearing in this publication and any accompanying materials was correct at the time of production. However, the authors, producers and presenters of this publication and any accompanying materials (the Relevant Persons)* make no representation or warranty as to the accuracy, reliability, completeness or currency of the information in this publication and any accompanying materials.
The information and any advice provided in this publication and any accompanying materials is provided solely on the basis that the audience will be responsible for making their own assessment of the matters discussed herein and are advised to verify all relevant representations, statements and information.
* The Relevant Persons:
• exclude, to the maximum extent permitted by law, all express or implied warranties of any kind in relation to any information in this publication and any accompanying materials;
• are under no obligation to update any information in this publication and any accompanying materials or correct any inaccuracy on this publication and any accompanying materials which may become apparent at a later time; and
• reserve the right, in their absolute discretion, to delete, alter or move the publication (and any accompanying materials) and any of the contents therein (including the terms and conditions of this disclaimer) at any time without notice.
* The Relevant Persons include any individual, company, partnership or government department involved in the making of the publication and their respective officers, employees and agents.
TRADEMARK NOTICEAll product names or websites referred to in this instructional publication may be the trademarks of third parties.
INTELLECTUAL PROPERTY NOTICE AND DISCLAIMERCopyright© Telstra Corporation Limited (ABN 33 051 775 556). All rights reserved. Third party copyright and trademarks reproduced with consent by Telstra Corporation Limited (ABN 33 051 775 556). The material is protected by copyright under the laws of Australia and, through international treaties, other countries. No part of these materials may be released, distributed, reproduced, copied, stored, or transmitted in any form or by any means whether electronic, mechanical, recording or otherwise except for your own information, research or study.