Embed Size (px)
Citation preview

Instructions for Use and Maintenance
Istruzioni per l'uso e la manutenzione
EN
IT
COD.: 3100ES_UEd. 02 - 02/2012
APPLICARE ETICHETTAMATRICOLA

Thank you for choosing our machine.
The instructions for installation, maintenance and use found on the following pages have
been prepared to ensure a long life and perfect operation of your unit.
Please, do follow the instructions carefully.
We have designed and built this machine using the latest innovative technologies. Now
you shall take good care of it.
Your full satisfaction is our greatest reward.
EN
page 25
CONTENTS Page
WARNINGS 271. MACHINE DESCRIPTION 29 1.1 Machine Description 29 1.2 Machine features 302. OPERATION 31 2.1 Control panel and relative symbols 31 2.2 Machine start-up 31 2.2.1 Start-up 31 2.2.2 Operation 32 2.2.3 Switching OFF 33 2.3 Detergent use 34 2.4 Rinse aid use 34 2.5 Drain pump system (optional) 34 2.6 Regeneration device (optional) 35 2.7 Door opening piston function (optional) 35WARNINGS 36
3. ECOLOGICAL ASPECTS 37 3.1 Recommendations for optimal use of energy, water and additives 374. H.A.C.C.P. AND HYGIENE REGULATIONS 37
5. MAINTENANCE 38 5.1 Routine maintenance 38 5.2ExtraordinaryMaintenance–byqualifiedServicePersonnel 396. MACHINE INSTALLATION 40 6.1 Handling 40 6.1.1 Handling the product 40 6.1.2 Storage 40 6.2 Prepare for installation 40 6.2.1 Room features 40 6.2.2 Electrical connection - Characteristics 41 6.2.3 Water supply connection - Characteristics 41 6.2.4 Steam evacuation 41 6.3 Installation 41 6.3.1 Positioning the machine 41 6.3.2 Electrical connection 42 6.3.3 Water connection 42 6.3.4 Start-up 42
7. SIGNALS AND ALARMS 43
8. ENVIRONMENTAL ASPECTS 44 8.1 Packaging 44 8.2 Disposal 449. TROUBLESHOOTING 45
READ THESE INSTRUCTIONS CAREFULLY BEFORE INSTALLING THE MACHINE.
WARNING: FAILURE TO COMPLY, EVEN PARTIALLY, WITH THE PRESCRIPTIONS IN THIS MANUAL WILL RENDER THE PRODUCT WARRANTY NULL, AND THE MANUFACTURER SHALL NOT BE LIABLE.
TRANSLATION OF THE ORIGINAL INSTRUCTION


EN
page 27
WARNINGSThis instruction booklet must be kept with the machine for future consultation. If this machine is sold or transferred to other users, make sure the booklet always goes with the unit so that the new owner can have all the necessary information on operations and all relevant instructions.The instruction booklet must be carefully read before installation and before starting the machine.These instructions are supplied to safeguard the users in compliance with Directive 2006/95/CE as amended and the “harmonized product Technical Standard” EN 60335-1 and EN 60335-2-58.• THECONNECTIONTOTHEELECTRICALANDWATERNETWORKS,FOR INSTALLING
THISUNIT,MUSTBECARRIEDOUTBYQUALIFIEDOPERATORSONLY.• Theusershallnotcarryoutanyrepairand/ormaintenanceoperations. Inanycasecontact
qualifiedpersonnel.• Onlyqualifiedpersonnelcanaccessthecontrolpanel,whenthemainpowerswitchisOFF.• Servicingofthismachinemustbeperformedbyauthorizedpersonnelonly. N.B.: Use genuine spare parts only. Non-genuine parts will void the warranty and the
manufacturer will take no responsibility for any damage.• Followtheinstructionsgiveninthemanufacturer’sbookletforcleaningoperations(chap.5).• Thismachinemustonlybeusedbyadults.Thisisaprofessionalmachinetobeusedbyqualified
personnel,installedandrepairedexclusivelybyqualifiedTechnicalPersonnel.TheManufacturerdeclines any responsibility for improper installation, use, maintenance or repair.
• Theapplianceshallnotbeusedbychildrenorpersonswithreducedphysical,sensoryormentalcapabilities, or lack of experience and knowledge.
• Childrenmustbeattendedandshallstayawayfromthismachine.
NOTE: The manufacturer declines any responsibility for accidents to people or any damage deriving from failure to observe the above listed instructions.

EN
page 29
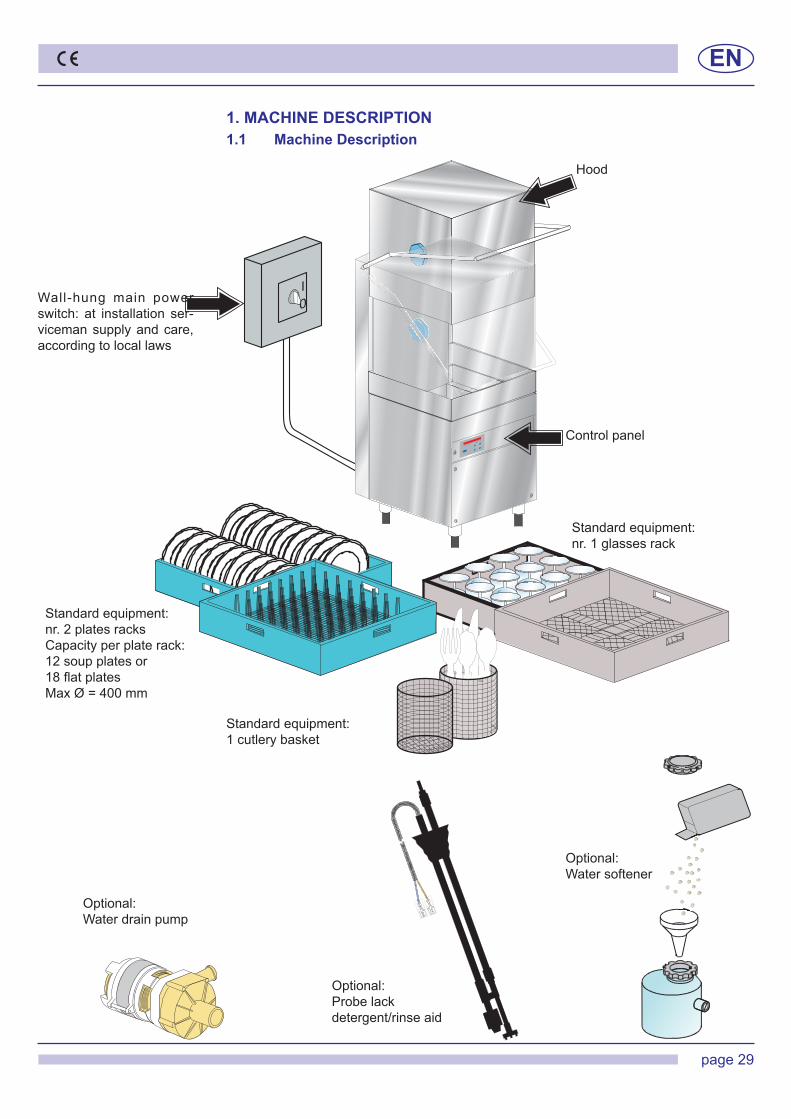
1. MACHINE DESCRIPTION1.1 Machine Description
Wall-hung main power switch: at installation ser-viceman supply and care, according to local laws
Standard equipment: nr. 2 plates racksCapacity per plate rack: 12 soup plates or18flatplatesMaxØ=400mm
Standard equipment: nr. 1 glasses rack
Standard equipment: 1 cutlery basket
Optional:Water drain pump
Optional:Water softener
Hood
Control panel
Optional:Probe lackdetergent/rinse aid
EN
page 30
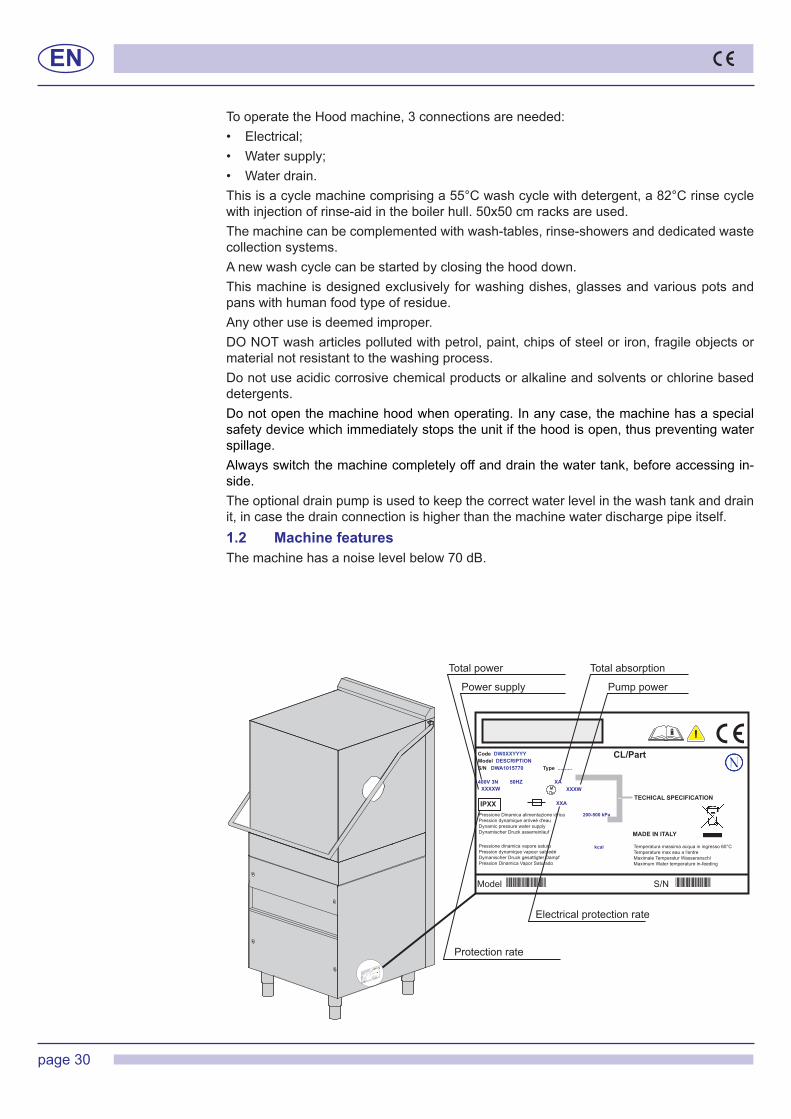
Total power
Power supply
Total absorption
Pump power
Protection rate
Electrical protection rate
TooperatetheHoodmachine,3connectionsareneeded:• Electrical;• Watersupply;• Waterdrain.This is a cycle machine comprising a 55°C wash cycle with detergent, a 82°C rinse cycle with injection of rinse-aid in the boiler hull. 50x50 cm racks are used.The machine can be complemented with wash-tables, rinse-showers and dedicated waste collection systems.Anewwashcyclecanbestartedbyclosingthehooddown.This machine is designed exclusively for washing dishes, glasses and various pots and pans with human food type of residue. Anyotheruseisdeemedimproper.DO NOT wash articles polluted with petrol, paint, chips of steel or iron, fragile objects or material not resistant to the washing process. Do not use acidic corrosive chemical products or alkaline and solvents or chlorine based detergents.Donotopenthemachinehoodwhenoperating.Inanycase,themachinehasaspecialsafety device which immediately stops the unit if the hood is open, thus preventing water spillage. Alwaysswitchthemachinecompletelyoffanddrainthewatertank,beforeaccessingin-side.The optional drain pump is used to keep the correct water level in the wash tank and drain it, in case the drain connection is higher than the machine water discharge pipe itself.1.2 Machine featuresThemachinehasanoiselevelbelow70dB.
EN
page 31
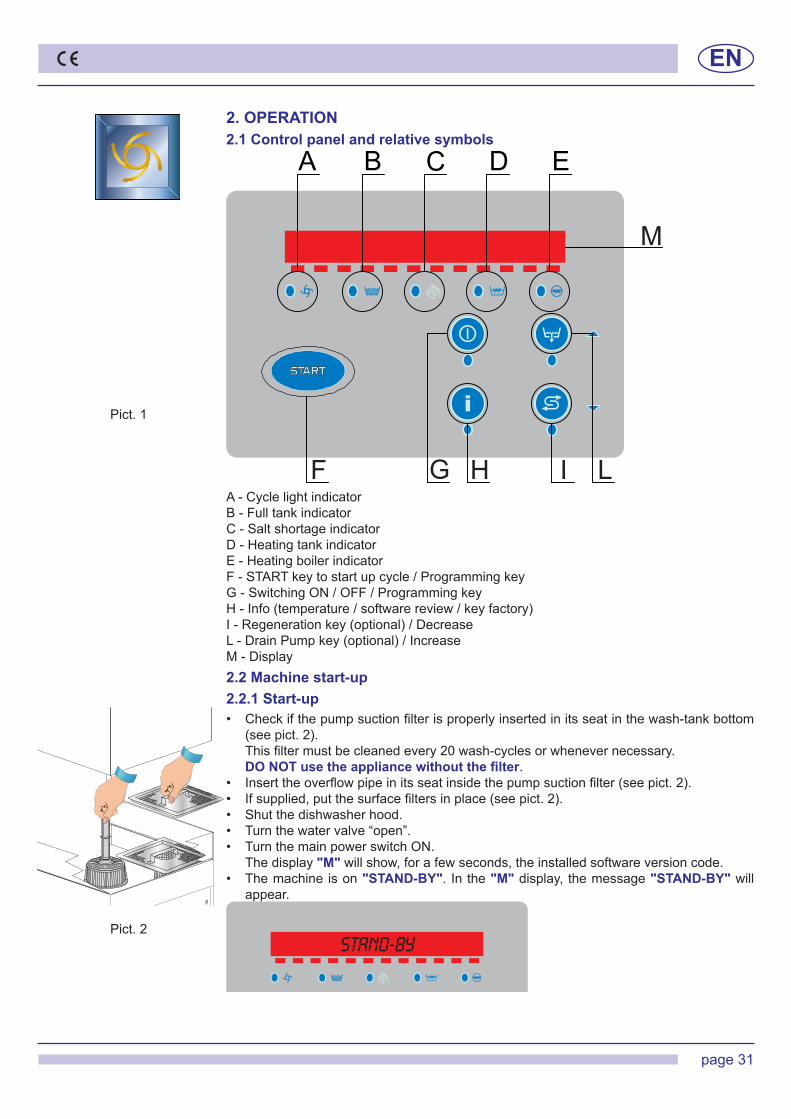
2. OPERATION2.1 Control panel and relative symbols
A-CyclelightindicatorB-FulltankindicatorC - Salt shortage indicatorD-HeatingtankindicatorE-HeatingboilerindicatorF-STARTkeytostartupcycle/ProgrammingkeyG-SwitchingON/OFF/ProgrammingkeyH-Info(temperature/softwarereview/keyfactory)I-Regenerationkey(optional)/DecreaseL-DrainPumpkey(optional)/IncreaseM-Display2.2 Machine start-up2.2.1 Start-up• Checkifthepumpsuctionfilterisproperlyinsertedinitsseatinthewash-tankbottom
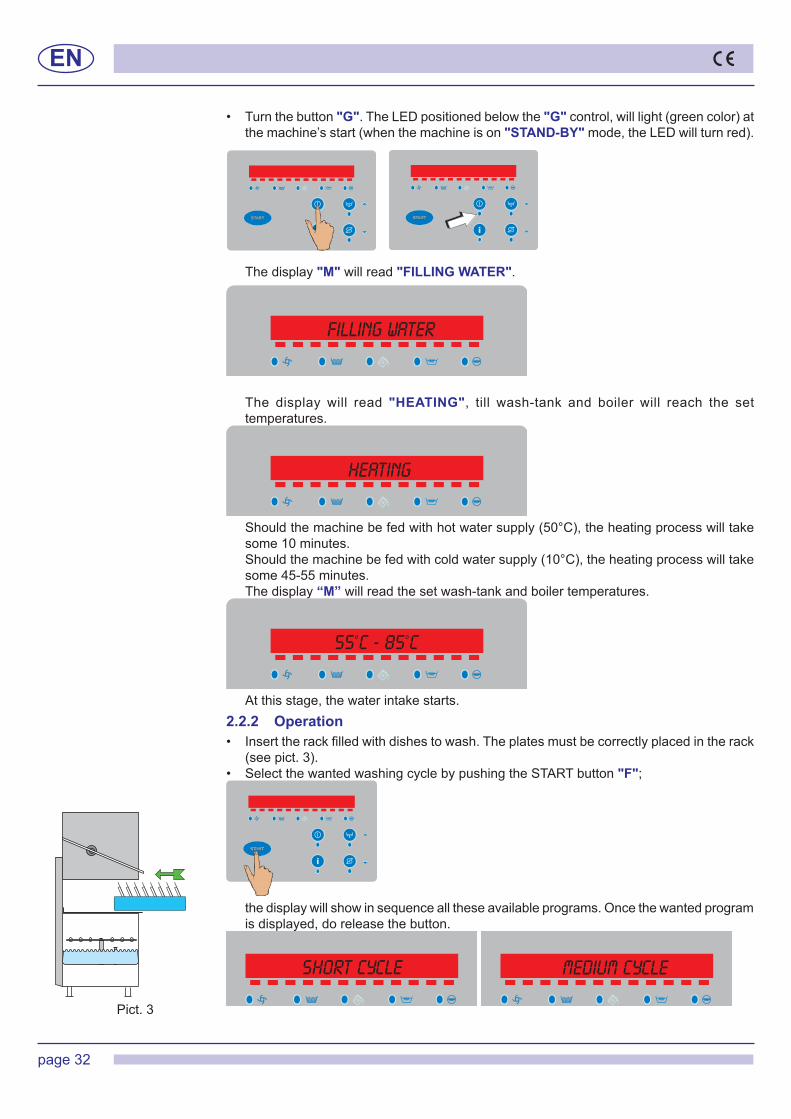
(seepict.2). Thisfiltermustbecleanedevery20wash-cyclesorwhenevernecessary. DONOTusetheappliancewithoutthefilter.• Inserttheoverflowpipeinitsseatinsidethepumpsuctionfilter(seepict.2).• Ifsupplied,putthesurfacefiltersinplace(seepict.2).• Shutthedishwasherhood.• Turnthewatervalve“open”.• TurnthemainpowerswitchON. The display "M" will show, for a few seconds, the installed software version code. • Themachineison"STAND-BY". Inthe"M" display, the message "STAND-BY" will
appear.
Pict. 1
Pict. 2stand-by
EN
page 32
• Turnthebutton"G".TheLEDpositionedbelowthe"G"control,willlight(greencolor)atthemachine’sstart(whenthemachineison"STAND-BY"mode,theLEDwillturnred).
The display "M" will read "FILLING WATER".
The display will read "HEATING", till wash-tank and boiler will reach the set temperatures.
Shouldthemachinebefedwithhotwatersupply(50°C),theheatingprocesswilltakesome 10 minutes.
Shouldthemachinebefedwithcoldwatersupply(10°C),theheatingprocesswilltakesome45-55minutes.
The display “M” will read the set wash-tank and boiler temperatures.
Atthisstage,thewaterintakestarts.2.2.2 Operation• Inserttherackfilledwithdishestowash.Theplatesmustbecorrectlyplacedintherack
(seepict.3).• SelectthewantedwashingcyclebypushingtheSTARTbutton"F";
the display will show in sequence all these available programs. Once the wanted program is displayed, do release the button.
Pict. 3
FILLING WATER
HEATING
55ºC - 85ºC
MEDIUM CYCLESHORT CYCLE
EN
page 33
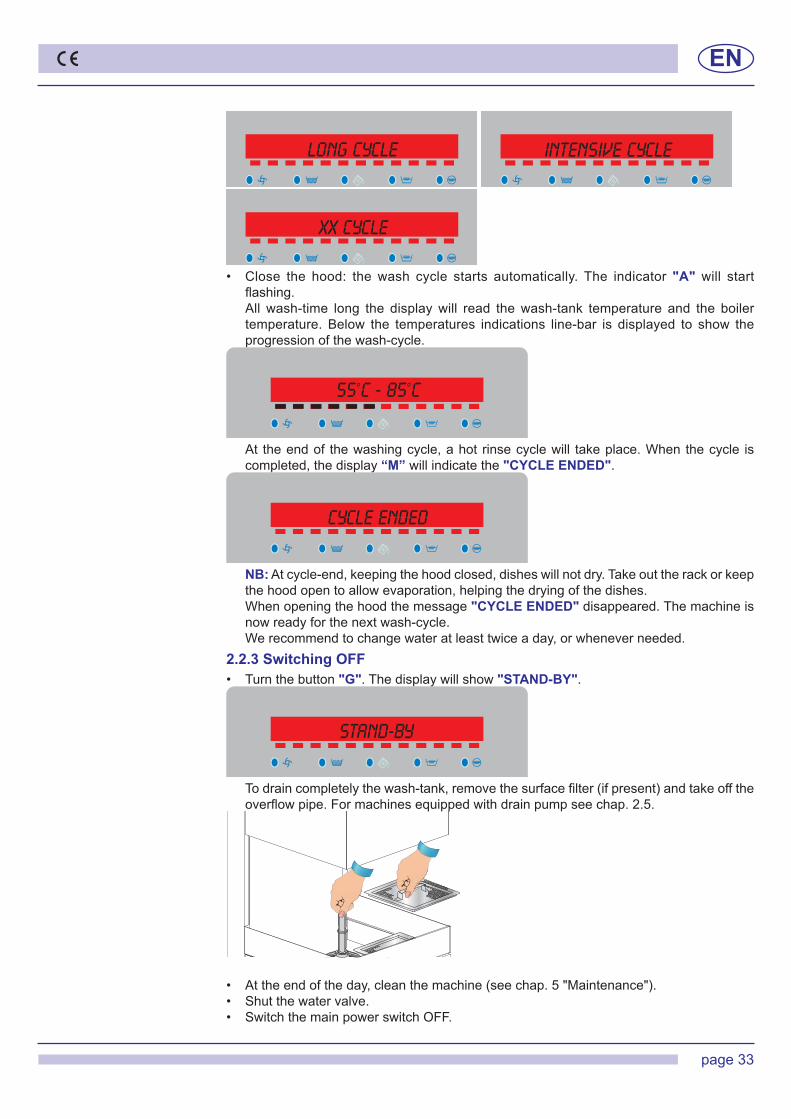
• Close the hood: thewash cycle starts automatically. The indicator "A" will start flashing.
Allwash-time long the displaywill read thewash-tank temperature and the boilertemperature.Below the temperatures indications line-bar is displayed to show theprogression of the wash-cycle.
At theendof thewashingcycle,ahot rinsecyclewill takeplace.Whenthecycle iscompleted, the display “M” will indicate the "CYCLE ENDED".
NB:Atcycle-end,keepingthehoodclosed,disheswillnotdry.Takeouttherackorkeepthe hood open to allow evaporation, helping the drying of the dishes.
When opening the hood the message "CYCLE ENDED" disappeared. The machine is now ready for the next wash-cycle.
We recommend to change water at least twice a day, or whenever needed.2.2.3 Switching OFF • Turnthebutton"G". The display will show "STAND-BY".
Todraincompletelythewash-tank,removethesurfacefilter(ifpresent)andtakeofftheoverflowpipe.Formachinesequippedwithdrainpumpseechap.2.5.
• Attheendoftheday,cleanthemachine(seechap.5"Maintenance").• Shutthewatervalve.• SwitchthemainpowerswitchOFF.
LONG CYCLE INTENSIVE CYCLE
XX CYCLE
CYCLE ENDED
STAND-BY
55ºC - 85ºC% % % % % %

EN
page34
2.3 Detergent useThedetergentshallbetheNOFOAMtype,suitableforindustrialdishwashersandmustcomplywiththeEN60335-2-58/A11norms.The use of good quality liquid detergents is recommended. Thedetergentshallbeplacedinthesump.Followthemanufacturer’srecommendationsforchemical dosage, related to the local water hardness. The machine can be ordered with an adjustableautomaticdetergentdispenser(alwaysrecommended).1cm.oftheproductdrawnintothetubeisequaltoabout0.15g.Acorrectamountofdeter-gent is very important for a successful wash.2.4 Rinse aid useThe machine has a standard rinse aid dispenser. The machine automatically sucks the product. The rinse-aid chemical, shall be suitable for professional glass and dishwashers and must complywiththeEN60335-2-58/A11norms.The recommended amount is 2-5 cm of product measured on the suction hose.1cmoftheproductdrawnintothehoseisequaltoabout0.13g.Acorrectamountofrinseaid is very important for a quick and proper drying.NB:Excessiveamountofchemicalsorfoamwillreducewashpumpefficiency.2.5 Drain pump system (optional)Todraincompletelythewash-tankkeepthemachineOFF,extracttheoverflowpipeandshut the hood.
Afterthat,pressthekey"L"fitillthedisplaywillshow"TANK DRAINING".
Thedischargepumpwillautomaticallydrainthewash-tank.Afterthedrainingiscomplete,the machine will turn automatically in "STAND-BY" mode.
Ifyouwanttorefillthemachineforanewcycle,seechap.2.2.The drain pump will operate also during the rinse cycle, to drain the water in excess from the wash tank.
RINSE AID
TANK DRAINING
DETERGENT
STAND-BY
EN
page 35
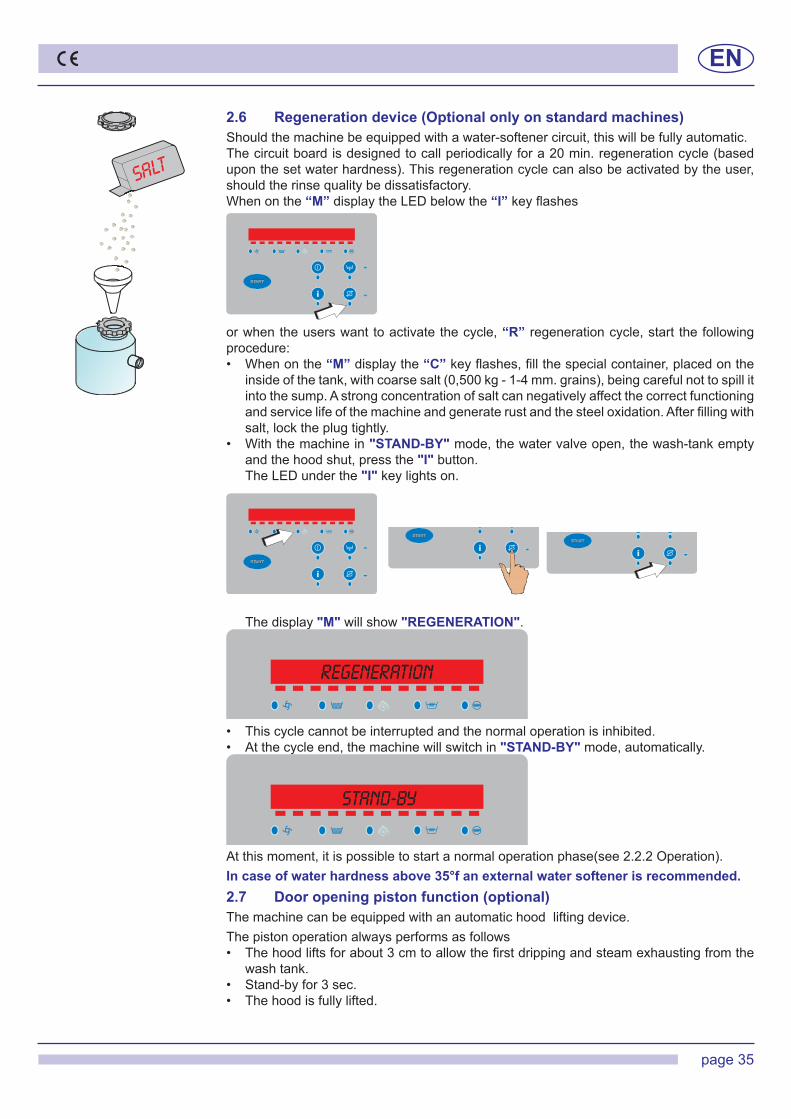
2.6 Regeneration device (Optional only on standard machines)Should the machine be equipped with a water-softener circuit, this will be fully automatic. Thecircuitboardisdesignedtocallperiodicallyfora20min.regenerationcycle(baseduponthesetwaterhardness).Thisregenerationcyclecanalsobeactivatedbytheuser,should the rinse quality be dissatisfactory. When on the “M”displaytheLEDbelowthe“I”keyflashes
or when the users want to activate the cycle, “R” regeneration cycle, start the following procedure:• Whenonthe“M” display the “C”keyflashes,fillthespecialcontainer,placedonthe
insideofthetank,withcoarsesalt(0,500kg-1-4mm.grains),beingcarefulnottospillitintothesump.Astrongconcentrationofsaltcannegativelyaffectthecorrectfunctioningandservicelifeofthemachineandgeneraterustandthesteeloxidation.Afterfillingwithsalt, lock the plug tightly.
• Withthemachinein"STAND-BY" mode, the water valve open, the wash-tank empty and the hood shut, press the "I" button.
TheLEDunderthe"I" key lights on.
The display "M" will show "REGENERATION".
• Thiscyclecannotbeinterruptedandthenormaloperationisinhibited.• Atthecycleend,themachinewillswitchin"STAND-BY" mode, automatically.
Atthismoment,itispossibletostartanormaloperationphase(see2.2.2Operation).In case of water hardness above 35°f an external water softener is recommended.2.7 Door opening piston function (optional)The machine can be equipped with an automatic hood lifting device.The piston operation always performs as follows • Thehoodliftsforabout3cmtoallowthefirstdrippingandsteamexhaustingfromthe
wash tank. • Stand-byfor3sec.• Thehoodisfullylifted.
SALt
stand-by
REGENERATION
EN
page 36
WARNINGS:• Donotslamthehoodwhenopeningandclosing.• Donotputmaterialorobjectsonthehood.• ThemachinehasanIPX3protectionratingagainstaccidentalwatersplashesandisnot
protectedagainstpressurizedwaterjets.Pressure-cleaningsystemsshall,therefore,notbe used on this machine.
• Do not dip bare hands intowater containing detergent. If this should occur,washthem immediately with plenty of water. Check the safety instructions on the detergent container.
• Someimportantrulesmustbefollowedforusingthisappliance: 1)nevertouchtheappliancewithwethandsorfeet; 2)neverusetheappliancewhenbarefooted; 3)donotinstalltheapplianceinplacesexposedtowatersplashes.• This machine must be disconnected from the main electrical supply after use at
the end of the day and for any service/maintenance operation. Switch off the main switch located on the wall, which shall be installed by a professional installer. Shut the water supply valve(s).
• Donotcovertheintakeordissipationgrids.• Donotusewatertoextinguishfiresonelectricalparts.WARNING: INTERNAL CLEANING OF THE MACHINE SHALL BE CARRIED OUT AT LEAST 10 MINUTES AFTER THE POWER SWITCH HAS BEEN TURNED OFF.WARNING: DO NOT INSERT HANDS AND/OR TOUCH THE PARTS LOCATED AT THE BOTTOM OF THE WASH TANK AND/OR AT THE END OF THE WASH CYCLE.
EN
page 37
3. ECOLOGICAL ASPECTS3.1 Recommendations for optimal use of energy, water and additivesSalt dosingApre-set(bythemanufacturer)quantityofsaltisinjectedintheresinsateachregenerationcycle.Itisimportanttoobservethenumberofregenerationcyclesrecommendedinpara-graph2.6"Regenerationdevice"inordertoavoidsaltspillsorlimedeposits.Use the machine fully loaded when possible.This shall prevent detergent, rinse aid, water and energy consumption waste.Detergent and rinse-aidsUse detergents and rinse-aid chemicals with high biodegradability, to best respect the en-vironment. Verify proper dosage in relation to water hardness at least three times a year. Excessproductpollutesriversandseaswhileaninsufficientdoseresultsinunsatisfactorydish washing and/or hygiene.BoilerandWash-TanktemperaturesThe boiler and tank temperatures are set by the manufacturer in order to obtain the best washing results with detergents on the market. The temperatures can be reset by the installer in relation to your detergent.Pre-washingCarefully pre-wash with a moderate amount of water at room temperature to facilitate the removal of animal fats. To remove encrusted materials warm water soaking is recommen-ded.Note:Wash objects as soon as possible to avoid deposits from drying and compromise effective washing.Foreffectivewashingroutinedishwashercleaningandmaintenanceisadvised(seechap.5).Disregarding the points listed above and of any the information contained in this manual can cause energy, water and detergent waste with a subsequent increase in running costs and/or performance reduction.4. H.A.C.C.P. AND HYGIENE REGULATIONS• WhenstartingthemachineON,nowash-cyclewillbestartinguntilthesetboilerand
wash-tank temperatures are reached. During operation, the machine will not start the rinse cycle till the set boiler temperature is reached.
• Removecarefullyallsolidsfromtheobjectstobewashed,toavoidobstructionoffilters,nozzlesandpiping.
• Drainthewashtankandcleanthefiltersatleasttwiceaday.• Check if the detergent and rinse-aid dosage are correct (as recommended by the
manufacturer).Inthemorning,beforestartingthemachine,checkthatthequantityofchemicals in the canisters is enough for daily supply.
• Keepyourworkingtablesclean.• Extracttherackwithcleanhandsorglovestoavoidfingermarks.• Do not dry or polish thewashed objectswith cloths, brushes or rags that are not
sterile.
EN
page 38
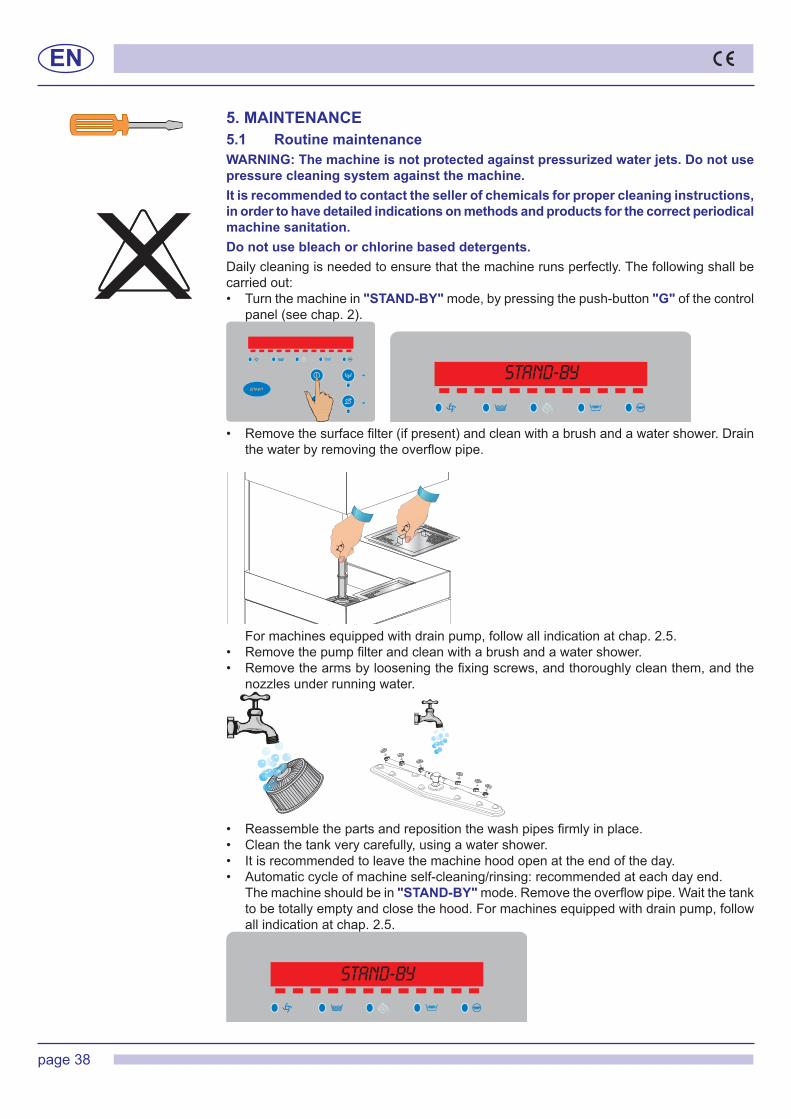
5. MAINTENANCE5.1 Routine maintenanceWARNING: The machine is not protected against pressurized water jets. Do not use pressure cleaning system against the machine.It is recommended to contact the seller of chemicals for proper cleaning instructions, in order to have detailed indications on methods and products for the correct periodical machine sanitation.Do not use bleach or chlorine based detergents.Daily cleaning is needed to ensure that the machine runs perfectly. The following shall be carried out:• Turnthemachinein"STAND-BY" mode, by pressing the push-button "G" of the control
panel(seechap.2).
• Removethesurfacefilter(ifpresent)andcleanwithabrushandawatershower.Drain
thewaterbyremovingtheoverflowpipe.
Formachinesequippedwithdrainpump,followallindicationatchap.2.5.• Removethepumpfilterandcleanwithabrushandawatershower.• Removethearmsbylooseningthefixingscrews,andthoroughlycleanthem,andthe
nozzlesunderrunningwater.
• Reassemblethepartsandrepositionthewashpipesfirmlyinplace.• Cleanthetankverycarefully,usingawatershower.• Itisrecommendedtoleavethemachinehoodopenattheendoftheday.• Automaticcycleofmachineself-cleaning/rinsing:recommendedateachdayend. The machine should be in "STAND-BY"mode.Removetheoverflowpipe.Waitthetank
tobetotallyemptyandclosethehood.Formachinesequippedwithdrainpump,followall indication at chap. 2.5.
STAND-BY
STAND-BY

EN
page 39
PushSTARTbutton"F";thedisplay"M" will show "SELF-CLEANING".
An automatic cycle of 30 secondswill start, after this themachine will be in "STAND-BY" mode.
• Shutthewatervalve.• TurnedoffthemachinebyswitchingthemainpowerswitchOFF.5.2 ExtraordinaryMaintenance–byqualifiedServicePersonnelAtleastonceperyear,themachineshouldbesupervisedbyqualifiedServicePersonnel:1 Cleanthesolenoid-valve(s)filters.2 Removescalefromtheheatingelements.3 Control the status of the seals.4 Controlforcomponentsintegrityand/orconsumption.5 Controlthedispenser(s)efficiency;6 Checktheefficiencyofthedoorsafetyswitch.Aqualifiedelectrician,shouldcheckallelectricconnections insidethemachine,at leastonce a year.
STAND-BY
SELF-CLEANING
EN
page40
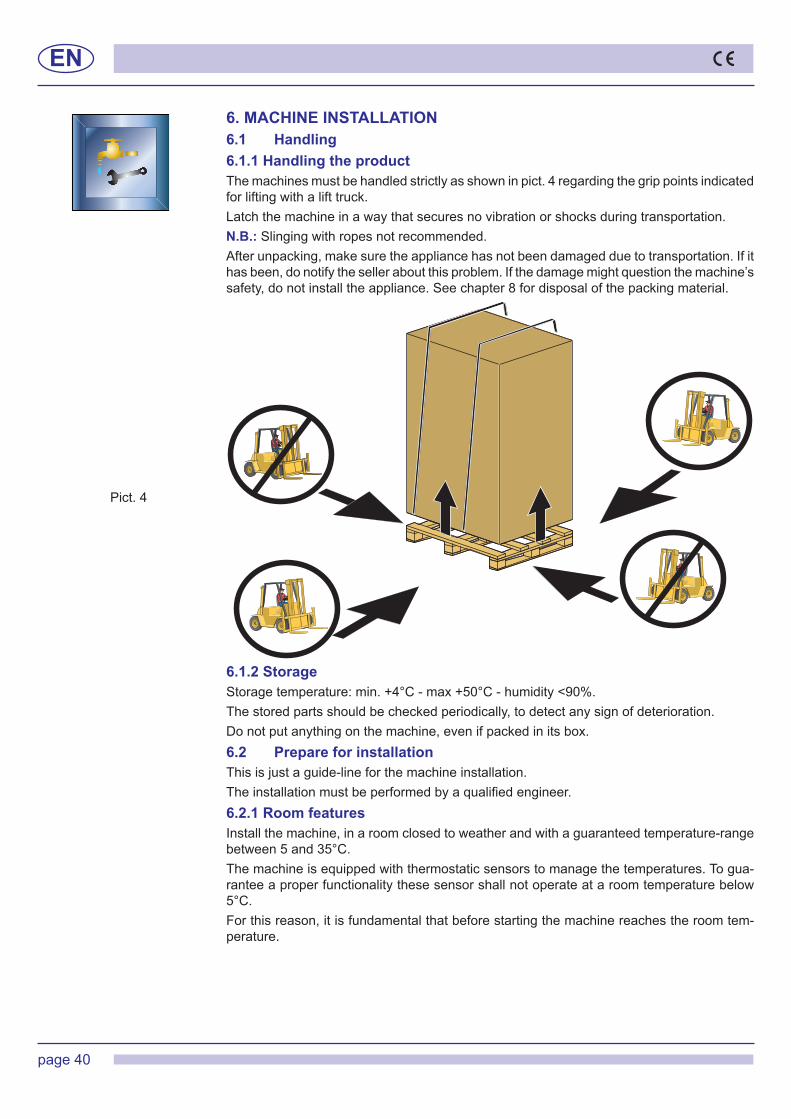
6. MACHINE INSTALLATION6.1 Handling 6.1.1 Handling the product Themachinesmustbehandledstrictlyasshowninpict.4regardingthegrippointsindicatedfor lifting with a lift truck.Latchthemachineinawaythatsecuresnovibrationorshocksduringtransportation.N.B.: Slinging with ropes not recommended. Afterunpacking,makesuretheappliancehasnotbeendamagedduetotransportation.Ifithasbeen,donotifytheselleraboutthisproblem.Ifthedamagemightquestionthemachine’ssafety, do not install the appliance. See chapter 8 for disposal of the packing material.
6.1.2 Storage Storagetemperature:min.+4°C-max+50°C-humidity<90%.The stored parts should be checked periodically, to detect any sign of deterioration.Do not put anything on the machine, even if packed in its box.6.2 Prepare for installationThis is just a guide-line for the machine installation. Theinstallationmustbeperformedbyaqualifiedengineer.6.2.1 Room featuresInstallthemachine,inaroomclosedtoweatherandwithaguaranteedtemperature-rangebetween 5 and 35°C.The machine is equipped with thermostatic sensors to manage the temperatures. To gua-rantee a proper functionality these sensor shall not operate at a room temperature below 5°C. Forthisreason,itisfundamentalthatbeforestartingthemachinereachestheroomtem-perature.
Pict.4
EN
page41
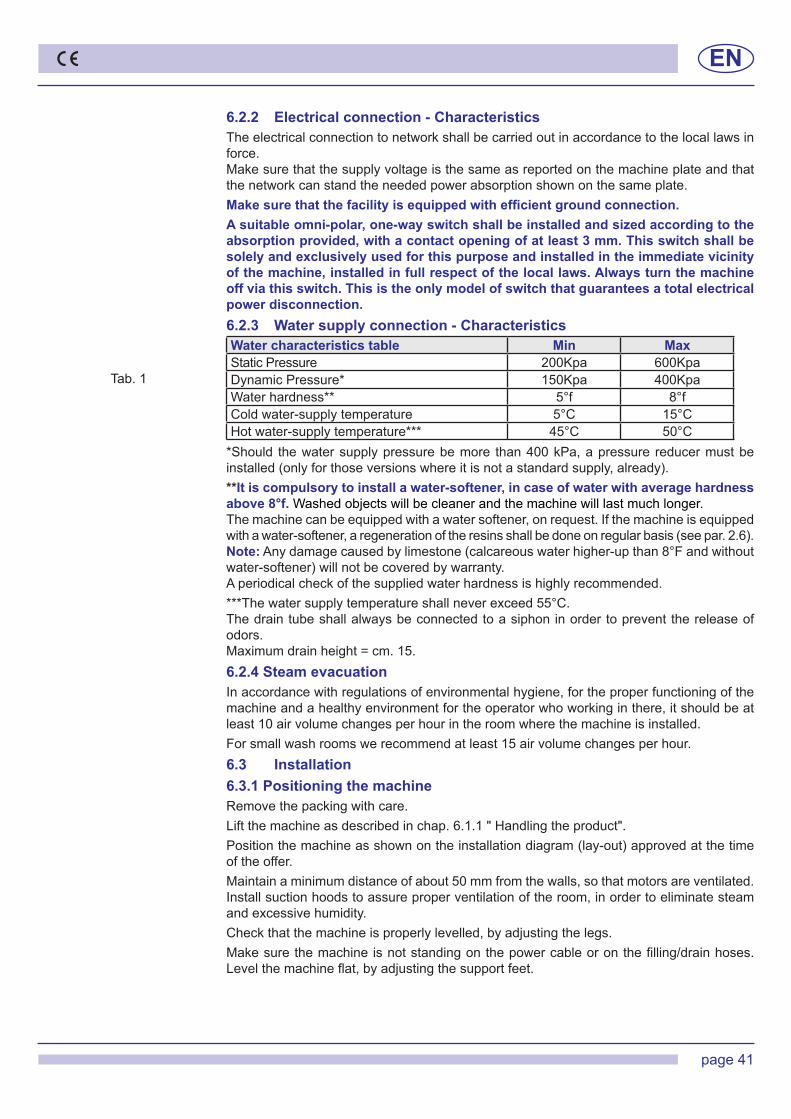
6.2.2 Electrical connection - CharacteristicsThe electrical connection to network shall be carried out in accordance to the local laws in force.Makesurethatthesupplyvoltageisthesameasreportedonthemachineplateandthatthe network can stand the needed power absorption shown on the same plate.Makesurethatthefacilityisequippedwithefficientgroundconnection.A suitable omni-polar, one-way switch shall be installed and sized according to the absorption provided, with a contact opening of at least 3 mm. This switch shall be solely and exclusively used for this purpose and installed in the immediate vicinity of the machine, installed in full respect of the local laws. Always turn the machine off via this switch. This is the only model of switch that guarantees a total electrical power disconnection.6.2.3 Water supply connection - Characteristics
*Should thewatersupplypressurebemore than400kPa,apressure reducermustbeinstalled(onlyforthoseversionswhereitisnotastandardsupply,already).**It is compulsory to install a water-softener, in case of water with average hardness above 8°f. Washed objects will be cleaner and the machine will last much longer.Themachinecanbeequippedwithawatersoftener,onrequest.Ifthemachineisequippedwithawater-softener,aregenerationoftheresinsshallbedoneonregularbasis(seepar.2.6).Note:Anydamagecausedbylimestone(calcareouswaterhigher-upthan8°Fandwithoutwater-softener)willnotbecoveredbywarranty.Aperiodicalcheckofthesuppliedwaterhardnessishighlyrecommended.***The water supply temperature shall never exceed 55°C.The drain tube shall always be connected to a siphon in order to prevent the release of odors.Maximumdrainheight=cm.15.6.2.4 Steam evacuationInaccordancewithregulationsofenvironmentalhygiene,fortheproperfunctioningofthemachine and a healthy environment for the operator who working in there, it should be at least 10 air volume changes per hour in the room where the machine is installed.Forsmallwashroomswerecommendatleast15airvolumechangesperhour.6.3 Installation6.3.1 Positioning the machineRemovethepackingwithcare.Liftthemachineasdescribedinchap.6.1.1"Handlingtheproduct".Positionthemachineasshownontheinstallationdiagram(lay-out)approvedatthetimeof the offer.Maintainaminimumdistanceofabout50mmfromthewalls,sothatmotorsareventilated.Installsuctionhoodstoassureproperventilationoftheroom,inordertoeliminatesteamand excessive humidity.Check that the machine is properly levelled, by adjusting the legs.Makesurethemachineisnotstandingonthepowercableoronthefilling/drainhoses.Levelthemachineflat,byadjustingthesupportfeet.
Water characteristics table Min MaxStatic Pressure 200Kpa 600KpaDynamic Pressure* 150Kpa 400KpaWater hardness** 5°f 8°fCold water-supply temperature 5°C 15°CHotwater-supplytemperature*** 45°C 50°C
Tab. 1
EN
page42
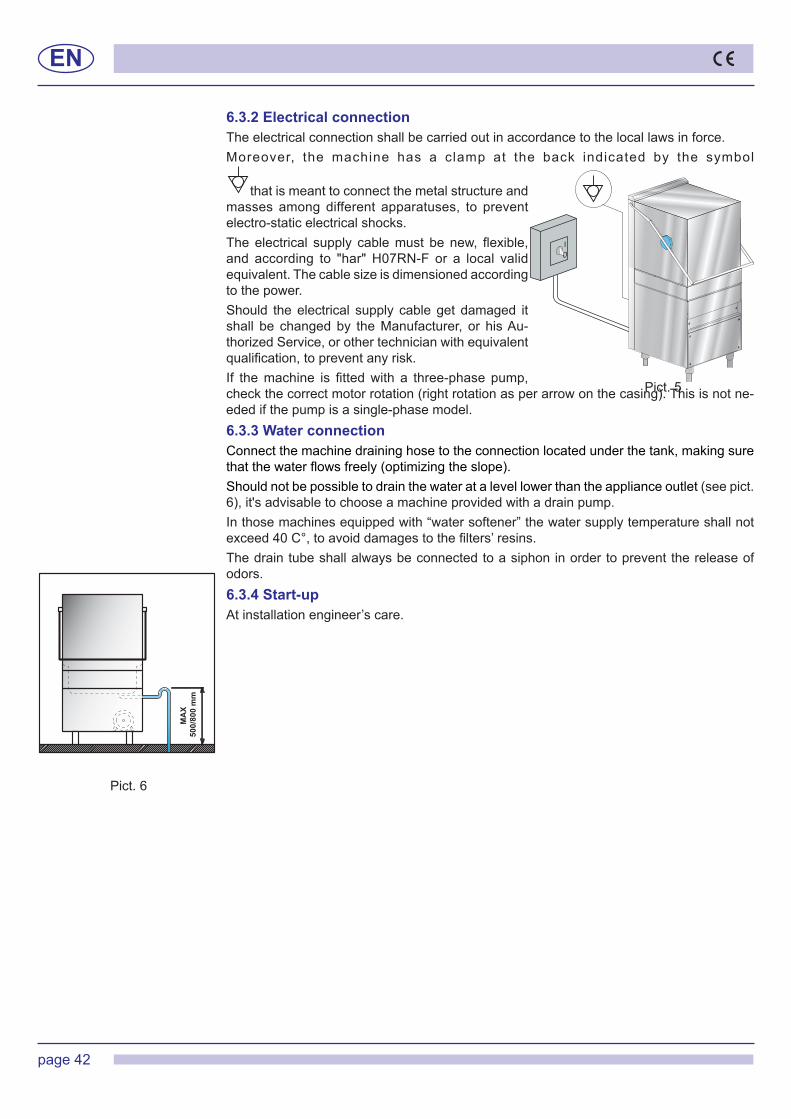
6.3.2 Electrical connectionThe electrical connection shall be carried out in accordance to the local laws in force.Moreover, the machine has a clamp at the back indicated by the symbol
that is meant to connect the metal structure and masses among different apparatuses, to prevent electro-static electrical shocks.Theelectrical supply cablemust benew, flexible,and according to "har"H07RN-F or a local validequivalent.Thecablesizeisdimensionedaccordingto the power.Should the electrical supply cable get damaged it shall be changedby theManufacturer, or hisAu-thorizedService,orothertechnicianwithequivalentqualification,topreventanyrisk.If themachine is fittedwith a three-phase pump,checkthecorrectmotorrotation(rightrotationasperarrowonthecasing).Thisisnotne-eded if the pump is a single-phase model.6.3.3 Water connectionConnect the machine draining hose to the connection located under the tank, making sure thatthewaterflowsfreely(optimizingtheslope).Should not be possible to drain the water at a level lower than the appliance outlet(seepict.6),it'sadvisabletochooseamachineprovidedwithadrainpump.Inthosemachinesequippedwith“watersoftener”thewatersupplytemperatureshallnotexceed40C°,toavoiddamagestothefilters’resins.The drain tube shall always be connected to a siphon in order to prevent the release of odors. 6.3.4 Start-upAtinstallationengineer’scare.
Pict. 5
Pict. 6
EN
page43
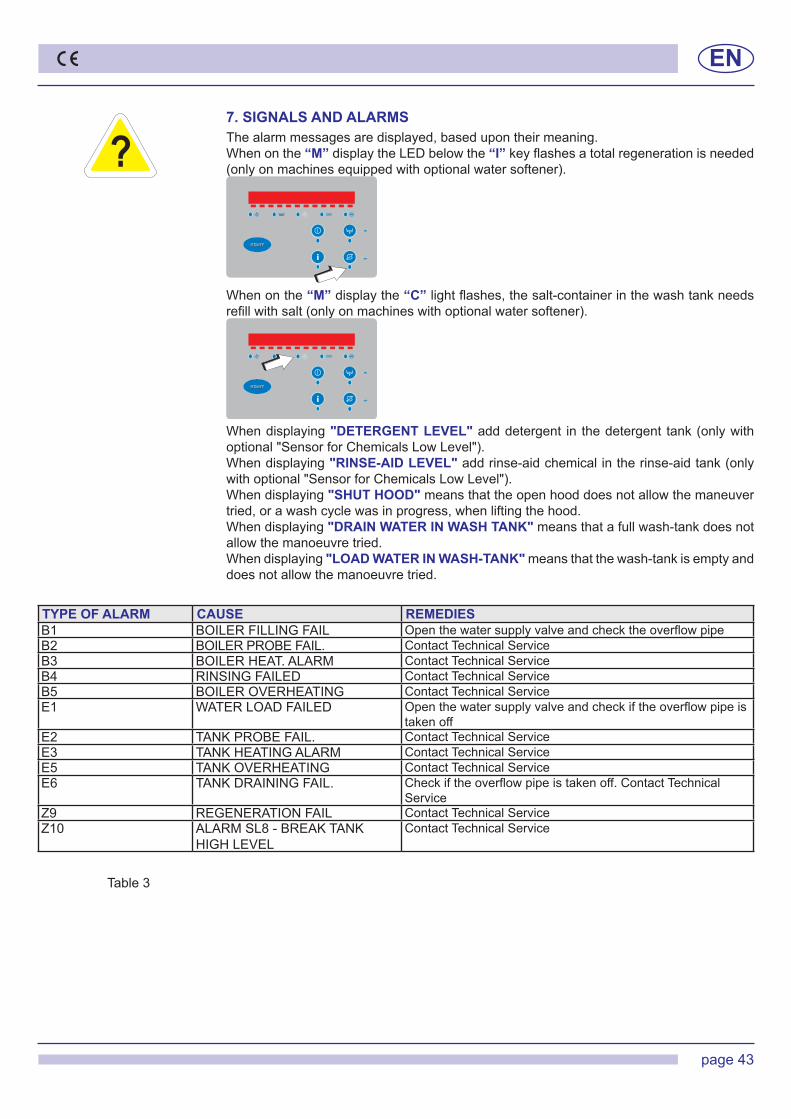
7. SIGNALS AND ALARMSThe alarm messages are displayed, based upon their meaning.When on the “M”displaytheLEDbelowthe“I”keyflashesatotalregenerationisneeded(onlyonmachinesequippedwithoptionalwatersoftener).
When on the “M” display the “C”lightflashes,thesalt-containerinthewashtankneedsrefillwithsalt(onlyonmachineswithoptionalwatersoftener).
When displaying "DETERGENT LEVEL"adddetergent in thedetergent tank(onlywithoptional"SensorforChemicalsLowLevel").When displaying "RINSE-AID LEVEL"addrinse-aidchemicalintherinse-aidtank(onlywithoptional"SensorforChemicalsLowLevel").When displaying "SHUT HOOD" means that the open hood does not allow the maneuver tried, or a wash cycle was in progress, when lifting the hood.When displaying "DRAIN WATER IN WASH TANK" means that a full wash-tank does not allow the manoeuvre tried.When displaying "LOAD WATER IN WASH-TANK" means that the wash-tank is empty and does not allow the manoeuvre tried.
Table 3
TYPE OF ALARM CAUSE REMEDIESB1 BOILERFILLINGFAIL OpenthewatersupplyvalveandchecktheoverflowpipeB2 BOILERPROBEFAIL. Contact Technical ServiceB3 BOILERHEAT.ALARM Contact Technical ServiceB4 RINSINGFAILED Contact Technical ServiceB5 BOILEROVERHEATING Contact Technical ServiceE1 WATERLOADFAILED Openthewatersupplyvalveandcheckiftheoverflowpipeis
taken offE2 TANKPROBEFAIL. Contact Technical ServiceE3 TANKHEATINGALARM Contact Technical ServiceE5 TANKOVERHEATING Contact Technical ServiceE6 TANKDRAININGFAIL. Checkiftheoverflowpipeistakenoff.ContactTechnical
ServiceZ9 REGENERATIONFAIL Contact Technical ServiceZ10 ALARMSL8-BREAKTANK
HIGHLEVELContact Technical Service
EN
page44
8. ENVIRONMENTAL ASPECTS8.1 PackagingPackaging is made of the following components:• awoodenpallet;• anylonsack(LDPE);• amulti-layercarton;• polystyrene(PS)strips;• polypropylene(PP)banding.Allabovematerials,shallbedisposedandtreatedinaccordancewiththeLocalLawsinforce.8.2 DisposalThesymbolWEEE/RAEEusedonthisproductindicatesthatitcannotbetreatedasdomesticwaste.Properdisposalofthisproductcontributestoprotectingtheenvironment.Formoreinformation on product recycling, contact the local authorities, domestic waste authorities or the dealer where the product was purchased. Forproductorpartsdisposal,followtheCouncildirectives2002/95/ECand2002/96/ECasamended and/or application legislative decrees.The present product or parts cannot be disposed of as urban waste but shall be collected in separatecontainers(seethewastebinonwheelssymbolwithan“X”ontheproduct).Atthetimeofproductdisposal,theusershallrefertothewasteelectricalandelectronicequipment(WEEE/RAEE)specification.ThemanufacturerguaranteestheabsenceofdangeroussubstancesintheEEAusedinconformity to the directive 2002/95/EC.If theuserdoesnotcomplywiththeregulationshe/sheshallbesubjecttothepenaltiesforeseen by each member state. Disconnect electricity and water before disposal. Cut away the electrical cable to ensure that further use is impossible.Allmetalpartsarerecyclableastheyaremadeofstainlesssteel.Recyclableplasticpartsaremarkedwiththeplasticmaterialsymbol.

EN
page45
9. TROUBLESHOOTING
N.B.: For any other question, please contact your Service provider.The manufacturer has right to modify any technical characteristics without prior notice.
Type of Problem Possible Causes CureThe machine does not turn on.
MainswitchnotON. Turn switch ON.
The machine does not load water.
Water valve shut. Open the hot and/or cold water valve.Rinseareanozzlesorsolenoid-valvefilterblockedand/orscaledwithlimestone.
Cleantherinsearmnozzles,conductorsandsolenoid-valvefilter.Checkthatthewaterhardnessis<10°f.
Defective pressure-switch. Replacepressure-switch.Thedisplaywillflash"ALARM"
Seechapter7"Alarms". ---
Washing results are unsatisfactory.
Thewashingnozzlesareobstructedor the rack does not rotate.
Cleanthenozzlescarefully,andchecktherightpositioningofthewash-arm,tighteningfirmly.
Foamispresent. Use no-foam detergents or reduce the dose in use. Check the rinse-aid dosage.
Fatsorstarchesnotremoved. Insufficientdetergentconcentration.Filtersaredirty. Removefilters,cleanwithbrushunderajetofwaterand
replace in original position.Checktanktemperature(whichmustbebetween50°Cand60°C).
Adjustthethermostatorcheckcorrectheatingelementopera-tion.
Washtimeinsufficientforthetypeofdirt.
Select a longer wash-cycle, if possible, otherwise repeat the wash cycle.
Wash water is dirty. Drainthetankwater,cleanthefilters;refillthetankandreplacethefilterscorrectly.
Glassesordishesarenotproperly dried.
Not enough rinse aid. Increasedosagebyturningthedispenserscrew(seepar."Rinseaiddispenser").
The rack is not suitable for the pots or the tools.
Use the suitable rack which gives the pots and tools an inclined position so that water can rinse away.
The washed items may have been sitting in the wash chamber too long.
Assoonasthecyclestops,removetherackwithpotsandtoolsso that they can dry more quickly in the air.
Rinsetemperatureunder80°C. Check the boiler thermostat temperature.Surface of dishes and glasses too rough or porous for material wear.
Replacetypeofdishesandglassesused.Ifthedirtonthedishes is dry and old, soak before washing.
Streaks and spots on glas-ses and dishes.
Too much rinse-aid chemical. Reducetherinseaidamountbyturningthemicrometricdispenserscrew(seepar.1.4"Rinseaiddispenser").
Too hard water. Check the water quality. Water must not exceed 8°f in hardness.Forapplianceswithsoftener:toolittlesalt in the salt container or the resins have not been properly regenerated.
Fillthesaltcontainer(coarsesalt:1-2mmgrains)andregene-ratetheresinsmoreoften.Iflimedepositsarealsoobservedonthebodyofthemachine,haveaqualifiedtechnicianchecktheoperation of the water softener.
Salt present in dishwasher sump. Thoroughly clean and rinse the appliance, and avoid spilling salt whenfillingthecontainer.
The machine suddenly stops during operation.
The machine is connected to an overload device.
Connectthemachineonaownoverloaddevice(callService).
Amachinesafetydevicewastriggered.
Checktheelectricaldevices(callService).
The machine stops during the wash stage and starts refillingwater.
Thepreviousday'swaterwasnotchanged.
Drainthetanktotallyandrefill.
Excessive water temperature in tank. Call Service to check thermostat and pressure-switch.Defective pressure switch.Overflowpipeimproperlypositioned. Removeandrepositiontheoverflowpipeproperly.