Embed Size (px)
Citation preview
Merchant Web Application Integration – Payeezy ConnectPay ACH API
January 4
2018© 2017 First Data Corporation. All Rights Reserved. All trademarks, service marks, and trade names referenced in this material are the property of their respective owners. This document contains confidential and proprietary information of First Data Corporation. You may not disclose, copy, or transmit any part of these materials for any purpose without the express written consent of First Data Corporation.
V2.1
Page 1
Table of Contents
1.0 Introduction ............................................................................................................................................................................................................................ 2
1.1 Purpose .............................................................................................................................................................................................................................. 2
1.2 Audience ............................................................................................................................................................................................................................. 2
1.3 Overview ............................................................................................................................................................................................................................ 2
2.0 Functional Flows of the demo application .............................................................................................................................................................................. 3
3.0 Sequence Diagrams........................................................................................................................................................................................................................ 15
3.1 Online Bank Login (Pre Enrollment) .......................................................................................................................................................................................... 15
3.2 Consumer Profile Management (Enrollment) ........................................................................................................................................................................... 16
............................................................................................................................................................................................................................................................. 16
3.3 ACH Transaction ............................................................................................................................................................................................................... 17
4.0 Deep dive into the demo web application ..................................................................................................................................................................................... 18
4.1 Pre Requisites of integration with Payeezy ConnectPay API ............................................................................................................................................ 19
4.2 Technology Stack of demo application ............................................................................................................................................................................. 19
4.3 Minimum PC requirements for running demo application............................................................................................................................................... 19
4.4 Project Structure of demo application ............................................................................................................................................................................. 20
4.5 Major Components of demo application .......................................................................................................................................................................... 21
4.6 Dry Run and code samples of demo application .............................................................................................................................................................. 26
4.6.1 Supporting Items .................................................................................................................................................................................................... 26
4.6.2 Core Application Flow ....................................................................................................................................................................................................... 35
5.0 Appendix ............................................................................................................................................................................................................................... 52
Page 2
1.0 Introduction
1.1 Purpose This Quick Start Integration guide provides an overview of the steps required to integrate a Merchant Web Application (that can handle a JavaScript call) with Payeezy ACH API (Application Program Interface).
1.2 Audience This documentation is primarily for technical representatives from a prospective merchant who is willing to use Payeezy ConnectPay ACH on File solution.
1.3 Overview The Payeezy ConnectPay ACH on File solution provides the controls and functions needed to 1) Validate and board the Merchant in the First Data Payeezy and TeleCheck system. 2) Allow consumers to enroll using manual or online bank login process. 3) Allow the consumer to transact using their ACH bank account information. To understand the requirements to integrate the merchant web application with the Payeezy ConnectPay ACH on File solution API, we would go through various aspects of a sample merchant web application named “ConnectPay Demo Company”. In this document, first we would see the functional flows (screenshots of a demo merchant web application) to have a high level vision of what we are trying to achieve. Once we are through it, we would look at the sequence diagrams to understand the sequence of events that need to occur to accomplish the mission of an online bank login consumer enrollment and an ACH purchase transaction. Following this we would deep dive into fragments of code from the demo application to explain how to implement the sequence of events that need to completed to accomplish the mission.
Page 3
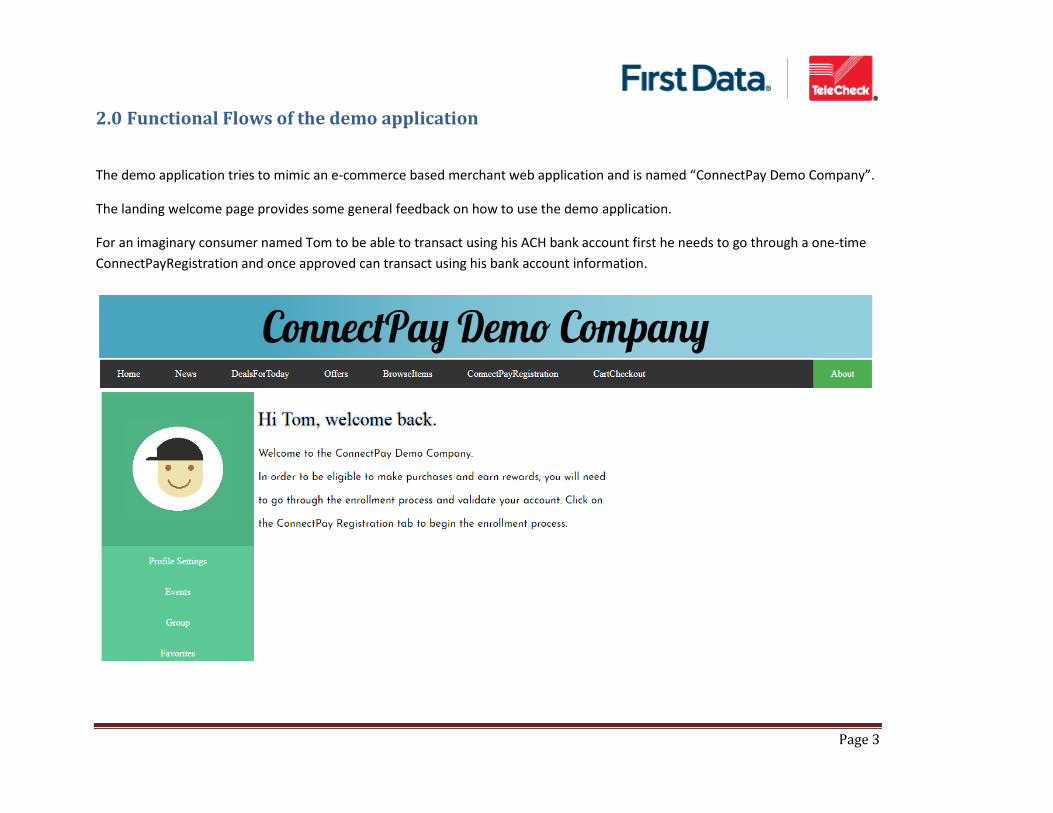
2.0 Functional Flows of the demo application
The demo application tries to mimic an e-commerce based merchant web application and is named “ConnectPay Demo Company”.
The landing welcome page provides some general feedback on how to use the demo application.
For an imaginary consumer named Tom to be able to transact using his ACH bank account first he needs to go through a one-time
ConnectPayRegistration and once approved can transact using his bank account information.
Page 4
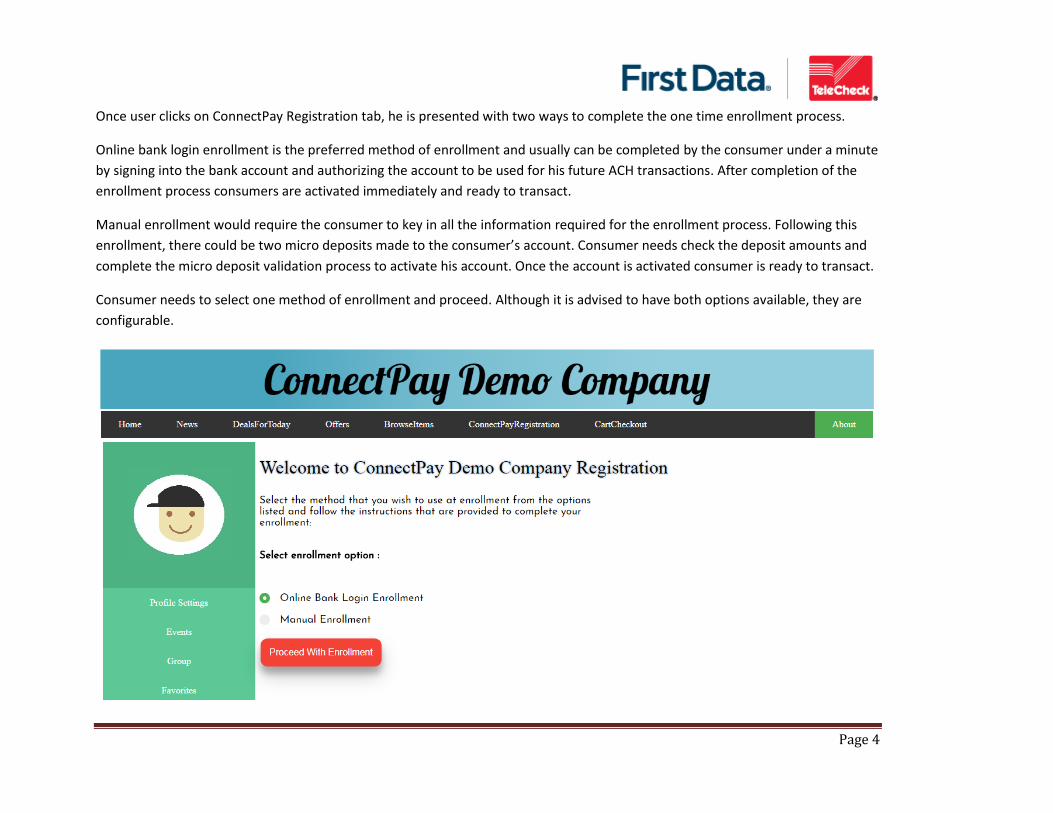
Once user clicks on ConnectPay Registration tab, he is presented with two ways to complete the one time enrollment process.
Online bank login enrollment is the preferred method of enrollment and usually can be completed by the consumer under a minute
by signing into the bank account and authorizing the account to be used for his future ACH transactions. After completion of the
enrollment process consumers are activated immediately and ready to transact.
Manual enrollment would require the consumer to key in all the information required for the enrollment process. Following this
enrollment, there could be two micro deposits made to the consumer’s account. Consumer needs check the deposit amounts and
complete the micro deposit validation process to activate his account. Once the account is activated consumer is ready to transact.
Consumer needs to select one method of enrollment and proceed. Although it is advised to have both options available, they are
configurable.
Page 5
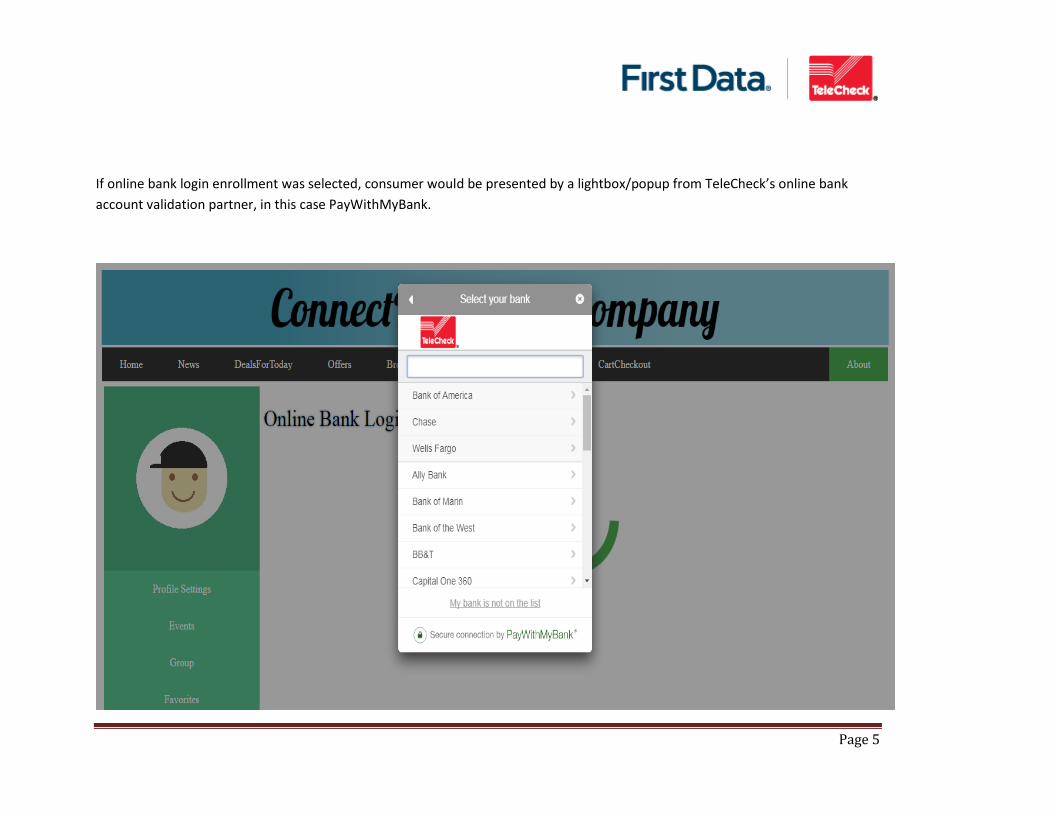
If online bank login enrollment was selected, consumer would be presented by a lightbox/popup from TeleCheck’s online bank
account validation partner, in this case PayWithMyBank.
Page 6
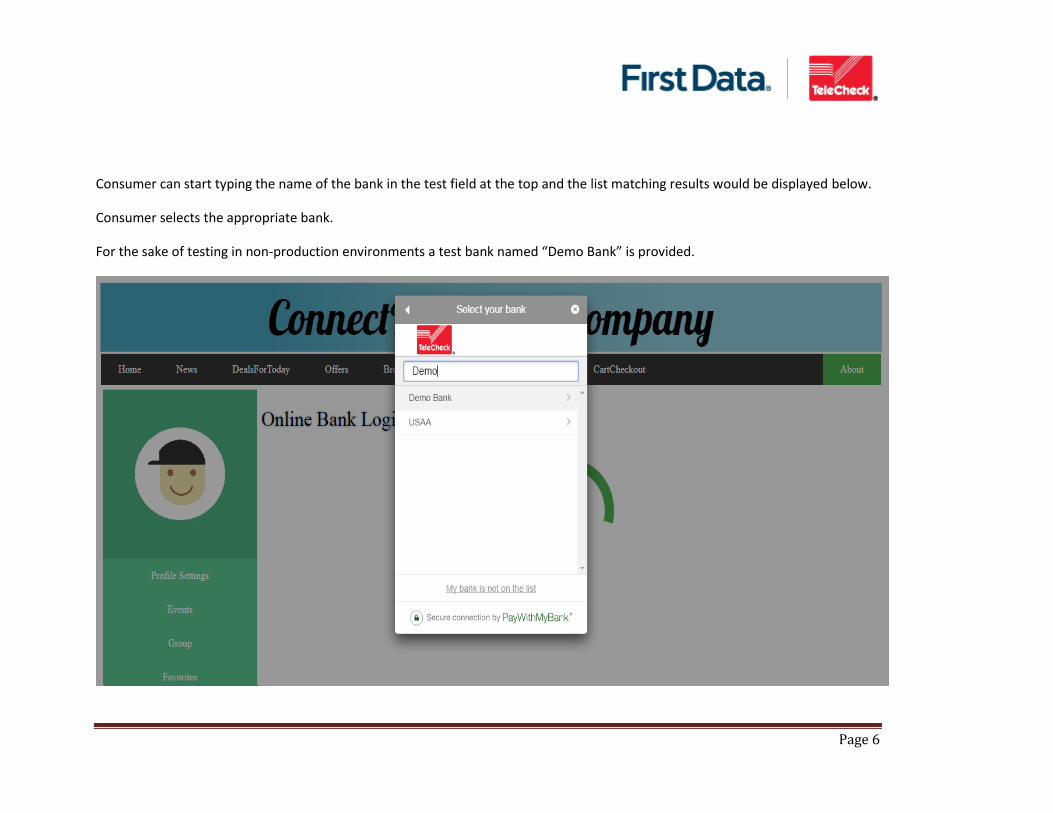
Consumer can start typing the name of the bank in the test field at the top and the list matching results would be displayed below.
Consumer selects the appropriate bank.
For the sake of testing in non-production environments a test bank named “Demo Bank” is provided.
Page 7
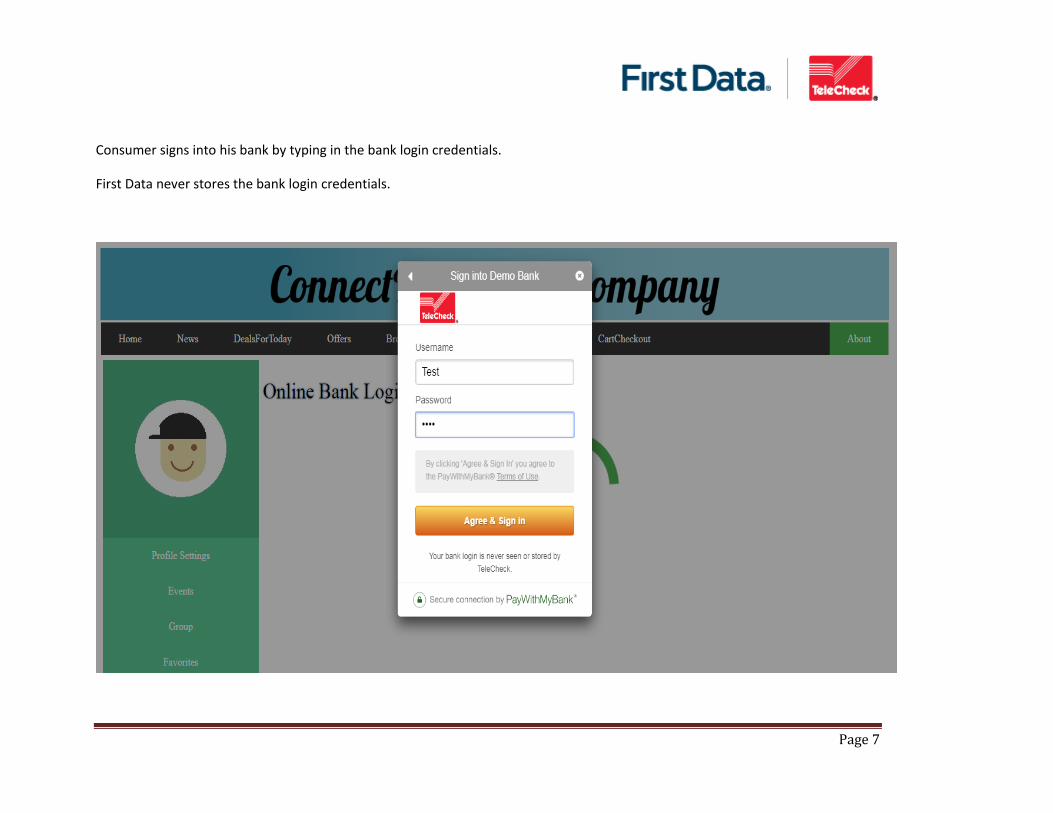
Consumer signs into his bank by typing in the bank login credentials.
First Data never stores the bank login credentials.
Page 8
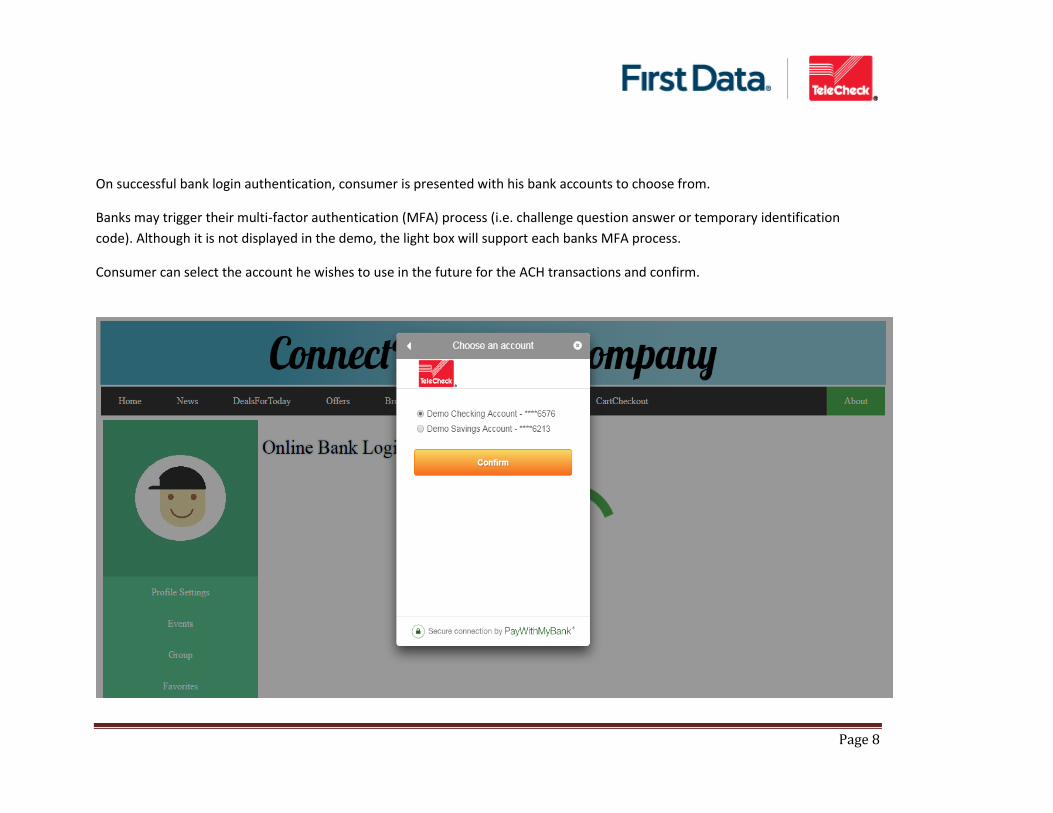
On successful bank login authentication, consumer is presented with his bank accounts to choose from.
Banks may trigger their multi-factor authentication (MFA) process (i.e. challenge question answer or temporary identification
code). Although it is not displayed in the demo, the light box will support each banks MFA process.
Consumer can select the account he wishes to use in the future for the ACH transactions and confirm.
Page 9
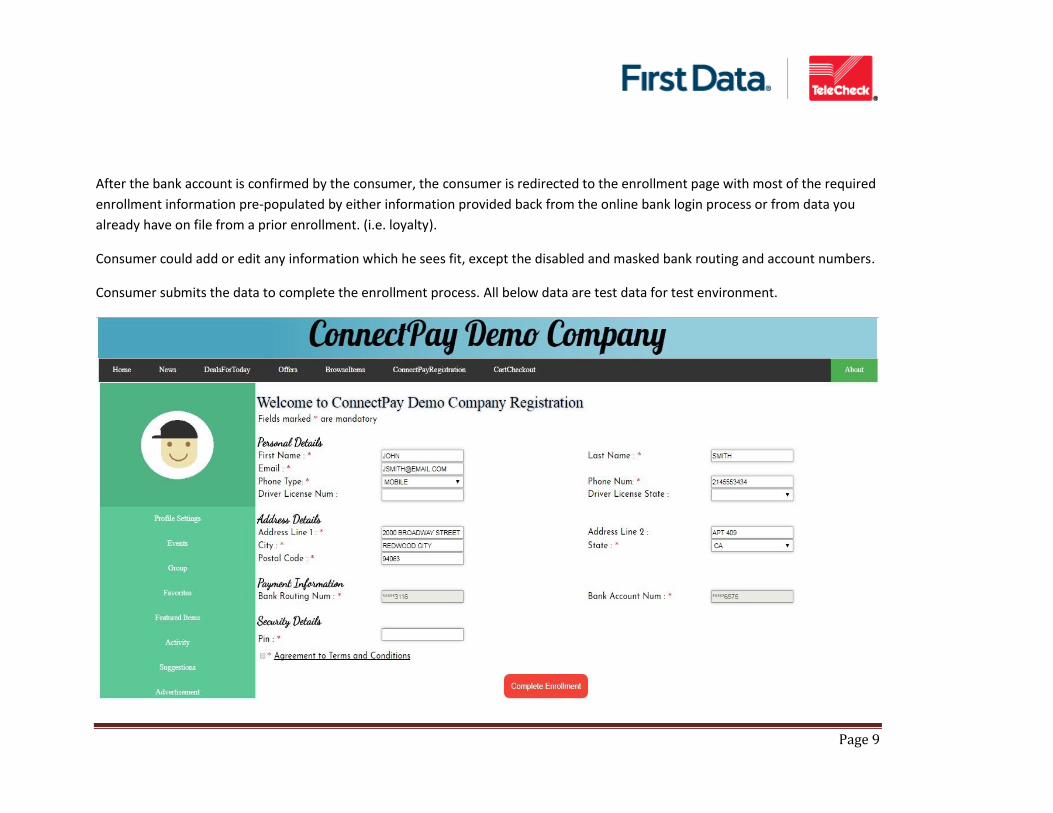
After the bank account is confirmed by the consumer, the consumer is redirected to the enrollment page with most of the required
enrollment information pre-populated by either information provided back from the online bank login process or from data you
already have on file from a prior enrollment. (i.e. loyalty).
Consumer could add or edit any information which he sees fit, except the disabled and masked bank routing and account numbers.
Consumer submits the data to complete the enrollment process. All below data are test data for test environment.
Page 10
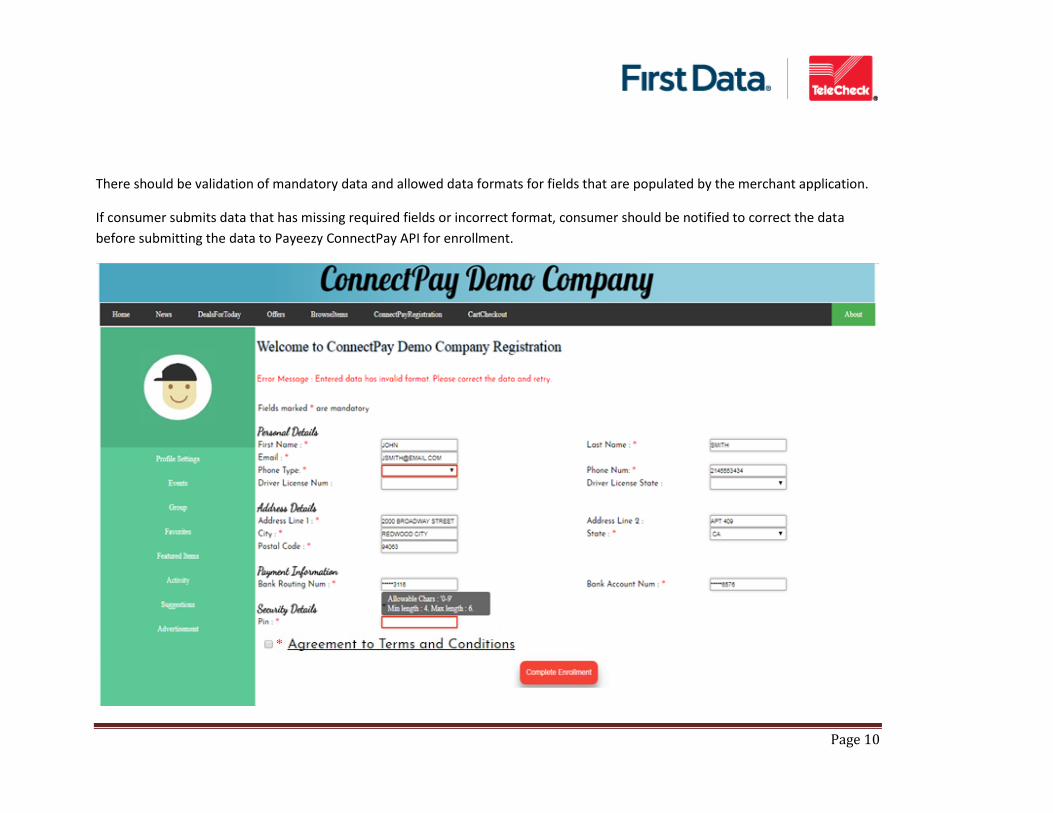
There should be validation of mandatory data and allowed data formats for fields that are populated by the merchant application.
If consumer submits data that has missing required fields or incorrect format, consumer should be notified to correct the data
before submitting the data to Payeezy ConnectPay API for enrollment.
Page 11
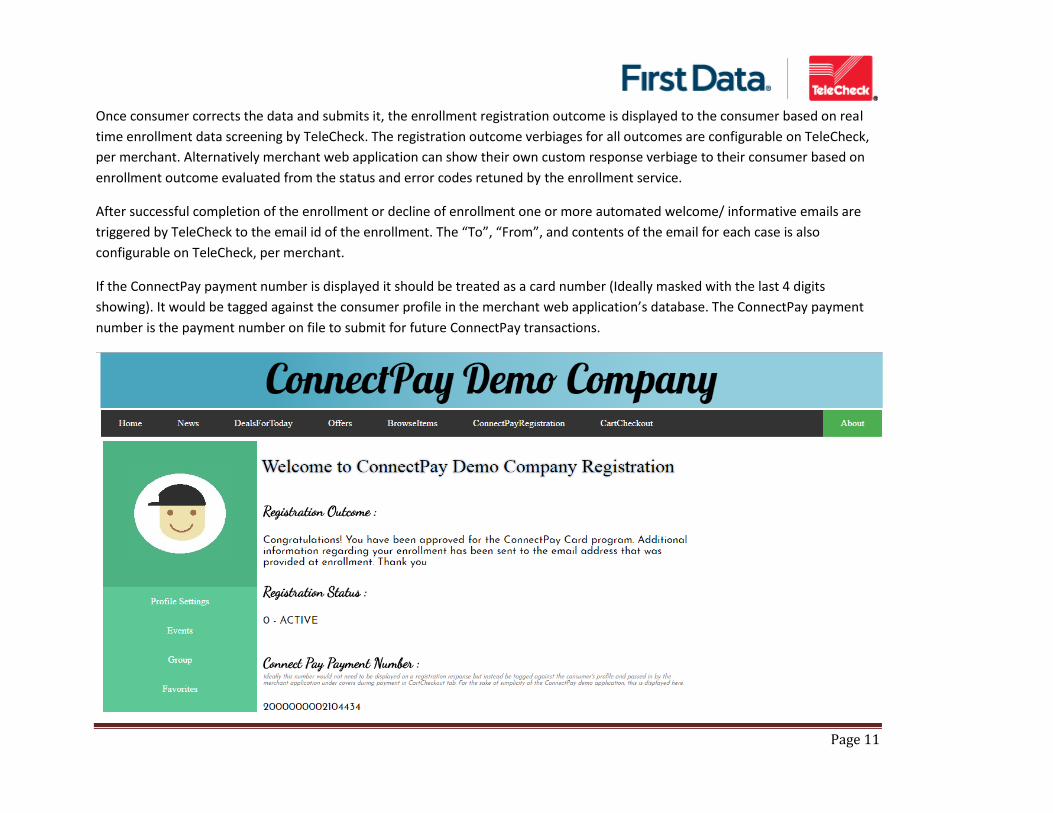
Once consumer corrects the data and submits it, the enrollment registration outcome is displayed to the consumer based on real
time enrollment data screening by TeleCheck. The registration outcome verbiages for all outcomes are configurable on TeleCheck,
per merchant. Alternatively merchant web application can show their own custom response verbiage to their consumer based on
enrollment outcome evaluated from the status and error codes retuned by the enrollment service.
After successful completion of the enrollment or decline of enrollment one or more automated welcome/ informative emails are
triggered by TeleCheck to the email id of the enrollment. The “To”, “From”, and contents of the email for each case is also
configurable on TeleCheck, per merchant.
If the ConnectPay payment number is displayed it should be treated as a card number (Ideally masked with the last 4 digits
showing). It would be tagged against the consumer profile in the merchant web application’s database. The ConnectPay payment
number is the payment number on file to submit for future ConnectPay transactions.
Page 12
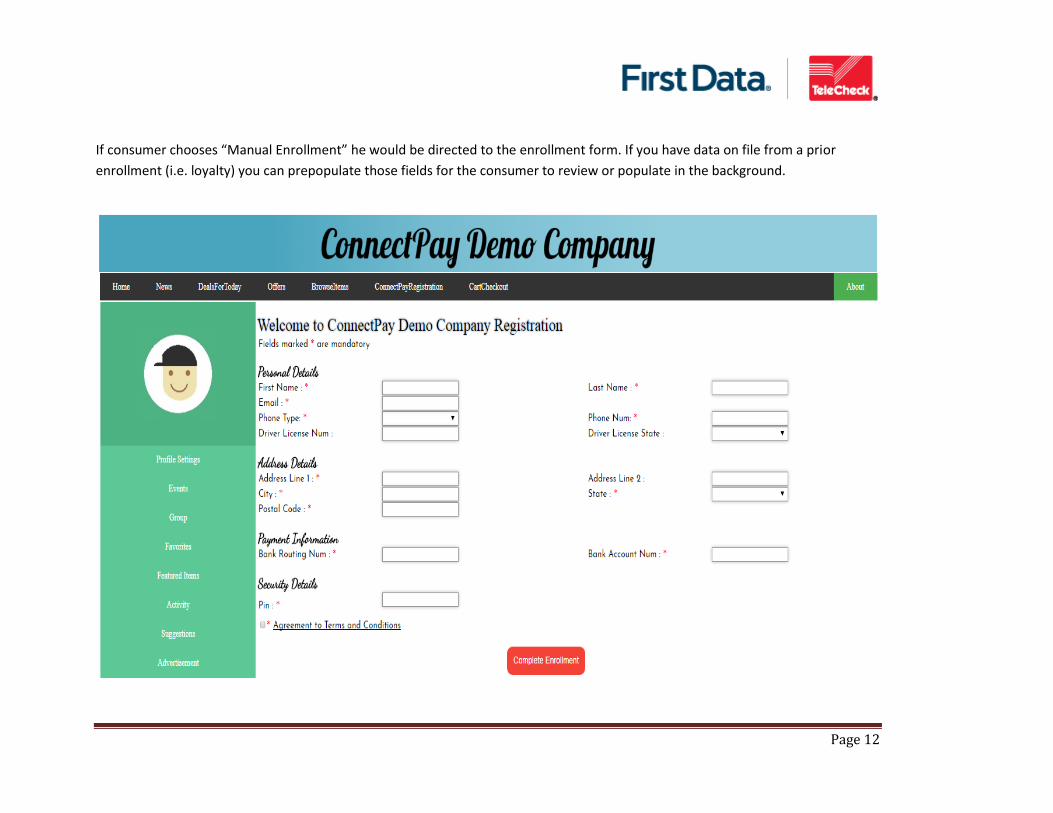
If consumer chooses “Manual Enrollment” he would be directed to the enrollment form. If you have data on file from a prior
enrollment (i.e. loyalty) you can prepopulate those fields for the consumer to review or populate in the background.

Page 13
Once consumer is enrolled and activated, consumer can transact using the bank account he enrolled with.
At the time of transaction merchant web application would submit the consumers ConnectPay payment number as the payment
number on file. For the sake of simplicity of the demo merchant application, ConnectPay payment number is introduced as a field
which can be populated by the consumer.
Page 14
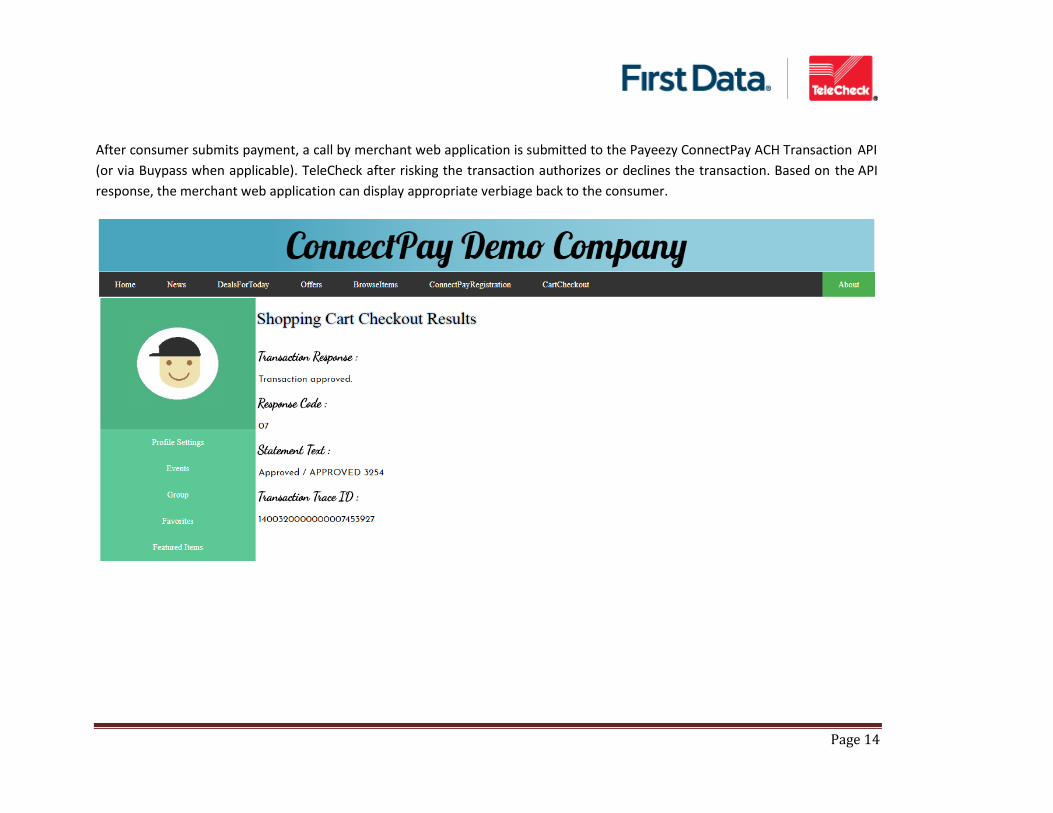
After consumer submits payment, a call by merchant web application is submitted to the Payeezy ConnectPay ACH Transaction API
(or via Buypass when applicable). TeleCheck after risking the transaction authorizes or declines the transaction. Based on the API
response, the merchant web application can display appropriate verbiage back to the consumer.
Page 15
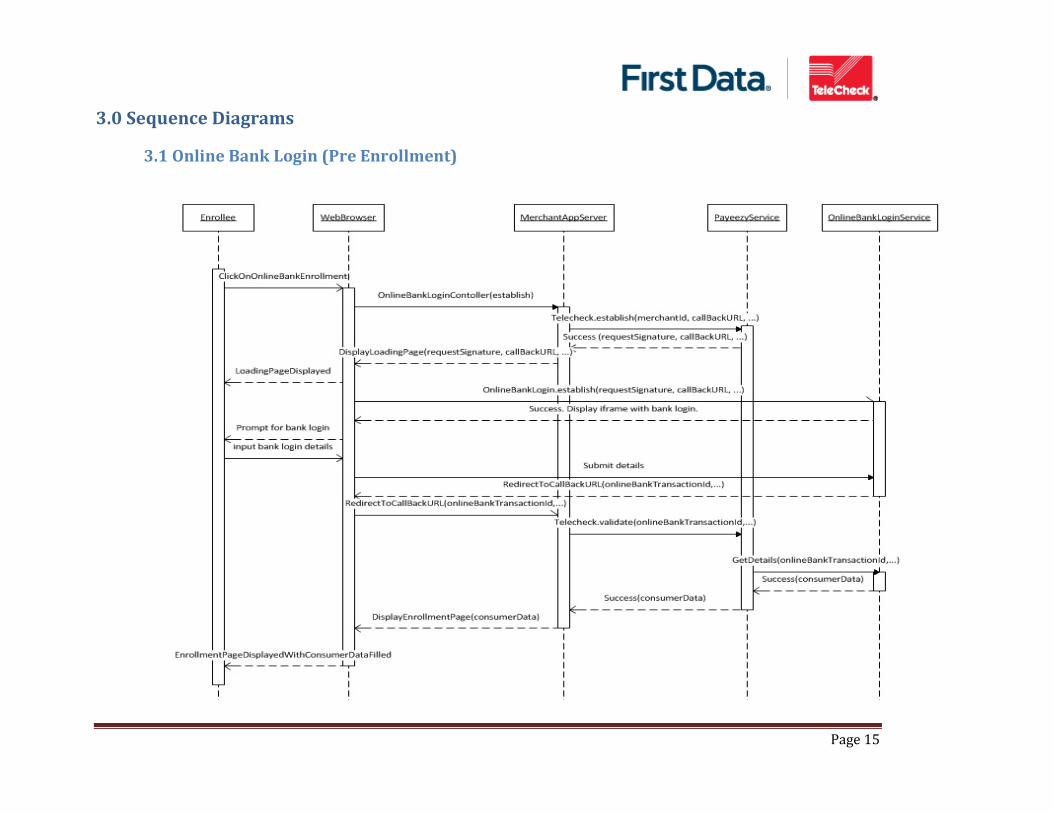
3.0 Sequence Diagrams
3.1 Online Bank Login (Pre Enrollment)
Page 16
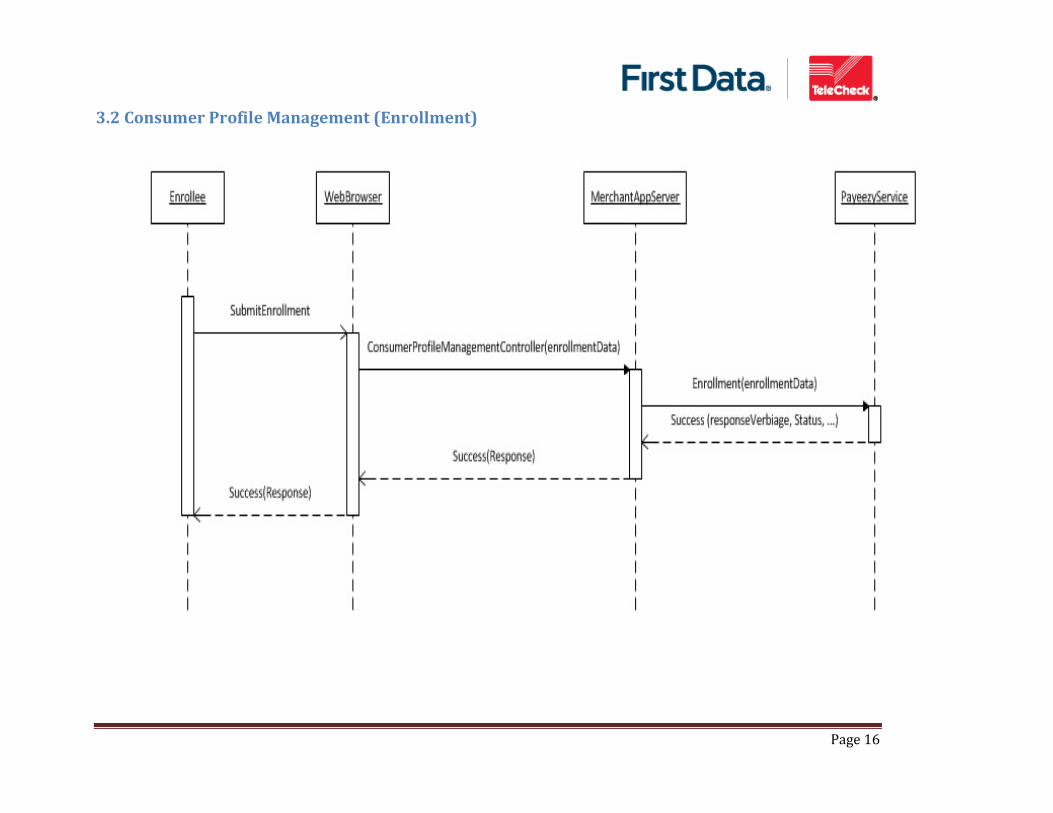
3.2 Consumer Profile Management (Enrollment)
Page 17
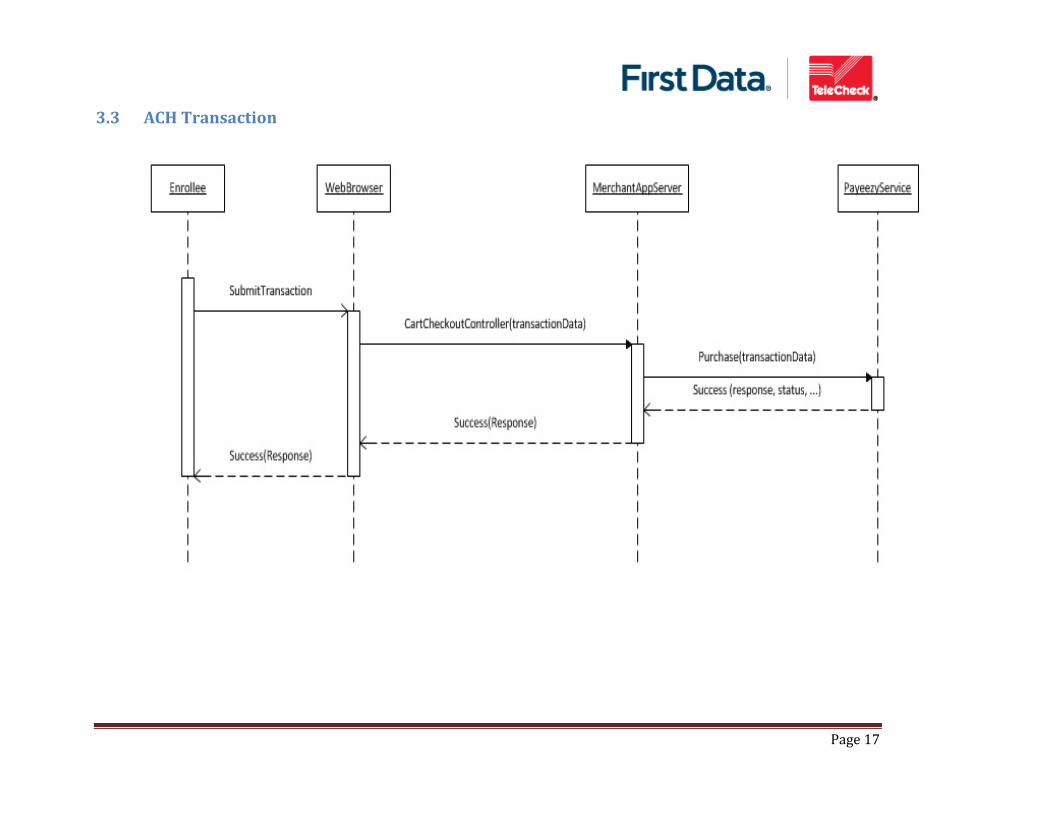
3.3 ACH Transaction
Page 18
4.0 Deep dive into the demo web application
We would divide this section into six sub parts.
First we would look at the pre requisites of integrating with Payeezy ConnectPay service.
Second we would look at the technology stack of the demo application
Third we would look at the minimum requirements of a PC to run the demo application
Fourth we would look at the project structure of demo application from Eclipse IDE.
Fifth we would look at the basic components that make up the demo application.
Finally we would dry run through the online bank login enrollment and cart checkout scenario and look at code fragments from the demo application to understand how to implement the changes required.
Page 19
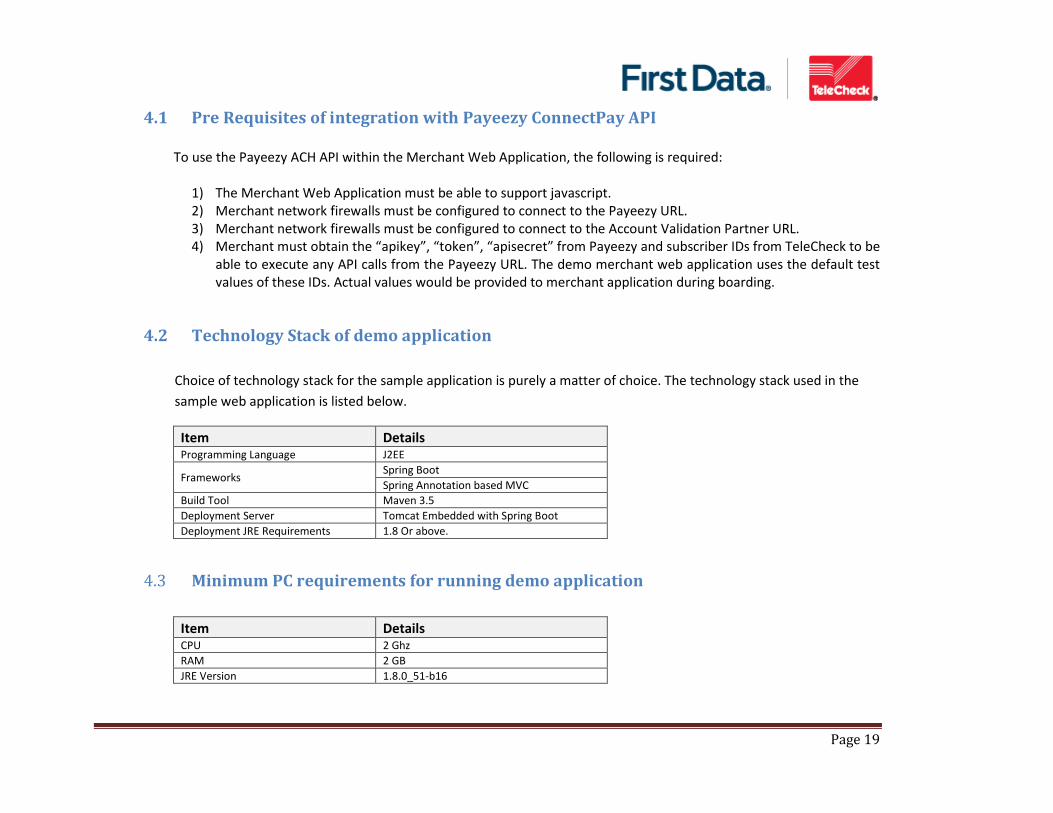
4.1 Pre Requisites of integration with Payeezy ConnectPay API To use the Payeezy ACH API within the Merchant Web Application, the following is required:
1) The Merchant Web Application must be able to support javascript. 2) Merchant network firewalls must be configured to connect to the Payeezy URL. 3) Merchant network firewalls must be configured to connect to the Account Validation Partner URL. 4) Merchant must obtain the “apikey”, “token”, “apisecret” from Payeezy and subscriber IDs from TeleCheck to be
able to execute any API calls from the Payeezy URL. The demo merchant web application uses the default test values of these IDs. Actual values would be provided to merchant application during boarding.
4.2 Technology Stack of demo application
Choice of technology stack for the sample application is purely a matter of choice. The technology stack used in the
sample web application is listed below.
Item Details Programming Language J2EE
Frameworks Spring Boot
Spring Annotation based MVC
Build Tool Maven 3.5
Deployment Server Tomcat Embedded with Spring Boot
Deployment JRE Requirements 1.8 Or above.
4.3 Minimum PC requirements for running demo application
Item Details CPU 2 Ghz
RAM 2 GB
JRE Version 1.8.0_51-b16
Page 20
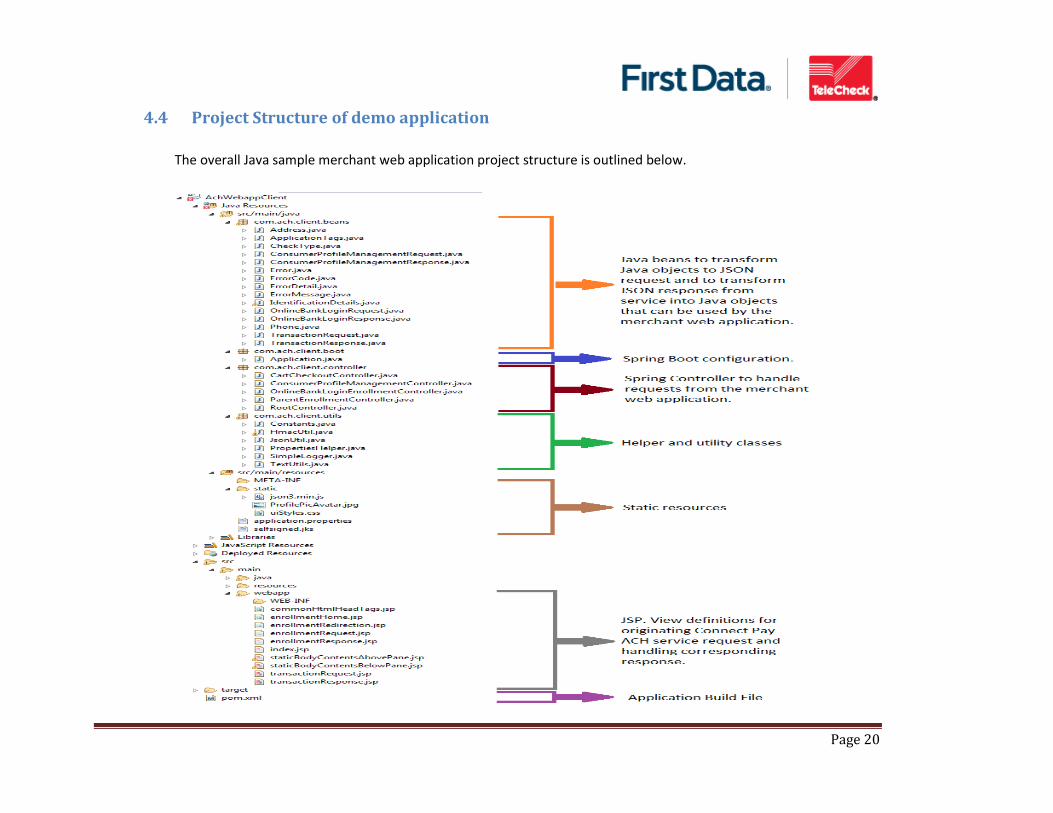
4.4 Project Structure of demo application
The overall Java sample merchant web application project structure is outlined below.
Page 21
4.5 Major Components of demo application
The demo merchant web application has the following basic components:
1) SpringBootApplication: This is a java class having the annotation @SpringBootApplication. This java class is
responsible to define a set of @Beans to be used by the application later, as spring managed beans. We use
this configuration class to define the RestTemplate that we are going to use later to call the Payeezy
ConnectPay services, Properties file loader that would be used by the Properties helper to find configurable
properties.
2) Request and Response Java Beans: These are java classes which assist in converting the java objects to
necessary json strings for interacting between Merchant web application and Payeezy service.
3) Controllers: To handle requests from Views. Views could request to perform the different Connect Pay
functions like online bank login request, consumer profile management requests and transaction requests.
Basic responsibilities of Controllers:
a. Receiving request from client / view layer
b. Build request data in format required to call Payeezy Connect Pay service
c. Validate request data locally to identify errors in missing required fields or field format
d. If validation error exists, notify consumer to correct data element/s.
e. Calling Payeezy Connect Pay service
f. Evaluate Payeezy Connect Pay service response
g. Formulate response it wants to display to end user based on service response
h. Send the response back to view layer
Page 22
Controllers Include:
a. RootController: This controller is used to handle the initial request to the root of the web application “/”
and redirect to the index page.
b. ParentEnrollmentController: This controller is used to handle HTTP Get the call when user clicks on
“ConnectPayRegistration” tab. This controlled redirects to View named enrollmentHome.jsp to display
the available enrollment options. This controller is also used in HTTP Post call when user selects the
enrollment option and clicks to proceed with enrollment. This controller forwards to appropriate view or
controller to handle the specific enrollment method.
c. OnlineBankLoginController: This controller is used to handle both Payeezy ConnectPay Establish and
Validate calls for online bank login process.
d. ConsumerProfileManagementController: This controller is used to trigger enrollment call to both
Payeezy ConnectPay for both enrollment methods.
e. CartCheckoutController: This controller is used to handle the call to Payeezy Connect Pay ACH
transaction service when supposedly consumer checks out the contents of his cart.
4) Utilities and Helpers: These java classes to keep code of the controller cleaner and follow separation of
responsibility principle.
Page 23
5) Static Resources: These are static resources required for proper functioning of the demo web application.
These resources include:
a. Json3.min.js: This java script is primarily used to convert JSON string passed to view to be converted to
JSON Object before passing the JSON Object to the PayWithMyBank.establish(JSONObject) call.
b. ProfilePicAvatar.jpg: This jpg image is created in Microsoft paint to mimic the profile picture of the end
user.
c. uiStyles.css: This is style sheet that is used by all the views layers for styling the display.
d. application.properties: This is a simple properties file to hold the configurable properties required by
the application. This is just used for the demo application. Merchant web application can choose its
own convenient method to maintain the configurable properties.
e. selfsigned.jks: This is a self-signed certificate for the demo application to be accessed over https
protocol. Merchant application would have their own CA signed certificate to accomplish the same.
6) Views: The view layer is to interact with the end user, capture inputs from user and display
responses/outcome to user.
These resources include:
a. index.jsp: This is the initial welcome page of the demo application which provides a brief introduction
on how to use the application.
b. commonHtmlHeadTags.jsp: This view is used to include all style sheets and is included in other views.
Page 24
c. staticBodyContentsAbovePane.jsp: This view includes the contents of the merchant application
framework, i.e. the top logo, horizontal menu bar, vertical menu bar, profile picture. All these static
contents are coded to this view and included in all the other views to keep the code cleaner for the
other views.
d. staticBodyContentsBelowPane.jsp: This view has the demo web application footer and included in all
other views.
e. enrollmentHome.jsp: This view presents the two enrollment options to the user to select from.
f. enrollmentRedirection.jsp: This view is an intermediate view called when user selects
OnlineBankLoginEnrollment from the enrollmentHome.jsp view. After user selects the
OnlineBankLoginEnrollment, the OnlineBankLoginController calls the Payeezy ConnectPay Establish
call. The response of the establish call is passed to the enrollmentHome.jsp view. Here a javascript call
to PayWithMyBank.establish(PayeezyConnectPayEstablishResponseJSONObject) from the intermediate view brings
up the light box/popup for online bank login process. This view also needs to include the following two
things from the account validation partner, PayWithMyBank: I. <link href='https://sandbox.paywithmybank.com/start/styles/pwmb.css' rel='stylesheet' type='text/css'>
II. <script type="text/javascript"
src="https://sandbox.paywithmybank.com/start/scripts/pwmb/pwmb.js?accessId=RqBNyqzgTVGhmvyV74NM"></sc
ript>
Above are test values used in test environment. Actual values would be provided during boarding.
This view could also be replaced by some kind of AJAX call in the merchant web application.
g. enrollmentRequest.jsp: This view is used to display the data required for completing the enrollment
process and is displayed in both the enrollment options. In case of OnlineBankLoginEnrollment this
page has the data pre-populated in the form from the bank login process. In case of Manual
enrollment, the same form is present to consumer where consumer has to key in all the details.
Page 25
h. enrollmentResponse.jsp: This view is used to display the outcome, approved or decline, from the
enrollment process, for both the enrollment options.
i. transactionRequest.jsp: This view is use to simulate the consumer cart checkout scenario where
consumer is on the checkout screen and is displayed the items he is buying, the total amount, and
button to authorize the transaction.
j. transactionResponse.jsp: This view is used to display the outcome of the transaction to the consumer.
7) Build File: This demo application uses Maven as build tool. Hence all build and deploy dependencies are
defined in the pom.xml.
Page 26
4.6 Dry Run and code samples of demo application
First let us look at the items that support the application. Then we would look at the core flows.
4.6.1 Supporting Items
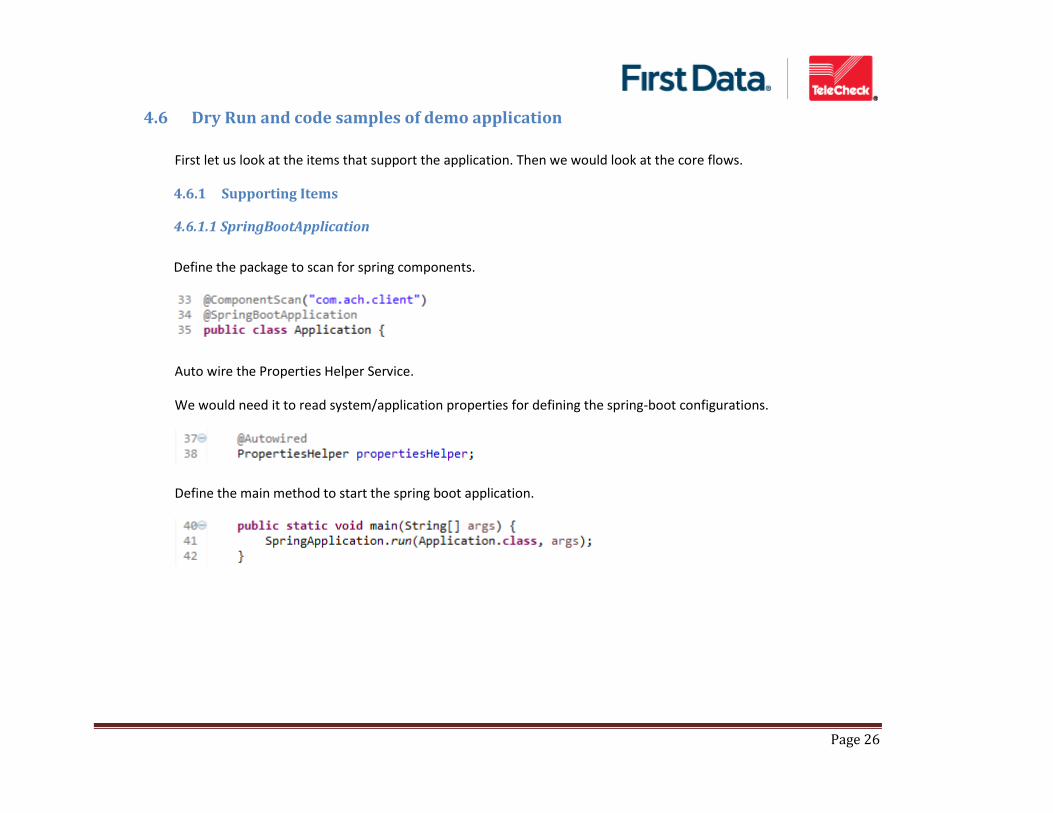
4.6.1.1 SpringBootApplication
Define the package to scan for spring components.
Auto wire the Properties Helper Service.
We would need it to read system/application properties for defining the spring-boot configurations.
Define the main method to start the spring boot application.
Page 27
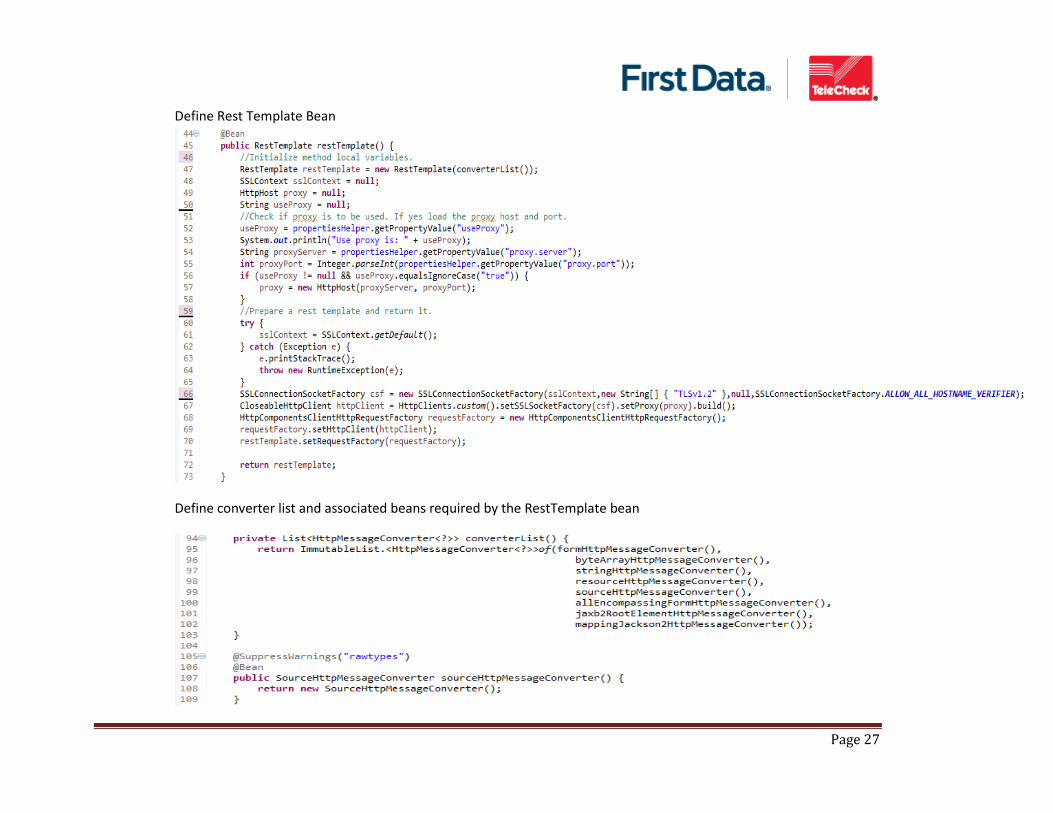
Define Rest Template Bean
Define converter list and associated beans required by the RestTemplate bean
Page 28
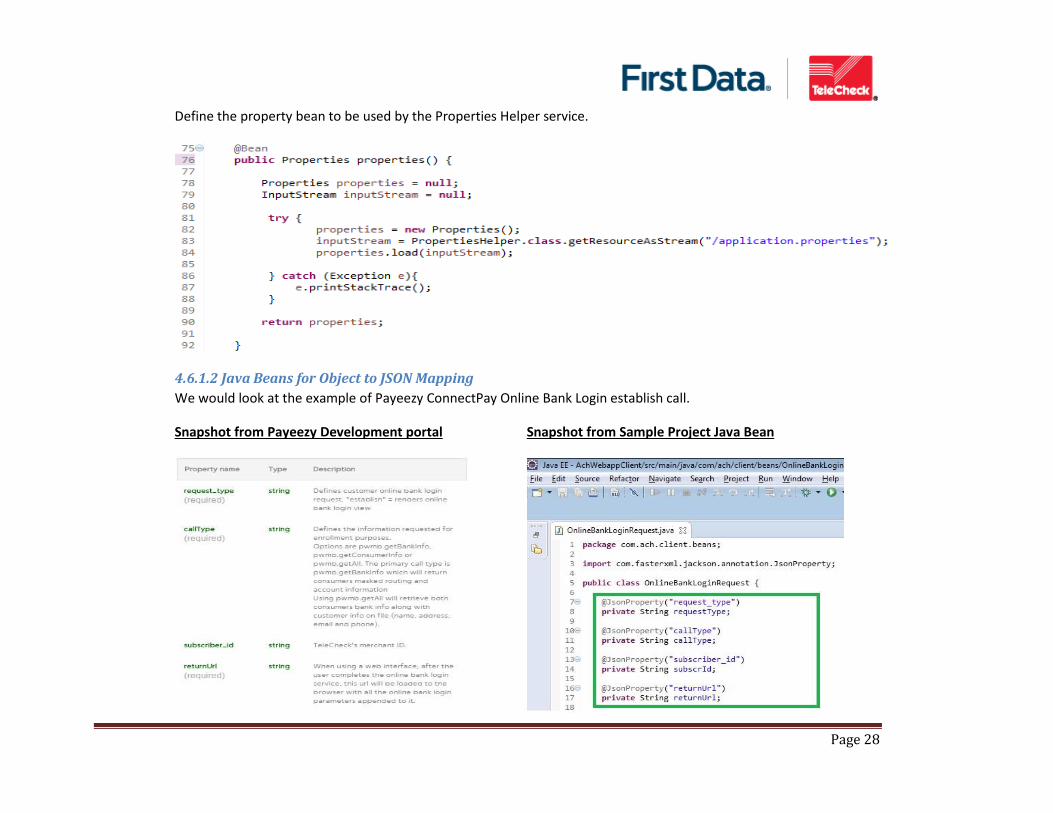
Define the property bean to be used by the Properties Helper service.
4.6.1.2 Java Beans for Object to JSON Mapping
We would look at the example of Payeezy ConnectPay Online Bank Login establish call.
Snapshot from Payeezy Development portal Snapshot from Sample Project Java Bean
Page 29
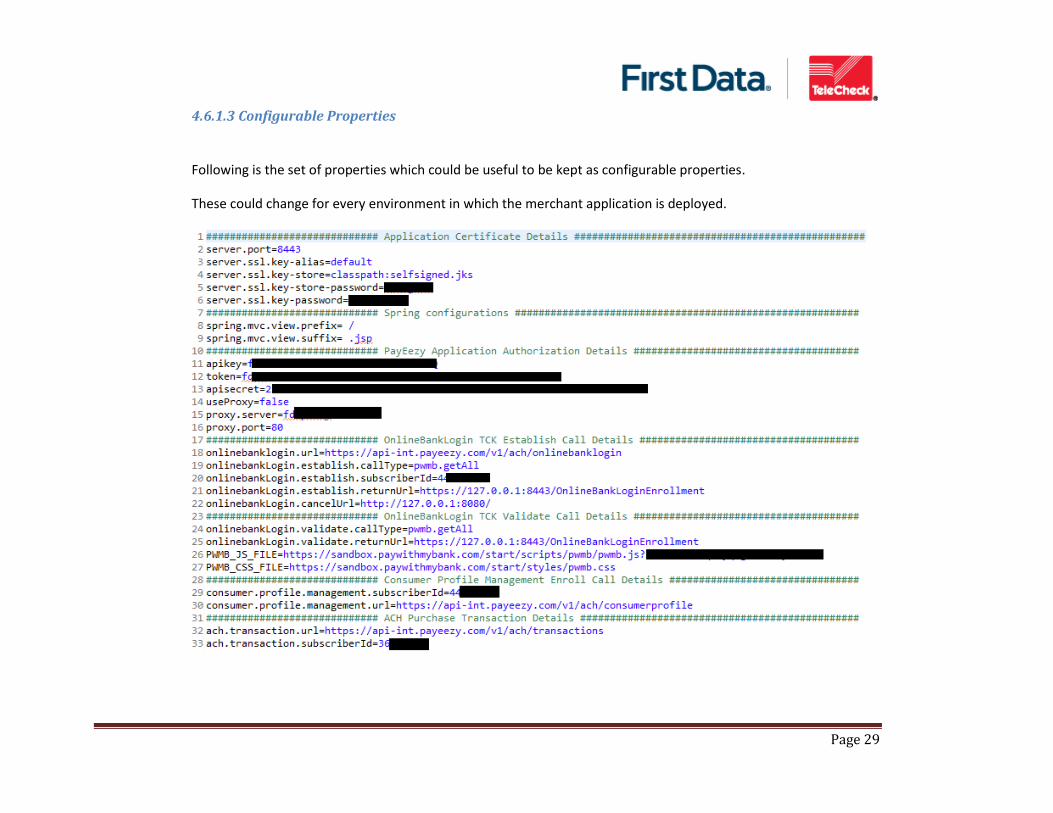
4.6.1.3 Configurable Properties
Following is the set of properties which could be useful to be kept as configurable properties.
These could change for every environment in which the merchant application is deployed.
Page 30
4.6.1.4 Utilities and Helper Classes
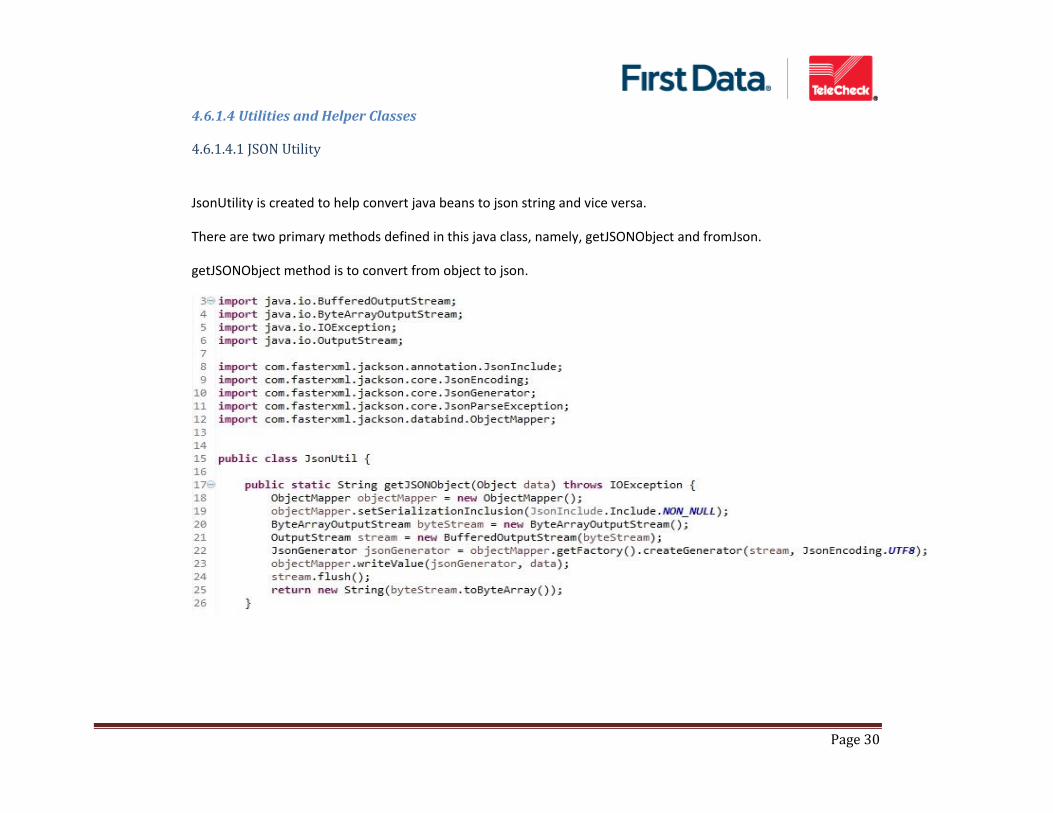
4.6.1.4.1 JSON Utility
JsonUtility is created to help convert java beans to json string and vice versa.
There are two primary methods defined in this java class, namely, getJSONObject and fromJson.
getJSONObject method is to convert from object to json.

Page 31
fromJson method is to convert from json to object
4.6.1.4.2 HMAC Utility
This utility is created to compute the message signature from the request message being sent and the secret.
The signature returned by this utility needs to added to the header of the request message.
Please ensure to protect your secret with appropriate security and make sure not to expose the secret anywhere
within merchant application (application logs etc.) or the communication between merchant server and Payeezy
server.
Page 32
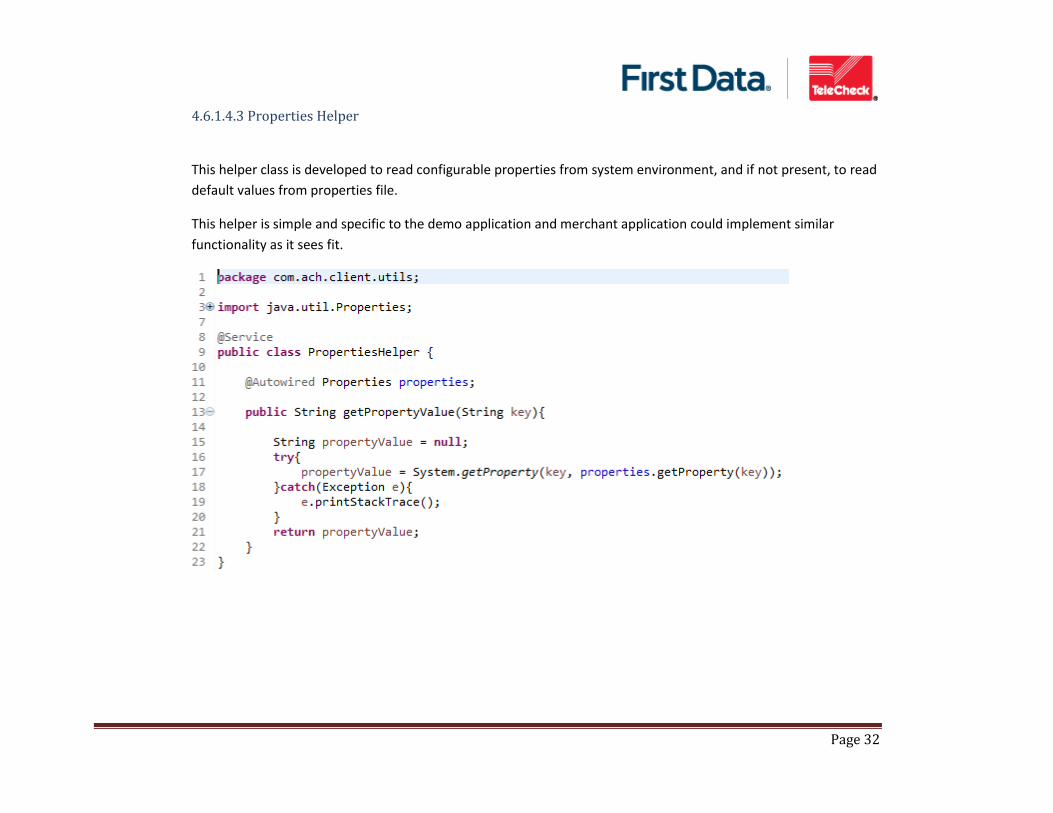
4.6.1.4.3 Properties Helper
This helper class is developed to read configurable properties from system environment, and if not present, to read
default values from properties file.
This helper is simple and specific to the demo application and merchant application could implement similar
functionality as it sees fit.
Page 33
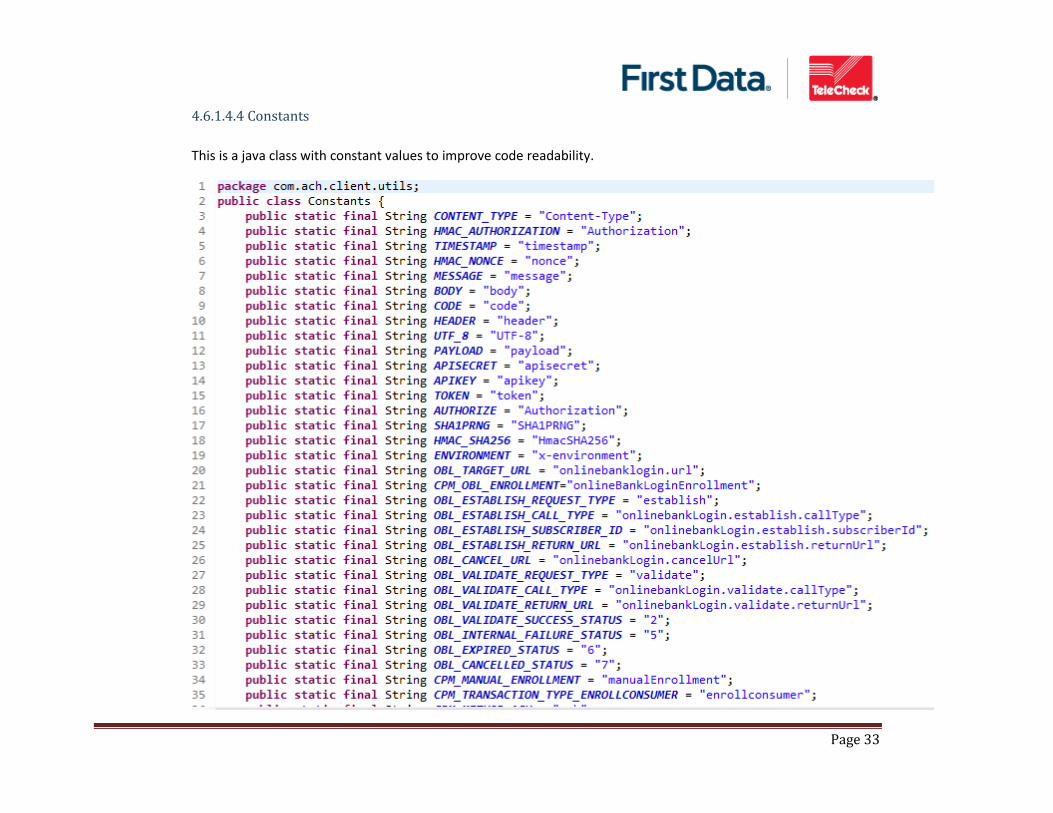
4.6.1.4.4 Constants
This is a java class with constant values to improve code readability.
Page 34
4.6.1.4.5 Simple Logger
As the name suggests, this java class provides simple custom methods to log the details of request and response
objects to sample application log for debugging purpose.
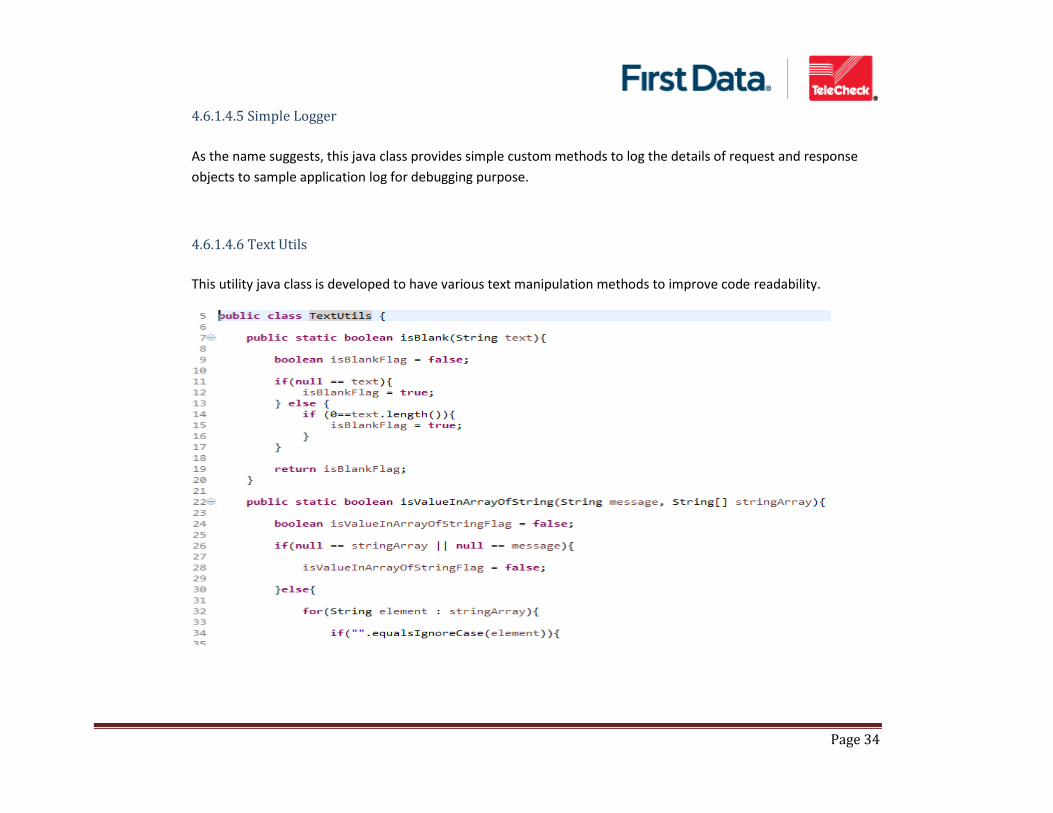
4.6.1.4.6 Text Utils
This utility java class is developed to have various text manipulation methods to improve code readability.
Page 35
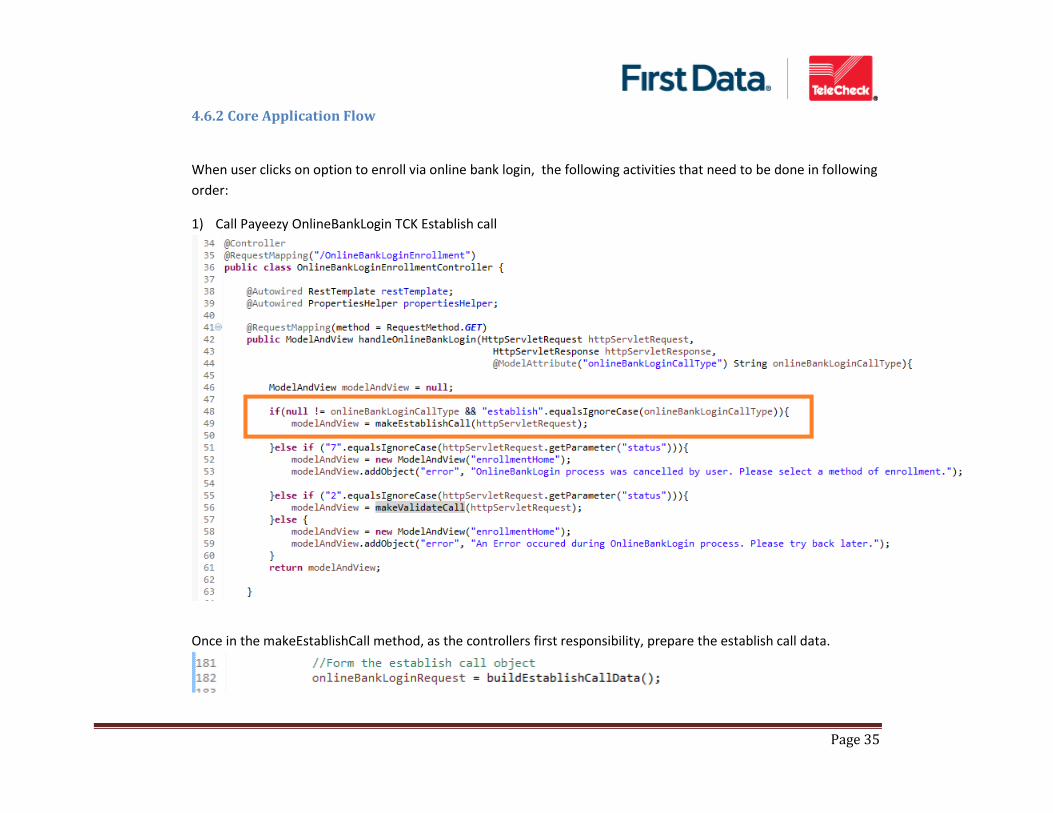
4.6.2 Core Application Flow
When user clicks on option to enroll via online bank login, the following activities that need to be done in following
order:
1) Call Payeezy OnlineBankLogin TCK Establish call
Once in the makeEstablishCall method, as the controllers first responsibility, prepare the establish call data.
Page 36
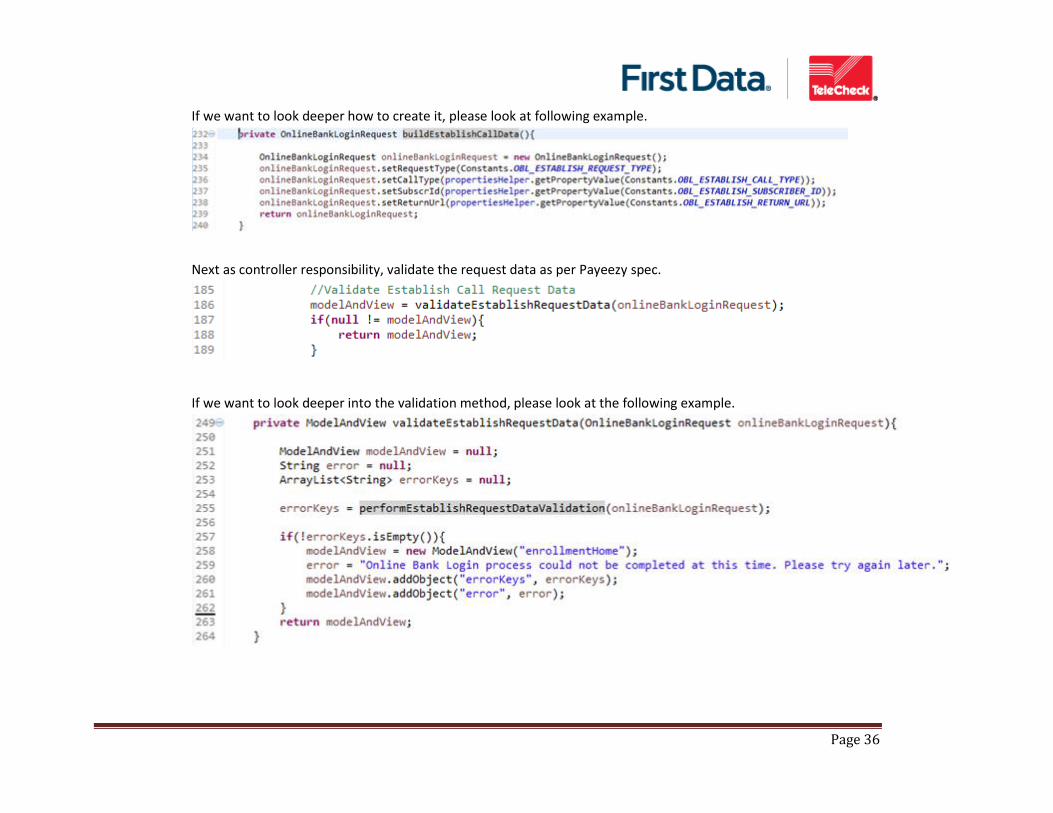
If we want to look deeper how to create it, please look at following example.
Next as controller responsibility, validate the request data as per Payeezy spec.
If we want to look deeper into the validation method, please look at the following example.

Page 37
If we still want to look deeper look at example below. Validate mandatory fields and format.
Next responsibility of the controller is to prepare the JSON String. Do this with help of the json utility we created.
Next responsibility of the controller would be to prepare the headers to authorize the source of message.
Page 38
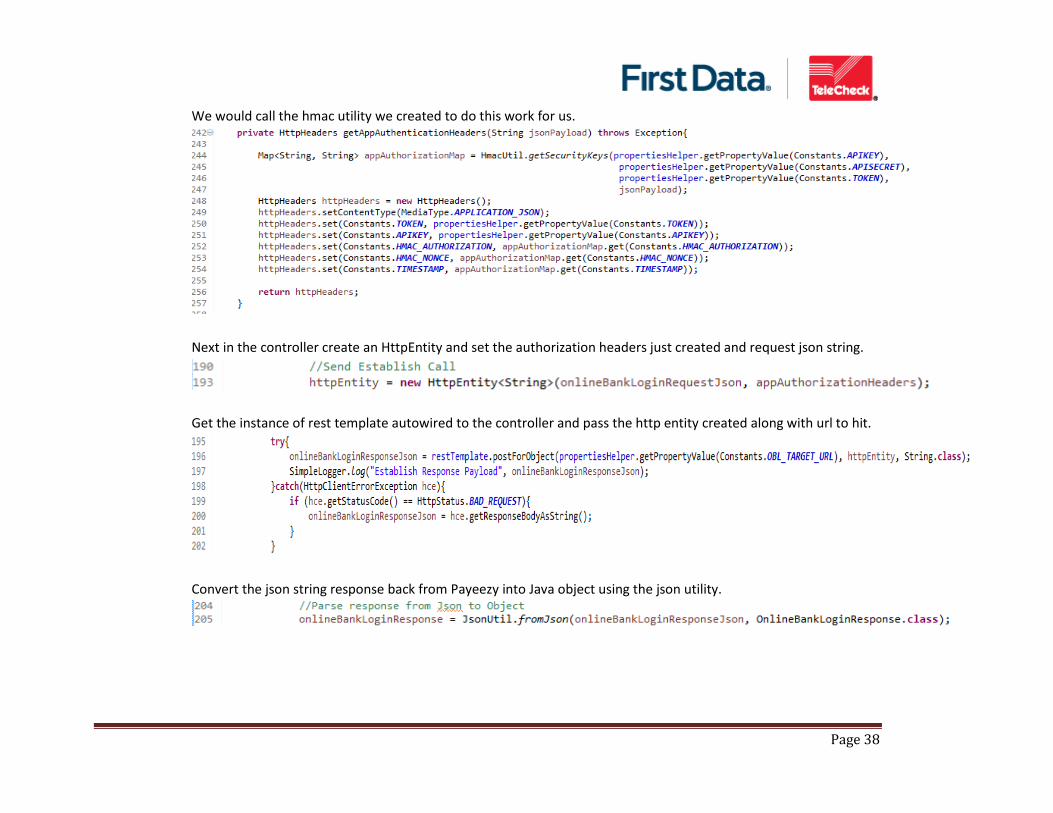
We would call the hmac utility we created to do this work for us.
Next in the controller create an HttpEntity and set the authorization headers just created and request json string.
Get the instance of rest template autowired to the controller and pass the http entity created along with url to hit.
Convert the json string response back from Payeezy into Java object using the json utility.
Page 39
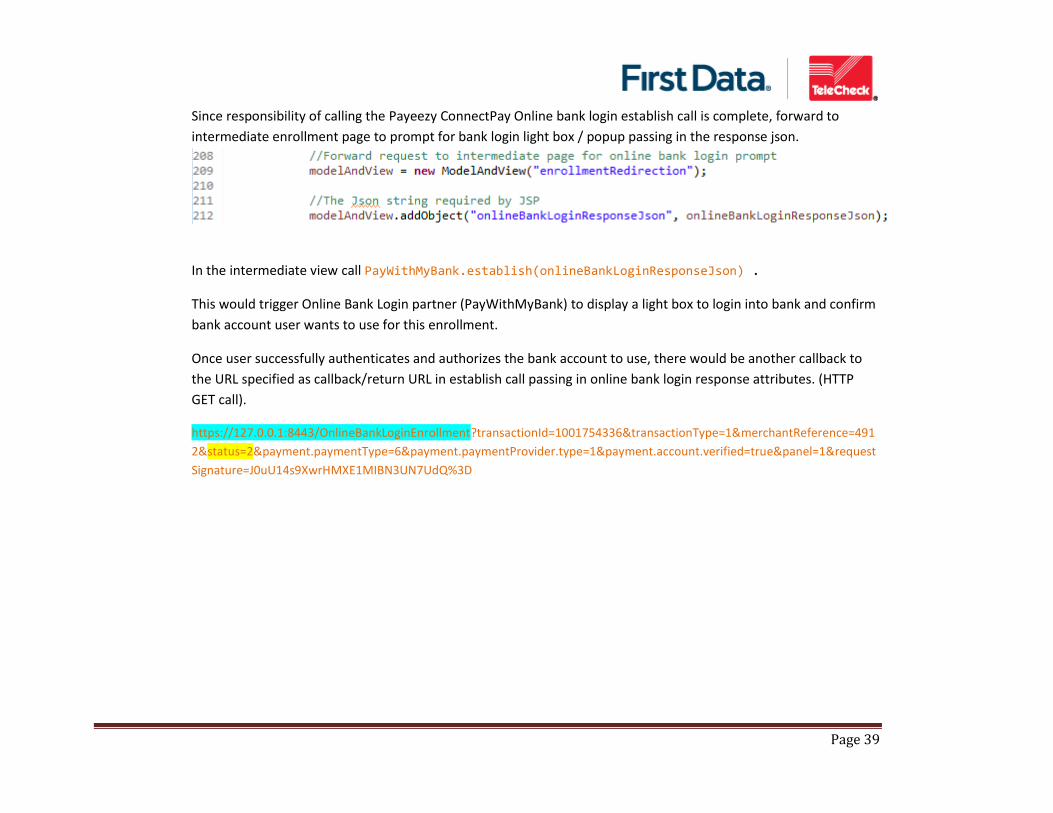
Since responsibility of calling the Payeezy ConnectPay Online bank login establish call is complete, forward to
intermediate enrollment page to prompt for bank login light box / popup passing in the response json.
In the intermediate view call PayWithMyBank.establish(onlineBankLoginResponseJson) .
This would trigger Online Bank Login partner (PayWithMyBank) to display a light box to login into bank and confirm
bank account user wants to use for this enrollment.
Once user successfully authenticates and authorizes the bank account to use, there would be another callback to
the URL specified as callback/return URL in establish call passing in online bank login response attributes. (HTTP
GET call).
https://127.0.0.1:8443/OnlineBankLoginEnrollment?transactionId=1001754336&transactionType=1&merchantReference=491
2&status=2&payment.paymentType=6&payment.paymentProvider.type=1&payment.account.verified=true&panel=1&request
Signature=J0uU14s9XwrHMXE1MIBN3UN7UdQ%3D
Page 40
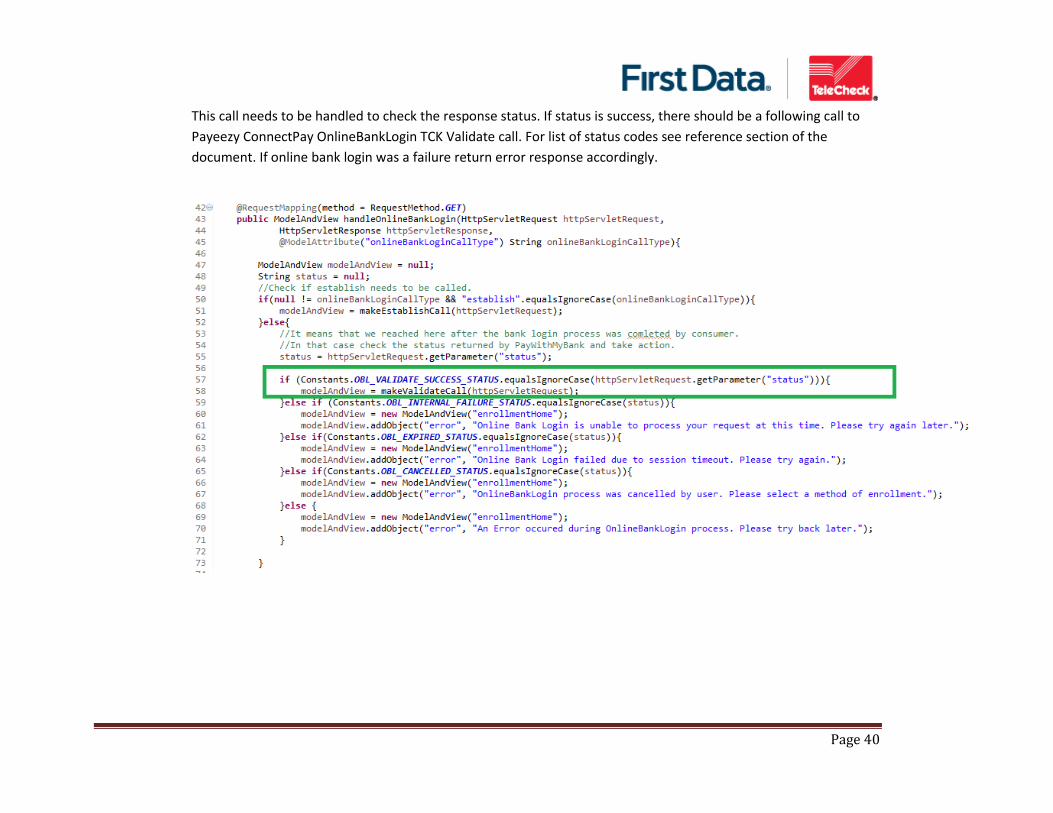
This call needs to be handled to check the response status. If status is success, there should be a following call to
Payeezy ConnectPay OnlineBankLogin TCK Validate call. For list of status codes see reference section of the
document. If online bank login was a failure return error response accordingly.
Page 41
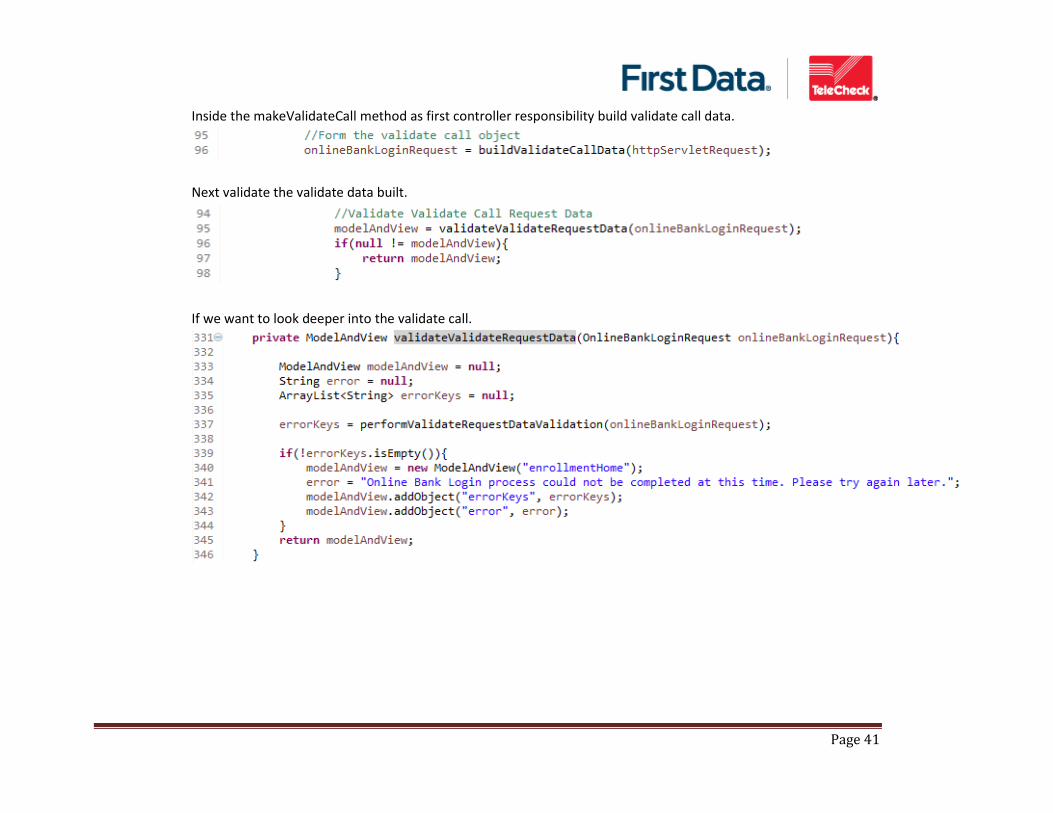
Inside the makeValidateCall method as first controller responsibility build validate call data.
Next validate the validate data built.
If we want to look deeper into the validate call.
Page 42
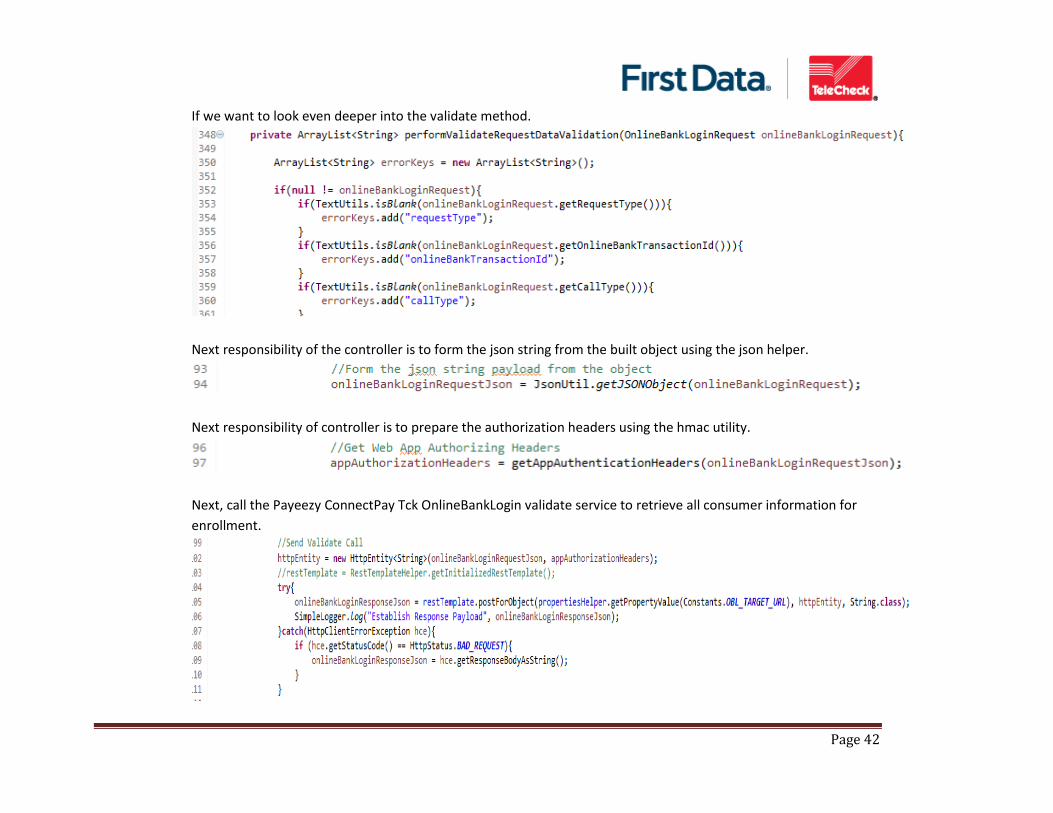
If we want to look even deeper into the validate method.
Next responsibility of the controller is to form the json string from the built object using the json helper.
Next responsibility of controller is to prepare the authorization headers using the hmac utility.
Next, call the Payeezy ConnectPay Tck OnlineBankLogin validate service to retrieve all consumer information for
enrollment.
Page 43
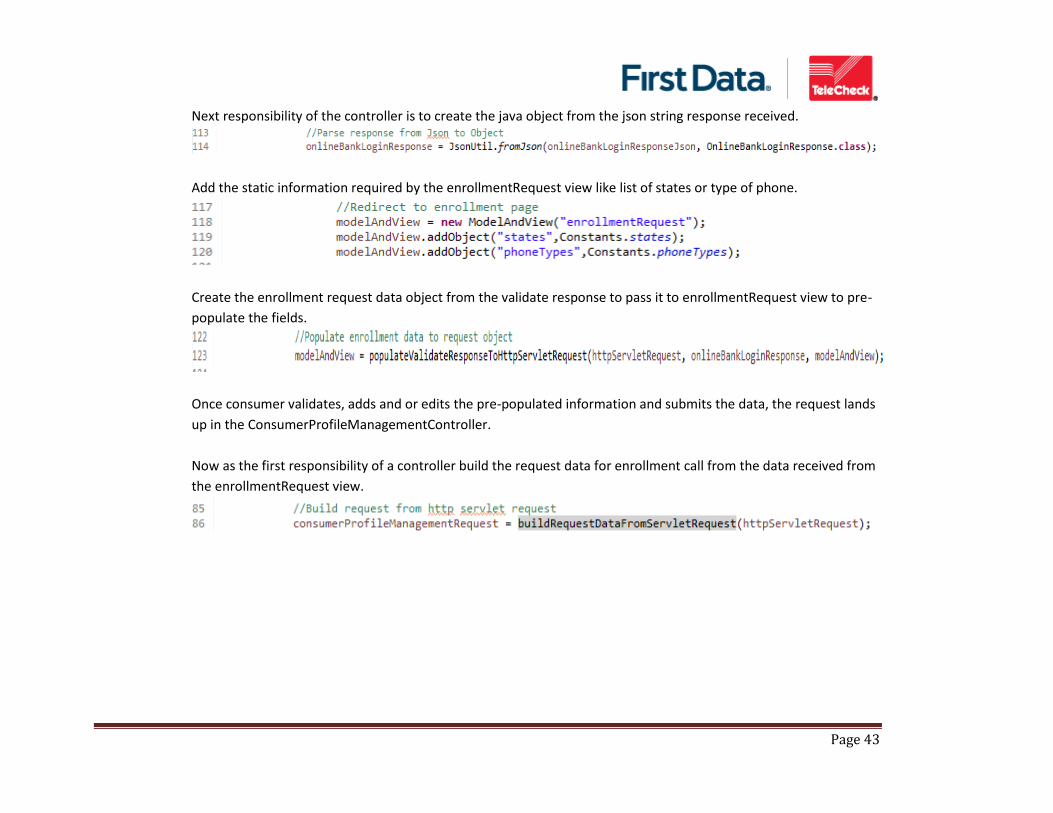
Next responsibility of the controller is to create the java object from the json string response received.
Add the static information required by the enrollmentRequest view like list of states or type of phone.
Create the enrollment request data object from the validate response to pass it to enrollmentRequest view to pre-
populate the fields.
Once consumer validates, adds and or edits the pre-populated information and submits the data, the request lands
up in the ConsumerProfileManagementController.
Now as the first responsibility of a controller build the request data for enrollment call from the data received from
the enrollmentRequest view.
Page 44
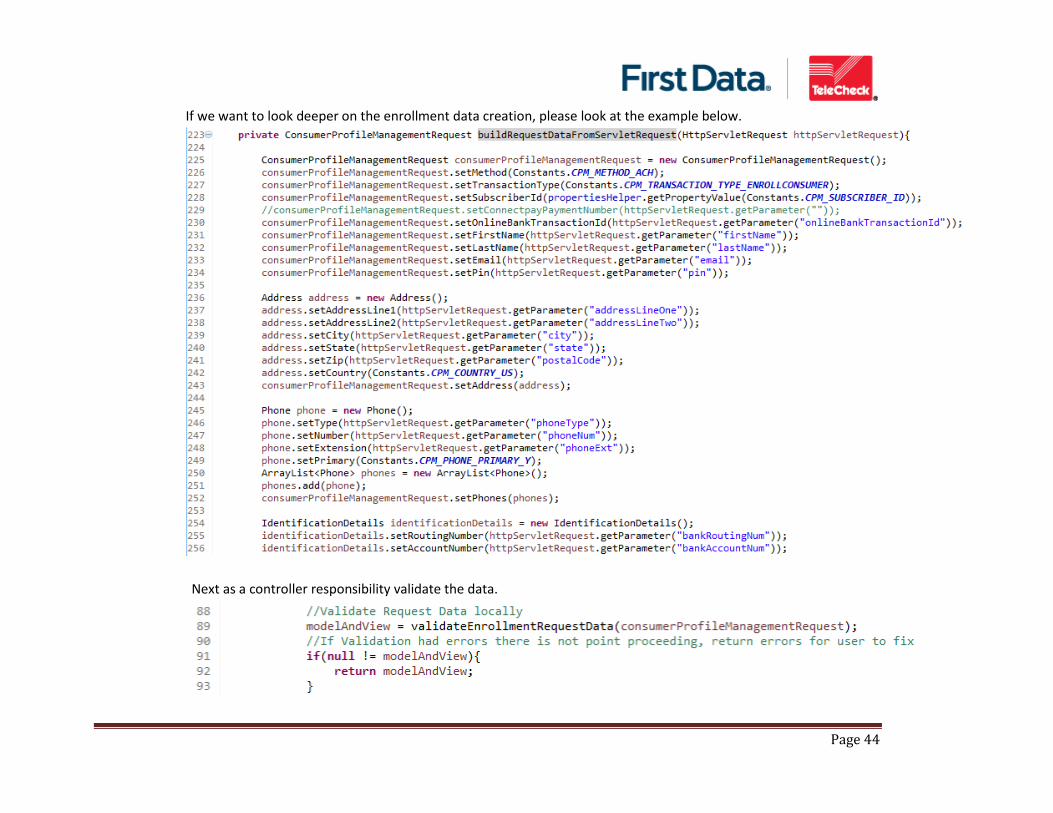
If we want to look deeper on the enrollment data creation, please look at the example below.
Next as a controller responsibility validate the data.
Page 45
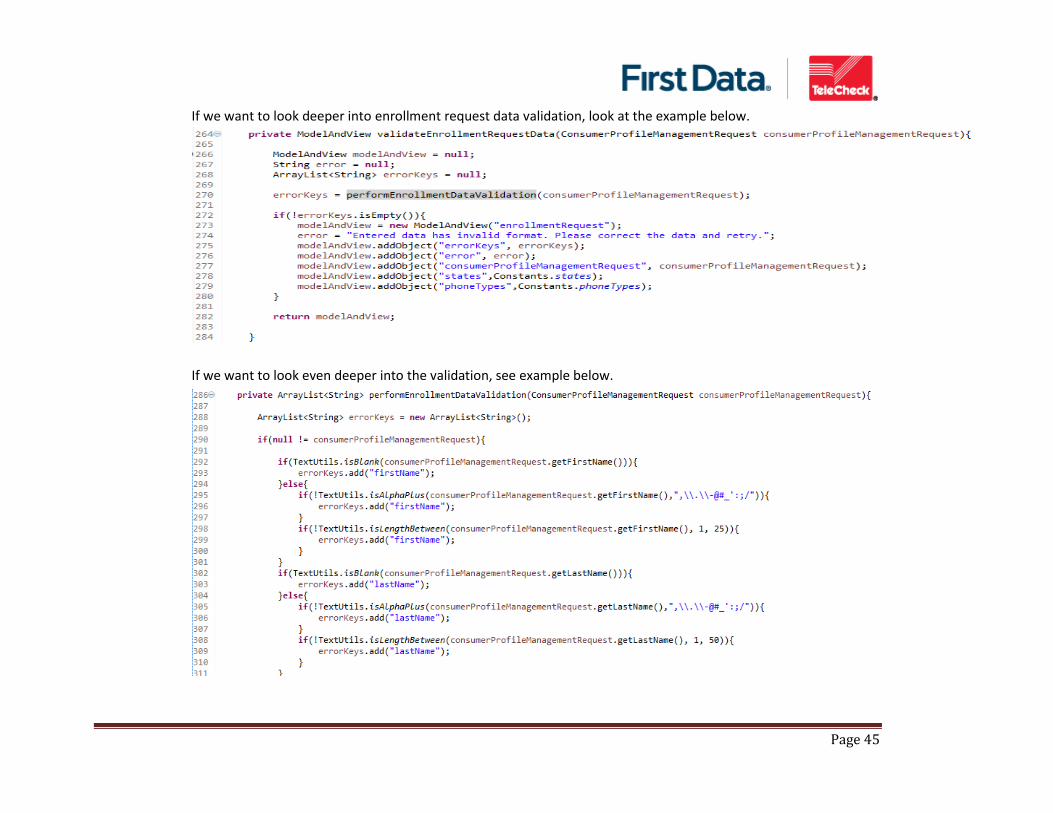
If we want to look deeper into enrollment request data validation, look at the example below.
If we want to look even deeper into the validation, see example below.
Page 46
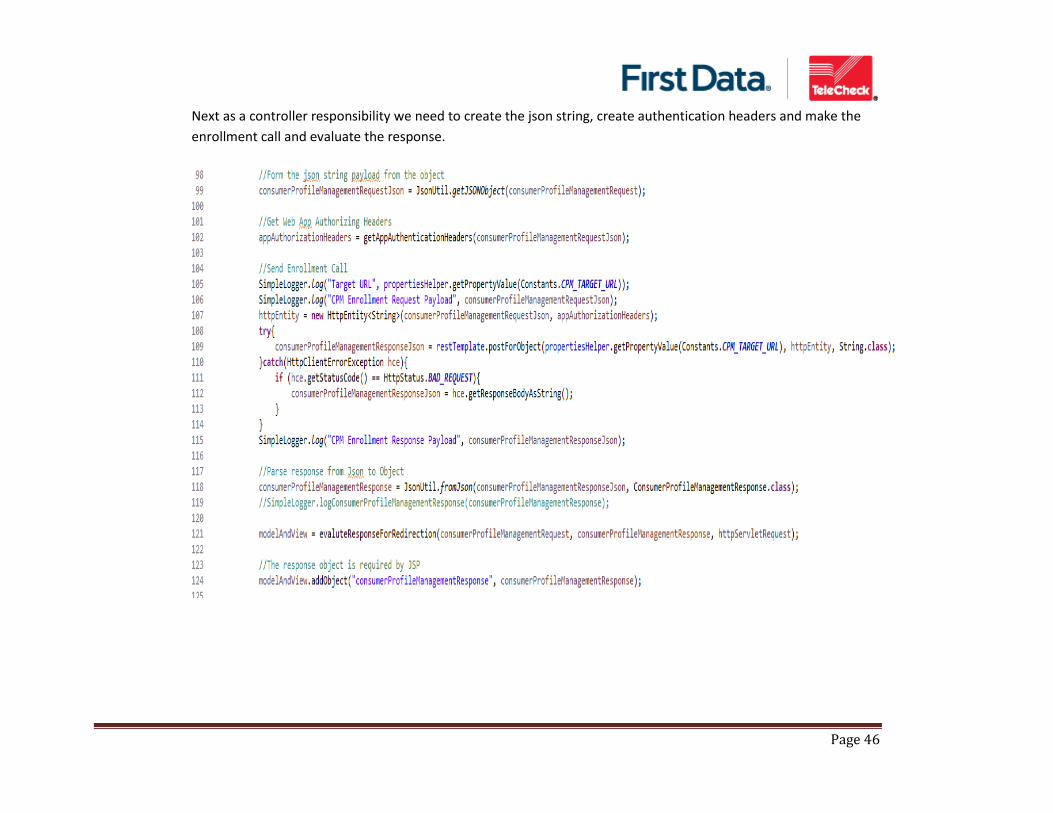
Next as a controller responsibility we need to create the json string, create authentication headers and make the
enrollment call and evaluate the response.
Page 47
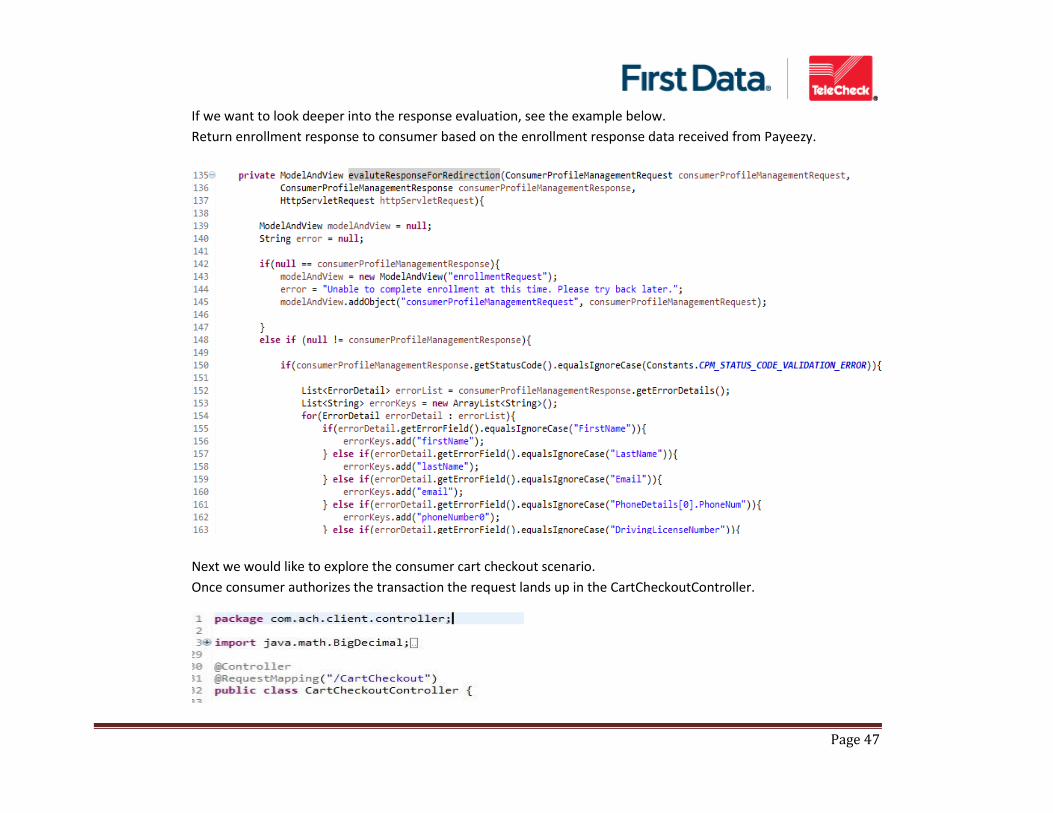
If we want to look deeper into the response evaluation, see the example below.
Return enrollment response to consumer based on the enrollment response data received from Payeezy.
Next we would like to explore the consumer cart checkout scenario.
Once consumer authorizes the transaction the request lands up in the CartCheckoutController.
Page 48
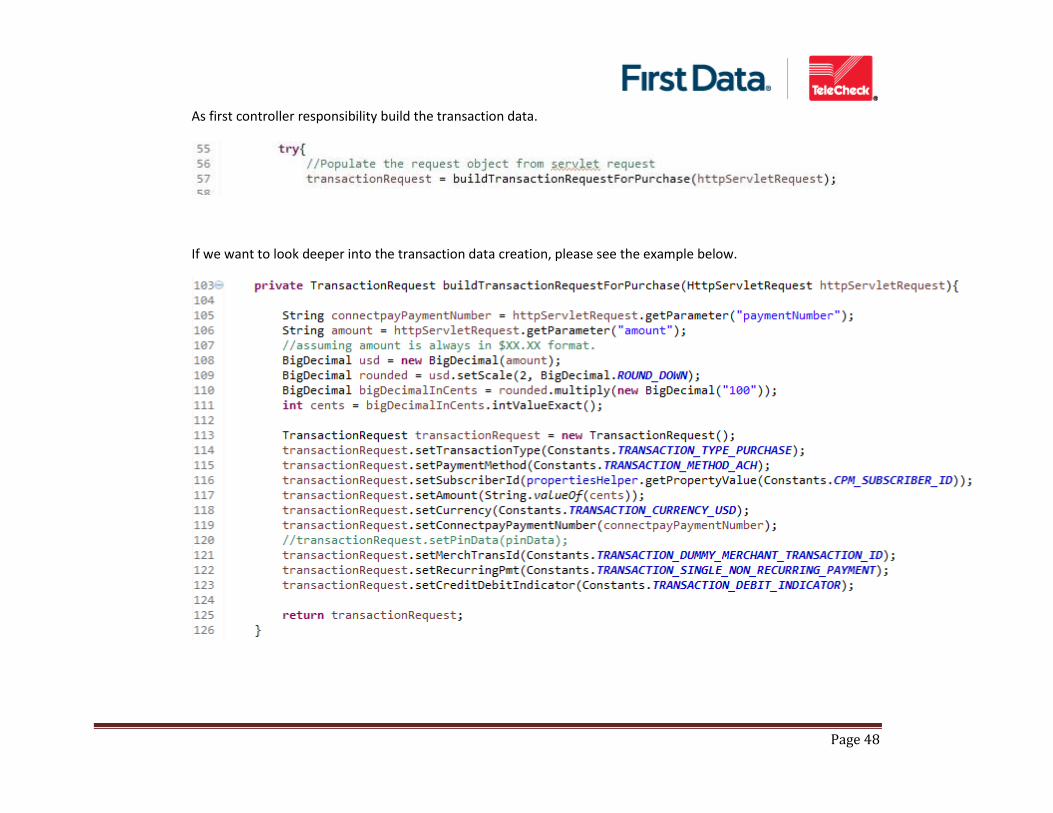
As first controller responsibility build the transaction data.
If we want to look deeper into the transaction data creation, please see the example below.
Page 49
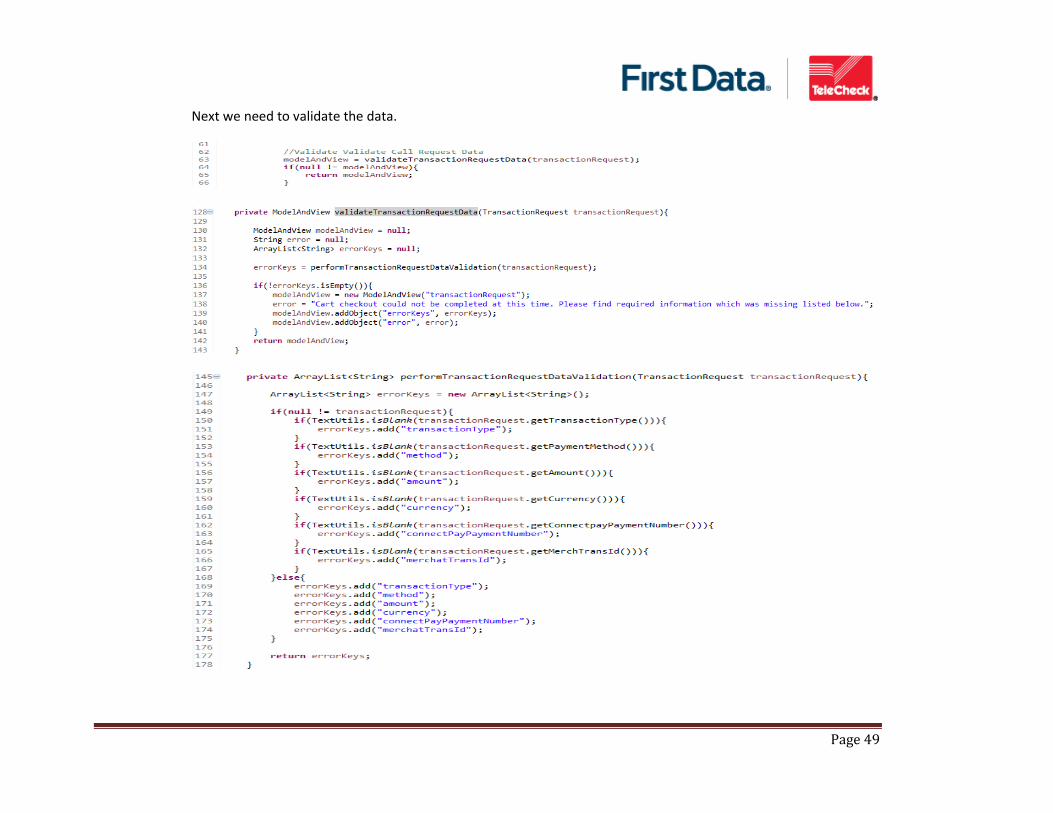
Next we need to validate the data.
Page 50
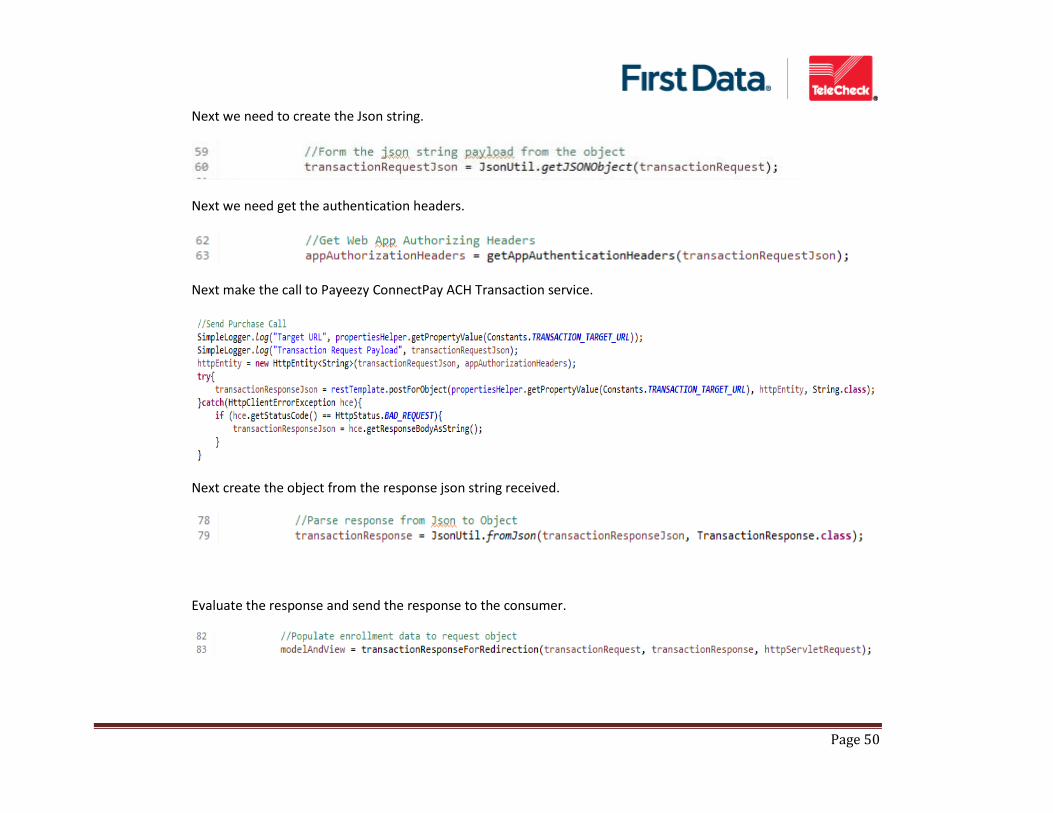
Next we need to create the Json string.
Next we need get the authentication headers.
Next make the call to Payeezy ConnectPay ACH Transaction service.
Next create the object from the response json string received.
Evaluate the response and send the response to the consumer.
Page 51
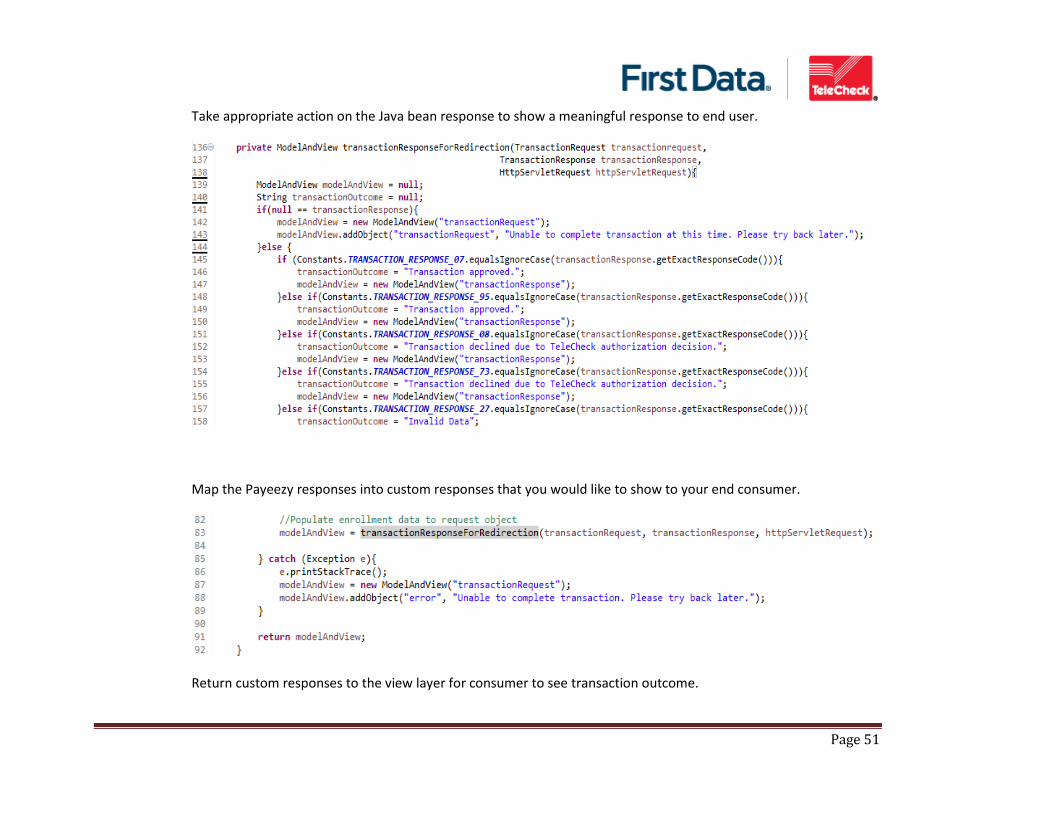
Take appropriate action on the Java bean response to show a meaningful response to end user.
Map the Payeezy responses into custom responses that you would like to show to your end consumer.
Return custom responses to the view layer for consumer to see transaction outcome.
Page 52
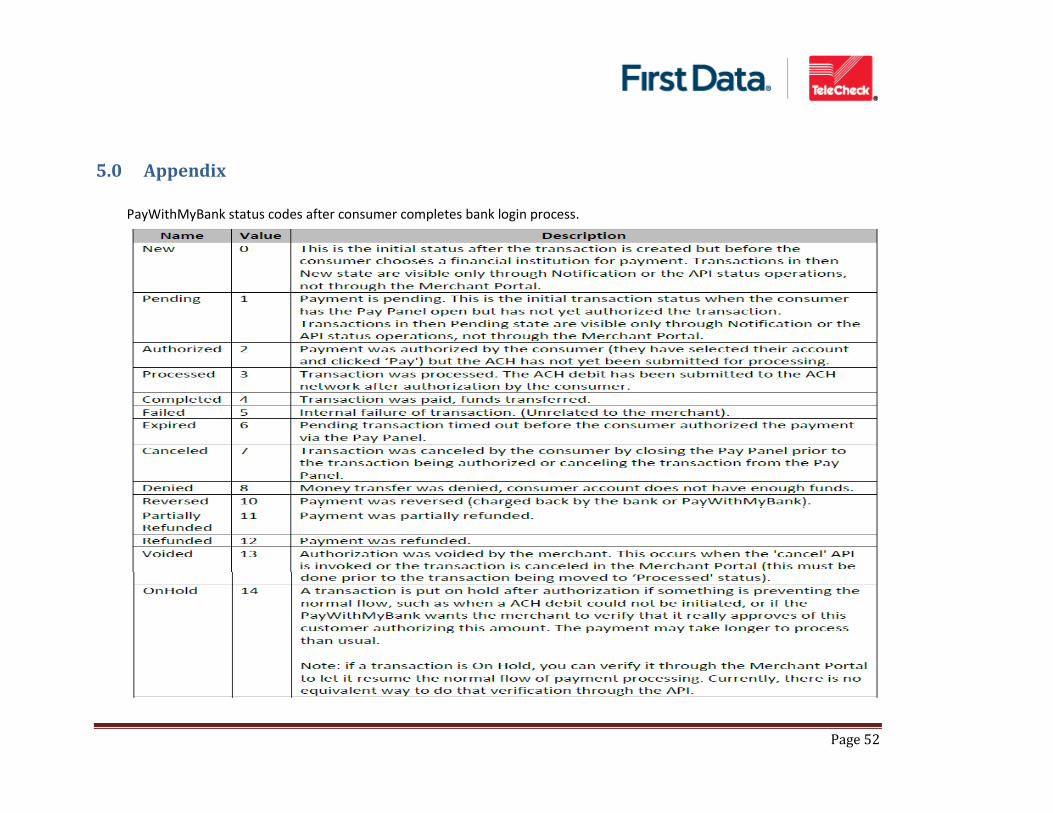
5.0 Appendix
PayWithMyBank status codes after consumer completes bank login process.
Page 53
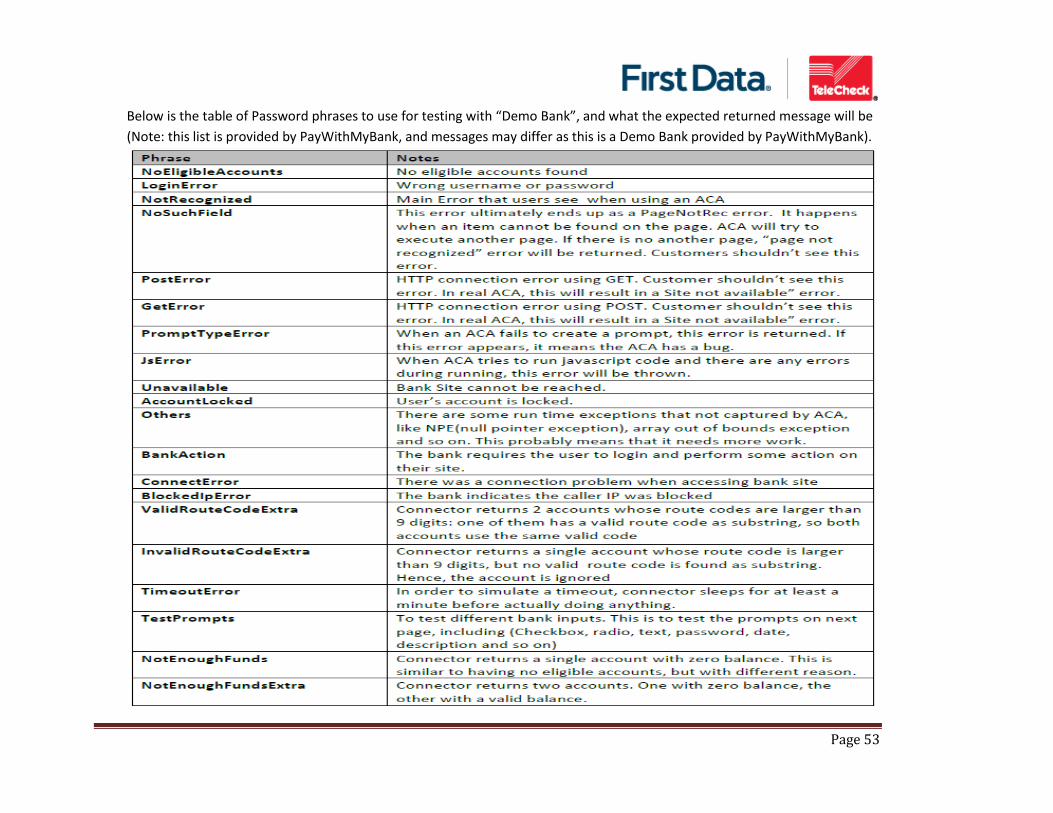
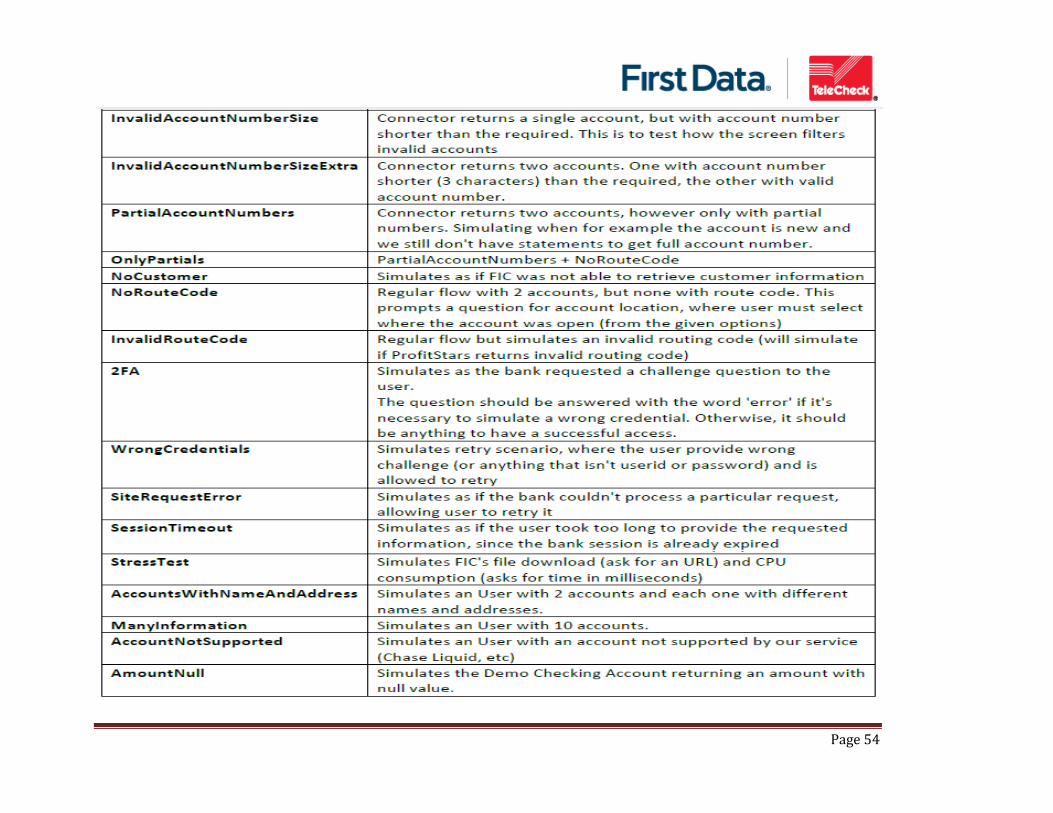
Below is the table of Password phrases to use for testing with “Demo Bank”, and what the expected returned message will be
(Note: this list is provided by PayWithMyBank, and messages may differ as this is a Demo Bank provided by PayWithMyBank).
Page 54


![[email protected] Computerising Mathematical Texts with MathLang [email protected] = *@[email protected]](https://img.pdfslide.net/doc/110x75/613c0d6722e01a42d40e691b/emailprotected-computerising-mathematical-texts-with-mathlang-emailprotected.jpg)


![Email: [email protected], [email protected] - Indian Institute of](https://img.pdfslide.net/doc/110x75/62407f276e6f00699b389ee5/email-emailprotected-emailprotected-indian-institute-of.jpg)

