Embed Size (px)
Citation preview

Junos® Fundamentals Series
Discover Junos revelations for
easier, faster, higher-performance
connectivity in this compendium
of tips, tricks, and techniques
gleaned from the Juniper Networks
user community.
Edited by: Jonathan Looney, Harry Reynolds, and Tom Van Meter
DAY ONE: JUNOS TIPS, TECHNIQUES, AND TEMPLATES 2011

Juniper Networks Books are singularly focused on network productivity and efficiency. Peruse the complete library at www.juniper.net/books.
Published by Juniper Networks Books
DAY ONE: JUNOS TIPS, TECHNIQUES, AND TEMPLATES 2011
From its inception over a decade ago, the Junos operating system has had the network operator in mind. Yet many operators use the CLI without appreciating the cool en-hancements that have been made and refined over the years. It’s a feature list that is forever growing and that ultimately makes operations easier, networks faster, and the bottom line more efficient.
So Juniper Networks Books and J-Net joined forces and went to the Junos user com-munity and asked them for their best and brightest Junos tips and techniques. Then it commissioned three expert Junos engineers to act as the selection committe and add color commentary. The result, published here for the first time, is not only a fantas-tic collection of Junos solutions, but expert annotation and commentary that provides helpful advice on when and how to deploy those solutions.
Here’s a Junos tips and tricks book that’s meant to be browsed with a terminal open to your favorite Junos device so you can try each and every technique.
IT’S DAY ONE AND HERE ARE A FEW TIPS FOR YOU:A tip is a one-step process.A technique is a tip requiring several steps to complete.A template is a process you can create and apply to different network scenarios. This book was created via a selection process that reviewed over 300 submitted tips by over 100 individuals on the J-Net community boards at forums.juniper.net.There are no chapters in this book, but there might be groupings of tips, one after the other, on similar topics.The editors’ commentary appears in greyscale. The submitted, winning tips, techiques, and templates appear in black.
“This book is a treasure chest of information for the Junos newbie and greybeard alike!”
David Ward, Juniper Fellow
7100 1333
ISBN 978-1-936779-26-0
9 781936 779260
5 2 0 0 0
07500211

Day One: Junos Tips, Techniques, and Templates 2011
Edited by: Jonathan Looney Harry Reynolds Tom Van Meter

© 2011 by Juniper Networks, Inc. All rights reserved.
Juniper Networks, the Juniper Networks logo, Junos, NetScreen, and ScreenOS are registered trademarks of Juniper Networks, Inc. in the United States and other countries. Junose is a trademark of Juniper Networks, Inc. All other trademarks, service marks, registered trademarks, or registered service marks are the property of their respective owners.
Juniper Networks assumes no responsibility for any inaccuracies in this document. Juniper Networks reserves the right to change, modify, transfer, or otherwise revise this publication without notice. Products made or sold by Juniper Networks or components thereof might be covered by one or more of the following patents that are owned by or licensed to Juniper Networks: U.S. Patent Nos. 5,473,599, 5,905,725, 5,909,440, 6,192,051, 6,333,650, 6,359,479, 6,406,312, 6,429,706, 6,459,579, 6,493,347, 6,538,518, 6,538,899, 6,552,918, 6,567,902, 6,578,186, and 6,590,785.
Published by Juniper Networks BooksTechnical Editors: Jonathan Looney, Harry Reynolds, Tom Van Meter, Jared Gull Editor in Chief: Patrick AmesCopyediting and Proofing: Nancy KoerbelJunos Product Manager: Cathy GadeckiJ-Net Community Management: Julie Wider
ISBN: 978-1-936779-26-0 (print)ISBN: 978-1-936779-27-7 (ebook)
Version History: June 2011 2 3 4 5 6 7 8 9 10 #7500211-en
This book is available in a variety of formats at: www.juniper.net/dayone.
Send your suggestions, comments, and critiques by email to [email protected].
Follow the Day One series on Twitter: @Day1Junos
ii

Forward
This book started out as a casual conversation, and by the time it was done people were talking about it in the hallways of Juniper Networks. That’s because it originated as a tips contest, hosted on J-Net, and now that some have seen the early drafts, there’s talk of doing it every year. Whether or not this becomes an annual affair depends on your ap-proval of it on J-Net, so post comments at http://forums.juniper.net/.
As editor in chief I had some difficult choices to make about this unique Day One book. The first was how to credit the original contributors. Initially, I was going to list contributors after their tips, but this is a community-generated book, so I ended up with a group contributor page in an effort to thank everyone equally. No matter the length, or the ah-ha factor, everyone listed took the time to contribute, so the contributor with the one-liner got the same credit as the person who contributed four-pages. I thought it was the fairest way to go.
Another tough decision was how to select, edit, and ultimately, anno-tate the tips. Our editors – Jonathan, Harry, and Tom – talked this over several times, and came up with a plan: many tips were brilliant but needed a simple lead-in, while others needed clarification, editing, and a useful cross-reference or two. So just about every tip got either an introduction or a summary, and some tips inspired the editors to embellish and accentuate the topic with their own advice and expertise. And to make things clear to the reader, anywhere the hand of the editors lands in this book is shown in greyscale.
Of course we had to go in and amend a few things, test the configura-tions, change the occasional Juniper terminology no-no, and, yes, rewrite sections that were obfuscated or unclear.
Finally, a judgment call had to be made about how the book was arranged. What followed what? How to arrange the sequence of tips? Sections? Parts? It was decided to group some similar tips and tech-niques together but other than that to arrange them in no particular sequence or order. Call it: The Joy of Browsing.
I must say it has been a delight to have the Junos community involved in a book. I want to thank the program management of the original contest by Cathy Gadecki, and the J-Net team, especially Julie Wider, for sponsoring the contest and posting the results.
Patrick Ames, Editor in Chief, Juniper Networks Books
iii

iv
Contributors
Thank you contributors for participating, and thank you for sharing your experience and knowledge. The contributors to Day One: Junos Tips, Techniques, and Templates 2011 are presented in no particular order. Note that some preferred to keep their their J-Net handles for anonymity. Many tips were anonymous, too.
Julian Eccli
Samuel Gay
Julien Goodwin
Michael A. Harrison
Paul Zugnoni
SSHSSH
Daniel Kharitonov
David Gao
Alasdair Keith
Taras Matselyukh
Phil Shafer
Gautam Kumar
Tim Eberhard
Mattia Petrucciani
Jaime A. Silva
Aidan Scheller
Emmanuel Gouriou

v
Jeff Sullivan
Mina S. Kirollos
Srijith Hariharan
Amita Gavirneni
Nwamo Ugochukwu
Barry Kalet
Jennifer Pulsifer
Manekar Umamaheshwararao
jtb
David Gao
Nils Swart
Romain Pillon
Carlos Isaza
Mike Willson
Jonathan Looney
Stefan Fouant
Thomas Schmidt
Ron Frederick
Mark D. Condry
Jared Gull

vi
Editors
Thank you, editors, for hanging in there and for the dozens of hours in phone conference and for your many weekends spent reviewing and editing. Also thanks to Jared Gull, who began as the fourth editor until the day job got in the way.
Jonathan Looney
Jonathan has worked in the networking industry full-time for over a decade. He is certified under the JNCIE progam, JNCIE-M No. 254 and JNCIE-ER No. 2, as well as the CCIE program, CCIE No. 7797. Jonathan served as the lead author for several training courses for Juniper, including the popular Junos as a Second Language series. Prior to joining Juniper, he performed network engineering for a large enterprise, a regional ISP, and an application service provider (ASP).
Jonathan works in Juniper's Education Services department, supporting the lab infrastructure and working on special projects. Jonathan enjoys the freedom his job at Juniper gives him to both continually learn and to share his knowledge with others through a wide range of media.
Jonathan worked as the lead technical editor for this book.
Harry Reynolds
Harry has over twenty-five years experience in the networking industry, with the last fifteen years focused on LANs and LAN interconnection. He is CCIE # 4977, and JNCIE # 3, and also holds various other industry and teaching certifications. Harry was a contributing author to Juniper Network Complete Reference (McGraw-Hill, 2002), and wrote the JNCIE and JNCIP Study Guides (Sybex Books, 2003). As as co-author he wrote Junos Enterprise Routing and Junos Enterprise Switching (O’Reilly, 2007 and 2009 respectively). Prior to joining Juniper, Harry served in the US Navy as an Avionics Technician, worked for equipment manufacturer Micom Systems, and spent much time developing and presenting hands-on technical training curriculums targeted to both enterprise and service provider needs. Harry has presented classes for organizations such as American Institute, Ameri-can Research Group, Hill Associates, and Data Training Resources.
vii
Harry is currently employed by Juniper Networks, where he functions as a senior test engineer performing customer specific testing. Harry previously functioned as a test engineer in the core protocols group at Juniper, as a consulting engineer on an aerospace routing contract, and as a senior education services engineer, where he worked on courseware and certification offerings.
Tom Van Meter
Tom has over twenty years experience in the telecommunications field. He has a BS from the United States Military Academy with a Computer Science concentration and a MS in Telecommunications and Computers from The George Washington University. From 2000 until 2011 he was an Adjunct Professor in the MS in Telecommunications Program at The George Mason University. Tom holds CCIE # 1769, and is a multiple JNCIE. Tom was a contributing author to Juniper Networks Routers: The Complete Reference (McGraw-Hill, 2002) and JNCIA Study Guide (Sybex Books, 2003). Tom spent 10 years on active duty in the Army in a variety of different positions. After leaving the Army, he attended graduate school. Upon completing graduate school, Tom worked for Automation Research Systems and Chesapeake Computer Consultants, Inc., as a Cisco Systems and Fore Systems technical trainer and consultant, focusing on routing and ATM technologies.
Tom has been employed by Juniper Networks since September 2000. He is the Systems Engineering Manager for the DoD SE team. Prior to becoming SEM, he was an SE on the DoD SE team and a trainer and certification proctor for Juniper Networks Education Services.

viii
TableofContents
Tip: Pre-configure Interfaces 12
Tips: Managing Disk Space 12
Tip: Verifying BGP Routing Policy Behavior 14
Tip: Automatically Generate Output Timestamps While Running Commands 15
Tip: Use Operational Scripts 16
Tip: Using Remote Commit Scripts 17
Tip: Use Junos Automation to Send SNMP Trap When Event Occurs 17
Tip: Applying CoS in VPN 19
Tip: Finding a Range of Prefixes in the Routing Table 20
Tip: Viewing Additional Details About the Contents of a Configuration 21
Tip: Viewing Additional Details About a Commit 23
Template: All About Configuration Groups 24
Tip: Set Idle Timeout for Root User 33
Tip: Increase Terminal Screen Width 33
Tip: View All Routes Except Those from a Particular Protocol 34
Tip: Logging Policy Drops to a Specific Log File 35
Tip: Troubleshooting Connectivity on the SRX 35
Tip: Debugging Screens on the SRX 37
Tip: Understand Filter Behavior and GRE Packet Flow 37
Template: Using the Interface Range Command 38
Tip: Commit Previous Configuration and Software Package 43
Technique: Automatically Allow Configured BGP Peers in a Loopback Firewall Filter 48
Tip: Accessing Online Help 50
Tip: SNMP OIDs for SRX Monitoring 51
Tip: Monitoring Router Alarm LEDs and Controls (craft-interface) 52
Tip : Why is My Junos Device Alarm LED Status Red? 53
Template: Pipe Commands 54
Tip: Show Version and Haiku 61
Tip: CLI History Search 62
Tip: Unable to Access a Standby SRX? 62
Tip: How to Chat Inside a Router Telnet Session with a Connected User 63
Tip: Loading a Junos Factory Default Configuration 64
Tip: Restart a Software Process 65
Tip: Remote Wireshark Analysis 66
Tip: Remote Wireshark/TShark Analysis Via SSH 67
Tip: Emacs Shortcuts 70
Template: 97 CLI Tips 70

ix
Technique: Port Mirroring on EX Switches 76
Technique: Remote Port-mirroring to a UNIX Host 78
Tip: Use “.x” Instead of “unit x” in Set Commands 82
Tip: Junos MOTD Before/After Login 82
Tip: Create a New Login Class and Add Users to It 83
Tip: J-series and SRX HA Cluster Status Information 84
Tip: Commit Confirm on a Clustered SRX 84
Tip: Change Interfaces 85
Tip: Wildcard Delete 87
Tip: Searching a Large Configuration 88
Tip: Make Sure You Haven’t Downloaded a Corrupted Junos Image 89
Techniques: Junos Boot Devices and Password Recovery 90
Technique: Replace a Missing Boot Device 93
Tip: Hide Pieces of the Configuration 96
Tip: How to View Built-in Configuration 97
Tip: Preventing Other Users From Editing a Configuration While You're Still Configuring 98
Tip: Logout a Connected User 99
Technique: Automatic Junos Configuration Backup 99
Tip: Quickly Synchronize System to NTP Server 100
Tip: Firewall Support for NTP Status 101
Tip: Configuration Loading on a Router from the Output of Show 102
Tip: Junos Display Set 103
Tip: Configure a Basic Firewall on SRX 104
Technique: SRX CLI Management Plane Traffic (Telnet/SSH) Timeout Settings 104
Tip: Layer 3 VPN Dynamic GRE 106
Tip: Fixing Corrupted (Failed) Junos EX or SRX Software Using USB Port 106
Tip: Interpreting Syslog Messages 107
Tip: Send Syslog Messages with Different Facility Codes to the Same Syslog Host 108
Tip: VRRP Fast Failover 109
Tip: Copying Files Between SRX Clusters 110
Tip: Connecting to the Secondary Node from the Primary Node on an SRX Cluster 110
Tip: Gracefully Shutdown Junos Software Before Removing Power 110
Tip: Connect Another Device Using Auxiliary Port 111
Tip: Checking a Link Status Using Port Descriptions 112
Technique: Monitor Interesting Commands Executed by Others in Real-time 113
Tip: Suspend and Resume Trace File Monitoring 114
Tip: Combine Match with Junos Syslog Capabilities 115
Tip: Static Host Mapping 115
Tip: Viewing Core Files 116
Additional Resources 118

x
ConventionsUsedinThisBook
A tip, or the beginning of a technique, is indicated with the thumbs-up icon for easy legibility, as shown here:
CThis is the start of the original tip or technique.
A tip is a one-step process.
A technique is a tip requiring several steps to complete.
A template is a process you can create and apply to different network scenarios, or it’s a collection of tips and techniques that we glued together.
There are no chapters in this book, but there might be groupings of tips, one after the other, on similar topics.
The most recent tip or technique or template appears on the recto (right hand) running head in printed books and on PDF pages. (eBook production has yet to reach a stage for recto and verso pages.)
Congfiguration code or output can be wide or short. When it’s wide, the typesetter is trying to get the line not to break. When it’s short, it just happens to fit into the body text margins:
like this, or:
like this, because the line length is so long, especially for some junos device output.
When one of the editors writes commentary, their voice appears in greyscale like this. They tend to ramble a bit, so entire paragraphs may be in greyscale. When they supply code or output it is in greyscale:
like this, or:
like this, if it's one of the editors inserting output or configurations into the tip.
ALERT! In fact, any book element that is in greyscale depicts one of the three editors writing commentary.

Day One: Junos Tips, Techniques, and Templates 2011

12 DayOne:JunosTips,Techniques,andTemplates2011
Tip: Pre-configure Interfaces
CSometimes it’s helpful to have the appropriate configuration already in place before you actually install hardware – so configure dummy interfaces when preparing for maintenance, or anytime when new interfaces or hardware need to be installed.
As this tip states, you can usually configure any valid interface on a platform whether or not the interface is actually installed in the device when you commit the changes. The configuration is ignored until the interface is installed. Once the interface is available, Junos recognizes it and begins to use the configuration.
Closely related to this is the ability to make configuration changes, but deactivate them prior to committing. This allows you to do most of the configuration work necessary for a change, while waiting to actually activate the configuration changes until an appropriate time (such as a maintenance window). In the meantime, you (or others) can continue to commit additional changes to the configuration. Assum-ing you deactivated the configuration you are pre-staging, Junos will not apply the new configuration until you activate it.
Tips: Managing Disk Space
C1. Use this operational-mode CLI command to have Junos attempt to automatically delete old files:
> request system storage cleanup
Sometimes it helps to run this command twice.
2. If you are not interested in rolling back to a previous image, you can delete the backup Junos image with this command:
> request system software delete-backup
If the installation of a new image fails, simply re-install the old image rather than use the software rollback function.
3. When installing a new Junos image, you can delete the image file as part of the installation by adding the unlink option to the command. For example:

Tips:ManagingDiskSpace 13
> request system software add /var/tmp/junosimage.tgz unlink
4. When installing a new Junos image, you can also prevent the installation process from making a backup copy of the image with the no-copy option. For example:
> request system software add /var/tmp/junosimage.tgz no-copy
You can regularly use the unlink and no-copy command options, as there is usually no need to keep the installation file after the new image has been installed.
Incidentally, if you don’t have enough room to download the installa-tion image to the local file system, installing directly from an FTP server (rather than first copying the image locally) probably won’t help. The image is still completely downloaded before installation begins.
Also, remember that the Junos operating system divides your storage into multiple partitions. You can use the operational-mode show system storage command to show the free space available in each par-tition. (In the output, the directory where the partition is mounted is listed on the far-right and the free space is listed in the middle.) If you can find a partition with enough free space to hold the image, you can download it to that partition.
If all of this doesn’t work, you can also go looking for large files using the Unix shell. Use the operational-mode CLI command start shell to access a Unix shell. Then, use the du command to find the largest directories/files. Start with du -sh /*. (On some platforms, you may actually need to start with du -sh /cf/*.) This lists the top-level directories or files and their sizes. You can then use the du command to see the size of each sub-directory within a directory, recursively inspecting directories as far as you desire. (For example, du -sh /var/* will display the size of each sub-directory or file in /var. du -sh /var/tmp/* will display the size of each sub-directory or file within /var/tmp.) As you examine the results of du, you should either find large files that can be deleted or find that everything looks normal. If everything is ‘normal’ and you are running out of disk space, it’s probably time to upgrade your compact flash!

14 DayOne:JunosTips,Techniques,andTemplates2011
Tip: Verifying BGP Routing Policy Behavior
Routing policy can have a direct impact on what routes are advertised or accepted from BGP peers, as well as how the attributes attached to those routes are altered as they either leave or enter the routing table, respectively. If you want to confirm what is sent or received from a specific BGP peer, then this tip is for you.
CUse the show route receive-protocol bgp <neighbor IP> command to determine which routes the local router is receiving from the designat-ed BGP neighbor. Note that the command displays the routes received from the neighbor before those routes are populated into the routing table (therefore, before policy takes effect.) To view how policy impacts the route as it’s placed into the routing table, issue the show route <prefix> command.
Conversely, use the show route advertising-protocol bgp <neighbor IP> command to determine which routes the local router is sending to the designated BGP neighbor.
Don’t forget to combine CLI matching when you only care about certain prefix ranges, as shown here, because we all know that BGP route updates can be pretty long:
{master}regress@mse-a> show route advertising-protocol bgp 192.168.1.1
vrf_1.inet.0: 5 destinations, 5 routes (5 active, 0 holddown, 0 hidden) Prefix Nexthop MED Lclpref AS path* 23.23.1.0/30 Self 100 I* 33.33.1.2/32 Self 100 I
{master}regress@mse-a> show route advertising-protocol bgp 192.168.1.1 23.23.1.0/30 detail
vrf_1.inet.0: 5 destinations, 5 routes (5 active, 0 holddown, 0 hidden)* 23.23.1.0/30 (1 entry, 1 announced) BGP group internal type Internal Route Distinguisher: 65056:1 VPN Label: 16 Nexthop: Self Flags: Nexthop Change Localpref: 100 AS path: [65056] I Communities: target:65056:

Tip:AutomaticallyGenerateOutputTimestampsWhileRunningCommands 15
The command does not return any error if a non-existent peer is specified, so do make sure the related peer address is correct when no results are shown. Also, the same form of this command can be used on RIP, but there is no equivalent for Link State protocols like OSPF or ISIS because these protocols do not send routes directly, instead, they send link-state database updates.
Tip: Automatically Generate Output Timestamps While Running Commands
It’s worthwhile to delineate actions in your capture files when trouble-shooting, and one way to delineate actions is to enable timestamps. Timestamps not only identify the difference between router output and user-entered commands, they also help later when you go back and review a file. With the timestamp enabled, you can determine if you captured a file all at once or if the file is an aggregation of outputs you took over a period of time. This command helps JTAC or others involved with replicating an issue because it makes it easy to keep track of the event timeline.
CWithout timestamp enabled your output might look like this:
lab@M7i-R106> show configuration interfaces fxp0 unit 0 { family inet { address 172.25.46.106/24; }}
So, for this tip, from operational mode, run the set cli timestamp command:
lab@M7i-R106> set cli timestamp May 04 18:26:54CLI timestamp set to: %b %d %T
And with timestamp enabled, our output looks like this:
lab@M7i-R106> show configuration interfaces fxp0 May 04 18:27:05unit 0 { family inet { address 172.25.46.106/24; }}

16 DayOne:JunosTips,Techniques,andTemplates2011
You can see that following this timestamp command, Junos displays the current date/time after each command that’s run. To disable the feature use the set cli timestamp disable command:
lab@M7i-R106> set cli timestamp disable CLI timestamp disabled
Note that you really need to ensure you have a valid system time. So use the show system uptime command to determine system time and date, then use the set date command to change the time and date, if necessary. First the show system uptime command:
lab@M7i-R106> show system uptime Current time: 2011-05-04 18:17:52 UTC <-- current timeSystem booted: 2011-05-03 20:08:32 UTC (22:09:20 ago)Protocols started: 2011-05-03 20:10:58 UTC (22:06:54 ago)Last configured: 2011-03-22 22:10:49 UTC (6w0d 20:07 ago) by lab 6:17PM up 22:09, 1 user, load averages: 0.04, 0.05, 0.02
Now use the set date command to change the time. This command provides you with two completions to either specify the date and time, or to use an NTP server to specify the date and time, as shown here using the help prompt:
lab@M7i-R106> set date ?Possible completions: <time> New date and time (YYYYMMDDhhmm.ss) ntp Set system date and time using Network Time Protocol servers
Note that if you identify an NTP option, you must provide a valid NTP server address and if you don’t, as shown here, it doesn’t work. Additional NTP tips are located in Tip: Quickly Synchronize System to the NTP Server.
lab@M7i-R106> set date ntp 1.1.1.1 4 May 18:21:28 ntpdate[1776]: no server suitable for synchronization found <-- Error message.
Tip: Use Operational Scripts
This is the first of three tips on Junos Automation, a powerful toolset that lets you change the behavior of Junos to match your network’s needs. There’s one tip from each of three main areas: Operation (“op”) scripts, Commit scripts, and Event scripts.

Tip:UsingRemoteCommitScripts 17
CYou can write your own operation script (op script) to get the output of the show commands in clean format based on the required columns/rows.
This tip, of course, gives only one small example of what you can do with Operation scripts. For example, you could write a script to try troubleshooting a remote network that is down. You could have the script ping the network’s CPE device, examine the routing table, look for errors on the interface, and even try disabling and re-enabling the interface.
MORE? Look in the Day One book library for any of the several Junos Auto-mation books: www.juniper.net/dayone. Also there’s a Juniper script library with example scripts available at no charge: http://www.juniper.net/us/en/community/junos/script-automation/#overview.
Tip: Using Remote Commit Scripts
This tip describes one way to ease management of Commit Scripts. Commit scripts examine the candidate configuration and take specified actions based on that configuration. Among other things, a script can issue a warning, issue an error (which will abort the commit process), make automatic changes to the configuration to correct an error, and interpret and silently expand your custom syntax. Commit scripts are powerful tools for controlling your Junos configurations.
CIf you need to load the same commit script on many devices, you can use remote commit scripts so that all the devices will update their local copy of the script from the same master location (for example, an SVN database). This greatly helps synchronize any deployed commit scripts and eases version control management.
Tip: Use Junos Automation to Send SNMP Trap When Event Occurs
This tip is about Event scripts…sort of. You can configure the router to take a particular action (or actions) when it observes a particular event (or events). You can even have the router look for basic correla-tions between events before triggering the actions. There are two ways to configure the policies and responses: in an actual Event script (written in XSLT or SLAX) or through configuration under the [edit event-options] hierarchy. This tip shows the latter method.
18 DayOne:JunosTips,Techniques,andTemplates2011
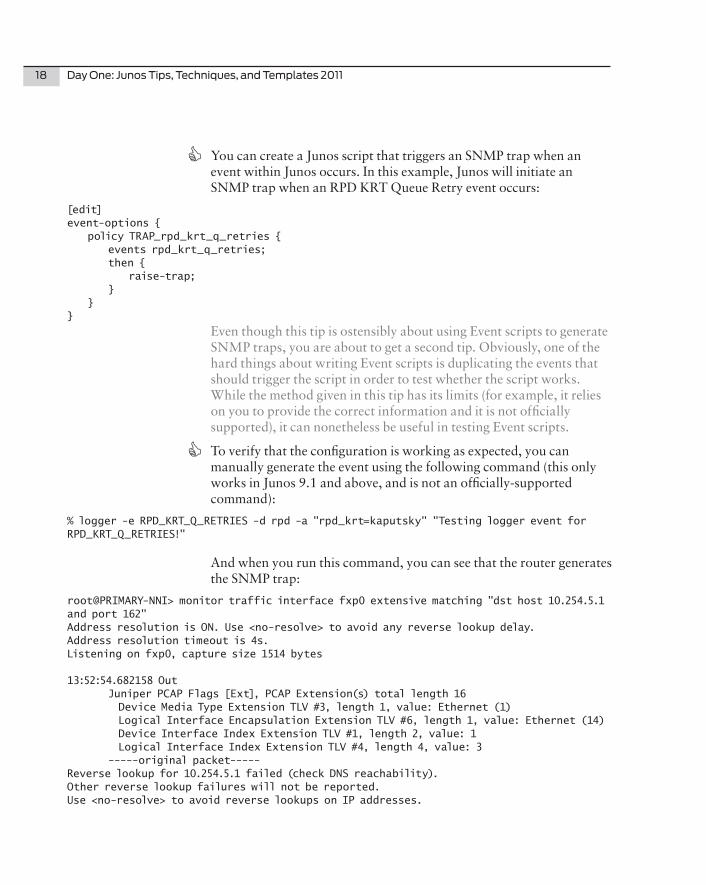
CYou can create a Junos script that triggers an SNMP trap when an event within Junos occurs. In this example, Junos will initiate an SNMP trap when an RPD KRT Queue Retry event occurs:
[edit]event-options { policy TRAP_rpd_krt_q_retries { events rpd_krt_q_retries; then { raise-trap; } }}
Even though this tip is ostensibly about using Event scripts to generate SNMP traps, you are about to get a second tip. Obviously, one of the hard things about writing Event scripts is duplicating the events that should trigger the script in order to test whether the script works. While the method given in this tip has its limits (for example, it relies on you to provide the correct information and it is not officially supported), it can nonetheless be useful in testing Event scripts.
CTo verify that the configuration is working as expected, you can manually generate the event using the following command (this only works in Junos 9.1 and above, and is not an officially-supported command):
% logger -e RPD_KRT_Q_RETRIES -d rpd -a "rpd_krt=kaputsky" "Testing logger event for RPD_KRT_Q_RETRIES!"
And when you run this command, you can see that the router generates the SNMP trap:
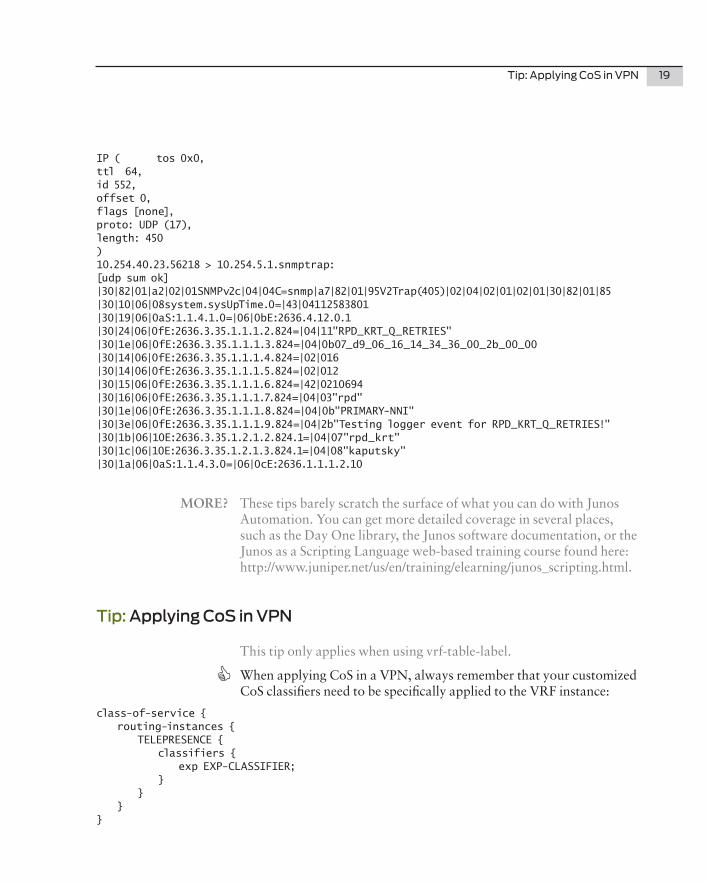
root@PRIMARY-NNI> monitor traffic interface fxp0 extensive matching "dst host 10.254.5.1 and port 162"Address resolution is ON. Use <no-resolve> to avoid any reverse lookup delay.Address resolution timeout is 4s.Listening on fxp0, capture size 1514 bytes
13:52:54.682158 Out Juniper PCAP Flags [Ext], PCAP Extension(s) total length 16 Device Media Type Extension TLV #3, length 1, value: Ethernet (1) Logical Interface Encapsulation Extension TLV #6, length 1, value: Ethernet (14) Device Interface Index Extension TLV #1, length 2, value: 1 Logical Interface Index Extension TLV #4, length 4, value: 3 -----original packet-----Reverse lookup for 10.254.5.1 failed (check DNS reachability).Other reverse lookup failures will not be reported.Use <no-resolve> to avoid reverse lookups on IP addresses.
Tip:ApplyingCoSinVPN 19
IP ( tos 0x0,ttl 64,id 552,offset 0,flags [none],proto: UDP (17),length: 450)10.254.40.23.56218 > 10.254.5.1.snmptrap:[udp sum ok] |30|82|01|a2|02|01SNMPv2c|04|04C=snmp|a7|82|01|95V2Trap(405)|02|04|02|01|02|01|30|82|01|85|30|10|06|08system.sysUpTime.0=|43|04112583801|30|19|06|0aS:1.1.4.1.0=|06|0bE:2636.4.12.0.1 |30|24|06|0fE:2636.3.35.1.1.1.2.824=|04|11"RPD_KRT_Q_RETRIES" |30|1e|06|0fE:2636.3.35.1.1.1.3.824=|04|0b07_d9_06_16_14_34_36_00_2b_00_00|30|14|06|0fE:2636.3.35.1.1.1.4.824=|02|016|30|14|06|0fE:2636.3.35.1.1.1.5.824=|02|012|30|15|06|0fE:2636.3.35.1.1.1.6.824=|42|0210694|30|16|06|0fE:2636.3.35.1.1.1.7.824=|04|03"rpd"|30|1e|06|0fE:2636.3.35.1.1.1.8.824=|04|0b"PRIMARY-NNI" |30|3e|06|0fE:2636.3.35.1.1.1.9.824=|04|2b"Testing logger event for RPD_KRT_Q_RETRIES!" |30|1b|06|10E:2636.3.35.1.2.1.2.824.1=|04|07"rpd_krt" |30|1c|06|10E:2636.3.35.1.2.1.3.824.1=|04|08"kaputsky"|30|1a|06|0aS:1.1.4.3.0=|06|0cE:2636.1.1.1.2.10
MORE? These tips barely scratch the surface of what you can do with Junos Automation. You can get more detailed coverage in several places, such as the Day One library, the Junos software documentation, or the Junos as a Scripting Language web-based training course found here: http://www.juniper.net/us/en/training/elearning/junos_scripting.html.
Tip: Applying CoS in VPN
This tip only applies when using vrf-table-label.
CWhen applying CoS in a VPN, always remember that your customized CoS classifiers need to be specifically applied to the VRF instance:
class-of-service { routing-instances { TELEPRESENCE { classifiers { exp EXP-CLASSIFIER; } } }}

20 DayOne:JunosTips,Techniques,andTemplates2011
Otherwise, the default classifier will be used implicitly, instead of your customized one.
Users commonly configure vrf-table-label for Layer 3 VPNs when they want the router to be able to perform operations on the contents of the Layer 3 VPN packet. The vrf-table-label statement causes the packet to be processed twice by the FPC – once to assign it to the appropriate routing table, and a second time to process the decapsulated IP packet.
In this configuration (and only in this configuration, as far as the editors can tell), configuring according to this tip ensures that the inner label of the MPLS packet is processed through your custom EXP classifier. If you don’t include this statement, Junos may use the default EXP classifier to assign a forwarding class for the packet based on the inner label and overwrite any forwarding class previously assigned for the packet.
In this case, you can use wildcards in the routing-instance name to assign the classifier to multiple routing instances. You can also assign a classifier for the special routing-instance name all, which will apply to any routing instance that does not have a more-specific classifier applied.
Tip: Finding a Range of Prefixes in the Routing Table
Routers often carry large routing tables that make line-by-line parsing all but impossible – at the time of this writing, a full BGP feed is over 340,000 routes. So while piping to match is always an option, the Junos operating system has built-in route matching. This example is based on the use of a supernet mask to return all routes with a mask length equal to or greater than that which is specified.
CIn this example, the goal is to display all (active) routes that have 200.10 in the first 16 bits with a mask length of 18 or greater.
regress@abita> show route 200.10/18
inet.0: 343492 destinations, 686941 routes (343491 active, 0 holddown, 343450 hidden)+ = Active Route, - = Last Active, * = Both
200.10.0.0/24 *[BGP/170] 02:55:18, localpref 100, from 192.168.69.71 AS path: 10458 14203 2914 12956 7004 16629 27853 I > to 192.168.51.126 via fxp0.0200.10.12.0/24 *[BGP/170] 02:55:39, localpref 100, from 192.168.69.71 AS path: 10458 14203 2914 27978 27978 27978 27978 6429 16990 I > to 192.168.51.126 via fxp0.0

Tip:ViewingAdditionalDetailsAbouttheContentsofaConfiguration 21
200.10.14.0/24 *[BGP/170] 02:55:39, localpref 100, from 192.168.69.71 AS path: 10458 14203 2914 27978 27978 27978 27978 6429 16990 I > to 192.168.51.126 via fxp0.0200.10.15.0/24 *[BGP/170] 02:54:41, localpref 100, from 192.168.69.71 AS path: 10458 14203 2914 3257 11556 I > to 192.168.51.126 via fxp0.0200.10.16.0/21 *[BGP/170] 02:55:28, localpref 100, from 192.168.69.71 AS path: 10458 14203 2914 6762 14259 14117 I > to 192.168.51.126 via fxp0.0. . .
Note that omitting the mask causes Junos to populate the rest of the prefix with 0’s and to then return only the prefix with the longest match. The result is a return of only 200.10.0.0/24 when a show route 200.10 is entered. Don’t forget you can add other modifiers such as pipe, or protocol qualifications such as bgp or ospf.
Tip: Viewing Additional Details About the Contents of a Configuration
This tip is about the | display detail option for a show command that provides additional information beyond the normal output. When coupled with show commands for the configuration, you can see a wide variety of useful information – like acceptable values and ranges for variables, defaults, and prohibited values – as well as various descriptive fields. The command can be executed from the top level or from a subordinate stanza, from either the operational or configuration mode.
CTo view additional information about the details of a configuration, run the show configuration | display detail command from operational mode.
From configuration mode it’s the show | display detail command.
Let’s try | display detail, and you’ll see a wide variety of available information including constraints, ranges, regular expression match-es, packages, permission bits required, default values, and eligible products for the command. Also note that not every command has every single field. The output here is truncated but highlights some examples of some of the additional detail:
lab@M7i-R106> show configuration | display detail | no-more ## Last commit: 2011-05-04 18:47:56 UTC by lab#### version: Software version information <-- description of command## require: system <-- system permission bits required to execute command

22 DayOne:JunosTips,Techniques,andTemplates2011
##version 10.3R1.9; <-- actual command#### system: System parameters## require: admin system ##system {… ## host-name: Hostname for this router ## range: 0 .. 255 <-- range of legal values ## match (regex): ̂ [[:alnum:]._-]+$ <-- regex match conditions ## require: system ## host-name M7i-R106; ## saved-core-files: Number of saved core files per executable ## range: 1 .. 10 <-- range of legal values ## ## default: 5 <-- default value for this parameter ## name-resolution { ## ## no-resolve-on-input: Resolve hostnames at time of use than at the of the input ## timeout: Timeout for a DNS query ## units: seconds <-- units for the described parameter ## range: 1 .. 90 ## no-resolve-on-input ## default: 2 ##interfaces { fe-0/1/0 { ## vpls: Virtual private LAN service parameters ## products: m5, m10, m20, m40, t640, t320, m40e, TX Matrix, m320, m7i, m10i, m120, mx960, jsr2300, jsr4300, jsr6300, jsr4350, jsr6350, jsr2320, jsr2350, mx480, mx240, txp, srx210b, srx210h, srx210h-poe, srx210h-p-m, srx240b, srx240h, srx240h-poe, srx240h-p-m, srx630, srx650, srx680, srx100b, srx100h, srx100b-wl, srx100h-wl, srx100b-vdsl, srx100h-vdsl, srx100h-wl-vdsl, srx220h, srx220h-poe, srx220h-p-m, ln1000-v, mx80, mx80-48t, srx240h-dc ## family vpls; } }
CYou can also view details on a specific part of the configuration by running a show on that particular hierarchy.
For example, without the | display detail command:
lab@M7i-R106> show configuration interfaces fxp0 unit 0 {

Tip:ViewingAdditionalDetailsAboutaCommit 23
family inet { address 172.25.46.106/24; }}
And now with | display detail command:
lab@M7i-R106> show configuration interfaces fxp0 | display detail #### range: 0 .. 1073741823##unit 0 { ## ## family: Protocol family ## constraint: Can't configure protocol family with encapsulation ppp-over-ether-over-atm-llc ## constraint: Can't configure protocol family with encapsulation ppp-over-ether ## ## ## inet: IPv4 parameters ## alias: inet4 ## constraint: family inet is not supported with MC-AE ## constraint: family inet is not supported on encapsulation frame-relay-ppp ## family inet { ## ## Interface address/destination prefix ## address 172.25.46.106/24; }}
Tip: Viewing Additional Details About a Commit
(This is an editors’ tip. After spending a couple of weeks of our lives on this book, we get to do that.)
When we sat around judging the merits of various tips, the previous tip about | display detail inspired us to recall this variation on a theme.
Just like the | display detail option that provides additional detail for router configurations, the option also provides additional detail for a system commit of the configuration file. You all know that a normal commit provides a simple commit complete as feedback, but with the | display detail, a veritable cornucopia of information on the commit is provided.
Below is the normal commit:
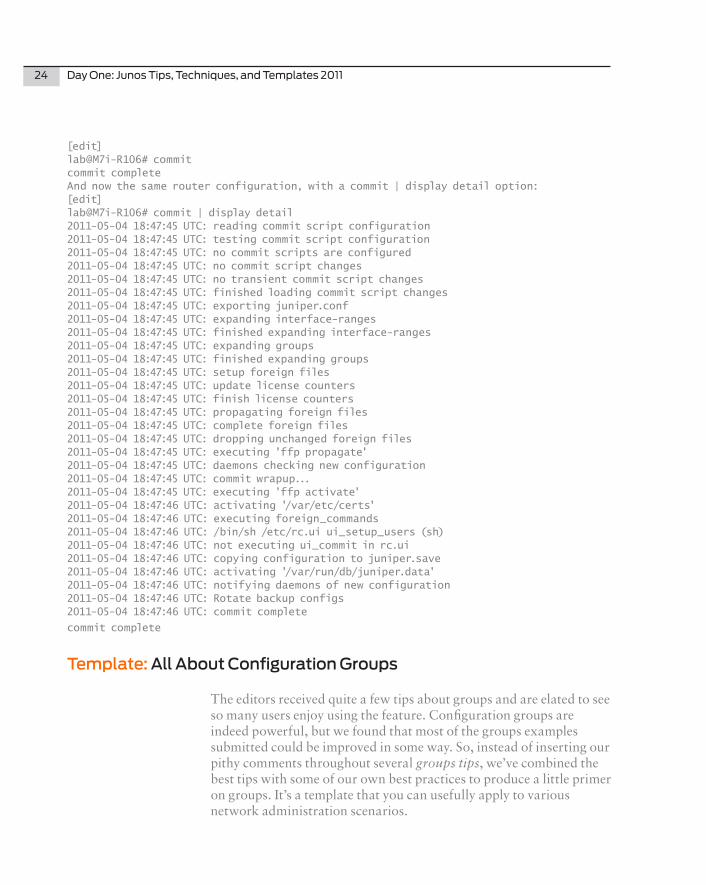
24 DayOne:JunosTips,Techniques,andTemplates2011
[edit]lab@M7i-R106# commit commit completeAnd now the same router configuration, with a commit | display detail option:[edit]lab@M7i-R106# commit | display detail 2011-05-04 18:47:45 UTC: reading commit script configuration2011-05-04 18:47:45 UTC: testing commit script configuration2011-05-04 18:47:45 UTC: no commit scripts are configured2011-05-04 18:47:45 UTC: no commit script changes2011-05-04 18:47:45 UTC: no transient commit script changes2011-05-04 18:47:45 UTC: finished loading commit script changes2011-05-04 18:47:45 UTC: exporting juniper.conf2011-05-04 18:47:45 UTC: expanding interface-ranges2011-05-04 18:47:45 UTC: finished expanding interface-ranges2011-05-04 18:47:45 UTC: expanding groups2011-05-04 18:47:45 UTC: finished expanding groups2011-05-04 18:47:45 UTC: setup foreign files2011-05-04 18:47:45 UTC: update license counters2011-05-04 18:47:45 UTC: finish license counters2011-05-04 18:47:45 UTC: propagating foreign files2011-05-04 18:47:45 UTC: complete foreign files2011-05-04 18:47:45 UTC: dropping unchanged foreign files2011-05-04 18:47:45 UTC: executing 'ffp propagate'2011-05-04 18:47:45 UTC: daemons checking new configuration2011-05-04 18:47:45 UTC: commit wrapup...2011-05-04 18:47:45 UTC: executing 'ffp activate'2011-05-04 18:47:46 UTC: activating '/var/etc/certs'2011-05-04 18:47:46 UTC: executing foreign_commands2011-05-04 18:47:46 UTC: /bin/sh /etc/rc.ui ui_setup_users (sh)2011-05-04 18:47:46 UTC: not executing ui_commit in rc.ui2011-05-04 18:47:46 UTC: copying configuration to juniper.save2011-05-04 18:47:46 UTC: activating '/var/run/db/juniper.data'2011-05-04 18:47:46 UTC: notifying daemons of new configuration2011-05-04 18:47:46 UTC: Rotate backup configs2011-05-04 18:47:46 UTC: commit complete
commit complete
Template: All About Configuration Groups
The editors received quite a few tips about groups and are elated to see so many users enjoy using the feature. Configuration groups are indeed powerful, but we found that most of the groups examples submitted could be improved in some way. So, instead of inserting our pithy comments throughout several groups tips, we’ve combined the best tips with some of our own best practices to produce a little primer on groups. It’s a template that you can usefully apply to various network administration scenarios.

Template:AllAboutConfigurationGroups 25
CConfiguration groups are a great way to apply common configuration to multiple parts of the configuration. The interface-range feature allows you to perform some of the same tasks for interface configura-tion, but the groups feature may still be the most appropriate way to handle some interface configuration, and it is the only way (short of Junos Automation scripts) to apply common settings to pieces of the configuration other than interfaces.
One of the big differences between the interface-range command and configuration groups is that the interface-range command will actually result in the interface being configured, even if the interface is not separately listed in the configuration. On the other hand, a configuration group with a match condition only applies to things that are already configured. So, a configuration group that applies to ge-0/0/* will only affect an interface that has a name beginning with ge-0/0/ and that is already listed in the configuration. On the other hand, an interface-range command that applies to ge-0/0/0 through ge-0/0/23 will actually configure those 24 interfaces as if you had individually configured them. You can see this using the show config-uration | display inheritance command. Therefore, if you want to configure a large number of interfaces, you may want to use the interface-range configuration. On the other hand, if you want to define some default configuration that will apply to interfaces that you configure individually, a configuration group is probably more appropriate.
For those who are curious, you can mix interface-range commands and configuration groups. The software expands interface-range commands first, and then it applies the statements from configuration groups to matching interfaces.
You define configuration groups in the [edit groups] hierarchy. You can have multiple groups. Each group has a name. You can configure the router to apply one or more groups at various levels of the configu-ration. Unless you configure the router to apply a group to the configu-ration, that configuration group will have no effect.
groups { BFD_BGP { protocols { bgp { group <*> { neighbor <10.100.1.*> { bfd-liveness-detection { minimum-interval 300;

26 DayOne:JunosTips,Techniques,andTemplates2011
multiplier 3; } } } } } } INTERFACE_DEFAULTS { interfaces { <*-*> { unit <*> { family mpls; family iso; } } } } DEFAULT_SYSTEM_SETTINGS { system { services { ssh; telnet; } } }}
You can configure configuration groups with or without match conditions. If you do not use match conditions (such as shown here with the DEFAULT_SYSTEM_SETTINGS group), Junos will simply merge the configuration from the group into the configuration when you apply the group to a level of the configuration hierarchy.
When you do use match conditions (as in the two preceding examples) and you apply the groups to a level of the hierarchy, the software examines that level of the hierarchy (as well as everything underneath it) for matching configuration entries. When it finds a match, it applies the listed configuration.
You can use angle brackets to define matches based on wildcards. An asterisk ( * ) matches any zero or more characters and a question mark ( ? ) matches a single character. (This is similar to the way a DOS or UNIX shell deals with wildcard matches.)
You can also use character classes. Here, you place a list of characters within square brackets. Junos finds a match if any of those characters exist in the string it is examining. For example, < [afgxc]e* > matches

Template:AllAboutConfigurationGroups 27
any interface name that begins with ae, fe, ge, xe, or ce. You can also specify a range of characters or numbers (such as [A-Za-z0-9] that would match any alphanumeric character).
You can only match on user-defined strings. (For example, the unit keyword is not a user-defined string, but the number that follows it is a user-defined string. Likewise, the address keyword is not a user-defined string, but the address itself is a user-defined string.) It is important to note that the match conditions in angle brackets must exactly match the entire user-defined string. You can use the asterisk to match those parts of the string that are unimportant for your purposes.
Here is an example of using matches in a group. Note that the group matches any interface name with a dash (which excludes the fxp0, me0, vme, and similar interfaces).
On its surface, this seems like a good tip, because it automatically excludes the management interfaces. However, note that it also excludes Aggregated Ethernet (ae) interfaces, which may not be what you want. A better solution may be to use the apply-groups-except statement in the management interface configuration. This tells Junos not to apply that group to that interface, even if the group is applied at a higher level of the hierarchy.
Also, note that the group matches the unit number with *. This matches absolutely any string (and, certainly, any unit number):
groups { INTERFACE_DEFAULTS { interfaces { <*-*> { unit <*> { family mpls; family iso; } } } }}
Here is another example of groups. In this case, it looks at IP address-es. BFD parameters are applied to all BGP neighbors that have an IP address beginning with 10.100.1. :
groups { BFD_BGP { protocols { bgp {

28 DayOne:JunosTips,Techniques,andTemplates2011
group <*> { neighbor <10.100.1.*> { bfd-liveness-detection { minimum-interval 300; multiplier 3; } } } } } }}
Now let’s extend the previous example and only apply the BFD parameters to any BGP group that starts with the name CUST_GOLD_. Junos will only apply these BFD parameters to BGP neighbors with an IP address beginning with 10.100.1. and which are in a group with a name that begins with CUST_GOLD_:
groups { BFD_BGP { protocols { bgp { group <CUST_GOLD_*> { neighbor <10.100.1.*> { bfd-liveness-detection { minimum-interval 300; multiplier 3; } } } } } }}
This is only a small introduction to these wildcard expressions. It is worth noting that this type of match is also used elsewhere. For example, the interface-range command will take a similar kind of wildcard match. Also, you can use these wildcard matches to select interface names in the show interfaces CLI command. The only big difference is that the angle-brackets (< >) are only used to surround matches in the [edit groups] configuration hierarchy; elsewhere, you just use the text of the match (for example, show interfaces ge-0/0/*).
Once you have defined the groups and applied them at the appropriate hierarchy levels, you can use the display inheritance pipe command to show the way the configuration looks with the group commands applied.
Template:AllAboutConfigurationGroups 29
The display inheritance pipe command has a few side-effects. It also expands interface ranges, it does not show configuration groups or interface ranges themselves, and it also hides any piece of the configu-ration marked as inactive. Even if you are not using groups, it can be a good way to exclude deactivated configurations from the configura-tion display.
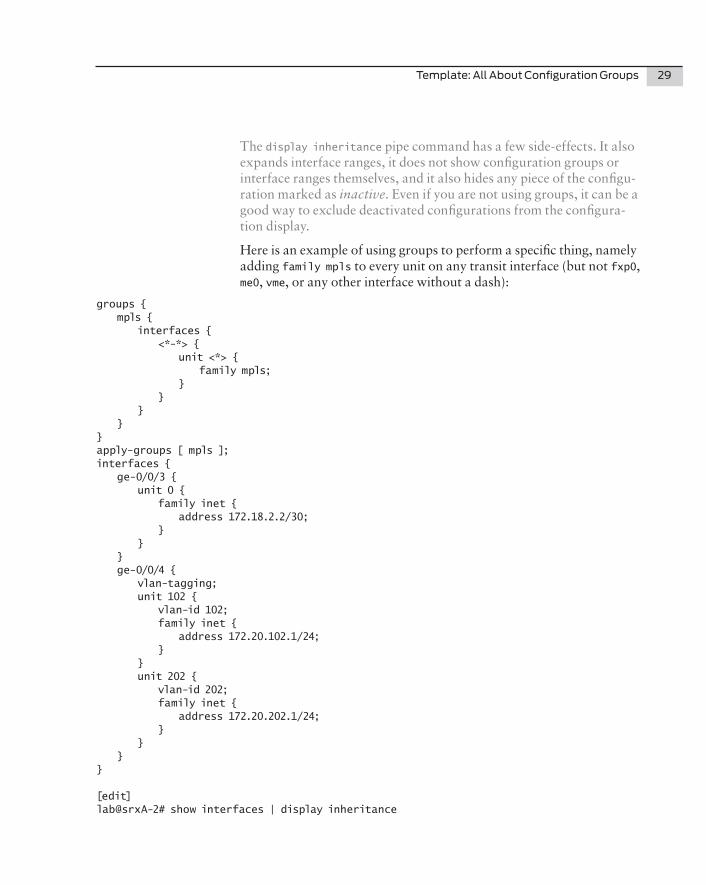
Here is an example of using groups to perform a specific thing, namely adding family mpls to every unit on any transit interface (but not fxp0, me0, vme, or any other interface without a dash):
groups { mpls { interfaces { <*-*> { unit <*> { family mpls; } } } }}apply-groups [ mpls ];interfaces { ge-0/0/3 { unit 0 { family inet { address 172.18.2.2/30; } } } ge-0/0/4 { vlan-tagging; unit 102 { vlan-id 102; family inet { address 172.20.102.1/24; } } unit 202 { vlan-id 202; family inet { address 172.20.202.1/24; } } }}
[edit]lab@srxA-2# show interfaces | display inheritance

30 DayOne:JunosTips,Techniques,andTemplates2011
ge-0/0/3 { unit 0 { family inet { address 172.18.2.2/30; } ## ## 'mpls' was inherited from group 'mpls' ## family mpls; }}ge-0/0/4 { vlan-tagging; unit 102 { vlan-id 102; family inet { address 172.20.102.1/24; } ## ## 'mpls' was inherited from group 'mpls' ## family mpls; } unit 202 { vlan-id 202; family inet { address 172.20.202.1/24; } ## ## 'mpls' was inherited from group 'mpls' ## family mpls; }}
In this next example, Junos sets the VRRP priority to 200 on any VRRP group configured for any unit numbered 500-599. It will also set the VRRP priority to 50 on any VRRP group configured for any unit numbered 600-699. You might use such a configuration in a load-balancing situation where one router is supposed to be the primary VRRP router for one set of VLANs and the backup VRRP router for another set of VLANs:
groups { VRRP-PRIMARY-500-SECONDARY-600 { interfaces { <*> { unit <5??> { family inet { address <*> { vrrp-group <*> {

Template:AllAboutConfigurationGroups 31
priority 200; } } } } unit <6??> { family inet { address <*> { vrrp-group <*> { priority 50; } } } } } } }}
Now, let’s apply BFD to OSPF interfaces. This configuration applies different settings for WAN and LAN interfaces, based on the interface name: <[fgxca]e> matches any transit Ethernet interface, and <*> matches any interface. When a piece of configuration matches multiple match conditions in a group, the values from the first-matched section override conflicting values from later matches. In this example, that means that for Ethernet interfaces, the values from the first interface specification will override the second one. Non-Ethernet interfaces should only match the second interface specification, so they will inherit those values:
groups { BFD_OSPF { protocols { ospf { area <*> { interface "<[fgxca]e*>" { bfd-liveness-detection { minimum-interval 50; multiplier 3; } } interface <*> { bfd-liveness-detection { minimum-interval 300; multiplier 3; } } } } }

32 DayOne:JunosTips,Techniques,andTemplates2011
}}
[edit]root@srxA-1# show protocols ospf| display inheritance area 0.0.0.0 { interface ge-0/0/0.0 { ## ## 'bfd-liveness-detection' was inherited from group 'BFD_OSPF' ## bfd-liveness-detection { ## ## '50' was inherited from group 'BFD_OSPF' ## minimum-interval 50; ## ## '3' was inherited from group 'BFD_OSPF' ## multiplier 3; } } interface se-0/0/0.0 { ## ## 'bfd-liveness-detection' was inherited from group 'BFD_OSPF' ## bfd-liveness-detection { ## ## '300' was inherited from group 'BFD_OSPF' ## minimum-interval 300; ## ## '3' was inherited from group 'BFD_OSPF' ## multiplier 3; } }}
While this has been a whirlwind tour through Junos configuration groups, mostly because our editor in chief was literally pacing outside our lab door demanding the final manuscript, you can see that they are powerful when used correctly. To get maximum benefit from groups, you need to understand the match conditions. Also, don’t forget to use the display inheritance pipe command before you commit in order to verify that the groups are applied as you expect before you commit the changes. BTW: Day One: Configuring Junos Basics has a good introduction on groups: www.juniper.net/dayone.

Tip:SetIdleTimeoutforRootUser 33
Tip: Set Idle Timeout for Root User
Here’s a nice security feature that’s easy to implement: the command line idle timeout.
CSet the idle timeout for the root user to keep the system secure in case an administrator forgets to logout from a console session. To do so, in operational mode use the set cli idle-timeout X command, where X is in minutes.
After the specified time with no interactive input, the session will log itself out. Set an idle timeout value no greater than 10 minutes as a reasonable security practice. Here are some other tidbits about idle-timeout:
lab@M7i-R106> set cli idle-timeout ?Possible completions: <timeout> Maximum idle time (0..100000 minutes)[edit]lab@M7i-R106# show | match idle | display set set system login class AUDITOR idle-timeout 10set system login class EMERGENCY idle-timeout 10
PS: See the next Tip’s show cli output to see the value that is actually configured for idle timeout.
Tip: Increase Terminal Screen Width
CWhen commands become too long you may not see the beginning of your line but instead the ... characters, or an ellipsis. To avoid truncated output, you can increase the terminal width with the set cli screen-width 200 operational mode command.
This is because the default screen-width is 157. Making the screen-width wider allows you to see more characters without using the ellipsis. Note that this feature only lasts for the duration of the session.
Let’s try to show an example, but keep in mind you’re reading this on paper, or a computer screen, or an eBook, and it probably will not show real well…
lab@M7i-R106> show cli CLI complete-on-space set to onCLI idle-timeout disabled <-- current setting for idle-timout (from previous Tip)CLI restart-on-upgrade set to on

34 DayOne:JunosTips,Techniques,andTemplates2011
CLI screen-length set to 68CLI screen-width set to 157 <-- default setting for screen widthCLI terminal is 'vt100'CLI is operating in enhanced modeCLI timestamp disabledCLI working directory is '/var/home/lab'
Here’s some output with the default setting:
[edit]lab@M7i-R106# ...s-is-a-long-lsp-name to 1.1.1.1 from 2.2.2.2 primary path-name-long optimize-timer 60 priority 7 7
And now some output of the same command with the screen-width set to a higher value:
lab@M7i-R106> set cli screen-width 200 Screen width set to 200lab@M7i-R106> edit Entering configuration modelab@M7i-R106# set protocols mpls label-switched-path this-is-a-long-lsp-name to 1.1.1.1 from 2.2.2.2 primary path-name-long optimize-timer 60 priority 7 7
With the wider screen-width, the beginning of the command line does not get turned into an ellipsis (…).
Tip: View All Routes Except Those from a Particular Protocol
Most readers should be familiar with how to specify a routing source as a qualifier to a show route command so that only the routes from that source, say BGP, are displayed. This tip makes good use of the CLI pipe and except function to allow a handy negation of this function when desired.
CIn many cases, the majority of routes come from a particular protocol, for example BGP. When you have a lesser subset that comes from a variety of sources, such as direct and your IGP, and you want to display all routes except those learned from BGP, use the show route terse command along with the pipe and except command to help reduce the clutter.
regress@abita> show route terse
inet.0: 343404 destinations, 686762 routes (343403 active, 0 holddown, 343359 hidden)+ = Active Route, - = Last Active, * = Both

Tip:LoggingPolicyDropstoaSpecificLogFile 35
A Destination P Prf Metric 1 Metric 2 Next hop AS path* 1.0.2.0/30 O 10 310 >172.16.1.97* 1.1.2.0/30 O 10 110 >172.16.1.97* 1.5.0.0/16 B 170 100 >192.168.51.126 10458 14203 2914 38639 I* 1.6.0.0/15 B 170 100 >192.168.51.126 10458 14203 2914 38639 I* 1.8.0.0/16 B 170 100 >192.168.51.126 10458 14203 2914 38639 I. . . regress@abita> show route terse | except B inet.0: 343404 destinations, 686762 routes (343403 active, 0 holddown, 343359 hidden)A Destination P Prf Metric 1 Metric 2 Next hop AS path* 1.0.2.0/30 O 10 310 >172.16.1.97* 1.1.2.0/30 O 10 110 >172.16.1.97* 10.4.0.0/16 S 5 >192.168.51.126* 10.5.0.0/16 S 5 >192.168.51.126. . .
Tip: Logging Policy Drops to a Specific Log File
CIt’s possible to log security policy denials to their own logfile – for example, if you wish to keep a separate copy of dropped traffic. To do this, create a new logfile and adjust the match condition:
[edit]juniper@SRX5800# set system syslog file traffic-deny any any
[edit]juniper@SRX5800# set system syslog file traffic-deny match "RT_FLOW_SESSION_DENY"
Note that you must configure logging on the security policy itself. Do it with the session-close and/or the session-init flag:
[edit]
juniper@SRX5800# set policy denied_apps then deny log session-close session-init
Tip: Troubleshooting Connectivity on the SRX
CWhen troubleshooting connectivity try using a basic datapath traceop-tion flag. This is done by setting a file, defining your filters, and then enabling the traceoptions flag, like so:
[edit]juniper@SRX5800# edit security flow traceoptions
[edit security flow traceoptions]juniper@SRX5800# set file tshoot_web

36 DayOne:JunosTips,Techniques,andTemplates2011
[edit security flow traceoptions]juniper@SRX5800# set packet-filter trust_to_web source-prefix 10.1.1.100/32 destination-prefix 10.2.0.3/32
[edit security flow traceoptions]juniper@SRX5800# set packet-filter web_to_trust source-prefix 10.2.0.3/32 destination-prefix 10.1.1.100/32 [edit security flow traceoptions]juniper@SRX5800# set flag basic-datapath
Once that has been commited and traffic has passed, you can quickly check for bi-directional traffic using the match command. Here you can see the traffic that matched the filters, and quickly confirm bidirection-al traffic:
juniper@SRX5800> show log tracetest | match matchedJan 21 23:32:21 23:32:21.807167:CID-0:RT:<10.1.1.100/58543- >172.31.100.60/80;6> matched filter Trust_to_dmz:Jan 21 23:32:21 23:32:21.823519:CID-0:RT:<172.31.100.60/80- >10.1.1.100/58543;6> matched filter dmz_to_trust:Jan 21 23:32:21 23:32:21.825358:CID-0:RT:<10.1.1.100/58543- >172.31.100.60/80;6> matched filter Trust_to_dmz:Jan 21 23:32:21 23:32:21.825358:CID-0:RT:<10.1.1.100/58543- >172.31.100.60/80;6> matched filter Trust_to_dmz:Jan 21 23:32:22 23:32:21.935552:CID-0:RT:<172.31.100.60/80- >10.1.1.100/58543;6> matched filter dmz_to_trust:Jan 21 23:32:22 23:32:21.937322:CID-0:RT:<10.1.1.100/58543- >172.31.100.60/80;6> matched filter Trust_to_dmz:
If you have to look at the entire debug, use the trim flag and it will cut out some of the unneeded information. Here trim 42 is used:
juniper@SRX5800> show log tshoot_web | trim 42<10.1.1.100/51510->10.2.0.3/80;6> matched filter trust_to_web:packet [48] ipid = 57203, @423f6b9e---- flow_process_pkt: (thd 1): flow_ctxt type 13, common flag 0x0,mbuf 0x423f6a00 flow process pak fast ifl 68 in_ifp ge-0/0/0.0ge-0/0/0.0:10.1.1.100/51510->10.2.0.3/80, tcp, flag 2 syn
On Junos 10.3R1.9, we found that trim 42 occasionally cut off the first character of the information for a data packet. You might need to use a lower or higher number depending on the output.

Tip:DebuggingScreensontheSRX 37
Tip: Debugging Screens on the SRX
This tip gives useful information on debugging screens. Although it is written in the context of implementing the screens, you can use this tip while troubleshooting connectivity problems, too.
CA helpful tip when designing or first implementing a new screen profile is to use the alarm-without-drop flag. It alarms and logs all screen hits, but doesn’t drop traffic. This makes it a great way to avoid unintended misconfigurations.
juniper@SRX5800# set security screen ids-option untrusted-internet alarm-without-drop
Once you’ve confirmed that there are no un-expected impacts you can configure the screens to drop attacks, as a good screen should.
Tip: Understand Filter Behavior and GRE Packet Flow
Juniper routers process GRE packets in relationship to firewall filters in a non-intuitive way. Knowing that outbound GRE packets are subjected to your inbound filter can help you avoid a problem that has driven others to the brink of madness.
CMost Juniper routers process GRE traffic in hardware, providing reliable performance for traffic that must traverse a tunnel. When transit packets are sent to the tunnel device for encapsulation and the tunnel device encapsulates the packet, it needs to send the new (now GRE) packet back to the PFE for processing. When it sends this outbound packet to the PFE for processing, it sets the input interface to be the next-hop outbound interface. This means that the packet is processed through all the input filters, input service-sets, etc., that are applied to the outbound interface. (After this, the PFE normally performs a route lookup and performs any necessary output process-ing associated with the outbound interface.) For this reason, the outbound GRE traffic needs to be permitted through the input filters on the outbound interface.
This tip shows how to configure a GRE tunnel for which you also want to configure an anti-spoofing firewall filter (a firewall filter that blocks any traffic from the Internet that has a source address from your internal network). Normally, such a filter would be applied in the input direction of the service provider-facing interface with a term set

38 DayOne:JunosTips,Techniques,andTemplates2011
to discard all traffic with a source address matching your internal networks, to include the source of the GRE tunnel itself. But the unique behavior described above for GRE packets means that you will have to allow GRE packets from your source address in the input direction of your outbound interface. For example, assume the following partial configuration:
interfaces { gr-0/0/0 { unit 0 { tunnel { source 1.1.1.1; destination 2.2.2.2; } } } fe-1/0/0 { unit 0 { family inet { filter { input inputfilter; } } } } }
Assume that a route lookup on 2.2.2.2 (the tunnel destination) shows a next-hop of fe-1/0/0.0.
The firewall filter inputfilter needs to allow GRE packets from 1.1.1.1 to 2.2.2.2 (in other words, it needs to allow the outbound packets). You can still gain spoof protection by filtering non-GRE traffic with your internal source address.
Note that this only affects transit traffic. Traffic (such as routing protocol traffic) originating from the R, should not be affected by the firewall filter.
Template: Using the Interface Range Command
The interface-range command is quite useful. It allows you to configure multiple interfaces at the same time. It also allows you to reference interfaces as a group elsewhere.

Template:UsingtheInterfaceRangeCommand 39
CIt’s a common task: you want to configure multiple interfaces the same way but you have to configure each interface separately, like this:
[edit] root@myrouter# set interfaces ge-0/0/0 unit 0 family ethernet-switching vlan members finance
[edit]root@myrouter# set interfaces ge-0/0/1 unit 0 family ethernet-switching vlan members finance
[edit]root@myrouter# set interfaces ge-0/0/2 unit 0 family ethernet-switching vlan members finance
[edit]root@myrouter# set interfaces ge-0/0/3 unit 0 family ethernet-switching vlan members finance
[edit]root@myrouter# show interfaces ge-0/0/0 { unit 0 { family ethernet-switching { vlan { members finance; } } }}ge-0/0/1 { unit 0 { family ethernet-switching { vlan { members finance; } } }}ge-0/0/2 { unit 0 { family ethernet-switching { vlan { members finance; } } }}ge-0/0/3 { unit 0 {

40 DayOne:JunosTips,Techniques,andTemplates2011
family ethernet-switching { vlan { members finance; } } }}
You end up with the desired result but it took four commands. Imagine if you had twenty interfaces to configure this way!
As of Junos 10.0, the interface-range command provides a good solution to this problem. Using the preceding example, the same result can be achieved in just two commands (assume the interfaces config-ured have been deleted). Here are the two commands:
[edit]root@myrouter# set interfaces interface-range vlan-finance member-range ge-0/0/0 to ge-0/0/3
[edit]root@myrouter# set interfaces interface-range vlan-finance unit 0 family ethernet-switching vlan members finance
[edit]root@myrouter# show interfaces interface-range vlan-finance { member-range ge-0/0/0 to ge-0/0/3; unit 0 { family ethernet-switching { vlan { members finance; } } }}
You can mix and match interface-range configuration with individual interface configuration; the settings are merged together.
You can also verify that the settings are correctly applied to each interface in the range by using the display inheritance pipe com-mand:
[edit]root@myrouter# show interfaces | display inheritance #### 'ge-0/0/0' was expanded from interface-range 'vlan-finance'##ge-0/0/0 { ##

Template:UsingtheInterfaceRangeCommand 41
## '0' was expanded from interface-range 'vlan-finance' ## unit 0 { ## ## 'ethernet-switching' was expanded from interface-range 'vlan-finance' ## family ethernet-switching { ## ## 'vlan' was expanded from interface-range 'vlan-finance' ## vlan { ## ## 'finance' was expanded from interface-range 'vlan-finance' ## members finance; } } }} ## ## 'ge-0/0/1' was expanded from interface-range 'vlan-finance'## ge-0/0/1 { . . .
Now let’s use the except pipe command to eliminate the hash marks:
[edit]root@myrouter# show | display inheritance | except ## ge-0/0/0 { unit 0 { family ethernet-switching { vlan { members finance; } } }}ge-0/0/1 { unit 0 { family ethernet-switching { vlan { members finance; } } }}ge-0/0/2 { unit 0 { family ethernet-switching {

42 DayOne:JunosTips,Techniques,andTemplates2011
vlan { members finance; } } }}ge-0/0/3 { unit 0 { family ethernet-switching { vlan { members finance; } } }}
The output now looks exactly as it did when configuring each interface manually. And, most importantly, it functions the same way, too.
Selecting Interfaces
You can select non-contiguous interfaces and place them in the same interface-range group. This example selects interfaces ge-0/0/2 through ge-0/0/10, ge-0/0/15 through ge-0/0/17, ge-0/0/19, and ge-0/0/20:
[edit]user@EX#set interfaces interface-range Range1 member-range ge-0/0/2 to ge-0/0/10;
[edit]user@EX#set interfaces interface-range Range1 member-range ge-0/0/15 to ge-0/0/17;
[edit]user@EX#set interfaces interface-range Range1 member-range ge-0/0/19 to ge-0/0/20;
You can also select interfaces using a similar (although slightly differ-ent) wildcard match notation as is used in configuration groups. Here is an annotated example:
user@sw> show configuration interfaces interface-range EDGE/* Match all interfaces that start with "ge-0/0/". */member ge-0/0/*;/* Match interfaces ge-1/0/0 through ge-1/0/9. */member "ge-1/0/[0-9]";/* Match interface ge-1/0/12. */member ge-1/0/12;/* Match interface ge-1/0/20 through ge-1/0/39. */member "ge-1/0/[20-39]";/* Match any ge- interface on PIC0 of FPC 2 through 8. */member "ge-[2-8]/0/*";

Tip:CommitPreviousConfigurationandSoftwarePackage 43
Note that the square brackets can enclose two-digit ranges of numbers. So, [20-39] will match every number from 20 through 39 (inclusive), and create an interface for each of those numbers.
Using Interface Ranges Elsewhere
You can also reference interface ranges in other places where you would reference an actual interface. For example, to set all interfaces in the interface range named EDGE to be edge ports for MSTP:
user@sw> show configuration protocols mstp...interface EDGE { edge;}
Tip: Commit Previous Configuration and Software Package
The Junos commit model provides a variety of useful features. The rollback feature, enabled by the commit model, can save a lot of operator agony. But first, here is the original tip. It will then be embellished, but only because the editors feel this is a topic deserving of such attention.
CTo commit a previous configuration and software package:
1. Go to edit/configure mode.
2. Issue the rollback <number> command.
3) Issue the commit command.
To load a previous software package:
1. Go to operational mode.
2. Issue the system software rollback command.
3 Issue the system reboot command.
Let’s drill down a little with some background.
The commit model provides a candidate configuration that is manipu-lated by the operator. The candidate configuration functions as a configuration scratchpad. When you’re ready and all desired configu-ration changes have been made, the operator executes a commit opera-tion, by typing commit : ) . If the candidate configuration parses

44 DayOne:JunosTips,Techniques,andTemplates2011
correctly (by passing syntax and semantic checks), it becomes the new operational configuration, with a name juniper.conf.gz. At this point both the operational configuration and the candidate configuration are identical. The immediately previous operational configuration is renamed to juniper.conf.1.gz.
Junos maintains the fifty most recent valid configurations. Each subse-quent configuration is renumbered. So 1 becomes 2, 2 becomes 3, and so forth, down to when juniper.conf.48 becomes 49, when the old juniper.conf.49.gz goes away (just like old network operators).
Note that just because a configuration is valid does not mean that it works the way you want. You can have functioning configurations that pass parsing, but that do not function. For example, you can have an incorrect loopback address listed for a BGP session. The configura-tion passes parsing because an address is listed. It’s just the wrong address – so do not confuse a valid configuration with a working configuration. The commit hierarchy only saves valid configurations. On systems with hard drives and compact flash, configuration file juniper.conf.gz up to juniper.conf.3.gz are stored on the compact flash and the remaining configuration files are stored on the hard drive. You can see from the following output of show system storage that /var/db/config and /config are on separate partitions. The output is truncated for space. (You can execute the operational mode command from configuration mode by using the run keyword.)
[edit]lab@M7i-R106# run show system storage <-- use run to execute operational mode commands Filesystem Size Used Avail Capacity Mounted on/dev/ad0s1a 885M 203M 611M 25% //dev/md9 2.0G 8.0K 1.8G 0% /tmp/dev/md10 2.0G 996K 1.8G 0% /mfs/dev/ad0s1e 98M 2.4M 88M 3% /config/dev/ad1s1f 34G 5.8G 25G 19% /varlab@M7i-R106> show system storage <-- execute command from operational modeFilesystem Size Used Avail Capacity Mounted on/dev/ad0s1a 885M 203M 611M 25% //dev/ad0s1e 98M 2.4M 88M 3% /config/dev/ad1s1f 34G 5.8G 25G 19% /varlab@M7i-R106# run file list /var/db/config /var/db/config:juniper.conf.10.gzjuniper.conf.11.gz...juniper.conf.38.gzjuniper.conf.39.gz

Tip:CommitPreviousConfigurationandSoftwarePackage 45
juniper.conf.4.gz <-- note file 4 shows up after file 39 and before 40juniper.conf.40.gzjuniper.conf.41.gz...juniper.conf.48.gzjuniper.conf.49.gz <-- last saved valid configurationjuniper.conf.5.gzjuniper.conf.6.gzjuniper.conf.7.gzjuniper.conf.8.gzjuniper.conf.9.gzjuniper.conf.pre-install[edit]lab@M7i-R106# run file list /config /config:.snap/juniper.conf.1.gzjuniper.conf.2.gzjuniper.conf.3.gzjuniper.conf.gzjuniper.conf.md5rescue.conf.gz
Using the rollback command, an operator can make any older con-figuration file the new candidate configuration. After a subsequent commit, it then becomes (again) the active configuration. A rollback 0 wipes out all scratchpad changes in the candidate configuration by making the candidate configuration identical to the active configura-tion.
This command is executed from the configuration mode. A nice option for the commit command is to do a commit comment “regex” where the “regex” is a comment. The show system commit command then lets you read the comment later on. This is especially useful if you are making a series of changes to identify the behavior changes that occur with different parameters. It’s always nice to be able to go back to a known working configuration through a simple rollback com-mand, as in this tip.
Use the following simple process to rollback a previous configuration file:
1) go to edit/configuration mode
2) rollback <number>
3) commit

46 DayOne:JunosTips,Techniques,andTemplates2011
In the example below, you change the interface name fe-0/1/1 to fe-0/1/3. You then use a show | compare to evaluate the effect of your changes on the configuration file and commit the configuration with a commit comment <regex>. You can see your comment associated with that iteration of the configuration with a show system commit:
[edit]lab@M7i-R106# rename interfaces fe-0/1/1 to fe-0/1/3lab@M7i-R106# show | compare <-- see what effect your change had[edit interfaces]- fe-0/1/1 {- vlan-tagging;- unit 10 {- description "VRF red interface";- vlan-id 10;- family inet {- address 10.10.1.2/30;- }- }- unit 20 {- description "VRF blue interface";- vlan-id 20;- family inet {- address 10.20.1.2/30;- }- }- }+ fe-0/1/3 {+ vlan-tagging;+ unit 10 {+ description "VRF red interface";+ vlan-id 10;+ family inet {+ address 10.10.1.2/30;+ }+ }+ unit 20 {+ description "VRF blue interface";+ vlan-id 20;+ family inet {+ address 10.20.1.2/30;+ }+ }+ }
Then:[edit]lab@M7i-R106# commit comment "change interface fe-0/1/1 to fe-0/1/3" commit complete

Tip:CommitPreviousConfigurationandSoftwarePackage 47
Now let’s verify that your comment string is associated with the configuration file:
[edit]lab@M7i-R106# run show system commit 0 2011-05-17 11:28:00 UTC by lab via cli change interface fe-0/1/1 to fe-0/1/31 2011-05-04 18:47:56 UTC by lab via cli2 2011-05-04 18:47:46 UTC by lab via cli
To demonstrate the rollback <number> capability, another configura-tion change was made and committed. So your original configuration is now number 2. To change the interface back to fe-0/1/1, simply do a rollback 2, such as the following:
[edit]lab@M7i-R106# run show system commit 0 2011-05-17 12:15:26 UTC by lab via cli1 2011-05-17 11:28:00 UTC by lab via cli <-- config with fe-0/1/3 change interface fe-0/1/1 to fe-0/1/32 2011-05-04 18:47:56 UTC by lab via cli <-- config with fe-0/1/13 2011-05-04 18:47:46 UTC by lab via cli[edit]lab@M7i-R106# rollback 2 load complete
And of course, verify that the changes match what you desire (in this case adding fe-0/1/1and removing fe-0/1/3):
[edit]lab@M7i-R106# show | compare [edit]- logical-systems {- test;- }[edit interfaces]+ fe-0/1/1 {+ vlan-tagging;+ unit 10 {+ description "VRF red interface";+ vlan-id 10;+ family inet {+ address 10.10.1.2/30;+ }+ }+ unit 20 {+ description "VRF blue interface";+ vlan-id 20;+ family inet {+ address 10.20.1.2/30;

48 DayOne:JunosTips,Techniques,andTemplates2011
+ }+ }+ }- fe-0/1/3 {- vlan-tagging;- unit 10 {- description "VRF red interface";- vlan-id 10;- family inet {- address 10.10.1.2/30;- }- }- unit 20 {- description "VRF blue interface";- vlan-id 20;- family inet {- address 10.20.1.2/30;- }- }- }[edit]lab@M7i-R106# commit
commit complete
Technique: Automatically Allow Configured BGP Peers in a Loopback Firewall Filter
This technique makes excellent use of the Junos prefix-list and apply-path features to parse a configuration and then dynamically build a list of matching prefixes for use in a firewall filter. It’s a real time-saver when your BGP peering environment undergoes frequent changes.
CThe Junos operating system allows you to protect your device’s control plane by applying a firewall filter to the lo0 interface, but you also want to permit BGP traffic only from explicitly configured peers without having to perform updates to the list of permitted BGP peers in the firewall filter when new peers are added or old ones are removed.
To achieve this goal use the apply-path directive to automatically add the IP addresses of configured BGP peers to a prefix-list, and then reference this prefix-list in a firewall filter to allow BGP traffic only from those peers. The apply-path statement is used to dynamically prefix-lists by referencing other portions of the configuration. The path consists of elements separated by spaces. Each element matches a

Technique:AutomaticallyAllowConfiguredBGPPeersinaLoopbackFirewallFilter 49
specific keyword or identifier within the configuration, and you can use wildcards to match more than one identifier as long as they are en-closed in angle brackets, for example, <*>.
Here, the apply-path directive is used to automatically add the IP addresses of configured BGP peers to a prefix-list:
policy-options { prefix-list bgp-peers { apply-path "protocols bgp group <*> neighbor <*>"; }}
Next, reference the resulting bgp-peers prefix list in a firewall filter. In this example, the port directive is used to match traffic with the well-known BGP port number (179) in either the source or destination port fields:
firewall { family inet { filter protect-re { ... term allow-bgp { from { source-prefix-list { bgp-peers; } protocol tcp; port 179; } then accept; } ... } }}
Note that this filter adheres to current best practice by also specifying the TCP transport protocol to prevent false matches against non-BGP traffic!

50 DayOne:JunosTips,Techniques,andTemplates2011
Tip: Accessing Online Help
Junos provides you with the flexibility to summon help about a command or topic from the CLI. In fact, large portions of the docu-mentation set are stored on secondary media via the Junos Online Documentation package provided in the standard software distribu-tion packages.
CThe Junos CLI offers three online help options:
1) Help topic: use it to obtain general guidelines for a statement:
user@host# help topic interfaces address Configuring the Interface Address
You assign an address to an interface by specifying the address when configuring the protocol family. For the inet family, configure the interface's IP address. For the iso family, configure one or more addresses for the loopback interface. For the ccc, tcc, mpls, tnp, and vpls families, you never configure an address..................<snip>
2) Help reference: use it for assistance with configuration syntax:
user@host# help reference interfaces addressaddress
Syntax
address address { arp ip-address (mac | multicast-mac) mac-address <publish>; broadcast address; destination address; destination-profile name; eui-64; master-only; multipoint-destination address dlci dlci-identifier; multipoint-destination address {................<snip>
3) Help apropos: use it to clarify the context of configuration or operational mode commands based on the specified keyword and mode in which the command is executed. It’s most useful when you remember a general action that is desired but cannot recall the exact syntax needed:
[edit]regress@mse-a# help apropos loopback set dynamic-profiles <profile-name> interfaces sonet-options loopback <loopback>

Tip:SNMPOIDsforSRXMonitoring 51
Loopback modeset dynamic-profiles <profile-name> interfaces sonet-options loopback <loopback> local Local loopbackset dynamic-profiles <profile-name> interfaces sonet-options loopback <loopback> remote . . . .
The help topic and help reference commands return the same result when run in operational or configuration mode. In contrast, help apropos provides contextual help based on the mode in which the command is entered; in operational mode it displays operational (show) commands for the specified variable, while in configuration mode the same command returns help with set commands.
user@host> help apropos loopback test interface feac-loop-initiate Initiate FEAC loopbacktest interface feac-loop-terminate Terminate FEAC loopback
. . .
Tip: SNMP OIDs for SRX Monitoring
Over time, SNMP Monitoring is useful to monitor and track device information, but finding the right Object IDs (OIDs) to monitor can sometimes be a challenge. This tip can help you find what you are looking for.
CUse the Junos CLI to browse the SNMP MIB by using the find function to locate items with a description:
lab@host> show snmp mib walk .1 | match descr sysDescr.0 = Juniper Networks, Inc. m320 internet router, kernel JUNOS 10.0-20110318.0 #0: 2011-03-18 03:10:39 UTC [email protected]:/volume/build/junos/10.0/production/20110318.0/obj-i386/bsd/sys/compile/JUNIPER Build date: 2011-03-18 02:52:44 UTC CopyifDescr.1 = fxp0. . .
You can pipe the output through XML Format to obtain the related information, to include the OID:
user@host> show snmp mib get sysDescr.0 | display xml <rpc-reply xmlns:junos="http://xml.juniper.net/junos/10.0I0/junos"> <snmp-object-information xmlns="http://xml.juniper.net/junos/10.0I0/junos-snmp"> <snmp-object> <name>sysDescr.0</name> <object-value-type>ASCII string</object-value-type> <object-value>Juniper Networks, Inc. m320 internet router, kernel JUNOS 10.0-20110318.0 #0: 2011-03-18 03:10:39 UTC [email protected]:/volume/build/

52 DayOne:JunosTips,Techniques,andTemplates2011
junos/10.0/production/20110318.0/obj-i386/bsd/sys/compile/JUNIPER Build date: 2011-03-18 02:52:44 UTC Copy</object-value> <oid>1.3.6.1.2.1.1.1.0</oid> </snmp-object> </snmp-object-information> <cli> <banner>{master}</banner> </cli></rpc-reply>
For a list of standard MIBs supported by Junos, see: http://www.juniper.net/techpubs/en_US/junos10.3/topics/reference/standards/snmp-std-mibs-junos-nm.html .
And for a list of private MIBs supported by Junos, see: http://www.juniper.net/techpubs/en_US/junos10.3/topics/concept/juniper-specific-mibs-junos-nm.html
NOTE The following MIB Table is useful for SRX monitoring:
run show snmp mib walk jnxJsSPUMonitoringMIB | display xml
Tip: Monitoring Router Alarm LEDs and Controls (craft-interface)
A popular remote troubleshooting command allows the operator to see the status of router alarm LEDs and controls without being physically present.
CThe show chassis craft-interface command provides a console/remote session display of the current alarms and control values. This is particularly useful if the remote operators are not familiar with the equipment or the equipment is in an unoccupied space where no one can see the information. See what happens when the command is issued:
root@M320> show chassis craft-interfaceFPM Display contents: <-- what you see on the front panel LCD +--------------------------+ |M320 | |1 Alarm active | |Y: Backup RE Active | | | +--------------------------|
Front Panel System LEDs: <-- outputs of control values on the chassis (* means value set)Routing Engine 0 1--------------------------OK * *Fail . .
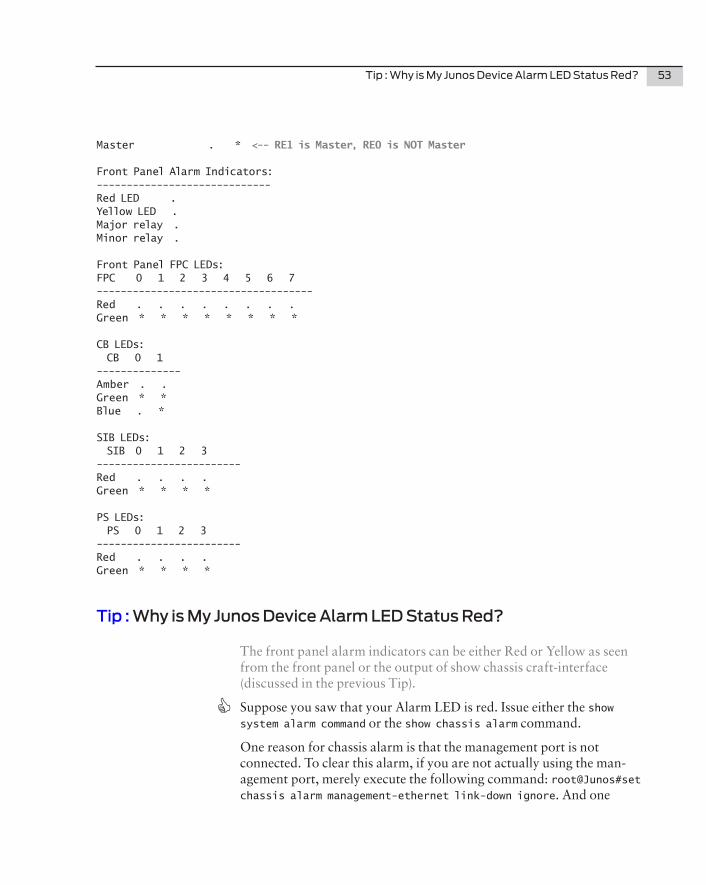
Tip:WhyisMyJunosDeviceAlarmLEDStatusRed? 53
Master . * <-- RE1 is Master, RE0 is NOT Master
Front Panel Alarm Indicators:-----------------------------Red LED .Yellow LED .Major relay .Minor relay .
Front Panel FPC LEDs:FPC 0 1 2 3 4 5 6 7------------------------------------Red . . . . . . . .Green * * * * * * * *
CB LEDs: CB 0 1--------------Amber . .Green * *Blue . *
SIB LEDs: SIB 0 1 2 3------------------------Red . . . .Green * * * *
PS LEDs: PS 0 1 2 3------------------------Red . . . .Green * * * *
Tip : Why is My Junos Device Alarm LED Status Red?
The front panel alarm indicators can be either Red or Yellow as seen from the front panel or the output of show chassis craft-interface (discussed in the previous Tip).
CSuppose you saw that your Alarm LED is red. Issue either the show system alarm command or the show chassis alarm command.
One reason for chassis alarm is that the management port is not connected. To clear this alarm, if you are not actually using the man-agement port, merely execute the following command: root@Junos#set chassis alarm management-ethernet link-down ignore. And one

54 DayOne:JunosTips,Techniques,andTemplates2011
reason for the system alarm is that there is no rescue configuration created. To fix this alarm, merely save a rescue configuration: root@Junos#run request system configuration rescue save.
Let’s illustrate this:
root@Junos#run request system configuration rescue save
lab@M7i-R106> show system alarms 1 alarms currently activeAlarm time Class Description2011-05-03 20:11:27 UTC Major PEM 1 Not OK
The output above does not cite the rescue configuration, because that file is present, as seen in the output of show system commit:
lab@M7i-R106> show system commit 0 2011-05-17 12:23:15 UTC by lab via cli1 2011-05-17 12:16:08 UTC by lab via cli2 2011-05-17 12:15:26 UTC by lab via cli...output truncated.49 2011-03-14 19:14:02 UTC by lab via clirescue 2011-05-05 18:26:22 UTC by lab via cli <-- rescue config
Template: Pipe Commands
The Junos OS contains a number of useful features that allow you to control the output you see when you run commands. They are called pipe commands, and you can even combine multiple pipe commands together.
If you’ve been randomly reading this book, you probably have come across several tips and techniques incorporating pipe commands. Well here, the editors have combined the many pipe command submissions into one template for you.
Regular Expressions
Both the match and except pipe commands use regular expressions, so we need to start with a quick tutorial on regular expressions.
CFor the match and except pipe commands, the Junos CLI uses a kind of matching syntax called regular expressions. Regular expressions are composed of elements, grouping operators, and repetition operators.

Template:PipeCommands 55
To match a fixed string of text, you simply specify that string of text. Here, the pipe looks for every phrase in the configuration that contains the word address:
root@srxA-1> show configuration | match address address 10.210.14.136/26;
Note that the Junos CLI interprets all regular expressions as case-insensitive. So, the regular expression SYSTEM will match system, even though the case differs.
You can also put lists of characters that should match within square brackets. For example, [0356A] will match 0, 3, 5, 6, or A. You can also include ranges of characters. For example, [A-Z] will match any letter. Here, the pipe command will match any interface on FPC 0:
root@srxA-1> show configuration | match "-0/[0-9]/" ge-0/0/0 {
You can also specify that you wish to match any character. The period ( . ) is a special character that matches any character. (It is very similar to the ? in wildcard expressions.) For example, if you use the match pipe command to look for lines in the configuration that match sys.em, you can see that the word system matches this regular expression, because the “t” in system matches the “ . ” in the regular expression:
root@srxA-1> show configuration | match sys.em system {
By default, a regular expression looks for a match anywhere on a line. If you want to change this behavior, you can use special characters to match the beginning ( ̂ ) or end ( $ ) of a line. You can then specify your match relative to that location. For example, this regular expres-sion looks for lines that begin with the word Physical:
root@srxA-1> show interfaces | match ̂ Physical Physical interface: ge-0/0/0, Enabled, Physical link is UpPhysical interface: gr-0/0/0, Enabled, Physical link is UpPhysical interface: ip-0/0/0, Enabled, Physical link is UpPhysical interface: lsq-0/0/0, Enabled, Physical link is UpPhysical interface: lt-0/0/0, Enabled, Physical link is UpPhysical interface: mt-0/0/0, Enabled, Physical link is UpPhysical interface: sp-0/0/0, Enabled, Physical link is UpPhysical interface: ge-0/0/1, Enabled, Physical link is UpPhysical interface: ge-0/0/2, Enabled, Physical link is UpPhysical interface: ge-0/0/3, Enabled, Physical link is UpPhysical interface: ge-0/0/4, Enabled, Physical link is UpPhysical interface: ge-0/0/5, Enabled, Physical link is UpPhysical interface: ge-0/0/6, Enabled, Physical link is UpPhysical interface: ge-0/0/7, Enabled, Physical link is Up

56 DayOne:JunosTips,Techniques,andTemplates2011
Physical interface: ge-0/0/8, Enabled, Physical link is UpPhysical interface: ge-0/0/9, Enabled, Physical link is UpPhysical interface: ge-0/0/10, Enabled, Physical link is UpPhysical interface: ge-0/0/11, Enabled, Physical link is UpPhysical interface: ge-0/0/12, Enabled, Physical link is DownPhysical interface: ge-0/0/13, Enabled, Physical link is DownPhysical interface: ge-0/0/14, Enabled, Physical link is UpPhysical interface: ge-0/0/15, Enabled, Physical link is UpPhysical interface: fxp2, Enabled, Physical link is UpPhysical interface: gre, Enabled, Physical link is UpPhysical interface: ipip, Enabled, Physical link is UpPhysical interface: lo0, Enabled, Physical link is UpPhysical interface: lsi, Enabled, Physical link is UpPhysical interface: mtun, Enabled, Physical link is UpPhysical interface: pimd, Enabled, Physical link is UpPhysical interface: pime, Enabled, Physical link is UpPhysical interface: pp0, Enabled, Physical link is UpPhysical interface: ppd0, Enabled, Physical link is UpPhysical interface: ppe0, Enabled, Physical link is UpPhysical interface: st0, Enabled, Physical link is UpPhysical interface: tap, Enabled, Physical link is UpPhysical interface: vlan, Enabled, Physical link is Up
You can use repetition arguments to specify that a particular item should be matched a particular number of times. An asterisk ( * ) tells the software to match zero or more instances of the immediately preceding element, the question-mark ( ? ) tells the software to match zero or one instances of the immediately preceding element, and the plus sign ( + ) tells the software to match one or more instances of the immediately preceding element. For example, sys*tem will match sytem (zero s’s), system (one s), and sysssssssstem (more than one s). For another example, sys?tem will match sytem (zero s’s) and system (one s), but not sysssssssstem (more than one s). Finally, sys+tem will match system (one s) and sysssssssstem (more than one s), but not sytem (zero s’s).
A very common use of the asterisk ( * ) repetition operator occurs with the period ( . ). The regular expression .* tells the software to match zero or more instances of any character. In other words, this will match any string, including an empty string.
You can use a logical or operator to specify that a match occurs if either condition is met. The pipe ( | ) is the logical or operator. (Be-cause the pipe also has special significance in the Junos CLI, you must enclose a regular expression in quotation marks if it includes a pipe as part of the regular expression itself.) Here, the | operator is used to match either the address or neighbor statements:

Template:PipeCommands 57
root@srxA-1> show configuration | match "address|neighbor" address 10.210.14.136/26;neighbor 10.210.14.188;
You can get a logical and operation with match and except simply by piping the results to another match or except operation. For example, show bgp summary | exclude Connect | exclude 1234 excludes any session in the Connect state, as well as any session with AS 1234.
You can use parentheses to group items in regular expressions. Once you do this, the parentheses-enclosed match is treated like a single element. You can use logical operators between these elements or you can use repetition operators on these elements. In this example, the expression looks for all Gigabit Ethernet interfaces, and all other interfaces that are Up:
root@srxA-1> show interfaces | match "(̂ Physical.* ge-)|(̂ Physical.*Up$)" Physical interface: ge-0/0/0, Enabled, Physical link is UpPhysical interface: gr-0/0/0, Enabled, Physical link is UpPhysical interface: ip-0/0/0, Enabled, Physical link is UpPhysical interface: lsq-0/0/0, Enabled, Physical link is UpPhysical interface: lt-0/0/0, Enabled, Physical link is UpPhysical interface: mt-0/0/0, Enabled, Physical link is UpPhysical interface: sp-0/0/0, Enabled, Physical link is UpPhysical interface: ge-0/0/1, Enabled, Physical link is UpPhysical interface: ge-0/0/2, Enabled, Physical link is UpPhysical interface: ge-0/0/3, Enabled, Physical link is UpPhysical interface: ge-0/0/4, Enabled, Physical link is UpPhysical interface: ge-0/0/5, Enabled, Physical link is UpPhysical interface: ge-0/0/6, Enabled, Physical link is UpPhysical interface: ge-0/0/7, Enabled, Physical link is UpPhysical interface: ge-0/0/8, Enabled, Physical link is UpPhysical interface: ge-0/0/9, Enabled, Physical link is UpPhysical interface: ge-0/0/10, Enabled, Physical link is UpPhysical interface: ge-0/0/11, Enabled, Physical link is UpPhysical interface: ge-0/0/12, Enabled, Physical link is DownPhysical interface: ge-0/0/13, Enabled, Physical link is DownPhysical interface: ge-0/0/14, Enabled, Physical link is UpPhysical interface: ge-0/0/15, Enabled, Physical link is UpPhysical interface: fxp2, Enabled, Physical link is UpPhysical interface: gre, Enabled, Physical link is UpPhysical interface: ipip, Enabled, Physical link is UpPhysical interface: lo0, Enabled, Physical link is UpPhysical interface: lsi, Enabled, Physical link is UpPhysical interface: mtun, Enabled, Physical link is UpPhysical interface: pimd, Enabled, Physical link is UpPhysical interface: pime, Enabled, Physical link is UpPhysical interface: pp0, Enabled, Physical link is UpPhysical interface: ppd0, Enabled, Physical link is UpPhysical interface: ppe0, Enabled, Physical link is Up

58 DayOne:JunosTips,Techniques,andTemplates2011
Physical interface: st0, Enabled, Physical link is UpPhysical interface: tap, Enabled, Physical link is UpPhysical interface: vlan, Enabled, Physical link is Up
If you want to match on any of the characters that have special meaning in regular expressions, you can precede them with a backs-lash ( \ ). For example, show configuration | match \[ displays any line in the configuration that contains a left square bracket. Backs-lashes are especially useful with IP addresses. Because the ( . ) has special meaning in regular expressions, you should precede any literal ( . ) in an IP address with a backslash. Otherwise, you could match things you did not intend.
You’ll see further examples in this template as you review the match and except operators.
Regular expressions are also used with the replace operator. There, the match is only on the user-defined string. For example, to match a BGP session with 10.210.38.12, you could use the regular expression 1̂0\.210\.38\.12$. However, with the match and except pipe operators,
the match occurs on the entire line, so this same regular expression would not work with those commands; rather, with the match and except pipe commands, you would want to match on neighbor 10\.210\.38\.12( |;).
Excluding Lines of Output
You can use the except pipe command to show all lines of output except those that match a regular expression.
As a specific example of this, you can use the except pipe command to eliminate the comments added when you are using the display inher-itance pipe command:
[edit]lab@srxA-2# show interfaces | display inheritance ge-0/0/3 { unit 0 { family inet { address 172.18.2.2/30; } ## ## 'mpls' was inherited from group 'mpls' ## family mpls; }}

Template:PipeCommands 59
ge-0/0/4 { vlan-tagging; unit 102 { vlan-id 102; family inet { address 172.20.102.1/24; } ## ## 'mpls' was inherited from group 'mpls' ## family mpls; } unit 202 { vlan-id 202; family inet { address 172.20.202.1/24; } ## ## 'mpls' was inherited from group 'mpls' ## family mpls; }}
[edit]lab@srxA-2# show interfaces | display inheritance | except ##ge-0/0/3 { unit 0 { family inet { address 172.18.2.2/30; } family mpls; }}ge-0/0/4 { vlan-tagging; unit 102 { vlan-id 102; family inet { address 172.20.102.1/24; } family mpls; } unit 202 { vlan-id 202; family inet { address 172.20.202.1/24; } family mpls; }}

60 DayOne:JunosTips,Techniques,andTemplates2011
Matching Output
You can use the match pipe command to show just the output that is most relevant for your purposes. The match command takes a regular expression as an argument.
For one example, a user may not want to sift through three pages of output to see queue drops in all forwarding classes on an interface. With this command you can get all the drop statistics in one page:
lab@M7i-R110> show interfaces queue fe-0/0/1 | match "Physical|Queue|Drop"Physical interface: fe-0/0/1, Enabled, Physical link is UpEgress queues: 4 supported, 4 in useQueue: 0, Forwarding classes: best-effort Queued: Tail-dropped packets : 0 0 pps RED-dropped packets : 0 0 pps RED-dropped bytes : 0 0 bpsQueue: 1, Forwarding classes: expedited-forwarding Queued: Tail-dropped packets : 0 0 pps RED-dropped packets : 0 0 pps RED-dropped bytes : 0 0 bpsQueue: 2, Forwarding classes: assured-forwarding Queued: Tail-dropped packets : 0 0 pps RED-dropped packets : 0 0 pps RED-dropped bytes : 0 0 bpsQueue: 3, Forwarding classes: network-control Queued: Tail-dropped packets : 0 0 pps RED-dropped packets : 0 0 pps RED-dropped bytes : 0 0 bps
In this example, you can quickly see the input and output rates on every interface. This is quite useful for tracking down Layer-2 loops or other conditions where an interface is transmitting or receiving large amounts of traffic:
> show interfaces | match "(̂ Physical|bps|pps)"
One helpful user offered one additional tip about the match pipe command, which he said was handy for UNIX junkies:
One can use grep keyword in place of the match keyword.

Tip:ShowVersionandHaiku 61
No Paging
There are some cases where it is better to temporarily disable the software’s automatic paging feature. You can do this by adding the no-more pipe command to a command. (You can also combine this with other pipe commands.)
This is useful when capturing data and works nicely with terminal programs that have a logging feature to capture the output.
The temporary disablement can be especially useful in two cases. First, the automatic paging feature adds line breaks after each line displayed on the screen. If the output contains long lines, this can add extraneous line breaks. If you are trying to copy parts of the configu-ration from one Junos device to another, these extra line breaks can cause problems. So, you should use the no-more pipe command to display the configuration when you are going to copy it from one router and paste it into another.
Second, disabling the automatic paging feature can be useful when the CLI is especially slow (for example, when displaying large amounts of data on the console) and you are trying to gather troubleshooting information. You can use the no-more command to cause the CLI to display information as quickly as possible.
Tip: Show Version and Haiku
This one probably doesn’t qualify as a tip... although most people in Juniper know about it, all us newbies don’t. Besides, someday it will be fun to see if it’s still there in Junos version 67.1.
CJunos is poetry.
root@srxA-1> show version and haiku Hostname: srxA-1Model: srx240h-poeJUNOS Software Release [10.4R1.9]
Glorious morning Well beyond what I deserve Stretch myself and grow
What can we say? CLI tricks and hidden commands are always interesting… especially when they serve almost no purpose.

62 DayOne:JunosTips,Techniques,andTemplates2011
Tip: CLI History Search
CThe Emacs shortcuts available for Junos are very powerful, and one not widely known is CTRL-R. This shortcut accesses the pool of previously-issued commands and lets you issue a search of sorts. For instance, let’s say about a half-hour ago you issued the run show security ipsec secu-rity-associations command, and would rather not up-arrow fifteen times to find it again.
First, press CTRL-R, and note that it lists a history search.
Next, type the letter ‘r’. The buffer automatically starts auto-completing based on commands issued that start with the letter ‘r’. After you get ‘ru’ typed in, the command is listed and all you have to do is press Enter to execute! Here’s the proof:
[edit](history search) '':
[edit](history search) 'r': run telnet 10.10.10.10
[edit](history search) 'ru': run show security ipsec security-associations
[edit]lab@srxA-2# run show security ipsec security-associations Total active tunnels: 1 ID Gateway Port Algorithm SPI Life:sec/kb Mon vsys <131073 172.18.1.2 500 ESP:3des/md5 fd8d9f55 2442/ unlim - 0 >131073 172.18.1.2 500 ESP:3des/md5 b3649bb5 2442/ unlim - 0 <131073 172.18.1.2 500 ESP:3des/md5 d9bf613c 2472/ unlim - 0 >131073 172.18.1.2 500 ESP:3des/md5 f4ebcd7a 2472/ unlim - 0
Tip: Unable to Access a Standby SRX?
CIf you’re unable to access a standby SRX, it’s probably due to the fact that the backup/standby SRX’s do not have a routing daemon running (rdp). As a result, static routes must be used, but not just any static route will do. To configure routing when the rdp daemon isn’t running you must configure a backup-router.
[edit]juniper@SRX5800#set system backup-router 10.10.10.1 [edit]juniper@SRX5800#set system backup-router destination 172.16.0.0/16
This will make the 172.16/16 network reachable at all times.

Tip:HowtoChatInsideaRouterTelnetSessionwithaConnectedUser 63
Tip: How to Chat Inside a Router Telnet Session with a Connected User
If you ever want to communicate with another user logged into the system, this tip is for you. Do it with a request message command. A common use of this command is with the all option, typically when you wish to inform all users that the system will be halted in five or ten minutes.
CA simple example of talking inside a router session, is to say hi to all users:
[edit] regress@bronica# run request message all message "hi" <-- note use of “run” optionBroadcast Message from regress@bronica(/dev/ttyp0) at 1:27 PST... hi[edit] regress@bronica#
If you want to chat with other users connected inside the router, the request message command also works well, just by identifying the specific user with whom you want to chat. Use a show system users command to identify the destined user.
lab@M7i-R106> show system users 12:49PM up 13 days, 16:41, 1 user, load averages: 0.00, 0.01, 0.04USER TTY FROM LOGIN@ IDLE WHATlab p0 172.23.1.252 12:31PM - -cli (cli)
Now send your chat:
lab@M7i-R106> request message user lab message "Did you check the redundant power supply?" Message from lab@M7i-R106 on ttyp0 at 12:50 ... <-- source user, time, and terminal idDid you check the redundant power suppl <-- messageEOF <-- End of file/message marker
Note that you can also identify the message recipient by terminal ID, in case you share a single login session amongst several users (like in a lab environment, because you would never share a common login ID in a production environment). Just use the keyword terminal in addition to the keyword user and provide the TTY id from the output of show system users:
lab@M7i-R106> request message terminal p0 user lab message "this message is to terminal p0"

64 DayOne:JunosTips,Techniques,andTemplates2011
Tip: Loading a Junos Factory Default Configuration
CFrequently in lab environments or for equipment qualification testing, you need to take the equipment back to the factory default. Using Junos, you have a variety of methods:
Method One (For all Junos devices):
Step 1. Configure the load factory-default option:
root@host# load factory-default
Step 2. Configure a root-authentication plain-text-password.
Note that you must have a valid root password configured. You must type the same password twice.
root@host# set system root-authentication plain-text-password (Press Enter)New password: Retype new password:
Step 3. Commit the configuration change.
root@host#commit
Step 4. Reboot the system. The rebooted system will boot up as amnesiac (meaning it is in factory default)—however, the root authen-tication password is still set!
Wed May 18 04:08:36 UTC 2011Amnesiac (ttyu0)login:
Method Two (For EX Series switches with LCD):
From LCD , under the Maintenance Tab , choose factory-default. After that you will be able to access CLI as root without a password. To be able to commit any changes you should first set a root password:
root@host# set system root-authentication plain-text-password (Press Enter)New password: Retype new password:
Method Three (For SRX Devices):
You can use the Reset Config button on the front panel of the SRX to reset the device to its factory default configuration. Press and hold the Reset Config button on the front panel of the SRX device (using any handy paperclip) for at least 15 seconds, until the Status LED glows amber.

Tip:RestartaSoftwareProcess 65
This is the display you see in the console window:
--- JUNOS 10.4R1.9 built 2010-12-04 10:20:16 UTC Broadcast Message from root@Student-18 (no tty) at 4:26 UTC... Config button pressed Committing factory default configuration
Power off the system and reboot it. You will come up in factory default, with no root password.
Tip: Restart a Software Process
Restarting a process is equivalent to a UNIX kill command. By default, the process is signaled with a -15 and is allowed to restart gracefully. You can signal an immediate and unconditional kill with the immediately keyword, which equates to a kill -9. Once a process is killed, the Junos inet process will automatically restart it, unless it repeatedly dies and thrashing is declared, in which case the process is not restarted.
You should contact JTAC and open a support case if you can repro-duce a situation where normal operation is only achieved after killing a process.
CJunos is modular in nature and while generally quite robust and stable, there are times when a specific set of actions or configuration steps can result in unexpected operation. When all looks right but things are just not working as you expect, consider restarting the related process before moving on to the significantly more drastic action of a reboot.
The CLI displays a list of processes that can be restarted:
user@host> restart ?Possible completions: adaptive-services Adaptive services process application-identification Application-identification process audit-process Audit process auto-configuration Interface Auto-configuration chassis-control Chassis control process class-of-service Class-of-service process database-replication Database Replication process dhcp-service Dynamic Host Configuration Protocol process diameter-service Diameter process

66 DayOne:JunosTips,Techniques,andTemplates2011
disk-monitoring Disk monitoring process. . .
The following processes do a lot of work in their respective areas:
routingsflow-serviceigmp-snoopingsnmpdhcpethernet-switching
When one of their functions appears broken consider performing a process restart. For example, a stuck EBGP peer may recover from a restart routing, which disrupts all routing protocols and peers, by the way, but is unlikely to be helped by a restart SNMP, for example.
Tip: Remote Wireshark Analysis
The write-file argument to the monitor traffic command is hidden due to concerns that a user may leave a capture running for so long that one could run out of /var space, leading to all sorts of various issues. It’s a valid concern, so watch out. In the past, filtering based on protocol expression, did not work on the CLI, but would work from a saved capture file. While this issue has since been remedied, many find that saved capture files are useful: this tip allows you to avoid having to go to a root shell to run tcpdump along with its arguments in order to save a capture file.
CMany people prefer a modern GUI-based packet decode with easy-to-use filtering rather than the old, stodgy tcpdump output provided by the CLI and shell. You can use a hidden write-file argument to the monitor traffic command to write matching output to a local pcap formatted file. You can then transfer the file to a PC or UNIX host to display with an analyzer, such as Wireshark.
This example filters traffic based on the OSPF protocol expression and writes the trace output to a file called ospf.cap, which is then verified to exist with sane pcap contents by reading the file back in, using the equally hidden read-file argument:
user@host# monitor traffic interface ge-0/2/3 matching "proto 89" write-file ospf.cap size 1200 detail Address resolution is ON. Use <no-resolve> to avoid any reverse lookup delay.Address resolution timeout is 4s.Listening on ge-0/2/3, capture size 1200 bytes

Tip:RemoteWireshark/TSharkAnalysisViaSSH 67
^C23 packets received by filter0 packets dropped by kernel
user@host# file list ospf.cap /var/home/regress/ospf.cap
user@host# monitor traffic read-file ospf.cap Reverse lookup for 172.16.1.98 failed (check DNS reachability).Other reverse lookup failures will not be reported.Use <no-resolve> to avoid reverse lookups on IP addresses.
15:17:48.201521 Out IP 172.16.1.98 > OSPF-ALL.MCAST.NET: OSPFv2, Hello, length 4815:17:48.916604 In IP 172.16.1.97 > OSPF-ALL.MCAST.NET: OSPFv2, Hello, length 48
Tip: Remote Wireshark/TShark Analysis Via SSH
The previous tip discussed the use of the monitor traffic command and how you can write the output to a file (using a hidden argument) for either local analysis via tcpdump/monitor traffic, or to transfer to a remote machine for analysis with a commercial/GUI-based protocol analyzer. This tip shows you how to get the best of both worlds: external protocol decode, text-based or GUI, via ssh without having to explicitly save results to a file which then needs to be transferred to the analysis host.
CUse this tip to get better protocol decodes when you have access to a root shell on a SSH-enabled version of Junos, with access to a remote SSH-enabled UNIX machine that has the TShark or Wireshark analysis programs installed. Pretty cool, huh?
user@host> start shell% suPassword:root@host%
root@host% tcpdump -c 1 -i xe-6/0/0 -n -s 2000 -w - -l "proto ospf" | ssh user@unix-host"(/usr/sbin/tshark -nVli -)"Address resolution is OFF.Listening on xe-6/0/0, capture size 2000 bytes
user@unix-host's password: Capturing on -Frame 1 (120 bytes on wire, 120 bytes captured) Arrival Time: Mar 25, 2011 10:04:19.739371000 [Time delta from previous captured frame: 0.000000000 seconds] [Time delta from previous displayed frame: 0.000000000 seconds]

68 DayOne:JunosTips,Techniques,andTemplates2011
[Time since reference or first frame: 0.000000000 seconds] Frame Number: 1 Frame Length: 120 bytes Capture Length: 120 bytes [Frame is marked: False] [Protocols in frame: juniper:eth:ip:ospf]Juniper Ethernet Magic-Number: 0x4d4743 Direction: Out L2-header: Present Extension(s) Total length: 16 Device Media Type Extension TLV #3, length: 1 Device Media Type: Ethernet (1) Logical Interface Encapsulation Extension TLV #6, length: 1 Logical Interface Encapsulation: Ethernet (14) Device Interface Index Extension TLV #1, length: 2 Device Interface Index: 273 Logical Interface Index Extension TLV #4, length: 4 Logical Interface Index: 78 [Payload Type: Ethernet]Ethernet II, Src: 00:21:59:fd:3b:f4 (00:21:59:fd:3b:f4), Dst: 01:00:5e:00:00:05 (01:00:5e:00:00:05) Destination: 01:00:5e:00:00:05 (01:00:5e:00:00:05) Address: 01:00:5e:00:00:05 (01:00:5e:00:00:05) .... ...1 .... .... .... .... = IG bit: Group address (multicast/broadcast) .... ..0. .... .... .... .... = LG bit: Globally unique address (factory default) Source: 00:21:59:fd:3b:f4 (00:21:59:fd:3b:f4) Address: 00:21:59:fd:3b:f4 (00:21:59:fd:3b:f4) .... ...0 .... .... .... .... = IG bit: Individual address (unicast) .... ..0. .... .... .... .... = LG bit: Globally unique address (factory default) Type: IP (0x0800)Internet Protocol, Src: 201.0.1.1 (201.0.1.1), Dst: 224.0.0.5 (224.0.0.5) Version: 4 Header length: 20 bytes Differentiated Services Field: 0xc0 (DSCP 0x30: Class Selector 6; ECN: 0x00) 1100 00.. = Differentiated Services Codepoint: Class Selector 6 (0x30) .... ..0. = ECN-Capable Transport (ECT): 0 .... ...0 = ECN-CE: 0 Total Length: 84 Identification: 0xcc8f (52367) Flags: 0x00 0.. = Reserved bit: Not Set .0. = Don't fragment: Not Set ..0 = More fragments: Not Set Fragment offset: 0 Time to live: 1 Protocol: OSPF IGP (0x59) Header checksum: 0x41fb [correct] [Good: True] [Bad : False] Source: 201.0.1.1 (201.0.1.1)
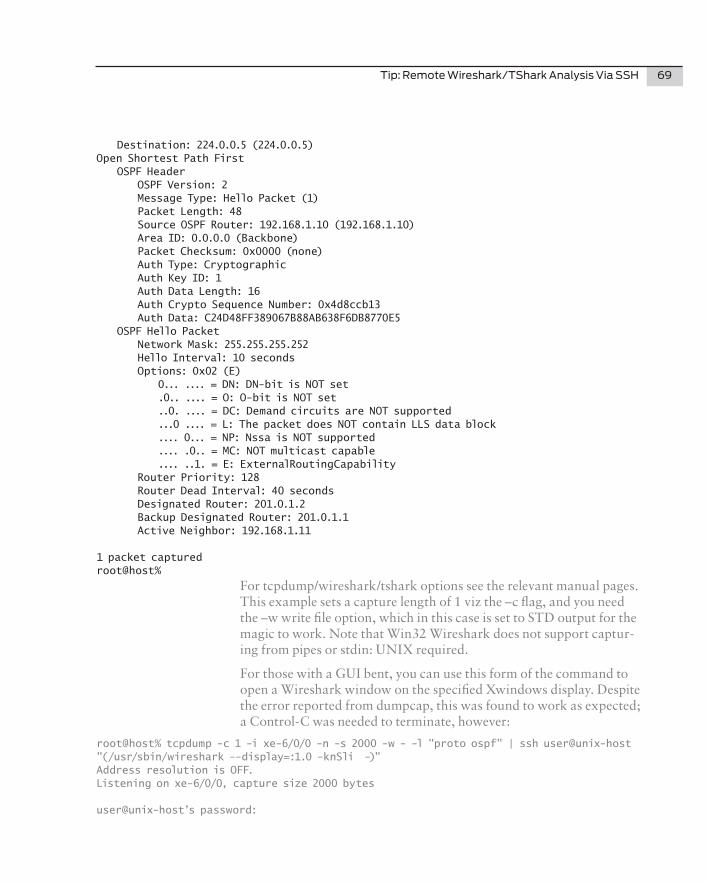
Tip:RemoteWireshark/TSharkAnalysisViaSSH 69
Destination: 224.0.0.5 (224.0.0.5)Open Shortest Path First OSPF Header OSPF Version: 2 Message Type: Hello Packet (1) Packet Length: 48 Source OSPF Router: 192.168.1.10 (192.168.1.10) Area ID: 0.0.0.0 (Backbone) Packet Checksum: 0x0000 (none) Auth Type: Cryptographic Auth Key ID: 1 Auth Data Length: 16 Auth Crypto Sequence Number: 0x4d8ccb13 Auth Data: C24D48FF389067B88AB638F6DB8770E5 OSPF Hello Packet Network Mask: 255.255.255.252 Hello Interval: 10 seconds Options: 0x02 (E) 0... .... = DN: DN-bit is NOT set .0.. .... = O: O-bit is NOT set ..0. .... = DC: Demand circuits are NOT supported ...0 .... = L: The packet does NOT contain LLS data block .... 0... = NP: Nssa is NOT supported .... .0.. = MC: NOT multicast capable .... ..1. = E: ExternalRoutingCapability Router Priority: 128 Router Dead Interval: 40 seconds Designated Router: 201.0.1.2 Backup Designated Router: 201.0.1.1 Active Neighbor: 192.168.1.11
1 packet capturedroot@host%
For tcpdump/wireshark/tshark options see the relevant manual pages. This example sets a capture length of 1 viz the –c flag, and you need the –w write file option, which in this case is set to STD output for the magic to work. Note that Win32 Wireshark does not support captur-ing from pipes or stdin: UNIX required.
For those with a GUI bent, you can use this form of the command to open a Wireshark window on the specified Xwindows display. Despite the error reported from dumpcap, this was found to work as expected; a Control-C was needed to terminate, however:
root@host% tcpdump -c 1 -i xe-6/0/0 -n -s 2000 -w - -l "proto ospf" | ssh user@unix-host "(/usr/sbin/wireshark --display=:1.0 -knSli -)"Address resolution is OFF.Listening on xe-6/0/0, capture size 2000 bytes
user@unix-host’s password:
70 DayOne:JunosTips,Techniques,andTemplates2011
dumpcap: There are no interfaces on which a capture can be done<Wireshark window opens at Unix host on the specified Xwindows display with captured packet decode>^CKilled by signal 2.root@host%
Tip: Emacs Shortcuts
These are common shortcuts that we suspect many Junos power users use on a regular basis, but hey, chances are they’ve been pushed aside by other Junos memorabilia.
CUsing key combinations at the command-line can save you time:
• CTRL-Atakesyoutothebeginningofthecommandline
• CTRL-Etakesyoutotheendofthecommandline
• CTRL-Wdeletesbackwardstothepreviousspace
• CTRL-Udeletestheentirecommandline
• CTRL-Lredrawsthecommandline(incaseithasbeeninterruptedby messages, etc.)
Template: 97 CLI Tips
One of the Junos developer gurus contributed 97 CLI tips. While some are covered elsewhere, they are duplicated here in their entirety because they make such a handy reference.
CUse configuration groups to represent common pieces of configuration and to reduce the size of your configuration file.
Use the re0 and re1 configuration groups to restrict configuration to a particular routing engine.
Use configuration groups to group related configuration statements.
Use configuration groups to supply default values.
Use the display inheritance CLI pipe to show where configuration groups are inherited.
In configuration mode, use the display detail CLI pipe to show more information about the configured values.

Template:97CLITips 71
In configuration mode, use the compare pipe to display differences between the candidate configuration and the committed configuration.
Use CTRL-R in the CLI to search the command line history for a matching command.
Use ESC-/ in the CLI to expand strings into matching words from the command line history.
Use the annotate command to add comments to your configuration.
Use # in the beginning of a line in command scripts to cause the rest of the line to be ignored.
Use help syslog to show more information about syslog messages.
Use help apropos to show commands related to a topic.
Use help topic to display Junos documentation on a topic.
Use help reference to display the Junos reference documentation on a topic.
Use CLI pipes to display more information about commands, control the automore feature, save CLI output, and more.
Use the display xml CLI pipe to show the equivalent XML output for any CLI command.
Use the no-more CLI pipe to disable the CLI’s more capability and let the multiple pages of output scroll without stopping.
Use the match CLI pipe to display lines matching a pattern.
Use the except CLI pipe to display lines that do not match a pattern.
Use the save CLI pipe to save output to a local or remote file.
Use the count CLI pipe to count the number of lines in the output.
Use multiple CLI pipes to build complex commands. For example: show interfaces | match Description | count.
When displaying a subset of lines using the match or except CLI pipes, type 'C' at the more prompt to display all lines.
Type 'G' at the more prompt to jump to the bottom of the output.
Type 'g' at the more prompt to jump to the top of the output.
Type 'b' at the more prompt to go backwards one page.

72 DayOne:JunosTips,Techniques,andTemplates2011
Type '/' at the more prompt to search for a string in the rest of the output.
Type '?' at the more prompt to search backwards for a string.
Type 's' at the more prompt to save the current display to a file or url.
Type 'N' at the more prompt to turn the more off for the rest of the current command.
Type 'h' at the more prompt to display help information.
Use the hold CLI pipe to hold the cli at the more prompt at the bottom of the output. This is useful when displaying less than one screen of data.
Type 'm' at the more prompt to give additional regular expressions against which to match output.
Type 'e' at the more prompt to give additional regular expressions against which to exclude output.
When hunting through large log files, use the 'm' and 'e' keys to iteratively refine your search by discarding irrelevant lines.
Use the TAB key to autocomplete interface names in operational mode.
Use the TAB key to autocomplete CLI commands.
Use the rollback command to restore previous configurations.
In configuration mode, type rollback ? to see when previous configu-rations were committed, and by whom.
Use the rollback command to discard uncommitted changes by reloading the most recently committed configuration.
In configuration mode, the status command displays who is editing the configuration and where in the hierarchy they are working.
Use configure private to edit a private copy of the configuration, so your work will be unaffected by others editing the configuration.
Use configure exclusive to ensure you are the only one editing the configuration. Other users are blocked from making changes.
In configuration mode, use the copy command to replicate configura-tion statements.
In configuration mode, use the insert command to insert a new configuration into existing lists.

Template:97CLITips 73
In configuration mode, use the rename command to give configuration a new identifier. For example, rename interface fe-0/0/1 to fe-0/0/2.
In configuration mode, the delete command with no arguments will delete the entire configuration hierarchy under the current location.
Use commit check to check configuration for correctness without making it active.
In configuration mode, use quit configuration-mode to exit configura-tion mode from any level of the hierarchy.
Use a URL to load configuration using ftp. For example, load merge ftp://user:password@host/filename.
Use a URL to load configuration using http. For example, load merge http://user:password@host/filename.
Use a URL to save output using ftp. For example, show route summary | save ftp://user:password@host/filename.
Use user@host: syntax to save output using scp. For example, show route summary | save user@host:filename.
Use a: to save output to the PCMCIA card. For example, show route summary | save a:filename.
Use b: to save output to the second (configuration) partition on the PCMCIA card. For example, show configuration | save b:filename.
Use re0: and re1: to save output to the other routing engine. For example, show route summary | save re1:filename.
On EX-series platforms in a Virtual Chassis configuration, you can use fpc0:, fpc1:, fpc2:, etc. to save files to the appropriate member switch.
In configuration mode, the [edit] banner displays the current location in the configuration hierarchy.
Use commit confirmed to ensure that configuration changes do not disconnect the router from the network.
Use the monitor command to monitor system log files for changes.
Use the monitor interface command to display real-time interface statistics.
Use the request system logout command to forcibly log a user out of the router.

74 DayOne:JunosTips,Techniques,andTemplates2011
Use request system snapshot to make a snapshot of the running system on the hard disk drive (or other alternate media).
Use the deactivate command to mark configuration statements inactive. The statements stay in the configuration, but are effectively commented out.
Use the activate command to clear the inactive marker from configu-ration statements. This is the opposite of the deactivate command.
Use top to get to the top of the configuration hierarchy. Use up to move up one level, and up <count> to move up a number of levels.
Use top <cmd> to issue a command at the top of the configuration hierarchy without moving the current edit point. You can use up <n> <cmd> also.
Use top edit <path> to move to a configuration statement relative to the top of the hierarchy.
Use up <n> edit <path> to move to a configuration relative to the statement <n> levels above the current edit point.
Use commit at <time> to perform a commit automatically at a desig-nated time. You can use clear commit to cancel a scheduled commit.
Use commit sync to keep configuration files synchronized between master and slave routing engines.
Use commit and-quit to exit configuration mode after the commit has succeeded. If the commit fails you are left in configuration mode.
Use commit comment <text> to add a log message to this commit.
Use load <style> terminal to load statements from the terminal using cut-n-paste. Use Control-D to mark the end of data.
Use load patch to load structured patch files that follow the unified patch style; show | compare generates this style.
Use show configuration | match { to see a quick overview of your configuration hierarchy. Use 'C' at the more prompt to clear the match.
Use request system software validate to validate the incoming software against the current configuration without impacting the running system.
Use request message user <foo> to send a text message to one user. Use request message all to send to all current users.

Template:97CLITips 75
Use request message CLI pipe to replicate output of show commands to other users.
Use the resolve CLI pipe to resolve IP addresses into hostnames.
In operational mode, use show cli history to view previously execut-ed commands.
Use run <command> to run operational mode commands from configu-ration mode.
In configuration mode, use run show cli history to view previously executed commands.
Use show configuration | except SECRET-DATA to exclude configura-tion statements tagged with the line comment marking them as sensitive.
Use the apply-groups statement at any level of the configuration hierarchy to inherit configuration statements from a configuration group.
Use the apply-groups-except statement at any level except the top level of the configuration hierarchy to turn off inheritance of configu-ration statements from configuration groups.
Use the apply-path statement to define a prefix list containing prefixes extracted from any configuration path.
Use the help tip cli to see more CLI tips.
Use the configuration statement [system login class <name> login-tip] to turn on CLI tips for a login class.
Use wildcarded identifiers in configuration groups to allow one statement to be applied in multiple locations.
Use the match and except CLI pipelines with the monitor start command to automatically filter logging output.
Use Escape-Q to toggle log output on the current terminal. Excessive log output can make typing difficult.
Use the wildcard delete command in configuration mode to delete a number of interfaces using a regular expression. The regular expres-sion is used to match the interface names.
Use load merge <filename> with relative option to avoid having to type the complete configuration hierarchy.

76 DayOne:JunosTips,Techniques,andTemplates2011
Include the configuration statement at the [system archival] hierar-chy level to have the router automatically copy configuration files to a FTP or SCP server.
Use M-. to insert last word of the previous command. Repeat M-. to scroll through last word of each command in the history. To do the same for Nth word, precede M-. with M-n.
One quick note: In this tip, the submitter uses the notation M-x. This notation is telling you to hold down your meta key and press the x key. What is your meta key? If you are an Emacs power-user, you already know how to handle this. For most people with Windows PCs, you can press and release the Escape key, and then press the x key. On some (or most?) Sun keyboards, you may use the diamond key as the meta key. For other platforms, well, you can submit your own tip for the next edition of this book. ; )
Use the replace command in configuration mode to globally replace a pattern with a new character string. The pattern can be a regular expression.
As noted elsewhere, the regular expression matches just the user-sup-plied identifier and not surrounding keywords. (So, ̂ 10\.210\.38\.12$ would match the neighbor IP address 10.210.38.12.)
Technique: Port Mirroring on EX Switches
Configuring port mirroring on EX switches is a bit more complex than the one-line port monitor statement that users of the equivalent SPAN feature on IOS switches may be familiar with. The need for two monitor ports for non-blocking full duplex might also catch such users off-guard.
CPort mirroring is used on Layer 2 switches to allow the redirection of desired traffic to a monitor port for protocol/security analysis.
Note that in Junos if you want to do line-rate monitoring then you’ll need to configure two monitors, one from input egress to a first output port, and a second from input ingress to a second output port, where Junos defines the following as:
ninput: the port being monitored
ninput egress: traffic leaving the switch

Technique:PortMirroringonEXSwitches 77
ninput ingress: traffic entering the switch
noutput: the port doing the monitoring
Use these commands to monitor a single port (ge-0/0/0 unit 0) in both transmit and receive directions (Full Duplex) to a single, and therefore 2X oversubscribed, output port (ge-0/0/10 unit 0):
user@host> configure Entering configuration mode
[edit]user@host# edit ethernet-switching-options analyzer foo
[edit ethernet-switching-options analyzer foo]user@host# set input egress interface ge-0/0/0.0
[edit ethernet-switching-options analyzer foo]user@host# set input ingress interface ge-0/0/0.0
[edit ethernet-switching-options analyzer foo]user@host# set output interface ge-0/0/10.0
[edit ethernet-switching-options analyzer foo]user@host# show input { ingress { interface ge-0/0/0.0; } egress { interface ge-0/0/0.0; }}output { interface { ge-0/0/10.0; }}
To monitor in a non-oversubscribed manner define two analyzers, each with an output port:
[edit ethernet-switching-options]user@host# set analyzer foo_ingress input ingress interface ge-0/0/0.0
[edit ethernet-switching-options]user@host# set analyzer foo_ingress output interface ge-0/0/10.0
[edit ethernet-switching-options]user@host# set analyzer foo_egress input egress interface ge-0/0/0.0

78 DayOne:JunosTips,Techniques,andTemplates2011
[edit ethernet-switching-options]user@host# set analyzer foo_egress output interface ge-0/0/11.0
[edit ethernet-switching-options]user@host# show analyzer foo_ingress { input { ingress { interface ge-0/0/0.0; } } output { interface { ge-0/0/10.0; } }}analyzer foo_egress { input { egress { interface ge-0/0/0.0; } } output { interface { ge-0/0/11.0; } }}
Technique: Remote Port-mirroring to a UNIX Host
Consider this technique if you need to perform port mirroring on a device when there is no local analyzer available for attachment to the monitor port. With this technique you can redirect matching traffic over a GRE tunnel for remote capture analysis on a UNIX host. Note that some Junos devices require Tunnel PIC hardware to perform GRE tunneling for transit traffic. If your device has a gr-x/x/x interface you should be good to go.
Note that you will need access to a root shell/sudo on the remote host for creation of the GRE device and route table manipulation.
CFollow these steps to perform report port monitoring between a Junos device with GRE tunnel support and a remote Linux host.

Technique:RemotePort-mirroringtoaUNIXHost 79
Configure the Junos Device
Configure the GRE tunnel interface to be used to redirect sampled traffic to the remote host (make sure to change the FPC and PIC numbers to match one of the tunnel devices in your system):
interfaces { gr-0/2/0 { unit 100 { tunnel { source 192.168.50.10; destination 192.168.51.20; ttl 10; } family inet { address 172.16.28.1/30; } } } }
Now, configure forwarding over the GRE interface. Make sure that your rate and run-length parameters reflect your sampling needs for the traffic that is being monitored:
forwarding-options { port-mirroring { family inet { input { rate 1; run-length 1; } output { interface gr-0/2/0.100; no-filter-check; } } } }
Next, configure a filter and apply it to the desired interface, in the desired direction:
interfaces { t1-1/0/3:3 { description Customer-A; unit 0 { family inet { filter { output capture-filter; } address 192.168.35.1/30;

80 DayOne:JunosTips,Techniques,andTemplates2011
} } } ...
Make sure that the desired traffic is directed out the interface that is being monitored in the case of output sampling. A static route is shown here:
routing-options { static { route 192.168.70.0/24 next-hop 192.168.35.2; } } ...
And now configure the firewall filter to match on the traffic you wish to monitor with a then port-mirror statement. Here accept-all is used to prevent disruption to non-matching traffic given the default deny-all that would otherwise be encountered:
firewall { family inet { filter capture-filter { term 0-capture { from { source-address { 192.168.70.0/24; 192.168.35.0/30; } } then { port-mirror; accept; } term 5-accept_all { then accept; } } } }
Configure the Remote Linux Host
Note that the following steps are performed in a root shell.
Ensure the host has GRE device support; if needed, load the GRE module:
[root@linux-host]# modprobe ip_gre

Technique:RemotePort-mirroringtoaUNIXHost 81
Configure the GRE device:
[root@linux-host]# ip tunnel add gre_int mode gre remote 192.168.50.10 local 192.168.51.20 ttl 255 [root@linux-host]# ip link set gre_int up [root@linux-host]# ip addr add 172.16.28.2/30 dev gre_int
[root@linux-host]# ifconfig gre_intgre_int Link encap:UNSPEC HWaddr C0-A8-33-14-7F-B7-01-00-00-00-00-00-00-00-00-00 inet addr:172.16.28.2 P-t-P:172.16.28.2 Mask:255.255.255.252 UP POINTOPOINT RUNNING NOARP MTU:1476 Metric:1 RX packets:0 errors:0 dropped:0 overruns:0 frame:0 TX packets:0 errors:0 dropped:0 overruns:0 carrier:0 collisions:0 txqueuelen:0 RX bytes:0 (0.0 b) TX bytes:0 (0.0 b)
Configure a route to the originating router that points over the new GRE interface:
[root@linux-host]# route add -net 192.168.50.10 netmask 255.255.255.255 gw 192.168.51.1
Verify IP connectivity over the tunnel:
[root@linux-host]# ping 172.16.28.1 PING 172.16.28.1 (172.16.28.1) 56(84) bytes of data. 64 bytes from 172.16.28.1: icmp_seq=0 ttl=64 time=0.587 ms 64 bytes from 172.16.28.1: icmp_seq=1 ttl=64 time=0.685 ms 64 bytes from 172.16.28.1: icmp_seq=2 ttl=64 time=0.611 ms 64 bytes from 172.16.28.1: icmp_seq=3 ttl=64 time=0.595 ms 4 packets transmitted, 4 received, 0% packet loss, time 3010ms rtt min/avg/max/mdev = 0.587/0.619/0.685/0.046 ms
Now start the traffic capture on the GRE device. If all has gone according to plan, you should begin seeing the traffic that was sampled remotely and redirected over the GRE tunnel:
[root@linux-host]# tethereal -i gre_int tethereal: arptype 778 not supported by libpcap - falling back to cooked socket. Capturing on netb 0.000000 192.168.70.5 -> 10.0.45.8 UDP Source port: 49378 Destination port: 18252 0.004236 192.168.70.5 -> 10.0.45.8 UDP Source port: 49380 Destination port: 16968 0.020132 192.168.70.5 -> 10.0.45.8 UDP Source port: 49378 Destination port: 18252 0.024303 192.168.70.5 -> 10.0.45.8 UDP Source port: 49380 Destination port: 16968 0.040096 192.168.70.5 -> 10.0.45.8 UDP Source port: 49378 Destination port: 18252 0.044314 192.168.70.5 -> 10.0.45.8 UDP Source port: 49380 Destination port: 16968 ̂ C 7 packets captured [root@linux-host]#
82 DayOne:JunosTips,Techniques,andTemplates2011
Tip: Use “.x” Instead of “unit x” in Set Commands
CTo save some keystrokes, use this handy (and currently un-document-ed) shortcut when you are configuring interfaces. Here the two forms of the command are treated identically; .x is just shorter:
regress@mse-a# set so-0/0/0.5 encapsulation ?Possible completions: ether-vpls-fr Ethernet VPLS over Frame Relay (bridging) encapsulation frame-relay-ccc Frame Relay DLCI for CCC frame-relay-ether-type Cisco-compatible Frame Relay Encapsulation DLCI frame-relay-ether-type-tcc Cisco-compatible Frame Relay Encapsulation DLCI for TCC frame-relay-ppp PPP over Frame Relay frame-relay-tcc Frame Relay DLCI for translational cross-connect{backup}[edit interfaces]
regress@mse-a# set so-0/0/0 unit 5 encapsulation ?Possible completions: ether-vpls-fr Ethernet VPLS over Frame Relay (bridging) encapsulation frame-relay-ccc Frame Relay DLCI for CCC frame-relay-ether-type Cisco-compatible Frame Relay Encapsulation DLCI frame-relay-ether-type-tcc Cisco-compatible Frame Relay Encapsulation DLCI for TCC frame-relay-ppp PPP over Frame Relay frame-relay-tcc Frame Relay DLCI for translational cross-connect{backup}[edit interfaces]regress@mse-a# set so-0/0/0 unit 5 encapsulation
Note that using a “.” to represent “unit” is the only supported method of specifying a non-default unit number when adding an interface to a protocols such as OSPF. This tip shows the same syntax can be used to configure the interface directly.
Tip: Junos MOTD Before/After Login
Using the system login message or system login announcement command allows you to display messages to users either before or after they login to the system.
CIf your company wants to make announcements to the users accessing the Junos device, you can use these commands:
root@SRX#set system login message <Before-Login-Message>
This causes <Before-Login-Message> to be displayed before Login Prompt.
root@SRX#set system login announcement <After-Login-Message>

Tip:CreateaNewLoginClassandAddUserstoIt 83
And this causes <After-Login-Message> to be displayed after successful authentication.
You can insert extra line breaks using the \n symbol:
lab@M7i-R106> show configuration system login announcement "you have successfully logged into the system \n";message "you are about to login to the system";
And the example login session one would see:
you are about to login to the system <-- login messageM7i-R106 (ttyp0)login: labPassword:--- JUNOS 10.3R1.9 built 2010-08-13 12:15:32 UTCyou have successfully logged into the system <-- login announcement
Tip: Create a New Login Class and Add Users to It
You can modify the values associated with a login class by simply creating a new login class. The new login class can provide the status of current alarms, Junos CLI tips, and associated permissions.
CTo create a new login class and add users to it:
set system login class <New class name> login-alarms <-- show alarms on loginset system login class <New class name> login-tip <-- show tips on loginset system login class <New class name> permissions all <-- assign privilegesset system login user <User Name> class <New class name> <-- assign user to new login class--- JUNOS 10.1R1.8 built 2010-02-12 17:24:20 UTC Tip: Use 'request message' CLI pipe to replicate output of show commands to other users.No alarms currently active
Note that if you use one of the predefined login classes (operator, read-only, super-user, and unauthorized), you can only get the default options associated with that pre-defined class. If you wish to modify the login class slightly, like seeing login-tips upon login, you effectively have to create a new login class with the same permissions as the default login class. Use the set system login user <blah> class ? option to see the default permission bits set with the pre-defined user classes:
lab@M7i-R106# set system login user test class ?Possible completions: <class> Login class AUDITOR EMERGENCY

84 DayOne:JunosTips,Techniques,andTemplates2011
operator permissions [ clear network reset trace view ] read-only permissions [ view ] super-user permissions [ all ] unauthorized permissions [ none ]
Also you can create a user class that mirrors the permissions of a default user class, but also provides Junos CLI tips and alarms upon login:
[edit]lab@M7i-R106# set system login class super-user-local permissions all login-tip login-alarms lab@M7i-R106# show system login class super-user-local login-alarms;login-tip;permissions all;
Tip: J-series and SRX HA Cluster Status Information
CThe following hidden command is a very useful tool when trouble-shooting J-Series and SRX HA cluster problems. It combines the output of performing a show chassis cluster [status][control-plane][data-plane][interfaces][stastics][status] all in one command, plus RG monitored events:
show chassis cluster information [no-forwarding]
Tip: Commit Confirm on a Clustered SRX
COne great missing feature that is available on the routers but hasn't officially made it to the SRX platform is the commit confirm command, that allows you to commit a configuration, and in the event things go wrong, the configuration automatically rollbacks after ten minutes if there isn't another commit done. It’s used often when editing routing, firewall filters, and now… security policies as well!
To use commit confirm you must enter in exclusive configuration mode and here you can see the completions:
user@SRX5800> configure exclusive warning: uncommitted changes will be discarded on exit Entering configuration mode
{primary:node0}[edit] user@SRX5800# commit ? Possible completions:

Tip:ChangeInterfaces 85
<[Enter]> Execute this command and-quit Quit configuration mode if commit succeeds at Time at which to activate configuration changes check Check correctness of syntax; do not apply changes comment Message to write to commit log confirmed Automatically rollback if not confirmed | Pipe through a command
A bit of warning, this is a hidden command (or is missing from the help menus at this time) so is most likely not supported by Juniper.
Yes, commit confirmed is available in exclusive for clusters, however test this on some versions and you will likely see Automatic rollback failed on a cluster member. JTAC reports commit confirmed is not supported in this deployment, so test it first on a lab device when you update to a new Junos version beyond the scope of this book.
Tip: Change Interfaces
Sometimes, during troubleshooting, you want to move the configura-tion associated with one interface to a different interface. You might also want to do this during a reconfiguration, when you are moving existing connections to new interfaces on the same device. This helpful tip describes an easy way to move the configuration associated with one interface to a different interface.
CLet’s say this is the configuration associated with one of your inter-faces:
[edit]user@device# show [...]interfaces { ge-0/0/0 { unit 0 { family inet { address 10.0.0.1/24; } } }} [...]protocols { ospf { area 0.0.0.0 { interface ge-0/0/0.0;

86 DayOne:JunosTips,Techniques,andTemplates2011
} }}
And you need to move the configuration on interface ge-0/0/0 to interface ge-0/1/0. Here’s an easy way to do this with one command:
[edit]user@device# replace pattern ge-0/0/0 with ge-0/1/0
Commit and now check the result:
[edit]user@device# show
[edit]user@device# show [...]interfaces { ge-0/0/1 { unit 0 { family inet { address 10.0.0.1/24; } } }} [...]protocols { ospf { area 0.0.0.0 { interface ge-0/0/1.0; } }}
Another option for moving interface configurations from one interface to another is to “rename” the interface in the [edit interfaces] hierarchy. However, that only moves the actual interface configura-tion to the new interface, while leaving the other configuration associated with the old interface unchanged.
As this tip shows, using the replace command at the [edit] hierarchy changes all configurations associated with an interface, regardless of the section of the hierarchy where it appears. (It does not, however, change configuration statements where the interface is not directly referenced, such as interface-range statements or groups statements that include the interface as part of a range, or through a wildcard expression.)
So always use show | compare to verify the changes match your expectations before you commit them.

Tip:WildcardDelete 87
Tip: Wildcard Delete
This tip can be useful, but like many powerful things in this world, using it should come with a warning.
CYou can use wildcards along with regular expressions (regex) to match large portions of a configuration and then choose to delete them. As an example, let’s delete specific interfaces:
[edit]regress@junoon# show interfaces ge-0/0/1 { unit 0 { family inet { address 1.1.1.1/32; } }}ge-0/0/2 { unit 0 { family inet { address 2.2.2.2/32; } }}ge-0/0/3 { unit 0 { family inet { address 3.3.3.3/32; } }}
[edit]regress@junoon# wildcard delete interfaces ge-0/0/[2-3] matched: ge-0/0/2 matched: ge-0/0/3Delete 2 objects? [yes,no] (no) yes
[edit]regress@junoon# show interfaces ge-0/0/1 { unit 0 { family inet { address 1.1.1.1/32; } }}

88 DayOne:JunosTips,Techniques,andTemplates2011
While this tip lets you quickly delete multiple items at the same level of the hierarchy, note that it does not delete related configurations, so, you may need to delete any configurations under the [edit protocols] hierarchy that references these interfaces.
Also note that despite the name wildcard, this command takes an argument of a regular expression. If you leave off the regular expres-sion, it functions like the normal delete command and deletes the specified hierarchy and everything underneath it.
So the warning should be obvious: this tip and command let you delete large portions of your configuration very quickly. Use it wisely.
Tip: Searching a Large Configuration
Frequently you will have to search your configuration for a specific parameter in a large file. For instance, you may have to see what happens if you change interface ge-1/0/0 to ge-2/0/0. A quick way to see every reference to ge-1/0/0 is to match on the regular expression string ge-1/0/0 in the configuration file with the | match option.
CIf you issue a show| match ge-1/0/0 command you get the following output.
regress@maple# show| match ge-1/0/0 ge-1/0/0 { interface ge-1/0/0.0 { interface ge-1/0/0.0;
Although informationally correct, it does not provide the depth of all the various instances. Try using another option, the | display set command to provide a detailed context of the search value, as in:
show| match ge-1/0/0| display set
And as you can see it provides a much clearer reference to every ge-1/0/0 value in the configuration file:
regress@maple# show| match ge-1/0/0 | display set set interfaces ge-1/0/0 unit 0 family inet address 11.1.200.21/30 set interfaces ge-1/0/0 unit 0 family mpls set protocols rsvp interface ge-1/0/0.0 aggregate set protocols rsvp interface ge-1/0/0.0 reliable set protocols rsvp interface ge-1/0/0.0 bandwidth 10g set protocols rsvp interface ge-1/0/0.0 link-protection max-bypasses 0 set protocols mpls interface ge-1/0/0.0

Tip:MakeSureYouHaven’tDownloadedaCorruptedJunosImage 89
set protocols ospf area 0.0.7.208 interface ge-1/0/0.0 interface-type p2p set protocols ospf area 0.0.7.208 interface ge-1/0/0.0 ldp-synchronization set protocols ldp interface ge-1/0/0.0 hello-interval 5 set protocols ldp interface ge-1/0/0.0 hold-time 15
Tip: Make Sure You Haven’t Downloaded a Corrupted Junos Image
CWhen you download a Junos image from the Juniper download website, and before upgrading your device using that new image, it is best practice to check that the image was downloaded without any corruption, so that nothing bad happens during the upgrade.
There are two methods to verify: checking the file size of the down-loaded image, and verifying the MD5 or SHA-1 checksum of that file.
First, check the file size of the downloaded image. The Juniper down-load website specifies the size of the image in bytes:
Branch SRX-series Install PackageSupported platforms SRX100, SRX210, SRX220, SRX240 and SRX650MD5 SHA-110.3R1.9 tgz210,595,90615 Aug 2010
After you’ve downloaded the image to the device, run the file list detail command and check the size of the image. If the size is different from the download website, the image was not downloaded properly:
lab@host> file list detail /cf/var/home/lab/:<snip>-rw-r--r-- 1 root staff 210595906 Sep 24 12:56 junos-srxsme-10.3R1.9-domestic.tgz
Second, if the file sizes match, run an MD5 or SHA-1 checksum on the file. The download website also specifies the MD5/SHA-1 checksums of the images to aid in the verification as shown in the previous image stats.
You can create an MD5 or SHA-1 checksum of the downloaded image in two ways, from either the operational mode or the shell mode.
From operational mode:
lab@host> file checksum md5 junos-srxsme-10.3R1.9-domestic.tgz MD5 (/cf/var/home/lab/junos-srxsme-10.3R1.9-domestic.tgz) = 0eb8a7703820994b0f0d1597b502c9c4
Then check the MD5 checksum from the web page (click on MD5 link), which in this instance cites MD5 0eb8a7703820994b0f0d1597b502c9c4. And to check on the SHA-1:

90 DayOne:JunosTips,Techniques,andTemplates2011
lab@host> file checksum sha1 junos-srxsme-10.3R1.9-domestic.tgz SHA1 (/cf/var/home/lab/junos-srxsme-10.3R1.9-domestic.tgz) = e0ecaf26e50e16a0e1252cd372847f6641a2d8a1
And the SHA-1 checksum from the web page (click on the SHA-1 link) is e0ecaf26e50e16a0e1252cd372847f6641a2d8a1.
For shell mode:
You may have to enter the shell and switch user (SU) to obtain root privileges:
lab@host> start shell % su Password: <-- provide the root-authentication passwordroot@host%
Now you can follow the rest of the tip:
root@host% md5 junos-srxsme-10.3R1.9-domestic.tgz MD5 (junos-srxsme-10.3R1.9-domestic.tgz) = 0eb8a7703820994b0f0d1597b502c9c4root@host% sha1 junos-srxsme-10.3R1.9-domestic.tgz SHA1 (junos-srxsme-10.3R1.9-domestic.tgz) = e0ecaf26e50e16a0e1252cd372847f6641a2d8a1
Visually compare the checksums to confirm that there were no issues in the download.
Techniques: Junos Boot Devices and Password Recovery
These techniques are for users that are either locked out due to a lost password or have a device that does not successfully boot, i.e., keeps crashing and rebooting because of a corrupted image or configuration, such that you are not able to enter CLI mode in order to execute a request system reboot media disk command to attempt to boot from alternative media. You did remember to perform a snapshot when all was working well, right?
To make boot times faster, Junos does not pause very long at the boot prompt (~.5 seconds), so you have to be fast, or early, or else you may have to try again. Most find that hitting space a few times before you see the prompt is a good way to ensure you catch it. With some versions of Junos, entering keystrokes during boot can leave you at a “boot:” prompt. If this happens enter “/boot/loader” to continue reboot with the default kernel.
CUse this technique to interrupt the boot loader in order to specify an alternative boot device, or to boot into single user mode for password recovery. This process is only possible from a console-attached terminal.

Techniques:JunosBootDevicesandPasswordRecovery 91
Specify an Alternate Boot Device at Boot Time
As the router boots and you see the BIOS/Power on Self Test (POST), get ready to hit the space bar on your keyboard. Remember, the interrupt period is short and therefore easy to miss:
Will try to boot from USB Compact Flash Hard Disk Network Trying to boot from USB Trying to boot from Compact Flash ial port BIOS drive A: is disk0 BIOS drive C: is disk1 BIOS drive D: is disk2 BIOS 627kB/3668992kB available FreeBSD/i386 bootstrap loader, Revision 1.1 ([email protected], Mon Mar 14 02:09:30 UTC 2011) Loading /boot/defaults/loader.conf /kernel text=0x7c54a4 data=0x44ea0+0x9a608 syms=[0x4+0x86c90+0x4+0xbd98b. . .syncing disks... All buffers synced.Hit [Enter] to boot immediately, or space bar for command prompt.
Now, QUICK! Enter a space to interrupt the boot process.
<space key>Type '?' for a list of commands, 'help' for more detailed help.OK ? <enter>Available commands: reboot reboot the system heap show heap usage bcachestat get disk block cache stats boot boot a file or loaded kernel autoboot boot automatically after a delay help detailed help ? list commands show show variable(s) set set a variable unset unset a variable echo echo arguments read read input from the terminal more show contents of a file nextboot set next boot device install install Junos include read commands from a file ls list files load load a kernel or module unload unload all modules

92 DayOne:JunosTips,Techniques,andTemplates2011
lsmod list loaded modules pnpscan scan for PnP devices recover initiate recovery process from compact flash boot-conf load kernel and modules, then autoboot read-conf read a configuration file enable-module enable loading of a module disable-module disable loading of a module toggle-module toggle loading of a moduleshow-module show module load data
Use the nextboot keyword to specify an alternative boot device. If the router has booted to flash, it tells the router to try booting from the hard disk:
OK nextboot diskNext device to boot from is currently disk
Use the reboot keyword (not boot, which simply continues the inter-rupted boot process), to reboot to the specified media:
OK rebootRebooting.... . .Will try to boot from USB Compact Flash Hard Disk Network Trying to boot from Hard Disk Loading /boot/loader . . .
Reset a Lost Root Password
Use these steps to reset a lost or forgotten root password for a Junos device. Note that resetting the root password is not possible on a FIPS-based Junos image, for security reasons.
Interrupt the boot process as previously described with a space key on a console-attached terminal to access the OK prompt. Now enter boot –s to boot into single user mode:
OK boot -splatform_early_bootinit: M/T Series Early Boot InitializationGDB: debug ports: sioGDB: current port: sioKDB: debugger backends: ddb gdb. . .Mounted jbase package on /dev/md0...System watchdog timer disabledEnter full pathname of shell or 'recovery' for root password recovery or RETURN for /bin/sh:

Technique:ReplaceaMissingBootDevice 93
Enter recovery to begin the recovery script:
Enter full pathname of shell or 'recovery' for root password recovery or RETURN for /bin/sh: recoveryPerforming filesystem consistency checks .../dev/ad0s1a: FILE SYSTEM CLEAN; SKIPPING CHECKS. . .Performing checkout of management services ...NOTE: Once in the CLI, you will need to enter configuration mode usingNOTE: the 'configure' command to make any required changes. For example,NOTE: to reset the root password, type:NOTE: configureNOTE: set system root-authentication plain-text-passwordNOTE: (enter the new password when asked)NOTE: commitNOTE: exitNOTE: exitNOTE: When you exit the CLI, you will be asked if you want to rebootNOTE: the systemStarting CLI ... root>
Enter a new root password. Be sure to remember it this time.
root> configure Entering configuration mode[edit]root# set system root-authentication plain-text-password <new password>root#commit
MORE? For general information on Junos router storage and boot devices see: http://www.juniper.net/techpubs/software/nog/nog-hardware/html/routing-engines18.html.
Refer to your specific hardware guide for platform-specific informa-tion. In many cases the router can detect boot issues with a device and will automatically attempt to reboot from the next device in the list.
Technique: Replace a Missing Boot Device
This tip might allow you to avoid a routing engine RMA by replacing a missing boot device, typically the hard disk, after errors are detected and it’s automatically removed from the list of boot options.
Given that the device was removed due to some error, it’s very possible that the storage device is either broken or on its way out, so this technique should be seen more as a temporary work-around while you make arrangements to replace the failing media.

94 DayOne:JunosTips,Techniques,andTemplates2011
Access to a root shell is required when updating the boot list via sysctl.
CMost Juniper routers store bootable copies of the Junos software in three possible locations: the internal flash disk, the hard drive, and the removable media. In some cases, SMART self tests on the hard drive will report an error resulting in the media being removed from the boot list. As the disk drive is also used for /var and /tmp, the removal of the device can also impact logging and the ability to save or load files. In these cases, Junos reports an alarm when the disk is removed from the boot list:
user@host> show system alarms 2 alarms currently activeAlarm time Class Description2011-03-31 10:17:38 PDT Major Rear Fan Tray Failure2011-03-31 10:17:07 PDT Major Host 1 hard-disk missing in Boot List . . .
You also receive a warning at login if the router has booted onto secondary media, which can happen if the compact flash is removed from the boot list, or the router is told to boot from alternate media:
--- JUNOS 10.4-20110314.0 built 2011-03-14 02:12:13 UTC
--- NOTICE: System is running on alternate media device (/dev/ad1s1a).
. . .
How to Display and Alter the Current Boot List
Use the following command in shell mode to display the current list of boot devices and their sequence:
root@host% sysctl -a | grep bootdevs
machdep.bootdevs: pcmcia-flash,compact-flash,lan
Note the absence of the disk in the current boot list. To place a device back, use the –w switch to write updated value with sysctl command. Note that a root shell is required for this step:
root@host% sysctl -w machdep.bootdevs=pcmcia-flash,compact-flash,disk,lanmachdep.bootdevs: compact-flash,lan -> compact-flash,disk,lan
The display confirms the delta and indicates the hard disk is again back in the list of bootable devices. You should now reboot the router and check to see if the alarm is cleared. If the disk is again found to be absent it’s a strong indication that the unit is truly defective and requires replacement.

Technique:ReplaceaMissingBootDevice 95
Given that we have mentioned root shells and hidden sysctl com-mands, it seems appropriate to mention the hidden hard-disk-test switch to the request chassis routing-engine command as it provides access to SMART disk status and read/write tests. You need to be logged in as root to use the command – super-user/wheel permissions are not enough. The command is hidden because misuse could prematurely wear out media (compact flash only has so many write cycles), or cause control plane/convergence issues on a busy system that needs IO bandwidth for reasons other than testing.
root@host> request chassis routing-engine hard-disk-test ?Possible completions: disk Name of hard disk long Run SMART extended self test short Run short test show-status Display status of testroot@host> request chassis routing-engine hard-disk-test show-status disk /dev/ad2 Device: ST940817SM Supports ATA Version 7, Firmware version 3.AABATA/ATAPI revision 7device model ST940817SMserial number 5RQ02H70firmware revision 3.AABcylinders 16383heads 16sectors/track 63lba supported 21248 sectorslba48 supported -4630046677200252160 sectorsdma supportedoverlap not supported
Feature Support EnableValue Vendorwrite cache yes yesread ahead yes yesdma queued no no 31/1FSMART yes yesmicrocode download yes yes. . .
SMART Error Log:SMART Error Logging Version: 1No Errors Logged
SMART SelfTest Log:SMART SelfTest Logging Version: 1
Selftest Type Status Failure-LBA Timestamp
Unknown Successful None 0

96 DayOne:JunosTips,Techniques,andTemplates2011
Tip: Hide Pieces of the Configuration
The editors learned a lot of new things while editing this book, the following being one good example.
CAn often forgotten or unnoticed Junos tip is that you can hide common pieces of configuration in everyday use by setting apply-flags omit in the hierarchy you want to omit, like so:
[edit]user@device# set system apply-flags omit
[edit]user@device# show ## Last changed: 2011-05-02 17:24:51 UTCversion 10.3R1.9;system { /* OMITTED */ };logical-systems {[...]
After committing, a show system in configuration mode will still show the whole stanza and editing works just as it usually does:
[edit]user@device# show system apply-flags omit;host-name device;root-authentication { encrypted-password "$1$KI99zGk6$MbYFuBbpLffu9tn2.sI7l1"; ## SECRET-DATA[...]
Use show | display omit in the top of configuration to show the entire configuration without omitting sections:
[edit]user@device# show | display omit ## Last changed: 2011-05-02 17:24:51 UTCversion 10.3R1.9;system { apply-flags omit; host-name device; root-authentication { encrypted-password "$1$KI99zGk6$MbYFuBbpLffu9tn2.sI7l1"; ## SECRET-DATA[...]
The editors found this tip useful for hiding long, uninteresting, static pieces of various configurations. However, if you are going to use it, you should probably make sure everyone on the team knows how to see the full configuration, unless it’s April Fool’s day.

Tip:HowtoViewBuilt-inConfiguration 97
Tip: How to View Built-in Configuration
This came to the editors as a tip for how to view the pre-defined applications on an SRX. And the tip is useful for that. However, we’d like to point out that the tip actually allows you to see a number of default settings, too.
CJunos software contains default configurations in a hidden group named junos-defaults. To see them, use the show configuration groups junos-defaults command:
user@mx240> show configuration groups junos-defaults dynamic-profiles { <*> { variables { junos-interface-unit { internal; valid-path interface_unit_number; } junos-interface-ifd-name { internal; valid-path "interface_name|underlying-interface"; } junos-underlying-interface-unit { internal; valid-path interface_unit_number; } junos-underlying-interface { internal; valid-path underlying-interface; }[...]
Pre-defined applications on a SRX device start with junos-. To view a list of the predefined services use the show configuration groups junos-defaults applications command like this:.
user@srx240> show configuration groups junos-defaults applications ## File Transfer Protocol #application junos-ftp { application-protocol ftp; protocol tcp; destination-port 21;}## Trivial File Transfer Protocol #

98 DayOne:JunosTips,Techniques,andTemplates2011
application junos-tftp { application-protocol tftp; protocol udp; destination-port 69;}
But, you can also see the default configuration with the show configu-ration | display inheritance defaults command. Here, we include the defaults in the system configuration:
user@mx240> show configuration system | display inheritance defaults host-name vr-device;#### 'ports' was inherited from group 'junos-defaults'##ports { ## ## 'console' was inherited from group 'junos-defaults' ## 'vt100' was inherited from group 'junos-defaults' ## console type vt100;}root-authentication { encrypted-password "$1$KI99zGk6$MbYFuBbpLffu9tn2.sI7l1"; ## SECRET-DATA[...]
You can see that the system ports console type vt100 statement was inherited from the junos-defaults group
Tip: Preventing Other Users From Editing a Configuration While You're Still Configuring
The Junos commit model provides you with the ability to have either a private or an exclusive configuration session. A private session is private to you only, but does not prevent other users from having their own sessions at the same time. An exclusive session means that no one else can have a configuration session at the same time. First let’s acknowledge the original tip:
CIf you want to prevent other users from editing the configuration use the configure exclusive command to exclude other users from editing the configuration:
ugo@nigeria> configure exclusivewarning: uncommitted changes will be discarded on exit
It’s important to note that if this session gets hung, the request system logout user <user> command can clear the session. (See the next entry, Tip: Logging Out a Connected User).

Tip:LogoutaConnectedUser 99
As shown here, however, to enter the exclusive configuration mode just add the keyword exclusive after your configure statement. Note that uncommitted changes are discarded on exit, which is not the normal behavior for a regular configuration session.
Tip: Logout a Connected User
CYou can disconnect a user from a session using the request system logout <user-name> command. You can also use this command if a user hangs a configuration session while in exlusive mode, or if they simply forget to logout.
As an example, let’s disconnect Robin from his CLI session:
root@Junos> show system users 2:13PM up 5:13, 2 users, load averages: 0.00, 0.00, 0.00 USER TTY FROM LOGIN@ IDLE WHAT root d0 - 9:01AM - cli Robin p0 X.X.X.X 2:13PM -cli (cli)root@Junos> request system logout Robinroot@Junos> show system users 2:13PM up 5:13, 2 users, load averages: 0.00, 0.00, 0.00 USER TTY FROM LOGIN@ IDLE WHAT root d0 - 9:01AM - cli
You can also logout based upon the TTY instead of the username. This is especially useful if a single user has multiple logins.
Technique: Automatic Junos Configuration Backup
CIf you do configuration changes all the time, you need an automatic method for configuration backup. Try this:
1. To remotely save a copy of a configuration each time you commit:
[edit]user@Junos# set system archival configuration transfer-on-commit
[edit]user@Junos# set system archival configuration archive-sites ftp://loginname:loginpassword@FTP-server-ip/directory
2. To remotely save a copy of a configuration at a specified time interval (in this example, 60 minutes):

100 DayOne:JunosTips,Techniques,andTemplates2011
[edit]user@Junos# set system archival configuration transfer-interval 60
[edit]user@Junos# set system archival configuration archive-sites ftp://loginname:loginpassword@FTP-server-ip/directory
For more secure password storage, you can specify the password separately from the URL. Use a URL in the form of ftp://user@server/directory and add the password argument. When you do this, the Junos software will encrypt the password in a reversible encryp-tion algorithm. Even though it is not completely secure, it makes the password harder to determine than a plain-text password encoded in a URL.
You can also use SCP for transferring the configurations. Use a URL in the form scp://user@host:/directory and provide the password with the password argument. According to JTAC, one of the most common mistakes with SCP URLs is leaving off the colon after the hostname. However, when tested with 10.3R1, it seemed to work both with and without the colon after the hostname. So the behavior of the software may have changed at some point. Try it out and leave a post on this book’s J-Net forum pages.
If you want to look for log messages related to the archival process, you can match on error messages with the user facility and a level of notice or more severe.
Tip: Quickly Synchronize System to NTP Server
While the purpose seems simple enough, the Network Time Protocol (NTP) is rife with nuisances that are not well understood. For exam-ple, a constant source of confusion is that in order for NTP to syn-chronize, the two systems clocks have to be already relatively close to one another, or else the server’s updates are ignored, equally a cart-before-the-horse type paradox, if you will.
The most common method to gain initial sync is via a NTP boot server. As its name implies, the system contacts the specified server at boot time and synchronizes its clock regardless of how far their clocks are skewed. You did remember the backup-router statement to ensure it has a route at boot before RPD and its minions of protocols have built their tables, right?

Tip:FirewallSupportforNTPStatus 101
This tip mimics the boot-servers initial clock set functionality but avoids the need to reboot.
CUse the set date ntp <server-address> command to synchronize the local clock without requiring explicit NTP configuration, or a reboot for initial synchronization via a boot server.
user@host> set date 201101010101 Sat Jan 1 01:01:00 PST 2011user@host> set date ntp 172.17.28.5 31 Mar 11:41:28 ntpdate[6670]: step time server 172.17.28.5 offset 7724421.644772 secuser@host> show system uptime
Current time: 2011-03-31 11:41:35 PDT
Tip: Firewall Support for NTP Status
Keeping routers (and their log timestamps) synchronized with NTP, and the use of lo0-based routing engine protection firewall filters, are two best practices that are often deployed together.
Another one of NTP’s not-so-well-understood nuances is its need to use the 127.0.0.1 loopback address when communicating with the local daemon to obtain server association status. Make sure your protecting filters allow such traffic, or you’ll get an error rather than the expected status display.
CScenario: You have configured Junos for NTP, and while actual clock synchronization appears to be working fine, you note that the show ntp associations command is timing-out:
user@host# show ntp associationslocalhost: timed out, nothing received***Request timed out
The solution is to make sure your routing-engine protection filter permits internal communications with the ntp daemon:
[edit]user@host# show firewall family inet filter router-access term ntp-rejectfrom { source-prefix-list { default-prefix; ntp-router-access except; } protocol udp; port ntp;}then {

102 DayOne:JunosTips,Techniques,andTemplates2011
discard;}
user@host# show policy-options prefix-list ntp-router-access10.0.3.1/32;10.0.3.99/32;
Modify the ntp-router-access prefix list to include the loopback address, like this:
user@host# show | compare[edit policy-options prefix-list ntp-router-access]+ 127.0.0.1/32;
user@host# run show ntp associations remote refid st t when poll reach delay offset jitter==============================================================================*10.0.3.99 130.149.17.8 2 u 29 64 377 0.624 -0.427 0.280+10.0.3.1 192.36.143.150 2 - 24 128 377 2.343 2.014 0.168
Tip: Configuration Loading on a Router from the Output of Show
This tip tells you how to use the load merge relative command.
CInstead of loading entire configuration files and committing them, you can do this for an interface, a protocol, or any other hierarchy.
For example, if you want to load an interface configuration:
1. On a Junos device, type show configuration interfaces. Copy the configuration to a text editor and make changes, as needed.
2. On the new Junos device, type edit interfaces to enter the edit interface hierarchy.
3. Enter the load merge relative command.
4. Here, you should paste the interface configuration you want to add.
5. Press Ctrl-D.
6. Type top.
7. Type commit.
The interfaces will have the configuration you loaded without needing to copy an entire configuration file!
It’s the same process for protocols, too, but in the [edit protocols] hierarchy.

Tip:JunosDisplaySet 103
The editors regularly use this in our labs. You can use show com-mands to display a small and specific piece of the configuration hierarchy on one device, and then paste it into the new device. Using load merge relative allows you to do that without having to modify the configuration you are pasting to include the levels of hierarchy above the piece you’re pasting.
Another use case example: if you want to disable an interface in both the ISIS and MPLS protocols you can copy the portion of the configu-ration that disables the interfaces and use load merge relative to copy it to both protocols at the same time.
Tip: Junos Display Set
CIf you are new to Junos and still not comfortable with its hierarchical shaped configuration, try using the display set command. First, look at a typical Junos configuration:
[edit]root@Junos# showsystem { services { web-management { http; } }}
And now here is the same thing but using the display set command:
[edit]root@Junos# show | display setset system services web-management http;
We’ve heard about people describing this as a way to become familiar with the Junos configuration hierarchy and explaining how it’s a good way to feel more comfortable with Junos for, say, former ScreenOS users, who are used to viewing a configuration as a list of “set” commands, or for IOS administrators. However we, as a group of Junos engineers, respectfully suggest that you try to view the Junos configuration in its hierarchical format. You’ll find that the hierarchi-cal format is easier to use over time, and it should also help you better navigate the configuration as you try to modify it. Rest assured, the display set pipe command is always there should you need it.

104 DayOne:JunosTips,Techniques,andTemplates2011
On a related note, if you are seeking to view set commands as an easy way to copy configuration changes from one device to another, consider using the load patch functionality instead. To use load patch, first make the changes on one device. On that device, use the command show | compare to show the changes. The output of show | compare is the patch that you will use to load on other devices. On a second device, you can type load patch terminal and paste the patch (the output of show | compare from the first device). Then, hit CTRL-D. The change will now be replicated to the candidate configuration on the second device.
Tip: Configure a Basic Firewall on SRX
CA basic firewall on a SRX device can be done in five steps. Count ‘em:
1. Create zones.
2. Add interfaces in the zones.
3. Enable system properties, protocols for each zone.
4. Create address book entries to allow/deny application traffic.
5. Create policy between zones to permit/deny.
That’s it – you’re done!
Now, issue the show security zone and show security policies commands to check your work.
Technique: SRX CLI Management Plane Traffic (Telnet/SSH) Timeout Settings
This is a great tip that explains how to reduce the frequency of, or to eliminate, hung SSH sessions to SRX devices.
CA CLI session (Telnet/SSH) to SRX timeouts in 30 minutes, regardless of your login class idle-timeout settings. Why? The nonuser-configu-rable policy self-traffic-policy controls management (Telnet/SSH) sessions to the SRX itself and the built-in junos-telnet/junos-ssh applications have 1800-second inactivity timeouts (the default value for TCP applications), as you can see:
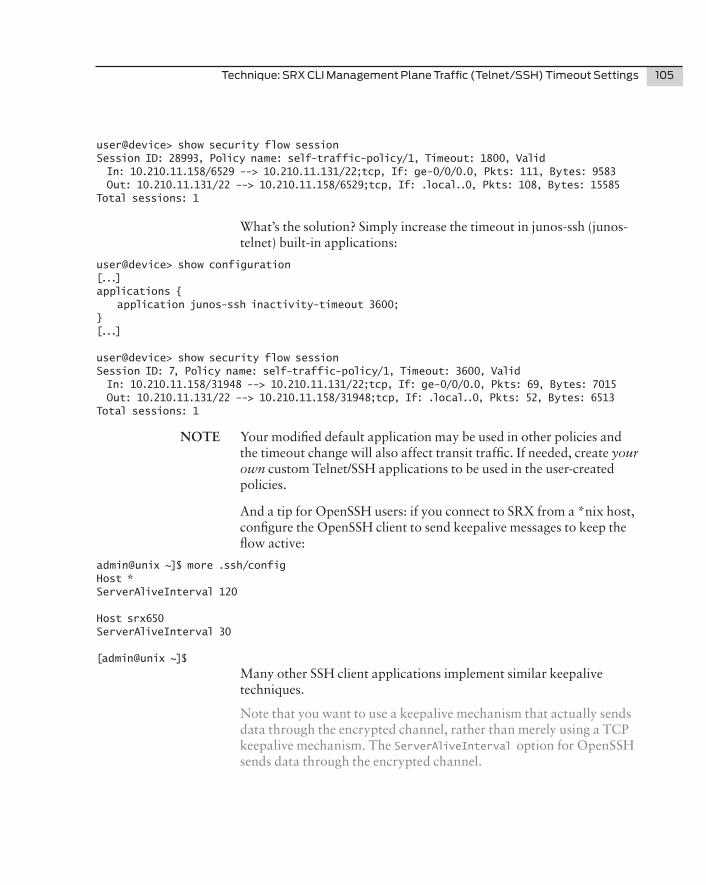
Technique:SRXCLIManagementPlaneTraffic(Telnet/SSH)TimeoutSettings 105
user@device> show security flow sessionSession ID: 28993, Policy name: self-traffic-policy/1, Timeout: 1800, Valid In: 10.210.11.158/6529 --> 10.210.11.131/22;tcp, If: ge-0/0/0.0, Pkts: 111, Bytes: 9583 Out: 10.210.11.131/22 --> 10.210.11.158/6529;tcp, If: .local..0, Pkts: 108, Bytes: 15585Total sessions: 1
What’s the solution? Simply increase the timeout in junos-ssh (junos-telnet) built-in applications:
user@device> show configuration[...]applications { application junos-ssh inactivity-timeout 3600;}[...]
user@device> show security flow session Session ID: 7, Policy name: self-traffic-policy/1, Timeout: 3600, Valid In: 10.210.11.158/31948 --> 10.210.11.131/22;tcp, If: ge-0/0/0.0, Pkts: 69, Bytes: 7015 Out: 10.210.11.131/22 --> 10.210.11.158/31948;tcp, If: .local..0, Pkts: 52, Bytes: 6513Total sessions: 1
NOTE Your modified default application may be used in other policies and the timeout change will also affect transit traffic. If needed, create your own custom Telnet/SSH applications to be used in the user-created policies.
And a tip for OpenSSH users: if you connect to SRX from a *nix host, configure the OpenSSH client to send keepalive messages to keep the flow active:
admin@unix ~]$ more .ssh/configHost *ServerAliveInterval 120
Host srx650ServerAliveInterval 30
[admin@unix ~]$
Many other SSH client applications implement similar keepalive techniques.
Note that you want to use a keepalive mechanism that actually sends data through the encrypted channel, rather than merely using a TCP keepalive mechanism. The ServerAliveInterval option for OpenSSH sends data through the encrypted channel.
106 DayOne:JunosTips,Techniques,andTemplates2011
We’ve heard about some operators using a very low-tech keepalive mechanism – a client programmed to periodically print a space over the SSH session. It’s not an elegant keepalive mechanism, but it works! (Test before using.)
Tip: Layer 3 VPN Dynamic GRE
If you cannot build MPLS LSPs, but you still want to support L3 VPNs, you can use Layer 3 VPNS over dynamic GRE tunnels. All that is required is IP connectivity. When you do so:
CA GRE tunnel will be built automatically and the GRE route to the remote side loopback interface will be placed in inet.3.
This capability also provides a good migration strategy if you want Layer3 VPNs over an IP core now, but still want to provide the flexibil-ity to migrate to an MPLS core in the future.
See the following link in the Junos documentation for details: http://www.juniper.net/techpubs/en_US/junos10.0/information-products/topic-collections/config-guide-vpns/vpns-configuring-gre-tunnels-for-layer-3-vpns.html
Tip: Fixing Corrupted (Failed) Junos EX or SRX Software Using USB Port
You discover that your Junos EX or SRX device does not complete normal boot up. For some reason, the image seems to be corrupted—for example, a continuous power failure. If this occurs, don’t worry, you can get it back up within few minutes using the USB port.
CStep 1. Get a USB flash drive. Copy the Junos image to the USB drive (without creating folders). Use FAT file format if the USB size is less than 2 GB. Use FAT32 if the USB size is greater than or equal to 4 GB. The example below uses the file image junos-srxsme-10.4R1.9-domes-tic.tgz.
Step 2. Insert the flash into an EX/SRX USB port.
Step 3. Reboot the device. When Junos boots up, you will see the message :

Tip:InterpretingSyslogMessages 107
Press Space to abort autoboot
Do nothing. A little while later, you will see:
Hit [Enter] to boot immediately, or space bar for command
prompt.
Touch the spacebar. You will be at loader mode; the prompt should be loader>. If the prompt is > , type >boot to make it loader>.
Step 4. Now type the following command:
loader> install file:///junos-srxsme-10.4R1.9-domestic.tgz.
Expect to wait awhile for the code to download. Additionally, after the Junos OS boots, you may see messages relating to file system structure and root file system creation. We originally planned to show this, but it went on for 15 pages and the editor in chief chucked it. So, trust us. After a bunch of messages, the system then reboots. You can try it yourself and watch the monitor the whole time – expect the entire process to take ten to fifteen minutes.
Tip: Interpreting Syslog Messages
CJunos uses standard BSD syslog formatting and some users find the various message codes somewhat cryptic and difficult to decipher. If that’s the case, use the help syslog <message code> command to provide additional information about a particular message code, like this:
user@host> help syslog UI_CMDLINE_READ_LINE Name: UI_CMDLINE_READ_LINE Message: User '<username>', command '<input>' Help: User entered command at CLI prompt Description: The indicated user typed the indicated command at the CLI prompt and pressed the Enter key, sending the command string to the management process (mgd). Type: Event: This message reports an event, not an error Severity: info
Now that you know what all those logging codes mean, don’t forget to search the syslog for any that may be of concern:
user@host> show log messages | match UI_CMDLINE_READ_LINE May 4 09:32:24 mse-a mgd[6926]: UI_CMDLINE_READ_LINE: User 'regress', command 'show version '

108 DayOne:JunosTips,Techniques,andTemplates2011
Tip: Send Syslog Messages with Different Facility Codes to the Same Syslog Host
Even with the default settings on, Junos can generate a lot of syslog information. That’s because syslog standards include a facility and a priority code that are used to identify the process that generated the messages, as well as their relative severity, respectively.
When using Junos software with a remote syslog server, you might normally configure a per-syslog host facility code, which means you loose the ability to filter and search based on specific facility codes.
This tip shows you how to generate messages with different facility codes to the same syslog host.
CYour operational goal is to send firewall logs with a facility code of local3, while all other logging information is sent as local4. The problem is you only have one remote syslog host and with Junos logging facilities defined on a per-host basis, in theory that forces all messages sent to that host to have a common facility.
So this tip provides a work around that involves the definition of multiple static-host-mappings for the same host along with multiple syslog host definitions using different facility values.
static-host-mapping { nms inet 100.0.33.99; nms-firewall-log inet 100.0.33.99;}
syslog {[...] host nms { authorization info; change-log info; interactive-commands info; facility-override local4;
host nms-firewall-log { firewall info; facility-override local3; }}

Tip:VRRPFastFailover 109
Tip: VRRP Fast Failover
VRRP can be configured for sub-second failover with the fast-interval option. The fast-interval setting is in ms. Setting a fast-interval value of 100 will provide failure detection within 300 ms. Failover time is a loss of three keepalives, so a setting of 100 ms means detec-tion within 300 ms:
interfaces { irb { unit 135 { family inet { address 10.150.135.2/24 { vrrp-group 135 { virtual-address 10.150.135.1; priority 100; fast-interval 100; <-- set failover to 300 ms (3x100ms) preempt; accept-data; } } } } }}
CVerify the VRRP configuration is active using show vrrp and show vrrp detail. You will see the fast-interval setting of 100 ms as Advertise-ment interval: .100 (where the interval is displayed in seconds).
jnpr@Ophion-MX240-RE0> show vrrp Interface State Group VR state VR Mode Timer Type Address vipirb.135 up 135 master Active A 0.079 lcl 10.150.135.2 10.150.135.1 jnpr@Ophion-MX240-RE0> show vrrp detail Physical interface: irb, Unit: 135, Address: 10.150.135.2/24 Index: 121, SNMP ifIndex: 5641, VRRP-Traps: enabled Interface state: up, Group: 135, State: master, VRRP Mode: Active Priority: 100, Advertisement interval: .100, Authentication type: none Delay threshold: 100, Computed send rate: 40 Preempt: yes, Accept-data mode: yes, VIP count: 1, VIP: 10.150.135.1 Advertisement Timer: 0.061s, Master router: 10.150.135.2 Virtual router uptime: 4d 00:03, Master router uptime: 4d 00:03 Virtual Mac: 00:00:5e:00:01:87 Tracking: disabled

110 DayOne:JunosTips,Techniques,andTemplates2011
Tip: Copying Files Between SRX Clusters
CIt’s often easier to copy code or log files from one SRX to another in the cluster. You can do this by entering the shell.
juniper@SRX5800# start shell%rcp -T junos-srx3000-10.1R1.8-domestic.tgz node1:
The syntax is rcp -T <file> <node> and allows you to copy files from one SRX to another, hopefully saving you some time and avoiding potential headaches.
Tip: Connecting to the Secondary Node from the Primary Node on an SRX Cluster
CThere may be instances where, due to some connectivity issues, you are unable to remotely log in into the secondary node on an SRX cluster.
In the absence of a console connection to the secondary, it is still possible to log into the secondary node from the primary node and run Junos commands without having to dispatch a technician to the site.
On branch SRX devices, this can be achieved by the command:
{primary:node0}lab@host-At> request routing-engine login node 1--- JUNOS 10.1R3.7 built 2010-011-10 04:15:10 UTC{secondary:node1}lab@host-B>
On high-end SRX devices, you need to be in the shell and run the following:
root@host-A% rlogin -T node1
Tip: Gracefully Shutdown Junos Software Before Removing Power
The following tip may seem completely obvious to long-time Junos users; however, it is not necessarily obvious to those new to the Junos platform. While some network vendors store configuration informa-tion only in flash and only when the user specifically requests it, Junos uses a real file system, which is always available for writing. As a consequence, the file system is open to corruption when the power is

Tip:ConnectAnotherDeviceUsingAuxiliaryPort 111
removed when the operating system is still running. Junos will automatically attempt to correct any file system errors, but still, just shut it down.
CIt’s recommended to gracefully shutdown the Junos software before removing power. When appropriate, use the request system halt command to gracefully halt Junos and help ensure file system integrity.
user@device> request system halt
When the software has been halted, system power is maintained.
You can also use request system power-off on some platforms. On platforms with dual routing engines, you may also want to use the both-routing-engines option (and, in fact, the software should warn you of that).
Tip: Connect Another Device Using Auxiliary Port
The editors have regularly heard people ask if Juniper has a capability similar to that found in one of our competitor’s terminals, but after seeing this tip this capability appears to only be available on the J Series Services Router, and it is only available for the single auxiliary port on that device. Still it might be useful in certain configurations. For example, it might be useful if you have two J Series in the same location, or you have a single J-Series and a single EX Series Ethernet Switch in a location. Try it.
CJunos permits you to use the AUX port to connect to another device’s console. Note that you must use a rollover cable to connect the Junos device and the other one.
You can use this capability in two ways:
1. Locally
Within the shell, type:
% /usr/libexec/interposer
You will now be connected to the auxiliary port:
% /usr/libexec/interposer
You are now connected to the console of the device attached to the AUX port.

112 DayOne:JunosTips,Techniques,andTemplates2011
Press CTRL-^ to disconnect.
2. Remotely
You can configure reverse Telnet or reverse SSH to connect to AUX port :
[edit]user@host# set system services reverse telnet
or:
[edit]user@host# set system services reverse ssh
Optionally, you can specify the port used for each one.
NOTE By default, the system uses port 2900 for reverse telnet and 2901 for reverse SSH.
Tip: Checking a Link Status Using Port Descriptions
CIf you set up port descriptions on all your ports using easy-to-remem-ber names, for example: # set interfaces ge-1/0/0 description Server1, you can quickly see the link status without having to remem-ber the port number, just the port description:
>show interfaces description | match Server1.
We regularly use show interfaces description while troubleshooting in our labs, and it’s worth noting one important element of the way Junos software implements this command.
The show interfaces description command only shows interfaces or units with descriptions. Therefore, you only see interfaces or units that have descriptions. If you configure descriptions on the interfaces, and not the units, you only see the interfaces in the command output. Likewise, if you configure descriptions on units, but not on interfaces, you only see the units in the command output.
Granted, in some cases, this doesn’t matter; however, in other cases (frame-relay being an example that quickly comes to mind), this distinction does matter. Play around with this one to refine its useful-ness.

Technique:MonitorInterestingCommandsExecutedbyOthersinReal-time 113
Technique: Monitor Interesting Commands Executed by Others in Real-time
Junos has great syslog capabilities, and the CLI has many useful features for parsing logs, and this technique is for the paranoid or perhaps slightly voyeuristic operators that are curious about what others may be doing on the device. For a better experience, use the | match and | except to filter the output so that you can focus on the juicy stuff.
CIf you wish to monitor the commands being entered by others, you must first configure syslog for interactive commands. Try something akin to the following:
user@host> show configuration system syslog user * { any emergency; } host 10.210.32.24 { authorization any; } file messages { any notice; authorization info; } file interactive-commands { interactive-commands any; }
Now, as a result, all log messages of type interactive-commands are logged to a file named interactive-commands. You can now monitor the changes to the interactive-commands file, but filter the delta to show only entries that match the pattern configure:
user@host> monitor start interactive-commands | match configure user@host>
Note that you see the matching output immediately because the command you just entered matches the pattern. Meanwhile, in another terminal window, various commands are run to include configure. As expected or hoped for, only the configure command appears in the output:
*** interactive-commands *** Dec 22 21:10:56 host mgd[58865]: UI_CMDLINE_READ_LINE: User 'user', command 'monitor start interactive-commands | match configure ' Dec 22 21:11:18 host mgd[58870]: UI_CMDLINE_READ_LINE: User 'user', command 'configure '

114 DayOne:JunosTips,Techniques,andTemplates2011
If you run monitor list, it will even show you the pipe commands applied to the output (not that any of us editors have ever done that, mind you, it just kind of came to us):
user@host> monitor list monitor start "interactive-commands" (Last changed Dec 22 21:11:18) | match "configure"
Tip: Suspend and Resume Trace File Monitoring
Junos supports a monitor stop command, which, like undebug all on other vendors’ equipment, stops the monitoring of all logs (tracefiles) that have been selected for monitoring. This tip shows you how Junos can quickly achieve a similar effect while still allowing the continuous writing to log files. It ensures that information isn’t lost while you catch up with all the information already displayed on your monitor.
COnce you have configured tracing/logging and have begun to view a given log file in real time using monitor start <filename>, you can always stop the output of trace to your terminal with a monitor stop <filename> command. But now you need another monitor start command to resume activity.
In those cases where you simply wish to pause the trace output, but expect you might again wish to resume monitoring, use the esc-q sequence to temporarily suspend monitor output. Though no longer displayed on your terminal, the trace information is still written to the log files until tracing is removed from the configuration:
user@host> monitor start trace-ospf*** trace-ospf ***Nov 10 20:22:56.970256 OSPF hello from 10.10.137.26 (IFL 74, transit area 0.0.0.0) absorbedNov 10 20:22:58.342734 OSPF hello from 10.10.137.24 (IFL 74, transit area 0.0.0.0) absorbedNov 10 20:23:00.073062 OSPF hello from 10.10.137.21 (IFL 74, transit area 0.0.0.0) absorbed
Here, the user enters the esq-q sequence…
*** monitor and syslog output disabled, press ESC-Q to enable ***
user@host>
user@host> show configuration protocols ospftraceoptions { file trace-ospf size 1m files 10; flag event; flag state; flag hello;[...]
user@host>

Tip:CombineMatchwithJunosSyslogCapabilities 115
Now the user enters the esq-q sequence to toggle the monitor output back on…
*** monitor and syslog output enabled, press ESC-Q to disable ***
Nov 10 20:23:12.812435 OSPF periodic xmit from 10.10.137.10 to 224.0.0.5 (IFL 73)Nov 10 20:23:13.094161 OSPF hello from 10.10.137.28 (IFL 74, transit area 0.0.0.0) absorbedNov 10 20:23:13.095060 OSPF hello from 10.10.137.29 (IFL 74, transit area 0.0.0.0) absorbed[...]
user@host> monitor stop
Tip: Combine Match with Junos Syslog Capabilities
The previous tip provided guidance about monitoring a tracefile in real time. It’s used again here because many do not realize the same approach can be used for remote sysloging or when writing to a local log file. Stated differently, the previous tip shows you how to filter what was viewed; this tip shows how to filter what is actually logged. Use it carefully because sloppy matching may omit important infor-mation.
CUse the Junos match function when configuring sysloging to reduce network traffic and storage space. That’s because only matching entries are actually logged!
Here’s a remote syslog example that results in only IDP related entries being sent to the remote host:
user@host# set system syslog host 10.10.10.100 any any user@host# system syslog host 10.10.10.100 match IDP_ATTACK_LOG_EVENT
And a logcal logging example that only logs interface flap events:
user@host# system syslog file interface-change-logs any any;
user@host# system syslog file interface-change-logs match UpDown;
Tip: Static Host Mapping
CYou can use static host mapping for situations where you find yourself pinging, tracerouting, or configuring a specific address on a regular basis. Once configured, you can use the name you’ve defined for an address instead of the address itself, thus saving you from having to look it up all the time.

116 DayOne:JunosTips,Techniques,andTemplates2011
Let’s say Customer-1 has a loopback address assigned to it of 192.168.2.1. First assign this address the name Customer-1:
[edit]lab@srxA-2# set system static-host-mapping Customer-1 inet 192.168.2.1
[edit]lab@srxA-2# commit commit complete
Now when you want to configure a protocol or other stanza that would include that address, you only have to remember that it was associated with Customer-1:
[edit]lab@srxA-2# set protocols bgp group internal neighbor Customer-1
Notice that the Juniper device recognizes the relationship and fills in the appropriate information:
[edit]lab@srxA-2# show protocols bgp group internal { neighbor 192.168.2.1;}
Tip: Viewing Core Files
COccasionally, the Junos operating system encounters an error and creates what is called a core dump. These files contain information that can help Juniper engineers find the cause of the error that was encoun-tered. You can use show system core-dumps command to list all core dumps on your router.
And, we are going to end this book with a bonus tip for all those of you who aren’t satisfied with letting JTAC do all the troubleshooting work. You can use the show system core-dumps core-file-info <filename> command to see the stack trace in the core file, like this:
user@device> show system core-dumps core-file-info /var/tmp/cores/rpd.core.2.201101191435.965992'rpd' process terminated with signal 11 Segmentation fault
Stack trace:#0 0x082b7649 in tai_delete_branch ()#0 0x082b7649 in tai_delete_branch ()

Tip:ViewingCoreFiles 117
#1 0x082b849a in tai_lsp_tunnel_id_available_notification ()#2 0x082b8709 in tai_update_ldp_p2mp_nexthop ()#3 0x082b87d3 in tai_update_rsvp_p2mp_nexthop ()#4 0x08180ddd in krt_floodnh_disassociate ()#5 0x08173eed in krt_add ()#6 0x08123677 in ?? ()#7 0x00000002 in ?? ()#8 0xbfbedef4 in ?? ()#9 0xbfbedf00 in ?? ()#10 0x0812366c in ?? ()#11 0x087f8a80 in idr_decode__rbrt_msg_0 ()
#12 0x00000002 in ??

118 DayOne:JunosTips,Techniques,andTemplates2011
Additional Resources
forums.juniper.net/jnet
J-Net is an interactive peer-based community dedicated to sharing information, resources, best practices, and questions about Juniper products, technologies, and solutions. Registration is free and you get access to premium content such as these Day One books. You can post questions and collaborate in the community forums, subscribe to content via RSS, email, and customize your user interface. In addition, there are regular promotional events in the community open only to members, such as the Junos Tips and Techniques Contest that was the basis for this book.
www.juniper.net/dayone
The Day One book series is available here for free in PDF format. Select titles also feature a Copy and Paste edition for direct placement of Junos configurations. (The library is available in eBook format for iPads and iPhones from iTunes. For Kindles, Androids, Blackberrys, Macs, and PCs visit the Kindle Store on your Kindle device. In addi-tion, print copies are available for sale at Amazon or Vervante.com.)
www.juniper.net/techpubs/
Juniper Networks technical documentation includes everything you need to understand and configure all aspects of Junos and all Juniper Networks devices. The documentation set is both comprehensive and thoroughly reviewed by Juniper engineering.
www.juniper.net/training/fasttrack
Take courses online, on location, or at one of the partner training centers around the world. The Juniper Network Technical Certifica-tion Program (JNTCP) allows you to earn certifications by demon-strating competence in configuration and troubleshooting of Juniper products. If you want the fast track to earning your certifications in enterprise routing, switching, or security use the available online courses, student guides, and lab guides.
www.juniper.net/books
Check out the complete Juniper Networks Books library.


