Embed Size (px)
Citation preview

K40 RL360/RL200QUICK REFERENCE GUIDE
Customizable SettingsTo access and change any of the factory default settings:• Press and hold VOLUME UP button for 3 seconds until
“Menu” is announced. • Press and release VOLUME UP button to scroll through the
menu options until desired option is heard.• Press and release VOLUME DOWN button to change
a setting. • Press and hold VOLUME UP button for 3 seconds or system
will automatically save settings and exit after 10 seconds.
1 Voice Type Female
2 Audible Voice On
3 Test On
4 POP Radar Band Off
5 QuietRideTM On (25 MPH)
6 Service Setting *WARNING*DO NOT CHANGE
(See Owner’s Manual pg.10)
7 Front Radar On
8 Front X-Band On
9 Front K-Band On
10 Front KA-Band On
11 Rear Radar On*
12 Rear X-Band On*
13 Rear K-Band On*
14 Rear KA-Band On*
15 Laser Defuser EX/EX2(optional) On
16 Factory Reset
Factory Default SettingMenu Options(in order presented)
*RL360 system only
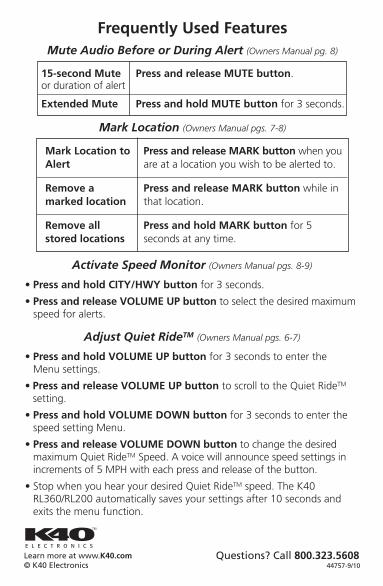
Frequently Used FeaturesMute Audio Before or During Alert (Owners Manual pg. 8)
15-second Mute Press and release MUTE button.or duration of alert
Extended Mute Press and hold MUTE button for 3 seconds.
Mark Location to Press and release MARK button when youAlert are at a location you wish to be alerted to.
Remove a Press and release MARK button while in marked location that location.
Remove all Press and hold MARK button for 5 stored locations seconds at any time.
Mark Location (Owners Manual pgs. 7-8)
Activate Speed Monitor (Owners Manual pgs. 8-9)
• Press and hold CITY/HWY button for 3 seconds.
• Press and release VOLUME UP button to select the desired maximumspeed for alerts.
Adjust Quiet RideTM (Owners Manual pgs. 6-7)
• Press and hold VOLUME UP button for 3 seconds to enter the Menu settings.
• Press and release VOLUME UP button to scroll to the Quiet RideTM
setting.
• Press and hold VOLUME DOWN button for 3 seconds to enter thespeed setting Menu.
• Press and release VOLUME DOWN button to change the desiredmaximum Quiet RideTM Speed. A voice will announce speed settings in increments of 5 MPH with each press and release of the button.
• Stop when you hear your desired Quiet RideTM speed. The K40RL360/RL200 automatically saves your settings after 10 seconds andexits the menu function.
Questions? Call 800.323.5608Learn more at www.K40.com© K40 Electronics 44757-9/10


K40 Consult
Don’t like to read manuals?
Call our experienced K40 Consultants.We’ll explain the whole thing.
800.323.5608
K40 ELECTRONICS600 Tollgate Rd.
Elgin, IL 60123
www.K40.com

3
Table of Contents
Start-up Sequence . . . . . . . . . . . . . . . . . . . . . . . . . . . . . . . . . .4
Receiving Alerts . . . . . . . . . . . . . . . . . . . . . . . . . . . . . . . . . . .5-6
Radar Alert Sequence . . . . . . . . . . . . . . . . . . . . . . . . . .5
Laser Alert Sequence . . . . . . . . . . . . . . . . . . . . . . . . . . .5
Alert Volume Reduction . . . . . . . . . . . . . . . . . . . . . . . .5
Non-Police Alerts . . . . . . . . . . . . . . . . . . . . . . . . . . . . .6
Special Features/Functions . . . . . . . . . . . . . . . . . . . . . . . . .6-11
City/Hwy/Filter (Sensitivity) . . . . . . . . . . . . . . . . . . . . . . . .6
Quiet RideTM . . . . . . . . . . . . . . . . . . . . . . . . . . . . . . . .6-7
Mark Location . . . . . . . . . . . . . . . . . . . . . . . . . . . . . .7-8
Mute Function . . . . . . . . . . . . . . . . . . . . . . . . . . . . . . .8
Speed Monitor . . . . . . . . . . . . . . . . . . . . . . . . . . . . . .8-9
Customizable Settings . . . . . . . . . . . . . . . . . . . . . .9-11
Remote Control . . . . . . . . . . . . . . . . . . . . . . . . . . . . . . . . .12-13
Warranty/Guarantees . . . . . . . . . . . . . . . . . . . . . . . . . . . . . . .14

Start-up Sequence (using factory default settings)
Your K40 RL360 /RL200 system will be ready for use following thisautomatic start-up sequence:
1. Start your vehicle – The K40 is designed to turn on automati-cally every time your vehicle is started.
2. Listen for Test Scan – Both front and rear alert lights in yourdash will flash (K40 RL200 models have one alert light). The voicewill announce “K40 Scan, Active” then you will hear alerts for all bands.
NOTE: If you don’t hear the test scan, press and release Powerbutton on the remote.
3. GPS Connection – After locating available satellites, the unit willannounce “GPS Connected”.
NOTE: If you are in a location that prevents connection with GPS(e.g. parking garage) your radar system will still protect you from allthreats. Once you drive to an unobstructed location, the GPS willconnect and you will hear “GPS Connected”.
4. You’re ready to drive without limits!
4
5
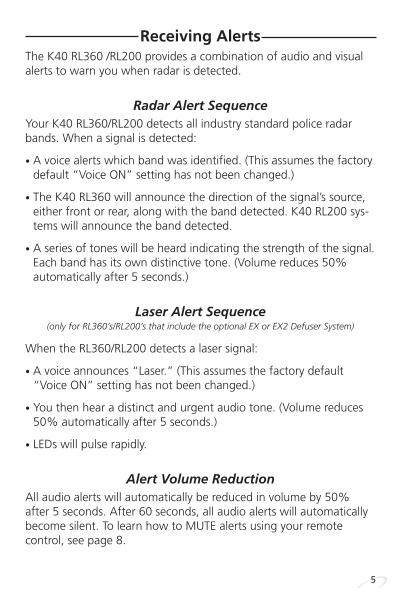
Receiving Alerts The K40 RL360 /RL200 provides a combination of audio and visualalerts to warn you when radar is detected.
Radar Alert Sequence Your K40 RL360/RL200 detects all industry standard police radarbands. When a signal is detected:
• A voice alerts which band was identified. (This assumes the factorydefault “Voice ON” setting has not been changed.)
• The K40 RL360 will announce the direction of the signal’s source,either front or rear, along with the band detected. K40 RL200 sys-tems will announce the band detected.
• A series of tones will be heard indicating the strength of the signal.Each band has its own distinctive tone. (Volume reduces 50%automatically after 5 seconds.)
Laser Alert Sequence(only for RL360’s/RL200’s that include the optional EX or EX2 Defuser System)
When the RL360/RL200 detects a laser signal:
• A voice announces “Laser.” (This assumes the factory default“Voice ON” setting has not been changed.)
• You then hear a distinct and urgent audio tone. (Volume reduces50% automatically after 5 seconds.)
• LEDs will pulse rapidly.
Alert Volume ReductionAll audio alerts will automatically be reduced in volume by 50%after 5 seconds. After 60 seconds, all audio alerts will automaticallybecome silent. To learn how to MUTE alerts using your remote control, see page 8.

6
Alerts from non-police signals Your RL360/RL200 is sensitive enough to detect signals generated by non-police equipment, such as bank security systems. To learnhow to minimize these signals, please read about FILTER options(below) and the Quiet RideTM function (page 6-7).
Special Features/FunctionsCITY/HWY FILTER Operation
(i.e. signal sensitivity)
The K40 RL360/RL200 offer 3 levels of radar sensitivity settings toaccommodate various driving situations. To change the level at anytime, press and release CITY/HWY button.
Level / Mode Sensitivity Recommended Use
1. Highway Detects all US industry stand- For highway travel or in any(factory default ard police radar signals at full area in which you are unfamil-
sensitivity. iar with the types of radar used.
2. City Reduced X Band sensitivity. When traveling in an urban(the most common source of area with minimal non-policenon-police radar) radar signals.
3. Filter X Band off. Reduced K and When traveling in a congestedKA Band sensitivity. traffic area with a high con-
centration of non-policeradar signals.
setting)
Quiet RideTM
The K40 RL360/RL200’s exclusive Quiet RideTM function will auto-matically silence all radar and laser alerts when traveling under aspeed of your choice between 20 and 65 MPH in 5 MPH increments.
The factory default setting for Quiet RideTM is “On” and your systemis preset to 25 MPH.
7
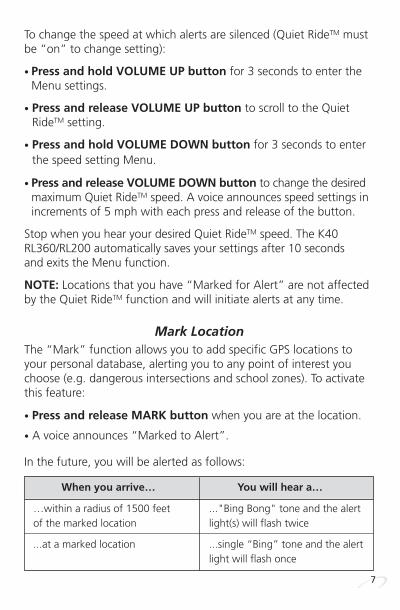
To change the speed at which alerts are silenced (Quiet RideTM mustbe “on” to change setting):
• Press and hold VOLUME UP button for 3 seconds to enter theMenu settings.
• Press and release VOLUME UP button to scroll to the QuietRideTM setting.
• Press and hold VOLUME DOWN button for 3 seconds to enterthe speed setting Menu.
• Press and release VOLUME DOWN button to change the desiredmaximum Quiet RideTM speed. A voice announces speed settings inincrements of 5 mph with each press and release of the button.
Stop when you hear your desired Quiet RideTM speed. The K40RL360/RL200 automatically saves your settings after 10 seconds and exits the Menu function.
NOTE: Locations that you have “Marked for Alert” are not affectedby the Quiet RideTM function and will initiate alerts at any time.
Mark LocationThe “Mark” function allows you to add specific GPS locations toyour personal database, alerting you to any point of interest youchoose (e.g. dangerous intersections and school zones). To activatethis feature:
• Press and release MARK button when you are at the location.
• A voice announces “Marked to Alert”.
In the future, you will be alerted as follows:
When you arrive… You will hear a…
…within a radius of 1500 feet ..."Bing Bong" tone and the alertof the marked location light(s) will flash twice
...at a marked location ...single “Bing” tone and the alertlight will flash once

8
To remove a previously marked location: Press and releaseMARK button while in that location.
To remove all currently stored locations: Press and hold MARKbutton for 5 seconds at any time.
Mute FunctionsUsing the MUTE button you can mute voice/tone audio alerts for15 seconds or an extended mute of 2 minutes (or more dependingon the duration of the initial alert).
• Press and release MUTE button for 15 second mute (or durationof initial alert).
• Press and hold MUTE button for extended mute (minimum 2minutes or duration of alert).
To turn the voice/tone audio alerts off, use the VOLUMEDOWN button until voice confirms “Audio Off”.
In both Mute settings and Volume Off settings, you will continue toreceive flashing visual alerts.
Speed MonitorThe Speed Monitor function alerts the driver when a pre-selectedspeed is exceeded. The Speed Monitor can be set to any speed between 40-100 MPH in 5 MPH increments.
When the preset speed is exceeded:
• The K40 RL360/RL200 will emit a continuous tone and LED(s) willremain lit.
• The alerts will continue until the vehicle’s speed is reduced tobelow the Speed Monitor setting.
The factory default setting for Speed Monitor is “Off.” To accessand turn on this function:
• Press and hold CITY/HWY button for 3 seconds.
9
• Then press and release VOLUME UP button to select the de-sired maximum speed for alerts. Stop pressing after you hear yourdesired speed announced.
• 5 seconds after your speed is selected, your setting will be savedand a voice will announce “Exit”.
Customizable SettingsTo change the factory preset features and optimize your K40RL360/RL200 for the way you drive, follow the instructions below, or call a K40 Consultant at 800.323.5608 Monday-Friday 8am to5pm CST. Be assured your call will be answered immediately andpersonally.
To change the preset settings:
• Enter Menu Mode - Press and hold VOLUME UP button for 3seconds. The voice will announce “Menu.”
• Scroll through Options - The RL360/RL200 will then announcethe first customizable option and its current status. Continue topress and release VOLUME UP button and listen to optionsuntil you get to the feature you want to change.
• Change a Setting - Press and release the VOLUME DOWNbutton. The voice will announce the change.
• Continue - To scroll to the next setting, press and release VOLUME UP.
To save your settings and exit:
• Press and hold the VOLUME UP for 3 seconds, or wait 10 seconds and the system will automatically save your preferences.
• The voice will announce “Exit”.
10
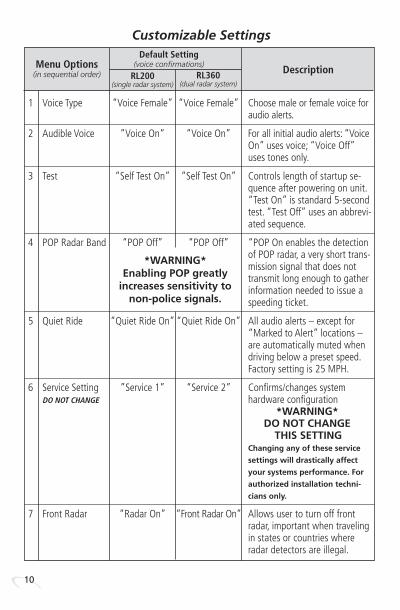
1 Voice Type “Voice Female” “Voice Female” Choose male or female voice for audio alerts.
2 Audible Voice ”Voice On“ “Voice On” For all initial audio alerts: “VoiceOn” uses voice; “Voice Off” uses tones only.
3 Test “Self Test On” “Self Test On” Controls length of startup se-quence after powering on unit.“Test On” is standard 5-second test. “Test Off” uses an abbrevi-ated sequence.
4 POP Radar Band “POP Off” “POP Off” “POP On enables the detection of POP radar, a very short trans-mission signal that does nottransmit long enough to gatherinformation needed to issue a speeding ticket.
5 Quiet Ride “Quiet Ride On” “Quiet Ride On” All audio alerts – except for “Marked to Alert” locations – are automatically muted whendriving below a preset speed.Factory setting is 25 MPH.
6 Service Setting ”Service 1” “Service 2” Confirms/changes system DO NOT CHANGE hardware configuration
*WARNING*DO NOT CHANGE
THIS SETTINGChanging any of these service
settings will drastically affect
your systems performance. For
authorized installation techni-
cians only.
7 Front Radar “Radar On” “Front Radar On” Allows user to turn off front radar, important when traveling in states or countries where radar detectors are illegal.
Default Setting(voice confirmations)Menu Options
(in sequential order) DescriptionRL200
(single radar system)RL360
(dual radar system)
*WARNING*Enabling POP greatly
increases sensitivity tonon-police signals.
Customizable Settings
11
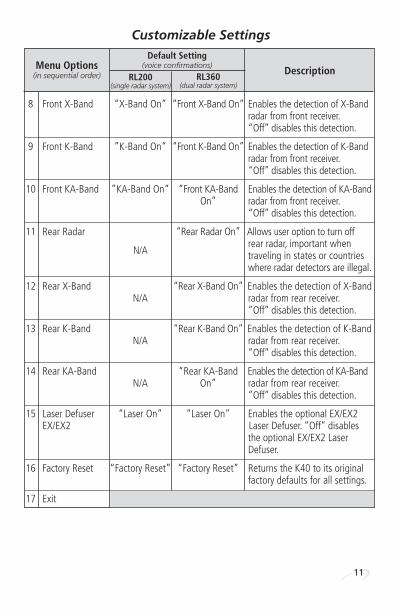
8 Front X-Band “X-Band On” “Front X-Band On” Enables the detection of X-Band radar from front receiver.“Off” disables this detection.
9 Front K-Band ”K-Band On“ “Front K-Band On” Enables the detection of K-Bandradar from front receiver.“Off” disables this detection.
10 Front KA-Band ”KA-Band On“ “Front KA-Band Enables the detection of KA-BandOn” radar from front receiver.
“Off” disables this detection.
11 Rear Radar “Rear Radar On” Allows user option to turn off
N/Arear radar, important when traveling in states or countrieswhere radar detectors are illegal.
12 Rear X-Band “Rear X-Band On” Enables the detection of X-BandN/A radar from rear receiver.
”Off” disables this detection.
13 Rear K-Band “Rear K-Band On” Enables the detection of K-BandN/A radar from rear receiver.
”Off” disables this detection.
14 Rear KA-Band “Rear KA-Band Enables the detection of KA-BandN/A On” radar from rear receiver.
”Off” disables this detection.
15 Laser Defuser “Laser On” “Laser On” Enables the optional EX/EX2 EX/EX2 Laser Defuser. “Off” disables
the optional EX/EX2 Laser Defuser.
16 Factory Reset “Factory Reset” “Factory Reset” Returns the K40 to its original factory defaults for all settings.
17 Exit
Default Setting(voice confirmations)Menu Options
(in sequential order) DescriptionRL200
(single radar system)RL360
(dual radar system)
Customizable Settings

12
CITY/HWY
VOL
VOL
MUTE
MARK
VOL
VOL
POWER
CITY/HWY
MUTE – Press and release to muteaudio alerts for 15 seconds, or theduration of the alert. Press and holdfor 3 seconds to engage extendedmute. (page 8)
MARK – Press and release to identifyand “mark” specific locations. Sys-tem will alert you to those locationswhen driving. (pages 7-8)
CITY/HWY – Press and release to se-lect level of alert sensitivity (page 6),or press and hold for 3 seconds toenter “Speed Monitor” function(pages 8-9)
VOLUME UP – Press and release toincrease alert volume. (Or press andhold to enter Menu Selection func-tion.)
VOLUME DOWN – Press and re-lease to decrease volume or turn offaudio alerts. (Also used to changeselection within Menu mode.)
POWER – Press and release to turnthe RL360/RL200 on or off.
To Enter Menu Mode and Set Preferences
• Press and hold VOLUME UP button for 3 seconds to enterMenu Mode.
• Press and release VOLUME DOWN button to change settings (page 9).
K40 RL360/RL200 Remote Control

13
OPEN
To Change Remote Battery:Unlock and remove batterydoor by turning the covercounter-clockwise as shown.
Insert battery with + symbolside facing the + symbol side of the battery door cover.
Requires use of a CR2032 button cell battery.
To Use Supplied Visor Clip:Insert by placing the clip in the back of the remote controlas shown. Press firmly until itclicks. Visor clip included inyour K40 RL360/RL200 parts kit.
Register your K40 RL360/RL200 today at www.K40.com to activate your guarantees:
Guaranteed immunity from speeding tickets If you get a radar speeding ticket within one year of purchase,we’ll reimburse you for the cost of the speeding ticket.*
Guaranteed performance If your K40 radar detection system does not outperform anyother radar detector you’ve owned, return it within 30 days for full product credit.
Guaranteed from theftIf your K40 RL360/RL200 is ever stolen, we’ll replace the stolenproduct.**
One year warrantyK40 offers a one-year “repair or replace” warranty for manufacturer defects.
*Offer not valid for speeding ticket violations incurred in school or construction zones, or connected with a DUI.
**Requires proof of purchase and a police report.
Register your K40 RL360/RL200 online today by visitingwww.K40.com
14

Product subject to one or more of the following patents:
U.S. Patents 7,298,248 B2
5,001,777
RE39,038
RE40,653
RE41,905
Other patents pending
Learn more at K40.com ©K40 Electronics
FCC IDS: W75-M2K-Y24 W75-RL-RCU
This device complies with part 15 of the FCC Rules.Operation is subject to the following two conditions:(1) This device may not cause harmful interference,and (2) this device must accept any interference received, including interference that may cause undesired operation.
In addition, any changes or modifications to thisproduct, which are not expressly approved by K40Electronics in writing, could void the user’s authorityto operate this product.