Embed Size (px)
Citation preview

page 1 of 18
KADOLUX shower system
To see the complete KADO range go to www.reece.com.au/bathrooms
Dimensions are nominal measurements only.
461
599
114
845
1200
835
835
300
300
845
1400
1145
461
599
114
845
1200
835
835
300
300
845
1400
1145
Centre Outlet
Rear Outlet
1000mm x 1000mm
1200mm x 900mm
Disclaimer: Products in this specification manual must by regulation be installed by licensed and registered trade people. The manufacturer/distributor reserves the right to vary specifications or delete models from their range without prior notification. Dimensions are nominal measurements only. Dimensions and set-outs listed are correct at time of publication however the manufacturer/distributor takes no responsibility for printing errors.
Tech Page Version 1

page 2 of 18
KADOLUX shower system
SPECIFICATIONSRecommended Use Domestic, hotel and commercial
Material Semi Frameless Shower screen, white acrylic shower base and white acrylic walls, chrome square handles
Screen Height 2000mm
Outlet 1000mm x 1000mm Centre or Rear
1200mm x 900mm Rear
Waste Chrome waste
Frame & Support rail colour
Chrome
Door Opening Right or Left
Glass Thickness 8mm Toughened Glass
We recommend the use of soapy water or approved cleaners.
This product should not be cleaned with abrasive materials.
Damage caused by any improper treatment is not covered by the product warranty- refer to Warranty Conditions.
ClEANING RECOMMENDATIONS
Disclaimer: Products in this specification manual must by regulation be installed by licensed and registered trade people. The manufacturer/distributor reserves the right to vary specifications or delete models from their range without prior notification. Dimensions are nominal measurements only. Dimensions and set-outs listed are correct at time of publication however the manufacturer/distributor takes no responsibility for printing errors.
Tech Page Version 1

page 3 of 18
KADOLUX shower system
The Kado Lux Shower Base can not be used with a Plumbdinger or Flexidinger
Important NoteINSTAllATION INSTRUCTIONS - SHOWER bASE AND WAll lINER
1. CONTENTS SUPPLIED
Shower Base / Pack contains
1 x Shower Base 1 x Shower Waste
Shower Wall Liner / Pack contains
1 x Shower Wall Liner 3 x Sika R Showerbond Adhesive 1 x Clear Anti-Fungal Silicon
IMPORTANT NOTE:
Only use adhesive or silicon supplied by Decina and follow the instructions on each product.
Ensure the “use -by” date is current. Warranty may be void if these points are not adhered to.
2. TOOLS REQUIRED
Masking Tape Tape Measure
Soft Pencil Drill & Drill Bit
Knife Spirit Level
Hole Saw Caulking Gun (to suit tapware) (+ Building Adhesive)
3. PERSONAL PROTECTIVE EQUIPMENT (PPE) For the safety of the installer, the following items should be used during the
installation of Decina products.
a) Protective Clothing
b) Protective Eyewear
c) Protective Gloves
d) Protective Footwear
e) Protective Earwear - whilst using power tools
f) Any other items listed by the manufacturer of the adhesives
or sealants used during this installation
4. WARNINGS a) Installation of Products MUST be carried out by a
QUALIFIED TRADESPERSON. b) Inspect the product and all components (listed) PRIOR TO INSTALLATION. c) Installation of damaged goods will VOID your Warranty d) Acrylic products shall not be used directly adjacent to any direct heat source
above 70 degrees Celsius, as this may cause distortion of the product. e) A crylic products will expand and contract with temperature changes, so it
is important to allow expansion gaps where shown in this instruction. f) Acrylic products may have sharp edges, so always wear appropriate
protective clothing and footwear during the installation process.
Kado Lux
(Not Supplied)
5. COMPLIANCE REQUIREMENTS
Any wet area installation or renovation must comply with the following:-
BUILDING CODE OF AUSTRALIA Volume One - Class 2 - 9 Buildings Volume Two - Class 1 and Class 10 buildings - Housing Provisions
• BCA 2006 Voume One references AS 3740 - ‘Waterproofing of wet areas in residential buildings’ as meeting the minimum performance requirements for construction of wet areas in Class 2, 3 and 4 buildings.
• BCA 2006 Voume Two gives detailed waterproofing requirements for various applications. These requirements are for all intents and purposes the same as those provided in AS 3740.
AUSTRALIAN STANDARD AS 3740 - 2010 Waterproofing of Domestic Wet Areas
This standard specifies the requirements for the physical elements of construction including floors, walls, junctions and penetration and the specific areas where these criteria apply including showers.

page 4 of 18
KADOLUX shower system
6. AREA PREPARATION • To ensure correct installation of Kado
Shower products, it is important to have the site floor and walls; level; square and plumb to within 5mm overall.
To not do so may prevent correct fitment of a glass shower screen system onto the Kado Shower Base or tiles and may
affect water drainage of the shower base.
• To ensure proper bond of the Kado Shower products, the floor and wall area must be smooth, clean, dry, unpainted and UNSEALED.
• For Acrylic Shower Wall Liner applications, installation shall only be on NEW wall lining WETBOARD, to ensure and effective bond of the adhesives and sealants.
• All floor and wall surface joints and fixings must be flush to prevent unevenness on the Kado shower products, potentially causing stress points or unsightly bulges.
• Kado Shower Base and Acrylic Shower Wall Lining products must be fitted to a structurally sound solid surface that does not flex under load. This will prevent unevenness in the product or potential weak spots.

page 5 of 18
KADOLUX shower system
8 9 © Copyright Decina Bathroomware Pty Ltd 2011
7. SHOWER BASE SITE PREPARATION
• Kado Shower Bases DO NOT require installation on a cement slurry mortar base, as they are fitted with SELF-SUPPORTING FEET.
• To ensure proper drainage of water to the waste and also for correct installation of an optional Kado Glass Shower Screen, the floor area under the Luna Base must be flat and level to within 2mm over the width of the proposed base installation area.
• For concrete floor installations, if the floor installation area is uneven or unlevel, the floor should be relevelled using a cement based self levelling compound (eg. ARDEX L292 or similar as per manufacturer’s instructions).
• For timber or panel floor installations, it is necessary to first lay a suitable fibre cement floor underlay sheet (eg. James Hardie Ceramic Tile Underlay or similar as per manufacturer’s instructions). The underlay must be laid level and all fixings set flush with the surface to avoid unevenness.
• Ensure the waste trap hole in the floor is no greater than 200 x200mm and does
not encroach on the position of the Kado Shower Base self supporting feet. • For timber or panel floor installations, ensure the waste trap hole does not result
in the weakening of the floor, as the Kado Shower base does not form part of the building integrity. If weakened, the opening should be suitably reinforced to provide a structurally sound and flex resistant floor once complete.
8. SHOWER BASE INSTALLATION FOR ACRYLIC SHOWER WALL APPLICATIONS
A For Acrylic Shower Wall Liner applications the Kado Shower Base does not
need checking into the stud wall, but can be simply pushed against the stud frame. The shower base can be installed before the Wetboard sheeting is applied.
B If the Shower Base is to be installed after the Wetboard is installed, the
wetboard sheet will need to be cut away to allow the base to sit against the stud wall, allowing a 6mm gap all around the shower base.
C All Kado Shower Bases are manufactured with a protective film to prevent
damage to the surface of the product. D Prior to installation, pull the protective film back from the edges of the shower
base (approx 25mm) and completely from the waste area.
DO NOT COMPLETELY REMOVE THE PROTECTIVE FILM AT THIS STAGE
E Qualified tradesperson should assemble the waste
and adjoining plumbing. The waste assembly should be checked to ensure it’s located centrally in the shower base waste hole for best appearance. The locking nut should be kept loose until the Chrome top cover is located and sits centrally in the hole, with equal spacing around all sides. Once satisfied, tighten the lock ring on the waste assembly back and then remove the chrome waste cover until the end of the installation for protection.
EVEN
• Before the shower base can be installed, the choice of wall construction and wall lining method must be determined. The choice will determine which of the following methods should be followed:

page 6 of 18
KADOLUX shower system
8 9 © Copyright Decina Bathroomware Pty Ltd 2011
7. SHOWER BASE SITE PREPARATION
• Kado Shower Bases DO NOT require installation on a cement slurry mortar base, as they are fitted with SELF-SUPPORTING FEET.
• To ensure proper drainage of water to the waste and also for correct installation of an optional Kado Glass Shower Screen, the floor area under the Luna Base must be flat and level to within 2mm over the width of the proposed base installation area.
• For concrete floor installations, if the floor installation area is uneven or unlevel, the floor should be relevelled using a cement based self levelling compound (eg. ARDEX L292 or similar as per manufacturer’s instructions).
• For timber or panel floor installations, it is necessary to first lay a suitable fibre cement floor underlay sheet (eg. James Hardie Ceramic Tile Underlay or similar as per manufacturer’s instructions). The underlay must be laid level and all fixings set flush with the surface to avoid unevenness.
• Ensure the waste trap hole in the floor is no greater than 200 x200mm and does
not encroach on the position of the Kado Shower Base self supporting feet. • For timber or panel floor installations, ensure the waste trap hole does not result
in the weakening of the floor, as the Kado Shower base does not form part of the building integrity. If weakened, the opening should be suitably reinforced to provide a structurally sound and flex resistant floor once complete.
8. SHOWER BASE INSTALLATION FOR ACRYLIC SHOWER WALL APPLICATIONS
A For Acrylic Shower Wall Liner applications the Kado Shower Base does not
need checking into the stud wall, but can be simply pushed against the stud frame. The shower base can be installed before the Wetboard sheeting is applied.
B If the Shower Base is to be installed after the Wetboard is installed, the
wetboard sheet will need to be cut away to allow the base to sit against the stud wall, allowing a 6mm gap all around the shower base.
C All Kado Shower Bases are manufactured with a protective film to prevent
damage to the surface of the product. D Prior to installation, pull the protective film back from the edges of the shower
base (approx 25mm) and completely from the waste area.
DO NOT COMPLETELY REMOVE THE PROTECTIVE FILM AT THIS STAGE
E Qualified tradesperson should assemble the waste
and adjoining plumbing. The waste assembly should be checked to ensure it’s located centrally in the shower base waste hole for best appearance. The locking nut should be kept loose until the Chrome top cover is located and sits centrally in the hole, with equal spacing around all sides. Once satisfied, tighten the lock ring on the waste assembly back and then remove the chrome waste cover until the end of the installation for protection.
EVEN
• Before the shower base can be installed, the choice of wall construction and wall lining method must be determined. The choice will determine which of the following methods should be followed:
Image of waste cover is purely indicitive only
Important Note

page 7 of 18
KADOLUX shower system
10 11 © Copyright Decina Bathroomware Pty Ltd 2011
F Ensure the floor surface is clean and dry. Apply a generous amount of building adhesive to the Shower Base self supporting feet - suitable for concrete bond (adhesive not supplied – eg. Liquid Nails or similar).
G Position the Shower Base against the wall studs and push the Shower Base down firmly to bed the feet against the floor. Recheck the Shower Base level and conduct a water test to ensure full drainage to the waste. Relevel the base as required whilst adhesive is still uncured.
H Allow the Shower Base to cure for at least 24 hrs as per the adhesive manufacturer’s instructions before installing the wall sheeting. This ensures the level will not change by standing on it.
I Once the Shower Base bond is fully cured, the Wet area sheeting can be applied over the Shower Base tile bead as per the relevant Wet Board manufacturer’s instructions. The Wetboard should sit over the top edge of the tile bead. Ensure the Wetboard is installed at least 6mm above the shower base tile bead for expansion.
• Once sheeting is completed, use a flexible waterproof sealant (not supplied) to seal the gap between the Shower Base tile bead and the Wetboard.
FOR STEEL STUD WALL FRAMES WITH ACRYLIC SHOWER WALL LINING APPLICATIONS - SEE BELOW
6mm min 6mm min
• NOTE: As a steel wall stud should not be cut, it is necessary to build out the wall level to clear the Shower Base tile bead thickness.
• A suitable WETBOARD product of no less than 12mm thickness is required to achieve the desired level. Use of either a 13mm Wet Area Plasterboard or 12mm Wet Area Fibre Cement sheet is advised.
• Install the chosen 12 or 13mm WETBOARD product bottom edge at least 6mm above the tile bead (as per relevant manufacturer’s instructions).
• Once sheeting is completed, use a flexible waterproof sealant (not supplied) to seal the gap between the Shower Base tile bead and the WETBOARD.

page 8 of 18
KADOLUX shower system
10 11 © Copyright Decina Bathroomware Pty Ltd 2011
F Ensure the floor surface is clean and dry. Apply a generous amount of building adhesive to the Shower Base self supporting feet - suitable for concrete bond (adhesive not supplied – eg. Liquid Nails or similar).
G Position the Shower Base against the wall studs and push the Shower Base down firmly to bed the feet against the floor. Recheck the Shower Base level and conduct a water test to ensure full drainage to the waste. Relevel the base as required whilst adhesive is still uncured.
H Allow the Shower Base to cure for at least 24 hrs as per the adhesive manufacturer’s instructions before installing the wall sheeting. This ensures the level will not change by standing on it.
I Once the Shower Base bond is fully cured, the Wet area sheeting can be applied over the Shower Base tile bead as per the relevant Wet Board manufacturer’s instructions. The Wetboard should sit over the top edge of the tile bead. Ensure the Wetboard is installed at least 6mm above the shower base tile bead for expansion.
• Once sheeting is completed, use a flexible waterproof sealant (not supplied) to seal the gap between the Shower Base tile bead and the Wetboard.
FOR STEEL STUD WALL FRAMES WITH ACRYLIC SHOWER WALL LINING APPLICATIONS - SEE BELOW
6mm min 6mm min
• NOTE: As a steel wall stud should not be cut, it is necessary to build out the wall level to clear the Shower Base tile bead thickness.
• A suitable WETBOARD product of no less than 12mm thickness is required to achieve the desired level. Use of either a 13mm Wet Area Plasterboard or 12mm Wet Area Fibre Cement sheet is advised.
• Install the chosen 12 or 13mm WETBOARD product bottom edge at least 6mm above the tile bead (as per relevant manufacturer’s instructions).
• Once sheeting is completed, use a flexible waterproof sealant (not supplied) to seal the gap between the Shower Base tile bead and the WETBOARD.

page 9 of 18
KADOLUX shower system
ACRYLIC SHOWER WALL LINER INSTALLATION
DRILLING TAP HOLES IN ACRYLIC LINER
• Have a qualified tradesperson install the shower fittings. Mark the position of the holes for the fittings on acrylic shower wall liner.
• Large holes must be drilled with a FINE tooth hole saw.
• Holes should be drilled from the outside show face only
ATTACHING THE ACRYLIC SHOWER WALL LINER
Positioning Shower Wall Liner
• Trial position the shower wall liner against the shower recess, ensuring it fits squarely into the recess corner and shower base.
• Tape the corners with masking tape to hold the liner in position. • Use a soft pencil to mark around the edges of the shower wall liner before
removing. Adhering Shower Wall Liner • Prepare area by wiping down the shower wall, base and wetboard ensuring it is
clean and dry. • The shower liner is adhered to the wetboard using Sika Showerbond adhesive
supplied. ONLY this adhesive should be used on the wall liner, as other brands may fail over time. Please read the manufacturer’s instructions on the back of the Showerbond cartridge before use.
• Ensure all final hole sizes have at least a 2mm clearance around tap fittings for expansion.
2mm min clearance
• Using the marked pencil lines as your guide and starting from the outside, apply the adhesive as per diagram below. Apply a continuous 5mm bead of adhesive onto the Wetboard, 15mm minimum from the side and bottom edges. DO NOT PUT ANY ADHESIVE ALONG THE TOP EDGE, as this will seal the wall liner and not allow expansion of air to escape during use – causing buckling of the liner.
• Apply a bead of adhesive around the tap fittings, with 15mm clearance on all
sides.
9.
14 15 © Copyright Decina Bathroomware Pty Ltd 2011
15mm
15mm
• Before fitting the shower wall liner, apply a bead of silicone sealant supplied along the inside face of the tile bead upstand of the shower base as shown below.
NOTE: THE SILICON SHOULD NOT BE VISIBLE ONCE THE WALL IS FITTED NOTE: Store silicon for use the following day.
• Apply vertical lines of Showerbond adhesive on the wetboard, 100mm apart to cover the remainder of the wall liner area.
FIXING SHOWER WALL LINER
YOU WILL ONLY HAVE 20 MINUTES
TO COMPLETE THE GLUEING PROCESS
100mm
• Place the wall lining into position ensuring that the corner area is pressed into place first. Note the bottom edge of the shower wall liner should be sitting hard on the shower base, in front of the tile bead.
• Remove the shower wall liner from position for approximately 5 seconds to allow the adhesive to aerate.
• Reposition the shower wall liner. Use a damp cloth and press towards the edges to ensure full contact has been made over the entire shower liner area.
• Ensure site is left for 20 minutes to cure and then brace as required to hold in position.
• Bracing should remain in position for not less than 18 hours for complete curing.
AFTER INSTALLATION
Once wall lining adhesion is fully cured, remove the protective film on the shower wall liner completely. • The protective film on the remainder of the Shower Base can also be
removed and the Chrome Waste Cover fitted.
• Apply silicone sealant provided around the tap hole penetrations to waterproof the gaps. A qualified tradesperson can now fit the tap sets over the wall liner.
• DO NOT USE THE SHOWER FOR AT LEAST 24 HOURS AFTER FINAL INSTALLATION TO ALLOW FOR FULL CURE.
• Refer to Section 13 for Cleaning and Maintenance Instructions.

page 10 of 18
KADOLUX shower system
10. SHOWER BASE INSTALLATION FOR TILE WALL APPLICATIONS
For tile wall applications it is important that the bottom edge of the wetboard sheet sits in front of the shower base tile bead - the following steps are required to prepare the wall
WALL PREPARATION FOR TIMBER STUD WALL FRAMES ON TILE LINING INSTALLATIONS
• Locate the shower base against the timber stud wall and mark the position of the
base along the studs and down the shower base sides at a distance of 10mm greater with a pencil.
TRAY INSTALLATION FOR TILE WALL APPLICATIONS - • Refer Steps A - G Section 10
• Allow the Shower Base to cure for at least 24 hrs as per the adhesive manufacturer’s instructions before installing the wall sheeting. This ensures the shower base level will not change by standing on it.
• Once the Shower Base bond is fully cured, the Wet area sheeting can be applied
over the Shower Base tile bead as per the relevant Wet Board manufacturer’s instructions. The Wetboard should sit over the front of the tile bead. Ensure the Wetboard is installed at least 6mm above the shower base floor level for expansion.
6mm min
10mm HIGH
6mm min
• With a chisel, check out the timber frame to a depth of between 10-15mm. This allows the shower base tile bead to sit behind the final wet board sheeting for waterproofing.
• • Once sheeting is completed, use a flexible waterproof sealant (not supplied) to
seal the gap between the Shower Base and the Wetboard.
10-15mm DEEP
WALL PREPARATION FOR STEEL STUD WALL FRAMES ON TILE WALL INSTALLATIONS - SEE BELOW
• NOTE: As a steel wall stud should not be cut, it is necessary to build out the wall level to clear the Shower Base tile bead thickness. On top of this a thinner 6mm wetboard is installed down inside the tile bead, this will provide support behind the bottom row of tiles. (See instructions below)
• A suitable WETBOARD product of no less than 12mm thickness is required to achieve the desired level. Use of either a 13mm Wet Area Plasterboard or 12mm Wet Area Fibre Cement sheet is advised.
• Install the chosen 12 or 13mm WETBOARD product bottom edge at least 6mm above the tile bead (as per relevant manufacturer’s instructions).
• Once completed the final 6mm WETBOARD sheet can be installed onto the 12 or 13mm WETBOARD. Ensure the 6mm WETBOARD is installed at least 5-6mm above the shower base for expansion.
11. CLEANING & MAINTENANCE If your Kado Shower Base or Shower wall are given the proper care, the lustrous surface of the Lucite sheet will retain its appearance for many years. It is very easy to clean using clear water with a small amount of detergent or mild soap. Chamois, soft cloth or sponge is suitable for cleaning but cloths must never be used dry.
Do not use window cleaner , benzene, toluene, acetone, methyl ethyl ketone or strong concentrated acids, etc Do not use abrasive substances and abrasive cleaners. To remove paint, grease or tar use a good grade of Isopropyl alcohol.
Fine hairline scratches may be minimized by the use of a mild polish such as Brasso, which has a mild abrasive action and tends to fill small scratches to make them less visible.
• Once sheeting is completed, use a flexible waterproof sealant (not supplied) to seal the gap between the Shower Base and the 6mm
WETBOARD.
• The Shower recess is now ready for tiling. Once tiling is completed, the protective film can be futher removed to allow for the shower screen installation. Once the screen installation is complete, the remainder of the protective film can be removed and the Chrome Waste Cover fitted.
• Refer to Section 13 for Cleaning and Maintenance Instructions

page 11 of 18
KADOLUX shower system
INSTAllATION INSTRUCTIONS - SHOWER SCREEN
The Kado Lux Shower Base can not be used with a Plumbdinger or Flexidinger
Important Note
INSTRUCTION�MANUAL-RECTANGULAR�AND�SQUARE�KADO�WITH�EZICLEAN

page 12 of 18
KADOLUX shower system
INSTRUCTION�MANUAL-RECTANGULAR�AND�SQUARE�KADO�WITH�EZICLEAN
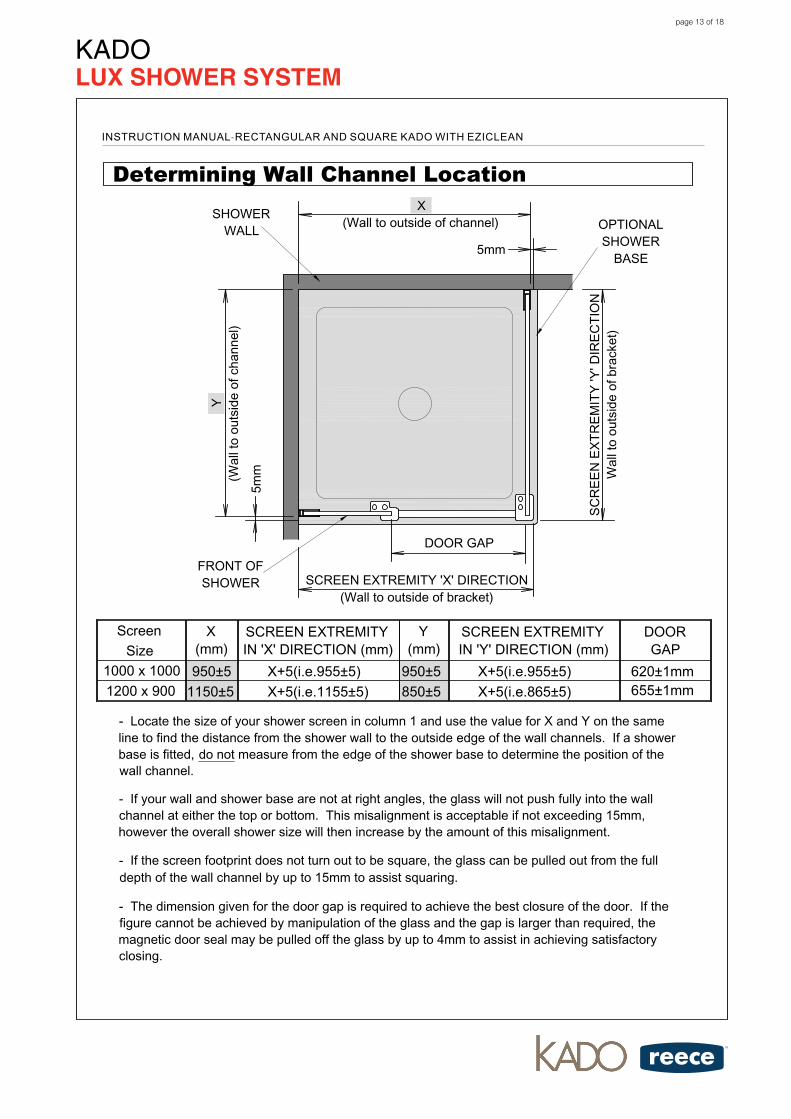
page 13 of 18
KADOLUX shower system
INSTRUCTION�MANUAL-RECTANGULAR�AND�SQUARE�KADO�WITH�EZICLEAN

page 14 of 18
KADOLUX shower system
INSTRUCTION�MANUAL-RECTANGULAR�AND�SQUARE�KADO�WITH�EZICLEAN

page 15 of 18
KADOLUX shower system
INSTRUCTION�MANUAL-RECTANGULAR�AND�SQUARE�KADO�WITH�EZICLEAN

page 16 of 18
KADOLUX shower system
INSTRUCTION�MANUAL-RECTANGULAR�AND�SQUARE�KADO�WITH�EZICLEAN

page 17 of 18
KADOLUX shower system
E
INSTRUCTION�MANUAL-RECTANGULAR�AND�SQUARE�KADO�WITH�EZICLEAN

page 18 of 18
KADOLUX shower system
REECE PRODUCT QUAlITY GUARANTEEYou have purchased a quality product from Reece Pty Ltd ABN 84 004 097 090 (“Reece”). This product is covered by a 7 year replacement product warranty and a 12 month warranty over spare parts and labour.
7 YEAR WARRANTY – DOMESTIC USEThis warranty covers faults in the product construction, material and assembly. Products which are within 7 years from the date of purchase, found upon inspection by an authorised Reece representative, to be defective in construction, material or assembly, will be repaired or exchanged with an equivalent product free of charge. Replaced items become Reece’s property.
All replacement products will be available for collection without charge to the customer at the nearest Reece branch to the customer’s location, or elsewhere as agreed between the customer and Reece.
labour and Spare PartsThe labour for the replacement of products and spare parts to which this warranty applies will be supplied by Reece or relevant supplier using licensed plumbers engaged by Reece or relevant supplier within 1 year from the date of purchase.
Labour will not be covered for removable items such as door drip seal. This item is removable for cleaning purposes.
Spare parts which are within 1 year from the date of purchase found upon inspection by an authorised Reece representative to be defective in construction, material or assembly, will be replaced free of charge.
Warranty ConditionsThis warranty will apply only under all of the following conditions:
• The item has been installed by a licensed plumber
• The item has been installed for and subjected to domestic residential use only
• Failure is due to a fault in the manufacture of the product
• Proof of purchase (including the date of purchase) is provided
• The installation of the product is in accordance with the instructions provided
• This warranty does not cover products purchased as an ex-display without being fully checked and tested for sale by the manufacturer.
• This warranty does not include faults caused by:
• Unsuitable or improper use
• Incorrect installation or installation not in accordance with the instructions provided
• Installation or part installation by the purchaser or any person other than a LICENSED PLUMBER
• Normal wear and tear
• Inadequate or complete lack of maintenance
• Chemical, electrochemical or electrical influences
• Harsh detergents or abrasive cleaners used on product finishes
1 YEAR WARRANTY – COMMERCIAl USE‘Commercial’ use is all use other than for normal domestic residential purposes, including use in non-business places as in public buildings, schools, sports centres and in establishments that contain private bathrooms with high frequency of use by many individuals, such as hotels, motels, retirement villages and hospitals.
The Commercial warranty covers this product against manufacturing faults in the construction, material and assembly of both the finished products and any spare parts for a period of 1 year from the date of purchase. Products and spare parts which are found upon inspection by an authorised Reece representative to be defective in construction, material or assembly will be repaired or exchanged free of charge. Replaced items become Reece’s property. The labour for the replacement of products and spare parts to which this warranty applies will be supplied by Reece or relevant supplier using licensed plumbers engaged by Reece or relevant supplier. The Warranty Conditions and exclusions which apply to the domestic use warranty also apply to this commercial warranty.
EXClUSIONSTo the fullest extent permitted by law, Reece excludes all liability for damage or injury to any person, damage to any property, and any indirect consequential or other loss or damage.
ClAIM PROCEDUREFor all warranty queries customers are to contact the branch where the product was purchased. These details can be found on your purchase invoice.
Our goods come with guarantees that cannot be excluded under the Australian Consumer Law. You are entitled to a replacement or refund for a major failure and for compensation for any other reasonably foreseeable loss or damage. You are also entitled to have the goods repaired or replaced if the goods fail to be of acceptable quality and the failure does not amount to a major failure.
SH
OW
SY
STE
M.T
1.T2
.7Y
R
Don’t risk it, use a licensed plumber.™
7YEARQ
U
ALITY GUARANTEE