Embed Size (px)
Citation preview

Kareo Quick Start Guide April 2012

Kareo Quick Start Guide – April 2012 i
Table of Contents 1. Get Started .............................................................................................................................................................................1
1.1 Practice Setup ................................................................................................................................................................................... 1 1.2 Training, Help Guides and Support ........................................................................................................................................... 1 1.3 User Login .......................................................................................................................................................................................... 1 1.4 Dashboard Navigation ................................................................................................................................................................. 2 1.5 Record Search................................................................................................................................................................................... 3
2. Appointment Scheduler ..................................................................................................................................................... 4
3. Patient Records .................................................................................................................................................................... 5 3.1 New Patient ...................................................................................................................................................................................... 5 3.2 Add Case to Patient Record ......................................................................................................................................................... 6 3.3 Add Insurance Policy to Patient Record .................................................................................................................................. 8
4. New Encounter .................................................................................................................................................................... 9 4.1 Enter Encounter for Patient ........................................................................................................................................................ 9
5. Patient Payment ................................................................................................................................................................. 11 5.1 Enter Patient Payment ..................................................................................................................................................................11 5.2 Print Patient Statement ...............................................................................................................................................................11
6. Send Claims ......................................................................................................................................................................... 12 6.1 Print Paper Claims ......................................................................................................................................................................... 12 6.2 Submit Electronic Claims ............................................................................................................................................................ 12

Kareo Quick Start Guide – April 2012 1
1. Get Started Welcome to Kareo! This Quick Start Guide has been written for the new Kareo user and covers the very basics of the billing process; from scheduling an appointment and entering a new patient to submitting a paper or electronic claim. For detailed information, please refer to the Kareo User Manual or the Kareo Help Center: www.kareo.com/help.
1.1 Practice Setup This guide assumes that your Kareo application administrator has already set up your practice and all its settings. The Kareo Implementation Guide for Company Administrators provides instructions on setting up and customizing one or more practices. When a practice has not been set up, the New Practice setup wizard will launch upon login.
1.2 Training, Help Guides and Support Kareo offers a comprehensive training program and video/user guide library. To access our support pages, visit www.kareo.com/help.
1.3 User Login
To log in to the application
1. Click Start > All Programs > Kareo > Kareo or;
locate the Kareo icon on your desktop and double-click it. 2. On the Sign-In window, enter your user name and password (refer to your confirmation email). 3. Click Sign In.
Get Started
Kareo Quick Start Guide – April 2012 2
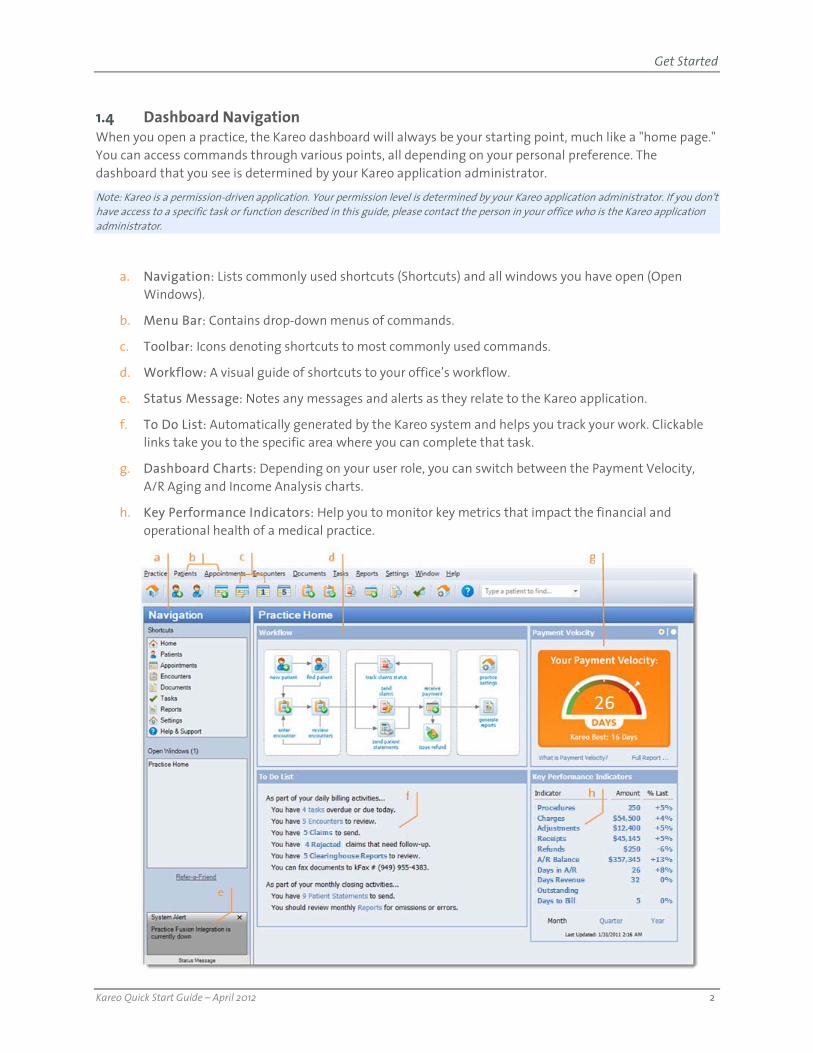
1.4 Dashboard Navigation When you open a practice, the Kareo dashboard will always be your starting point, much like a "home page." You can access commands through various points, all depending on your personal preference. The dashboard that you see is determined by your Kareo application administrator.
Note: Kareo is a permission-driven application. Your permission level is determined by your Kareo application administrator. If you don't have access to a specific task or function described in this guide, please contact the person in your office who is the Kareo application administrator.
a. Navigation: Lists commonly used shortcuts (Shortcuts) and all windows you have open (Open Windows).
b. Menu Bar: Contains drop-down menus of commands.
c. Toolbar: Icons denoting shortcuts to most commonly used commands.
d. Workflow: A visual guide of shortcuts to your office’s workflow.
e. Status Message: Notes any messages and alerts as they relate to the Kareo application.
f. To Do List: Automatically generated by the Kareo system and helps you track your work. Clickable links take you to the specific area where you can complete that task.
g. Dashboard Charts: Depending on your user role, you can switch between the Payment Velocity, A/R Aging and Income Analysis charts.
h. Key Performance Indicators: Help you to monitor key metrics that impact the financial and operational health of a medical practice.

Get Started
Kareo Quick Start Guide – April 2012 3
1.5 Record Search When searching for a record within Kareo, you can search by entering all or part of a keyword as well as selecting a specific search criteria. When you have located a record, double-click on it to open.
a. In the Look For field, type all or part of a word or number sequence.
b. Select a specific search criteria in the Search In field drop-down menu, then click Find Now.
c. Click any column header to sort the list.
d. Click Clear to start another search.
e. A maximum of 20 results per page is listed. Click the arrows to navigate between pages. Or click in the page number field, type a page number and press Enter on your keyboard.
Tips
• Name Search: Enter either the first name, last name or partial name.
• Number Search: Use a single number string without dashes or diagonal symbols.
• Insurance Search: Enter the insurance company/plan zip code in the Look For box and select Address in the Search In drop-down menu.
• Code Search: Enter the complete or partial code number; or enter the most descriptive word or abbreviation of the code name (for example, “consult” for consultation).

Kareo Quick Start Guide – April 2012 4
2. Appointment Scheduler The appointment scheduler is available to Complete and Max plans only. A user with permissions can customize calendar views, color-coding, appointment reasons, office hours, service locations and timeblocks.
To schedule an appointment
1. Click Appointments on the top menu. Select Daily or Workweek Calendar. 2. In the Resource section, check the box next to the resource(s) you want to schedule. 3. Select a date on the calendar in the top right of the window. 4. Double-click on a time slot in the calendar. A new appointment opens. 5. Complete the appointment details. If you are scheduling a new patient, click Patient and then New
(see section New Patient). 6. Click Save.
a. Appointment: Color-coded based on appointment reason. b. Calendar: Select a month, week or day. c. Resource: List of resources for scheduling. Check one or more boxes to view calendars. d. Actions: Click for a list of appointment options.

Kareo Quick Start Guide – April 2012 5
3. Patient Records Patient records store information about the patients associated with a medical practice. A patient record includes the patient demographics, guarantor, employer, insurance policies, case details, patient alerts, prior patient activities, document attachments and more.
3.1 New Patient The tasks associated with creating a new patient record include:
• Entering general patient information • Creating a patient case • Adding insurance policies
To add a new patient
1. Click Patients > Find Patients on the top menu.
Note: To avoid duplication, a best practice is to first search the patient database to see if the patient already exists in the system.
2. If patient is not in the system, click New at the bottom. 3. Enter patient information.
a. Enter general patient information. b. Enter patient contact information. c. Select providers. d. If person other than patient is financially responsible, check the box and complete guarantor
information. e. Select payer scenario. f. After completing patient information, click Save & Add Case to create a case for the patient or
Save & Add Policy to add insurance information.

Patient Records
Kareo Quick Start Guide – April 2012 6
3.2 Add Case to Patient Record Creating individual cases for patient visits simplifies the selection of insurance policies and the order in which insurance plans may be billed. For example, you may have a patient that is being treated for injuries sustained from an auto accident that is covered under one insurance policy; yet that patient may receive treatment during the same visit for a condition unrelated to the auto accident and for which a different policy is billed. Separate cases should be created for each policy type.
To add a case to a patient record
1. In the New Patient window, click Save & Add Case at the bottom or; click Patients > Find Patient. Once you find the patient, double-click to open the record.
2. Click the Cases tab at the top. 3. Click Add on the right of the window. 4. Enter case information and click Save.
a. Enter name and description for the case. b. Select the payer scenario from the drop-down list.
Note: If you select any of the Workers Comp scenarios, the Attorneys and Workers’ Compensation tabs will appear at the top to add any attorneys and workers comp information to the case.
c. Send patient statement is checked by default. d. Click Add to add insurance information if not already present. e. Order in which more than one insurance company will be billed. Click Move Up or Move Down
on the right to adjust. f. Optional: On the Conditions tab, enter the reason for the patient treatment. g. If applicable, enter any authorization numbers from an insurance company on the
Authorizations tab.
Patient Records
Kareo Quick Start Guide – April 2012 7
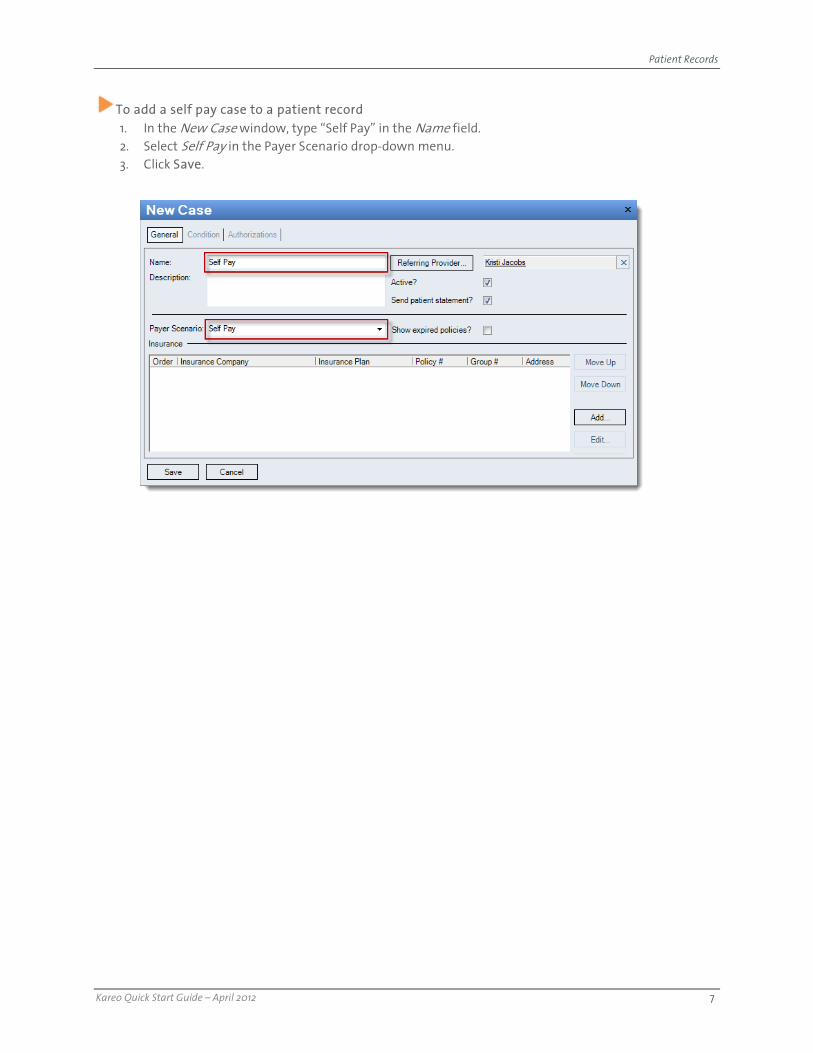
To add a self pay case to a patient record 1. In the New Case window, type “Self Pay” in the Name field. 2. Select Self Pay in the Payer Scenario drop-down menu. 3. Click Save.

Patient Records
Kareo Quick Start Guide – April 2012 8
3.3 Add Insurance Policy to Patient Record
To add an insurance policy to a patient record
1. In the New Patient window, click Save & Add Policy at the bottom or; click Patients > Find Patient. Once you find the patient, double-click to open the record.
2. Click the Cases tab at the top. 3. Click Add on the right of the window. 4. Search your list for the insurance plan associated with the patient.
Note: To avoid duplication, always do a search in your database for existing plans and policies before adding new ones.
5. Double-click on a plan to add it to the patient record or; click New at the bottom to add a new plan.
6. Enter policy information and click Save.
a. Enter insurance information from patient’s insurance card. b. Policy Type: Only available for Medicare as a secondary policy. c. Release of Info: Select signed or informed consent. d. The Eligibility tab appears for Max and Complete plans only. Through the Eligibility tab, you can
initiate an eligibility request (enrollment in eligibility verification services required). See Patient Records > Patient Eligibility in the online help files.
e. Check this box if the insurance policy is through the patient’s employer. f. By default, Patient Relationship to Insured is set to “Self.” If other than self, choose from the
drop-down list and complete the Insured section (g).

Kareo Quick Start Guide – April 2012 9
4. New Encounter Encounters capture charges and store information about a patient visit. The encounter record can be thought of as a digital version of a Superbill and includes general information about the visit, the primary party responsible for payment, and the treatment rendered by the provider.
4.1 Enter Encounter for Patient
To create a new encounter
1. Click Patients > Find Patients. 2. Once you find the patient, click on the name to highlight it. 3. Click Create Encounter at the bottom of the window or;
click Encounters > New Encounter on the top menu. 4. When you have completed the information (see image next page), choose one of the following:
• Save as Draft: Places the encounter in Draft status • Save for Review: Places the encounter in Review status • Approve: Places the encounter in Approved status

New Encounter
Kareo Quick Start Guide – April 2012 10
a. Enter patient information. Many of these fields are auto-populated. If not, click the buttons to locate the information.
b. If prior authorization is required, click to select the authorization number. c. Enter dates and Batch #.
Note: Batch # is optional. Entering a batch number is helpful for running reports. For example, if you consistently use a naming convention such as date posted + initials of person posting (example: 021411CB), you can easily run reports for specific users who manage payment posting in your office.
d. Enter providers and location of service. e. Enter payment. Once you enter the amount, additional fields become available regarding
payment. f. Enter procedures, diagnoses and charges.
Note: These columns can be customized. Right-click on a column and select Customize or Remove Procedure. Note: Hover over a procedure or diagnosis code to see the full description. Note: Enter a “?” in the procedure or diagnosis fields to launch a searchable list of codes.
g. Click the arrows to add additional information regarding hospitalization, ambulance, and other miscellaneous data.

Kareo Quick Start Guide – April 2012 11
5. Patient Payment During a patient visit you can enter a patient payment, such as a copay, into the Kareo system. If you are enrolled in the Integrated Credit Card Processing service, you can enter payments made with a credit card.
5.1 Enter Patient Payment
To enter a copay 1. Click Encounters > Receive Payment on the top menu. 2. In the New Payment window, enter patient and payment information.
• In the Type field, select Patient. • In the Method field, select payment method.
3. Click Save & Print Receipt. You can apply the payment at a later time.
To enter a credit card payment You must be enrolled in the Integrated Credit Card Processing service to process a credit card transaction. 1. In the New Payment window, enter patient and payment information.
• In the Method field, select Credit Card from the drop-down menu.
2. Click Process Credit Card Payment. The Process Credit Card Payment window opens to process the credit card transaction.
• Select Swipe Card to process a credit card through a credit card reader attached to your computer; select Enter information to manually type in the credit card information.
3. When finished, click Process Payment. 4. Click Save & Print Receipt.
5.2 Print Patient Statement
To print a patient statement 1. Click Patients. 2. Double-click on a patient name to open the record. 3. At the bottom of the window, click Reports and select Patient Statement. The Patient Statement
window will open. 4. Click Print at the bottom of the window. The standard
Windows Print dialog box opens. 5. Select your printer and printing options.

Kareo Quick Start Guide – April 2012 12
6. Send Claims Once an encounter has been approved, the Kareo system automatically generates one or more claims related to the encounter (i.e.: one claim per procedure listed). Claims can then be printed for mailing or submitted electronically.
Note: If you are submitting both paper and electronic claims, we recommend sending all electronic paper claims before printing paper claims.
6.1 Print Paper Claims
To print one or more claims 1. Click Encounters > Track Claim Status on the top menu. 2. In the Find Claims window, select Ready to print paper claims in the drop-down menu to the left of
the search bar.
3. Click Find Now. This displays a list of claims ready to be printed. 4. Review claims if necessary. 5. Choose one of the following actions:
• To print a single procedure on a claim: Click on a procedure to highlight it. Right-click and select Print paper claim.
• To print multiple claims: Click Print Claims at the bottom of the window. You can print all claims in the queue or select a specific date range, insurance, patient or payer scenario.
6. Select your printer and printing options.
6.2 Submit Electronic Claims
A Kareo application administrator must first complete enrollment in electronic claim services before you can submit claims electronically (see the Kareo Implementation Guide for Company Administrators).
To submit electronic claims
1. Click Encounters > Submit Electronic Claims on the top menu. 2. On the Submit Electronic Claims window, select which claims you want to submit. 3. Click Submit Claims.