Embed Size (px)
Citation preview

Kennedy Access Resume System
User Manual
2018.01

1. Sign-up
1. Kannedyaccess.com
All applicants are strongly advised to enter their referral information
(recruiting agent’s Email) in this box
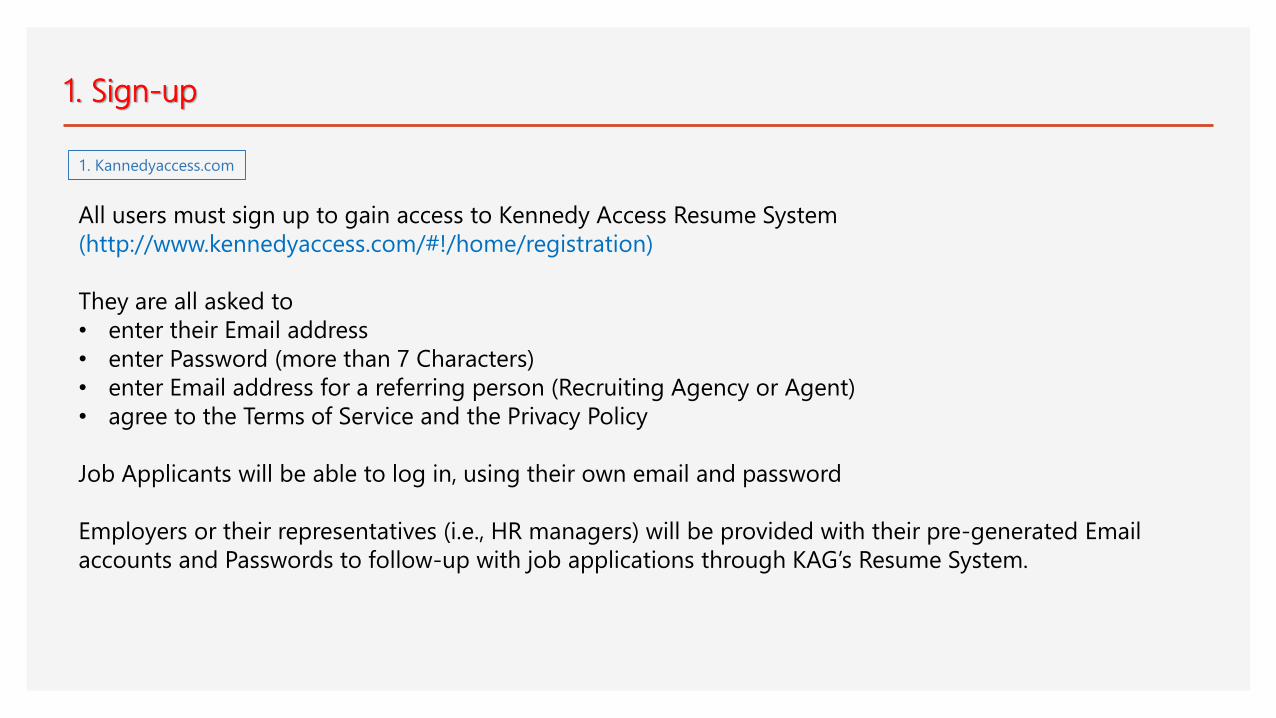
1. Sign-up
1. Kannedyaccess.com
All users must sign up to gain access to Kennedy Access Resume System
(http://www.kennedyaccess.com/#!/home/registration)
They are all asked to
• enter their Email address
• enter Password (more than 7 Characters)
• enter Email address for a referring person (Recruiting Agency or Agent)
• agree to the Terms of Service and the Privacy Policy
Job Applicants will be able to log in, using their own email and password
Employers or their representatives (i.e., HR managers) will be provided with their pre-generated Email
accounts and Passwords to follow-up with job applications through KAG’s Resume System.

2. Log-In
All users must log in to Kennedy Access Resume System
They are all asked to
• enter their Email address
• enter Password

2. Log-in
Log-InWith Email & Password
Reset Email & Change Password functions enabled on this stage

2. Log-in
Applicant User Menu
Applicant User MenuCreating Resume
Job Application
Job Status
Change Password
Log-out
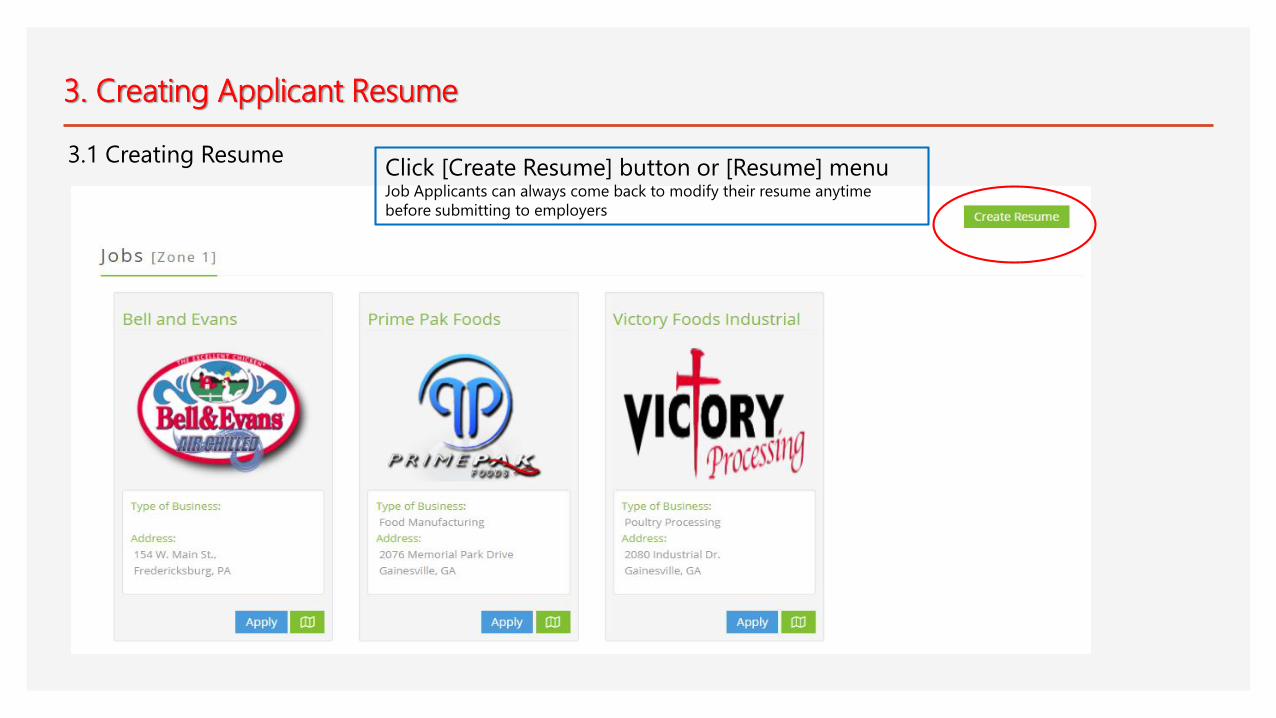
3. Creating Applicant Resume
Click [Create Resume] button or [Resume] menuJob Applicants can always come back to modify their resume anytime
before submitting to employers
3.1 Creating Resume
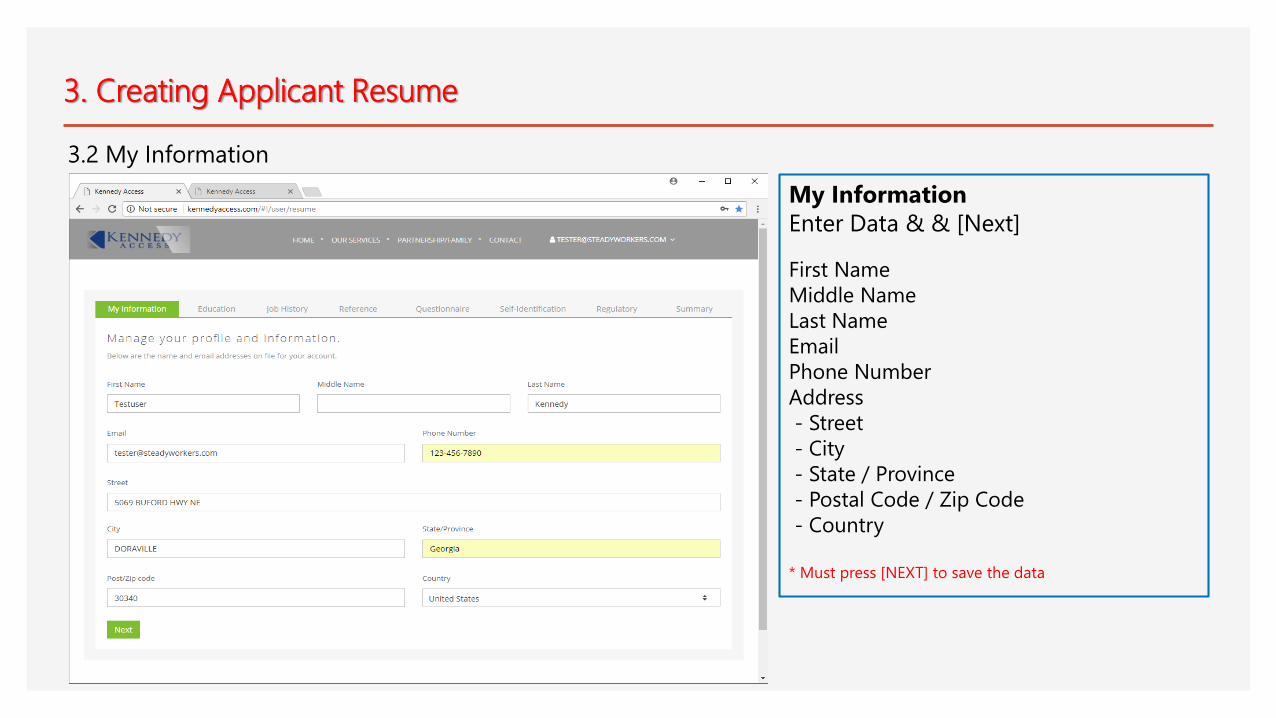
3. Creating Applicant Resume
3.2 My Information
My Information
Enter Data & & [Next]
First Name
Middle Name
Last Name
Phone Number
Address
- Street
- City
- State / Province
- Postal Code / Zip Code
- Country
* Must press [NEXT] to save the data

3. Creating Applicant Resume
3.3 Education
Education History
Enter Data & [ADD] & [Next]Enter as many education history
Institution
Program
Education Level
• Enter from the most recent
• Must press [NEXT] to save the data
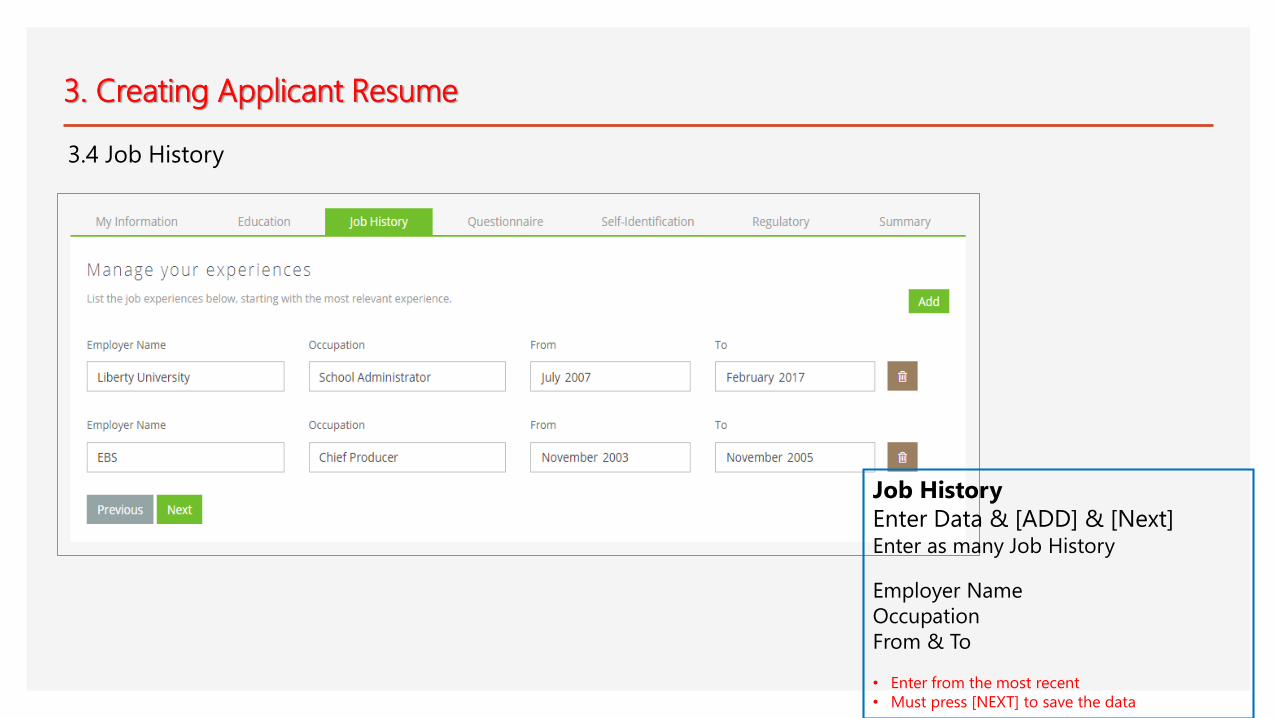
3. Creating Applicant Resume
3.4 Job History
Job History
Enter Data & [ADD] & [Next]Enter as many Job History
Employer Name
Occupation
From & To
• Enter from the most recent
• Must press [NEXT] to save the data
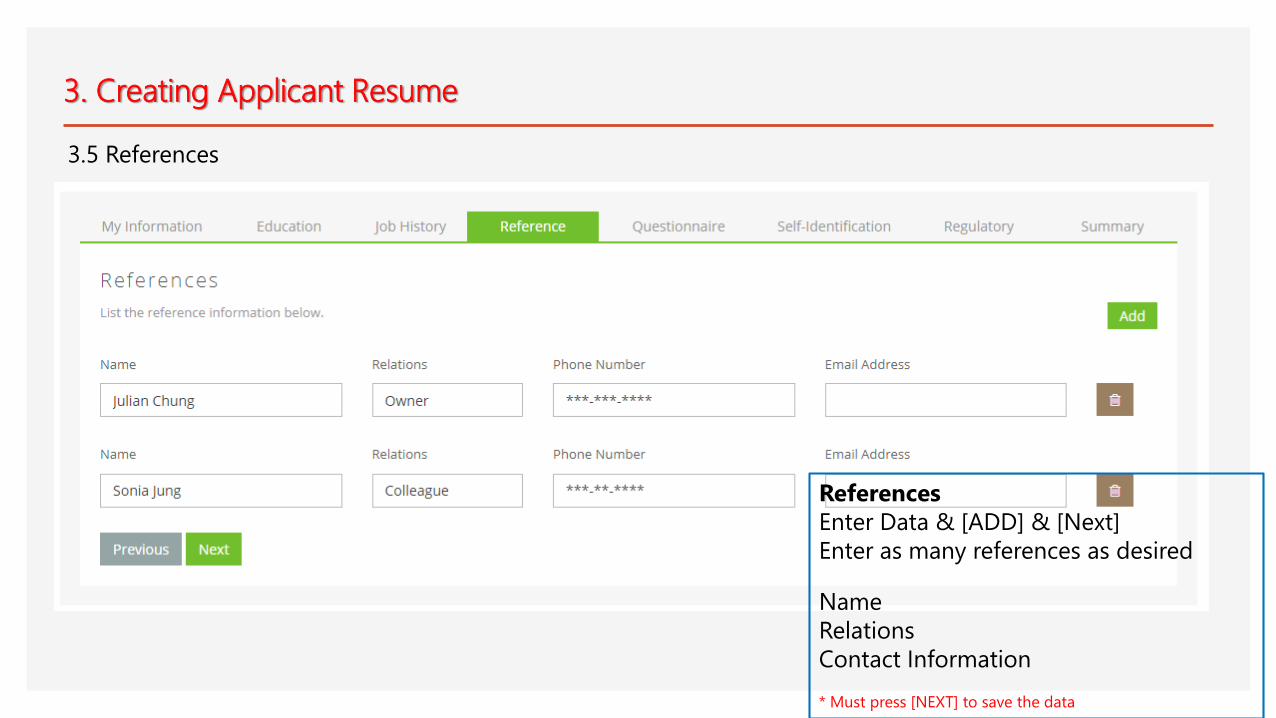
3. Creating Applicant Resume
3.5 References
References
Enter Data & [ADD] & [Next]
Enter as many references as desired
Name
Relations
Contact Information
* Must press [NEXT] to save the data
3. Creating Applicant Resume
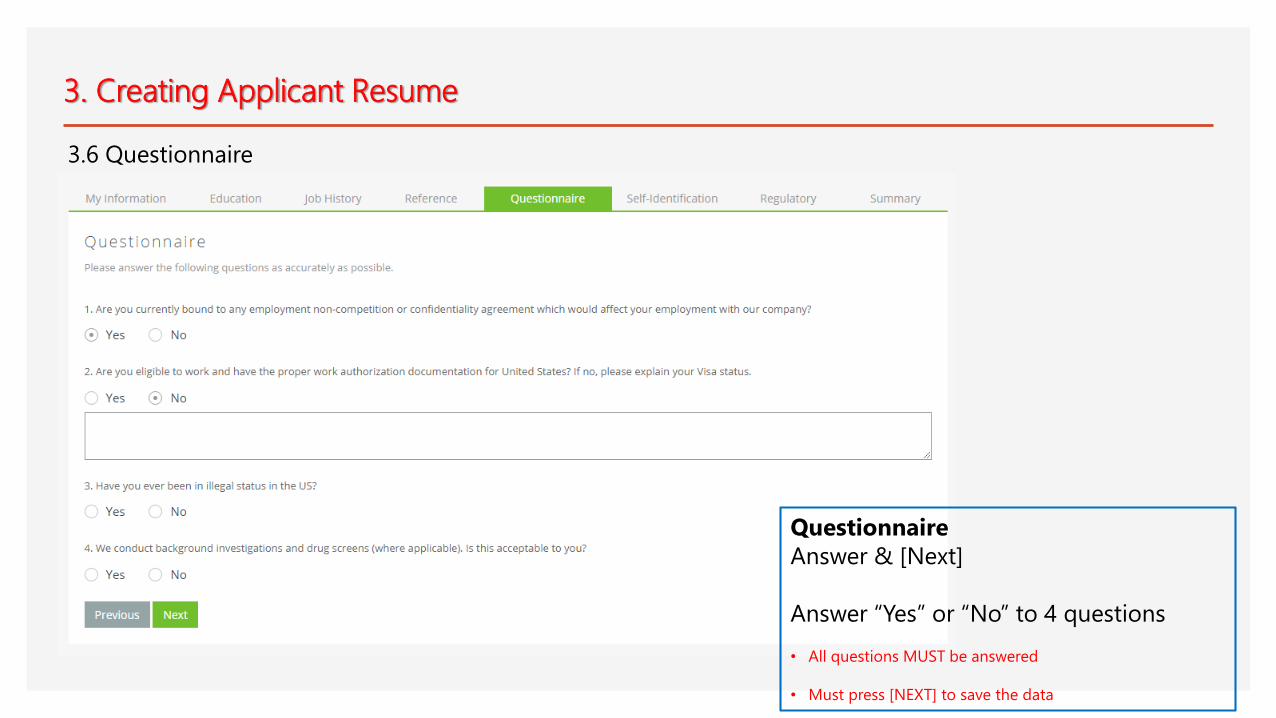
3.6 Questionnaire
Questionnaire
Answer & [Next]
Answer “Yes” or “No” to 4 questions
• All questions MUST be answered
• Must press [NEXT] to save the data
3. Creating Applicant Resume
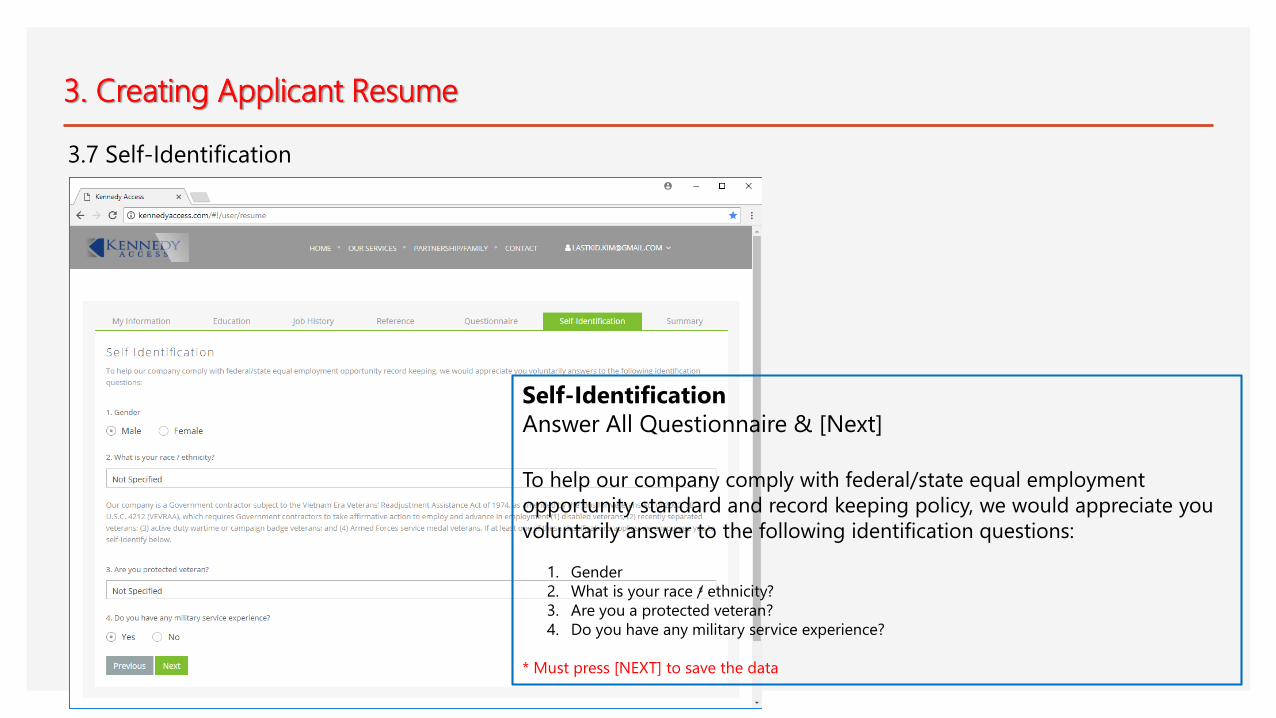
3.7 Self-Identification
Self-Identification
Answer All Questionnaire & [Next]
To help our company comply with federal/state equal employment
opportunity standard and record keeping policy, we would appreciate you
voluntarily answer to the following identification questions:
1. Gender
2. What is your race / ethnicity?
3. Are you a protected veteran?
4. Do you have any military service experience?
* Must press [NEXT] to save the data
3. Creating Applicant Resume
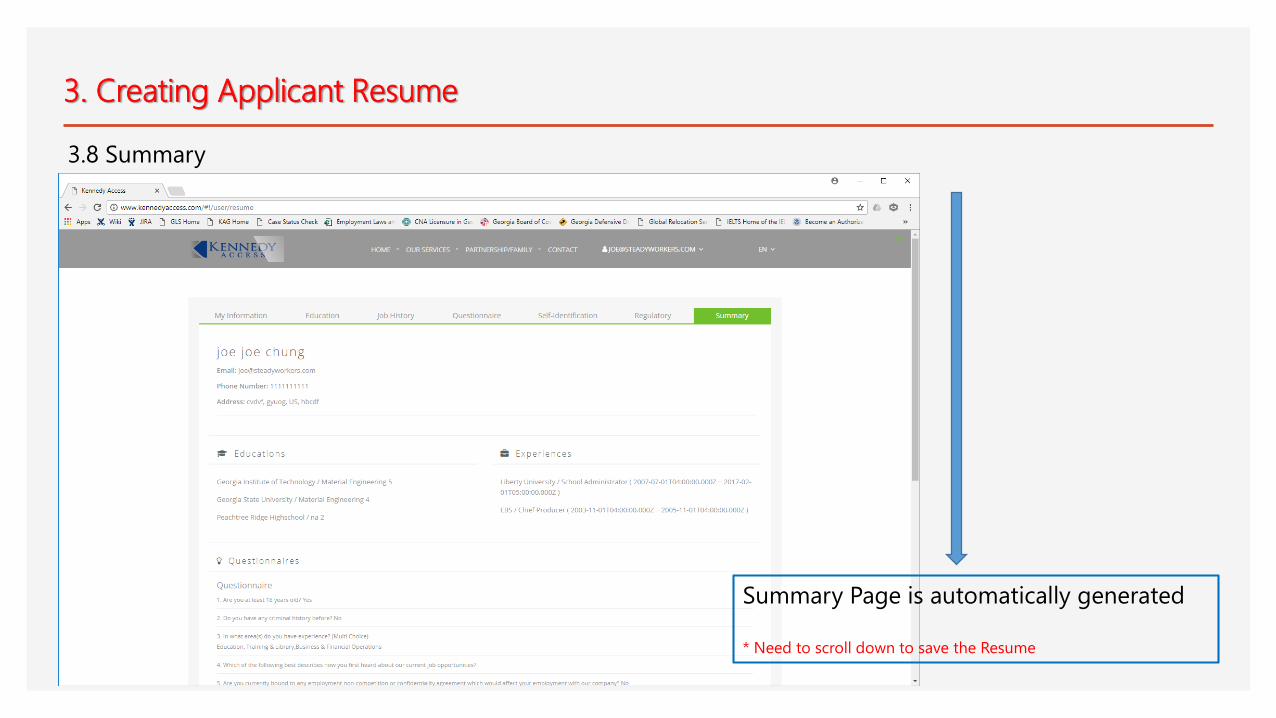
3.8 Summary
Summary Page is automatically generated
* Need to scroll down to save the Resume
3. Creating Applicant Resume
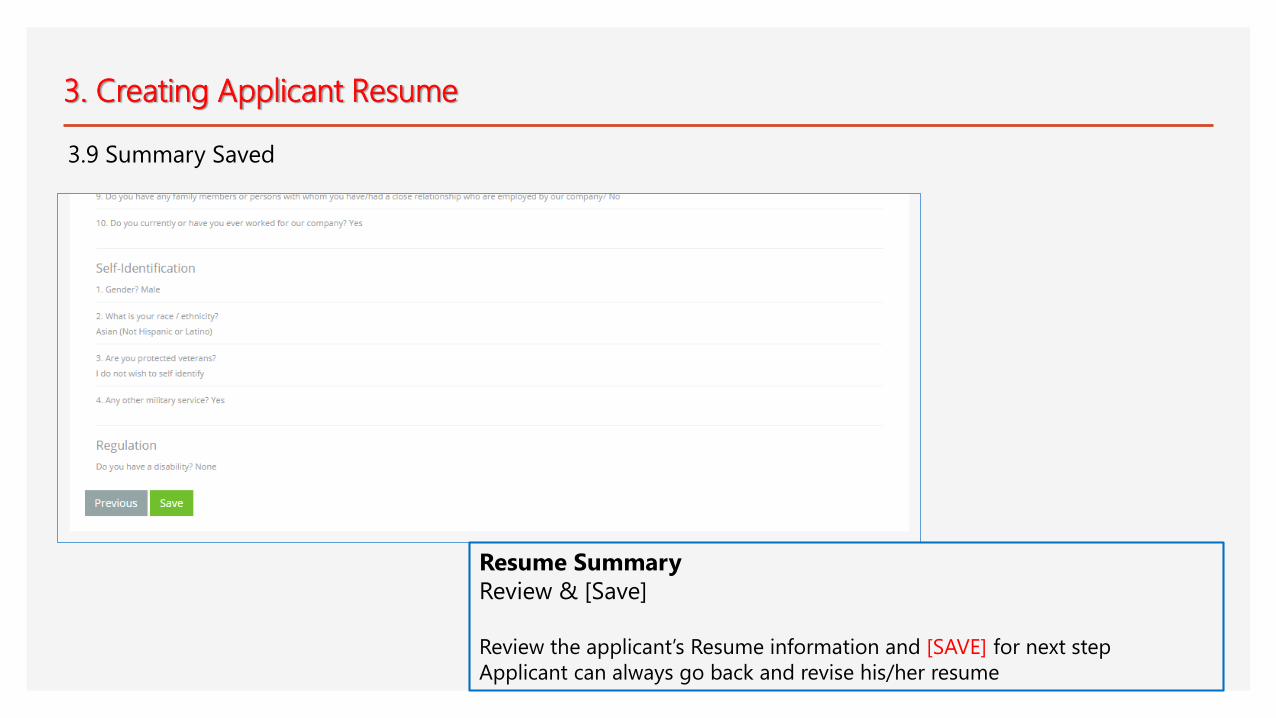
3.9 Summary Saved
Resume Summary
Review & [Save]
Review the applicant’s Resume information and [SAVE] for next step
Applicant can always go back and revise his/her resume

4. Job Application
Click [Apply] button
Job Application
Applicant chooses one Employer to APPLY
- Click [Apply] Button

4. Job Application
4.1 User Verification
User Verification
Applicant must enter the PIN from his/her
Email to verify the application
1. Click for Email with PIN
2. Enter PIN
3. Verification

4. Job Application
4.2 Resume Submitted
Resume Submitted
Applicant has a chance to review the Resume.
After reviewing the content, the Applicant has a
choice either to ”Submit” or “Modify Resume”.
Click [Submit] button
Click [Modify Resume] button
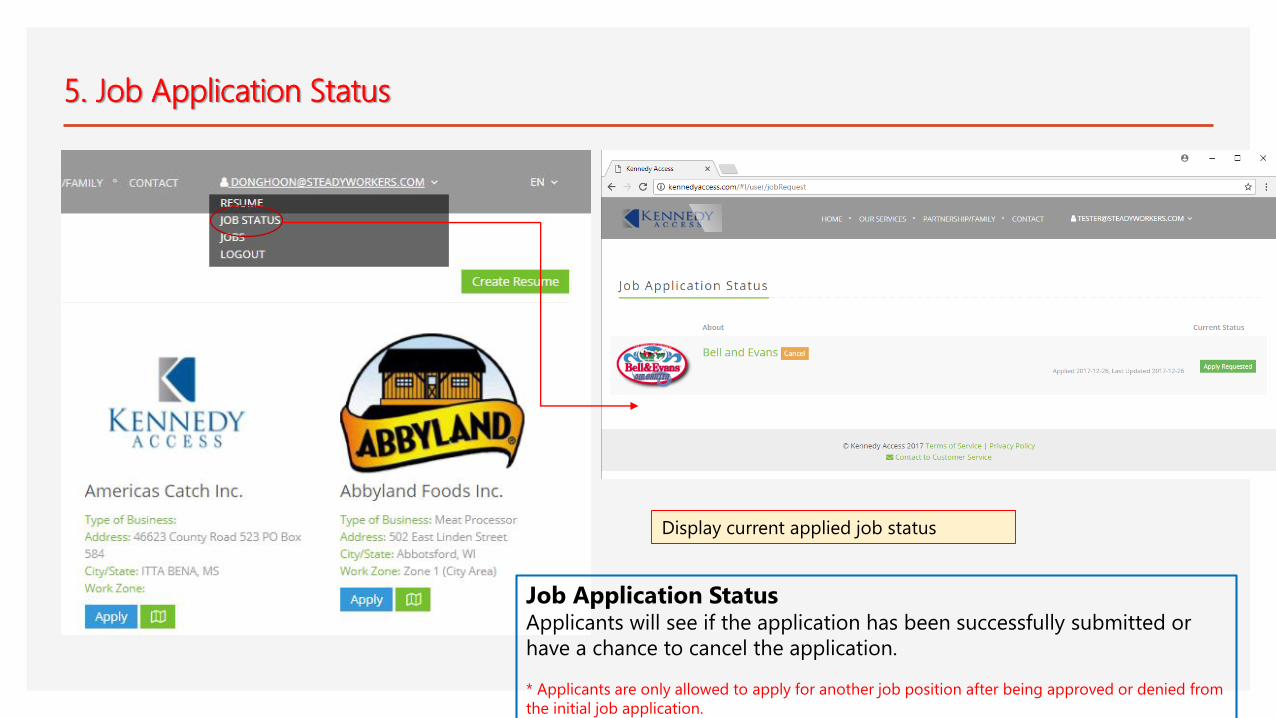
5. Job Application Status
Display current applied job status
Job Application StatusApplicants will see if the application has been successfully submitted or
have a chance to cancel the application.
* Applicants are only allowed to apply for another job position after being approved or denied from
the initial job application.
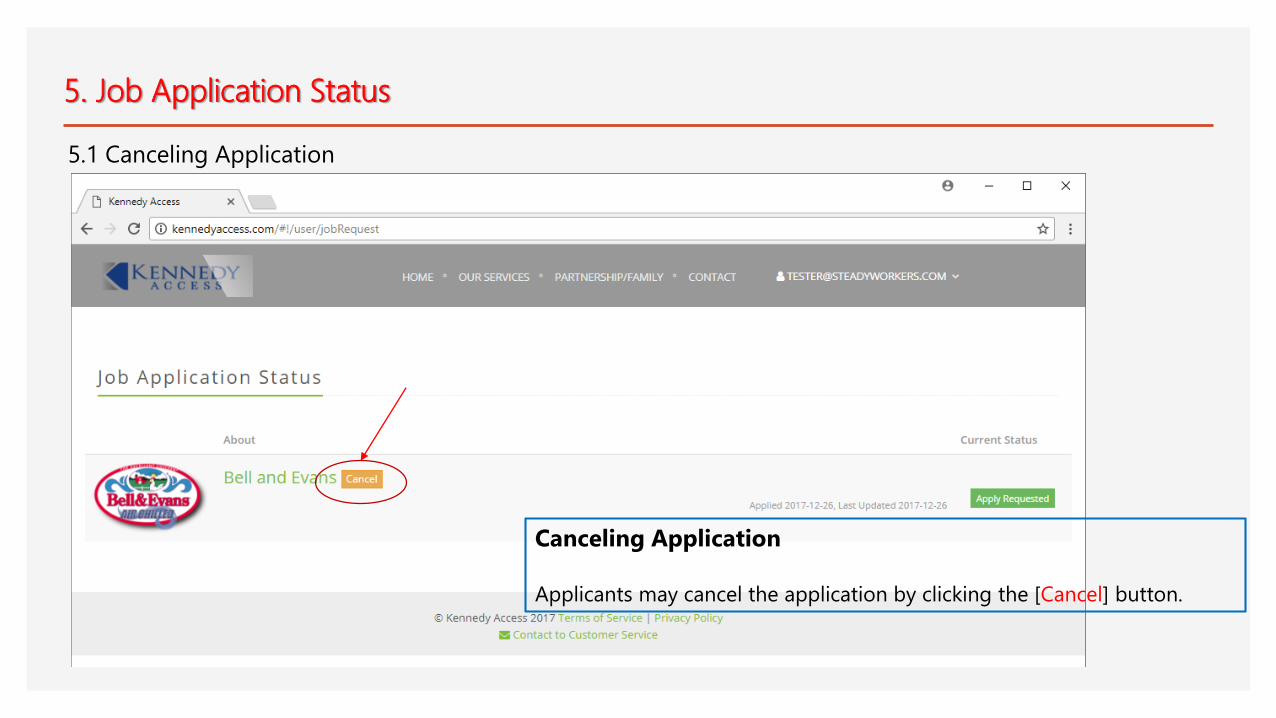
5. Job Application Status
Canceling Application
Applicants may cancel the application by clicking the [Cancel] button.
5.1 Canceling Application

5. Job Application Status
Confirming Cancelation
Press “Yes” button to confirm application
cancelation.
5.2 Canceling Application - Confirmation
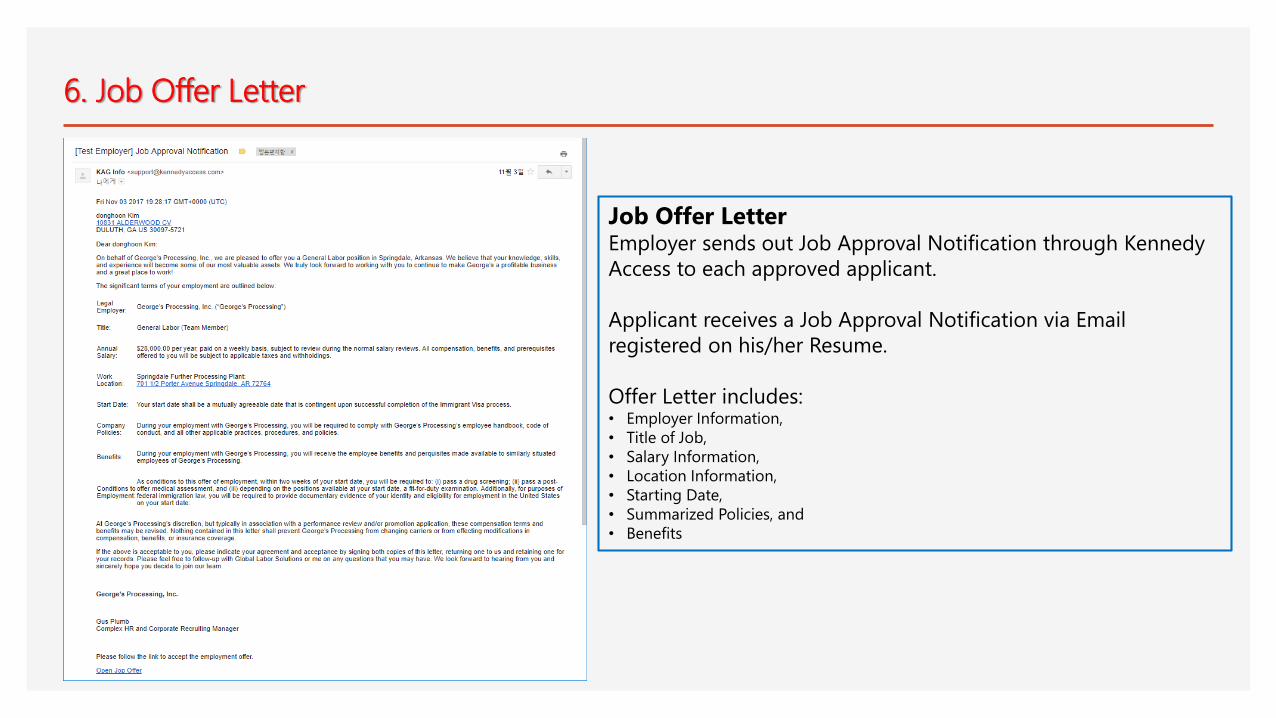
6. Job Offer Letter
Job Offer LetterEmployer sends out Job Approval Notification through Kennedy
Access to each approved applicant.
Applicant receives a Job Approval Notification via Email
registered on his/her Resume.
Offer Letter includes:• Employer Information,
• Title of Job,
• Salary Information,
• Location Information,
• Starting Date,
• Summarized Policies, and
• Benefits
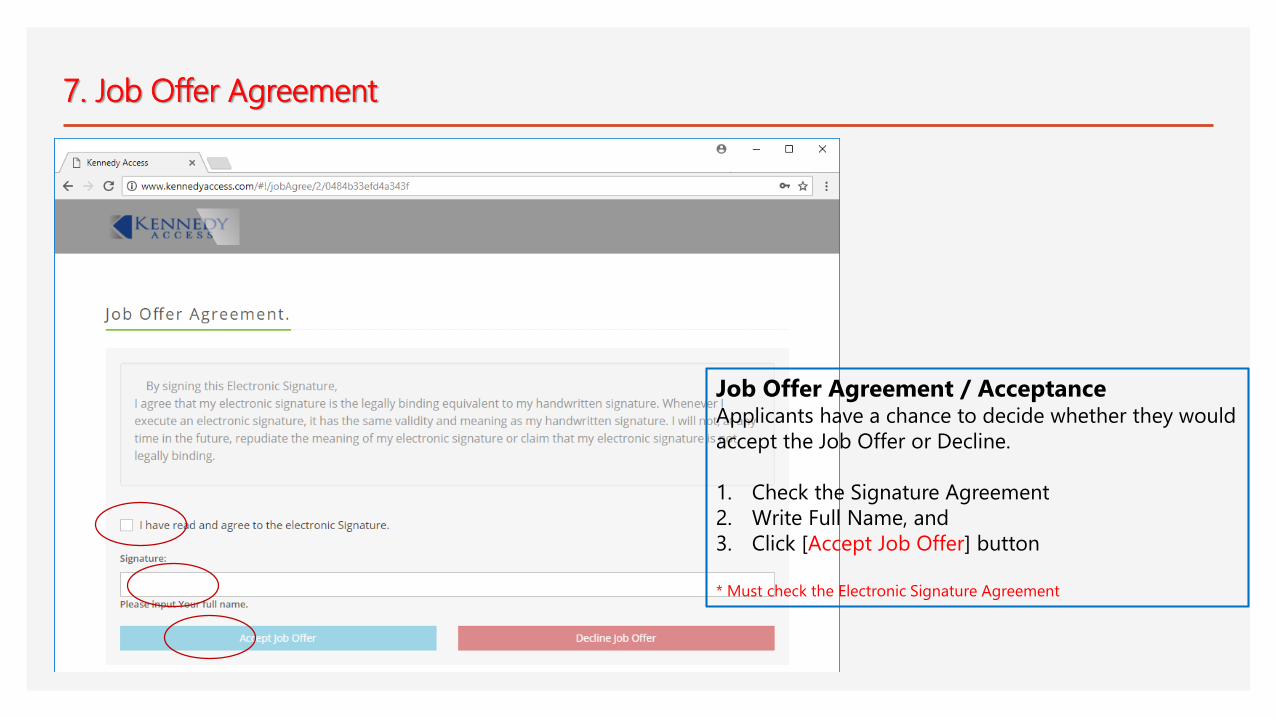
7. Job Offer Agreement
Job Offer Agreement / Acceptance Applicants have a chance to decide whether they would
accept the Job Offer or Decline.
1. Check the Signature Agreement
2. Write Full Name, and
3. Click [Accept Job Offer] button
* Must check the Electronic Signature Agreement