Embed Size (px)
Citation preview

1 Copyright 2009
COPYRIGHT 2009
Version: 12.1 / Jan10
UNLOCKING TECHNOLOGY
KEY PROGRAMMING OPERATING MANUAL

SOFTWARE LICENSE AGREEMENT
The Software contained on the key Programming equipment is owned by Advanced Diagnostics Ltd.
The customer has no title of ownership of the software, other than the ownership of the physical media that the software is intended to work on. The Copyright of software is owned by Advanced
Diagnostics and any customer responsible for software infringement or violation of this agreement
will be held responsible for infringement of the copyright laws.
Advanced Diagnostics retains the right to erase software from any tester/customer that has been
found to infringe these laws.

3 Copyright 2009
COPYRIGHT 2009
Version: 12.1 / Jan10
PRECAUTIONS………………………………………….... 4
CONTENTSMANUAL
AD100………………………………………………... 5 - 12 B1 Introduction B2 General Operation B3 Functionality B4 Software Update
MVP………………………………………………….. 13 - 22 C1 Introduction C2 General Operation C3 Functionality C4 Software Update C5 Tokens
AD100Pro………………………………………….. 23 - 44 D1 Introduction D2 General Operation D3 Functionality D4 Software Update D5 Smartcard Security
DECLARATION OF CONFORMITY……………….... 75
AD50 GM HOLDEN DUPLICATOR …….….. 70 - 73
MVP Pro…………………………………..……….. 45 - 69 E1 Introduction E2 General Operation E3 Functionality E4 Software Update E5 Tokens E6 Smartcard Security
AD100/MVP/AD100Pro SPECIFICATION…….. 74

4 Copyright 2009
COPYRIGHT 2009
Version: 12.1 / Jan10
1. The hand held diagnostic tool is an electronic piece of equipment, and although designed for hostile environments it should not be exposed to excessive sunlight, high temperatures or immersed in liquids. 2. Return unit to carrying case when not in use. 3. Observe normal health and safety precautions when using this equipment. 4. Keep clear of all moving objects when near engine compartment. 5. Incorrect connections may damage sensitive electronic devices fitted to the vehicle. 6. Switch off the vehicle ignition when making or breaking connections. 7. Keep the unit away from spark plugs and coil leads to avoid measurement errors. 8. DO NOT disconnect any wiring harnesses or electronic component while ignition is ON. 9. DO NOT disconnect battery while engine is running. 10. Before any work is carried out, consult the Vehicle Manufacturers recommended procedures to ensure any work is carried out in accordance with their instructions. 11. Before any work is carried out, consult the Vehicle Manufacturers warranty specifications to ensure any work is carried out in accordance with their instructions.
PRECAUTIONS
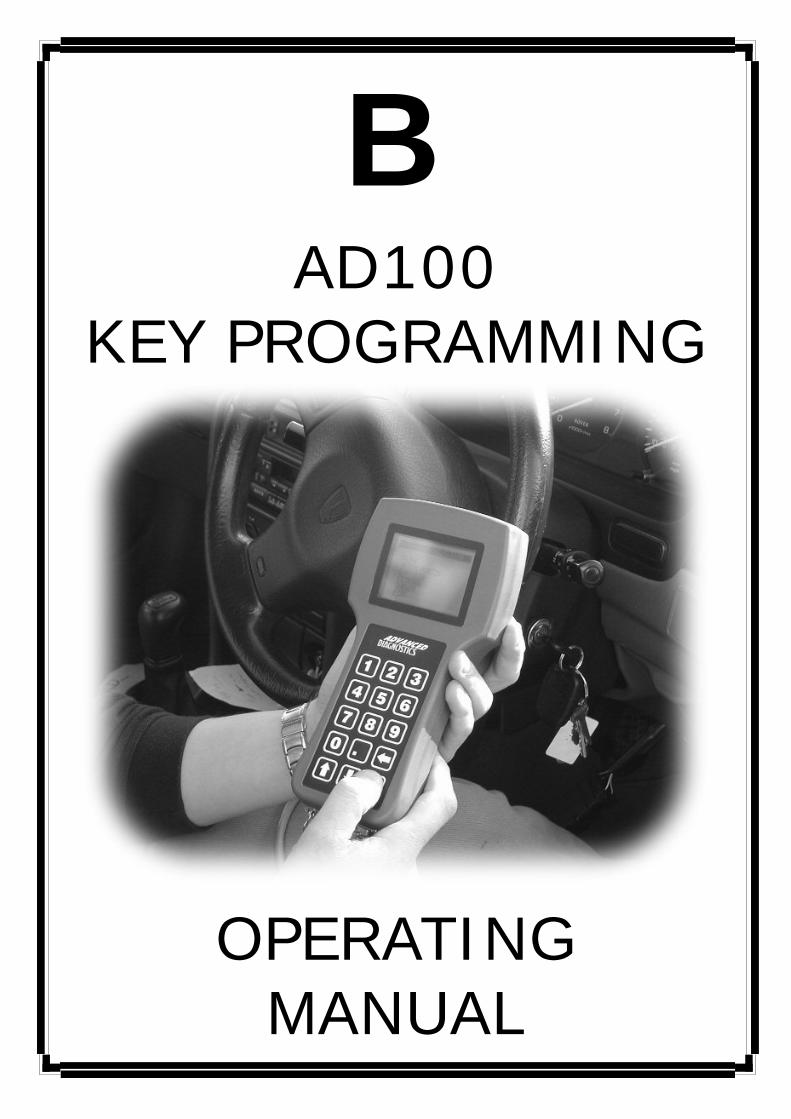
B AD100
KEY PROGRAMMING
OPERATING MANUAL

6 Copyright 2009
COPYRIGHT 2009
Version: 12.1 / Jan10
AD100 - INTRODUCTION
The AD100 is an Advanced Serial Diagnostic system which has been designed and developed to offer key transponder programming. The AD100 can be used as a hand held portable diagnostic system, and is equipped with 64MB of RAM which is used for the application data, and 4MB of Flash for the protocol handling system. In addition to this it has a RS232 interface connection for transferring application data from a PC. The unit is capable of reading/clearing fault codes, displaying live data, programming keys/remotes, extracting pin codes (certain vehicles), erasing/resetting immobilisers ECU’s along with other functions that a particular system may allow.
POWER CONNECTION
Powered via the diagnostic socket through a 25 way D-Type cable system. If no power is available through the vehicle diagnostic socket then the adapter cable will have the vehicle battery connections.
VEHICLE CONNECTION
The unit is supplied with a range of cables to cover various manufacturers. The smaller adaptor cables use the ADC100 Master Cable, which connects to the AD100. These adaptor cables can then be connected depending on which system is being tested
LCD BACKLIGHT
The LCD BACKLIGHT is automatically switched on when the unit has power. This cannot be switched off or adjusted. If the unit is not used for a period of time the LCD backlight will automatically switch off, and as soon as any key is pressed it will switch back on again.
PASSWORD OPERATION
To stop unauthorised access the unit is fitted with a password system. If the password is entered incorrectly three times the tester will be erased. For any problems with password operation or software updates, the unit must be returned to Advanced Diagnostics.
_ _ _ _ _ _
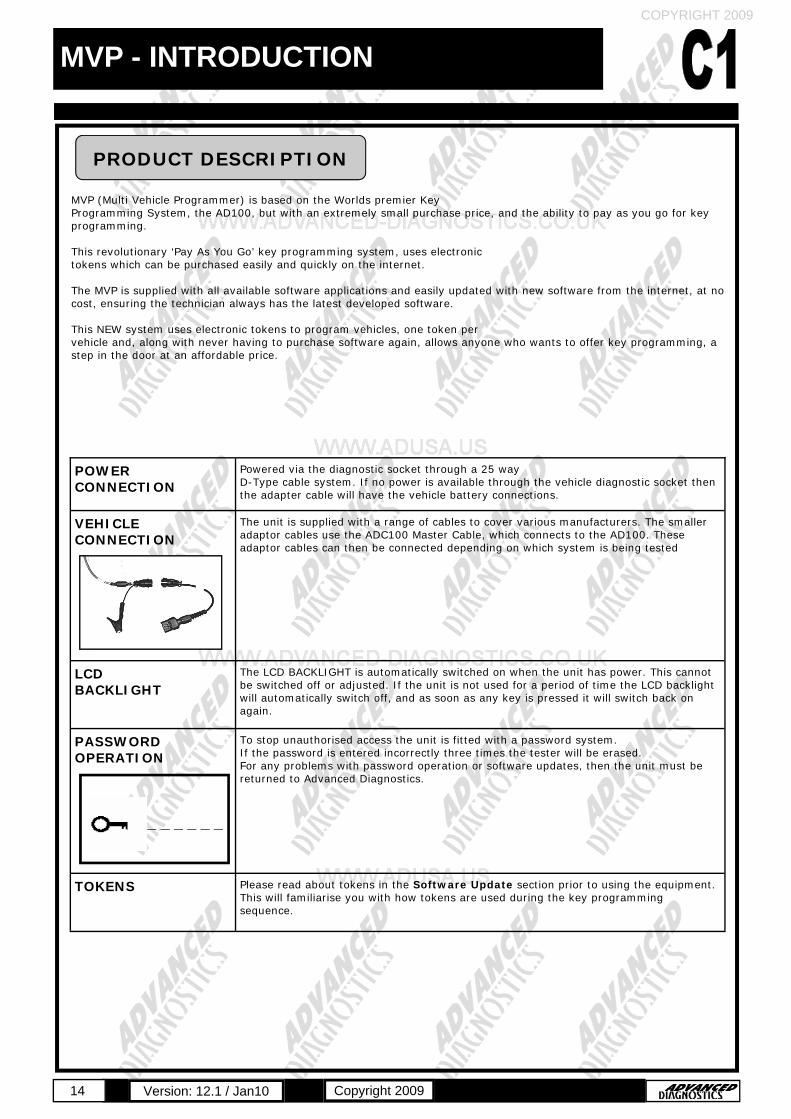
PRODUCT DESCRIPTION

7 Copyright 2009
COPYRIGHT 2009
Version: 12.1 / Jan10
AD100 - INTRODUCTION
Entering Alpa-Numeric Digits The keypad numbers can also be used to enter letters. There are two methods of entering letters when on the appropriate screen. Method 1: Pressing the arrows will display a list of letters and numbers to select. Method 2: Using the numbers to select letters in the same way you would use a mobile phone ie 1=a,b or c dependant upon the number of presses.
1 = ,/* 4 = g,h,i 7 = p,q,r,s 2 = a,b,c 5 = j,k,l 8 = t,u,v 3 = d,e,f 6 = m,n,o 9 = w,x,y,z
Number keys for entering codes and number selection
Key’s are used for UP and DOWN movement of selection
KEYPAD OPERATION
Key is used for ENTER and CONTINUE operations
Key is used for EXIT and BACKWARDS selection's

8 Copyright 2009
COPYRIGHT 2009
Version: 12.1 / Jan10
AD100 - GENERAL OPERATION
When connected to the vehicle the tester will power up and the following screens will be displayed.
The screen can be adjusted between dark and light. The LCD contrast will be stored in memory, until the next power on. Use the UP and DOWN arrows to adjust the contrast, then press the ENTER key. Enter the 6 Digit security code.
Displays the current software version loaded on the tester. Note: The version can also be displayed by selecting ‘Version’ from the vehicle menu.
This warning screen will automatically go in approx 5 seconds. By pressing the UP arrow followed by the ENTER key this will bypass the time delay.
Using the UP and DOWN arrows select the required manufacturer, and then press the ENTER key. NOTE : For further information and operation refer to the specific applications manual.
> FORD GM ROVER
VEHICLE SELECTION
PRESS ENTER KEY
_ _ _ _ _ _
ILLEGAL COPYING OF THIS SOFTWARE
WILL RESULT IN SEVERE CRIMINAL ACTION
SOFTWARE WILL BE ERASED FROM THIS UNIT
VEHICLE SELECTION
PRESS ENTER KEY
V1.00
S/W VERSION
INITIAL OPERATION

9 Copyright 2009
COPYRIGHT 2009
Version: 12.1 / Jan10
FAULT CODES
READING FAULT CODES Lists fault codes that are stored on the vehicle. NOTE : Fault codes can be either current, historic or intermittent. CLEARING FAULT CODES
Allows fault codes to be cleared.
LIVE DATA Allows values of certain components to displayed in real time ie battery voltage, ignition status etc.
ACTUATOR OPERATION
Allows actuators to be operated via the tester to check they are working eg Immobiliser LED, central door locking.
SPECIAL FUNCTIONS
A variety of functions that are available, dependant upon the system ie (not all systems have the same options available). These Include: KEY INFORMATION Displays specific information ie no. of keys programmed. KEY PROGRAMMING Ability to clear, add or re-program keys. REMOTE PROGRAMMING Ability to clear, add or re-program remotes. EMS On some systems the Engine Management System data is available whilst the AD100 is communicating to the vehicle. In these circumstances this information can be accessed on tester via the EMS menu selection. ECU LEARN/RESET On certain systems the immobiliser control unit needs to be either initialised, cleared or matched to the Engine Control Unit. This facility is not generally available via the tester, however when it is, this menu option will appear.
AD100 - FUNCTIONALITY
The functionality of the software will vary dependant upon the vehicle. ypical functions are as follows

10 Copyright 2009
COPYRIGHT 2009
Version: 12.1 / Jan10
AD100 - SOFTWARE UPDATE
Advanced Diagnostics are constantly improving the existing software and developing new software. To ensure you get all software updates it is recommended that you connect to our website and download the latest software on a regular basis ie every 2 weeks.
The following procedure will guide you through the necessary steps to download the software. Step 1 - AD100 Loader a. Visit the Advanced Diagnostics website at www.advanced-diagnostics.co.uk b. Select the AD100 Loader from the AD100 Product section and download it to your computer.
Note: It is important that you always have the latest version of download
program loaded on your computer. The version number can be found in the title bar of the AD100 Loader program when launched. When loading a new version of the Loader program you must fully uninstall the previous version.
Step 2 - Launching AD100 Loader
Double click the icon on your desktop.
The following dialogue box will appear.
The three pull down menu’s provide the following functions: File This allows the comm. port of your PC to be selected for the AD100. It will automatically set itself to the ‘Auto’ function. If problems exist, manually change the setting to comm. 1 and try. If problems still persist try the other comm ports. Software This allows you to select either STANDARD or BETA software for downloading. Software Lookup This function allows you to check what software you have loaded to your tester for both STANDARD & BETA software. 1. Select SOFTWARE LOOKUP 2. Select STANDARD or BETA. 3. Enter Tester Serial No. 4. Enter 6 Digit passcode. 5. All software that is available for download to that tester is displayed.
INTRODUCTION
DOWNLOADING SOFTWARE

11 Copyright 2009
COPYRIGHT 2009
Version: 12.1 / Jan10
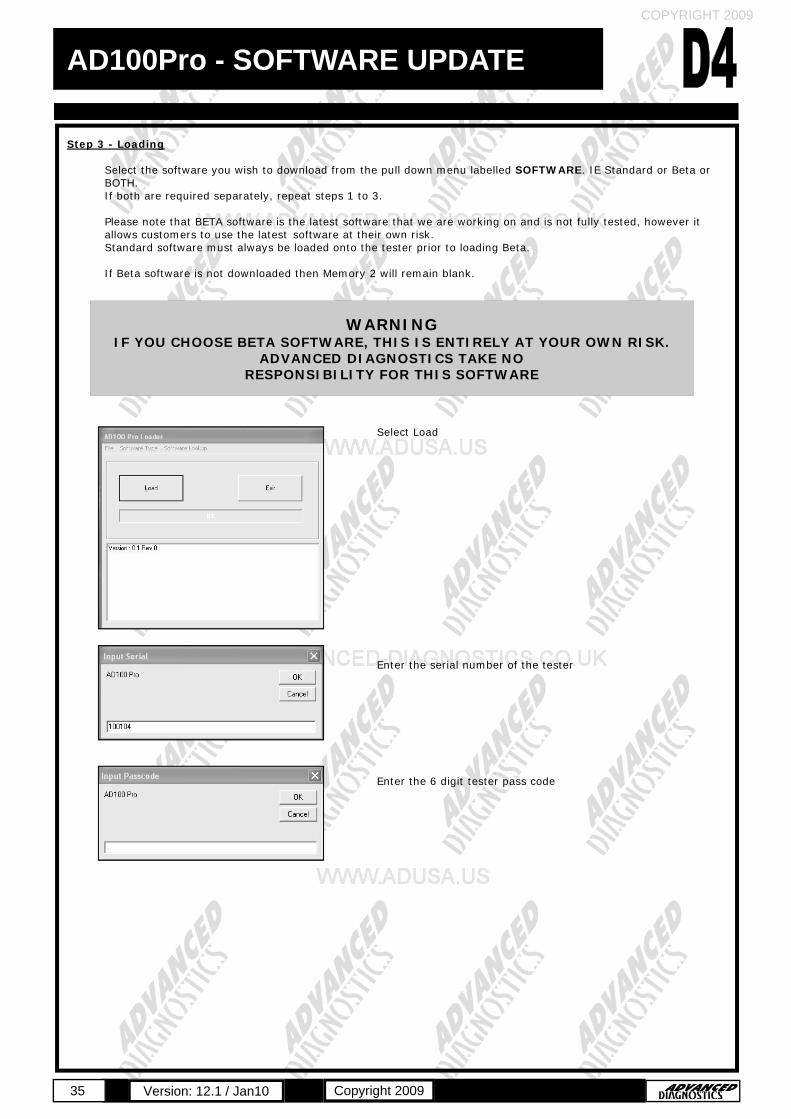
Step 3 - Loading
Select the software you wish to download from the pull down menu labelled SOFTWARE. Ie Standard or Beta.
Please note that BETA software is the latest software that we are working on and is not fully tested, however it al lows customers to use the latest software at their own risk.
WARNING
IF YOU CHOOSE BETA SOFTWARE, THIS IS ENTIRELY AT YOUR OWN RISK. ADVANCED DIAGNOSTICS TAKE NO RESPONSIBILITY FOR THIS SOFTWARE.
Ensure the tester is on the vehicle manufacturer selection as shown.
Select Load Enter the serial number of the tester Enter the 6 digit tester pass code
The latest software will be downloaded to the tester. IMPORTANT Note: If the unit has had the 6 digit security number entered incorrectly more than 3 times, this will blank the tester. See common problems section.
AD100 - SOFTWARE UPDATE
> FORD GM ROVER
VEHICLE SELECTION
PRESS ENTER KEY

12 Copyright 2009
COPYRIGHT 2009
Version: 12.1 / Jan10
COMMON DOWNLOADING PROBLEMS
Incorrect Passcode Entered 3 Times If the unit has had the 6 digit security number entered incorrectly more than 3 times, this will blank the tester. This can be identified by a square with a black cross being displayed on the tester. If this happens the tester needs to be loaded again at the point this symbol is displayed on the tester instead of the vehicle manufacturer selection. Software Not Downloading The main problem encountered when customers are trying to update their testers is caused by the interference of the PC’s firewall or anti-virus program which either: A. Blocks the Loader program from accessing the internet. B. Prevents the file from being transferred to the tester. In order to resolve these problems you will need to ensure that both the firewall and aniti-virus software allow Advanced Diagnostics as a trusted site and allow the download to take place. Tester Not Connected This message will be displayed if the PC cannot detect that your tester is connected to the PC. If this occurs please check: A. Your tester is switched ON. B. The tester screen is displaying the vehicle manufacturer menu or the black square and cross. Note: You may also need to restart your PC loader program once the tester is in the correct mode.
AD100 - SOFTWARE UPDATE

C MVP
KEY PROGRAMMING
OPERATING MANUAL
US PATENT #7,315,238
14 Copyright 2009
COPYRIGHT 2009
Version: 12.1 / Jan10
MVP - INTRODUCTION
MVP (Multi Vehicle Programmer) is based on the Worlds premier Key Programming System, the AD100, but with an extremely small purchase price, and the ability to pay as you go for key programming. This revolutionary ‘Pay As You Go’ key programming system, uses electronic tokens which can be purchased easily and quickly on the internet. The MVP is supplied with all available software applications and easily updated with new software from the internet, at no cost, ensuring the technician always has the latest developed software. This NEW system uses electronic tokens to program vehicles, one token per vehicle and, along with never having to purchase software again, allows anyone who wants to offer key programming, a step in the door at an affordable price.
POWER CONNECTION
Powered via the diagnostic socket through a 25 way D-Type cable system. If no power is available through the vehicle diagnostic socket then the adapter cable will have the vehicle battery connections.
VEHICLE CONNECTION
The unit is supplied with a range of cables to cover various manufacturers. The smaller adaptor cables use the ADC100 Master Cable, which connects to the AD100. These adaptor cables can then be connected depending on which system is being tested
LCD BACKLIGHT
The LCD BACKLIGHT is automatically switched on when the unit has power. This cannot be switched off or adjusted. If the unit is not used for a period of time the LCD backlight will automatically switch off, and as soon as any key is pressed it will switch back on again.
PASSWORD OPERATION
To stop unauthorised access the unit is fitted with a password system. If the password is entered incorrectly three times the tester will be erased. For any problems with password operation or software updates, then the unit must be returned to Advanced Diagnostics.
TOKENS Please read about tokens in the Software Update section prior to using the equipment. This will familiarise you with how tokens are used during the key programming sequence.
_ _ _ _ _ _
PRODUCT DESCRIPTION

15 Copyright 2009
COPYRIGHT 2009
Version: 12.1 / Jan10
MVP - GENERAL OPERATION
Key is used for ENTER and CONTINUE operations
Key is used for EXIT and BACKWARDS selection's
Number keys for entering codes and number selection
Key’s is used for UP and DOWN movement of selection
Entering Alpa-Numeric Digits The keypad numbers can also be used to enter letters. There are two methods of entering letters when on the appropriate screen. Method 1: Pressing the arrows will display a list of letters and numbers to select. Method 2: Using the numbers to select letters in the same way you would use a mobile phone ie 1=a, b or c dependant upon the number of presses. 1 = ,/* 4 = g,h,i 7 = p,q,r,s 2 = a,b,c 5 = j,k,l 8 = t,u,v 3 = d,e,f 6 = m,n,o 9 = w,x,y,z
KEYPAD OPERATION

16 Copyright 2009
COPYRIGHT 2009
Version: 12.1 / Jan10
TOKENS REMAINING
TOKENS: 123
PRESS ENTER KEY
When connected to the vehicle the tester will power up and the following screens will be displayed.
The screen can be adjusted between dark and light. The LCD contrast will be stored in memory, until the next power on. Use the UP and DOWN arrows to adjust the contrast, then press the ENTER key. Enter the 6 Digit security code. Displays the current software version loaded on the tester. Note: The version can also be displayed by selecting ‘Version’ from the vehicle menu.
The tokens remaining screen will be displayed, followed by the Vehicle Selection menu.
This warning screen will automatically go in approx 5 seconds. By pressing the UP arrow followed by the ENTER key this will bypass the time delay.
Using the UP and DOWN arrows select the required manufacturer, and then press the ENTER key. NOTE : For further information and operation refer to the specific applications manual.
> FORD GM ROVER
VEHICLE SELECTION
PRESS ENTER KEY
_ _ _ _ _ _
ILLEGAL COPYING OF THIS SOFTWARE
WILL RESULT IN SEVERE CRIMINAL ACTION
SOFTWARE WILL BE ERASED FROM THIS UNIT
VEHICLE SELECTION
PRESS ENTER KEY
V1.00
S/W VERSION
INITIAL OPERATION
MVP - GENERAL OPERATION

17 Copyright 2009
COPYRIGHT 2009
Version: 12.1 / Jan10
FAULT CODES
READING FAULT CODES Lists fault codes that are stored on the vehicle. NOTE : Fault codes can be either current, historic or intermittent. CLEARING FAULT CODES
Allows fault codes to be cleared.
LIVE DATA Allows values of certain components to displayed in real time ie battery voltage, ignition status etc.
ACTUATOR OPERATION
Allows actuators to be operated via the tester to check they are working eg Immobiliser LED, central door locking.
SPECIAL FUNCTIONS
A variety of functions that are available, dependant upon the system ie (not all systems have the same options available). These Include: KEY INFORMATION Displays specific information ie no. of keys programmed. KEY PROGRAMMING Ability to clear, add or re-program keys. REMOTE PROGRAMMING Ability to clear, add or re-program remotes. EMS On some systems the Engine Management System data is available whilst the AD100 is communicating to the vehicle. In these circumstances this information can be accessed on tester via the EMS menu selection. ECU LEARN/RESET On certain systems the immobiliser control unit needs to be either initialised, cleared or matched to the Engine Control Unit. This facility is not generally available via the tester, however when it is, this menu option will appear.
MVP - FUNCTIONALITY
The functionality of the software will vary dependant upon the vehicle. typical functions are as follows

18 Copyright 2009
COPYRIGHT 2009
Version: 12.1 / Jan10
MVP - SOFTWARE UPDATE
The MVP is supplied with all the available software at that particular point in time. However, Advanced Diagnostics are constantly improving the existing software and developing new software. With the MVP you have access to all of this software for free Note: If a new cable is introduced then the cable only will be chargeable. To ensure you get all additional software it is recommended that you connect to our website and download the latest software on a regular basis ie every 2 weeks.
The following procedure will guide you through the necessary steps to download the software. Step 1 - MVP Token Loader a. Visit the Advanced Diagnostics website at www.advanced-diagnostics.co.uk b. Select the MVP Token Loader from the MVP section and download to your computer.
Note: It is important that you always have the latest version of download
program loaded on your computer. The version number can be found in the title bar of the MVP Token Loader program when launched. When loading a new version of the Loader program you must fully uninstall the previous version.
Step 2 - Launching MVP Token Loader Double click the icon on your desktop.
The following dialogue box will appear.
The pull down menu’s provide the following functions: File This allows the comm. port of your Pc to be selected for the MVP. It will automatically set itself to the ‘Auto’ function. If problems exist manually change the setting to comm. 1 and try. If prob-lems still persist try the other comm ports. Software This allows you to select either STANDARD or BETA software for downloading. Check Tokens This function allows you to check how many tokens are loaded on the tester. Software Lookup This function allows you to check what software you have loaded to your tester. 1. Select SOFTWARE LOOKUP 2. Enter Tester Serial No. 3. Enter 6 Digit pass code. 4. All software that is available for download to that tester is displayed.
INTRODUCTION
DOWNLOADING SOFTWARE

19 Copyright 2009
COPYRIGHT 2009
Version: 12.1 / Jan10
MVP - SOFTWARE UPDATE
Step 3 - Loading Select the software you wish to download from the pull down menu labelled SOFTWARE. Ie Standard or Beta. The option to load BETA software has been added to the MVP. Please note that BETA software is the latest software that we are working on and is not fully tested, however it allows customers to use the latest software at their own risk. It should be noted that using BETA software on MVP could result in tokens being used incorrectly.
WARNING
IF YOU CHOOSE BETA SOFTWARE, THIS IS ENTIRELY AT YOUR OWN RISK. ADVANCED DIAGNOSTICS TAKE NO RESPONSIBILITY FOR THIS SOFTWARE OR USEAGE OF TOKENS.
PLEASE NOTE THAT LOST TOKENS WILL NOT BE REPLACED.
Ensure the tester is on the vehicle manufacturer selection as shown.
Select Load Enter the serial number of the tester Enter the 6 digit tester pass code
The latest software will be downloaded to the tester
IMPORTANT If the unit has been blanked ie all software erased for any reason then an error will be displayed.
Note: If the unit has had the 6 digit security number entered incorrectly more than 3 times, this will blanks the tester. See common problems section.
> FORD GM ROVER
VEHICLE SELECTION
PRESS ENTER KEY

20 Copyright 2009
COPYRIGHT 2009
Version: 12.1 / Jan10
MVP - TOKENS
The tokens are stored on the MVP and used each time a vehicle or key is programmed. A maximum of 200 tokens can be stored at any one time on the tester. The balance of tokens will stay on your web account until required. Each time tokens are loaded it will load all available tokens until the tester has 200 loaded. Using a token only occurs when the key(s) have been programmed. Dependant upon which function is selected under key programming will determine how many keys are programmed for each token, as follows: Selecting ‘Add Key’ This normally only allows the programming of one key at a time and will use 1 token per key Selecting ‘Clear Keys’ This function will normally clear all keys and allow the programming of a number of keys eg GM Can on a Vectra allows up to a max of 5 keys to be programmed. Programming the 5 keys in this method will only use 1 token not 5. Tokens are not taken for:
Programming Remotes (unless the remote is also used as the immobiliser) Live Data Fault Code Read/Clear Vehicles that are problematic to program do not use a token.
Warning Be aware tokens are used if the cases of operator error ie incorrect system used to program keys, incorrect transponders etc.
It is in your interest to ensure that you always maintain a reasonable level of tokens on your tester so that you don’t run out at an inconvenient time. In those rare instances where no tokens are left on the tester, the MVP has 5off Emergency Tokens that can be used. Emergency Tokens are Premium Tokens Please be warned that for each emergency token used, it is replaced by 2 tokens when tokens are downloaded from the website.
INTRODUCTION
EMERGENCY TOKENS

21 Copyright 2009
COPYRIGHT 2009
Version: 12.1 / Jan10
MVP - TOKENS
The number of tokens remaining on your tester is displayed each time the unit is powered up. Additionally you can check from the vehicle selection menu by selecting Check Tokens. With the tester connected to your computer and the MVP Token Loader program open the number of tokens loaded on
the tester can be checked by clicking the Check Tokens menu.
Select Add Tokens
Enter 6 Digit Security Code
The tester will now be downloaded with the tokens. Note: A maximum of 200 tokens can be stored at any one time on the tester. The balance of tokens will stay on your web account until required.
HOW TO CHECK YOUR TOKENS
DOWNLOADING TOKENS

22 Copyright 2009
COPYRIGHT 2009
Version: 12.1 / Jan10
COMMON DOWNLOADING PROBLEMS
Incorrect Passcode Entered 3 Times If the unit has had the 6 digit security number entered incorrectly more than 3 times, this will blank the tester. This can be identified by a square with a black cross being displayed on the tester. If this happens the tester needs to be loaded again at the point this symbol is displayed on the tester instead of the vehicle manufacturer selection. Software Not Downloading The main problem encountered when customers are trying to update their testers is caused by the interference of the PC’s firewall or anti-virus program which either: A. Blocks the Loader program from accessing the internet. B. Prevents the file from being transferred to the tester. In order to resolve these problems you will need to ensure that both the firewall and aniti-virus software allow Advanced Diagnostics as a trusted site and allow the download to take place. Tester Not Connected This message will be displayed if the PC cannot detect that your tester is connected to the PC. If this occurs please check: A. Your tester is switched ON. B. The tester screen is displaying the vehicle manufacturer menu or the black square and cross. Note: You may also need to restart your PC loader program once the tester is in the correct mode.
MVP - SOFTWARE UPDATE

D AD100Pro
KEY PROGRAMMING
OPERATING MANUAL

24 Copyright 2009
COPYRIGHT 2009
Version: 12.1 / Jan10
AD100Pro - INTRODUCTION
POWER CONNECTION
Powered via the diagnostic socket through a 25 way D-Type cable system. If no power is available through the vehicle diagnostic socket then the adapter cable will have the vehicle battery connections.
VEHICLE CONNECTION
The unit is supplied with a range of cables to cover various manufacturers. The smaller adaptor cables use the ADC100 Master Cable, which connects to the tester. These adaptor cables can then be connected depending on which system is being tested
LCD BACKLIGHT
The LCD BACKLIGHT is automatically switched on when the unit has power. This cannot be switched off or adjusted. If the unit is not used for a period of time the LCD backlight will automatically switch off, and as soon as any key is pressed it will switch back on again.
PASSWORD OPERATION
To stop unauthorised access the unit is fitted with a password system. If the password is entered incorrectly three times the tester will be erased. For any problems with password operation or software updates, then the unit must be returned to Advanced Diagnostics.
SOFTWARE AD100Pro has the ability to store both a Standard version and Beta version of software. The required software is selected each time the tester is used.
AD100Pro builds on the success of the AD100 and is the next generation in key transponder programming. Designed with simplicity in mind, AD100Pro integrates the variety of adaptors previously required for AD100 by using simple colour coded dongles that configure the tester, thus reducing the quantity of cables/adaptors required. The AD100Pro is a hand held portable diagnostic system, equipped with 64MB of RAM used for the application data, and 512MB of Flash memory for the protocol handling system. In addition, it has a USB interface connection for fast software downloads. The large LCD 320x240 Touch Screen provides easy navigation/selection and the ability to display more information, diagrams and incorporate a keypad entry system to allow easy alphanumeric entry for pin codes etc. Alternatively the menus and screens can be fully navigated using the keypad. The unit is capable of reading/clearing fault codes, displaying live data, programming keys/remotes, extracting pin codes (certain vehicles), erasing/resetting immobiliser ECU’s along with other functions that a particular system may allow.
_ _ _ _ _ _
PRODUCT DESCRIPTION

25 Copyright 2009
COPYRIGHT 2009
Version: 12.1 / Jan10
AD100Pro - GENERAL OPERATION
Contrast Brightness Control
Power Turns tester ON/OFF.
Hold button down for approx 1 sec
Function Buttons Used to SELECT & CONTINUE
operations. Function of buttons will vary but will be indicated on the appropriate
screen
Directional Arrows Used for Screen navigation
Enter Key
Used to SELECT & CONTINUE operations
DONGLE CONNECTOR 50 Way D Type
VEHICLE CONNECTOR 25 Way D Type USB PORT
POWER
KEYPAD OPERATION
CONNECTIONS
BACK Stepping Back
through software

26 Copyright 2009
COPYRIGHT 2009
Version: 12.1 / Jan10
AD100Pro - GENERAL OPERATION
TOUCH SCREEN KEYPAD At various stages in the software, you will be required to enter data (letters and/or numbers). These are entered via the touch screen keypad. When the screen requires data to be entered, the first keypad option will be numbers 0 to 9. By pressing the right arrow, you will move to the next set of characters as shown. Pressing the left arrow moves you back to the previous set of characters. Note: If a character is entered incorrectly, Press the BACK key IMPORTANT: If the screen is not calibrated or has drifted out of calibration due to temperature variations, then character selection can be inaccurate. Re-calibrate the screen periodically and each time you download new software.
A B C D E
F G H I J
K L M N O
P Q R S T
U V W
X Y Z
! “ £ $ %
^ & * ( )
- + _ = @
{ } [ ] ?
\ : ; ‘ ~
# < > , .
1 2 3 4 5
6 7 8 9 0
KEYPAD OPERATION (CONT)

27 Copyright 2009
COPYRIGHT 2009
Version: 12.1 / Jan10
AD100Pro - GENERAL OPERATION
To stop unauthorised access the unit is protected by a unique password, which must be entered each time the tester is switched on.
Additionally this password will also be required for a number of other services such as updating software etc.
The unit is supplied with a range of cables to connect to various manufacturers diagnostic sockets. The smaller adaptor cables use the ADC100 Master Cable (Fig 7), which connects to the AD100Pro. These adaptor cables can then be connected depending on which system is being tested. The unit is also supplied with a range of dongles (Fig 6) that configure the tester for the particular system being tested. The tester screen will advise if the incorrect dongle is fitted when the tester attempts to communicate with the vehicle. NOTE: In the majority of cases for modern vehicles, the OBD cable ADC151 and Dongle ’A’ is used. Refer to the appro-priate vehicle manufacturer section for which cable and dongle to use.
FIG 5
WARNING If the password is entered incorrectly 3 times the unit will ‘lock’ and the
AD100Pro will have to be sent back to Advanced Diagnostics for unlocking. If there are any other problems with password operation or software updating,
then the unit will be ‘locked’ and must be returned to Advanced Diagnostics.
ENSURE THE SCREEN IS CALIBRATED
1 2 3 4 5
6 7 8 9 0
FIG 6 - Dongle
FIG 7 - ADC100 + adaptor
PASSWORD OPERATION
VEHICLE CONNECTIONS & DONGLES

28 Copyright 2009
COPYRIGHT 2009
Version: 12.1 / Jan10
AD100Pro - GENERAL OPERATION
1. Connect the appropriate dongle and diagnostic cable for the vehicle being connected to. The tester screen will advise if the incorrect dongle is fitted when the tester attempts to communicate with the vehicle. 2. Press & hold the Power button until the green
LED illuminates / the tester emits a beep. 3. The main menu selection screen will appear. SEE IMPORTANT NOTE BELOW 4. If required the contrast can be adjusted using the ‘+ or -’ buttons. Note: The contrast can be adjusted on any screen.
Contrast Adjust Buttons
F1
F5
F3
12.50V
IMPORTANT If the AD100Pro is being loaded from a blank state then the screen calibration
process must be completed initially. If the unit is blank and any part of the screen is touched the unit will enter the
calibration process.
INITIAL OPERATION

29 Copyright 2009
COPYRIGHT 2009
Version: 12.1 / Jan10
AD100Pro - GENERAL OPERATION
Main Menu To select a function either press the Function buttons (F1 to F5) or touch. the appropriate icon.
F1
F5
F3
F1
F5
F3
12.50V
Battery Voltage This displays the battery voltage of the vehicle connected to. Ensure the battery voltage is sufficient before proceeding. Note the voltage is displayed inside the icon and is not a selectable function
Calibration This function is selected to calibrate the touch screen. Once selected a ‘+’ will appear on the screen. The user must touch the centre of this cross either with a finger or pointer (not sharp and careful not to damage screen). Whilst being pressed a progress bar will fill up. Keep pressing the ‘+’ until the progress bar fills. This process needs to be repeated as another ‘+’ will appear in a different area of the screen, which must be touched centrally again. Repeat this for all the ‘+’ that appear on the screen. Once complete the screen will indicate that calibration was successful and then revert to the main menu.
Download This function is selected when new/updated software needs to be loaded. Refer to the Software Update section of this manual.
Vehicle Selection This function is selected to proceed to the Vehicle Selection menu.
12.50V
INITIAL OPERATION

30 Copyright 2009
COPYRIGHT 2009
Version: 12.1 / Jan10
AD100Pro - GENERAL OPERATION
Main Vehicle Manufacturer Selection Screen
In addition to the keypad arrows, the symbols can be used to move around the main vehicle manufacturer selection screen quicker.
Used to move across to the next column. Used to move across to the next page when the tester is loaded with a lot of software.
Enter key - Used to confirm a selection.
Note: The F1 / F2 / F4 & F5 keys can also be used to obtain the same function as pressing the symbols above the appropriate key. The + sign that appears before each menu item indicates that there is another menu selection below. These + signs will appear at every menu level until you reach the final level.
+ ALFA + KIA + BMW + LANCIA + ASTON MARTIN + LDV + CHRYSLER + LEXUS + CITROEN + MAZDA
VEHICLE SELECTION
< > < <
< > <
<
< >
< <

31 Copyright 2009
COPYRIGHT 2009
Version: 12.1 / Jan10
AD100Pro - GENERAL OPERATION
Select the Vehicle Selection menu by pressing F1 or touchscreen.
Enter the 6 Digit security code using the screen keypad. Software warning screen. Displays the current software and version loaded on the tester. Select either STANDARD or BETA software.
Using the arrows select the required manufacturer, and then press ENTER. NOTE : For further information and operation refer to the specific application manual.
F1
_ _ _ _ _ _
1 2 3 4 5
6 7 8 9 0
WARNING If the password is entered incorrectly 3 times the unit will ‘lock’ and the AD100Pro will have to be sent back to Advanced Diagnostics for unlocking. If there are any other problems with password
operation or software updating, then the unit will be ‘locked’ and must be returned to Advanced
Diagnostics.
ENSURE THE SCREEN IS CALIBRATED
SOFTWARE SELECTION
BETA
V4.25
Memory 2
STANDARD
V4.05
Memory 1
PRESS ENTER KEY
INITIAL OPERATION
ILLEGAL COPYING OF THIS SOFTWARE
WILL RESULT IN SEVERE CRIMINAL ACTION
SOFTWARE WILL BE ERASED FROM THIS UNIT
VEHICLE SELECTION
PRESS ENTER KEY
+ ALFA + KIA + BMW + LANCIA + ASTON MARTIN + LDV + CHRYSLER + LEXUS + CITROEN + MAZDA
VEHICLE SELECTION
< >
< <

32 Copyright 2009
COPYRIGHT 2009
Version: 12.1 / Jan10
FAULT CODES
READING FAULT CODES Lists fault codes that are stored on the vehicle. NOTE : Fault codes can be either current, historic or intermittent. CLEARING FAULT CODES Allows fault codes to be cleared.
LIVE DATA Allows values of certain components to displayed in real time ie battery voltage
ACTUATOR OPERATION
Allows actuators to be operated via the tester to check they are working eg Immobiliser LED.
SPECIAL FUNCTIONS
A variety of functions that are available, dependant upon the system ie all systems do not have the same options available. These Include: KEY INFORMATION Displays specific information ie no. of keys programmed. KEY PROGRAMMING Ability to Clear, Add or re-program keys. REMOTE PROGRAMMING Ability to Clear, Add or re-program remotes. EMS On some systems the Engine Management System data is available whilst the AD100 is communicating to the vehicle. In these circumstances this information can accessed on tester via the EMS menu selection. ECU LEARN/RESET On certain systems the immobiliser control unit needs to be either initialised, cleared or matched to the engine Control Unit. This facility is not generally available via the tester, however when it is, this menu option will appear.
AD100Pro - FUNCTIONALITY
The functionality of the software will vary dependant upon the vehicle. Typical functions are as follows

33 Copyright 2009
COPYRIGHT 2009
Version: 12.1 / Jan10
AD100Pro - SOFTWARE UPDATE
Advanced Diagnostics are constantly improving the existing software and developing new software. To ensure you get all software updates it is recommended that you connect to our website and download the latest software on a regular basis ie every 2 weeks. AD100Pro has the ability to store both a Standard version and Beta version of software. The required software is se-lected each time the tester is used. Each time you have downloaded new software, re-calibrate the touch screen.
The following procedure will guide you through the necessary steps to download the software. Step 1 - AD100Pro Loader
a. Visit Advanced Diagnostics website at www.advanced-diagnostics.co.uk b. Select the AD100Pro Loader from the Downloads section and download to your computer. c. Download the AD100Pro Loader Driver from the website and save it on your PC in a known location, then
install it. d. Connect the power cable to the AD100Pro. e. Connect the USB cable between PC and AD100Pro f. Turn AD100Pro on and select Download (F3). g. For the first time the PC will detect the new hardware and install the driver. NB: You may have to select
the location of the driver if prompted. Note: It is important that you always have the latest version of download program loaded on your computer. The version number can be found in the title bar of the AD100Pro Loader program when launched. When loading a new version of the Loader program you must fully uninstall the previous version.
Step 2 - Launching AD100Pro Loader
A) Double click the icon on your desktop.
B) The following dialogue box will appear. Note: The version of the Loader program will appear in the white box.
INTRODUCTION
DOWNLOADING SOFTWARE

34 Copyright 2009
COPYRIGHT 2009
Version: 12.1 / Jan10
AD100Pro - SOFTWARE UPDATE
The pull down menu’s provide the following functions: File Allows loader program to be exited. Software This allows you to select either STANDARD or BETA or BOTH software for downloading. AD100Pro has the ability to store both a Standard version and Beta version of Software on it at the same time. The required software is selected each time the tester is used. The unit has two memory locations as follows: Memory Location 1: STANDARD SOFTWARE Memory Location 2: BETA SOFTWARE When either Standard or Beta is selected it will be downloaded into the correct memory location. Any previous software versions held in that memory location will be overwritten. Standard software must always be loaded onto the tester prior to loading Beta. If Beta software is not downloaded then Memory 2 will remain blank. Selecting BOTH will download Standard & Beta software at the same time. Load Alternate Character Set This option under Software is for units starting with serial units starting with either 130xxx and is used to load characters for displaying certain languages. This option should not be chosen unless advised by Advanced Diagnostics. Software Lookup This function allows you to check what software you have loaded to your tester for both STANDARD & BETA software. 1. Select SOFTWARE LOOKUP 2. Select STANDARD or BETA. 3. Enter Tester Serial No. 4. Enter 6 Digit passcode. 5. All software that is available for download to that tester is displayed. Check Web This function will perform an automatic check to see if you are able to connect to the internet and Advanced Diagnostics website. Under most circumstances it will also check that your firewall is not blocking the download (unless a specific URL is being blocked by your firewall settings). If you have a connection problem indicated after this test, you will need to check your firewall/anti-virus program settings with someone that understands how to configure the settings.
35 Copyright 2009
COPYRIGHT 2009
Version: 12.1 / Jan10
AD100Pro - SOFTWARE UPDATE
Step 3 - Loading
Select the software you wish to download from the pull down menu labelled SOFTWARE. IE Standard or Beta or BOTH. If both are required separately, repeat steps 1 to 3.
Please note that BETA software is the latest software that we are working on and is not fully tested, however it allows customers to use the latest software at their own risk.
Standard software must always be loaded onto the tester prior to loading Beta. If Beta software is not downloaded then Memory 2 will remain blank.
WARNING IF YOU CHOOSE BETA SOFTWARE, THIS IS ENTIRELY AT YOUR OWN RISK.
ADVANCED DIAGNOSTICS TAKE NO RESPONSIBILITY FOR THIS SOFTWARE
Select Load Enter the serial number of the tester Enter the 6 digit tester pass code

36 Copyright 2009
COPYRIGHT 2009
Version: 12.1 / Jan10
AD100Pro - SOFTWARE UPDATE
The latest software will downloaded to the tester. Repeat steps 1 to 3 if both Standard & Beta software requires loading separately. The red USB LED on the AD100Pro flashes during data transfer.
WARNING If the password is entered incorrectly 3 times the unit will
‘lock’ and the AD100Pro will have to be sent back to Advanced Diagnostics for unlocking.
If there are any other problems with password operation or software updating, then the unit will be ‘locked’ and must be
returned to Advanced Diagnostics.
After Downloading new software, re-calibrate your screen

37 Copyright 2009
COPYRIGHT 2009
Version: 12.1 / Jan10
AD100Pro - SMARTCARD SECURITY
INTRODUCTION
The smart card security system consists of a calculator and smart card. The smart card is required for each vehicle manufacturer after the system has been selected from the main vehicle menu. The tester will display a CHALLENGE code, to continue, the user must enter this code on the smartcard calculator. A corresponding RESPONSE code is then displayed on the smartcard calculator, which must be entered back into the tester. Providing the CHALLENGE/RESPONSE codes correspond, access to continue will be granted. After each RESPONSE code is given the smart card's uses count on the smart card will be reduced by 1. To protect the smart card and software the smart card has a number of security features built in as follows: 1. Each smart card can be used a maximum of 5000 times. 2. After 500 uses the smart card will need to be re-charged via the Advanced Diagnostics website http://www.advanced-diagnostics.co.uk/htm/SmartCard-English.php. The card has a total of 10 recharges providing the 5000 limit. 3. Once the card has reached its 5000 limit, a new smart card will need to be used. 4. The smart card is unique to each tester. 5. The user has 55 seconds to enter the RESPONSE code. If it is not entered within this time then the tester will generate a new CHALLENGE code. This will continue to change every 55 seconds while no RESPONSE code is entered. 6. The user will have 3 attempts to enter a correct RESPONSE code. After 3 incorrect RESPONSE codes the tester will have to be turned off and re-started.
A number of vehicles use coded access to gain security access to program keys. Coded access systems consist of obtaining a challenge code from the vehicle, this code then needs to be converted into a response code that the vehicle will recognise and therefore allow access to the programming function to be performed. The response code can be generated by 2 methods, as follows: Emergency Smartcard Security
The function can be used temporarily if ALL smartcards have been lost. SmartCard Security
The technician uses the SmartCard security system to generate the response code. The advantage of this system is that website access is not required. (Except for Ford Coded and SSangyong)

38 Copyright 2009
COPYRIGHT 2009
Version: 12.1 / Jan10
USING SMARTCARD SECURITY
+ ALFA + KIA + BMW + LANCIA + ASTON MARTIN + LDV + CHRYSLER + LEXUS + CITROEN + MAZDA
< <
VEHICLE SELECTION
< <
147 + 156 159 + 166 GT
< <
VEHICLE SELECTION
< <
SMART CARD SECURITY
CODE: 1 2 3 4 5 6 7 8 9 0 RESPONSE: _ _ _ _ _ _ _ _ _ _
NEW CODE IN X SECONDS
1 2 3 4 5
6 7 8 9 0
1. Select the vehicle manufacturer. 2. Put smart card into the calculator 3. The calculator will power up and after a few seconds display Enter Code: Note: After 30 seconds the calculator will automatically power off if no RESPONSE CODE is entered. 4. Select vehicle model. 5. The smartcard security screen is displayed.
Enter Code:
AD100Pro - SMARTCARD SECURITY
39 Copyright 2009
COPYRIGHT 2009
Version: 12.1 / Jan10
SMART CARD SECURITY
ACCESS GAINED
PRESS ENTER KEY
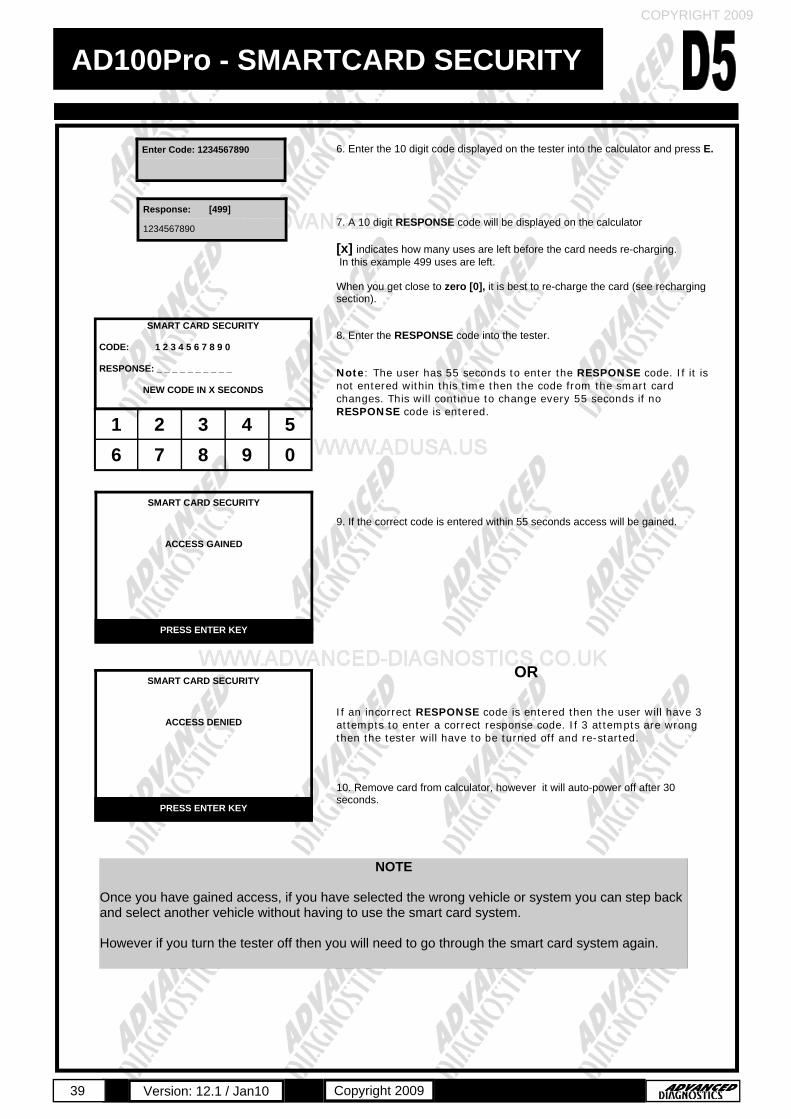
6. Enter the 10 digit code displayed on the tester into the calculator and press E. 7. A 10 digit RESPONSE code will be displayed on the calculator
[x] indicates how many uses are left before the card needs re-charging. In this example 499 uses are left. When you get close to zero [0], it is best to re-charge the card (see recharging section). 8. Enter the RESPONSE code into the tester. Note: The user has 55 seconds to enter the RESPONSE code. If it is not entered within this time then the code from the smart card changes. This will continue to change every 55 seconds if no RESPONSE code is entered. 9. If the correct code is entered within 55 seconds access will be gained.
OR If an incorrect RESPONSE code is entered then the user will have 3 attempts to enter a correct response code. If 3 attempts are wrong then the tester will have to be turned off and re-started. 10. Remove card from calculator, however it will auto-power off after 30 seconds.
Enter Code: 1234567890
Response: [499]
1234567890
SMART CARD SECURITY
CODE: 1 2 3 4 5 6 7 8 9 0 RESPONSE: _ _ _ _ _ _ _ _ _ _
NEW CODE IN X SECONDS
1 2 3 4 5
6 7 8 9 0
SMART CARD SECURITY
ACCESS DENIED
PRESS ENTER KEY
NOTE
Once you have gained access, if you have selected the wrong vehicle or system you can step back and select another vehicle without having to use the smart card system. However if you turn the tester off then you will need to go through the smart card system again.
AD100Pro - SMARTCARD SECURITY

40 Copyright 2009
COPYRIGHT 2009
Version: 12.1 / Jan10
When the display indicates limit reached then the smartcard will need recharging with a further 500 uses. The smart card can be re-charged at any point rather then waiting until its at zero, however the number of uses left at the point of re-charging will be lost. The smartcard can be used a maximum of 5000 times. Therefore the card has a total of 10 re-charges providing the 5000 limit. Once the card has reached its 5000 limit, a new card needs to be purchased. 1. Select SmartCard Security from the Coded menu.
RECHARGE SMARTCARD
Re-Charging Procedure
2. Click Recharge SmartCard button. 3. Complete the web form and click CHECK Note: Card ID is written on the card itself.
AD100Pro - SMARTCARD SECURITY
Limit reached
Recharge now

41 Copyright 2009
COPYRIGHT 2009
Version: 12.1 / Jan10
4. Follow the instructions on the website, as shown. After the 3 recharge codes have been entered into the calculator, a RESPONSE code will be displayed on the Calculator. Enter the Response Code from the calculator and click Validate Response.
After completion of the process the following message will be displayed on the website. The number of re-charges that are left for the particular card is displayed.
AD100Pro - SMARTCARD SECURITY

42 Copyright 2009
COPYRIGHT 2009
Version: 12.1 / Jan10
SMARTCARD STATUS
Selecting this function allows the user to check how many recharges are left on each of the valid cards for the spe-cific tester. Each card has a maximum of 10 recharges. After this limit has been reached a new card will need to be purchased from your distributor.
The status of all the valid smart cards are displayed.
2. Click SmartCard status button. 3. Complete the web form and click CHECK
AD100Pro - SMARTCARD SECURITY
43 Copyright 2009
COPYRIGHT 2009
Version: 12.1 / Jan10
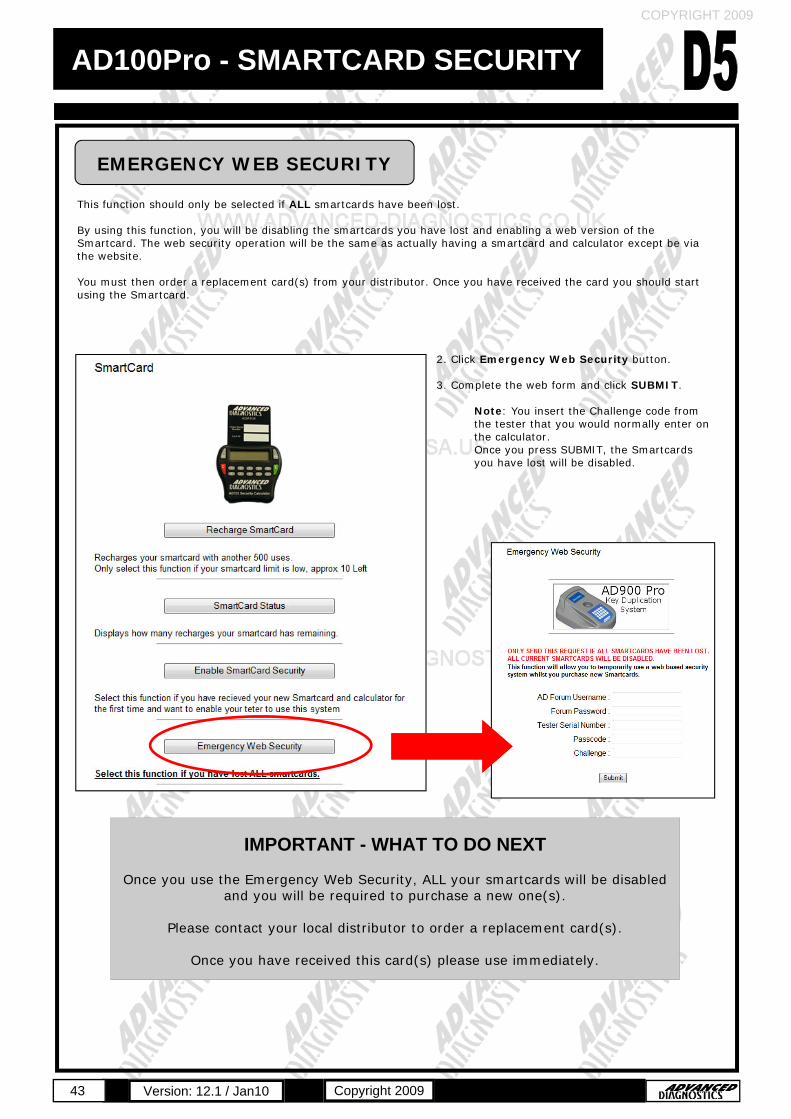
EMERGENCY WEB SECURITY
This function should only be selected if ALL smartcards have been lost. By using this function, you will be disabling the smartcards you have lost and enabling a web version of the Smartcard. The web security operation will be the same as actually having a smartcard and calculator except be via the website. You must then order a replacement card(s) from your distributor. Once you have received the card you should start using the Smartcard.
2. Click Emergency Web Security button. 3. Complete the web form and click SUBMIT.
Note: You insert the Challenge code from the tester that you would normally enter on the calculator. Once you press SUBMIT, the Smartcards you have lost will be disabled.
IMPORTANT - WHAT TO DO NEXT
Once you use the Emergency Web Security, ALL your smartcards will be disabled and you will be required to purchase a new one(s).
Please contact your local distributor to order a replacement card(s).
Once you have received this card(s) please use immediately.
AD100Pro - SMARTCARD SECURITY

44 Copyright 2009
COPYRIGHT 2009
Version: 12.1 / Jan10
ENABLE SMARTCARD SECURITY
This function should only be selected if you have received a new smartcard and calculator for the first time. By selecting this function, you will be advising Advanced Diagnostics to disable the web security and enable the smartcard security.
2. Click Enable SmartCard Security button. 3. Complete the web form and click SUBMIT. 4. You will be advised by e-mail to re-load your tester when the smartcard security has been enabled. 5. Onve toy have updated your tester, the SmartCard system will be enabled
AD100Pro - SMARTCARD SECURITY

E MVP Pro
KEY PROGRAMMING
OPERATING MANUAL
US PATENT #7,315,238

46 Copyright 2009
COPYRIGHT 2009
Version: 12.1 / Jan10
MVP Pro - INTRODUCTION
MVP Pro has the same software functionality and coverage as the AD100Pro, except uses electronic tokens when programming. Designed with simplicity in mind, MVP Pro integrates the variety of adaptors previously required for MVP by using simple colour coded dongles that configure the tester, thus reducing the quantity of cables/adaptors required. The MVP Pro is a hand held portable diagnostic system, equipped with 64MB of RAM used for the application data, and 512MB of Flash memory for the protocol handling system. In addition, it has a USB interface connection for fast software downloads. The large LCD 320x240 Touch Screen provides easy navigation/selection and the ability to display more information, diagrams and incorporate a keypad entry system to allow easy alphanumeric entry for pin codes etc. Alternatively the menus and screens can be fully navigated using the keypad. The unit is capable of reading/clearing fault codes, displaying live data, programming keys/remotes, extracting pin codes (certain vehicles), erasing/resetting immobiliser ECU’s along with other functions that a particular system may allow. This revolutionary ‘Pay As You Go’ key programming system, uses electronic tokens which can be purchased easily and quickly on the internet. The MVP Pro is supplied with all available software applications and easily updated with new software from the internet, at no cost, ensuring the technician always has the latest developed software. This system uses electronic tokens to program vehicles, one token per vehicle and, along with never having to purchase software again, allows anyone who wants to offer key programming, a step in the door at an affordable price.
PRODUCT DESCRIPTION
POWER CONNECTION
Powered via the diagnostic socket through a 25 way D-Type cable system. If no power is available through the vehicle diagnostic socket then the adapter cable will have the vehicle battery connections.
VEHICLE CONNECTION
The unit is supplied with a range of cables to cover various manufacturers. The smaller adaptor cables use the ADC100 Master Cable, which connects to the tester. These adaptor cables can then be connected depending on which system is being tested
LCD BACKLIGHT
The LCD BACKLIGHT is automatically switched on when the unit has power. This cannot be switched off or adjusted. If the unit is not used for a period of time the LCD backlight will automatically switch off, and as soon as any key is pressed it will switch back on again.
PASSWORD OPERATION
To stop unauthorised access the unit is fitted with a password system. If the password is entered incorrectly three times the tester will be erased. For any problems with password operation or software updates, then the unit must be returned to Advanced Diagnostics.
SOFTWARE AD100Pro has the ability to store both a Standard version and Beta version of software. The required software is selected each time the tester is used.
_ _ _ _ _ _

47 Copyright 2009
COPYRIGHT 2009
Version: 12.1 / Jan10
MVP Pro - GENERAL OPERATION
Contrast Brightness Control
Power Turns tester ON/OFF.
Hold button down for approx 1 sec
Function Buttons Used to SELECT & CONTINUE
operations. Function of buttons will vary but will be indicated on the appropriate
screen
Directional Arrows Used for Screen navigation
Enter Key
Used to SELECT & CONTINUE operations
DONGLE CONNECTOR 50 Way D Type
VEHICLE CONNECTOR 25 Way D Type USB PORT
POWER
KEYPAD OPERATION
CONNECTIONS
MVP PRO
BACK Stepping Back
through software

48 Copyright 2009
COPYRIGHT 2009
Version: 12.1 / Jan10
MVP Pro - GENERAL OPERATION
TOUCH SCREEN KEYPAD At various stages in the software, you will be required to enter data (letters and/or numbers). These are entered via the touch screen keypad. When the screen requires data to be entered, the first keypad option will be numbers 0 to 9. By pressing the right arrow, you will move to the next set of characters as shown. Pressing the left arrow moves you back to the previous set of characters. Note: If a character is entered incorrectly, Press the BACK key IMPORTANT: If the screen is not calibrated or has drifted out of calibration due to temperature variations, then character selection can be inaccurate. Re-calibrate the screen periodically and each time you download new software.
A B C D E
F G H I J
K L M N O
P Q R S T
U V W
X Y Z
! “ £ $ %
^ & * ( )
- + _ = @
{ } [ ] ?
\ : ; ‘ ~
# < > , .
KEYPAD OPERATION (CONT)
1 2 3 4 5
6 7 8 9 0
MVP PRO

49 Copyright 2009
COPYRIGHT 2009
Version: 12.1 / Jan10
MVPPro - GENERAL OPERATION
To stop unauthorised access the unit is protected by a unique password, which must be entered each time the tester is switched on.
Additionally this password will also be required for a number of other services such as updating software etc.
The unit is supplied with a range of cables to connect to various manufacturers diagnostic sockets. The smaller adaptor cables use the ADC100 Master Cable (Fig 7), which connects to the AD100Pro. These adaptor cables can then be connected depending on which system is being tested. The unit is also supplied with a range of dongles (Fig 6) that configure the tester for the particular system being tested. The tester screen will advise if the incorrect dongle is fitted when the tester attempts to communicate with the vehicle. NOTE: In the majority of cases for modern vehicles, the OBD cable ADC151 and Dongle ’A’ is used. Refer to the appro-priate vehicle manufacturer section for which cable and dongle to use.
FIG 5
WARNING If the password is entered incorrectly 3 times the unit will ‘lock’ and the MVPPRO
will have to be sent back to Advanced Diagnostics for unlocking. If there are any other problems with password operation or software updating,
then the unit will be ‘locked’ and must be returned to Advanced Diagnostics.
ENSURE THE SCREEN IS CALIBRATED
1 2 3 4 5
6 7 8 9 0
FIG 6 - Dongle
FIG 7 - ADC100 + adaptor
PASSWORD OPERATION
VEHICLE CONNECTIONS & DONGLES

50 Copyright 2009
COPYRIGHT 2009
Version: 12.1 / Jan10
MVPPro - GENERAL OPERATION
1. Connect the appropriate dongle and diagnostic cable for the vehicle being connected to. The tester screen will advise if the incorrect dongle is fitted when the tester attempts to communicate with the vehicle. 2. Press & hold the Power button until the green
LED illuminates / the tester emits a beep. 3. The main menu selection screen will appear. SEE IMPORTANT NOTE BELOW 4. If required the contrast can be adjusted using the ‘+ or -’ buttons. Note: The contrast can be adjusted on any screen.
Contrast Adjust Buttons
F1
F5
F3
12.50V
IMPORTANT If the MVPPro is being loaded from a blank state then the screen calibration
process must be completed initially. If the unit is blank and any part of the screen is touched the unit will enter the
calibration process.
INITIAL OPERATION

51 Copyright 2009
COPYRIGHT 2009
Version: 12.1 / Jan10
MVPPro - GENERAL OPERATION
Main Menu To select a function either press the Function buttons (F1 to F5) or touch. the appropriate icon.
F1
F5
F3
F1
F5
F3
12.50V
Battery Voltage This displays the battery voltage of the vehicle connected to. Ensure the battery voltage is sufficient before proceeding. Note the voltage is displayed inside the icon and is not a selectable function
Calibration This function is selected to calibrate the touch screen. Once selected a ‘+’ will appear on the screen. The user must touch the centre of this cross either with a finger or pointer (not sharp and careful not to damage screen). Whilst being pressed a progress bar will fill up. Keep pressing the ‘+’ until the progress bar fills. This process needs to be repeated as another ‘+’ will appear in a different area of the screen, which must be touched centrally again. Repeat this for all the ‘+’ that appear on the screen. Once complete the screen will indicate that calibration was successful and then revert to the main menu.
Download This function is selected when new/updated software needs to be loaded. Refer to the Software Update section of this manual.
Vehicle Selection This function is selected to proceed to the Vehicle Selection menu.
12.50V
INITIAL OPERATION

52 Copyright 2009
COPYRIGHT 2009
Version: 12.1 / Jan10
MVPPro - GENERAL OPERATION
Main Vehicle Manufacturer Selection Screen
In addition to the keypad arrows, the symbols can be used to move around the main vehicle manufacturer selection screen quicker.
Used to move across to the next column. Used to move across to the next page when the tester is loaded with a lot of software.
Enter key - Used to confirm a selection.
Note: The F1 / F2 / F4 & F5 keys can also be used to obtain the same function as pressing the symbols above the appropriate key. The + sign that appears before each menu item indicates that there is another menu selection below. These + signs will appear at every menu level until you reach the final level.
+ ALFA + KIA + BMW + LANCIA + ASTON MARTIN + LDV + CHRYSLER + LEXUS + CITROEN + MAZDA
VEHICLE SELECTION
< > < <
< > <
<
< >
< <

53 Copyright 2009
COPYRIGHT 2009
Version: 12.1 / Jan10
MVPPro - GENERAL OPERATION
Select the Vehicle Selection menu by pressing F1 or touchscreen.
Enter the 6 Digit security code using the screen keypad. Software warning screen. Displays the current software and version loaded on the tester. Select either STANDARD or BETA software.
Using the arrows select the required manufacturer, and then press ENTER. NOTE : For further information and operation refer to the specific application manual.
F1
_ _ _ _ _ _
1 2 3 4 5
6 7 8 9 0
WARNING If the password is entered incorrectly 3 times the unit will ‘lock’ and the AD100Pro will have to be sent back to Advanced Diagnostics for unlocking. If there are any other problems with password
operation or software updating, then the unit will be ‘locked’ and must be returned to Advanced
Diagnostics.
ENSURE THE SCREEN IS CALIBRATED
SOFTWARE SELECTION
BETA
V4.25
Memory 2
STANDARD
V4.05
Memory 1
PRESS ENTER KEY
INITIAL OPERATION
ILLEGAL COPYING OF THIS SOFTWARE
WILL RESULT IN SEVERE CRIMINAL ACTION
SOFTWARE WILL BE ERASED FROM THIS UNIT
VEHICLE SELECTION
PRESS ENTER KEY
+ ALFA + KIA + BMW + LANCIA + ASTON MARTIN + LDV + CHRYSLER + LEXUS + CITROEN + MAZDA
VEHICLE SELECTION
< >
< <

54 Copyright 2009
COPYRIGHT 2009
Version: 12.1 / Jan10
FAULT CODES
READING FAULT CODES Lists fault codes that are stored on the vehicle. NOTE : Fault codes can be either current, historic or intermittent. CLEARING FAULT CODES Allows fault codes to be cleared.
LIVE DATA Allows values of certain components to displayed in real time ie battery voltage
ACTUATOR OPERATION
Allows actuators to be operated via the tester to check they are working eg Immobiliser LED.
SPECIAL FUNCTIONS
A variety of functions that are available, dependant upon the system ie all systems do not have the same options available. These Include: KEY INFORMATION Displays specific information ie no. of keys programmed. KEY PROGRAMMING Ability to Clear, Add or re-program keys. REMOTE PROGRAMMING Ability to Clear, Add or re-program remotes. EMS On some systems the Engine Management System data is available whilst the AD100 is communicating to the vehicle. In these circumstances this information can accessed on tester via the EMS menu selection. ECU LEARN/RESET On certain systems the immobiliser control unit needs to be either initialised, cleared or matched to the engine Control Unit. This facility is not generally available via the tester, however when it is, this menu option will appear.
MVPPro - FUNCTIONALITY
The functionality of the software will vary dependant upon the vehicle. Typical functions are as follows

55 Copyright 2009
COPYRIGHT 2009
Version: 12.1 / Jan10
MVP Pro - SOFTWARE UPDATE
Advanced Diagnostics are constantly improving the existing software and developing new software. To ensure you get all software updates it is recommended that you connect to our website and download the latest software on a regular basis ie every 2 weeks. MVP Pro has the ability to store both a Standard version and Beta version of software. The required software is selected each time the tester is used. Each time you have downloaded new software, re-calibrate the touch screen.
The following procedure will guide you through the necessary steps to download the software. The loader for the MVP is the same as the AD100Pro and will show additional menu items when it has first been connected to an MVP Pro. Step 1 - MVP Pro Loader a. Visit Advanced Diagnostics website at www.advanced-diagnostics.co.uk b. Select the MVP Pro Loader from the Downloads section and download to your computer. c. Download the MVP Pro Loader Driver from the website and save it on your PC in a known location, then install
it. d. Connect the power cable to the MVP Pro. e. Connect the USB cable between PC and MVP Pro f. Turn MVP Pro on and select Download (F3). g. For the first time the PC will detect the new hardware and install the driver. NB: You may have to select the
location of the driver if prompted. Note: It is important that you always have the latest version of download program loaded on your computer. The version number can be found in the title bar of the MVP Pro Loader program when launched. When loading a new version of the Loader program you must fully uninstall the previous version.
Step 2 - Launching MVP Pro Loader
A) Double click the icon on your desktop.
B) The following dialogue box will appear. Note: The version of the Loader program will appear in the white box.
INTRODUCTION
DOWNLOADING SOFTWARE

56 Copyright 2009
COPYRIGHT 2009
Version: 12.1 / Jan10
MVP Pro - SOFTWARE UPDATE
The pull down menu’s provide the following functions: File Allows loader program to be exited. Software This allows you to select either STANDARD or BETA or BOTH software for downloading. MVP Pro has the ability to store both a Standard version and Beta version of Software on it at the same time. The required software is selected each time the tester is used. The unit has two memory locations as follows: Memory Location 1: STANDARD SOFTWARE Memory Location 2: BETA SOFTWARE When either Standard or Beta is selected it will be downloaded into the correct memory location. Any previous software versions held in that memory location will be overwritten. Standard software must always be loaded onto the tester prior to loading Beta. If Beta software is not downloaded then Memory 2 will remain blank. Selecting BOTH will download Standard & Beta software at the same time. Load Alternate Character Set This option under Software is for units starting with serial units starting with either 160xxx and is used to load characters for displaying certain languages. This option should not be chosen unless advised by Advanced Diagnostics. Software Lookup This function allows you to check what software you have loaded to your tester for both STANDARD & BETA software. 1. Select SOFTWARE LOOKUP 2. Select STANDARD or BETA. 3. Enter Tester Serial No. 4. Enter 6 Digit passcode. 5. All software that is available for download to that tester is displayed. Check Web This function will perform an automatic check to see if you are able to connect to the internet and Advanced Diagnostics website. Under most circumstances it will also check that your firewall is not blocking the download (unless a specific URL is being blocked by your firewall settings). If you have a connection problem indicated after this test, you will need to check your firewall/anti-virus program settings with someone that understands how to configure the settings.

57 Copyright 2009
COPYRIGHT 2009
Version: 12.1 / Jan10
MVP Pro - SOFTWARE UPDATE
Tokens Allows the number of tokens on the tester or held in the website bank to be checked. There is also the function to add additional tokens to the tester. Step 3 - Loading
Select the software you wish to download from the pull down menu labelled SOFTWARE. IE Standard or Beta or BOTH. If both are required separately, repeat steps 1 to 3.
Please note that BETA software is the latest software that we are working on and is not fully tested, however it allows customers to use the latest software at their own risk. Standard software must always be loaded onto the tester prior to loading Beta. If Beta software is not downloaded then Memory 2 will remain blank.
WARNING IF YOU CHOOSE BETA SOFTWARE, THIS IS ENTIRELY AT YOUR
OWN RISK. ADVANCED DIAGNOSTICS TAKE NO
RESPONSIBILITY FOR THIS SOFTWARE
Select Load Enter the serial number of the tester Enter the 6 digit tester pass code

58 Copyright 2009
COPYRIGHT 2009
Version: 12.1 / Jan10
MVP Pro - SOFTWARE UPDATE
The latest software will downloaded to the tester. Repeat steps 1 to 3 if both Standard & Beta software requires loading separately. The red USB LED on the MVP Pro flashes during data transfer.
WARNING If the password is entered incorrectly 3 times the unit will ‘lock’
and the MVP Pro will have to be sent back to Advanced Diagnostics for unlocking.
If there are any other problems with password operation or software updating, then the unit will be ‘locked’ and must be
returned to Advanced Diagnostics.
After Downloading new software, re-calibrate your screen

59 Copyright 2009
COPYRIGHT 2009
Version: 12.1 / Jan10
MVP Pro - TOKENS
The tokens are stored on the MVP Pro and used each time a vehicle or key is Programmed, pin code is read. A warning will appear before a token is taken. The balance of tokens will stay on your web account until required. Each time tokens are loaded it will load the number of tokens that you require added the tester. Using a token only occurs when the key(s) have been programmed. Dependant upon which function is selected under key programming will determine how many keys are programmed for each token, as follows: Selecting ‘Add Key’ This normally only allows the programming of one key at a time and will use 1 token per key. Selecting ‘Clear Keys’ This function will normally clear all keys and allow the programming of a number of keys eg GM Can on a Vectra allows up to a max of 5 keys to be programmed. Programming the 5 keys in this method will only use 1 token not 5. Tokens are not taken for:
Programming Remotes (unless the remote is also used as the immobiliser) Live Data Fault Code Read/Clear Vehicles that are problematic to program do not use a token.
Warning Be aware tokens are used if the cases of operator error ie incorrect system used to program keys, incorrect transponders etc. It is in your interest to ensure that you always maintain a reasonable level of tokens on your tester so that you don’t run out at an inconvenient time.
In those rare instances where no tokens are left on the tester, there are 5off Emergency Tokens that can be used. Emergency Tokens are Premium Tokens Please be warned that for each emergency token used, it is replaced by 2 tokens when tokens are downloaded from the website.
INTRODUCTION
EMERGENCY TOKENS

60 Copyright 2009
COPYRIGHT 2009
Version: 12.1 / Jan10
MVP - TOKENS
The number of tokens remaining on your tester is displayed each time the unit is powered up. Additionally you can check from the vehicle selection menu by selecting Check Tokens. With the tester connected to your computer and the MVP Pro Loader program open, the number of tokens loaded on the tester or held within the website bank can be checked by clicking the Check Tokens menu. 1. Ensure your tester is in the download mode by selecting the Download icon from the main menu. 2. Select Tokens then either Check Tester Tokens or Check Bank Tokens from the drop down menu of the loader
program. 3. Selecting Check Tester Tokens 4. Selecting Check Bank Tokens The tester will now be downloaded with the tokens. Note: A maximum of 500 tokens can be stored at any one time on the tester. The balance of tokens will stay on your web account until required.
HOW TO CHECK YOUR TOKENS
Check Tester Tokens Check Bank Tokens Add Tokens

61 Copyright 2009
COPYRIGHT 2009
Version: 12.1 / Jan10
DOWNLOADING TOKENS
MVP - TOKENS
With the tester connected to your computer and the MVP Pro Loader program open, additional tokens can be loaded onto your tester. 1. Ensure your tester is in the download mode by selecting the Download icon from the main menu. 2. Select Tokens then select Add Tokens from the drop down menu of the loader program. 3. Enter tester passcode 4. Enter the amount of tokens you wish to add to your tester. 5. Your new tester and bank token balance will be displayed.
Check Tester Tokens Check Bank Tokens Add Tokens

62 Copyright 2009
COPYRIGHT 2009
Version: 12.1 / Jan10
MVPPro - SMARTCARD SECURITY
INTRODUCTION
The smart card security system consists of a calculator and smart card. The smart card is required for each vehicle manufacturer after the system has been selected from the main vehicle menu. The tester will display a CHALLENGE code, to continue, the user must enter this code on the smartcard calculator. A corresponding RESPONSE code is then displayed on the smartcard calculator, which must be entered back into the tester. Providing the CHALLENGE/RESPONSE codes correspond, access to continue will be granted. After each RESPONSE code is given the smart card's uses count on the smart card will be reduced by 1. To protect the smart card and software the smart card has a number of security features built in as follows: 1. Each smart card can be used a maximum of 5000 times. 2. After 500 uses the smart card will need to be re-charged via the Advanced Diagnostics website http://www.advanced-diagnostics.co.uk/htm/SmartCard-English.php. The card has a total of 10 recharges providing the 5000 limit. 3. Once the card has reached its 5000 limit, a new smart card will need to be used. 4. The smart card is unique to each tester. 5. The user has 55 seconds to enter the RESPONSE code. If it is not entered within this time then the tester will generate a new CHALLENGE code. This will continue to change every 55 seconds while no RESPONSE code is entered. 6. The user will have 3 attempts to enter a correct RESPONSE code. After 3 incorrect RESPONSE codes the tester will have to be turned off and re-started.
A number of vehicles use coded access to gain security access to program keys. Coded access systems consist of obtaining a challenge code from the vehicle, this code then needs to be converted into a response code that the vehicle will recognise and therefore allow access to the programming function to be performed. The response code can be generated by 2 methods, as follows: Emergency Smartcard Security
The function can be used temporarily if ALL smartcards have been lost. SmartCard Security
The technician uses the SmartCard security system to generate the response code. The advantage of this system is that website access is not required. (Except for Ford Coded and SSangyong)

63 Copyright 2009
COPYRIGHT 2009
Version: 12.1 / Jan10
USING SMARTCARD SECURITY
+ ALFA + KIA + BMW + LANCIA + ASTON MARTIN + LDV + CHRYSLER + LEXUS + CITROEN + MAZDA
< <
VEHICLE SELECTION
< <
147 + 156 159 + 166 GT
< <
VEHICLE SELECTION
< <
SMART CARD SECURITY
CODE: 1 2 3 4 5 6 7 8 9 0 RESPONSE: _ _ _ _ _ _ _ _ _ _
NEW CODE IN X SECONDS
1 2 3 4 5
6 7 8 9 0
1. Select the vehicle manufacturer. 2. Put smart card into the calculator 3. The calculator will power up and after a few seconds display Enter Code: Note: After 30 seconds the calculator will automatically power off if no RESPONSE CODE is entered. 4. Select vehicle model. 5. The smartcard security screen is displayed.
Enter Code:
MVPPro - SMARTCARD SECURITY

64 Copyright 2009
COPYRIGHT 2009
Version: 12.1 / Jan10
SMART CARD SECURITY
ACCESS GAINED
PRESS ENTER KEY
6. Enter the 10 digit code displayed on the tester into the calculator and press E. 7. A 10 digit RESPONSE code will be displayed on the calculator
[x] indicates how many uses are left before the card needs re-charging. In this example 499 uses are left. When you get close to zero [0], it is best to re-charge the card (see recharging section). 8. Enter the RESPONSE code into the tester. Note: The user has 55 seconds to enter the RESPONSE code. If it is not entered within this time then the code from the smart card changes. This will continue to change every 55 seconds if no RESPONSE code is entered. 9. If the correct code is entered within 55 seconds access will be gained.
OR If an incorrect RESPONSE code is entered then the user will have 3 attempts to enter a correct response code. If 3 attempts are wrong then the tester will have to be turned off and re-started. 10. Remove card from calculator, however it will auto-power off after 30 seconds.
Enter Code: 1234567890
Response: [499]
1234567890
SMART CARD SECURITY
CODE: 1 2 3 4 5 6 7 8 9 0 RESPONSE: _ _ _ _ _ _ _ _ _ _
NEW CODE IN X SECONDS
1 2 3 4 5
6 7 8 9 0
SMART CARD SECURITY
ACCESS DENIED
PRESS ENTER KEY
NOTE
Once you have gained access, if you have selected the wrong vehicle or system you can step back and select another vehicle without having to use the smart card system. However if you turn the tester off then you will need to go through the smart card system again.
MVPPro - SMARTCARD SECURITY

65 Copyright 2009
COPYRIGHT 2009
Version: 12.1 / Jan10
When the display indicates limit reached then the smartcard will need recharging with a further 500 uses. The smart card can be re-charged at any point rather then waiting until its at zero, however the number of uses left at the point of re-charging will be lost. The smartcard can be used a maximum of 5000 times. Therefore the card has a total of 10 re-charges providing the 5000 limit. Once the card has reached its 5000 limit, a new card needs to be purchased. 1. Select SmartCard Security from the Coded menu.
RECHARGE SMARTCARD
Re-Charging Procedure
2. Click Recharge SmartCard button. 3. Complete the web form and click CHECK Note: Card ID is written on the card itself.
Limit reached
Recharge now
MVPPro - SMARTCARD SECURITY

66 Copyright 2009
COPYRIGHT 2009
Version: 12.1 / Jan10
4. Follow the instructions on the website, as shown. After the 3 recharge codes have been entered into the calculator, a RESPONSE code will be displayed on the Calculator. Enter the Response Code from the calculator and click Validate Response.
After completion of the process the following message will be displayed on the website. The number of re-charges that are left for the particular card is displayed.
MVPPro - SMARTCARD SECURITY

67 Copyright 2009
COPYRIGHT 2009
Version: 12.1 / Jan10
SMARTCARD STATUS
Selecting this function allows the user to check how many recharges are left on each of the valid cards for the spe-cific tester. Each card has a maximum of 10 recharges. After this limit has been reached a new card will need to be purchased from your distributor.
The status of all the valid smart cards are displayed.
2. Click SmartCard status button. 3. Complete the web form and click CHECK
MVPPro - SMARTCARD SECURITY

68 Copyright 2009
COPYRIGHT 2009
Version: 12.1 / Jan10
EMERGENCY WEB SECURITY
This function should only be selected if ALL smartcards have been lost. By using this function, you will be disabling the smartcards you have lost and enabling a web version of the Smartcard. The web security operation will be the same as actually having a smartcard and calculator except be via the website. You must then order a replacement card(s) from your distributor. Once you have received the card you should start using the Smartcard.
2. Click Emergency Web Security button. 3. Complete the web form and click SUBMIT.
Note: You insert the Challenge code from the tester that you would normally enter on the calculator. Once you press SUBMIT, the Smartcards you have lost will be disabled.
IMPORTANT - WHAT TO DO NEXT
Once you use the Emergency Web Security, ALL your smartcards will be disabled and you will be required to purchase a new one(s).
Please contact your local distributor to order a replacement card(s).
Once you have received this card(s) please use immediately.
AD100Pro - SMARTCARD SECURITY

69 Copyright 2009
COPYRIGHT 2009
Version: 12.1 / Jan10
ENABLE SMARTCARD SECURITY
This function should only be selected if you have received a new smartcard and calculator for the first time. By selecting this function, you will be advising Advanced Diagnostics to disable the web security and enable the smartcard security.
2. Click Enable SmartCard Security button. 3. Complete the web form and click SUBMIT. 4. You will be advised by e-mail to re-load your tester when the smartcard security has been enabled. 5. Onve toy have updated your tester, the SmartCard system will be enabled
MVPPro - SMARTCARD SECURITY

F AD50
GM HOLDEN DUPLICATOR
OPERATING MANUAL

71 Copyright 2009
COPYRIGHT 2009
Version: 12.1 / Jan10
AD50 GM HOLDEN DUPLICATOR
The AD50 Commodore Duplicator has been designed to offer key duplication for a range of GM Holden Commodore vehicles. The AD50 Offers 4 and 6 digit key code reading, 4 and 6 digit key copying and 4 and 6 digit key programming. The AD50 has also been designed to offer mechanical key reading information direct from the vehicles memory, without the need to turn the ignition ON.
VEHICLE YEAR KEY PROG
PLIP PROG
LIVE DATA
ACTUATORS FAULT CODES
VR COMMODORE ALL MODELS Y Y Y Y Y
VS COMMODORE ALL MODELS Y Y Y Y Y
VT COMMODORE ALL MODELS Y Y Y Y Y
VX COMMODORE ALL MODELS Y Y Y Y Y
VU Ute ALL MODELS Y Y Y Y Y
WH STATESMAN ALL MODELS Y Y Y Y Y
WH CAPRICE ALL MODELS Y Y Y Y Y
VY2 COMMODORE ALL MODELS Y Y Y Y Y
VY COMMODORE ALL MODELS Y Y Y Y Y
VZ COMMODORE ALL MODELS Y Y Y Y Y
INTRODUCTION
VEHICLE APPLICATIONS
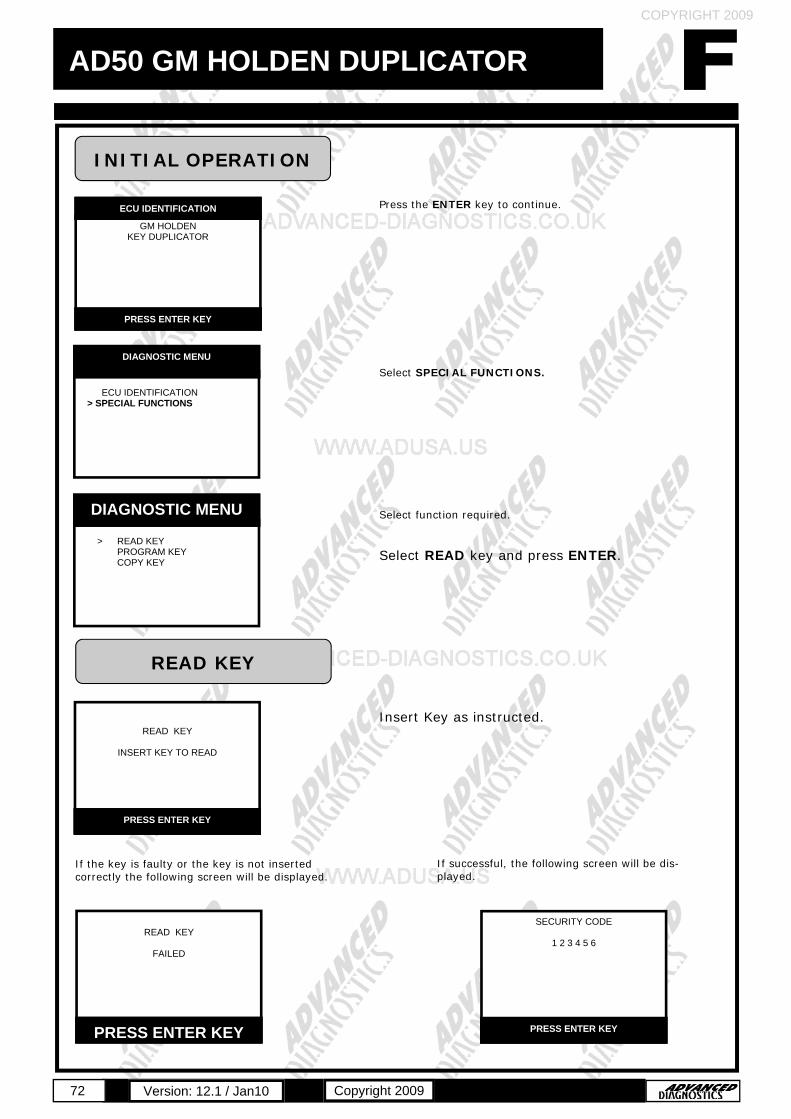
72 Copyright 2009
COPYRIGHT 2009
Version: 12.1 / Jan10
GM HOLDEN KEY DUPLICATOR
ECU IDENTIFICATION
PRESS ENTER KEY
ECU IDENTIFICATION > SPECIAL FUNCTIONS
DIAGNOSTIC MENU
> READ KEY PROGRAM KEY COPY KEY
DIAGNOSTIC MENU
Press the ENTER key to continue. Select SPECIAL FUNCTIONS. Select function required. Select READ key and press ENTER. Insert Key as instructed.
INITIAL OPERATION
READ KEY
INSERT KEY TO READ
PRESS ENTER KEY
READ KEY
FAILED
PRESS ENTER KEY
SECURITY CODE
1 2 3 4 5 6
PRESS ENTER KEY
READ KEY
If successful, the following screen will be dis-played.
If the key is faulty or the key is not inserted correctly the following screen will be displayed.
AD50 GM HOLDEN DUPLICATOR

73 Copyright 2009
COPYRIGHT 2009
Version: 12.1 / Jan10
Select PROGRAM KEY and press ENTER. Type in 4 or 6 digit code. NOTE : If 4 digit, insert 2 zero’s before inserted final 4 digits. Press ENTER. Insert Key as instructed. Select COPY KEY and press ENTER. A. Insert key to be copied. Press ENTER B. Insert key to be programmed. Press ENTER
SECURITY CODE
0 0 1 2 4 3
IS CODE CORRECT OK=ENTER CLEAR=BACK
COPY KEY
INSERT KEY TO COPY
PRESS ENTER KEY
PROGRAM KEY
INSERT KEY TO PROGRAM
PRESS ENTER KEY
PROGRAM KEY
KEY PROGRAMMED
PRESS ENTER KEY
COPY KEY FUNCTION
SECURITY CODE
_ _ _ _ _ _
PRESS ENTER KEY
PROGRAM KEY
READ KEY > PROGRAM KEY COPY KEY
DIAGNOSTIC MENU
READ KEY PROGRAM KEY > COPY KEY
DIAGNOSTIC MENU
AD50 GM HOLDEN DUPLICATOR

74 Copyright 2009
COPYRIGHT 2009
Version: 12.1 / Jan10
DESCRIPTION
AD100Pro MVP PRO AD100 MVP
OPERATING SUPPLY
12 VOLTS DC 12 VOLTS DC 12 VOLTS DC 12 VOLTS DC
USER INTERFACE KEYPAD & TOUCHSCREEN
KEYPAD & TOUCHSCREEN
KEYPAD KEYPAD
DISPLAY 320 x 240 DOT MATRIX LCD
TOUCHSCREEN BACKLIGHT
320 x 240 DOT MATRIX LCD
TOUCHSCREEN BACKLIGHT
128 x 64 GRAPHIC
DOT MATRIX LED BACKLIGHT
128 x 64 GRAPHIC
DOT MATRIX LED BACKLIGHT
COMMUNICATION PROTOCOLS
CAN, J1850, ISO9141, SCP,
5 VOLTS, CCD & VPW PROTOCOLS
CAN, J1850, ISO9141, SCP,
5 VOLTS, CCD & VPW PROTOCOLS
CAN, J1850, ISO9141, SCP,
5 VOLTS, CCD & VPW PROTOCOLS
CAN, J1850, ISO9141, SCP,
5 VOLTS, CCD & VPW PROTOCOLS
PC INTERFACE USB USB SERIAL SERIAL
REVERSE POLARITY PROTECTION
YES YES YES YES
SIZE (MM) 265 X 220 X 50 265 X 220 X 50 230 x 115 x 80 237 x 117 x 42
WEIGHT 1030gms 1030gms 400gms 500 gms
MEMORY 512KB RAM 64MB FLASH
512KB RAM 64MB FLASH
512KB RAM 32MB FLASH 64KB ROM
512KB RAM 32MB FLASH 64KB ROM
STORAGE TEMPERATURE
0°C to +50°C 0°C to +50°C 0°C to +50°C 0°C to +50°C
OPERATING TEMPERATURE
+5°C TO +40°C +5°C TO +40°C +5°C TO +40°C +5°C TO +40°C
CURRENT CONSUMPTION
200mA 360mA (Back Lit)
200mA 360mA (Back Lit)
200mA 280 mA (Back
Lit)
200 mA
ELECTRONIC TOKENS
NO YES NO YES
PATENT US PATENT #7,315,238
US PATENT #7,315,238
SPECIFICATION
SPECIFICATIONS

75 Copyright 2009
COPYRIGHT 2009
Version: 12.1 / Jan10
DECLARATION OF CONFORMITY
DECLARATION OF CONFORMITY
Manufacturer’s Name: Advanced Diagnostics Ltd Manufacturer’s Address: Diagnostics House Eastboro Fields Hemdale Nuneaton Warwickshire CV116GL Uk Product Name: Key Programming Equipment Product Model: AD100, MVP, AD100Pro, MVPPro, AD100Pro Truck Product Options: All Conforms to: Specifications EN 55022:1998, A1: 2000 + A2: 2003 EN 55024:1998, A1: 2001 + A2: 2003 Following the Provisions of EMC Directive: 89/336/EEC AD100 & MVP Date: 30th October 2001 AD100Pro Date: May 2006 AD100Pro Truck Date: July 2007 All products conform to class A emission standards Signed: on behalf of Advanced Diagnostics Ltd

76 Copyright 2009
COPYRIGHT 2009
Version: 12.1 / Jan10

77 Copyright 2009
COPYRIGHT 2009
Version: 12.1 / Jan10
VEHICLE TYPE
VEHICLE MODEL YEARS
KEY PROGRAMMING
REMOTE CONTROL PROGRAMMING
PIN CODE READING
PIN CODE REQUIRED
@ PIN CODES AVAILABLE VIA ADVANCED DIAGNOSTICS WEBSITE
REMOTE CONTROL PROGRAMMING MANUAL PROCEDURE
1 2 3 4
The following symbols are used in the vehicle application sections.
KEY TO SYMBOLS

78 Copyright 2009
COPYRIGHT 2009
Version: 12.1 / Jan10
Advanced Diagnostics Ltd Diagnostics House Eastboro Fields Hemdale Nuneaton CV11 6GL T: +44(0)2476 347000 F: +44(0)2476 347100 W: www.advanced-diagnostics.co.uk