Embed Size (px)
Citation preview

© COPLIN 2019-2020 www.kodeklix.com Page 1®
Kode:Bit for the BBC micro:bit
Quick Start Guide
®
Kode:BitTM
Kode:BitTM PLUS

© COPLIN 2019-2020 www.kodeklix.com Page 2®
Introduction
Kode:BitTM allows you to connector your BBC micro:bit board to:
Other snap controllers such as the SnapCPUTM for use as a co-process for display or other functionality
Build interfacing circuits using your KodeKLIX® or other compatible snap
electronic components

© COPLIN 2019-2020 www.kodeklix.com Page 3®
Power Configuration
Your BBC micro:bit simply inserts into the connector on the Kode:Bit, but before doing so, consider how you will be using your micro:bit…
4.5V Battery Pack
In this configuration no link is required. Internally, the voltage from battery pack [70] is reduced to the safe level needed for the micro:bit
3.0V Battery Pack
In this configuration a link may be required if your display is very dim or some of the micro:bit’s sensors do not work reliably.
This configuration is also used if you power your Bit with the USB cable.

© COPLIN 2019-2020 www.kodeklix.com Page 4®
Power Configuration - PLUS
Your BBC micro:bit simply inserts into the connector on the Kode:Bit PLUS, but before doing so, consider how you will be using your micro:bit…
In this configuration no link is required. Internally, the voltage from battery pack [70] is reduced to the safe level needed for the micro:bit
In this configuration a link may be required if your display is very dim or some of the micro:bit’s sensors do not work reliably.
This configuration is also used if you power your Bit with the USB cable.
4.5V Battery Pack 3.0V Battery Pack

© COPLIN 2019-2020 www.kodeklix.com Page 5®
Inserting the micro:bit
Once you have decided on whether to use the power link or not, the micro:bit can be easily inserted into the Kode:Bit adaptor
Power and ground (0V) are supplied to the micro:bit through the top snaps
Input/Output pins P0, P1 and P2 are routed as shown These pins are yours to use, but remember all
the connection rules for the micro:bit still apply

© COPLIN 2019-2020 www.kodeklix.com Page 6®
micro:bit Coding
Making code for the micro:bit is the same as usual, using the on-line MakeCodeutilities at http://makecode.microbit.org/#editor
Downloading code for the micro:bit is the same as usual, using the USB cable and drag-and-drop method
Basic pin I/O can be controlled with these MakeCode Blocks

© COPLIN 2019-2020 www.kodeklix.com Page 7®
micro:bit I/O Coding Blocks
Various coding blocks can be found under the Pins menu in the advanced section
Digital I/O is where signals are either ON (1) or OFF (0)
Analog inputs are signals which have a value between 0-255

© COPLIN 2019-2020 www.kodeklix.com Page 8®
micro:bit Music Coding
By default, the micro:bit plays all sounds and music through P0
Since the micro:bit has no built-in speaker so an external speaker [20] or piezo [11] willneed to be connected

© COPLIN 2019-2020 www.kodeklix.com Page 9®
Push button input to the Kode:BitTM
Assemble the snap components as shown in circuit 1.0; Construct the MakeCodebelow and download to the micro:bit
The battery pack [70] is for powering the circuit (and the micro:bit when not on USB)
Example Project 1.0
Circuit 1.0
**code set to read from inputP1
Connecting to “high” is the equivalent of connecting to the +ve terminal of the battery box.
Completed
A push-button switch is momentary (only valid when being pressed) so needs to be held until the code “sees” it.
Challenge: modify the code to make P2 stay lit for a fixed time after the button P1 is pressed.
**illuminates the DLED on P2
**plays tune through piezo on P0

© COPLIN 2019-2020 www.kodeklix.com Page 10®
Advanced micro:bit I/O Coding
Various coding blocks can be found under the Pins menu in the advanced section
Digital I/O is where signals are either ON (1) or OFF (0)
Analog inputs are signals which have a value between 0-255

© COPLIN 2019-2020 www.kodeklix.com Page 11®
Using the micro:bit with the SnapCPUTM
This project demonstrates how to computers, the SnapCPU and the micro:bit can be made to communicate
In this project, the micro:bit is a displayfor the SnapCPUTM
Assemble the snap components as shown in circuit 2.0
Construct the MakeCode on the next page and download to the micro:bit
Construct the Blockly code on the next page and download it to the SnapCPUTM
If all goes to plan, the micro:bit display show A, B, C, …
Example Project 2.0a
Circuit 2.0
Completed

© COPLIN 2019-2020 www.kodeklix.com Page 12®
Using the micro:bit with the SnapCPUTM
Example Project 2.0bCompleted
**send data as the ASCII codes; after each letter send a CR code so the micro:bit knows to read the data that was sent
**setup for serial protocols to be used; these must match on both the micro:bit and SnapCPU
**receive and display the information which was sent
Challenge: modify the code in the SnapCPU to send a message letter by letter, rather than the ABCDE sequence of characters… you can do it by codes or characters!

© COPLIN 2019-2020 www.kodeklix.com Page 13®
Kode:BitTM Motor Driver Blocks
To simplify the control of motors, install this driver as an extension to MakeCode:
http://github.com/waveshare/pxt-Motor
1. Open extensions menu
2. Enter the web link details
3. A new block menu is added!

© COPLIN 2019-2020 www.kodeklix.com Page 14®
micro:bit Motor Coding Blocks
Various coding blocks can be found under the new MotorDriver menu
Motor ‘A’ is used
The first block controls motor direction and speed
The second blockstops the motor
Note: driver may need to beinstalled for each new project
© COPLIN 2019-2020 www.kodeklix.com Page 15®
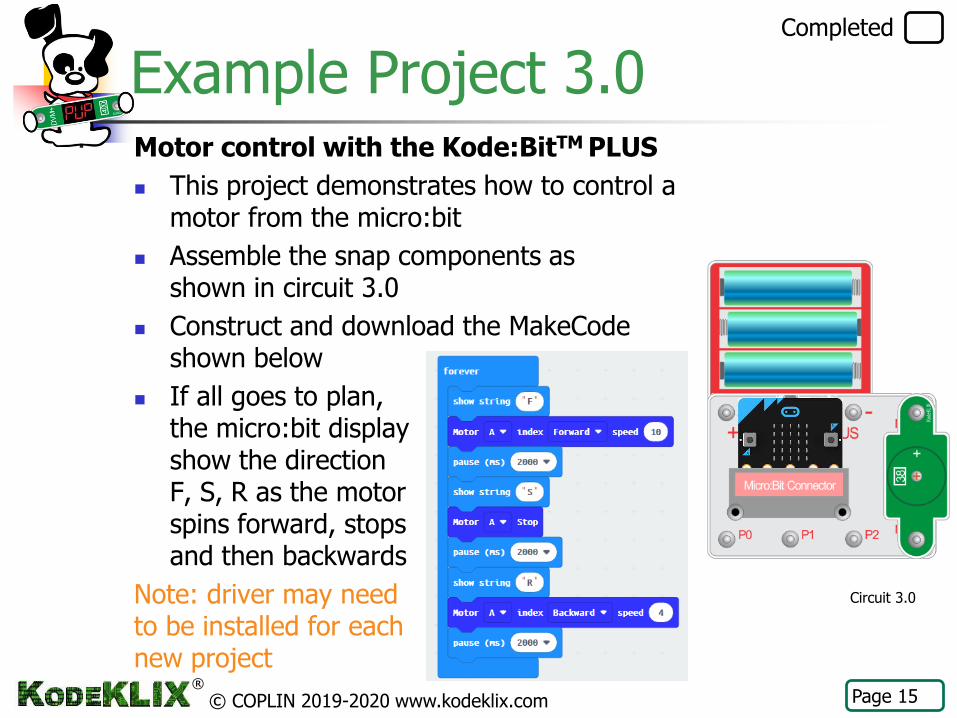
Motor control with the Kode:BitTM PLUS
This project demonstrates how to control a motor from the micro:bit
Assemble the snap components as shown in circuit 3.0
Construct and download the MakeCodeshown below
If all goes to plan, the micro:bit display show the directionF, S, R as the motorspins forward, stops and then backwards
Note: driver may need to be installed for each new project
Example Project 3.0
Circuit 3.0
Completed

© COPLIN 2019-2020 www.kodeklix.com Page 16®
What Next…?
The internet is has many example projects for the micro:bit
Try building these using snap parts rather than tiny components and clips
Think of other creative ways to use the power of two CPUs connected at the same time
Send / receive data
Send / receive signals