Embed Size (px)
DESCRIPTION
Lab 1 - Collaboration Edge (1)_2014
Citation preview
Lab 1 – Collaboration Edge & Jabber for Windows
Lab written by: Brent Foster, Collaboration CSE [email protected]
Technical Overview written by: Kevin Roarty, CTG TME [email protected]
Last Updated: September 29, 2013
Cisco’s Collaboration Edge is an umbrella term describing Cisco’s entire collaboration architecture for edge access. The core products that make up the Collaboration Edge Architecture include:
• Cisco Expressway • CUBE • TDM & Analog Gateways • SRST
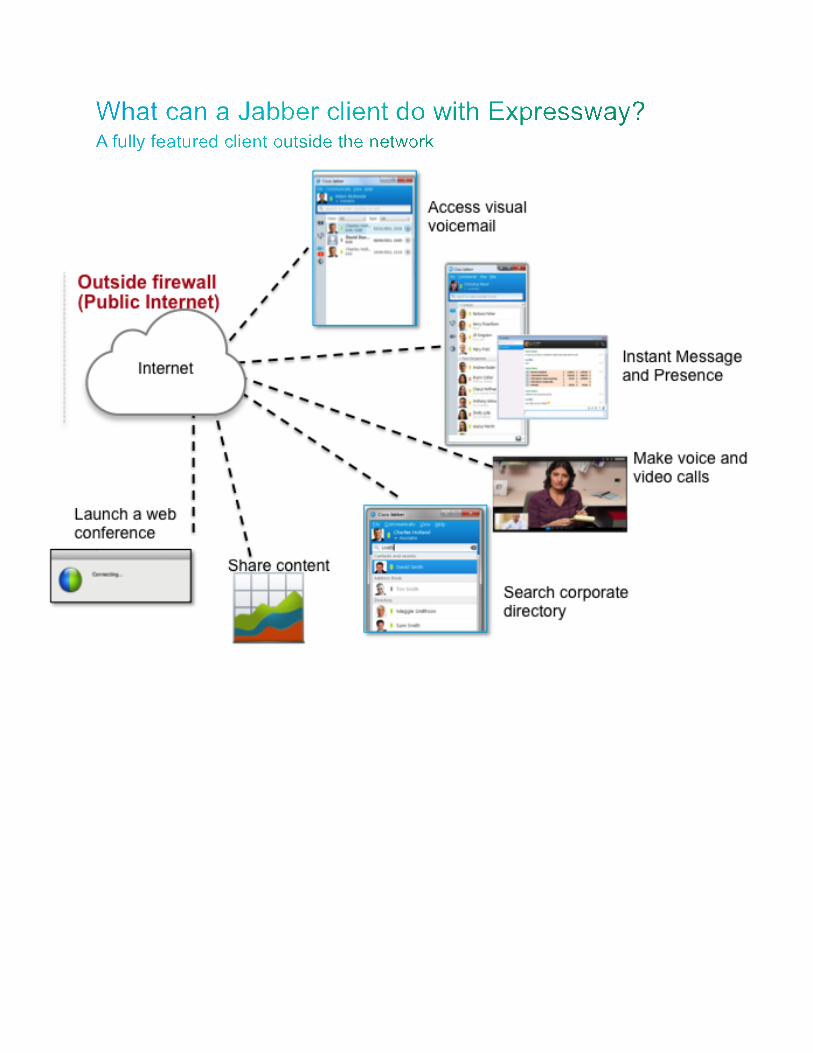
One of the most highly desired features enabled with the Collaboration Edge is the ability to use Jabber clients from outside of the enterprise network without VPN technology. This capability is specifically enabled by the Cisco Expressway product and is referred to as “remote and mobile access” at the feature level. This feature will be delivered in the X8.1 software release of the Expressway product. This lab will guide you through configuring the remote and mobile access features to use with Jabber for Windows.
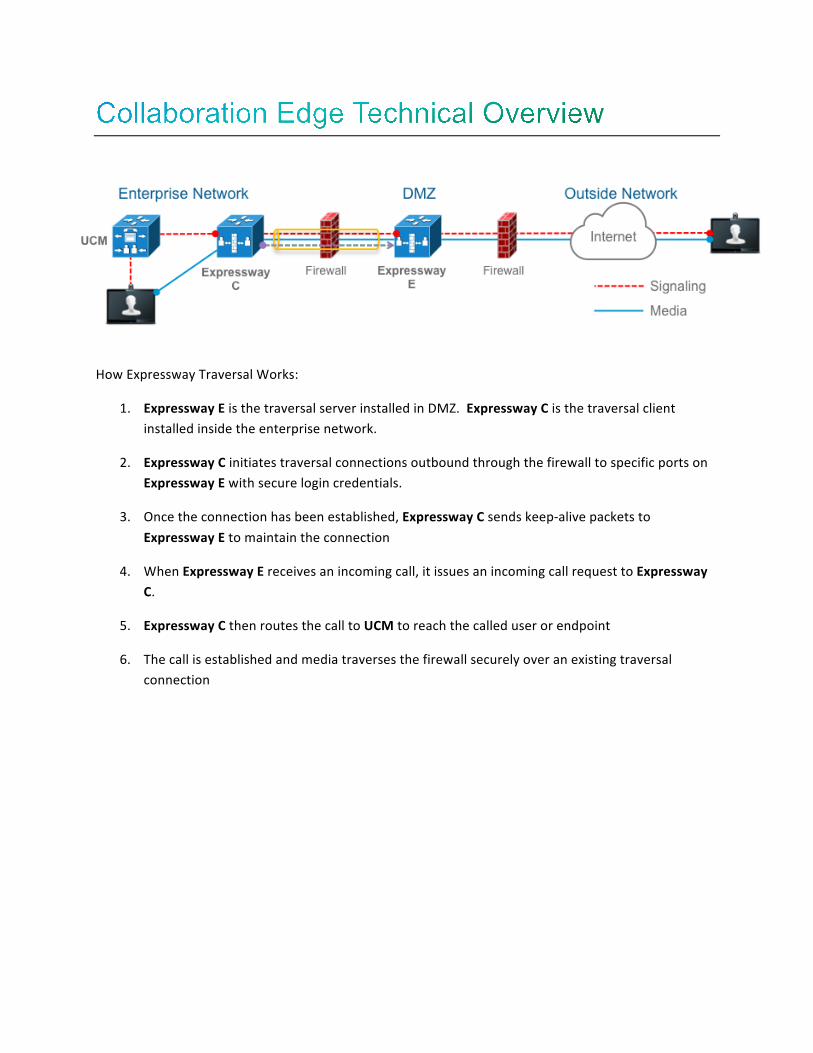
How Expressway Traversal Works:
1. Expressway E is the traversal server installed in DMZ. Expressway C is the traversal client installed inside the enterprise network.
2. Expressway C initiates traversal connections outbound through the firewall to specific ports on Expressway E with secure login credentials.
3. Once the connection has been established, Expressway C sends keep-‐alive packets to Expressway E to maintain the connection
4. When Expressway E receives an incoming call, it issues an incoming call request to Expressway C.
5. Expressway C then routes the call to UCM to reach the called user or endpoint
6. The call is established and media traverses the firewall securely over an existing traversal connection
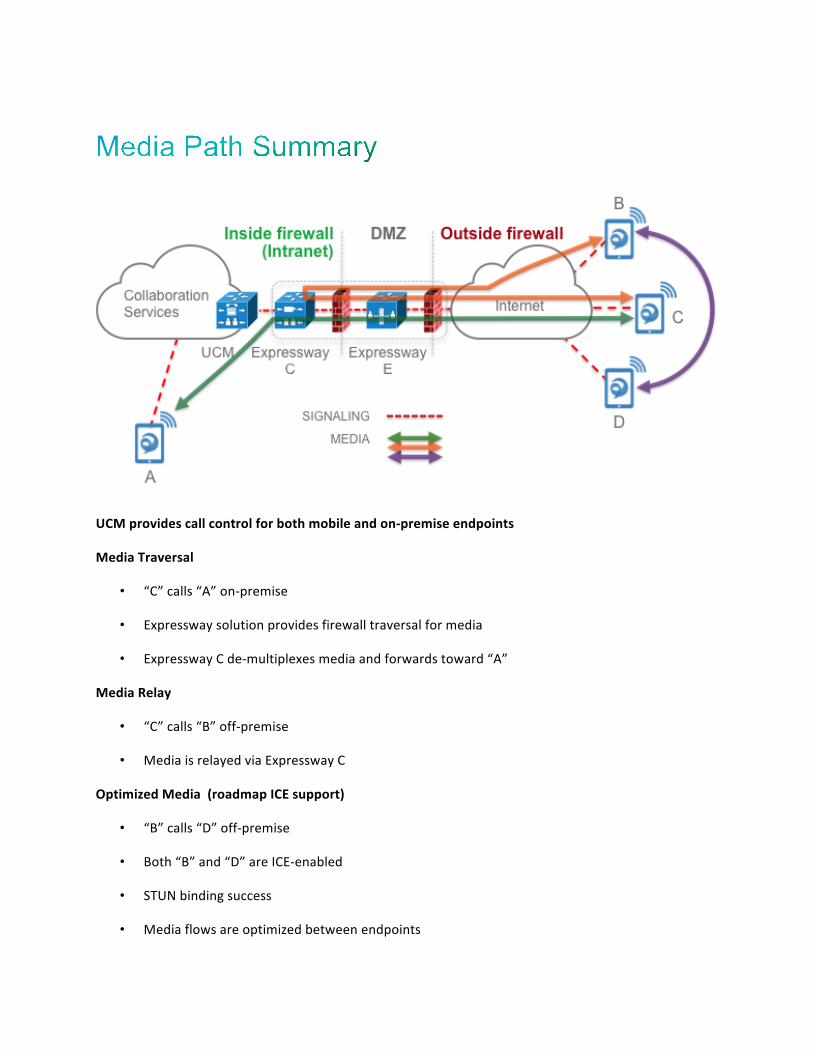
UCM provides call control for both mobile and on-‐premise endpoints
Media Traversal
• “C” calls “A” on-‐premise
• Expressway solution provides firewall traversal for media
• Expressway C de-‐multiplexes media and forwards toward “A”
Media Relay
• “C” calls “B” off-‐premise
• Media is relayed via Expressway C
Optimized Media (roadmap ICE support)
• “B” calls “D” off-‐premise
• Both “B” and “D” are ICE-‐enabled
• STUN binding success
• Media flows are optimized between endpoints
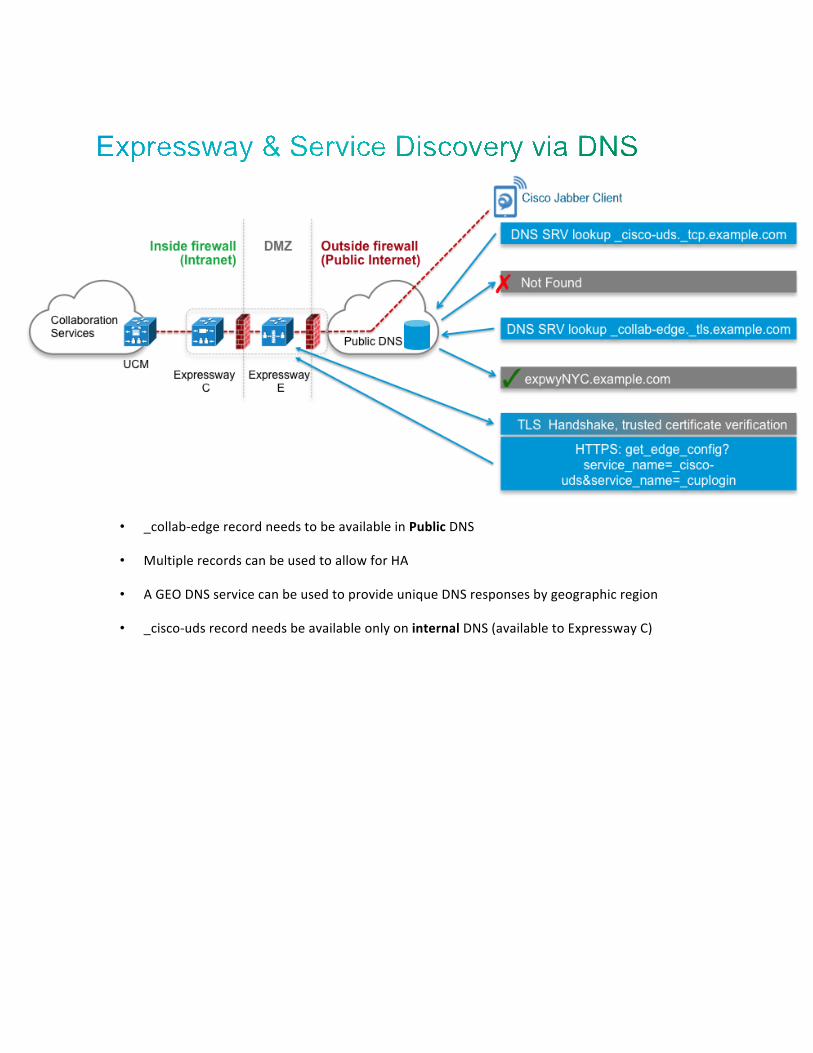
• _collab-‐edge record needs to be available in Public DNS
• Multiple records can be used to allow for HA
• A GEO DNS service can be used to provide unique DNS responses by geographic region
• _cisco-‐uds record needs be available only on internal DNS (available to Expressway C)

This lab will walk you through the configuration of the remote and mobile access feature to enable Jabber for Windows access outside of the corporate network.
As this feature is still under active development you will be using pre-‐release software for the lab. The remote and mobile access feature of the Expressway is enabled via the Experimental Mode in the X8.0 software. Additionally, you will be using an Alpha release of the Jabber for Windows 9.6 client that does not have all features fully enabled. The CUCM and CUCM-‐IM servers are on the latest 9.1 software release.
When the full solution launches it will be based on Expressway X8.1, CUCM 9.1, Jabber for Windows 9.6 and TelePresence TC 7.0. Note that ICE (STUN/TURN) support is road mapped for the CUCM 10.5 release.
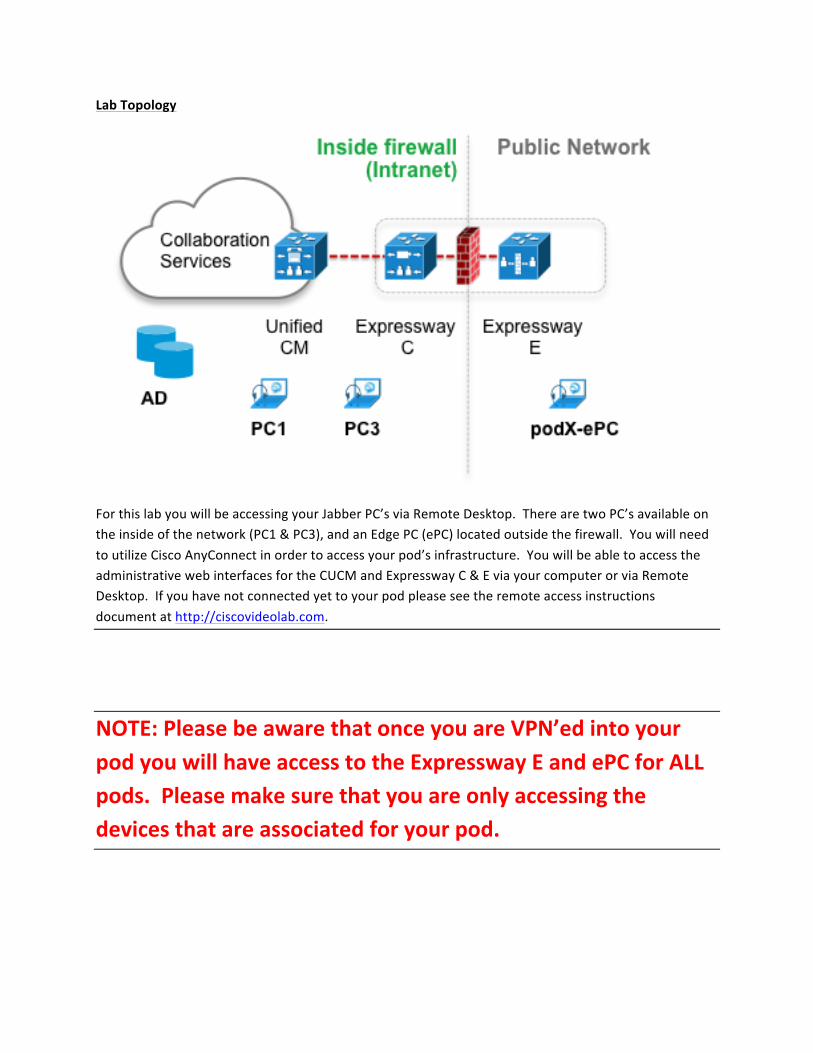
Lab Topology
For this lab you will be accessing your Jabber PC’s via Remote Desktop. There are two PC’s available on the inside of the network (PC1 & PC3), and an Edge PC (ePC) located outside the firewall. You will need to utilize Cisco AnyConnect in order to access your pod’s infrastructure. You will be able to access the administrative web interfaces for the CUCM and Expressway C & E via your computer or via Remote Desktop. If you have not connected yet to your pod please see the remote access instructions document at http://ciscovideolab.com.
NOTE: Please be aware that once you are VPN’ed into your pod you will have access to the Expressway E and ePC for ALL pods. Please make sure that you are only accessing the devices that are associated for your pod.
DNS Setup
As you read earlier in the Technical Overview DNS is critical to how the Collaboration Edge solution works with Jabber. As such, the first item you will need to configure will be DNS SRV records that enable automatic service discovery for the Jabber clients. The service discovery feature allows Jabber to determine several items:
• Are you on the internal or external network? • CUCM Server Address • IM Server Address & Type (on-‐prem or WebEx SaaS)
Your internal DNS server for lab is a Microsoft Windows Active Directory Server. Let’s connect to it to begin configuration:
1. Initiate a Remote Desktop to ad.collab.com Login Credentials: Username: COLLAB\administrator Password: Cisco12345 Domain: COLLAB
2. Launch the DNS management application from the Windows Desktop
3. Once you are in the DNS Manager expand the Forward Lookup Zones folder 4. Expand collab.com 5. Click on the _tcp folder
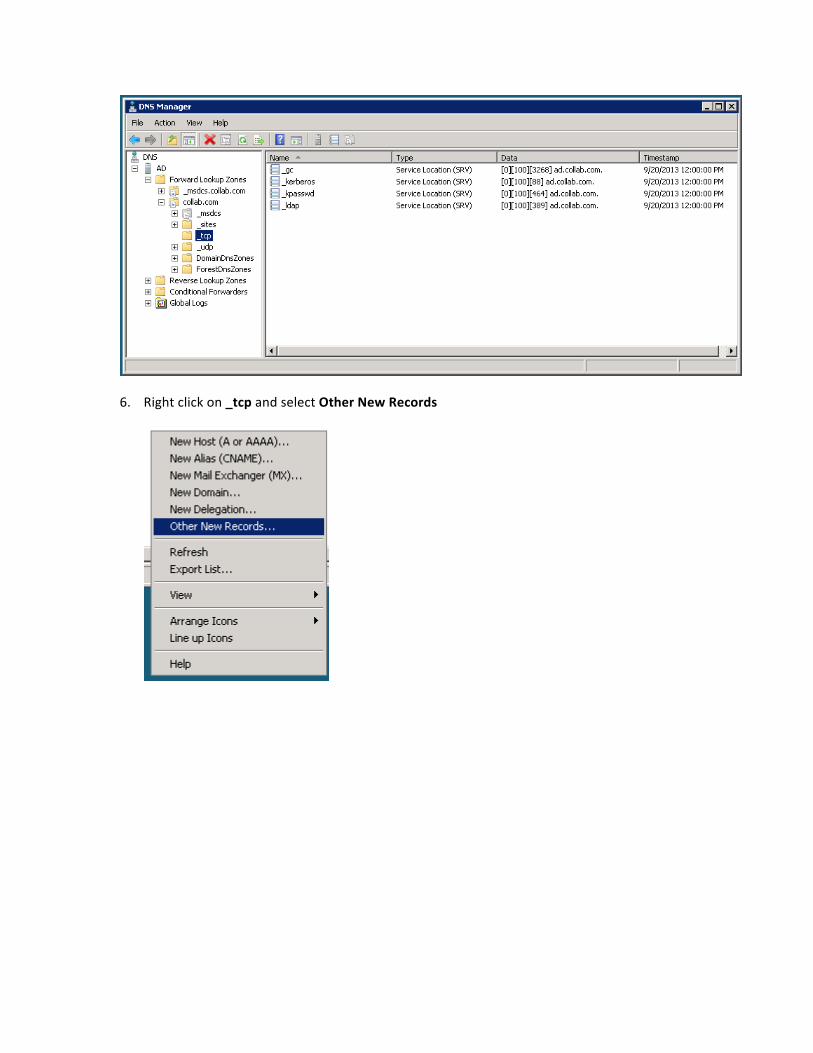
6. Right click on _tcp and select Other New Records
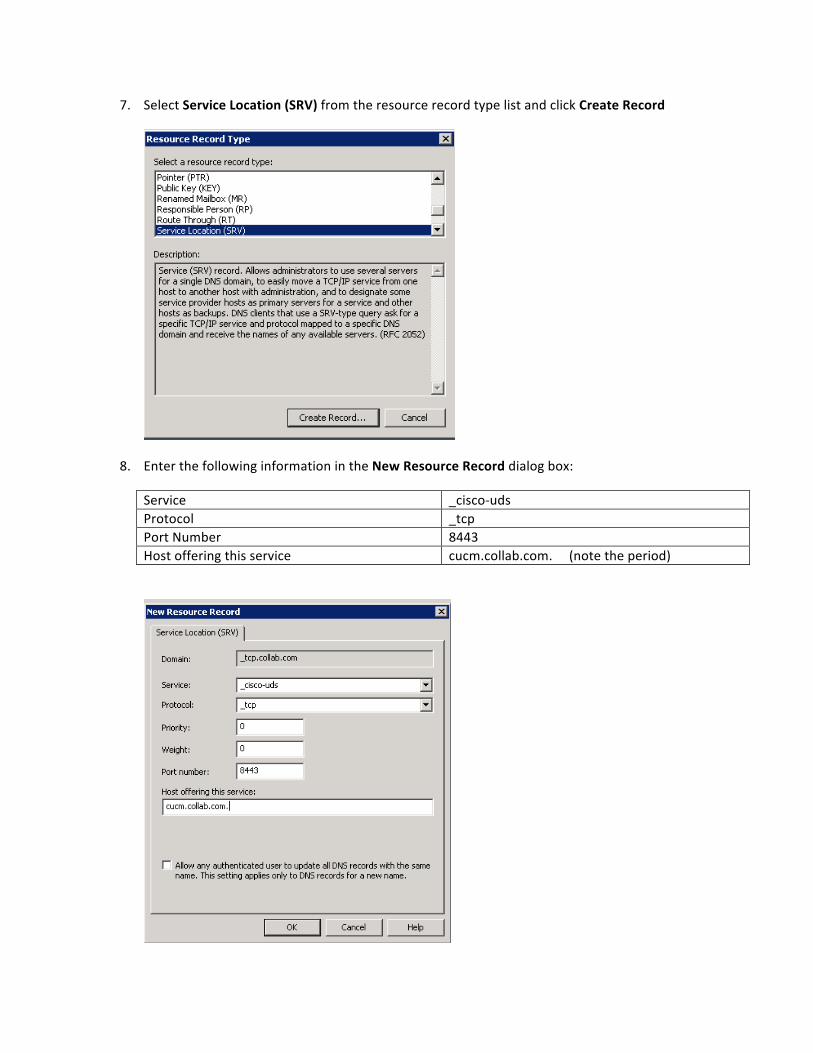
7. Select Service Location (SRV) from the resource record type list and click Create Record
8. Enter the following information in the New Resource Record dialog box:
Service _cisco-‐uds Protocol _tcp Port Number 8443 Host offering this service cucm.collab.com. (note the period)
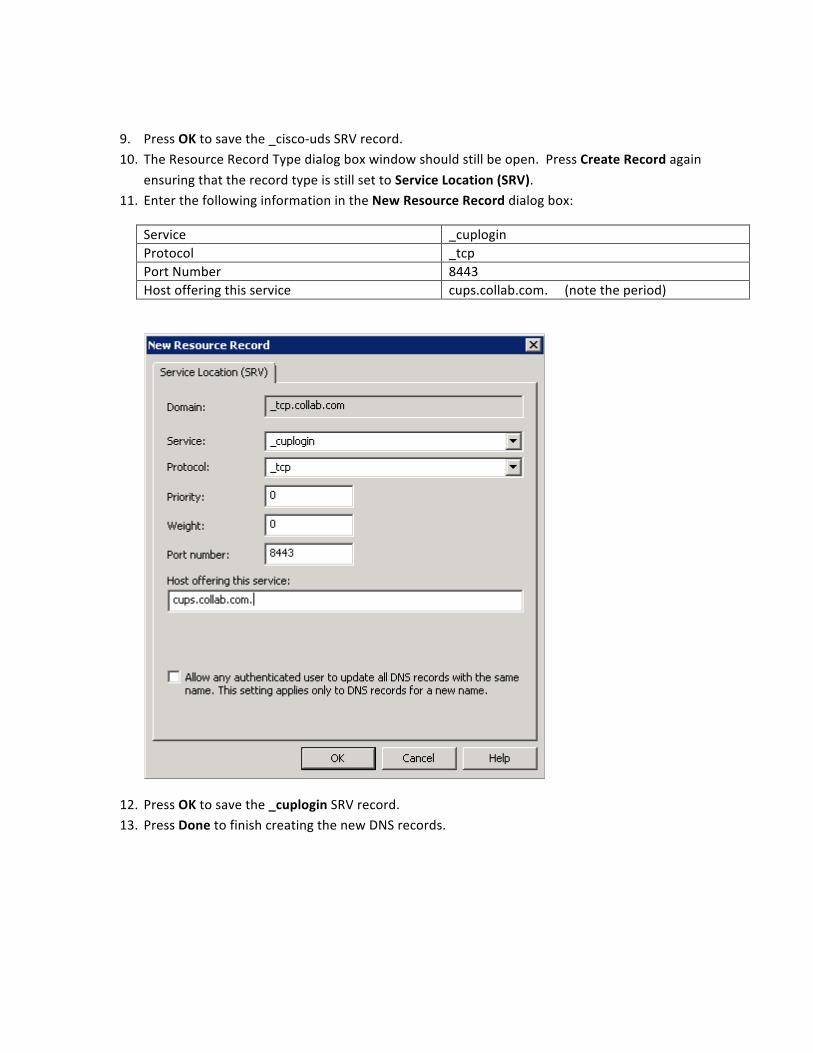
9. Press OK to save the _cisco-‐uds SRV record. 10. The Resource Record Type dialog box window should still be open. Press Create Record again
ensuring that the record type is still set to Service Location (SRV). 11. Enter the following information in the New Resource Record dialog box:
Service _cuplogin Protocol _tcp Port Number 8443 Host offering this service cups.collab.com. (note the period)
12. Press OK to save the _cuplogin SRV record. 13. Press Done to finish creating the new DNS records.
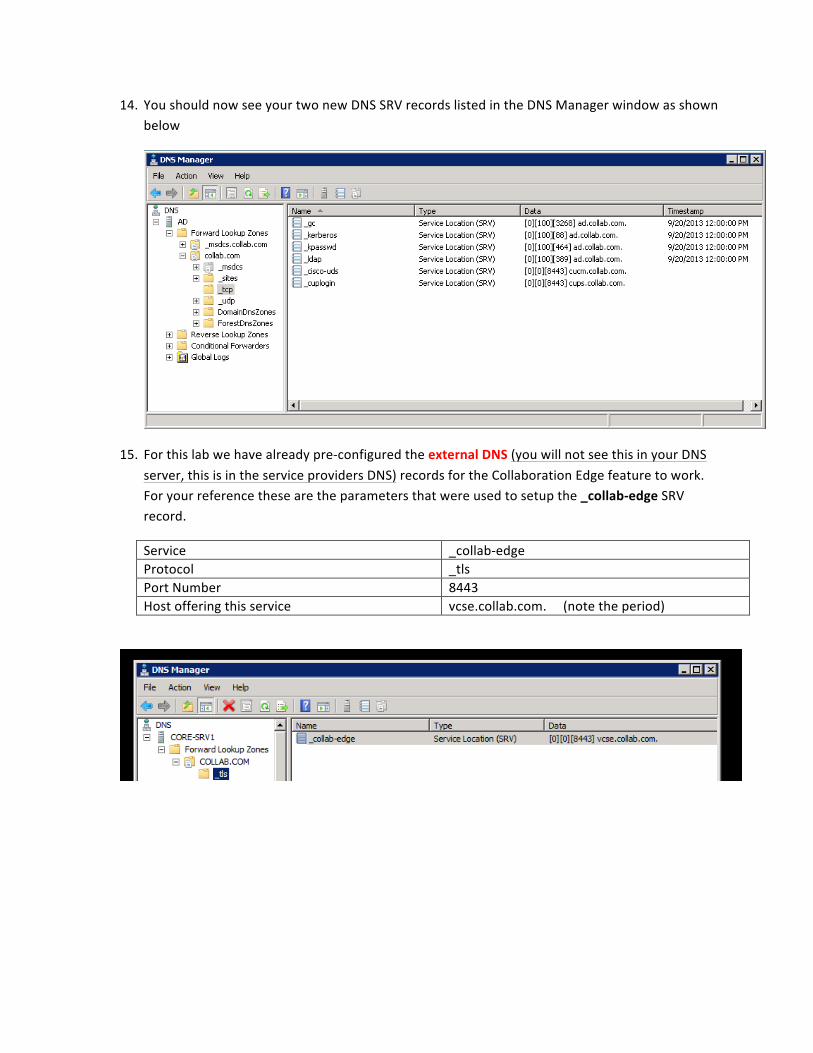
14. You should now see your two new DNS SRV records listed in the DNS Manager window as shown below
15. For this lab we have already pre-‐configured the external DNS (you will not see this in your DNS server, this is in the service providers DNS) records for the Collaboration Edge feature to work. For your reference these are the parameters that were used to setup the _collab-‐edge SRV record.
Service _collab-‐edge Protocol _tls Port Number 8443 Host offering this service vcse.collab.com. (note the period)
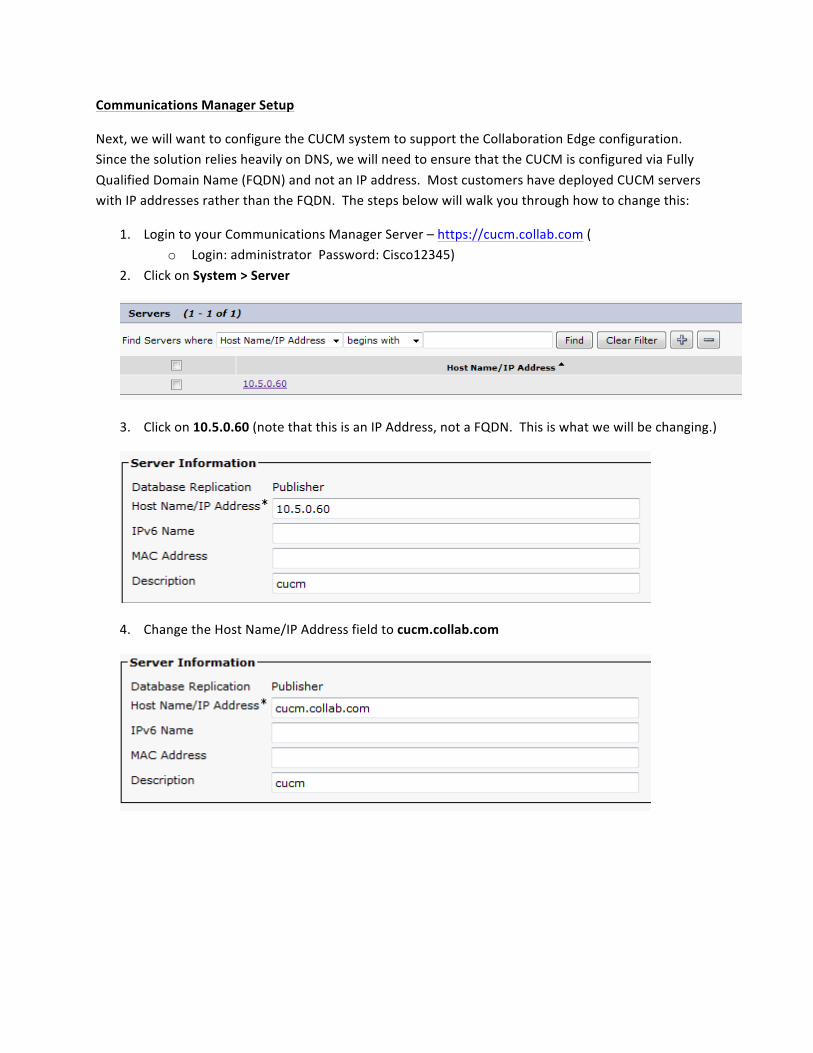
Communications Manager Setup
Next, we will want to configure the CUCM system to support the Collaboration Edge configuration. Since the solution relies heavily on DNS, we will need to ensure that the CUCM is configured via Fully Qualified Domain Name (FQDN) and not an IP address. Most customers have deployed CUCM servers with IP addresses rather than the FQDN. The steps below will walk you through how to change this:
1. Login to your Communications Manager Server – https://cucm.collab.com ( o Login: administrator Password: Cisco12345)
2. Click on System > Server
3. Click on 10.5.0.60 (note that this is an IP Address, not a FQDN. This is what we will be changing.)
4. Change the Host Name/IP Address field to cucm.collab.com
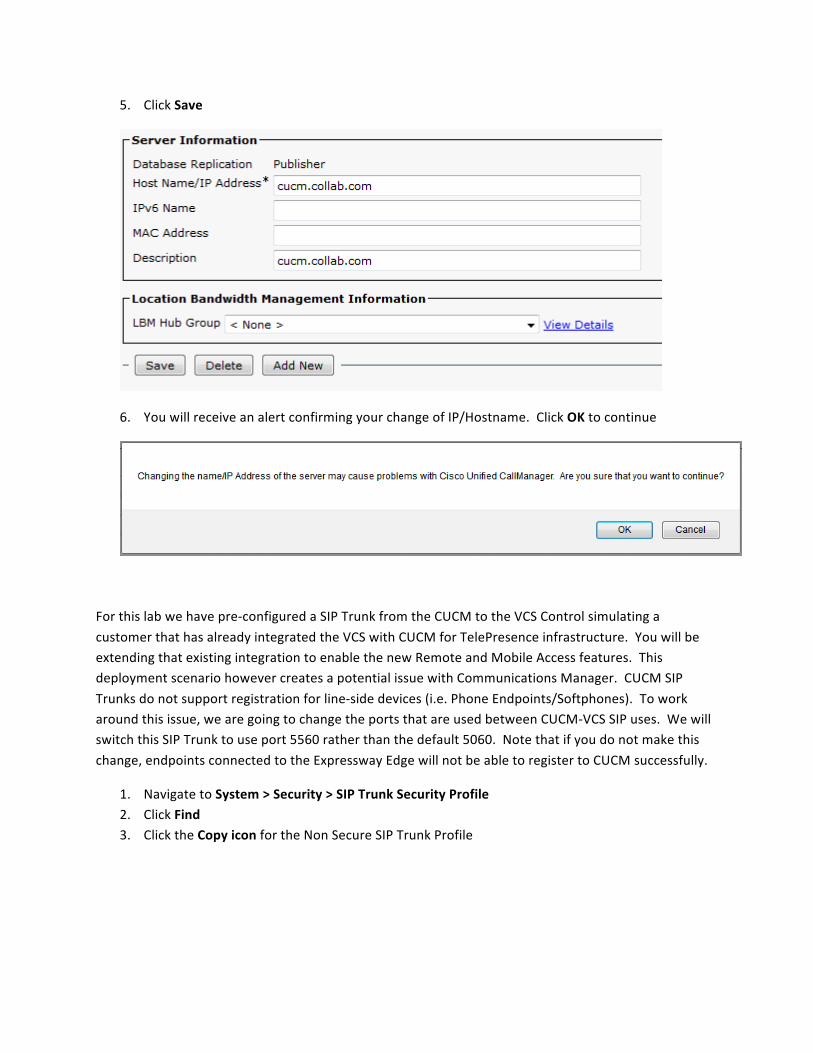
5. Click Save
6. You will receive an alert confirming your change of IP/Hostname. Click OK to continue
For this lab we have pre-‐configured a SIP Trunk from the CUCM to the VCS Control simulating a customer that has already integrated the VCS with CUCM for TelePresence infrastructure. You will be extending that existing integration to enable the new Remote and Mobile Access features. This deployment scenario however creates a potential issue with Communications Manager. CUCM SIP Trunks do not support registration for line-‐side devices (i.e. Phone Endpoints/Softphones). To work around this issue, we are going to change the ports that are used between CUCM-‐VCS SIP uses. We will switch this SIP Trunk to use port 5560 rather than the default 5060. Note that if you do not make this change, endpoints connected to the Expressway Edge will not be able to register to CUCM successfully.
1. Navigate to System > Security > SIP Trunk Security Profile 2. Click Find 3. Click the Copy icon for the Non Secure SIP Trunk Profile
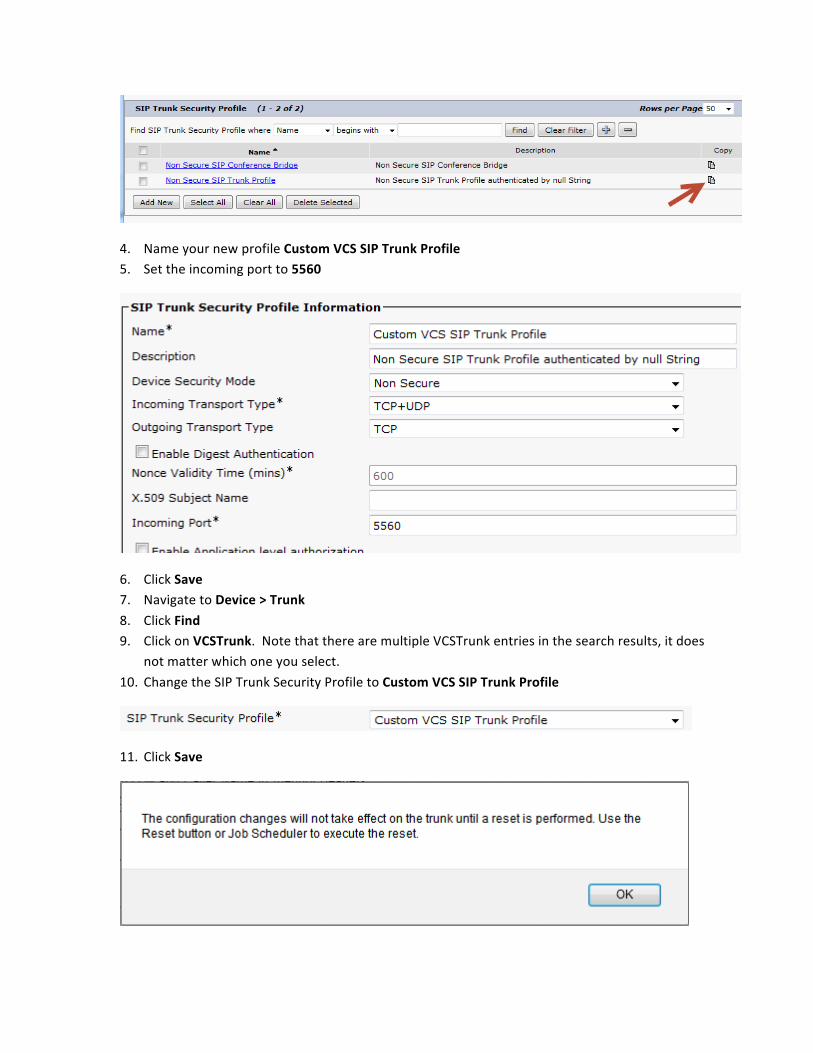
4. Name your new profile Custom VCS SIP Trunk Profile 5. Set the incoming port to 5560
6. Click Save 7. Navigate to Device > Trunk 8. Click Find 9. Click on VCSTrunk. Note that there are multiple VCSTrunk entries in the search results, it does
not matter which one you select. 10. Change the SIP Trunk Security Profile to Custom VCS SIP Trunk Profile
11. Click Save

12. You will receive an alert confirming your trunk changes. Click OK to continue.
13. Press the button to reset the SIP trunk. Press the button on the pop-‐up window.
Expressway E Setup
Next, we will want to configure the Expressway E to support the Collaboration Edge. The items you are going to do are:
• Verify the base configuration and DNS setup • Turn on the Experimental Features to enable Remote and Mobile Access • Configure the Firewall Traversal Server zone for the Expressway C to use
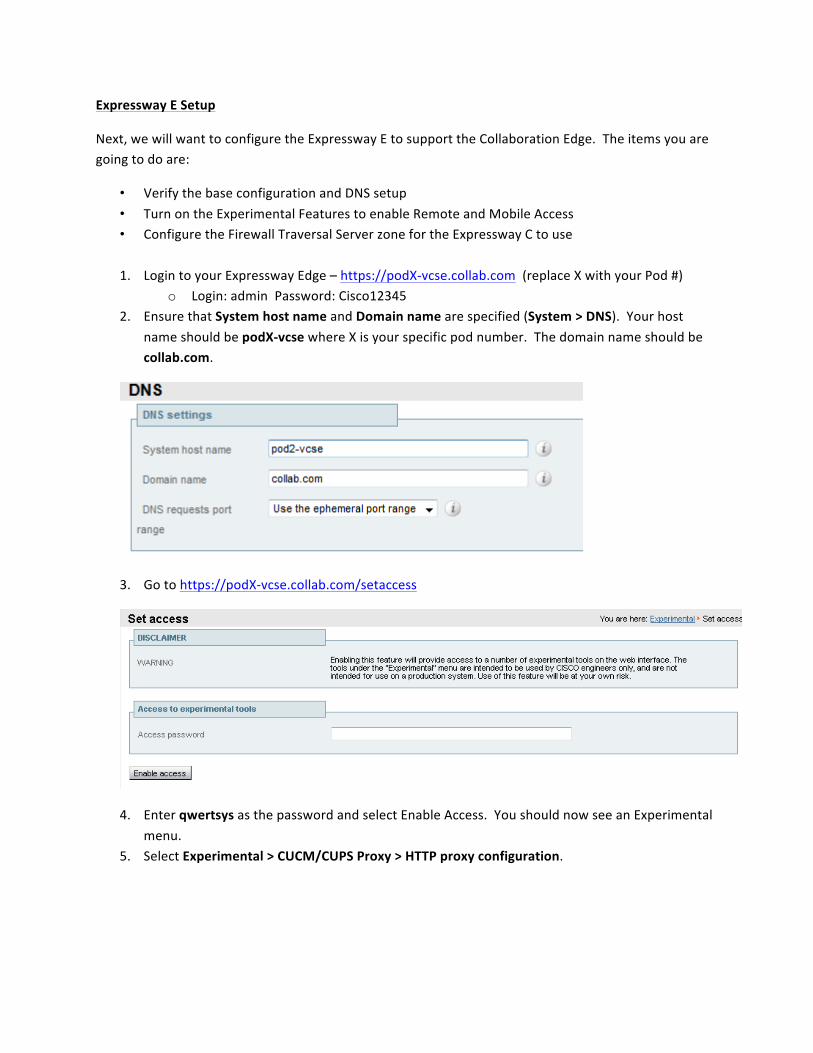
1. Login to your Expressway Edge – https://podX-‐vcse.collab.com (replace X with your Pod #)
o Login: admin Password: Cisco12345 2. Ensure that System host name and Domain name are specified (System > DNS). Your host
name should be podX-‐vcse where X is your specific pod number. The domain name should be collab.com.
3. Go to https://podX-‐vcse.collab.com/setaccess
4. Enter qwertsys as the password and select Enable Access. You should now see an Experimental menu.
5. Select Experimental > CUCM/CUPS Proxy > HTTP proxy configuration.
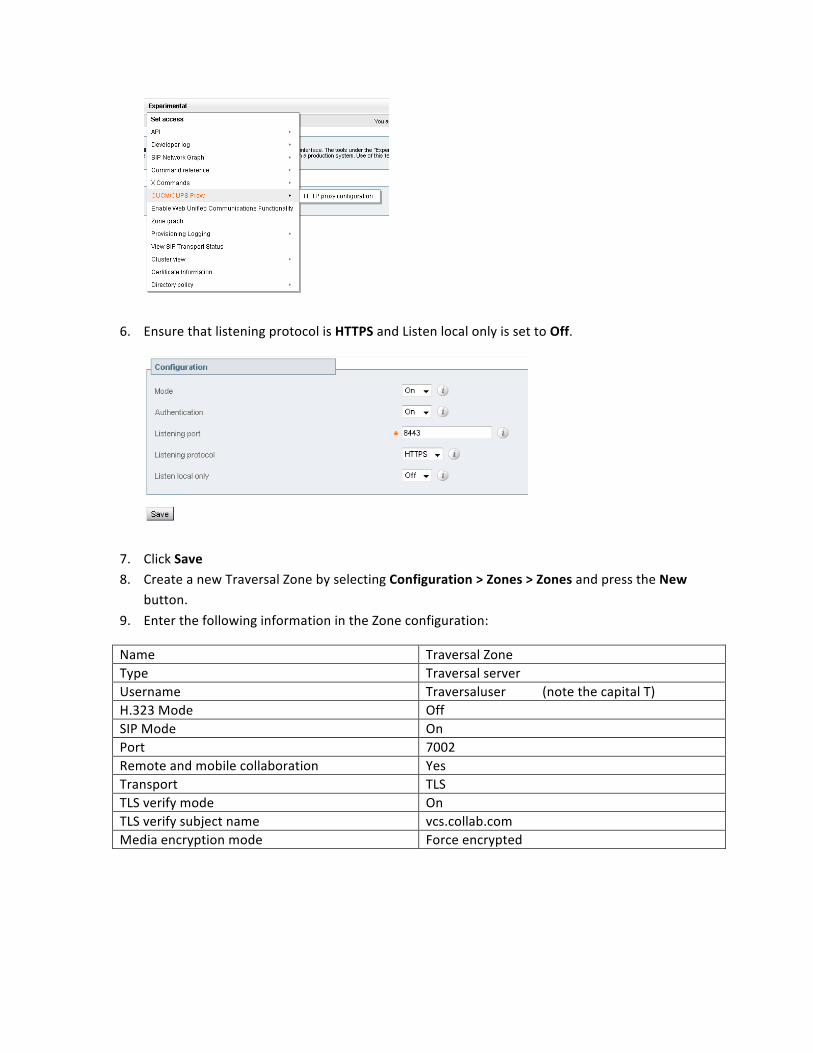
6. Ensure that listening protocol is HTTPS and Listen local only is set to Off.
7. Click Save 8. Create a new Traversal Zone by selecting Configuration > Zones > Zones and press the New
button. 9. Enter the following information in the Zone configuration:
Name Traversal Zone Type Traversal server Username Traversaluser (note the capital T) H.323 Mode Off SIP Mode On Port 7002 Remote and mobile collaboration Yes Transport TLS TLS verify mode On TLS verify subject name vcs.collab.com Media encryption mode Force encrypted
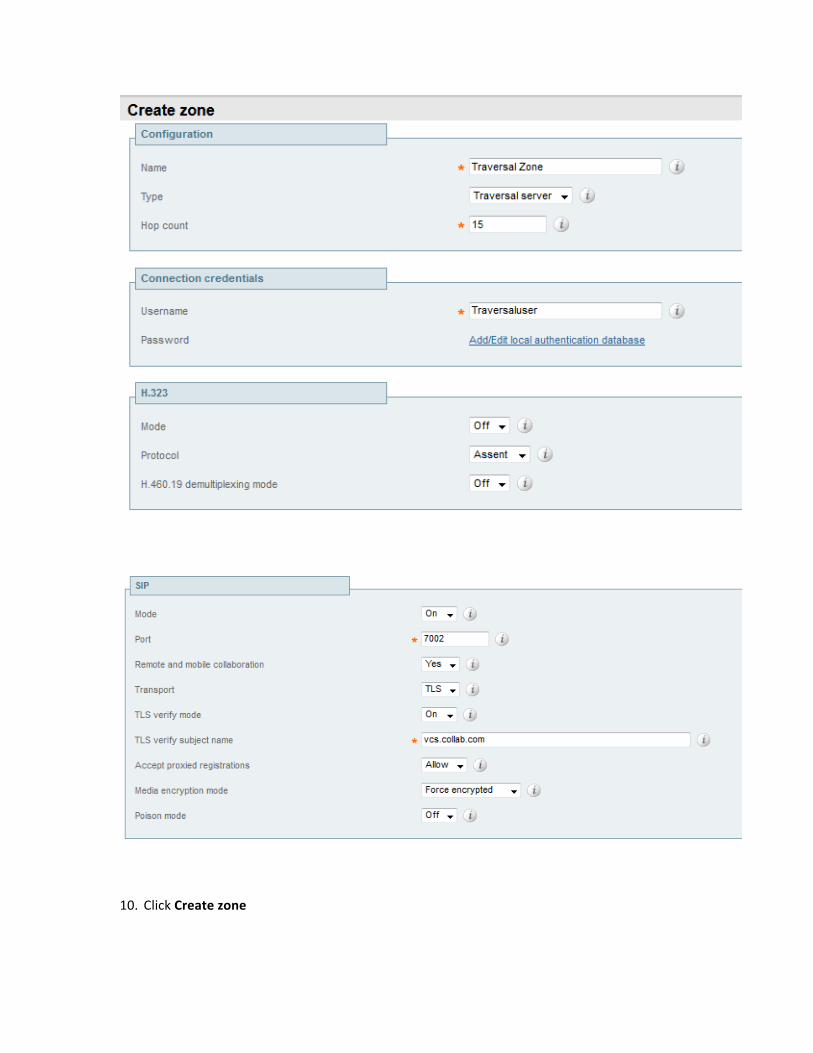
10. Click Create zone
Expressway C Setup
Next, we will configure the Expressway C to support the Collaboration Edge. The items you are going to do are:
• Verify the base configuration and DNS setup • Discover the CUCM servers • Discover the CUCM-‐IM servers • Configure Domain routing to support CUCM • Configure the advanced features to enable the HTTP Reverse Proxy & TFTP access • Configure the Firewall Traversal client zone to connect with the Expressway E • Note: for this lab the Experimental Features for the Collaboration Edge have been pre-‐
configured to On in the Expressway C. You will not need to turn them on again.
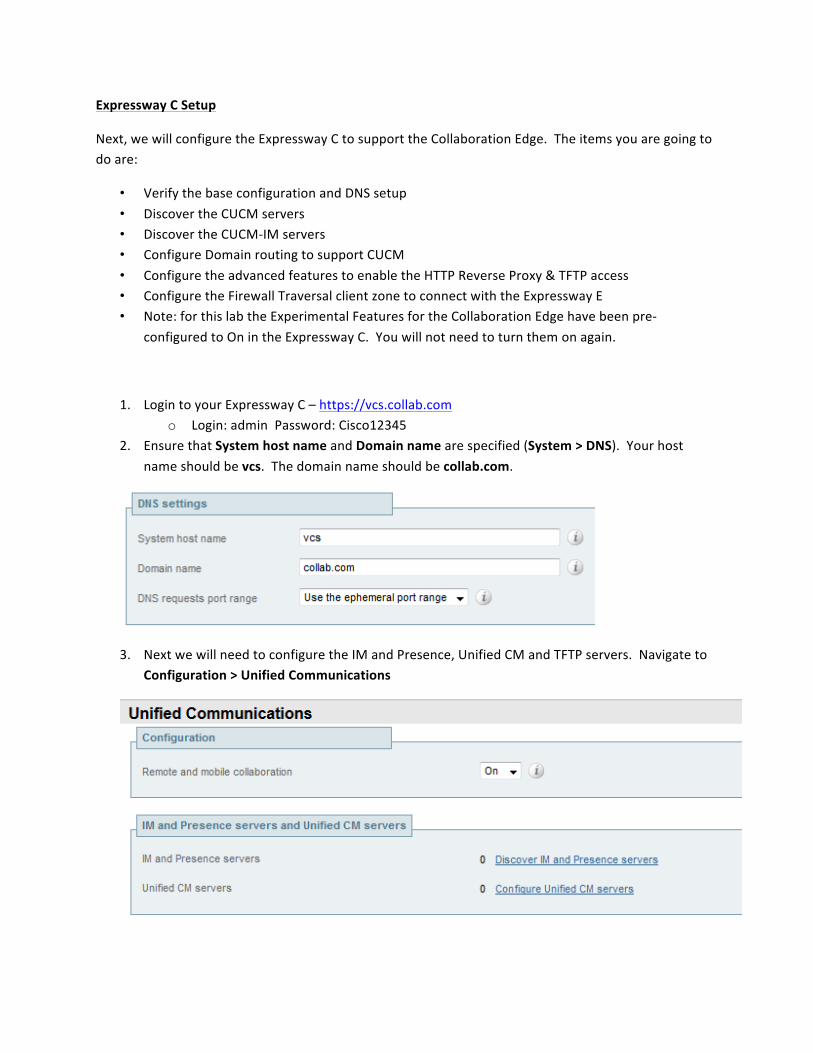
1. Login to your Expressway C – https://vcs.collab.com o Login: admin Password: Cisco12345
2. Ensure that System host name and Domain name are specified (System > DNS). Your host name should be vcs. The domain name should be collab.com.
3. Next we will need to configure the IM and Presence, Unified CM and TFTP servers. Navigate to Configuration > Unified Communications
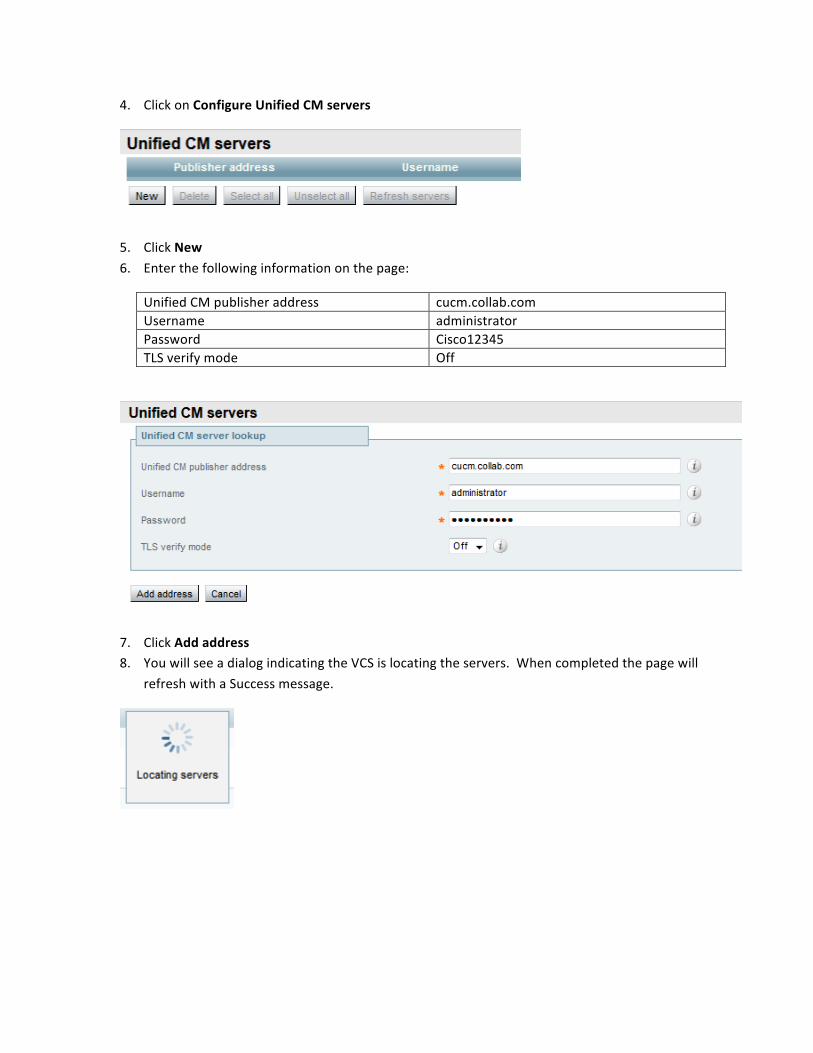
4. Click on Configure Unified CM servers
5. Click New 6. Enter the following information on the page:
Unified CM publisher address cucm.collab.com Username administrator Password Cisco12345 TLS verify mode Off
7. Click Add address 8. You will see a dialog indicating the VCS is locating the servers. When completed the page will
refresh with a Success message.
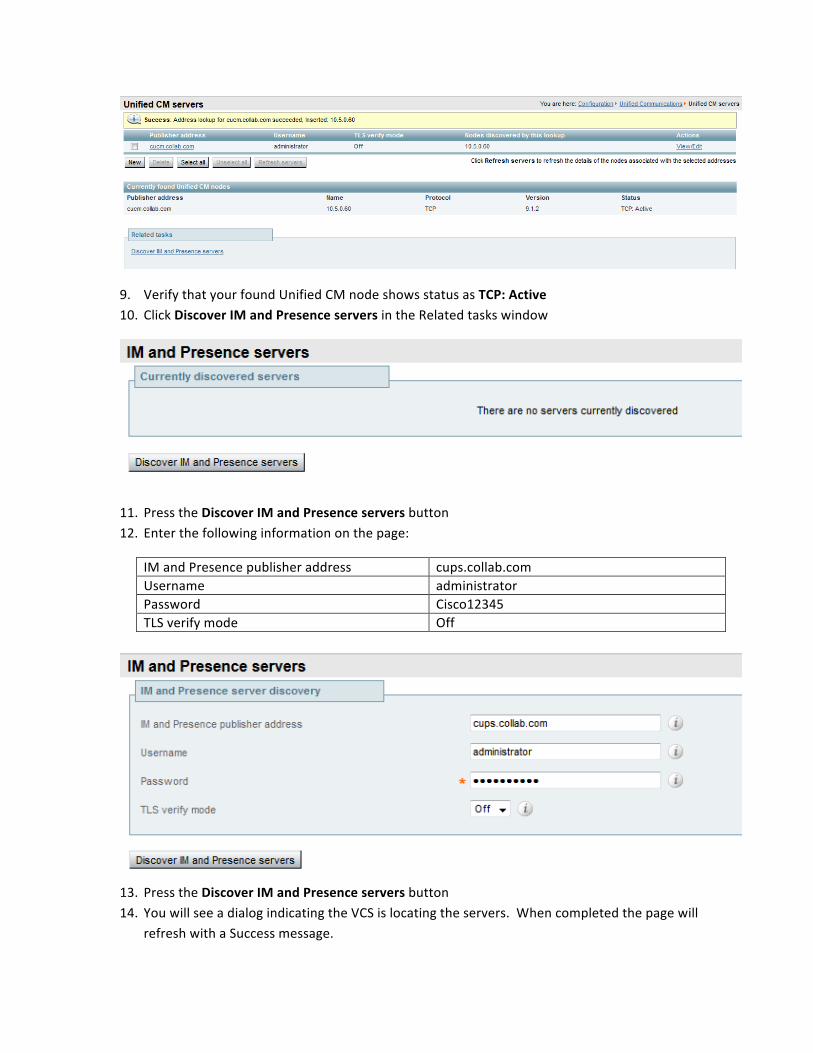
9. Verify that your found Unified CM node shows status as TCP: Active 10. Click Discover IM and Presence servers in the Related tasks window
11. Press the Discover IM and Presence servers button 12. Enter the following information on the page:
IM and Presence publisher address cups.collab.com Username administrator Password Cisco12345 TLS verify mode Off
13. Press the Discover IM and Presence servers button 14. You will see a dialog indicating the VCS is locating the servers. When completed the page will
refresh with a Success message.
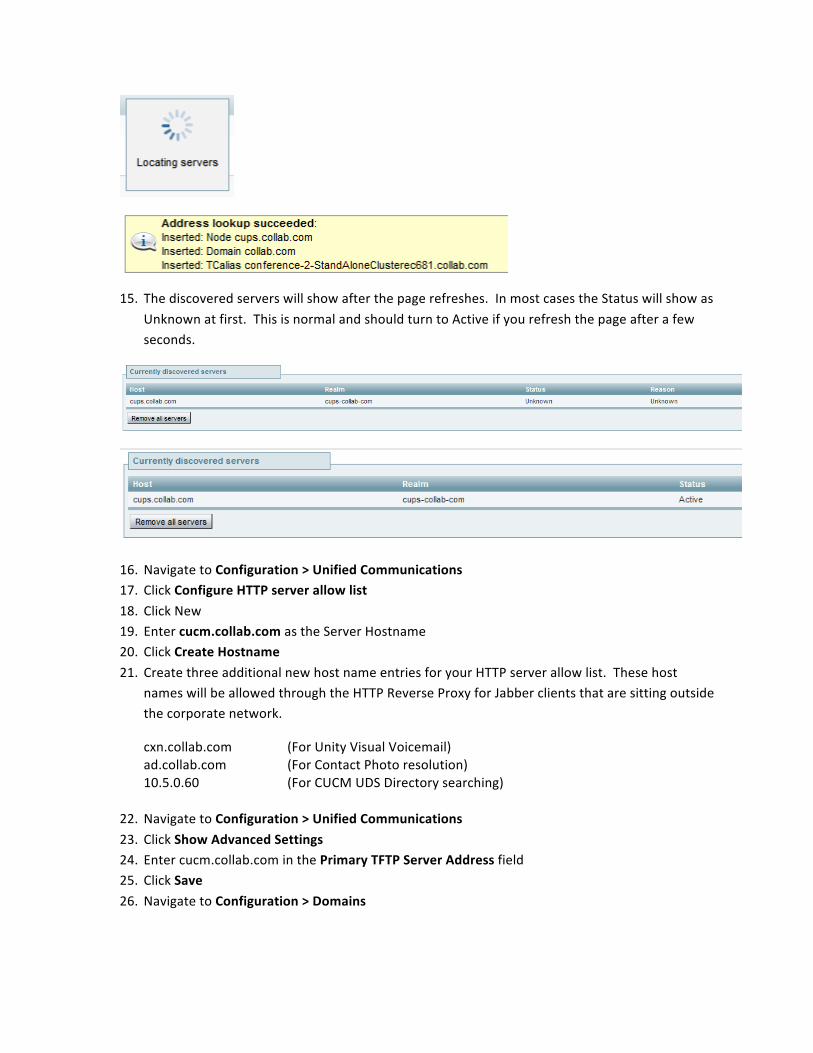
15. The discovered servers will show after the page refreshes. In most cases the Status will show as Unknown at first. This is normal and should turn to Active if you refresh the page after a few seconds.
16. Navigate to Configuration > Unified Communications 17. Click Configure HTTP server allow list 18. Click New 19. Enter cucm.collab.com as the Server Hostname 20. Click Create Hostname 21. Create three additional new host name entries for your HTTP server allow list. These host
names will be allowed through the HTTP Reverse Proxy for Jabber clients that are sitting outside the corporate network.
cxn.collab.com (For Unity Visual Voicemail) ad.collab.com (For Contact Photo resolution) 10.5.0.60 (For CUCM UDS Directory searching)
22. Navigate to Configuration > Unified Communications 23. Click Show Advanced Settings 24. Enter cucm.collab.com in the Primary TFTP Server Address field 25. Click Save 26. Navigate to Configuration > Domains
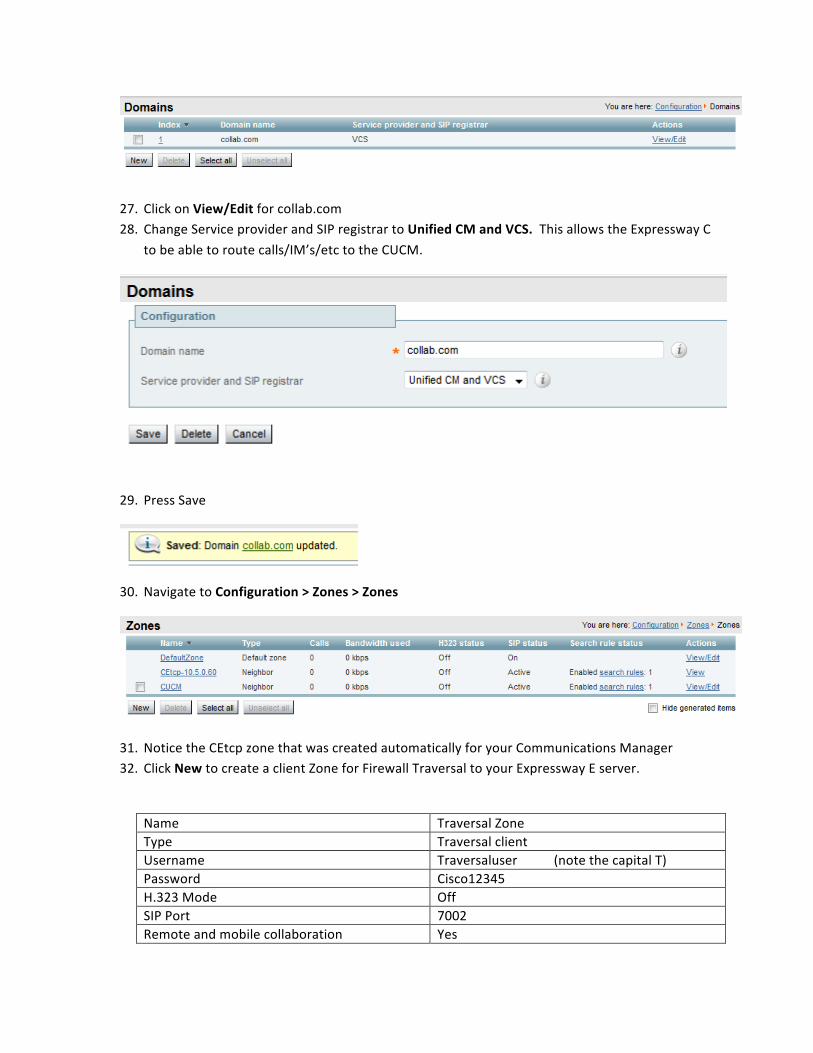
27. Click on View/Edit for collab.com 28. Change Service provider and SIP registrar to Unified CM and VCS. This allows the Expressway C
to be able to route calls/IM’s/etc to the CUCM.
29. Press Save
30. Navigate to Configuration > Zones > Zones
31. Notice the CEtcp zone that was created automatically for your Communications Manager 32. Click New to create a client Zone for Firewall Traversal to your Expressway E server.
Name Traversal Zone Type Traversal client Username Traversaluser (note the capital T) Password Cisco12345 H.323 Mode Off SIP Port 7002 Remote and mobile collaboration Yes
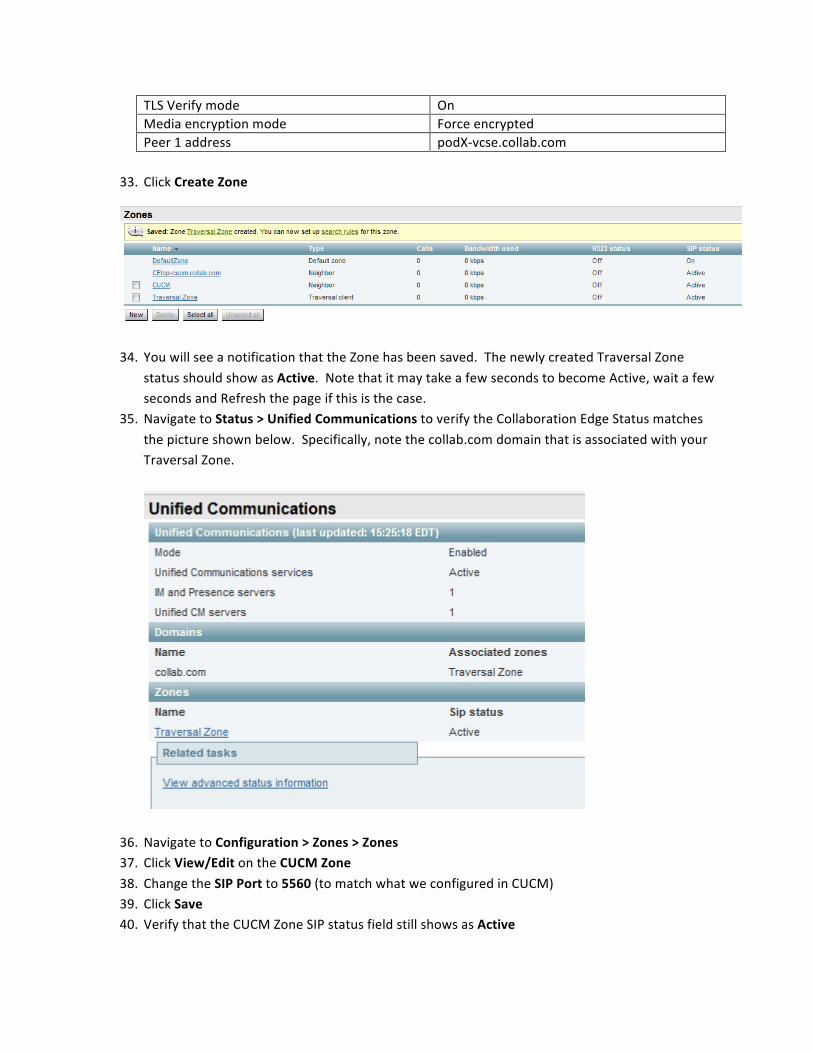
TLS Verify mode On Media encryption mode Force encrypted Peer 1 address podX-‐vcse.collab.com
33. Click Create Zone
34. You will see a notification that the Zone has been saved. The newly created Traversal Zone status should show as Active. Note that it may take a few seconds to become Active, wait a few seconds and Refresh the page if this is the case.
35. Navigate to Status > Unified Communications to verify the Collaboration Edge Status matches the picture shown below. Specifically, note the collab.com domain that is associated with your Traversal Zone.
36. Navigate to Configuration > Zones > Zones 37. Click View/Edit on the CUCM Zone 38. Change the SIP Port to 5560 (to match what we configured in CUCM) 39. Click Save 40. Verify that the CUCM Zone SIP status field still shows as Active
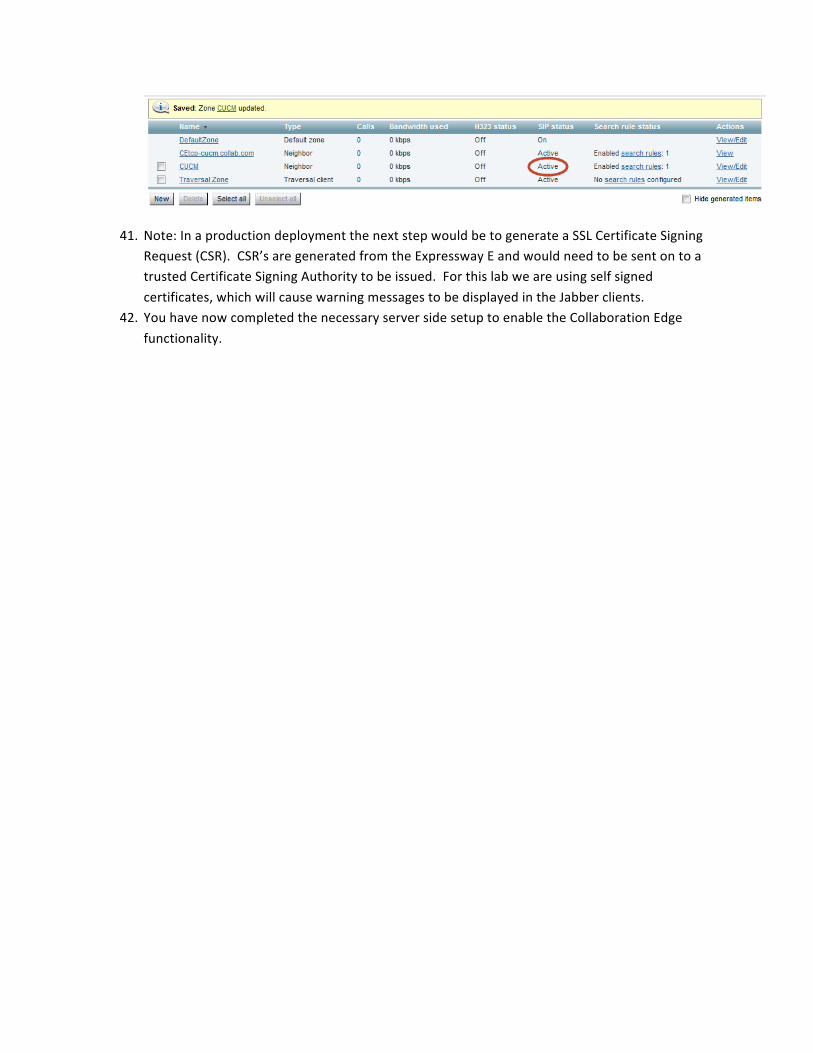
41. Note: In a production deployment the next step would be to generate a SSL Certificate Signing Request (CSR). CSR’s are generated from the Expressway E and would need to be sent on to a trusted Certificate Signing Authority to be issued. For this lab we are using self signed certificates, which will cause warning messages to be displayed in the Jabber clients.
42. You have now completed the necessary server side setup to enable the Collaboration Edge functionality.
Jabber Client Setup
1. Initiate a Remote Desktop Session to your edge PC podX-‐ePC.collab.com (replace X with your Pod #).
2. Login as Username: COLLAB\dblake and Password: Cisco12345 Domain: COLLAB 3. Upon login the VCam Manager application will pop up on the screen. Minimize this application
(do not close it) as it will be used later with Jabber to simulate a video call.
Note: For the purposes of this lab we are sharing the collab.com domain between all of the pods. In order for this to work, we need to create a static host entry on your Edge PC to be able to connect to the correct Expressway E. You would not need to do this in a standard customer deployment.
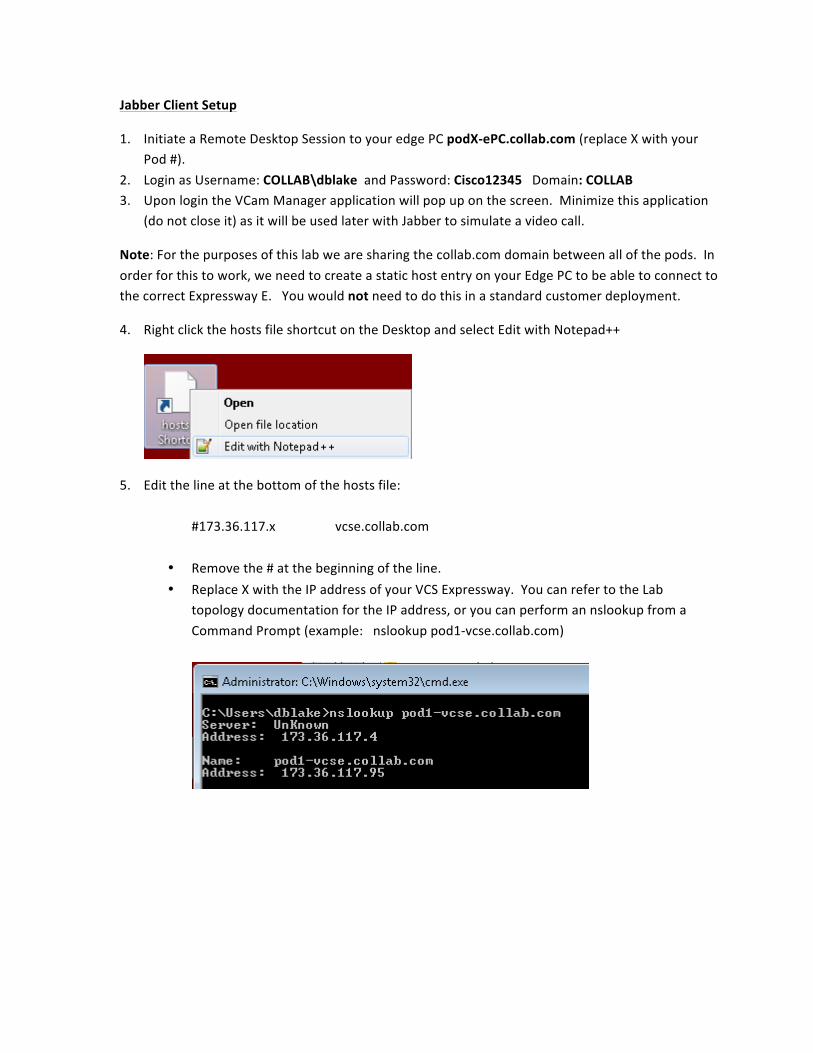
4. Right click the hosts file shortcut on the Desktop and select Edit with Notepad++
5. Edit the line at the bottom of the hosts file: #173.36.117.x vcse.collab.com
• Remove the # at the beginning of the line. • Replace X with the IP address of your VCS Expressway. You can refer to the Lab
topology documentation for the IP address, or you can perform an nslookup from a Command Prompt (example: nslookup pod1-‐vcse.collab.com)
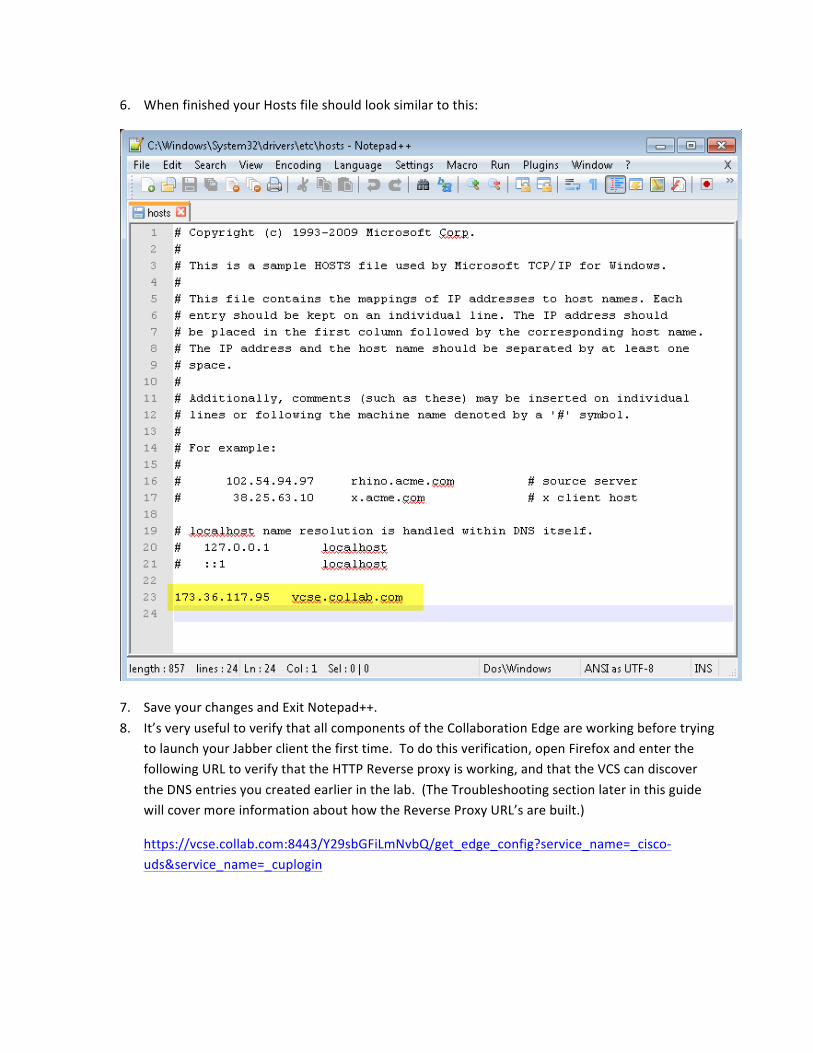
6. When finished your Hosts file should look similar to this:
7. Save your changes and Exit Notepad++. 8. It’s very useful to verify that all components of the Collaboration Edge are working before trying
to launch your Jabber client the first time. To do this verification, open Firefox and enter the following URL to verify that the HTTP Reverse proxy is working, and that the VCS can discover the DNS entries you created earlier in the lab. (The Troubleshooting section later in this guide will cover more information about how the Reverse Proxy URL’s are built.)
https://vcse.collab.com:8443/Y29sbGFiLmNvbQ/get_edge_config?service_name=_cisco-‐uds&service_name=_cuplogin
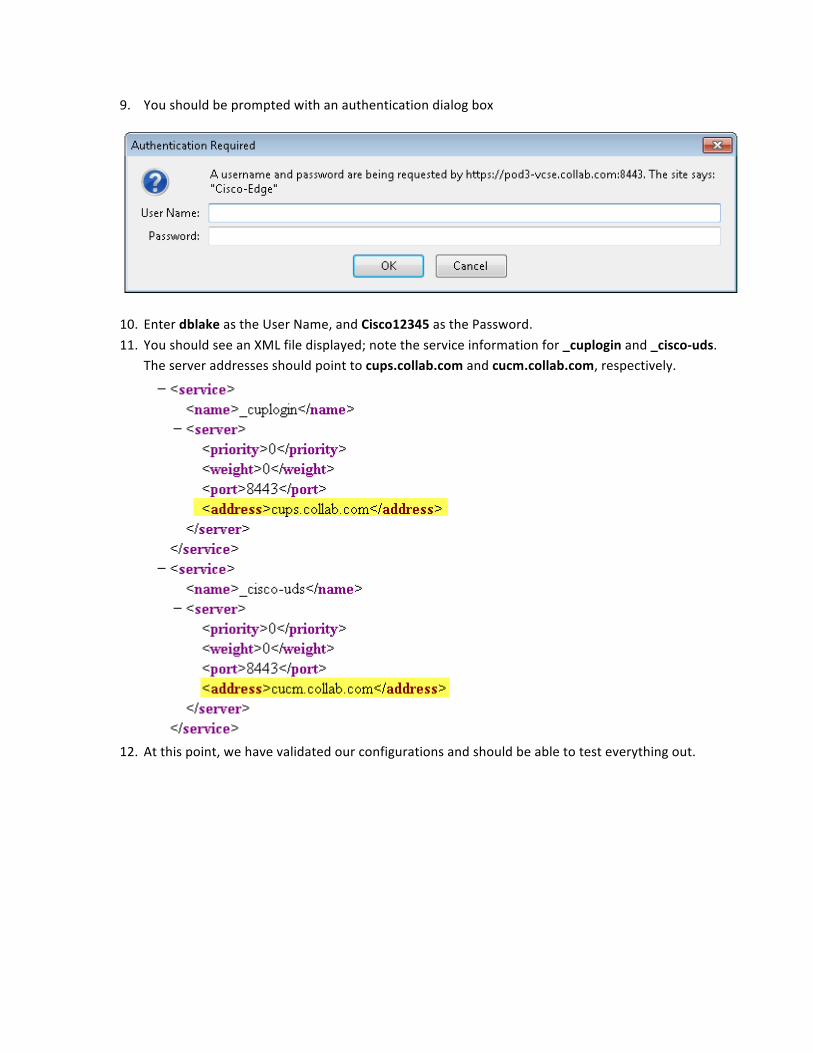
9. You should be prompted with an authentication dialog box
10. Enter dblake as the User Name, and Cisco12345 as the Password. 11. You should see an XML file displayed; note the service information for _cuplogin and _cisco-‐uds.
The server addresses should point to cups.collab.com and cucm.collab.com, respectively.
12. At this point, we have validated our configurations and should be able to test everything out.
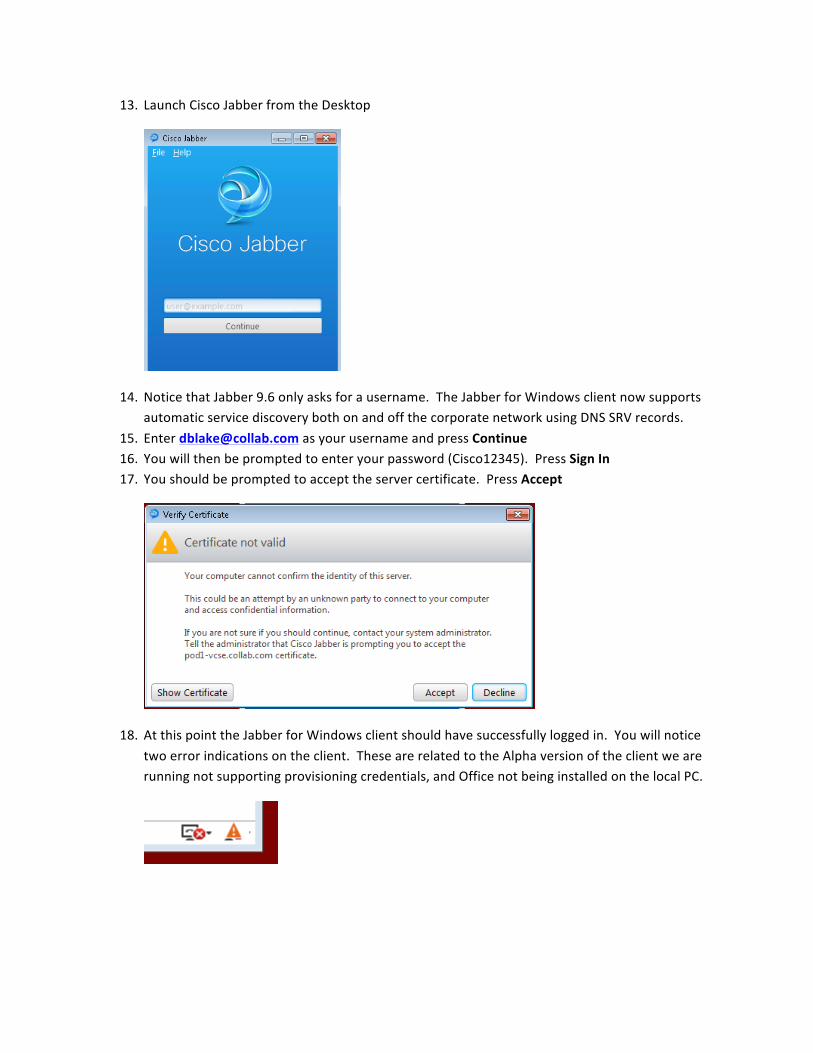
13. Launch Cisco Jabber from the Desktop
14. Notice that Jabber 9.6 only asks for a username. The Jabber for Windows client now supports automatic service discovery both on and off the corporate network using DNS SRV records.
15. Enter [email protected] as your username and press Continue 16. You will then be prompted to enter your password (Cisco12345). Press Sign In 17. You should be prompted to accept the server certificate. Press Accept
18. At this point the Jabber for Windows client should have successfully logged in. You will notice two error indications on the client. These are related to the Alpha version of the client we are running not supporting provisioning credentials, and Office not being installed on the local PC.
19. To resolve these two warnings click on File > Options and select the Phone accounts tab. Enter the Username and Password for both Phone Services and Voicemail. The username is dblake and the password is Cisco12345. Note: the current Alpha build of Jabber will not work for voicemail access.
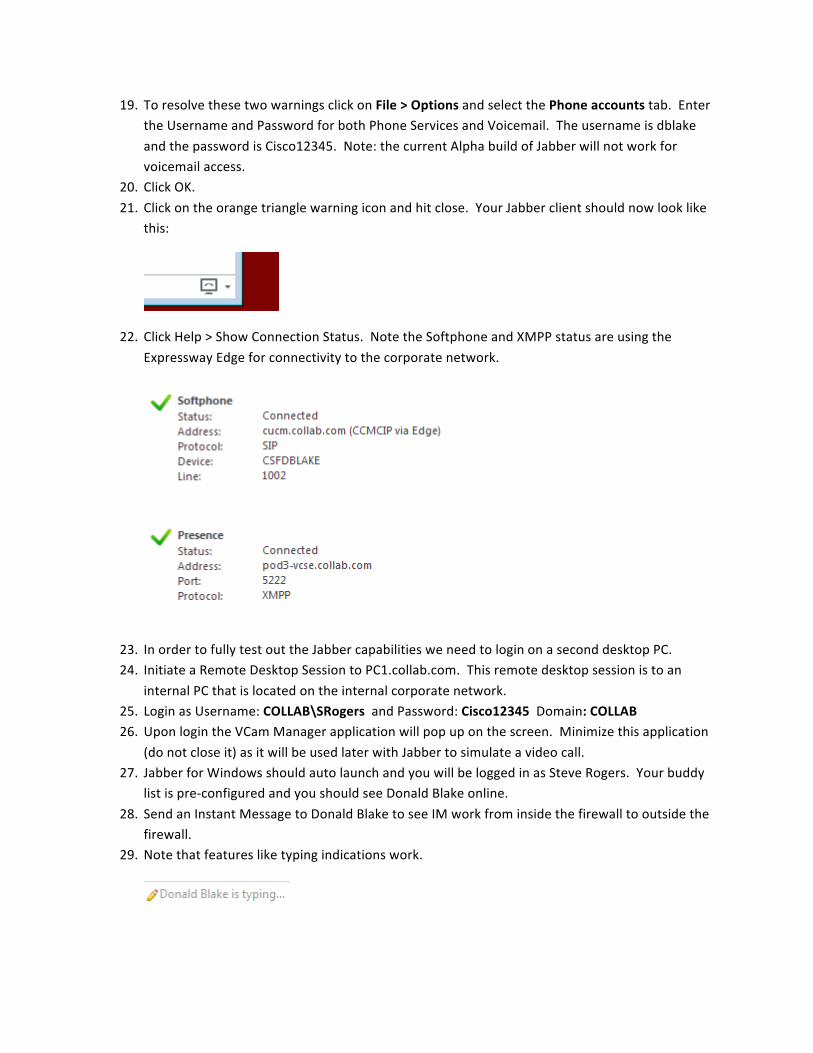
20. Click OK. 21. Click on the orange triangle warning icon and hit close. Your Jabber client should now look like
this:
22. Click Help > Show Connection Status. Note the Softphone and XMPP status are using the Expressway Edge for connectivity to the corporate network.
23. In order to fully test out the Jabber capabilities we need to login on a second desktop PC. 24. Initiate a Remote Desktop Session to PC1.collab.com. This remote desktop session is to an
internal PC that is located on the internal corporate network. 25. Login as Username: COLLAB\SRogers and Password: Cisco12345 Domain: COLLAB 26. Upon login the VCam Manager application will pop up on the screen. Minimize this application
(do not close it) as it will be used later with Jabber to simulate a video call. 27. Jabber for Windows should auto launch and you will be logged in as Steve Rogers. Your buddy
list is pre-‐configured and you should see Donald Blake online. 28. Send an Instant Message to Donald Blake to see IM work from inside the firewall to outside the
firewall. 29. Note that features like typing indications work.
30. Other features like Screen Capture and File Transfer do not work yet in the initial release of the Collaboration Edge.
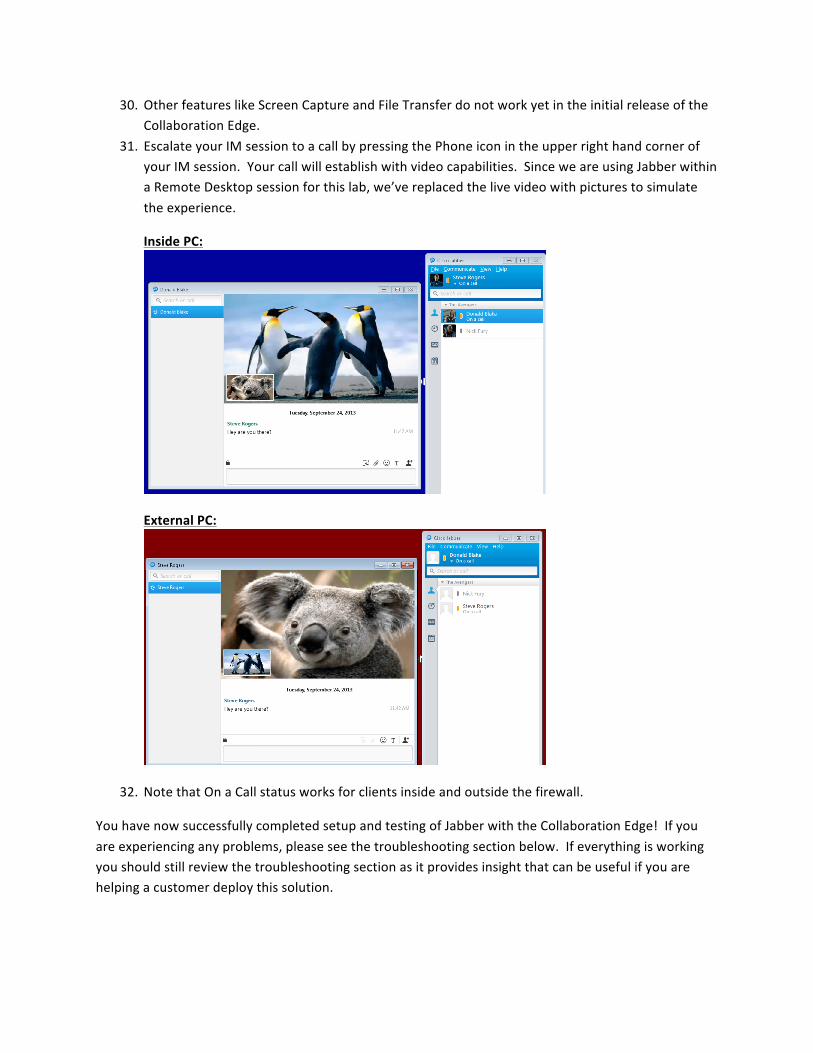
31. Escalate your IM session to a call by pressing the Phone icon in the upper right hand corner of your IM session. Your call will establish with video capabilities. Since we are using Jabber within a Remote Desktop session for this lab, we’ve replaced the live video with pictures to simulate the experience.
Inside PC:
External PC:
32. Note that On a Call status works for clients inside and outside the firewall.
You have now successfully completed setup and testing of Jabber with the Collaboration Edge! If you are experiencing any problems, please see the troubleshooting section below. If everything is working you should still review the troubleshooting section as it provides insight that can be useful if you are helping a customer deploy this solution.

Note: Current limitations of the Jabber for Windows alpha build:
• HTTP Photo contact retrieval from Edge PC’s. o This is due to a bug in the Alpha client not correctly transforming the Image file
name. If you would like to see photos in the Jabber client you can Remote Desktop to ad.collab.com. Navigate to c:\inetpub\wwwroot\images. Copy one of the image files and name it sAMAccountName.jpg. You will see that image for all contacts on your Edge PC
• Visual Voicemail from Edge PC’s does not yet work.
Troubleshooting
Issues with Jabber hanging, crashing and doing other odd things:
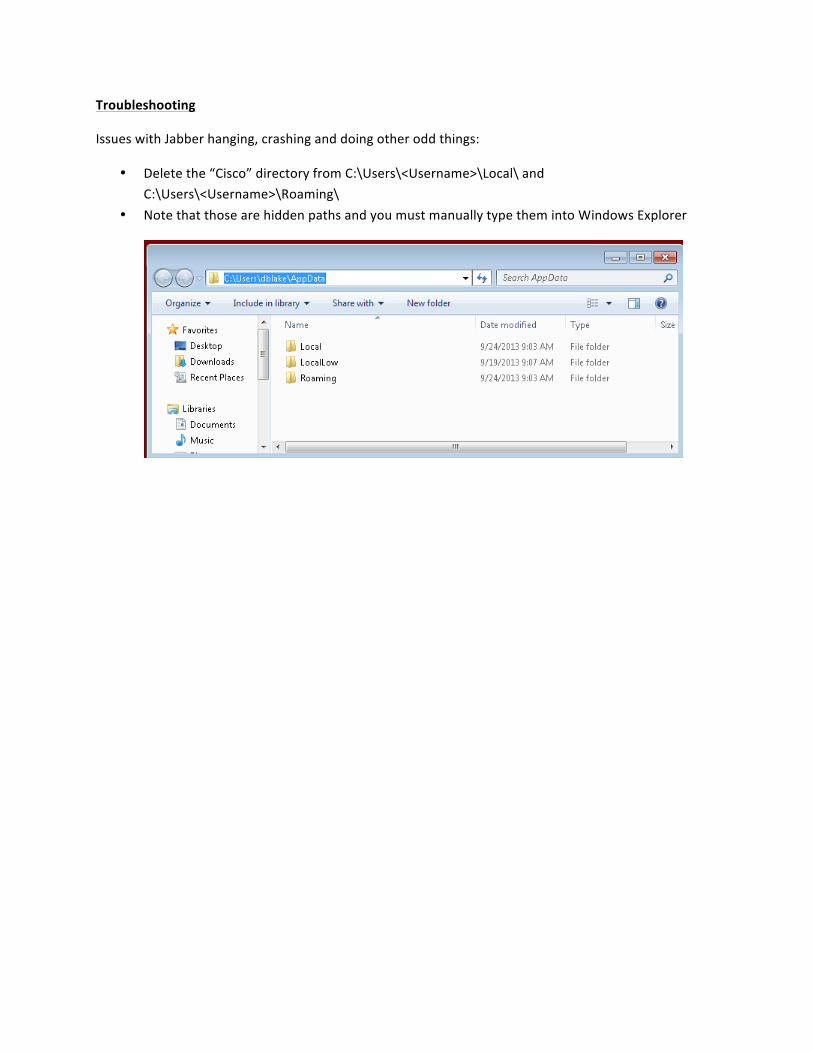
• Delete the “Cisco” directory from C:\Users\<Username>\Local\ and C:\Users\<Username>\Roaming\
• Note that those are hidden paths and you must manually type them into Windows Explorer
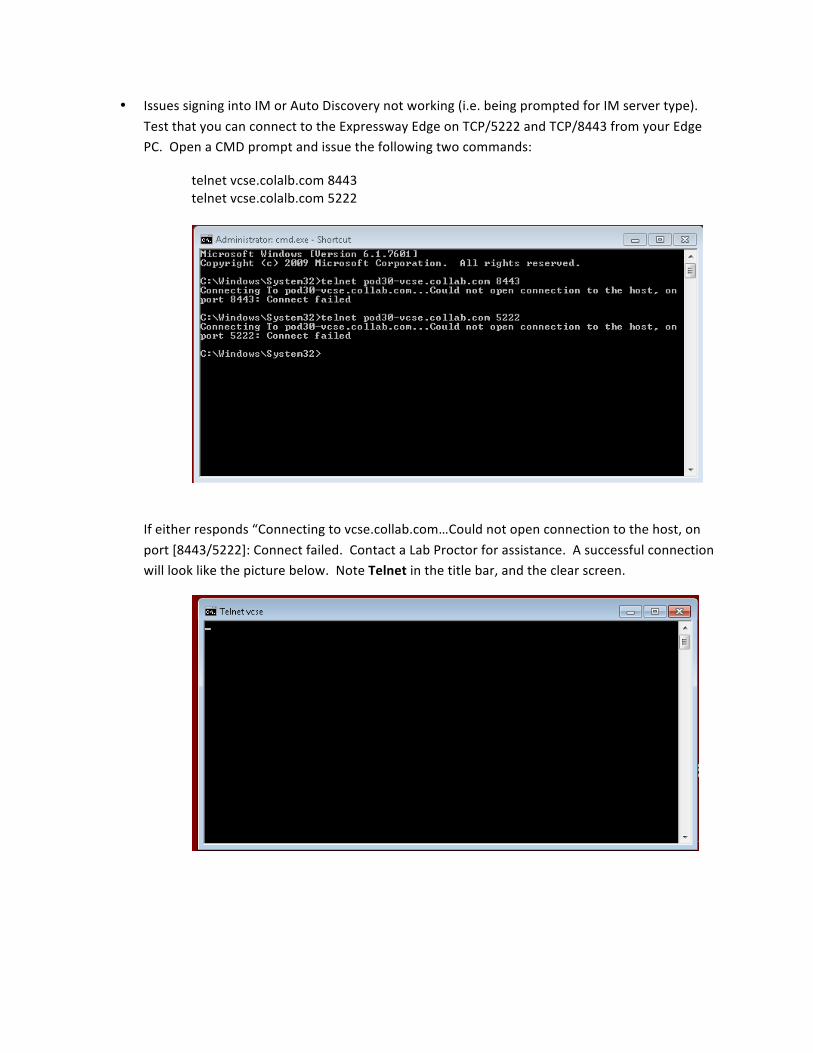
• Issues signing into IM or Auto Discovery not working (i.e. being prompted for IM server type). Test that you can connect to the Expressway Edge on TCP/5222 and TCP/8443 from your Edge PC. Open a CMD prompt and issue the following two commands:
telnet vcse.colalb.com 8443 telnet vcse.colalb.com 5222
If either responds “Connecting to vcse.collab.com…Could not open connection to the host, on port [8443/5222]: Connect failed. Contact a Lab Proctor for assistance. A successful connection will look like the picture below. Note Telnet in the title bar, and the clear screen.
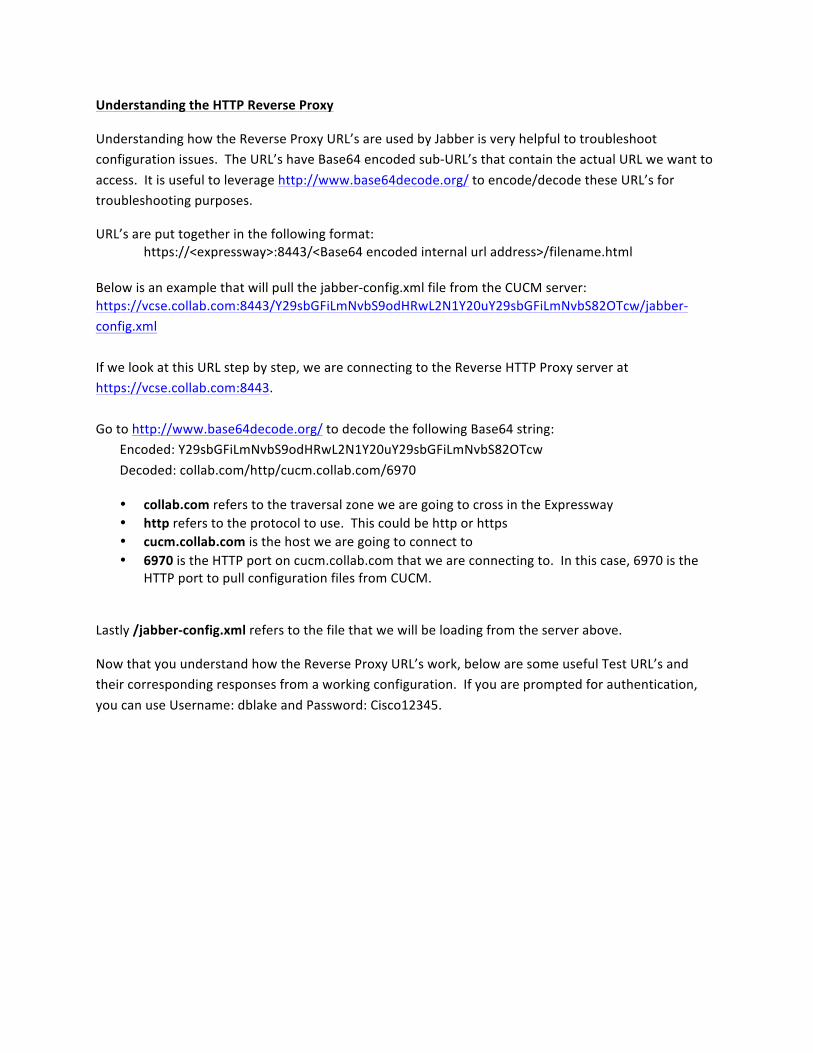
Understanding the HTTP Reverse Proxy
Understanding how the Reverse Proxy URL’s are used by Jabber is very helpful to troubleshoot configuration issues. The URL’s have Base64 encoded sub-‐URL’s that contain the actual URL we want to access. It is useful to leverage http://www.base64decode.org/ to encode/decode these URL’s for troubleshooting purposes.
URL’s are put together in the following format: https://<expressway>:8443/<Base64 encoded internal url address>/filename.html
Below is an example that will pull the jabber-‐config.xml file from the CUCM server: https://vcse.collab.com:8443/Y29sbGFiLmNvbS9odHRwL2N1Y20uY29sbGFiLmNvbS82OTcw/jabber-‐config.xml If we look at this URL step by step, we are connecting to the Reverse HTTP Proxy server at https://vcse.collab.com:8443. Go to http://www.base64decode.org/ to decode the following Base64 string:
Encoded: Y29sbGFiLmNvbS9odHRwL2N1Y20uY29sbGFiLmNvbS82OTcw Decoded: collab.com/http/cucm.collab.com/6970
• collab.com refers to the traversal zone we are going to cross in the Expressway • http refers to the protocol to use. This could be http or https • cucm.collab.com is the host we are going to connect to • 6970 is the HTTP port on cucm.collab.com that we are connecting to. In this case, 6970 is the
HTTP port to pull configuration files from CUCM.
Lastly /jabber-‐config.xml refers to the file that we will be loading from the server above.
Now that you understand how the Reverse Proxy URL’s work, below are some useful Test URL’s and their corresponding responses from a working configuration. If you are prompted for authentication, you can use Username: dblake and Password: Cisco12345.
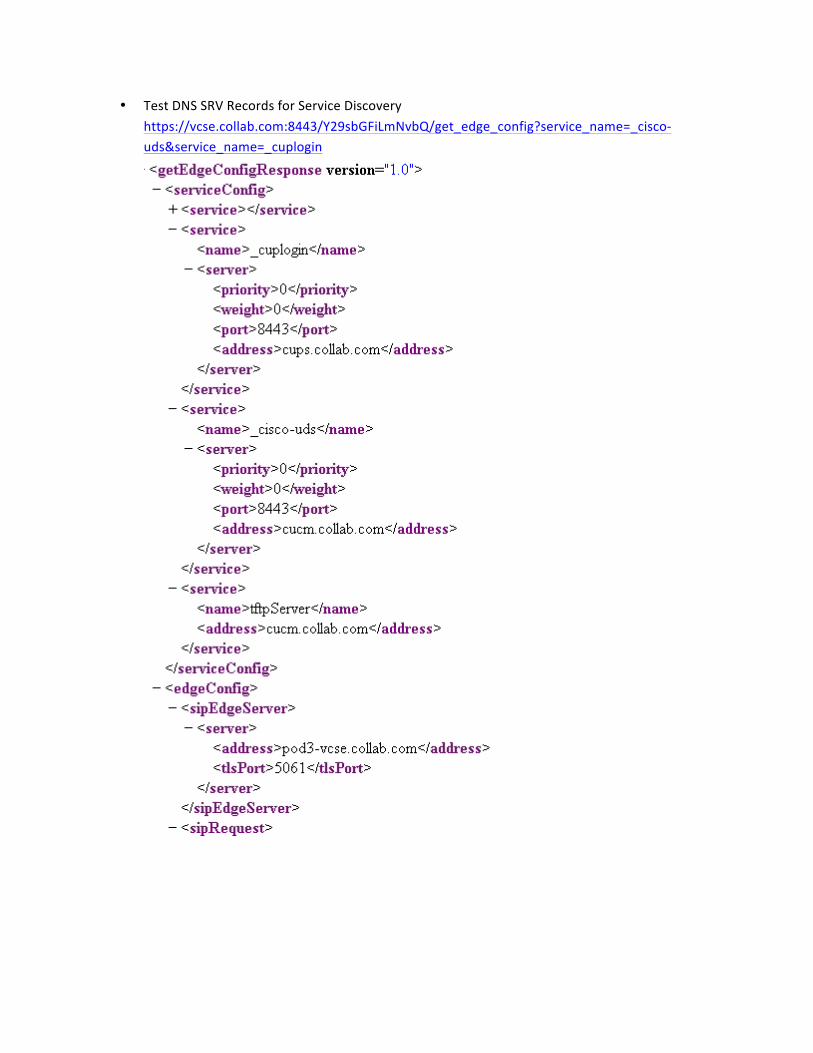
• Test DNS SRV Records for Service Discovery https://vcse.collab.com:8443/Y29sbGFiLmNvbQ/get_edge_config?service_name=_cisco-‐uds&service_name=_cuplogin
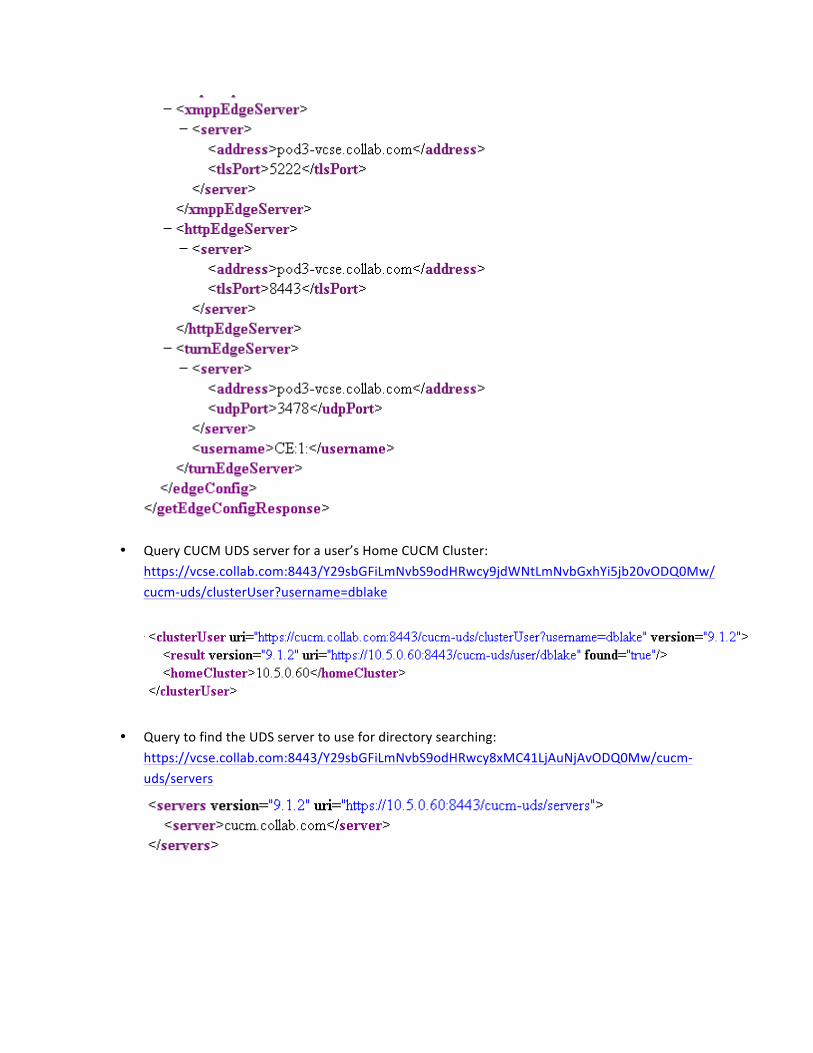
• Query CUCM UDS server for a user’s Home CUCM Cluster: https://vcse.collab.com:8443/Y29sbGFiLmNvbS9odHRwcy9jdWNtLmNvbGxhYi5jb20vODQ0Mw/cucm-‐uds/clusterUser?username=dblake
• Query to find the UDS server to use for directory searching: https://vcse.collab.com:8443/Y29sbGFiLmNvbS9odHRwcy8xMC41LjAuNjAvODQ0Mw/cucm-‐uds/servers
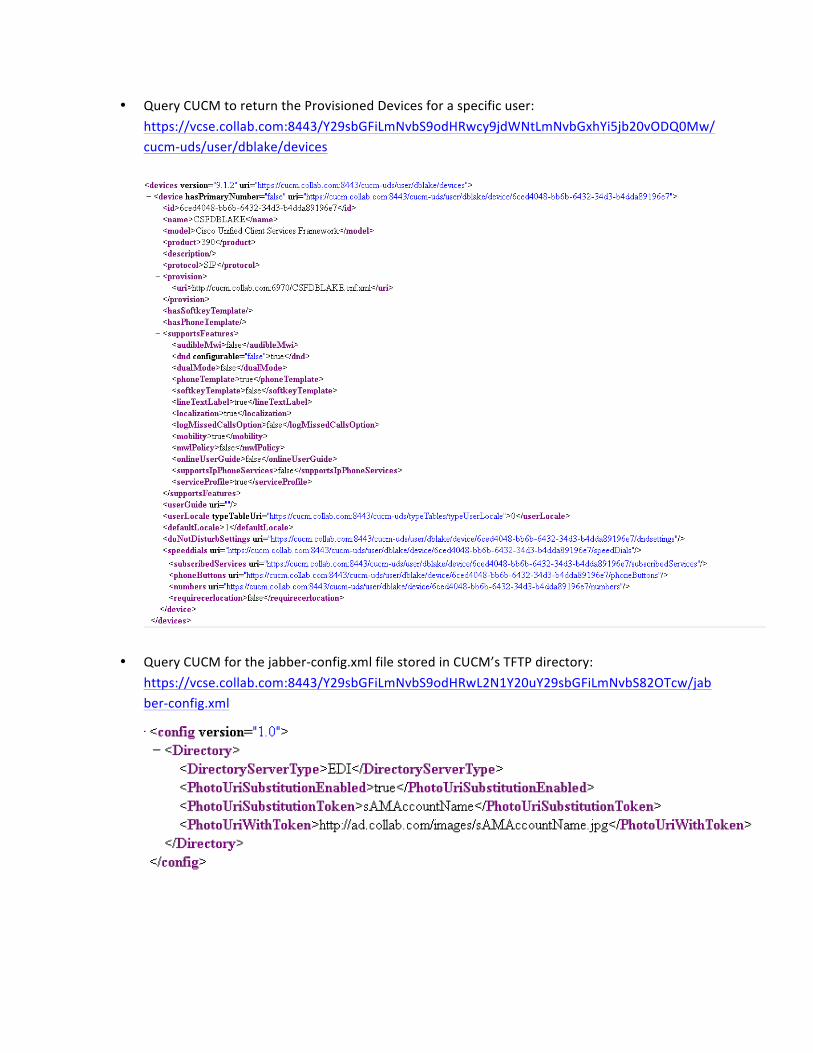
• Query CUCM to return the Provisioned Devices for a specific user: https://vcse.collab.com:8443/Y29sbGFiLmNvbS9odHRwcy9jdWNtLmNvbGxhYi5jb20vODQ0Mw/cucm-‐uds/user/dblake/devices
• Query CUCM for the jabber-‐config.xml file stored in CUCM’s TFTP directory: https://vcse.collab.com:8443/Y29sbGFiLmNvbS9odHRwL2N1Y20uY29sbGFiLmNvbS82OTcw/jabber-‐config.xml