Embed Size (px)
Citation preview
Lab 1: Familiarity with Virtualbox and Pcap Tools
This is the first lab intended to develop skills that will enable a learner to compete effectively in the CDEST contest. Some experience with Linux and shell commands in particular is assumed. Instructions below are for Linux but it is not hard to find Windows and MacOS counterparts with a Google search for specific commands that will be mentioned.
Get and Install VirtualboxInstall VirtualBox on some computer with at least 8GB Ram, 250GB secondary storage, at least 2 cores, preferably 4 (hyperthreads don't count). The link for downloading this software is
https://www.virtualbox.org/wiki/Downloads
for Windows and
https://www.virtualbox.org/wiki/Linux_Downloads
for Linux distributions.
Also download the latest extension pack, which is also at this location: https://www.virtualbox.org/wiki/Downloads
Put the extensions file in, say, directory ~/Downloads, start Virtualbox: run the command virtualbox from the command line or by clicking on a VirtualBox icon that was put on your machine when VirtualBox was installed. When started for the first time, VirtualBox looks similar to this:
Figure 1: Virtualbox when first started
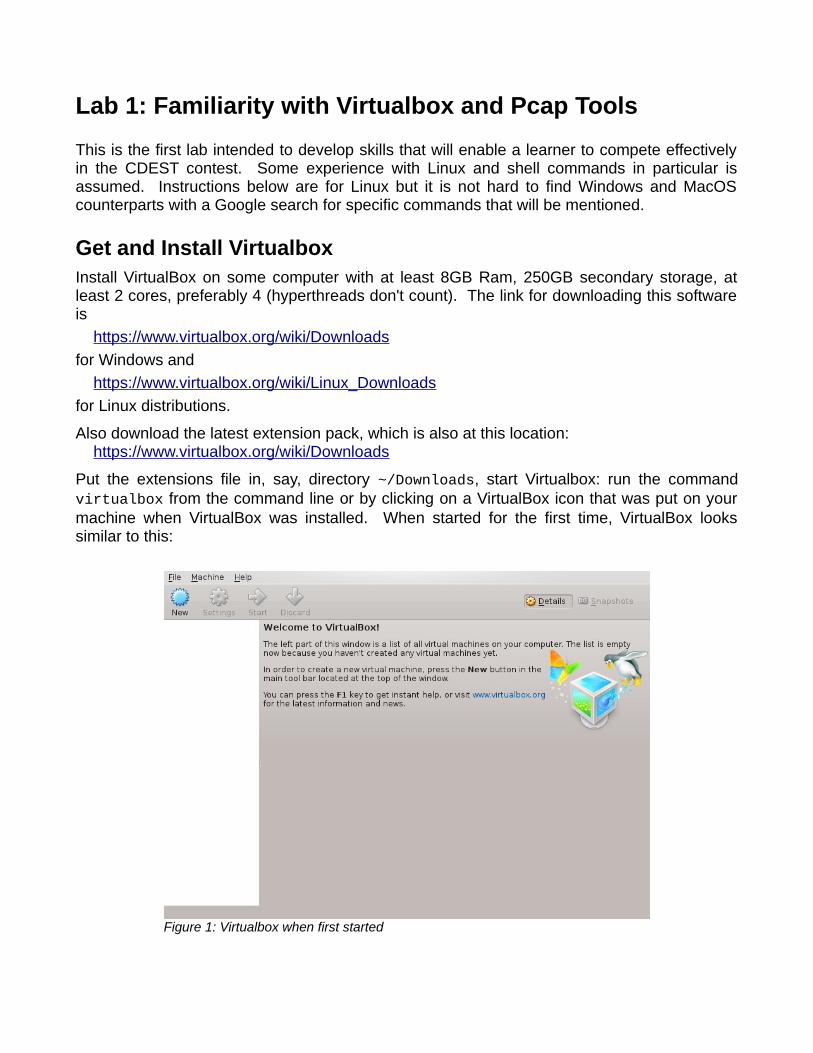
You will build three virtual machines, most likely 64 bits - one will be Kali Linux and the other two will be chosen by you, and most likely will be Ubuntu. Prepare the install of each by clicking "New", then enter a name, select a type (say, Linux), and select an OS (with Kali Linux select "Ubuntu Linux (64-bit)"), and click "Next". Set the memory size to at least 2048 MB (assuming you have at least 8 GB of RAM) and click "Next". To create the virtual hard drive click "Create". Choose VirtualBox disk image, click "Next". Choose "Dynamically allocated", click "Next". Choose the name and size (say 25 GB) for the disk, click "Create". After doing this for Ubuntu and Kali the VirtualBox main page should look like this except perhaps some systems parameters are different:
Install the extensions as follows. Drop the "File" menu and select "Preferences". Click on "Extensions". The small topmost button on the right of the dialog box adds extensions. Click it and navigate to where the downloaded extensions file is (probably ~/Downloads) and select the extensions file. VirtualBox is now ready to install your virtual machines.
Download Operating System Install ISOsGet the Ubuntu 20.04.1 LTS install iso from http://www.ubuntu.com/download/desktop. You should choose 64 bits. Assume in the following that the iso winds up in the ~/Downloads directory as ubuntu-20.04.1-desktop-amd64.iso. You can get the latest Kali Linux iso from http://www.kali.org/downloads. You probably will choose "Kali Linux 64-bit" iso. Choose HTTP or Torrent. Your iso should land in the ~/Downloads directory as
kali-linux-2020.3-installer-amd64.iso
or something similar.
Figure 2: Virtualbox main page after reserving resources for Kali and Ubuntu OSes.
Install the Virtual MachinesHighlight a Virtual Machine entry in the left margin of the VirtualBox main page. Figure 2 shows Ubuntu highlighted. Click "Settings" then click "Storage". To the right of "Controller: IDE" is a small round icon and a small square icon. Click on the small round one, click "Choose Disk" and navigate to where the Ubuntu ISO is, probably ~/Downloads. Click "OK". Highlight ubuntu-20.04.1-desktop-amd64.iso (or similar name) and click "OK" to close the box. Click on the "Start" (green) arrow. The Live DVD will boot. Click on “Install”, the only place to worry about during the install is where to put the OS. If you click on "Something else" when the time comes, you can check that the install target is /dev/sda and that the size of the target is only around 10 to 30 GB. Installation of Kali is similar.
Note: you should not have to burn the downloaded iso files to any medium.
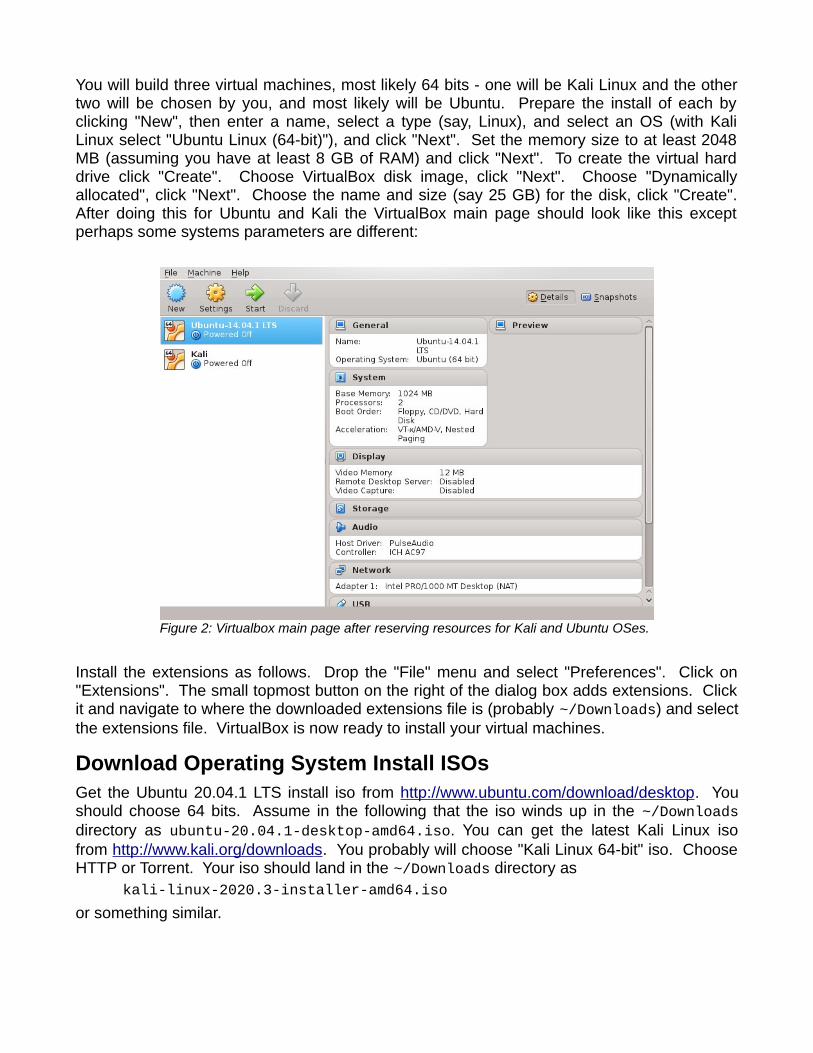
Try the Virtual MachinesTry Kali. Highlight the Kali entry in left margin of the VirtualBox main page and click the "Start" (green) arrow. Choose your identity in the login window and supply your password. When kali is up, pull down the "Applications" menu and select "Wireless Attacks". Then hover over "Kismet". The result looks like this:
Explore more possibilities by selecting other menus. This shows the wealth of tools that come with the Kali distribution. Many of these tools must be run as root or set up by root to allow non-root users to run. In addition, some like wireshark require being in promiscuous mode. If you installed Kali like I did you had to login as root so all these tools will be available to you without you having to sudo as root. If the VM network adapter is set to NAT and the host is on a wireless network then it will not be possible to enter promiscuous mode.
Figure 3: Kali linux - ready to invoke kismet
In that case, before starting Kali, change the adapter to Internal network and then choose promiscuous mode before returning to NAT.
Lab PrepSet up three systems to be networked using VirtualBox with the following configuration:
→ Two virtual machines plus your laptop or desktop (that is, the host).
Host-only networking should be used to configure networking on a common interface (such as vboxnet0) so that all machines may see each other. To see how this is set up, read the Host-Only Adapter Section below.
Boot into Kali. You will need to be able to demonstrate the ability to communicate from the host to the Ubuntu VM and use the Kali VM to capture all of the network traffic into a file. The UI in Wireshark makes this relatively easy. If you want to do it using tcpdump, become root and do this:
tcpdump -i eth0 -w your-output.pcap [options...]
Lab Exercise1. You will need to utilize nmap in the host to perform a scan, and that scanning activity
should be captured in the Kali VM. Use man nmap
from the command line for documentation showing how to operate the nmap utility.2. You will need to use the first two hosts to communicate a "flag" from one to the other
using any method to your liking (use of the nc/netcat tool class is sufficient) and capture that communication. Use
man netcat
from the command line for documentation on netcat. Minimally, execute netcat -l -p 8000 -u -v
on one machine to establish one end of a communication pipe, on port 8000 (-u means UDP, -l means listen but once a connection is made, it becomes 2-way), and
netcat <ip-address> 8000 -u
on another machine to establish the other end (where data is put into the pipe) of the connection (<ip-address> is the address of the first machine). Then, what is typed on the second machine is seen on the first machine. Redirect the output of netcat on the first machine to a file to save what is sent: e.g. like this: netcat <ip-address> 8000 -u > output.txt
3. Describe the method used to accomplish 1 and 2 above.4. Use the PCAP analysis tools (wireshark, tcpdump, networkMiner, etc., whatever you
wish) to find the "flag" in the pcap file, and explain where it can be found. You may use timestamps, TCP sequence numbers, and/or references to packet data.
The flag is the following sentence, a quote by Donald Knuth: “We should forget about small efficiencies, say about 97% of the time: premature optimization is the root of all evil.”
What to Turn InA lab report detailing all the steps you took in the lab exercise. Include anything unexpected, especially problems that prevented smooth completion of the exercise and problems unique to the operating system of the host, and how those problems or situations were dealt with. An example report is here.
Host-Only Adapter
Introduction
The default network configuration for a VirtualBox VM is a NAT adapter. This allows VMs to `see' machines beyond the host but not the host and other VMs. Since labs in this course will usually involve three or more machines that must have access to each other’s transmissions, a different network configuration needs to be used. VirtualBox solves the above problem with a `host-only' adapter.
Host-Only Adapter Definition
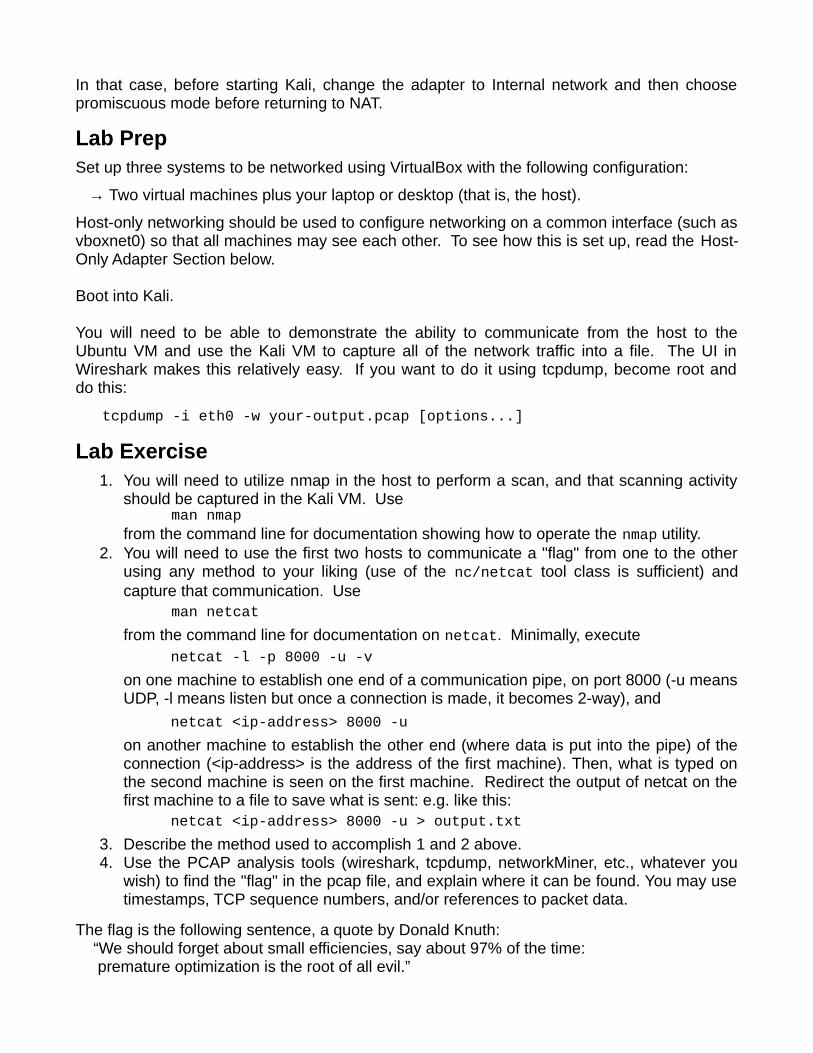
Start VirtualBox but not any VMs. You will see the main page:
Figure 4: VirtualBox main page - begin switching to host-only network
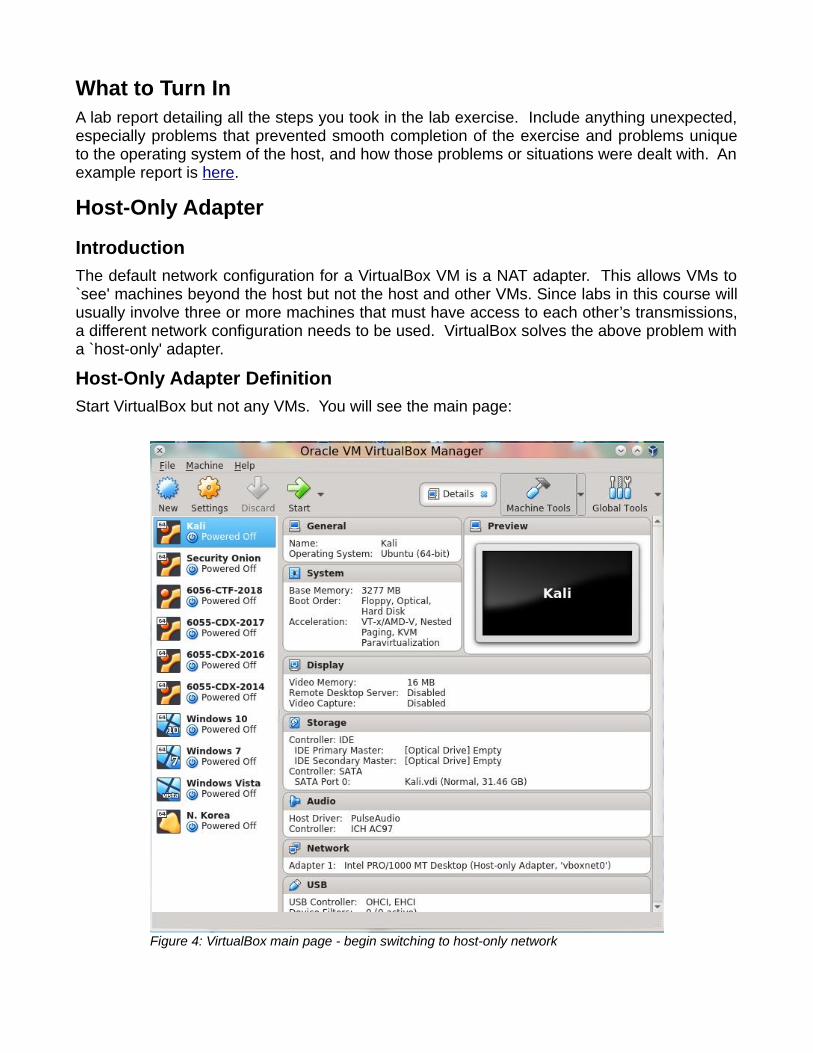
Drop the ‘File’ menu and select ‘Host Network Manager’ as shown in Figure 5. The Host Network Manager window has a ‘create’ icon to the left. Click that icon. The result is a vboxnet0 interface. The window looks as shown in Figure 6. Make sure the DHCP server is enabled. Click the 'DHCP Server' tab and check the range of IP addresses that will be made available. You can change them if you wish.
Figure 5: Choose the Host Network Manager
Figure 6: Enable Host-Only Network and the DHCP Server
Host-Only Adapter Setup
Note: when the expression “something like this” is used below it means that there is a good chance that some portions of text shown here are different from what you will see on your computer. For example, an interface name eth0 may be shown in this lab but your interface may be enp0sb1.
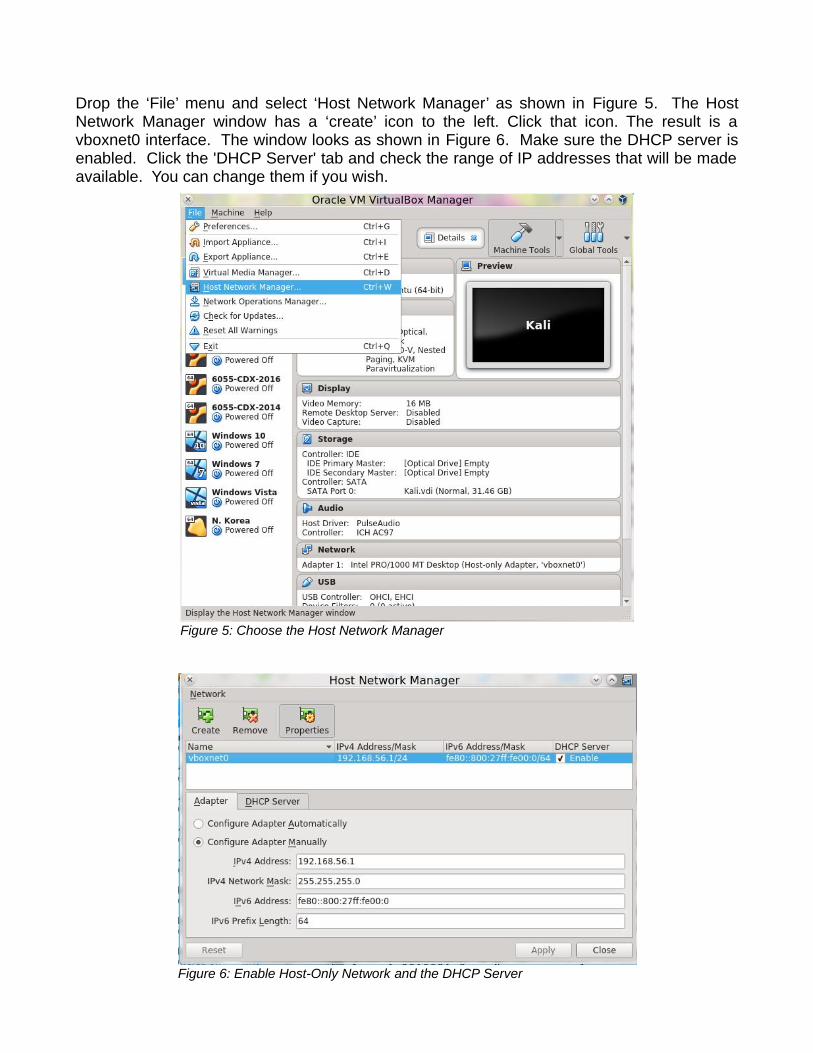
Select the VM you will start from the menu in the VirtualBox main page (see Figure 4). Select ‘Settings’. Select ‘Network’. The window shown in Figure 7 appears.
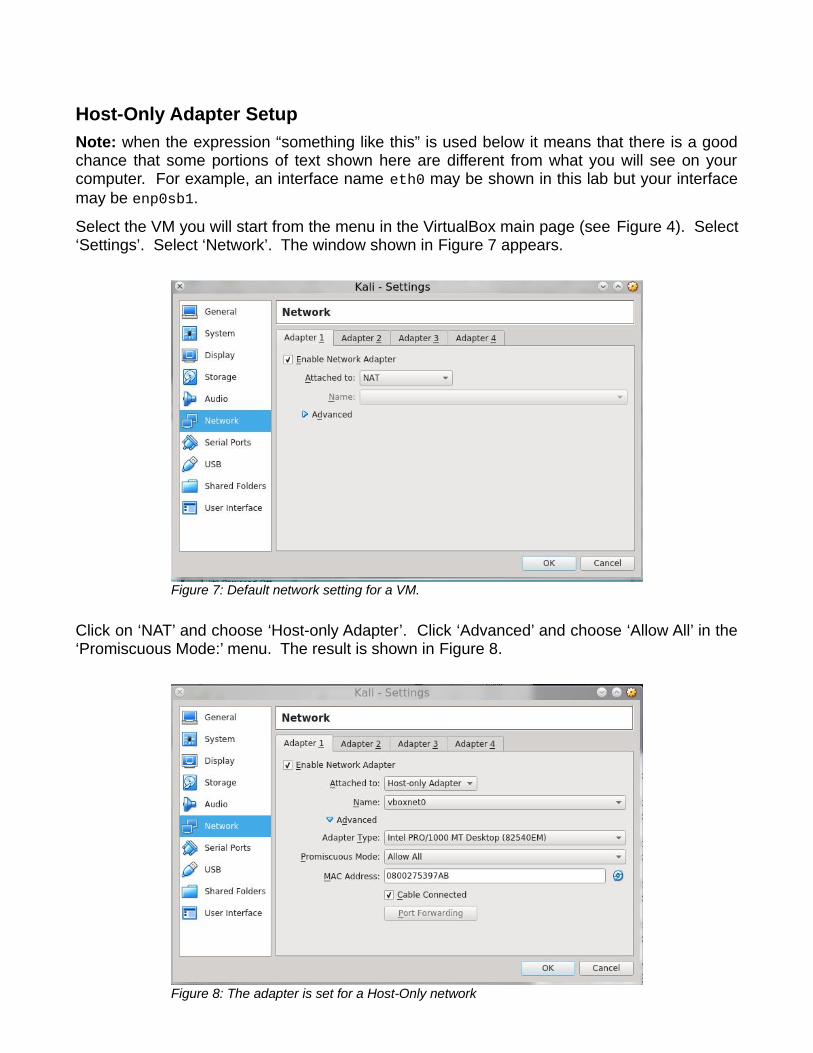
Click on ‘NAT’ and choose ‘Host-only Adapter’. Click ‘Advanced’ and choose ‘Allow All’ in the ‘Promiscuous Mode:’ menu. The result is shown in Figure 8.
Figure 7: Default network setting for a VM.
Figure 8: The adapter is set for a Host-Only network

Note the use of the ‘vboxnet0’ adapter that was defined globally. Start the VM by clicking on the green arrow (see Figure 4).
Test the results
Open a shell in the host machine (hopefully Linux). Execute ‘/sbin/ifconfig’and the result should look like this, in part:
vboxnet0 Link encap:Ethernet HWaddr 0a:00:27:00:00:00 inet addr:192.168.56.1 Bcast:192.168.56.255 Mask:255.255.255.0 inet6 addr: fe80::800:27ff:fe00:0/64 Scope:Link UP BROADCAST RUNNING MULTICAST MTU:1500 Metric:1 RX packets:0 errors:0 dropped:0 overruns:0 frame:0 TX packets:305 errors:0 dropped:0 overruns:0 carrier:0 collisions:0 txqueuelen:1000 RX bytes:0 (0.0 B) TX bytes:52301 (52.3 KB)
If the host machine is running Windows use ipconfig.
Open a shell in a VM (say Kali) and execute ‘/sbin/ifconfig’. Note the name of the interface that will be used to connect with the host. It is probably ‘eth0’ or ‘eth1’ or maybe ‘enp0s3’. Suppose it is ‘eth0’. Execute ‘/sbin/ifconfig’ again to find something like this:
eth0 Link encap:Ethernet HWaddr 08:00:27:91:74:9d inet addr:192.168.56.101 Bcast:192.168.56.255 Mask:255.255.255.0 inet6 addr: fe80::a00:27ff:fe9a:749d/64 Scope:Link UP BROADCAST RUNNING MULTICAST MTU:1500 Metric:1 RX packets:0 errors:0 dropped:0 overruns:0 frame:0 TX packets:37 errors:0 dropped:0 overruns:0 carrier:0 collisions:0 txqueuelen:1000 RX bytes:0 (0.0 B) TX bytes:7182 (7.0 KiB)
If you do not see an IP address try executing this:
/sbin/ifconfig eth0 192.168.56.101 netmask 255.255.255.0 up
From the host's shell execute this:
ping 192.168.56.101
but use your IP address. The result is similar to this:
PING 192.168.56.101 (192.168.56.101) 56(84) bytes of data. 64 bytes from 192.168.56.101: icmp_seq=1 ttl=64 time=1.34 ms 64 bytes from 192.168.56.101: icmp_seq=2 ttl=64 time=0.763 ms 64 bytes from 192.168.56.101: icmp_seq=3 ttl=64 time=0.621 ms 64 bytes from 192.168.56.101: icmp_seq=4 ttl=64 time=0.842 ms 64 bytes from 192.168.56.101: icmp_seq=5 ttl=64 time=1.02 ms
Start a second VM and change the network adapter from ‘NAT’ to ‘Host-only’ using ‘vboxnet0’ (which is probably the only choice at this point anyway). Then open a shell in the second VM and execute ‘/sbin/ifconfig’ to find the interface that will connect to the host and then, assuming it is ‘eth0’, you will likely see something like this:
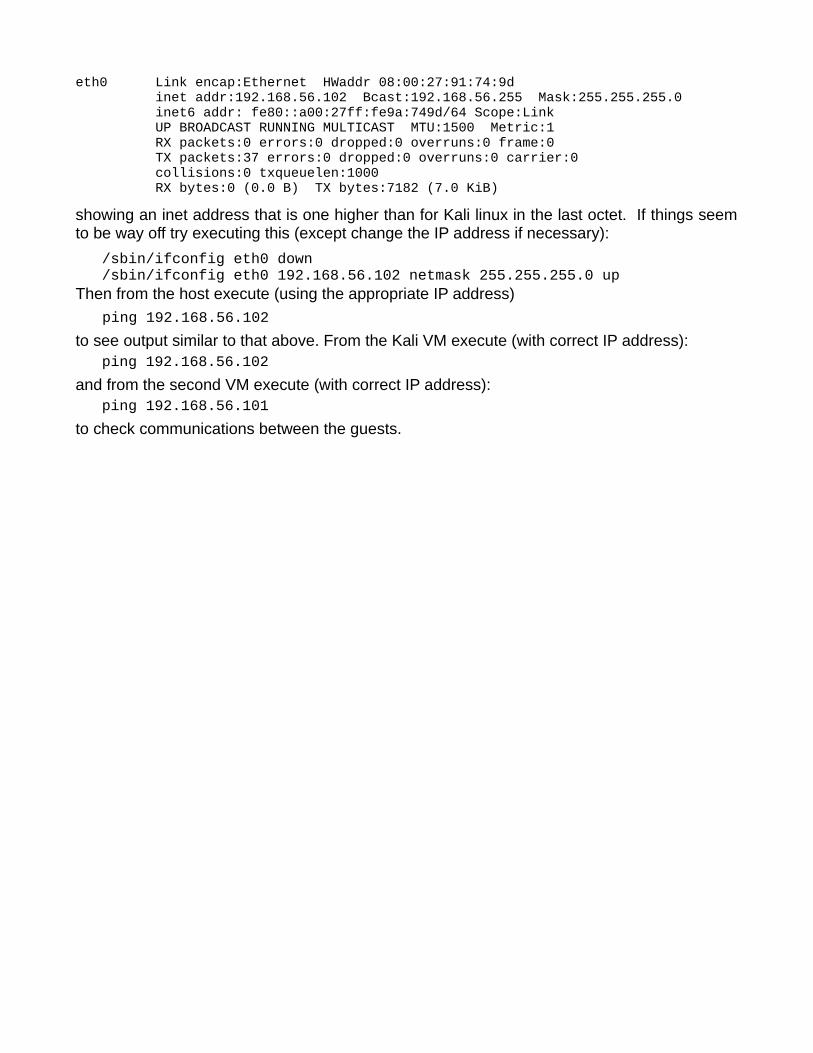
eth0 Link encap:Ethernet HWaddr 08:00:27:91:74:9d inet addr:192.168.56.102 Bcast:192.168.56.255 Mask:255.255.255.0 inet6 addr: fe80::a00:27ff:fe9a:749d/64 Scope:Link UP BROADCAST RUNNING MULTICAST MTU:1500 Metric:1 RX packets:0 errors:0 dropped:0 overruns:0 frame:0 TX packets:37 errors:0 dropped:0 overruns:0 carrier:0 collisions:0 txqueuelen:1000 RX bytes:0 (0.0 B) TX bytes:7182 (7.0 KiB)
showing an inet address that is one higher than for Kali linux in the last octet. If things seem to be way off try executing this (except change the IP address if necessary):
/sbin/ifconfig eth0 down /sbin/ifconfig eth0 192.168.56.102 netmask 255.255.255.0 upThen from the host execute (using the appropriate IP address)
ping 192.168.56.102
to see output similar to that above. From the Kali VM execute (with correct IP address): ping 192.168.56.102
and from the second VM execute (with correct IP address): ping 192.168.56.101
to check communications between the guests.