Embed Size (px)
Citation preview
KING SAUD UNIVERSITY/ COLLEGE OF SCIENCE
Botany and Microbiology
LAB SKILLS (240 MBIO)
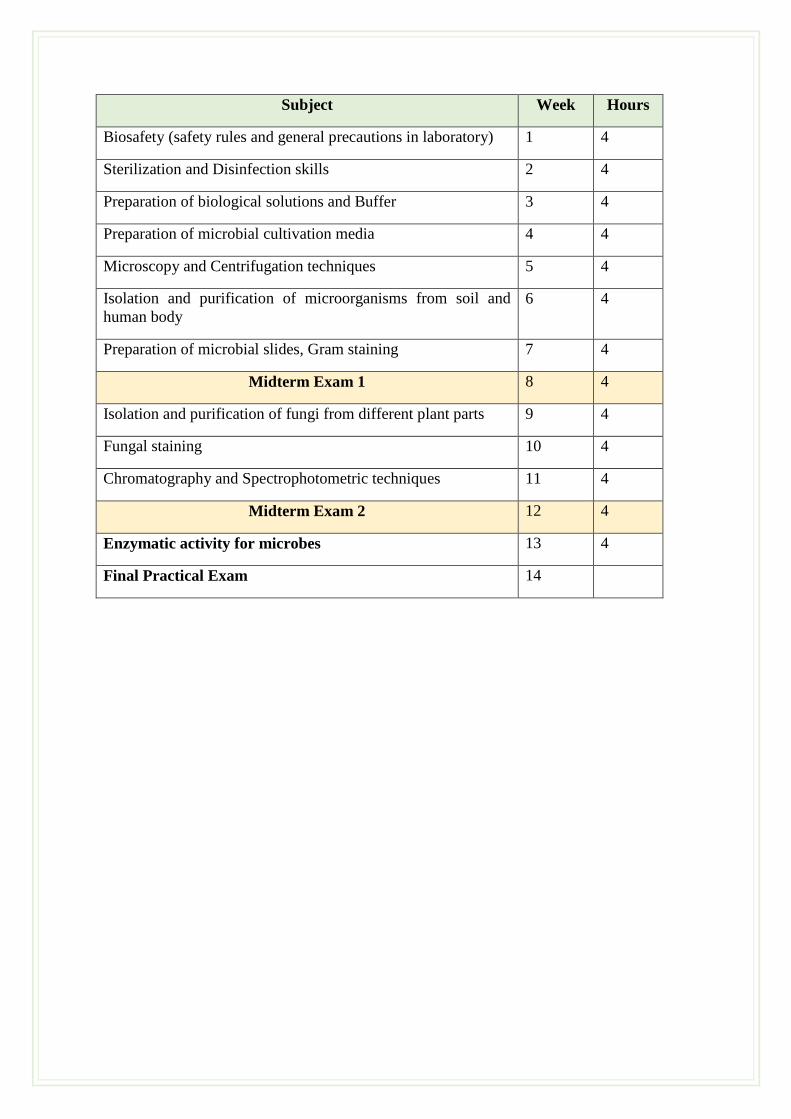
Subject Week Hours
Biosafety (safety rules and general precautions in laboratory) 1 4
Sterilization and Disinfection skills 2 4
Preparation of biological solutions and Buffer 3 4
Preparation of microbial cultivation media 4 4
Microscopy and Centrifugation techniques 5 4
Isolation and purification of microorganisms from soil and
human body
6 4
Preparation of microbial slides, Gram staining 7 4
Midterm Exam 1 8 4
Isolation and purification of fungi from different plant parts 9 4
Fungal staining 10 4
Chromatography and Spectrophotometric techniques 11 4
Midterm Exam 2 12 4
Enzymatic activity for microbes 13 4
Final Practical Exam 14

Symbol and number of course: MBIO 240
Name of course: Laboratory Skills
Number of experiment: 1
Lab 1
Title of the experiment: Biosafety (safety rules and general precautions in the laboratory)
Brief introduction:
1. Learning the technical safety requirements for work in microbiological laboratories.
2. Avoiding the harmful effects of microorganisms, chemical and radiation exposure in
microbiological labs.
Materials, tools and equipment:
Lab coat, Hand gloves, Safety goggles, Masks, Absolute Alcohol, etc
Procedures:
1. Use your lab coat, when working in the laboratory to protect clothing from
contamination or accidental discoloration by staining solutions.
2. Clean your work area (laboratory bench) with a recommended disinfectant such as 5%
Lysol or 5% phenol before and after each laboratory period to avoid contamination.
3. Eating, drinking, and smoking are forbidden at all times in the laboratory.
4. Always keep the laboratory work area free from articles not actually in us and replace
all reagents, cultures, and glassware in their appropriate places.
5. Keep your hands away from your mouth and eyes while in the laboratory. Do not place
anything such as pencils, food, and fingers in your mouth.
6. Wash your hands thoroughly before and after each experiment, using disinfecting soap
if possible.
7. Wear your musk and gloves to avoid inhalation of harmful solvents and buffer solutions
as well as affecting your hands.
8. Avoid contamination of benches, floor, and wastebaskets.
9. Place all discarded cultures, infectious materials, used glass slides and contaminated
glassware into the provided receptacles. Do not let unneeded materials accumulate.
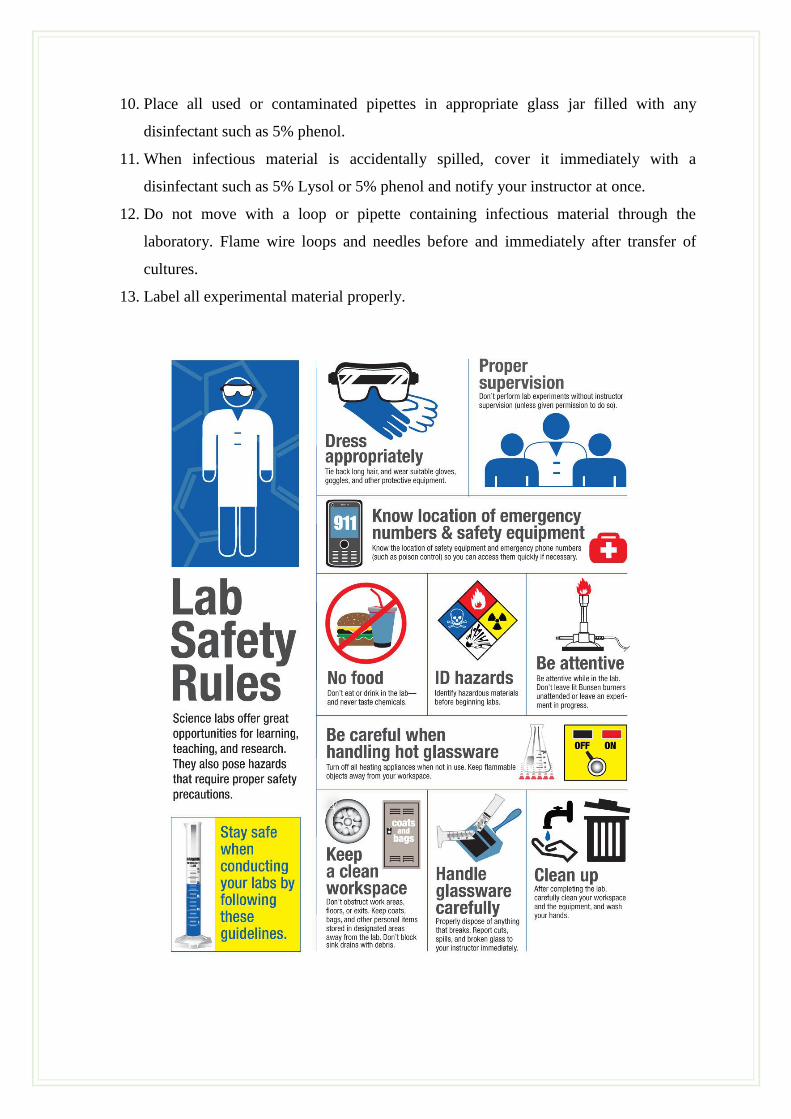
10. Place all used or contaminated pipettes in appropriate glass jar filled with any
disinfectant such as 5% phenol.
11. When infectious material is accidentally spilled, cover it immediately with a
disinfectant such as 5% Lysol or 5% phenol and notify your instructor at once.
12. Do not move with a loop or pipette containing infectious material through the
laboratory. Flame wire loops and needles before and immediately after transfer of
cultures.
13. Label all experimental material properly.
Results:
…………………………………………………………………………………………………
…………………………………………………………………………………………………
…………………………………………………………………………………………………
…………………………………………………………………………………………………
…………………………………………………………………………………………………
…………………………………………………………………………………………………
…………………………………………………………………………………………………
…………………………………………………………………………………………………
…………………………………………………………………………………………………
…………………………………………………………………………………………………
…………………………………………………………………………………………………
…………………………………………………………………………………………………
…………………………………………………………………………………………………
…………………………………………………………………………………………………
…………………………………………………………………………………………………
…………………………………………………………………………………………………
…………………………………………………………………………………………………
…………………………………………………………………………………………………
Conclusion:
The above mentioned safety rules will be beneficial for the students to work in safe and clean
environment.
References
1. Charlotte Bailey and Vicki Barwick (2007). Laboratory Skills Training Handbook. May
2007
Symbol and number of course: MBIO 240
Name of course: Laboratory Skills
Number of experiment: 2
Lab 2
Title of experiment: Sterilization and Disinfection Skills
Brief introduction:
Study the sterilization techniques and learn, how and when we use the different heat based and
another sterilization tools.
Sterilization: is defined as, the complete destruction or elimination of all forms of viable
microorganisms from a material by a chemical or physical methods.
Material, tools and equipment
Autoclave, Hot air over, Filtration assembly, portable UV chamber, Petri dishes, Erlenmeyer
flask, Beakers, Nichrome Wire Loop, Alcohol.
Procedure
Definition and explanations of Sterilization techniques:
1-Heat:
It is considering the most common and reliable method of sterilization. This method can be
used for all materials that withstand heat. Sterilization by heat could be concluded as follow.
1.1. Dry Heat:
a. Direct flaming:
It is a simple and common method for effective sterilization, of materials that can be heated to
redness in direct flame. Flaming could be used in microbiology labs to sterilize inoculating
needles, loops, forceps tips, searing spatulas and straight-wires by exposure to Bunsen burner
until become red. Loops, forceps tips and other metal object could be dipped in 70% ethanol
before briefly passing over Bunsen burner flame to obtained maximum degree of sterilization.
Mouth of test tubes, flasks, glass slides and cover slips are also sterilized by passing through
the Bunsen burner flame for a few seconds to become free from germs.

b. Hot air ovens:
Dry heat can be used to sterilize glassware or other non-porous heat conductive materials. In
dry ovens, 1 to 2 hours at 160 to 170°C is standard setting for complete sterilization. Dry heat
takes much longer time than moist heat to be transferred to the organism, thus both the time
and the temperature must usually be increased. Dry heat has the advantage that it can be used
on powders and other heat-stable materials that are adversely affected by steam.
1.2. Moist Heat:
Steam under pressure (Autoclaving):
This technique could be used to sterilize microorganism’s culture media, aqueous solutions,
and contaminated items such as Petri dishes, tips, tubes, gloves and plastic vessels comprised
of polypropylene.
Water boils at 100°C at atmospheric temperature, but within an autoclave, steam pressure can
reach (15 psi, above atmospheric pressure) with this increased pressure (the water temperature
will be increased to 121°C which will sterilize media more efficiently. Generally, we can use
an autoclave or pressure cooker at 121°C; 15 psi for 15 minutes, this is the standard
recommended for most microbiological media. These conditions are adequate to quickly and
effectively kill all microbial forms even the hardiest spore formers.
2. Radiation:
There are two types of radiation could be employed to achieve microbe-free environment.
Because radiation does not generate heat, it is termed "cold sterilization". Rays are harmful to
skin and eyes. It doesn't penetrate glass, paper or plastic.
Ionizing rays but. Electromagnetic rays such as gamma rays produced by a linear accelerator
from a heated cathode are high-energy with good penetrative power. It is used to sterilize
disposable Petri dishes, gloves, plastic syringes, dressing packs, antibiotics, vitamins,
hormones and fabrics in few seconds.
Non-ionizing rays: UV rays of wavelength longer than the visible light are low energy with
poor penetrative power. Wavelengths of UV rays, ranged from 200-280 nm have a destruction
effect on microbial cells, with 260 nm being most effective. UV rays use in surface disinfection
to disinfect hospital wards, operation theatres, virus laboratories, corridors, etc.
3. Chemicals:
There are many chemicals that have a broad spectrum of antimicrobial activity and are fast
acting. Mercuric chloride, sodium hypochlorite, formalin, phenols, ethanol and isopropanol are
extensively used in microbiological labs for a variety of purposes such as swabbing a bench
before and after use, for the sterilisation of surfaces, and for the disposal of used instruments
such as Pasteur pipettes. Many laboratory disinfectants need to be prepared before they can be
used.
When using disinfectants, it is important to ensure that they are used at the correct concentration
and that they are left to work for the correct length of time.
4. Filtration:
Filtration could be done for liquids and gases that may chemically altered by heat exposure
such as antibiotic and certain of culture media components. These solutions could be sterilized
by passing them through filters of an appropriate pore size. While most solutions used in
molecular biology will be adequately sterilized with a 0.22-μ filter, those for tissue culture
should be use A 0.1-μ filter to remove mycoplasma from tissue-culture. There are much kind
of filters could be used for such purpose i.e. asbestos filters, membrane filters and sintered
glass.
Results:
…………………………………………………………………………………………………
…………………………………………………………………………………………………
…………………………………………………………………………………………………
…………………………………………………………………………………………………
…………………………………………………………………………………………………
…………………………………………………………………………………………………
…………………………………………………………………………………………………
…………………………………………………………………………………………………
…………………………………………………………………………………………………
…………………………………………………………………………………………………
…………………………………………………………………………………………………
…………………………………………………………………………………………………
…………………………………………………………………………………………………
…………………………………………………………………………………………………
…………………………………………………………………………………………………
…………………………………………………………………………………………………
…………………………………………………………………………………………………
…………………………………………………………………………………………………
Conclusion
The student learned different sterilization methods.
References
1. Rutala, W. A.; Weber, D. J. (2004) "Disinfection and Sterilization in Health Care Facilities:
What Clinicians Need to Know". Clinical Infectious Diseases. 39 (5): 702–709.
2. Mushtaq, Maryam; Banks, Charles J.; Heaven, Sonia (2012). "Effectiveness of pressurised
carbon dioxide for inactivation of Escherichia coli isolated from sewage sludge". Water
Science and Technology. 65 (10): 1759–1764.
Symbol and number of course: MBIO 240
Name of course: Laboratory Skills
Number of experiment: 3
Lab 3
Title of experiment: Preparation of biological solutions and Buffers
Brief introduction:
Learn preparation biological solution, calculations and preparation of buffer solution.
Material, tools and equipment:
Salt, Sugar, Buffer tablets of varying pH, water, pH meter
Procedure
Solution:
A liquid mixture in which the minor component (the solute) is uniformly distributed within
the major component (the solvent).
Components of Solution
Solvent
The component present in larger proportion is known as solvent.
Solute
The component present in smaller proportion is known as solute.
Solution = Solvent + Solute
Ex. Sugar solution = Sugar (solute) + Water (solvent)
Common salt solution = Salt (solute) + Water (solvent)
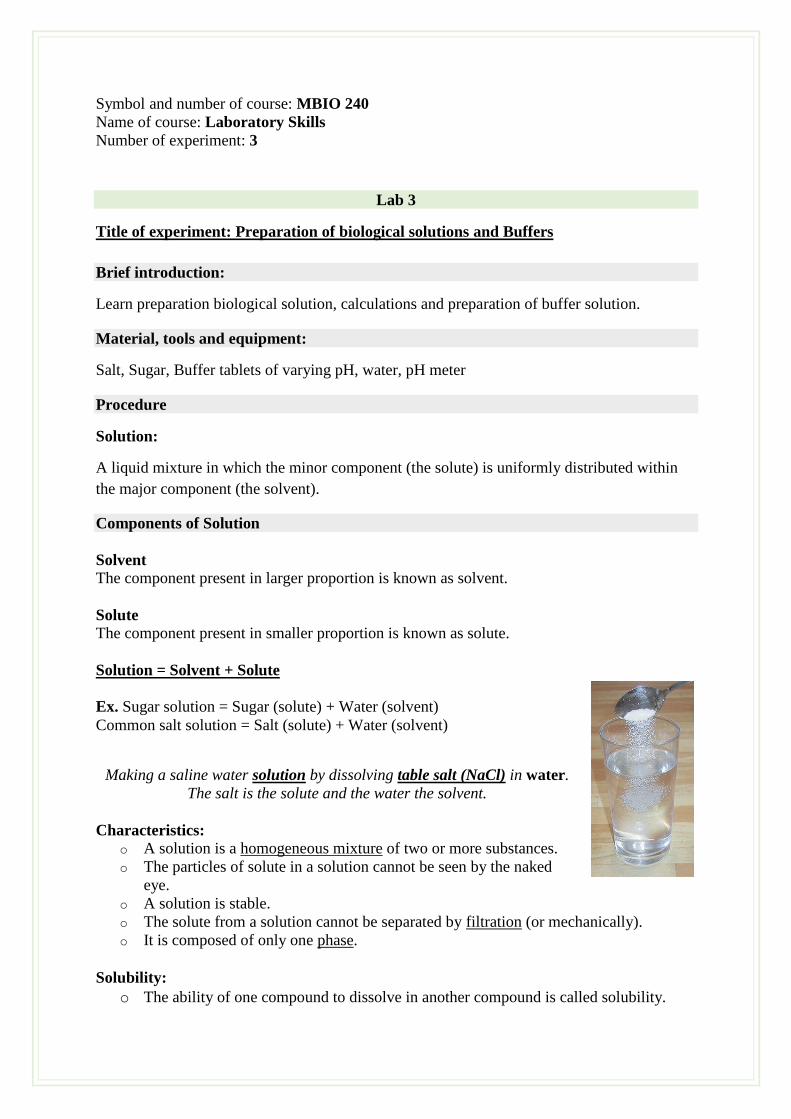
Making a saline water solution by dissolving table salt (NaCl) in water.
The salt is the solute and the water the solvent.
Characteristics:
o A solution is a homogeneous mixture of two or more substances.
o The particles of solute in a solution cannot be seen by the naked
eye.
o A solution is stable.
o The solute from a solution cannot be separated by filtration (or mechanically).
o It is composed of only one phase.
Solubility:
o The ability of one compound to dissolve in another compound is called solubility.
o When a liquid can completely dissolve in another liquid the two liquids are miscible.
o Two substances that can never mix to form a solution are called immiscible.
Calculations:
Grams per liter (g/L.) Simply the mass of a solute in grams dissolved in a given volume of
solution. Usually used for solutions made from solid solutes and liquid solvents, like our sugar
and vinegar example.
Sugar: 20 gms/lit
Percent composition. The number of parts (again, usually grams) of solute found in one
hundred parts of solution. The percent symbol % means "out of 100" so you can easily write
the fraction as a percentage.
Sugar: 10% means, 10 gms/100 ml
PPM = parts per million
PPM is a term used in chemistry to denote a very, very low concentration of a solution.
One gram in 1000 ml is 1000 ppm and one thousandth of a gram (0.001g) in 1000 ml is one
ppm.
One thousandth of a gram is one milligram (1 gm = 1000 mg)
and 1000 ml is one liter, (1 lit= 1000 ml)
so that 1 ppm = 1 mg per liter = mg/Liter.
Molal solution:
Molality (m) is defined as the number of moles of solute per kilogram of solvent.
molality = moles of solute/kilograms of solvent
Molar solution
Molarity (M) is defined as the number of moles of solute per liter of solution.
molarity = moles of solute/liters of solution
o One molar (1 M) solution means one mole of a substance (solute) per liter of solution.
o A mole means gram molecular weight or molecular weight of a substance in grams. So
the molecular weight of a chemical is also its molar weight.
o To calculate the molecular weight one needs to add the atomic weights of all the atoms
in the molecular formula unit.
For example the molecule of NaCl consist of sodium (Na) and Chlorine (Cl). Their respective
atomic weights are NA-23 and Cl-35, so the molecular weight is 23+35= 58. Thus 58 grams of
NaCl equals one mole of NaCl.
Normality
Normality (N) is defined as the number of mole equivalents per liter of solution:
normality = number of mole equivalents/1 L of solution
Like molarity, normality relates the amount of solute to the total volume of solution; however,
normality is specifically used for acids and bases. The mole equivalents of an acid or base are
calculated by determining the number of H+ or OH- ions per molecule:
N = n × M (where n is an integer)
For an acid solution, n is the number of H+ ions provided by a formula unit of acid.
Example: A 3 M H2SO4 solution is the same as a 6 N H2SO4 solution.
For a basic solution, n is the number of OH- ions provided by a formula unit of base.
Example: A 1 M Ca(OH)2 solution is the same as a 2 N Ca(OH)2 solution.
Examples:
If 40 grams of NaOH with an equivalent weight or mass of 40 is dissolved in one liter of a
solution, normality of the solution is one and the solution is called as ONE
36.5 grams of hydrochloric acid (HCl) is a 1 N (one normal) solution of HCl.
Note: The normality of a solution is NEVER less than its molarity!
Dilution Formula: N1V1 = N2V2
This equation applies to all dilution problems.
C1 (initial conc) x V1 (initial volume) = C2 (final conc) x V2 (final volume)
Example: What volume of 1 N solution must be used to give 4.00 liters of a 0.1 N solution?
N1 = 1 N, V1 = unknown, N2 = 0.1 N, V2 = 4 liters = 4000 mls
N1V1= N2V2
V1 = (C2 x V2) / C1
= (0.100 X 4000) / 1 = 400 / 1 = 400 ml.
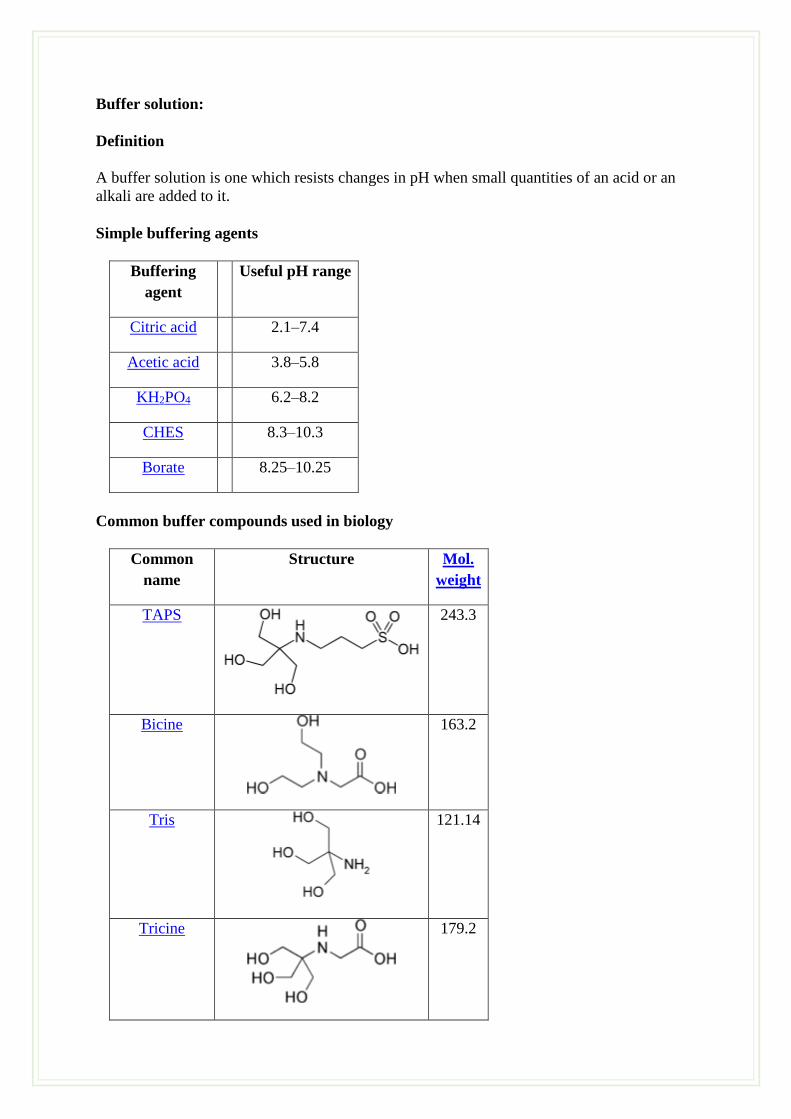
Buffer solution:
Definition
A buffer solution is one which resists changes in pH when small quantities of an acid or an
alkali are added to it.
Simple buffering agents
Buffering
agent
Useful pH range
Citric acid 2.1–7.4
Acetic acid 3.8–5.8
KH2PO4 6.2–8.2
CHES 8.3–10.3
Borate 8.25–10.25
Common buffer compounds used in biology
Common
name
Structure Mol.
weight
TAPS
243.3
Bicine
163.2
Tris
121.14
Tricine
179.2
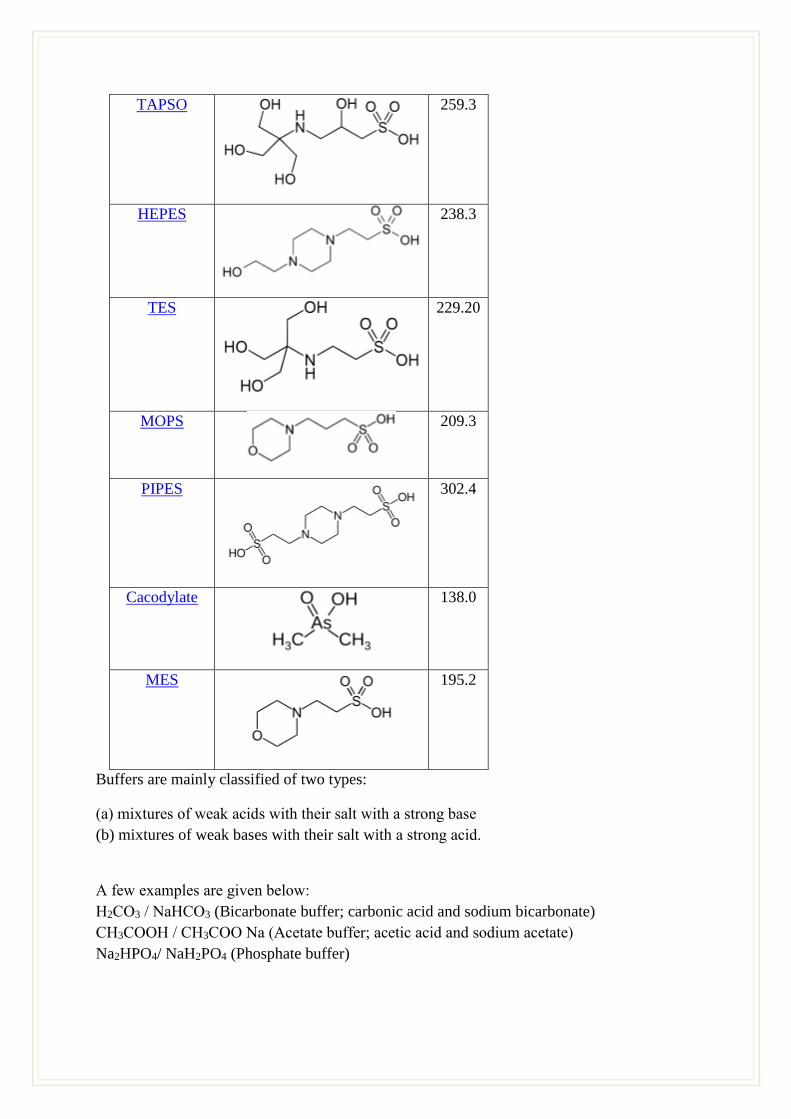
TAPSO
259.3
HEPES
238.3
TES
229.20
MOPS
209.3
PIPES
302.4
Cacodylate
138.0
MES
195.2
Buffers are mainly classified of two types:
(а) mixtures of weak acids with their salt with а strong base
(b) mixtures of weak bases with their salt with а strong acid.
А few examples are given below:
Н2СО3 / NаНСО3 (Bicarbonate buffer; carbonic acid and sodium bicarbonate)
СН3СООН / СН3СОО Na (Acetate buffer; acetic acid and sodium acetate)
Na2HPO4/ NaH2PO4 (Phosphate buffer)
Results
…………………………………………………………………………………………………
…………………………………………………………………………………………………
…………………………………………………………………………………………………
…………………………………………………………………………………………………
…………………………………………………………………………………………………
…………………………………………………………………………………………………
…………………………………………………………………………………………………
…………………………………………………………………………………………………
…………………………………………………………………………………………………
…………………………………………………………………………………………………
…………………………………………………………………………………………………
…………………………………………………………………………………………………
…………………………………………………………………………………………………
…………………………………………………………………………………………………
…………………………………………………………………………………………………
…………………………………………………………………………………………………
…………………………………………………………………………………………………
…………………………………………………………………………………………………
Conclusion
The student prepared varying concentration of the solution and buffers, and learned the
calculations about solution in laboratory.
References
1. Charlotte Bailey and Vicki Barwick (2007). Laboratory Skills Training Handbook. May
2007
2. Scorpio, R. (2000). Fundamentals of Acids, Bases, Buffers & Their Application to
Biochemical Systems. ISBN 978-0-7872-7374-3.
Symbol and number of course: MBIO 240
Name of course: Laboratory Skills
Number of experiment: 4
Lab 4
Title of experiment: Microscopy and Centrifugation techniques
Brief introduction:
1. Study the different kinds of microscopes and centrifuge.
2. Learn how to use this device correctly.
Material, tools and equipment
Microscope, glass slides, cover slips, Cedar wood oil, tissue papers, etc.
Centrifuge, rotors, Tubes, Eppendorf.
Procedure
Definitions and explanations (kinds of microscopes):
1. Optical Microscope:
The optical microscope has one or two lenses that work to enlarge and enhance images placed
between the lower-most lens and the light source. It was the first device ever created.
a. Simple Optical Microscope:
It was used by Anton Van Leeuwenhoek during the late-sixteen and early-seventeenth
centuries, around the time that the microscope was invented. It has one lens, the convex lens,
in the magnifying process.
b. Compound Optical Microscope:
It has two lenses, work to minimize both chromatic and spherical aberrations so that the view
is unobstructed and uncorrupted. The compound light microscope consists of three sets of
lenses: -
- Condenser contains lenses that collect and focuses the light to upward directing through
any object on the stage. The amount of light is controlled by shutter, or iris diaphragm,
which adjust the amount of light admitted.
- The objectives include three or four lenses that provide a magnified and inverted image
of the specimen
- The eyepiece adds further magnification
2. Stereoscopic (Dissecting) microscope:
It is two microscopes in one, and uses two separate optical shafts, which focus on the same
point from different angles to produces a three-dimensional visualization of the examined
sample. It provides slightly different viewing angles to the left and right eyes because using
two separate optical paths with two objectives and two eyepieces.
Stereo microscope is relatively low power compared with compound microscopes (below 100
X). It is often used to study the surfaces of solid specimens or to carry out close work such as
sorting, dissection, microsurgery, small circuit board manufacture or inspection, and the like.
3. Inverted Microscope:
This kind of microscope views objects from an inverted position than that of regular
microscopes. It used to the study cell cultures in liquid media.
4. Fluorescence microscopy:
Fluorescence microscope is widely used device in the life sciences and biology. It is a light
microscope used to study properties of organic or inorganic substances using the phenomena
of fluorescence and phosphorescence. Both of an excitation and emission filters used in the
fluorescent microscope.
5. Digital microscope:
Traditional optical, stereoscopic and inverted microscopes have been recently modified into
digital microscopes. These modified microscopes constructed from computer units attached to
camera devices. Computer software converts the images to be displayed on a high resolution
LCD monitor instead of direct viewing.
6. Electron Microscopes:
Electron microscopy employs electron waves running parallel to a magnetic field providing
higher resolution. Electron microscopy allows one to visualize objects that are as small as 1
nm. Electron microscopy is a high-cost technology use very expensive materials such as
osmium gold-palladium or carbon or platinum.
a. Scanning electron microscope (SEM): Scanning electron microscope used to visualize the surface of tissues, macromolecular
aggregates.
b. Transmission electron microscope (TEM):
Transmission electron microscope used to study the inner structure of objects (tissues,
cells, viruses).
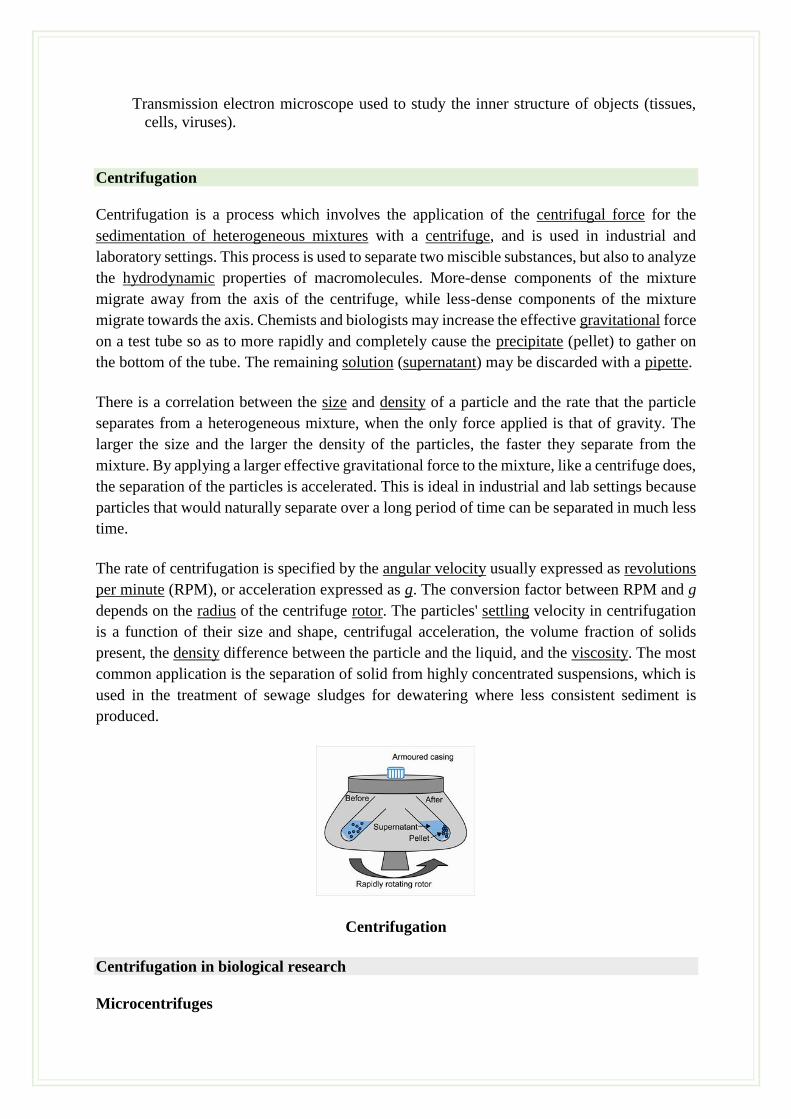
Centrifugation
Centrifugation is a process which involves the application of the centrifugal force for the
sedimentation of heterogeneous mixtures with a centrifuge, and is used in industrial and
laboratory settings. This process is used to separate two miscible substances, but also to analyze
the hydrodynamic properties of macromolecules. More-dense components of the mixture
migrate away from the axis of the centrifuge, while less-dense components of the mixture
migrate towards the axis. Chemists and biologists may increase the effective gravitational force
on a test tube so as to more rapidly and completely cause the precipitate (pellet) to gather on
the bottom of the tube. The remaining solution (supernatant) may be discarded with a pipette.
There is a correlation between the size and density of a particle and the rate that the particle
separates from a heterogeneous mixture, when the only force applied is that of gravity. The
larger the size and the larger the density of the particles, the faster they separate from the
mixture. By applying a larger effective gravitational force to the mixture, like a centrifuge does,
the separation of the particles is accelerated. This is ideal in industrial and lab settings because
particles that would naturally separate over a long period of time can be separated in much less
time.
The rate of centrifugation is specified by the angular velocity usually expressed as revolutions
per minute (RPM), or acceleration expressed as g. The conversion factor between RPM and g
depends on the radius of the centrifuge rotor. The particles' settling velocity in centrifugation
is a function of their size and shape, centrifugal acceleration, the volume fraction of solids
present, the density difference between the particle and the liquid, and the viscosity. The most
common application is the separation of solid from highly concentrated suspensions, which is
used in the treatment of sewage sludges for dewatering where less consistent sediment is
produced.
Centrifugation
Centrifugation in biological research
Microcentrifuges
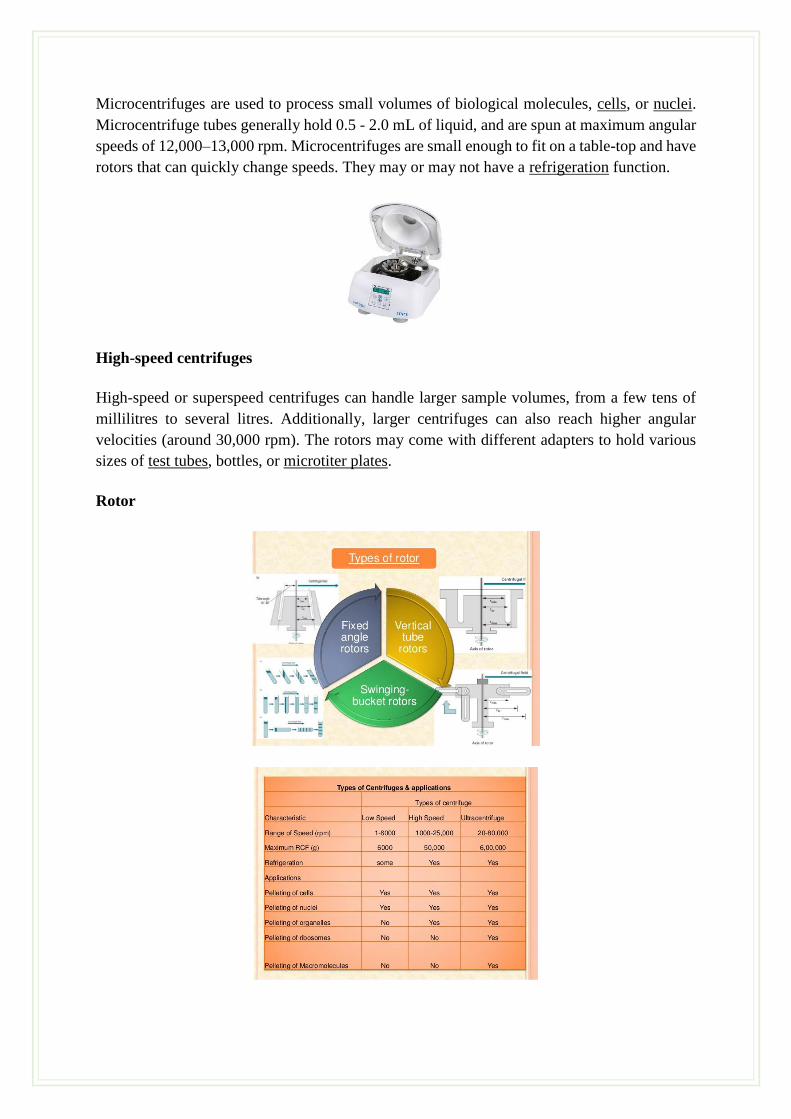
Microcentrifuges are used to process small volumes of biological molecules, cells, or nuclei.
Microcentrifuge tubes generally hold 0.5 - 2.0 mL of liquid, and are spun at maximum angular
speeds of 12,000–13,000 rpm. Microcentrifuges are small enough to fit on a table-top and have
rotors that can quickly change speeds. They may or may not have a refrigeration function.
High-speed centrifuges
High-speed or superspeed centrifuges can handle larger sample volumes, from a few tens of
millilitres to several litres. Additionally, larger centrifuges can also reach higher angular
velocities (around 30,000 rpm). The rotors may come with different adapters to hold various
sizes of test tubes, bottles, or microtiter plates.
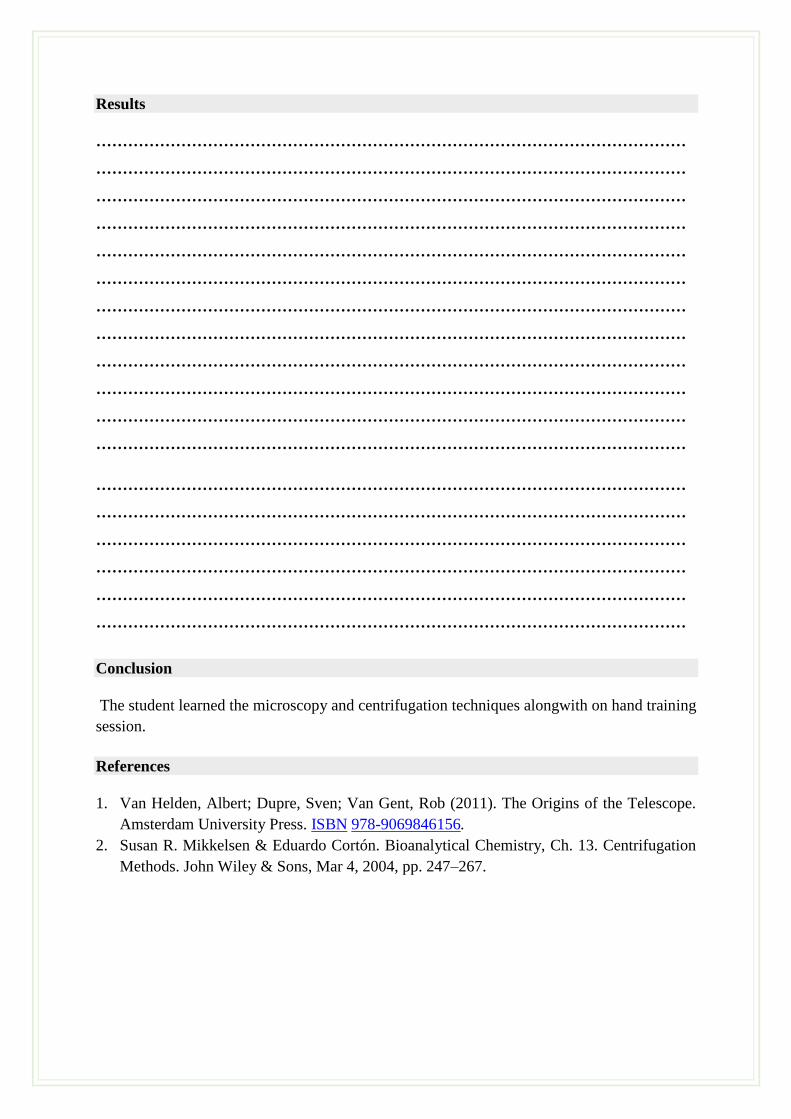
Rotor
Results
…………………………………………………………………………………………………
…………………………………………………………………………………………………
…………………………………………………………………………………………………
…………………………………………………………………………………………………
…………………………………………………………………………………………………
…………………………………………………………………………………………………
…………………………………………………………………………………………………
…………………………………………………………………………………………………
…………………………………………………………………………………………………
…………………………………………………………………………………………………
…………………………………………………………………………………………………
…………………………………………………………………………………………………
…………………………………………………………………………………………………
…………………………………………………………………………………………………
…………………………………………………………………………………………………
…………………………………………………………………………………………………
…………………………………………………………………………………………………
…………………………………………………………………………………………………
Conclusion
The student learned the microscopy and centrifugation techniques alongwith on hand training
session.
References
1. Van Helden, Albert; Dupre, Sven; Van Gent, Rob (2011). The Origins of the Telescope.
Amsterdam University Press. ISBN 978-9069846156.
2. Susan R. Mikkelsen & Eduardo Cortón. Bioanalytical Chemistry, Ch. 13. Centrifugation
Methods. John Wiley & Sons, Mar 4, 2004, pp. 247–267.
Symbol and number of course: MBIO 240
Name of course: Laboratory Skills
Number of experiment: 5
Lab 5
Title of the experiment: Preparation of microbial cultivation media
Brief introduction:
1. Study the different kinds of media.
2. Learn how to use them during isolation and purification of microorganisms.
Material, tools and equipment:
Nutrient agar, Nutrient broth, Potato Destrose Agar, Mac Conkey Agar, Agar agar, Distilled
water. etc,
Procedure:
Medium: a nutrient blend used to support microbial growth.
A medium is sterilized (living organisms removed) before usage in the lab.
Important points:
Sterilization methods include; autoclaving, dry-heat, filtration, UV exposure and ethylene
oxide.
Culture: Is part of specimen grown in culture media.
Culture Media: is a medium (liquid or solid) that contains nutrients to grow bacteria in vitro.
Because sometimes we cannot identify with microscopical examination directly, and
sometimes we do culture for antibiotic sensitivity testing.
History o The original media used by Louis Pasteur – meat broth
o Liquid medium – diffuse (spread out over a large area) growth
o Solid medium – discrete (individually separate and distinct) colonies.
o Cooked cut potato by Robert Koch – earliest solid medium
o Gelatin – not satisfactory
o -liquefy at 24oC
Properties of agar:
o Angelina Fanny Hesse
o Used for preparing solid medium
o Obtained from seaweeds
o Comes as sold powder and then you add water to it.
o No nutritive value
o Not affected by the growth of the bacteria.
o Melts at 98oC & sets at 42oC
o 2% agar is employed in solid medium
Properties of Media
o Support the growth of the bacteria.
o Should be nutritive (contains the required amount of nutrients).
o Suitable pH (neutral to slightly alkaline 7.3-7.4).
o Suitable temperature, and suitable atmosphere. (Bacteria grow at 370C)
o Note: media are sterilized by autoclaving at 1210C and 2 atmosphere for 15-20 minutes.
With the autoclave, all bacteria, fungi, viruses, and spores are destroyed. Some media
can’t be sterilized by autoclaving because they contain eggs or carbohydrates.
Types of culture media
I. Based on their consistency
a) solid medium
b) liquid medium
c) semi solid medium
II. Based on the constituents/ ingredients
a) simple medium
b) complex medium
c) synthetic or defined medium
d) Special media
Special media
• Enriched media
• Enrichment media
• Selective media
• Indicator media
• Differential media
• Sugar media
• Transport media
• Media for biochemical reactions
III. Based on Oxygen requirement
- Aerobic media
- Anaerobic media
Results
…………………………………………………………………………………………………
…………………………………………………………………………………………………
…………………………………………………………………………………………………
…………………………………………………………………………………………………
…………………………………………………………………………………………………
…………………………………………………………………………………………………
…………………………………………………………………………………………………
…………………………………………………………………………………………………
…………………………………………………………………………………………………
…………………………………………………………………………………………………
…………………………………………………………………………………………………
…………………………………………………………………………………………………
…………………………………………………………………………………………………
…………………………………………………………………………………………………
…………………………………………………………………………………………………
…………………………………………………………………………………………………
…………………………………………………………………………………………………
…………………………………………………………………………………………………
Conclusion
The students learned to prepare various kinds of media for the growth of microorganisms.
References
1. Madigan M, Martinko J, eds. (2005). Brock Biology of Microorganisms (11th ed.). Prentice
Hall. ISBN 0-13-144329-1.

Symbol and number of course: MBIO 240
Name of course: Laboratory Skills
Number of experiment: 6
Lab 6
Title of experiment: Isolation, purification of microorganisms from soil and human body
Brief introduction
Isolation of fungi from soil from soil:
Learning how to isolate soil fungi.
Materials, tools and equipment:
Soil sample.
Acidified Czapek–Dox + 0.5 % yeast extract agar medium.
Sterilized Petri plates.
Sterilized distilled water in test tubes (9cm water/each).
Golf shaped like glass road.
Procedures
Simple plating technique (Direct isolation): The direct inoculation method may be best for
isolating various and general soil fungi simply, readily, and economically.
1- Transfer a small amount (0.005–0.015 gm) of soil to a sterilized Petri dish.
2- Added 8–10 ml. of semi-cooled (45°C) nutrient medium and shake the plate to let the
soil particles dispersed throughout the thin layer of agar medium before it solidifies.
3- If the soil is very dry, or contains a high proportion of clay, it is preferable to mix the
particles with a drop of sterile water in the plate, before adding the medium.
4- Incubate treated plates at 20-30°C, investigate the colonies appearance after 48 and
record the results.
-Dilution (Plate) Method: -
- Take a proper amount of air dried soil sample after saving it to remove any undesirable
materials (plant duperies and beg granuls).
- Prepare cereal dilution (i.e. 1:10, 1:100, 1:1000……. etc) from the soil sample.
-Transfer one drop from each of the last two dilution samples to plated isolation media using a
sterile pipette.
- Use golf shaped like glass road to spread the droplets onto the agar surface.
- Incubate treated plates at 20-30°C, investigate the colonies appearance after 48 and record the
results.
Isolation of soil bacteria
Objective:
Learning how to isolate soil bacteria.
Materials:
Soil samples.
Water agar medium.
Sterilized Petri plates.
Bacterial loop.
Sterilized distilled water in test tubes (9cm water/each).
Procedure:
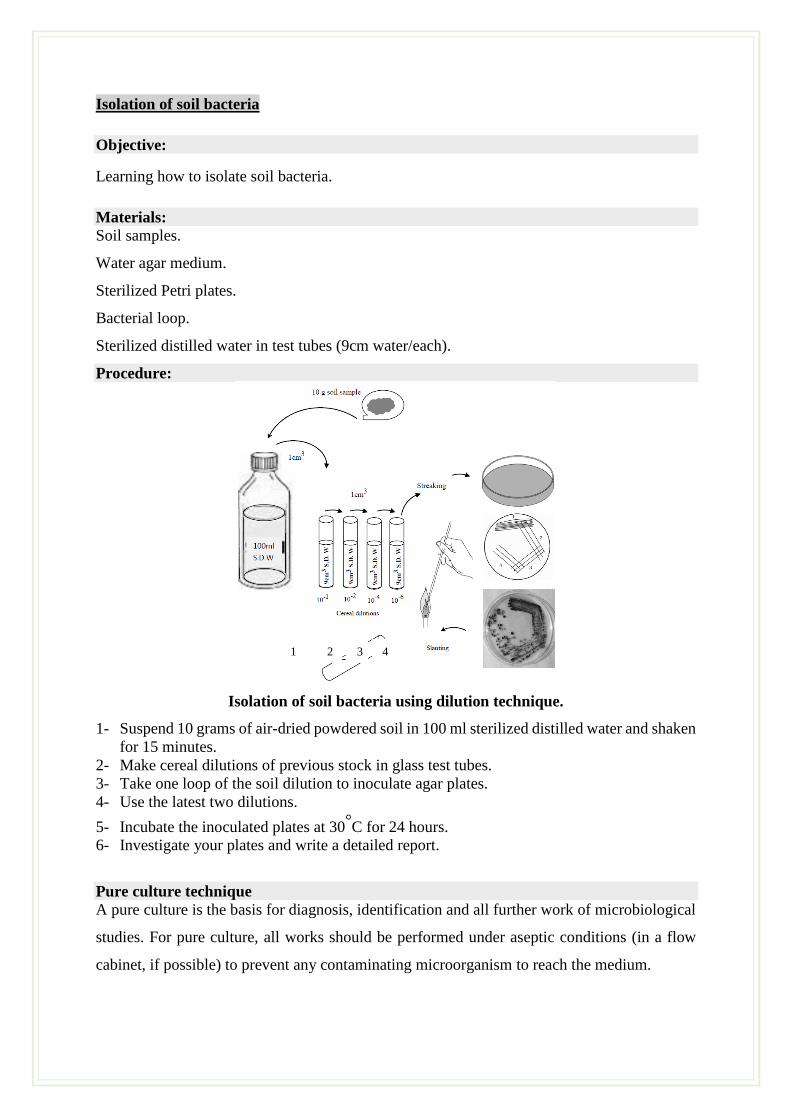
Isolation of soil bacteria using dilution technique.
1- Suspend 10 grams of air-dried powdered soil in 100 ml sterilized distilled water and shaken
for 15 minutes.
2- Make cereal dilutions of previous stock in glass test tubes.
3- Take one loop of the soil dilution to inoculate agar plates.
4- Use the latest two dilutions.
5- Incubate the inoculated plates at 30°C for 24 hours.
6- Investigate your plates and write a detailed report.
Pure culture technique
A pure culture is the basis for diagnosis, identification and all further work of microbiological
studies. For pure culture, all works should be performed under aseptic conditions (in a flow
cabinet, if possible) to prevent any contaminating microorganism to reach the medium.
1 2 3 4
Isolation of Fungi:
Objective:
Learning the purification techniques of fungal isolates.
Materials:
Fresh fungal culture.
Water agar medium.
Sterilized Petri plates.
Bacterial loop.
Sterilized distilled water in test tubes (9cm water/each).
Procedures:
There are two different methods to obtain fungal pure culture from the wild isolates.
Single spore culture: This method used in sporulating fungi such as Fusarium, Cladosporium
and Cercospora as a following:
1. Cereal dilution of spore suspension is prepared from previously plated fungal isolate using
sterile distilled water.
2. Solidified water agar plates are inoculated by droplets from the last two dilutions.
3. Golf stick like glass road is used to spread the spore suspension droplet onto the agar
surface. Bacterial loop could be also used to streak spore suspension onto the agar surface.
4. Inoculated plates are investigated under light microscope to locate single spore.
5. Marked single spore is transferred to the surface of new agar plate and incubated at 25-
30°C for 12-24h to germinate and start to grown into new single colony.
6. Obtained single spore isolates are immediately slanted and preserved.
Hypal tip culture:
This method used in unsporulating fungi or that producing very few spores.
- By the aide of dissecting microscope, most freely grown hyphal tip are cut from the
margin of previously plated fungal isolate and transfer to new water agar plates.
- Inoculated plates are incubated at 25-30°C for 24-72h until reaching a new single
colony.
- Obtained colonies are immediately slanted and preserved as pure cultures.

Results
…………………………………………………………………………………………………
…………………………………………………………………………………………………
…………………………………………………………………………………………………
…………………………………………………………………………………………………
…………………………………………………………………………………………………
…………………………………………………………………………………………………
…………………………………………………………………………………………………
…………………………………………………………………………………………………
…………………………………………………………………………………………………
…………………………………………………………………………………………………
…………………………………………………………………………………………………
…………………………………………………………………………………………………
…………………………………………………………………………………………………
…………………………………………………………………………………………………
…………………………………………………………………………………………………
…………………………………………………………………………………………………
…………………………………………………………………………………………………
…………………………………………………………………………………………………
Conclusion
The student learned the isolation techniques from the soil samples, that brought to the laboratory
by different student from various places around campus.
References
1. Stefanis C, Alexopoulos A, Voidarou C, Vavias S, Bezirtzoglou E. (2013). Principal methods
for isolation and identification of soil microbial communities Folia Microbiol (Praha).
58(1):61-8.
2. Warcup J.H (1950). The Soil-Plate Method for Isolation of Fungi from Soil. Nature. 166: 117-
118.
Bacterial isolates:
Objective:
Learning the purification techniques of bacterial isolates.
Materials:
Fresh bacterial culture.
Water agar medium.
Sterilized Petri plates.
Bacterial loop.
Selective media.
Sterilized distilled water in test tubes (9cm water/each).
Procedure:
Bacterial pure culture could be obtained from mixed culture by using:
- Single colony selection.
- A selective medium such as mannitol salt agar is used to select Staphylococcus as a
selective medium, MacConkey agar is a selective medium for E. coli
- A differential medium is designed to show visible differences between micro-
organisms such as different bacteria producing different colours of colonies.
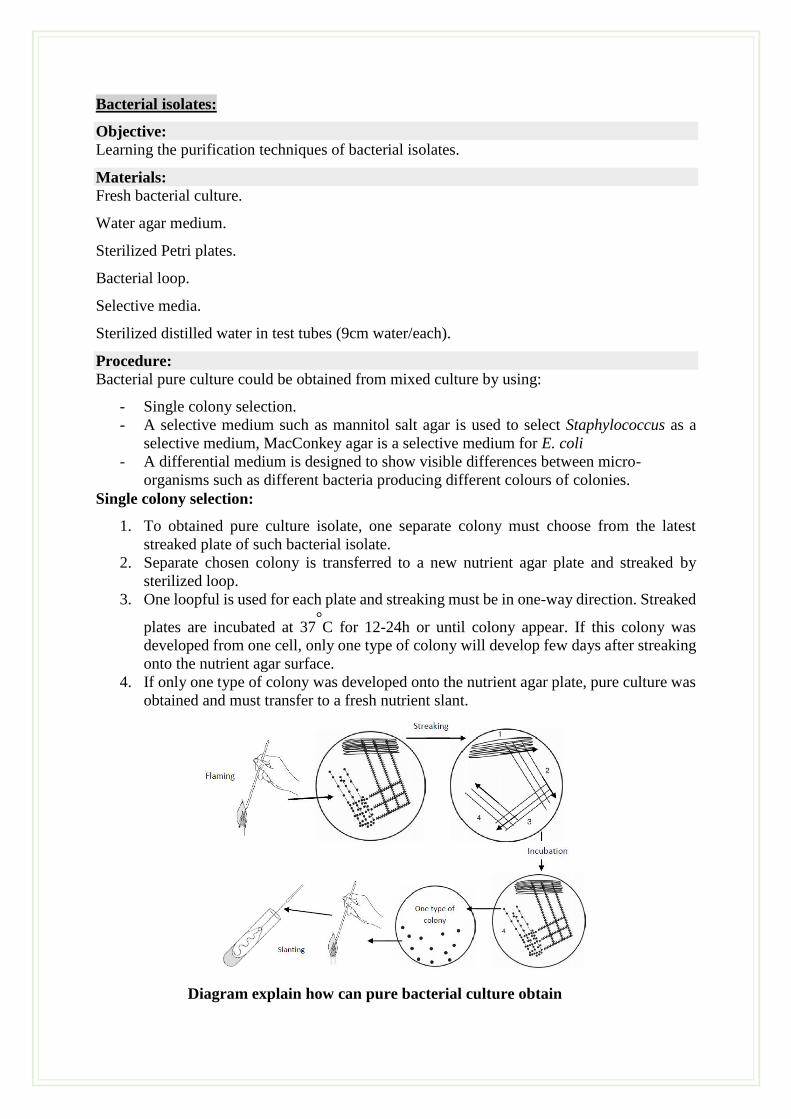
Single colony selection:
1. To obtained pure culture isolate, one separate colony must choose from the latest
streaked plate of such bacterial isolate.
2. Separate chosen colony is transferred to a new nutrient agar plate and streaked by
sterilized loop.
3. One loopful is used for each plate and streaking must be in one-way direction. Streaked
plates are incubated at 37°C for 12-24h or until colony appear. If this colony was
developed from one cell, only one type of colony will develop few days after streaking
onto the nutrient agar surface.
4. If only one type of colony was developed onto the nutrient agar plate, pure culture was
obtained and must transfer to a fresh nutrient slant.
Diagram explain how can pure bacterial culture obtain
Results
…………………………………………………………………………………………………
…………………………………………………………………………………………………
…………………………………………………………………………………………………
…………………………………………………………………………………………………
…………………………………………………………………………………………………
…………………………………………………………………………………………………
…………………………………………………………………………………………………
…………………………………………………………………………………………………
…………………………………………………………………………………………………
…………………………………………………………………………………………………
…………………………………………………………………………………………………
…………………………………………………………………………………………………
…………………………………………………………………………………………………
…………………………………………………………………………………………………
…………………………………………………………………………………………………
…………………………………………………………………………………………………
…………………………………………………………………………………………………
…………………………………………………………………………………………………
Conclusion
The student learned the isolation techniques from the soil samples, that brought to the laboratory
by different student from various places around campus.
References
3. Stefanis C, Alexopoulos A, Voidarou C, Vavias S, Bezirtzoglou E. (2013). Principal methods
for isolation and identification of soil microbial communities Folia Microbiol (Praha).
58(1):61-8.
4. Warcup J.H (1950). The Soil-Plate Method for Isolation of Fungi from Soil. Nature. 166: 117-
118.
Symbol and number of course: MBIO 240
Name of course: Laboratory Skills
Number of experiment: 8
Lab 8
Title of experiment: Preparing of microbial slides, Gram staining
Brief introduction:
Microscope examinations of microorganisms require some preparation to get a clear and
informative vision. Prepare of stained slide is one of the most common tool in this particular.
Bacterial staining:
Simple Stains
Bacterial shapes and activities could be observed under a cover glass without staining, but
forming a complete idea about their morphology is so difficult. Bacterial cells are minute and
tend to be transparent, even when magnified. So the simplest method for examining them is to
make stain preparations for microscopic study.
Objective:
To learn the simple stain technique and its value in studying basic microbial morphology.
Materials:
Alcohol solution.
Glass slides and cover slips.
Bacterial loop.
Sterilized distilled water.
Staining rack
Methylene blue.
Safranin.
Compound microscope
Procedures:
1. Wash appropriate numbers of glass slides by dipping in alcohol and polishing with
tissue or soft cloth.
2. Take three clean slides, label them and make a circle (about 1 cm in diameter) in the
center of each one using a fine marker.
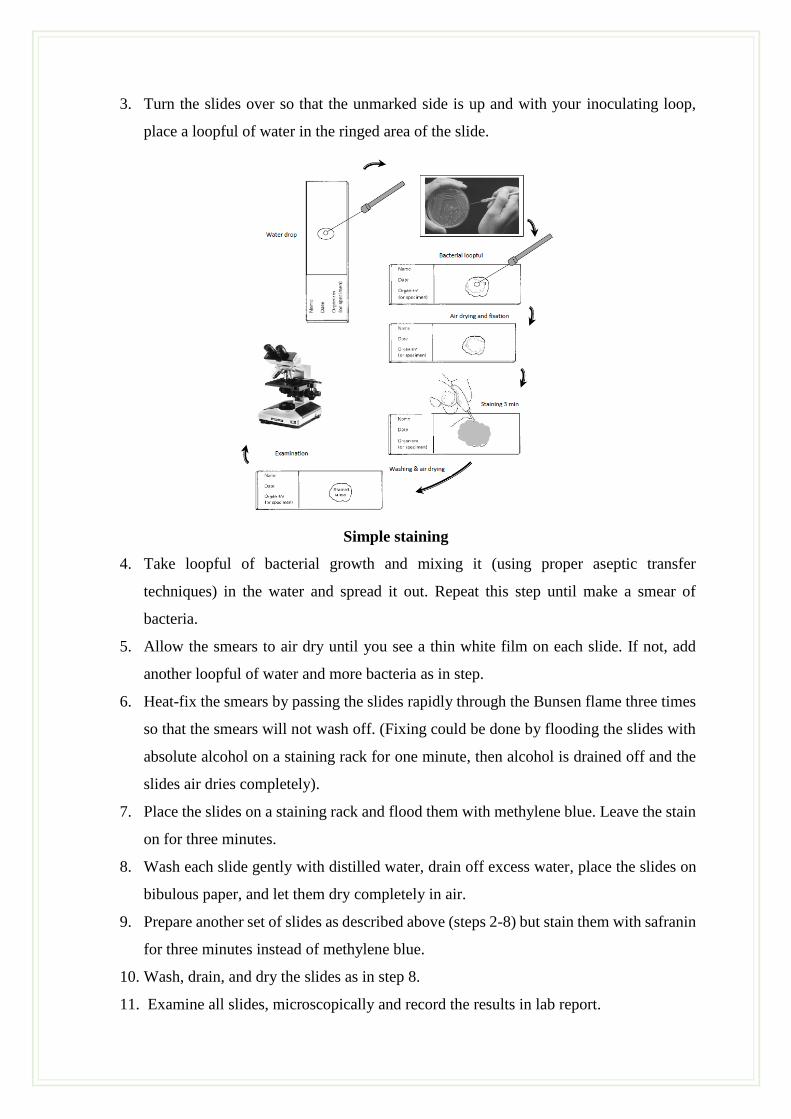
3. Turn the slides over so that the unmarked side is up and with your inoculating loop,
place a loopful of water in the ringed area of the slide.
Simple staining
4. Take loopful of bacterial growth and mixing it (using proper aseptic transfer
techniques) in the water and spread it out. Repeat this step until make a smear of
bacteria.
5. Allow the smears to air dry until you see a thin white film on each slide. If not, add
another loopful of water and more bacteria as in step.
6. Heat-fix the smears by passing the slides rapidly through the Bunsen flame three times
so that the smears will not wash off. (Fixing could be done by flooding the slides with
absolute alcohol on a staining rack for one minute, then alcohol is drained off and the
slides air dries completely).
7. Place the slides on a staining rack and flood them with methylene blue. Leave the stain
on for three minutes.
8. Wash each slide gently with distilled water, drain off excess water, place the slides on
bibulous paper, and let them dry completely in air.
9. Prepare another set of slides as described above (steps 2-8) but stain them with safranin
for three minutes instead of methylene blue.
10. Wash, drain, and dry the slides as in step 8.
11. Examine all slides, microscopically and record the results in lab report.
Gram Stains
Bacteria morphology could be determined using the simple staining, but further staining
method is required to distinguish between bacteria of similar morphology. Gram stain
(differential staining) could be used in this particular. It stains gram positive bacteria by violet
color wile gram negative by red color.
Objective:
To learn the gram stain technique and its value in distinguishing bacterial groups.
Materials:
Alcohol solutions (70-95%).
Glass slides and cover slips.
Bacterial loop.
Sterilized distilled water.
Staining rack
Crystal violet.
Gram’s iodine
Safranin.
Bibulous paper
Compound microscope
Procedures:
1. Take for clean slides, mark them and make a circle (about 1 cm in diameter) in the
center of each one using a fine marker.
2. Turn the slides over so that the unmarked side is up and with your inoculating loop,
place a loopful of water in the ringed area of the slide.
3. Take loopful of bacterial growth and mixing it (using proper aseptic transfer
techniques) in the water and spread it out. Repeat this step until make a smear of
bacteria.

4. Allow the smears to air dry until you see a thin white film on each slide. If not, add
another loopful of water and more bacteria as in step.
5. Heat-fix the smears by passing the slides rapidly through the Bunsen flame three times
so that the smears will not wash off. (Fixing could be done by flooding the slides with
absolute alcohol on a staining rack for one minute, then alcohol is drained off and the
slides air dries completely).
6. Flood the slides with crystal violet (Leave for one minute) then wash off with tap water.
7. Flood with Gram’s iodine (Leave for one minute) then wash off with tap water
8. Wash with alcohol (95% for 10–20 seconds) until no more color washes off (avoid
over washing) then wash off with tap water.
9. Apply safranin (for one minute) then wash off with tap water.
10. Drain off excess water, place the slides on bibulous paper, let them dry completely in
air (just before you examine the preparation microscopically). Label the slides when
become dry.
11. Examine all slides under oil with the oil-immersion objective and record your
observations in lab report.
Results
…………………………………………………………………………………………………
…………………………………………………………………………………………………
…………………………………………………………………………………………………
…………………………………………………………………………………………………
…………………………………………………………………………………………………
…………………………………………………………………………………………………
…………………………………………………………………………………………………
…………………………………………………………………………………………………
…………………………………………………………………………………………………
…………………………………………………………………………………………………
…………………………………………………………………………………………………
…………………………………………………………………………………………………
…………………………………………………………………………………………………
…………………………………………………………………………………………………
…………………………………………………………………………………………………
…………………………………………………………………………………………………
…………………………………………………………………………………………………
…………………………………………………………………………………………………
Conclusion
The students learned the staining technique for bacteria. Gram positive and negative bacteria
retain the primary and secondary stain due to the respective cell wall architecture
(Peptidoglycan layer in cell wall).
References
1. Madigan M, Martinko J, eds. (2005). Brock Biology of Microorganisms (11th ed.). Prentice
Hall. ISBN 0-13-144329-1.

Symbol and number of course: MBIO 240
Name of course: Laboratory Skills
Number of experiment: 9
Lab 9
Title of experiment: Isolation of fungi from diseased plant parts
Brief introduction:
Learning how to isolate plant pathogenic fungi from diseased plant parts.
Material, tools and equipment:
Diseased plant sample.
Sterilized filter papers.
Sodium hypochlorite solution 5%.
Water agar medium.
Sterilized Petri plates.
Sterilized distilled water.
Procedures:
The general procedures for isolation of any fungi from diseased plant materials are as follows:
1. Use running tap water to wash plant materials for at least 30 min.
2. Select the most freshly infected plant parts (from diseased plants), sterilize the selected parts
using 5% sodium hypochlorite solution or 70% ethanol for 30 sec to 3 min.
3. Cut each surface sterilized plant part into tissue segments of less than 5 mm.
4. Transfer prepared tissue segments to plated isolation media using sterilized forceps (3-4
segments/9cm. plate).
5. Incubate cultured plates at the appropriate temperature (25-30°C) for 1 to 7 days.
6. Investigate the incubated plates regularly because fungal hyphae may be elongated from the
plated tissue segments within a few days.
7. Transfer any appeared hyphal tip to a new agar plate as soon as possible to avoid any
contamination.
Results
…………………………………………………………………………………………………
…………………………………………………………………………………………………
…………………………………………………………………………………………………
…………………………………………………………………………………………………
…………………………………………………………………………………………………
…………………………………………………………………………………………………
…………………………………………………………………………………………………
…………………………………………………………………………………………………
…………………………………………………………………………………………………
…………………………………………………………………………………………………
…………………………………………………………………………………………………
…………………………………………………………………………………………………
…………………………………………………………………………………………………
…………………………………………………………………………………………………
…………………………………………………………………………………………………
…………………………………………………………………………………………………
…………………………………………………………………………………………………
…………………………………………………………………………………………………
Conclusion
The students learned the isolation technique for the fungi, separate them individually.
Reference
1. Hawksworth DL, Lücking R (2017). Fungal Diversity Revisited: 2.2 to 3.8 Million
Species.. Microbiol Spectr. Microbiol Spectrum 5(4):FUNK-0052-2016.

Symbol and number of course: MBIO 240
Name of course: Laboratory Skills
Number of experiment: 10
Lab 10
Title of experiment: Fungal staining
Brief introduction:
To learn the simplest preparation technique of stained fungal slides and its value in fungal
identification.
Material, tools and equipments:
Fungal cultures on Sabouraud dextrose agar (Aspergillus, Penicillium, Rhizopus &
Saccharomyces).
Clear tape.
Glass slides.
Lactophenol cotton blue (for staining molds).
Light microscope.
Miscellaneous supplies.
Lens paper.
Procedure:
1. Examine the plated cultures of the four fungi, recording all colony characters that may help
recognizing fungal genes.
2. After examining the colonies, make a pressure tape preparation of the 4 fungal cultures as
following:
a. Place a drop of lactophenol cotton blue on the center of the slide using a fine dropper.
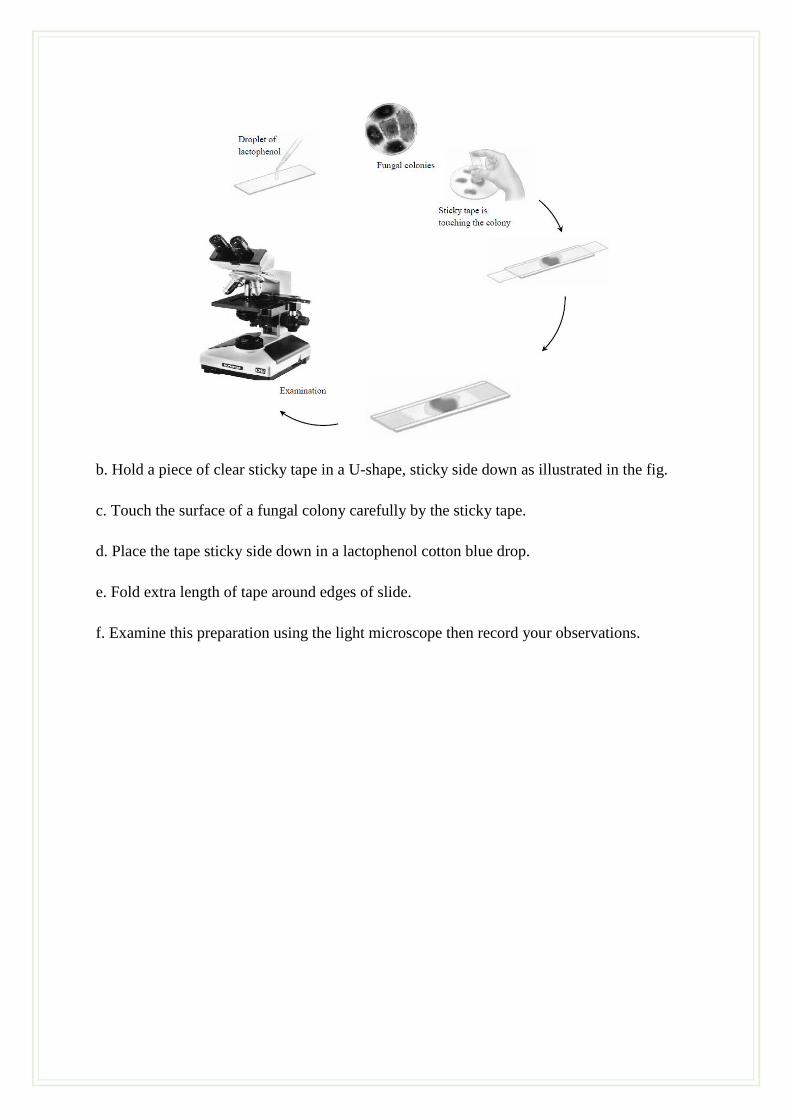
b. Hold a piece of clear sticky tape in a U-shape, sticky side down as illustrated in the fig.
c. Touch the surface of a fungal colony carefully by the sticky tape.
d. Place the tape sticky side down in a lactophenol cotton blue drop.
e. Fold extra length of tape around edges of slide.
f. Examine this preparation using the light microscope then record your observations.
Results
…………………………………………………………………………………………………
…………………………………………………………………………………………………
…………………………………………………………………………………………………
…………………………………………………………………………………………………
…………………………………………………………………………………………………
…………………………………………………………………………………………………
…………………………………………………………………………………………………
…………………………………………………………………………………………………
…………………………………………………………………………………………………
…………………………………………………………………………………………………
…………………………………………………………………………………………………
…………………………………………………………………………………………………
…………………………………………………………………………………………………
…………………………………………………………………………………………………
…………………………………………………………………………………………………
…………………………………………………………………………………………………
…………………………………………………………………………………………………
…………………………………………………………………………………………………
Conclusion
The student learned the staining technique for the fungi. Each student performed staining
individually by taking precautionary measures.
References
1. Cumitech 11: Practical Methods for Culture and Identification of Fungi in the Clinical
Microbiology Laboratory. 1980. American Society for Microbiology, Washington,
D.C.
2. Kwon-Chung, K.J. and J.E. Bennett. 1992. Medical Mycology. Lea and Febiger,
Malvern, PA.
Symbol and number of course: MBIO 240
Name of course: Laboratory Skills
Number of experiment: 11
Lab 11
Title of experiment: Chromatography Technique
Brief introduction:
1. Study the different kinds of chromatography and spectroscophometric procedure.
2. Learn how to use this device correctly.
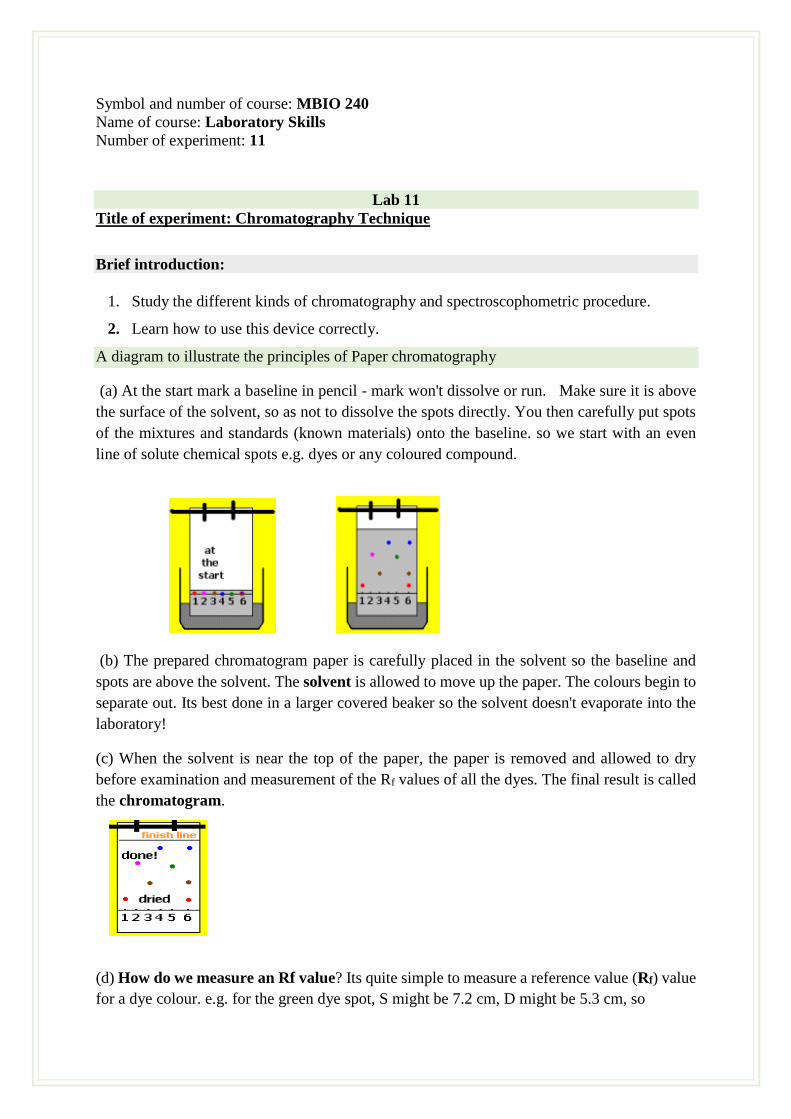
A diagram to illustrate the principles of Paper chromatography
(a) At the start mark a baseline in pencil - mark won't dissolve or run. Make sure it is above
the surface of the solvent, so as not to dissolve the spots directly. You then carefully put spots
of the mixtures and standards (known materials) onto the baseline. so we start with an even
line of solute chemical spots e.g. dyes or any coloured compound.
(b) The prepared chromatogram paper is carefully placed in the solvent so the baseline and
spots are above the solvent. The solvent is allowed to move up the paper. The colours begin to
separate out. Its best done in a larger covered beaker so the solvent doesn't evaporate into the
laboratory!
(c) When the solvent is near the top of the paper, the paper is removed and allowed to dry
before examination and measurement of the Rf values of all the dyes. The final result is called
the chromatogram.
(d) How do we measure an Rf value? Its quite simple to measure a reference value (Rf) value
for a dye colour. e.g. for the green dye spot, S might be 7.2 cm, D might be 5.3 cm, so
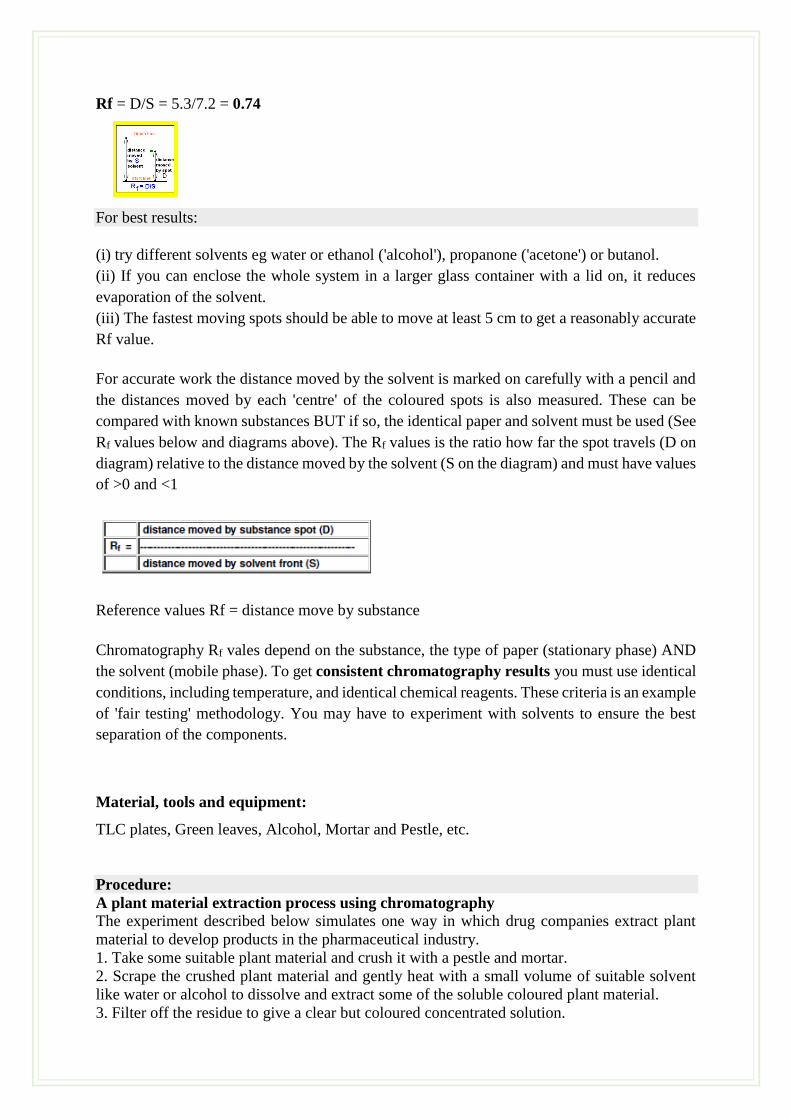
Rf = D/S = 5.3/7.2 = 0.74
For best results:
(i) try different solvents eg water or ethanol ('alcohol'), propanone ('acetone') or butanol.
(ii) If you can enclose the whole system in a larger glass container with a lid on, it reduces
evaporation of the solvent.
(iii) The fastest moving spots should be able to move at least 5 cm to get a reasonably accurate
Rf value.
For accurate work the distance moved by the solvent is marked on carefully with a pencil and
the distances moved by each 'centre' of the coloured spots is also measured. These can be
compared with known substances BUT if so, the identical paper and solvent must be used (See
Rf values below and diagrams above). The Rf values is the ratio how far the spot travels (D on
diagram) relative to the distance moved by the solvent (S on the diagram) and must have values
of >0 and <1
Reference values Rf = distance move by substance
Chromatography Rf vales depend on the substance, the type of paper (stationary phase) AND
the solvent (mobile phase). To get consistent chromatography results you must use identical
conditions, including temperature, and identical chemical reagents. These criteria is an example
of 'fair testing' methodology. You may have to experiment with solvents to ensure the best
separation of the components.
Material, tools and equipment:
TLC plates, Green leaves, Alcohol, Mortar and Pestle, etc.
Procedure:
A plant material extraction process using chromatography The experiment described below simulates one way in which drug companies extract plant
material to develop products in the pharmaceutical industry.
1. Take some suitable plant material and crush it with a pestle and mortar.
2. Scrape the crushed plant material and gently heat with a small volume of suitable solvent
like water or alcohol to dissolve and extract some of the soluble coloured plant material.
3. Filter off the residue to give a clear but coloured concentrated solution.
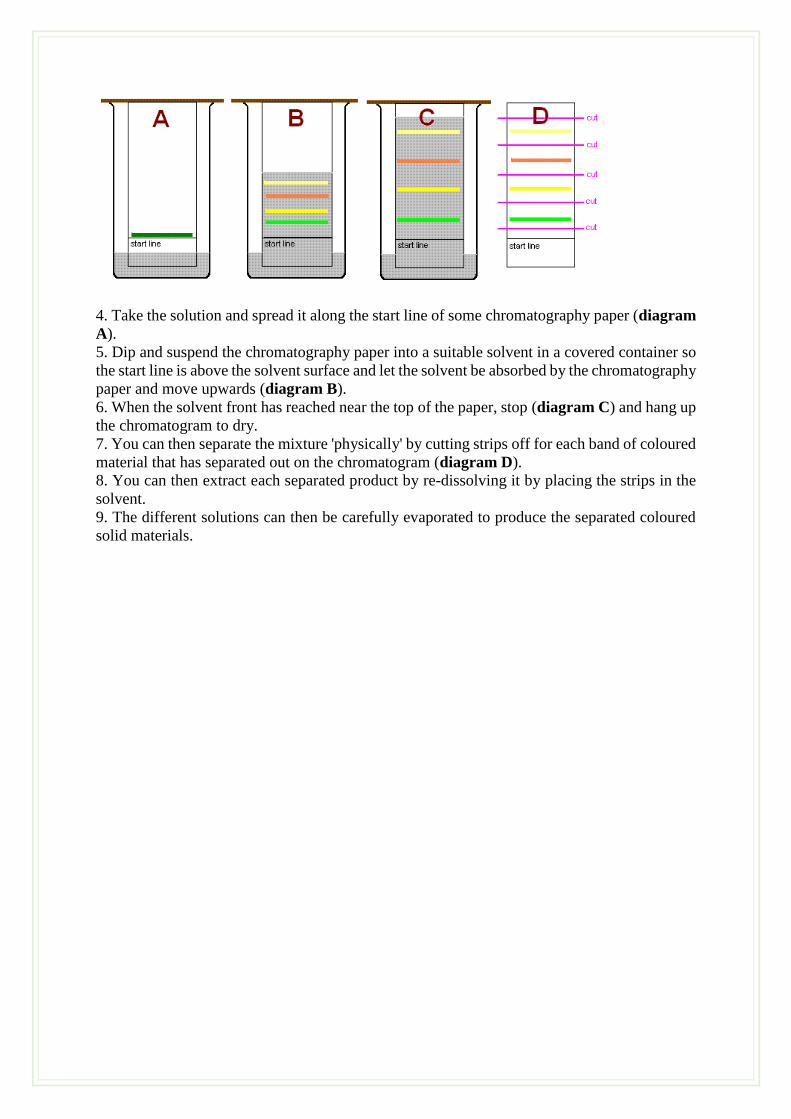
4. Take the solution and spread it along the start line of some chromatography paper (diagram
A).
5. Dip and suspend the chromatography paper into a suitable solvent in a covered container so
the start line is above the solvent surface and let the solvent be absorbed by the chromatography
paper and move upwards (diagram B).
6. When the solvent front has reached near the top of the paper, stop (diagram C) and hang up
the chromatogram to dry.
7. You can then separate the mixture 'physically' by cutting strips off for each band of coloured
material that has separated out on the chromatogram (diagram D).
8. You can then extract each separated product by re-dissolving it by placing the strips in the
solvent.
9. The different solutions can then be carefully evaporated to produce the separated coloured
solid materials.
Results
…………………………………………………………………………………………………
…………………………………………………………………………………………………
…………………………………………………………………………………………………
…………………………………………………………………………………………………
…………………………………………………………………………………………………
…………………………………………………………………………………………………
…………………………………………………………………………………………………
…………………………………………………………………………………………………
…………………………………………………………………………………………………
…………………………………………………………………………………………………
…………………………………………………………………………………………………
…………………………………………………………………………………………………
…………………………………………………………………………………………………
…………………………………………………………………………………………………
…………………………………………………………………………………………………
…………………………………………………………………………………………………
…………………………………………………………………………………………………
…………………………………………………………………………………………………
Conclusion
The students learned the chromatographic technique by doing individual experiments by leaf
extract and separated the different leaf compound in different solvent system.
References
1. McMurry, John (2011). Organic chemistry: with biological applications (2nd ed.).
Belmont, CA: Brooks/Cole. p. 395. ISBN 9780495391470.
2. Ettre, L. S.; Sakodynskii, K. I. (1993). "M. S. Tswett and the discovery of
chromatography II: Completion of the development of chromatography (1903–1910)".
Chromatographia. 35 (5–6): 329–338.
Symbol and number of course: MBIO 240
Name of course: Laboratory Skills
Number of experiment: 13
Lab 13
Title of experiment: Microbial enzymatic activities
Brief introduction
Some microorganisms capable of hydrolyze large organic molecules due to enzymatic activity
and then use the component parts in further metabolic processes.
Amylase activity
Starch is a polysaccharide that is hydrolyzed by amylase producing microorganisms. When
iodine is added to the intact starch molecule, a blue-colored complex forms. If starch is
hydrolyzed into simple sugars i.e. glucose and maltose, however, no color reaction is seen.
Materials, tool and equipment:
Starch agar plates - Fresh culture of Aspergillius niger. - Gram’s iodine solution
Procedures:
1. Prepare starch agar plates. Invert each one, and divided it into two equal sections with
marking pencil.
2. Inoculate one section with 6mm plug of Aspergillius niger and another section with water
agar plug as a control.
3. Label each section of the plate correctly and incubate treated plates for three days at 28°C.
5. When the cultures have grown, drop Gram’s iodine solution onto the plate until the entire
surface is lightly covered.
6. Record your investigations in lab report.
Results
…………………………………………………………………………………………………
…………………………………………………………………………………………………
…………………………………………………………………………………………………
…………………………………………………………………………………………………
…………………………………………………………………………………………………
…………………………………………………………………………………………………
…………………………………………………………………………………………………
…………………………………………………………………………………………………
…………………………………………………………………………………………………
…………………………………………………………………………………………………
…………………………………………………………………………………………………
…………………………………………………………………………………………………
…………………………………………………………………………………………………
…………………………………………………………………………………………………
…………………………………………………………………………………………………
…………………………………………………………………………………………………
…………………………………………………………………………………………………
…………………………………………………………………………………………………
Conclusion
The student learned the enzyme assay by employing the fungus Aspergillus niger in the starch
agar plate. The starch hydrolysis took place near the growth of the fungal mycelial mat, hence
the clear zone appears by addition of iodine.
References:
1. Tille P.M. 2014. Bailey and Scott’s diagnostic microbiology. Thirteen edition. Mosby, Inc.,
an affiliate of Elsevier Inc. 3251 Riverport Lane. St. Louis. Missouri 63043
Urease activity: -
Some bacteria produce urease enzyme and split urea molecule, releasing carbon dioxide and
ammonia. When bacterial cells that produce urease are grown in this medium, urea is degraded,
ammonia is released, and the pH becomes alkaline. This pH shift is detected by a change in the
Phenol red color from orange-pink to dark pink.
Materials:
Urea broth or urea agar medium and Proteus vulgaris culture.
Procedures
1. Inoculate a tube of urea broth or agar with the Proteus culture. Include un-inoculated
treatment.
2. Incubate the tubes at 35°C for 24 hours.
5. When the cultures have grown, drop Phenol red solution in the broth or onto the plate until
the entire surface is lightly covered.
6. Record your investigations in lab report.
Results
…………………………………………………………………………………………………
…………………………………………………………………………………………………
…………………………………………………………………………………………………
…………………………………………………………………………………………………
…………………………………………………………………………………………………
…………………………………………………………………………………………………
…………………………………………………………………………………………………
…………………………………………………………………………………………………
…………………………………………………………………………………………………
…………………………………………………………………………………………………
…………………………………………………………………………………………………
…………………………………………………………………………………………………
…………………………………………………………………………………………………
…………………………………………………………………………………………………
…………………………………………………………………………………………………
…………………………………………………………………………………………………
…………………………………………………………………………………………………
…………………………………………………………………………………………………
Conclusion
…………………………………………………………………………………………………
…………………………………………………………………………………………………
…………………………………………………………………………………………………
References:
1. Tille P.M. 2014. Bailey and Scott’s diagnostic microbiology. Thirteen edition. Mosby, Inc.,
an affiliate of Elsevier Inc. 3251 Riverport Lane. St. Louis. Missouri 63043