Embed Size (px)
Citation preview
8/6/2019 LacieBigDiscEthernetBD
http://slidepdf.com/reader/full/laciebigdiscethernetbd 1/48
LaCie Ethernet Big Disk User Manual
Table of Contentspage
Table o Contents
Health and Saety Precautions 4
General Use Precautions 4
1. Introduction to the LaCie Ethernet Big Disk 6
1.1. Hard Drive Heat Management 7
1.2. Racking Options 8
2. Your LaCie Ethernet Big Disk 9
2.1. Minimum System Requirements 9
2.2. Package Content 10
2.3. Views o the Drive 11
2.4. Cables and Connectors 13
3. Setting Up Your LaCie Ethernet Big Disk 14
3.1. Installation Steps 14
3.2. Connecting the External Power Supply 15
3.3. Connecting the Interace Cable 16
3.3.1. USB Connection 16
3.3.2. Ethernet Connection 16
3.4. Driver Installation (USB Only) 17
3.4.1. Windows XP and 2000 Users 17
3.4.2. Mac Users 18
3.5. Installing and Running the IP Congurator Wizard 193.6. Congure Your Drive On a Local Area Network with no DHCP Server 20
3.7. Disconnecting Your LaCie Hard Drive (Ethernet Connection) 21
4. Accessing the Shared Storage 22
4.1. Windows XP/2000 Users 22
4.2. Mapping the Network Drive (Windows Users Only) 23
4.3. Mac Users 24
4.4. Linux Users 25
5. Congure Your Drive Using the NAS Administration Page 26
5.1. Accessing Te NAS Administration Page 26
5.2. Administering Te LaCie Ethernet Big Disk 28
5.2.1. Setting Te User Language 28
5.2.2. Log O 28
5.3. Conguration Menu 29
5.3.1. Machine Name 295.3.2. Windows Workgroup 30
5.3.3. Applealk Zone 30
5.3.4. Select a ime Zone 31
8/6/2019 LacieBigDiscEthernetBD
http://slidepdf.com/reader/full/laciebigdiscethernetbd 2/48
LaCie Ethernet Big Disk User Manual
Table of Contentspage
5.3.5. Change Date and ime 31
5.3.6. Network Synchronization 325.3.7. Restart/Shut Down 32
5.4. Network Menu 33
5.4.1. IP Conguration 33
5.5. Disk Menu 35
5.5.1.Reormatting the Disk 35
5.5.2.Adding Additional Storage Space 35
5.6. Shares Menu 36
5.6.1. Create New Share 365.6.2. Edit a Share 37
5.7. Users Menu 37
5.7.1. Add A User 38
5.7.2. Edit a User 38
5.7.3. Change Administrator Password 39
5.9. Status Menu 40
5.9.1. FP and HP Protocols 405.9.2. System Log 40
6. Ethernet Big Disk Media Server Functionality 41
6.1. About UPnP Media Server 41
6.2. Conguring Media Server Functions 42
6.2.1. Enabling the MediaServer 42
6.2.2. Selecting Shares with Media Content 42
6.2.3. Restarting the Media Server 42
7. roubleshooting 43
8. Contacting Customer Support 46
8.1. LaCie echnical Support Contacts 47
9. Warranty Inormation 48
8/6/2019 LacieBigDiscEthernetBD
http://slidepdf.com/reader/full/laciebigdiscethernetbd 3/48
LaCie Ethernet Big Disk User Manual
Coyigts
Copyright © 2006 LaCie. Allrights reserved. No part o this publi-
cation may be reproduced, stored in a
retrieval system, or transmitted in any
orm or by any means, electronic, me-
chanical, photocopying, recording or
otherwise, without the prior written
consent o LaCie.
Tademaks
Apple, Mac, and Macintosh are reg-
istered trademarks o Apple Computer,
Inc. Microsot, Windows 98, Windows
98 SE, Windows 2000, Windows Mil-
lennium Edition and Windows XP
are registered trademarks o Microsot
Corporation. Other trademarks men-
tioned in this manual are the property
o their respective owners.
Canges
Te material in this document is
or inormation only and subject to
change without notice. While reason-
able eorts have been made in the
preparation o this document to assure
its accuracy, LaCie assumes no liability
resulting rom errors or omissions in
this document, or rom the use o the
inormation contained herein. LaCiereserves the right to make changes or
revisions in the product design or the
product manual without reservation
and without obligation to notiy any
person o such revisions and changes.
Canada Comiance Statement
Tis Class A digital apparatus
meets all requirements o the Cana-
dian Intererence-Causing Equipment
Regulations.
FCC Statement
Tis device complies with Part 15
o the FCC Rules. Operation is subject
to the ollowing conditions:
Te devices may not cause harmulintererence
Te devices must accept any inter-
erence received, including inter-
erence that may cause undesired
operation.
NOE: Tis equipment has been
tested and ound to comply with thelimits or a Class B digital device, pur-
suant to Part 15 o the FCC Rules.
Tese limits are designed to provide
reasonable protection against harmul
intererence in a residential installa-
tion. Tis equipment generates, uses
and can radiate radio requency en-ergy and, i not installed and used in
accordance with the instructions, may
cause harmul intererence to radio
communications. However, there is no
guarantee that intererence will not oc-
cur in a particular installation. I this
equipment does cause harmul inter-
erence to radio or television reception,
which can be determined by turning
the equipment o and on, the user is
encouraged to try and correct the in-
1.
2.
tererence by one or more o the ol-
lowing measures:Reorient or relocate the receiving
antenna.
Increase the separation between the
equipment and receiver.
Connect the equipment into an out-
let on a circuit dierent rom that to
which the receiver is connected.Consult the dealer or an experienced
radio/V technician or help.
Modications to this product not
authorized by LaCie could void the
FCC & Industry Canada regulations
and negate your authority to operate
the product.
Manuactue’s Decaa-
tion o CE Cetifcation
We, LaCie, solemnly declare
that this product conorms to the ol-
lowing European standards: Class B
EN60950, EN55022, EN50082-1,EN61000-3-2
With reerence to the ollowing condi-
tions: 73/23/EEC Low Voltage Direc-
tive; 89/336/EEC EMC Directive
ROHS Compliance Tis product is ROHS compliant
(European Directive 2002/95/EC on
the Restriction o Hazardous Sub-
stances).
❖
❖
❖
❖
ested o Comply With FCC standards
For Home o Oce Use
LaCie Ethernet Big Disk
CAUTION: Modicationsnot authorized by the manu-
acturer may void the user’s
authority to operate this device.
Forwardpage
CAUTION: Te LaCie
Ethernet Big Disk’s warranty
may be void as a result o the
ailure to respect the precautions
listed above.
8/6/2019 LacieBigDiscEthernetBD
http://slidepdf.com/reader/full/laciebigdiscethernetbd 4/48
LaCie Ethernet Big Disk User Manual
Forwardpage
Tis symbol on the prod-
uct or on its packagingindicates that this prod-
uct must not be disposed
o with your other household waste.
Instead, it is your responsibility to
dispose o your waste equipment by
handing it over to a designed collec-
tion point or the recycling o waste
electrical and electronic equipment. Te separate collection and recycling
o your waste equipment at the time o
disposal will help to conserve natural
resources and ensure that it is recy-
cled in a manner that protects human
health and the environment. For more
inormation about where you can drop
o your waste equipment or recycling,please contact your local city oce,
your household waste disposal service,
or the shop where you purchased the
product.
Only qualied persons are autho-
rized to carry out maintenance on
this device.
Read this User Manual careully
and ollow the correct procedure
when setting up the device.
Do not open your LaCie Ethernet
Big Disk or attempt to disassemble
or modiy it. Never insert any metal-
lic object into the drive to avoid any
risk o electrical shock, re, short-
circuiting or dangerous emissions.
❖
❖
❖
Your LaCie Ethernet Big Disk con-
tains no user-serviceable parts. I it
appears to be malunctioning, have
it inspected by a qualied LaCie echnical Support representative.
Never expose your device to rain, or
use it near water, or in damp or wet
conditions. Never place objects con-
taining liquids on the LaCie Ether-
net Big Disk, as they may spill into
its openings. Doing so increases therisk o electrical shock, short-cir-
❖
cuiting, re or personal injury.
Make sure that the computer and
LaCie Ethernet Big Disk are elec-
trically grounded. I the devices are
not grounded, there is an increased
risk o electrical shock. Power re-
quirements 100-240 V~, 1.5 A, 60-
50 Hz, (Supply voltage fuctuations
not exceeding ± 10% o the nominal,
transient over-voltages according to
over-voltage category II).
❖
Health and Saety Precautions
General Use Precautions
Do not expose the LaCie Ethernet
Big Disk to temperatures outside
the range o 5° C to 35° C (41° F
to 95° F); or to operational humid-
ity beyond 5-80%, non-condensing,
or non-operating humidity beyond
10-90%, non-condensing. Doing
so may damage the LaCie Ether-
net Big Disk or disgure its casing.Avoid placing your LaCie Ethernet
❖ Big Disk near a source o heat or ex-
posing it to sunlight (even through
a window). Inversely, placing your
LaCie Ethernet Big Disk in an en-
vironment that is too cold or humid
may damage the unit.
Always unplug the LaCie Ethernet
Big Disk rom the electrical outlet
i there is a risk o lightning or i
it will be unused or an extended
❖
period o time. Otherwise, there is
an increased risk o electrical shock,
short-circuiting or re.
Use only the power supply shipped
with the device.
Do not use the LaCie Ethernet Big
Disk near other electrical applianc-
es such as televisions or radios. Do-ing so may cause intererence which
❖
❖
8/6/2019 LacieBigDiscEthernetBD
http://slidepdf.com/reader/full/laciebigdiscethernetbd 5/48
LaCie Ethernet Big Disk User Manual
Forwardpage
will adversely aect the operation o
the other products.Do not place the LaCie Ethernet
Big Disk near sources o magnetic
intererence, such as computer
displays, televisions or speakers.
Magnetic intererence can a-
ect the operation and stability o
❖
your LaCie Ethernet Big Disk.
Do not place heavy objects on topo the LaCie Ethernet Big Disk or
use excessive orce on it.
Never use excessive orce on your
LaCie Ethernet Big Disk. I you
detect a problem, see the rouble-
shooting section in this manual.
❖
CAUTION: A shielded-type
power cord is required in orderto meet FCC emission limits
and also to prevent intererence
to the nearby radio and televi-
sion reception. It is essential
that only the supplied power
cord be used.
IMpOrTANT INFO: Any loss, corruption or destruction o data while using a LaCie drive is the sole responsibility o the
user, and under no circumstances will LaCie be held liable or the recovery or restoration o this data. o help prevent the loss
o your data, LaCie highly recommends that you keep WO copies o your data; one copy on your external hard drive, or
instance, and a second copy either on your internal hard drive, another external hard drive or some other orm o removable
storage media. LaCie oers a complete line o CD and DVD drives. I you would like more inormation on backup, please
reer to our website.
IMpOrTANT INFO: 1GB = 1,000,000,000 bytes. 1B = 1,000,000,000,000 bytes. Once ormatted, the actual available
storage capacity varies depending on operating environment (typically 10-15% less). 1GB = 1,000,000,000 bytes. 1B =
1,000,000,000,000 bytes.
8/6/2019 LacieBigDiscEthernetBD
http://slidepdf.com/reader/full/laciebigdiscethernetbd 6/48
LaCie Ethernet Big Disk User Manual
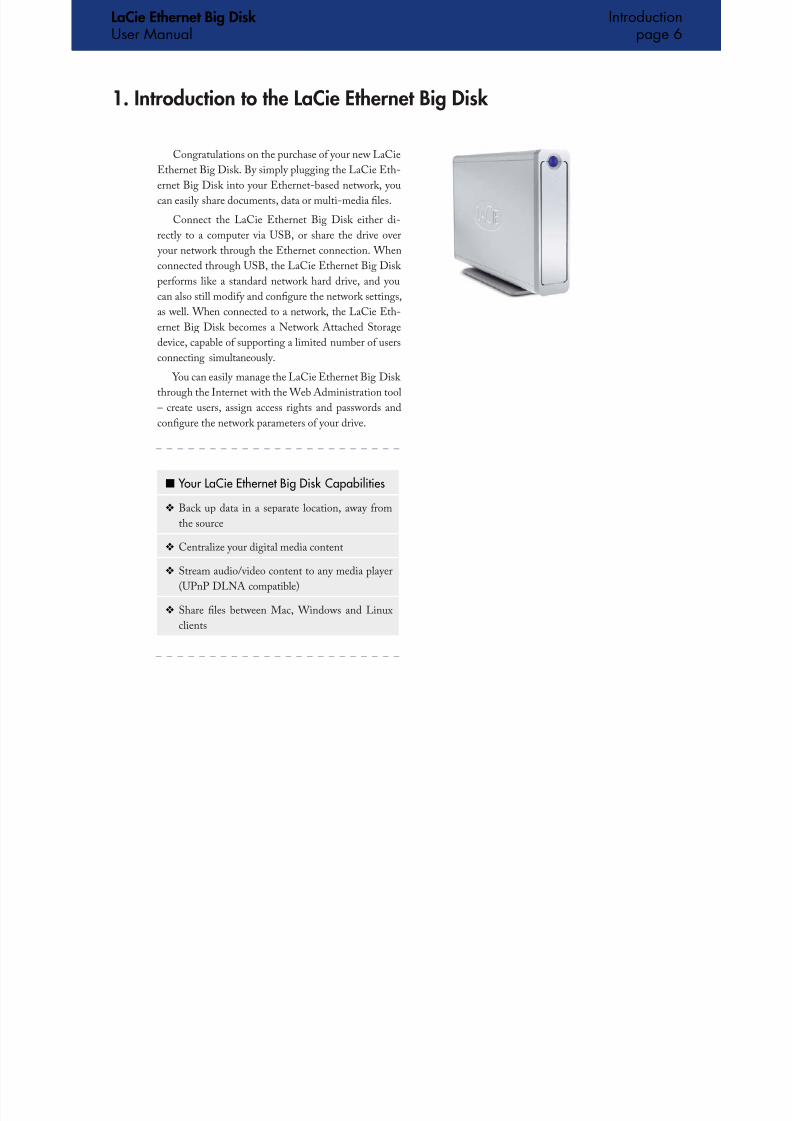
Congratulations on the purchase o your new LaCie
Ethernet Big Disk. By simply plugging the LaCie Eth-
ernet Big Disk into your Ethernet-based network, you
can easily share documents, data or multi-media les.
Connect the LaCie Ethernet Big Disk either di-
rectly to a computer via USB, or share the drive over
your network through the Ethernet connection. When
connected through USB, the LaCie Ethernet Big Disk
perorms like a standard network hard drive, and you
can also still modiy and congure the network settings,
as well. When connected to a network, the LaCie Eth-
ernet Big Disk becomes a Network Attached Storage
device, capable o supporting a limited number o usersconnecting simultaneously.
You can easily manage the LaCie Ethernet Big Disk
through the Internet with the Web Administration tool
– create users, assign access rights and passwords and
congure the network parameters o your drive.
1. Introduction to the LaCie Ethernet Big Disk
Your LaCie Ethernet Big Disk Capabilities■
Back up data in a separate location, away rom
the source
❖
Centralize your digital media content❖
Stream audio/video content to any media player(UPnP DLNA compatible)
❖
Share les between Mac, Windows and Linux
clients
❖
Introductionpage
8/6/2019 LacieBigDiscEthernetBD
http://slidepdf.com/reader/full/laciebigdiscethernetbd 7/48
LaCie Ethernet Big Disk User Manual
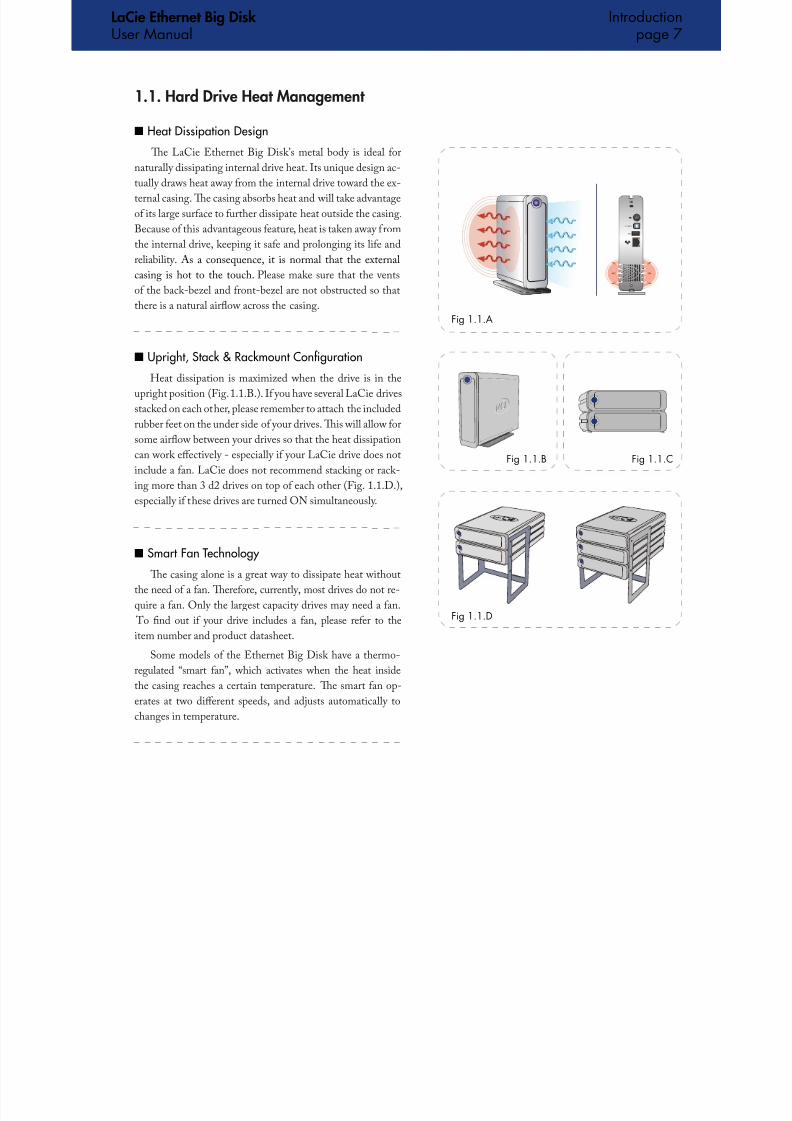
Te LaCie Ethernet Big Disk’s metal body is ideal or
naturally dissipating internal drive heat. Its unique design ac-
tually draws heat away rom the internal drive toward the ex-
ternal casing. Te casing absorbs heat and will take advantage
o its large surace to urther dissipate heat outside the casing.
Because o this advantageous eature, heat is taken away romthe internal drive, keeping it sae and prolonging its lie and
reliability. As a consequence, it is normal that the external
casing is hot to the touch. Please make sure that the vents
o the back-bezel and ront-bezel are not obstructed so that
there is a natural airfow across the casing.
1.1. Hard Drive Heat Management
Heat Dissipation Design■
Smart Fan Technology■
U S B 2 . 0
U S B
Te casing alone is a great way to dissipate heat withoutthe need o a an. Tereore, currently, most drives do not re-
quire a an. Only the largest capacity drives may need a an.
o nd out i your drive includes a an, please reer to the
item number and product datasheet.
Some models o the Ethernet Big Disk have a thermo-
regulated “smart an”, which activates when the heat inside
the casing reaches a certain temperature. Te smart an op-erates at two dierent speeds, and adjusts automatically to
changes in temperature.
Upright, Stack & Rackmount Confguration■
Heat dissipation is maximized when the drive is in the
upright position (Fig. 1.1.B.). I you have several LaCie drives
stacked on each other, please remember to attach the included
rubber eet on the under side o your drives. Tis will allow or
some airfow between your drives so that the heat dissipation
can work eectively - especially i your LaCie drive does notinclude a an. LaCie does not recommend stacking or rack-
ing more than 3 d2 drives on top o each other (Fig. 1.1.D.),
especially i these drives are turned ON simultaneously.
Fig ..A
Fig ..B Fig ..C
Fig ..D
Introductionpage
L Ci E h Bi Di k I d
8/6/2019 LacieBigDiscEthernetBD
http://slidepdf.com/reader/full/laciebigdiscethernetbd 8/48
LaCie Ethernet Big Disk User Manual
Introductionpage
1.2. Racking Options
Te LaCie Ethernet Big Disk includes a convenient
drive stand, which allows the drive to be placed in an
upright position. Please reer to the instruction sheet in-
cluded with the drive stand or specic instructions.
Te LaCie Ethernet Big Disk can be incorporated
into standard 19” computer equipment racks, using the
LaCie Rackmount Kit (sold separately). Please reer to
the instructions included with the LaCie Rackmount
Kit or specic instructions.
Fig. ..A Fig. ..B
Standalone Installation■ Rackmount Installation■
L Ci Eth t Bi Di k Y L Ci Eth t Bi Di k
8/6/2019 LacieBigDiscEthernetBD
http://slidepdf.com/reader/full/laciebigdiscethernetbd 9/48
LaCie Ethernet Big Disk User Manual
2. Your LaCie Ethernet Big Disk
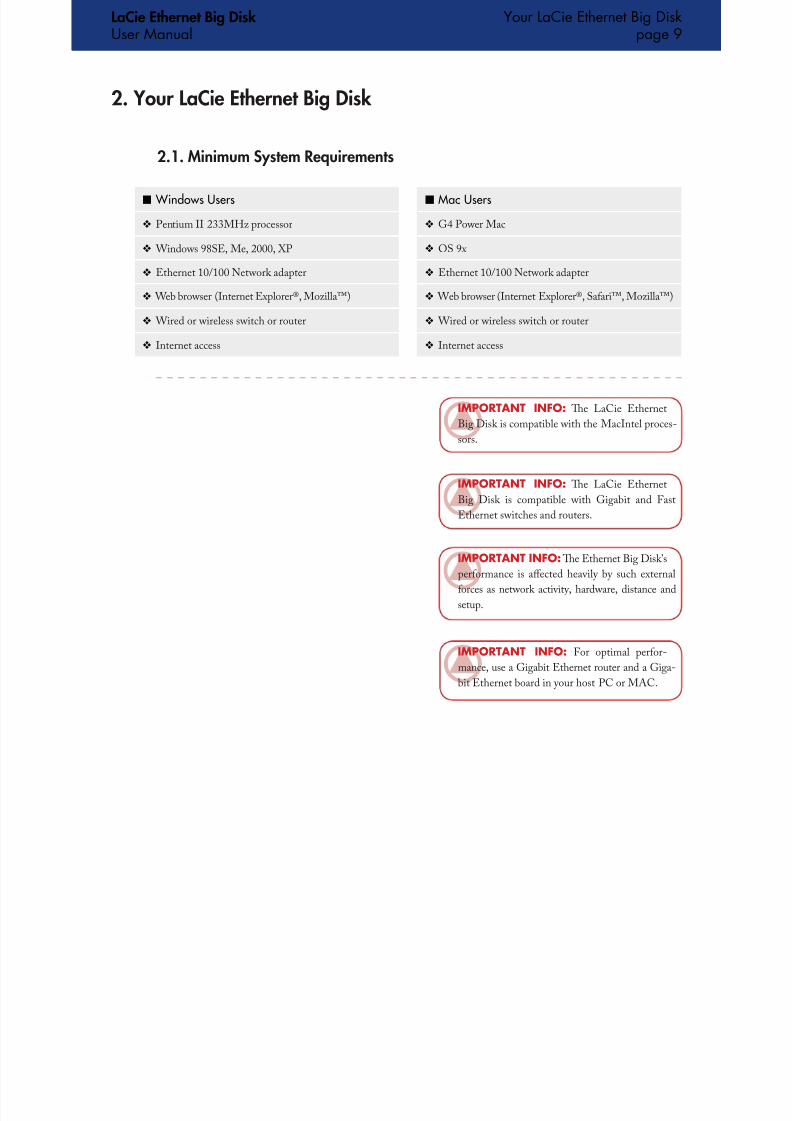
2.1. Minimum System Requirements
Windows Users■ Mac Users■
Pentium II 233MHz processor❖
G4 Power Mac❖
Windows 98SE, Me, 2000, XP❖ OS 9x❖
Ethernet 10/100 Network adapter❖ Ethernet 10/100 Network adapter❖
Web browser (Internet Explorer®, Mozilla™)❖ Web browser (Internet Explorer®, Saari™, Mozilla™)❖
Wired or wireless switch or router❖ Wired or wireless switch or router❖
Internet access❖ Internet access❖
IMpOrTANT INFO: Te LaCie Ethernet
Big Disk is compatible with the MacIntel proces-
sors.
Your LaCie Ethernet Big Diskpage
IMpOrTANT INFO: Te LaCie Ethernet
Big Disk is compatible with Gigabit and Fast
Ethernet switches and routers.
IMpOrTANT INFO: Te Ethernet Big Disk’s
perormance is aected heavily by such externalorces as network activity, hardware, distance and
setup.
IMpOrTANT INFO: For optimal peror-
mance, use a Gigabit Ethernet router and a Giga-
bit Ethernet board in your host PC or MAC.
LaCie Ethernet Big Disk Your LaCie Ethernet Big Disk
8/6/2019 LacieBigDiscEthernetBD
http://slidepdf.com/reader/full/laciebigdiscethernetbd 10/48
LaCie Ethernet Big Disk User Manual
Your LaCie Ethernet Big Diskpage 0
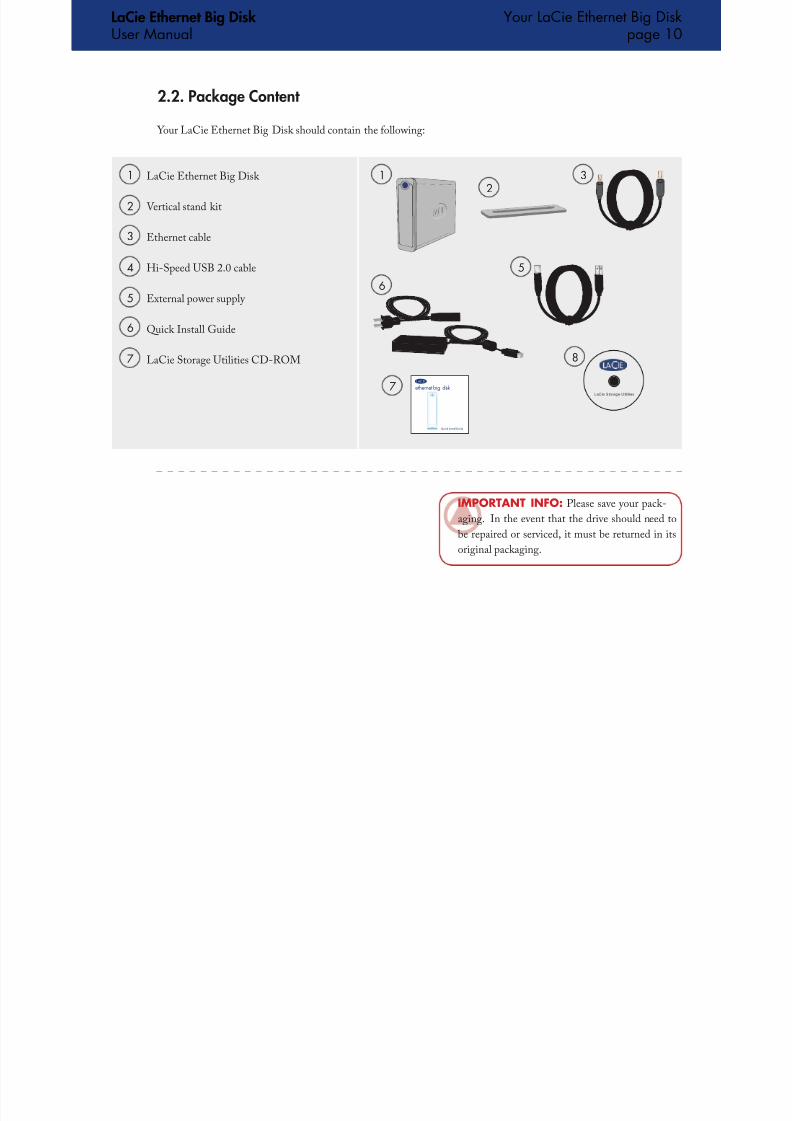
2.2. Package Content
IMpOrTANT INFO: Please save your pack-
aging. In the event that the drive should need to
be repaired or serviced, it must be returned in its
original packaging.
LaCie Ethernet Big Disk
Vertical stand kit
Ethernet cable
Hi-Speed USB 2.0 cable
External power supply
Quick Install Guide
LaCie Storage Utilities CD-ROM
Your LaCie Ethernet Big Disk should contain the ollowing:
Quick InstallGuide
ethernetbig disk
LaCie Ethernet Big Disk Your LaCie Ethernet Big Disk
8/6/2019 LacieBigDiscEthernetBD
http://slidepdf.com/reader/full/laciebigdiscethernetbd 11/48
LaCie Ethernet Big Disk User Manual
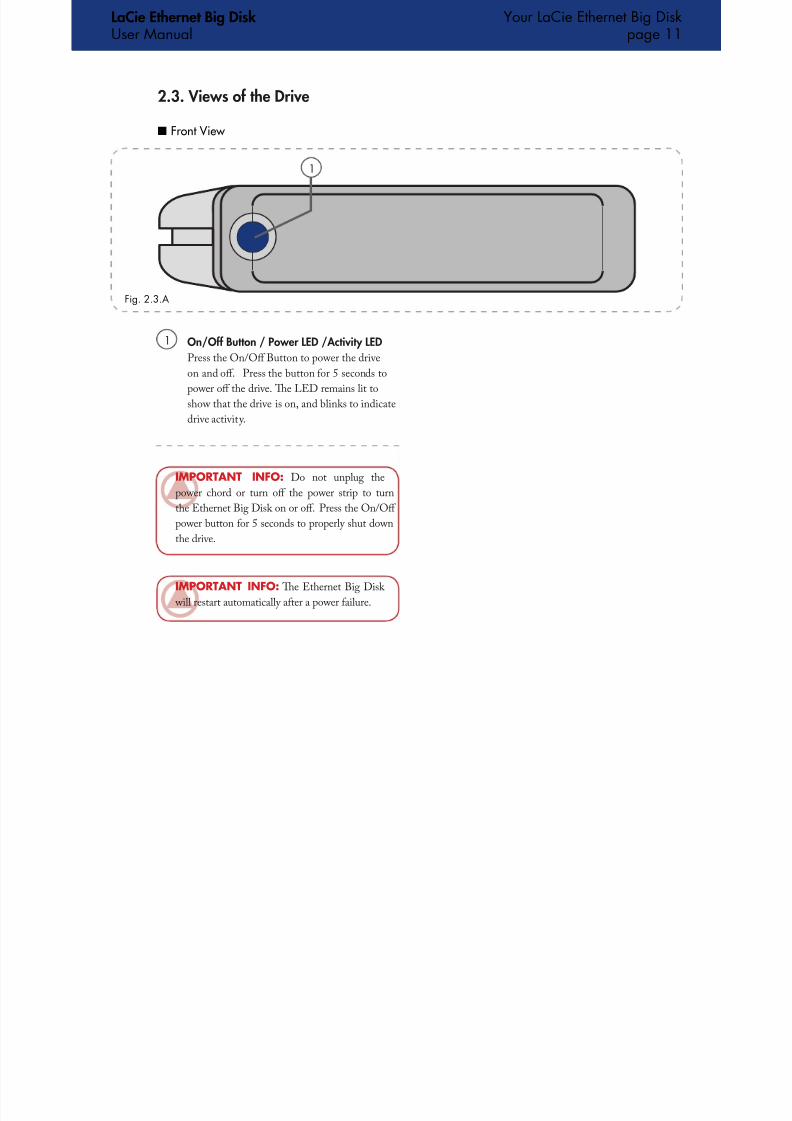
2.3. Views o the Drive
On/O Button / Power LED /Activity LEDPress the On/O Button to power the drive
on and o. Press the button or 5 seconds to
power o the drive. Te LED remains lit to
show that the drive is on, and blinks to indicate
drive activity.
Front View■
IMpOrTANT INFO: Do not unplug the
power chord or turn o the power strip to turn
the Ethernet Big Disk on or o. Press the On/O
power button or 5 seconds to properly shut down
the drive.
Your LaCie Ethernet Big Diskpage
Fig. ..A
IMpOrTANT INFO: Te Ethernet Big Disk
will restart automatically ater a power ailure.
LaCie Ethernet Big Disk
Your LaCie Ethernet Big Disk
8/6/2019 LacieBigDiscEthernetBD
http://slidepdf.com/reader/full/laciebigdiscethernetbd 12/48
LaCie Ethernet Big Disk User Manual
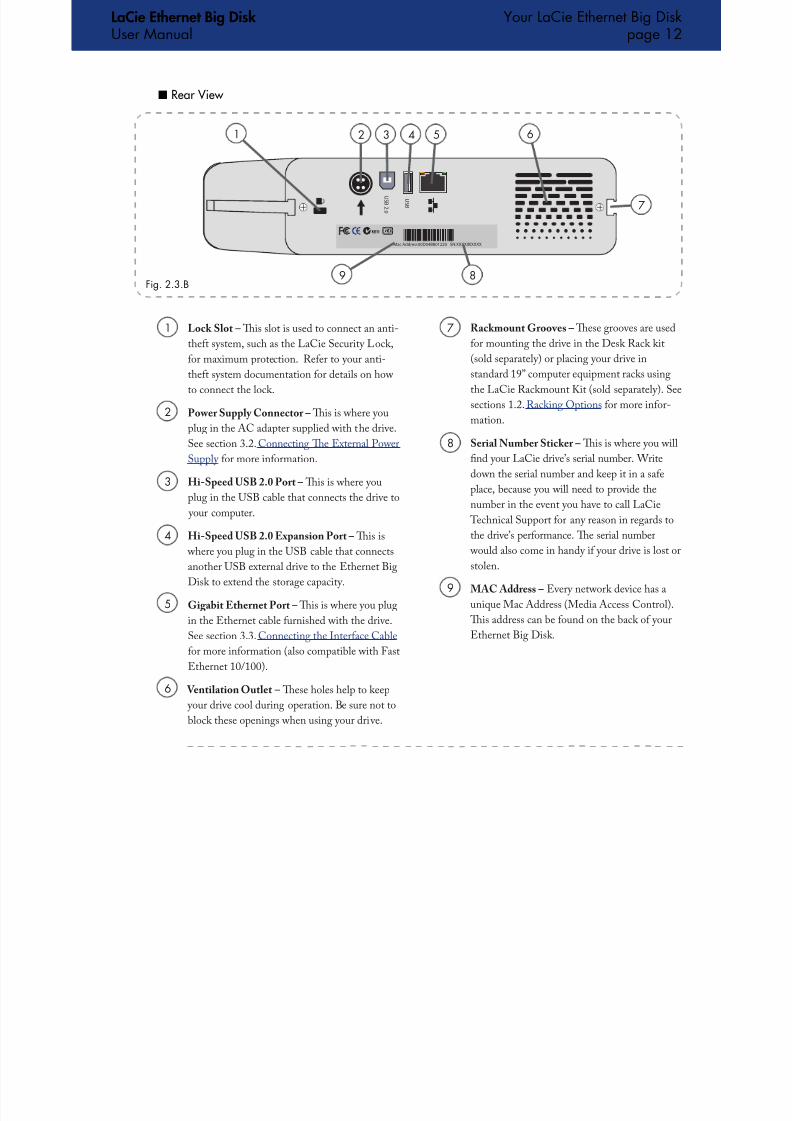
Lock Slot – Tis slot is used to connect an anti-
thet system, such as the LaCie Security Lock,or maximum protection. Reer to your anti-
thet system documentation or details on how
to connect the lock.
Power Supply Connector – Tis is where you
plug in the AC adapter supplied with the drive.
See section 3.2. Connecting Te External Power
Supply or more inormation.
Hi-Speed USB 2.0 Port – Tis is where you
plug in the USB cable that connects the drive to
your computer.
Hi-Speed USB 2.0 Expansion Port – Tis is
where you plug in the USB cable that connects
another USB external drive to the Ethernet Big
Disk to extend the storage capacity.
Gigabit Ethernet Port – Tis is where you plug
in the Ethernet cable urnished with the drive.
See section 3.3. Connecting the Interace Cable
or more inormation (also compatible with Fast
Ethernet 10/100).
Ventilation Outlet – Tese holes help to keep your drive cool during operation. Be sure not to
block these openings when using your drive.
Rackmount Grooves – Tese grooves are used
or mounting the drive in the Desk Rack kit(sold separately) or placing your drive in
standard 19” computer equipment racks using
the LaCie Rackmount Kit (sold separately). See
sections 1.2. Racking Options or more inor-
mation.
Serial Number Sticker – Tis is where you will
nd your LaCie drive’s serial number. Writedown the serial number and keep it in a sae
place, because you will need to provide the
number in the event you have to call LaCie
echnical Support or any reason in regards to
the drive’s perormance. Te serial number
would also come in handy i your drive is lost or
stolen.
MAC Address – Every network device has a
unique Mac Address (Media Access Control).
Tis address can be ound on the back o your
Ethernet Big Disk.
Rear View■
Mac Address:00D04B801220 SN:XXXXXXXXXX
U S B
2 . 0
U S B
Your LaCie Ethernet Big Diskpage
Fig. ..B
LaCie Ethernet Big Disk Your LaCie Ethernet Big Disk
8/6/2019 LacieBigDiscEthernetBD
http://slidepdf.com/reader/full/laciebigdiscethernetbd 13/48
LaCie Ethernet Big Disk User Manual
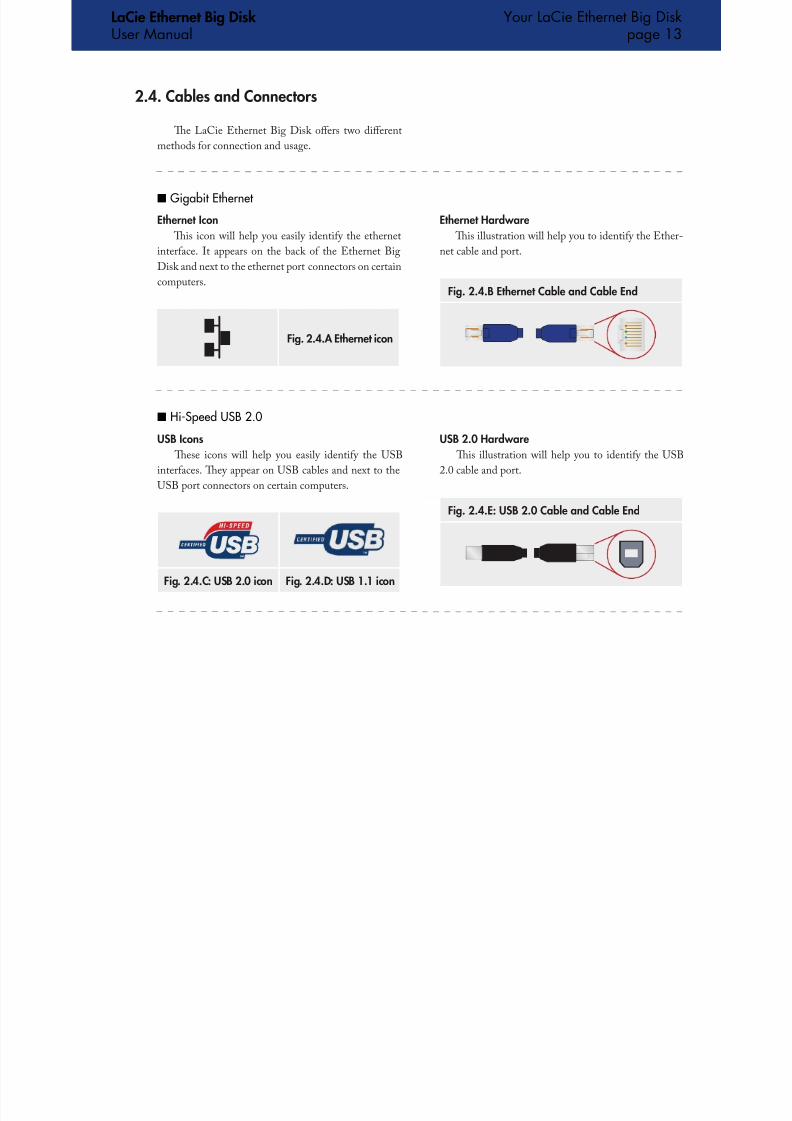
2.4. Cables and Connectors
Te LaCie Ethernet Big Disk oers two dierent
methods or connection and usage.
Gigabit Ethernet ■
Fig. 2.4.A Ethernet icon
Ethernet Icon
Tis icon will help you easily identiy the ethernet
interace. It appears on the back o the Ethernet Big
Disk and next to the ethernet port connectors on certain
computers.
Ethernet Hardware
Tis illustration will help you to identiy the Ether-
net cable and port.
Fig. 2.4.B Ethernet Cable and Cable End
Your LaCie Ethernet Big Diskpage
Fig. 2.4.C: USB 2.0 icon Fig. 2.4.D: USB 1.1 icon
USB Icons
Tese icons will help you easily identiy the USBinteraces. Tey appear on USB cables and next to the
USB port connectors on certain computers.
USB 2.0 Hardware
Tis illustration will help you to identiy the USB2.0 cable and port.
Fig. 2.4.E: USB 2.0 Cable and Cable End
Hi-Speed USB 2.0■
LaCie Ethernet Big Disk Setting Up Your Ethernet Big Disk
8/6/2019 LacieBigDiscEthernetBD
http://slidepdf.com/reader/full/laciebigdiscethernetbd 14/48
gUser Manual
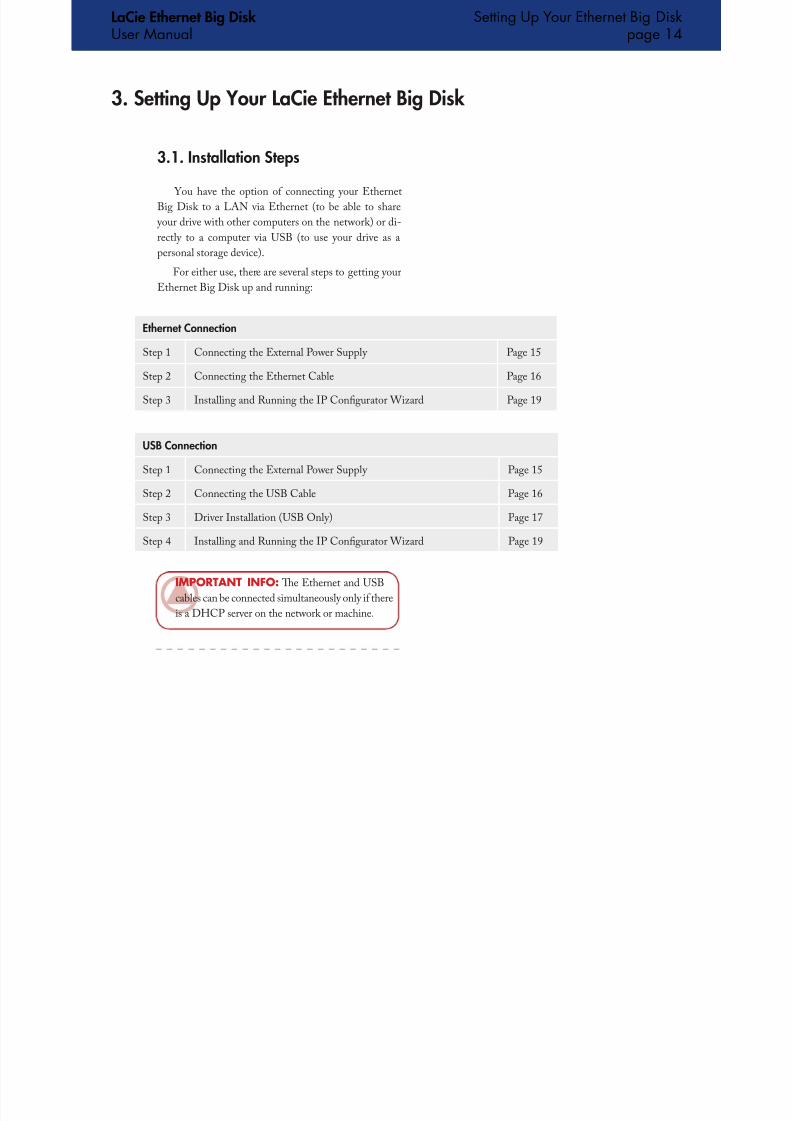
3. Setting Up Your LaCie Ethernet Big Disk
g p gpage
You have the option o connecting your Ethernet
Big Disk to a LAN via Ethernet (to be able to share
your drive with other computers on the network) or di-
rectly to a computer via USB (to use your drive as a
personal storage device).
For either use, there are several steps to getting your
Ethernet Big Disk up and running:
Ethernet Connection
Step 1 Connecting the External Power Supply Page 15
Step 2 Connecting the Ethernet Cable Page 16
Step 3 Installing and Running the IP Congurator Wizard Page 19
3.1. Installation Steps
IMpOrTANT INFO: Te Ethernet and USB
cables can be connected simultaneously only i there
is a DHCP server on the network or machine.
USB Connection
Step 1 Connecting the External Power Supply Page 15
Step 2 Connecting the USB Cable Page 16
Step 3 Driver Installation (USB Only) Page 17
Step 4 Installing and Running the IP Congurator Wizard Page 19
LaCie Ethernet Big Disk Setting Up Your Ethernet Big Disk
8/6/2019 LacieBigDiscEthernetBD
http://slidepdf.com/reader/full/laciebigdiscethernetbd 15/48
gUser Manual page
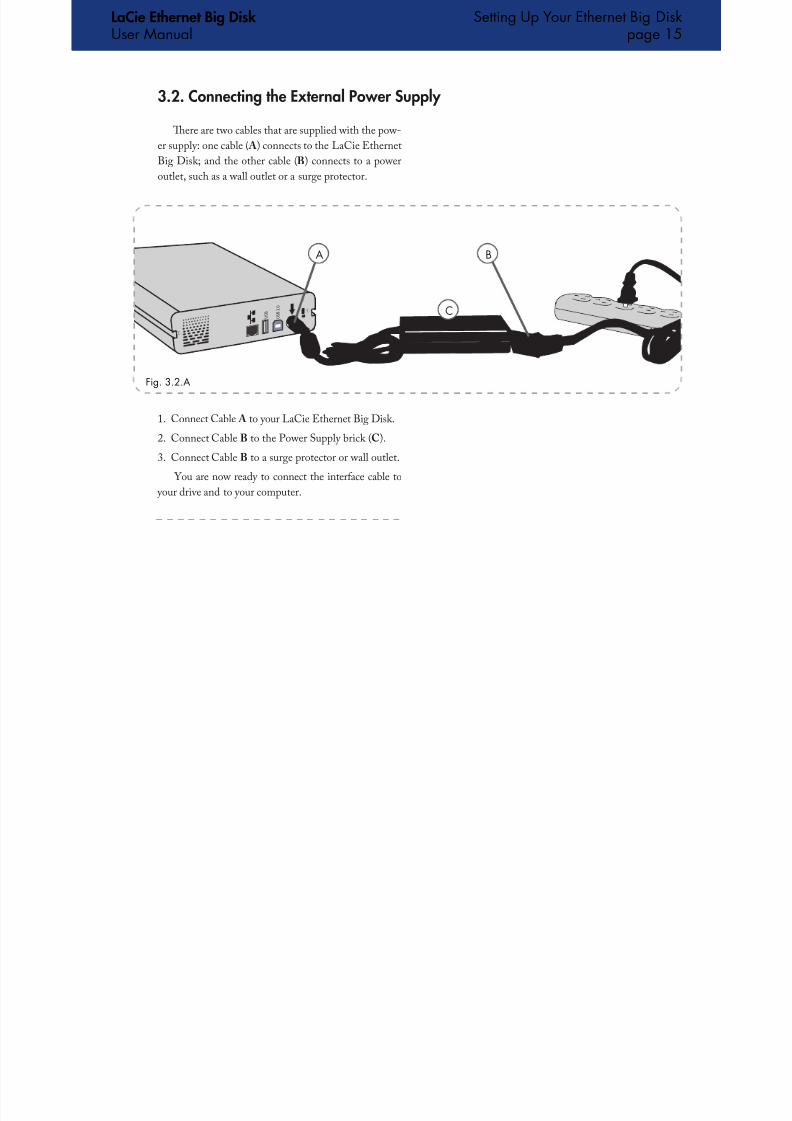
3.2. Connecting the External Power Supply
Tere are two cables that are supplied with the pow-
er supply: one cable ( A) connects to the LaCie Ethernet
Big Disk; and the other cable (B) connects to a power
outlet, such as a wall outlet or a surge protector.
U S B 2 . 0
U S B C
A B
Fig. ..A
Connect Cable A to your LaCie Ethernet Big Disk.
Connect Cable B to the Power Supply brick (C).
Connect Cable B to a surge protector or wall outlet. You are now ready to connect the interace cable to
your drive and to your computer.
1.
2.
3.
LaCie Ethernet Big Disk l
Setting Up Your Ethernet Big Disk
8/6/2019 LacieBigDiscEthernetBD
http://slidepdf.com/reader/full/laciebigdiscethernetbd 16/48
User Manual page
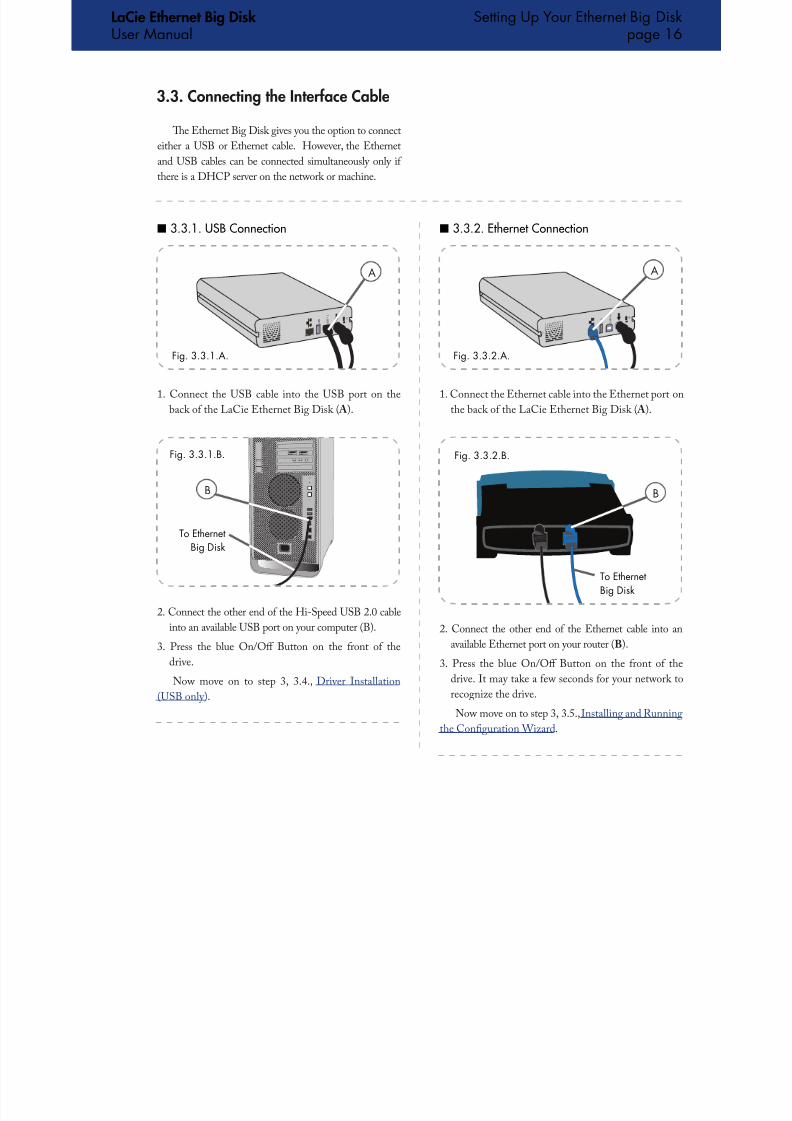
3.3. Connecting the Interace Cable
Te Ethernet Big Disk gives you the option to connect
either a USB or Ethernet cable. However, the Ethernet
and USB cables can be connected simultaneously only i
there is a DHCP server on the network or machine.
U S B 2 . 0
U S B
Fig. ...A.
3.3.1. USB Connection■ 3.3.2. Ethernet Connection■
1. Connect the Ethernet cable into the Ethernet port on
the back o the LaCie Ethernet Big Disk ( A).
1. Connect the USB cable into the USB port on the
back o the LaCie Ethernet Big Disk ( A).
Fig. ...B.
U S B 2 . 0
U S B
Fig. ...B.
Fig. ...A.
A
B
2. Connect the other end o the Hi-Speed USB 2.0 cable
into an available USB port on your computer (B).
3. Press the blue On/O Button on the ront o the
drive.
Now move on to step 3, 3.4., Driver Installation
(USB only).
2. Connect the other end o the Ethernet cable into an
available Ethernet port on your router (B).
3. Press the blue On/O Button on the ront o the
drive. It may take a ew seconds or your network to
recognize the drive.
Now move on to step 3, 3.5., Installing and Running
the Conguration Wizard.
B
To EthernetBig Disk
To Ethernet
Big Disk
A
LaCie Ethernet Big Disk U M l
Setting Up Your Ethernet Big Disk
8/6/2019 LacieBigDiscEthernetBD
http://slidepdf.com/reader/full/laciebigdiscethernetbd 17/48
User Manual page
3.4. Driver Installation (USB Only)
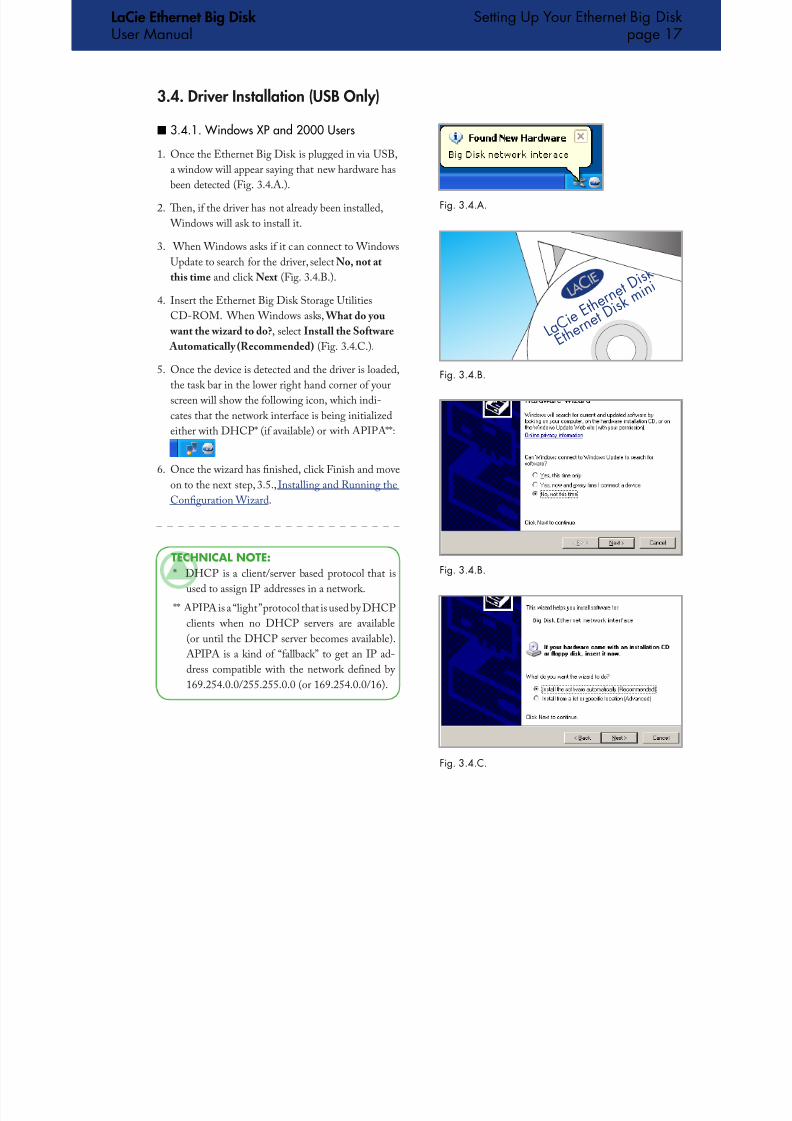
3.4.1. Windows XP and 2000 Users
Once the Ethernet Big Disk is plugged in via USB,
a window will appear saying that new hardware has
been detected (Fig. 3.4.A.).
Ten, i the driver has not already been installed,
Windows will ask to install it.
When Windows asks i it can connect to Windows
Update to search or the driver, select No, not at
this time and click Next (Fig. 3.4.B.).
Insert the Ethernet Big Disk Storage Utilities
CD-ROM. When Windows asks, What do you
want the wizard to do?, select Install the Sotware
Automatically (Recommended) (Fig. 3.4.C.).
Once the device is detected and the driver is loaded,
the task bar in the lower right hand corner o your
screen will show the ollowing icon, which indi-
cates that the network interace is being initialized
either with DHCP* (i available) or with APIPA**:
Once the wizard has nished, click Finish and move
on to the next step, 3.5., Installing and Running the
Conguration Wizard.
■
1.
2.
3.
4.
5.
6.
Fig. ..A.
Fig. ..B.
Fig. ..C.
Fig. ..B.
L a C i
e E t h e
r n e t D
i s k
E t h e r n
e t D i
s k m i
n i
TEChNICAl NOTE:
* DHCP is a client/server based protocol that isused to assign IP addresses in a network.
** APIPA is a “light” protocol that is used by DHCP
clients when no DHCP servers are available
(or until the DHCP server becomes available).
APIPA is a kind o “allback” to get an IP ad-
dress compatible with the network dened by
169.254.0.0/255.255.0.0 (or 169.254.0.0/16).
LaCie Ethernet Big Disk U M l
Setting Up Your Ethernet Big Disk
8/6/2019 LacieBigDiscEthernetBD
http://slidepdf.com/reader/full/laciebigdiscethernetbd 18/48
User Manual page
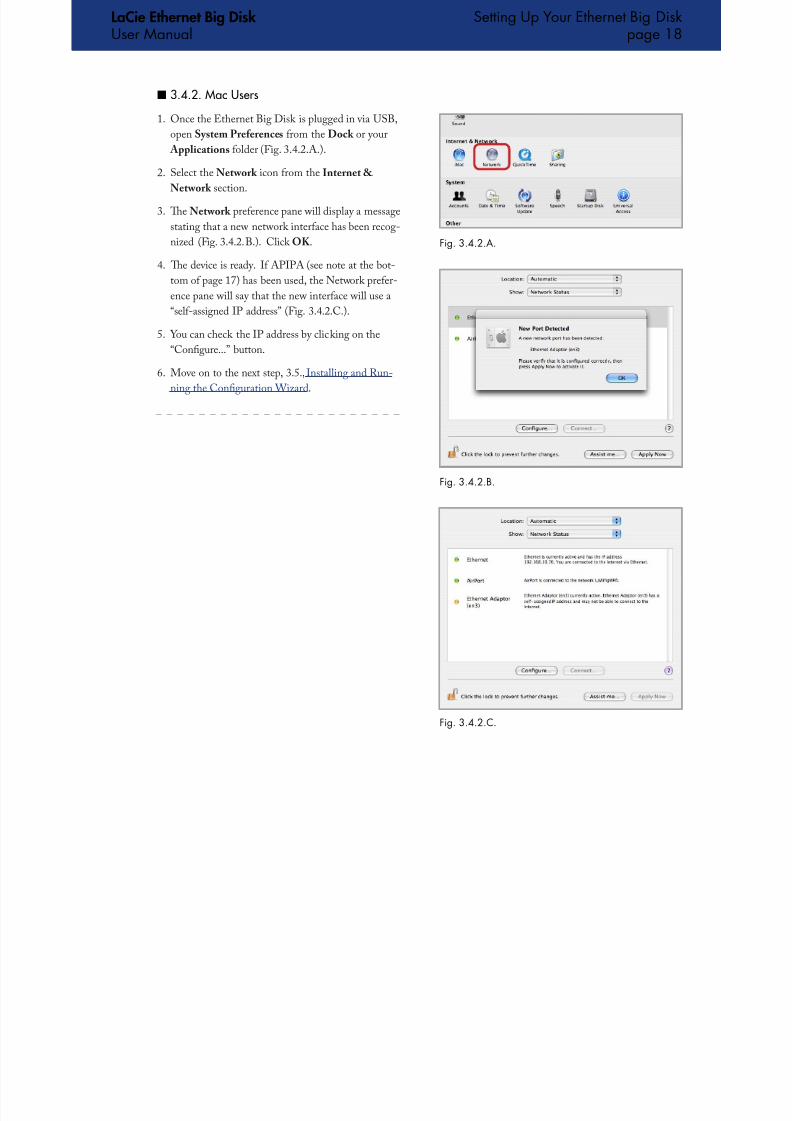
3.4.2. Mac Users
Once the Ethernet Big Disk is plugged in via USB,open System Preerences rom the Dock or your
Applications older (Fig. 3.4.2.A.).
Select the Network icon rom the Internet &
Network section.
Te Network preerence pane will display a message
stating that a new network interace has been recog-nized (Fig. 3.4.2.B.). Click OK.
Te device is ready. I APIPA (see note at the bot-
tom o page 17) has been used, the Network preer-
ence pane will say that the new interace will use a
“sel-assigned IP address” (Fig. 3.4.2.C.).
You can check the IP address by clicking on the
“Congure...” button.
Move on to the next step, 3.5., Installing and Run-
ning the Conguration Wizard.
■
1.
2.
3.
4.
5.
6.
Fig. ...A.
Fig. ...B.
Fig. ...C.
LaCie Ethernet Big Disk User Manual
Setting Up Your Ethernet Big Diskpage
8/6/2019 LacieBigDiscEthernetBD
http://slidepdf.com/reader/full/laciebigdiscethernetbd 19/48
User Manual
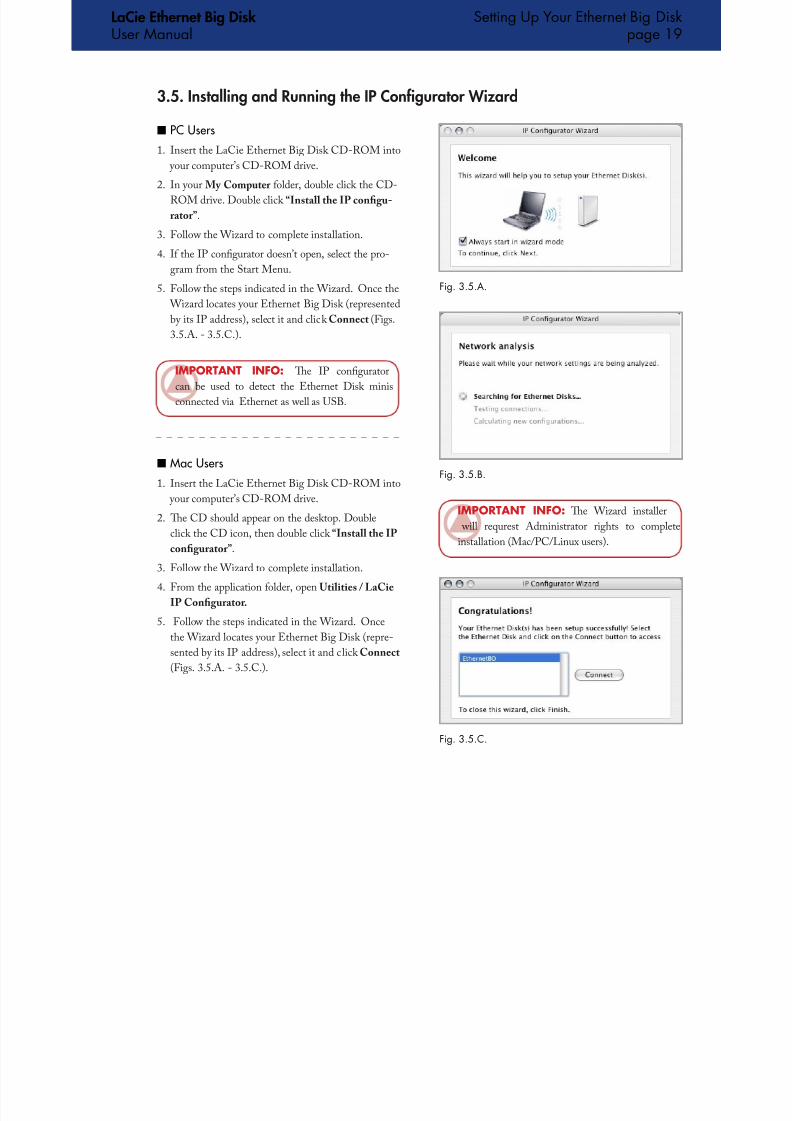
3.5. Installing and Running the IP Confgurator Wizard
PC Users
Insert the LaCie Ethernet Big Disk CD-ROM into
your computer’s CD-ROM drive.
In your My Computer older, double click the CD-
ROM drive. Double click “Install the IP congu-
rator”.
Follow the Wizard to complete installation.
I the IP congurator doesn’t open, select the pro-
gram rom the Start Menu.
Follow the steps indicated in the Wizard. Once the
Wizard locates your Ethernet Big Disk (represented
by its IP address), select it and click Connect (Figs.
3.5.A. - 3.5.C.).
■
1.
2.
3.
4.
5.
Mac UsersInsert the LaCie Ethernet Big Disk CD-ROM into
your computer’s CD-ROM drive.
Te CD should appear on the desktop. Double
click the CD icon, then double click “Install the IP
congurator”.
Follow the Wizard to complete installation.
From the application older, open Utilities / LaCie
IP Congurator.
Follow the steps indicated in the Wizard. Once
the Wizard locates your Ethernet Big Disk (repre-
sented by its IP address), select it and click Connect
(Figs. 3.5.A. - 3.5.C.).
■
1.
2.
3.
4.
5.
Fig. ..A.
Fig. ..B.
IMpOrTANT INFO: Te Wizard installer
will requrest Administrator rights to complete
installation (Mac/PC/Linux users).
Fig. ..C.
IMpOrTANT INFO: Te IP congurator
can be used to detect the Ethernet Disk minis
connected via Ethernet as well as USB.
page
LaCie Ethernet Big Disk User Manual
Setting Up Your Ethernet Big Diskpage 0
8/6/2019 LacieBigDiscEthernetBD
http://slidepdf.com/reader/full/laciebigdiscethernetbd 20/48
User Manual page 0
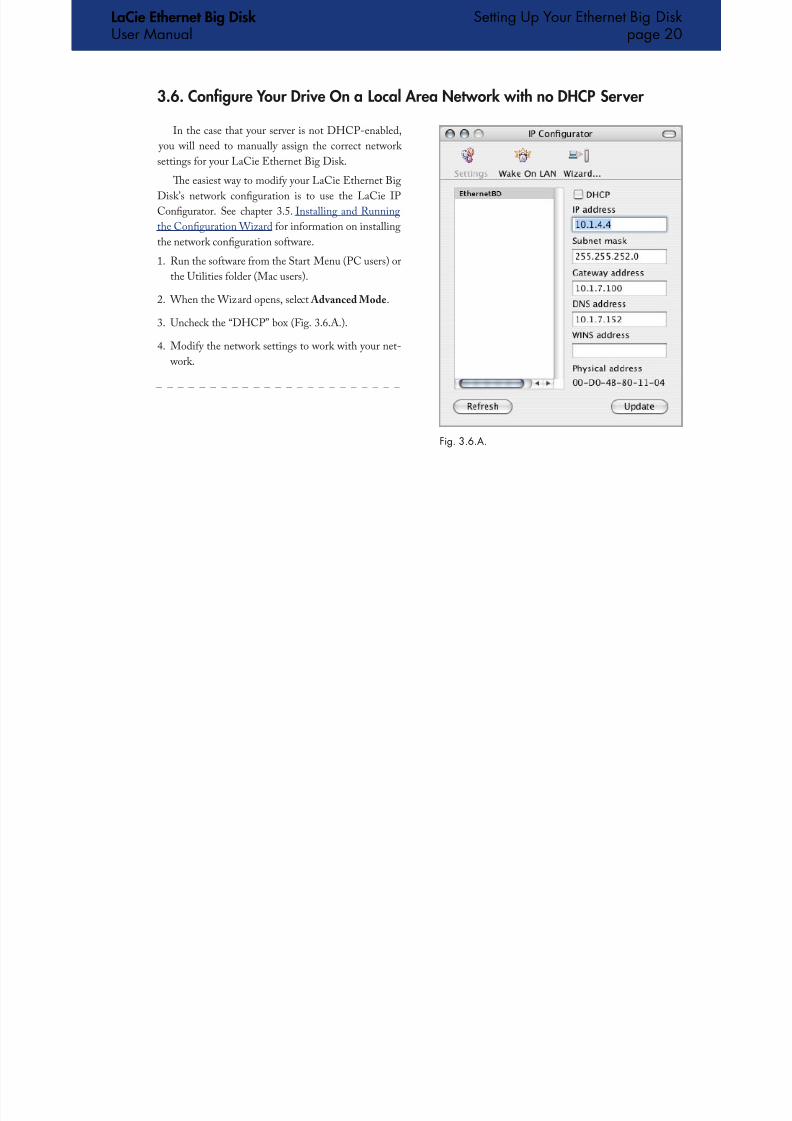
3.6. Confgure Your Drive On a Local Area Network with no DHCP Server
In the case that your server is not DHCP-enabled,
you will need to manually assign the correct network
settings or your LaCie Ethernet Big Disk.
Te easiest way to modiy your LaCie Ethernet Big
Disk’s network conguration is to use the LaCie IP
Congurator. See chapter 3.5. Installing and Running
the Conguration Wizard or inormation on installing
the network conguration sotware.
Run the sotware rom the Start Menu (PC users) or
the Utilities older (Mac users).
When the Wizard opens, select Advanced Mode.
Uncheck the “DHCP” box (Fig. 3.6.A.).
Modiy the network settings to work with your net- work.
1.
2.
3.
4.
Fig. ..A.
LaCie Ethernet Big Disk User Manual
Setting Up Your Ethernet Big Diskpage
8/6/2019 LacieBigDiscEthernetBD
http://slidepdf.com/reader/full/laciebigdiscethernetbd 21/48
User Manual
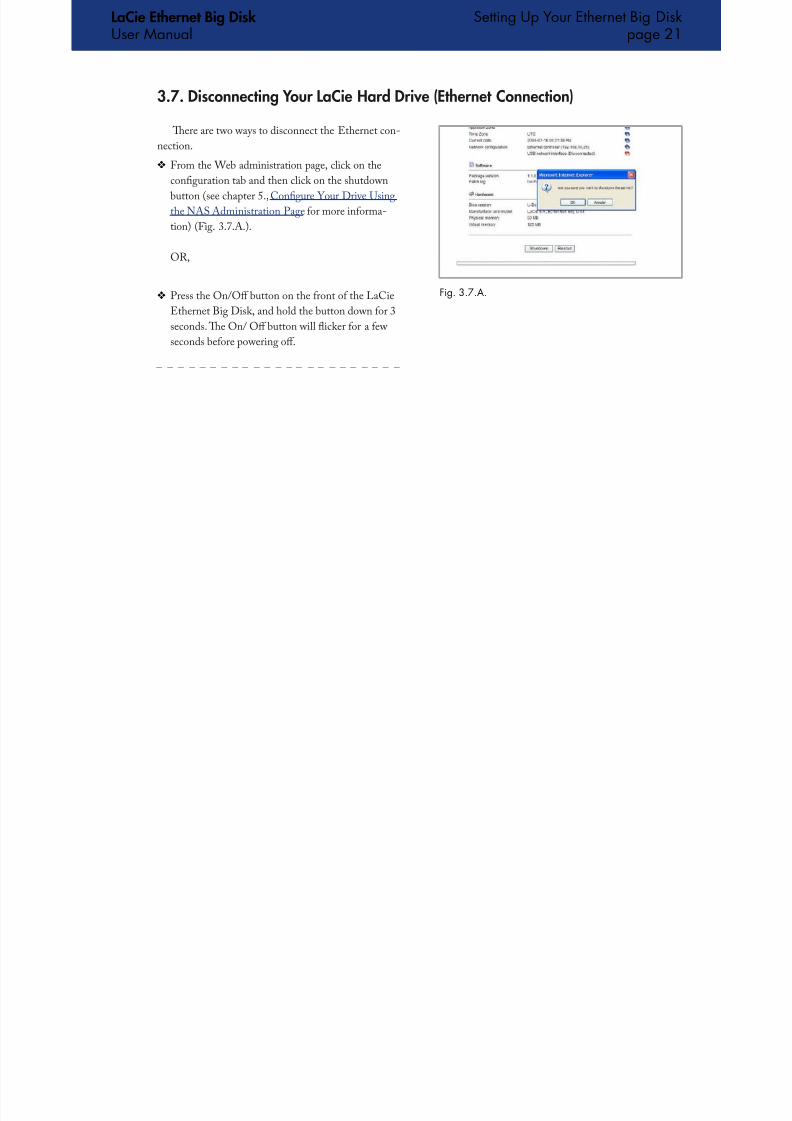
3.7. Disconnecting Your LaCie Hard Drive (Ethernet Connection)
page
Tere are two ways to disconnect the Ethernet con-
nection.
From the Web administration page, click on the
conguration tab and then click on the shutdown
button (see chapter 5., Congure Your Drive Using
the NAS Administration Page or more inorma-
tion) (Fig. 3.7.A.).
OR,
Press the On/O button on the ront o the LaCie
Ethernet Big Disk, and hold the button down or 3
seconds. Te On/ O button will ficker or a ew
seconds beore powering o.
❖
❖ Fig. ..A.
LaCie Ethernet Big Disk User Manual
Accessing the Sharepage
8/6/2019 LacieBigDiscEthernetBD
http://slidepdf.com/reader/full/laciebigdiscethernetbd 22/48
p g
4. Accessing the Shared Storage
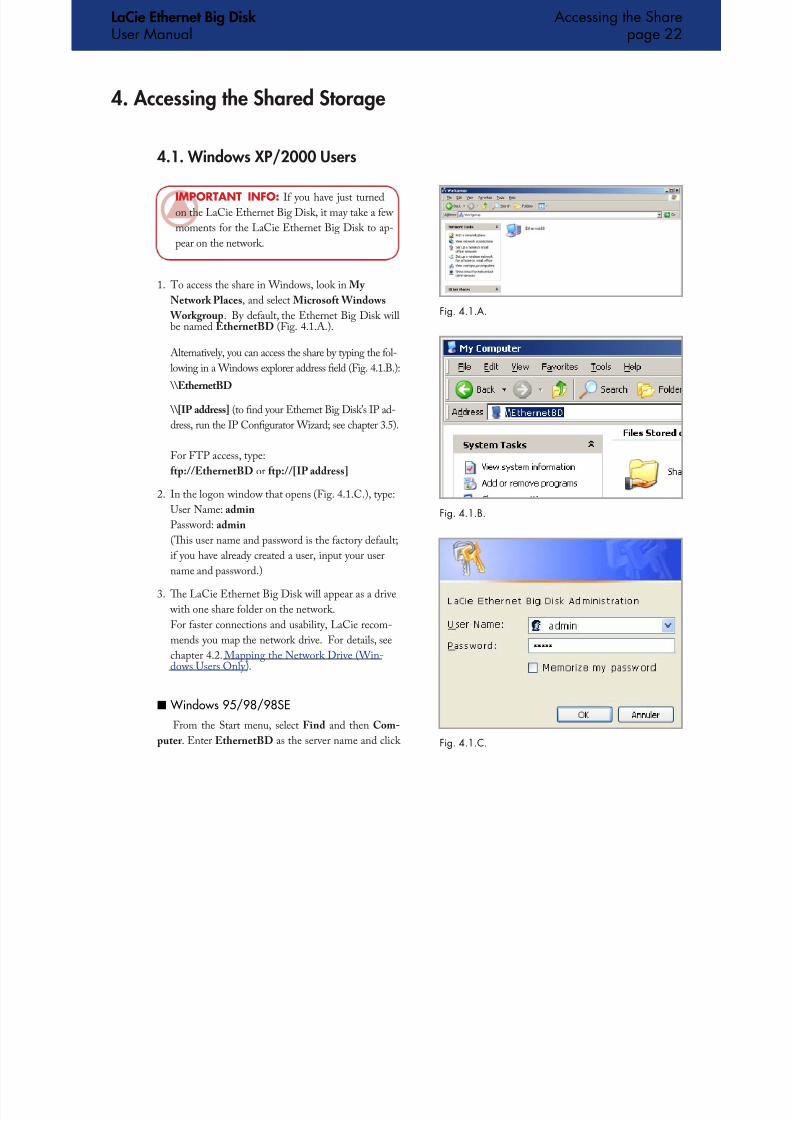
4.1. Windows XP/2000 Users
o access the share in Windows, look in My
Network Places, and select Microsot Windows
Workgroup. By deault, the Ethernet Big Disk willbe named EthernetBD (Fig. 4.1.A.).
Alternatively, you can access the share by typing the ol-
lowing in a Windows explorer address eld (Fig. 4.1.B.):
\\EthernetBD
\\[IP address] (to nd your Ethernet Big Disk’s IP ad-
dress, run the IP Congurator Wizard; see chapter 3.5).
For FP access, type:
tp://EthernetBD or tp://[IP address]
In the logon window that opens (Fig. 4.1.C.), type:
User Name: admin
Password: admin
(Tis user name and password is the actory deault;
i you have already created a user, input your user
name and password.) Te LaCie Ethernet Big Disk will appear as a drive
with one share older on the network.
For aster connections and usability, LaCie recom-
mends you map the network drive. For details, see
chapter 4.2. Mapping the Network Drive (Win-dows Users Only).
Windows 95/98/98SE
From the Start menu, select Find and then Com-
puter . Enter EthernetBD as the server name and click
1.
2.
3.
■
Fig. ..A.
Fig. ..B.
Fig. ..C.
IMpOrTANT INFO: I you have just turned
on the LaCie Ethernet Big Disk, it may take a ew
moments or the LaCie Ethernet Big Disk to ap-pear on the network.
LaCie Ethernet Big Disk User Manual
Accessing the Sharepage
8/6/2019 LacieBigDiscEthernetBD
http://slidepdf.com/reader/full/laciebigdiscethernetbd 23/48
p g
Find Now . Windows will search your system and ater a
little while, the LaCie Ethernet Big Disk should appear
in the result window. Click on the icon, and you will
then be asked to enter a username and password.
Windows Me/2000
For Windows Me and Windows 2000 users, i you
cannot nd the LaCie Ethernet Big Disk rom your
workstation, try using the Windows search tool.
■
From the Start menu, select Search, and then click
on For Files or Folders. In the Search Results window,
select Computers.
In the Search or Computers dialog box, enter the
server name and click the Search Now button. By de-
ault, the LaCie Ethernet Big Disk will be named “Eth-
ernetBD” , and the share “SHARE”.
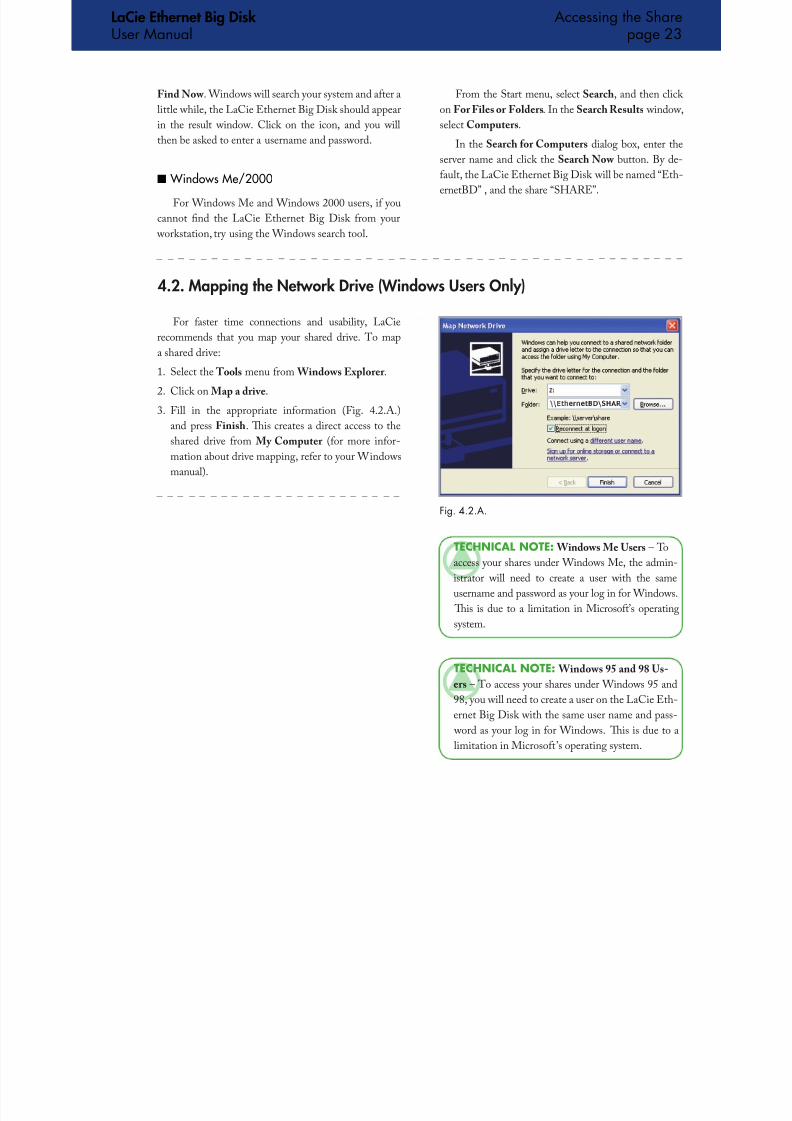
4.2. Mapping the Network Drive (Windows Users Only)
For aster time connections and usability, LaCie
recommends that you map your shared drive. o map
a shared drive:
Select the ools menu rom Windows Explorer .
Click on Map a drive.
Fill in the appropriate inormation (Fig. 4.2.A.)
and press Finish. Tis creates a direct access to the
shared drive rom My Computer (or more inor-
mation about drive mapping, reer to your Windowsmanual).
1.
2.
3.
TEChNICAl NOTE: Windows Me Users – o
access your shares under Windows Me, the admin-
istrator will need to create a user with the sameusername and password as your log in or Windows.
Tis is due to a limitation in Microsot’s operating
system.
TEChNICAl NOTE: Windows 95 and 98 Us-
ers – o access your shares under Windows 95 and
98, you will need to create a user on the LaCie Eth-
ernet Big Disk with the same user name and pass-
word as your log in or Windows. Tis is due to a
limitation in Microsot’s operating system.
Fig. ..A.
LaCie Ethernet Big Disk User Manual
Accessing the Sharepage
8/6/2019 LacieBigDiscEthernetBD
http://slidepdf.com/reader/full/laciebigdiscethernetbd 24/48
Fig. ..C.
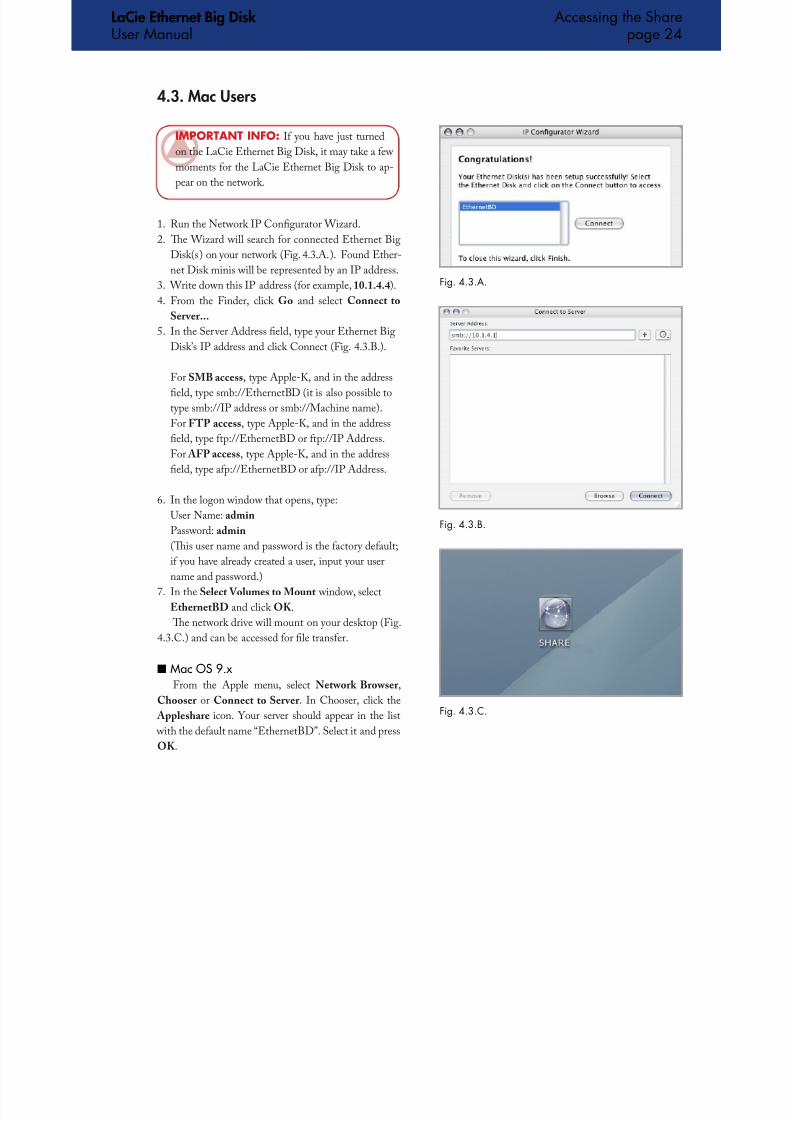
Run the Network IP Congurator Wizard.
Te Wizard will search or connected Ethernet Big
Disk(s) on your network (Fig. 4.3.A.). Found Ether-
net Disk minis will be represented by an IP address.
Write down this IP address (or example, 10.1.4.4).
From the Finder, click Go and select Connect to
Server...
In the Server Address eld, type your Ethernet Big
Disk’s IP address and click Connect (Fig. 4.3.B.).
For SMB access, type Apple-K, and in the address
eld, type smb://EthernetBD (it is also possible to
type smb://IP address or smb://Machine name).
For FP access, type Apple-K, and in the address
eld, type tp://EthernetBD or tp://IP Address.
For AFP access, type Apple-K, and in the address
eld, type ap://EthernetBD or ap://IP Address.
In the logon window that opens, type:
User Name: admin
Password: admin
(Tis user name and password is the actory deault;
i you have already created a user, input your user
name and password.)In the Select Volumes to Mount window, select
EthernetBD and click OK.
Te network drive will mount on your desktop (Fig.
4.3.C.) and can be accessed or le transer.
Mac OS 9.x
From the Apple menu, selectNetwork Browser
,Chooser or Connect to Server . In Chooser, click the
Appleshare icon. Your server should appear in the list
with the deault name “EthernetBD”. Select it and press
OK.
1.
2.
3.
4.
5.
6.
7.
■
IMpOrTANT INFO: I you have just turned
on the LaCie Ethernet Big Disk, it may take a ew
moments or the LaCie Ethernet Big Disk to ap-
pear on the network.
4.3. Mac Users
Fig. ..A.
Fig. ..B.
LaCie Ethernet Big Disk User Manual
Accessing the Sharepage
8/6/2019 LacieBigDiscEthernetBD
http://slidepdf.com/reader/full/laciebigdiscethernetbd 25/48
Under KDE, open konqueror and type in the IP ad-
dress o the LaCie Ethernet Big Disk into the address
eld:
For FP access – tp:// [IP address]
For HP access – http:// [IP address]
For SMB/CIFS access (in order or this to method
to work, the services need to be properly congured)
– smb:// [IP address].
❖
❖
❖
4.4. Linux Users
LaCie Ethernet Big Disk User Manual
Using the NAS Administration Pagepage
8/6/2019 LacieBigDiscEthernetBD
http://slidepdf.com/reader/full/laciebigdiscethernetbd 26/48
5. Confgure Your Drive Using the NAS Administration Page
Te LaCie Ethernet Big Disk eatures an easy-to-
use Web-based tool or conguring the drive and ad-
ministering users.
5.1. Accessing The NAS Administration Page
Fig. ..A.
Fig. ..B.
Tere are two ways o accessing the NAS Admin-
istration page, Using the IP Congurator Wizard, and
Using the Browser.
Using the IP Confgurator WizardSelect the program rom the Start Menu (PC users)
or rom the Applications older (Mac users).
Follow the steps indicated in the Wizard. Once the
Wizard locates your Ethernet Big Disk (represented
by its IP address), select it and click Connect (Figs.
5.1.A. - 5.1.B.).
Once the NAS Administration Page opens in your
deault browser, click on the Administration link.
In the logon window that opens, type:
User Name: admin
Password: admin
(Tis user name and password is the actory deault;
i you have already created a user, input your username and password. Tis is the administration
logon and you can change it or more security i you
choose.) Te NAS Administration page will open
in your deault browser.
■
1.
2.
3.
4.
8/6/2019 LacieBigDiscEthernetBD
http://slidepdf.com/reader/full/laciebigdiscethernetbd 27/48
LaCie Ethernet Big Disk User Manual
Using the NAS Administration Pagepage
8/6/2019 LacieBigDiscEthernetBD
http://slidepdf.com/reader/full/laciebigdiscethernetbd 28/48
5.2. Administering The LaCie Ethernet Big Disk
Ater the login is validated, you will enter the LaCie
Ethernet Big Disk’s Web Administration Page. Along
the top o the page are a series o tabs (Conguration,
Network, Disk, Shares, Users, Media and Status), rom
which you can navigate and congure the LaCie Eth-
ernet Big Disk.
Te rst page that appears will give you the oppor-
tunity to select the language that you wish to use or the
Web Administration Page. Simply use the pull-down
menu beside the Language selector to nd your lan-
guage, and then click Submit Changes to activate your
language. You may come back to this page at any time
by clicking on the language’s fag, located just below the
program tabs (Fig. 5.2.1.A.).
5.2.1. Setting The User Language■
Fig. ...A.
Fig. ...A.
You can close the Web Administration program atany point while the Web page is open by clicking Log
O, located just below the tabs in the upper-right hand
corner o the screen.
Ater clicking Log Of , click on the Close Window
button to leave the program (Fig. 5.2.2.A.).
5.2.2. Log O ■
TEChNICAl NOTE: Depending on your
browser settings, clicking the “Log O ” button may
or may not close the browser window.
LaCie Ethernet Big Disk User Manual
Using the NAS Administration Pagepage

8/6/2019 LacieBigDiscEthernetBD
http://slidepdf.com/reader/full/laciebigdiscethernetbd 29/48
Fig. ..A.
5.3. Confguration Menu
By clicking on the Conguration tab, you will be
brought to the main page o the Conguration menu.
From this window you can see details about your net-
work, sotware and hardware, while also being able to
restart or shutdown your LaCie Ethernet Big Disk (Fig.
5.3.A).
Here you can change the Ethernet Big Disk’s name.
ype the name and click the Submit Changes button.
Te deault machine name or the LaCie Ethernet Big
Disk is “EthernetBD” (Fig. 5.3.1.A.).
5.3.1. Machine Name■
Fig. ...A.
IMpOrTANT INFO: Te Conguration page
allows you to check the sotware version o your
drive.
TEChNICAl NOTE: Machine name changes
will be registered in the local DNS servers ONLY
ater a restart.
IMpOrTANT INFO: I you intend to use more
than one Ethernet Big Disk on your network, you
must change the deault machine name. Each
Ethernet Big Disk must have a unique name.
LaCie Ethernet Big Disk User Manual
Using the NAS Administration Pagepage 0
8/6/2019 LacieBigDiscEthernetBD
http://slidepdf.com/reader/full/laciebigdiscethernetbd 30/48
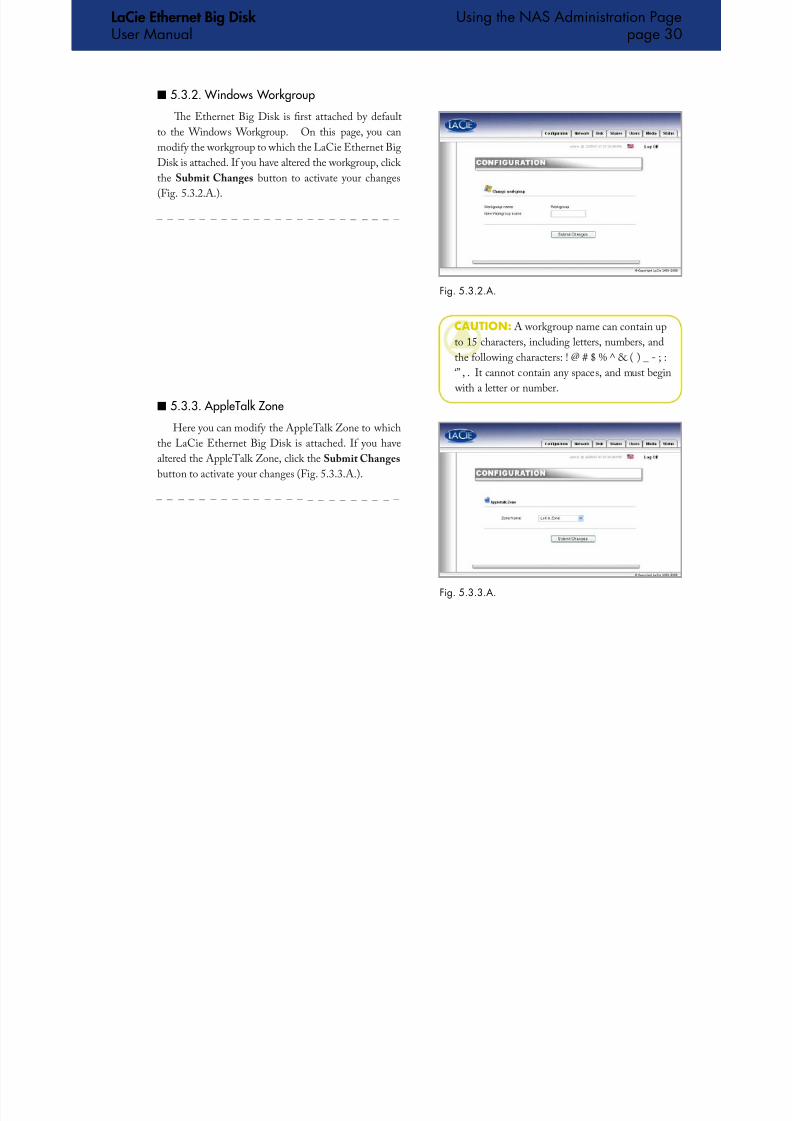
Te Ethernet Big Disk is rst attached by deaultto the Windows Workgroup. On this page, you can
modiy the workgroup to which the LaCie Ethernet Big
Disk is attached. I you have altered the workgroup, click
the Submit Changes button to activate your changes
(Fig. 5.3.2.A.).
5.3.2. Windows Workgroup■
Fig. ...A.
CAUTION: A workgroup name can contain up
to 15 characters, including letters, numbers, and
the ollowing characters: ! @ # $ % ^ & ( ) _ - ; :
‘” , . It cannot contain any spaces, and must begin
with a letter or number.
Here you can modiy the Applealk Zone to which
the LaCie Ethernet Big Disk is attached. I you have
altered the Applealk Zone, click the Submit Changes button to activate your changes (Fig. 5.3.3.A.).
5.3.3. AppleTalk Zone■
Fig. ...A.
LaCie Ethernet Big Disk User Manual
Using the NAS Administration Pagepage

8/6/2019 LacieBigDiscEthernetBD
http://slidepdf.com/reader/full/laciebigdiscethernetbd 31/48
Here you can modiy the ime Zone to which theLaCie Ethernet Big Disk is attached.
I you have altered the ime Zone, click the Sub-
mit Changes button to activate your changes (Fig.
5.3.4.A.).
5.3.4. Select a Time Zone■
Fig. ...A.
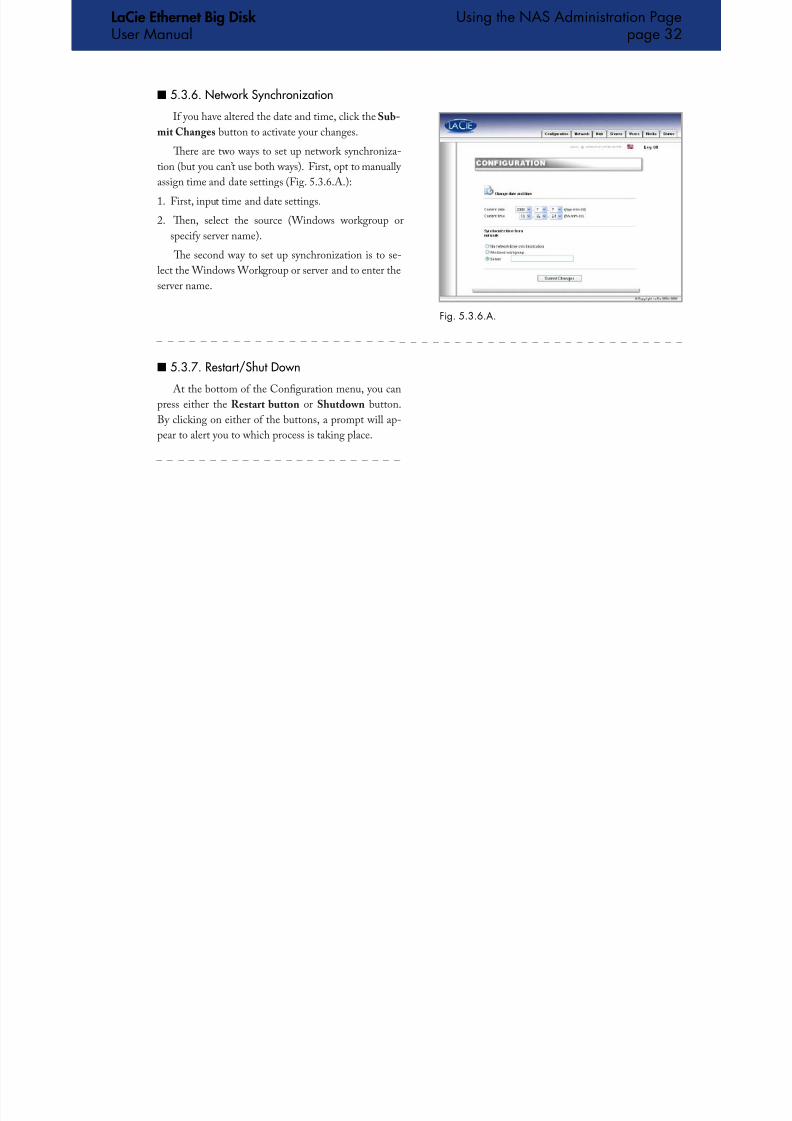
Here you can modiy the date and time settings o
the LaCie Ethernet Big Disk. I you have altered the
date and time, click the Submit Changes button to ac-tivate your changes (Fig. 5.3.5.A.).
5.3.5. Change Date and Time■
Fig. ...A.
LaCie Ethernet Big Disk User Manual
Using the NAS Administration Pagepage
8/6/2019 LacieBigDiscEthernetBD
http://slidepdf.com/reader/full/laciebigdiscethernetbd 32/48
I you have altered the date and time, click the Sub-mit Changes button to activate your changes.
Tere are two ways to set up network synchroniza-
tion (but you can’t use both ways). First, opt to manually
assign time and date settings (Fig. 5.3.6.A.):
First, input time and date settings.
Ten, select the source (Windows workgroup or
speciy server name). Te second way to set up synchronization is to se-
lect the Windows Workgroup or server and to enter the
server name.
1.
2.
5.3.6. Network Synchronization■
Fig. ...A.
At the bottom o the Conguration menu, you can
press either the Restart button or Shutdown button.
By clicking on either o the buttons, a prompt will ap-
pear to alert you to which process is taking place.
5.3.7. Restart/Shut Down■
LaCie Ethernet Big Disk User Manual
Using the NAS Administration Pagepage

8/6/2019 LacieBigDiscEthernetBD
http://slidepdf.com/reader/full/laciebigdiscethernetbd 33/48
Fig. ..A.
5.4. Network Menu
On this page you can view inormation about the
LaCie Ethernet Big Disk’s IP conguration. From this
page, you can also modiy the IP conguration o the
LaCie Ethernet Big Disk (Fig. 5.4.A.).
On this page, the connected interace will be repre-
sented by a blue button, and the disconnected interace
by a red button. Only settings or connected interaces
can be modied.
On this page, you can check which interace is
connected, either the Ethernet, or USB or both and
then to congure the connection. Tere are two alternative methods or determining
the LaCie Ethernet Big Disk’s IP address: Obtain
Conguration From DHCP Server or Congure
Manually (Fig. 5.4.1.A.).
Obtain Confguration From DHCP Server
Tis method is used when the LaCie Ethernet BigDisk is connected to a DHCP enabled network with a
DHCP server. In this case, the server automatically as-
signs the IP address or the LaCie Ethernet Big Disk.
Confgure Manually
Tis method is used when the LaCie Ethernet Big
Disk is connected to a non-DHCP enabled network.In this case, you will need to manually assign the cor-
rect network settings or your LaCie Ethernet Big Disk.
Please reer to your network administrator or more in-
ormation about your network and which parameters you
should use. For more inormation, reer to chapter 3.6.,
Congure Your Drive On a Local Area Network with no
DHCP Server.
5.4.1. IP Confguration■
Fig. ...B.
TEChNICAl NOTE: I you have a small home
network with a router, the Gateway and DNS
Server address will be the local IP address o your
router.
LaCie Ethernet Big Disk User Manual
Using the NAS Administration Pagepage
8/6/2019 LacieBigDiscEthernetBD
http://slidepdf.com/reader/full/laciebigdiscethernetbd 34/48
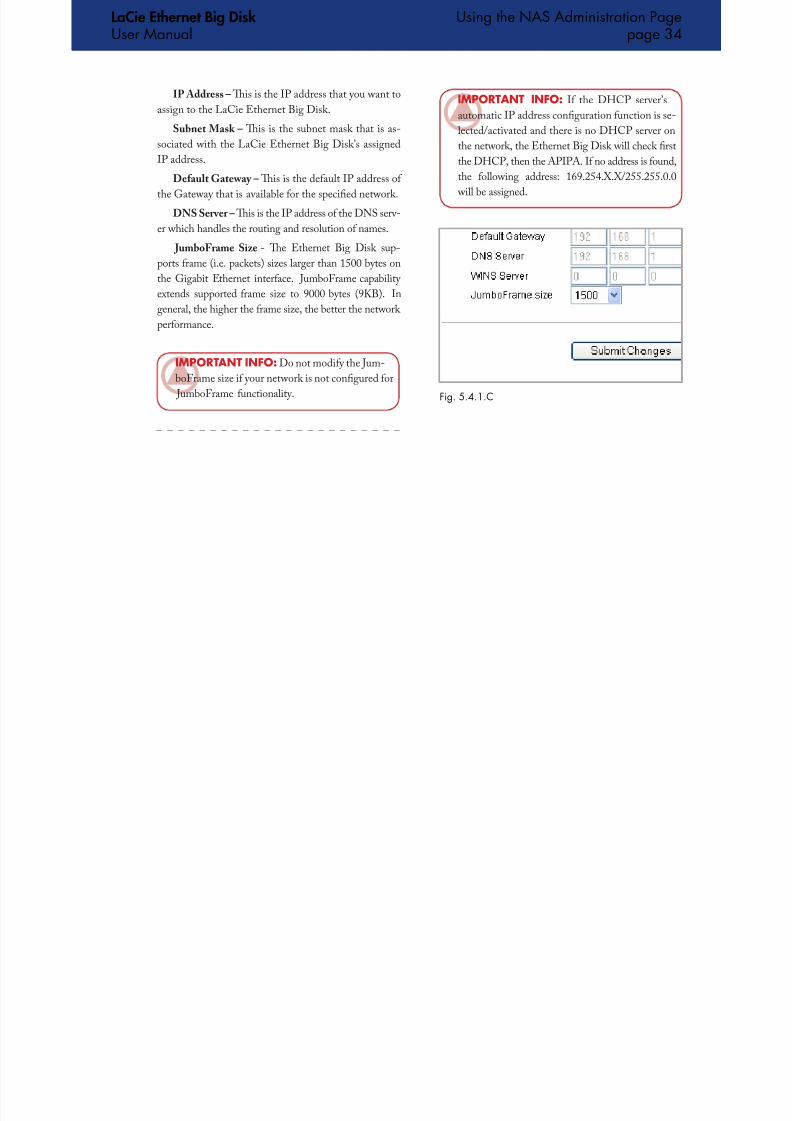
IP Address – Tis is the IP address that you want to
assign to the LaCie Ethernet Big Disk.
Subnet Mask – Tis is the subnet mask that is as-
sociated with the LaCie Ethernet Big Disk’s assigned
IP address.
Deault Gateway – Tis is the deault IP address o
the Gateway that is available or the specied network.
DNS Server – Tis is the IP address o the DNS serv-
er which handles the routing and resolution o names.
JumboFrame Size - Te Ethernet Big Disk sup-
ports rame (i.e. packets) sizes larger than 1500 bytes on
the Gigabit Ethernet interace. JumboFrame capability
extends supported rame size to 9000 bytes (9KB). In
general, the higher the rame size, the better the network
perormance.
IMpOrTANT INFO: I the DHCP server’s
automatic IP address conguration unction is se-
lected/activated and there is no DHCP server on
the network, the Ethernet Big Disk will check rst
the DHCP, then the APIPA. I no address is ound,
the ollowing address: 169.254.X.X/255.255.0.0
will be assigned.
Fig. ...C
IMpOrTANT INFO: Do not modiy the Jum-
boFrame size i your network is not congured or
JumboFrame unctionality.
LaCie Ethernet Big Disk User Manual
Using the NAS Administration Pagepage
8/6/2019 LacieBigDiscEthernetBD
http://slidepdf.com/reader/full/laciebigdiscethernetbd 35/48
Fig. ...C.
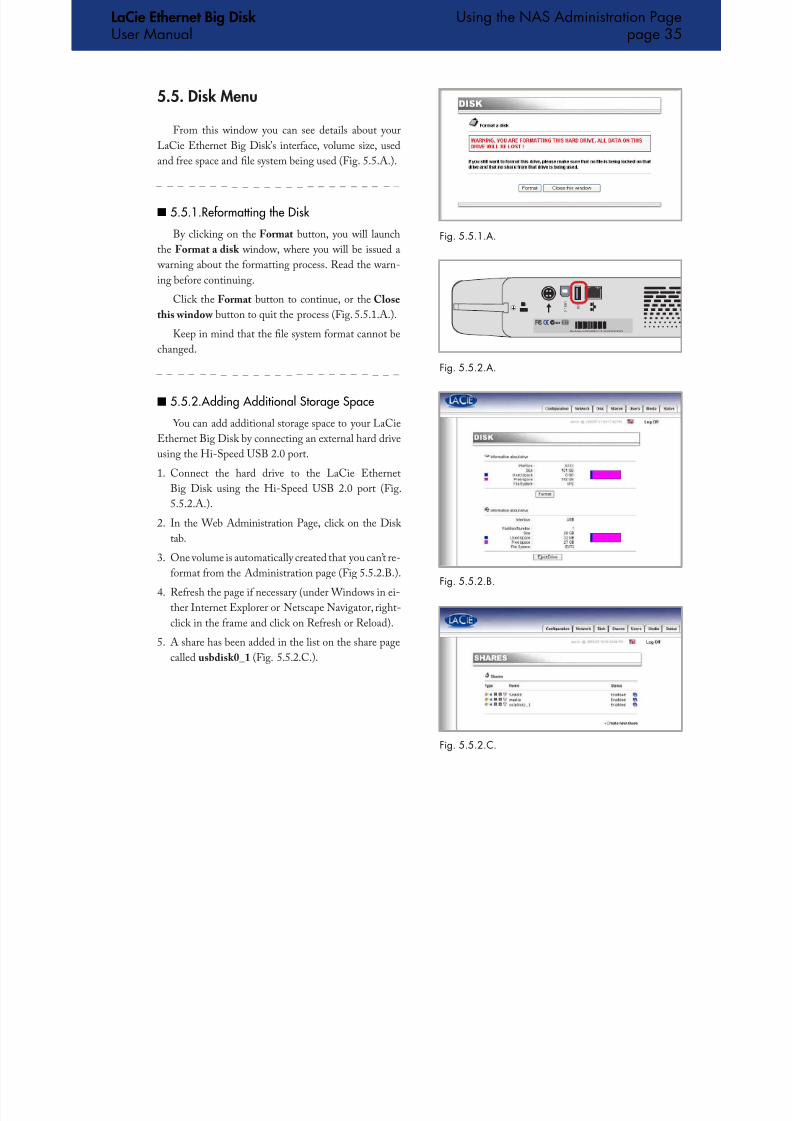
5.5. Disk Menu
From this window you can see details about your
LaCie Ethernet Big Disk’s interace, volume size, used
and ree space and le system being used (Fig. 5.5.A.).
5.5.1.Reormatting the Disk■
By clicking on the Format button, you will launchthe Format a disk window, where you will be issued a
warning about the ormatting process. Read the warn-
ing beore continuing.
Click the Format button to continue, or the Close
this window button to quit the process (Fig. 5.5.1.A.).
Keep in mind that the le system ormat cannot be
changed.
Fig. ...A.
5.5.2.Adding Additional Storage Space■
You can add additional storage space to your LaCie
Ethernet Big Disk by connecting an external hard drive
using the Hi-Speed USB 2.0 port.
Connect the hard drive to the LaCie Ethernet
Big Disk using the Hi-Speed USB 2.0 port (Fig.
5.5.2.A.).
In the Web Administration Page, click on the Disk
tab.
One volume is automatically created that you can’t re-
ormat rom the Administration page (Fig 5.5.2.B.).
Reresh the page i necessary (under Windows in ei-
ther Internet Explorer or Netscape Navigator, right-
click in the rame and click on Reresh or Reload).
A share has been added in the list on the share page
called usbdisk0_1 (Fig. 5.5.2.C.).
1.
2.
3.
4.
5.
Fig. ...B.
MacAddress:00D04B801220 SN:XXXXXXXXXX
U S B
2 . 0
U S B
Fig. ...A.
LaCie Ethernet Big Disk User Manual
Using the NAS Administration Pagepage
8/6/2019 LacieBigDiscEthernetBD
http://slidepdf.com/reader/full/laciebigdiscethernetbd 36/48
Fig. ..A.
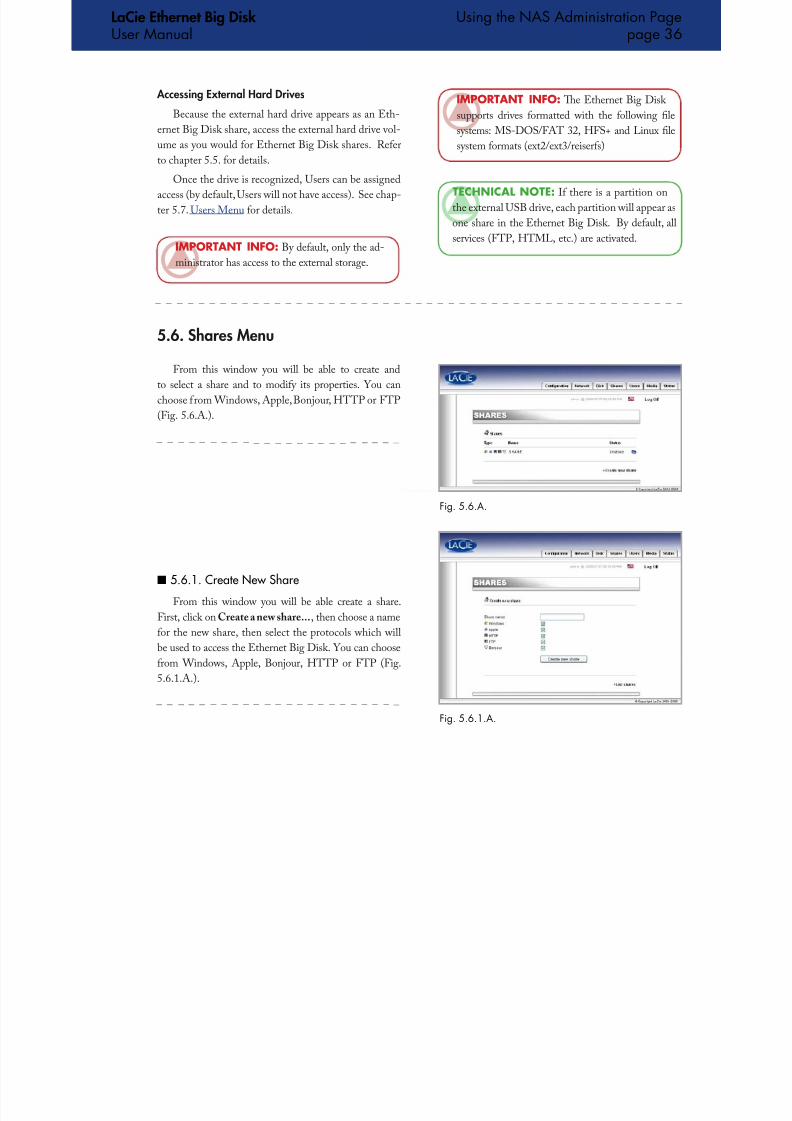
5.6. Shares Menu
From this window you will be able to create and
to select a share and to modiy its properties. You can
choose rom Windows, Apple, Bonjour, HP or FP
(Fig. 5.6.A.).
From this window you will be able create a share.
First, click on Create a new share..., then choose a name
or the new share, then select the protocols which will
be used to access the Ethernet Big Disk. You can choose
rom Windows, Apple, Bonjour, HP or FP (Fig.
5.6.1.A.).
5.6.1. Create New Share■
Fig. ...A.
IMpOrTANT INFO: Te Ethernet Big Disk
supports drives ormatted with the ollowing le
systems: MS-DOS/FA 32, HFS+ and Linux le
system ormats (ext2/ext3/reisers)
TEChNICAl NOTE: I there is a partition on
the external USB drive, each partition will appear as
one share in the Ethernet Big Disk. By deault, all
services (FP, HML, etc.) are activated.
Accessing External Hard Drives
Because the external hard drive appears as an Eth-
ernet Big Disk share, access the external hard drive vol-
ume as you would or Ethernet Big Disk shares. Reer
to chapter 5.5. or details.
Once the drive is recognized, Users can be assigned
access (by deault, Users will not have access). See chap-
ter 5.7. Users Menu or details.
IMpOrTANT INFO: By deault, only the ad-
ministrator has access to the external storage.
LaCie Ethernet Big Disk User Manual
Using the NAS Administration Pagepage
8/6/2019 LacieBigDiscEthernetBD
http://slidepdf.com/reader/full/laciebigdiscethernetbd 37/48
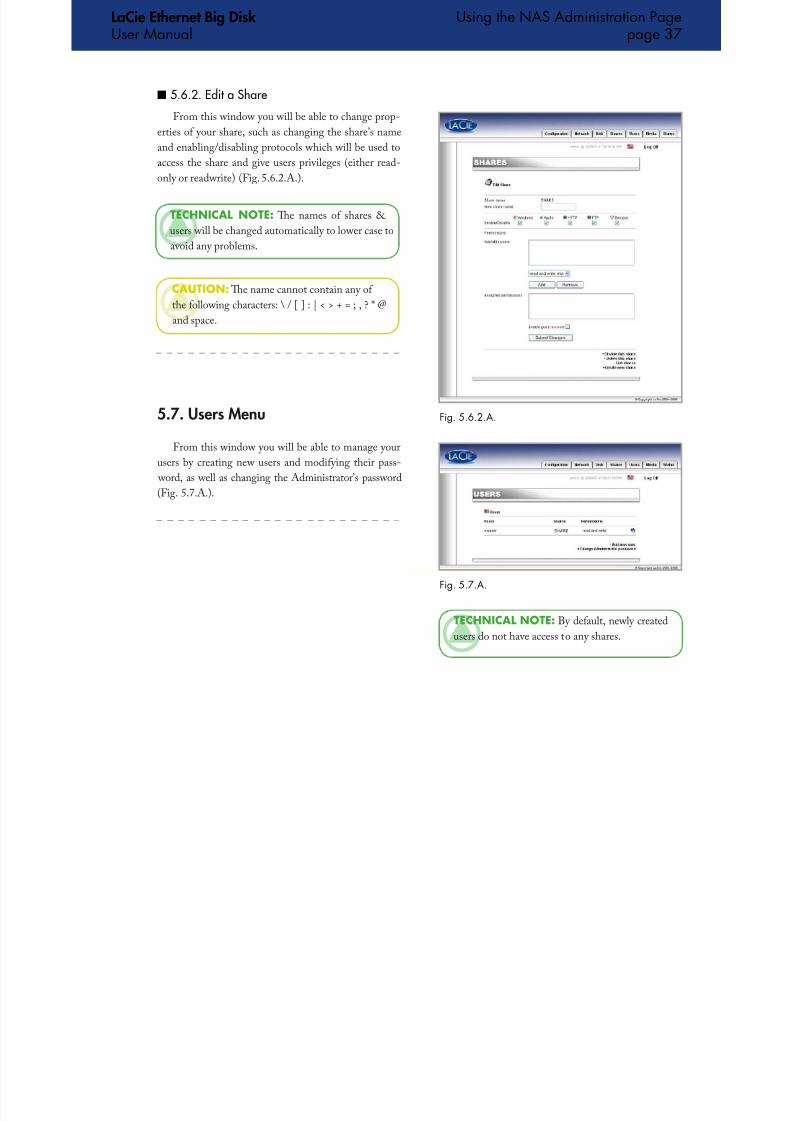
From this window you will be able to change prop-
erties o your share, such as changing the share’s name
and enabling/disabling protocols which will be used to
access the share and give users privileges (either read-
only or readwrite) (Fig. 5.6.2.A.).
5.6.2. Edit a Share■
Fig. ...A.
Fig. ..A.
5.7. Users Menu
TEChNICAl NOTE: By deault, newly created
users do not have access to any shares.
From this window you will be able to manage your
users by creating new users and modiying their pass- word, as well as changing the Administrator’s password
(Fig. 5.7.A.).
TEChNICAl NOTE: Te names o shares &
users will be changed automatically to lower case to
avoid any problems.
CAUTION: Te name cannot contain any o
the ollowing characters: \ / [ ] : | < > + = ; , ? * @
and space.
LaCie Ethernet Big Disk User Manual
Using the NAS Administration Pagepage
8/6/2019 LacieBigDiscEthernetBD
http://slidepdf.com/reader/full/laciebigdiscethernetbd 38/48
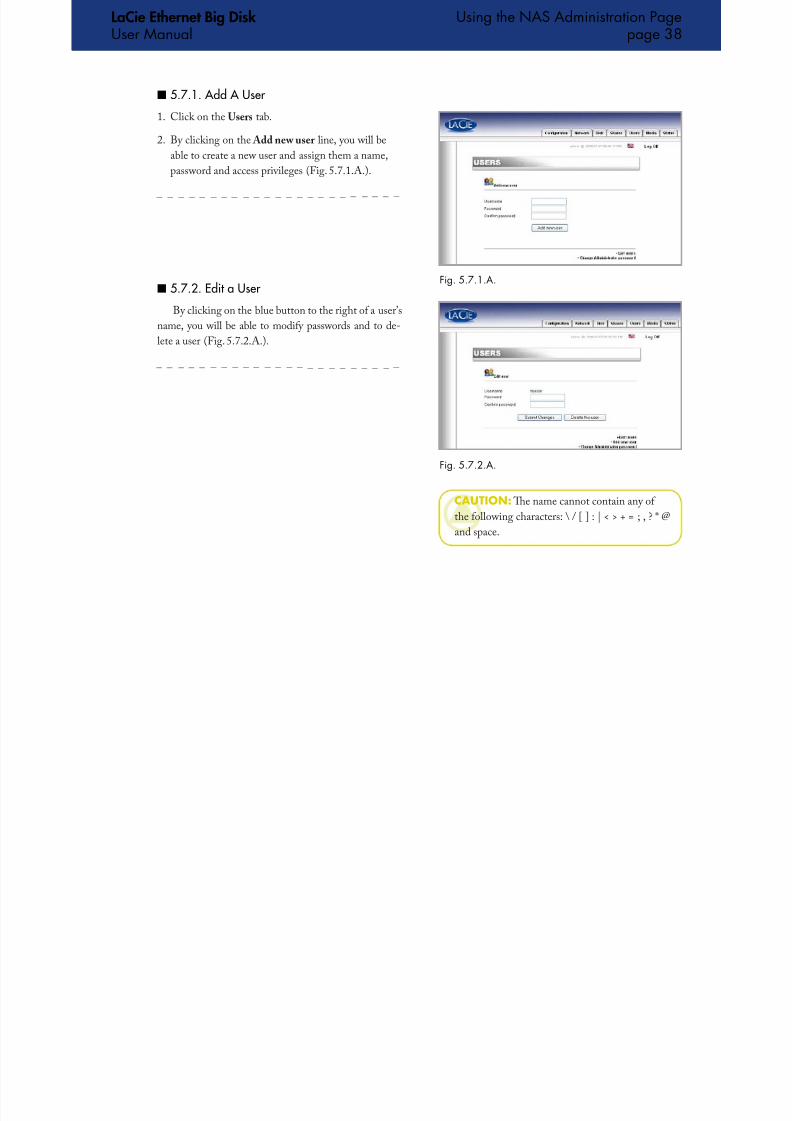
5.7.1. Add A User■
Fig. ...A.
By clicking on the blue button to the right o a user’s
name, you will be able to modiy passwords and to de-
lete a user (Fig. 5.7.2.A.).
5.7.2. Edit a User■
Click on the Users tab.
By clicking on the Add new user line, you will be
able to create a new user and assign them a name,
password and access privileges (Fig. 5.7.1.A.).
1.
2.
Fig. ...A.
CAUTION: Te name cannot contain any o
the ollowing characters: \ / [ ] : | < > + = ; , ? * @
and space.
LaCie Ethernet Big Disk User Manual
Using the NAS Administration Pagepage
8/6/2019 LacieBigDiscEthernetBD
http://slidepdf.com/reader/full/laciebigdiscethernetbd 39/48
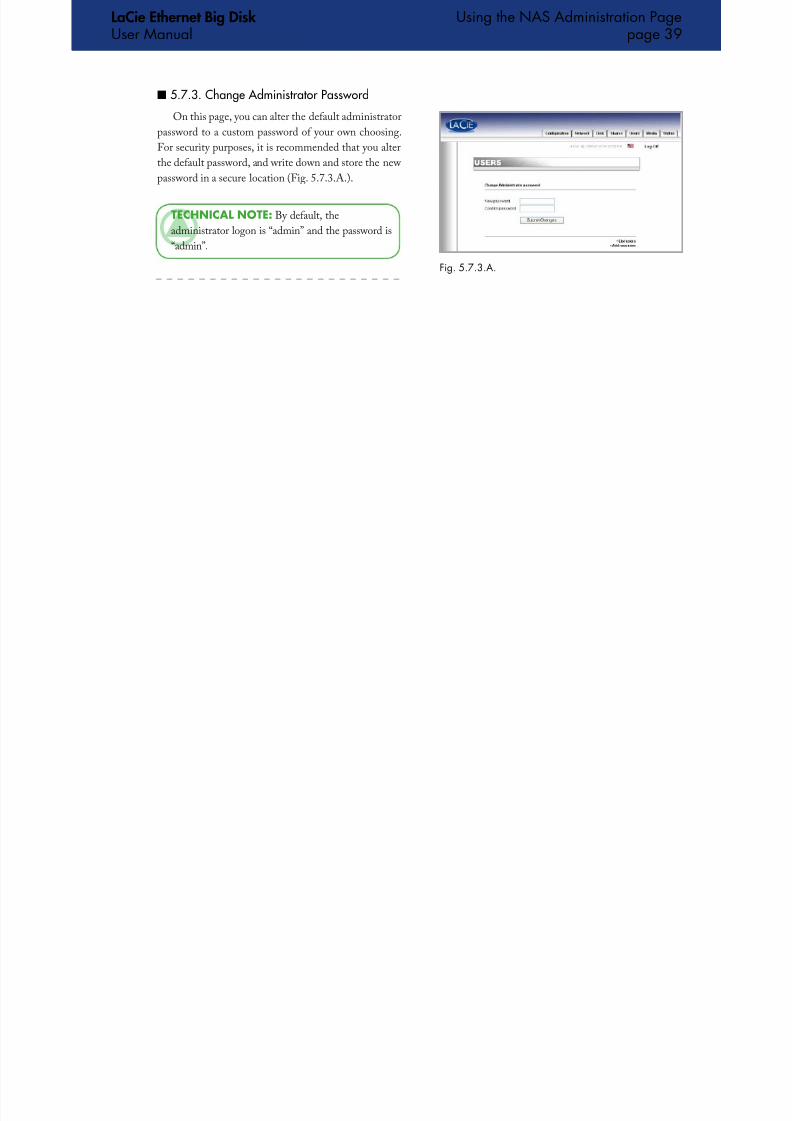
On this page, you can alter the deault administrator
password to a custom password o your own choosing.
For security purposes, it is recommended that you alter
the deault password, and write down and store the new
password in a secure location (Fig. 5.7.3.A.).
5.7.3. Change Administrator Password■
Fig. ...A.
TEChNICAl NOTE: By deault, the
administrator logon is “admin” and the password is
“admin”.
LaCie Ethernet Big Disk User Manual
Using the NAS Administration Pagepage 0
8/6/2019 LacieBigDiscEthernetBD
http://slidepdf.com/reader/full/laciebigdiscethernetbd 40/48
Fig. ..A.
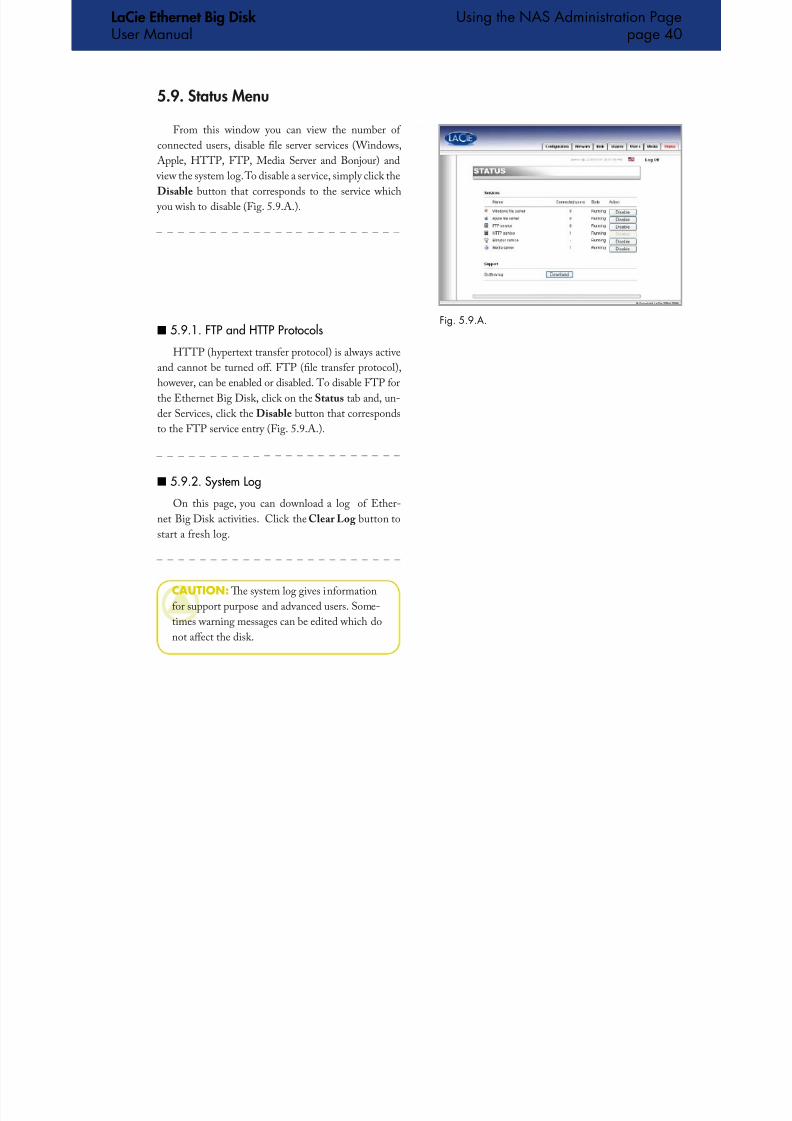
5.9. Status Menu
From this window you can view the number o
connected users, disable le server services (Windows,
Apple, HP, FP, Media Server and Bonjour) and
view the system log. o disable a service, simply click the
Disable button that corresponds to the service which
you wish to disable (Fig. 5.9.A.).
5.9.1. FTP and HTTP Protocols■
HP (hypertext transer protocol) is always activeand cannot be turned o. FP (le transer protocol),
however, can be enabled or disabled. o disable FP or
the Ethernet Big Disk, click on the Status tab and, un-
der Services, click the Disable button that corresponds
to the FP service entry (Fig. 5.9.A.).
On this page, you can download a log o Ether-
net Big Disk activities. Click the Clear Log button to
start a resh log.
5.9.2. System Log■
CAUTION: Te system log gives inormation
or support purpose and advanced users. Some-
times warning messages can be edited which do
not aect the disk.
LaCie Ethernet Big Disk User Manual
Media Server Functionalitypage
8/6/2019 LacieBigDiscEthernetBD
http://slidepdf.com/reader/full/laciebigdiscethernetbd 41/48
6. Ethernet Big Disk Media Server Functionality
Tanks to the Ethernet Big Disk’s UPnP (Universal
Plug and Play) compatibility, it can act as a multimedia
server, managing access to content and making it avail-
able to a digital media player (DMP).Because the Ethernet Big Disk is UPnP, it can dy-
namically:
Join automatically a home entertainment network,
Convey its capabilities to other UPnP devices
Learn about the presence and capabilities o other
devices
Te Ethernet Big Disk media server can stream any
content – whether it be music, videos, or photos – to a
Digital Media Adapter (DMA) connected to a display
(V) or audio system.
Te Ethernet Big Disk media server will automati-
cally organize music, photo, video les using embedded
metadata inormation to allow quick and easy display
rom any digital media adapter.
Once enabled and congured, the Ethernet Big Disk
media server will allow you to enjoy your music, photos
and video without turning on your computer.
❖
❖
❖
Digital Home Network: Components■
Network (Ethernet or Wi)
Media Server Computer/NAS (Ethernet BigDisk)
Digital Media Adapter/Player (DMA) connect-
ed to V/Stereo
Multimedia content (photos, music, videos)
❖
❖
❖
❖
6.1. About UPnP Media Server
LaCie Ethernet Big Disk User Manual
Media Server Functionalitypage
8/6/2019 LacieBigDiscEthernetBD
http://slidepdf.com/reader/full/laciebigdiscethernetbd 42/48
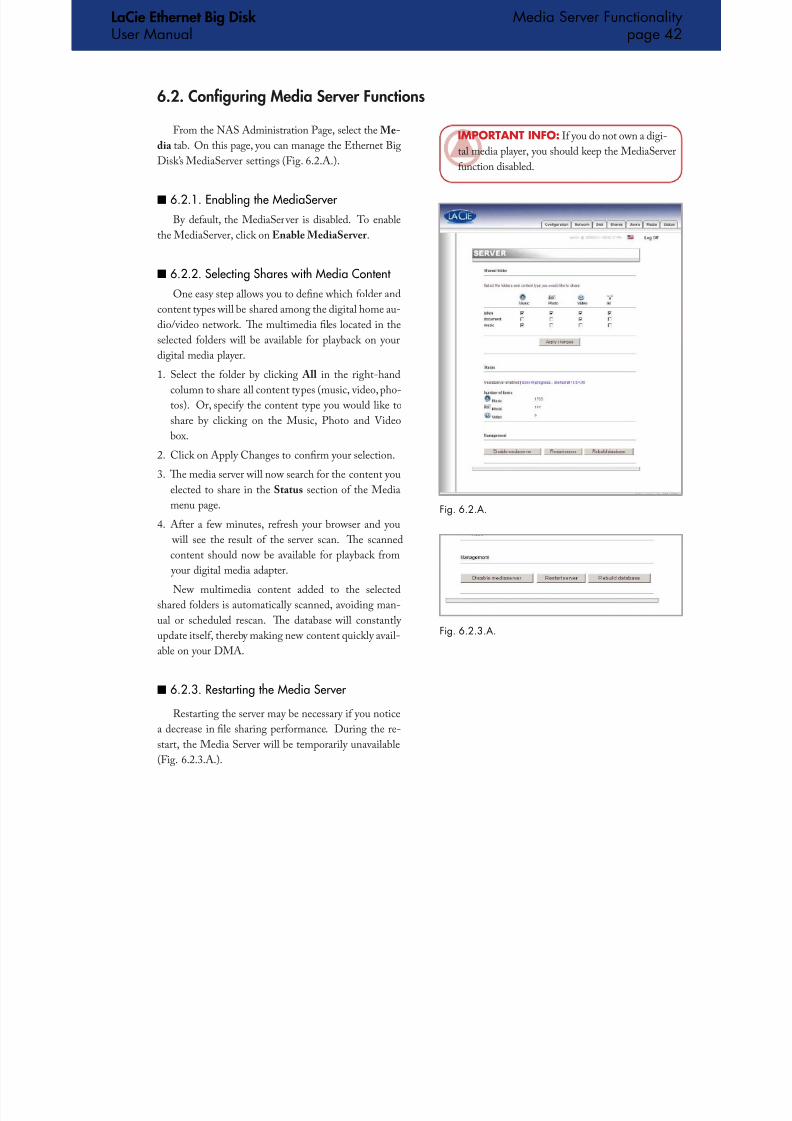
6.2. Confguring Media Server Functions
From the NAS Administration Page, select the Me-
dia tab. On this page, you can manage the Ethernet Big
Disk’s MediaServer settings (Fig. 6.2.A.).
6.2.1. Enabling the MediaServer
By deault, the MediaServer is disabled. o enable
the MediaServer, click on Enable MediaServer .
6.2.2. Selecting Shares with Media Content
One easy step allows you to dene which older and
content types will be shared among the digital home au-
dio/video network. Te multimedia les located in the
selected olders will be available or playback on your
digital media player.
Select the older by clicking All in the right-hand
column to share all content types (music, video, pho-
tos). Or, speciy the content type you would like to
share by clicking on the Music, Photo and Video
box.
Click on Apply Changes to conrm your selection.
Te media server will now search or the content you
elected to share in the Status section o the Media
menu page.
Ater a ew minutes, reresh your browser and you
will see the result o the server scan. Te scanned
content should now be available or playback rom
your digital media adapter.
New multimedia content added to the selected
shared olders is automatically scanned, avoiding man-
ual or scheduled rescan. Te database will constantly
update itsel, thereby making new content quickly avail-
able on your DMA.
6.2.3. Restarting the Media ServerRestarting the server may be necessary i you notice
a decrease in le sharing perormance. During the re-
start, the Media Server will be temporarily unavailable
(Fig. 6.2.3.A.).
■
■
1.
2.
3.
4.
■
Fig. ..A.
IMpOrTANT INFO: I you do not own a digi-
tal media player, you should keep the MediaServer
unction disabled.
Fig. ...A.
LaCie Ethernet Big Disk User Manual
Troubleshootingpage
8/6/2019 LacieBigDiscEthernetBD
http://slidepdf.com/reader/full/laciebigdiscethernetbd 43/48
7. Troubleshooting
In the event that your LaCie Ethernet Big Disk is
not working correctly, please take a look at the rou-
bleshooting section on the ollowing pages and at the
FAQs published on our web site – www.lacie.com. One
o these FAQs may provide an answer to your specic
question. You can also visit the drivers pages, where the
most recent sotware updates will be available, at
www.lacie.com/support/drivers.
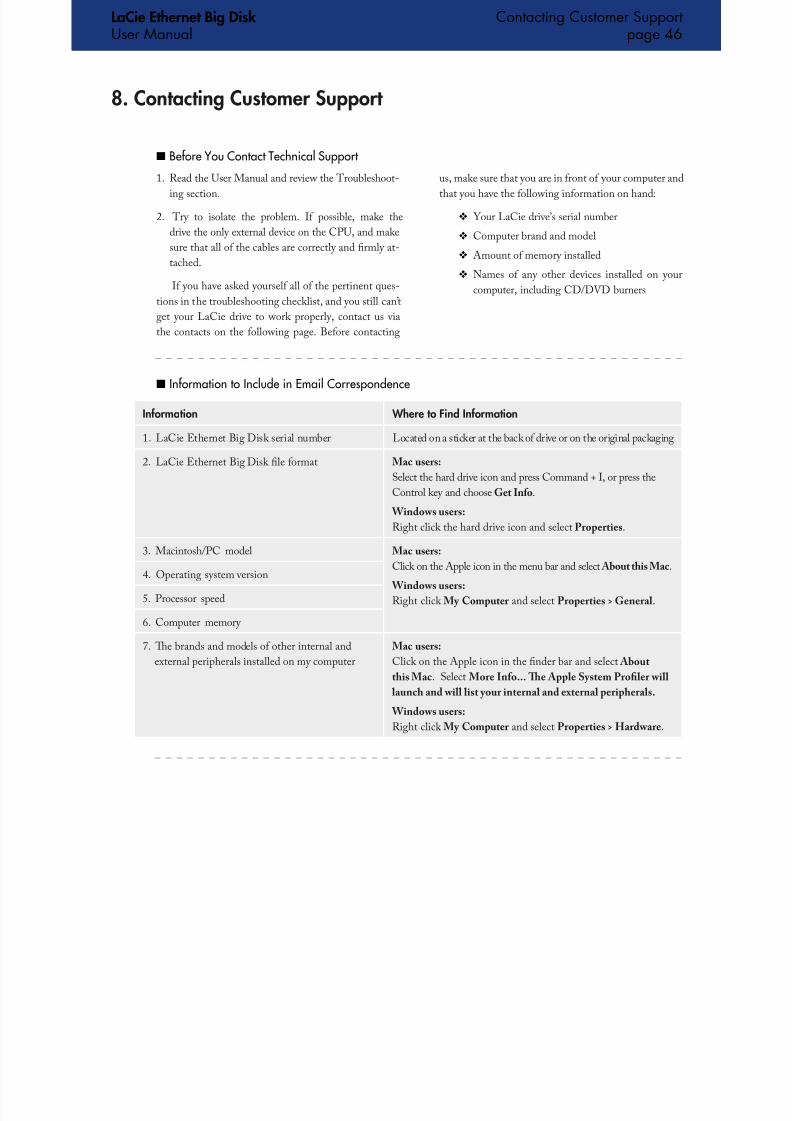
I you need urther assistance, please contact your
LaCie reseller or LaCie echnical Support (see chapter
8. Contacting Customer Service or details).
System Log
Te system log allows you to review the type, date,
time, source and event ID o activities on the LaCie
Ethernet Big Disk. For more inormation, reer to
chapter 5.9.2. System Log.
■
Manual Updates
LaCie is constantly striving to give you the most
up-to-date, comprehensive User Manuals available on
the market. It is our goal to provide you with a riendly,
easy-to-use ormat that will help you quickly install and
utilize the many unctions o your new device.
I your manual does not refect the congurations o
the product that you purchased, please check our web-
site or the most current version available
■
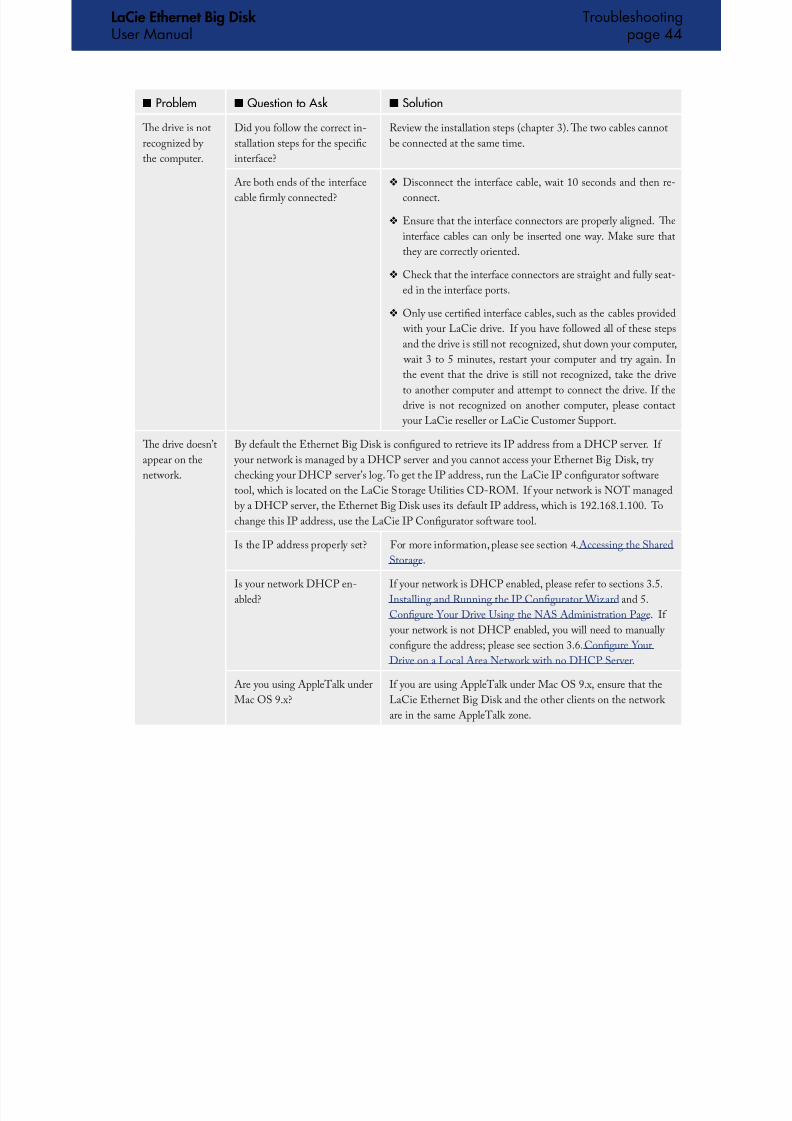
Problem■ Question to Ask■ Solution■
Te drive is not
recognized by
the computer.
Does your computer’s con-
guration meet the minimum
system requirements?
Check section 2.1. Minimum System Requirements or more
inormation.
Is the drive’s power supply con-
nected and is the blue light on
the ront o the drive on?
Make sure that the power supply is properly connected (see
section 3.2. Connecting Te External Power Supply or details);
that the drive has been powered on by pressing the blue On/O
button on the ront o the drive; and that the outlet the power
supply is connected to is powered on or has a sucient supply o
power.
Is the blue light on the ront o
the drive fickering?
I the blue light is fickering or will not turn on, the power
supply may be deective. Please contact your LaCie reseller or
LaCie Customer Support.
LaCie Ethernet Big Disk User Manual
Troubleshootingpage
8/6/2019 LacieBigDiscEthernetBD
http://slidepdf.com/reader/full/laciebigdiscethernetbd 44/48
Problem■ Question to Ask■ Solution■
Te drive is notrecognized by
the computer.
Did you ollow the correct in-stallation steps or the specic
interace?
Review the installation steps (chapter 3). Te two cables cannotbe connected at the same time.
Are both ends o the interace
cable rmly connected?
Disconnect the interace cable, wait 10 seconds and then re-
connect.
Ensure that the interace connectors are properly aligned. Te
interace cables can only be inserted one way. Make sure thatthey are correctly oriented.
Check that the interace connectors are straight and ully seat-
ed in the interace ports.
Only use certied interace cables, such as the cables provided
with your LaCie drive. I you have ollowed all o these steps
and the drive is still not recognized, shut down your computer,
wait 3 to 5 minutes, restart your computer and try again. In
the event that the drive is still not recognized, take the drive
to another computer and attempt to connect the drive. I the
drive is not recognized on another computer, please contact
your LaCie reseller or LaCie Customer Support.
❖
❖
❖
❖
Te drive doesn’t
appear on the
network.
By deault the Ethernet Big Disk is congured to retrieve its IP address rom a DHCP server. I
your network is managed by a DHCP server and you cannot access your Ethernet Big Disk, try
checking your DHCP server’s log. o get the IP address, run the LaCie IP congurator sotware
tool, which is located on the LaCie Storage Utilities CD-ROM. I your network is NO managed
by a DHCP server, the Ethernet Big Disk uses its deault IP address, which is 192.168.1.100. o
change this IP address, use the LaCie IP Congurator sotware tool.
Is the IP address properly set? For more inormation, please see section 4. Accessing the Shared
Storage.
Is your network DHCP en-abled?
I your network is DHCP enabled, please reer to sections 3.5.Installing and Running the IP Congurator Wizard and 5.
Congure Your Drive Using the NAS Administration Page. I
your network is not DHCP enabled, you will need to manually
congure the address; please see section 3.6. Congure Your
Drive on a Local Area Network with no DHCP Server.
Are you using Applealk under
Mac OS 9.x?
I you are using Applealk under Mac OS 9.x, ensure that the
LaCie Ethernet Big Disk and the other clients on the network are in the same Applealk zone.
LaCie Ethernet Big Disk User Manual
Troubleshootingpage
8/6/2019 LacieBigDiscEthernetBD
http://slidepdf.com/reader/full/laciebigdiscethernetbd 45/48
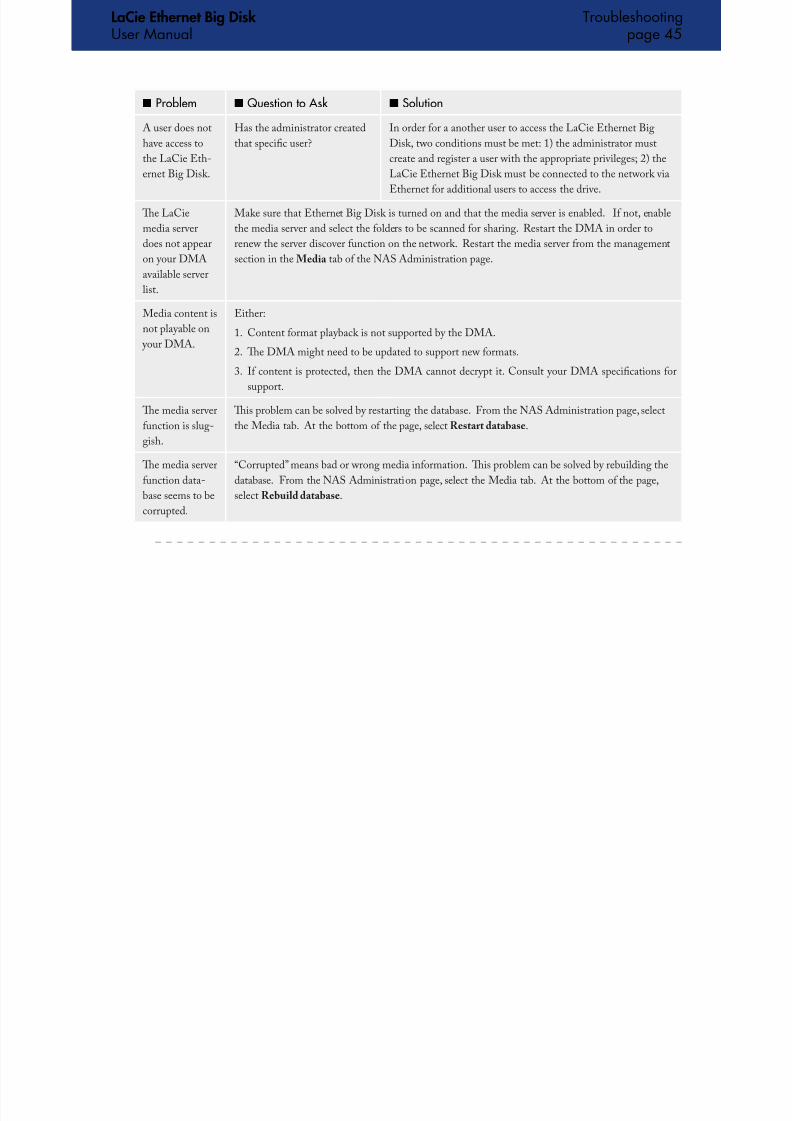
Problem■ Question to Ask■ Solution■
A user does nothave access to
the LaCie Eth-
ernet Big Disk.
Has the administrator createdthat specic user?
In order or a another user to access the LaCie Ethernet BigDisk, two conditions must be met: 1) the administrator must
create and register a user with the appropriate privileges; 2) the
LaCie Ethernet Big Disk must be connected to the network via
Ethernet or additional users to access the drive.
Te LaCie
media server
does not appearon your DMA
available server
list.
Make sure that Ethernet Big Disk is turned on and that the media server is enabled. I not, enable
the media server and select the olders to be scanned or sharing. Restart the DMA in order to
renew the server discover unction on the network. Restart the media server rom the managementsection in the Media tab o the NAS Administration page.
Media content is
not playable on
your DMA.
Either:
Content ormat playback is not supported by the DMA.
Te DMA might need to be updated to support new ormats.I content is protected, then the DMA cannot decrypt it. Consult your DMA specications or
support.
1.
2.3.
Te media server
unction is slug-
gish.
Tis problem can be solved by restarting the database. From the NAS Administration page, select
the Media tab. At the bottom o the page, select Restart database.
Te media serverunction data-
base seems to be
corrupted.
“Corrupted” means bad or wrong media inormation. Tis problem can be solved by rebuilding thedatabase. From the NAS Administration page, select the Media tab. At the bottom o the page,
select Rebuild database.
8/6/2019 LacieBigDiscEthernetBD
http://slidepdf.com/reader/full/laciebigdiscethernetbd 46/48
LaCie Ethernet Big Disk User Manual
Contacting Customer Supportpage
h l
8/6/2019 LacieBigDiscEthernetBD
http://slidepdf.com/reader/full/laciebigdiscethernetbd 47/48
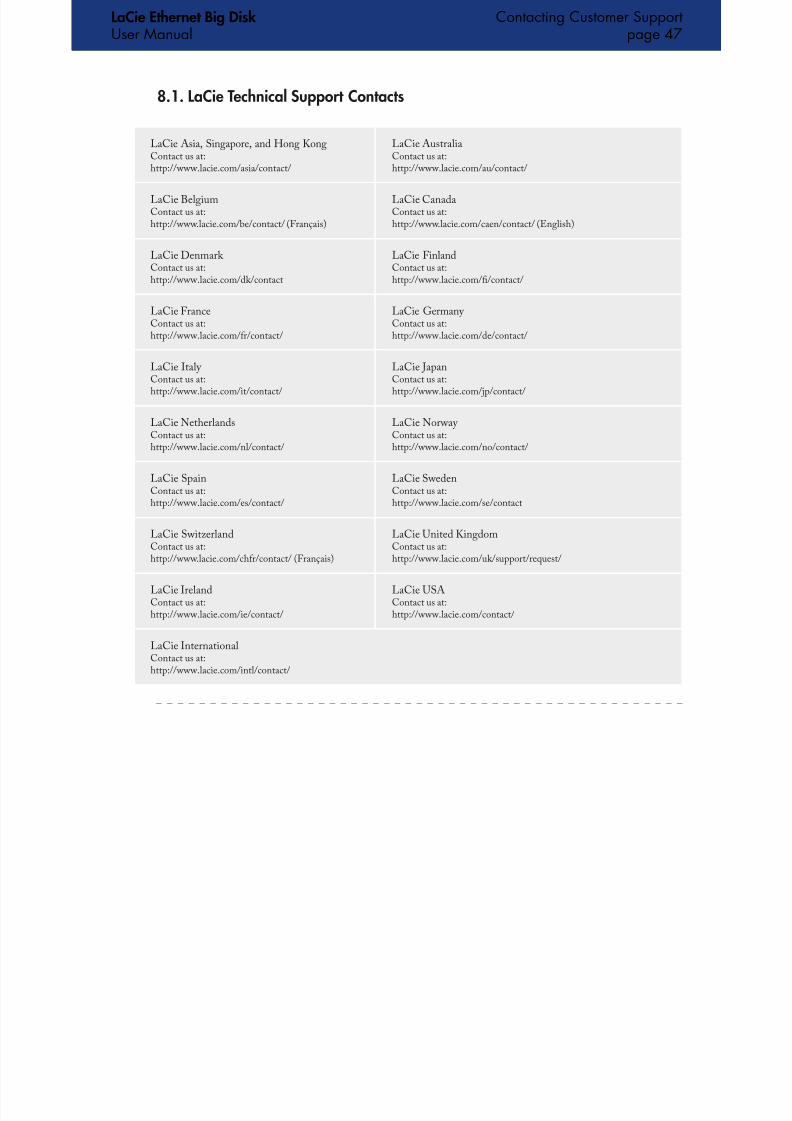
8.1. LaCie Technical Support Contacts
LaCie Asia, Singapore, and Hong KongContact us at:http://www.lacie.com/asia/contact/
LaCie AustraliaContact us at:http://www.lacie.com/au/contact/
LaCie BelgiumContact us at:http://www.lacie.com/be/contact/ (Français)
LaCie CanadaContact us at:http://www.lacie.com/caen/contact/ (English)
LaCie Denmark Contact us at:http://www.lacie.com/dk/contact
LaCie FinlandContact us at:http://www.lacie.com//contact/
LaCie FranceContact us at:http://www.lacie.com/r/contact/
LaCie Germany Contact us at:http://www.lacie.com/de/contact/
LaCie Italy Contact us at:http://www.lacie.com/it/contact/
LaCie JapanContact us at:http://www.lacie.com/jp/contact/
LaCie NetherlandsContact us at:http://www.lacie.com/nl/contact/
LaCie Norway Contact us at:http://www.lacie.com/no/contact/
LaCie SpainContact us at:http://www.lacie.com/es/contact/
LaCie SwedenContact us at:http://www.lacie.com/se/contact
LaCie SwitzerlandContact us at:http://www.lacie.com/chr/contact/ (Français)
LaCie United KingdomContact us at:http://www.lacie.com/uk/support/request/
LaCie IrelandContact us at:http://www.lacie.com/ie/contact/
LaCie USAContact us at:http://www.lacie.com/contact/
LaCie InternationalContact us at:http://www.lacie.com/intl/contact/
LaCie Ethernet Big Disk User Manual
9 W I i
Warranty Informationpage
8/6/2019 LacieBigDiscEthernetBD
http://slidepdf.com/reader/full/laciebigdiscethernetbd 48/48
9. Warranty Inormation
LaCie warrants your drive against any deect in ma-
terial and workmanship, under normal use, or the peri-
od designated on your warranty certicate. In the event
this product is ound to be deective within the warranty
period, LaCie will, at its option, repair or replace the
deective drive. Tis warranty is void i:
Te drive was operated/stored in abnormal use or
maintenance conditions;
Te drive is repaired, modied or altered, unless such
repair, modication or alteration is expressly autho-
rized in writing by LaCie;
Te drive was subjected to abuse, neglect, lightning
strike, electrical ault, improper packaging or acci-dent;
Te drive was installed improperly;
Te serial number o the drive is deaced or missing;
Te broken part is a replacement part such as a pick-
up tray, etc.
Te tamper seal on the drive casing is broken.
LaCie and its suppliers accept no liability or any
loss o data during the use o this device, or or any o
the problems caused as a result.
❖
❖
❖
❖
❖
❖
❖
LaCie will not, under any circumstances, be liable
or direct, special or consequential damages such as, but
not limited to, damage or loss o property or equipment,
loss o prots or revenues, cost o replacement goods,
or expense or inconvenience caused by service interrup-
tions.
Any loss, corruption or destruction o data while us-
ing a LaCie drive is the sole responsibility o the user,
and under no circumstances will LaCie be held liable or
the recovery or restoration o this data.
Under no circumstances will any person be entitled
to any sum greater than the purchase price paid or the
drive.
o obtain warranty service, call LaCie echni-
cal Support. You will be asked to provide your LaCie
product’s serial number, and you may be asked to urnish
proo o purchase to conrm that the drive is still under
warranty.
All drives returned to LaCie must be securely pack-
aged in their original box and shipped with postage pre-
paid.
IMpOrTANT INFO: Register online or ree
technical support: www.lacie.com/register


