Embed Size (px)
DESCRIPTION
learning program
Citation preview
Glove Box Training Transporting Chemicals Instructor Package Winter 2013
Produced for & in Conjunction with…
Arndtsen Research Group
Dept. of Chemistry McGill University
Lab 240 801 Sherbrooke St. W.
Montreal, QC H3A 2K6 Canada
Phone: 514.398.5273 Website: arndtsen-group.mcgill.ca
Glove Box Training Transporting Chemicals
©2012 Jessica Haak. All rights reserved.
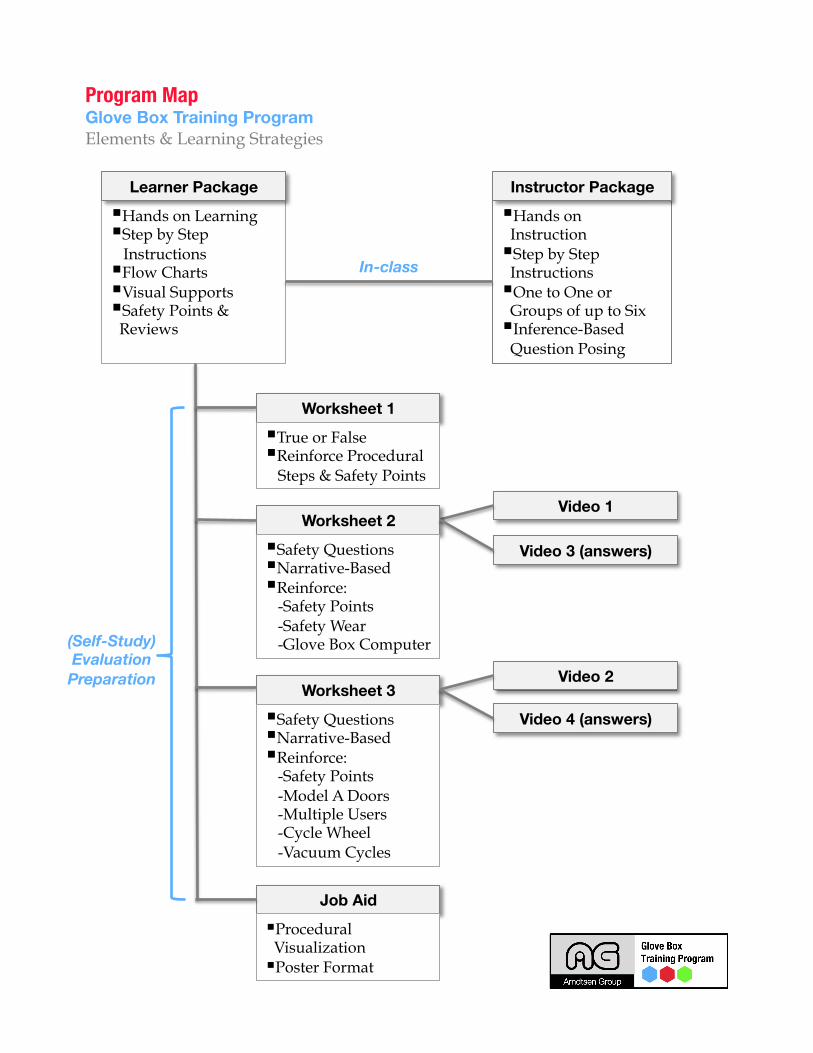
Program Map Glove Box Training Program Elements & Learning Strategies
Hands on Learning Step by Step Instructions Flow Charts Visual Supports Safety Points & Reviews
Hands on Instruction Step by Step Instructions One to One or Groups of up to Six Inference-Based Question Posing
Instructor Package Learner Package
Video 1
Video 3 (answers)
Video 2
Video 4 (answers)
Worksheet 1
Worksheet 2
Worksheet 3
True or False Reinforce Procedural Steps & Safety Points
Safety Questions Narrative-Based Reinforce: -Safety Points -Safety Wear -Glove Box Computer
Safety Questions Narrative-Based Reinforce: -Safety Points -Model A Doors -Multiple Users -Cycle Wheel -Vacuum Cycles
Job Aid
Procedural Visualization Poster Format
In-class
(Self-Study) Evaluation
Preparation
Table of Contents
Introduction to the Course
Instructor Package
How to Use this Package
Trainer Tips
Pre-Training
Introducing the Topic
Assessing Background Knowledge
General Safety Information
Section 1: Using the Glove Box Computer
Ideal Conditions
Cause for Concern
Section 2: Bringing Chemicals Into the Glove Box
Introducing the Steps
Steps 1 & 2
Step 3
Step 4
The Cycle Wheel
Step 5
Steps 6, 7 & 8
Section 3: Bringing Chemicals Out of the Glove Box
16-17
18-19
20-21
22-23
24-25
26-29
30-33
12-13
14-15
6-7
8-9
10-11
2
3
4-5
2-5
6-11
12-15
16-33
34-35
Table of Contents
Section 4: Preparing the Glove Box for the Next User
Evaluations
General Info
Worksheet 1 Answers
Worksheet 2 Answers
Worksheet 3 Answers
Observational Set-Up
Observational Rubric 1
Observational Rubric 2
Observational Rubric 3
Observational Rubric 4
40
41
42
43
44
45
46
47
48
36-37
Wrap-Up 38-39
40-48
Program Formative Evaluations 53-67
54-57
58-64
65-67
Expert Review
Pilot Study
Editorial Review
Glossary 49-50
References 51-52

Introduction: The Instructor Package
This training program has been developed to help you more easily train beginner level frequent and beginner level infrequent users of the glove box. It includes detailed instructions for you to walk your learner(s) through the procedures.
The program uses a hands on and practical approach with lots of visuals and subsequent job aids to help support the learner after the training is finished.
A quick note to instructors. It is suggested that you limit your training group sizes to six, although the more time each learner receives on the equipment the greater level of expected success. The instructors are for one-on-one training sessions with adaptation notes for groups. Do what works best for your group and based on the number of available training glove boxes in your working space.
① How to read the glove box computer.
② How to bring chemicals into the glove box.
③ How to bring chemicals out of the glove box.
④ How to prepare the glove box for the next user.
The 4 Topics Covered in this session
① Instructor tips section. ② Instructor package with cross-
referenced learner pages. ③ Video exercises for the learners to do
outside of the session. ④ An job aid to outline the procedures. ⑤ Observational evaluation
instructions & rubrics.
Materials Available to You
Video Exercises
A poster-sized job aid
Instructor & Learner Packages
2
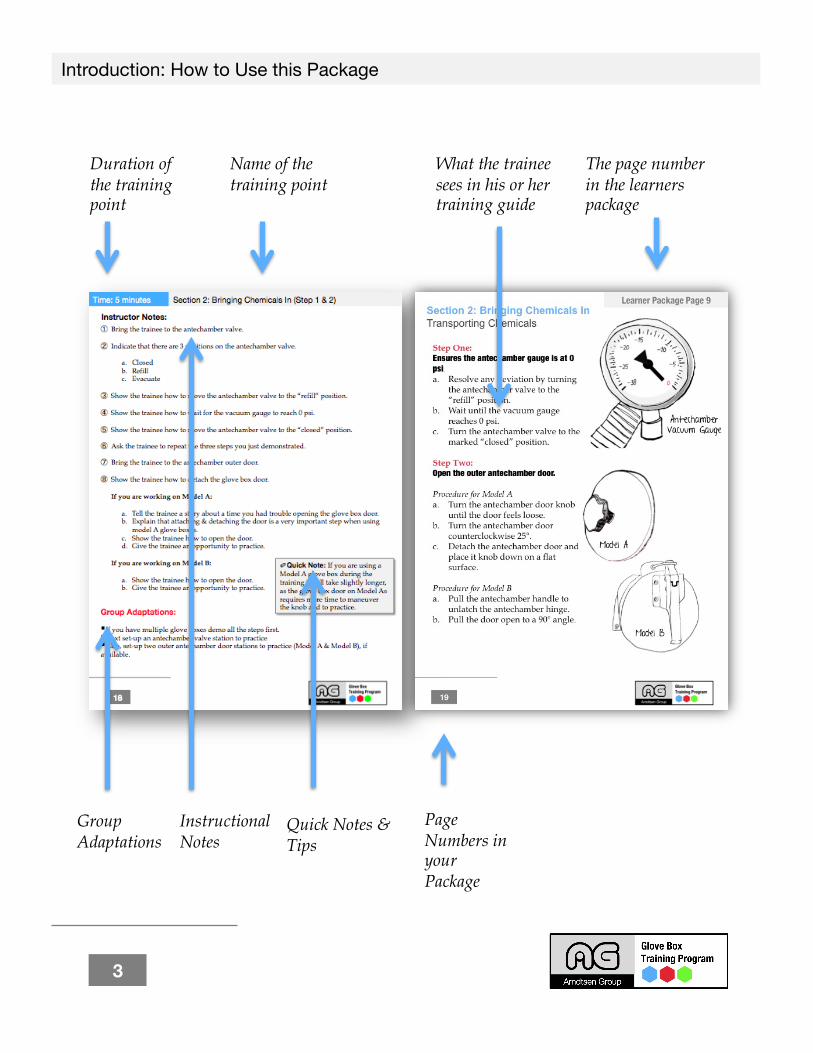
Introduction: How to Use this Package
Duration of the training point
Name of the training point
Instructional Notes
What the trainee sees in his or her training guide
Page Numbers in your Package
The page number in the learners package
Quick Notes & Tips
Group Adaptations
3
Introduction: Trainer Tips
4
Safety. The purpose of this training is to ensure that the learners are able to safely and correctly bring chemicals in and out of the glove box. Be sure to communicate all of the red starred items in the learner package and on the job aid. These are must know points. Also, always be sure to follow the general departmental procedures when doing any chemistry training in your lab.
The Learner Experience. It can be difficult to put ourselves in the learners shoes, especially when it has been a long time since we learned the skill we are teaching. Remember, this may be the first time your trainees have put their hands in a glove box. It may feel strange to your learners at first to maneuver in the box. Just like mom used to say, practice makes perfect, so try to give the students as much time to physically execute the procedures as possible.
Hands On Learning. Hands on learning is just that giving your trainees lots of time to touch and use the equipment. Do you know the difference between declarative and procedural knowledge? Declarative knowledge is understanding something conceptually and procedural knowledge is understanding how to do something physically or in an applied sense (Driscoll 2005).
The main focus of this training is procedural knowledge. When it comes to the evaluation you will be observing the students doing the skills you covered in the training.
Declarative Knowledge: Knowing something conceptually.
Procedural Knowledge: Knowing how to do something physically or in an applied sense. The main focus of this training.
Hands on Learning: Giving learners a chance to learn in real-life contexts.
5
Stick to the Content. Did you know that your learners can only absorb a limited amount of information at one time. This is called “cognitive load theory”. Unfortunately our working memories can be overwhelmed by too much content in one sitting (Driscoll 2005). We all know what it is like to feel overexerted mentally in a training session, so try to limit your instructions and details to simple and clear descriptions. Beginner level learners may have a particularly difficult time with absorbing new information as they have little background knowledge to apply it to (Driscoll 2005).
Training Ain’t What it Use to Be. Gone are the days when training has to be stuffy and dull. Try and keep things light, focused, and interactive. You have likely experienced a training session where you weren’t given an opportunity to answer questions and interact with the trainer. By giving your learners a chance to speak and feel heard you will increase their interest in the topic. Even more importantly they will likely feel more comfortable asking important safety related questions.
Knowing Your Lab Best. The truth is you know your lab better than anyone else, right? You’re likely there everyday!
Cognitive Load Theory: John Sweller’s theory regarding the working memory’s limited capacity to absorb information at one time.
Background Knowledge: What the learner knows before the training.
So if something doesn’t match your labs explicit lab procedures word for word, then adapt it. Your supervisor’s instructions and logic always wins.
Have Fun. Lastly, the best instructors are those that are most passionate about their topics, so let your love of chemistry show!
Introduction: Trainer Tips
Time: 5 minutes Pre-Training: Introducing the Topic
① Begin by explaining that the training will include 4 sections:
a) The glove box computer. b) Bringing chemicals into the glove box. c) Bringing chemicals out of the glove box. d) How to prepare the glove box for the next user.
② Explain that the training will be done through a hands on method.
③ Indicate that there will be a hands on evaluation.
④ Coordinate a time with the trainee for this purpose.
Instructor Notes:
6
Group Adaptations:
Have each person introduce themselves, indicate what kind of chemistry they are interested in and state if they were a chemical which chemical they would be and why.
When setting up evaluation time ensure that you have enough glove box stations for each person involved.
Knowing the fundamentals in glove box chemistry is essential for your success as a chemist. Did you know that when you incorrectly transport chemicals into the glove box you can damage the equipment, harm you or your colleagues’ experiments and/or waste valuable chemicals?
The purpose of this training program is to ensure you are able to confidently follow the procedures necessary to correctly and safely transport chemicals into and out of the glove box. This training program has been designed to guide you through the procedures in a step-by-step and hands-on manner.
During the training you will be using the glove box directly in a hands on session with a glove box head. Additionally, you will be provided with materials to review outside of the session including films, questions, and worksheets to help you better retain the presented information.
A Step-by-Step Guide to Master Chemical Transport
Learn How to Transport Chemicals Safely and Confidently
. YOUR NAME: _____________________________________________
YOUR TRAINER’S NAME _____________________________________________
DATE OF TRAINING _____________________________________________
① How to read the glove box computer.
② How to bring chemicals into the glove box.
③ How to bring chemicals out of the glove box.
④ How to prepare the glove box for the next user.
The 4 Topics Covered in this Session
7
Course Info Transporting Chemicals
Learner Package Page 2
Time: 10 minutes Pre-Training: Assessing Background Knowledge
① Ensure that the trainee meets the requirements for the course prior to beginning the main content.
② If time allows, do a walk around of the glove box.
a. Ask the trainee to name the parts of the machine. b. Ask the trainee how the value on the vacuum gauge relates to the pressure inside
the antechamber. c. Ask the trainee how the glove box removes oxygen and water from its atmosphere. d. Ask the trainee what chemicals are incompatible with O2 purifier in the glove box. e. Ask the trainee what the four circulator icons on the glove box computer represent. f. Ask the trainee what types of reactions are unsafe/impossible to conduct in the
glove box.
Instructor Notes:
8
Group Adaptations:
You may wish to send these questions out in a mass e-mail & have the trainees submit their answers to you in advance.
Those who make multiple errors could then be asked to do some research prior to the training or to have an additional session prior to this training.
Preparation for the Training Transporting Chemicals
Before starting make sure that you are able to complete the tasks below. If you are uncertain about any of these steps it is important to talk to your trainer in advance. Without a basic grasp of the glove box as a system it is easy to make a mistake that can have a big impact on the equipment, your work, and the work of others in the lab, so don’t be shy. Communication is a necessary part of using the glove box.
To Start
Can you...
Task ✔
Name the major parts of the glove box. ✔
Label a basic diagram of a glove box. ✔
Explain how the value on the vacuum gauge relates to the pressure inside the antechamber.
✔
Explain how the glove box removes oxygen and water from its atmosphere.
✔
Explain what types of chemicals are incompatible with the O2 purifier in the glove box.
✔
Explain what each of the four circular icons on the glove box computer main menu represent in relationship to the glove box.
✔
Explain what types of reactions are unsafe or impossible to conduct in a glove box.
✔
9
Learner Package Page 3
Time: 5 minutes Pre-Training: General Safety Information
① Ask the trainee to read the safety procedures below.
② Ask the trainee to quickly indicate what to do in the event of a spill.
③ Ask the trainee to quickly indicate what to do in the event of an emergency.
④ Outline that safety equipment must be worn at all times during the training:
a) safety glasses b) latex gloves c) lab coat d) close toed shoes e) long sleeved shirt is advised
⑤ Indicate that safety material must be put on before entering the lab.
⑥ Highlight that latex gloves cannot be worn in the corridors.
⑦ If the trainee seems nervous at all, assure them that you will be guiding them at a reasonable pace through the training in a step-by-step manner.
⑧ Indicate to the trainee that if they have any safety concerns whatsoever that they should let you know right away.
Instructor Notes:
10
Group Adaptations:
Have the trainees work in groups of 2 or 3 and ask them to name all of the general departmental safety procedures they can think of in a minute.
Those not stated could then be indicated after each group presents.
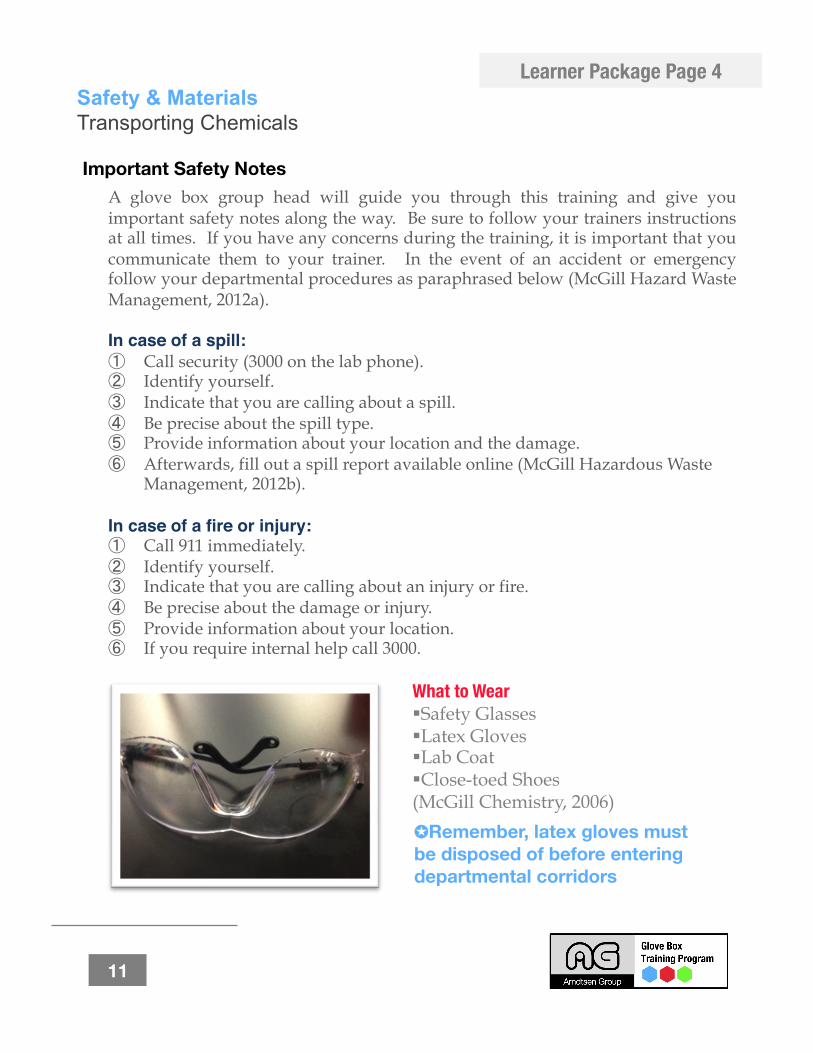
Safety & Materials Transporting Chemicals
What to Wear Safety Glasses Latex Gloves Lab Coat Close-toed Shoes (McGill Chemistry, 2006)
A glove box group head will guide you through this training and give you important safety notes along the way. Be sure to follow your trainers instructions at all times. If you have any concerns during the training, it is important that you communicate them to your trainer. In the event of an accident or emergency follow your departmental procedures as paraphrased below (McGill Hazard Waste Management, 2012a).
In case of a spill: ① Call security (3000 on the lab phone). ② Identify yourself. ③ Indicate that you are calling about a spill. ④ Be precise about the spill type. ⑤ Provide information about your location and the damage. ⑥ Afterwards, fill out a spill report available online (McGill Hazardous Waste
Management, 2012b).
In case of a fire or injury: ① Call 911 immediately. ② Identify yourself. ③ Indicate that you are calling about an injury or fire. ④ Be precise about the damage or injury. ⑤ Provide information about your location. ⑥ If you require internal help call 3000.
Important Safety Notes
✪Remember, latex gloves must be disposed of before entering departmental corridors
11
Learner Package Page 4
Time: 1 minutes Section 1: The Glove Box Computer (Ideal Conditions)
① Walk to the glove box computer screen.
② Go to the default menu.
③ Point out the measurement icons:
a. Indicate that the O2 level should always be between 0.1-5 ppm. b. Indicate that the H2O level should always be between 0.1-5 ppm. c. Indicate that the pressure should always be between 1-6 mbar. d. Indicate that the four circulator icons should always be green. e. Indicate that the alarm sign should always be off.
Instructor Notes:
12
Group Adaptations:
If the trainees do not fit comfortably in the space to see the glove box computer have them do this activity using their learn packages.
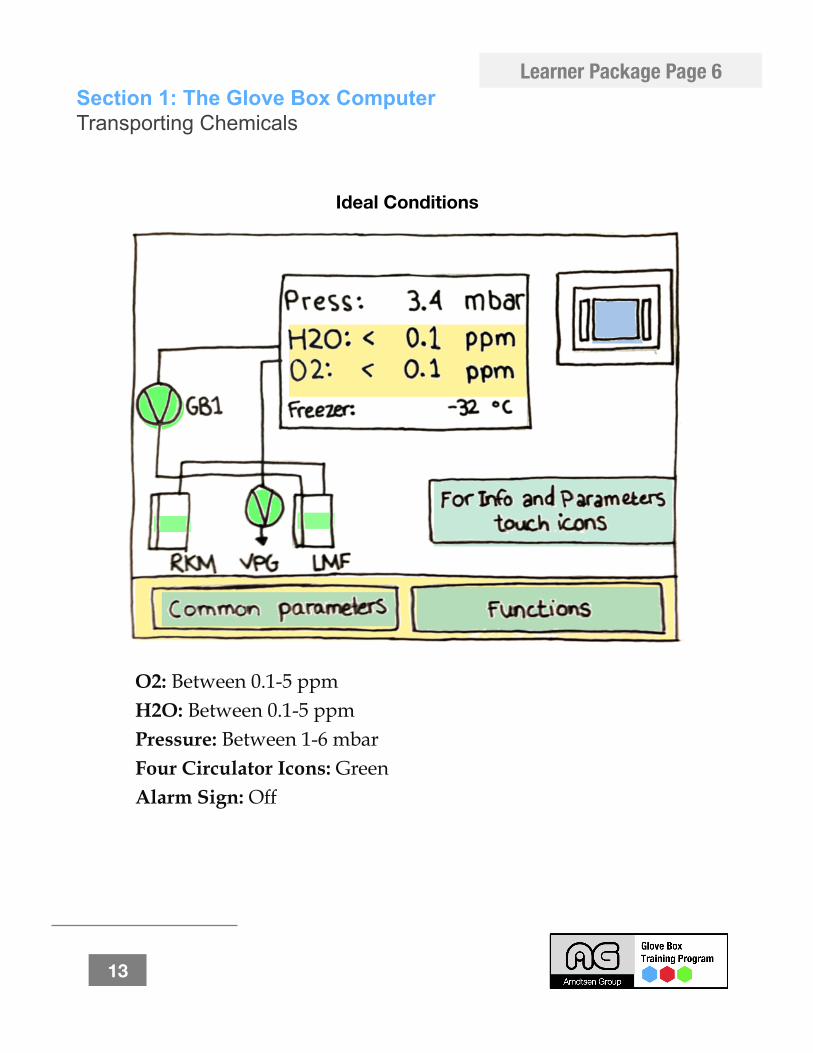
Section 1: The Glove Box Computer Transporting Chemicals
Ideal Conditions
O2: Between 0.1-5 ppm H2O: Between 0.1-5 ppm Pressure: Between 1-6 mbar Four Circulator Icons: Green Alarm Sign: Off
13
Learner Package Page 6
Time: 1 minutes Section 1: The Glove Box Computer (Cause for Concern)
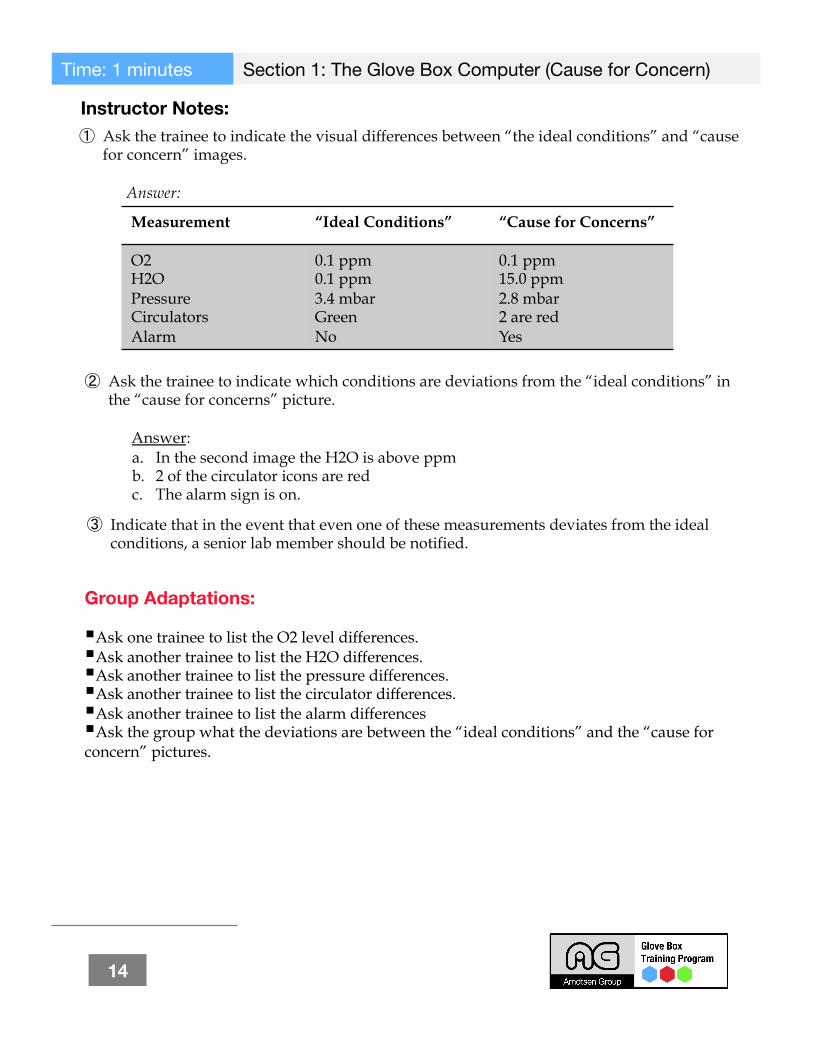
① Ask the trainee to indicate the visual differences between “the ideal conditions” and “cause for concern” images.
Answer:
Instructor Notes:
Measurement “Ideal Conditions” “Cause for Concerns”
O2 H2O Pressure Circulators Alarm
0.1 ppm 0.1 ppm 3.4 mbar Green No
0.1 ppm 15.0 ppm 2.8 mbar 2 are red Yes
② Ask the trainee to indicate which conditions are deviations from the “ideal conditions” in the “cause for concerns” picture.
Answer: a. In the second image the H2O is above ppm b. 2 of the circulator icons are red c. The alarm sign is on.
③ Indicate that in the event that even one of these measurements deviates from the ideal conditions, a senior lab member should be notified.
14
Group Adaptations:
Ask one trainee to list the O2 level differences. Ask another trainee to list the H2O differences. Ask another trainee to list the pressure differences. Ask another trainee to list the circulator differences. Ask another trainee to list the alarm differences Ask the group what the deviations are between the “ideal conditions” and the “cause for concern” pictures.
Section 1: The Glove Box Computer Transporting Chemicals
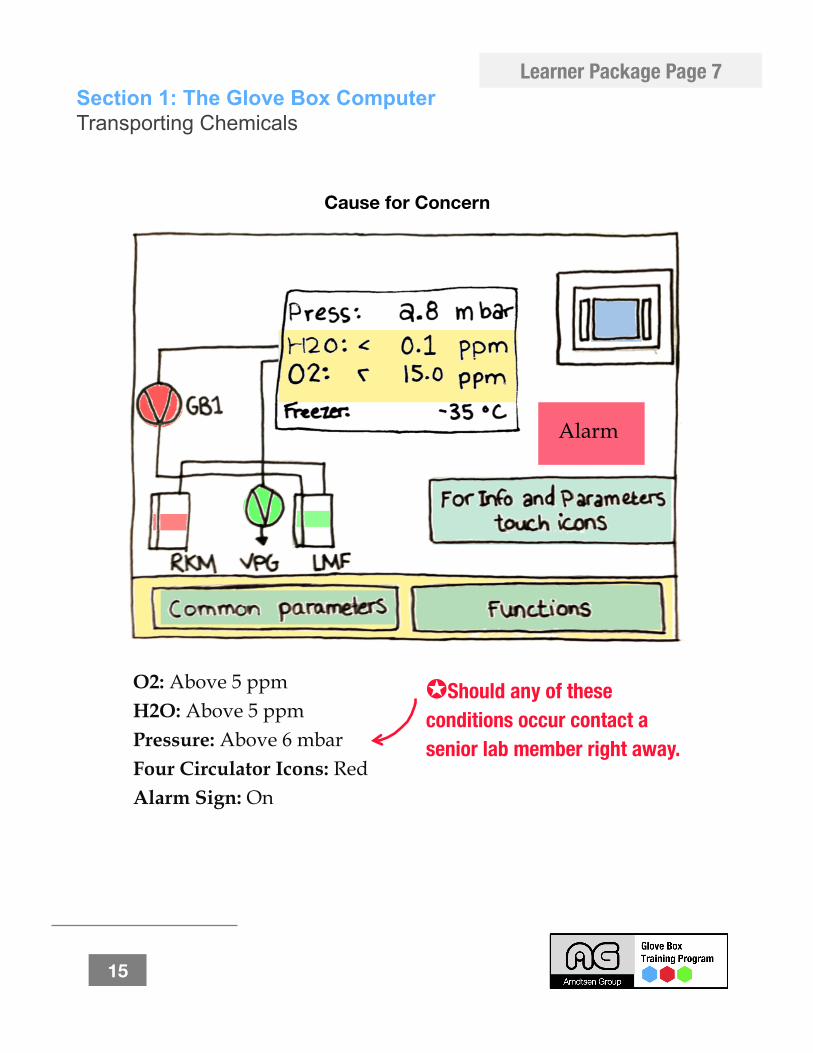
Cause for Concern
O2: Above 5 ppm H2O: Above 5 ppm Pressure: Above 6 mbar Four Circulator Icons: Red Alarm Sign: On
Alarm
✪ Should any of these conditions occur contact a senior lab member right away.
15
Learner Package Page 7
Time: 1 minutes Section 2: Bringing Chemicals In (Overview)
① Explain that there are 8 main steps when bringing chemicals into the box.
② Ask the trainee to follow along in their learning package while you name the 8 steps.
i. Ensure the antechamber vacuum gauge is at 0 psi. ii. Open the outer antechamber door. iii. Load a sealed chemical into the antechamber. iv. Close the outer antechamber door. v. Conduct three full vacuum and refill cycles. vi. Open the inner antechamber door vii. With your hands in the glove box pick up your chemical and place it in the
glove box. viii. Close the inner antechamber door.
Instructor Notes:
✐ Quick Tip: When going through the list try to be animated (e.g. mime the steps on the equipment).
16
Group Adaptations:
Go around the group and have the trainees name off the steps.
Section 2: Bringing Chemicals in Transporting Chemicals
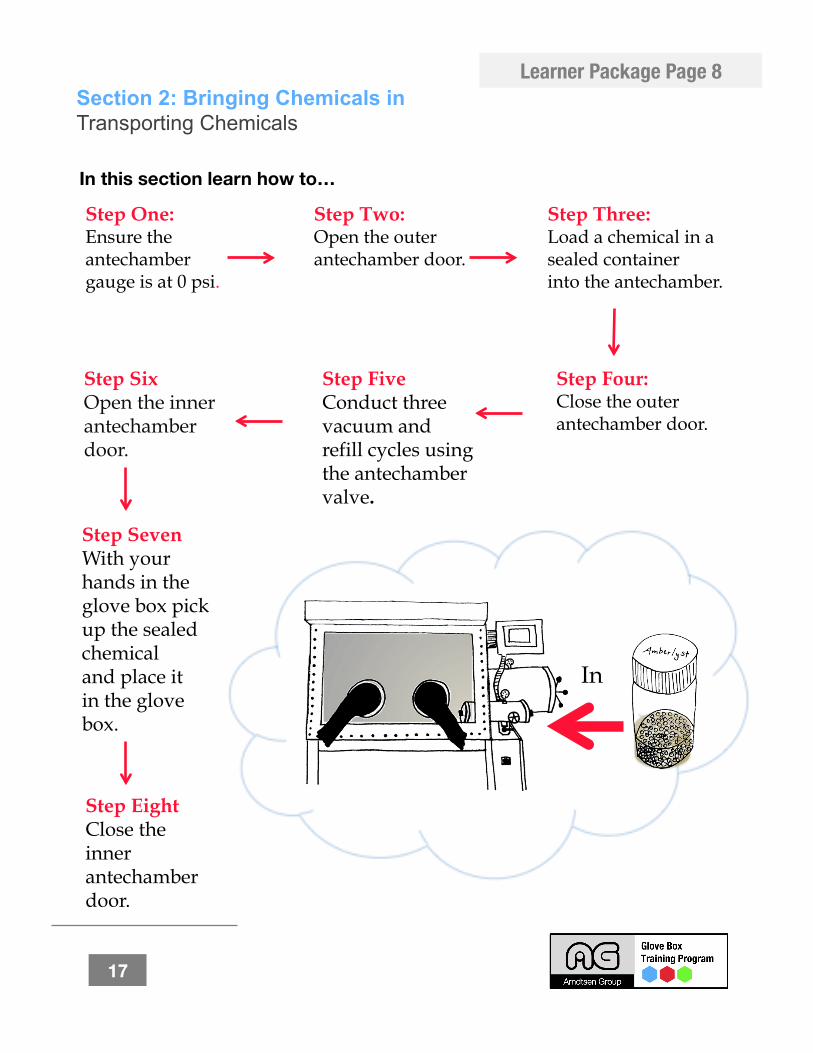
Step One: Ensure the antechamber gauge is at 0 psi.
Step Two: Open the outer antechamber door.
Step Three: Load a chemical in a sealed container into the antechamber.
Step Four: Close the outer antechamber door.
In
Step Six Open the inner antechamber door.
Step Seven With your hands in the glove box pick up the sealed chemical and place it in the glove box.
In this section learn how to…
Step Eight Close the inner antechamber door.
Step Five Conduct three vacuum and refill cycles using the antechamber valve.
17
Learner Package Page 8
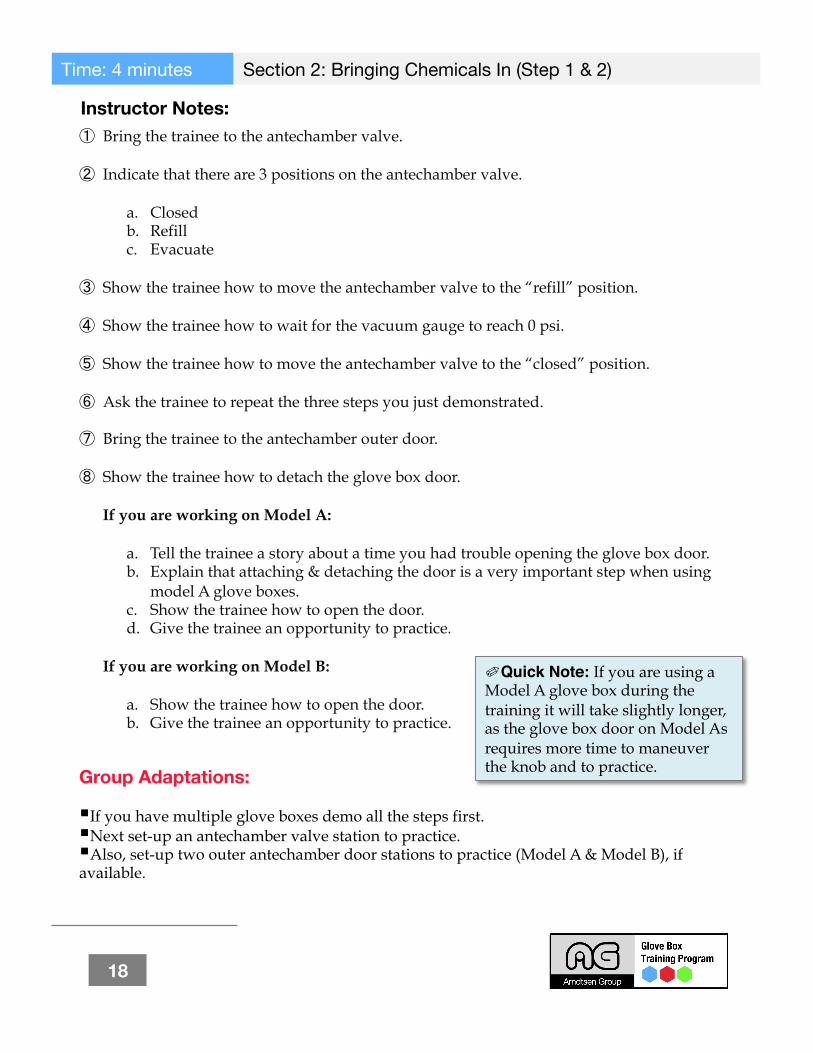
Time: 4 minutes Section 2: Bringing Chemicals In (Step 1 & 2)
① Bring the trainee to the antechamber valve.
② Indicate that there are 3 positions on the antechamber valve.
a. Closed b. Refill c. Evacuate
③ Show the trainee how to move the antechamber valve to the “refill” position.
④ Show the trainee how to wait for the vacuum gauge to reach 0 psi.
⑤ Show the trainee how to move the antechamber valve to the “closed” position.
⑥ Ask the trainee to repeat the three steps you just demonstrated.
⑦ Bring the trainee to the antechamber outer door.
⑧ Show the trainee how to detach the glove box door.
If you are working on Model A:
a. Tell the trainee a story about a time you had trouble opening the glove box door. b. Explain that attaching & detaching the door is a very important step when using
model A glove boxes. c. Show the trainee how to open the door. d. Give the trainee an opportunity to practice.
If you are working on Model B:
a. Show the trainee how to open the door. b. Give the trainee an opportunity to practice.
Instructor Notes:
✐ Quick Note: If you are using a Model A glove box during the training it will take slightly longer, as the glove box door on Model As requires more time to maneuver the knob and to practice.
18
Group Adaptations:
If you have multiple glove boxes demo all the steps first. Next set-up an antechamber valve station to practice. Also, set-up two outer antechamber door stations to practice (Model A & Model B), if available.
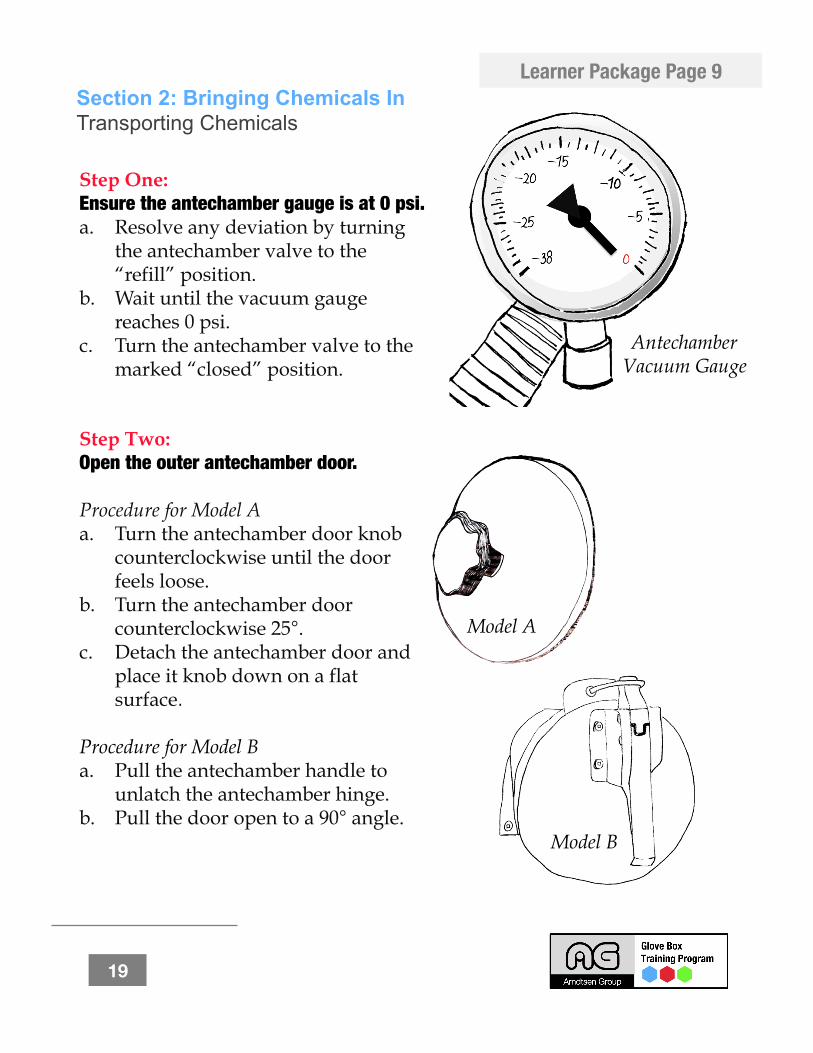
Section 2: Bringing Chemicals In Transporting Chemicals
Step One: Ensure the antechamber gauge is at 0 psi. a. Resolve any deviation by turning
the antechamber valve to the “refill” position.
b. Wait until the vacuum gauge reaches 0 psi.
c. Turn the antechamber valve to the marked “closed” position.
Antechamber Vacuum Gauge
Step Two: Open the outer antechamber door.
Procedure for Model A a. Turn the antechamber door knob
counterclockwise until the door feels loose.
b. Turn the antechamber door counterclockwise 25°.
c. Detach the antechamber door and place it knob down on a flat surface.
Procedure for Model B a. Pull the antechamber handle to
unlatch the antechamber hinge. b. Pull the door open to a 90° angle.
Model B
Model A
19
Learner Package Page 9
Time: 3 minutes Section 2: Bringing Chemicals In (Steps 3)
① If the glove box you are training on has a tray, ask the trainee to pull it out.
② Hand the trainee the chemical and ask them to place it inside the antechamber.
Instructor Notes:
20
Group Adaptations:
You may wish to do this step at multiple stations.
In that event you should have multiple sealed chemicals available for this purpose.
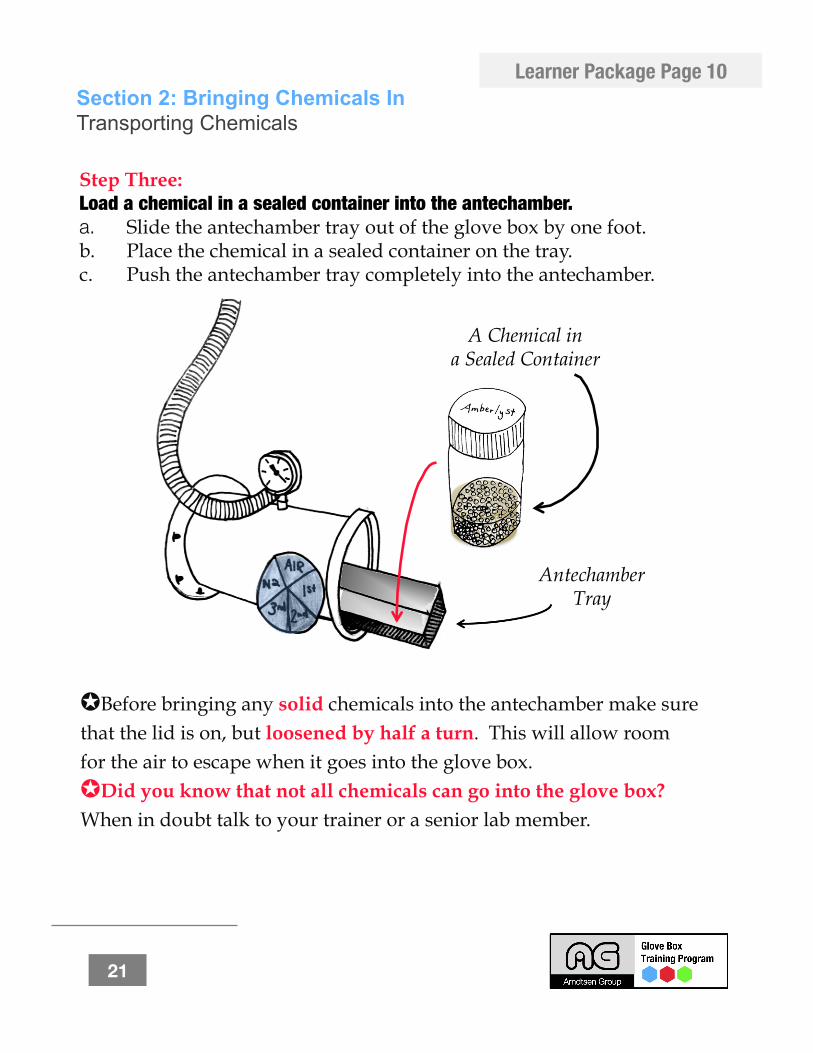
Section 2: Bringing Chemicals In Transporting Chemicals
A Chemical in a Sealed Container
✪ Before bringing any solid chemicals into the antechamber make sure that the lid is on, but loosened by half a turn. This will allow room for the air to escape when it goes into the glove box. ✪ Did you know that not all chemicals can go into the glove box? When in doubt talk to your trainer or a senior lab member.
Step Three: Load a chemical in a sealed container into the antechamber. a. Slide the antechamber tray out of the glove box by one foot. b. Place the chemical in a sealed container on the tray. c. Push the antechamber tray completely into the antechamber.
Antechamber Tray
21
Learner Package Page 10
Time: 3 minutes Section 2: Bringing Chemicals In (Step 4)
① Show the trainee how to close the outer antechamber door.
If you are working on Model A:
a. Show the trainee the three finger rule (e.g. using only your thumb, index finger, and middle finger to tighten the glove box).
b. Give the trainee an opportunity to practice. c. After a brief time practicing, loosen the door to a point that would not be correct. d. Ask the trainee to feel the loosened door. e. Explain that this is too loose. f. Next, tighten the door to the perfect position. g. Ask the trainee to feel the perfectly tightened door. h. Explain that this is the ideal position.
If you are working on Model B:
a. Show the trainee how to open the door. b. Give the trainee an opportunity to practice.
Instructor Notes:
✐ Quick Note: If you have access to both models, it may be worthwhile to show the trainee how to use both model doors, in particular if you know they will be using both glove boxes.
22
Group Adaptations:
If you have both models, have the trainees practice on one model type and then switch stations.
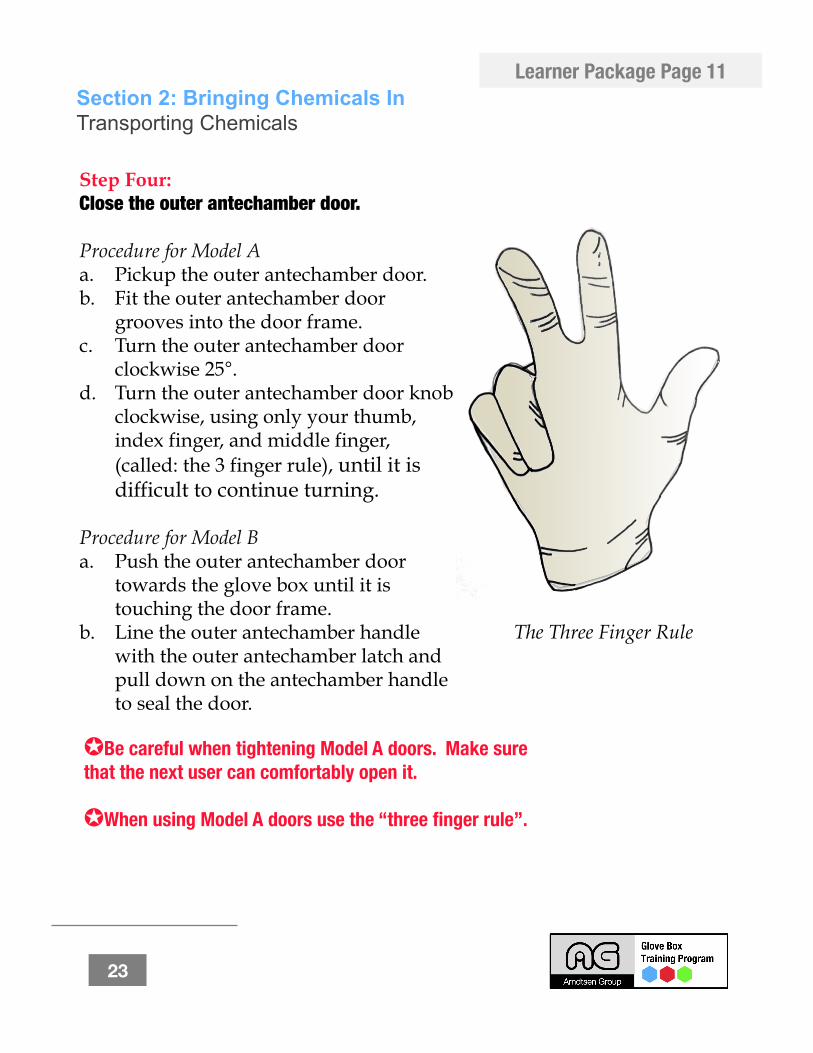
Section 2: Bringing Chemicals In Transporting Chemicals
Step Four: Close the outer antechamber door.
Procedure for Model A a. Pickup the outer antechamber door. b. Fit the outer antechamber door
grooves into the door frame. c. Turn the outer antechamber door
clockwise 25°. d. Turn the outer antechamber door knob
clockwise, using only your thumb, index finger, and middle finger, (called: the 3 finger rule), until it is difficult to continue turning.
Procedure for Model B a. Push the outer antechamber door
towards the glove box until it is touching the door frame.
b. Line the outer antechamber handle with the outer antechamber latch and pull down on the antechamber handle to seal the door.
✪ Be careful when tightening Model A doors. Make sure that the next user can comfortably open it.
✪ When using Model A doors use the “three finger rule”.
23
The Three Finger Rule
Learner Package Page 11
Time: 1 minutes Section 2: Bringing Chemicals In (Cycle Wheel)
① Explain that the purpose of the cycle wheel in that it indicates the cycle you are on and helps avoid confusion when there are multiple users.
a. 1st = the 1st vacuum cycle b. 2nd = the 2nd vacuum cycle c. 3rd = the 3rd vacuum cycle d. Air = needs to be cycled before bringing anything in. e. N2 = 3 full cycles have been conducted.
Instructor Notes:
24
Section 2: Bringing Chemicals In Transporting Chemicals
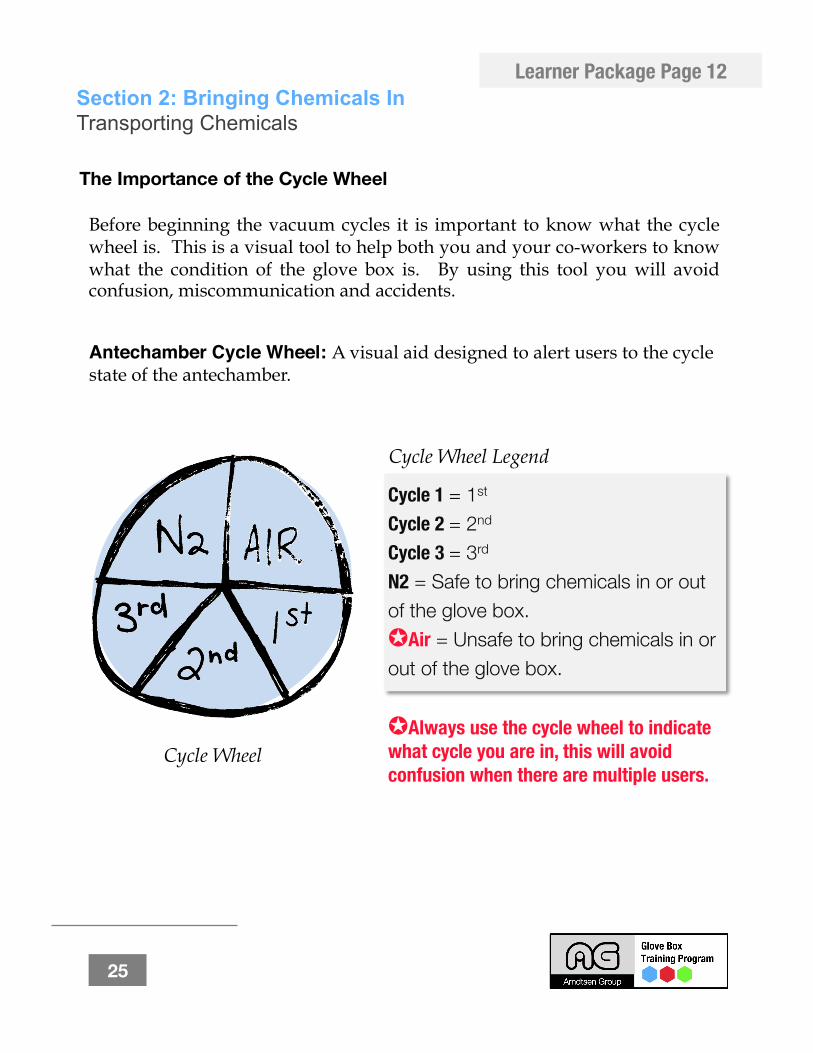
✪ Always use the cycle wheel to indicate what cycle you are in, this will avoid confusion when there are multiple users.
Cycle 1 = 1st Cycle 2 = 2nd Cycle 3 = 3rd N2 = Safe to bring chemicals in or out of the glove box. ✪ Air = Unsafe to bring chemicals in or out of the glove box.
Cycle Wheel Legend
Cycle Wheel
Antechamber Cycle Wheel: A visual aid designed to alert users to the cycle state of the antechamber.
Before beginning the vacuum cycles it is important to know what the cycle wheel is. This is a visual tool to help both you and your co-workers to know what the condition of the glove box is. By using this tool you will avoid confusion, miscommunication and accidents.
The Importance of the Cycle Wheel
25
Learner Package Page 12
Time: 2 minutes Section 2: Bringing Chemicals In (Step 5, Cycles 1 & 2)
① Bring the trainee to the antechamber valve.
② Ask the trainee to turn the antechamber valve to the “evacuate” positions.
③ Ask the trainee to turn the cycle wheel to “1”.
④ Explain that in normal circumstances you will wait 5 minutes but for the purpose of the training you will simply demo the steps.
⑤ Next, ask the trainee to turn the antechamber valve to “refill”.
⑥ Ask the trainee to wait until the vacuum gauge reads between 5 psi & 15 psi.
⑦ Ask the trainee to repeat the steps they just performed.
Instructor Notes:
26
Group Adaptations:
Have each individual in the group do one step in the procedure. (call it “production” line chemistry).
In this event make sure you number off each participant (e.g. give them the step number they are to perform).
Section 2: Bringing Chemicals In Transporting Chemicals
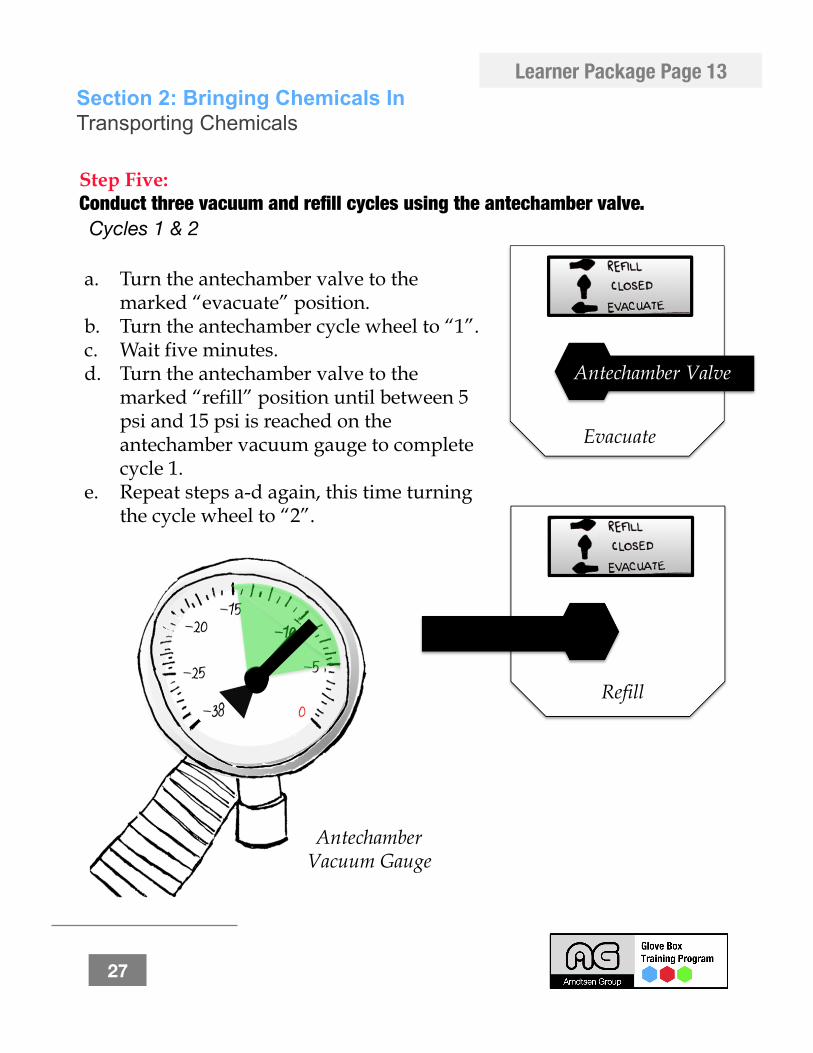
a. Turn the antechamber valve to the marked “evacuate” position.
b. Turn the antechamber cycle wheel to “1”. c. Wait five minutes. d. Turn the antechamber valve to the
marked “refill” position until between 5 psi and 15 psi is reached on the antechamber vacuum gauge to complete cycle 1.
e. Repeat steps a-d again, this time turning the cycle wheel to “2”.
Evacuate
Refill
Antechamber Vacuum Gauge
Antechamber Valve
Cycles 1 & 2
Step Five: Conduct three vacuum and refill cycles using the antechamber valve.
27
Learner Package Page 13
Time: 3 minutes Section 2: Bringing Chemicals In (Step 5, Cycles 3)
① Explain that cycle 3 follows the same steps as cycles 1 and 2 for the first half of the cycle.
a. Antechamber valve to evacuate position. b. Cycle wheel on the cycle number. c. Wait 5 minutes.
② Explain that cycle 3 follows different steps for the second half of the cycle.
a. Antechamber valve to “refill”. b. Wait until the vacuum gauge reads 0 psi. c. Antechamber valve to “closed”. d. Cycle wheel to “N2”
③ Ask the trainee what the difference between cycles 1 & 2 and cycle 3 are. If they have misunderstood your description, clarify.
④ Ask the trainee to perform the steps (with the exception of waiting 5 minutes, simply have them state this step out loud).
Instructor Notes:
28
Group Adaptations:
For step 5 do “production line” chemistry again, having each trainee do a single step.
In this event make sure you number off each participant (e.g. give them the step number they are to perform).
Section 2: Bringing Chemicals In Transporting Chemicals
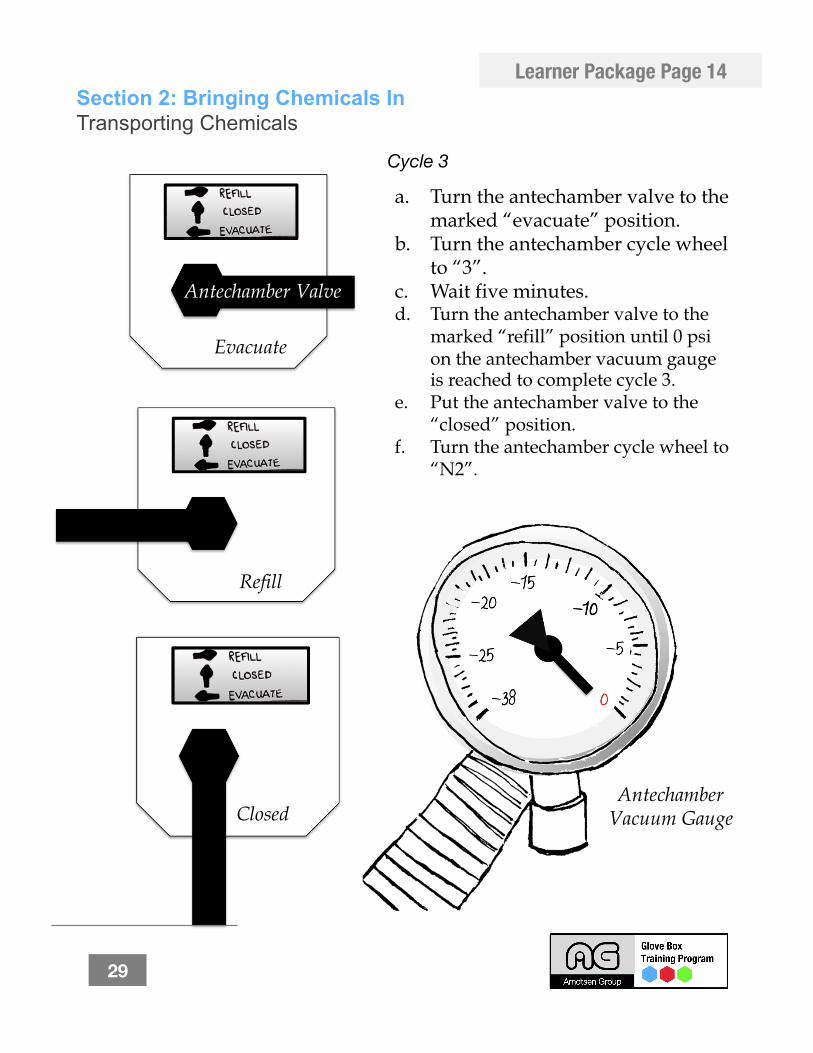
Cycle 3
a. Turn the antechamber valve to the marked “evacuate” position.
b. Turn the antechamber cycle wheel to “3”.
c. Wait five minutes. d. Turn the antechamber valve to the
marked “refill” position until 0 psi on the antechamber vacuum gauge is reached to complete cycle 3.
e. Put the antechamber valve to the “closed” position.
f. Turn the antechamber cycle wheel to “N2”.
Evacuate
Refill
Closed Antechamber
Vacuum Gauge
Antechamber Valve
29
Learner Package Page 14
Time: 3 minutes Section 2: Bringing Chemicals In (Step 6, 7, 8)
① Explain that the mechanics of the inner and outer doors are equivalent.
② Explain that it may be difficult to maneuver in the box with the gloves at first.
③ Outline the glove tips.
a. When working in the glove box it is recommended that you wear a long sleeve shirt.
b. Until you feel confident moving in the box, go slow! c. Make sure that your fingertips do not feel loose. If they do maneuver your hands
until they feel snug. d. If you suspect that there is a hole in the gloves talk to a senior lab member right
away.
④ Tell the trainee to put their hands through the gloves.
⑤ Encourage the trainee if they are having issues or appear nervous.
⑥ Give the trainee an opportunity to practice moving in the box.
⑦ Give the trainee an instrument and ask them to pick something up.
Instructor Notes:
30
Group Adaptations:
Have the trainees put in only one hand if you have limited glove box space.
Section 2: Bringing Chemicals In Transporting Chemicals
Procedure for Model A a. Put hands through the box gloves and extend them into the box. b. Turn the inner antechamber doorknob counterclockwise 360°. c. Turn the inner antechamber door counterclockwise 25°. d. Detach the inner antechamber door and place it knob down on the
glove box floor.
Procedure for Model B a. Put hands through the box gloves and extend them into the box. b. Pull the inter antechamber handle to unlatch the inner
antechamber hinge. c. Pull the door open to a 90° angle.
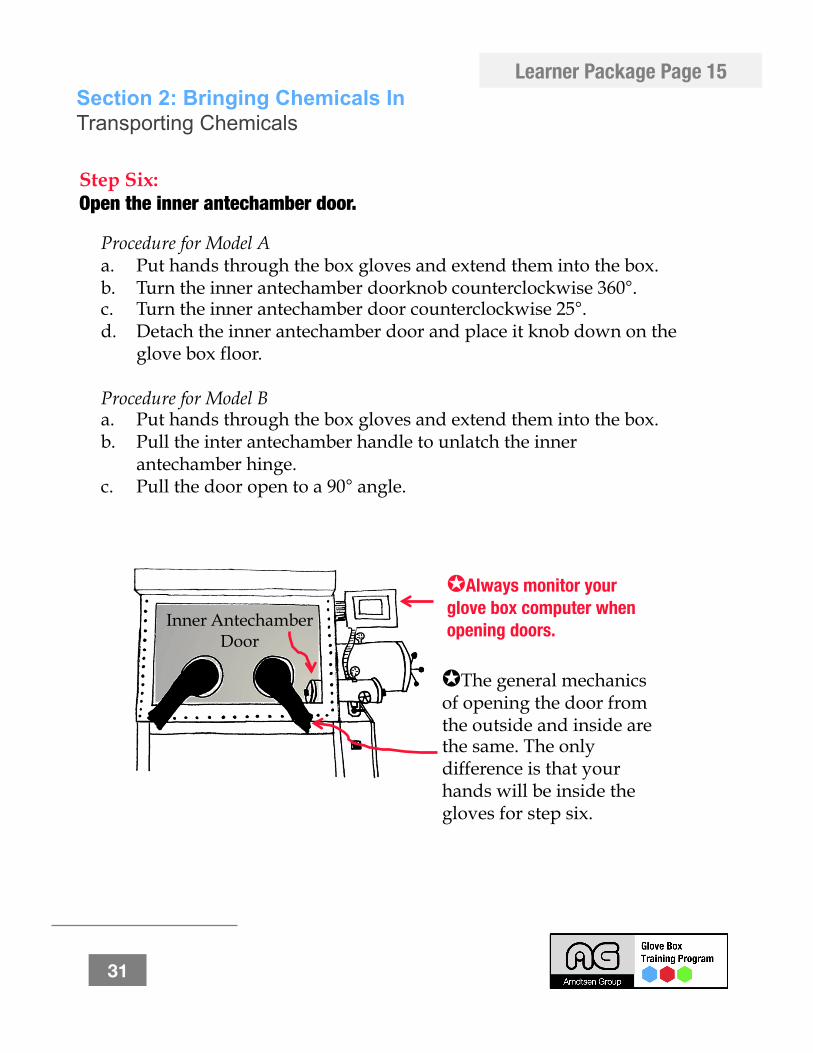
✪ The general mechanics of opening the door from the outside and inside are the same. The only difference is that your hands will be inside the gloves for step six.
✪ Always monitor your glove box computer when opening doors. Inner Antechamber
Door
Step Six: Open the inner antechamber door.
31
Learner Package Page 15
Time: 2 minutes Section 2: Bringing Chemicals In (Step 6, 7, 8)
① Ask the trainee to read the glove box computer one more time & to state if there are any deviations.
② Have the trainee touch the glove box door knob.
③ Without looking at their notebooks and while their hands are still in the glove box, ask the trainee to infer the procedures for opening the inner antechamber door
④ Ask the trainee to explicitly state the steps:
a. Open the inner antechamber door. b. Bring the chemical in. c. Close the inner antechamber door.
⑤ Ask the trainee to remove their hands from the glove box.
Instructor Notes:
✐ Quick Note: At this time do not ask the trainee to open the inner antechamber door as you did not complete full vacuum cycles to save time in the training.
32
Group Adaptations:
Pose the questions for these steps to the group as a whole.

Section 2: Bringing Chemicals In Transporting Chemicals
Step Seven: With your hands in the gloves pick up the sealed chemical and place it in the glove box.
Step Eight: With your hands in the gloves close the inner antechamber door.
Procedure for Model A a. Pickup the inner antechamber door. b. Fit the inner antechamber door grooves into the door frame. c. Turn the inner antechamber door clockwise 25°. d. Turn the outer antechamber door knob clockwise, using only your
thumb, index finger, and middle finger, (called: the 3 finger rule), until it is difficult to continue turning.
Procedure for Model B a. Push the inner antechamber door towards the glove box until it is
touching the door frame. b. Line the inner antechamber handle with the inner antechamber latch
and pull down on the inner antechamber handle to seal the door.
When working in the glove box it is recommended that you wear a long sleeve shirt.
Until you feel confident moving in the box, go slow! Make sure that your fingertips do not feel loose. If they do maneuver
your hands until they feel snug. If you suspect that there is a hole in the gloves talk to a senior lab
member right away.
Glove Tips
33
Learner Package Page 16
Time: 3 minutes Section 3: Bringing Chemicals Out (All Steps)
① Ask the trainee to infer based on their current knowledge of the glove box how you would bring a chemical out.
② Assert that you do not have to do vacuum cycles on the way out because the glove box is under nitrogen.
③ Explain the six main steps:
a. Open the inner antechamber door. b. Place the sealed chemical in the antechamber. c. Close the inner antechamber door. d. Open the outer antechamber door. e. Remove the sealed chemical. f. Close the outer antechamber door.
Instructor Notes:
34
Group Adaptations:
Pose these questions to the group as a whole.
✐ Quick Note: The trainees have a safety review of section 2 on page 17 of their learner packages.
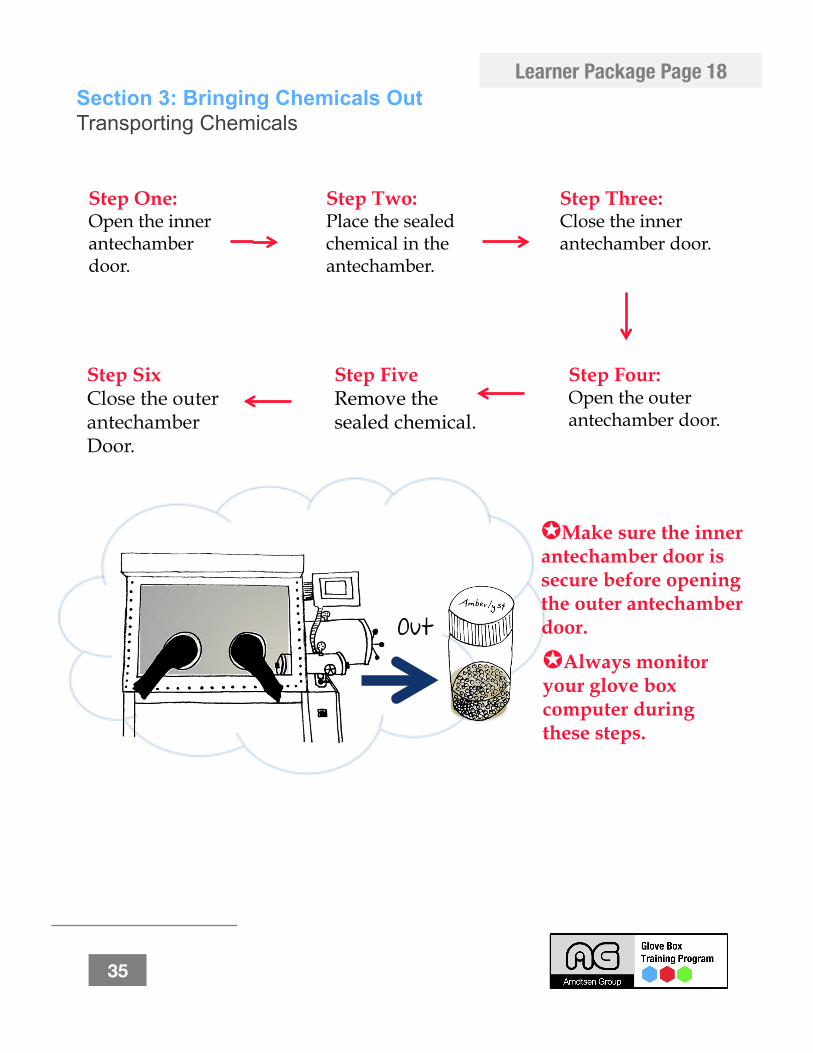
Section 3: Bringing Chemicals Out Transporting Chemicals
Step One: Open the inner antechamber door.
Step Two: Place the sealed chemical in the antechamber.
Step Three: Close the inner antechamber door.
Step Four: Open the outer antechamber door.
Out
Step Six Close the outer antechamber Door.
Step Five Remove the sealed chemical.
✪ Always monitor your glove box computer during these steps.
✪ Make sure the inner antechamber door is secure before opening the outer antechamber door.
35
Learner Package Page 18
Time: 3 minutes Section 4: Preparing for the Next User (All Steps)
① Finish by explaining the importance of keeping the glove box tidy for the next user.
a. Reduces conflict in the lab. b. Prevents lost time. c. Prevents accidents/mistakes in the box. d. It is just a considerate thing to do.
② List the 6 main steps.
a. All chemical in the glove box are labeled. b. All chemicals and equipment are put away. c. All dirty and empty glassware, bottles & cloths in the garbage. d. The bench is debris free. e. The inside of the gloves are debris free. f. The outside of the gloves are debris free.
Instructor Notes:
36
Group Adaptations:
Ask the trainees to tell a quick story about a messy roommate or sibling and a conflict.
Explain that these same issues can occur when working in glove boxes.
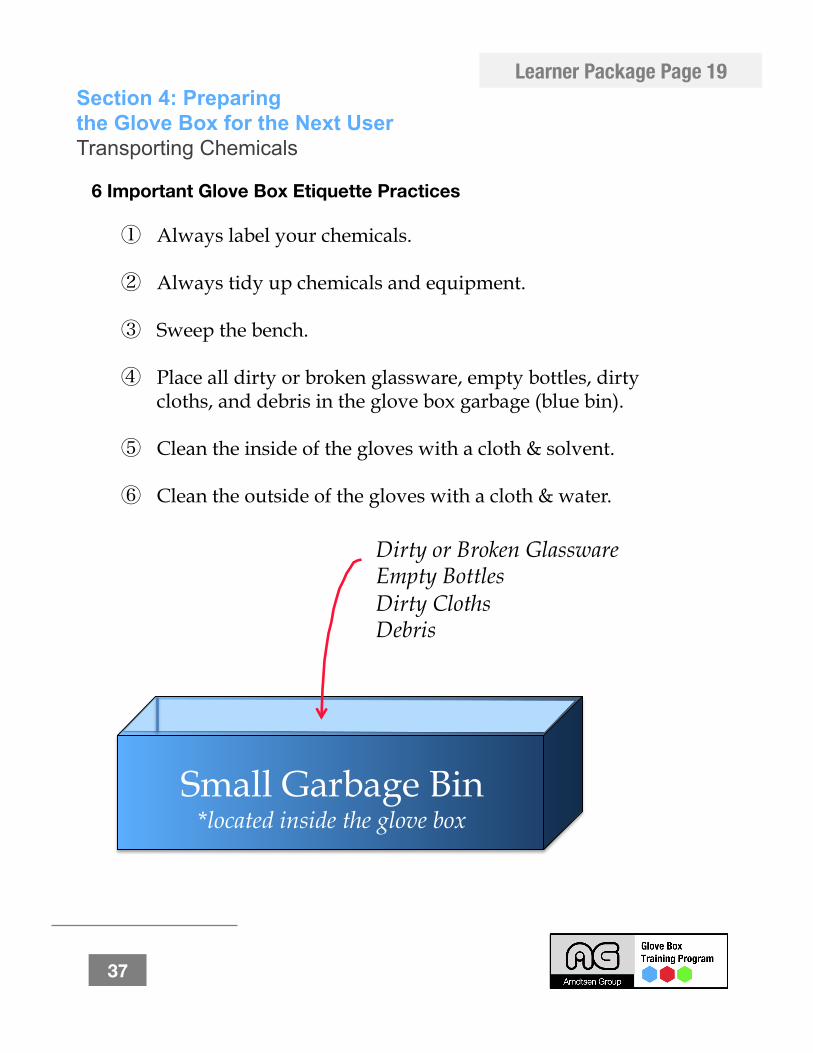
Section 4: Preparing the Glove Box for the Next User Transporting Chemicals
① Always label your chemicals.
② Always tidy up chemicals and equipment.
③ Sweep the bench.
④ Place all dirty or broken glassware, empty bottles, dirty cloths, and debris in the glove box garbage (blue bin).
⑤ Clean the inside of the gloves with a cloth & solvent.
⑥ Clean the outside of the gloves with a cloth & water.
6 Important Glove Box Etiquette Practices
Small Garbage Bin *located inside the glove box
Dirty or Broken Glassware Empty Bottles Dirty Cloths Debris
37
Learner Package Page 19
If Time Permits Wrap-up
① You can do an informal quiz of the trainee’s knowledge using the evaluation preparation tools (worksheet 1 in the learning guide).
② You can ask the trainer to do an “Italian” run of the glove box procedures. This means to walk through the steps quickly and to mime the steps that cannot be performed in a rapid fashion.
③ You may wish to have the trainee complete worksheets 2 and/or 3 in his or her workbook, which require the trainee to view videos 1 & 2 from this package. The answers to these worksheets are in the following section, some of the answers are also highlighted in videos 3 & 4 of this package.
④ Before completing the session be sure to offer some encouraging comments and highlight what the leaner did well.
⑤ Politely give the trainee some tips for improving the more difficult procedures, or those that they appeared to struggle with.
⑥ Always end on a positive note.
Instructor Notes:
38
Group Adaptations:
Do a “production line” “Italian” run. Meaning you will assign each trainee a part of the equipment.
Next ask, the group to do the procedures sequentially, and indicate that each trainee will state out loud the steps related to their part of the equipment.
✐ Quick Note: The learner package also has a “Rate Your Training” questionnaire on page 28 & 29.
Conclusion Transporting Chemicals
✪ It takes time to remember all of the steps in this procedure, so use the visuals in this guide to help you for the first couple of weeks.
✪ Try not to rush through the steps. It will take a long time for a senior lab member to fix the machine if oxygen or air is introduced.
✪ Always remember to monitor your glove box computer and let a senior lab member know if there is a deviation.
✪ Always use your cycle wheel. This will avoid confusion especially if there are multiple users at one time.
✪ Be careful when tightening model A doors. Make sure that you or the next user will be able to open it. (Use the three finger rule).
✪ Always make sure that the inner antechamber door is closed when opening the outer antechamber door and vice versa.
✪ Always do three full vacuum and refill cycles.
✪ If you are introducing a solid chemical into the box loosen the sealed container a bit to allow for air to escape.
✪ Not everything can go in the glove box. Avoid introducing a chemical or item that you are unsure of, this can be very dangerous.
✪ Lastly, it takes time to master moving in the glove box. Don’t be shy to ask your trainer about tips on how to move around.
Most important things to remember when working…
39
Learner Package Page 20
✪ You will be administering a hands on training. ✪ You will coordinate this session with the trainee. ✪ During this evaluation you will observe the trainee as they bring a chemical in and out of the box and tidy up afterwards. ✪ Prior to the the evaluation the trainee can complete the activities in his or her learning package to help reinforce the learning from their training session. ✪ The answers to these worksheets are provided on the following pages.
The Set-up
Included in the Trainees Learning Package
① Worksheet 1: Glove Box True or False ② Worksheet 2: The Evil Chemist & the Glove Box Computer ③ Worksheet 3: The Busy Chemists & the Glove Box Confusion ④ Video 1a: The Evil Chemist & the Glove Box Computer ⑤ Video 2a: The Busy Chemists & the Glove Box Confusion ⑥ Video 1b: The Evil Chemist (Highlighted Answers) ⑦ Video 2b: The Busy Chemist (Highlighted Answers)
40
Evaluations: General Information
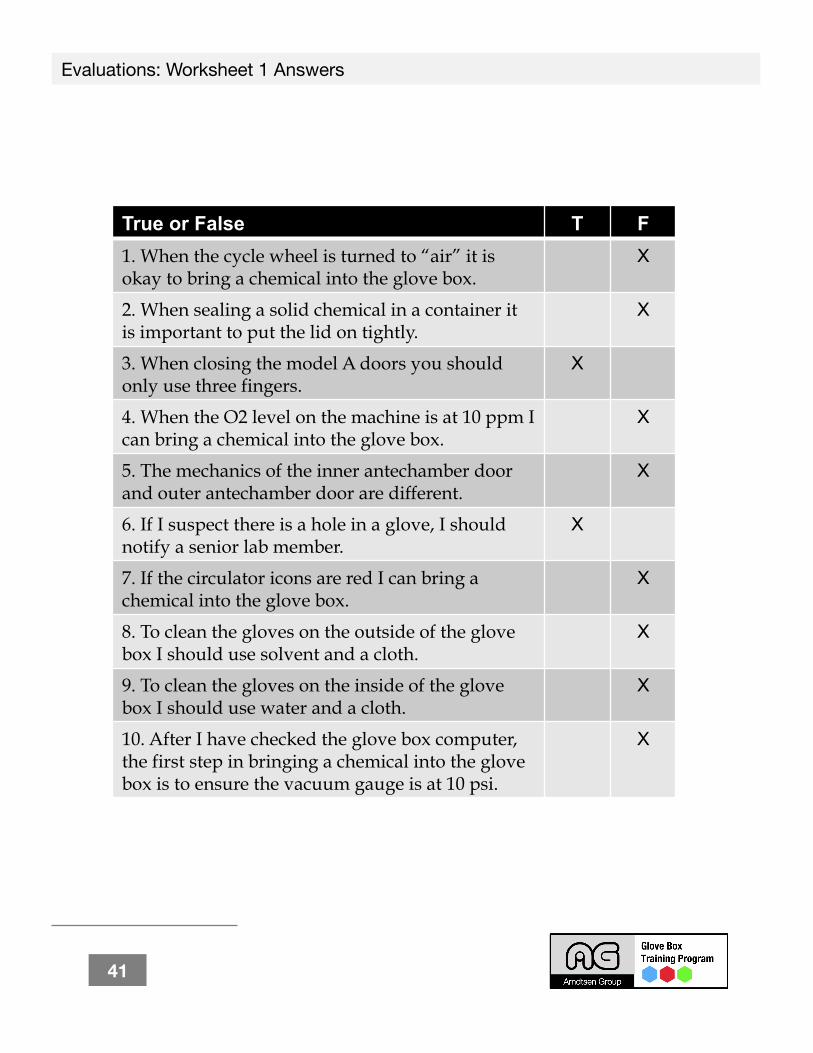
True or False T F 1. When the cycle wheel is turned to “air” it is okay to bring a chemical into the glove box.
X
2. When sealing a solid chemical in a container it is important to put the lid on tightly.
X
3. When closing the model A doors you should only use three fingers.
X
4. When the O2 level on the machine is at 10 ppm I can bring a chemical into the glove box.
X
5. The mechanics of the inner antechamber door and outer antechamber door are different.
X
6. If I suspect there is a hole in a glove, I should notify a senior lab member.
X
7. If the circulator icons are red I can bring a chemical into the glove box.
X
8. To clean the gloves on the outside of the glove box I should use solvent and a cloth.
X
9. To clean the gloves on the inside of the glove box I should use water and a cloth.
X
10. After I have checked the glove box computer, the first step in bringing a chemical into the glove box is to ensure the vacuum gauge is at 10 psi.
X
41
Evaluations: Worksheet 1 Answers
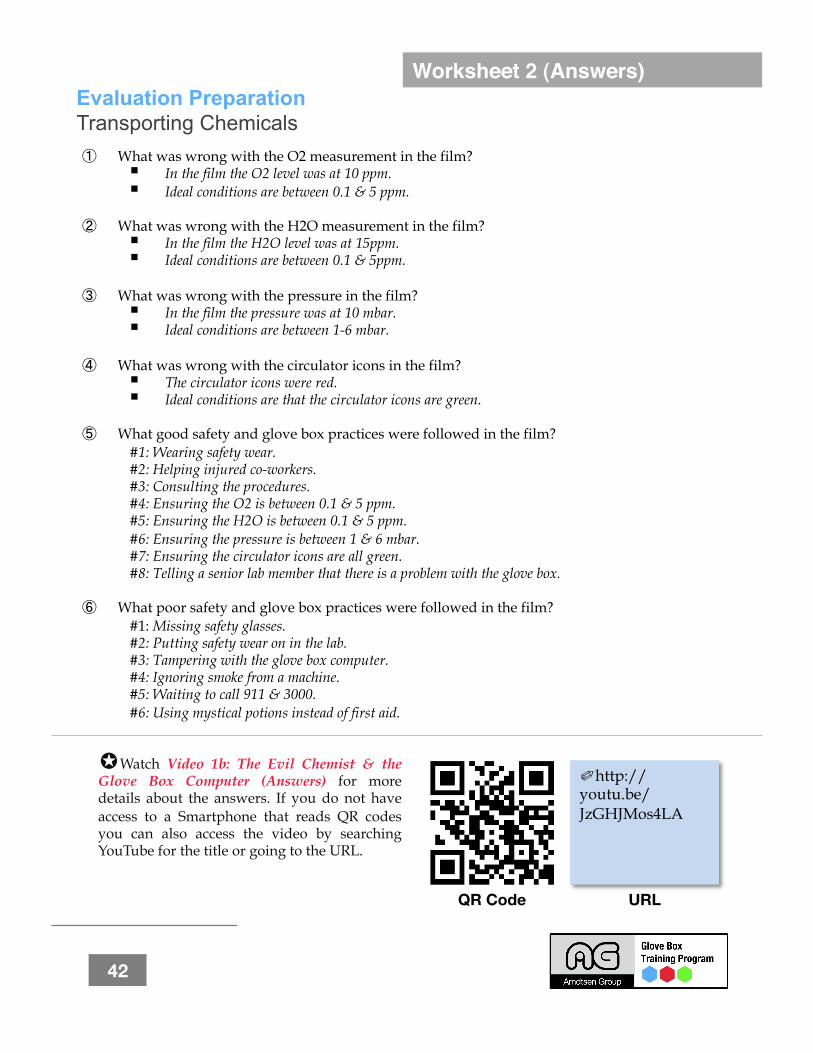
Evaluation Preparation Transporting Chemicals ① What was wrong with the O2 measurement in the film?
In the film the O2 level was at 10 ppm. Ideal conditions are between 0.1 & 5 ppm.
② What was wrong with the H2O measurement in the film? In the film the H2O level was at 15ppm. Ideal conditions are between 0.1 & 5ppm.
③ What was wrong with the pressure in the film? In the film the pressure was at 10 mbar. Ideal conditions are between 1-6 mbar.
④ What was wrong with the circulator icons in the film? The circulator icons were red. Ideal conditions are that the circulator icons are green.
⑤ What good safety and glove box practices were followed in the film? #1: Wearing safety wear. #2: Helping injured co-workers. #3: Consulting the procedures. #4: Ensuring the O2 is between 0.1 & 5 ppm. #5: Ensuring the H2O is between 0.1 & 5 ppm. #6: Ensuring the pressure is between 1 & 6 mbar. #7: Ensuring the circulator icons are all green. #8: Telling a senior lab member that there is a problem with the glove box.
⑥ What poor safety and glove box practices were followed in the film? #1: Missing safety glasses. #2: Putting safety wear on in the lab. #3: Tampering with the glove box computer. #4: Ignoring smoke from a machine. #5: Waiting to call 911 & 3000. #6: Using mystical potions instead of first aid.
42
Worksheet 2 (Answers)
✐ http://youtu.be/JzGHJMos4LA
✪ Watch Video 1b: The Evil Chemist & the Glove Box Computer (Answers) for more details about the answers. If you do not have access to a Smartphone that reads QR codes you can also access the video by searching YouTube for the title or going to the URL.
QR Code URL
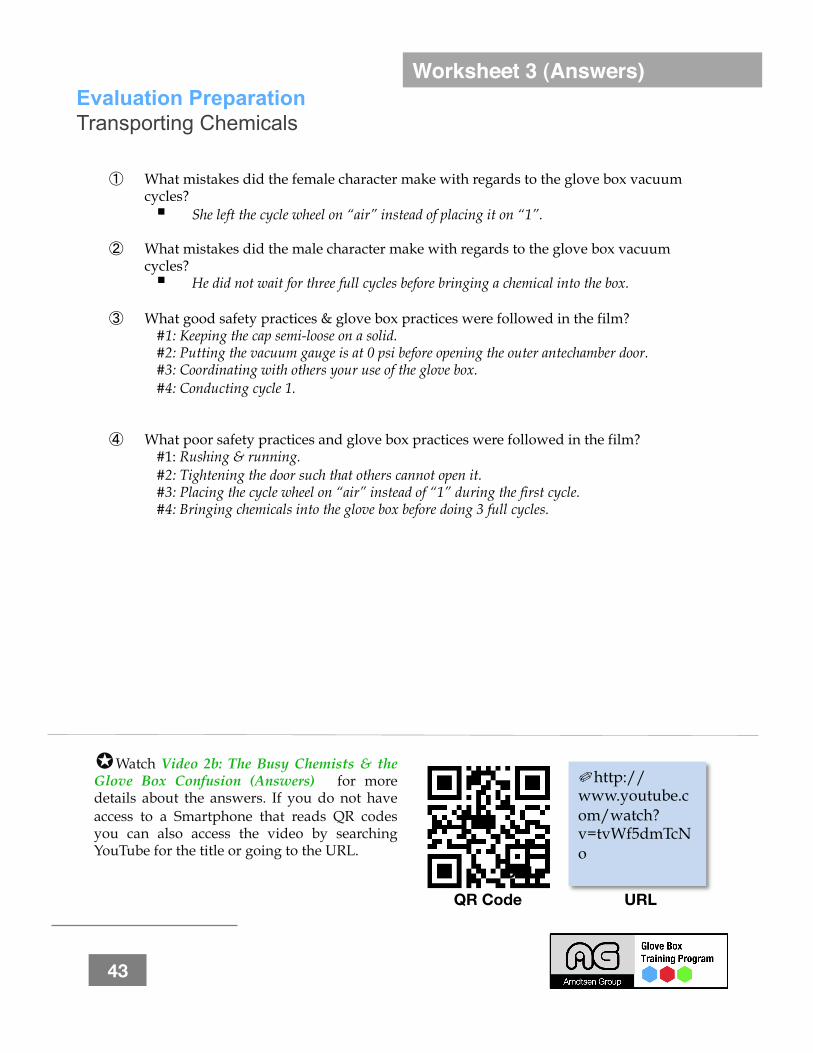
✪ Watch Video 2b: The Busy Chemists & the Glove Box Confusion (Answers) for more details about the answers. If you do not have access to a Smartphone that reads QR codes you can also access the video by searching YouTube for the title or going to the URL.
Evaluation Preparation Transporting Chemicals
① What mistakes did the female character make with regards to the glove box vacuum cycles? She left the cycle wheel on “air” instead of placing it on “1”.
② What mistakes did the male character make with regards to the glove box vacuum cycles? He did not wait for three full cycles before bringing a chemical into the box.
③ What good safety practices & glove box practices were followed in the film? #1: Keeping the cap semi-loose on a solid. #2: Putting the vacuum gauge is at 0 psi before opening the outer antechamber door. #3: Coordinating with others your use of the glove box. #4: Conducting cycle 1.
④ What poor safety practices and glove box practices were followed in the film? #1: Rushing & running. #2: Tightening the door such that others cannot open it. #3: Placing the cycle wheel on “air” instead of “1” during the first cycle. #4: Bringing chemicals into the glove box before doing 3 full cycles.
43
Worksheet 3 (Answers)
✐ http://www.youtube.com/watch?v=tvWf5dmTcNo
URL
QR Code URL
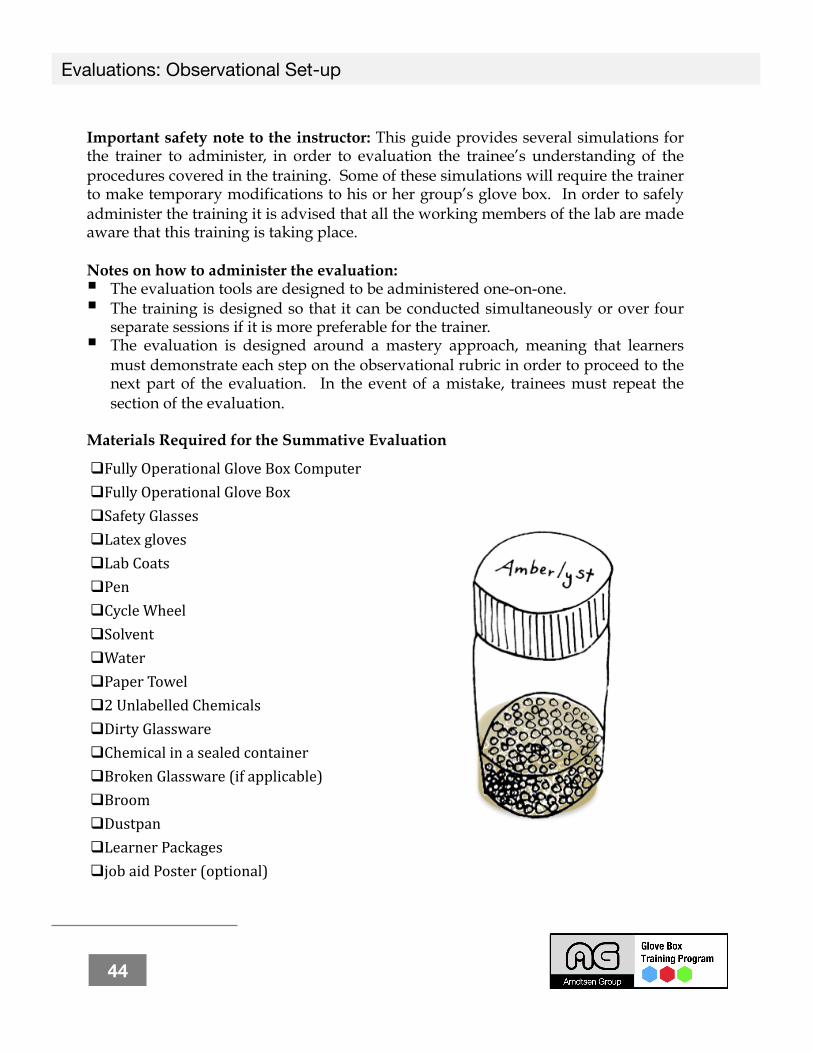
Important safety note to the instructor: This guide provides several simulations for the trainer to administer, in order to evaluation the trainee’s understanding of the procedures covered in the training. Some of these simulations will require the trainer to make temporary modifications to his or her group’s glove box. In order to safely administer the training it is advised that all the working members of the lab are made aware that this training is taking place.
Notes on how to administer the evaluation: The evaluation tools are designed to be administered one-on-one. The training is designed so that it can be conducted simultaneously or over four
separate sessions if it is more preferable for the trainer. The evaluation is designed around a mastery approach, meaning that learners
must demonstrate each step on the observational rubric in order to proceed to the next part of the evaluation. In the event of a mistake, trainees must repeat the section of the evaluation.
Materials Required for the Summative Evaluation
FullyOperationalGloveBoxComputer FullyOperationalGloveBox SafetyGlasses Latexgloves LabCoats Pen CycleWheel Solvent Water PaperTowel 2UnlabelledChemicals DirtyGlassware Chemicalinasealedcontainer BrokenGlassware(ifapplicable) Broom Dustpan LearnerPackages jobaidPoster(optional)
44
Evaluations: Observational Set-up
Observational Rubric
1) What does the O2 level read on the glove box? _______________________________ ☐ 2) What does the H2O level read on the glove box? _______________________________ ☐ 3) What does the pressure read on the glove box? _______________________________ ☐ 4) What colors are the circulation icons? _______________________________ ☐ 5) Are there any deviations in the glove box conditions that make it unsafe to bring a chemical into the glove box? _______________________________ ☐ 6) What are they? _______________________________
_______________________________ _______________________________ ☐
7) What procedures should you follow in this case? _______________________________ _______________________________ _______________________________ ☐
Evaluation Instructions & Rubric Transporting Chemicals
Main Objective 1 ✪ Given a glove box computer screen menu, state whether the glove box is ready to safely bring a chemical into the antechamber, with a 100% accuracy.
① Prepare the training, by doing a minor box modification (please note: that this will include temporarily turning the circulation off).
a. Open the main menu on the glove box computer. b. Press the “function” button. c. Press the “circulation” button. d. Press the “back” button to return to the main
screen.
② How to Administer this Portion of the Evaluation:
a. Once the modification has been made to the glove box and you are ready to begin the evaluation have the trainee come to the glove box.
b. Pose the questions below to the trainee & record his or her answers. c. In the box beside the answers mark a checkmark for a correct answer or an “x”
for an incorrect answer. d. When complete return the glove box to its regular settings.
✐ Materials Operational Glove Box Safety Glasses Latex Gloves Lab Coats 2 Pens
Kirkpatrick 2
Total:__/7
45
Evaluation Instructions & Rubric Transporting Chemicals
Main Objective 2 ✪ Given a chemical in a sealed container, a vacuum pump, a cycle wheel, a glove box and a set of outline procedures, safely bring the chemical into the glove box, without causing damage to the equipment.
① Prepare the training.
a. Get a chemical in a sealed container for transport into the glove box following departmental procedures (e.g. put a solid in a vial with a screw cap, slightly loosening the lid).
b. Find the materials required for this section.
② How to Administer this Portion of the Evaluation:
a. Once the chemical has been prepared pose the following instructions to the trainee: “Please bring this chemical into the glove box safely following the procedures we covered in the training.”
b. Use the observational checklist below to assess the trainee.
✐ Materials Operational Glove Box Safety Glasses Latex Gloves Lab Coats 2 Pens Cycle Wheel Learners Package (Section 2) A Chemical in a sealed container.
Kirkpatrick 2
Observational Rubric
1) Ensured the chamber valve was at 0 psi. ☐ 2) Opened the outer antechamber door. ☐ 3) Loaded a chemical in the antechamber. ☐ 4) Closed the outer antechamber door. ☐ 5) Conducted a full first cycle. ☐ 6) Conducted a full second cycle. ☐ 7) Conducted a full third cycle. ☐ 8) Opened inner antechamber door. ☐ 9) Removed chemical from antechamber. ☐ 10) Closed inner antechamber door. ☐ 11) Verify the glove box conditions have not deviated. ☐
Total:__/11
46
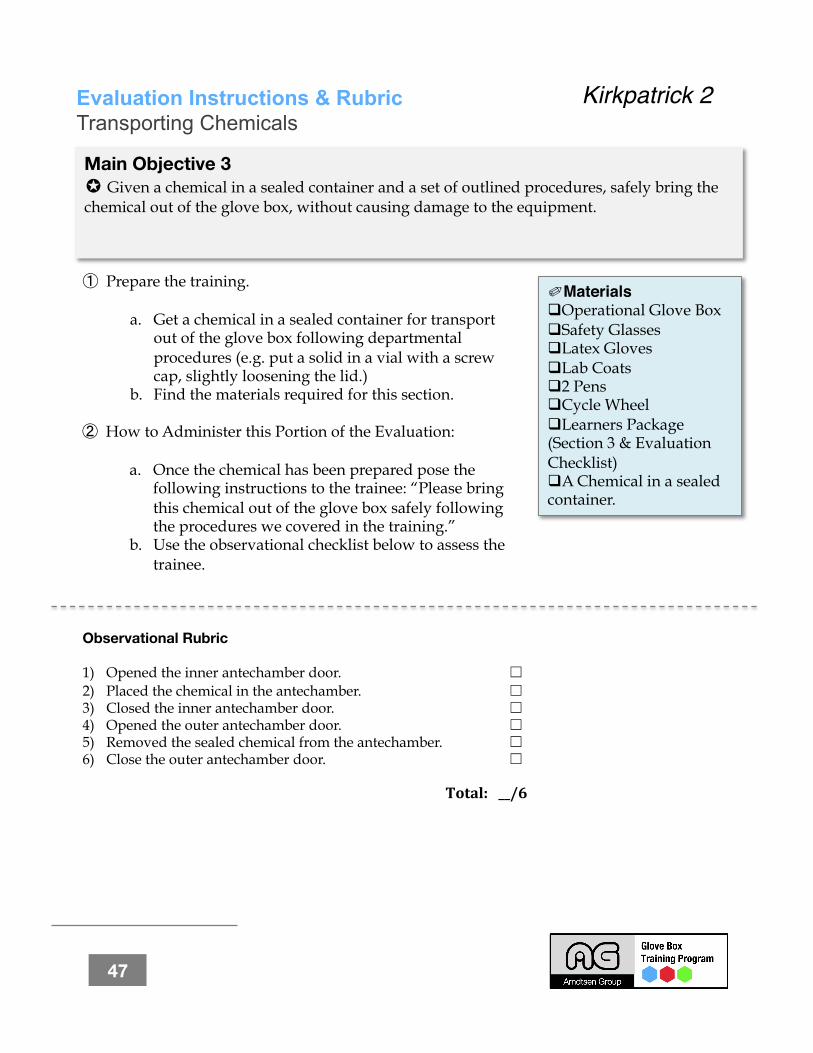
Evaluation Instructions & Rubric Transporting Chemicals
Main Objective 3 ✪ Given a chemical in a sealed container and a set of outlined procedures, safely bring the chemical out of the glove box, without causing damage to the equipment.
① Prepare the training.
a. Get a chemical in a sealed container for transport out of the glove box following departmental procedures (e.g. put a solid in a vial with a screw cap, slightly loosening the lid.)
b. Find the materials required for this section.
② How to Administer this Portion of the Evaluation:
a. Once the chemical has been prepared pose the following instructions to the trainee: “Please bring this chemical out of the glove box safely following the procedures we covered in the training.”
b. Use the observational checklist below to assess the trainee.
✐ Materials Operational Glove Box Safety Glasses Latex Gloves Lab Coats 2 Pens Cycle Wheel Learners Package (Section 3 & Evaluation Checklist) A Chemical in a sealed container.
Kirkpatrick 2
Observational Rubric
1) Opened the inner antechamber door. ☐ 2) Placed the chemical in the antechamber. ☐ 3) Closed the inner antechamber door. ☐ 4) Opened the outer antechamber door. ☐ 5) Removed the sealed chemical from the antechamber. ☐ 6) Close the outer antechamber door. ☐
Total:__/6
47
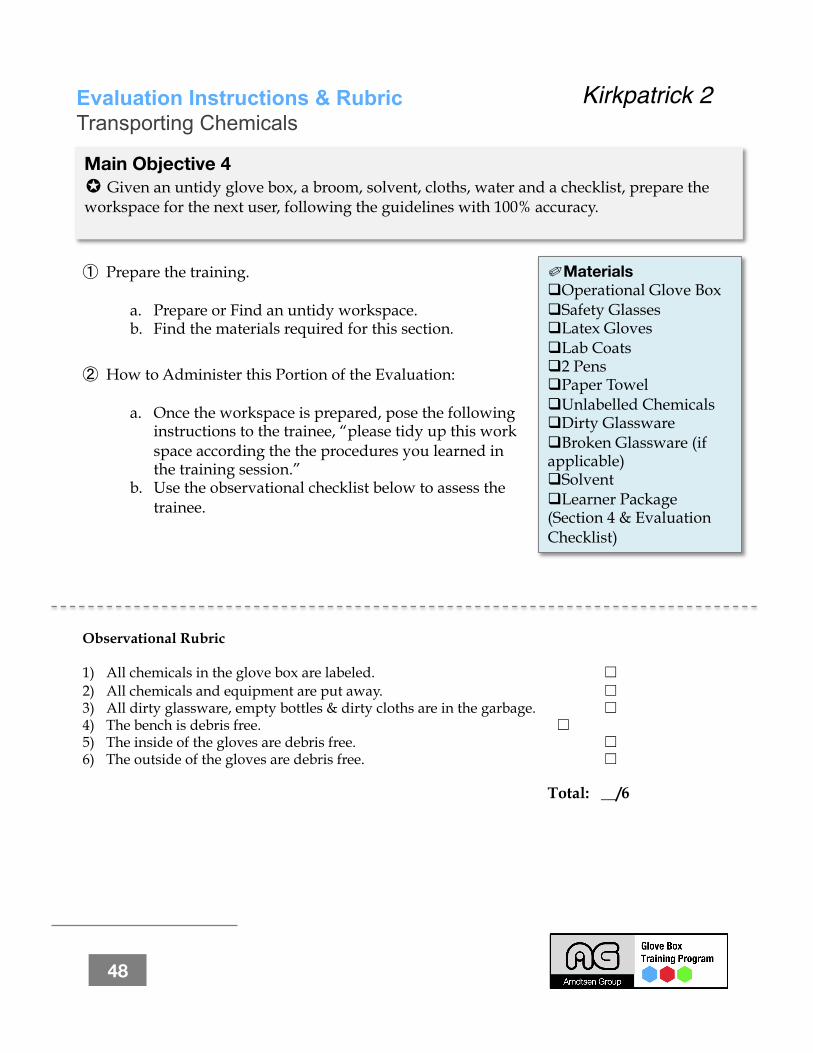
Evaluation Instructions & Rubric Transporting Chemicals
Main Objective 4 ✪ Given an untidy glove box, a broom, solvent, cloths, water and a checklist, prepare the workspace for the next user, following the guidelines with 100% accuracy.
① Prepare the training.
a. Prepare or Find an untidy workspace. b. Find the materials required for this section.
② How to Administer this Portion of the Evaluation:
a. Once the workspace is prepared, pose the following instructions to the trainee, “please tidy up this work space according the the procedures you learned in the training session.”
b. Use the observational checklist below to assess the trainee.
✐ Materials Operational Glove Box Safety Glasses Latex Gloves Lab Coats 2 Pens Paper Towel Unlabelled Chemicals Dirty Glassware Broken Glassware (if applicable) Solvent Learner Package (Section 4 & Evaluation Checklist)
Kirkpatrick 2
Observational Rubric
1) All chemicals in the glove box are labeled. ☐ 2) All chemicals and equipment are put away. ☐ 3) All dirty glassware, empty bottles & dirty cloths are in the garbage. ☐ 4) The bench is debris free. ☐ 5) The inside of the gloves are debris free. ☐ 6) The outside of the gloves are debris free. ☐
Total: __/6
48
Glossary of Terms Transporting Chemicals
Antechamber: A metal container attached to a vacuum source and an inert gas source, designed to transport materials in and out of a glove box.
Antechamber Cycle: A procedure involving evacuation and subsequent refilling of the antechamber with inert gas.
Antechamber Handle: A piece of equipment on certain glove box models that allows for the opening and closing of the antechamber inner and outer doors.
Antechamber Latch: A large metal loop attached to the inner and outer antechamber doors on some glove box models that holds the antechamber handles in place.
Antechamber Tray: A flat metal surface inside the antechamber designed to transport chemicals in and out of the antechamber.
Antechamber Valve: A small knob that can divert the antechamber to the vacuum source or inert gas source.
Closed Position: A setting on the vacuum gauge that seals the antechamber from inert gas flow and the vacuum pump.
Cycle Wheel: A visual aid designed to alert users to the cycle state of the antechamber.
Evacuate Position: A setting on the antechamber valve that removes the atmospheric gases from the antechamber.
49

Glossary of Terms Transporting Chemicals
Inner Antechamber Door: The direct entry and exit point to the glove box and secured antechamber.
mbar (millibar pressure unit): a unit of pressure, used within the metric system. 1 mbar is equal to 100 Pascals. (also abbreviated with mb and mbr).
Outer Antechamber Door: The direct entry and exit point to the antechamber and the outside lab area.
ppm (parts per million): Unit used to measure trace amounts of chemicals or gases.
psi (pounds per square inch): The unit measure of pressure.
Refill Position: A setting on the antechamber valve that introduces inert gas into the antechamber.
Sealed Container: An airtight vessel designed to hold chemicals.
Three Finger Rule: A procedure for opening Model A glove boxes, that involves using only your thumb, index finger and middle finger.
Vacuum Gauge: An instrument that measures vacuum pressure.
50
References Transporting Chemicals
51
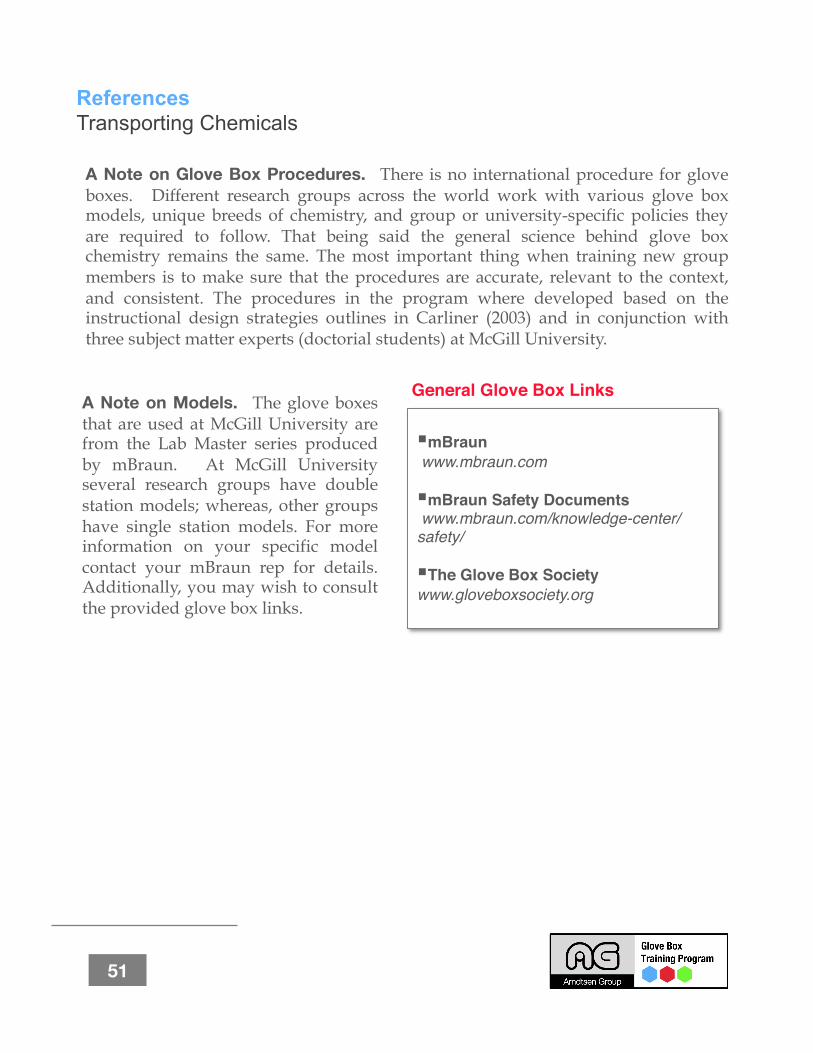
A Note on Glove Box Procedures. There is no international procedure for glove boxes. Different research groups across the world work with various glove box models, unique breeds of chemistry, and group or university-specific policies they are required to follow. That being said the general science behind glove box chemistry remains the same. The most important thing when training new group members is to make sure that the procedures are accurate, relevant to the context, and consistent. The procedures in the program where developed based on the instructional design strategies outlines in Carliner (2003) and in conjunction with three subject matter experts (doctorial students) at McGill University.
A Note on Models. The glove boxes that are used at McGill University are from the Lab Master series produced by mBraun. At McGill University several research groups have double station models; whereas, other groups have single station models. For more information on your specific model contact your mBraun rep for details. Additionally, you may wish to consult the provided glove box links.
mBraun www.mbraun.com
mBraun Safety Documents www.mbraun.com/knowledge-center/safety/
The Glove Box Society www.gloveboxsociety.org
General Glove Box Links
References Transporting Chemicals
52
Carliner, S. (2003). Training Design Basics. Alexandria, VA: ASTD Press.
Driscoll, M. P. (2005). Psychology of learning for instruction. (3rd ed.). Needham Heights,
MA.: Allyn-Bacon, Inc.
McGill Hazardous Waste Management (2012, October 22). Emergencies. (Online Post).
Retrieved from http://www.mcgill.ca/hwm/emergencies
McGill Hazardous Waste Management (2012, October 18). Waste Management Forms.
(Online Post). Retrieved from http://www.mcgill.ca/hwm/forms/
McGill Chemistry (2006). Guidelines and Procedures. (Online Post). Retrieved from
http://www.chemistry.mcgill.ca/safety/guidelines.html
Formative Evaluation Plan Transporting Chemicals
53
Review Phase # of Reviewers Main Purpose
1. Expert Review 2-3 Subject Matter Experts Content Accuracy
2. Pilot Study (1 to 1) 1 Trainee, 1 instructor* Program Usability
3. Pilot Study (group) 6 Trainees, 1 instructor* Program Usability
4. Editorial Review 2-3 Editors Program Readability
Expert Review Pilot Studies Editorial Review
*The same trainers for both 1 to 1 and group pilot studies would be ideal.
Expert Review Formative Evaluation
A needs assessment was conducted in October, 2012. At this time I spoke with glove box heads from three separate research groups at
McGill University. A pre-meeting questionnaire was also distributed. (See results below) It was decided by the feedback received and in conjunction with the project sponsor
(Jeffrey Quesnel) to make the training accessible to beginner level frequent and beginner level infrequent users and to target four main training areas:
a. Using the glove box computer. b. Bringing chemicals into the glove box. c. Bringing chemicals out of the glove box. d. Preparing the workspace for the next user.
Decision-Making to Date
Identified Performance Gaps from Questionnaire # of People who Identified this
Not preparing the workspace for the next user 3
Using solvents and/or chemicals inappropriately 3
Increasing O2 or H2O levels 2
Not repairing holes in the gloves 2
Inability to do maintenance 1
Tightening valves and lids too tightly or too loosely 1
Mistakes in using the vacuum pump 1
Issues related to users overlapping 1
Identified Training Issues from Questionnaire # of People who Identified this
Students lack a basic understanding of the central concepts of glove boxes
4
The glove box is a common space used by multiple users 2
Not all techniques translate across labs & equipment 1
No consistent training protocol exists for glove box training 1
Not sure of the student’s prior knowledge 1
The trainer lacks knowledge himself or herself in some areas
1
Some techniques have very complex procedures 1
There is lots of information to cover in a limited timeframe 1
54
Expert Review Formative Evaluation
In order to ensure that the content being prepared for the glove box training program is accurate, logical, and safe. I will be asking several subject matter experts (SMEs) to review the content produced to date. A pilot study & editorial review will also be conducted.
For the purpose of this review a small questionnaire has been created to direct your attention to important aspects of the project, with a place for general feedback at the end of sections 2 & 4.
Your honest and full feedback is welcomed! The more information you provide the more likely your comments will translate into a better training experience for everyone involved, so please don’t be shy!
Should you have any questions, or should you like to follow up further on a particular point, please contact Jessica Haak by e-mail, [email protected] or by phone, 514.589.4251.
Background Information
Section One: Learner Package Accuracy
Instructions: Please review the materials making sure to assess each of the elements below. It is asked that you annotate the document using the “review comments” function in PowerPoint, located within the tools menu.
1. Safety information in the introductory section.
2. “4 important glove box pointers” & labeled glove box schematic.
3. Glove box computer usage.
4. Sequence of steps relating to bringing a chemical into the glove box.
5. The 8 steps listed in relation to bringing a chemical into the glove box.
6. Bringing chemicals into the glove box safety review.
7. The 6 steps listed in relation to bringing a chemical out of the glove box.
8. Bringing chemical out of the glove box safety review.
9. The 6 steps listed in relation to preparing the glove box for the next user.
10. Worksheets 1, 2 & 3
11. Videos 1, 2, 3 & 4
12. Evaluation Section
13. Glossary
14. Job Aid
55
Expert Review Formative Evaluation
Section Three: Instructional Package Accuracy
Instructions: Please answer the questions below in a separate document & submit them to the instructional designer.
1. What 3 words would you use to describe the learning package you just viewed?
2. Name the elements that would think are most important to preserve in the final draft.
3. Name the elements that you would most like to see improved.
4. Name the visuals that you most appreciated.
5. Name the visuals that you would like to see improved.
6. What topic do you think was best articulated in the package?
7. What topic do you think was worst articulated in the package?
8. Were there any safety issues that you noted? If so, what advice would you give to
improve this issue?
9. How did you find the sequence of the program? Was it logical? If not, what advice
would you give to improve this issue?
10. Did you find it to navigate through the content? If not, what advice would you give
to improve these issues?
11. Please provide your general feedback on the learning package.
Section Two: Learning Package Overall Impressions
Instructions: Please review the materials making sure to assess each of the elements below. It is asked that you annotate the document using the “review comments” function in PowerPoint, located within the tools menu.
1. Instructions for the teaching the glove box computer.
2. Instructions for teaching how to bring a chemical into the glove box.
3. Instructions for teaching how to bring a chemical out of the glove box.
4. Instructions for teaching how to prepare the glove box for the next user.
5. Instructors for conducting the evaluations.
56
Expert Review Formative Evaluation
Instructions: Please answer the questions below in a separate document and submit them to the instructional designer.
1. What 3 words would you use to describe the learning package you just viewed?
2. Which instructions do you think would be most successful in a training setting?
3. What instructions do you think would be least successful in a training setting?
4. Is there any content that you would like to see added to the instructional package?
5. Is there any content that you would like to see removed from the instructional
package?
6. Were there any safety issues that you noted? If so, what advice would you give to
improve this issue?
7. How did you find the sequence of the instructor package? Was it logical? If not,
what advice would you give to improve this issue?
8. Please provide your general feedback on the instructional package.
Section Four: Instructional Package Overall Impressions
Thank you very much for your feedback!
57
Pilot Study (Trainee & Trainer Information) Formative Evaluation
Background Information
The purpose of this pilot study is to assess how easy it is to read through and use the content in the glove box training program.
Through this process it is hoped that any procedural gaps, poor labeling, logistical problems, and inappropriate teaching strategies written into the program are identified.
To best accomplish this, it is asked that you follow the steps in the training to identify problem areas (in the event that you notice any safety-related issues please always air on the side of logic & caution).
Your honest and full feedback is welcomed! The more information you provide the more likely your comments will translate into a better training experience for everyone involved, so please don’t be shy!
Lastly, it is important that trainees in the pilot study are able to complete the entry level tasks prior to participating.
Should you have any questions, or should you like to follow up further on a particular point, please contact Jessica Haak by e-mail, [email protected] or by phone, 514.589.4251.
Task ✔
Name the major parts of the glove box. ✔
Label a basic diagram of a glove box. ✔
Explain how the value on the vacuum gauge relates to the pressure inside the antechamber.
✔
Explain how the glove box removes oxygen and water from its atmosphere. ✔
Explain what types of chemicals are incompatible with the O2 purifier in the glove box.
✔
Explain what each of the four circular icons on the glove box computer main menu represent in relationship to the glove box.
✔
Explain what types of reactions are unsafe or impossible to conduct in a glove box.
✔
58
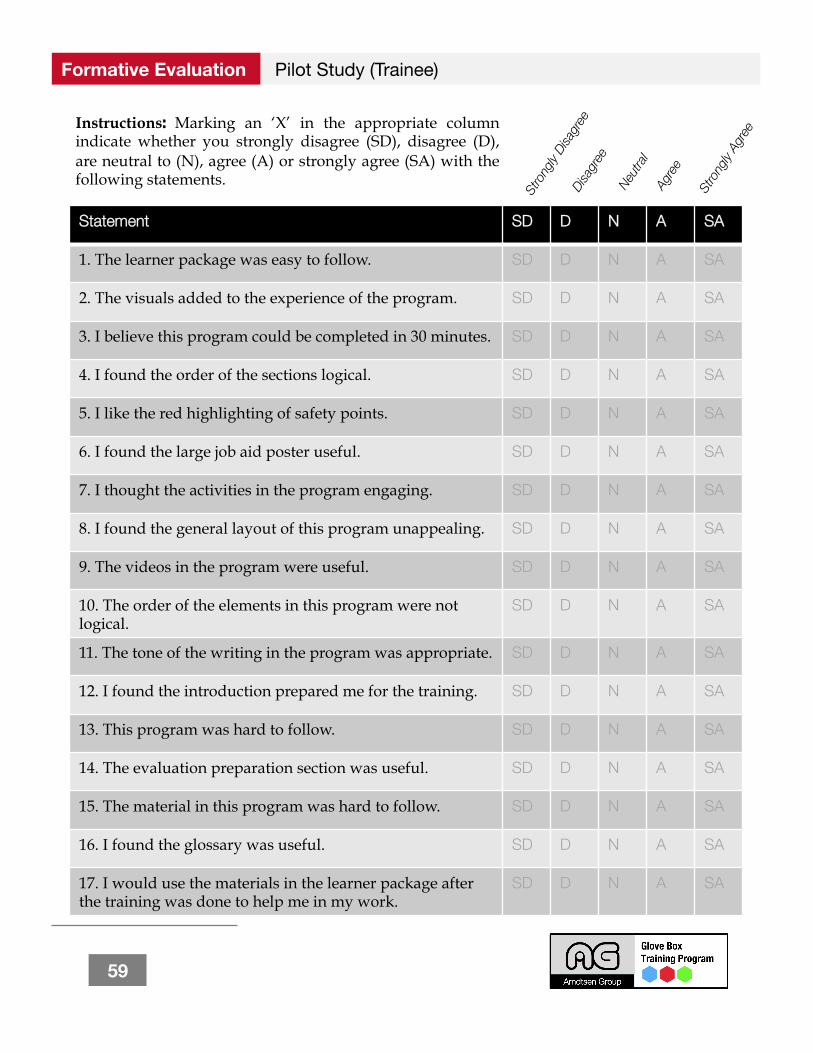
Instructions: Marking an ‘X’ in the appropriate column indicate whether you strongly disagree (SD), disagree (D), are neutral to (N), agree (A) or strongly agree (SA) with the following statements.
Statement SD D N A SA
1. The learner package was easy to follow. SD D N A SA
2. The visuals added to the experience of the program. SD D N A SA
3. I believe this program could be completed in 30 minutes. SD D N A SA
4. I found the order of the sections logical. SD D N A SA
5. I like the red highlighting of safety points. SD D N A SA
6. I found the large job aid poster useful. SD D N A SA
7. I thought the activities in the program engaging. SD D N A SA
8. I found the general layout of this program unappealing. SD D N A SA
9. The videos in the program were useful. SD D N A SA
10. The order of the elements in this program were not logical.
SD D N A SA
11. The tone of the writing in the program was appropriate. SD D N A SA
12. I found the introduction prepared me for the training. SD D N A SA
13. This program was hard to follow. SD D N A SA
14. The evaluation preparation section was useful. SD D N A SA
15. The material in this program was hard to follow. SD D N A SA
16. I found the glossary was useful. SD D N A SA
17. I would use the materials in the learner package after the training was done to help me in my work.
SD D N A SA
Rate Your Training Pilot Study (Trainee) Formative Evaluation
59

Pilot Study (Trainee) Formative Evaluation
Instructions: Please check off the boxes that apply, and provide additional feedback in the ‘other’ section.
1. Which sections of the program did you find confusing?
2. Which sections of the program did you find well-articulated?
Table of Contents Section 1 Evaluation Prep Page
Course Info Page Section 2 Worksheets
Training Prep Page Section 3 Videos
Safety & Materials Page Section 4 Glossary
Other: __________________________________________________________________________________________________________________________________________________________________________________________________________________________________________________________________________________________________________________________________________________________________________________________________________________
60
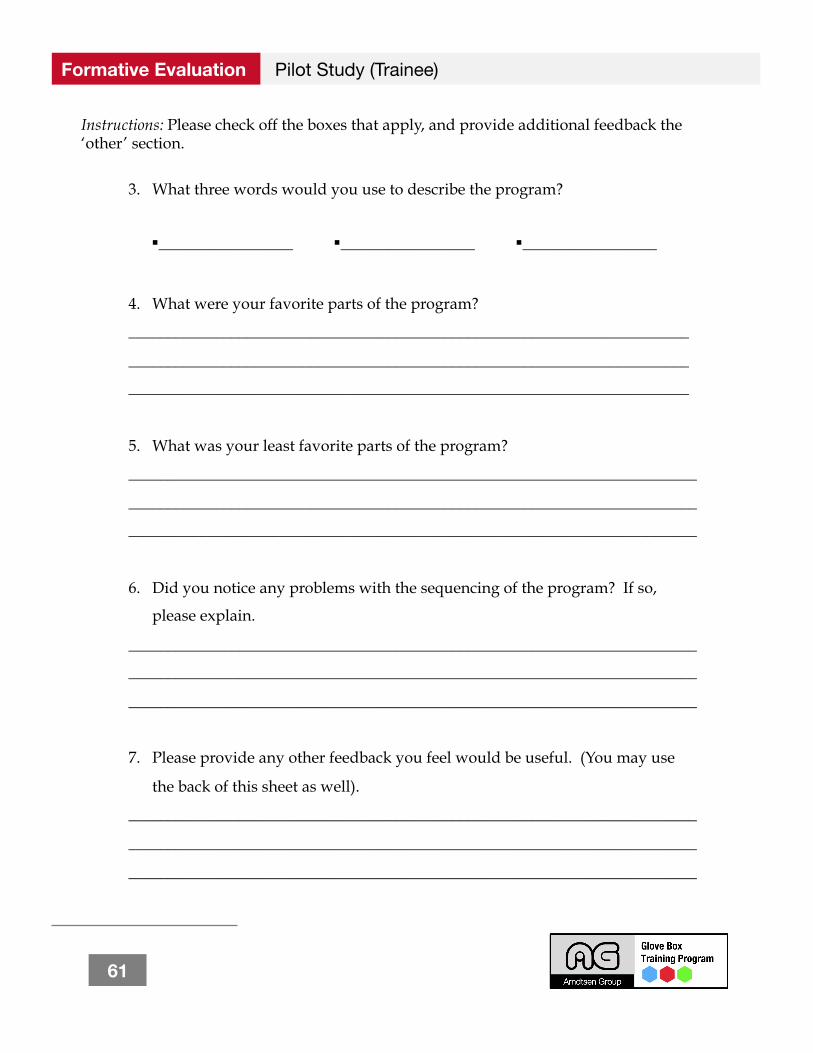
Pilot Study (Trainee) Formative Evaluation
Instructions: Please check off the boxes that apply, and provide additional feedback the ‘other’ section.
3. What three words would you use to describe the program?
4. What were your favorite parts of the program?
_______________________________________________________________________
_______________________________________________________________________
_______________________________________________________________________
5. What was your least favorite parts of the program?
________________________________________________________________________
________________________________________________________________________
________________________________________________________________________
6. Did you notice any problems with the sequencing of the program? If so,
please explain.
________________________________________________________________________
________________________________________________________________________
________________________________________________________________________
7. Please provide any other feedback you feel would be useful. (You may use
the back of this sheet as well).
________________________________________________________________________
________________________________________________________________________
________________________________________________________________________
_________________ _________________ _________________
61
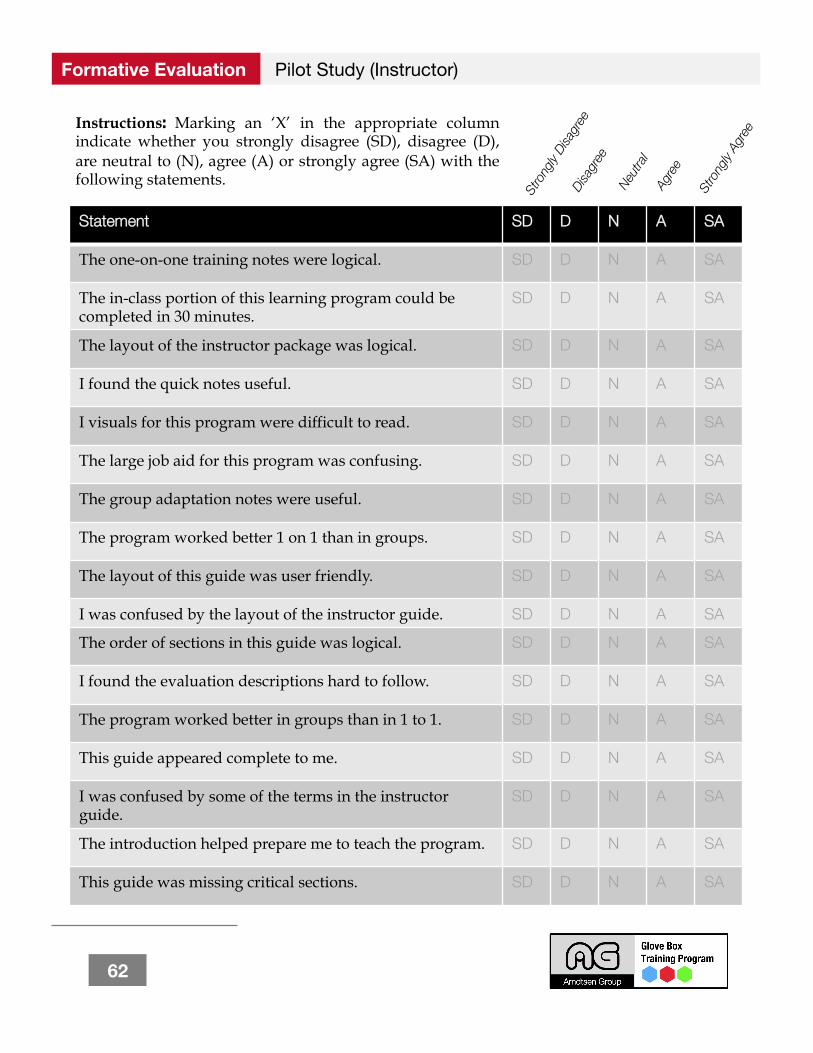
Instructions: Marking an ‘X’ in the appropriate column indicate whether you strongly disagree (SD), disagree (D), are neutral to (N), agree (A) or strongly agree (SA) with the following statements.
Statement SD D N A SA
The one-on-one training notes were logical. SD D N A SA
The in-class portion of this learning program could be completed in 30 minutes.
SD D N A SA
The layout of the instructor package was logical. SD D N A SA
I found the quick notes useful. SD D N A SA
I visuals for this program were difficult to read. SD D N A SA
The large job aid for this program was confusing. SD D N A SA
The group adaptation notes were useful. SD D N A SA
The program worked better 1 on 1 than in groups. SD D N A SA
The layout of this guide was user friendly. SD D N A SA
I was confused by the layout of the instructor guide. SD D N A SA
The order of sections in this guide was logical. SD D N A SA
I found the evaluation descriptions hard to follow. SD D N A SA
The program worked better in groups than in 1 to 1. SD D N A SA
This guide appeared complete to me. SD D N A SA
I was confused by some of the terms in the instructor guide.
SD D N A SA
The introduction helped prepare me to teach the program. SD D N A SA
This guide was missing critical sections. SD D N A SA
Rate Your Training
62
Pilot Study (Instructor) Formative Evaluation
Pilot Study (Trainer) Formative Evaluation
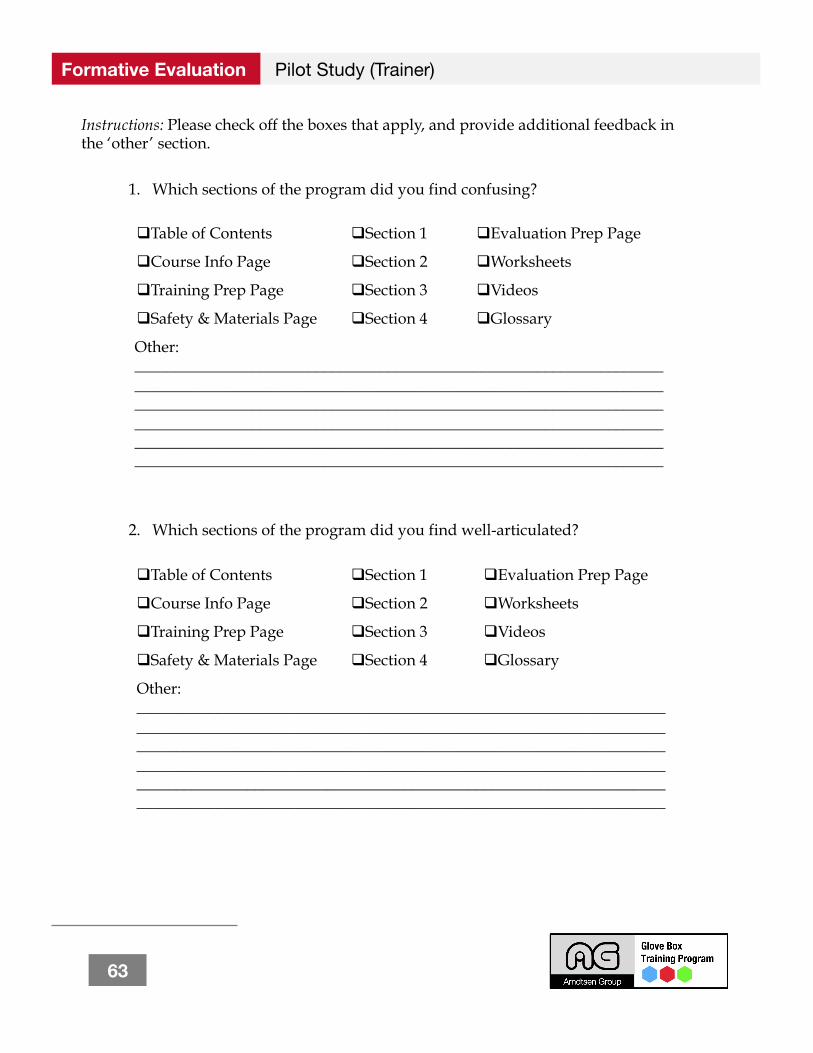
Instructions: Please check off the boxes that apply, and provide additional feedback in the ‘other’ section.
1. Which sections of the program did you find confusing?
2. Which sections of the program did you find well-articulated?
Table of Contents Section 1 Evaluation Prep Page
Course Info Page Section 2 Worksheets
Training Prep Page Section 3 Videos
Safety & Materials Page Section 4 Glossary
Other: __________________________________________________________________________________________________________________________________________________________________________________________________________________________________________________________________________________________________________________________________________________________________________________________________________________
Table of Contents Section 1 Evaluation Prep Page
Course Info Page Section 2 Worksheets
Training Prep Page Section 3 Videos
Safety & Materials Page Section 4 Glossary
Other: __________________________________________________________________________________________________________________________________________________________________________________________________________________________________________________________________________________________________________________________________________________________________________________________________________________
63
Pilot Study (Trainer) Formative Evaluation
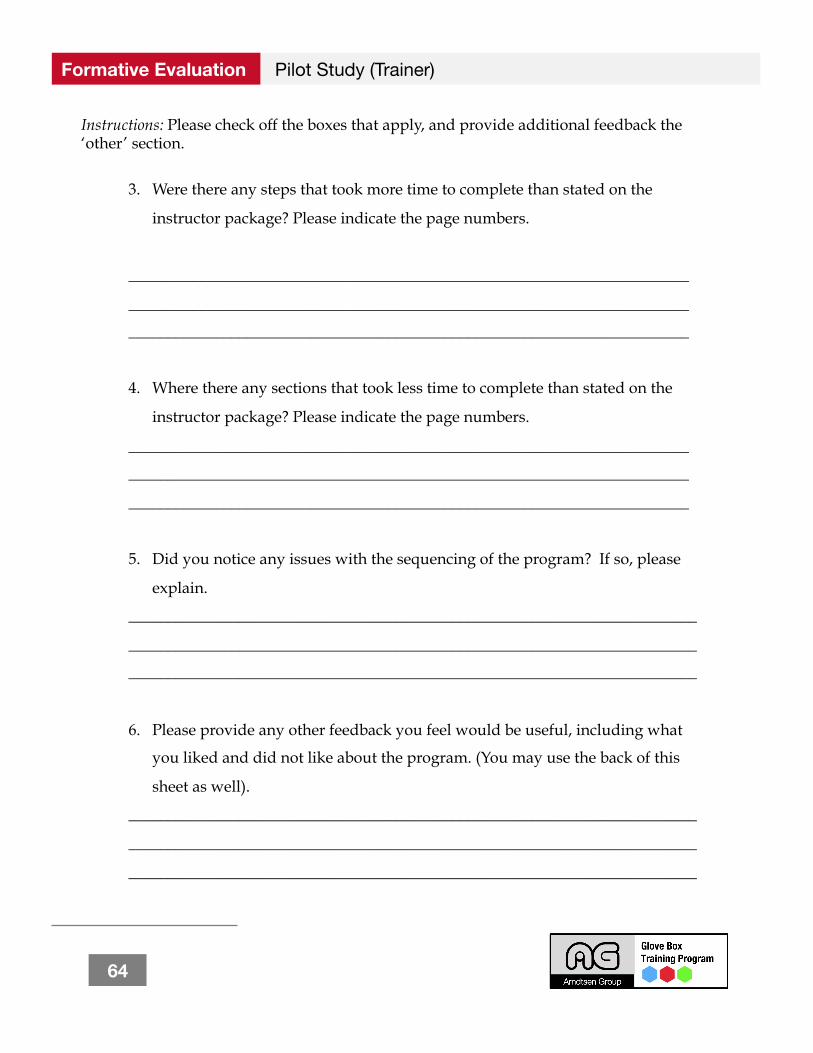
Instructions: Please check off the boxes that apply, and provide additional feedback the ‘other’ section.
3. Were there any steps that took more time to complete than stated on the
instructor package? Please indicate the page numbers.
_______________________________________________________________________
_______________________________________________________________________
_______________________________________________________________________
4. Where there any sections that took less time to complete than stated on the
instructor package? Please indicate the page numbers.
_______________________________________________________________________
_______________________________________________________________________
_______________________________________________________________________
5. Did you notice any issues with the sequencing of the program? If so, please
explain.
________________________________________________________________________
________________________________________________________________________
________________________________________________________________________
6. Please provide any other feedback you feel would be useful, including what
you liked and did not like about the program. (You may use the back of this
sheet as well).
________________________________________________________________________
________________________________________________________________________
________________________________________________________________________
64
Editorial Review Formative Evaluation
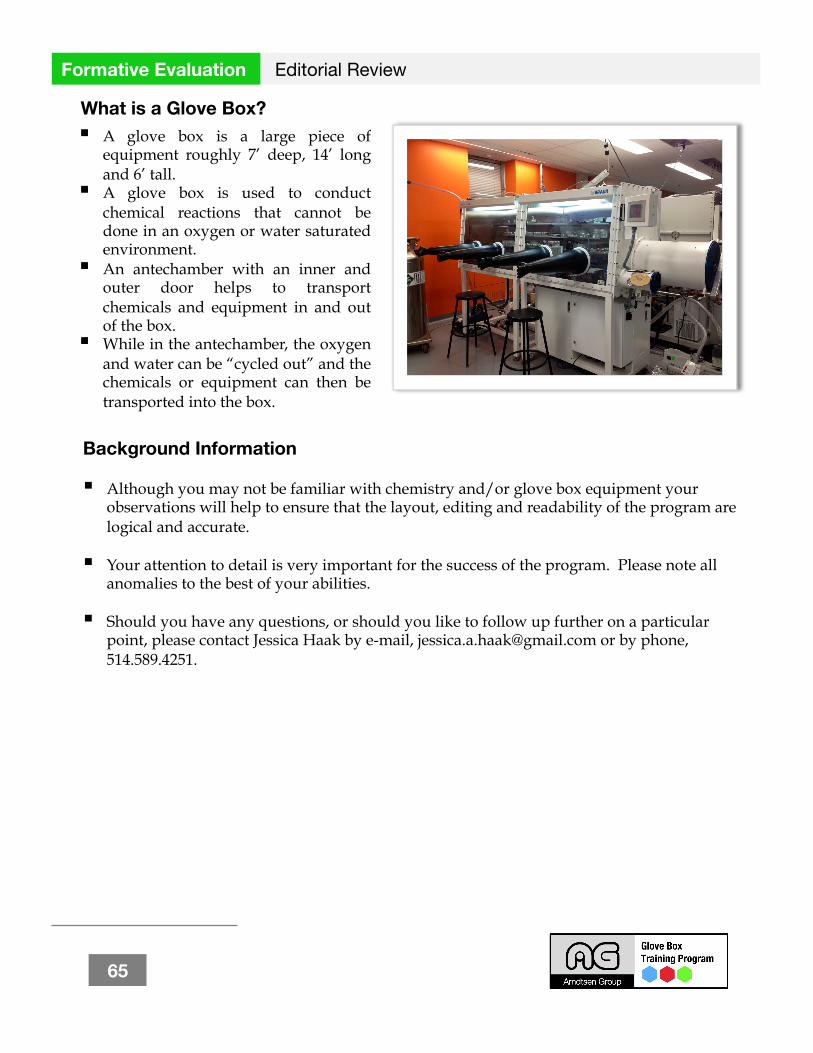
A glove box is a large piece of equipment roughly 7’ deep, 14’ long and 6’ tall.
A glove box is used to conduct chemical reactions that cannot be done in an oxygen or water saturated environment.
An antechamber with an inner and outer door helps to transport chemicals and equipment in and out of the box.
While in the antechamber, the oxygen and water can be “cycled out” and the chemicals or equipment can then be transported into the box.
What is a Glove Box?
Background Information
Although you may not be familiar with chemistry and/or glove box equipment your observations will help to ensure that the layout, editing and readability of the program are logical and accurate.
Your attention to detail is very important for the success of the program. Please note all anomalies to the best of your abilities.
Should you have any questions, or should you like to follow up further on a particular point, please contact Jessica Haak by e-mail, [email protected] or by phone, 514.589.4251.
65
Editorial Review Formative Evaluation
Instructions: Please review the copy making sure to assess each of the points listed below on all of the pages of the program. It is asked that you annotate the document using the “review comments” function in PowerPoint, located within the tools menu. Additionally please review videos 1, 2, 3 & 4 including the credit sections.
1. Heading mistakes
2. Inconsistent terminology
3. Spelling errors
4. Sentence errors
5. Missing steps
6. Inconsistent procedures
7. Issues with jargon
8. Issues with definitions
9. Issues with poor word choices
10. Cultural issues or biases
11. Issues with pictorial labels
12. Issues with image placement
13. Issues with fonts
14. Issues with layout
15. Issue with colors
16. Issues with legibility
17. Issues with bullets
18. Issues with spacing
19. Other noted problems
Section One: Instructor & Learner Package Accuracy
66
Editorial Review Formative Evaluation
Section Two: General Issues
Instructions: Please answer the questions below.
1. Did you find any elements of the program to be incomplete?
_________________________________________________________________________
_________________________________________________________________________
_________________________________________________________________________
_________________________________________________________________________
2. Did you find any major inconsistencies in style or layout?
_________________________________________________________________________
_________________________________________________________________________
_________________________________________________________________________
_________________________________________________________________________
3. Did you find any major issues with the tone of the writing?
__________________________________________________________________________
_________________________________________________________________________
_________________________________________________________________________
_________________________________________________________________________
4. Where there any other critical issues you noted?
__________________________________________________________________________
_________________________________________________________________________
_________________________________________________________________________
_________________________________________________________________________
67

Winter 2013