Embed Size (px)
Citation preview

SAVE
20%ON LESSON PLAN
MATERIALS!See price insert
for details.
LessonPlans
Spring 2013
2
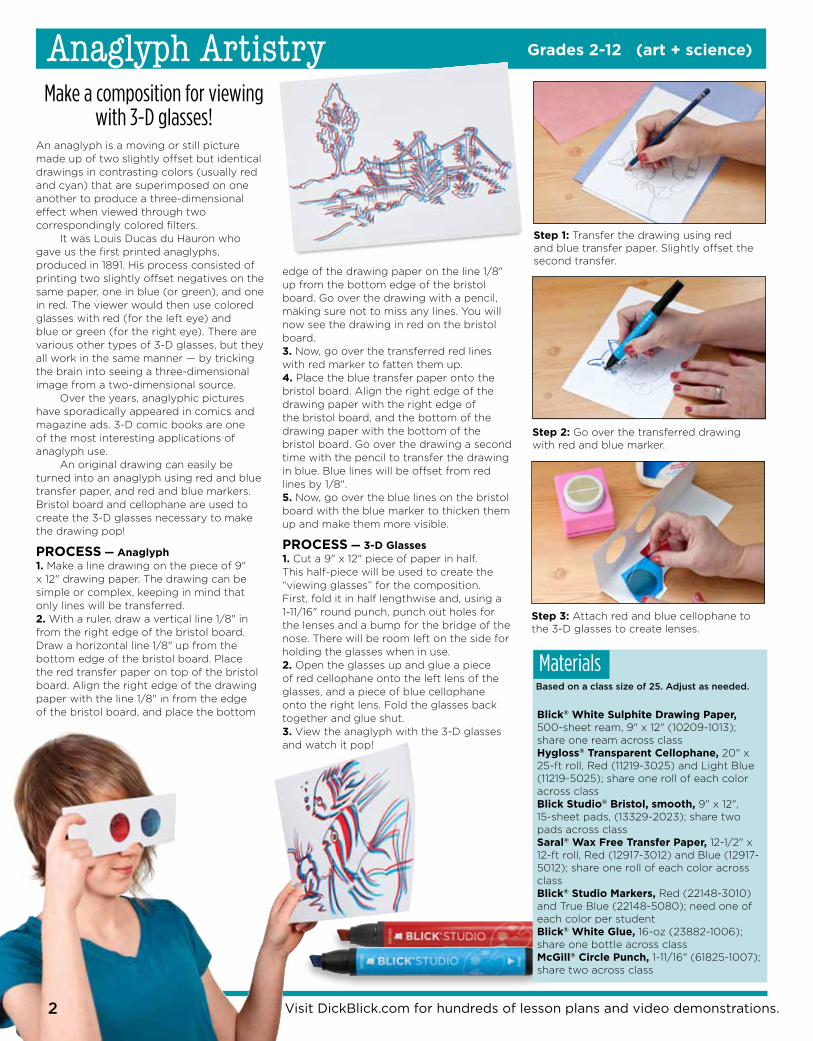
Step 1: Transfer the drawing using red and blue transfer paper. Slightly offset the second transfer.
Step 2: Go over the transferred drawing with red and blue marker.
Step 3: Attach red and blue cellophane to the 3-D glasses to create lenses.
Blick® White Sulphite Drawing Paper, 500-sheet ream, 9" x 12" (10209-1013); share one ream across classHygloss® Transparent Cellophane, 20" x 25-ft roll, Red (11219-3025) and Light Blue (11219-5025); share one roll of each color across classBlick Studio® Bristol, smooth, 9" x 12", 15-sheet pads, (13329-2023); share two pads across classSaral® Wax Free Transfer Paper, 12-1/2" x 12-ft roll, Red (12917-3012) and Blue (12917-5012); share one roll of each color across classBlick® Studio Markers, Red (22148-3010) and True Blue (22148-5080); need one of each color per studentBlick® White Glue, 16-oz (23882-1006); share one bottle across classMcGill® Circle Punch, 1-11/16" (61825-1007); share two across class
Based on a class size of 25. Adjust as needed.
Materials
Anaglyph ArtistryMake a composition for viewing
with 3-D glasses!
Grades 2-12 (art + science)
An anaglyph is a moving or still picture made up of two slightly offset but identical drawings in contrasting colors (usually red and cyan) that are superimposed on one another to produce a three-dimensional effect when viewed through two correspondingly colored filters. It was Louis Ducas du Hauron who gave us the first printed anaglyphs, produced in 1891. His process consisted of printing two slightly offset negatives on the same paper, one in blue (or green), and one in red. The viewer would then use colored glasses with red (for the left eye) and blue or green (for the right eye). There are various other types of 3-D glasses, but they all work in the same manner — by tricking the brain into seeing a three-dimensional image from a two-dimensional source. Over the years, anaglyphic pictures have sporadically appeared in comics and magazine ads. 3-D comic books are one of the most interesting applications of anaglyph use. An original drawing can easily be turned into an anaglyph using red and blue transfer paper, and red and blue markers. Bristol board and cellophane are used to create the 3-D glasses necessary to make the drawing pop!
PROCESS — Anaglyph1. Make a line drawing on the piece of 9" x 12" drawing paper. The drawing can be simple or complex, keeping in mind that only lines will be transferred.2. With a ruler, draw a vertical line 1/8" in from the right edge of the bristol board. Draw a horizontal line 1/8" up from the bottom edge of the bristol board. Place the red transfer paper on top of the bristol board. Align the right edge of the drawing paper with the line 1/8" in from the edge of the bristol board, and place the bottom
edge of the drawing paper on the line 1/8" up from the bottom edge of the bristol board. Go over the drawing with a pencil, making sure not to miss any lines. You will now see the drawing in red on the bristol board.3. Now, go over the transferred red lines with red marker to fatten them up.4. Place the blue transfer paper onto the bristol board. Align the right edge of the drawing paper with the right edge of the bristol board, and the bottom of the drawing paper with the bottom of the bristol board. Go over the drawing a second time with the pencil to transfer the drawing in blue. Blue lines will be offset from red lines by 1/8".5. Now, go over the blue lines on the bristol board with the blue marker to thicken them up and make them more visible.
PROCESS — 3-D Glasses1. Cut a 9" x 12" piece of paper in half. This half-piece will be used to create the “viewing glasses” for the composition. First, fold it in half lengthwise and, using a 1-11/16" round punch, punch out holes for the lenses and a bump for the bridge of the nose. There will be room left on the side for holding the glasses when in use.2. Open the glasses up and glue a piece of red cellophane onto the left lens of the glasses, and a piece of blue cellophane onto the right lens. Fold the glasses back together and glue shut.3. View the anaglyph with the 3-D glasses and watch it pop!
2 Visit DickBlick.com for hundreds of lesson plans and video demonstrations.
800•447•8192 DickBlick.com 3
In Japan, the arrival of May is heralded by the appearance of flying fish — carp-shaped windsocks known as "Koinobori" flown on May 5th in honor of Children’s Day, or "Tango no Sekku" (originally Boy's Day). In this lesson, students design a “scale”-shaped block from soft block printing material and apply it repetitively to outdoor-safe fabric that has been cut in the shape of a fish. Add details like eyes, fins, and a tail using metallic and sparkle paint, and the Koinobori is ready to hang and “swim” through the breeze!
PREPARATION1. Cut Smart-Fab into 24" x 30" pieces. Smart-Fab is a strong, non-woven fabric that is waterproof and durable enough for outdoor display. 2. Using teacher's shears or a paper trimmer, cut Eco Karve into 4" x 4-1/2" pieces. Eco Karve is made from 100% recycled materials and is latex-free.
PROCESS1. Design a "scale" shape on printing blocks. Visit www.DickBlick.com/lesson-plans/Koinobori for a template. 2. Carve the negative space away from the outside of the scale using a square gouge linoleum cutter. Cut the inside design with a V-shaped cutter.3. Fold the Smart-Fab in half vertically, making a mark 8" from the fold on one end to indicate the amount of fabric needed for the mouth. Draw a curved line from that mark to the other end of the fabric to create
the belly of the fish; see (A). Cut the line and save the excess fabric to make a fin and tail. 4. Make a stamp pad by placing a piece of acrylic felt on a disposable plate. Squeeze acrylic paint onto the felt and fold and press it until the ink is evenly distributed. Press the scale-shaped printing block into the stamp pad several times.5. Position the scale in the center of the fish's back, leaving approximately 8" for the head; see (B). Press firmly. Reload the paint and continue to print scales until the fish is covered. NOTE: the print will reveal the fabric's texture — expect imperfections.6. At the mouth, gather the fabric around a macramé ring and secure it by stitching around it with a blunt needle.7. Position the tail and fin and place a line of Weldbond adhesive along the outside edge of the belly. Do not glue the entire body together or it will not function as a windsock. Allow to dry.8. Twist wire around the hoop mouth to make a strong hanger. Place the fish where it can catch air currents.
OPTIONS— As an alternative to block-print scales, paint designs directly onto the fish using a brush.— Mini windsocks can be created using 12" x 14" pieces of Smart-Fab and 2" book rings.
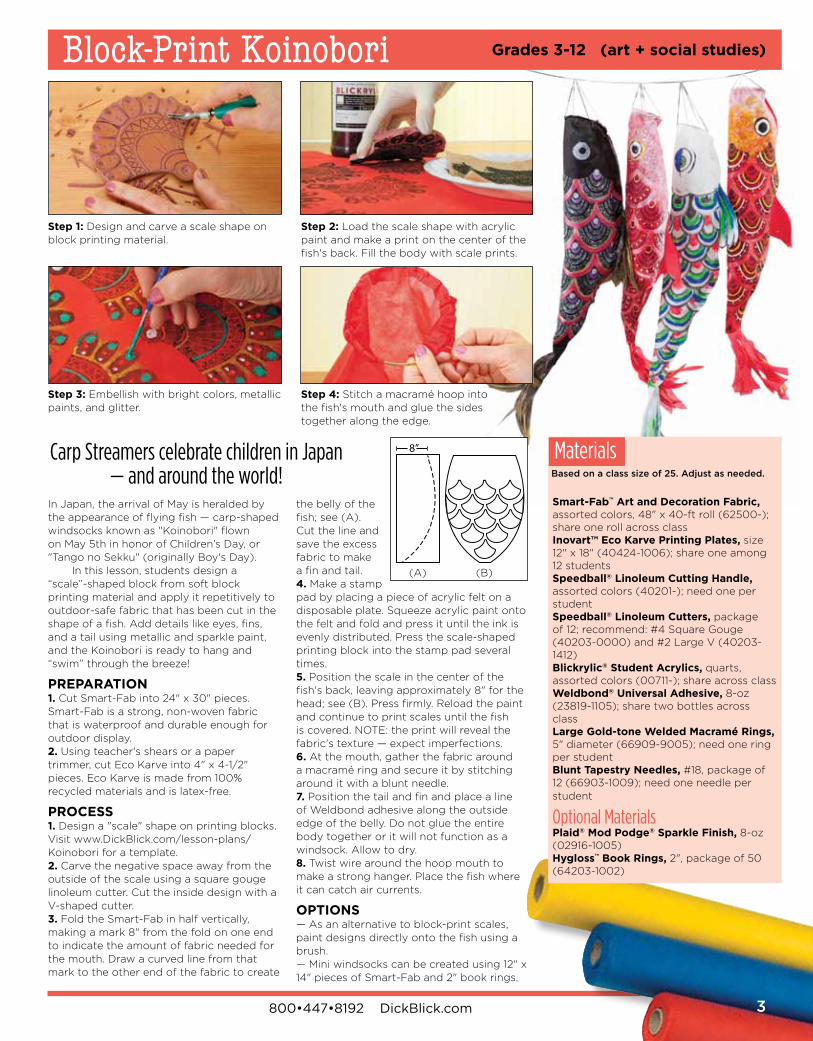
Step 1: Design and carve a scale shape on block printing material.
Step 2: Load the scale shape with acrylic paint and make a print on the center of the fish's back. Fill the body with scale prints.
Step 3: Embellish with bright colors, metallic paints, and glitter.
Step 4: Stitch a macramé hoop into the fish's mouth and glue the sides together along the edge.
Block-Print Koinobori Grades 3-12 (art + social studies)
Carp Streamers celebrate children in Japan — and around the world!
Smart-Fab™ Art and Decoration Fabric, assorted colors, 48" x 40-ft roll (62500-); share one roll across classInovart™ Eco Karve Printing Plates, size 12" x 18" (40424-1006); share one among 12 studentsSpeedball® Linoleum Cutting Handle, assorted colors (40201-); need one per studentSpeedball® Linoleum Cutters, package of 12; recommend: #4 Square Gouge (40203-0000) and #2 Large V (40203-1412)Blickrylic® Student Acrylics, quarts, assorted colors (00711-); share across classWeldbond® Universal Adhesive, 8-oz (23819-1105); share two bottles across classLarge Gold-tone Welded Macramé Rings, 5" diameter (66909-9005); need one ring per studentBlunt Tapestry Needles, #18, package of 12 (66903-1009); need one needle per student
Optional MaterialsPlaid® Mod Podge® Sparkle Finish, 8-oz (02916-1005)Hygloss™ Book Rings, 2", package of 50 (64203-1002)
Based on a class size of 25. Adjust as needed.
Materials
3
8”8”
(A) (B)
4
Challenge Coins are specially designed and minted for service personnel to recognize an achievement, enhance morale, or to signify membership in (or experience on) a particular mission. The oldest known Challenge Coins were minted when the Green Berets were formed, and the coins became a tradition for special forces units during the Vietnam War. Gaining popularity during Operation Desert Storm, each branch of the U.S. military now has Challenge Coins, as well as firefighters, police officers, fraternal organizations, athletic groups, and others. The official portrait of President Bill Clinton on display in the White House shows in the background the collection of Challenge Coins that is displayed in the Oval Office. Personal Artist's Challenge Coins (ACCs) can be created by students for sharing or collecting. On one side of a coin-shaped wooden disk, the artist makes a small drawing, painting, print, collage, stamp, or photo appliqué. On the reverse, he or she writes a challenge or message that expresses: • a reminder of a personal goal • a motto, purpose, or mission statement to share • a memento of a special relationship or event • a shared bond as part of a group or experience • a message of encouragement or a challenge to someone to meet a goal or commitment • a means of expressing gratitude, recognizing achievements, or honoring an outstanding idea or performanceThe ACCs are then traded, given away, or collected. Challenge Coins aren’t just for students to create — teachers, parents,
organizations, and groups can use them as awards or incentives, too.
PROCESS1. A package of wooden circles contains 1-5/16" diameter disks (about the size of an Eisenhower dollar coin) and 7/8" diameter disks (nickel-sized). Both may be used to make ACCs. The package also contains small, 7/16" diameter disks that are too small for ACCs and should be set aside for other projects. 2. ACCs may be created in any manner, with any materials that can be used on a small surface. For example: — Paint the coin with metallic gold, silver, or copper acrylic paints so it resembles real currency.— Use small brushes to create small paintings in acrylic paint or ink.— Draw images with fine-point permanent markers or colored pencils.— Create elegant script lettering with calligraphy markers or dip pens and permanent ink.— Use dimensional paint to make raised lettering or edges.— Use an ink pad and small stamps to make designs.— Incorporate small photos, photocopied images, found illustrations, and computer-generated text.— Collage decorative paper and words cut from magazines and newspapers.— Apply stickers, decals, or small paper-punched designs.— Use lightweight tooling foil, cut to size, and glue embossed designs to the coins.3. Since the ACCs will most likely be handled, it is recommend that they be sealed with a protective coating.
Artist's Challenge Coins (ACCs)
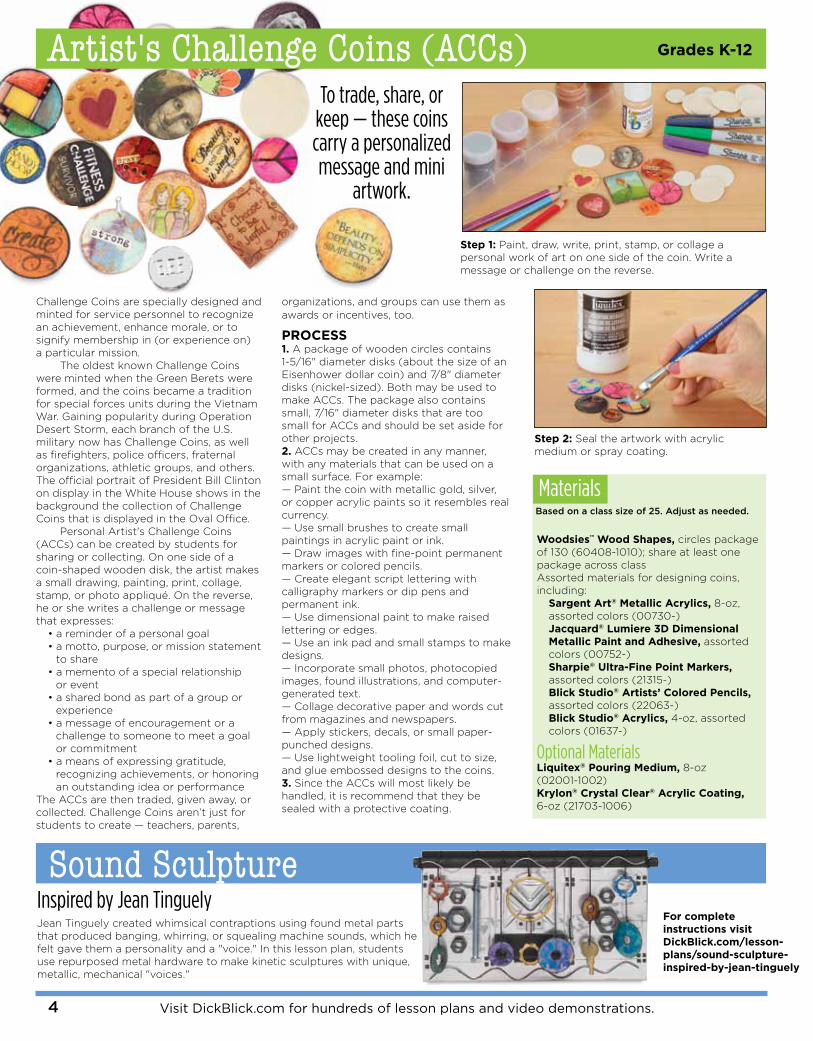
Step 1: Paint, draw, write, print, stamp, or collage a personal work of art on one side of the coin. Write a message or challenge on the reverse.
Step 2: Seal the artwork with acrylic medium or spray coating.
Woodsies™ Wood Shapes, circles package of 130 (60408-1010); share at least one package across classAssorted materials for designing coins, including: Sargent Art® Metallic Acrylics, 8-oz, assorted colors (00730-) Jacquard® Lumiere 3D Dimensional Metallic Paint and Adhesive, assorted colors (00752-) Sharpie® Ultra-Fine Point Markers, assorted colors (21315-) Blick Studio® Artists’ Colored Pencils, assorted colors (22063-) Blick Studio® Acrylics, 4-oz, assorted colors (01637-)
Optional MaterialsLiquitex® Pouring Medium, 8-oz (02001-1002) Krylon® Crystal Clear® Acrylic Coating, 6-oz (21703-1006)
Based on a class size of 25. Adjust as needed.
Materials
Inspired by Jean TinguelySound Sculpture
For complete instructions visit DickBlick.com/lesson-plans/sound-sculpture-inspired-by-jean-tinguely
Jean Tinguely created whimsical contraptions using found metal parts that produced banging, whirring, or squealing machine sounds, which he felt gave them a personality and a "voice." In this lesson plan, students use repurposed metal hardware to make kinetic sculptures with unique, metallic, mechanical "voices."
To trade, share, or keep — these coins carry a personalized message and mini
artwork.
Visit DickBlick.com for hundreds of lesson plans and video demonstrations.
Grades K-12
800•447•8192 DickBlick.com 5
Role-playing and escape into fantasy have always been an important part of childhood, helping children to manage the realities of their lives. This project encourages students to create fantasy mittens that express their own personal "wild side" emotions. Consider introducing this project by reading "Where the Wild Things Are," a children's book by American writer and illustrator Maurice Sendak that beautifully balances the conflicting emotions of anger and comfort. Using a recycled wool sweater, shrink film, and other adornments, create a fun and functional "Wild Thing" mitten!
PREPARATION 1. Read "Where the Wild Things Are."2. Find an outgrown, cast-off, or thrift store sweater (100% wool is best).
PROCESS1. If the sweater being used is 100% wool, it can be felted by washing it in hot water and then drying it on the "hot" setting in a clothes dryer. This will cause the sweater to shrink considerably and “felt” the wool fibers. 2. Cut the sleeves off the sweater.3. Lay one arm on top of the sleeve of a sweater, so that the cuff ribbing is at the wrist and the hand lies further up the sleeve, toward the shoulder end. If desired, the mitten can be long and extend down the arm, so the cuff will be at mid-arm. Hold the fingers together, but move the thumb apart from the fingers.4. Using a dark marker, trace around the hand and arm, leaving a 1" inch border for sewing.5. Cut the mitten out, through both layers, cutting just inside the traced line.6. Repeat for the other hand.7. Embellish the body of the mitten by adding buttons, yarn stripes, needle felted additions (see note), or animal print felt pieces. Glue or sew on the embellishments.8. To sew, turn right sides together, with embellishments facing in, and sew around the edges of the mitten. Bendable plastic needles are well suited for younger students while older students may use tapestry needles.9. Make "wild" claws out of shrink film! Using permanent colored and metallic markers, draw large claws on a sheet of shrink film. Make the claws approximately half as long as the page. Add polka dots, leopard striping, or fake fur designs. Punch at least three holes along the bottom edge of the claws with a hole punch. Place them on a medium-weight piece of cardboard, and bake them in a regular oven or toaster
oven at 300-350 degrees for 2-3 minutes. To keep the claws from curling, cover them with a piece of parchment paper. Alternately, use an embossing tool to shrink the film.10. Sew the claws onto the mittens and explore the wild side!
NOTE: To add needle felted additions, tear small amounts of wool from the ball of wool rove, and use a felting needle to punch through the wool, into the mitten, and into a felting mat placed beneath the mitten. Punch many times to firmly adhere the wool to the mitten. Occasionally place a hand into the mitten to separate the fibers.
OPTIONS— Make a hat using the bottom half of the sweater. — Add shrink film ears with wool tufts.
"Wild Thing" Mittens Grades K-12 (art + literature)
An “upcycled” sweater becomes a great pair of costume mittens
Upcycled sweater; one per studentGrafix® Shrink Films, package of 6 sheets, White (61412-1010) or Black (61412-2020); need one half-sheet per studentSakura® Permapaque® Markers, set of 16 colors (21377-0169); share two sets across classCraft Button Assortment, 1-lb (61495-1001); share one bag across classCreativity Street® Embroidery Floss, set of 24 skeins (63100-1009); share one set across classNeedles, Blunt Tapestry #13, package of 12 (65104-1009)
Optional MaterialsClover® Natural Wool Roving (63239-)Felting Needles, 4-pack (63122-1004)Clover® Needle Felting Mats (63236-)
Based on a class size of 25. Adjust as needed.
Materials
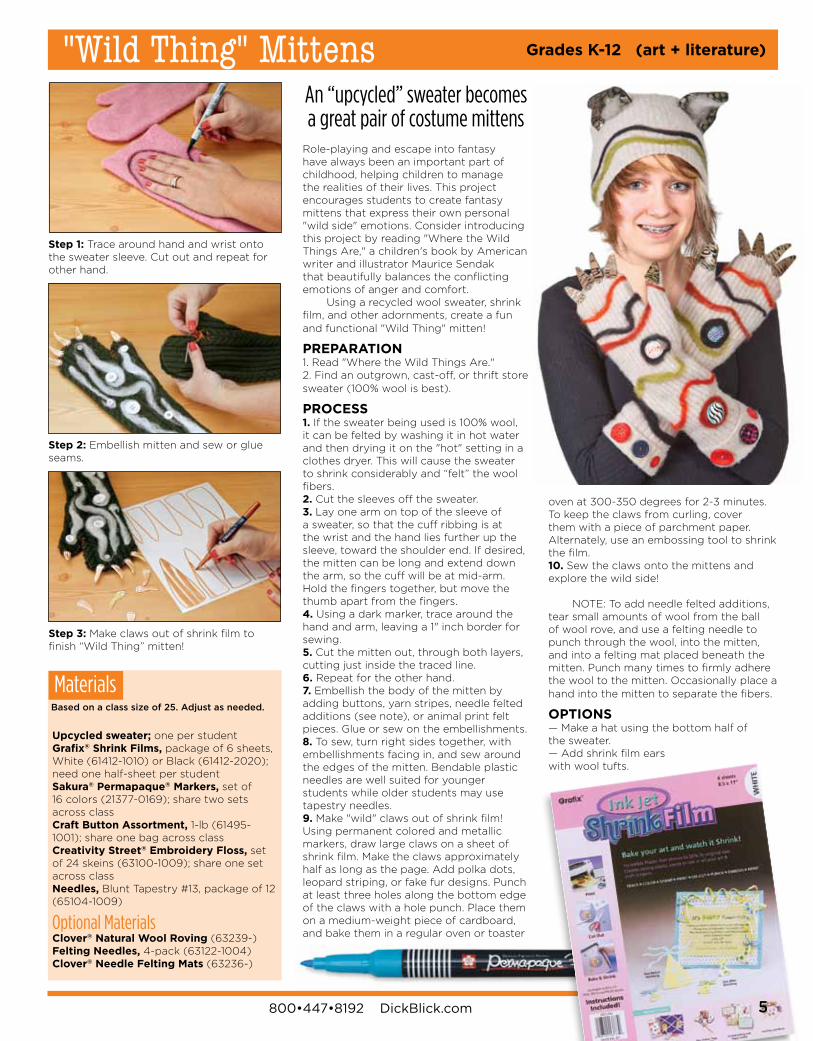
Step 1: Trace around hand and wrist onto the sweater sleeve. Cut out and repeat for other hand.
Step 2: Embellish mitten and sew or glue seams.
Step 3: Make claws out of shrink film to finish “Wild Thing” mitten!
5

6
Step 1: Transfer moccasin pattern to canvas and cut out. Cut vamp out of leather or suede remnant.
Make a Mock-Moc Grades 5-12 (art + history)
A moccasin is a Native American shoe made of deerskin or other soft leather. The vamp, or upper part of the moccasin, is often adorned with embroidery or beading. Traditionally, the way in which the vamps were decorated varied depending on which region or tribe a person was from, and served as one way that person could be identified. Each tribe used the materials that were available to them to decorate the vamps. Coastal tribes often used shells, while woodland and plains people sometimes used porcupine quills cut into beads, or bone beads made from a variety of animal bones. The ornate decoration of the vamp often took a lot of time, and when the soles of a moccasin wore out, the vamps and decorative portions of the shoe were removed and sewn onto a new pair of moccasins. A moccasin was usually made of three pieces: the sole, the ankle flap, and the vamp. In this lesson plan, canvas is used for the sole and ankle flaps, while the vamp can be made of suede or leather scraps, or canvas embellished with leather remnants.
PREPARATION1. Research Native American moccasin designs and choose a design to reproduce, or create a new moccasin design.2. Enlarge the pattern at right or visit DickBlick.com/lesson-plans/make-a-mock-moc for a full-page example.
PROCESS1. To make a small model of a moccasin, transfer the pattern of the moccasin to the canvas by cutting it out and tracing around it onto the canvas. Optionally, for a wearable moccasin, stand on the muslin and trace around your foot. Draw a line 2" from the first tracing, except at the middle, or widest part of the foot, where it will be about 1" away. Adapt the ankle flap and vamp to this size. Keep the same ratio in all parts. (This canvas moccasin is intended for light indoor use as an example of Native American regalia.)
2. Cut out the canvas patterns. If suede or leather remnants will be used for the vamp, cut those out also.3. Using thinned acrylic paint, paint the canvas brown to look like leather. Add a darker brown or black to the sole of the moccasin. NOTE: Make sure the paint is thin so the canvas doesn’t become too stiff with paint.4. Decorate the vamp and ankle piece of the shoe. Use a fine-line marker to lightly draw the beaded design. Using Delta Sobo glue, apply seed beads and hemp cord to create a design. If using a canvas vamp, apply leather or suede remnant pieces to the vamp in addition to the beads and cord. Let the vamp and ankle piece dry completely.5. Using clothespins or binder clips to hold pieces in place, glue the back seam of the sole together. Glue the vamp to the sole of the moccasin, gathering the sole as you go, to create darts or puckers. Turn the top of the vamp down about 1", glue it, and then cut fringe, if desired.6. Glue the ankle piece to the inside of the moccasin, and turn it down over the top edge. Cut the flap in half at the back, if needed, and allow it to overlap for a better fit. Trim as needed before applying decorative elements. Run deerskin lacing under the outside of the ankle flap and tie a bow at the center of the moccasin.
Create a traditional Chippewa or Pucker-top moccasin
Blick® Unprimed Canvas, 62" wide x 1-yd (07309-1062); need 1/3 yard per studentPremium Leather Remnants, 1-lb bag (61706-1001); share one bag across classGlass Indian Seed Beads, assorted colors, 3-oz bag (60725-); share at least three colors across classDarice® Hemp Cord Card, Earthy Pastels, 20-lb, 120-ft (62986-2010); share one across classDelta® Sobo Glue, 8-oz (23820-1008); share three bottles across classBlick® Studio Acrylics, 8-oz, Raw Sienna (01637-8062) and Ivory Black (01637-2252); share two tubes of each color across classAcco® Binder Clips, small 3/4", box of 12 (57330-4034); share six boxes across class (or use clothespins)
Based on a class size of 25. Adjust as needed.
Materials
Step 2: Using washes of brown and black acrylic paint, create a leather look on canvas moccasin pieces.
Step 3: Embellish the vamp and ankle piece using glue, seed beads, and hemp cord.
Step 4: Create a finished moccasin by gluing or sewing the pieces into place.
Visit DickBlick.com for hundreds of lesson plans and video demonstrations.
800•447•8192 DickBlick.com 7
Activa® Fast Mache, 4-lb (33116-1004); share two bags across classHardboard Panels, 9" x 12" (14945-1023); need one per studentNatural Burlap, 1 yard (63202-1436); share one across classBlick® Studio Acrylics, assorted 4-oz or 8-oz (01637-); share at least six tubes across classDelta® Sobo Glue, 8-oz (23820-1008); share two across classNatural found objects, such as pine needles, twigs and leaves
Based on a class size of 25. Adjust as needed.
Materials
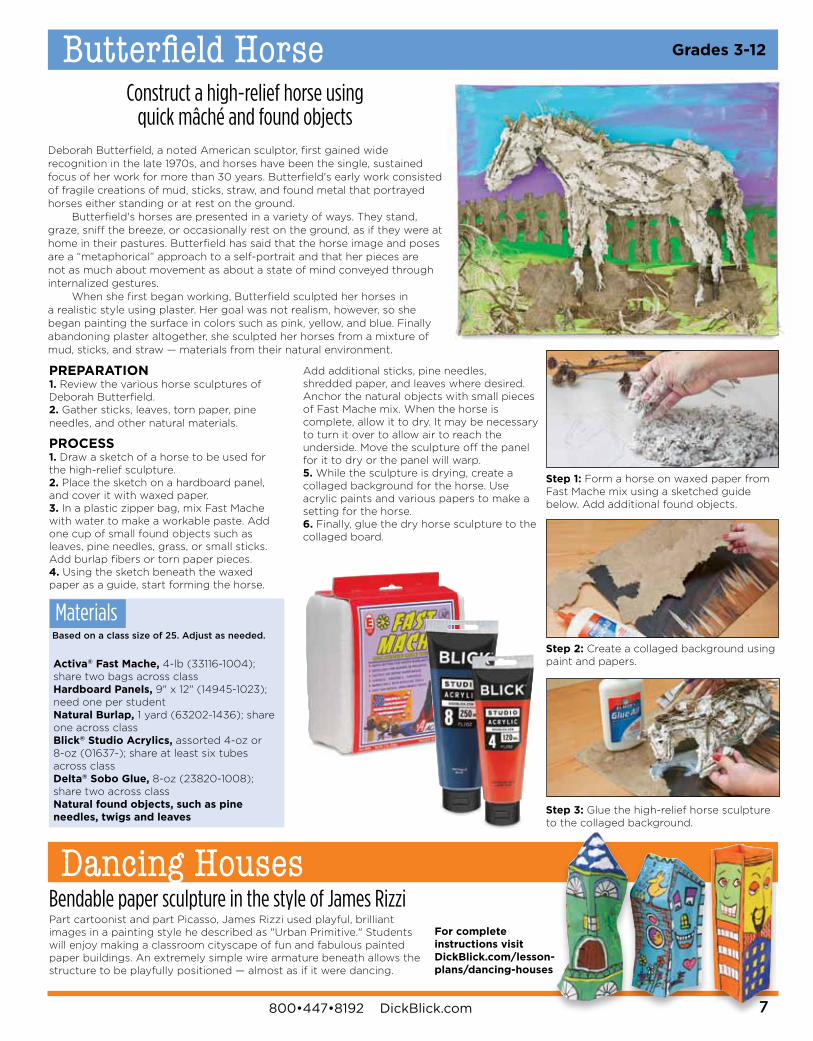
Deborah Butterfield, a noted American sculptor, first gained wide recognition in the late 1970s, and horses have been the single, sustained focus of her work for more than 30 years. Butterfield's early work consisted of fragile creations of mud, sticks, straw, and found metal that portrayed horses either standing or at rest on the ground. Butterfield's horses are presented in a variety of ways. They stand, graze, sniff the breeze, or occasionally rest on the ground, as if they were at home in their pastures. Butterfield has said that the horse image and poses are a “metaphorical” approach to a self-portrait and that her pieces are not as much about movement as about a state of mind conveyed through internalized gestures. When she first began working, Butterfield sculpted her horses in a realistic style using plaster. Her goal was not realism, however, so she began painting the surface in colors such as pink, yellow, and blue. Finally abandoning plaster altogether, she sculpted her horses from a mixture of mud, sticks, and straw — materials from their natural environment.
Construct a high-relief horse using quick mâché and found objects
Butterfield Horse Grades 3-12
Step 1: Form a horse on waxed paper from Fast Mache mix using a sketched guide below. Add additional found objects.
Step 2: Create a collaged background using paint and papers.
Step 3: Glue the high-relief horse sculpture to the collaged background.
Add additional sticks, pine needles, shredded paper, and leaves where desired. Anchor the natural objects with small pieces of Fast Mache mix. When the horse is complete, allow it to dry. It may be necessary to turn it over to allow air to reach the underside. Move the sculpture off the panel for it to dry or the panel will warp.5. While the sculpture is drying, create a collaged background for the horse. Use acrylic paints and various papers to make a setting for the horse. 6. Finally, glue the dry horse sculpture to the collaged board.
For complete instructions visit DickBlick.com/lesson-plans/dancing-houses
Bendable paper sculpture in the style of James RizziDancing Houses
Part cartoonist and part Picasso, James Rizzi used playful, brilliant images in a painting style he described as "Urban Primitive." Students will enjoy making a classroom cityscape of fun and fabulous painted paper buildings. An extremely simple wire armature beneath allows the structure to be playfully positioned — almost as if it were dancing.
PREPARATION1. Review the various horse sculptures of Deborah Butterfield.2. Gather sticks, leaves, torn paper, pine needles, and other natural materials.
PROCESS1. Draw a sketch of a horse to be used for the high-relief sculpture.2. Place the sketch on a hardboard panel, and cover it with waxed paper.3. In a plastic zipper bag, mix Fast Mache with water to make a workable paste. Add one cup of small found objects such as leaves, pine needles, grass, or small sticks. Add burlap fibers or torn paper pieces.4. Using the sketch beneath the waxed paper as a guide, start forming the horse.
8
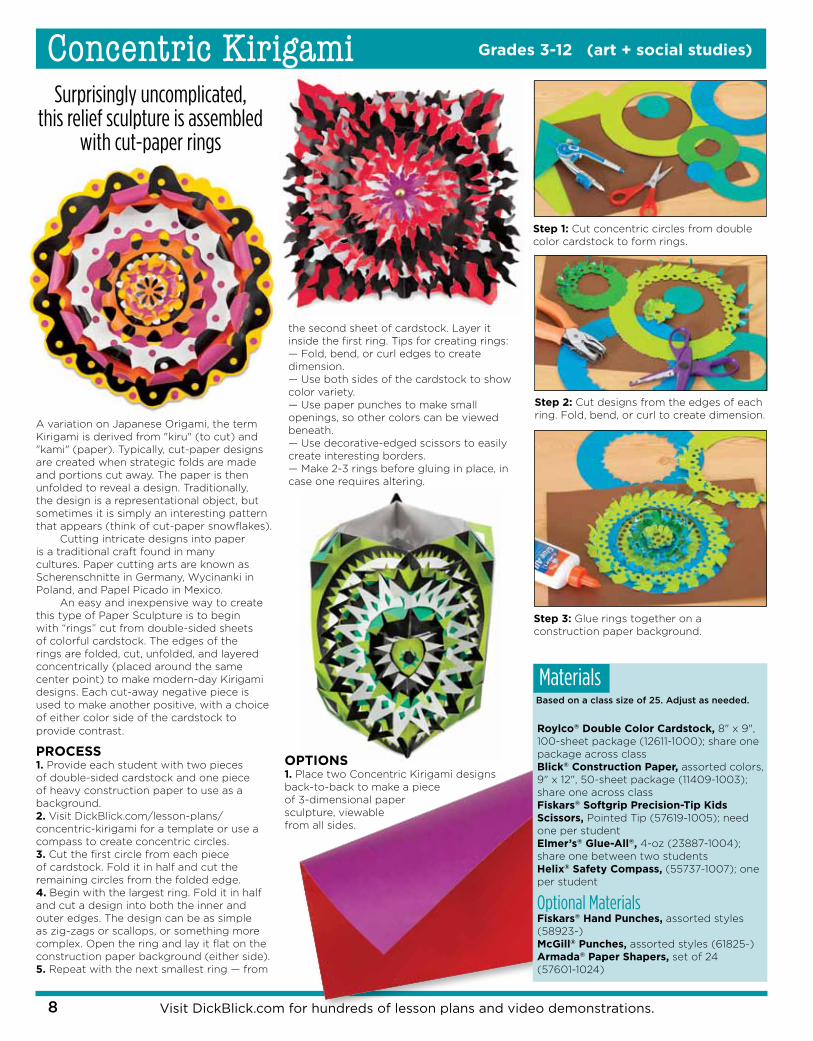
Concentric KirigamiSurprisingly uncomplicated,
this relief sculpture is assembled with cut-paper rings
Grades 3-12 (art + social studies)
Roylco® Double Color Cardstock, 8" x 9", 100-sheet package (12611-1000); share one package across classBlick® Construction Paper, assorted colors, 9" x 12", 50-sheet package (11409-1003); share one across classFiskars® Softgrip Precision-Tip Kids Scissors, Pointed Tip (57619-1005); need one per studentElmer’s® Glue-All®, 4-oz (23887-1004); share one between two studentsHelix® Safety Compass, (55737-1007); one per student
Optional MaterialsFiskars® Hand Punches, assorted styles (58923-)McGill® Punches, assorted styles (61825-)Armada® Paper Shapers, set of 24 (57601-1024)
Based on a class size of 25. Adjust as needed.
Materials
A variation on Japanese Origami, the term Kirigami is derived from "kiru" (to cut) and "kami" (paper). Typically, cut-paper designs are created when strategic folds are made and portions cut away. The paper is then unfolded to reveal a design. Traditionally, the design is a representational object, but sometimes it is simply an interesting pattern that appears (think of cut-paper snowflakes). Cutting intricate designs into paper is a traditional craft found in many cultures. Paper cutting arts are known as Scherenschnitte in Germany, Wycinanki in Poland, and Papel Picado in Mexico. An easy and inexpensive way to create this type of Paper Sculpture is to begin with “rings” cut from double-sided sheets of colorful cardstock. The edges of the rings are folded, cut, unfolded, and layered concentrically (placed around the same center point) to make modern-day Kirigami designs. Each cut-away negative piece is used to make another positive, with a choice of either color side of the cardstock to provide contrast.
PROCESS1. Provide each student with two pieces of double-sided cardstock and one piece of heavy construction paper to use as a background. 2. Visit DickBlick.com/lesson-plans/concentric-kirigami for a template or use a compass to create concentric circles.3. Cut the first circle from each piece of cardstock. Fold it in half and cut the remaining circles from the folded edge. 4. Begin with the largest ring. Fold it in half and cut a design into both the inner and outer edges. The design can be as simple as zig-zags or scallops, or something more complex. Open the ring and lay it flat on the construction paper background (either side). 5. Repeat with the next smallest ring — from
the second sheet of cardstock. Layer it inside the first ring. Tips for creating rings:— Fold, bend, or curl edges to create dimension.— Use both sides of the cardstock to show color variety.— Use paper punches to make small openings, so other colors can be viewed beneath.— Use decorative-edged scissors to easily create interesting borders.— Make 2-3 rings before gluing in place, in case one requires altering.
Step 1: Cut concentric circles from double color cardstock to form rings.
Step 2: Cut designs from the edges of each ring. Fold, bend, or curl to create dimension.
Step 3: Glue rings together on a construction paper background.
Visit DickBlick.com for hundreds of lesson plans and video demonstrations.
OPTIONS1. Place two Concentric Kirigami designs back-to-back to make a piece of 3-dimensional paper sculpture, viewable from all sides.
800•447•8192 DickBlick.com 9
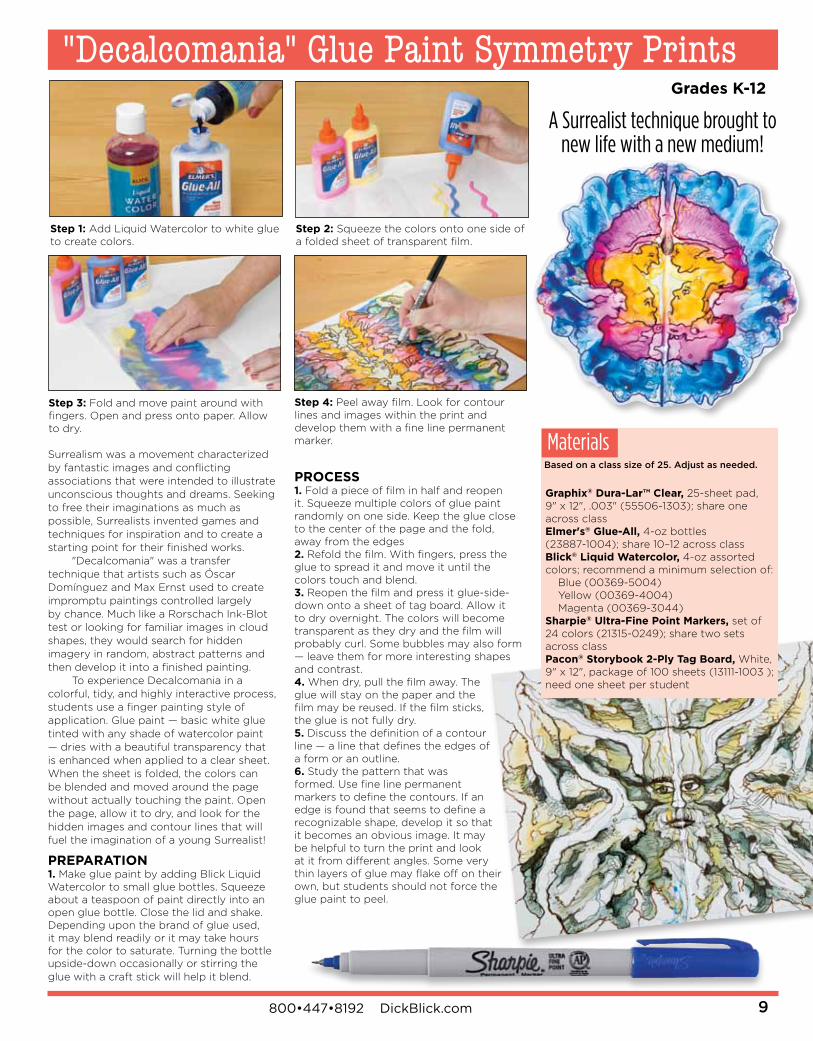
A Surrealist technique brought to new life with a new medium!
"Decalcomania" Glue Paint Symmetry PrintsGrades K-12
Surrealism was a movement characterized by fantastic images and conflicting associations that were intended to illustrate unconscious thoughts and dreams. Seeking to free their imaginations as much as possible, Surrealists invented games and techniques for inspiration and to create a starting point for their finished works. "Decalcomania" was a transfer technique that artists such as Óscar Domínguez and Max Ernst used to create impromptu paintings controlled largely by chance. Much like a Rorschach Ink-Blot test or looking for familiar images in cloud shapes, they would search for hidden imagery in random, abstract patterns and then develop it into a finished painting. To experience Decalcomania in a colorful, tidy, and highly interactive process, students use a finger painting style of application. Glue paint — basic white glue tinted with any shade of watercolor paint — dries with a beautiful transparency that is enhanced when applied to a clear sheet. When the sheet is folded, the colors can be blended and moved around the page without actually touching the paint. Open the page, allow it to dry, and look for the hidden images and contour lines that will fuel the imagination of a young Surrealist!
PREPARATION1. Make glue paint by adding Blick Liquid Watercolor to small glue bottles. Squeeze about a teaspoon of paint directly into an open glue bottle. Close the lid and shake. Depending upon the brand of glue used, it may blend readily or it may take hours for the color to saturate. Turning the bottle upside-down occasionally or stirring the glue with a craft stick will help it blend.
PROCESS1. Fold a piece of film in half and reopen it. Squeeze multiple colors of glue paint randomly on one side. Keep the glue close to the center of the page and the fold, away from the edges2. Refold the film. With fingers, press the glue to spread it and move it until the colors touch and blend. 3. Reopen the film and press it glue-side-down onto a sheet of tag board. Allow it to dry overnight. The colors will become transparent as they dry and the film will probably curl. Some bubbles may also form — leave them for more interesting shapes and contrast.4. When dry, pull the film away. The glue will stay on the paper and the film may be reused. If the film sticks, the glue is not fully dry.5. Discuss the definition of a contour line — a line that defines the edges of a form or an outline.6. Study the pattern that was formed. Use fine line permanent markers to define the contours. If an edge is found that seems to define a recognizable shape, develop it so that it becomes an obvious image. It may be helpful to turn the print and look at it from different angles. Some very thin layers of glue may flake off on their own, but students should not force the glue paint to peel.
Step 1: Add Liquid Watercolor to white glue to create colors.
Step 3: Fold and move paint around with fingers. Open and press onto paper. Allow to dry.
Step 2: Squeeze the colors onto one side of a folded sheet of transparent film.
Step 4: Peel away film. Look for contour lines and images within the print and develop them with a fine line permanent marker.
Graphix® Dura-Lar™ Clear, 25-sheet pad, 9" x 12", .003" (55506-1303); share one across classElmer's® Glue-All, 4-oz bottles (23887-1004); share 10–12 across classBlick® Liquid Watercolor, 4-oz assorted colors; recommend a minimum selection of: Blue (00369-5004) Yellow (00369-4004) Magenta (00369-3044)Sharpie® Ultra-Fine Point Markers, set of 24 colors (21315-0249); share two sets across classPacon® Storybook 2-Ply Tag Board, White, 9" x 12", package of 100 sheets (13111-1003 ); need one sheet per student
Based on a class size of 25. Adjust as needed.
Materials
10
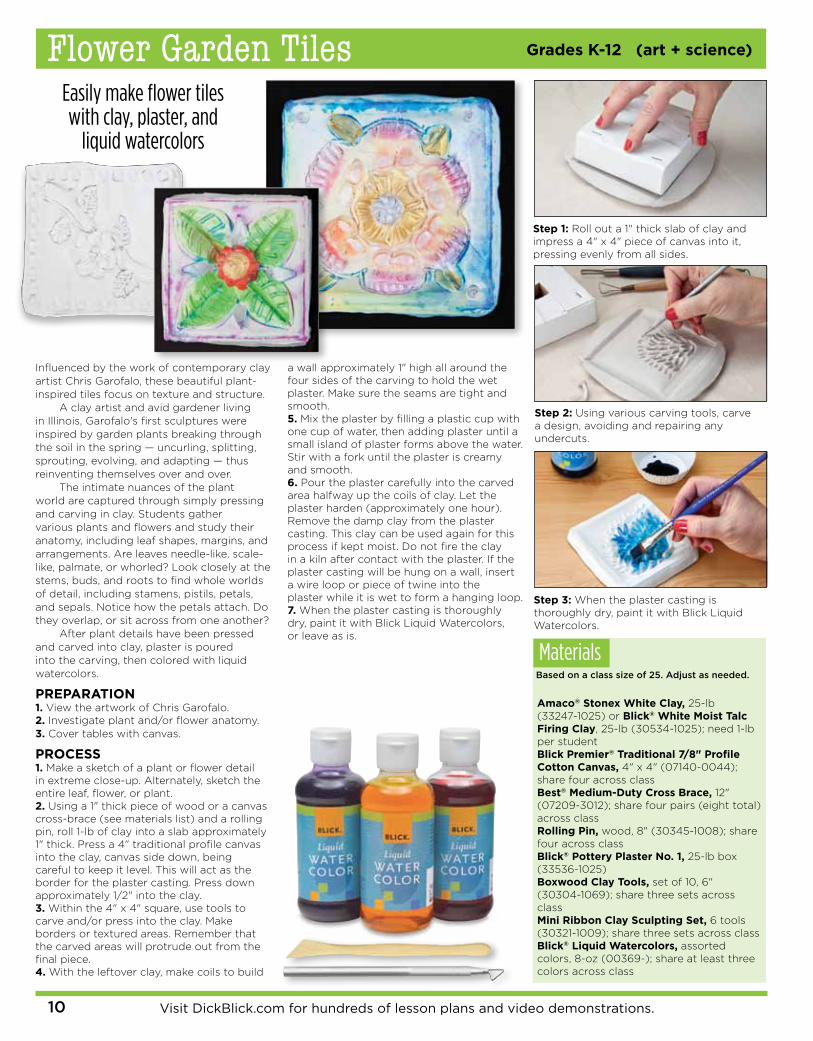
Flower Garden Tiles Grades K-12 (art + science)
Step 1: Roll out a 1" thick slab of clay and impress a 4" x 4" piece of canvas into it, pressing evenly from all sides.
Step 2: Using various carving tools, carve a design, avoiding and repairing any undercuts.
Step 3: When the plaster casting is thoroughly dry, paint it with Blick Liquid Watercolors.
Easily make flower tiles with clay, plaster, and
liquid watercolors
Amaco® Stonex White Clay, 25-lb (33247-1025) or Blick® White Moist Talc Firing Clay, 25-lb (30534-1025); need 1-lb per studentBlick Premier® Traditional 7/8" Profile Cotton Canvas, 4" x 4" (07140-0044); share four across classBest® Medium-Duty Cross Brace, 12" (07209-3012); share four pairs (eight total) across classRolling Pin, wood, 8" (30345-1008); share four across classBlick® Pottery Plaster No. 1, 25-lb box (33536-1025)Boxwood Clay Tools, set of 10, 6" (30304-1069); share three sets across classMini Ribbon Clay Sculpting Set, 6 tools (30321-1009); share three sets across classBlick® Liquid Watercolors, assorted colors, 8-oz (00369-); share at least three colors across class
Based on a class size of 25. Adjust as needed.
Materials
Visit DickBlick.com for hundreds of lesson plans and video demonstrations.
Influenced by the work of contemporary clay artist Chris Garofalo, these beautiful plant-inspired tiles focus on texture and structure. A clay artist and avid gardener living in Illinois, Garofalo's first sculptures were inspired by garden plants breaking through the soil in the spring — uncurling, splitting, sprouting, evolving, and adapting — thus reinventing themselves over and over. The intimate nuances of the plant world are captured through simply pressing and carving in clay. Students gather various plants and flowers and study their anatomy, including leaf shapes, margins, and arrangements. Are leaves needle-like, scale-like, palmate, or whorled? Look closely at the stems, buds, and roots to find whole worlds of detail, including stamens, pistils, petals, and sepals. Notice how the petals attach. Do they overlap, or sit across from one another? After plant details have been pressed and carved into clay, plaster is poured into the carving, then colored with liquid watercolors.
PREPARATION1. View the artwork of Chris Garofalo.2. Investigate plant and/or flower anatomy.3. Cover tables with canvas.
PROCESS1. Make a sketch of a plant or flower detail in extreme close-up. Alternately, sketch the entire leaf, flower, or plant. 2. Using a 1" thick piece of wood or a canvas cross-brace (see materials list) and a rolling pin, roll 1-lb of clay into a slab approximately 1" thick. Press a 4" traditional profile canvas into the clay, canvas side down, being careful to keep it level. This will act as the border for the plaster casting. Press down approximately 1/2" into the clay.3. Within the 4" x 4" square, use tools to carve and/or press into the clay. Make borders or textured areas. Remember that the carved areas will protrude out from the final piece.4. With the leftover clay, make coils to build
a wall approximately 1" high all around the four sides of the carving to hold the wet plaster. Make sure the seams are tight and smooth.5. Mix the plaster by filling a plastic cup with one cup of water, then adding plaster until a small island of plaster forms above the water. Stir with a fork until the plaster is creamy and smooth.6. Pour the plaster carefully into the carved area halfway up the coils of clay. Let the plaster harden (approximately one hour). Remove the damp clay from the plaster casting. This clay can be used again for this process if kept moist. Do not fire the clay in a kiln after contact with the plaster. If the plaster casting will be hung on a wall, insert a wire loop or piece of twine into the plaster while it is wet to form a hanging loop.7. When the plaster casting is thoroughly dry, paint it with Blick Liquid Watercolors, or leave as is.
800•447•8192 DickBlick.com 11
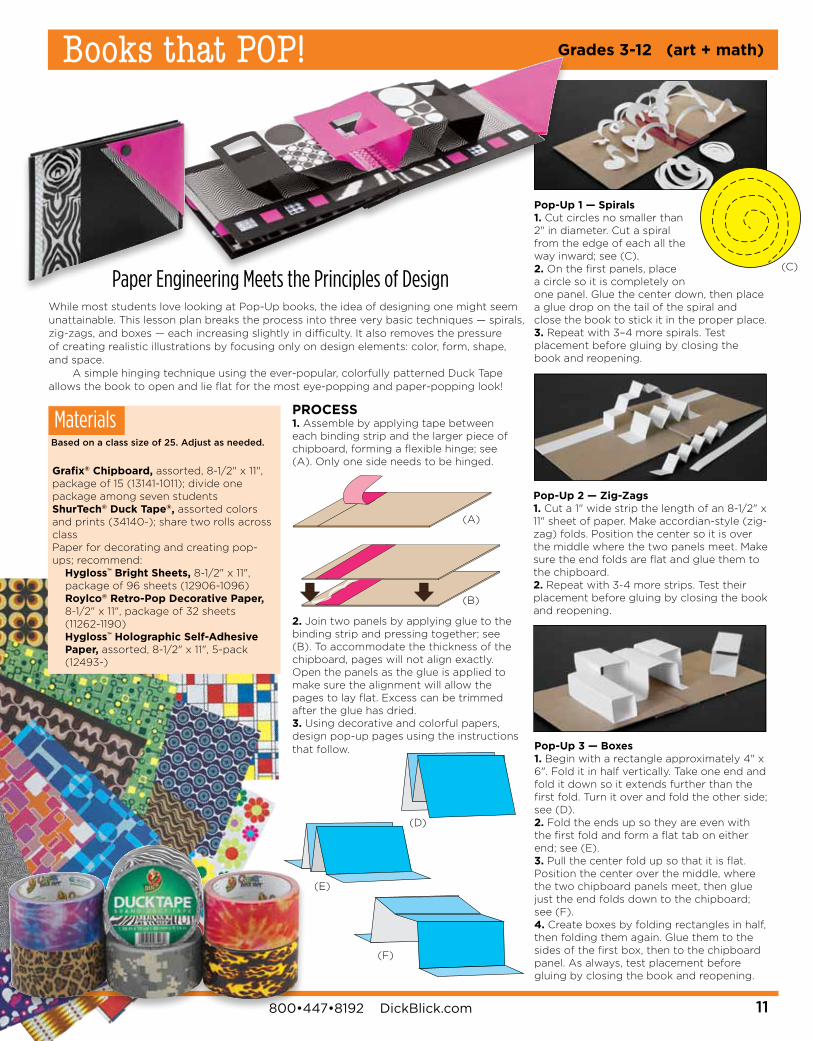
Pop-Up 1 — Spirals1. Cut circles no smaller than 2" in diameter. Cut a spiral from the edge of each all the way inward; see (C). 2. On the first panels, place a circle so it is completely on one panel. Glue the center down, then place a glue drop on the tail of the spiral and close the book to stick it in the proper place.3. Repeat with 3–4 more spirals. Test placement before gluing by closing the book and reopening.
Pop-Up 2 — Zig-Zags1. Cut a 1" wide strip the length of an 8-1/2" x 11" sheet of paper. Make accordian-style (zig-zag) folds. Position the center so it is over the middle where the two panels meet. Make sure the end folds are flat and glue them to the chipboard.2. Repeat with 3-4 more strips. Test their placement before gluing by closing the book and reopening.
Pop-Up 3 — Boxes1. Begin with a rectangle approximately 4" x 6". Fold it in half vertically. Take one end and fold it down so it extends further than the first fold. Turn it over and fold the other side; see (D). 2. Fold the ends up so they are even with the first fold and form a flat tab on either end; see (E).3. Pull the center fold up so that it is flat. Position the center over the middle, where the two chipboard panels meet, then glue just the end folds down to the chipboard; see (F).4. Create boxes by folding rectangles in half, then folding them again. Glue them to the sides of the first box, then to the chipboard panel. As always, test placement before gluing by closing the book and reopening.
(C)
Grafix® Chipboard, assorted, 8-1/2" x 11", package of 15 (13141-1011); divide one package among seven studentsShurTech® Duck Tape®, assorted colors and prints (34140-); share two rolls across classPaper for decorating and creating pop-ups; recommend: Hygloss™ Bright Sheets, 8-1/2" x 11",
package of 96 sheets (12906-1096) Roylco® Retro-Pop Decorative Paper,
8-1/2" x 11", package of 32 sheets (11262-1190) Hygloss™ Holographic Self-Adhesive
Paper, assorted, 8-1/2" x 11", 5-pack (12493-)
Based on a class size of 25. Adjust as needed.
Materials
Books that POP!
Paper Engineering Meets the Principles of DesignWhile most students love looking at Pop-Up books, the idea of designing one might seem unattainable. This lesson plan breaks the process into three very basic techniques — spirals, zig-zags, and boxes — each increasing slightly in difficulty. It also removes the pressure of creating realistic illustrations by focusing only on design elements: color, form, shape, and space. A simple hinging technique using the ever-popular, colorfully patterned Duck Tape allows the book to open and lie flat for the most eye-popping and paper-popping look!
PROCESS1. Assemble by applying tape between each binding strip and the larger piece of chipboard, forming a flexible hinge; see (A). Only one side needs to be hinged.
2. Join two panels by applying glue to the binding strip and pressing together; see (B). To accommodate the thickness of the chipboard, pages will not align exactly. Open the panels as the glue is applied to make sure the alignment will allow the pages to lay flat. Excess can be trimmed after the glue has dried.3. Using decorative and colorful papers, design pop-up pages using the instructions that follow.
(A)
(B)
(D)
(F)
(E)
Grades 3-12 (art + math)
12
Lessons on Lascaux Grades 3-12 (art + history)
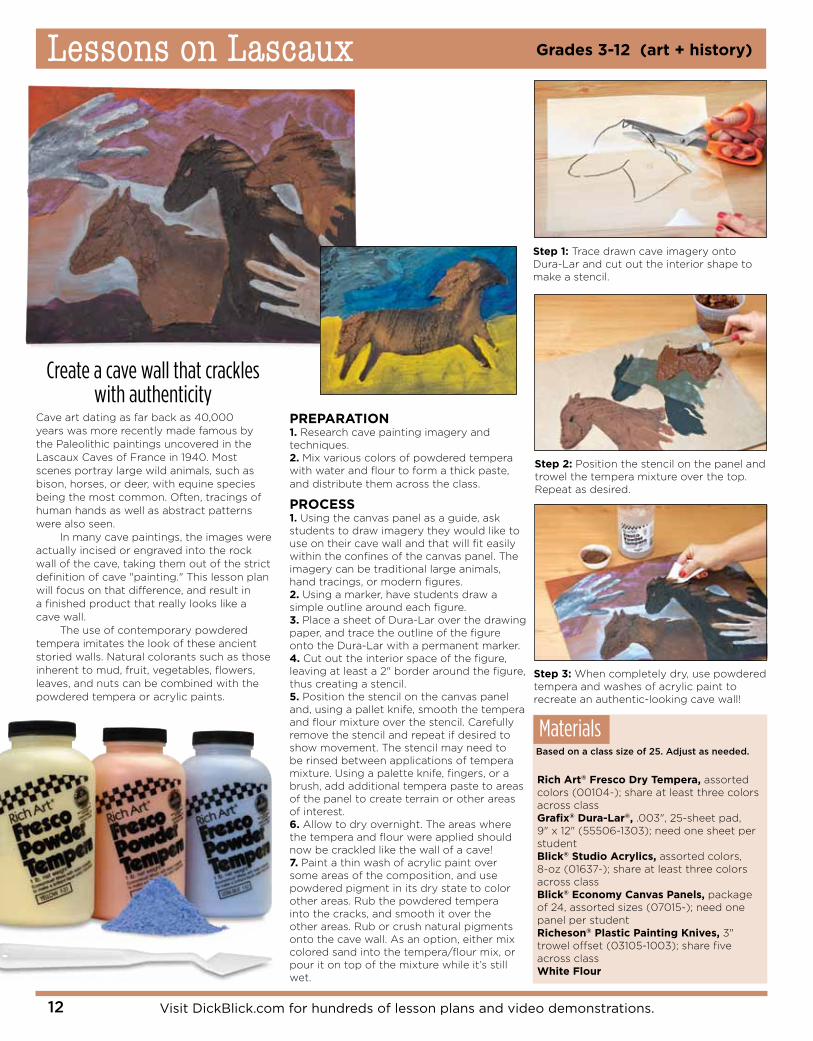
Cave art dating as far back as 40,000 years was more recently made famous by the Paleolithic paintings uncovered in the Lascaux Caves of France in 1940. Most scenes portray large wild animals, such as bison, horses, or deer, with equine species being the most common. Often, tracings of human hands as well as abstract patterns were also seen. In many cave paintings, the images were actually incised or engraved into the rock wall of the cave, taking them out of the strict definition of cave "painting." This lesson plan will focus on that difference, and result in a finished product that really looks like a cave wall. The use of contemporary powdered tempera imitates the look of these ancient storied walls. Natural colorants such as those inherent to mud, fruit, vegetables, flowers, leaves, and nuts can be combined with the powdered tempera or acrylic paints.
PREPARATION1. Research cave painting imagery and techniques.2. Mix various colors of powdered tempera with water and flour to form a thick paste, and distribute them across the class.
PROCESS1. Using the canvas panel as a guide, ask students to draw imagery they would like to use on their cave wall and that will fit easily within the confines of the canvas panel. The imagery can be traditional large animals, hand tracings, or modern figures.2. Using a marker, have students draw a simple outline around each figure.3. Place a sheet of Dura-Lar over the drawing paper, and trace the outline of the figure onto the Dura-Lar with a permanent marker.4. Cut out the interior space of the figure, leaving at least a 2" border around the figure, thus creating a stencil.5. Position the stencil on the canvas panel and, using a pallet knife, smooth the tempera and flour mixture over the stencil. Carefully remove the stencil and repeat if desired to show movement. The stencil may need to be rinsed between applications of tempera mixture. Using a palette knife, fingers, or a brush, add additional tempera paste to areas of the panel to create terrain or other areas of interest. 6. Allow to dry overnight. The areas where the tempera and flour were applied should now be crackled like the wall of a cave!7. Paint a thin wash of acrylic paint over some areas of the composition, and use powdered pigment in its dry state to color other areas. Rub the powdered tempera into the cracks, and smooth it over the other areas. Rub or crush natural pigments onto the cave wall. As an option, either mix colored sand into the tempera/flour mix, or pour it on top of the mixture while it’s still wet.
Create a cave wall that crackles with authenticity
Rich Art® Fresco Dry Tempera, assorted colors (00104-); share at least three colors across classGrafix® Dura-Lar®, .003", 25-sheet pad, 9" x 12" (55506-1303); need one sheet per studentBlick® Studio Acrylics, assorted colors, 8-oz (01637-); share at least three colors across classBlick® Economy Canvas Panels, package of 24, assorted sizes (07015-); need one panel per studentRicheson® Plastic Painting Knives, 3" trowel offset (03105-1003); share five across classWhite Flour
Based on a class size of 25. Adjust as needed.
Materials
Step 1: Trace drawn cave imagery onto Dura-Lar and cut out the interior shape to make a stencil.
Step 2: Position the stencil on the panel and trowel the tempera mixture over the top. Repeat as desired.
Step 3: When completely dry, use powdered tempera and washes of acrylic paint to recreate an authentic-looking cave wall!
Visit DickBlick.com for hundreds of lesson plans and video demonstrations.
800•447•8192 DickBlick.com 13
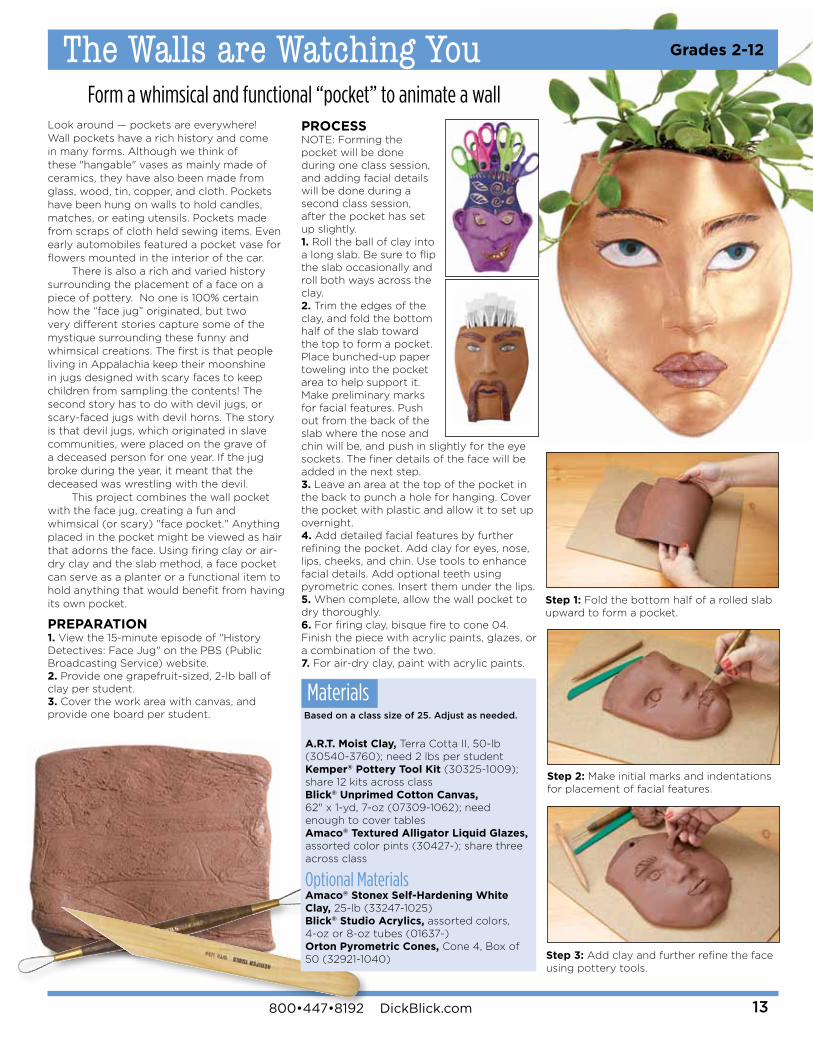
The Walls are Watching You Grades 2-12
Look around — pockets are everywhere! Wall pockets have a rich history and come in many forms. Although we think of these "hangable" vases as mainly made of ceramics, they have also been made from glass, wood, tin, copper, and cloth. Pockets have been hung on walls to hold candles, matches, or eating utensils. Pockets made from scraps of cloth held sewing items. Even early automobiles featured a pocket vase for flowers mounted in the interior of the car. There is also a rich and varied history surrounding the placement of a face on a piece of pottery. No one is 100% certain how the “face jug” originated, but two very different stories capture some of the mystique surrounding these funny and whimsical creations. The first is that people living in Appalachia keep their moonshine in jugs designed with scary faces to keep children from sampling the contents! The second story has to do with devil jugs, or scary-faced jugs with devil horns. The story is that devil jugs, which originated in slave communities, were placed on the grave of a deceased person for one year. If the jug broke during the year, it meant that the deceased was wrestling with the devil. This project combines the wall pocket with the face jug, creating a fun and whimsical (or scary) "face pocket." Anything placed in the pocket might be viewed as hair that adorns the face. Using firing clay or air-dry clay and the slab method, a face pocket can serve as a planter or a functional item to hold anything that would benefit from having its own pocket.
PREPARATION1. View the 15-minute episode of "History Detectives: Face Jug" on the PBS (Public Broadcasting Service) website.2. Provide one grapefruit-sized, 2-lb ball of clay per student.3. Cover the work area with canvas, and provide one board per student.
PROCESSNOTE: Forming the pocket will be done during one class session, and adding facial details will be done during a second class session, after the pocket has set up slightly.1. Roll the ball of clay into a long slab. Be sure to flip the slab occasionally and roll both ways across the clay.2. Trim the edges of the clay, and fold the bottom half of the slab toward the top to form a pocket. Place bunched-up paper toweling into the pocket area to help support it. Make preliminary marks for facial features. Push out from the back of the slab where the nose and chin will be, and push in slightly for the eye sockets. The finer details of the face will be added in the next step.3. Leave an area at the top of the pocket in the back to punch a hole for hanging. Cover the pocket with plastic and allow it to set up overnight.4. Add detailed facial features by further refining the pocket. Add clay for eyes, nose, lips, cheeks, and chin. Use tools to enhance facial details. Add optional teeth using pyrometric cones. Insert them under the lips.5. When complete, allow the wall pocket to dry thoroughly.6. For firing clay, bisque fire to cone 04. Finish the piece with acrylic paints, glazes, or a combination of the two.7. For air-dry clay, paint with acrylic paints.
Form a whimsical and functional “pocket” to animate a wall
Step 1: Fold the bottom half of a rolled slab upward to form a pocket.
Step 2: Make initial marks and indentations for placement of facial features.
Step 3: Add clay and further refine the face using pottery tools.
A.R.T. Moist Clay, Terra Cotta II, 50-lb (30540-3760); need 2 lbs per studentKemper® Pottery Tool Kit (30325-1009); share 12 kits across classBlick® Unprimed Cotton Canvas, 62" x 1-yd, 7-oz (07309-1062); need enough to cover tablesAmaco® Textured Alligator Liquid Glazes, assorted color pints (30427-); share three across class
Optional MaterialsAmaco® Stonex Self-Hardening White Clay, 25-lb (33247-1025)Blick® Studio Acrylics, assorted colors, 4-oz or 8-oz tubes (01637-)Orton Pyrometric Cones, Cone 4, Box of 50 (32921-1040)
Based on a class size of 25. Adjust as needed.
Materials
14
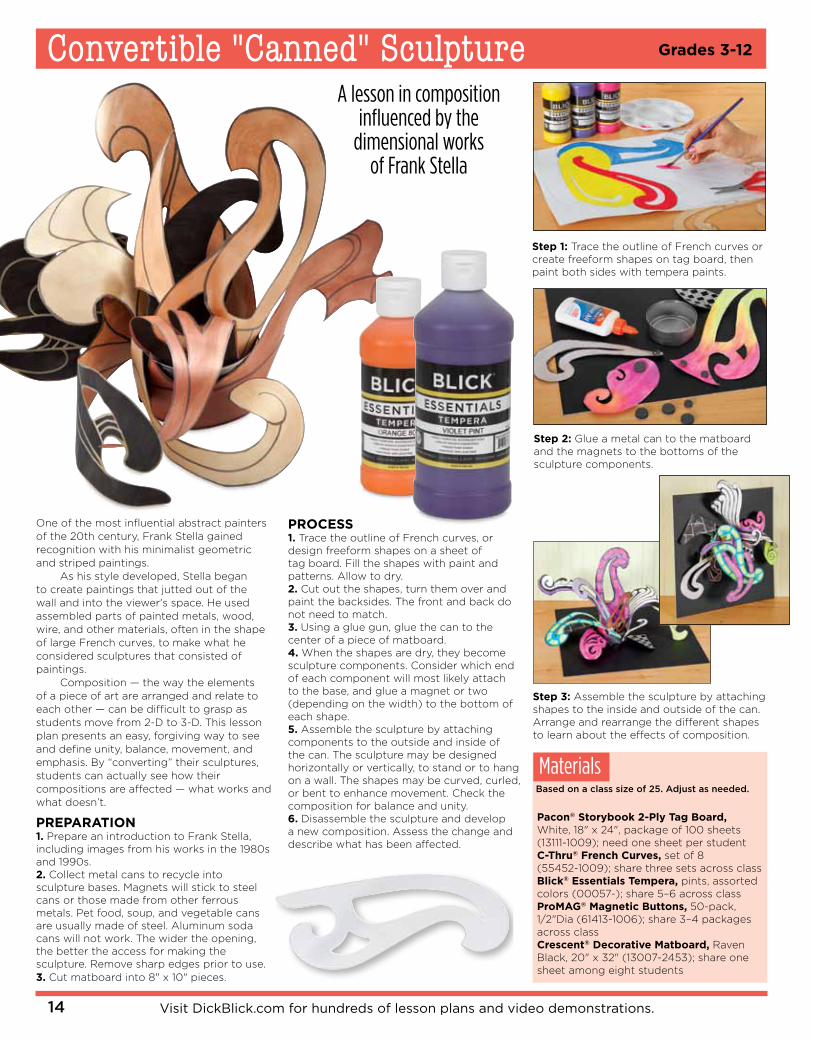
Convertible "Canned" Sculpture Grades 3-12
One of the most influential abstract painters of the 20th century, Frank Stella gained recognition with his minimalist geometric and striped paintings. As his style developed, Stella began to create paintings that jutted out of the wall and into the viewer's space. He used assembled parts of painted metals, wood, wire, and other materials, often in the shape of large French curves, to make what he considered sculptures that consisted of paintings. Composition — the way the elements of a piece of art are arranged and relate to each other — can be difficult to grasp as students move from 2-D to 3-D. This lesson plan presents an easy, forgiving way to see and define unity, balance, movement, and emphasis. By “converting” their sculptures, students can actually see how their compositions are affected — what works and what doesn’t.
PREPARATION1. Prepare an introduction to Frank Stella, including images from his works in the 1980s and 1990s.2. Collect metal cans to recycle into sculpture bases. Magnets will stick to steel cans or those made from other ferrous metals. Pet food, soup, and vegetable cans are usually made of steel. Aluminum soda cans will not work. The wider the opening, the better the access for making the sculpture. Remove sharp edges prior to use.3. Cut matboard into 8" x 10" pieces.
PROCESS1. Trace the outline of French curves, or design freeform shapes on a sheet of tag board. Fill the shapes with paint and patterns. Allow to dry.2. Cut out the shapes, turn them over and paint the backsides. The front and back do not need to match.3. Using a glue gun, glue the can to the center of a piece of matboard.4. When the shapes are dry, they become sculpture components. Consider which end of each component will most likely attach to the base, and glue a magnet or two (depending on the width) to the bottom of each shape. 5. Assemble the sculpture by attaching components to the outside and inside of the can. The sculpture may be designed horizontally or vertically, to stand or to hang on a wall. The shapes may be curved, curled, or bent to enhance movement. Check the composition for balance and unity. 6. Disassemble the sculpture and develop a new composition. Assess the change and describe what has been affected.
A lesson in composition influenced by the
dimensional works of Frank Stella
Pacon® Storybook 2-Ply Tag Board, White, 18" x 24", package of 100 sheets (13111-1009); need one sheet per studentC-Thru® French Curves, set of 8 (55452-1009); share three sets across classBlick® Essentials Tempera, pints, assorted colors (00057-); share 5–6 across classProMAG® Magnetic Buttons, 50-pack, 1/2"Dia (61413-1006); share 3–4 packages across classCrescent® Decorative Matboard, Raven Black, 20" x 32" (13007-2453); share one sheet among eight students
Based on a class size of 25. Adjust as needed.
Materials
Step 1: Trace the outline of French curves or create freeform shapes on tag board, then paint both sides with tempera paints.
Step 2: Glue a metal can to the matboard and the magnets to the bottoms of the sculpture components.
Step 3: Assemble the sculpture by attaching shapes to the inside and outside of the can. Arrange and rearrange the different shapes to learn about the effects of composition.
Visit DickBlick.com for hundreds of lesson plans and video demonstrations.
800•447•8192 DickBlick.com 15
Easy Order Management: You can now manage your orders online at DickBlick.com.
• Place orders• View order details• Track orders• Easily re-order favorites• View your order history
Orders usually ship within 2-3 business days!
National ConventionPlatinum Sponsor
Beyond a high level of commitment to the National Art Education
Association, Blick provides $4,000 in school grants for teachers to attend at
no cost to them.
Blick also supports more than 50 education conferences and 18,000 participating educators each year.
Scholastic Art & Writing Awards
Founded in 1923, this is the oldest, longest-running, most prestigious recognition program for student
achievement in the visual arts and creative writing in the United States, recognizing more than 30,000 teen
artists annually.
Blick provides awards for: • 74 Regional Art Affiliates • 700 Art Gold & Silver Medal teachers • Scholastic Art Portfolio Gold Medal ScholorshipBlick also sponsors a traveling exhibition of the Scholastic Art & Writing Awards.
Visit www.artandwriting.org to learn more!
Proud Sponsor of:
Alliancefor Young
&WritersArtists
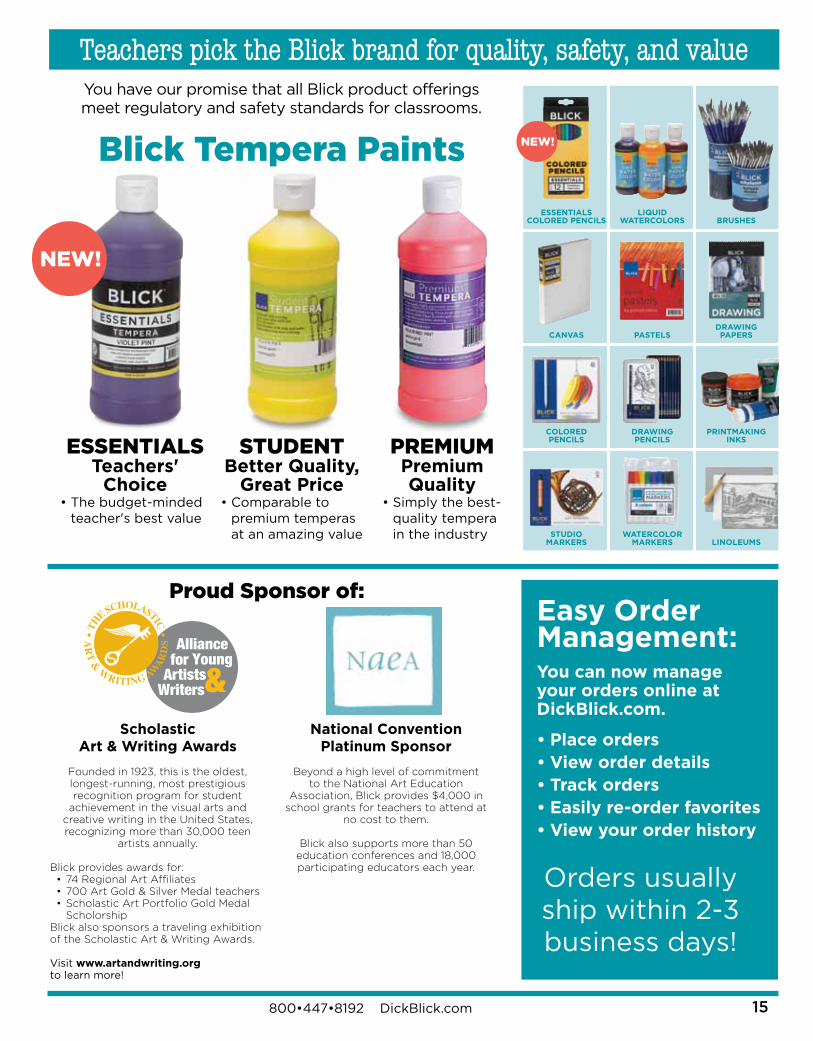
Teachers pick the Blick brand for quality, safety, and valueYou have our promise that all Blick product offerings meet regulatory and safety standards for classrooms.
ESSENTIALSCOLORED PENCILS
CANVAS
COLOREDPENCILS
STUDIOMARKERS
LIQUIDWATERCOLORS
PASTELS
DRAWINGPENCILS
WATERCOLORMARKERS
BRUSHES
DRAWINGPAPERS
PRINTMAKINGINKS
LINOLEUMS
Blick Tempera Paints
NEW!
NEW!
ESSENTIALSTeachers'
Choice • The budget-minded
teacher's best value
STUDENTBetter Quality,
Great Price • Comparable to
premium temperas at an amazing value
PREMIUMPremiumQuality
• Simply the best- quality tempera in the industry
16
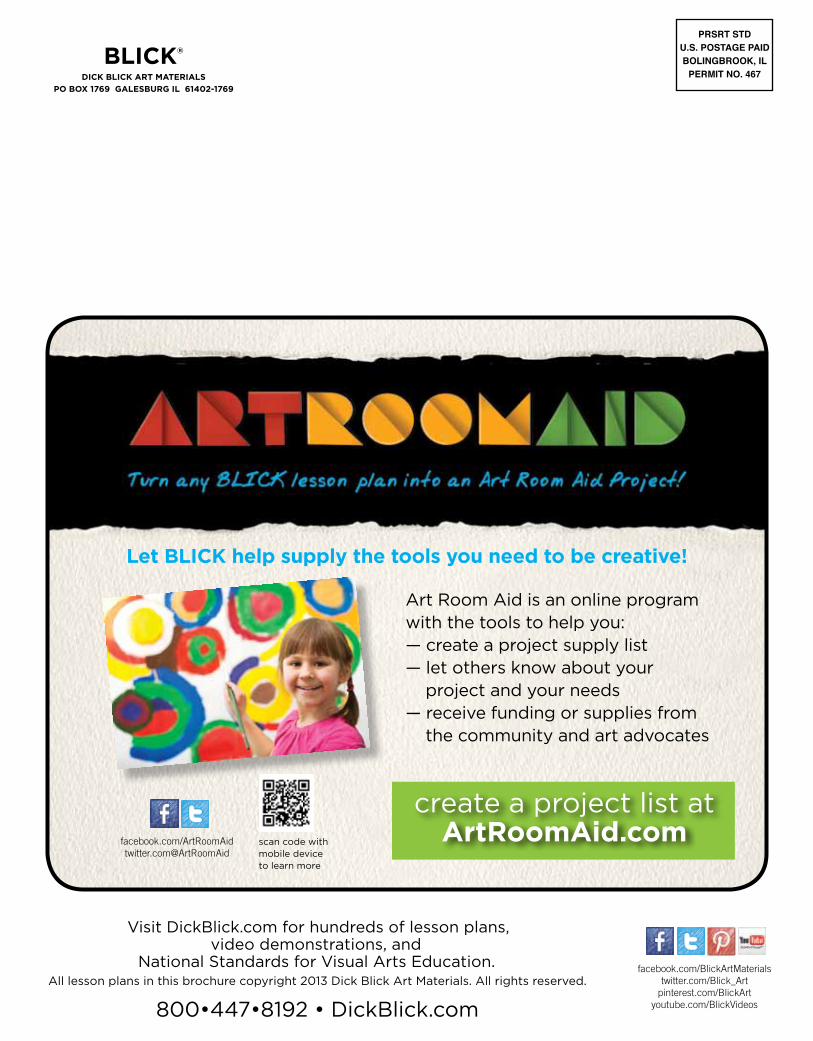
scan code with mobile device to learn more
create a project list atArtRoomAid.com
Let BLICK help supply the tools you need to be creative!
Art Room Aid is an online program with the tools to help you:— create a project supply list— let others know about your project and your needs— receive funding or supplies from the community and art advocates
BLICK®
DICK BLICK ART MATERIALS
PO BOX 1769 GALESBURG IL 61402-1769
PRSRT STDU.S. POSTAGE PAIDBOLINGBROOK, IL
PERMIT NO. 467
Visit DickBlick.com for hundreds of lesson plans, video demonstrations, and
National Standards for Visual Arts Education.All lesson plans in this brochure copyright 2013 Dick Blick Art Materials. All rights reserved.
800•447•8192 • DickBlick.com
facebook.com/BlickArtMaterialstwitter.com/Blick_Art
pinterest.com/BlickArtyoutube.com/BlickVideos
facebook.com/ArtRoomAid twitter.com@ArtRoomAid