Embed Size (px)
Citation preview
Now, as you draft memoranda,briefs and other vital research-based documents with word-processing software*, you’vegot more!
• More LexisNexis™ tools toverify your work’s accuracyin its earliest stages.
• More tools to help pinpointthe right facts as you buildyour premise. (That’s whenyou need the right answersets most.)
• More tools you can customizeto fit your work style, savingvaluable research time.
The LEXLink Feature
Perfect for drafting, the LEXLink feature copies your word-processingdocument, counts the recognizable citations and adds hyperlinks towww.lexis.com and LexisNexis™ Shepard’s® Citations Service. One step.Complete links.
Create links to cases, federal and state statutes, federal rules andimportant tax material citations without altering your originalMicrosoft® Word, WordPerfect® or HTML document.
What a great way to build a brief, moving seamlessly from your workto answer sets within www.lexis.com and Shepard’s Citations Service.Plus, use the LEXLink feature to:
• Get a case, statute or other document from www.lexis.com• Shepardize® a case, statute or other document• Create a citation list for your review• Highlight text and use www.lexis.com to find “More Like Selected Text”
Try it! There’s no charge to add links or create a cite list. Plus, your regularprices apply when you Shepardize citations and retrieve documents.
CheckCite
When you’re ready to verify citations, the CheckCite program offersconsistent, reliable performance. CheckCite collects the citations fromyour document, verifies them through Shepard’s Citations, the premiercitation verification service, and generates a summary report that tagsproblem cites for immediate attention. You can even verify quotes!
Now…one integrated package for drafting and verifying…The LEXLink feature and CheckCite. Look inside
to see how you can put these tools to work for you.
* Microsoft® Word 97 or higher or WordPerfect® 8.0 or higher.
NOTE: This publication shows you how to use theLEXLink feature with word-processing documents.The LEXLink feature also allows you to add links withindocuments you’re viewing in Microsoft® InternetExplorer Version 5.0 or XP. For step-by-step directionson how to use the LEXLink feature with your InternetExplorer browser, ask your LexisNexis account executivefor LEXLink publication number LO12605-2.
LexisNexis™
Citation Tools 2003…LEXLink™ v. 8.4 and CheckCite® v. 8.4

Once installed, LexisNexis CitationTools 2003 adds four icons to yourword-processing toolbar:
Click here to activate theLEXLink feature and addlinks to your draft document.
Click here to create a cite list.
Click the drop-down arrow toget additional cases or statutes,to Shepardize additional citationsor to search for similar text.
Click here to activate CheckCite.
Activating the LEXLinkfeature to add links1. As you review your draft document,
click on the LEXLink magnifyingglass icon.
2. Click OK. The LEXLink feature willcopy your document and add hyperlinks.
3. Click OK to display and use the links.(See above right.)
To save your linked document, followstandard document-saving procedure.
To return to your original copied brief afterlinking, minimize or close the document window.
Adding a linkTo add a link within your document:
1. Highlight the citation.
2. Select Tools from the toolbar, thenInsert Link.
Your originaldocument is notaltered. Save thiscopy. Share it.
Options
To customize your LEXLink feature options:
1. Right-click anywhere in your linked document.(Or select Tools from the toolbar, then LEXLink)
2. Select LEXLink; select options.
Under Display options you can:
• Turn on/off the Shepard’s links. (Default is on.)
• Add links to parallel cites. (Default is primarycite only.)
• Overwrite existing links. (Default is to overwrite.)
➤
➤
➤
➤
The LEXLink feature identifies and counts citations.
Click here to Shepardize the citationin one easy step — screen A .
Click on the link to move to the full textthrough www.lexis.com — screen B(See next page). (You will be promptedto sign on if you are not online.)

Activating theLEXLink feature tocreate a cite list
1. As you review your draft document,click on the LEXLink page icon.
2. Click OK to display link list.
To verify and/or print multiple cites, checkthe boxes next to the cites you need.
To save your cite list, save as a Web page.
To return to your copied brief, minimizeor close the document window.
Review the complete Shepard’s report.To return to the screen where you enteredShepard’s, use your PC’s ALT-TAB function.
A
Review the full-text case. To return to your linkeddocument, use your PC’s ALT-TAB function.
➤
➤
B
Fast and accurate!Just click the cite togo to the full text.
To find a case, statute or ruling not in yourlist, select the category and enter the cite.
The LEXLink feature categorizescites into cases/law reviews andstatutes/other documents.
➤
➤
➤
Check here to retrieve, print and/orShepardize. Then click SUBMIT.
➤

Activating the lexis.com ®
iconto expand your research
When you click on the drop-down arrow nextto the lexis.com icon, you can:
• Get a case not listed in your document.Click Get a Case, enter the citationand click OK.
• Get a statute not listed inyour document.Click Get a Statute, enter the citationand click OK.
• Shepardize a citation.Click Shepardize, enter the citationand click OK.
• Find More Like Selected Text.1. Highlight any on-point text
in your document. (See right.)
2. Click the drop-down arrow nextto the lexis.com icon; selectMore Like Selected Text.
3. Review and revise the text inthe text box; click OK.
4. Choose your source —even news sources. (If you aren’tonline, you will be prompted toenter your www.lexis.com IDand password.)
5. Click Search. Then review yoursearch results. (See right.)
1
2
5

Activating aCheckCite Session
When you start the CheckCite program, you’ll see theNew Session screen. To start a new CheckCite session:
1. Enter a name to identify the session.*Use the default or type a new name.
2. Enter a client or matter name in the Client field.
3. Enter the name of the document you wantto check. Select from the drop-down list, orclick Browse to display files and directories.
Click Type in Citations to enter individual citations.
Click Valid Reporters to check format. To updatethe reporter list, click Update.
Note: If you are using a document management system,the DMS document search screen may display.
4. Click the drop-down list to choose a destinationfor your CheckCite report. Click Display Reportin Report Viewer to view the completed report onthe screen as well as send it to the destination youhave chosen under “Send Report To.”
5. Choose an option set to be used for this session.The list box contains the name of the last optionset you used. Use this one, or select another fromthe drop-down list.
The services for the option set you selected aredisplayed under the option set name. To change thesettings for a particular service for this session,click YES or NO next to the service you want tochange. To see all the selections for this option set,click Modify. To create, delete or modify option sets,click Advanced.
6. Click Next.
When the CheckCite program is finished extractingcitations from your document, you’ll see theCitation List.
NextOptionSets
SessionName
ClientSource forCitations
ReportDestination
Modify
1
2
Name ofDocument
3
4
5
6
*Note: What’s a Session Name?A session name is a name you give a session so you canrecognize it later—or delete it from your system—fromthe Previous Session dialog box. You can open a previoussession and print/view the results of that session. A sessionname may be up to 64 characters.
AdvancedOption
Modifying
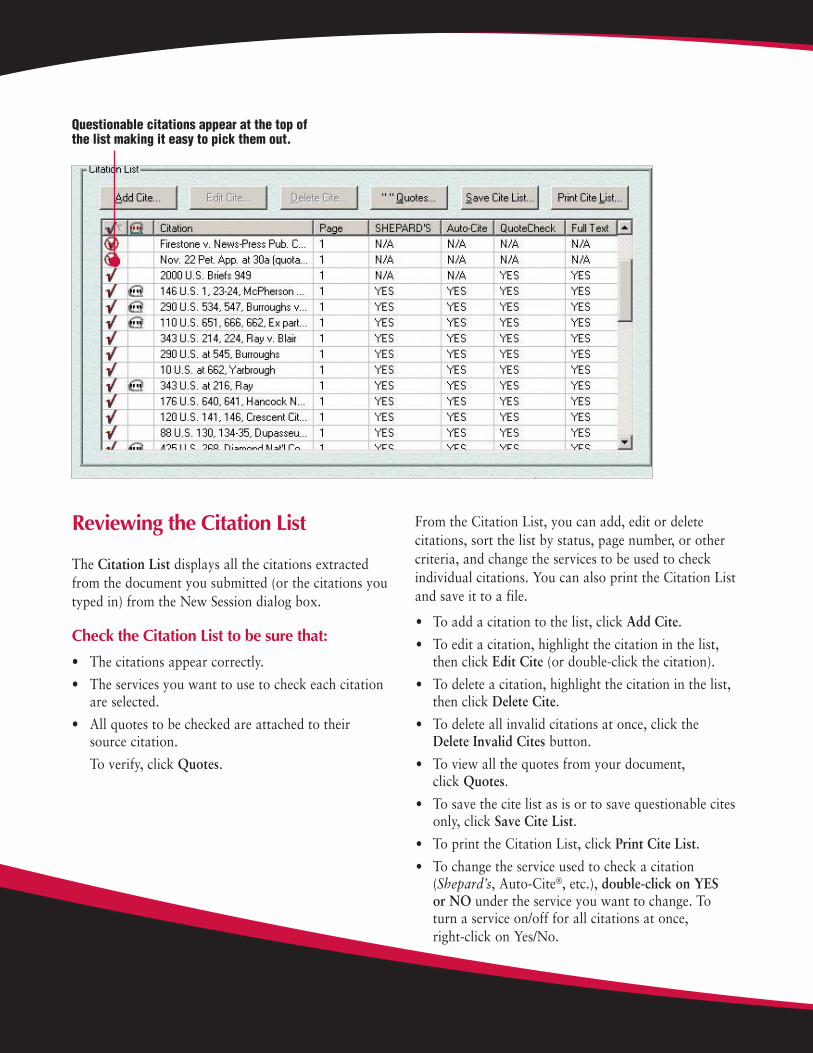
Reviewing the Citation List
The Citation List displays all the citations extractedfrom the document you submitted (or the citations youtyped in) from the New Session dialog box.
Check the Citation List to be sure that:
• The citations appear correctly.
• The services you want to use to check each citationare selected.
• All quotes to be checked are attached to theirsource citation.
To verify, click Quotes.
Questionable citations appear at the top ofthe list making it easy to pick them out.
From the Citation List, you can add, edit or deletecitations, sort the list by status, page number, or othercriteria, and change the services to be used to checkindividual citations. You can also print the Citation Listand save it to a file.
• To add a citation to the list, click Add Cite.
• To edit a citation, highlight the citation in the list,then click Edit Cite (or double-click the citation).
• To delete a citation, highlight the citation in the list,then click Delete Cite.
• To delete all invalid citations at once, click theDelete Invalid Cites button.
• To view all the quotes from your document,click Quotes.
• To save the cite list as is or to save questionable citesonly, click Save Cite List.
• To print the Citation List, click Print Cite List.
• To change the service used to check a citation(Shepard’s, Auto-Cite®, etc.), double-click on YESor NO under the service you want to change. Toturn a service on/off for all citations at once,right-click on Yes/No.

Checking Your Citations Online
After reviewing the Citation List and making anychanges you wish, click Create Report to send thecitations to be checked online with the LexisNexisservices. (If you are not signed on to www.lexis.com,you will be asked for your ID and password.)
CheckCite Summary Report
The CheckCite Summary Report lets you quickly checkyour results. Any areas of concern are bolded makingit easy to scan the report. It tells you which serviceswere used to check the citations and what the resultswere. The Summary Report will include questionablecitations and any duplicates.
Shepard’s Signal™ indicators displayedin the Expand All view
To display all the signals for all the citations, selectExpand All from the view menu.
A list of the citations appears in the left-hand column ofthe report. Click on a citation to display the indicatorsfor that citation—Shepard’s, Auto-Cite, Full Text, or theQuoteCheck™ feature. The signals tell you, at a glance,if you should check the case further. Click one of theindicators to display a report.
Citing references in Shepard’s reports are linked so youcan move to the full text of these references.
In addition to reviewing the report, you can send it to aprinter or a word processor, or save the report to a file.
Stop indicators will also display next to a citation forwhich a report was not returned due to an error, andnext to quotations with differences.
CheckCite(R) Summary Report

Modifying Option Sets
You can modify existing option sets or createnew ones. Select Option Sets from the Edit menu.Or click Advanced on the New Session screen.
To modify an option set:
1. Click Advanced and highlight the option set youwant to modify in the list.
2. Click Modify.
3. Click the tab for the service you want tomodify (Shepard’s, Auto-Cite, etc.) andmake the changes to the service’s options.
4. Click the tab for each service and make theselections you want.
5. Click Apply.
6. Click OK when you are finished making theselections for each service.
To copy an option set:
1. Click Advanced and highlight the option set youwant to copy. The new option set initially will havethe properties of the set you copy.
2. Click Copy.
3. You may have the choice to save the option set as aGlobal or Personal option set; give the new optionset a name; click OK.
4. Select the new option set from the list andclick Modify.
5 . Click the tab for the services in which you want tomodify options (Shepard’s, Auto-Cite, etc.) and makethe changes you want.
6. Click Apply.
7. Click OK when you are finished makingthe selections for each service.
To create a new option set:
1. Click New.
2. Give the new option set a name and click OK.You may have the choice to save the option set asa Global or Personal option set.
3. Select the new option set from the list andclick Modify.
4. Click the tab for each service and make theselections you want.
5. Click Apply.
6. Click OK when you are finished making theselections for each service.
LexisNexis, the Knowledge Burst logo, LEXLink, QuoteCheck, and Shepard’s Signal are trademarksand CheckCite, lexis.com, Shepard’s and Shepardize are registered trademarks of Reed ElsevierProperties Inc., used under license. It’s How You Know is a trademark of LexisNexis, a division ofReed Elsevier Inc. Auto-Cite is a registered trademark of Reed Elsevier Inc. Microsoft is a registeredtrademark of Microsoft Corporation. WordPerfect is a registered trademark of Corel CorporationLimited. Other products and services may be trademarks or registered trademarks of their respectivecompanies. © 2003 LexisNexis, a division of Reed Elsevier Inc. All rights reserved. LO12606-1 1203