Embed Size (px)
Citation preview
2
LIST OF CONTENT:
INTRODUCTION
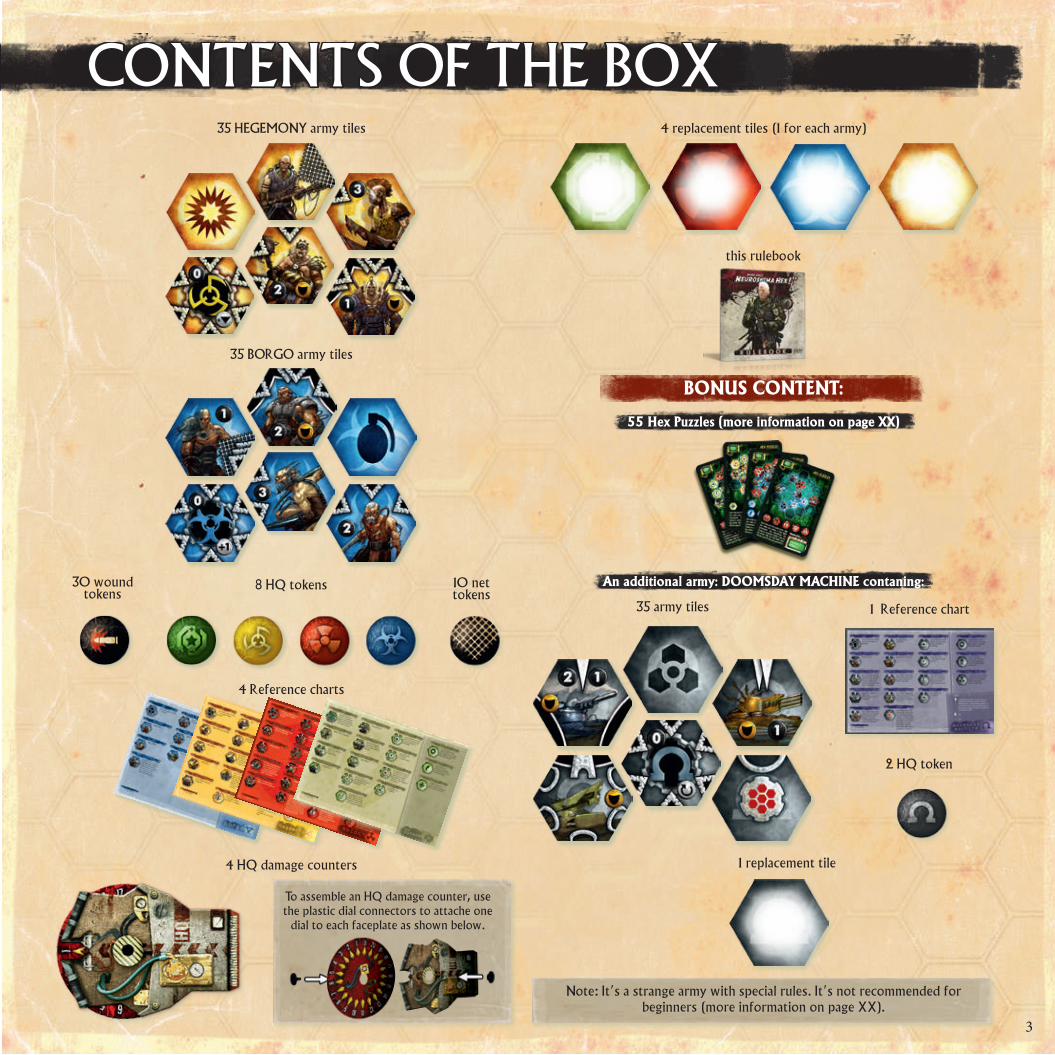
CONTENTS OF THE BOX
GAME RULES•Goal of the game• Setting up • Starting the game •Game sequence •Using tiles •Battles • Ending the game
•Victory
TILE DESCRIPTIONS• Initiative• Instant action tiles•Unit tiles
•Modules
COMMON PROBLEMS
THE MULTIPLAYER MODE
ARMY DESCRIPTION•Borgo•Moloch•Hegemony•The Outpost•Doomsday Machine
HEX PUZZLES
EXAMPLE OF PLAY
INTRODUCTION
Neuroshima HEX is a game of tactics, where armies wage continuous battles against each other. It is based on a roleplaying game called Neuroshima RPG published by Portal in 2001. While being familiar with the RPG is not necessary, the players will find it easier to identify with their armies if they have read or played the game.
The world of Neuroshima RPG is that of a post-apocalypse world torn apart by a war between humans and machines. The remains of humanity took shel-ter in the ruins of cities and organized in small communities, gangs and armies. Conflicts between such groups are not uncommon and the reasons of such are numerous: territory, food or equipment. What is more, the ruined cities are constantly patrolled by machines sent from the north, where a vast cybernetic entity, called MOLOCH, appeared. Great wastelands that surround what was left of the greatest cities are home to another enemy - BORGO - a charismatic leader who controls an army of gruesome mutants. One of the last hopes of humanity is the OUTPOST, a perfectly organized army which wages a guerilla war against MOLOCH. Nevertheless, most human settlements, including the HEGEMONY, are not concerned with war until it comes banging at their door. Such is the world of Neuroshima.
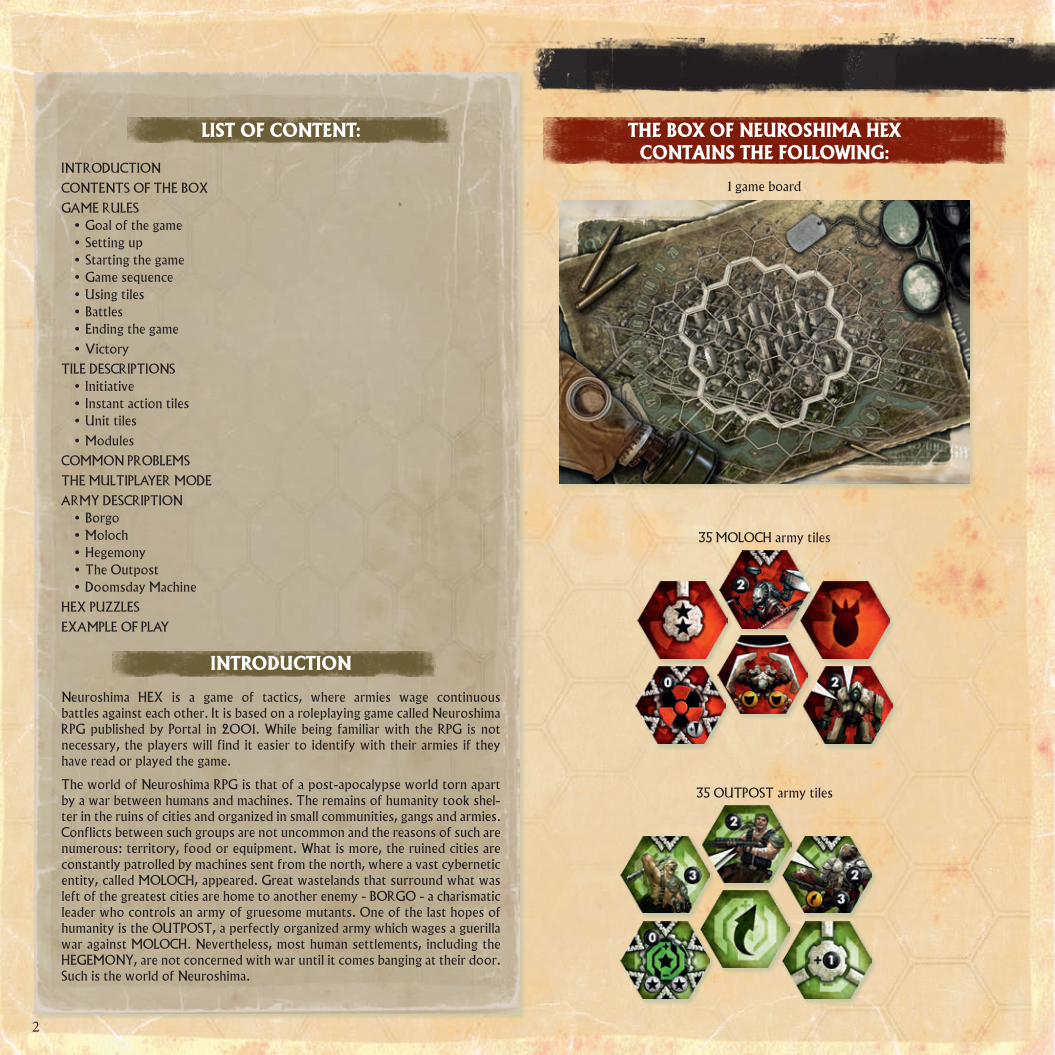
THE BOX OF NEUROSHIMA HEX CONTAINS THE FOLLOWING:
1 game board
35 MOLOCH army tiles
35 OUTPOST army tiles
3
CONTENTS OF THE BOX 35 HEGEMONY army tiles
35 BORGO army tiles
4 Reference charts
4 HQ damage counters
4 replacement tiles (1 for each army)
this rulebook
BONUS CONTENT:
55 Hex Puzzles (more information on page XX)
An additional army: DOOMSDAY MACHINE contaning:
Note: It’s a strange army with special rules. It’s not recommended for
beginners (more information on page XX).
30 wound tokens
10 net tokens
8 HQ tokens
35 army tiles
2 HQ token
1 replacement tile
1 Reference chart
To assemble an HQ damage counter, use the plastic dial connectors to attache one
dial to each faceplate as shown below.
4
If you are already familiar with Neuroshima Hex rules and just want to check the changes and clarifications in this new edition, it is enough for you to read the sections marked with this symbol .
The following rules refer to a two-player game. All adjustments necessary for a 3- or 4-player game are presented on page XX.
GOAL OF THE GAME
The goal of each player is to attack the enemy’s Headquarters (HQ). At the beginning of the game each HQ has 20 ”hit points”. If, during the game, an HQ loses its last, twentieth hit point it is destroyed and the player does not take part in the game any more.
If, at the end of the game, (see ENDING THE GAME section at page XX) none of the HQ’s have been destroyed the players compare current hit point levels for each one. The player whose HQ is in the best condition (received least da-mage) is the winner.
SETTING UP
Put the board in the middle of the table. Distribute appropriate army tiles among the players. Each player commands a single army represented by 35 tiles. Next, each player separates their HQ tile from the remaining ones (you can distinguish them by a different back) and shuffles the tiles thoroughly.
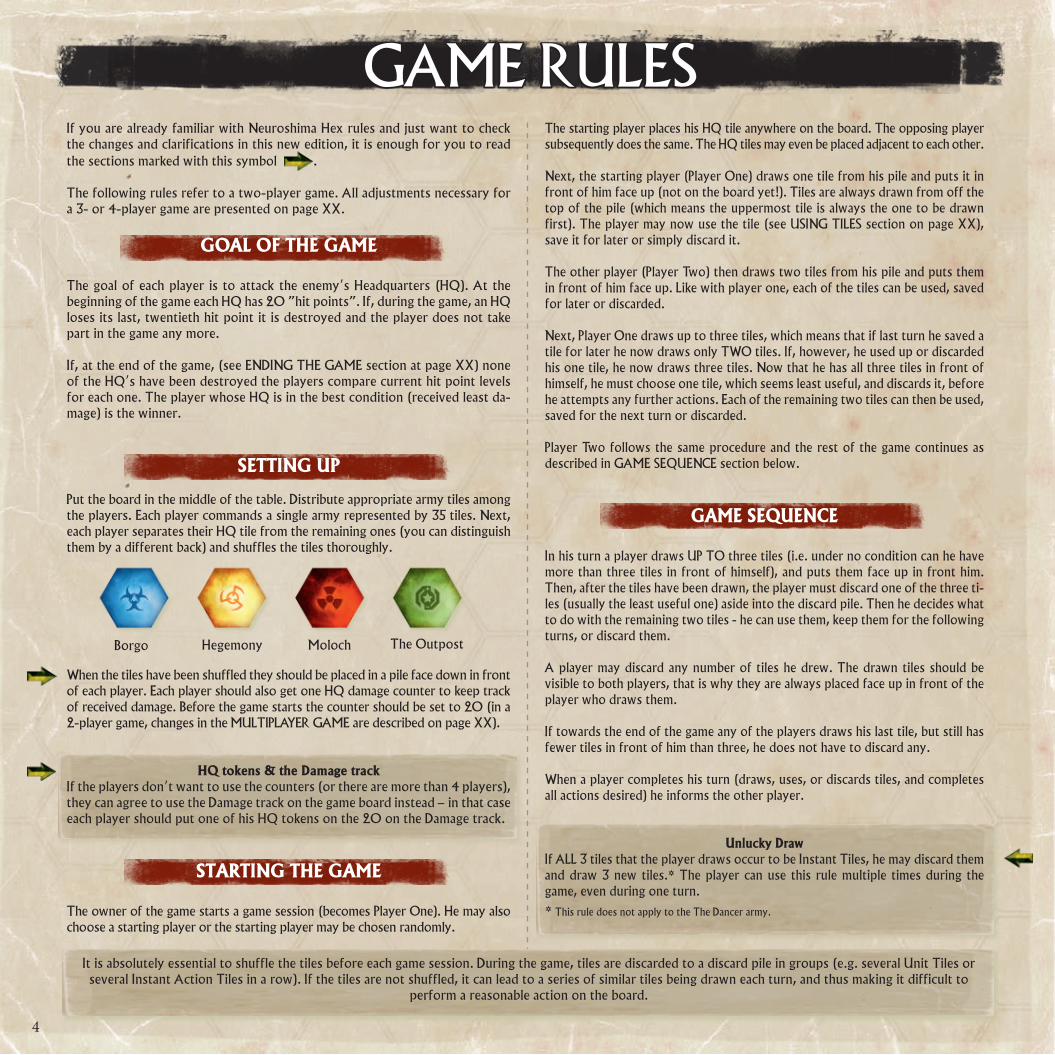
When the tiles have been shuffled they should be placed in a pile face down in front of each player. Each player should also get one HQ damage counter to keep track of received damage. Before the game starts the counter should be set to 20 (in a 2-player game, changes in the MULTIPLAYER GAME are described on page XX).
HQ tokens & the Damage trackIf the players don’t want to use the counters (or there are more than 4 players), they can agree to use the Damage track on the game board instead – in that case each player should put one of his HQ tokens on the 20 on the Damage track.
STARTING THE GAME
The owner of the game starts a game session (becomes Player One). He may also choose a starting player or the starting player may be chosen randomly.
The starting player places his HQ tile anywhere on the board. The opposing player subsequently does the same. The HQ tiles may even be placed adjacent to each other.
Next, the starting player (Player One) draws one tile from his pile and puts it in front of him face up (not on the board yet!). Tiles are always drawn from off the top of the pile (which means the uppermost tile is always the one to be drawn first). The player may now use the tile (see USING TILES section on page XX), save it for later or simply discard it.
The other player (Player Two) then draws two tiles from his pile and puts them in front of him face up. Like with player one, each of the tiles can be used, saved for later or discarded.
Next, Player One draws up to three tiles, which means that if last turn he saved a tile for later he now draws only TWO tiles. If, however, he used up or discarded his one tile, he now draws three tiles. Now that he has all three tiles in front of himself, he must choose one tile, which seems least useful, and discards it, before he attempts any further actions. Each of the remaining two tiles can then be used, saved for the next turn or discarded.
Player Two follows the same procedure and the rest of the game continues as described in GAME SEQUENCE section below.
GAME SEQUENCE
In his turn a player draws UP TO three tiles (i.e. under no condition can he have more than three tiles in front of himself), and puts them face up in front him. Then, after the tiles have been drawn, the player must discard one of the three ti-les (usually the least useful one) aside into the discard pile. Then he decides what to do with the remaining two tiles - he can use them, keep them for the following turns, or discard them.
A player may discard any number of tiles he drew. The drawn tiles should be visible to both players, that is why they are always placed face up in front of the player who draws them.
If towards the end of the game any of the players draws his last tile, but still has fewer tiles in front of him than three, he does not have to discard any.
When a player completes his turn (draws, uses, or discards tiles, and completes all actions desired) he informs the other player.
Unlucky DrawIf ALL 3 tiles that the player draws occur to be Instant Tiles, he may discard them and draw 3 new tiles.* The player can use this rule multiple times during the game, even during one turn.
* This rule does not apply to the The Dancer army.
GAME RULES
It is absolutely essential to shuffle the tiles before each game session. During the game, tiles are discarded to a discard pile in groups (e.g. several Unit Tiles or several Instant Action Tiles in a row). If the tiles are not shuffled, it can lead to a series of similar tiles being drawn each turn, and thus making it difficult to
perform a reasonable action on the board.
Borgo Hegemony Moloch The Outpost
5
USING TILES
After drawing the tiles, placing them face up and discarding the third, least useful one, the remaining two can be put into play.
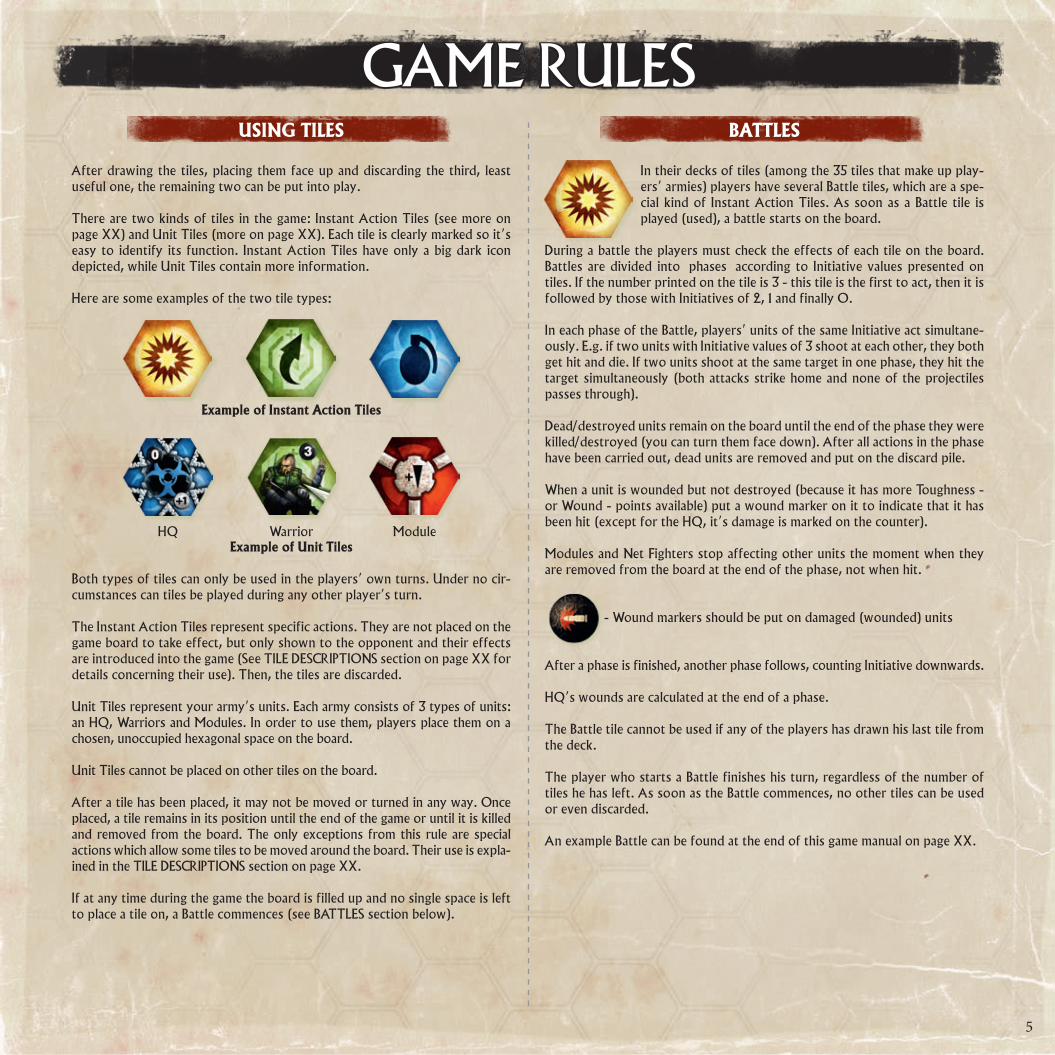
There are two kinds of tiles in the game: Instant Action Tiles (see more on page XX) and Unit Tiles (more on page XX). Each tile is clearly marked so it’s easy to identify its function. Instant Action Tiles have only a big dark icon depicted, while Unit Tiles contain more information.
Here are some examples of the two tile types:
Example of Instant Action Tiles
Example of Unit Tiles
Both types of tiles can only be used in the players’ own turns. Under no cir-cumstances can tiles be played during any other player’s turn.
The Instant Action Tiles represent specific actions. They are not placed on the game board to take effect, but only shown to the opponent and their effects are introduced into the game (See TILE DESCRIPTIONS section on page XX for details concerning their use). Then, the tiles are discarded.
Unit Tiles represent your army’s units. Each army consists of 3 types of units: an HQ, Warriors and Modules. In order to use them, players place them on a chosen, unoccupied hexagonal space on the board.
Unit Tiles cannot be placed on other tiles on the board.
After a tile has been placed, it may not be moved or turned in any way. Once placed, a tile remains in its position until the end of the game or until it is killed and removed from the board. The only exceptions from this rule are special actions which allow some tiles to be moved around the board. Their use is expla-ined in the TILE DESCRIPTIONS section on page XX.
If at any time during the game the board is filled up and no single space is left to place a tile on, a Battle commences (see BATTLES section below).
BATTLES
In their decks of tiles (among the 35 tiles that make up play-ers’ armies) players have several Battle tiles, which are a spe-cial kind of Instant Action Tiles. As soon as a Battle tile is played (used), a battle starts on the board.
During a battle the players must check the effects of each tile on the board. Battles are divided into «phases» according to Initiative values presented on tiles. If the number printed on the tile is 3 - this tile is the first to act, then it is followed by those with Initiatives of 2, 1 and finally 0.
In each phase of the Battle, players’ units of the same Initiative act simultane-ously. E.g. if two units with Initiative values of 3 shoot at each other, they both get hit and die. If two units shoot at the same target in one phase, they hit the target simultaneously (both attacks strike home and none of the projectiles passes through).
Dead/destroyed units remain on the board until the end of the phase they were killed/destroyed (you can turn them face down). After all actions in the phase have been carried out, dead units are removed and put on the discard pile.
When a unit is wounded but not destroyed (because it has more Toughness - or Wound - points available) put a wound marker on it to indicate that it has been hit (except for the HQ, it’s damage is marked on the counter).
Modules and Net Fighters stop affecting other units the moment when they are removed from the board at the end of the phase, not when hit.
- Wound markers should be put on damaged (wounded) units
After a phase is finished, another phase follows, counting Initiative downwards.
HQ’s wounds are calculated at the end of a phase.
The Battle tile cannot be used if any of the players has drawn his last tile from the deck.
The player who starts a Battle finishes his turn, regardless of the number of tiles he has left. As soon as the Battle commences, no other tiles can be used or even discarded.
An example Battle can be found at the end of this game manual on page XX.
GAME RULES
HQ Warrior Module

6
ENDING THE GAME
If any of the players draws his last tile from the deck, he can finish his turn. Then the opposing player finishes his and the Final Battle begins.
When any of the players has drawn his last tile, Battle tiles cannot be used.
If a player has used his last tile and filled in the last unoccupied hex on the board a Battle starts. Then, after the Battle the opposing player can use his remaining tiles and the Final Battle begins.
VICTORY
The game ends after the Final Battle or when the Toughness points of an HQ are reduced to zero.
If one of the HQs is destroyed, the game ends and the player whose HQ su-rvived wins.
If any of the HQs is destroyed during a Battle, the Battle goes on as usual. If the other HQ is destroyed as well, the game finishes with a draw.
If none of the HQs is destroyed and the Final Battle has been fought, the player whose HQ has more Toughness points left is the winner.
If both HQs have the same number of points remaining, each player takes one more turn as if the game continued in the normal way (if a player has no more tiles left to draw, he can only use abilities of the tiles on the board, e. g. unit’s Mobility). Then an additional Battle begins. If both HQs still have the same number of points remaining after this additional Battle, the game actually ends with a draw.
GAME RULESBOARD DESCRIPTION
The main battlefield consists of 19 hexes set in the middle of the board. It is exactly as in the previous edition. Around it you can find a circle of eighteen additional hexes which we suggest to be used when there are more than 4 players. It gives a bit of air on the battlefield.
Finally, there is also a Damage track on the board. It can be used instead of the Damage counters or when there are more than 4 players. In such case players will also use the HQ tokens - each player places his HQ token on space 20 on the board and moves the token every time their HQ gets hit.
MORE TACTICAL GAME
Alternative start. At the beginning the game: Player One draws three tiles from his pile. Then he has to discard one and from the remaining two he chooses one tile to be used. He can also save it or discard it if he wants to. The other tile can be only saved for later or discarded. Next, starting with Player Two, players draw up to three tiles, choose one to discard and then can use, save for the next turn or discard the remaining two tiles.
Reinforcement rule. If you think there is too much randomness in the game and you want to reduce it, you can play with the following rule: In your turn, instead of 3, draw up to 6 tiles, discard one and play a maximum of two tiles, any other you can save for later or discard.
main board
Damage track
additional 18 hexes used in a 5- or 6-players game
TIPS FOR THE BEGINNERSIf after the first few plays the game seems too chaotic to you, we recommend you to play more to get to know the game better. During the next plays try to use the army reference charts which allow you to maximally take advantage of probability and risk, and to play more tactically.
If you feel that some armies are stronger, others weaker, we recommend you to play a lot more - some armies are just easier, others a little more difficult to learn (e.g. easy Borgo, quite easy Moloch, more difficult Hegemony and the Outpost).
Do not worry if you draw only Instant Action Tiles during one turn - remember about the Unlucky Draw rule. Do not worry if you draw only Modules in one turn, because it’s worthy to place them around the HQ to protect it.
7
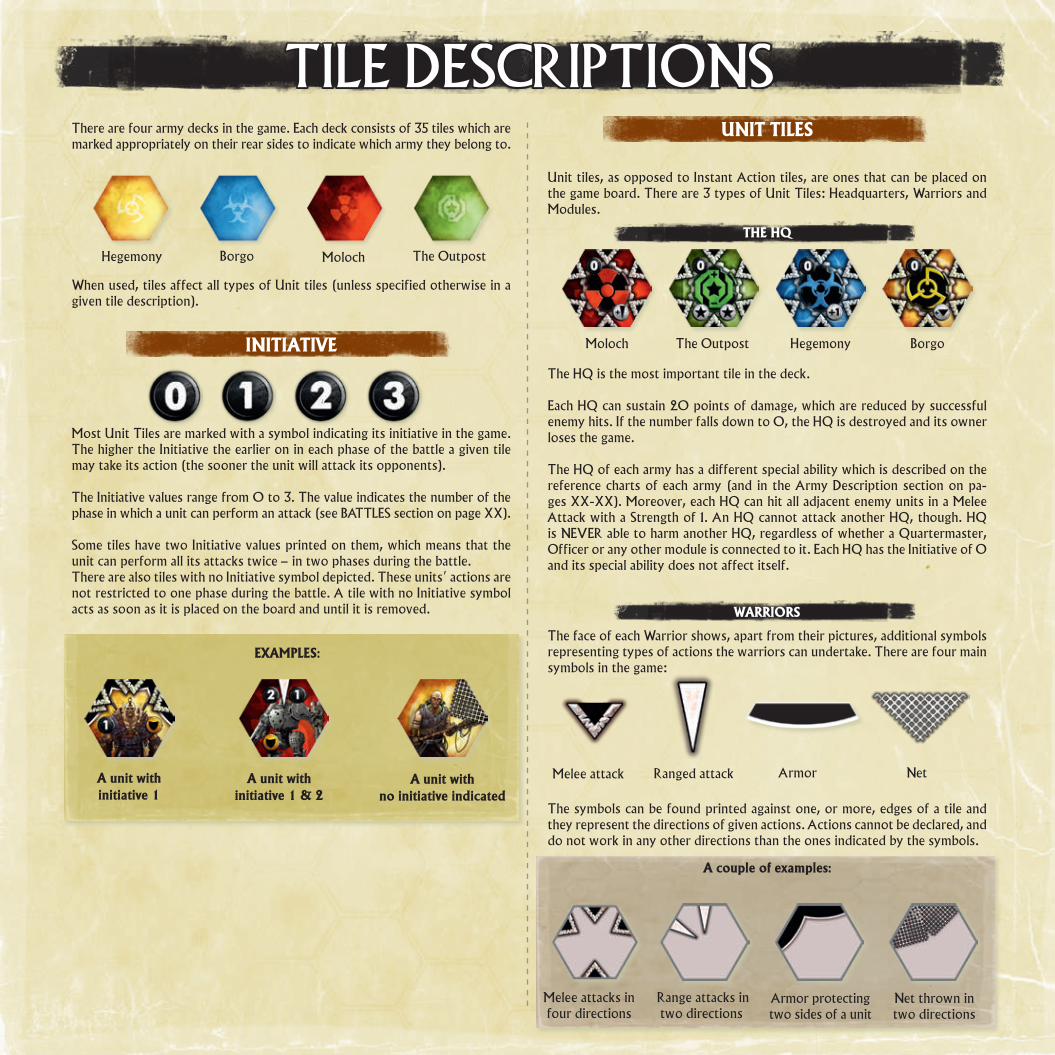
TILE DESCRIPTIONSThere are four army decks in the game. Each deck consists of 35 tiles which are marked appropriately on their rear sides to indicate which army they belong to.
When used, tiles affect all types of Unit tiles (unless specified otherwise in a given tile description).
INITIATIVE
Most Unit Tiles are marked with a symbol indicating its initiative in the game. The higher the Initiative the earlier on in each phase of the battle a given tile may take its action (the sooner the unit will attack its opponents).
The Initiative values range from 0 to 3. The value indicates the number of the phase in which a unit can perform an attack (see BATTLES section on page XX).
Some tiles have two Initiative values printed on them, which means that the unit can perform all its attacks twice – in two phases during the battle. There are also tiles with no Initiative symbol depicted. These units’ actions are not restricted to one phase during the battle. A tile with no Initiative symbol acts as soon as it is placed on the board and until it is removed.
BorgoHegemony Moloch The Outpost
A unit with initiative 1
A unit with initiative 1 & 2
A unit with no initiative indicated
UNIT TILES
Unit tiles, as opposed to Instant Action tiles, are ones that can be placed on the game board. There are 3 types of Unit Tiles: Headquarters, Warriors and Modules.
THE HQ
The HQ is the most important tile in the deck.
Each HQ can sustain 20 points of damage, which are reduced by successful enemy hits. If the number falls down to 0, the HQ is destroyed and its owner loses the game.
The HQ of each army has a different special ability which is described on the reference charts of each army (and in the Army Description section on pa-ges XX-XX). Moreover, each HQ can hit all adjacent enemy units in a Melee Attack with a Strength of 1. An HQ cannot attack another HQ, though. HQ is NEVER able to harm another HQ, regardless of whether a Quartermaster, Officer or any other module is connected to it. Each HQ has the Initiative of 0 and its special ability does not affect itself.
WARRIORS
The face of each Warrior shows, apart from their pictures, additional symbols representing types of actions the warriors can undertake. There are four main symbols in the game:
The symbols can be found printed against one, or more, edges of a tile and they represent the directions of given actions. Actions cannot be declared, and do not work in any other directions than the ones indicated by the symbols.
A couple of examples:
BorgoHegemonyMoloch The Outpost
Melee attack Ranged attack Armor Net
Melee attacks in four directions
Range attacks in two directions
Armor protecting two sides of a unit
Net thrown in two directions
EXAMPLES:
8
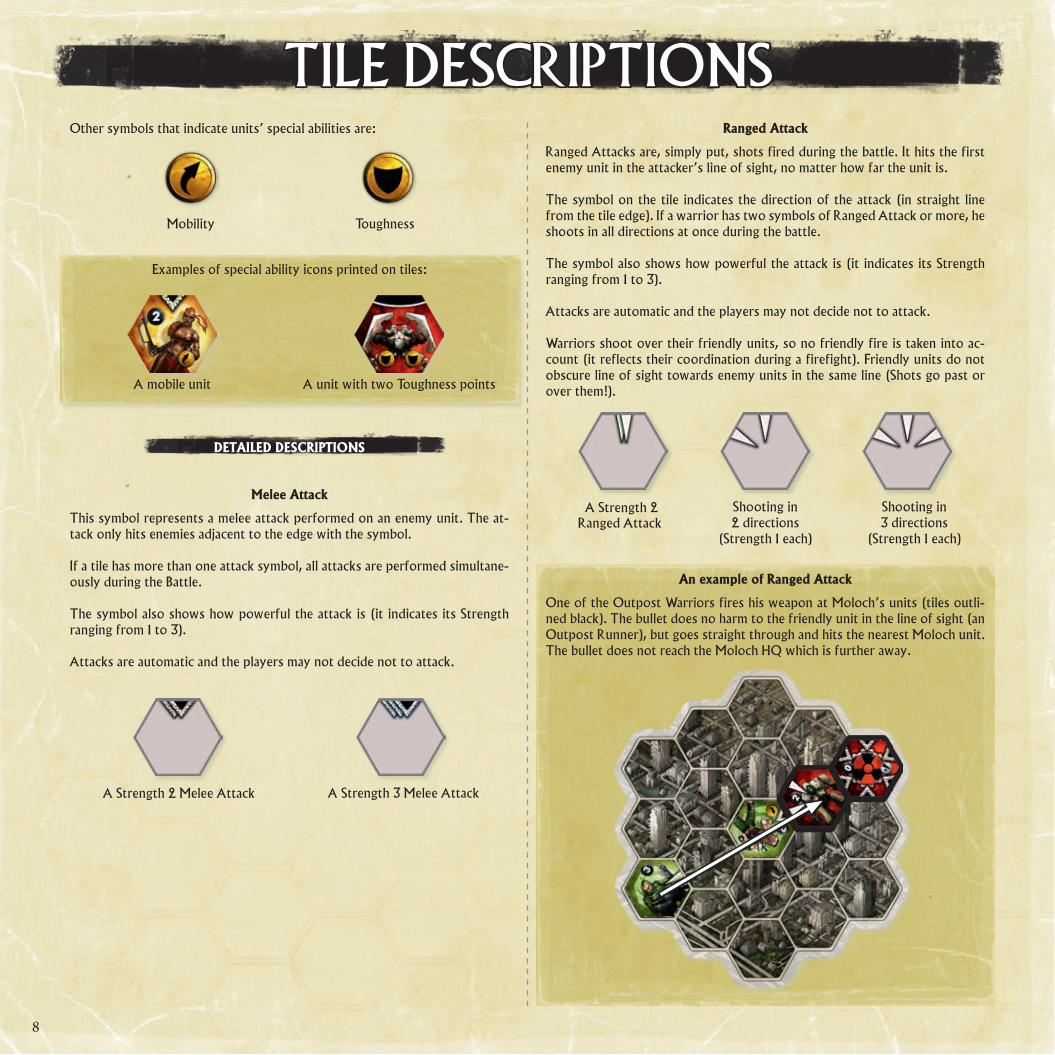
Other symbols that indicate units’ special abilities are:
Examples of special ability icons printed on tiles:
DETAILED DESCRIPTIONS
Melee Attack
This symbol represents a melee attack performed on an enemy unit. The at-tack only hits enemies adjacent to the edge with the symbol.
If a tile has more than one attack symbol, all attacks are performed simultane-ously during the Battle.
The symbol also shows how powerful the attack is (it indicates its Strength ranging from 1 to 3).
Attacks are automatic and the players may not decide not to attack.
Ranged Attack
Ranged Attacks are, simply put, shots fired during the battle. It hits the first enemy unit in the attacker’s line of sight, no matter how far the unit is.
The symbol on the tile indicates the direction of the attack (in straight line from the tile edge). If a warrior has two symbols of Ranged Attack or more, he shoots in all directions at once during the battle.
The symbol also shows how powerful the attack is (it indicates its Strength ranging from 1 to 3).
Attacks are automatic and the players may not decide not to attack.
Warriors shoot over their friendly units, so no friendly fire is taken into ac-count (it reflects their coordination during a firefight). Friendly units do not obscure line of sight towards enemy units in the same line (Shots go past or over them!).
An example of Ranged Attack
One of the Outpost Warriors fires his weapon at Moloch’s units (tiles outli-ned black). The bullet does no harm to the friendly unit in the line of sight (an Outpost Runner), but goes straight through and hits the nearest Moloch unit. The bullet does not reach the Moloch HQ which is further away.
TILE DESCRIPTIONS
Mobility Toughness
A mobile unit A unit with two Toughness points
A Strength 2 Melee Attack A Strength 3 Melee Attack
A Strength 2 Ranged Attack
Shooting in 2 directions
(Strength 1 each)
Shooting in 3 directions
(Strength 1 each)
9
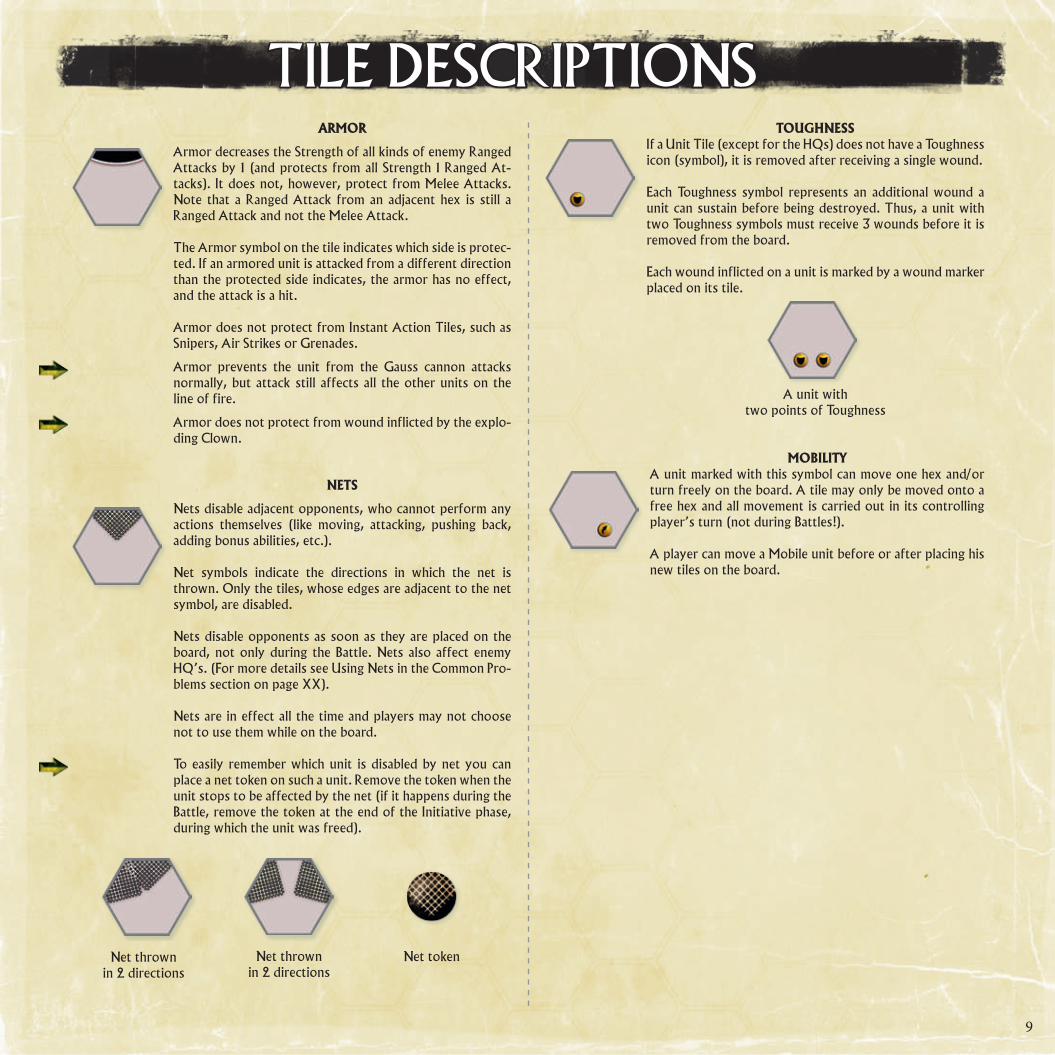
TILE DESCRIPTIONSARMOR
Armor decreases the Strength of all kinds of enemy Ranged Attacks by 1 (and protects from all Strength 1 Ranged At-tacks). It does not, however, protect from Melee Attacks. Note that a Ranged Attack from an adjacent hex is still a Ranged Attack and not the Melee Attack.
The Armor symbol on the tile indicates which side is protec-ted. If an armored unit is attacked from a different direction than the protected side indicates, the armor has no effect, and the attack is a hit.
Armor does not protect from Instant Action Tiles, such as Snipers, Air Strikes or Grenades.
Armor prevents the unit from the Gauss cannon attacks normally, but attack still affects all the other units on the line of fire.
Armor does not protect from wound inflicted by the explo-ding Clown.
NETS
Nets disable adjacent opponents, who cannot perform any actions themselves (like moving, attacking, pushing back, adding bonus abilities, etc.).
Net symbols indicate the directions in which the net is thrown. Only the tiles, whose edges are adjacent to the net symbol, are disabled.
Nets disable opponents as soon as they are placed on the board, not only during the Battle. Nets also affect enemy HQ’s. (For more details see Using Nets in the Common Pro-blems section on page XX).
Nets are in effect all the time and players may not choose not to use them while on the board.
To easily remember which unit is disabled by net you can place a net token on such a unit. Remove the token when the unit stops to be affected by the net (if it happens during the Battle, remove the token at the end of the Initiative phase, during which the unit was freed).
TOUGHNESS If a Unit Tile (except for the HQs) does not have a Toughness icon (symbol), it is removed after receiving a single wound.
Each Toughness symbol represents an additional wound a unit can sustain before being destroyed. Thus, a unit with two Toughness symbols must receive 3 wounds before it is removed from the board.
Each wound inflicted on a unit is marked by a wound marker placed on its tile.
A unit with two points of Toughness
MOBILITY A unit marked with this symbol can move one hex and/or turn freely on the board. A tile may only be moved onto a free hex and all movement is carried out in its controlling player’s turn (not during Battles!).
A player can move a Mobile unit before or after placing his new tiles on the board.
Net thrown in 2 directions
Net thrown in 2 directions
Net token
10
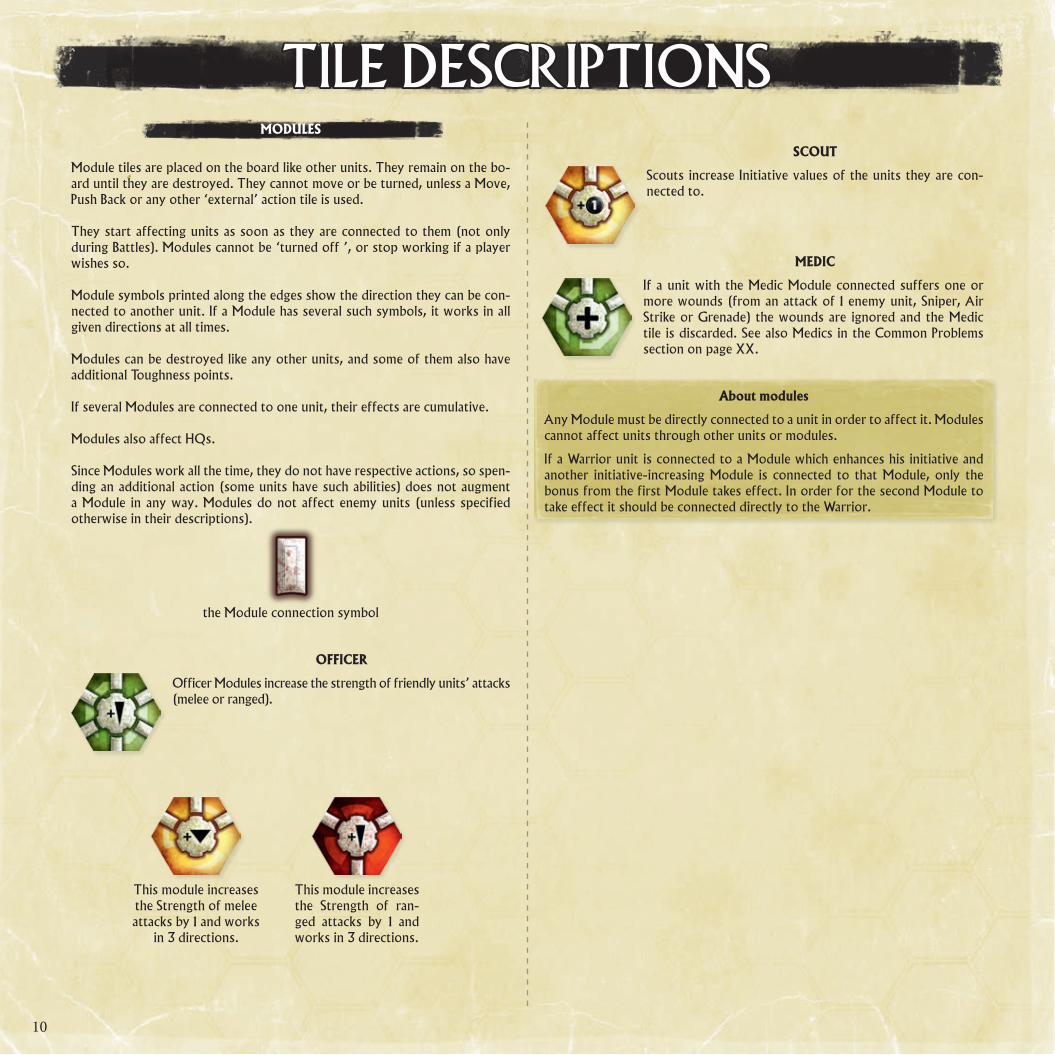
TILE DESCRIPTIONSMODULES
Module tiles are placed on the board like other units. They remain on the bo-ard until they are destroyed. They cannot move or be turned, unless a Move, Push Back or any other ‘external’ action tile is used.
They start affecting units as soon as they are connected to them (not only during Battles). Modules cannot be ‘turned off ’, or stop working if a player wishes so.
Module symbols printed along the edges show the direction they can be con-nected to another unit. If a Module has several such symbols, it works in all given directions at all times.
Modules can be destroyed like any other units, and some of them also have additional Toughness points.
If several Modules are connected to one unit, their effects are cumulative.
Modules also affect HQs.
Since Modules work all the time, they do not have respective actions, so spen-ding an additional action (some units have such abilities) does not augment a Module in any way. Modules do not affect enemy units (unless specified otherwise in their descriptions).
the Module connection symbol
OFFICER
Officer Modules increase the strength of friendly units’ attacks (melee or ranged).
This module increases the Strength of melee attacks by 1 and works
in 3 directions.
This module increases the Strength of ran-ged attacks by 1 and works in 3 directions.
SCOUT
Scouts increase Initiative values of the units they are con-nected to.
MEDIC
If a unit with the Medic Module connected suffers one or more wounds (from an attack of 1 enemy unit, Sniper, Air Strike or Grenade) the wounds are ignored and the Medic tile is discarded. See also Medics in the Common Problems section on page XX.
About modules
Any Module must be directly connected to a unit in order to affect it. Modules cannot affect units through other units or modules.
If a Warrior unit is connected to a Module which enhances his initiative and another initiative-increasing Module is connected to that Module, only the bonus from the first Module takes effect. In order for the second Module to take effect it should be connected directly to the Warrior.
11
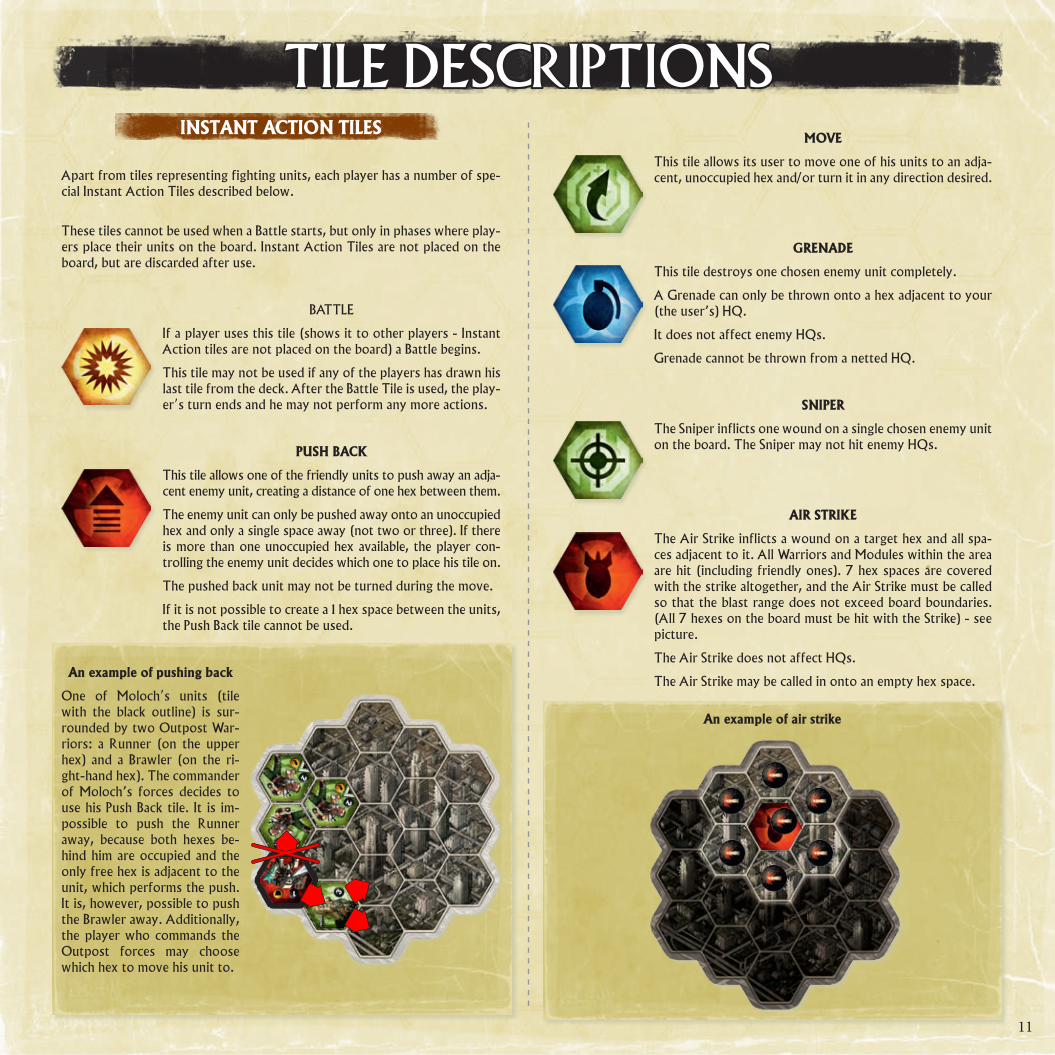
TILE DESCRIPTIONSMOVE
This tile allows its user to move one of his units to an adja-cent, unoccupied hex and/or turn it in any direction desired.
GRENADE
This tile destroys one chosen enemy unit completely.
A Grenade can only be thrown onto a hex adjacent to your (the user’s) HQ.
It does not affect enemy HQs.
Grenade cannot be thrown from a netted HQ.
SNIPER
The Sniper inflicts one wound on a single chosen enemy unit on the board. The Sniper may not hit enemy HQs.
AIR STRIKE
The Air Strike inflicts a wound on a target hex and all spa-ces adjacent to it. All Warriors and Modules within the area are hit (including friendly ones). 7 hex spaces are covered with the strike altogether, and the Air Strike must be called so that the blast range does not exceed board boundaries. (All 7 hexes on the board must be hit with the Strike) - see picture.
The Air Strike does not affect HQs.
The Air Strike may be called in onto an empty hex space.
An example of air strike
INSTANT ACTION TILES
Apart from tiles representing fighting units, each player has a number of spe-cial Instant Action Tiles described below.
These tiles cannot be used when a Battle starts, but only in phases where play-ers place their units on the board. Instant Action Tiles are not placed on the board, but are discarded after use.
BATTLE
If a player uses this tile (shows it to other players - Instant Action tiles are not placed on the board) a Battle begins.
This tile may not be used if any of the players has drawn his last tile from the deck. After the Battle Tile is used, the play-er’s turn ends and he may not perform any more actions.
PUSH BACK
This tile allows one of the friendly units to push away an adja-cent enemy unit, creating a distance of one hex between them.
The enemy unit can only be pushed away onto an unoccupied hex and only a single space away (not two or three). If there is more than one unoccupied hex available, the player con-trolling the enemy unit decides which one to place his tile on.
The pushed back unit may not be turned during the move.
If it is not possible to create a 1 hex space between the units, the Push Back tile cannot be used.
An example of pushing back
One of Moloch’s units (tile with the black outline) is sur-rounded by two Outpost War-riors: a Runner (on the upper hex) and a Brawler (on the ri-ght-hand hex). The commander of Moloch’s forces decides to use his Push Back tile. It is im-possible to push the Runner away, because both hexes be-hind him are occupied and the only free hex is adjacent to the unit, which performs the push. It is, however, possible to push the Brawler away. Additionally, the player who commands the Outpost forces may choose which hex to move his unit to.
12
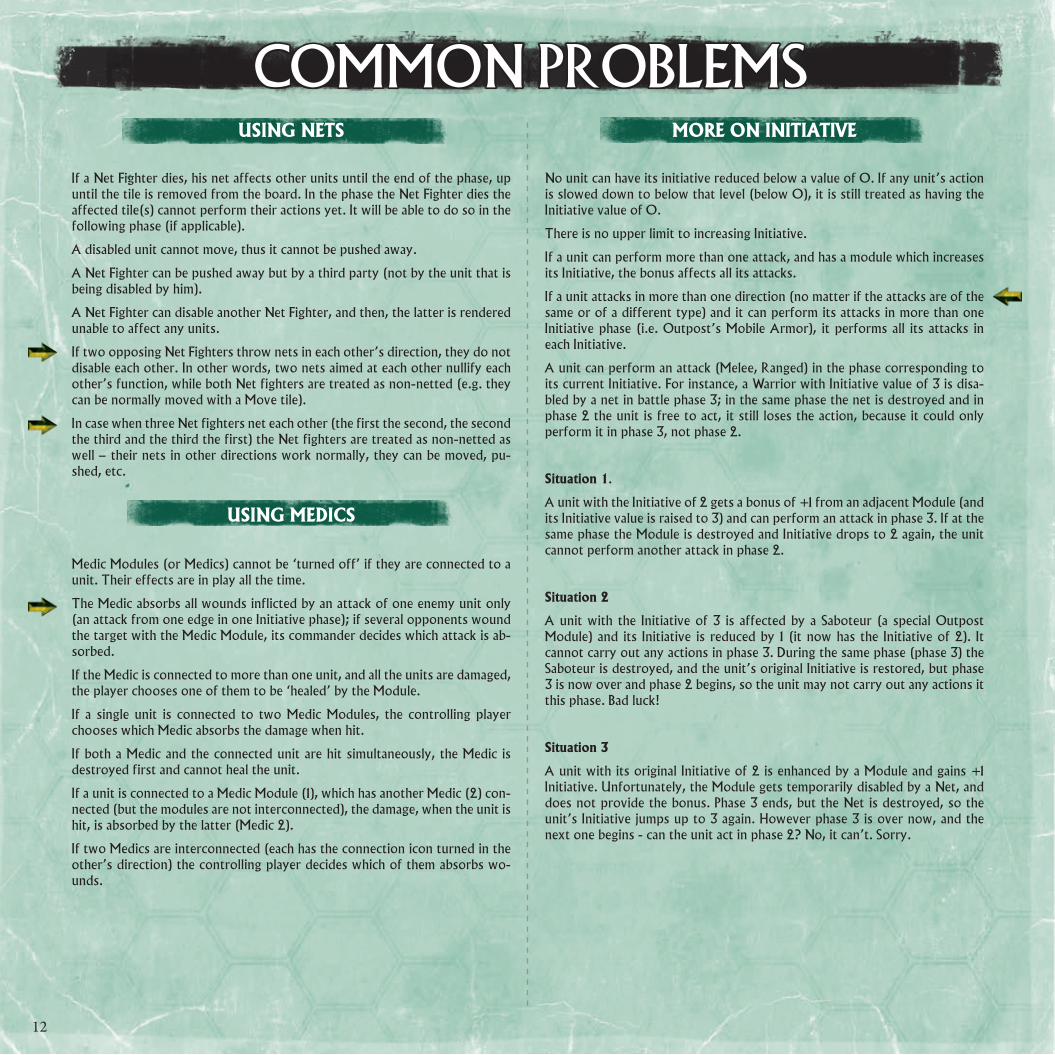
COMMON PROBLEMSUSING NETS
If a Net Fighter dies, his net affects other units until the end of the phase, up until the tile is removed from the board. In the phase the Net Fighter dies the affected tile(s) cannot perform their actions yet. It will be able to do so in the following phase (if applicable).
A disabled unit cannot move, thus it cannot be pushed away.
A Net Fighter can be pushed away but by a third party (not by the unit that is being disabled by him).
A Net Fighter can disable another Net Fighter, and then, the latter is rendered unable to affect any units.
If two opposing Net Fighters throw nets in each other’s direction, they do not disable each other. In other words, two nets aimed at each other nullify each other’s function, while both Net fighters are treated as non-netted (e.g. they can be normally moved with a Move tile).
In case when three Net fighters net each other (the first the second, the second the third and the third the first) the Net fighters are treated as non-netted as well – their nets in other directions work normally, they can be moved, pu-shed, etc.
USING MEDICS
Medic Modules (or Medics) cannot be ‘turned off’ if they are connected to a unit. Their effects are in play all the time.
The Medic absorbs all wounds inflicted by an attack of one enemy unit only (an attack from one edge in one Initiative phase); if several opponents wound the target with the Medic Module, its commander decides which attack is ab-sorbed.
If the Medic is connected to more than one unit, and all the units are damaged, the player chooses one of them to be ‘healed’ by the Module.
If a single unit is connected to two Medic Modules, the controlling player chooses which Medic absorbs the damage when hit.
If both a Medic and the connected unit are hit simultaneously, the Medic is destroyed first and cannot heal the unit.
If a unit is connected to a Medic Module (1), which has another Medic (2) con-nected (but the modules are not interconnected), the damage, when the unit is hit, is absorbed by the latter (Medic 2).
If two Medics are interconnected (each has the connection icon turned in the other’s direction) the controlling player decides which of them absorbs wo-unds.
MORE ON INITIATIVE
No unit can have its initiative reduced below a value of 0. If any unit’s action is slowed down to below that level (below 0), it is still treated as having the Initiative value of 0.
There is no upper limit to increasing Initiative.
If a unit can perform more than one attack, and has a module which increases its Initiative, the bonus affects all its attacks.
If a unit attacks in more than one direction (no matter if the attacks are of the same or of a different type) and it can perform its attacks in more than one Initiative phase (i.e. Outpost’s Mobile Armor), it performs all its attacks in each Initiative.
A unit can perform an attack (Melee, Ranged) in the phase corresponding to its current Initiative. For instance, a Warrior with Initiative value of 3 is disa-bled by a net in battle phase 3; in the same phase the net is destroyed and in phase 2 the unit is free to act, it still loses the action, because it could only perform it in phase 3, not phase 2.
Situation 1.
A unit with the Initiative of 2 gets a bonus of +1 from an adjacent Module (and its Initiative value is raised to 3) and can perform an attack in phase 3. If at the same phase the Module is destroyed and Initiative drops to 2 again, the unit cannot perform another attack in phase 2.
Situation 2
A unit with the Initiative of 3 is affected by a Saboteur (a special Outpost Module) and its Initiative is reduced by 1 (it now has the Initiative of 2). It cannot carry out any actions in phase 3. During the same phase (phase 3) the Saboteur is destroyed, and the unit’s original Initiative is restored, but phase 3 is now over and phase 2 begins, so the unit may not carry out any actions it this phase. Bad luck!
Situation 3
A unit with its original Initiative of 2 is enhanced by a Module and gains +1 Initiative. Unfortunately, the Module gets temporarily disabled by a Net, and does not provide the bonus. Phase 3 ends, but the Net is destroyed, so the unit’s Initiative jumps up to 3 again. However phase 3 is over now, and the next one begins - can the unit act in phase 2? No, it can’t. Sorry.
13
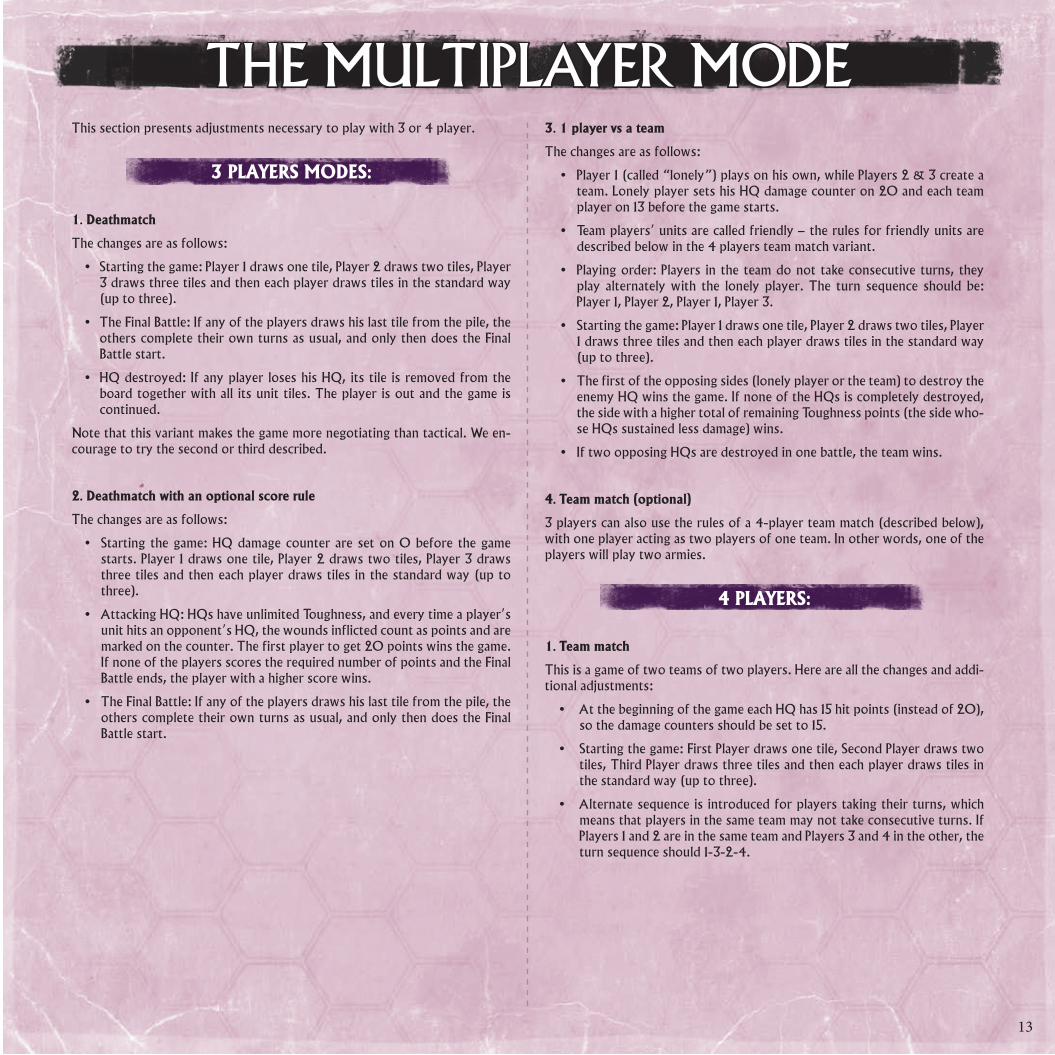
THE MULTIPLAYER MODEThis section presents adjustments necessary to play with 3 or 4 player.
3 PLAYERS MODES:
1. Deathmatch
The changes are as follows:
• Starting the game: Player 1 draws one tile, Player 2 draws two tiles, Player 3 draws three tiles and then each player draws tiles in the standard way (up to three).
• The Final Battle: If any of the players draws his last tile from the pile, the others complete their own turns as usual, and only then does the Final Battle start.
• HQ destroyed: If any player loses his HQ, its tile is removed from the board together with all its unit tiles. The player is out and the game is continued.
Note that this variant makes the game more negotiating than tactical. We en-courage to try the second or third described.
2. Deathmatch with an optional score rule
The changes are as follows:
• Starting the game: HQ damage counter are set on 0 before the game starts. Player 1 draws one tile, Player 2 draws two tiles, Player 3 draws three tiles and then each player draws tiles in the standard way (up to three).
• Attacking HQ: HQs have unlimited Toughness, and every time a player’s unit hits an opponent’s HQ, the wounds inflicted count as points and are marked on the counter. The first player to get 20 points wins the game. If none of the players scores the required number of points and the Final Battle ends, the player with a higher score wins.
• The Final Battle: If any of the players draws his last tile from the pile, the others complete their own turns as usual, and only then does the Final Battle start.
3. 1 player vs a team
The changes are as follows:
• Player 1 (called “lonely”) plays on his own, while Players 2 & 3 create a team. Lonely player sets his HQ damage counter on 20 and each team player on 13 before the game starts.
• Team players’ units are called friendly – the rules for friendly units are described below in the 4 players team match variant.
• Playing order: Players in the team do not take consecutive turns, they play alternately with the lonely player. The turn sequence should be: Player 1, Player 2, Player 1, Player 3.
• Starting the game: Player 1 draws one tile, Player 2 draws two tiles, Player 1 draws three tiles and then each player draws tiles in the standard way (up to three).
• The first of the opposing sides (lonely player or the team) to destroy the enemy HQ wins the game. If none of the HQs is completely destroyed, the side with a higher total of remaining Toughness points (the side who-se HQs sustained less damage) wins.
• If two opposing HQs are destroyed in one battle, the team wins.
4. Team match (optional)
3 players can also use the rules of a 4-player team match (described below), with one player acting as two players of one team. In other words, one of the players will play two armies.
4 PLAYERS:
1. Team match
This is a game of two teams of two players. Here are all the changes and addi-tional adjustments:
• At the beginning of the game each HQ has 15 hit points (instead of 20), so the damage counters should be set to 15.
• Starting the game: First Player draws one tile, Second Player draws two tiles, Third Player draws three tiles and then each player draws tiles in the standard way (up to three).
• Alternate sequence is introduced for players taking their turns, which means that players in the same team may not take consecutive turns. If Players 1 and 2 are in the same team and Players 3 and 4 in the other, the turn sequence should 1-3-2-4.
14
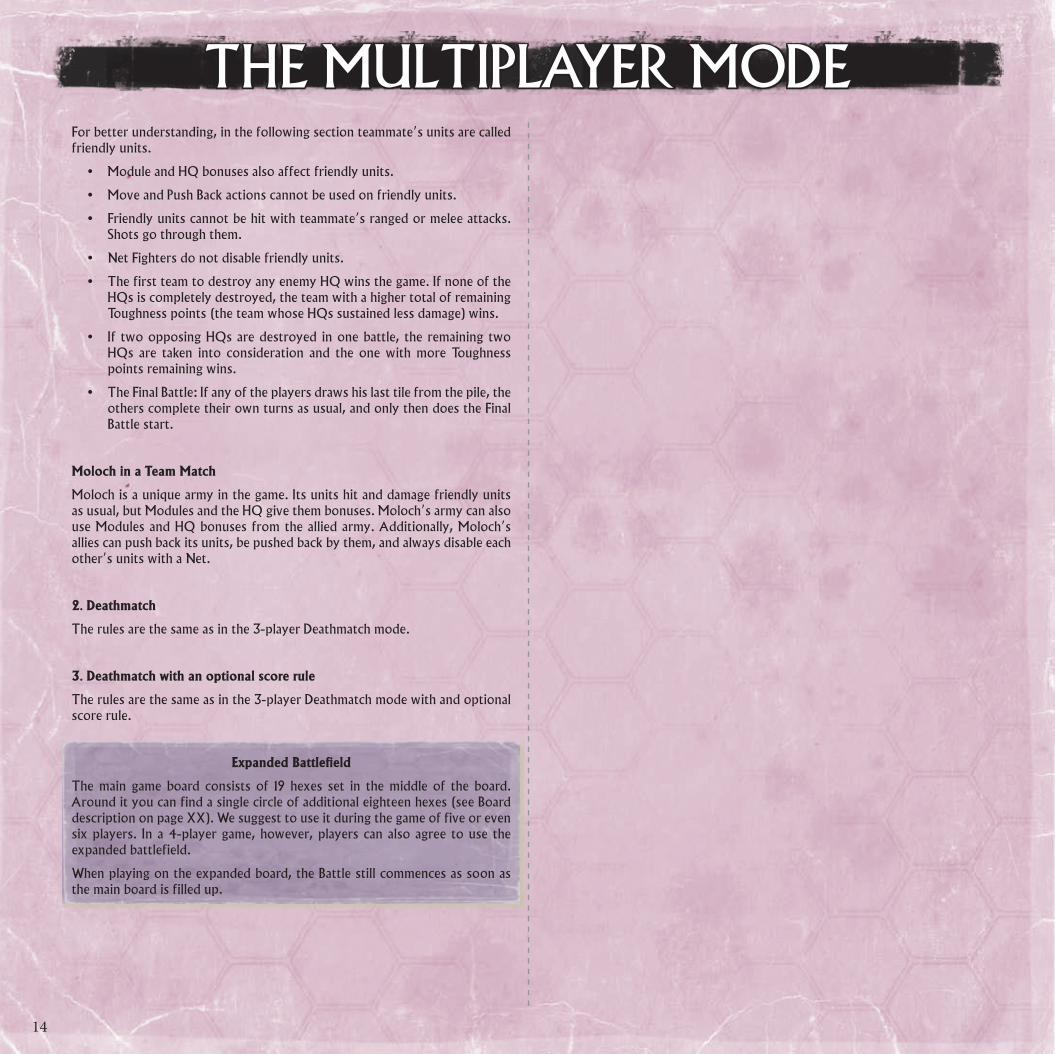
THE MULTIPLAYER MODEFor better understanding, in the following section teammate’s units are called friendly units.
• Module and HQ bonuses also affect friendly units.
• Move and Push Back actions cannot be used on friendly units.
• Friendly units cannot be hit with teammate’s ranged or melee attacks. Shots go through them.
• Net Fighters do not disable friendly units.
• The first team to destroy any enemy HQ wins the game. If none of the HQs is completely destroyed, the team with a higher total of remaining Toughness points (the team whose HQs sustained less damage) wins.
• If two opposing HQs are destroyed in one battle, the remaining two HQs are taken into consideration and the one with more Toughness points remaining wins.
• The Final Battle: If any of the players draws his last tile from the pile, the others complete their own turns as usual, and only then does the Final Battle start.
Moloch in a Team Match
Moloch is a unique army in the game. Its units hit and damage friendly units as usual, but Modules and the HQ give them bonuses. Moloch’s army can also use Modules and HQ bonuses from the allied army. Additionally, Moloch’s allies can push back its units, be pushed back by them, and always disable each other’s units with a Net.
2. Deathmatch
The rules are the same as in the 3-player Deathmatch mode.
3. Deathmatch with an optional score rule
The rules are the same as in the 3-player Deathmatch mode with and optional score rule.
Expanded Battlefield
The main game board consists of 19 hexes set in the middle of the board. Around it you can find a single circle of additional eighteen hexes (see Board description on page XX). We suggest to use it during the game of five or even six players. In a 4-player game, however, players can also agree to use the expanded battlefield.
When playing on the expanded board, the Battle still commences as soon as the main board is filled up.
15
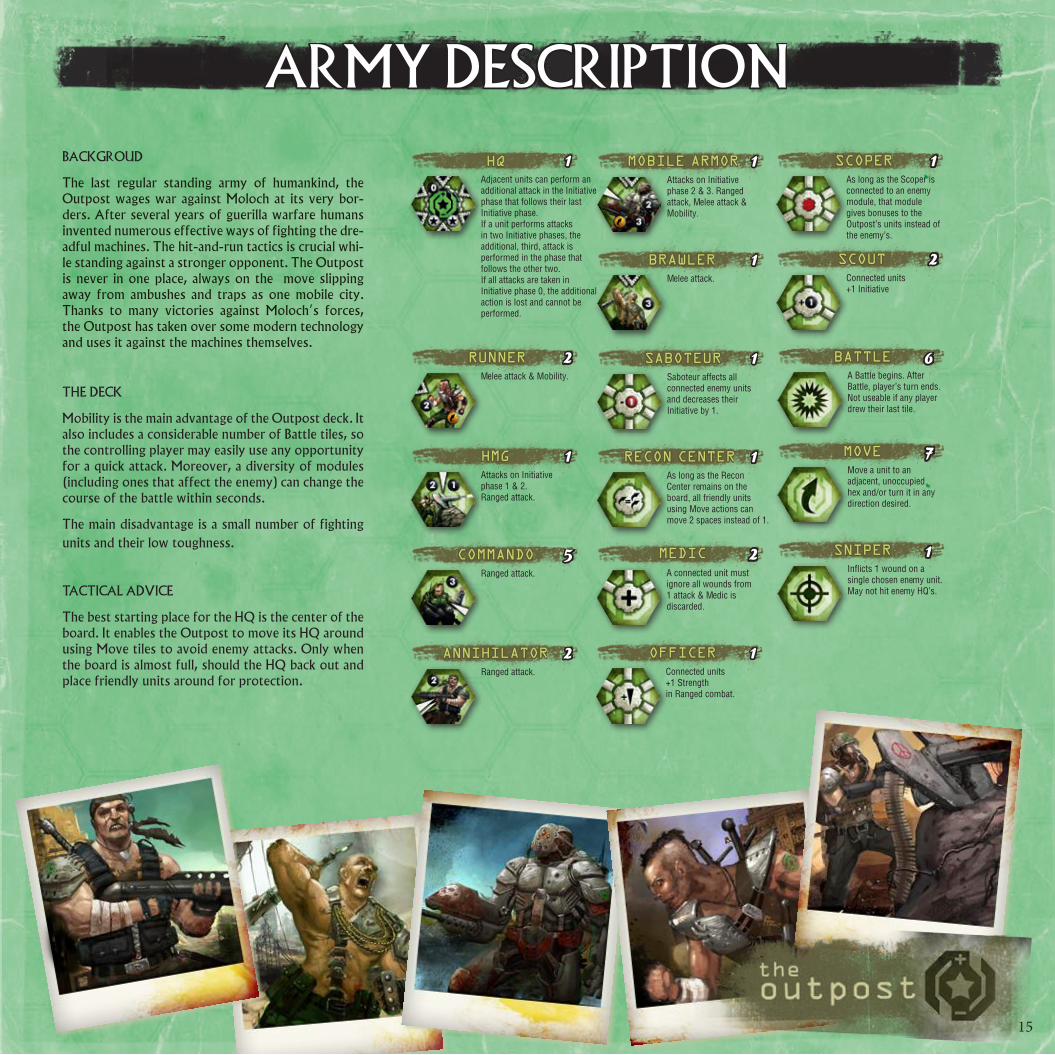
ARMY DESCRIPTIONBACKGROUD
The last regular standing army of humankind, the Outpost wages war against Moloch at its very bor-ders. After several years of guerilla warfare humans invented numerous effective ways of fighting the dre-adful machines. The hit-and-run tactics is crucial whi-le standing against a stronger opponent. The Outpost is never in one place, always on the move slipping away from ambushes and traps as one mobile city. Thanks to many victories against Moloch’s forces, the Outpost has taken over some modern technology and uses it against the machines themselves.
THE DECK
Mobility is the main advantage of the Outpost deck. It also includes a considerable number of Battle tiles, so the controlling player may easily use any opportunity for a quick attack. Moreover, a diversity of modules (including ones that affect the enemy) can change the course of the battle within seconds.
The main disadvantage is a small number of fighting units and their low toughness.
TACTICAL ADVICE
The best starting place for the HQ is the center of the board. It enables the Outpost to move its HQ around using Move tiles to avoid enemy attacks. Only when the board is almost full, should the HQ back out and place friendly units around for protection.
1Adjacent units can perform an additional attack in the Initiative phase that follows their last Initiative phase. If a unit performs attacks in two Initiative phases, the additional, third, attack is performed in the phase that follows the other two.If all attacks are taken in Initiative phase 0, the additional action is lost and cannot be performed.
HQ
2Melee attack & Mobility.
RUNNER
1Attacks on Initiative phase 1 & 2. Ranged attack.
HMG
5Ranged attack.
COMMANDO
2Ranged attack.
ANNIHILATOR
1Attacks on Initiative phase 2 & 3. Ranged attack, Melee attack & Mobility.
MOBILE ARMOR
1Melee attack.
BRAWLER
1Saboteur affects all connected enemy units and decreases their Initiative by 1.
SABOTEUR
1As long as the Recon Center remains on the board, all friendly units using Move actions can move 2 spaces instead of 1.
RECON CENTER
2A connected unit must ignore all wounds from 1 attack & Medic is discarded.
MEDIC
1Connected units +1 Strength in Ranged combat.
OFFICER
1As long as the Scoper is connected to an enemy module, that module gives bonuses to the Outpost’s units instead of the enemy’s.
SCOPER
2Connected units +1 Initiative
SCOUT
A Battle begins. After Battle, player’s turn ends. Not useable if any player drew their last tile.
BATTLE
Move a unit to an adjacent, unoccupied hex and/or turn it in any direction desired.
MOVE
Inflicts 1 wound on a single chosen enemy unit. May not hit enemy HQ’s.
SNIPER
6
7
1

16
ARMY DESCRIPTIONBACKGROUND
Moloch is a half-mechanical, half-electronic entity which spreads across an area as large as several states. It was Moloch that brought about the fall of humankind in 2020. Now, after thirty years have passed, it’s even bigger and more powerful. Hordes of machines search through the barren lands in pursuit of what’s left of hu-mans to destroy them. All orders are transmitted from within Moloch’s ‘body’ of several interconnected artifi-cial brains that scheme on the latest plans of the ultimate conquest. Despite its military and technological advan-tages Moloch’s forces lack the natural intelligence and flexibility of humans.
THE DECK
Among its advantages, high toughness of units is one of the most important. Thanks to this, more units remain on the board after each battle as compared to opponents’ forces. A considerable number of units skilled in ranged combat and reinforced by modules enables Moloch to create a literally unbreakable line of machines capable of inflicting heavy damage upon enemy HQ’s, its own one being protected by highly efficient blocking units.
On the other hand, Moloch’s army is not as mobile as the other ones and the deck has only a few Battle ti-les, which does not give the controlling player an upper hand in deciding about the moment a battle should start.
TACTICAL ADVICE
A good idea is to place the HQ in one of the corners of the board and surround it with heavily armored units. Then surround the enemy HQ to prevent it from moving around. Finally, a number of shooting units with varied Initiative should be placed in a line to break through enemy defences and damage the HQ. Another opportunity is to place a unit in a convenient place and use the Push Back action.
HQ itself thanks to its special Strength bonus can be well used for attacking the enemy (a good idea is to place the HQ near the enemy one, provided the enemy HQ does not escape too easily).
1All friendly adjacent units +1 Strength in Ranged combat.
HQ
2May not attack other units. Armor & Toughness.
BLOCKER
2Ranged attack.
HYBRID
1Can hit multiple enemies simultaneously. All enemy units in a line of fire get 1 wound. No bonuses increasing firepower take effect. Toughness.
GAUSS CANNON
1Armor, Ranged attack, Melee attack & Toughness.
JUGGERNAUT
2Melee attack.
HUNTER-KILLER
1Ranged attack & Toughness.
PROTECTOR
2Armor & Melee attack.
ARMORED HUNTER
1Armor & Ranged attack.
ARMORED GUARD
1Melee attack & Toughness. Instead of performing an attack it may explode in its Initiative phase, inflicting 1 wound to each adjacent unit (no bonuses take effect) both friendly and enemy (including HQs). After explosion The Clown is discarded. Cannot be repaired in any way.
THE CLOWN
1Melee attack.
HORNET
1Connected units +1 Strength in Melee & Ranged combat.
THE BRAIN
1Net.
NET FIGHTER
1Attacks on Initiative phase 1 & 2. Ranged attack & Toughness.
STORMTROOPER
2A connected unit must ignore all wounds from 1 attack & Medic is discarded.
MEDIC
1Connected unit can perform an additional attack in the Initiative phase that follows its last Initiative phase. If a unit performs attacks in two Initiative phases, the additional, third, attack is performed in the phase that follows the other two.If all attacks are taken in Ini-tiative phase 0, the additional action is lost and cannot be performed.
MOTHER MODULE
1Ranged attack.
GUARD 1Connected units +1 Strength in Ranged combat.
OFFICER
1Connected units +1 Initiative.
SCOUT
4A Battle begins. After Battle, player’s turn ends. Not useable if any player drew their last tile.
BATTLE
1Move a unit to an adjacent, unoccupied hex and/or turn it in any direction desired.
MOVE
5Push an adjacent enemy unit 1 hex away to unoccupied hex. If choice, enemy player selects hex.
PUSH BACK
1Inflicts 1 wound on a target hex and all spaces adjacent to it. Can’t attack edge hex. Does not affect HQs.
AIR STRIKE
17
ARMY DESCRIPTIONBACKGROUND
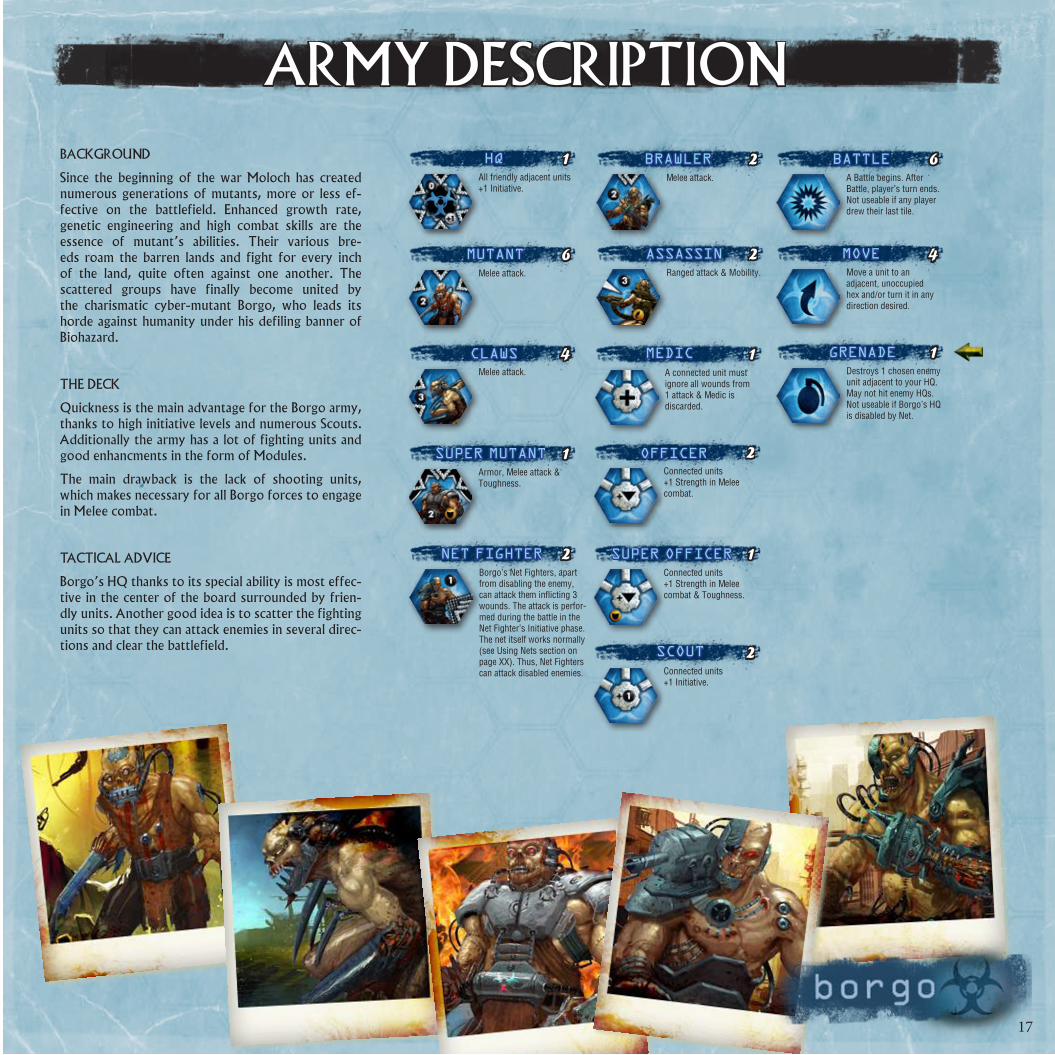
Since the beginning of the war Moloch has created numerous generations of mutants, more or less ef-fective on the battlefield. Enhanced growth rate, genetic engineering and high combat skills are the essence of mutant’s abilities. Their various bre-eds roam the barren lands and fight for every inch of the land, quite often against one another. The scattered groups have finally become united by the charismatic cyber-mutant Borgo, who leads its horde against humanity under his defiling banner of Biohazard.
THE DECK
Quickness is the main advantage for the Borgo army, thanks to high initiative levels and numerous Scouts. Additionally the army has a lot of fighting units and good enhancments in the form of Modules.
The main drawback is the lack of shooting units, which makes necessary for all Borgo forces to engage in Melee combat.
TACTICAL ADVICE
Borgo’s HQ thanks to its special ability is most effec-tive in the center of the board surrounded by frien-dly units. Another good idea is to scatter the fighting units so that they can attack enemies in several direc-tions and clear the battlefield.
1All friendly adjacent units +1 Initiative.
HQ
6Melee attack.
MUTANT
4Melee attack.
CLAWS
2Borgo’s Net Fighters, apart from disabling the enemy, can attack them inflicting 3 wounds. The attack is perfor-med during the battle in the Net Fighter’s Initiative phase. The net itself works normally (see Using Nets section on page XX). Thus, Net Fighters can attack disabled enemies.
NET FIGHTER
1Armor, Melee attack & Toughness.
SUPER MUTANT
2Melee attack.
BRAWLER
2Ranged attack & Mobility.
ASSASSIN
1A connected unit must ignore all wounds from 1 attack & Medic is discarded.
MEDIC
2Connected units +1 Strength in Melee combat.
OFFICER
1Connected units +1 Strength in Melee combat & Toughness.
SUPER OFFICER
2Connected units +1 Initiative.
SCOUT
6A Battle begins. After Battle, player’s turn ends. Not useable if any player drew their last tile.
BATTLE
4Move a unit to an adjacent, unoccupied hex and/or turn it in any direction desired.
MOVE
1Destroys 1 chosen enemy unit adjacent to your HQ. May not hit enemy HQs. Not useable if Borgo’s HQ is disabled by Net.
GRENADE
18
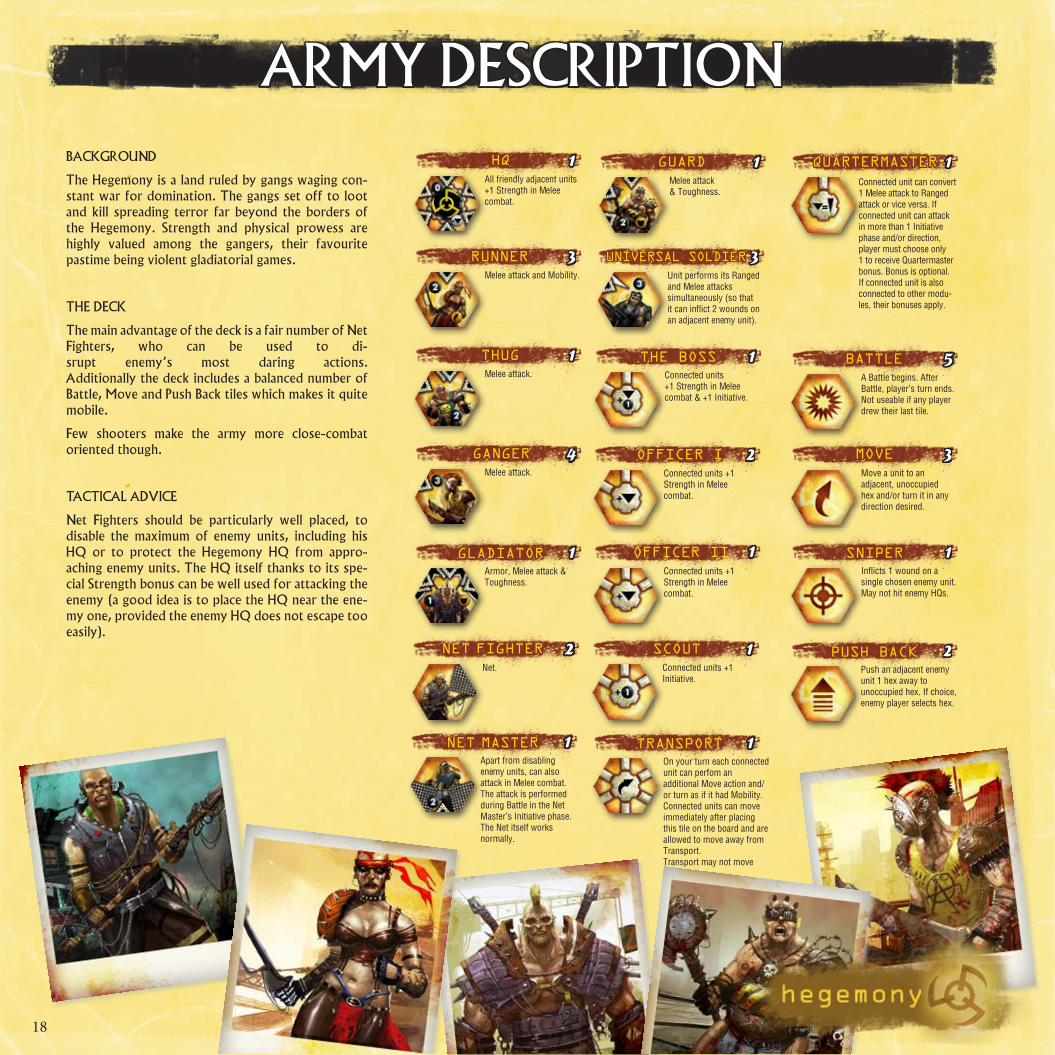
ARMY DESCRIPTIONBACKGROUND
The Hegemony is a land ruled by gangs waging con-stant war for domination. The gangs set off to loot and kill spreading terror far beyond the borders of the Hegemony. Strength and physical prowess are highly valued among the gangers, their favourite pastime being violent gladiatorial games.
THE DECK
The main advantage of the deck is a fair number of Net Fighters, who can be used to di-srupt enemy’s most daring actions. Additionally the deck includes a balanced number of Battle, Move and Push Back tiles which makes it quite mobile.
Few shooters make the army more close-combat oriented though.
TACTICAL ADVICE
Net Fighters should be particularly well placed, to disable the maximum of enemy units, including his HQ or to protect the Hegemony HQ from appro-aching enemy units. The HQ itself thanks to its spe-cial Strength bonus can be well used for attacking the enemy (a good idea is to place the HQ near the ene-my one, provided the enemy HQ does not escape too easily).
1All friendly adjacent units +1 Strength in Melee combat.
HQ
3Melee attack and Mobility.
RUNNER
1Melee attack.
THUG
4Melee attack.
GANGER
2Net.
NET FIGHTER
1Melee attack & Toughness.
GUARD
1Connected units +1 Initiative.
SCOUT
1Apart from disabling enemy units, can also attack in Melee combat. The attack is performed during Battle in the Net Master’s Initiative phase. The Net itself works normally.
NET MASTER
3Unit performs its Ranged and Melee attacks simultaneously (so that it can inflict 2 wounds on an adjacent enemy unit).
UNIVERSAL SOLDIER
1Connected units +1 Strength in Melee combat & +1 Initiative.
THE BOSS
1QUARTERMASTER
2Connected units +1 Strength in Melee combat.
OFFICER I
1Connected units +1 Strength in Melee combat.
1On your turn each connected unit can perfom an additional Move action and/or turn as if it had Mobility. Connected units can move immediately after placing this tile on the board and are allowed to move away from Transport. Transport may not move itself.
5A Battle begins. After Battle, player’s turn ends. Not useable if any player drew their last tile.
3Move a unit to an adjacent, unoccupied hex and/or turn it in any direction desired.
1Inflicts 1 wound on a single chosen enemy unit. May not hit enemy HQs.
2Push an adjacent enemy unit 1 hex away to unoccupied hex. If choice, enemy player selects hex.
1Armor, Melee attack & Toughness.
GLADIATOR
Connected unit can convert 1 Melee attack to Ranged attack or vice versa. If connected unit can attack in more than 1 Initiative phase and/or direction, player must choose only 1 to receive Quartermaster bonus. Bonus is optional. If connected unit is also connected to other modu-les, their bonuses apply.
OFFICER II
TRANSPORT
BATTLE
MOVE
SNIPER
PUSH BACK
19
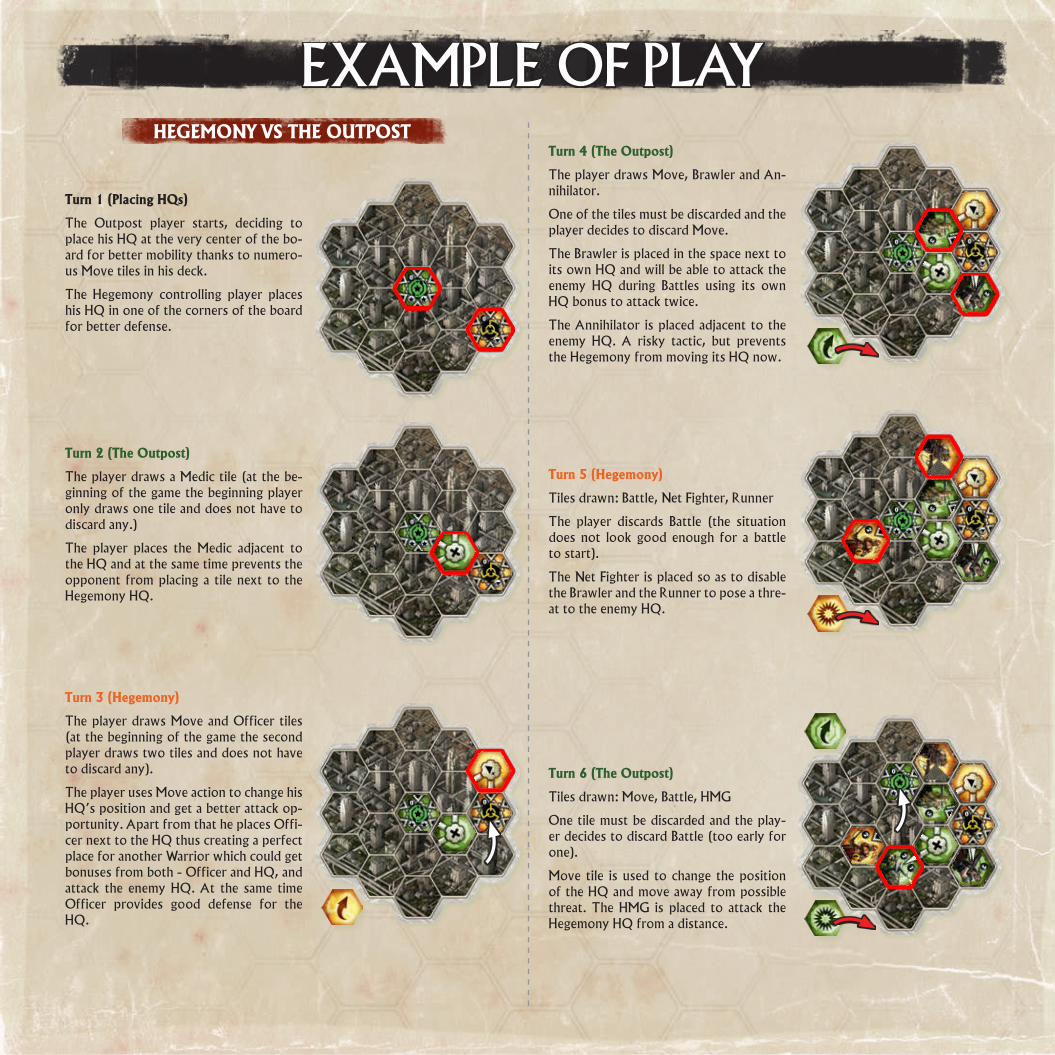
EXAMPLE OF PLAY
Turn 1 (Placing HQs)
The Outpost player starts, deciding to place his HQ at the very center of the bo-ard for better mobility thanks to numero-us Move tiles in his deck.
The Hegemony controlling player places his HQ in one of the corners of the board for better defense.
Turn 2 (The Outpost)
The player draws a Medic tile (at the be-ginning of the game the beginning player only draws one tile and does not have to discard any.)
The player places the Medic adjacent to the HQ and at the same time prevents the opponent from placing a tile next to the Hegemony HQ.
Turn 3 (Hegemony)
The player draws Move and Officer tiles (at the beginning of the game the second player draws two tiles and does not have to discard any).
The player uses Move action to change his HQ’s position and get a better attack op-portunity. Apart from that he places Offi-cer next to the HQ thus creating a perfect place for another Warrior which could get bonuses from both - Officer and HQ, and attack the enemy HQ. At the same time Officer provides good defense for the HQ.
Turn 4 (The Outpost)
The player draws Move, Brawler and An-nihilator.
One of the tiles must be discarded and the player decides to discard Move.
The Brawler is placed in the space next to its own HQ and will be able to attack the enemy HQ during Battles using its own HQ bonus to attack twice.
The Annihilator is placed adjacent to the enemy HQ. A risky tactic, but prevents the Hegemony from moving its HQ now.
Turn 5 (Hegemony)
Tiles drawn: Battle, Net Fighter, Runner
The player discards Battle (the situation does not look good enough for a battle to start).
The Net Fighter is placed so as to disable the Brawler and the Runner to pose a thre-at to the enemy HQ.
Turn 6 (The Outpost)
Tiles drawn: Move, Battle, HMG
One tile must be discarded and the play-er decides to discard Battle (too early for one).
Move tile is used to change the position of the HQ and move away from possible threat. The HMG is placed to attack the Hegemony HQ from a distance.
HEGEMONY VS THE OUTPOST
20
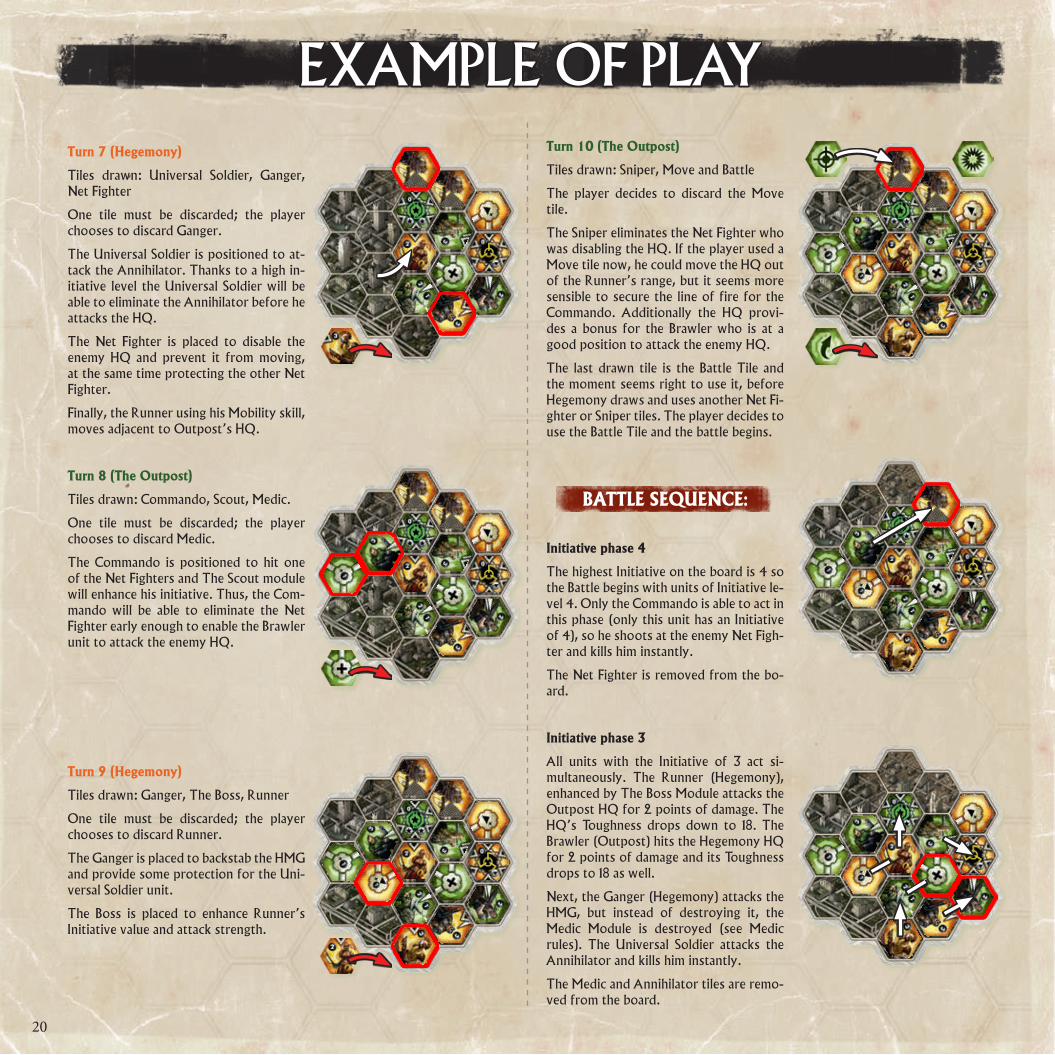
EXAMPLE OF PLAYTurn 7 (Hegemony)
Tiles drawn: Universal Soldier, Ganger, Net Fighter
One tile must be discarded; the player chooses to discard Ganger.
The Universal Soldier is positioned to at-tack the Annihilator. Thanks to a high in-itiative level the Universal Soldier will be able to eliminate the Annihilator before he attacks the HQ.
The Net Fighter is placed to disable the enemy HQ and prevent it from moving, at the same time protecting the other Net Fighter.
Finally, the Runner using his Mobility skill, moves adjacent to Outpost’s HQ.
Turn 8 (The Outpost)
Tiles drawn: Commando, Scout, Medic.
One tile must be discarded; the player chooses to discard Medic.
The Commando is positioned to hit one of the Net Fighters and The Scout module will enhance his initiative. Thus, the Com-mando will be able to eliminate the Net Fighter early enough to enable the Brawler unit to attack the enemy HQ.
Turn 9 (Hegemony)
Tiles drawn: Ganger, The Boss, Runner
One tile must be discarded; the player chooses to discard Runner.
The Ganger is placed to backstab the HMG and provide some protection for the Uni-versal Soldier unit.
The Boss is placed to enhance Runner’s Initiative value and attack strength.
Turn 10 (The Outpost)
Tiles drawn: Sniper, Move and Battle
The player decides to discard the Move tile.
The Sniper eliminates the Net Fighter who was disabling the HQ. If the player used a Move tile now, he could move the HQ out of the Runner’s range, but it seems more sensible to secure the line of fire for the Commando. Additionally the HQ provi-des a bonus for the Brawler who is at a good position to attack the enemy HQ.
The last drawn tile is the Battle Tile and the moment seems right to use it, before Hegemony draws and uses another Net Fi-ghter or Sniper tiles. The player decides to use the Battle Tile and the battle begins.
BATTLE SEQUENCE:
Initiative phase 4
The highest Initiative on the board is 4 so the Battle begins with units of Initiative le-vel 4. Only the Commando is able to act in this phase (only this unit has an Initiative of 4), so he shoots at the enemy Net Figh-ter and kills him instantly.
The Net Fighter is removed from the bo-ard.
Initiative phase 3
All units with the Initiative of 3 act si-multaneously. The Runner (Hegemony), enhanced by The Boss Module attacks the Outpost HQ for 2 points of damage. The HQ’s Toughness drops down to 18. The Brawler (Outpost) hits the Hegemony HQ for 2 points of damage and its Toughness drops to 18 as well.
Next, the Ganger (Hegemony) attacks the HMG, but instead of destroying it, the Medic Module is destroyed (see Medic rules). The Universal Soldier attacks the Annihilator and kills him instantly.
The Medic and Annihilator tiles are remo-ved from the board.
21
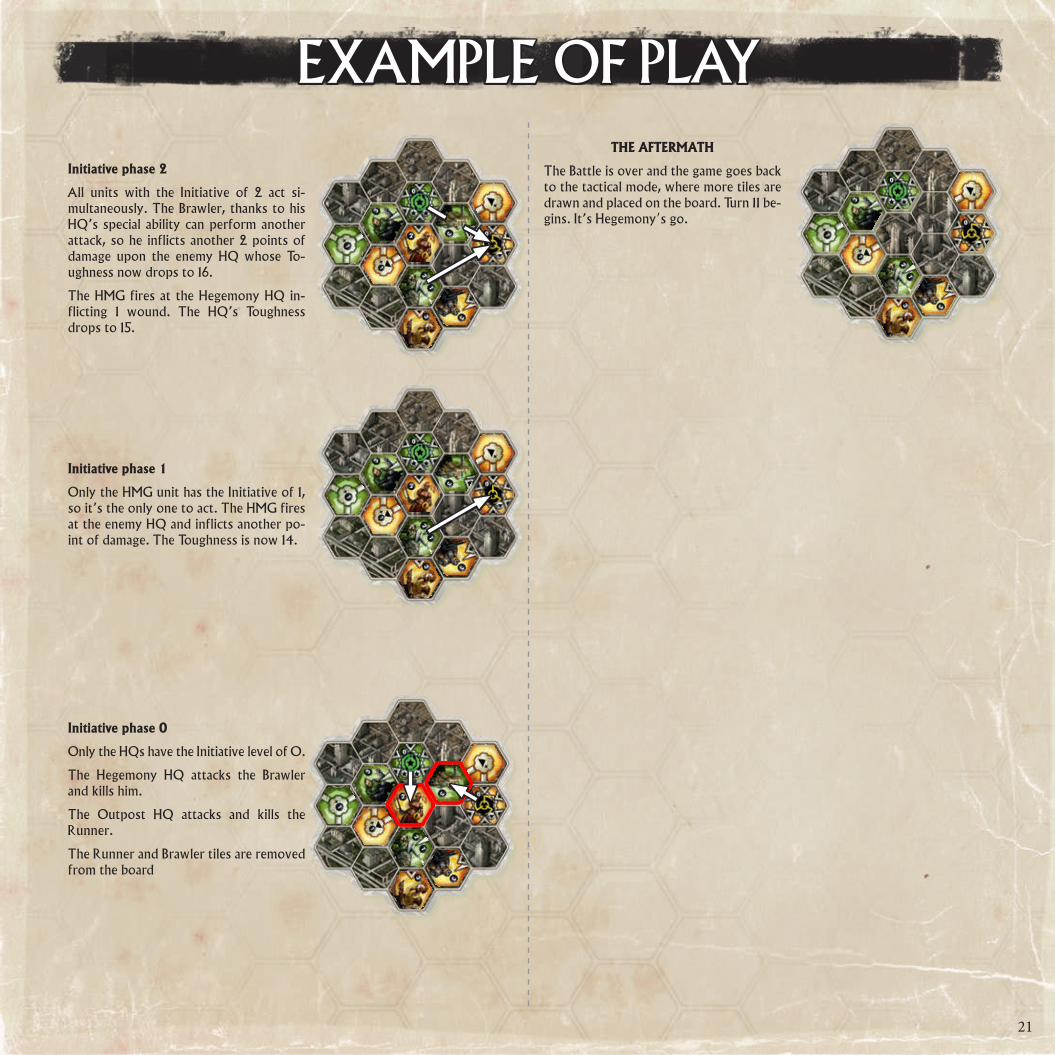
THE AFTERMATH
The Battle is over and the game goes back to the tactical mode, where more tiles are drawn and placed on the board. Turn 11 be-gins. It’s Hegemony’s go.
Initiative phase 2
All units with the Initiative of 2 act si-multaneously. The Brawler, thanks to his HQ’s special ability can perform another attack, so he inflicts another 2 points of damage upon the enemy HQ whose To-ughness now drops to 16.
The HMG fires at the Hegemony HQ in-flicting 1 wound. The HQ’s Toughness drops to 15.
Initiative phase 1
Only the HMG unit has the Initiative of 1, so it’s the only one to act. The HMG fires at the enemy HQ and inflicts another po-int of damage. The Toughness is now 14.
Initiative phase 0
Only the HQs have the Initiative level of 0.
The Hegemony HQ attacks the Brawler and kills him.
The Outpost HQ attacks and kills the Runner.
The Runner and Brawler tiles are removed from the board
EXAMPLE OF PLAY
22
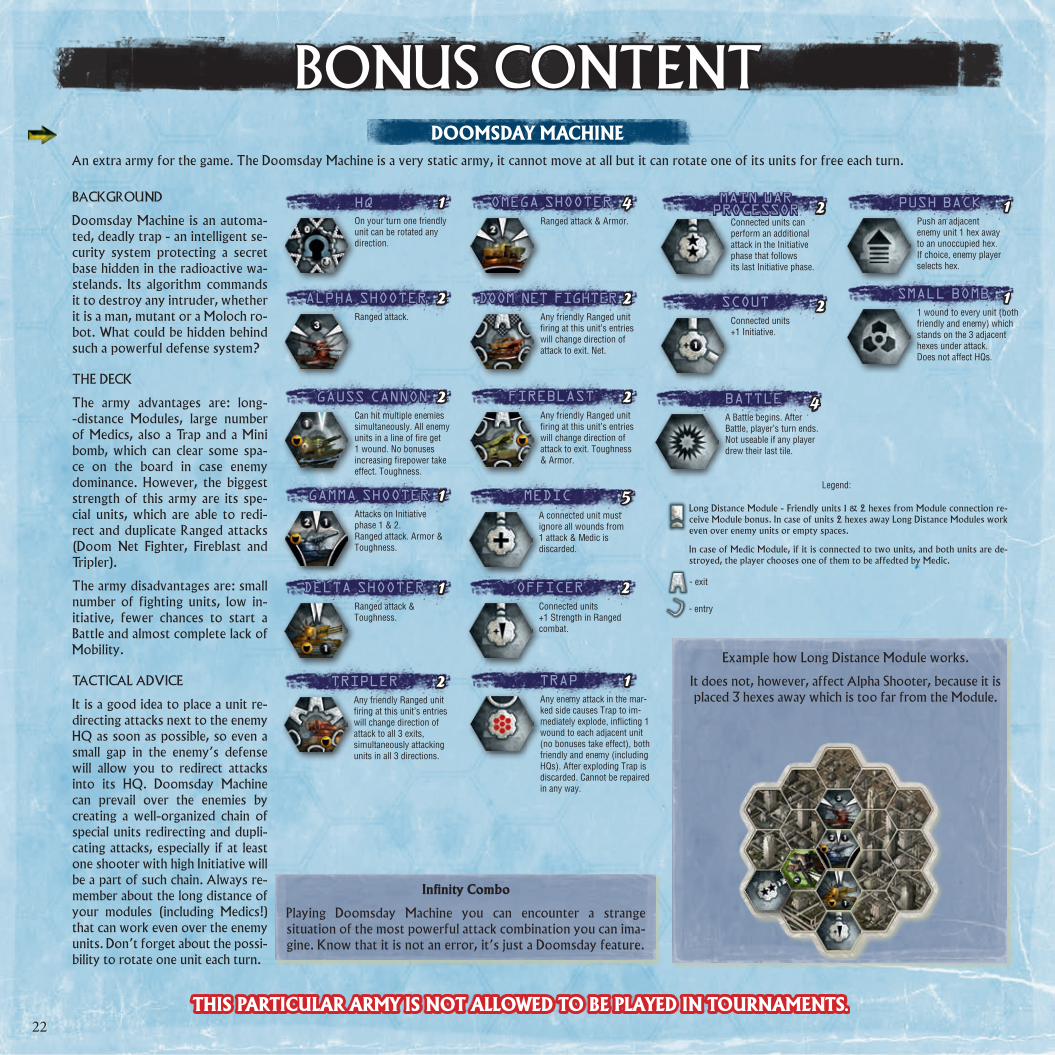
An extra army for the game. The Doomsday Machine is a very static army, it cannot move at all but it can rotate one of its units for free each turn.
THIS PARTICULAR ARMY IS NOT ALLOWED TO BE PLAYED IN TOURNAMENTS.
BACKGROUND
Doomsday Machine is an automa-ted, deadly trap - an intelligent se-curity system protecting a secret base hidden in the radioactive wa-stelands. Its algorithm commands it to destroy any intruder, whether it is a man, mutant or a Moloch ro-bot. What could be hidden behind such a powerful defense system?
THE DECK
The army advantages are: long--distance Modules, large number of Medics, also a Trap and a Mini bomb, which can clear some spa-ce on the board in case enemy dominance. However, the biggest strength of this army are its spe-cial units, which are able to redi-rect and duplicate Ranged attacks (Doom Net Fighter, Fireblast and Tripler).
The army disadvantages are: small number of fighting units, low in-itiative, fewer chances to start a Battle and almost complete lack of Mobility.
TACTICAL ADVICE
It is a good idea to place a unit re-directing attacks next to the enemy HQ as soon as possible, so even a small gap in the enemy’s defense will allow you to redirect attacks into its HQ. Doomsday Machine can prevail over the enemies by creating a well-organized chain of special units redirecting and dupli-cating attacks, especially if at least one shooter with high Initiative will be a part of such chain. Always re-member about the long distance of your modules (including Medics!) that can work even over the enemy units. Don’t forget about the possi-bility to rotate one unit each turn.
BONUS CONTENTDOOMSDAY MACHINE
1On your turn one friendly unit can be rotated any direction.
HQ
2Ranged attack.
ALPHA SHOOTER
2Can hit multiple enemies simultaneously. All enemy units in a line of fire get 1 wound. No bonuses increasing firepower take effect. Toughness.
GAUSS CANNON
1Attacks on Initiative phase 1 & 2. Ranged attack. Armor & Toughness.
GAMMA SHOOTER
1Ranged attack &Toughness.
DELTA SHOOTER
4Ranged attack & Armor.
OMEGA SHOOTER
2Any friendly Ranged unit firing at this unit’s entries will change direction of attack to exit. Net.
DOOM NET FIGHTER
2Any friendly Ranged unit firing at this unit’s entries will change direction of attack to exit. Toughness & Armor.
FIREBLAST
2Any friendly Ranged unit firing at this unit’s entries will change direction of attack to all 3 exits, simultaneously attacking units in all 3 directions.
TRIPLER
5A connected unit must ignore all wounds from 1 attack & Medic is discarded.
MEDIC
2Connected units +1 Strength in Ranged combat.
OFFICER
2Connected units can perform an additional attack in the Initiative phase that follows its last Initiative phase.
MAIN WAR PROCESSOR
2Connected units +1 Initiative.
SCOUT
4A Battle begins. After Battle, player’s turn ends. Not useable if any player drew their last tile.
BATTLE
1Push an adjacent enemy unit 1 hex away to an unoccupied hex. If choice, enemy player selects hex.
PUSH BACK
1SMALL BOMB1 wound to every unit (both friendly and enemy) which stands on the 3 adjacent hexes under attack. Does not affect HQs.
1Any enemy attack in the mar-ked side causes Trap to im-mediately explode, inflicting 1 wound to each adjacent unit (no bonuses take effect), both friendly and enemy (including HQs). After exploding Trap is discarded. Cannot be repaired in any way.
TRAP
- entry
- exit
Long Distance Module - Friendly units 1 & 2 hexes from Module connection re-ceive Module bonus. In case of units 2 hexes away Long Distance Modules work even over enemy units or empty spaces.
In case of Medic Module, if it is connected to two units, and both units are de-stroyed, the player chooses one of them to be affedted by Medic.
Legend:
Infinity Combo
Playing Doomsday Machine you can encounter a strange situation of the most powerful attack combination you can ima-gine. Know that it is not an error, it’s just a Doomsday feature.
Example how Long Distance Module works.
It does not, however, affect Alpha Shooter, because it is placed 3 hexes away which is too far from the Module.
23
HEX PUZZLES
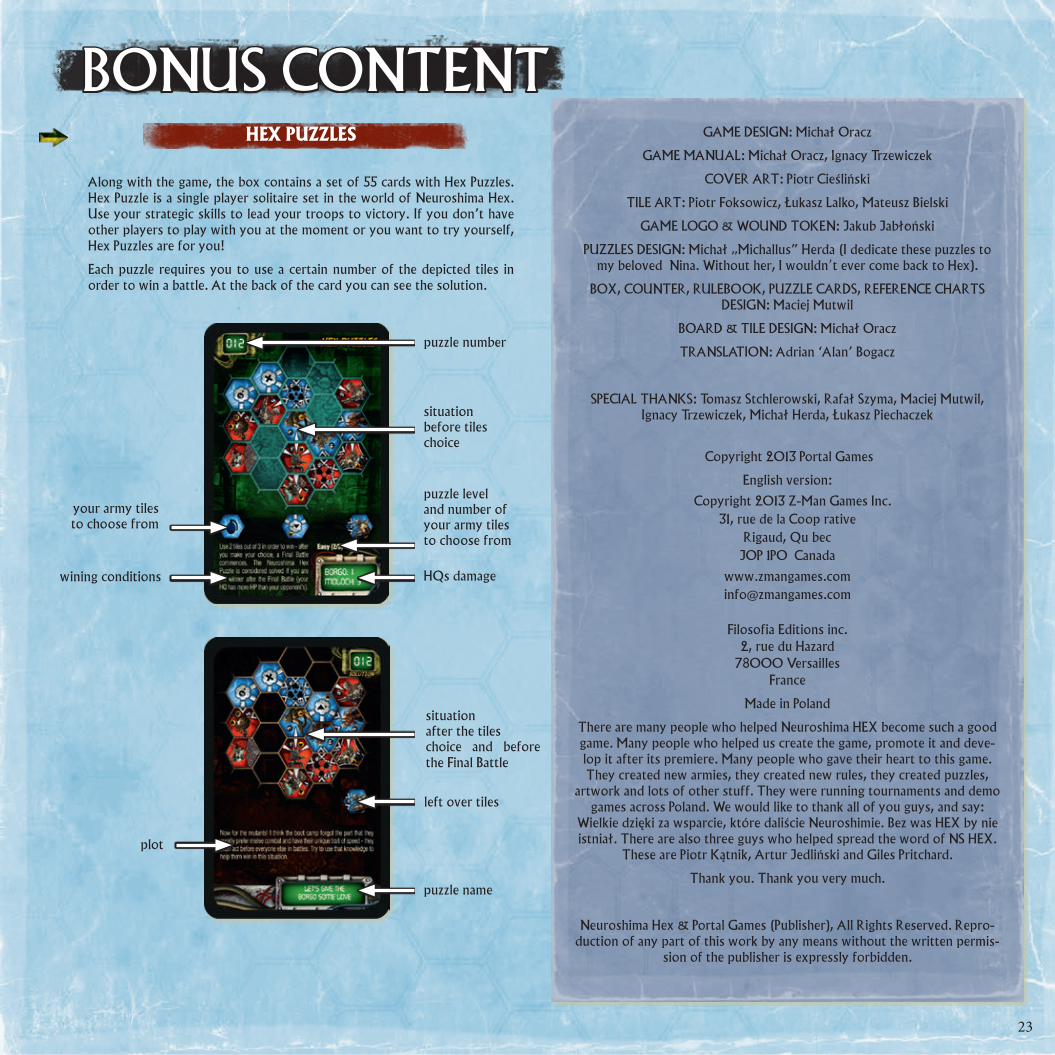
Along with the game, the box contains a set of 55 cards with Hex Puzzles. Hex Puzzle is a single player solitaire set in the world of Neuroshima Hex. Use your strategic skills to lead your troops to victory. If you don’t have other players to play with you at the moment or you want to try yourself, Hex Puzzles are for you!
Each puzzle requires you to use a certain number of the depicted tiles in order to win a battle. At the back of the card you can see the solution.
BONUS CONTENTGAMEDESIGN:MichałOracz
GAMEMANUAL:MichałOracz,IgnacyTrzewiczek
COVERART:PiotrCieśliński
TILEART:PiotrFoksowicz,ŁukaszLalko,MateuszBielski
GAMELOGO&WOUNDTOKEN:JakubJabłoński
PUZZLESDESIGN:Michał„Michallus”Herda(Idedicatethesepuzzlestomy beloved Nina. Without her, I wouldn’t ever come back to Hex).
BOX, COUNTER, RULEBOOK, PUZZLE CARDS, REFERENCE CHARTS DESIGN: Maciej Mutwil
BOARD&TILEDESIGN:MichałOracz
TRANSLATION: Adrian ‘Alan’ Bogacz
SPECIALTHANKS:TomaszStchlerowski,RafałSzyma,MaciejMutwil,IgnacyTrzewiczek,MichałHerda,ŁukaszPiechaczek
©Copyright 2013 Portal Games
English version:
© ©Copyright 2013 Z-Man Games Inc.31, rue de la Coopérative
Rigaud, QuébecJ0P 1P0 Canada
Filosofia Editions inc.2, rue du Hazard
78000 VersaillesFrance
Made in Poland
There are many people who helped Neuroshima HEX become such a good game. Many people who helped us create the game, promote it and deve-lop it after its premiere. Many people who gave their heart to this game. They created new armies, they created new rules, they created puzzles,
artwork and lots of other stuff. They were running tournaments and demo games across Poland. We would like to thank all of you guys, and say:
Wielkiedziękizawsparcie,któredaliścieNeuroshimie.BezwasHEXbynieistniał.TherearealsothreeguyswhohelpedspreadthewordofNSHEX.
ThesearePiotrKątnik,ArturJedlińskiandGilesPritchard.
Thank you. Thank you very much.
Neuroshima Hex™& Portal Games (Publisher), All Rights Reserved. Repro-duction of any part of this work by any means without the written permis-
sion of the publisher is expressly forbidden.
wining conditions
puzzle leveland number ofyour army tiles to choose from
left over tiles
situation after the tiles choice and before the Final Battle
puzzle name
plot
puzzle number
situation before tiles choice
your army tiles to choose from
HQs damage