Embed Size (px)
Citation preview
Métier
Loom
IMPROVED!JANUARY 2000
1573 SavoieC. P. 4Plessisville, Qc.G6L 2Y6
TEL: 819-362-2408FAX: 819-362-2045
d:\leclerc\inst\acc\cendrel
3310-0000
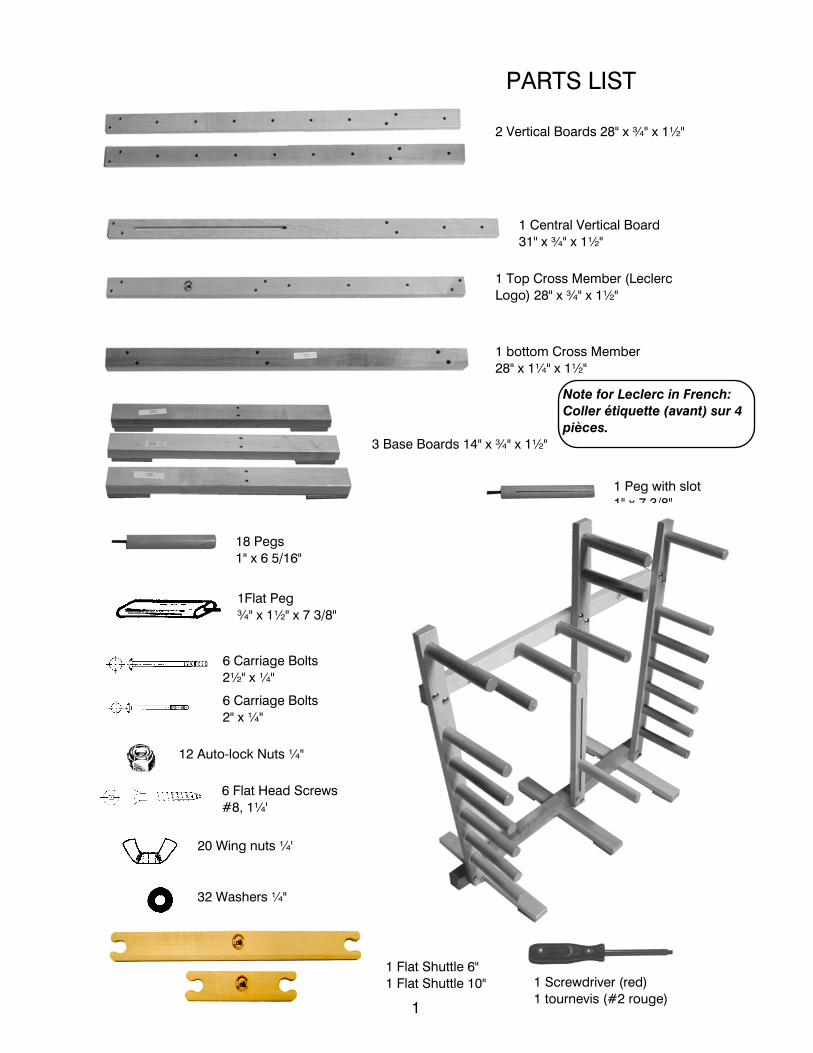
PARTS LIST
1 bottom Cross Member 28" x 1¼" x 1½"
3 Base Boards 14" x ¾" x 1½"
18 Pegs 1" x 6 5/16"
1 Peg with slot1" x 7 3/8"
1Flat Peg ¾" x 1½" x 7 3/8"
6 Carriage Bolts 2½" x ¼"
6 Carriage Bolts 2" x ¼"
12 Auto-lock Nuts ¼"
6 Flat Head Screws #8, 1¼'
20 Wing nuts ¼'
32 Washers ¼"
1 Flat Shuttle 6"1 Flat Shuttle 10"
1 Top Cross Member (LeclercLogo) 28" x ¾" x 1½"
1 Central Vertical Board 31" x ¾" x 1½"
2 Vertical Boards 28" x ¾" x 1½"
1
Note for Leclerc in French: Coller étiquette (avant) sur 4pièces.
1 Screwdriver (red)1 tournevis (#2 rouge)
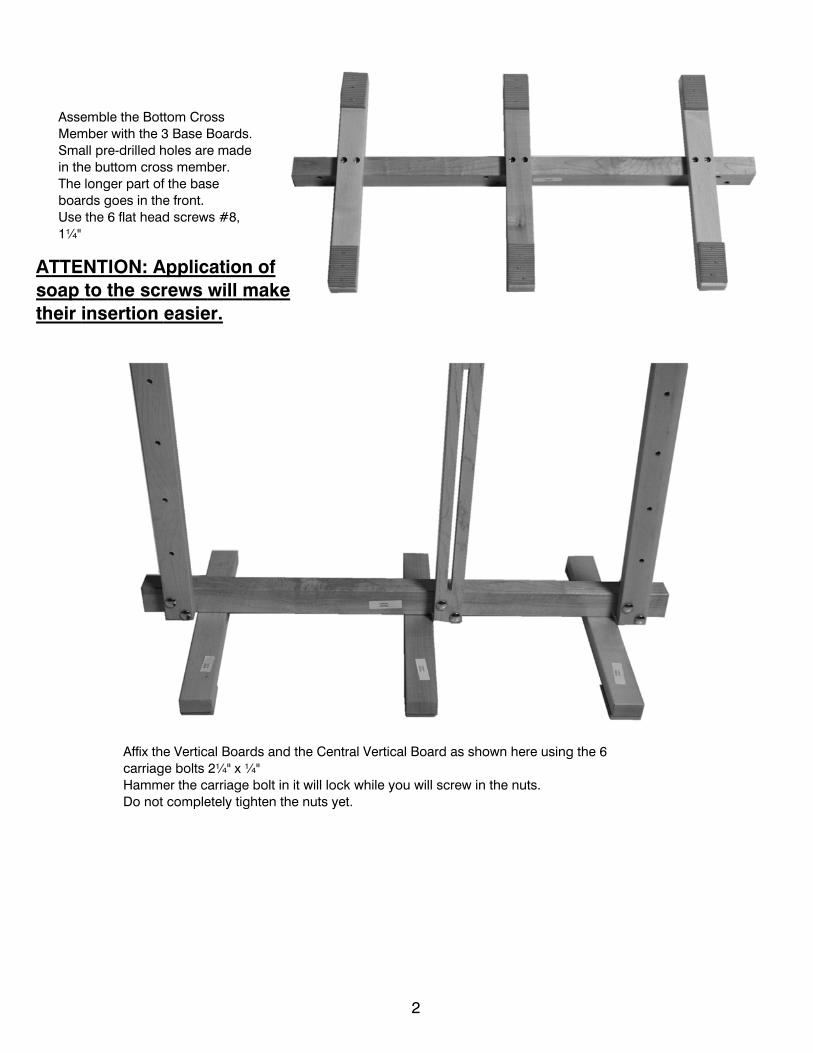
Assemble the Bottom CrossMember with the 3 Base Boards.Small pre-drilled holes are madein the buttom cross member.The longer part of the baseboards goes in the front.Use the 6 flat head screws #8,1¼"
Affix the Vertical Boards and the Central Vertical Board as shown here using the 6carriage bolts 2¼" x ¼"Hammer the carriage bolt in it will lock while you will screw in the nuts.Do not completely tighten the nuts yet.
2
ATTENTION: Application ofsoap to the screws will maketheir insertion easier.
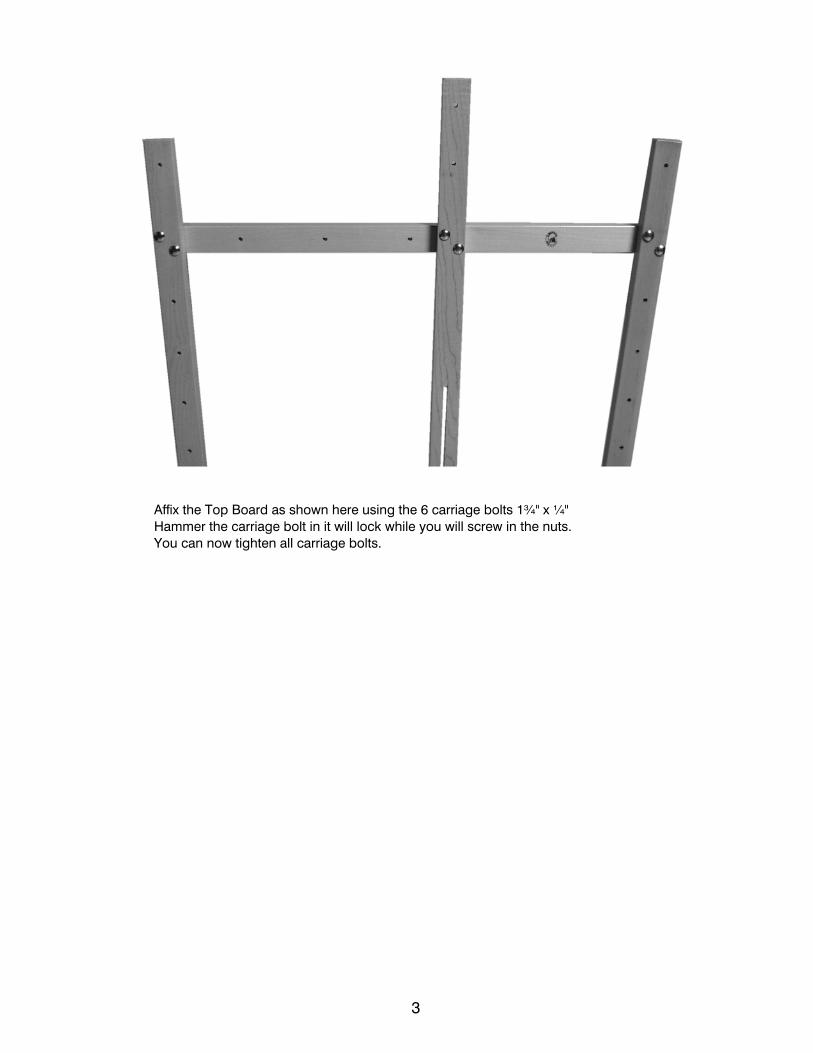
Affix the Top Board as shown here using the 6 carriage bolts 1¾" x ¼"Hammer the carriage bolt in it will lock while you will screw in the nuts.You can now tighten all carriage bolts.
3
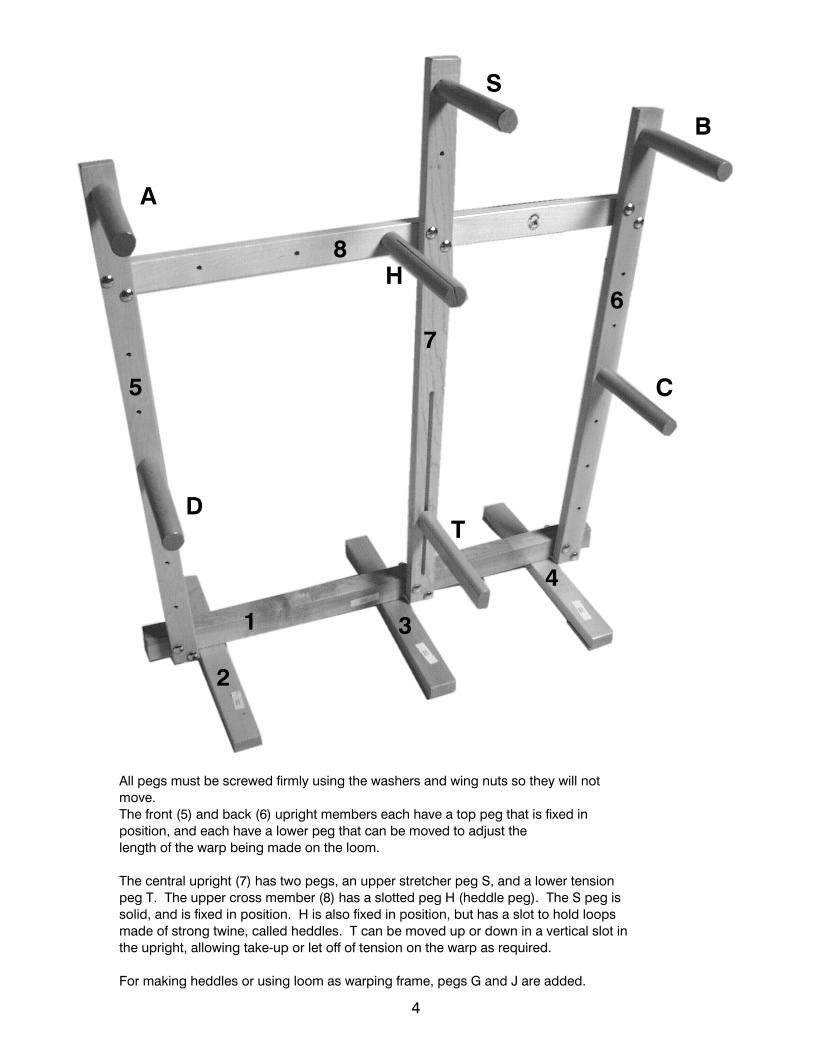
All pegs must be screwed firmly using the washers and wing nuts so they will notmove. The front (5) and back (6) upright members each have a top peg that is fixed inposition, and each have a lower peg that can be moved to adjust the length of the warp being made on the loom. The central upright (7) has two pegs, an upper stretcher peg S, and a lower tensionpeg T. The upper cross member (8) has a slotted peg H (heddle peg). The S peg issolid, and is fixed in position. H is also fixed in position, but has a slot to hold loopsmade of strong twine, called heddles. T can be moved up or down in a vertical slot inthe upright, allowing take-up or let off of tension on the warp as required. For making heddles or using loom as warping frame, pegs G and J are added.
5
6
7
8
A
S
B
C
H
DT
1
2
3
4
4

WEAVING ON AN INKLE LOOM
An "inkle" is a narrow woven band, and an inkle loom is a simple loom designed forweaving narrow but strong strips of fabric.
This type of fabric is both useful and ornamental, and throughout the inkle loom's longhistory various forms of this simple loom have developed in widely separated times andcultures. The Leclerc open- side "Cendrel" is a most efficient and versatile form of inkleloom.
As well as being a loom, the "Cendrel" can be converted to a warping frame. Thus thisbeginner's loom becomes an efficient basic tool for the advanced weaver as well.
The inkle loom presents the novice weaver with an approach to weaving that is simple,practical and artistic. While the imagination of the new veaver is often fresh and original,technical control is usually limited and of fairly short duration. Warping this loom is quick,and so simple that a child can learn the technique easily. The weaving itself is swift andsilent, and attractive, colorful articles can be completed in an hour's time. This floor modelloom provides easy, quiet enjoyment for people of any age. Wound with a brightly coloredwarp, the "Cendrel" makes an attractive decoration.
Uses of the "Cendrel" are as varied as the people who weave with it; belts, neckties,headbands, guitar straps are but a few. Bands as wide as six inches can be woven,making it possible to produce large articles by joining woven strips together to achieve anywidth desired. Thus purses; cushions, wall hangings, table runners and mats, mats for hot dishes,ponchos., vests, and a host of other articles, limited only by the imagination of the weaver,can be made.
There are four simple steps to be mastered.First, the yarns must be warped onto the loom with an even tension. Second, the warpyarns must be separated into two alternating positions called sheds. Third, a continuousyarn carried on a shuttle, called the weft yarn, must be carried through the sheds at aright-angle to the warp and beaten into place. Fourth, as the warp shortens in the processof weaving because of take-up, tension must be released to allow the warp to moveforward.
5
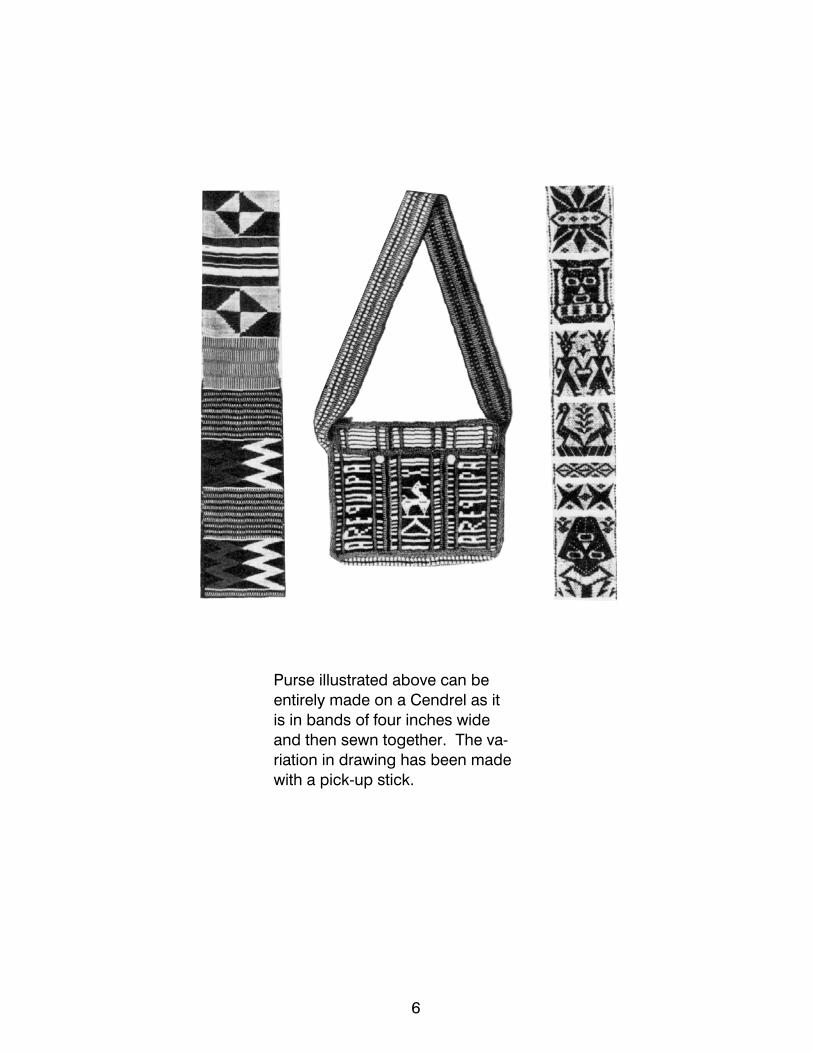
Purse illustrated above can be entirely made on a Cendrel as it is in bands of four inches wide and then sewn together. The va- riation in drawing has been made with a pick-up stick.
6
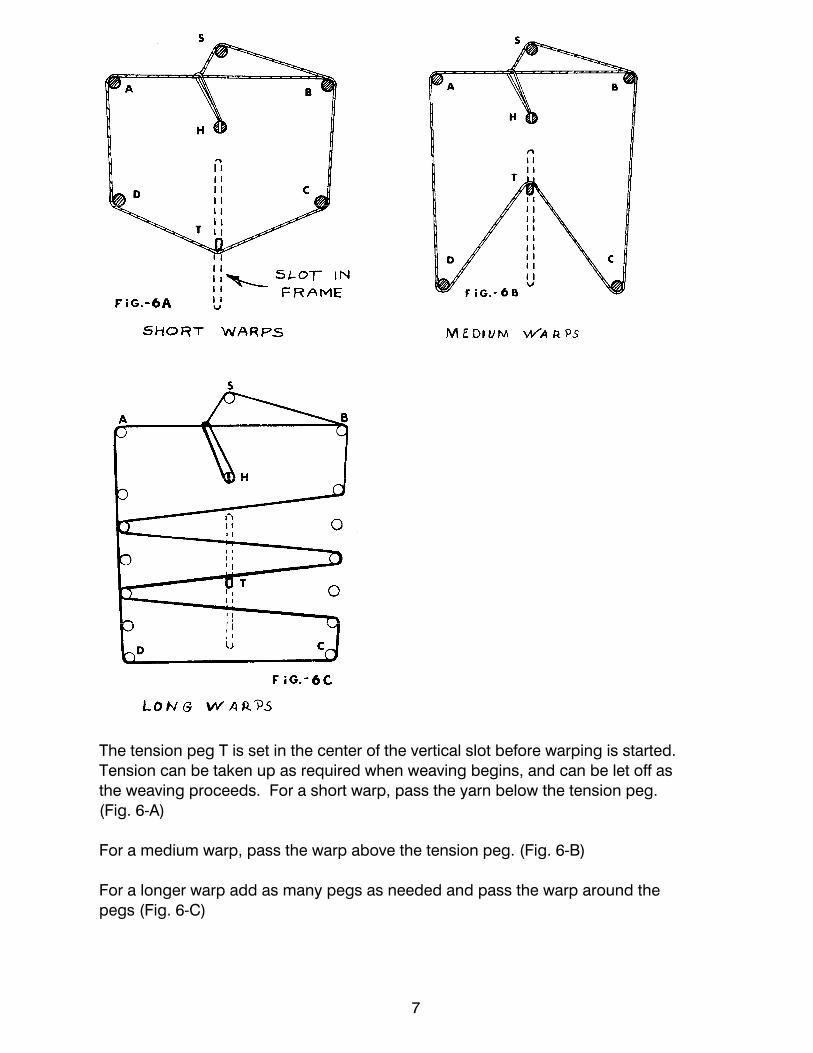
The tension peg T is set in the center of the vertical slot before warping is started. Tension can be taken up as required when weaving begins, and can be let off asthe weaving proceeds. For a short warp, pass the yarn below the tension peg. (Fig. 6-A)
For a medium warp, pass the warp above the tension peg. (Fig. 6-B)
For a longer warp add as many pegs as needed and pass the warp around thepegs (Fig. 6-C)
7
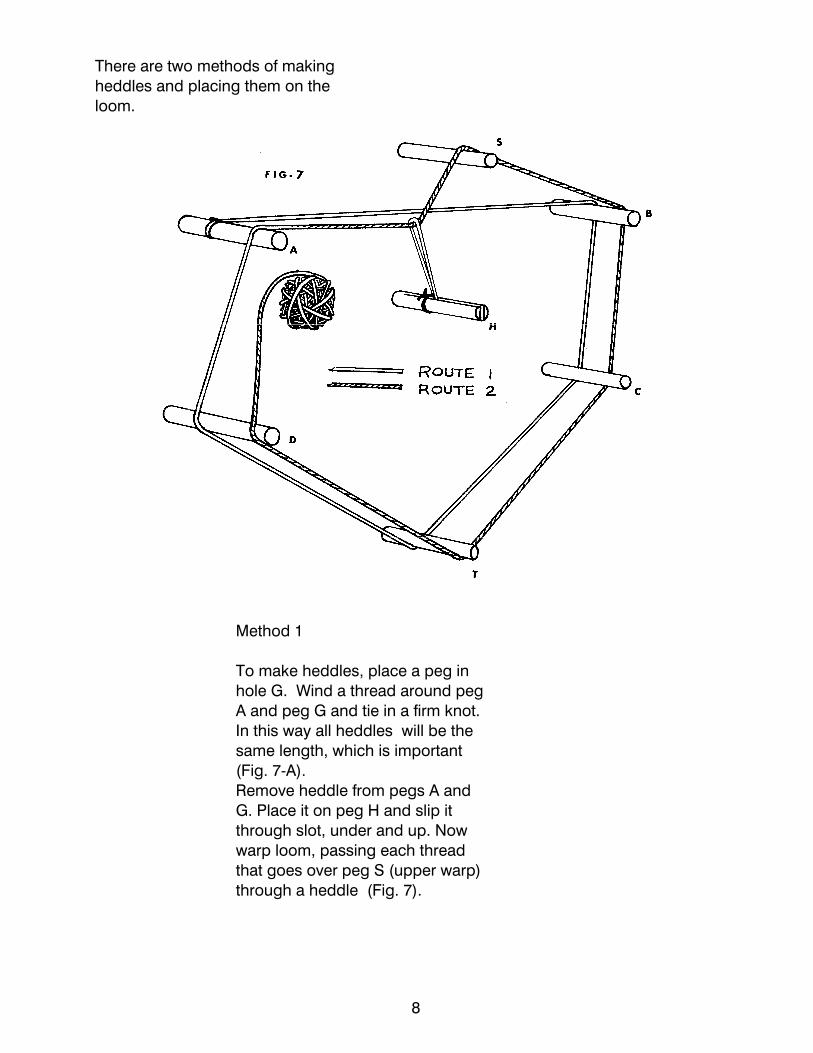
There are two methods of making heddles and placing them on the loom.
Method 1
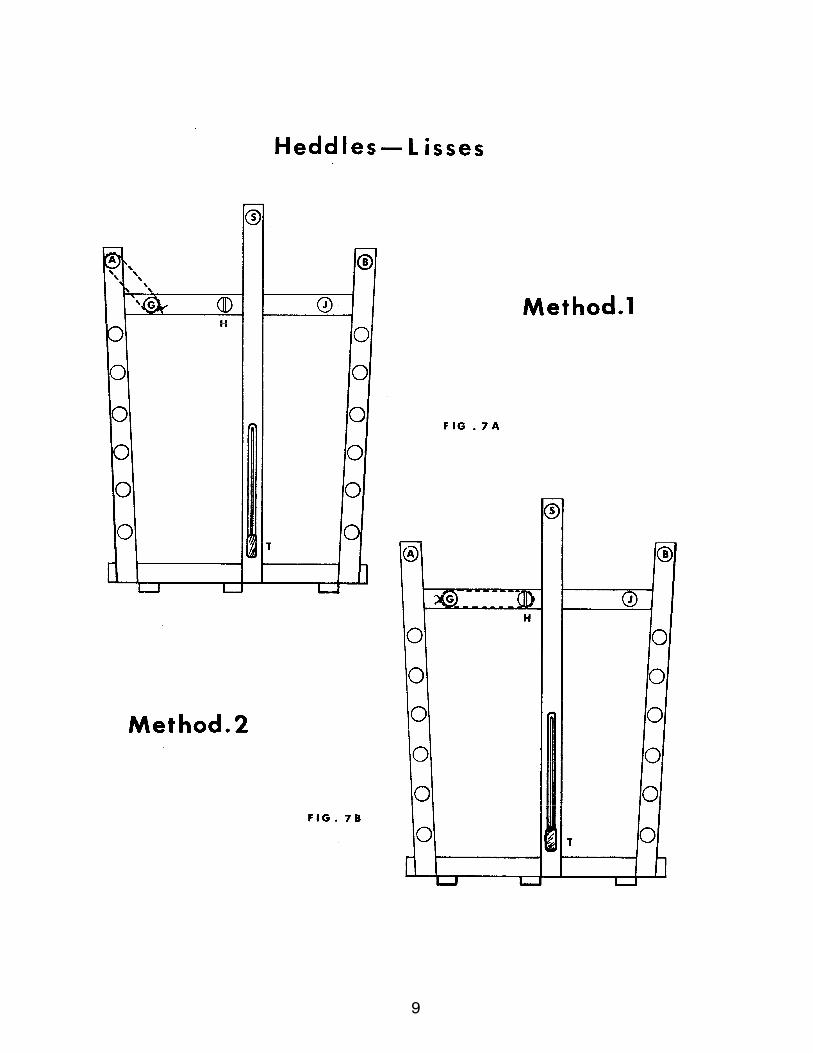
To make heddles, place a peg inhole G. Wind a thread around pegA and peg G and tie in a firm knot. In this way all heddles will be thesame length, which is important(Fig. 7-A). Remove heddle from pegs A andG. Place it on peg H and slip itthrough slot, under and up. Nowwarp loom, passing each threadthat goes over peg S (upper warp)through a heddle (Fig. 7).
8
9
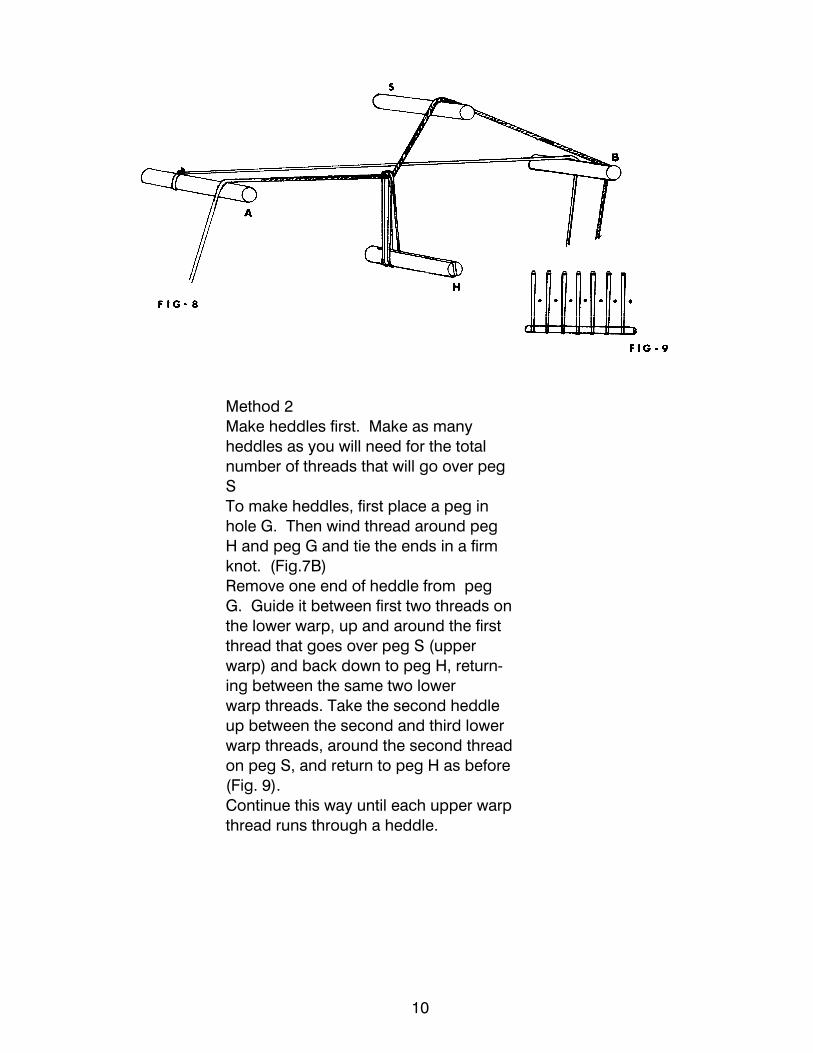
Method 2 Make heddles first. Make as manyheddles as you will need for the totalnumber of threads that will go over pegSTo make heddles, first place a peg inhole G. Then wind thread around pegH and peg G and tie the ends in a firmknot. (Fig.7B) Remove one end of heddle from pegG. Guide it between first two threads onthe lower warp, up and around the firstthread that goes over peg S (upperwarp) and back down to peg H, return- ing between the same two lower warp threads. Take the second heddleup between the second and third lower warp threads, around the second threadon peg S, and return to peg H as before(Fig. 9). Continue this way until each upper warpthread runs through a heddle.
10
WARPING THE LOOM The warp yarns are wound on the loom in two alternating routes. Tie warp to peg A to start winding. This is later removed. Take thread over the top front peg A, over the top back peg B, under the lower back peg C, under orover the tension peg T, under the lower front peg D, and back to A again. Now continue over peg A, through the empty heddle nearest the upright (for Method 1), over S and B,under C, under or over T, under D, and back to the start of the route at A. (See Fig. 7) For Method 2: Tie warp to peg A and directly from A to B for one route, and from A pass to peg Sthen B for the other route. All even numbered warp threads must be on peg S, and all odd numberedthreads must be direct from A to B. (See Fig. 8)
The warp must not be fixed permanently to any peg, so that it will turn freely as the weavingprogresses. When the warp is finished, tie the end firmly to the last thread. Untie the first warp threadfrom peg A and tie it to the adjacent thread.
Now wind a warp on the loom, using a smooth cotton yarn such as pearl cotton. Be sure to use thetwo alternating routes. The warp can be made more interesting by winding a dark color four times,then a light color four times. Start by making a half bow of the dark yarn at peg A. When you havewound the dark yarn four times to make four warp ends, cut the last strand a few inches longer thanthe others. Now untie the half bow and tie the start of the light yarn to the end of the dark yarn. Thewarp you are making is a continuous one, which is pulled toward the weaver as the weavingprogresses, so do not tie the yarns to any of the pegs, only to other yarns.
11
Repeat the process with the light yarn four times, then the dark yarn, and so on. Continue until you have a warp about as wide as the shuttle that comes with the loom.(1 1/4"). A fine warp will require more winding than a coarse one; pearl cotton No. 3 will make a warpmore quickly than No. 5. Finish the warp with four strands of the dark color, just as you started. When making a draft (pattern)for a warp add an extra thread once (5 threads)in order to finish with an odd number of threads (ends). This extra thread should not be added at either edge of warp, but some where in the middle. The inkle loom weaves warp-faced fabric, which means that the weft yarn carried by the shuttle showsvery little (just at the edges of the band being woven). A special weaving technique is used to control the warp-faced effect. This control is most easily learned by having a warp on the loom and using the weaving technique described previously.
After the warp is wound, tighten the tension by adjusting the tension peg T so that a springi- ness remains in the warp. Grasp the warp in front of the heddles and pull the warp toward you. See how the heddles also move toward you. Now push the heddles back with the flat side of theshuttle, underneath the warp, and you will see that they straighten up again. It is important to push the heddles into a more upright position each time you advance the warp, so as tokeep a clear shed.
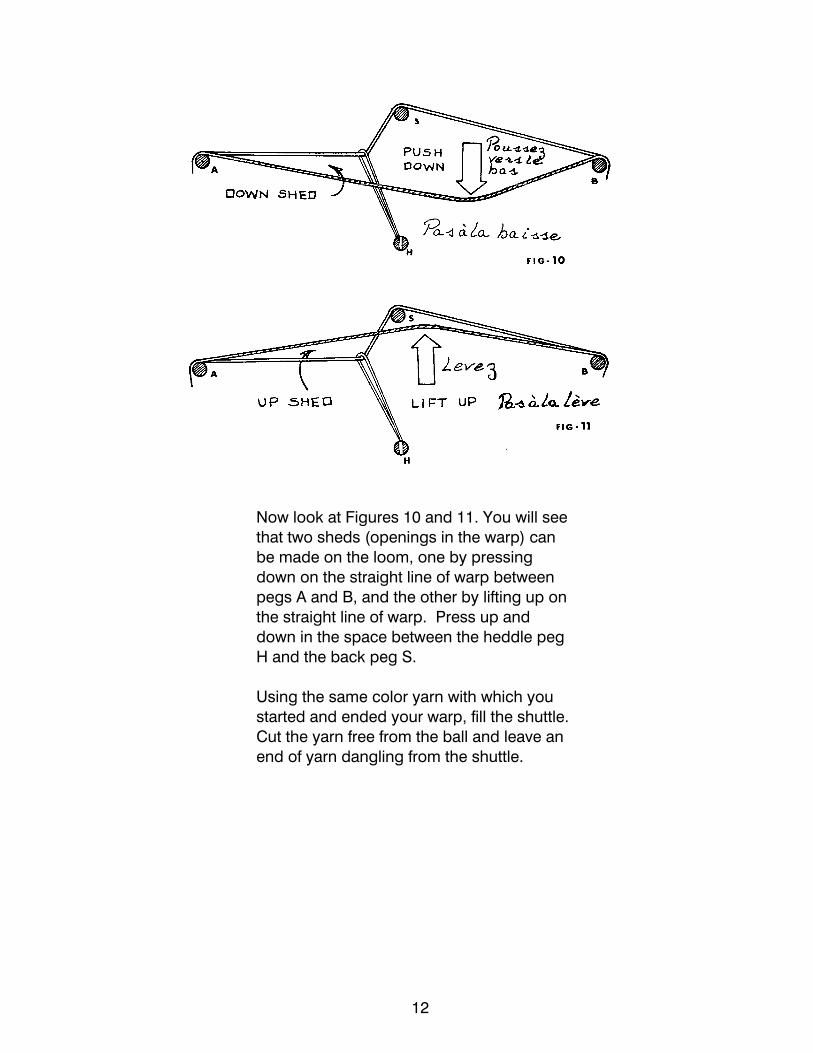
Now look at Figures 10 and 11. You will seethat two sheds (openings in the warp) canbe made on the loom, one by pressingdown on the straight line of warp betweenpegs A and B, and the other by lifting up onthe straight line of warp. Press up anddown in the space between the heddle pegH and the back peg S.
Using the same color yarn with which youstarted and ended your warp, fill the shuttle.Cut the yarn free from the ball and leave anend of yarn dangling from the shuttle.
12
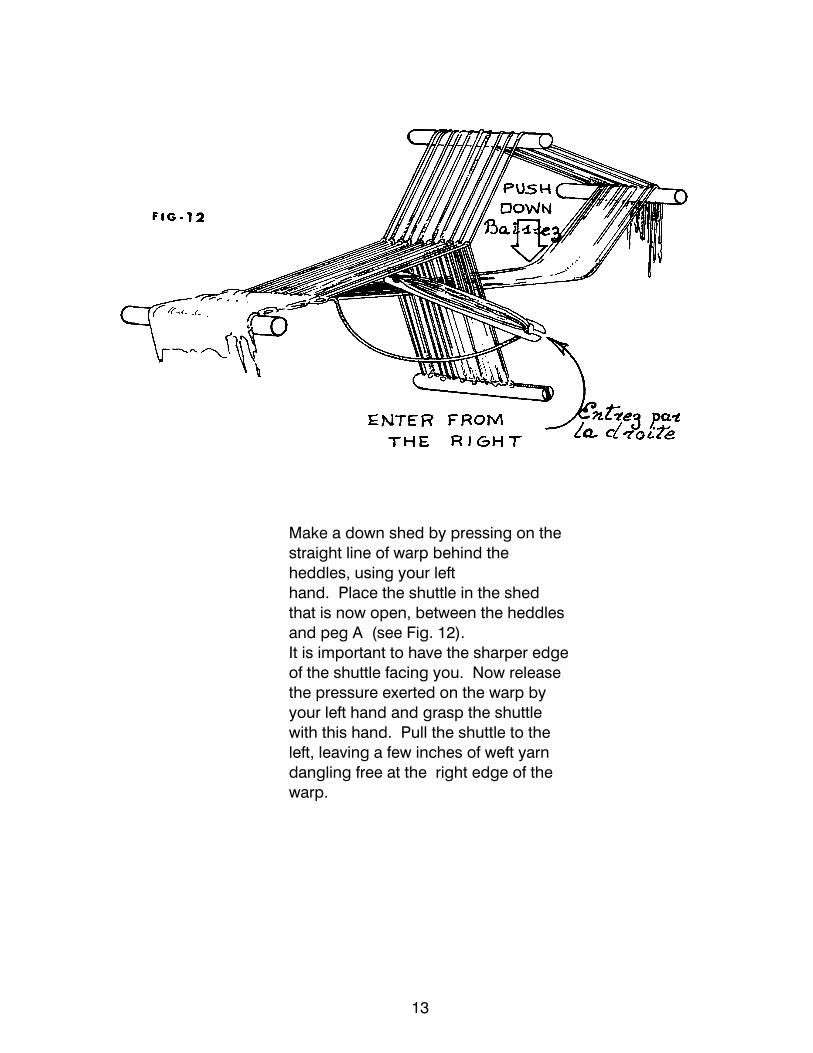
Make a down shed by pressing on thestraight line of warp behind theheddles, using your left hand. Place the shuttle in the shedthat is now open, between the heddlesand peg A (see Fig. 12). It is important to have the sharper edgeof the shuttle facing you. Now releasethe pressure exerted on the warp byyour left hand and grasp the shuttlewith this hand. Pull the shuttle to theleft, leaving a few inches of weft yarndangling free at the right edge of thewarp.
13
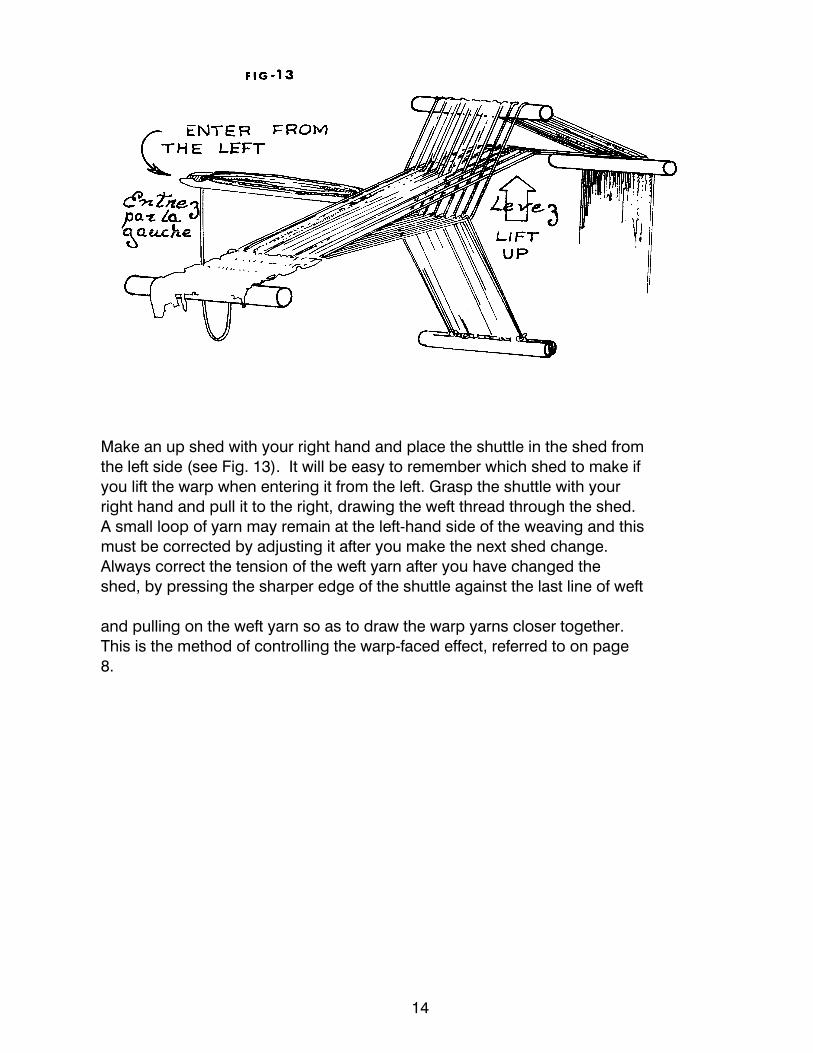
Make an up shed with your right hand and place the shuttle in the shed fromthe left side (see Fig. 13). It will be easy to remember which shed to make ifyou lift the warp when entering it from the left. Grasp the shuttle with yourright hand and pull it to the right, drawing the weft thread through the shed.A small loop of yarn may remain at the left-hand side of the weaving and thismust be corrected by adjusting it after you make the next shed change.Always correct the tension of the weft yarn after you have changed theshed, by pressing the sharper edge of the shuttle against the last line of weft
and pulling on the weft yarn so as to draw the warp yarns closer together. This is the method of controlling the warp-faced effect, referred to on page8.
14
After a few inches have been woven in this way, the weaving will be closer to the heddles and there will be less space for the shuttle to move in. You will then need to pull the warp toward you in order to bring forward a new area for weaving. It may be necessary to release thetension on the warp by adjusting peg T, so that the warp will be easier to move around the pegs. Continue weaving in this manner until the beginning of the weaving reaches the back peg B, or alittle beyond this point. It will then become difficult to make a clear shed. To secure the weaving so that it does not unravel, thread a tapestry needle with some of the weft yarn and whip the last line of weft to the one just before it. Do the same at the beginning of the weaving, using the yarn left free when you started using the shuttle.
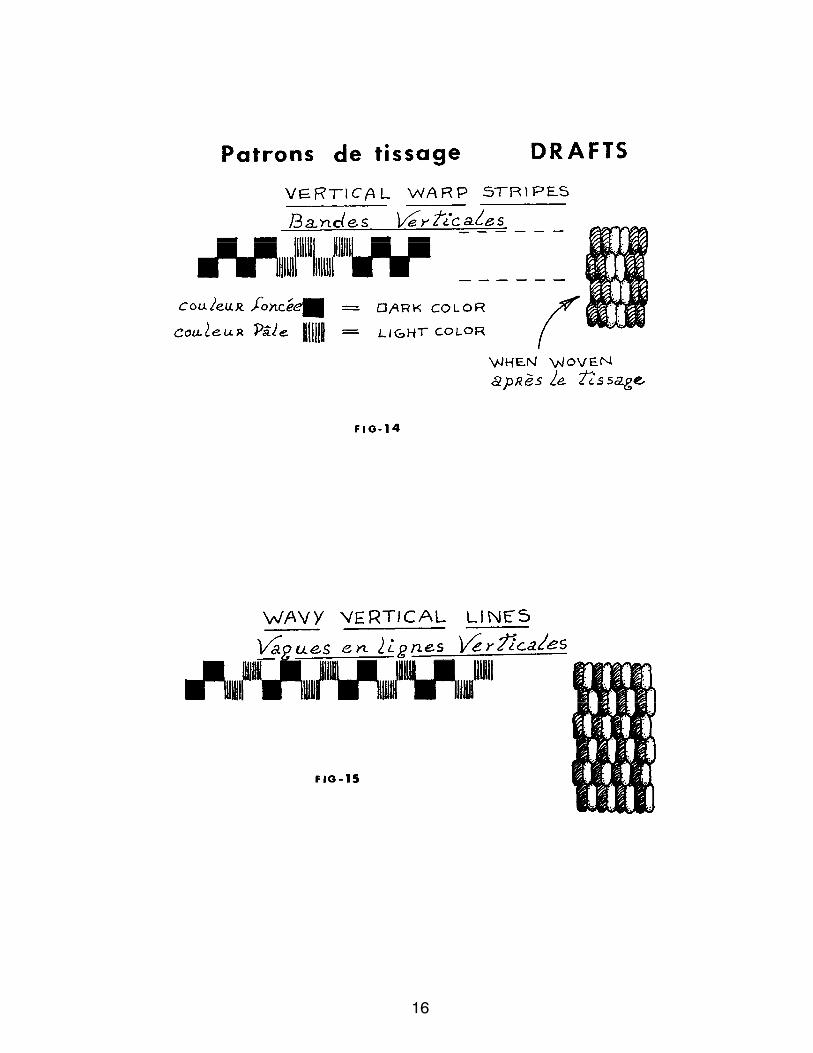
Weaving bands of striped colors will not interest you indefinitely, so consider other possibilities. Tomake your own designs you will need a vocabulary of warp effects. To convey these effects to oneanother, weavers use a set of symbols called a threading draft, which is a graphic representation ofall the warp yarns used in warping a given design. Only the simple drafts used for inkle looms will be discussed here.
The symbols used are written on two lines, corresponding to the two warp routes shown in Figs 7and 8. The draft is read from left to right, as the loom is warped from left to right.
A symbol on the lower line refers to a warp yarn going straight from A to B. A symbol on the upperline refers to a warp yarn going through a heddle and then over stretcher peg S before it goes topeg B.
15
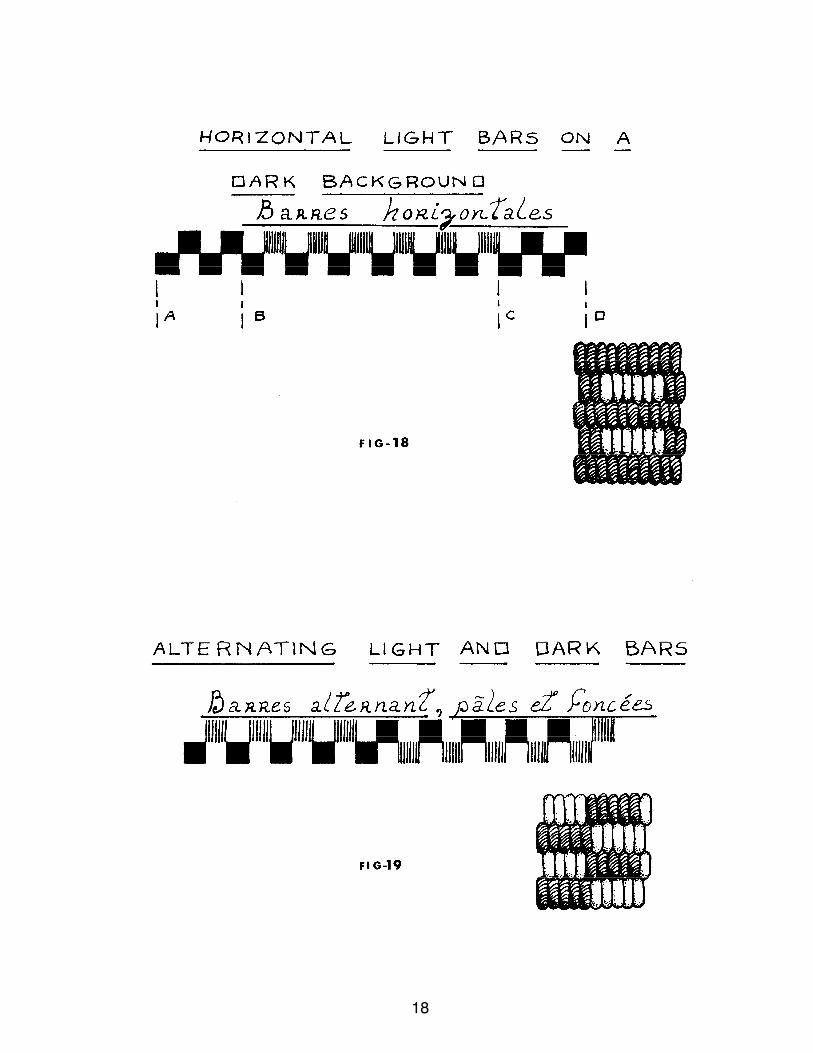
The symbol indicates the color of the yarn as well as its route, since no pattern draft would beneeded if only one color were being warped. Now look at Fig. 14. You will see the striped band youhave woven portrayed in two ways: one in the set of symbols called a draft, and a drawing thatshows how the fabric appears when woven according to the draft. Figures 14 to 19 each show adifferent draft, for a variety of effects.
A good selection of colors in suitable yarns will encourage the creation of many new effects.Fuzzy·yarns should be avoided by the beginner. Pearl cotton has already been mentioned. Plied linenmakes a smooth, firm warp. Hard twisted worsted yarns are also good. Colorful yarns and differentdrafts can be combined in countless ways. There are no bounds to imagination and inventiveness.
16

17
18

WARPING FRAME To make a wrarp on the "Cendrel" loom: Attach a thread (or threads, two or four) tostarting peg T as on Figs. 20 and 21, or E onFig. 22. Using one thread, yarn must becarried around the pegs as many times as youwant threads in the warp. Using two threadsonly half as many complete turns arenecessary, and using four, only one-quarteras many.
Take yarn around pegs on frame asillustrated, make a cross at top between Gand H on Fig. 20 or H and J on Fig. 21, andreturn to starting point, following the samepegs, until you have the number of threadsneeded for your warp.
Always keep the tension even when placingyarn on warping frame; all threads should lie flat on the pegs. When using more than onethread (two or four), separate all threads by putting your fingers between them and makesure that they are always wound in the sameorder.
When you want to change color, cut thread(leave an extra two inches), pass it aroundone peg end (either starting peg T or end ofcross G, Fig. 21), tie it to a thread of a differentcolor, and continue warping.
Be sure to always make the cross in the samemanner (around the same pegs).
19
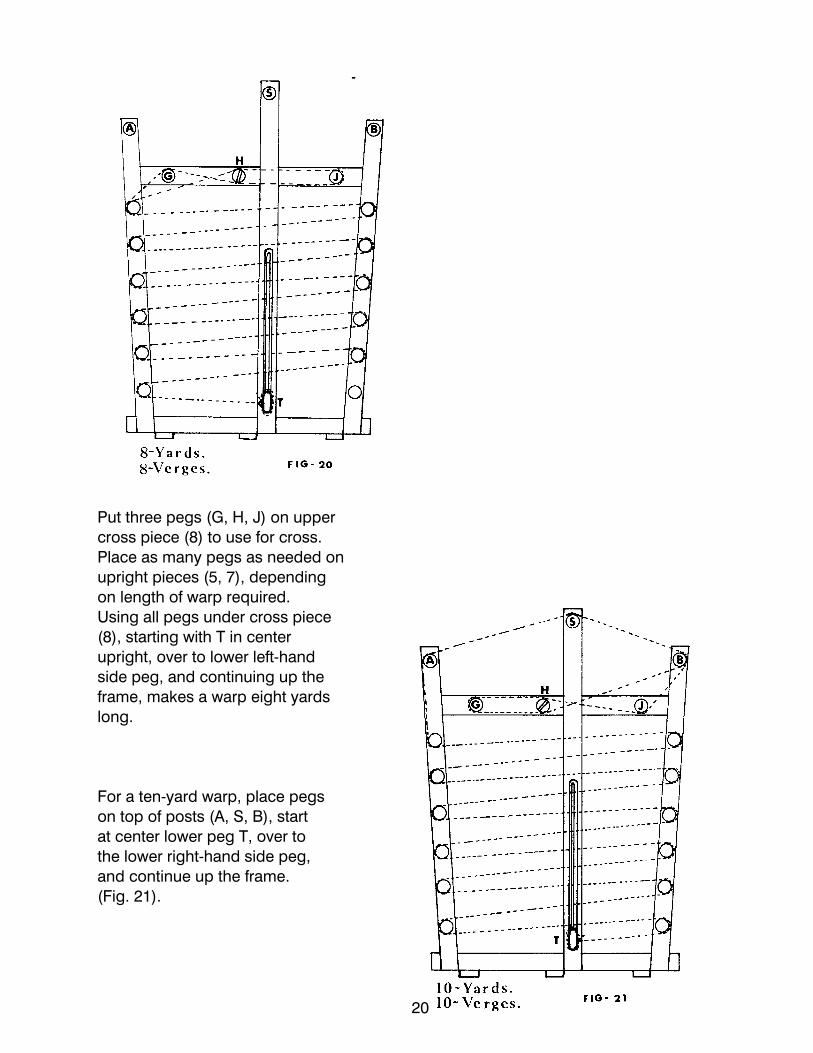
Put three pegs (G, H, J) on upper cross piece (8) to use for cross. Place as many pegs as needed on upright pieces (5, 7), depending on length of warp required. Using all pegs under cross piece (8), starting with T in center upright, over to lower left-hand side peg, and continuing up the frame, makes a warp eight yards long. For a ten-yard warp, place pegs on top of posts (A, S, B), start at center lower peg T, over to the lower right-hand side peg, and continue up the frame. (Fig. 21).
20
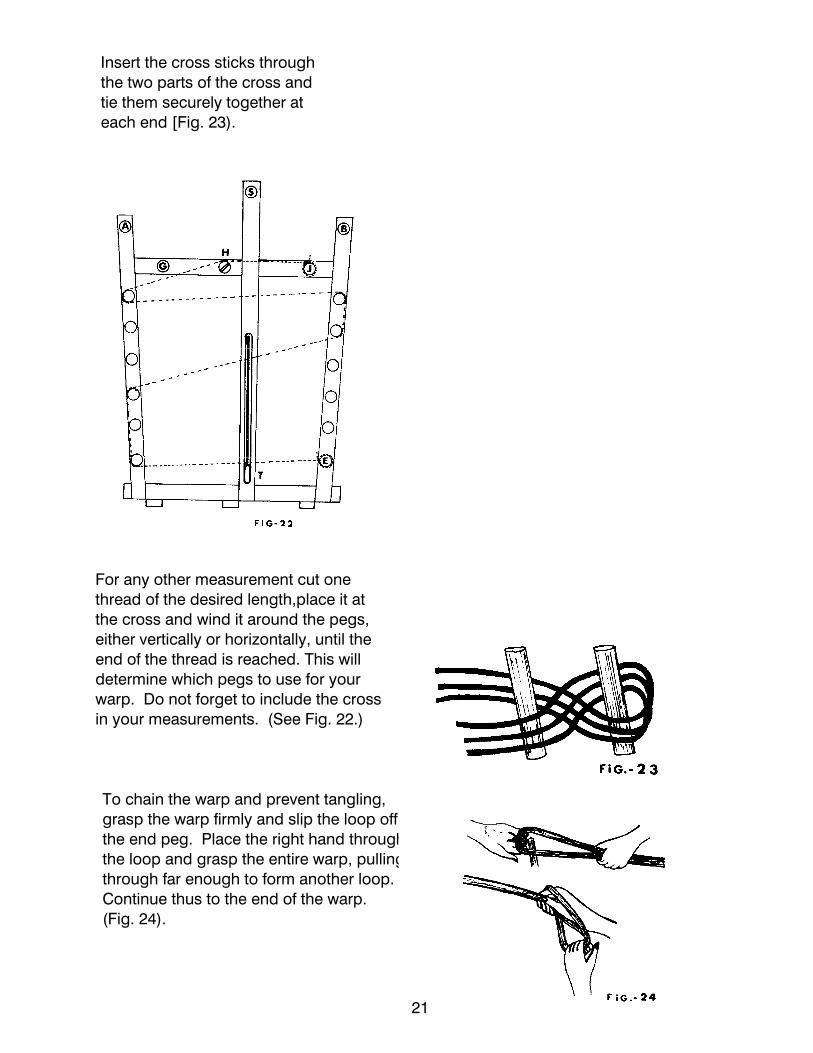
Insert the cross sticks through the two parts of the cross and tie them securely together at each end [Fig. 23).
For any other measurement cut one thread of the desired length,place it atthe cross and wind it around the pegs,either vertically or horizontally, until the end of the thread is reached. This willdetermine which pegs to use for yourwarp. Do not forget to include the crossin your measurements. (See Fig. 22.) To chain the warp and prevent tangling,grasp the warp firmly and slip the loop offthe end peg. Place the right hand throughthe loop and grasp the entire warp, pulling itthrough far enough to form another loop. Continue thus to the end of the warp. (Fig. 24).
21
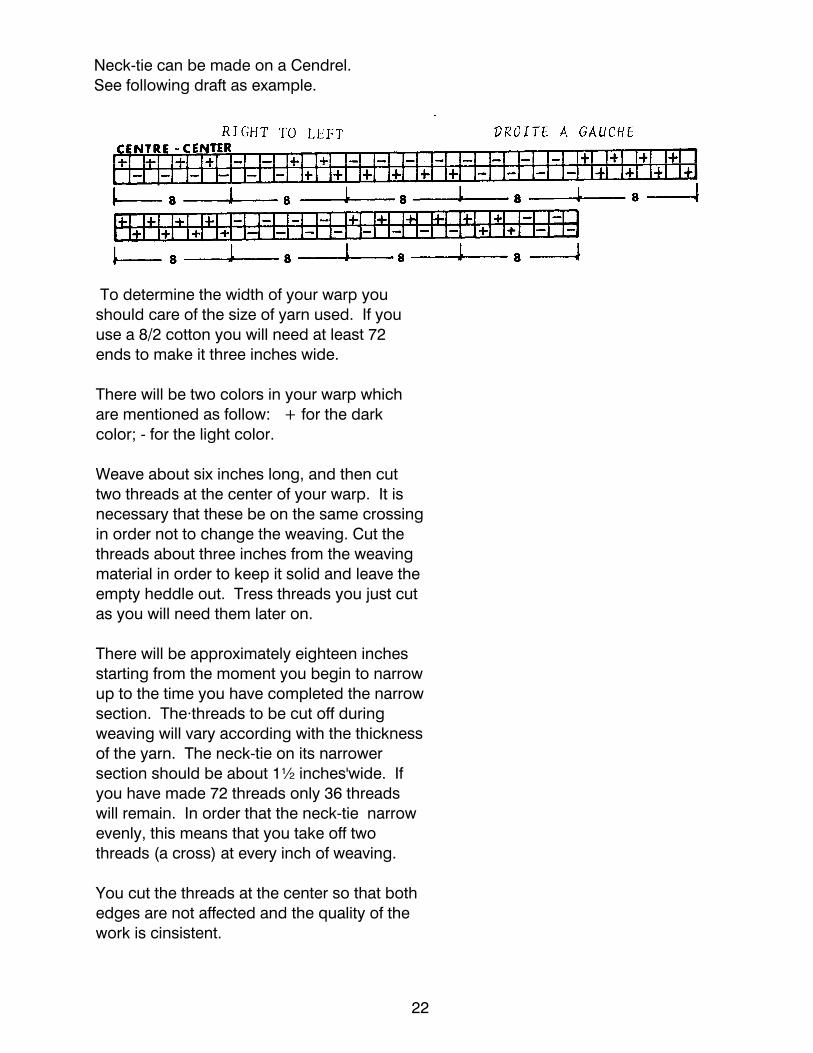
Neck-tie can be made on a Cendrel. See following draft as example.
To determine the width of your warp youshould care of the size of yarn used. If youuse a 8/2 cotton you will need at least 72ends to make it three inches wide.
There will be two colors in your warp whichare mentioned as follow: + for the darkcolor; - for the light color.
Weave about six inches long, and then cuttwo threads at the center of your warp. It isnecessary that these be on the same crossingin order not to change the weaving. Cut thethreads about three inches from the weavingmaterial in order to keep it solid and leave the empty heddle out. Tress threads you just cutas you will need them later on.
There will be approximately eighteen inchesstarting from the moment you begin to narrowup to the time you have completed the narrowsection. The·threads to be cut off duringweaving will vary according with the thicknessof the yarn. The neck-tie on its narrowersection should be about 1½ inches'wide. Ifyou have made 72 threads only 36 threadswill remain. In order that the neck-tie narrowevenly, this means that you take off twothreads (a cross) at every inch of weaving.
You cut the threads at the center so that bothedges are not affected and the quality of thework is cinsistent.
22

23
Depending of the effect you want to make, youcan cut off other threads than those at thecenter,as long as they are not too close to theedges. However, note that you have to cut off twothreads on each side which makes four insteadof only two and then, take them off at every twoinches instead of at every inch. When you want to widen the neck-tie,approximately fifteen inches after you finish the narrow part, readjust your threads by takingthe two last ones you had cut and thensubsequently attaching to the following ones atevery inch. Fix them on the weaving part with the help of a pin. Be careful to give them thesame tension as the whole warp. If you wish to have a width of 2 1 /2 inches at theend of your neck-tie from the 36 threads whichremain on the narrow part, you have to re-tie thethreads until you have 60 in use. There will be 12remaining that are not used. It is necessary to finish your neck-tie verycarefully in order to have a good quality product.Take the threads which have been cut and witha round point needle, weave them into the backside of the neck-tie.