Embed Size (px)
Citation preview
LPA SiteManager Quick reference guide
1
LPA SiteManager
Contents Workflow ....................................................................................................................................................... 2
Daily Work Reports ....................................................................................................................................... 3
DWR Info. tab ............................................................................................................................................ 3
Contractors tab ......................................................................................................................................... 4
Contractor Equip. tab ................................................................................................................................ 5
Daily Staff tab ........................................................................................................................................... 6
Work Items tab ......................................................................................................................................... 7
Diary .............................................................................................................................................................. 8
Estimate ........................................................................................................................................................ 9
Generate an Estimate ............................................................................................................................... 9
Approve an Estimate ............................................................................................................................... 10
Reject an Estimate .................................................................................................................................. 10
View Estimate History/Delete an Estimate ............................................................................................. 11
Tracking an Estimate............................................................................................................................... 12
Process Lists ................................................................................................................................................ 13
Equipment/Personnel/ Staff Lists ................................................................................................................ 16
Equipment ............................................................................................................................................... 16
Personnel ................................................................................................................................................. 17
Staff ......................................................................................................................................................... 18
Print the Diary ............................................................................................................................................. 19
2
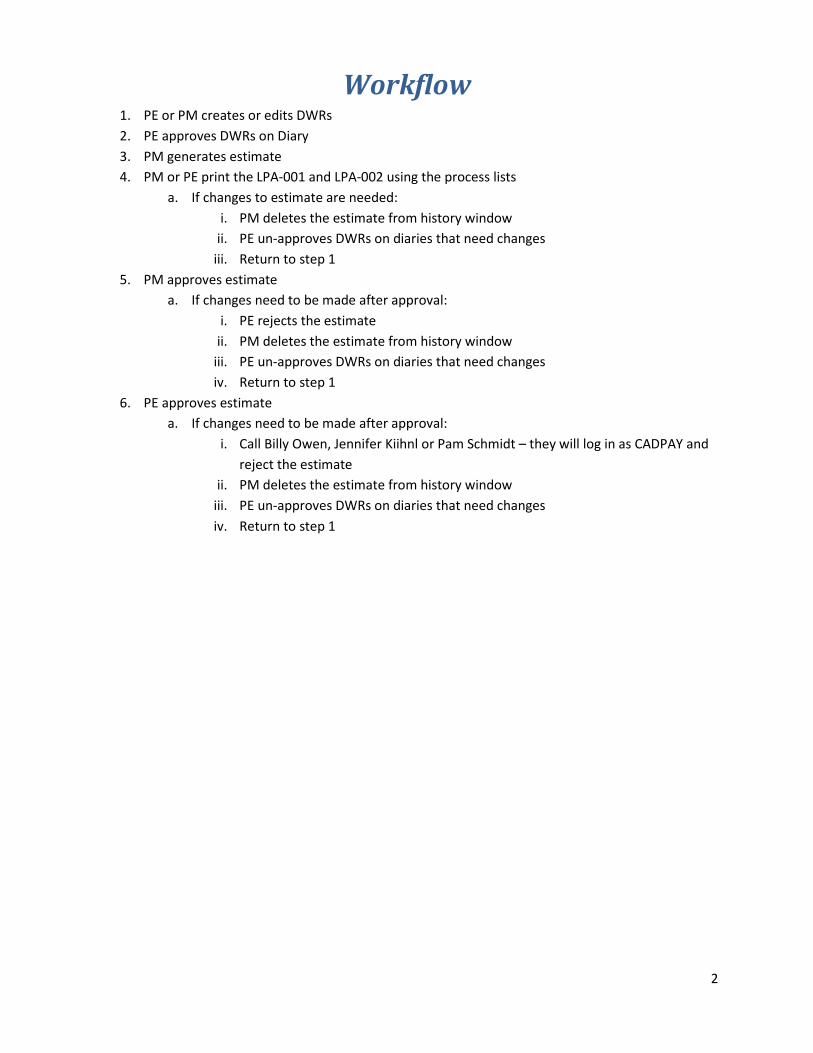
Workflow 1. PE or PM creates or edits DWRs 2. PE approves DWRs on Diary 3. PM generates estimate 4. PM or PE print the LPA-001 and LPA-002 using the process lists
a. If changes to estimate are needed: i. PM deletes the estimate from history window
ii. PE un-approves DWRs on diaries that need changes iii. Return to step 1
5. PM approves estimate a. If changes need to be made after approval:
i. PE rejects the estimate ii. PM deletes the estimate from history window
iii. PE un-approves DWRs on diaries that need changes iv. Return to step 1
6. PE approves estimate a. If changes need to be made after approval:
i. Call Billy Owen, Jennifer Kiihnl or Pam Schmidt – they will log in as CADPAY and reject the estimate
ii. PM deletes the estimate from history window iii. PE un-approves DWRs on diaries that need changes iv. Return to step 1
3
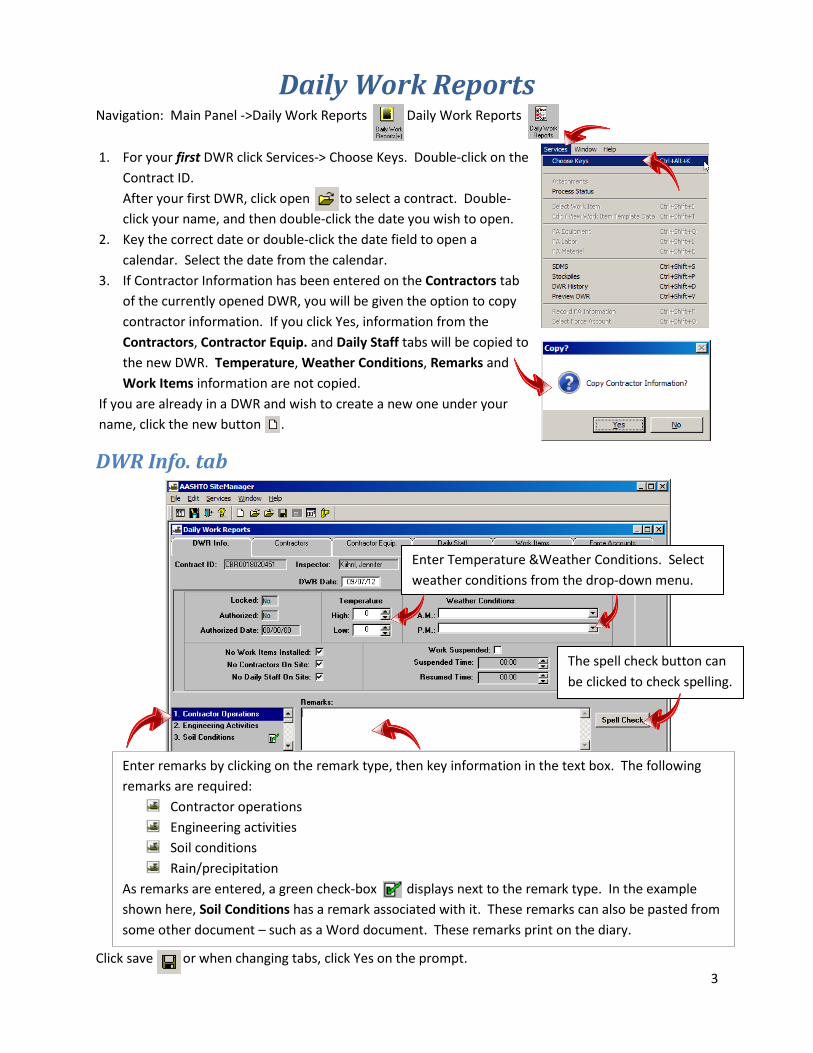
Daily Work Reports Navigation: Main Panel ->Daily Work Reports Daily Work Reports
DWR Info. tab Click save or when changing tabs, click Yes on the prompt.
1. For your first DWR click Services-> Choose Keys. Double-click on the Contract ID. After your first DWR, click open to select a contract. Double-click your name, and then double-click the date you wish to open.
2. Key the correct date or double-click the date field to open a calendar. Select the date from the calendar.
3. If Contractor Information has been entered on the Contractors tab of the currently opened DWR, you will be given the option to copy contractor information. If you click Yes, information from the Contractors, Contractor Equip. and Daily Staff tabs will be copied to the new DWR. Temperature, Weather Conditions, Remarks and Work Items information are not copied.
If you are already in a DWR and wish to create a new one under your name, click the new button .
Enter remarks by clicking on the remark type, then key information in the text box. The following remarks are required:
Contractor operations Engineering activities Soil conditions Rain/precipitation
As remarks are entered, a green check-box displays next to the remark type. In the example shown here, Soil Conditions has a remark associated with it. These remarks can also be pasted from some other document – such as a Word document. These remarks print on the diary.
Enter Temperature &Weather Conditions. Select weather conditions from the drop-down menu.
The spell check button can be clicked to check spelling.
4
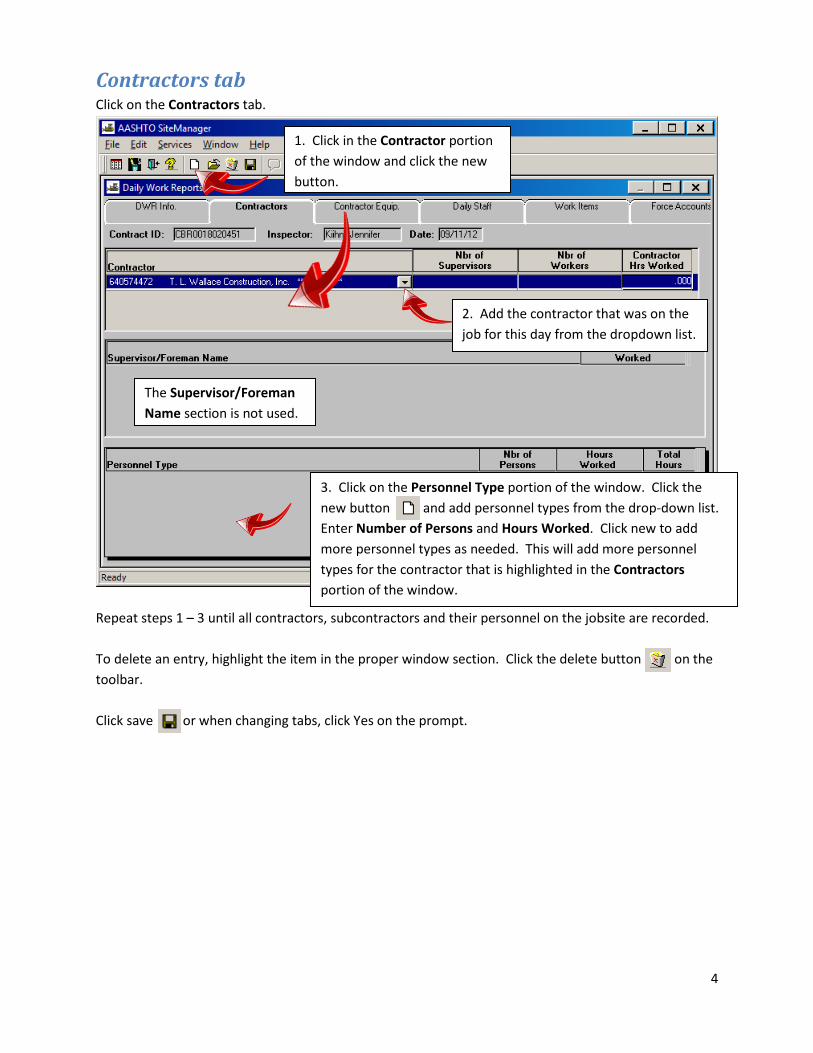
2. Add the contractor that was on the job for this day from the dropdown list.
Contractors tab Click on the Contractors tab. Repeat steps 1 – 3 until all contractors, subcontractors and their personnel on the jobsite are recorded. To delete an entry, highlight the item in the proper window section. Click the delete button on the toolbar. Click save or when changing tabs, click Yes on the prompt.
1. Click in the Contractor portion of the window and click the new button.
3. Click on the Personnel Type portion of the window. Click the new button and add personnel types from the drop-down list. Enter Number of Persons and Hours Worked. Click new to add more personnel types as needed. This will add more personnel types for the contractor that is highlighted in the Contractors portion of the window.
The Supervisor/Foreman Name section is not used.
5
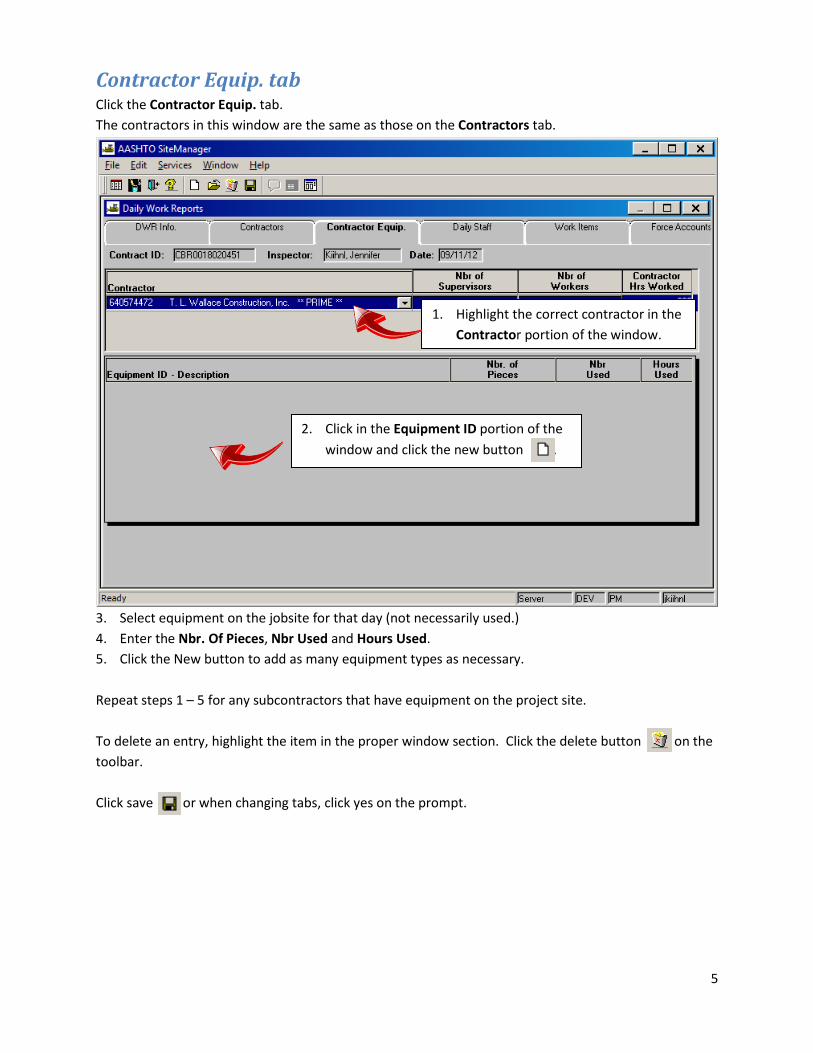
Contractor Equip. tab Click the Contractor Equip. tab. The contractors in this window are the same as those on the Contractors tab. 3. Select equipment on the jobsite for that day (not necessarily used.) 4. Enter the Nbr. Of Pieces, Nbr Used and Hours Used. 5. Click the New button to add as many equipment types as necessary. Repeat steps 1 – 5 for any subcontractors that have equipment on the project site. To delete an entry, highlight the item in the proper window section. Click the delete button on the toolbar. Click save or when changing tabs, click yes on the prompt.
2. Click in the Equipment ID portion of the window and click the new button .
1. Highlight the correct contractor in the Contractor portion of the window.
6
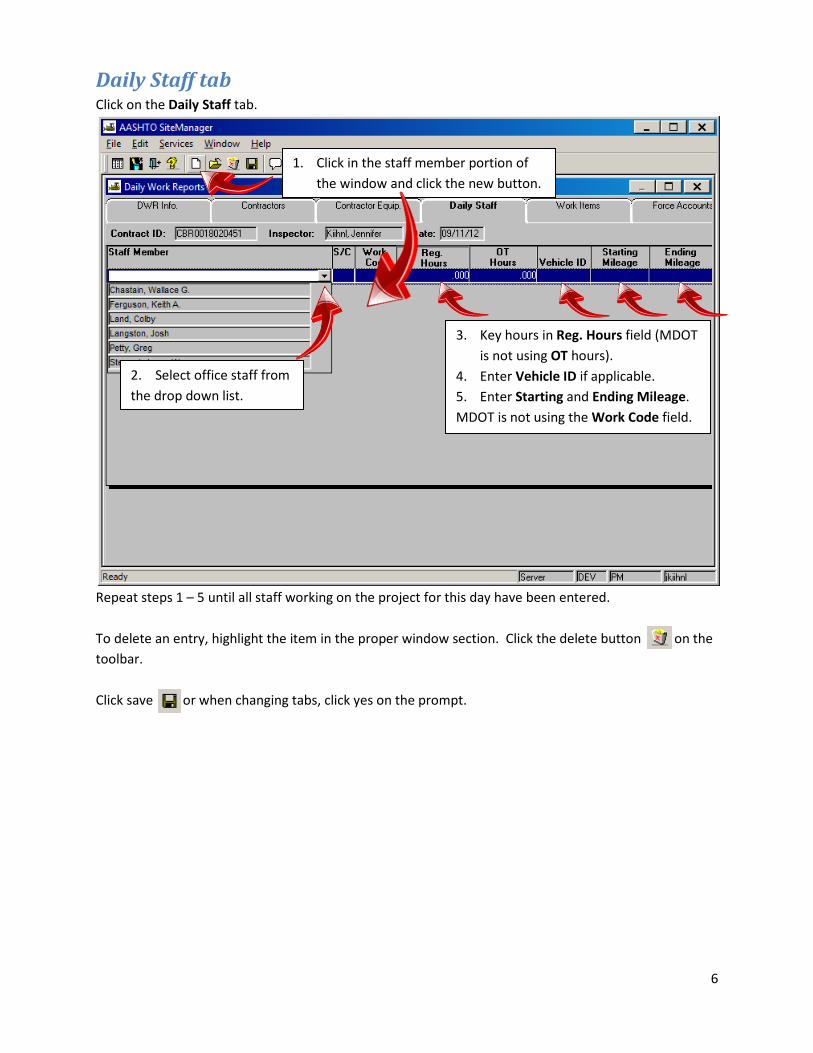
Daily Staff tab Click on the Daily Staff tab. Repeat steps 1 – 5 until all staff working on the project for this day have been entered. To delete an entry, highlight the item in the proper window section. Click the delete button on the toolbar. Click save or when changing tabs, click yes on the prompt.
1. Click in the staff member portion of the window and click the new button.
2. Select office staff from the drop down list.
3. Key hours in Reg. Hours field (MDOT is not using OT hours).
4. Enter Vehicle ID if applicable. 5. Enter Starting and Ending Mileage. MDOT is not using the Work Code field.
7
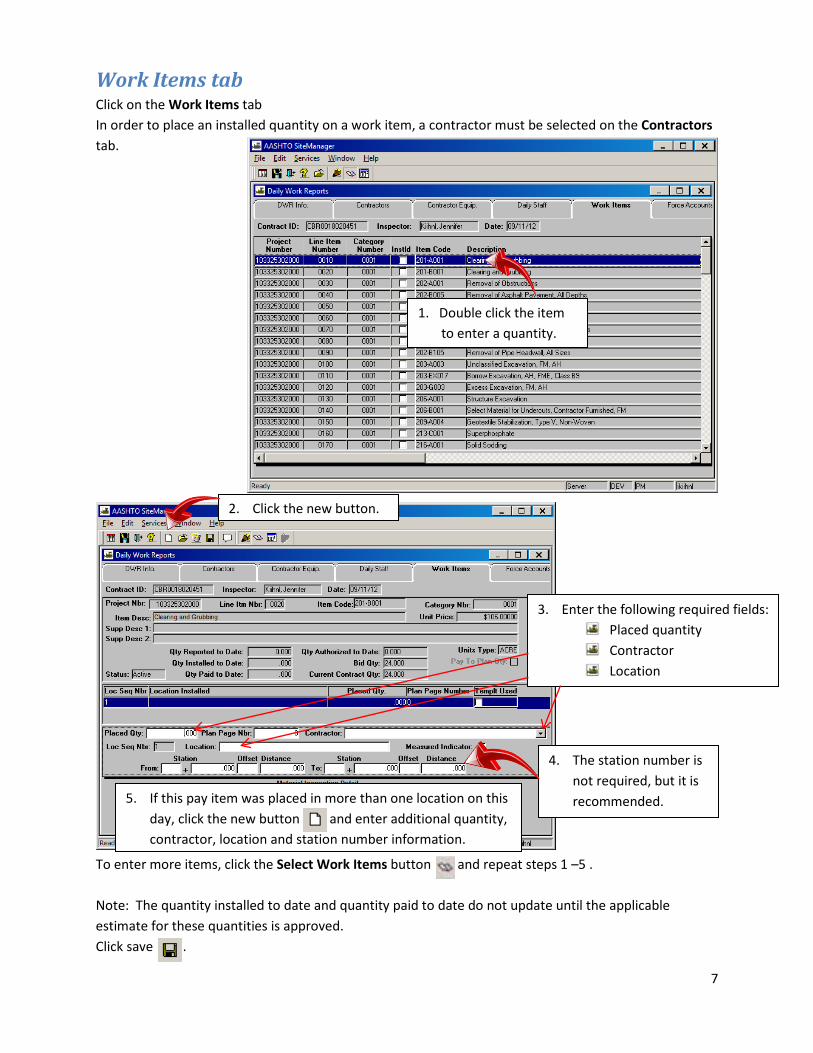
Work Items tab Click on the Work Items tab In order to place an installed quantity on a work item, a contractor must be selected on the Contractors tab. To enter more items, click the Select Work Items button and repeat steps 1 –5 . Note: The quantity installed to date and quantity paid to date do not update until the applicable estimate for these quantities is approved. Click save .
1. Double click the item to enter a quantity.
2. Click the new button.
3. Enter the following required fields: Placed quantity Contractor Location
4. The station number is not required, but it is recommended. 5. If this pay item was placed in more than one location on this
day, click the new button and enter additional quantity, contractor, location and station number information.
8
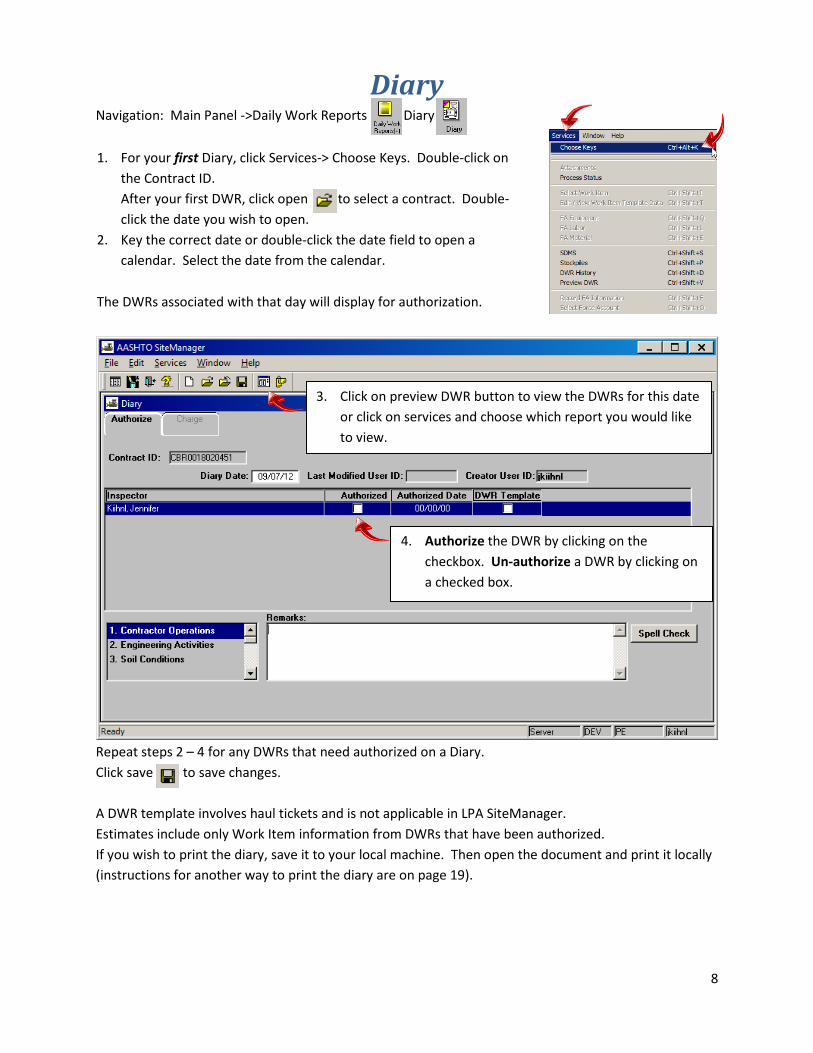
Diary Navigation: Main Panel ->Daily Work Reports Diary Repeat steps 2 – 4 for any DWRs that need authorized on a Diary. Click save to save changes. A DWR template involves haul tickets and is not applicable in LPA SiteManager. Estimates include only Work Item information from DWRs that have been authorized. If you wish to print the diary, save it to your local machine. Then open the document and print it locally (instructions for another way to print the diary are on page 19).
1. For your first Diary, click Services-> Choose Keys. Double-click on the Contract ID. After your first DWR, click open to select a contract. Double-click the date you wish to open.
2. Key the correct date or double-click the date field to open a calendar. Select the date from the calendar.
The DWRs associated with that day will display for authorization.
3. Click on preview DWR button to view the DWRs for this date or click on services and choose which report you would like to view.
4. Authorize the DWR by clicking on the checkbox. Un-authorize a DWR by clicking on a checked box.
9
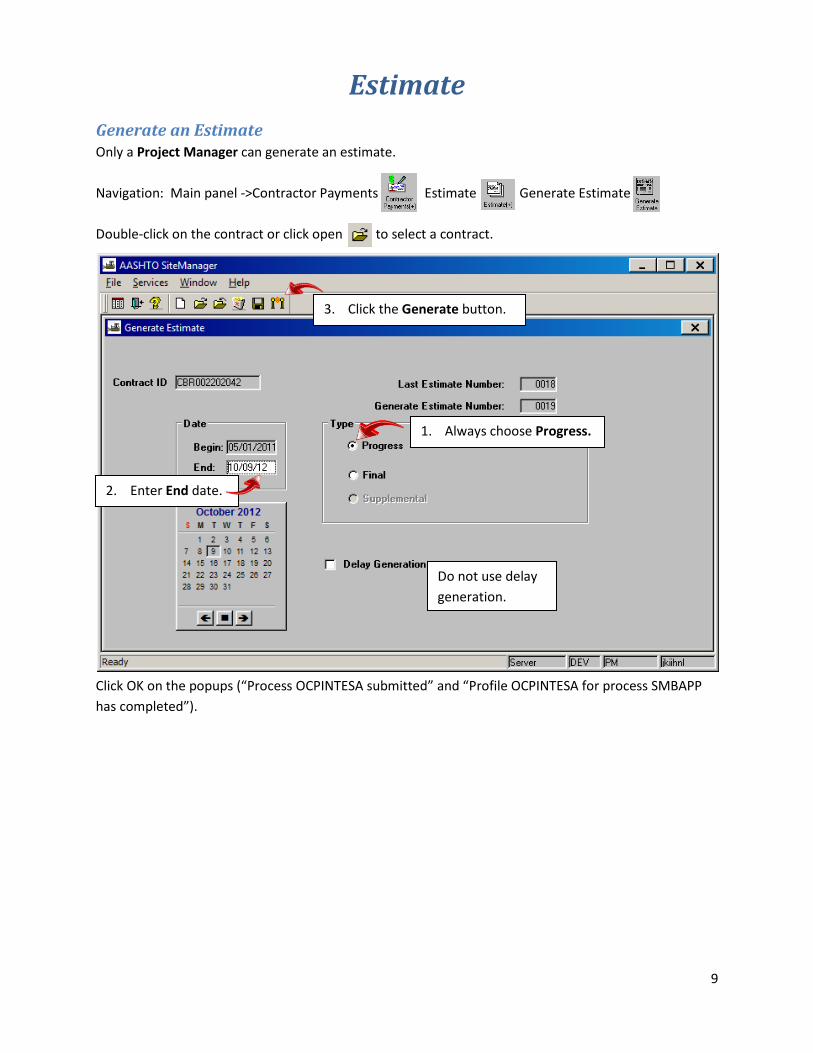
Estimate Generate an Estimate Only a Project Manager can generate an estimate. Navigation: Main panel ->Contractor Payments Estimate Generate Estimate Double-click on the contract or click open to select a contract. Click OK on the popups (“Process OCPINTESA submitted” and “Profile OCPINTESA for process SMBAPP has completed”).
1. Always choose Progress.
2. Enter End date.
Do not use delay generation.
3. Click the Generate button.
10
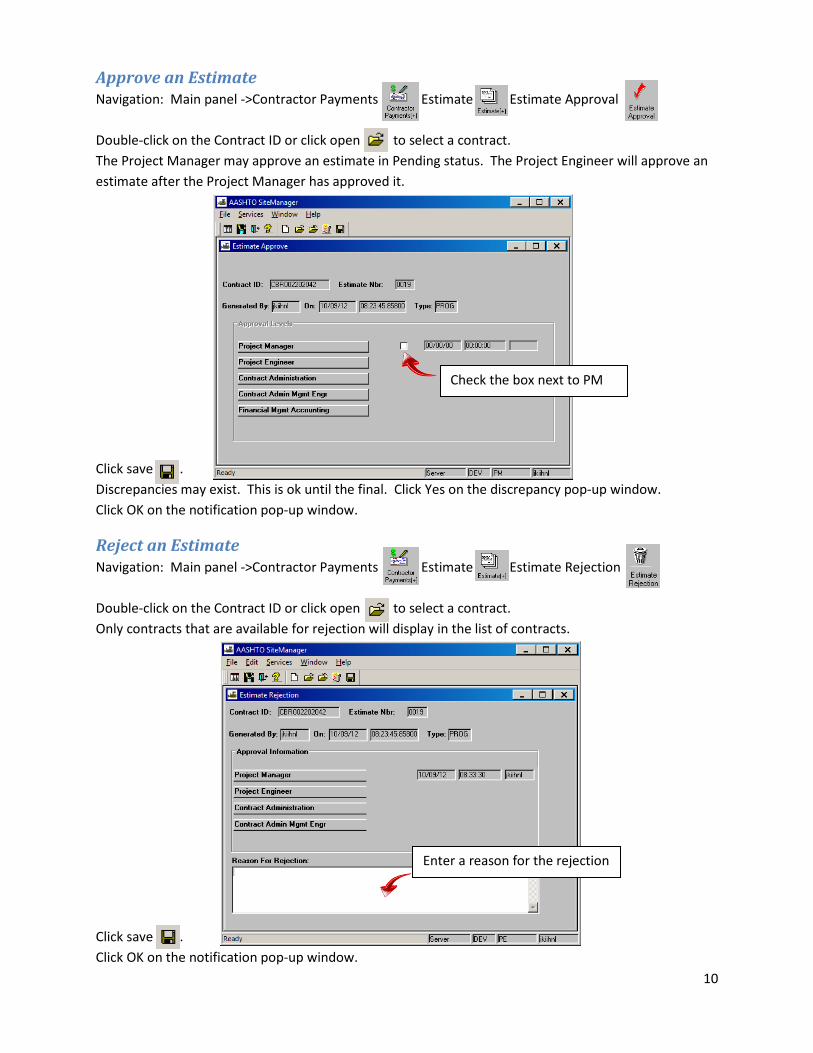
Approve an Estimate Navigation: Main panel ->Contractor Payments Estimate Estimate Approval Double-click on the Contract ID or click open to select a contract. The Project Manager may approve an estimate in Pending status. The Project Engineer will approve an estimate after the Project Manager has approved it. Click save . Discrepancies may exist. This is ok until the final. Click Yes on the discrepancy pop-up window. Click OK on the notification pop-up window.
Reject an Estimate Navigation: Main panel ->Contractor Payments Estimate Estimate Rejection Double-click on the Contract ID or click open to select a contract. Only contracts that are available for rejection will display in the list of contracts. Click save . Click OK on the notification pop-up window.
Check the box next to PM
Enter a reason for the rejection
11
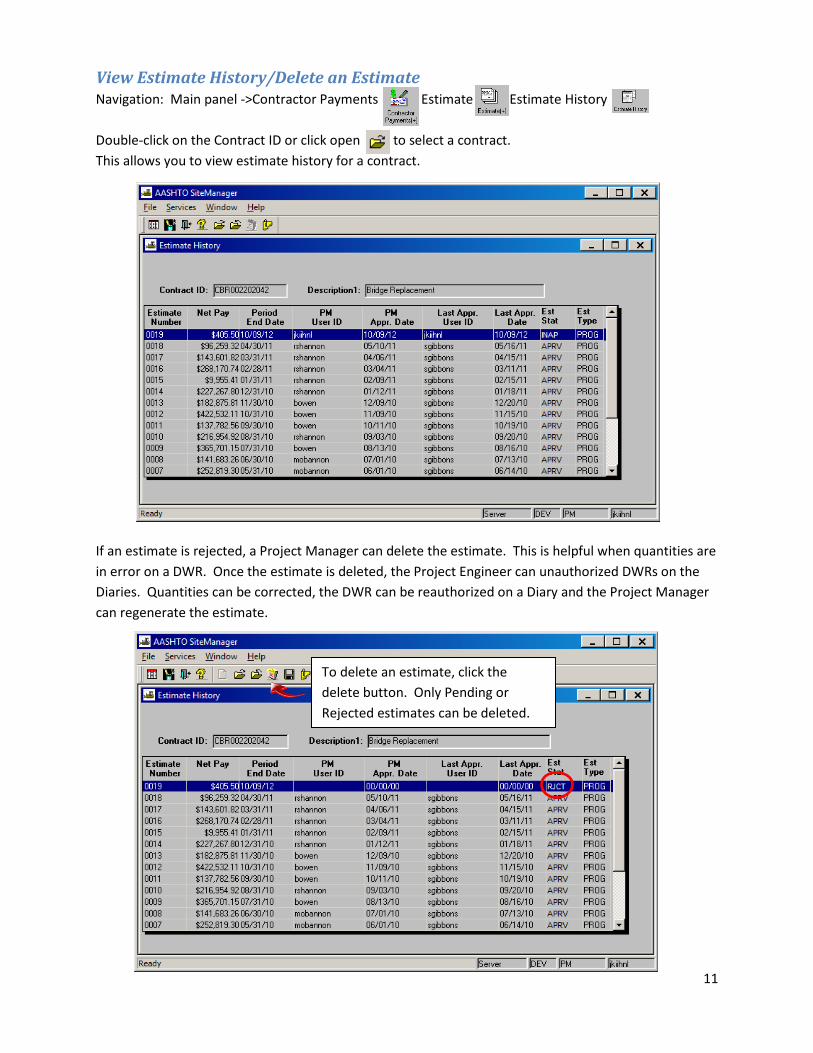
View Estimate History/Delete an Estimate Navigation: Main panel ->Contractor Payments Estimate Estimate History Double-click on the Contract ID or click open to select a contract. This allows you to view estimate history for a contract. If an estimate is rejected, a Project Manager can delete the estimate. This is helpful when quantities are in error on a DWR. Once the estimate is deleted, the Project Engineer can unauthorized DWRs on the Diaries. Quantities can be corrected, the DWR can be reauthorized on a Diary and the Project Manager can regenerate the estimate.
To delete an estimate, click the delete button. Only Pending or Rejected estimates can be deleted.
12
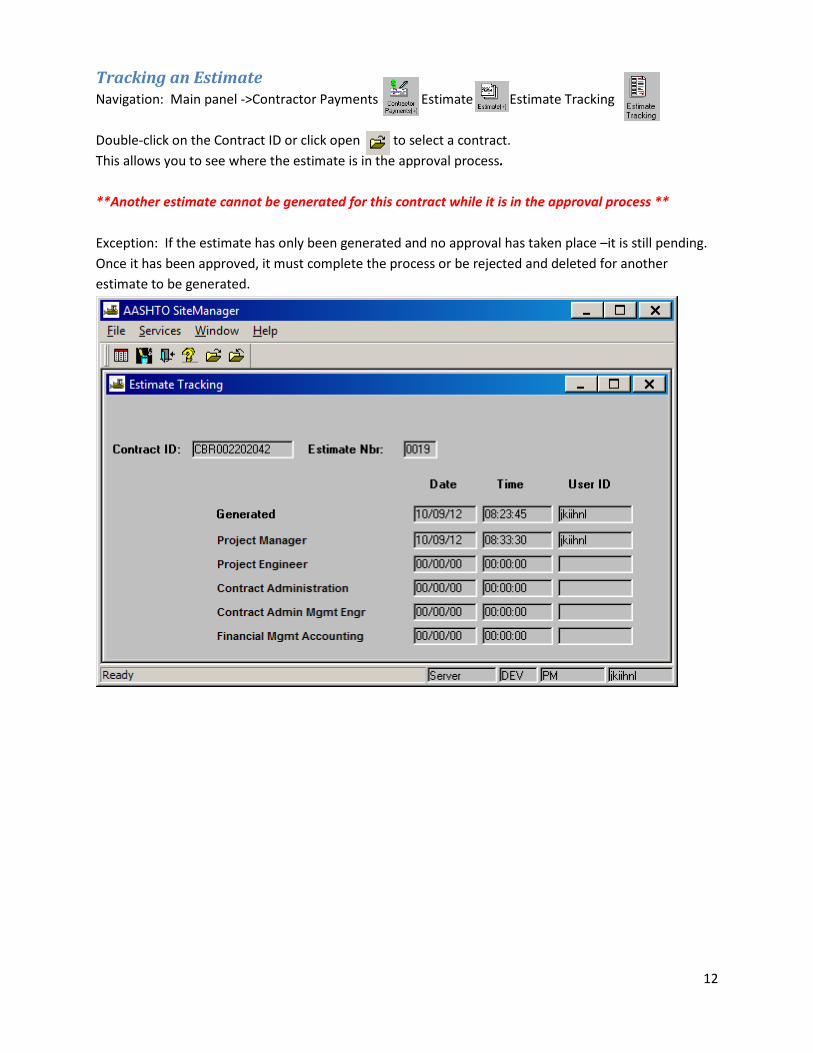
Tracking an Estimate Navigation: Main panel ->Contractor Payments Estimate Estimate Tracking Double-click on the Contract ID or click open to select a contract. This allows you to see where the estimate is in the approval process. **Another estimate cannot be generated for this contract while it is in the approval process ** Exception: If the estimate has only been generated and no approval has taken place –it is still pending. Once it has been approved, it must complete the process or be rejected and deleted for another estimate to be generated.
13
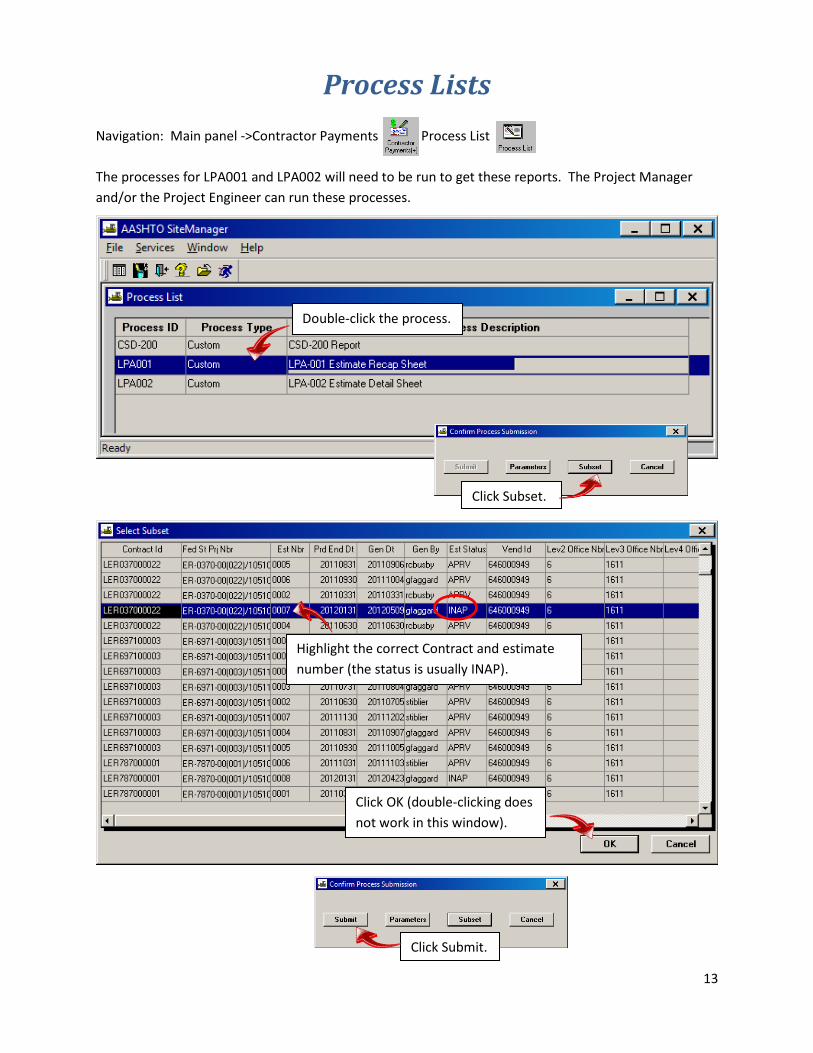
Process Lists Navigation: Main panel ->Contractor Payments Process List The processes for LPA001 and LPA002 will need to be run to get these reports. The Project Manager and/or the Project Engineer can run these processes.
Highlight the correct Contract and estimate number (the status is usually INAP).
Click Subset.
Double-click the process.
Click OK (double-clicking does not work in this window).
Click Submit.
14
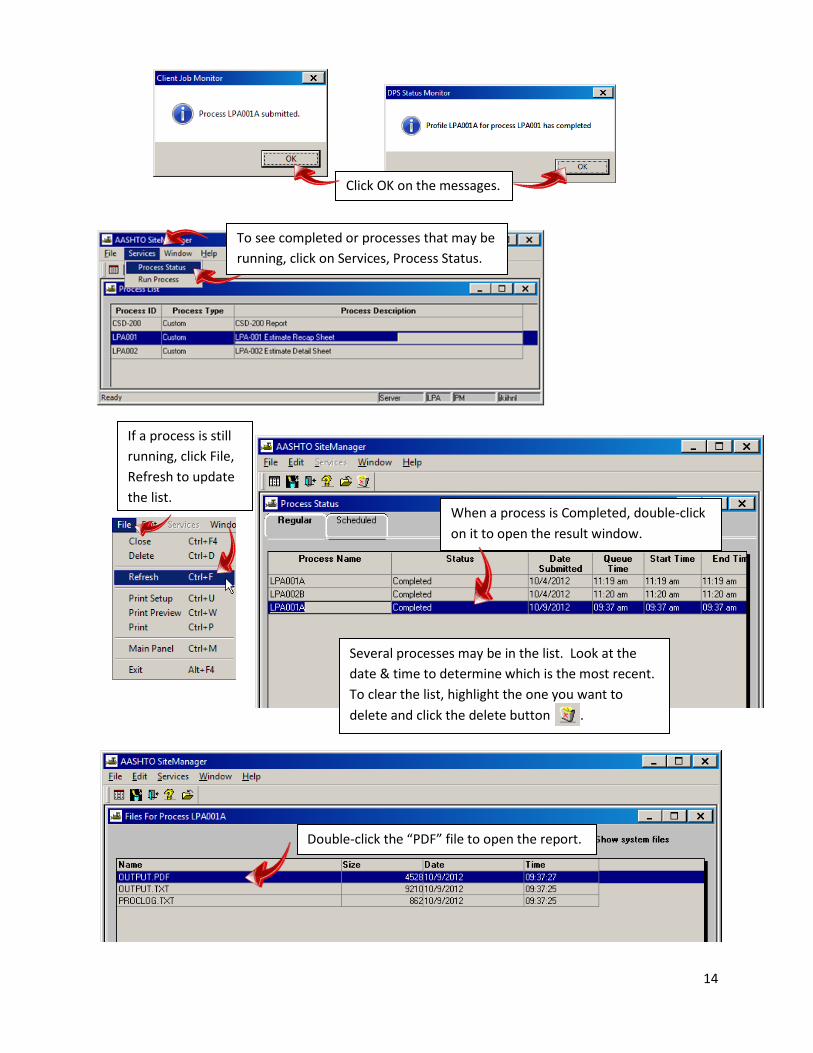
Click OK on the messages.
To see completed or processes that may be running, click on Services, Process Status.
If a process is still running, click File, Refresh to update the list.
When a process is Completed, double-click on it to open the result window.
Double-click the “PDF” file to open the report.
Several processes may be in the list. Look at the date & time to determine which is the most recent. To clear the list, highlight the one you want to delete and click the delete button .
15
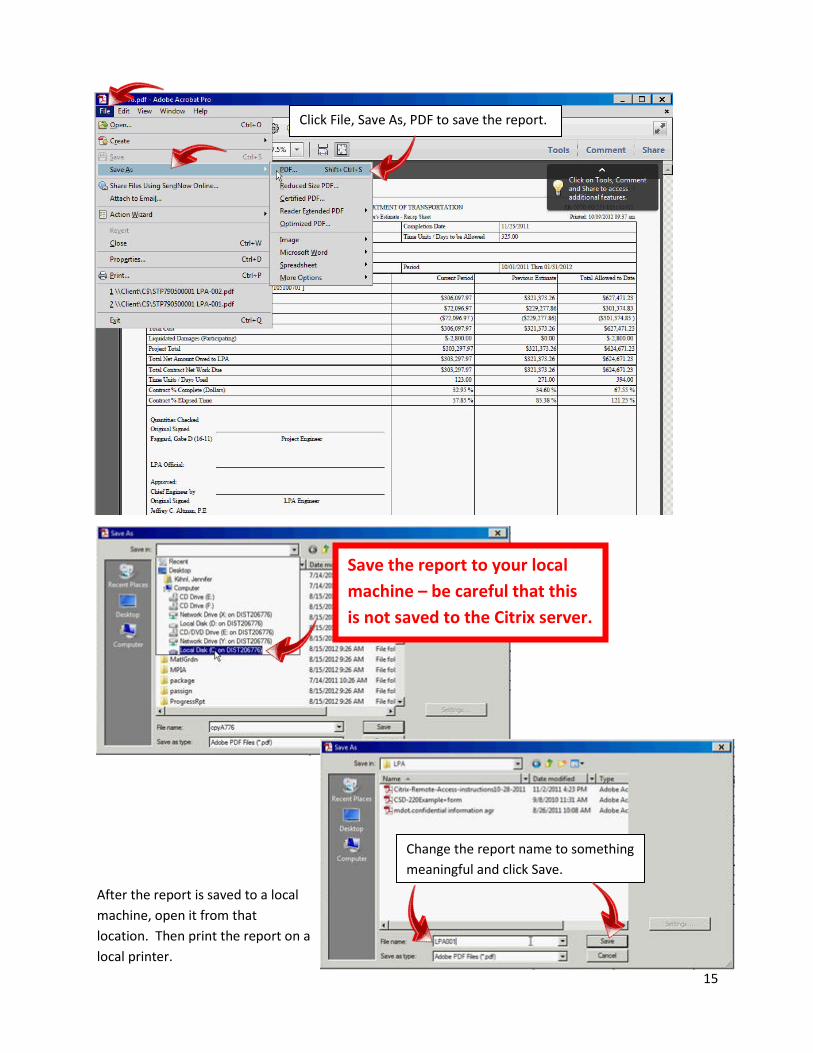
Change the report name to something meaningful and click Save.
Save the report to your local machine – be careful that this is not saved to the Citrix server.
Click File, Save As, PDF to save the report.
After the report is saved to a local machine, open it from that location. Then print the report on a local printer.
16
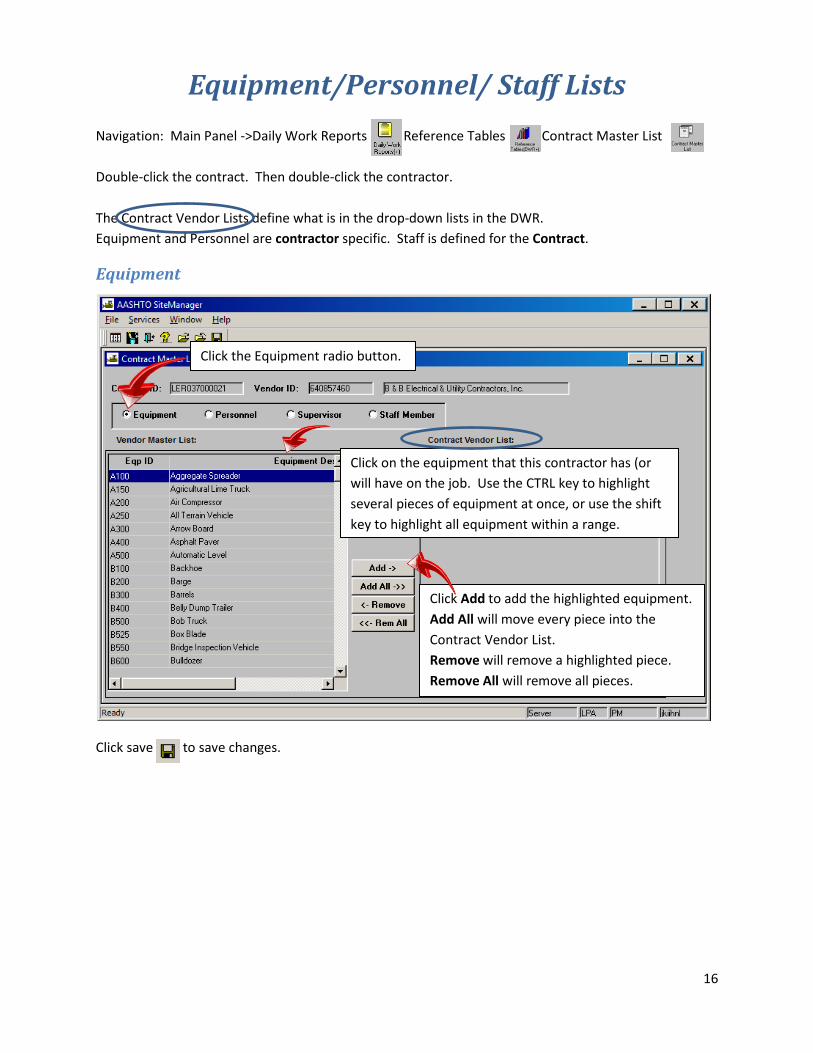
Equipment/Personnel/ Staff Lists Navigation: Main Panel ->Daily Work Reports Reference Tables Contract Master List Double-click the contract. Then double-click the contractor. The Contract Vendor Lists define what is in the drop-down lists in the DWR. Equipment and Personnel are contractor specific. Staff is defined for the Contract.
Equipment Click save to save changes.
Click the Equipment radio button.
Click on the equipment that this contractor has (or will have on the job. Use the CTRL key to highlight several pieces of equipment at once, or use the shift key to highlight all equipment within a range.
Click Add to add the highlighted equipment. Add All will move every piece into the Contract Vendor List. Remove will remove a highlighted piece. Remove All will remove all pieces.
17
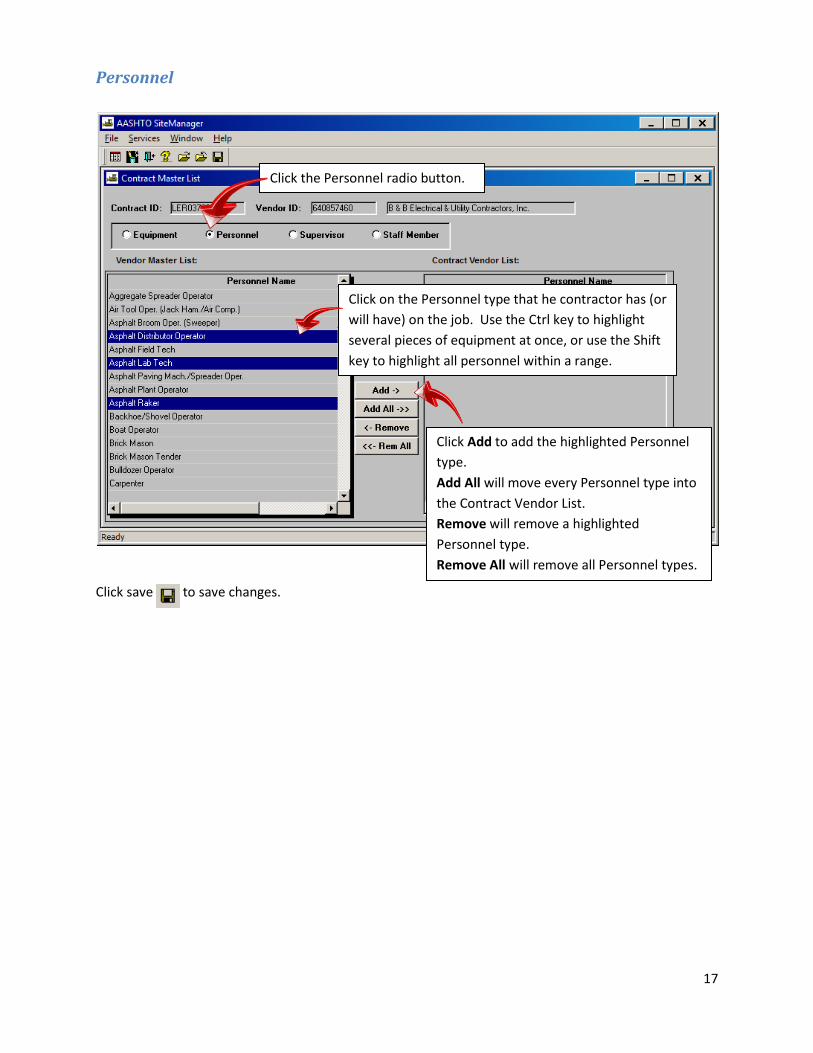
Personnel Click save to save changes.
Click the Personnel radio button.
Click on the Personnel type that he contractor has (or will have) on the job. Use the Ctrl key to highlight several pieces of equipment at once, or use the Shift key to highlight all personnel within a range.
Click Add to add the highlighted Personnel type. Add All will move every Personnel type into the Contract Vendor List. Remove will remove a highlighted Personnel type. Remove All will remove all Personnel types.
18
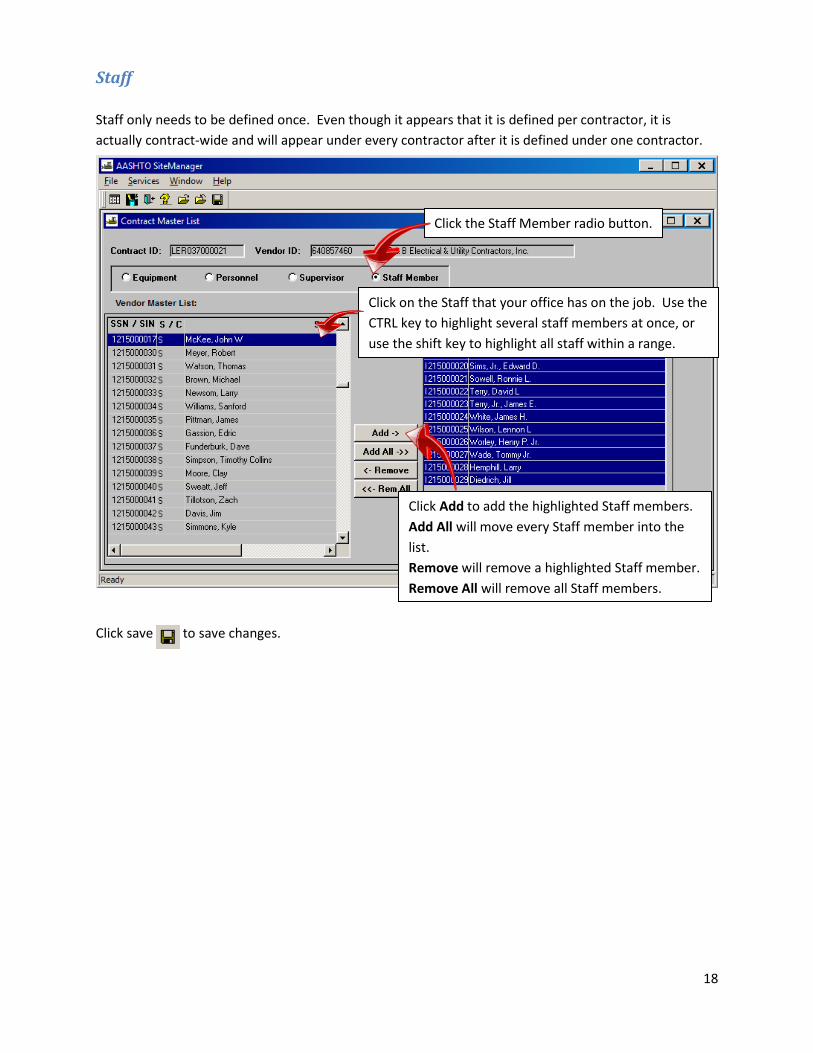
Staff Staff only needs to be defined once. Even though it appears that it is defined per contractor, it is actually contract-wide and will appear under every contractor after it is defined under one contractor. Click save to save changes.
Click the Staff Member radio button.
Click Add to add the highlighted Staff members. Add All will move every Staff member into the list. Remove will remove a highlighted Staff member. Remove All will remove all Staff members.
Click on the Staff that your office has on the job. Use the CTRL key to highlight several staff members at once, or use the shift key to highlight all staff within a range.
19
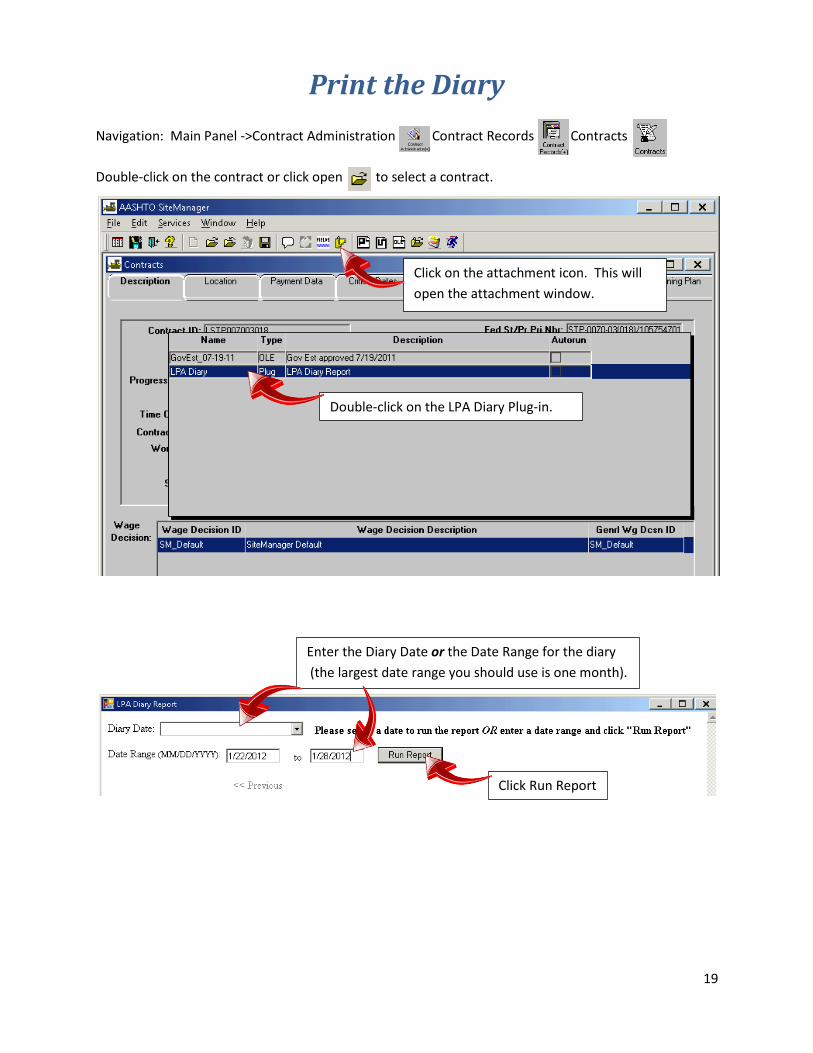
Print the Diary Navigation: Main Panel ->Contract Administration Contract Records Contracts Double-click on the contract or click open to select a contract.
Click on the attachment icon. This will open the attachment window.
Double-click on the LPA Diary Plug-in.
Click Run Report
Enter the Diary Date or the Date Range for the diary (the largest date range you should use is one month).
20
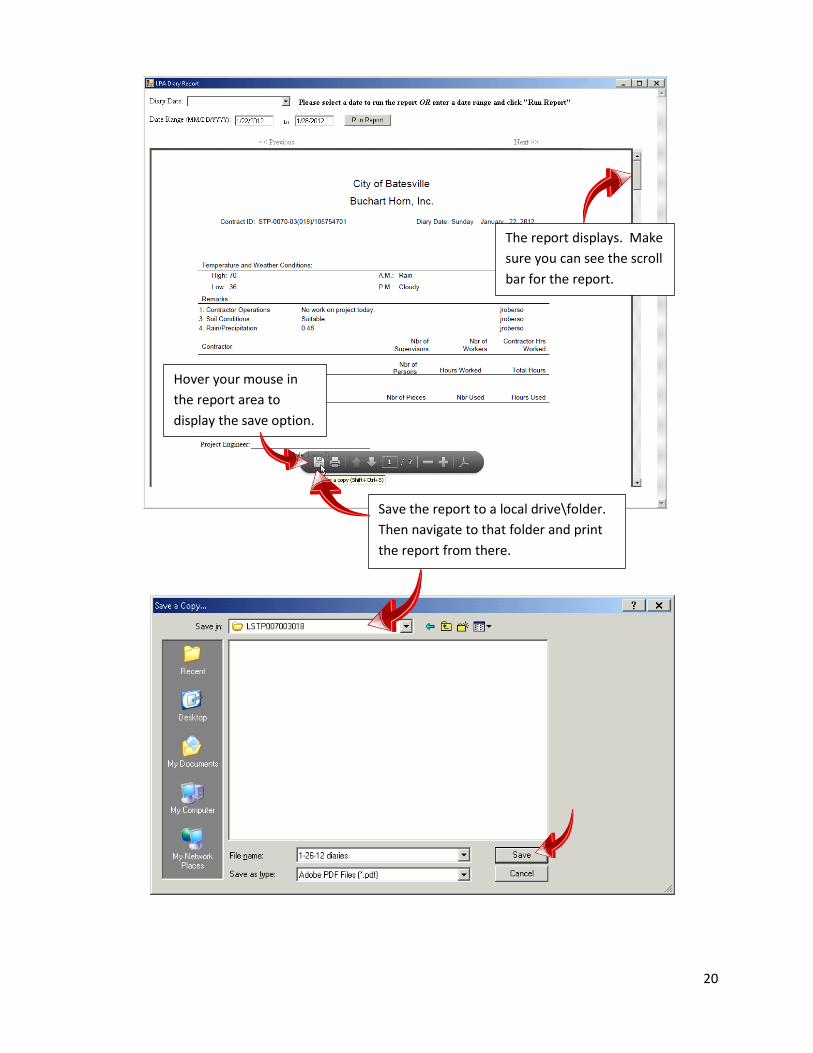
Hover your mouse in the report area to display the save option.
The report displays. Make sure you can see the scroll bar for the report.
Save the report to a local drive\folder. Then navigate to that folder and print the report from there.