Embed Size (px)
Citation preview

8/3/2019 M-Audio Fast Track Pro User Guide (en)
http://slidepdf.com/reader/full/m-audio-fast-track-pro-user-guide-en 1/17
Fast Track Pro
User Guide
8/3/2019 M-Audio Fast Track Pro User Guide (en)
http://slidepdf.com/reader/full/m-audio-fast-track-pro-user-guide-en 2/17
Legal Notices
This guide is copyrighted ©2010 by Avid Technology, Inc., with all rightsreserved. Under copyright laws, this guide may not be duplicated inwhole or in part without the written consent of Avid Technology, Inc.
Avid, M-Audio and Fast Track Pro are either trademarks or registered
trademarks of Avid Technology, Inc. All other trademarks containedherein are the property of their respective owners.
Product features, specications, system requirements, and availabilityare subject to change without notice.
Guide Part Number 9329-65014-00 REV A 05/10
Documentation Feedback
At Avid, we are always looking for ways to improve our documentation.If you have comments, corrections, or suggestions regarding ourdocumentation, email us at [email protected].
8/3/2019 M-Audio Fast Track Pro User Guide (en)
http://slidepdf.com/reader/full/m-audio-fast-track-pro-user-guide-en 3/17
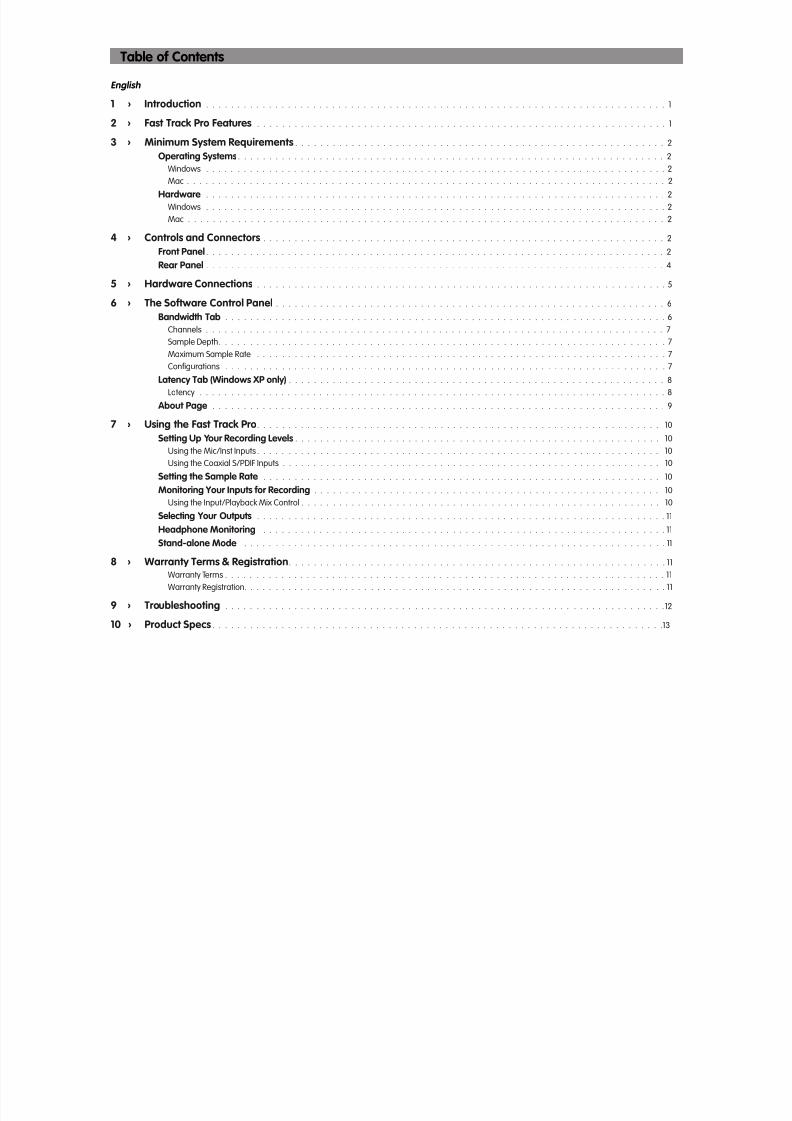
Table of Contents
English
1 › Introduction . . . . . . . . . . . . . . . . . . . . . . . . . . . . . . . . . . . . . . . . . . . . . . . . . . . . . . . . . . . . . . . . . . . . . . . . . 1
2 › Fast Track Pro Features . . . . . . . . . . . . . . . . . . . . . . . . . . . . . . . . . . . . . . . . . . . . . . . . . . . . . . . . . . . . . . . . . 1
3 › Minimum System Requirements . . . . . . . . . . . . . . . . . . . . . . . . . . . . . . . . . . . . . . . . . . . . . . . . . . . . . . . . . . . 2
Operating Systems . . . . . . . . . . . . . . . . . . . . . . . . . . . . . . . . . . . . . . . . . . . . . . . . . . . . . . . . . . . . . . . . . . . . 2
Windows . . . . . . . . . . . . . . . . . . . . . . . . . . . . . . . . . . . . . . . . . . . . . . . . . . . . . . . . . . . . . . . . . . . . . . . . . 2
Mac . . . . . . . . . . . . . . . . . . . . . . . . . . . . . . . . . . . . . . . . . . . . . . . . . . . . . . . . . . . . . . . . . . . . . . . . . . . . 2
Hardware . . . . . . . . . . . . . . . . . . . . . . . . . . . . . . . . . . . . . . . . . . . . . . . . . . . . . . . . . . . . . . . . . . . . . . . . . 2
Windows . . . . . . . . . . . . . . . . . . . . . . . . . . . . . . . . . . . . . . . . . . . . . . . . . . . . . . . . . . . . . . . . . . . . . . . . . 2
Mac . . . . . . . . . . . . . . . . . . . . . . . . . . . . . . . . . . . . . . . . . . . . . . . . . . . . . . . . . . . . . . . . . . . . . . . . . . . . 2
4 › Controls and Connectors . . . . . . . . . . . . . . . . . . . . . . . . . . . . . . . . . . . . . . . . . . . . . . . . . . . . . . . . . . . . . . . . 2
Front Panel . . . . . . . . . . . . . . . . . . . . . . . . . . . . . . . . . . . . . . . . . . . . . . . . . . . . . . . . . . . . . . . . . . . . . . . . . 2
Rear Panel . . . . . . . . . . . . . . . . . . . . . . . . . . . . . . . . . . . . . . . . . . . . . . . . . . . . . . . . . . . . . . . . . . . . . . . . . 4
5 › Hardware Connections . . . . . . . . . . . . . . . . . . . . . . . . . . . . . . . . . . . . . . . . . . . . . . . . . . . . . . . . . . . . . . . . . 5
6 › The Software Control Panel . . . . . . . . . . . . . . . . . . . . . . . . . . . . . . . . . . . . . . . . . . . . . . . . . . . . . . . . . . . . . . 6
Bandwidth Tab . . . . . . . . . . . . . . . . . . . . . . . . . . . . . . . . . . . . . . . . . . . . . . . . . . . . . . . . . . . . . . . . . . . . . . 6
Channels . . . . . . . . . . . . . . . . . . . . . . . . . . . . . . . . . . . . . . . . . . . . . . . . . . . . . . . . . . . . . . . . . . . . . . . . . 7
Sample Depth . . . . . . . . . . . . . . . . . . . . . . . . . . . . . . . . . . . . . . . . . . . . . . . . . . . . . . . . . . . . . . . . . . . . . . . 7Maximum Sample Rate . . . . . . . . . . . . . . . . . . . . . . . . . . . . . . . . . . . . . . . . . . . . . . . . . . . . . . . . . . . . . . . . . 7
Congurations . . . . . . . . . . . . . . . . . . . . . . . . . . . . . . . . . . . . . . . . . . . . . . . . . . . . . . . . . . . . . . . . . . . . . . 7
Latency Tab (Windows XP only) . . . . . . . . . . . . . . . . . . . . . . . . . . . . . . . . . . . . . . . . . . . . . . . . . . . . . . . . . . . . 8
Latency . . . . . . . . . . . . . . . . . . . . . . . . . . . . . . . . . . . . . . . . . . . . . . . . . . . . . . . . . . . . . . . . . . . . . . . . . . 8
About Page . . . . . . . . . . . . . . . . . . . . . . . . . . . . . . . . . . . . . . . . . . . . . . . . . . . . . . . . . . . . . . . . . . . . . . . . 9
7 › Using the Fast Track Pro. . . . . . . . . . . . . . . . . . . . . . . . . . . . . . . . . . . . . . . . . . . . . . . . . . . . . . . . . . . . . . . . 10
Setting Up Your Recording Levels . . . . . . . . . . . . . . . . . . . . . . . . . . . . . . . . . . . . . . . . . . . . . . . . . . . . . . . . . . 10
Using the Mic/Inst Inputs . . . . . . . . . . . . . . . . . . . . . . . . . . . . . . . . . . . . . . . . . . . . . . . . . . . . . . . . . . . . . . . . 10
Using the Coaxial S/PDIF Inputs . . . . . . . . . . . . . . . . . . . . . . . . . . . . . . . . . . . . . . . . . . . . . . . . . . . . . . . . . . . . 10
Setting the Sample Rate . . . . . . . . . . . . . . . . . . . . . . . . . . . . . . . . . . . . . . . . . . . . . . . . . . . . . . . . . . . . . . . 10
Monitoring Your Inputs for Recording . . . . . . . . . . . . . . . . . . . . . . . . . . . . . . . . . . . . . . . . . . . . . . . . . . . . . . . 10
Using the Input/Playback Mix Control . . . . . . . . . . . . . . . . . . . . . . . . . . . . . . . . . . . . . . . . . . . . . . . . . . . . . . . . . 10
Selecting Your Outputs . . . . . . . . . . . . . . . . . . . . . . . . . . . . . . . . . . . . . . . . . . . . . . . . . . . . . . . . . . . . . . . . . 11
Headphone Monitoring . . . . . . . . . . . . . . . . . . . . . . . . . . . . . . . . . . . . . . . . . . . . . . . . . . . . . . . . . . . . . . . . 11
Stand-alone Mode . . . . . . . . . . . . . . . . . . . . . . . . . . . . . . . . . . . . . . . . . . . . . . . . . . . . . . . . . . . . . . . . . . . 11
8 › Warranty Terms & Registration. . . . . . . . . . . . . . . . . . . . . . . . . . . . . . . . . . . . . . . . . . . . . . . . . . . . . . . . . . . . 11
Warranty Terms . . . . . . . . . . . . . . . . . . . . . . . . . . . . . . . . . . . . . . . . . . . . . . . . . . . . . . . . . . . . . . . . . . . . . . 11
Warranty Registration . . . . . . . . . . . . . . . . . . . . . . . . . . . . . . . . . . . . . . . . . . . . . . . . . . . . . . . . . . . . . . . . . . . 11
9 › Troubleshooting . . . . . . . . . . . . . . . . . . . . . . . . . . . . . . . . . . . . . . . . . . . . . . . . . . . . . . . . . . . . . . . . . . . . . .12
10 › Product Specs . . . . . . . . . . . . . . . . . . . . . . . . . . . . . . . . . . . . . . . . . . . . . . . . . . . . . . . . . . . . . . . . . . . . . . . .13

8/3/2019 M-Audio Fast Track Pro User Guide (en)
http://slidepdf.com/reader/full/m-audio-fast-track-pro-user-guide-en 4/17
1 › Introduction
Thank you for choosing the M-Audio Fast Track Pro. The Fast Track Pro has been designed to give you a professional, portable audio andMIDI interface for your Windows or Macintosh laptop or desktop computer. Using the convenience and dependability of the industry-standard USB bus, the Fast Track Pro provides your computer with an exceptionally exible audio interface offering unequalled routing
power and versatility, while delivering high-resolution 24-bit audio to and from your computer at sampling rates up to 96kHz. The FastTrack Pro also gives you sixteen channels of MIDI in and out—all in a sleek, rugged, lightweight and highly portable design. It connectsto your computer with a single USB cable—no tools needed, no cards to install, and no bulky external power supply.
The Fast Track Pro was created with the home or portable studio user in mind. With two high-quality microphone/instrument preamps,the Fast Track Pro gives you a great sounding, easy-to-use interface for your digital audio software. The convenient front panel hybridXLR/TRS inputs can accommodate balanced or unbalanced line or instrument levels, with switchable phantom power and individual–20dB pads. The rear panel offers you insert points for inputs one and two, two balanced TRS analog outputs and four unbalanced RCAconnectors, as well as dedicated S/PDIF inputs and outputs, for a total of four inputs and four outputs.
The front panel is also set up for easy monitoring, with a variable Input/Playback knob and mono switch, dedicated headphone levelcontrol and A/B switch for headphone signal source selection. Signal and clipping indicators, MIDI input and output LEDs, and phantompower indicators make the Fast Track Pro an ideal solution for beginning and advanced computer recording users.
Even if you’re an experienced musician and digital recording enthusiast, please take some time to read through this owner’s manual andfamiliarize yourself with the Fast Track Pro’s features and operation. You may also want to refer to your audio software’s documentationto better understand how the Fast Track Pro’s features may be integrated with the program. Your experience and enjoyment of your FastTrack Pro will be greatly enhanced by a good working knowledge of your audio software.
2 › Fast Track Pro Features< Two front-panel balanced/unbalanced mic/instrument/line inputs on combo XLR/TRS jacks, with individual instrument/line level
switches and –20dB pad switches
< Two balanced/unbalanced outputs on TRS jacks
< Two inserts on TRS jacks
< Four unbalanced outputs on RCA jacks
< S/PDIF digital I/O on coaxial jacks
< Signal and Clip indicators for inputs 1 & 2
< Two mic pre input level controls
< Supports sample rates up to 96kHz with full 24-bit resolution
< Functions as a stand-alone 24-bit/44.1kHz A/D converter
< MIDI Input and Output with front-panel MIDI I/O indicators
< Power LED
< Phantom Power switch with indicator LED
< Mono switch for input monitoring
< Variable Input/Playback control for input monitoring
< Output Level control
< A/B switch for headphone source selection
< Headphone Level knob
< Front-panel headphone output
< Output Level control
< Rear-panel KensingtonTM lock port
< Driver support for WDM/MME (Windows XP), CoreAudio (MacOS X (v10.3.9 or later), and ASIO2.
English
8/3/2019 M-Audio Fast Track Pro User Guide (en)
http://slidepdf.com/reader/full/m-audio-fast-track-pro-user-guide-en 5/17
3 › Minimum System Requirements
Operating Systems
WindowsThe Fast Track Pro is supported under Windows XP, with Service Pack 2 or later only. It is not supported under Windows 2000, Windows98, 98SE or Windows ME. Visit the Windows update web pages to make certain you have the most current updates and xes suppliedby Microsoft.
MacThe Fast Track Pro is supported under Mac OS X version 10.3.9, 10.4.2 or later. Earlier versions of Mac operating systems are notsupported.
Hardware
Windows< Pentium 3 – 500 MHz (higher speed CPU may be necessary for laptops)
< 256MB RAM
< DirectX 9.0c or higher
< Windows XP (SP2)
(Windows 2000, 98, 98SE, ME & NT not supported)
Mac< Macintosh G3** 600 / G4** 667MHz (higher speed may be necessary for laptops)
< 256MB RAM
< OS X 10.3.9 or later (earlier versions of Mac operating systems are not supported)
*M-Audio suggests that you also check the minimum system requirements for your software, as they may greater than theabove.
** G3/G4 accelerator cards not supported; native FireWire ports required.
4 › Controls and Connectors
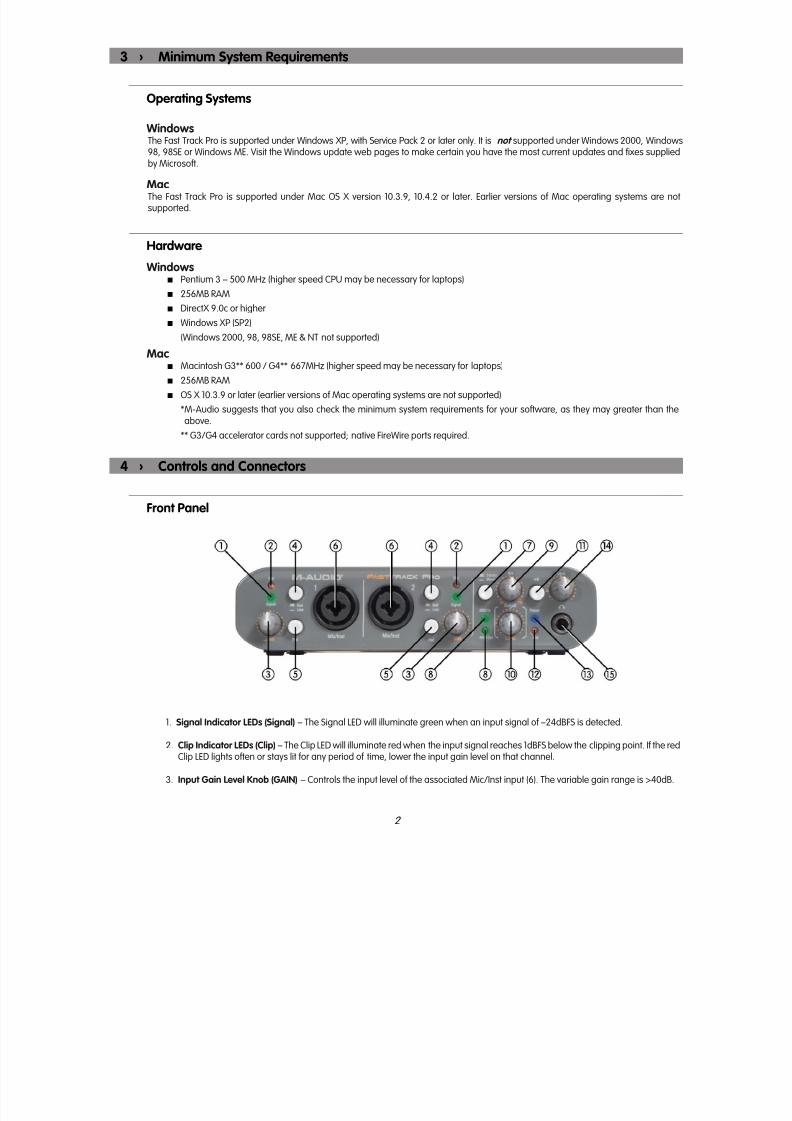
Front Panel
1. Signal Indicator LEDs (Signal) – The Signal LED will illuminate green when an input signal of –24dBFS is detected.
2. Clip Indicator LEDs (Clip) – The Clip LED will illuminate red when the input signal reaches 1dBFS below the clipping point. If the redClip LED lights often or stays lit for any period of time, lower the input gain level on that channel.
3. Input Gain Level Knob (GAIN) – Controls the input level of the associated Mic/Inst input (6). The variable gain range is >40dB.
8/3/2019 M-Audio Fast Track Pro User Guide (en)
http://slidepdf.com/reader/full/m-audio-fast-track-pro-user-guide-en 6/17
4. Instrument/Line Selector Button (Inst/Line) – This button selects the input level of the front panel 1⁄4” inputs. In the out position,the inputs are set to accept an instrument level signal (such as that from a guitar or bass) while in the in position they are set toaccept a line level input (such as that from a keyboard or drum machine). Please note that the XLR input level is unaffected bythis switch.
5. Pad Button (Pad) – With this switch in the in position, a –20dB pad is inserted into the input circuit, lowering the input level. Use
this pad when the input level of your analog signal is too hot (as indicated by illumination of the Clip LED (2)), even with the GAINknob (3) at or near minimum.
6. Microphone/Instrument Inputs (Mic/Inst) – These Neutrik hybrid connectors will each accept a low-impedance mic level signalon a standard three-pin balanced XLR or TRS plug, or a high-impedance instrument level signal on an unbalanced 1/4” TSplug.
7. Stereo/Mono Button (Stereo/Mono) – This button toggles the direct input monitoring between stereo and mono operation. InMono mode, an input will be heard equally in the left and right of the headphones. In Stereo mode, input 1 will be heard in theleft while input 2 will be heard in the right.
8. MIDI Input/Output Indicator LEDs (MIDI In/MIDI Out) – These LEDs display MIDI input and output activity. They will light wheneverMIDI data is seen at the rear panel MIDI output (20) or MIDI input (21).
9. Input/Playback Mix Level Knob (Mix IN, PB) – This knob controls the audio mix sent to the Line Outputs, fading between theinput signals (input monitoring) and the output signal from your audio application software. When turned fully counter-clockwise(IN position), only the input signals are heard at the line outputs. When turned fully clockwise (PB position), only the output signalfrom your DAW software is heard at the line outputs.
10. Output Level Knob (Output Level) – This knob controls the signal level at the line outputs. This control is independent from the
Level knob (14).
11. A/B Monitor Selector Button (A/B) – This switch selects the output source sent to the Level knob (14). In the A (out) position, themain line output signal is sent to the headphone outputs. In the B (in) position, the signal assigned to the S/PDIF output is sentto the headphone outputs.
12. Phantom Power Indicator LED (48V) – This LED lights to indicate the presence of 48V phantom power at the front-panel XLRinputs, as activated by the rear-panel Phantom Power switch (22).
13. Power Indicator LED (Power) – This LED lights when the Power switch (16) is activated, with the unit receiving power from either
the host computer’s USB bus, or from the (optional) external power supply.
14. Headphone Output Level Knob (Level) – This knob controls the output level to the Headphone output (15). It is independent of the main Output Level control knob (10).
15. Headphone Output – This is a 1 ⁄4” stereo TRS jack, designed to drive a pair of stereo headphones. The output level is controlledby the Level knob (14), and its source is selected by the A/B button (11).
8/3/2019 M-Audio Fast Track Pro User Guide (en)
http://slidepdf.com/reader/full/m-audio-fast-track-pro-user-guide-en 7/17
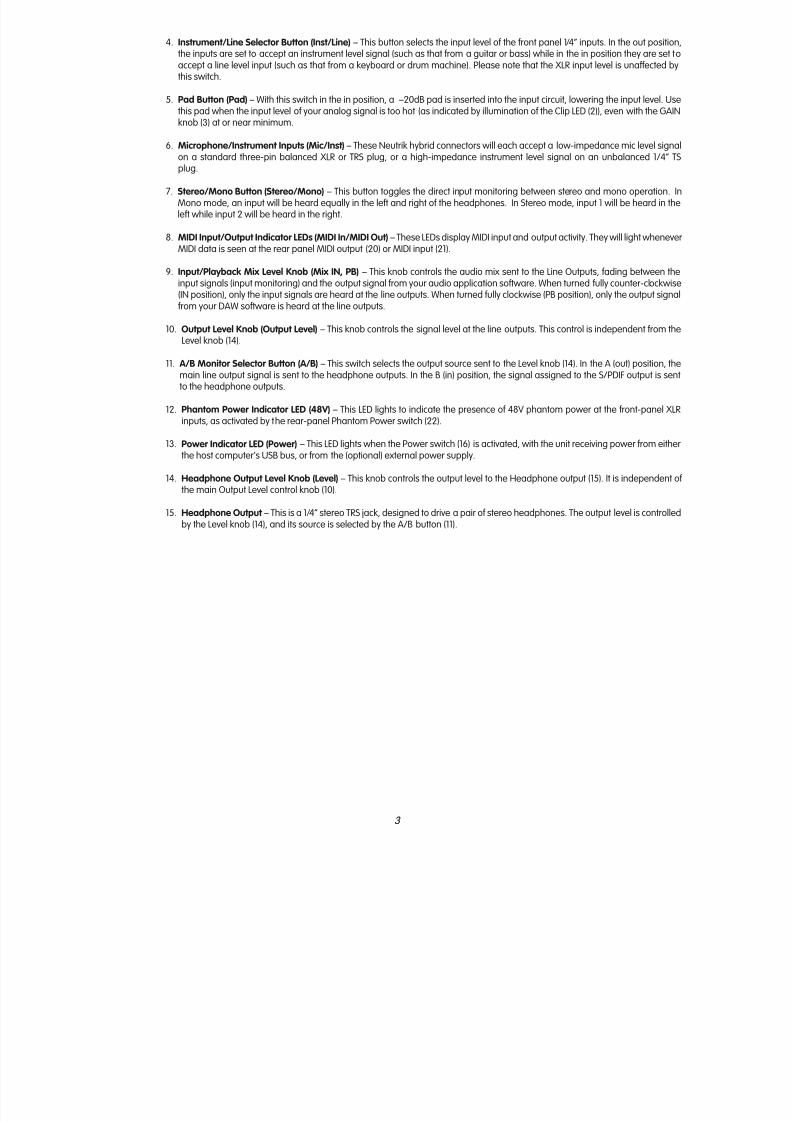
Rear Panel
16. Power Button (Power) – Pressing this button will power on the Fast Track Pro, illuminating the front-panel Power LED (13). Theunit must be connected to a functioning host computer’s USB bus, or to the optional external power supply.
17. Kensington TM Lock Port – This connector is compatible with Kensington® security cables to protect your device from theft.
7.00+.26–.00
3.00 +.26–.00
4 * R 1.00 max
Kensington Security SlotAll measurements are in millimeters
Slot Clearance—Side viewAll measurements are in millimeters
Slot Outside ClearanceAll measurements are in millimeters
Slot Inside ClearanceAll measurements are in millimeters
R 3.50
Security Slot SpecificationsLock Clearance Specifications and Electrical ConsiderationsThe Notebook MicroSaver has an interference volume insidethe computer equipment it secures. There should not be anyelectrical components adjacent to the slot, and the MicroSaverproduct should never be in contact with any electricalcomponents.
Notes:1. Interpret dimensions and tolerances per ASME Y14.5M-1994.
2. All indicated dimensions are in millimeters. Indicatedvolume to be left free and clear of obstructions. Cable ringcan rotate 360 degrees with respect to hole.
R18.50Cable ring canrotate 360° withrespect to slot
R30.00Lock at base
Min. clearance
22.60
26.607.70
Cable
Rotating cable
ring
Wall thicknessrange includingmetal backing2.50 to 4.00
Metal backingrecommended> 0.8 stainlesssteel
Kensington Technology Group

8/3/2019 M-Audio Fast Track Pro User Guide (en)
http://slidepdf.com/reader/full/m-audio-fast-track-pro-user-guide-en 8/17
18. Power Supply Connector (9V DC 500 mA) – Connect the optional 9V DC 500mA power supply to this jack when using the FastTrack Pro as a stand-alone 24-bit A/D converter. Use the optional power supply to power the Fast Track Pro.
19. USB Input (USB) – Connect a standard USB cable to this port, connecting the other end to your host computer.
20. MIDI Output (MIDI Out) – Connect to the MIDI input of your controller or other MIDI device.
21. MIDI Input (MIDI In) – Connect to the MIDI output of your controller or other MIDI device.
22. Phantom Power Switch (48V PH Power) – Sliding this switch activates the phantom power circuitry, sending 48V power to thefront-panel XLR inputs for use with condenser microphones requiring external power.
23. S/PDIF Output (S/PDIF Out) – Digital output on coaxial (RCA-type) connector. The S/PDIF Out is activated by selecting outputs 3and 4 in the Control Panel (see section 7). The S/PDIF output signal is duplicated on Outputs 3 and 4 (26). This output will alsosupport pass-through of AC-3 or DTS encoded surround formats.
NOTE: When AC-3 or DTS encoded signals are passed through this output, all analog input and output will be muted.
24. S/PDIF Input (S/PDIF In) – Digital input on coaxial (RCA-type) connector. This input will accept digital input signal at any of thesupported sample rates.
25. Unbalanced Outputs 1 and 2 (Outputs 1/2) – These are unbalanced outputs on RCA connectors. The signal to these outputsmirrors the signal to TRS Outputs 1 and 2 (27).
26. Unbalanced Outputs 3 and 4 (Outputs 3/4) – These are unbalanced outputs on RCA connectors. The signal to these connectorsmirrors the signal to the S/PDIF outputs (23), and is activated by selecting outputs 3 and 4 in the control panel (see section 7).
27. Balanced Outputs 1 and 2 (TRS Outputs 1/2) – These are balanced 1⁄4” TRS jacks. The output signal to these jacks is controlledby the front-panel Output Level (10), and Input/Playback Mix Level.
28. Inserts 1 and 2 (Insert 1 / Insert 2) – These 1⁄4” TRS jacks are congured to connect to an analog outboard effect (compressor/limiter, delay, reverb, etc.), inserting the effect between the preamp and the A/D converter. These inserts are only activewhen a connector is inserted, and are otherwise bypassed. The TRS jack is congured as follows: Tip=Send; Ring=Return;Sleeve=Ground.
5 › Hardware Connections< Connect the Fast Track Pro’s Balanced Outputs 1 and 2 to your amplier, powered monitors or mixer.
< Connect your outboard effects units or dynamic processors to the Fast Track Pro’s Insert 1 and Insert 2 jacks, using an insert-congured Y-cable (balanced TRS-to-dual 1/4-inch mono).
< Connect your S/PDIF digital equipment (DAT or CD recorder, etc.) to the Fast Track Pro’s S/PDIF digital in and out connectors.(NOTE : the S/PDIF output is only active when Outputs 3 and 4 are activated in the control panel.)
<
Connect your headphones to the Fast Track Pro’s front-panel headphone output.
< Connect a microphone (using XLR or TRS/TS connector) or instrument (using TRS/TS connector only) such as an electric guitaror bass to the front-panel Mic/Inst input channels 1 and 2. If connecting a 1⁄4” connector, make sure the Inst/Line button is set tothe correct input level.
< Connect your MIDI device’s MIDI output to the Fast Track Pro’s MIDI input.
< Connect your MIDI device’s MIDI input to the Fast Track Pro’s MIDI output.
8/3/2019 M-Audio Fast Track Pro User Guide (en)
http://slidepdf.com/reader/full/m-audio-fast-track-pro-user-guide-en 9/17
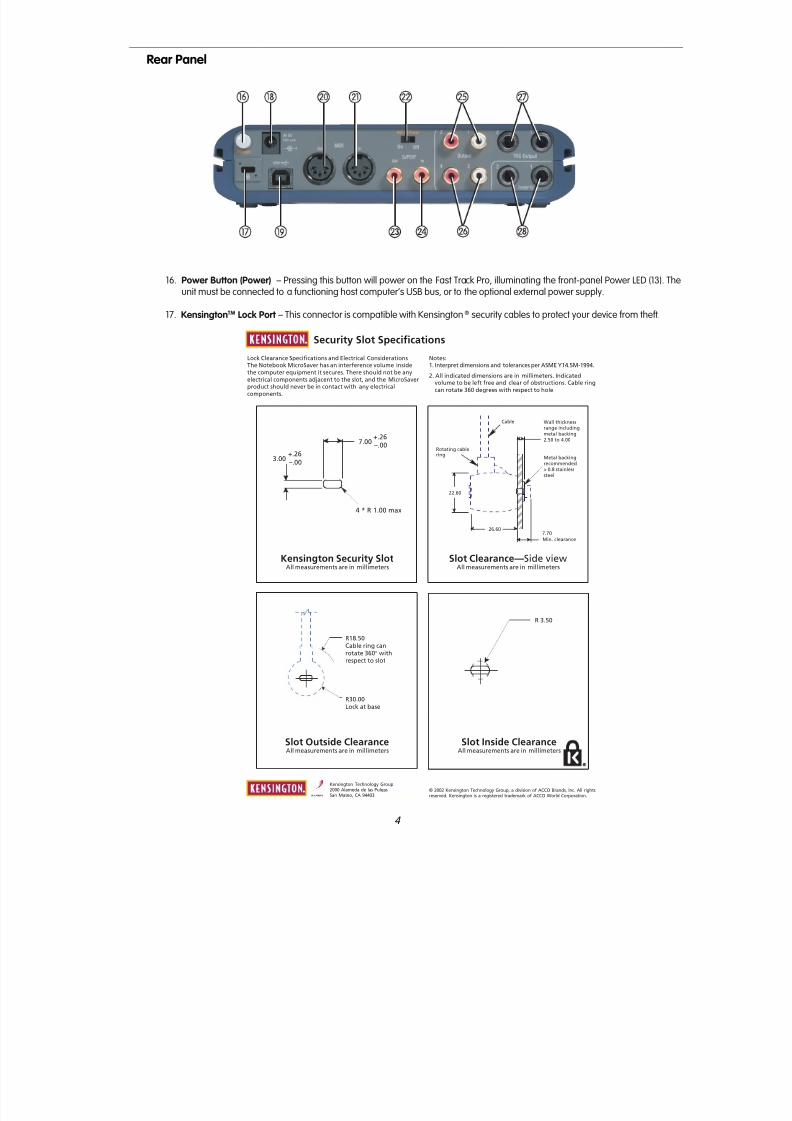
6 › The Software Control Panel
This section will explain the features of the Fast Track Pro’s Control Panel.
Bandwidth Tab
Fig 7.01 – Windows Control Panel – Bandwidth Tab
Fig 7.02 – Mac Control Panel – Bandwidth Tab
8/3/2019 M-Audio Fast Track Pro User Guide (en)
http://slidepdf.com/reader/full/m-audio-fast-track-pro-user-guide-en 10/17
Open the Control Panel by clicking on the Fast Track Pro icon in the Windows Control Panel. On the Mac, click on the Fast Track Pro iconin the System Preferences pane. In most digital audio applications, you may also access the Control Panel via the program.
In Windows, the Control Panel shows three tabs: Bandwidth, Latency and About. On the Mac, the Control Panel shows two tabs:Bandwidth and About. Descriptions of the functions within each tab are detailed in this section.
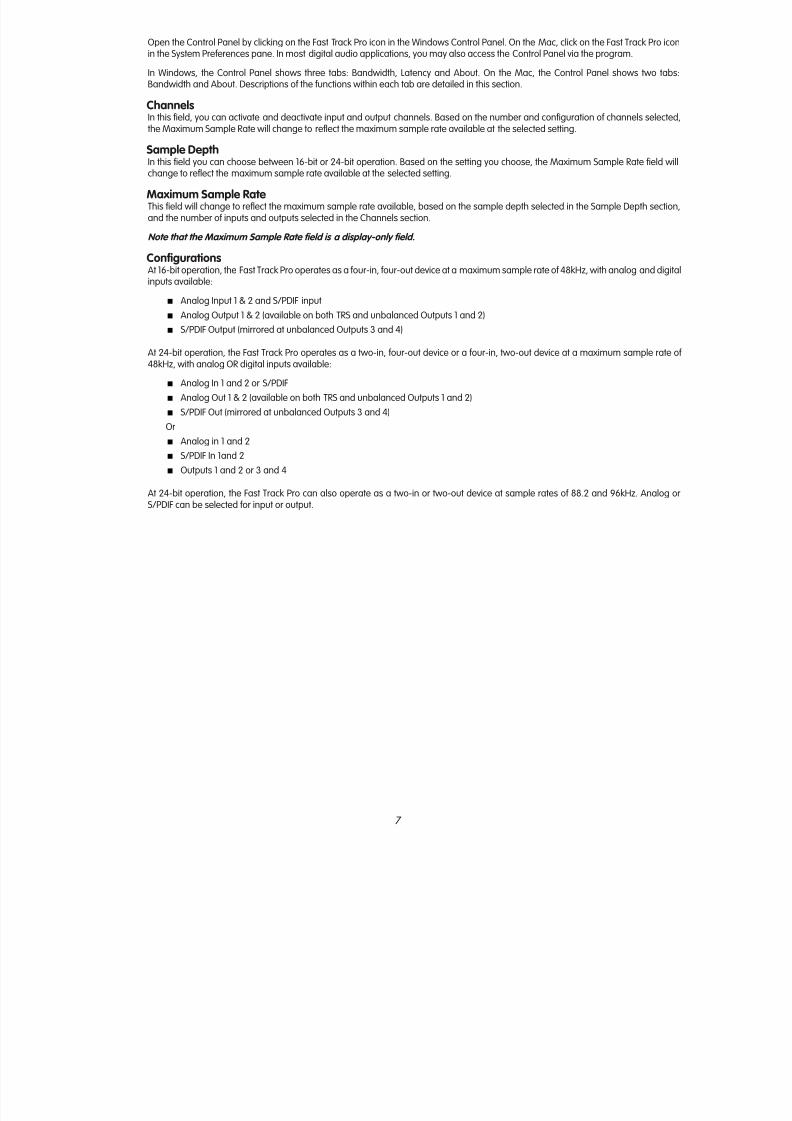
ChannelsIn this eld, you can activate and deactivate input and output channels. Based on the number and conguration of channels selected,the Maximum Sample Rate will change to reect the maximum sample rate available at the selected setting.
Sample DepthIn this eld you can choose between 16-bit or 24-bit operation. Based on the setting you choose, the Maximum Sample Rate eld willchange to reect the maximum sample rate available at the selected setting.
Maximum Sample RateThis eld will change to reect the maximum sample rate available, based on the sample depth selected in the Sample Depth section,and the number of inputs and outputs selected in the Channels section.
Note that the Maximum Sample Rate eld is a display-only eld.
CongurationsAt 16-bit operation, the Fast Track Pro operates as a four-in, four-out device at a maximum sample rate of 48kHz, with analog and digitalinputs available:
< Analog Input 1 & 2 and S/PDIF input
< Analog Output 1 & 2 (available on both TRS and unbalanced Outputs 1 and 2)
< S/PDIF Output (mirrored at unbalanced Outputs 3 and 4)
At 24-bit operation, the Fast Track Pro operates as a two-in, four-out device or a four-in, two-out device at a maximum sample rate of 48kHz, with analog OR digital inputs available:
< Analog In 1 and 2 or S/PDIF
< Analog Out 1 & 2 (available on both TRS and unbalanced Outputs 1 and 2)
< S/PDIF Out (mirrored at unbalanced Outputs 3 and 4)
Or
< Analog in 1 and 2
< S/PDIF In 1and 2< Outputs 1 and 2 or 3 and 4
At 24-bit operation, the Fast Track Pro can also operate as a two-in or two-out device at sample rates of 88.2 and 96kHz. Analog orS/PDIF can be selected for input or output.
8/3/2019 M-Audio Fast Track Pro User Guide (en)
http://slidepdf.com/reader/full/m-audio-fast-track-pro-user-guide-en 11/17
Latency Tab (Windows XP only)
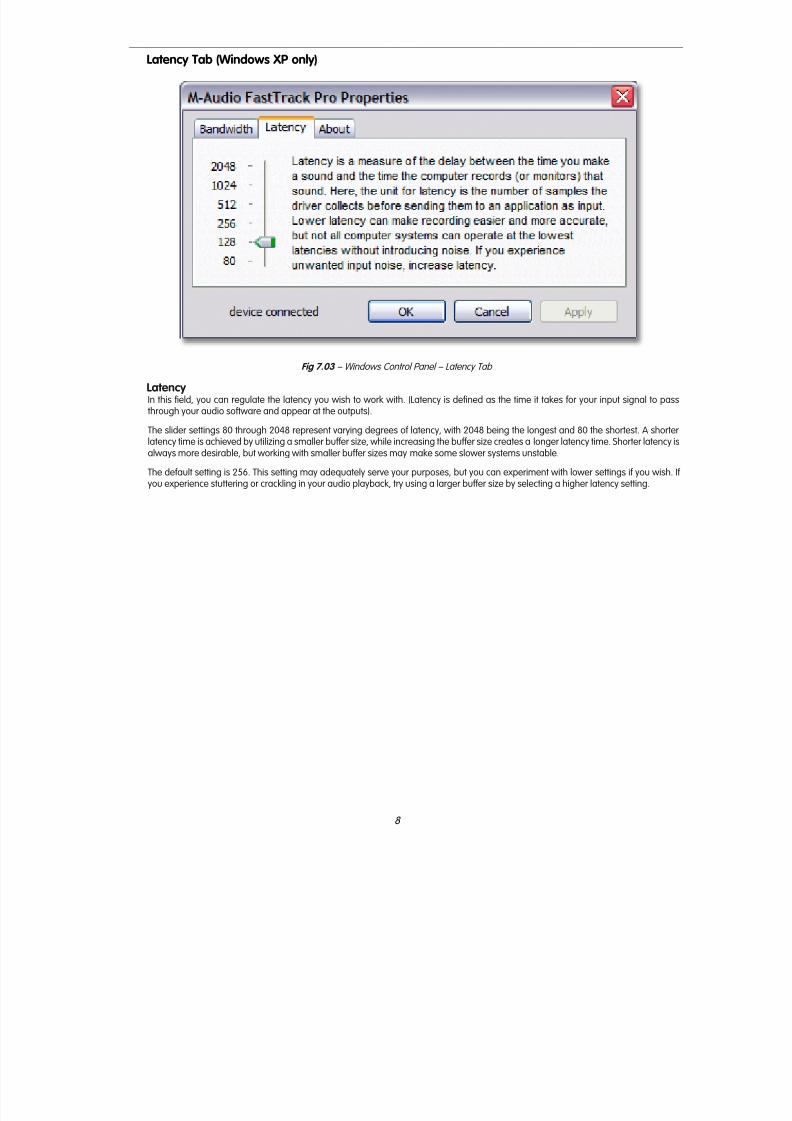
Fig 7.03 – Windows Control Panel – Latency Tab
LatencyIn this eld, you can regulate the latency you wish to work with. (Latency is dened as the time it takes for your input signal to passthrough your audio software and appear at the outputs).
The slider settings 80 through 2048 represent varying degrees of latency, with 2048 being the longest and 80 the shortest. A shorterlatency time is achieved by utilizing a smaller buffer size, while increasing the buffer size creates a longer latency time. Shorter latency isalways more desirable, but working with smaller buffer sizes may make some slower systems unstable.
The default setting is 256. This setting may adequately serve your purposes, but you can experiment with lower settings if you wish. If you experience stuttering or crackling in your audio playback, try using a larger buffer size by selecting a higher latency setting.
8/3/2019 M-Audio Fast Track Pro User Guide (en)
http://slidepdf.com/reader/full/m-audio-fast-track-pro-user-guide-en 12/17
About Page
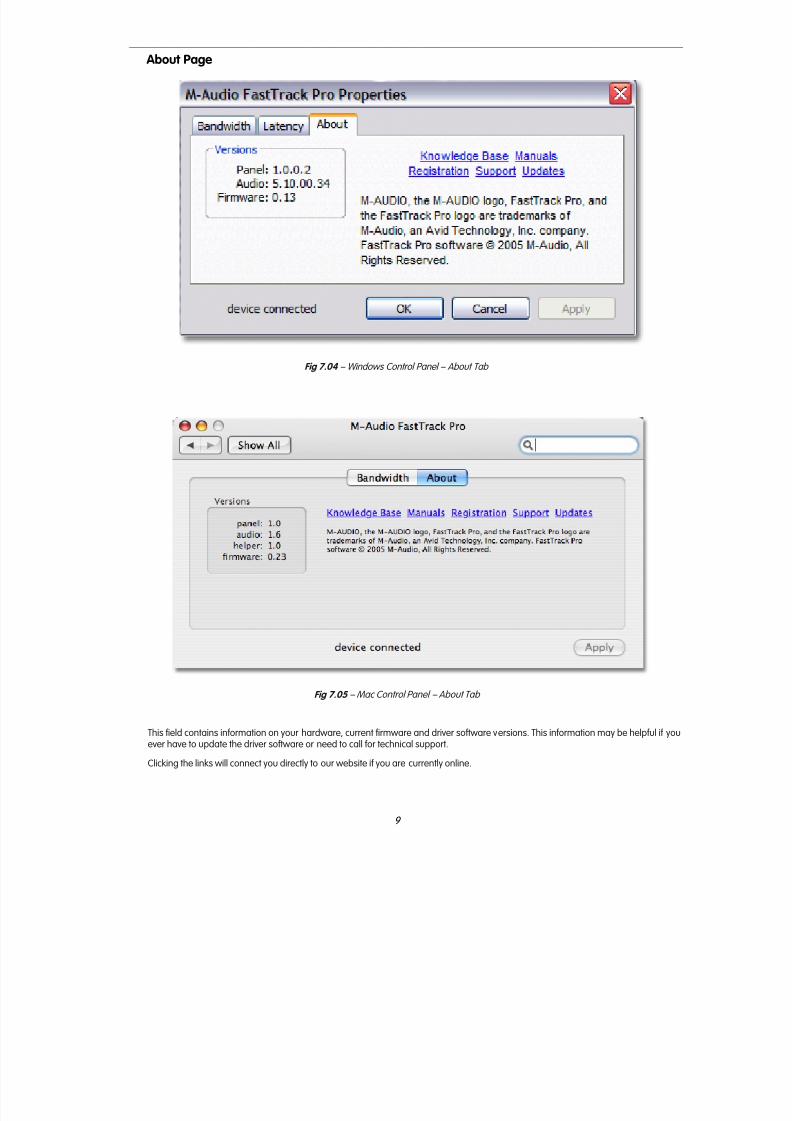
Fig 7.04 – Windows Control Panel – About Tab
Fig 7.05 – Mac Control Panel – About Tab
This eld contains information on your hardware, current rmware and driver software versions. This information may be helpful if youever have to update the driver software or need to call for technical support.
Clicking the links will connect you directly to our website if you are currently online.
8/3/2019 M-Audio Fast Track Pro User Guide (en)
http://slidepdf.com/reader/full/m-audio-fast-track-pro-user-guide-en 13/17
7 › Using the Fast Track Pro
The following sections address a number of real-life situations that you may encounter while using your Fast Track Pro. These brief tutorials should help guide you through them.
Also check the M-Audio website from time to time for additional tutorials or FAQs.
Setting Up Your Recording Levels
Using the Mic/Inst InputsConnect your microphone, instrument or line level source to the Fast Track Pro’s front panel Mic/Inst inputs. Make sure the associatedchannel’s Inst/Line button is set to the out (Inst) position for microphone or instrument input, or to the in (Line) position for line levelsources. If you are using a condenser microphone, be certain to slide the 48V PH Power switch to the On position (after connecting themicrophone to the XLR input). If your microphone input signal is too hot (Clip LED lights steadily), press the Pad button to lower the input
level.Adjust each channel’s input GAIN knob to achieve a fairly steady green Signal LED without triggering the red Clip LED, while audiblytesting your input levels (i.e., strumming the guitar, or speaking into the mic).
NOTE: When recording with microphones, it is best to keep the mic at some distance from the main speakers, or use headphones to monitor. Feedback may occur when microphones are too close to speakers.
Using the Coaxial S/PDIF InputsConnect the S/PDIF output of your external audio device to the Fast Track Pro’s rear panel S/PDIF In. The signal level that you receive atthe S/PDIF In will be the signal level that you record. Any adjustments to that signal level must be made at the source. If you have an
output level control on the device that you’ve connected to the Fast Track Pro’s S/PDIF inputs, adjust that output level control to change therecording level. Most recording software will allow you to add gain to a recorded track that was made at a level that is initially too low,but be careful that the recording level is not reaching digital clipping (signal over 0dB—going into the red) while recording.
You will then want to route the input signal to your audio software’s inputs. Refer to the section below on “Monitoring Your Inputs ForRecording,” and your software’s documentation for more information.
Setting the Sample Rate
You will want to set the sample rate from within your audio software. When the input source is an S/PDIF signal, the Fast Track Pro willreceive the sample rate from your audio application.
Monitoring Your Inputs for Recording
Using the Input/Playback Mix ControlThe input/playback Mix knob controls the source of the audio sent to TRS Outputs 1 and 2, fading between the input signal (at the front-panel Mic/Inst inputs 1 and 2) and the output signal from your audio application.
<
When the knob is turned fully counter-clockwise (the IN position), only the input signals are heard at the outputs.< When the knob is turned fully clockwise (the PB position), only the output signal from your DAW is heard at the outputs.
< Any point between the IN and PB positions will give you a mix of both inputs.
The real advantage of the Mix knob is that it enables you to monitor your live inputs in real time as you’re recording them, while alsomonitoring the existing tracks coming from your DAW, as well as allowing you to control the relative levels of both sources. When youdo this, be sure to mute the inputs on the tracks you’re recording. Otherwise, you’ll hear the direct signal AND the return signal fromthe DAW.
8/3/2019 M-Audio Fast Track Pro User Guide (en)
http://slidepdf.com/reader/full/m-audio-fast-track-pro-user-guide-en 14/17
Selecting Your Outputs
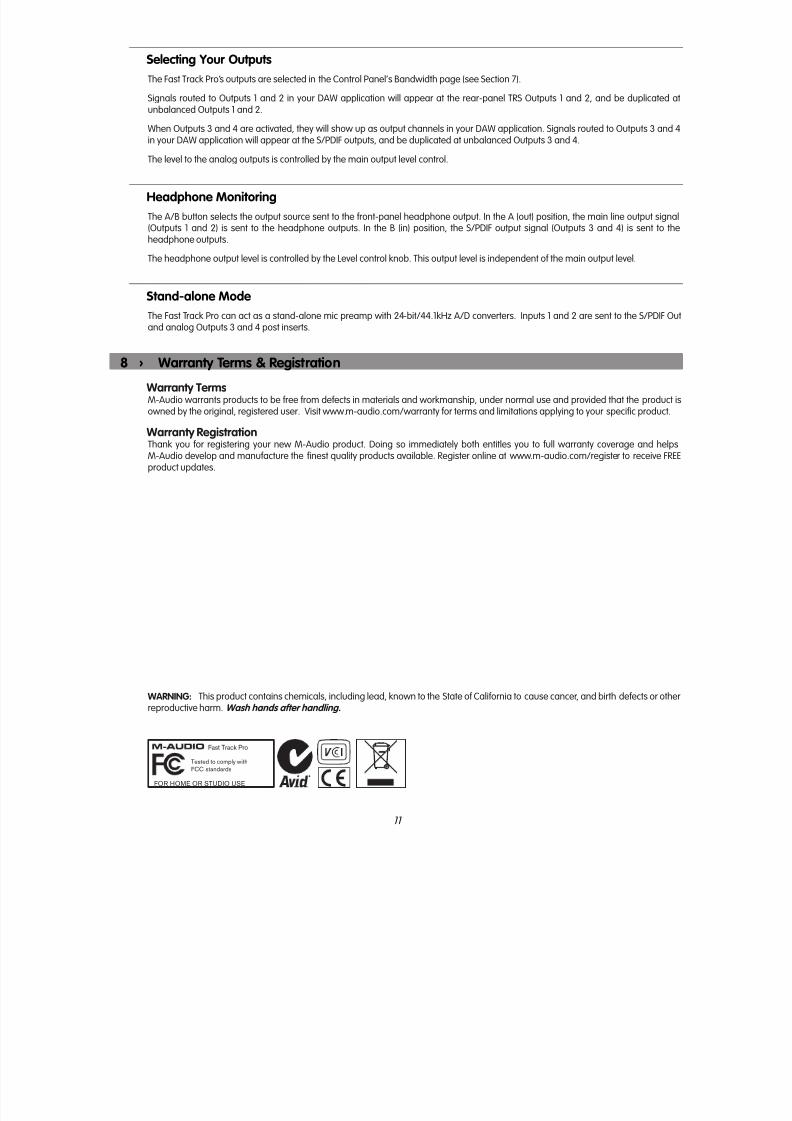
The Fast Track Pro’s outputs are selected in the Control Panel’s Bandwidth page (see Section 7).
Signals routed to Outputs 1 and 2 in your DAW application will appear at the rear-panel TRS Outputs 1 and 2, and be duplicated atunbalanced Outputs 1 and 2.
When Outputs 3 and 4 are activated, they will show up as output channels in your DAW application. Signals routed to Outputs 3 and 4in your DAW application will appear at the S/PDIF outputs, and be duplicated at unbalanced Outputs 3 and 4.
The level to the analog outputs is controlled by the main output level control.
Headphone Monitoring
The A/B button selects the output source sent to the front-panel headphone output. In the A (out) position, the main line output signal
(Outputs 1 and 2) is sent to the headphone outputs. In the B (in) position, the S/PDIF output signal (Outputs 3 and 4) is sent to theheadphone outputs.
The headphone output level is controlled by the Level control knob. This output level is independent of the main output level.
Stand-alone Mode
The Fast Track Pro can act as a stand-alone mic preamp with 24-bit/44.1kHz A/D converters. Inputs 1 and 2 are sent to the S/PDIF Outand analog Outputs 3 and 4 post inserts.
8 › Warranty Terms & Registration
Warranty TermsM-Audio warrants products to be free from defects in materials and workmanship, under normal use and provided that the product isowned by the original, registered user. Visit www.m-audio.com/warranty for terms and limitations applying to your specic product.
Warranty RegistrationThank you for registering your new M-Audio product. Doing so immediately both entitles you to full warranty coverage and helps
M-Audio develop and manufacture the nest quality products available. Register online at www.m-audio.com/register to receive FREEproduct updates.
WARNING: This product contains chemicals, including lead, known to the State of California to cause cancer, and birth defects or otherreproductive harm. Wash hands after handling.
Fast Track Pro
Tested to comply withFCC standards
FOR HOME OR STUDIO USE
8/3/2019 M-Audio Fast Track Pro User Guide (en)
http://slidepdf.com/reader/full/m-audio-fast-track-pro-user-guide-en 15/17
9 › Troubleshooting
The Fast Track Pro has been designed to give you high performance and professional- quality audio. It has been tested under a widerange of systems and operating conditions. However, there are a virtually limitless number of operating scenarios, any of which couldaffect your system’s performance. Though this section cannot cover all possible issues you may encounter, we would like to offer you
some suggestions for dealing with common problems.We recommend that you avoid connecting too many devices. The USB bus is a dependable protocol that is ideally suited for digital audio.Nevertheless, it is important to remember that audio and multimedia streaming place considerable demands on your processor and theUSB bus. Although it is theoretically possible to chain many multiple USB devices in series, doing so has the potential to degrade youraudio performance.
Generally, USB devices do not suffer from the IRQ conicts often encountered with PCI cards on Windows PCs. If you are having troublegetting audio in or out of your Fast Track Pro, please check the following:
If you have no sound:
> Check to see if the Fast Track Pro drivers are properly installed.
< In Windows XP, go to the Control Panel and double-click the System icon (under Performance and Maintenance if youare in Category view).
< Select the Hardware tab and click the Device Manager button.
< Click the plus sign (“+”) next to Sound, Video and Game Controllers, and locate the Fast Track Pro listing. If you see aquestion mark or exclamation point next to it, or if you don’t see it listed, you may need to reinstall the driver software.
> Make sure your audio software has been set up to use the Fast Track Pro.
> Open your application’s audio settings page and check to see if the Fast Track Pro’s ASIO, WDM, or Core Audio drivers have beenselected.
> If you’re certain the Fast Track Pro is correctly installed and congured for your audio software, check your signal path. Make sureyour inputs are routed correctly by verifying that your application is receiving audio signal. Make sure your outputs are routedcorrectly so that your signal is sent to your headphones, amp and/or monitors.
> Check your audio connections and cables to make sure everything is plugged in correctly.
> Check if the power button is enabled.
> Check mic/line selector switch to verify that you’ve chosen the proper input.
If you’re trying to record a digital input to the Fast Track Pro and have no sound:> Make sure your audio software is congured to receive digital input, and that the input source is set as clock master.
If you’re experiencing clicks and pops in your recordings:
> Make sure your input levels are not too hot, as this can cause distortion and clipping.
> Check the input level meters in your audio application.
> If you are recording a digital input source, make sure the sync source in your audio software is set to external.
> You might want to try using a larger buffer size (higher latency setting). Larger buffer sizes can increase input latency time, but
this is not an issue if you’re mixing, for example. Increasing the buffer size can be helpful, particularly in the case of older orlower-powered systems.
> If you are using a USB hub, try connecting the Fast Track Pro directly to your computer.
8/3/2019 M-Audio Fast Track Pro User Guide (en)
http://slidepdf.com/reader/full/m-audio-fast-track-pro-user-guide-en 16/17
10 › Product Specs
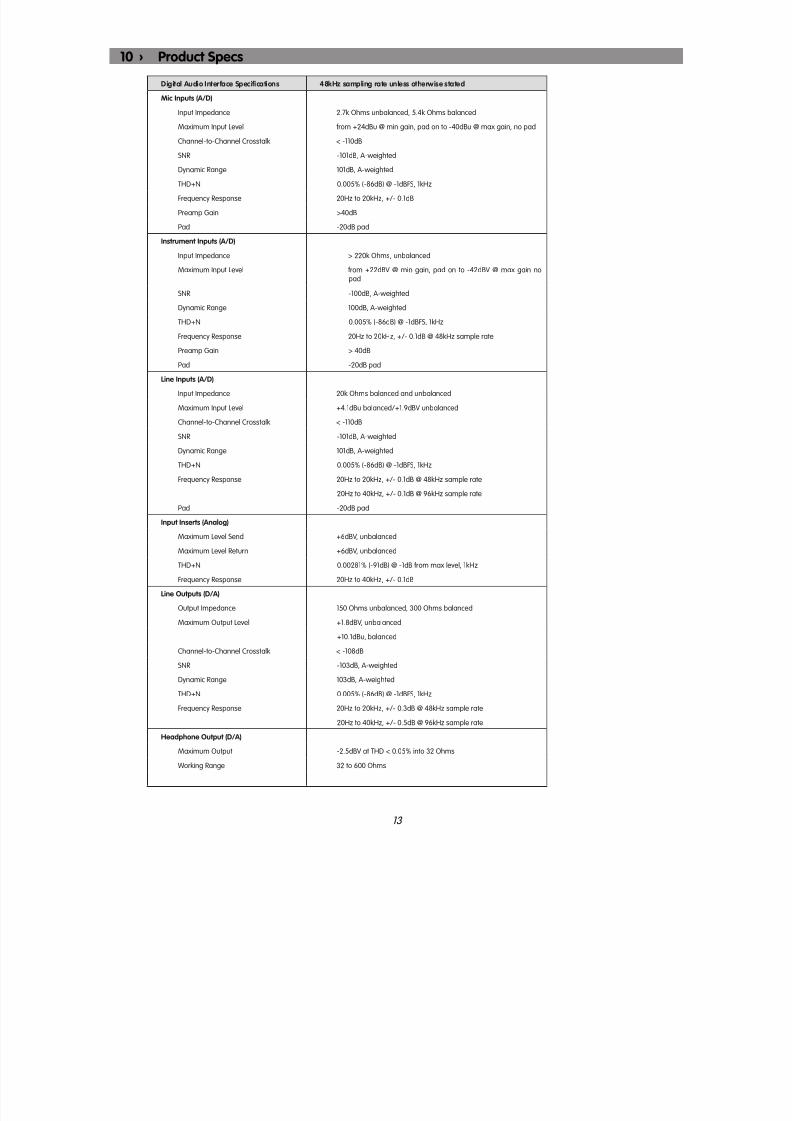
Digital Audio Interface Specications 48kHz sampling rate unless otherwise stated
Mic Inputs (A/D)
Input Impedance 2.7k Ohms unbalanced, 5.4k Ohms balanced
Maximum Input Level from +24dBu @ min gain, pad on to -40dBu @ max gain, no pad
Channel-to-Channel Crosstalk < -110dB
SNR -101dB, A-weighted
Dynamic Range 101dB, A-weighted
THD+N 0.005% (-86dB) @ -1dBFS, 1kHz
Frequency Response 20Hz to 20kHz, +/- 0.1dB
Preamp Gain >40dB
Pad -20dB pad
Instrument Inputs (A/D)
Input Impedance > 220k Ohms, unbalanced
Maximum Input Level from +22dBV @ min gain, pad on to -42dBV @ max gain nopad
SNR -100dB, A-weighted
Dynamic Range 100dB, A-weighted
THD+N 0.005% (-86dB) @ -1dBFS, 1kHz
Frequency Response 20Hz to 20kHz, +/- 0.1dB @ 48kHz sample rate
Preamp Gain > 40dB
Pad -20dB pad
Line Inputs (A/D)
Input Impedance 20k Ohms balanced and unbalanced
Maximum Input Level +4.1dBu balanced/+1.9dBV unbalanced
Channel-to-Channel Crosstalk < -110dB
SNR -101dB, A-weighted
Dynamic Range 101dB, A-weighted
THD+N 0.005% (-86dB) @ -1dBFS, 1kHz
Frequency Response 20Hz to 20kHz, +/- 0.1dB @ 48kHz sample rate
20Hz to 40kHz, +/- 0.1dB @ 96kHz sample rate
Pad -20dB pad
Input Inserts (Analog)
Maximum Level Send +6dBV, unbalanced
Maximum Level Return +6dBV, unbalanced
THD+N 0.00281% (-91dB) @ -1dB from max level, 1kHz
Frequency Response 20Hz to 40kHz, +/- 0.1dB
Line Outputs (D/A)
Output Impedance 150 Ohms unbalanced, 300 Ohms balanced
Maximum Output Level +1.8dBV, unbalanced
+10.1dBu, balanced
Channel-to-Channel Crosstalk < -108dB
SNR -103dB, A-weighted
Dynamic Range 103dB, A-weighted
THD+N 0.005% (-86dB) @ -1dBFS, 1kHz
Frequency Response 20Hz to 20kHz, +/- 0.3dB @ 48kHz sample rate
20Hz to 40kHz, +/- 0.5dB @ 96kHz sample rate
Headphone Output (D/A)
Maximum Output -2.5dBV at THD < 0.05% into 32 Ohms
Working Range 32 to 600 Ohms
8/3/2019 M-Audio Fast Track Pro User Guide (en)
http://slidepdf.com/reader/full/m-audio-fast-track-pro-user-guide-en 17/17
Technical Support (USA)Visit the Online Support Center atwww.m-audio.com/support
Product InformationFor company and product information,visit us on the web at www.avid.com
Avid5795 Martin RoadIrwindale, CA 91706-6211 USA