Embed Size (px)
Citation preview
User Manual Version 2.3 ©2012
Using this manual
2
Using this manual Thank you for purchasing this M3 T. This device will provide you with high quality data capture and mobile communication at industrial level of ruggedness.
This user manual has been specially designed to guide you through the basic functions and features of M3 T.
Read me first Please read all safety precautions and this manual carefully before using your
device to ensure safe and proper use.
This user manual is written based on current state of the device and the detail of this manual are subject to change without prior notice.
The description on this manual is based on the default setting of the device.
Images and screenshots are taken using current version of software.
This user manual assumes the device is fully optioned. For the available options with your device, please contact your local distributor or visit our homepage at http://www.m3mobile.net
M3 Mobile is not liable for performance issues caused by third-party applications.
M3 Mobile is not liable for performance issues or incompatibilities caused by user mistakes.
M3 Mobile is not liable for copyright/patent infringement by the user.
M3 Mobile may request part of or entire application developed by third-party company to improve the overall product performance.
Newer version of operating system (OS) than your current OS may have been released after your purchase. For the latest OS version information, please contact your local distributor.
This user manual may contain technical and/or editing error.
Using this manual
3
Copyright Copyright © 2012 M3 Mobile Co., Ltd.
This user manual is protected under international copyright laws. Any part of this document cannot be copied, reproduces, modified or translated to other languages without prior written consent of M3 Mobile.
Trademarks M3 Mobile and the M3 logo is registered trademark of M3 Mobile Co., Ltd.
M3 T is a registered trademark of M3 Mobile.
Microsoft logo, Windows logo, MS Office, ActiveSync and Windows Mobile Device Center are registered trademarks of Microsoft Corporation.
Bluetooth® is a registered trademark of the Bluetooth SIG, Inc.
Summit and SCU are trademarks of Summit data communication.
Instructional icons Before you start, familiarize yourself with the below icons to help with the manual.
Warning – situations that could cause injury to yourself or others.
Caution – situations that could cause damage to your device or other equipment.
Note – useful tips or additional information.
Using this manual
4
Safety precaution.
Do not use PDA while driving. It can expose to serious accident. Using PDA while driving may defend against law.
Do not touch charging plug with wet hand. It may cause electric shock.
Be aware of handling battery. Do not apply big impact or drill into it. Avoid damping the battery or submerge into water. Avoid metallic contact with the battery.
Do not expose PDA, battery or charger to excessive heat. It may cause PDA’s corruption or explosion. If PDA has been left in a car, as temperature increases it may cause
explosion.
Do not use PDA in event of thunder and lightning. Using PDA in lightning condition can cause electric shock.
Avoid use of PDA in restricted area. It can cause radio interference. Avoid use of PDA within aircraft. It can interfere with the navigational
system of the vessel. Avoid use of PDA within hospital. It can interfere with the medical
equipment.
Turn off PDA where explosion risk area. Please obey rules of explosion risk area. It is safe to turn off PDA in patrol station.
Be aware of using head set. Continuous use of head set with high volume can damage hearing ability. Using headset while walking or driving, it can decrease attentiveness and
cause accident.
Using this manual
5
Revision History Version 2.3 Release date: September, 2012
Ear-Mic has been removed from package contents.
Version 2.2 Release date: July, 2012
Service Center Address has been changed.
Version 2.1 Release date: March, 2012
New Pre-Caution note has been added.
Version 2.0 Release date: January, 2012
New form applied.
Added new categories. : Program development requirement. : Brief application description
Version 1.0 Release date: August, 2010
Initial release
Contents
6
Contents 1. Getting Started ....................................................................... - 8 -
1.1 Product package ......................................................................... - 8 -
1.1.1 Device and Peripherals ................................................................... - 8 -
1.2 Battery ............................................................................................. - 9 -
1.2.1 How to Uses ...................................................................................... - 9 -
1.2.2 How to charge ................................................................................ - 10 -
1.3 Power on & off ........................................................................... - 13 -
1.3.1 Power on ......................................................................................... - 13 -
1.3.2 Power off ......................................................................................... - 13 -
1.3.3 Sleep mode ..................................................................................... - 13 -
1.4 Memory card ............................................................................... - 14 -
1.4.1 Inserting memory card ................................................................. - 14 -
1.4.2 Data check ...................................................................................... - 14 -
1.5 SIM card ....................................................................................... - 15 -
1.5.1 Inserting SIM card ........................................................................ - 15 -
2. Basic usage .............................................................................. - 16 -
2.1 Features ........................................................................................ - 16 -
2.2 Keypad ........................................................................................... - 17 -
2.2.1 Buttons ............................................................................................ - 17 -
2.3 Screen ............................................................................................ - 18 -
2.3.1 Task bar ........................................................................................... - 18 -
2.3.2 Today screen .................................................................................. - 19 -
2.4 Data input .................................................................................... - 20 -
2.4.1 Stylus pen ....................................................................................... - 20 -
2.4.2 Keyboard ......................................................................................... - 20 -
2.5 Reset .............................................................................................. - 22 -
2.5.1 Soft reset ......................................................................................... - 22 -
Contents
7
2.5.2 Hard Reset ...................................................................................... - 22 -
2.6 Sync with PC ............................................................................... - 23 -
2.6.1 How to sync .................................................................................... - 23 -
3. Application usage ................................................................ - 25 -
3.1 Bluetooth ...................................................................................... - 25 -
3.1.1 Bluetooth configuration ............................................................... - 25 -
3.1.2 Getting connected ......................................................................... - 25 -
3.2 Camera .......................................................................................... - 27 -
3.2.1 Camera basics ................................................................................ - 27 -
3.3 GPS .................................................................................................. - 28 -
3.3.1 GPS basics ....................................................................................... - 28 -
3.4 Scanner ......................................................................................... - 29 -
3.4.1 Scanner basics ............................................................................... - 29 -
3.4.2 Scanner use .................................................................................... - 29 -
3.5 Wireless LAN ............................................................................... - 30 -
3.5.1 WLAN configuration ...................................................................... - 30 -
4. Advanced usage ................................................................... - 33 -
4.1 Software development kit (SDK) ...................................... - 33 -
4.1.1 SDK Package ................................................................................... - 33 -
4.1.2 OS Update ....................................................................................... - 34 -
4.1.3 Key customization ......................................................................... - 34 -
5. Etc ................................................................................................... - 36 -
5.1 Specification ............................................................................... - 36 -
5.2 Services ......................................................................................... - 37 -
5.2.1 Contact details ............................................................................... - 37 -
Getting Started
8
1. Getting Started
1.1 Product package
1.1.1 Device and Peripherals
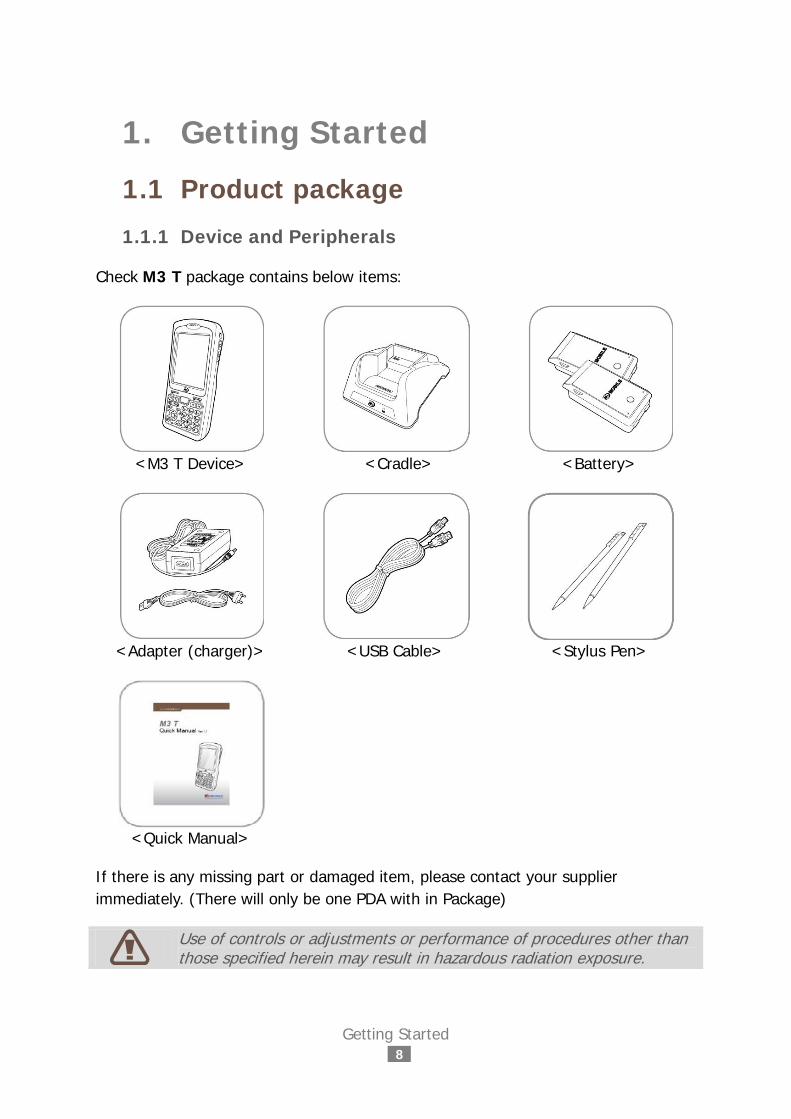
Check M3 T package contains below items:
<M3 T Device> <Cradle>
<Battery>
<Adapter (charger)>
<USB Cable> <Stylus Pen>
<Quick Manual>
If there is any missing part or damaged item, please contact your supplier immediately. (There will only be one PDA with in Package)
Use of controls or adjustments or performance of procedures other than those specified herein may result in hazardous radiation exposure.

Getting Started
9
1.2 Battery
1.2.1 How to Uses
Inserting battery
Release hand strap, and position the battery to the bottom of battery pack.
Push down the battery with one hand and lock battery lock with the other hand.
Put the hand strap back in its original position.
M3 T uses Li-ion 3.7V, 2,700mAh battery.
Using unauthorized battery may cause explosion or serious damage of the device.
Risk of explosion if battery is replaced by an incorrect type. Dispose of used batteries according to the instructions.
Check the battery is placed in the correct direction.
Removing battery
Release the hand strap and slide up the battery lock to unlock the battery pack.
Then remove the battery from the battery position using small hole located at the upper left side of the battery pack.
Getting Started
10
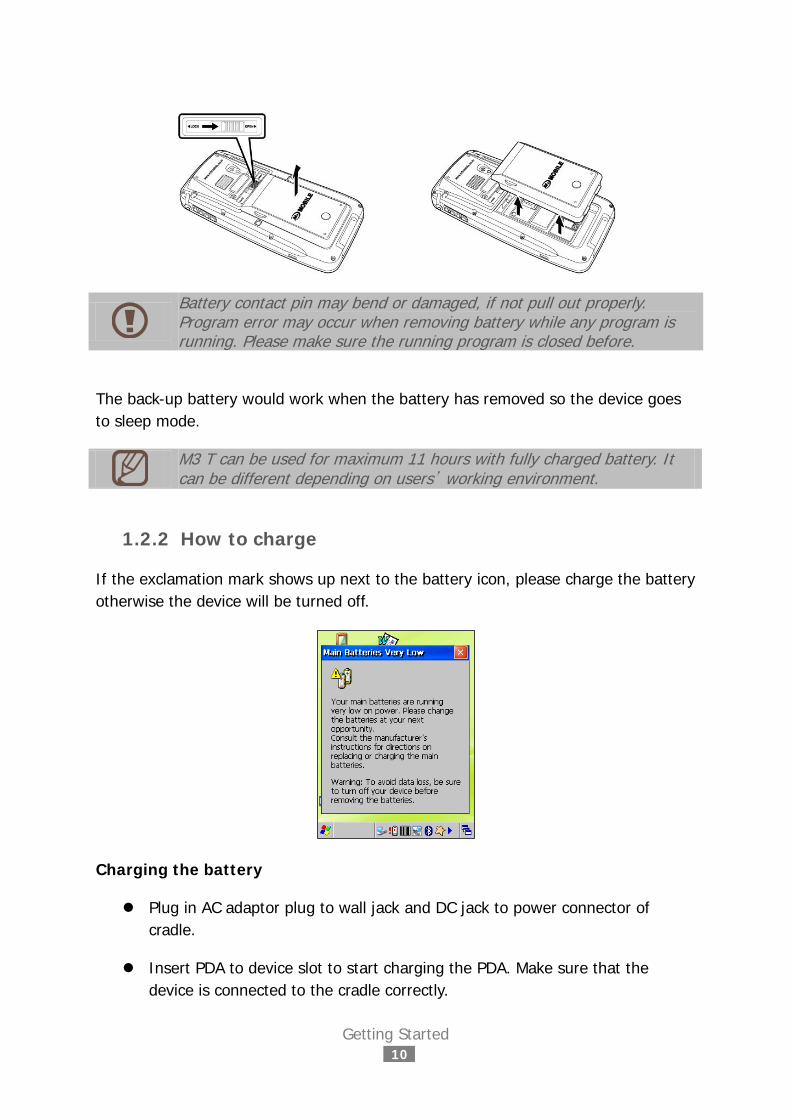
Battery contact pin may bend or damaged, if not pull out properly. Program error may occur when removing battery while any program is running. Please make sure the running program is closed before.
The back-up battery would work when the battery has removed so the device goes to sleep mode.
M3 T can be used for maximum 11 hours with fully charged battery. It can be different depending on users’ working environment.
1.2.2 How to charge
If the exclamation mark shows up next to the battery icon, please charge the battery otherwise the device will be turned off.
Charging the battery
Plug in AC adaptor plug to wall jack and DC jack to power connector of cradle.
Insert PDA to device slot to start charging the PDA. Make sure that the device is connected to the cradle correctly.

Getting Started
11
AC adaptor is rated at 100~240V, 5A. Do not use the adapter outside the rated voltage.
Please use authentic cradle that M3 Mobile provides only, there might be a malfunction and/or failure of device.
If PDA is in right position, charging LED will indicate red and it will start charging the battery. It will change to green when the battery is fully charged.
If the charging LED is not turned on, please re-insert the device to the cradle.
LED Color Description Red The battery is charging.
Green The battery is fully charged.
Do not exposure the battery to excessive temperature. Acceptable user temperature range is -20oC (-4oF)~60oC (140oF).
It will take approximately 4 hours to fully charge from deplete state using the supplied charging cradle.
Charging spare battery
Getting Started
12
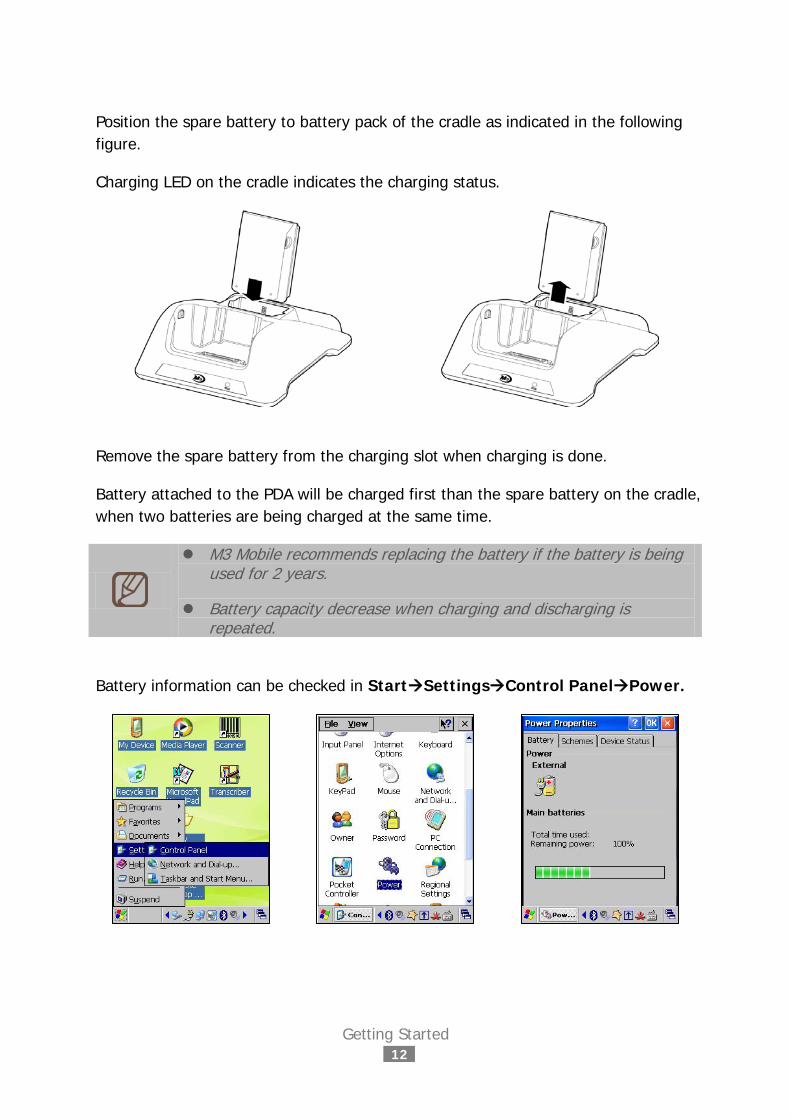
Position the spare battery to battery pack of the cradle as indicated in the following figure.
Charging LED on the cradle indicates the charging status.
Remove the spare battery from the charging slot when charging is done.
Battery attached to the PDA will be charged first than the spare battery on the cradle, when two batteries are being charged at the same time.
M3 Mobile recommends replacing the battery if the battery is being used for 2 years.
Battery capacity decrease when charging and discharging is repeated.
Battery information can be checked in StartSettingsControl PanelPower.
Getting Started
13
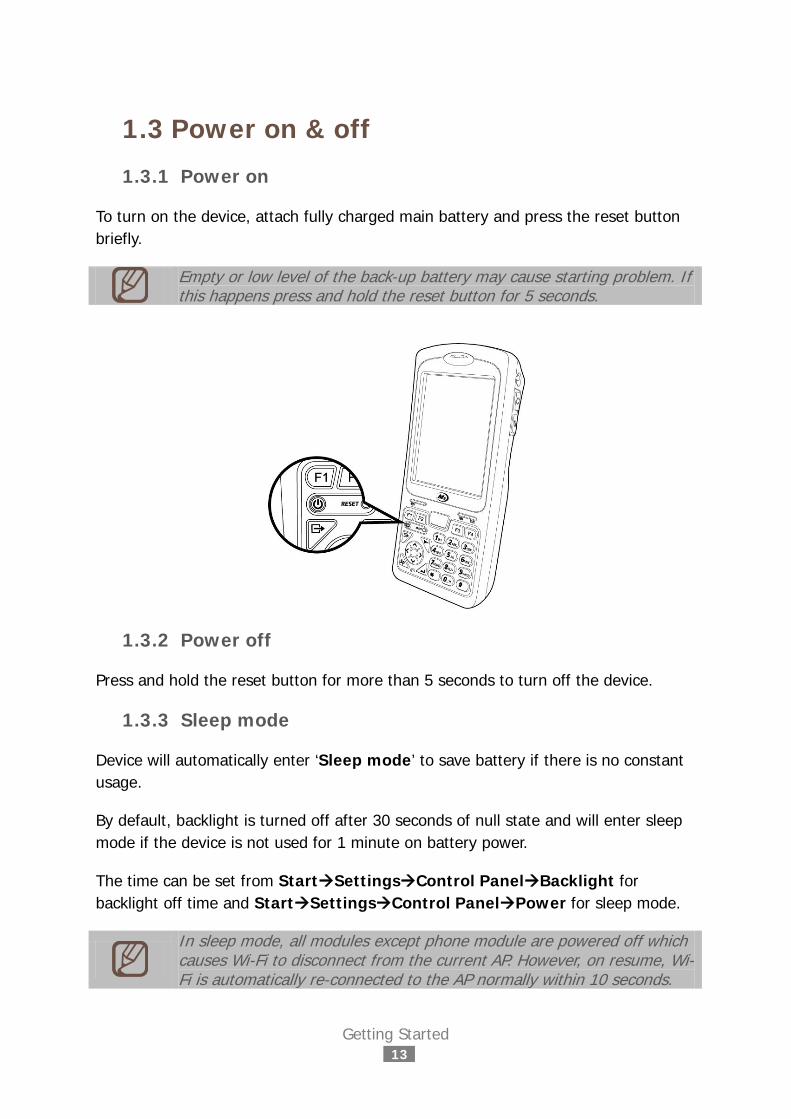
1.3 Power on & off
1.3.1 Power on
To turn on the device, attach fully charged main battery and press the reset button briefly.
Empty or low level of the back-up battery may cause starting problem. If this happens press and hold the reset button for 5 seconds.
1.3.2 Power off
Press and hold the reset button for more than 5 seconds to turn off the device.
1.3.3 Sleep mode
Device will automatically enter ‘Sleep mode’ to save battery if there is no constant usage.
By default, backlight is turned off after 30 seconds of null state and will enter sleep mode if the device is not used for 1 minute on battery power.
The time can be set from StartSettingsControl PanelBacklight for backlight off time and StartSettingsControl PanelPower for sleep mode.
In sleep mode, all modules except phone module are powered off which causes Wi-Fi to disconnect from the current AP. However, on resume, Wi-Fi is automatically re-connected to the AP normally within 10 seconds.
Getting Started
14
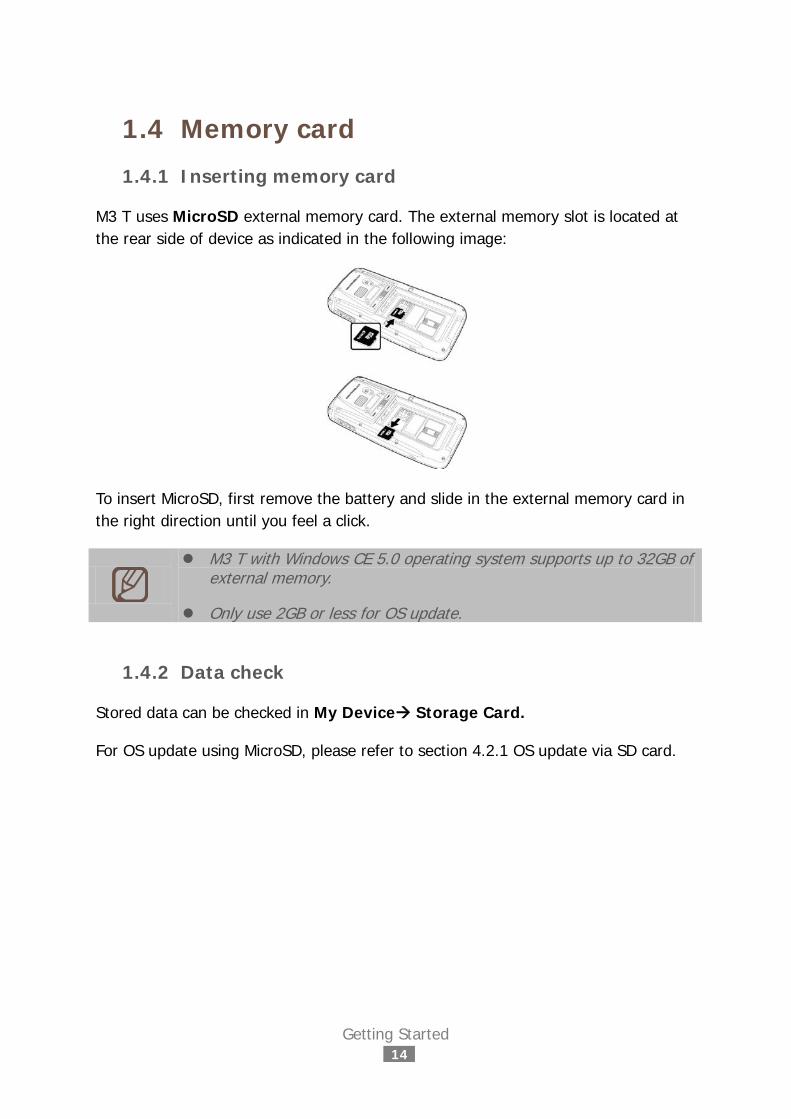
1.4 Memory card
1.4.1 Inserting memory card
M3 T uses MicroSD external memory card. The external memory slot is located at the rear side of device as indicated in the following image:
To insert MicroSD, first remove the battery and slide in the external memory card in the right direction until you feel a click.
M3 T with Windows CE 5.0 operating system supports up to 32GB of external memory.
Only use 2GB or less for OS update.
1.4.2 Data check
Stored data can be checked in My Device Storage Card.
For OS update using MicroSD, please refer to section 4.2.1 OS update via SD card.
Getting Started
15
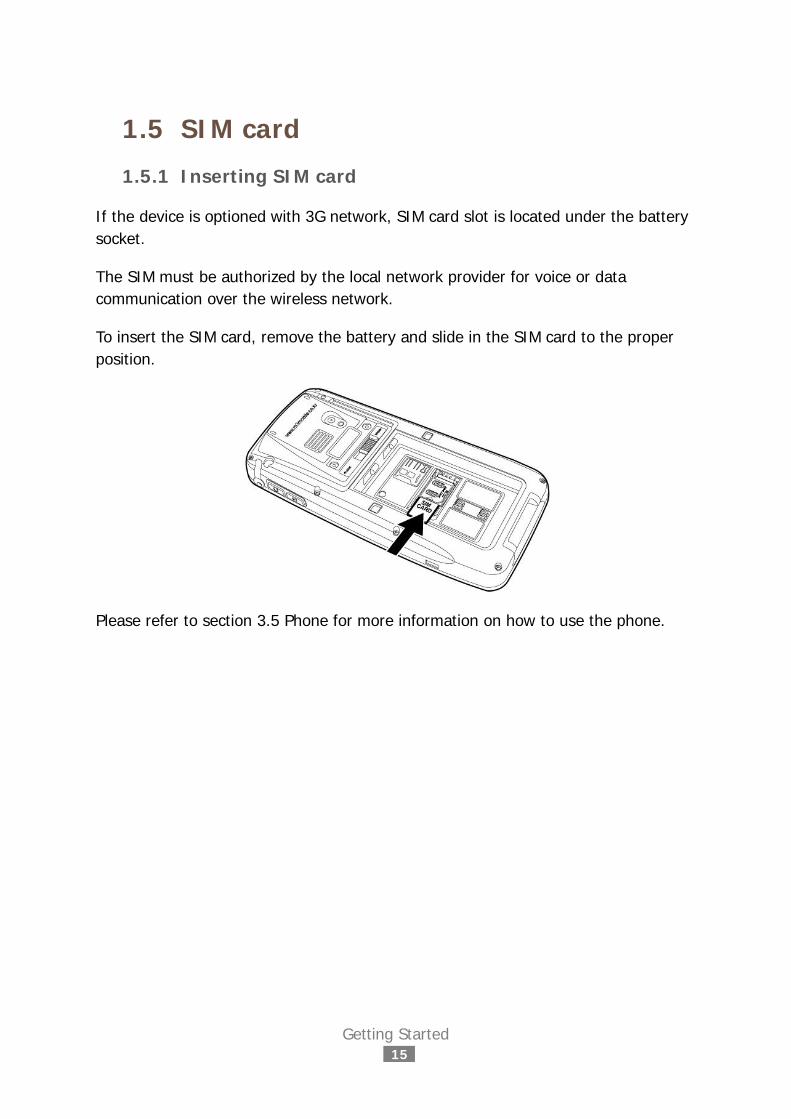
1.5 SIM card
1.5.1 Inserting SIM card
If the device is optioned with 3G network, SIM card slot is located under the battery socket.
The SIM must be authorized by the local network provider for voice or data communication over the wireless network.
To insert the SIM card, remove the battery and slide in the SIM card to the proper position.
Please refer to section 3.5 Phone for more information on how to use the phone.
Basic usage
16
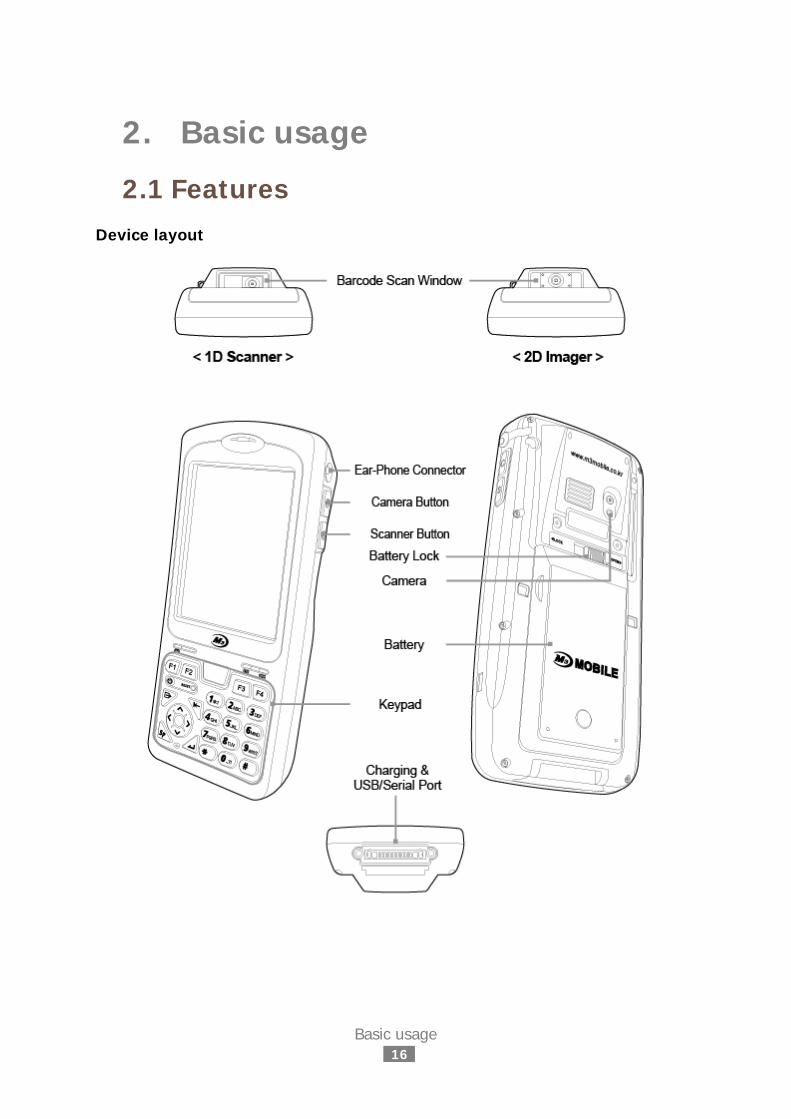
2. Basic usage
2.1 Features Device layout
Basic usage
17
2.2 Keypad
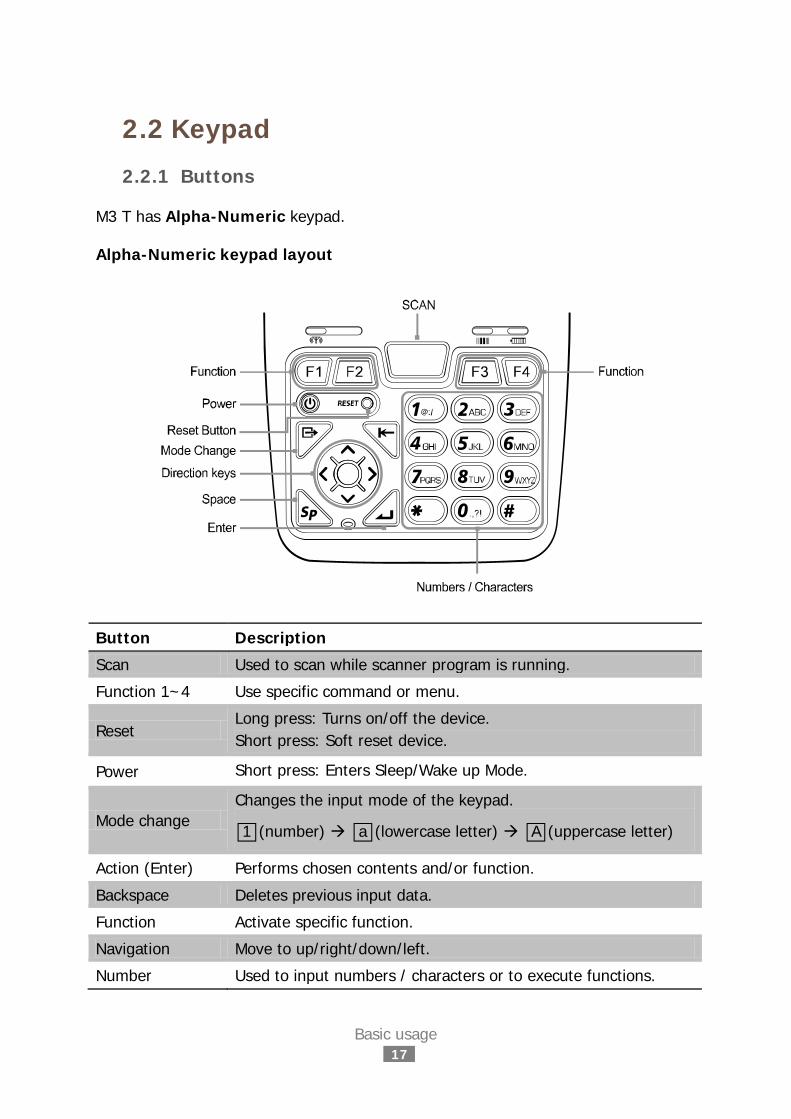
2.2.1 Buttons
M3 T has Alpha-Numeric keypad.
Alpha-Numeric keypad layout
Button Description
Scan Used to scan while scanner program is running.
Function 1~4 Use specific command or menu.
Reset Long press: Turns on/off the device. Short press: Soft reset device.
Power Short press: Enters Sleep/Wake up Mode.
Mode change Changes the input mode of the keypad.
□1 (number) □a (lowercase letter) □A (uppercase letter)
Action (Enter) Performs chosen contents and/or function.
Backspace Deletes previous input data.
Function Activate specific function.
Navigation Move to up/right/down/left.
Number Used to input numbers / characters or to execute functions.
Basic usage
18
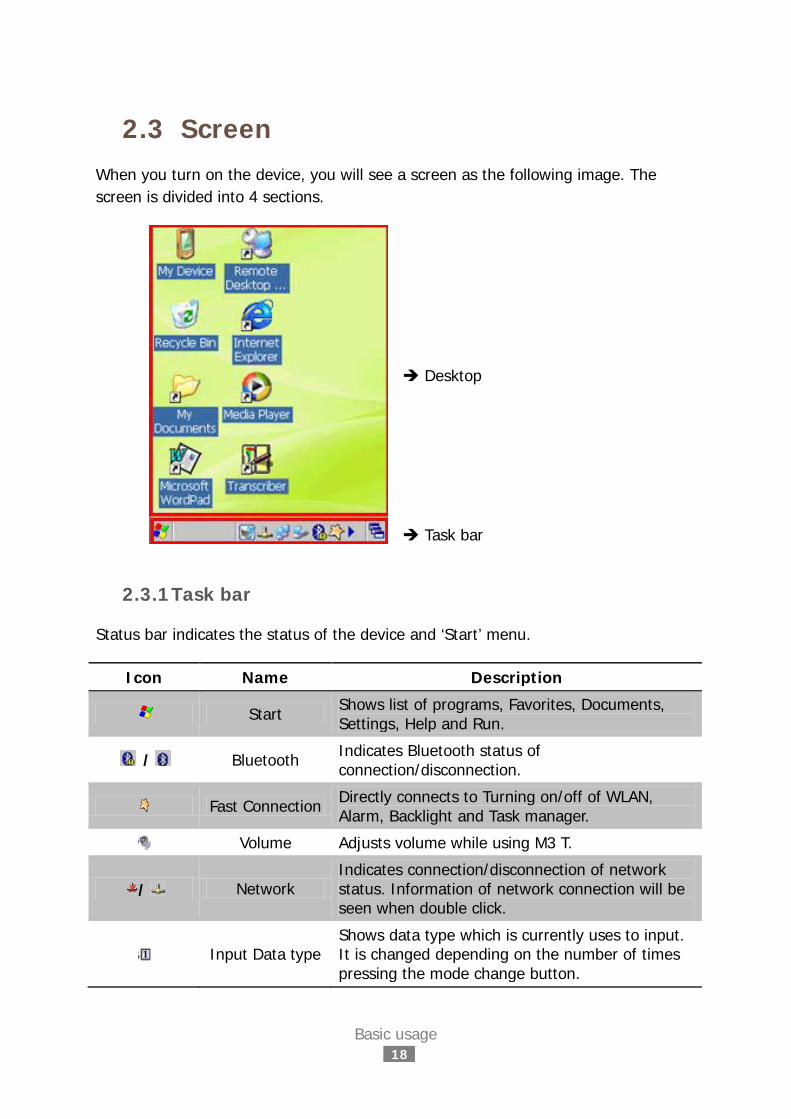
2.3 Screen When you turn on the device, you will see a screen as the following image. The screen is divided into 4 sections.
Desktop
Task bar
2.3.1 Task bar
Status bar indicates the status of the device and ‘Start’ menu.
Icon Name Description
Start Shows list of programs, Favorites, Documents, Settings, Help and Run.
/ Bluetooth Indicates Bluetooth status of connection/disconnection.
Fast Connection Directly connects to Turning on/off of WLAN, Alarm, Backlight and Task manager.
Volume Adjusts volume while using M3 T.
/ Network Indicates connection/disconnection of network status. Information of network connection will be seen when double click.
Input Data type Shows data type which is currently uses to input. It is changed depending on the number of times pressing the mode change button.
Basic usage
19
Input Mode Shows input mode. Users can choose input mode between Transcriber and Keyboard with long press.
Activated program Window
Shows list of programs that are currently running.
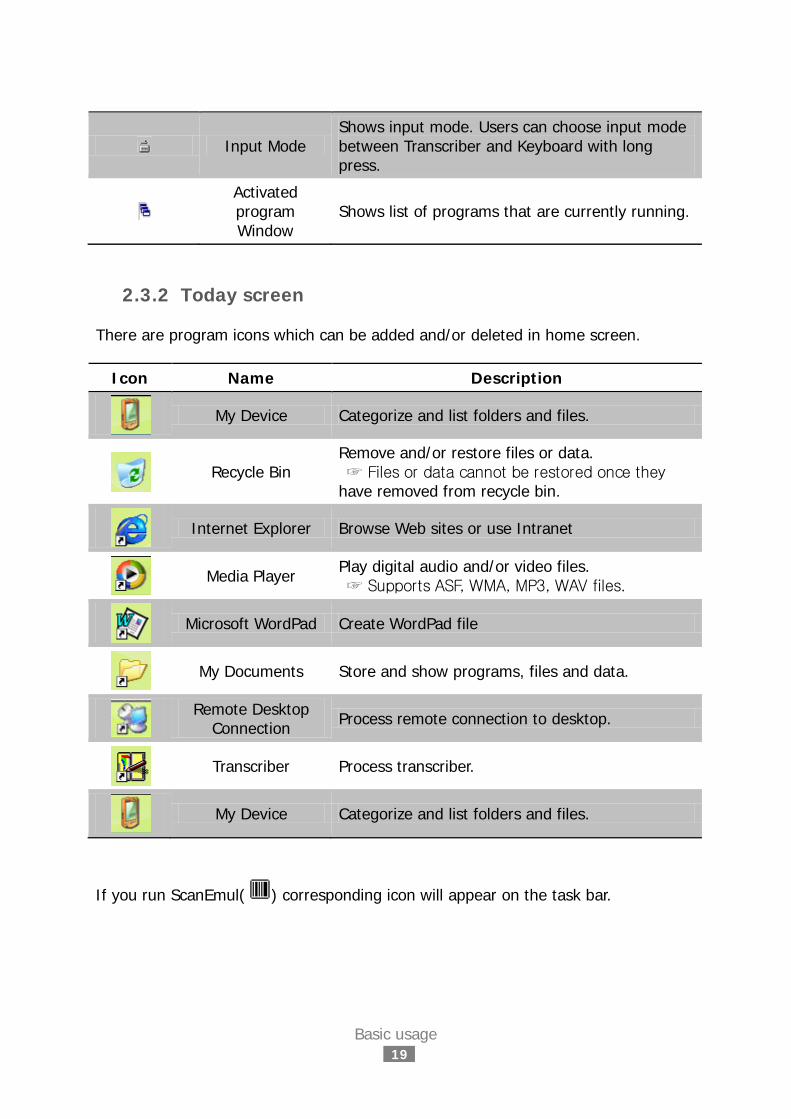
2.3.2 Today screen
There are program icons which can be added and/or deleted in home screen.
Icon Name Description
My Device Categorize and list folders and files.
Recycle Bin
Remove and/or restore files or data. ☞ Files or data cannot be restored once they have removed from recycle bin.
Internet Explorer Browse Web sites or use Intranet
Media Player Play digital audio and/or video files.
☞ Supports ASF, WMA, MP3, WAV files.
Microsoft WordPad Create WordPad file
My Documents Store and show programs, files and data.
Remote Desktop
Connection Process remote connection to desktop.
Transcriber Process transcriber.
My Device Categorize and list folders and files.
If you run ScanEmul( ) corresponding icon will appear on the task bar.
Basic usage
20
2.4 Data input
2.4.1 Stylus pen
Selecting Contents Click on the target icon with stylus pen.
Performing Double-click on the icon to perform, with Stylus pen.
Selecting Menu Long press on touch screen allows user to selection on particular functions - cut, copy, delete, etc.
Selecting several contents Drag several icons to choose and/or set block.
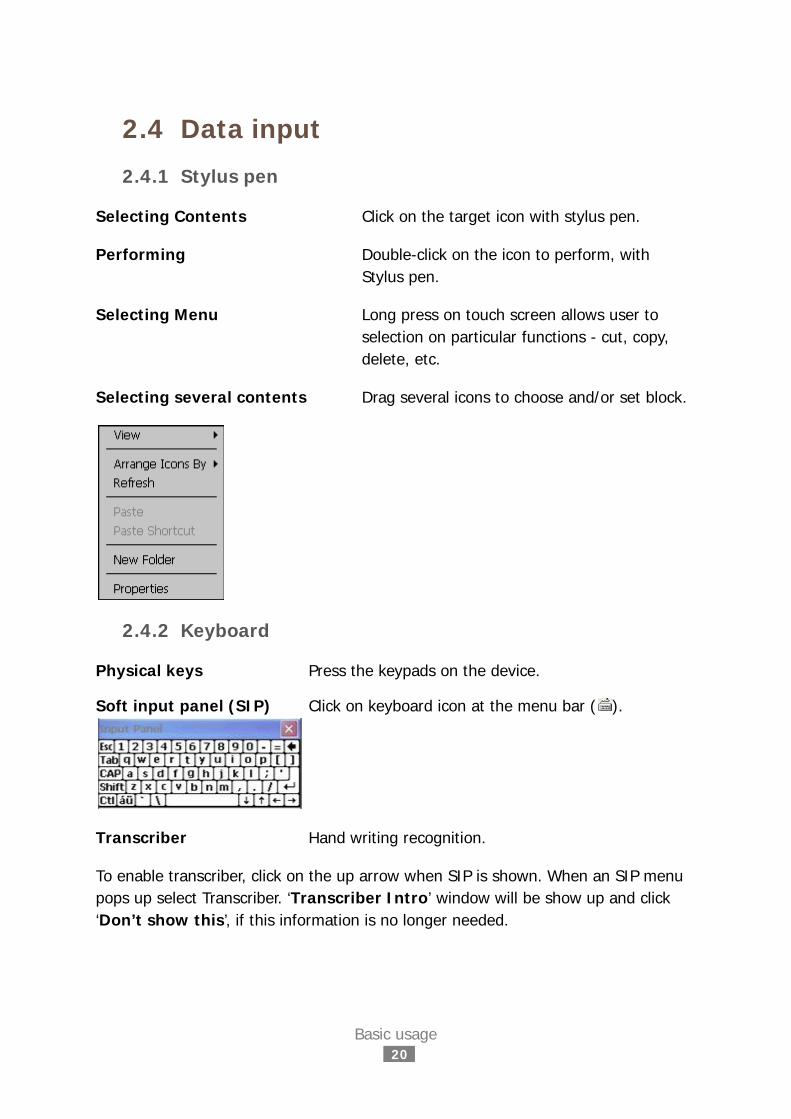
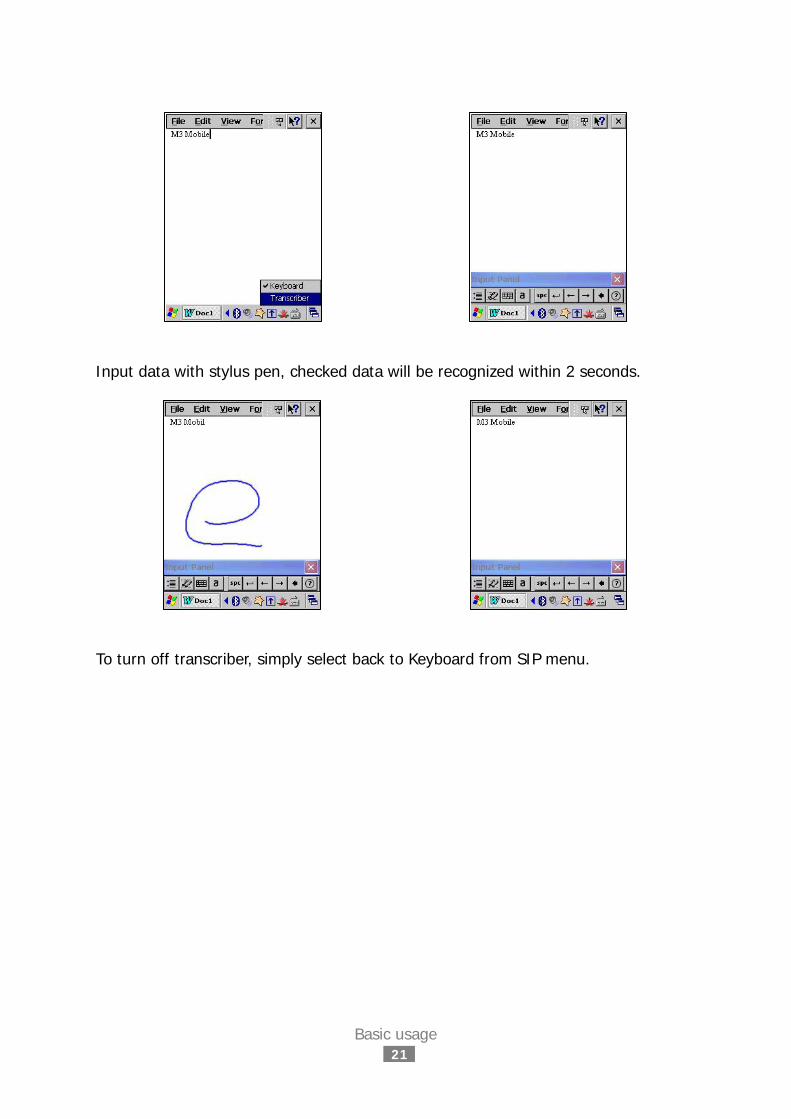
2.4.2 Keyboard
Physical keys Press the keypads on the device.
Soft input panel (SIP) Click on keyboard icon at the menu bar ( ).
Transcriber Hand writing recognition.
To enable transcriber, click on the up arrow when SIP is shown. When an SIP menu pops up select Transcriber. ‘Transcriber Intro’ window will be show up and click ‘Don’t show this’, if this information is no longer needed.
Basic usage
21
Input data with stylus pen, checked data will be recognized within 2 seconds.
To turn off transcriber, simply select back to Keyboard from SIP menu.
Basic usage
22
2.5 Reset
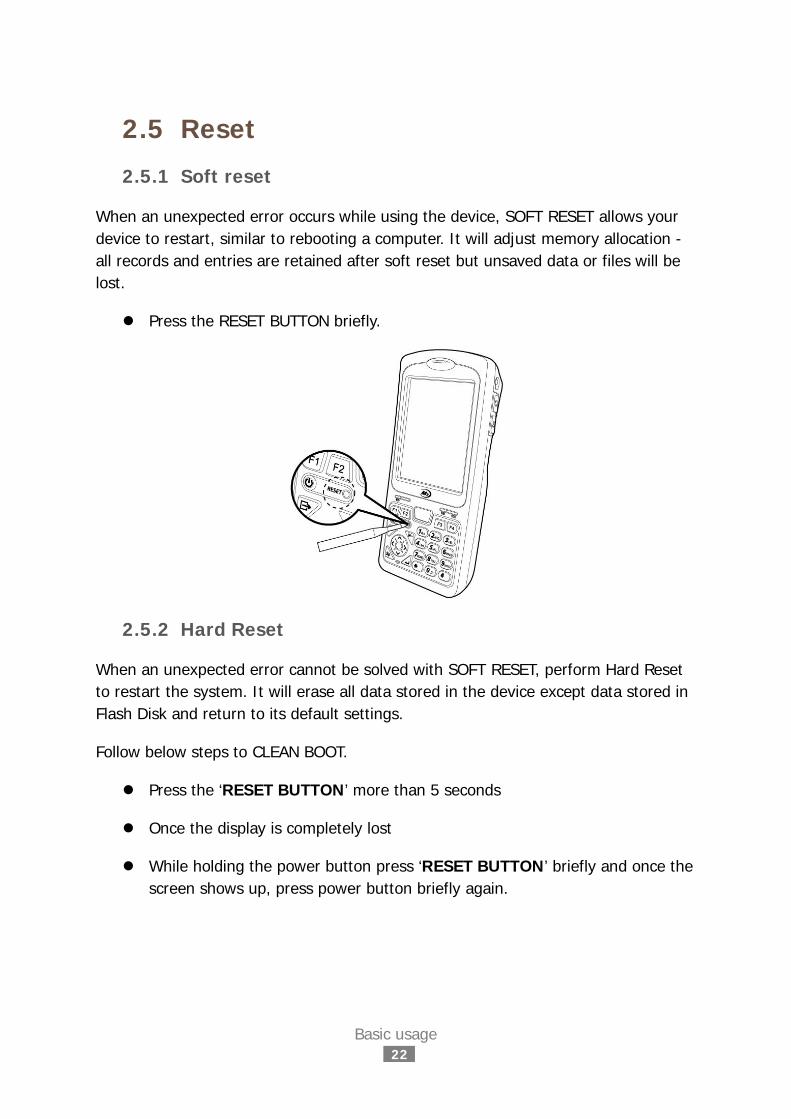
2.5.1 Soft reset
When an unexpected error occurs while using the device, SOFT RESET allows your device to restart, similar to rebooting a computer. It will adjust memory allocation - all records and entries are retained after soft reset but unsaved data or files will be lost.
Press the RESET BUTTON briefly.
2.5.2 Hard Reset
When an unexpected error cannot be solved with SOFT RESET, perform Hard Reset to restart the system. It will erase all data stored in the device except data stored in Flash Disk and return to its default settings.
Follow below steps to CLEAN BOOT.
Press the ‘RESET BUTTON’ more than 5 seconds
Once the display is completely lost
While holding the power button press ‘RESET BUTTON’ briefly and once the screen shows up, press power button briefly again.
Basic usage
23
2.6 Sync with PC Sync is simplified form of Synchronization, which enables files transfer or back-up data between PC and the device.
To synchronize the device with PC, one of the following sync programs must be installed on the PC. Please download appropriate program depending on the operating system of the PC
Sync program download
Windows Mobile Device Center (Windows Vista or later): Download
ActiveSync (Windows XP): Download
2.6.1 How to sync
To sync, please follow the steps described below.
1. Download and install WMDC (or ActiveSync) on PC.
2. Connect the cradle to PC using supplied USB cable.
3. Supply AC power to the cradle.
4. Turn on the device and place it on the cradle.
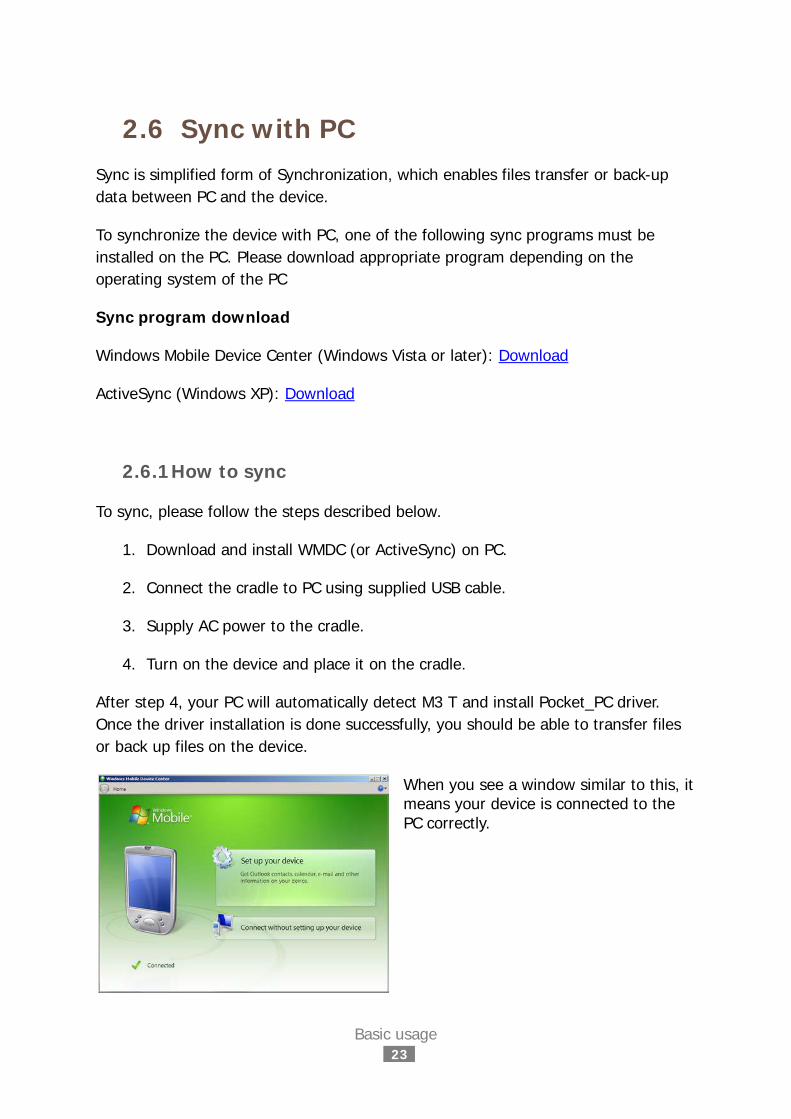
After step 4, your PC will automatically detect M3 T and install Pocket_PC driver. Once the driver installation is done successfully, you should be able to transfer files or back up files on the device.
When you see a window similar to this, it means your device is connected to the PC correctly.
Basic usage
24
If Cradle and PC is connected with USB cable before install ActiveSync, PC may not recognize Equipment.
For features of WMDC or ActiveSync, please visit Microsoft homepage for more details.
If ActiveSync does not work please check followings.
Check USB cable is connected to cradle and PC properly.
Check PDA and its LCD are turned on
Check if [Allow USB connection w ith this desktop computer] is checked from ActiveSync program menuFileConnecting Option
After checking all those above, try ActiveSync again or try Soft/Hard reset and ActiveSync.
Application usage
25
3. Application usage
3.1 Bluetooth
3.1.1 Bluetooth configuration
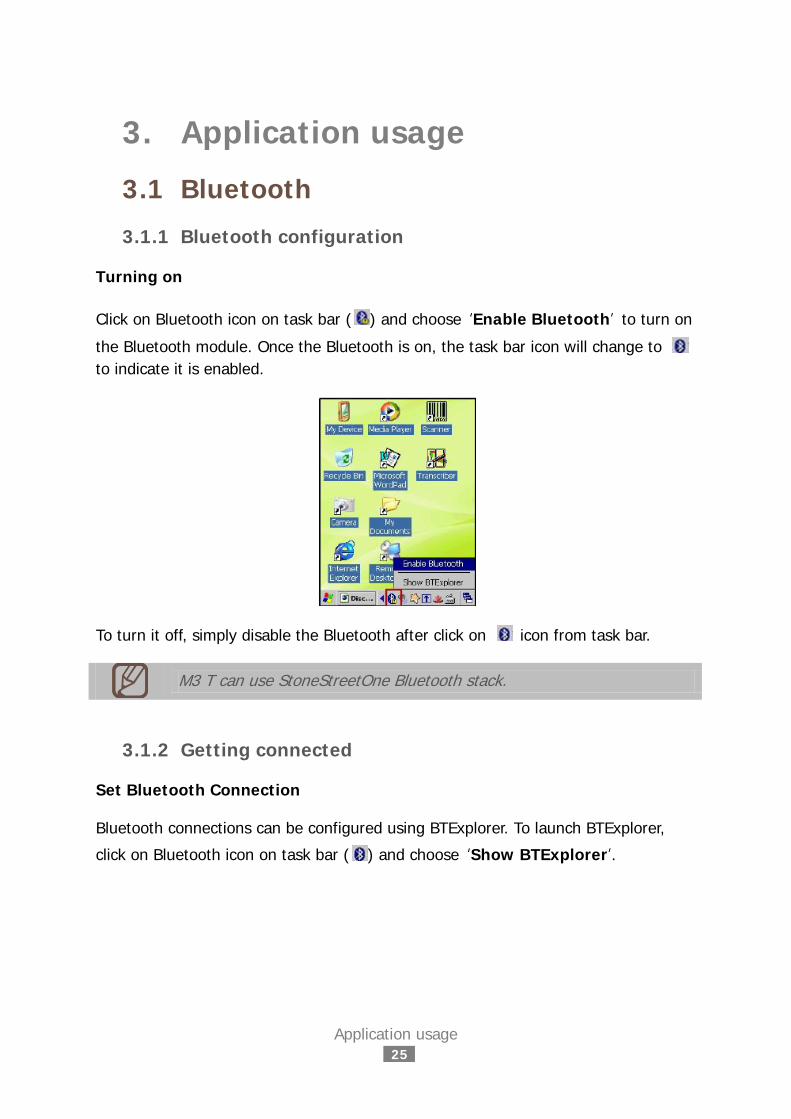
Turning on
Click on Bluetooth icon on task bar ( ) and choose ‘Enable Bluetooth’ to turn on
the Bluetooth module. Once the Bluetooth is on, the task bar icon will change to to indicate it is enabled.
To turn it off, simply disable the Bluetooth after click on icon from task bar.
M3 T can use StoneStreetOne Bluetooth stack.
3.1.2 Getting connected
Set Bluetooth Connection
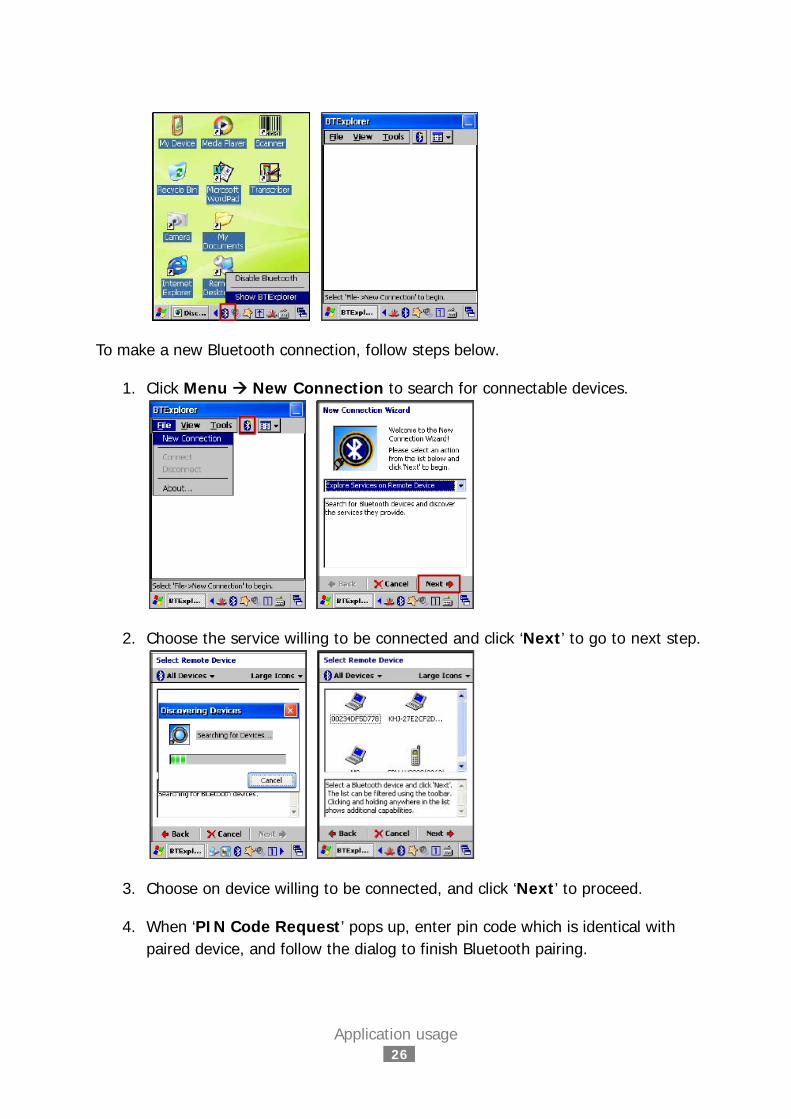
Bluetooth connections can be configured using BTExplorer. To launch BTExplorer,
click on Bluetooth icon on task bar ( ) and choose ‘Show BTExplorer’.
Application usage
26
To make a new Bluetooth connection, follow steps below.
1. Click Menu New Connection to search for connectable devices.
2. Choose the service willing to be connected and click ‘Next’ to go to next step.
3. Choose on device willing to be connected, and click ‘Next’ to proceed.
4. When ‘PIN Code Request’ pops up, enter pin code which is identical with paired device, and follow the dialog to finish Bluetooth pairing.
Application usage
27
3.2 Camera
3.2.1 Camera basics
M3 Mobile provides its own camera application for 3.0 MP AF camera with enhanced features.
Camera is an optional module.
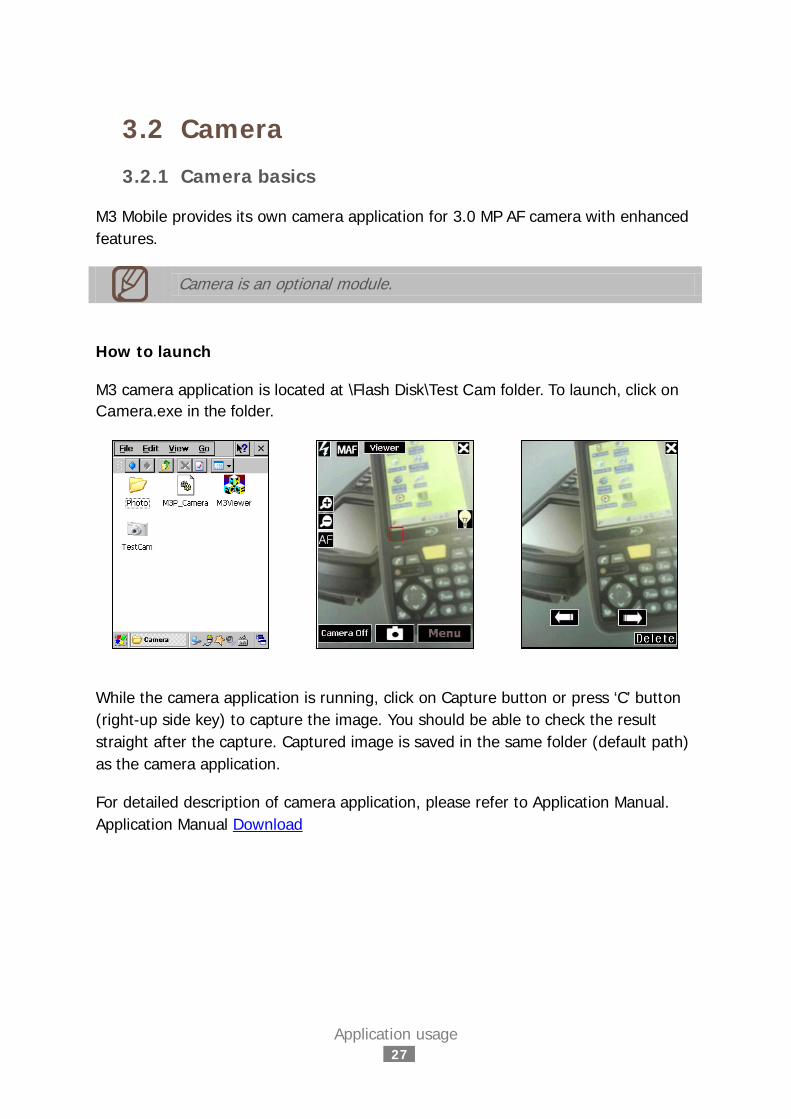
How to launch
M3 camera application is located at \Flash Disk\Test Cam folder. To launch, click on Camera.exe in the folder.
While the camera application is running, click on Capture button or press ‘C’ button (right-up side key) to capture the image. You should be able to check the result straight after the capture. Captured image is saved in the same folder (default path) as the camera application.
For detailed description of camera application, please refer to Application Manual. Application Manual Download
Application usage
28
3.3 GPS M3 ORANGE provides Global Positioning System (GPS) and its test application.
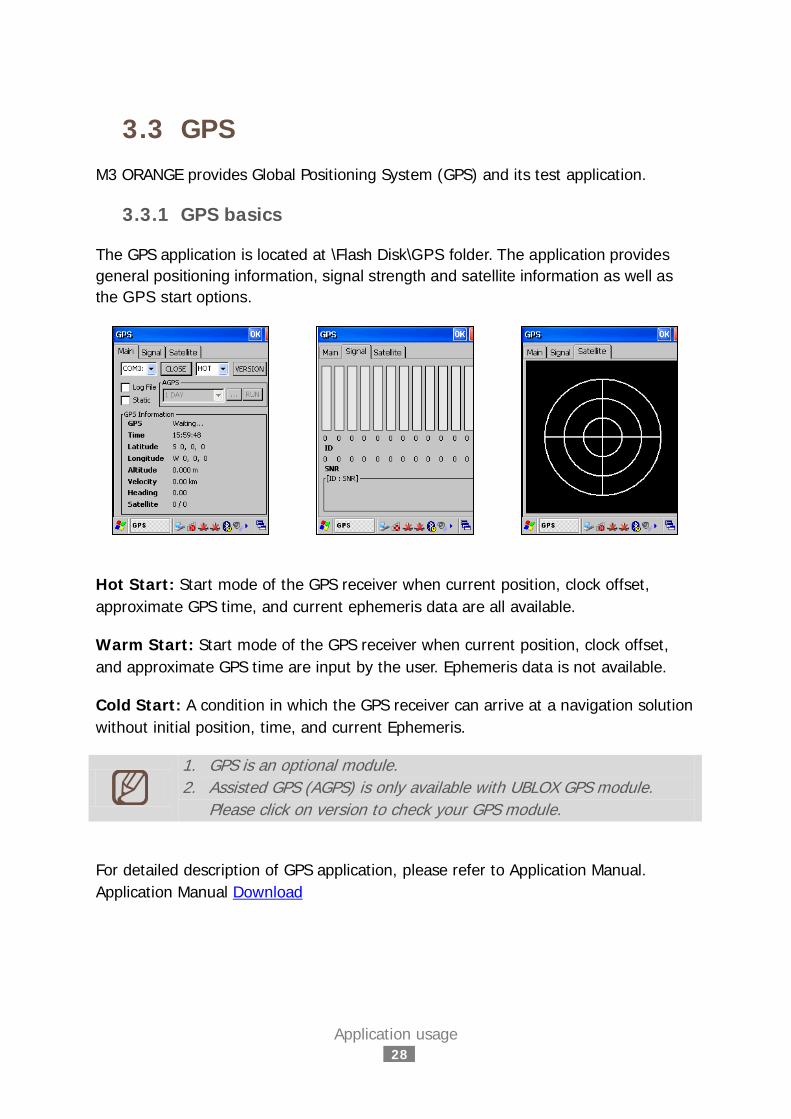
3.3.1 GPS basics
The GPS application is located at \Flash Disk\GPS folder. The application provides general positioning information, signal strength and satellite information as well as the GPS start options.
Hot Start: Start mode of the GPS receiver when current position, clock offset, approximate GPS time, and current ephemeris data are all available.
Warm Start: Start mode of the GPS receiver when current position, clock offset, and approximate GPS time are input by the user. Ephemeris data is not available.
Cold Start: A condition in which the GPS receiver can arrive at a navigation solution without initial position, time, and current Ephemeris.
1. GPS is an optional module. 2. Assisted GPS (AGPS) is only available with UBLOX GPS module.
Please click on version to check your GPS module.
For detailed description of GPS application, please refer to Application Manual. Application Manual Download
Application usage
29
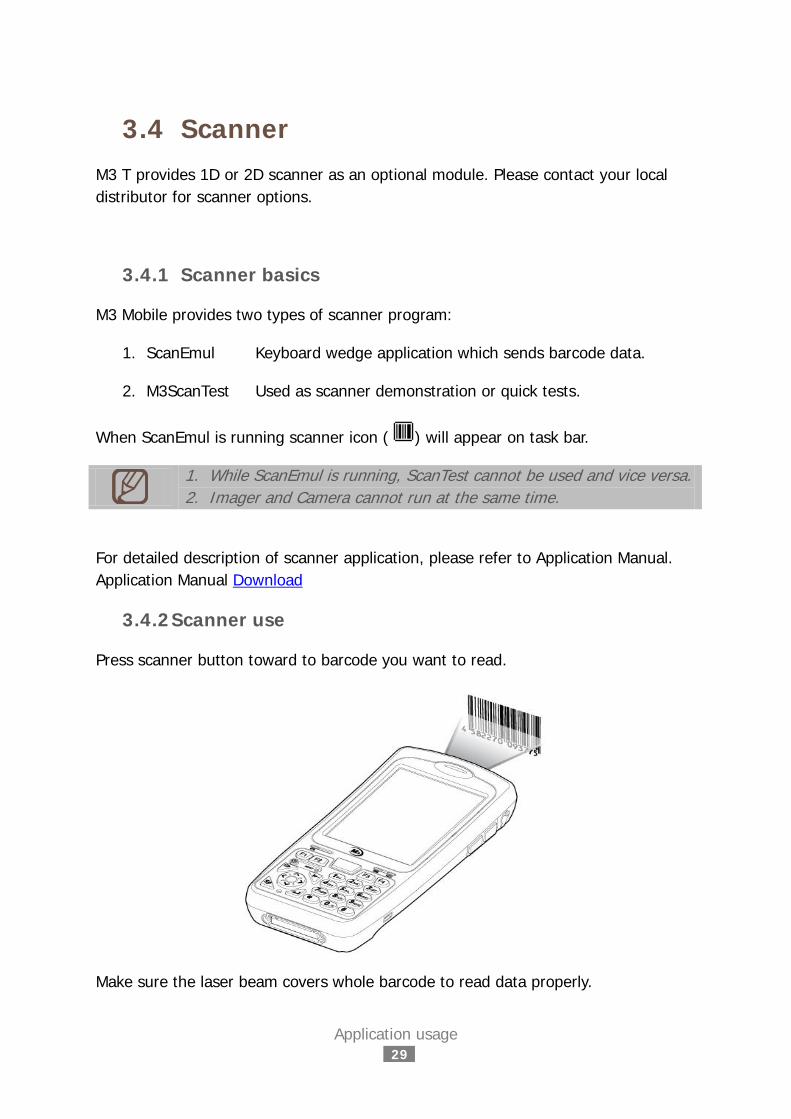
3.4 Scanner M3 T provides 1D or 2D scanner as an optional module. Please contact your local distributor for scanner options.
3.4.1 Scanner basics
M3 Mobile provides two types of scanner program:
1. ScanEmul Keyboard wedge application which sends barcode data.
2. M3ScanTest Used as scanner demonstration or quick tests.
When ScanEmul is running scanner icon ( ) will appear on task bar.
1. While ScanEmul is running, ScanTest cannot be used and vice versa. 2. Imager and Camera cannot run at the same time.
For detailed description of scanner application, please refer to Application Manual. Application Manual Download
3.4.2 Scanner use
Press scanner button toward to barcode you want to read.
Make sure the laser beam covers whole barcode to read data properly.
Application usage
30
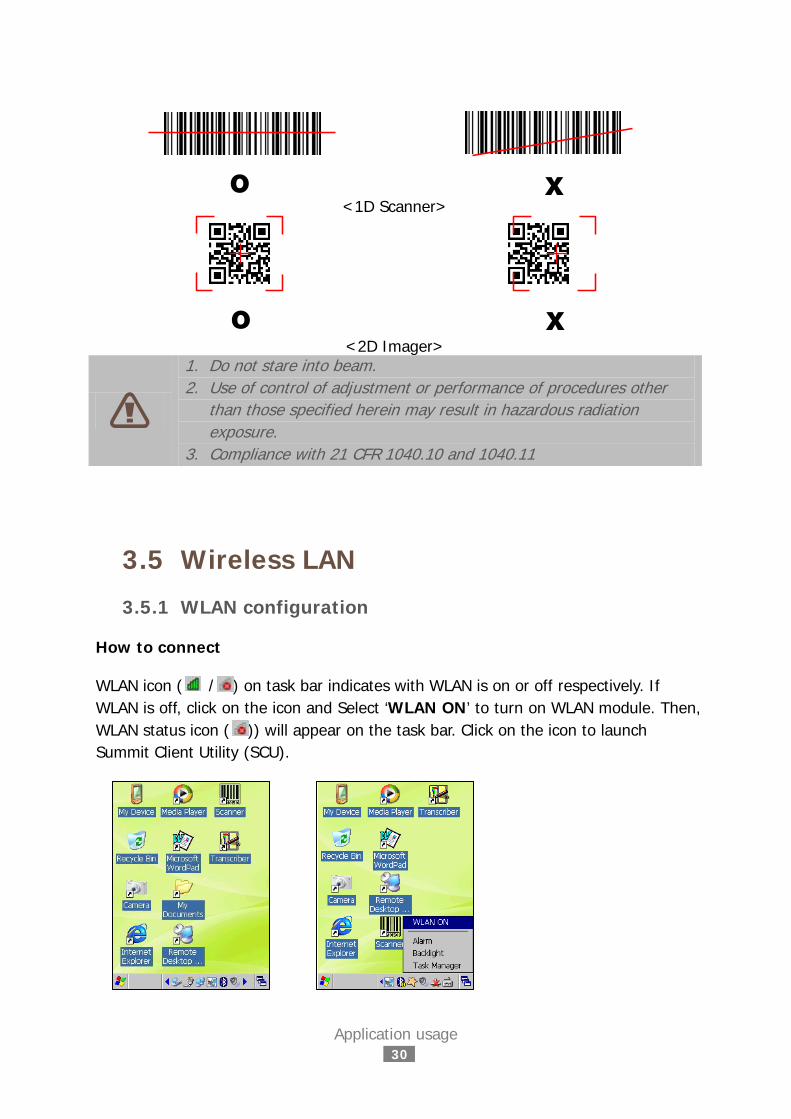
<1D Scanner>
<2D Imager>
1. Do not stare into beam. 2. Use of control of adjustment or performance of procedures other
than those specified herein may result in hazardous radiation exposure.
3. Compliance with 21 CFR 1040.10 and 1040.11
3.5 Wireless LAN
3.5.1 WLAN configuration
How to connect
WLAN icon ( / ) on task bar indicates with WLAN is on or off respectively. If WLAN is off, click on the icon and Select ‘WLAN ON’ to turn on WLAN module. Then, WLAN status icon ( )) will appear on the task bar. Click on the icon to launch Summit Client Utility (SCU).
Application usage
31
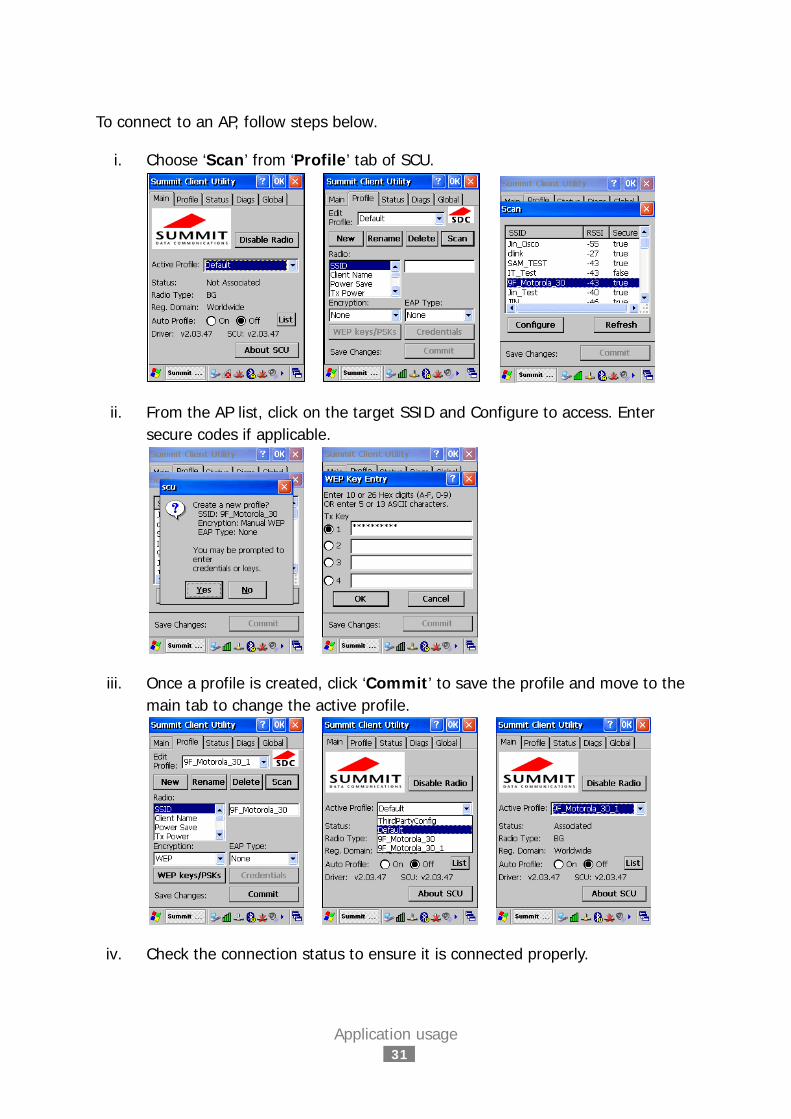
To connect to an AP, follow steps below.
i. Choose ‘Scan’ from ‘Profile’ tab of SCU.
ii. From the AP list, click on the target SSID and Configure to access. Enter secure codes if applicable.
iii. Once a profile is created, click ‘Commit’ to save the profile and move to the main tab to change the active profile.
iv. Check the connection status to ensure it is connected properly.

Application usage
32
Entering sleep mode while the WLAN is connected will cause connection drop. However, upon wake up, it will automatically re-connect to the AP within 10 seconds.
Advanced usage
33
4. Advanced usage
4.1 Software development kit (SDK) M3 Mobile provides SDK to software developers to help them with their development.
Supported development tools
Visual Studio 2005 (8.0) (.NET Framework 2.0) or higher Visual C++, Visual C#, Visual Basic .NET
Development System Requirements
Pentium compatible 500MHz processor or better
Microsoft Windows 98 / ME / 2000 / 2003 / XP
ActiveSync
Development Platform Requirements
Windows Mobile Platform SDK must be installed on your computer to be able to develop software using this SDK.
4.1.1 SDK Package
M3 Mobile provides SDK as a package for each product. For M3 T, software developer should download M3 T SDK package.
In the package the following are included:
i. SDK for each module : Bluetooth, Camera, GPS, Camera, Scanner
ii. Sample test program for each module.
iii. SDK Manual : Introduction, Tutorial, Sample sources, References
Advanced usage
34
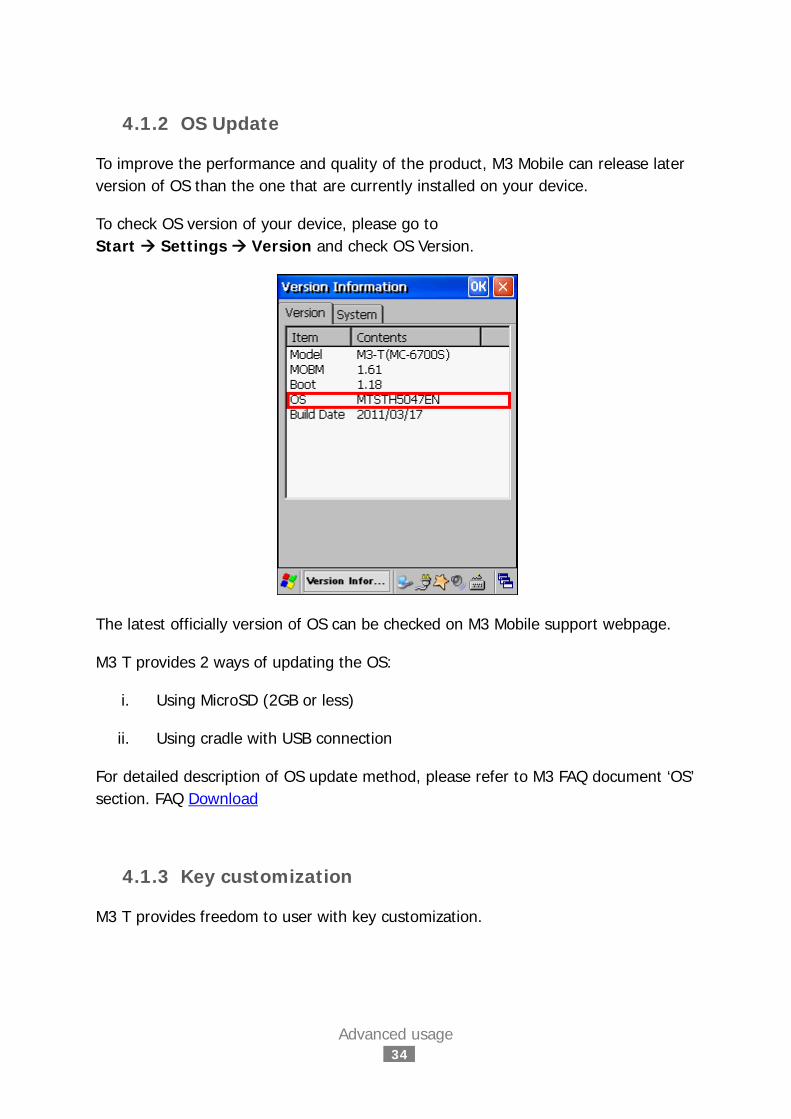
4.1.2 OS Update
To improve the performance and quality of the product, M3 Mobile can release later version of OS than the one that are currently installed on your device.
To check OS version of your device, please go to Start Settings Version and check OS Version.
The latest officially version of OS can be checked on M3 Mobile support webpage.
M3 T provides 2 ways of updating the OS:
i. Using MicroSD (2GB or less)
ii. Using cradle with USB connection
For detailed description of OS update method, please refer to M3 FAQ document ‘OS’ section. FAQ Download
4.1.3 Key customization
M3 T provides freedom to user with key customization.
Advanced usage
35
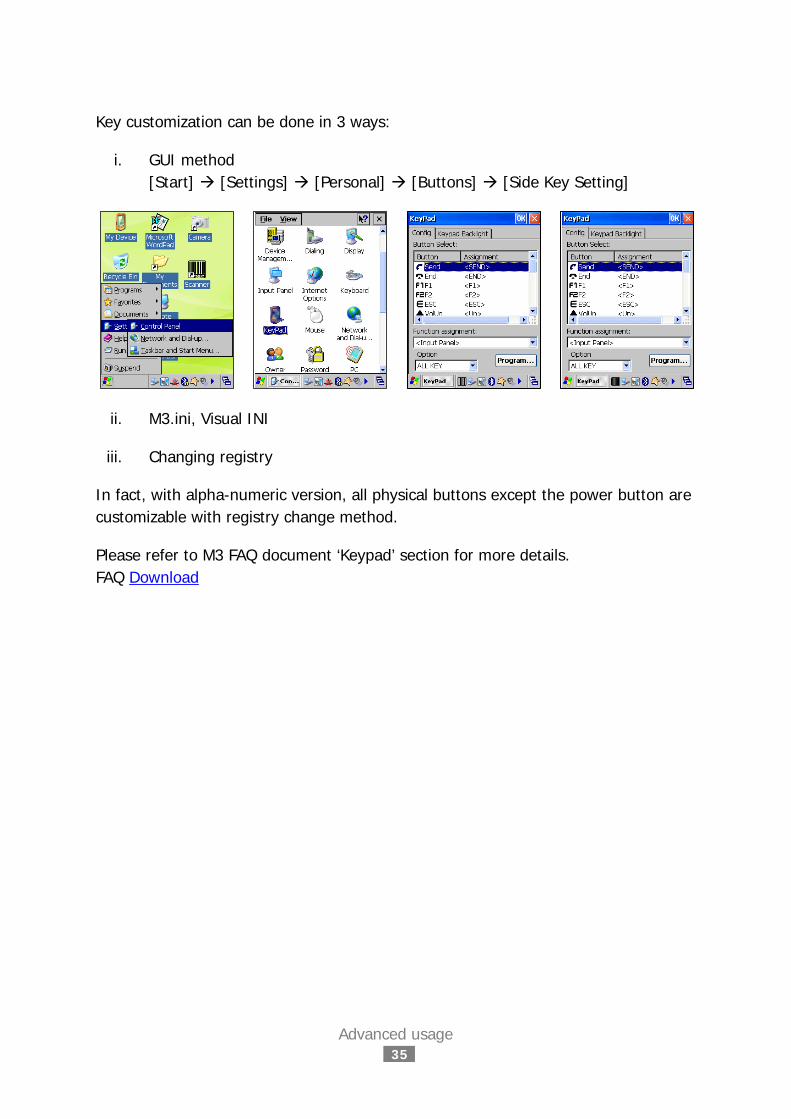
Key customization can be done in 3 ways:
i. GUI method [Start] [Settings] [Personal] [Buttons] [Side Key Setting]
ii. M3.ini, Visual INI
iii. Changing registry
In fact, with alpha-numeric version, all physical buttons except the power button are customizable with registry change method.
Please refer to M3 FAQ document ‘Keypad’ section for more details. FAQ Download
Etc 36
5. Etc
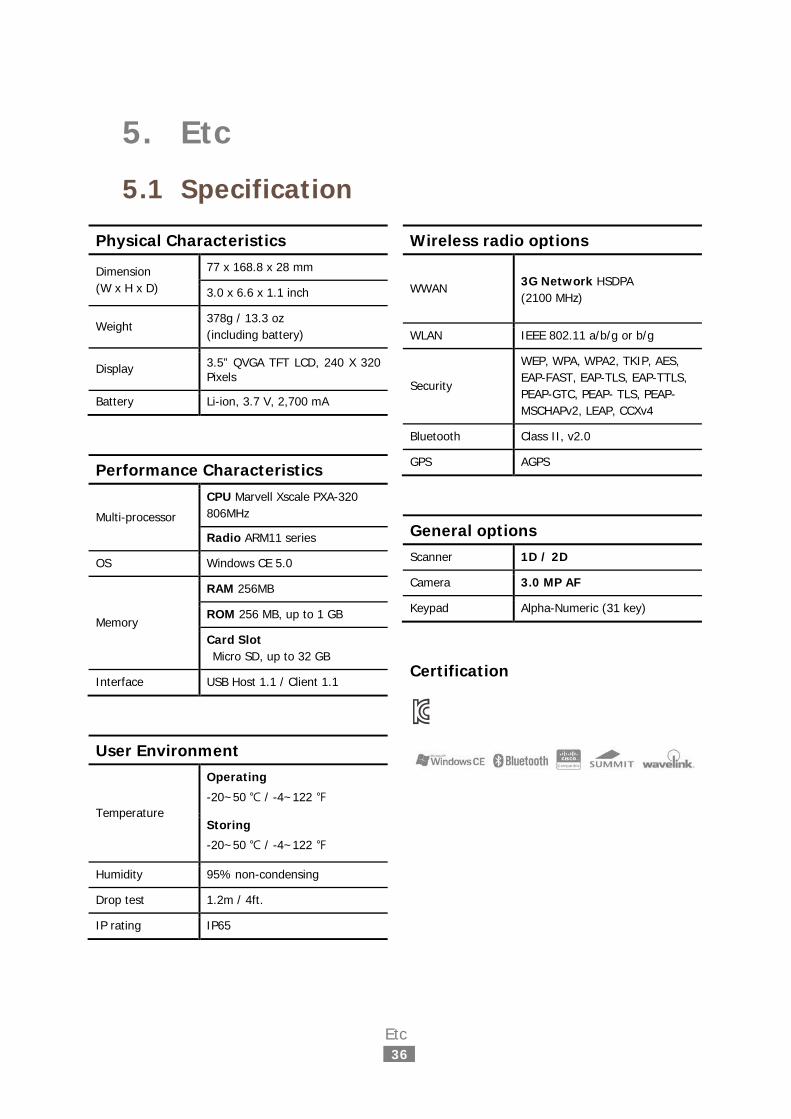
5.1 Specification
Physical Characteristics
Dimension (W x H x D)
77 x 168.8 x 28 mm
3.0 x 6.6 x 1.1 inch
Weight 378g / 13.3 oz (including battery)
Display 3.5” QVGA TFT LCD, 240 X 320 Pixels
Battery Li-ion, 3.7 V, 2,700 mA
Performance Characteristics
Multi-processor
CPU Marvell Xscale PXA-320 806MHz
Radio ARM11 series
OS Windows CE 5.0
Memory
RAM 256MB
ROM 256 MB, up to 1 GB
Card Slot Micro SD, up to 32 GB
Interface USB Host 1.1 / Client 1.1
User Environment
Temperature
Operating
-20~50 ℃ / -4~122 ℉
Storing
-20~50 ℃ / -4~122 ℉
Humidity 95% non-condensing
Drop test 1.2m / 4ft.
IP rating IP65
Wireless radio options
WWAN 3G Network HSDPA (2100 MHz)
WLAN IEEE 802.11 a/b/g or b/g
Security
WEP, WPA, WPA2, TKIP, AES, EAP-FAST, EAP-TLS, EAP-TTLS, PEAP-GTC, PEAP- TLS, PEAP-MSCHAPv2, LEAP, CCXv4
Bluetooth Class II, v2.0
GPS AGPS
General options Scanner 1D / 2D
Camera 3.0 MP AF
Keypad Alpha-Numeric (31 key)
Certification
5.2 Services If you experience any trouble while using our product, you can visit M3 Service center or send enquires to our online support web page (http://support.m3mobile.co.kr), we will do our best to solve your trouble as soon as we can.
M3 FAQ document can help you with troubleshooting.
For any enquires about business program, please contact program provider for faster service.
5.2.1 Contact details
Headquarter
M3 Bldg., 735-45, Yeoksam-Dong, Gangnam-Gu, Seoul, 135-080, Korea Tel: +82 2 574 0037 Fax: +82 2 558 1253
www.m3mobile.co.kr, [email protected]
Service Center
9F M3 Bldg., 735-45, Yeoksam-Dong, Gangnam-Gu, Seoul, 135-080, Korea Tel: +82 2 574 0037
Online Support Web page
http://support.m3mobile.co.kr